Loading…


KnowledgeBase
Sign Up & Verify Your Account
What this covers#
Signing up for AI Engage CRM takes a few minutes. You fill in one short form, confirm your email address with a six-digit code, tell us a little about your company, and then add a payment card to start your 14-day free trial. Once the card is saved, the CRM builds your workspace around your answers.
This article walks through that sequence end to end, screen by screen. It stops at the point where you choose how to set your CRM up; that choice has its own article.
ℹ️
A card is now required to start your trial. You are not charged when you add it. The trial is free for 14 days, and the first payment is taken only when the trial ends — the exact date is shown on the card screen.
Before you begin#
A work email address you can open straight away — the verification code is sent there.
Your company details: company name, industry and number of employees (all required), and optionally your company website.
A credit or debit card in your name. Keep your phone nearby: your bank may send a one-time password (OTP) to approve the card.
Step 1 — Open the sign-up page#
Open the sign-up link you were given (for example from the pricing page, where it already carries the plan you picked), or go to your AI Engage CRM address and click Sign up under “Don’t have an account?” on the Sign in screen.
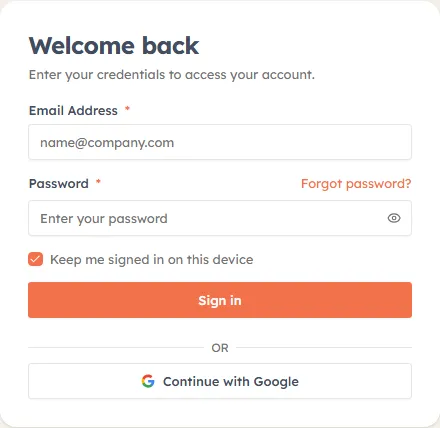
What this screenshot shows. The Sign in screen. The Sign up link at the bottom is the way in for a brand-new account.
If you already have an account, sign in here instead — signing up again creates a second, separate workspace.
Step 2 — Fill in your details#
The sign-up page opens on Create your account. Every field is required — each is marked with a red asterisk (*).
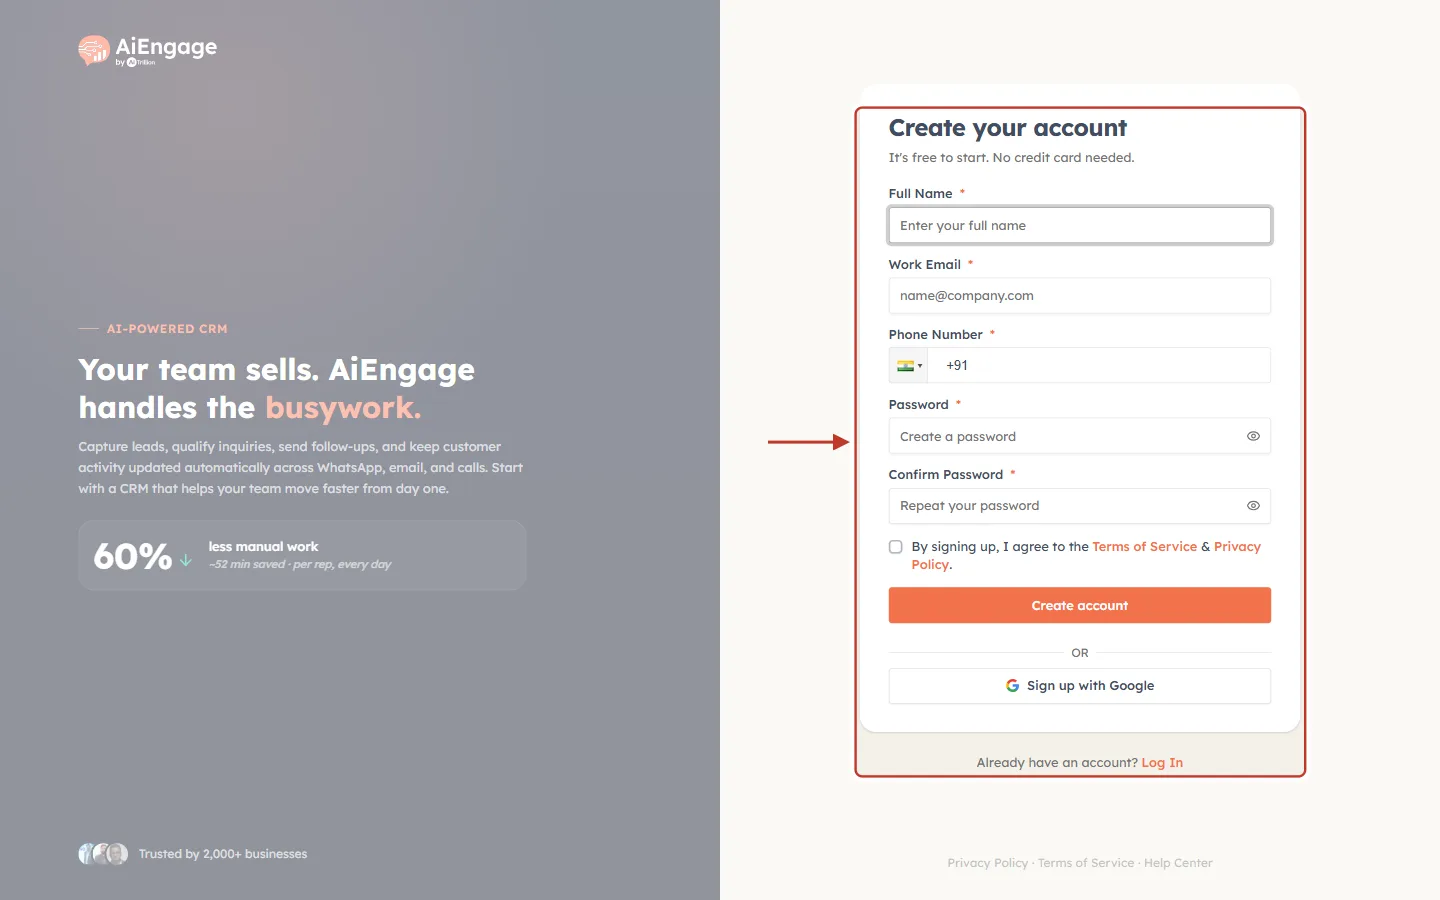
What this screenshot shows. The Create your account form is ringed on the right of the sign-up page.
Left panel: the AiEngage introduction (“Your team sells. AiEngage handles the busywork.”). It is information only.
Full Name: your first and last name.
Work Email: the address the account is created under. The code is sent here, and it becomes your sign-in username.
Phone Number: choose the country from the flag first so the dialling code (for example +91) is right, then type your number.
Password and Confirm Password: at least 8 characters, typed twice. The eye icon shows what you typed.
Terms checkbox: “By signing up, I agree to the Terms of Service & Privacy Policy.” — must be ticked.
Create account submits the form. Sign up with Google (under OR) is the password-free alternative. Log In at the bottom is for existing accounts.
ℹ️
The form’s subtitle reads “It’s free to start. No credit card needed.” — creating the account itself needs no card. The card is asked for later, in Step 6, to start your 14-day trial.
Field | What to enter |
|---|---|
Full Name | Your first and last name. A single word is rejected — the form asks for both. |
Work Email | The address you want the account under. The verification code is sent here. |
Phone Number | Your number, with the right country selected. It is carried over to your company details later. |
Password | At least 8 characters. |
Confirm Password | The same password again. The two must match. |
Click Create account. If anything is missing, the form tells you inline and nothing is sent:
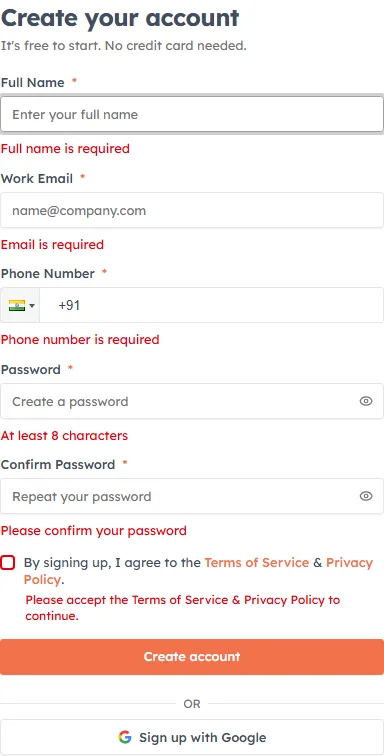
What this screenshot shows. The messages you get when you click Create account with empty fields.
Each empty field shows a red message under it — including the 8-character minimum on the password. Fill them in and click Create account again.
ℹ️
Prefer not to set a password? Sign up with Google creates the account from your Google identity instead, and skips the code step, because Google has already confirmed the address.
Step 3 — Verify your email#
Submitting the form sends a six-digit code to the address you entered, and the screen changes to Verify your email — “We’ve sent a 6-digit code to your email.”
Open your inbox, find the message, and enter the code into the six boxes. They advance as you type, and pasting the full code fills every box at once. A partial code is refused with “Please enter all 6 digits.” A wrong code is rejected and the boxes clear so you can try again.
Resend code — beside “Didn’t received the code?”. It is greyed out for a short cool-down after each send, then becomes clickable again. A successful resend shows “Verification code resent.”
Change email — if you mistyped the address, this takes you back without starting over.
Resending too often is throttled: “Too many resend attempts. Please wait.” Wait a minute and try again.
⚠️
No code after a minute or two? Check your spam or junk folder first, then confirm the address on screen is right, using Change email if it is not. Corporate mail filters are the usual culprit on a work domain.
Step 4 — Add your company website (optional)#
Onboarding now shows its progress at the top of each screen — ONBOARDING, Step 2 of 5 here — with an orange bar for each step completed.
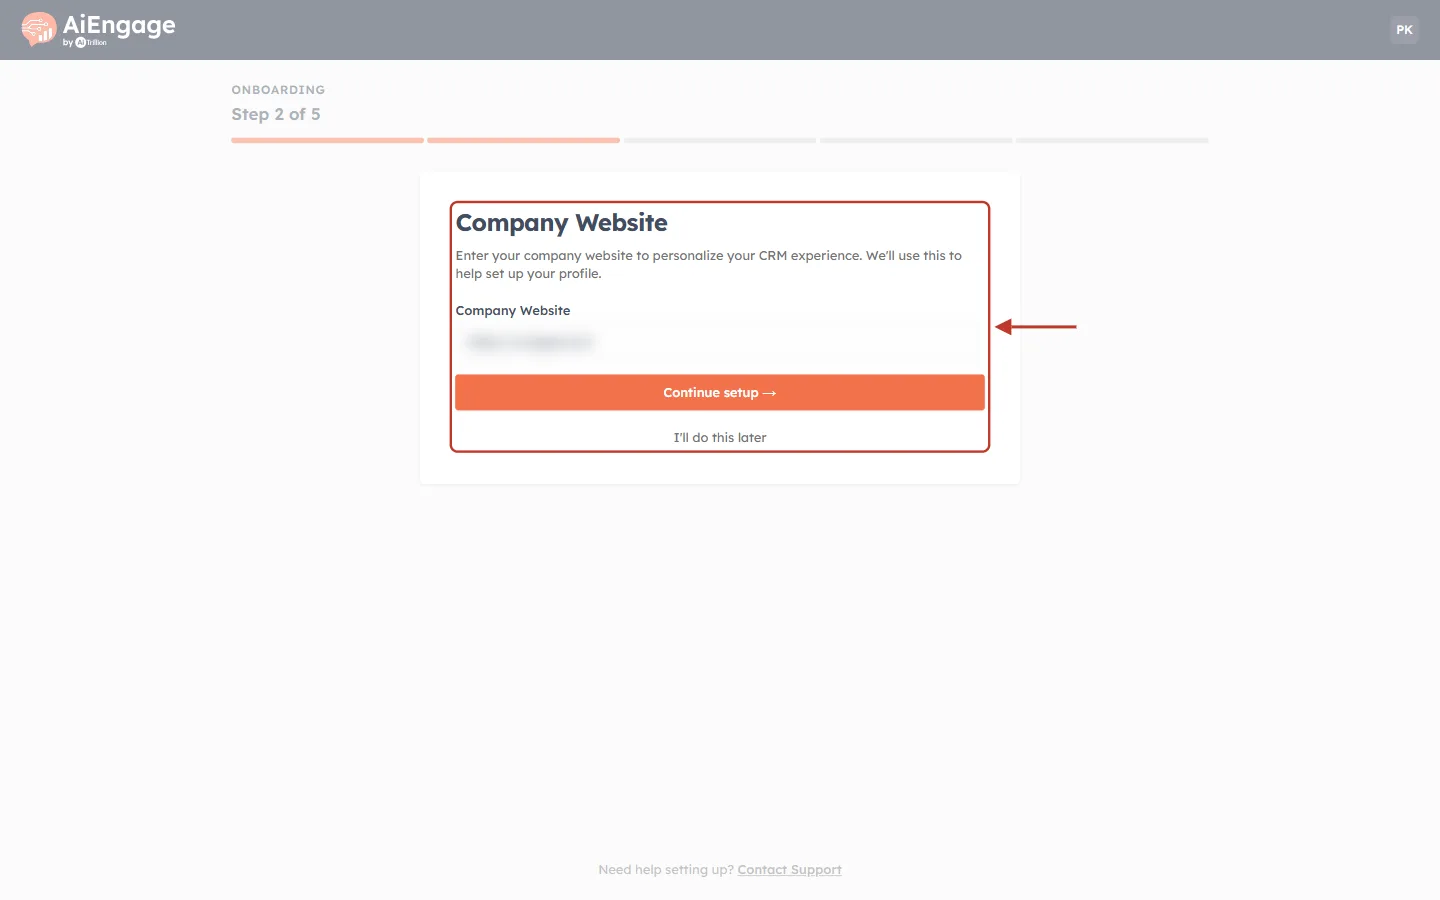
What this screenshot shows. The Company Website card is ringed. (The website in the box is blurred.)
Progress: ONBOARDING — Step 2 of 5, with two of the five bars filled.
Company Website — “Enter your company website to personalize your CRM experience. We’ll use this to help set up your profile.”
Company Website box: type your site, for example https://yourcompany.com.
Continue setup → saves it and moves on.
I’ll do this later skips it — you can add it to your company profile at any time.
Step 5 — Tell us about your company#
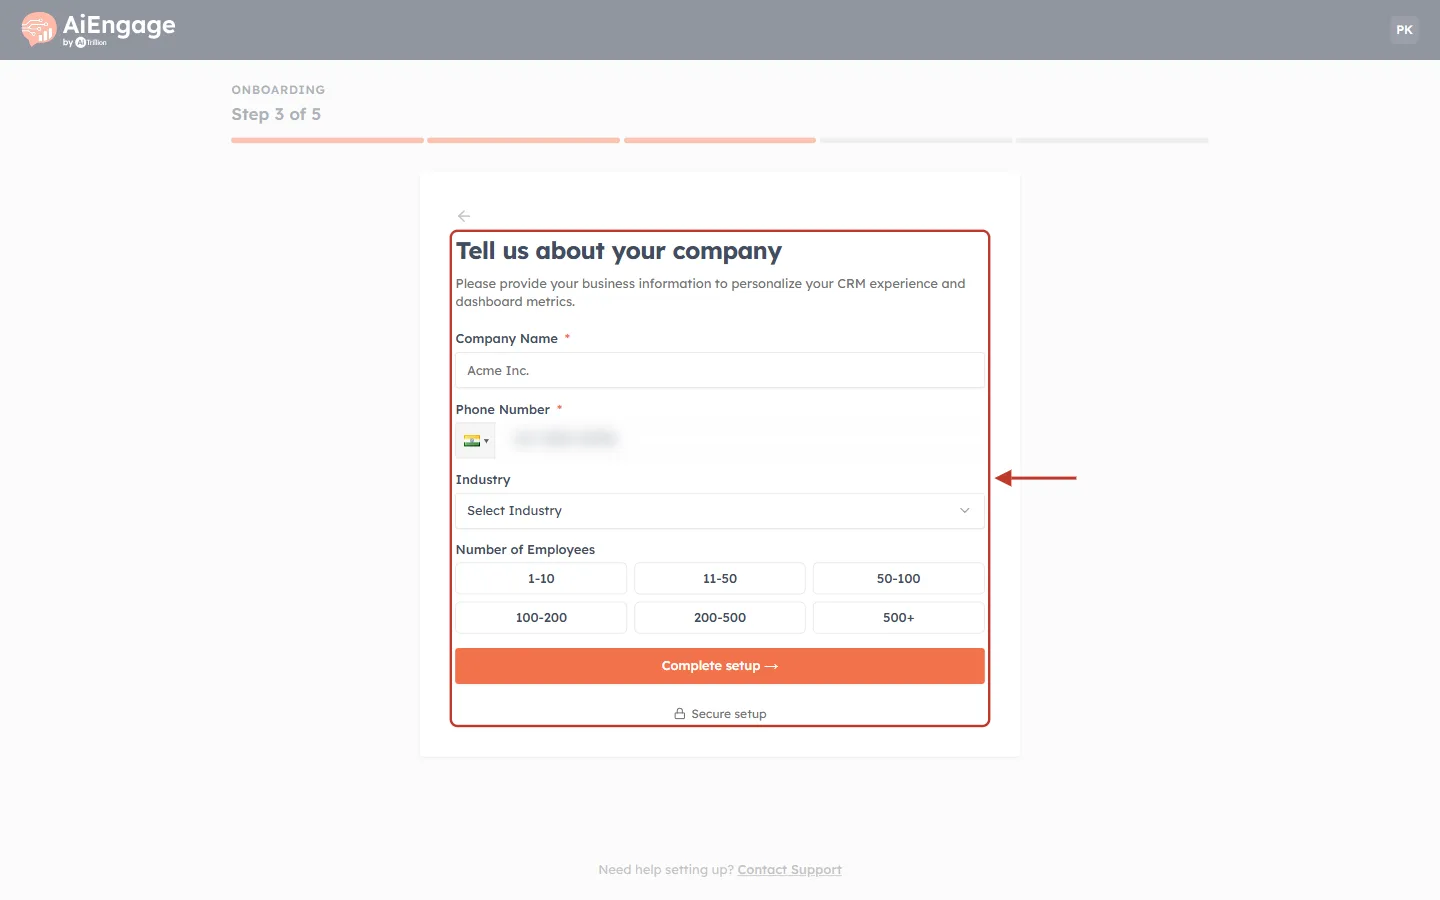
What this screenshot shows. The Tell us about your company card is ringed. (The phone number is blurred.)
Progress: Step 3 of 5. The ← arrow at the top of the card goes back to the previous step.
Company Name * (required) — your business name as it should appear in the CRM. The grey Acme Inc. is only an example.
Phone Number * (required) — filled in from the sign-up form; change it if the company number is different.
Industry — choose from the Select Industry list (for example Advertising & Marketing).
Number of Employees — click one size band: 1-10, 11-50, 50-100, 100-200, 200-500 or 500+. The chosen band turns orange.
Complete setup → saves the details and moves on. Secure setup underneath is a reminder that the connection is encrypted.
⚠️
Industry and Number of Employees must be filled in. If either is empty, clicking Complete setup shows “Please select an industry” or “Please select a company size” and does not continue. Choose your industry carefully — it decides which starter pack of modules, templates and web forms you are offered later.
Step 6 — Add your card and start your free trial#
Next comes Step 4 of 5 — Start your Business Pro trial. This step is required: the workspace is only set up once a card is saved.
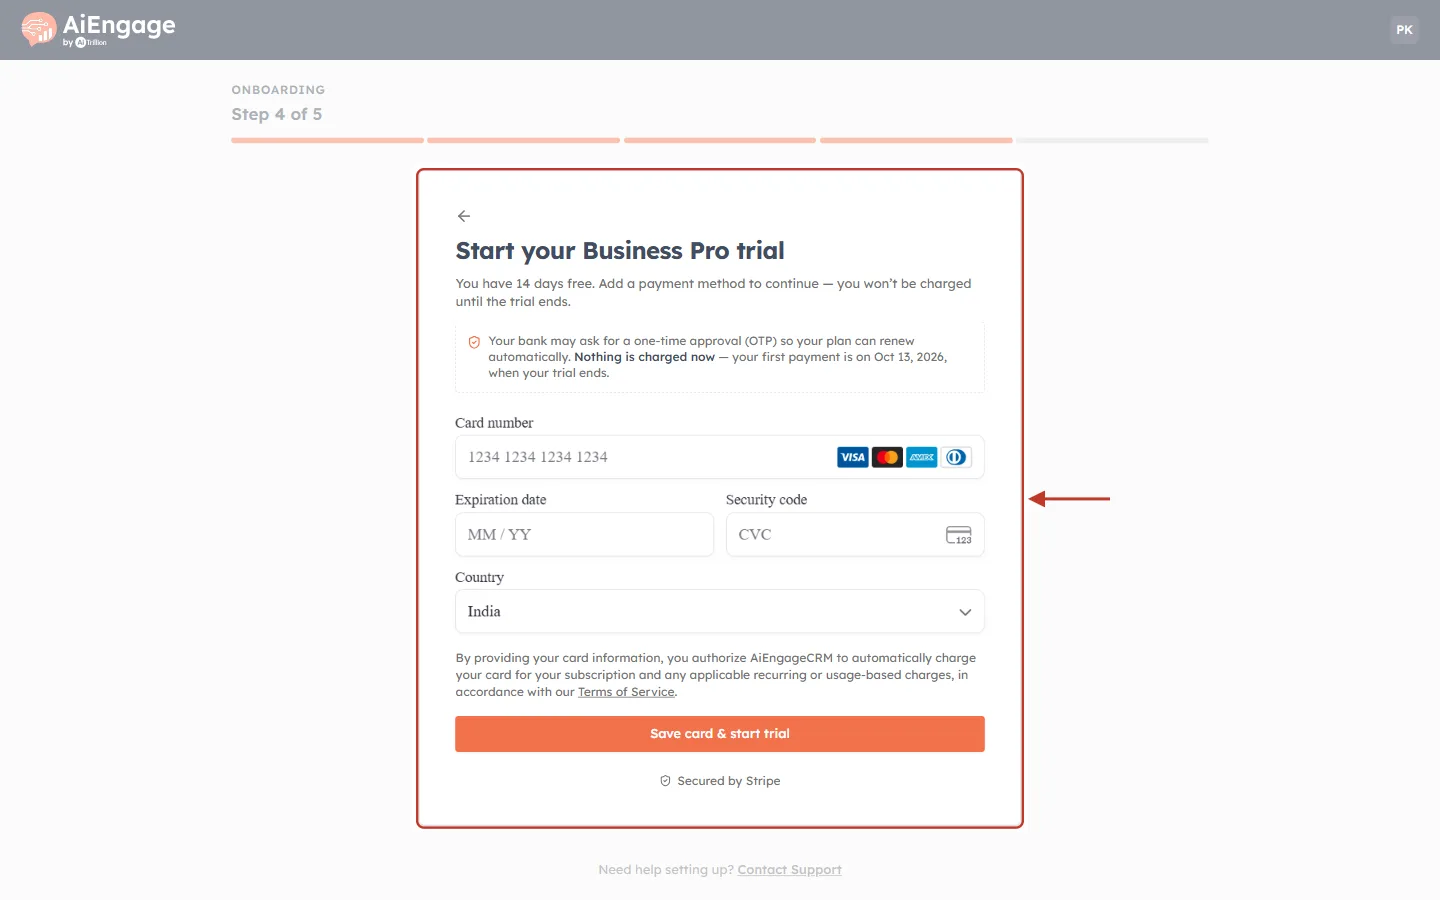
What this screenshot shows. The whole Start your Business Pro trial card is ringed. The rest of the page is faded.
Progress: Step 4 of 5 — four bars filled, one to go.
Heading and intro: the plan (Business Pro), the trial length (14 days free) and the promise that you are not charged until the trial ends.
Card details: card number, expiry date, security code and country, in a secure form provided by Stripe.
Authorisation text, the Save card & start trial button, and Secured by Stripe at the bottom.
The ← arrow at the top of the card goes back to your company details.
Read the trial terms#
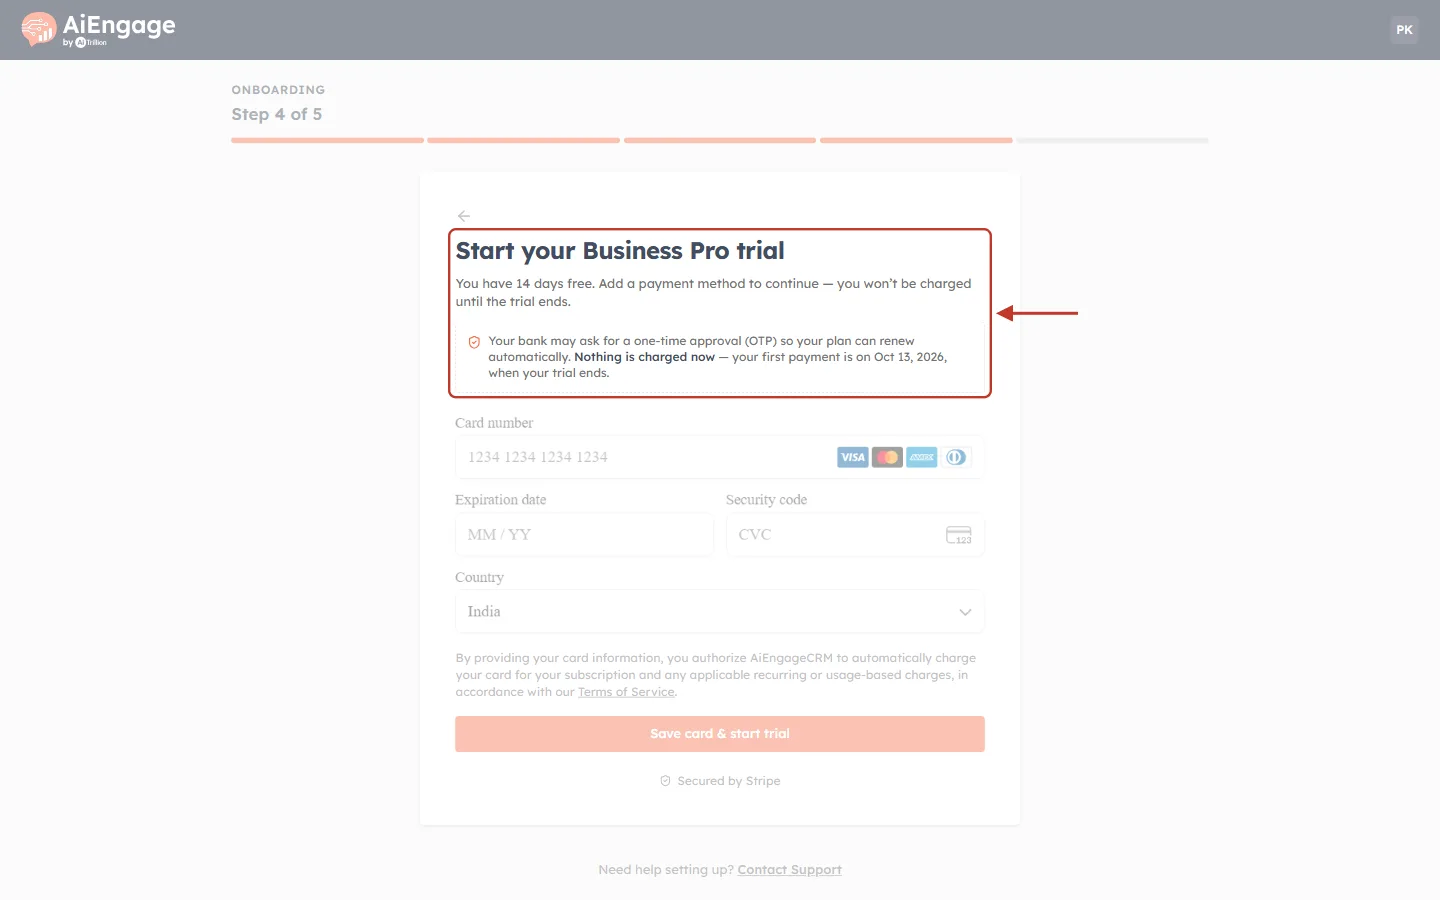
What this screenshot shows. The heading, the intro line and the notice box are ringed.
Start your Business Pro trial — the plan you are signing up to.
“You have 14 days free. Add a payment method to continue — you won’t be charged until the trial ends.”
Notice box: “Your bank may ask for a one-time approval (OTP) so your plan can renew automatically. Nothing is charged now — your first payment is on [date], when your trial ends.” The date shown is 14 days from today; note it down.
Enter your card details#
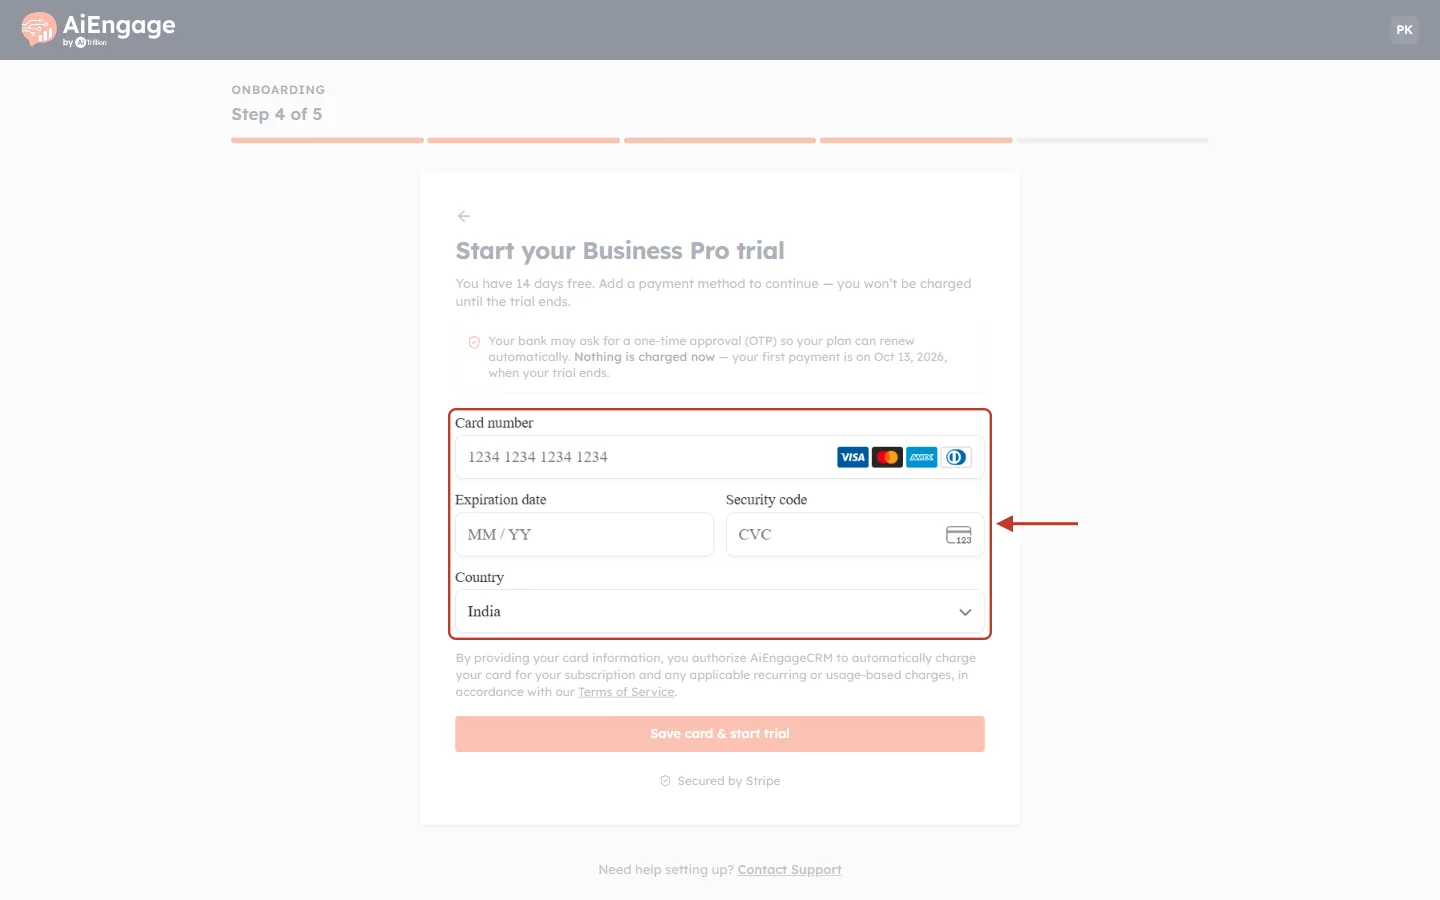
What this screenshot shows. The card fields are ringed. They are empty in this screenshot — never share a photo of a filled-in card form.
Card number: the long number on the front of your card. The logos on the right show the accepted card brands (such as Visa, Mastercard and American Express).
Expiration date: the month and year from the card, as MM / YY.
Security code: the 3-digit CVC on the back of the card (4 digits on the front for American Express). The small card icon shows where to find it.
Country: the country where the card was issued — already filled in (India in this screenshot); change it if your card was issued elsewhere.
ℹ️
Your card details are entered into a secure form run by Stripe, a payment provider. They are sent directly to Stripe.
Save the card and start the trial#
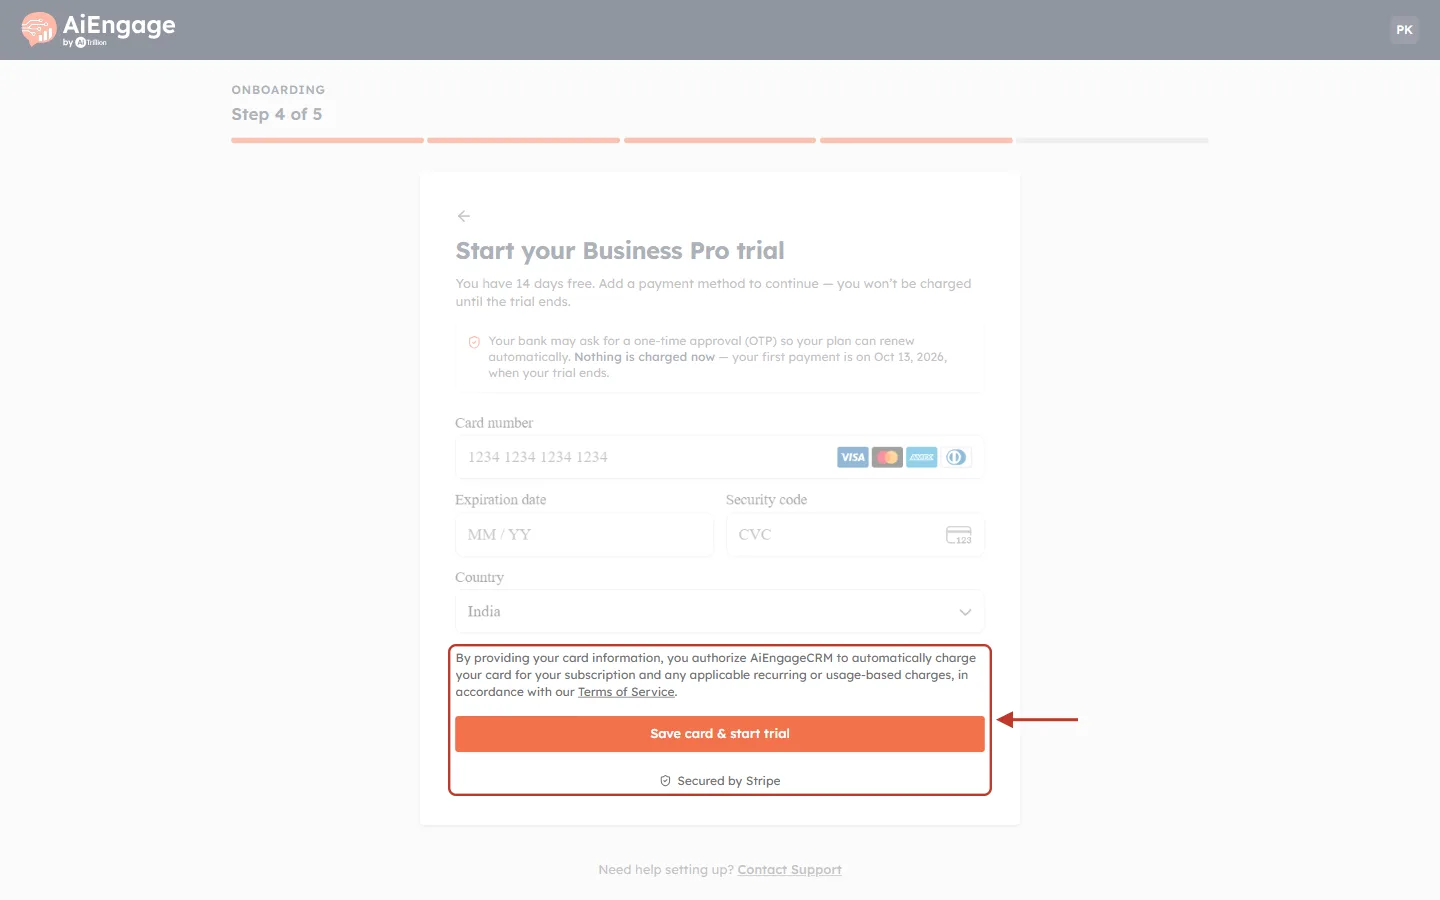
What this screenshot shows. The authorisation text and the Save card & start trial button are ringed.
Authorisation: “By providing your card information, you authorize AiEngageCRM to automatically charge your card for your subscription and any applicable recurring or usage-based charges, in accordance with our Terms of Service.” The Terms of Service link opens the full terms.
Save card & start trial — saves the card and starts your 14-day trial.
Secured by Stripe — the card is handled by Stripe.
Click Save card & start trial. If your bank asks for a one-time password (OTP) or an in-app approval, complete it in the window that opens — this approves the card for automatic renewal; it does not charge you now.
⚠️
Card not accepted? Check the number, expiry date and security code, make sure the card is enabled for online and international payments, and complete any OTP your bank sends. If it still fails, try another card or contact your bank.
Step 7 — Your workspace is built#
With the card saved, onboarding moves on to its last step. A progress screen — Setting up your workspace…, “We’re preparing your CRM with default modules, pipelines, and more.” — may appear while your account’s starting structure is created. Leave the tab open.
You are then asked How would you like to set up your CRM?, with a starter pack picked out for the industry you chose. That choice — Quick Start, Setup Wizard or Start from scratch — is covered in its own article.
Your trial and billing#
Question | Answer |
|---|---|
Am I charged when I add the card? | No. Nothing is charged now. |
How long is the trial? | 14 days. The date of your first payment is shown on the card screen. |
What happens when the trial ends? | Your plan renews automatically and the first payment is taken from the saved card. |
Why might my bank ask for an OTP? | To approve the card for automatic renewals. It is an approval, not a charge. |
How do I stop before I am charged? | Cancel before the trial end date — see How to Cancel Your Subscription. |
Where do I change plan or card later? | In billing — see Billing & Subscription and Change Your Plan. |
✅
Put a reminder in your calendar a day or two before the trial end date shown on the card screen, so you can decide whether to continue before the first payment.
Signing in from now on#
From now on, go to Sign in and use the work email and password you set.
Keep me signed in on this device saves you signing in every visit. Leave it clear on a shared or public computer.
Forgot password? emails you a reset link — see Change Your Password & Account Security.
With the account open, Getting Started with AI Engage CRM is the guide to what to do first.
Two different verification emails#
The six-digit code in Step 3 confirms a brand-new sign-up. You type it into the sign-up screen.
A one-click confirmation link is used to reactivate an existing account. It opens a page headed Confirm your email.
⚠️
Confirmation links must be opened exactly as sent. If yours reports “Link no longer valid — this link is missing information”, your mail client probably clipped it. Copy the whole URL into the address bar instead, or request a fresh one.
Being invited instead of signing up#
Everything above creates a new account, with you as its first user — and asks for a card to start its trial. If a colleague has invited you to an AI Engage CRM account that already exists, do not sign up here; that would build a second, separate workspace. Follow the link in your invitation email instead — Accepting Your Invitation covers that route.
Was this article helpful?
Ready to implement this?
OpenAI Engage and apply what you just learned to your own workspace.
Open AI Engage CRM