Loading…


KnowledgeBase
Sharing Rules: Share Records Across Teams, Roles & Users (Step-by-Step Guide)
Introduction#
In AiEngage CRM, who can see a record is decided first by the role hierarchy: every user sees the records they own, plus the records owned by the people below them. That keeps each team focused on its own data — but sooner or later one group needs to see another group's records. Marketing wants the contacts Sales has collected. A manager in one branch needs to follow high-value deals owned by another branch. Finance needs every large deal, whoever owns it.
Sharing Rules are how you open up that access, deliberately and in a controlled way. A sharing rule says: “Take these records in this module, and give this user, role or team this level of access to them.” Nobody's role or profile changes; the rule simply adds visibility on top of what people already have.
This article walks through the whole feature, screen by screen. You will learn how to open the Sharing Rules page and read it, how to build an owner-based rule (share by who owns the records), how to build a criteria-based rule (share by field values, such as Amount greater than 50,000), and how to edit, clone, deactivate and delete rules afterwards. Every screenshot is followed by a plain-language description of everything on the screen, so you can match it against your own.
ℹ️
Sharing rules only add access. They never take away access that a user already has through their role, and they never lift a user above what their profile allows. If you are new to these ideas, read Understanding Sharing Rules: When and Why to Use Them first — it explains the concepts; this article is the hands-on guide.
Before You Begin#
You need access to Settings. Sharing Rules live under Settings → Security Control, which is normally available to administrators. If you cannot see the Settings gear or the Security Control group, ask your administrator to check your profile.
Create your roles and teams first. A rule shares records from and to a user, a role or a team, and you pick them from lists. If the role or team you need does not exist yet, create it first — see Create Roles: Build Your Hierarchy Step by Step and Create Teams: Group Users for Lead Routing, Reporting & Sharing.
Check the recipients’ profiles. A sharing rule works inside the recipient’s profile permissions. If a profile does not allow editing Deals, a Read/Write rule on Deals still only lets those users read. See Understanding Profile Permissions: What Every Setting Controls.
Know what you want to share. Write down, in one sentence, the module, whose records (or which records), who should get them, and what they may do — for example: “Contacts owned by the Sales Team → the Manager role → Read Only.” That sentence maps directly onto the form.
Key Terms on the Sharing Rules Screens#
The form uses a handful of terms. Here is what each one means before you start:
Term | What it means |
|---|---|
Module | The kind of record the rule shares — Contacts, Deals, Companies, Calls, Meetings, Tasks, Quotes, Invoices, or any custom module. One rule covers one module. |
Sharing Rule Name | Your own label for the rule. It is what you see on the Sharing Rules list, so make it describe the rule. |
Sharing Type | Based on Record Owner shares records by who owns them. Based on Criteria shares records whose field values match conditions you set. |
Records Shared From | Owner-based rules only. The user, role or team whose records are shared. |
Sharing Conditions | Criteria-based rules only. Up to 5 conditions (Field + Operator + Value) that a record must match to be shared. |
Records Shared To | The user, role or team that receives access. |
Access Level | What the recipients may do with the shared records: Read Only, Read/Write, or Read/Write/Delete. |
Allow Superiors | When on, users above the recipients in the role hierarchy get the same access too. |
Priority | The rule’s number among the rules for the same module, shown on the list. Rules are numbered in the order they are created within each module. |
Status | Active rules are applied; Inactive rules are kept but do nothing until you activate them again. |
Part 1 — Open the Sharing Rules Page#
Step 1: Open Settings#
On the far left of the screen is a narrow, dark icon rail. Near the bottom of it, just above your profile initials, is the Settings gear. Click it to open the Settings menu.
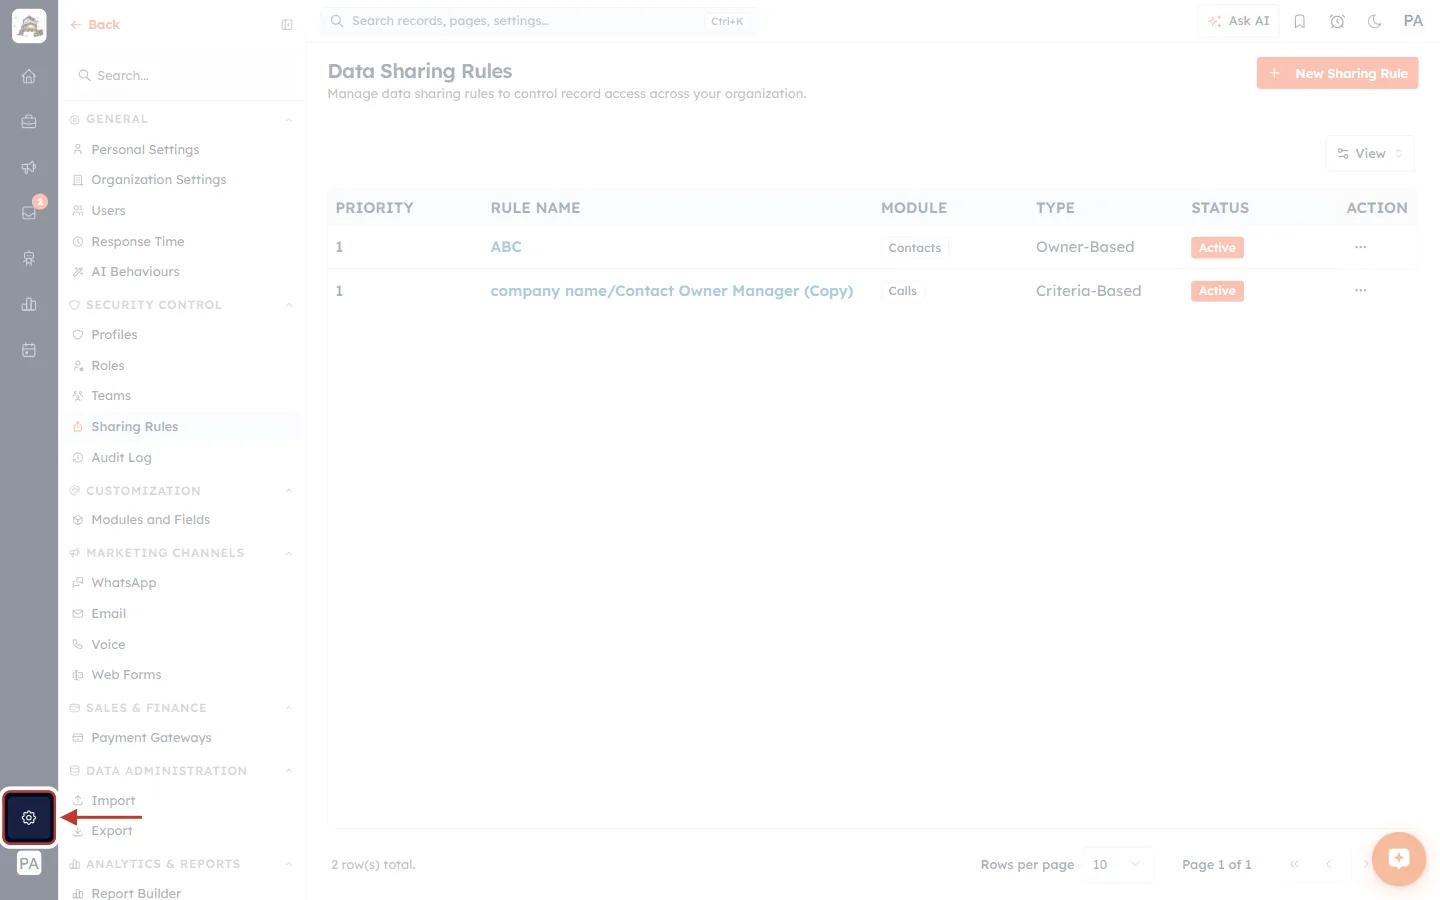
What this screenshot shows. The Settings gear is ringed in red at the bottom of the left-hand icon rail, with the arrow pointing to it. The rest of the page is faded so the gear stands out.
Left icon rail (dark strip): from top to bottom — the company logo, then icons for Home, Sales, Marketing, Inbox (with a red unread badge), and the other modules. The gear sits near the bottom and is highlighted when Settings is open.
Your initials (for example PA) sit below the gear; that opens your own account menu, not Settings.
Settings menu (light panel): once Settings is open, this panel lists every settings page in groups — General, Security Control, Customization, Marketing Channels and more.
Top bar: the search box (Search records, pages, settings…, shortcut Ctrl+K), Ask AI, and the bookmark, reminder and theme icons.
Step 2: Click Sharing Rules under Security Control#
In the Settings menu, find the SECURITY CONTROL group. It holds everything that controls who can see and do what: Profiles, Roles, Teams, Sharing Rules and Audit Log. Click Sharing Rules.
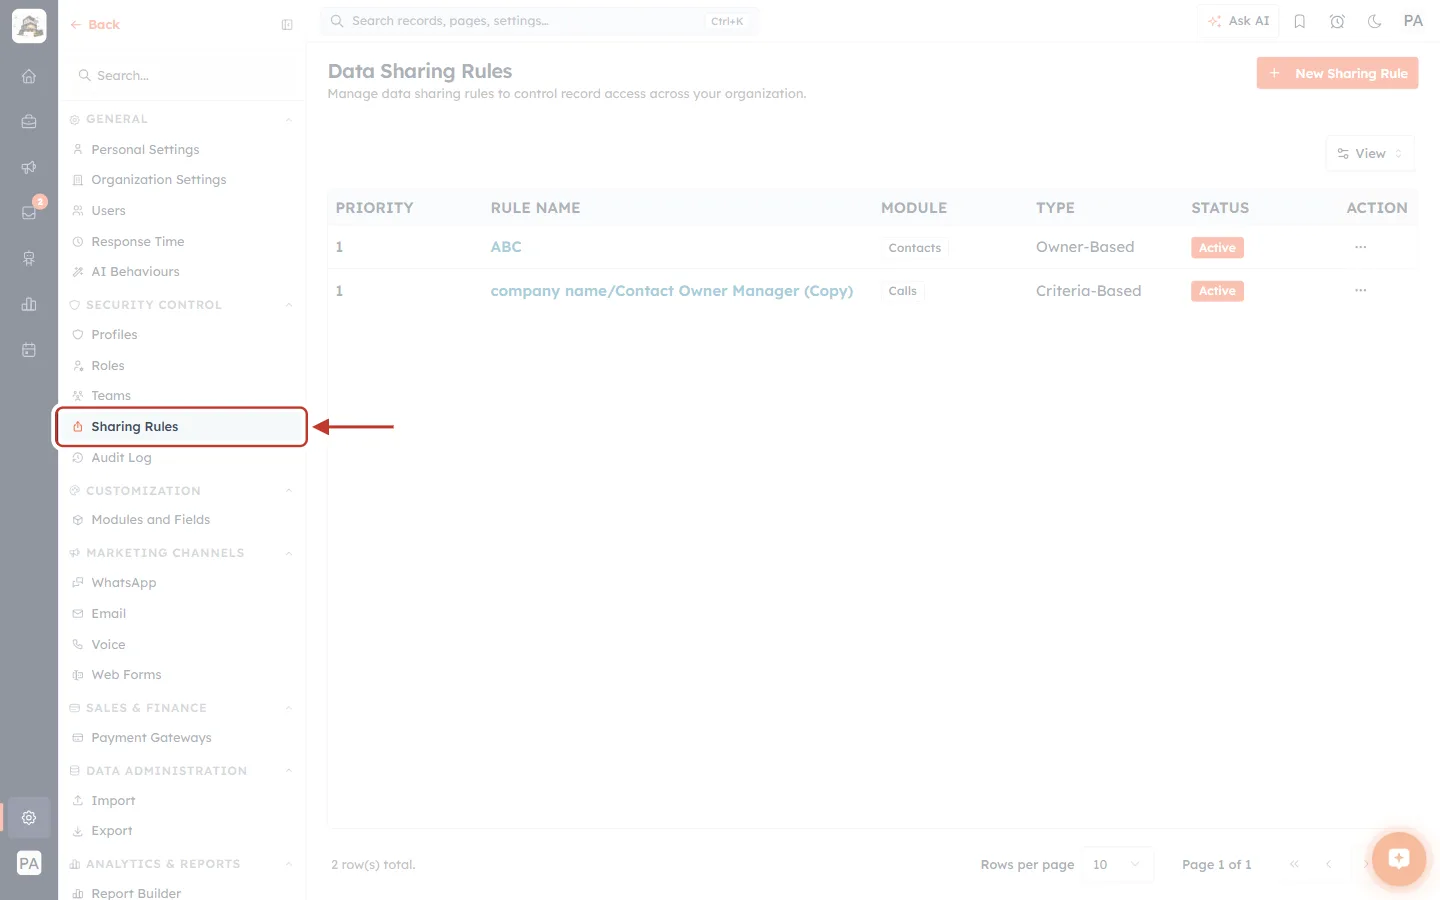
What this screenshot shows. Sharing Rules is ringed in the Settings menu, inside the Security Control group.
GENERAL (top): Personal Settings, Organization Settings, Users, Response Time and AI Behaviours.
SECURITY CONTROL: Profiles (what each user may do), Roles (the hierarchy that decides default visibility), Teams (groups of users), Sharing Rules (this page) and Audit Log.
The item you are on is shown with a light highlight and an orange icon, so you can always tell which settings page is open.
Below are the other groups — Customization, Marketing Channels, Sales & Finance, Data Administration, Analytics & Reports and Developer Hub.
Tip: you can also type sharing into the Search… box at the top of this menu to jump straight to it.
Step 3: Read the Data Sharing Rules list#
The Data Sharing Rules page lists every rule in your organisation. Before creating anything, it is worth checking what already exists — you may find a rule you can edit instead of adding a new one.
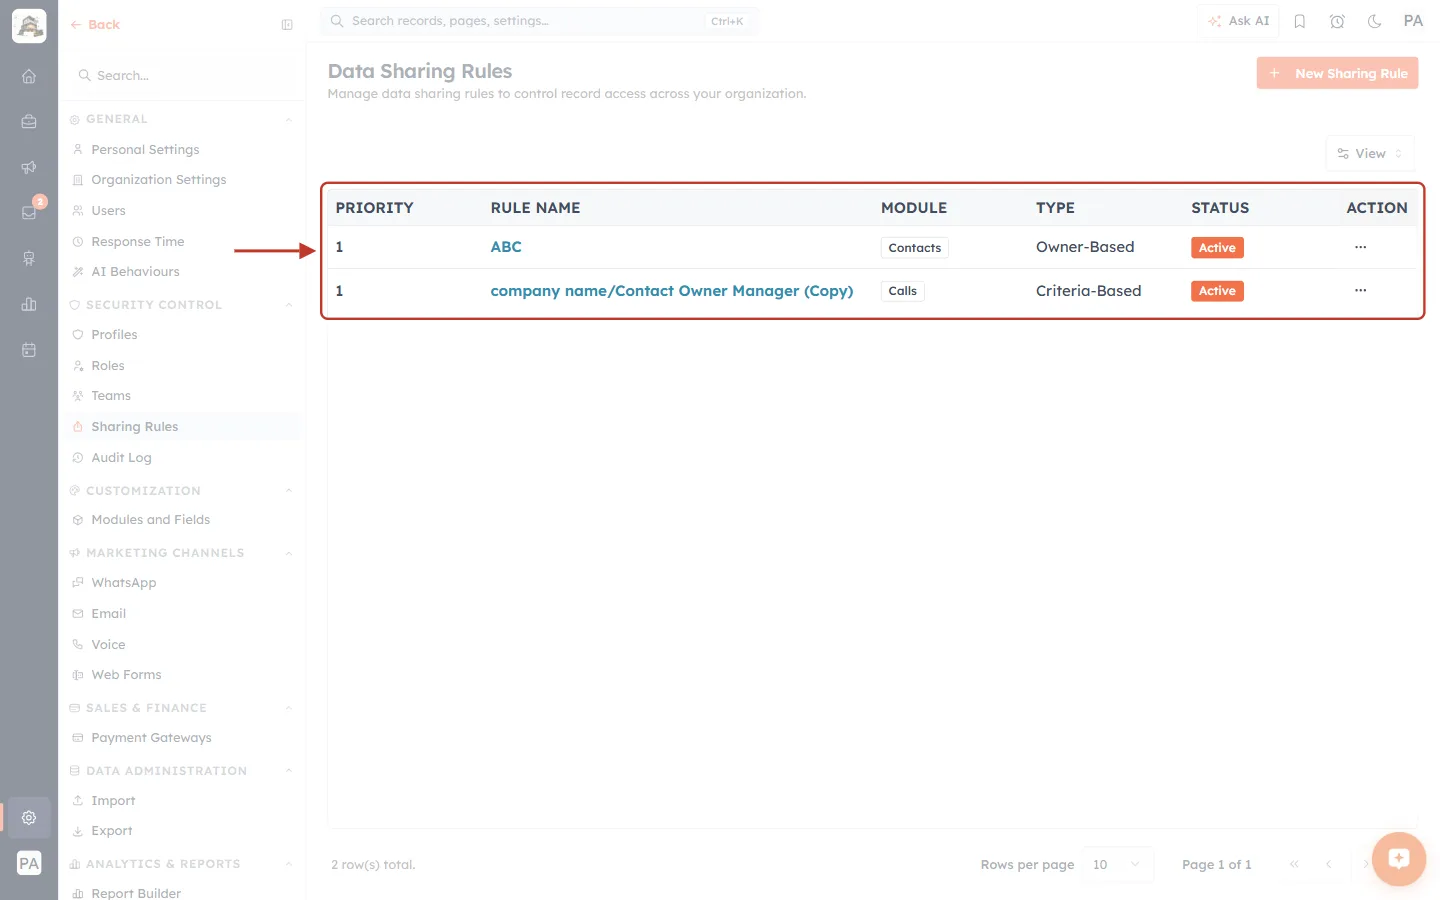
What this screenshot shows. The rules table is ringed. It shows one row per sharing rule.
Page title: Data Sharing Rules — Manage data sharing rules to control record access across your organization.
New Sharing Rule (orange button, top right): starts a new rule. Covered in Part 2.
View (below the button): chooses which columns the table shows.
PRIORITY: the rule’s number within its module. Rules for different modules each start from 1, which is why two rules can both show 1.
RULE NAME: the name you gave the rule, shown as a blue link.
MODULE: the module the rule shares, shown as a small tag (for example Contacts or Calls).
TYPE: Owner-Based or Criteria-Based.
STATUS: an orange Active badge, or a grey Inactive badge for a rule that is switched off.
ACTION (⋯): the menu for Edit, Deactivate/Activate, Clone and Delete. Covered in Part 4.
Bottom bar: the total number of rules (2 row(s) total), Rows per page, the page number and the paging arrows.
Step 4 (optional): Choose which columns to show#
Click View to show or hide columns. This only changes your own view of the list; it does not change any rule.
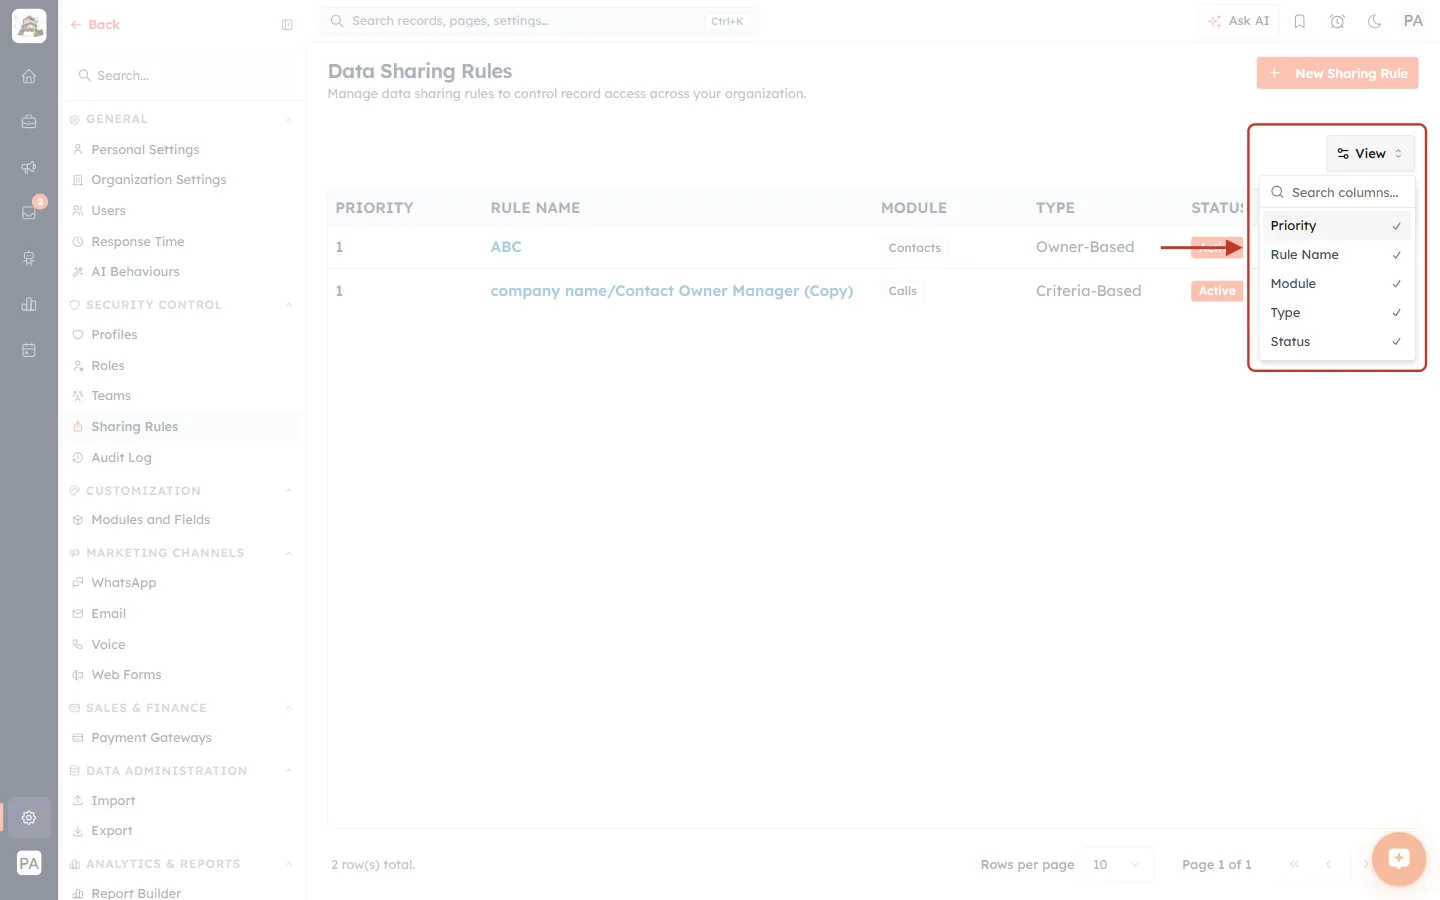
What this screenshot shows. The View button and its menu are ringed. The menu lists every column with a tick next to the ones that are showing.
Search columns… at the top filters the list of columns.
Priority, Rule Name, Module, Type, Status: click one to hide it (the tick disappears); click again to show it.
Click anywhere outside the menu, or press Esc, to close it.
Part 2 — Create an Owner-Based Sharing Rule#
An owner-based rule shares records according to who owns them. In this walk-through we build the rule from the sentence above: share Contacts owned by the Sales Team with the Manager role, Read Only.
Step 5: Click New Sharing Rule#
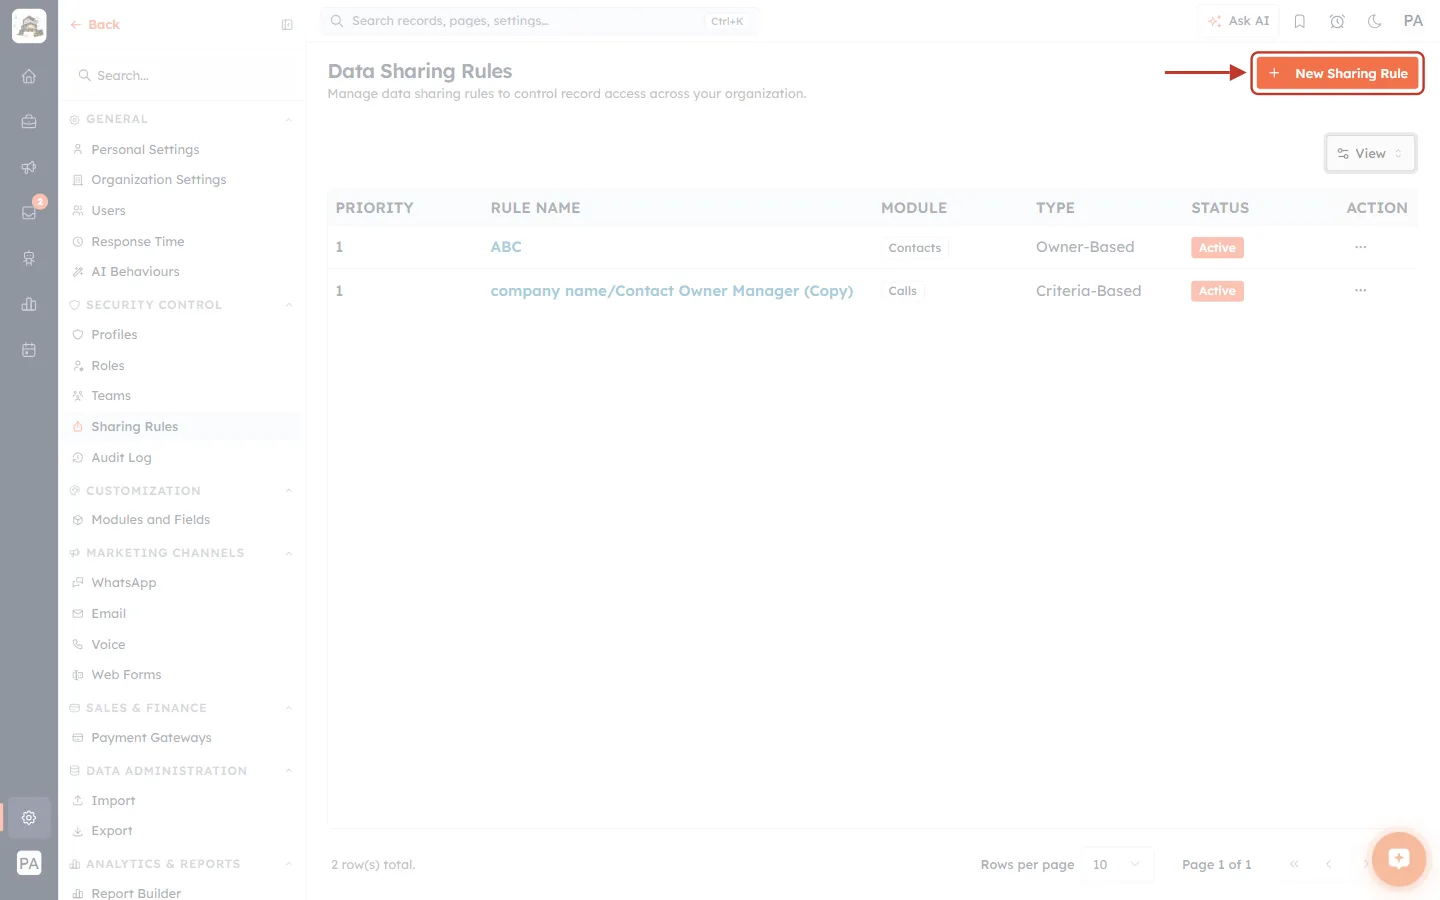
What this screenshot shows. The orange New Sharing Rule button at the top right of the page is ringed.
Clicking it opens the New Sharing Rule form on a page of its own.
The existing rules stay listed underneath; nothing changes until you click Create Rule on the form.
The form has three cards, filled from top to bottom: Basic Information (module and name), Sharing Configuration (what is shared, and with whom) and Permissions (access level and Allow Superiors). The Create Rule button sits at the top right, and the ← arrow beside the title takes you back to the list without saving.
Step 6: Choose the Module#
In Basic Information, click the Module box (it reads Select module…). A searchable list of every module in your CRM opens.
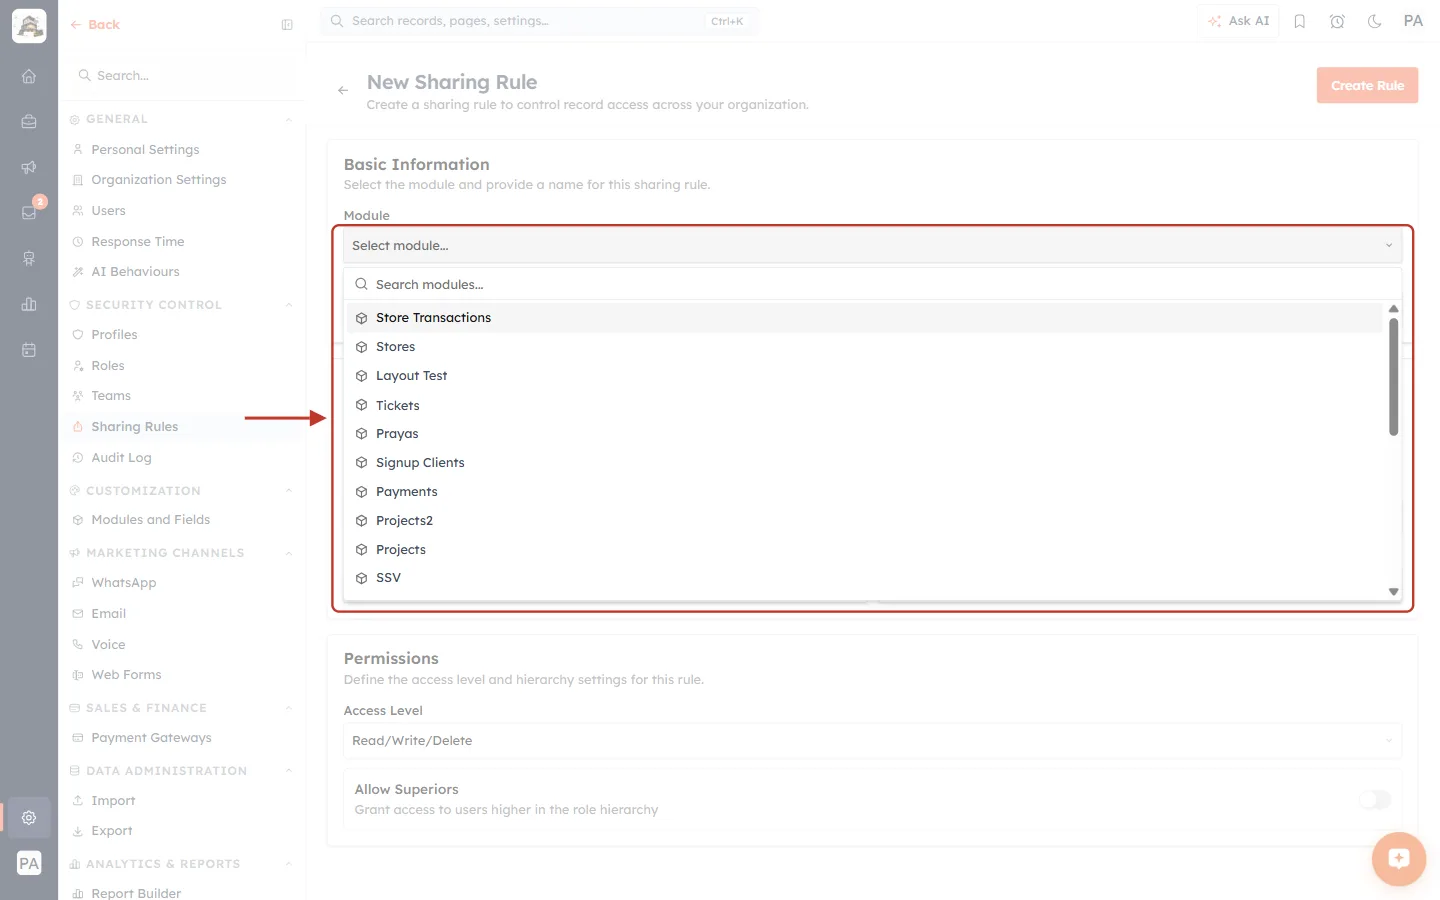
What this screenshot shows. The Module box and its open list are ringed.
Search modules… at the top of the list: type a few letters (for example con) to find a module quickly.
Module list: every standard module (Contacts, Companies, Deals, Tasks, Meetings, Calls, Notes, Quotes, Invoices, Products…) and every custom module your organisation has built. Scroll to see them all. Your list will show your own custom modules.
Pick one module. A rule always applies to a single module; to share Contacts and Deals, create two rules.
Below the ring you can see the rest of the form waiting to be filled: Sharing Configuration and Permissions.
⚠️
Choose the module carefully. Once the rule is saved, the Module cannot be changed — on the Edit screen the box is locked. If you pick the wrong one, delete the rule and create a new one.
Step 7: Name the rule#
Type a Sharing Rule Name. A good name says what is shared, with whom and how, so anyone reading the list understands the rule without opening it.
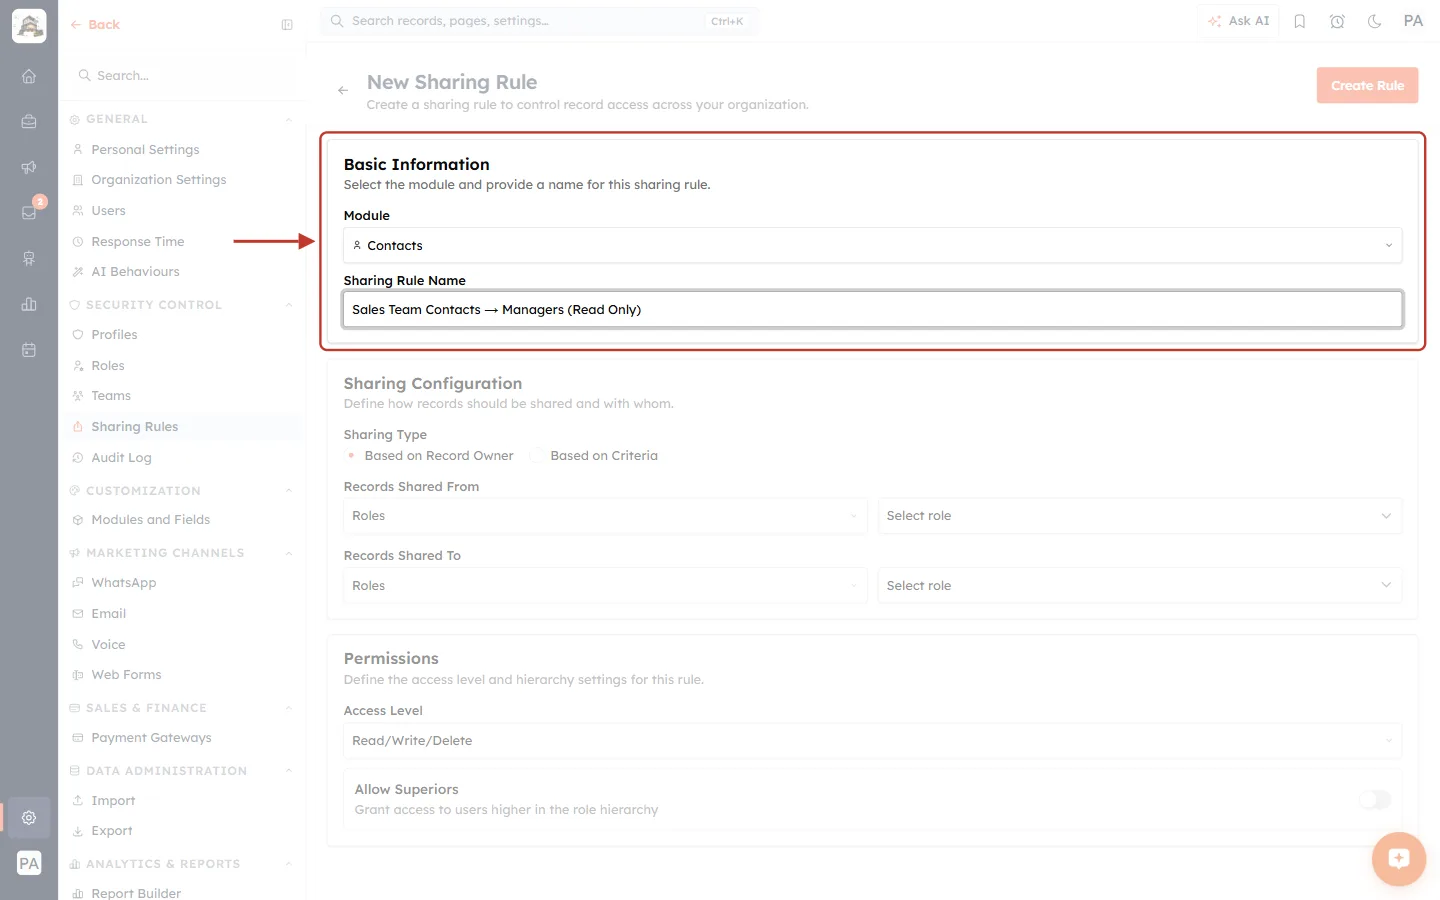
What this screenshot shows. The completed Basic Information card is ringed.
Module: now shows Contacts with the module’s icon.
Sharing Rule Name: Sales Team Contacts → Managers (Read Only). The pattern [whose/which records] → [who gets them] ([access]) works well.
Both fields are required. If either is empty when you click Create Rule, the form shows Module is required or Name is required in red (see Troubleshooting).
Step 8: Choose the Sharing Type#
In Sharing Configuration, the Sharing Type decides how records are picked. Leave it on Based on Record Owner for this example.
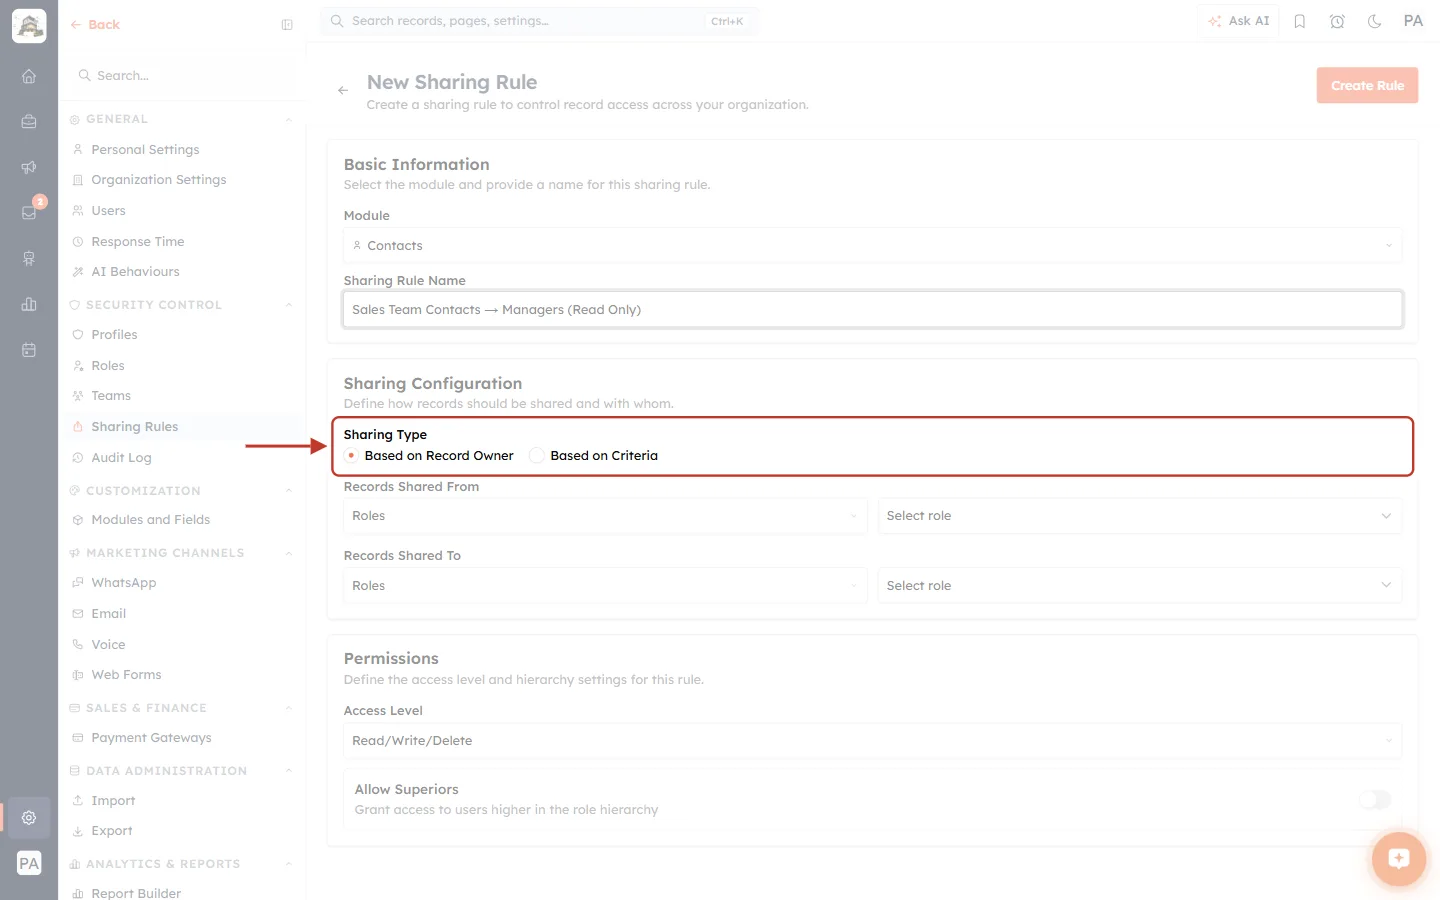
What this screenshot shows. The two Sharing Type options are ringed. The orange dot shows the selected one.
Based on Record Owner (selected by default): share records according to who owns them. The next row asks Records Shared From.
Based on Criteria: share records whose field values match conditions. Choosing it replaces Records Shared From with a Sharing Conditions builder (see Part 3).
Everything below — Records Shared To and the Permissions card — is the same for both types.
✅
Which type should I use? If you can describe the records by who owns them (“the Sales Team’s contacts”), use Based on Record Owner. If you describe them by what is in them (“deals over 50,000”, “contacts in Mumbai”), use Based on Criteria.
Step 9: Choose whose records are shared (Records Shared From)#
Records Shared From has two boxes. The left box sets the kind of owner; the right box picks the actual one. Click the left box first.
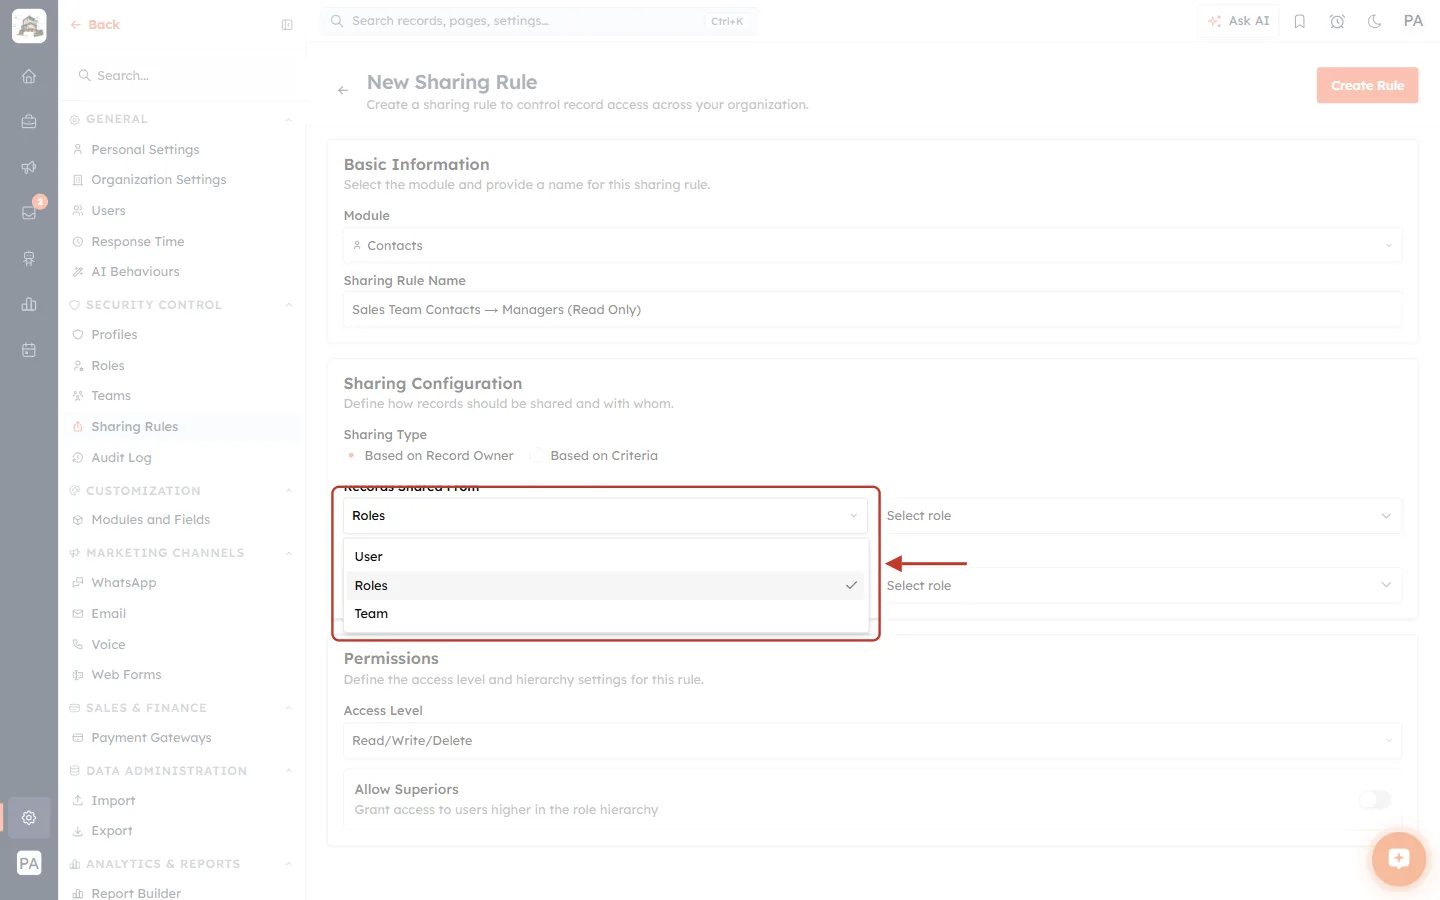
What this screenshot shows. The left-hand Records Shared From box is open and ringed, showing its three choices.
User: share the records owned by one named person.
Roles (the default, ticked): share the records owned by everyone in a role, such as Team Lead.
Team: share the records owned by the members of a team, such as Sales Team.
The right-hand box changes to match — Select role, Select user or Select team.
Choose Team, then click the right-hand box and pick the team whose records you want to share.
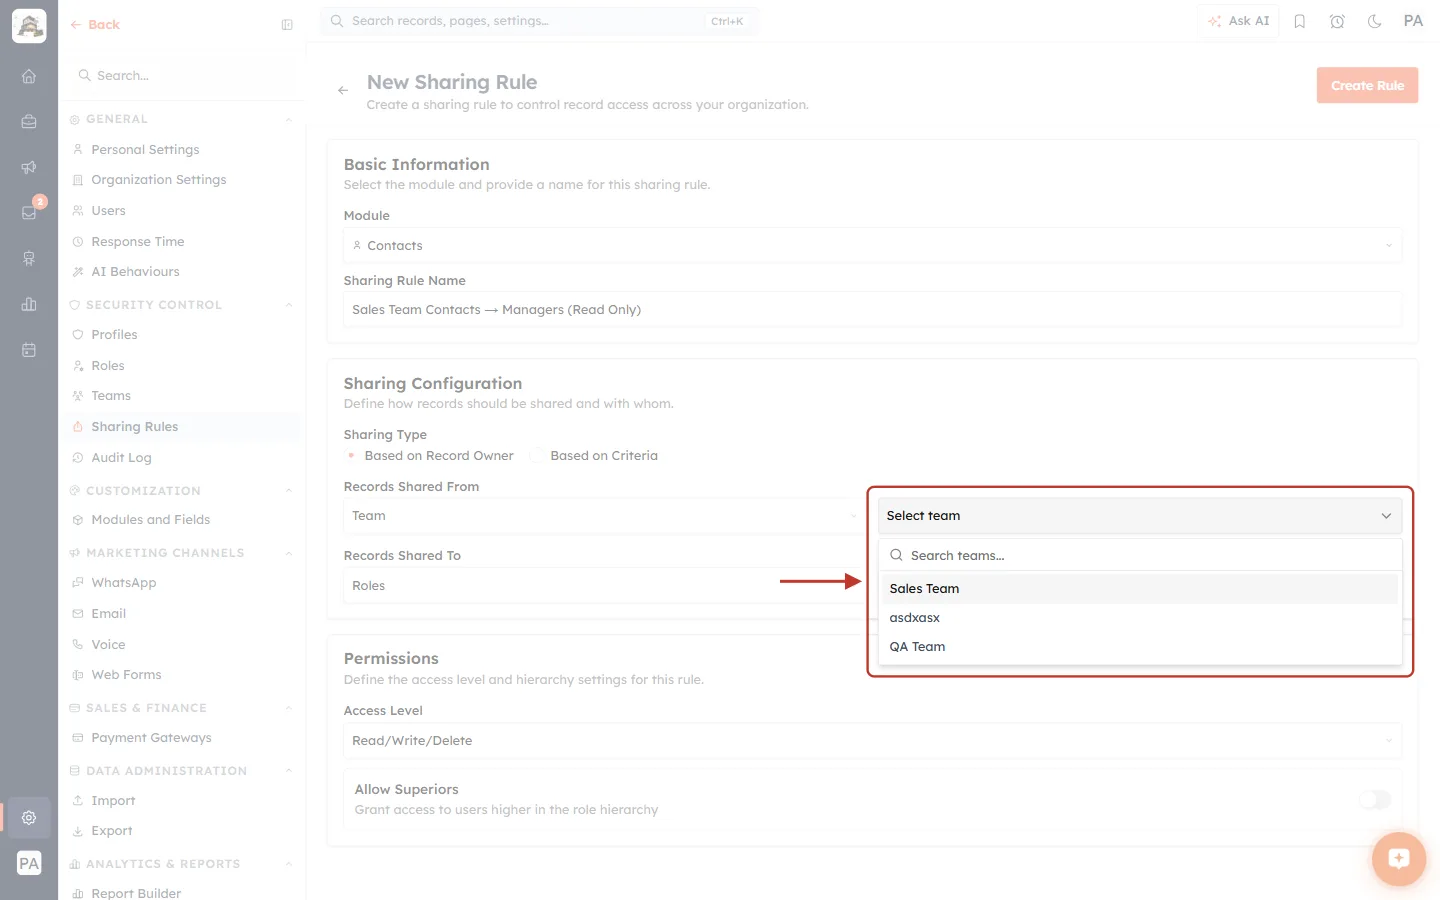
What this screenshot shows. The right-hand Records Shared From box is open and ringed, listing the teams in your organisation.
The box now reads Select team, and a Search teams… box sits at the top of the list — type part of a name to filter it.
Below it is every team created in Settings → Teams. Your list will show your own team names.
Pick Sales Team. Every Contact owned by a member of that team is now included in the rule.
If the team you need is missing, create it first (see Create Teams: Group Users for Lead Routing, Reporting & Sharing), then come back and reload this form.
Step 10: Choose who receives access (Records Shared To)#
Records Shared To works the same way: the left box sets User, Roles or Team, and the right box picks which one. Leave the left box on Roles and open the right-hand box.
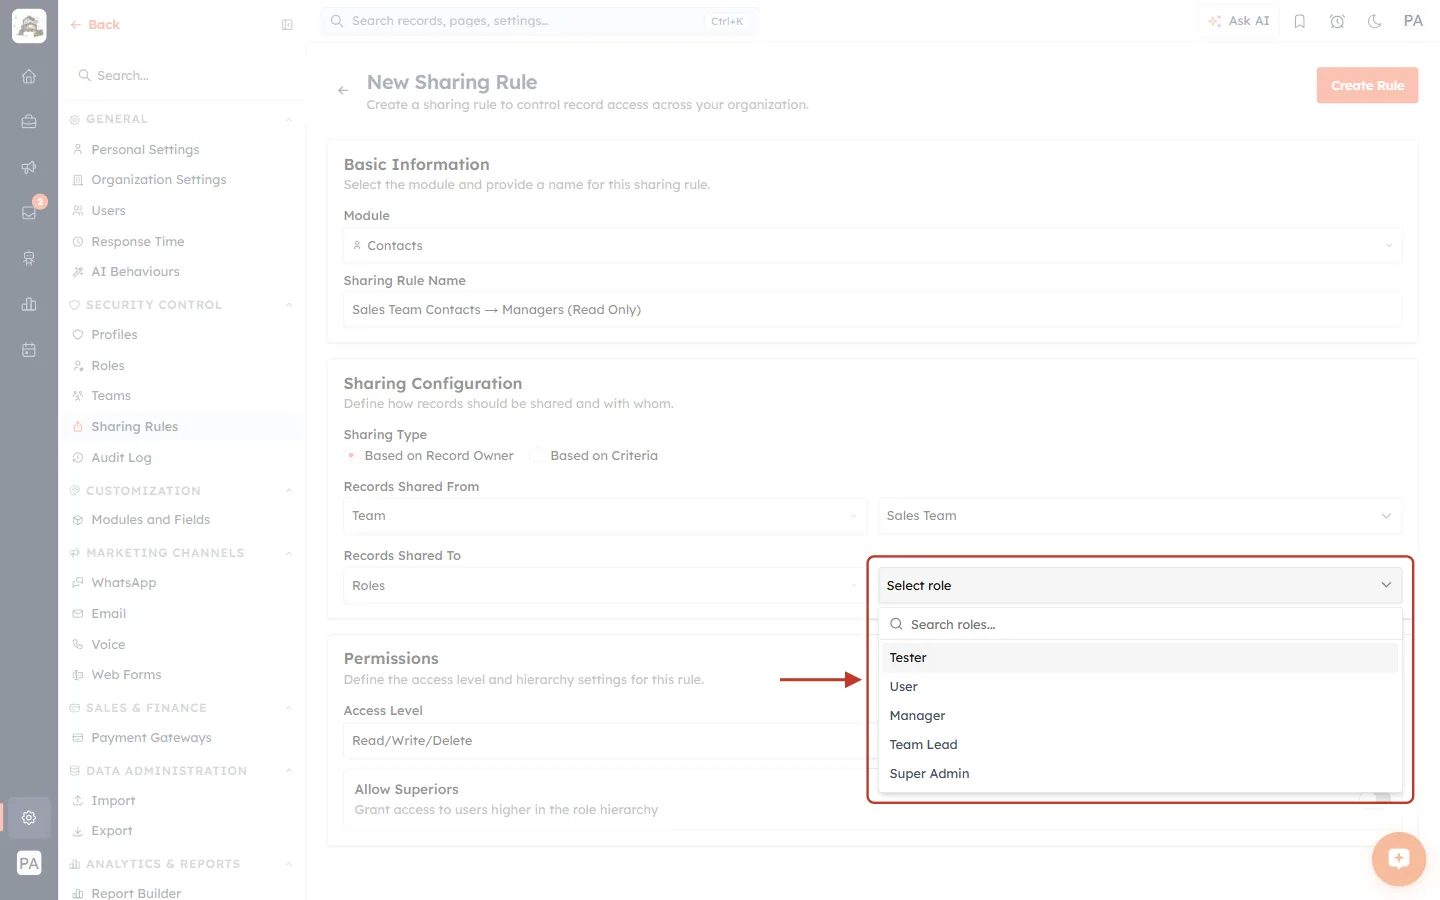
What this screenshot shows. The right-hand Records Shared To box is open and ringed, listing your roles.
Like the team list, it opens with a search box at the top. Below it is every role from Settings → Roles — here Tester, User, Manager, Team Lead and Super Admin. Your roles will differ.
Pick Manager. Everyone who holds the Manager role receives access through this rule.
Sharing to a role or team rather than a named user keeps the rule working when people join or leave — new members get access automatically.
Check both rows before moving on:
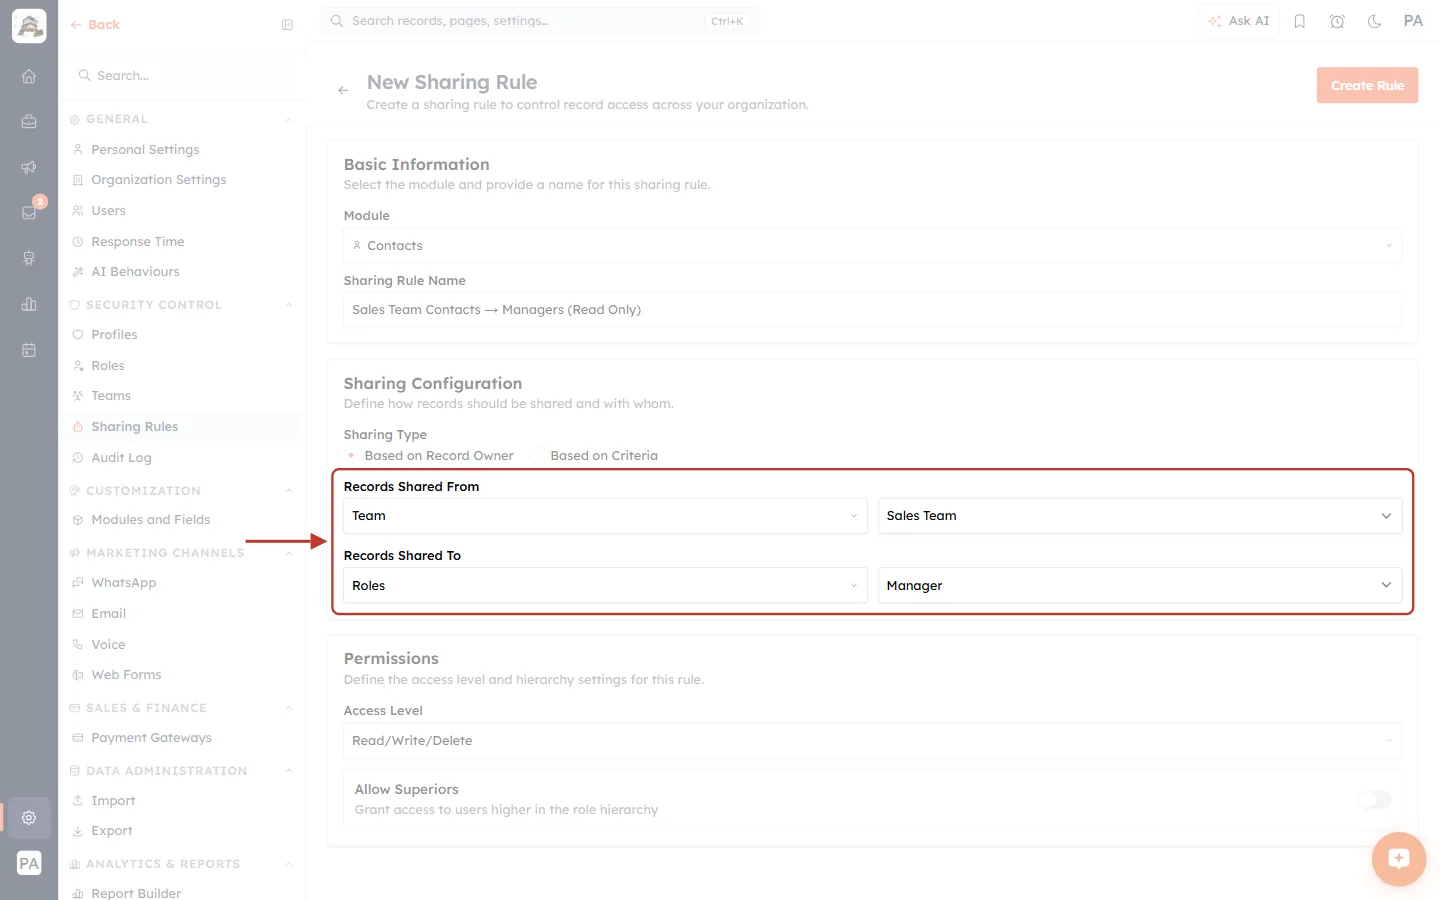
What this screenshot shows. The completed Records Shared From and Records Shared To rows are ringed together.
Records Shared From: Team → Sales Team — whose records are shared.
Records Shared To: Roles → Manager — who receives them.
Read the two rows together as a sentence: “Contacts owned by the Sales Team are shared with the Manager role.” If the sentence is not what you meant, change the boxes now.
Above the ring, Basic Information still shows the module (Contacts) and the rule name.
Step 11: Set the Access Level#
Scroll down to the Permissions card and open Access Level.
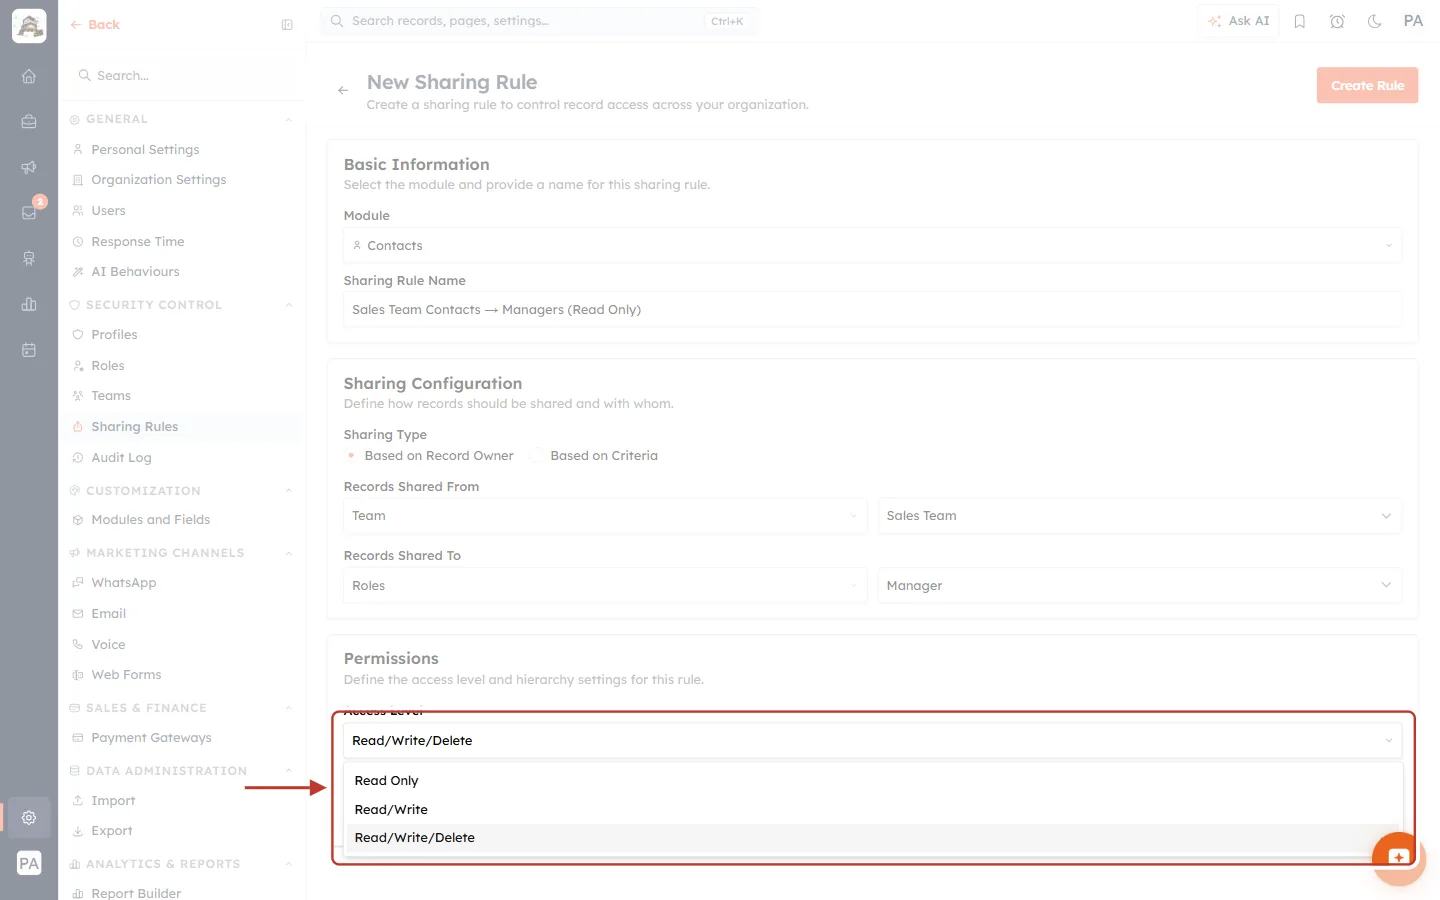
What this screenshot shows. The Access Level box is open and ringed, showing the three levels.
Read Only: recipients can open and view the shared records, but cannot change or delete them.
Read/Write: recipients can view and edit the shared records, but cannot delete them.
Read/Write/Delete: recipients can view, edit and delete the shared records.
The tick shows the current choice. New rules start on Read/Write/Delete — the widest level — so always check this box before saving.
Pick Read Only for this example.
⛔
The form defaults to Read/Write/Delete. If you skip this box, everyone in “Records Shared To” may be able to delete the shared records (as far as their profile allows). Start with Read Only and raise the level only when there is a clear need.
Access Level | View | Edit | Delete | Typical use |
|---|---|---|---|---|
Read Only | ✔ | — | — | Marketing viewing Sales contacts; Finance reviewing large deals. |
Read/Write | ✔ | ✔ | — | A partner team that updates records on behalf of another team. |
Read/Write/Delete | ✔ | ✔ | ✔ | Rare — only when the recipients fully co-own the records. |
ℹ️
The access level works within each recipient’s profile. A profile that does not allow Edit or Delete on the module still blocks those actions, whatever the rule says. Profiles set the ceiling; sharing rules decide which extra records fall under it.
Step 12: Decide on Allow Superiors#
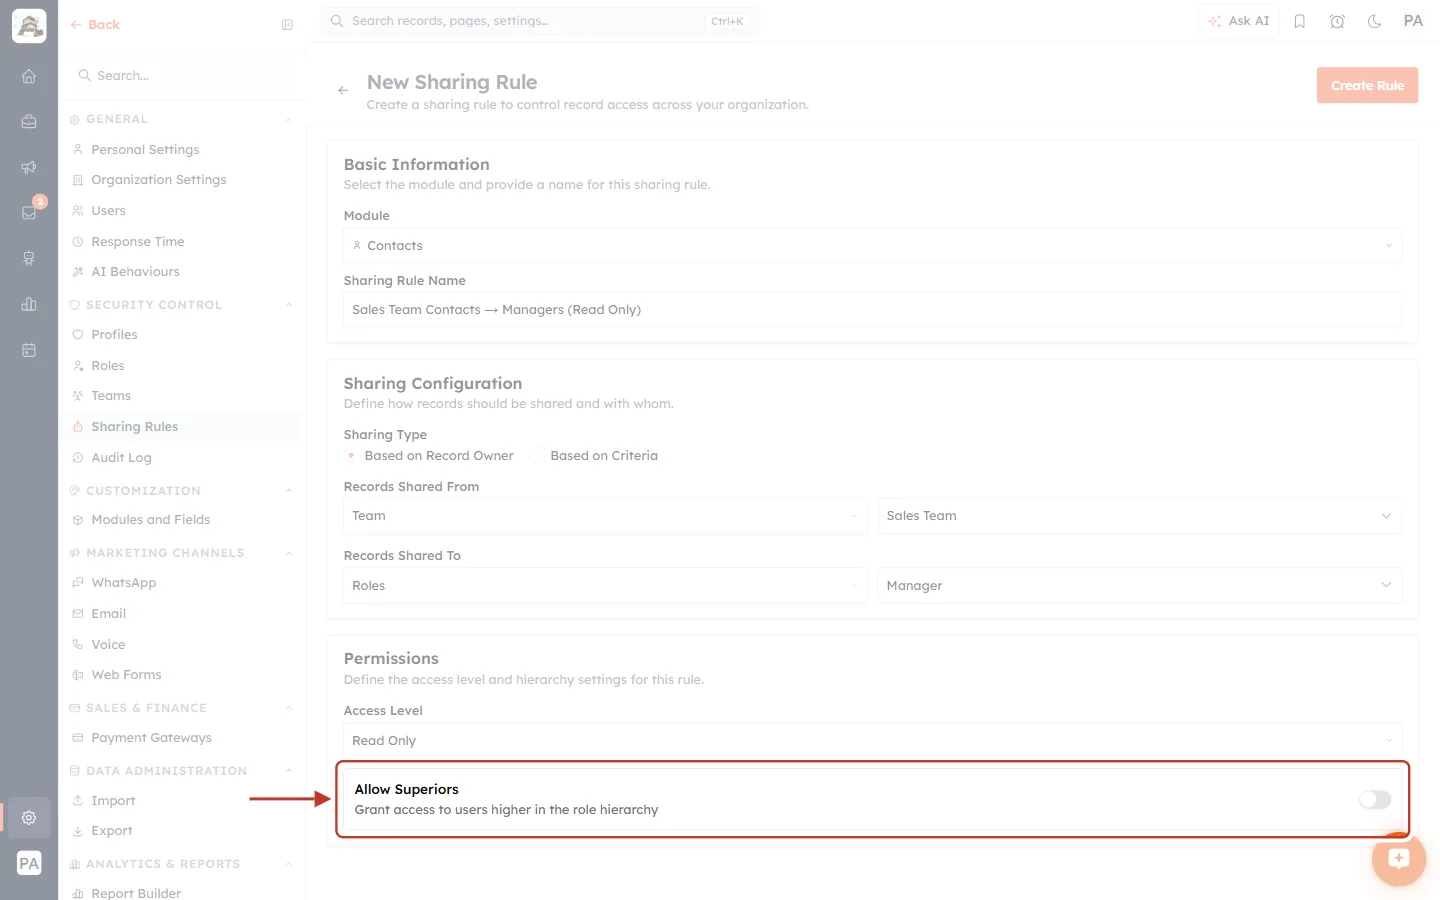
What this screenshot shows. The Allow Superiors row and its switch are ringed.
Allow Superiors — Grant access to users higher in the role hierarchy.
Switch off (grey, the default): only the users in “Records Shared To” get access.
Switch on (coloured): users whose role sits above the recipients in the role hierarchy get the same access too, without being listed.
Above the ring, Access Level now shows Read Only.
Example: you share with the Team Lead role and turn Allow Superiors on. Anyone above Team Lead in your hierarchy (for example a Manager) also receives the access. Leave it off unless you specifically want that — it can widen access more than you expect. See Understanding the Role Hierarchy: How Data Visibility Works to check who sits above whom.
Step 13: Click Create Rule#
Scroll back to the top of the form and click Create Rule.
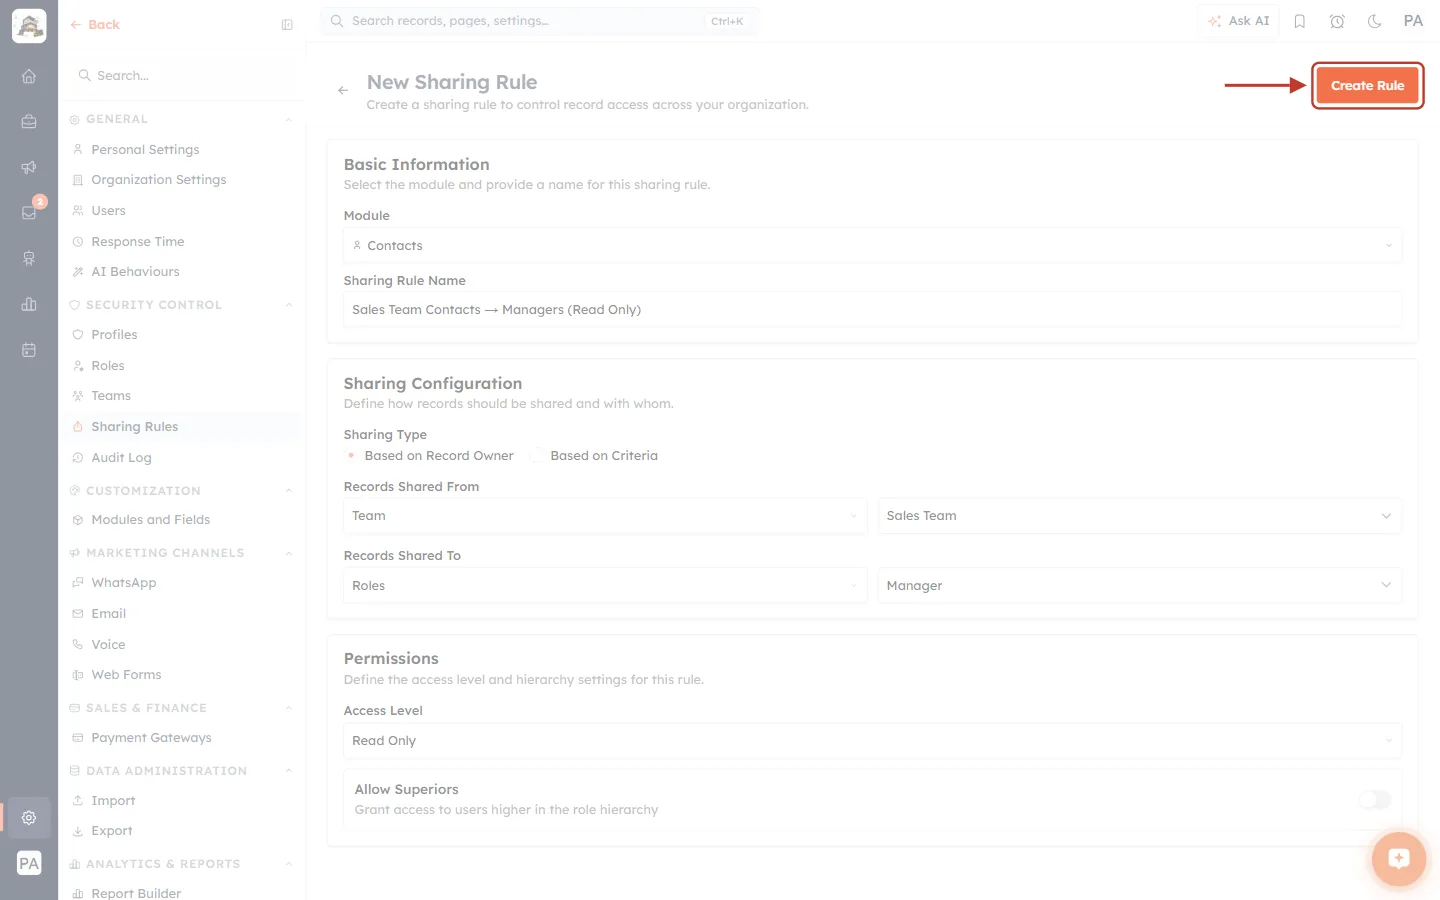
What this screenshot shows. The orange Create Rule button at the top right of the form is ringed.
Create Rule saves the rule and returns you to the Data Sharing Rules list.
The ← arrow beside New Sharing Rule leaves the form without saving.
If a required field is missing, the rule is not saved; the missing fields are marked in red instead (see Troubleshooting).
Step 14: Check the new rule on the list#
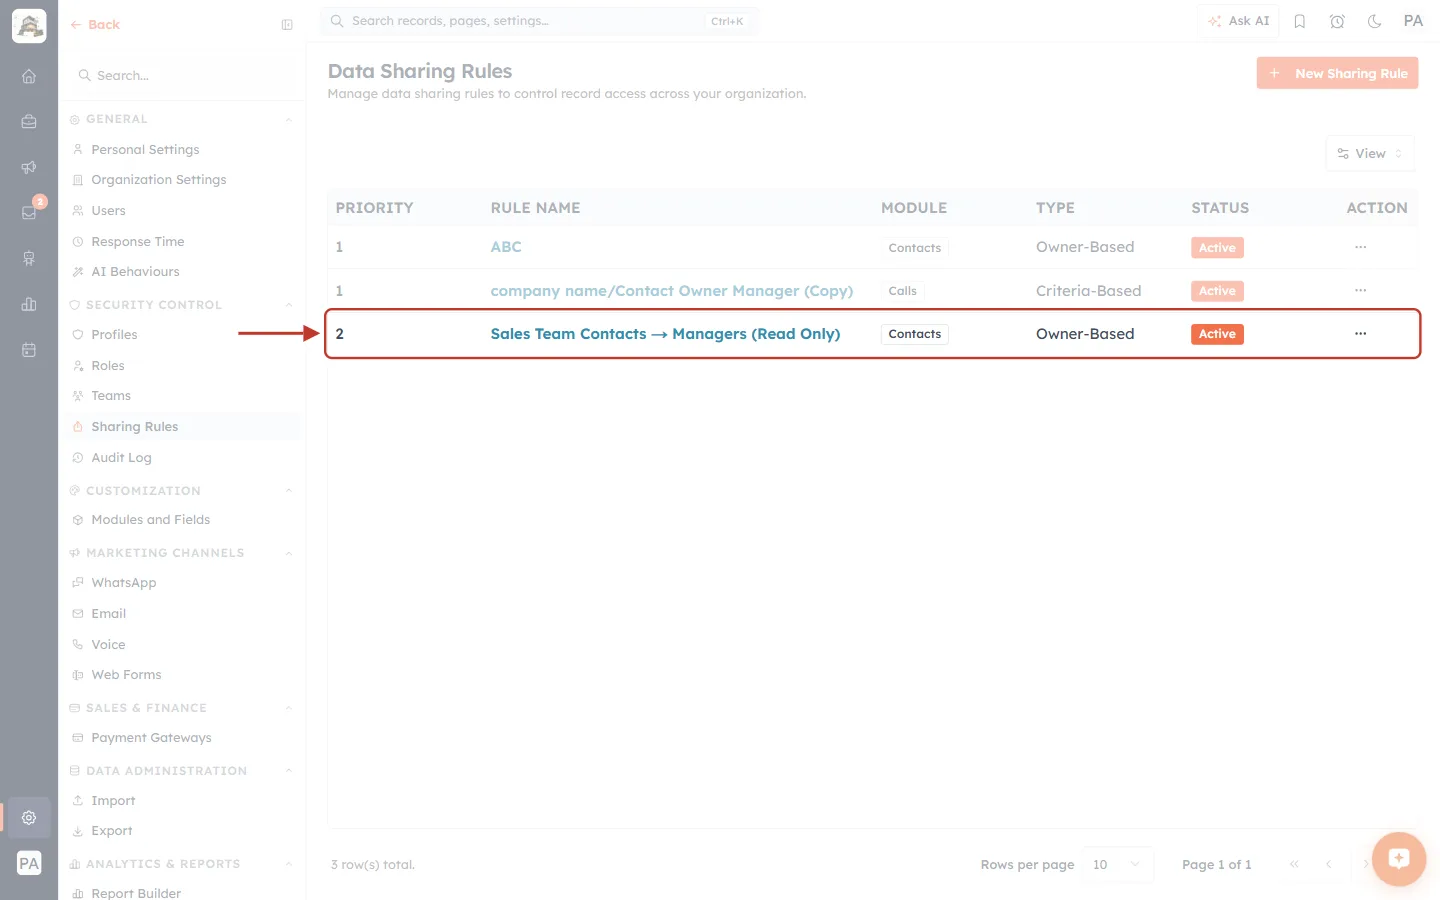
What this screenshot shows. The new rule’s row is ringed on the Data Sharing Rules list.
Priority: 2 — it is the second rule for the Contacts module (an older Contacts rule already holds 1).
Rule Name: Sales Team Contacts → Managers (Read Only). Click the name to open it.
Module: Contacts. Type: Owner-Based.
Status: Active — the rule is saved and switched on.
✅
Test it. Ask someone who holds the Manager role to open Contacts and search for a contact owned by a Sales Team member. They should be able to open it but, with Read Only, not edit it.
Part 3 — Create a Criteria-Based Sharing Rule#
A criteria-based rule shares records according to what is in them, whoever owns them. In this walk-through we share Deals worth more than 50,000, or with “Enterprise” in the deal name, with the Manager role, Read Only.
Click New Sharing Rule again, choose the Deals module, enter a name (for example High-Value or Enterprise Deals → Managers (Read Only)), then continue below.
Step 15: Switch the Sharing Type to Based on Criteria#
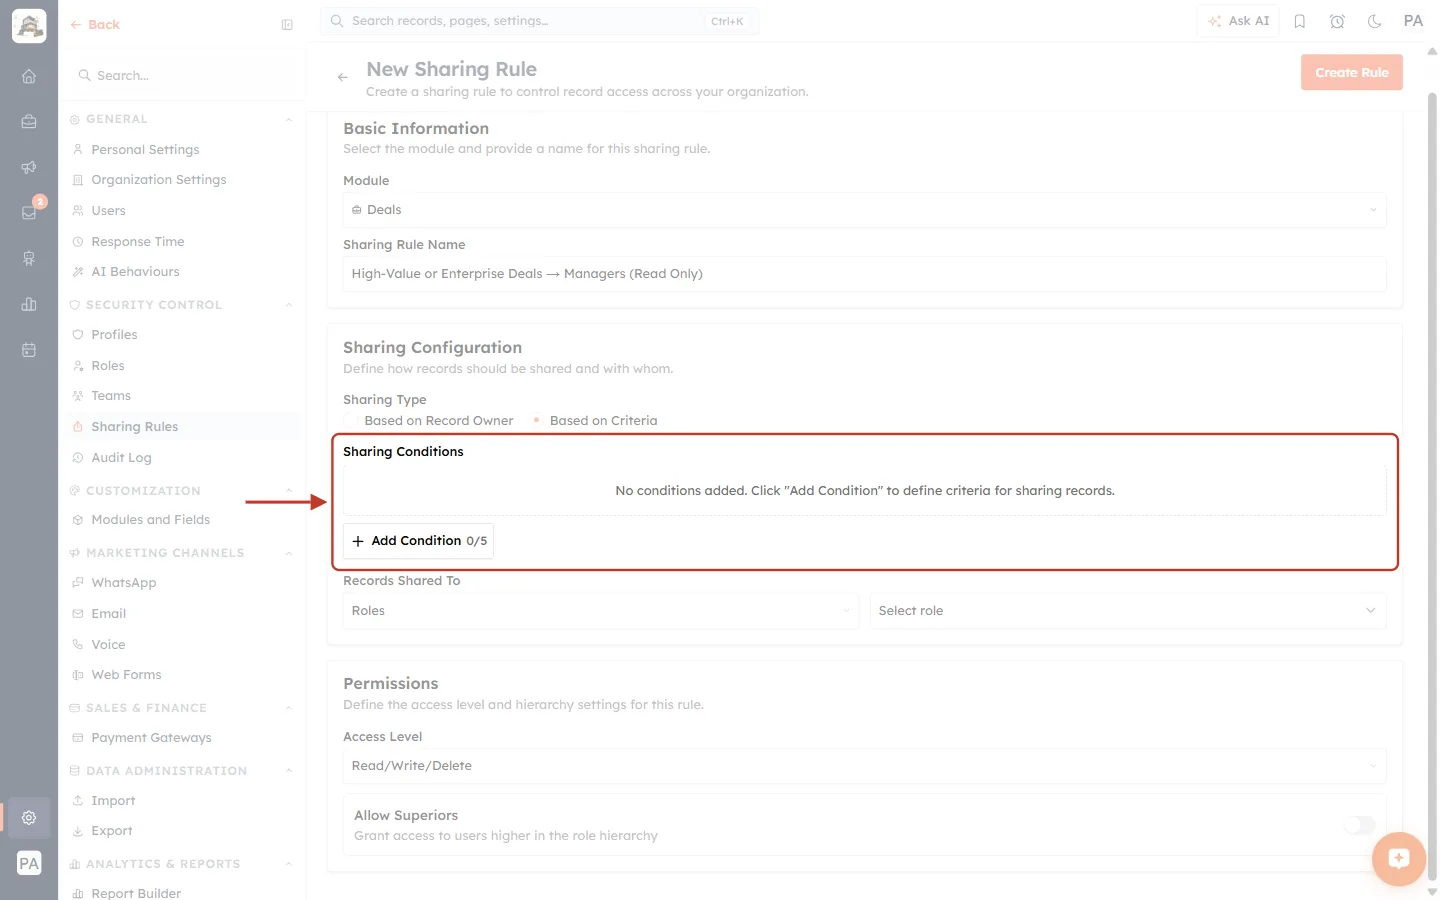
What this screenshot shows. Based on Criteria is selected and the new Sharing Conditions area is ringed.
Sharing Type: the orange dot is now on Based on Criteria.
Records Shared From has gone — the conditions take its place.
Sharing Conditions: No conditions added. Click “Add Condition” to define criteria for sharing records.
Add Condition 0/5: adds a condition row. The counter shows how many you have used out of the maximum of five.
ℹ️
Pick the Module before switching to criteria. Without a module the area only says Please select a module first to define sharing criteria, because the field list comes from the module.
Step 16: Add the first condition — choose the Field#
Click Add Condition. A row labelled Rule 1 appears with three boxes: Field, Operator and Value. Open Field.
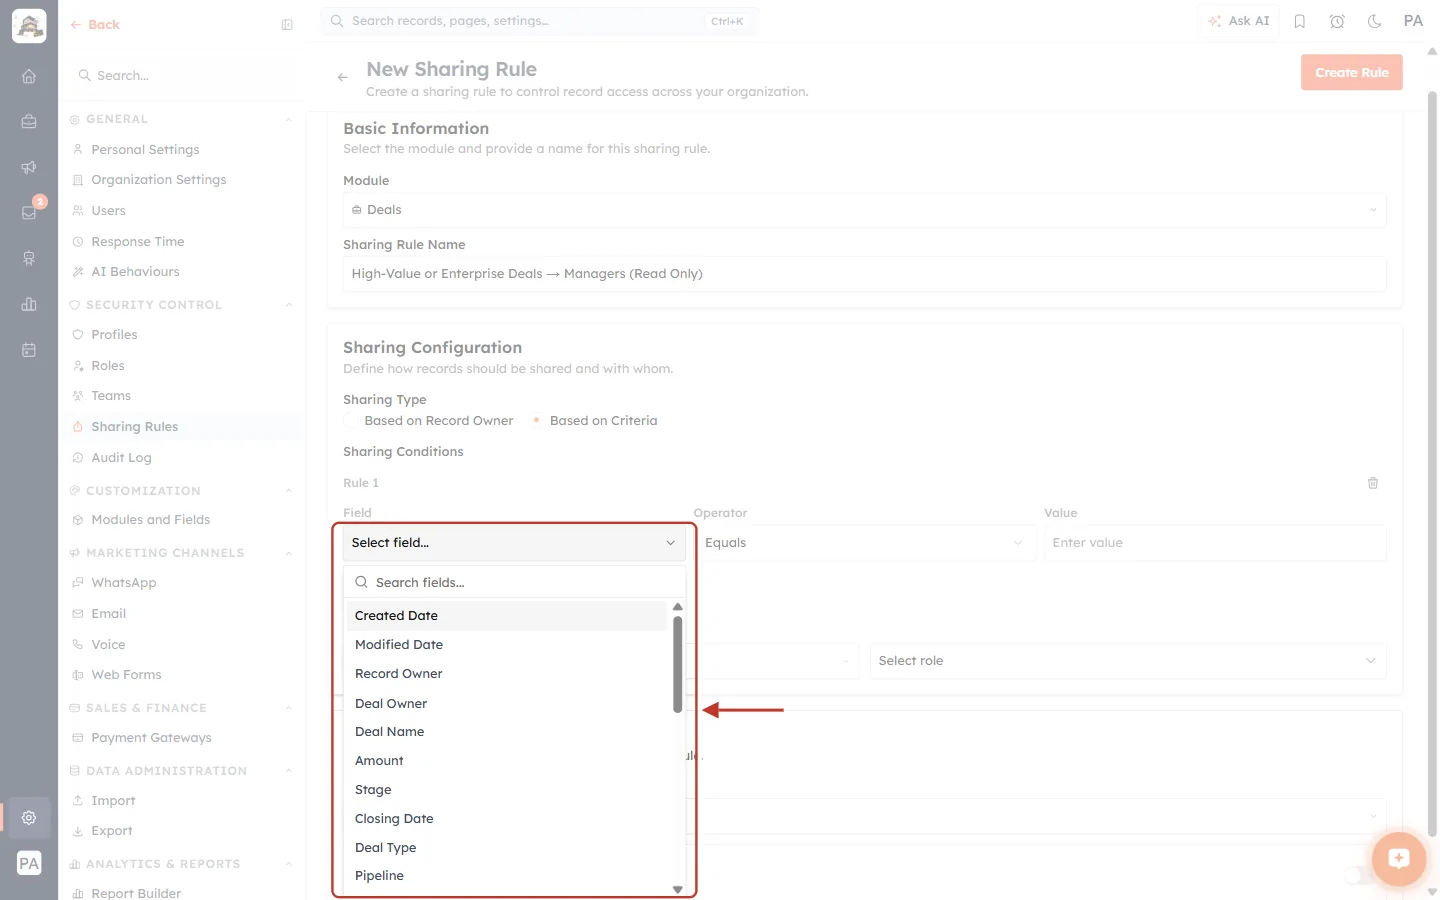
What this screenshot shows. The Field box of Rule 1 is open and ringed, listing the fields of the Deals module.
Search fields… at the top of the list filters it as you type.
The list contains the module’s fields — for Deals: Deal Name, Amount, Stage, Closing Date, Deal Type, Pipeline, Deal Owner, Record Owner, Contact Name — plus system fields such as Created Date, Modified Date, Created By, Modified By and Last Activity Date. Your own custom fields appear here too.
Scroll or type to find the field you want.
Pick Amount.
Step 17: Choose the Operator and enter the Value#
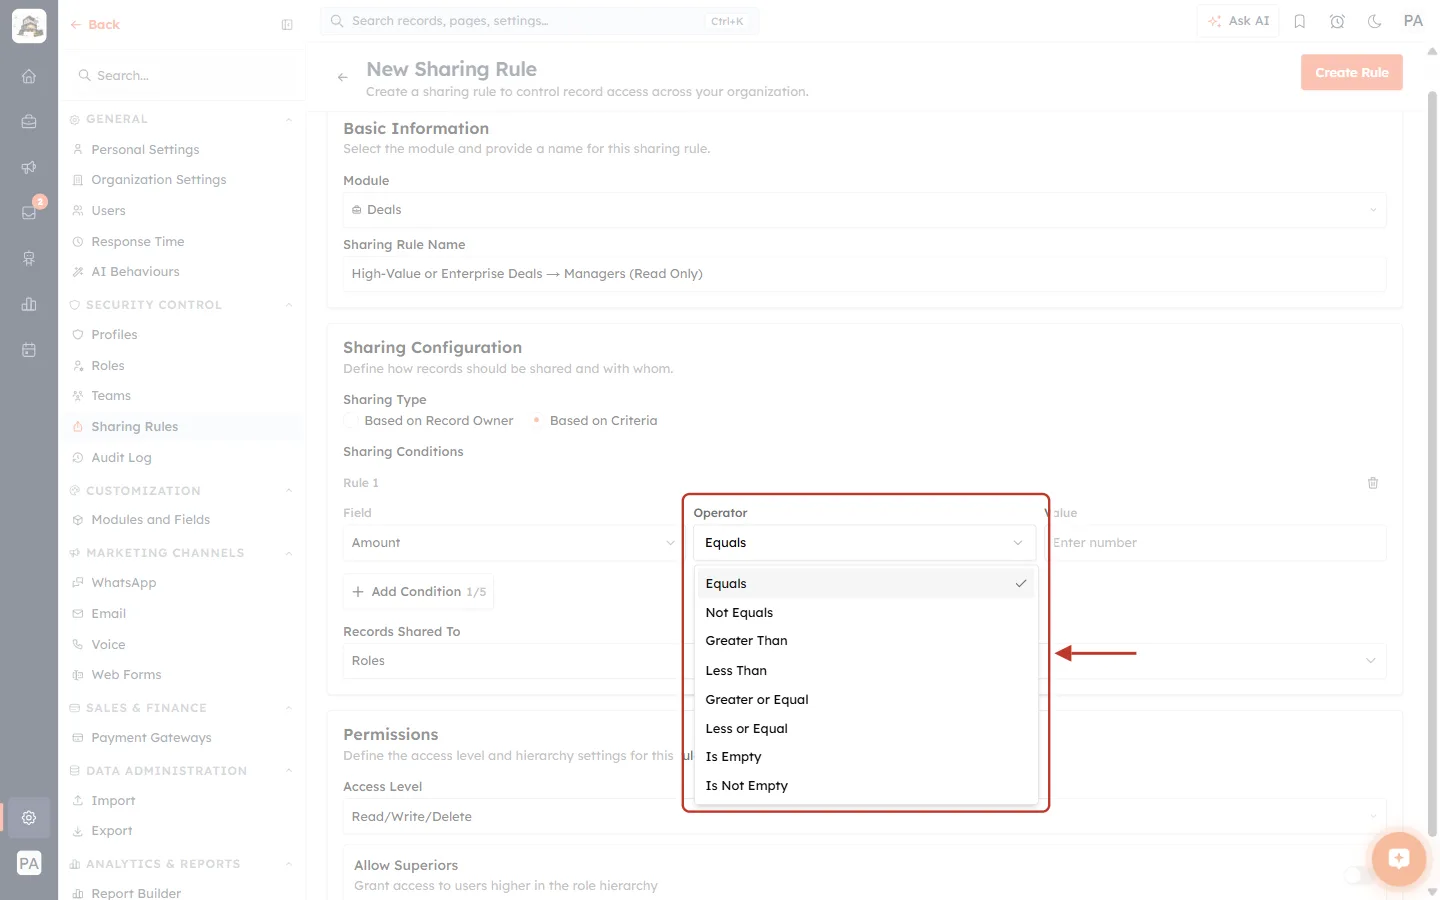
What this screenshot shows. The Operator box is open and ringed. Because Amount is a number, only number-friendly operators are listed.
Equals / Not Equals: exactly this value, or anything else.
Greater Than / Less Than: strictly above or below the value.
Greater or Equal / Less or Equal: the same, including the value itself.
Is Empty / Is Not Empty: the field has no value, or has any value. These need no Value box.
On the left, Field shows Amount. On the right, the Value box reads Enter number.
The operators change with the field type. Text fields offer Equals, Not Equals, Contains, Does Not Contain, Starts With, Ends With, Is Empty and Is Not Empty; number and date fields add the greater/less-than comparisons; pick-list fields can also offer Is any of and Is none of. Choose Greater Than and type 50000 in Value.
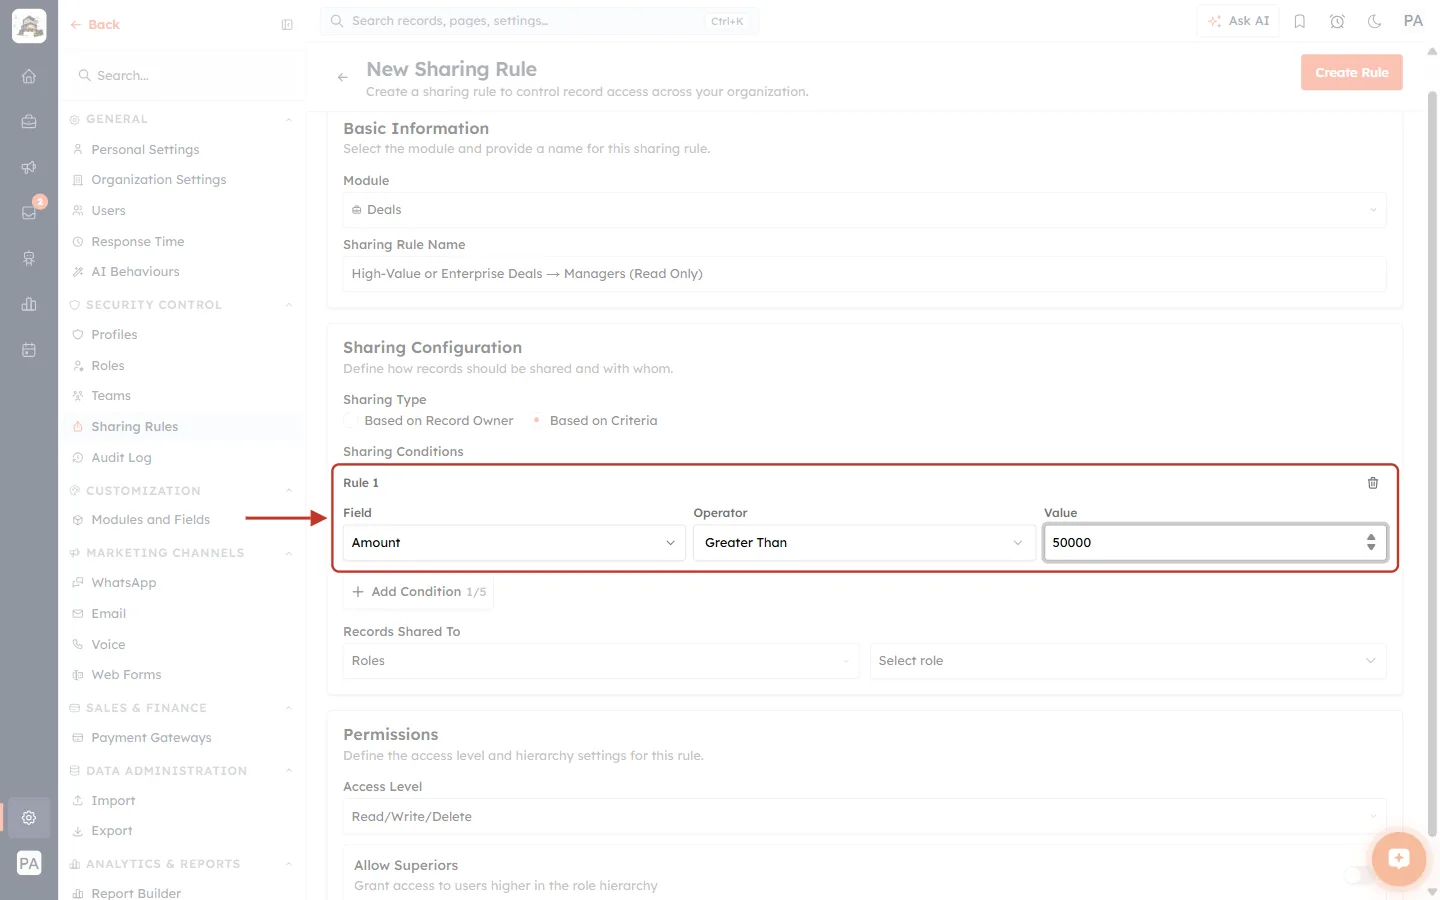
What this screenshot shows. The completed Rule 1 row is ringed.
Field: Amount. Operator: Greater Than. Value: 50000.
Read it as: “Share every Deal whose Amount is greater than 50,000.”
The bin icon at the right end of the Rule 1 heading removes the condition.
Add Condition 1/5 below it adds another row.
Step 18: Add a second condition and choose AND or OR#
Click Add Condition again and fill in Rule 2: Field Deal Name, Operator Contains, Value Enterprise. Between the two rows a small AND button appears. Click it to switch it to OR.
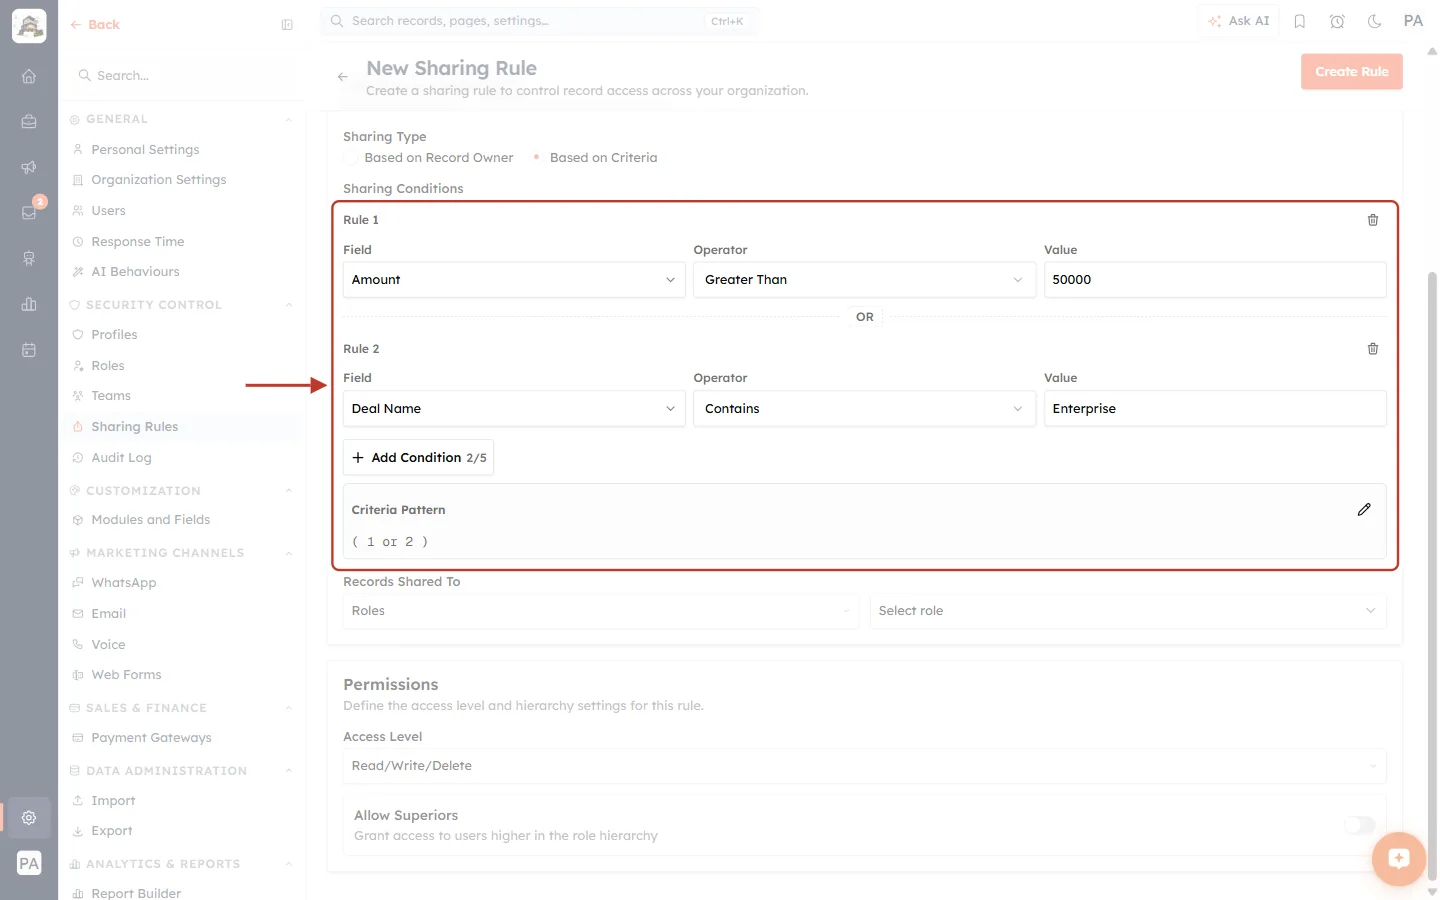
What this screenshot shows. Both conditions, the connector between them and the Criteria Pattern box are ringed.
Rule 1: Amount · Greater Than · 50000.
Connector (between the rows): now reads OR. Click it to toggle between AND and OR.
Rule 2: Deal Name · Contains · Enterprise.
Add Condition 2/5: you can add up to three more.
Criteria Pattern:
( 1 or 2 )— the logic in words: a deal is shared if it matches condition 1 or condition 2.
Connector | A record is shared when… | Example |
|---|---|---|
AND | it matches every condition | Amount > 50,000 AND Stage = Negotiation → only large deals in negotiation. |
OR | it matches at least one condition | Amount > 50,000 OR Deal Name contains “Enterprise” → both groups. |
Step 19 (optional): Edit the Criteria Pattern for mixed logic#
With three or more conditions you may need a mix of AND and OR, for example “(1 and 2) or 3”. Click the pencil icon on the Criteria Pattern box to type the pattern yourself.
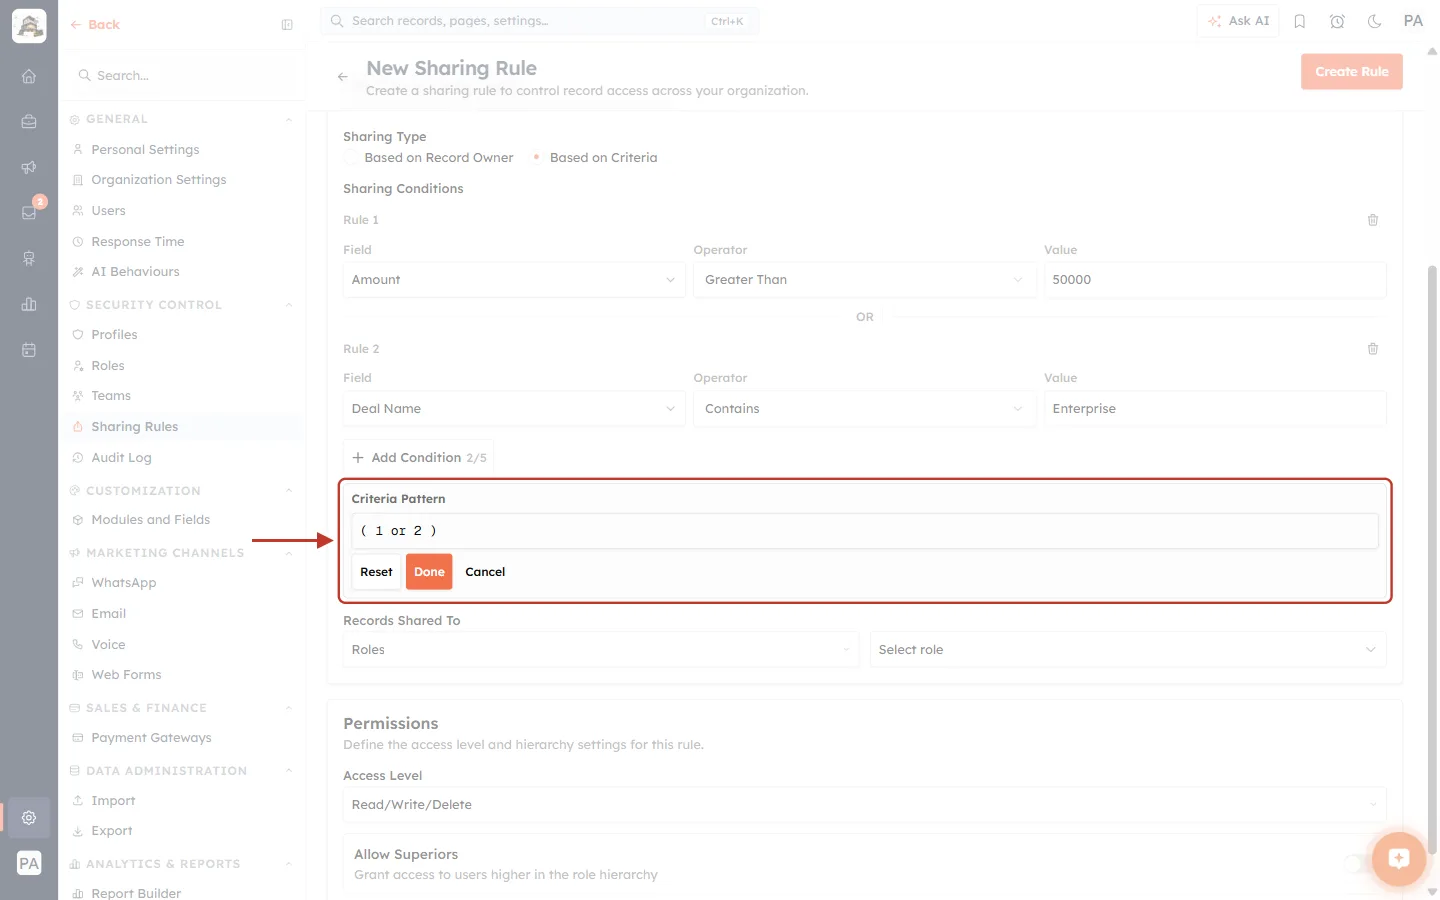
What this screenshot shows. The Criteria Pattern editor is ringed.
Pattern box: holds the current pattern — here
( 1 or 2 ). The numbers refer to the Rule 1, Rule 2… labels on each condition. The grey hint shows the format: e.g. ( 1 and 2 ) or 3.Reset: puts the pattern back to what the AND/OR buttons produce.
Done: keeps your pattern.
Cancel: closes the editor without changing anything.
⚠️
Use every condition number exactly once, and wrap groups in brackets. For example, with three conditions write
( 1 and 2 ) or 3 — not 1 and 2 or 3, which is ambiguous.Step 20: Finish the rule#
The rest is the same as an owner-based rule: set Records Shared To (Roles → Manager), set Access Level (Read Only), decide on Allow Superiors, then click Create Rule. The rule appears on the list with the type Criteria-Based.
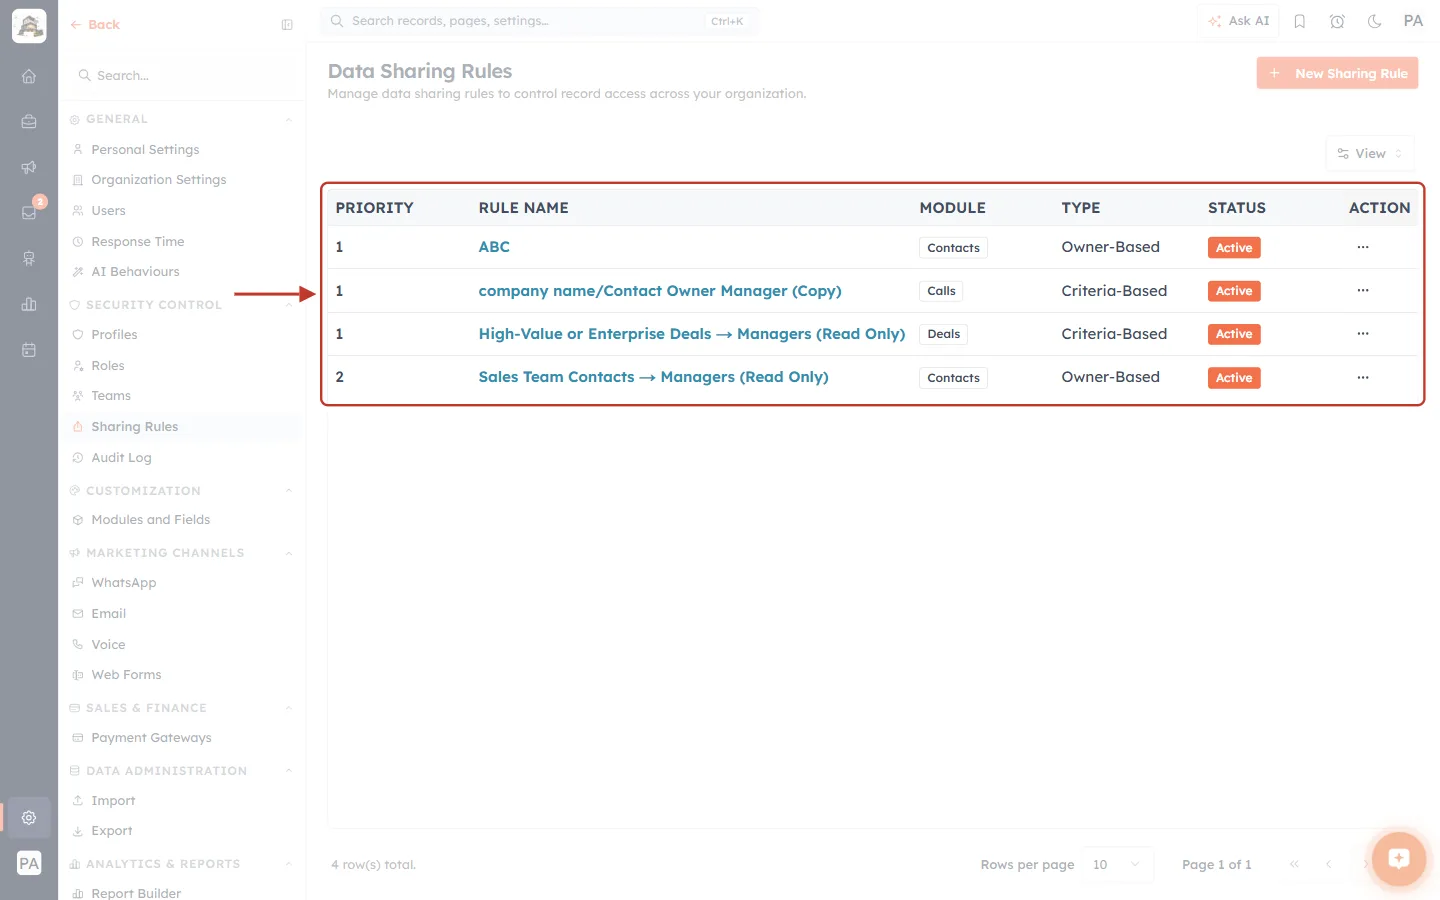
What this screenshot shows. The full rules table is ringed, now including both rules built in this guide.
Sales Team Contacts → Managers (Read Only) — Contacts, Owner-Based, Active.
High-Value or Enterprise Deals → Managers (Read Only) — Deals, Criteria-Based, Active, Priority 1 (the first rule for Deals).
Rules for other modules are listed alongside, each with its own Priority numbering.
ℹ️
A criteria-based rule is checked against the record’s values. If a deal’s Amount later drops below 50,000 and its name does not contain “Enterprise”, it no longer matches the rule.
Part 4 — Manage Your Sharing Rules#
Step 21: Open a rule’s Action menu#
Every row has a ⋯ button in the ACTION column. Click it to see what you can do with that rule.
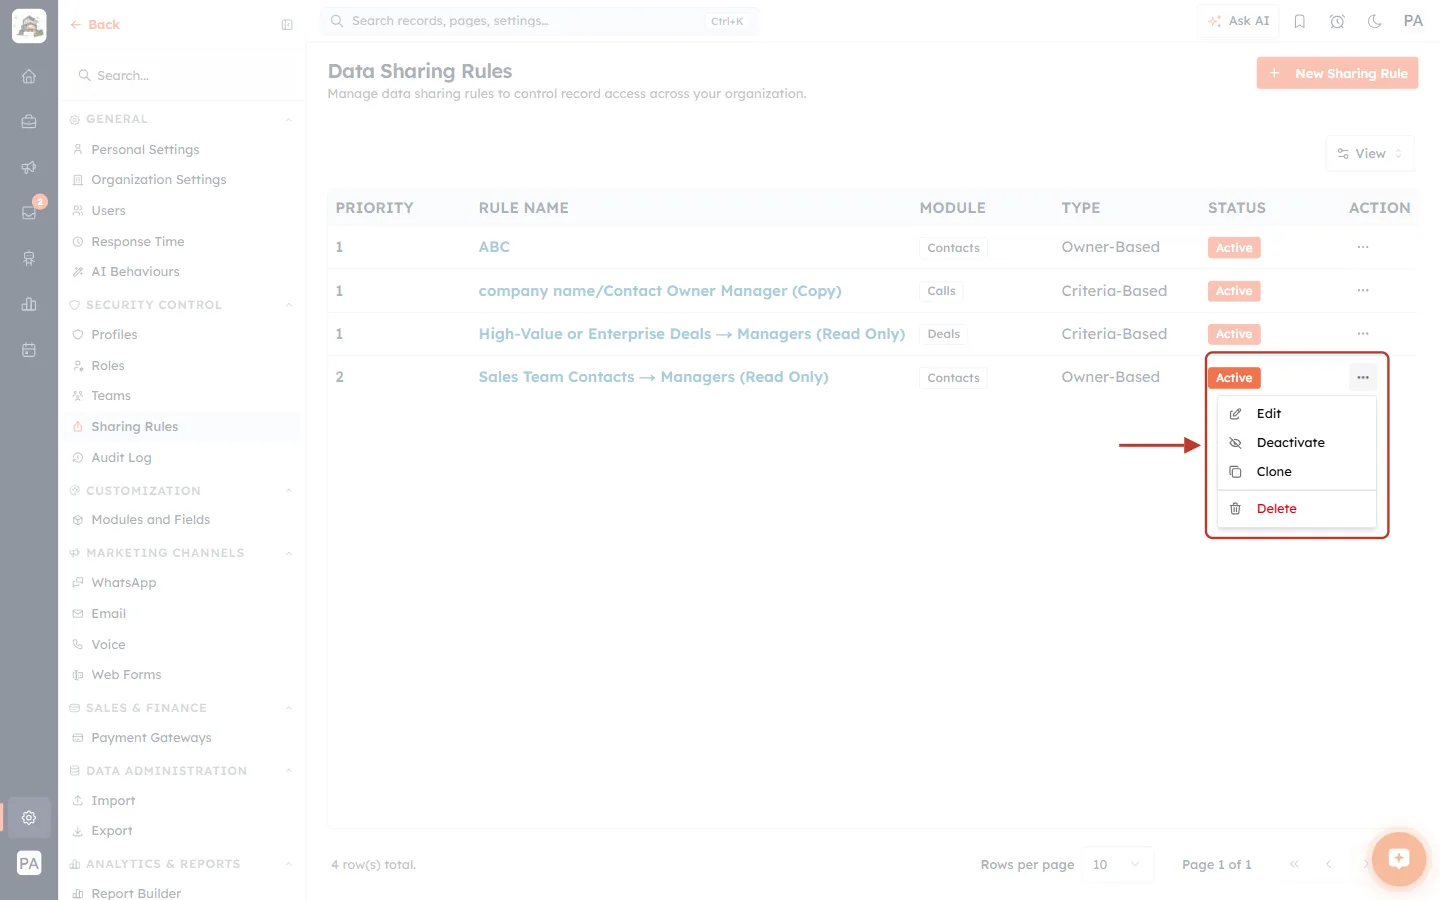
What this screenshot shows. The ⋯ button of the Sales Team Contacts → Managers (Read Only) row and its open menu are ringed.
Edit: opens the rule in the Edit Sharing Rule form.
Deactivate: switches the rule off without deleting it. On an inactive rule this item reads Activate instead.
Clone: makes a copy of the rule.
Delete: removes the rule permanently.
Edit a rule#
Choose Edit (or click the rule’s name). The Edit Sharing Rule form opens with every setting filled in. Change what you need and click Update Rule at the top right.
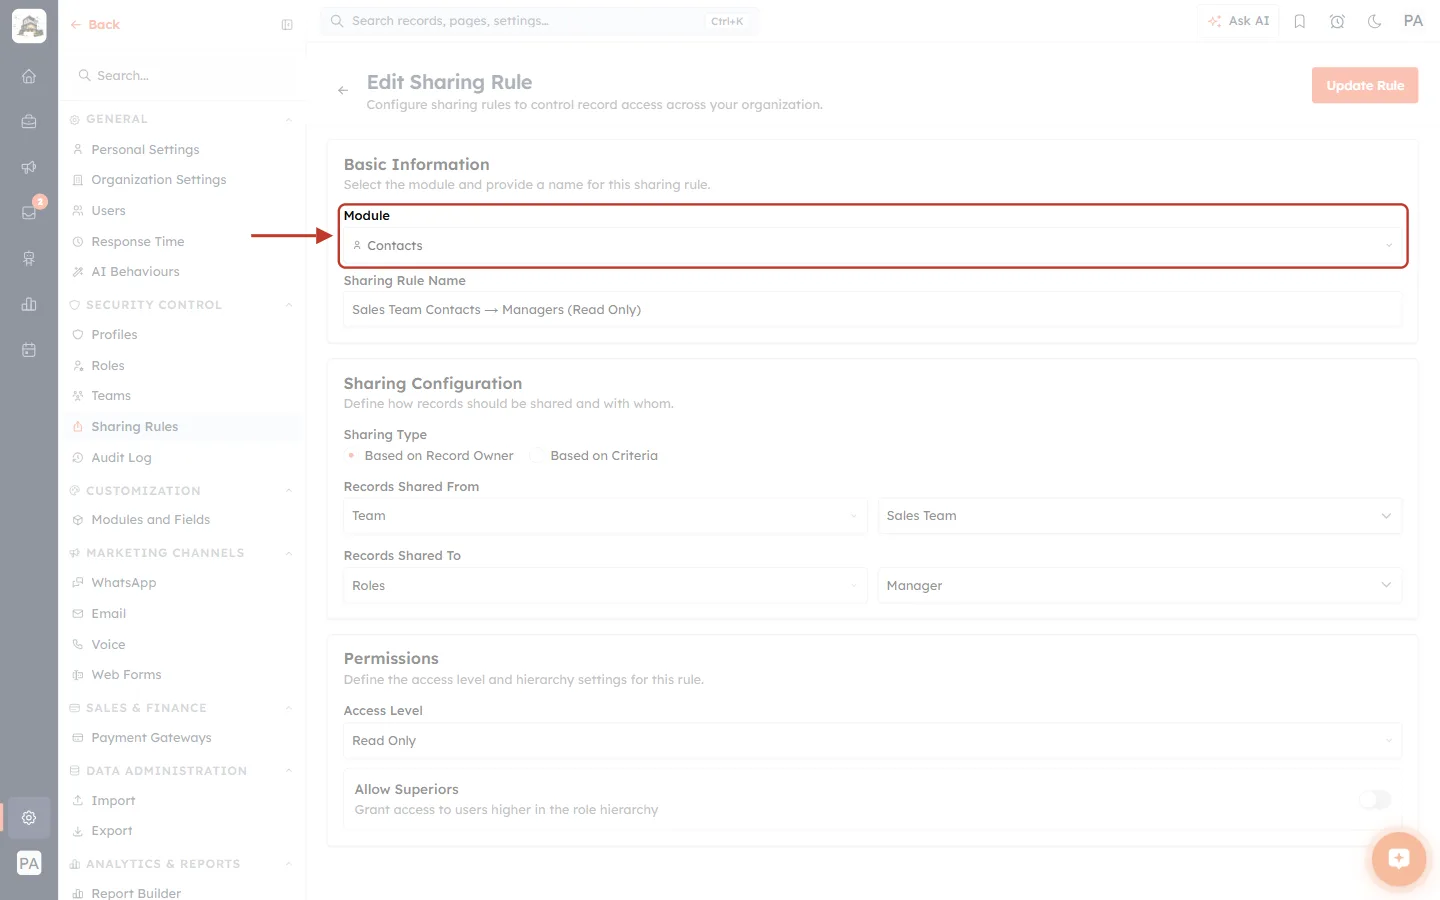
What this screenshot shows. The Module box on the Edit Sharing Rule form is ringed. It shows the rule’s module (Contacts) but is locked: a saved rule’s module cannot be changed.
Title: Edit Sharing Rule, and the button at the top right reads Update Rule instead of Create Rule.
Module: shown but locked — clicking it does nothing.
The rest of the form shows the saved settings: Sharing Type Based on Record Owner, From Team → Sales Team, To Roles → Manager, Access Level Read Only, Allow Superiors off.
Sharing Rule Name, Sharing Type, Records Shared From/To, conditions, Access Level and Allow Superiors can all still be changed.
The ← arrow beside the title leaves without saving.
Deactivate or activate a rule#
Choose Deactivate to switch a rule off while keeping its settings — handy when you are testing access, or when a temporary arrangement ends. The Status badge changes to grey Inactive and the menu item changes to Activate. Choose Activate to switch it back on. The list can take a moment to refresh after the change.
Clone a rule#
Choose Clone to copy a rule — the quickest way to build a similar one, such as the same sharing for a different team. The copy is added straight to the list.
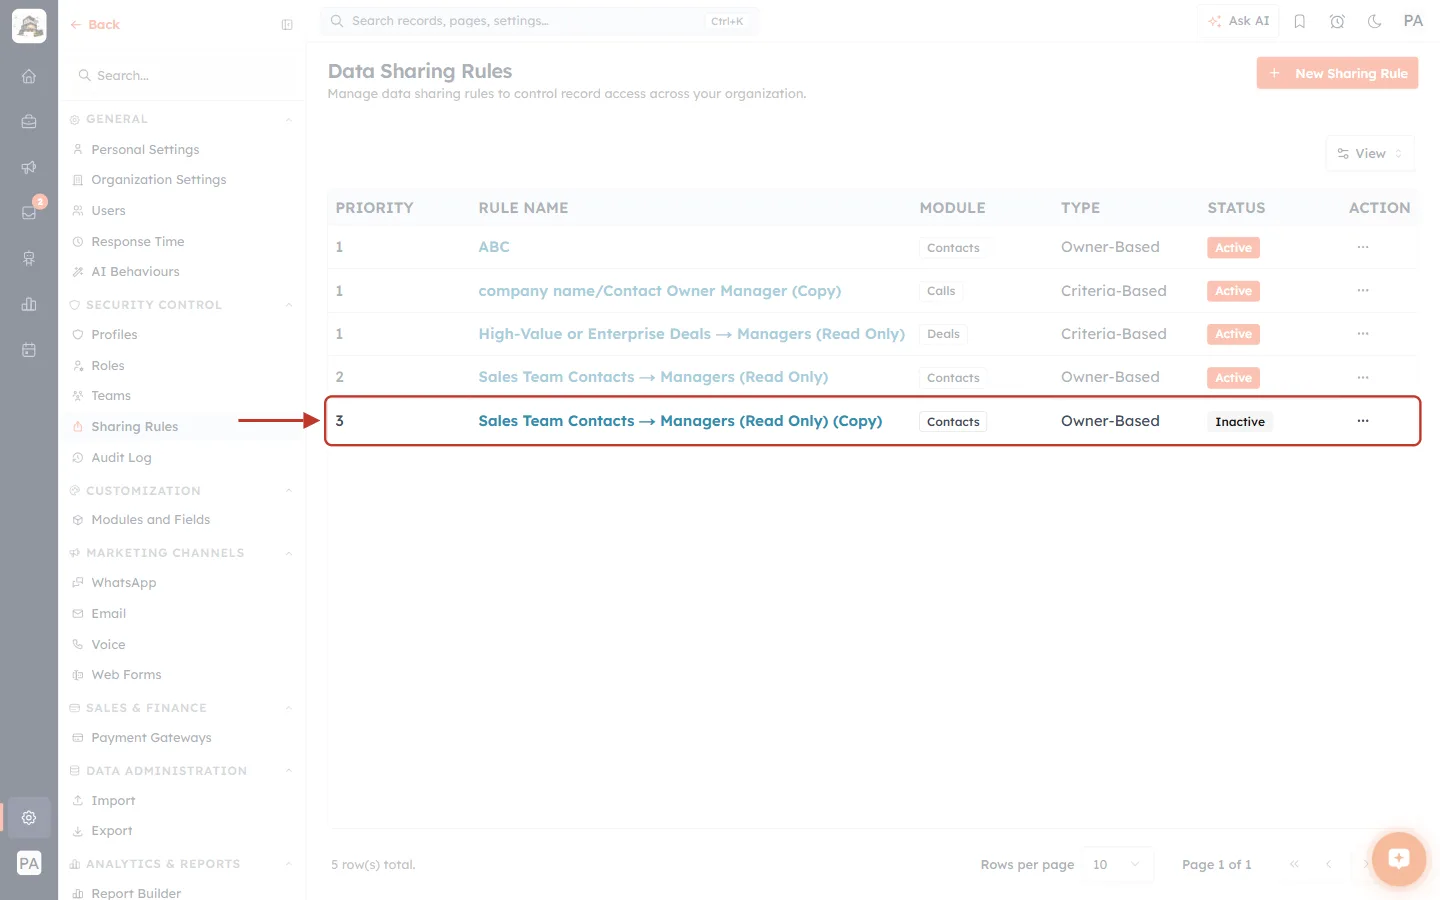
What this screenshot shows. The cloned rule’s row is ringed.
Rule Name: the original name with (Copy) added at the end.
Module and Type: the same as the original.
Priority: the next number for that module.
Status: Inactive. A clone never takes effect by itself — edit it, rename it, and activate it when it is ready.
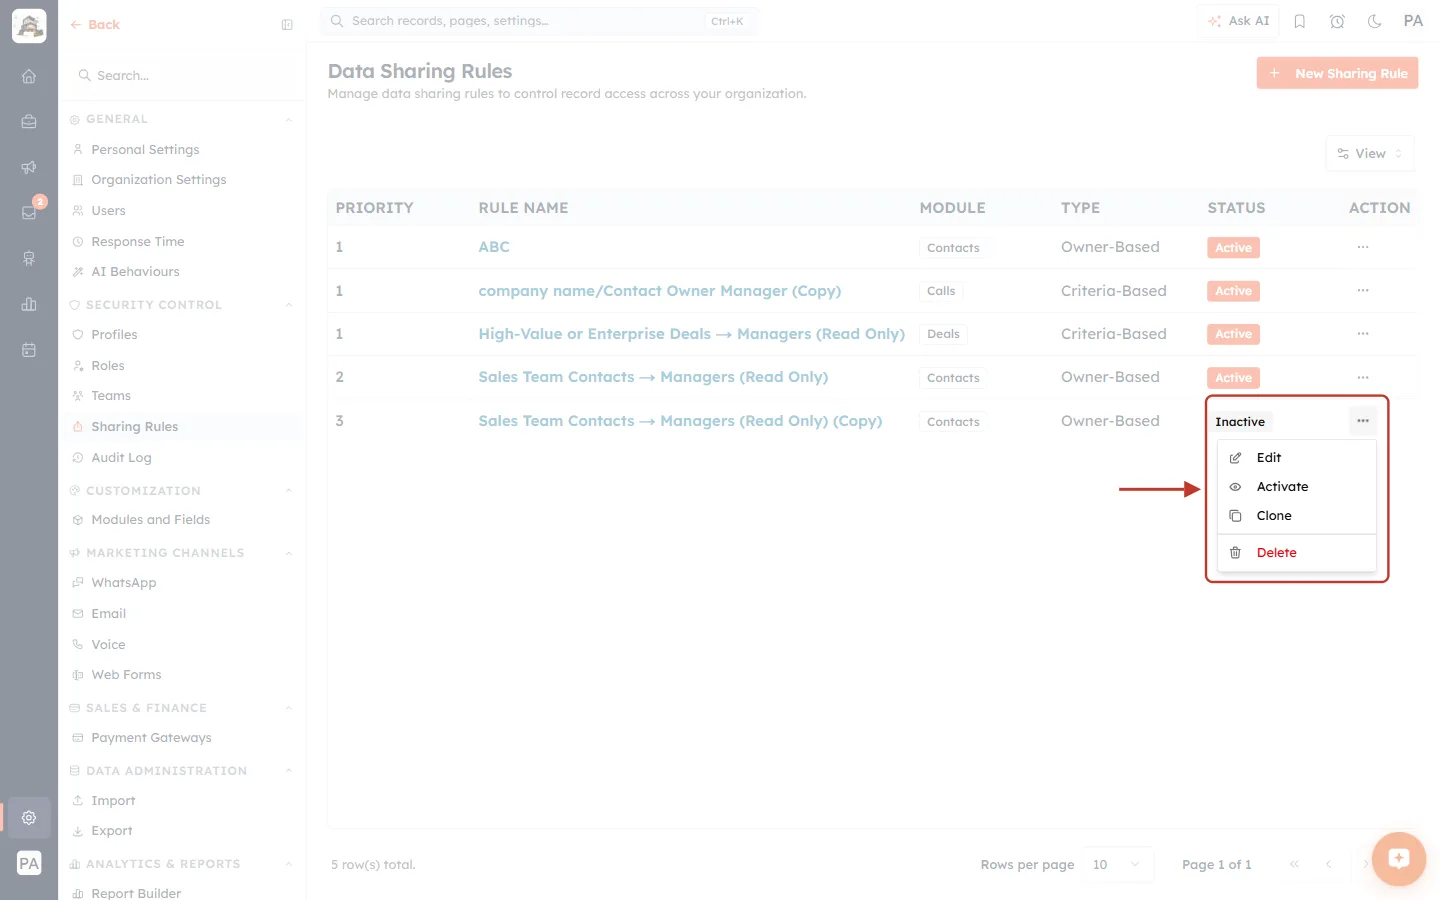
What this screenshot shows. The Action menu of the inactive copy is open and ringed. Because the rule is inactive, the second item reads Activate.
Edit: change the copy — at least give it a new name and adjust the Shared From/To or conditions.
Activate: switch the copy on once it is ready.
Clone and Delete work as on any other rule.
✅
Because the module cannot be changed on a saved rule, a clone always stays on the same module. To share a different module, create a new rule instead.
Delete a rule#
Choose Delete. Your browser asks: “Are you sure you want to delete this sharing rule? This action cannot be undone.” Click OK to delete it, or Cancel to keep it. Deleting a rule removes only the extra access it granted — no records are deleted, and nobody loses access they have through their own role.
⚠️
Deleting cannot be undone. If you might need the rule again, Deactivate it instead.
Ready-Made Examples#
Goal | Module | Type | Shared From / Conditions | Shared To | Access |
|---|---|---|---|---|---|
Marketing can use Sales contacts in campaigns | Contacts | Owner-Based | Team → Sales Team | Team → Marketing | Read Only |
Finance sees every large deal | Deals | Criteria-Based | Amount · Greater Than · 50000 | Roles → Finance | Read Only |
Customer Success sees closed-won deals | Deals | Criteria-Based | Stage · Equals · Closed Won | Team → Customer Success | Read Only |
Two support teams cover for each other | Contacts | Owner-Based | Team → Support A | Team → Support B | Read/Write |
A regional director follows one branch | Deals | Owner-Based | Roles → West Sales Manager | User → the director | Read Only |
For two-way sharing (Support A ↔ Support B), create two rules — one in each direction.
Best Practices#
Start with Read Only. The form defaults to Read/Write/Delete; lower it unless there is a clear need.
Share with roles and teams, not individuals. Rules keep working as people join, move or leave.
Name rules as sentences. “Sales Team Contacts → Managers (Read Only)” tells everyone what the rule does without opening it.
One purpose per rule. Several small, clearly named rules are easier to review than one rule that tries to do everything.
Leave Allow Superiors off unless you have checked who sits above the recipients in the role hierarchy.
Deactivate before you delete when you are unsure whether a rule is still needed.
Review the list regularly — for example each quarter, or whenever teams are reorganised — and remove rules that are no longer needed.
Troubleshooting#
The form shows red messages and will not save#
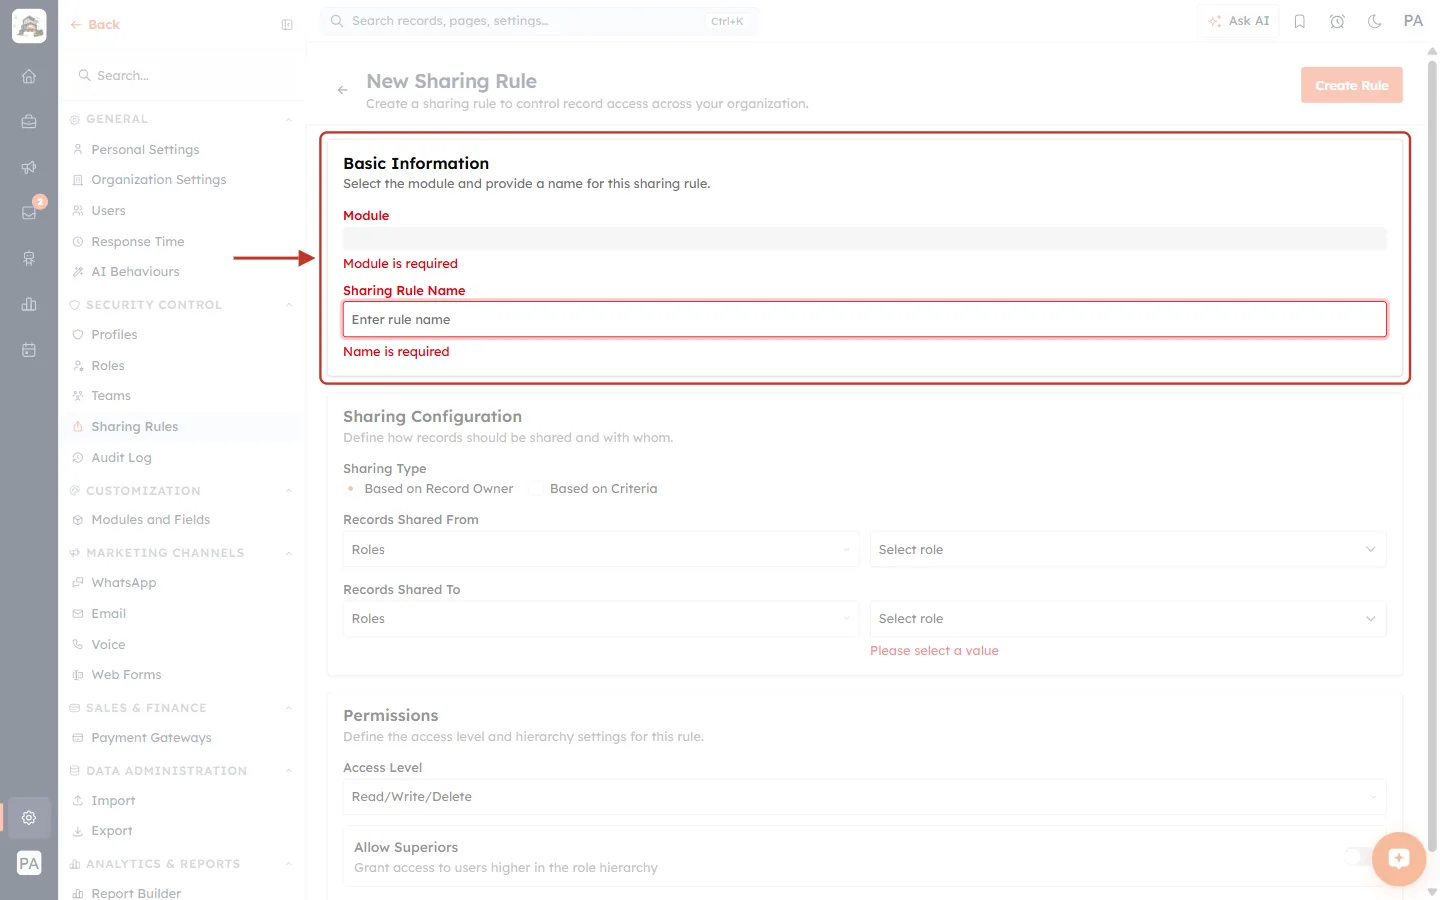
What this screenshot shows. The Basic Information card is ringed after clicking Create Rule with nothing filled in. The required fields are marked in red.
Module is required: choose a module.
Name is required: type a Sharing Rule Name.
Further down, Please select a value appears in red under the empty right-hand box of Records Shared To — the same happens for Records Shared From once a type is chosen and the value is left empty.
Fill every red field and click Create Rule again.
The Sharing Conditions area says “Please select a module first”#
Choose the Module in Basic Information first; the field list for conditions comes from the module.
The recipient still cannot see the records#
Check the rule’s Status is Active.
Check the Module — a rule on Contacts does nothing for Deals.
Check the recipient really is in the role, team or user chosen in Records Shared To (see Settings → Users, Roles and Teams).
For owner-based rules, check the records are owned by someone in Records Shared From. For criteria-based rules, open one of the records and check its values really match the conditions.
Check the recipient’s profile allows access to the module at all — a sharing rule cannot give access to a module the profile hides.
Ask the recipient to refresh the page.
The recipient can see but not edit the records#
Either the rule is Read Only, or the recipient’s profile does not allow editing that module. Raise the rule to Read/Write, or update the profile — see Control Permissions with Profiles: Create a Profile Step by Step.
I picked the wrong module#
The module cannot be changed after saving. Delete the rule (or deactivate it) and create a new one with the right module.
I cannot add another condition#
A rule holds up to 5 conditions (the counter reads 5/5). Split the logic across two rules, or simplify the conditions.
Frequently Asked Questions#
Can a sharing rule remove someone’s access?
No. Sharing rules only add access. To restrict what someone sees, change their role or profile.
Does a user need to log out for a new rule to apply?
No — ask them to refresh the page they are on.
Can one rule share several modules?
No. Each rule covers one module; create one rule per module.
What happens to a cloned rule?
It is saved as Inactive with “(Copy)” added to its name, so it has no effect until you edit and activate it.
Does deleting a rule delete any records?
No. Only the extra access granted by the rule is removed.
Previous and Next#
Previous: Understanding Sharing Rules: When and Why to Use Them
Next: Create a New Module: Build Custom Modules for Your CRM
Related Articles#
Was this article helpful?
Ready to implement this?
OpenAI Engage and apply what you just learned to your own workspace.
Open AI Engage CRM