Loading…


KnowledgeBase
Create, Share & Manage Custom Views (List & Kanban)
Custom views let you save a specific slice of any module — the filter conditions, the columns and their order, the sort, and who the view is shared with — so you and your team can jump straight to the records that matter instead of re-filtering every time. Views work the same way across every module (Contacts, Leads, Deals, Companies, and any custom module you build), and each user can favourite the views they use most, reorder them, and switch between a List table, a Kanban board, or a Grid.
Before you start#
Custom views are a plan-limited feature — your plan sets how many custom views each user can create. When you reach that limit, clicking Create New View opens an Unlock More Custom Views upgrade prompt instead of the builder. Existing views keep working; you just cannot add new ones until you upgrade or delete one. Built-in system views never count towards the limit.
💡
Every view starts private. A brand-new view defaults to Only me, so nobody else can see it until you change Share this with.
Open the view selector#
On any module's records page, the view switcher sits just below the page title. It appears either as a row of tabs or as a single dropdown, and you can switch between the two at any time. The active view is highlighted; when no custom view is applied you see All <Module> (for example, All Contacts).
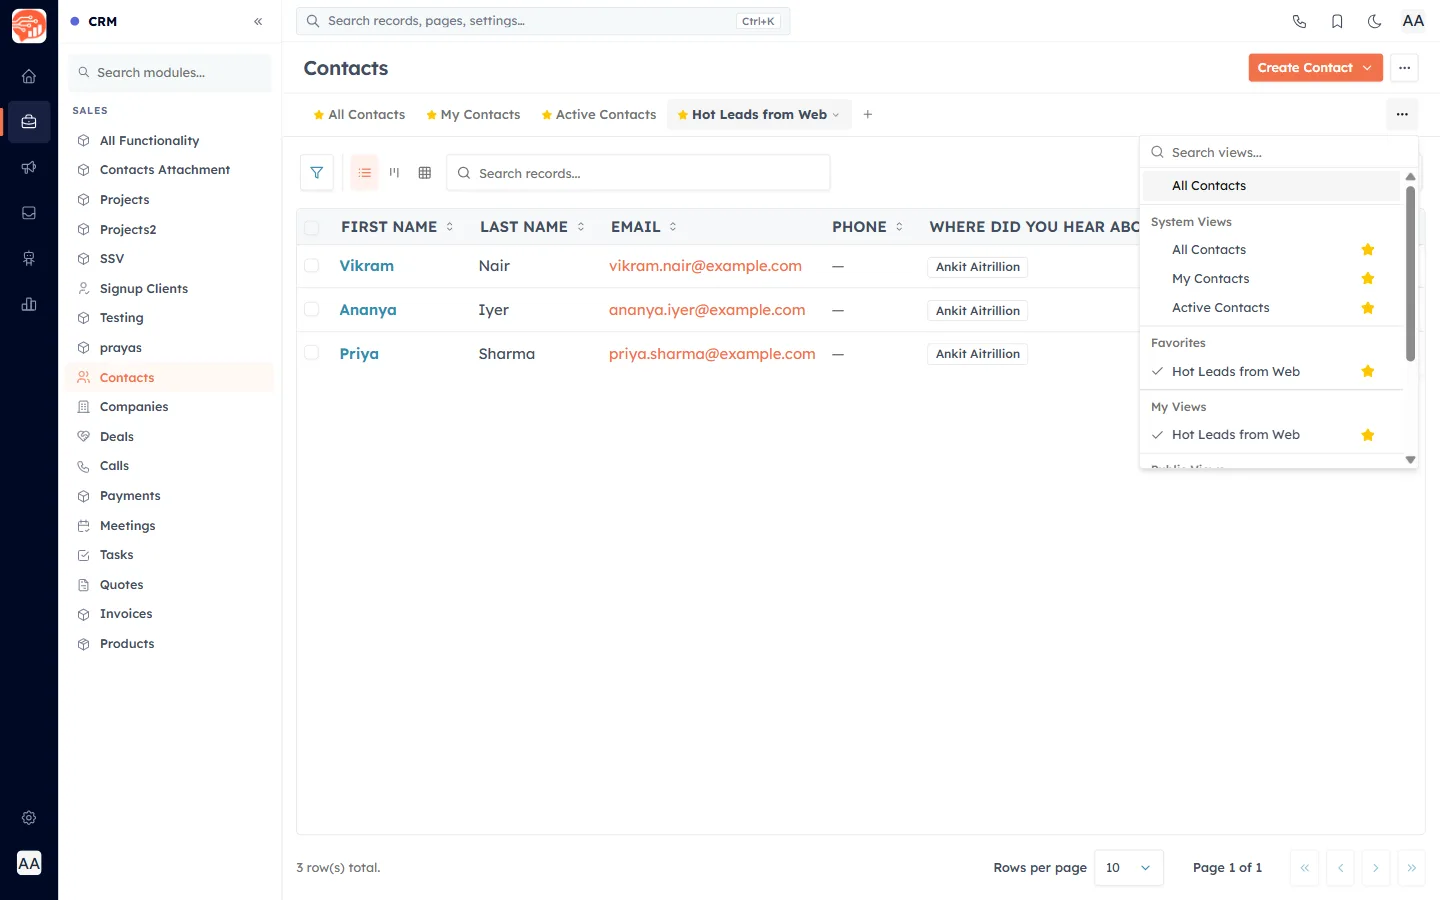
Open the selector to see every view you can use, grouped into:
- All <Module> — the unfiltered default list. Its ··· menu lets you Edit the default columns (Clone and Delete are disabled here).
- System Views — built-in views such as All Contacts and My Contacts (plus Active Contacts on the Contacts module). These are seeded for you and cannot be deleted.
- Favorites — views you have starred.
- My Views — views you created.
- Shared With Me — views other people shared with you.
- Public Views — views shared with everyone.
Use Search views… to filter the list, the star to favourite a view, and each view's ··· menu for Edit, Clone, or Delete. At the bottom of the selector, Show custom views as Tab / Show as Dropdown switches the layout, Manage Custom Views opens the full management page, and Create New View starts a new one.
Create a list view#
- Open the view selector and choose Create New View to open the Create Custom View page.
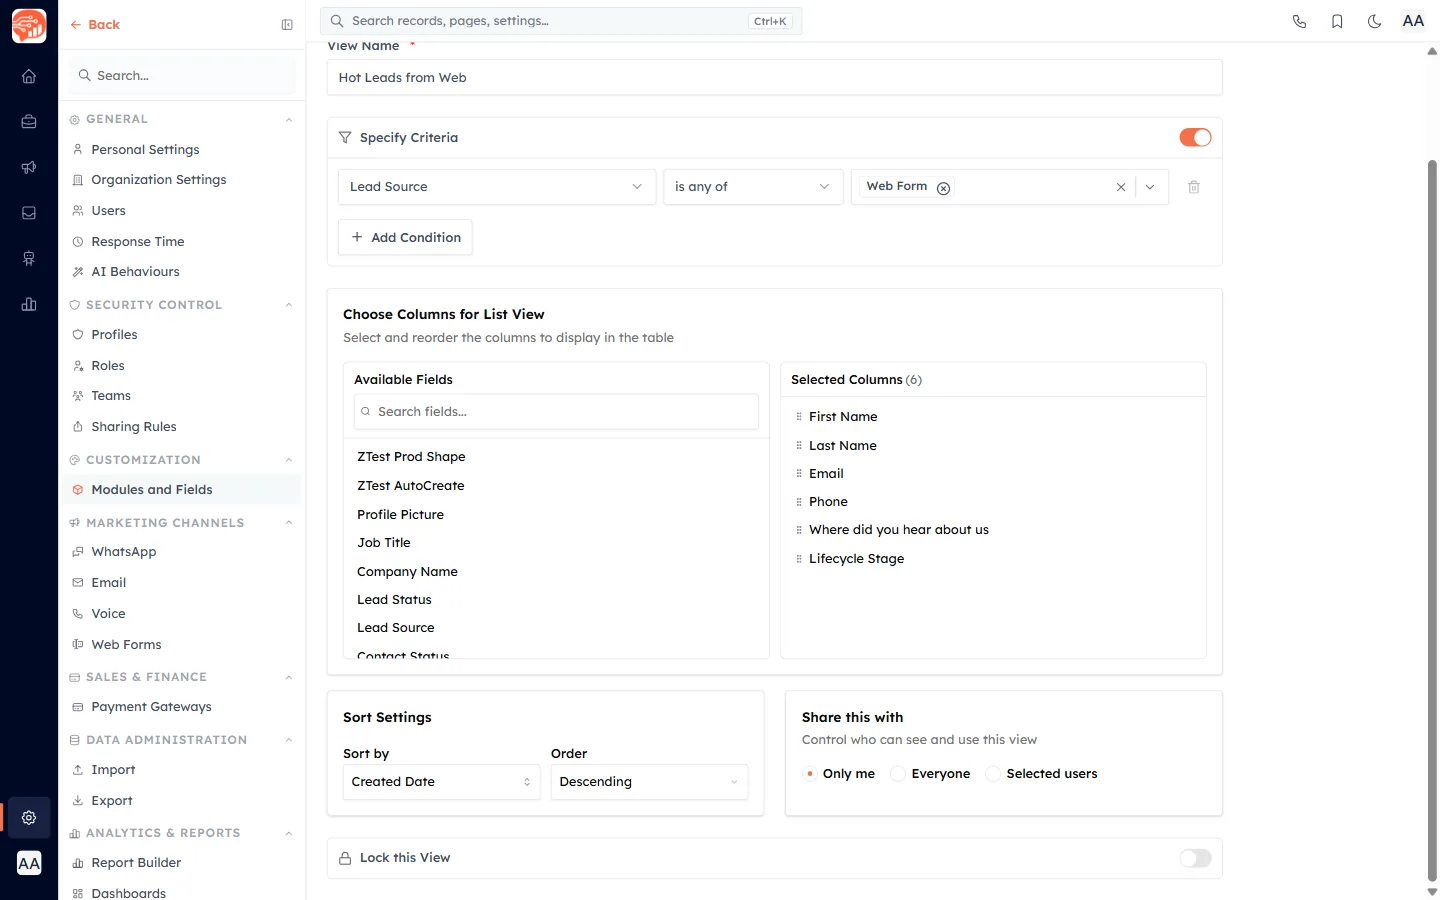
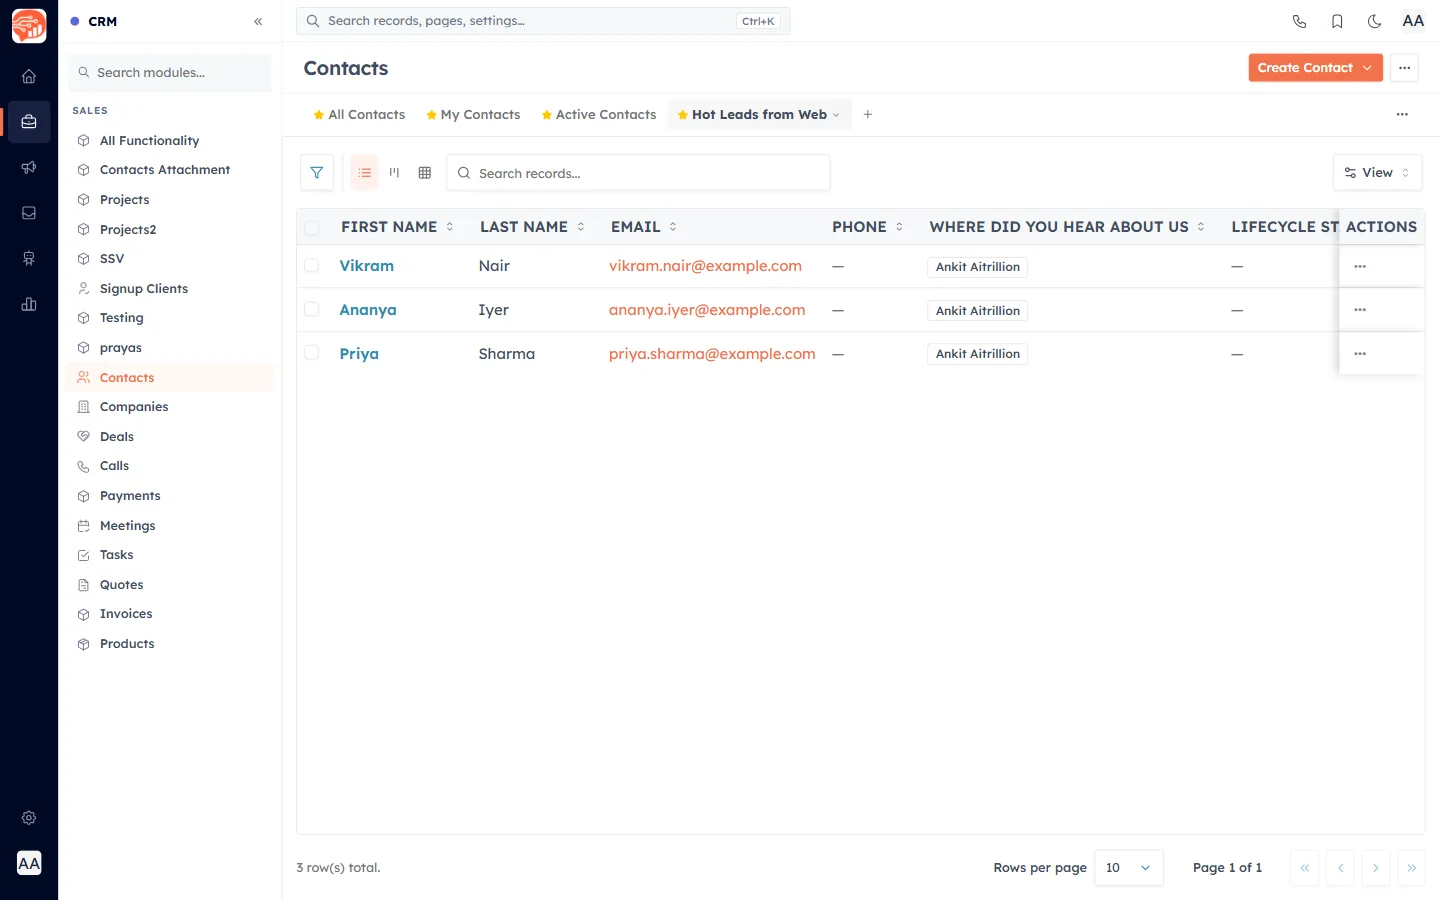
- Enter a View Name (required) — for example, Hot Leads from Web.
- Under Specify Criteria, leave the toggle on to filter the view, then build your conditions:
- Field / Operator / Value — pick the field to test, the comparison, and the value. The operators on offer depend on the field type: text fields get options like contains, starts with, and is empty; date fields get before, after, in range, and more than X days ago; pick-lists get is any of and is none of.
- AND / OR — the connector shown between two rows decides how they combine.
- Add Condition — adds another row. With two or more conditions a Criteria Pattern box appears so you can write custom logic such as
( ( 1 and 2 ) or 3 )using AND, OR, and parentheses.
- Under Choose Columns for List View, build the table with the two-panel picker:
- Available Fields — search and click a field to add it.
- Selected Columns — drag by the handle to reorder, click the pin to lock one column to the far left (only one column can be pinned), or the minus to remove it. At least one column must remain.
- Set Sort Settings — a Sort by field (including Created Date and Updated Date) and an Order of Ascending or Descending (the default).
- Choose Share this with (covered in the next section).
- Optionally turn on Lock this View to protect its configuration.
- Click Save View. You return to the records list with your new view applied.
Share a view#
Share this with controls who can see and use the view:
- Only me — private to you (the default).
- Everyone — visible to all users, listed under Public Views.
- Selected users — pick specific people; the view then appears under Shared With Me for them.
💡
Sharing and locking work together. As the creator you can always edit your own view. For a shared view, other people can edit it only if it is not locked — turn on Lock this View to let colleagues use it without changing it.
Favourite, switch layout & reorder#
Click the star on any view to add it to Favorites (a favourited view also appears as a tab). Use the List, Kanban, and Grid buttons on the toolbar to change how the active view is displayed, and use Show custom views as Tab / Show as Dropdown to choose how the switcher itself looks.
💡
Favouriting is separate from a default view — starring pins a view for quick access; it does not automatically become the view you land on when you open the module.
Build a Kanban view#
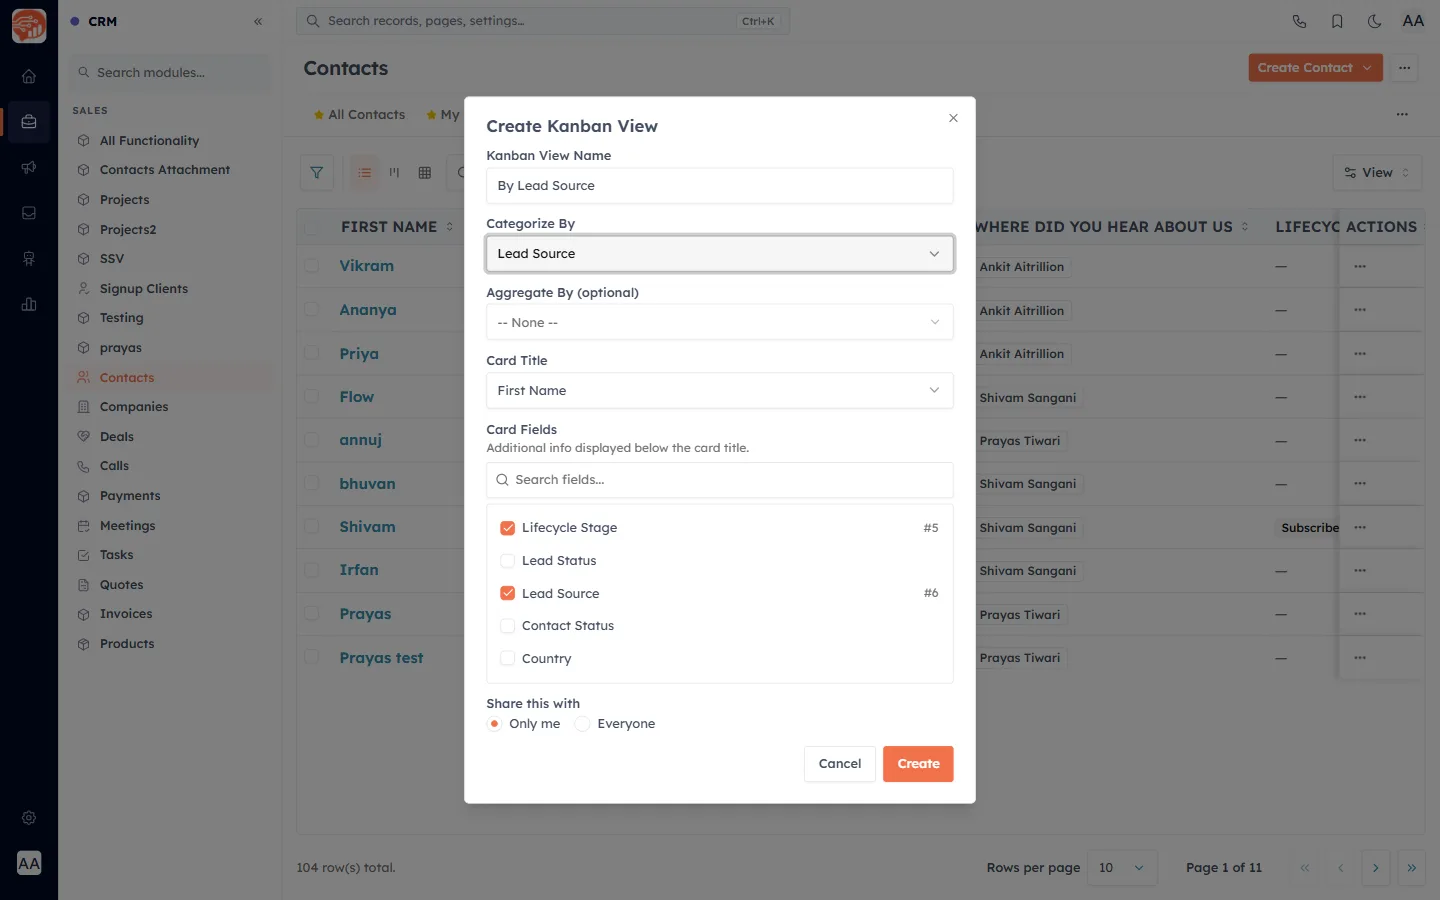
A Kanban view turns the list into a board with one column per option of a pick-list field. Switch to Kanban on the toolbar and, in the Create Kanban View dialog, set:
- Kanban View Name — required.
- Categorize By — the pick-list field whose options become the board columns (required).
- Aggregate By — an optional numeric field to total per column, with a function of Sum, Average, Min, or Max.
- Card Title — the field shown at the top of each card (required).
- Card Fields — extra fields listed under the title; tick as many as you like (the number shows their display order).
- Share this with — Only me or Everyone.
Manage, clone, reorder & pin#
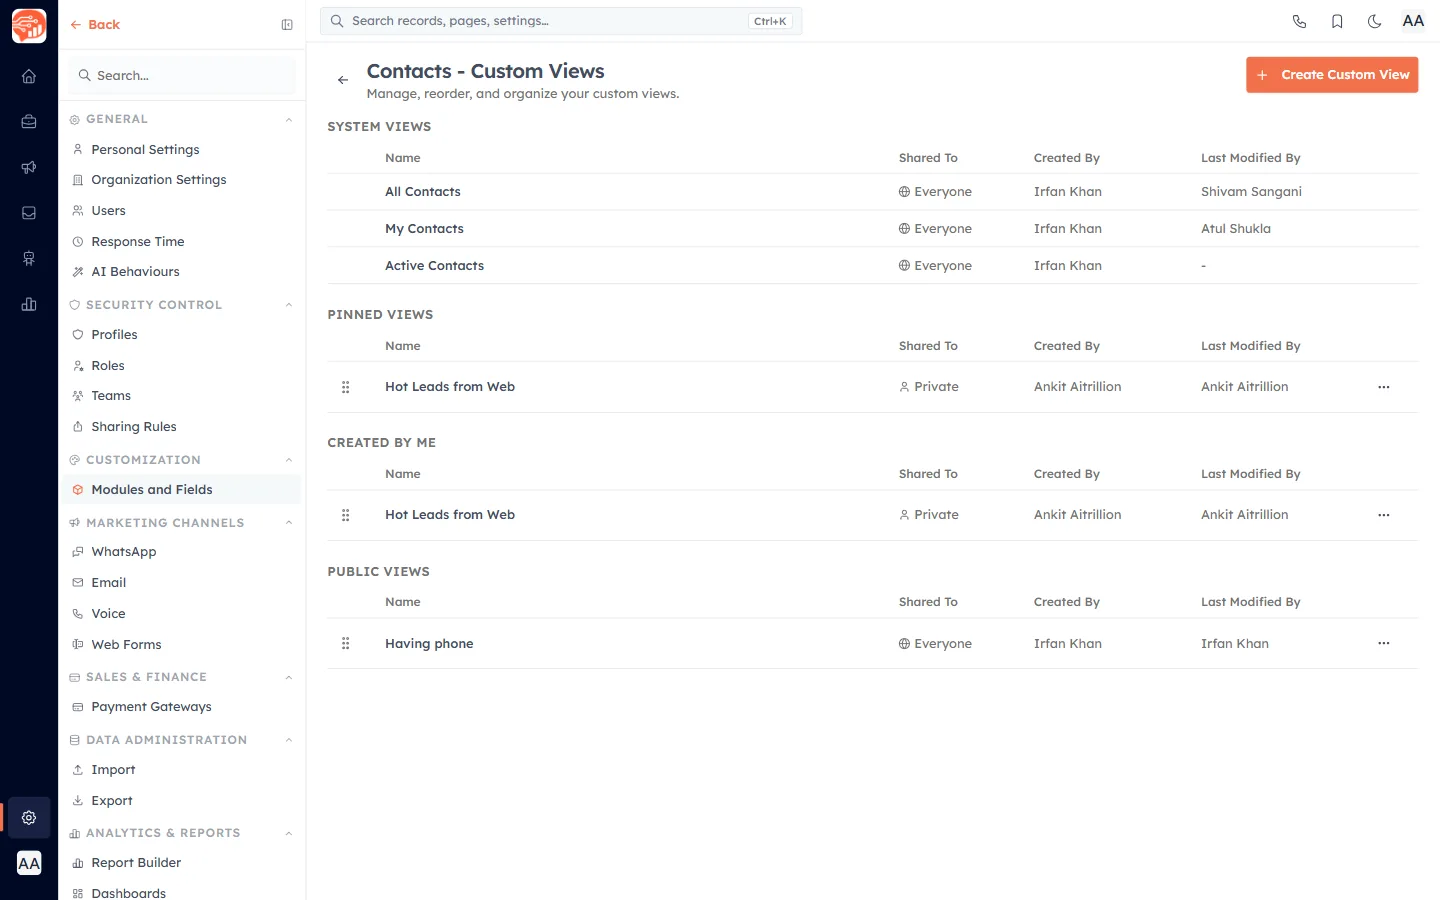
Choose Manage Custom Views from the selector to open the Custom Views page. Every view is grouped as System Views, Pinned Views, Created By Me, Shared With Me, and Public Views, with columns for Name, Shared To, Created By, and Last Modified By. Drag the handle to reorder views within a group (system views are fixed). Each row's ··· menu offers Edit, Clone, and Delete (Delete only for views you own). The Shared To column shows Everyone, a user count, or Private.
✅
Cloning is the quickest way to make a variant — it copies the filters and columns into a new view set to Only me, so you can tweak it without touching the original.
💡
A note on wording: the pop-out selector labels these groups Favorites and My Views, while this management page calls the same views Pinned Views and Created By Me.
Edit the default columns (All Records)#
The unfiltered All <Module> list has its own columns. To change them, open its ··· menu in the selector and choose Edit — this opens Edit Default Columns, the same column picker used in the builder. It changes only the default list; it does not create a custom view.
Delete a view#
Delete a view from its ··· menu in the selector or on the Manage page. You will be asked to confirm first.
⚠️
Deleting a view cannot be undone. Anyone who had it set as their default is automatically switched back to All Records.
Now, your custom view is created — here it is applied to the Contacts list, showing only the records that match:
Related: Choose & Reorder List Columns and The Record Detail Page: Related Lists & Pinned Fields.
Was this article helpful?
Ready to implement this?
OpenAI Engage and apply what you just learned to your own workspace.
Open AI Engage CRM