Loading…


KnowledgeBase
Bulk Import Contacts: Bring Your Existing Data into AI Engage CRM
What is Bulk Import?#
The Bulk Import tool uploads a spreadsheet — CSV, XLSX, or XLS — and creates or updates hundreds of contact records in one operation. It is the fastest way to bring your existing customer database into AI Engage CRM when you are starting out, or to add a batch of new leads after a trade show or campaign.
💡
This same importer works for any module, not just Contacts — deals, companies, and your custom modules too. See Import Data into Any Module for the generic version.
💡
Always test with 10–20 rows first. Import a small sample, verify the records look correct in the CRM, then import the full file. Cleaning up incorrectly imported data across thousands of records is far more time-consuming than running a test import.
Before you start — prepare your spreadsheet#
The importer accepts CSV, XLSX, and XLS files up to 50 MB. Before uploading, make sure your file is structured correctly:
Row 1 must be column headers — e.g. First Name, Last Name, Email, Phone, Company
One contact per row — no merged cells, no blank rows between data
Consistent date format — pick one format (e.g. DD/MM/YYYY) and use it throughout
Valid email addresses — used for duplicate detection; invalid emails will cause rows to fail
Phone numbers with country code — e.g. +1-555-0101 or +44 7700 900000
No special characters in headers — the auto-mapper works best with clean, readable column names
💡
You do not need to name your columns to exactly match CRM field names. The importer has an auto-mapping engine that recognises common synonyms — "fname" maps to First Name, "emailaddress" maps to Email, and so on. You can also adjust mappings manually in Step 3.
Step 1 — Import Contacts#
From the left sidebar, navigate to Contacts. Click the Import button at the top right of the contacts list — or go to CRM → Contacts → Create Contacts and click on Import Contacts. The Import wizard opens.
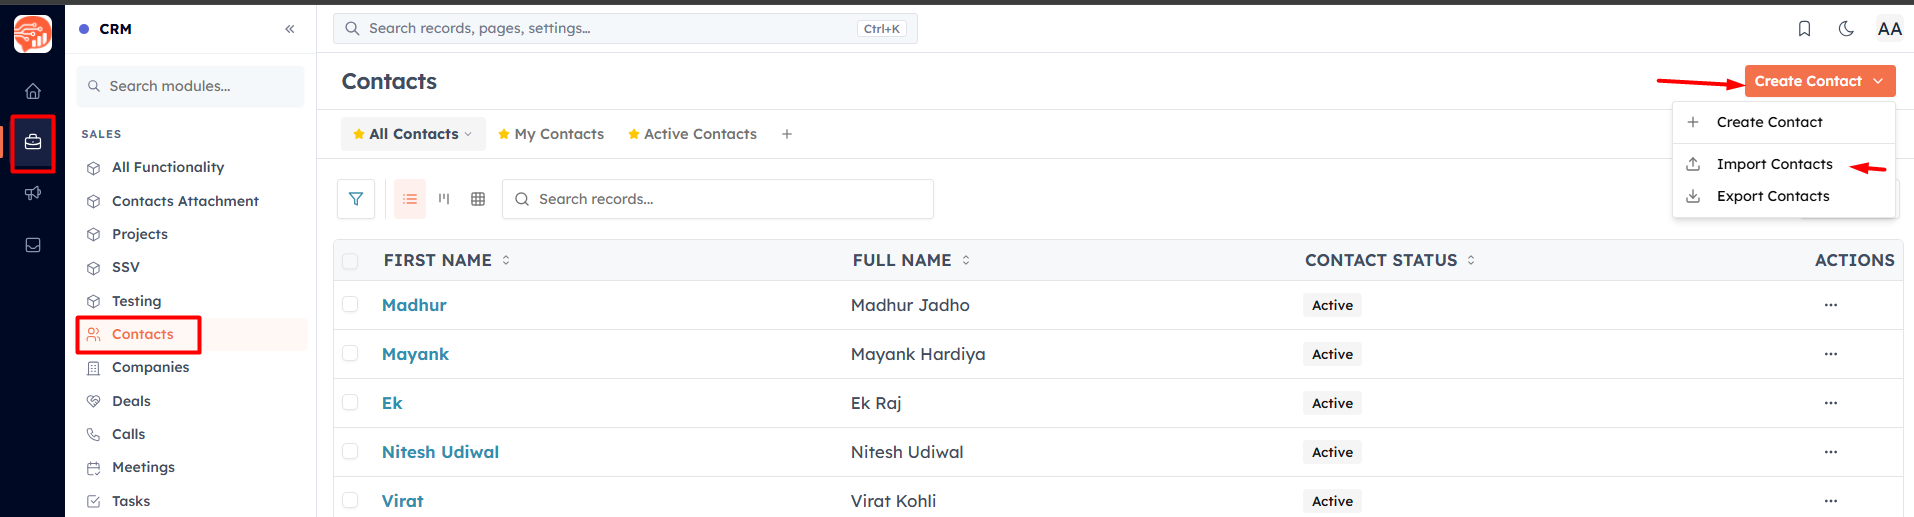
Step 2 — Click Import Contacts#
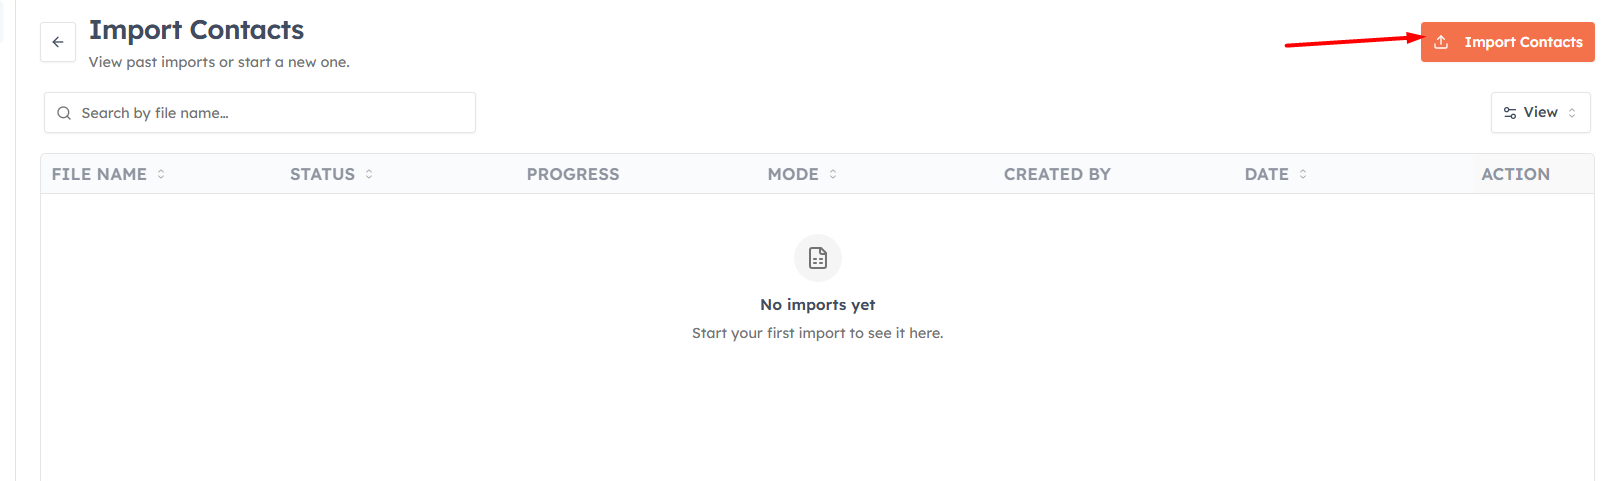
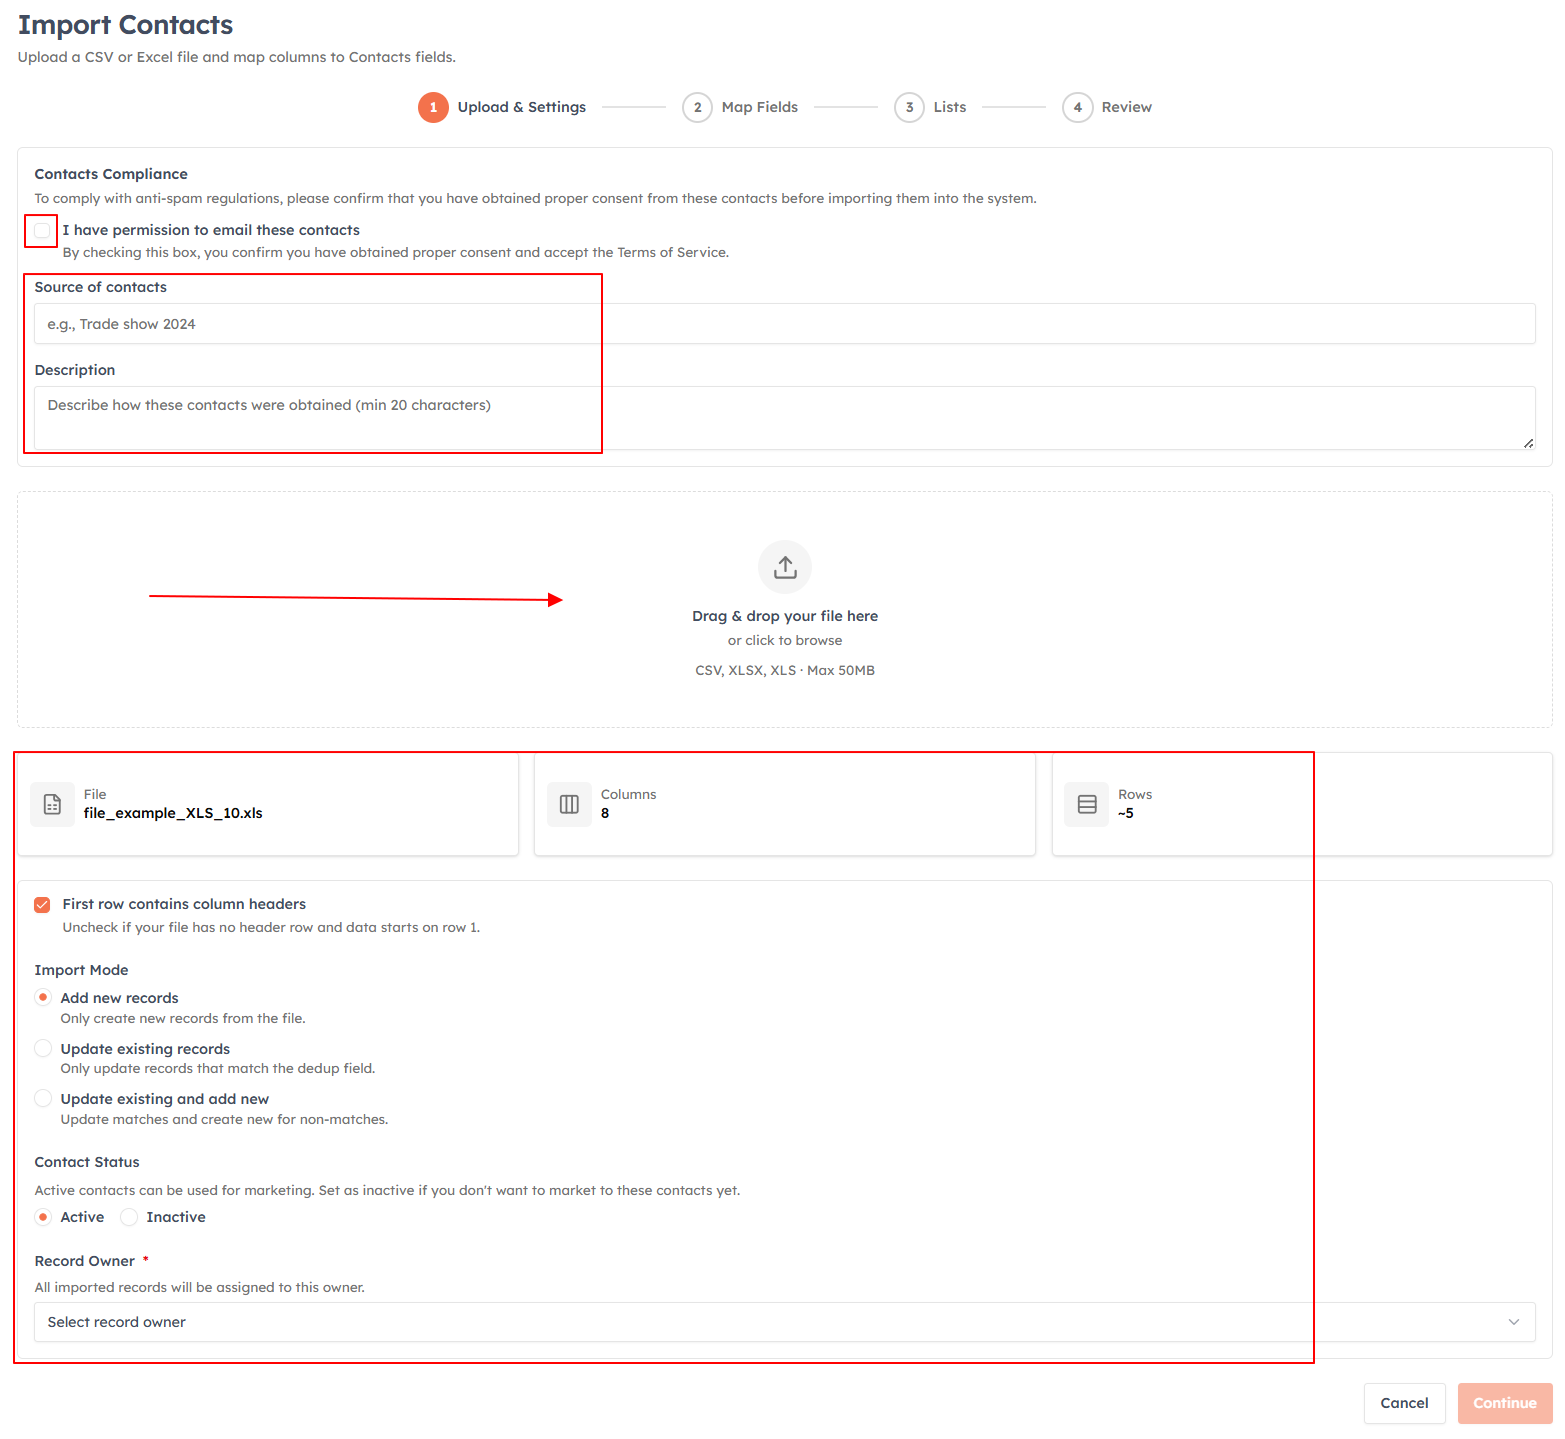
Step 3 — Upload your file and configure settings#
Drag your file onto the upload area, or click Choose File to browse. Once the file is selected, the wizard previews the first few rows so you can verify the data loaded correctly.
Below the file preview, configure the import settings:
Import Mode — choose one of three options:
Add new records — only creates new contacts; skips any row that matches an existing contact
Update existing records — only updates contacts that already exist; skips rows with no match
Update existing and add new — updates matches and creates new contacts for rows with no match
Duplicate detection field — the field used to match incoming rows to existing contacts (required when using Update mode)
Contact Status — set all imported contacts to Active or Inactive
Record Owner — assign all imported contacts to a specific CRM user (defaults to you)
Compliance — confirm that you have permission to email these contacts
💡
If you are importing a mix of new contacts and updates to existing ones, choose Update existing and add new. This is the safest mode for most bulk imports — new contacts are created and existing ones are refreshed in a single pass.
Step 3 — Map your columns to CRM fields#
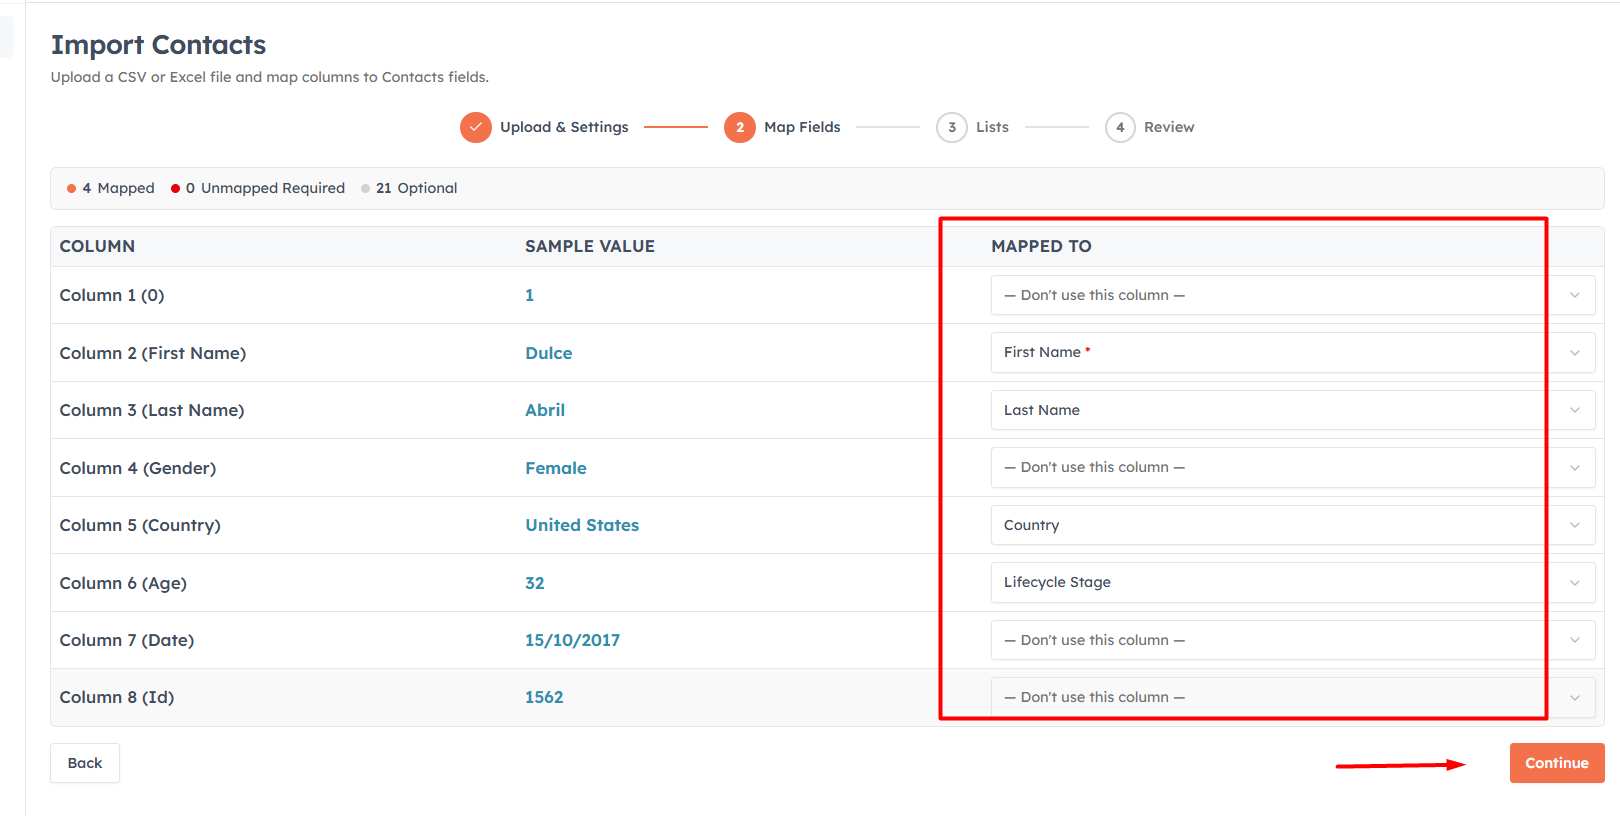
The mapping step shows a table with three columns: your spreadsheet column name, a sample value from row 2 of your file, and a CRM field dropdown. The auto-mapper pre-fills as many mappings as it can recognise.
Review each row and correct any mismatches:
Select the correct CRM field from the dropdown for each column
Columns you do not want to import — select Don't use this column
Each CRM field can only be mapped once — already-mapped fields are greyed out in the dropdown
First name is required. Fields marked with a red asterisk * — you cannot proceed until all required fields are mapped
💡
The sample value column is your best tool for spotting mapping errors. If the sample shows "sarah.johnson@acme.com" but the dropdown says "First Name", you know something went wrong in the auto-mapping.
Step 4 — Assign to a Contact List (optional)#
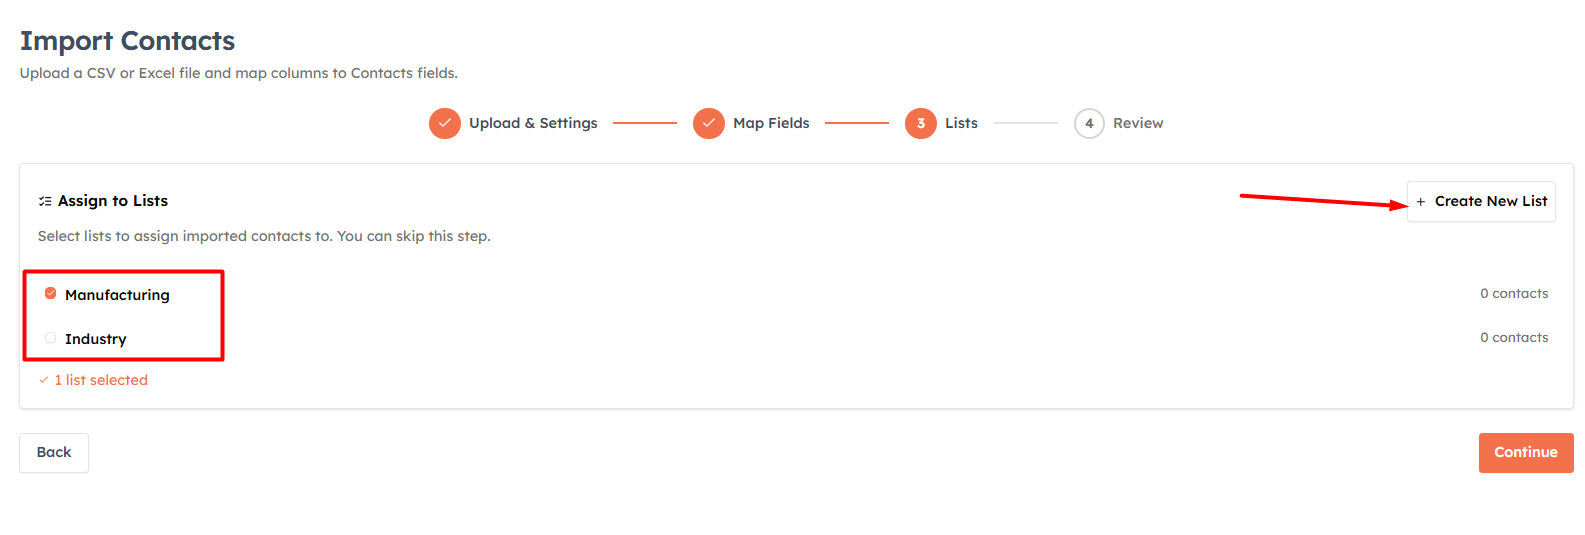
Select one or more existing contact lists to add the imported contacts to, or create a new list on the spot. This step is optional — skip it if you do not use lists.
Adding contacts to a list during import is faster than tagging them individually afterwards, especially for segment-specific imports like "Trade Show Leads Q2" or "Newsletter Subscribers".
Step 5 — Review and start the import#
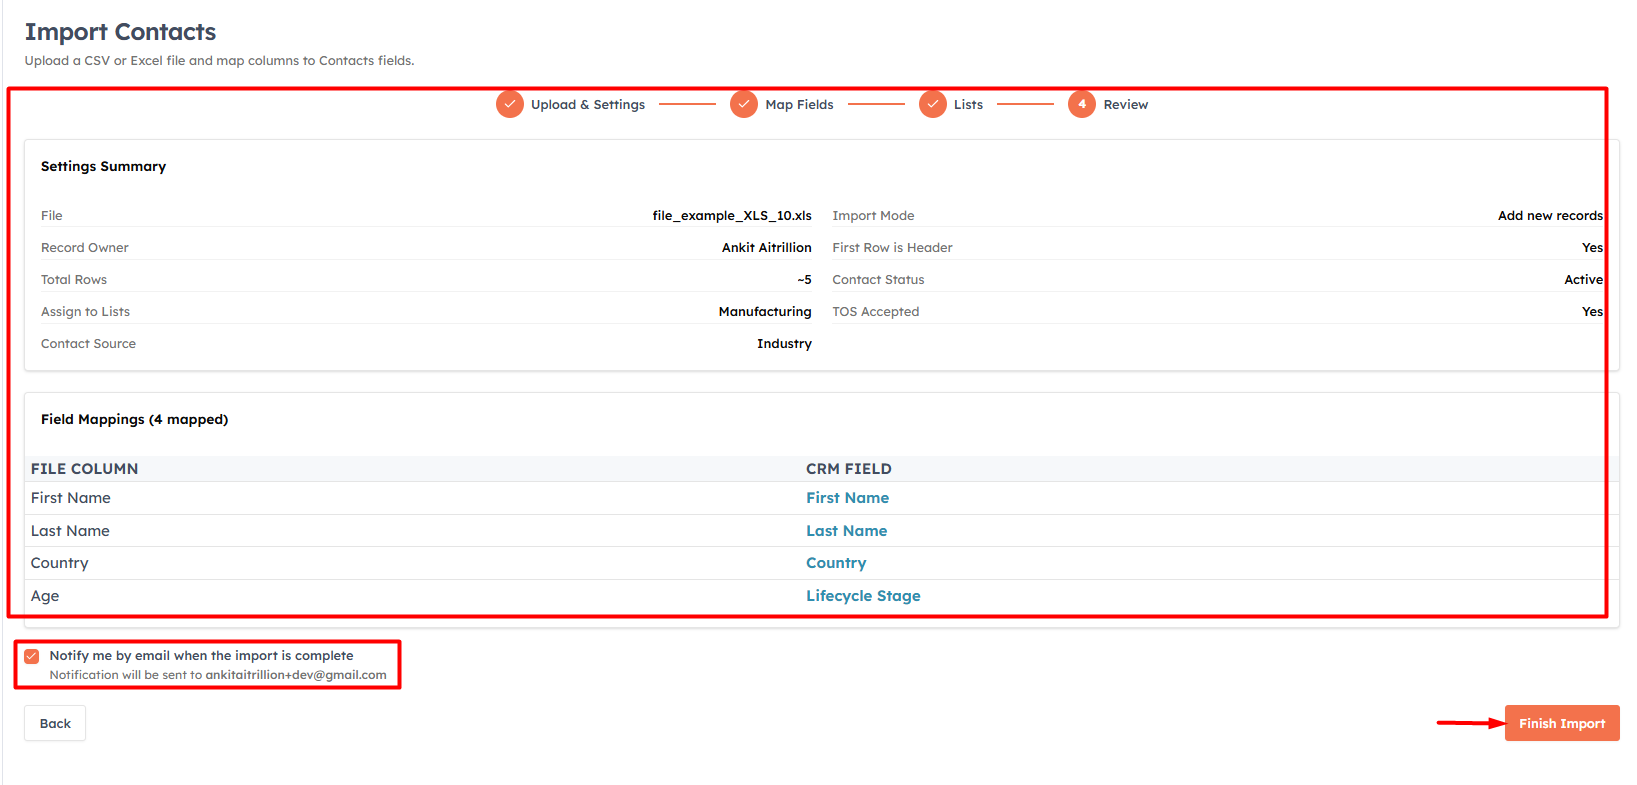
The Review step summarises everything you have configured: import mode, dedup field, record owner, contact status, field mappings, and selected lists. Check each section before starting.
Tick Send me an email when the import completes if you want a notification — useful for large files that take several minutes to process. Then click Start Import.
💡
Large imports run as a background job. You do not need to stay on the page — navigate away freely. The import progress appears in a status bar at the top of the screen and you will receive an email notification when it finishes (if you ticked the checkbox).
After the import — check the results#
When the import completes, you can view the full results from Contacts → Import (or Settings → Data Administration → Import). Each import job shows:
Created — new contact records added
Updated — existing contacts refreshed
Skipped — rows ignored (duplicate in Add-only mode, or no match in Update-only mode)
Failed — rows that could not be processed due to validation errors
💡
If any rows failed, download the Error Report from the import results page. It shows exactly which rows failed and why — for example, invalid email format or a value that is too long for the field. Fix the errors in your spreadsheet and re-import just the failed rows.
💡
Your contacts are now in the CRM. Head to the Contacts module to see them — apply filters, assign to workflows, or start a campaign directly from the list.
💡
Related: Add contacts one at a time for individual records, or learn how to use Sharing Rules to control which teams see your imported contacts.
Was this article helpful?
Ready to implement this?
OpenAI Engage and apply what you just learned to your own workspace.
Open AI Engage CRM