Loading…


KnowledgeBase
Profiles FAQ & Troubleshooting: Step-by-Step Fixes for Permission and Access Problems
How to Use This Page#
This page collects the questions people ask most about permission profiles in AiEngage CRM, with a step-by-step fix for each. Every answer explains why it happens, gives numbered steps to fix it, and shows the exact screen with a description of everything on it. Most answers end with a link to the full guide.
Section | Typical questions |
|---|---|
1. A user sees too much or too little | Module hidden · can’t edit · still has access I removed · can’t reply to chats |
2. Creating and editing profiles | New profile has full access · name error · Update Profile greyed out · can’t find a setting |
3. The Administrator profile | Can’t edit or delete it · how to make a near-admin profile |
4. Assigning profiles | Profile missing from the list · who holds a profile · changing a user’s profile |
5. Bulk tools | Mass Update or Merge missing a module · switching a tool off |
6. Removing profiles | Inactive vs delete · deleting a profile people still hold |
ℹ️
Profiles are managed by an administrator in Settings → Security Control → Profiles. If you’re not an admin, send this page to yours.
1. A User Sees Too Much or Too Little#
A user can’t see a module at all#
Why it happens: On their profile, that module’s VIEW is set to None. None hides the module completely.
How to fix it:
Open Settings → Profiles, find the user’s profile and choose ⋮ → Edit.
Click Module Access and find the module (use Search modules…).
Set VIEW to All, Team or Own.
Click Update Profile and ask the user to refresh.
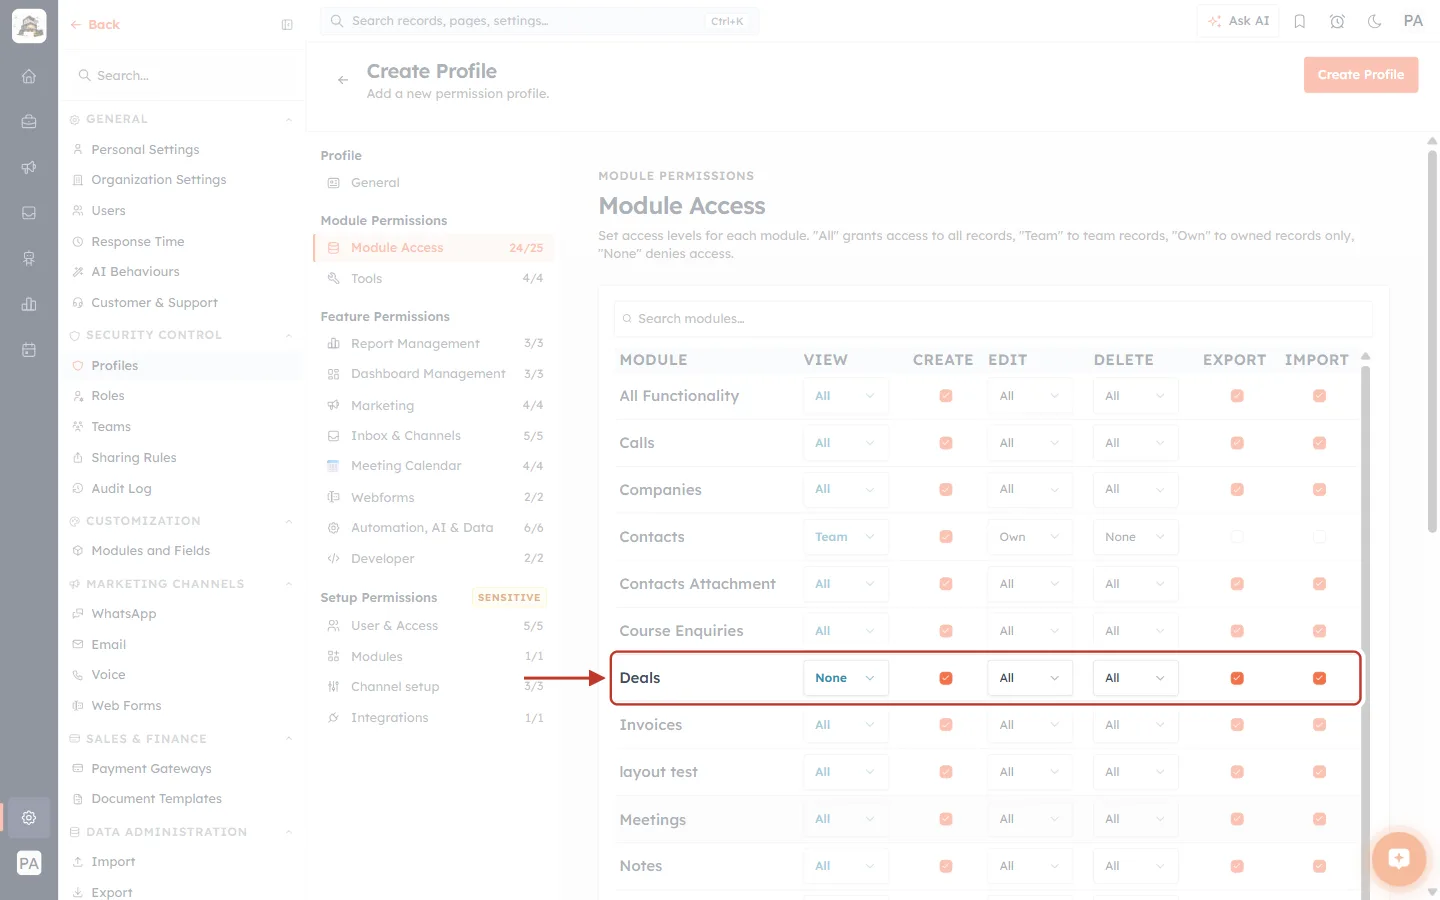
What this screenshot shows. In Module Access, the ringed Deals row has VIEW = None.
Everyone on this profile can no longer see Deals.
The Module Access counter in the section list drops from 25/25 to 24/25. It counts how many modules the profile can see.
Full guide: Profile Permissions Explained: What Every Module, Feature & Setup Setting Controls.
A user can see records but can’t change or delete them#
Why it happens: Their EDIT or DELETE level is narrower than VIEW. For example, View Team with Edit Own lets them read teammates’ records but only change their own.
How to fix it:
Open the profile → Module Access → the module’s row.
Widen EDIT (or DELETE) if they should change more records.
Click Update Profile.
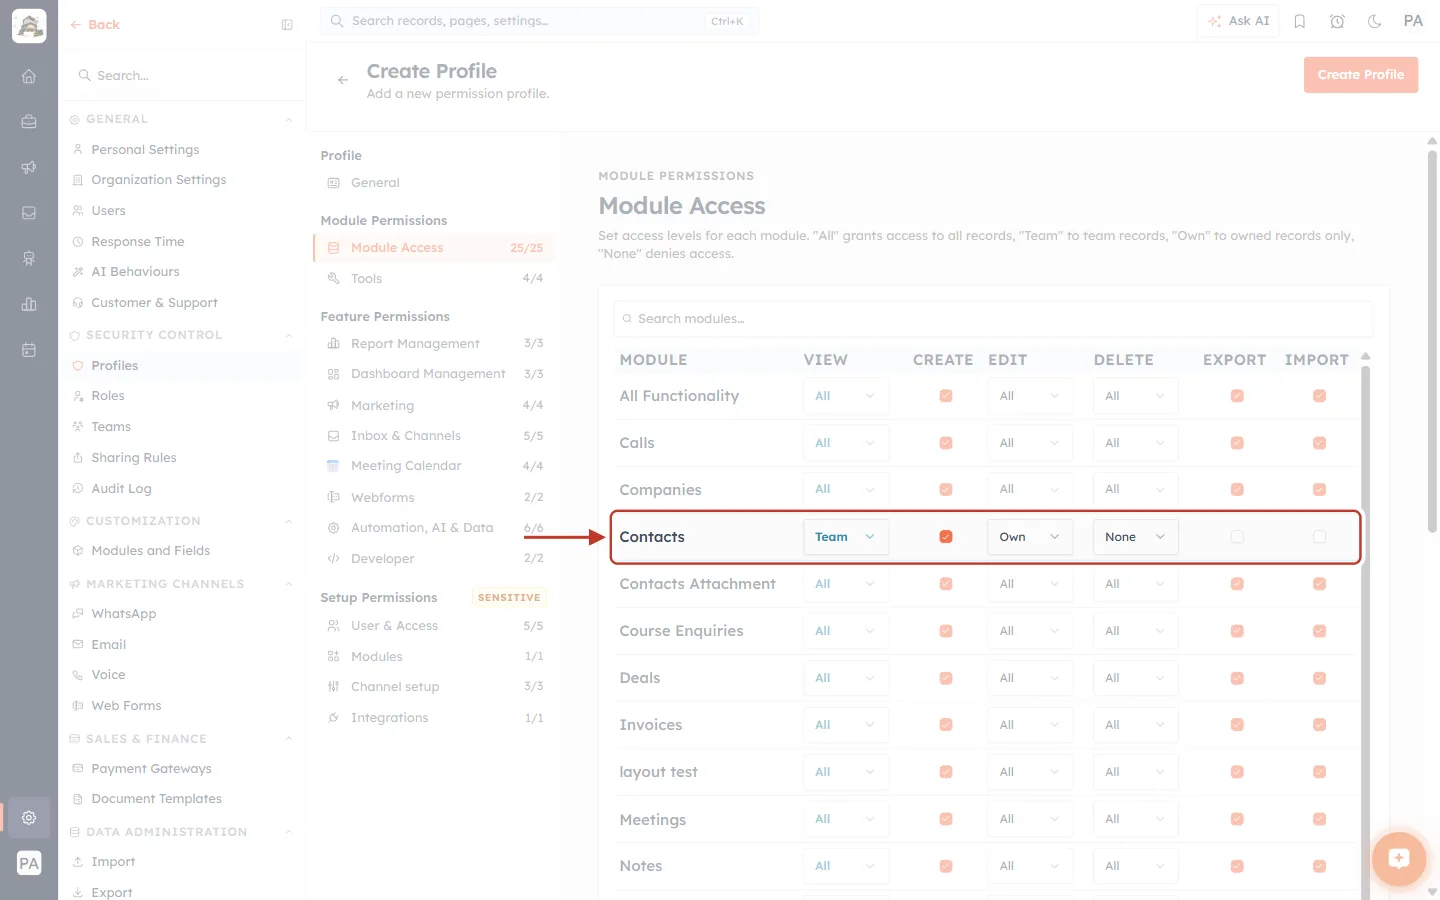
What this screenshot shows. The ringed Contacts row shows a typical sales-rep setup.
VIEW: Team (sees the team’s contacts), CREATE ticked, EDIT: Own (changes only their own), DELETE: None.
EXPORT and IMPORT are unticked.
Keep Edit and Delete no wider than View. The form doesn’t stop you picking a wider level, so check each row.
I removed a permission but the user can still use it#
Why it happens: One of three things: they hold a different profile from the one you changed, you didn’t save, or they are an Admin or the Owner. Feature and Setup permissions only limit Members.
How to fix it:
In Settings → Users, check the user’s PROFILE column.
Open that profile and confirm the change is there, then click Update Profile if it is still bright orange.
Check whether they are an Admin or the Owner. If so, profiles don’t limit their features.
Ask them to refresh the page or sign in again.
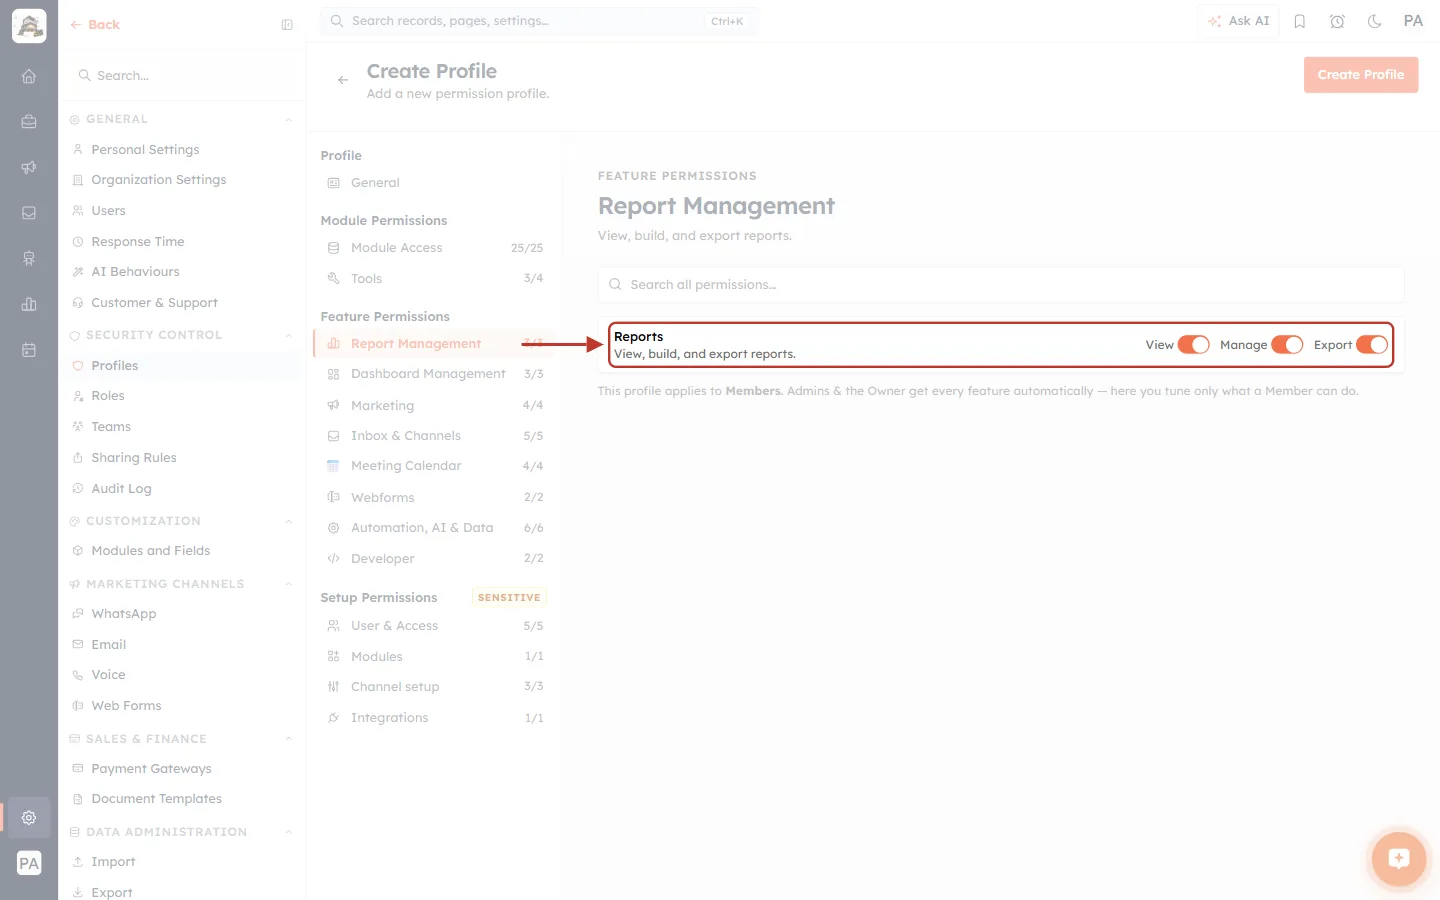
What this screenshot shows. The ringed Reports row has View, Manage and Export switches.
Below every Feature and Setup section is the note This profile applies to Members. Admins & the Owner get every feature automatically — here you tune only what a Member can do.
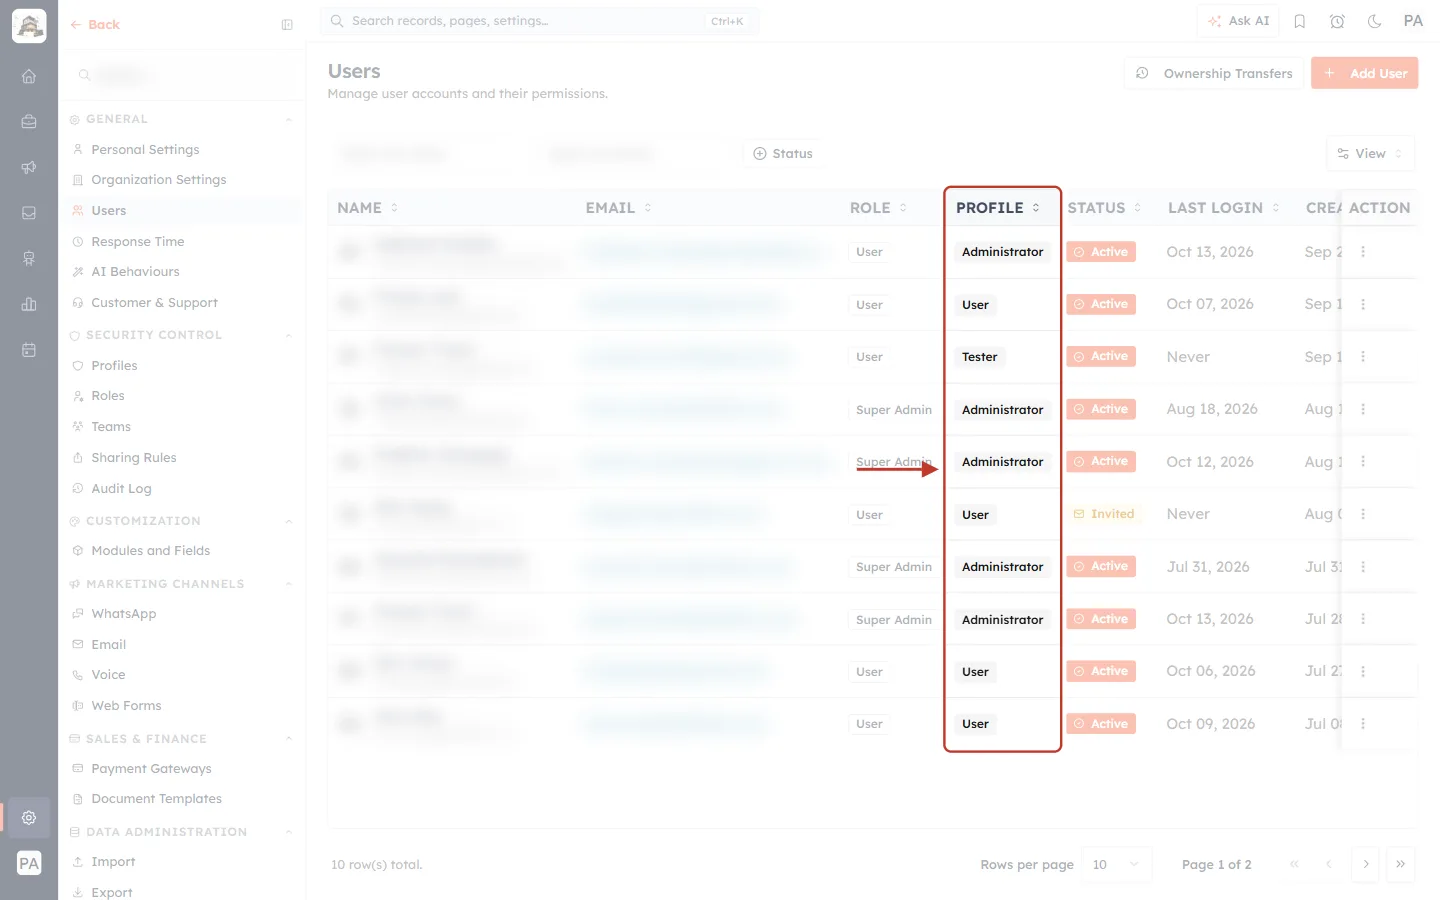
What this screenshot shows. The ringed PROFILE column shows which profile each person holds. Names are blurred.
Make sure you changed the profile the user actually holds.
Full guide: Assign a Profile to a User Step by Step: Give, Change and Check Each Person’s Permissions.
An agent can see a chat but can’t reply to it#
Why it happens: Chat access is set separately from module access, under Inbox & Channels. Their Reply / Assign level may be narrower than See chats.
How to fix it:
Open the profile → Inbox & Channels.
Under the channel, click Advanced — set See / Reply / Close separately.
Widen Reply / Assign, or assign the chat to the agent, then click Update Profile.
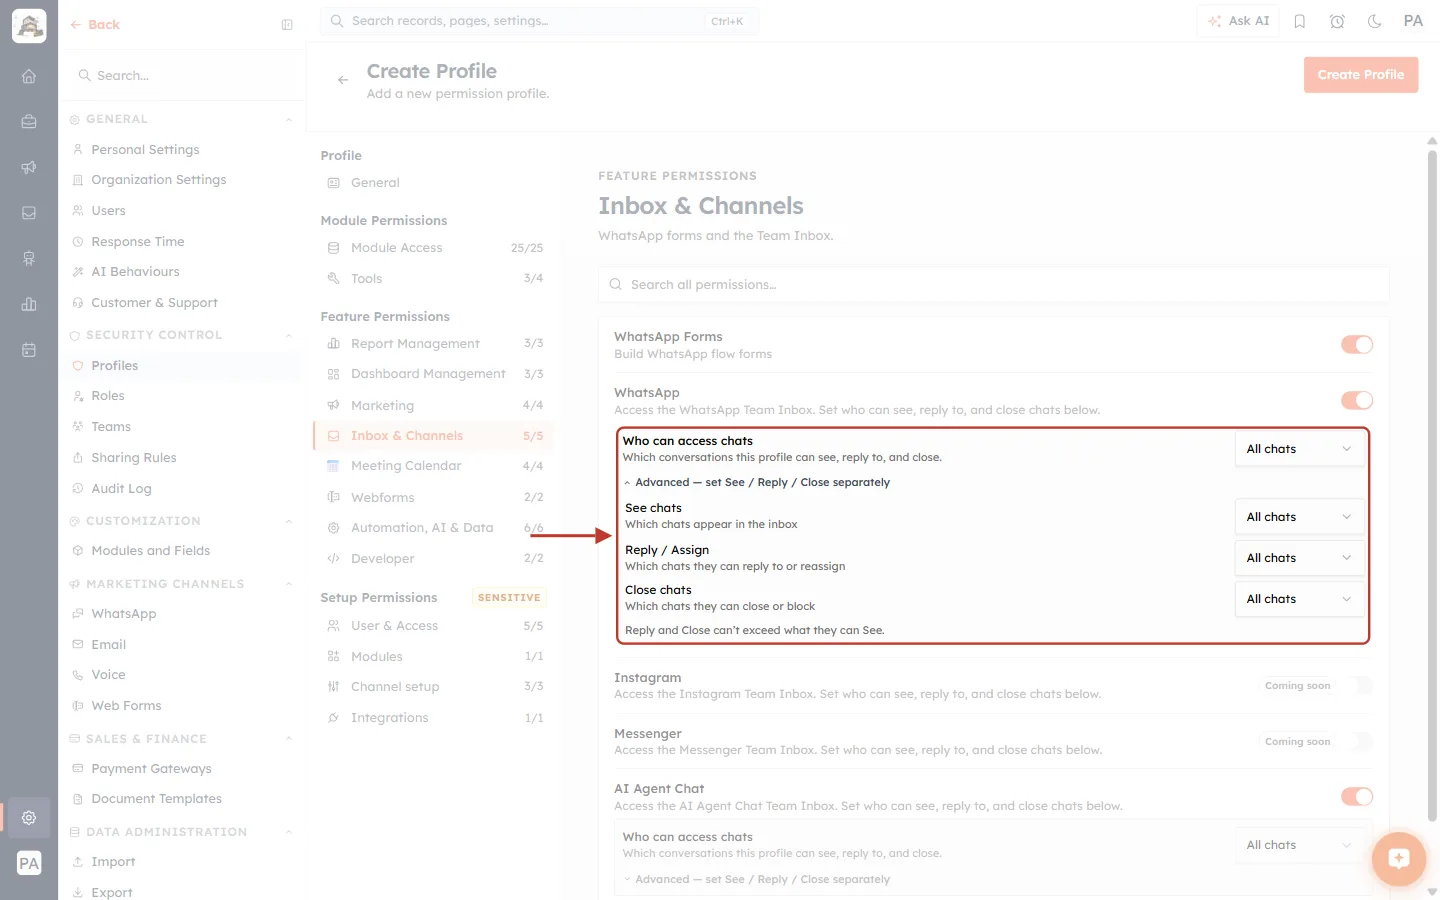
What this screenshot shows. The ringed Advanced settings split chat access into three.
See chats: Which chats appear in the inbox.
Reply / Assign: Which chats they can reply to or reassign.
Close chats: Which chats they can close or block.
The rule reads Reply and Close can’t exceed what they can See.
Full guide: Ticket Permissions Step by Step: Set Who Can View, Edit, Delete and Reply to Support Tickets.
A user sees records they shouldn’t, even with View set to Own#
Why it happens: A sharing rule can open extra records on top of the profile, and the role hierarchy lets managers see their reports’ records.
How to fix it:
Check Settings → Sharing Rules for rules that include the user’s role or team.
Check their place in Settings → Roles. People above others in the tree see those people’s records.
See Sharing Rules: Share Records Across Teams, Roles & Users (Step-by-Step Guide) and Understanding the Role Hierarchy: How Roles Decide Whose Records Each User Can See.
2. Creating and Editing Profiles#
My new profile gave someone full access#
Why it happens: New profiles start with full Administrator access, and you build them by switching things off. Saving without going through every section leaves everything on.
How to fix it:
Open the profile with Edit.
Go through every section in the section list. A full counter (for example 3/3) means nothing was switched off there.
Remove what the job doesn’t need, then click Update Profile.
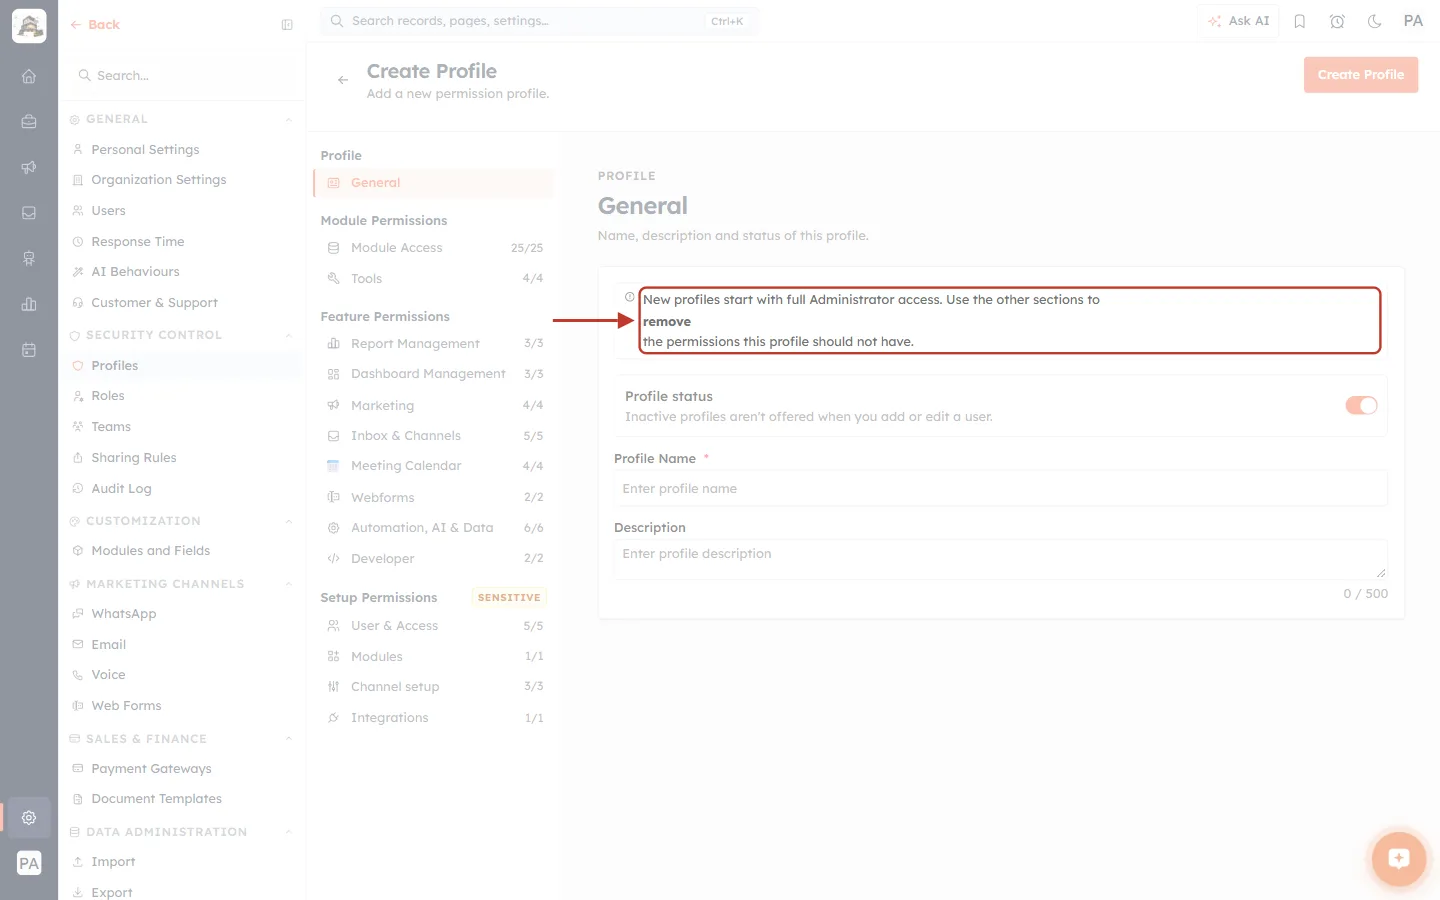
What this screenshot shows. The ringed note at the top of a new profile’s General section.
It reads New profiles start with full Administrator access. Use the other sections to remove the permissions this profile should not have.
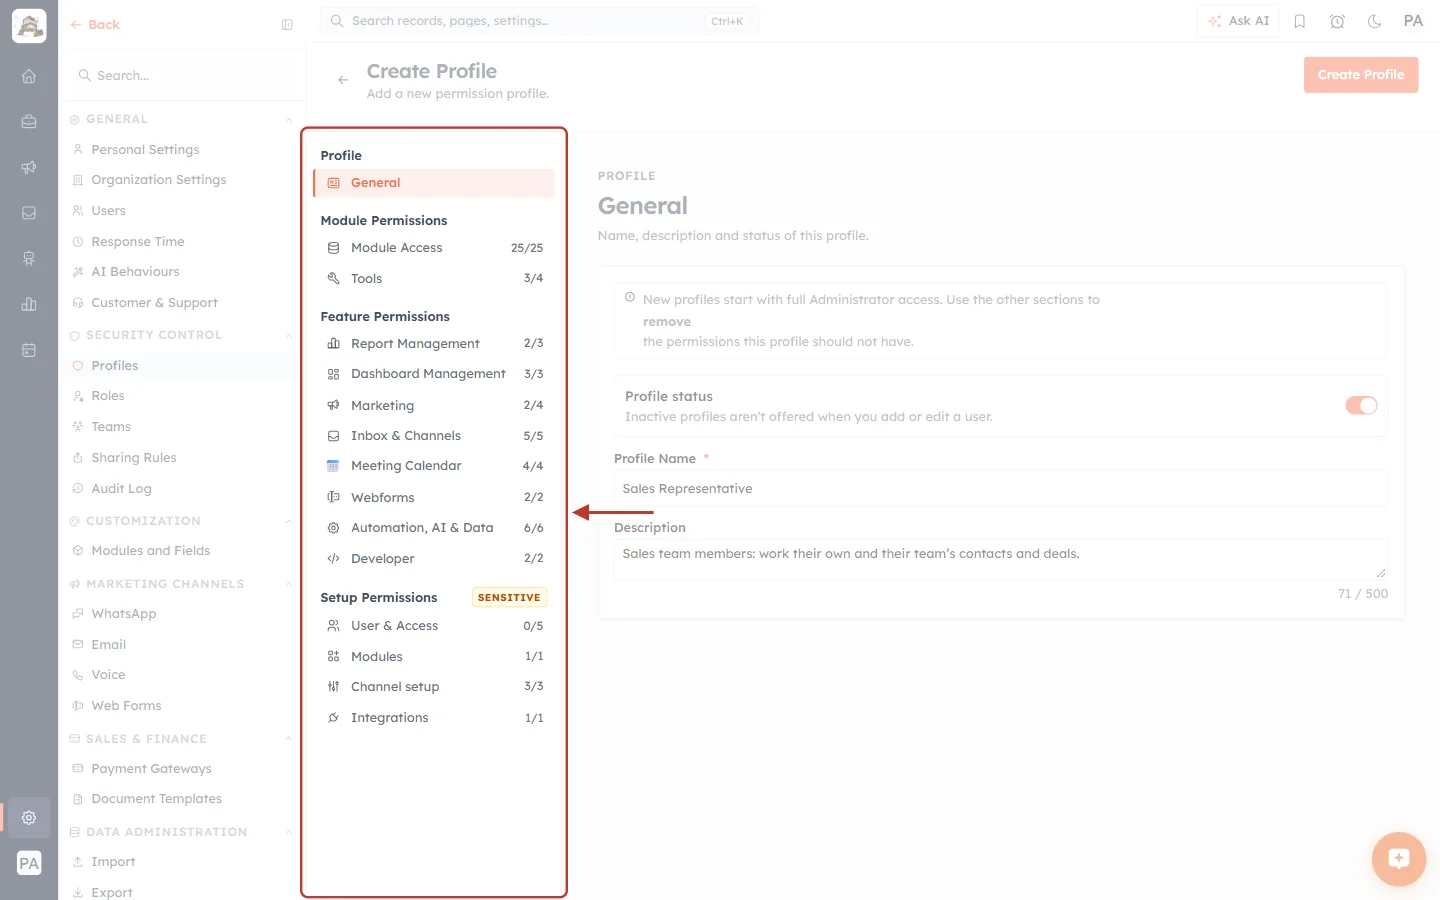
What this screenshot shows. The ringed section list shows counters after some permissions were switched off.
Tools 3/4, Report Management 2/3, Marketing 2/4 and User & Access 0/5 show what was removed.
Full counters, such as Channel setup 3/3, still have full access. Check them before saving.
Full guide: Create a Permission Profile Step by Step: Build, Edit, Clone, Deactivate & Delete.
“Name must be at least 2 characters” when saving#
Why it happens: The Profile Name is required and must be at least two characters long.
How to fix it:
Click General in the section list.
Enter a name such as Sales Representative.
Click Create Profile (or Update Profile) again.
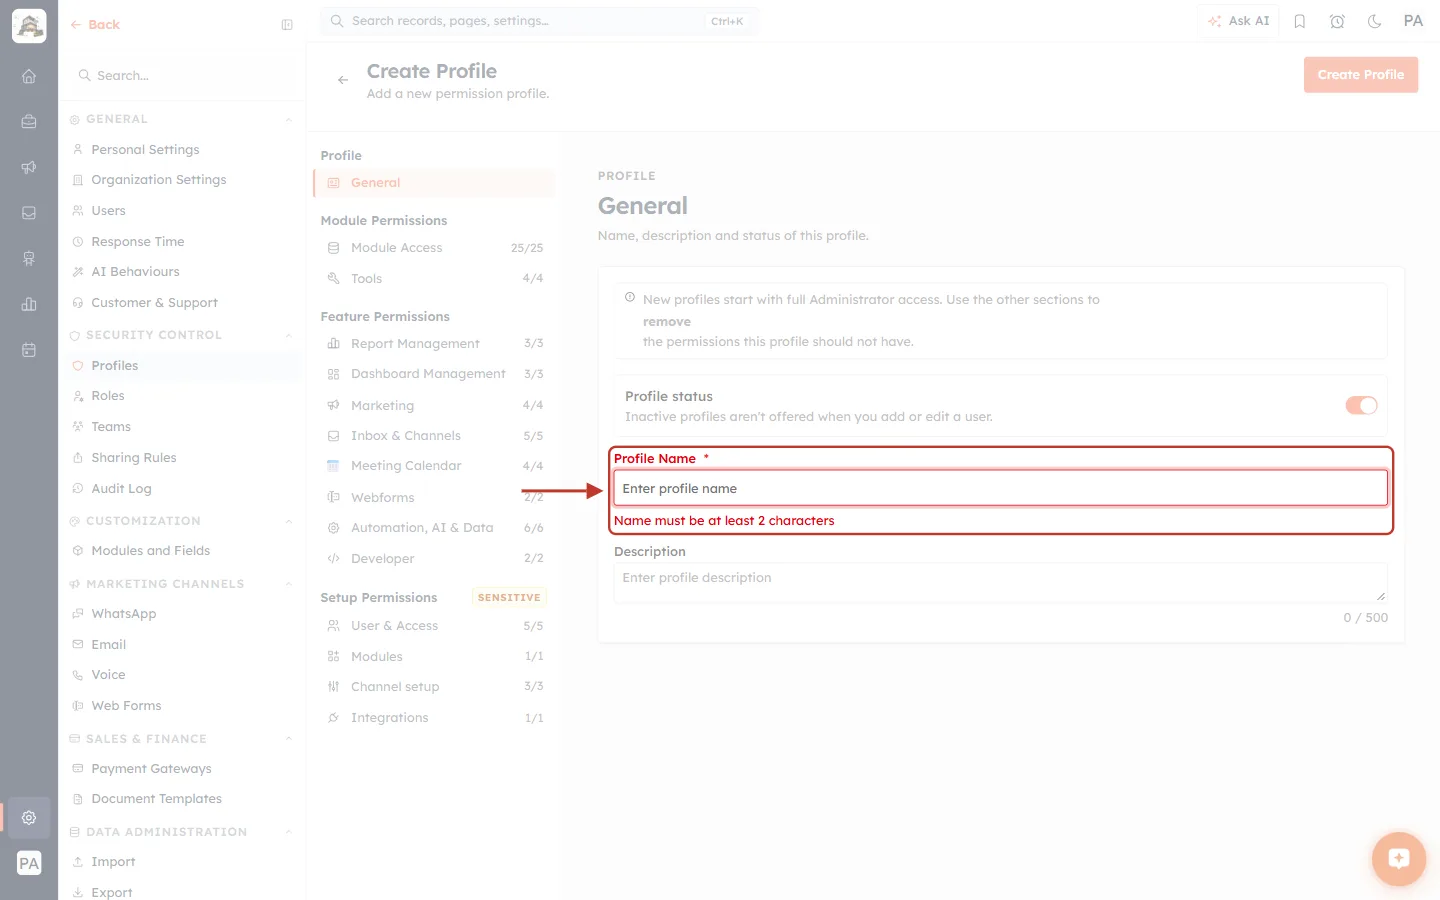
What this screenshot shows. The ringed Profile Name field in its error state.
The label and box are red, with Name must be at least 2 characters underneath.
Update Profile is greyed out#
Why it happens: The button only becomes active after you change something on the profile.
How to fix it:
Make your change in any section.
The button turns bright orange. Click it to save.
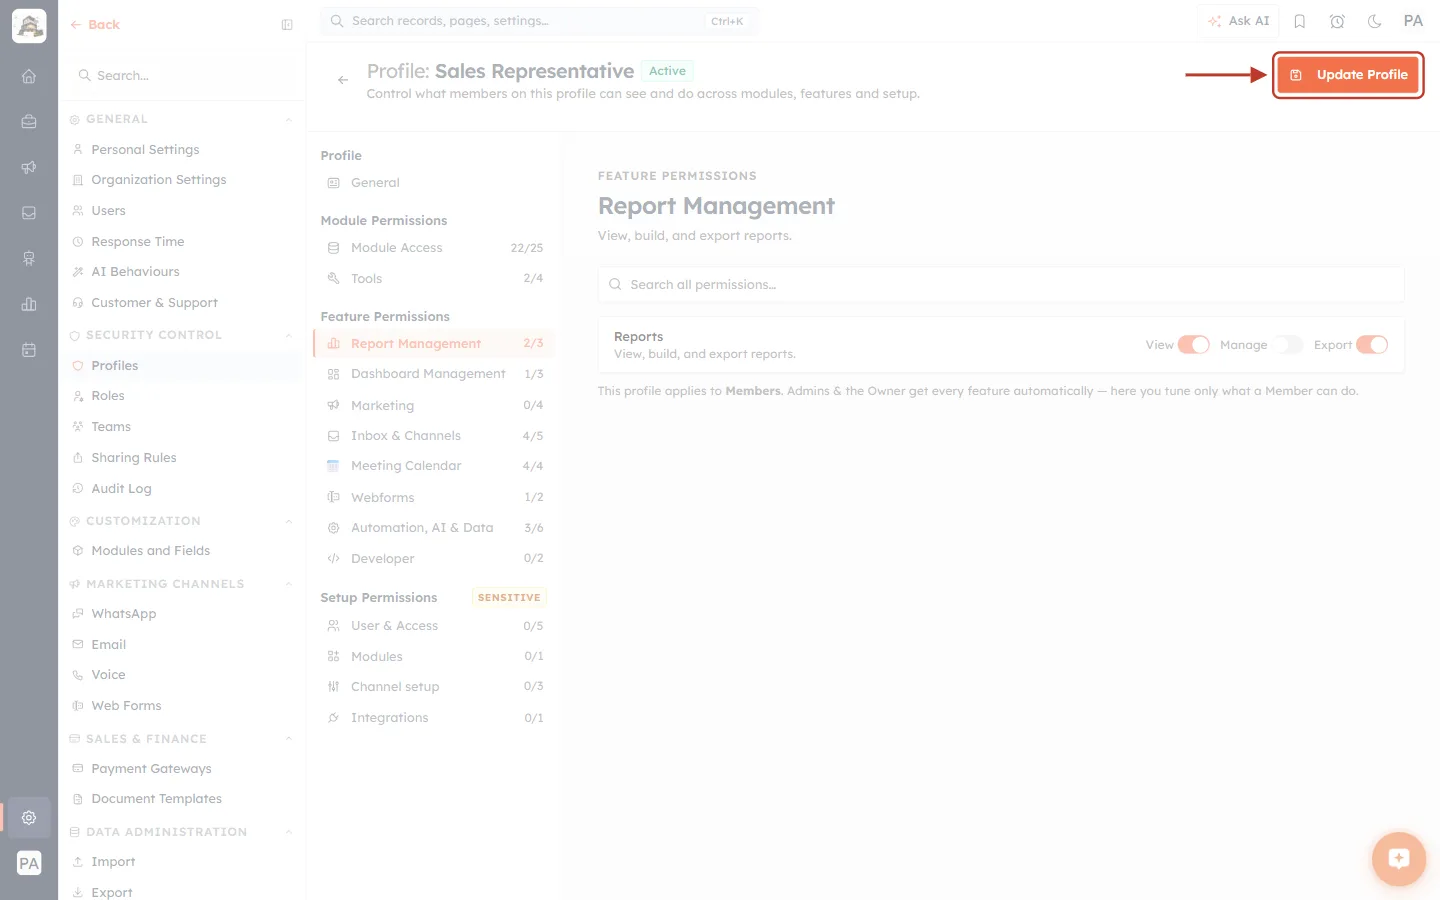
What this screenshot shows. The ringed Update Profile button turned bright orange after one switch was changed.
After saving, Profile updated successfully appears and you return to the Profiles list.
I can’t find a particular permission#
Why it happens: Permissions are spread over many sections. You don’t need to know which one holds a setting.
How to fix it:
Open any Feature or Setup section.
Type in Search all permissions…, for example export.
Switch the permission on or off from the results.
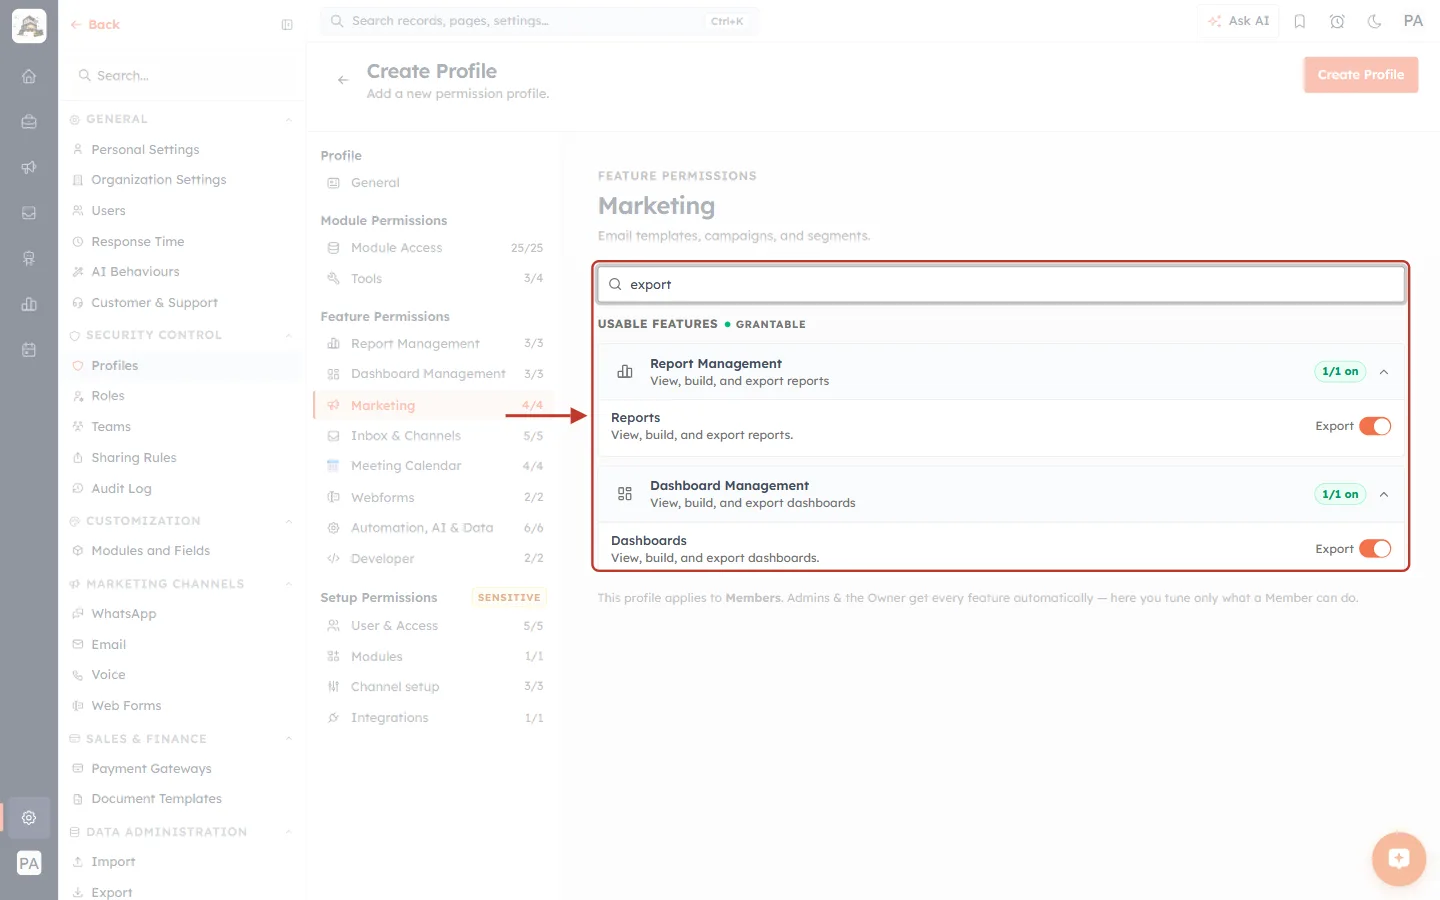
What this screenshot shows. Searching export lists matches from every section under USABLE FEATURES • GRANTABLE.
Report Management → Reports → Export and Dashboard Management → Dashboards → Export are both found.
The green 1/1 on chip shows how many matching switches are on.
3. The Administrator Profile#
I can’t edit, deactivate or delete the Administrator profile#
Why it happens: Administrator is a System profile with fixed, full access. Its menu offers only View and Clone.
How to fix it:
To give someone almost full access, choose ⋮ → Clone on Administrator.
Name the copy, then Edit it and switch off what they shouldn’t have.
Give the copy to the user.
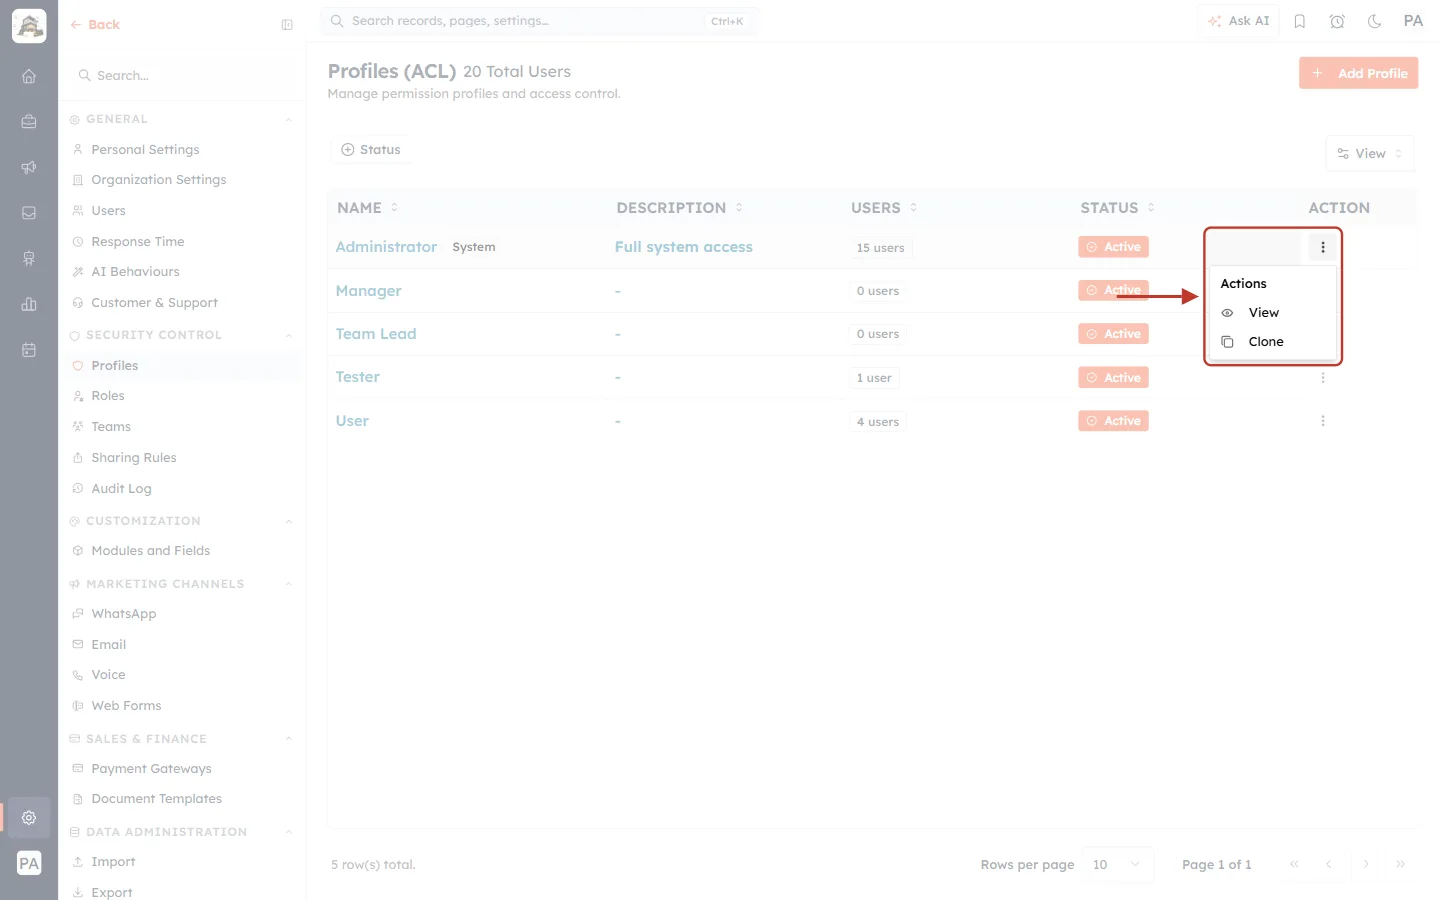
What this screenshot shows. The ringed ⋮ menu of Administrator offers only View and Clone.
There is no Edit, Mark Inactive or Delete.
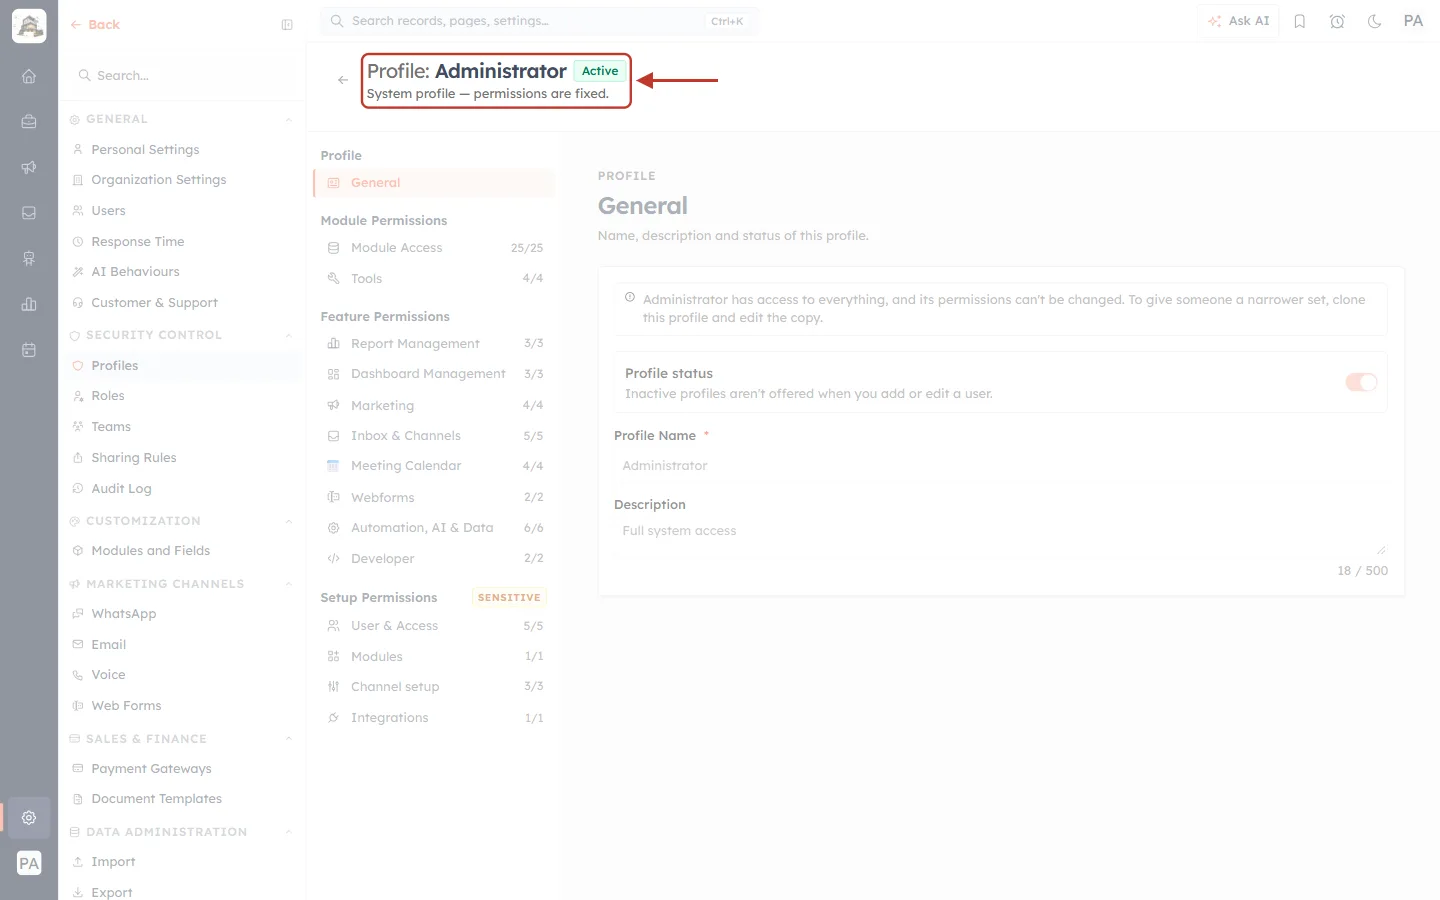
What this screenshot shows. The ringed header reads System profile — permissions are fixed.
The page explains: Administrator has access to everything, and its permissions can’t be changed. To give someone a narrower set, clone this profile and edit the copy.
Full guide: Manage Profiles Step by Step: Clone, Rename, Mark Inactive, Reactivate and Delete Permission Profiles.
4. Assigning Profiles#
A profile is missing when I add or edit a user#
Why it happens: The profile is inactive. Inactive profiles aren’t offered when you add or edit a user.
How to fix it:
Go to Settings → Profiles and filter Status by Inactive.
On the profile, choose ⋮ → Mark Active.
Go back to the user and pick it.
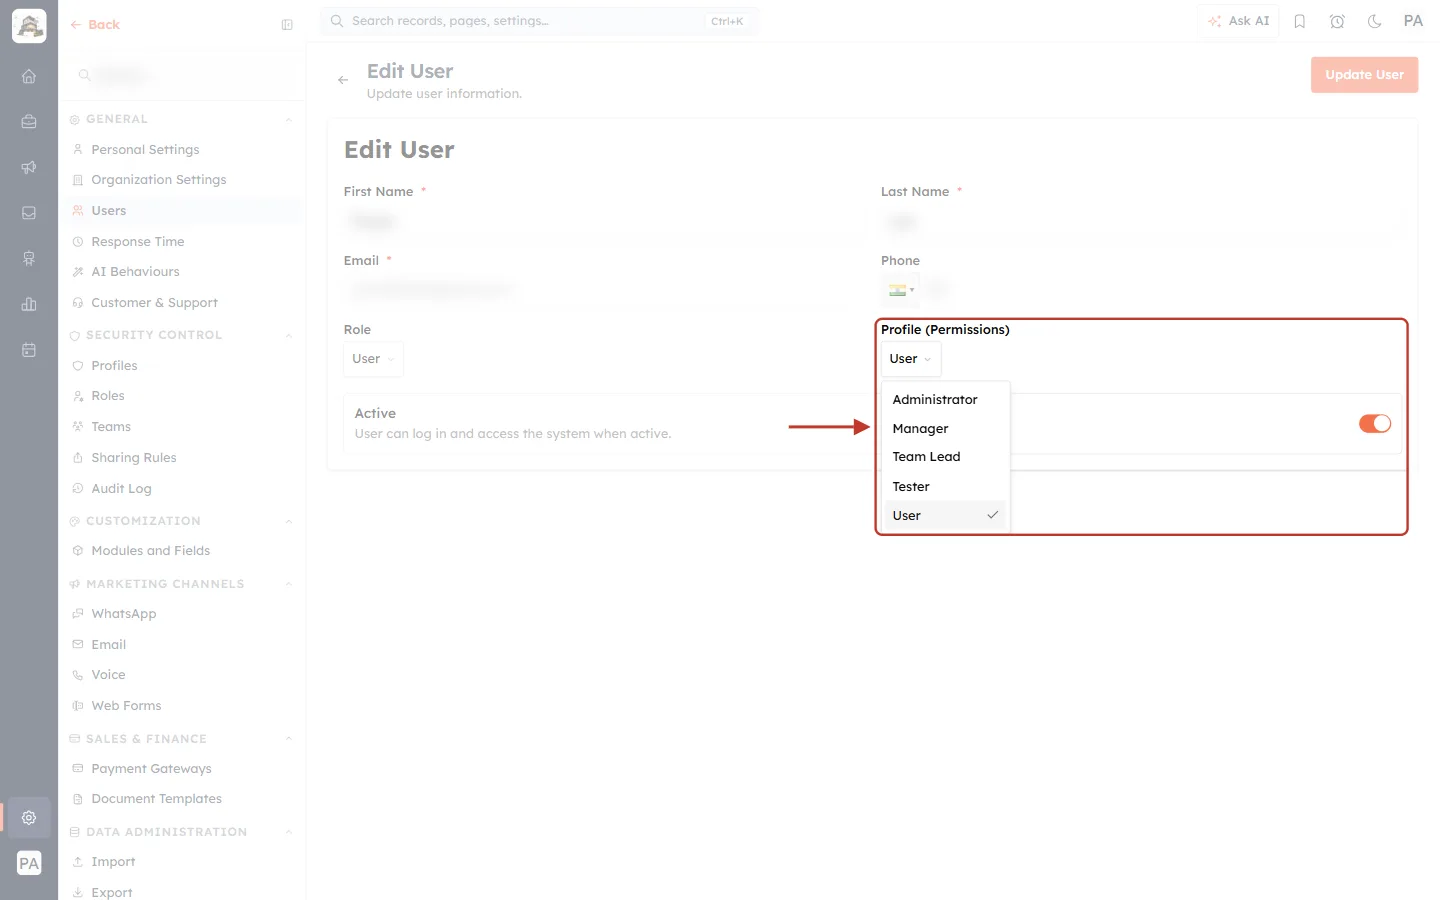
What this screenshot shows. The ringed Profile (Permissions) drop-down on Edit User lists only active profiles.
Administrator, Manager, Team Lead, Tester and User are offered. An inactive profile isn’t.
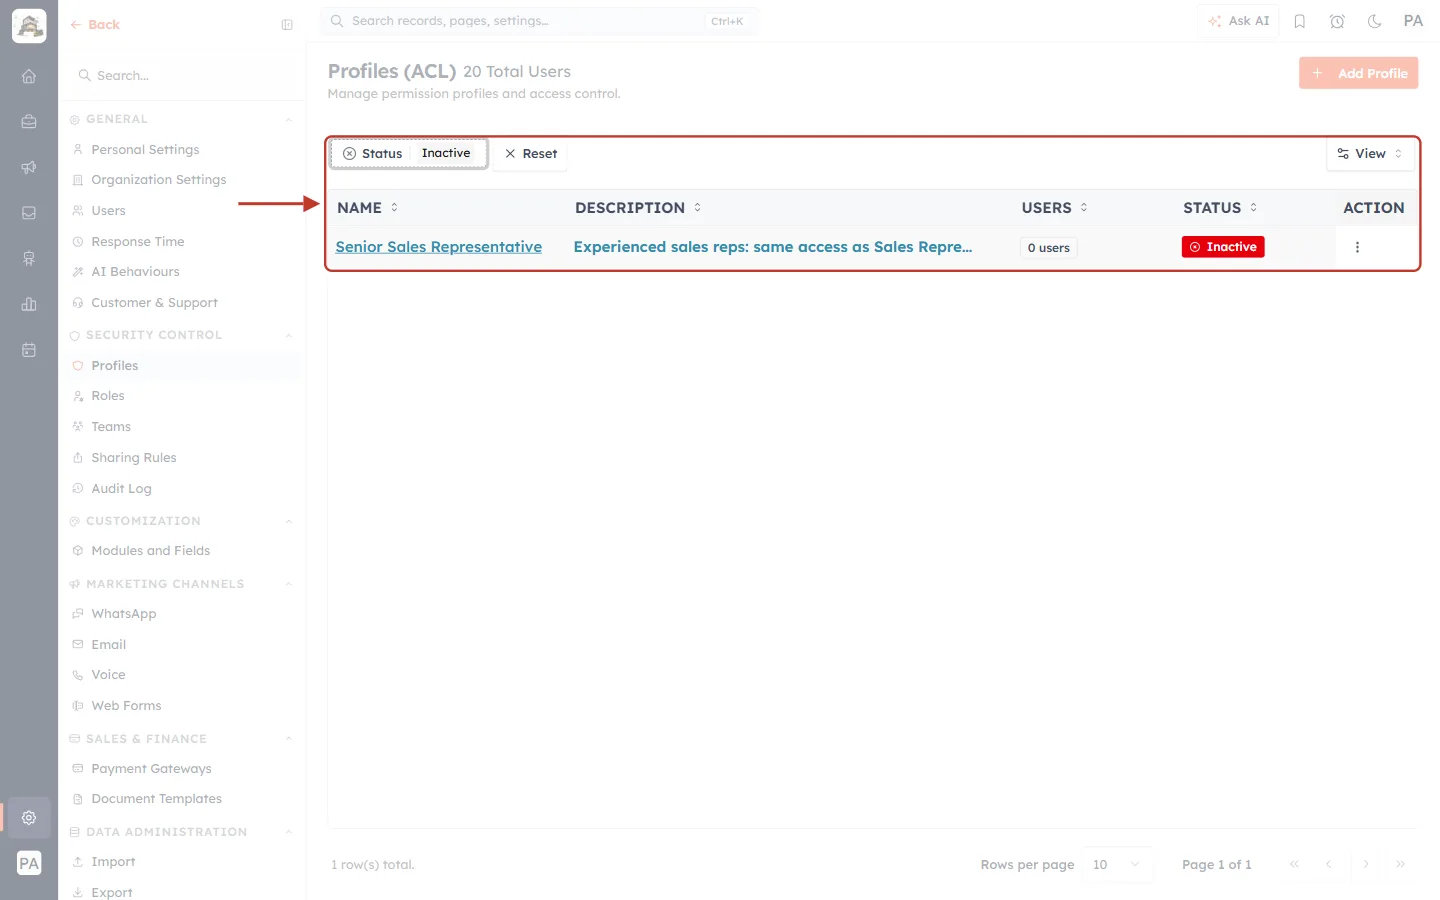
What this screenshot shows. With the Status filter set to Inactive, the ringed list shows only retired profiles.
Open the profile’s ⋮ menu to find Mark Active. Reset clears the filter.
Full guide: Manage Profiles Step by Step: Clone, Rename, Mark Inactive, Reactivate and Delete Permission Profiles.
How do I see how many people hold a profile?#
Why it happens: Every profile shows its user count on the Profiles list.
How to fix it:
Open Settings → Profiles.
Read the USERS column.
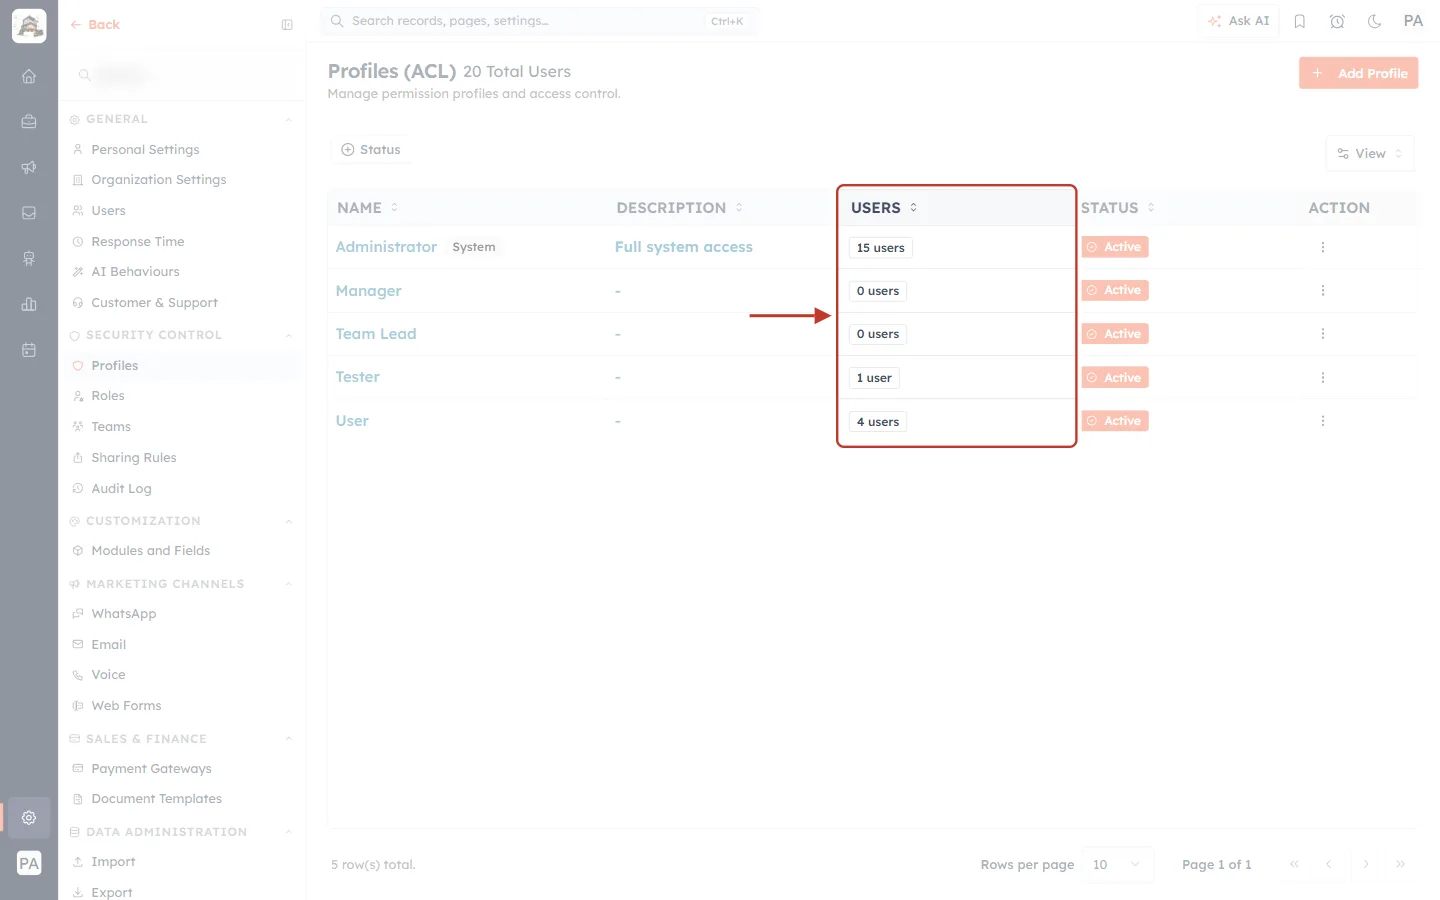
What this screenshot shows. The ringed USERS column.
For example, Administrator: 15 users, User: 4 users, Manager: 0 users.
Any change to a profile affects everyone counted here.
How do I change which profile a user has?#
Why it happens: Each user holds one profile, set on their Edit User page.
How to fix it:
Go to Settings → Users and choose ⋮ → Edit on the user.
Pick the new profile in Profile (Permissions).
Click Update User.
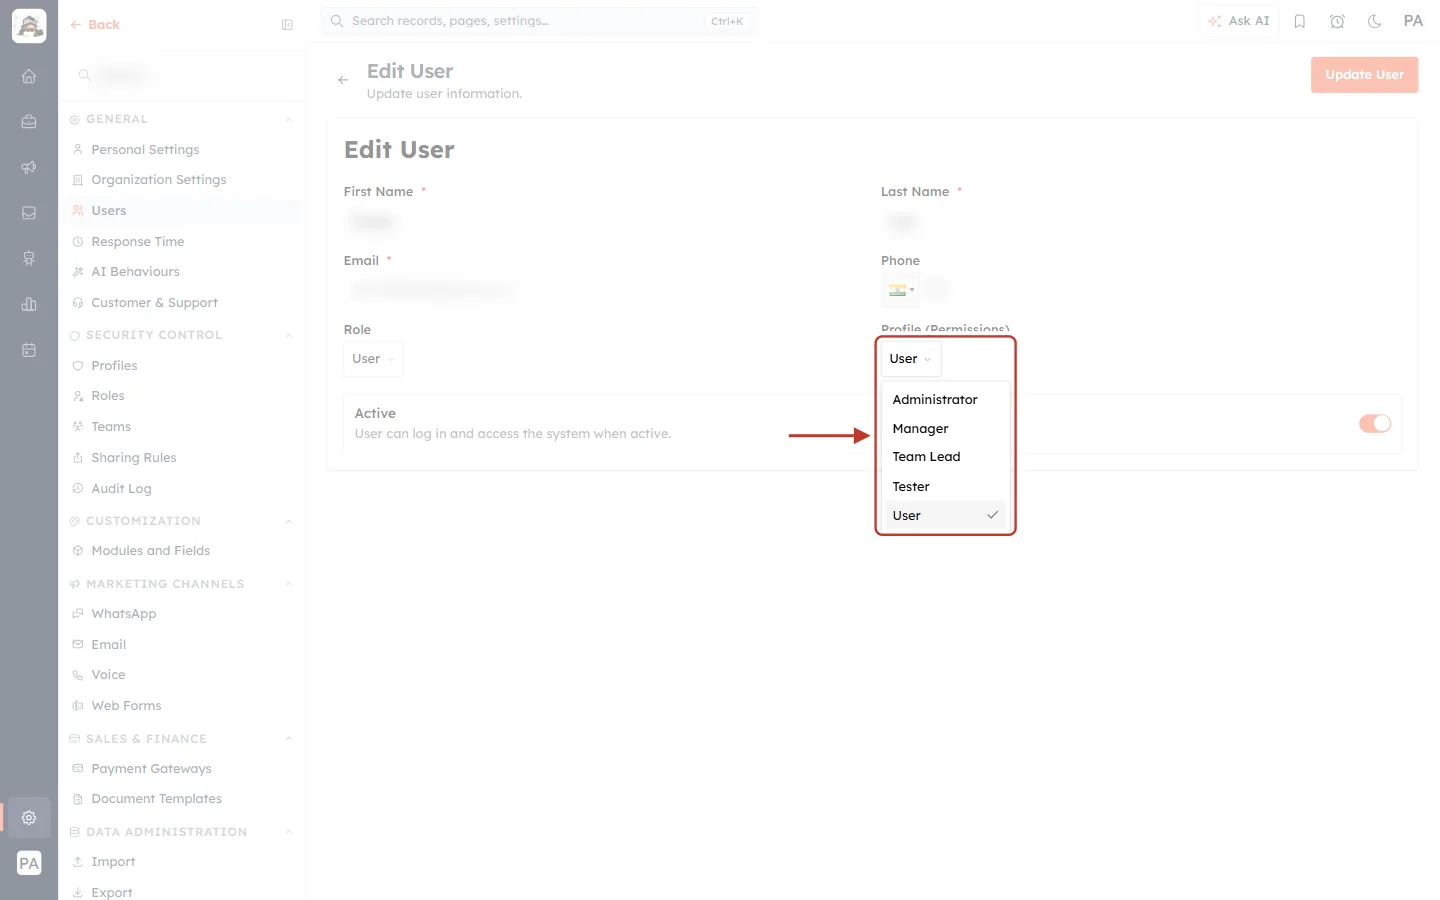
What this screenshot shows. The ringed Profile (Permissions) drop-down on Edit User.
The current profile is ticked. Choose another, then click Update User.
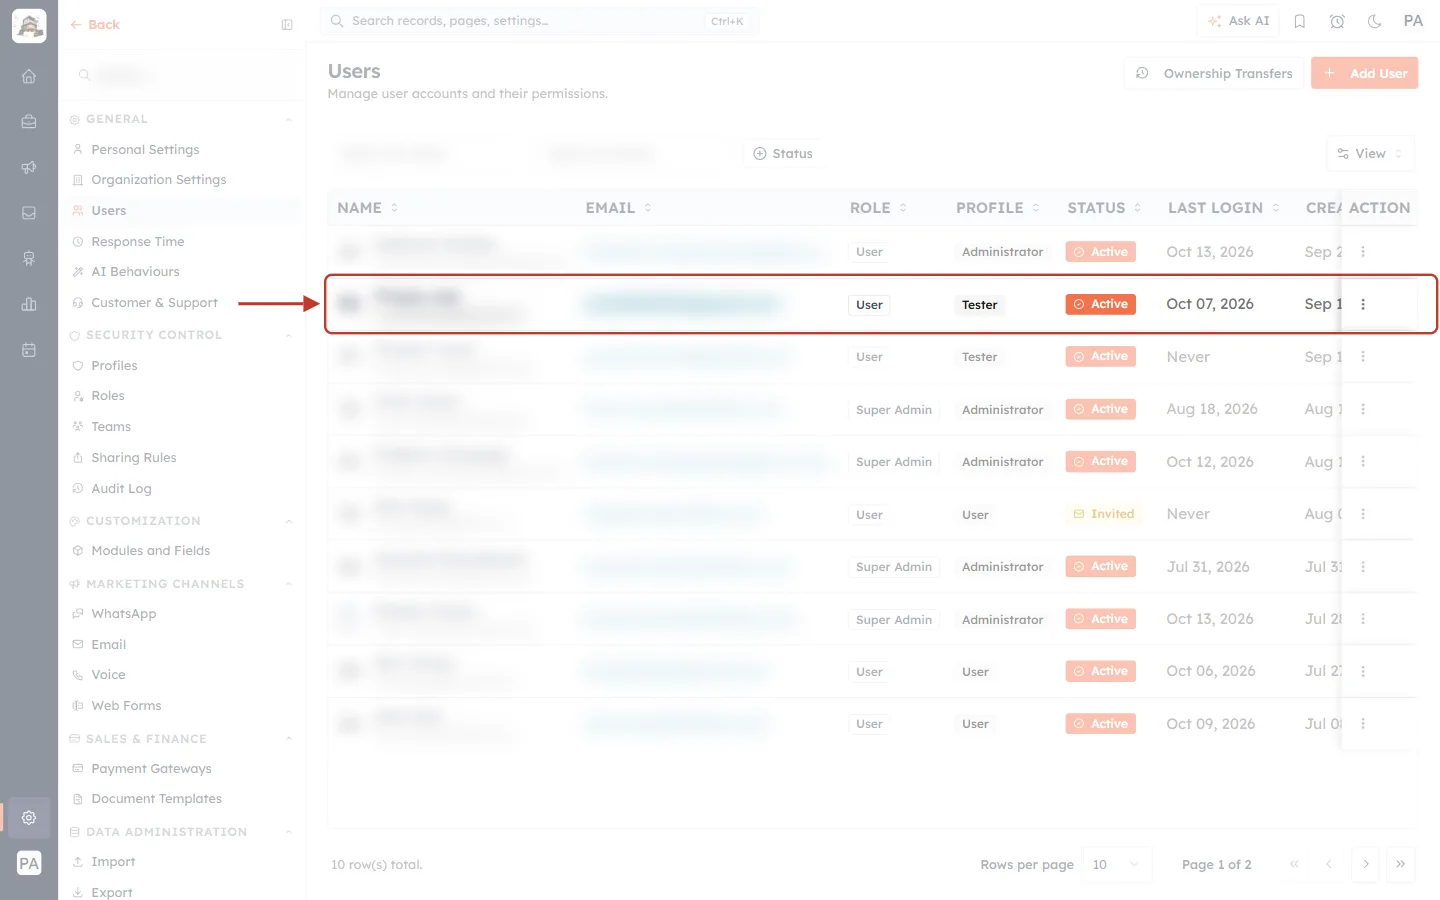
What this screenshot shows. Back on the Users list, the ringed row shows the new profile, Tester.
The ROLE is unchanged. Role and profile are separate settings.
Full guide: Assign a Profile to a User Step by Step: Give, Change and Check Each Person’s Permissions.
5. Bulk Tools#
A module is missing from the Mass Update, Change Owner or Mass Merge list#
Why it happens: Each tool only offers modules the profile can already act on. Mass Update and Change Owner need Edit, Mass Delete needs Delete, and Mass Merge needs Edit plus Duplicate Check & Merge turned on for the module.
How to fix it:
Open the profile → Module Access and give the module the right level (Edit or Delete).
For Mass Merge, turn on duplicate checking for the module.
Go to Tools, open the tool’s module list and tick the module.
Click Update Profile.
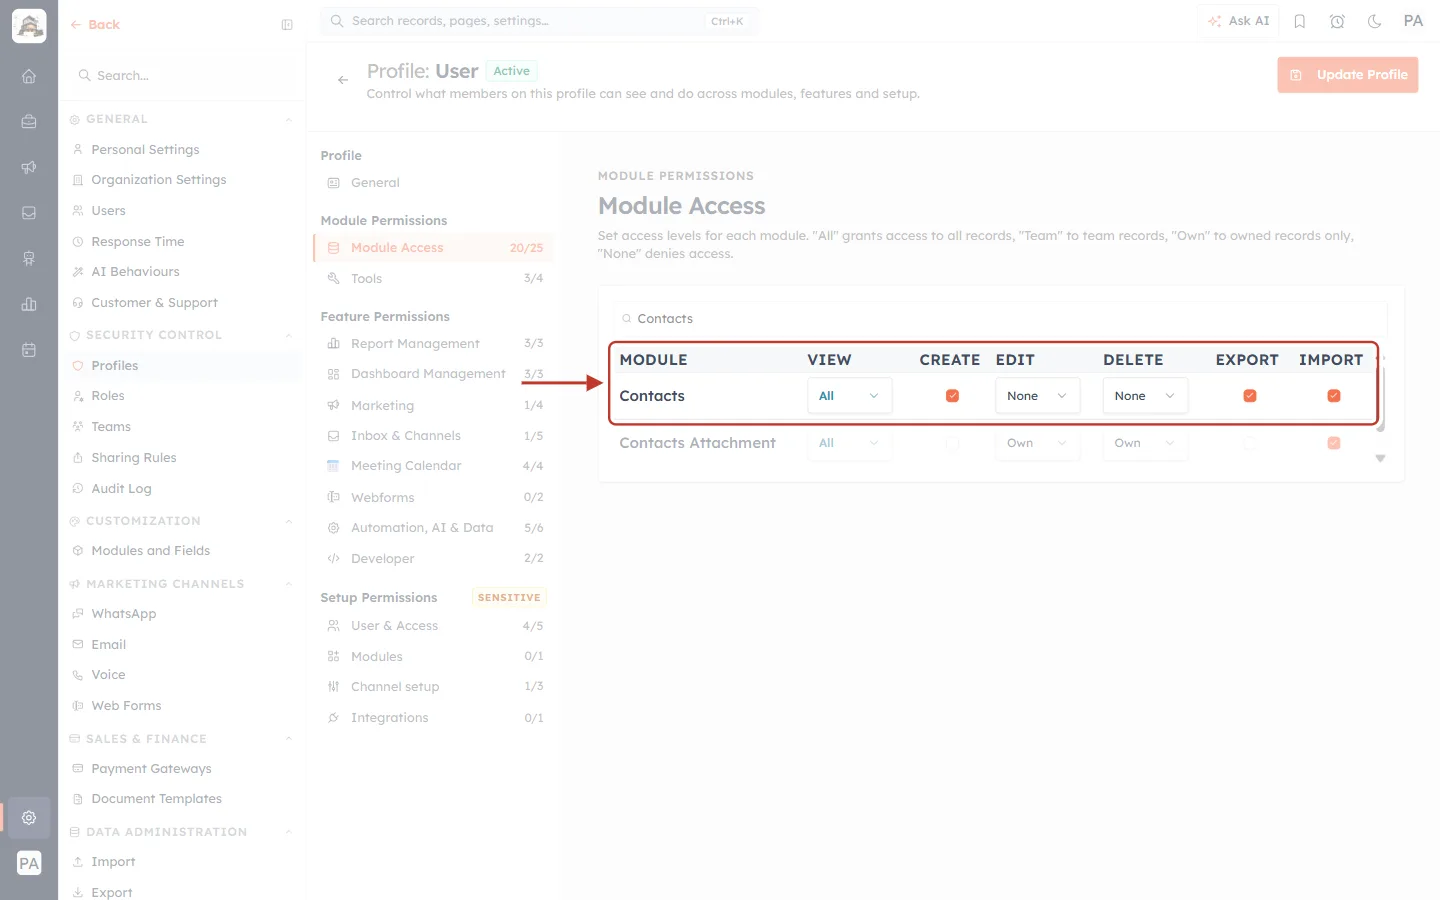
What this screenshot shows. In Module Access, the ringed Contacts row has EDIT: None and DELETE: None.
VIEW is still All, so contacts can be seen but not changed.
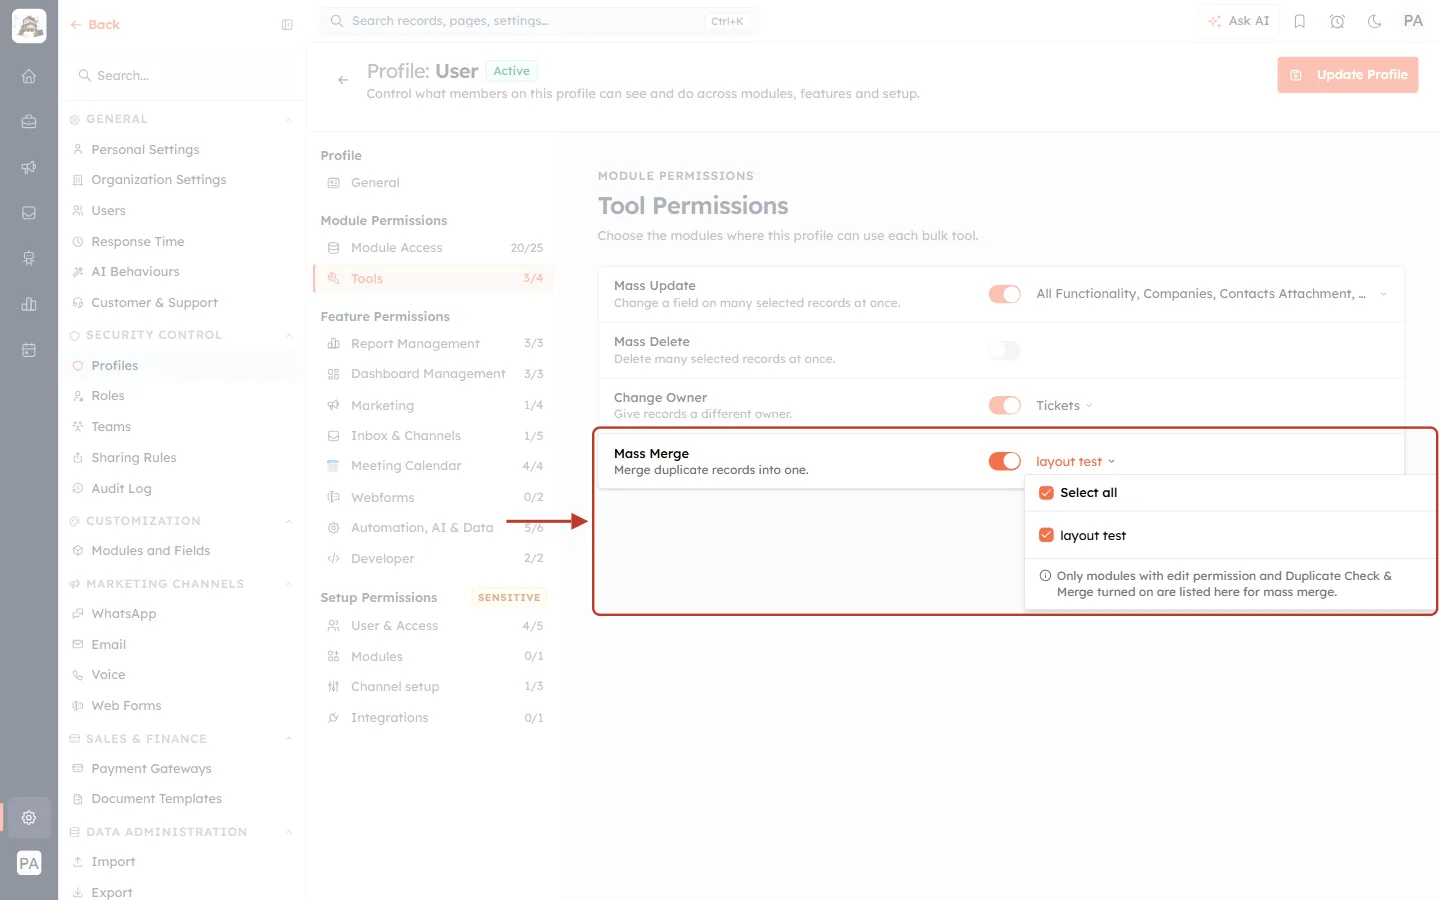
What this screenshot shows. The ringed Mass Merge list now offers only layout test. Contacts has gone.
The note reads Only modules with edit permission and Duplicate Check & Merge turned on are listed here for mass merge.
Full guide: Tool Permissions Step by Step: Control Who Can Mass Update, Mass Delete, Change Owner and Merge Records.
How do I stop people bulk-deleting records?#
Why it happens: Mass Delete is a separate switch under Tools. Single-record deletes still follow the Delete level in Module Access.
How to fix it:
Open the profile → Tools.
Switch Mass Delete off.
Click Update Profile.
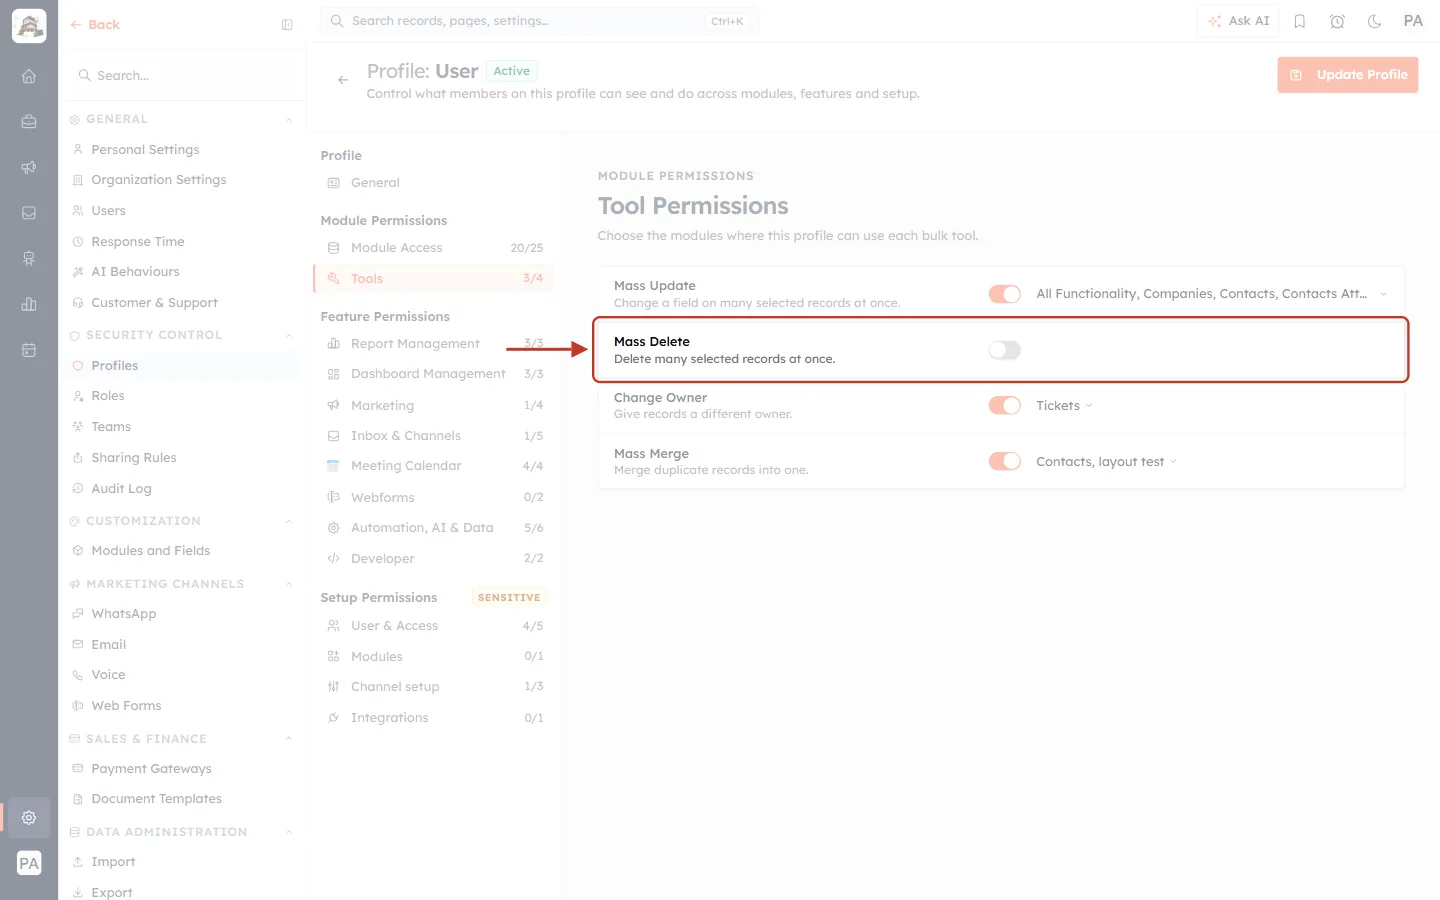
What this screenshot shows. The ringed Mass Delete row has its switch off (grey), and its module list is gone.
The Tools counter drops from 4/4 to 3/4.
6. Removing Profiles#
Should I mark a profile inactive or delete it?#
Why it happens: Marking inactive keeps the profile and its settings, but stops it being given out. Deleting removes it for good, and can’t be undone.
How to fix it:
If you might need it again, choose ⋮ → Mark Inactive.
If you are sure, move its users to another profile first, then choose ⋮ → Delete.
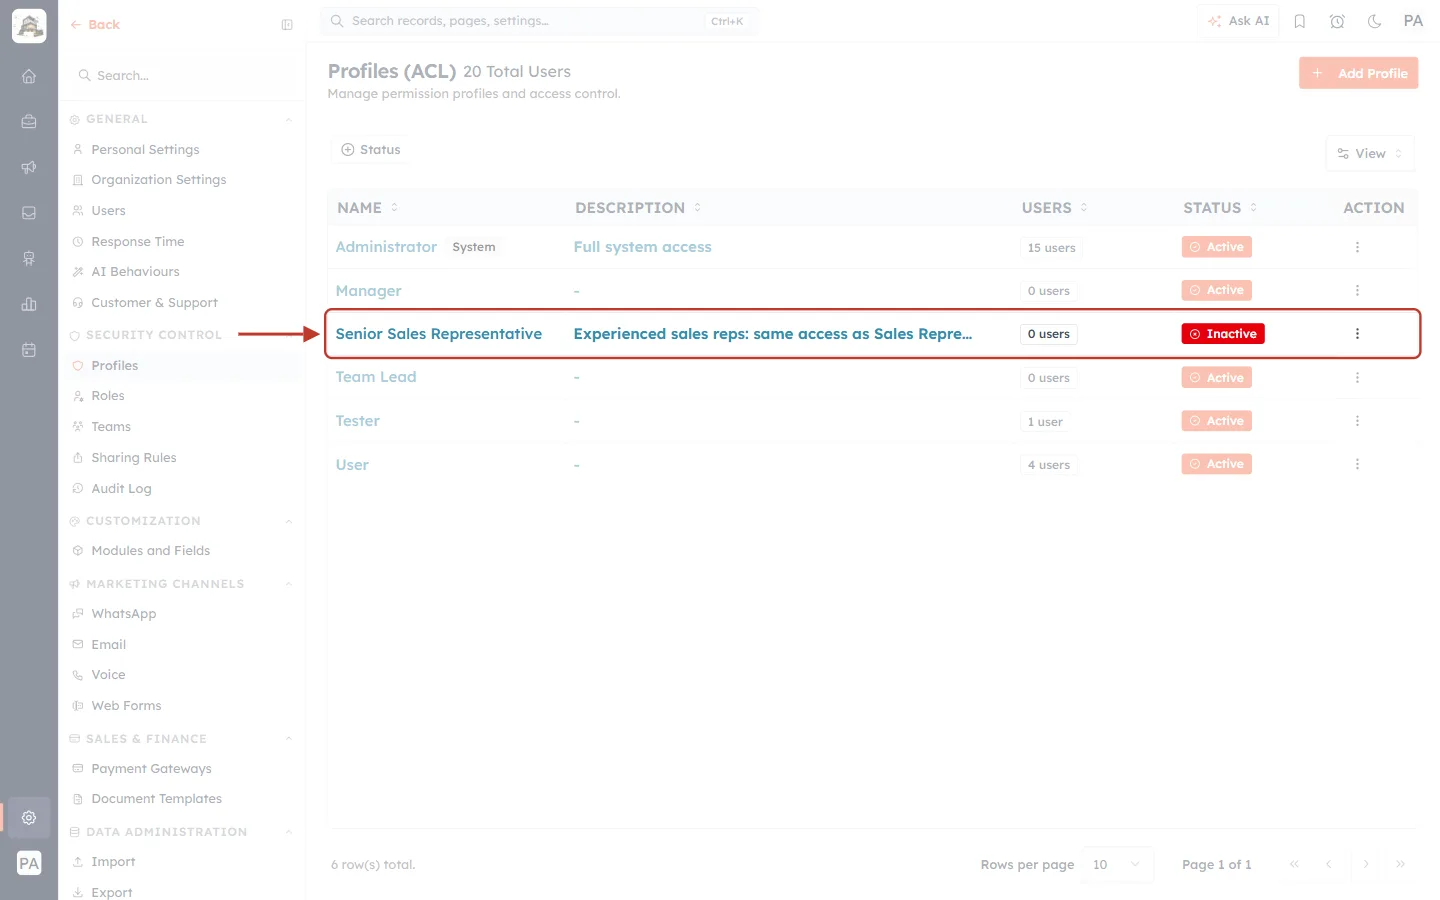
What this screenshot shows. The ringed row shows a red Inactive status after Profile marked inactive.
Bring it back at any time with ⋮ → Mark Active.
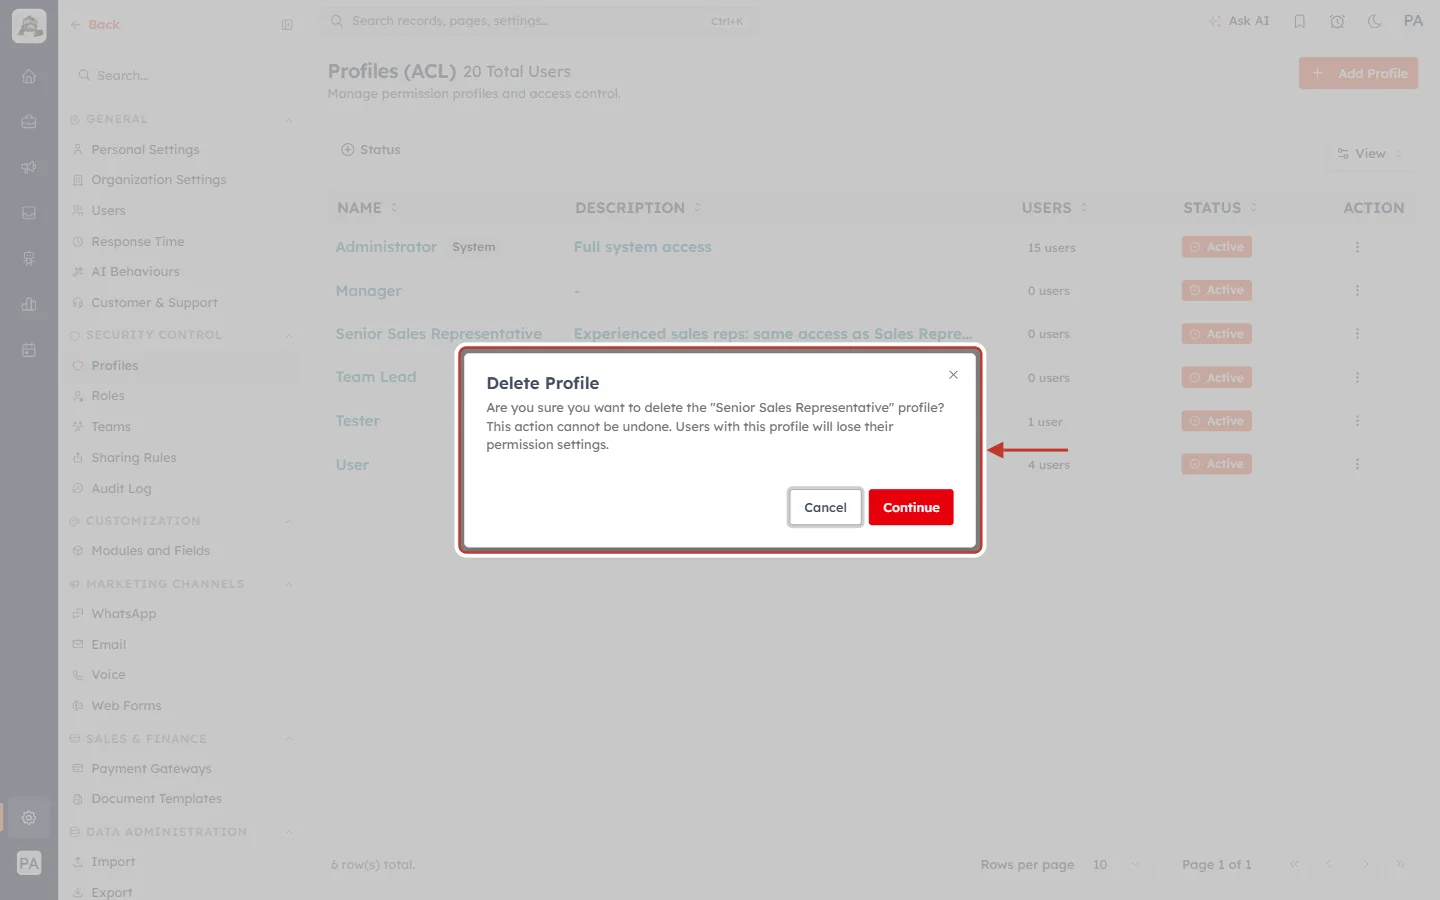
What this screenshot shows. The ringed confirmation shown before deleting.
It reads This action cannot be undone. Users with this profile will lose their permission settings.
Continue deletes. Cancel keeps the profile.
Full guide: Manage Profiles Step by Step: Clone, Rename, Mark Inactive, Reactivate and Delete Permission Profiles.
How do I make a new profile that is almost the same as an existing one?#
Why it happens: Cloning copies every permission, so you only change what differs.
How to fix it:
On the existing profile, choose ⋮ → Clone.
Type a New Profile Name and click Clone Profile.
Edit the copy and click Update Profile.
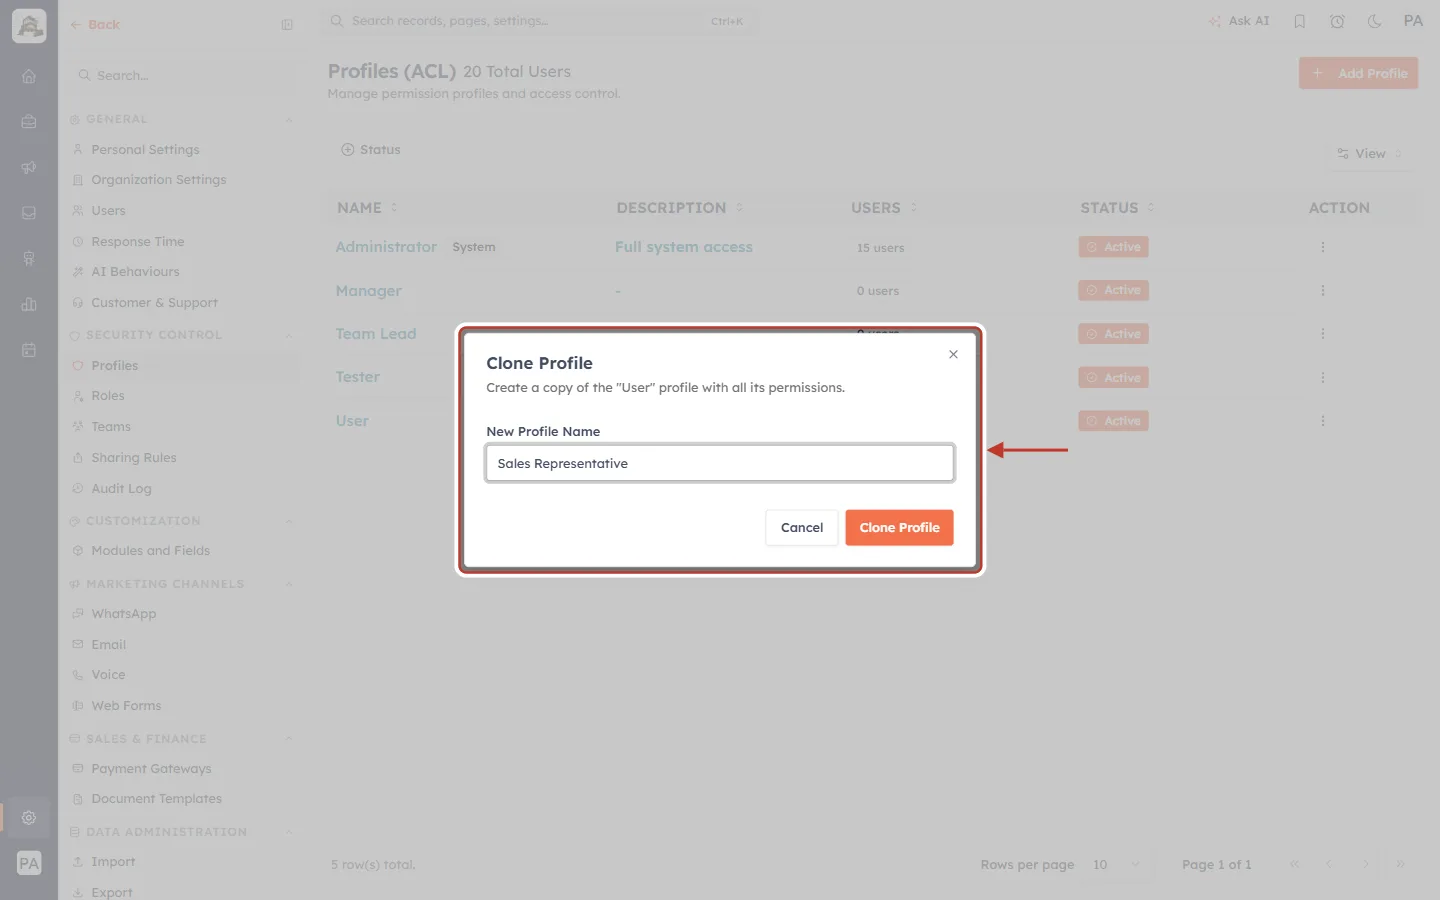
What this screenshot shows. The ringed Clone Profile dialog: Create a copy of the “User” profile with all its permissions.
New Profile Name: Sales Representative. Click Clone Profile.
The copy starts with 0 users.
Still Stuck?#
Check which profile the person holds (Users → PROFILE), and that you changed that one.
Remember that Admins and the Owner aren’t limited by Feature and Setup permissions.
Check the Audit Log to see who changed a profile and when. See Audit Log: See Who Changed Which Setting in Your CRM, and When.
Ask the user to refresh after any change.
✅
Start new profiles narrow, give profiles by job rather than by person, and prefer Mark Inactive over Delete when you are unsure.
Previous and Next#
Related Articles#
Profile Permissions Explained: What Every Module, Feature & Setup Setting Controls
Create a Permission Profile Step by Step: Build, Edit, Clone, Deactivate & Delete
Assign a Profile to a User Step by Step: Give, Change and Check Each Person’s Permissions
Ticket Permissions Step by Step: Set Who Can View, Edit, Delete and Reply to Support Tickets
Understanding the Role Hierarchy: How Roles Decide Whose Records Each User Can See
Sharing Rules: Share Records Across Teams, Roles & Users (Step-by-Step Guide)
Was this article helpful?
Ready to implement this?
OpenAI Engage and apply what you just learned to your own workspace.
Open AI Engage CRM