Loading…


KnowledgeBase
Layout Rules: Show, Hide or Lock Fields and Sections Based on a Pick List Value (Step-by-Step)
What Layout Rules do#
A layout decides which fields a form has. A Layout Rule goes one step further: it makes the form react to what the user picks. You choose one Pick List field (for example Lifecycle Stage) and tell the CRM what should happen to the rest of the form for each of its values.
A rule can do three things:
Action | What it does | Where it works |
|---|---|---|
Show only these | While the value is picked, the form shows only the sections and fields you choose. Everything else is hidden, except required fields and the rule’s own field. | Create form, Edit form and the record page |
Hide | While the value is picked, the sections or fields you choose disappear from the form. | Create form, Edit form and the record page |
Lock (read-only) | While the value is picked, the fields you choose are still shown but can’t be changed. They show the note Read-only at this stage. | Edit form and the record page only (the Create form stays editable) |
In this guide we build one rule on the Contacts module, Standard layout, with two conditions:
Condition 1 — when Lifecycle Stage is Subscriber, hide the Address Information section (a newsletter subscriber doesn’t need an address yet).
Condition 2 — when Lifecycle Stage is Customer, lock Lead Source and Created Source, so nobody changes where a paying customer came from.
The guide is in five parts:
Part 1 — open the field’s Rules tab in the Layout Builder.
Part 2 — create the rule and its first condition (Hide).
Part 3 — add a second condition (Lock) and read the summary table.
Part 4 — turn a rule off, remove a condition or delete the rule, and save.
Part 5 — check the result on the Create and Edit forms.
Key words used in this guide#
Term | What it means |
|---|---|
Rule | All the conditions attached to one Pick List field on one layout. A field has at most one rule per layout. |
Rule’s own field (trigger) | The Pick List whose value the rule watches — here Lifecycle Stage. It always stays visible and editable, so users can change it back. |
Condition | One “When the field is these values → then do this action to these targets” line of the rule. |
Value | An option of the Pick List (for example Subscriber). One condition can list several values; it matches when the field is any one of them. |
Target | A whole section, or a single field, that the action applies to. |
Before you begin#
You need permission to customise modules (the Administrator profile has it).
Rules can be built on a Pick List field or a Yes/No checkbox. Other field types (text, number, date…) don’t show a Rules tab.
A rule belongs to one layout. If your team uses several layouts, open each one and add the rule where it is needed.
Rules can only use saved fields. If you just added a new field, click Save first, then build the rule.
Nothing you do in the Rules tab is saved until you click Save.
ℹ️
Hiding a field never deletes its data. If a Customer is moved back to Lead, the hidden values appear again exactly as they were.
Part 1: Open the Rules tab of a Pick List field#
Step 1: Go to the module’s Layouts page#
Click the gear icon at the bottom of the left menu bar to open Setup, click Modules and Fields under CUSTOMIZATION, then click Configure on the module’s row.
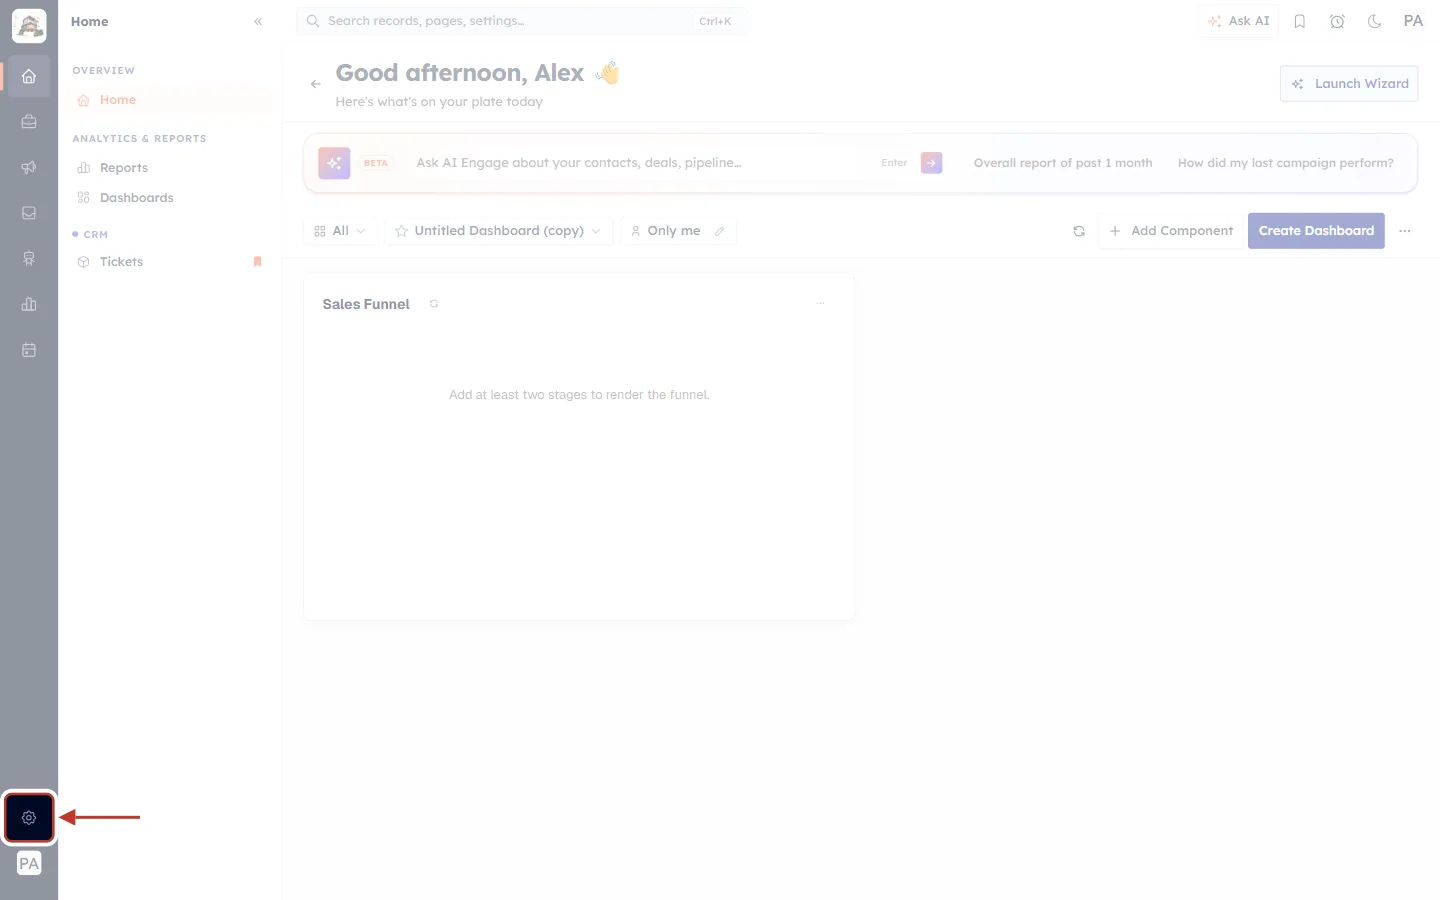
What this screenshot shows. The CRM home page with the gear icon (Setup) ringed at the bottom of the narrow dark menu bar on the left.
The icons above it open the main parts of the CRM (Home, CRM, Marketing, Inbox and so on).
Your initials below it open your own profile — not the Setup area.
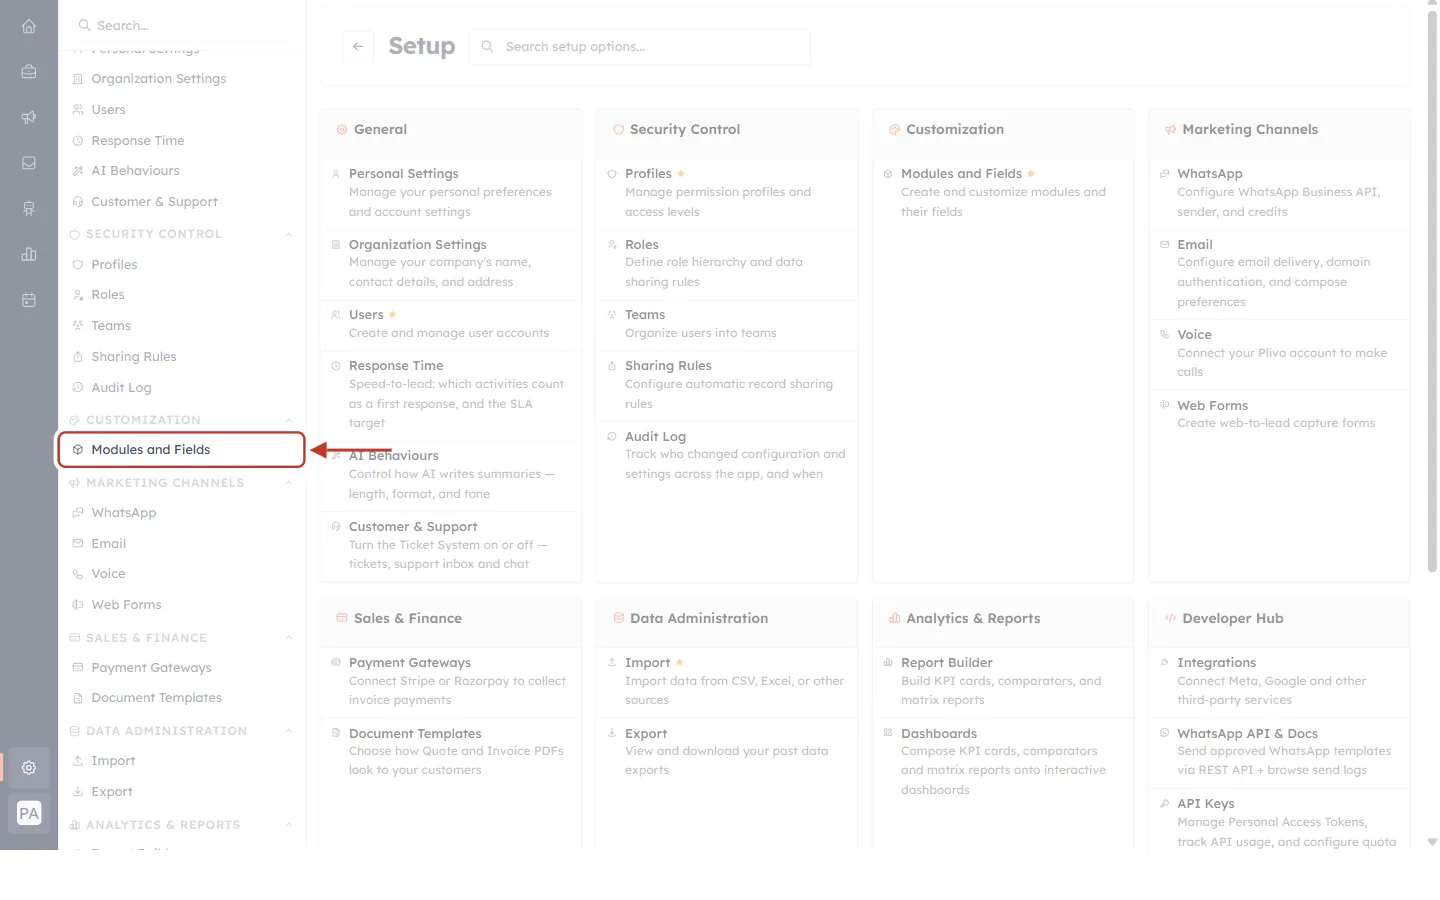
What this screenshot shows. The Setup page with Modules and Fields ringed in the Setup menu, under the CUSTOMIZATION heading.
This is where every module’s fields and layouts are managed.
The cards in the middle of the page link to the same settings, if you prefer to click there.
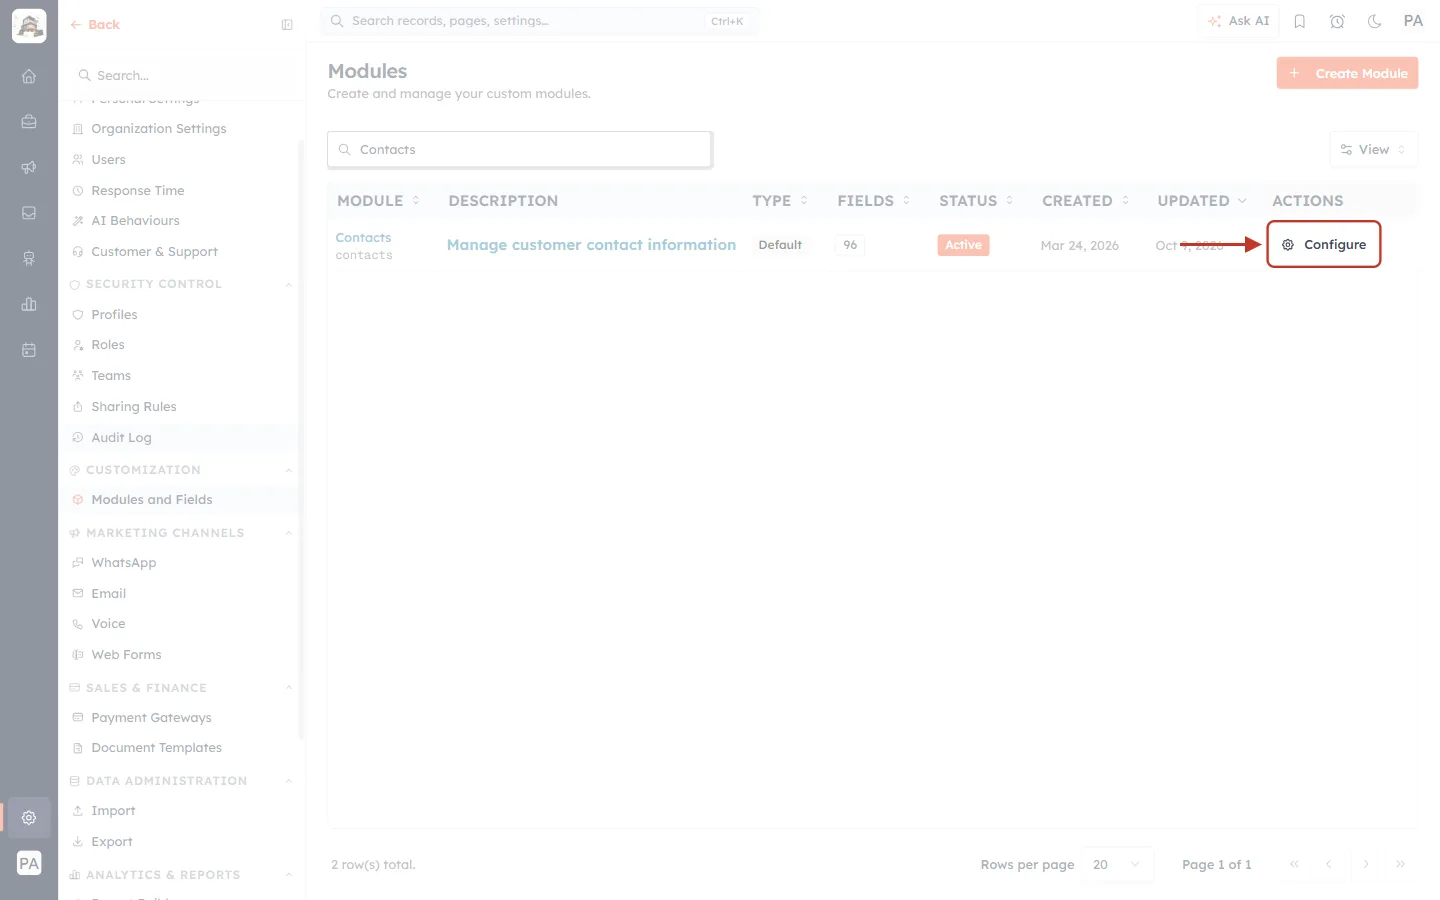
What this screenshot shows. The Modules page filtered to “Contacts”, with the Configure button ringed.
Use Search modules… to find your module quickly.
Configure opens the module’s Layouts page.
Step 2: Open the layout in the Layout Builder#
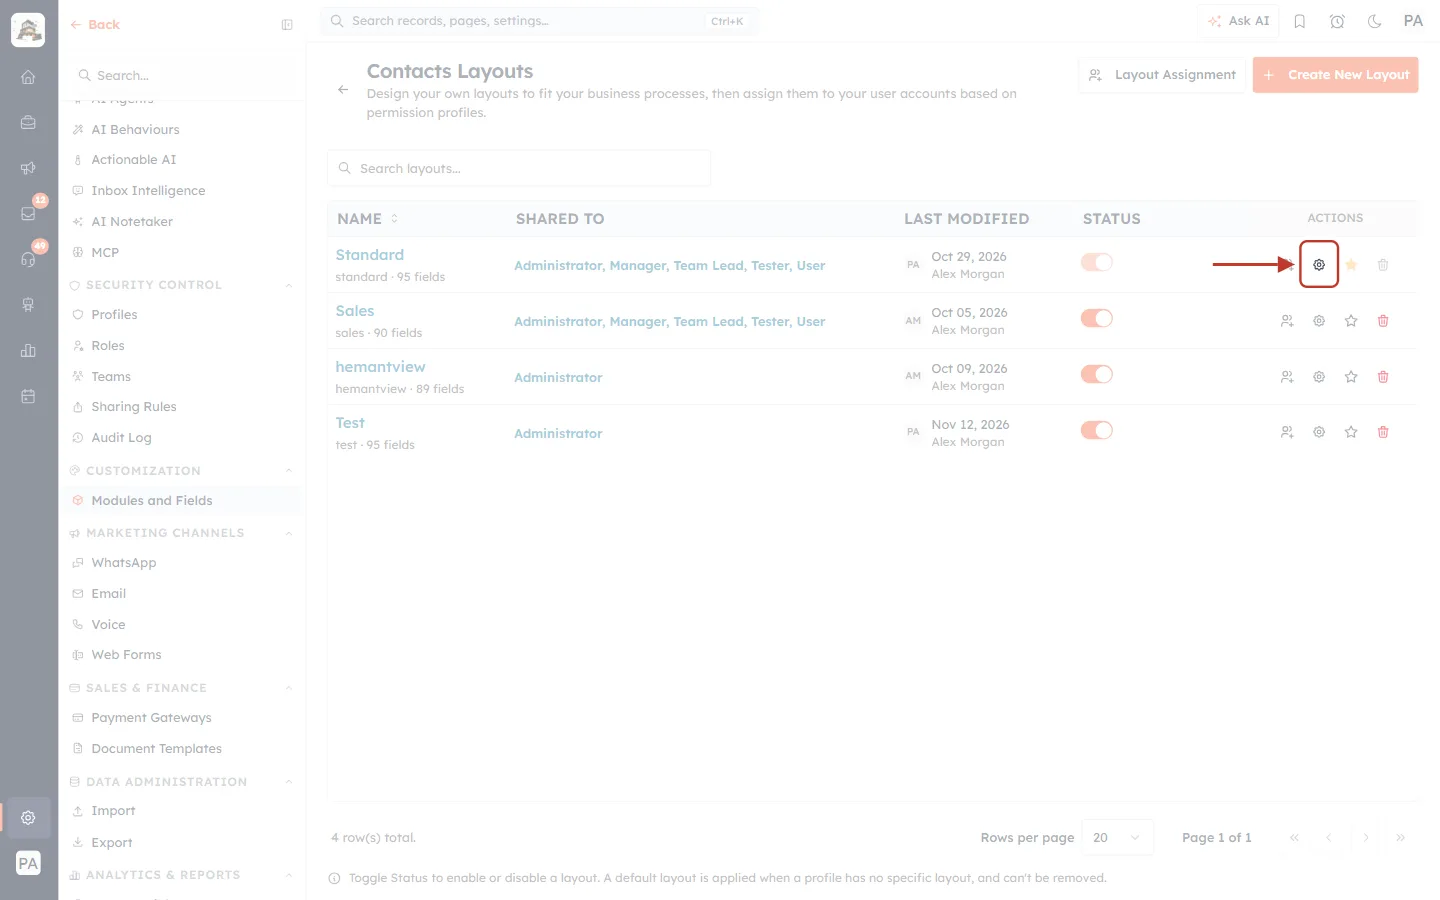
What this screenshot shows. The Contacts Layouts page. On the Standard row, the gear icon in the ACTIONS column (tooltip Open in Layout Builder) is ringed.
Each row is one layout: its NAME, the profiles it is SHARED TO, who changed it last and its STATUS switch.
Clicking the blue layout name does the same as the gear.
Pick the layout your team actually uses — the rule will apply to that layout only.
Step 3: Click the Pick List field the rule should watch#
In the middle column (the canvas) find the field whose value should change the form, and click it. We click Lifecycle Stage in the Lead Information section.
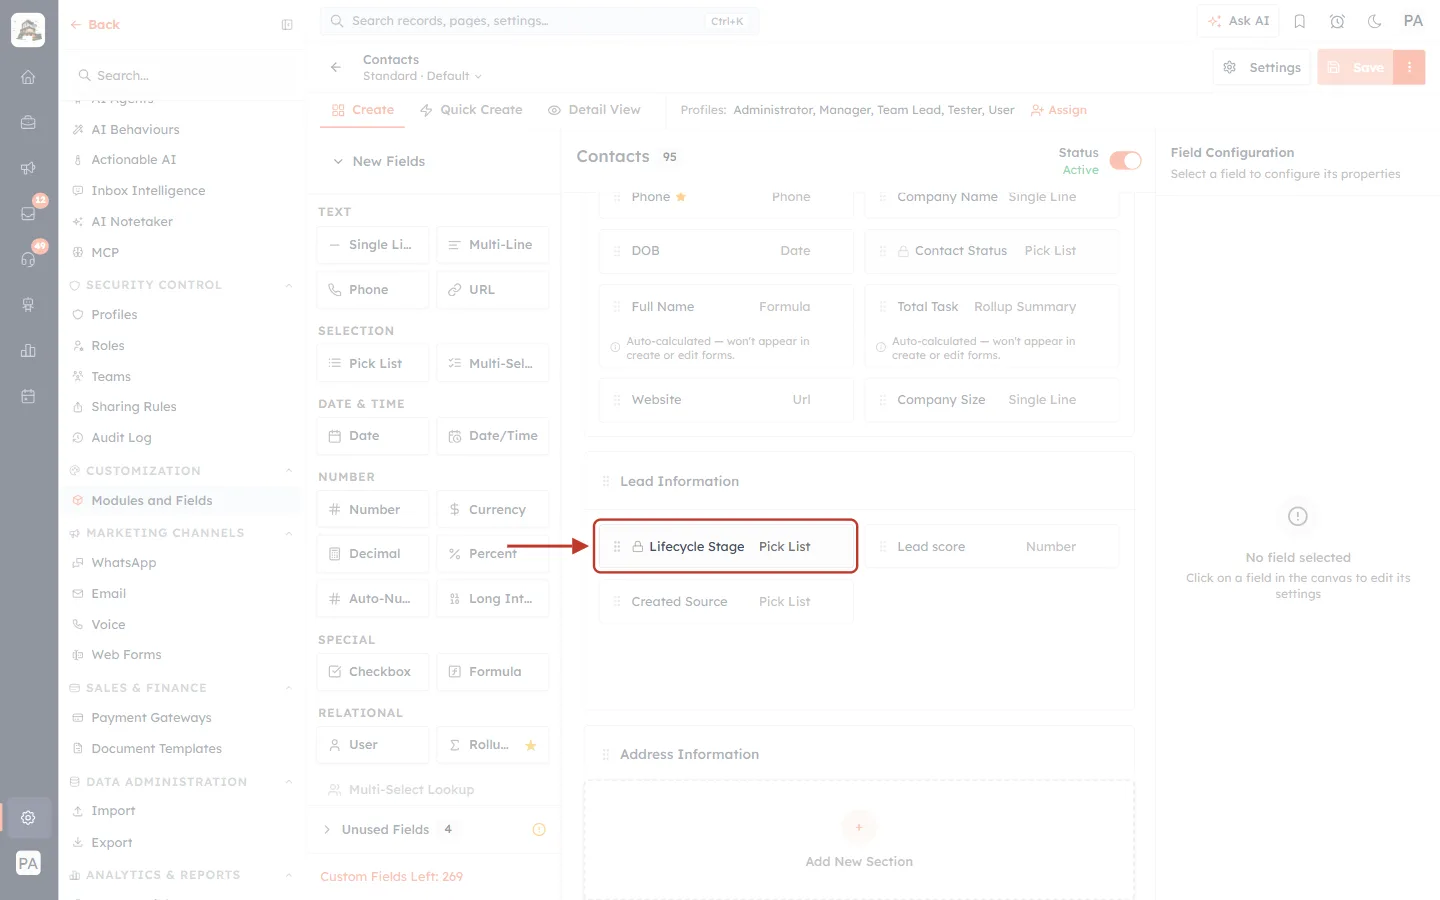
What this screenshot shows. The Layout Builder for Contacts · Standard. The Lifecycle Stage — Pick List card is ringed in the Lead Information section.
The type is printed on the right of each card. Look for Pick List (or a Yes/No Checkbox) — only these can carry a rule.
The small lock icon means it is a system field. System Pick Lists can carry rules too.
The right-hand column says No field selected until you click a card.
Step 4: Switch to the Rules tab#
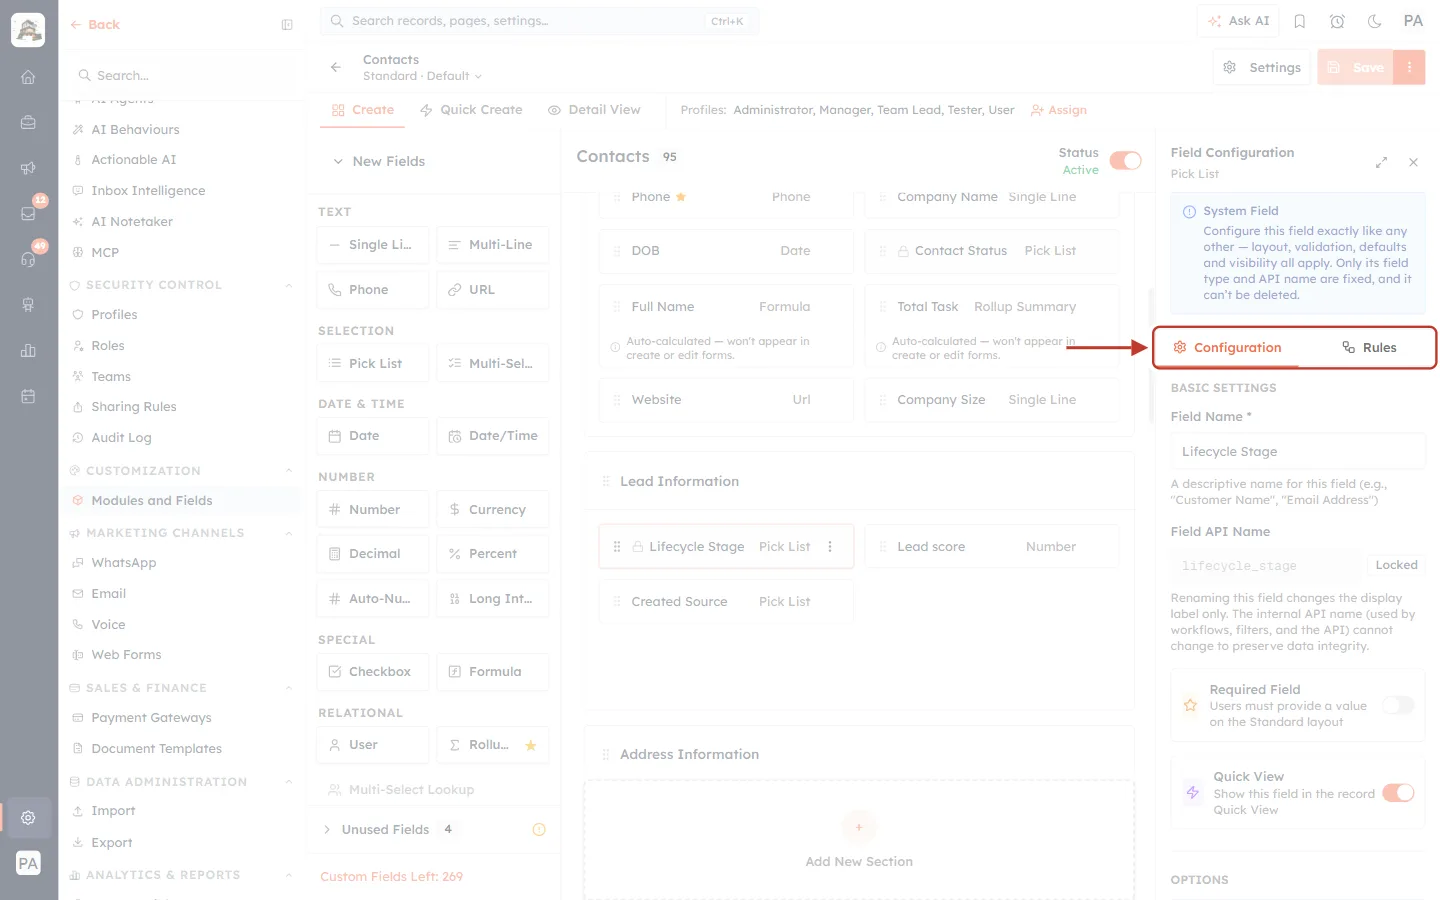
What this screenshot shows. The Field Configuration panel on the right, now showing Lifecycle Stage. The two tabs Configuration and Rules are ringed.
Configuration (open by default) holds the field’s usual settings: name, Required Field, options and so on.
Rules is where Layout Rules are built. Click it.
If you click a text, number or date field you won’t see these tabs at all — that field can’t carry a rule.
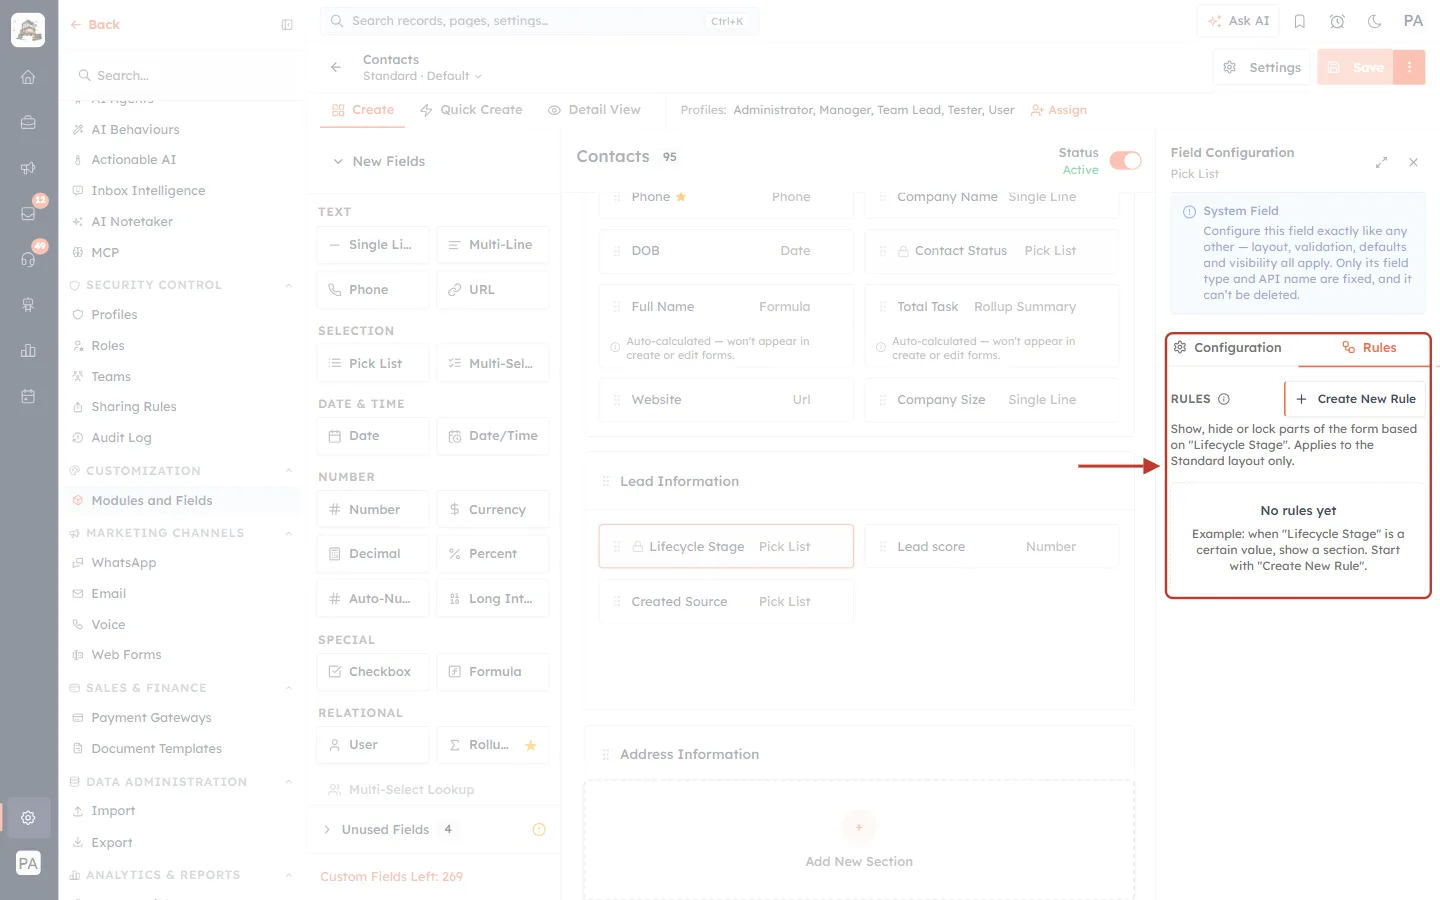
What this screenshot shows. The Rules tab before any rule exists. The heading RULES and the box No rules yet are ringed.
The line under the heading reminds you what a rule does: Show, hide or lock parts of the form based on “Lifecycle Stage”. Applies to the Standard layout only.
The empty box gives an example: when “Lifecycle Stage” is a certain value, show a section.
Create New Rule sits on the right of the heading (next step).
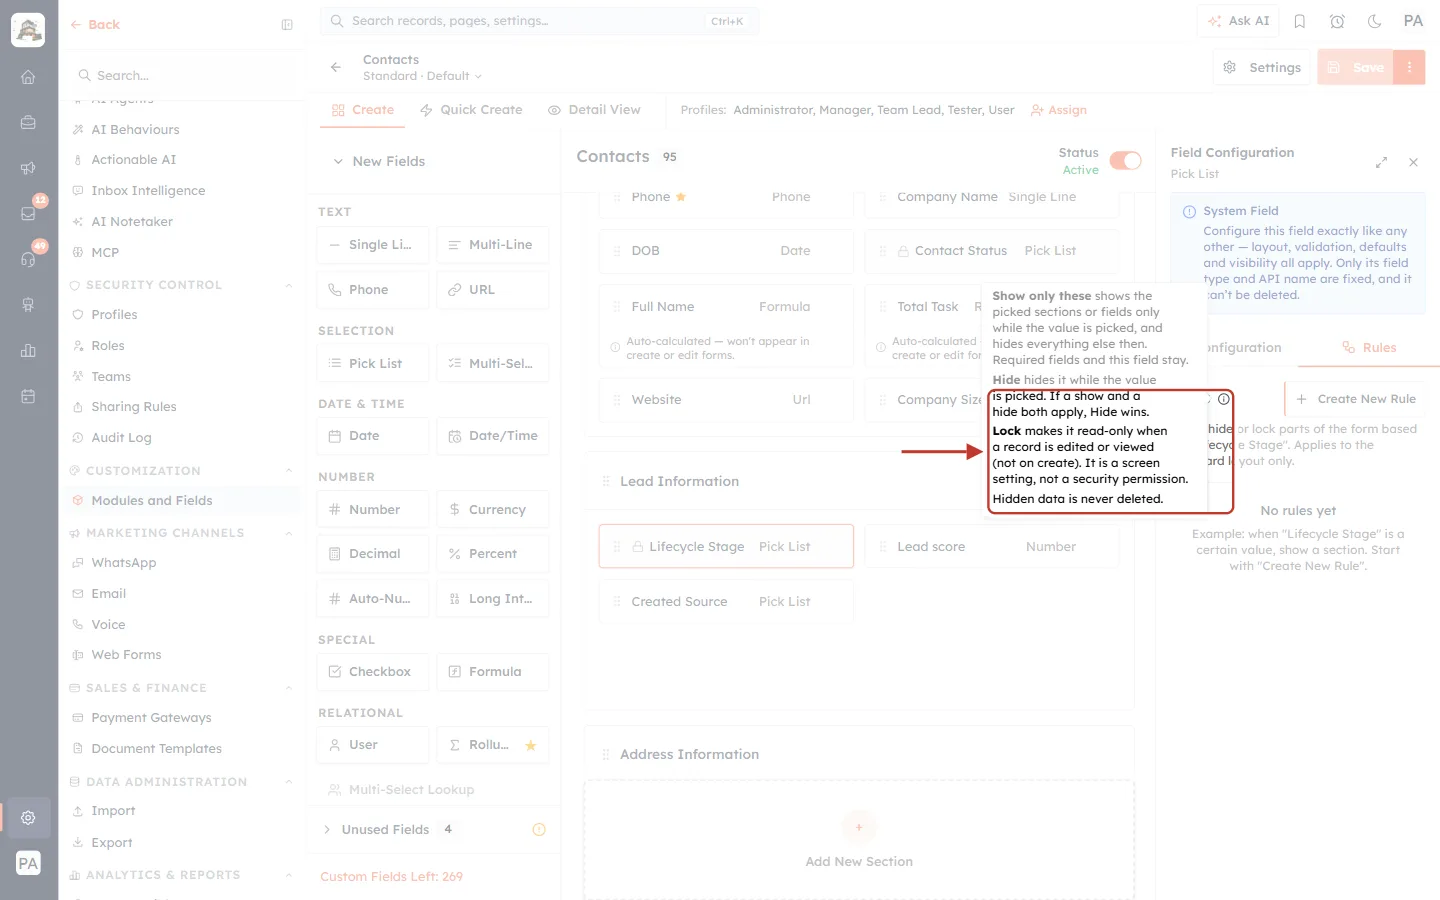
What this screenshot shows. The small ⓘ icon next to RULES, hovered, with its How rules work tooltip ringed.
Show only these shows the picked sections or fields only while the value is picked, and hides everything else then. Required fields and this field stay.
Hide hides it while the value is picked. If a show and a hide both apply, Hide wins.
Lock makes it read-only when a record is edited or viewed (not on create). It is a screen setting, not a security permission.
Hidden data is never deleted.
⚠️
Lock is not a permission. It stops changes on the form screens only. To stop a profile from seeing or editing a field everywhere (API, imports, workflows), use the field’s Field access setting or the profile’s permissions instead.
Part 2: Create the rule and its first condition#
Step 5: Click Create New Rule#
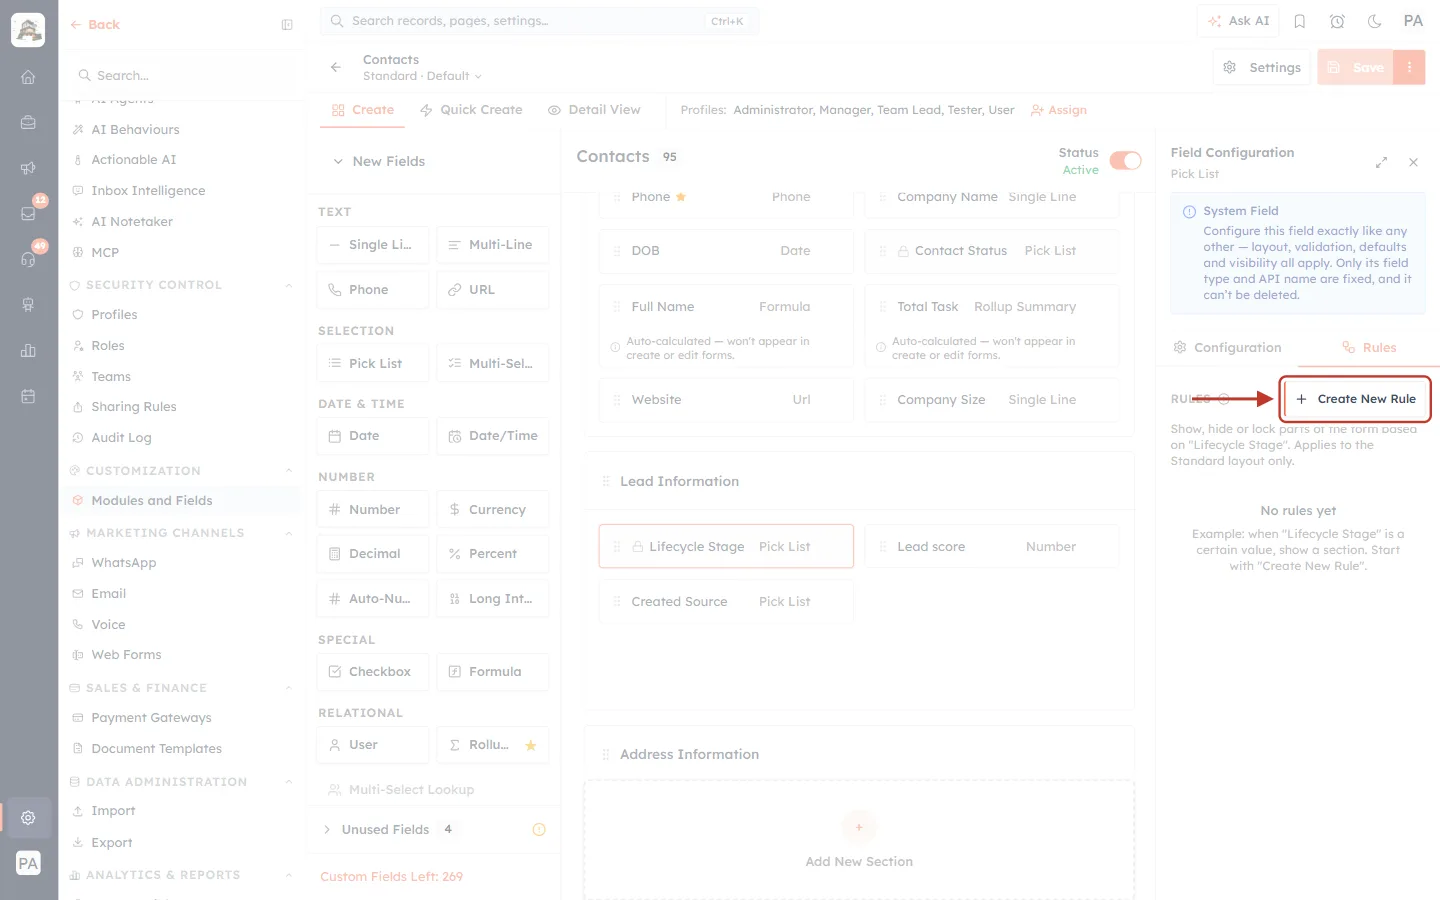
What this screenshot shows. The + Create New Rule button, ringed, on the right of the RULES heading.
One rule is created for this field on this layout. Inside it you will add one or more conditions.
A layout can have at most 10 rules; when it reaches that limit, the Rules tab tells you so.
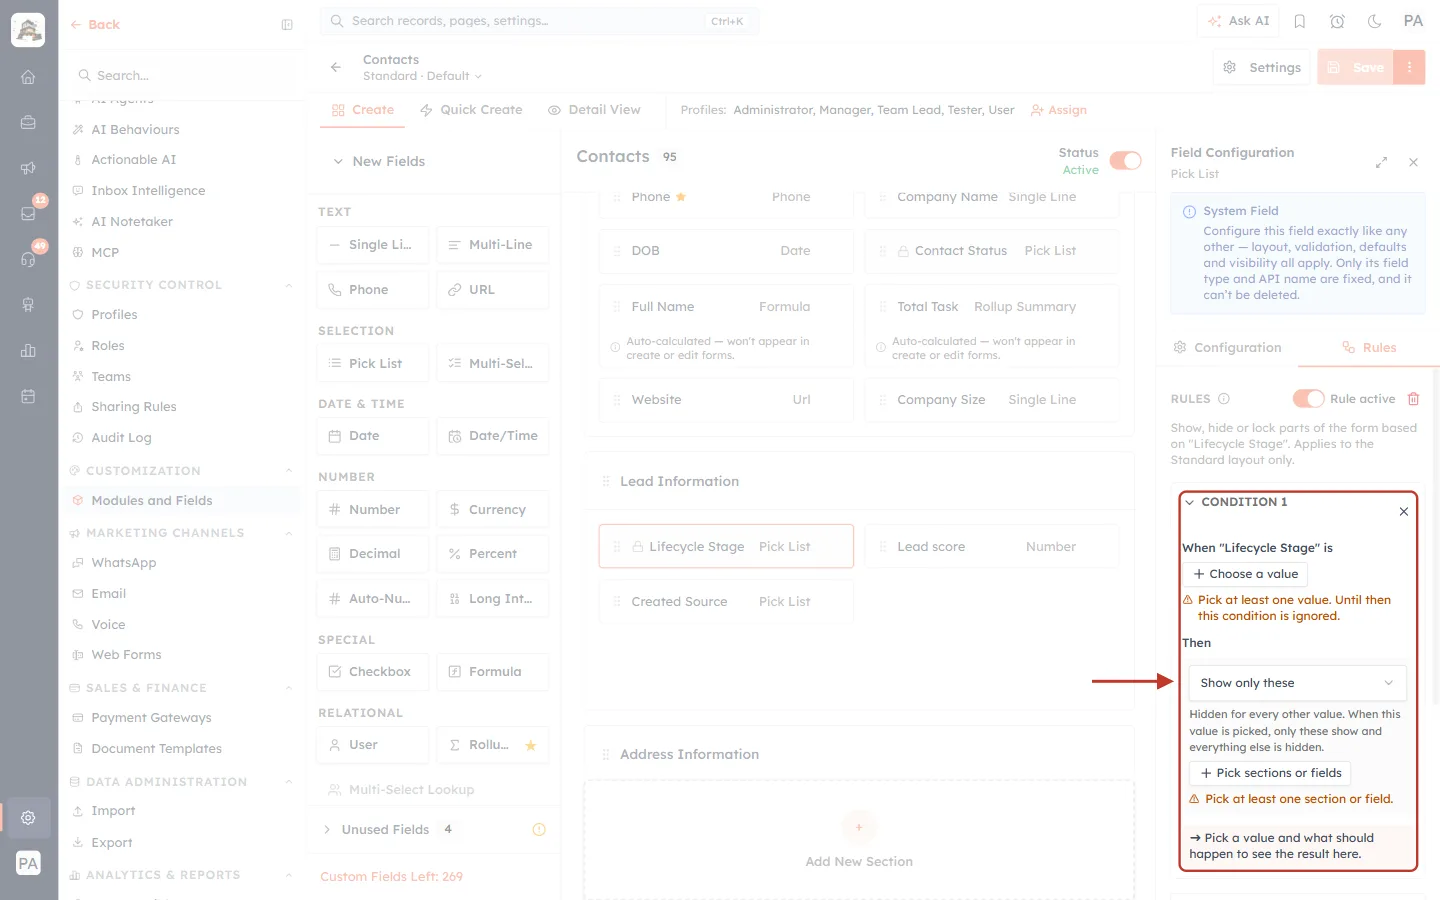
What this screenshot shows. The new rule in the side panel. CONDITION 1 is ringed, with its three parts: When “Lifecycle Stage” is (+ Choose a value), Then (an action, Show only these by default) and the result line at the bottom.
Orange notes tell you what is still missing: Pick at least one value. Until then this condition is ignored. and Pick at least one section or field.
At the top, the Rule active switch is on and a red bin (Delete rule) appears.
The header of the page now shows an orange • Rule not finished note until the condition is complete.
Step 6: Expand the panel for more room (optional)#
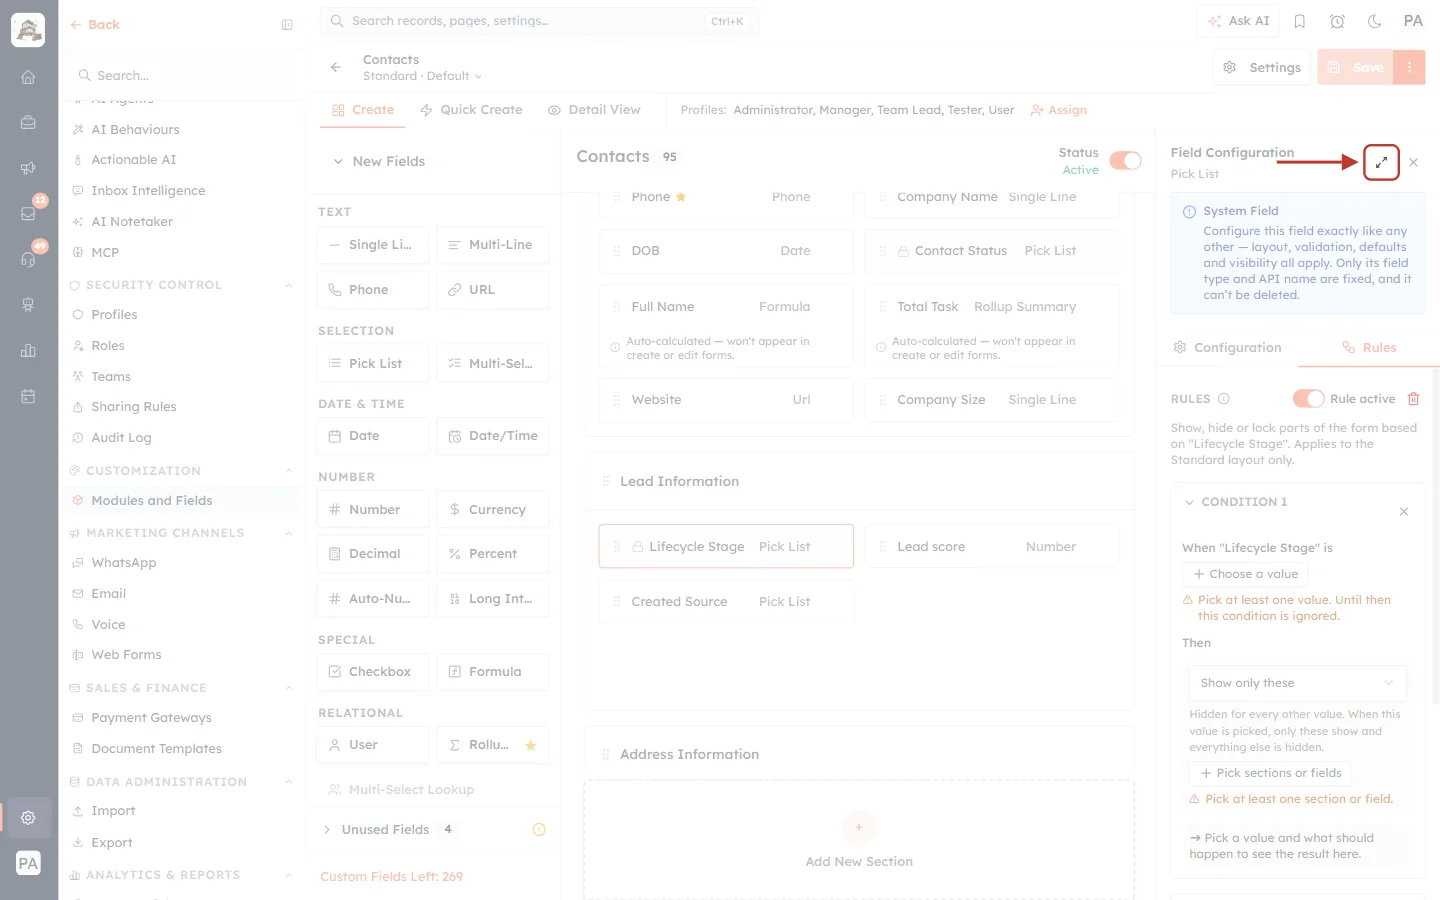
What this screenshot shows. The Expand panel icon (two diagonal arrows), ringed, at the top right of Field Configuration next to the ✕.
The side panel is narrow; expanding it opens a large editor over the builder. Everything works the same in both views.
In the expanded view the same icon (now pointing inwards) takes you back to the side panel.
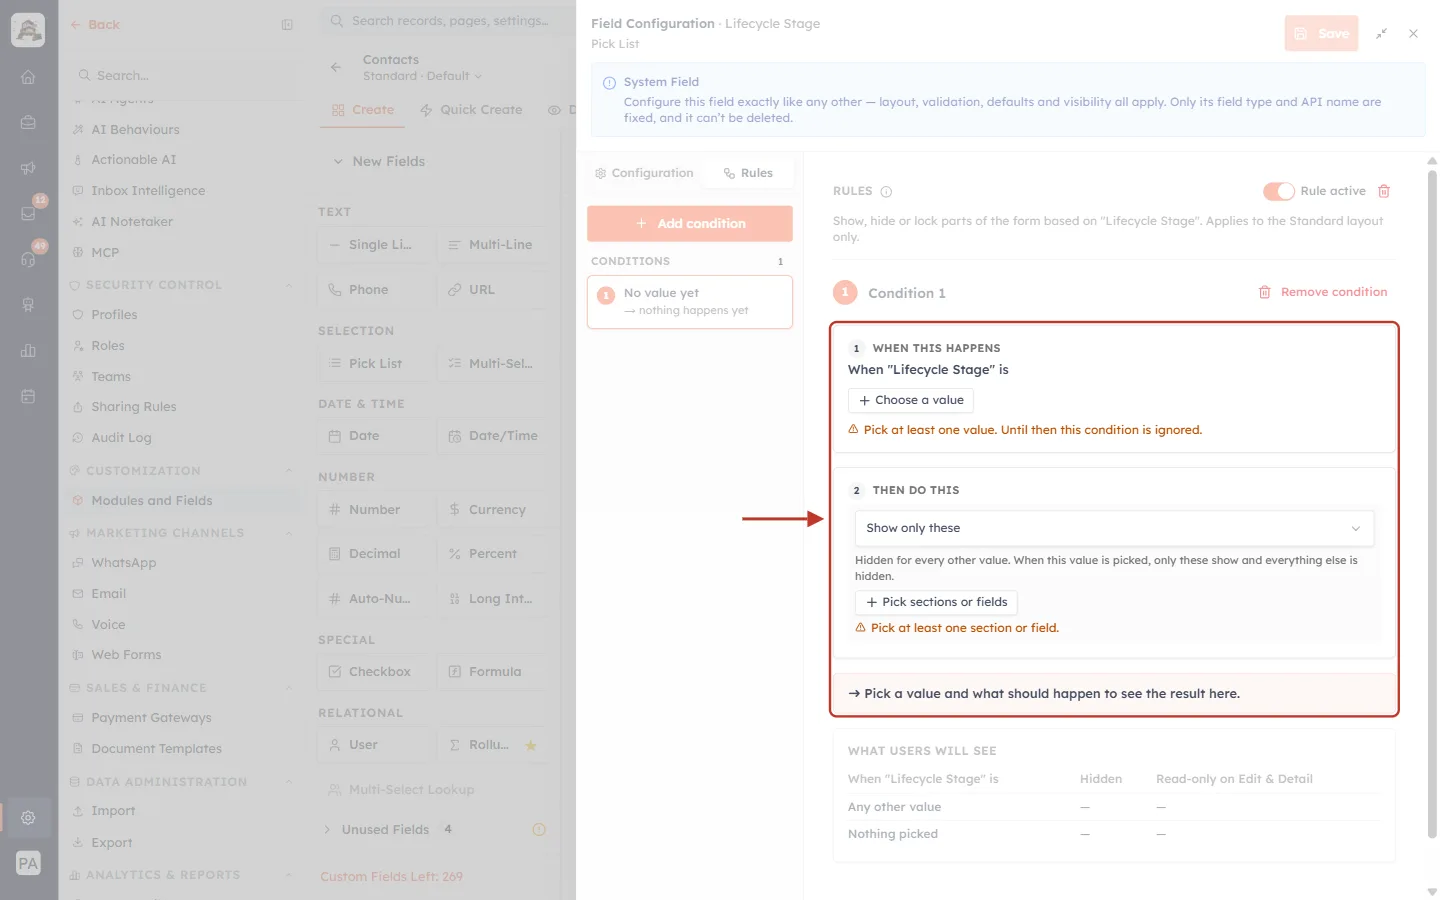
What this screenshot shows. The expanded editor for Condition 1. The ringed area shows the two numbered boxes 1 WHEN THIS HAPPENS and 2 THEN DO THIS, and the result line ➜ Pick a value and what should happen to see the result here.
On the left: Configuration / Rules tabs, the orange + Add condition button and the CONDITIONS list (Condition 1 shows No value yet → nothing happens yet).
At the top right: Save, the collapse icon and ✕.
Further down: WHAT USERS WILL SEE, a live table of the rule’s effect (see Step 10).
Step 7: Choose the value that should trigger the change#
Click + Choose a value under When “Lifecycle Stage” is and tick the value. We tick Subscriber.
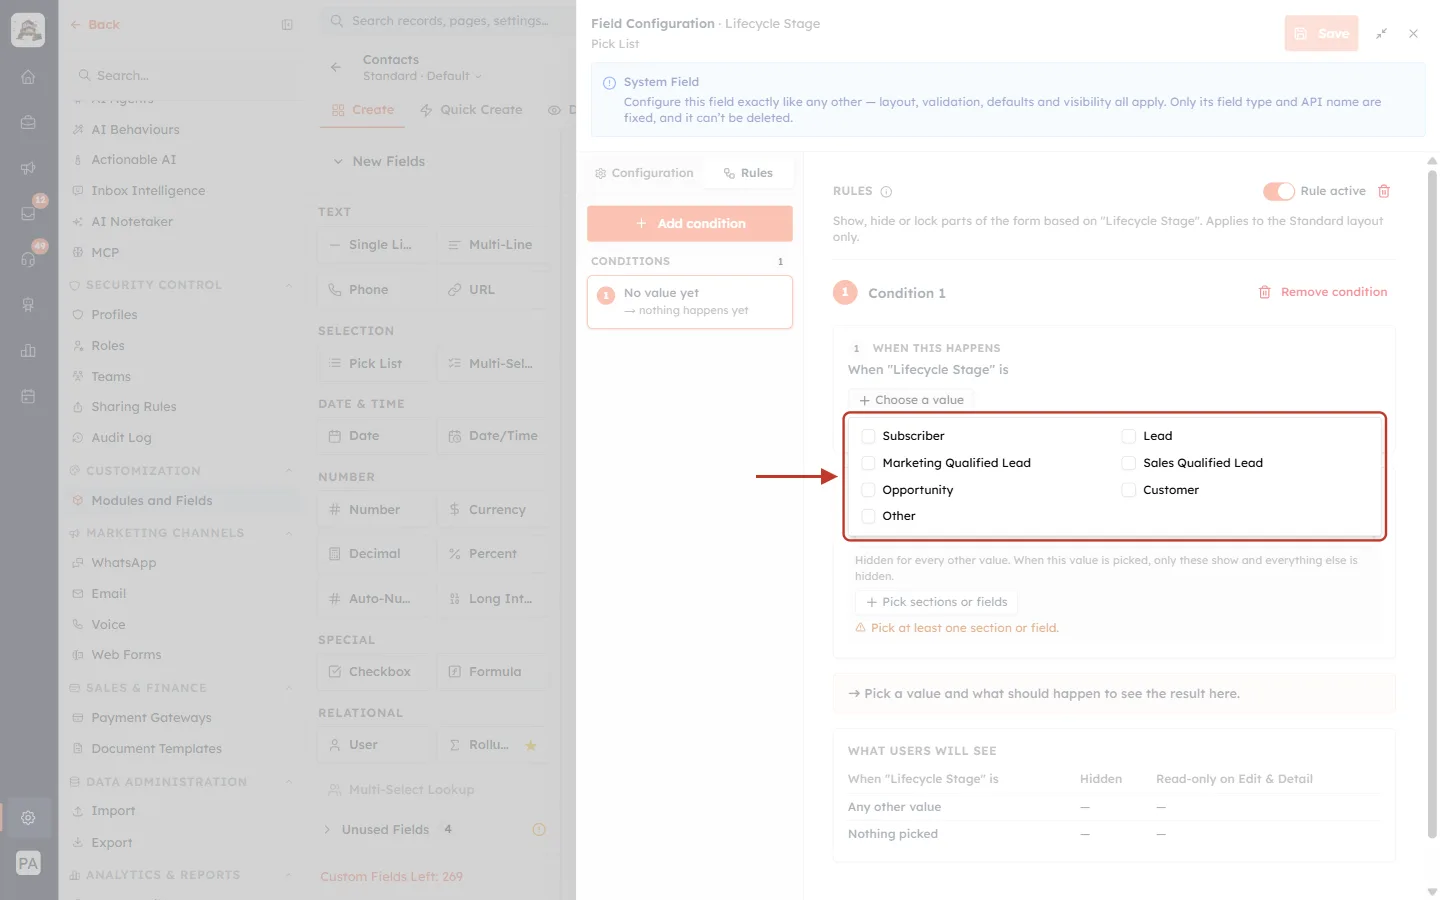
What this screenshot shows. The value list, ringed, opened from + Choose a value. Each option of the Pick List has a tick box.
The list shows the field’s own options: Subscriber, Lead, Marketing Qualified Lead, Sales Qualified Lead, Opportunity, Customer, Other and so on.
You can tick more than one value. The condition then matches when the field is any one of them (up to 50 values per condition).
A value already used in another condition of the same rule is marked In Condition N.
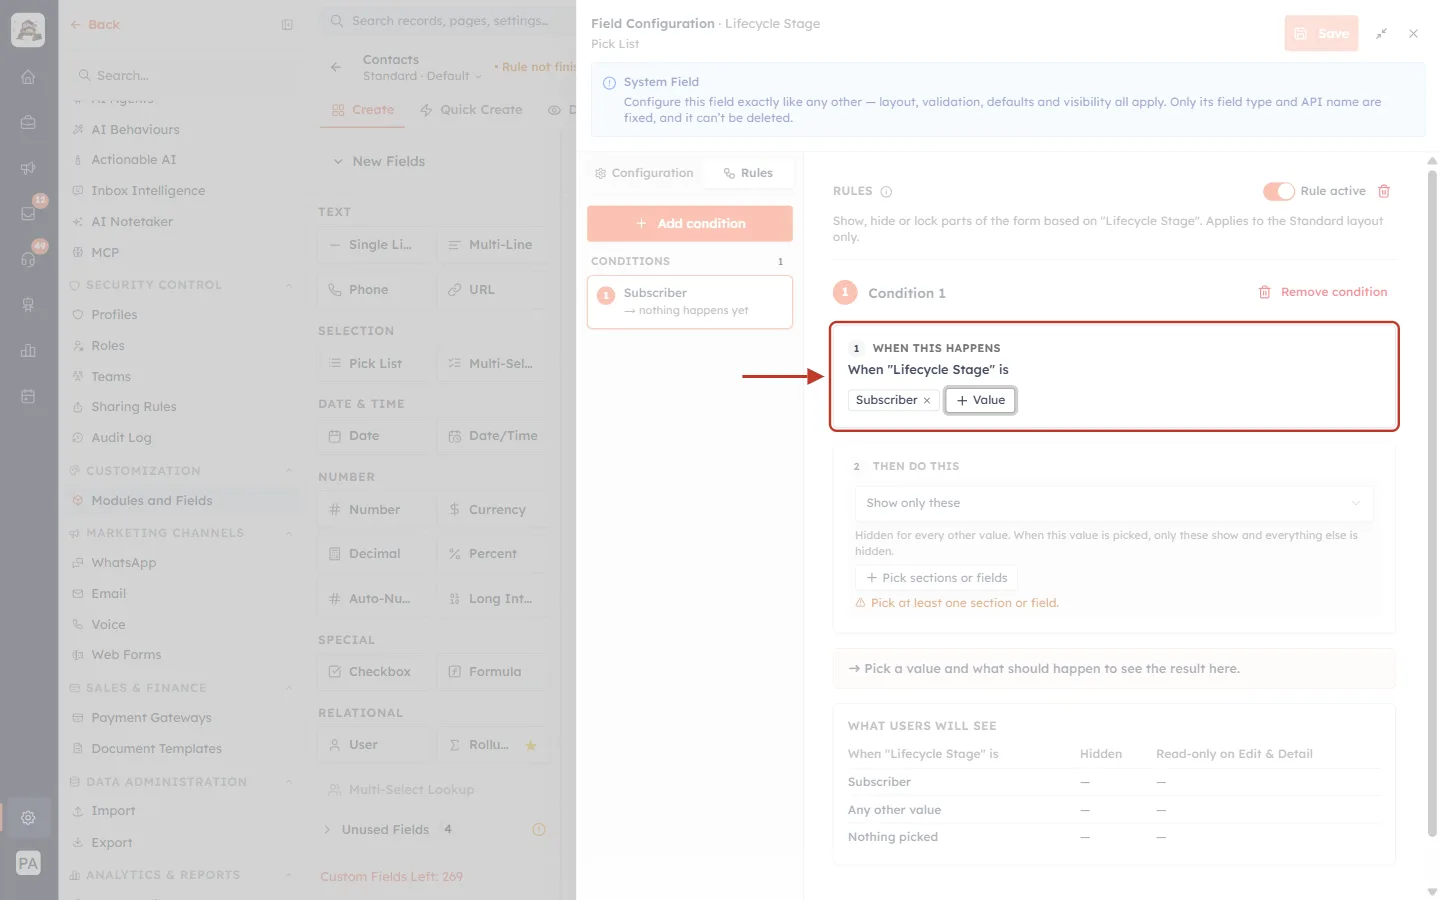
What this screenshot shows. The 1 WHEN THIS HAPPENS box, ringed, now reading When “Lifecycle Stage” is Subscriber × + Value.
The × on a value chip removes it.
+ Value adds another value to the same condition.
The condition in the left-hand list is renamed from No value yet to Subscriber.
Step 8: Choose what should happen#
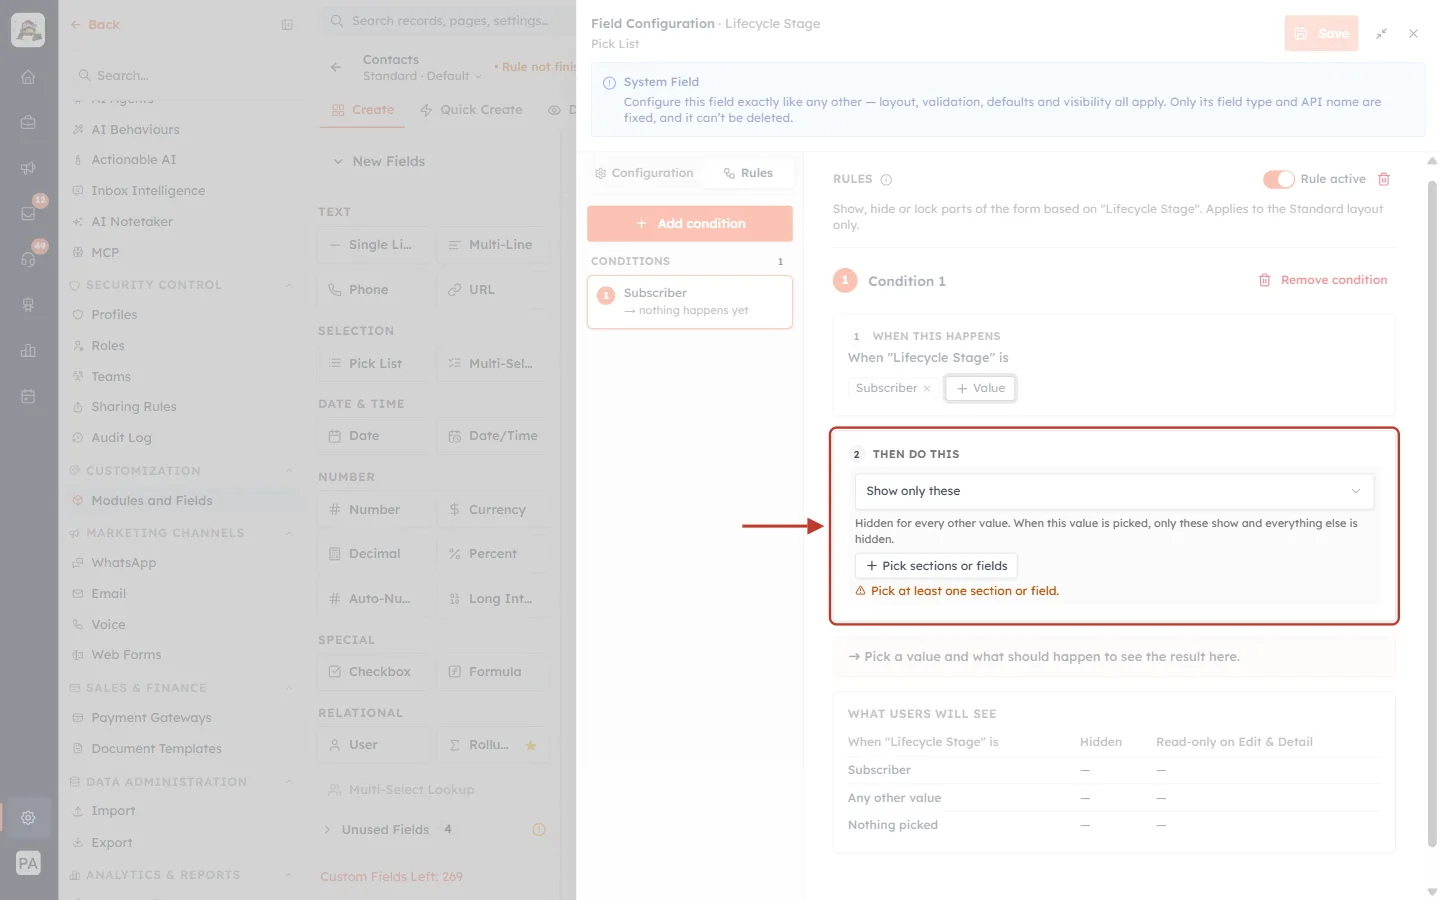
What this screenshot shows. The 2 THEN DO THIS box, ringed, with the default action Show only these and its help text.
Help text for Show only these: Hidden for every other value. When this value is picked, only these show and everything else is hidden.
+ Pick sections or fields chooses the targets.
The orange note Pick at least one section or field. stays until you choose a target.
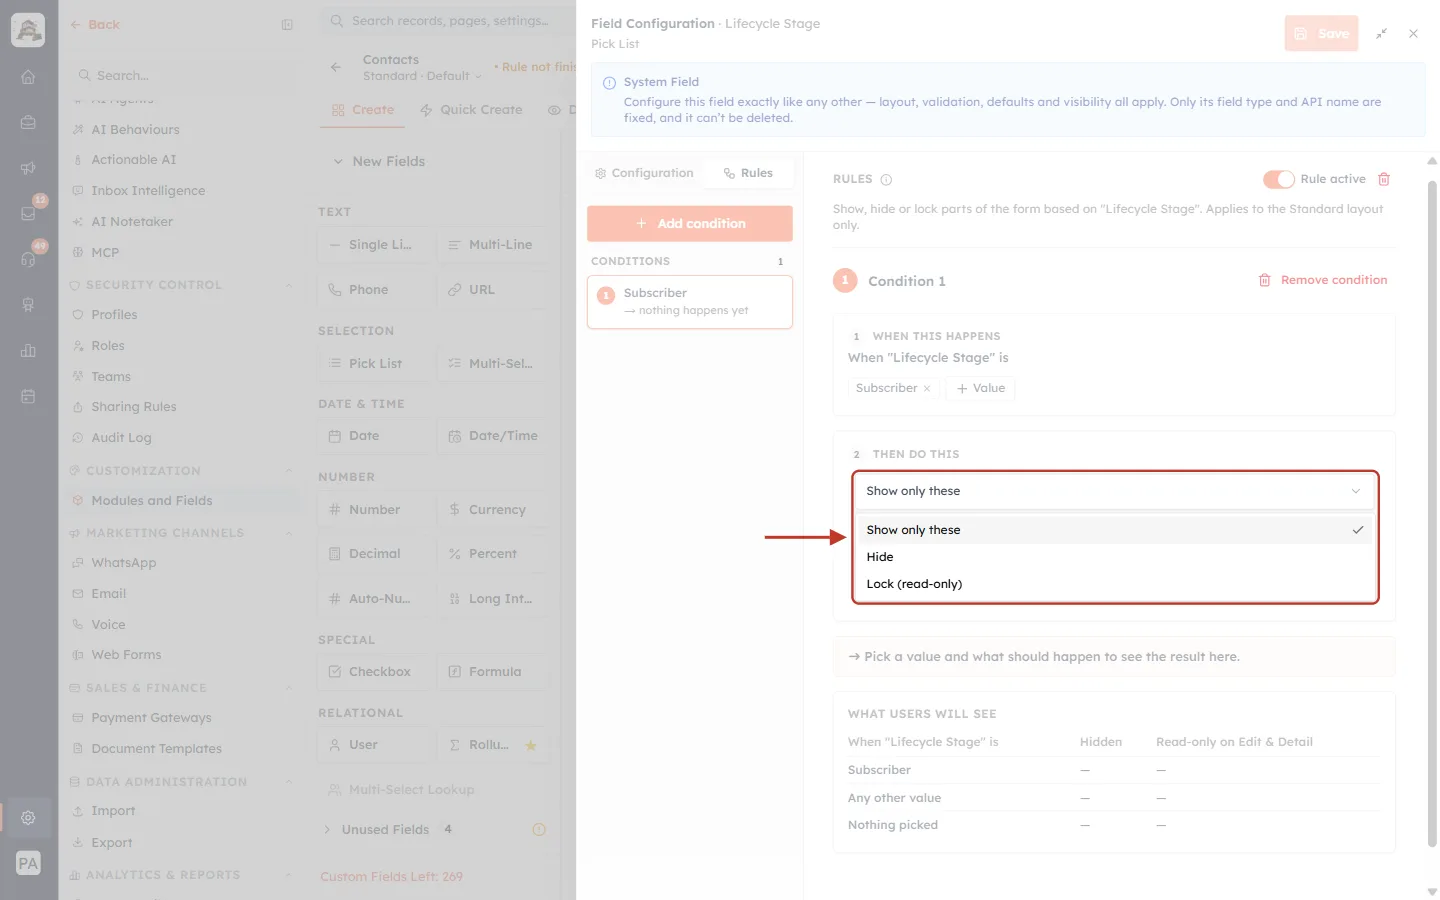
What this screenshot shows. The action drop-down, ringed and opened, with its three choices: Show only these, Hide and Lock (read-only).
For this condition we choose Hide.
Use Show only these when a value needs a short, focused form; use Hide when only a few parts are not relevant; use Lock to protect values that must not change at that stage.
✅
Show only these is powerful: it hides everything you didn’t pick — including fields you add to the layout later. When only one or two parts should go away, Hide is the safer choice.
Step 9: Pick the sections or fields to hide#
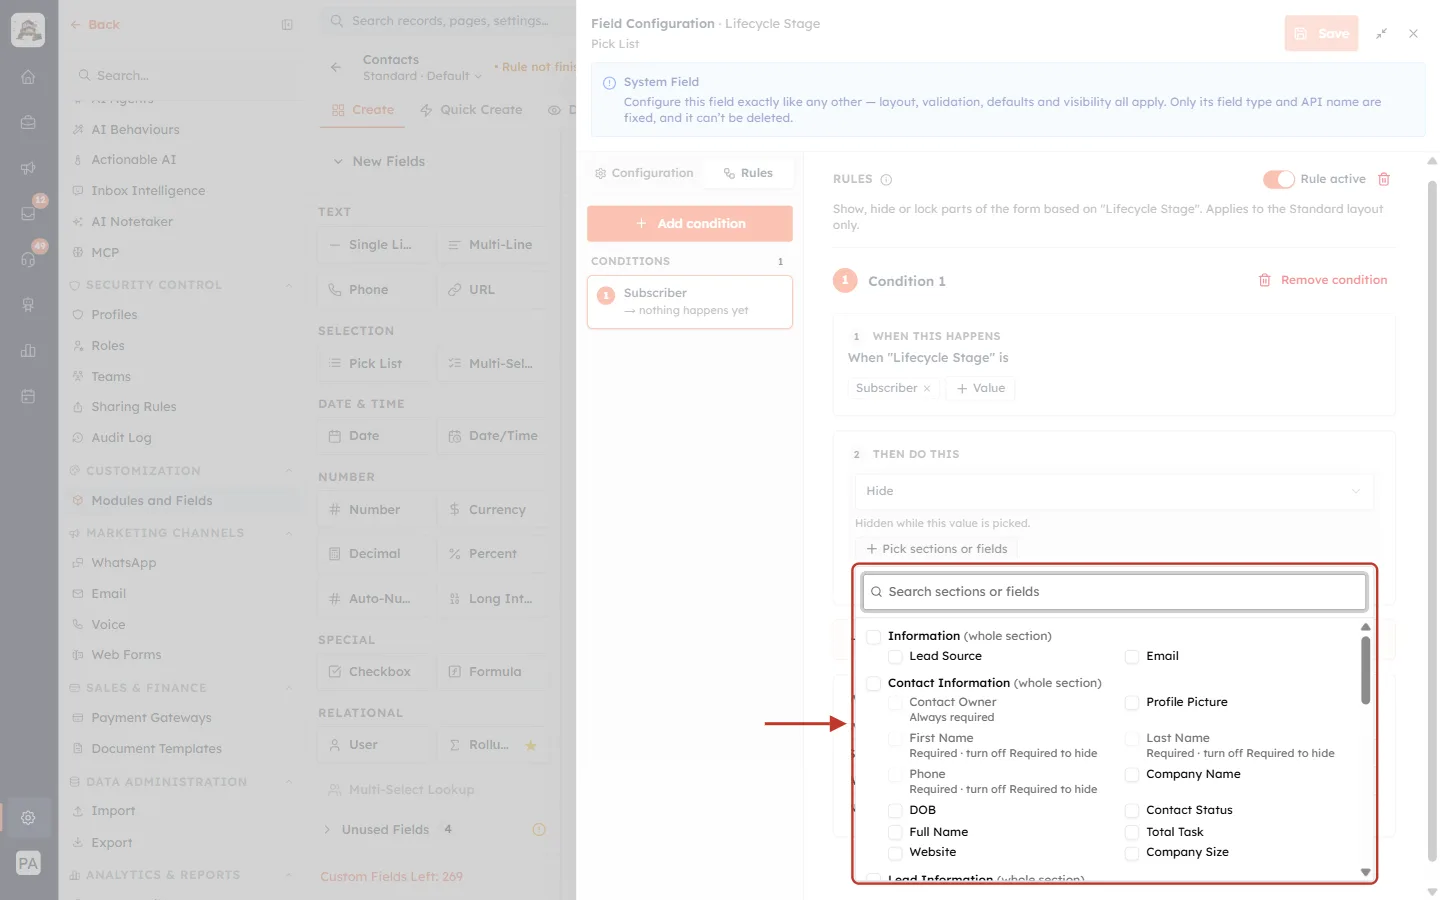
What this screenshot shows. The picker, ringed, opened from + Pick sections or fields. It has a Search sections or fields box and lists the layout’s sections with their fields underneath.
Tick a line marked (whole section) to target the entire section — for example Contact Information (whole section).
Tick a single field to target only that field.
Some lines are greyed with a reason: Always required (for example Contact Owner) or Required · turn off Required to hide (First Name, Last Name, Phone). Required fields can’t be hidden, but they can be locked.
The rule’s own field shows This rule’s own field and can’t be picked.
We tick Address Information (whole section). An action can have up to 40 targets.
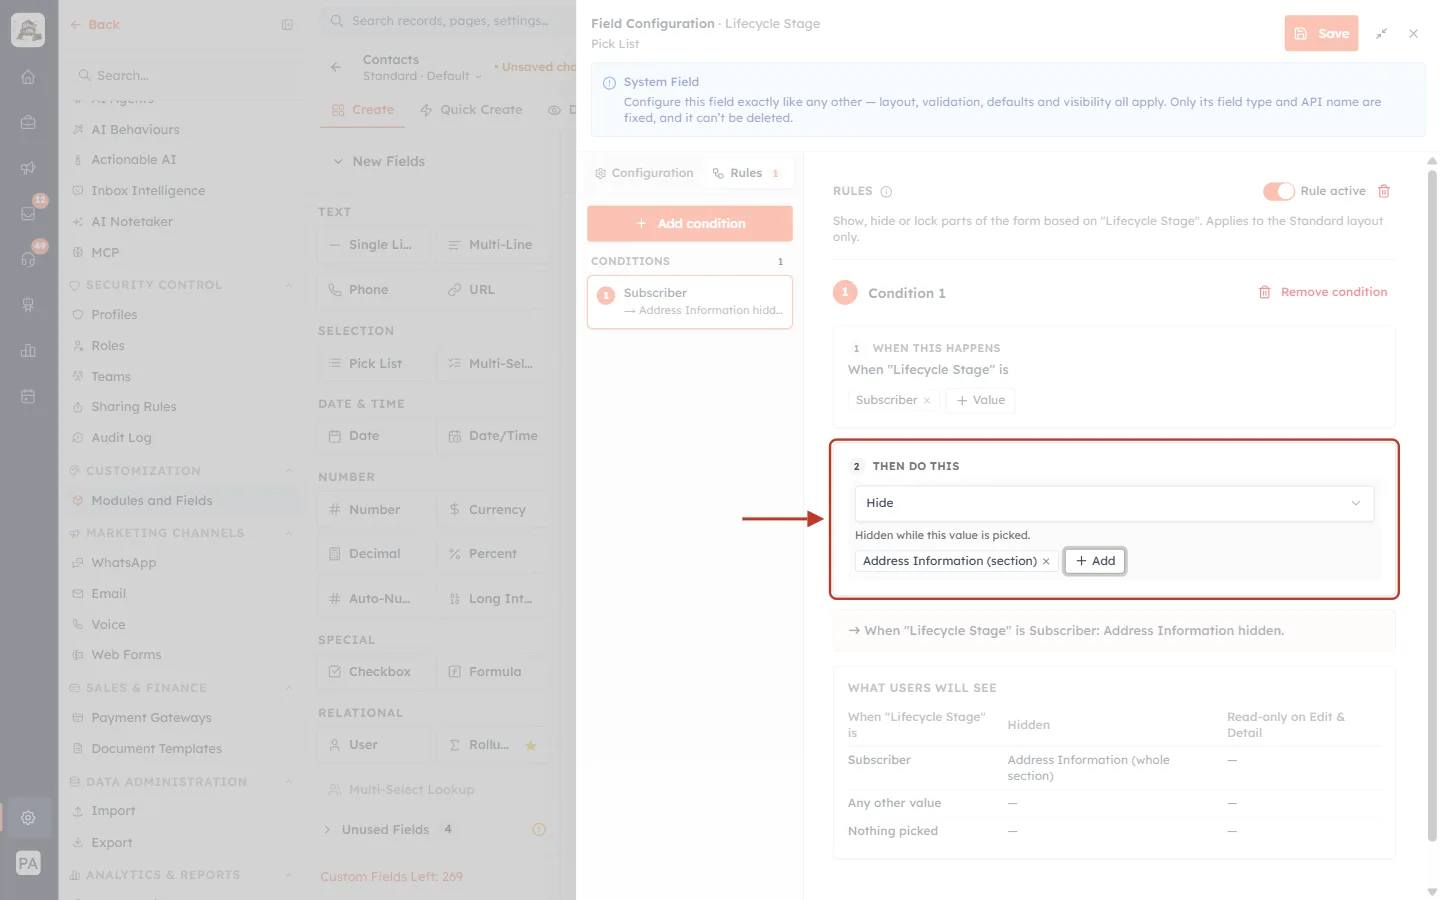
What this screenshot shows. The 2 THEN DO THIS box, ringed: action Hide, help text Hidden while this value is picked., and the target chip Address Information (section) × with + Add.
The × on the chip removes that target.
+ Add opens the picker again to add more targets.
Step 10: Read the result line and the What users will see table#
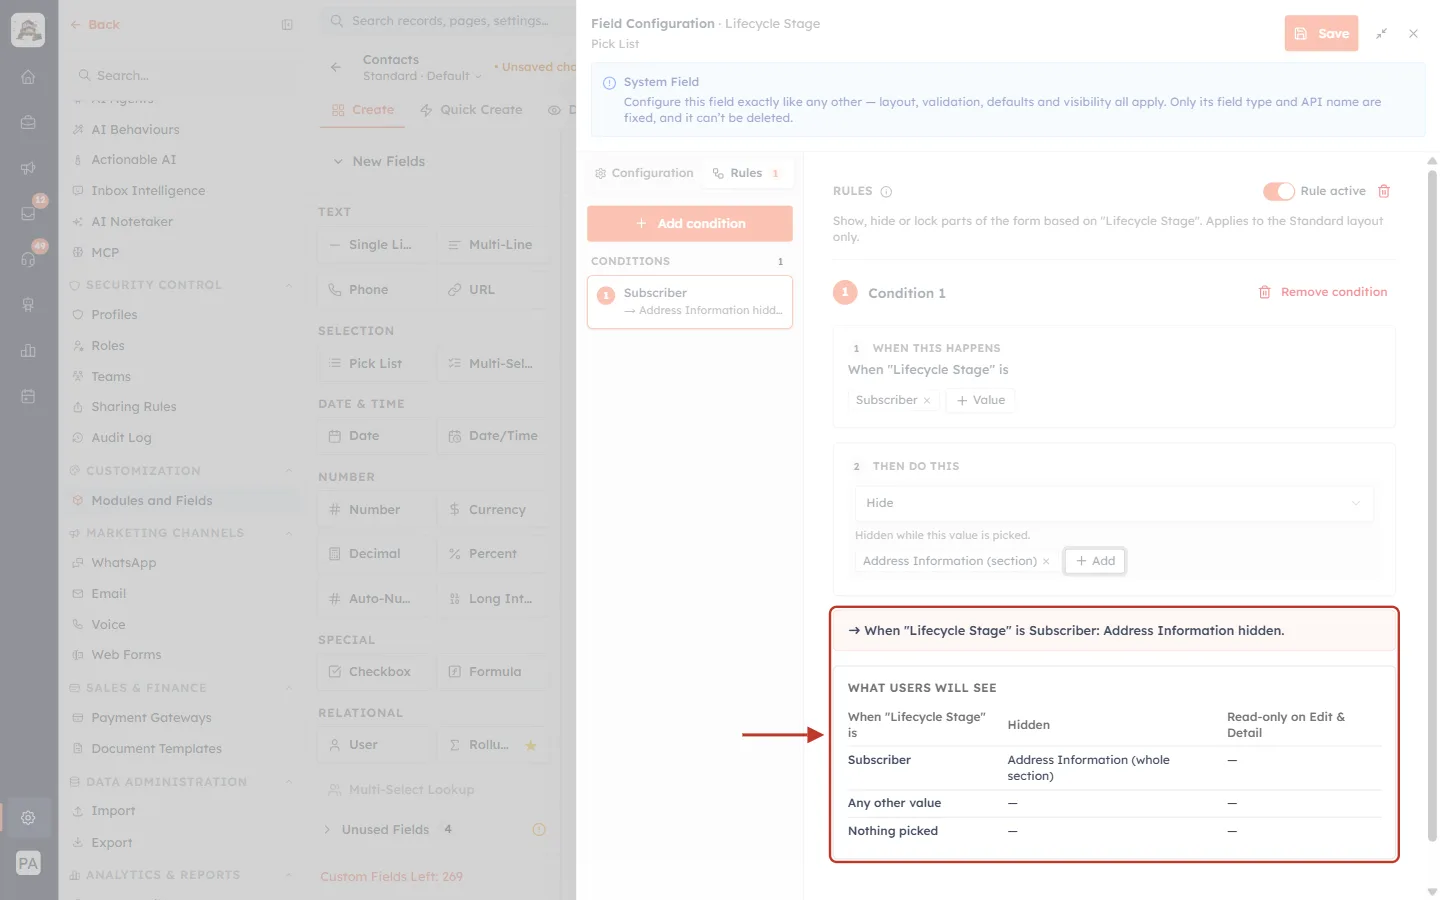
What this screenshot shows. Ringed: the result line ➜ When “Lifecycle Stage” is Subscriber: Address Information hidden. and the WHAT USERS WILL SEE table under it.
The table has one row per value: Subscriber → Hidden: Address Information (whole section).
Any other value and Nothing picked show “—”: for those, the form is unchanged.
The third column, Read-only on Edit & Detail, fills in when you use Lock (Part 3).
Read this table before saving — it is exactly what your users will get.
Part 3: Add a second condition (Lock fields for Customers)#
Step 11: Click Add condition#
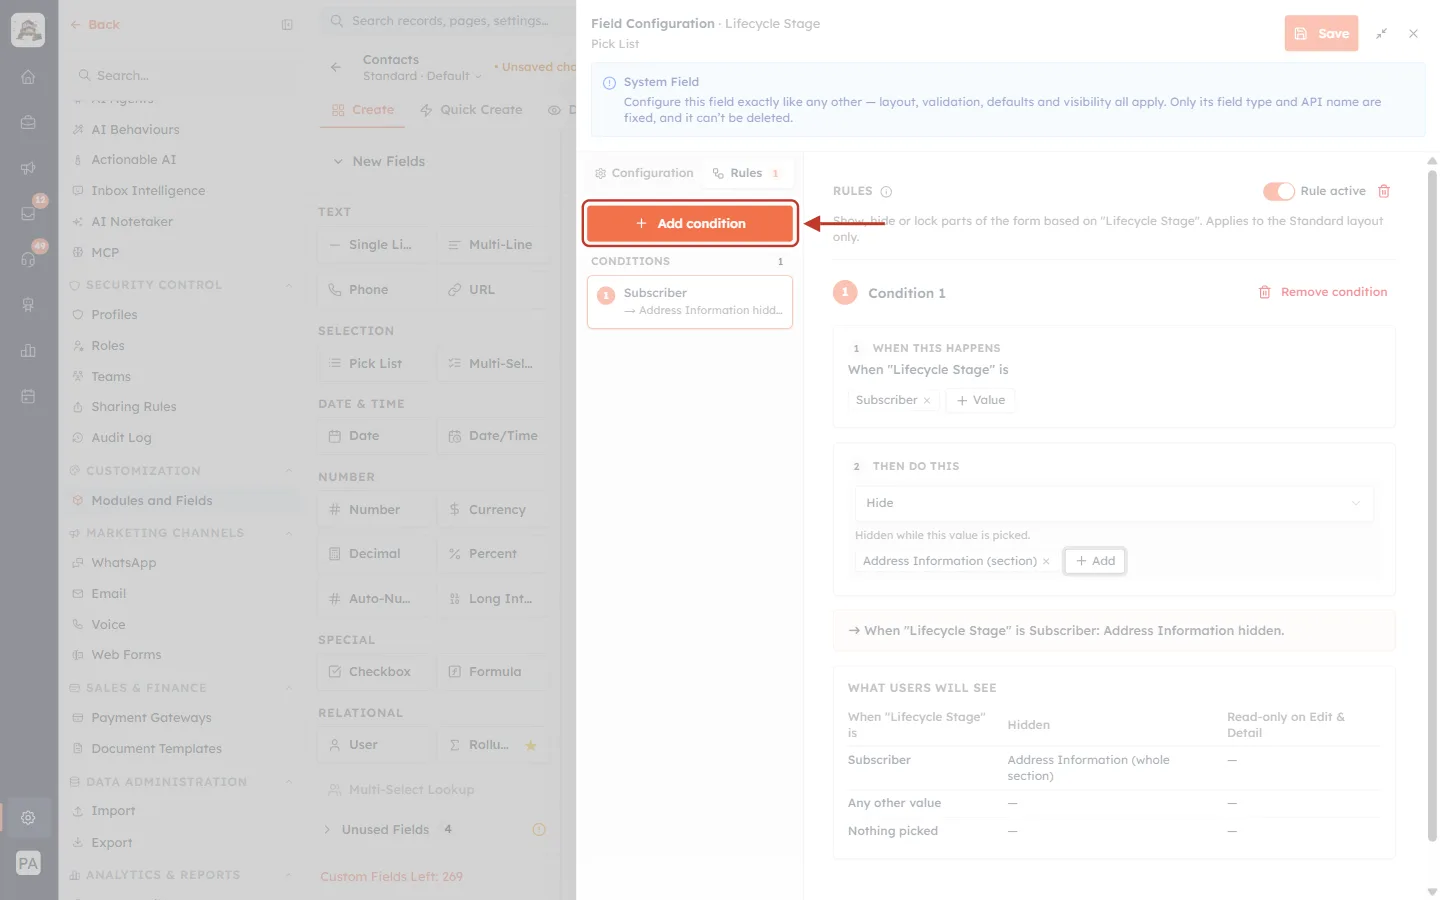
What this screenshot shows. The orange + Add condition button, ringed, at the top of the left-hand column of the expanded editor.
A new, empty Condition 2 opens on the right.
A rule can have up to 25 conditions. In the side panel the same button is at the bottom of the rule.
Step 12: Fill in Condition 2#
Do the same as in Steps 7–9: choose the value Customer, set the action to Lock (read-only), and pick the fields Lead Source and Created Source.
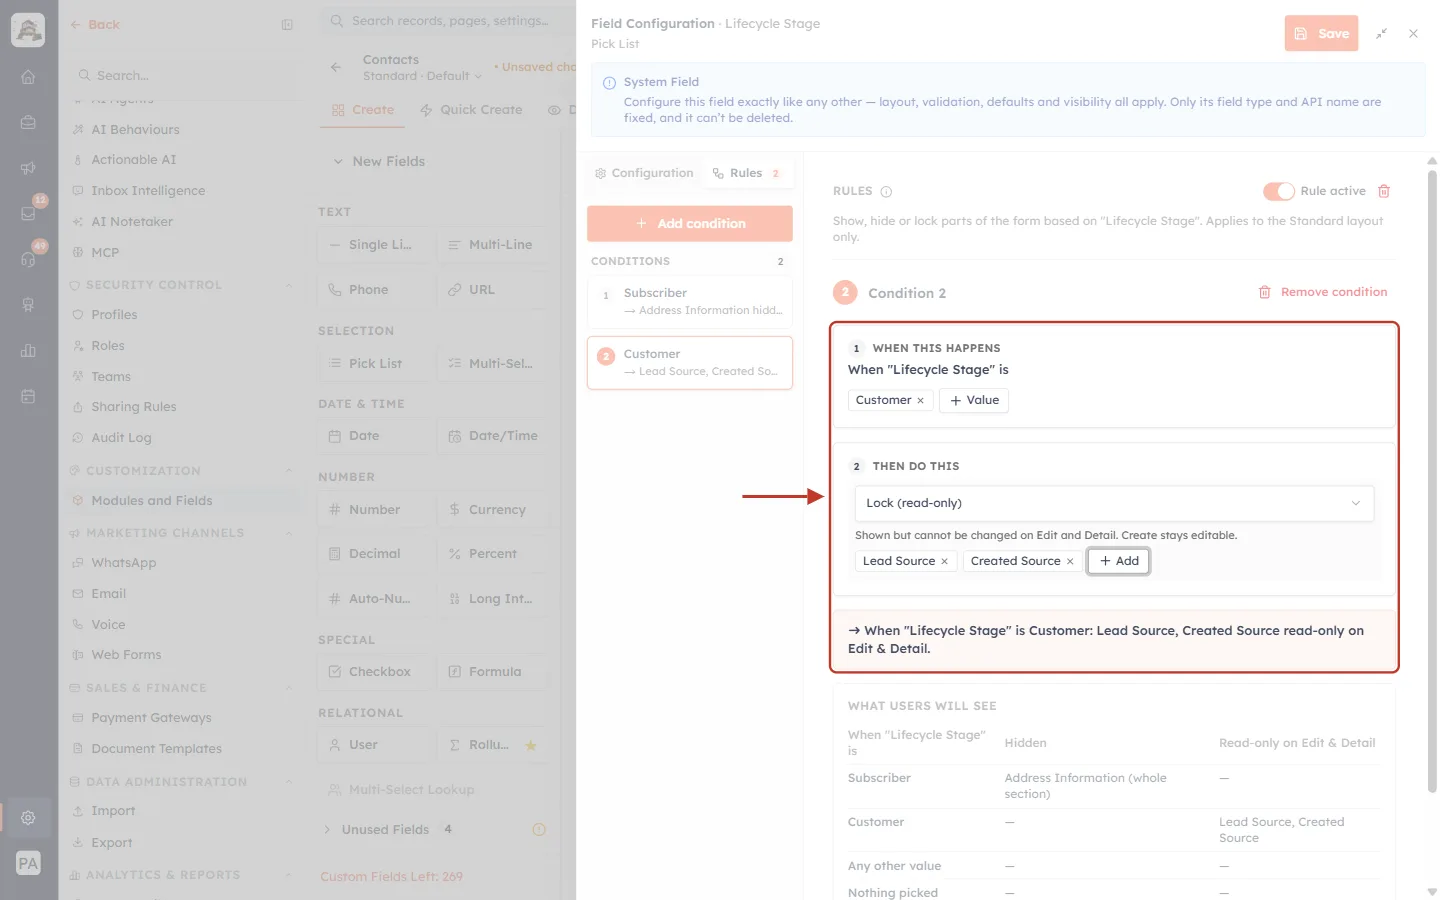
What this screenshot shows. Condition 2 filled in, ringed: When “Lifecycle Stage” is Customer, Then Lock (read-only) on Lead Source and Created Source, and the result line.
Help text for Lock: Shown but cannot be changed on Edit and Detail. Create stays editable.
Result line: ➜ When “Lifecycle Stage” is Customer: Lead Source, Created Source read-only on Edit & Detail.
Required fields can be locked even though they can’t be hidden.
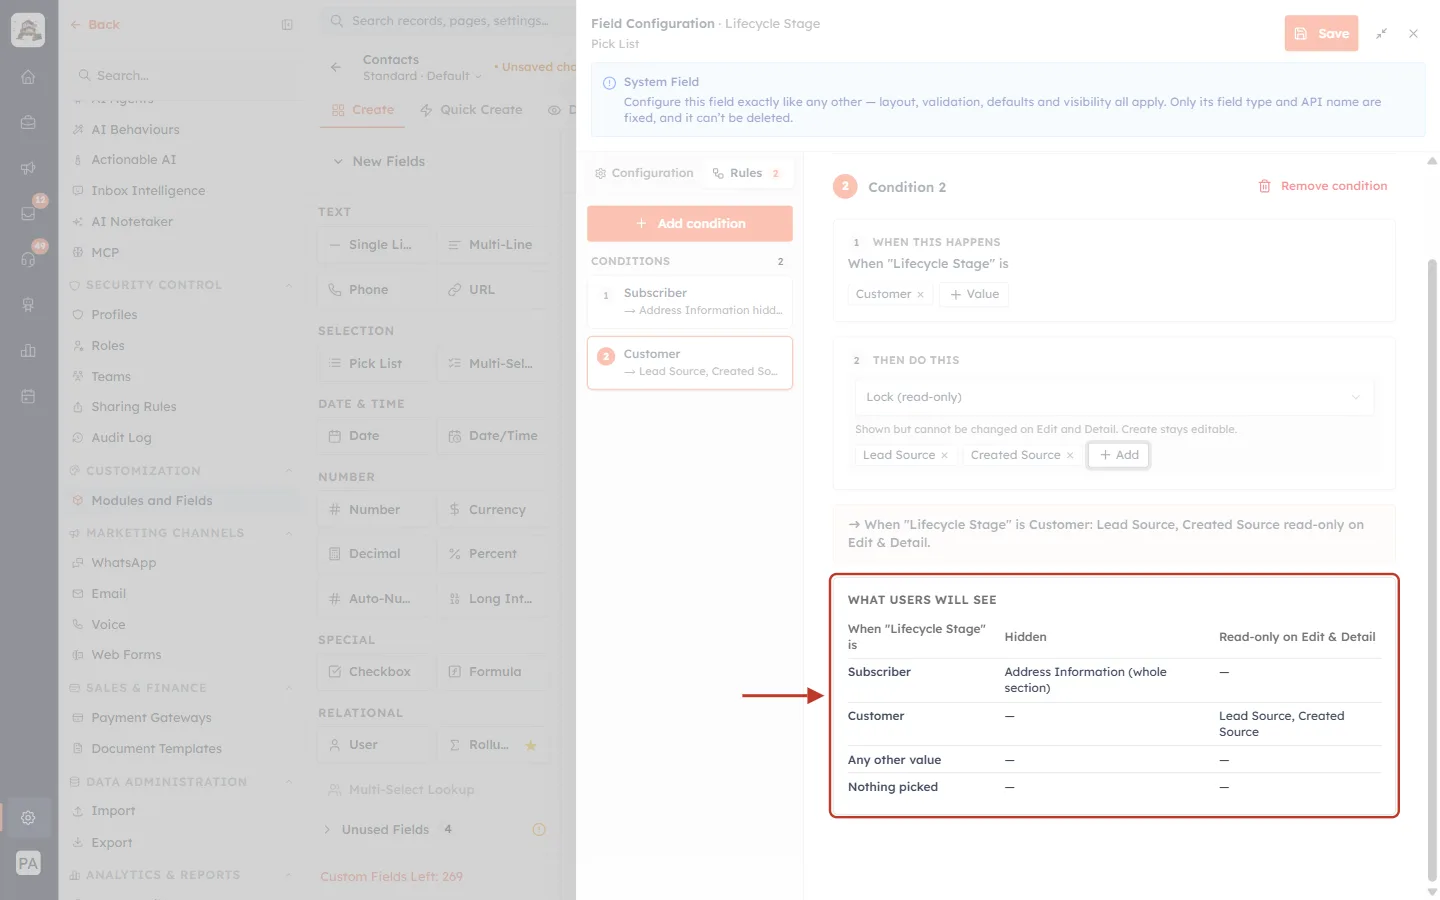
What this screenshot shows. The WHAT USERS WILL SEE table, ringed, now covering both conditions.
Subscriber → Hidden: Address Information (whole section); Read-only: —.
Customer → Hidden: —; Read-only on Edit & Detail: Lead Source, Created Source.
Any other value and Nothing picked → no change.
If two conditions disagree about the same field (one shows it, one hides it), the editor warns you — and on the form Hide wins.
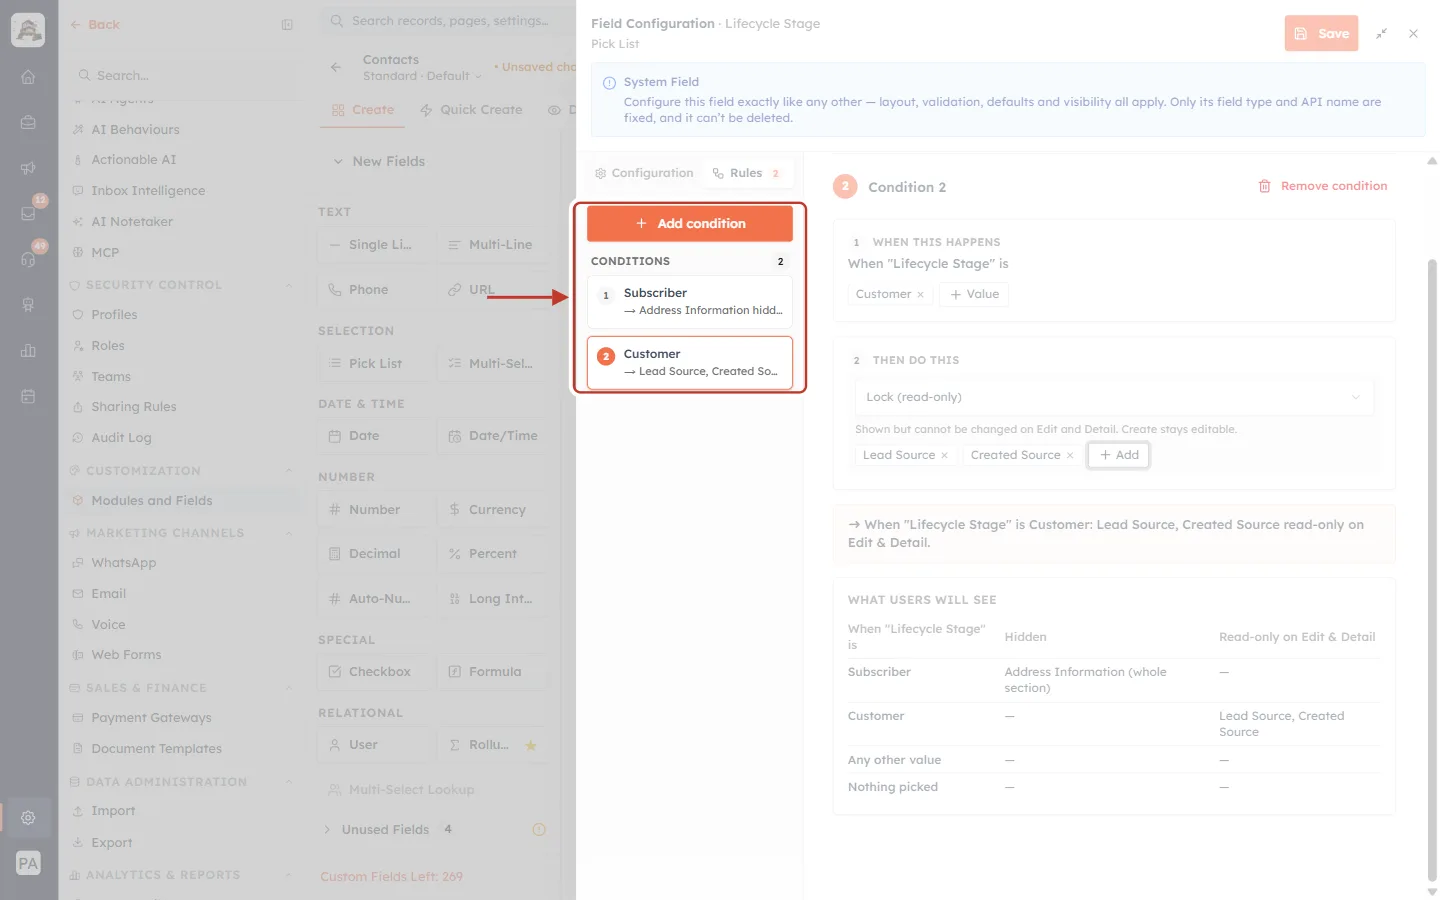
What this screenshot shows. The left-hand column, ringed: + Add condition and the CONDITIONS 2 list with 1 Subscriber → Address Information hidden and 2 Customer → Lead Source, Created Source….
Click a condition in this list to open it on the right. The open one has an orange border.
Each line is a short summary of the condition, so you can check the whole rule at a glance.
Part 4: Turn off, remove, delete and save#
Step 13: Turn the rule off without deleting it (optional)#
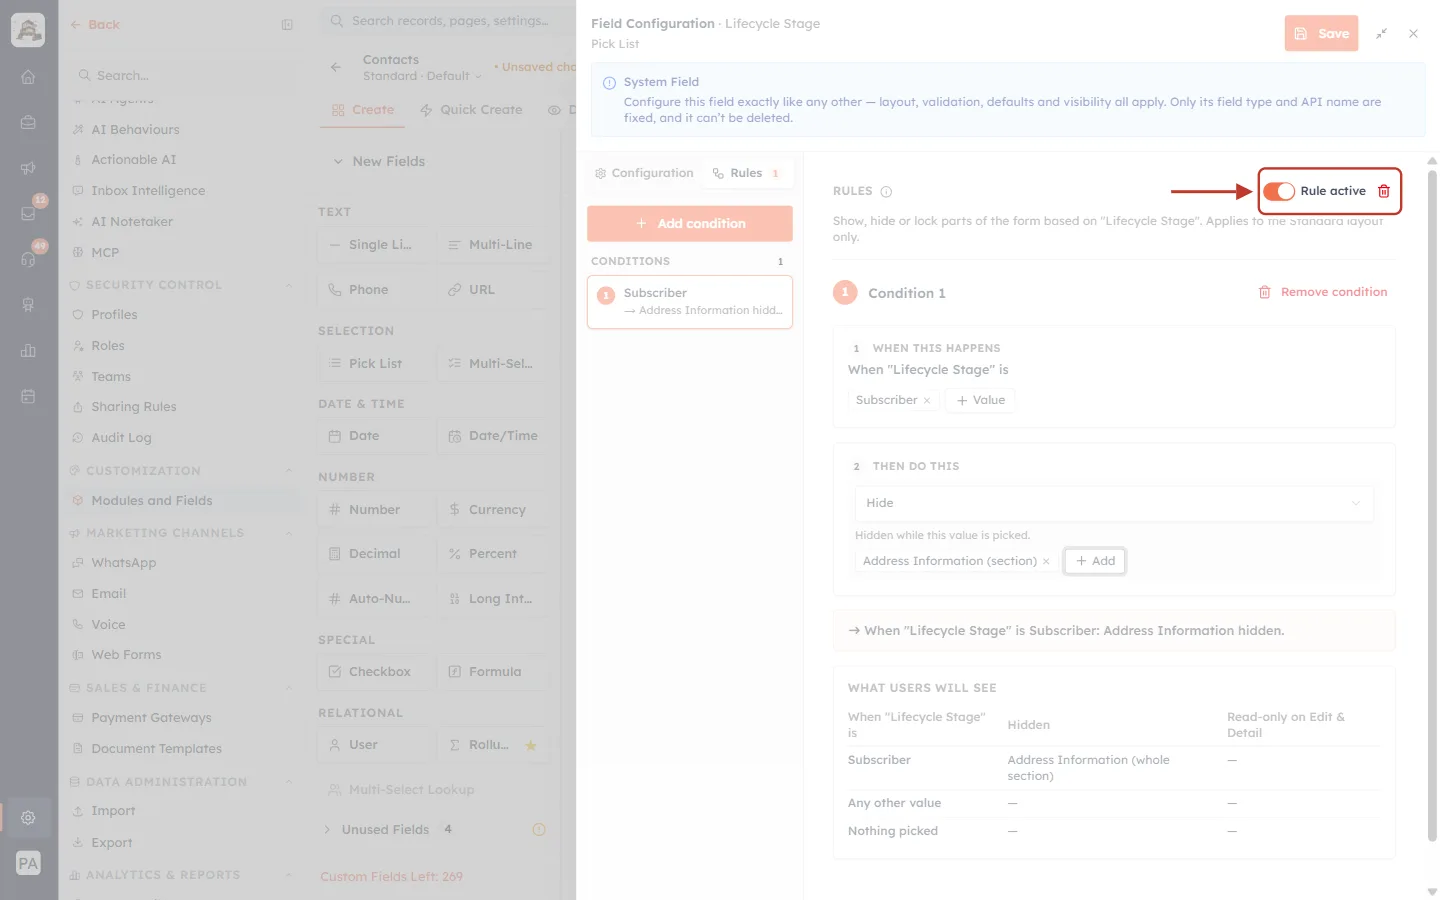
What this screenshot shows. The Rule active switch and the red bin icon, ringed, at the top right of the RULES area.
Switch Rule active off to pause the rule: the form then behaves as if the rule didn’t exist, but all its conditions are kept. The editor shows The rule is off, so nothing changes for any value.
Switch it on again (and Save) to bring it back.
The bin deletes the whole rule (see below).
Step 14: Remove one condition, or delete the whole rule#
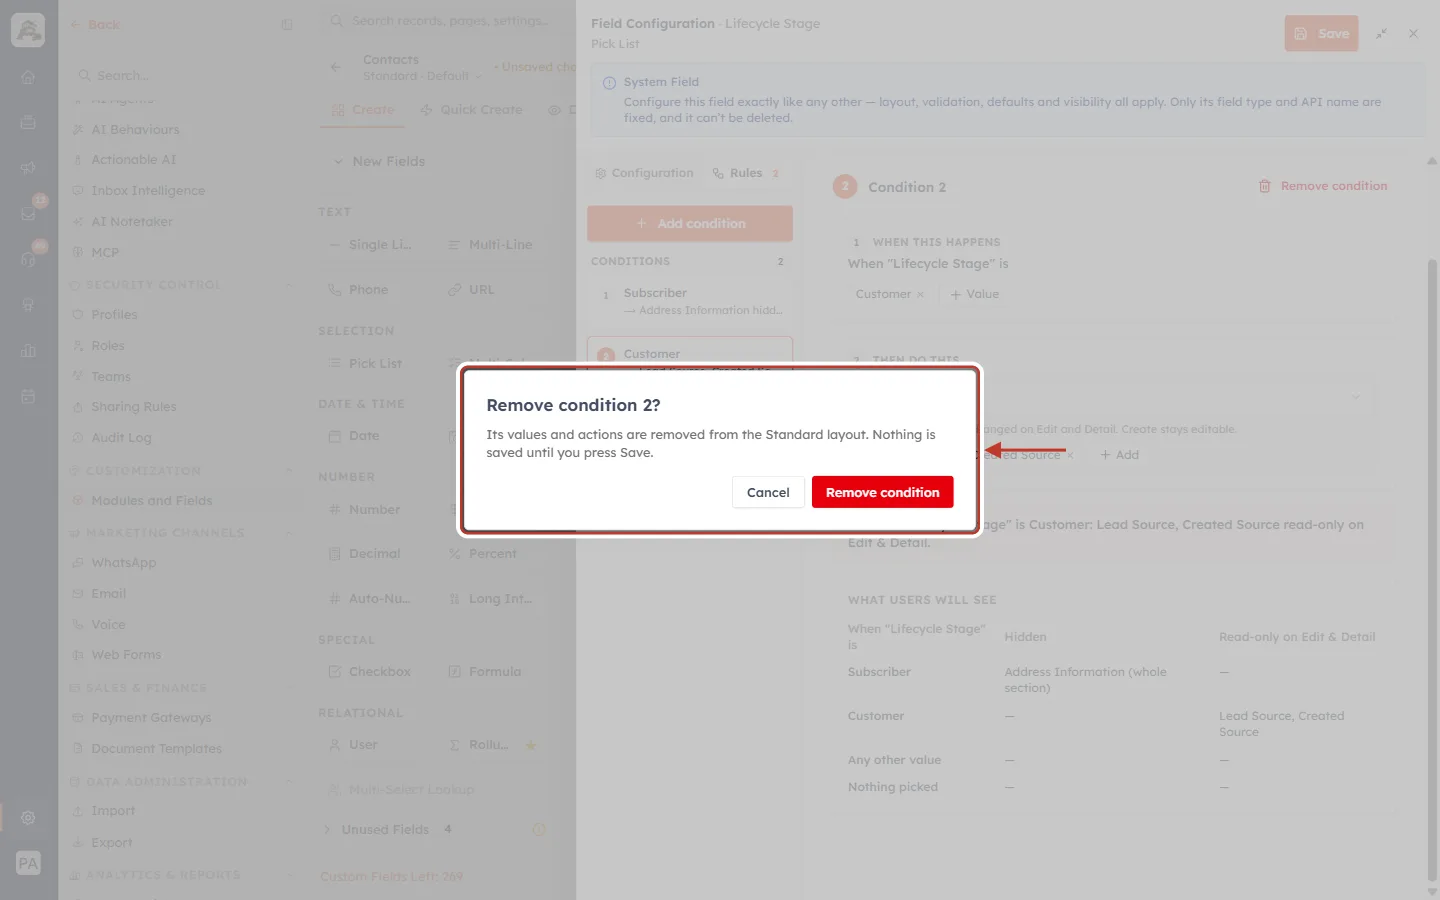
What this screenshot shows. The Remove condition 2? window, ringed, opened with 🗑 Remove condition at the top right of a condition.
Text: Its values and actions are removed from the Standard layout. Nothing is saved until you press Save.
Remove condition removes it; Cancel keeps it. We click Cancel.
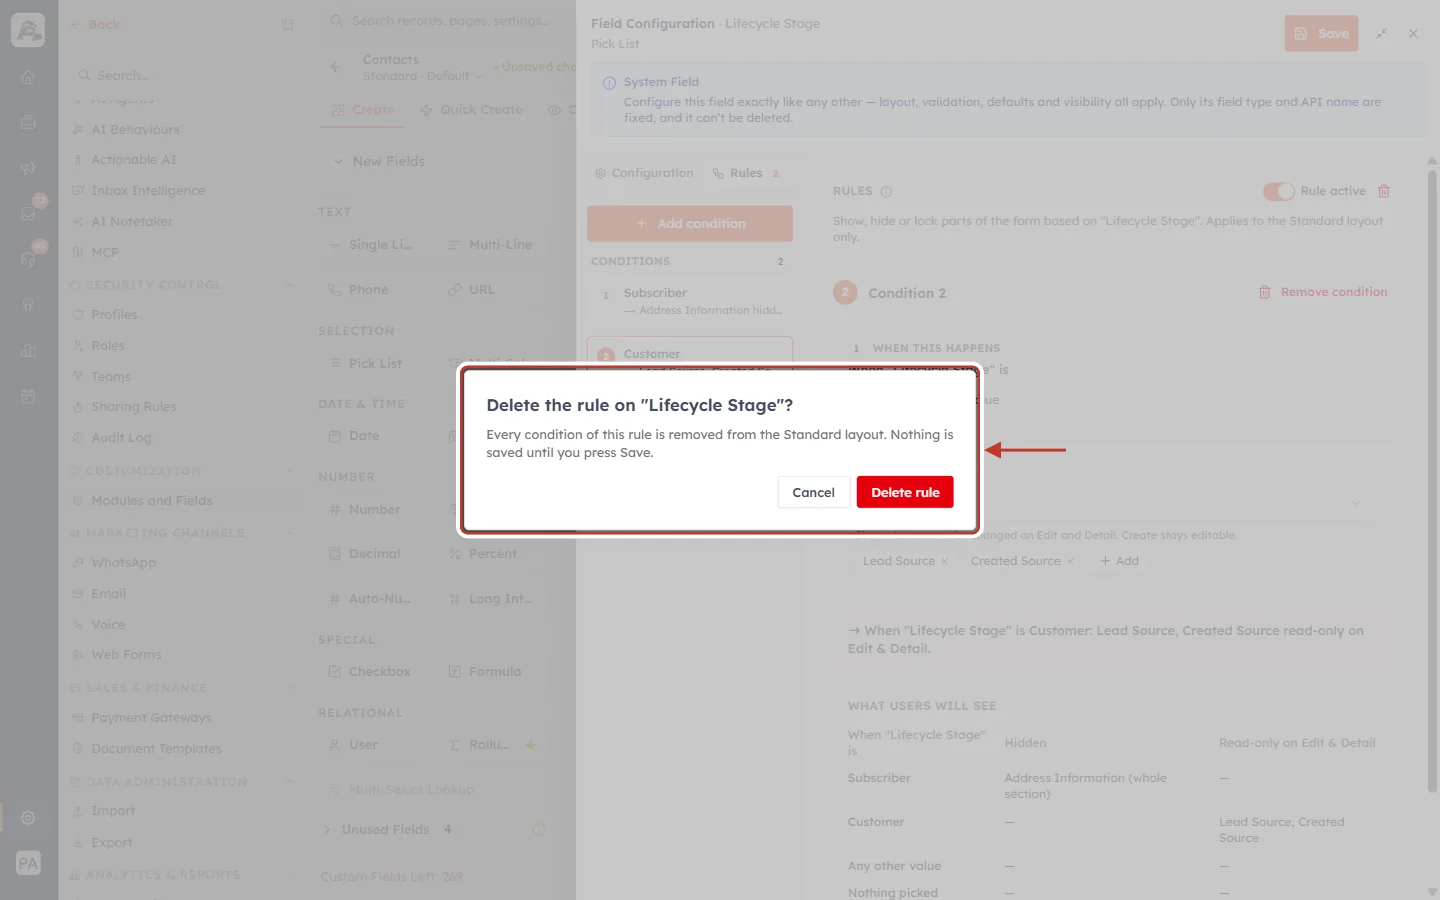
What this screenshot shows. The Delete the rule on “Lifecycle Stage”? window, ringed, opened with the red bin next to Rule active.
Text: Every condition of this rule is removed from the Standard layout. Nothing is saved until you press Save.
Delete rule removes the rule; Cancel keeps it. We click Cancel.
If you delete by mistake, use Discard Changes in the builder’s Save ⋮ menu before saving.
Step 15: Save the layout#
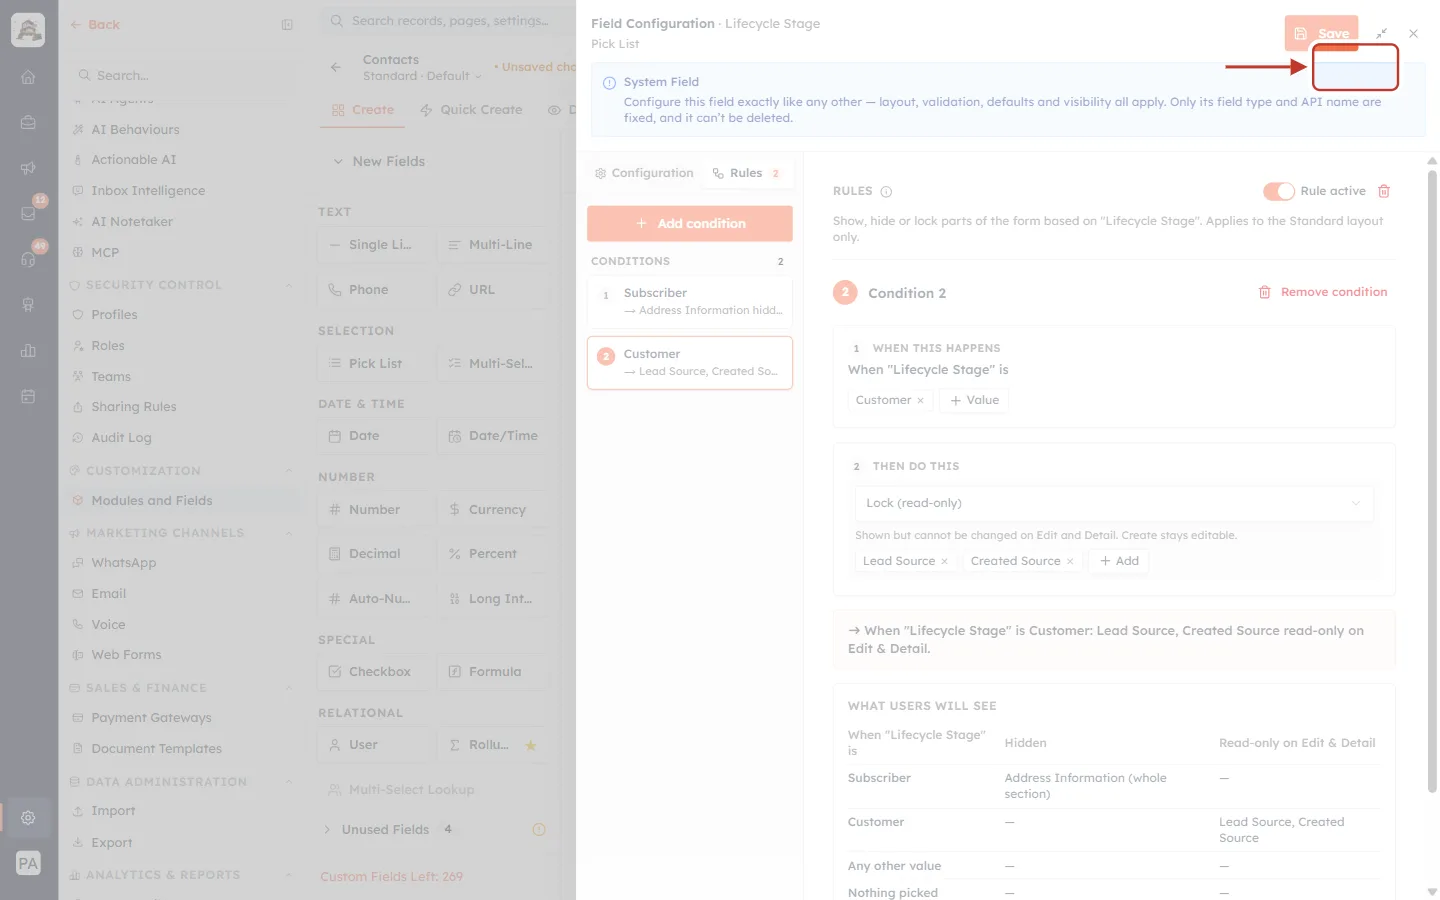
What this screenshot shows. The orange Save button, ringed, at the top right of the expanded editor. In the side panel view, use the builder’s own Save at the top right of the page.
Save saves the whole layout, including the rule.
If a condition is half-finished (a value but no target, or a target but no value), Save stops and tells you which rule to finish — complete it or press Delete rule.
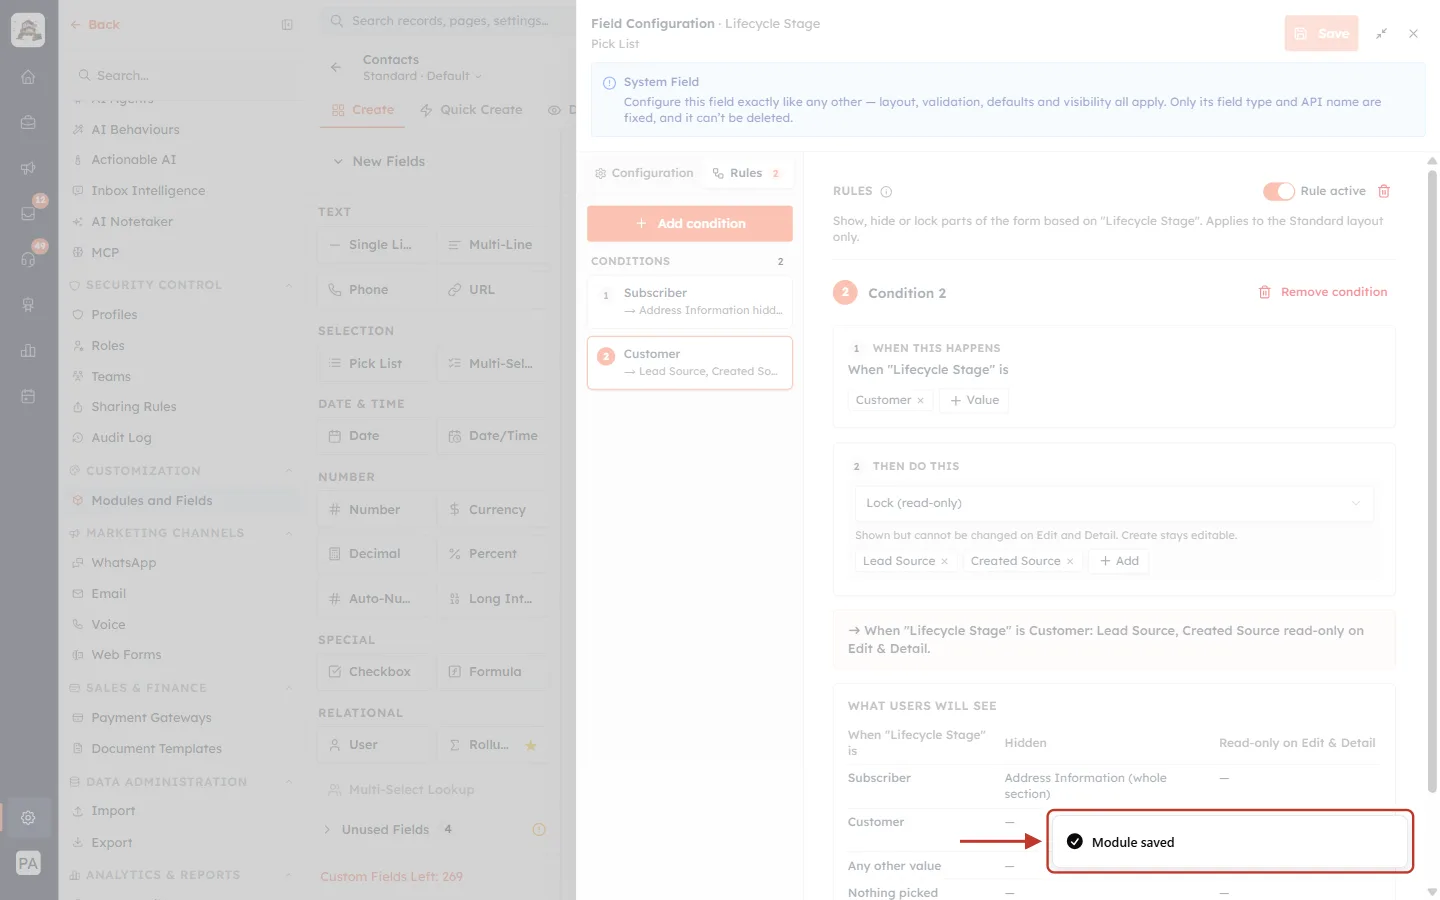
What this screenshot shows. The green-ticked Module saved message, ringed, at the bottom right.
The rule is now live for everyone who uses the Standard layout.
Users who already have a form open see the change the next time they open the form.
Step 16: Recognise a saved rule in the builder#
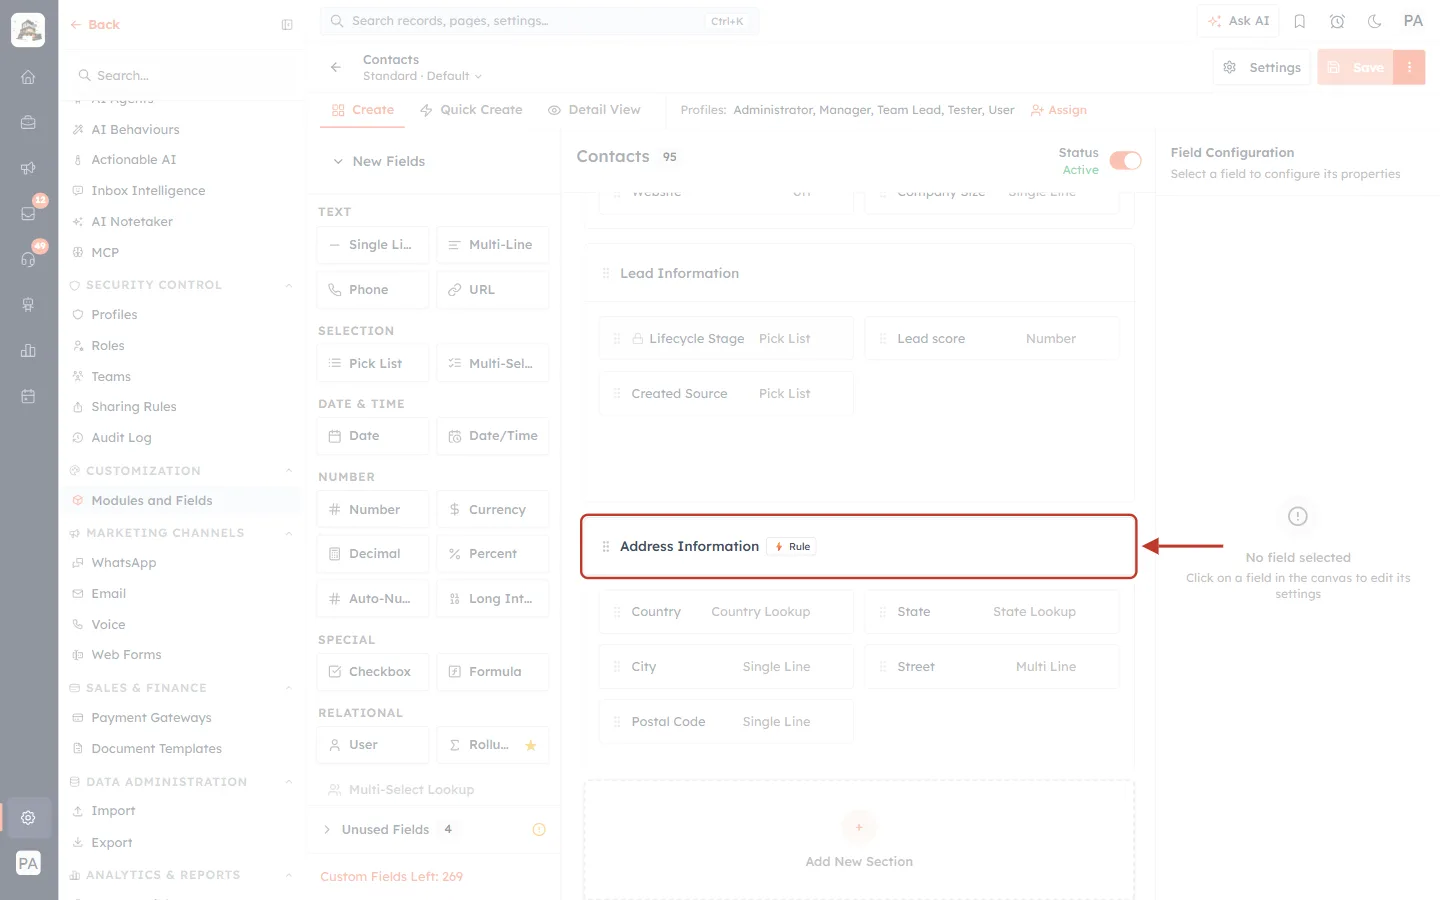
What this screenshot shows. The Address Information section header on the canvas, ringed, now with a small orange ⚡ Rule badge.
The badge means A layout rule shows or hides this section. Hover it to see that tooltip.
Use it to spot, at a glance, which sections can disappear for some values before you move or delete them.
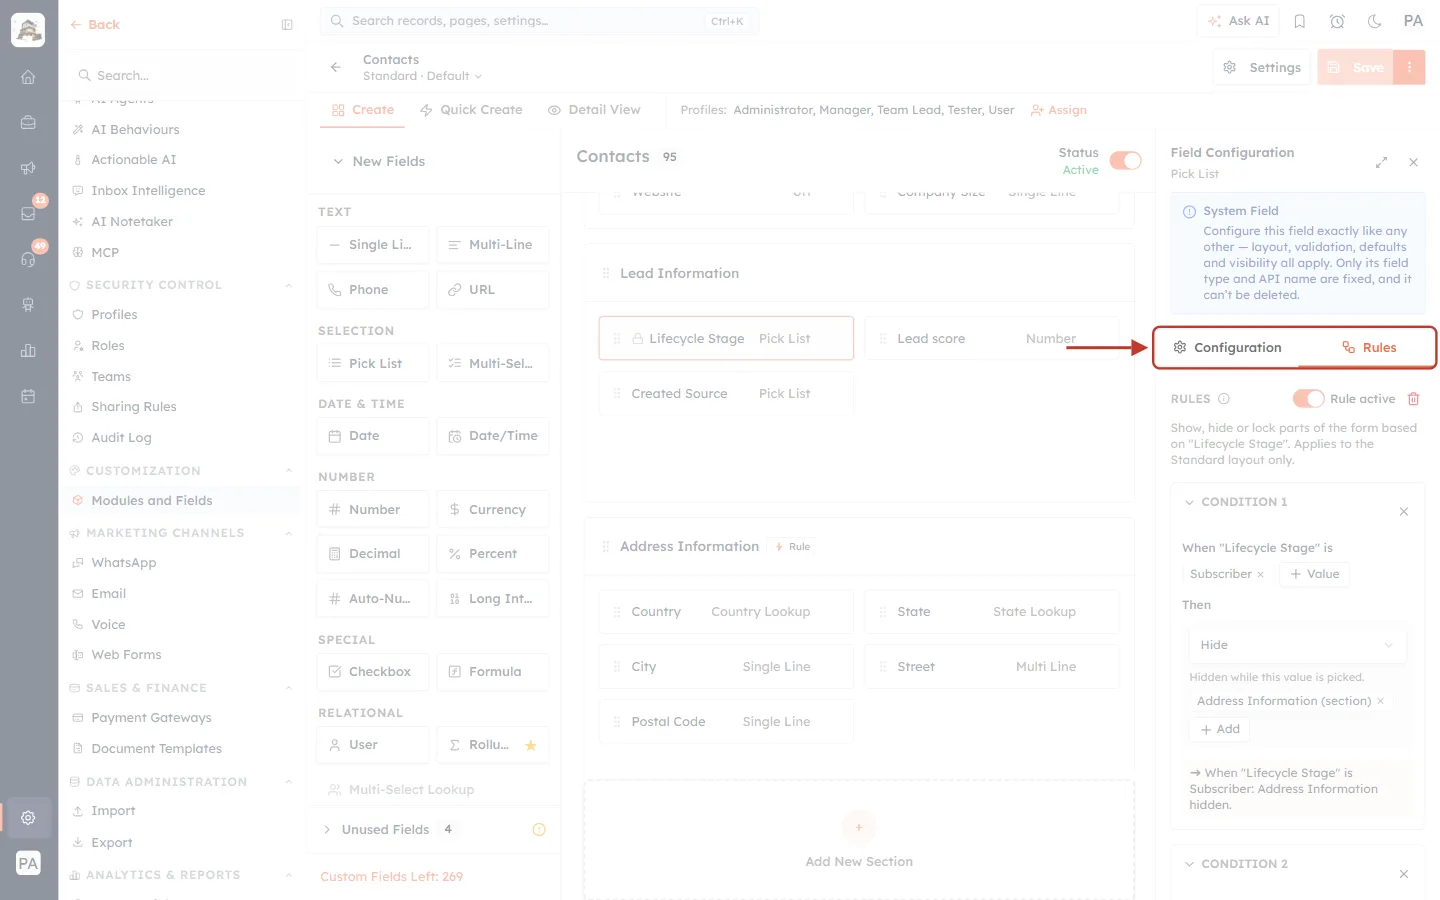
What this screenshot shows. Lifecycle Stage clicked again after saving: the Configuration / Rules tabs are ringed, and the Rules tab below shows the saved rule with Rule active on and its conditions.
Condition 1 is listed as When “Lifecycle Stage” is Subscriber → Hide → Address Information (section), followed by Condition 2.
To change the rule later, open it here, edit, and click Save again.
Part 5: Check the result on the record forms#
Step 17: Create form: pick Subscriber and watch Address Information disappear#
Open the module’s list, click Create Contact ▾ → Create Single and make sure the layout drop-down at the top of the form says Standard.
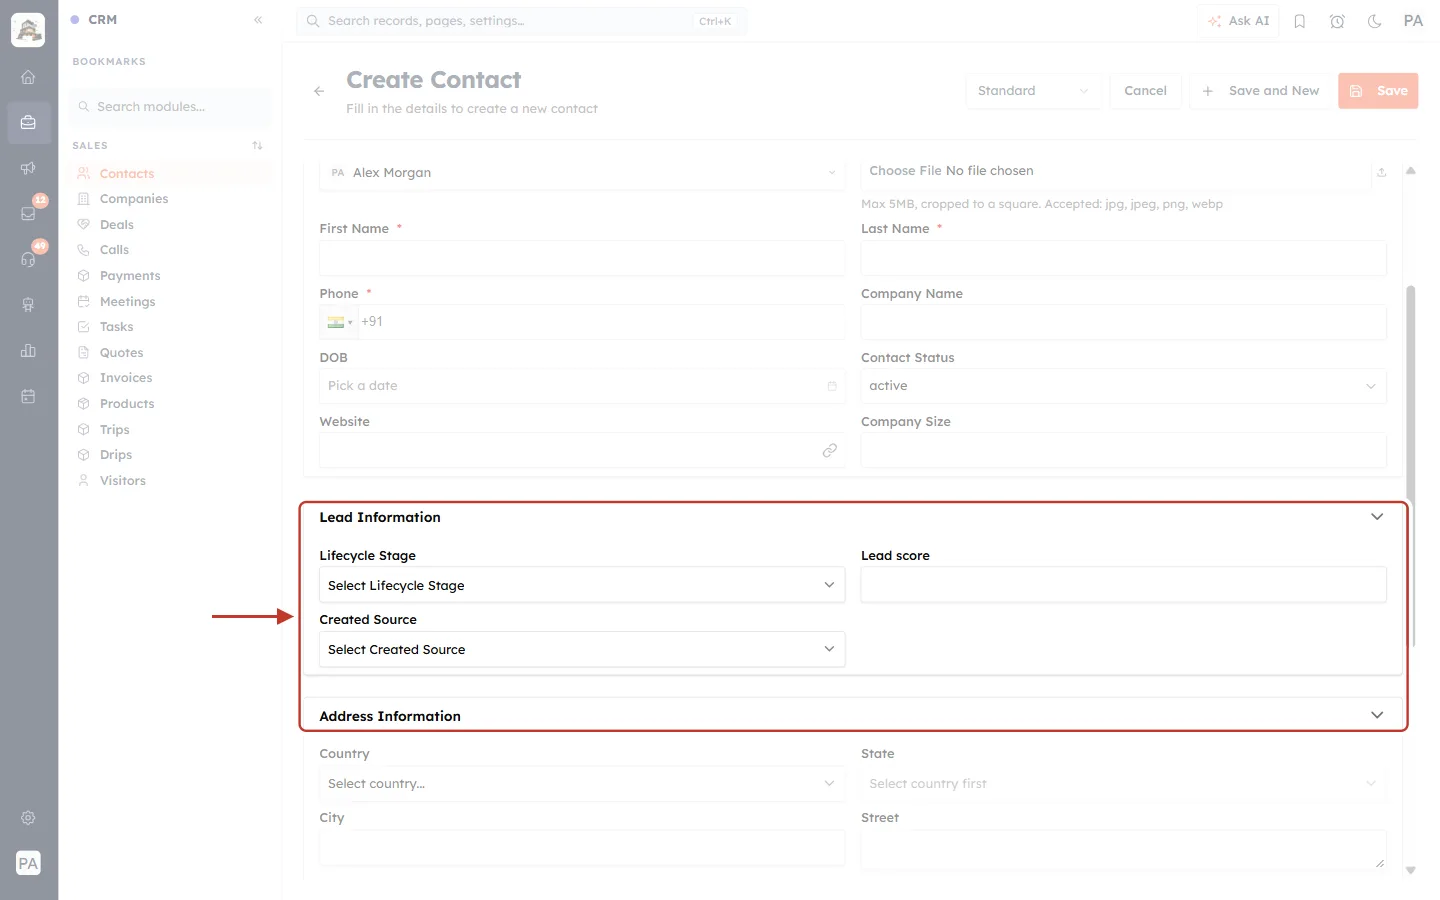
What this screenshot shows. The Create Contact form (Standard layout). Ringed: the Lead Information section with Lifecycle Stage still empty (Select Lifecycle Stage), and the Address Information section right below it.
With no value picked, the rule does nothing — the form is the normal Standard layout.
Lead Information also shows Lead score and Created Source.
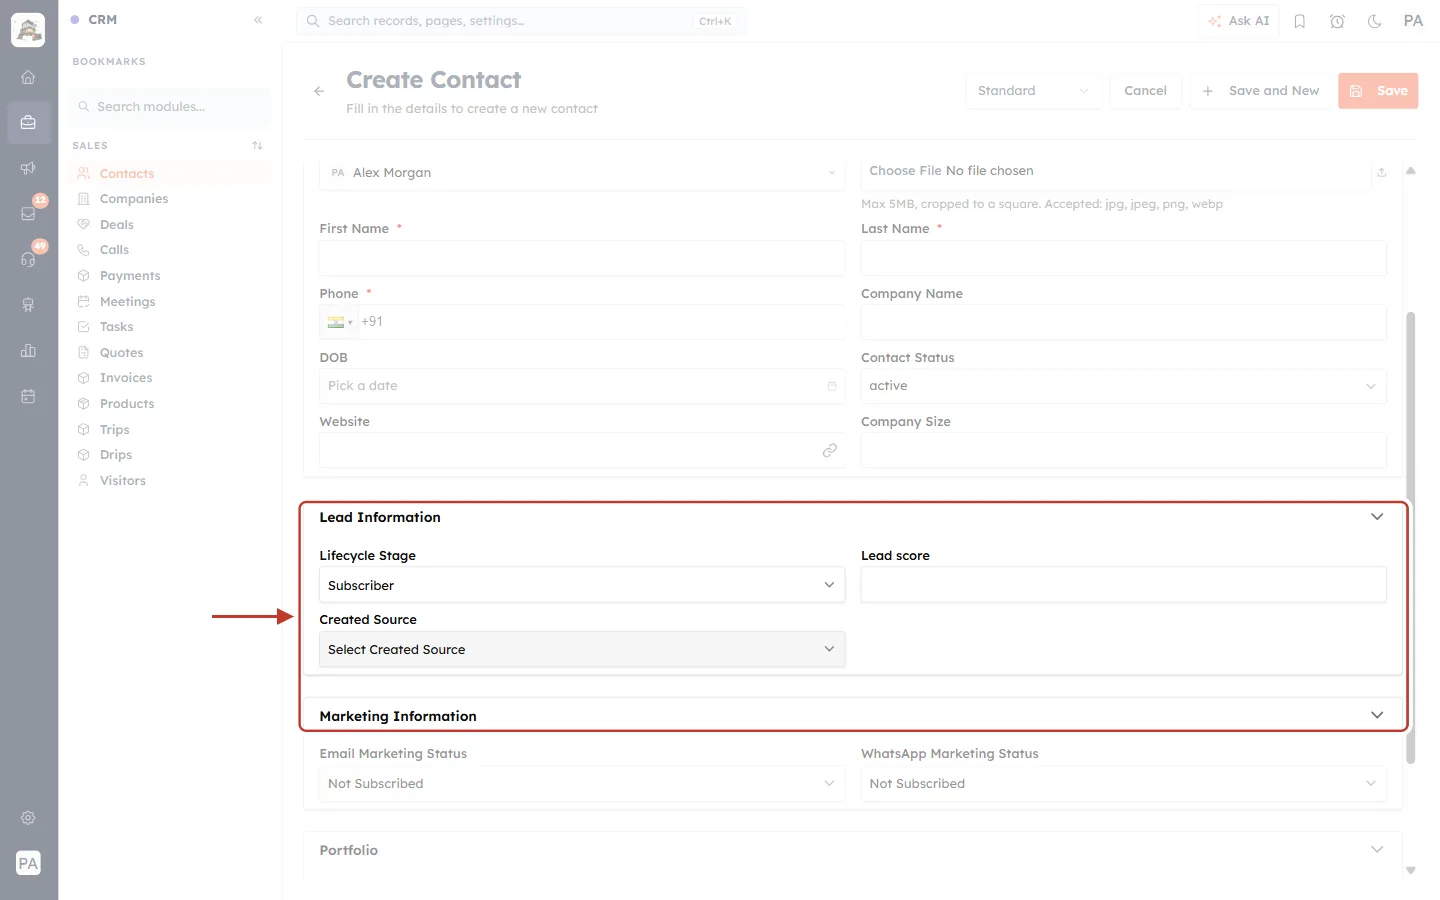
What this screenshot shows. The same form after choosing Subscriber in Lifecycle Stage. Ringed: Lead Information is now followed directly by Marketing Information — the Address Information section has gone.
The change is instant; no saving or reloading is needed.
Choose any other value (or clear the field) and Address Information comes back.
Created Source is still editable here: Lock never applies on the Create form.
Step 18: Edit form: a Customer’s source fields are locked#
Open a contact whose Lifecycle Stage is Customer and click Edit.
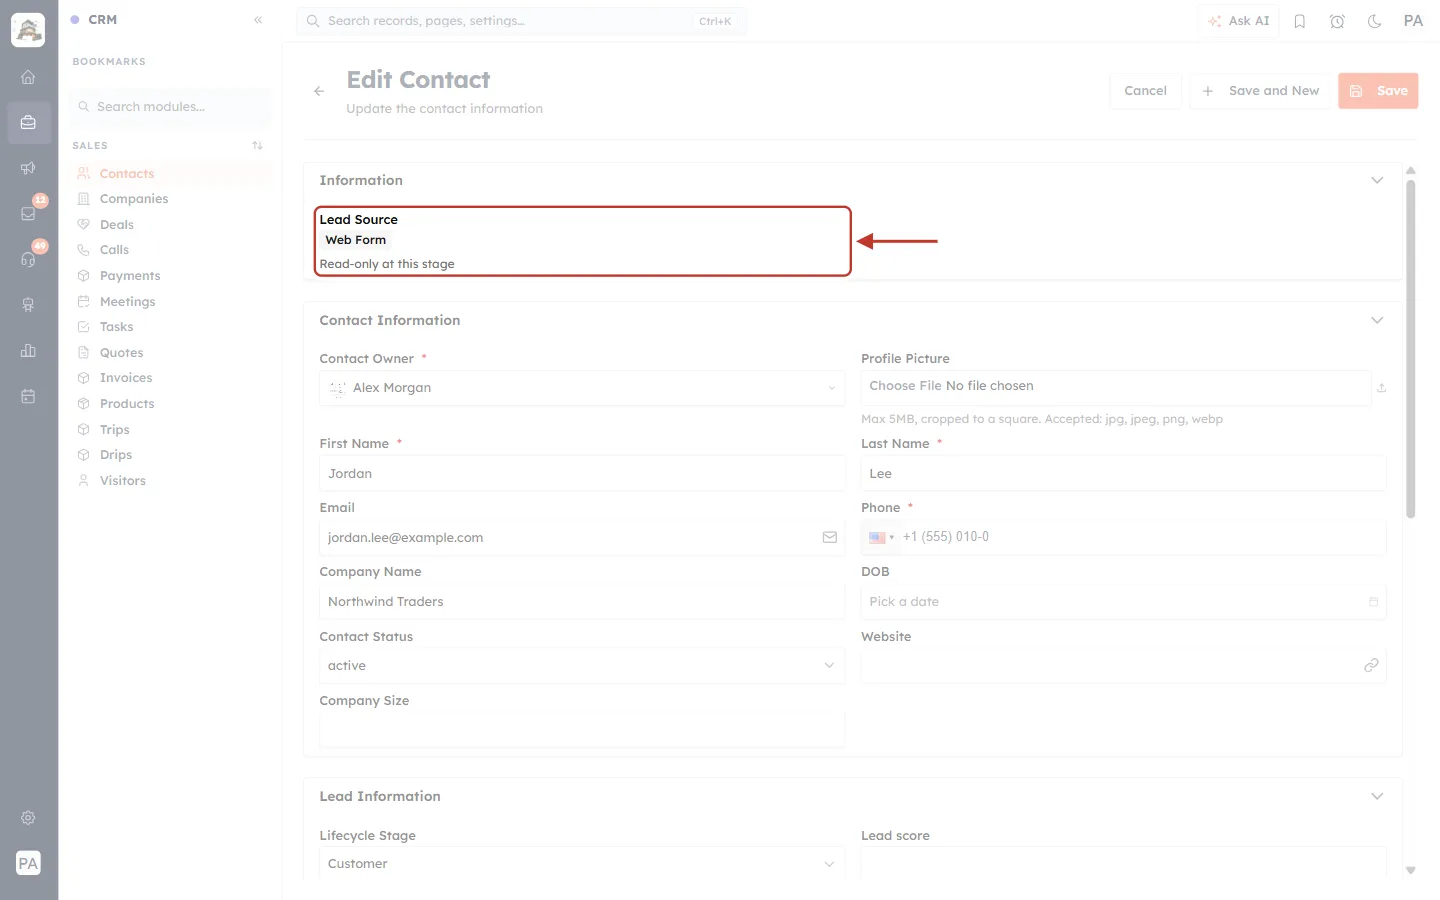
What this screenshot shows. The Edit Contact form. The Lead Source field is ringed: its value (Web Form) is shown on a grey background with the note Read-only at this stage.
The value can be read but not changed.
All other fields on the form (First Name, Email, Company Name…) stay editable.
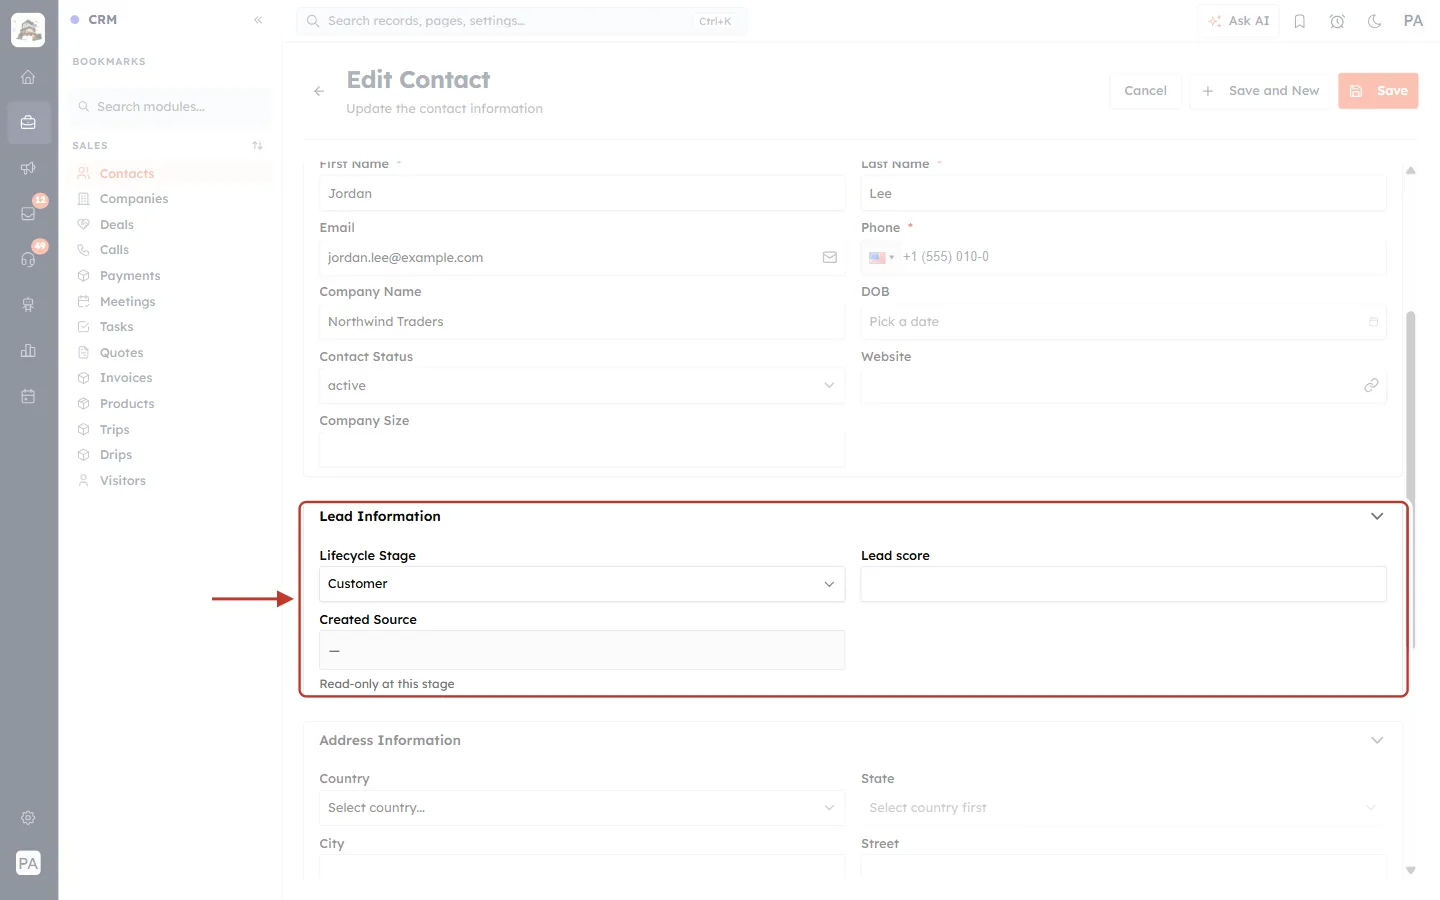
What this screenshot shows. The Lead Information section of the same form, ringed: Lifecycle Stage = Customer (still editable) and Created Source locked with Read-only at this stage.
Lifecycle Stage itself always stays editable, because it is the rule’s own field.
Lead score, which no condition targets, stays editable as usual.
Rules and limits at a glance#
Item | Limit or behaviour |
|---|---|
Fields that can carry a rule | Pick List and Yes/No checkbox fields |
Rules per field | One rule per field, per layout |
Rules per layout | Up to 10 |
Conditions per rule | Up to 25 |
Values per condition | Up to 50 (matches when the field is any one of them) |
Targets per action | Up to 40 sections or fields |
Show and Hide on the same field | Hide wins |
Hide on a required field | Not allowed — turn off Required first, or use Lock |
Lock on the Create form | Never applies; Create stays editable |
Hidden data | Never deleted |
Other layouts | Not affected — each layout has its own rules |
Troubleshooting#
I don’t see a Rules tab#
You clicked a field that isn’t a Pick List or Yes/No checkbox. Click a Pick List field instead.
The field was just added and not saved yet. Click Save, then click the field again.
A field I want to hide is greyed out in the picker#
It is a required field (Required · turn off Required to hide) or always required (Always required). Turn off Required Field in its Configuration tab, or Lock it instead.
It is the rule’s own field, or a field that drives another rule (Drives another rule). These always stay visible so users can change the value back.
The rule doesn’t change the form#
Check the user’s form uses the same layout as the rule (the layout name is in the drop-down at the top of the Create form).
Check Rule active is on and that you clicked Save.
Lock only works on Edit and the record page, not on Create.
Re-open the form after saving; a form that was already open keeps the old layout.
Save says a rule is not finished#
A condition has a value but no section or field (or the other way round). Open the rule named in the message, finish the condition, or press Delete rule.
A rule says it “no longer runs”#
The field the rule watches was deleted, moved to Unused Fields or changed so it can’t carry rules. Open the Rules tab and click Remove on that rule, then Save.
Frequently asked questions#
Does hiding a field delete what was typed in it?#
No. Hidden data is never deleted. It is kept on the record and shows again as soon as the rule no longer hides it.
Can one rule watch two fields?#
No. A rule watches one field. Make a second rule on the other field — both apply together, and if they disagree, Hide wins.
Is Lock the same as making a field read-only for a profile?#
No. Lock is a screen setting on the form only. For real access control, use the field’s Field access option or the profile permissions.
Do rules apply to every layout of the module?#
No. Each rule belongs to the layout it was built on. Open each layout that needs the rule and build it there.
Previous and next#
Previous: Quick Create Fields per Layout: Choose the Short Form for “+ New”
Next: Importing Records When a Module Has Several Layouts: What Happens and How to Move Records
Related articles#
Was this article helpful?
Ready to implement this?
OpenAI Engage and apply what you just learned to your own workspace.
Open AI Engage CRM