Loading…


KnowledgeBase
Set the Module Default Layout: Choose the Form Everyone Falls Back On (Step-by-Step)
What is the module default layout?#
When a module has more than one layout, the CRM has to decide which layout each person sees. Most of the time you decide that per profile with Layout Assignment. The module default layout is the safety net under those choices: it is the layout used for anyone the CRM has no other answer for.
Every module has exactly one default layout, marked with a filled orange star on the module’s Layouts page. At first it is Standard, the layout every module starts with. You can make any other active layout the default with one click.
How the CRM picks a layout for someone#
For each person, the CRM goes down this list and stops at the first answer it finds:
The Default Layout of their profile, if one is set in Layout Assignment and that layout is active.
Otherwise, the first active layout assigned to their profile.
Otherwise, the module default layout.
So the module default is used for profiles that have no active layout of their own — for example a new profile you have just created, or a profile whose only layout was switched off or deleted. Profiles that already have their own layouts are not affected when you change the module default.
Example used in this guide. The Contacts module has three layouts: Standard (the current default), Sales (shared with Administrator, Manager and Team Lead) and Support (switched off). You make Sales the module default, look at what changes, see why Support can’t be the default, and then switch the default back to Standard.
Before you begin#
You need permission to customise modules (the Administrator profile has it).
The layout you want as the default must be active (its Status switch on).
Check the layout has all the fields people need: anyone who falls back on the default will create records with it. See Edit a Layout in the Layout Builder.
Part 1: Find the current default layout#
Step 1: Open the module’s Layouts page#
Click the gear icon at the bottom of the left menu bar (Setup), click Modules and Fields under CUSTOMIZATION, then click Configure on the module’s row.
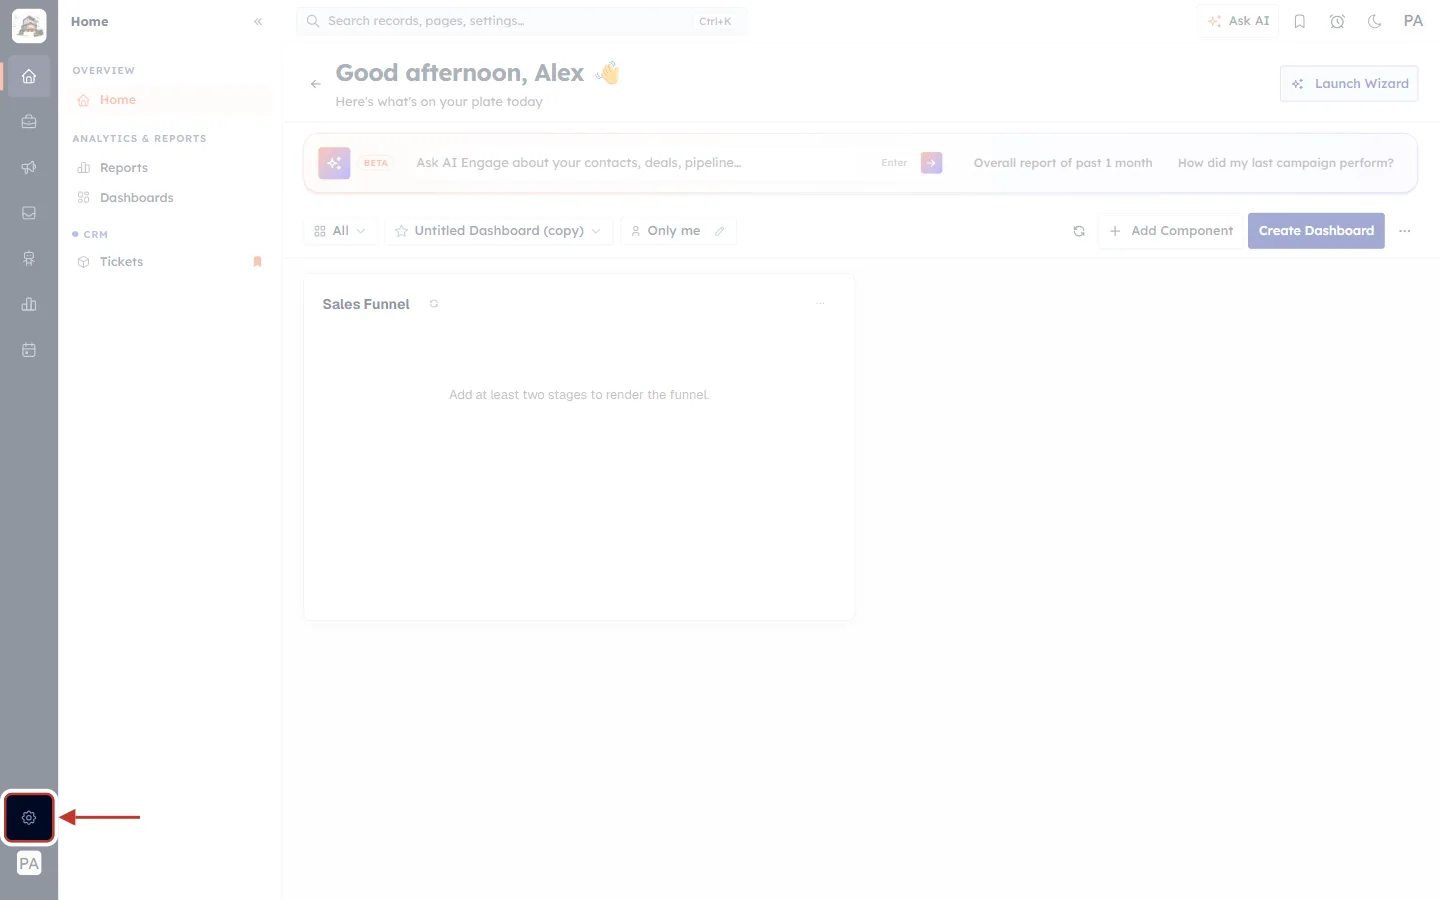
What this screenshot shows. The CRM home page with the gear icon ringed at the bottom of the narrow dark menu bar.
It opens Setup.
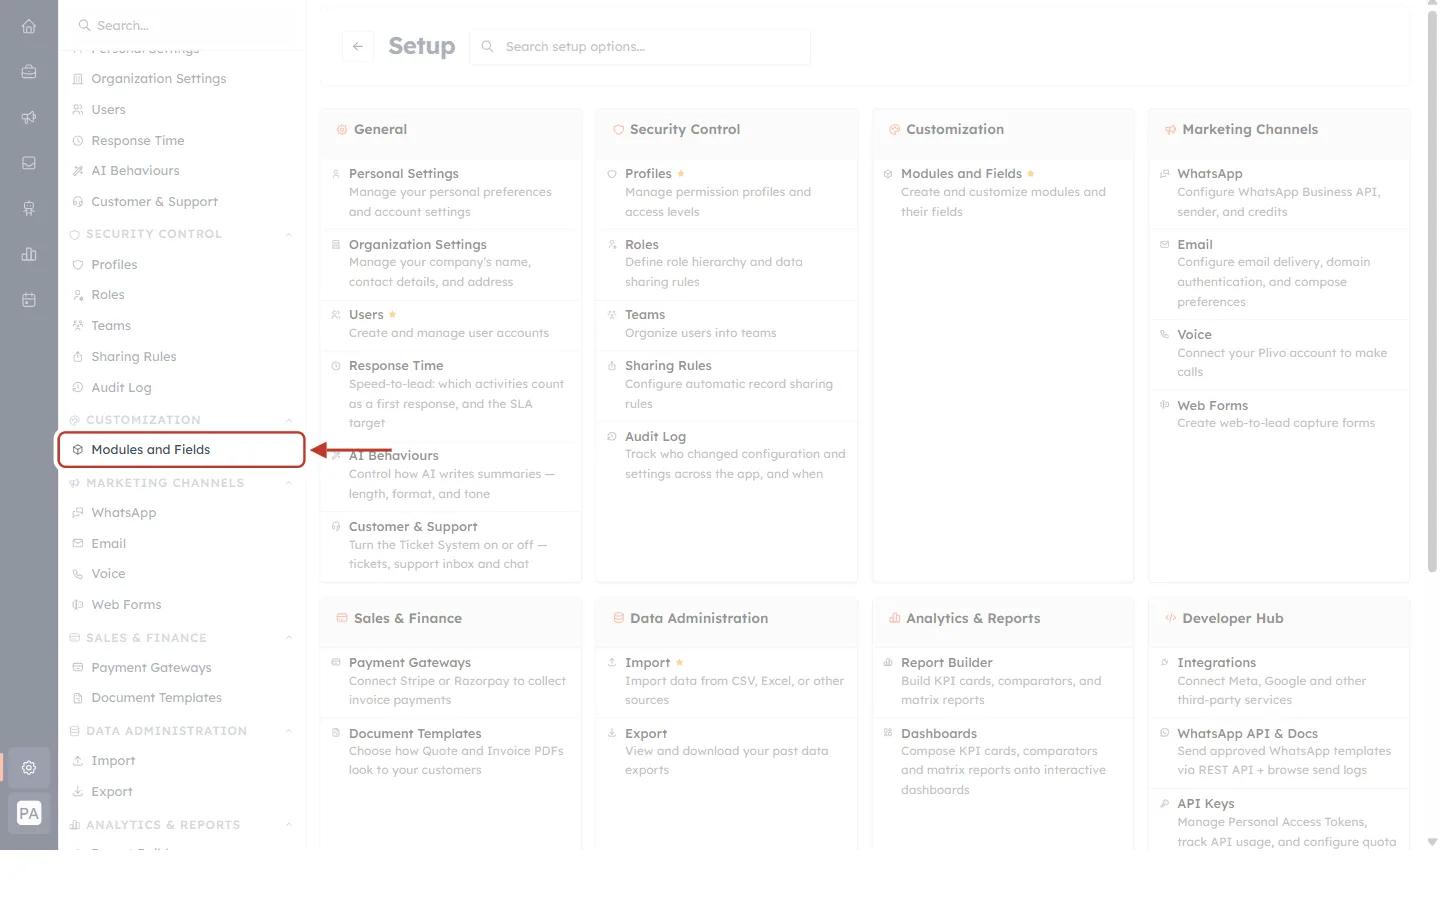
What this screenshot shows. The Setup page with Modules and Fields ringed under CUSTOMIZATION.
The cards in the middle of the page link to the same place.
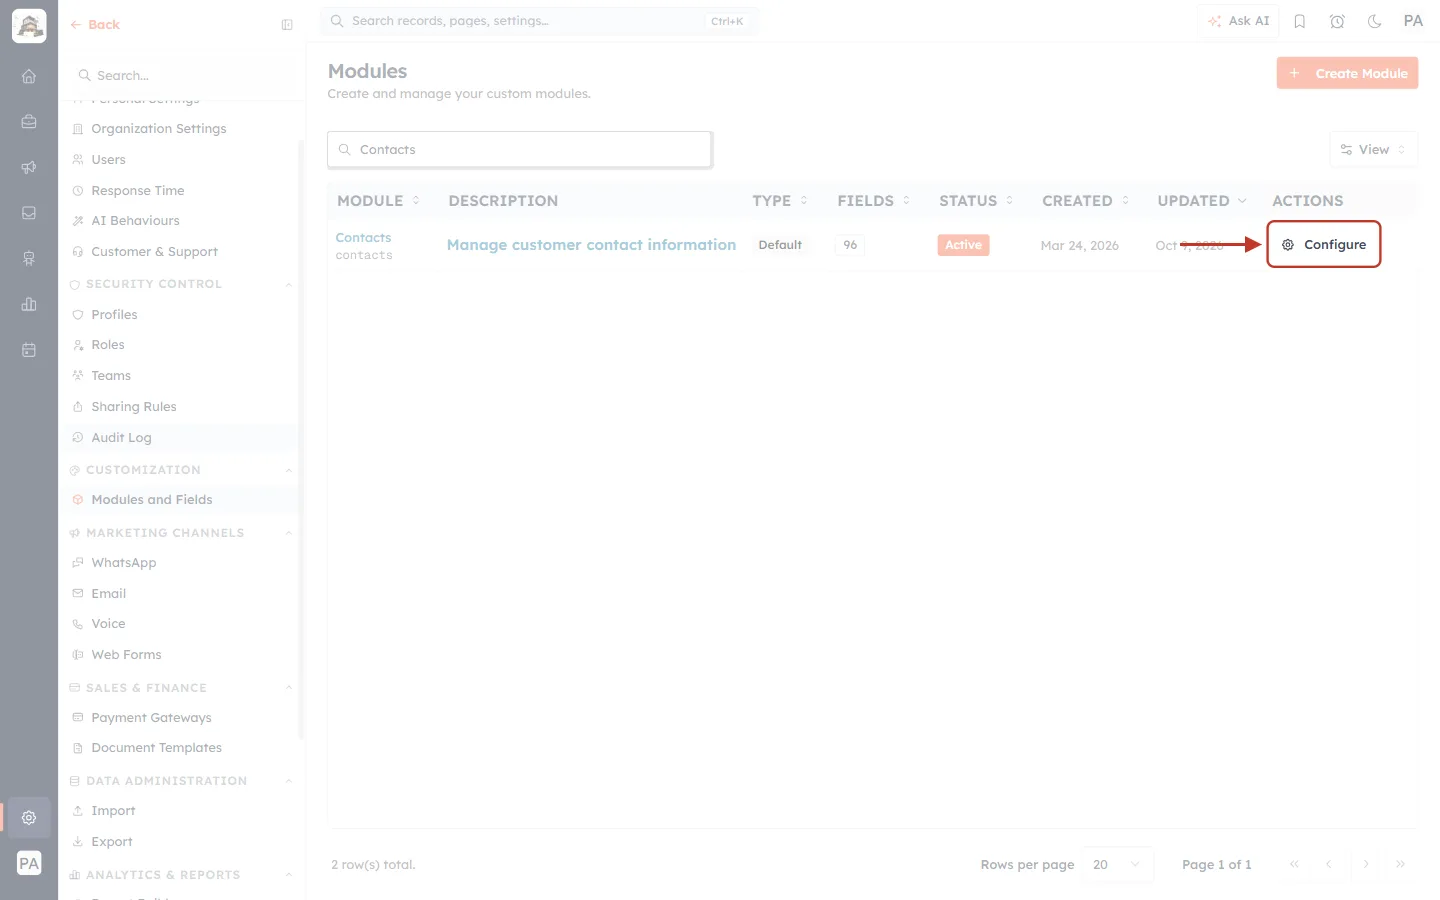
What this screenshot shows. The Modules page filtered to “Contacts”, with Configure ringed.
Clicking it opens the module’s Layouts page.
Step 2: Read the Layouts table#
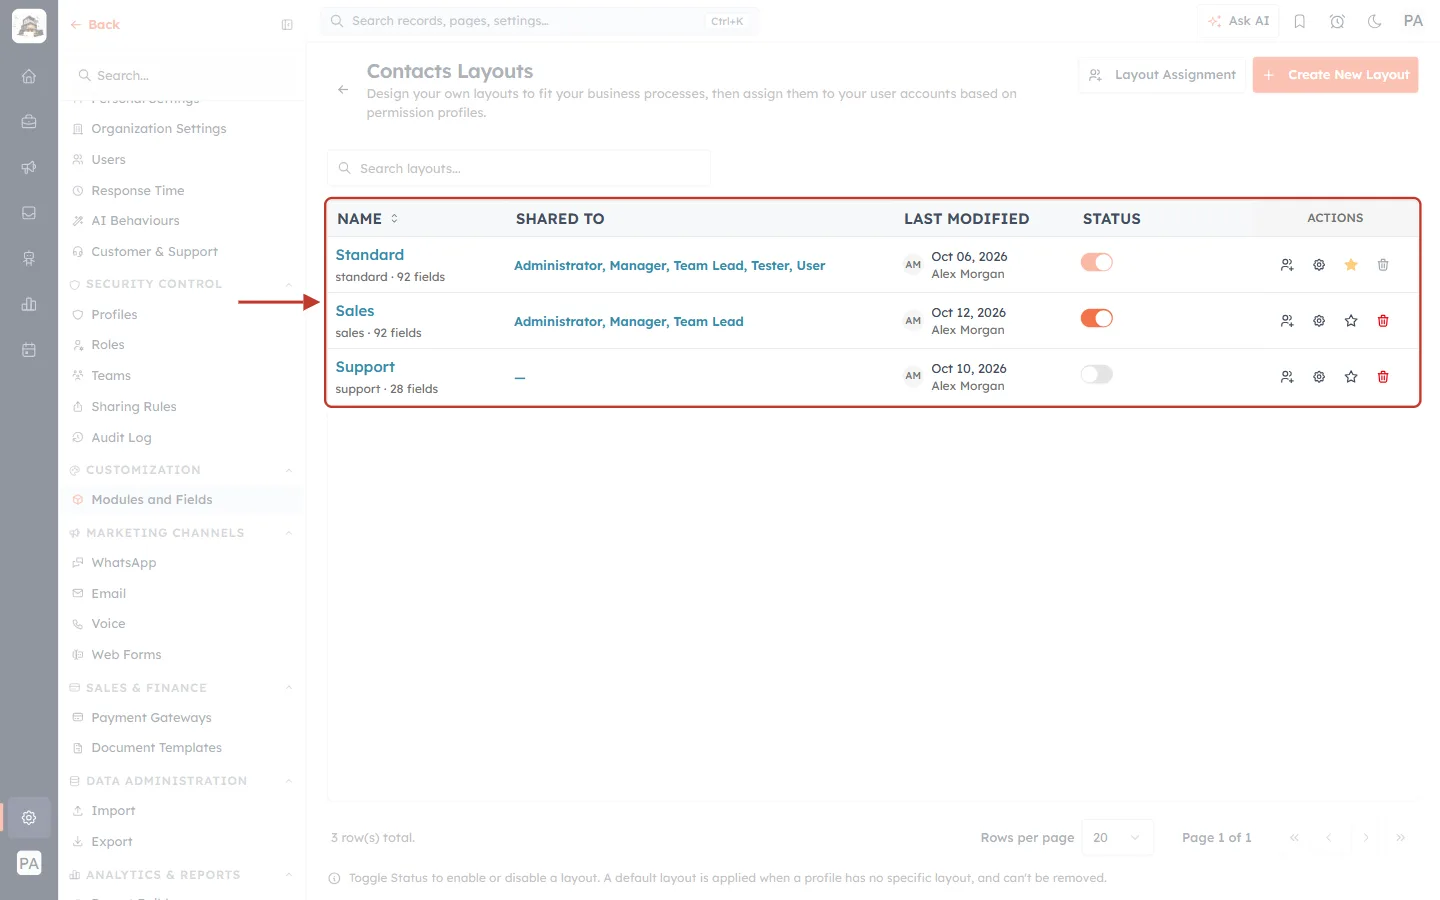
What this screenshot shows. The Contacts Layouts table, ringed, with three layouts.
Standard — shared with every profile, active, and (as the next figure shows) the current default.
Sales — shared with Administrator, Manager and Team Lead, active.
Support — switched off: its Status switch is grey and SHARED TO shows “—”, because a switched-off layout is offered to nobody.
The note under the table says: “Toggle Status to enable or disable a layout. A default layout is applied when a profile has no specific layout, and can’t be removed.”
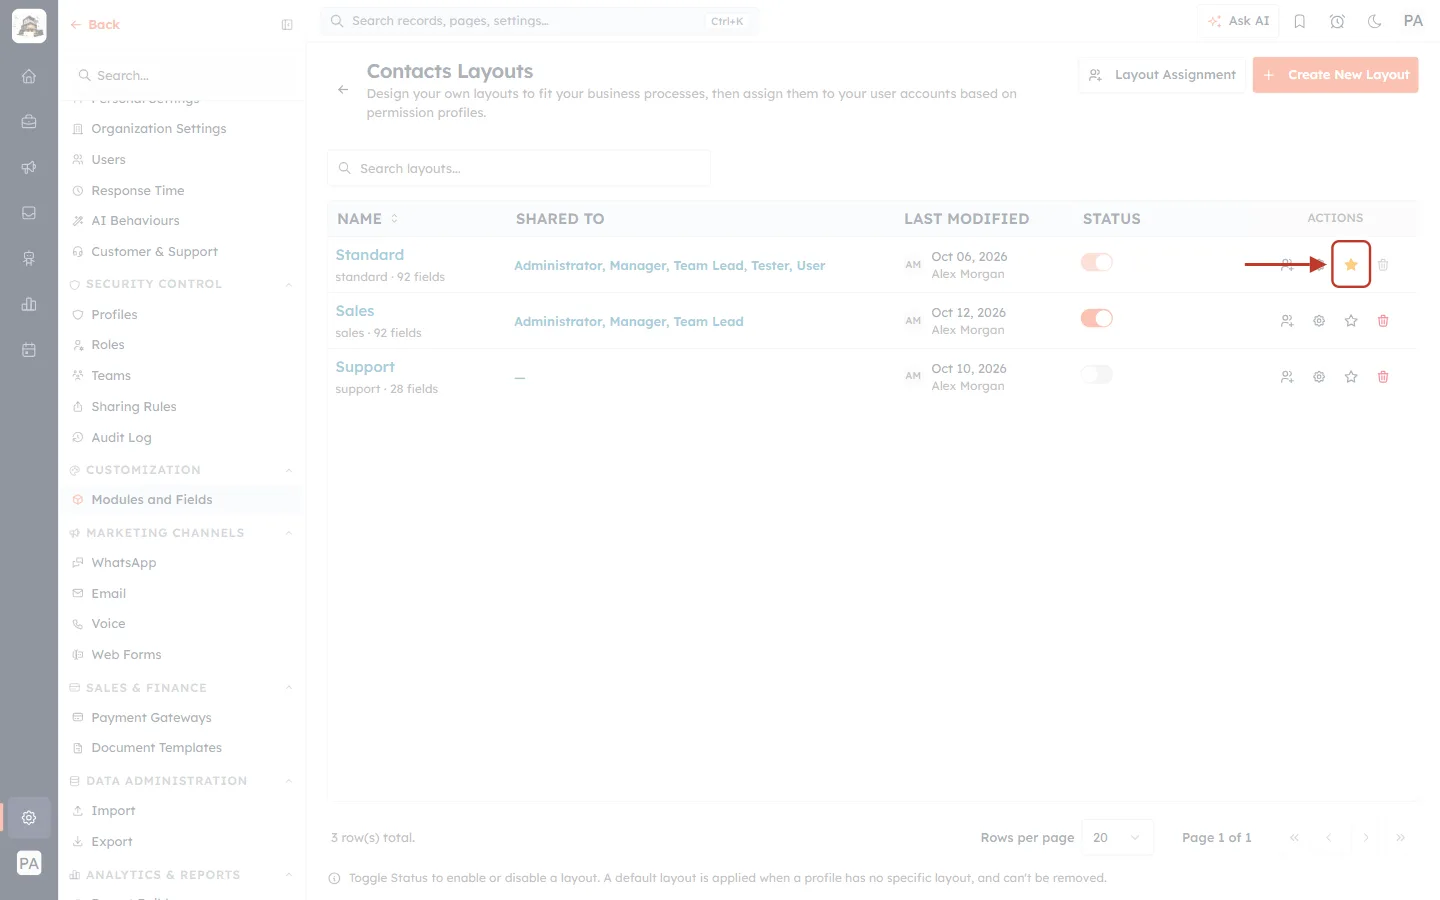
What this screenshot shows. The star in the ACTIONS column of the Standard row, ringed. It is filled orange.
A filled orange star means “this is the module default layout”. Its tooltip reads This is the default layout, and it can’t be clicked.
Every other row has an empty star. Only one layout can have a filled star at a time.
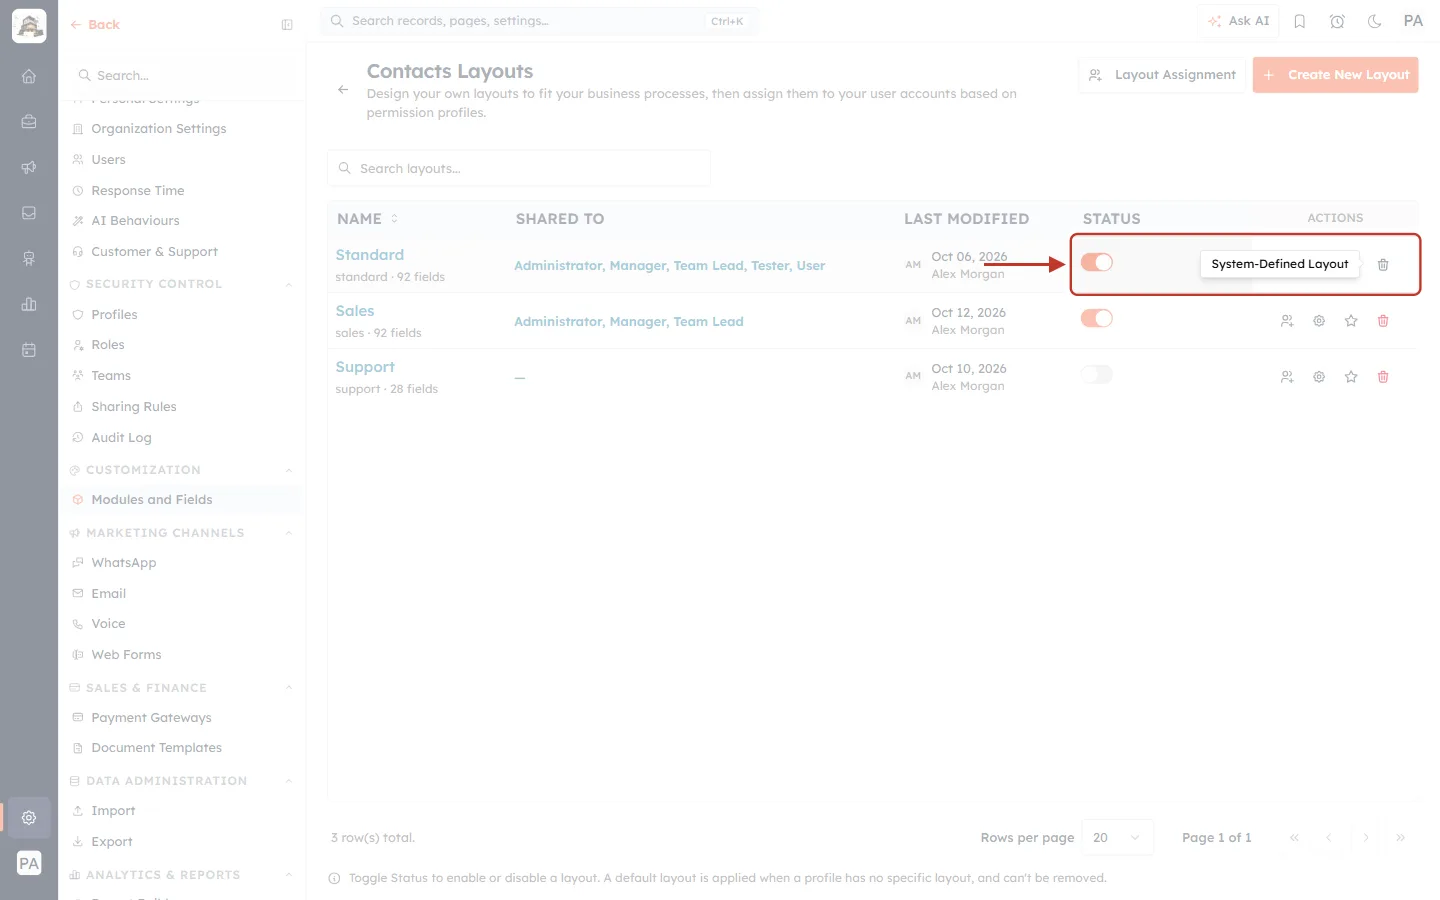
What this screenshot shows. The Status switch and the action icons of the Standard row, ringed, with the tooltip of the greyed-out bin: System-Defined Layout.
Standard’s Status switch is faded: Standard is always active.
Standard’s bin is greyed out: Standard can never be deleted. This stays true even after another layout becomes the default.
Part 2: Make another layout the default#
Step 3: Click the empty star of the layout#
On the row of the layout you want as the default — here Sales — click the empty star.
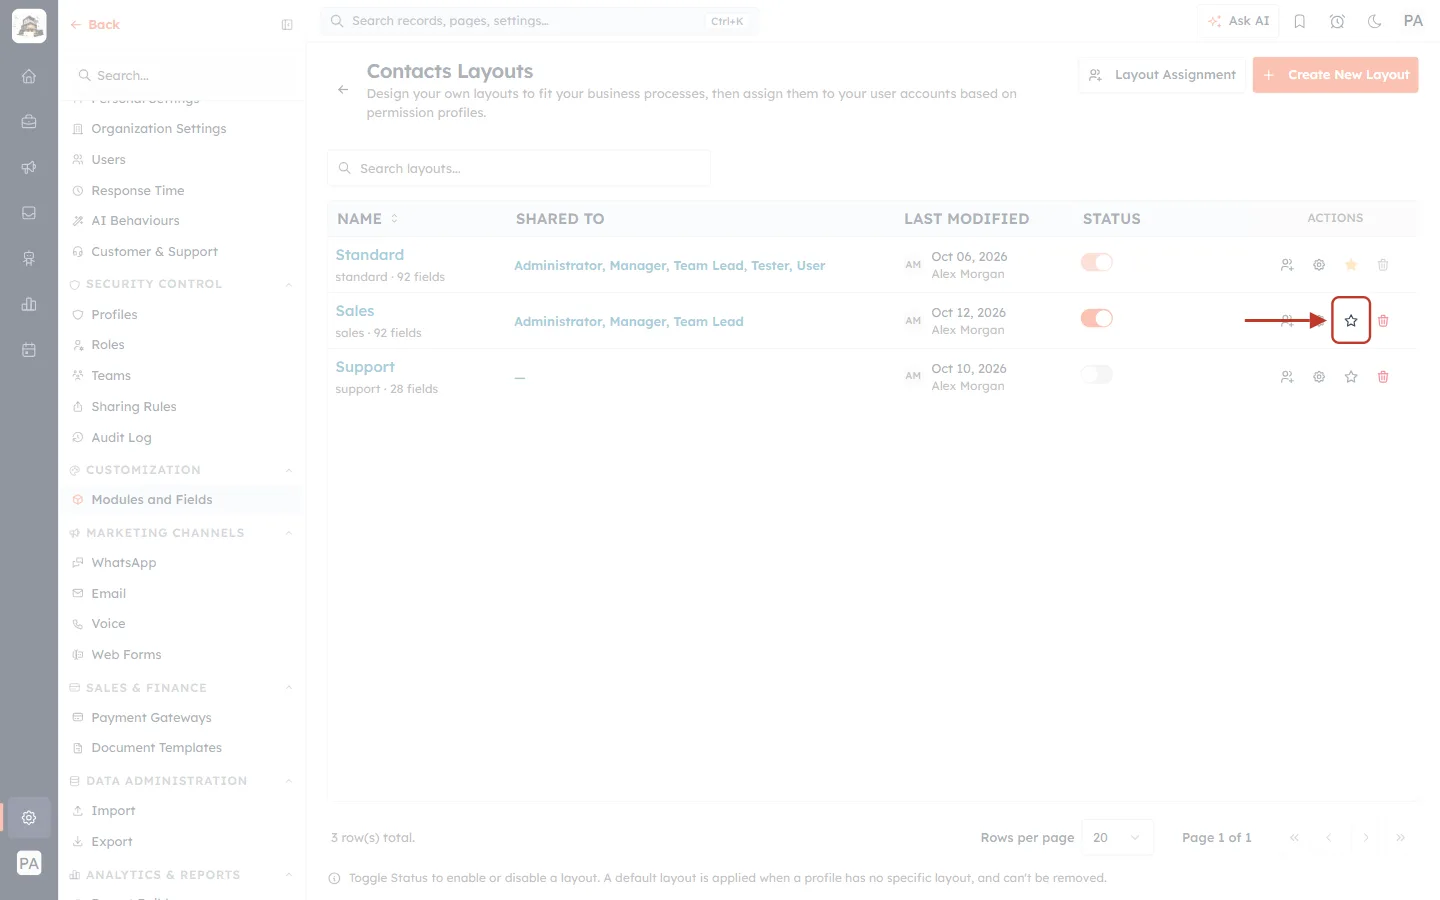
What this screenshot shows. The empty star in the ACTIONS column of the Sales row, ringed. Its tooltip reads Set as default.
The icons beside it are Assign profiles, Open in Layout Builder (gear) and Delete (bin).
There is no confirmation step: the change happens as soon as you click.
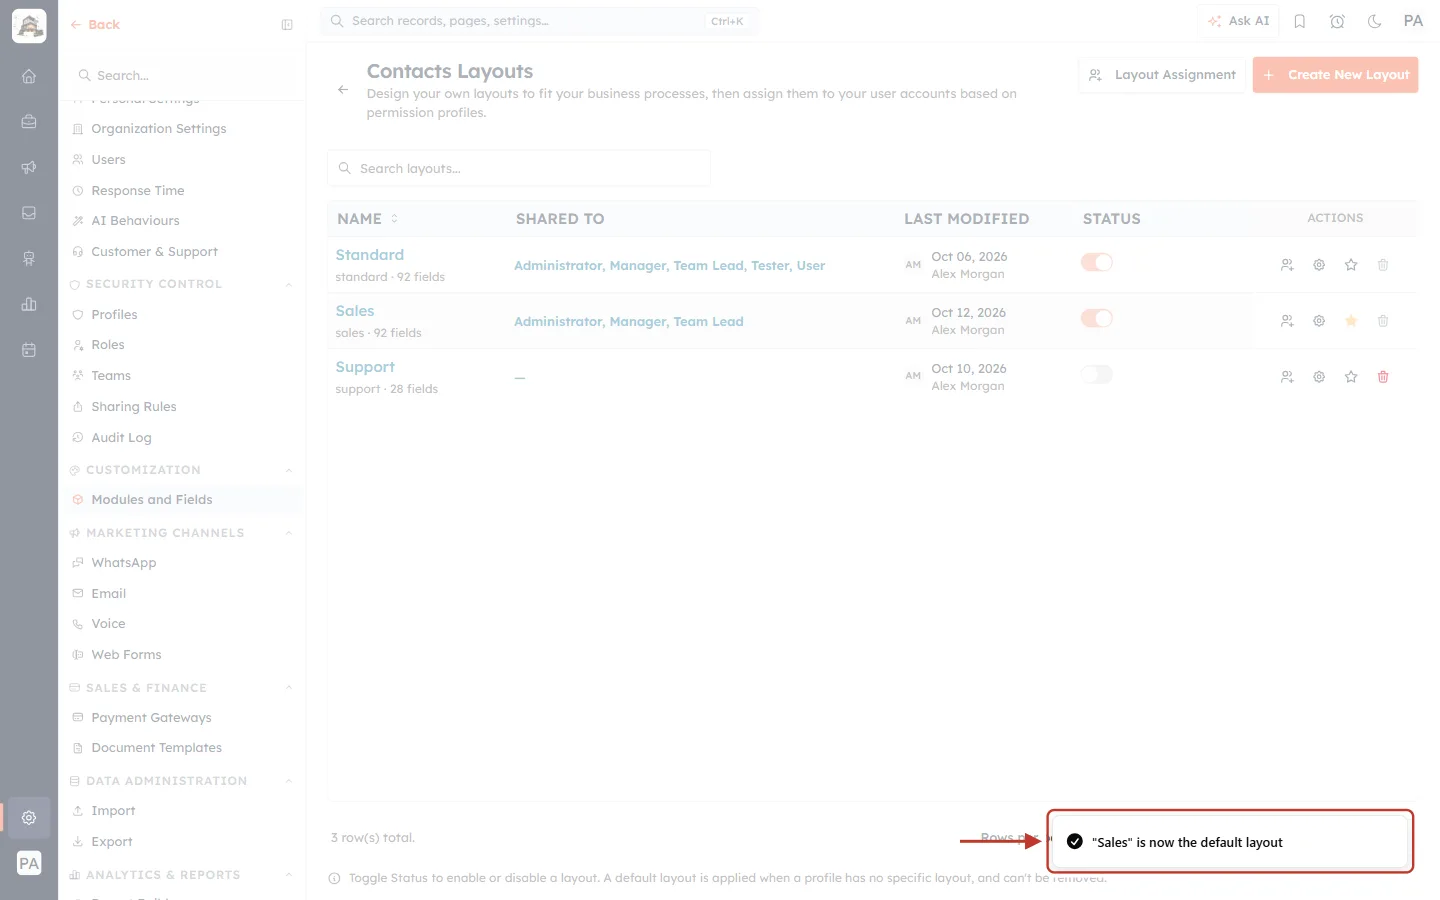
What this screenshot shows. The confirmation at the bottom right of the screen, ringed: “Sales” is now the default layout.
The table reloads straight away to show the new default.
Step 4: Check the result#
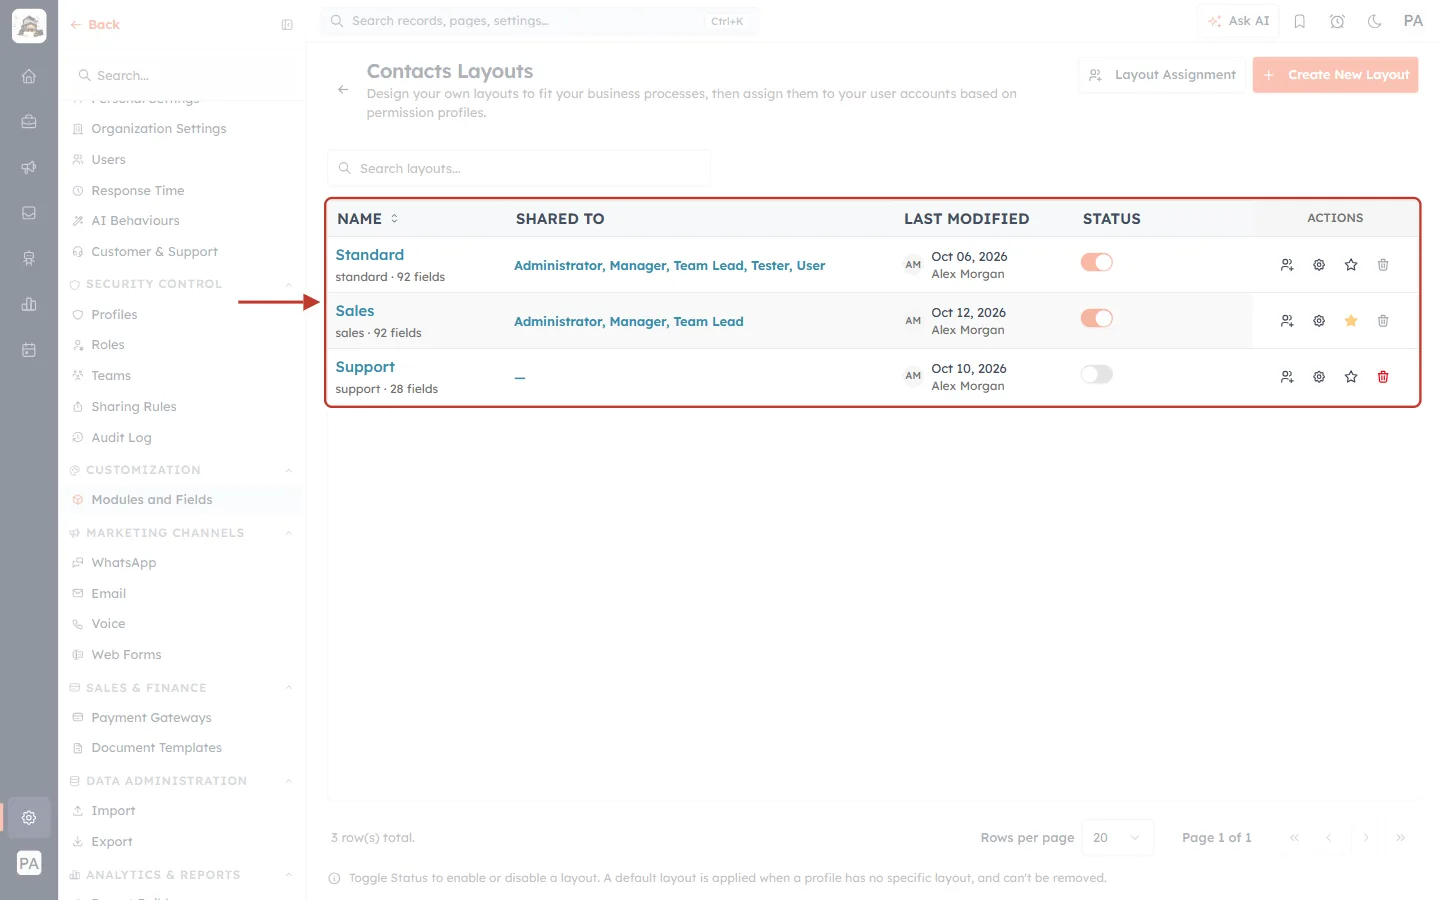
What this screenshot shows. The Contacts Layouts table after the change, ringed.
The Sales row now has the filled orange star, and Standard’s star is empty.
SHARED TO hasn’t changed on any row: making a layout the default doesn’t share it with more profiles. It is simply what profiles without a layout of their own now get.
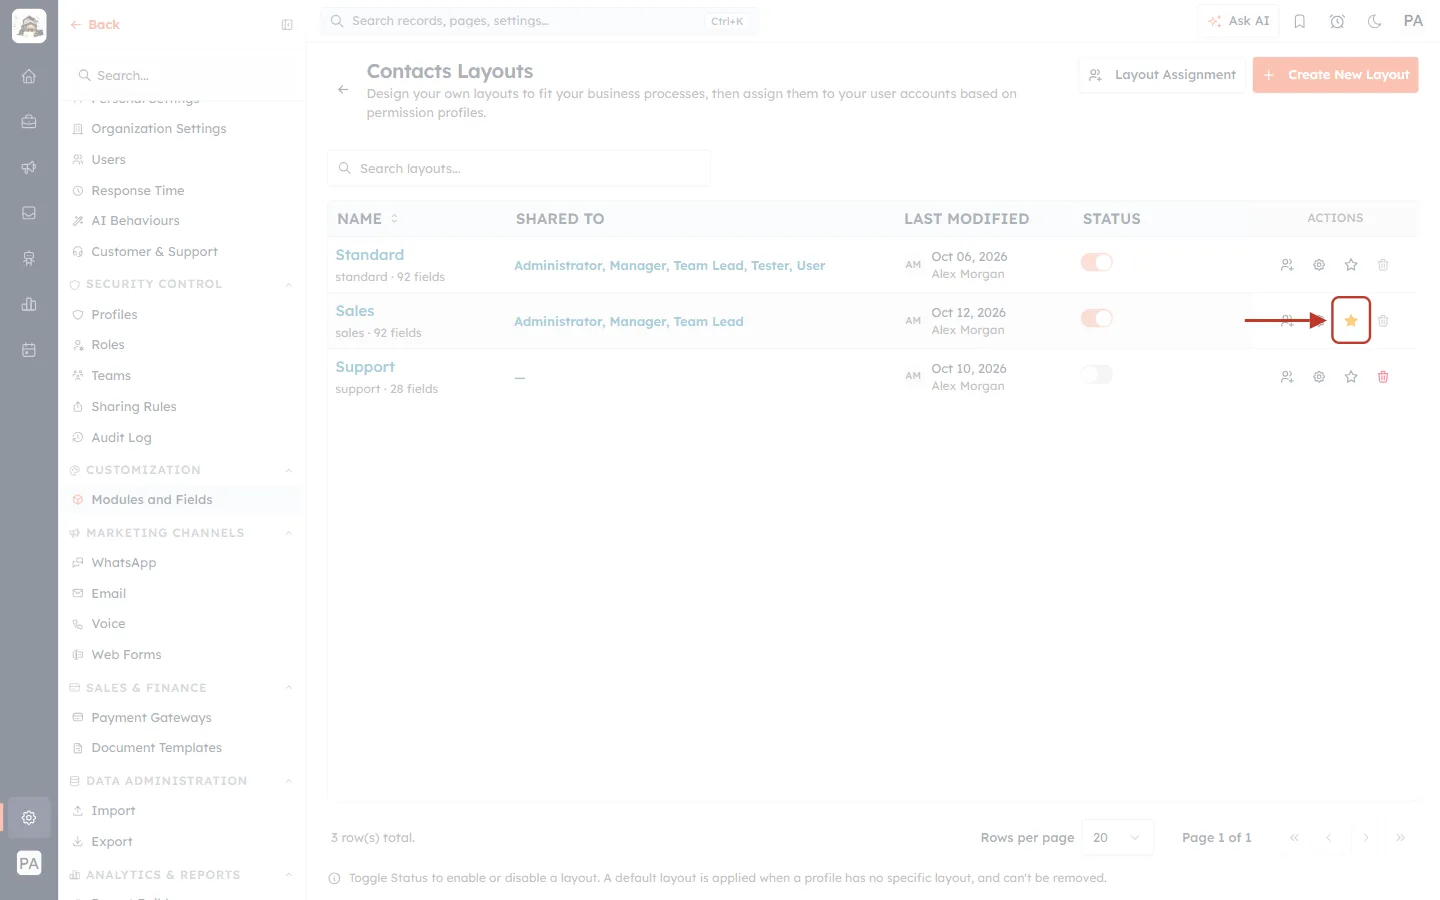
What this screenshot shows. The Sales row’s star, ringed — now filled orange.
Its tooltip now reads This is the default layout, and it can’t be clicked again.
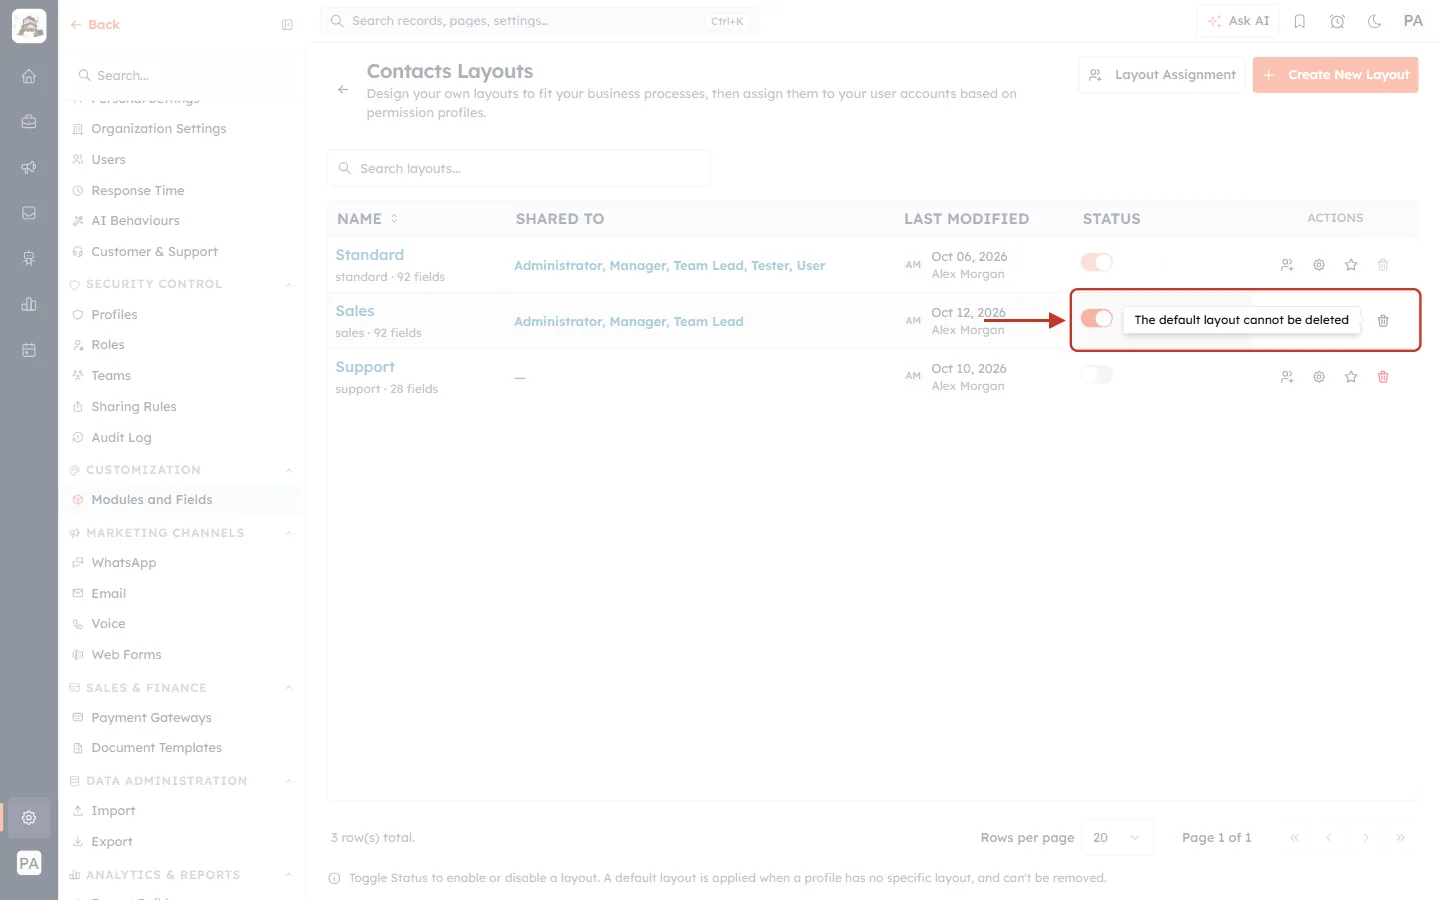
What this screenshot shows. The Status switch and action icons of the Sales row, ringed, with the bin’s tooltip: The default layout cannot be deleted.
While Sales is the default, its Status switch is locked on. Its tooltip reads The default layout is always active. Make another layout the default first.
Its bin is greyed out. To switch off or delete Sales, make another layout the default first.
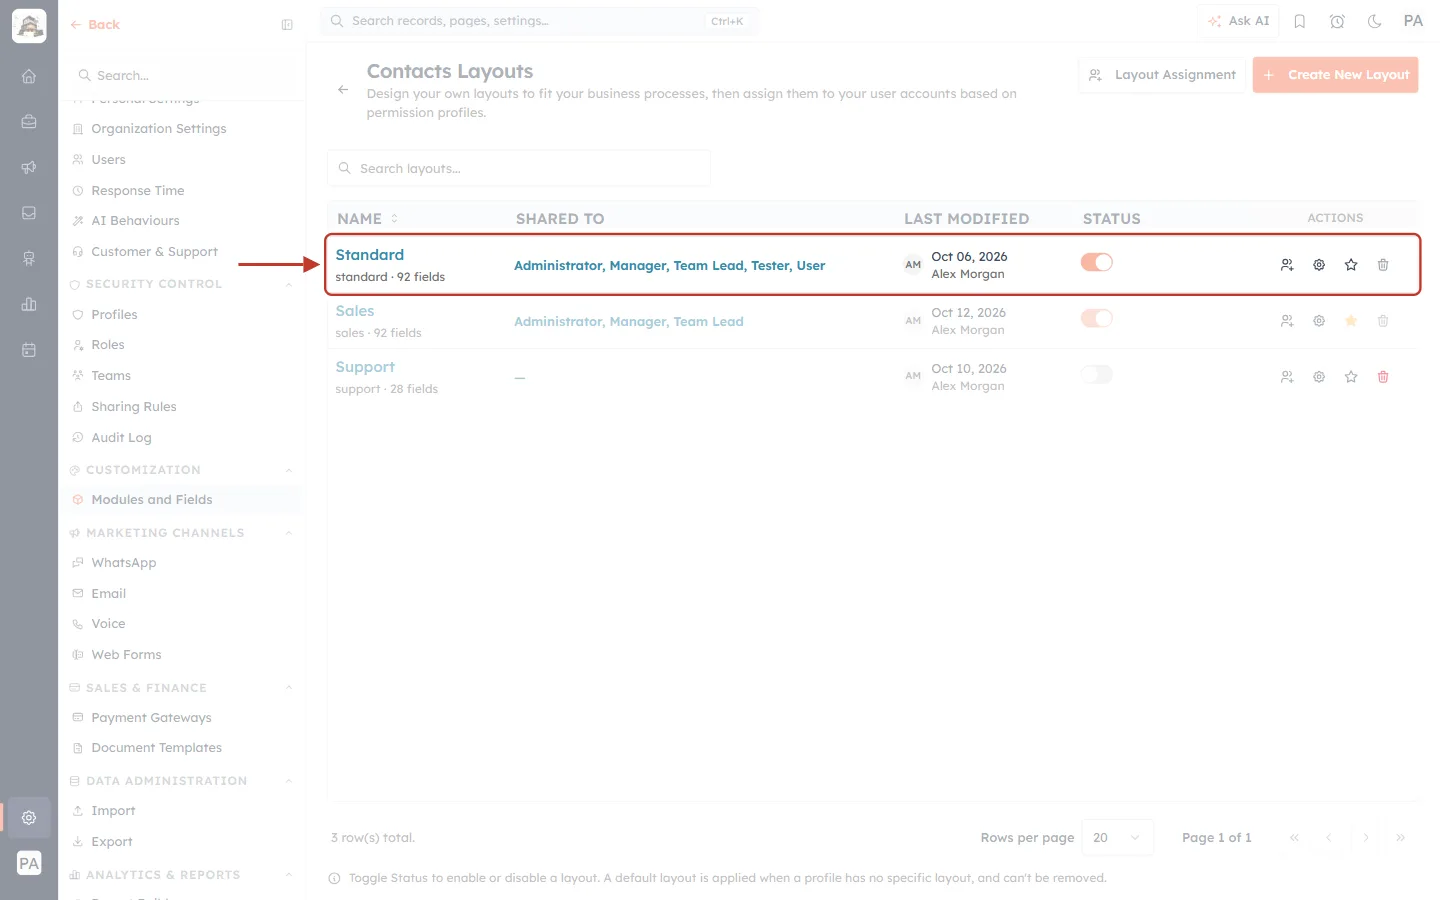
What this screenshot shows. The Standard row, ringed. Its star is now empty.
Standard is still active and still can’t be deleted, because it is the system layout of the module.
People whose profiles have Standard assigned keep using Standard — the change only affects profiles with no layout of their own.
Step 5: See the default in the Layout Builder#
Open the default layout with its gear icon. The Layout Builder labels it too.
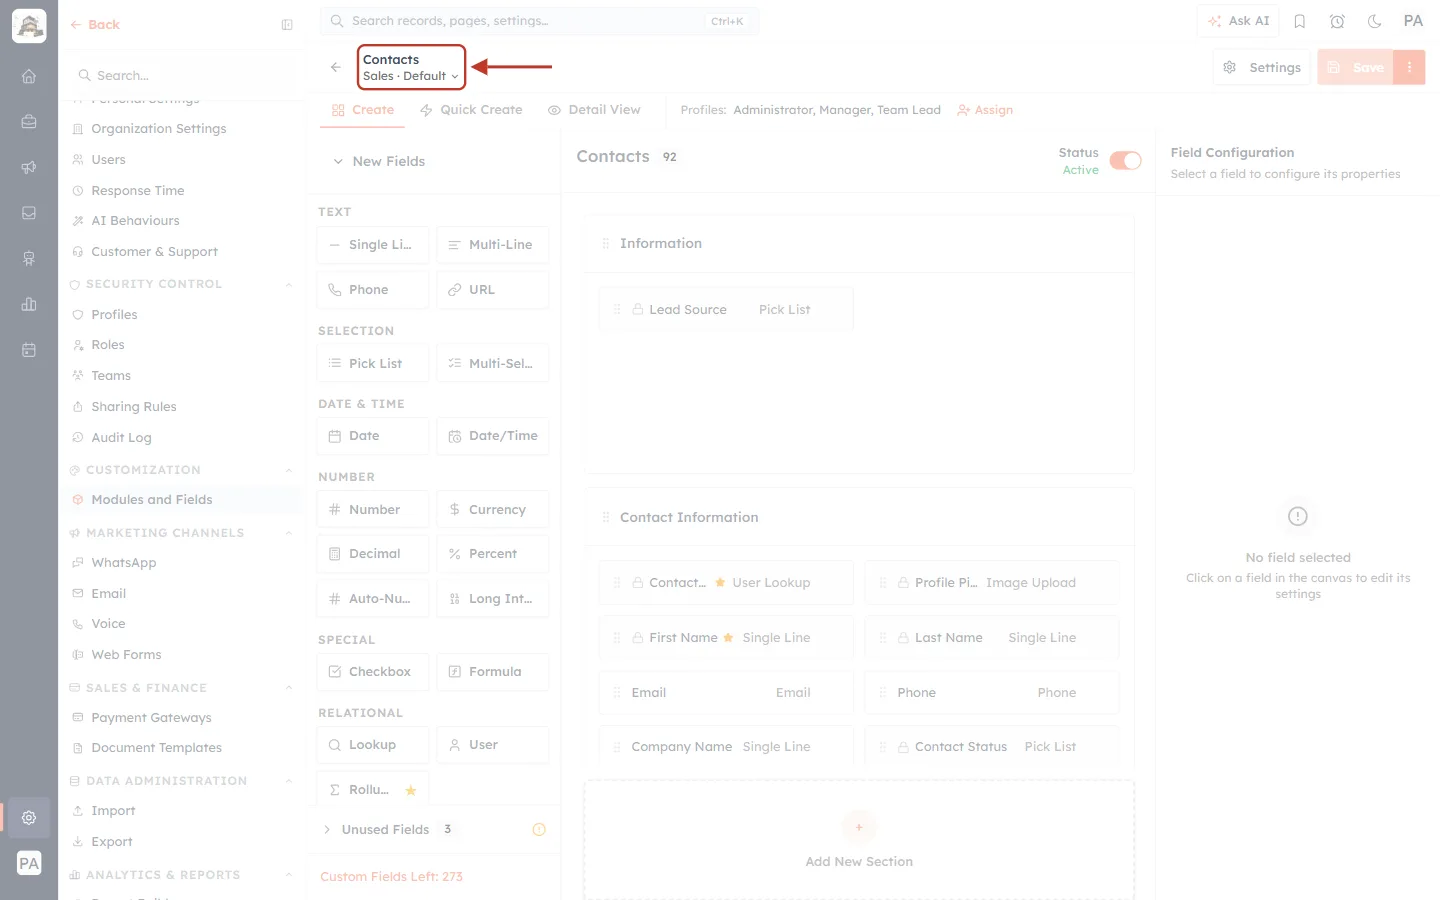
What this screenshot shows. The top left of the Layout Builder, ringed: Contacts and, under it, Sales · Default.
“· Default” is shown after the name of whichever layout is the module default.
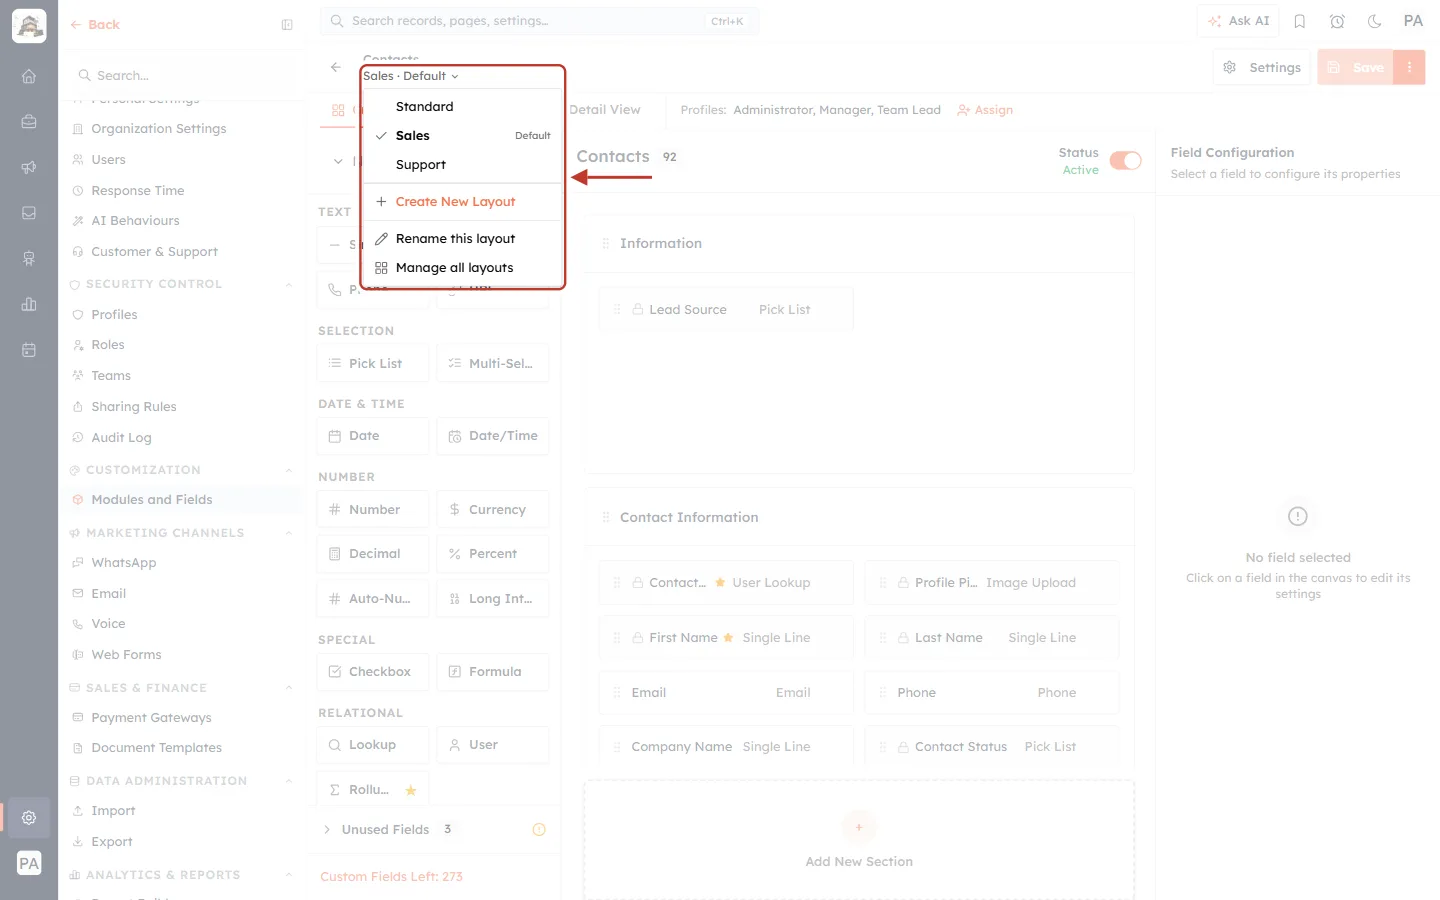
What this screenshot shows. The layout menu, opened from the layout name and ringed. Sales has a tick (it is open) and the word Default on the right.
Standard and Support are listed without it.
The menu also has Create New Layout, Rename this layout and Manage all layouts, which goes back to the Layouts page.
ℹ️
When you create a new layout, the Clone From box in the Create New Layout window starts on the module default, marked “(Default)”. See Create a New Layout for a Module.
Part 3: An inactive layout can’t be the default#
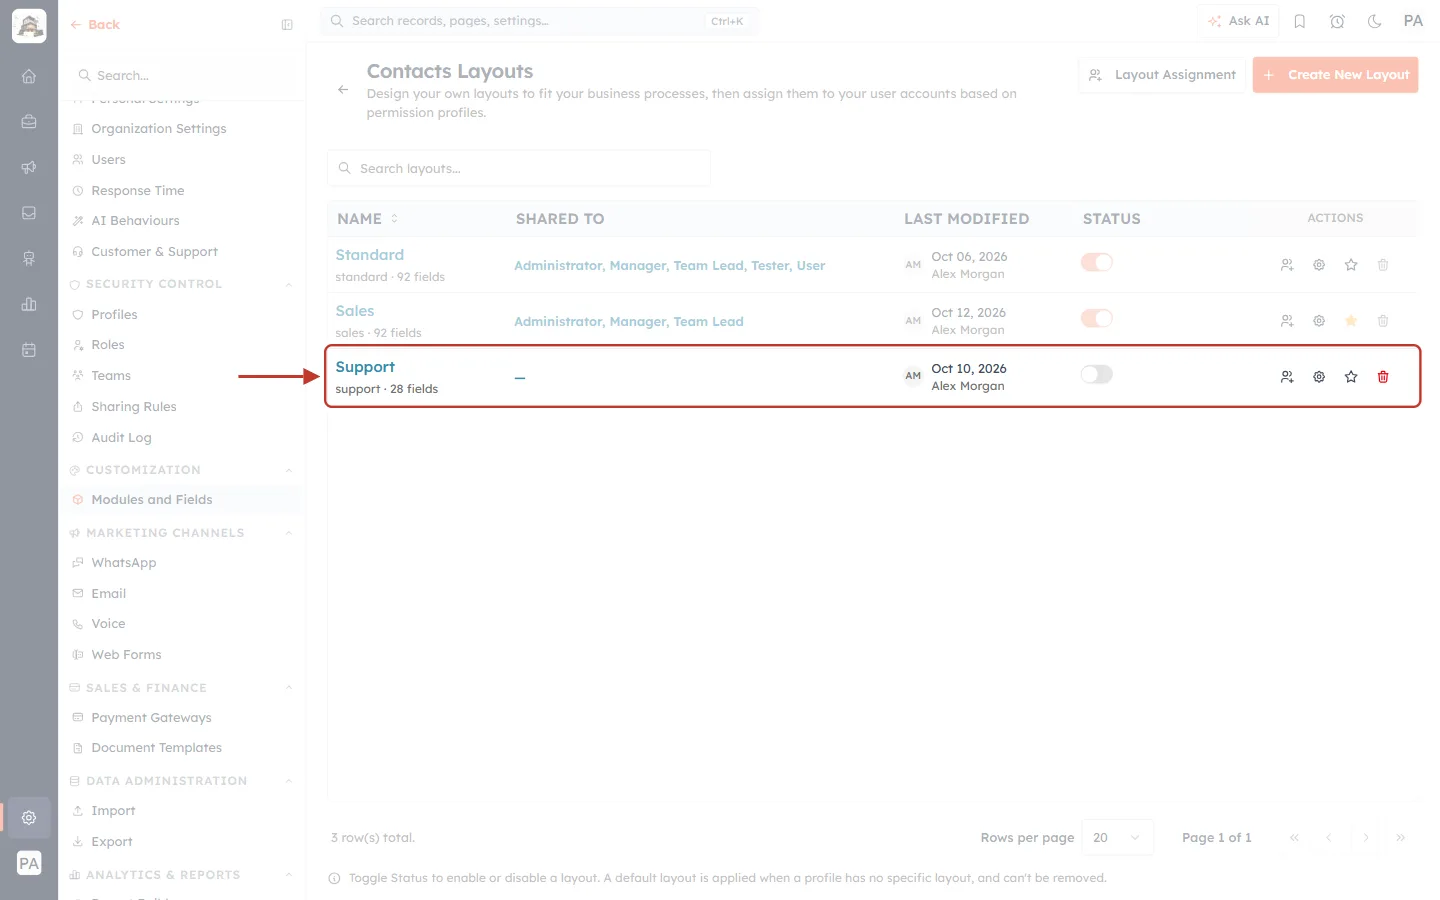
What this screenshot shows. The Support row, ringed. Its Status switch is off and SHARED TO shows “—”.
Its star is empty and can be clicked — but the CRM refuses the change, as the next figure shows.
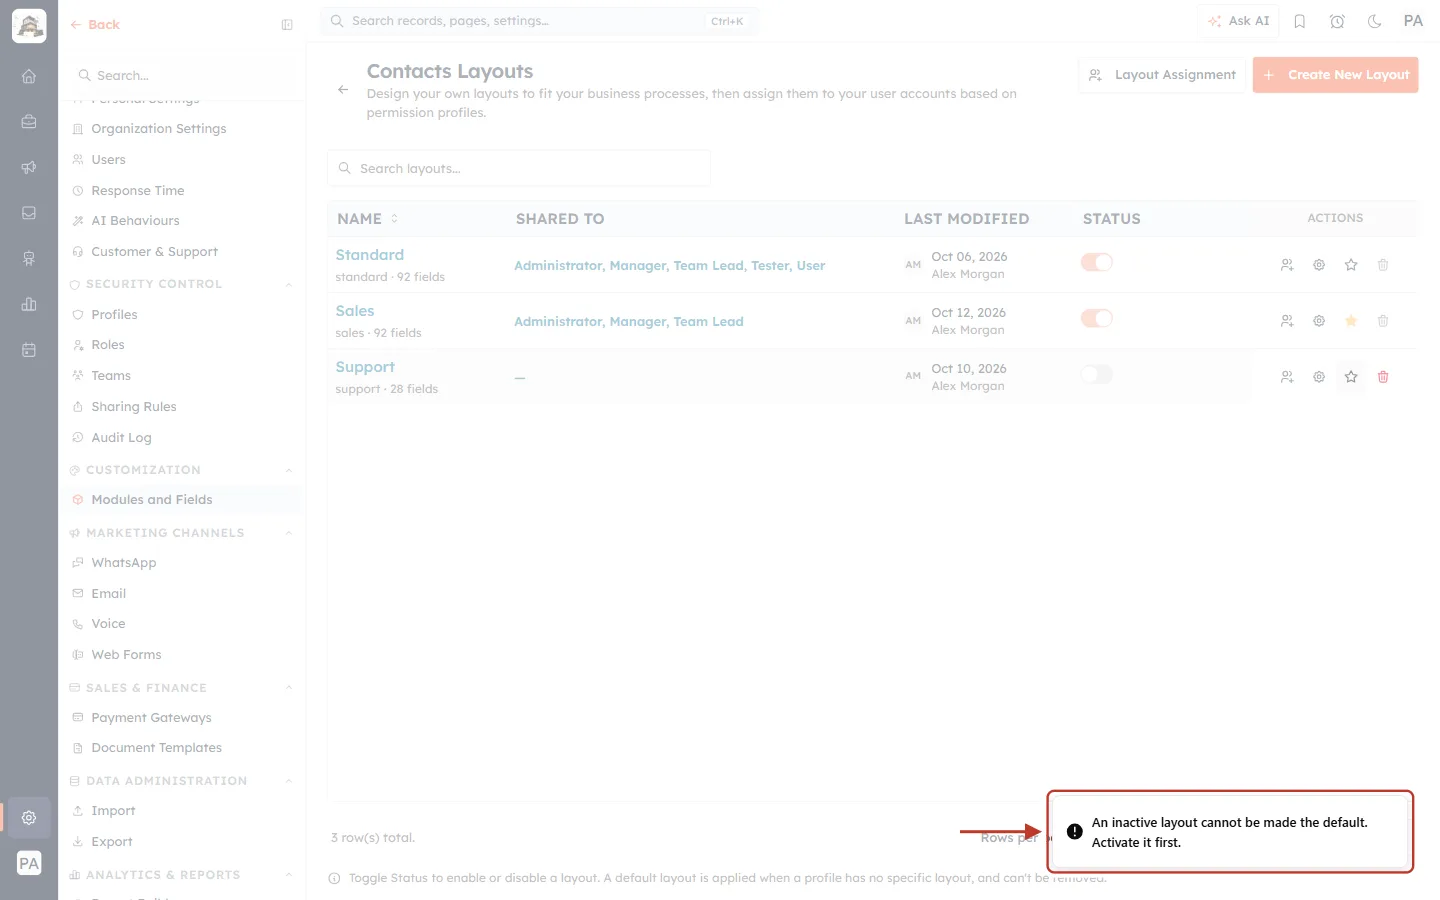
What this screenshot shows. The message after clicking Support’s star, ringed: “An inactive layout cannot be made the default. Activate it first.”
Nothing changes: Sales stays the default.
To make Support the default, first turn its Status switch on (switching a layout on happens straight away, with no questions), then click its star.
⚠️
Before you make a layout the default, make sure it is ready: it should have every field people need, and the right fields marked as required. Everyone without a layout of their own will start creating records with it straight away.
Part 4: Switch the default back#
Step 6: Click the star of the layout you want back#
To make Standard the default again, click the empty star on the Standard row.
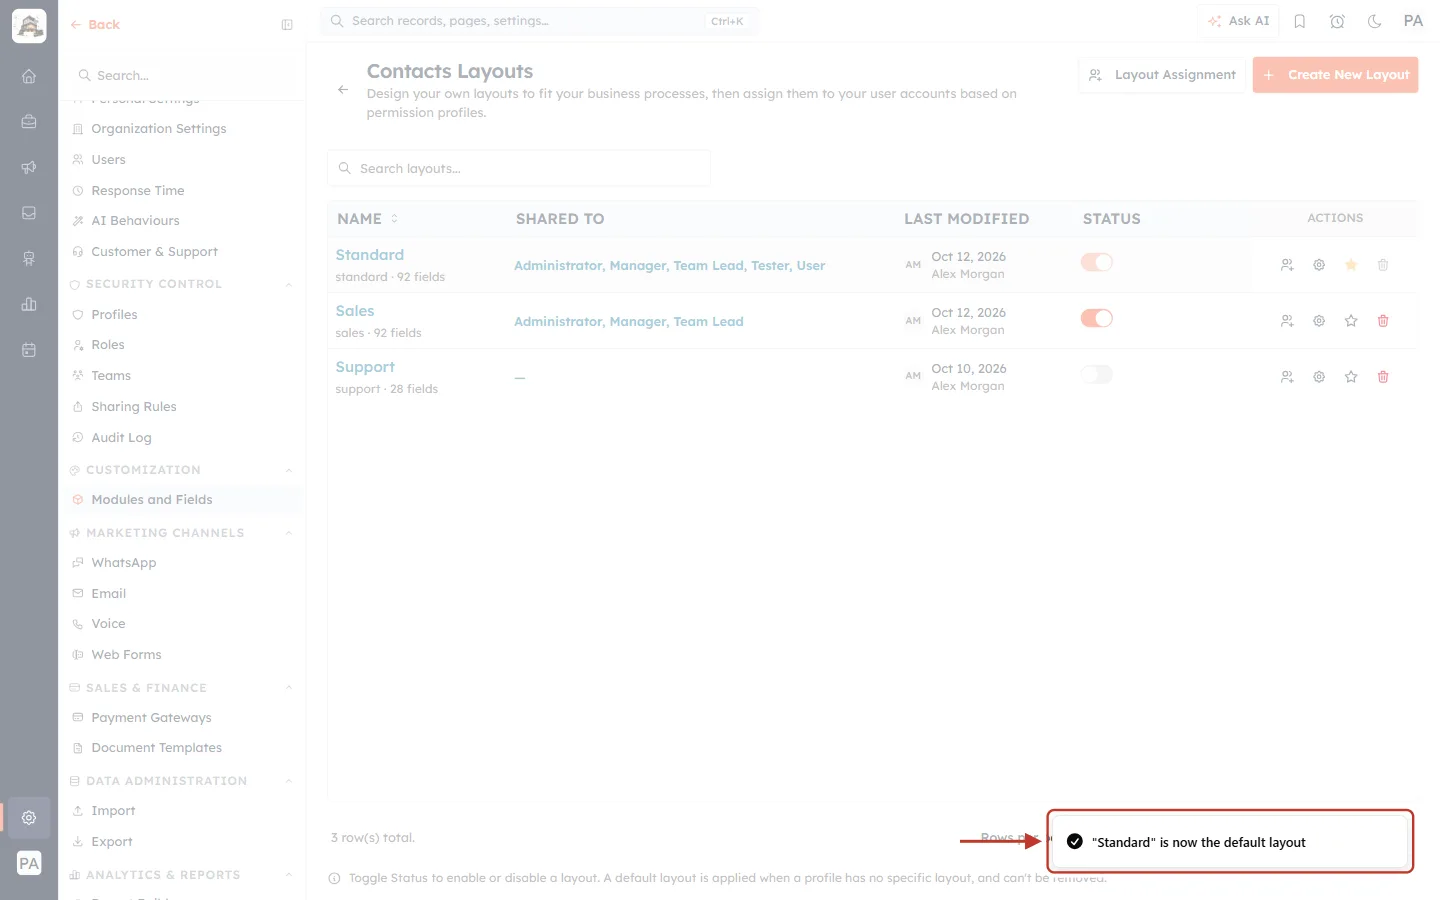
What this screenshot shows. The confirmation at the bottom right, ringed: “Standard” is now the default layout.
Switching the default back and forth is safe: no records, fields or profiles are changed.
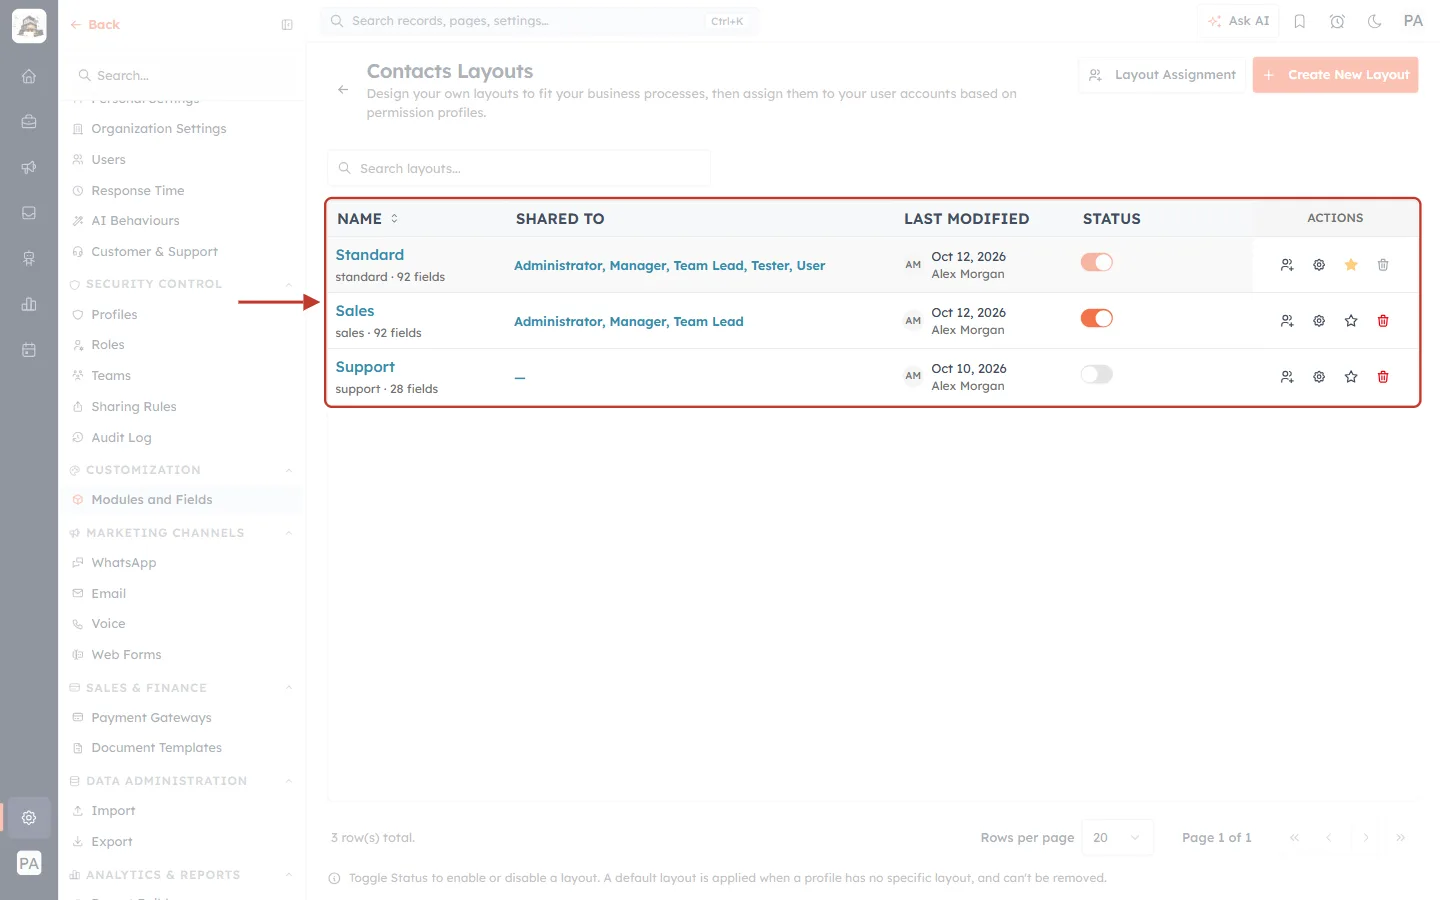
What this screenshot shows. The Contacts Layouts table, ringed. Standard has the filled star again and Sales’s star is empty.
Sales’s Status switch and bin are no longer locked — you could now switch Sales off or delete it.
Rules at a glance#
| Rule | What you see |
|---|---|
| A module always has exactly one default layout. | One filled orange star in the table. Clicking another star moves it. |
| The default layout is always active. | Its Status switch is locked: “The default layout is always active. Make another layout the default first.” |
| The default layout can’t be deleted. | Its bin is greyed out: “The default layout cannot be deleted”. |
| An inactive layout can’t become the default. | “An inactive layout cannot be made the default. Activate it first.” |
| Standard is the system layout. | It is always active and can never be deleted (“System-Defined Layout”), even when it isn’t the default. |
Common questions#
Who actually sees the module default layout?#
Only people whose profile has no active layout of its own: no Default Layout set in Layout Assignment and no active layout assigned. In Layout Assignment, a profile with no layouts shows the module default’s name in grey italics in its Default Layout column.
Does changing the default move existing records to the new layout?#
No. A record stays on the layout it was created on, for everyone who opens it. To move one record, use Change Layout on the record.
Is the module default the same as a profile’s Default Layout?#
No. A profile’s Default Layout (set in Layout Assignment) decides which layout opens first for people with that profile. The module default is only used when a profile has no layout of its own. The profile’s choice always wins.
Can I make the default layout private to some profiles?#
Sharing (the SHARED TO column) and being the default are separate. A profile without layouts of its own still falls back on the default, whatever the default is shared with.
Why is the star greyed out on one row?#
That row is already the default. The filled star can’t be clicked; click the empty star on another row to move the default there.
Previous and next#
Previous: Make a Field Required on One Layout Only: Ask Each Team for the Fields They Need
Next: Activate or Deactivate a Layout: Switch a Form Off Without Losing It
Related articles#
Was this article helpful?
Ready to implement this?
OpenAI Engage and apply what you just learned to your own workspace.
Open AI Engage CRM