Loading…


KnowledgeBase
Deactivate or Delete a User and Transfer Their Records: Offboard a Teammate Without Losing Any Work (Step-by-Step)
Introduction#
People leave teams, change roles or go on long leave. When that happens you need to do two things: stop their account from signing in, and make sure their customers, deals and follow-ups are not forgotten.
AiEngage CRM does both from one place. When you deactivate or delete a user, the CRM first checks everything that person owns. It then lets you keep those records with them, or transfer them to a teammate in the same step. Every transfer is logged, so you can check later what moved and who did it.
This guide has six parts:
Part | What you’ll learn |
|---|---|
Part 1 | Deactivate or delete: which one to choose |
Part 2 | Open the Users page and find the person |
Part 3 | Deactivate a user and keep their records with them |
Part 4 | Deactivate a user and transfer their records to a teammate |
Part 5 | Delete a user, and restore a deleted user |
Part 6 | Reactivate an account and check the Ownership Transfers history |
All screenshots use a sample team. Alex Morgan is leaving, and Riya Kapoor takes over Alex’s work. Your names and numbers will be different.
ℹ️
Before you start: you need access to Settings → Users, which is normally given to admins. You cannot deactivate or delete a person who has only been invited and has not joined yet. Use Revoke Invite for them instead (see Invite Your Team: How to Add and Manage Users).
Part 1: Deactivate or delete?#
Both options stop the person from signing in. The difference is what happens next.
Deactivate | Delete | |
|---|---|---|
Can the person sign in? | No | No |
Their records | You choose: keep them with the person, or transfer them | Must be transferred to someone else (unless they own nothing) |
Shown in the Users list | Yes, with the status Inactive | Only when you filter by Deleted |
Can you undo it? | Yes: one click on Activate | You can Restore the account, but transferred records stay with the new owner |
Best for | Long leave, seasonal staff, someone who may come back, or when you are not sure yet | Someone who has left for good |
✅
Not sure? Deactivate first. It is the safest choice. You can always delete the account later, and nothing is lost in the meantime.
Part 2: Open the Users page and find the person#
Step 1: Go to Settings → Users#
Click the gear icon (Settings) at the bottom of the left-hand rail. In the settings menu, under GENERAL, click Users.
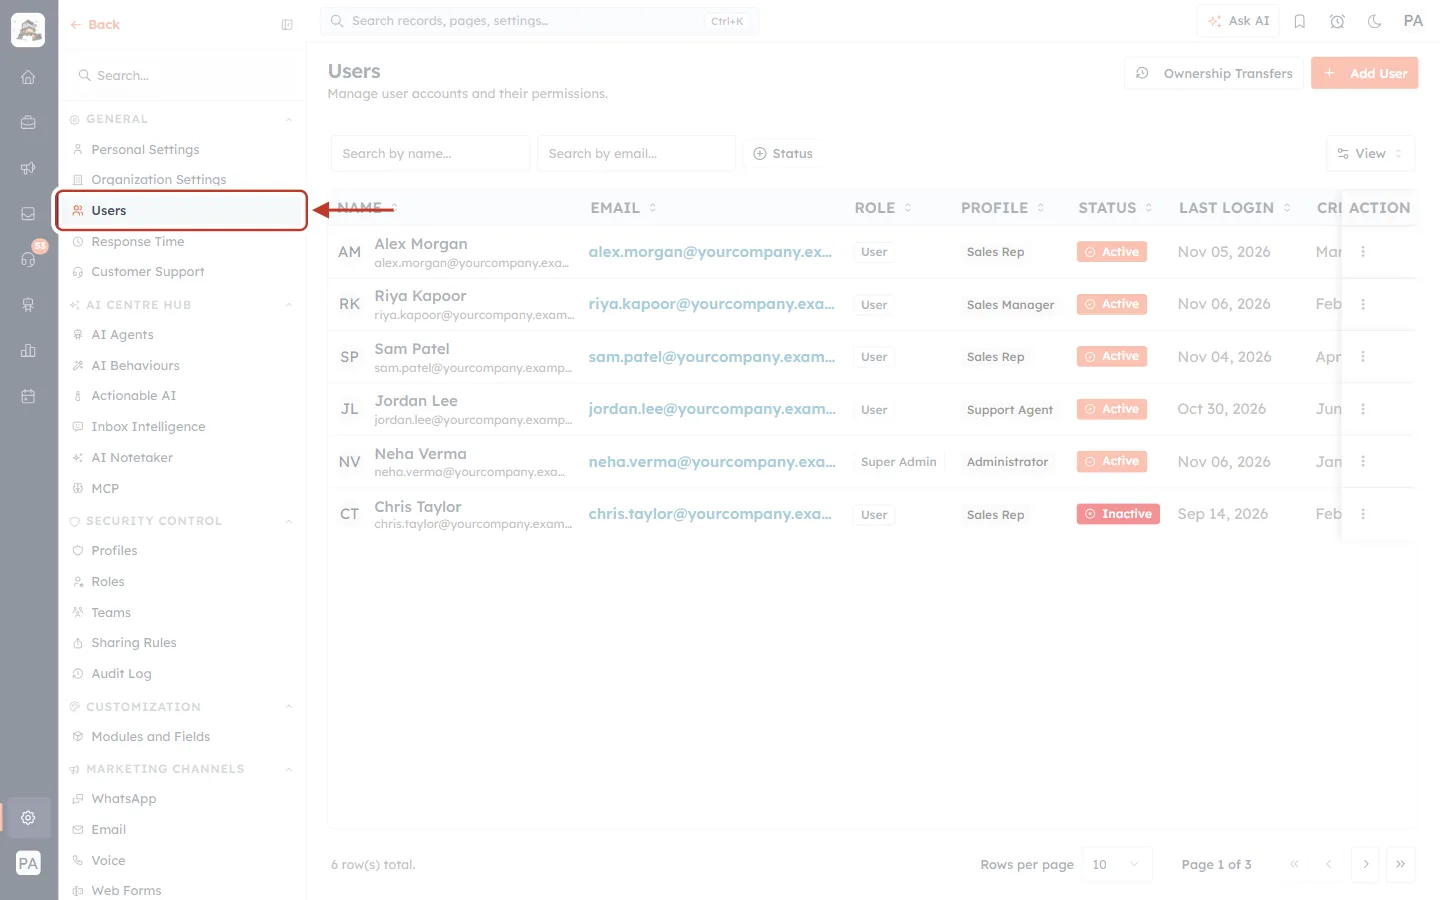
What this screenshot shows. The settings menu, open on the left of the screen. The Users link is ringed in red.
The gear icon at the bottom of the dark rail on the far left opens this menu.
The menu is split into groups: GENERAL, AI CENTRE HUB, SECURITY CONTROL, CUSTOMIZATION and MARKETING CHANNELS.
Users is the third item under GENERAL, below Personal Settings and Organization Settings.
If you cannot see Users, your profile does not have access. Ask an admin.
Step 2: Find the person in the Users list#
The Users page lists everyone in your organisation. Find the person who is leaving. If the list is long, type their name in Search by name… or their email in Search by email….
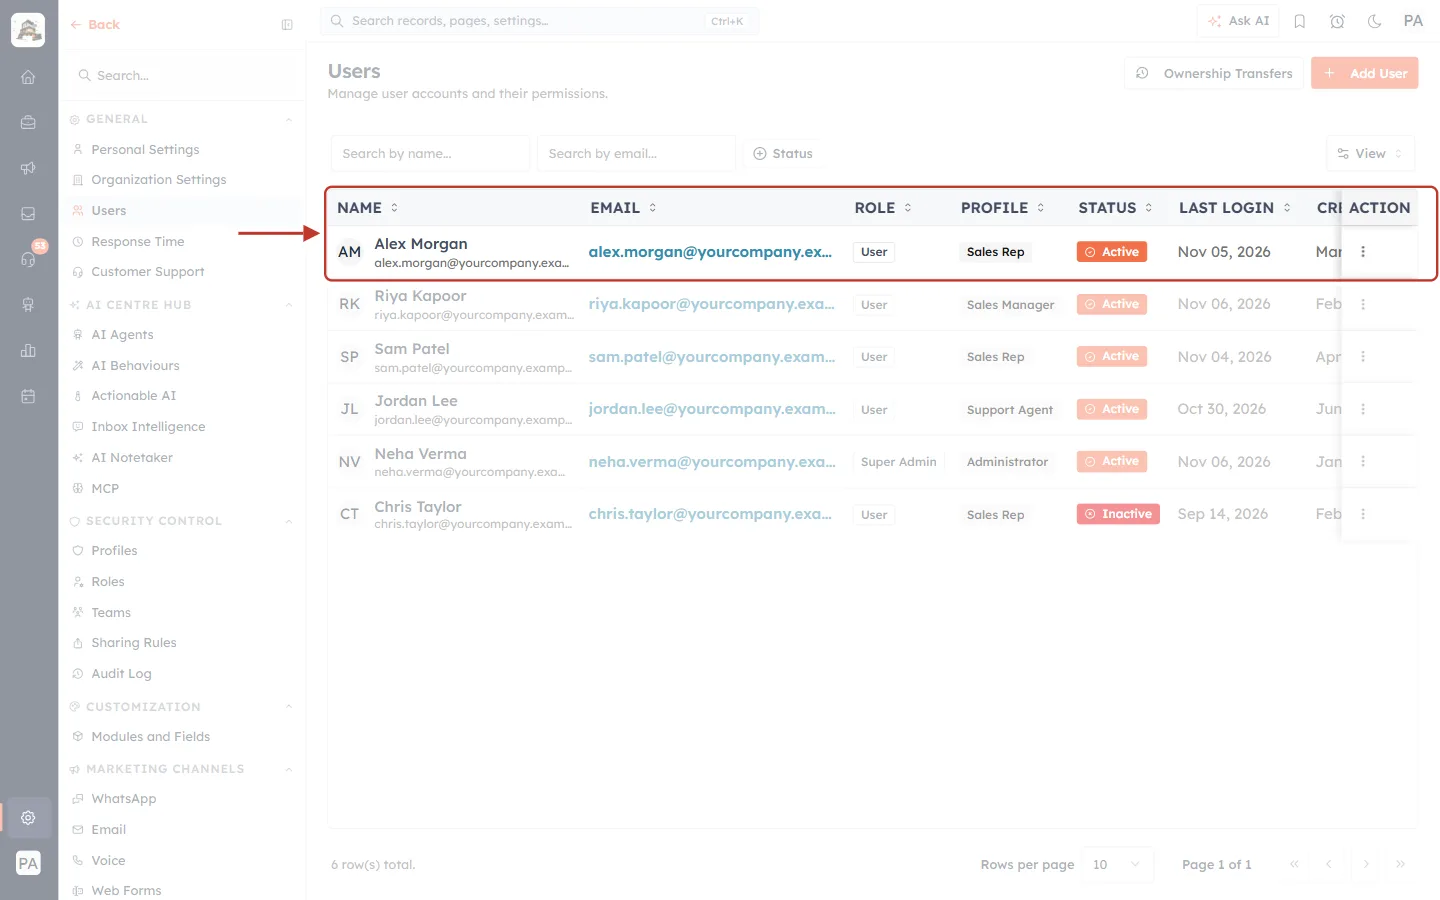
What this screenshot shows. The Users page. The column headings and the row for Alex Morgan are ringed.
At the top right are two buttons: Ownership Transfers (the history of record transfers, see Part 6) and Add User (invite someone new).
Below the title are two search boxes and a Status filter.
The columns are NAME, EMAIL, ROLE, PROFILE, STATUS, LAST LOGIN, CREATED, CREATED BY and ACTION.
The STATUS column shows Active for people who can sign in and Inactive for deactivated accounts (Chris Taylor in this example).
The ⋮ button at the end of each row, in the ACTION column, opens the actions for that person.
Step 3: Open the row menu#
Click the ⋮ button at the end of the person’s row. A small Actions menu opens.
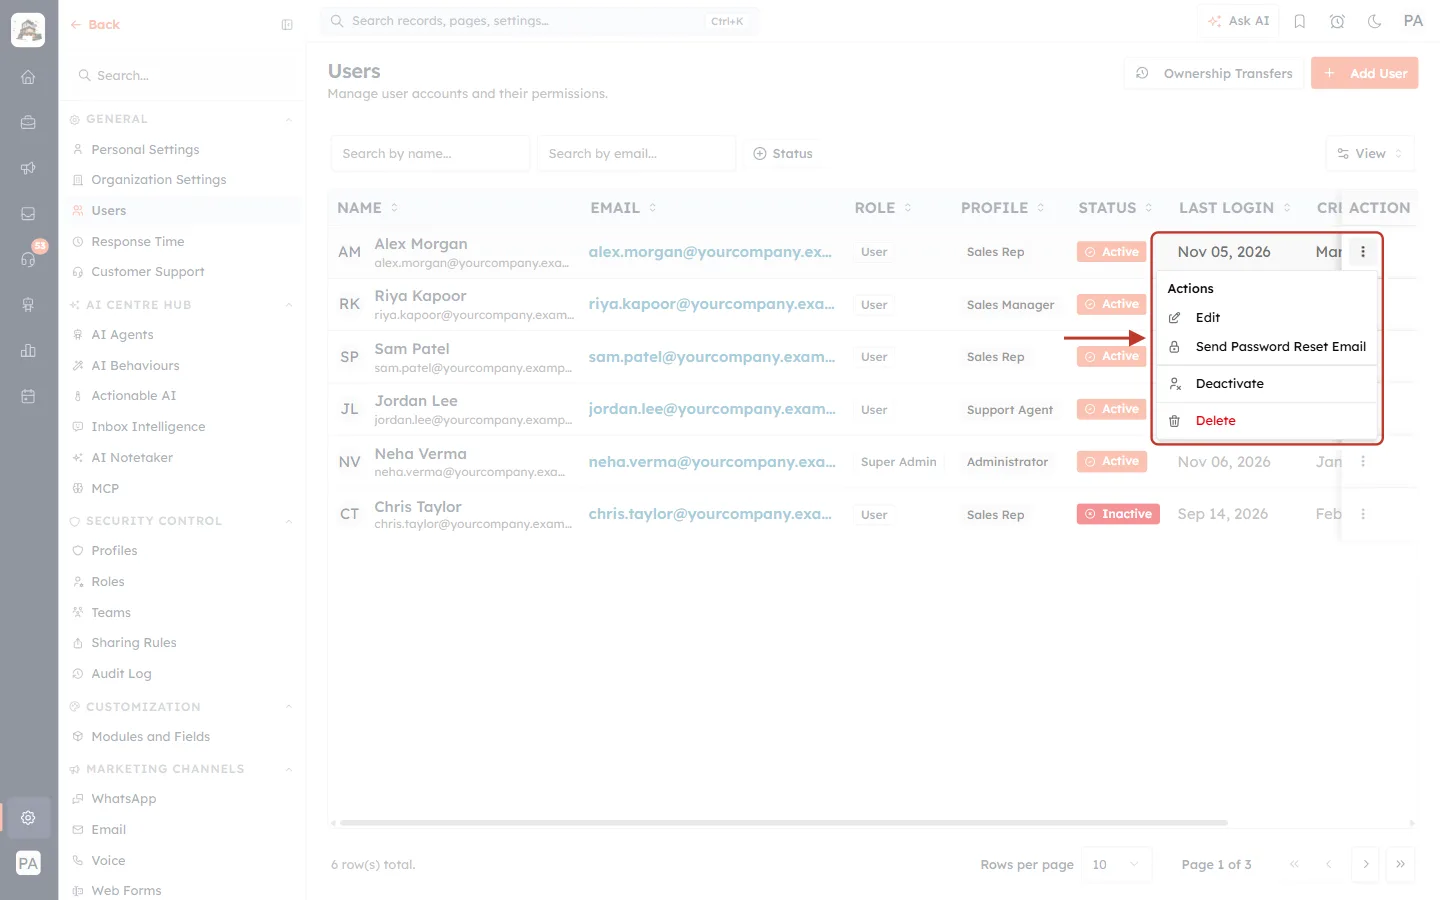
What this screenshot shows. The Actions menu for Alex Morgan, ringed together with the ⋮ button that opened it.
Edit opens the user’s details, where you can change their role, profile or teams.
Send Password Reset Email emails them a link to set a new password.
Deactivate stops them signing in. You can keep or transfer their records. This is Part 3 and Part 4.
Delete removes the account. Their records must go to someone else. This is Part 5.
Part 3: Deactivate a user and keep their records#
Choose this when the person may come back, for example after leave. Their records stay in their name, and when you reactivate the account they get everything back exactly as it was.
Step 4: Click Deactivate and read the summary#
In the Actions menu, click Deactivate. A window titled Deactivate <name> opens. For a moment it says Checking what this user owns… while the CRM counts the person’s records. Then the summary appears.
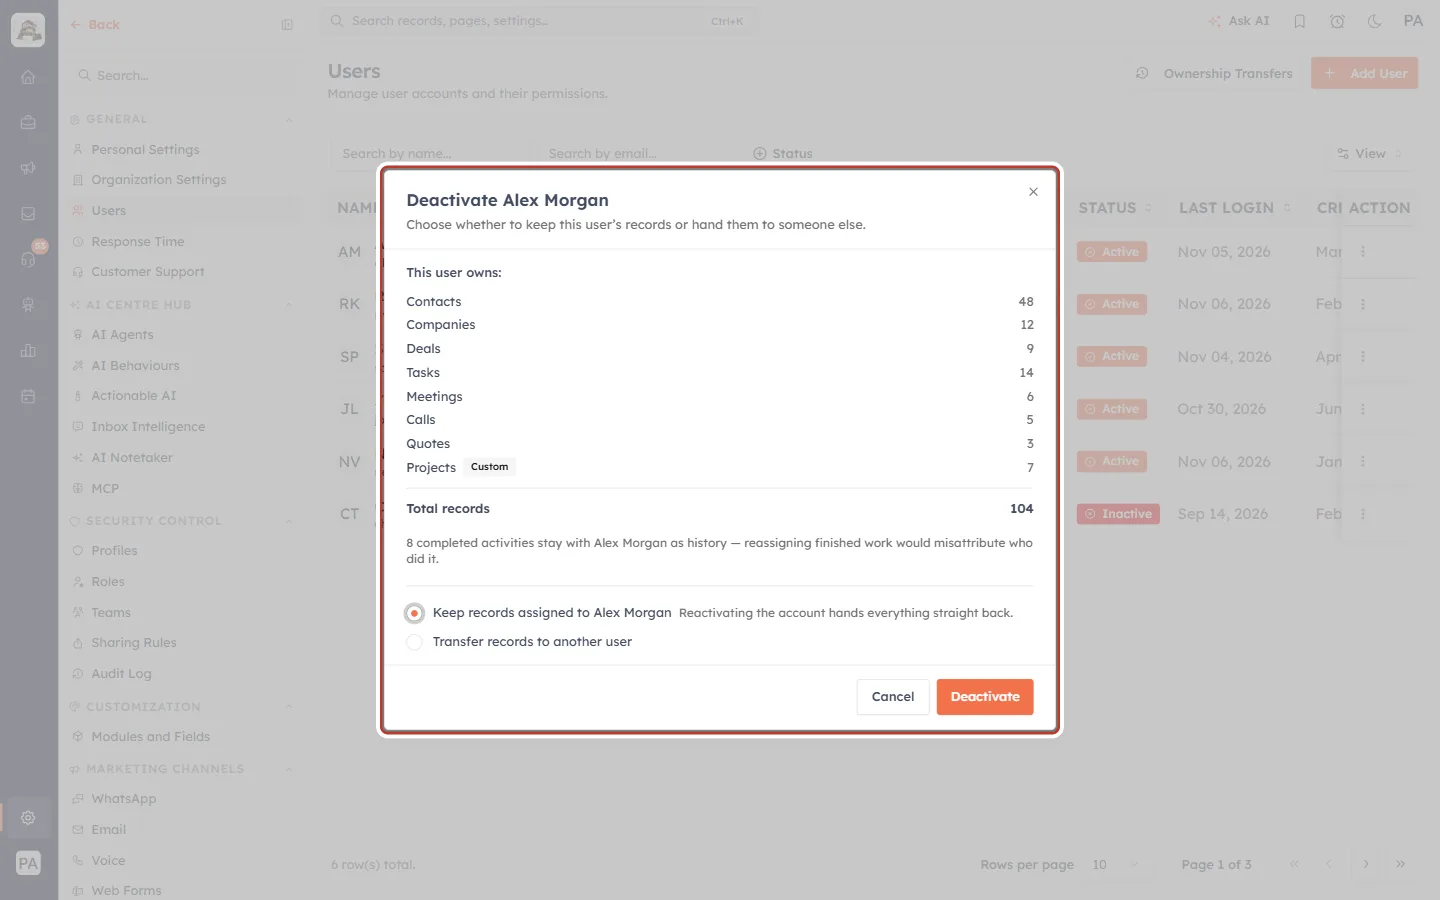
What this screenshot shows. The whole Deactivate Alex Morgan window, after the CRM has finished counting.
The line under the title reads Choose whether to keep this user’s records or hand them to someone else.
This user owns: lists every module where the person owns records, with a count on the right: Contacts 48, Companies 12, Deals 9, Tasks 14, Meetings 6, Calls 5, Quotes 3.
Modules you built yourself carry a grey Custom tag, like Projects here.
Total records adds them all up: 104 in this example.
The grey sentence below explains that 8 completed activities stay with Alex Morgan as history. Finished tasks, past meetings and completed calls are never moved, so your reports still show who really did the work.
At the bottom are two choices. Keep records assigned to Alex Morgan is selected by default. The other is Transfer records to another user.
Cancel closes the window without changing anything. Deactivate carries on.
Here is the record summary on its own, so you can match it with your screen:
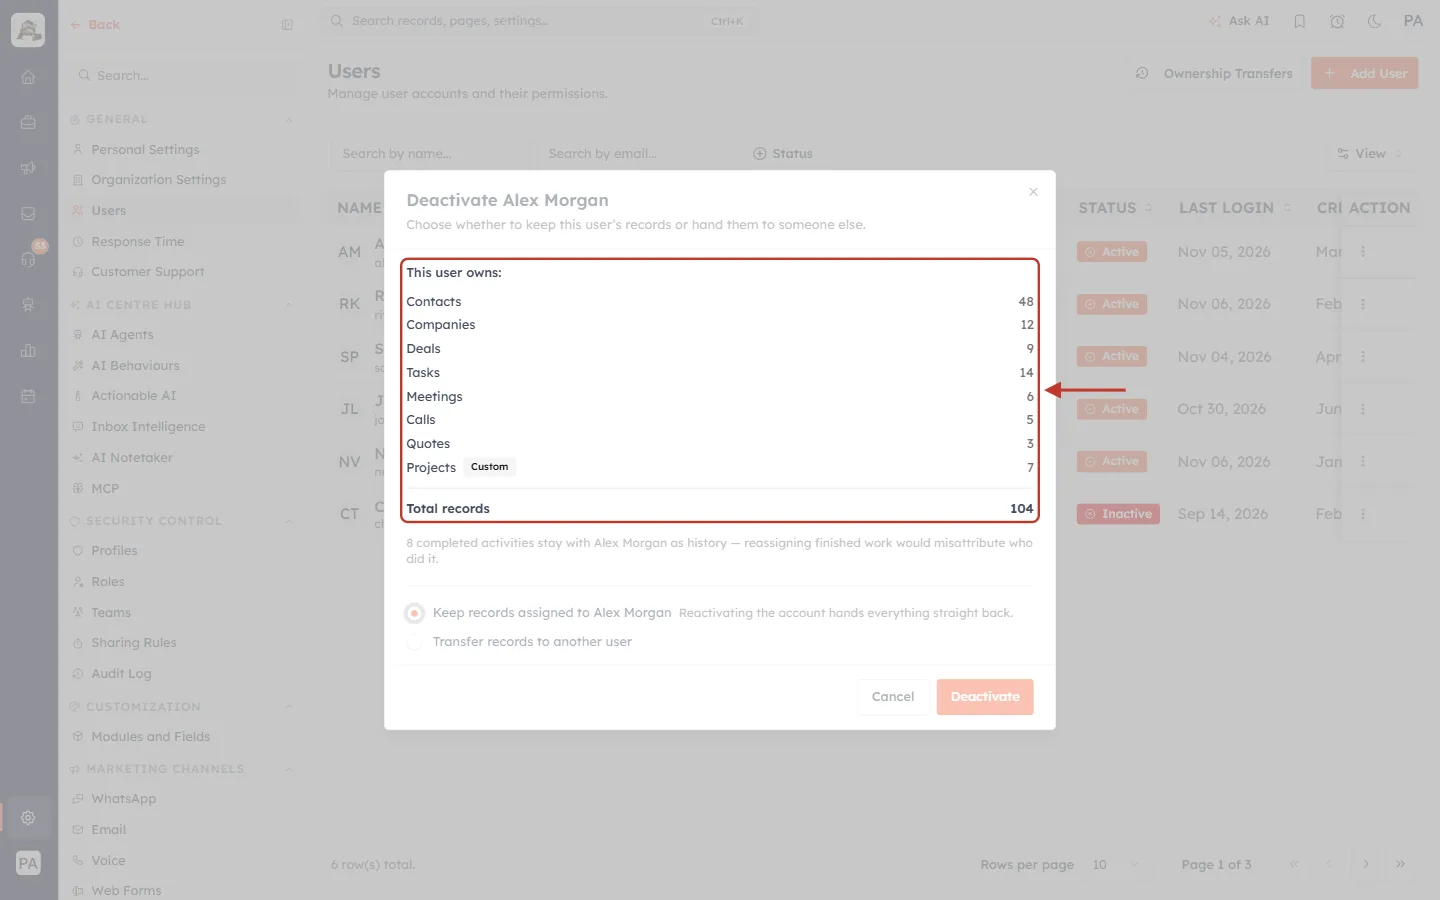
What this screenshot shows. The This user owns: list, ringed from its heading down to the Total records line.
Each line is one module. The number on the right is how many records in that module the person owns.
Only modules where the person owns at least one record are listed.
Use this list to decide who should take over. Someone who owns many deals and contacts is usually best handed to a person on the same team.
ℹ️
If the person owns nothing, the window says This user doesn’t own any records. Nothing needs to be reassigned. There is no choice to make. Click Deactivate and the account is switched off straight away.
Step 5: Leave “Keep records assigned to …” selected#
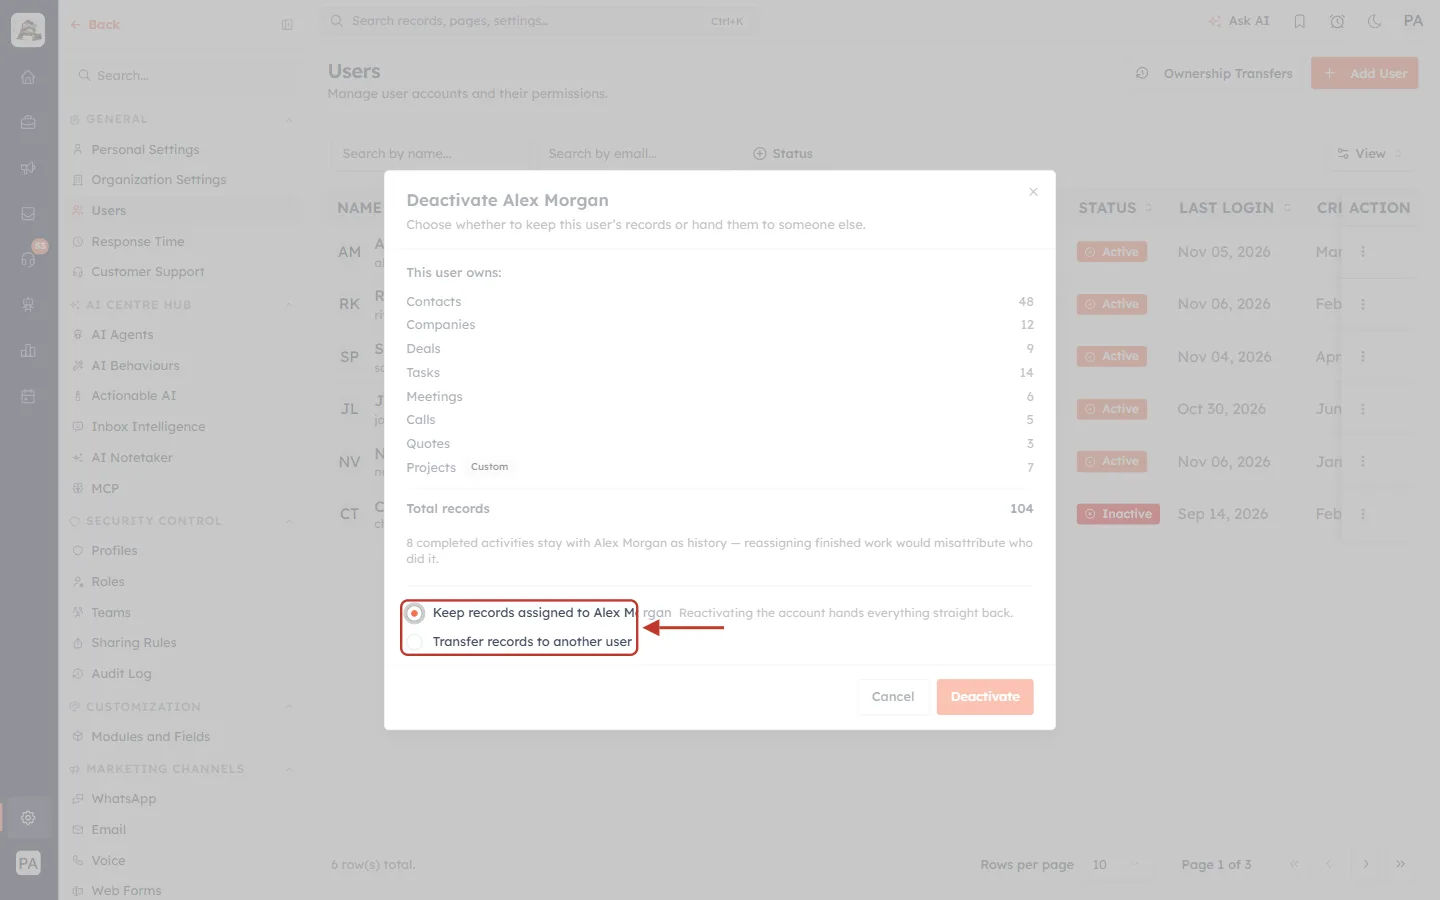
What this screenshot shows. The two choices, ringed. The first one, Keep records assigned to Alex Morgan, has its round button filled in.
The grey note beside it reads Reactivating the account hands everything straight back.
With this choice nothing moves. Alex stays the owner of every record, and those records still show Alex’s name.
The button at the bottom stays Deactivate.
⚠️
Keeping records means nobody is following them up. Open tasks and upcoming meetings stay with a person who cannot sign in. If customers are waiting, use Transfer records to another user instead (Part 4).
Step 6: Confirm#
Click Deactivate. A smaller window asks you to confirm.
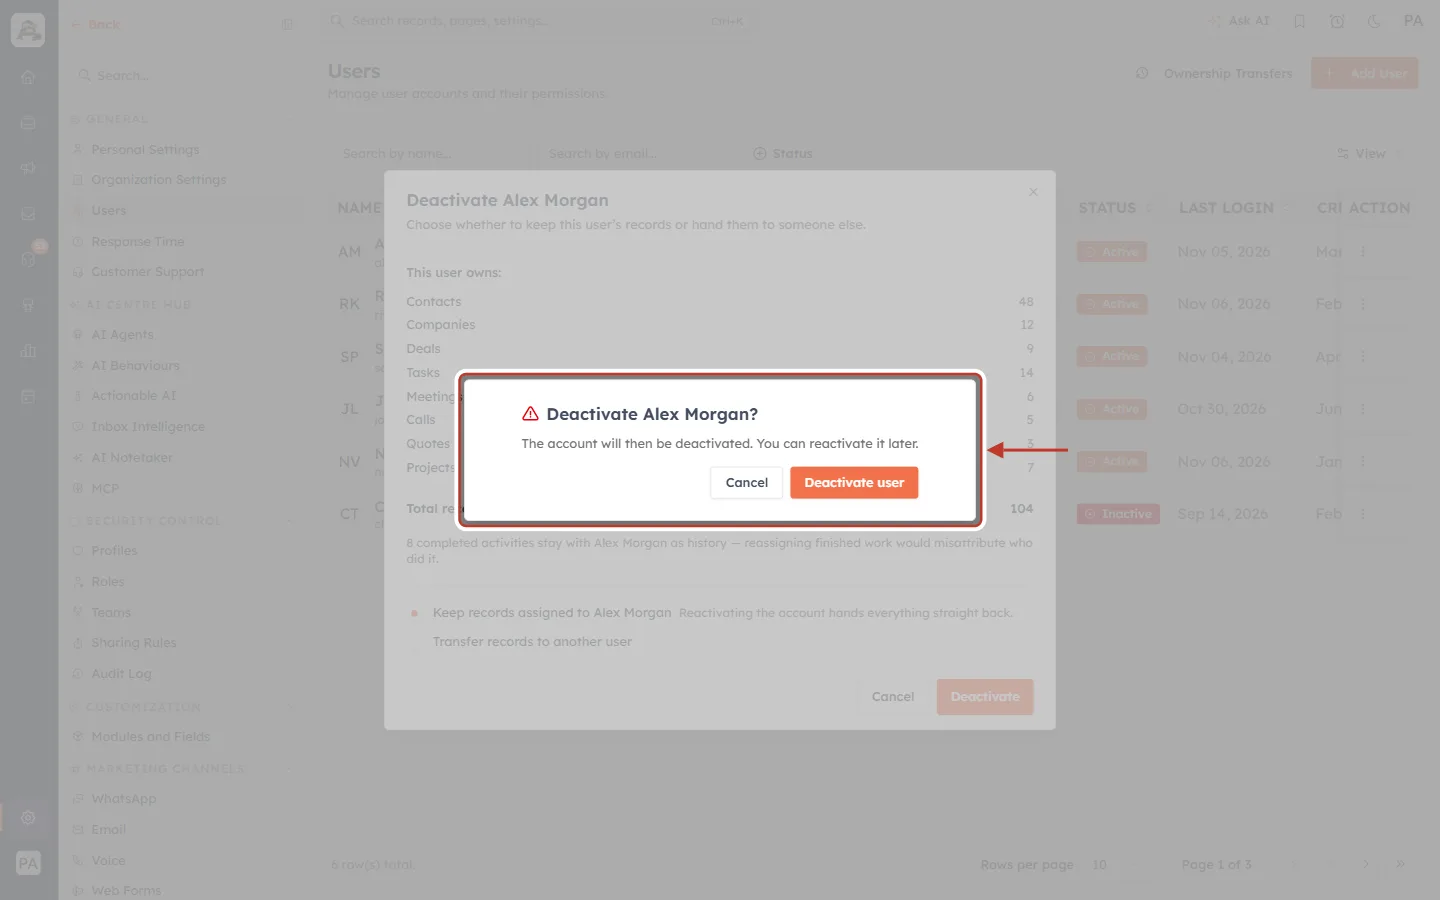
What this screenshot shows. The confirmation window, ringed.
The title has a warning triangle and reads Deactivate Alex Morgan?
The text reads The account will then be deactivated. You can reactivate it later.
Cancel takes you back to the previous window. Deactivate user does it.
Click Deactivate user. A message appears at the bottom right of the screen.
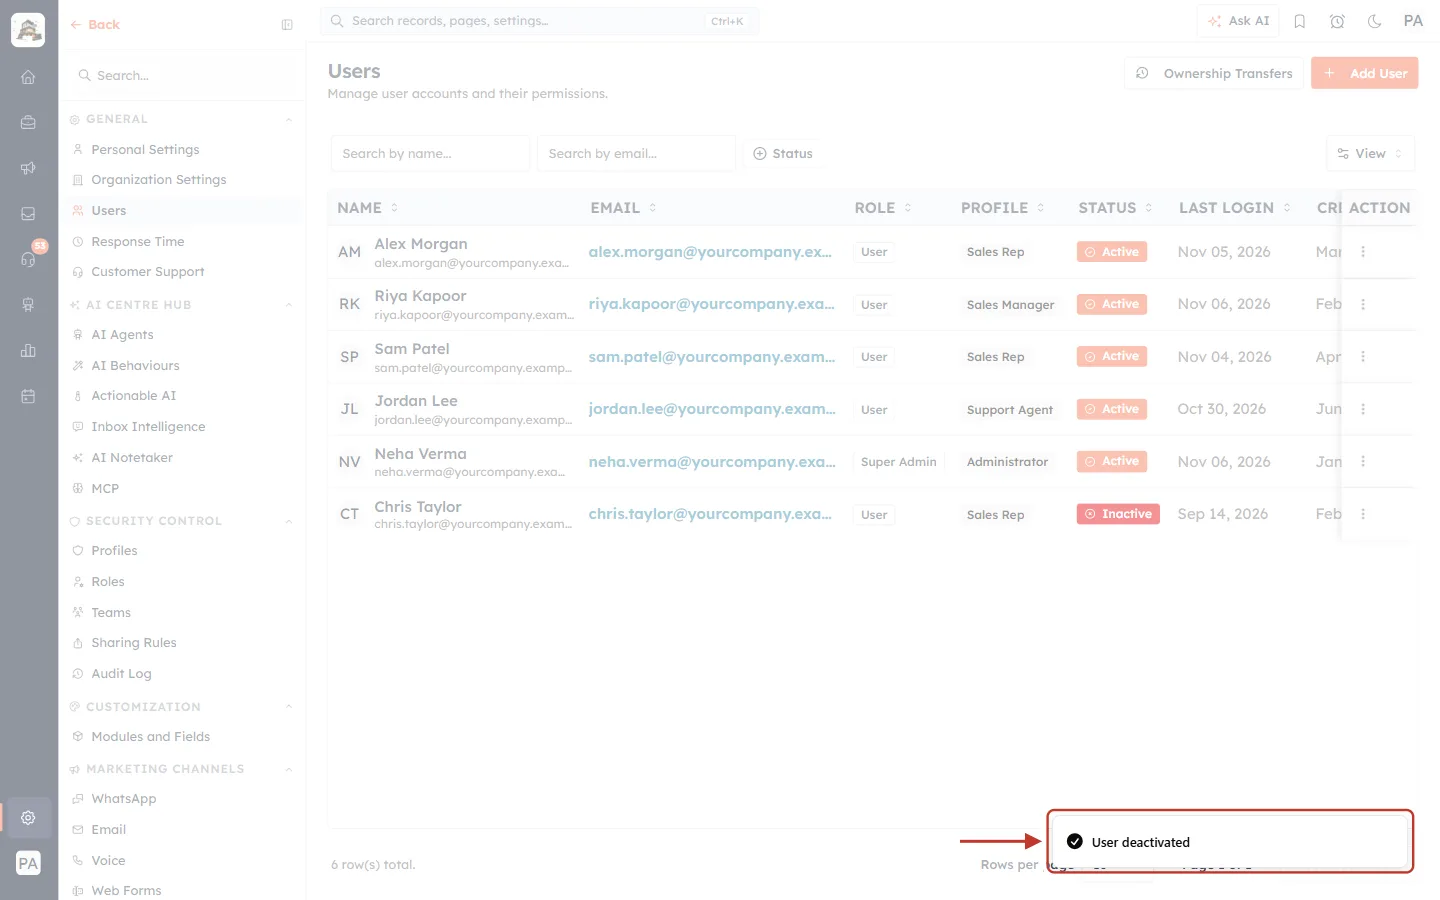
What this screenshot shows. The confirmation message at the bottom right of the Users page, ringed.
It reads User deactivated with a tick.
The person’s status in the list changes to Inactive, and they can no longer sign in.
Part 4: Deactivate a user and transfer their records#
Choose this when the person’s work must carry on, for example a sales rep who is leaving with open deals. You pick a new owner, choose what to move, and the CRM moves it all for you before it switches the account off.
Step 7: Choose “Transfer records to another user”#
Open Deactivate from the row menu again (Steps 3–4). In the window, click Transfer records to another user. New fields appear below it.
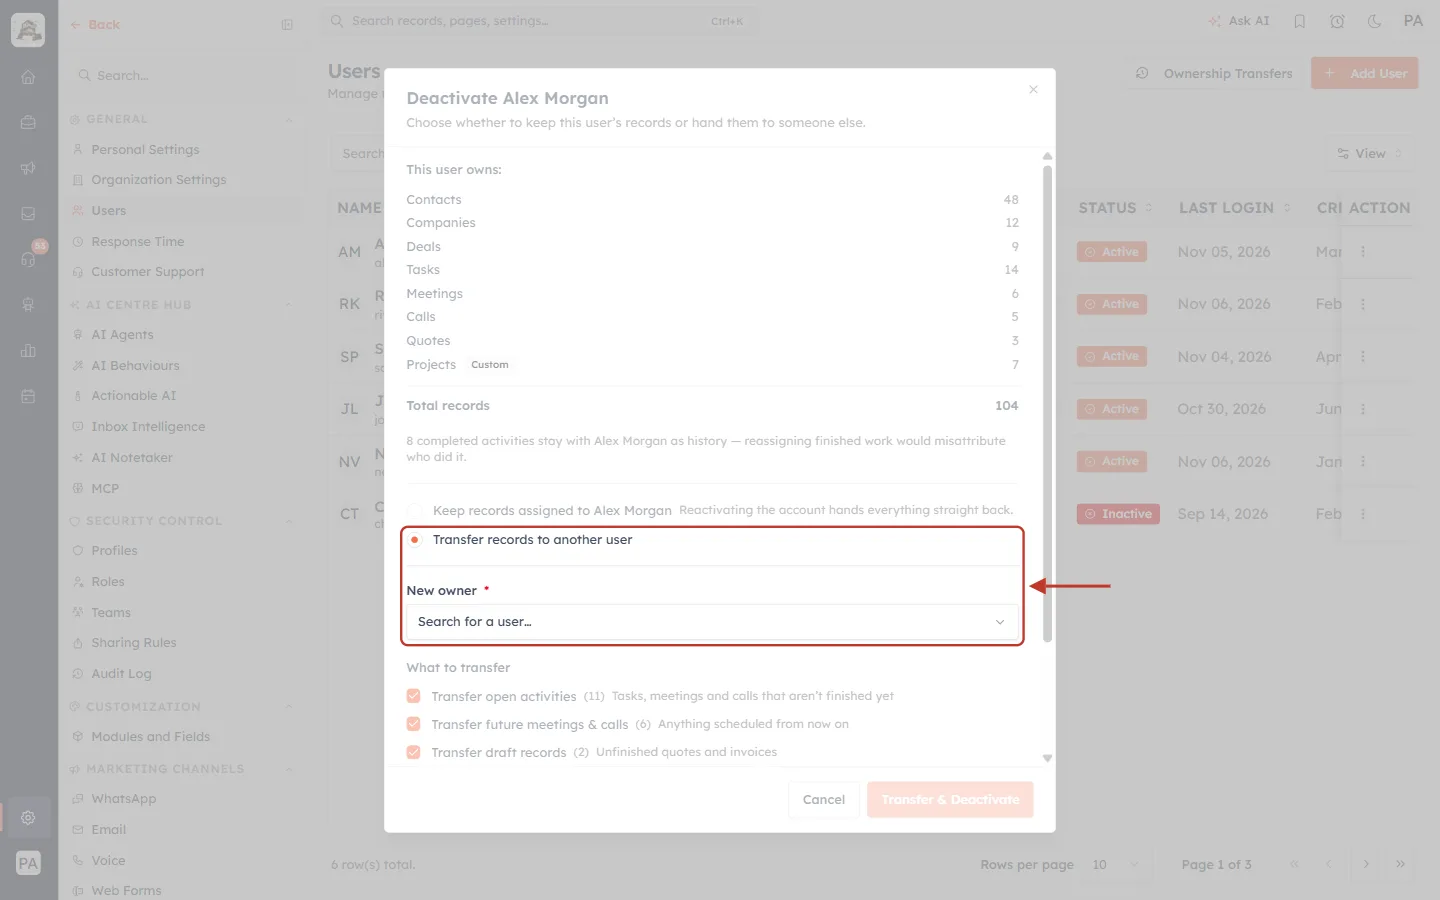
What this screenshot shows. The Transfer records to another user choice, now selected, and the new New owner field below it, ringed together.
New owner has a red star, which means you must fill it in.
The box shows Search for a user… until you pick someone.
Below it a What to transfer section appears (Step 9).
The button at the bottom changes to Transfer & Deactivate. It stays greyed out until you choose a new owner.
Step 8: Pick the new owner#
Click the New owner box. A list of your teammates opens. Type a few letters of a name to narrow it down, then click the person who should take over.
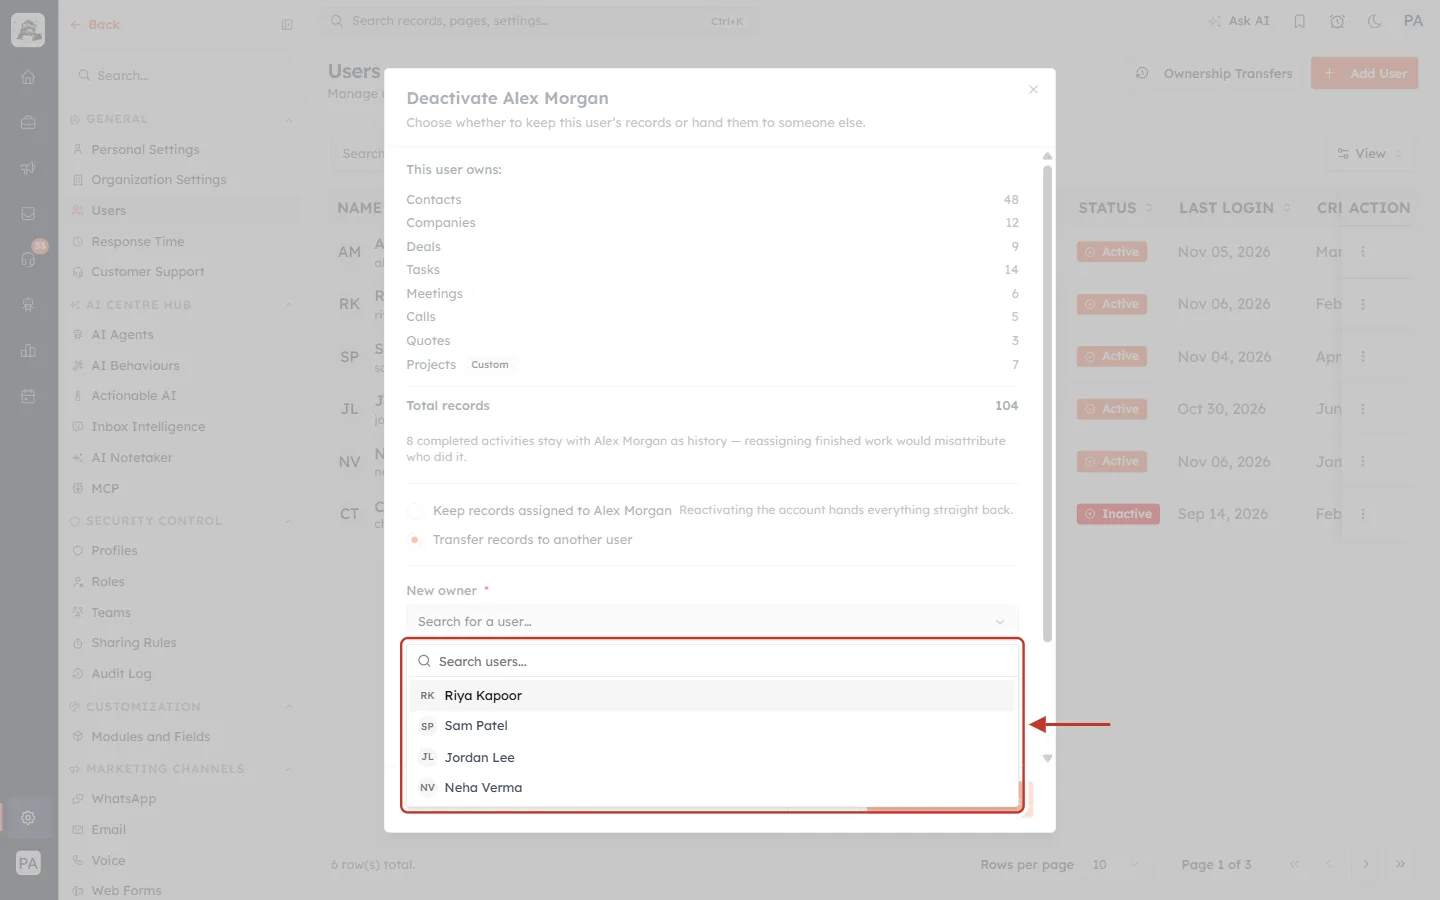
What this screenshot shows. The New owner box and the list that opens under it, ringed.
Each teammate is shown with their initials and full name.
Only active users are listed. People who are inactive or deleted cannot receive records.
The person you are deactivating (Alex Morgan) is not in the list.
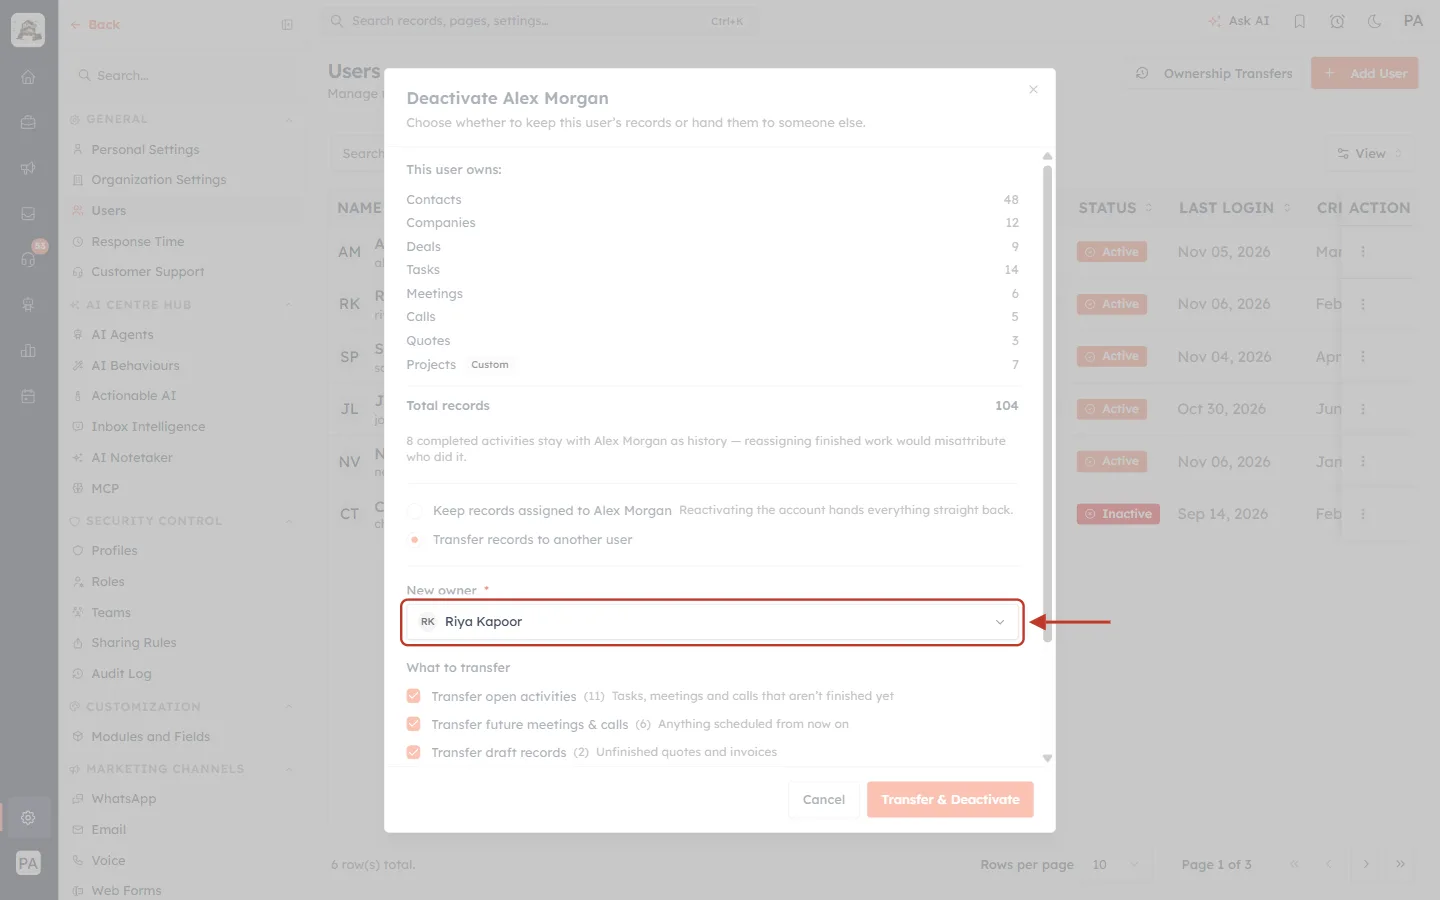
What this screenshot shows. The New owner box after you pick someone. It now shows Riya Kapoor.
To change your mind, click the box again and pick someone else.
All the records you choose in the next step go to this one person. To split work between several people, see the tip under Step 12.
Step 9: Choose what to transfer#
Scroll down inside the window to What to transfer. Records such as contacts, companies and deals always move. These options let you decide about the rest.
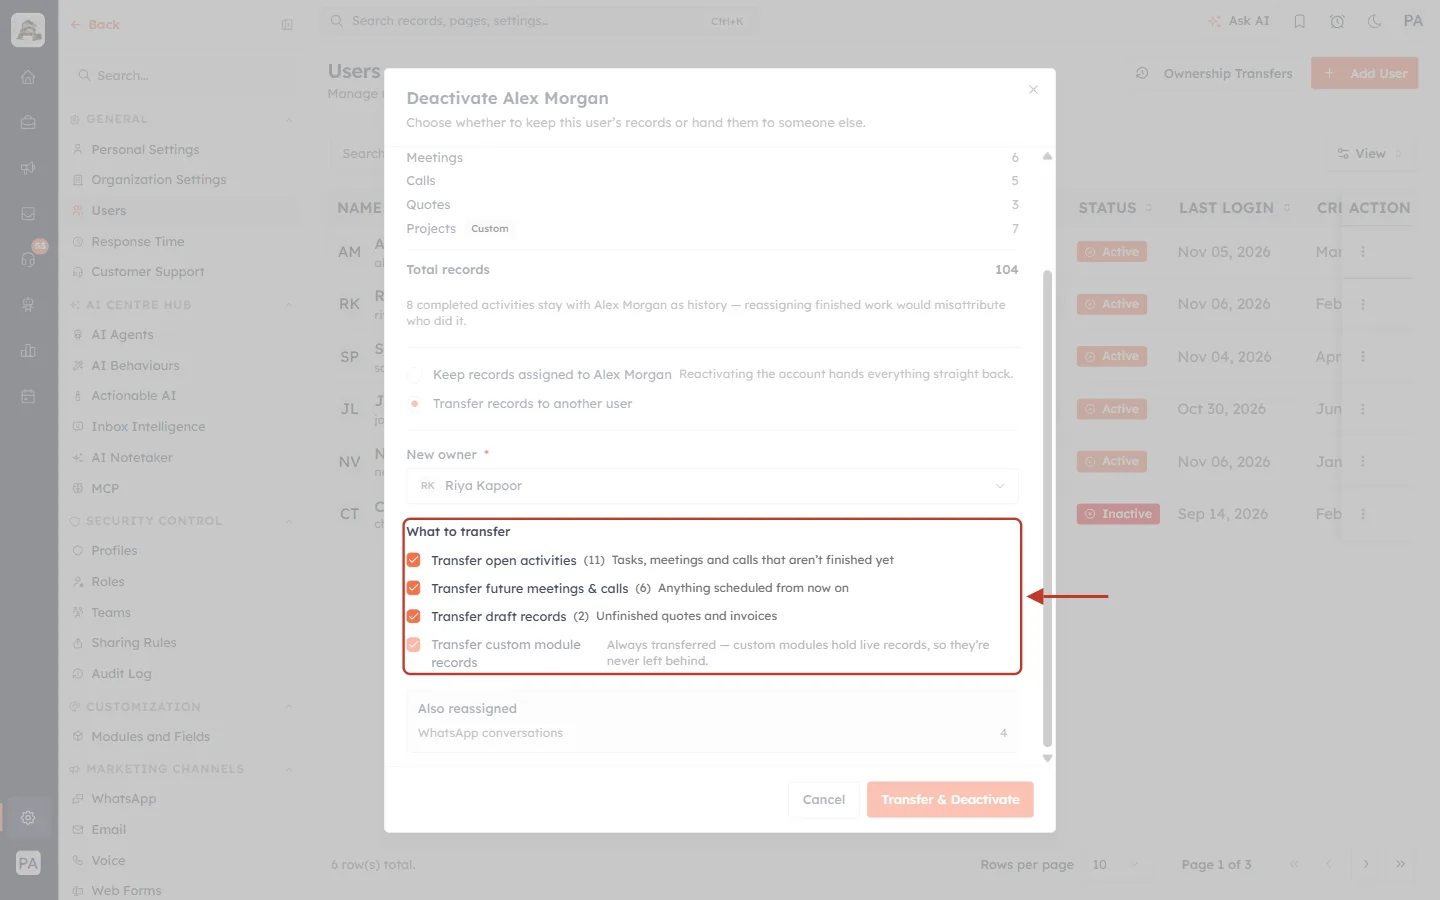
What this screenshot shows. The What to transfer section, ringed. Every option is ticked, which is the default.
Transfer open activities (11): tasks, meetings and calls that aren’t finished yet. Untick it if you want those to stay with the person who is leaving.
Transfer future meetings & calls (6): anything scheduled from now on, so the new owner turns up to those meetings.
Transfer draft records (2): unfinished quotes and invoices.
The number in brackets is how many records each option covers. If a person has none of one kind, that option is greyed out and reads, for example, No draft records to transfer.
Transfer custom module records is ticked and greyed out. Records in modules you built yourself are always transferred, so they are never left behind.
ℹ️
Completed work never moves. Finished tasks, past meetings and completed calls stay with the person who did them, whatever you tick here. That keeps your activity reports honest.
Step 10: Check “Also reassigned”#
Below the options there may be one more box, Also reassigned. It lists things that are not records but still belong to the person, and that move to the new owner with everything else.
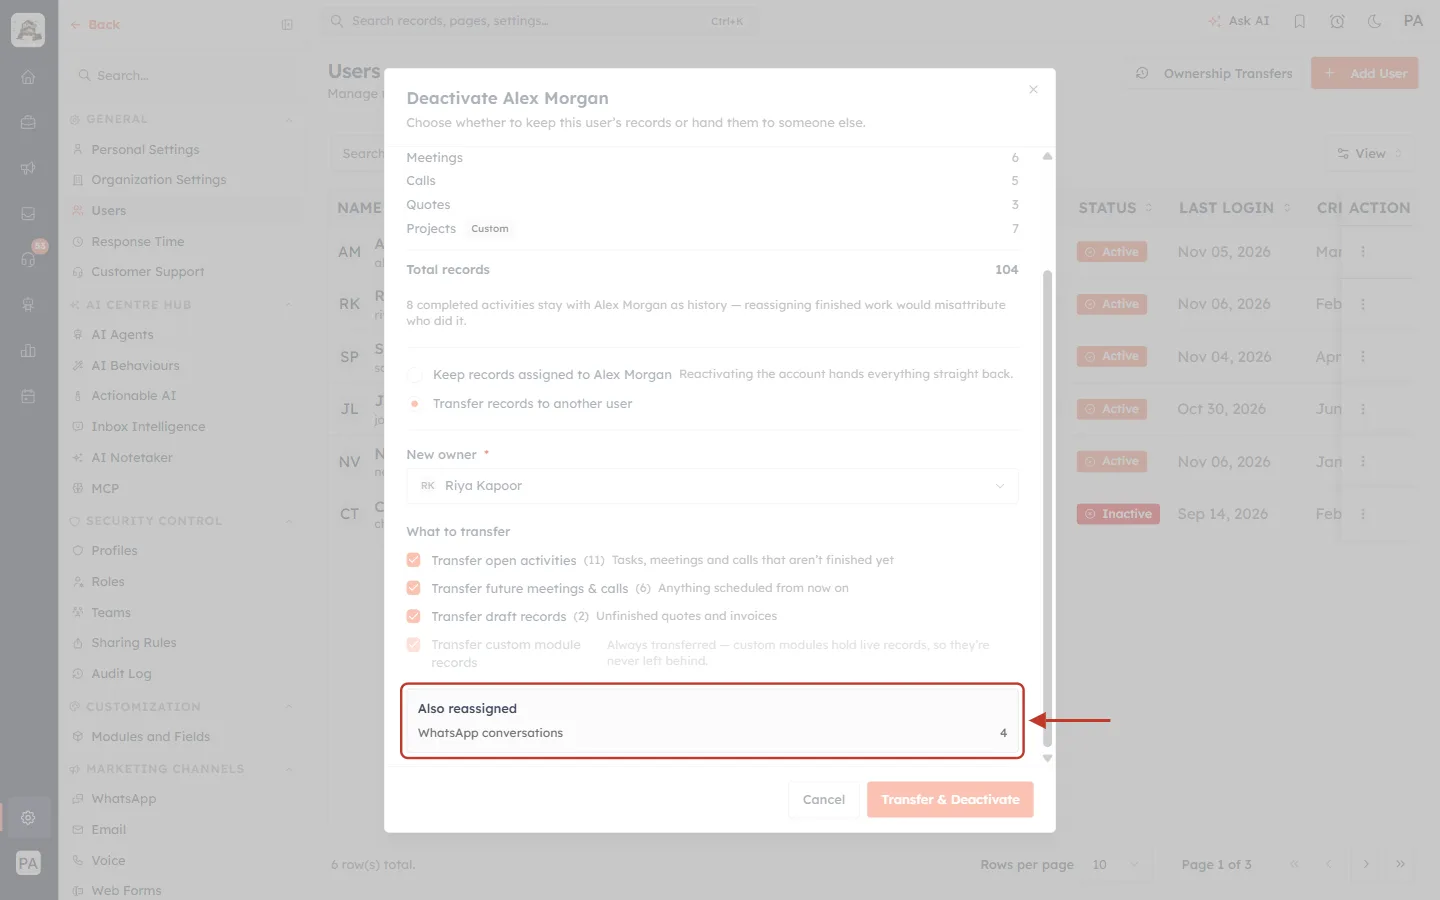
What this screenshot shows. The Also reassigned box, ringed.
In this example it lists WhatsApp conversations: 4. Those chats are now assigned to Riya, so customers who reply will still get an answer.
This box only appears when you are transferring and the person owns items like this.
Step 11: Click Transfer & Deactivate#
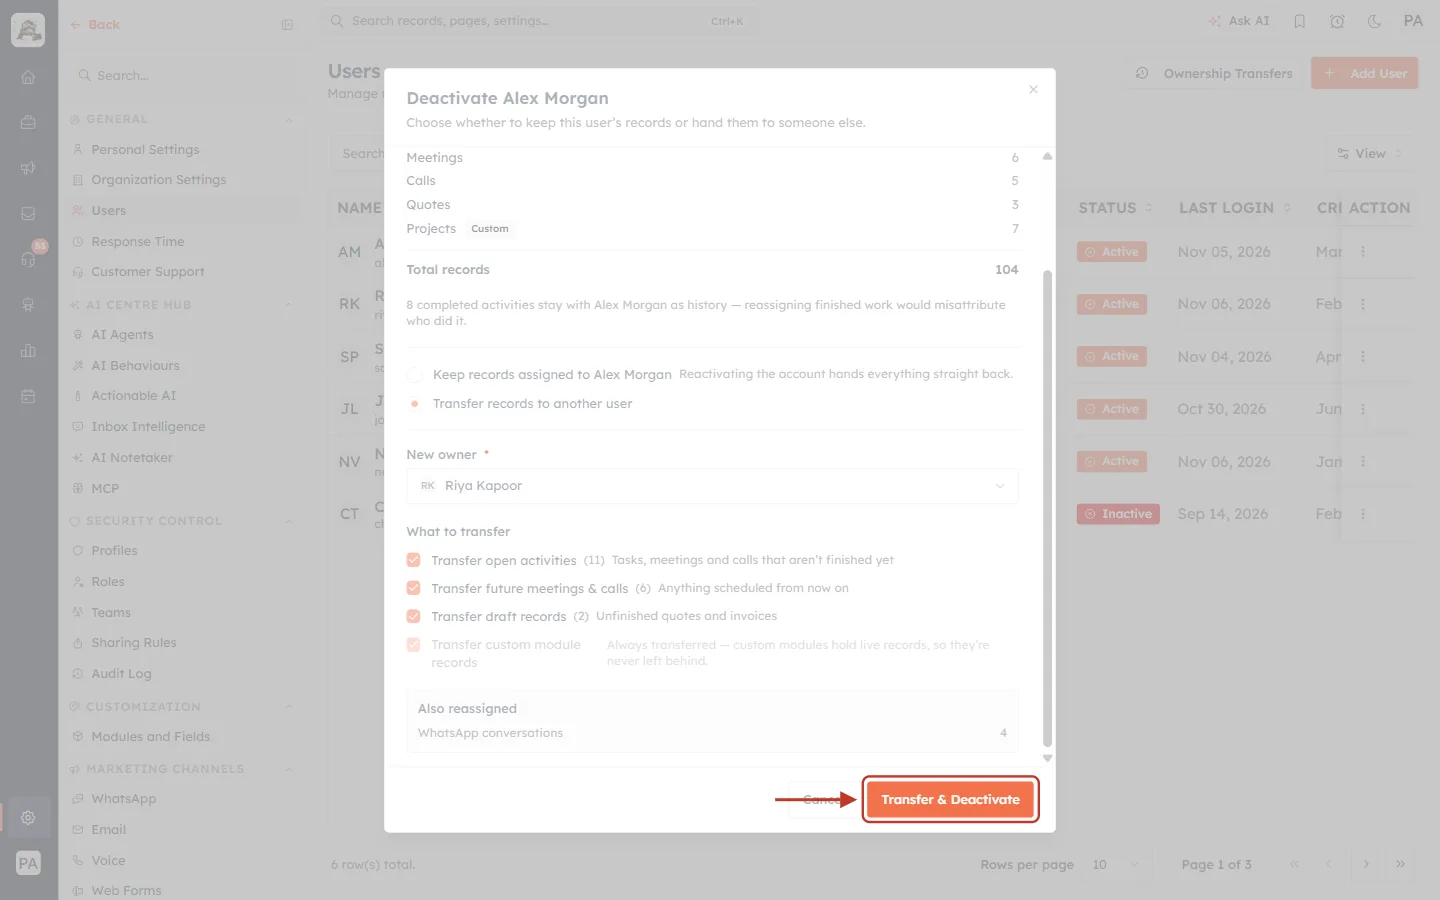
What this screenshot shows. The Transfer & Deactivate button at the bottom right of the window, ringed.
It turns orange once a new owner is chosen.
Cancel beside it closes the window without changing anything.
A confirmation window opens. Read it carefully: it tells you exactly how many records will move and to whom.
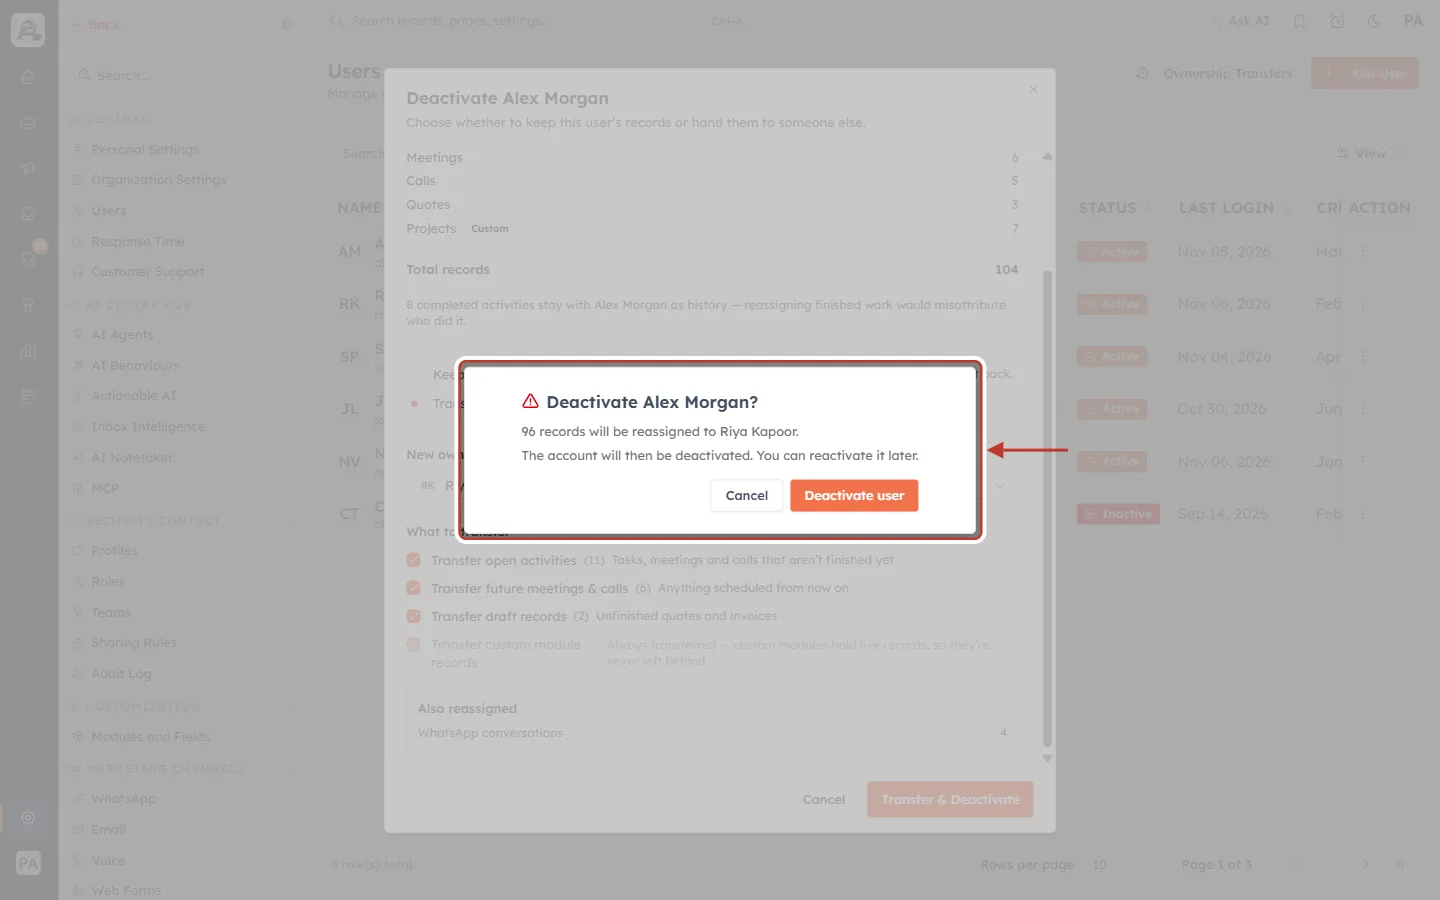
What this screenshot shows. The confirmation window, ringed.
The title reads Deactivate Alex Morgan?
The first line reads 96 records will be reassigned to Riya Kapoor. That is the 104 records Alex owns, minus the 8 completed activities that stay as history.
The second line reads The account will then be deactivated. You can reactivate it later.
Click Deactivate user to start. While it works the button reads Working….
Step 12: Watch the transfer finish#
Small transfers finish almost at once and you see User deactivated. Bigger ones run in the background, and a progress message appears at the bottom right.
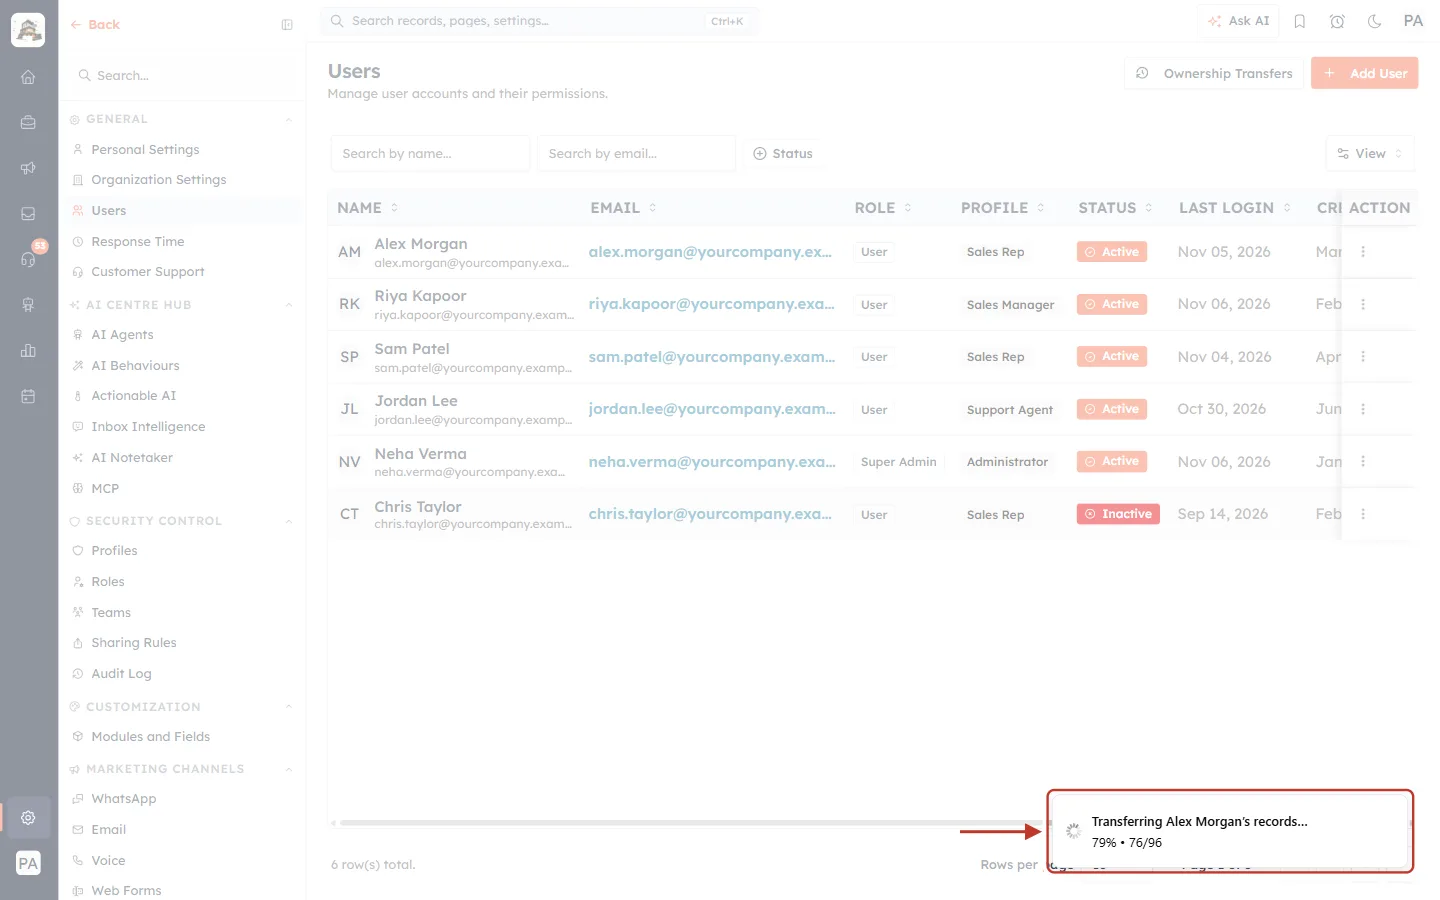
What this screenshot shows. The progress message at the bottom right, ringed.
It reads Transferring Alex Morgan’s records…
The second line shows the progress: 79% • 76/96 means 76 of the 96 records have moved so far.
You can keep working in the CRM while it runs.
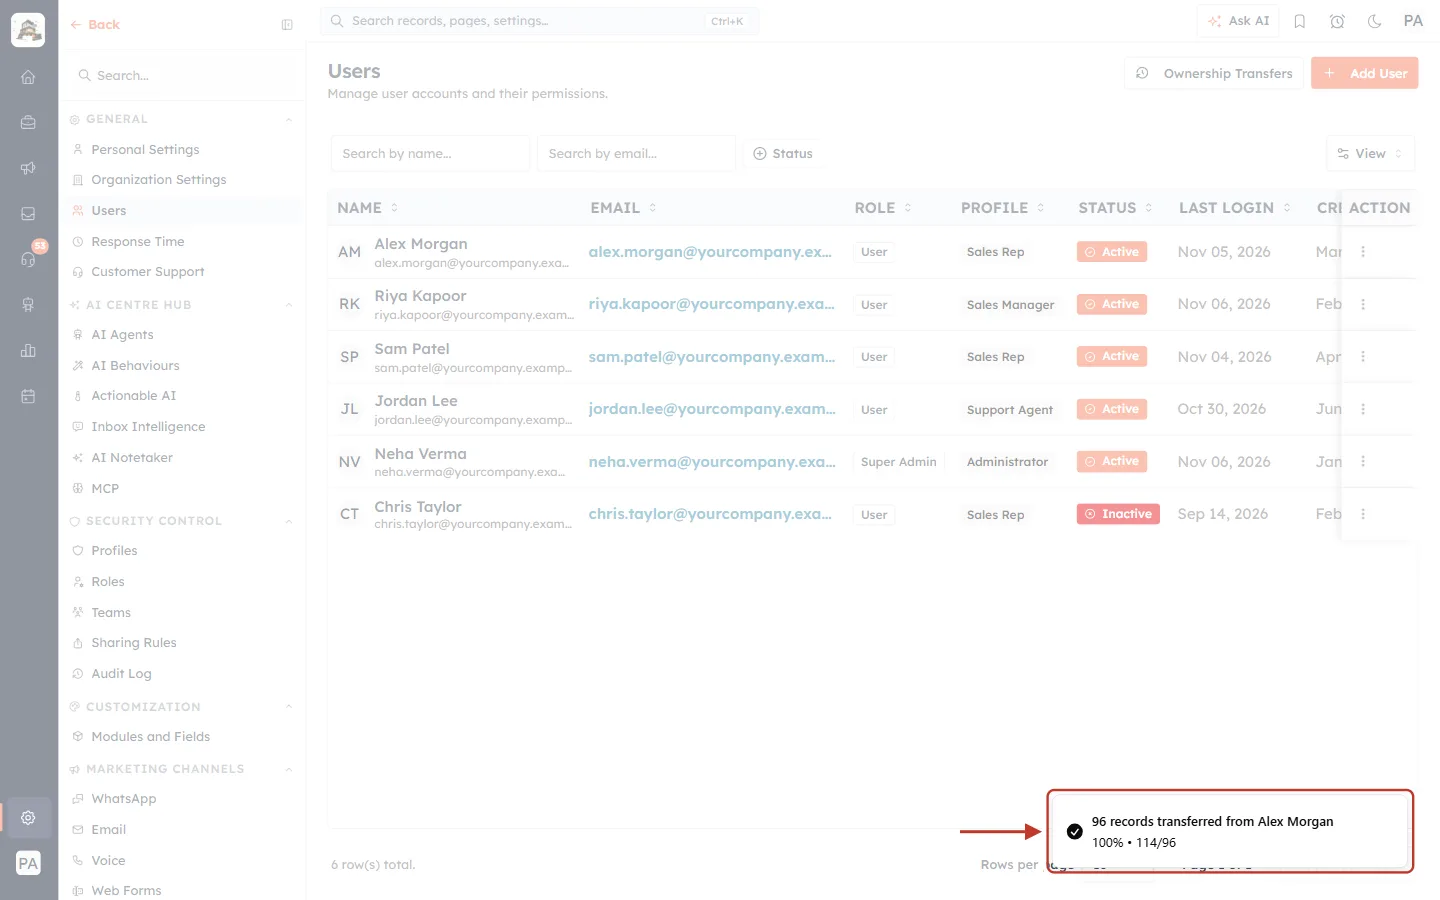
What this screenshot shows. The same message once the transfer is complete, ringed.
It reads 96 records transferred from Alex Morgan with a tick.
The account is deactivated at the end of the transfer.
Riya now owns those records, open tasks, upcoming meetings and WhatsApp conversations.
If you see… | What it means and what to do |
|---|---|
Still transferring records… | A very large transfer is taking a while. It keeps running in the background. Check back shortly, or look at Ownership Transfers (Part 6). |
N records transferred with a warning | Most records moved, but a few could not. The message names the first problem. Check the Ownership Transfers page, then move the rest with Change Owner. |
Ownership transfer failed | Nothing was left without an owner. Try again. If it keeps failing, contact support. |
Lost track of the ownership transfer | The page lost contact with the transfer. It may still be running. Refresh the page to see the latest. |
✅
Want to split the work between several people? A transfer sends everything to one new owner. To share it out, first move some records with Change the Owner of Records and Move Their Related Records (for example, give half the deals to a second teammate). Then deactivate the user and transfer the rest.
Part 5: Delete a user, and restore a deleted user#
Delete is for someone who has left for good. A deleted account cannot own records, so the CRM makes you transfer them first. There is no “keep” option.
Step 13: Click Delete#
In the person’s row menu, click Delete. The same kind of window opens, titled Delete <name>.
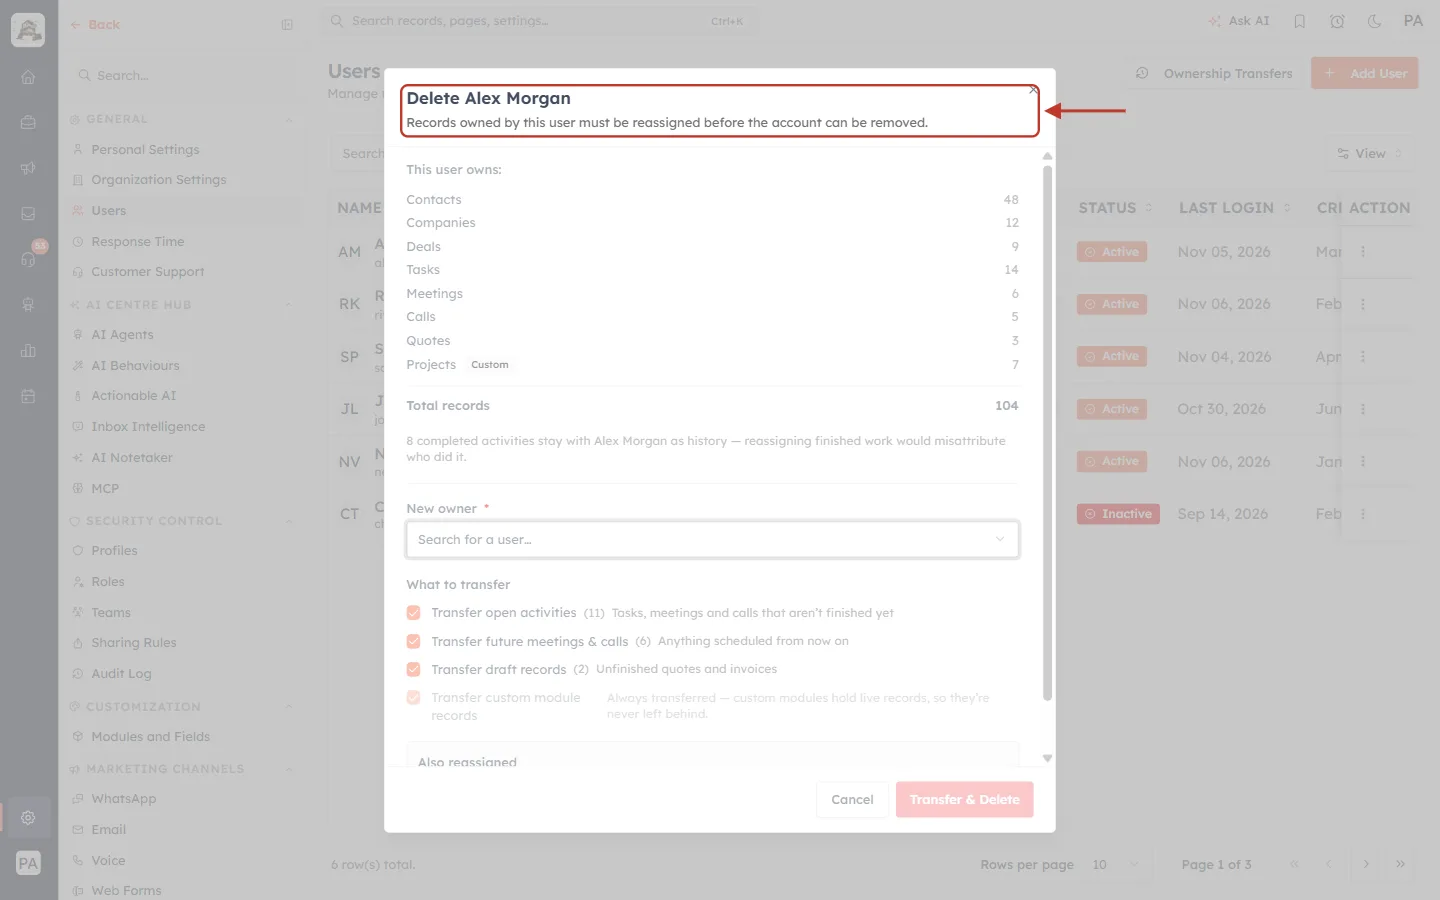
What this screenshot shows. The title and the line under it, ringed.
The title reads Delete Alex Morgan.
The line under it reads Records owned by this user must be reassigned before the account can be removed.
Below that you see the same This user owns: summary as in Step 4.
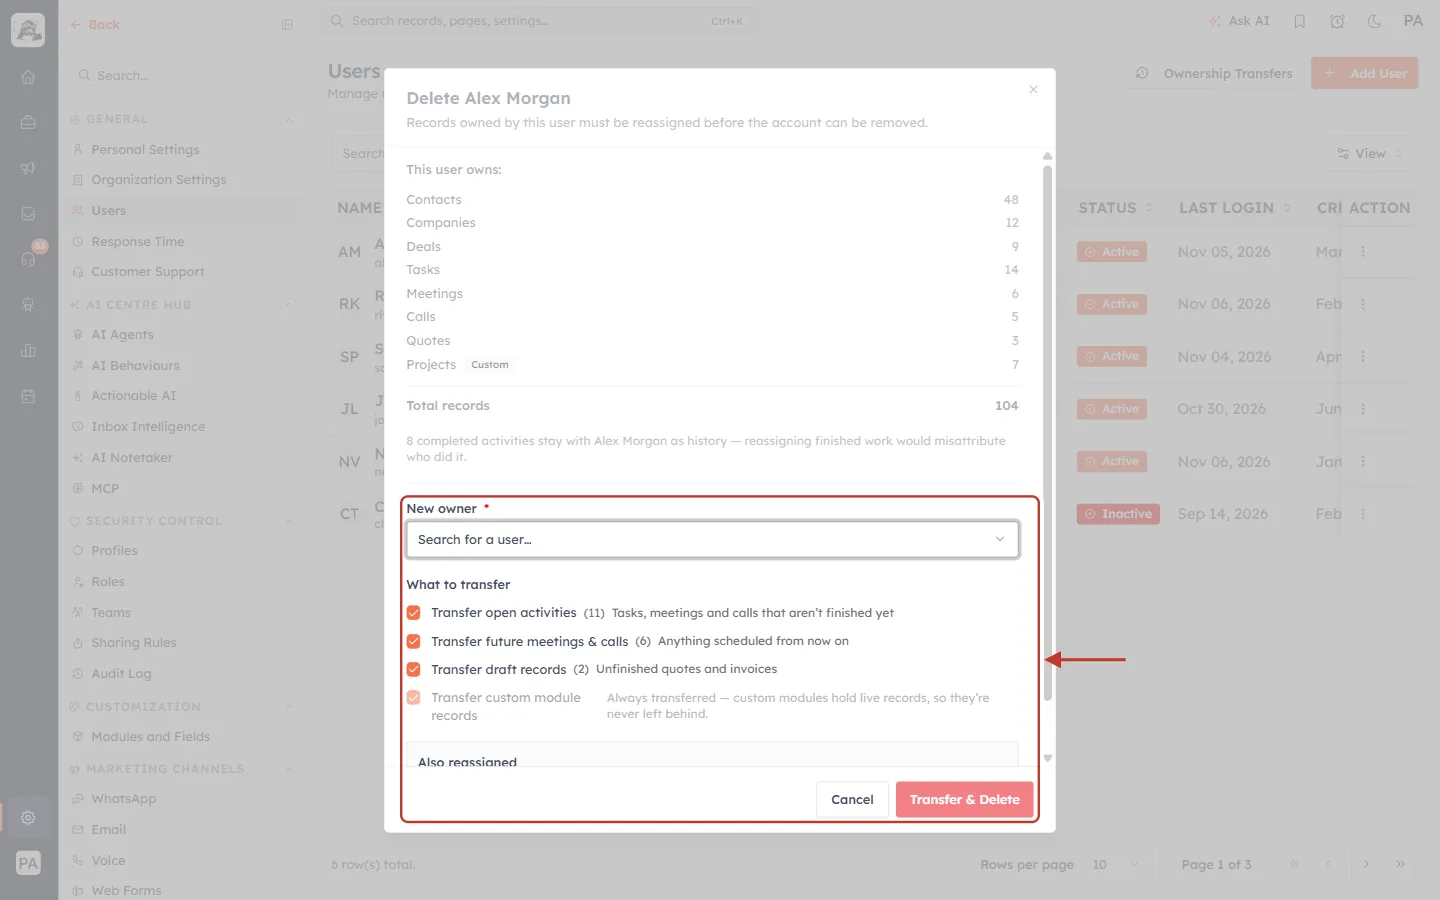
What this screenshot shows. The New owner field and the Transfer & Delete button, ringed together.
There are no Keep or Transfer choices. The New owner field is shown straight away and is required.
The What to transfer and Also reassigned sections work exactly as in Steps 9 and 10.
The red button reads Transfer & Delete and stays greyed out until you choose a new owner.
Step 14: Pick the new owner and confirm#
Pick the new owner as in Step 8, check the options, then click Transfer & Delete.
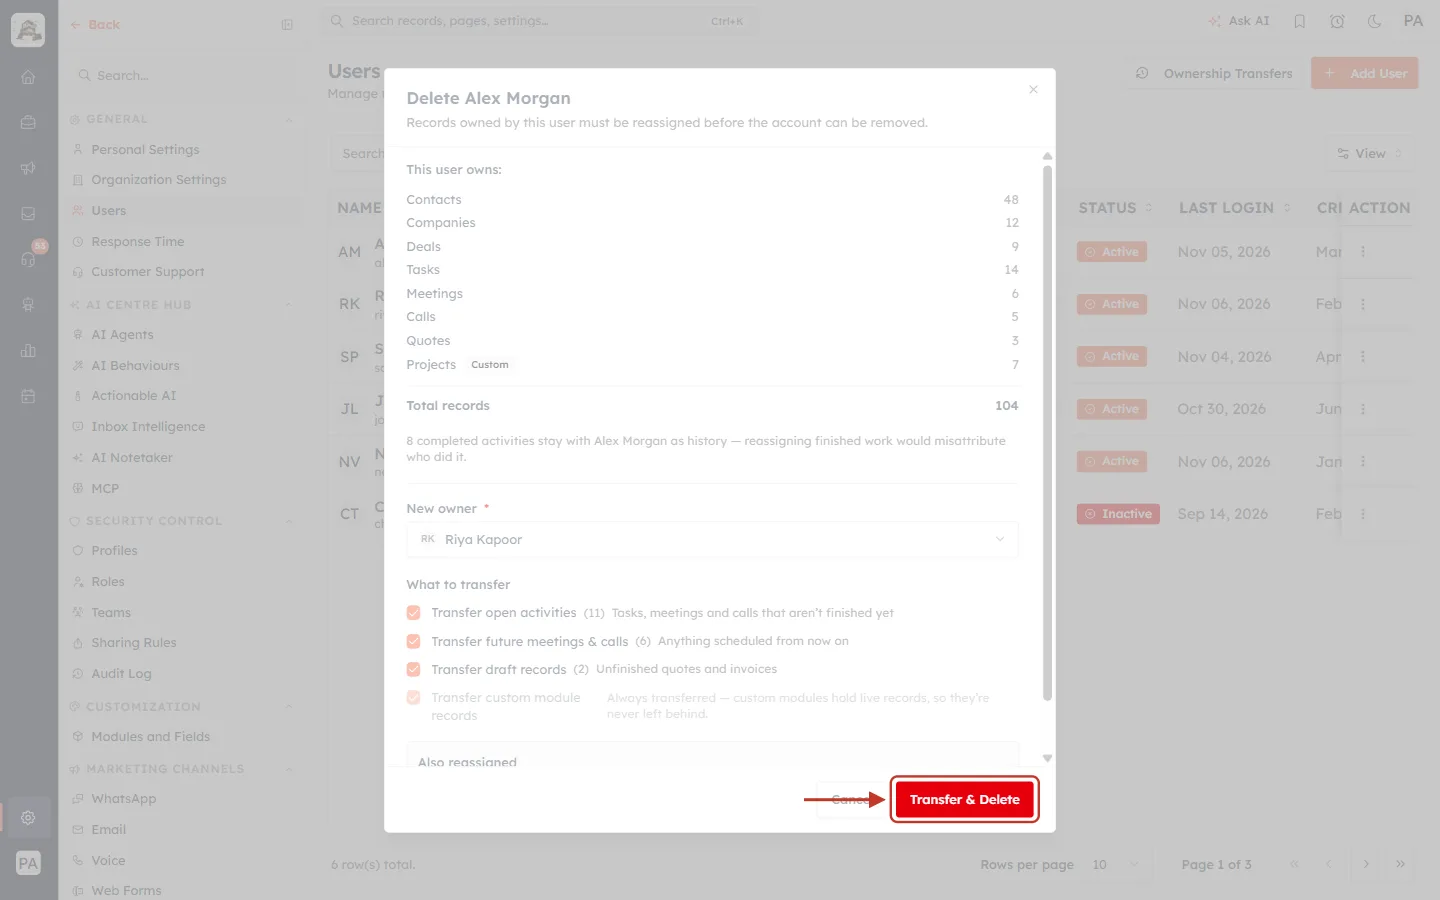
What this screenshot shows. The Transfer & Delete button, now red and clickable because a new owner is chosen.
It is red rather than orange to remind you that deleting is a bigger step than deactivating.
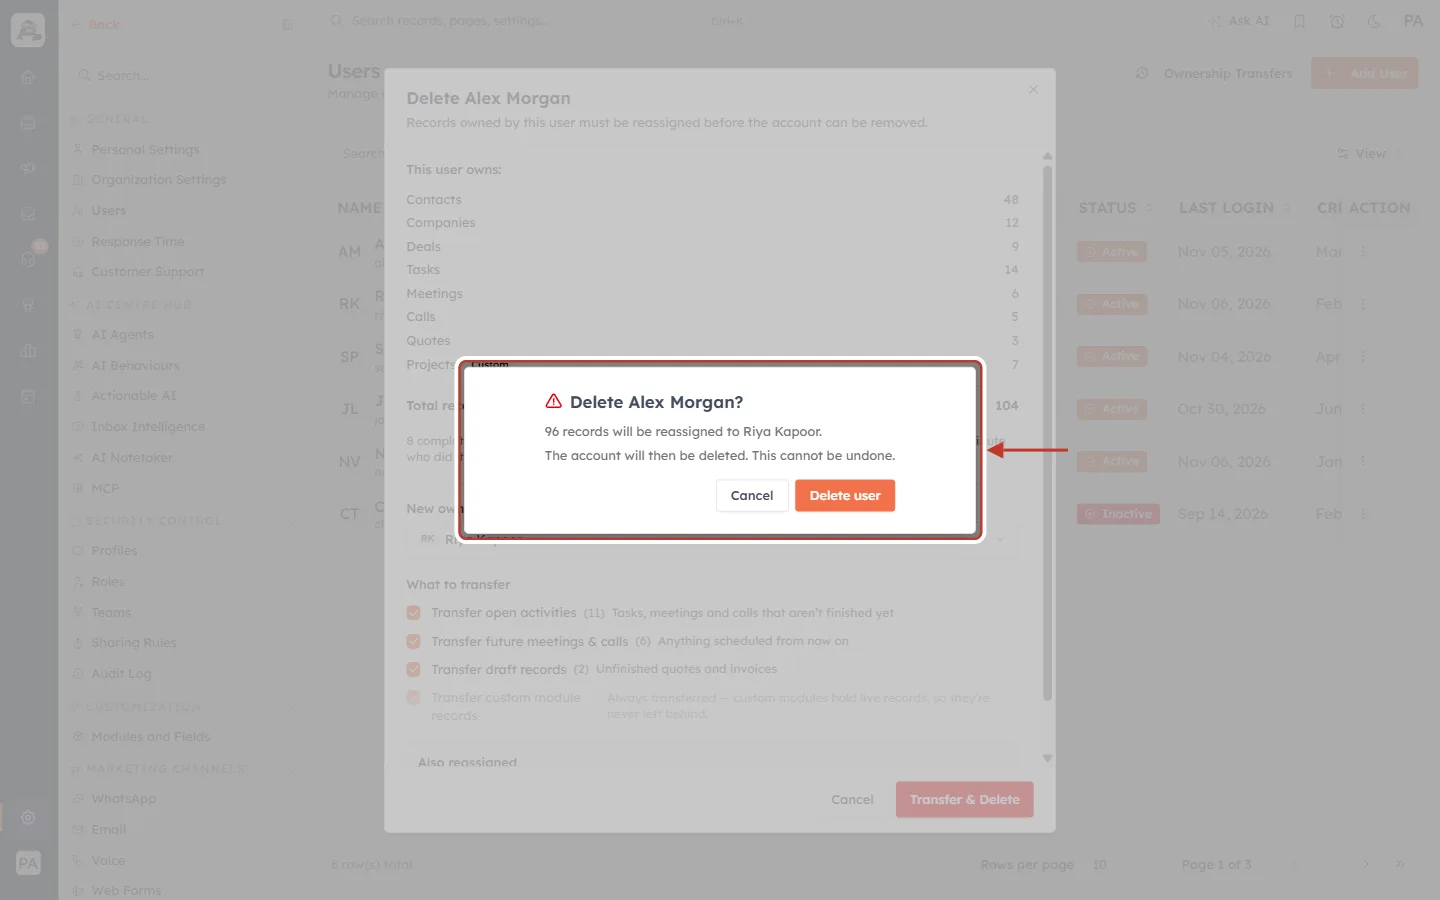
What this screenshot shows. The confirmation window, ringed.
The title reads Delete Alex Morgan?
96 records will be reassigned to Riya Kapoor.
The account will then be deleted. This cannot be undone. The record transfer cannot be undone. The account itself can be restored later (Step 16), but the records stay with Riya.
Click Delete user to go ahead, or Cancel to go back.
The transfer runs exactly as in Step 12, and at the end the account is deleted.
If the person owns nothing#
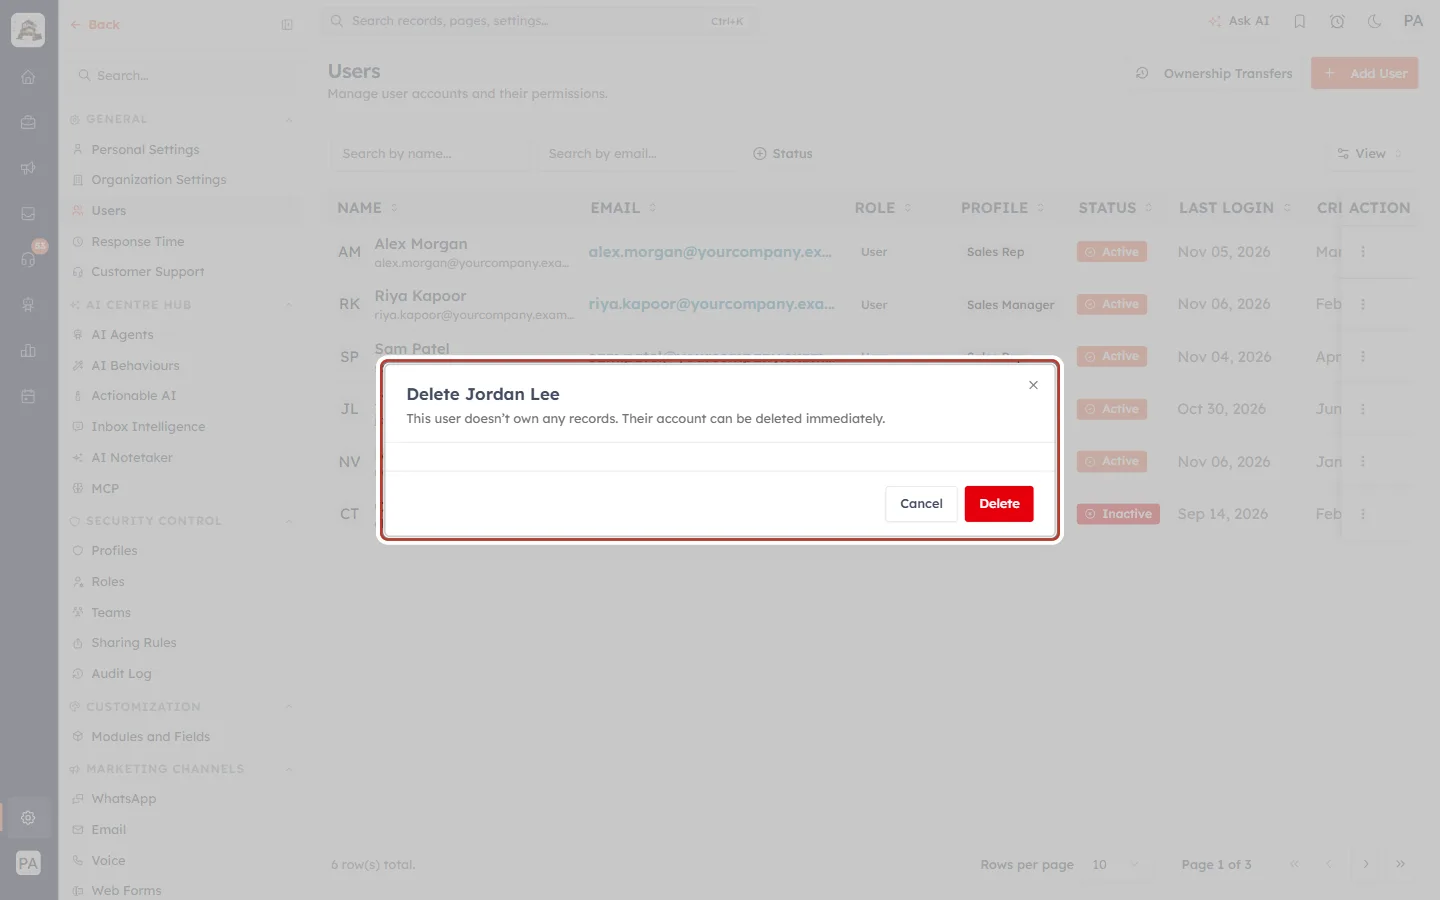
What this screenshot shows. The whole Delete Jordan Lee window, for a person who owns no records.
It reads This user doesn’t own any records. Their account can be deleted immediately.
There is no New owner field. The button simply reads Delete.
Clicking Delete removes the account straight away, without a second confirmation.
Step 15: Find deleted users#
Deleted users are hidden from the normal list. To see them, click Status above the list and choose Deleted.
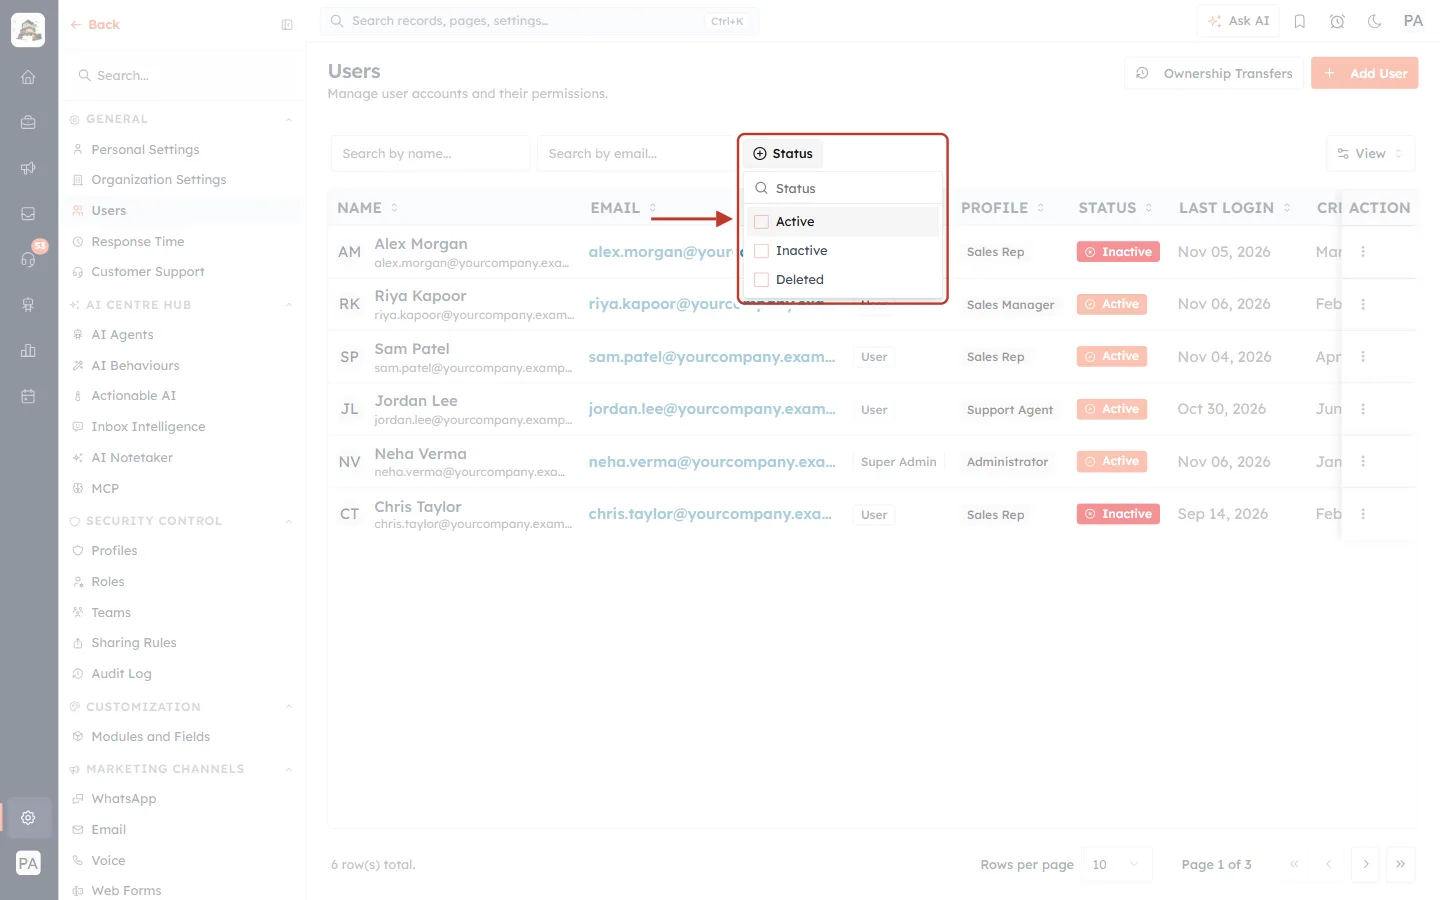
What this screenshot shows. The Status filter button and the list of choices it opens, ringed.
Active: people who can sign in.
Inactive: deactivated accounts.
Deleted: deleted accounts.
Once a status is picked, a Reset button appears beside the filter to clear it.
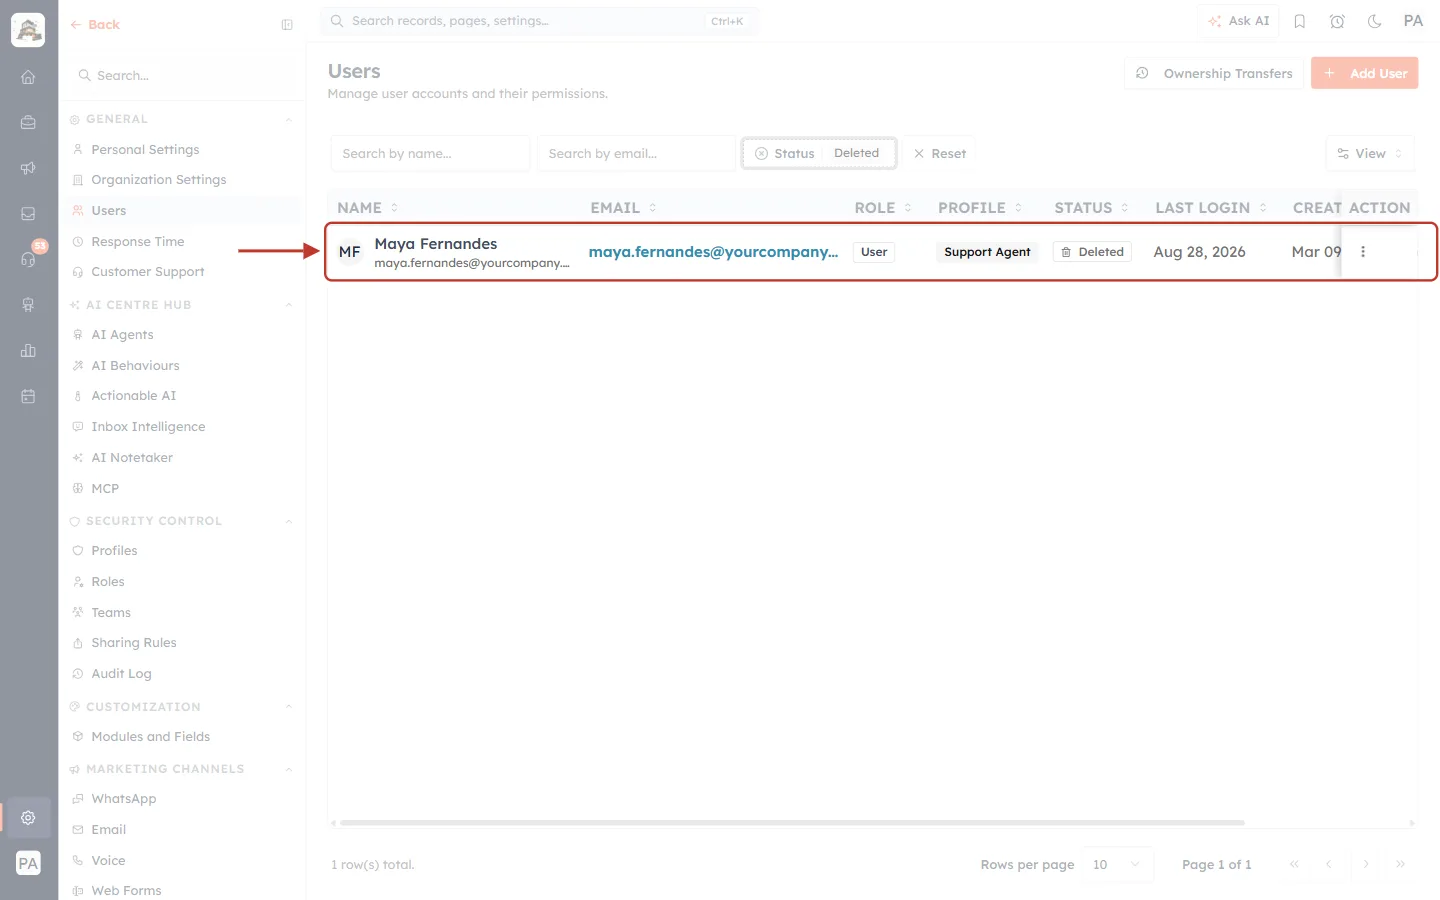
What this screenshot shows. A deleted user’s row, ringed, with the list filtered to Deleted.
The STATUS column shows a grey Deleted badge with a bin icon.
Their name, email, role and profile are still shown, so you know who the account belonged to.
Step 16: Restore a deleted user (if they come back)#
If a deleted person rejoins, you can bring their account back instead of inviting them again. Click ⋮ on their row. The only action is Restore User.
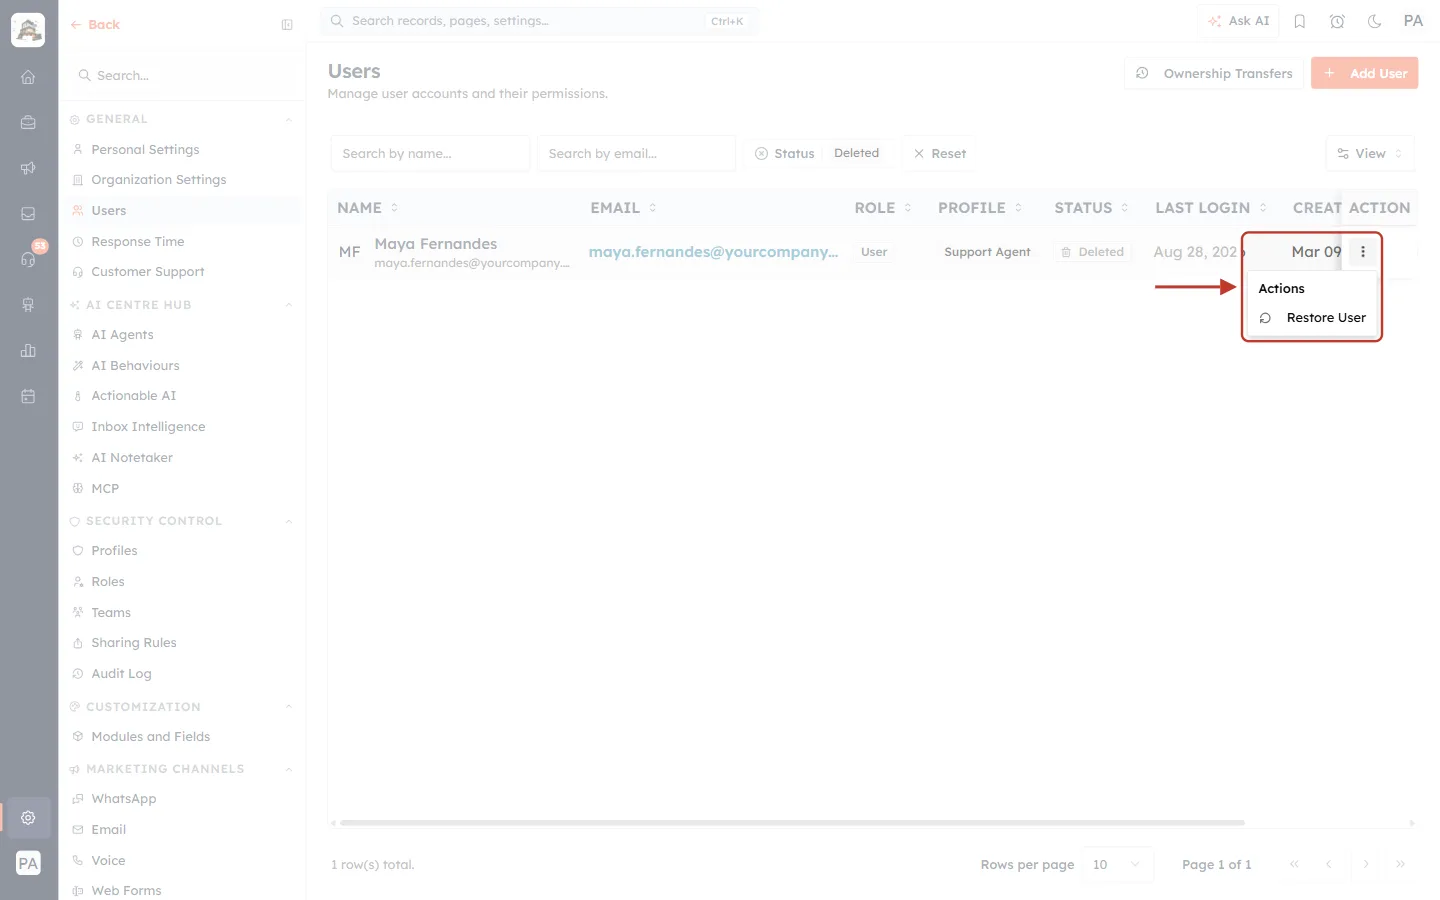
What this screenshot shows. The Actions menu for a deleted user, ringed with its ⋮ button.
Deleted accounts have one action only: Restore User.
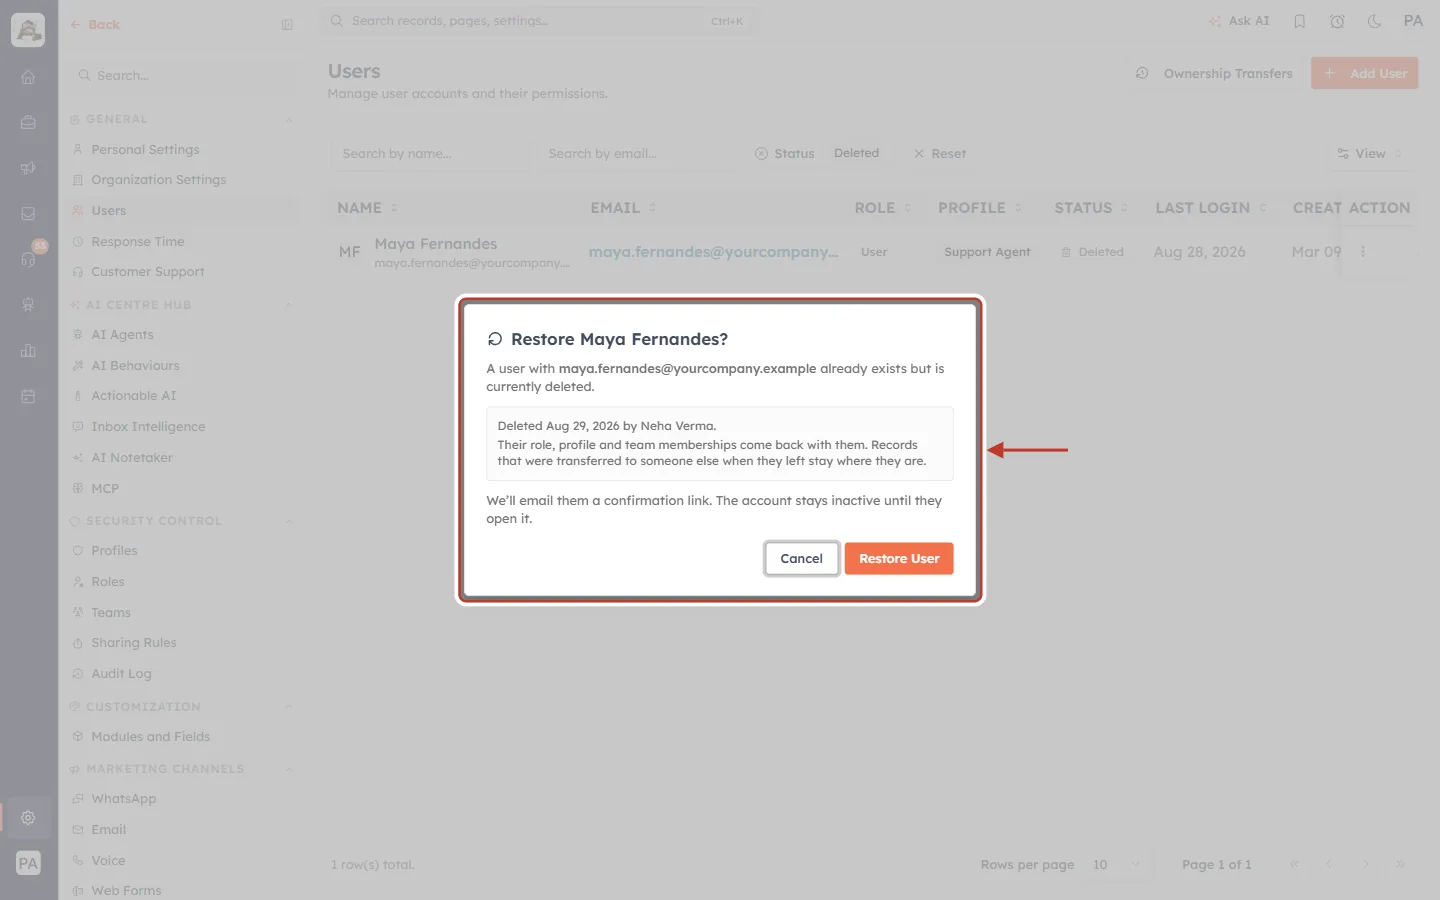
What this screenshot shows. The Restore Maya Fernandes? window, ringed.
It says that a user with this email already exists but is currently deleted, and when and by whom they were deleted.
Their role, profile and team memberships come back with them.
Records that were transferred to someone else when they left stay where they are. If they should get some back, move them with Change Owner.
We’ll email them a confirmation link. The account stays inactive until they open it.
Click Restore User to send the link, or Cancel.
Part 6: Reactivate an account and check the transfer history#
Step 17: Reactivate a deactivated user#
When a deactivated person comes back, find them in the Users list. If they are not shown, click Status and pick Inactive.
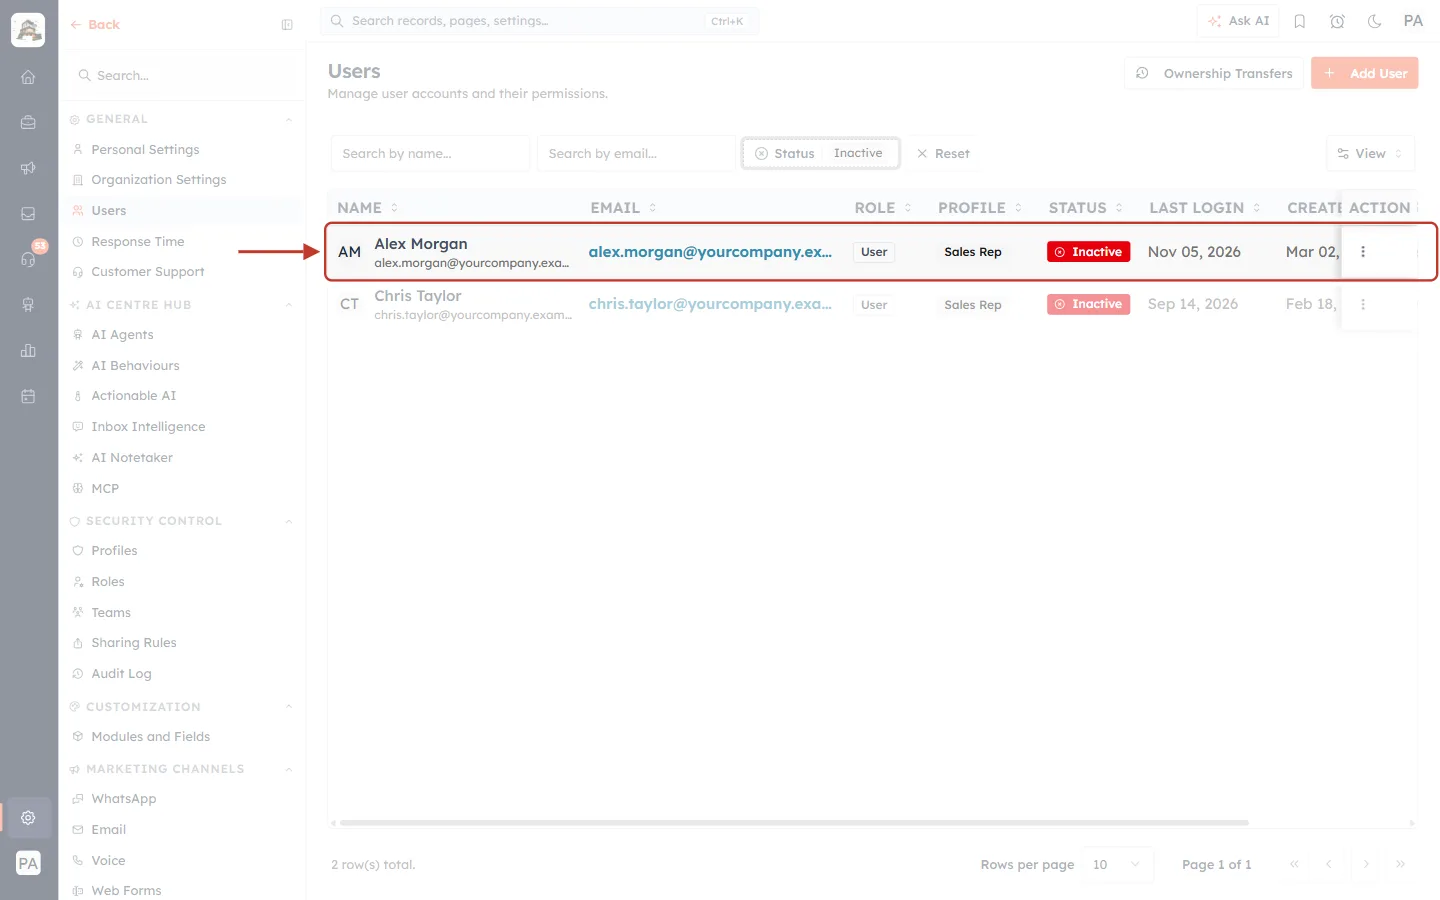
What this screenshot shows. Alex Morgan’s row after deactivation, ringed.
The STATUS column now shows a red Inactive badge.
Name, email, role and profile are unchanged.
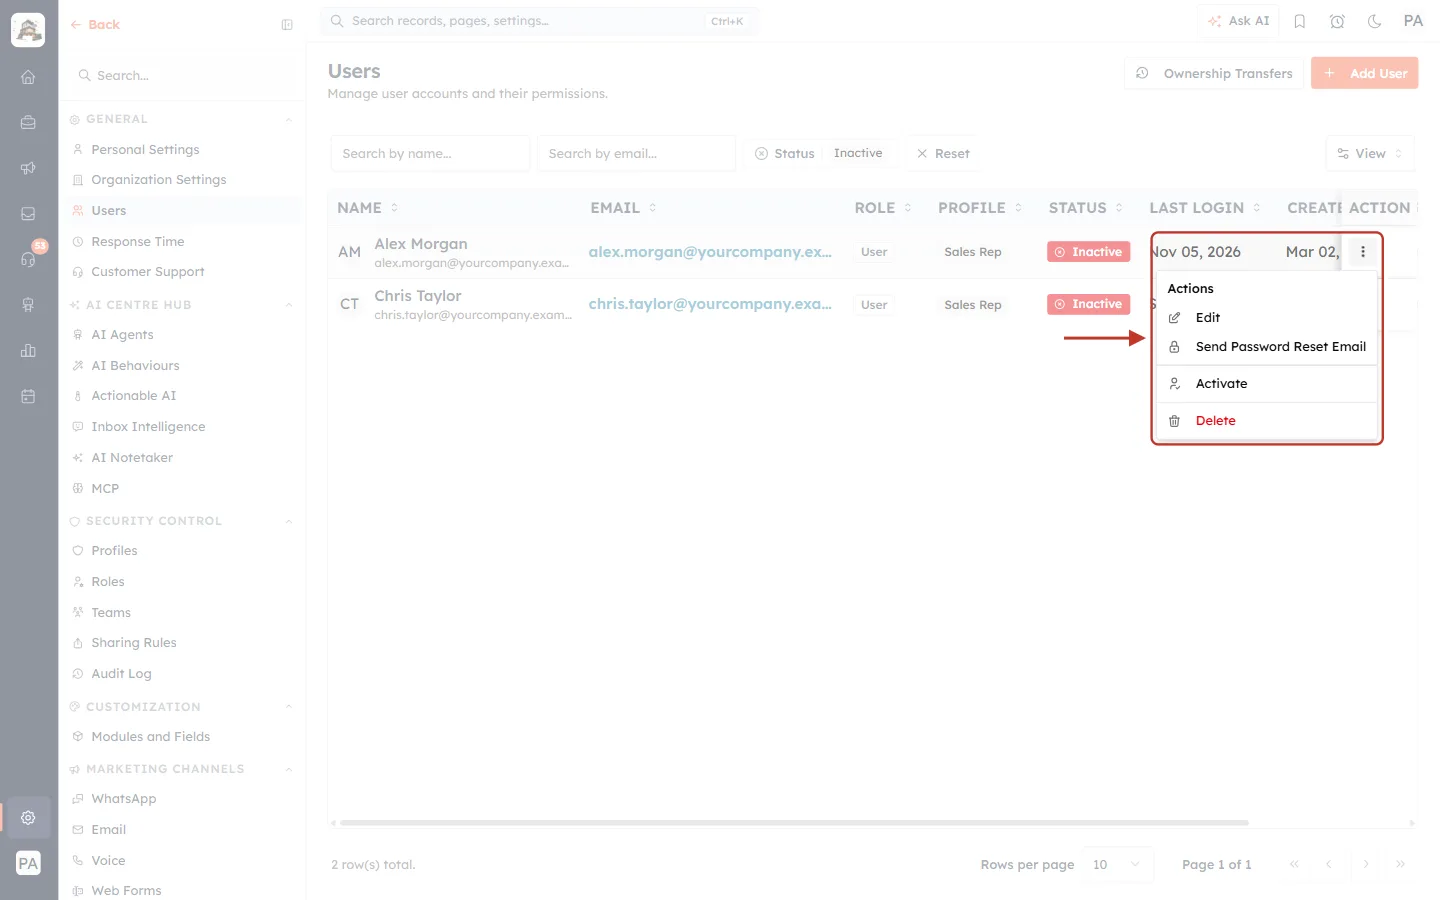
What this screenshot shows. The Actions menu for the inactive user, ringed with its ⋮ button.
Where it used to say Deactivate, it now says Activate.
Click Activate. There is no extra window. You see User activated successfully and the person can sign in again.
If you kept their records (Part 3), they get everything straight back. If you transferred them (Part 4), the records stay with the new owner.
Step 18: Review Ownership Transfers#
Every time a person’s records are transferred, it is logged. Click Ownership Transfers at the top right of the Users page.
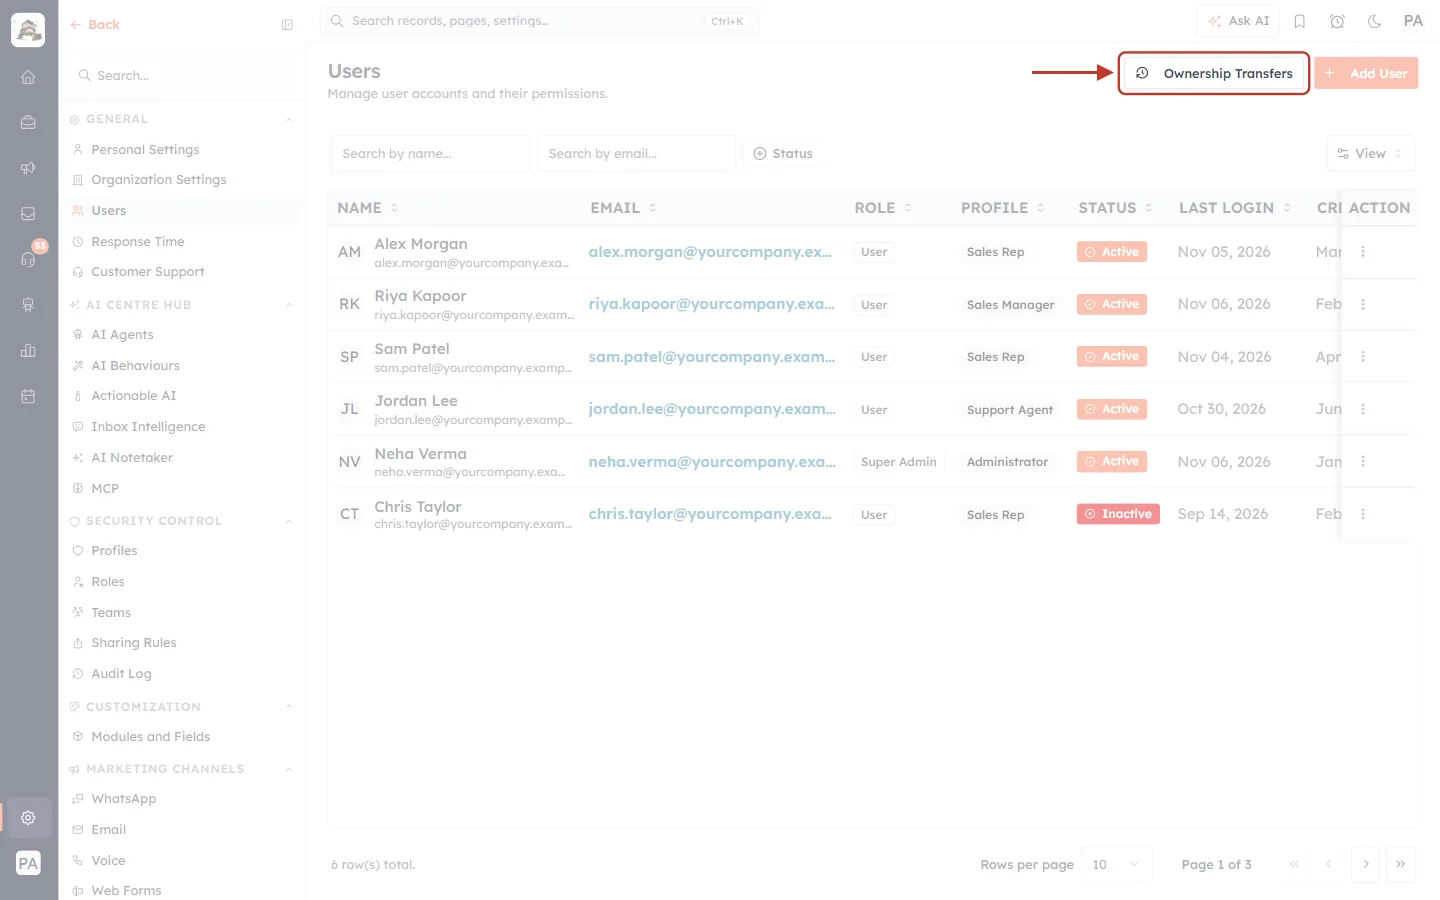
What this screenshot shows. The Ownership Transfers button, ringed, beside Add User.
It has a small clock icon.
It opens a separate page. Use Back to Users on that page to return.
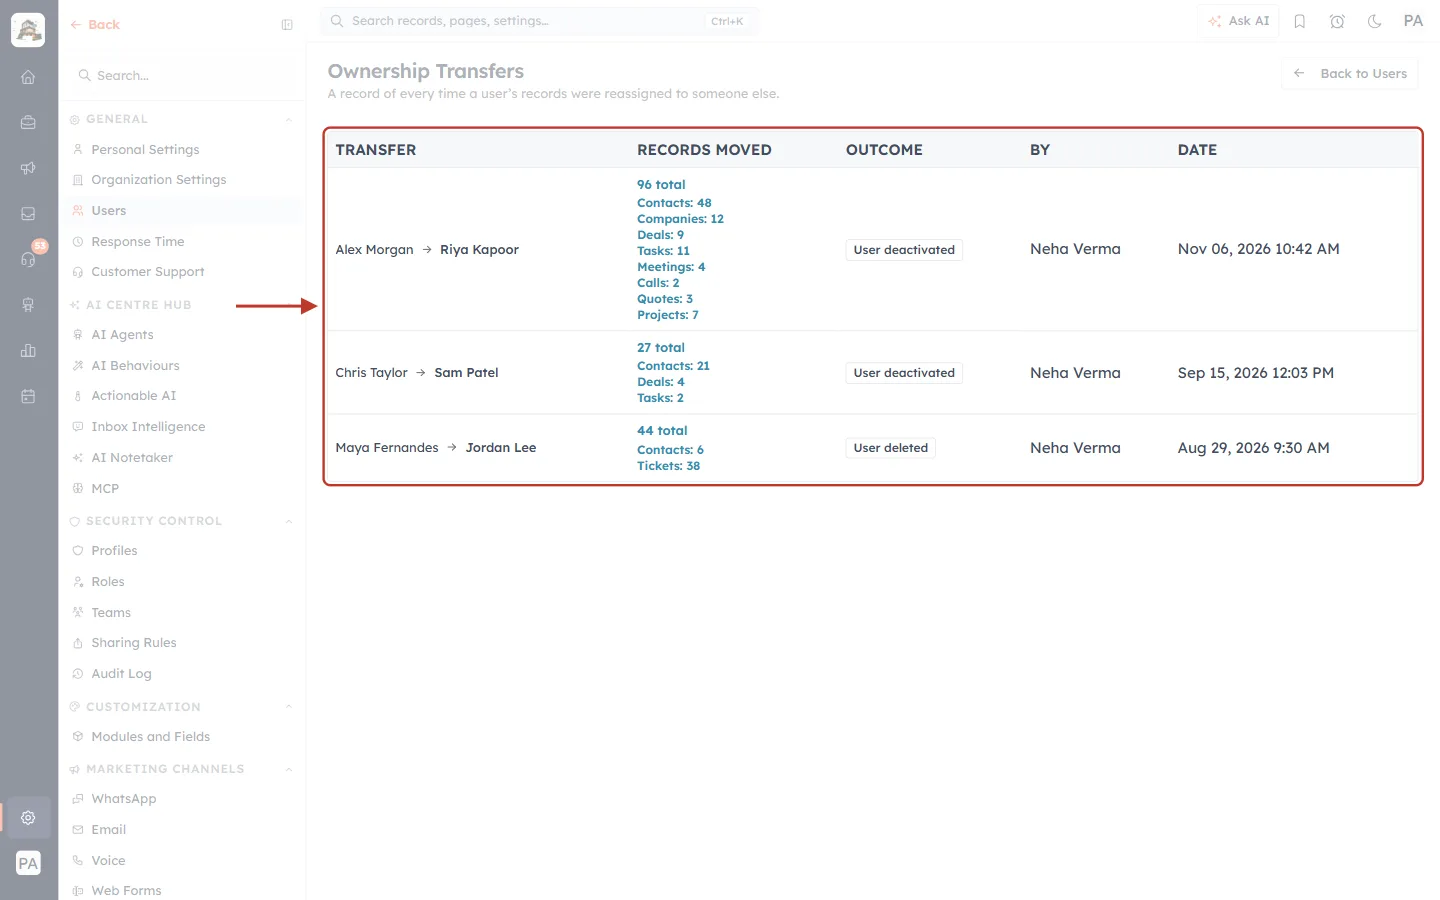
What this screenshot shows. The Ownership Transfers page. The table of past transfers is ringed.
Under the title: A record of every time a user’s records were reassigned to someone else.
TRANSFER: who the records came from and who received them, for example Alex Morgan → Riya Kapoor.
RECORDS MOVED: the total, then a count for each module (Contacts: 48, Companies: 12, Deals: 9 and so on).
OUTCOME: User deactivated, User deleted or Records reassigned. A transfer that is still running shows In progress, and one that did not work shows Failed.
BY: the admin who started the transfer. DATE: when it finished.
Before your first transfer the page reads No ownership transfers yet.
Offboarding checklist#
Decide: deactivate (may come back, or not sure) or delete (gone for good).
Agree who takes over. If the work should be split, move part of it first with Change Owner.
Deactivate or delete with Transfer records to another user, and keep open activities and future meetings ticked.
Wait for N records transferred from …, then check Ownership Transfers.
Tell the new owner what they have received, especially upcoming meetings and open deals.
Check other places that may name the person: workflow Assign Owner steps, team membership, and round-robin lists.
Frequently asked questions#
Can a deactivated user still sign in?
No. Only active users can sign in. The account and its settings are kept, so you can switch it back on at any time.
Do I lose any data when I deactivate someone?
No. Deactivating never deletes records. They either stay with the person or move to the new owner.
Why didn’t all of the person’s records move?
Completed activities (finished tasks, past meetings and completed calls) always stay with the person who did them. Anything you unticked under What to transfer also stays.
Can I send the records to more than one person?
Not in a single transfer. Move some records first with Change Owner, then transfer the rest.
Why can’t I pick a certain teammate as the new owner?
Only active users are listed. Activate that person first, or pick someone else.
Why is there no Deactivate or Delete option for someone?
They have been invited but have not joined yet. Use Revoke Invite instead.
I restored a deleted user. Why don’t they have their old records?
Records that were transferred when they left stay with the new owner. Move back what they need with Change Owner.
Previous and next#
Related articles#
Was this article helpful?
Ready to implement this?
OpenAI Engage and apply what you just learned to your own workspace.
Open AI Engage CRM