Loading…


KnowledgeBase
Create a New Layout for a Module: Clone, Customise and Save a Form for Each Team (Step-by-Step)
What is a layout, and why create a new one?#
A layout decides which fields a record shows and how they are grouped into sections. Every module in AiEngage CRM (Contacts, Companies, Deals, Tickets and any module you build yourself) starts with one layout called Standard, which holds every field of the module.
Different teams rarely need the same fields. Your sales team may never touch the advertising and tracking fields that marketing relies on, while your support team needs fields that sales never fills in. Instead of making everyone scroll past fields they don’t use, you can give a module more than one layout — each one a separate, named form with just the fields a team needs.
Example used in this guide. You create a Sales layout for the Contacts module. You start it as a copy of Standard, then:
take off a field your sales team doesn’t use (Company Size),
rename a section so it matches how your team talks (Lead Information → Sales Information),
add a new section called Deal Preferences with a new Budget Range pick list,
save the layout, and check it on the module’s Layouts page.
Follow the same steps for any module and any team — only the names change.
Key words used in this guide#
| Term | What it means |
|---|---|
| Layout | A named set of fields and sections for one module. A module can have several layouts. |
| Standard | The layout every module starts with. It is always active and can’t be deleted. |
| Clone From | The existing layout your new layout is copied from. The copy includes all of its fields, sections and section settings. |
| Layout Builder | The drag-and-drop screen where you edit a layout’s fields and sections. |
| Section | A titled group of fields on the form, for example Contact Information or Address Information. |
| Unused Fields | Fields that belong to the module but are not placed on this layout. Their data is kept, and you can drag them back at any time. |
| Profile | A set of permissions given to users (for example Administrator, Manager, User). Layouts are shared with profiles. See Control Permissions with Profiles. |
Before you begin#
You need permission to customise modules. The Administrator profile has it. Without it, Modules and Fields does not appear in Setup.
Decide what the new layout is for and who will use it, and give it a name your team will recognise (for example Sales, Support or Partners).
Have a rough list of the fields this team needs. It is quicker to remove a few fields from a copy than to build a layout from nothing.
Part 1: Open the Layouts page of your module#
Step 1: Open Setup#
Click the gear icon near the bottom of the dark menu bar on the left of the screen.
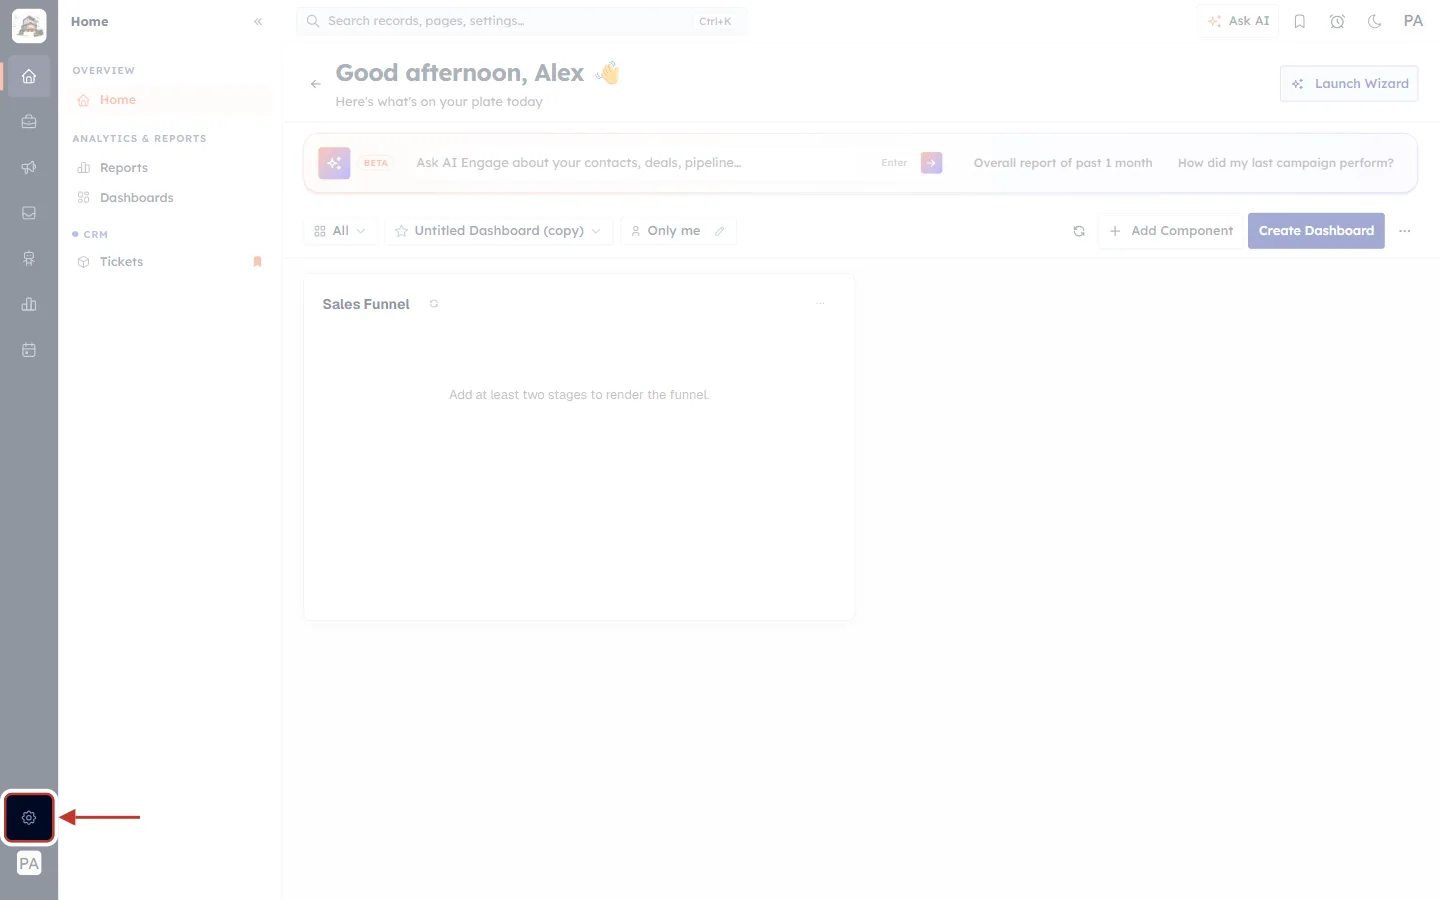
What this screenshot shows. The CRM home page. The gear icon at the bottom of the narrow dark menu bar on the left is ringed, with the red arrow pointing to it.
The icons above the gear open the main parts of the CRM (Home, Sales, Marketing, Inbox and so on).
The circle with your initials below the gear opens your own profile, not Setup.
The rest of the page (your dashboard) is faded because you don’t need it for this task.
Step 2: Open Modules and Fields#
The Setup page opens. In the Setup menu on the left, find the CUSTOMIZATION group and click Modules and Fields.
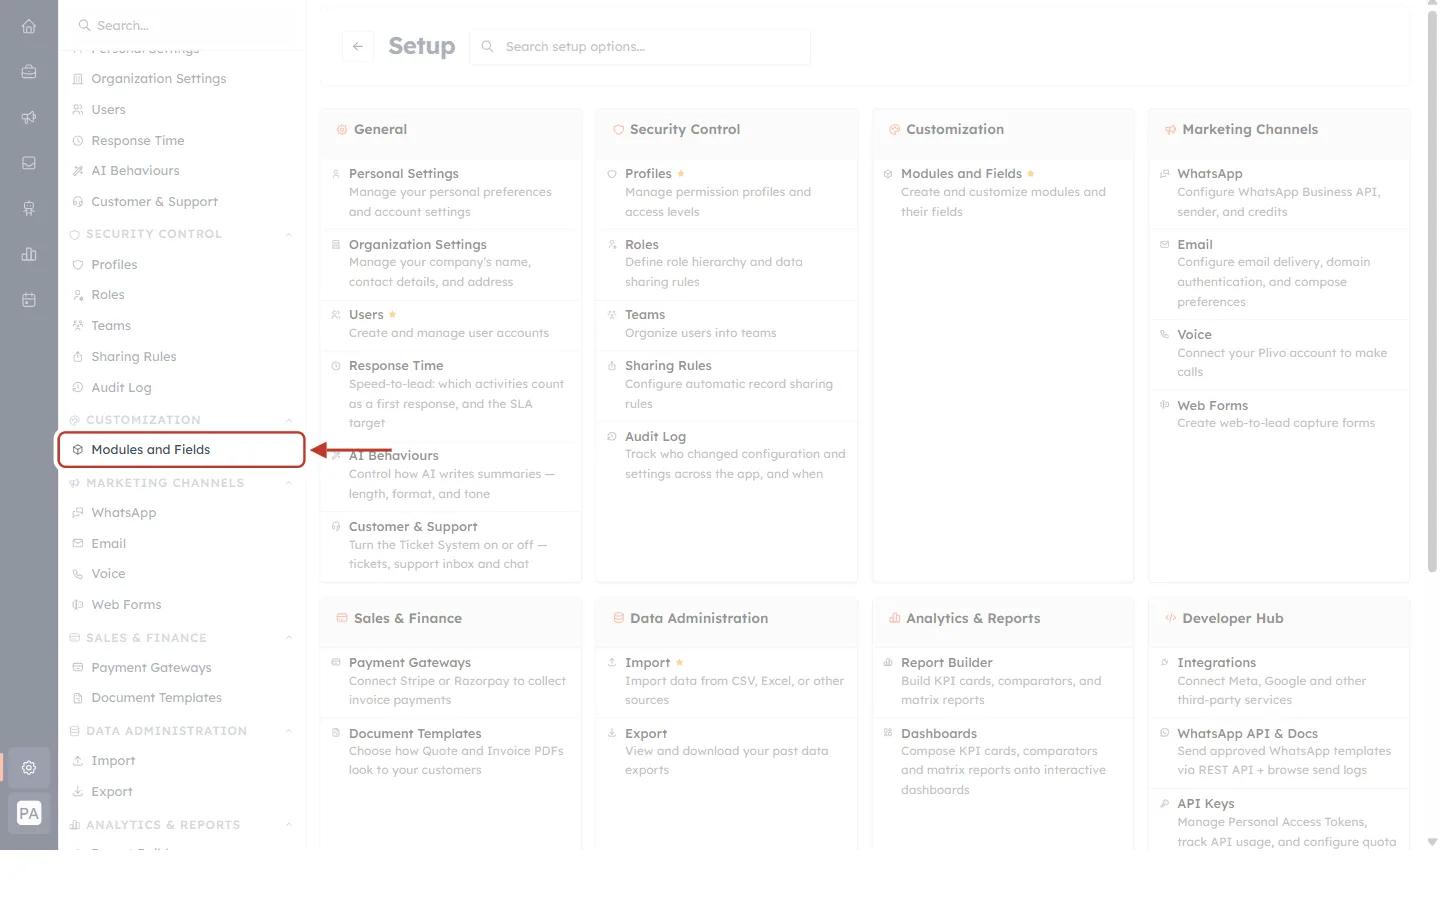
What this screenshot shows. The Setup page. Modules and Fields is ringed in the Setup menu on the left, under the CUSTOMIZATION heading.
Above it are the GENERAL and SECURITY CONTROL groups (Users, Profiles, Roles, Teams, Sharing Rules, Audit Log).
Below it are MARKETING CHANNELS, SALES & FINANCE, DATA ADMINISTRATION and more.
The cards in the middle of the page link to the same settings. The Customization card also has a Modules and Fields link; either one works.
Step 3: Click Configure on the module#
The Modules page lists every module in your CRM. Type the module’s name into the Search modules… box (this guide uses Contacts), then click Configure at the right end of its row.
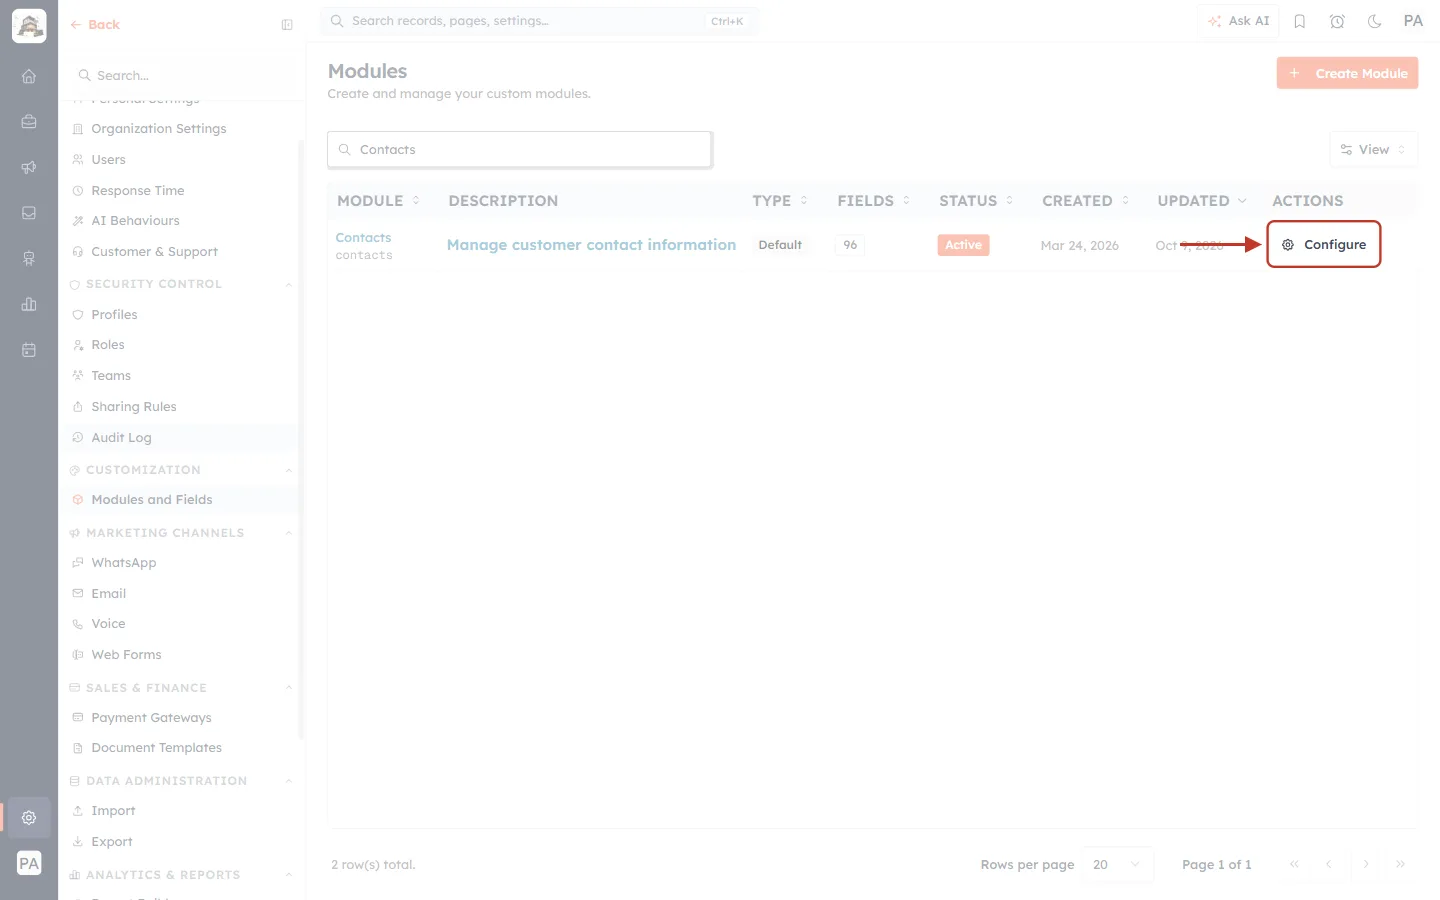
What this screenshot shows. The Modules page, filtered to “Contacts”. The Configure button in the ACTIONS column is ringed.
MODULE shows the module’s name and its short code (contacts).
DESCRIPTION, TYPE (Default for built-in modules, Custom for modules you created), FIELDS (how many fields the module has), STATUS, CREATED and UPDATED describe the module.
Configure opens the module’s Layouts page, where every layout of the module is listed.
Step 4: Look at the Layouts page#
You are now on the Contacts Layouts page. Before you add a layout, take a moment to see what is already there.
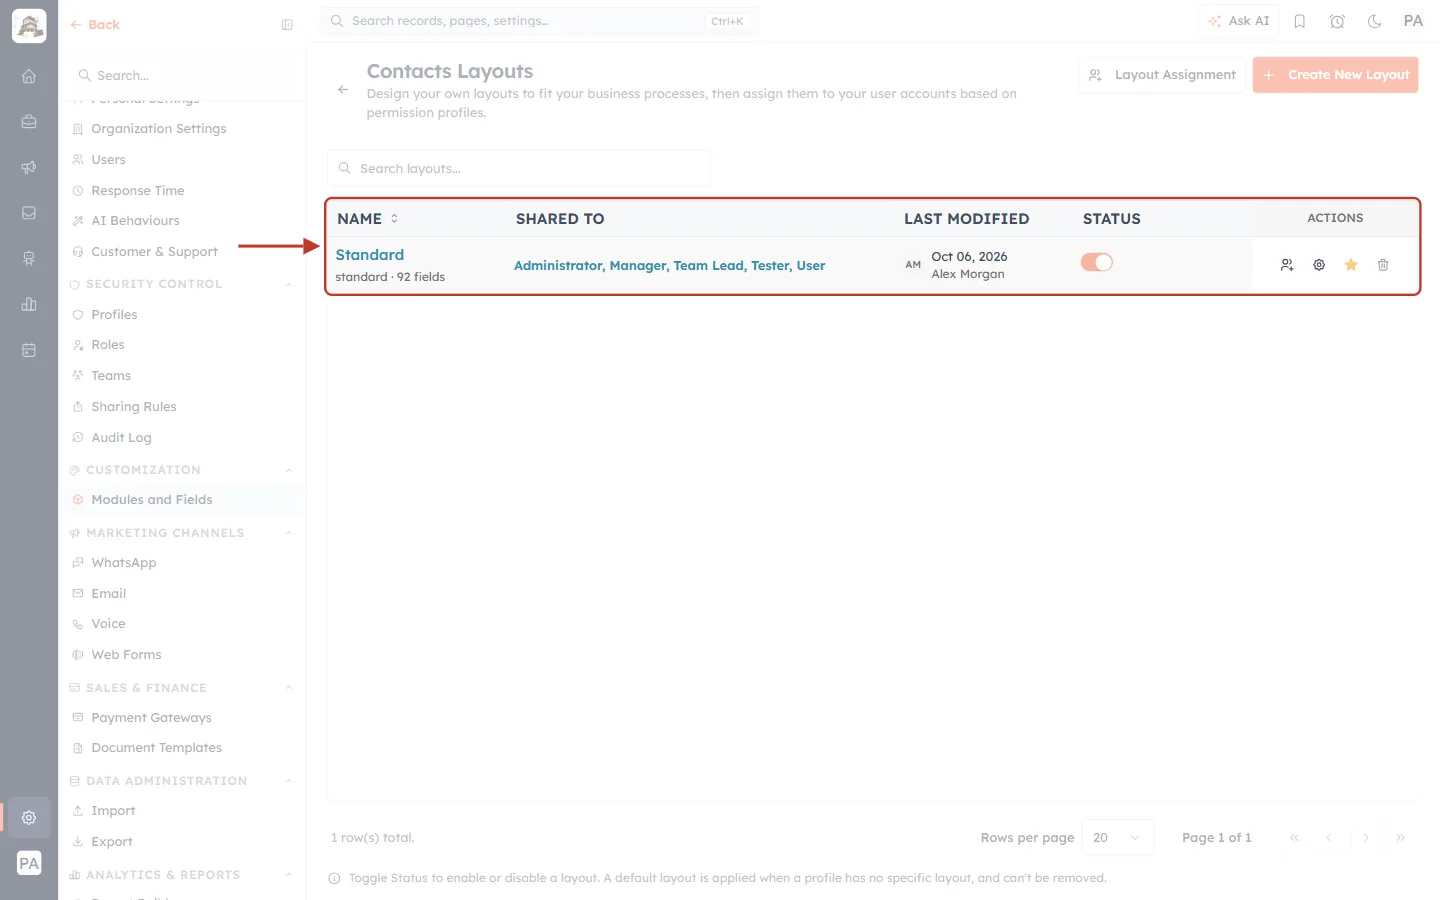
What this screenshot shows. The Contacts Layouts page. The table, ringed, has a single row: Standard.
NAME — Standard, its short code standard and the number of fields on it (92 fields). Clicking the name opens it in the Layout Builder.
SHARED TO — the profiles that can use this layout. Standard is shared with every profile (Administrator, Manager, Team Lead, Tester, User).
LAST MODIFIED — when the layout was last changed, and by whom.
STATUS — the on/off switch. Standard’s switch is faded because Standard is always on.
ACTIONS — Assign profiles (person icon), Open in Layout Builder (gear), the default layout star (filled orange on Standard) and Delete (bin, greyed out because Standard can’t be deleted).
The note under the table reads: “Toggle Status to enable or disable a layout. A default layout is applied when a profile has no specific layout, and can’t be removed.”
Part 2: Create the new layout#
Step 5: Click Create New Layout#
Click the orange Create New Layout button at the top right of the Layouts page.
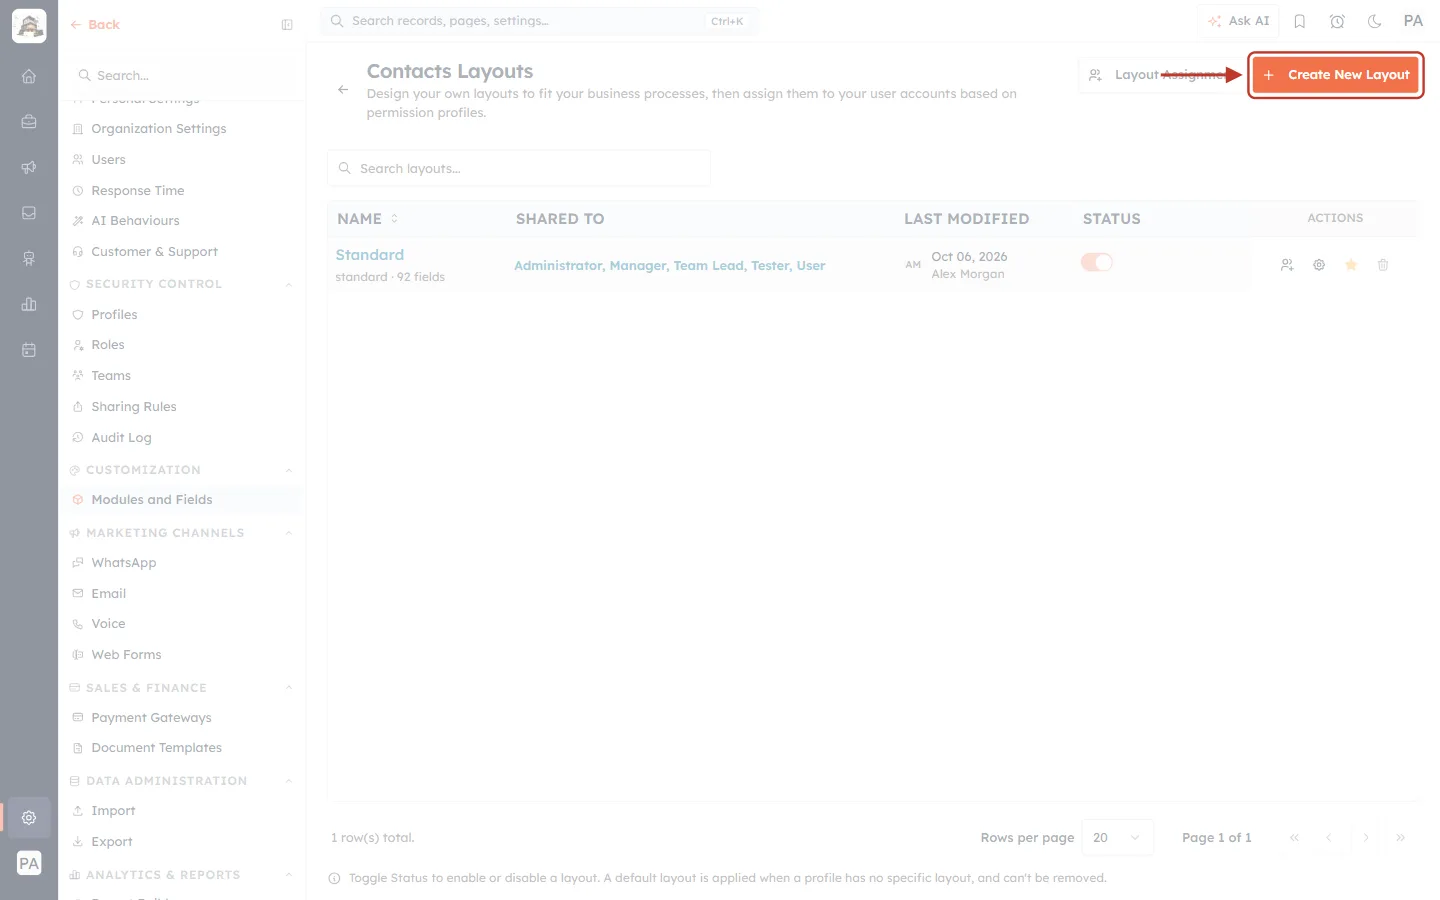
What this screenshot shows. The top right of the Contacts Layouts page. The orange + Create New Layout button is ringed.
Layout Assignment, to its left, is for deciding which profiles use which layouts once you have more than one. You don’t need it to create a layout.
The page title and subtitle (“Design your own layouts to fit your business processes, then assign them to your user accounts based on permission profiles.”) confirm which module you are working on.
Step 6: Read the Create New Layout window#
A small window opens in the middle of the screen.
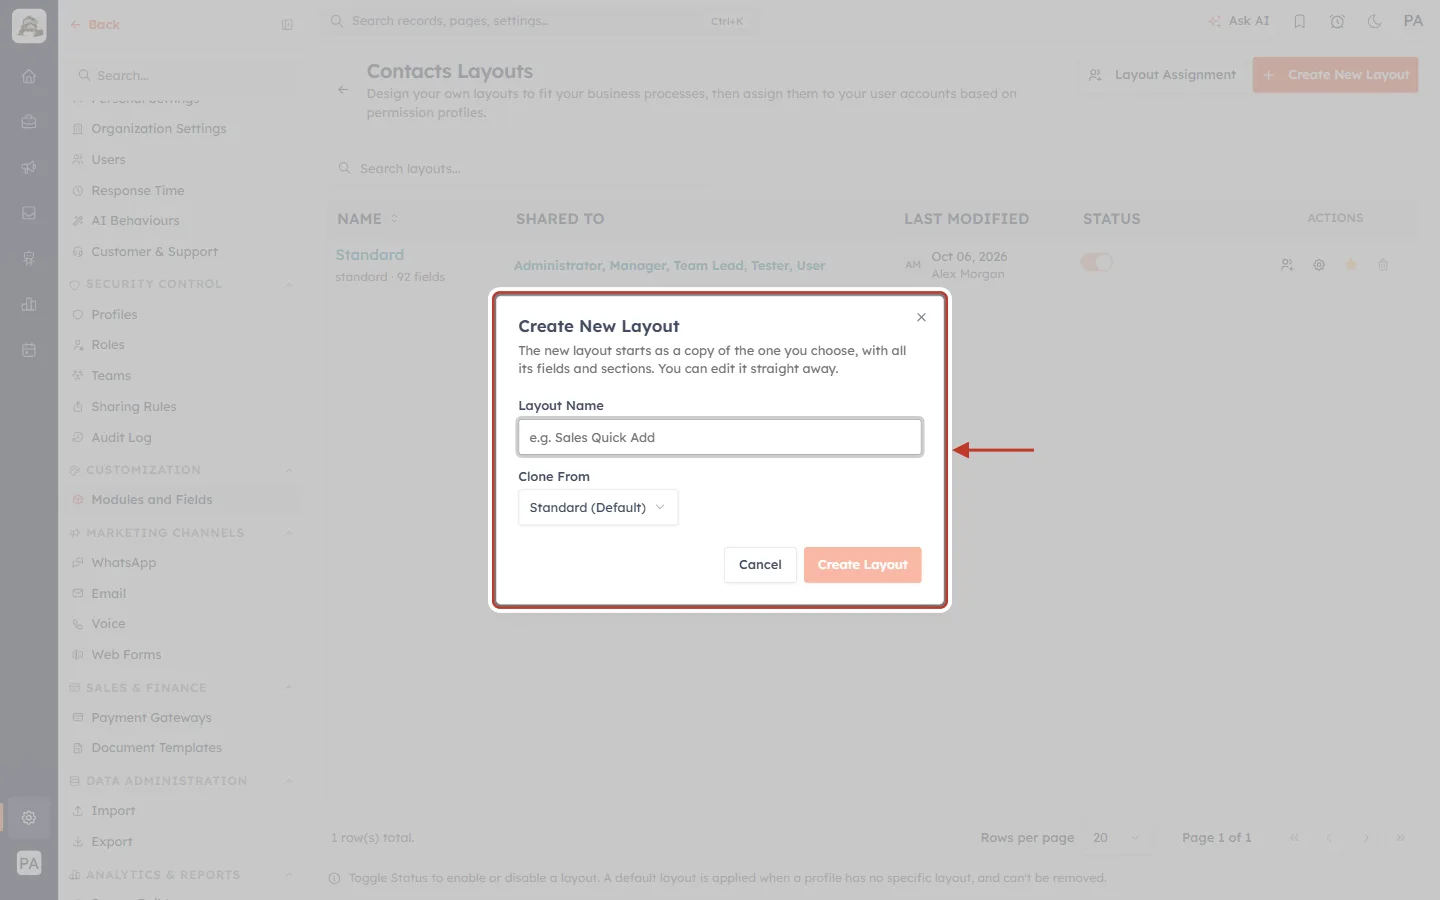
What this screenshot shows. The Create New Layout window as it first opens, ringed.
The line under the title explains what will happen: “The new layout starts as a copy of the one you choose, with all its fields and sections. You can edit it straight away.”
Layout Name — an empty box with the grey hint e.g. Sales Quick Add. The cursor is already in it, so you can start typing.
Clone From — already set to Standard (Default), the module’s default layout.
Create Layout is faded and can’t be clicked until you type a name. Cancel or the × at the top right closes the window without creating anything.
Step 7: Type a name for the layout#
Click in Layout Name and type the name, for example Sales. Each layout in a module needs its own name, so the window warns you straight away if you type a name that is already taken.
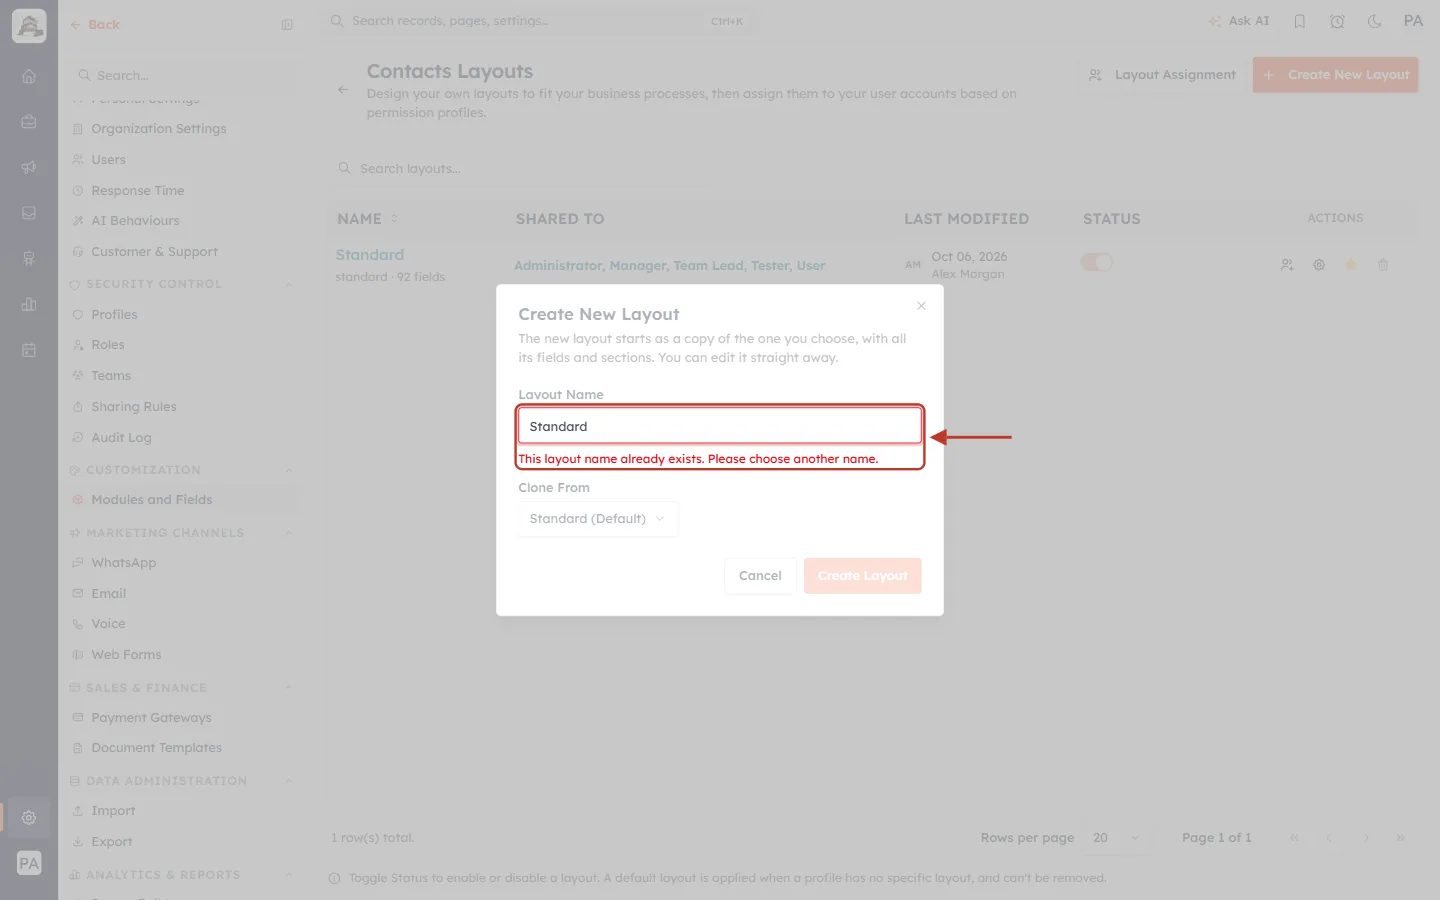
What this screenshot shows. The Layout Name box with Standard typed in, ringed together with the red message underneath.
The box turns red and the message reads “This layout name already exists. Please choose another name.”
The check ignores capital letters and extra spaces, so standard and Standard are refused as well.
Create Layout stays faded until you change the name to one that isn’t used yet.
Step 8: Choose which layout to copy (Clone From)#
Click the Clone From box to see the layouts you can copy, and click the one that is closest to what you want. In most cases that is the default layout.
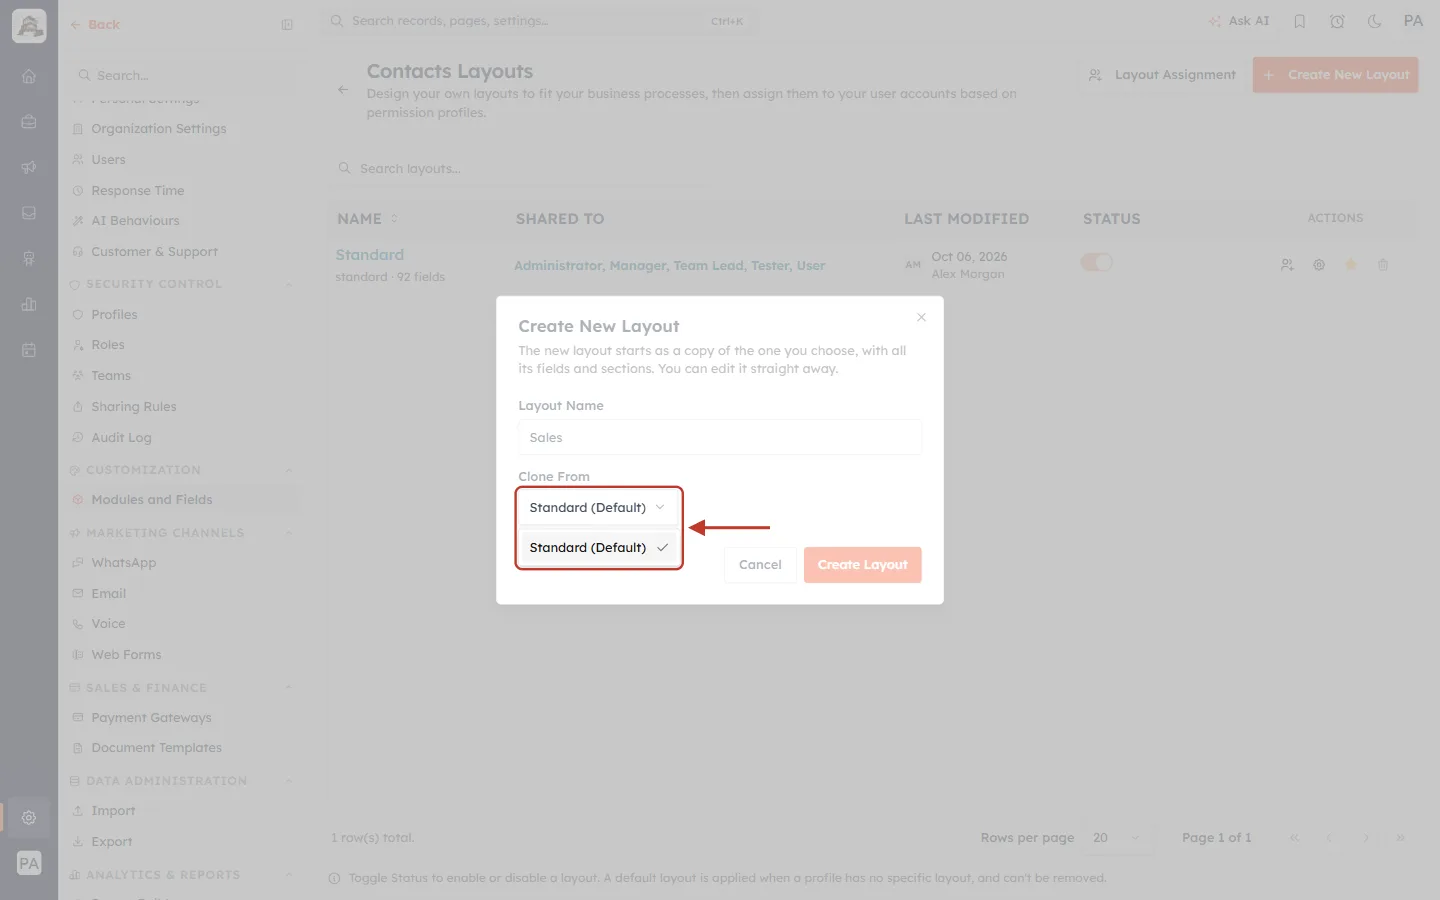
What this screenshot shows. The Clone From list, opened and ringed. In this example the module has only one layout, so the list shows Standard (Default) with a tick next to it.
Every active layout of the module appears in this list. Layouts that are switched off are left out.
(Default) marks the module’s default layout. It is selected automatically when the window opens.
The new layout gets a copy of everything on the layout you pick — its fields, its sections and their settings — so it opens ready to edit rather than empty.
ℹ️
Choosing the layout to copy only decides where your new layout starts. The two layouts are separate from then on: changes you make to the new layout do not change the layout you copied.
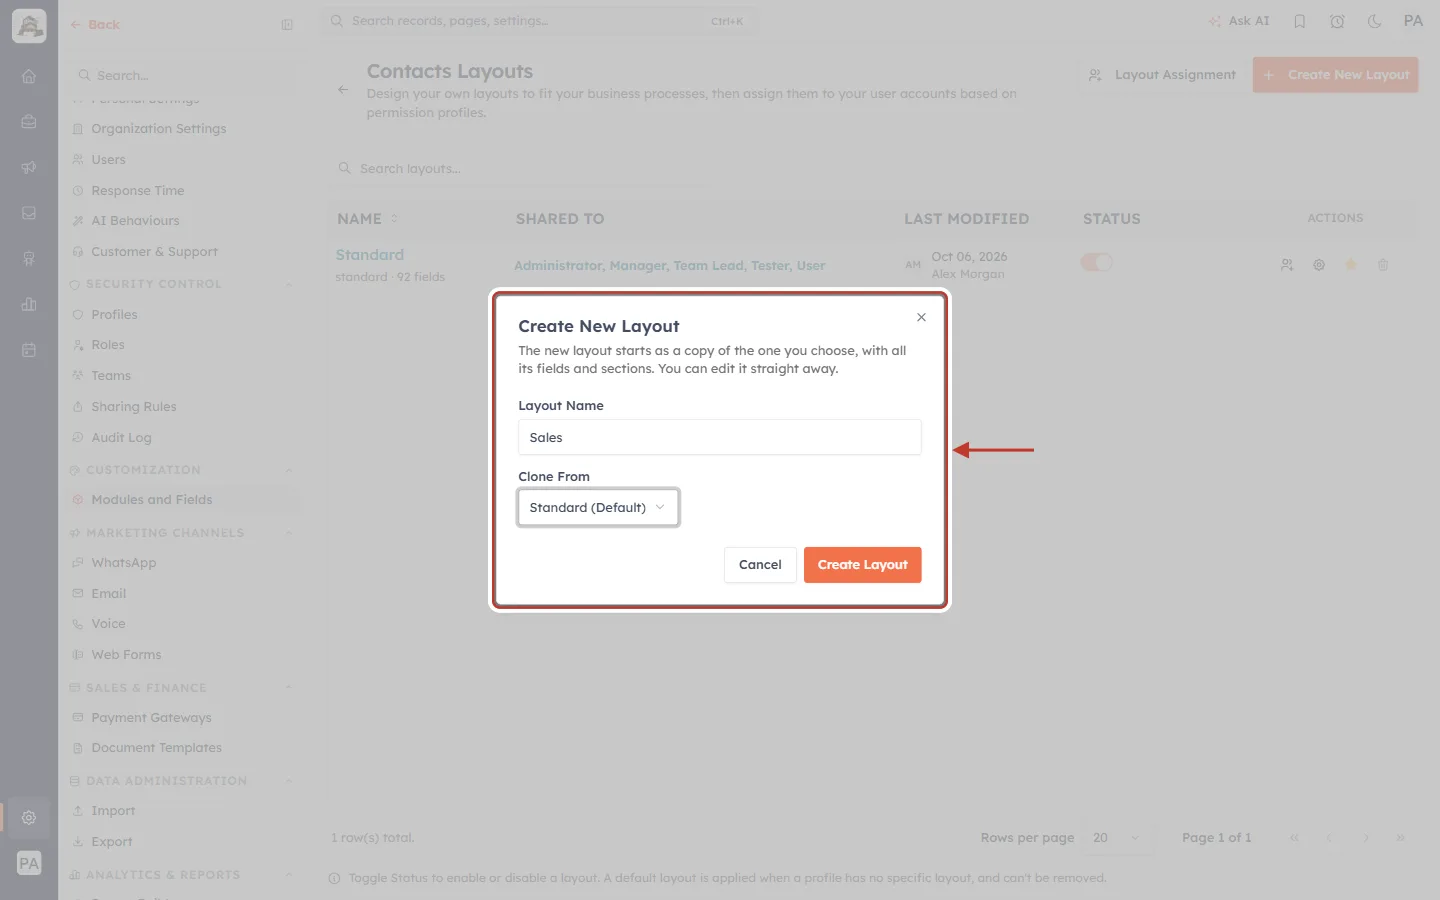
What this screenshot shows. The finished window, ringed: Layout Name is Sales and Clone From is Standard (Default).
The Create Layout button is now bright orange, which means it can be clicked.
You can also press Enter in the name box instead of clicking the button.
Step 9: Click Create Layout#
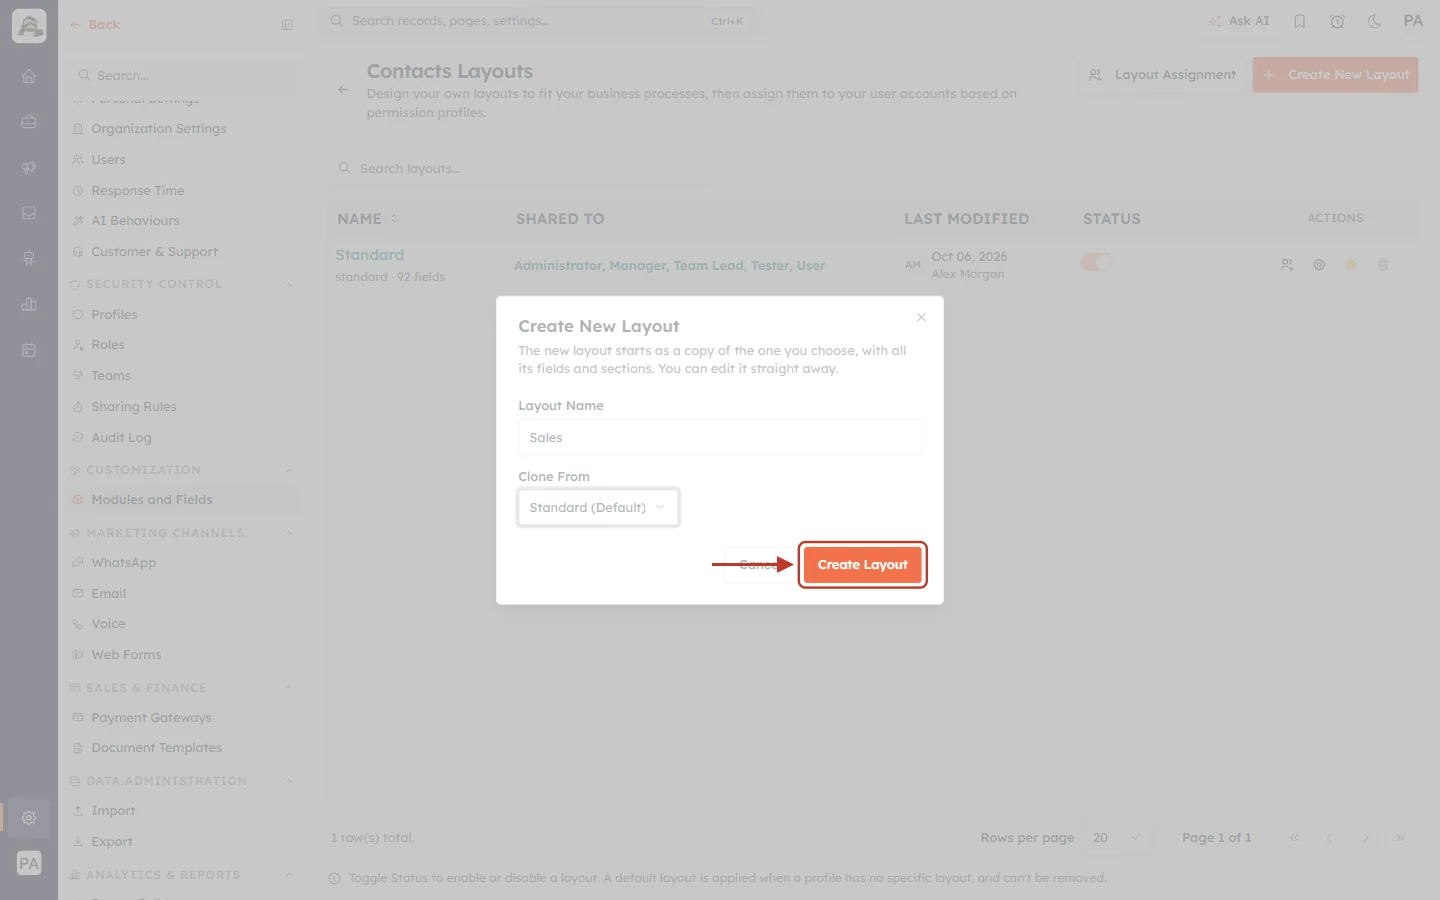
What this screenshot shows. The orange Create Layout button at the bottom right of the window, ringed.
While the layout is being created the button reads Creating....
A short “Layout created” message appears at the bottom right of the screen, and the CRM takes you straight into the Layout Builder on your new layout.
Part 3: Get to know the Layout Builder#
Your new Sales layout is open in the Layout Builder. Because it is a copy of Standard, it already contains every field and section of Standard. Nothing you do here is saved until you click Save, so feel free to try things out.
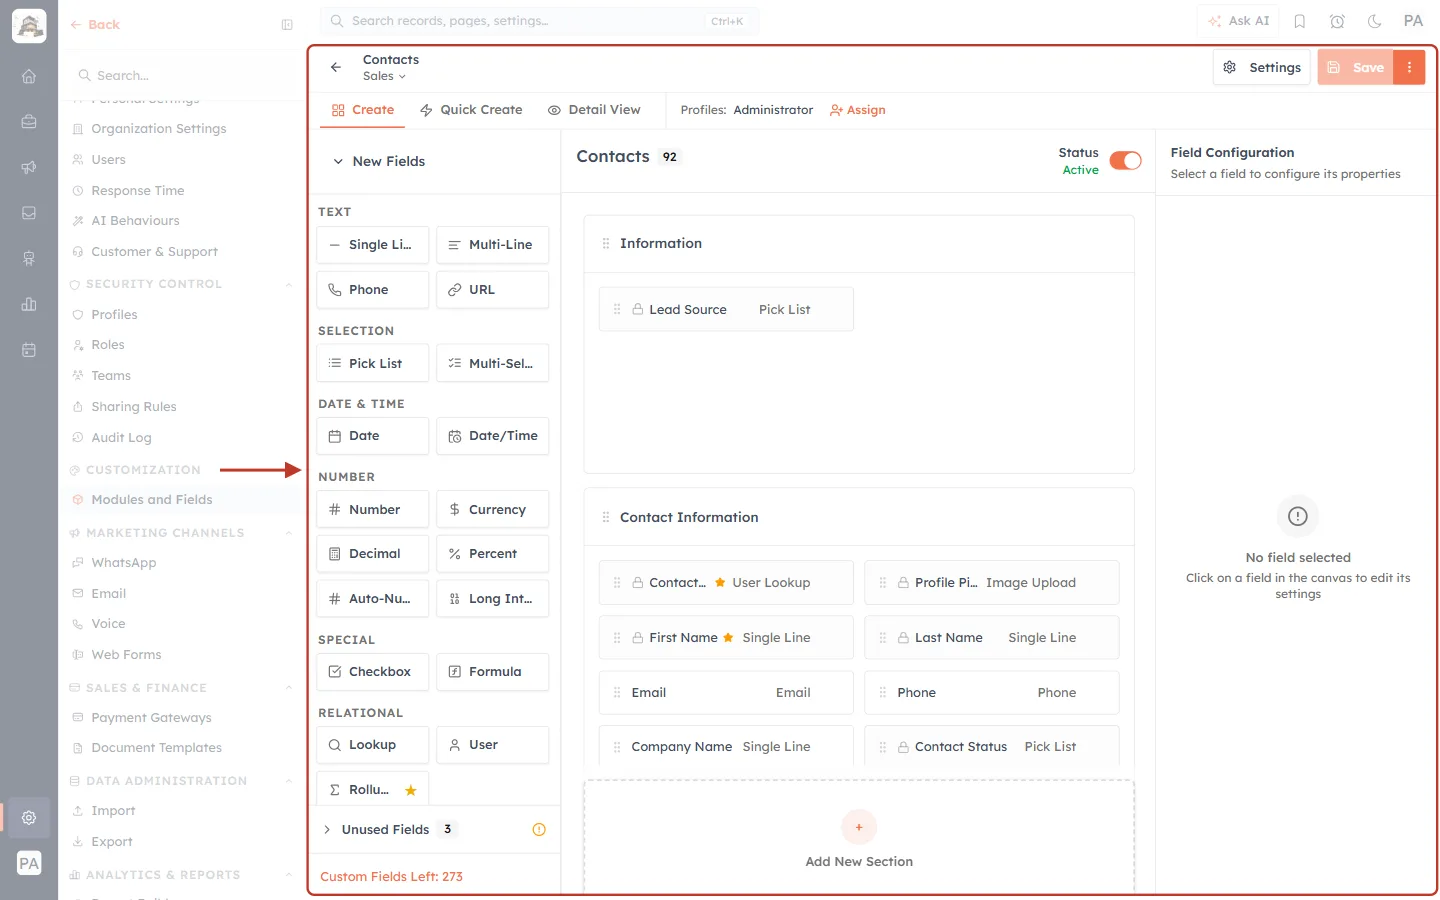
What this screenshot shows. The whole Layout Builder, ringed. It has a header at the top and three columns below it.
Header (top) — the module name Contacts with the layout name Sales under it, the Create / Quick Create / Detail View tabs, the profiles this layout is shared with, and the Settings and orange Save buttons.
Left column — New Fields: the field types you can add (Single Line, Phone, Pick List, Date, Number, Currency, Checkbox, Lookup and more). At the bottom are Unused Fields (with a count) and Custom Fields Left (how many more custom fields your plan allows).
Middle column — the canvas: the layout itself. The heading shows Contacts with the number of fields on the layout (92) and the layout’s Status switch. Below are the sections (Contact Information, Lead Information and so on) with their fields, and a dashed Add New Section box at the bottom.
Right column — Field Configuration: empty for now (“No field selected”). It shows the settings of whichever field you click.
A lock icon in front of a field (for example Contact Owner or First Name) marks a system field: you can’t take it off the layout. A small star marks a required field.
Step 10: Check which layout you are editing#
Always check the name under the module name before you change anything, so you don’t edit the wrong layout.
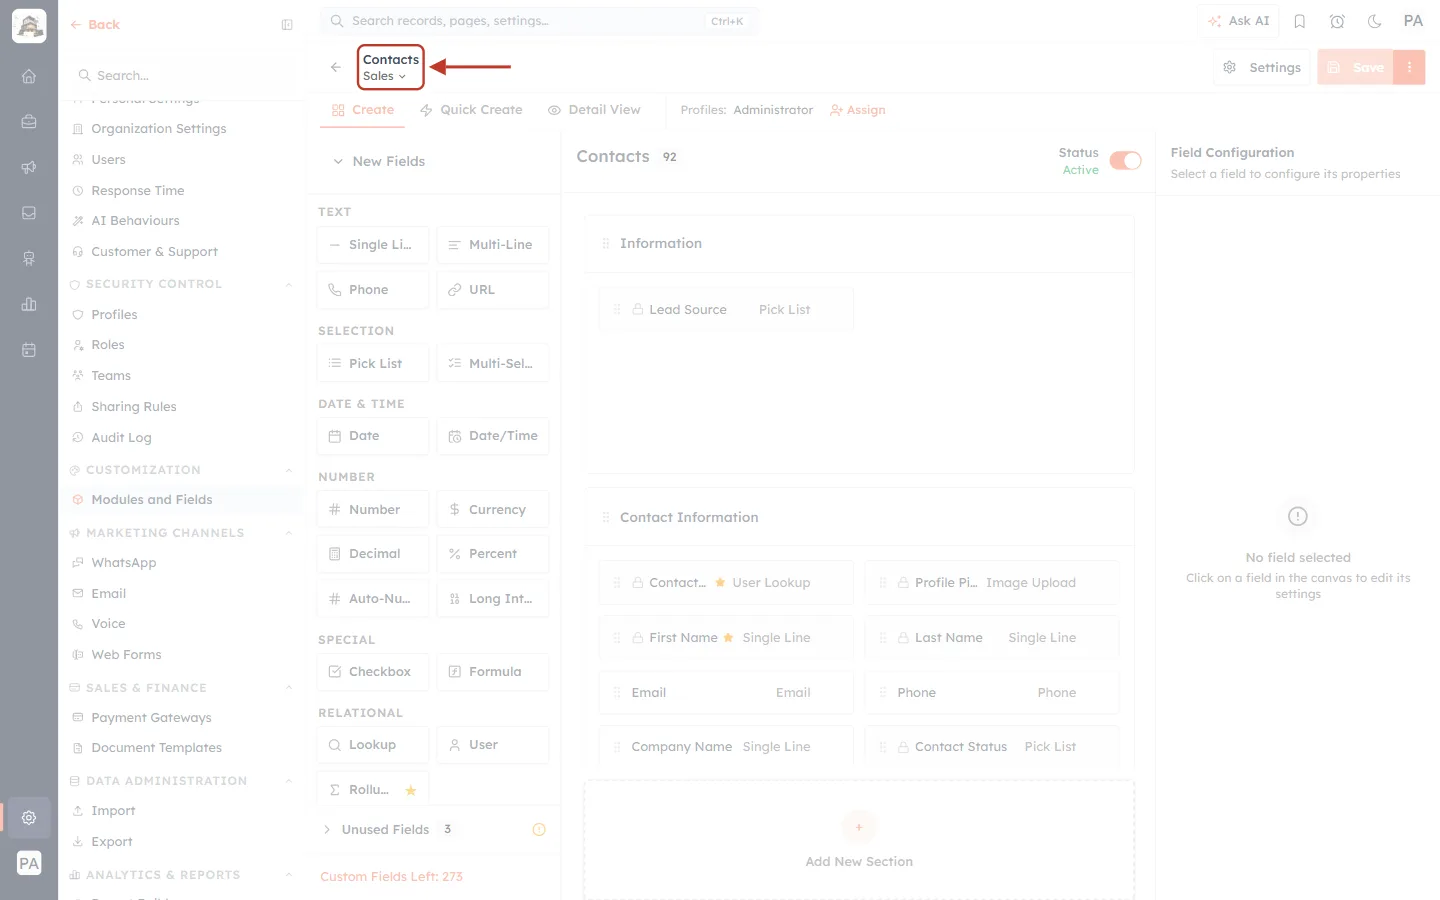
What this screenshot shows. The top left of the builder, ringed: Contacts (the module) with Sales ⌄ (the layout you are editing) under it.
When you open the module’s default layout, the line reads Standard · Default instead.
The small arrow ⌄ after the name opens the layout menu shown next.
The left-pointing arrow before the name takes you back.
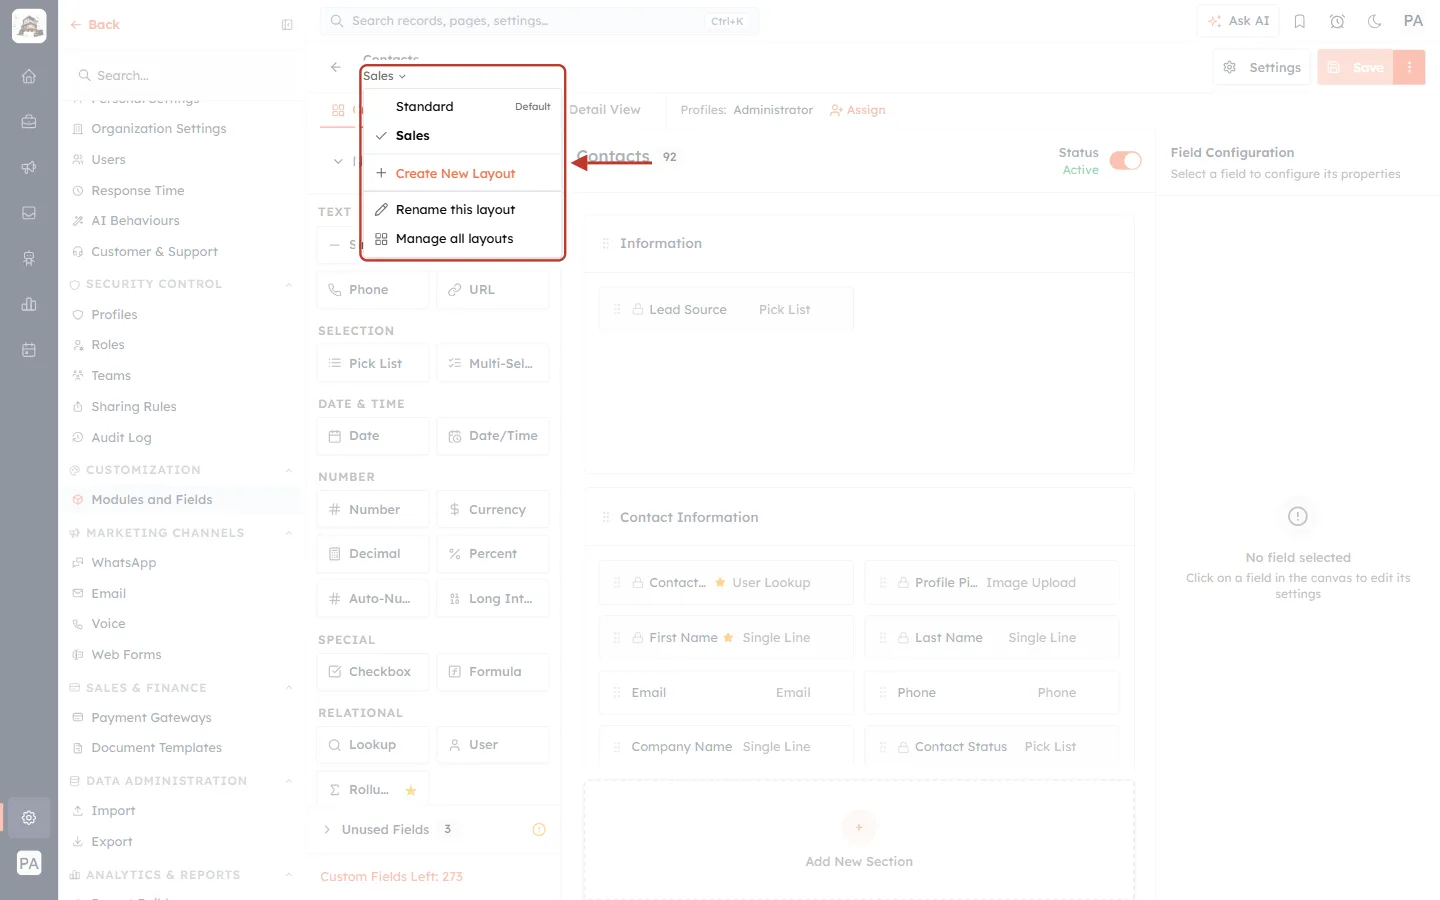
What this screenshot shows. The layout menu, opened by clicking Sales ⌄, ringed.
Standard (marked Default) and Sales (with a tick, because it is open now) — click a layout’s name to switch to it without going back to the Layouts page.
+ Create New Layout — opens the same Create New Layout window as in Part 2. If you have unsaved changes, the CRM asks you to save or discard your changes before creating a layout.
Rename this layout — turns the name into a box you can type in. Press Enter to keep the new name or Esc to cancel.
Manage all layouts — goes back to the module’s Layouts page.
Step 11: Understand the three form tabs#
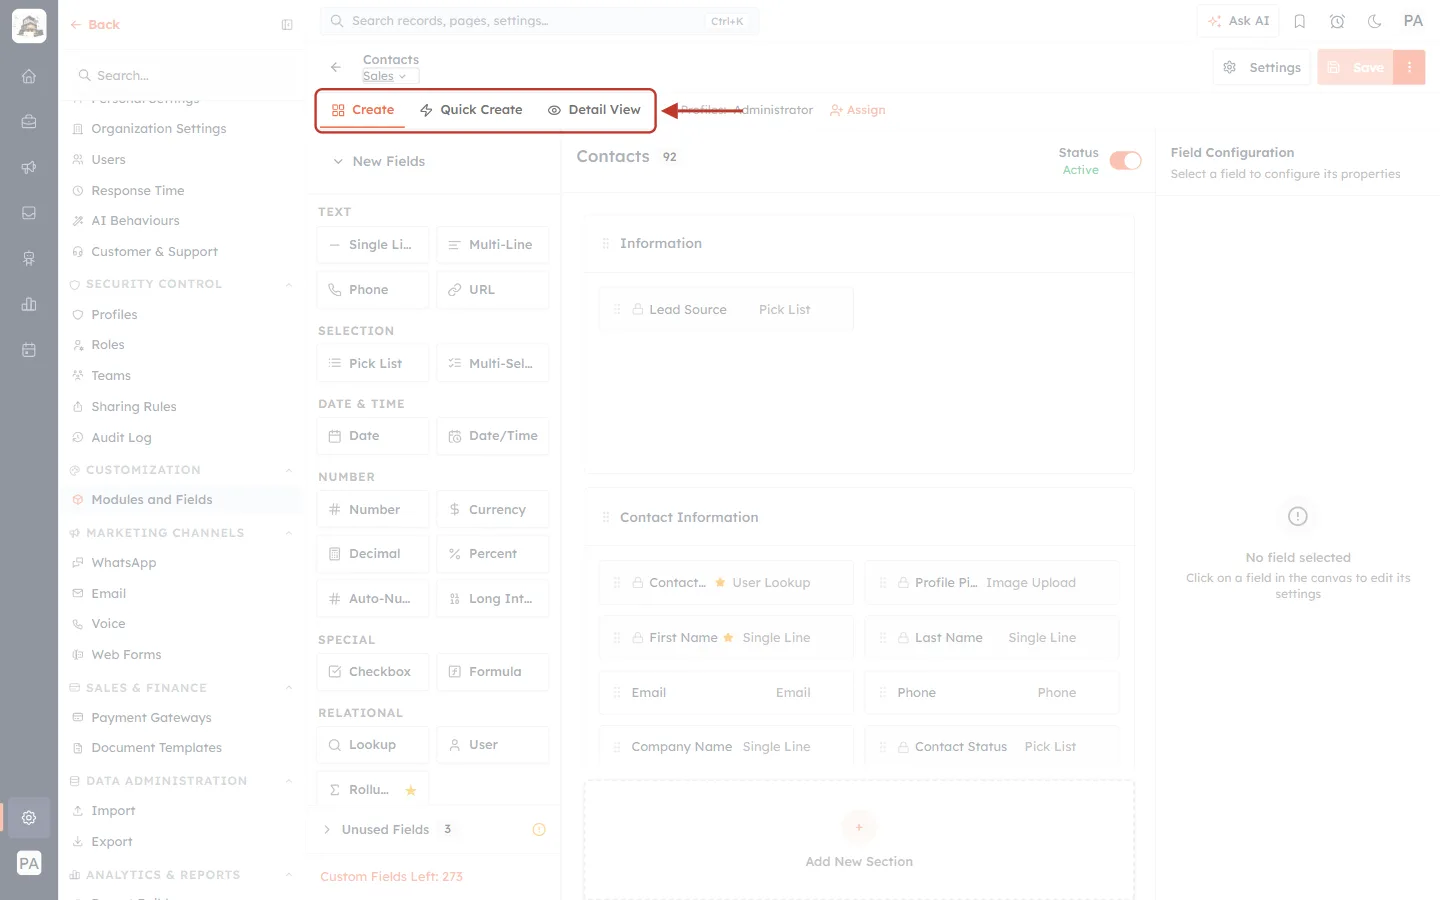
What this screenshot shows. The three tabs under the header, ringed: Create (selected, in orange), Quick Create and Detail View.
Create — the full form people fill in when they create or edit a record with this layout. This guide works on this tab.
Quick Create — the short form used when a record is created quickly, for example from a lookup field on another record.
Detail View — how the fields are arranged when someone opens a record.
Each layout has its own set of these three forms, so changing them on Sales does not change Standard.
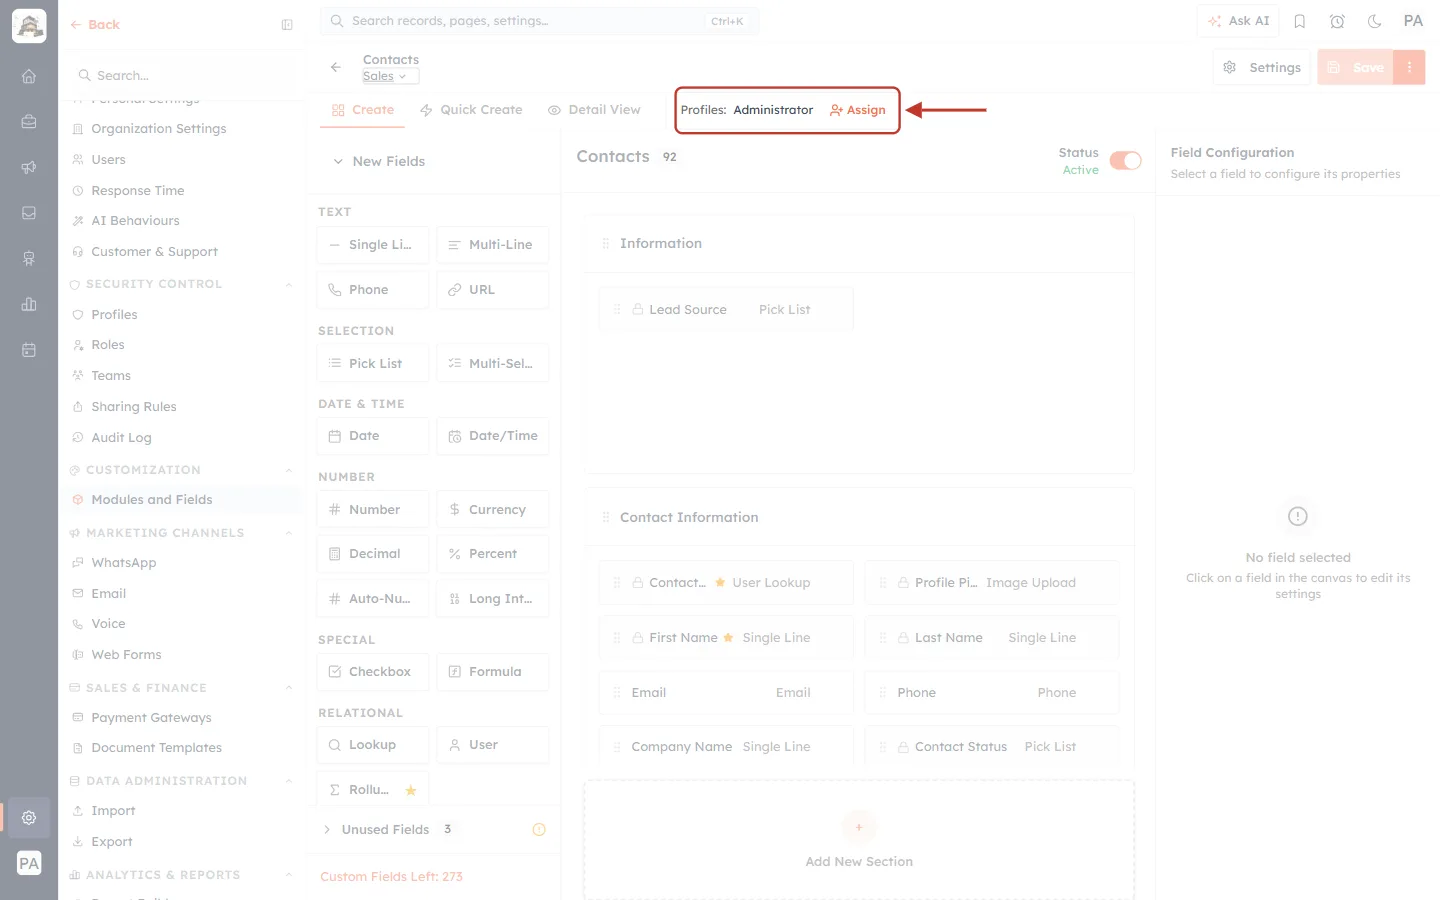
What this screenshot shows. The right end of the tabs row, ringed: Profiles: Administrator and the orange Assign button.
A new layout is shared only with the Administrator profile at first, so nobody else sees it while you are still building it.
Assign opens a window where you choose more profiles to share this layout with. You can also do this later from the Layouts page (Part 5).
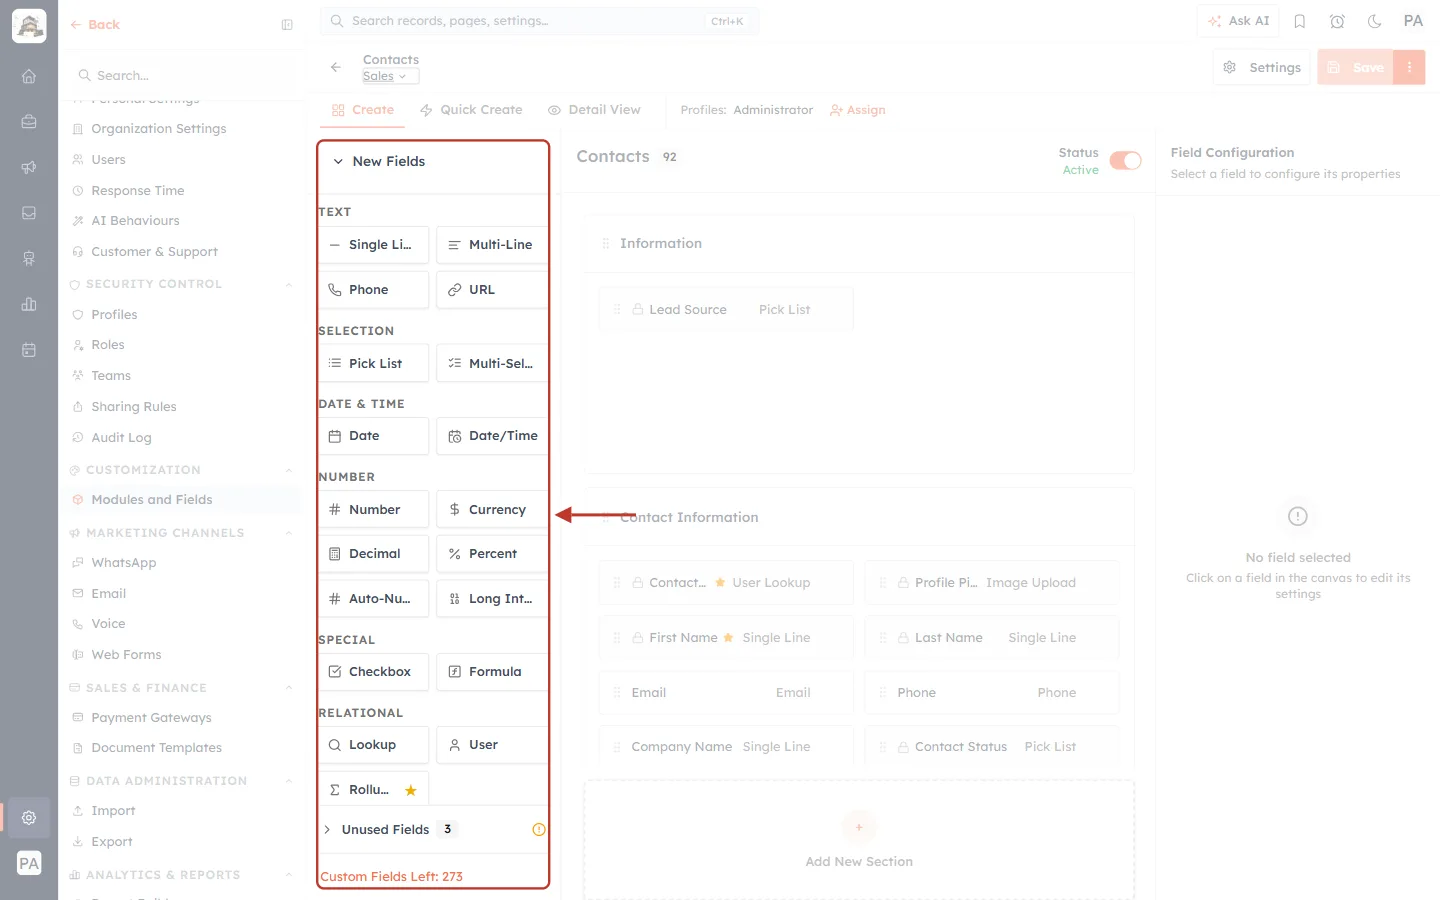
What this screenshot shows. The left column of the builder, ringed, with New Fields at the top.
Field types are grouped under TEXT, SELECTION, DATE & TIME, NUMBER, SPECIAL, RELATIONAL and more. You drag a field type from here onto a section to add a new field (Step 15).
Unused Fields (with a number) lists fields of this module that are not placed on this layout. Click it to open the list; drag a field from it into a section to put it back.
Custom Fields Left shows how many more custom fields you can create on your plan.
Part 4: Customise the new layout#
Now make the layout fit your team. You can do the steps below in any order, and as many times as you like, before you save.
Step 12: Take a field off the layout#
Point at the field you don’t need — in this example Company Size in the Contact Information section. Three dots ⋮ appear at the right end of the field. Click them.
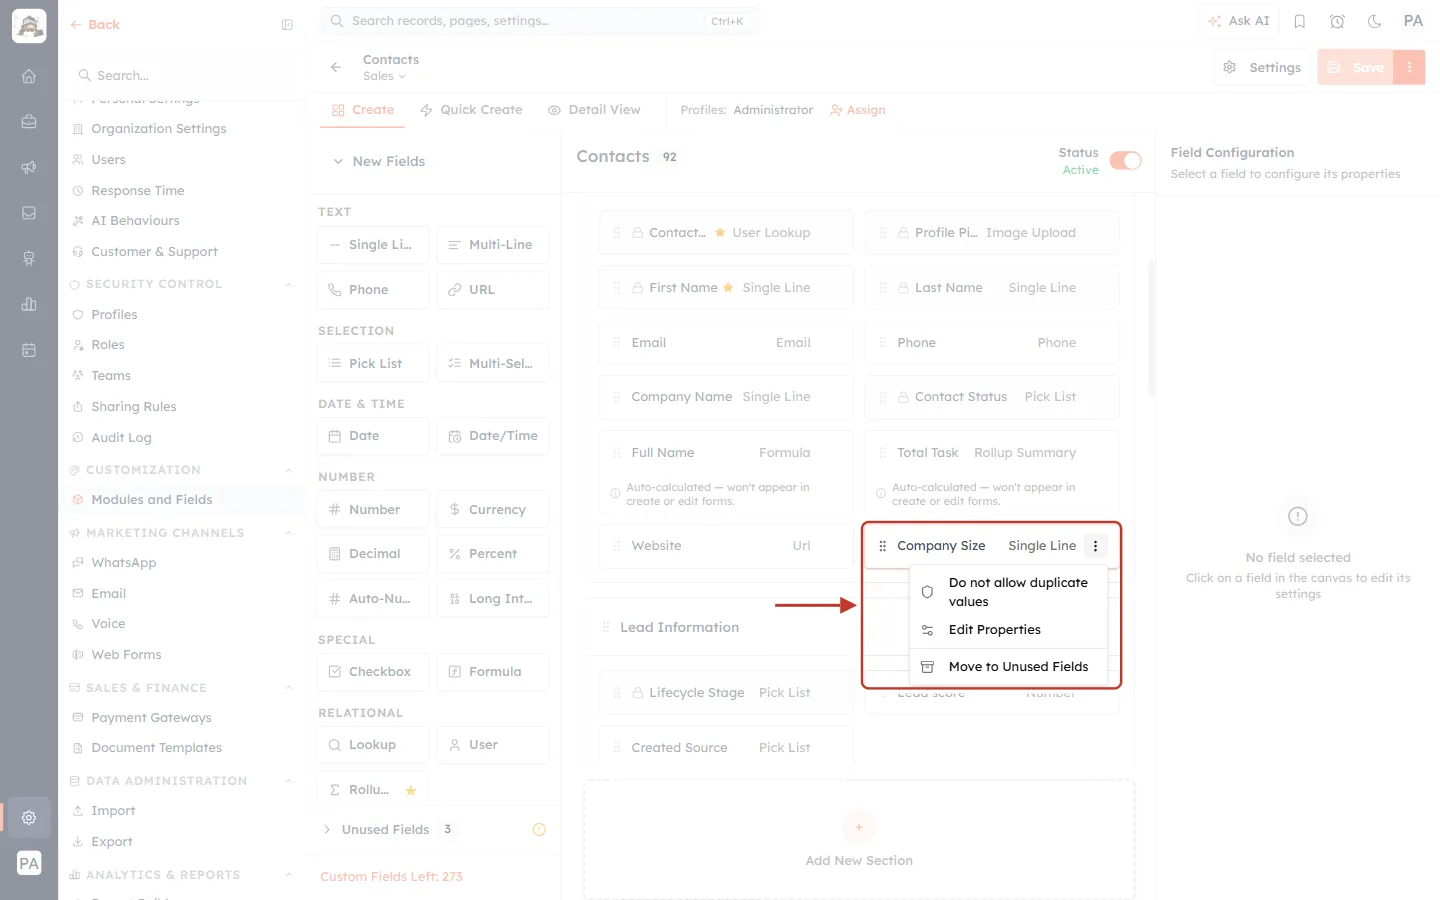
What this screenshot shows. The Company Size field with its menu open, ringed together.
Do not allow duplicate values — stops two records having the same value in this field (shown only for field types that support it).
Edit Properties — opens the field’s settings in the right column (the same as clicking the field).
Move to Unused Fields — takes the field off this layout. Click this one.
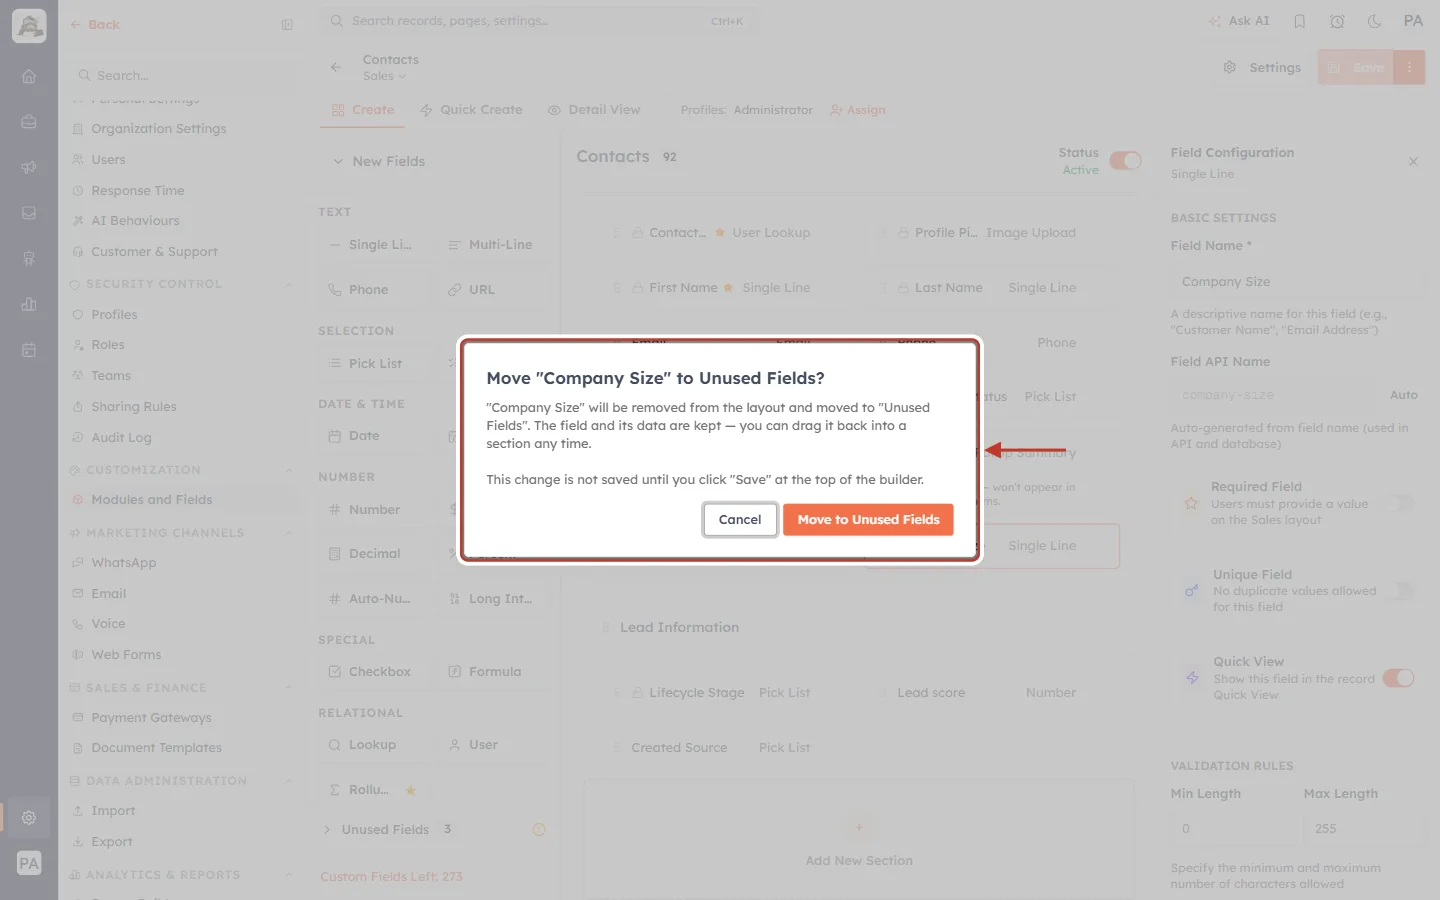
What this screenshot shows. The confirmation window, ringed, titled Move “Company Size” to Unused Fields?
It explains that the field will be removed from the layout and moved to Unused Fields, and that the field and its data are kept — you can drag it back into a section any time.
It also reminds you that the change is not saved until you click Save at the top of the builder.
Click the orange Move to Unused Fields button to confirm, or Cancel to leave the field where it is.
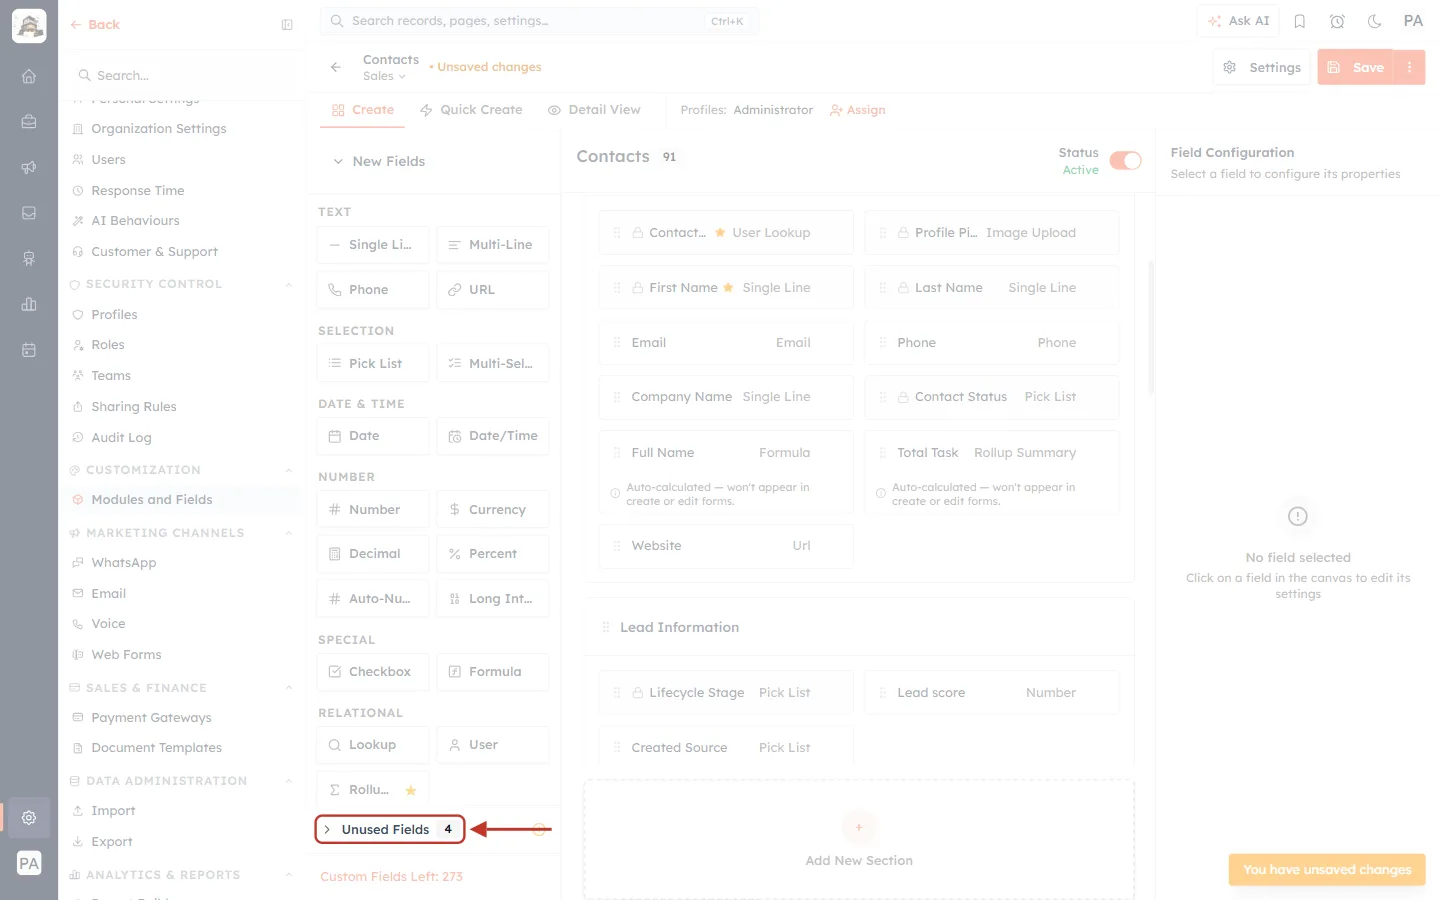
What this screenshot shows. Unused Fields at the bottom of the left column, ringed. Its number went up from 3 to 4, because Company Size is now there.
Company Size has disappeared from the Contact Information section on the canvas.
At the top of the page, an orange • Unsaved changes label has appeared next to the layout name, and the field count next to Contacts dropped from 92 to 91.
⚠️
Some fields can’t be taken off a layout. System fields (with a lock icon) have no Move to Unused Fields option. A required field shows Required — turn off to move to Unused instead: turn off Required Field in its settings first. A field you have only just added, and not changed yet, is simply removed instead of going to Unused Fields.
Step 13: Rename or move a section#
Each section has its own menu. Point at the section’s title bar and click the three dots ⋮ that appear at its right end.
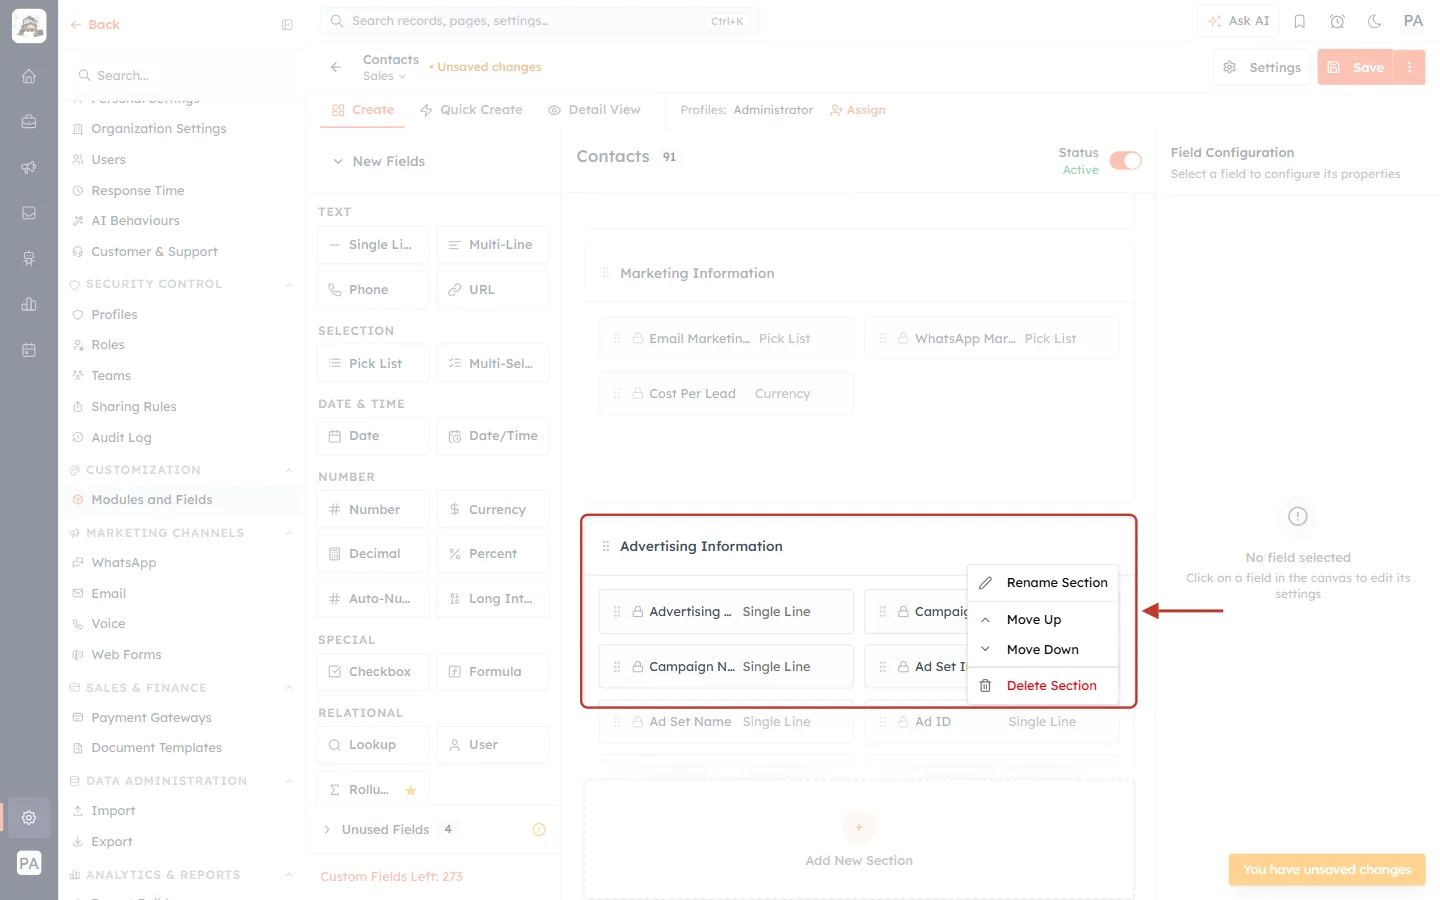
What this screenshot shows. The Advertising Information section with its menu open, ringed.
Rename Section — changes the section’s title.
Move Up / Move Down — moves the whole section, with its fields, one place up or down on the form. You can also drag a section by the dotted handle to the left of its title.
Delete Section (in red) — removes the section from this layout and moves its fields to Unused Fields, so nothing is lost.
ℹ️
A section that contains system fields (lock icon) or required fields can’t be deleted yet — the CRM shows the message “Can’t delete this section yet”. Move those fields to another section first, or turn Required Field off on them, then delete the section.
The quickest way to rename a section is to click its title. In this example, click Lead Information, type Sales Information and press Enter.
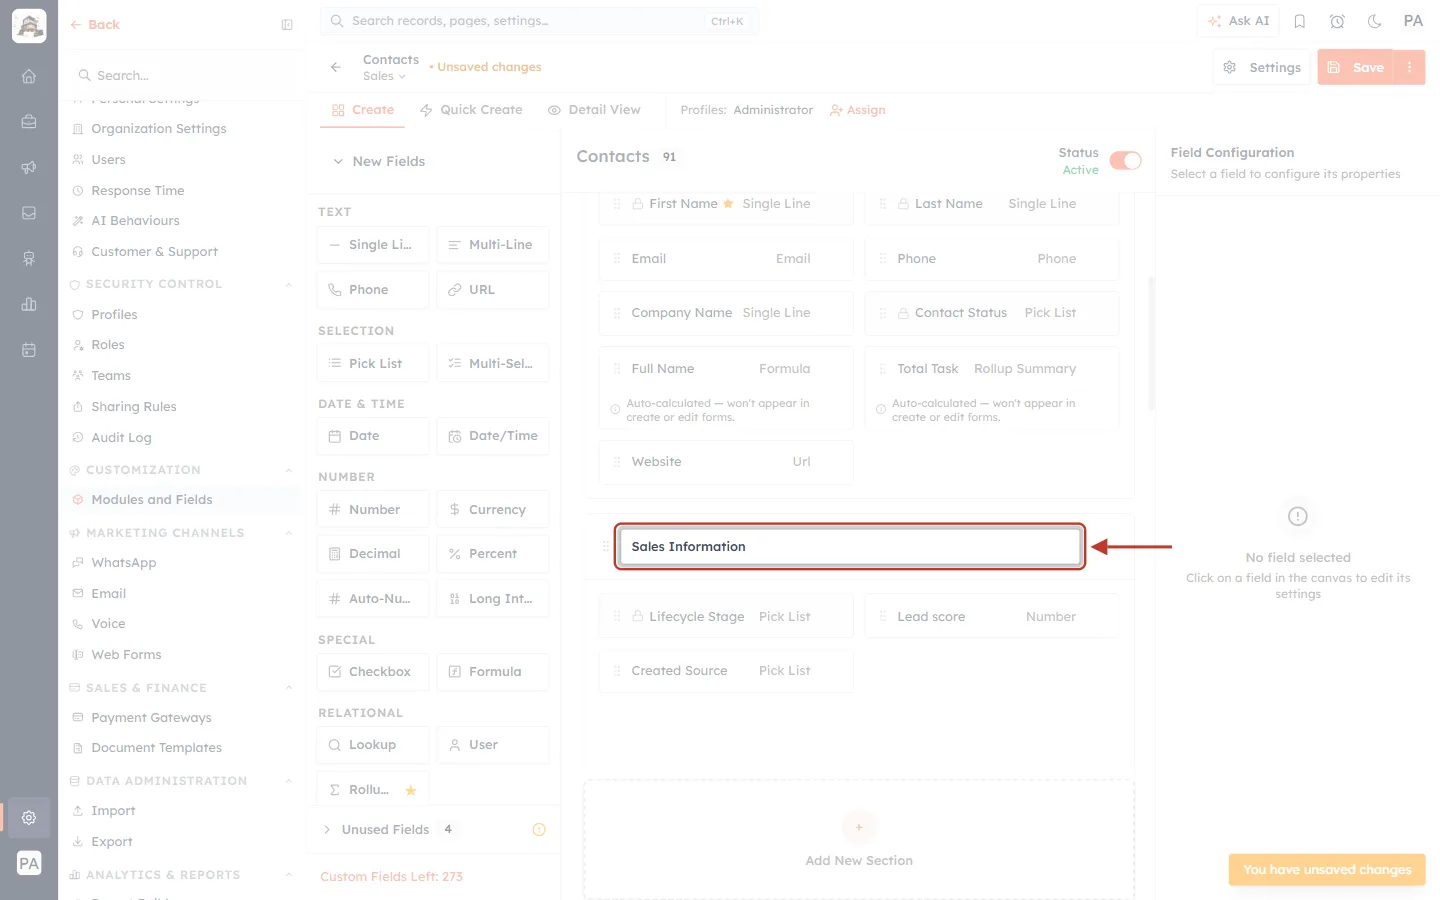
What this screenshot shows. The section title turned into a text box, ringed, with Sales Information typed in.
Press Enter or click anywhere else to keep the new name.
The fields in the section (Lifecycle Stage, Lead score, Created Source…) stay exactly where they were — only the title changes.
Step 14: Add a new section#
Scroll to the bottom of the canvas and click the dashed Add New Section box.
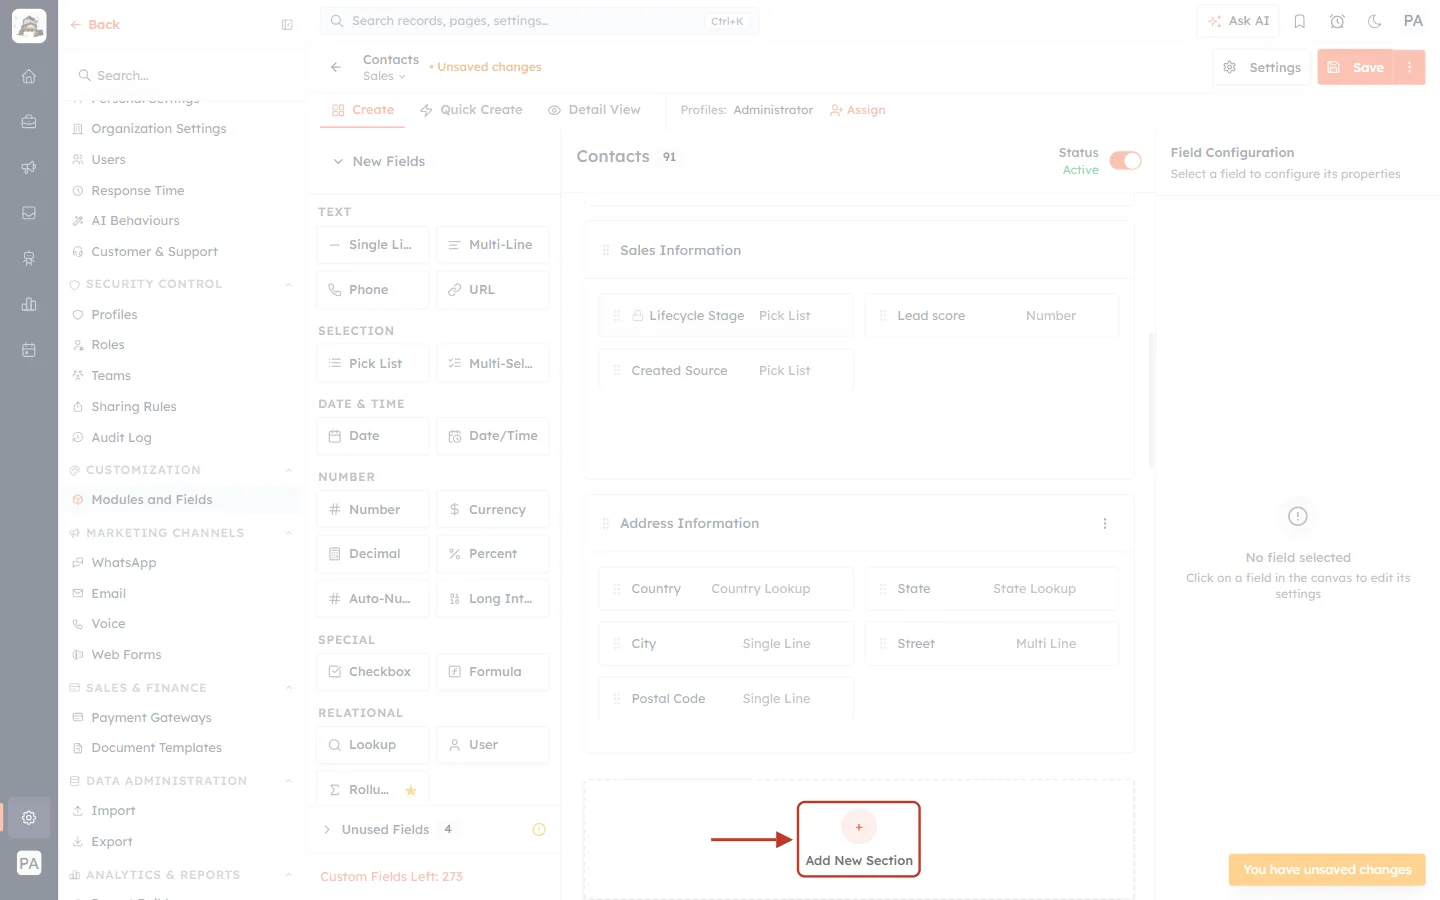
What this screenshot shows. The + Add New Section box at the bottom of the canvas, ringed.
Clicking it adds an empty section below the last section of the layout.
You can move the new section higher up later with Move Up or by dragging its handle.
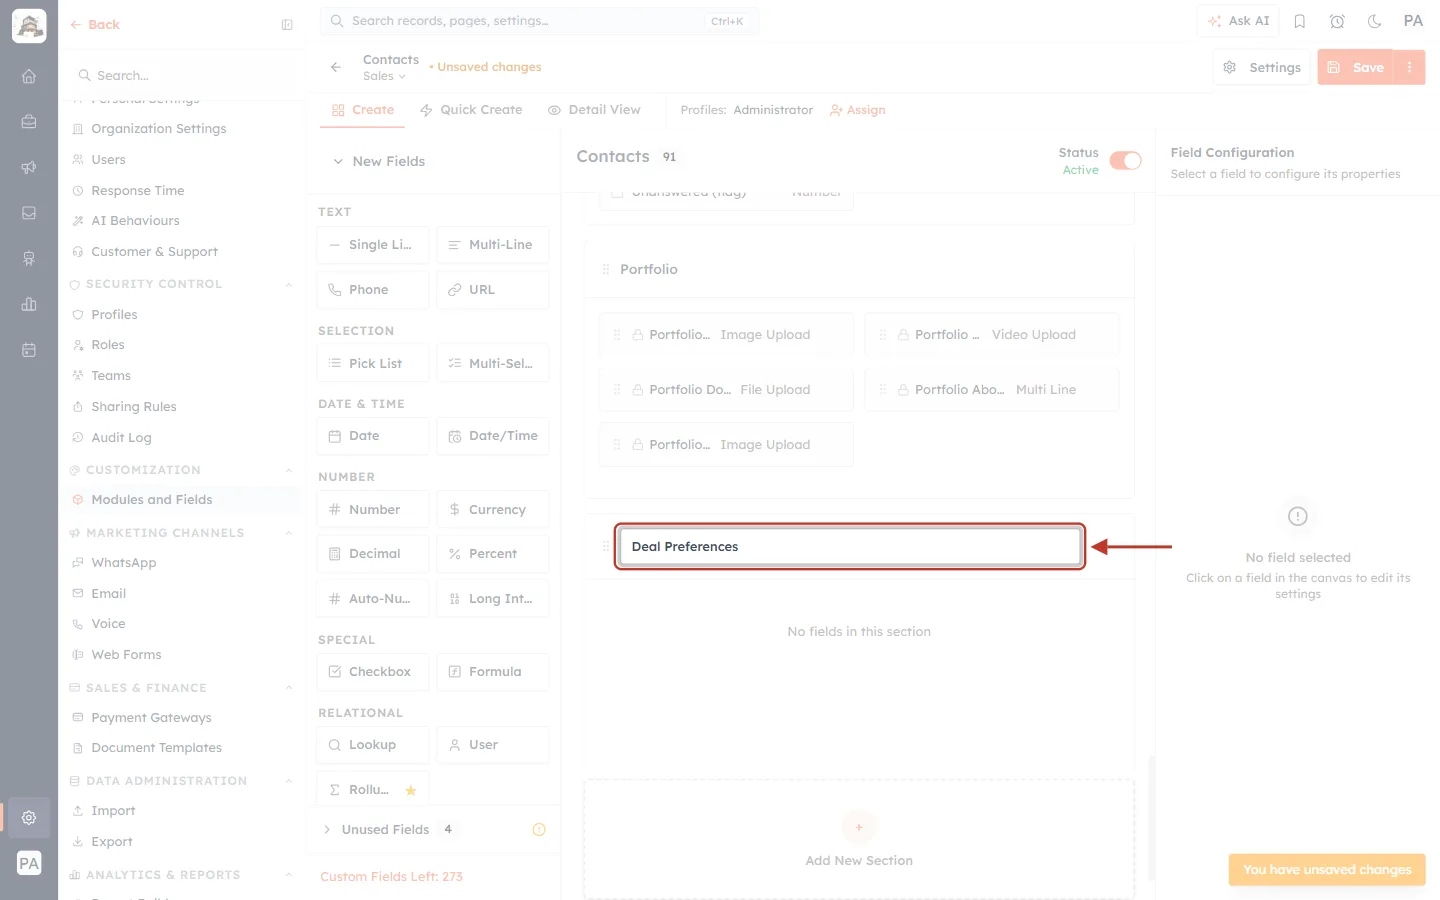
What this screenshot shows. The new section’s title box, ringed, with Deal Preferences typed in.
Type a short title that tells your team what the section is for, then press Enter.
Under the title the section reads “No fields in this section” until you add fields to it.
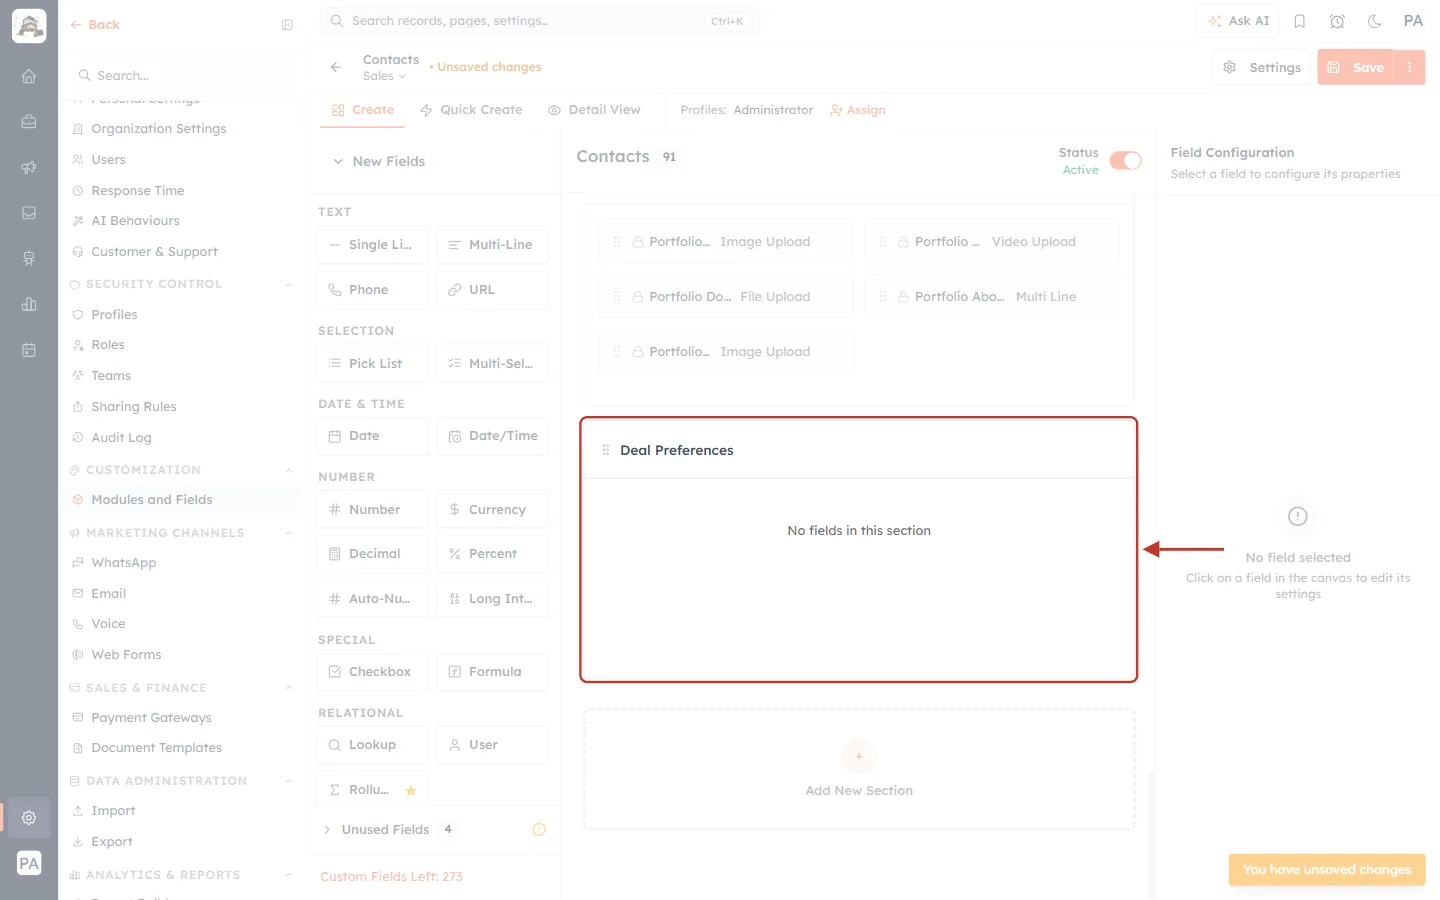
What this screenshot shows. The new Deal Preferences section, ringed, ready for fields.
The section has its own dotted drag handle and ⋮ menu, just like the sections copied from Standard.
Step 15: Add a field to the section#
From New Fields on the left, drag the field type you need and drop it inside the section. In this example, drag Pick List (under SELECTION) into Deal Preferences. To put back a field you removed earlier, open Unused Fields and drag it from there instead.
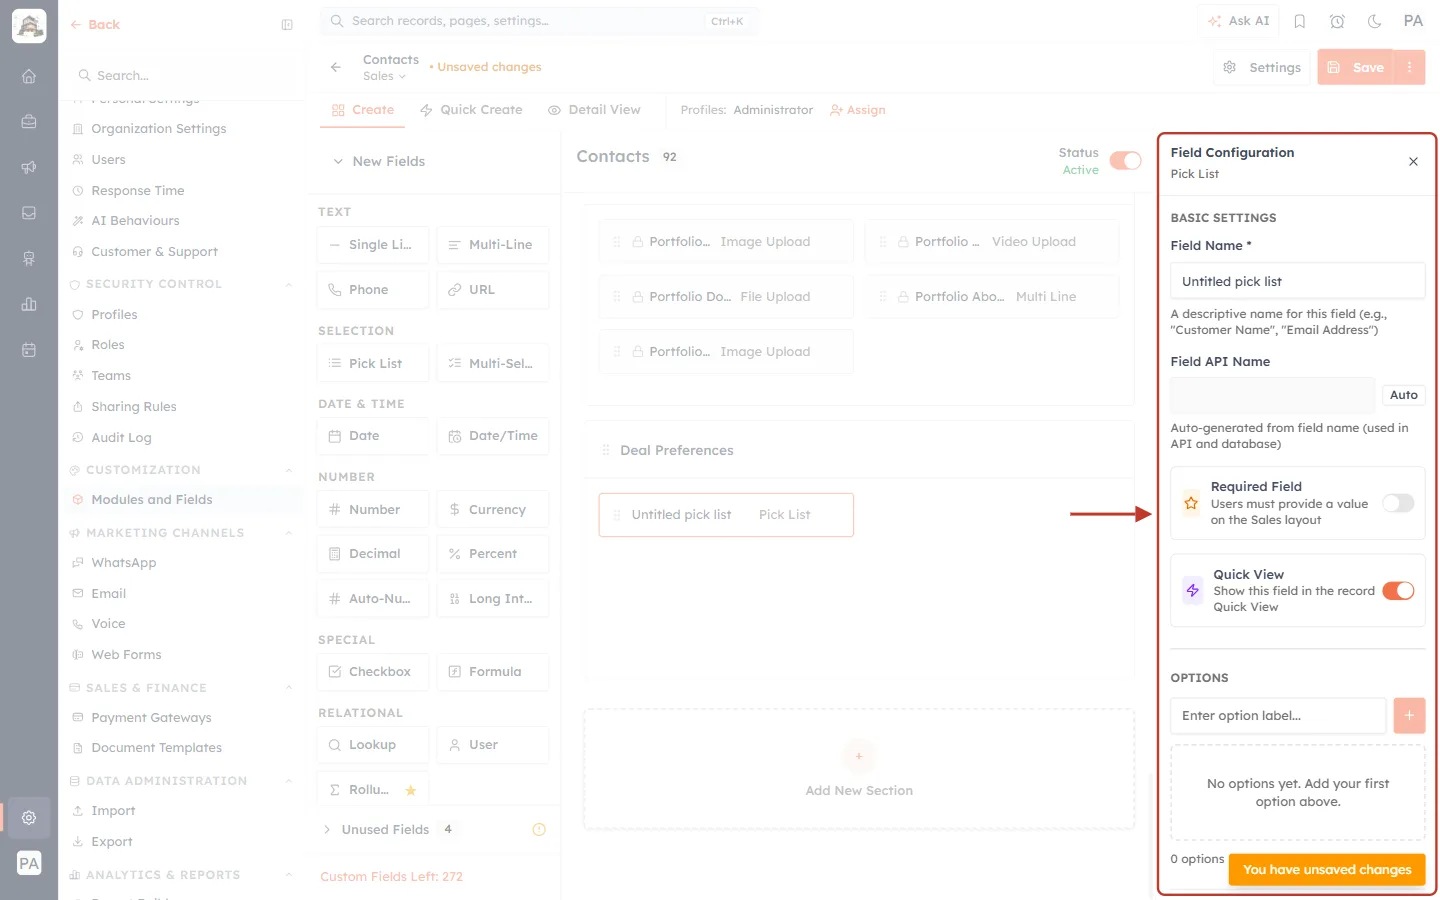
What this screenshot shows. The Field Configuration column on the right, ringed. As soon as the field is dropped, it is selected and its settings open here.
Field Name * — the label people see. It starts as Untitled pick list; replace it with a clear name.
Field API Name — filled in automatically from the field name (marked Auto). It is used by integrations and the API.
Required Field — “Users must provide a value on the Sales layout”. Turning this on makes the field required on this layout only.
Quick View — shows the field in the record’s Quick View.
OPTIONS — for a pick list, the choices people can pick from. It reads “No options yet. Add your first option above.”
Type Budget Range in Field Name. Then, in Enter option label…, type each choice and press Enter after it: Under $5,000, $5,000 – $20,000 and Over $20,000.
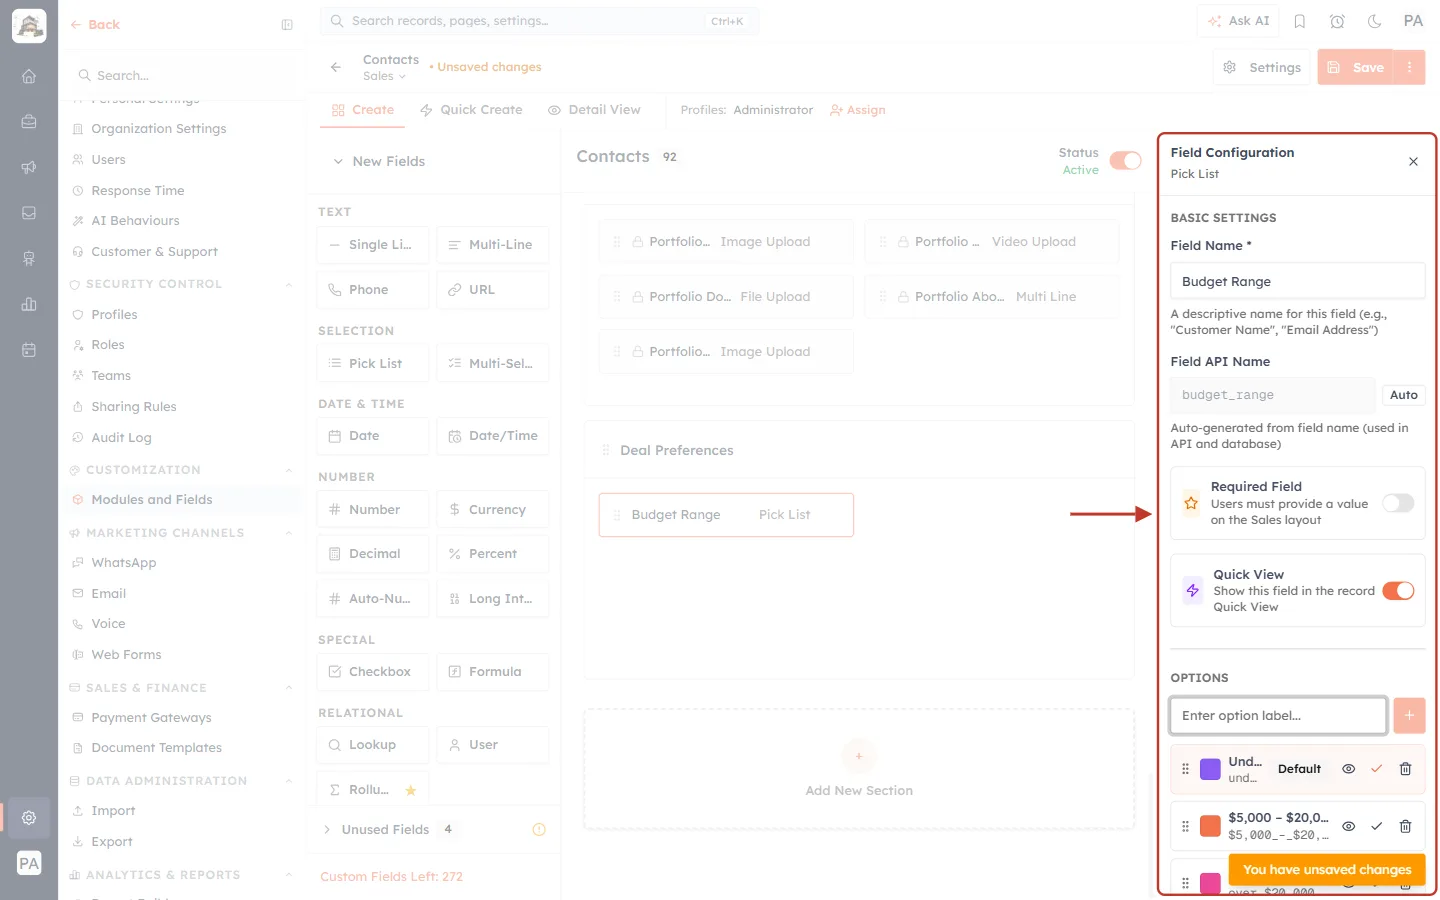
What this screenshot shows. The same Field Configuration column after filling it in, ringed.
Field Name now reads Budget Range, and the API name below it became budget_range by itself.
The OPTIONS list shows the three choices, each with a colour, an eye icon (show/hide) and a bin (delete). The first option is marked Default.
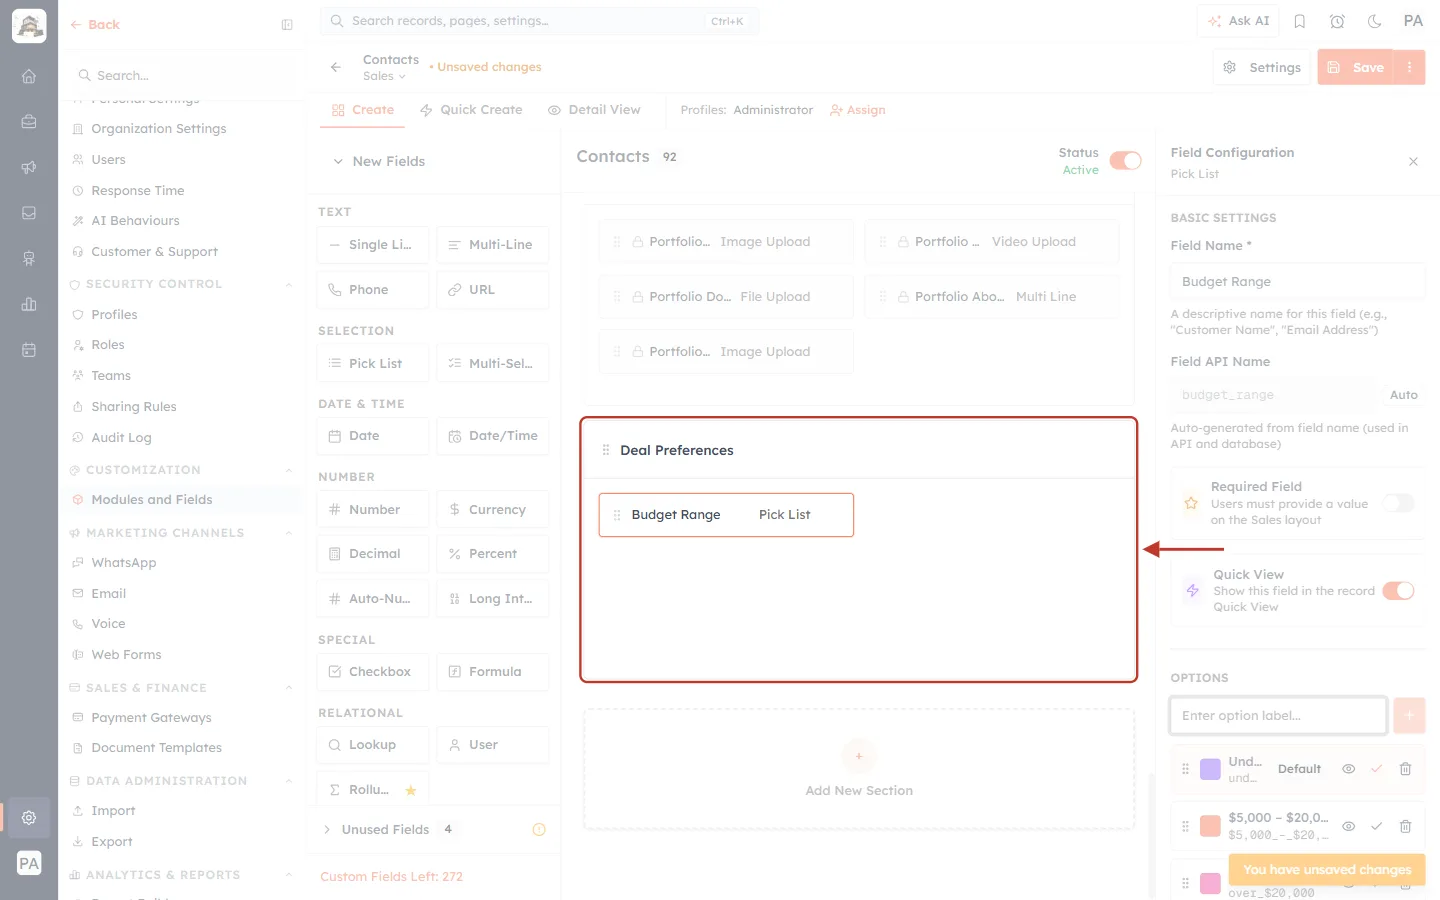
What this screenshot shows. The Deal Preferences section on the canvas, ringed, now holding the Budget Range pick list.
Drop more fields into the section the same way. Drag a field by its dotted handle to change its position.
Each new field is added to the module, so Custom Fields Left at the bottom of the left column goes down by one.
Step 16: Save the layout#
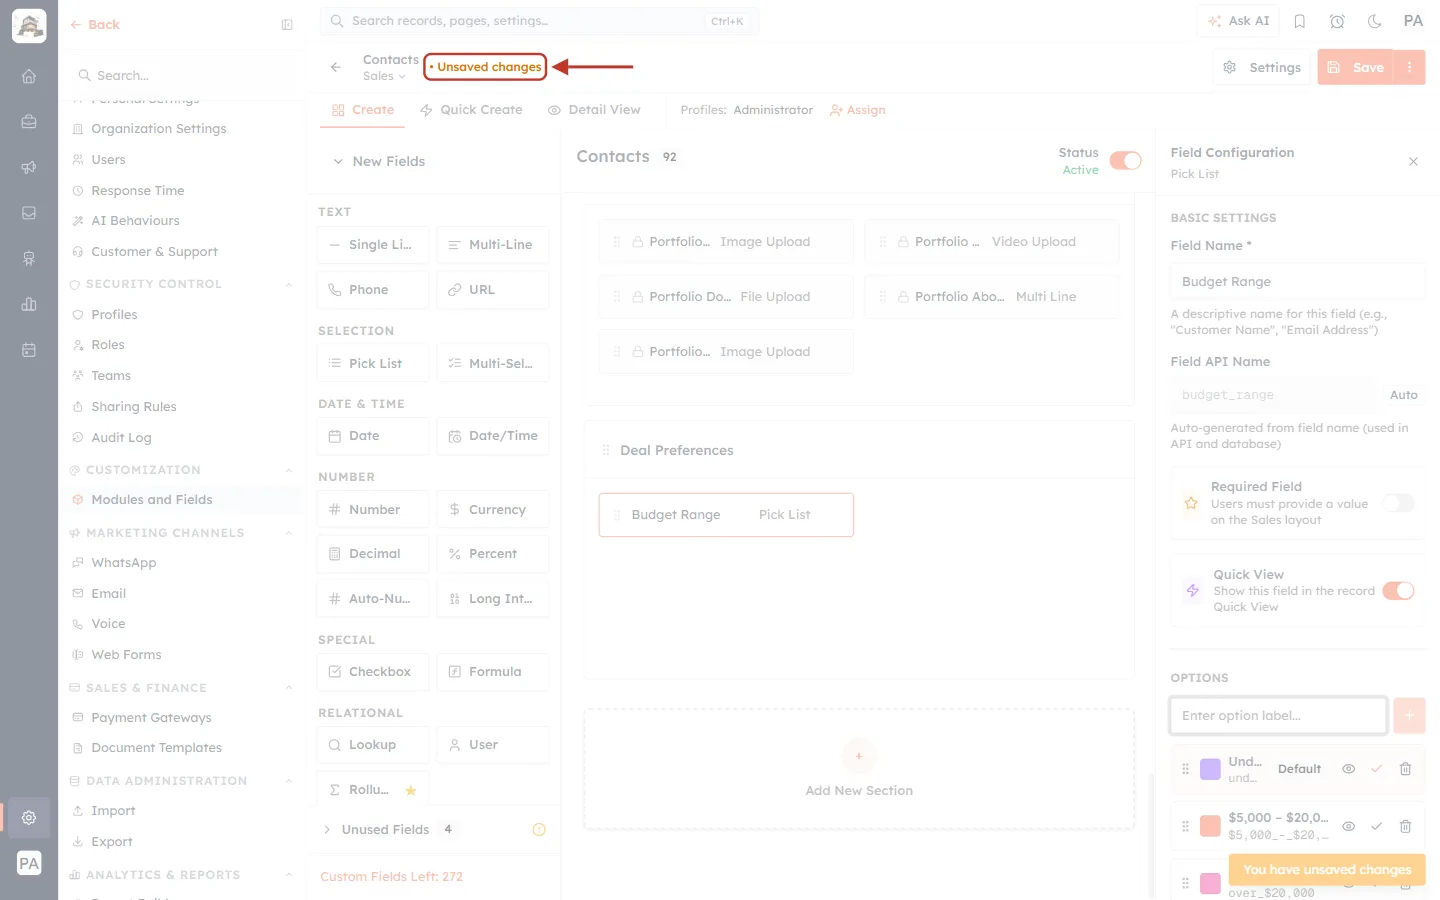
What this screenshot shows. The orange • Unsaved changes label next to Contacts / Sales, ringed.
It appears as soon as you change anything, and stays until you save.
If you try to leave the builder with unsaved changes, the CRM warns you first so that you don’t lose your work.
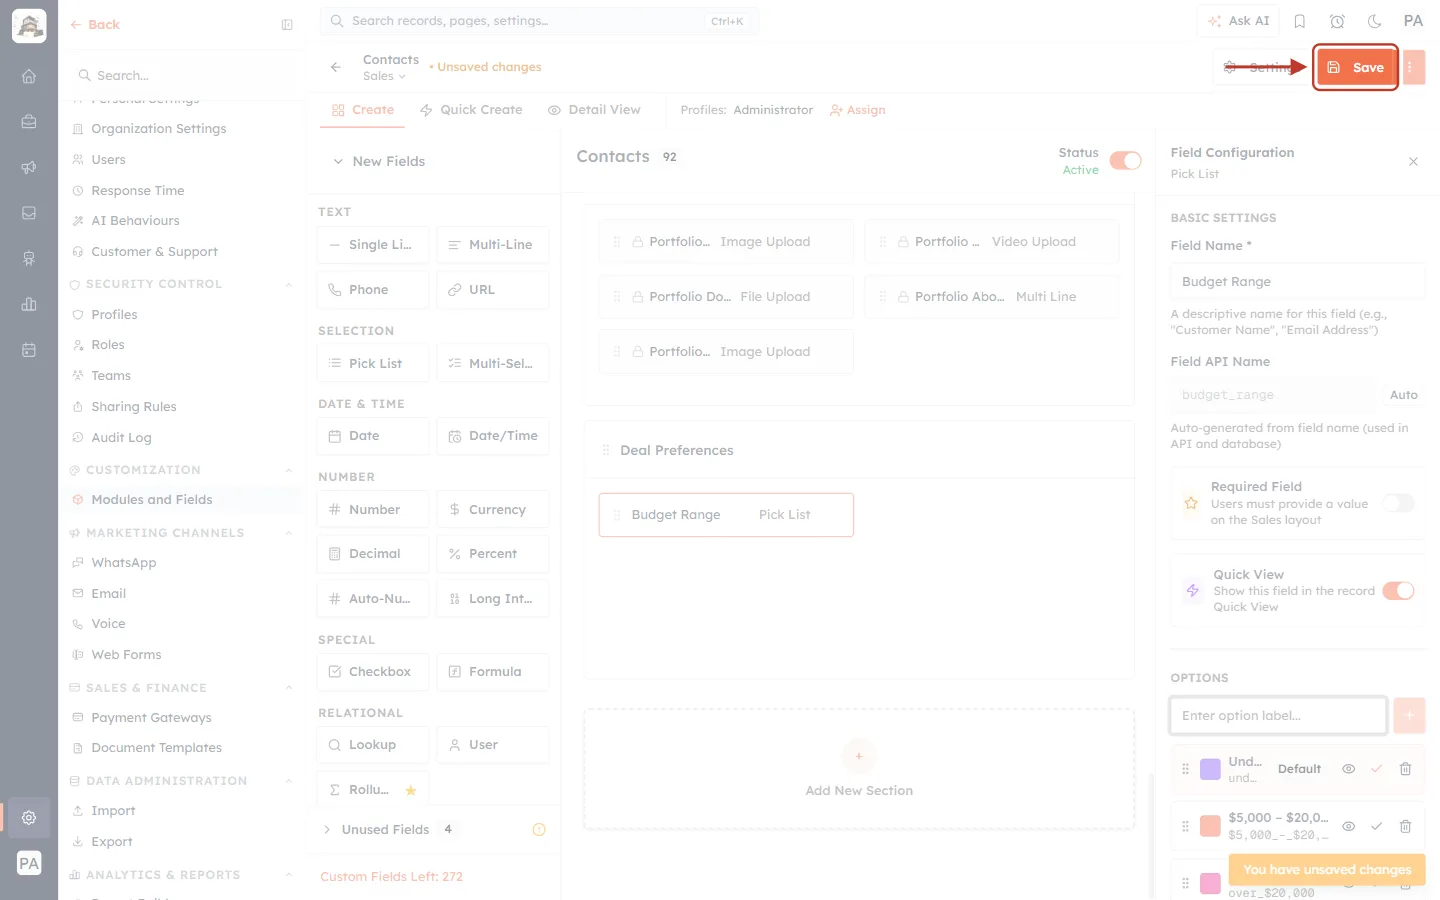
What this screenshot shows. The orange Save button at the top right of the builder, ringed.
Click Save to save every change you made to this layout.
The small ⋮ button next to it offers Save and Close, which saves and leaves the builder in one step.
Settings, to the left, holds the module’s own settings (not the layout’s).
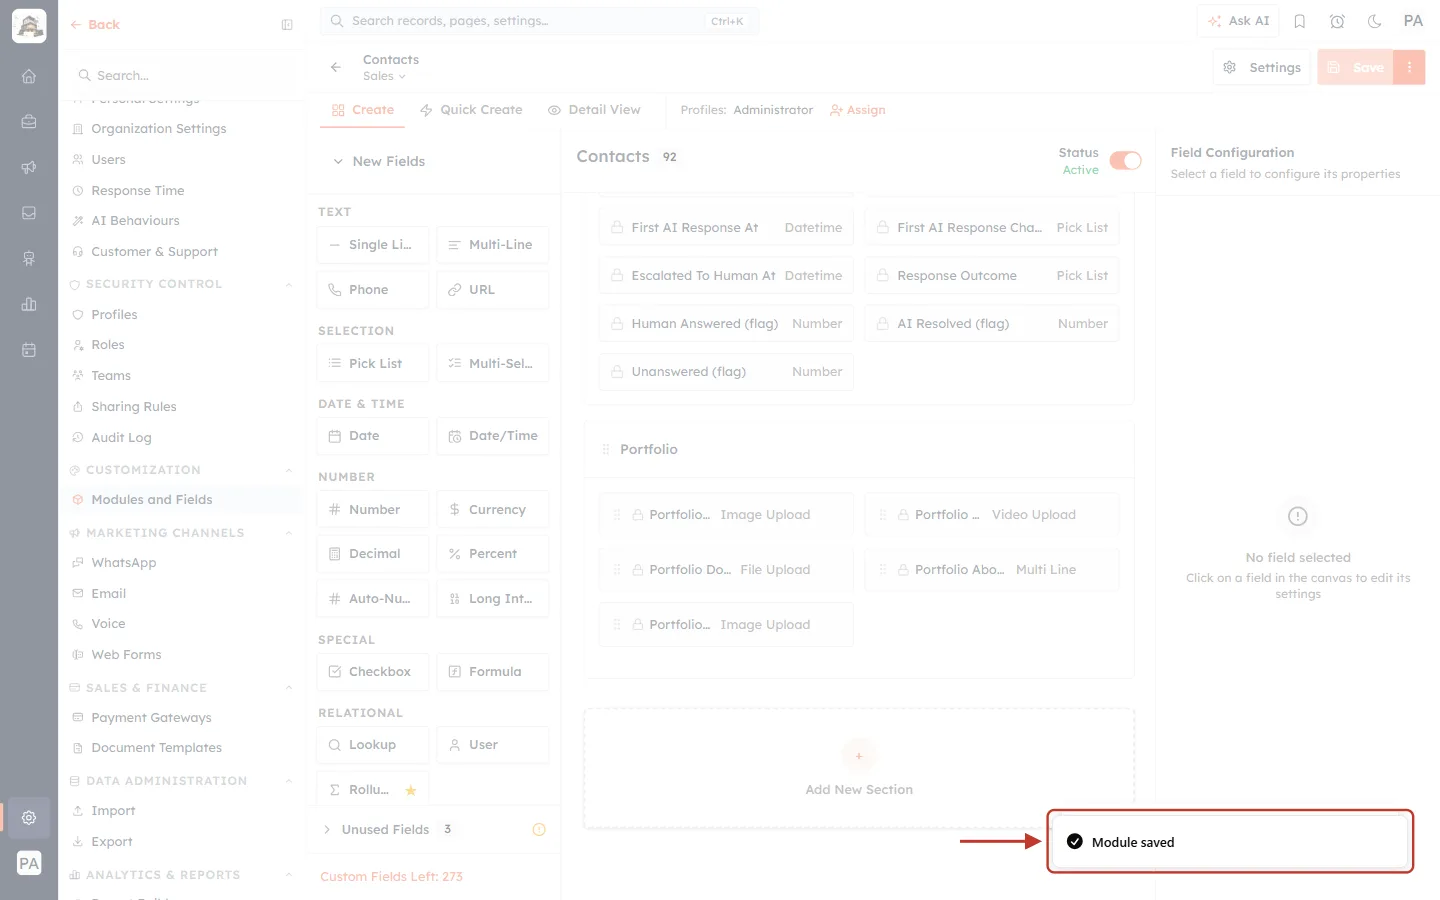
What this screenshot shows. The confirmation at the bottom right of the screen, ringed: Module saved.
The Unsaved changes label disappears from the header.
Your Sales layout now has the changes from Steps 12–15.
Part 5: Check the new layout and get it ready for your team#
Step 17: Go back to the Layouts page#
Click the layout name (Sales ⌄) at the top left, then click Manage all layouts.
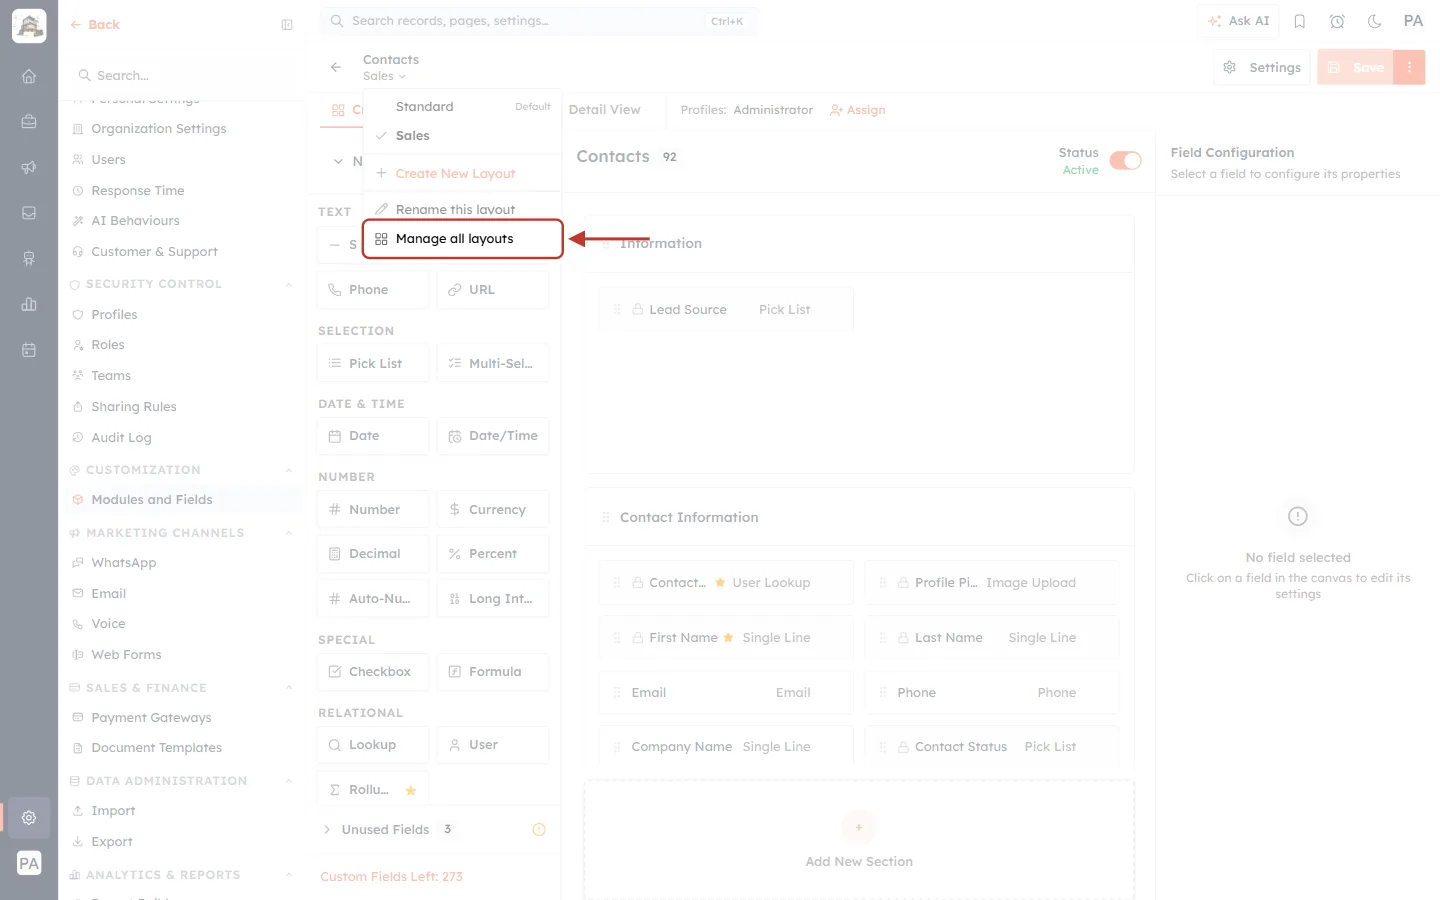
What this screenshot shows. The layout menu open, with Manage all layouts ringed at the bottom.
It takes you back to the module’s Layouts page. You can also use Back at the top of the Setup menu and open the module again.
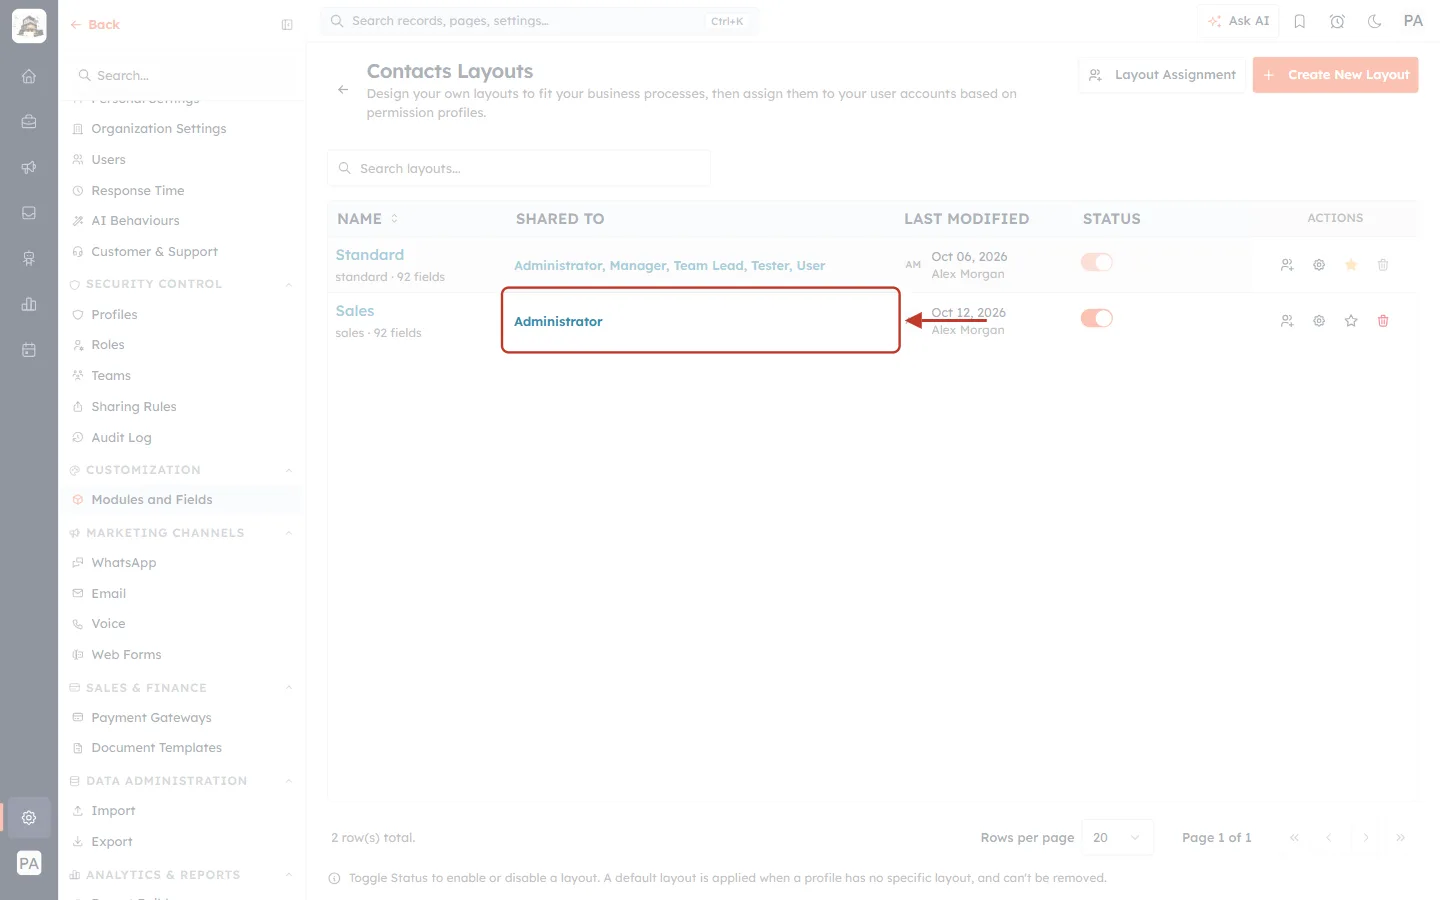
What this screenshot shows. The new Sales row on the Contacts Layouts page. Its SHARED TO cell, ringed, reads Administrator.
Under the name you can see the layout’s short code and field count (sales · 92 fields — one field removed and one added).
Only administrators can use the layout for now. The next figure shows how to share it with your team.
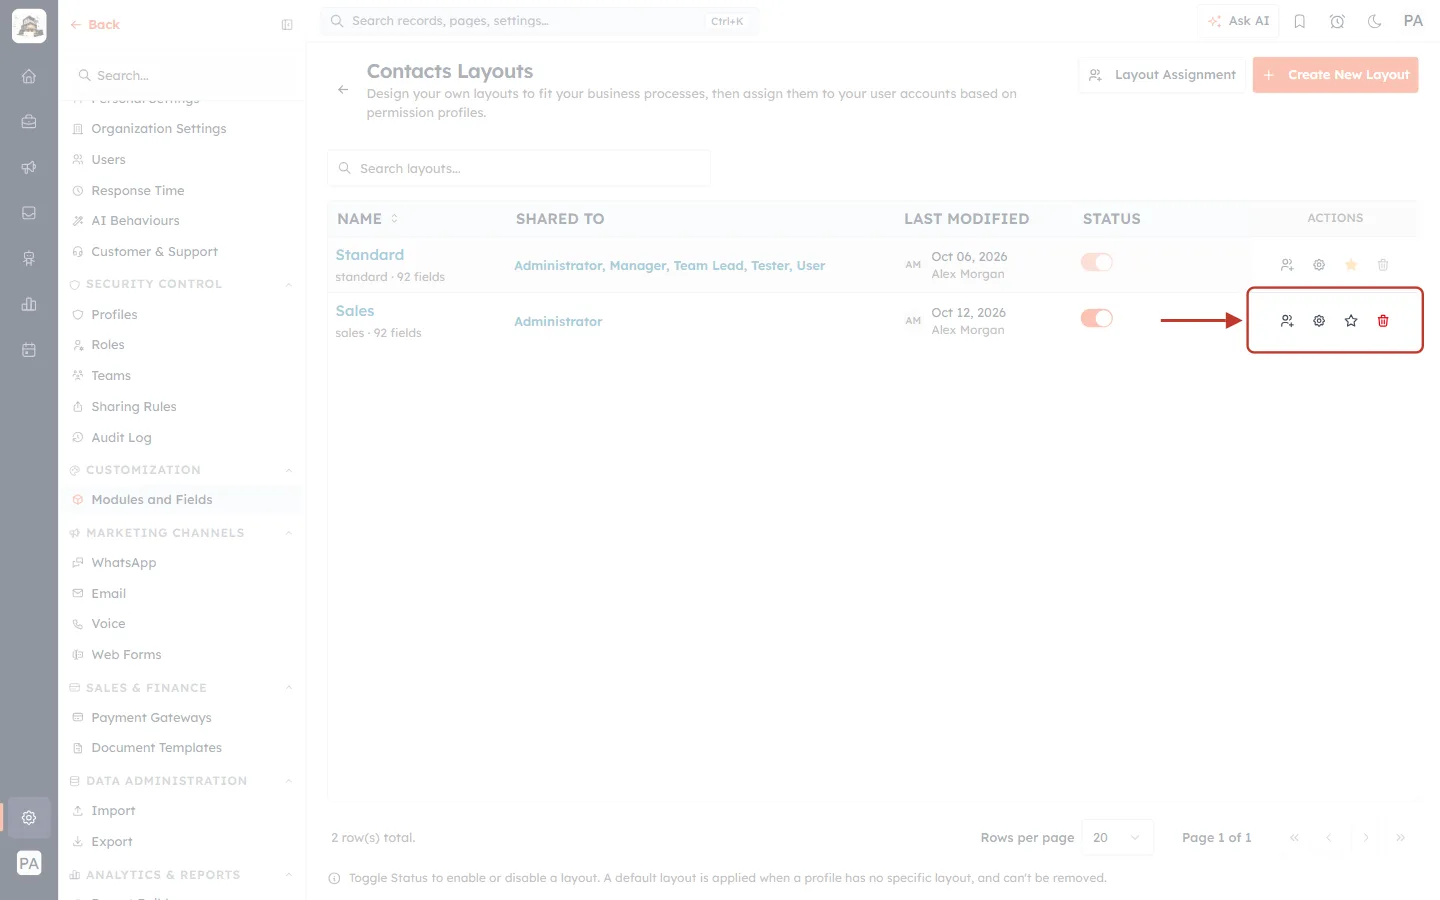
What this screenshot shows. The ACTIONS icons on the Sales row, ringed.
Person with a plus (Assign profiles) — choose which profiles can use this layout, for example Manager and Team Lead for your sales team. To set the layouts for all profiles in one go, use Layout Assignment at the top of the page instead.
Gear (Open in Layout Builder) — opens the layout again so you can keep editing it.
Star — empty on Sales. Click it to make Sales the module default layout, which is used by every profile that has no layout of its own.
Bin (Delete layout, in red) — deletes the layout. You are asked which layout its records should move to first.
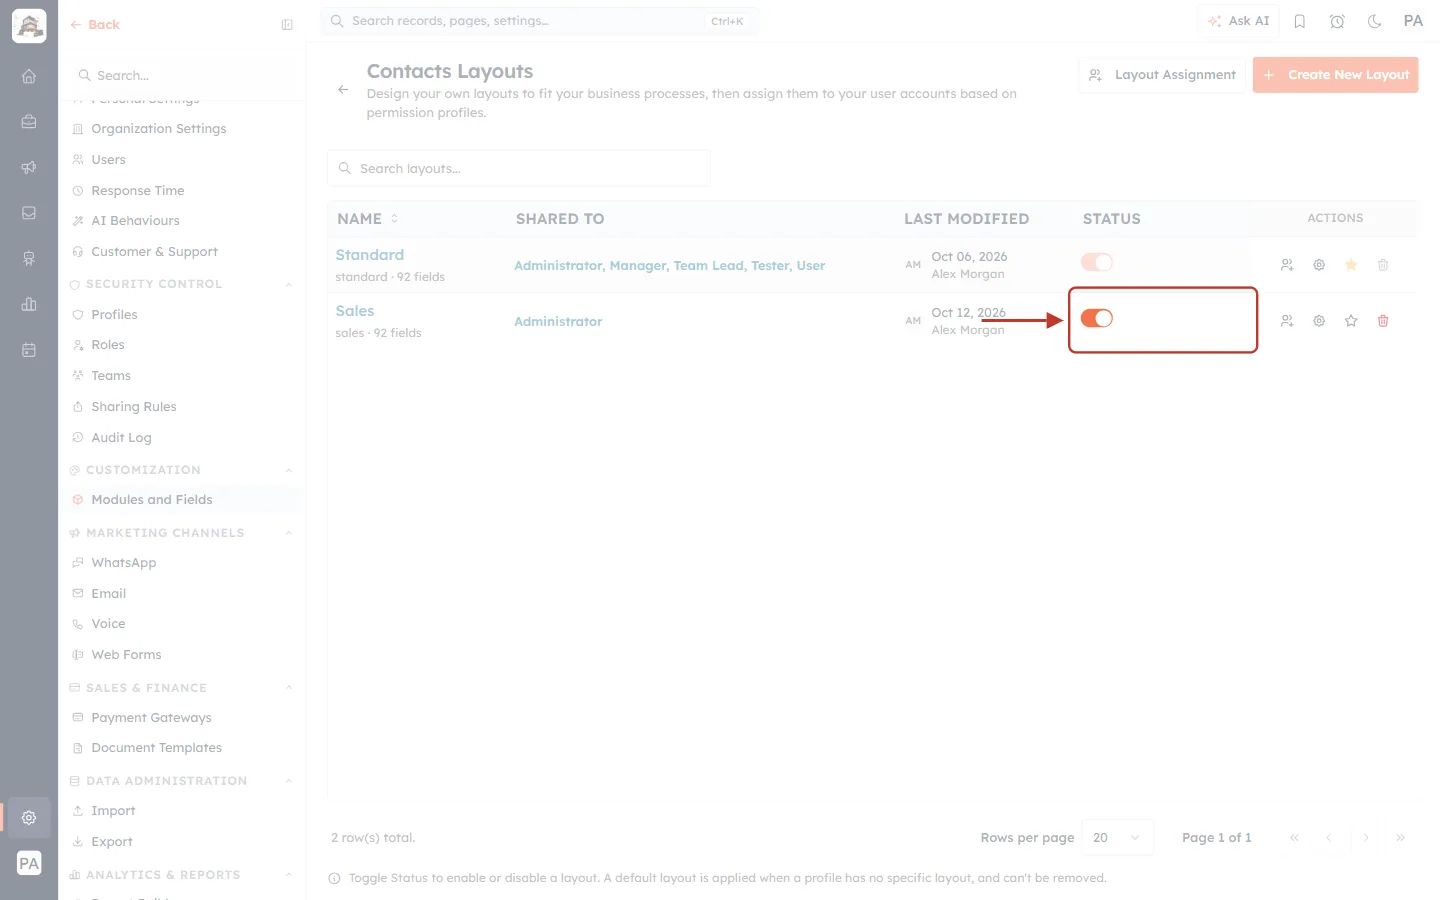
What this screenshot shows. The STATUS switch on the Sales row, ringed. It is on (orange), so the layout is active.
Turn it off to stop offering the layout to anyone without deleting it. The CRM first asks which active layout the profiles that use it should move to.
Turn it back on to offer it again; nothing is lost while it is off.
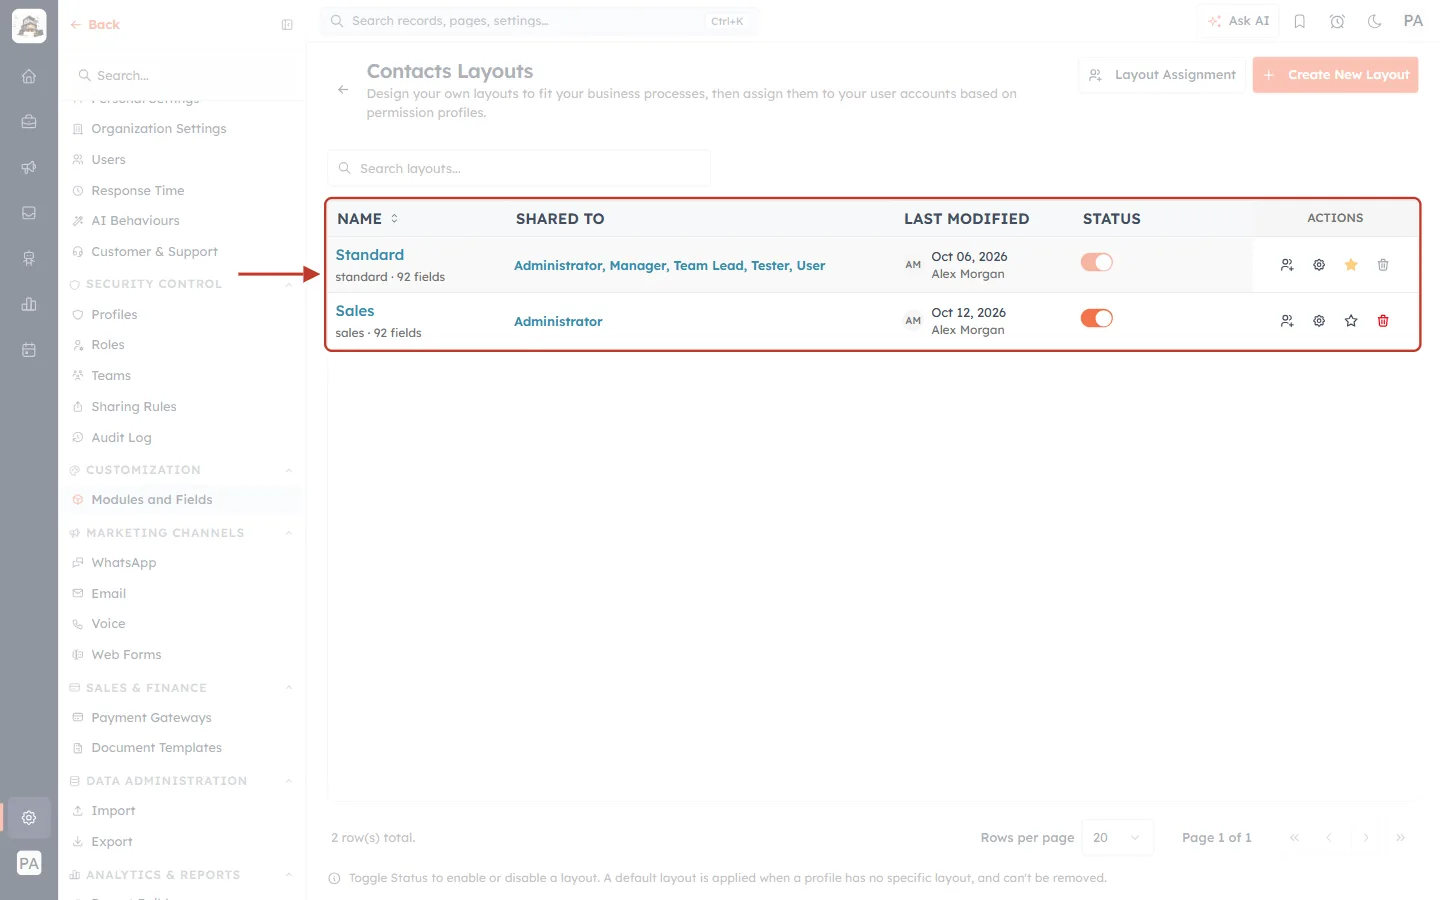
What this screenshot shows. The Contacts Layouts table, ringed, now with two layouts.
Standard — still the module default (filled star), shared with every profile, 92 fields.
Sales — your new layout, shared with Administrator, last modified today by you.
The footer reads 2 row(s) total.
✅
Your layout is ready. Once a module has two or more active layouts and a person can use more than one of them, a layout picker appears at the top of the Create form, and a Change Layout button appears on records, so people can choose the right form.
Common questions#
I can’t click Create Layout. Why?#
The button stays faded while Layout Name is empty, or while the name matches a layout that already exists in this module (the box turns red with “This layout name already exists”). Type a different name.
Does changing my new layout change Standard?#
No. The new layout is a copy. Removing, moving or renaming things on it does not change Standard or any other layout. The only thing shared between layouts is the field itself: a new field you create belongs to the module, so it uses one of your custom fields.
If I move a field to Unused Fields, do I lose its data?#
No. The field and every value already saved in it are kept. The field is only hidden from this layout. Open Unused Fields and drag it back into a section to show it again.
Can I build a layout from scratch instead of copying one?#
Every new layout starts as a copy of an existing one, so it is never empty. Pick the layout closest to what you need in Clone From, then take off the fields you don’t want.
Can I rename the layout later?#
Yes. Open it in the Layout Builder, click its name at the top left and choose Rename this layout. The layout’s short code (for example sales) doesn’t change.
Why don’t my team see the new layout?#
A new layout is shared with Administrator only. Share it with their profiles using the Assign profiles icon on its row, or with Layout Assignment on the Layouts page. Also check that its Status switch is on.
Can I delete or switch off Standard?#
No. Standard is the layout everything else falls back on, so it is always active and can’t be deleted. The current default layout (filled star) can’t be switched off or deleted either — make another layout the default first.
Previous and next#
Previous: Field Layouts and Required Fields: Organise Your CRM Forms
Next: Edit a Layout in the Layout Builder: Rearrange Fields, Change Field Settings and Save
Related articles#
Was this article helpful?
Ready to implement this?
OpenAI Engage and apply what you just learned to your own workspace.
Open AI Engage CRM