Loading…


KnowledgeBase
Edit a Layout in the Layout Builder: Rearrange Fields, Change Field Settings and Save (Step-by-Step)
What you can do in the Layout Builder#
A layout is the form your team fills in and reads for a module — which fields it has, in which sections, and in what order. Teams change over time, so the layout you created last month will need changes too: a new field the sales team asked for, a field nobody fills in, a section that should be higher up, or a field that should be required.
All of this is done in the Layout Builder. This guide opens an existing layout — the Sales layout of the Contacts module — and walks through every kind of change:
Part 1 — open the layout you want to change.
Part 2 — move fields within a section, to another section, and move whole sections.
Part 3 — change a field’s settings: required, unique, validation, help text and where it is shown.
Part 4 — bring back a field from Unused Fields, and understand when a field is deleted for good.
Part 5 — edit the Quick Create and Detail View forms of the layout.
Part 6 — save your work, or discard it and start again.
ℹ️
If you haven’t made a second layout yet, start with Create a New Layout for a Module. Everything in this guide works the same way on the Standard layout too.
Key words used in this guide#
| Term | What it means |
|---|---|
| Layout Builder | The screen where you edit a layout. It has a field list on the left, the layout (the canvas) in the middle and the field’s settings on the right. |
| Canvas | The middle column of the builder: the layout itself, with its sections and fields. |
| Drag handle | The six small dots (⋮⋮) at the left of a field or section. You hold it to drag the field or section to a new place. |
| Field Configuration | The right-hand column, which shows the settings of the field you clicked. |
| Unused Fields | Fields of the module that are not on this layout. Their data is kept. |
| Per layout | A setting that applies only to the layout you have open, for example Required Field or Show this field on…. Other layouts keep their own setting. |
Before you begin#
You need permission to customise modules (the Administrator profile has it).
Know which layout you want to change. Changes on one layout don’t change the others, except where this guide says so.
Nothing you do in the builder is saved until you click Save — apart from Remove from this layout (Step 11), which saves at once.
Part 1: Open the layout you want to edit#
Step 1: Go to the module’s Layouts page#
Click the gear icon at the bottom of the left menu bar to open Setup, click Modules and Fields under CUSTOMIZATION, then click Configure on the module’s row.
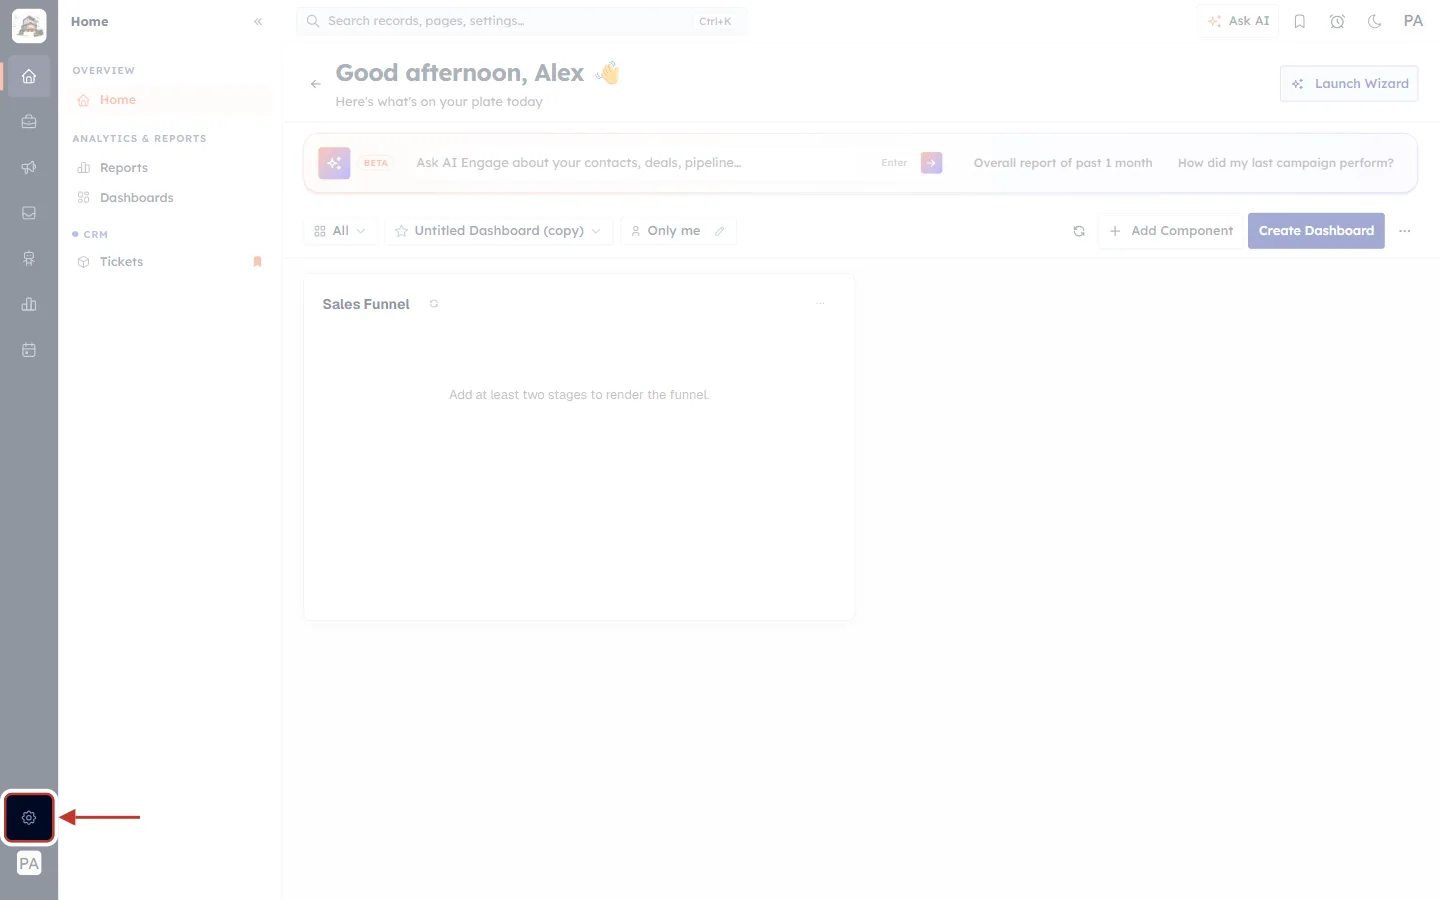
What this screenshot shows. The CRM home page with the gear icon (Setup) ringed at the bottom of the narrow dark menu bar.
The icons above it open the main parts of the CRM; your initials below it open your own profile.
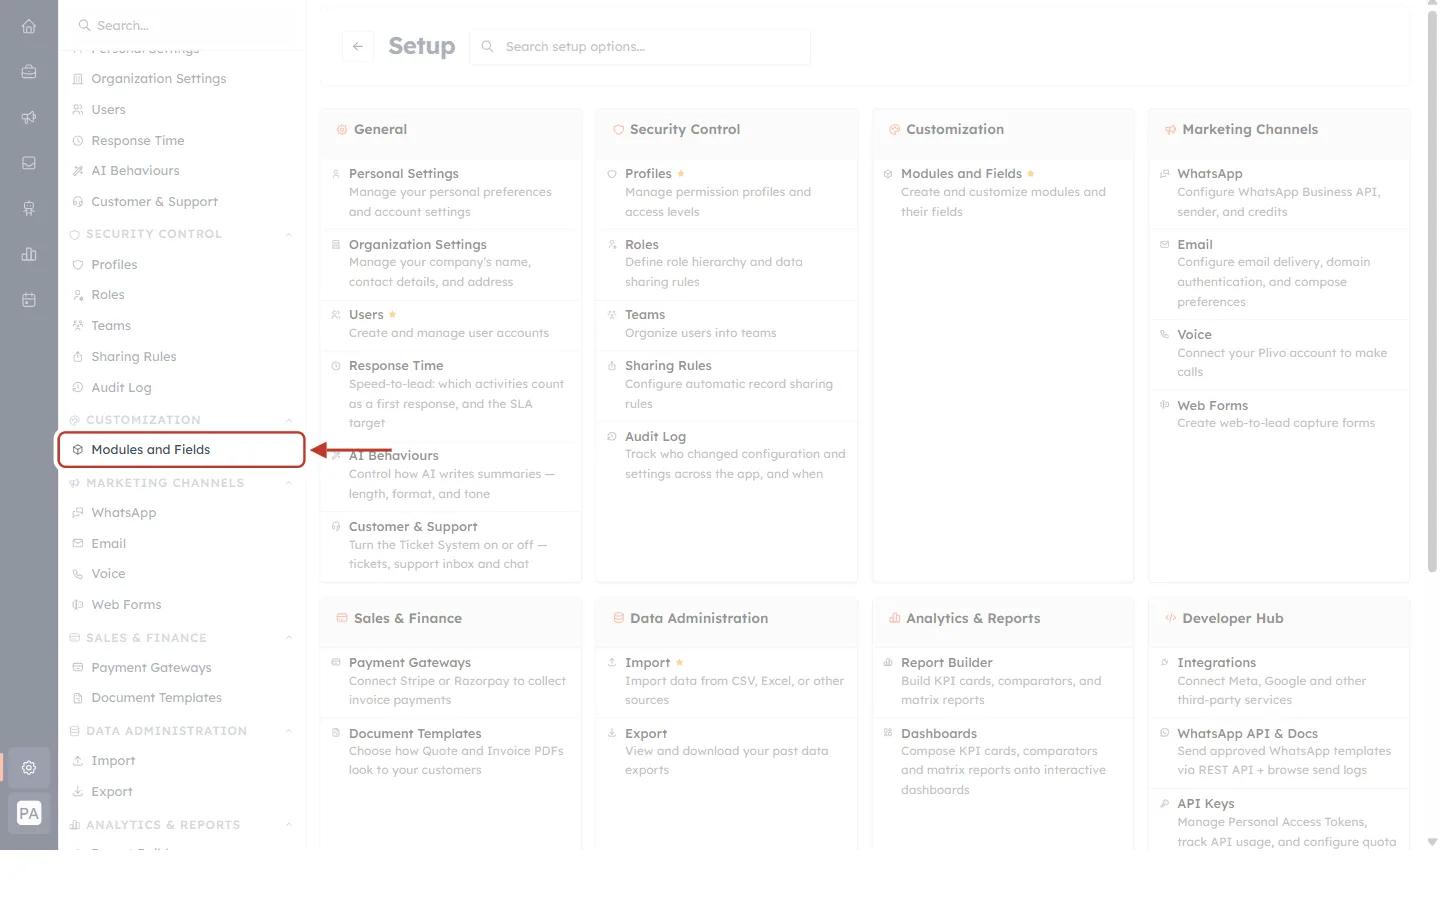
What this screenshot shows. The Setup page with Modules and Fields ringed in the Setup menu, under CUSTOMIZATION.
The cards in the middle of the page link to the same settings, if you prefer to click there.
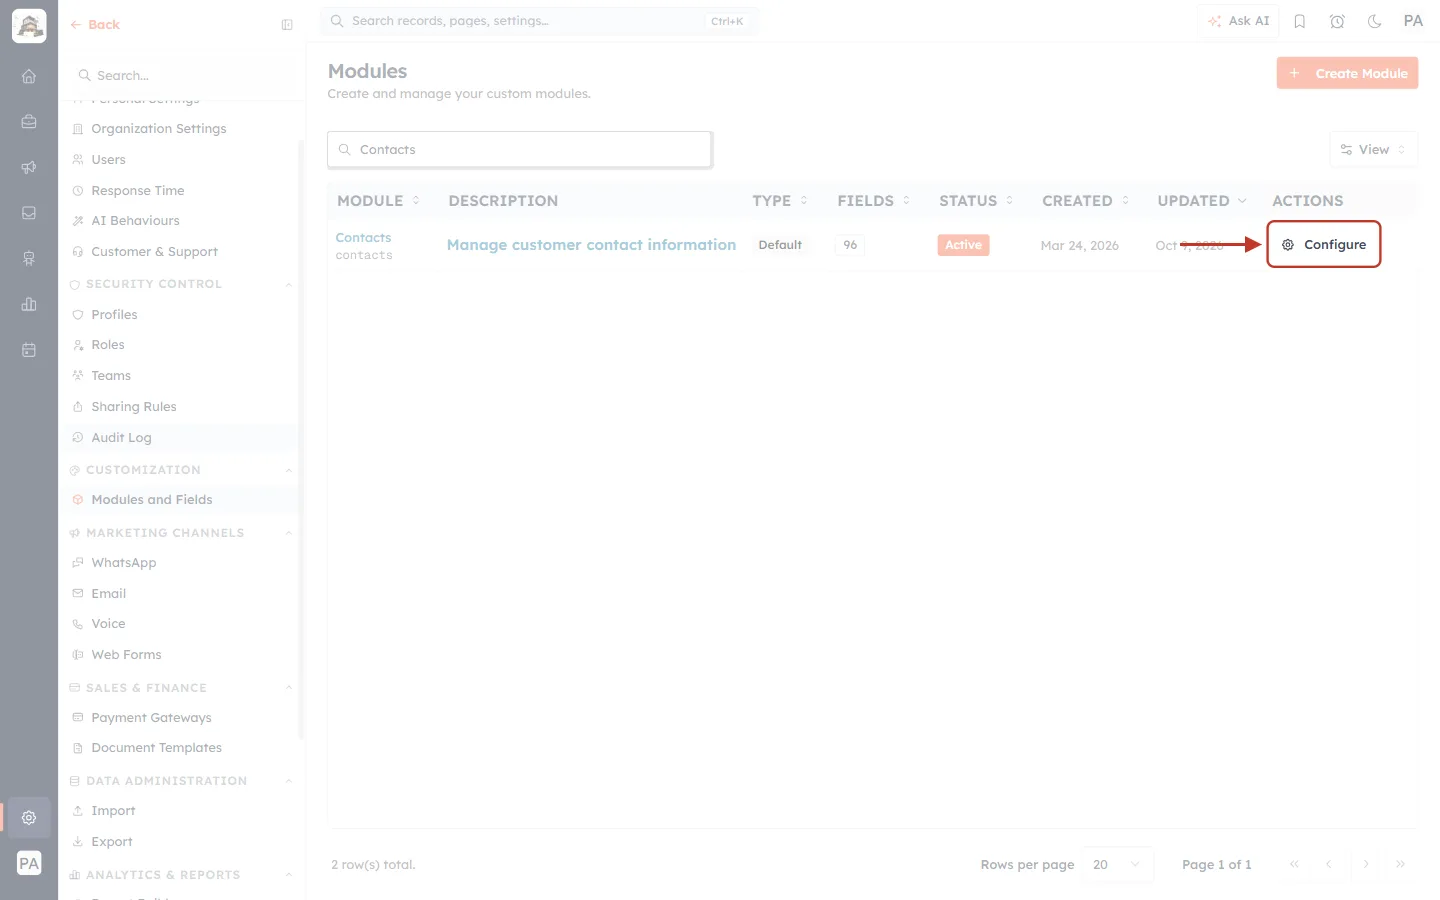
What this screenshot shows. The Modules page filtered to “Contacts”, with the Configure button ringed.
Use Search modules… to find your module quickly, then click Configure on its row.
Step 2: Open the layout in the Layout Builder#
The Contacts Layouts page lists every layout of the module. There are two ways to open one.
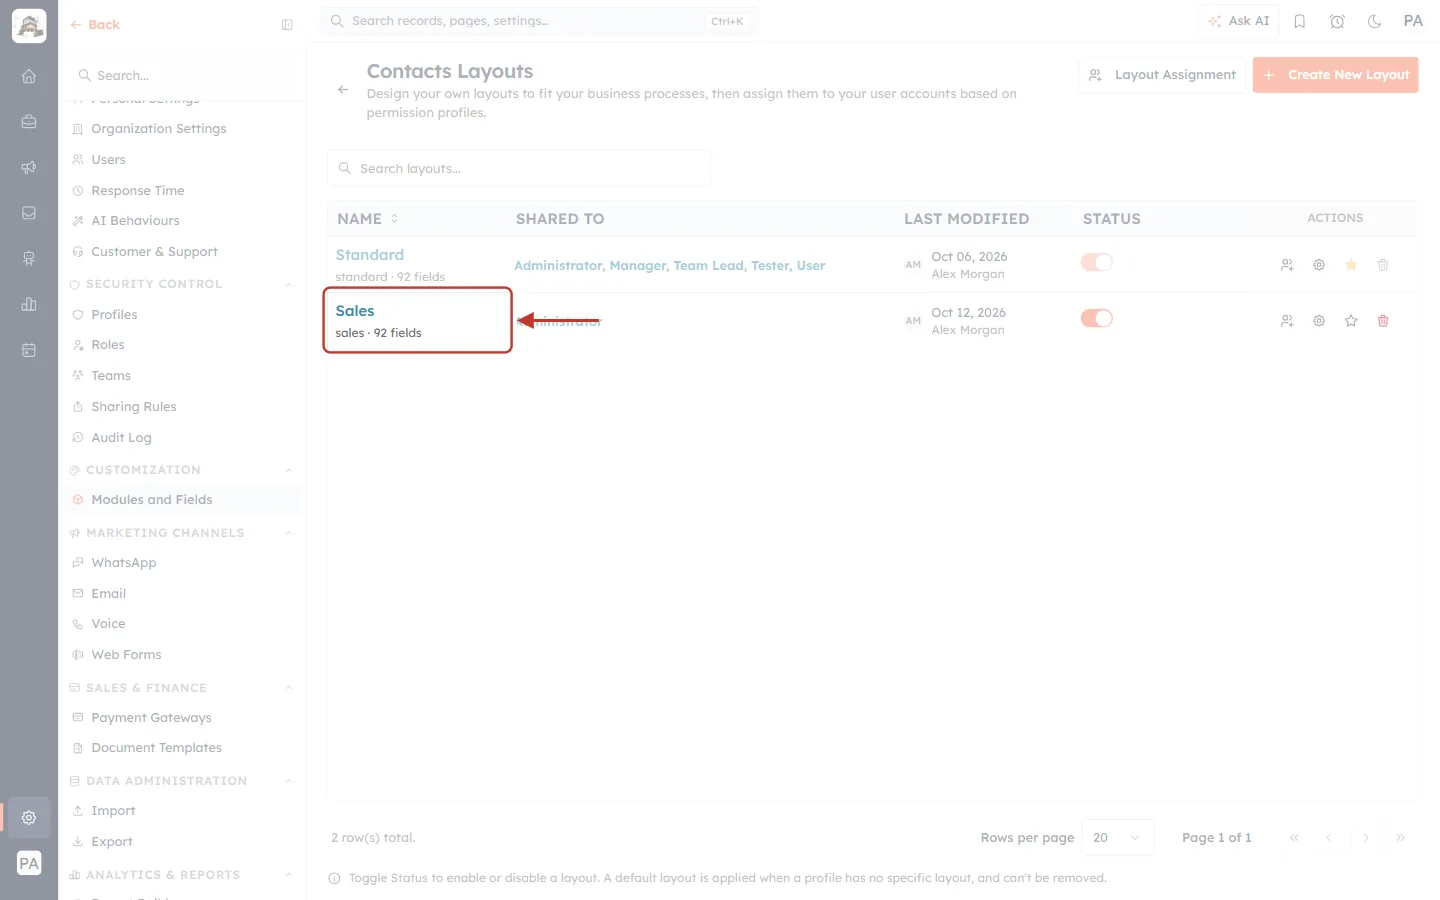
What this screenshot shows. The NAME cell of the Sales row, ringed. The name is a link.
Click the layout name (blue) to open it in the Layout Builder.
Under the name you see its short code and field count (sales · 92 fields).
The Standard row above works the same way.
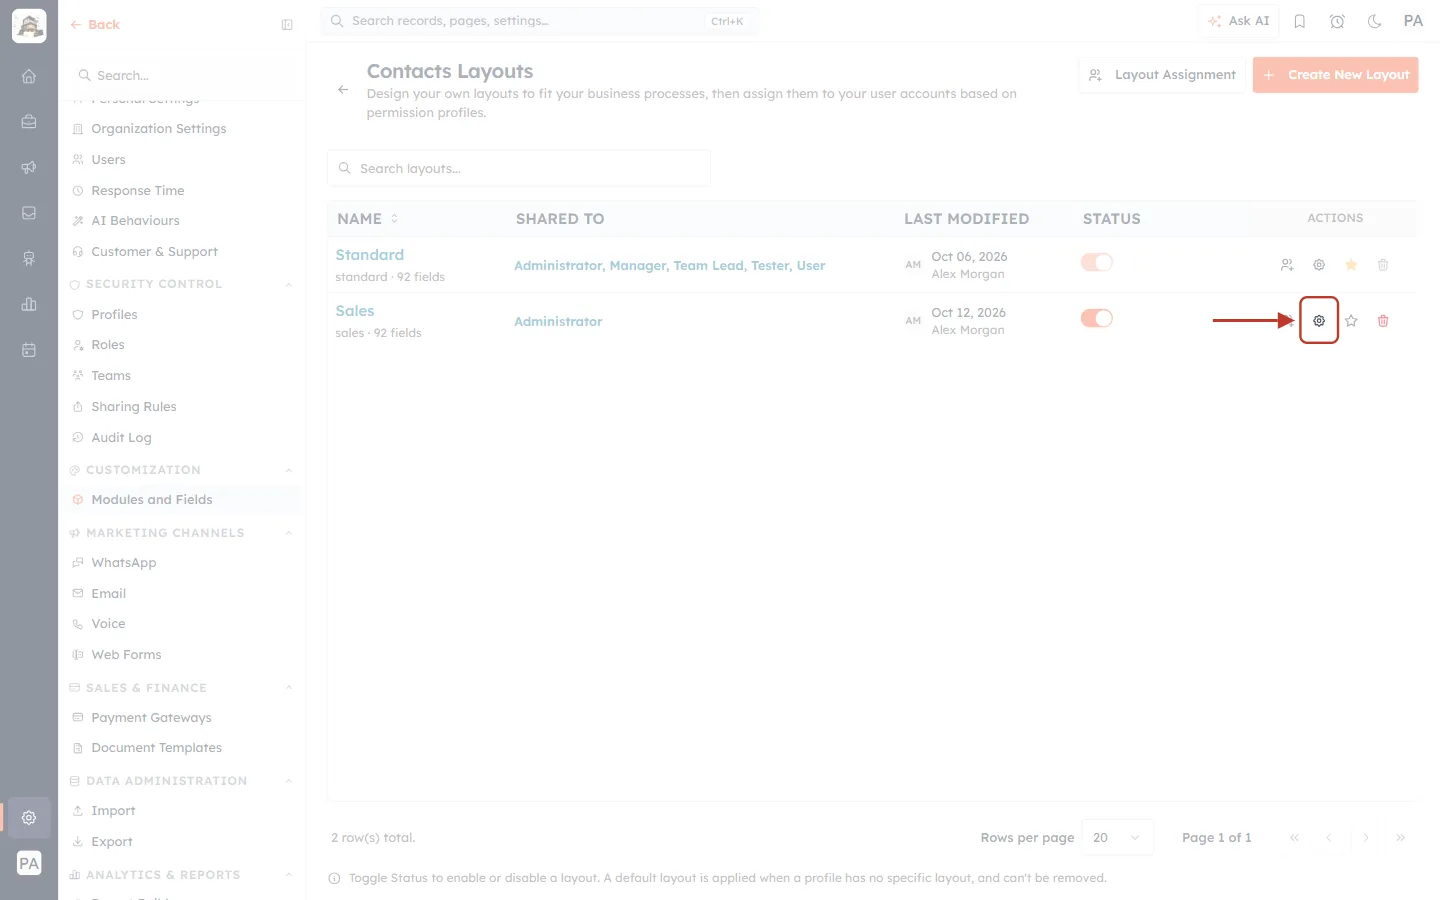
What this screenshot shows. The gear icon in the ACTIONS column of the Sales row, ringed. Its tooltip is Open in Layout Builder.
It does exactly the same as clicking the name.
The other icons on the row are Assign profiles (person with a plus), the default layout star and Delete (bin).
Step 3: Check you are on the right layout#
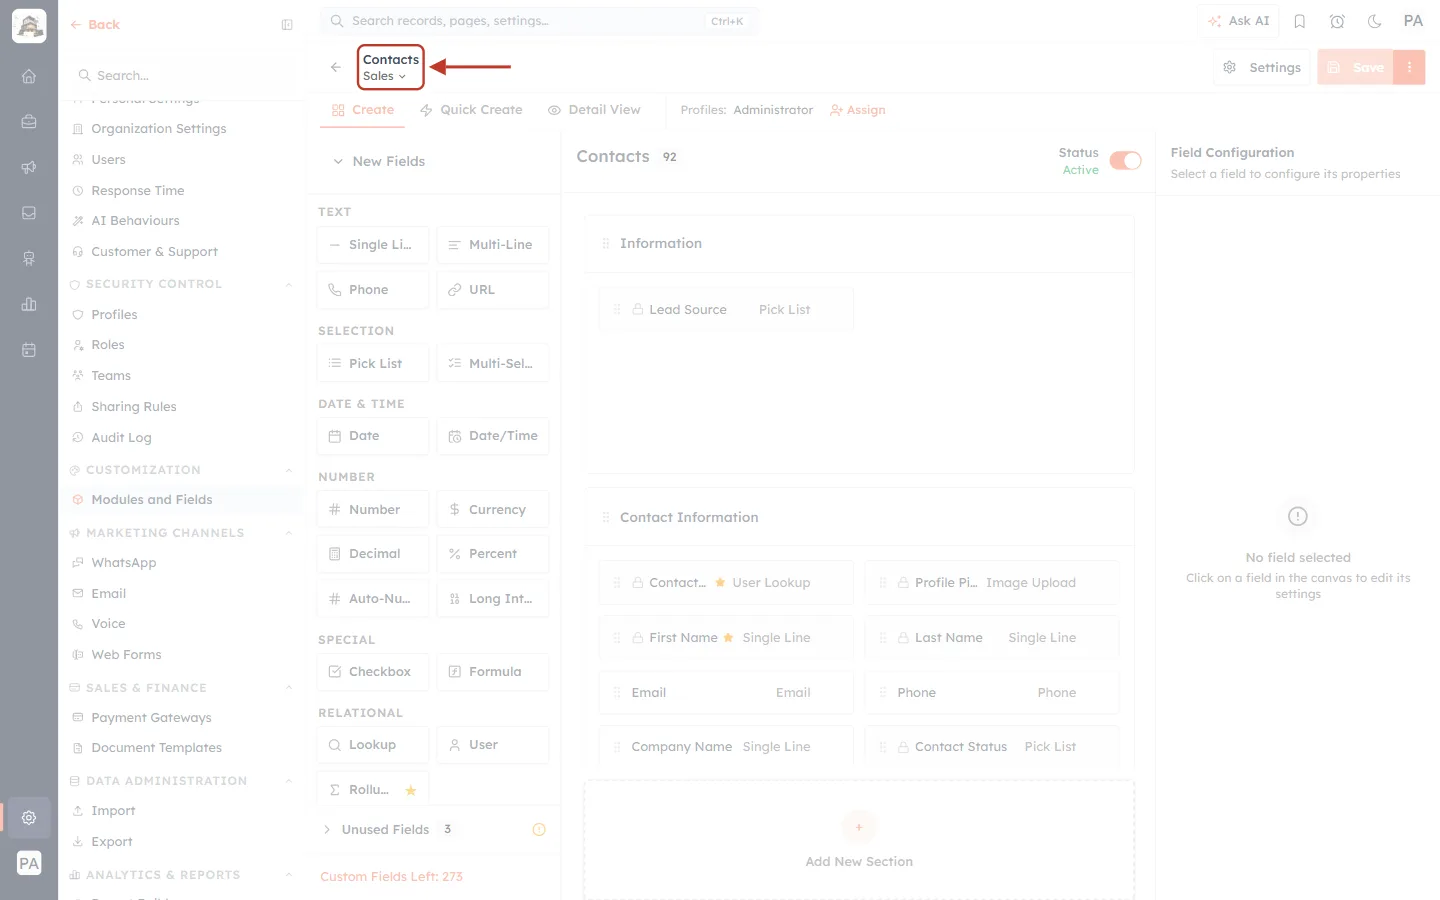
What this screenshot shows. The top left of the Layout Builder, ringed: Contacts (the module) and Sales ⌄ (the layout you are editing).
On the module’s default layout this line reads Standard · Default.
Always check this name before you change anything.
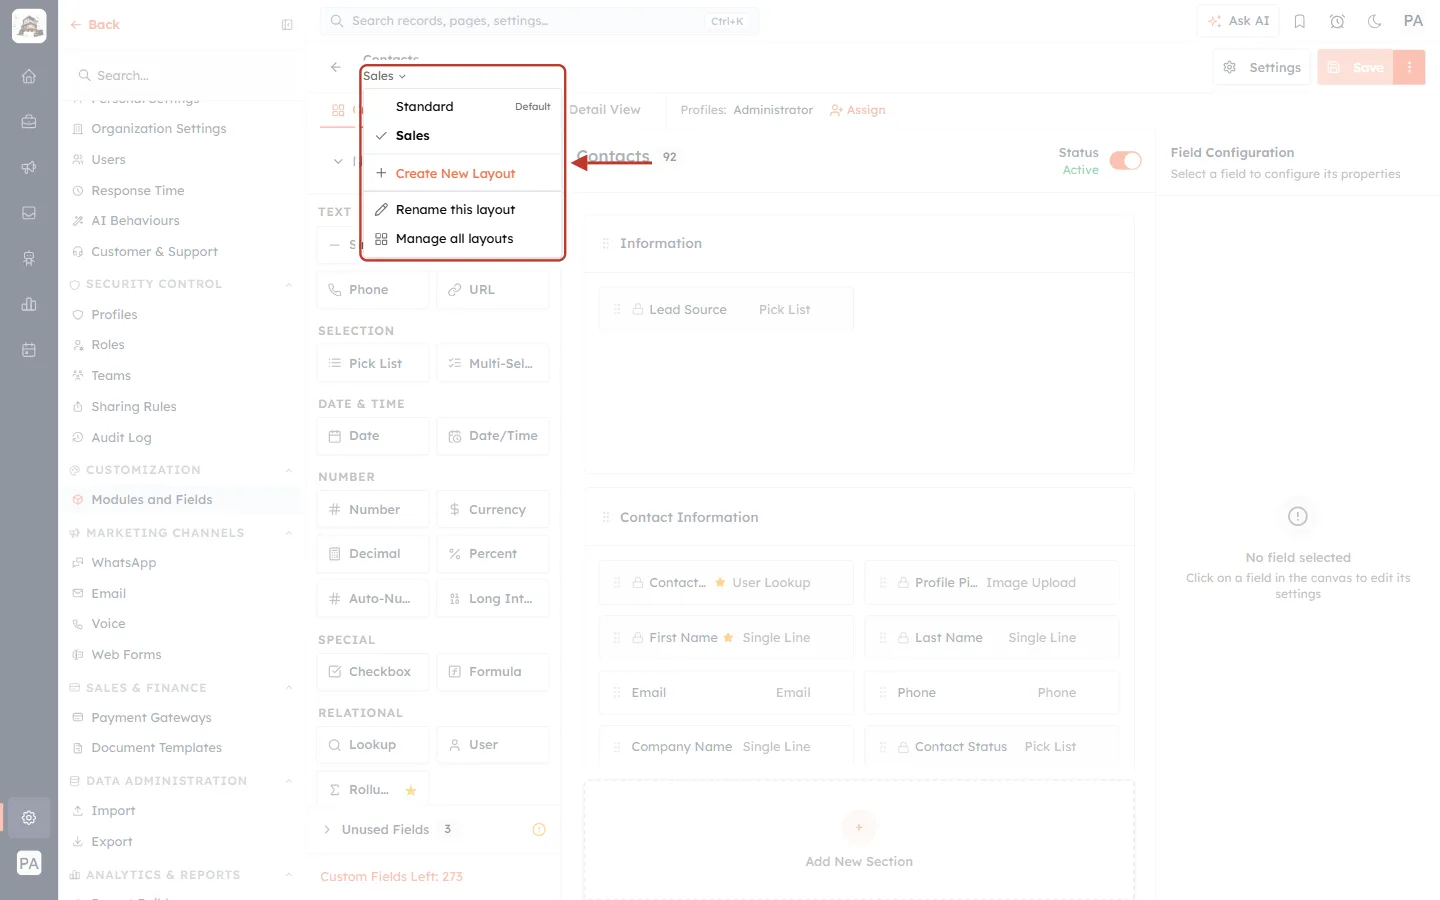
What this screenshot shows. The layout menu, opened by clicking Sales ⌄, ringed.
Click another layout’s name (here Standard) to switch to it without going back to the Layouts page. The open layout has a tick.
Create New Layout, Rename this layout and Manage all layouts are also here.
If you have unsaved changes, the CRM asks before it leaves the layout, so you don’t lose them.
Part 2: Rearrange fields and sections#
Step 4: Find the drag handle of a field#
Every field on the canvas is a small card with its name on the left and its type on the right (for example Website · Url). Point at a field: the six dots ⋮⋮ at its left edge darken — that is the drag handle — and the three-dot menu ⋮ appears at its right edge.
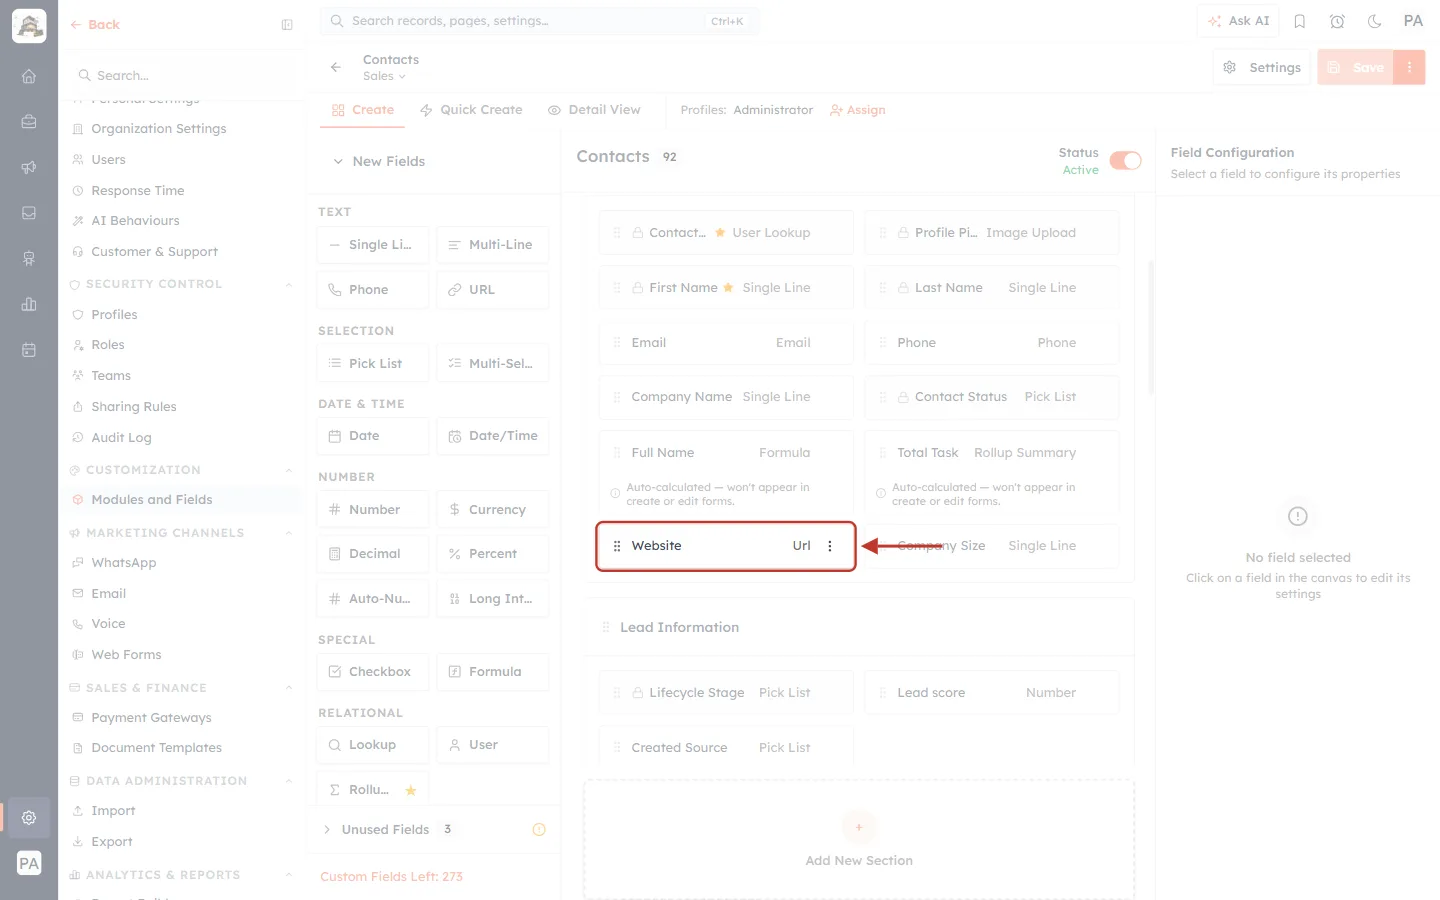
What this screenshot shows. The Website field card in the Contact Information section, ringed while the mouse is on it.
⋮⋮ on the left — the drag handle. Hold the mouse button down on it to pick up the field.
Url — the field’s type.
⋮ on the right — the field menu (Edit Properties, Move to Unused Fields and, for some types, Do not allow duplicate values).
Fields with a small lock are system fields. Some of them keep a fixed position: pointing at their handle shows System field — position is managed by the platform.
Step 5: Drag the field to its new place#
Hold the drag handle, move the field to where you want it and let go. You can drop it between two fields of the same section to change the order, or into another section to move it there. In this example, Website is dragged from Contact Information into Lead Information, next to Created Source.
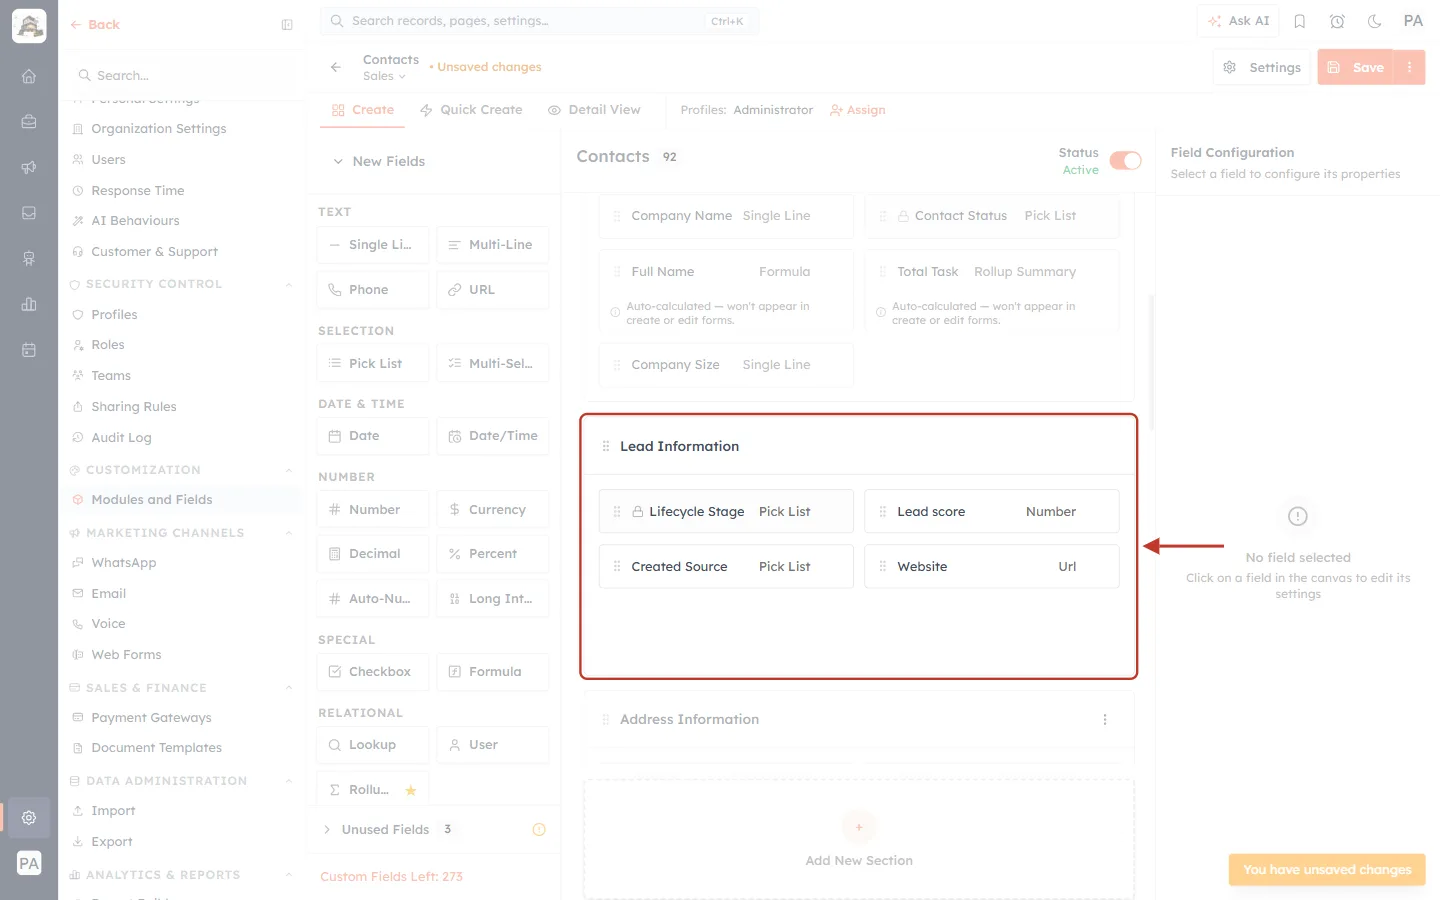
What this screenshot shows. The Lead Information section, ringed. Website is now its last field, next to Created Source.
Fields are laid out two per row, left to right, top to bottom, in the order you put them.
Website is no longer in Contact Information above.
The orange • Unsaved changes label appears at the top of the page as soon as you move something.
Step 6: Move a whole section#
Point at the title bar of the section you want to move and click the ⋮ at its right end. In this example, Address Information is moved above Lead Information.
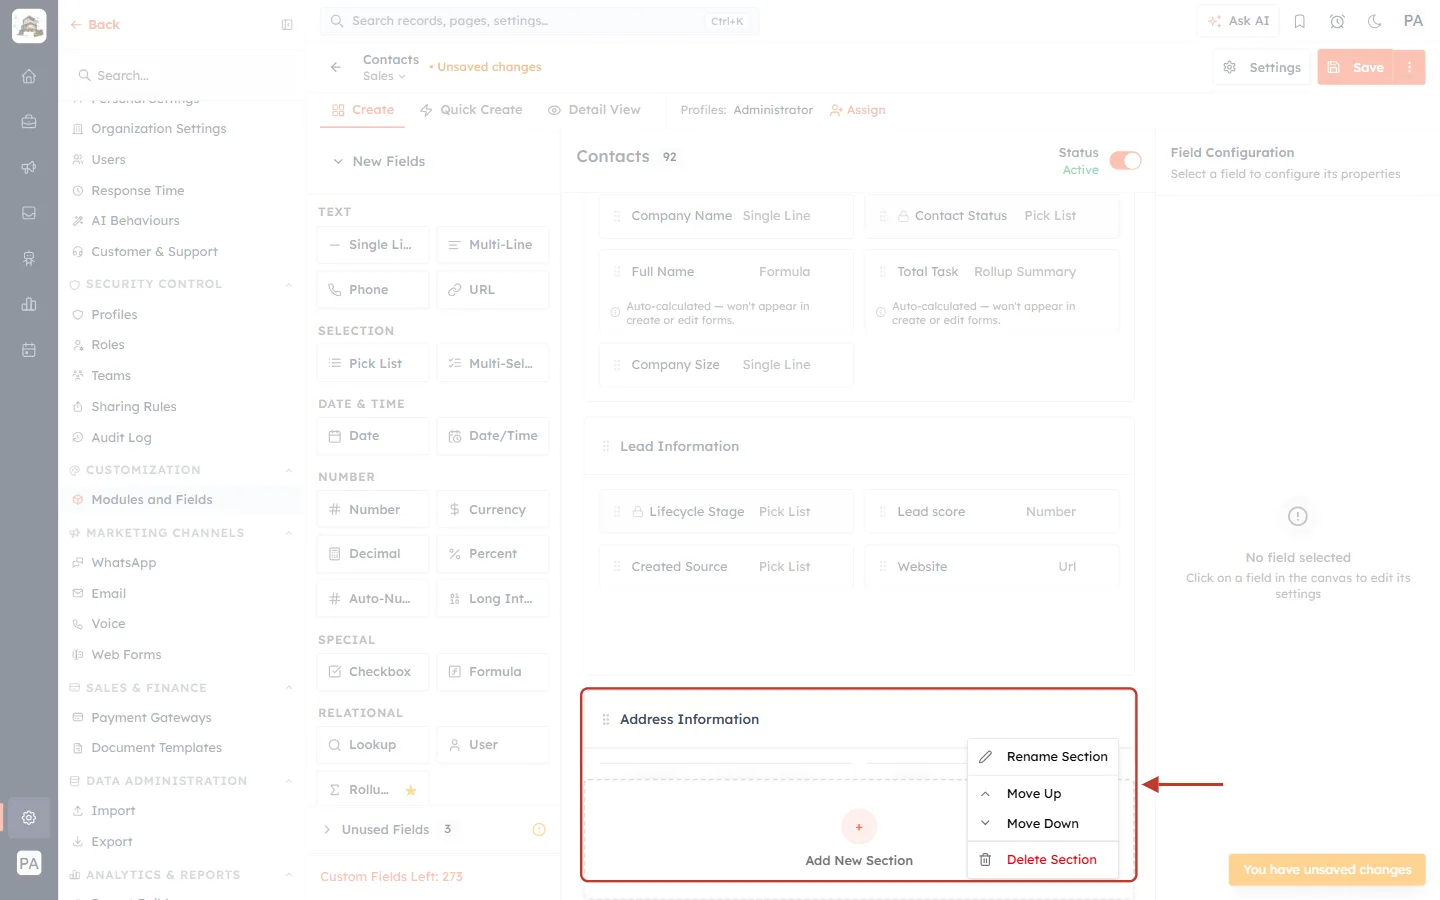
What this screenshot shows. The Address Information section with its menu open, ringed.
Rename Section — change the title (or simply click the title).
Move Up / Move Down — move the section, with all its fields, one place up or down. Move Up is greyed out on the first section and Move Down on the last.
Delete Section — remove the section from this layout; its fields go to Unused Fields. A section that holds system or required fields can’t be deleted until you move those fields out.
You can also drag a section by the dots to the left of its title.
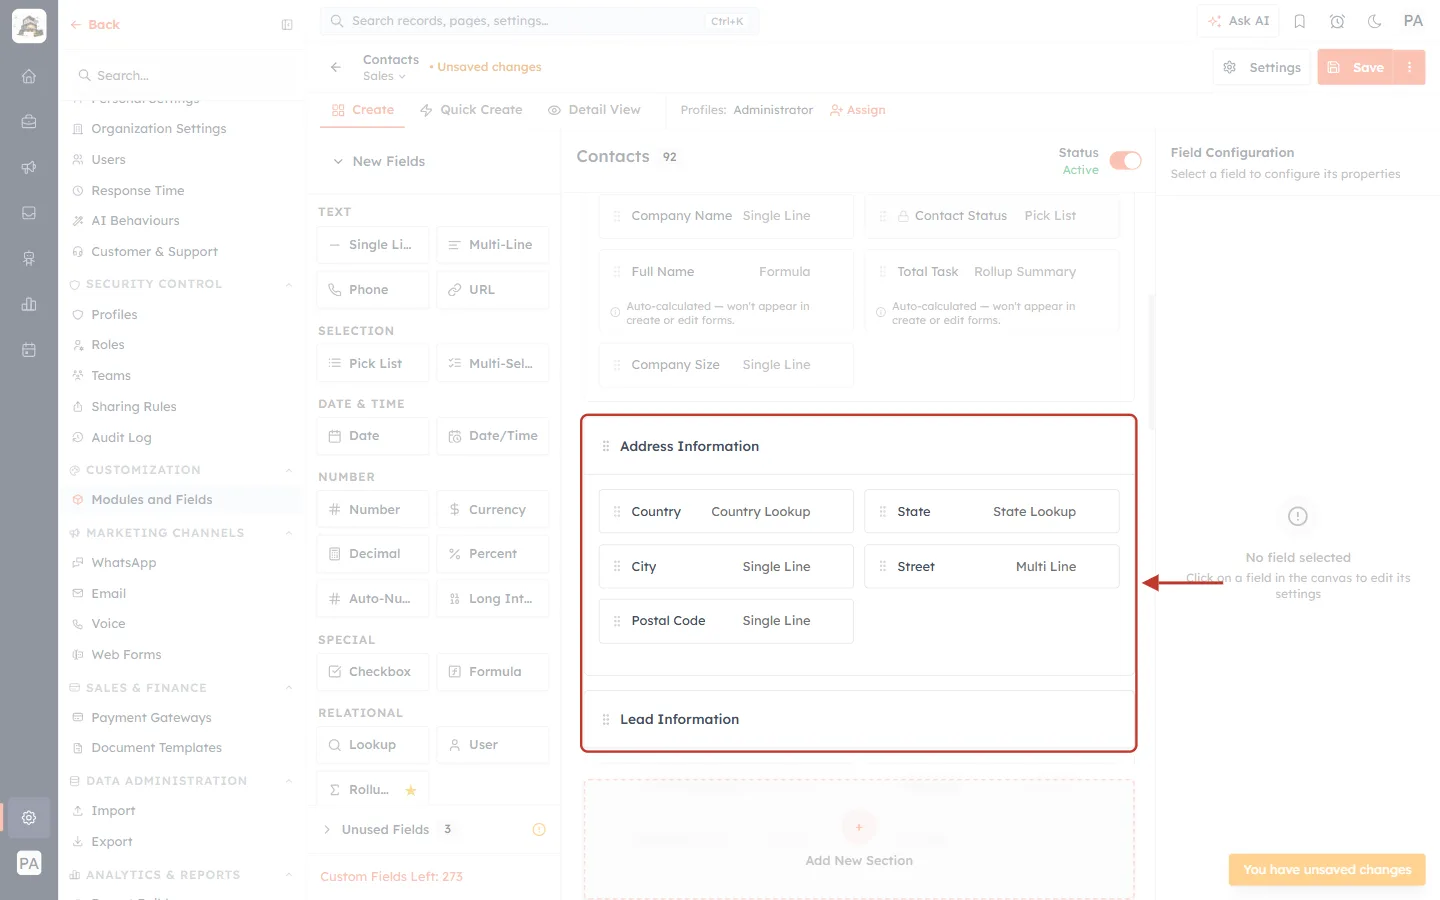
What this screenshot shows. The canvas after clicking Move Up, ringed: Address Information (Country, State, City, Street, Postal Code) now comes before Lead Information.
The fields inside the section move with it and keep their order.
Part 3: Change a field’s settings#
Step 7: Click the field#
Click anywhere on a field card (not on the drag handle). Its settings open in the Field Configuration column on the right. In this example, click Company Name.
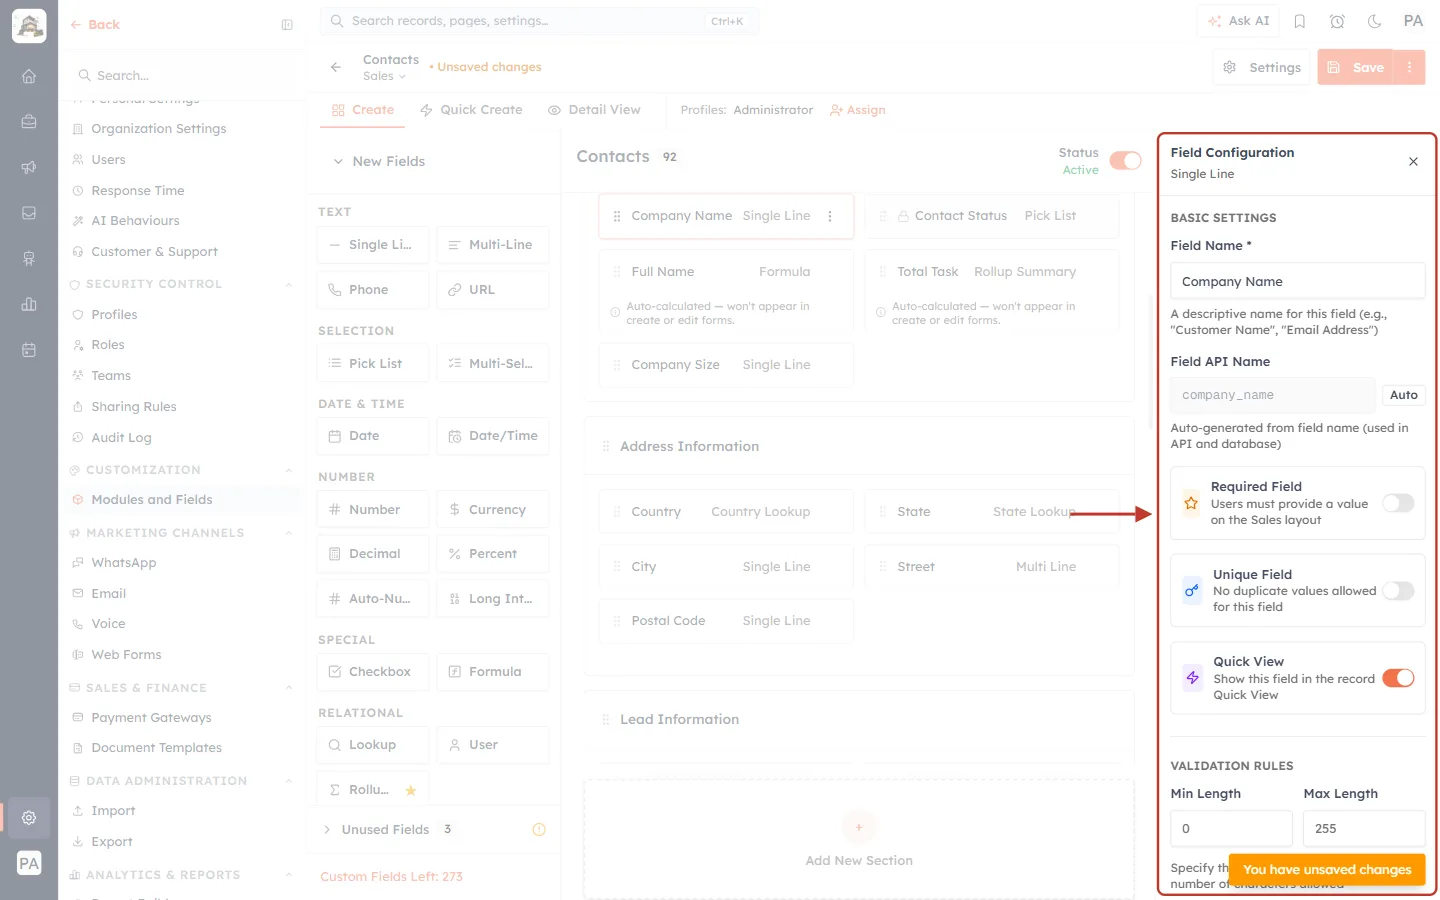
What this screenshot shows. The Field Configuration column, ringed, for the Company Name field (type Single Line). The field’s card on the canvas has an orange border to show it is selected.
Field Name * — the label people see on the form.
Field API Name — the name used by the API and integrations, created automatically from the field name (company_name). It is greyed out and can’t be typed over.
Required Field — “Users must provide a value on the Sales layout”.
Unique Field — “No duplicate values allowed for this field”: two records can’t have the same value.
Quick View — shows the field in the record’s Quick View.
VALIDATION RULES start at the bottom; scroll the column to see the rest. Click × at the top right of the column to close it.
Step 8: Make the field required on this layout#
Turn on the Required Field switch.
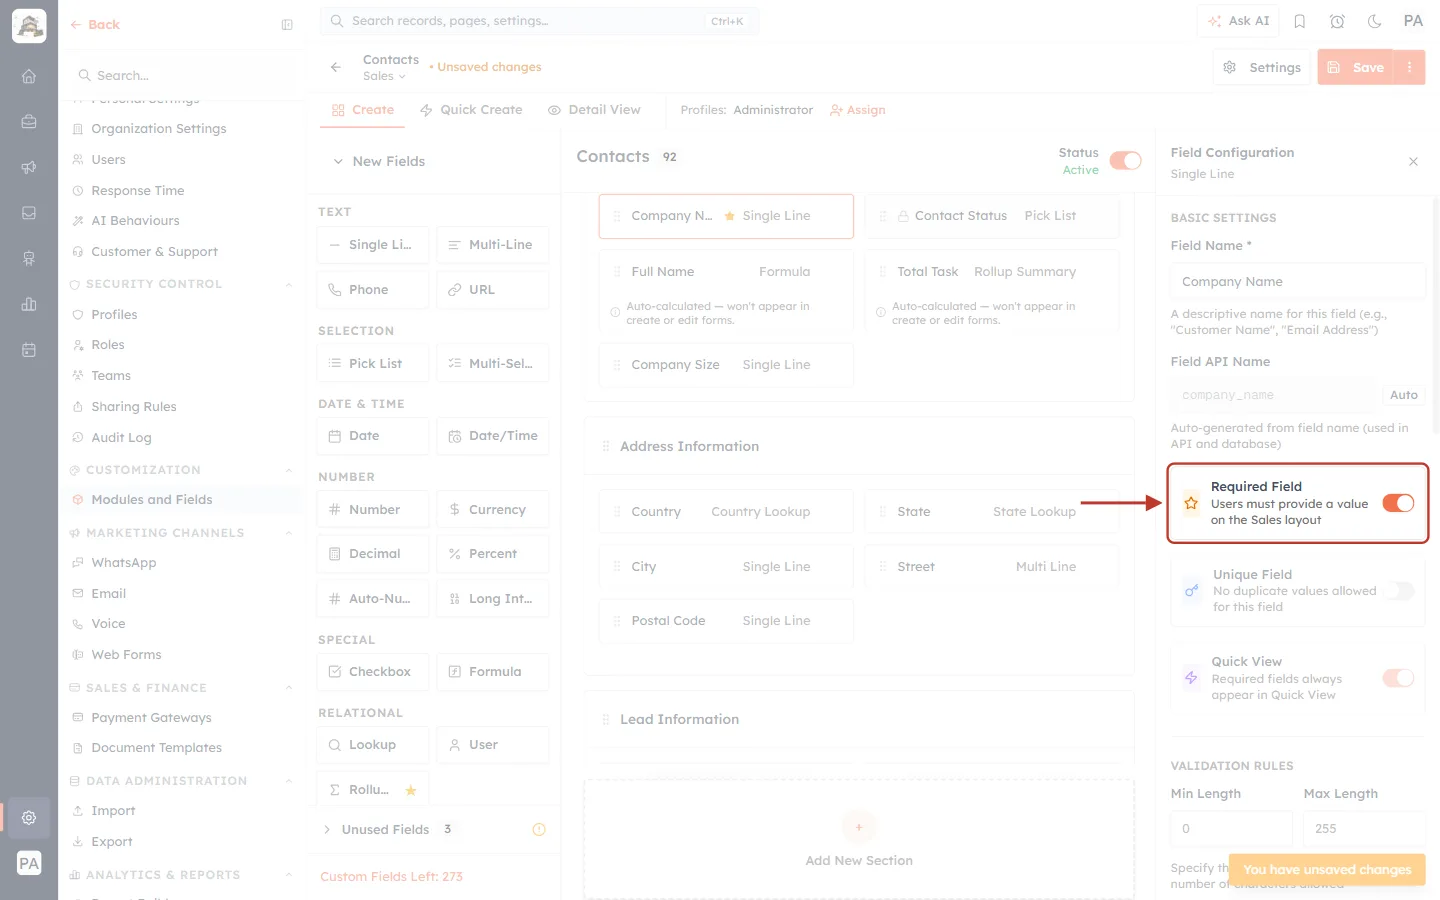
What this screenshot shows. The Required Field box, ringed, with its switch now on (orange).
The text says on the Sales layout: the field becomes required only for people creating or editing records with the Sales layout. On Standard it stays optional unless you turn it on there too.
A required field always appears in Quick View, so the Quick View switch below becomes faded with the note “Required fields always appear in Quick View”.
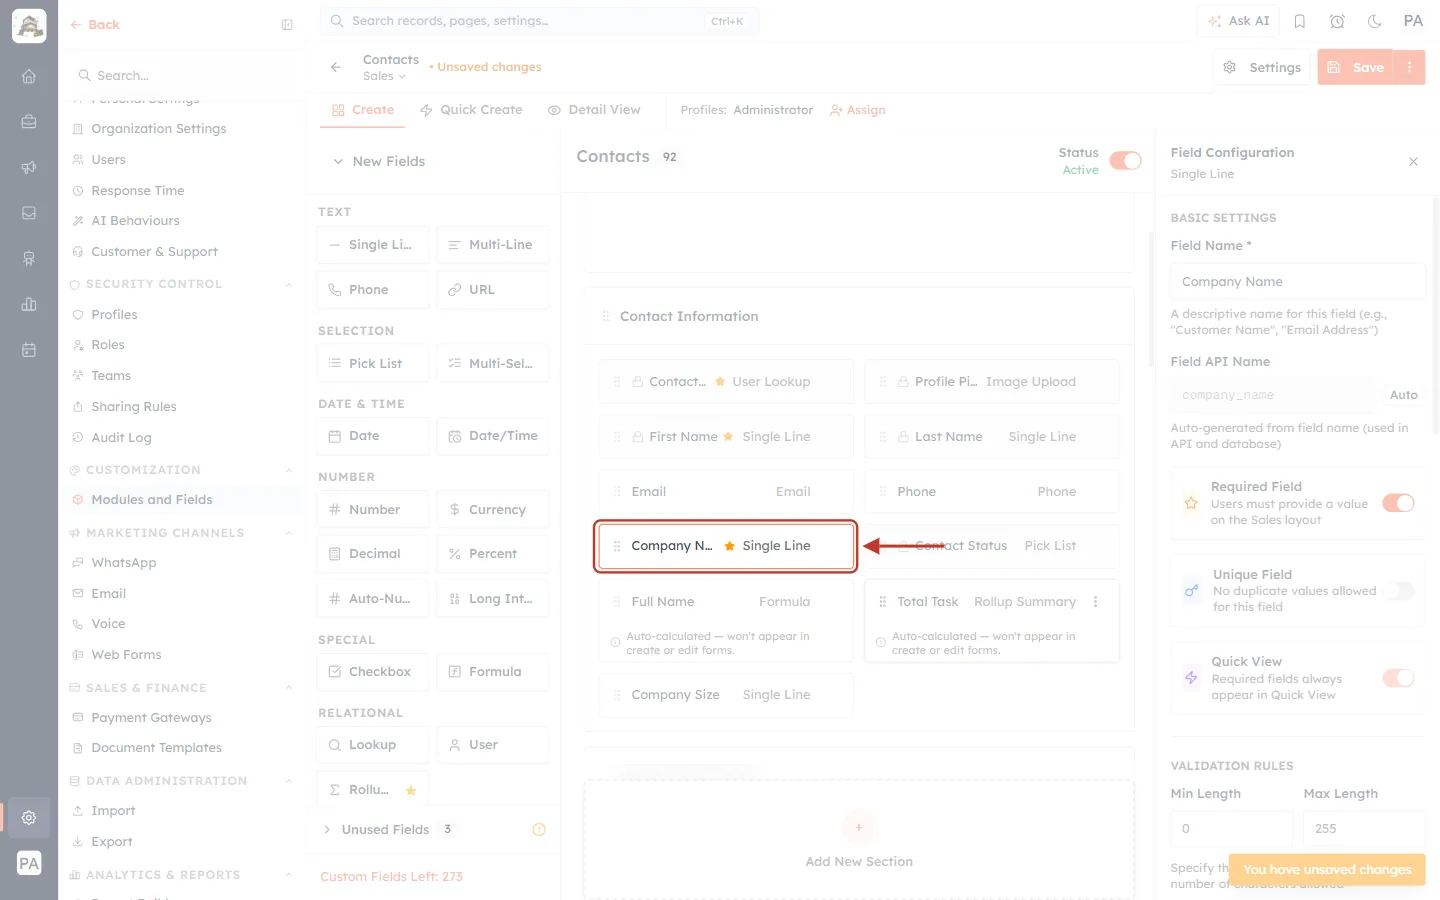
What this screenshot shows. The Company Name card on the canvas, ringed. A small orange ★ now follows its name.
The star marks every required field on the layout, so you can see them at a glance (First Name and Contact Owner have one too).
A required field can’t be moved to Unused Fields until you turn Required off again.
Step 9: Set validation rules#
Scroll down the Field Configuration column to VALIDATION RULES. The options depend on the field type; for a text field like Company Name they are:
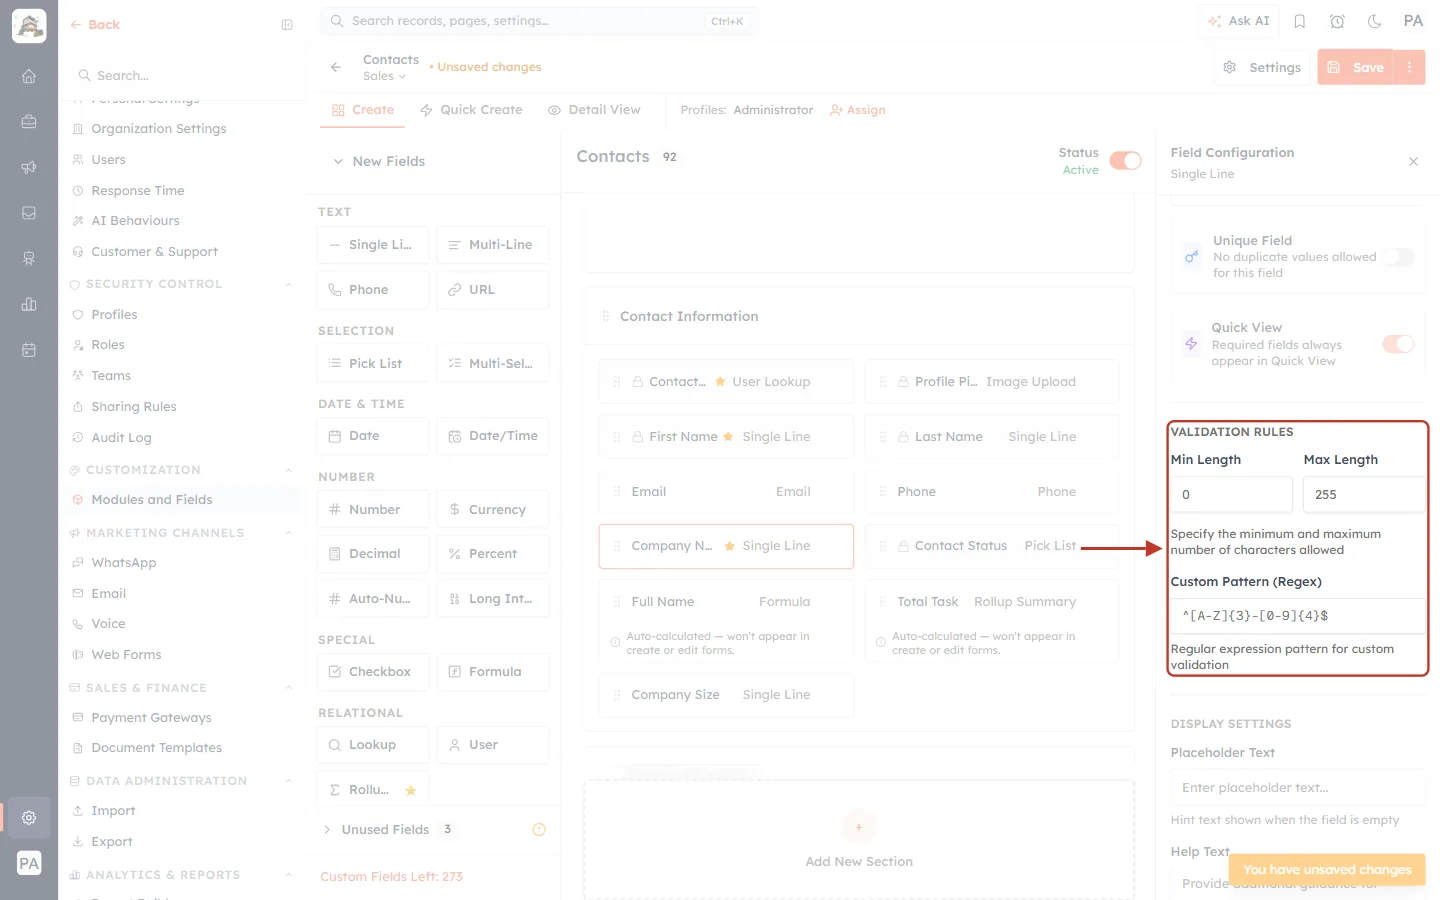
What this screenshot shows. The VALIDATION RULES block, ringed.
Min Length / Max Length — the fewest and most characters people may type (here 0 and 255).
Custom Pattern (Regex) — an optional pattern the value must match. The grey text ^[A-Z]{3}-[0-9]{4}$ is only an example (three capital letters, a dash and four digits); the box is empty until you type a pattern.
Some field types have no extra rules. For those the block reads “No additional validation options for this field type”.
Step 10: Add hint and help text#
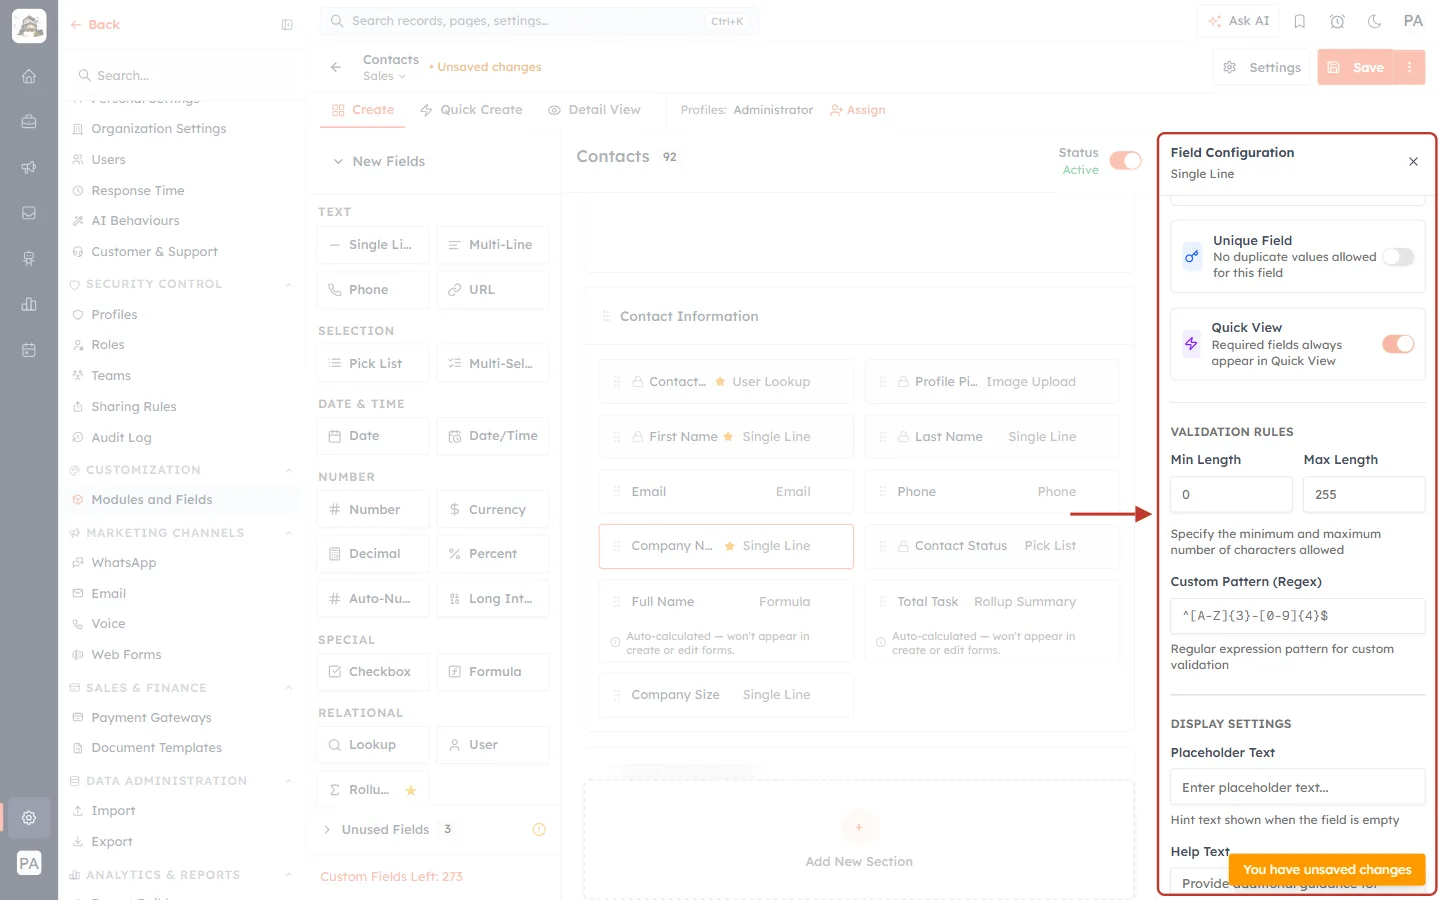
What this screenshot shows. The Field Configuration column scrolled down to DISPLAY SETTINGS, ringed.
Placeholder Text — grey hint text shown inside the empty box, for example e.g. Acme Ltd.
Help Text — a short explanation shown below the field.
Default Value (further down) — a value filled in automatically on new records.
Step 11: Choose where the field is shown on this layout#
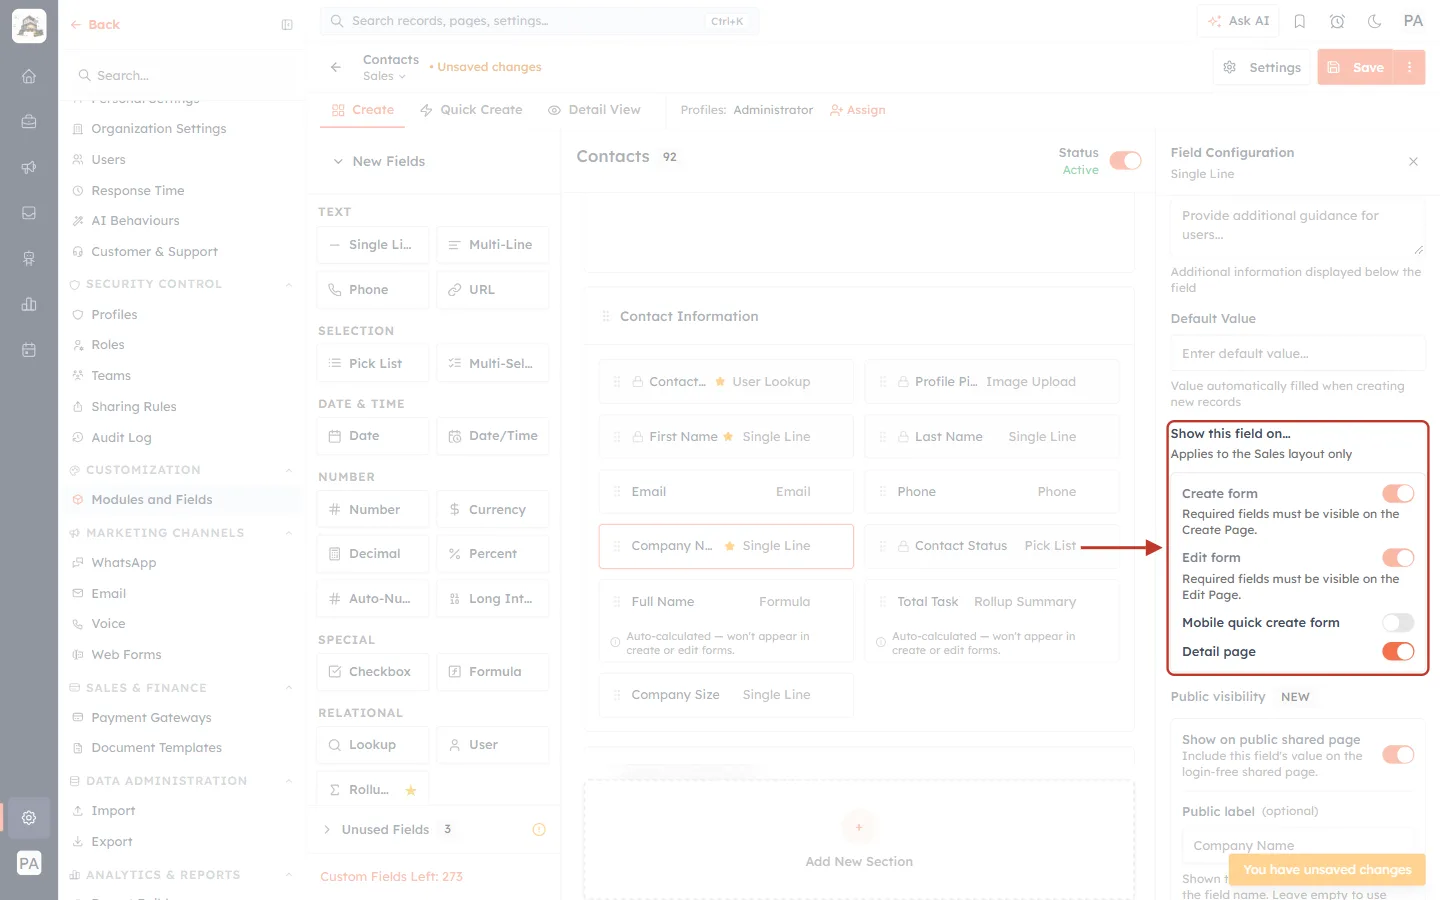
What this screenshot shows. The Show this field on… block, ringed. Its subtitle reads Applies to the Sales layout only.
Create form and Edit form — show the field when a record is created or edited. For a required field these are locked on, with the note “Required fields must be visible on the Create Page / Edit Page”.
Mobile quick create form — show the field on the short create form of the mobile app.
Detail page — show the field when someone opens a record.
Further down, Public visibility (“Show on public shared page”, with an optional Public label) controls the login-free shared page, and Field access (“Visible to all users”) can hide the field’s value from people whose role or profile isn’t allowed to see it.
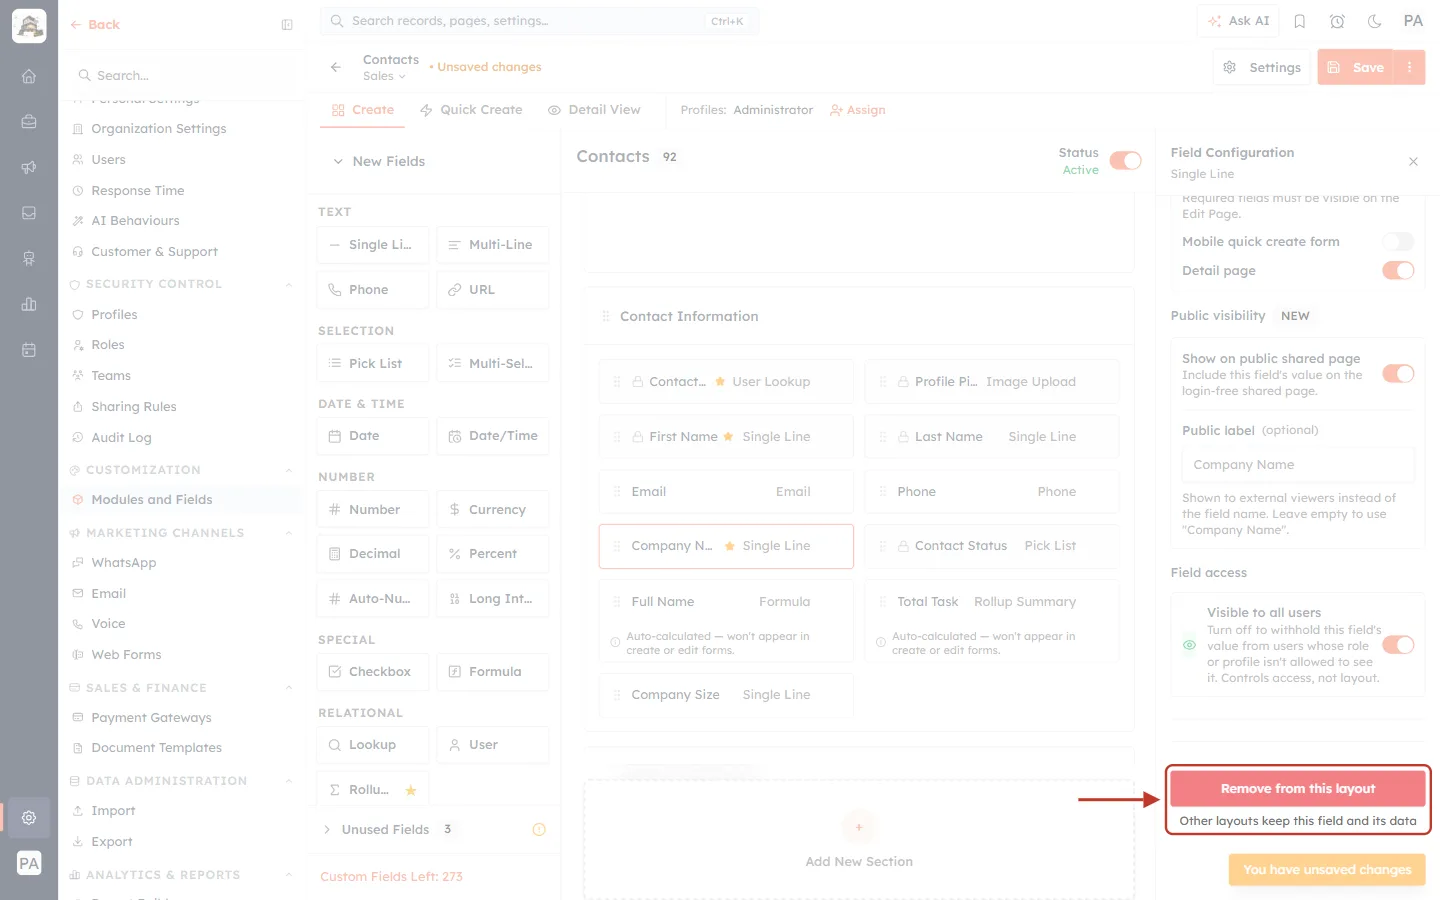
What this screenshot shows. The red Remove from this layout button at the very bottom of the Field Configuration column, ringed, with the note “Other layouts keep this field and its data”.
It takes the field off the Sales layout only. The field, and every value stored in it, stays on the module and on the other layouts.
You are asked to confirm. Unlike most changes, this one is saved straight away — together with any other unsaved changes you have.
To take a field off the layout without saving at once, use Move to Unused Fields in the field’s ⋮ menu instead.
ℹ️
Which settings are per layout? Required Field and Show this field on… say which layout they apply to and only change the open layout. The other settings (name, unique, validation, placeholder, help text, default value) belong to the field itself, so they apply wherever the field is used.
Part 4: Work with Unused Fields#
Step 12: Open Unused Fields#
At the bottom of the left column, click Unused Fields.
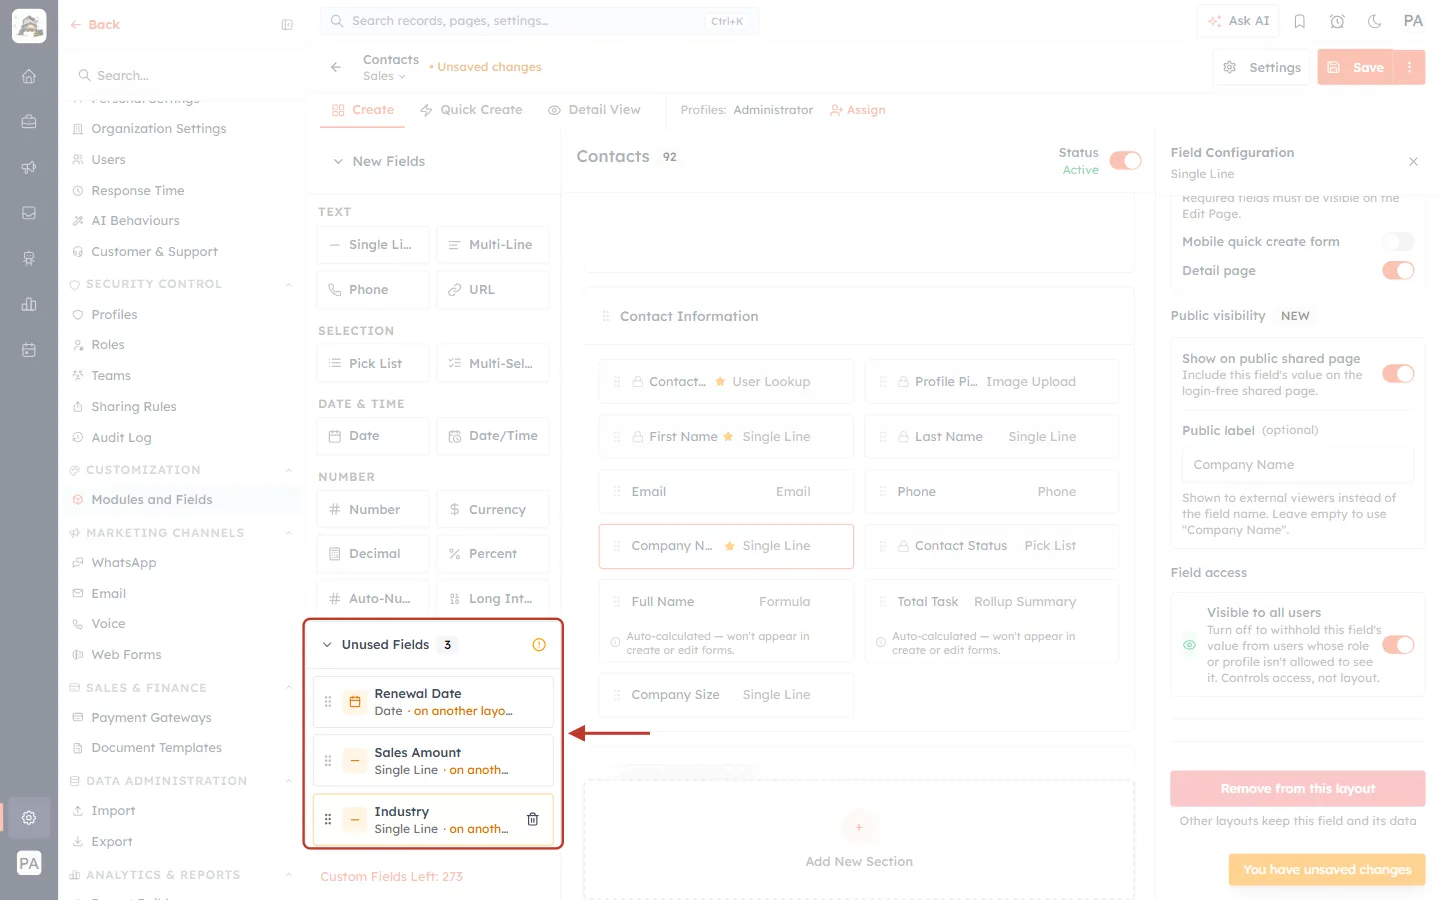
What this screenshot shows. The Unused Fields list, open and ringed. The number 3 next to the title is how many fields are in it.
Each field shows its name and type: Renewal Date (Date), Sales Amount (Single Line) and Industry (Single Line).
· on another layout (in orange) means the field is not on this layout but is on another layout of the module — here Standard.
The orange ! at the right of the title explains the list when you point at it.
Step 13: Put a field back on the layout#
Drag the field by its handle from the Unused Fields list onto a section of the canvas. In this example, Industry is dragged into Contact Information, next to Company Size.
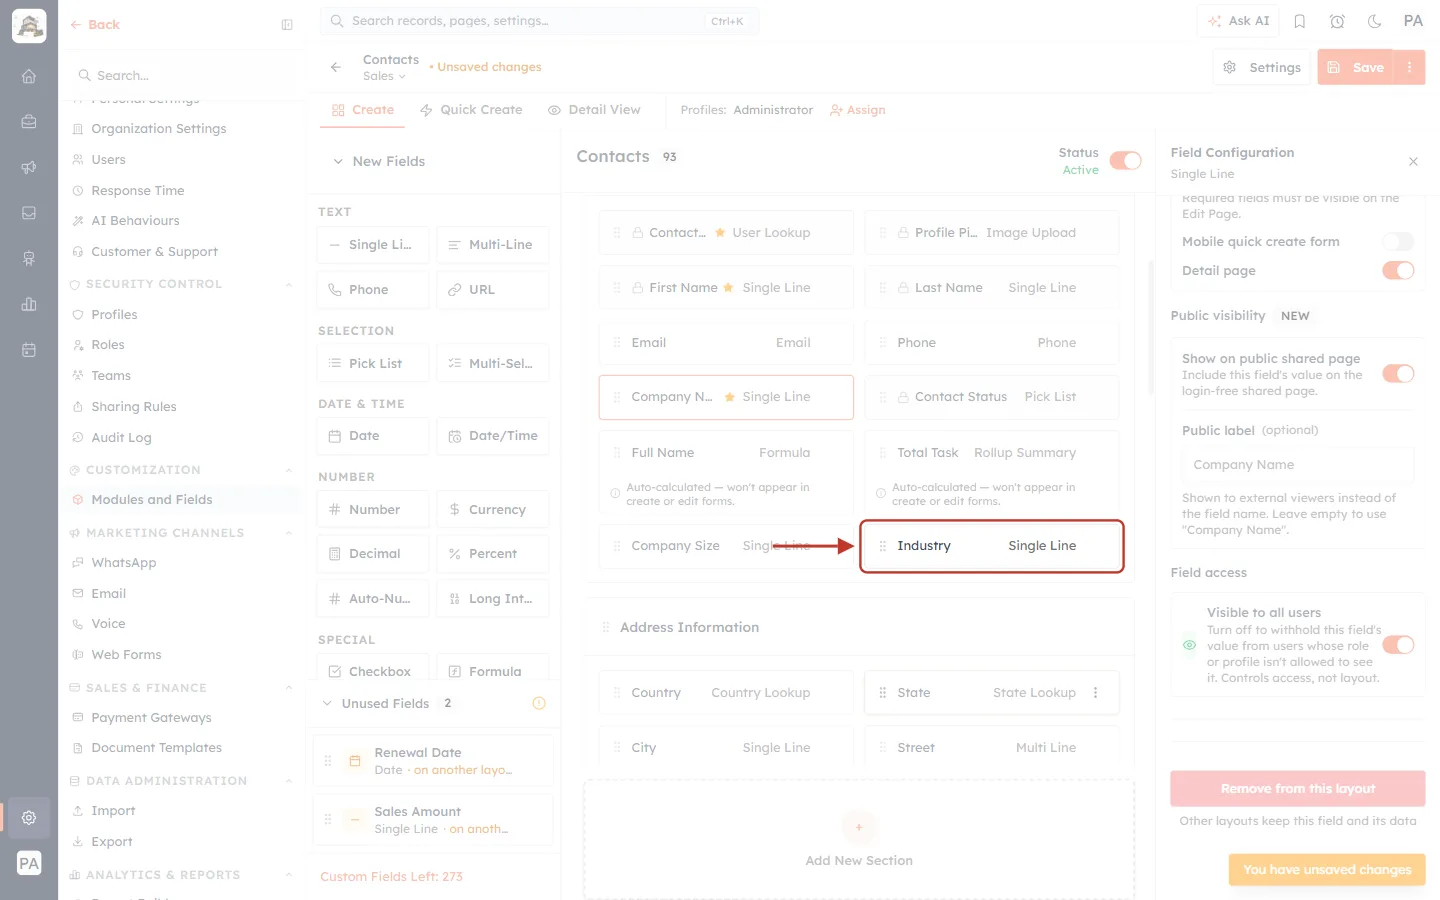
What this screenshot shows. The Industry card, ringed, now in the Contact Information section next to Company Size.
The Unused Fields count dropped from 3 to 2, and the field count next to Contacts at the top of the canvas went up by one.
Every value already saved in Industry on your records shows again on this layout.
Step 14: Know what the bin does before you click it#
Point at a field in the Unused Fields list and a bin icon appears at its right end.
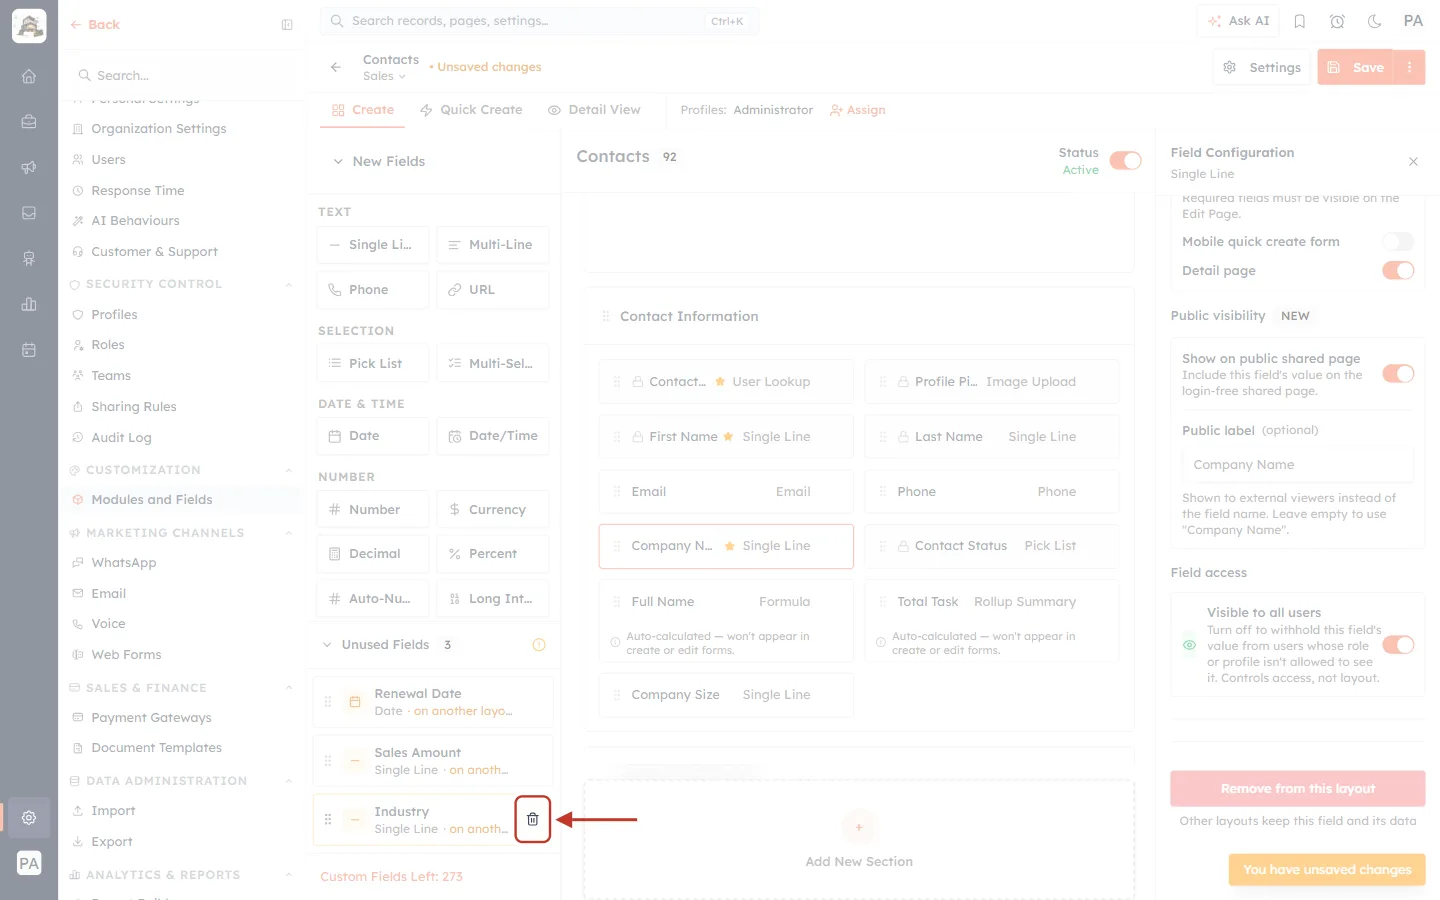
What this screenshot shows. The bin on the Industry card in the Unused Fields list, ringed.
The bin does not just take the field off this layout — it deletes the field from the whole module.
Its tooltip warns you when the field is on another layout: deleting it removes it there too, with its data on every record.
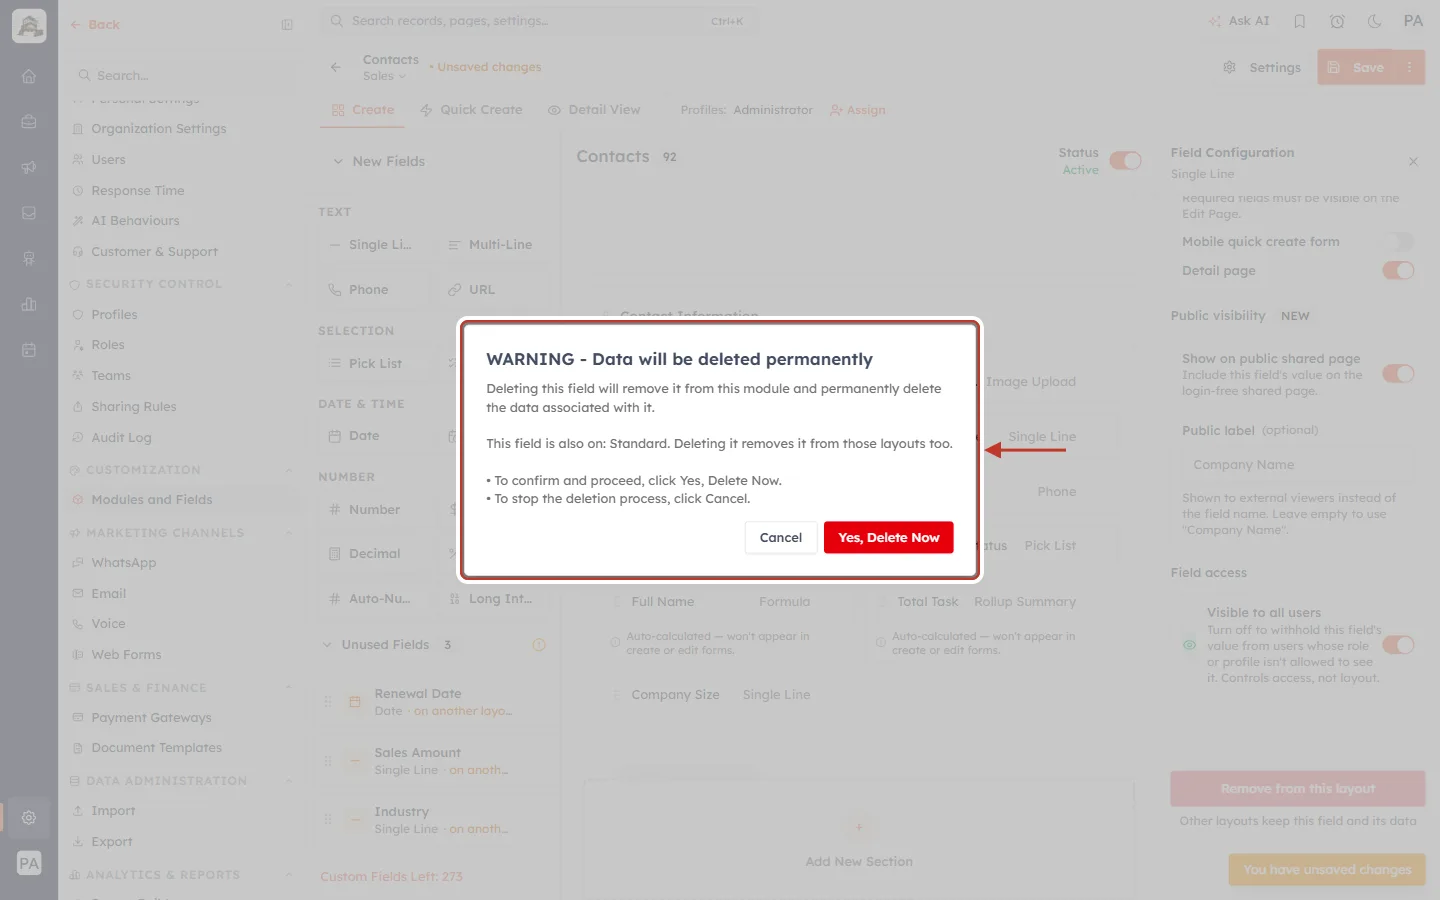
What this screenshot shows. The confirmation that opens when you click the bin, ringed. Its title is WARNING - Data will be deleted permanently.
“Deleting this field will remove it from this module and permanently delete the data associated with it.”
“This field is also on: Standard. Deleting it removes it from those layouts too.” — this line appears only when another layout uses the field.
Yes, Delete Now (red) takes the field out of the builder; the field and its data are deleted for good when you next click Save. Cancel closes the window and changes nothing — this guide clicks Cancel.
⚠️
Once you Save after deleting a field, the deletion can’t be undone — the field and its data are gone from every record and every layout. If you clicked Yes, Delete Now by mistake, use Discard Changes (Step 18) before saving to get the field back. If you only want the field off this layout, leave it in Unused Fields: it costs nothing and its data stays safe.
Part 5: Edit the Quick Create and Detail View forms#
Each layout has three forms, shown as tabs under the header: Create (the full form, used in Parts 2–4), Quick Create and Detail View.
Step 15: Choose the Quick Create fields#
Click the Quick Create tab. The Quick Create form is the short form people get when they add a record from another record with + New — for example creating a contact from a deal’s lookup field.
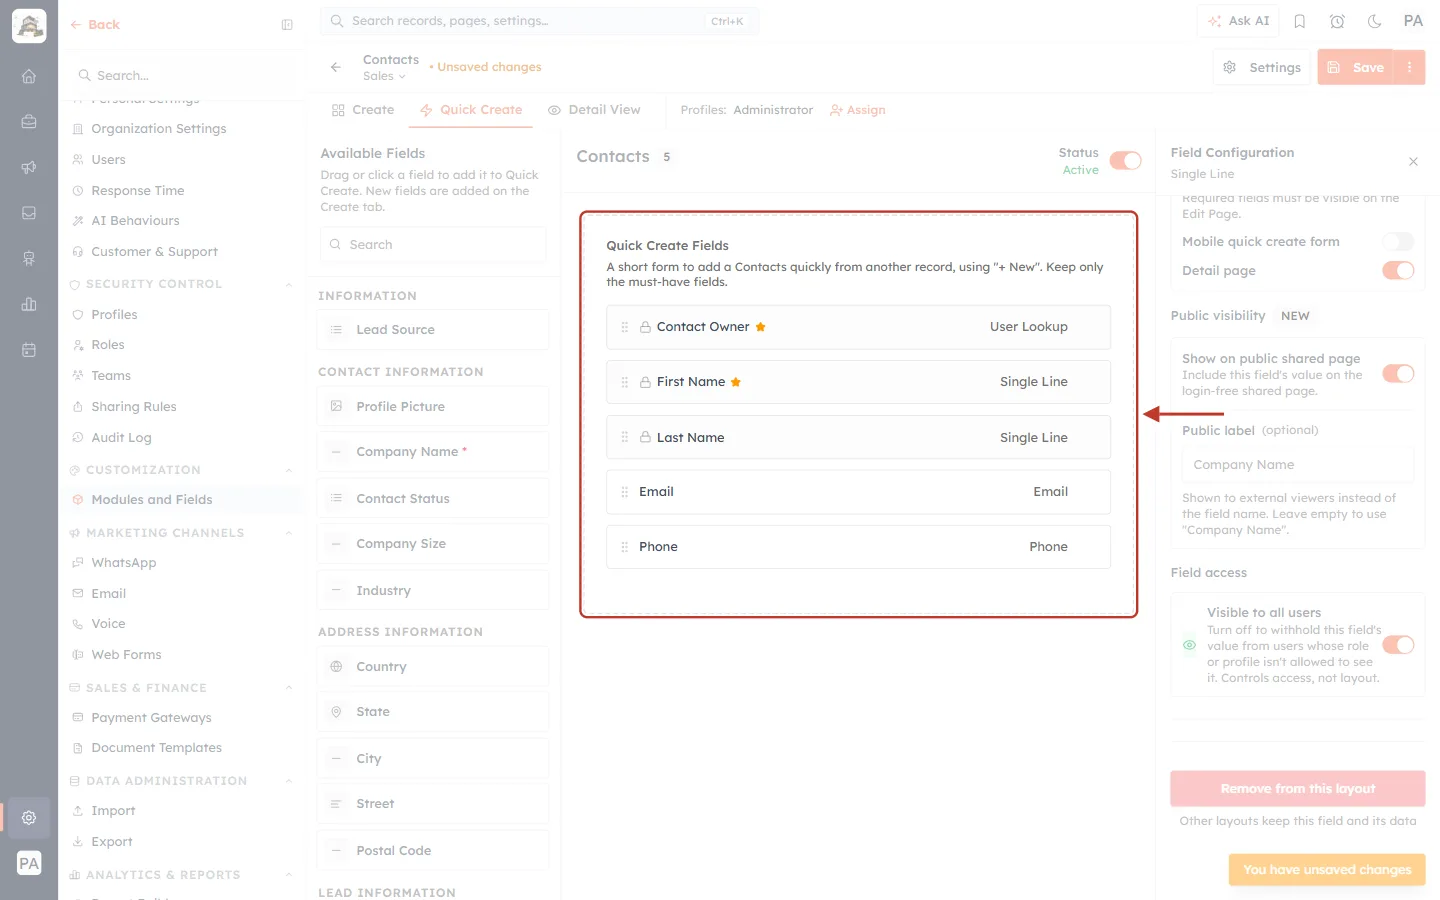
What this screenshot shows. The Quick Create Fields box on the canvas, ringed. The count next to Contacts shows 5 fields.
The note reads: “A short form to add a Contacts quickly from another record, using “+ New”. Keep only the must-have fields.”
The fields are Contact Owner, First Name, Last Name, Email and Phone.
Drag a field by its handle to change the order. Point at a field and use its ⋮ menu to take it off the Quick Create form; this does not remove it from the Create form.
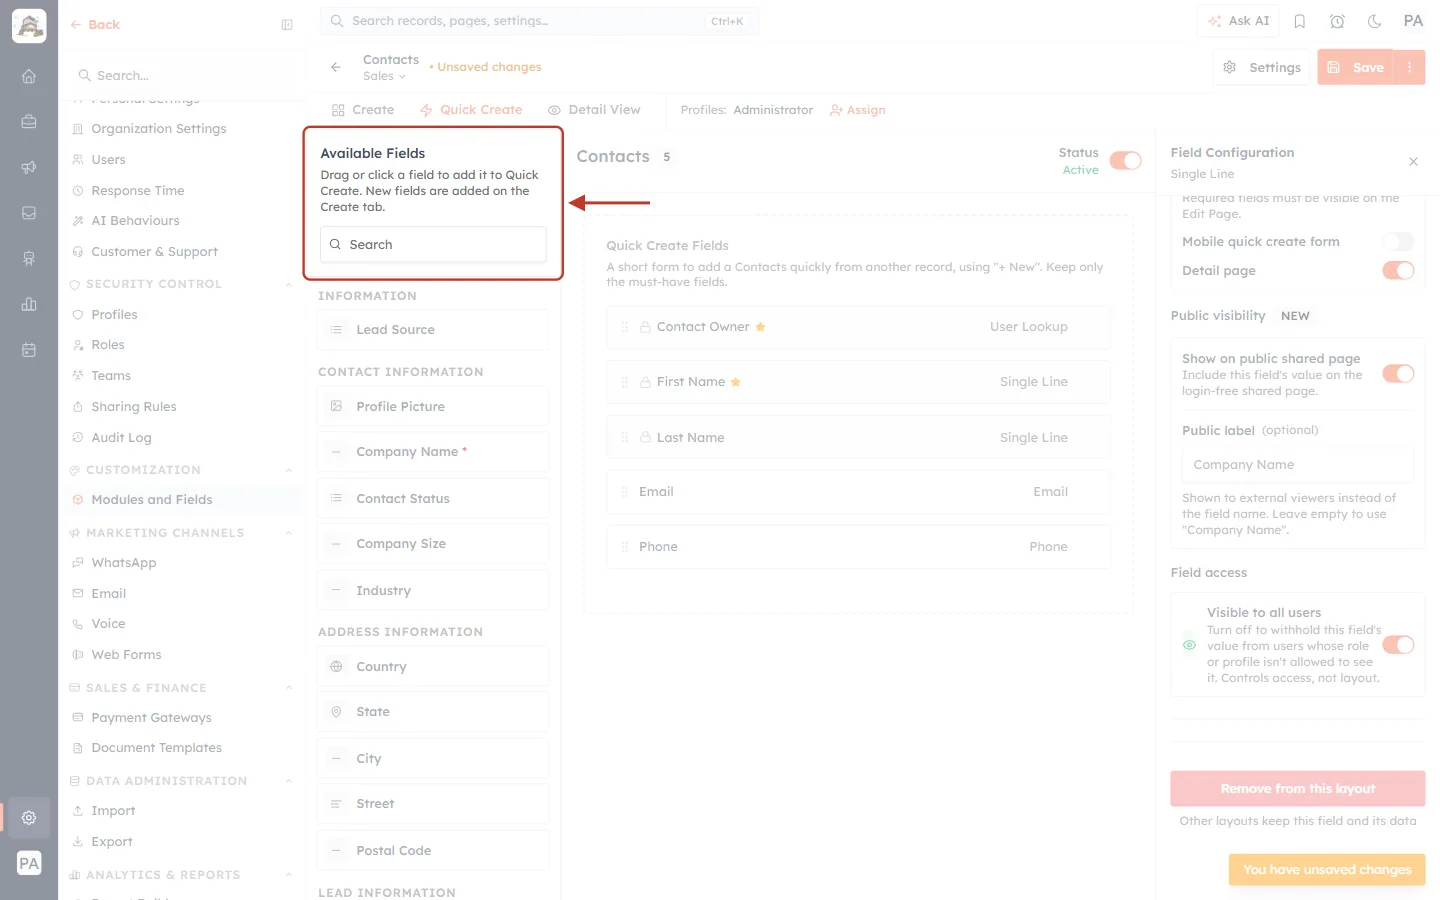
What this screenshot shows. The left column on the Quick Create tab, now called Available Fields, ringed at the top.
The note reads: “Drag or click a field to add it to Quick Create. New fields are added on the Create tab.”
Use Search to find a field, or scroll the list, which is grouped by section (INFORMATION, CONTACT INFORMATION, ADDRESS INFORMATION…).
Click a field (or drag it) to add it to the Quick Create form. To make a brand-new field, go back to the Create tab.
Step 16: Arrange the Detail View#
Click the Detail View tab. This is how fields are arranged when someone opens a record that uses this layout.
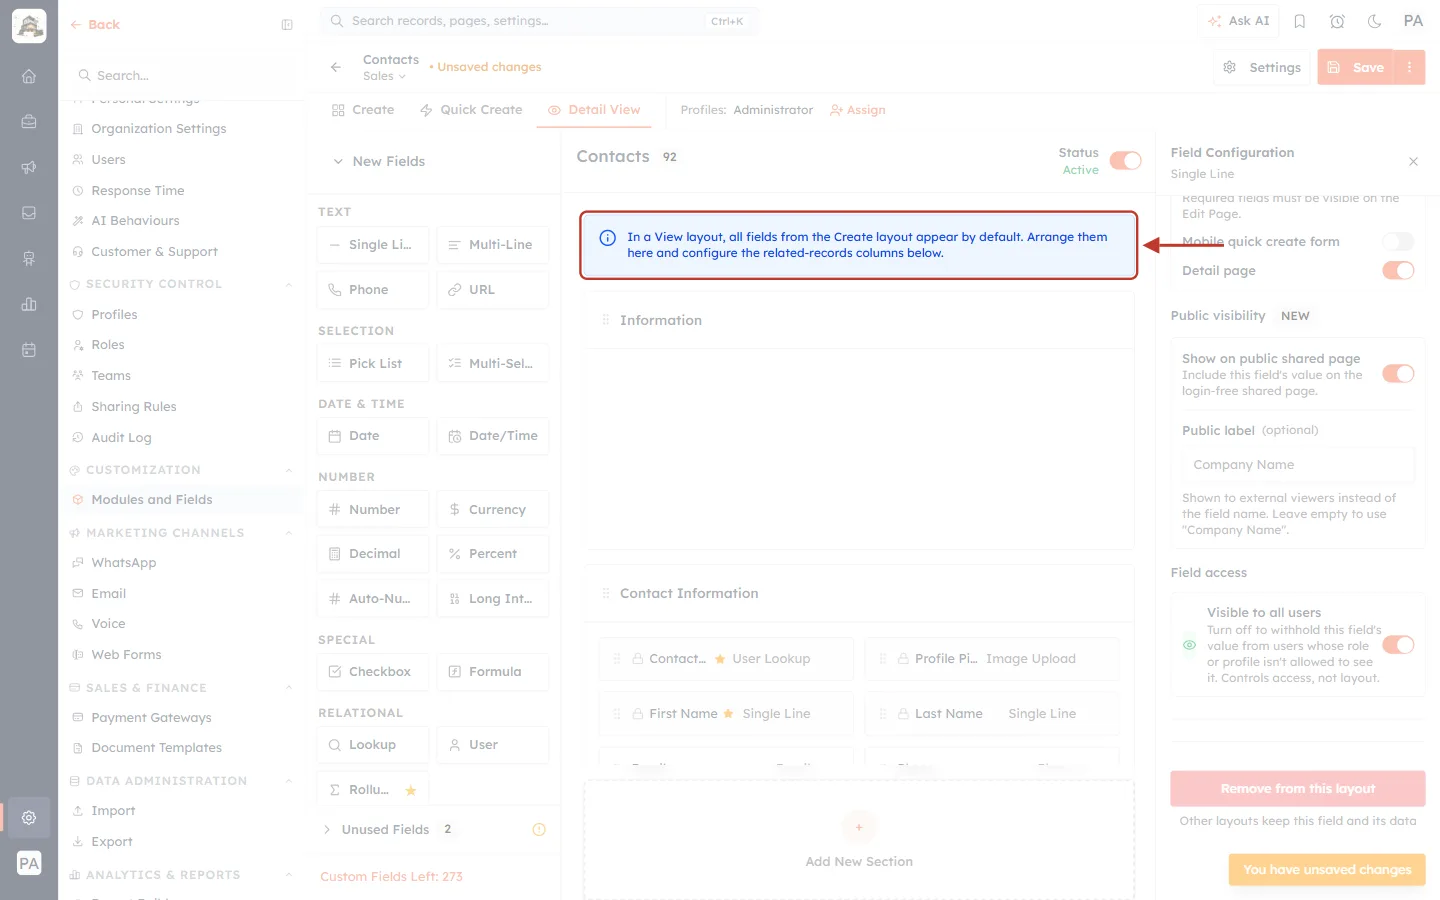
What this screenshot shows. The blue note at the top of the Detail View canvas, ringed.
It reads: “In a View layout, all fields from the Create layout appear by default. Arrange them here and configure the related-records columns below.”
Below the note are the same sections as on the Create tab. Drag fields and sections to arrange how a record reads, without changing the order of the Create form.
Further down the canvas you can choose the columns of each related list (for example the deals or tasks shown on a contact).
Part 6: Save, or discard your changes#
Step 17: Check for unsaved changes#
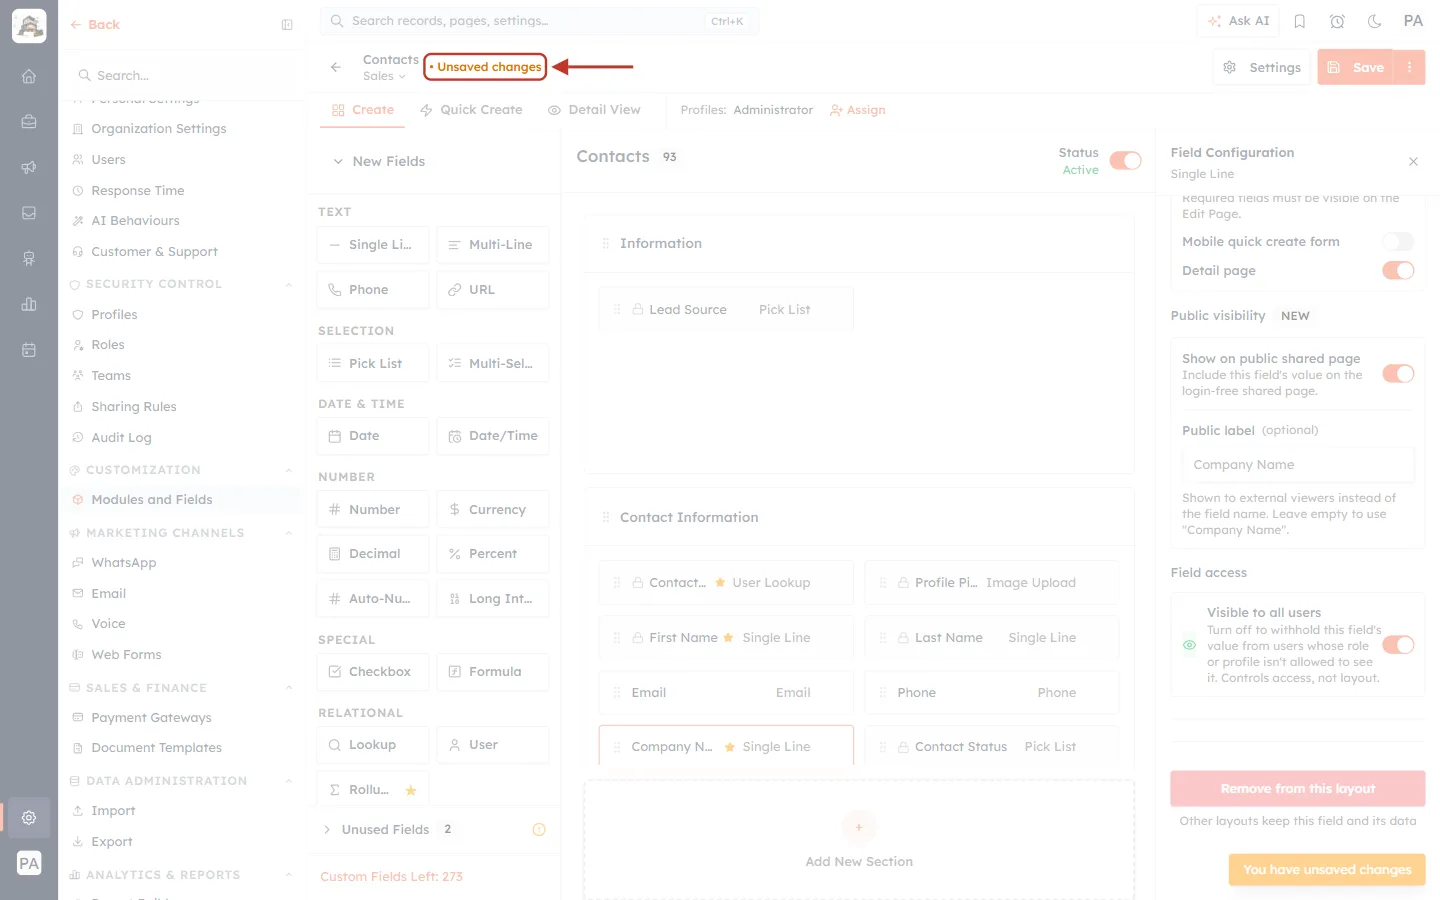
What this screenshot shows. The orange • Unsaved changes label next to the module and layout name, ringed.
It appears after any change and stays until you save or discard.
If you try to leave the builder or switch layouts with unsaved changes, the CRM asks you first.
Step 18: Use the Save menu#
Click the small ⋮ button on the right of the orange Save button.
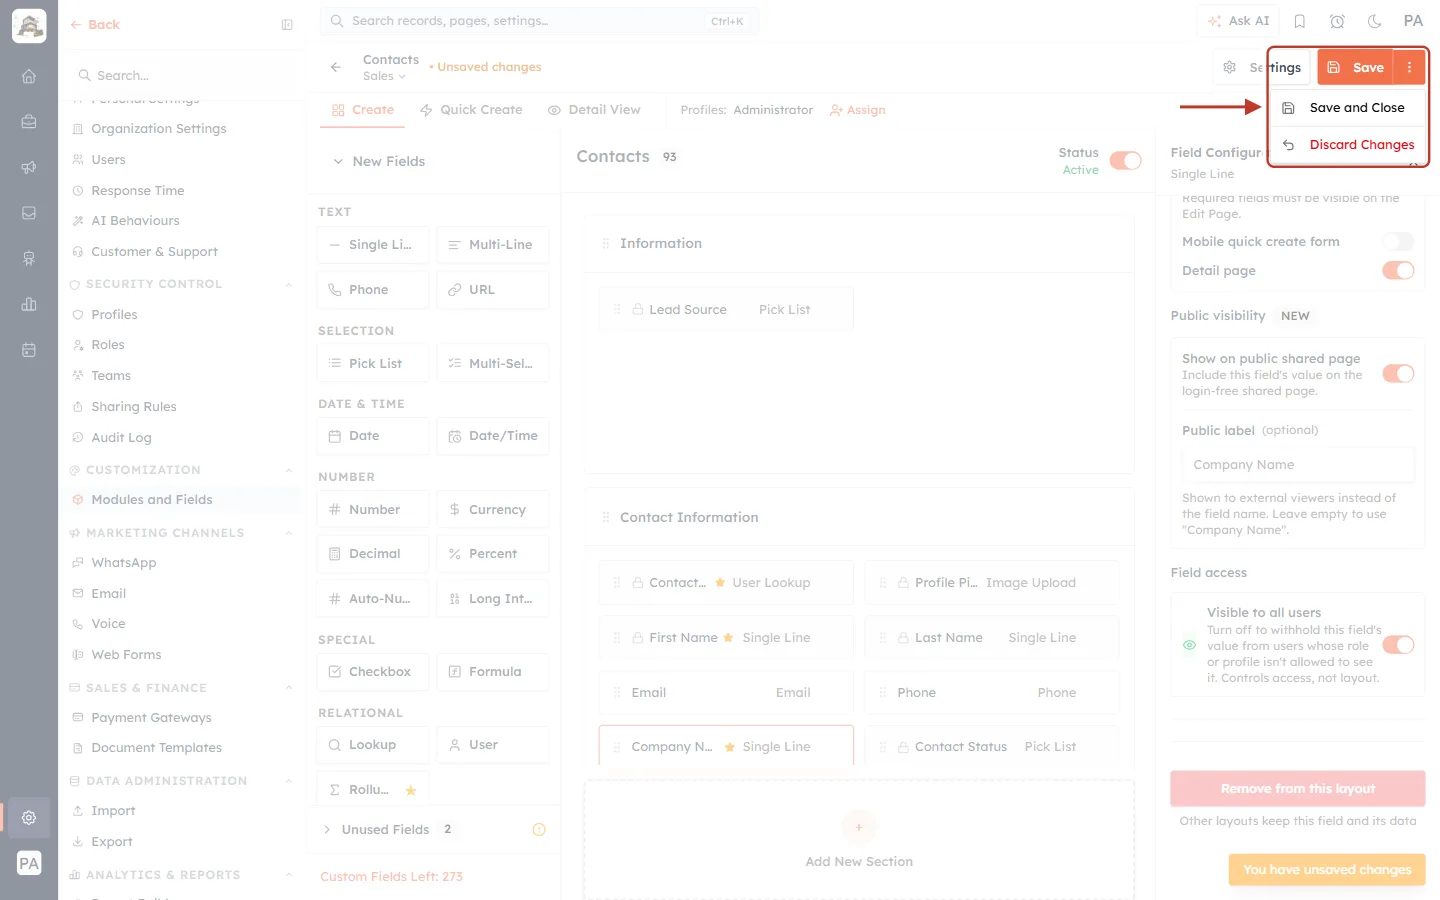
What this screenshot shows. The Save menu, open and ringed.
Save and Close — saves every change and leaves the builder.
Discard Changes (red) — throws away all changes since you last saved and puts the layout back as it was. There is no extra question, so be sure before you click.
Both options are greyed out while there is nothing to save.
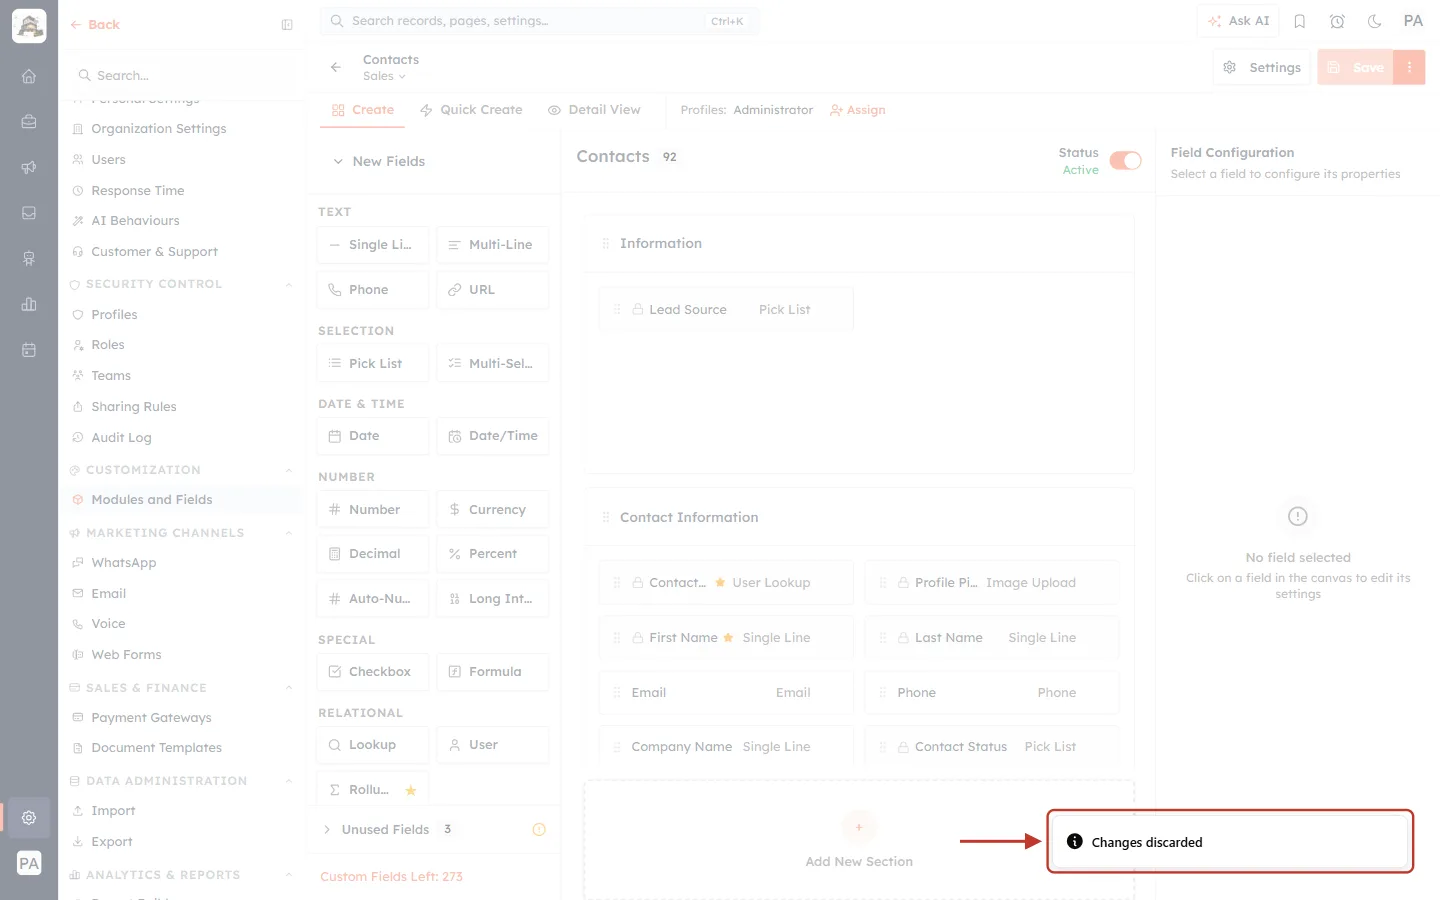
What this screenshot shows. The message at the bottom right of the screen after clicking Discard Changes, ringed: Changes discarded.
The canvas goes back to the last saved version: Website is back in Contact Information, Address Information is back below Lead Information, and Company Name is no longer required.
The Unsaved changes label disappears.
Step 19: Save your changes#
Make the changes you want to keep, then click the orange Save button at the top right of the builder.
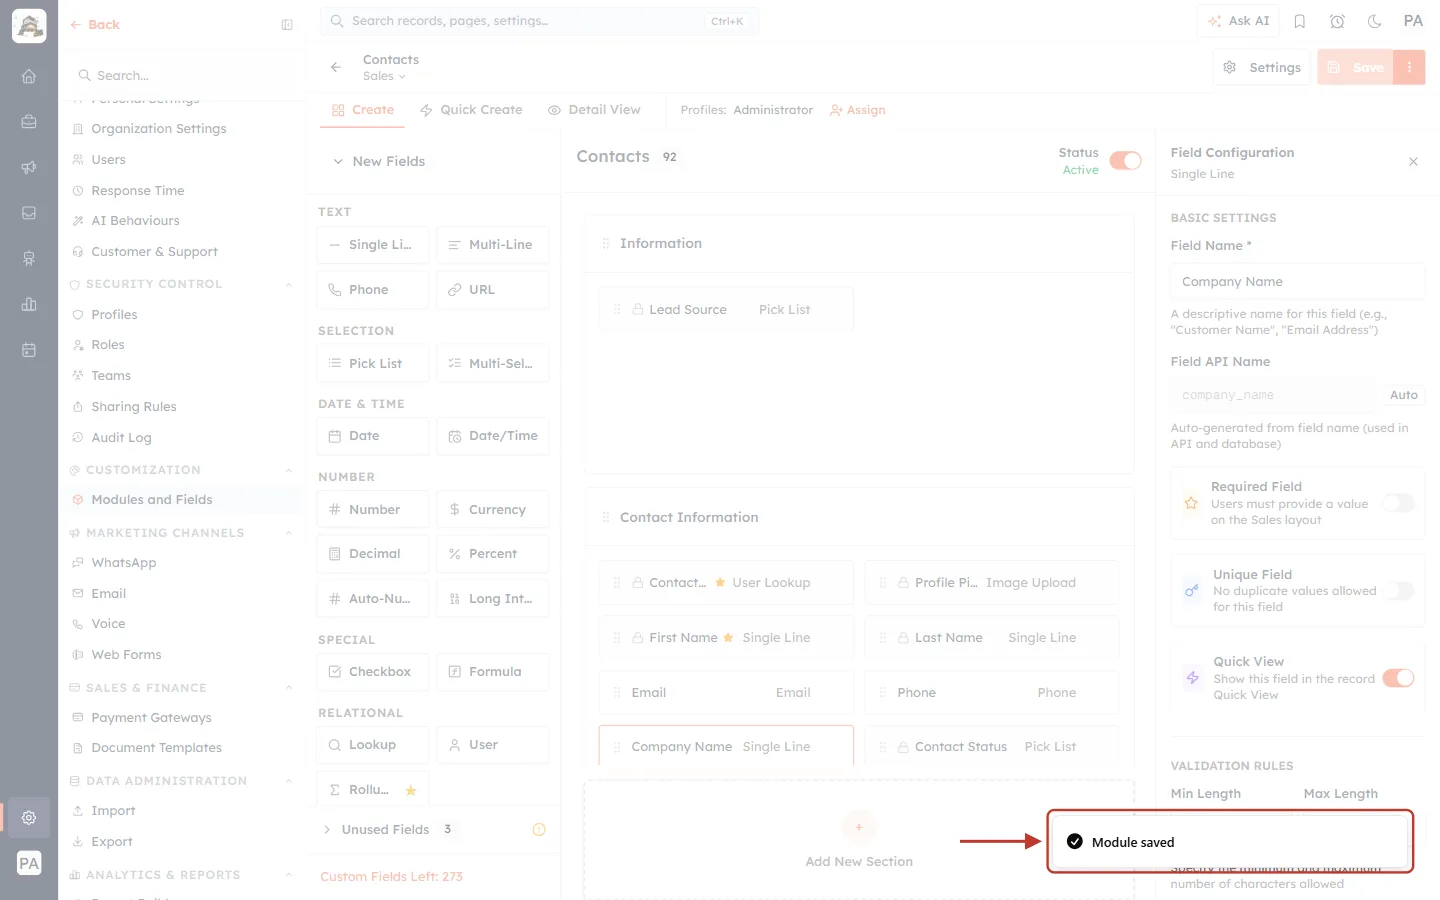
What this screenshot shows. The confirmation at the bottom right of the screen, ringed: Module saved.
Your changes are now live: anyone who creates, edits or opens a record with the Sales layout sees the new form.
The Unsaved changes label disappears and the Save button fades until you change something else.
✅
Test your change. Open the module, create a test record with this layout and check that the fields, sections and required fields look the way you expect. Delete the test record afterwards.
Common questions#
Does editing one layout change the others?#
Moving fields and sections, Required Field and the Show this field on… switches only change the layout you have open. Settings that belong to the field itself — its name, Unique Field, validation rules, placeholder, help text and default value — apply wherever the field is used. Deleting a field with the bin in Unused Fields removes it from every layout.
What is the difference between “Move to Unused Fields”, “Remove from this layout” and the bin?#
| Action | Where | What happens | Saved |
|---|---|---|---|
| Move to Unused Fields | Field ⋮ menu on the canvas | Off this layout; field and data kept | When you click Save |
| Remove from this layout | Bottom of Field Configuration | Off this layout; other layouts keep it; data kept | Straight away |
| Bin | Unused Fields list | Field deleted from the module and every layout, with its data | When you click Save — then it can’t be undone |
I can’t drag a field. Why?#
Make sure you hold the ⋮⋮ handle on the left of the card, not the name. Some system fields (with a lock) keep a fixed position that the platform manages, and a required field can’t be moved to Unused Fields until Required is turned off.
I clicked Discard Changes by mistake. Can I get my changes back?#
No. Discard Changes puts the layout back to its last saved version, and the unsaved changes are gone. Make them again and click Save.
Why can’t I see my change on a record?#
Check that you clicked Save, that you edited the layout the record uses (the record’s Change Layout button shows its layout when the module has more than one), and that you edited the right tab — Create for the form, Detail View for how an opened record reads.
Previous and next#
Previous: Create a New Layout for a Module: Clone, Customise and Save a Form for Each Team
Next: Make a Field Required on One Layout Only: Ask Each Team for the Fields They Need
Related articles#
Was this article helpful?
Ready to implement this?
OpenAI Engage and apply what you just learned to your own workspace.
Open AI Engage CRM