Loading…


KnowledgeBase
Assign a Profile to a User Step by Step: Give, Change and Check Each Person’s Permissions
Introduction#
A permission profile only takes effect once it is given to people. Every user in AiEngage CRM holds exactly one profile, which decides what they can see and do: which modules they can open, what they can create, edit, delete and export, and which features they can use.
This guide shows how to:
See which profile each person has, and how many people hold each profile.
Change an existing user’s profile.
Choose a profile when you invite someone new.
Each screenshot is followed by a description of the whole screen. Names, email addresses and phone numbers are blurred.
ℹ️
Don’t have the right profile yet? Create it first with Create a Permission Profile Step by Step: Build, Edit, Clone, Deactivate & Delete, or copy an existing one with Manage Profiles Step by Step: Clone, Rename, Mark Inactive, Reactivate and Delete Permission Profiles.
Before You Begin#
You need access to Settings → Users. The account owner and administrators have it, as do members whose profile includes User Management.
Only active profiles can be given to people. An inactive profile isn’t offered in the list.
Each user also has a role, set on the same form. The role decides whose records they reach, and the profile decides what they can do. See Create Roles Step by Step: Build, Edit and Delete Your Role Hierarchy.
Part 1: See Who Holds Each Profile#
Step 1: Count the users on each profile#
Go to Settings (gear) → Security Control → Profiles.
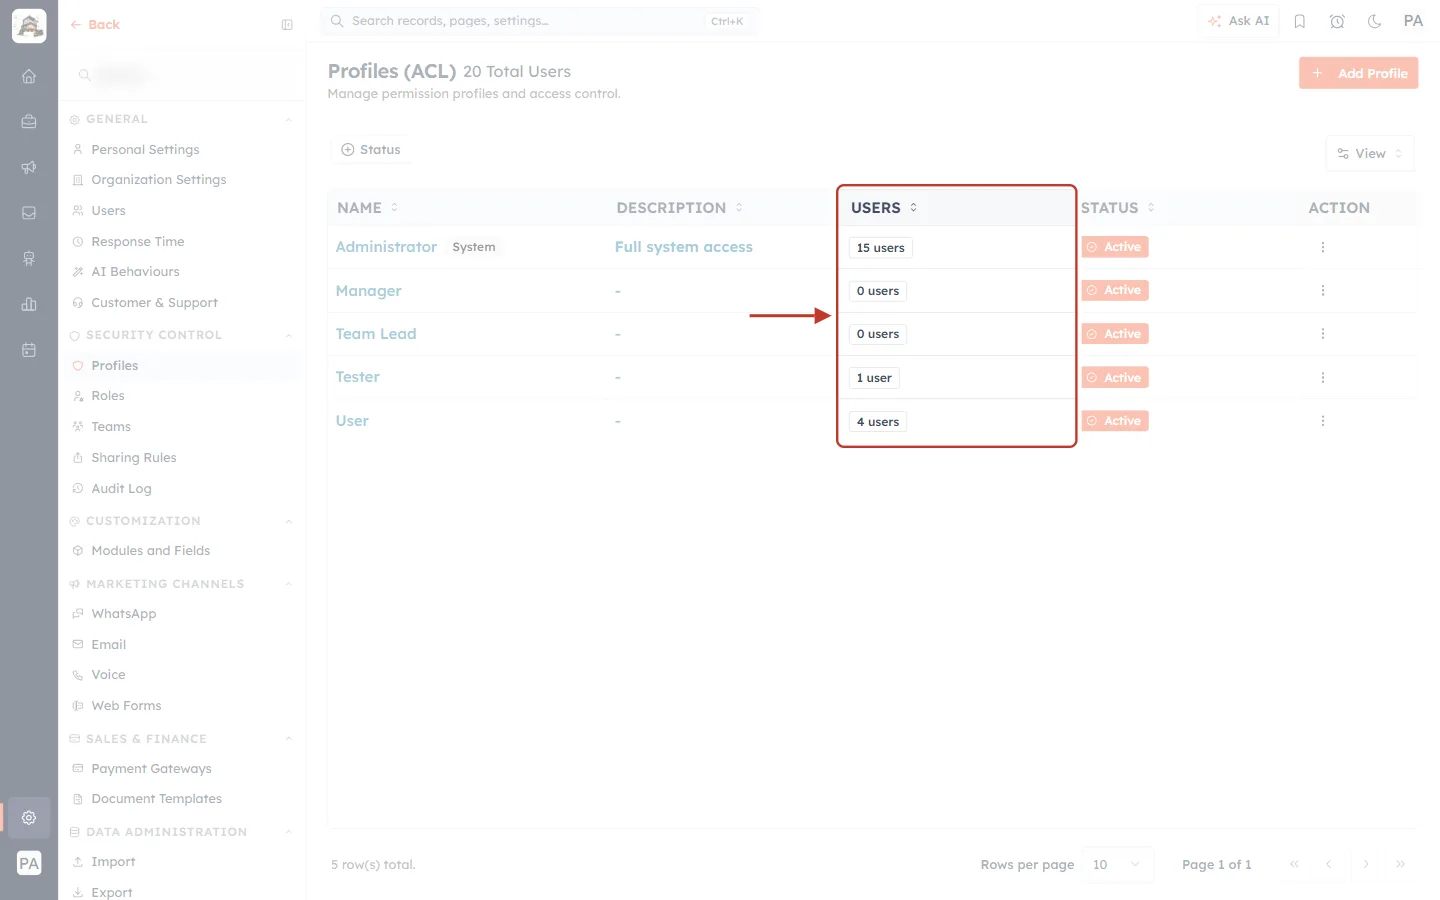
What this screenshot shows. The ringed USERS column shows how many people hold each profile.
Administrator: 15 users. Manager and Team Lead: 0 users. Tester: 1 user. User: 4 users.
Check this count before you change or remove a profile. Everyone it lists is affected.
Step 2: Open the Users page#
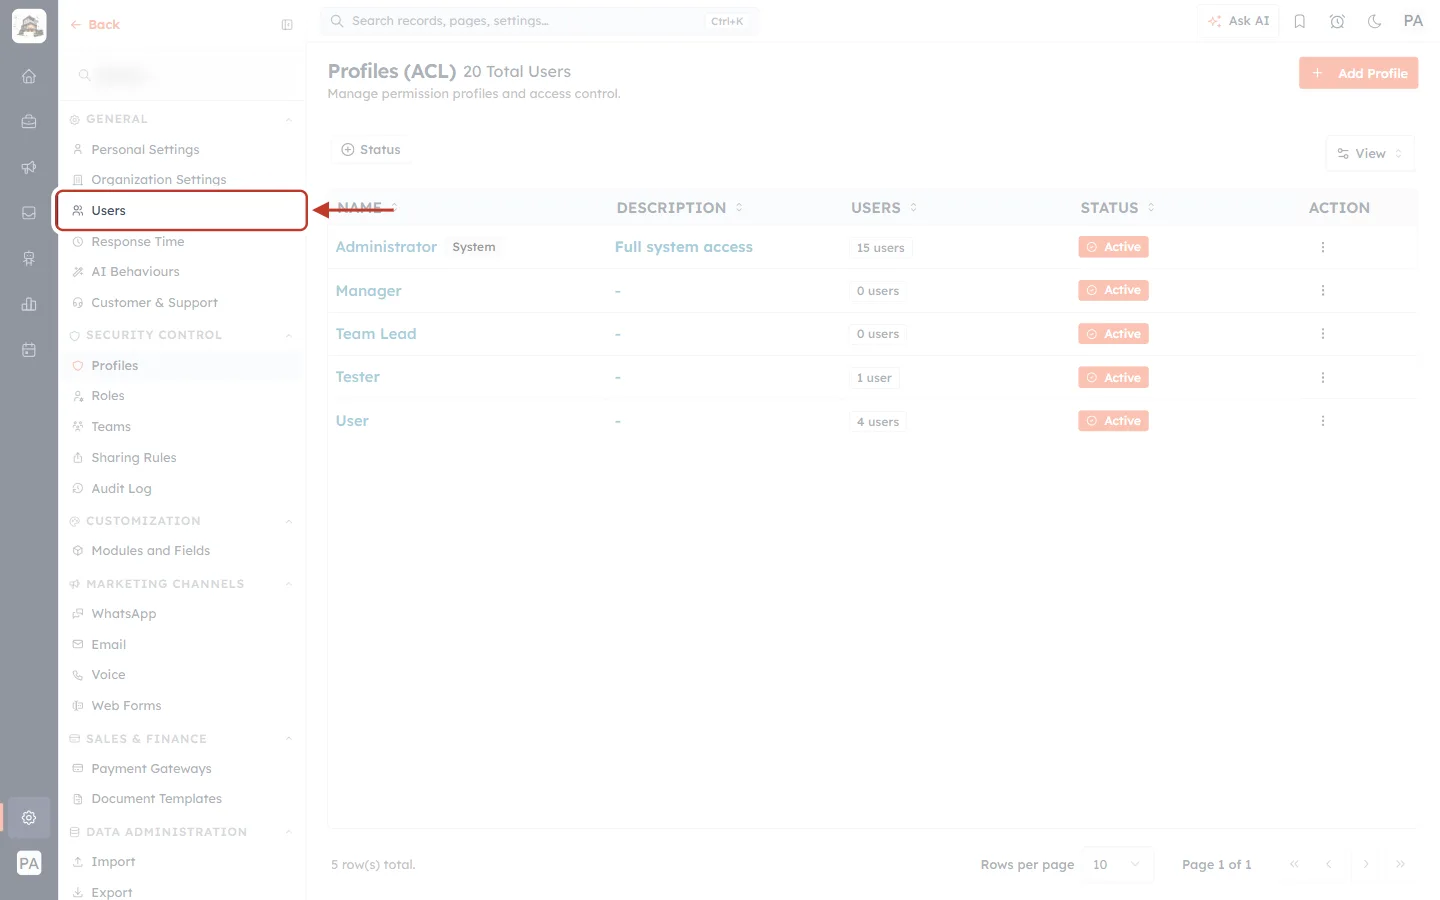
What this screenshot shows. Users is ringed under GENERAL in the Settings menu.
Click it to open the list of everyone in your organisation.
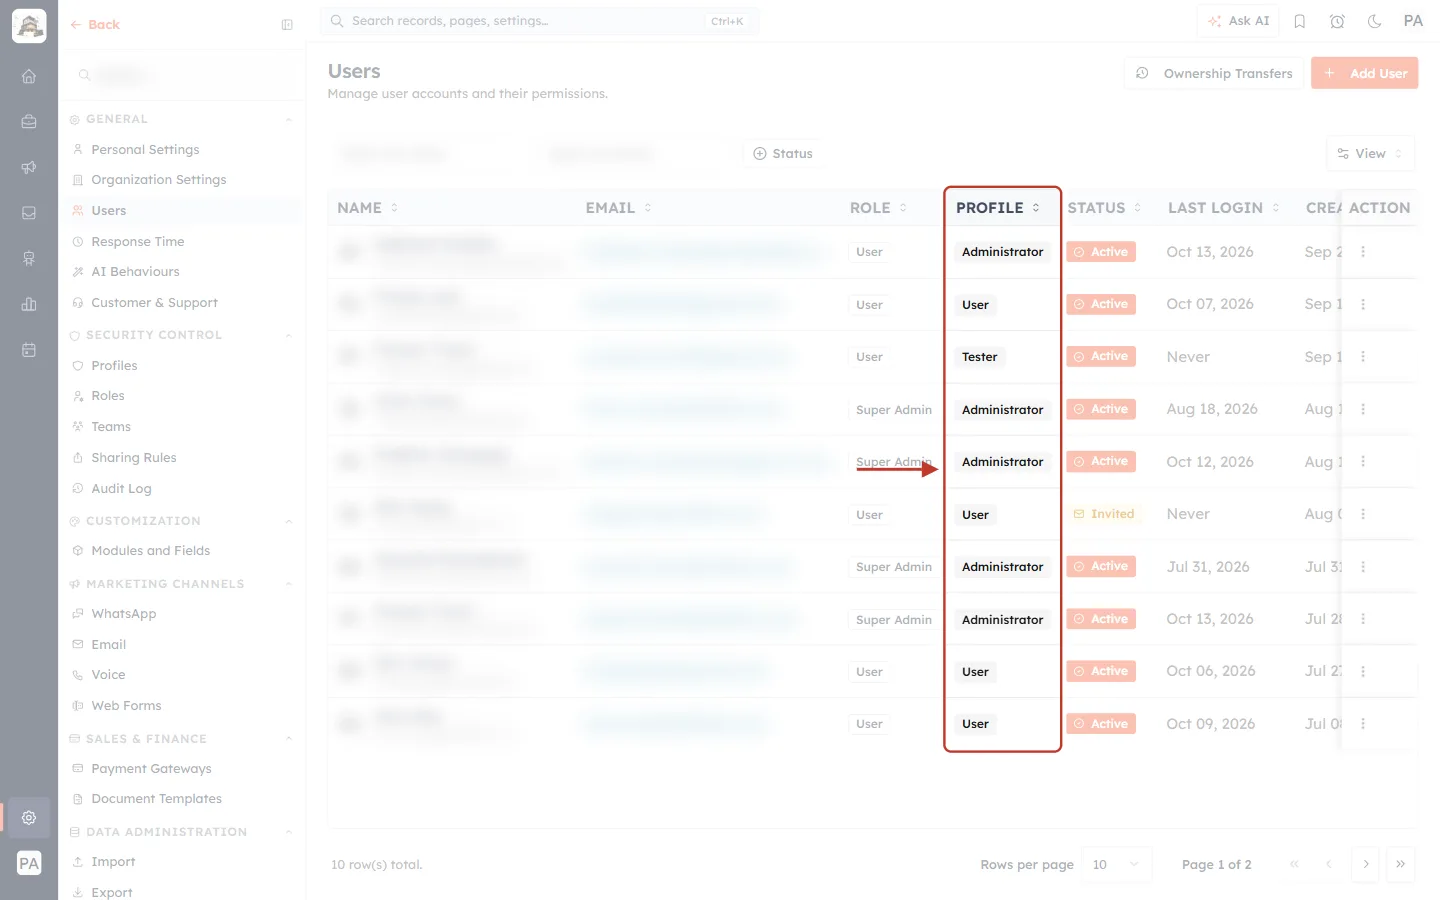
What this screenshot shows. The ringed PROFILE column shows each person’s profile. Names and emails are blurred.
Each row is one user. Their profile is shown as a label, for example Administrator, User or Tester.
The other columns are NAME, EMAIL, ROLE, STATUS (Active or Invited), LAST LOGIN, CREATED and CREATED BY.
Above the list, you can search by name or email, filter by Status (Active, Inactive, Deleted) and choose columns with View. Ownership Transfers and + Add User are at the top right.
Part 2: Change a User’s Profile#
In this example, a user who currently holds the User profile moves to the Tester profile.
Step 3: Find the user#
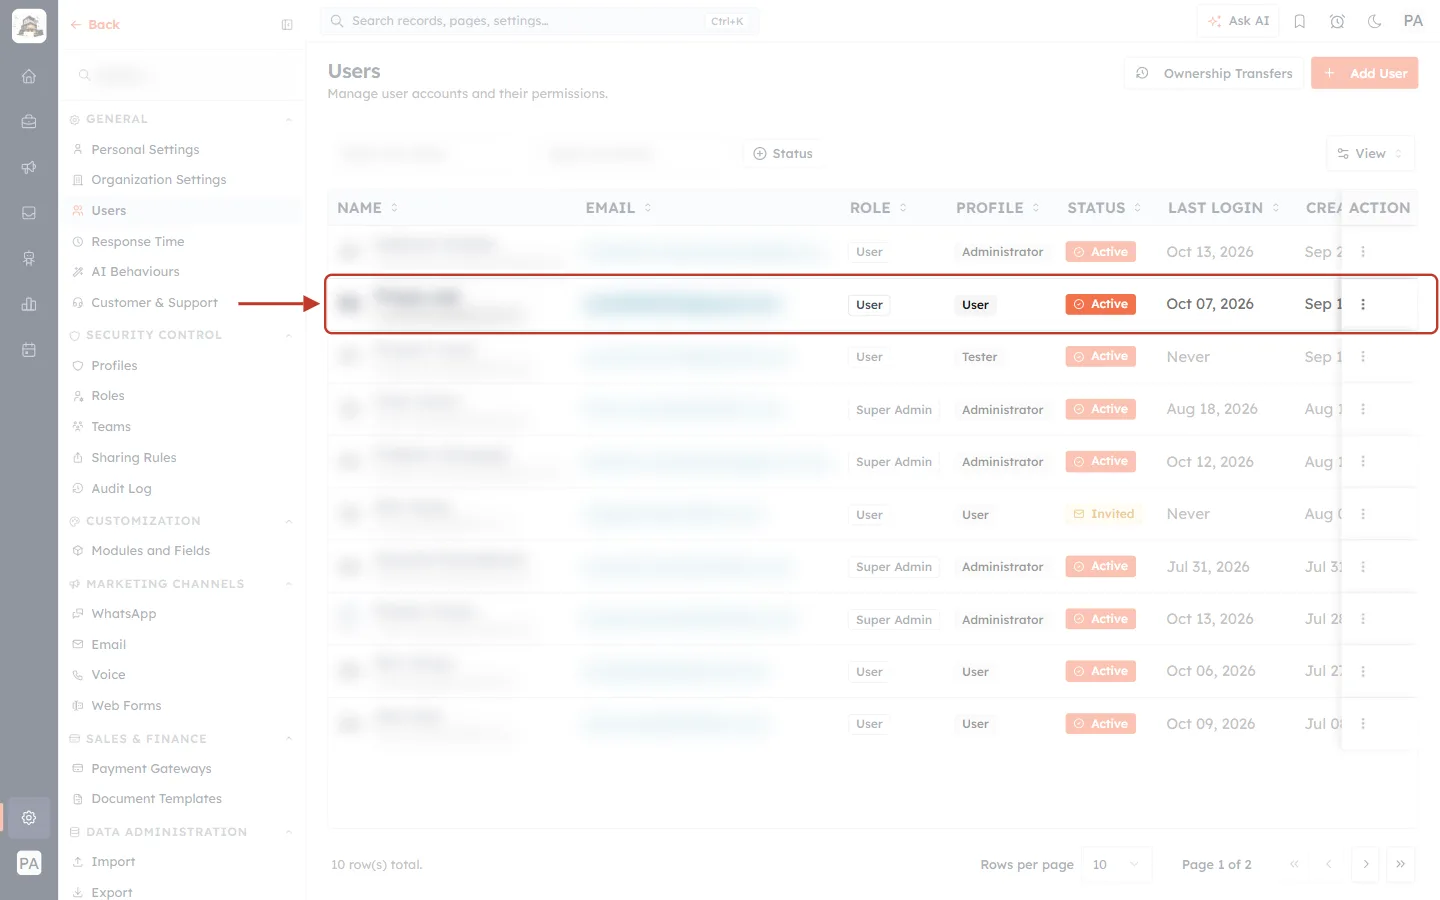
What this screenshot shows. The ringed row is the person whose profile is changing.
ROLE: User. PROFILE: User. STATUS: Active.
The ⋮ menu is at the right end of the row.
Step 4: Choose Edit#
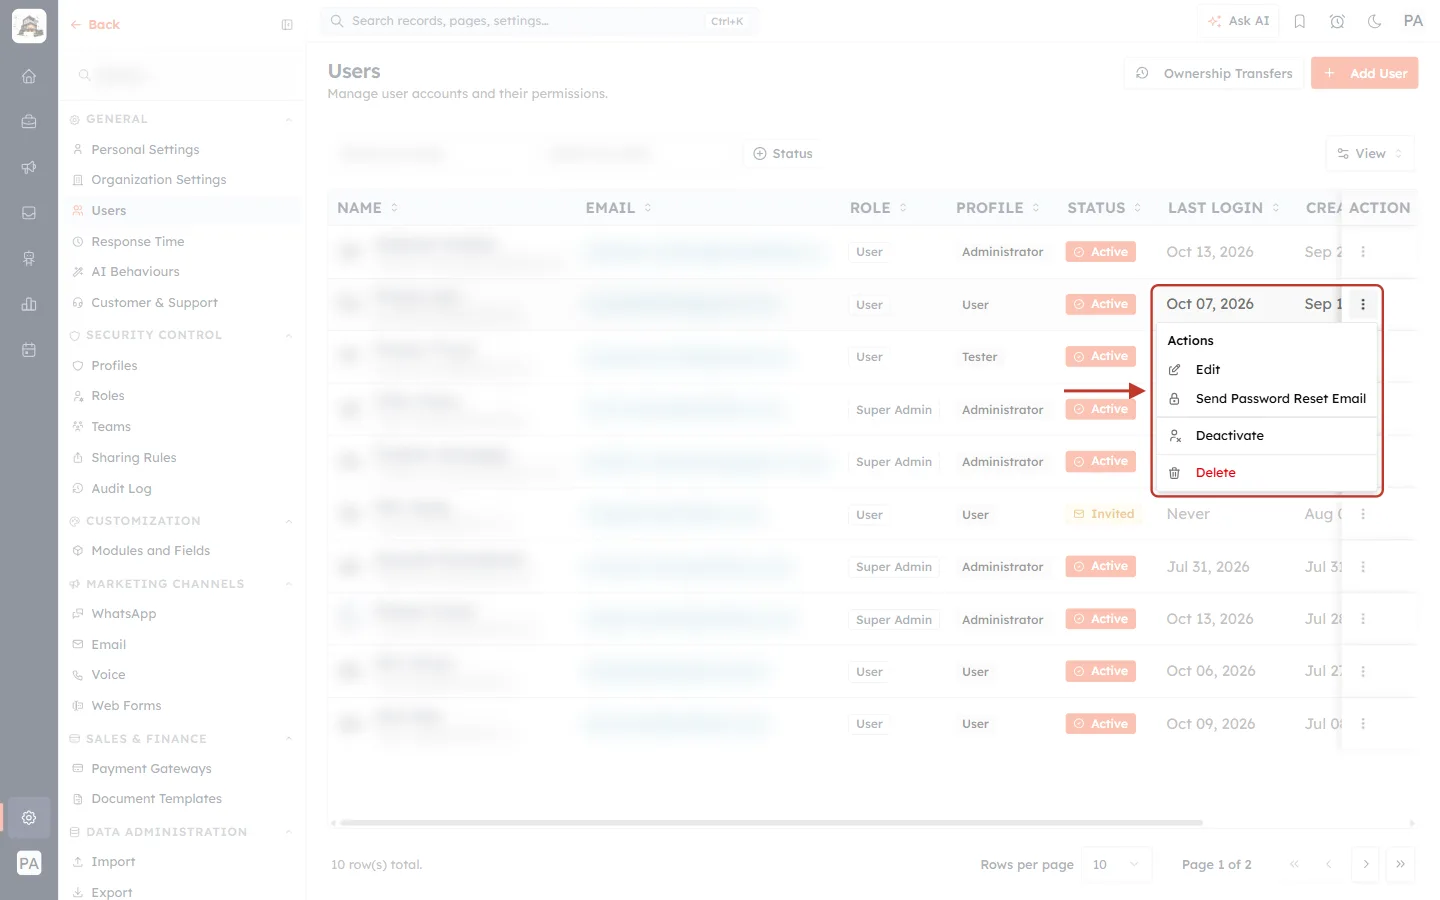
What this screenshot shows. The ⋮ menu on the user’s row is open and ringed.
Edit: open the user’s details, including their profile. Click this.
Send Password Reset Email: email them a link to set a new password.
Deactivate: stop them signing in. Delete (red): remove them.
For someone who hasn’t accepted their invitation yet, the menu shows Resend Invite and Revoke Invite instead.
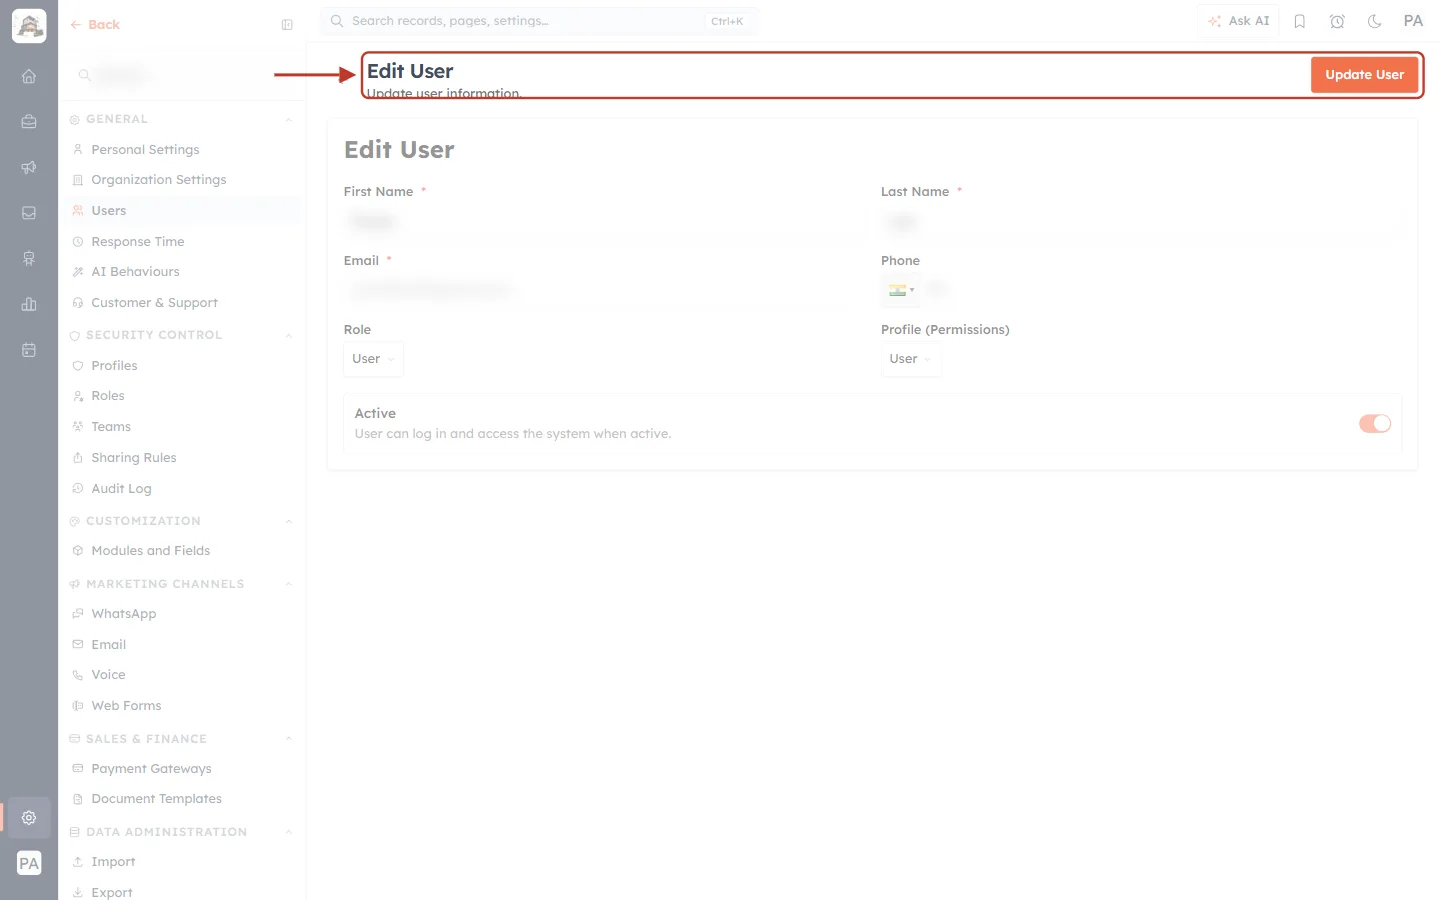
What this screenshot shows. The ringed header shows the Edit User page (Update user information.).
The form holds First Name, Last Name, Email, Phone, Role, Profile (Permissions) and Active.
Update User (top right) saves your changes.
Step 5: Find the Profile (Permissions) field#
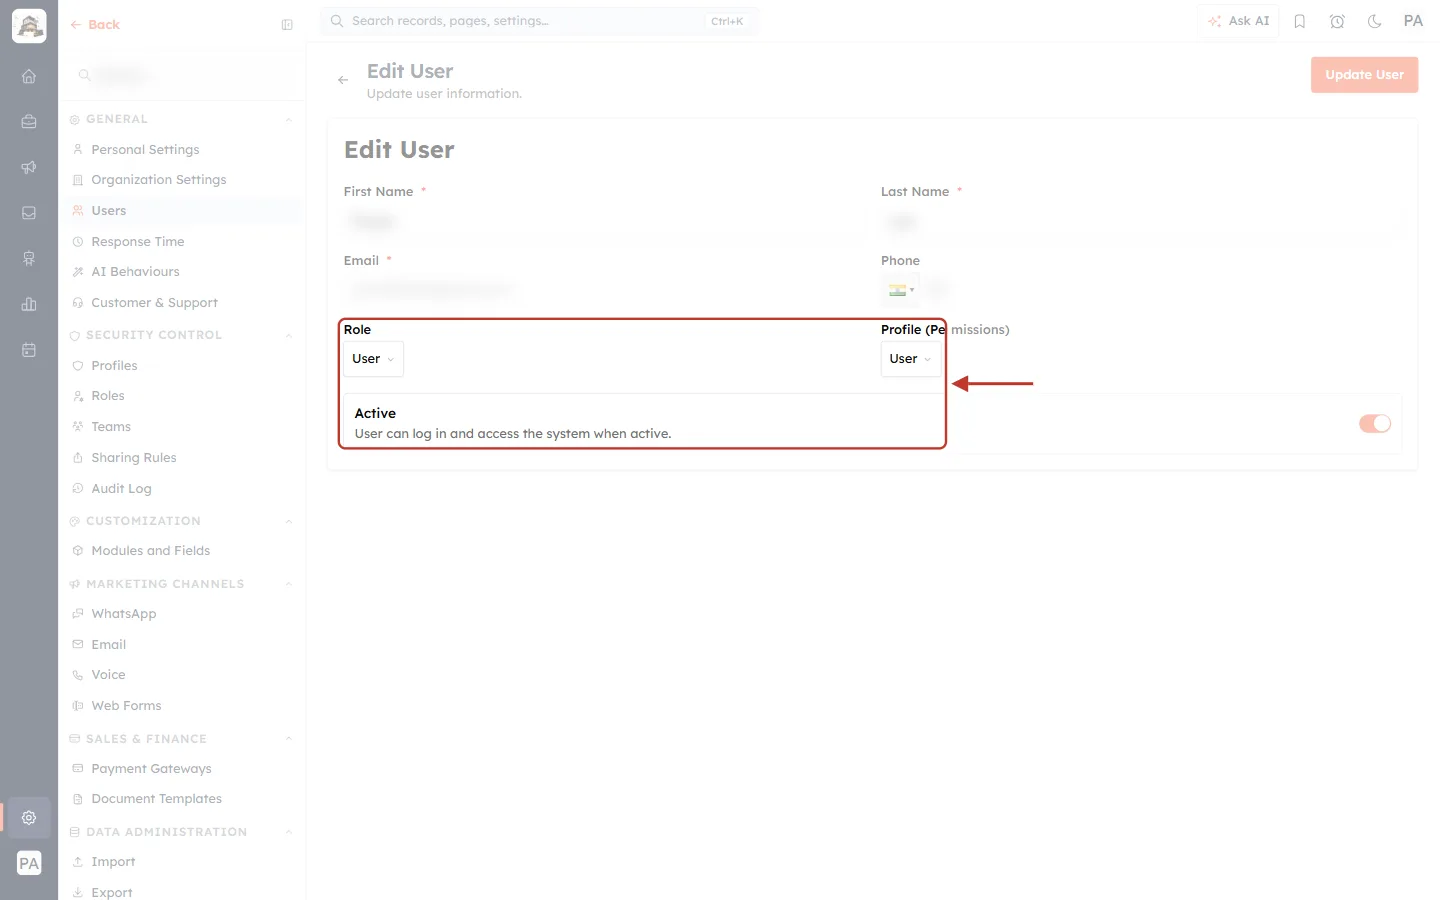
What this screenshot shows. The ringed part of the form holds the access settings.
Role: User. This is their place in the role hierarchy, not their permissions.
Profile (Permissions): User, their current profile.
Active (on): User can log in and access the system when active.
Step 6: Pick the new profile#
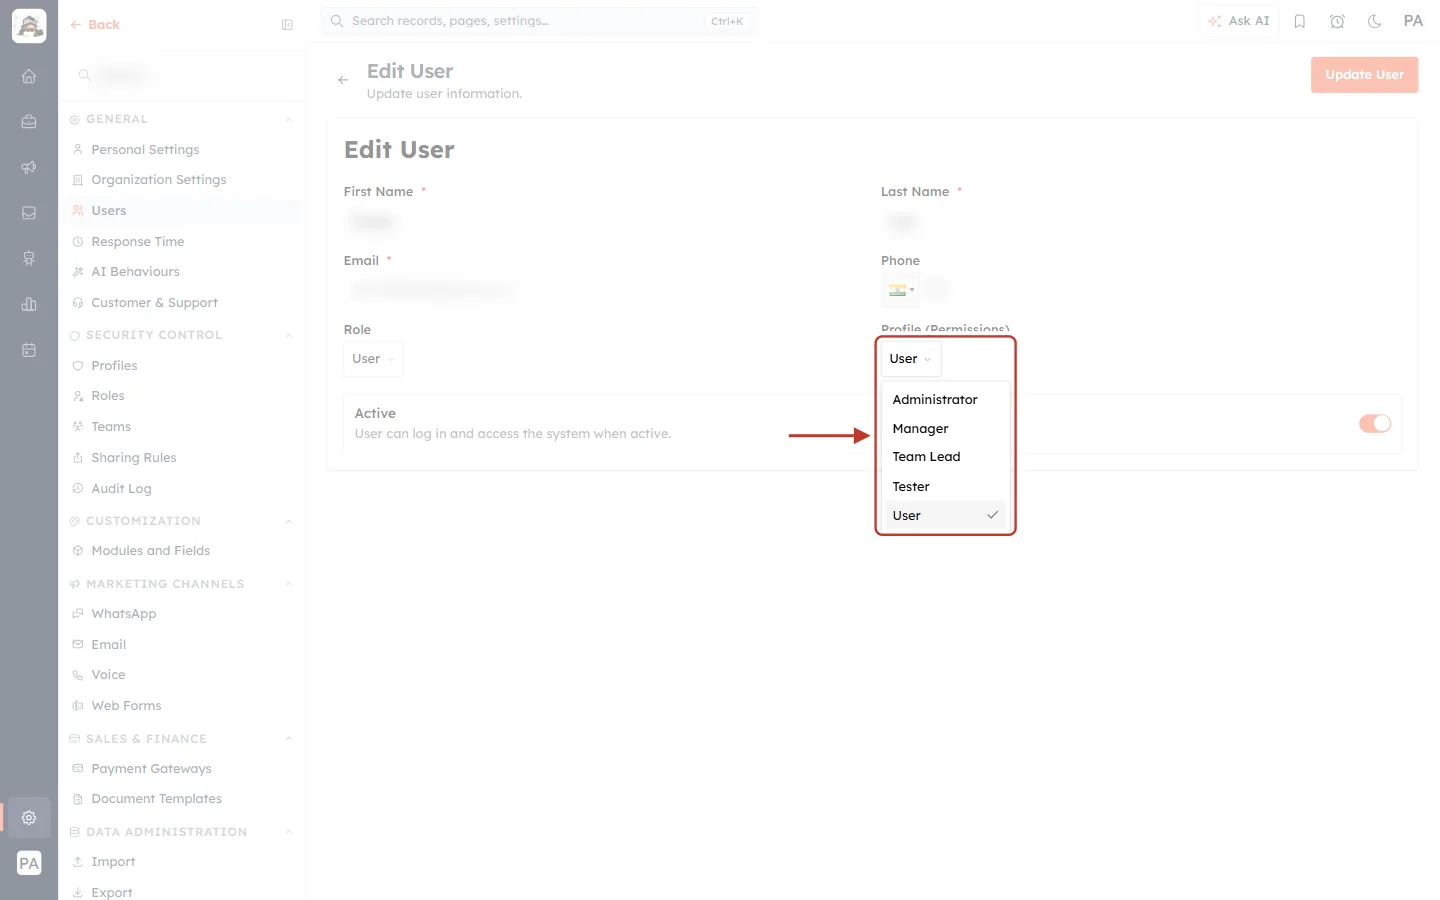
What this screenshot shows. The Profile (Permissions) drop-down is open and ringed.
It lists every active profile: Administrator, Manager, Team Lead, Tester and User (ticked, the current one).
Inactive profiles aren’t listed. If you need one, mark it active first (see Manage Profiles Step by Step: Clone, Rename, Mark Inactive, Reactivate and Delete Permission Profiles).
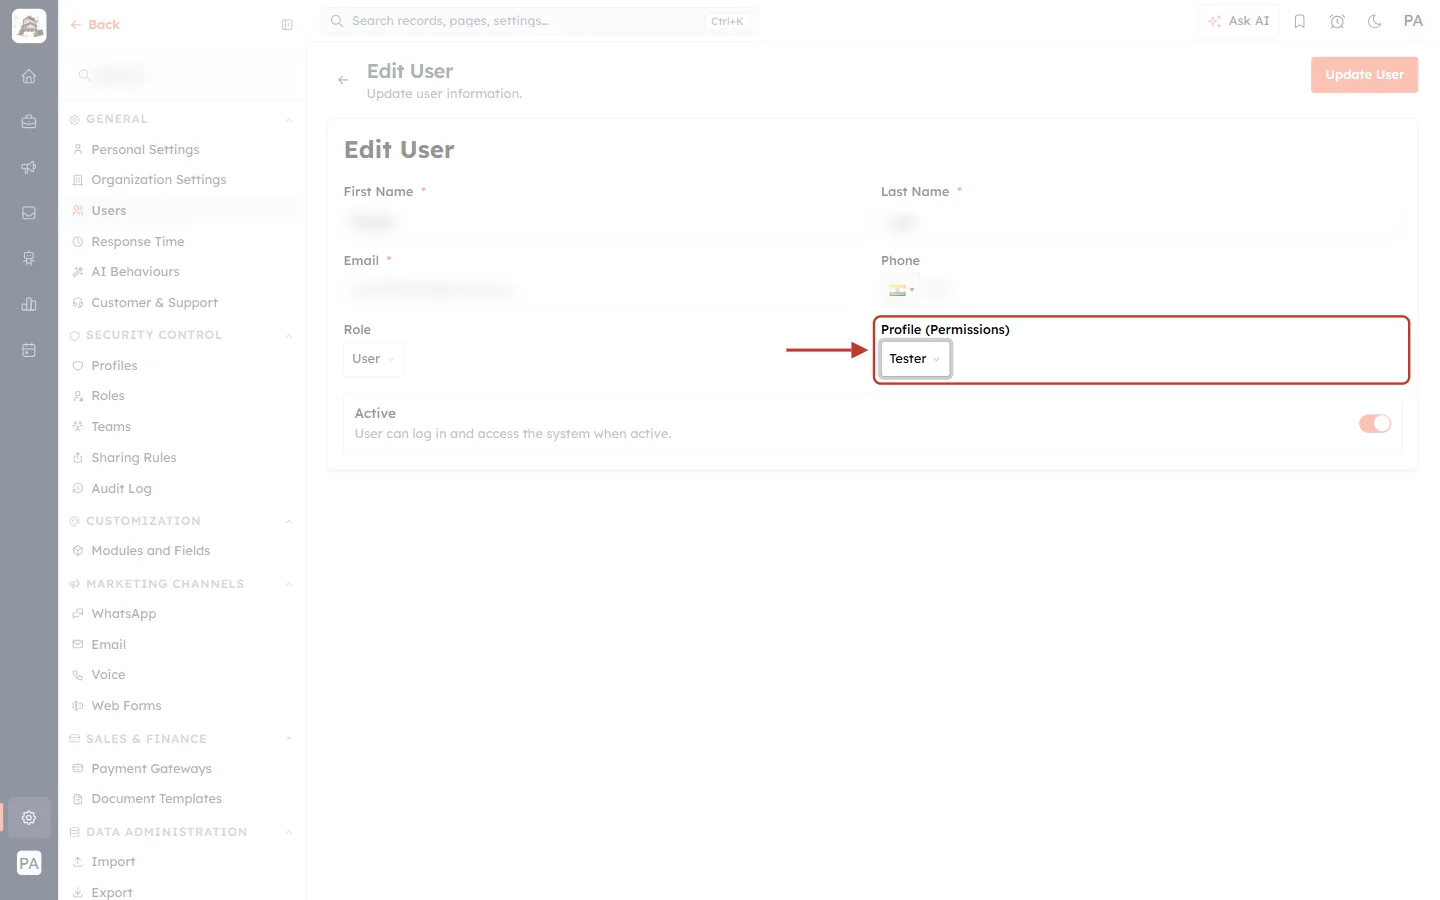
What this screenshot shows. The ringed field now shows Tester.
The change isn’t saved yet.
Leave the other fields as they are unless they also need changing.
Step 7: Click Update User#
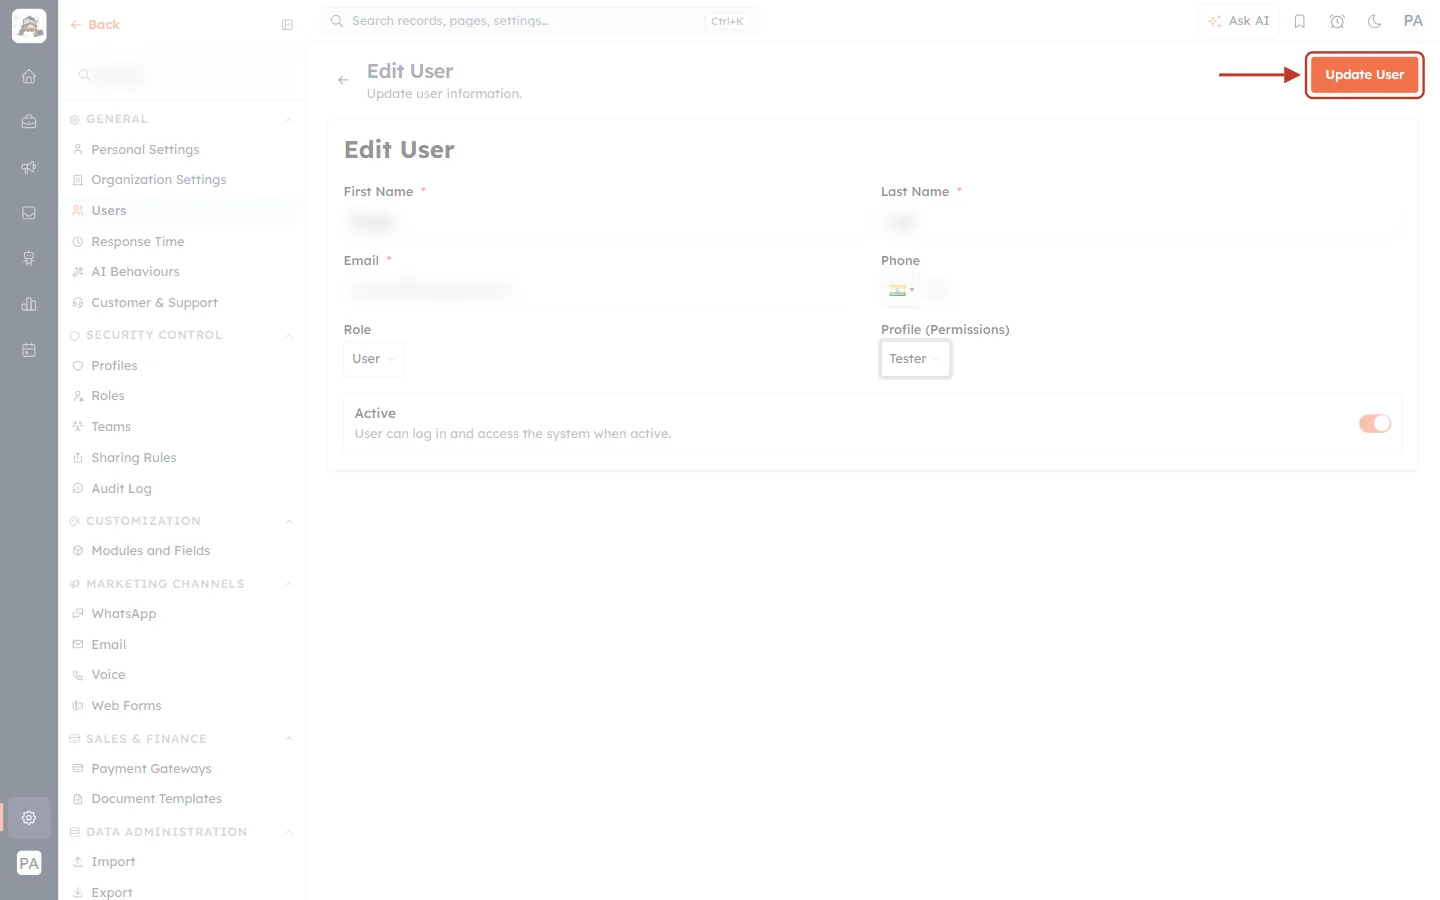
What this screenshot shows. The orange Update User button at the top right is ringed.
Click it to save. You return to the Users list.
The user gets the new profile’s permissions. Ask them to refresh their browser, or sign out and back in, to pick them up straight away.
Step 8: Check the result#
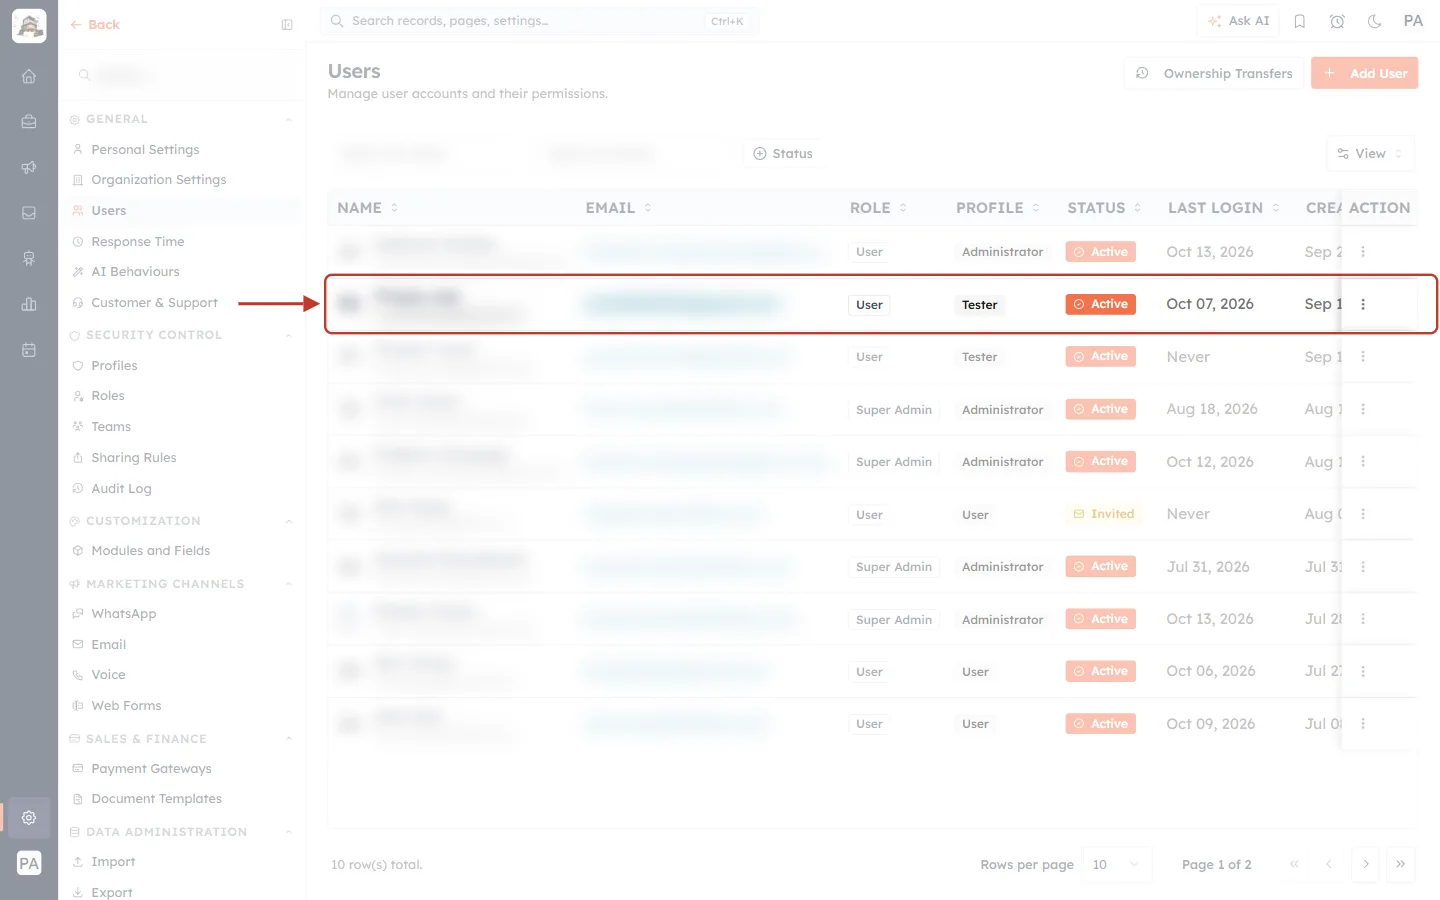
What this screenshot shows. Back on the Users list, the ringed row now shows the new profile.
PROFILE: Tester (was User).
ROLE is unchanged (User), because role and profile are separate settings.
On the Profiles list, the USERS counts move with it: one less on User, one more on Tester.
⚠️
Moving someone to a profile with less access takes effect for them straight away. Make sure the new profile covers everything they still need, for example ticket or inbox access.
Part 3: Choose a Profile When Inviting Someone#
New team members get their profile in the invitation. Click + Add User on the Users page.
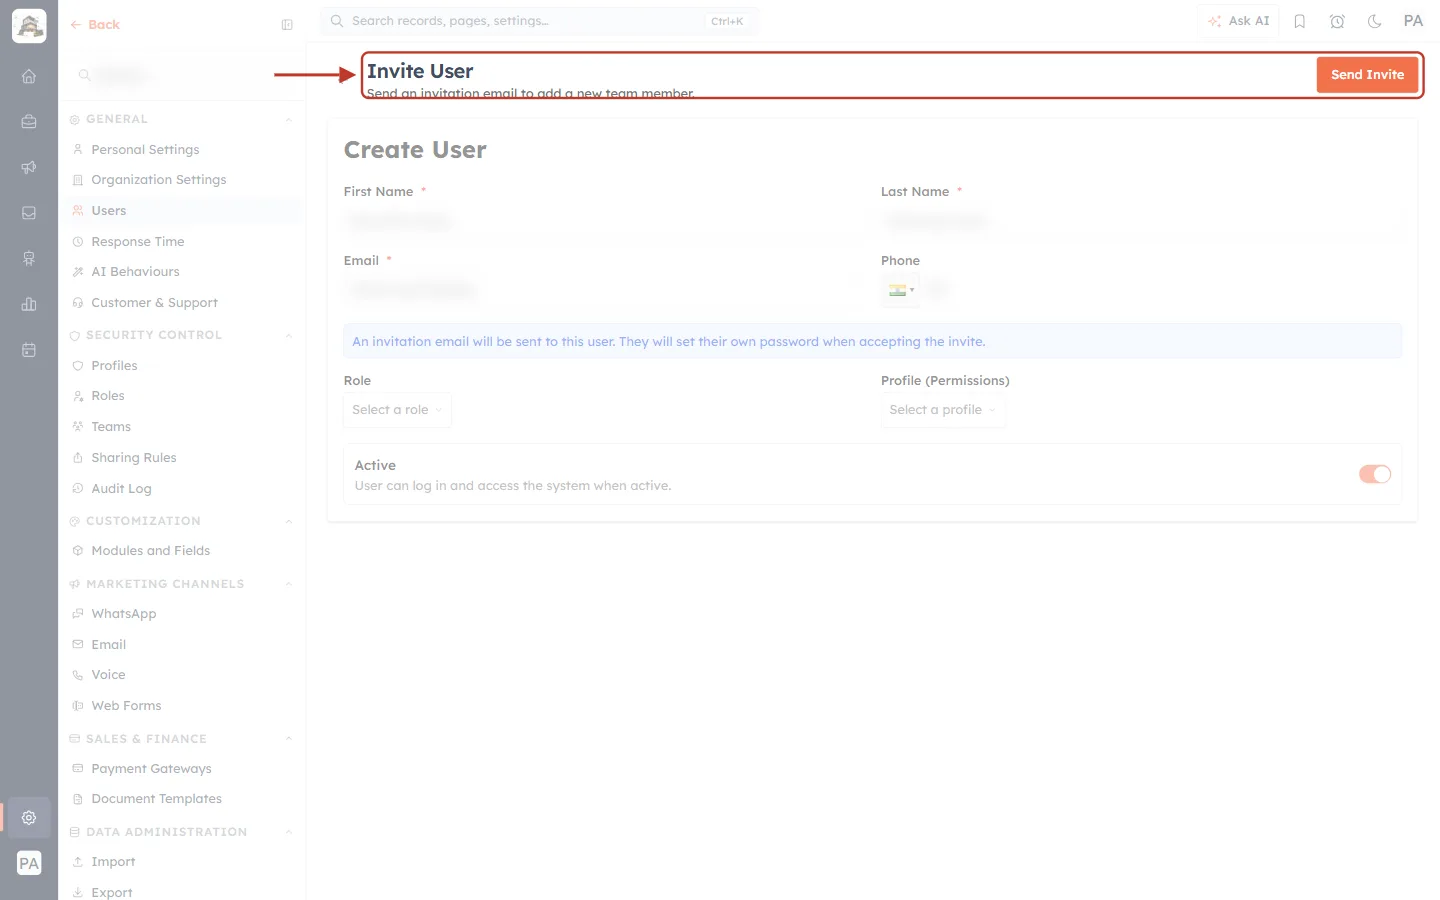
What this screenshot shows. The ringed header shows Invite User: Send an invitation email to add a new team member.
The Create User form asks for First Name, Last Name, Email and Phone.
The note reads An invitation email will be sent to this user. They will set their own password when accepting the invite.
Send Invite (top right) sends the invitation. The profile you pick is applied when they join.
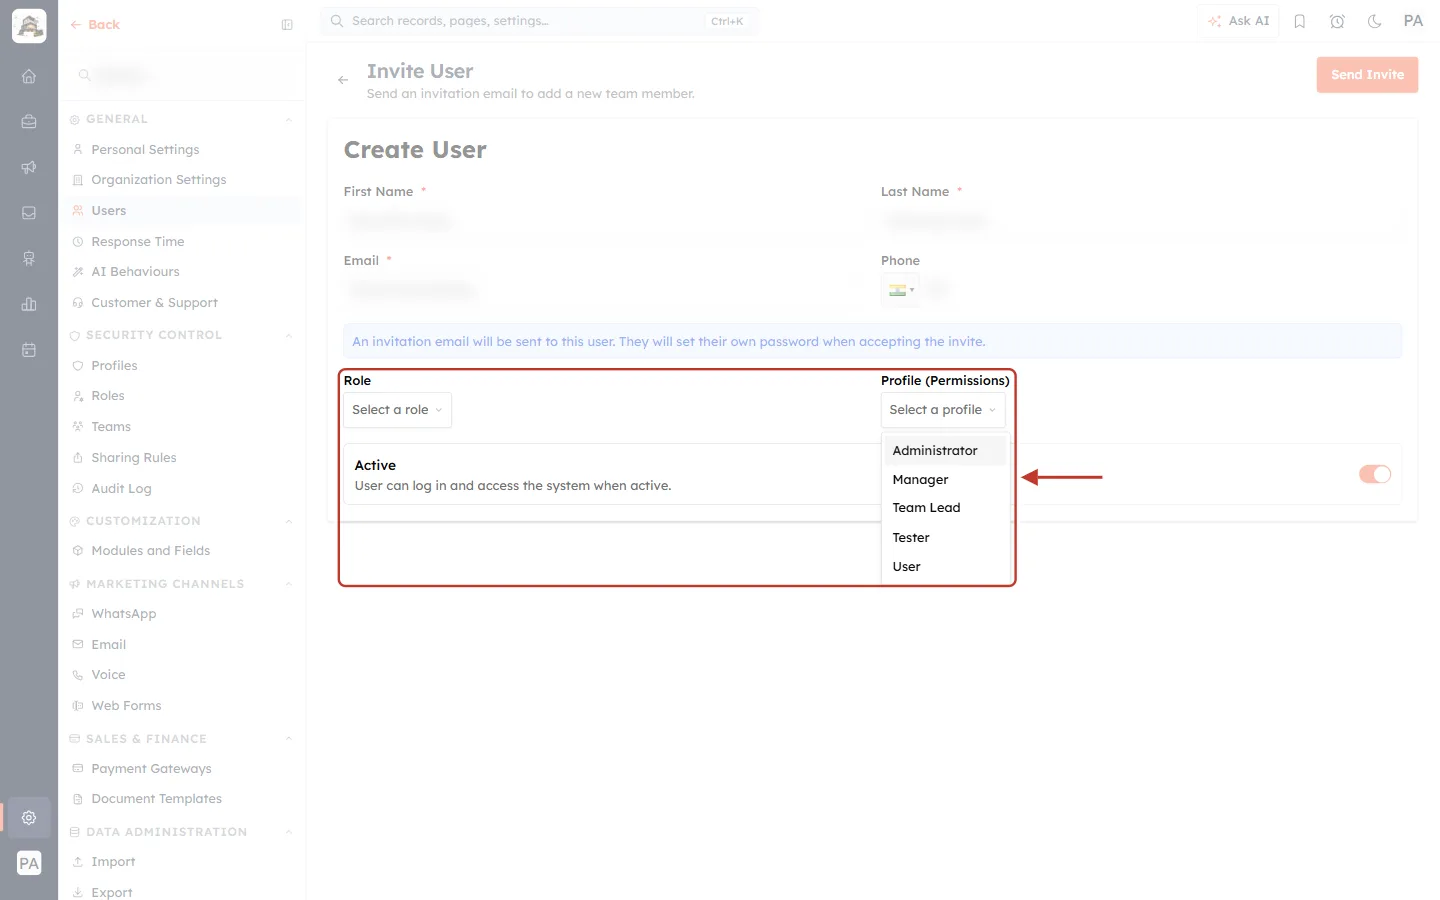
What this screenshot shows. The ringed area shows Role (Select a role) and the open Profile (Permissions) list (Select a profile).
Pick the profile for their job, for example Tester or User. Only active profiles are listed.
Choose their Role too, then click Send Invite.
For the whole invitation flow, see Invite Your Team: How to Add and Manage Users in AI Engage CRM.
Quick Reference#
I want to… | Where | Steps |
|---|---|---|
See someone’s profile | Settings → Users | Read the PROFILE column |
Count who has a profile | Settings → Profiles | Read the USERS column |
Change someone’s profile | Settings → Users | ⋮ → Edit → Profile (Permissions) → Update User |
Give a new person a profile | Settings → Users → + Add User | Pick Profile (Permissions) → Send Invite |
Offer a profile that isn’t in the list | Settings → Profiles | ⋮ → Mark Active |
Best Practices#
Give profiles by job, not by person. Everyone doing the same job should hold the same profile.
Start with less access. It is easier to move someone up later.
Review the Users list regularly, especially after people change jobs or leave.
Keep Administrator for admins. It gives full access and can’t be limited.
Check the audit log to see who changed a user’s settings and when. See Audit Log: See Who Changed Which Setting in Your CRM, and When.
Troubleshooting#
The profile I want isn’t in the drop-down#
It is inactive. Go to Settings → Profiles, filter by Inactive, and choose ⋮ → Mark Active.
The user still has their old permissions#
Check you clicked Update User and the PROFILE column shows the new profile.
Ask them to refresh the page, or sign out and back in.
If they are an Admin or the Owner, they get every feature whatever their profile.
I can’t open Settings → Users#
Your own profile needs User Management (Setup Permissions → User & Access). Ask an administrator.
Frequently Asked Questions#
Can a user have two profiles?
No. Each user holds one profile. Clone a profile and adjust it if someone needs a mix.
Does changing a profile affect the user’s records?
No. Their records stay the same. Only what they can see and do changes.
What is the difference between Role and Profile on this form?
Role is their place in the reporting tree (whose records they reach). Profile is their permissions (what they can do).
Previous and Next#
Related Articles#
Create a Permission Profile Step by Step: Build, Edit, Clone, Deactivate & Delete
Profile Permissions Explained: What Every Module, Feature & Setup Setting Controls
Create Roles Step by Step: Build, Edit and Delete Your Role Hierarchy
Invite Your Team: How to Add and Manage Users in AI Engage CRM
Audit Log: See Who Changed Which Setting in Your CRM, and When
Was this article helpful?
Ready to implement this?
OpenAI Engage and apply what you just learned to your own workspace.
Open AI Engage CRM