Loading…


KnowledgeBase
Create a Permission Profile Step by Step: Build, Edit, Clone, Deactivate & Delete
Introduction#
A profile is a permission template. It answers one question for everyone who uses your CRM: “What is this person allowed to do?” You build one profile per job type, such as Sales Representative, Marketing Executive or Support Agent, and give it to everyone who does that job.
In this guide you build a complete Sales Representative profile on screen, from the first click to the saved result. Then you learn how to edit, clone, mark inactive and delete profiles. Every screenshot is followed by a description of the whole screen, so you can compare it with your own as you go.
ℹ️
This is the hands-on guide. For a full explanation of what each individual setting controls, read Profile Permissions Explained: What Every Module, Feature & Setup Setting Controls.
Before You Begin#
You need access to Settings → Security Control → Profiles. The account owner and administrators have it.
List your job types and, for each one, which modules they use and whether they should create, edit, delete, export or import records.
Know the four access levels. All means every record. Team means records owned by the user’s team. Own means only the user’s own records. None means no access.
Create profiles before you invite users. You choose a profile when you invite someone. See Invite Your Team: How to Add and Manage Users in AI Engage CRM.
What you will build | Settings |
|---|---|
Profile | Sales Representative, Active |
Contacts and Deals | View Team · Create ✓ · Edit Own · Delete None · no Export · no Import |
Invoices, Payments, Store Transactions | View None (hidden) |
Tools | Mass Update on, Change Owner on Contacts and Deals only, Mass Delete and Mass Merge off |
Features | Reports and Dashboards view-only. Marketing off. WhatsApp chats: Own. No workflows or API keys. |
Setup Permissions | All off |
Part 1: Open the Profiles Page#
Step 1: Open Settings#
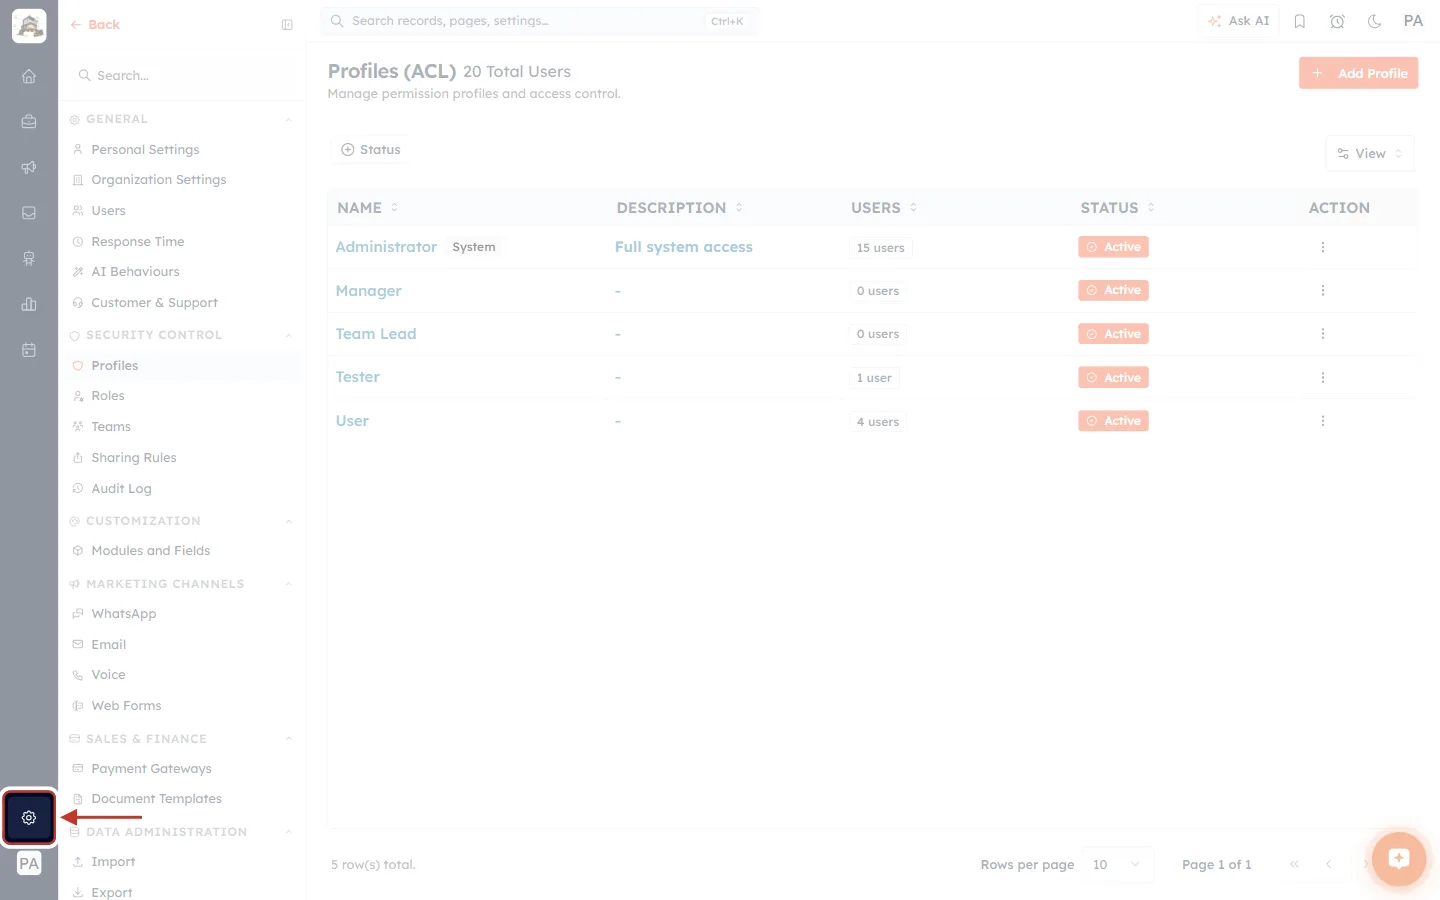
What this screenshot shows. The ringed gear icon near the bottom of the dark icon bar on the far left opens Settings.
The dark bar on the far left holds the main app icons: home, Sales, Marketing, the inbox and the other modules.
The gear sits just above your initials at the bottom of the bar.
Settings is already open here. Its menu fills the second column, and the Profiles page fills the rest of the screen.
Step 2: Click Profiles under Security Control#
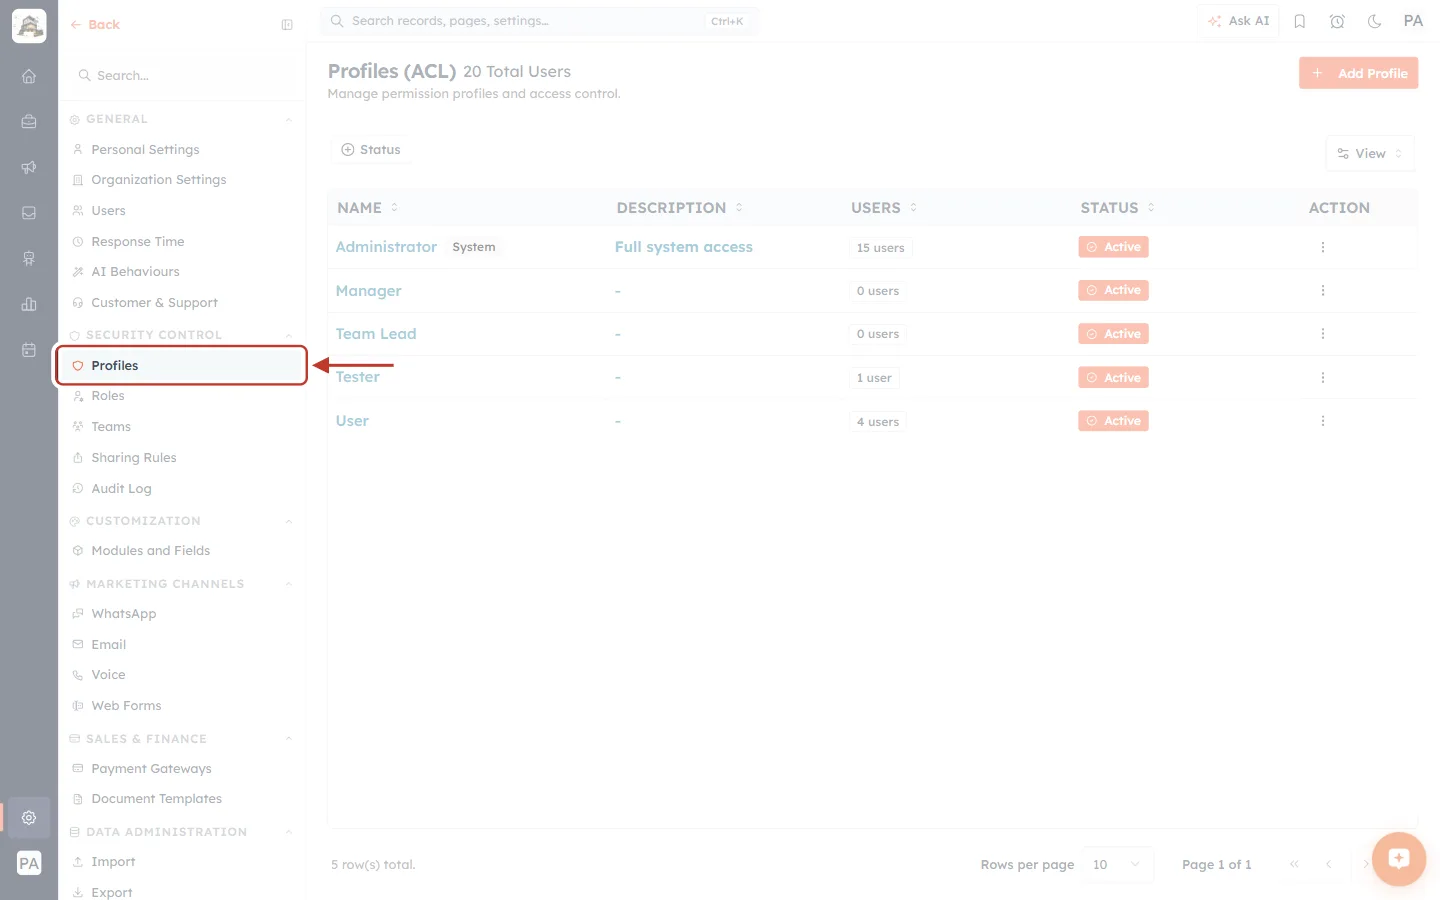
What this screenshot shows. Profiles is ringed in the SECURITY CONTROL group of the Settings menu.
SECURITY CONTROL also holds Roles, Teams, Sharing Rules and Audit Log, the other pages that decide who sees what.
The Search… box at the top of the menu finds any settings page by name.
Step 3: Read the Profiles list#
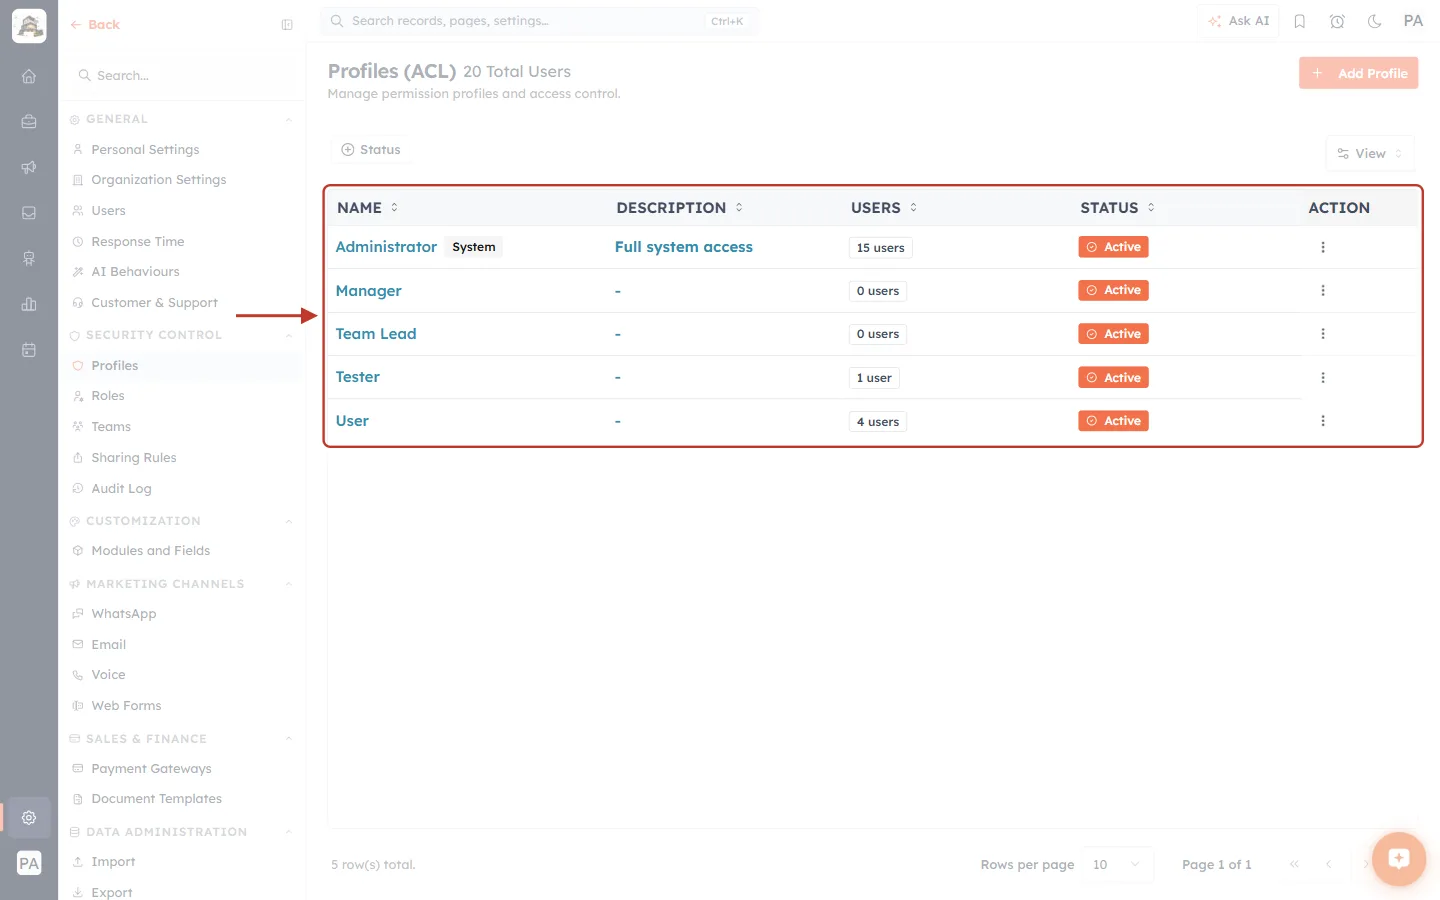
What this screenshot shows. The ringed table lists every profile in your organisation.
The page title reads Profiles (ACL) with your total number of users (20 Total Users).
NAME: the profile’s name. The built-in Administrator profile carries a System badge.
DESCRIPTION: what the profile is for. A dash means no description was entered.
USERS: how many users hold the profile, such as 15 users or 0 users.
STATUS: Active (orange) or Inactive (red).
ACTION: the ⋮ menu for each row.
Below the table, 5 row(s) total counts the profiles. Rows per page and the page arrows move through long lists.
Step 4 (optional): Filter by status#
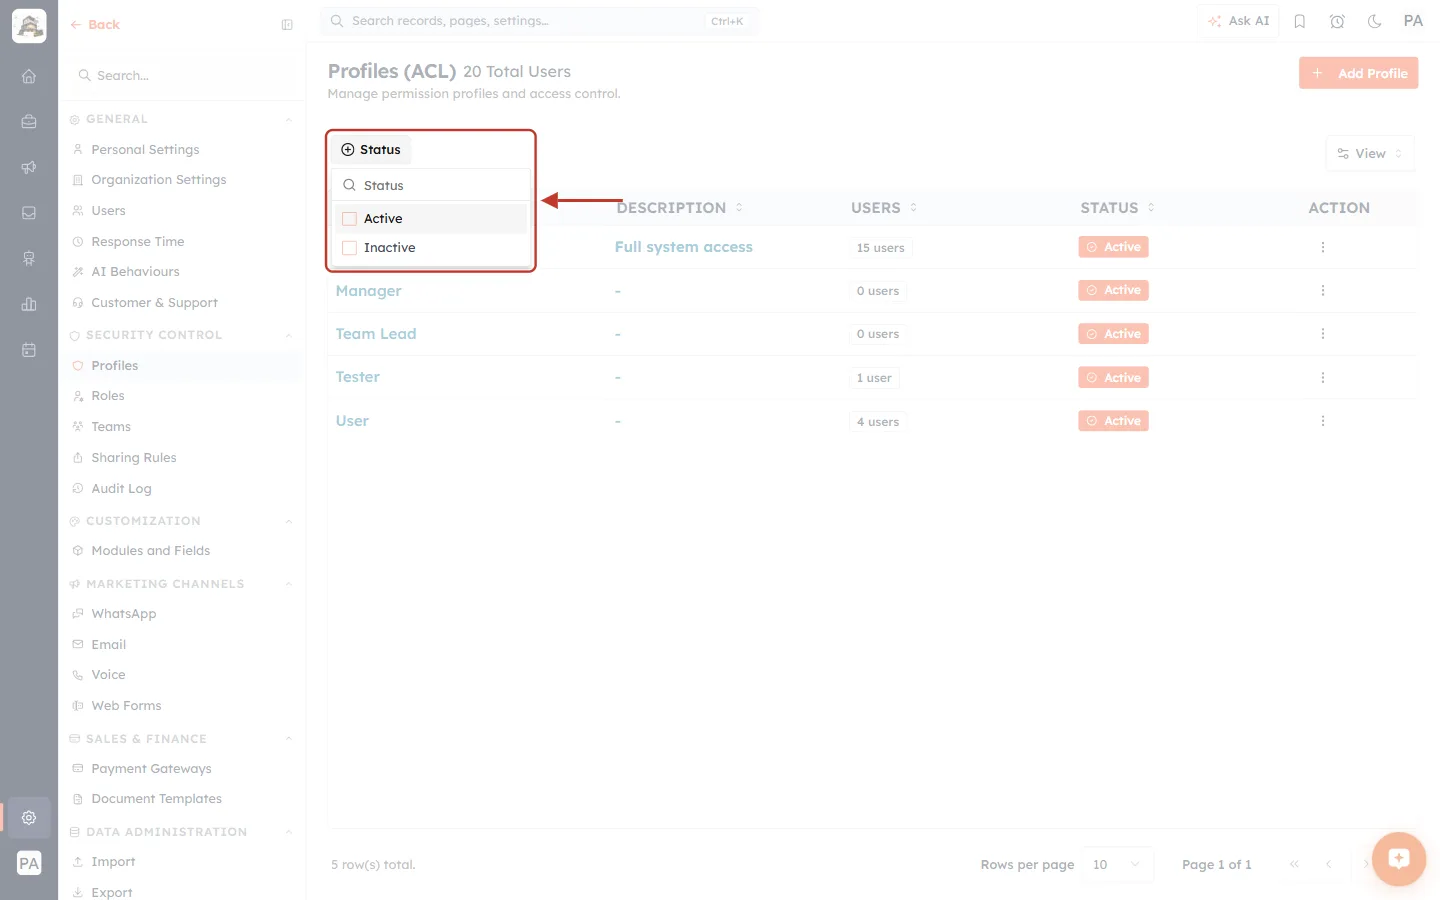
What this screenshot shows. The Status filter above the table is open and ringed.
Tick Active or Inactive to show only those profiles. The small Status box at the top searches the options.
This is handy once you have inactive profiles you want to find again.
View on the right of the toolbar chooses which columns are shown.
About the Administrator profile#
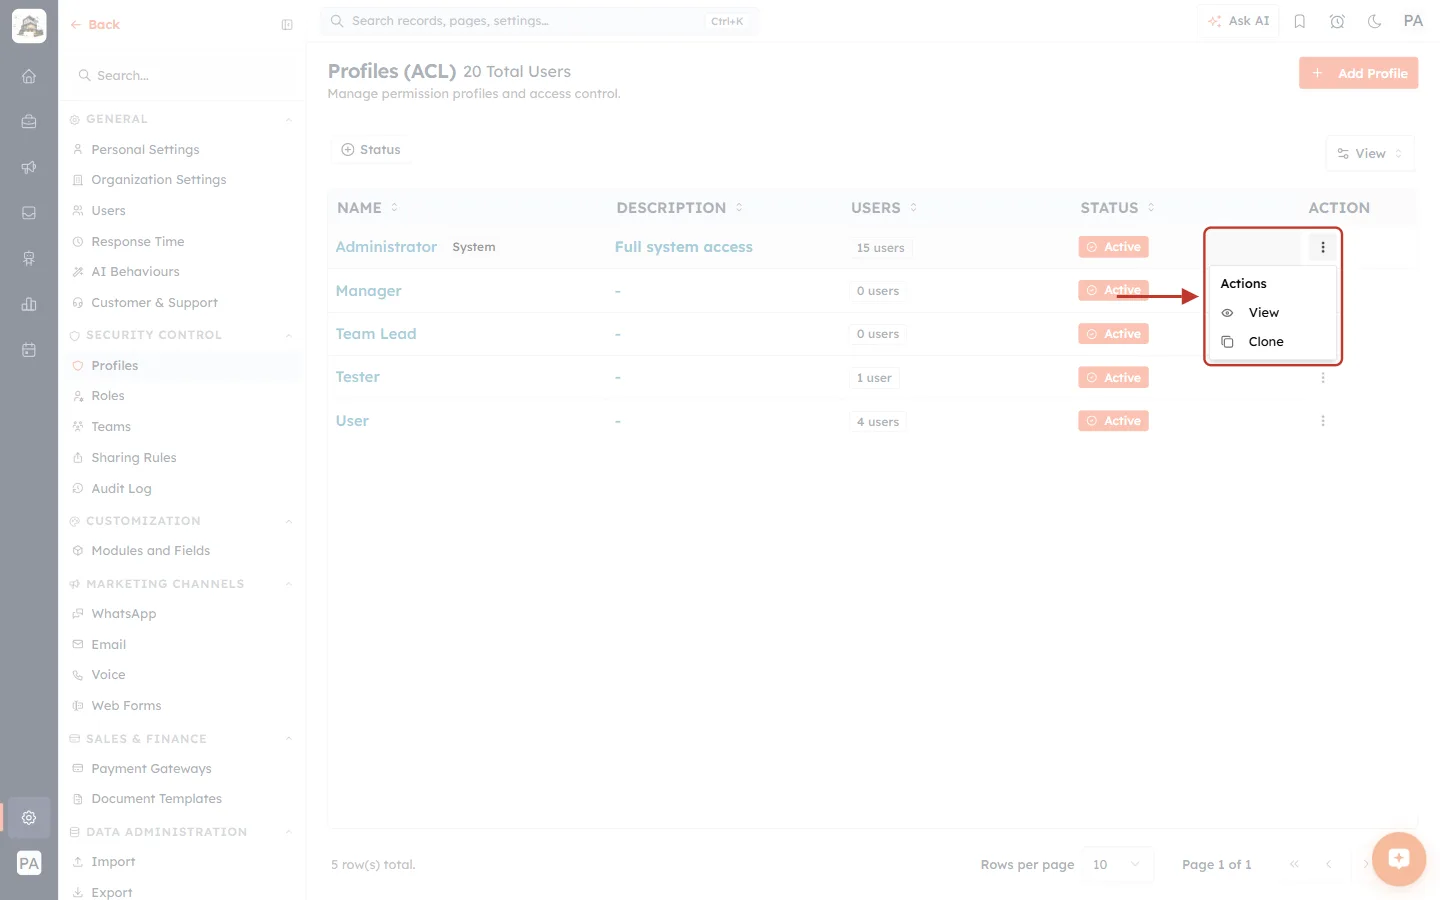
What this screenshot shows. The ⋮ menu of the Administrator profile is open and ringed.
It offers only View (see its settings) and Clone (copy it).
Administrator is a System profile. It cannot be edited, deactivated or deleted, so your organisation always keeps a full-access profile.
To make a profile that is almost full access, clone Administrator and switch off what you don’t want.
Part 2: Create the Profile#
Step 5: Click Add Profile#
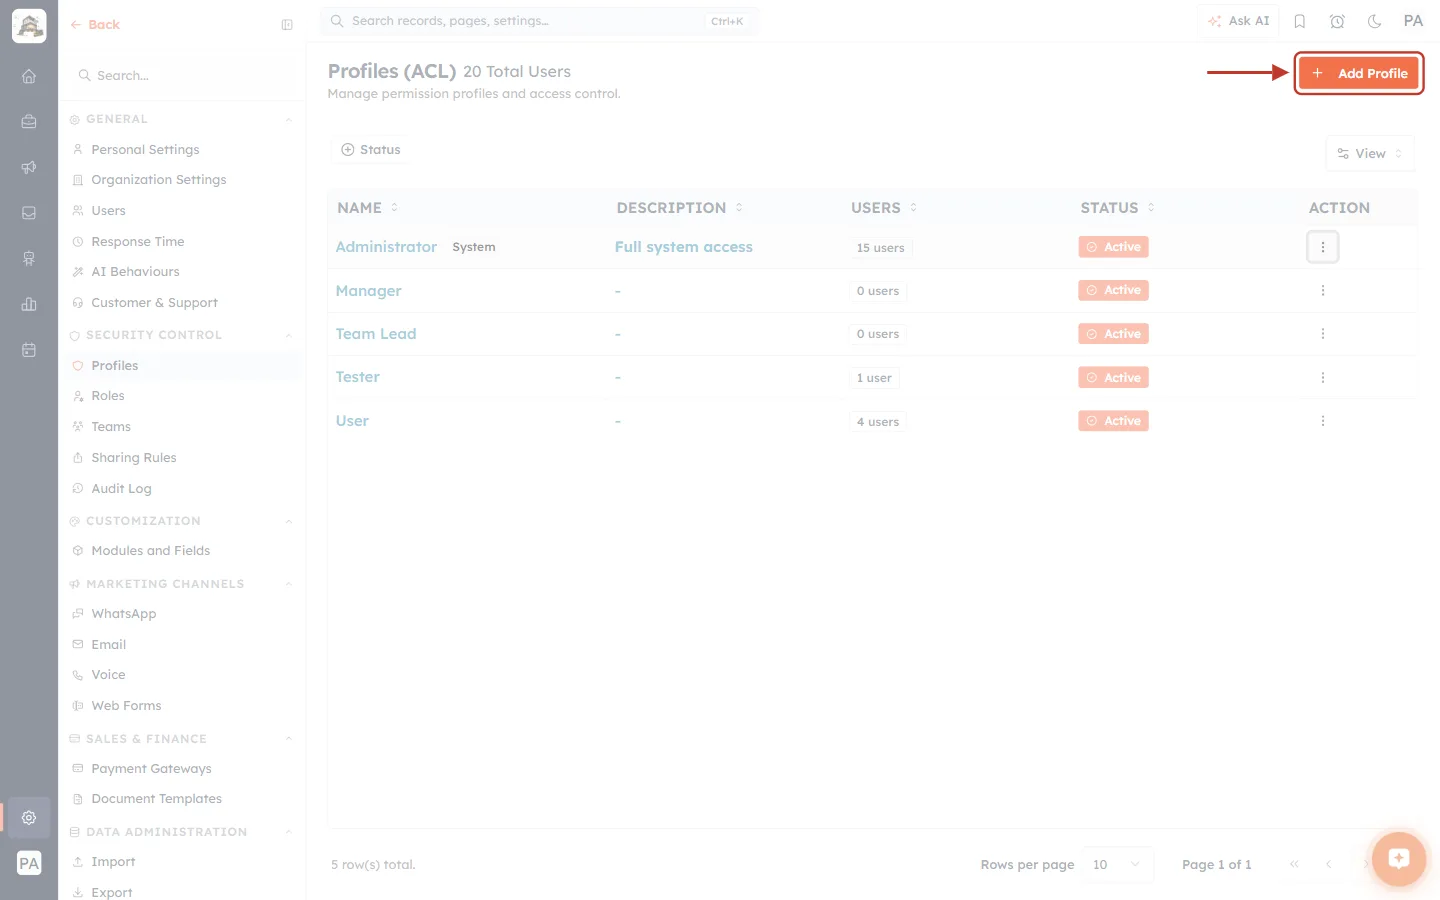
What this screenshot shows. The orange + Add Profile button at the top right of the Profiles page is ringed.
Clicking it opens the Create Profile page.
Nothing is saved until you click Create Profile at the end, so you can work through every section first.
Step 6: Get to know the section list#
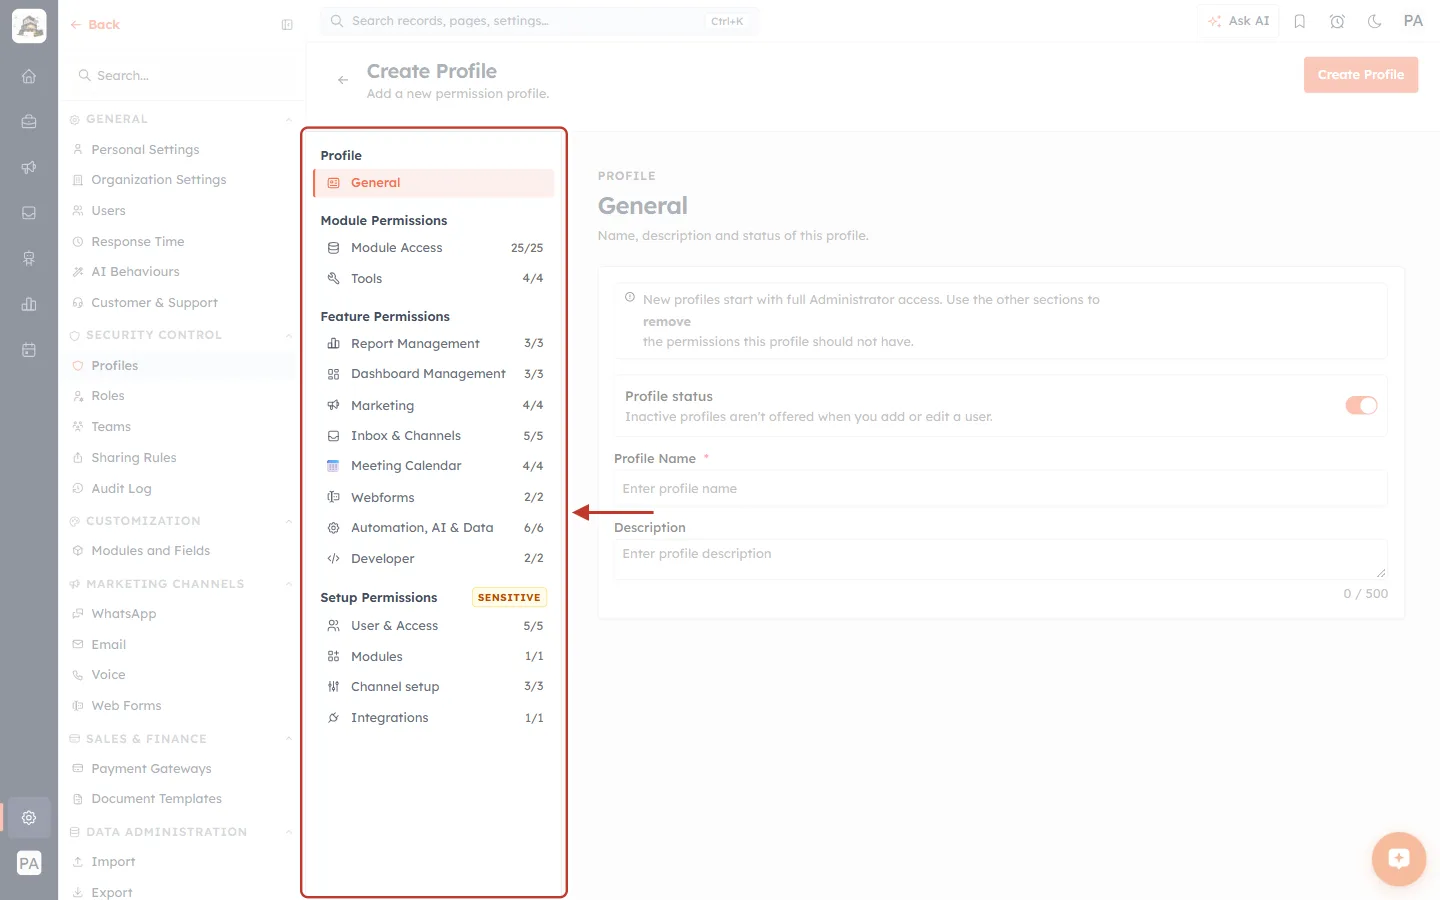
What this screenshot shows. The ringed column is the section list. Each section holds one group of settings, shown on the right when you click it.
Profile → General: name, description, status.
Module Permissions: Module Access (25/25) and Tools (4/4).
Feature Permissions: Report Management, Dashboard Management, Marketing, Inbox & Channels, Meeting Calendar, Webforms, Automation, AI & Data, and Developer.
Setup Permissions, marked SENSITIVE: User & Access, Modules, Channel setup and Integrations.
The numbers show how many permissions in each section are on. Every counter is full at the start.
Step 7: Understand the starting point#
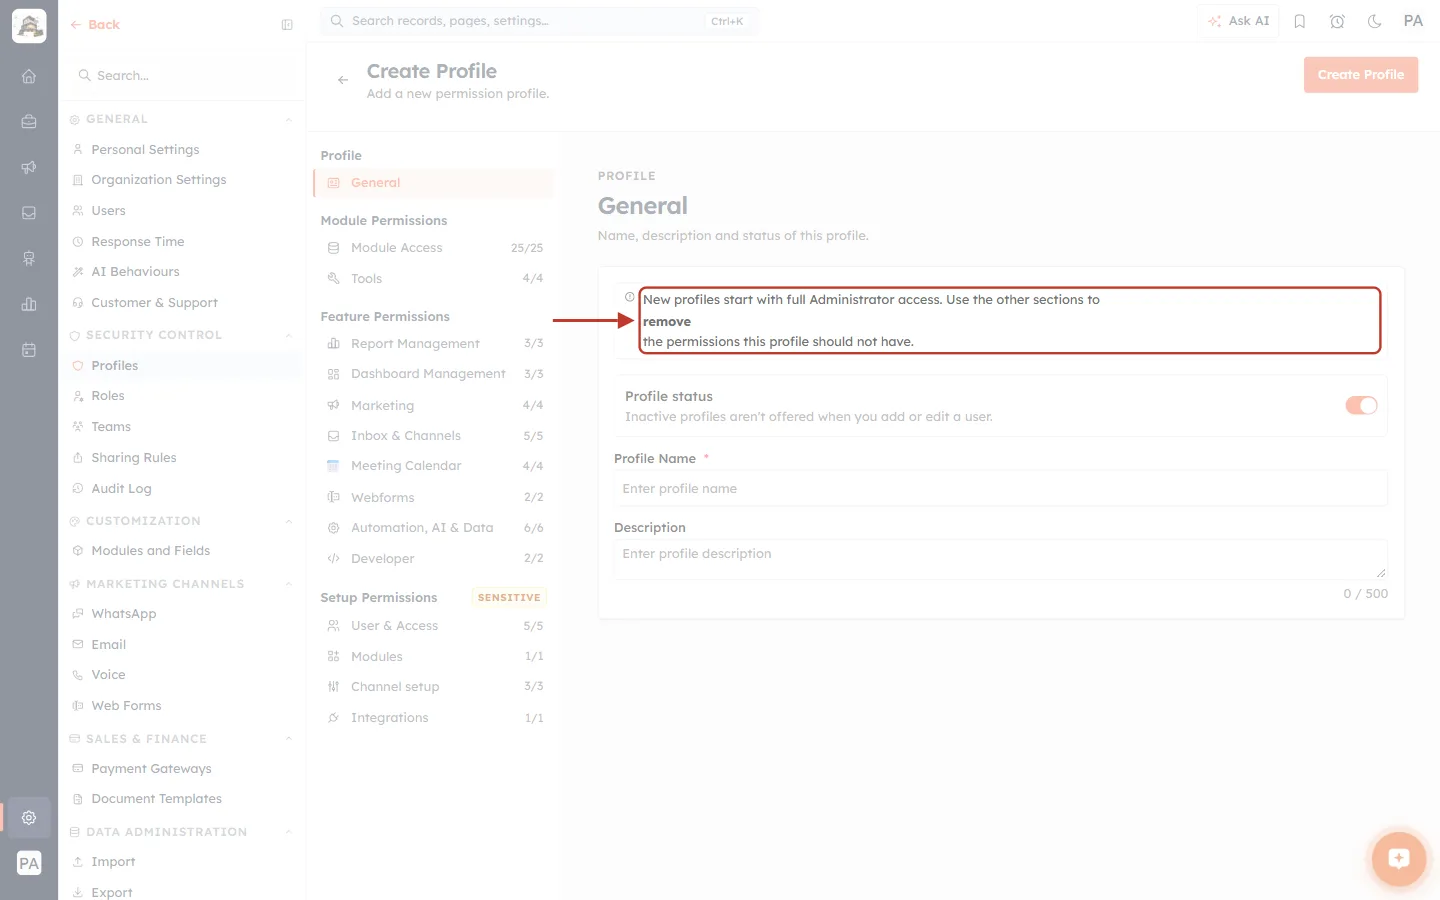
What this screenshot shows. The ringed note at the top of the General section explains how profiles are built.
It reads New profiles start with full Administrator access. Use the other sections to remove the permissions this profile should not have.
Every switch starts on and every level starts at All. You build the profile by switching things off.
⚠️
If you click Create Profile straight away, the new profile has full Administrator-level access. Always go through every section before saving.
Step 8: Enter the Profile Name and Description#
The name is required. If you try to save without one, the form stops you:
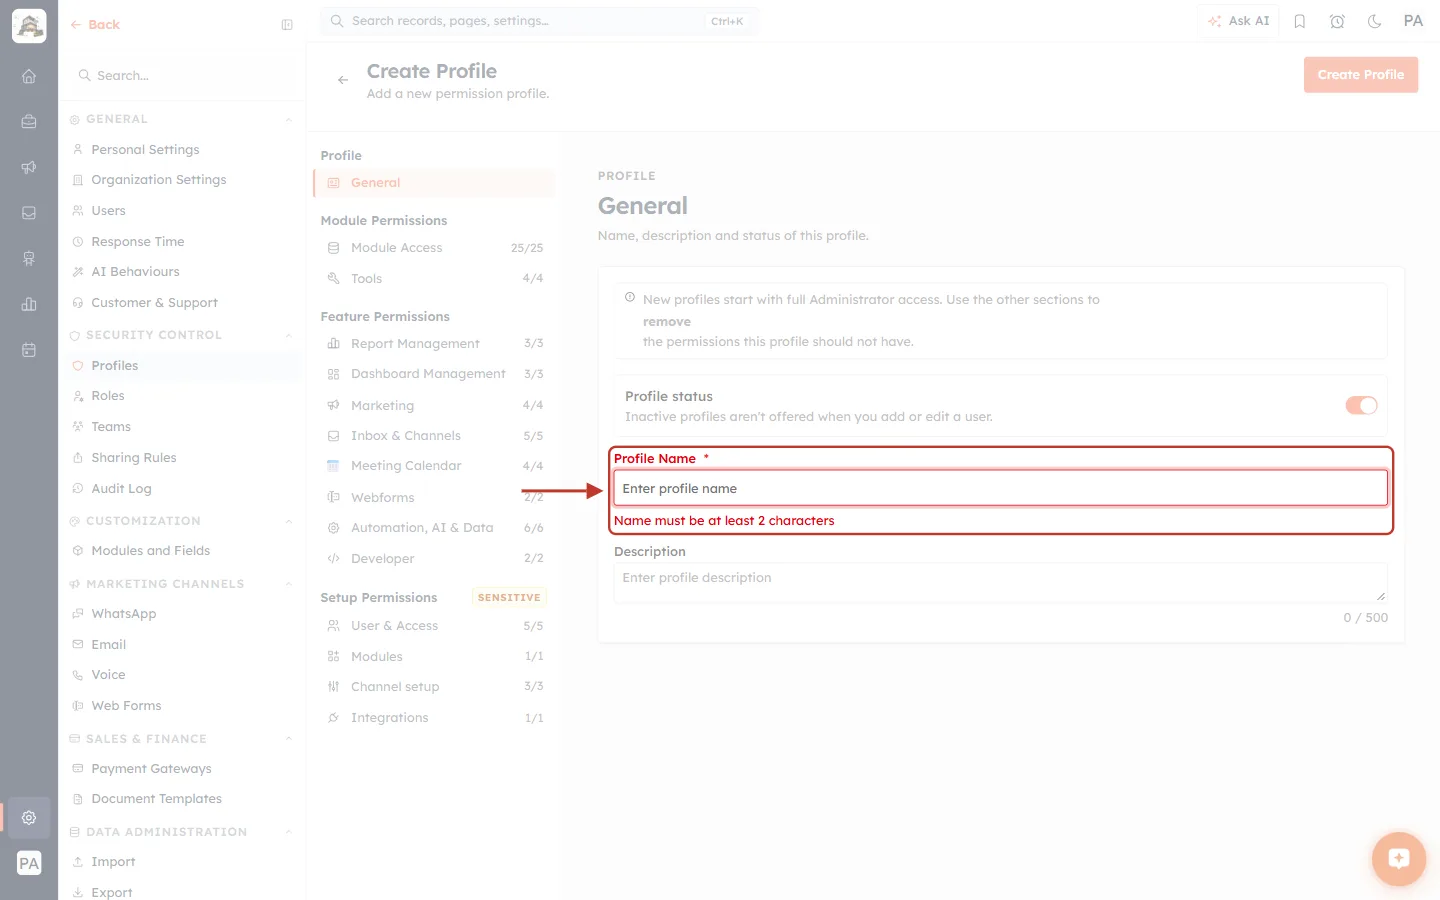
What this screenshot shows. The Profile Name field is ringed in its error state.
The label and box turn red, and Name must be at least 2 characters appears underneath.
The profile is not saved until a name of at least two characters is entered.
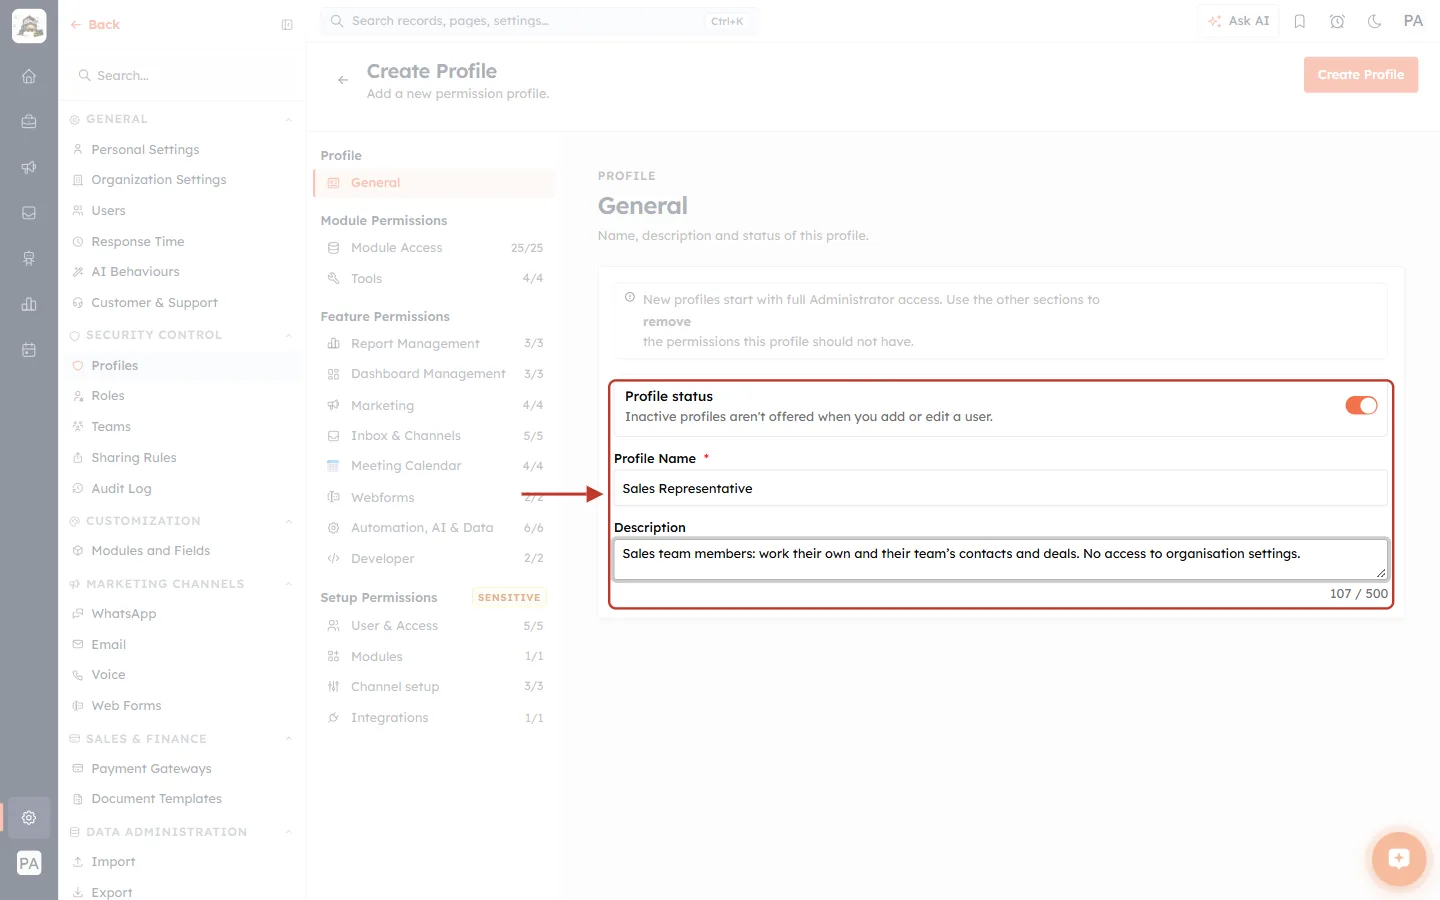
What this screenshot shows. The ringed card shows the General section completed for the demo profile.
Profile status: the orange switch on means Active. As the text says, Inactive profiles aren’t offered when you add or edit a user. Leave it on.
Profile Name *: Sales Representative. Name profiles after the job, not the person.
Description: Sales team members: work their own and their team’s contacts and deals. No access to organisation settings. The counter shows 107 / 500 characters.
Step 9: Open Module Access#
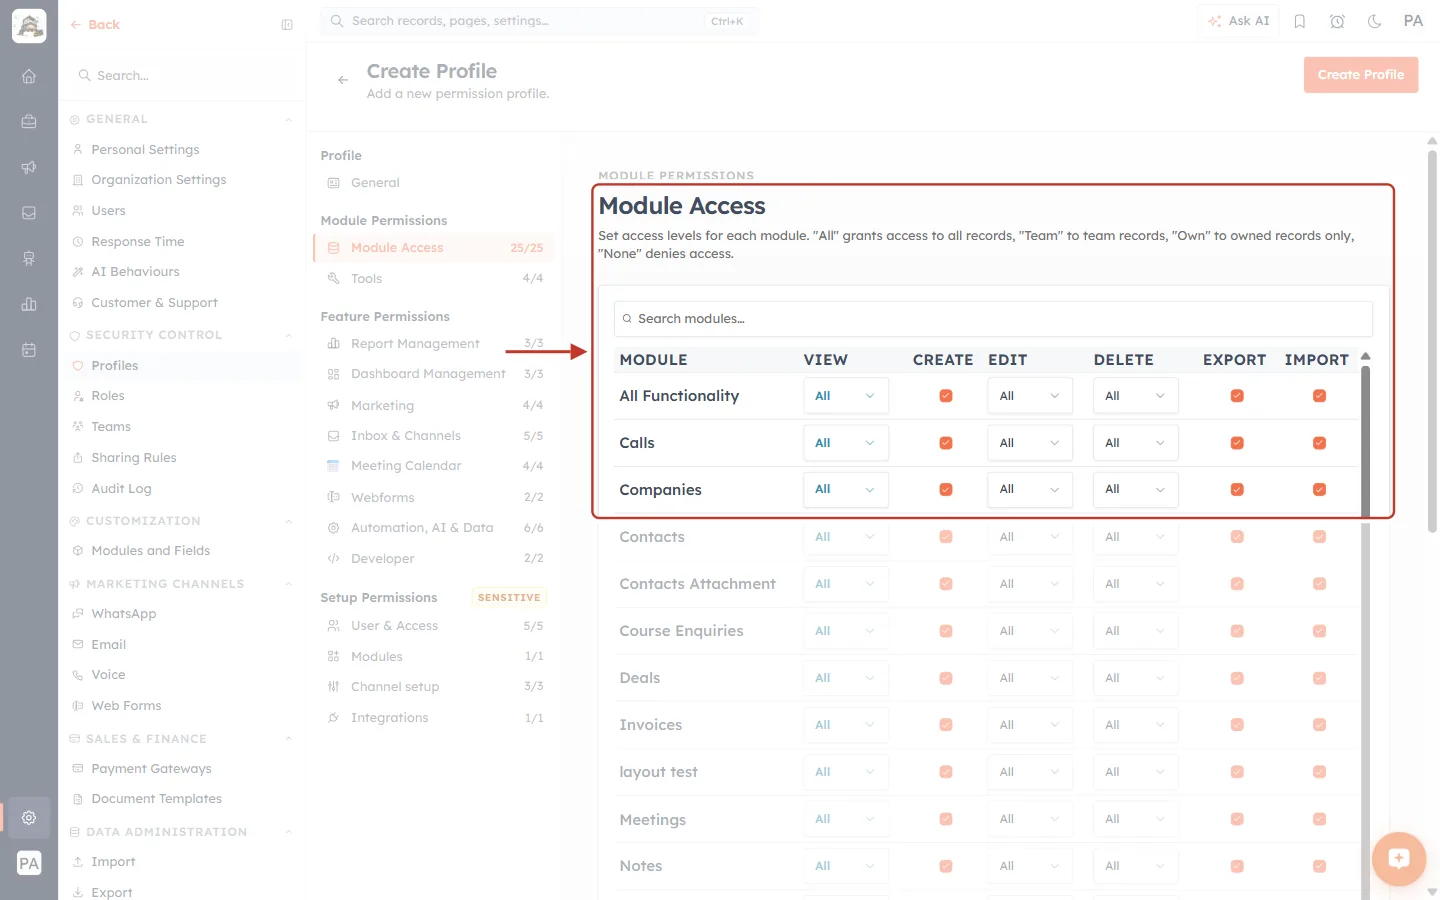
What this screenshot shows. Click Module Access in the section list. The ringed area is the top of its table.
The intro explains the levels: “All” grants access to all records, “Team” to team records, “Own” to owned records only, “None” denies access.
Search modules… filters the rows.
Each row is a module. VIEW, EDIT and DELETE are drop-downs (All / Team / Own / None). CREATE, EXPORT and IMPORT are tick boxes.
Every row starts at All with every box ticked.
Step 10: Find Contacts#
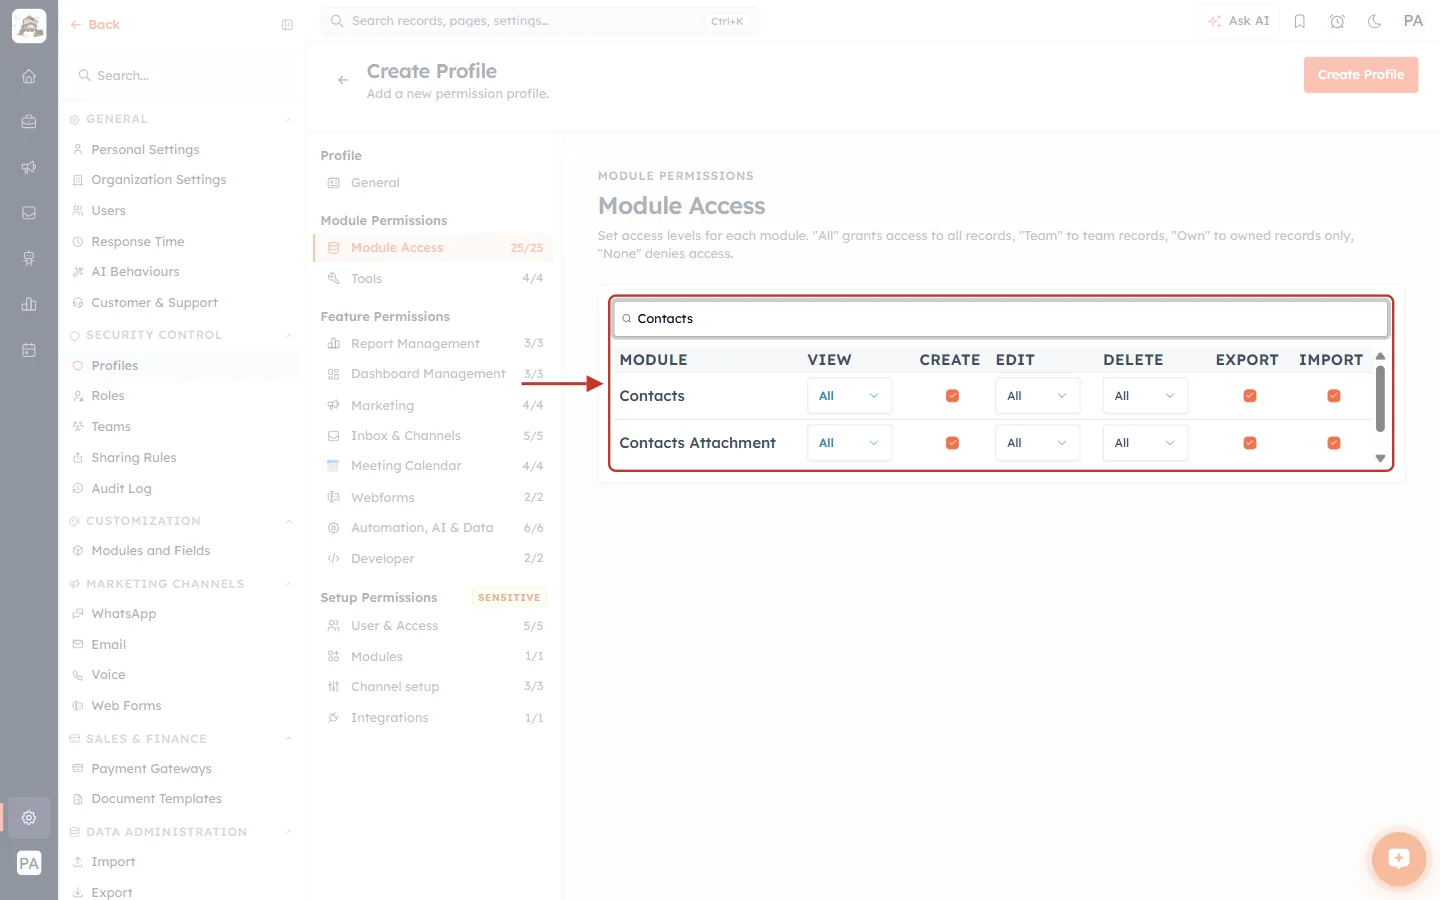
What this screenshot shows. The search box and the filtered table are ringed.
Typing Contacts leaves the Contacts and Contacts Attachment rows.
Searching saves scrolling when you have many modules. Your changes are kept when you clear the search.
Step 11: Set how far the profile can see (View)#
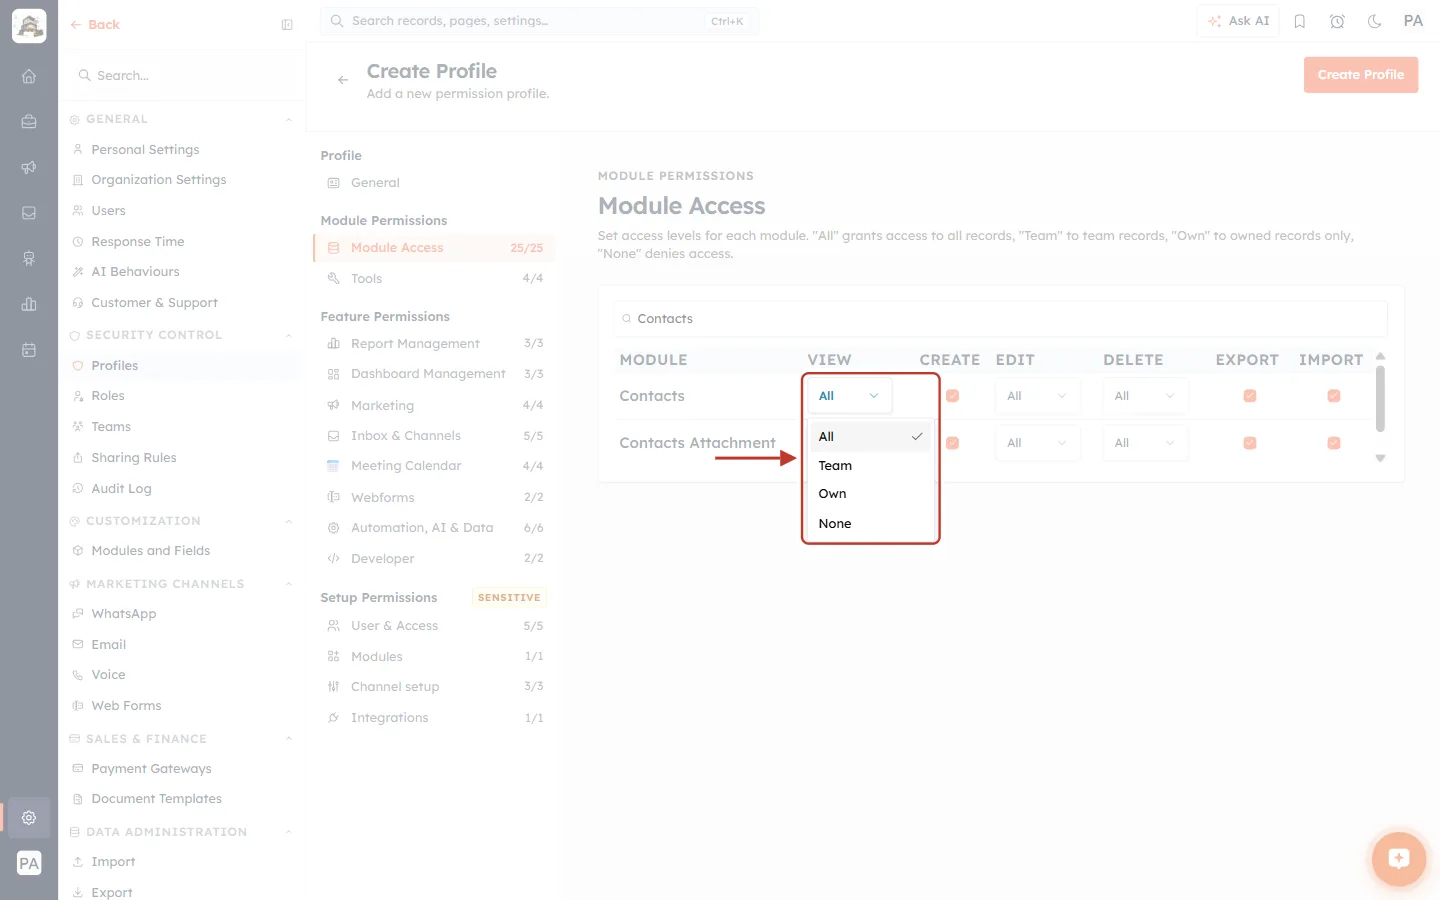
What this screenshot shows. The VIEW drop-down on the Contacts row is open and ringed.
The choices are All (currently ticked), Team, Own and None.
Choose Team so sales reps can see their teammates’ contacts and cover for each other.
Step 12: Complete the Contacts row#
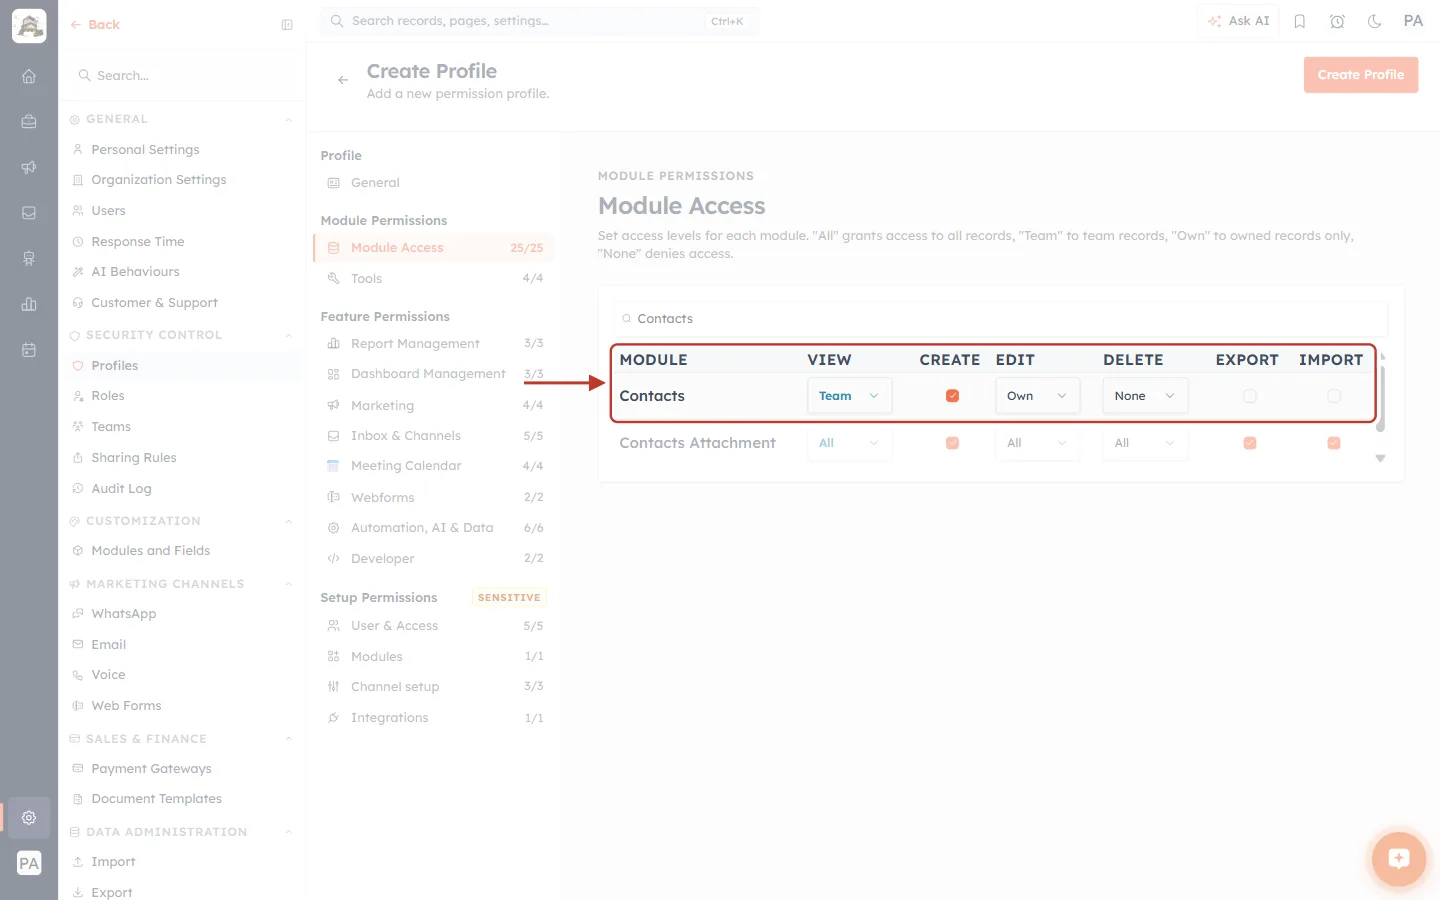
What this screenshot shows. The ringed Contacts row, with the column headings, shows the finished settings.
VIEW: Team: sees the team’s contacts.
CREATE: ticked: can add new contacts.
EDIT: Own: can change only the contacts they own.
DELETE: None: cannot delete contacts.
EXPORT and IMPORT unticked: cannot download or bulk-import contacts.
Step 13: Repeat for Deals#
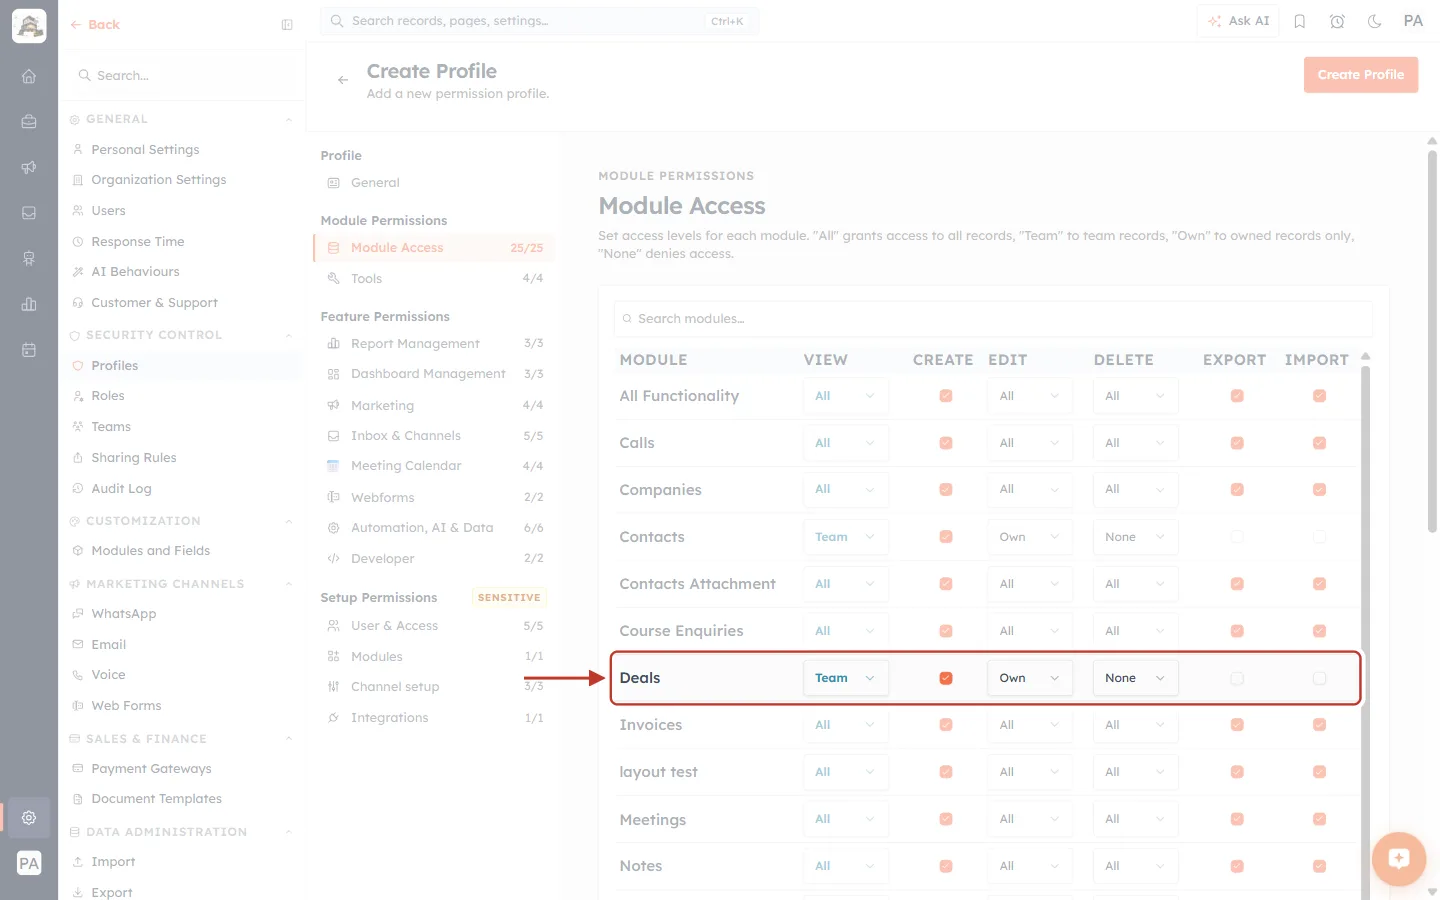
What this screenshot shows. The ringed Deals row has the same settings as Contacts.
View Team, Create ticked, Edit Own, Delete None, Export and Import unticked.
The rows above and below still show All. Every module needs its own decision.
Step 14: Hide modules the job doesn’t use#
Set VIEW to None on every module a sales rep never needs. In the demo these are Invoices, Payments and Store Transactions.
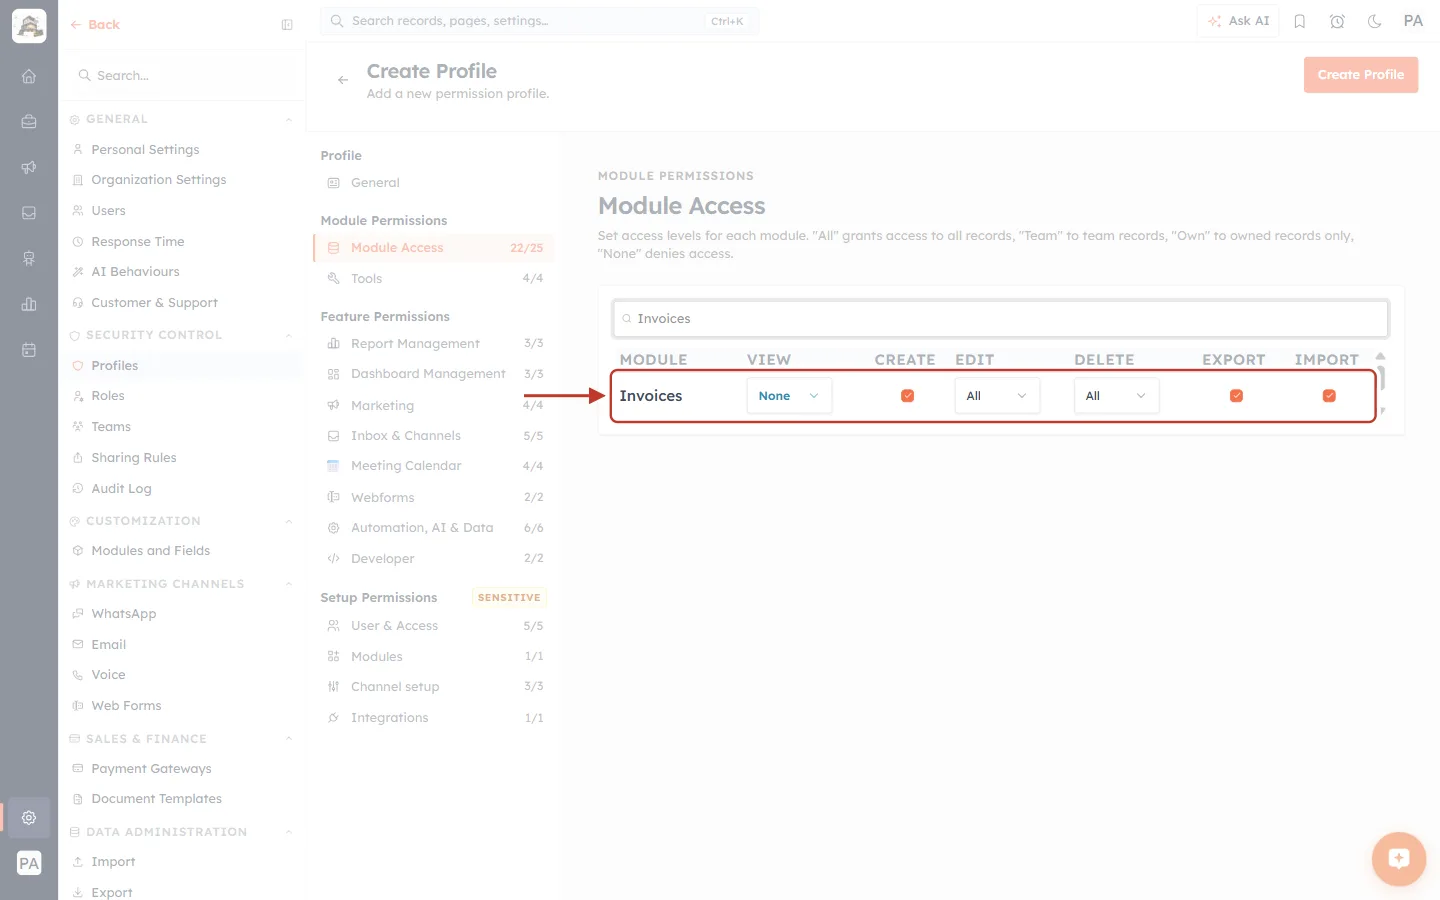
What this screenshot shows. The ringed Invoices row has VIEW = None.
With View set to None, the module is hidden completely from users on this profile. Its other settings no longer matter.
After three modules are set to None, the Module Access counter in the section list reads 22/25: the profile can see 22 of 25 modules.
Work down the whole table this way. Remember custom modules too.
✅
Keep Delete, Export and Import off on every module unless the job really needs them. These are where data can be lost or leave the company.
Step 15: Set the bulk Tools#
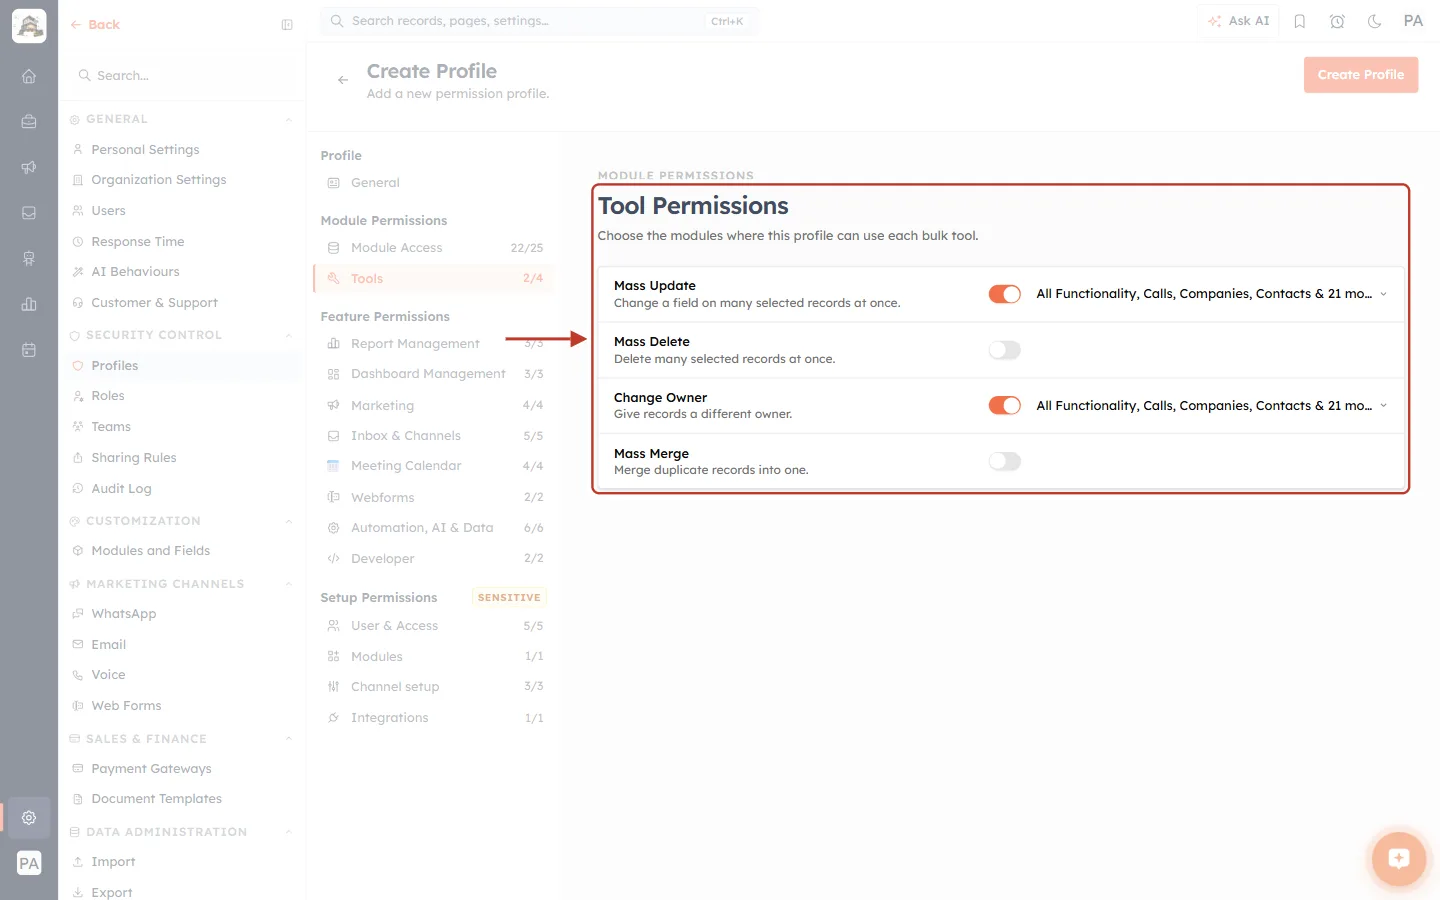
What this screenshot shows. Click Tools. The ringed card lists the four bulk tools.
Mass Update (Change a field on many selected records at once): left on.
Mass Delete (Delete many selected records at once): switched off (grey).
Change Owner (Give records a different owner): left on.
Mass Merge (Merge duplicate records into one): switched off.
A tool that is on shows the modules it can be used in on the right. A tool that is off has no module list.
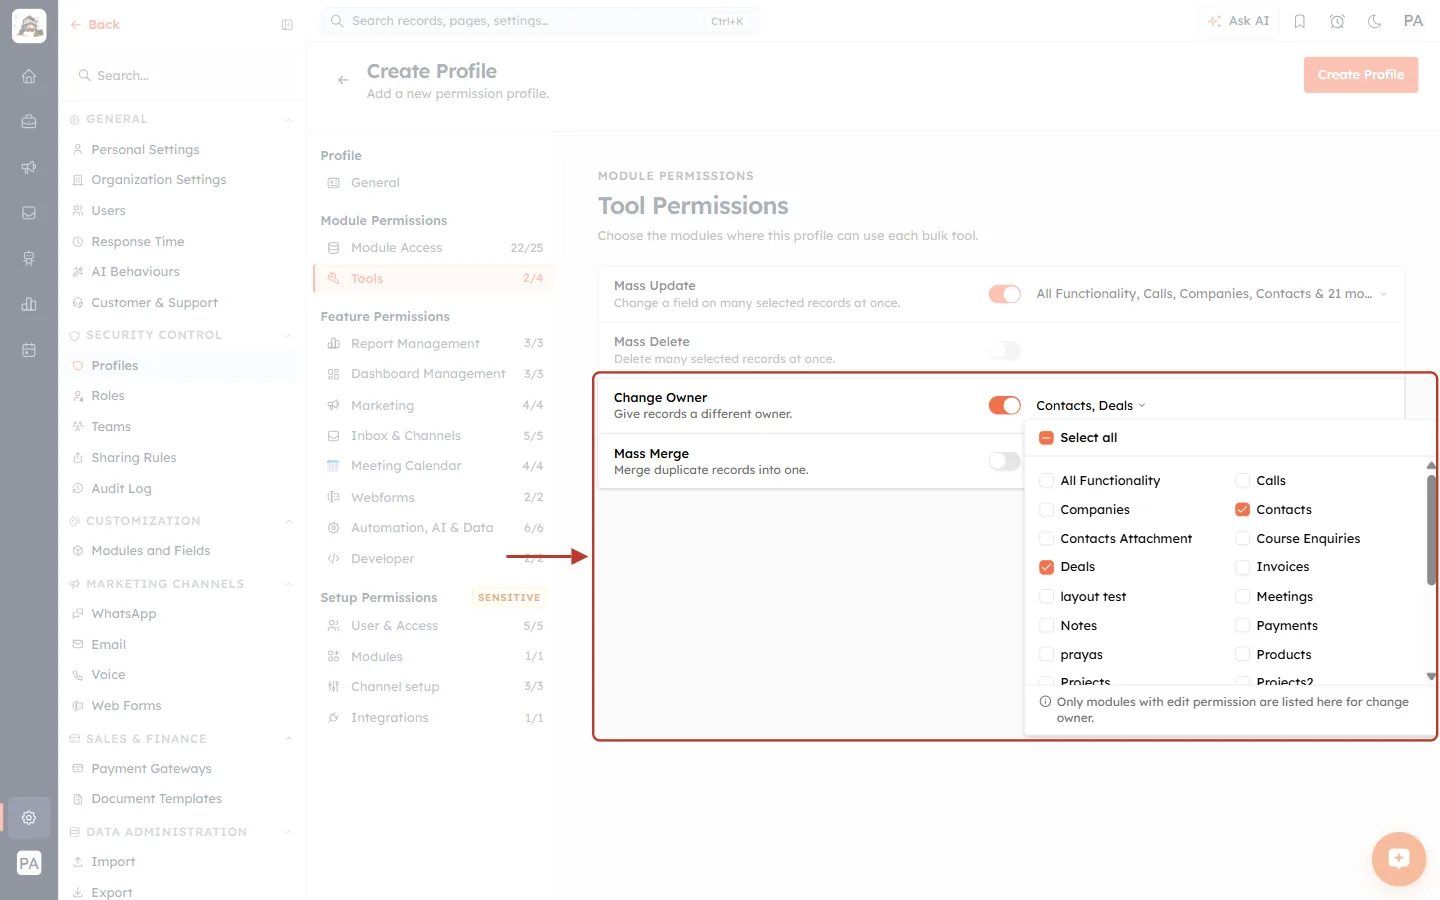
What this screenshot shows. The module picker for Change Owner is open and ringed.
Clicking Select all clears every module. Then Contacts and Deals are ticked again.
The picker now reads Contacts, Deals, so sales reps can reassign contacts and deals but nothing else.
The note at the bottom explains that only modules with edit permission are listed here. A module with Edit set to None in Module Access does not appear.
Step 16: Set Reports and Dashboards to view-only#
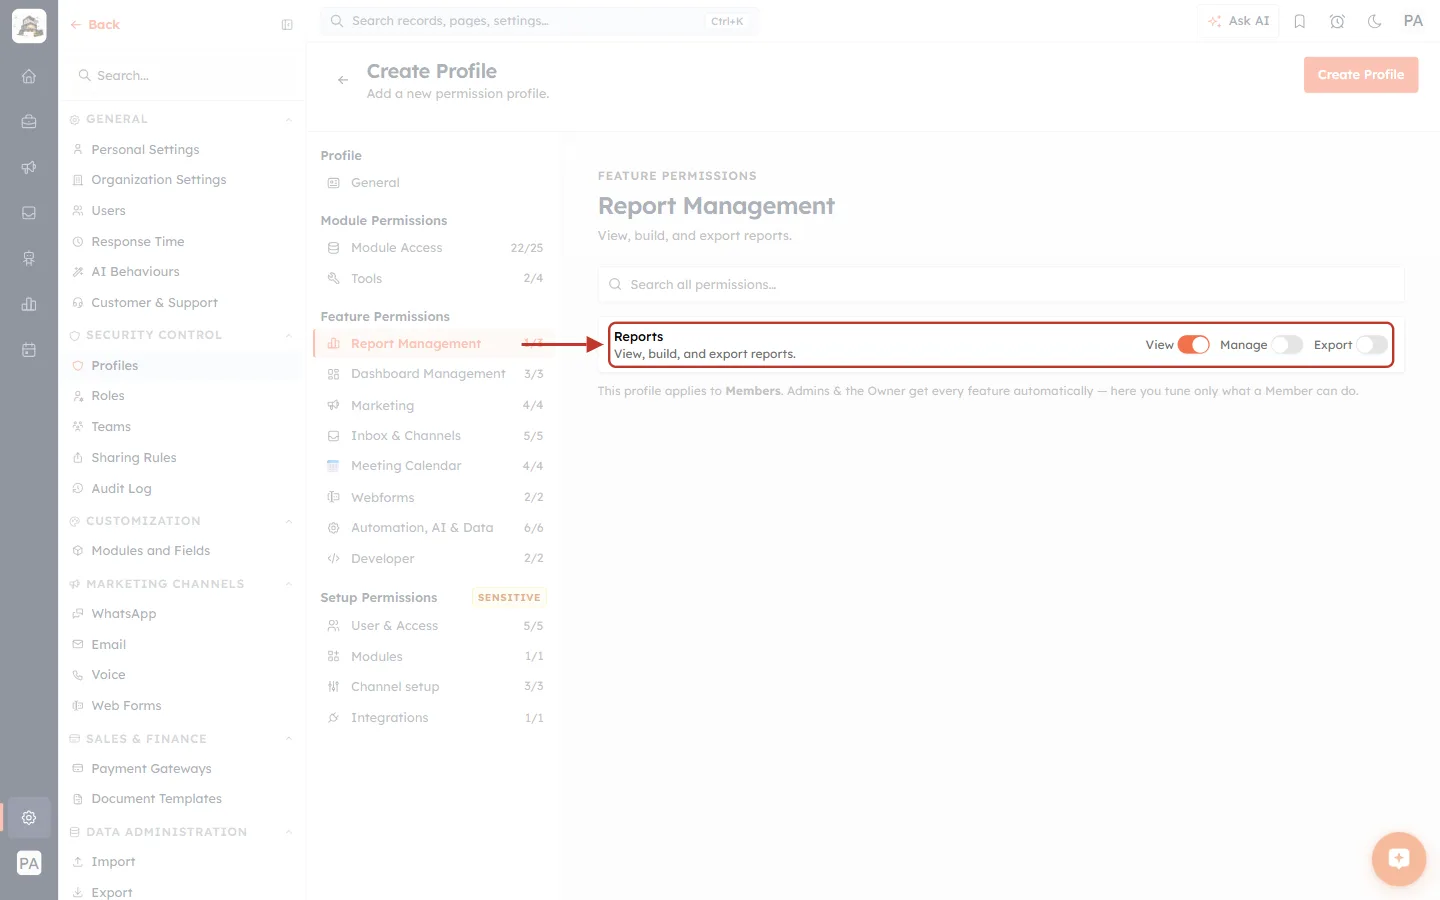
What this screenshot shows. Click Report Management. The ringed Reports row has three switches.
View stays on, so reps can open and run saved reports.
Manage (build, edit, delete and share reports) is switched off.
Export (download results) is switched off.
Do the same in Dashboard Management: leave View on and switch Manage and Export off.
Step 17: Switch off Marketing#
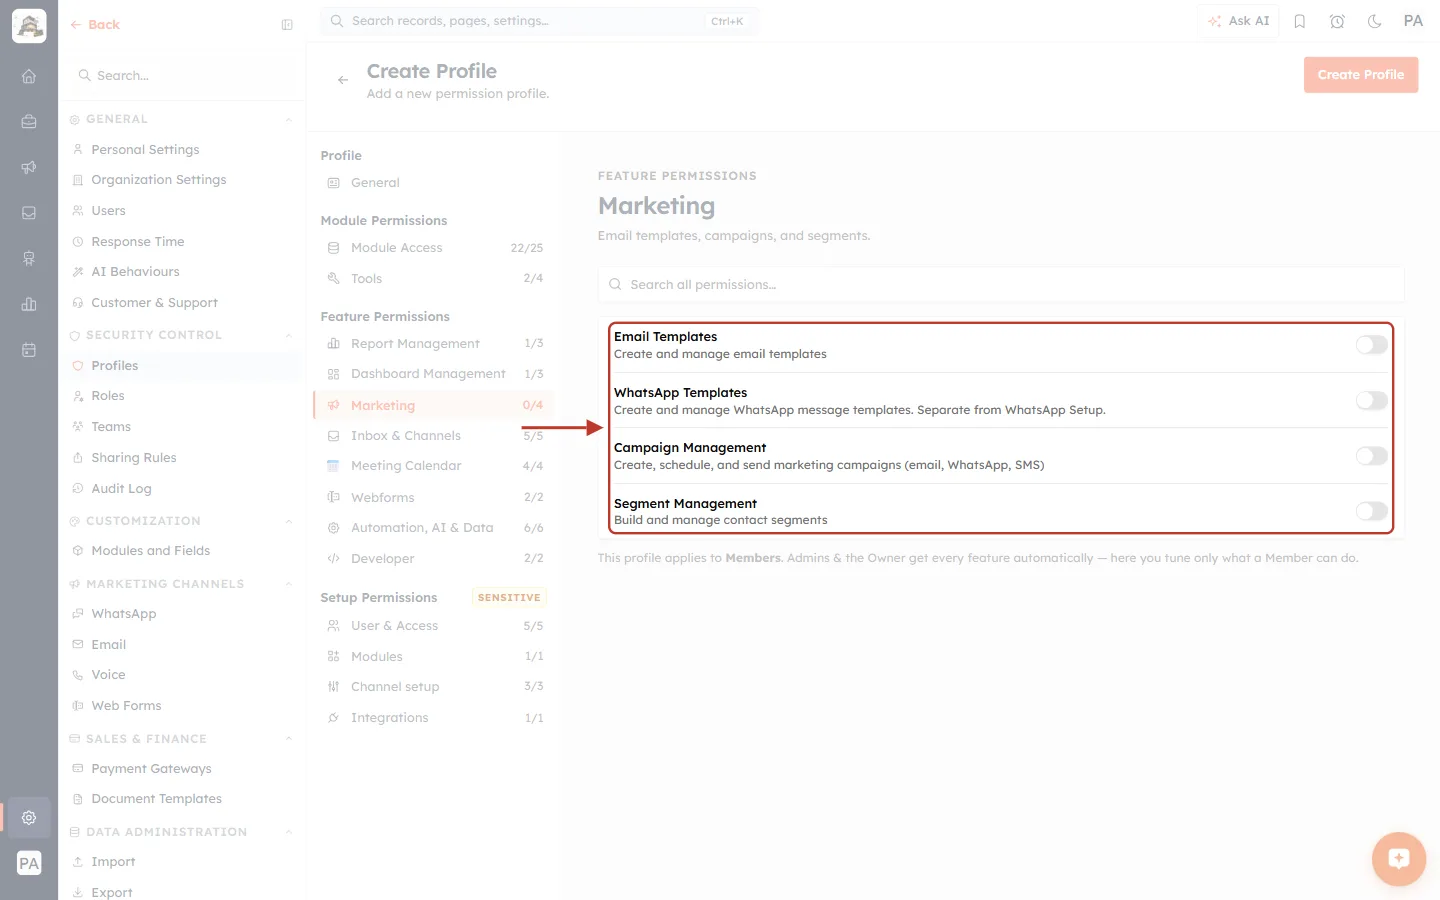
What this screenshot shows. Click Marketing. All four ringed permissions are now off (grey).
Email Templates: Create and manage email templates.
WhatsApp Templates: Create and manage WhatsApp message templates.
Campaign Management: Create, schedule, and send marketing campaigns (email, WhatsApp, SMS).
Segment Management: Build and manage contact segments.
The Marketing counter now reads 0/4..
Step 18: Decide which Team Inbox chats they can use#
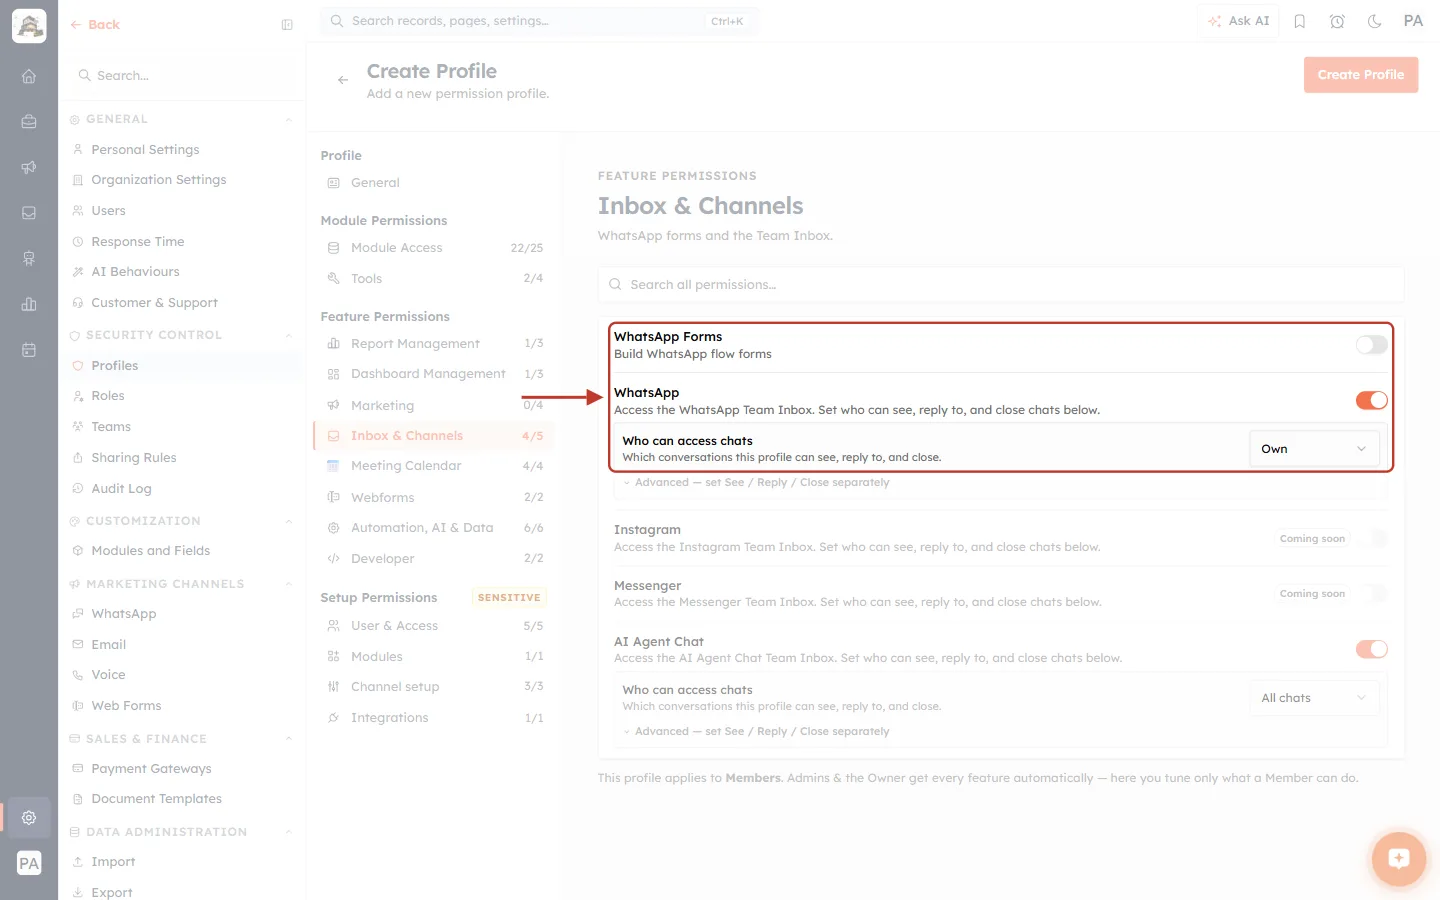
What this screenshot shows. Click Inbox & Channels. The ringed area shows the WhatsApp settings.
WhatsApp Forms (Build WhatsApp flow forms) is switched off.
WhatsApp stays on, so reps can use the WhatsApp Team Inbox.
Who can access chats is set to Own: reps see, reply to and close only the chats assigned to them.
Use Advanced — set See / Reply / Close separately if you want different levels for each. Instagram and Messenger show Coming soon.
Step 19: Check Webforms, Automation and Developer#
In Webforms, switch off Webform Approval so only your lead manager approves form submissions. Then open Automation, AI & Data:
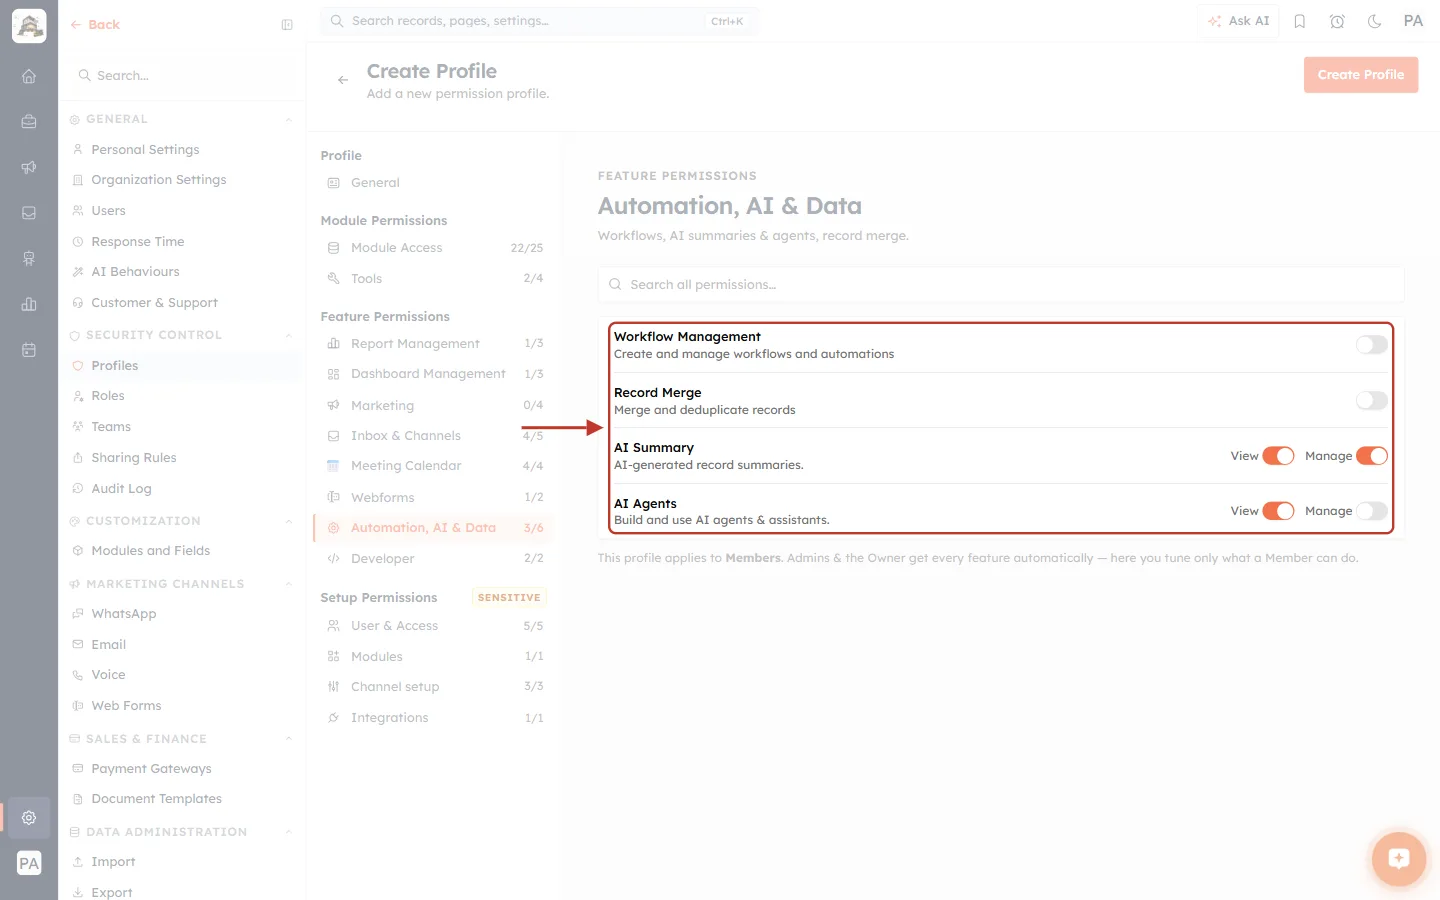
What this screenshot shows. The ringed card shows the four automation and AI permissions after the changes.
Workflow Management: off. Workflows can change many records automatically, so keep them with an admin.
Record Merge: off.
AI Summary: View and Manage left on, so reps can read and use AI summaries on records.
AI Agents: View on, Manage off. Reps can use AI agents but not build or change them.
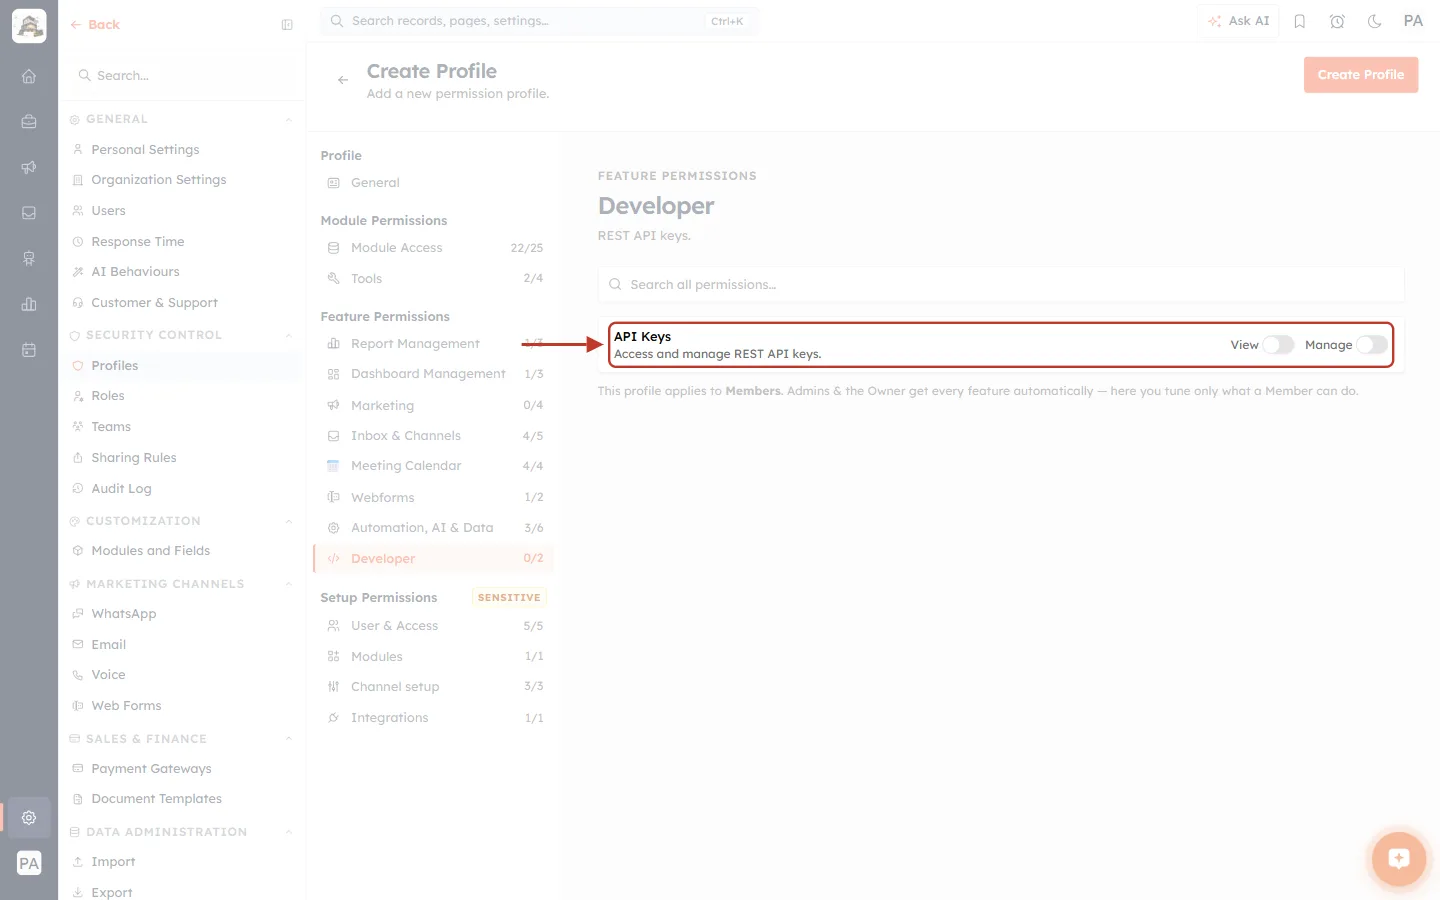
What this screenshot shows. Click Developer. The ringed API Keys row has both switches off.
View and Manage are off, so reps cannot see or create REST API keys.
An API key gives another system access to your CRM data. Keep it with your developers and admins.
The Meeting Calendar section (AI Notetaker, recordings and booking links) is left at full access in this demo. Adjust it the same way if needed.
Step 20: Switch off every Setup Permission#
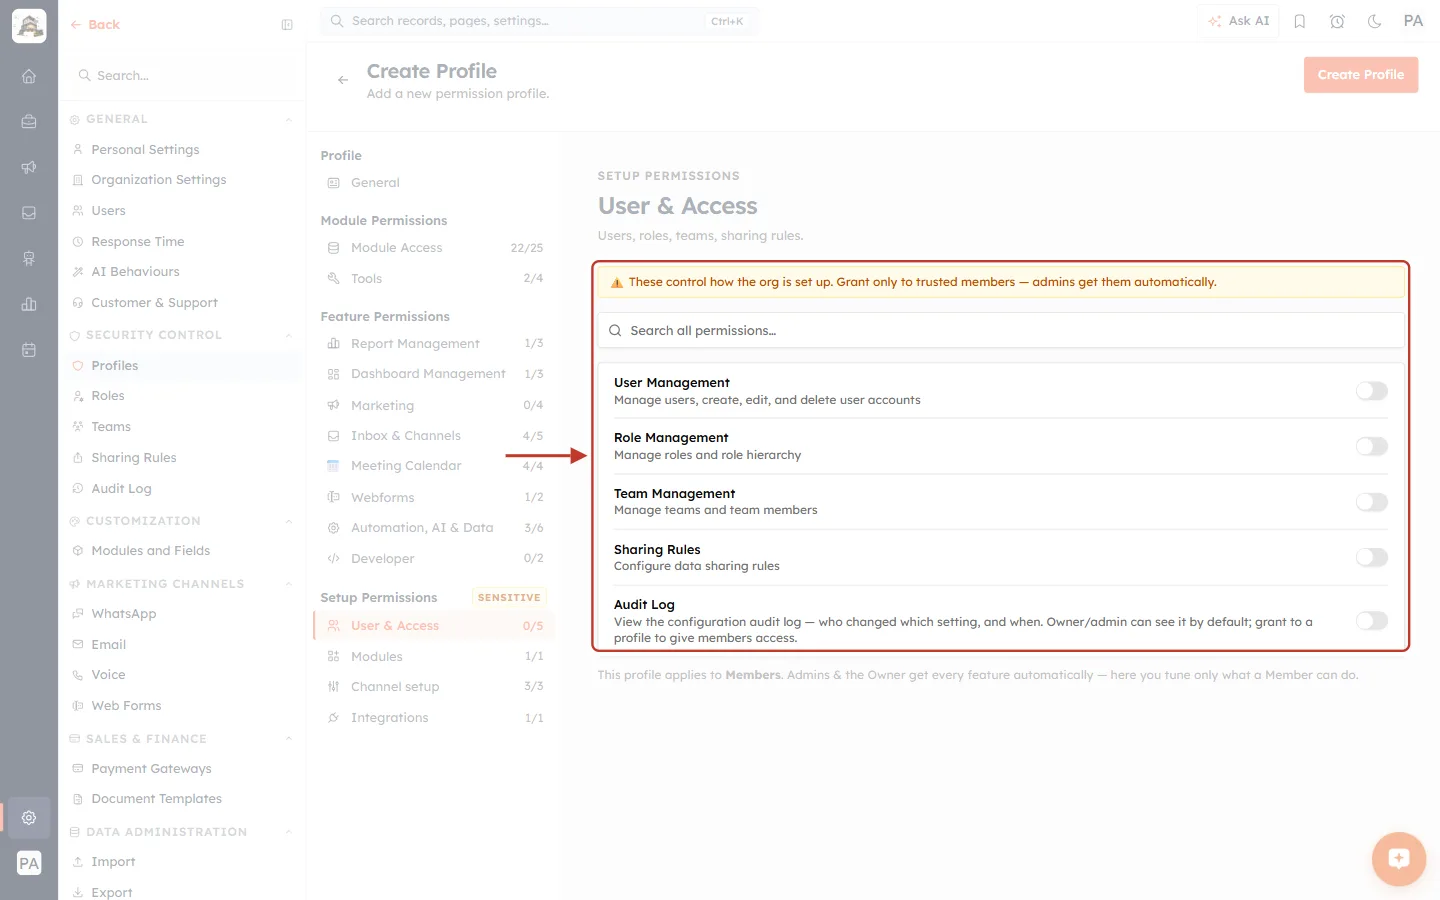
What this screenshot shows. Click User & Access. The ringed area shows the warning and five switches, all off.
The warning reads These control how the org is set up. Grant only to trusted members — admins get them automatically.
User Management, Role Management, Team Management, Sharing Rules and Audit Log are all off. A sales rep should never change who has access to what.
Do the same in Modules (switch off Module Customization) and Integrations (switch off Web Integrations). Then open Channel setup:
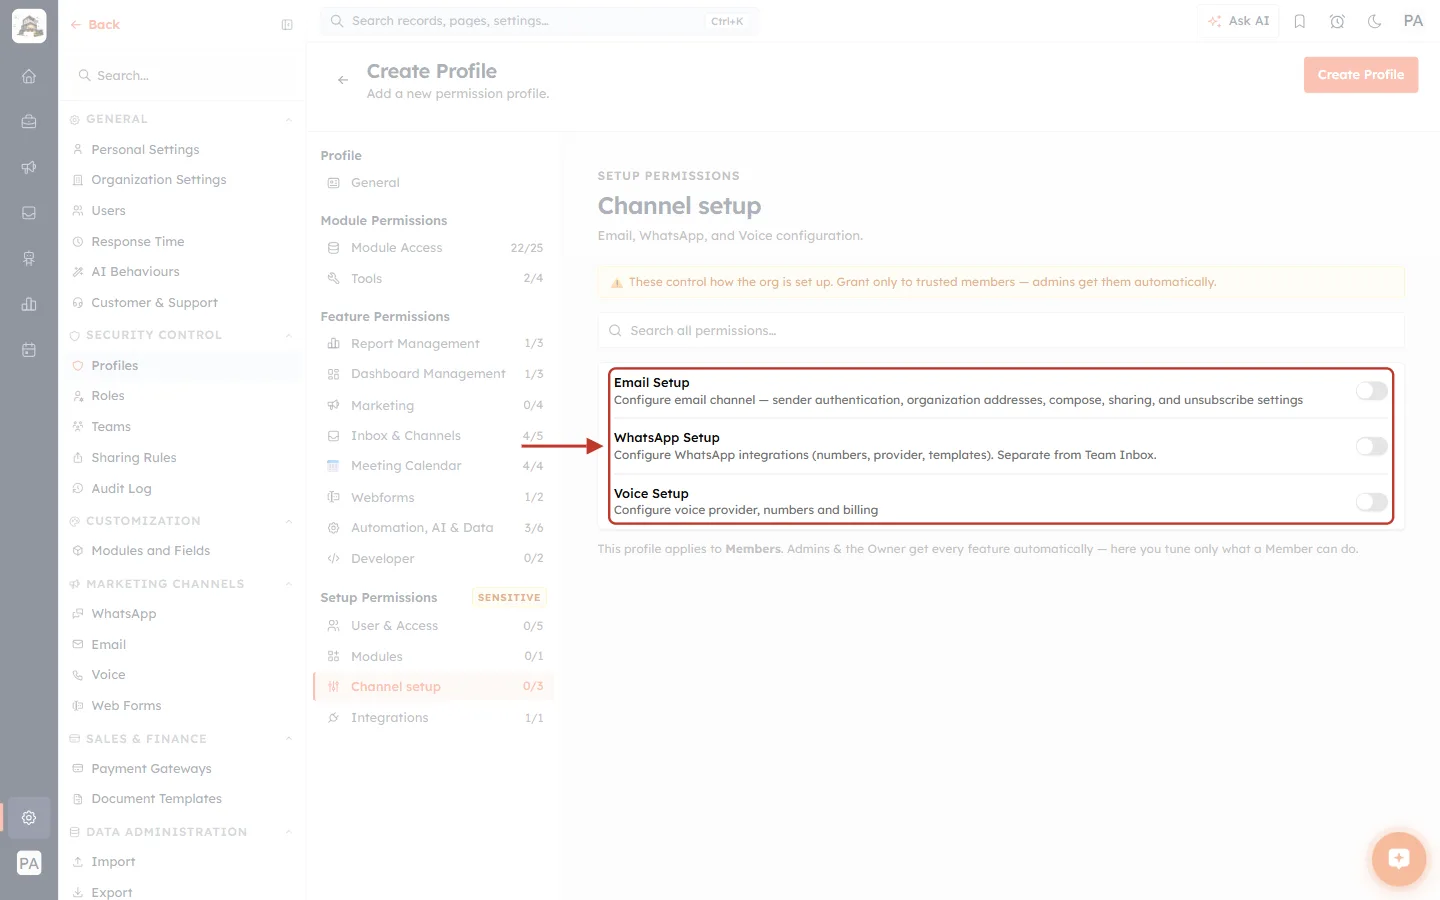
What this screenshot shows. The ringed card shows the three Channel setup permissions, all off.
Email Setup: sender authentication, organisation addresses, compose, sharing and unsubscribe settings.
WhatsApp Setup: numbers, provider and templates. This is separate from the Team Inbox, so reps can still answer WhatsApp chats.
Voice Setup: voice provider, numbers and billing.
Step 21: Check the counters#
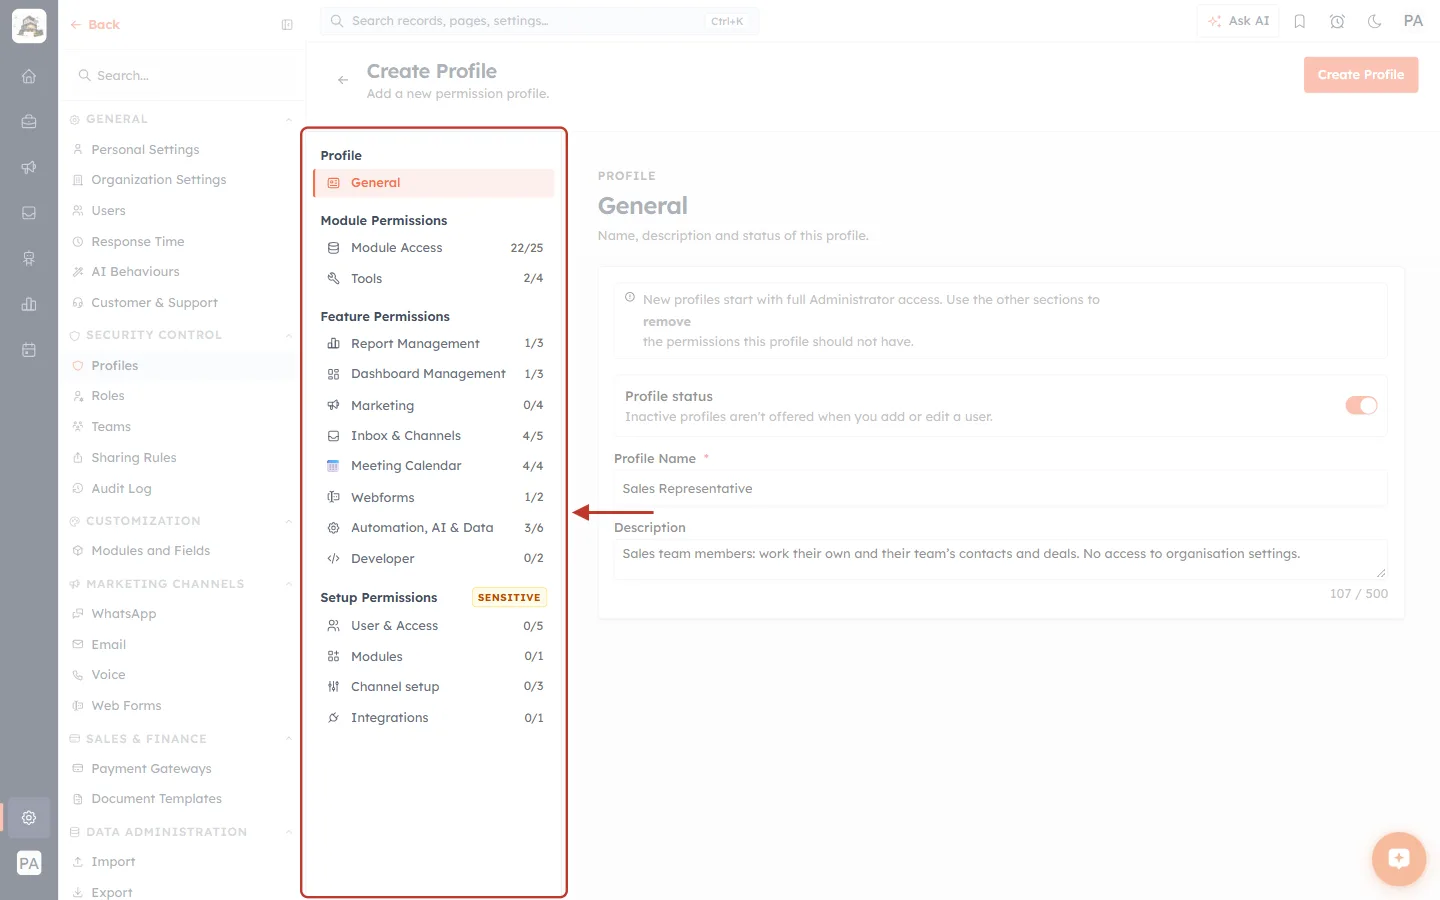
What this screenshot shows. Back on General, the ringed section list shows a summary of the whole profile.
Module Access 22/25: three modules hidden. Tools 2/4: Mass Delete and Mass Merge off.
Report Management 1/3 and Dashboard Management 1/3: view only.
Marketing 0/4, Inbox & Channels 4/5, Webforms 1/2, Automation, AI & Data 3/6 and Developer 0/2.
Meeting Calendar 4/4 is still full. A full counter means that section was not changed, so check it is what you want.
Every Setup Permissions section reads 0: User & Access 0/5, Modules 0/1, Channel setup 0/3, Integrations 0/1.
Step 22: Click Create Profile#
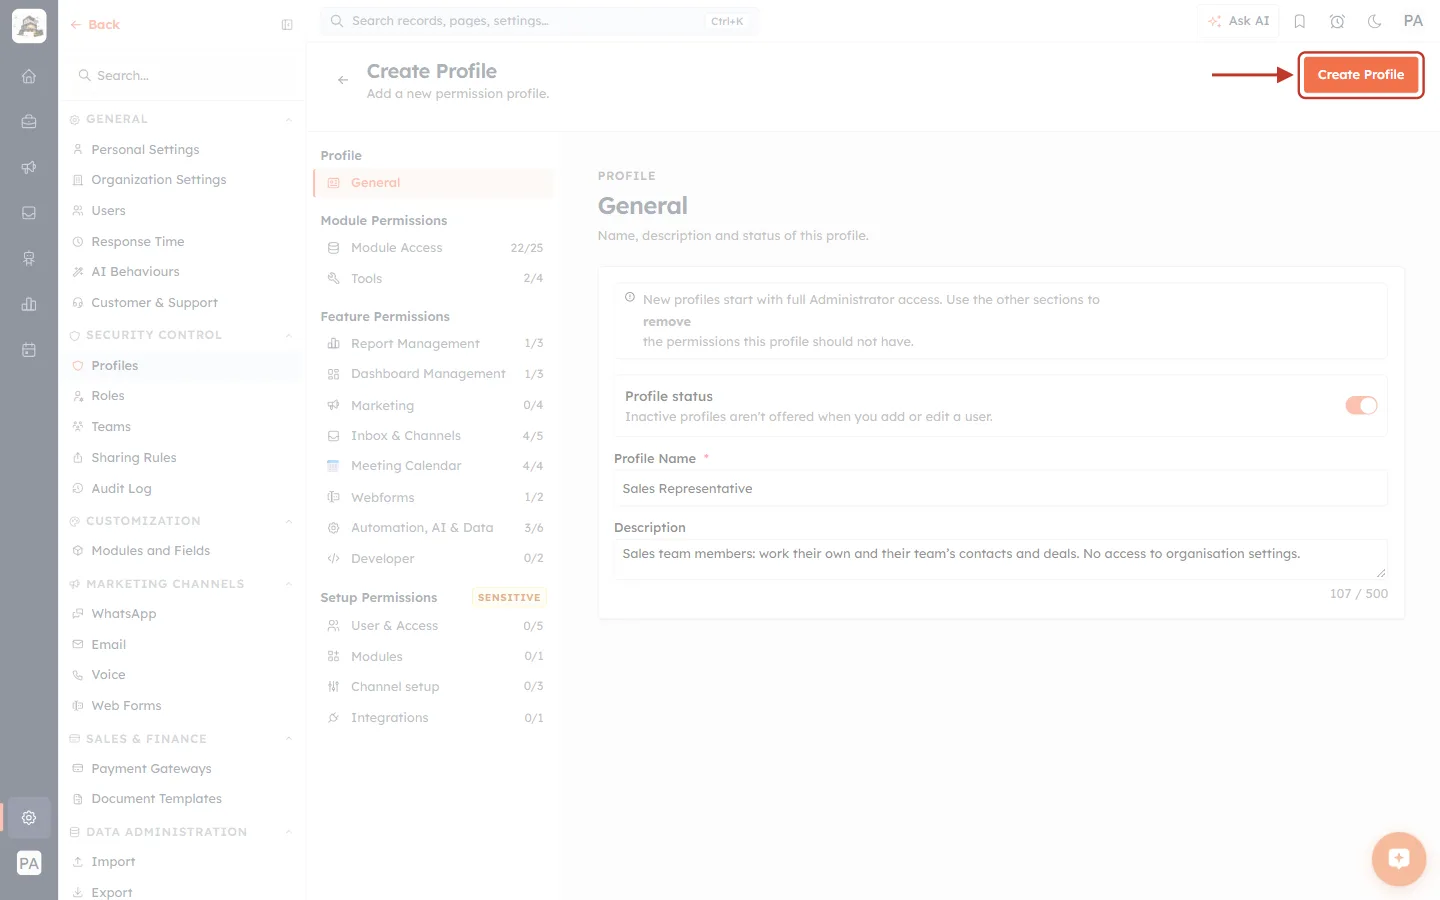
What this screenshot shows. The orange Create Profile button at the top right is ringed.
Click it to save. The button briefly reads Creating….
If a required field is missing, you stay on the page and the field turns red (see Step 8).
Step 23: Check the new profile on the list#
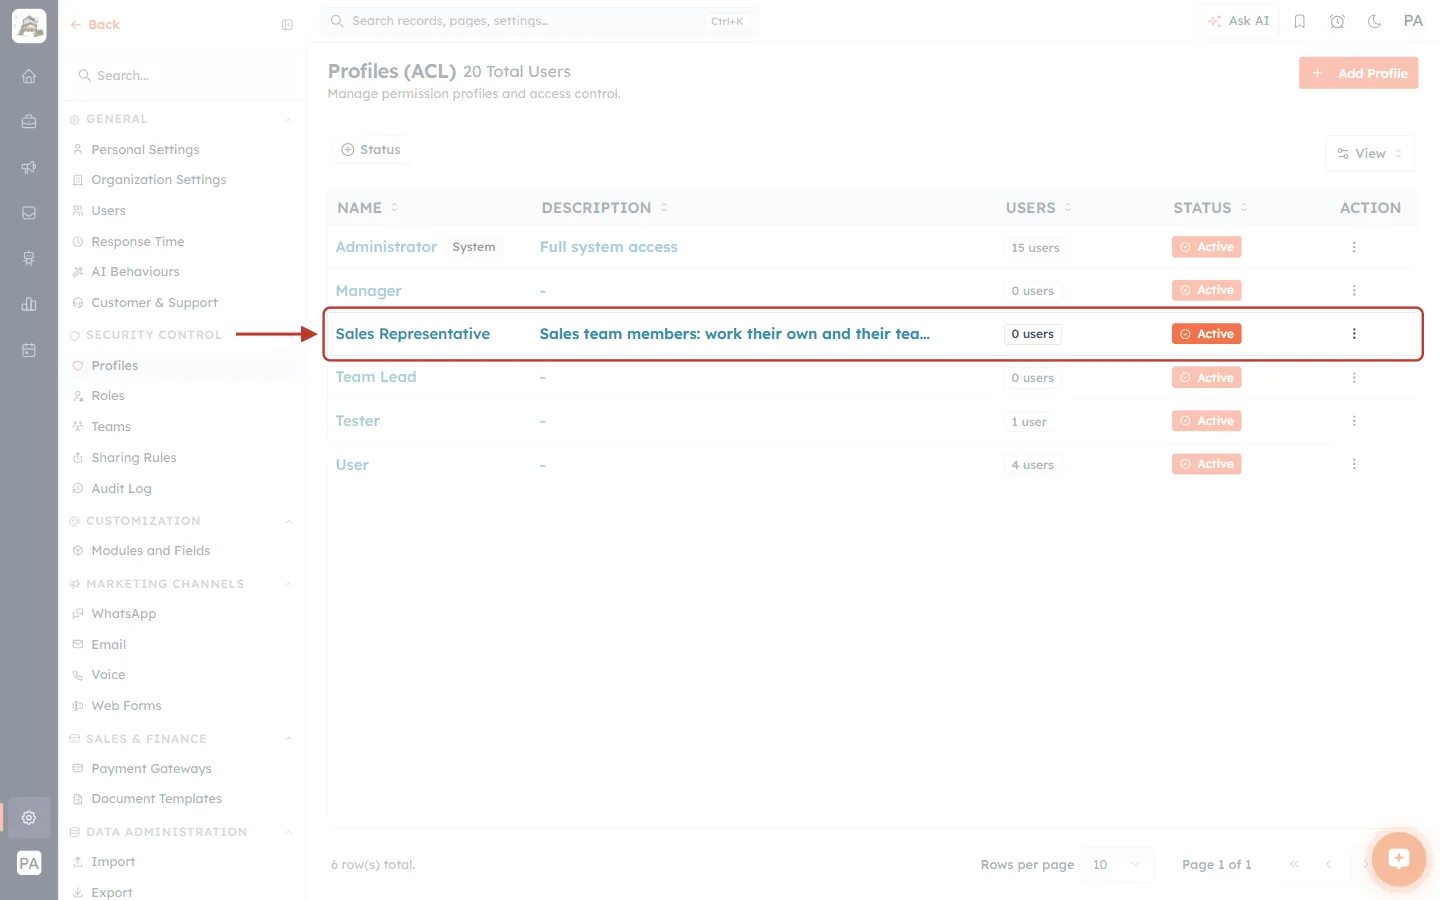
What this screenshot shows. Back on the Profiles list, the new Sales Representative row is ringed.
NAME: Sales Representative. DESCRIPTION: the start of the text you entered.
USERS: 0 users. Nobody holds the profile yet.
STATUS: Active, so it can now be chosen when you invite or edit a user.
ℹ️
To give the profile to someone, open Settings → Users, edit the user (or invite a new one) and choose Sales Representative as their profile. See Invite Your Team: How to Add and Manage Users in AI Engage CRM.
Part 3: Manage Profiles#
Step 24: Open a profile’s action menu#
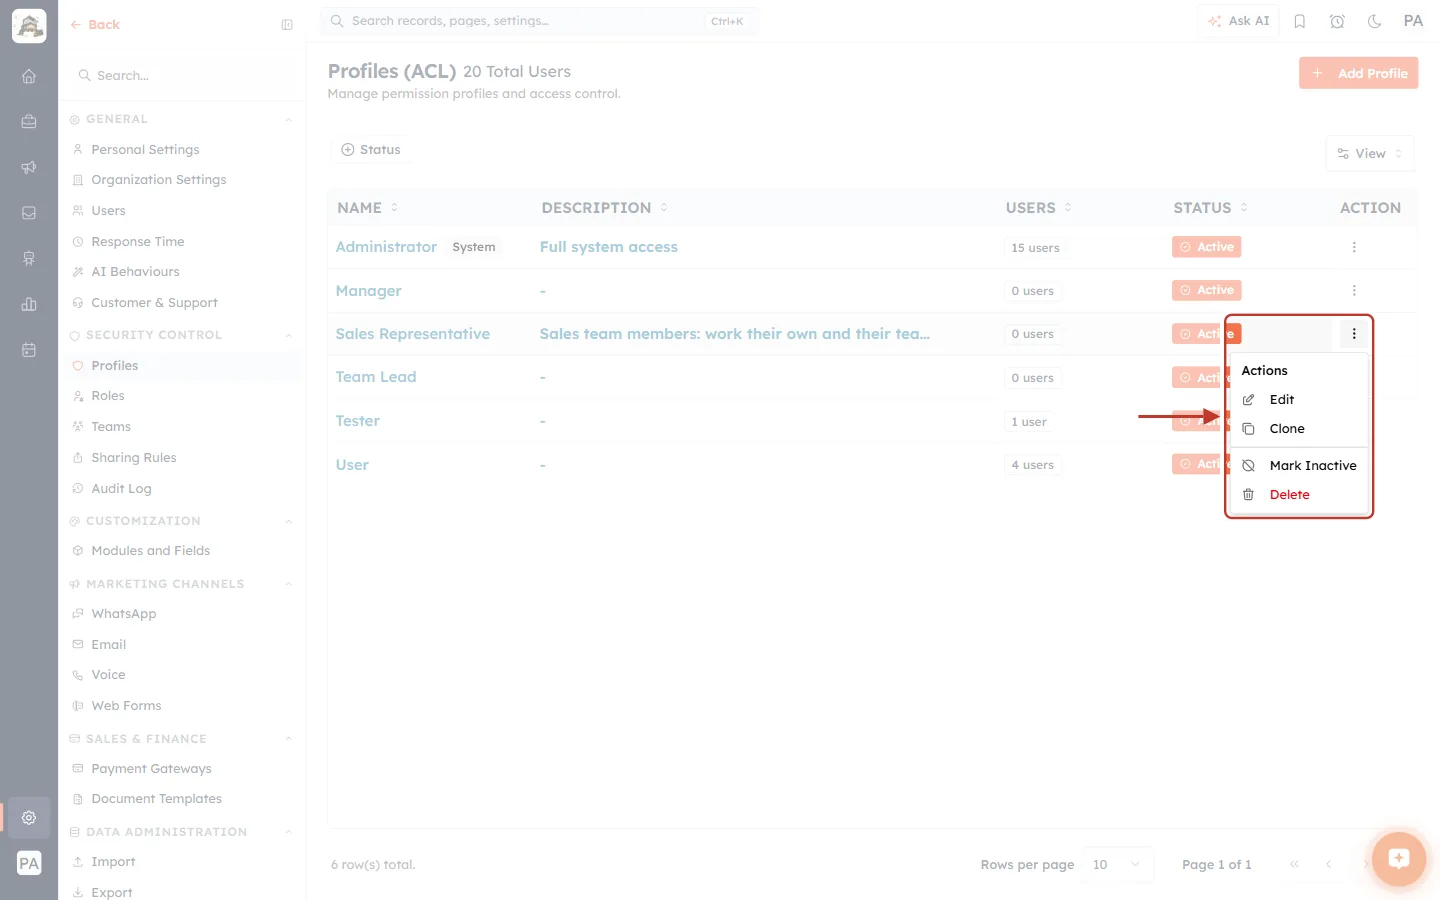
What this screenshot shows. The ⋮ menu of Sales Representative is open and ringed.
Edit: change the profile’s settings.
Clone: copy it with all its permissions.
Mark Inactive: stop it being offered to users, but keep its settings.
Delete (red): remove it permanently.
Edit a profile#
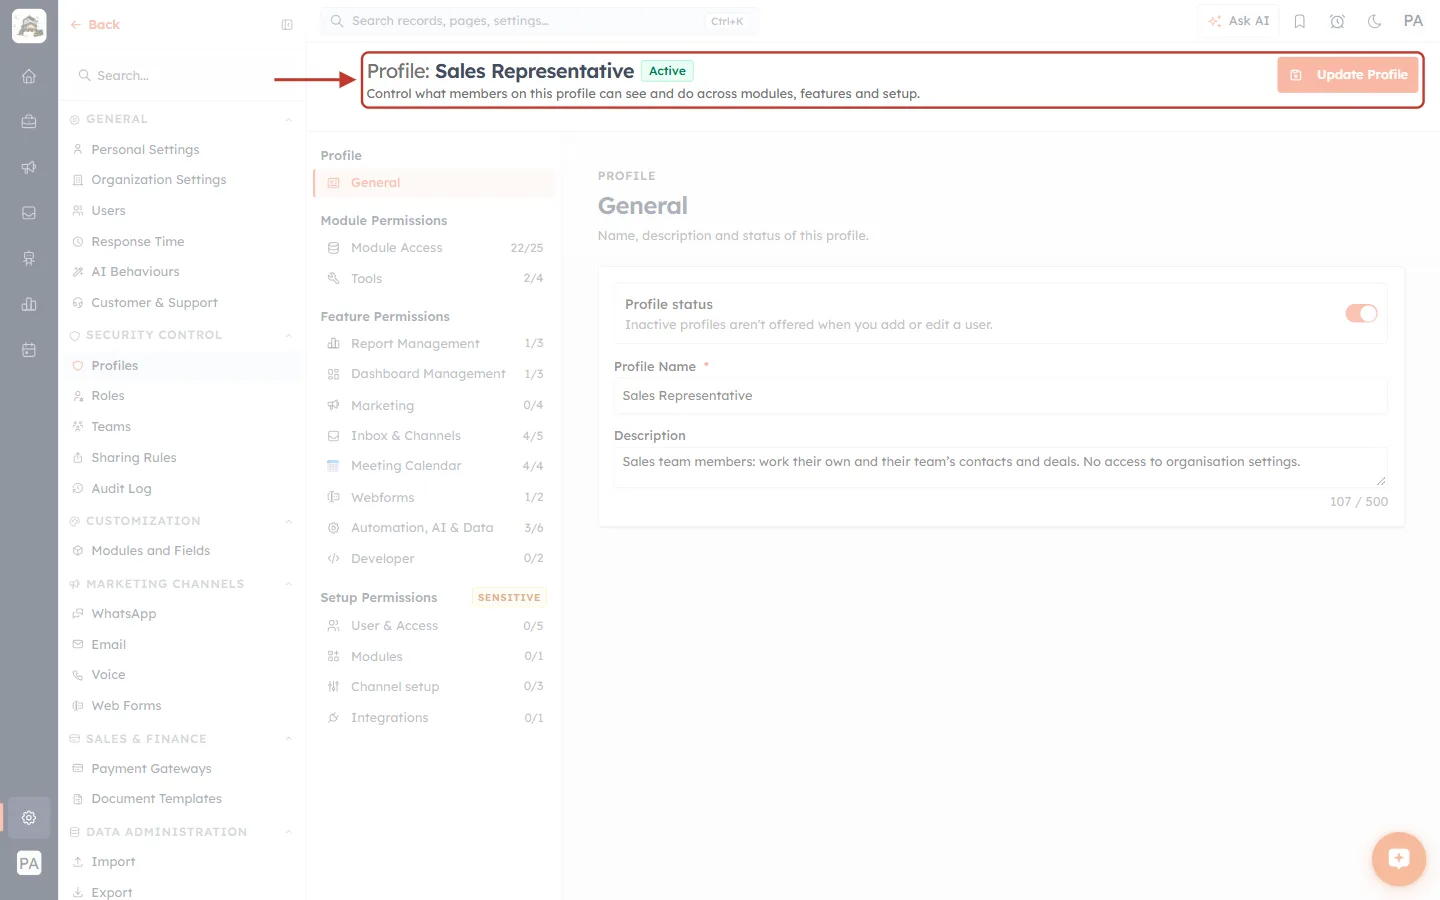
What this screenshot shows. Click Edit. The ringed header shows which profile you are editing.
Profile: Sales Representative with a green Active badge.
The line underneath reads Control what members on this profile can see and do across modules, features and setup.
Update Profile (top right) stays faded until you change something.
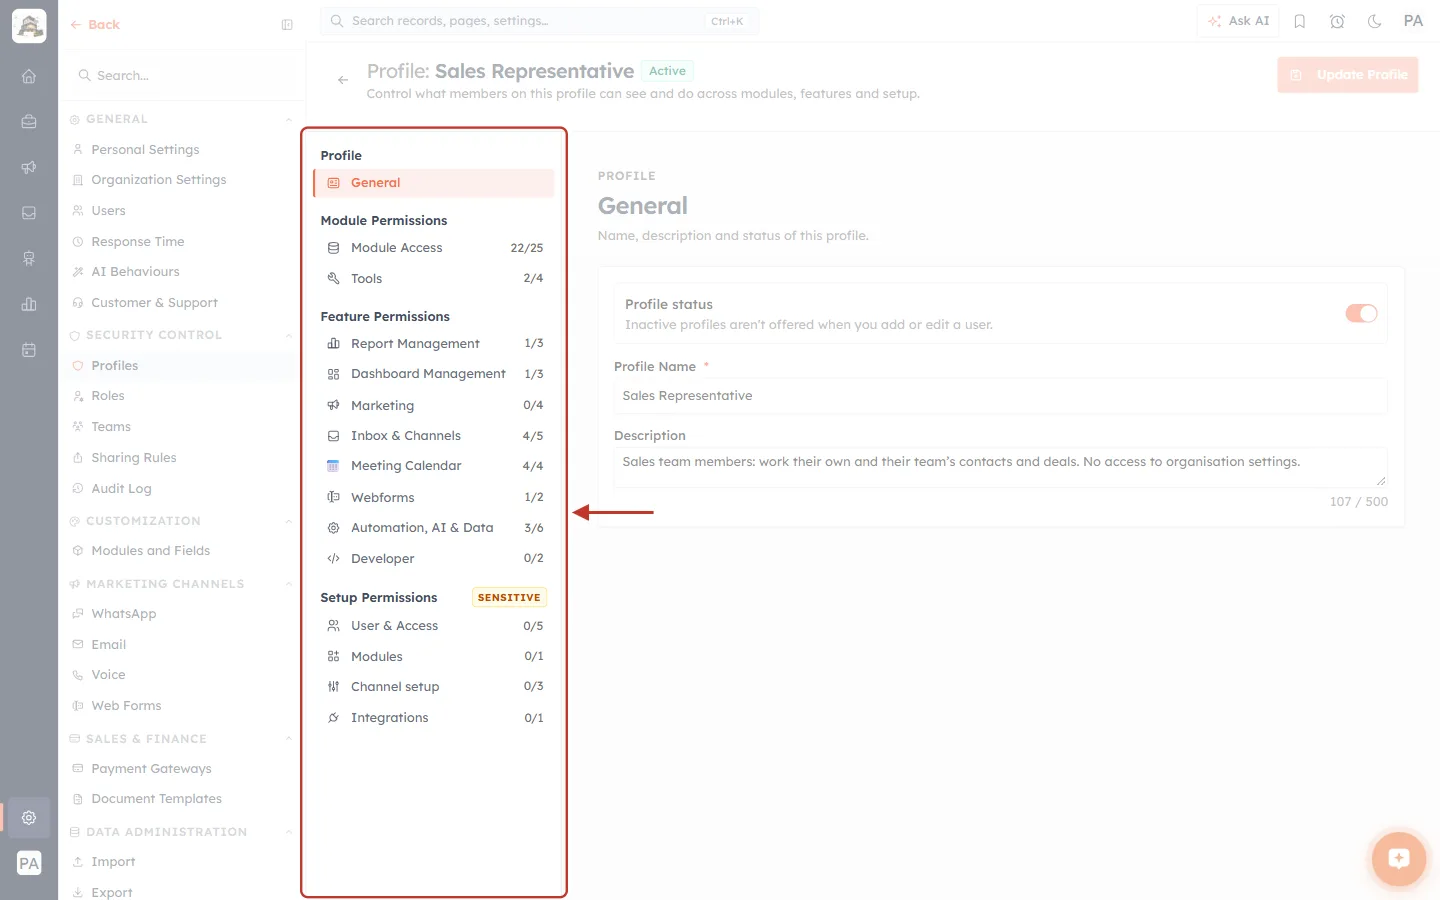
What this screenshot shows. The ringed section list shows that everything you set was saved.
The counters match Step 21: Module Access 22/25, Tools 2/4, Report Management 1/3, Marketing 0/4, all Setup sections at 0.
Click any section to check or change its settings.
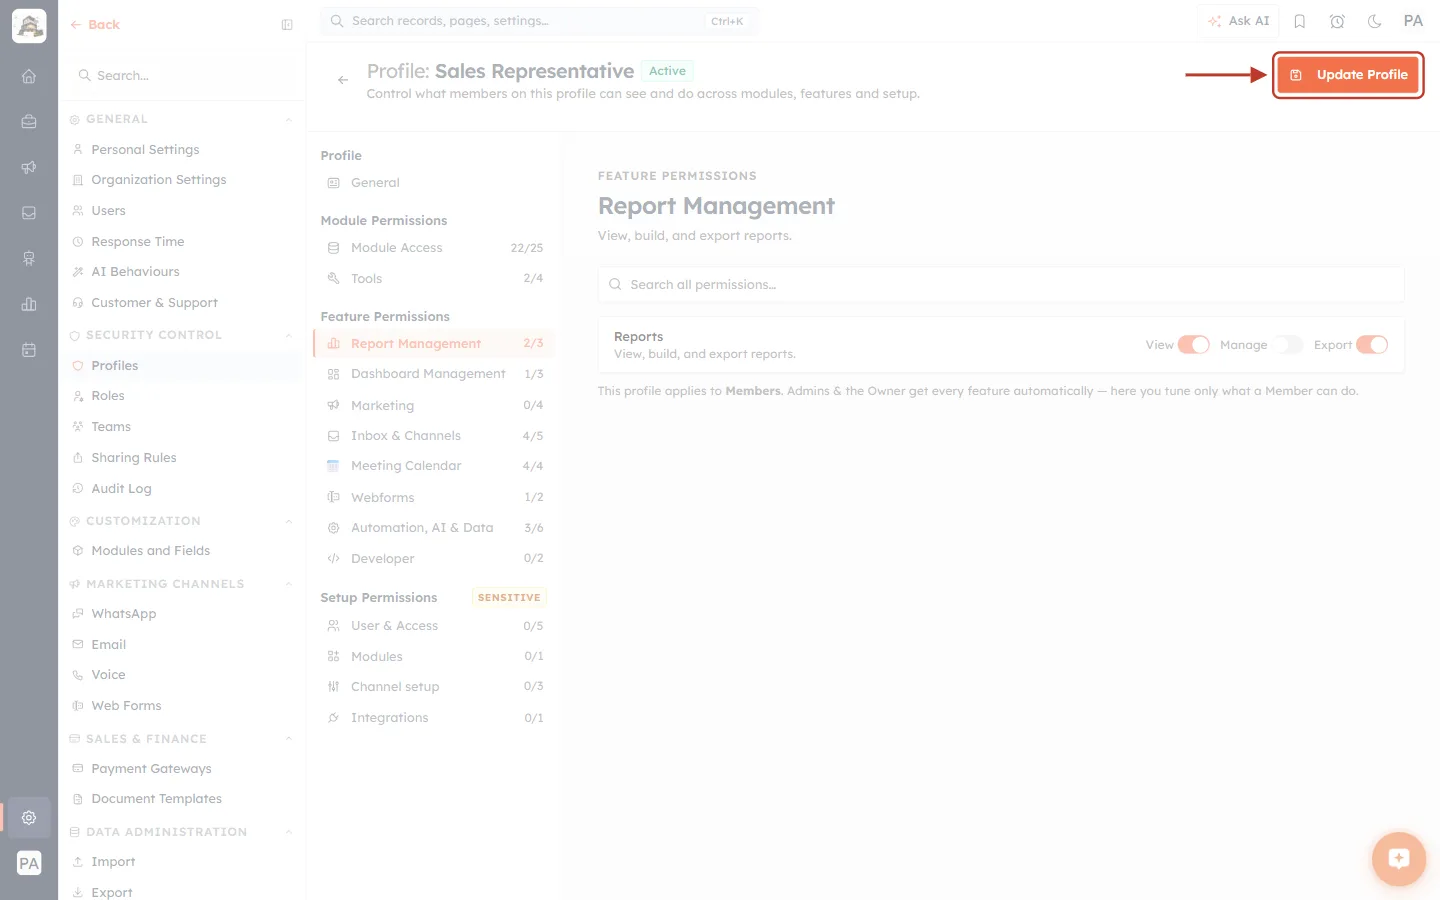
What this screenshot shows. After one change, switching Reports → Export back on, the ringed Update Profile button turns bright orange.
Click it to save. The message Profile updated successfully appears and you return to the Profiles list.
The change applies to every user on this profile. Ask them to refresh their browser to pick it up.
Clone a profile#
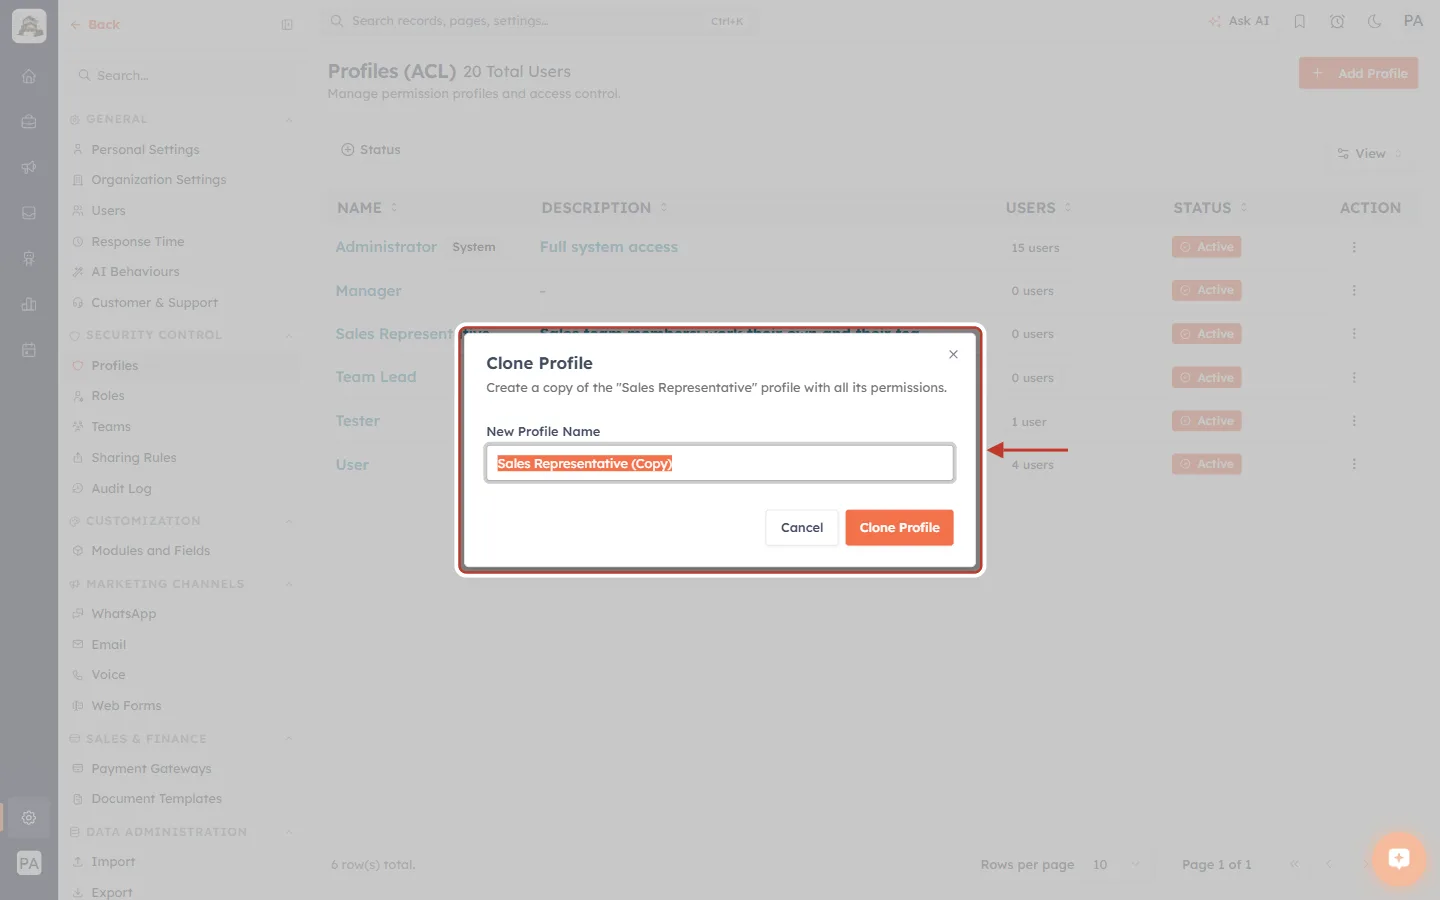
What this screenshot shows. Click Clone. The ringed Clone Profile dialog opens.
It reads Create a copy of the “Sales Representative” profile with all its permissions.
New Profile Name is filled in as Sales Representative (Copy). Type a better name, such as Senior Sales Representative.
Clone Profile makes the copy. Cancel closes the dialog.
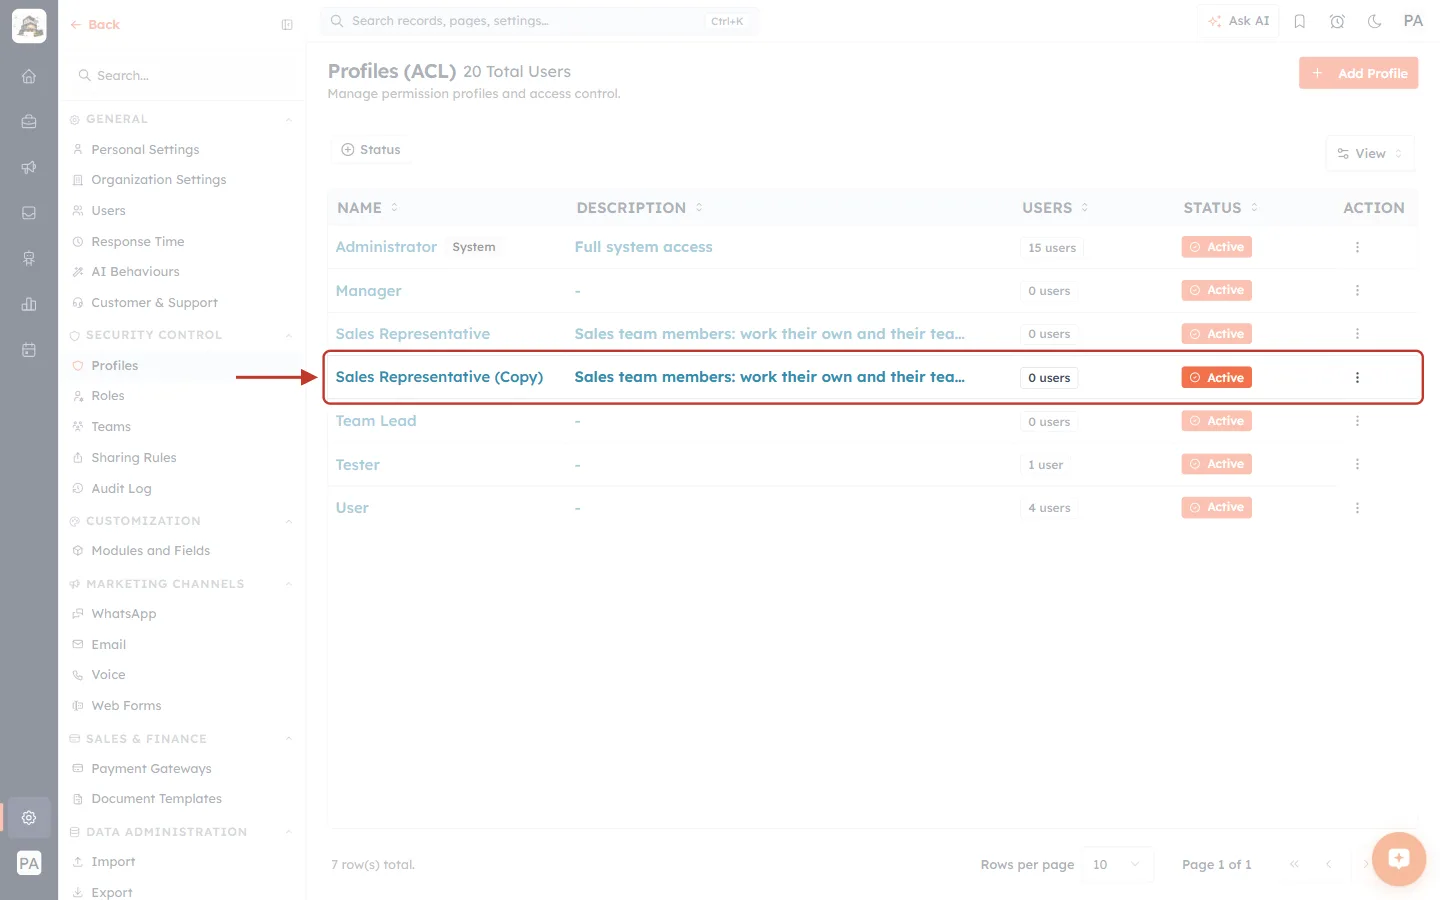
What this screenshot shows. The new Sales Representative (Copy) row is ringed.
It has the same description and every permission of the original, 0 users and an Active status.
Edit the copy to make the differences, such as giving a senior rep Delete: Own on Deals.
Mark a profile inactive#
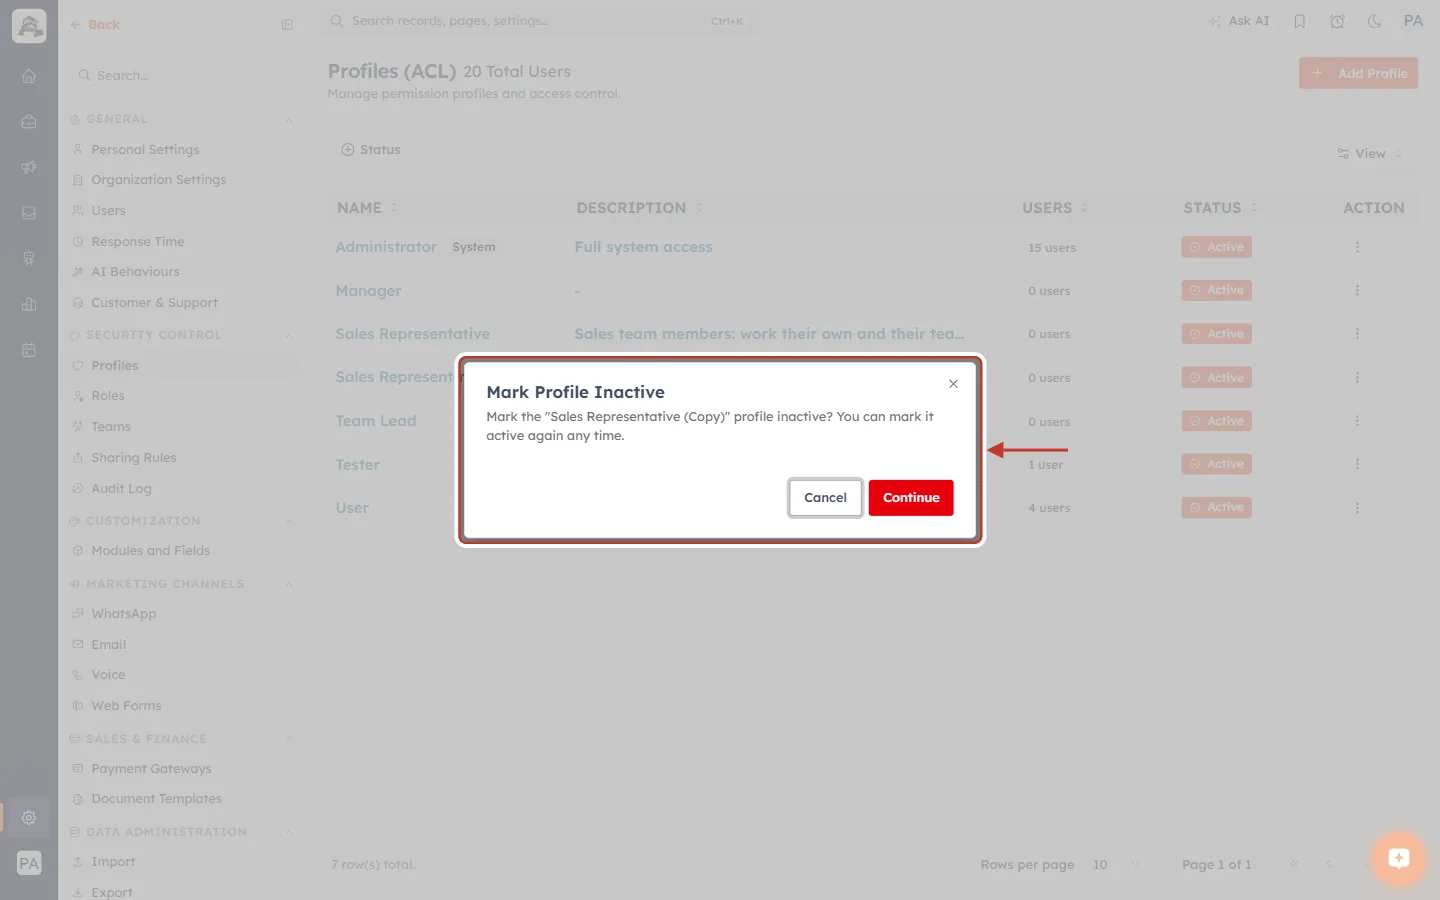
What this screenshot shows. Click Mark Inactive. The ringed confirmation dialog opens.
It reads Mark the “Sales Representative (Copy)” profile inactive? You can mark it active again any time.
Click Continue to confirm, or Cancel to keep it active.
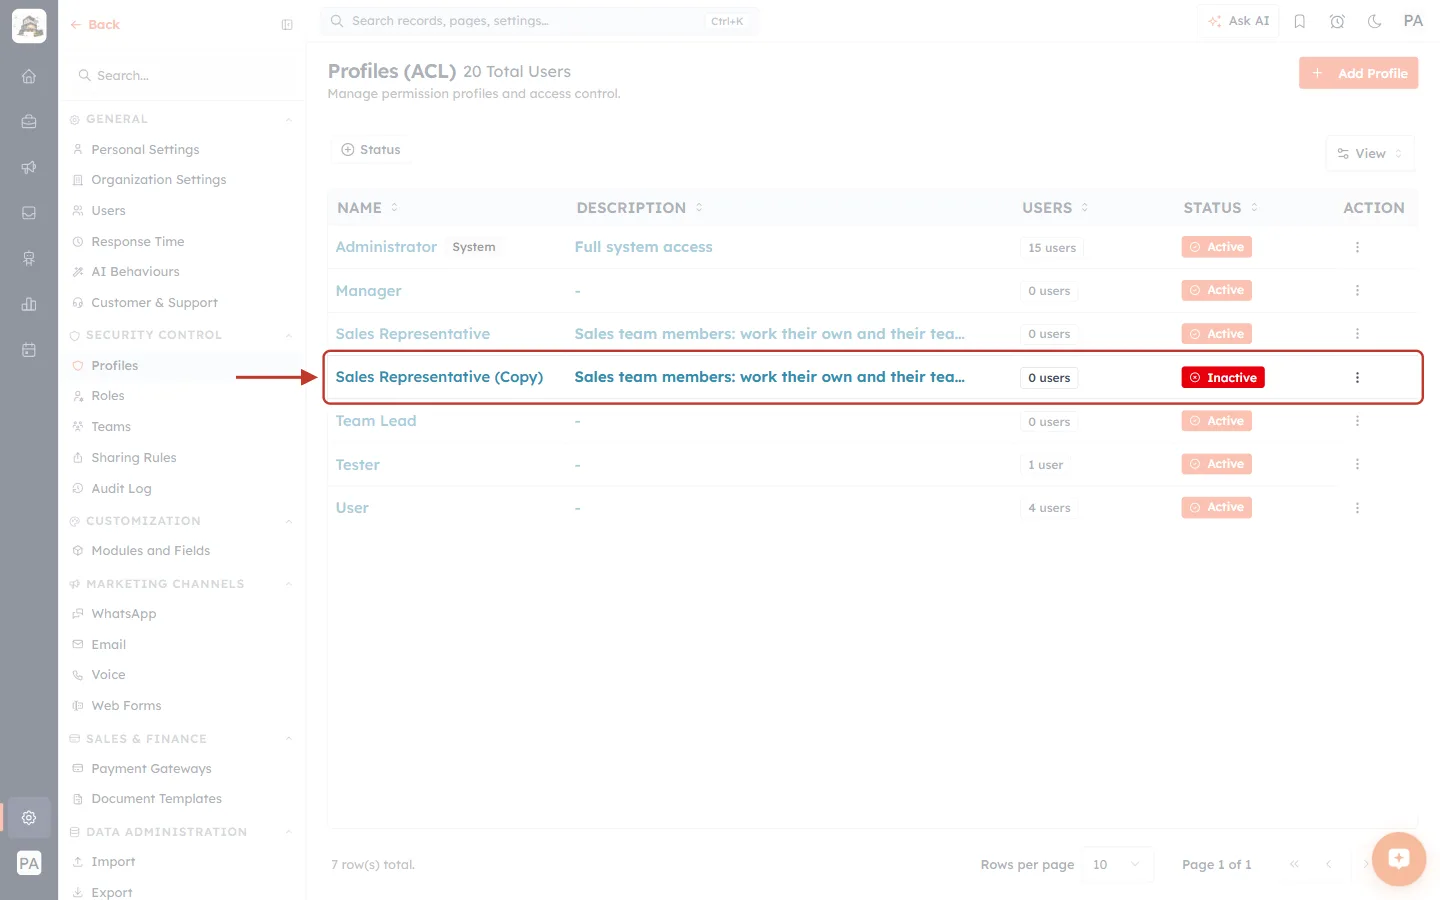
What this screenshot shows. The ringed row now shows a red Inactive status.
The profile and all its settings are kept.
It is no longer offered when you add or edit a user.
Use this instead of deleting when you are not sure a profile is still needed.
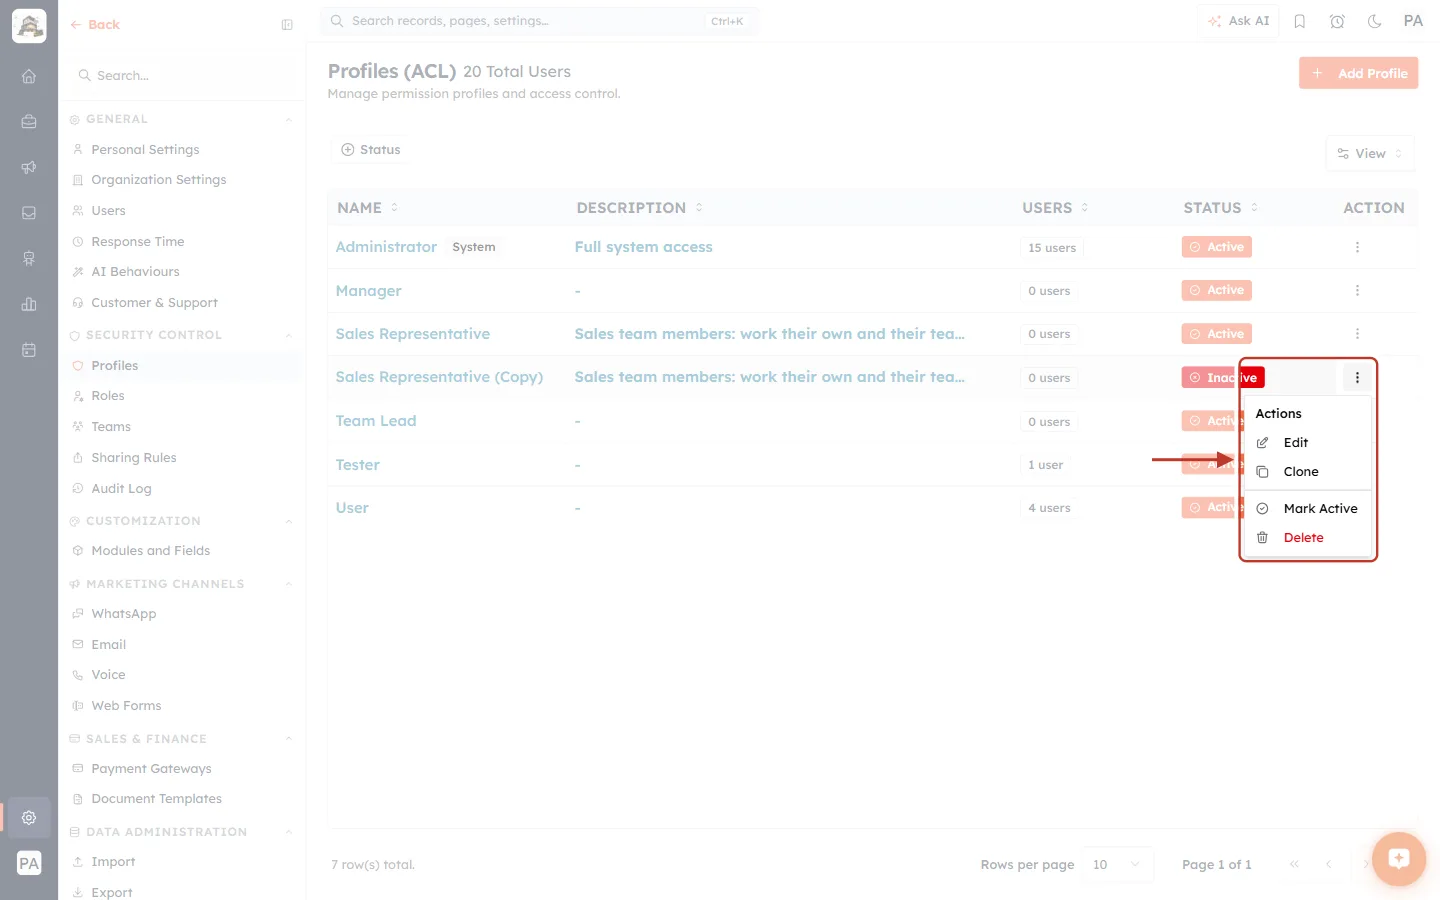
What this screenshot shows. The ⋮ menu of the inactive profile is open and ringed.
Mark Inactive has become Mark Active. Click it to bring the profile back.
Edit, Clone and Delete are still available.
Delete a profile#
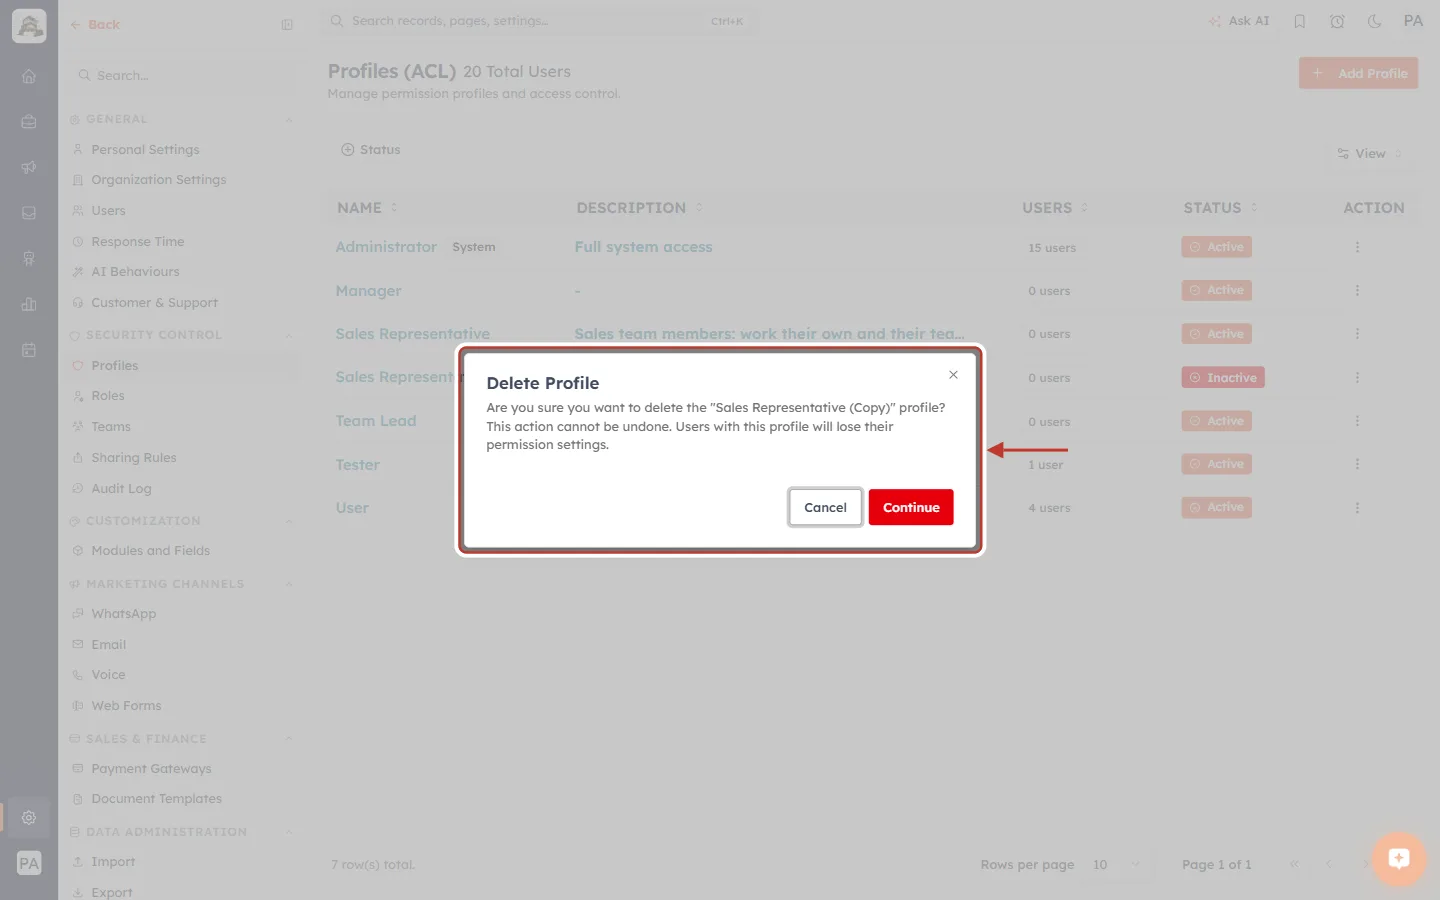
What this screenshot shows. Click Delete. The ringed Delete Profile dialog asks you to confirm.
It reads Are you sure you want to delete the “Sales Representative (Copy)” profile? This action cannot be undone. Users with this profile will lose their permission settings.
Click Continue to delete, or Cancel to keep it.
⚠️
Before deleting a profile, check its USERS count. Move everyone on it to another profile in Settings → Users first, so nobody is left without permissions.
Suggested Starting Profiles#
Profile | Module Access (main modules) | Tools | Features | Setup |
|---|---|---|---|---|
Sales Representative | View Team · Edit Own · Delete None | Mass Update, Change Owner | Reports/Dashboards view, WhatsApp: Own | All off |
Sales Manager | View All · Edit Team · Delete Own | All except Mass Delete | Reports/Dashboards manage, WhatsApp: Team | All off |
Marketing Executive | Contacts View All · Edit None | Mass Update on Contacts | All Marketing on, Workflow Management | All off |
Support Agent | Tickets View Team · Edit Own · Delete None | None | WhatsApp + AI Agent Chat: Team | All off |
Best Practices#
Remove, then save. New profiles start with full access. Check every counter before clicking Create Profile.
Make one profile per job type, not one per person, and name it after the job.
Start narrow. It is easier to add a permission later than to take one away.
Use descriptions so the next admin knows who each profile is for.
Clone instead of starting over when you need a similar profile.
Mark inactive before deleting if you are not sure a profile is still needed.
Review all profiles when you add a module. It appears in every profile with full access.
Check the audit log to see who changed a profile and when. See Audit Log: See Who Changed Which Setting in Your CRM, and When.
Troubleshooting#
“Name must be at least 2 characters”#
Open General and enter a Profile Name of at least two characters, then click Create Profile again.
Update Profile is greyed out#
It only becomes active once you change something. If you changed a setting and it is still grey, click the section again to check the change took effect.
A module is missing from the Change Owner or Mass Update picker#
The picker only lists modules where the profile can edit. In Module Access, set that module’s Edit to something other than None, then open the picker again.
A user can still see or do something they shouldn’t#
Open Settings → Users and check which profile the user actually holds.
Check whether they are an Admin or the Owner. Feature and Setup permissions don’t limit them.
Check sharing rules. They can open extra records on top of the profile. See Understanding Sharing Rules: When and Why to Use Them.
Ask the user to refresh their browser after you save.
I can’t edit or delete the Administrator profile#
That is by design. The built-in Administrator profile only offers View and Clone.
Frequently Asked Questions#
What is the difference between a profile and a role?
The profile decides what a user can do. The role decides whose records they can reach in the hierarchy. See Understanding the Role Hierarchy: How Data Visibility Works.
If I edit a profile, does it change for everyone who has it?
Yes. Every user on the profile gets the new settings when you click Update Profile.
Can one user have two profiles?
No. Each user holds one profile. Clone the closest profile and adjust it if someone needs a mix.
Does a cloned profile stay linked to the original?
No. The copy is independent. Later changes to one don’t affect the other.
Where do I control ticket access?
In the Tickets row of Module Access, plus the Team Inbox settings. See Ticket Permissions: Control Who Can See, Edit and Reply to Support Tickets (Step-by-Step).
Previous and Next#
Previous: Profile Permissions Explained: What Every Module, Feature & Setup Setting Controls
Next: Understanding the Role Hierarchy: How Data Visibility Works
Related Articles#
Profile Permissions Explained: What Every Module, Feature & Setup Setting Controls
Create Teams: Group Users for Lead Routing, Reporting & Sharing
Invite Your Team: How to Add and Manage Users in AI Engage CRM
Ticket Permissions: Control Who Can See, Edit and Reply to Support Tickets (Step-by-Step)
Audit Log: See Who Changed Which Setting in Your CRM, and When
Was this article helpful?
Ready to implement this?
OpenAI Engage and apply what you just learned to your own workspace.
Open AI Engage CRM