Loading…


KnowledgeBase
Audit Log: See Who Changed Which Setting in Your CRM, and When
What is the Audit Log?#
The Audit Log is a history of every important change made to how your CRM is set up. Each line tells you who made the change, when they made it, what part of the CRM it was in, and exactly what they changed.
Example. On Monday morning your sales reps tell you they can no longer delete contacts. You open the Audit Log, pick the Profiles area, and straight away see: “Riya Kapoor — Changed permissions on profile ‘Sales Rep’: Contacts — Delete set to None”, with the date and time. Now you know what changed, who changed it, and when — and you can put it back or ask Riya why.
Use the Audit Log to:
Find out why something stopped working — a field that disappeared, a workflow that stopped running, a permission that changed.
Keep an eye on sensitive changes — new users, deactivated users, profile and role changes, API tokens, billing changes.
Check deleted or merged records — see who deleted or merged a contact, deal or other record.
Keep a record for compliance — export the log to a CSV file for your own files or an auditor.
What is recorded?#
Every entry belongs to an area of the CRM. These are the areas you can filter by:
| Area | Examples of changes recorded |
|---|---|
| Module Config, Field Config, Layout, View | Creating a module, adding or deleting a field, changing a field’s options, making a field required, editing a layout, creating or deleting a list view |
| Users, Profiles, Permissions, Roles, Teams, Sharing Rules | Inviting, activating or deactivating a user, changing a profile’s permissions, creating a role, adding someone to a team, creating a sharing rule |
| Org Settings, Billing | Changing the company time zone or logo, changing or renewing your plan |
| Workflows, Campaigns, Webforms, Scheduling | Creating, publishing or deactivating a workflow, archiving a campaign, publishing a web form, editing a booking page |
| WhatsApp, Email Config, Voice, Integrations, Api Tokens | Connecting a WhatsApp account, changing email sharing, turning on call recording, connecting or disconnecting an integration, creating an API token |
| Analytics Config, Ai Config, Data Admin | Creating a dashboard, changing AI settings such as AI Summaries, other data administration changes |
| Records | Deleting or merging records such as contacts or deals |
ℹ️
Everyday record edits are not in the Audit Log. If someone changes a contact’s phone number or a deal’s stage, that is shown on the record’s own timeline. See Track Activity with the Record Timeline. The Audit Log is for settings and set-up changes, plus record deletes and merges.
How far back can I see?#
How long entries are kept depends on your plan. Older entries are removed automatically.
| Plan | Entries kept for |
|---|---|
| Free | 1 day |
| Solo | 5 days |
| Business | 15 days |
| Business Pro | 30 days |
The date filter only offers ranges that fit your plan. For example, on a plan that keeps 30 days you will see Last 30 Days but not Last Quarter.
✅
If you need a longer history, export the log to CSV regularly (see Part 5) and keep the files. An exported file never expires.
Before you begin#
Who can open the Audit Log: the account Owner and Admins can always see it. Other members can see it only if their profile has the Audit Log permission switched on (see Part 6).
The log is read-only. Nobody — not even the Owner — can edit or delete an entry. That is what makes it trustworthy.
Times are shown in your own time zone, using the date format from your personal settings.
Part 1: Open the Audit Log#
Step 1: Open Setup#
Click the Setup icon (the gear) near the bottom of the dark icon bar on the left of the screen.
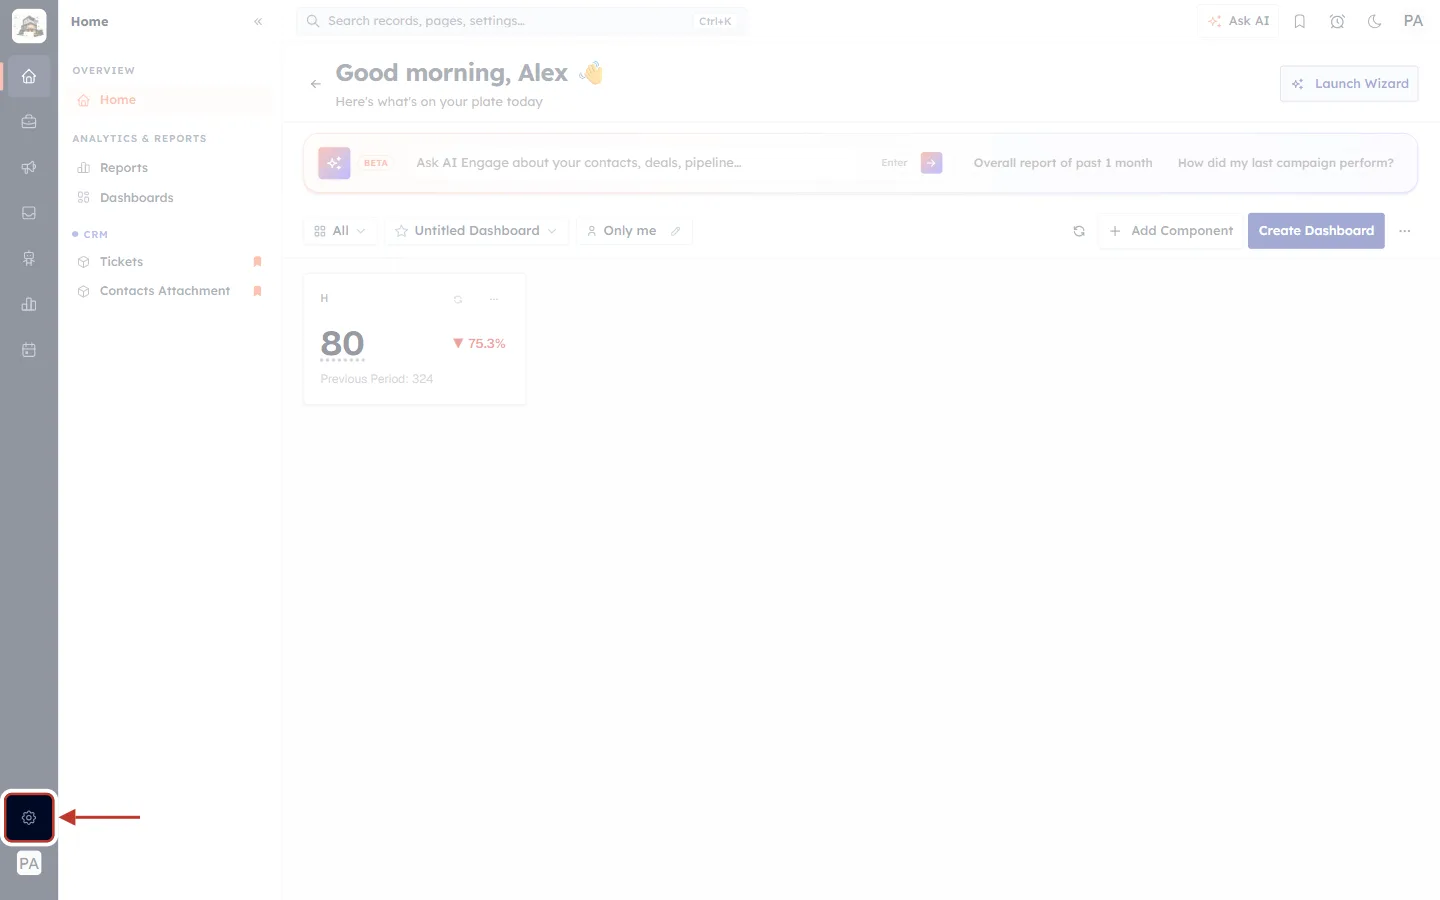
What this screenshot shows. The CRM with the Setup gear icon ringed at the bottom-left.
Setup icon (ringed): opens the Setup page, where all the settings of your CRM are grouped into cards.
Icons above it: Home, Sales, Marketing, Inbox and your other main menus. You don’t need them for this task.
Your initials (below the gear): your own profile menu.
Step 2: Click Audit Log in the Security Control card#
On the Setup page, find the Security Control card. It holds everything to do with who can do what in your CRM: Profiles, Roles, Teams, Sharing Rules and Audit Log.
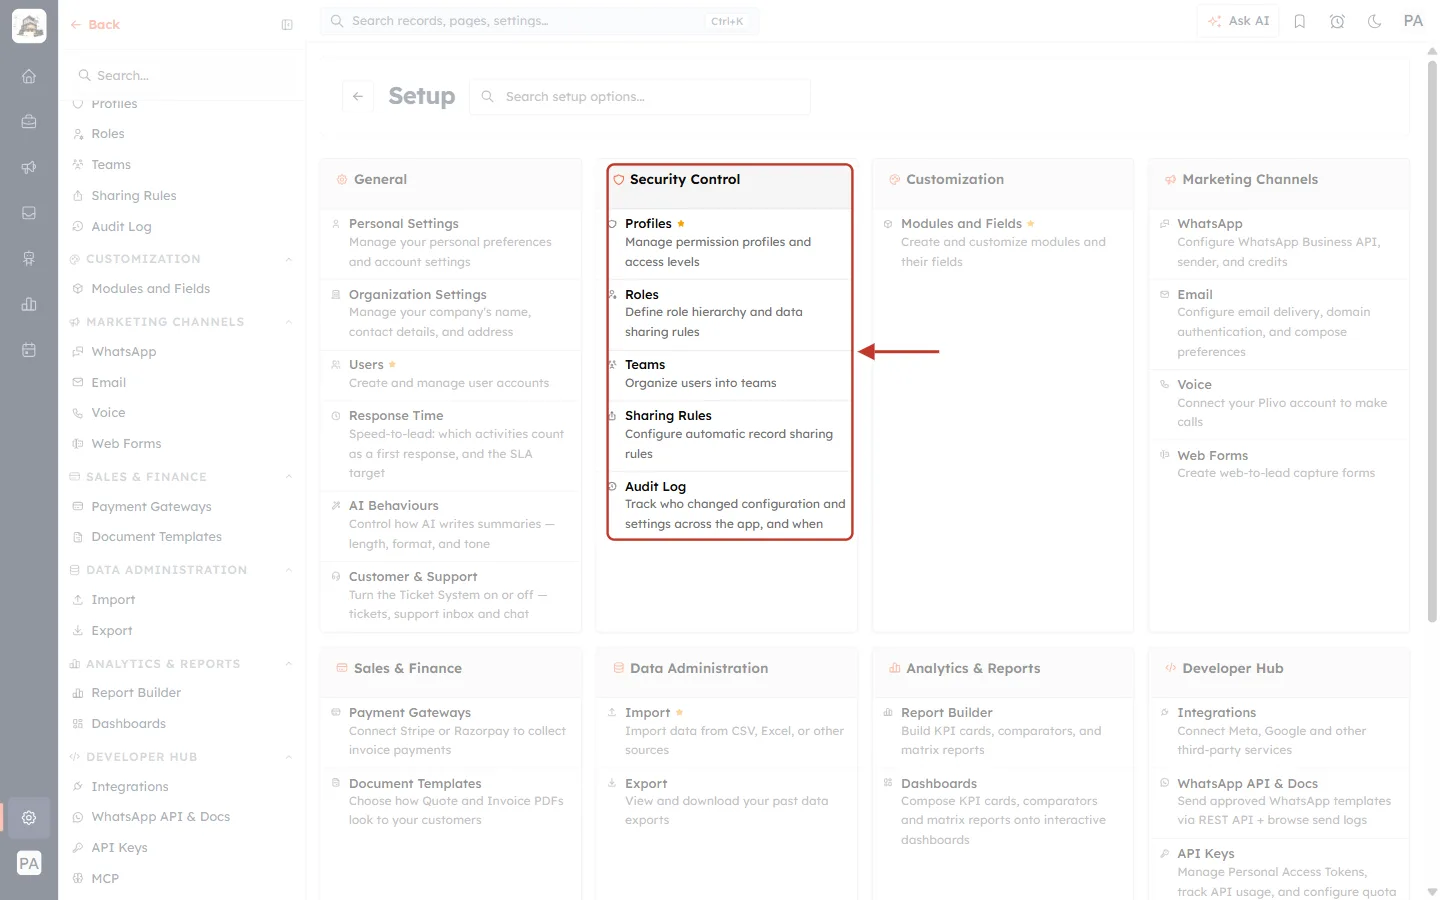
What this screenshot shows. The Setup page with the Security Control card ringed.
Security Control card (ringed): lists Profiles, Roles, Teams, Sharing Rules and, at the bottom, Audit Log.
Other cards: General, Customization, Marketing Channels, Sales & Finance, Data Administration, Analytics & Reports and Developer Hub hold the rest of your settings.
Left menu: the same settings as a list. Security Control → Audit Log there takes you to the same page.
Search setup options: you can also type “audit” here to find it.
Click Audit Log.
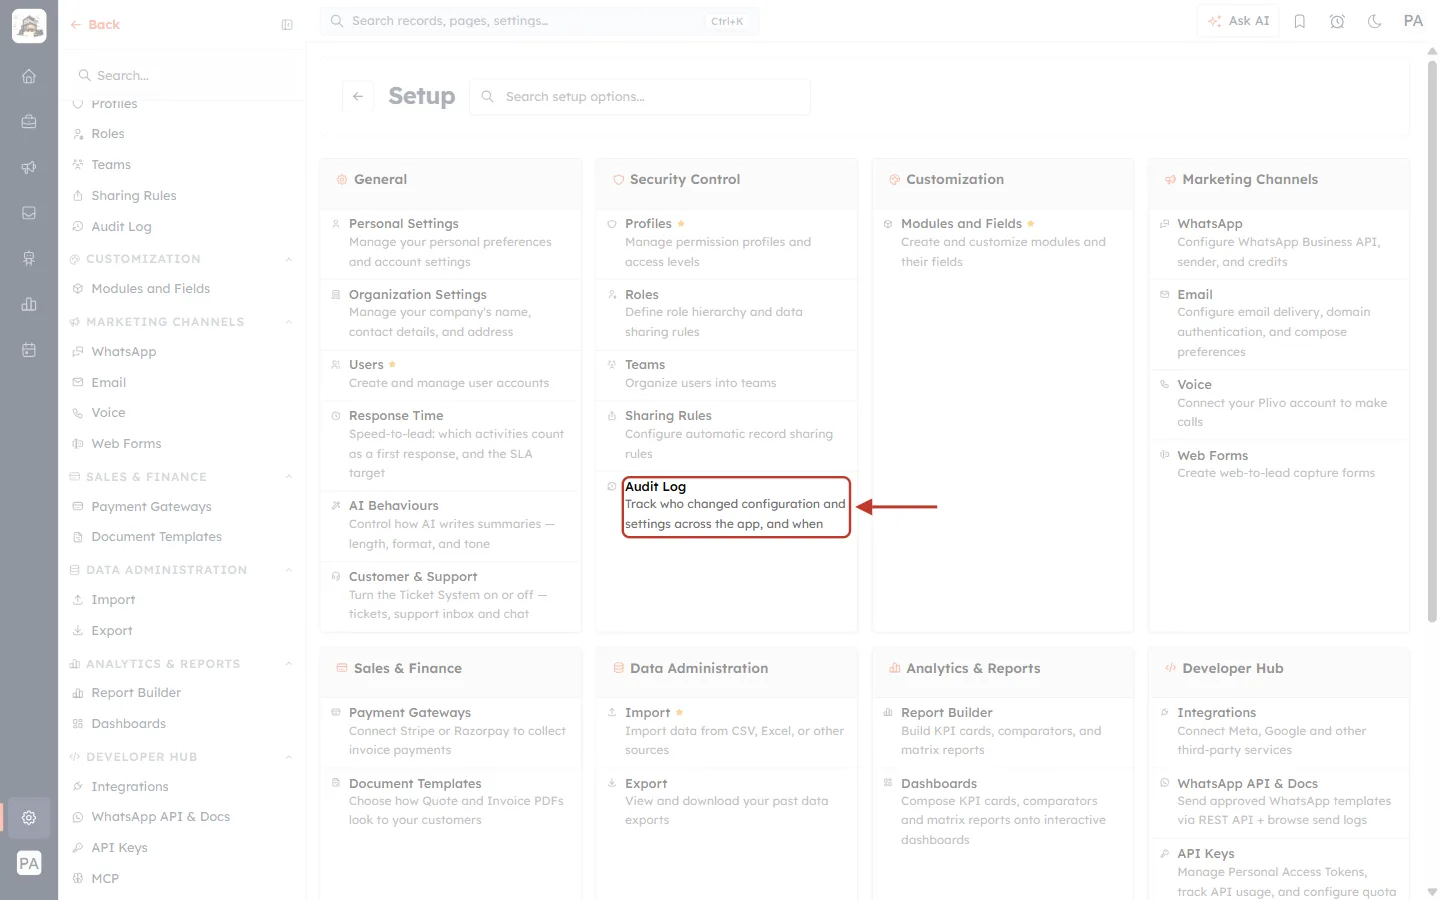
What this screenshot shows. The Audit Log item, with its description “Track who changed configuration and settings across the app, and when.”
Audit Log (ringed): click the name to open the log.
If you don’t see Audit Log here, your profile doesn’t have access. Ask your account Owner or an Admin (see Part 6).
The Audit Log page at a glance#
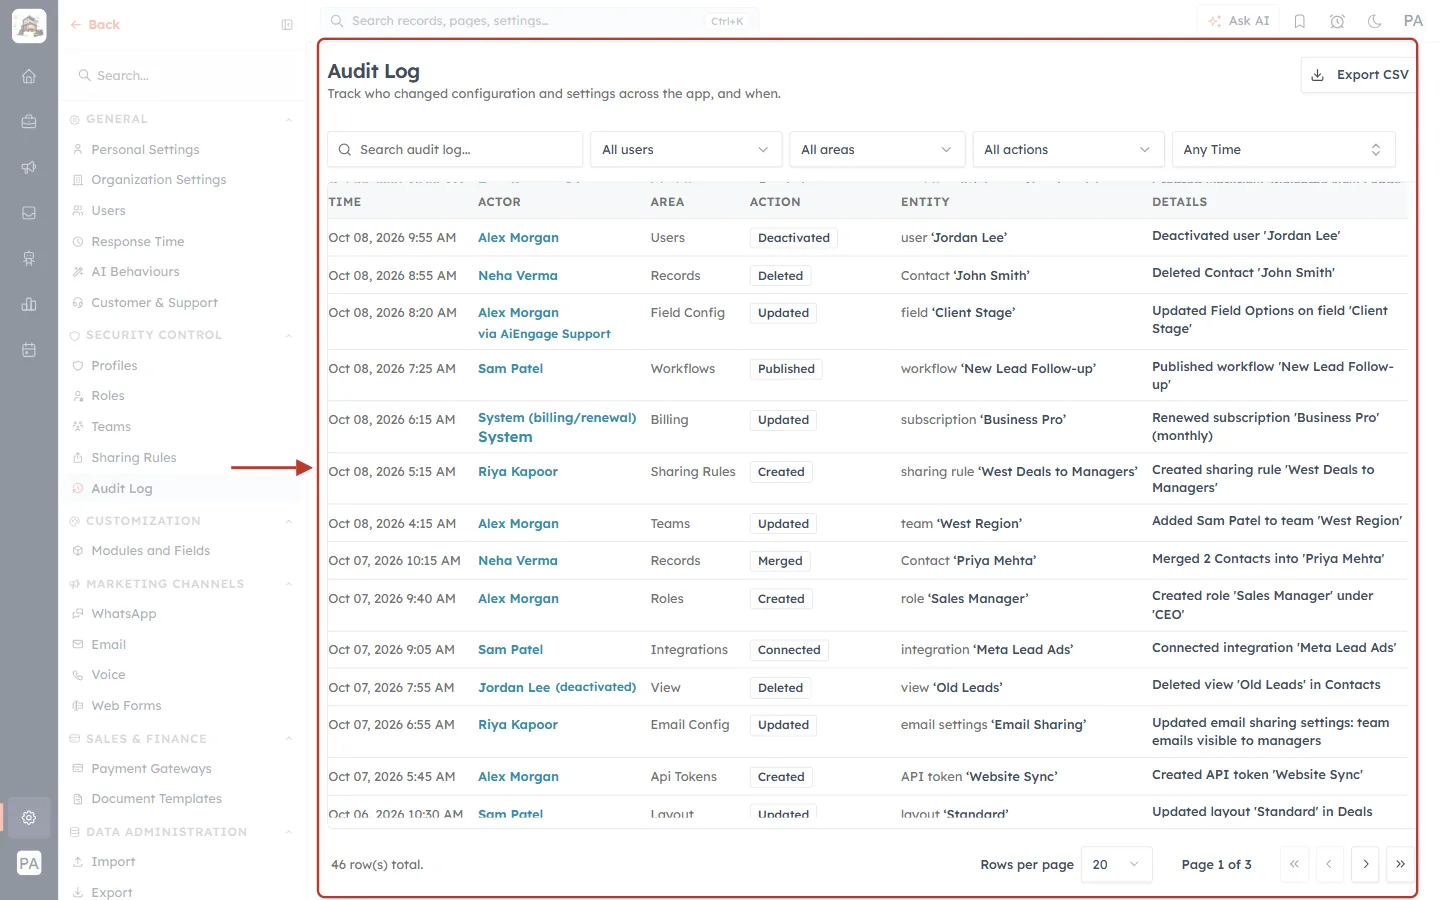
What this screenshot shows. The whole Audit Log page, ringed. The newest change is always at the top.
Title and description (top-left): “Audit Log — Track who changed configuration and settings across the app, and when.”
Export CSV (top-right): downloads the entries you are looking at as a spreadsheet file (Part 5).
Filter bar: a search box, then All users, All areas, All actions and Any Time (Part 3).
The list: one row per change, with six columns — Time, Actor, Area, Action, Entity and Details (Part 2).
Footer: the total number of entries (here “46 row(s) total.”), Rows per page and the page buttons (Part 4).
Part 2: Read an entry#
Each row is one change. Read it from left to right like a sentence: at this time, this person, in this area, did this to this item — and here are the details.
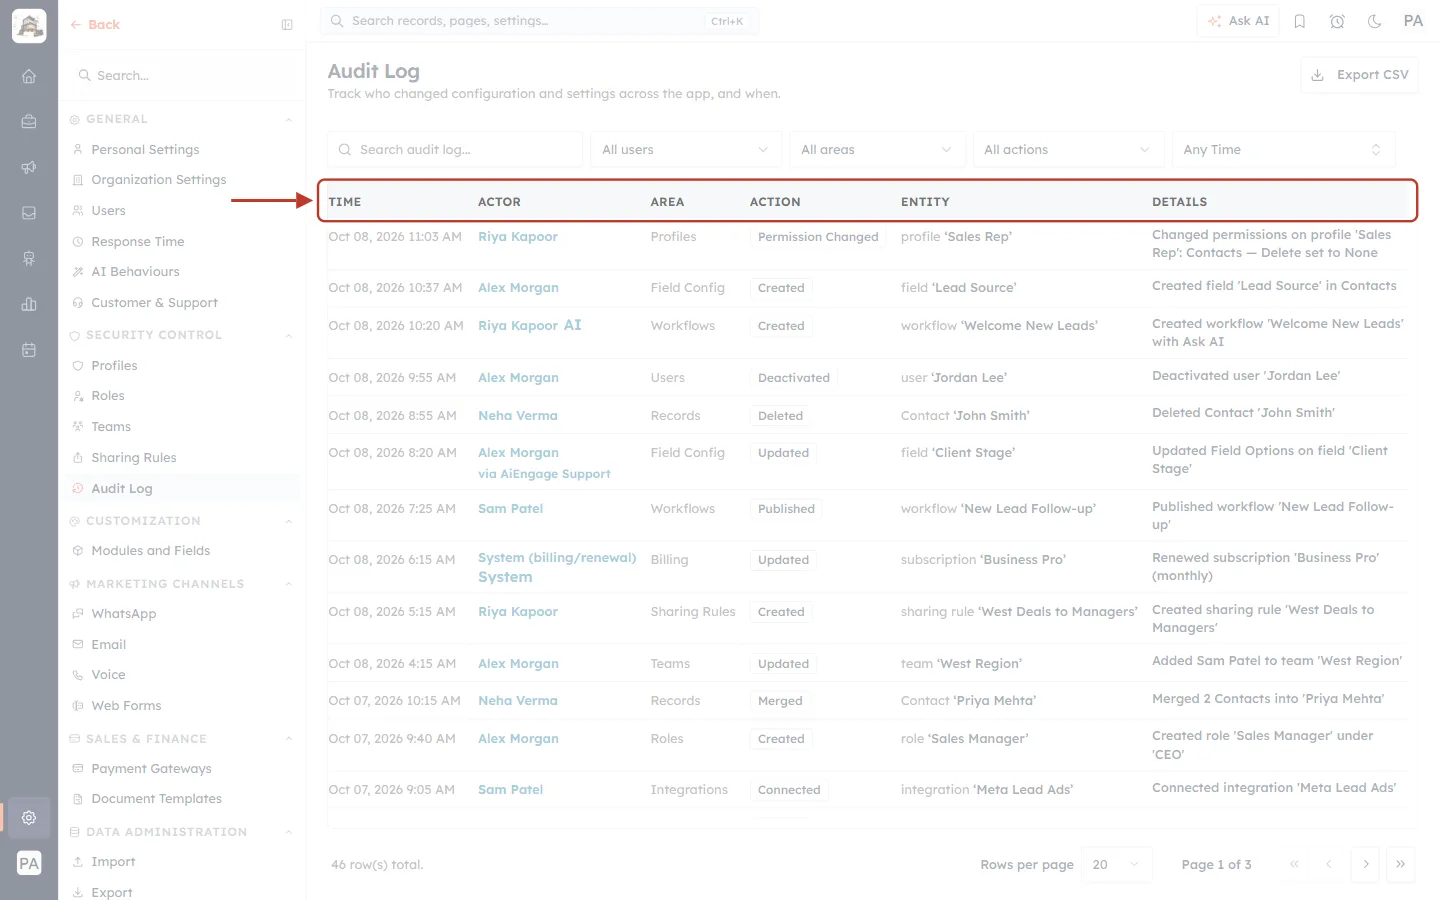
What this screenshot shows. The six column headings, ringed.
TIME — the date and time of the change, in your time zone.
ACTOR — who made the change.
AREA — the part of the CRM where the change happened, such as Profiles or Field Config.
ACTION — what kind of change it was, shown in a small box: Created, Updated, Deleted, Permission Changed and so on.
ENTITY — the item that was changed: its type (field, profile, user…) and its name in quotes.
DETAILS — a full sentence describing the change.
Here is one entry, ringed so you can follow it column by column:
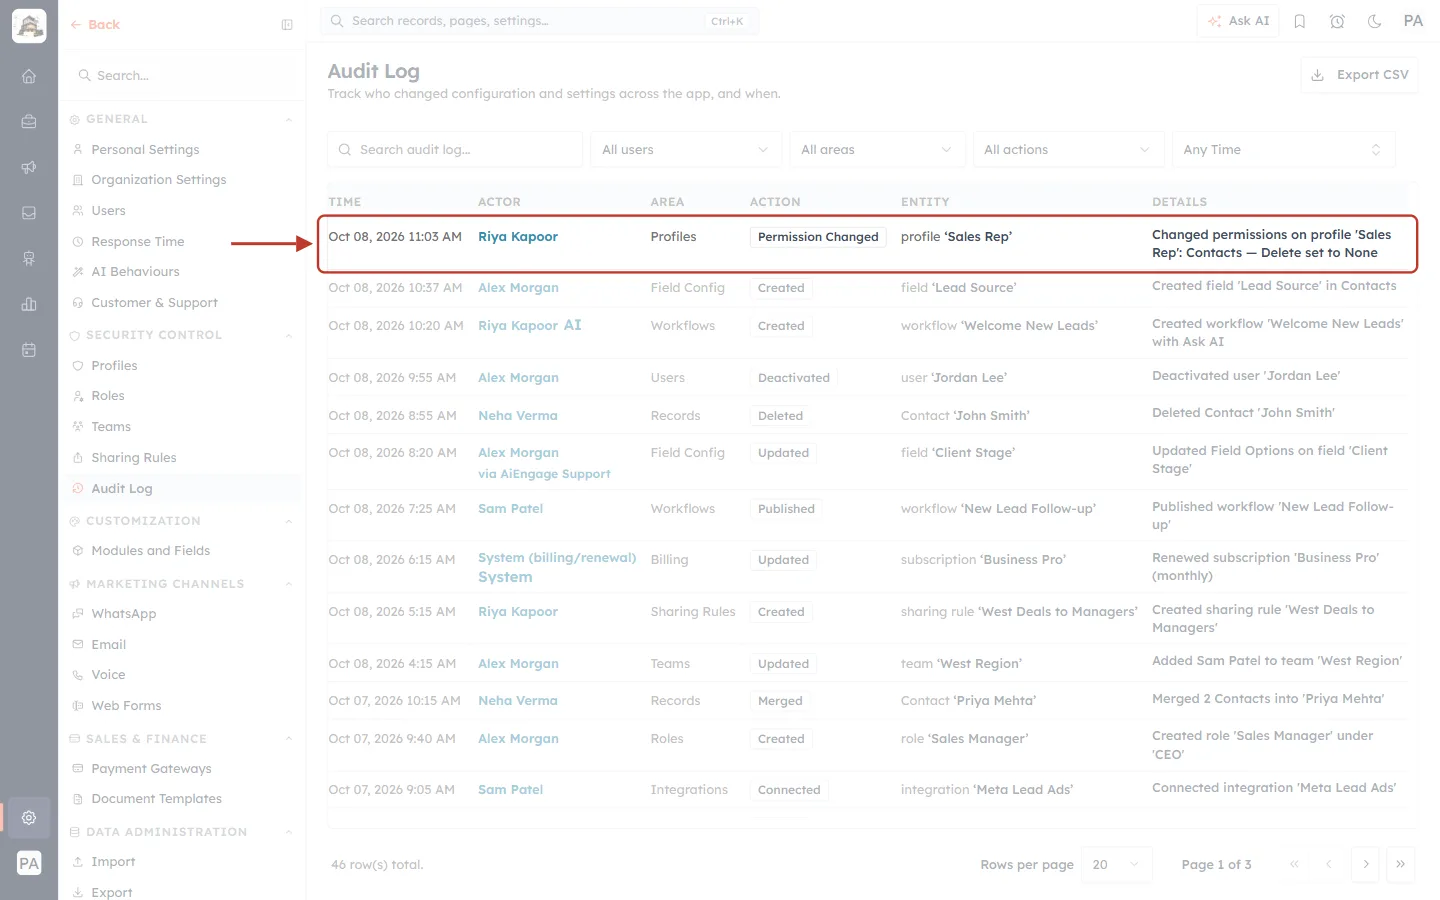
What this screenshot shows. One full entry: a change to the Sales Rep profile.
Time: Oct 08, 2026, late morning.
Actor: Riya Kapoor made the change.
Area: Profiles.
Action: Permission Changed.
Entity: profile ‘Sales Rep’.
Details: “Changed permissions on profile ‘Sales Rep’: Contacts — Delete set to None”. In other words, people with the Sales Rep profile can no longer delete contacts.
See the person’s email address#
Hold your mouse over a name in the Actor column. A small box pops up with that person’s email address, so you can tell apart two people with the same name.
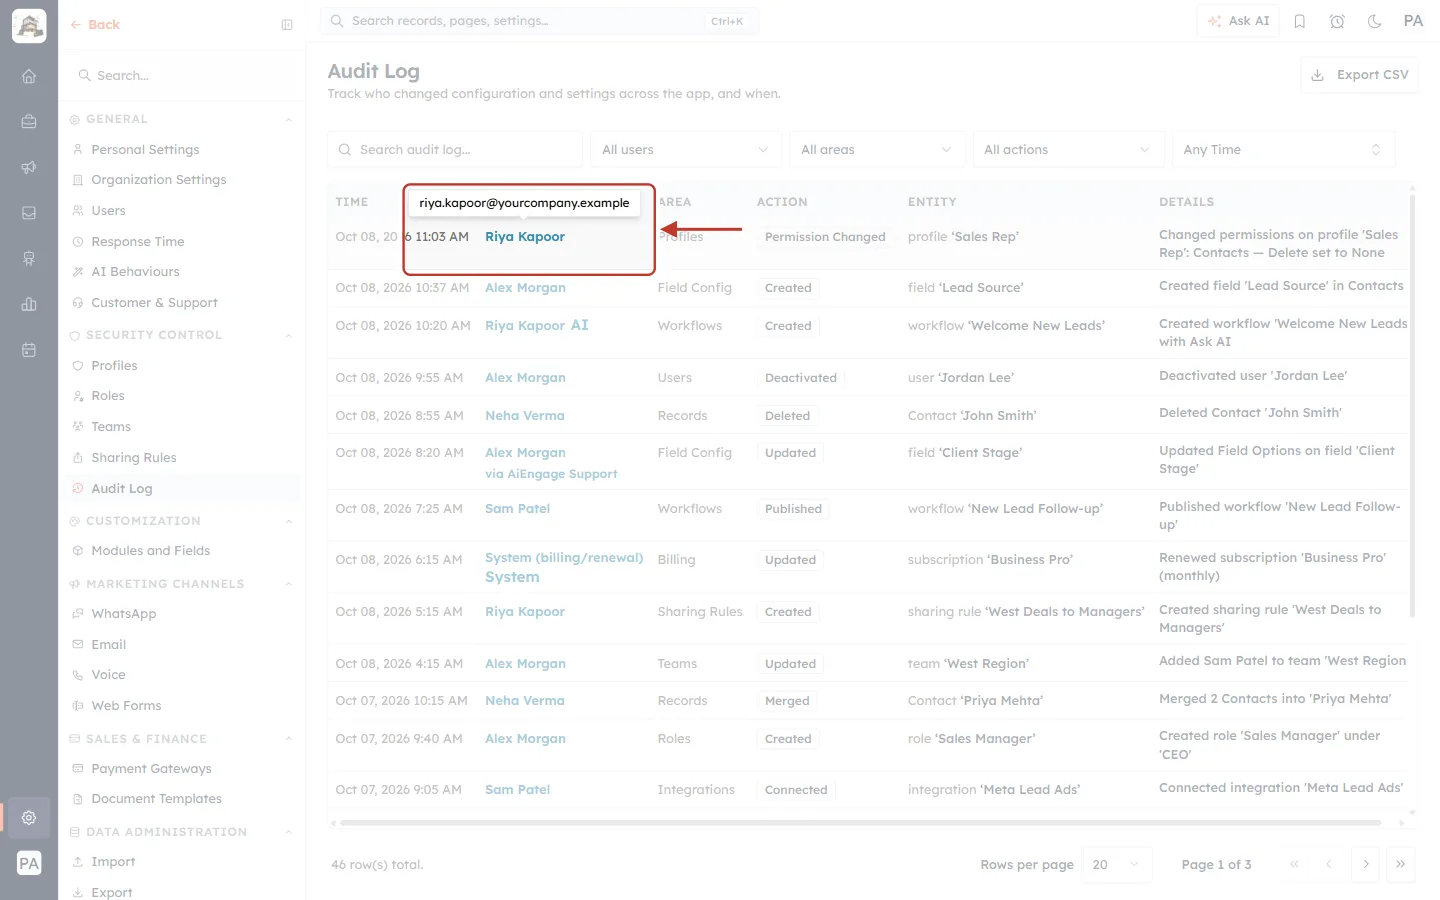
What this screenshot shows. The mouse is over Riya Kapoor, and the email box riya.kapoor@yourcompany.example has appeared above the name.
Email box (ringed): appears while your mouse is over the name and disappears when you move away.
The rest of the row stays the same — hovering changes nothing.
Labels you may see next to a name#
Sometimes the Actor column has an extra label. Here is what each one means.
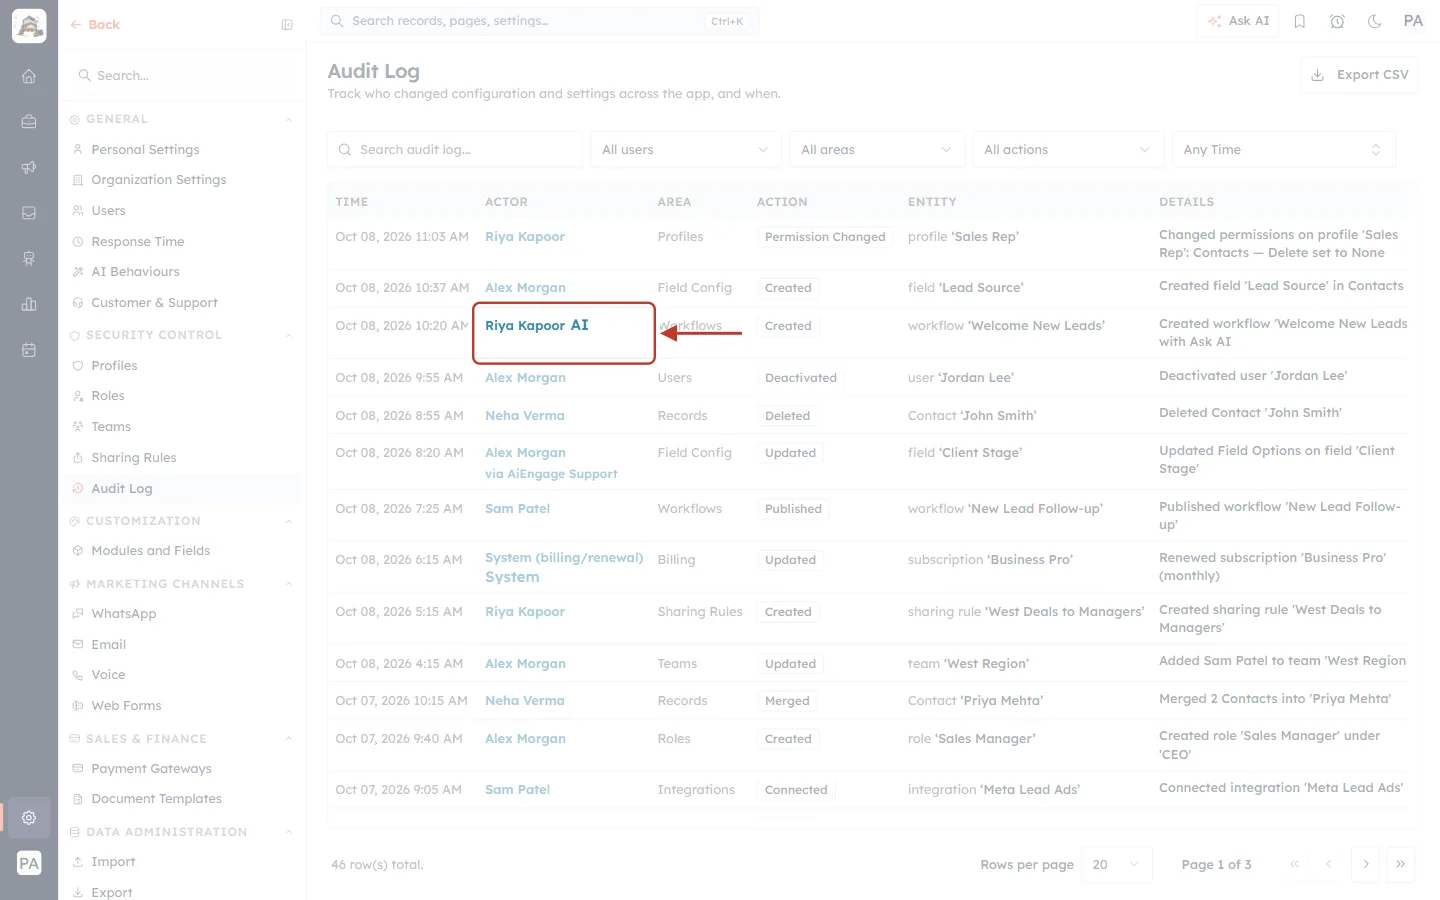
What this screenshot shows. The Actor cell of an entry with a small AI label after the name.
AI: the change was made by an AI feature (for example, a workflow built with Ask AI), not typed in by hand. The name tells you whose account the AI was working for.
In this example the Details column says “Created workflow ‘Welcome New Leads’ with Ask AI”.
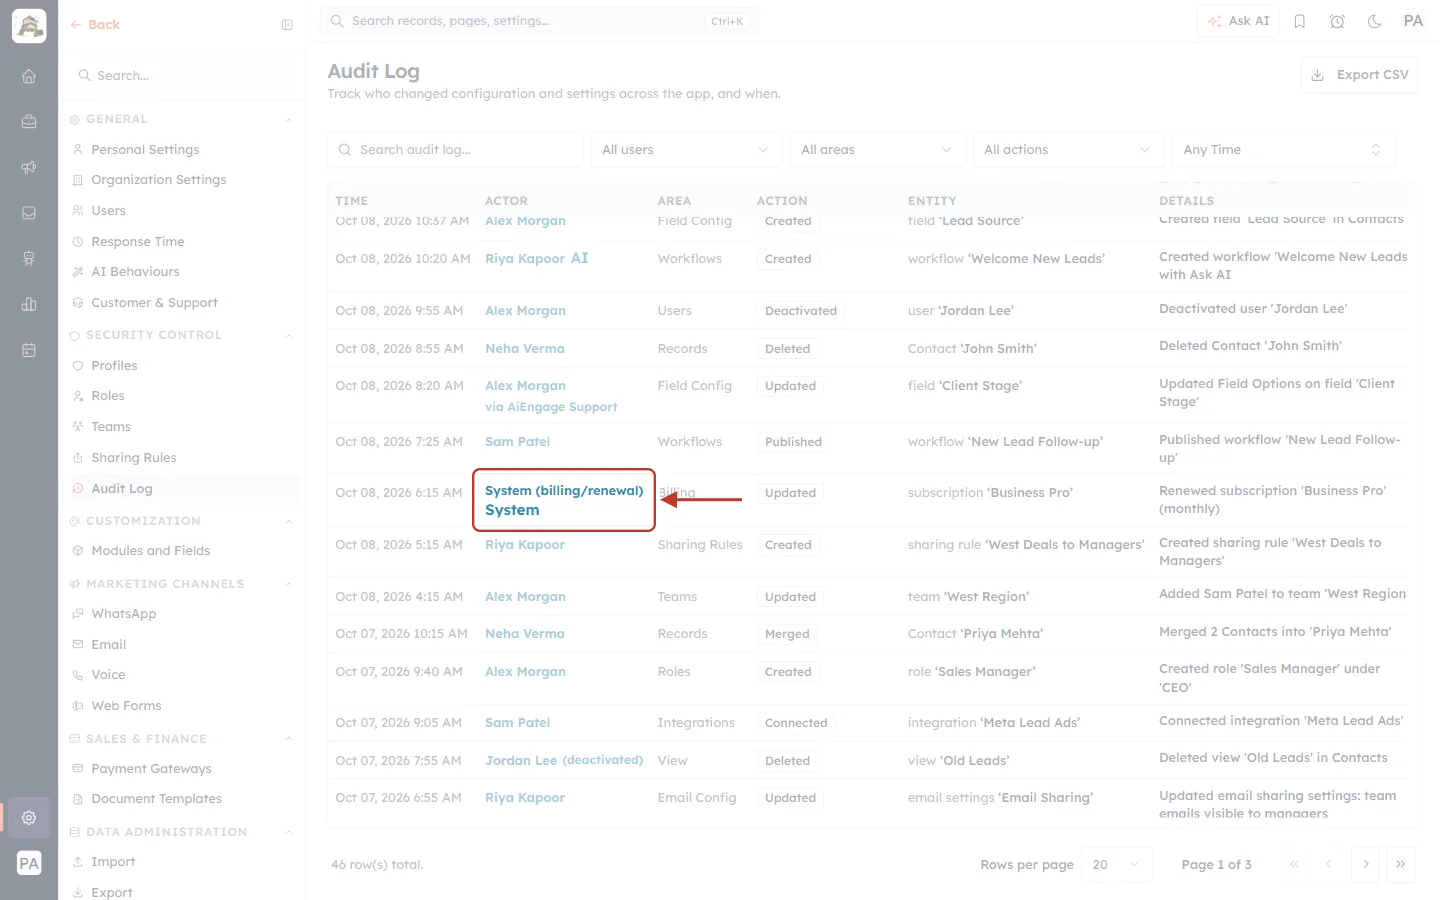
What this screenshot shows. The Actor cell of an entry made by System.
System: nobody clicked anything — the CRM did it automatically, for example renewing your subscription. The text in brackets, here (billing/renewal), tells you which automatic process it was.
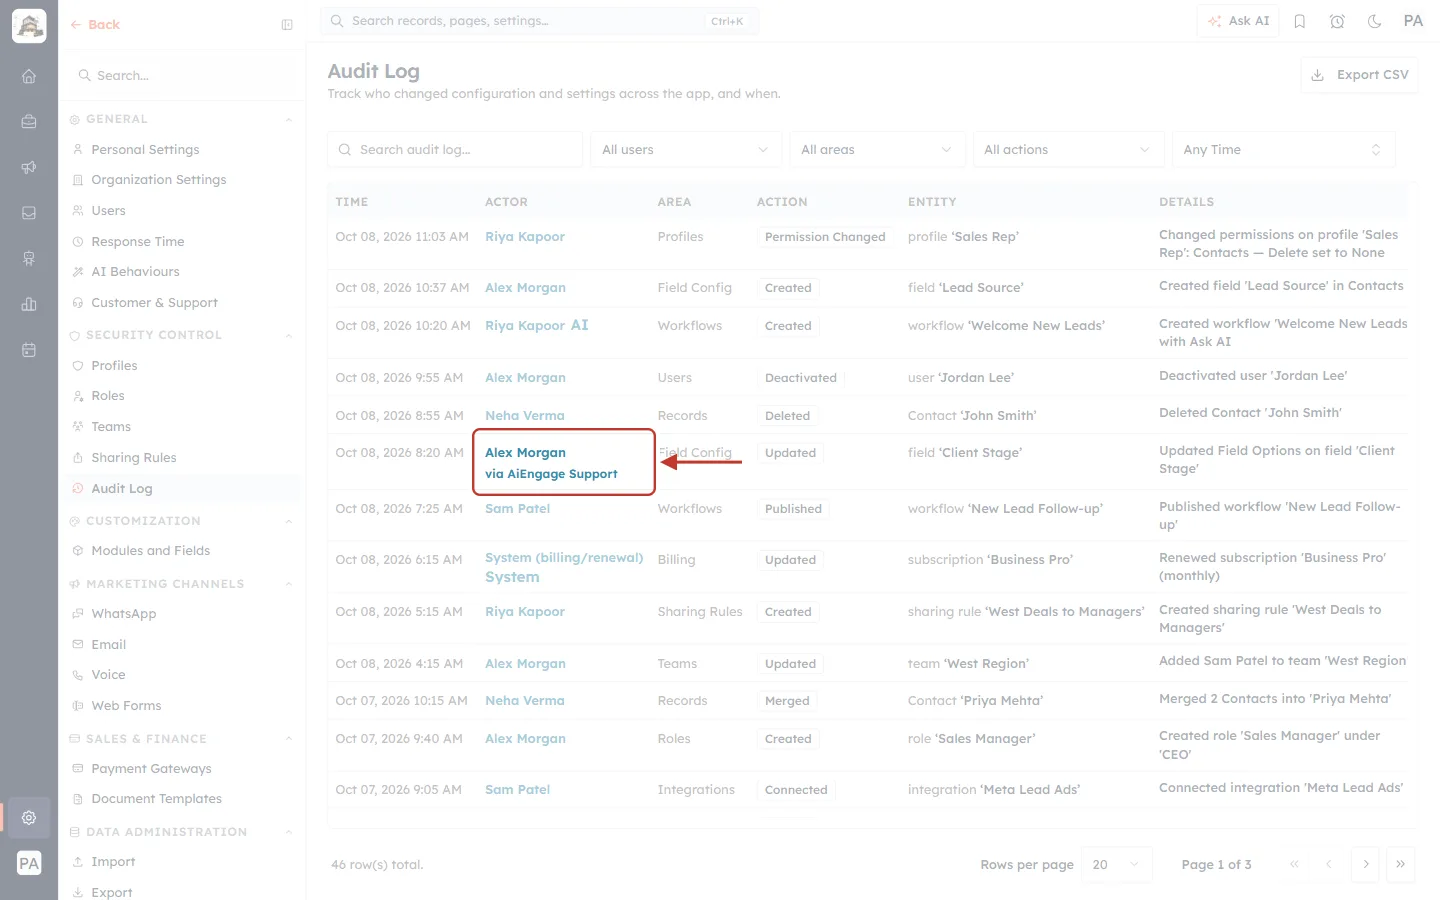
What this screenshot shows. The Actor cell shows Alex Morgan and, underneath, via AiEngage Support.
via …: someone else was working inside this person’s account with their permission — most often the AiEngage support team helping you set something up. The change is shown under the account holder’s name, and the “via” label shows who actually did it.
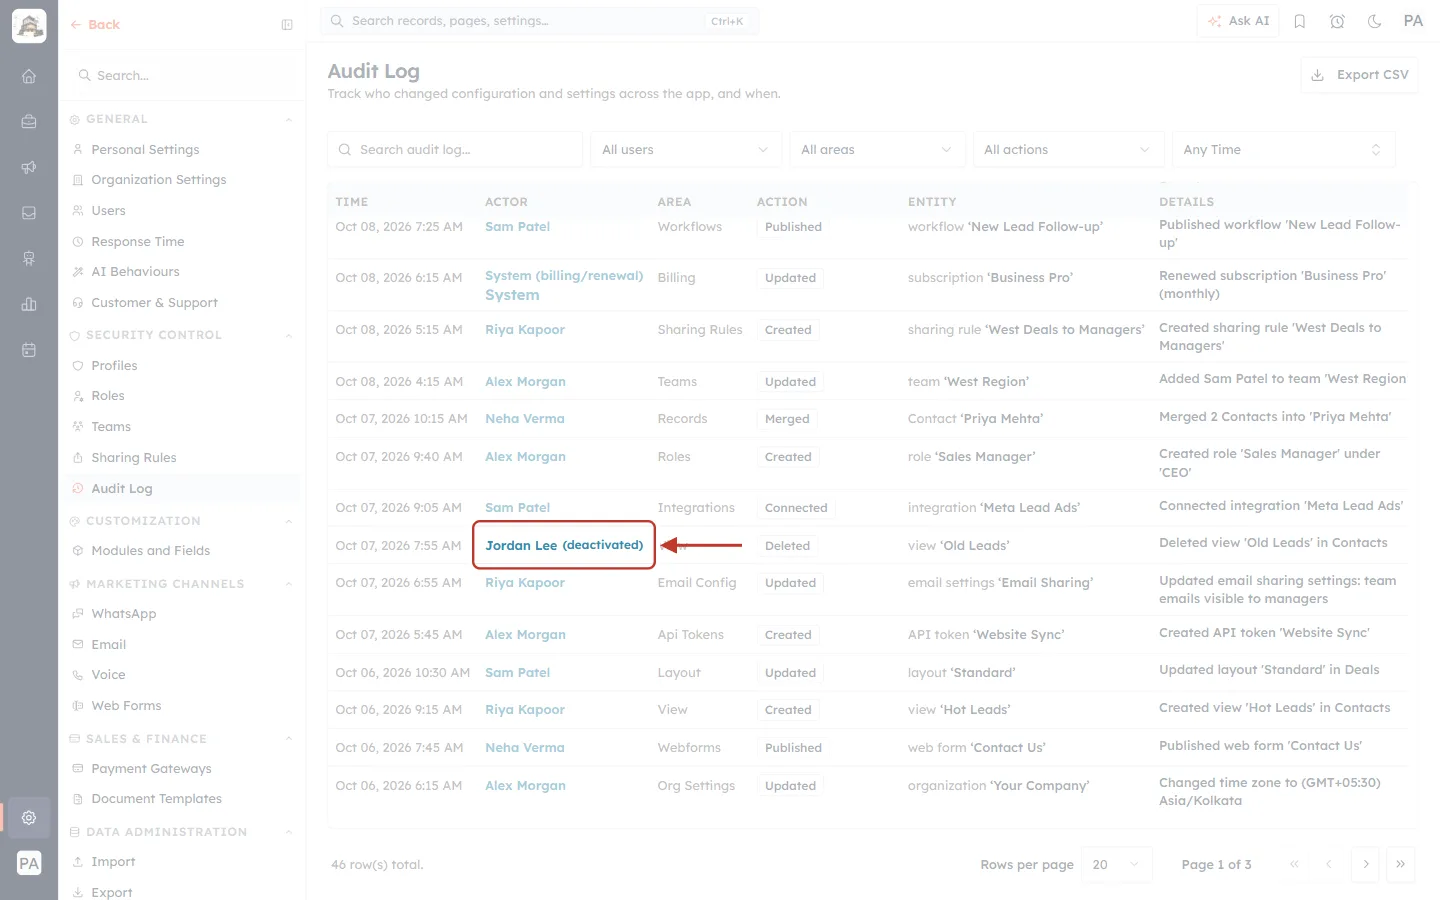
What this screenshot shows. The Actor cell shows Jordan Lee with (deactivated) under the name.
(deactivated) or (deleted): the person’s user account has since been deactivated or deleted. Their past changes stay in the log under their name.
Deleted and merged records#
When someone deletes or merges a record, the entry’s area is Records.
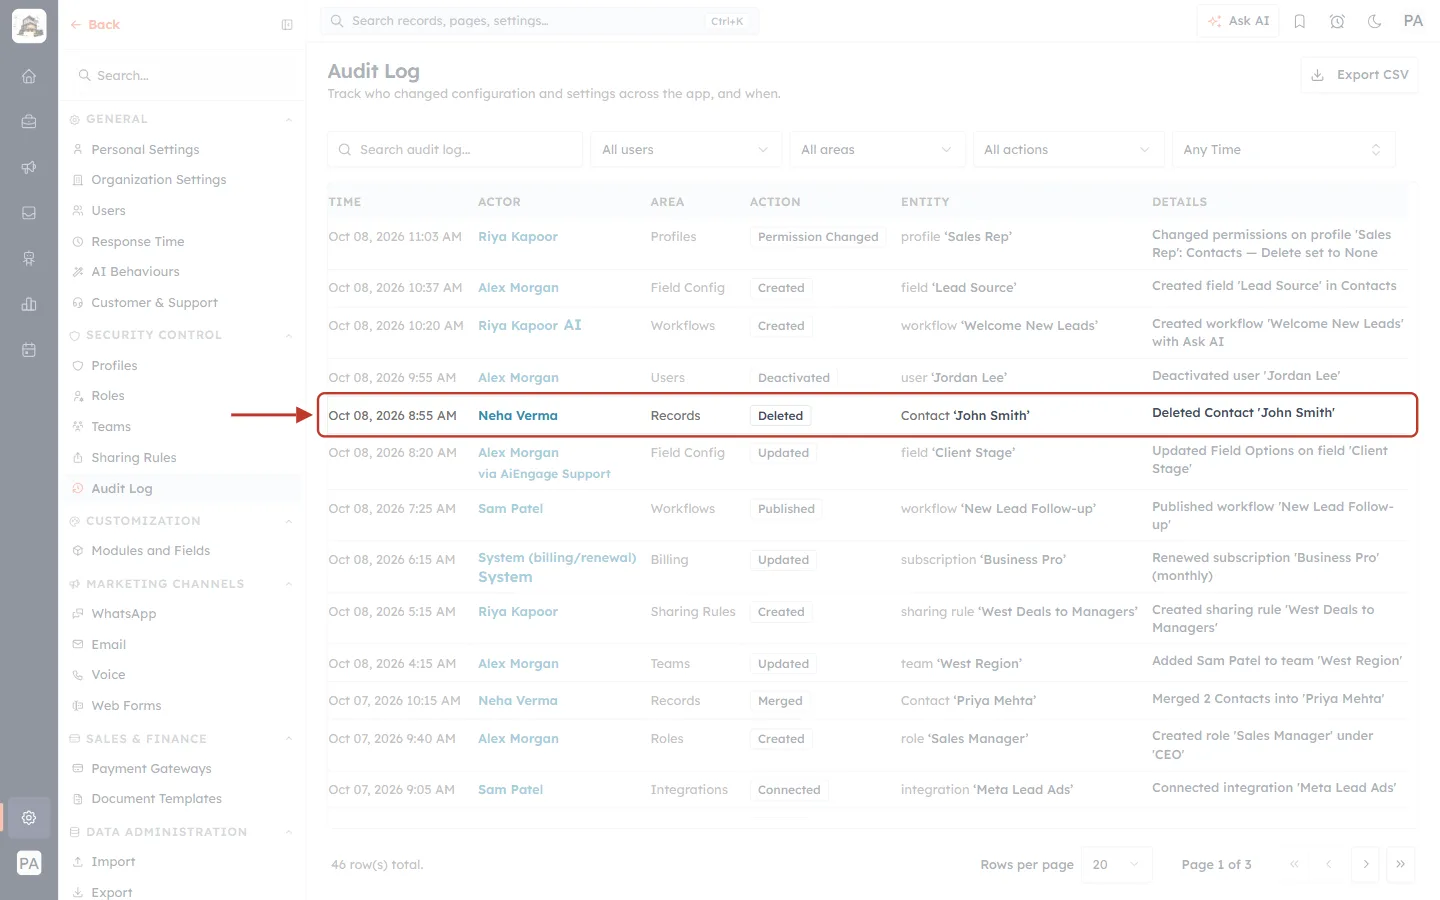
What this screenshot shows. An entry in the Records area: Neha Verma deleted the contact ‘John Smith’.
Area: Records. Action: Deleted.
Entity: Contact ‘John Smith’ — the type of record and its name.
Part 3: Find a change with the filters#
A busy CRM can have hundreds of entries. Use the filter bar above the list to narrow them down. You can use one filter or combine several.
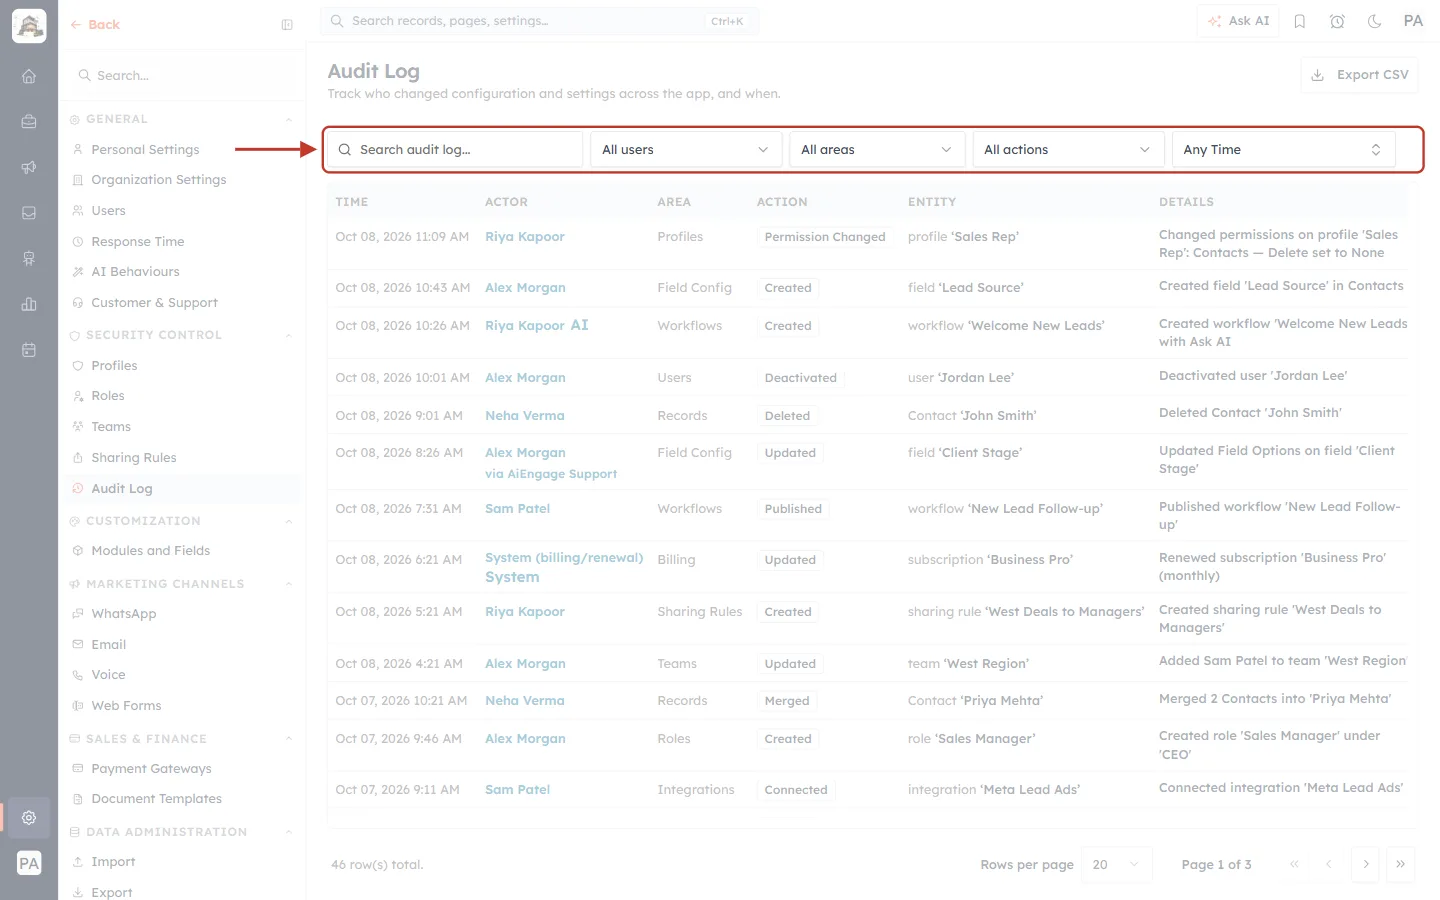
What this screenshot shows. The filter bar, ringed.
Search audit log… — type any word from the Details column: a field name, profile name, workflow name and so on.
All users — show only changes made by one person.
All areas — show only one part of the CRM, such as Profiles or Workflows.
All actions — show only one kind of change, such as Deleted.
Any Time — show only changes made in a date range.
ℹ️
Each time you change a filter, the list goes back to page 1. The filters are also saved in the page address, so you can bookmark a filtered view or send the link to another admin.
Step 1: Search for a word#
Click in Search audit log… and type a word. The list updates on its own as you type — there is no Search button to press.
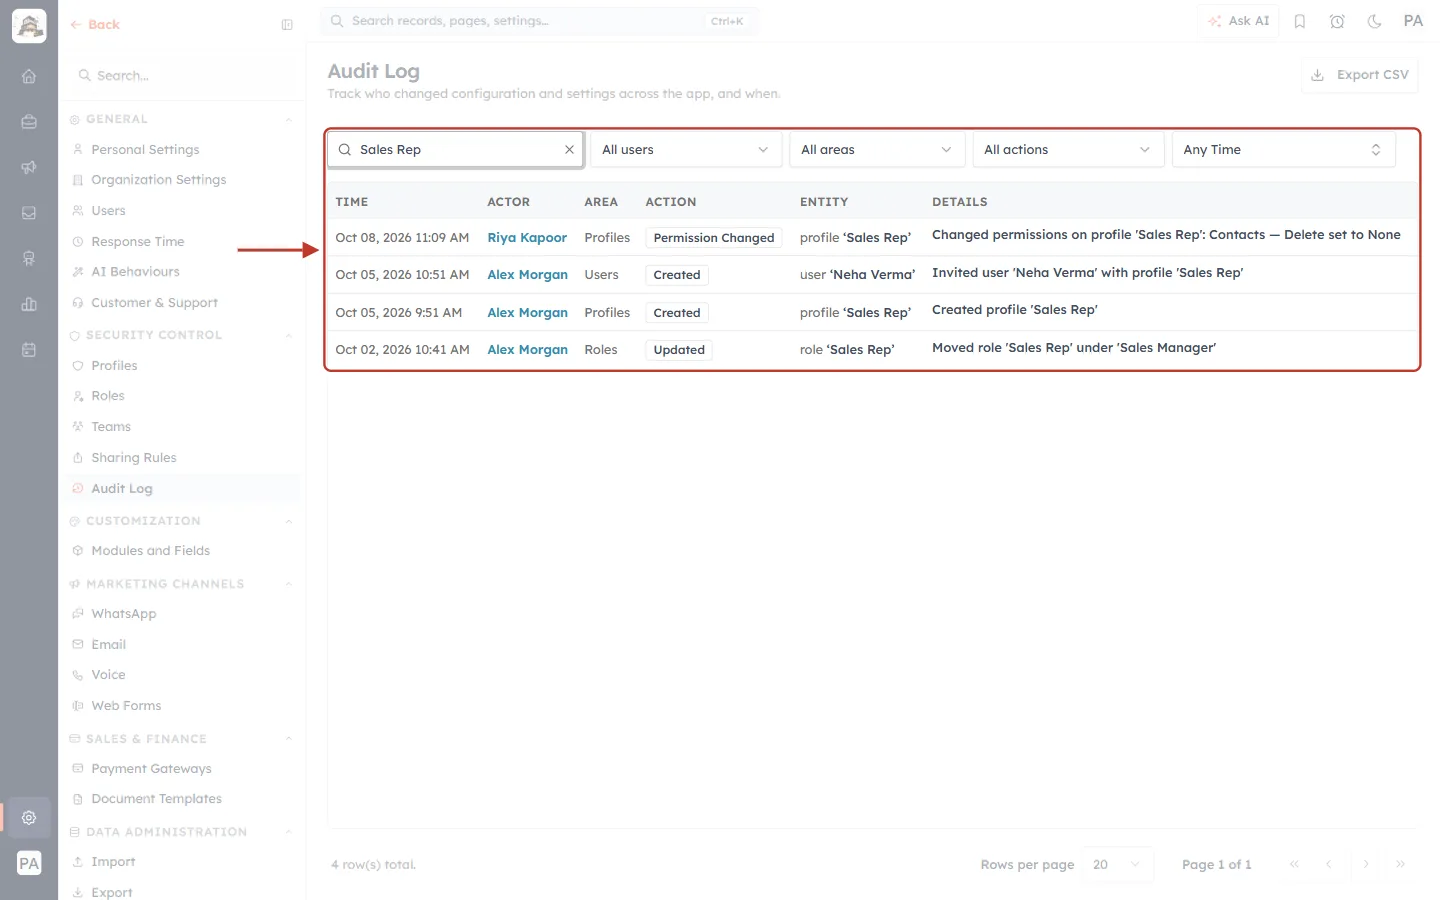
What this screenshot shows. The search box contains Sales Rep, and only the 4 entries that mention it are listed.
Search box: shows what you typed. Click the × at its right end to clear it.
Results: the profile was created, a user was invited with it, a role with the same name was moved, and the profile’s permissions were changed — the full history of “Sales Rep” on one screen.
The search looks in the Details text. To find changes by a particular person, use the All users filter instead (Step 2).
Step 2: Show one person’s changes#
Click All users. A list of everyone in your organization opens. Type a few letters to find someone quickly, then click their name.
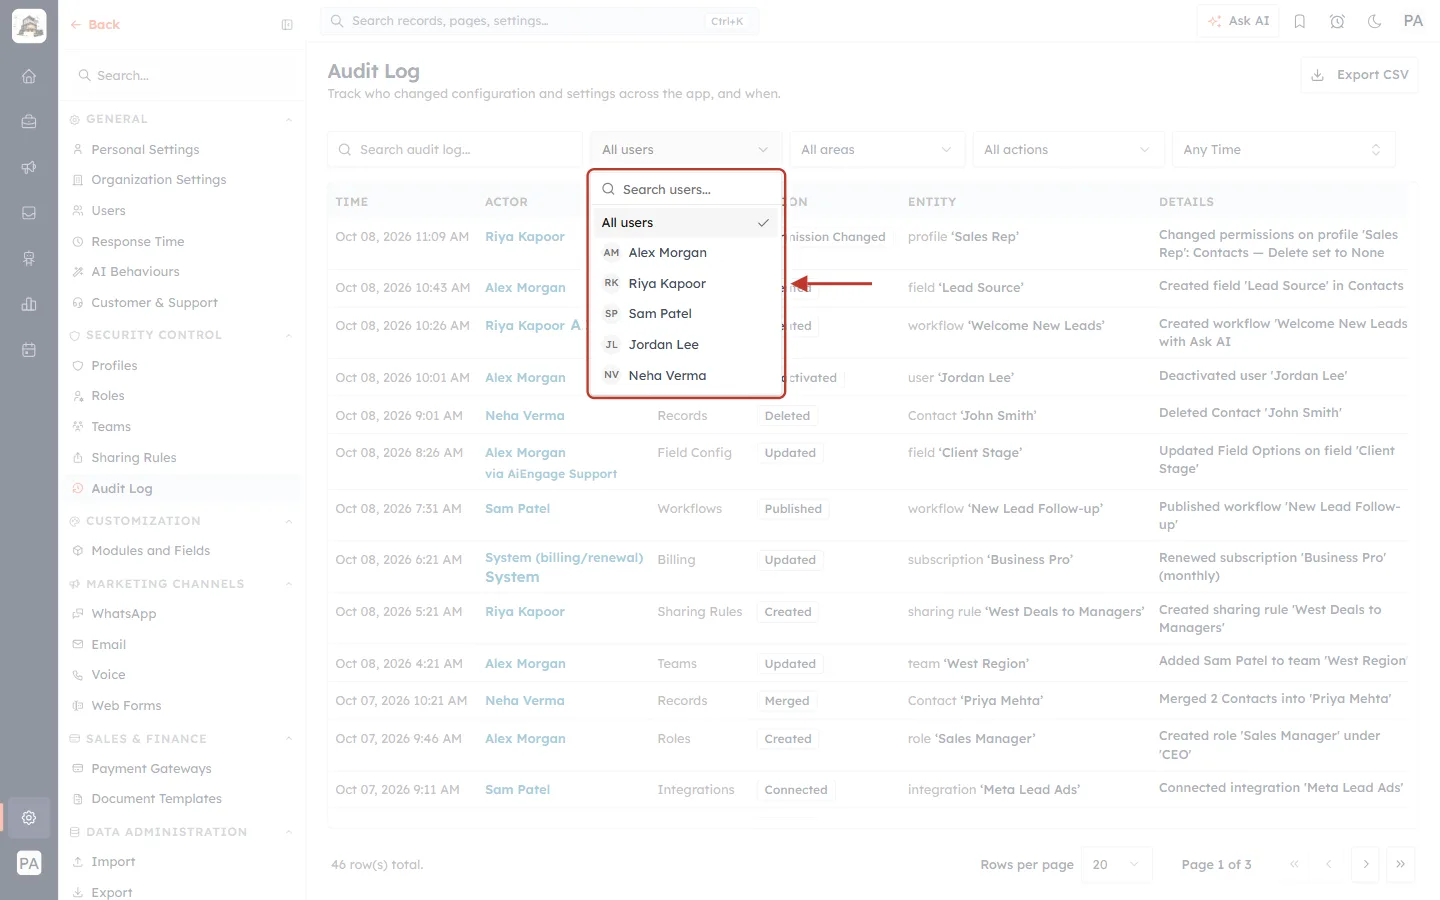
What this screenshot shows. The All users list is open.
Search users… — type part of a name to shorten the list.
All users (ticked) — the default; shows everyone’s changes.
Names below — click one to see only that person’s changes.
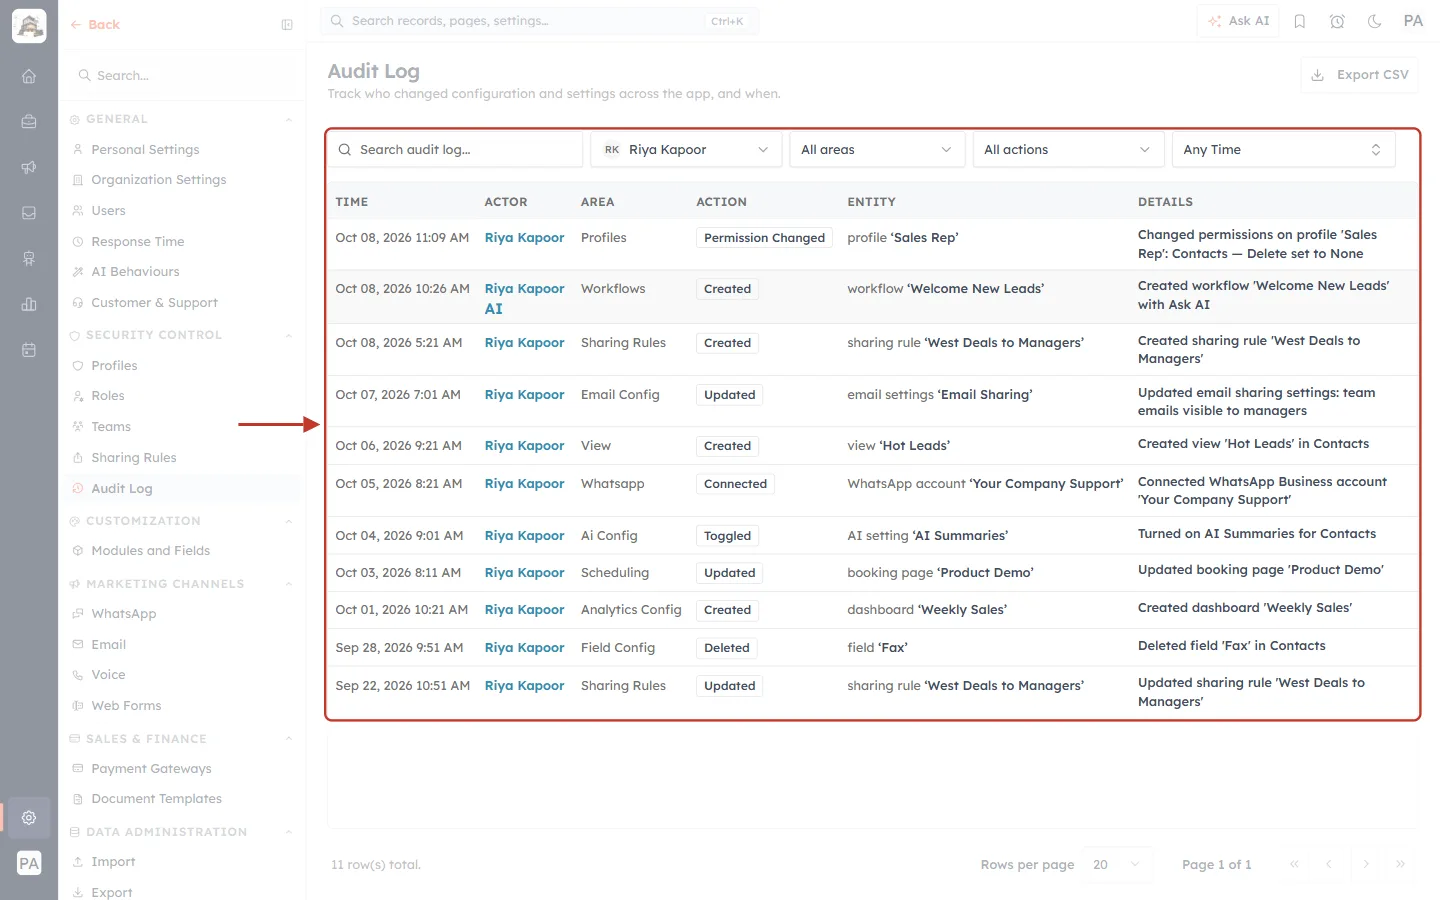
What this screenshot shows. The filter now says Riya Kapoor, and every row in the list is a change she made.
User filter (ringed): shows the chosen person with their initials.
List: only Riya Kapoor’s changes, newest first, across every area.
To go back to everyone, open the filter again and choose All users.
Step 3: Show one area#
Click All areas and choose the part of the CRM you are interested in. There are 25 areas, so you can type to find one quickly.
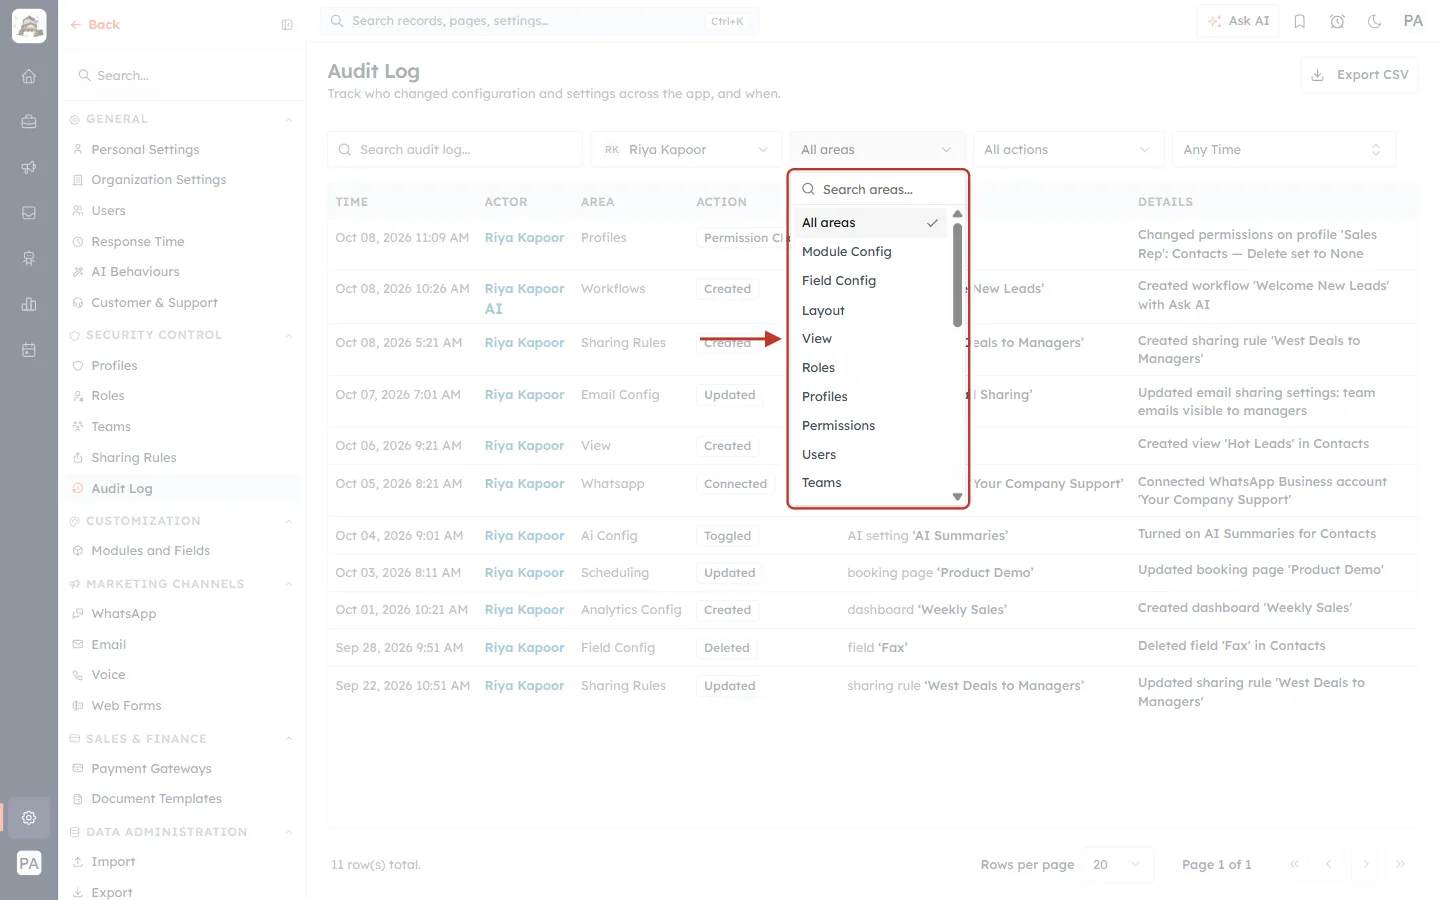
What this screenshot shows. The All areas list is open. Riya Kapoor is still chosen in the user filter, so the list behind shows only her changes.
Search areas… — type to shorten the list.
Areas: Module Config, Field Config, Layout, View, Roles, Profiles, Permissions, Users, Teams and more — scroll down to see the rest (they are listed in the table at the top of this article).
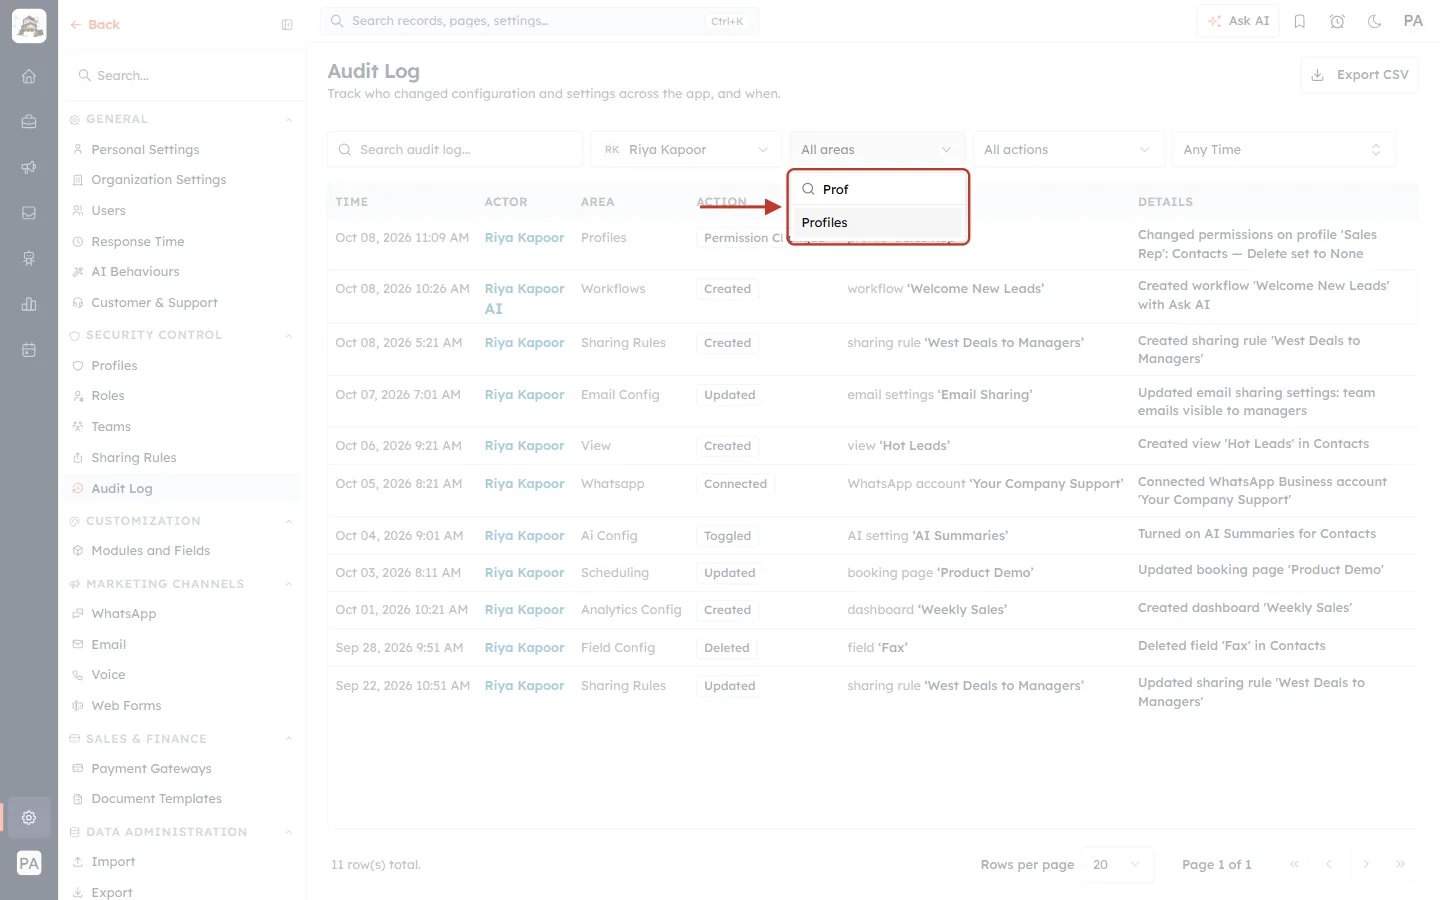
What this screenshot shows. After typing Prof, only Profiles is left in the list.
Click Profiles to apply it.
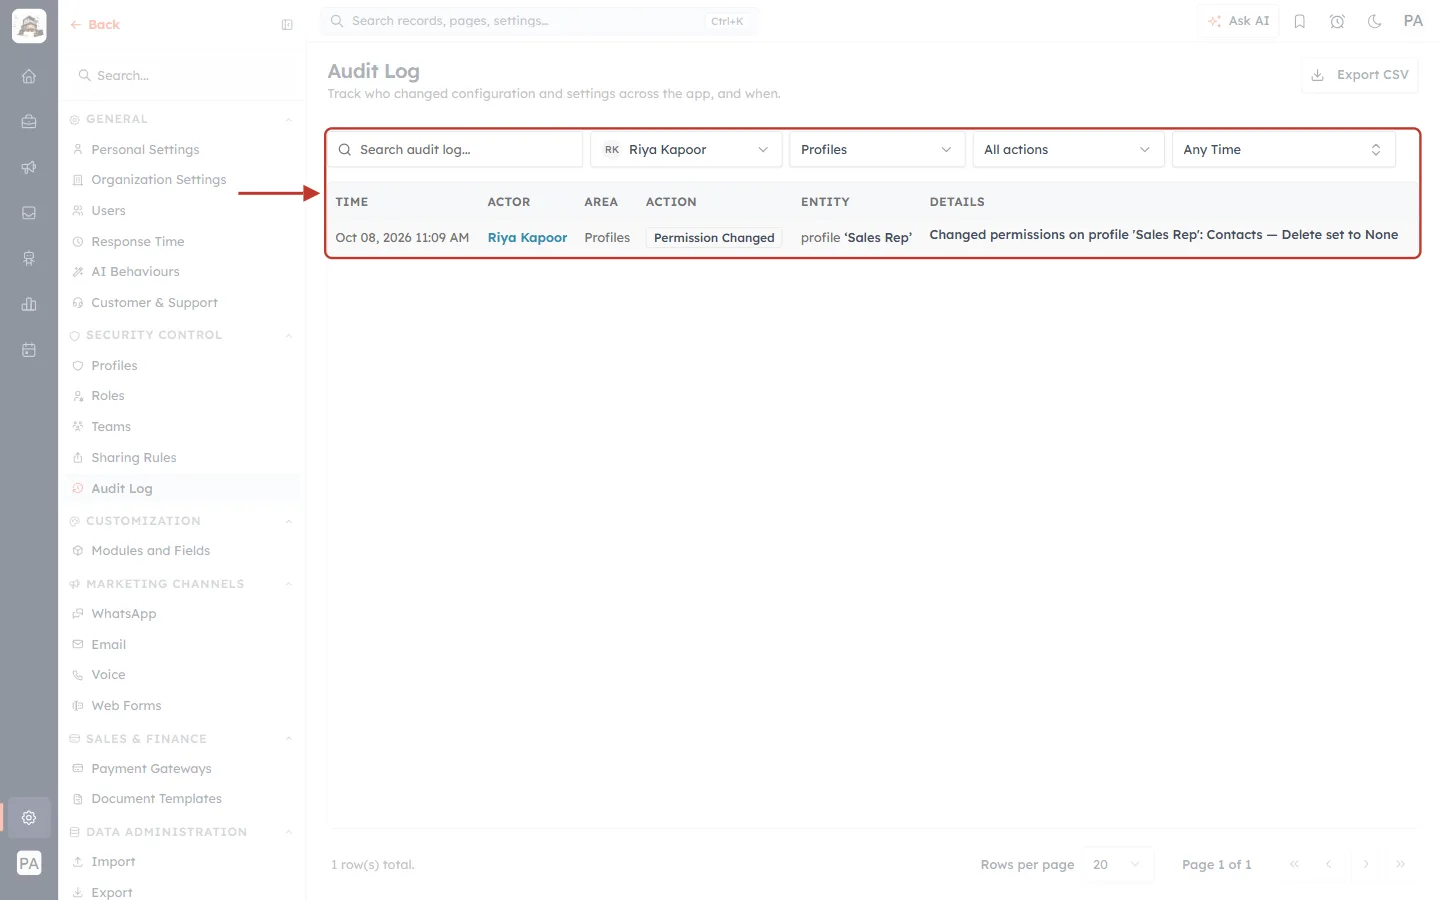
What this screenshot shows. Two filters at once: Riya Kapoor and Profiles. Just one entry matches.
Filters (ringed): both filters apply together — an entry must match all of them to be shown.
Result: the one profile change Riya made. This is how you answer a question like “What did Riya change in profiles?” in two clicks.
Step 4: Show one kind of action#
Click All actions and choose a type of change. For example, choose Deleted to see everything that has been deleted.
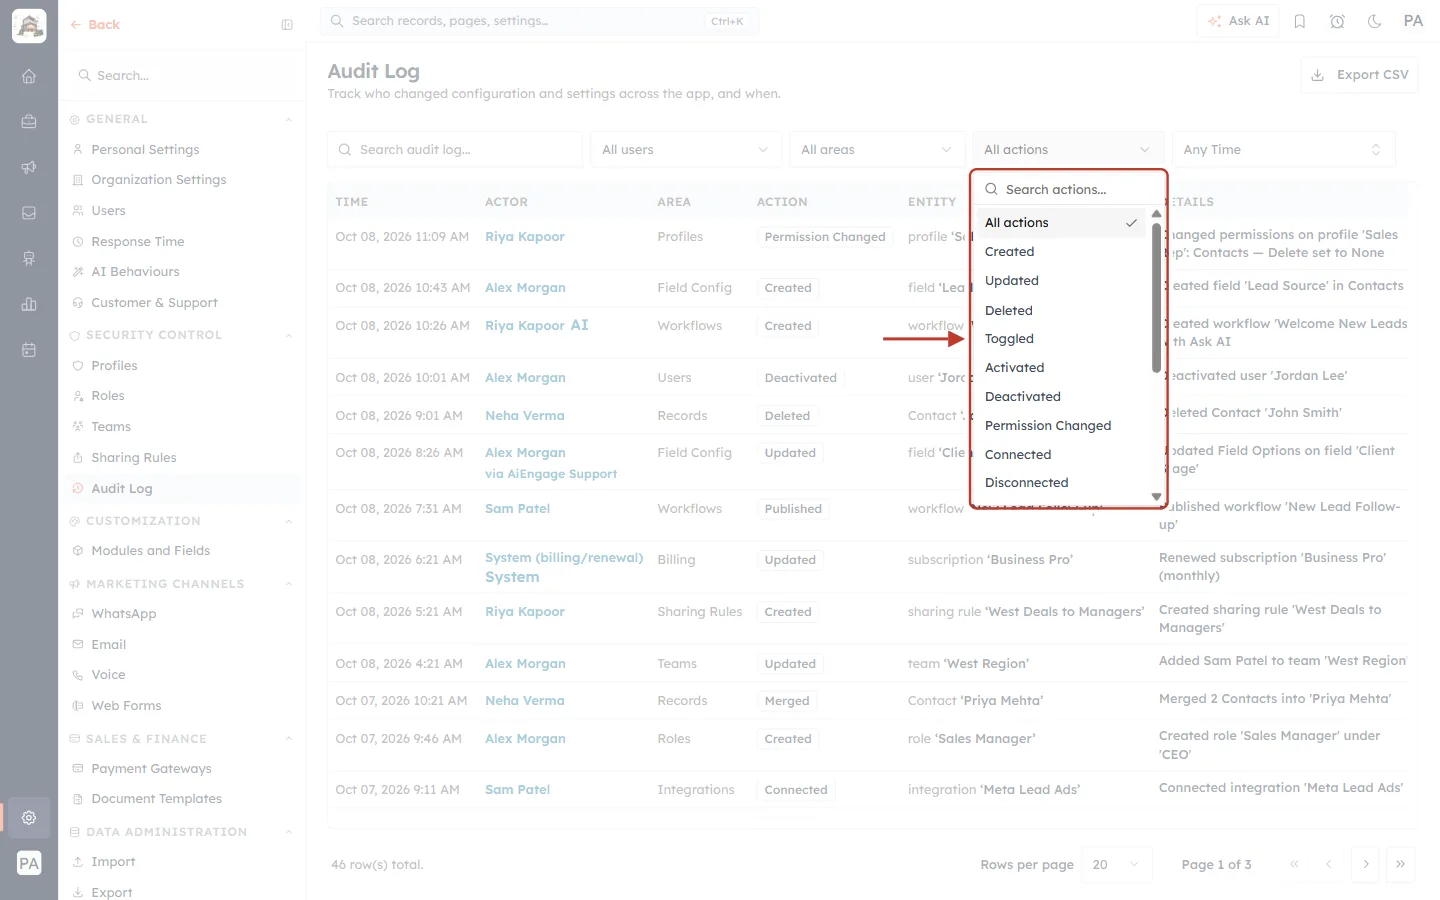
What this screenshot shows. The All actions list is open.
Actions: Created, Updated, Deleted, Toggled (switched on or off), Activated, Deactivated, Permission Changed, Connected, Disconnected — and, further down, Published, Archived, Restored, Duplicated, Reordered, Merged, Blocked and Unblocked.
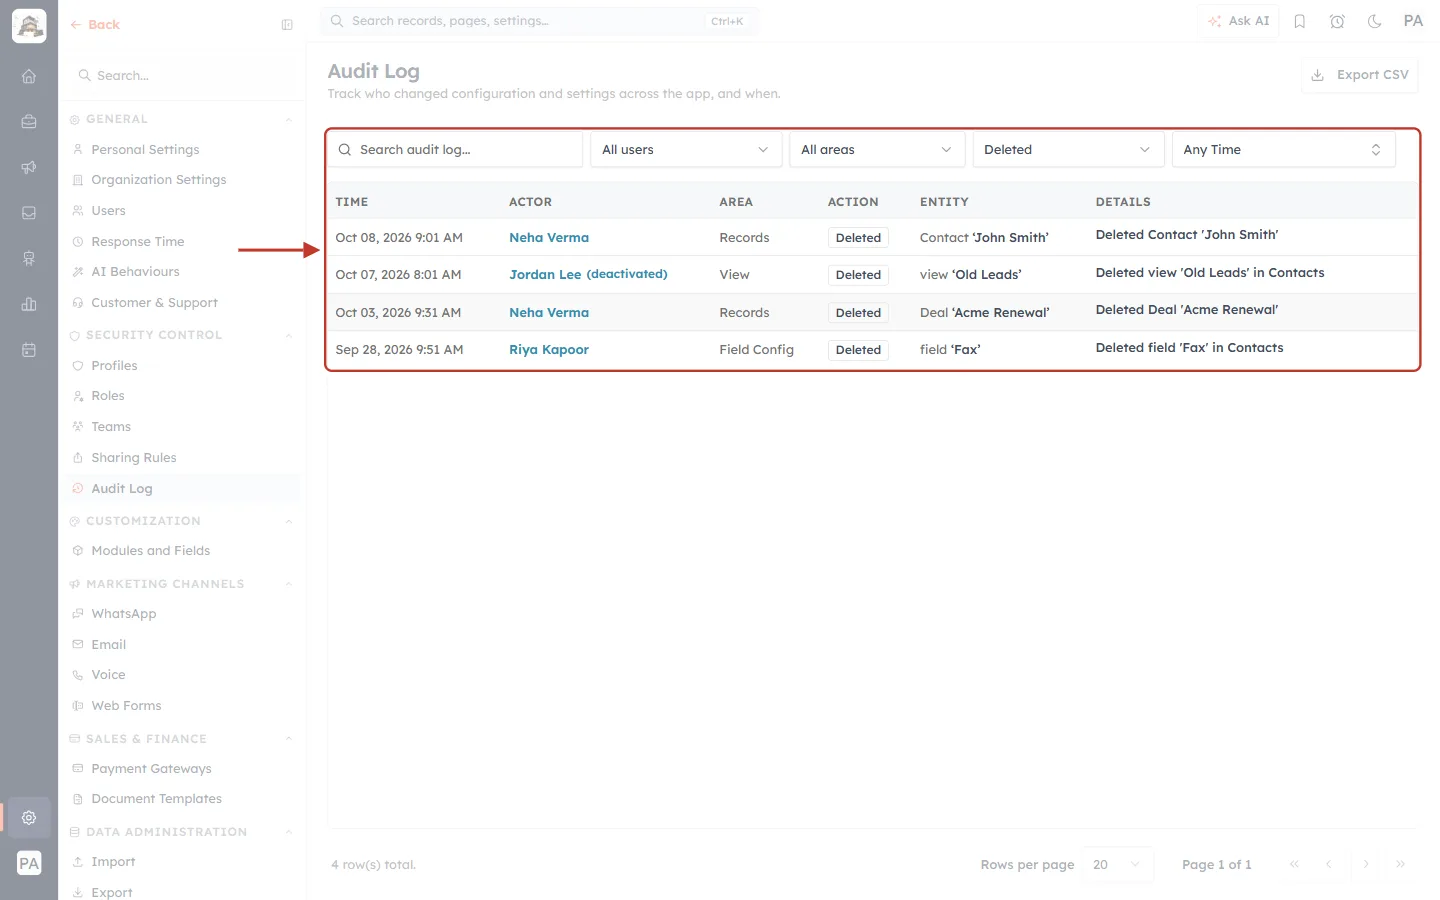
What this screenshot shows. The action filter says Deleted, and only deletions are listed.
Results: deleted records (contacts and deals), a deleted field and a deleted view — from different people and different areas.
Combine this with an area to narrow it further, for example Records + Deleted to see only deleted records.
Step 5: Show a date range#
Click Any Time and choose a range.
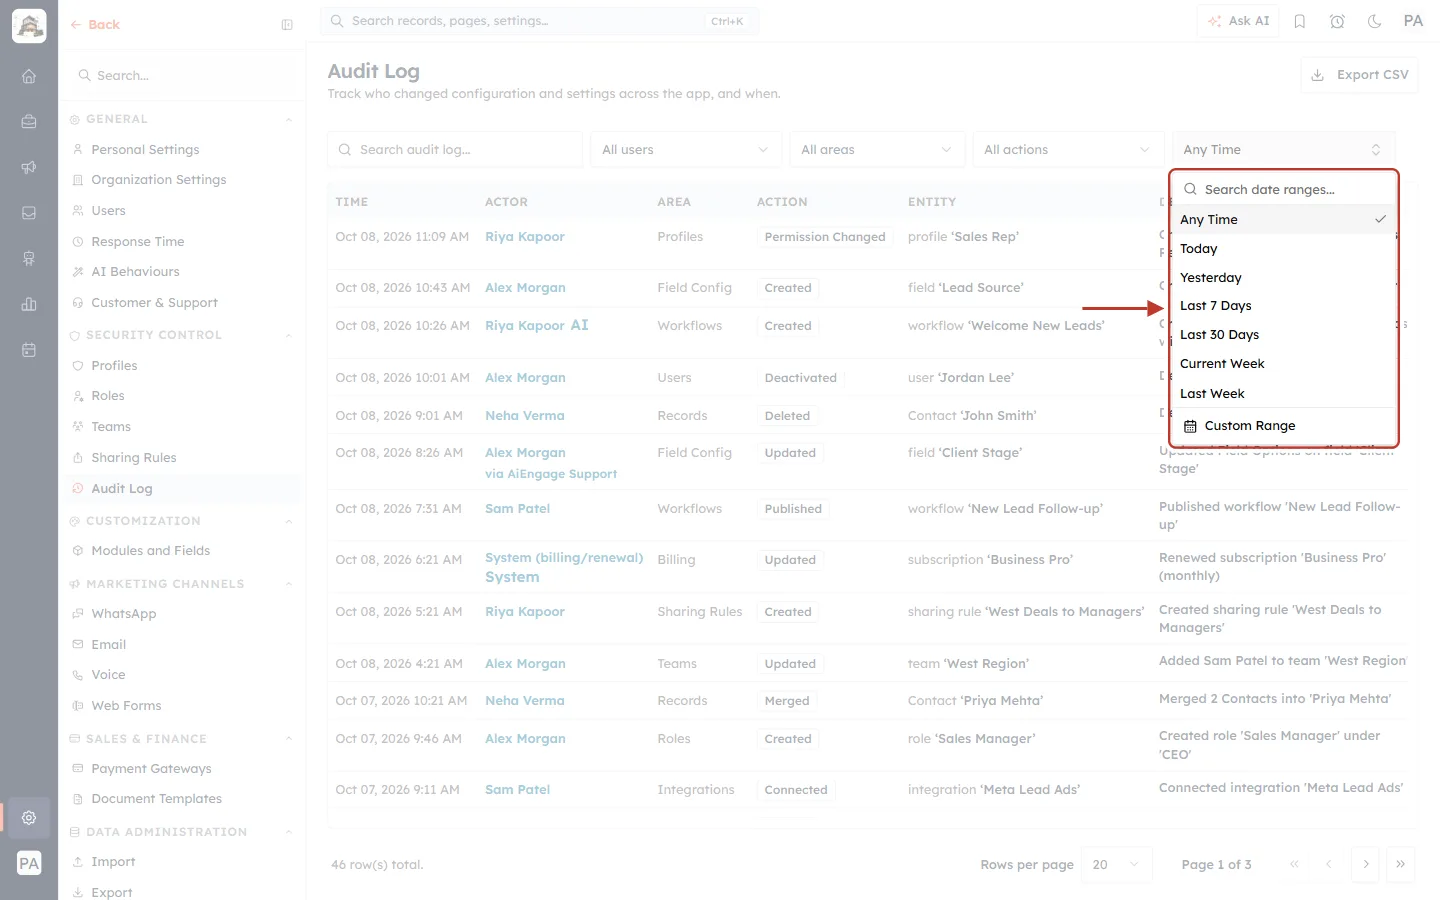
What this screenshot shows. The date list is open.
Search date ranges… — type to find a range.
Ranges: Any Time, Today, Yesterday, Last 7 Days, Last 30 Days, Current Week and Last Week. Only ranges that fit your plan’s history are offered.
Custom Range (at the bottom) — pick your own start and end dates.
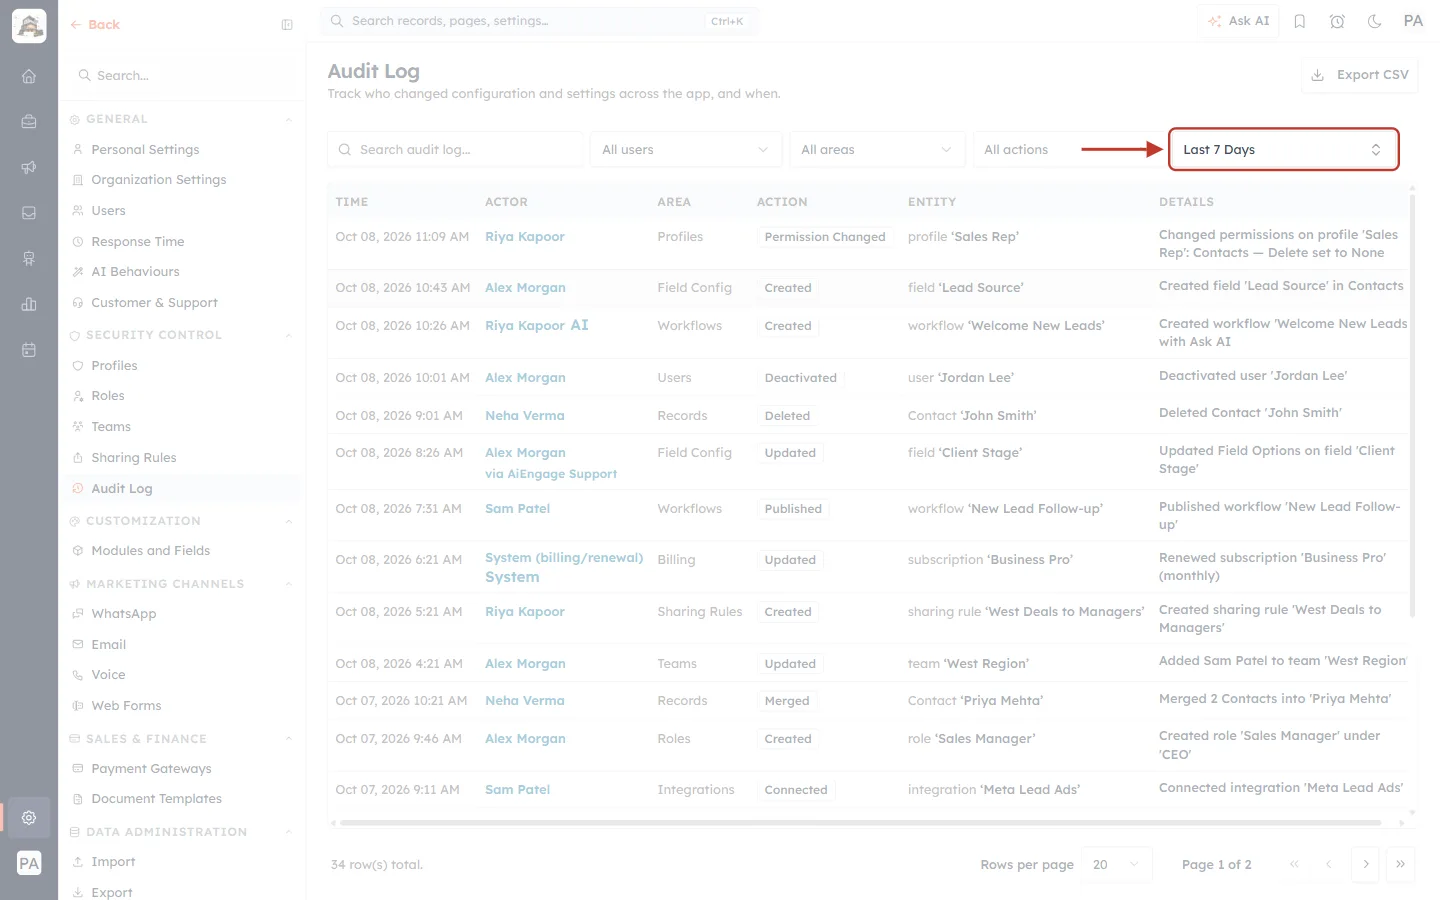
What this screenshot shows. The date filter now says Last 7 Days. The footer drops to 34 entries.
Only changes from the last seven days are listed. Everything else is hidden, not removed.
To choose your own dates, click Custom Range. Two months are shown side by side. Click the first day, then the last day.
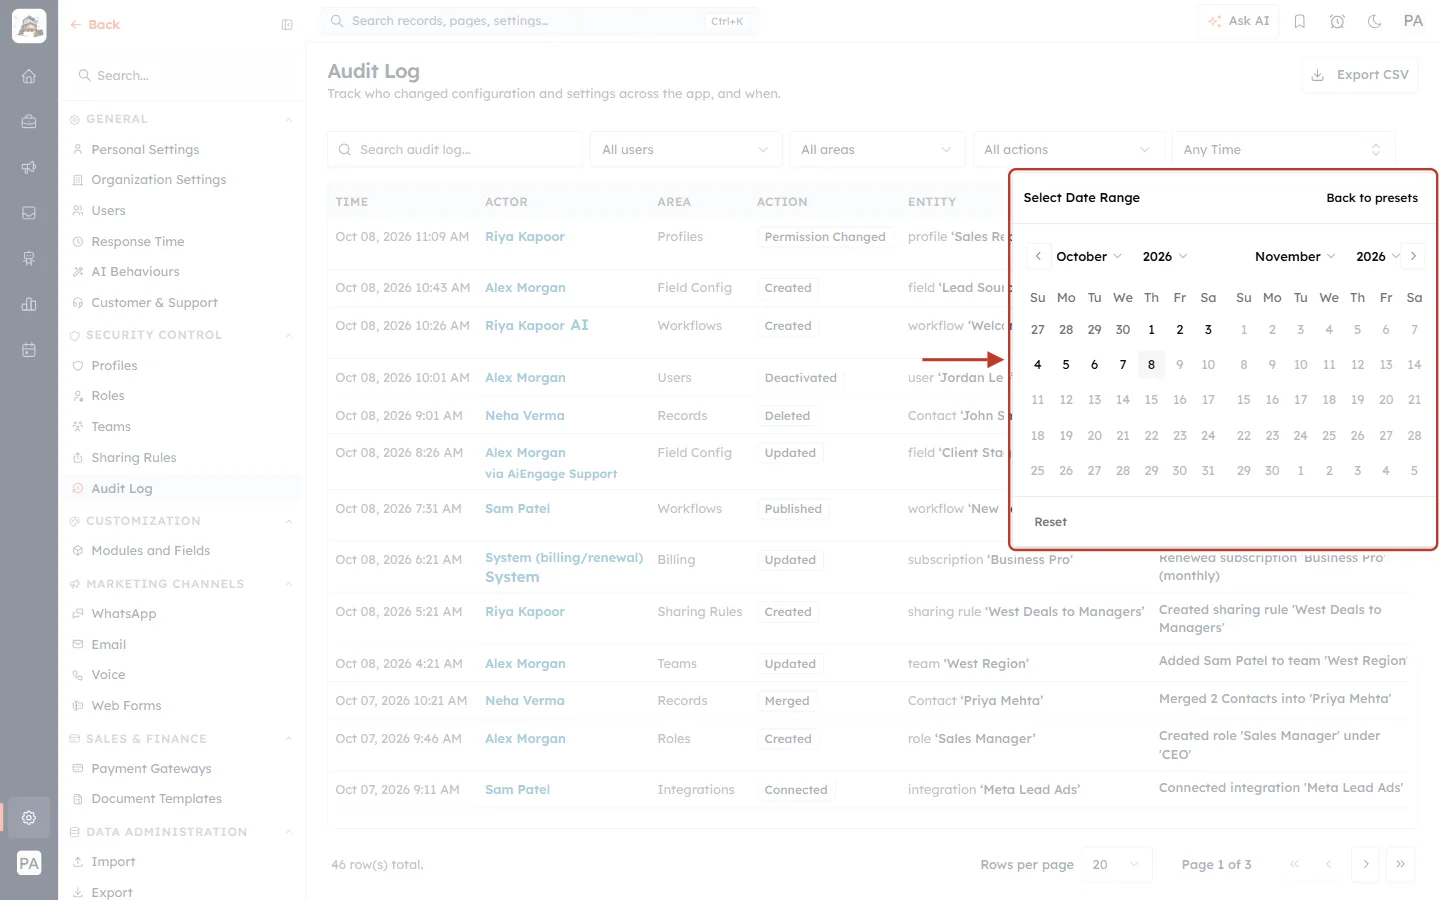
What this screenshot shows. The Select Date Range calendar.
Two months side by side — use the arrows or the month and year menus to move.
Click a start day, then an end day — the list updates straight away.
Back to presets (top-right) returns to the ready-made ranges. Reset (bottom) clears the dates.
If nothing is found#
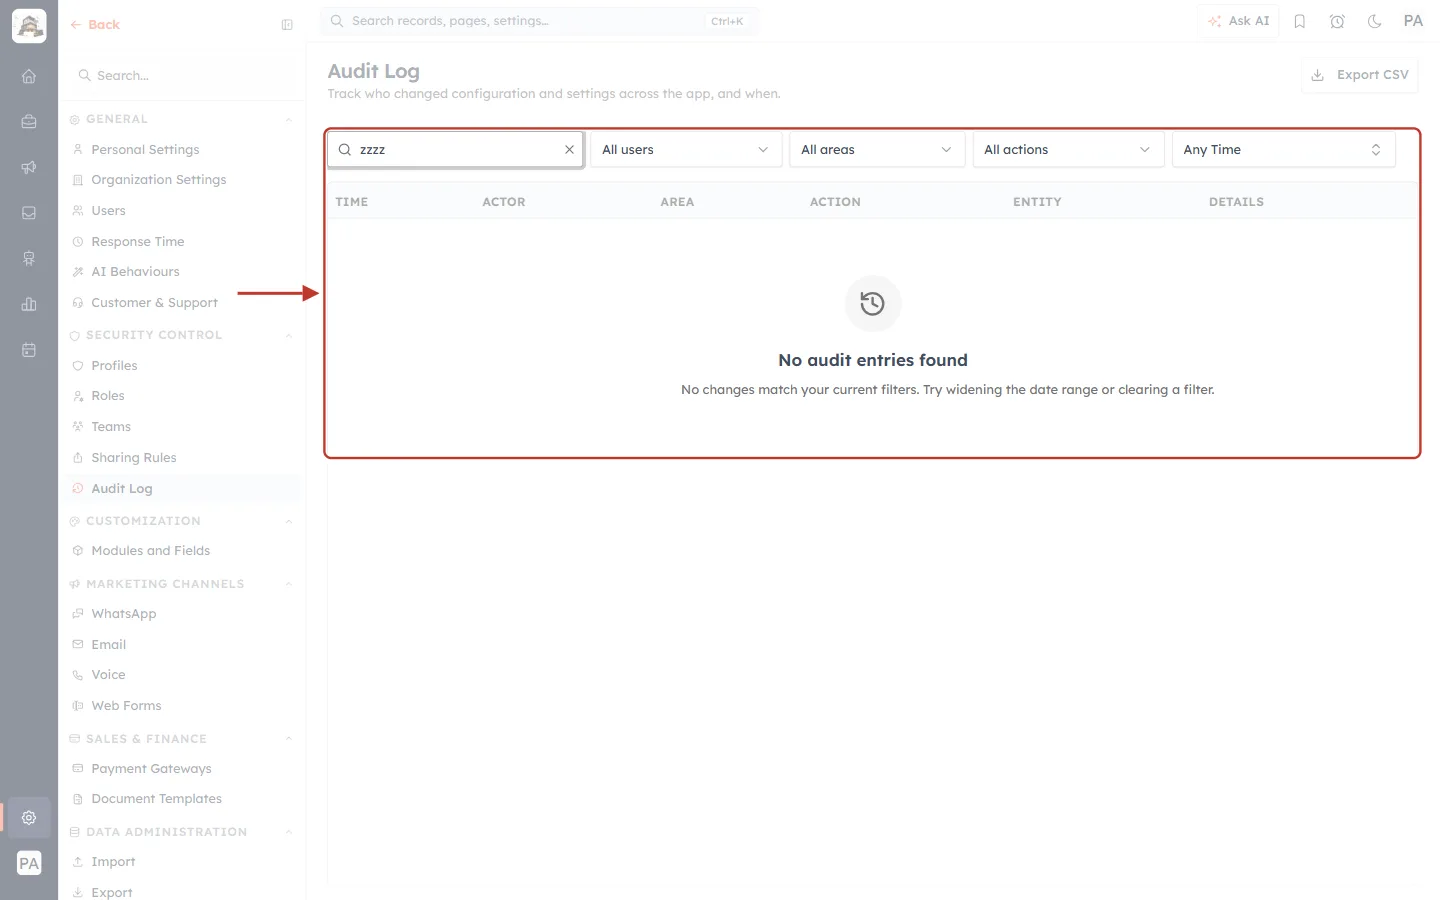
What this screenshot shows. A search that matches nothing shows No audit entries found.
Message: “No changes match your current filters. Try widening the date range or clearing a filter.”
What to do: clear the search with the ×, or set the other filters back to All users, All areas, All actions and Any Time.
If you still find nothing, the change may be older than your plan keeps (see “How far back can I see?”).
Part 4: Move between pages#
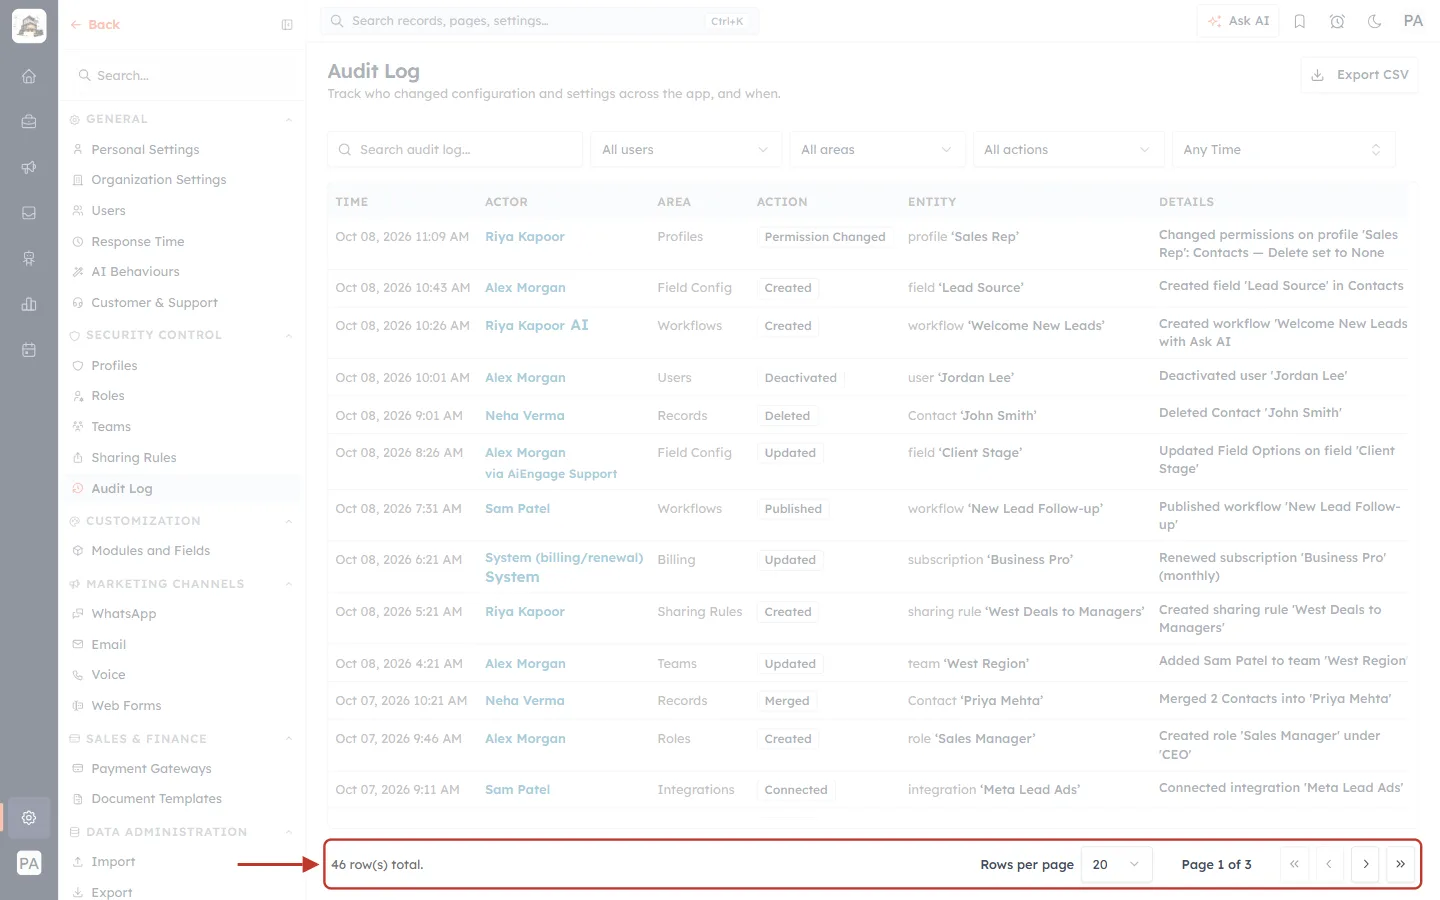
What this screenshot shows. The footer below the list, ringed.
46 row(s) total. — how many entries match your filters.
Rows per page — how many entries are shown on one page (20 to start with).
Page 1 of 3 — which page you are on.
Buttons: first page «, previous page ‹, next page › and last page ».
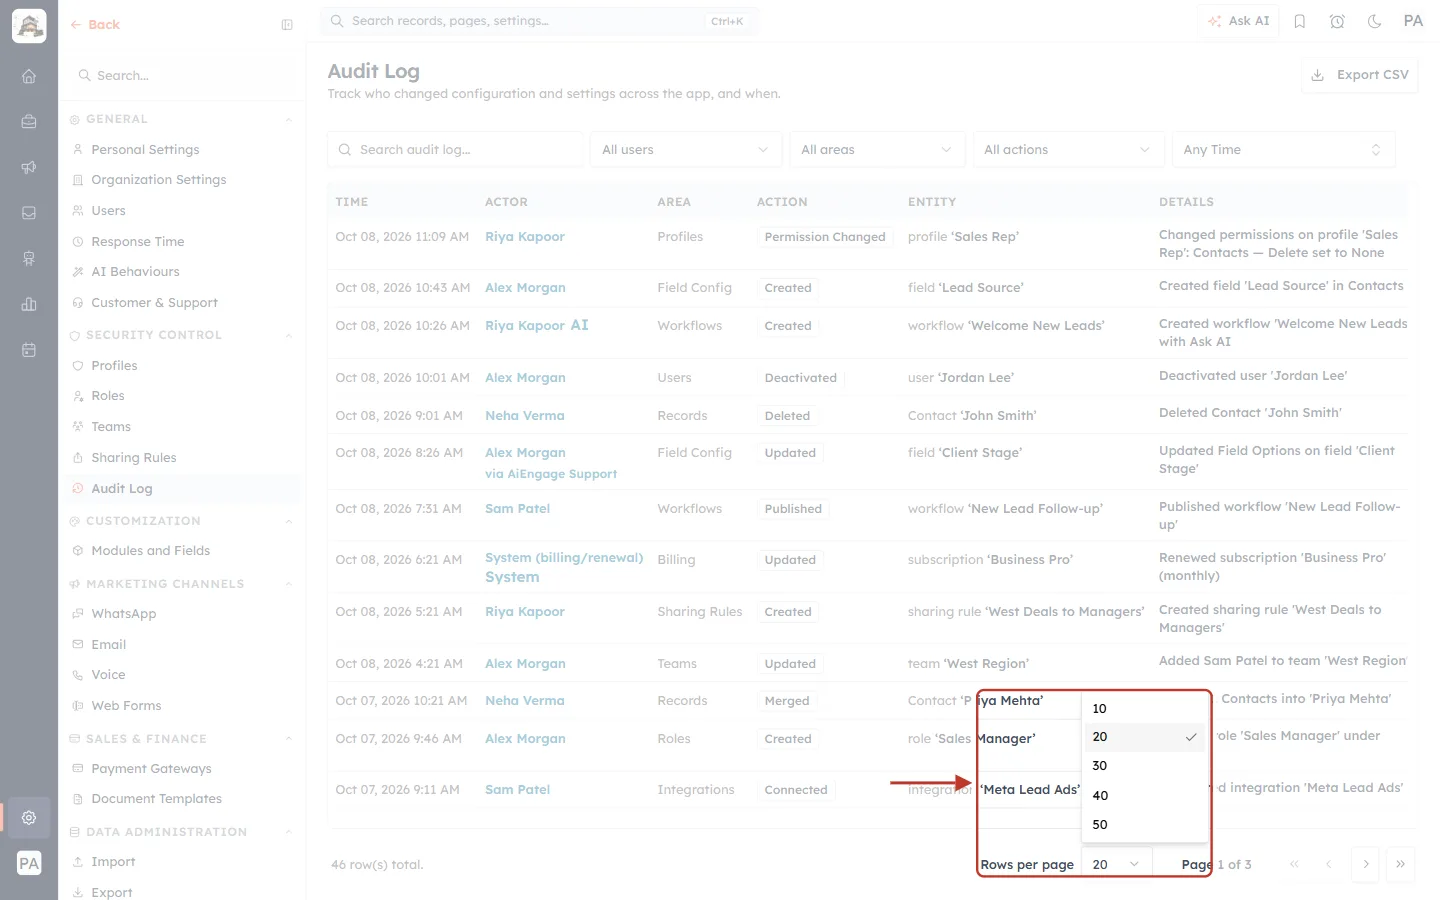
What this screenshot shows. The Rows per page list is open.
Choose 10, 20, 30, 40 or 50. More rows per page means fewer pages to click through.
Part 5: Export the log to a CSV file#
You can download the Audit Log as a CSV file, which opens in Excel, Google Sheets or Numbers.
Step 1: Set your filters first#
The export contains exactly what your filters show, on every page — not just the page you are looking at. So first set the filters for what you need. For example, choose Records in the area filter to export every deleted and merged record.
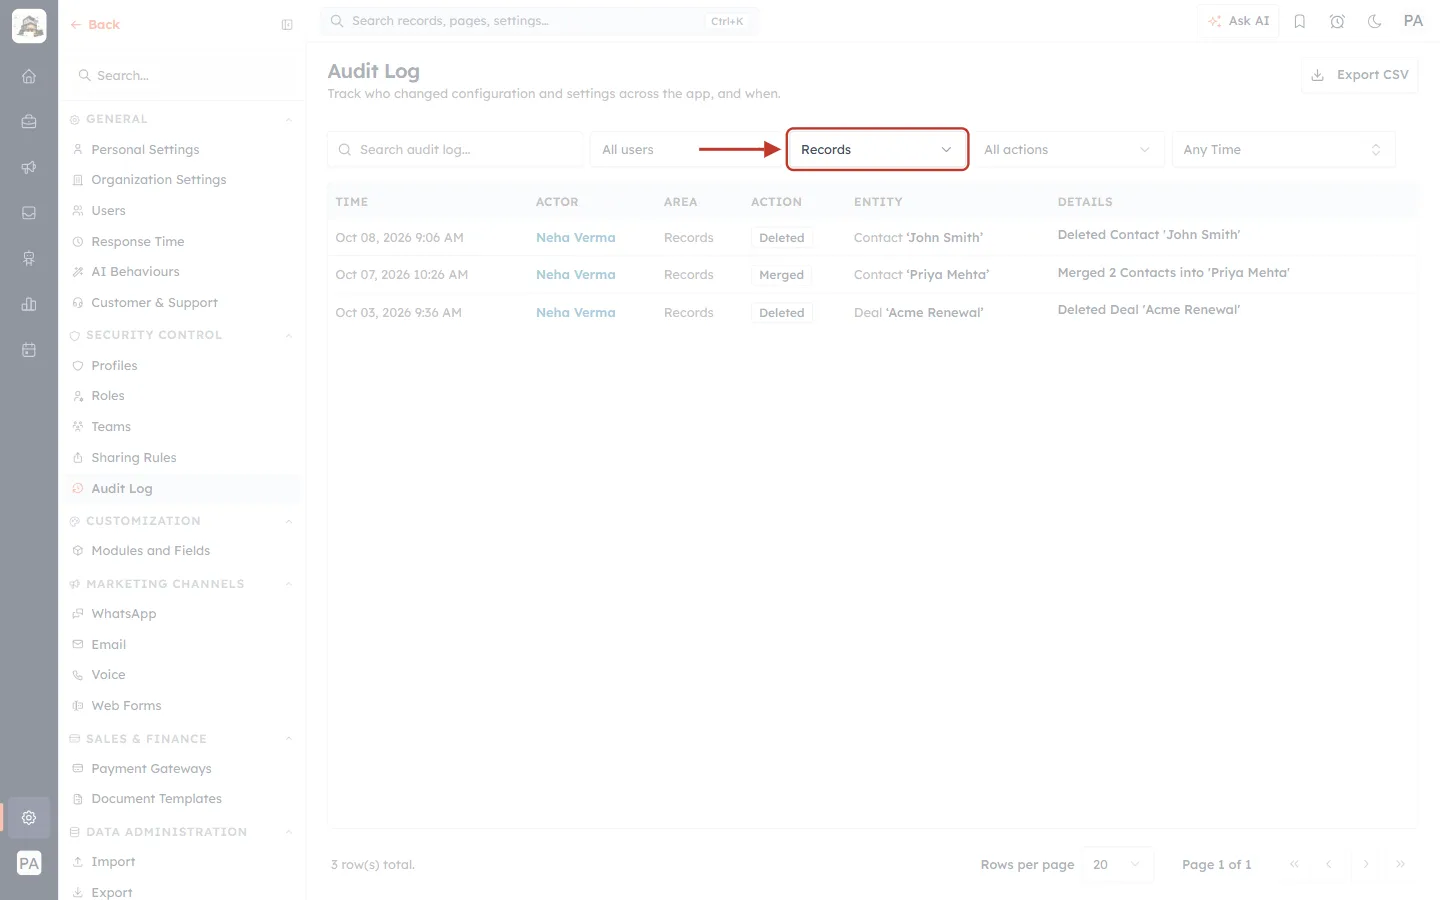
What this screenshot shows. The area filter is set to Records, so only the 3 deleted and merged records are listed.
Area filter (ringed): shows Records. Whatever the list shows now is what will be exported.
Leave every filter on “All” / “Any Time” to export the whole log.
Step 2: Click Export CSV#
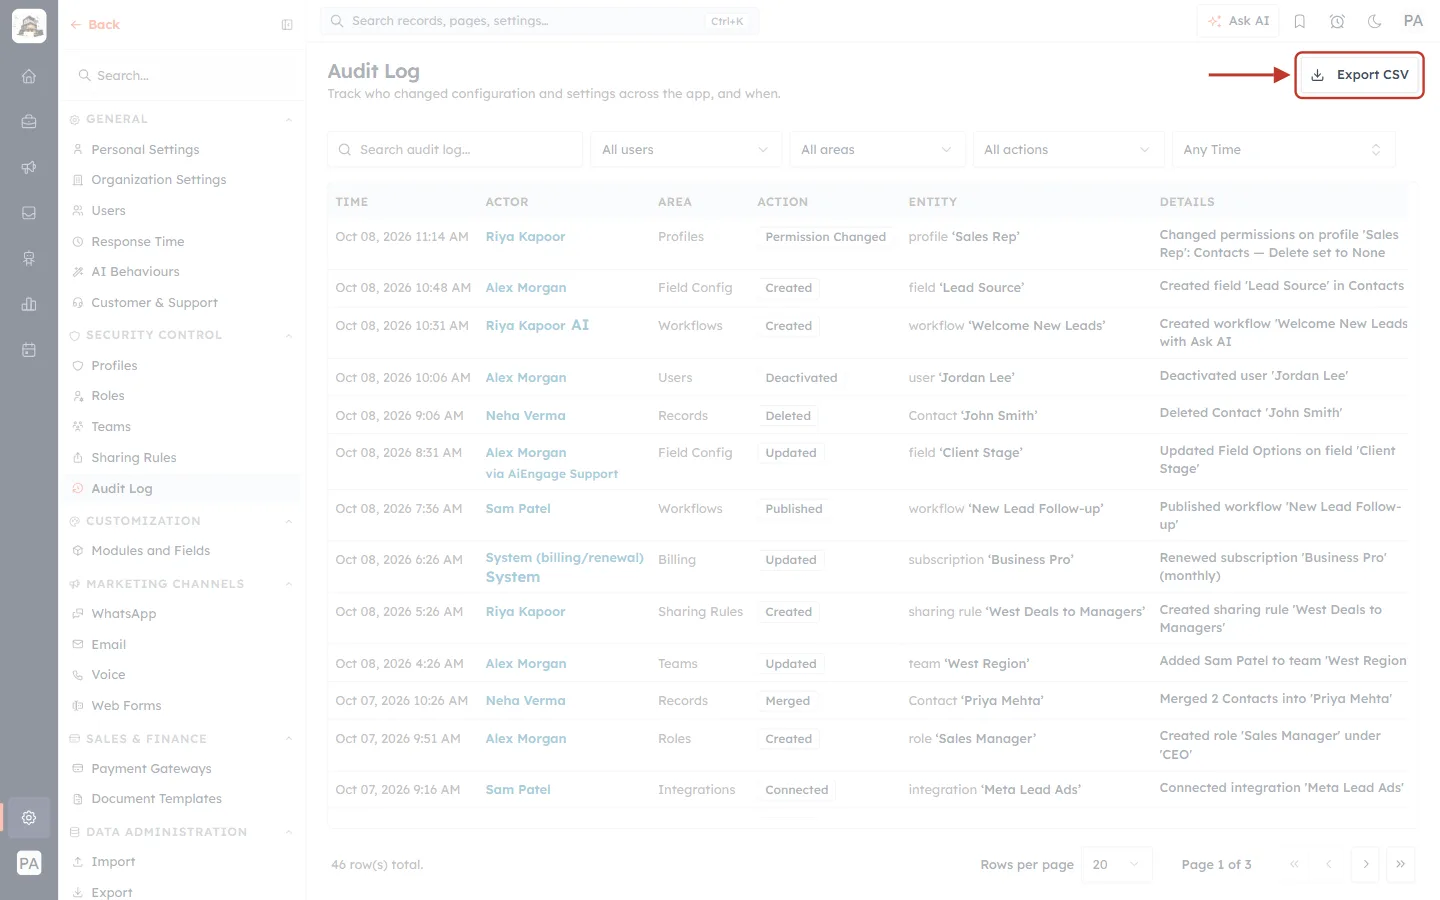
What this screenshot shows. The Export CSV button, ringed.
While the file is being made, the button says Exporting… with a spinning circle.
Your browser then downloads a file named like audit-log-2026-10-08.csv.
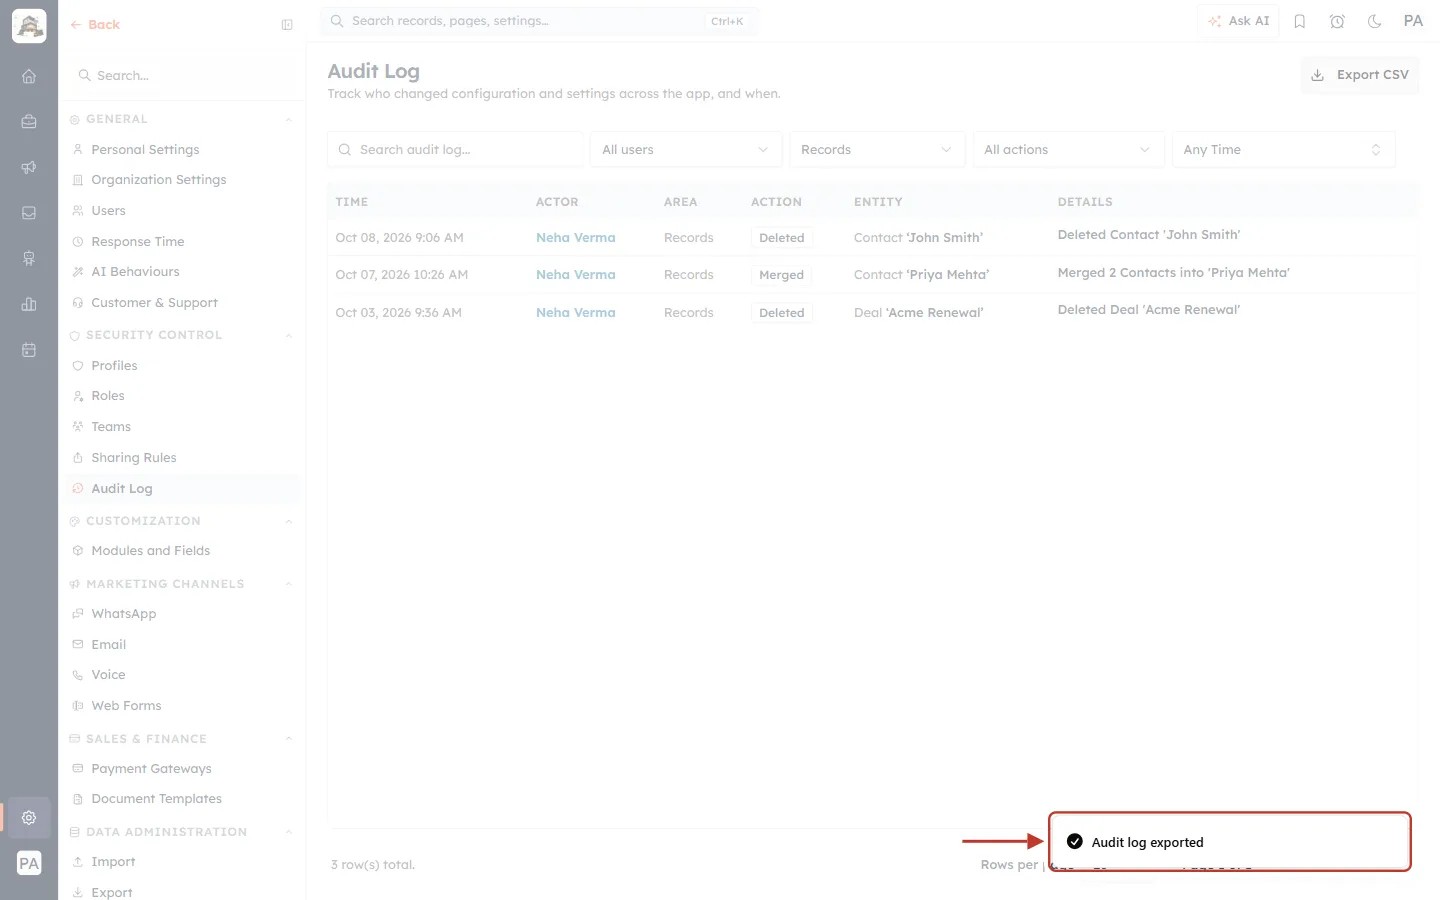
What this screenshot shows. The message Audit log exported appears in the bottom-right corner when the download is ready.
Look for the file in your browser’s Downloads folder.
The file has these columns:
| Column | What it contains |
|---|---|
| Time (UTC) | The date and time of the change, in UTC (world time — not your local time zone) |
| User | The person’s name |
| The person’s email address | |
| Source | Where the change came from: web (the CRM screens), api (an API token) or system (automatic) |
| Area | The area, as a short code, for example field_config |
| Action | The action, as a short code, for example permission_changed |
| Entity Type / Entity | The type and name of the item that was changed |
| Description | The full sentence from the Details column |
⚠️
One export holds up to 5,000 entries. If more entries match, the file contains the newest 5,000 and ends with a note saying it was cut short. Narrow the date range and export the rest in parts.
Part 6: Let a team member see the Audit Log#
The Owner and Admins always have access. To let other people see the Audit Log, switch on the Audit Log permission in their profile.
Go to Setup → Security Control → Profiles and open the profile you want to change (or click Add Profile to make a new one).
In the left-hand list of the profile, under Setup Permissions, click User & Access.
Switch Audit Log on, then save the profile.
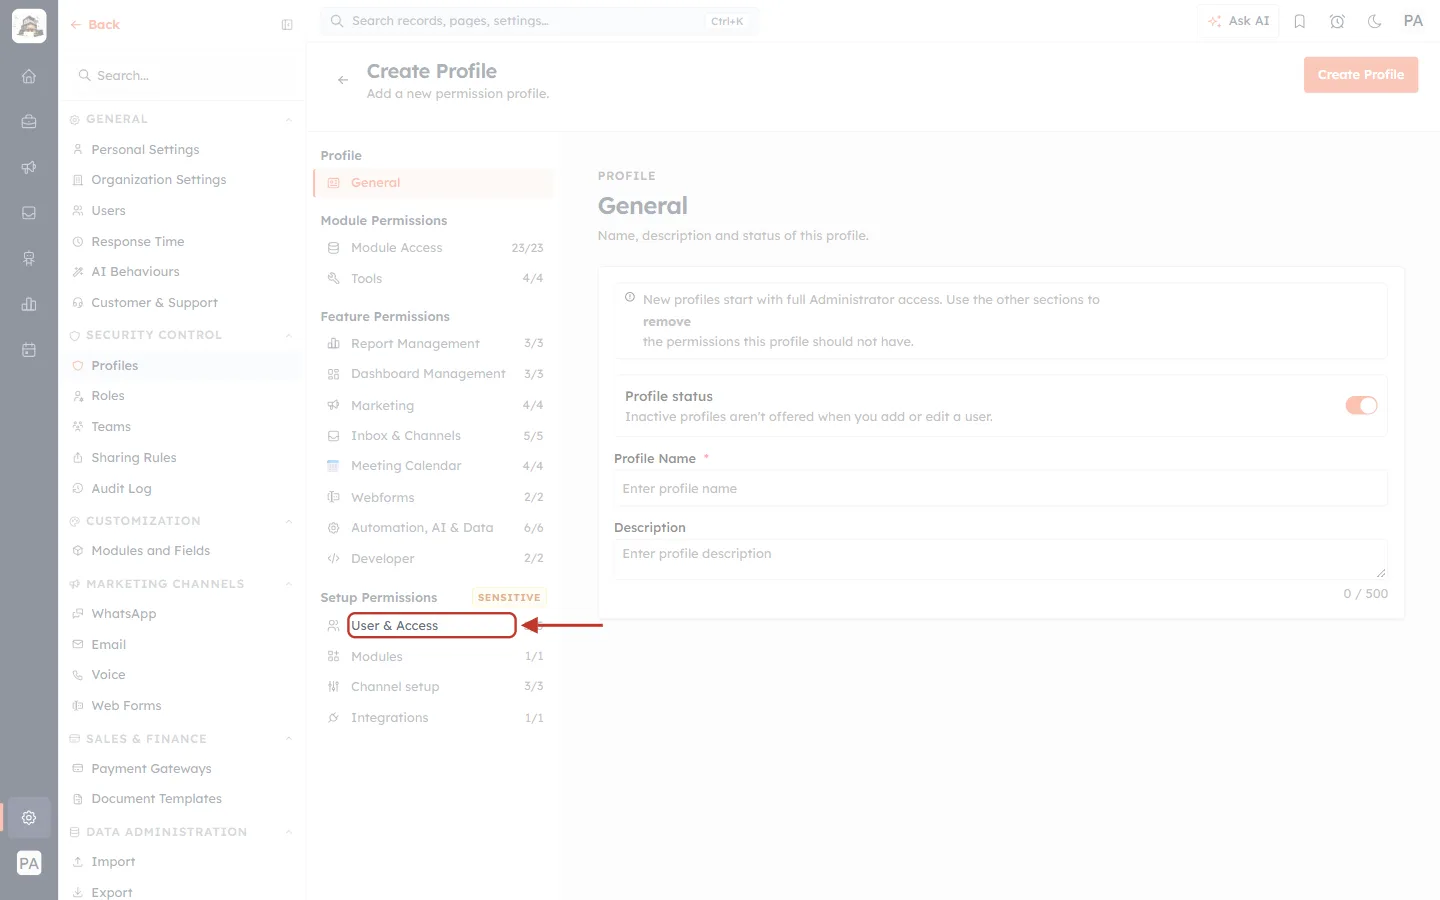
What this screenshot shows. The left-hand list of a profile, with User & Access ringed under Setup Permissions.
SENSITIVE label: Setup Permissions control how your organization is set up, so grant them carefully.
5/5 means all five User & Access permissions are switched on in this profile.
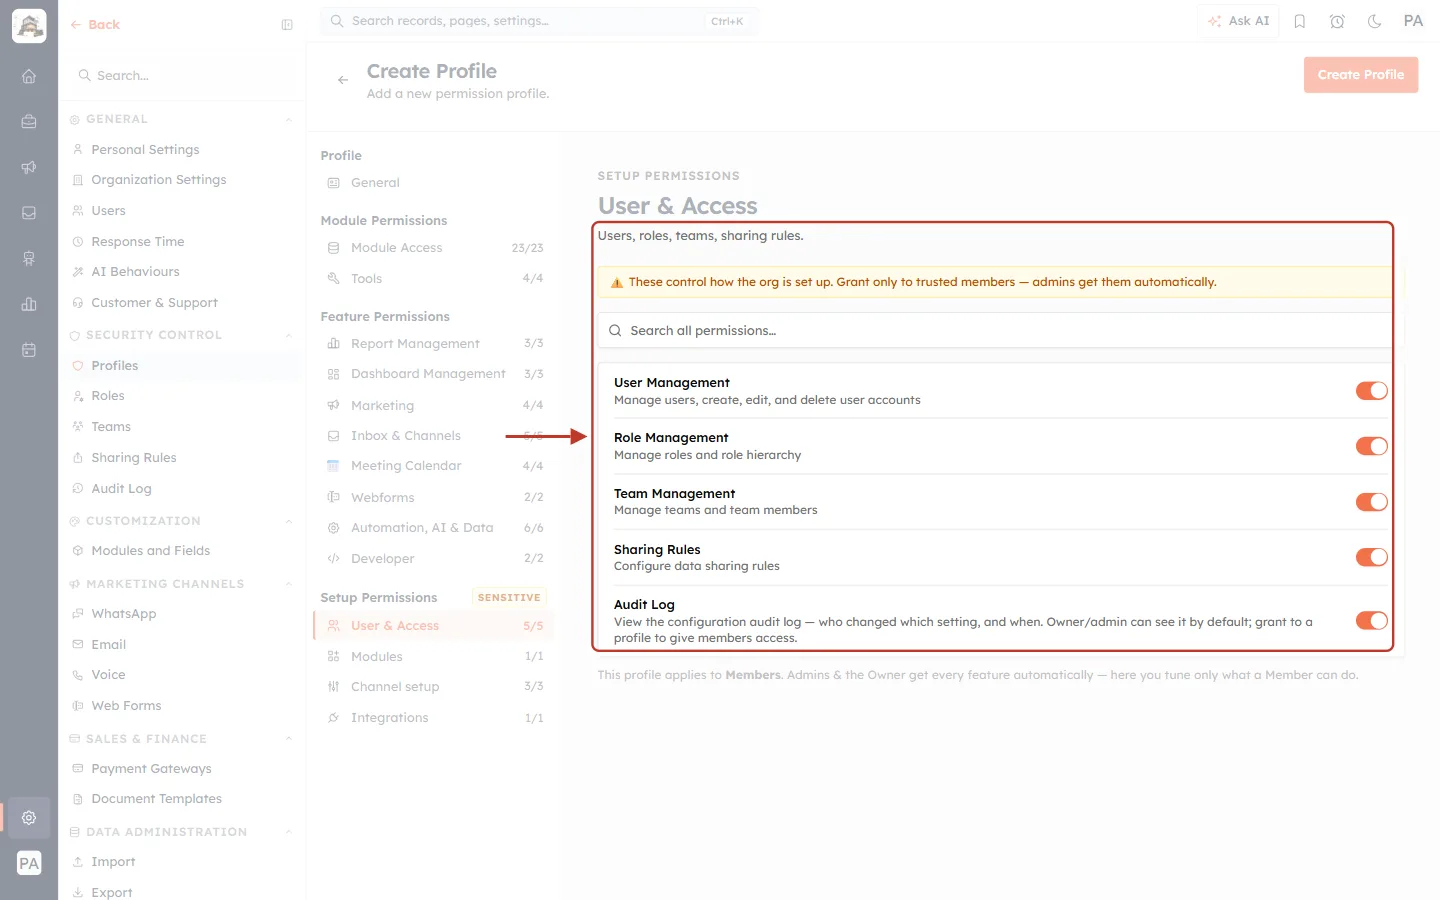
What this screenshot shows. The User & Access section of a profile, with the Audit Log switch at the bottom.
Audit Log — “View the configuration audit log — who changed which setting, and when. Owner/admin can see it by default; grant to a profile to give members access.”
Switch on (orange) — people with this profile see Audit Log in Setup. Switch off (grey) — they don’t.
The other switches here (User Management, Role Management, Team Management, Sharing Rules) are separate — turning on Audit Log does not let someone change users or roles. It only lets them look at the log.
For more about profiles, see Control Permissions with Profiles: Create a Profile Step by Step.
Common questions#
Can I edit or delete an entry?#
No. The Audit Log is read-only for everyone, including the Owner. This makes sure the history can be trusted.
Why can’t I see Audit Log in Setup?#
Your profile doesn’t have the Audit Log permission. Ask your account Owner or an Admin to switch it on (Part 6).
Why can’t I find a change from a few weeks ago?#
Entries are kept only as long as your plan allows — 1 day on Free, 5 on Solo, 15 on Business and 30 on Business Pro. Older entries are removed automatically. Export the log regularly if you need to keep it longer.
Someone edited a contact’s details — why isn’t it here?#
Everyday edits to records are kept on the record’s own timeline, not in the Audit Log. Open the record and look at its timeline. The Audit Log only shows record deletes and merges.
Why is the time in my CSV file different from the screen?#
The screen shows times in your time zone. The CSV file uses UTC so that everyone who opens it sees the same time, wherever they are.
Previous and next#
Previous: Sharing Rules: Share Records Across Teams, Roles & Users (Step-by-Step Guide)
Next: Create a New Module: Build Custom Modules for Your CRM
Related articles#
Was this article helpful?
Ready to implement this?
OpenAI Engage and apply what you just learned to your own workspace.
Open AI Engage CRM