Loading…


KnowledgeBase
Import Notes into Any Module: Attach Notes to Existing Records from CSV or Excel and Check Your Notes Import History (Step-by-Step)
Introduction#
When you move to AiEngage CRM, your history often comes with you as notes: call summaries, meeting notes, visit reports and so on. Typing them in one by one would take days. Import Notes lets you upload them all at once from a CSV or Excel file. Each note is attached to the right record, such as a contact, company, deal or a record in one of your custom modules.
Every notes import is also listed in Notes Import History, where you can check how many notes were added, see which rows failed and why, and download a report.
This guide has five parts:
Part | What you’ll learn |
|---|---|
Part 1 | How to prepare your file, and where to start the import |
Part 2 | Step 1 of the wizard: upload the file and choose the settings |
Part 3 | Step 2 of the wizard: map your columns, and match each note to a record by a unique field |
Part 4 | Step 3 of the wizard: review and start the import, then follow its progress |
Part 5 | Notes Import Details and Notes Import History: check results, errors and past imports |
We import four notes into Contacts, matched by each contact’s email address. The steps are the same for any module: replace “Contacts” with the module you are using.
ℹ️
Before you start:
The records the notes belong to must already exist in the CRM. Import Notes adds notes to existing records; it doesn’t create contacts, deals or other records. To bring in the records themselves first, see Import Data into Any Module.
The module needs a unique field to match on, such as Email. Step 8 explains this.
Part 1: Prepare your file and start the import#
Step 1: Prepare your notes file#
Put one note per row. You need at least two columns:
A column that identifies the record the note belongs to, for example the contact’s email address. This column is mapped to Related To in Step 7.
The note text, mapped to Note Content. This is required.
Other columns are optional. Here is the example file we use:
Contact Email | Note Title | Note Content | Created Date |
|---|---|---|---|
priya.nair@coastalcafes.in | Discovery call | Discussed café furniture for two new outlets. Wants a quote by Friday. | 2026-10-02 11:30:00 |
arjun@mehtalogistics.in | Site visit | Visited the warehouse. Needs 40 ergonomic chairs and 10 desks. | 2026-10-05 15:00:00 |
kavya.rao@raodental.in | Follow-up | Sent the reception sofa catalogue. Call back next Tuesday. | 2026-10-09 10:15:00 |
rohan@desaiandsons.com | Pricing objection | Feels the showroom quote is high. Offer 5% for a 3-year contract. | 2026-10-12 17:45:00 |
These are the note fields you can fill from your file. They are also the columns in the sample file you can download in Step 3:
Note field | What to put in the column |
|---|---|
Note Content (required) | The text of the note |
Note Title | A short heading for the note |
Related To | The value that identifies the record, such as an email address. It is matched by a unique field (Step 8). |
Note Owner | The email address of the user who should own the note. If you leave it out, the owner chosen in Step 5 is used. |
Pinned | true to pin the note on the record |
Attachments | A public link to a file, for example https://example.com/file.pdf |
Note Type, Checklist Items | Extra note details, if your team uses them |
Related To Module, Related To ID | Optional extra columns that appear in the sample file. Most imports only need Related To. |
⚠️
Dates aren’t imported. There is no date field to map to, so a column such as Created Date is left as Don’t use this column. If the original date matters, add it to the note text, for example “2 Oct 2026: Discussed café furniture…”.
Step 2: Open Import Notes from the module’s list#
Open the module the notes belong to, for example Contacts. At the top right of the list, click the arrow on the orange Create Contact button.
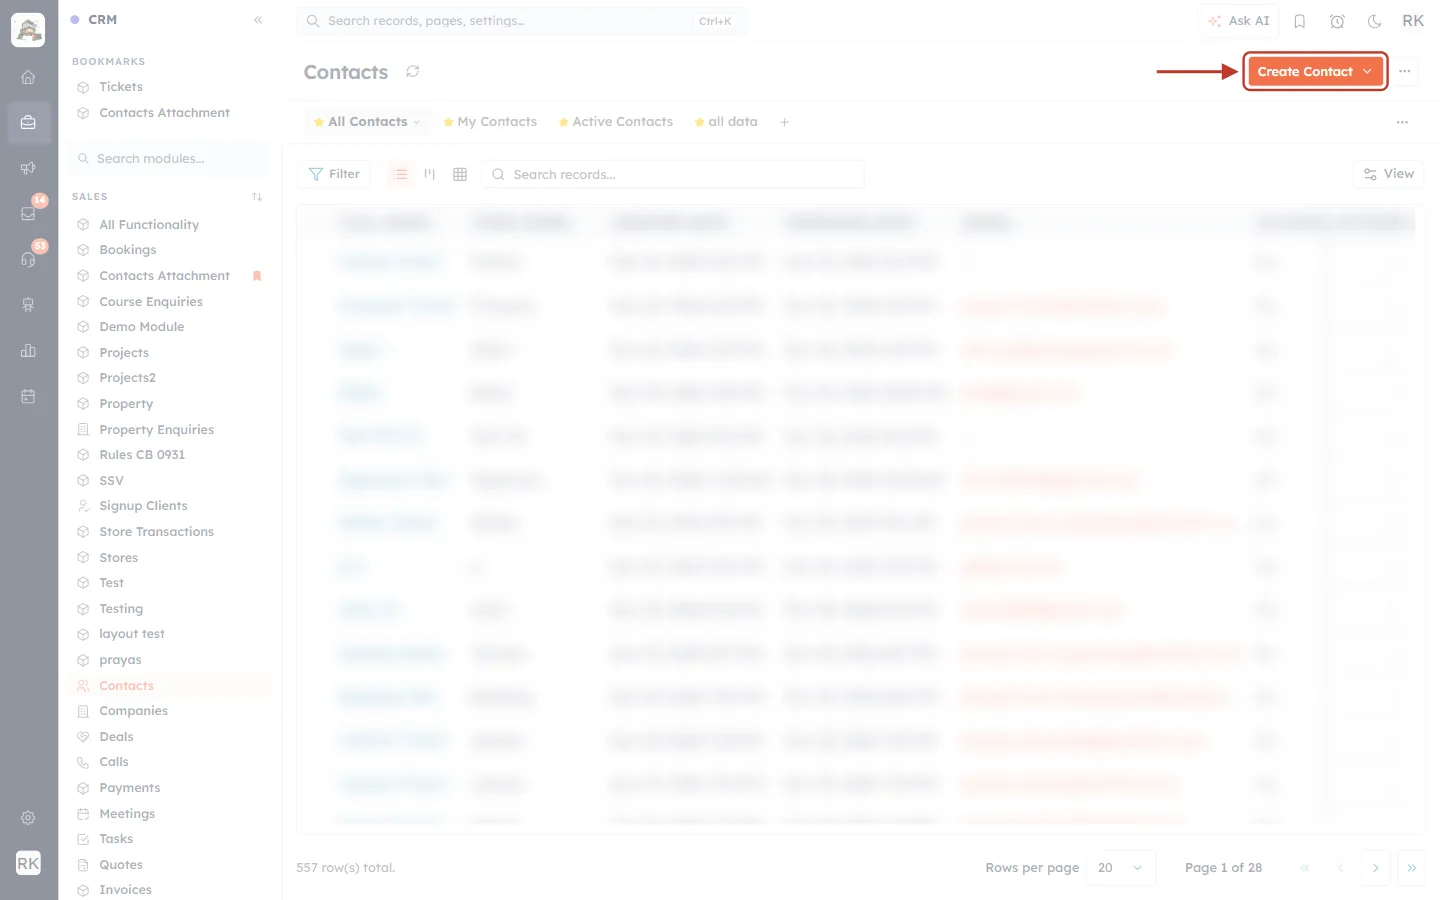
What this screenshot shows. The Contacts list, with the orange Create Contact button at the top right ringed. The contact rows are blurred.
Create Contact ▾: the small arrow on the right of the button opens a menu of ways to add data. In other modules, the button is named after that module, for example Create Deal. If you can’t create records in a module, it is called Actions instead.
The views (All Contacts, My Contacts, Active Contacts…) and the toolbar (Filter, Search records…) are faded because they aren’t needed for importing.
557 row(s) total at the bottom left is how many contacts this sample account has. Notes are attached to these existing contacts.
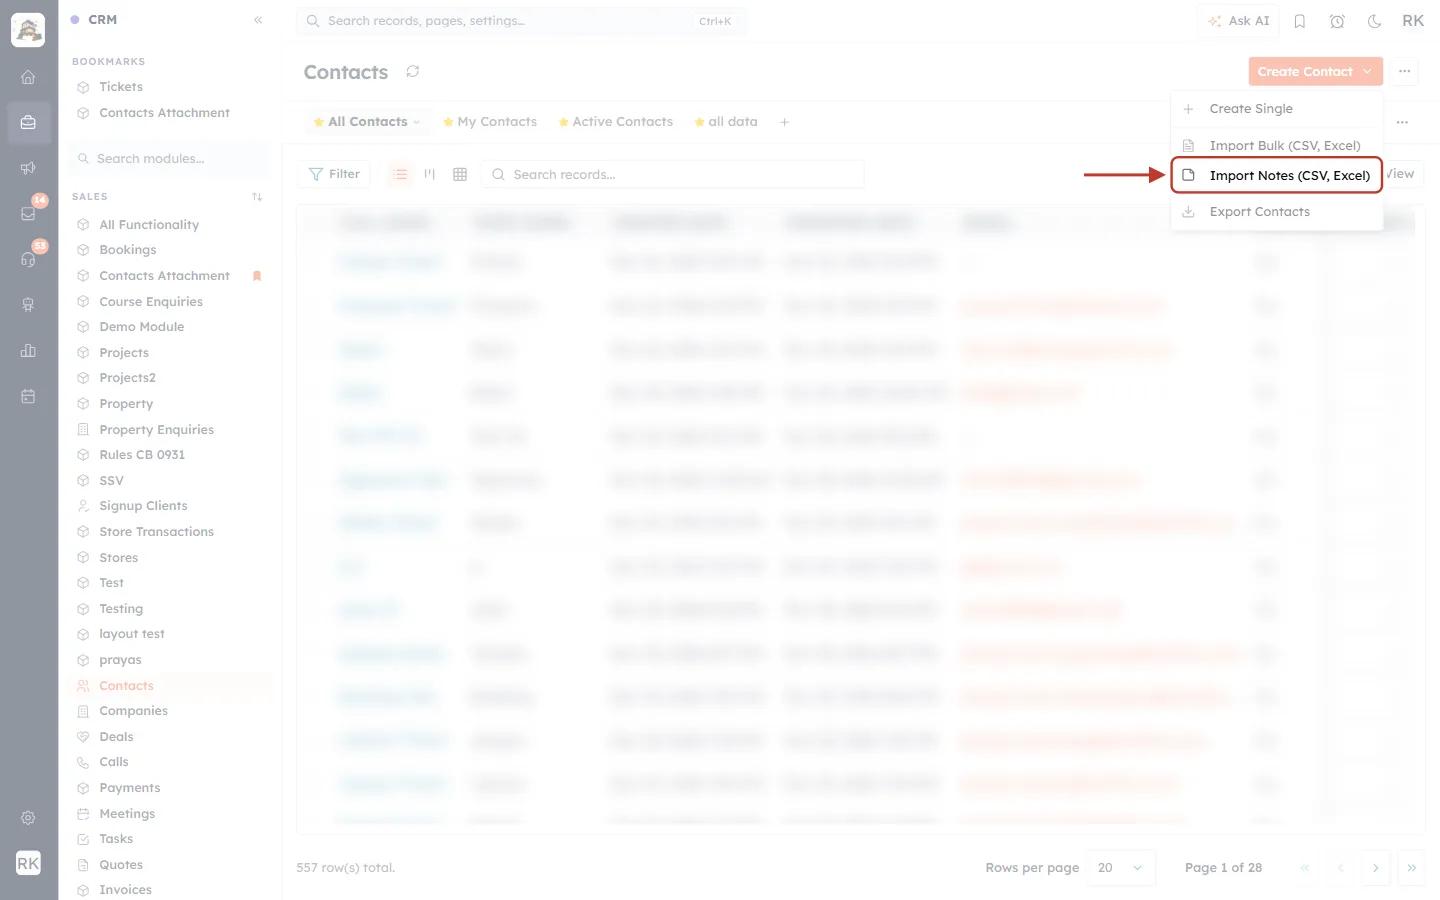
What this screenshot shows. The menu that opens from Create Contact. Import Notes (CSV, Excel) is ringed.
Create Single: add one contact by hand.
Import Bulk (CSV, Excel): import the contacts themselves. See Import Data into Any Module.
Import Notes (CSV, Excel): import notes onto contacts you already have. Click this.
Export Contacts: download your contacts.
If Import Notes is missing, notes are switched off for that module. Ask your admin.
Part 2: Step 1 of the wizard — Upload & Settings#
Step 3: Upload your file#
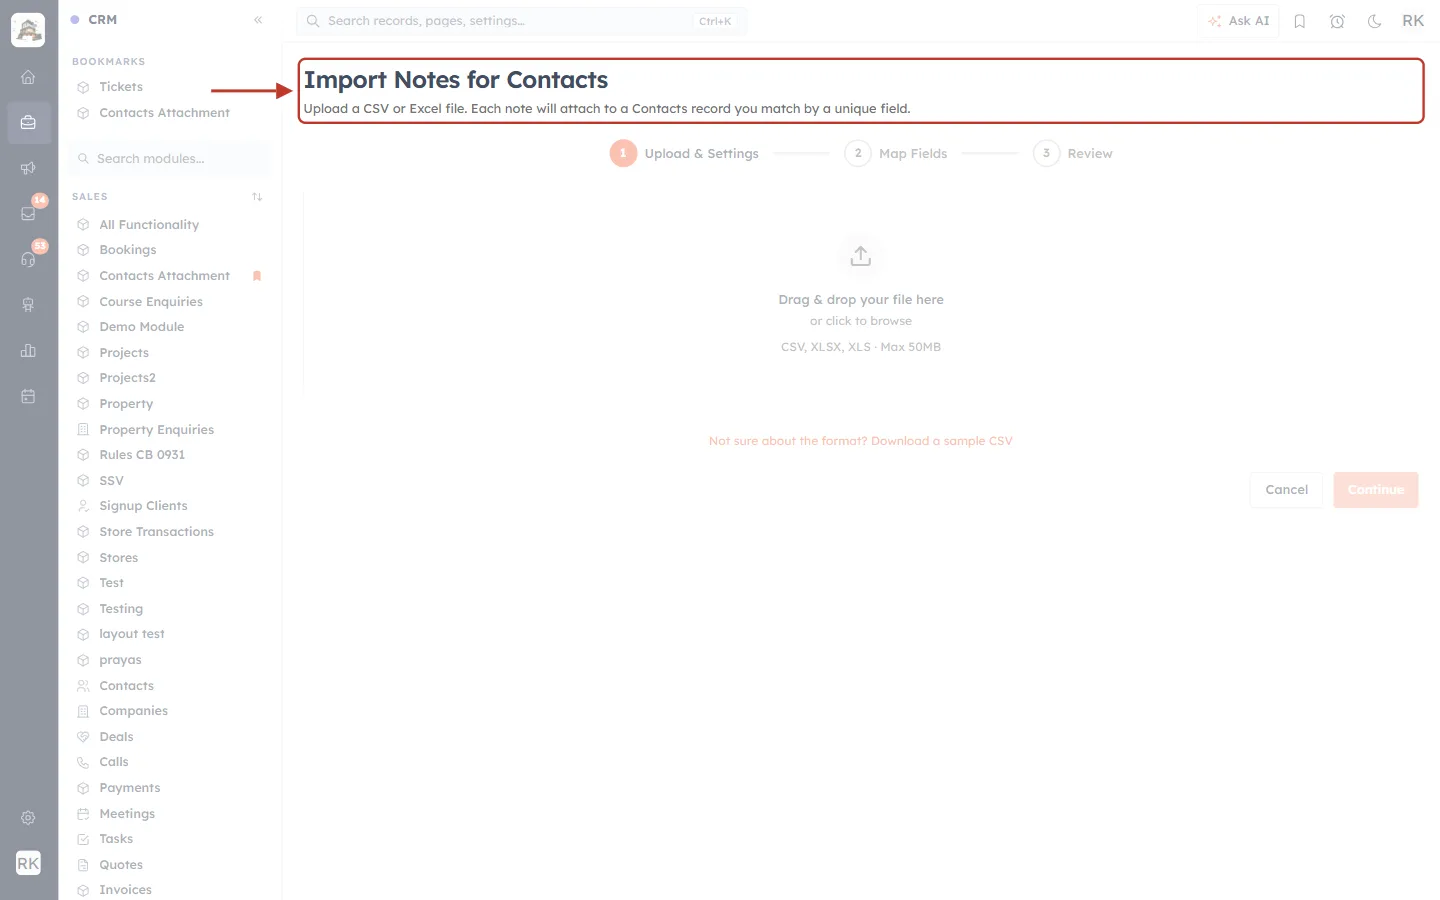
What this screenshot shows. The top of the import page. The title and the line under it are ringed.
Import Notes for Contacts: the module name tells you where the notes will go.
Upload a CSV or Excel file. Each note will attach to a Contacts record you match by a unique field. This sums up how the import works.
1 Upload & Settings → 2 Map Fields → 3 Review below are the three steps of the wizard. You are on step 1.
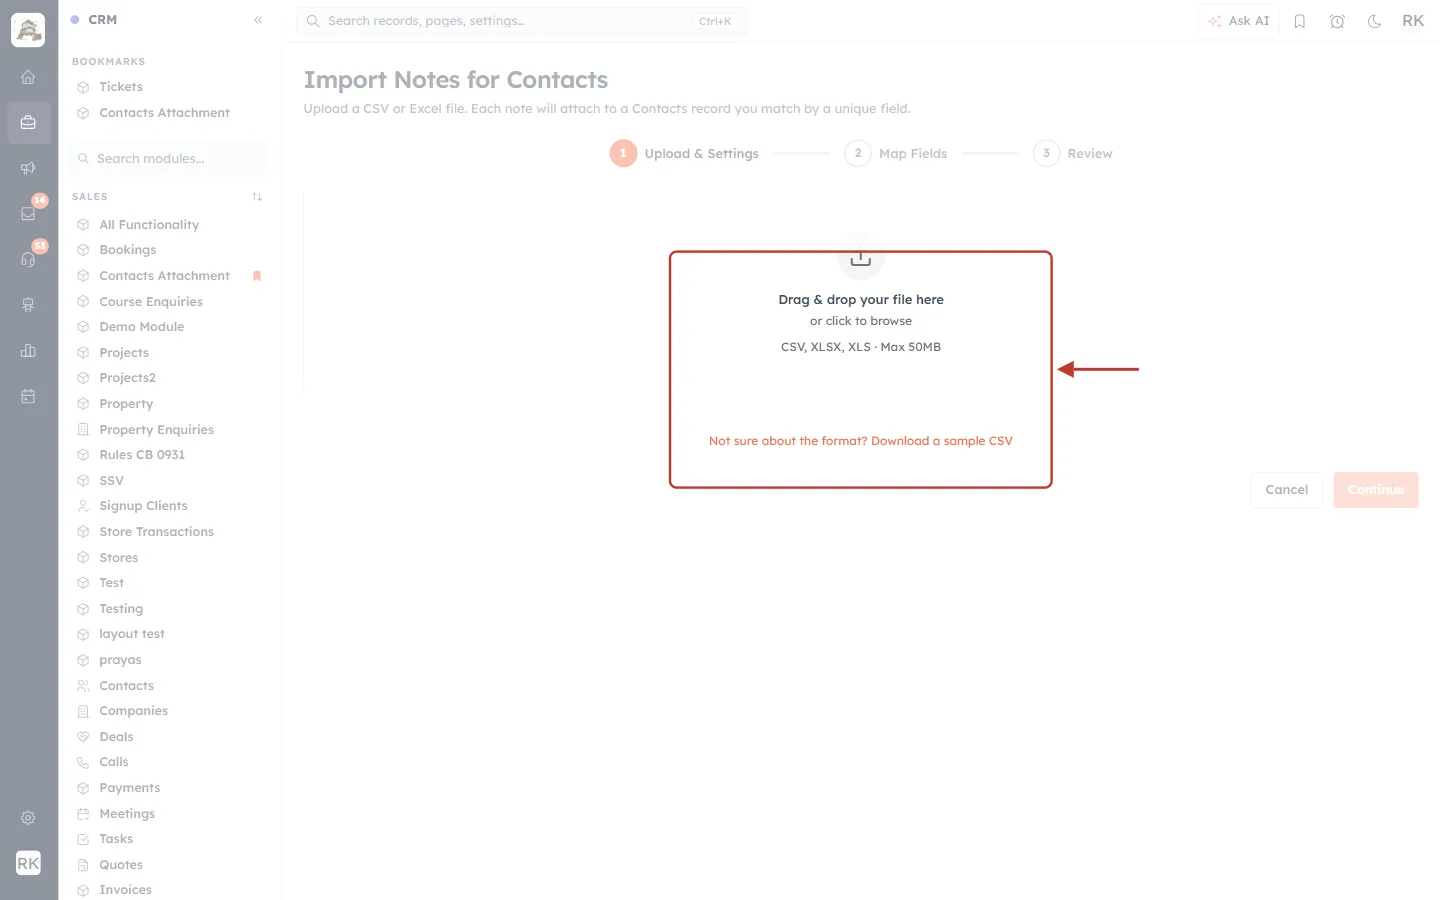
What this screenshot shows. The upload area and the sample file link are ringed.
Drag & drop your file here or click to browse: drop your file on this box, or click it to choose the file from your computer.
CSV, XLSX, XLS · Max 50MB: the file types you can use, and the largest file size.
Not sure about the format? Download a sample CSV: downloads notes_sample.csv, a ready-made file with every note column (see the table in Step 1). Fill it in and upload it.
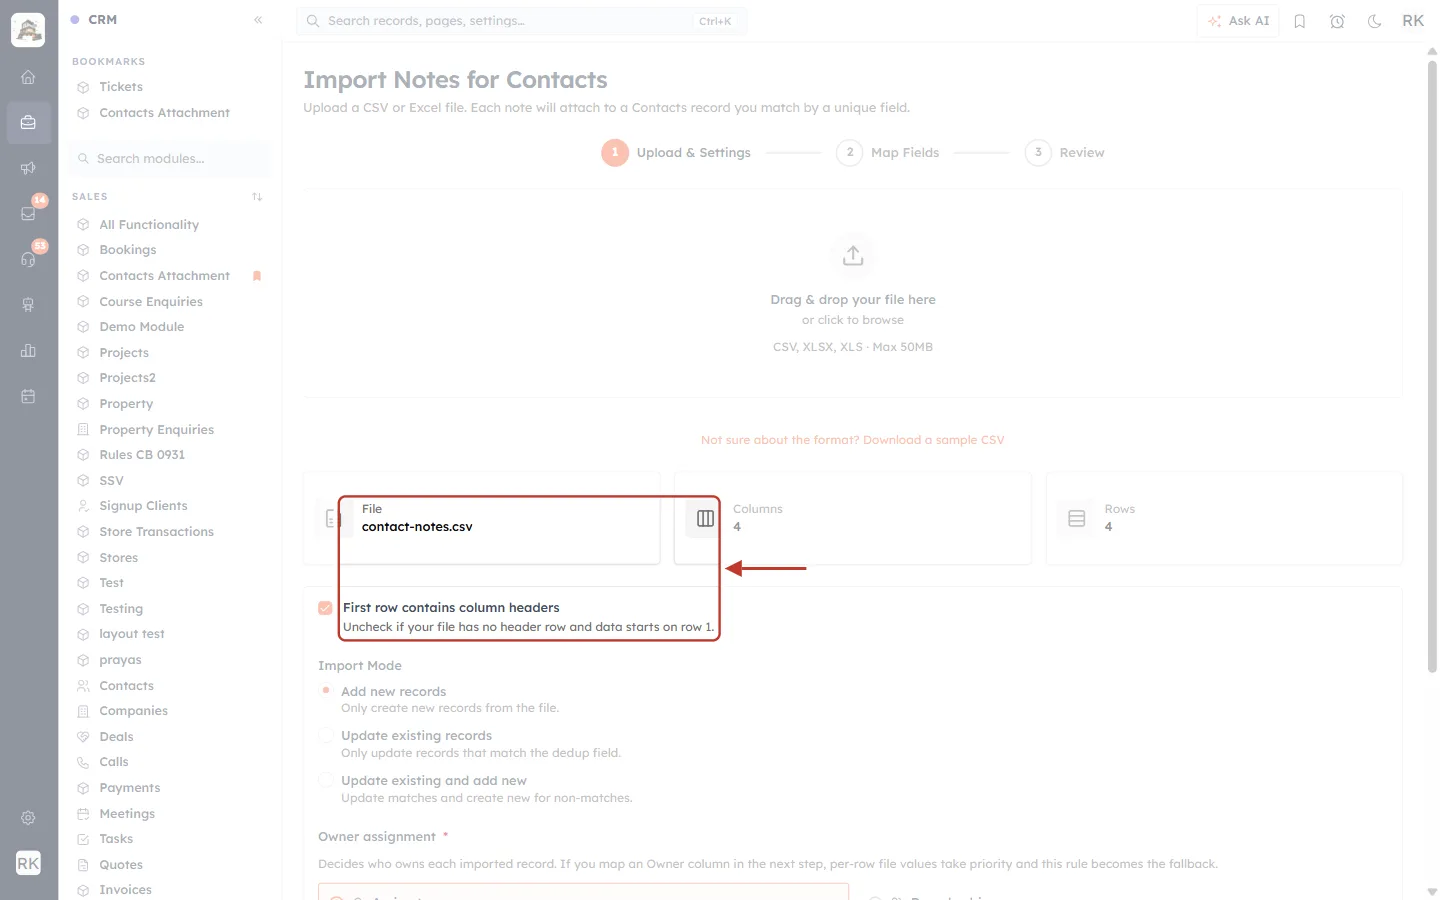
What this screenshot shows. The page after uploading contact-notes.csv. The file summary and the header option are ringed.
File: contact-notes.csv: the file you chose.
Columns: 4 and Rows: 4: what the CRM found in the file, here four columns and four notes. If these numbers look wrong, check your file before you continue.
First row contains column headers (ticked): the first row holds column names such as “Note Title”, not a note. Untick it only if your file has no header row and the notes start on row 1.
To use a different file, drop or browse to another file in the upload area above.
Step 4: Choose the import mode#
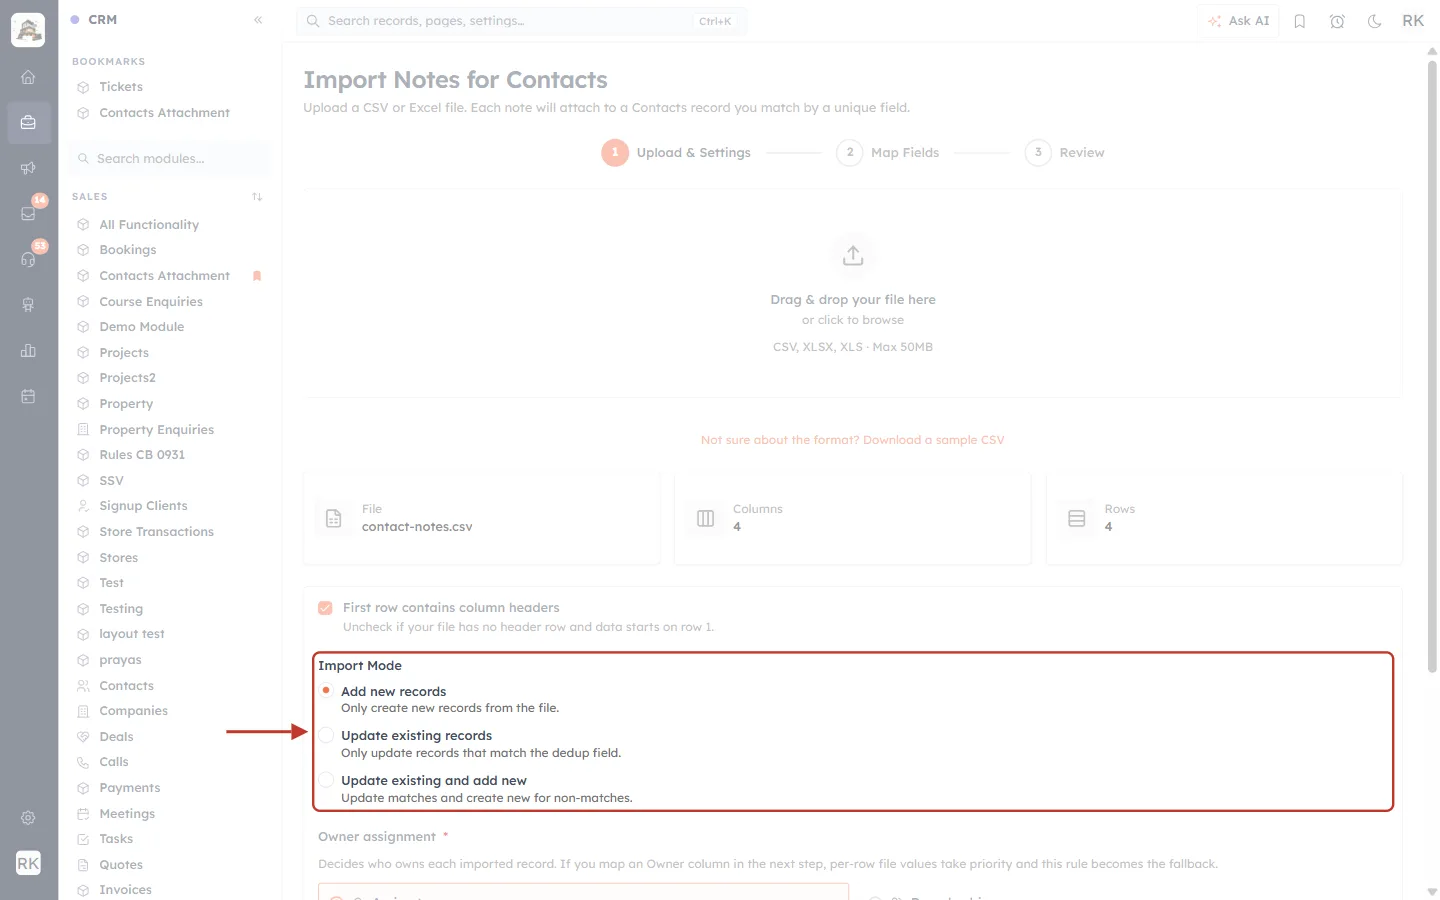
What this screenshot shows. The Import Mode section is ringed.
Add new records (selected): every row becomes a new note. Use this for notes.
Update existing records: only changes records that match on a chosen deduplication field. It creates nothing new.
Update existing and add new: updates matches and adds the rest as new.
The update modes need a column that identifies each existing note. That is rarely the case when you bring in notes from elsewhere, so leave Add new records selected.
Step 5: Choose who owns the notes#
Owner assignment is required. Continue stays greyed out until you pick an owner.
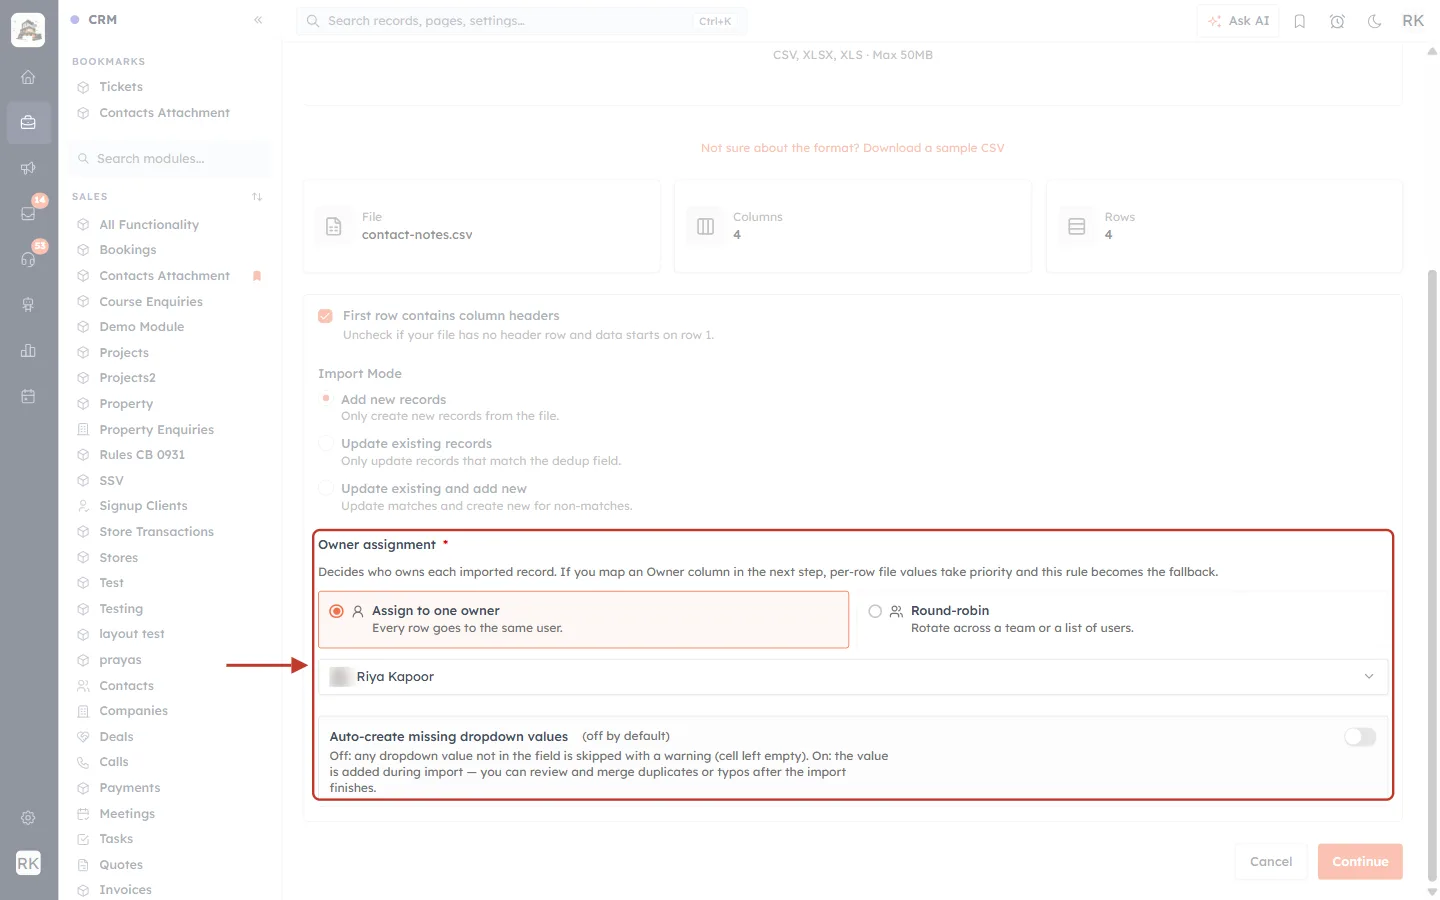
What this screenshot shows. The Owner assignment section, with an owner chosen, is ringed.
Owner assignment *: who owns each imported note. If you map a Note Owner column in the next step, the owner in each row wins and this choice is only used as a fallback.
Assign to one owner (selected): every note goes to the same person. Here, Riya Kapoor was picked from the list below it.
Round-robin: shares the notes out across a team or a list of users in turn. See Round-Robin Owner Assignment When Importing Records.
Auto-create missing dropdown values (off by default): if a dropdown column such as Note Type has a value the field doesn’t have yet, that cell is left empty with a warning. Switch it on to add the value instead.
Continue at the bottom right is now available. Click it.
Part 3: Step 2 of the wizard — Map Fields#
Step 6: Check how your columns are mapped#
Each column in your file is shown with a sample value and the note field it goes into. Columns whose names match a note field, such as “Note Title”, are mapped for you.
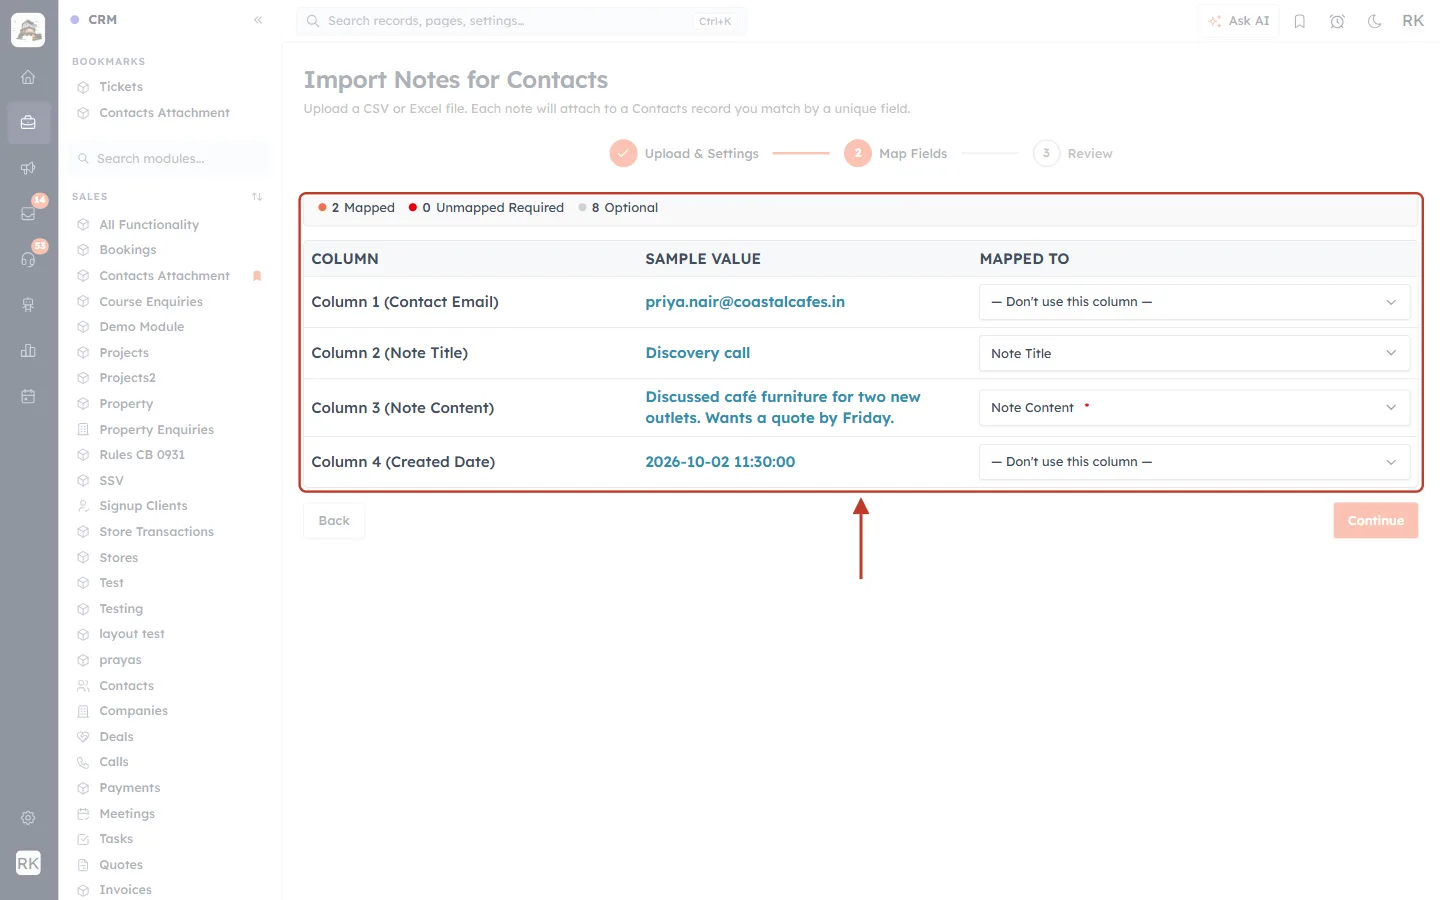
What this screenshot shows. The mapping summary and the table are ringed.
2 Mapped · 0 Unmapped Required · 8 Optional: two columns are mapped, no required field is missing, and eight optional note fields are unused.
Column: each column in your file, by position and header, for example Column 1 (Contact Email).
Sample Value: the value from the first row, so you can check you have the right column.
Mapped To: the note field the column fills. Note Title and Note Content * were mapped by name. The red star means Note Content is required.
Column 1 (Contact Email) and Column 4 (Created Date) say — Don’t use this column —, so they aren’t imported yet. Contact Email must be mapped (Step 7).
Step 7: Map the record column to “Related To”#
Click the box next to the column that identifies the record (here, Column 1 (Contact Email)) and choose Related To.
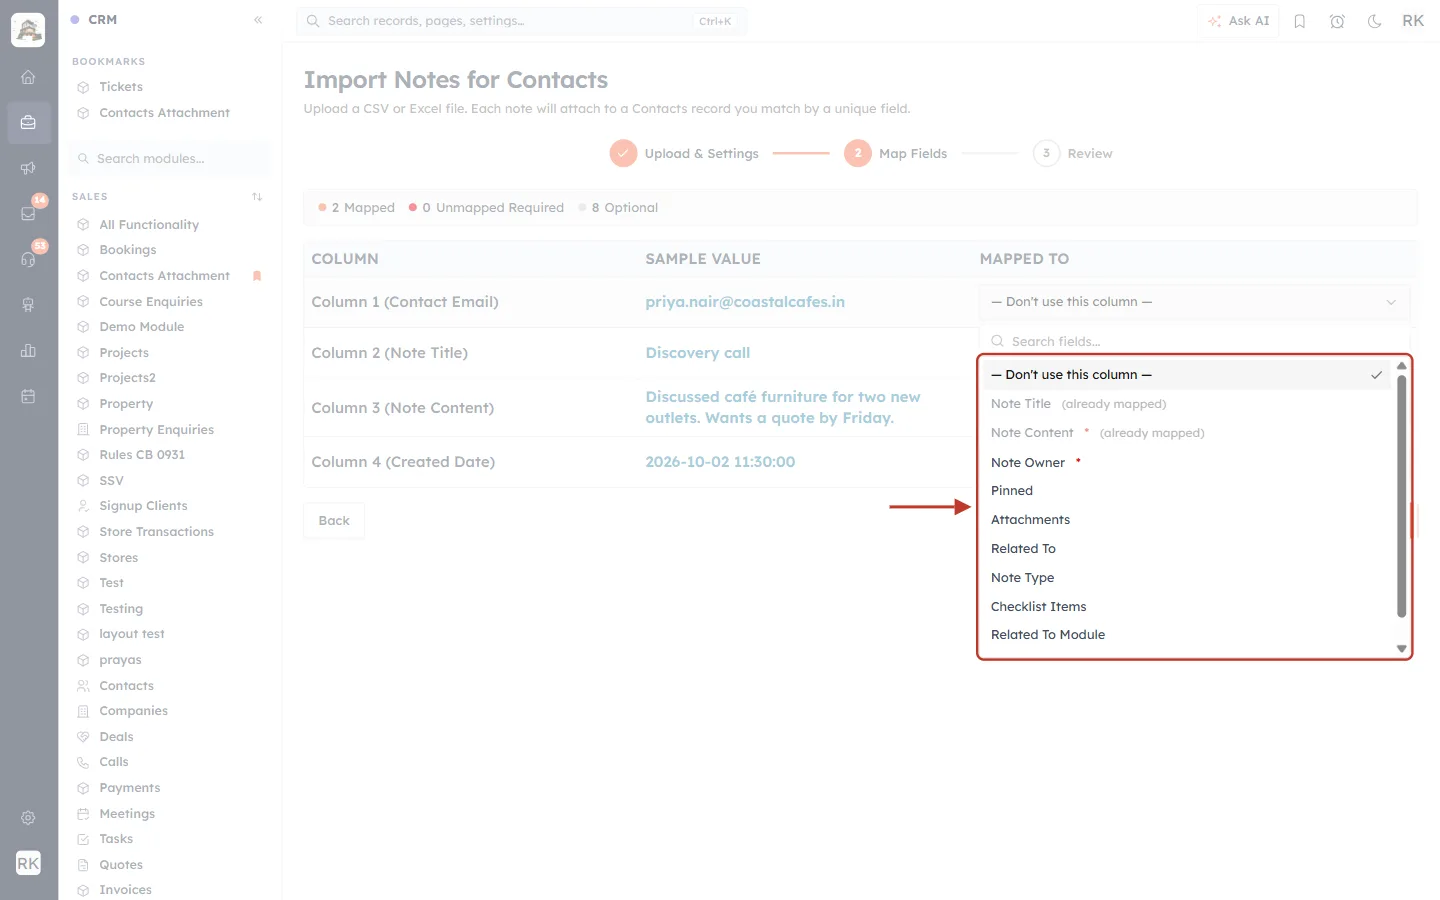
What this screenshot shows. The list that opens from Column 1’s Mapped To box is ringed.
— Don’t use this column —: skip the column.
Note Title and Note Content are marked (already mapped) because other columns use them.
Note Owner, Pinned, Attachments, Note Type, Checklist Items, Related To Module and Related To ID are the other note fields.
Related To: links each note to a record. Choose this for the Contact Email column.
There is no date field in this list, which is why dates can’t be imported.
As soon as you choose Related To, the Match Contacts by window opens. It asks which contact field your column’s values should be compared with.
Step 8: Make sure the module has a unique field#
Only unique fields can be used for matching. A unique field never has the same value on two records, so each note can only match one record. If the module has no unique field, you’ll see this:
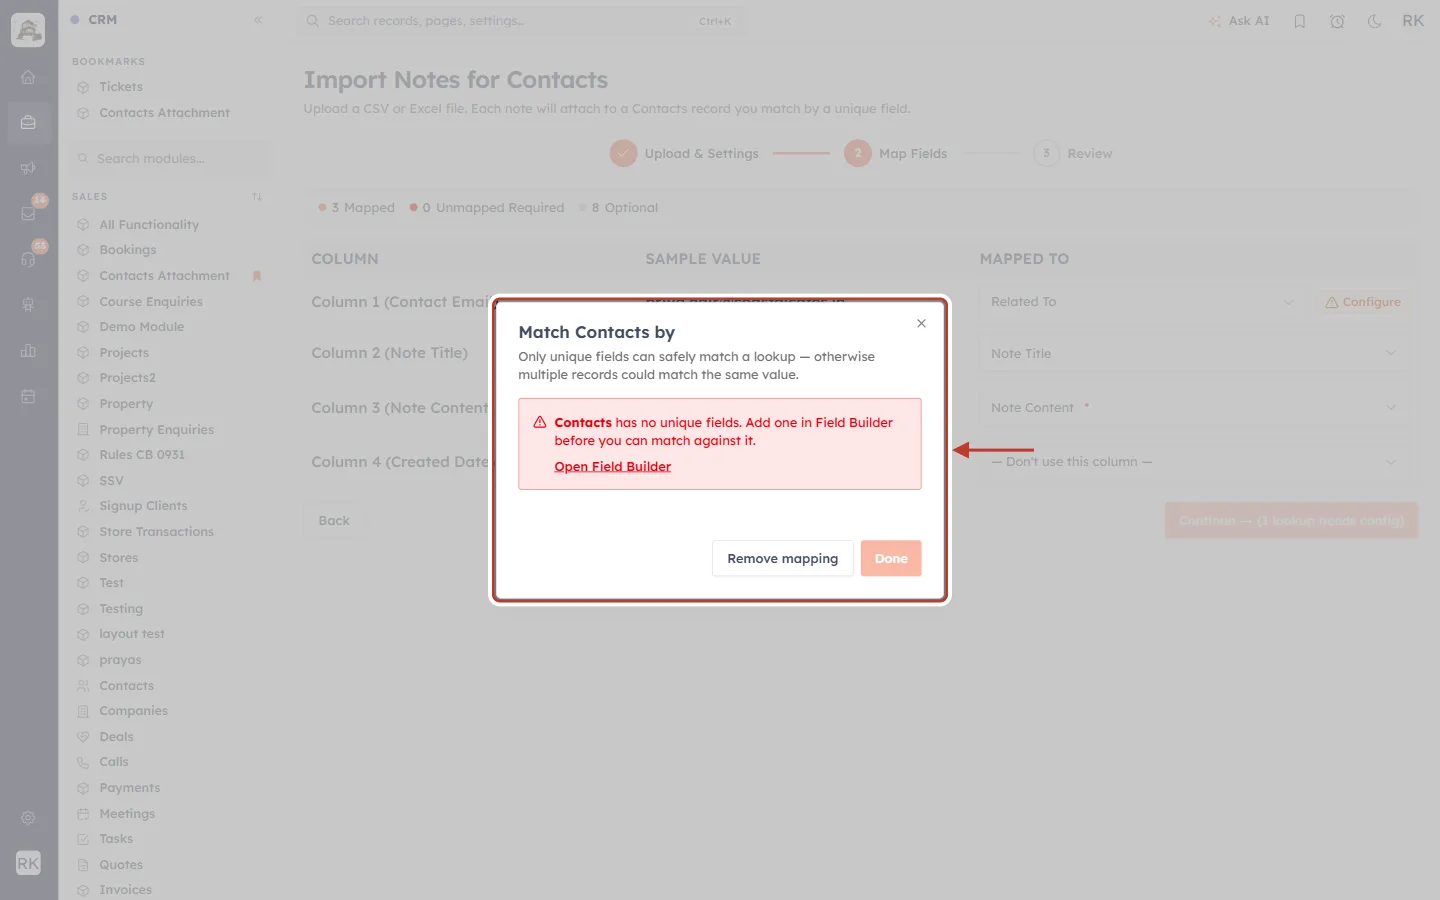
What this screenshot shows. The Match Contacts by window when Contacts has no unique field. The window is ringed.
Match Contacts by and Only unique fields can safely match a lookup — otherwise multiple records could match the same value. explain the rule.
The red box, Contacts has no unique fields. Add one in Field Builder before you can match against it., means you can’t finish this import yet.
Open Field Builder: takes you to the module’s fields so you can make one unique.
Remove mapping takes Related To off the column. Done is greyed out.
Behind the window, the Continue button reads Continue → (1 lookup needs config) and can’t be clicked until Related To is set up.
To make a field unique, an admin opens Setup → Modules and Fields, clicks Configure on the module, opens its layout and clicks the field, for example Email. You can also click Open Field Builder in the window.
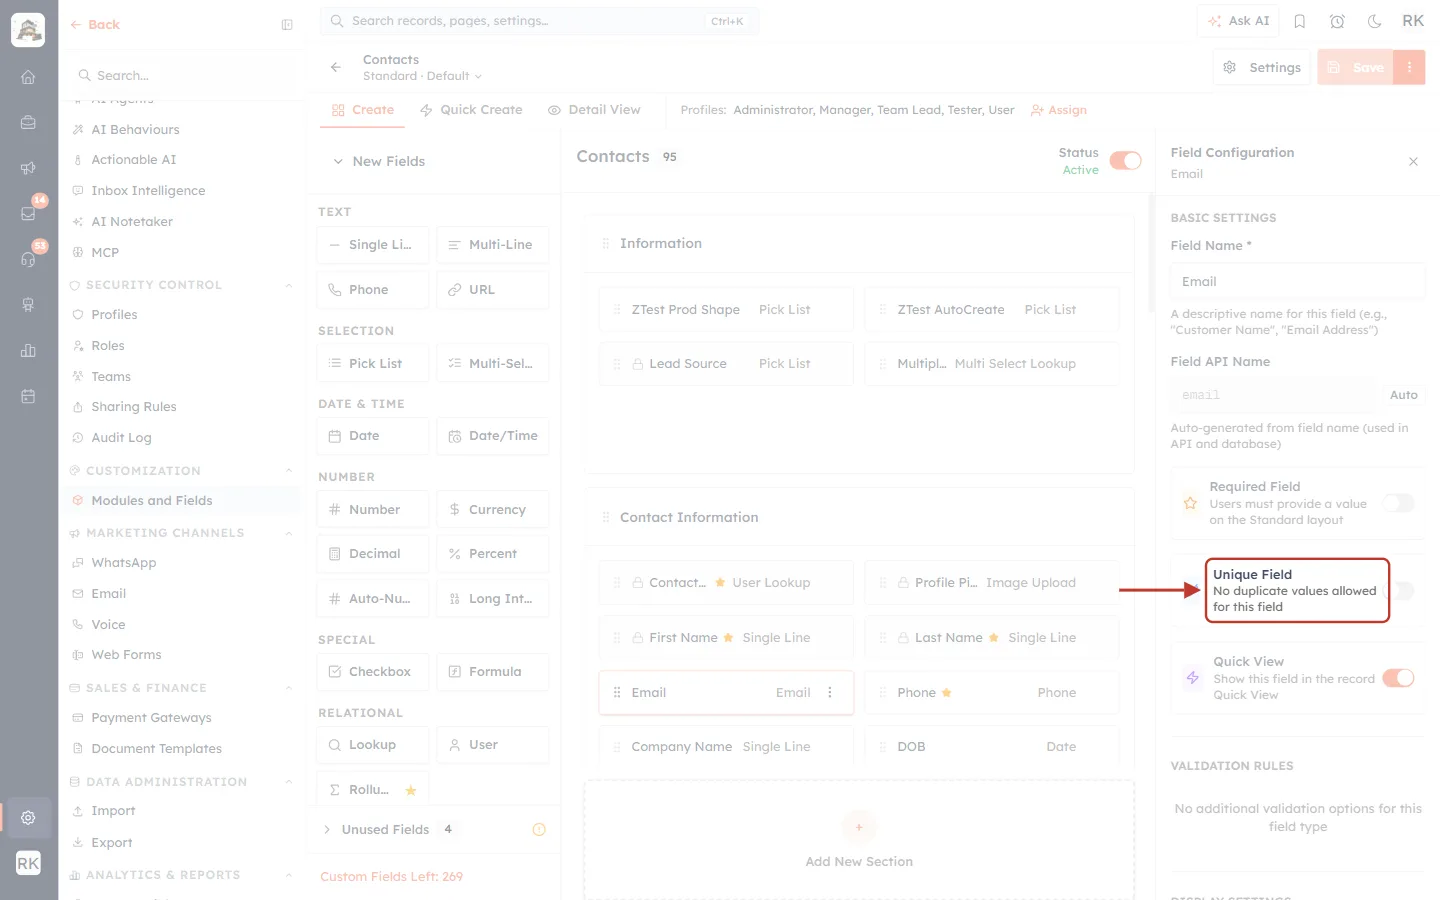
What this screenshot shows. The field settings for Email in the Field Builder. The Unique Field setting is ringed.
Field Configuration · Email: the settings panel for the field you clicked.
Unique Field — No duplicate values allowed for this field: switch this on, then save the layout. From then on, two contacts can’t share the same email address, and Email can be used to match notes.
Required Field and Quick View above and below it are separate settings and don’t affect importing.
⚠️
Check for duplicates first. Before you make a field unique, make sure your existing records don’t share values in it. Merge any duplicates first, for example two contacts with the same email address. Then start the notes import again from Step 2.
Step 9: Choose the match field and click Done#
Once the module has a unique field, the window lets you pick it.
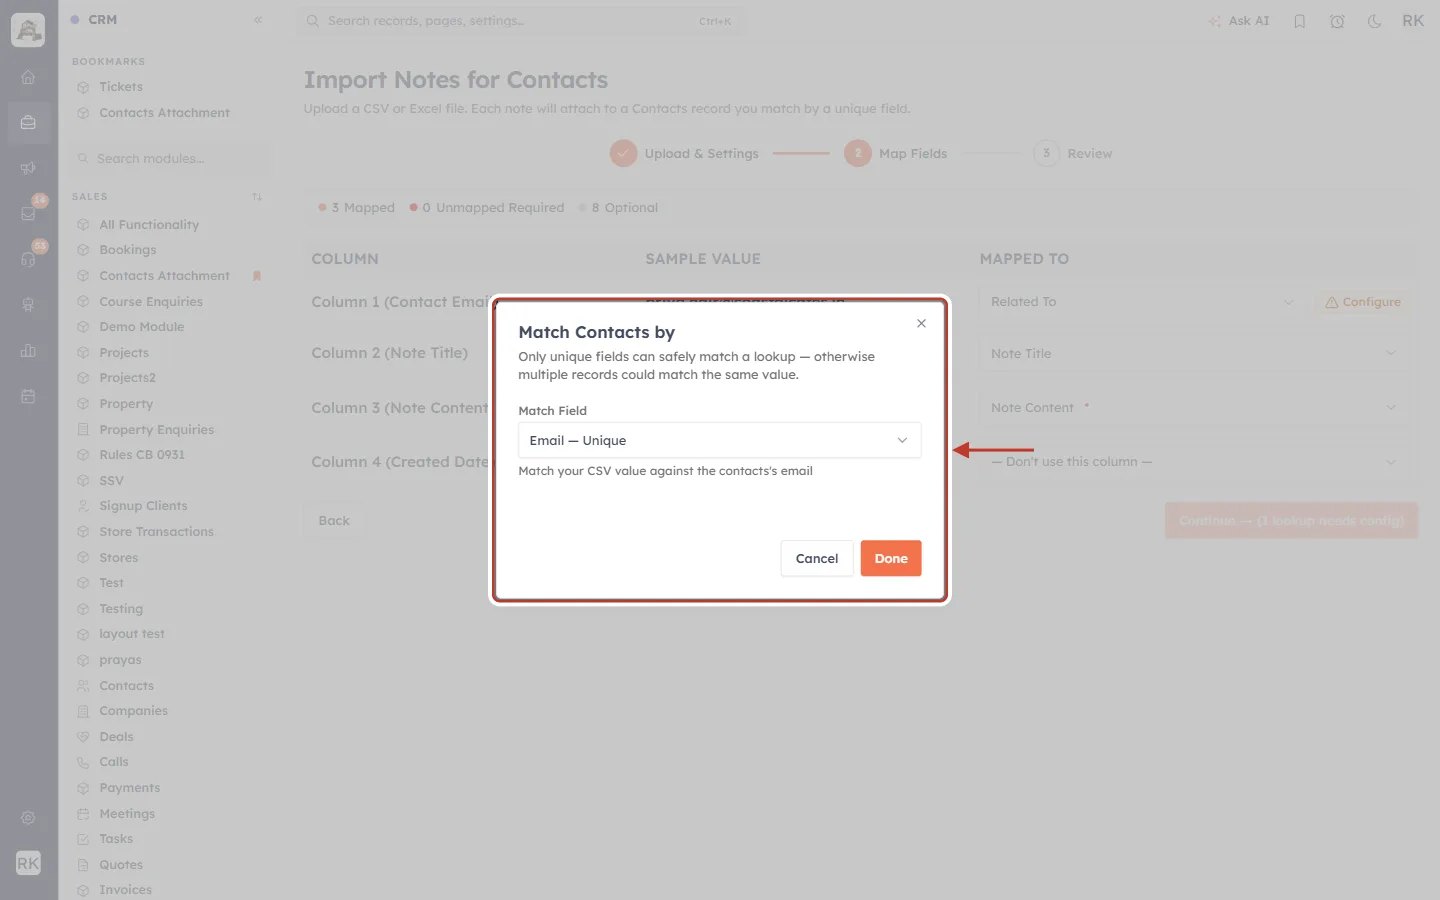
What this screenshot shows. The Match Contacts by window with a unique field available. The window is ringed.
Match Field: Email — Unique: the contact field to compare with. Only unique fields are listed.
Match your CSV value against the contacts’s email: each value in your Contact Email column is looked up in the contacts’ Email field. A note is attached to the contact whose email matches.
Done saves the choice. Cancel closes the window without it.
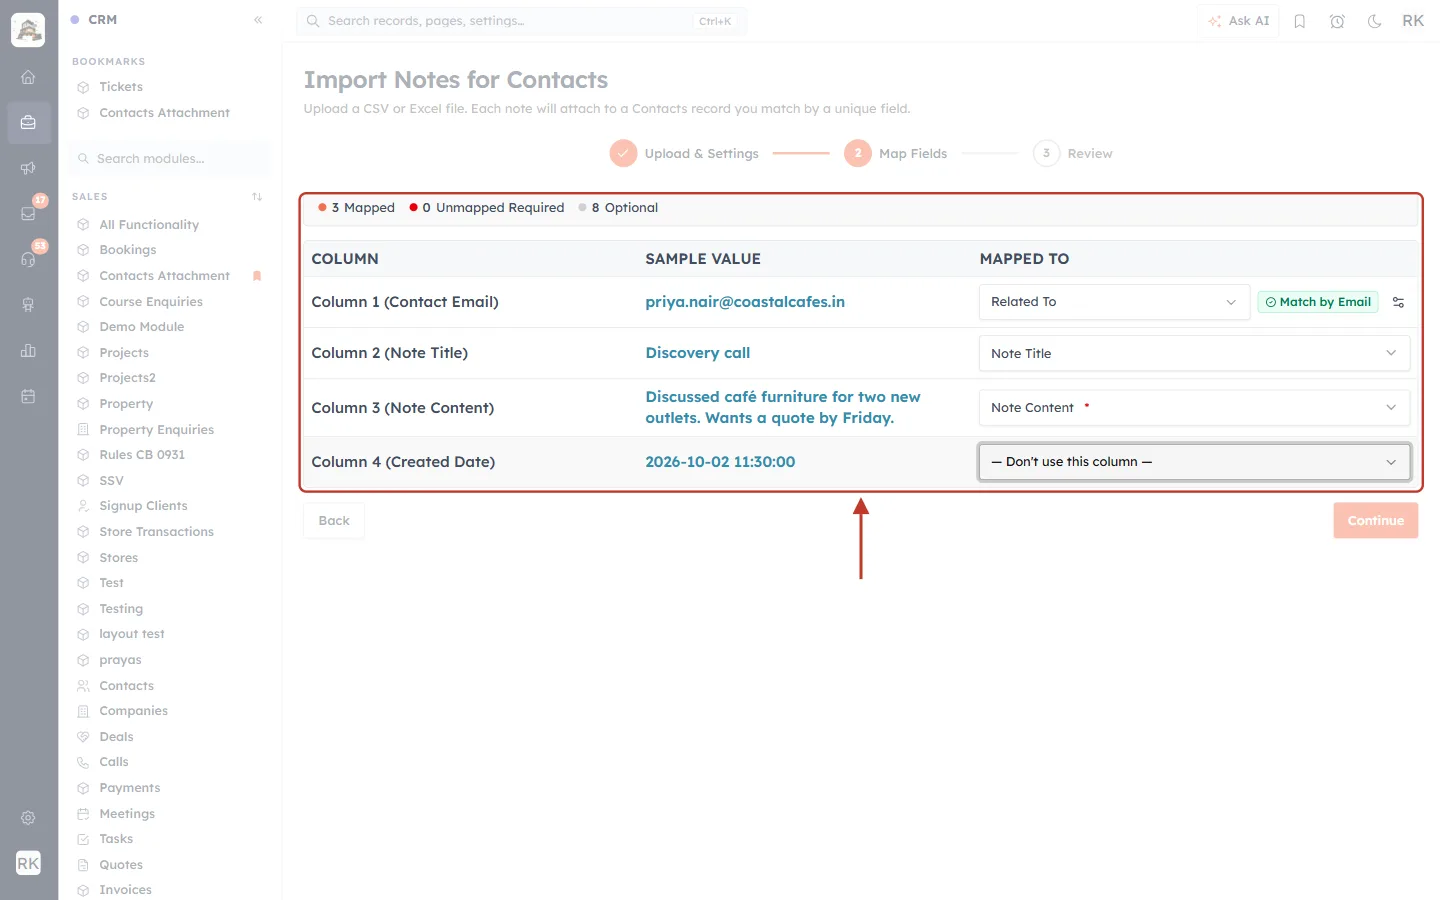
What this screenshot shows. The mapping table after clicking Done. The summary and table are ringed.
3 Mapped: Contact Email now counts as mapped.
Column 1 (Contact Email) → Related To · Match by Email: notes will be attached to the contact with that email.
Note Title and Note Content * are mapped as before.
Column 4 (Created Date) stays — Don’t use this column —.
Continue at the bottom right is now available. Click it.
Part 4: Step 3 of the wizard — Review and start#
Step 10: Review your choices#
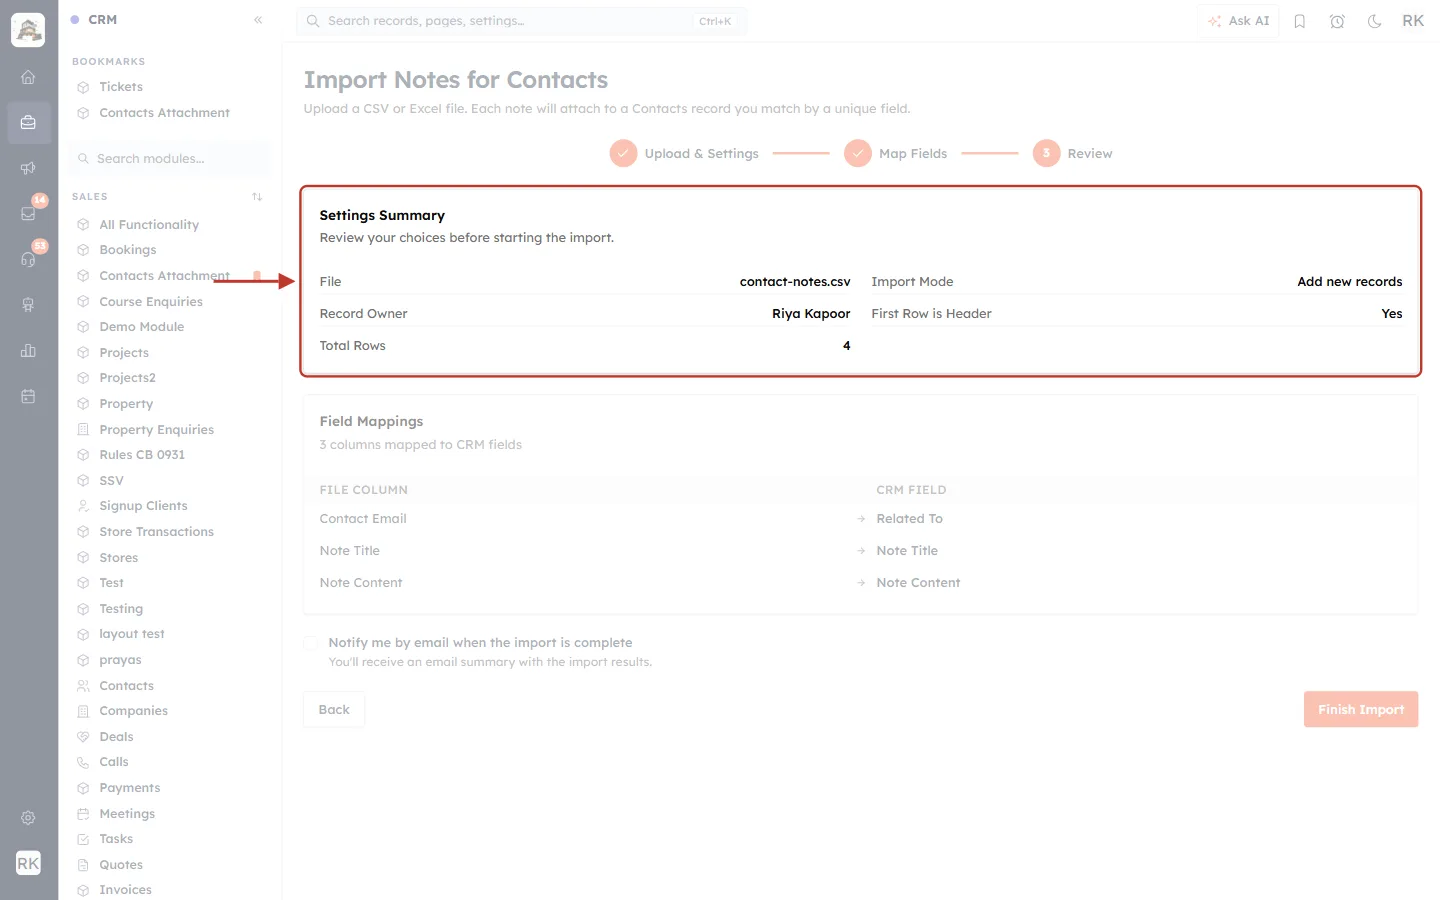
What this screenshot shows. The Review step. The Settings Summary card is ringed.
File: contact-notes.csv and Total Rows: 4: four notes will be imported.
Import Mode: Add new records: each row becomes a new note.
Record Owner: Riya Kapoor: the owner you chose in Step 5.
First Row is Header: Yes: the first row is treated as column names.
Field Mappings below lists each file column and the note field it fills: Contact Email → Related To, Note Title → Note Title, Note Content → Note Content.
Something wrong? Click Back to change it.
Step 11: Click Finish Import#
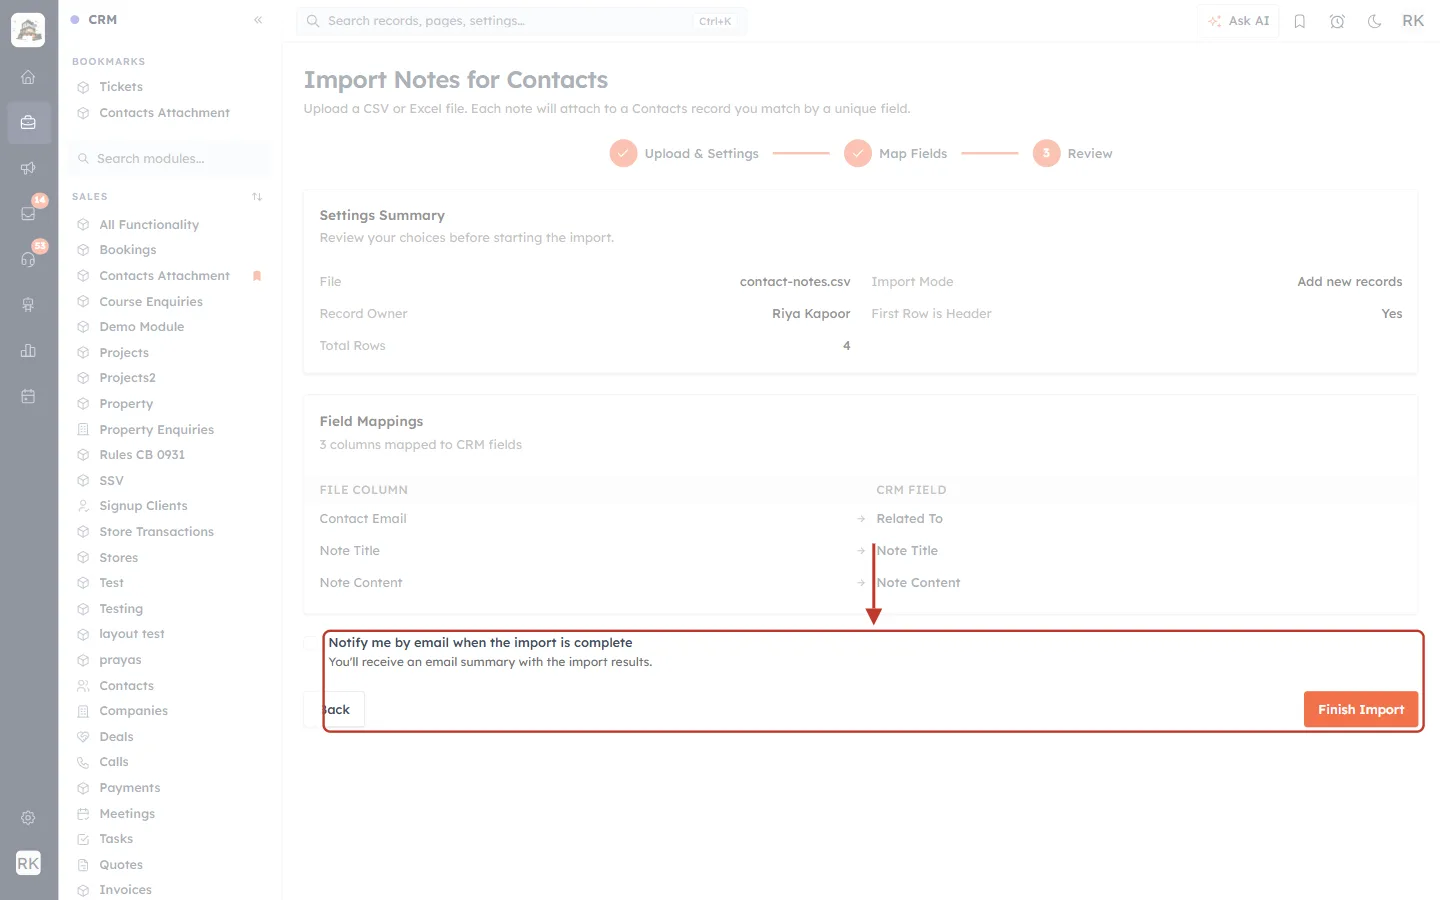
What this screenshot shows. The bottom of the Review step. The email option and Finish Import button are ringed.
Notify me by email when the import is complete: tick this to get an email summary of the results, which is useful for big files.
Finish Import: starts the import. While it starts, the button says Starting Import....
Back returns to Map Fields.
The import runs in the background. You are taken back to the module’s list, and a progress card appears in the bottom-right corner. You can carry on working while it runs.
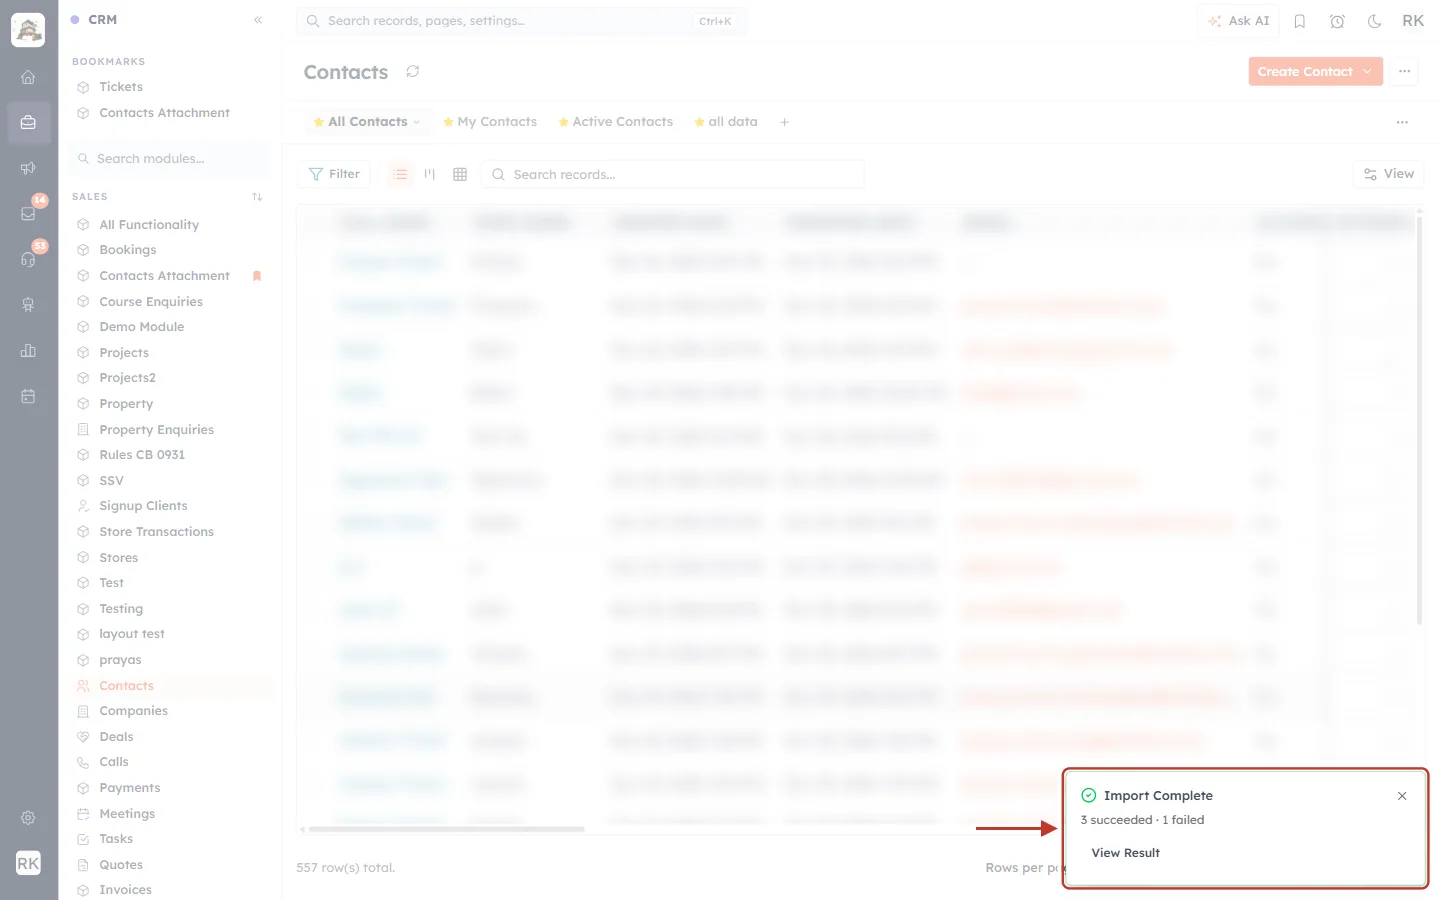
What this screenshot shows. The Contacts list after the import. The progress card in the bottom-right corner is ringed.
While it runs, the card says Importing Notes..., with a progress bar and, for example, “50% · 2/4”.
Import Complete with a green tick: the import has finished.
3 succeeded · 1 failed: three notes were added and one row couldn’t be imported.
View Result: opens Notes Import Details for this import (Step 12).
× closes the card. You can still find the import in Notes Import History (Step 14).
If the whole import fails, the card says Import Failed with a View Errors button.
✅
See the notes on a record: open one of the contacts from your file and look at its notes. For the full list of notes across a record and its related records, see The Related Notes View (All Related Notes).
Part 5: Notes Import Details and Notes Import History#
Step 12: Read Notes Import Details#
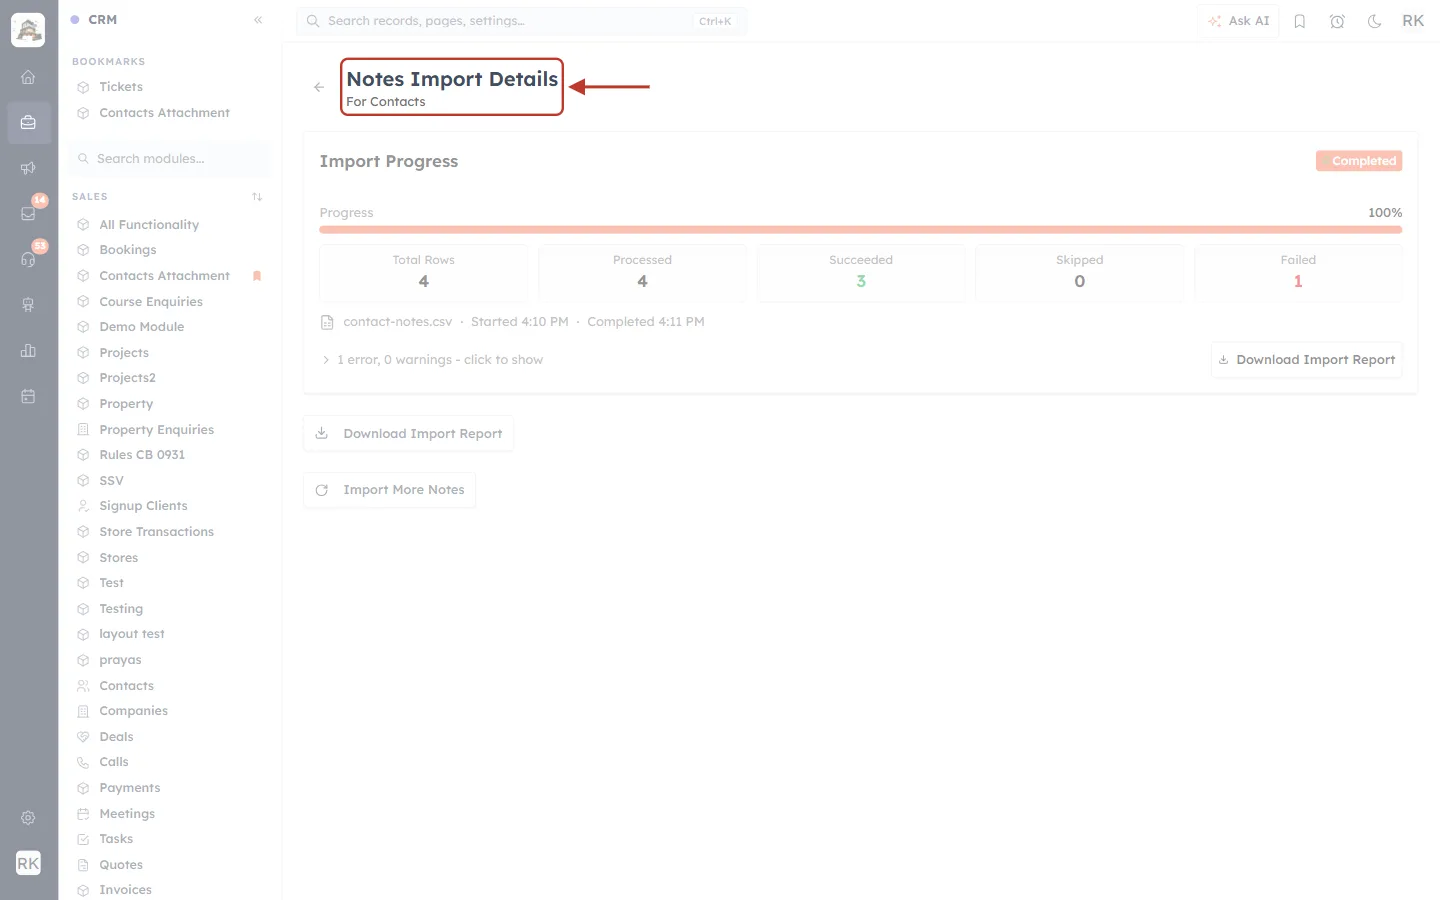
What this screenshot shows. The top of Notes Import Details. The title is ringed.
Notes Import Details · For Contacts: the results of one notes import into Contacts.
The ← arrow on the left opens Notes Import History (Step 14).
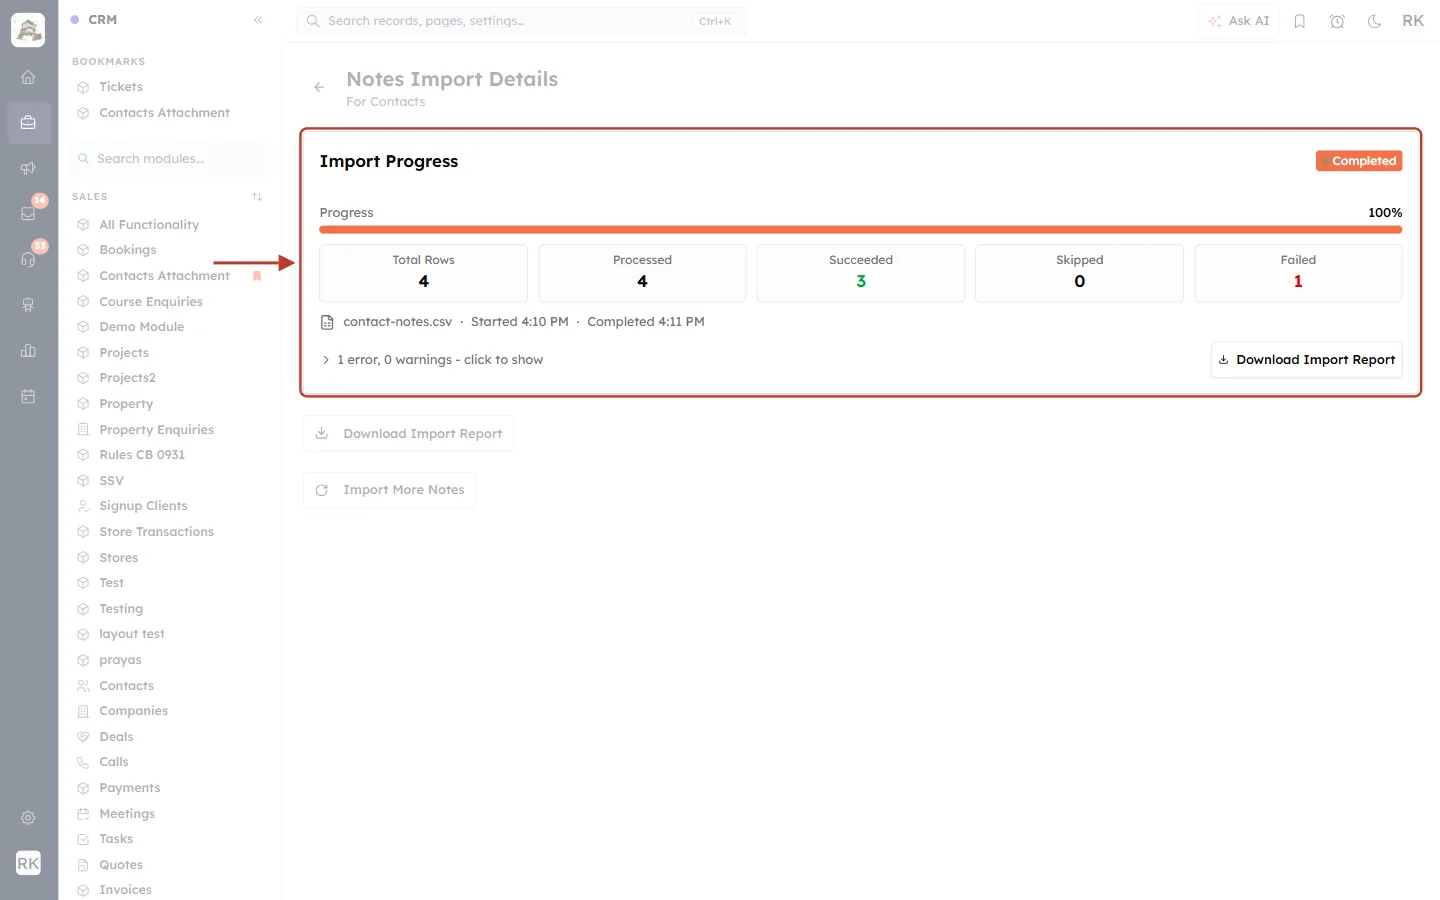
What this screenshot shows. The Import Progress card is ringed.
Completed (top right): the import’s status. Other statuses are Queued, Validated, Processing, Failed and Mapping Failed.
Progress 100%: every row has been processed.
Total Rows 4 · Processed 4 · Succeeded 3 · Skipped 0 · Failed 1: four rows were read, three notes were added and one row failed.
contact-notes.csv · Started 4:10 PM · Completed 4:11 PM: the file name and when the import ran.
1 error, 0 warnings - click to show: opens the list of problems (Step 13).
Download Import Report: downloads a CSV report of the problem rows.
Step 13: Find out why a row failed#
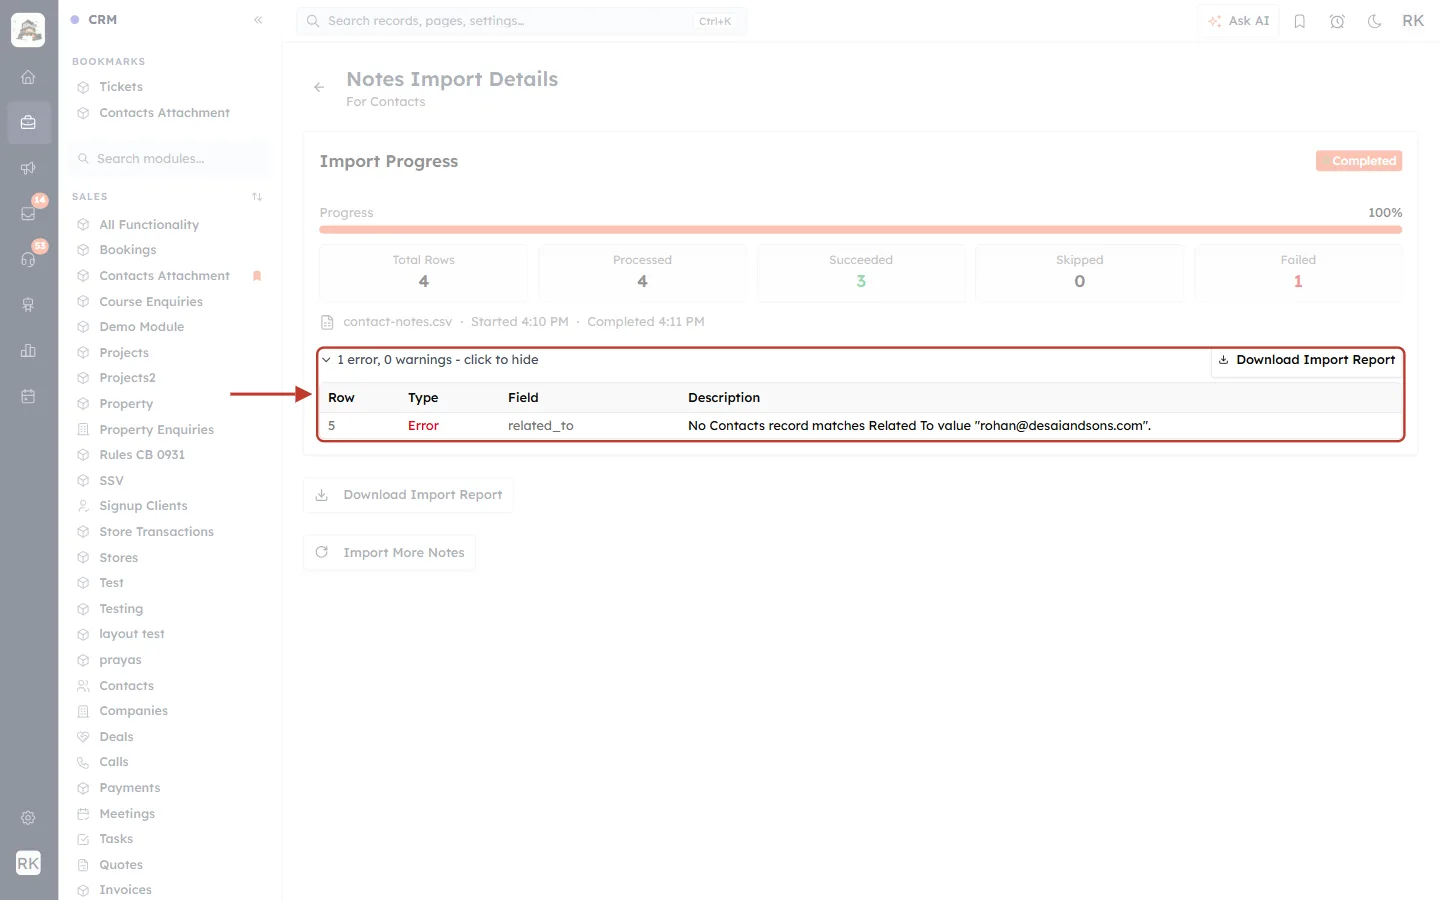
What this screenshot shows. The error list opened. The list and the Download Import Report button are ringed.
1 error, 0 warnings - click to hide: click again to close the list.
Row 5: the row number in your file where the problem is. Here it is Rohan’s note.
Type: Error: the row wasn’t imported. A Warning means the row was imported, but something was skipped, for example a dropdown value.
Field: related_to: the problem is with the Related To column.
Description explains the reason. In this example, no contact has the email rohan@desaiandsons.com.
Download Import Report: saves the problem rows as contact-notes_import_report.csv.
To fix failed rows, correct them in your file, for example by fixing the email or creating the missing contact first. Then import only those rows again. Don’t re-import the whole file, or the notes that worked will be added a second time.
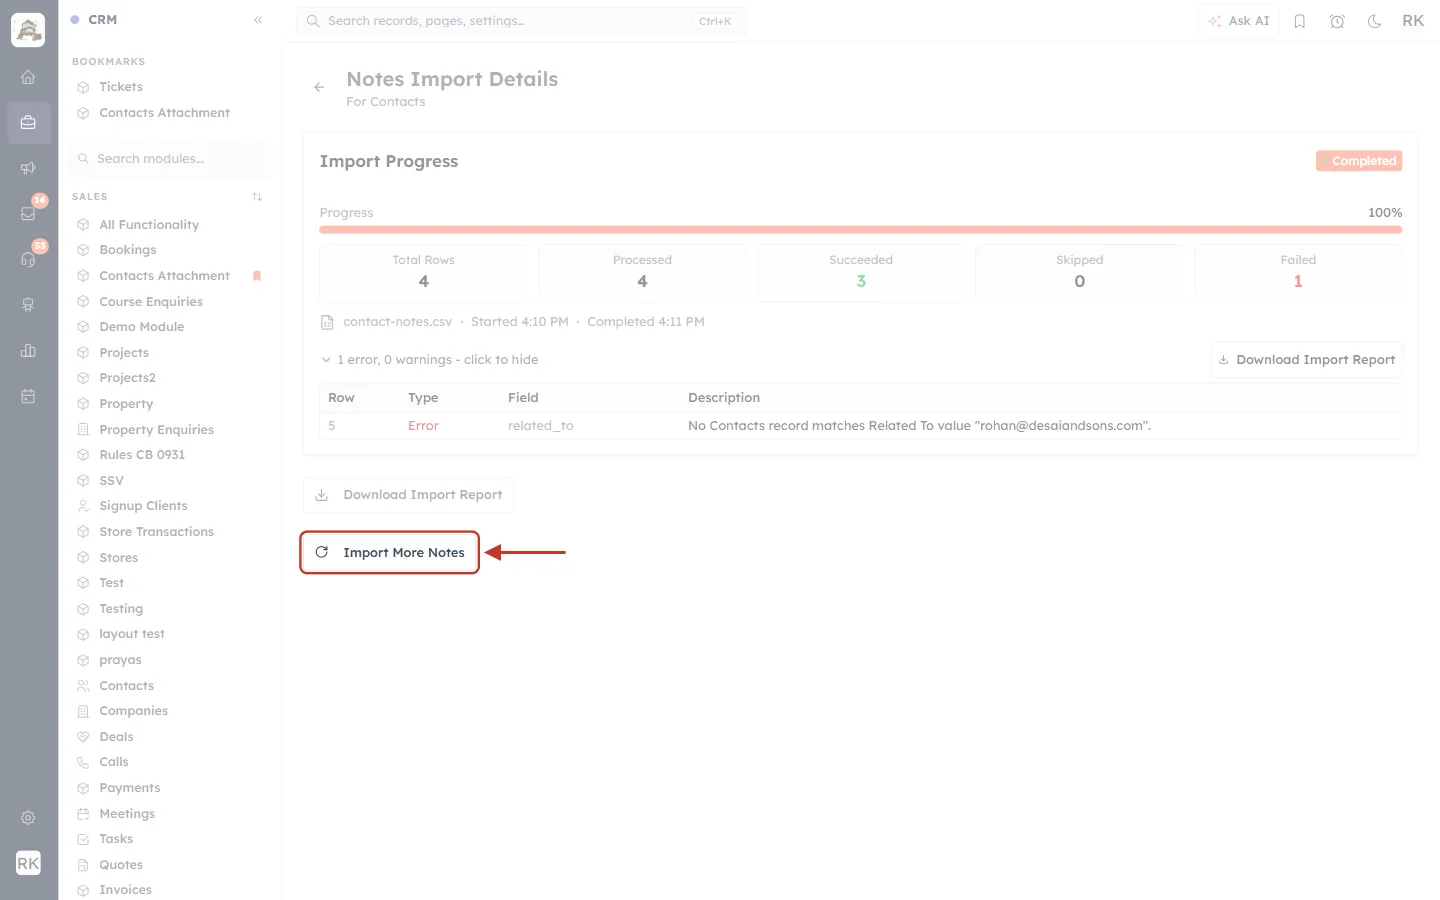
What this screenshot shows. The Import More Notes button below the card is ringed.
Import More Notes: starts a new notes import for the same module (back to Step 3).
Step 14: Open Notes Import History#
Click the ← arrow next to the page title.
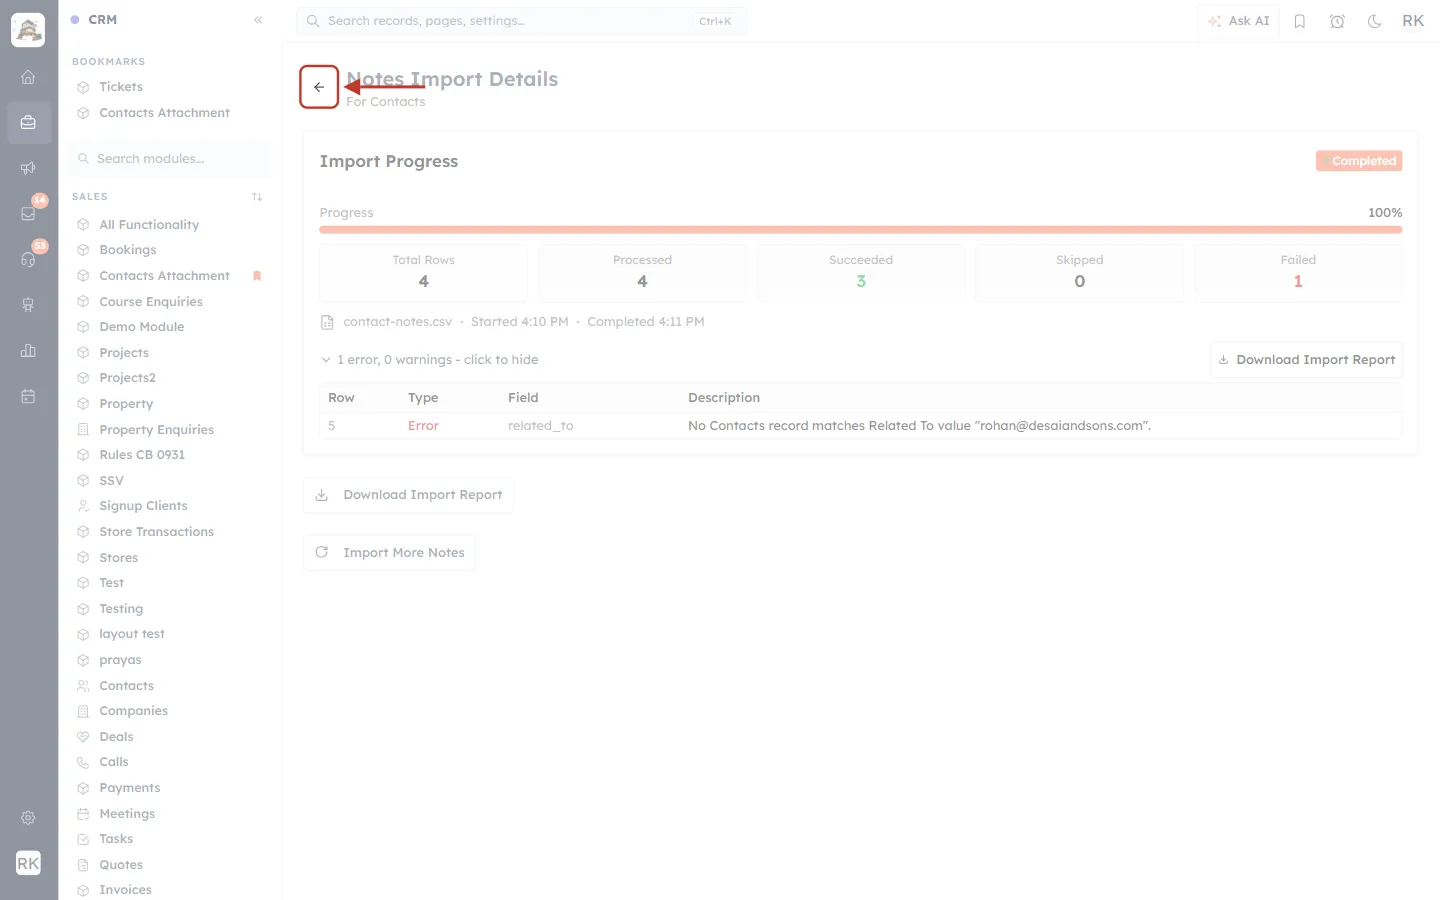
What this screenshot shows. The ← arrow next to the Notes Import Details title is ringed.
←: opens Notes Import History for this module.
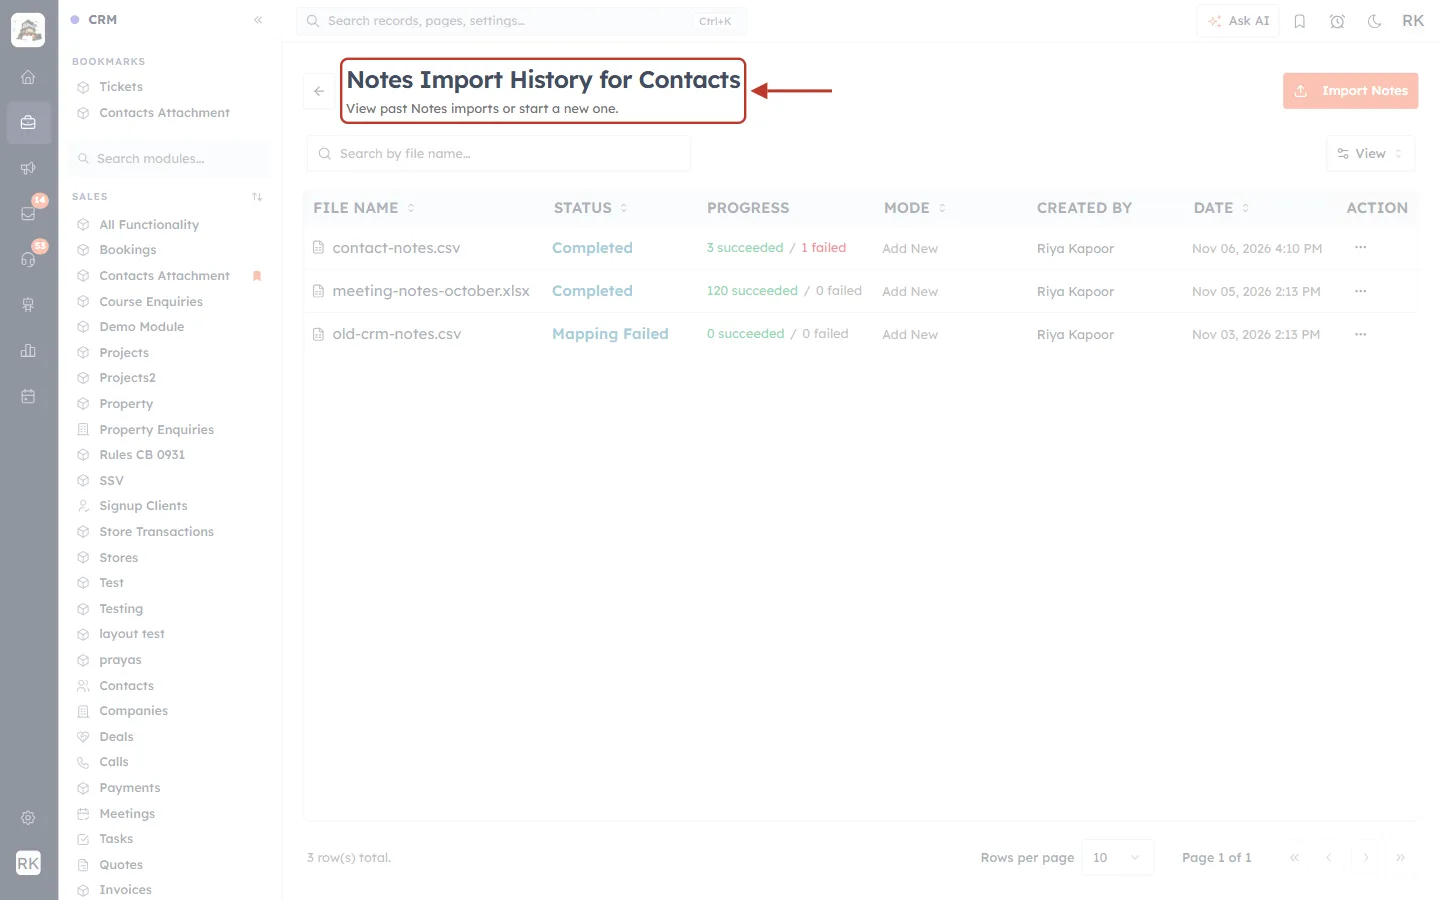
What this screenshot shows. The top of Notes Import History. The title is ringed.
Notes Import History for Contacts: every notes import into Contacts.
View past Notes imports or start a new one. describes the page.
Import Notes (top right): starts a new notes import.
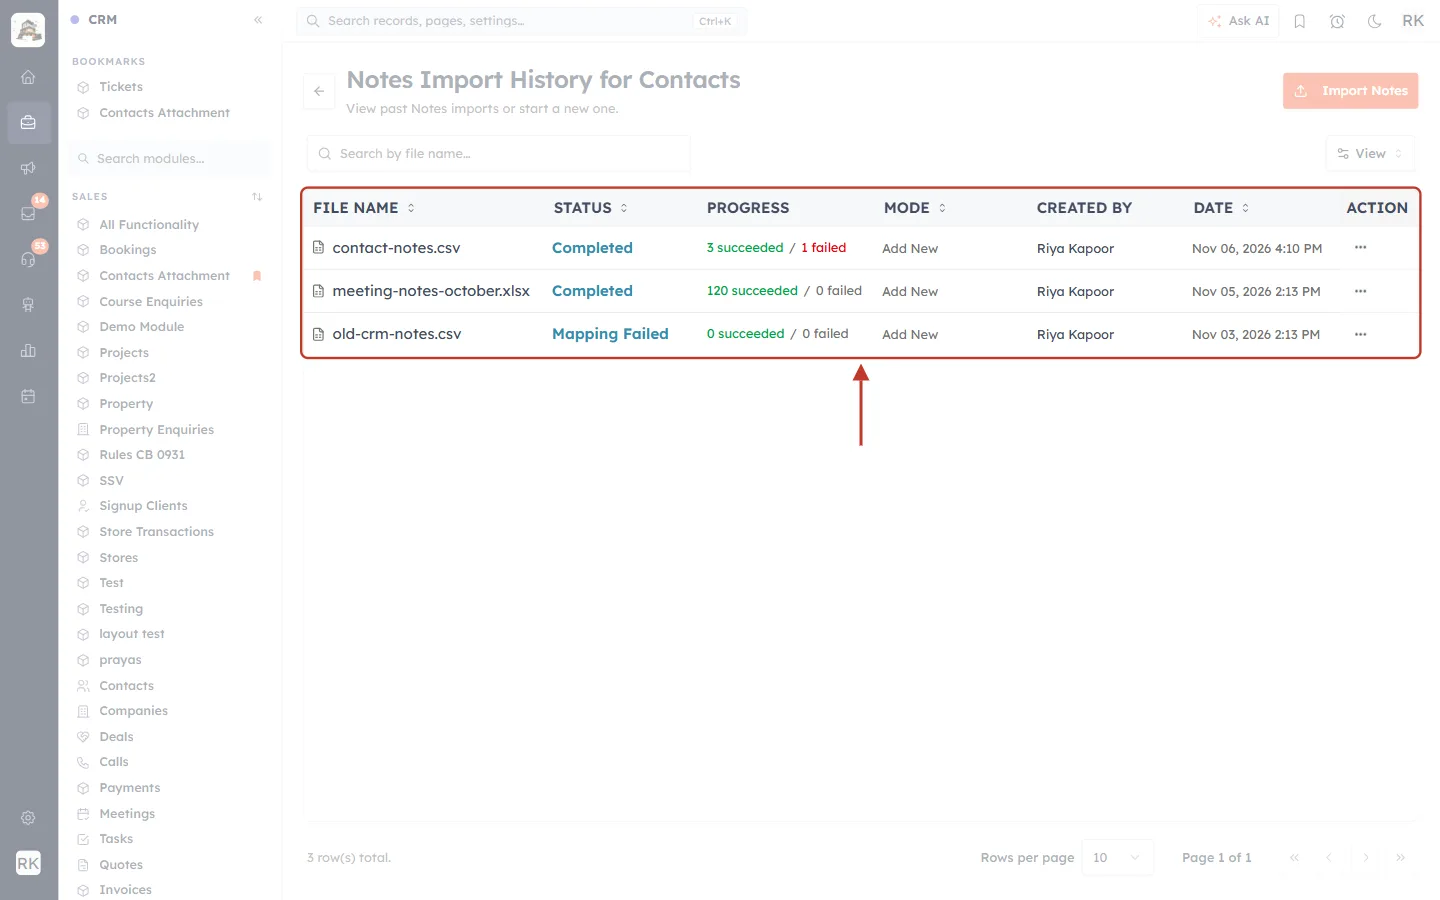
What this screenshot shows. The history table is ringed.
File Name: the file that was imported, for example contact-notes.csv.
Status: Completed for the first two, Mapping Failed for old-crm-notes.csv. Mapping Failed means the import stopped before any notes were added, because of a problem with the column mapping.
Progress: for example 3 succeeded / 1 failed and 120 succeeded / 0 failed. If rows were skipped, a third “skipped” count appears.
Mode: Add New, Update Existing or Update & Add, from Step 4.
Created By: who ran the import. Date: when it ran, newest first.
Action: the ⋯ menu for each import (Step 15).
Above the table, the Search by file name… box finds an import by its file name, and View chooses which columns to show.
Below the table, 3 row(s) total, Rows per page and the page buttons let you move through a long history.
Step 15: Open an import’s details or download its report#
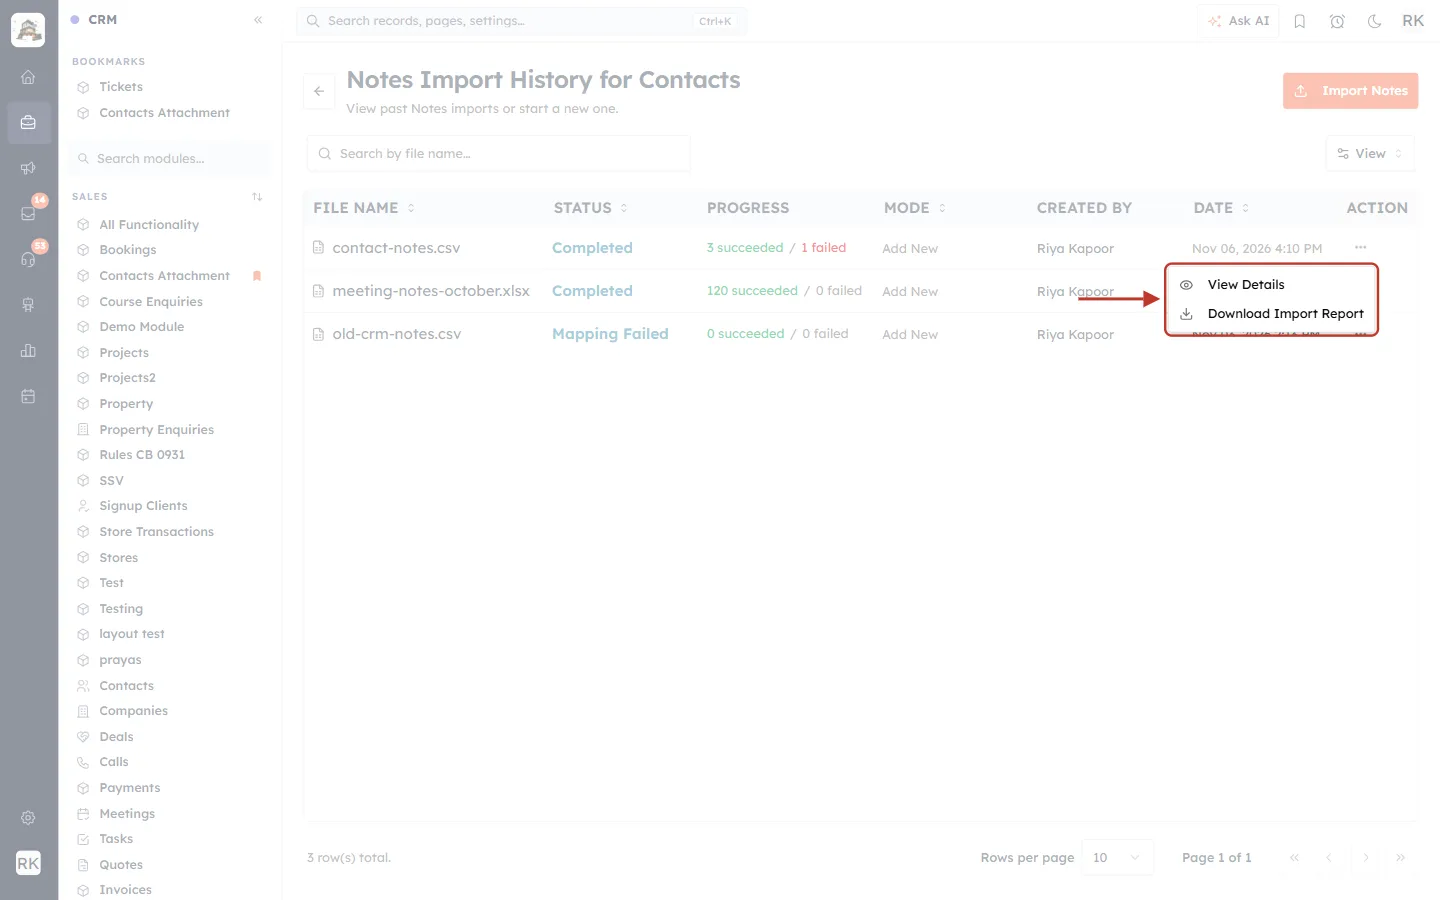
What this screenshot shows. The ⋯ menu for contact-notes.csv is open and ringed.
View Details: opens Notes Import Details for that import (Step 12).
Download Import Report: downloads the report of failed or warning rows. It only appears when there is something to report.
✅
Bookmark it: Notes Import History has its own page address, ending in
/notes/imports after the module name. Bookmark it in your browser to get back quickly.Quick reference#
To do this | Do this |
|---|---|
Start a notes import | Module list → Create <Module> ▾ → Import Notes (CSV, Excel) |
Get a template | Download a sample CSV on the upload step |
Attach each note to a record | Map the identifying column to Related To and pick a unique Match Field |
Fix “has no unique fields” | Turn on Unique Field for a field such as Email in the Field Builder |
Follow progress | The card in the bottom-right corner → View Result |
See why rows failed | Notes Import Details → errors - click to show, or Download Import Report |
See all past notes imports | Notes Import Details → ←, or the ⋯ → View Details menu in the history |
Frequently asked questions#
Can I import notes for records that don’t exist yet?
No. Import the records first (Import Data into Any Module), then import the notes.
Why is Continue greyed out on Upload & Settings?
Choose an owner under Owner assignment first.
The button says “Continue → (1 lookup needs config)”.
You mapped a column to Related To but haven’t picked a match field. Click Configure next to Related To and choose one.
Can I keep the original note dates?
There is no date field in the mapping, so dates in your file aren’t imported. Add the date to the note text if you need it.
I imported the same file twice. Are the notes duplicated?
With Add new records, every row becomes a new note each time, so yes. Check Notes Import History before you import a file again.
Does this work for deals, companies and custom modules?
Yes. Use Import Notes from that module’s list. You need a unique field in that module to match on.
Previous and next#
Related articles#
Was this article helpful?
Ready to implement this?
OpenAI Engage and apply what you just learned to your own workspace.
Open AI Engage CRM