Loading…


KnowledgeBase
Two-Step Verification: Add an Email Code to Every Sign-In
A password is one thing you know, and anybody who learns it can sign in as you. Two-step verification adds a second thing — a 6-digit code that AI Engage emails you at the moment you sign in. Someone who steals your password still cannot get into your CRM, because they would also need your inbox.
It takes about a minute to switch on, and it lives in one place: your own Profile, under Security. This guide walks the whole thing end to end — turning it on, what signing in looks like afterwards, how to stop it asking on the computer you use every day, and how to turn it back off.
ℹ️
Two-step verification is a per-user setting. You switch it on for your own account from your own Profile — an administrator cannot switch it on for you, and switching it on for yourself does not change how anybody else on your team signs in. If you want the whole team protected, ask each person to follow this guide.
Before you start#
You need your current password. AI Engage asks for it again before it will change this setting, so nobody who wanders up to an unlocked laptop can quietly switch your protection off.
You need to be able to read your account email. Codes go to the address on your account and nowhere else. That address is fixed — the Email field on your Profile is read-only, and says "Email cannot be changed. Contact support for assistance." If you cannot reach that inbox, sort that out first.
Step 1 — Open your Profile#
Start on your dashboard at /dashboard/dashboards. Click your avatar — the round initials button in the very top-right corner of the header — and choose Profile from the menu that drops down.
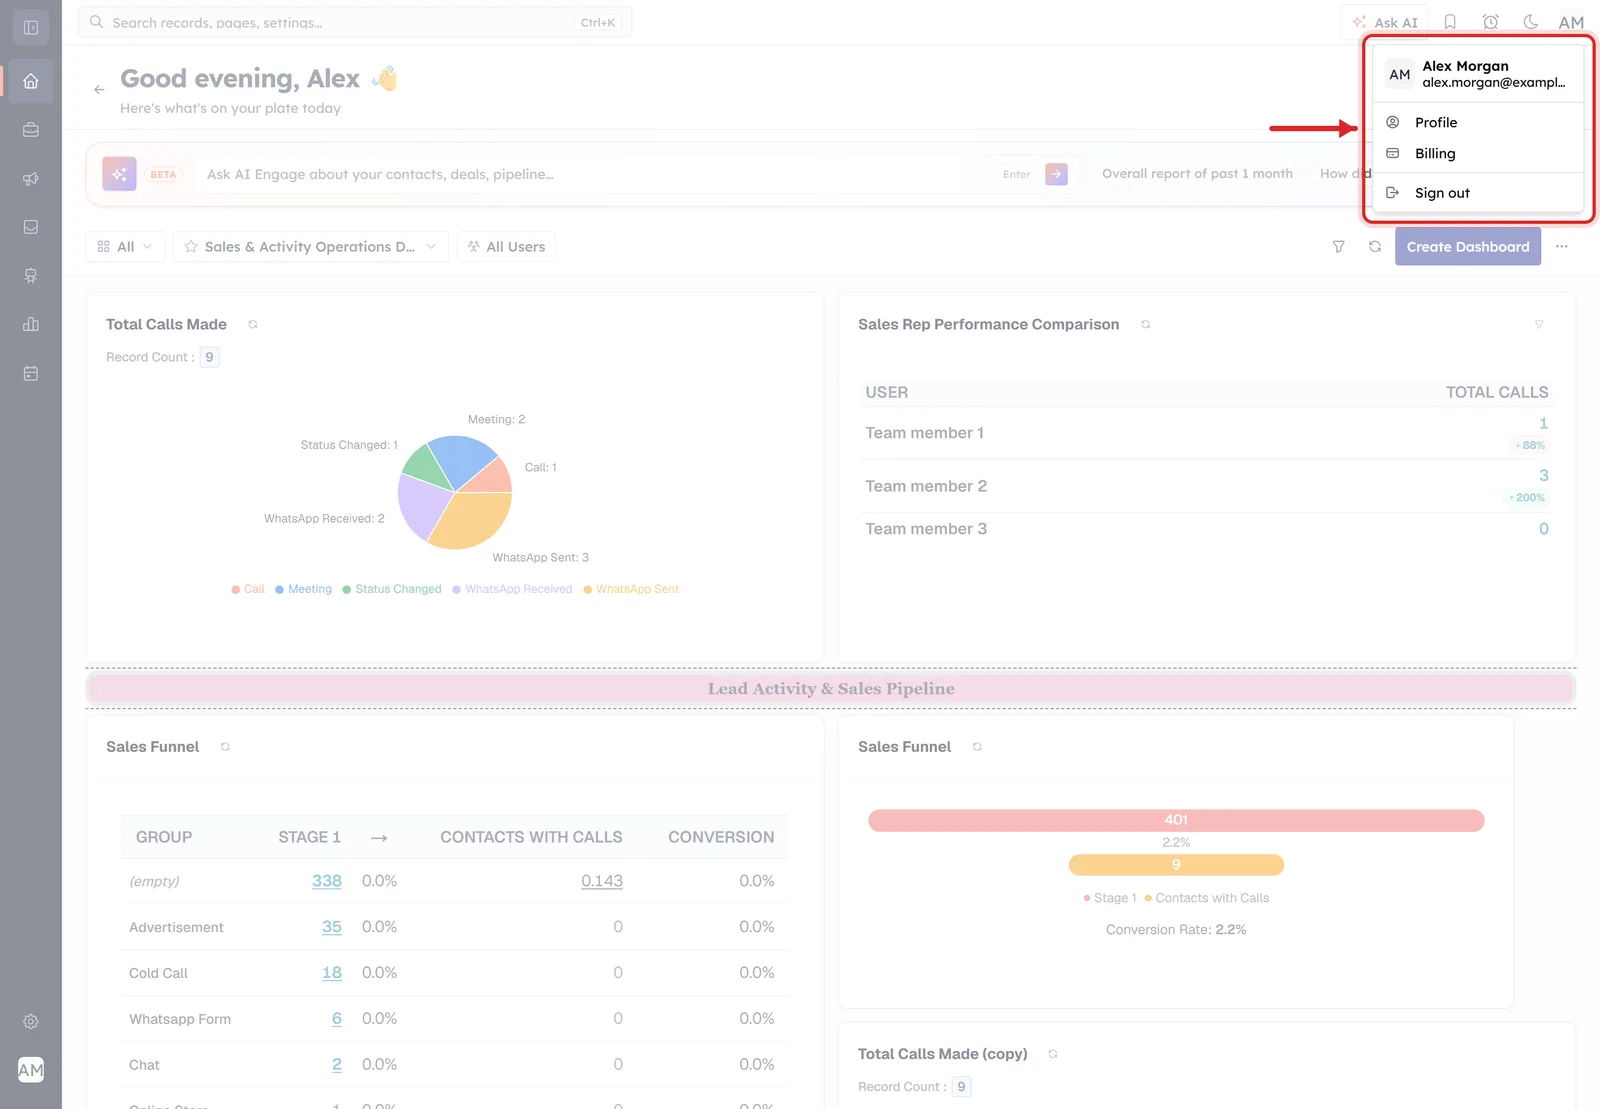
In the picture above, the red box surrounds the avatar menu and the red arrow points at Profile, which is the item you want. The menu itself is short: your name and email address at the top (here "Alex Morgan"), then Profile, Billing, and Sign out at the bottom.
Everything behind the menu is the ordinary Dashboards screen and you can ignore it — the greeting "Good evening, Alex" and the line "Here's what's on your plate today" along the top, the Ask AI Engage bar beneath it with its BETA tag, the toolbar with the dashboard picker, the All Users badge and the Create Dashboard button, and then the dashboard tiles themselves: a "Total Calls Made" pie chart on the left, a "Sales Rep Performance Comparison" table on the right, a pink "Lead Activity & Sales Pipeline" divider, and two "Sales Funnel" tiles below.
💡
The same page is reachable from Settings › Personal Settings, or by going straight to
/dashboard/profile. Note the address: your personal settings are not filed under /dashboard/settings/… with the rest of the admin screens.Step 2 — Find the Security card#
The Profile page is laid out in cards. Your name, email, phone, timezone and date formats are in the big card at the top; Social Links sits in the right-hand column. Scroll to the bottom of the left column and you will find Security.
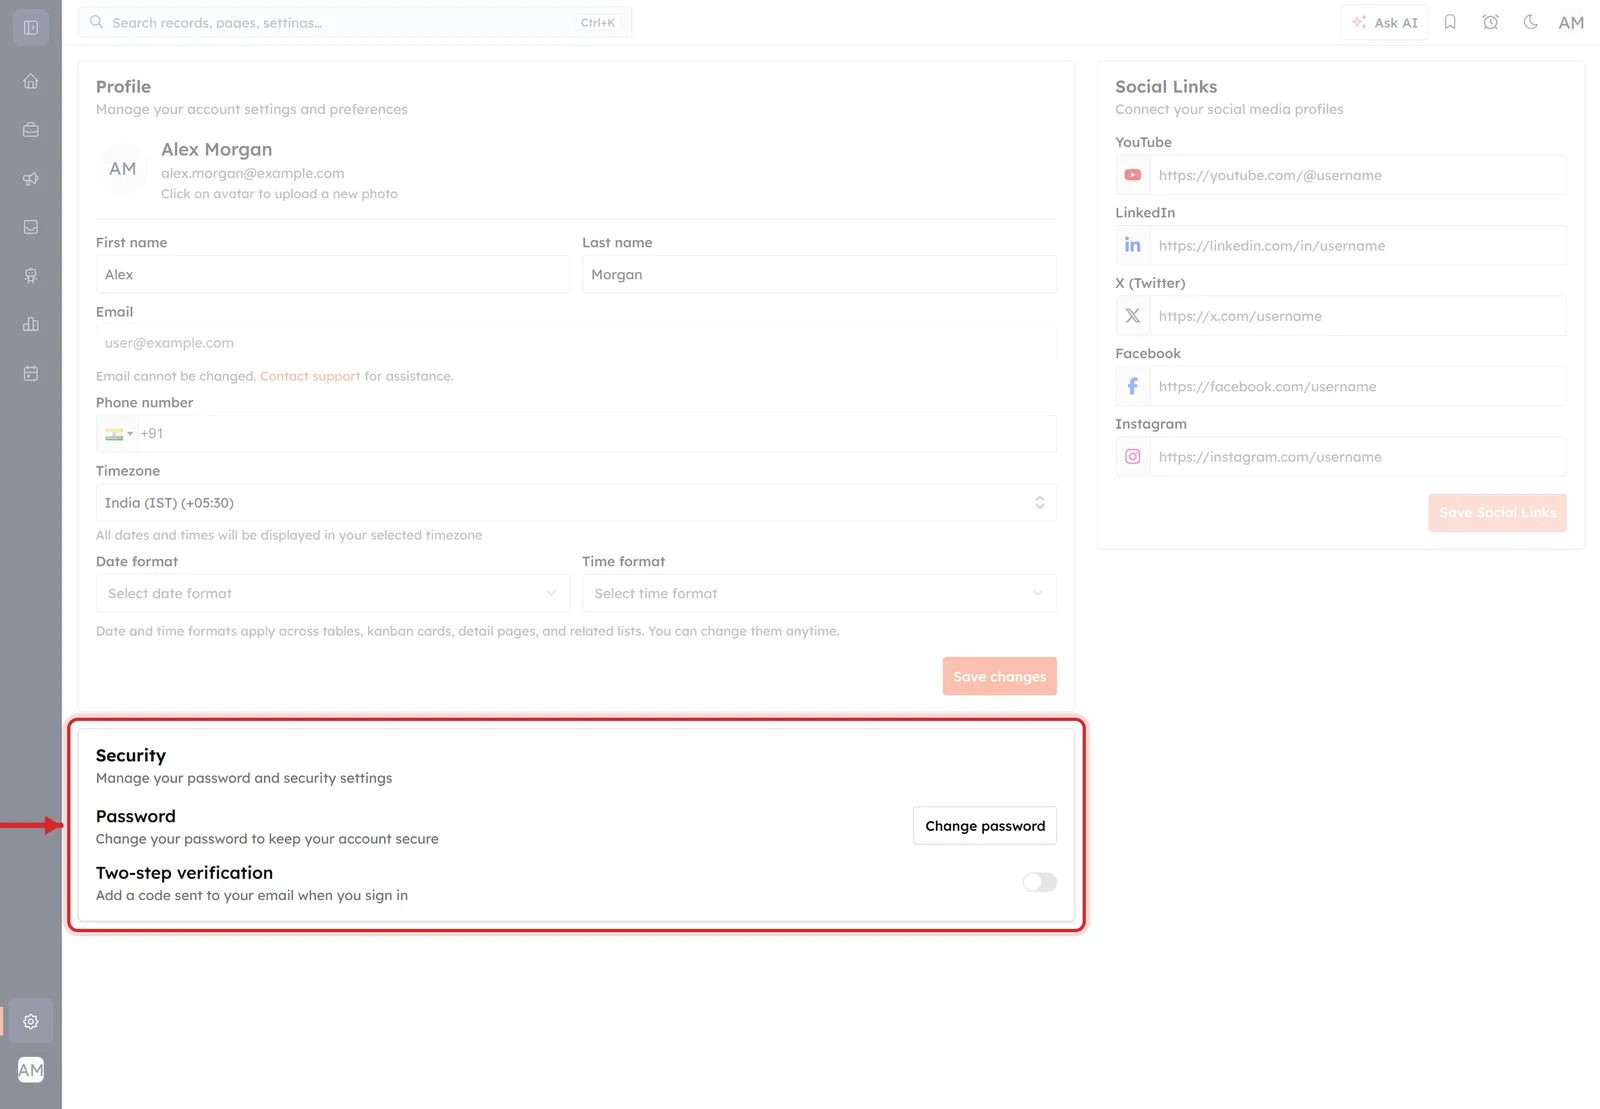
The red box marks the whole Security card and the arrow points at it from the left. Under the heading and its subtitle — "Manage your password and security settings" — the card holds every setting that protects your account:
Password — "Change your password to keep your account secure", with a Change password button on the right. That one is covered in Change Your Password & Account Security.
Two-step verification — the row this guide is about, with an on/off switch on the right.
Remembered devices — a third row that only appears once two-step verification is on. More on it further down.
Everything above the card in the screenshot is the rest of your Profile: the avatar with "Click on avatar to upload a new photo", First name and Last name, the greyed-out Email field, Phone number, Timezone, Date format and Time format, and a Save changes button. Those are explained in Set Up Your Personal Profile.
Step 3 — The Two-step verification row#
Look at the middle row of the Security card. When the feature is switched off, it reads like this:
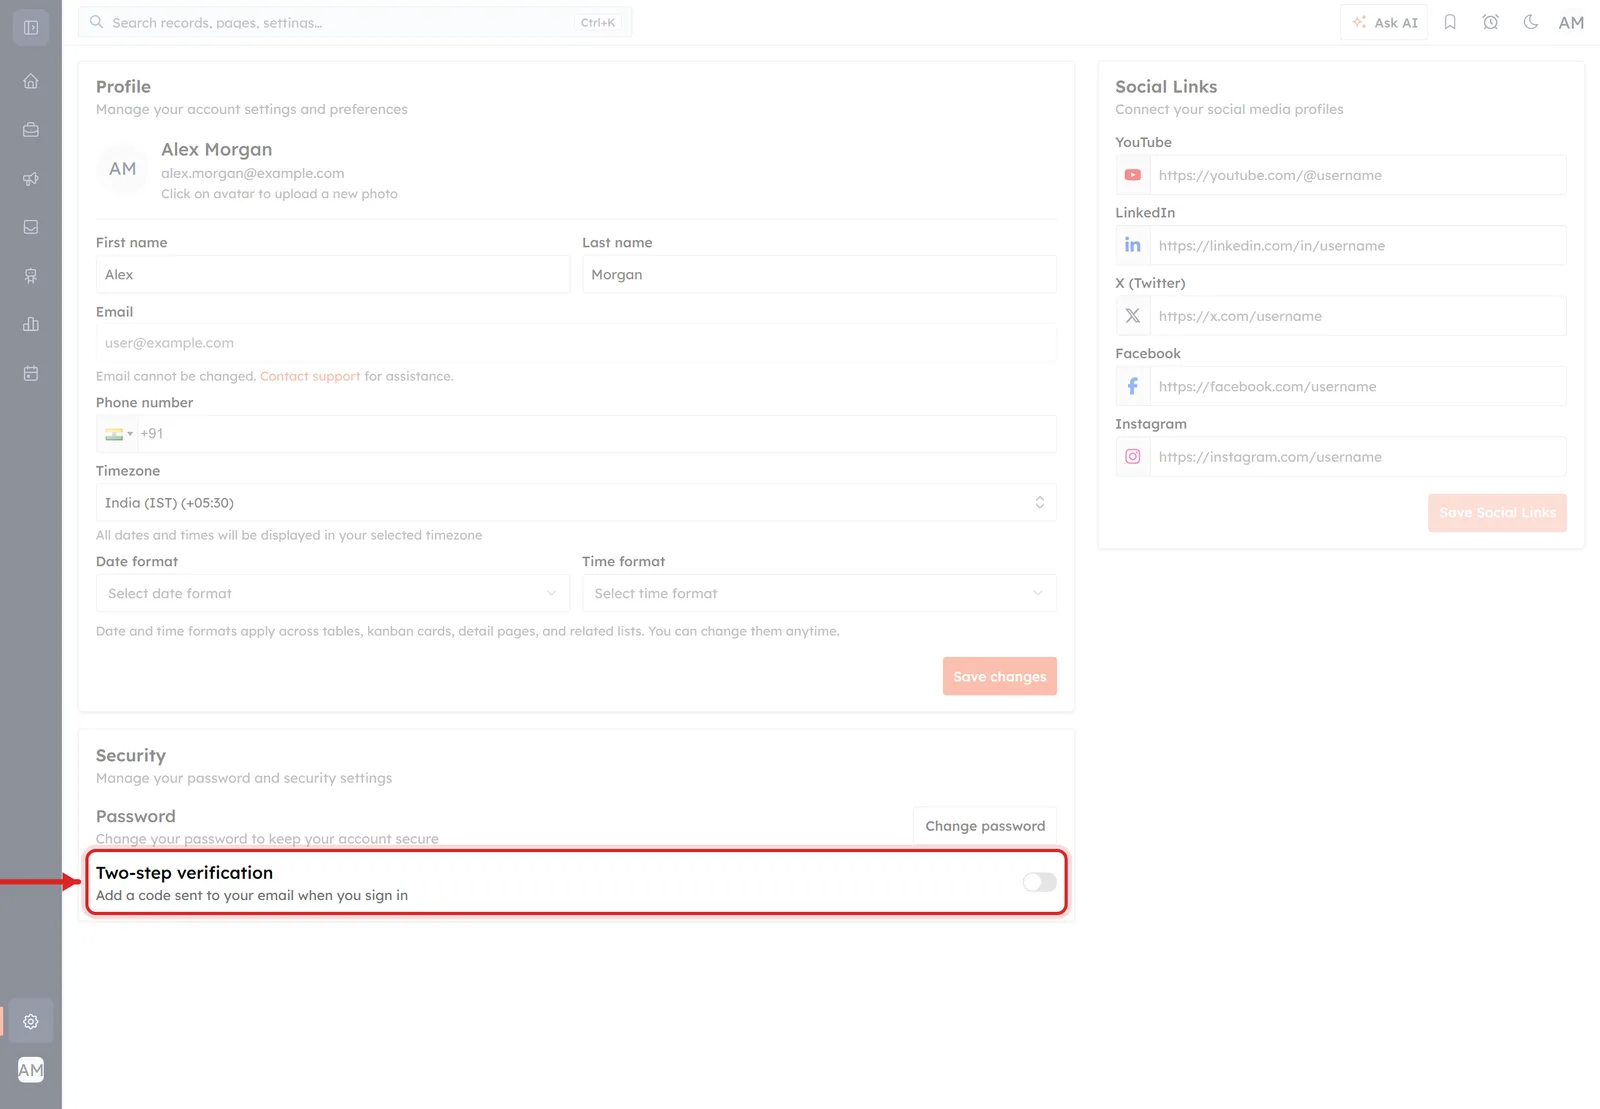
The ringed row has three parts. On the left, the label Two-step verification. Under it, the grey subtitle "Add a code sent to your email when you sign in" — which is the CRM telling you what it would do, not what it is doing. On the far right, a toggle switch, sitting to the left and shown in grey, which is the off position.
That subtitle is the quickest way to check where you stand. "Add a code sent to your email when you sign in" means it is off. Once it is on, the same line changes to "On — we email a code each time you sign in".
Click the toggle to start switching it on.
Step 4 — Turn it on#
Clicking the toggle does not switch anything on by itself. It opens a dialog that asks you to prove two things first: that you know the password, and that you can actually receive email at your account address.
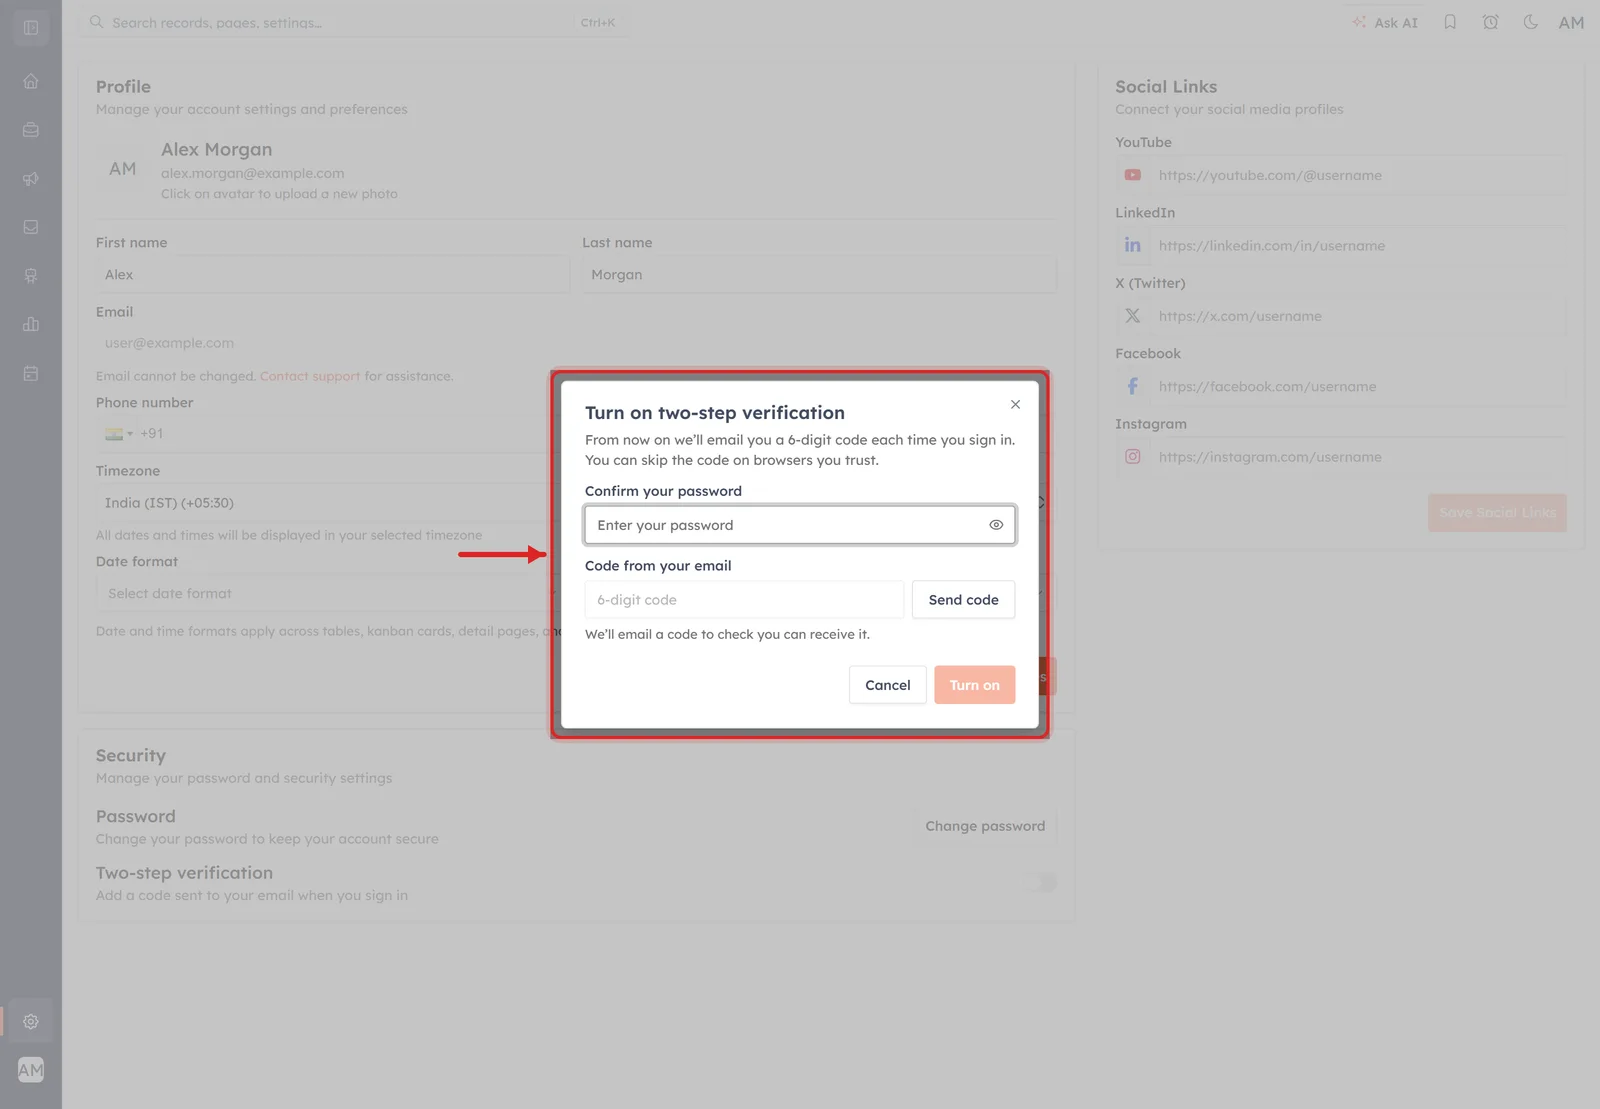
The red box outlines the whole dialog, titled "Turn on two-step verification". Under the title it explains exactly what you are agreeing to: "From now on we'll email you a 6-digit code each time you sign in. You can skip the code on browsers you trust." Below that are two fields — Confirm your password and Code from your email — and at the bottom right, a Cancel button and a Turn on button which is greyed out until the form is complete. An × in the top-right corner closes the dialog too.
Notice the Security card behind the dialog: it still shows the toggle in its off position and the subtitle "Add a code sent to your email when you sign in". Nothing has changed yet.
Confirm your password#
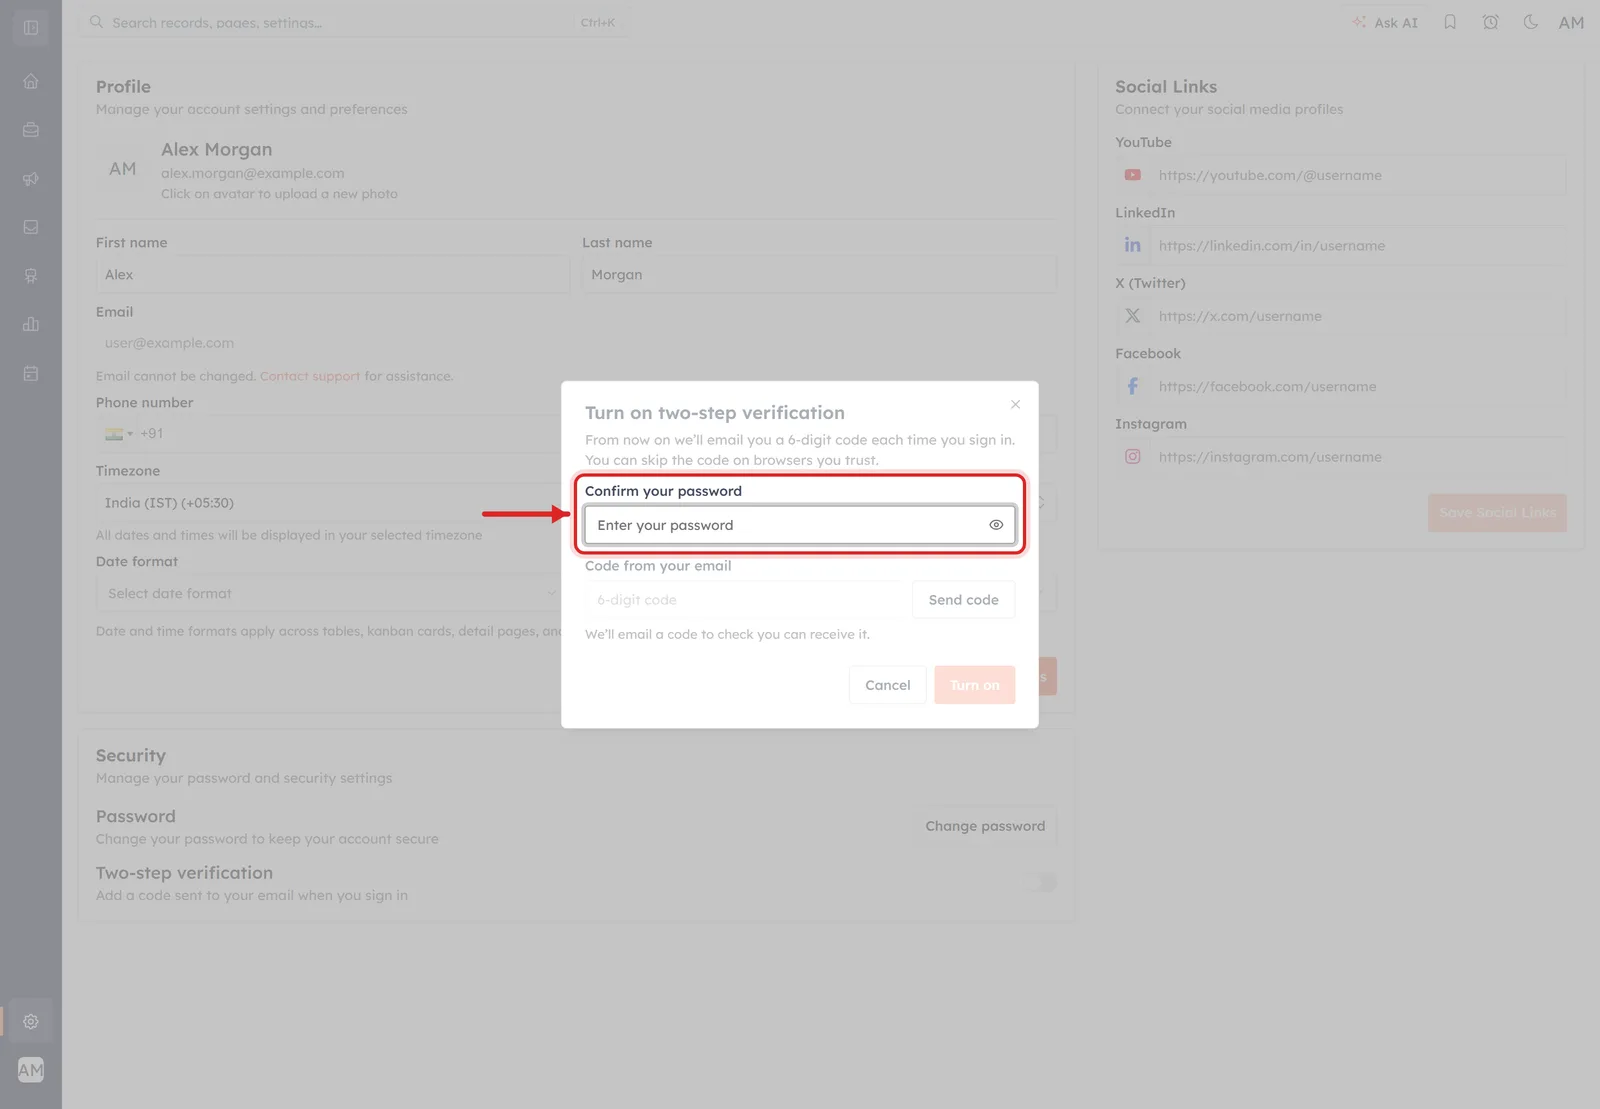
The first field is Confirm your password, with the placeholder "Enter your password". Type your current AI Engage password here — this is not a place to set a new one. The small eye icon at the right-hand end of the box reveals what you typed, which is worth using before you submit.
If the password is wrong, the dialog stays open and puts a red message under this field: "That password is not correct." Nothing is switched on and you can simply try again.
Get your code and enter it#
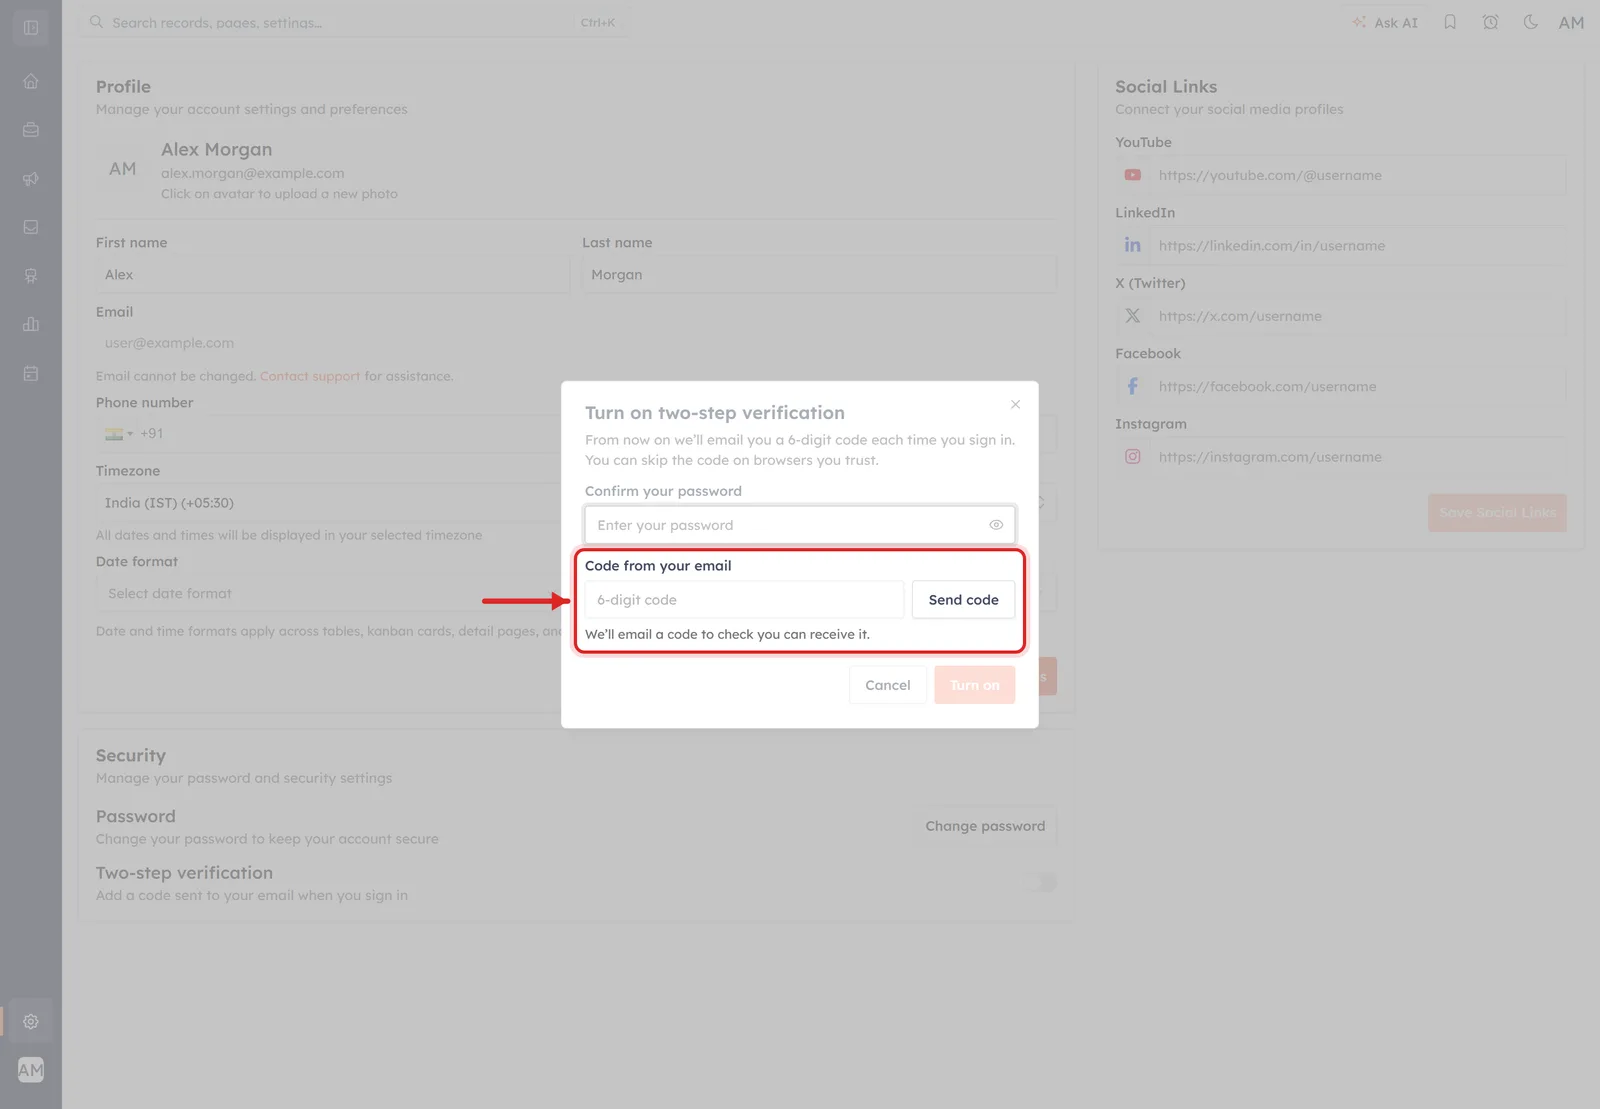
The second field is Code from your email. Two things sit on this row: a text box with the placeholder "6-digit code", and a Send code button beside it. Underneath is the grey hint "We'll email a code to check you can receive it."
The order matters, and it catches people out:
Click Send code first. The code box is disabled until you do. A green message confirms it went — "Code sent. Check your email." — and the hint line changes to name the address it went to and add "It works for 10 minutes."
Then type the 6 digits from the email into the box. The button beside it now reads Resend rather than "Send code", in case the first email does not arrive.
Then click Turn on. It stays greyed out until a code has been sent, so if the button looks dead, that is the step you have missed.
A wrong or expired code produces a red "That code is not right." under the field. Click Resend and try the newest email — a fresh code always replaces the previous one.
💡
This first code is not protecting anything yet. Its only job is to prove that the address on your account is one you can actually open, so that you never lock yourself out with a setting you cannot satisfy later.
Step 5 — Check that it is on#
When it works you get a green confirmation across the screen — "Two-step verification is on. We'll email a code when you sign in." — the dialog closes by itself, and the row in the Security card changes.
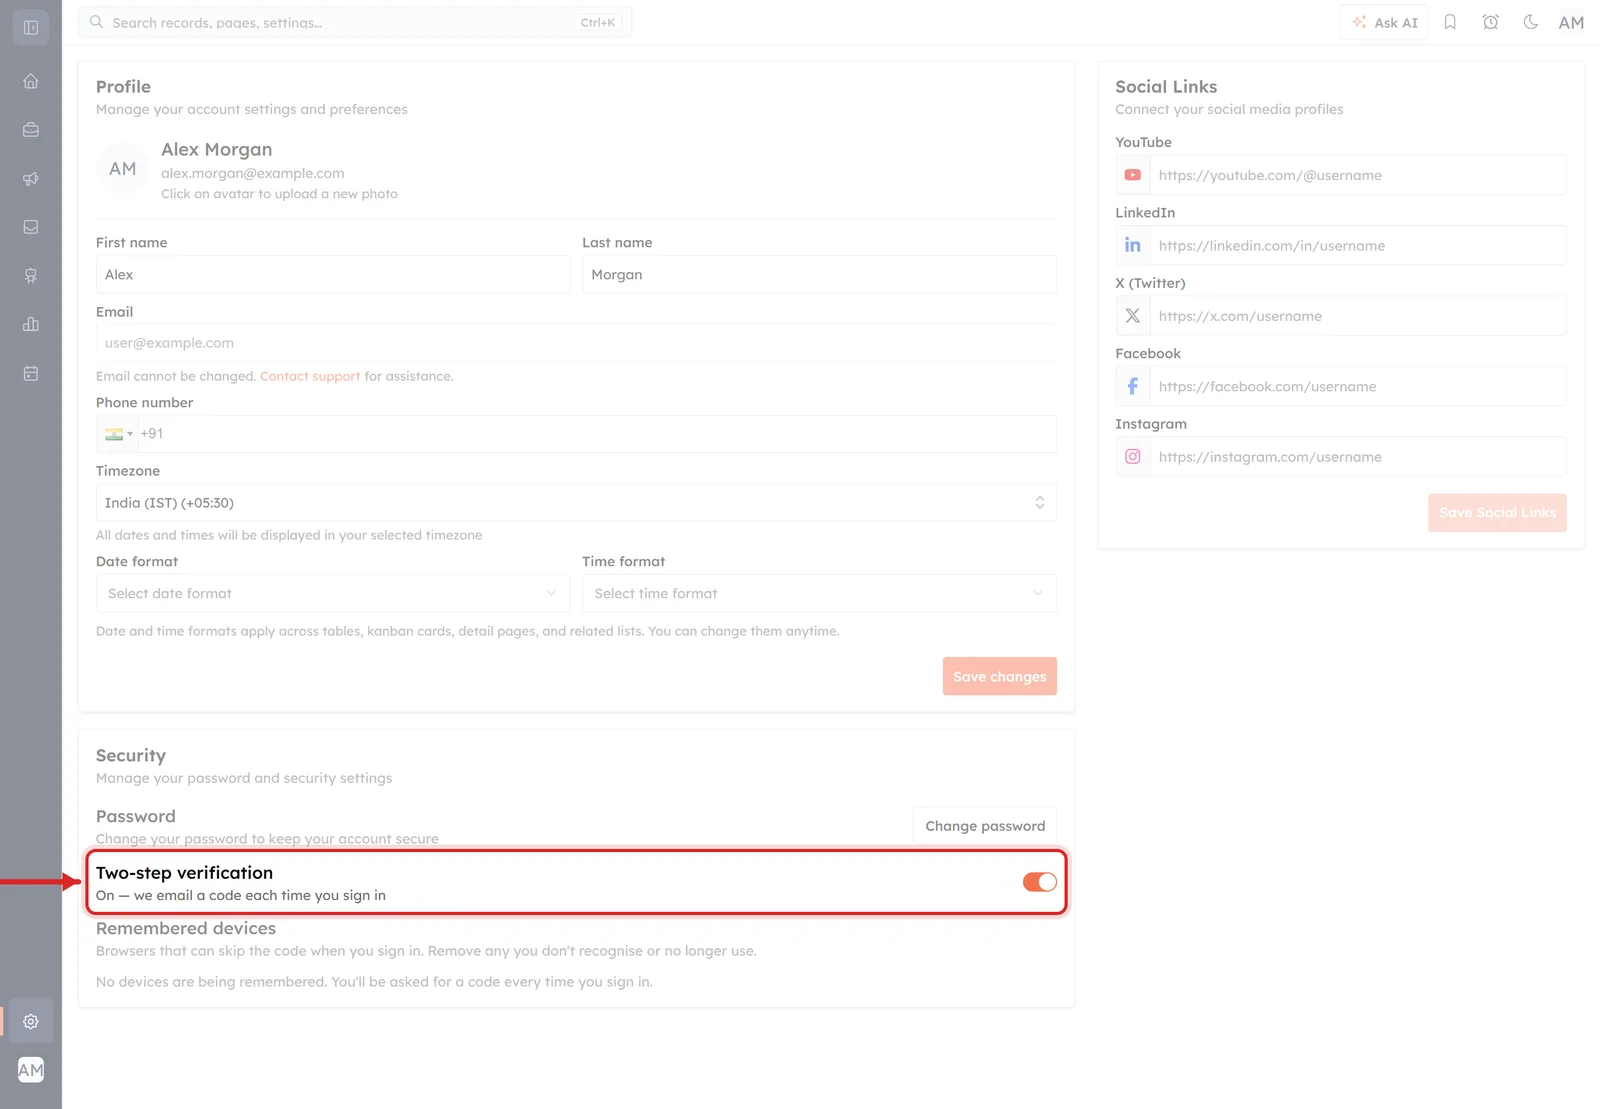
The ringed row now reads "On — we email a code each time you sign in" under the Two-step verification label, and the toggle on the right has moved to the right and turned orange. That is the whole confirmation — there is nothing else to save, and no Save changes button to press for this setting.
A third row, Remembered devices, has also appeared beneath it. It is only shown while two-step verification is on, and we come back to it below.
What signing in looks like from now on#
Two-step verification changes sign-in from one screen to two. Nothing about your password changes.
The first screen: email and password#
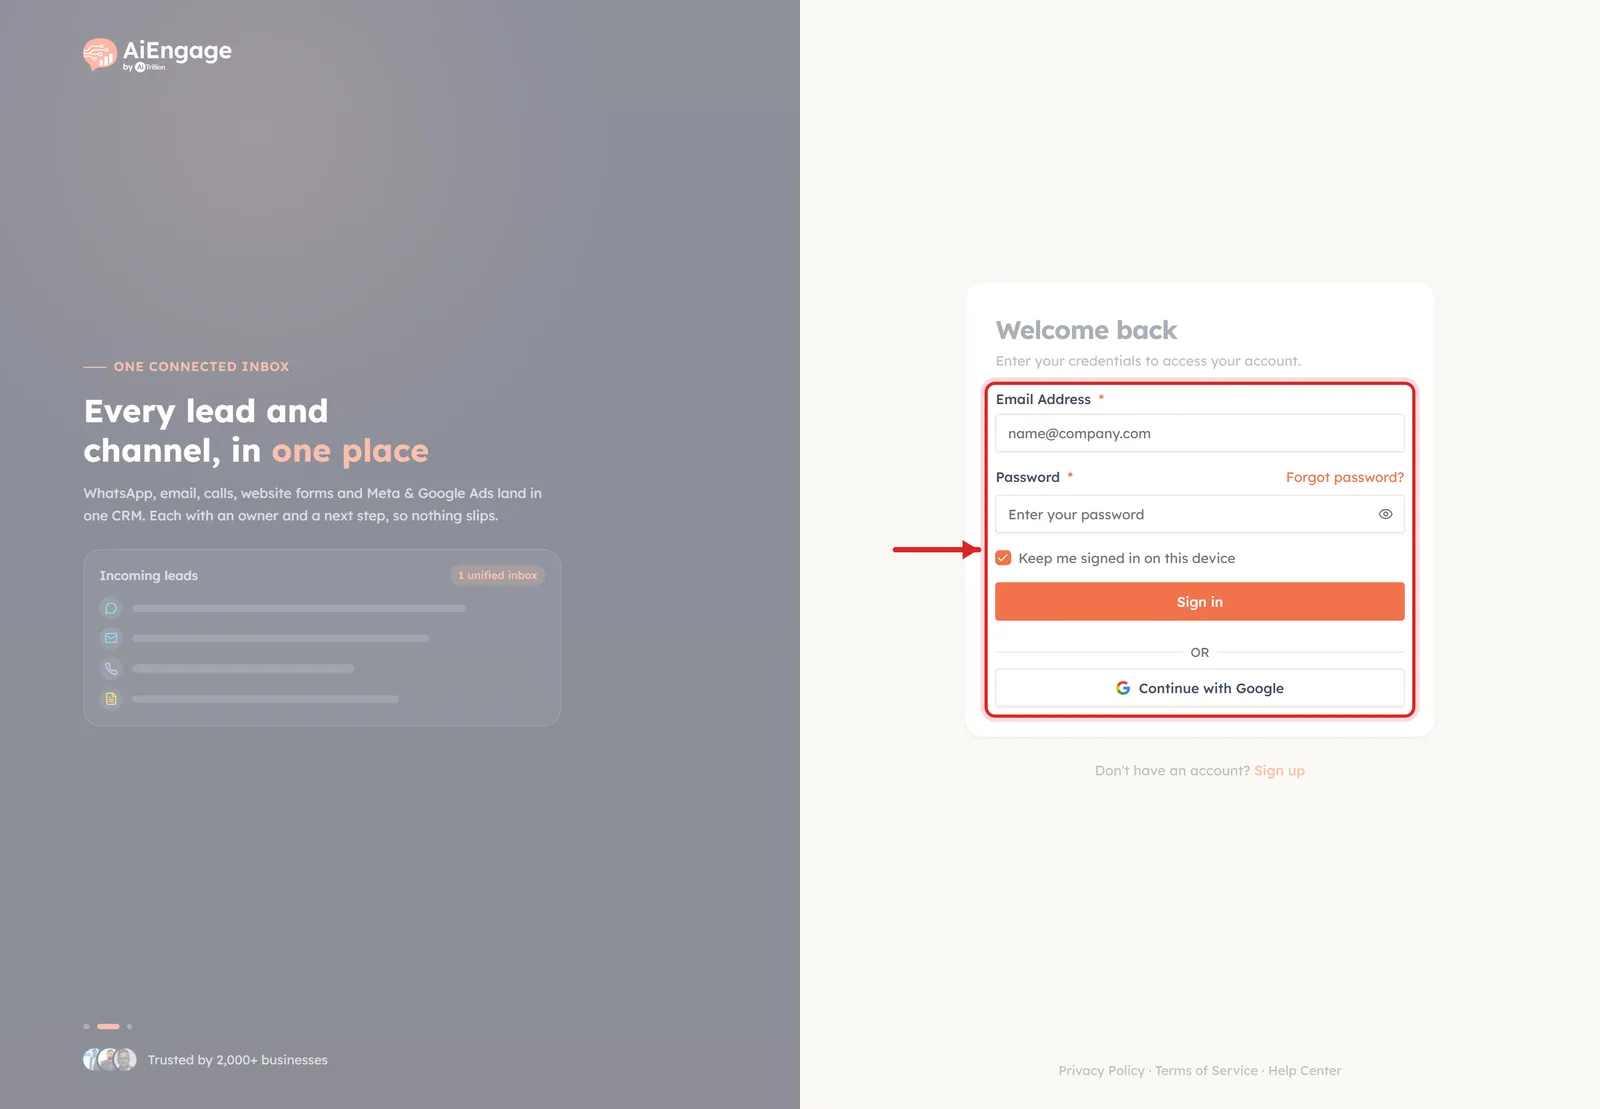
This is the sign-in screen you already know. The red box surrounds the form: Email Address, Password (with a Forgot password? link beside its label and an eye icon to reveal what you type), the Keep me signed in on this device checkbox that the arrow points at, the orange Sign in button, and beneath an OR divider, Continue with Google. The heading above the form reads "Welcome back / Enter your credentials to access your account", and "Don't have an account? Sign up" sits below the card. The left half of the screen is the AI Engage marketing panel and has nothing to do with signing in.
ℹ️
"Keep me signed in on this device" is not the same thing as two-step verification. It controls how long your session lasts before you are signed out. The code step below is about proving who you are when a new session starts. They are separate settings and you can use both.
The second screen: your code#
Enter your password and click Sign in, and instead of landing on your dashboard you get a second screen. AI Engage has already sent the code by the time you see it.
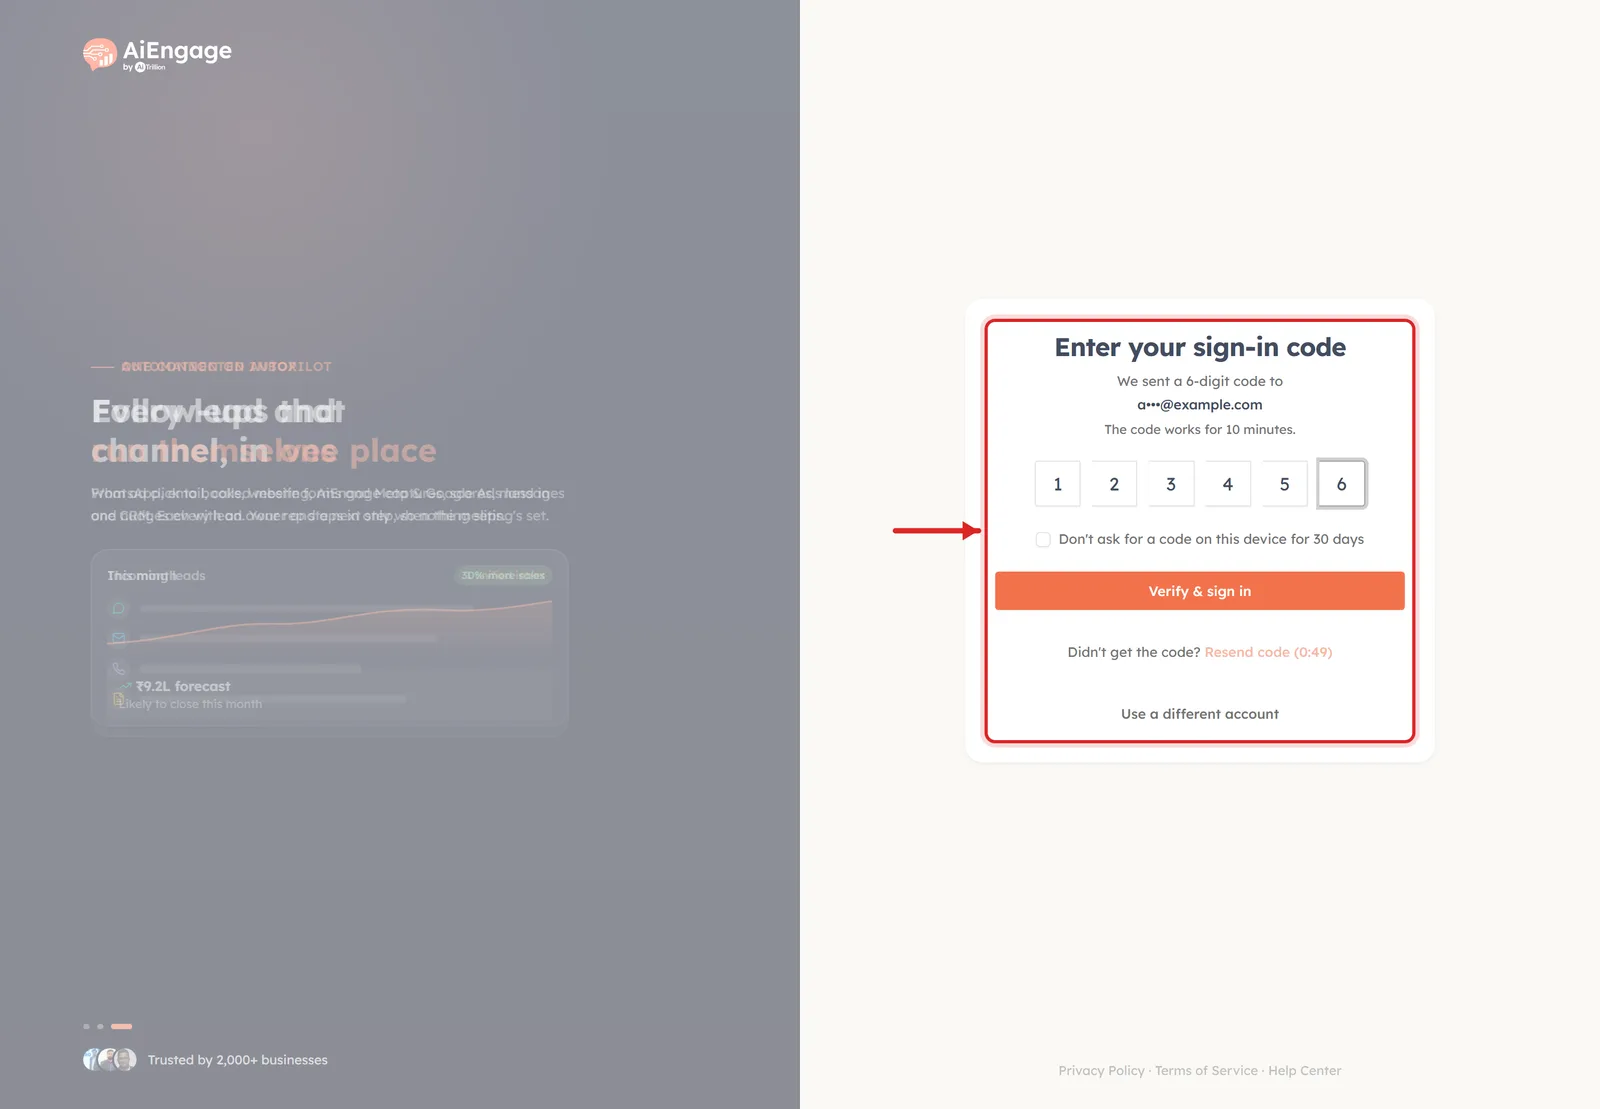
The ringed card is the entire second step. Reading down it:
The heading "Enter your sign-in code".
"We sent a 6-digit code to" followed by your email address with the middle hidden — in the picture,
a•••@example.com. Only enough is shown for you to recognise which account it is."The code works for 10 minutes."
Six boxes for the digits.
The "Don't ask for a code on this device for 30 days" checkbox.
The orange Verify & sign in button, which reads "Verifying…" while it works.
"Didn't get the code? Resend code" with a countdown, and Use a different account at the very bottom.
Typing the code#
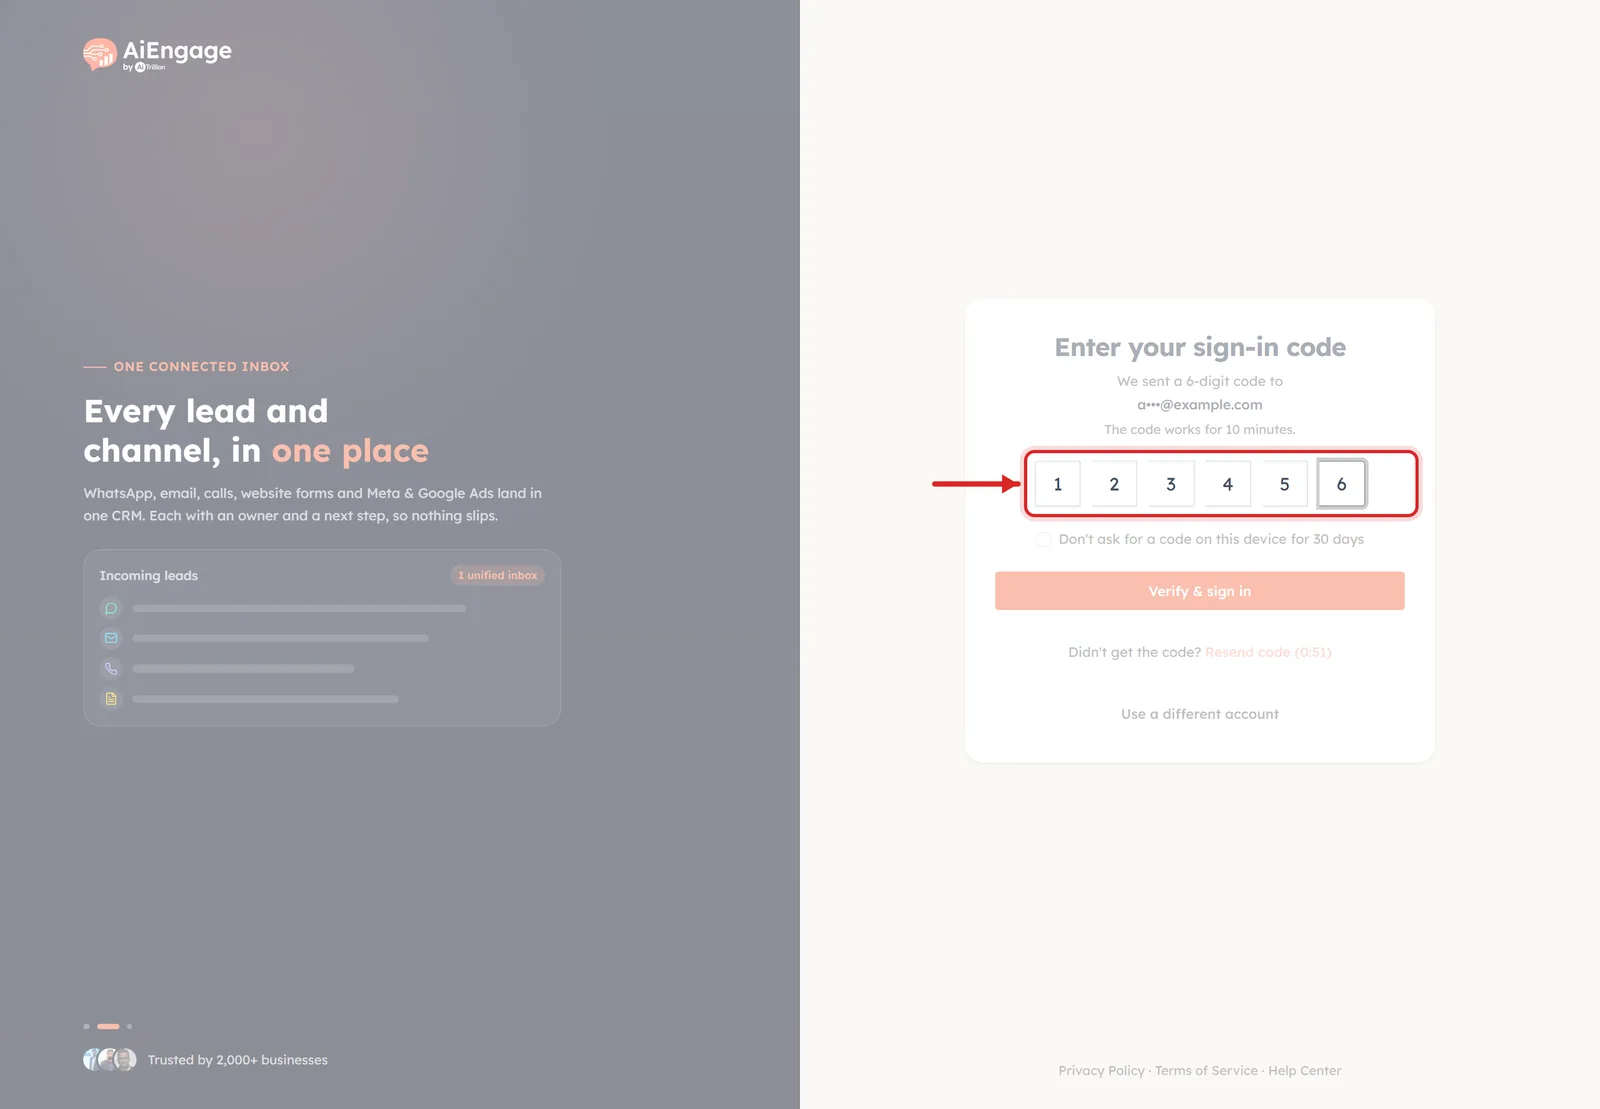
The ringed strip is the code entry itself: six separate boxes, one digit each, rather than a single long field. Type the first digit and the cursor jumps to the next box on its own, so you can type all six straight through without clicking. Pasting the code from your email fills all six at once. The box you are on is outlined more heavily than the rest, as the sixth one is in the picture.
Skip the code on a computer you trust#
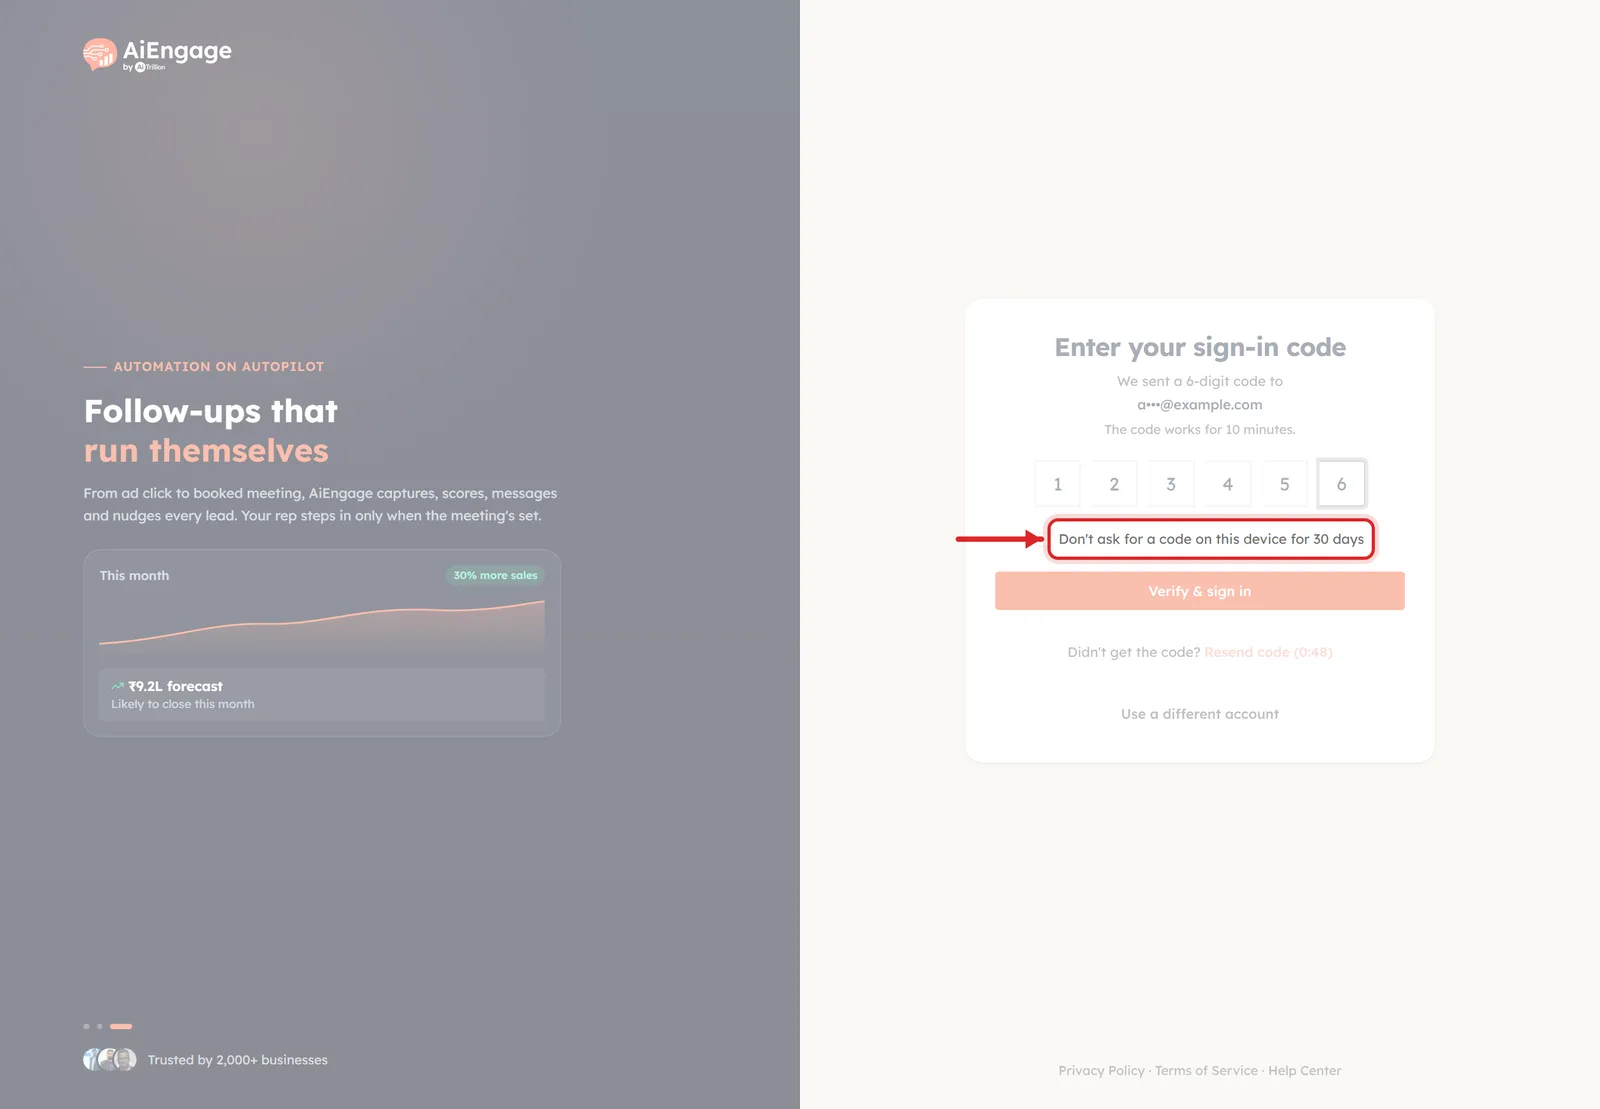
Directly under the boxes is the checkbox the arrow points at: "Don't ask for a code on this device for 30 days". Tick it before you click Verify & sign in and this browser is remembered — for the next 30 days it goes straight from password to dashboard, with no code step.
What it remembers is a browser on a machine, not you. Chrome and Firefox on the same laptop count as two different devices, and a private/incognito window forgets the moment you close it. Tick it on your own work computer; leave it clear on anything shared, borrowed or public.
⚠️
Do not tick this box on a shared or public computer. Anyone who uses that browser afterwards only needs your password to get in — the second step is exactly what you have just switched off for them.
If the code does not arrive#
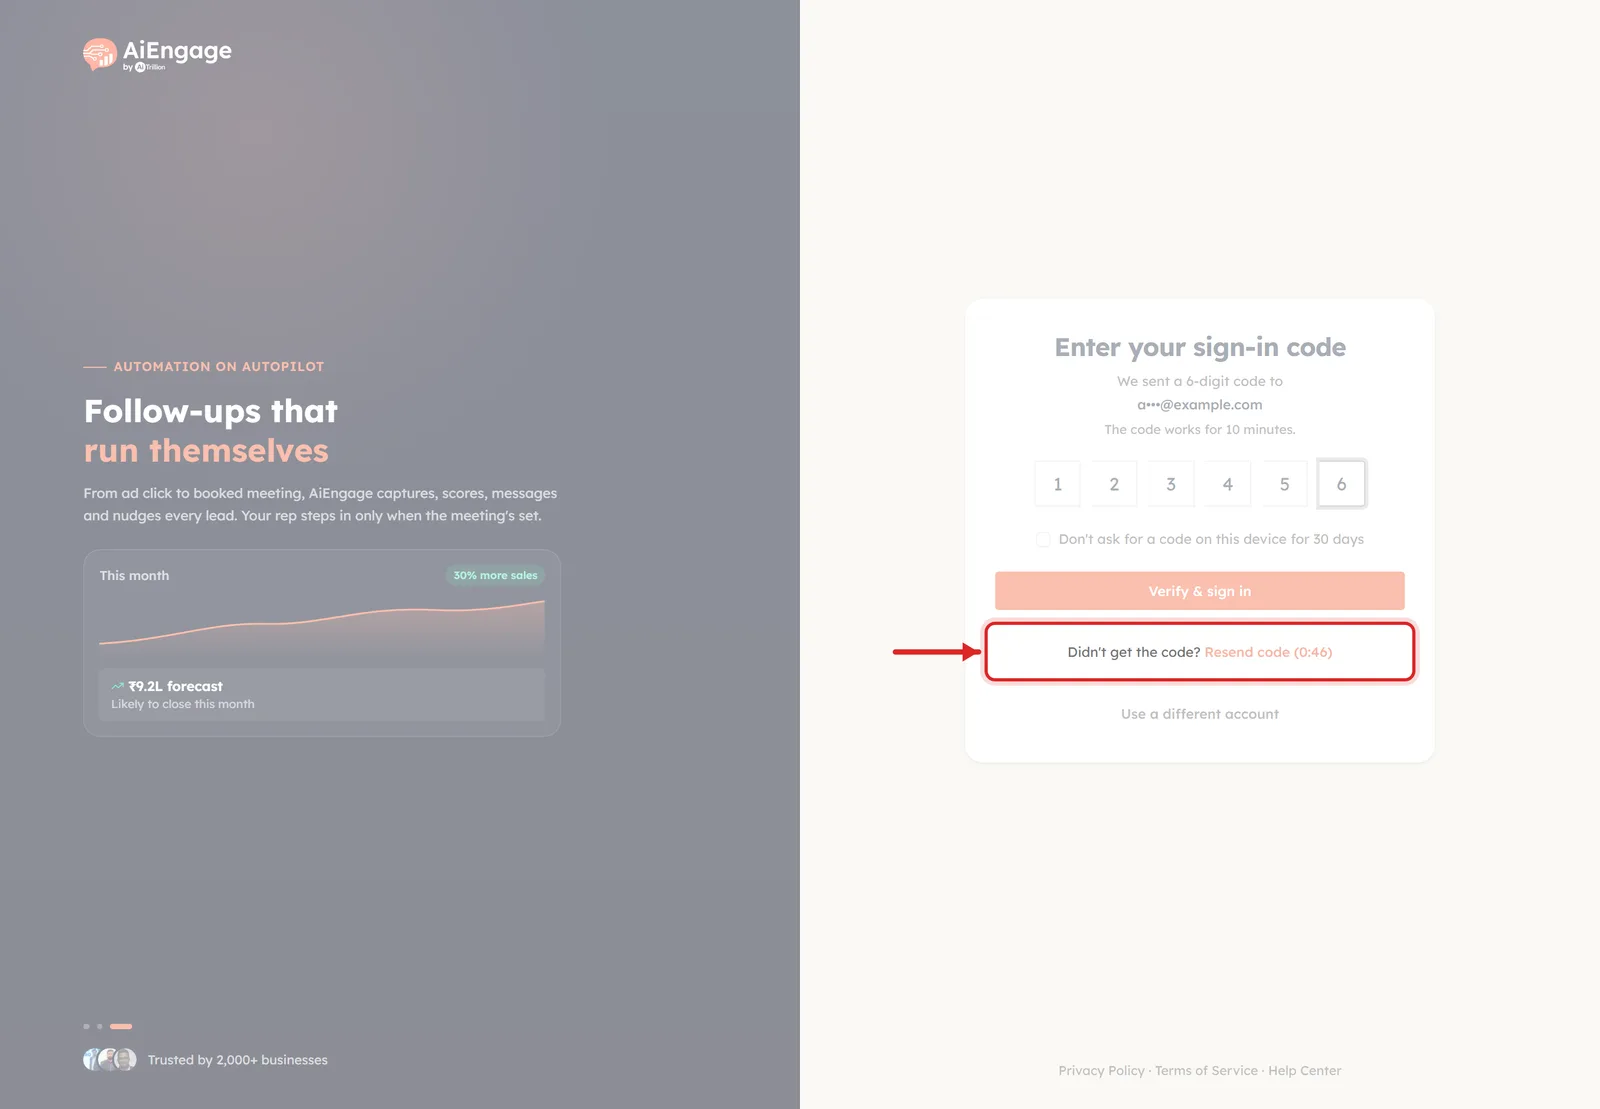
The ringed line at the bottom of the card reads "Didn't get the code?" followed by Resend code in orange with a countdown beside it — (0:50) in the picture. The countdown is a short cooling-off period so the same code cannot be mailed over and over; when it reaches zero, the link becomes clickable and a fresh code is sent.
Two more things worth knowing on this screen:
Use a different account, below the resend line, throws away the half-finished sign-in and takes you back to the email and password screen. Use it if you started signing in as the wrong person.
The whole sign-in expires after 10 minutes. Leave the screen sitting too long and you get a message reading "For your security the sign-in expires after 10 minutes. Your password is fine — just start again." That is not an error and your account is fine — go Back to sign in and enter your password again.
💡
No code in your inbox? Check the spam or junk folder first, then search for mail from AI Engage. Codes go only to the address on your account, so if you have several work addresses, make sure you are looking in the right one.
Remembered devices#
Every browser you tick that 30-day box on gets listed on your Profile, so you can see what is currently allowed to skip the code — and take it away again.
When nothing is remembered#
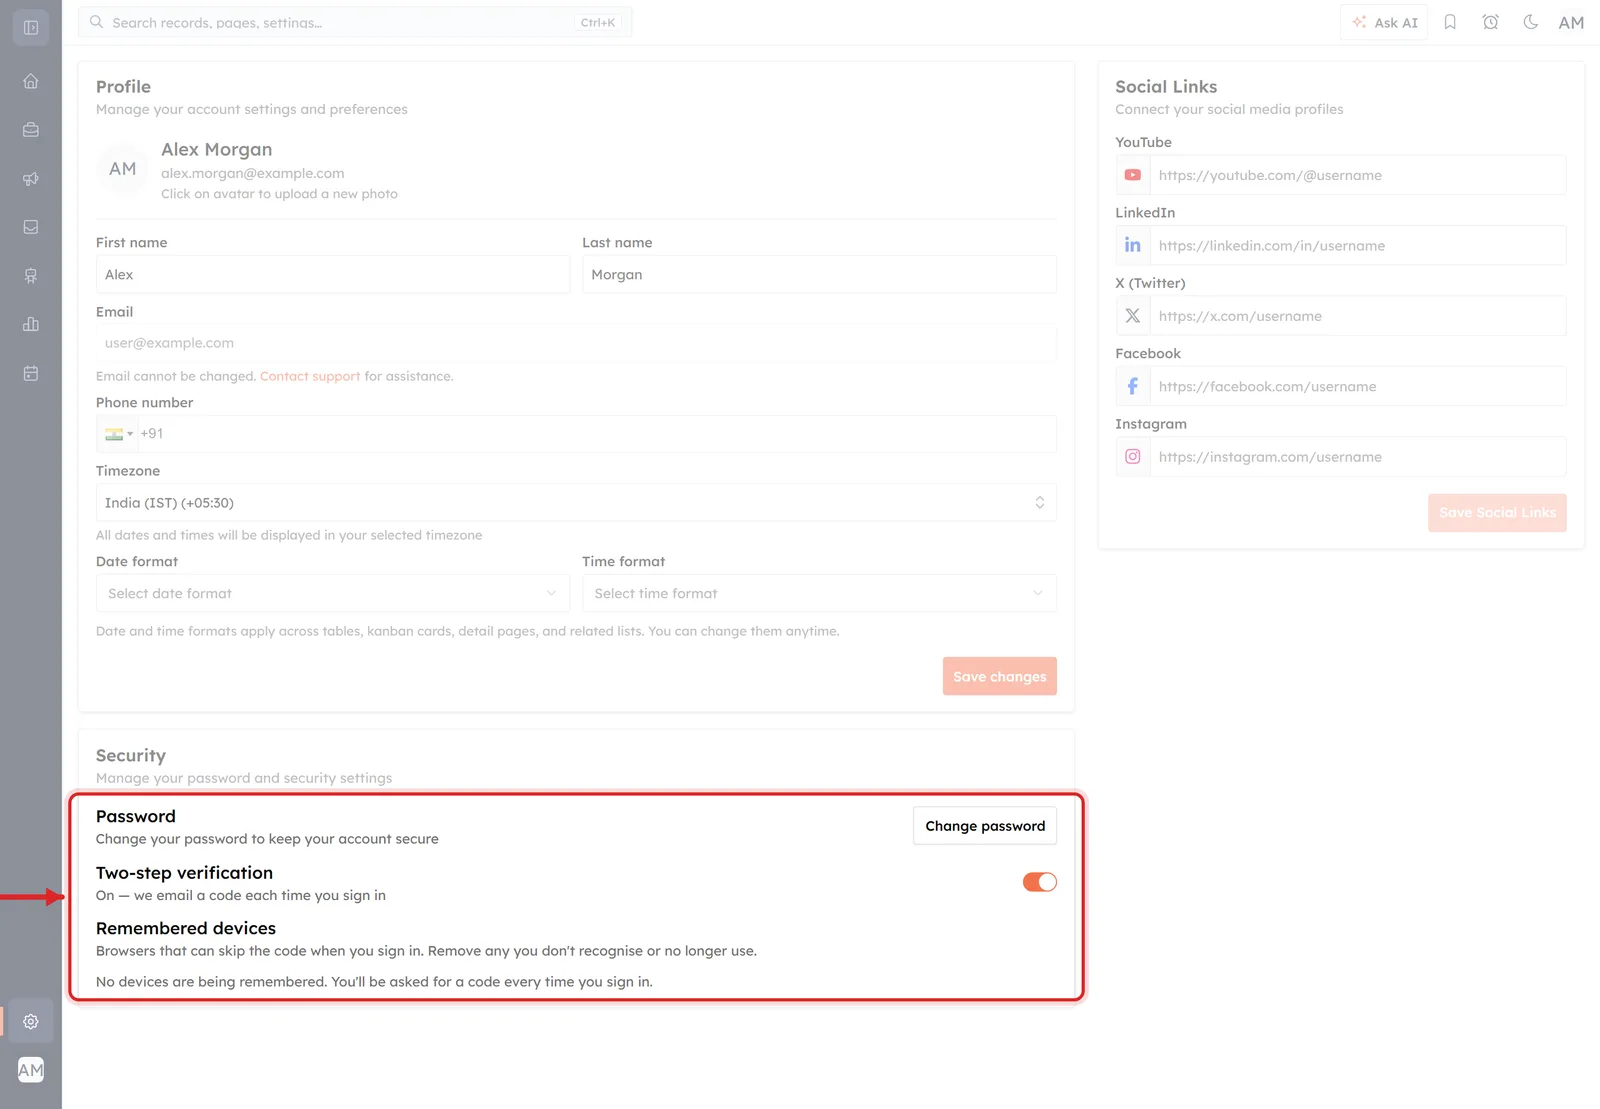
Straight after switching the feature on, the ringed Remembered devices row explains itself — "Browsers that can skip the code when you sign in. Remove any you don't recognise or no longer use." — and then says "No devices are being remembered. You'll be asked for a code every time you sign in."
That is the most protected setting there is, and it is the right one to leave alone if you only sign in occasionally.
When browsers are remembered#
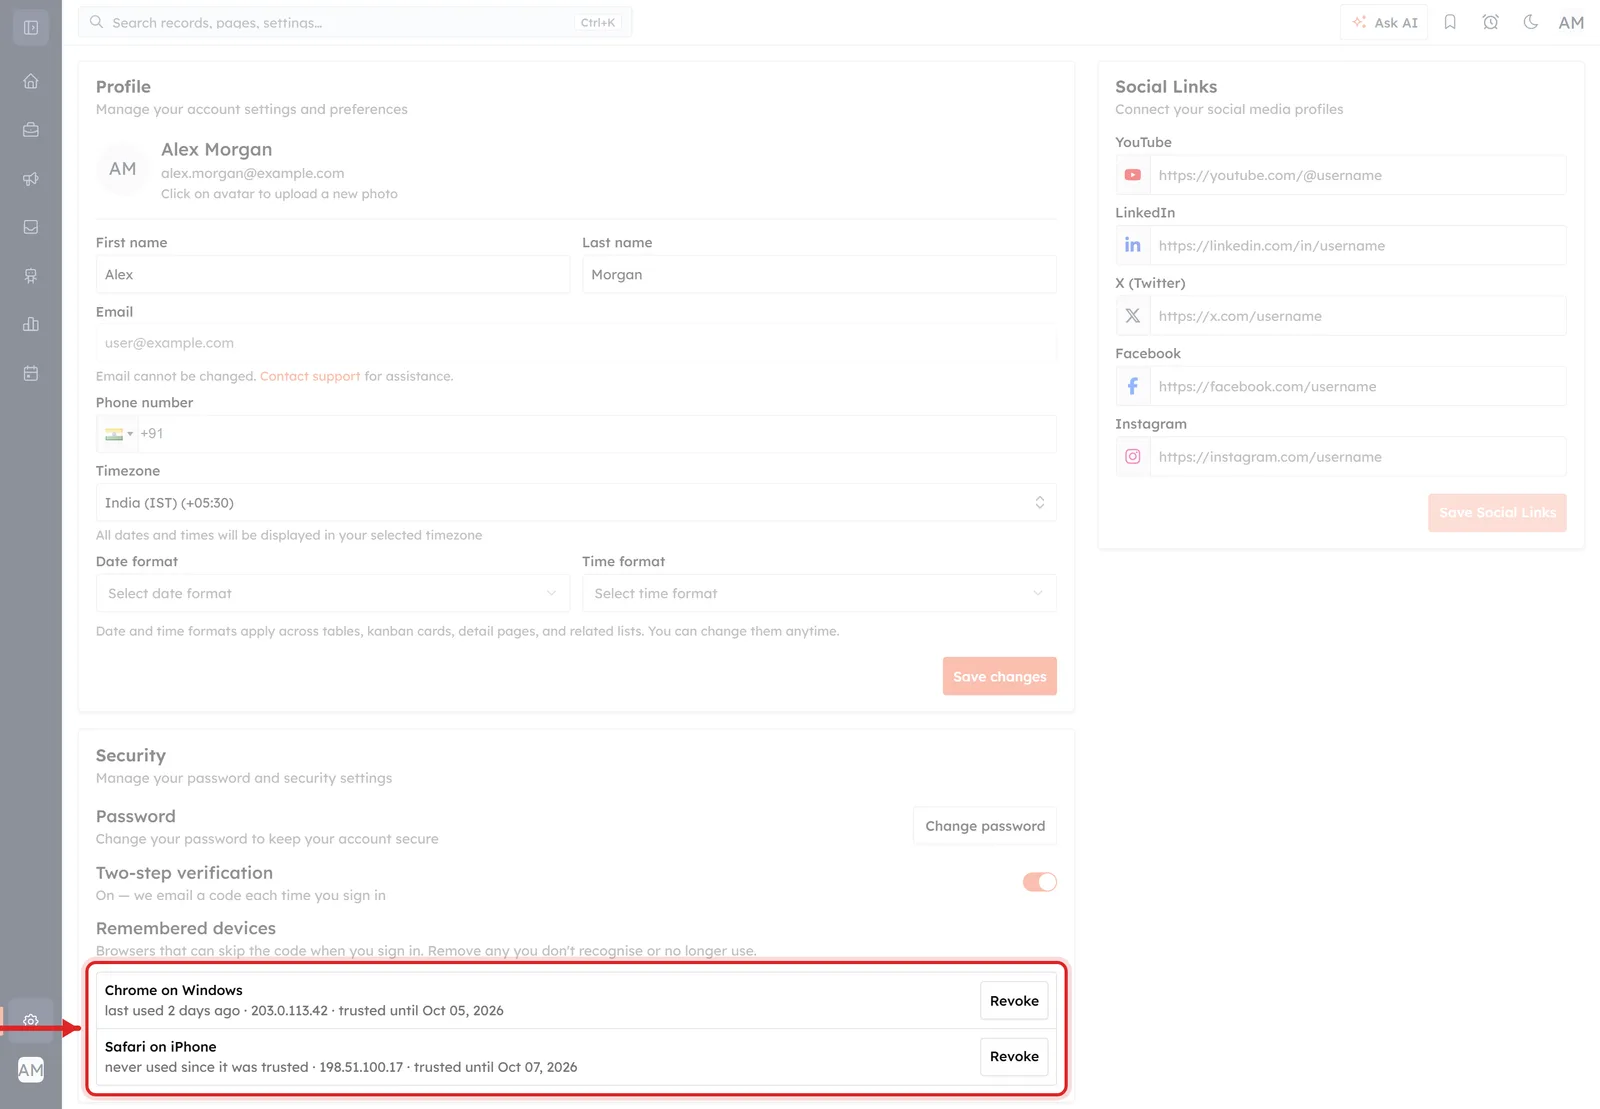
Once you have ticked the box somewhere, the list fills in. The ring in this picture is around the list itself; each row is one browser:
The device name in bold — "Chrome on Windows", "Safari on iPhone". AI Engage works this out from the browser itself; you do not name them.
A grey detail line underneath, holding up to three facts separated by dots: when it was last used ("last used 2 days ago", or "never used since it was trusted" if it has not signed in since), the IP address it was trusted from, and "trusted until" with the date the 30 days run out.
A Revoke button on the right of every row.
Read the list the way you would read a receipt: if there is a browser on it you do not recognise, or one you used once at a client's office, revoke it.
Revoking a device#
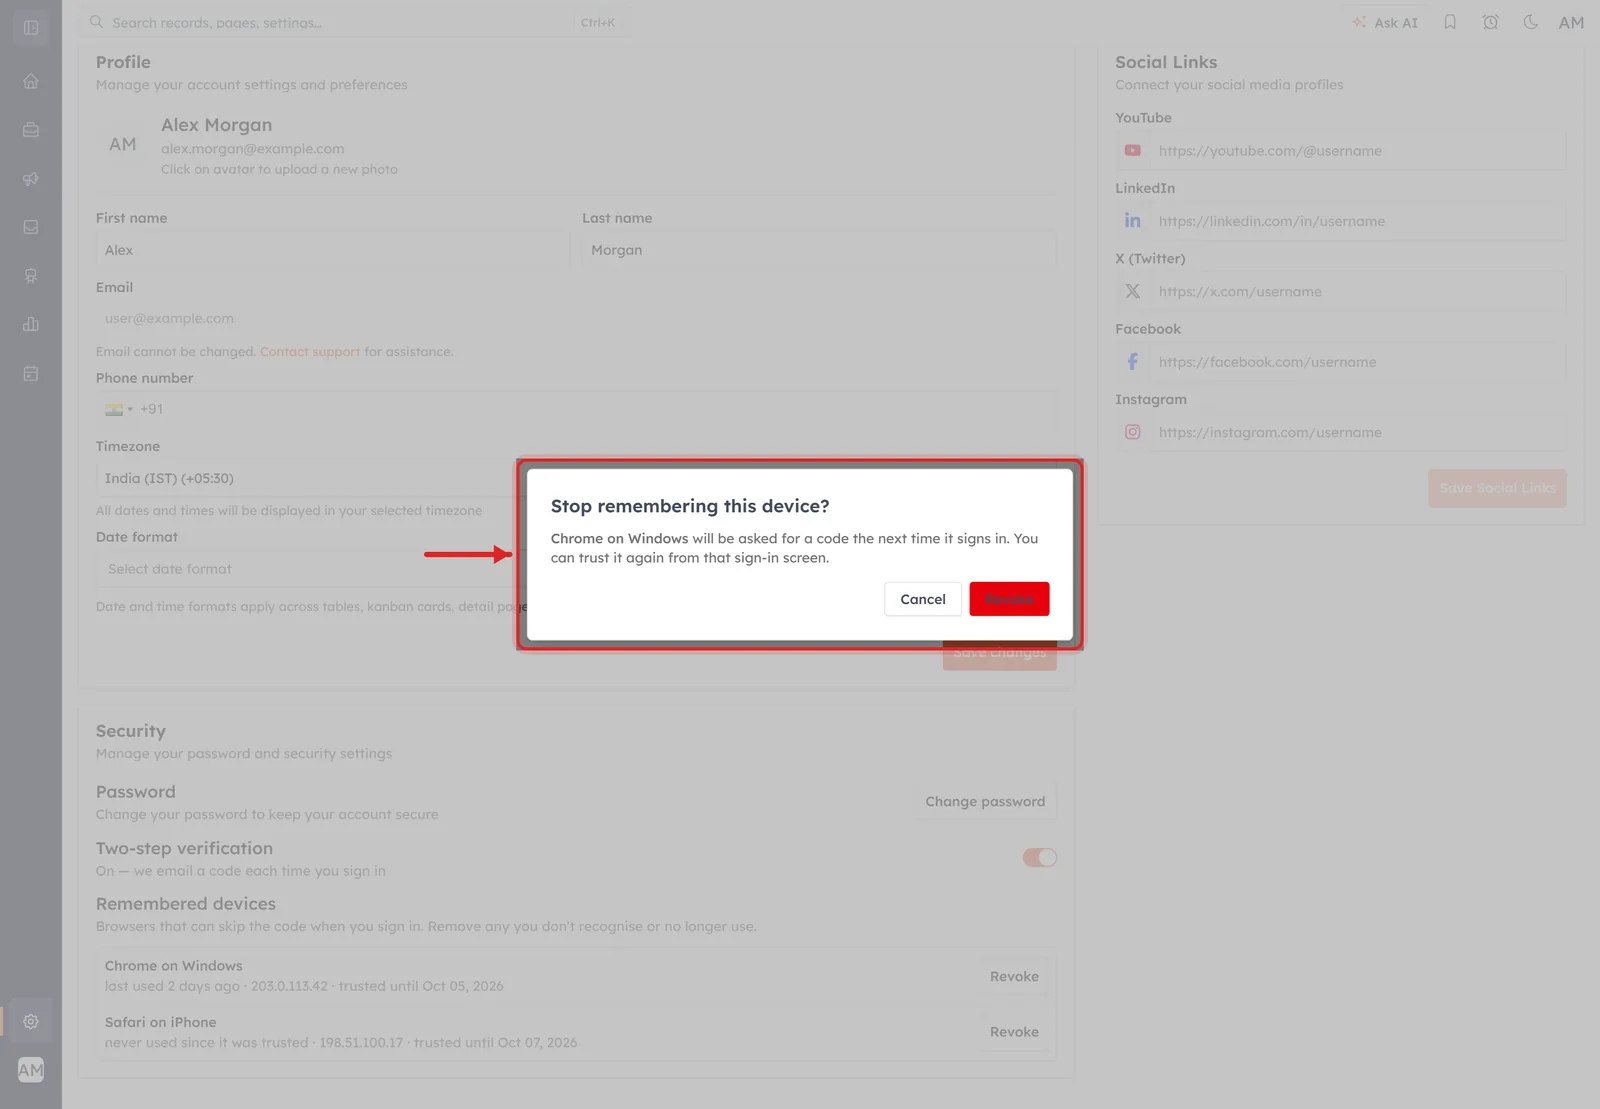
Clicking Revoke opens the small confirmation the red box marks: "Stop remembering this device?", with the device's own name in bold in the sentence beneath — "Chrome on Windows will be asked for a code the next time it signs in. You can trust it again from that sign-in screen." Cancel backs out; the red Revoke button confirms.
Nothing dramatic happens: that browser is not signed out on the spot, it simply loses its skip-the-code pass, and a green message confirms "Device removed. It will ask for a code next time." The row disappears from the list. If you want the pass back, sign in on that browser and tick the 30-day box again.
ℹ️
Lost a laptop or phone? Revoke it here and change your password. Revoking removes the skip-the-code pass; changing the password is what stops the sign-in itself. See Change Your Password & Account Security.
Turning two-step verification off#
You can switch it off at any time from the same row. Click the toggle again while it is on.
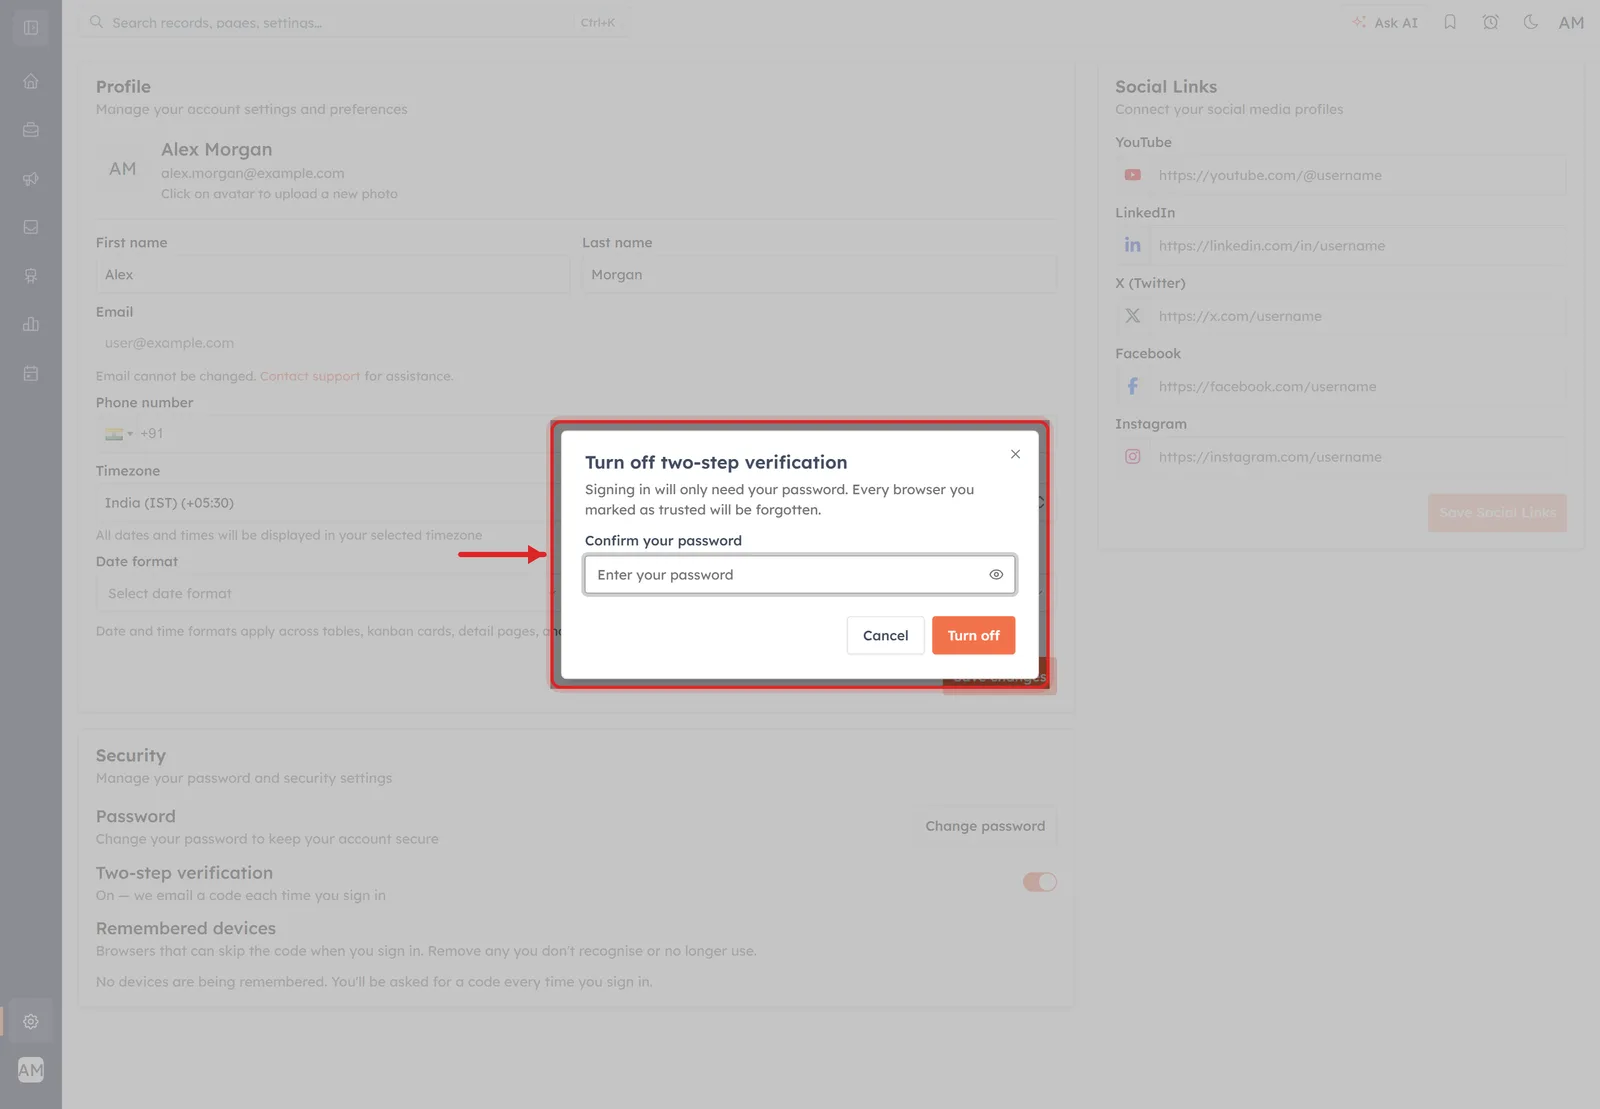
The ringed dialog is titled "Turn off two-step verification" and spells out both consequences: "Signing in will only need your password. Every browser you marked as trusted will be forgotten."
There is only one field this time — Confirm your password — and then Cancel and Turn off. No email code is needed to switch it off; your password alone is enough. When it is done you get the message "Two-step verification is off.", the subtitle in the Security card goes back to "Add a code sent to your email when you sign in", and the Remembered devices row disappears along with everything that was in it.
⚠️
Turning it off clears your remembered-devices list for good. If you turn it back on later, every browser has to be trusted again from scratch — the old 30-day passes do not come back.
Quick answers#
How long is a code good for? Ten minutes, and so is the sign-in attempt itself. A new code cancels the previous one.
Do I need an authenticator app? No. AI Engage sends the code to your email — there is nothing to install and no QR code to scan.
Where does the code go? To the email address on your account, which is the one shown on your Profile and cannot be edited there.
Will it ask every single time? Yes, unless you tick "Don't ask for a code on this device for 30 days" on a browser you trust.
Can an administrator turn it on for my account? No. It is switched on per user, from that user's own Profile, and it needs that user's password.
Does it change my password rules? No. Passwords are unchanged — see Change Your Password & Account Security.
I have a new phone/laptop. Nothing to do in advance. Sign in as usual, enter the emailed code, and tick the 30-day box if it is your own device.
Where to go next#
Change Your Password & Account Security — the other half of the Security card.
Invite Your Team — bring colleagues in, then ask each of them to follow this guide on their own account.
Set Up Your Personal Profile — everything else on the Profile page.
Was this article helpful?
Ready to implement this?
OpenAI Engage and apply what you just learned to your own workspace.
Open AI Engage CRM