Loading…


KnowledgeBase
Contact Portfolios: Add Images, Videos & Documents, Then Share One Public Link
Every contact in AiEngage CRM carries a Portfolio of its own — a tab on the record holding images, videos and documents about that person or company. You choose which of those items are private and which are published, and the published ones become a single web page you can send to anyone with a link. No sign-in, no setup, nothing to build first.
This guide fills one in from scratch: open a contact, add the work, publish the pieces that should be seen, and share the link.
ℹ️
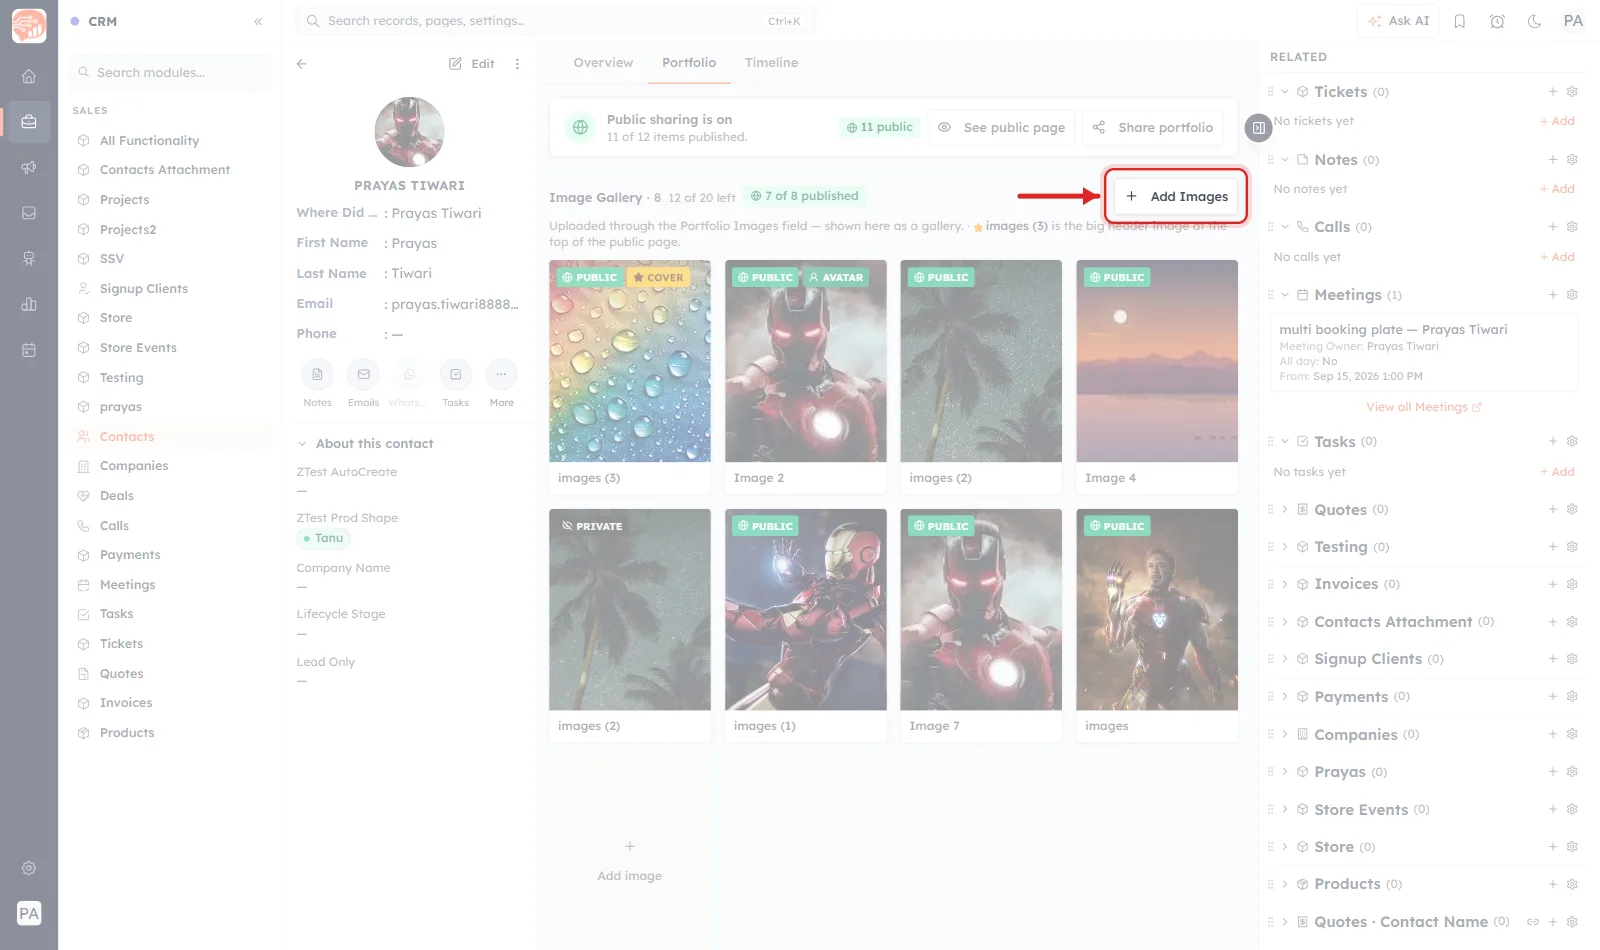
Every screenshot below is a real capture of the Portfolio tab. Each one shows the whole screen with the control that step is about ringed in red and an arrow pointing straight at it.
What a portfolio holds#
- Images — up to 20 per contact, 10 MB each, as PNG, JPG, GIF or WEBP. One can be the cover and one can be the public page's avatar.
- Videos — up to 5, 50 MB each if you upload the file. You can also point at a YouTube or Instagram link instead, which stays where it is and costs you no storage.
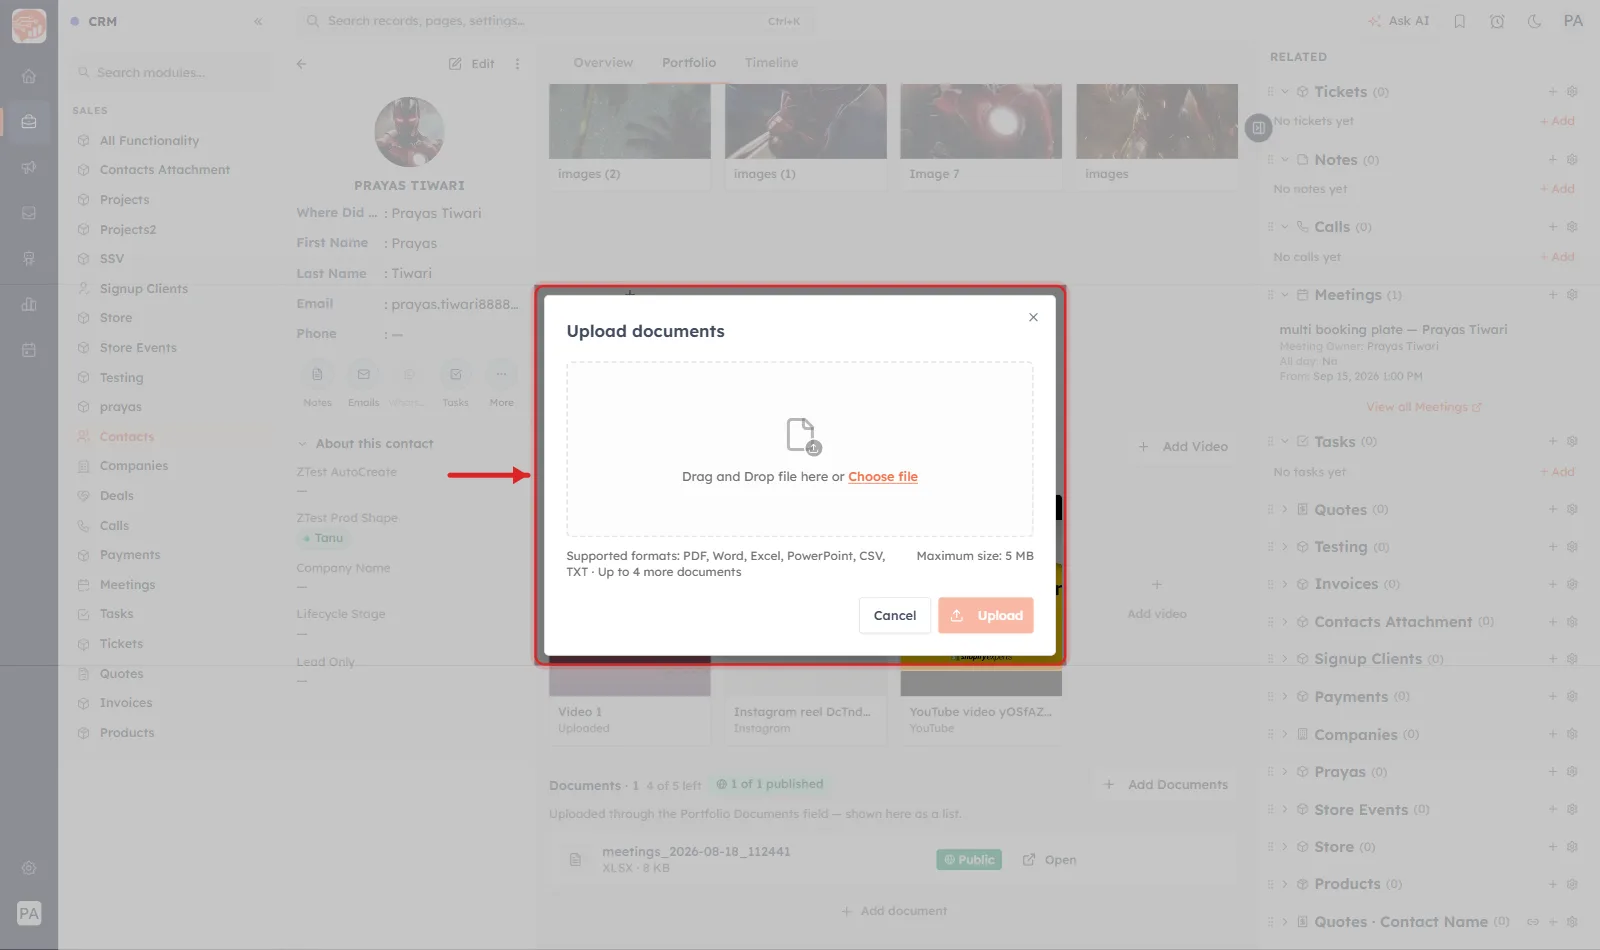
- Documents — up to 5, 5 MB each: PDF, Word, Excel, PowerPoint, CSV or TXT.
⚠️
Everything you add starts private. An uploaded image, video or document is visible to your team on the record and to nobody else until you publish it by hand. Nothing lands on the public page by accident.
Before you start#
- You need permission to edit the contact. No administrator setup is required — the Portfolio tab is already on every contact record.
- Leads live in Contacts in AiEngage CRM, so a lead has a portfolio too. Everything below applies unchanged.
- Have the files to hand. Uploads happen one batch at a time, and each one is a real file picker.
Step 1 — Open the contact#
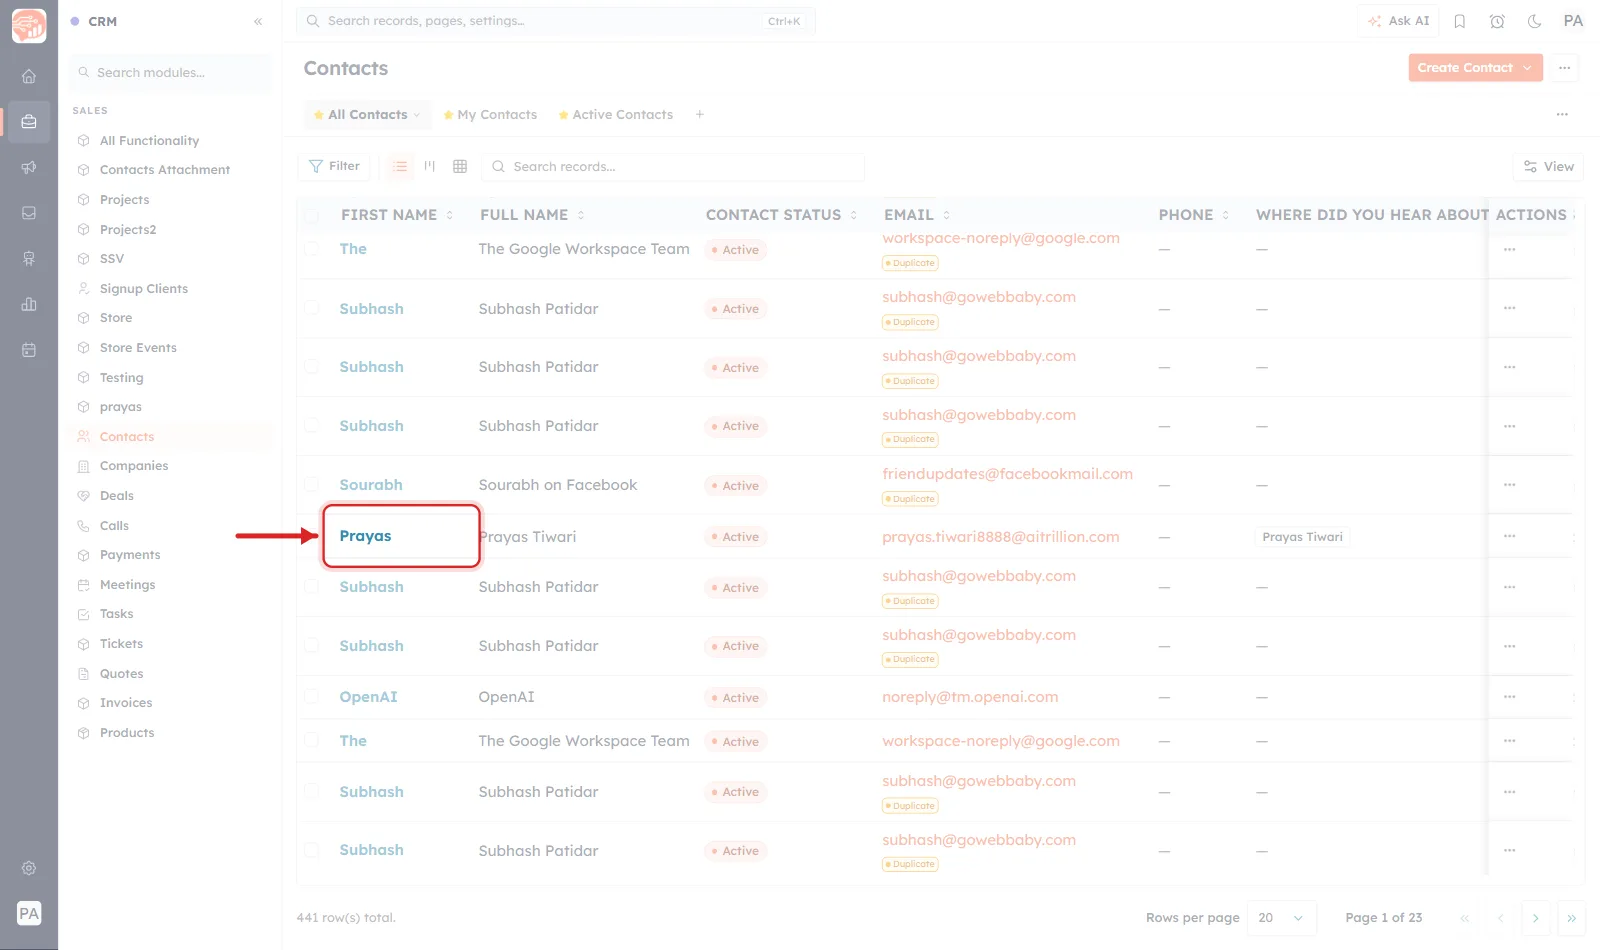
From the left menu choose Contacts, then click the name of the contact you want. Any column with the name in it works — the first cell is a link.
Step 2 — Switch to the Portfolio tab#
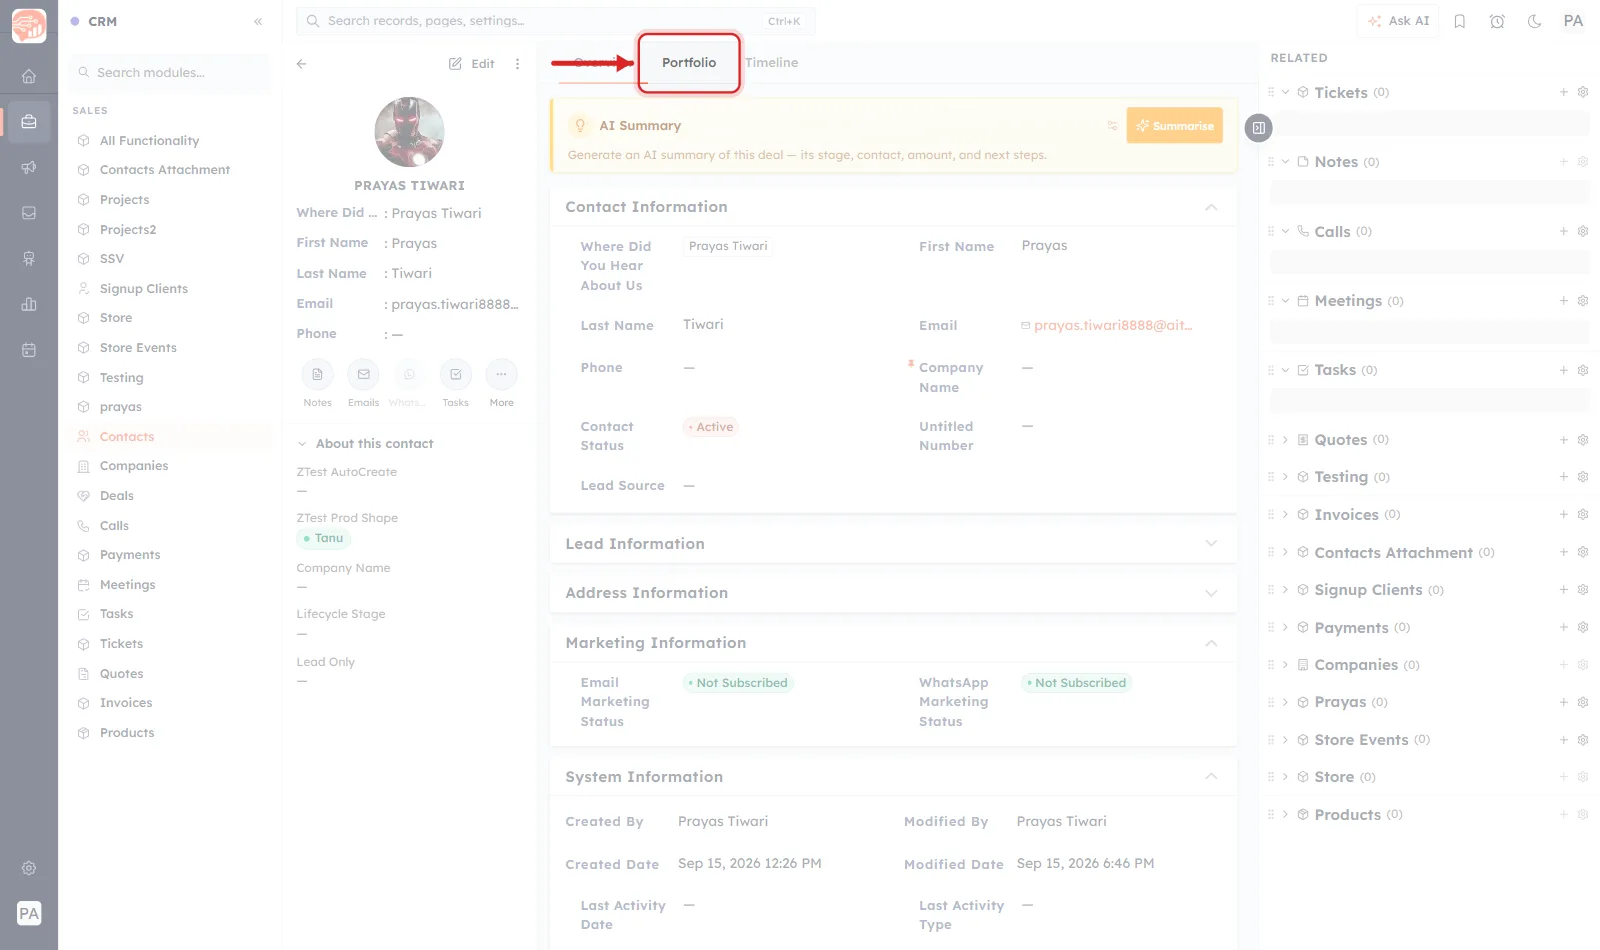
The record opens on Overview. Above it sits a row of tabs — Overview, Portfolio, Timeline. Click Portfolio.
Step 3 — What an empty portfolio looks like#
A contact nobody has touched yet shows three empty sections stacked down the page: Image Gallery, Video Gallery and Documents. Each one tells you how much room is left — 20 of 20 left, 5 of 5 left, 5 of 5 left — and offers a big button to add the first item.
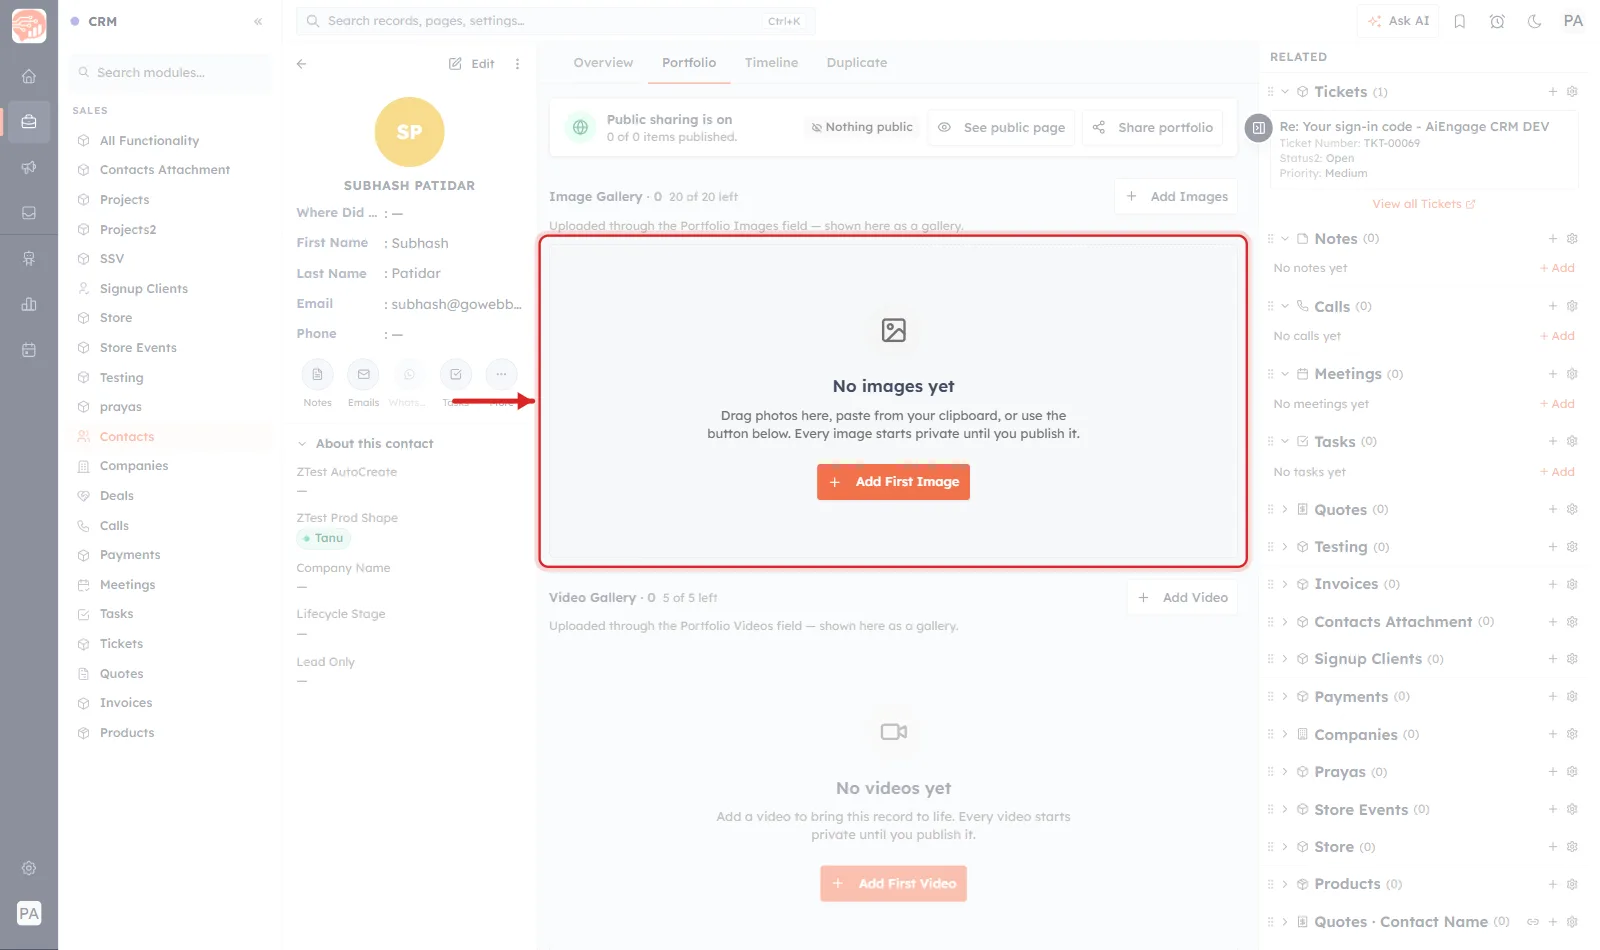
You can also drag photos straight onto the gallery, or paste one from your clipboard, without opening the upload box at all.
Step 4 — Read the sharing bar#
Across the top of the tab is the sharing bar. It is the one place that tells you what the outside world can currently see.
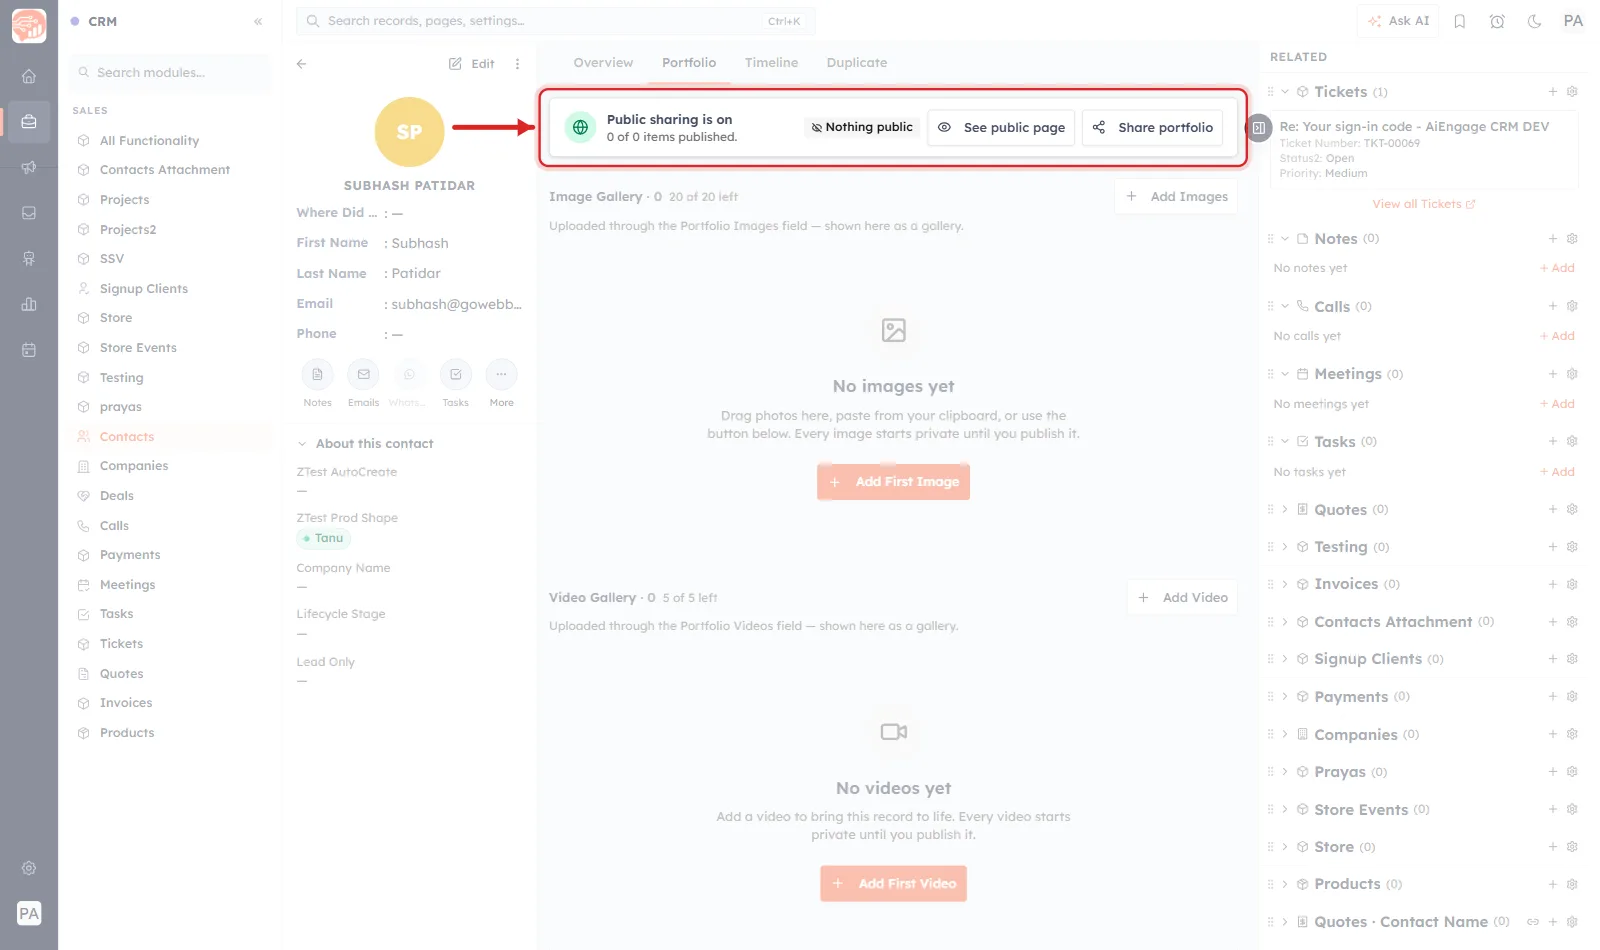
On an untouched contact it reads Public sharing is on with 0 of 0 items published and a Nothing public badge. Sharing being switched on does not expose anything — it has nothing to expose until you publish an item. Publish at least one and this bar gains a Public link is live block with the link itself, which is Step 9.
Step 5 — Add images#
Click Add Images at the top right of the Image Gallery. On an empty portfolio, Add First Image in the middle of the panel does the same thing.
The Upload images box opens. Drop files on it or click Choose file, then click Upload.
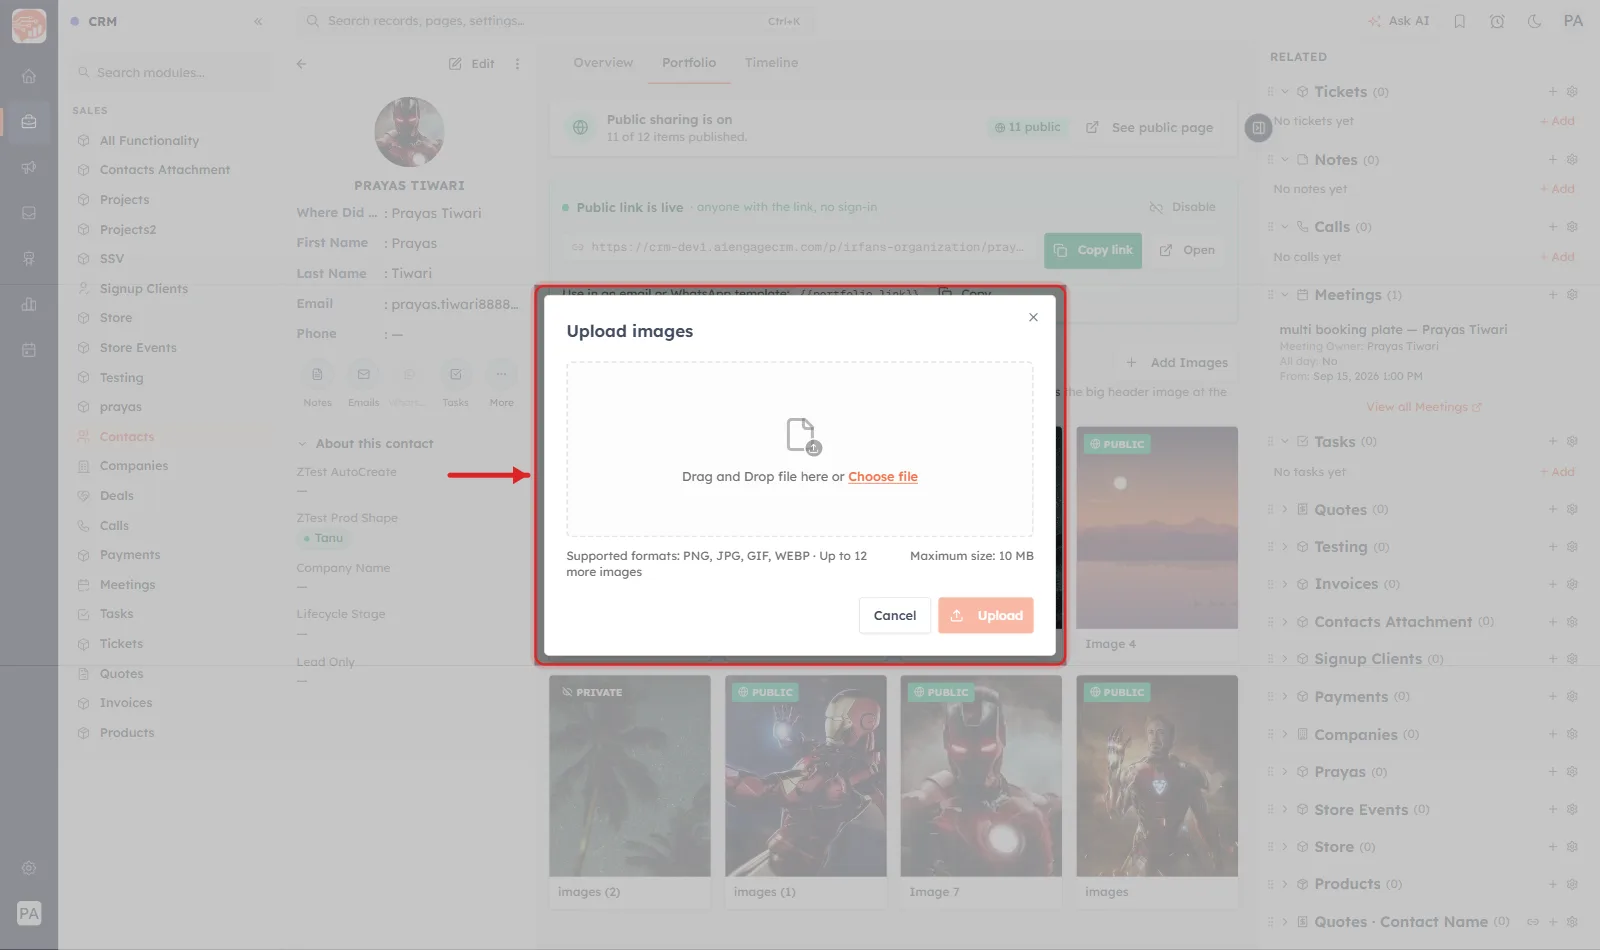
The dialog counts down as you go — up to 12 more images when eight of the twenty slots are already used — so you always know how much room is left before you pick the files.
Step 6 — Publish the ones that should be seen#
Every new tile arrives marked PRIVATE. Hover over a tile and its controls appear in the corner: a star to set it as the cover, an eye to publish or unpublish it, a bin to delete it, and a small button at the foot to use it as the public page's avatar.
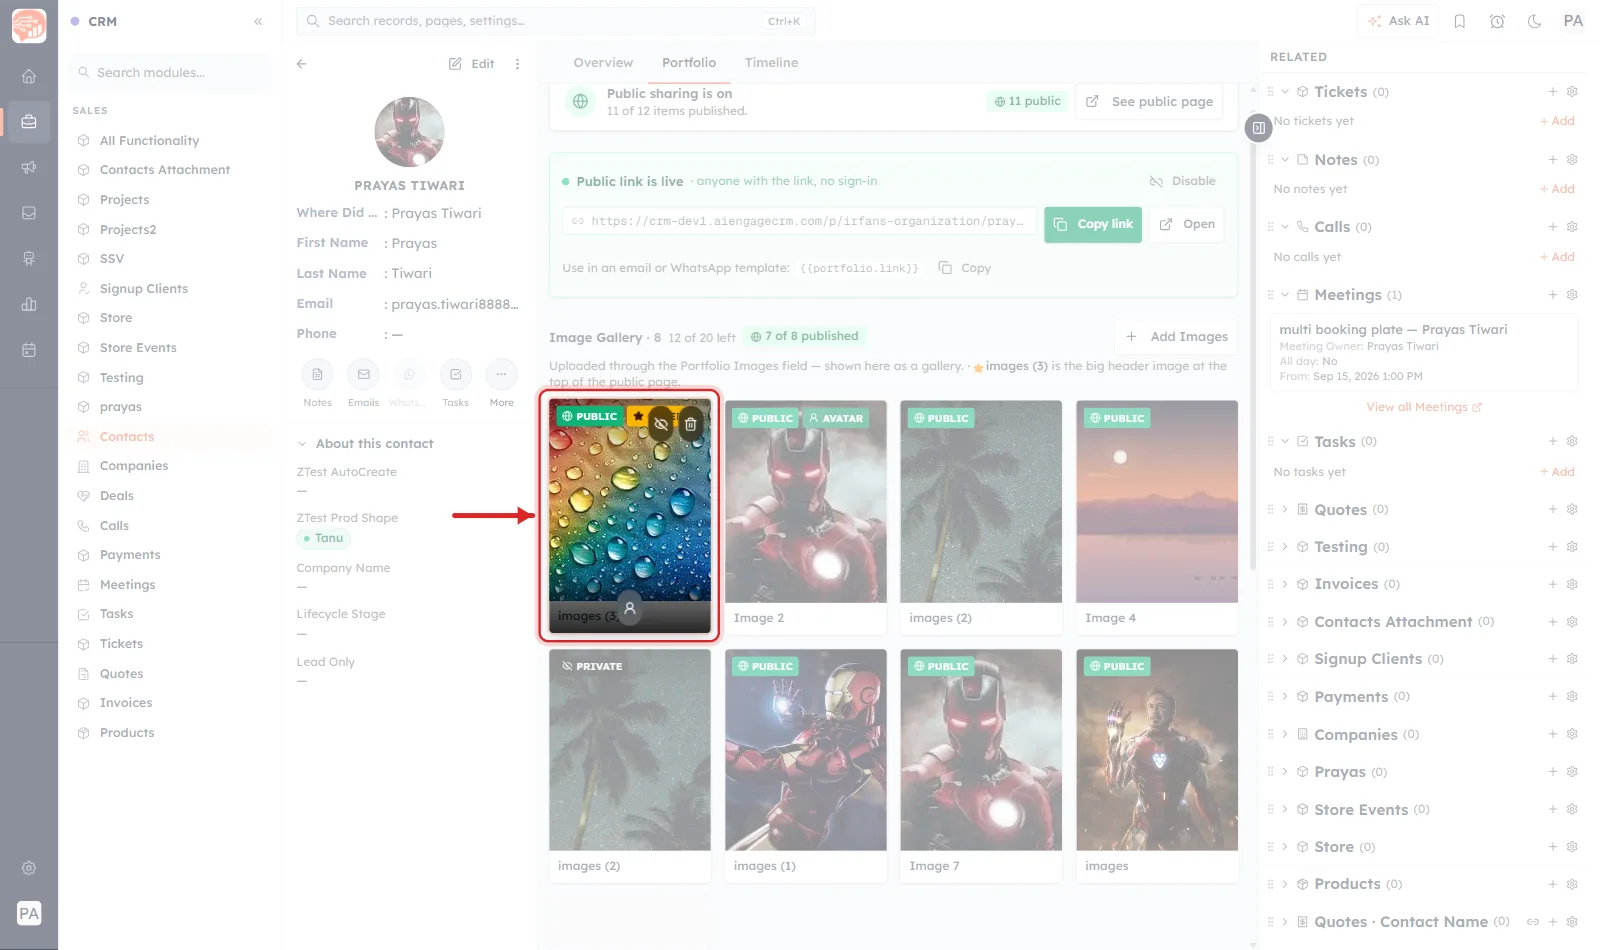
Publishing an item flips its badge from PRIVATE to PUBLIC, and both counters move with it.
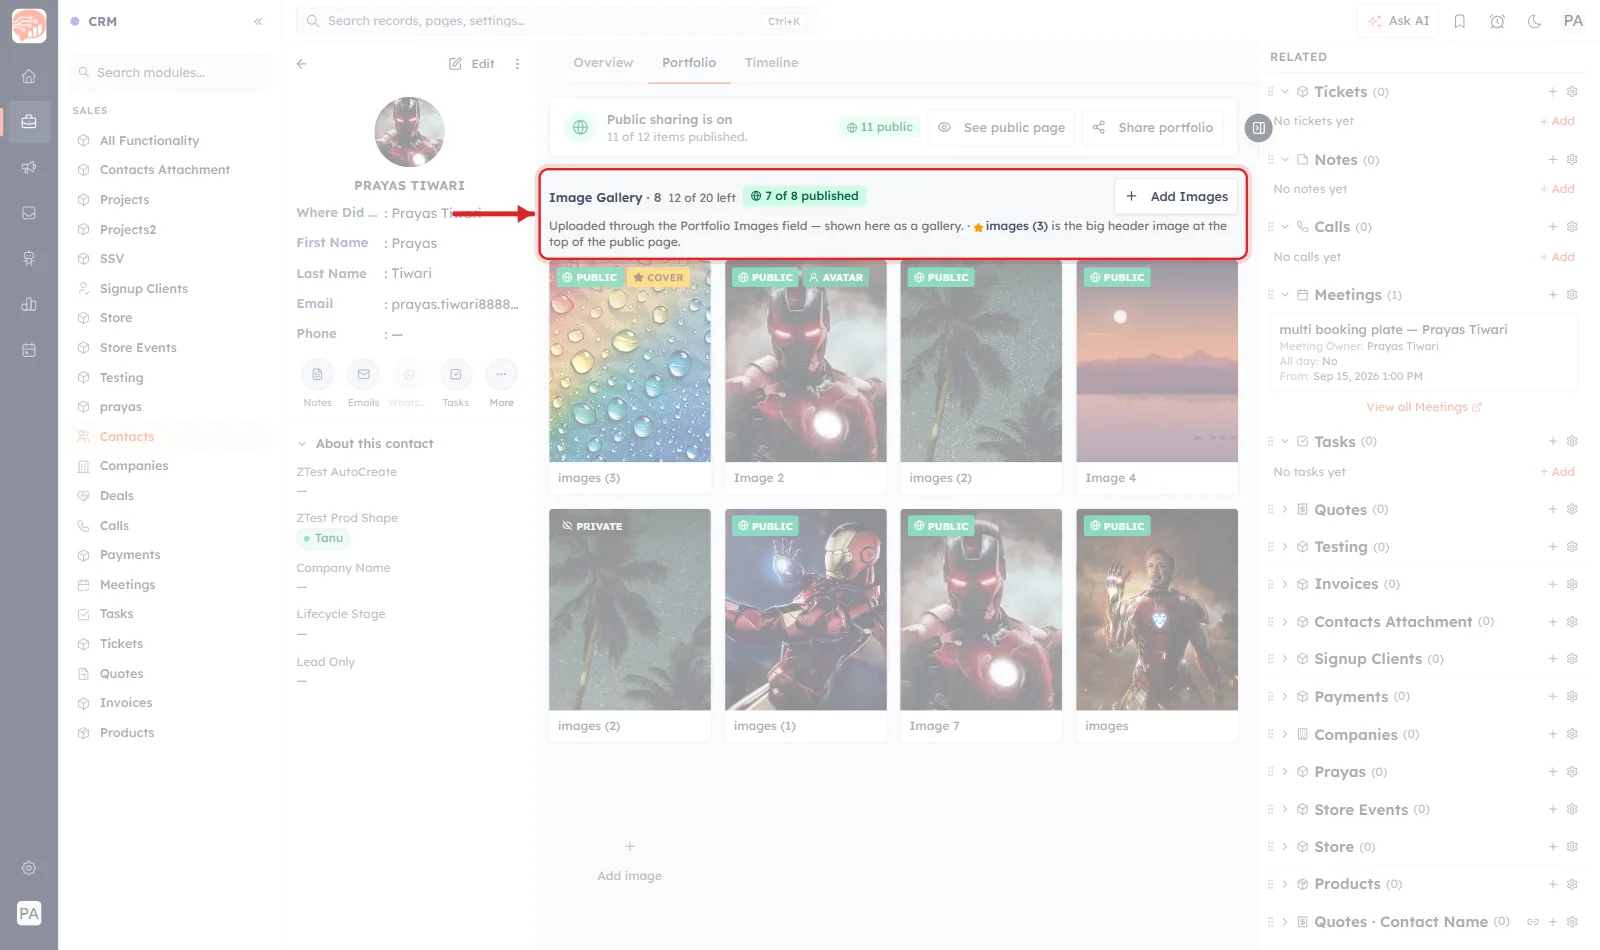
The heading now reads 8 items, 12 of 20 left, 7 of 8 published, and the sharing bar at the top agrees with it. When you are deciding what to send someone, those two numbers are the whole story.
ℹ️
Tiles are sortable — drag one to move it, and the order you leave them in is the order they appear on the public page. Put your strongest work first.
Step 7 — Choose the cover and the avatar#
Two images do a special job, and both are set from the tile itself:
- Cover (the star) — the wide header image across the top of the public page. The gallery's helper line names the current one for you.
- Avatar — the round picture that sits over the cover, beside the name.
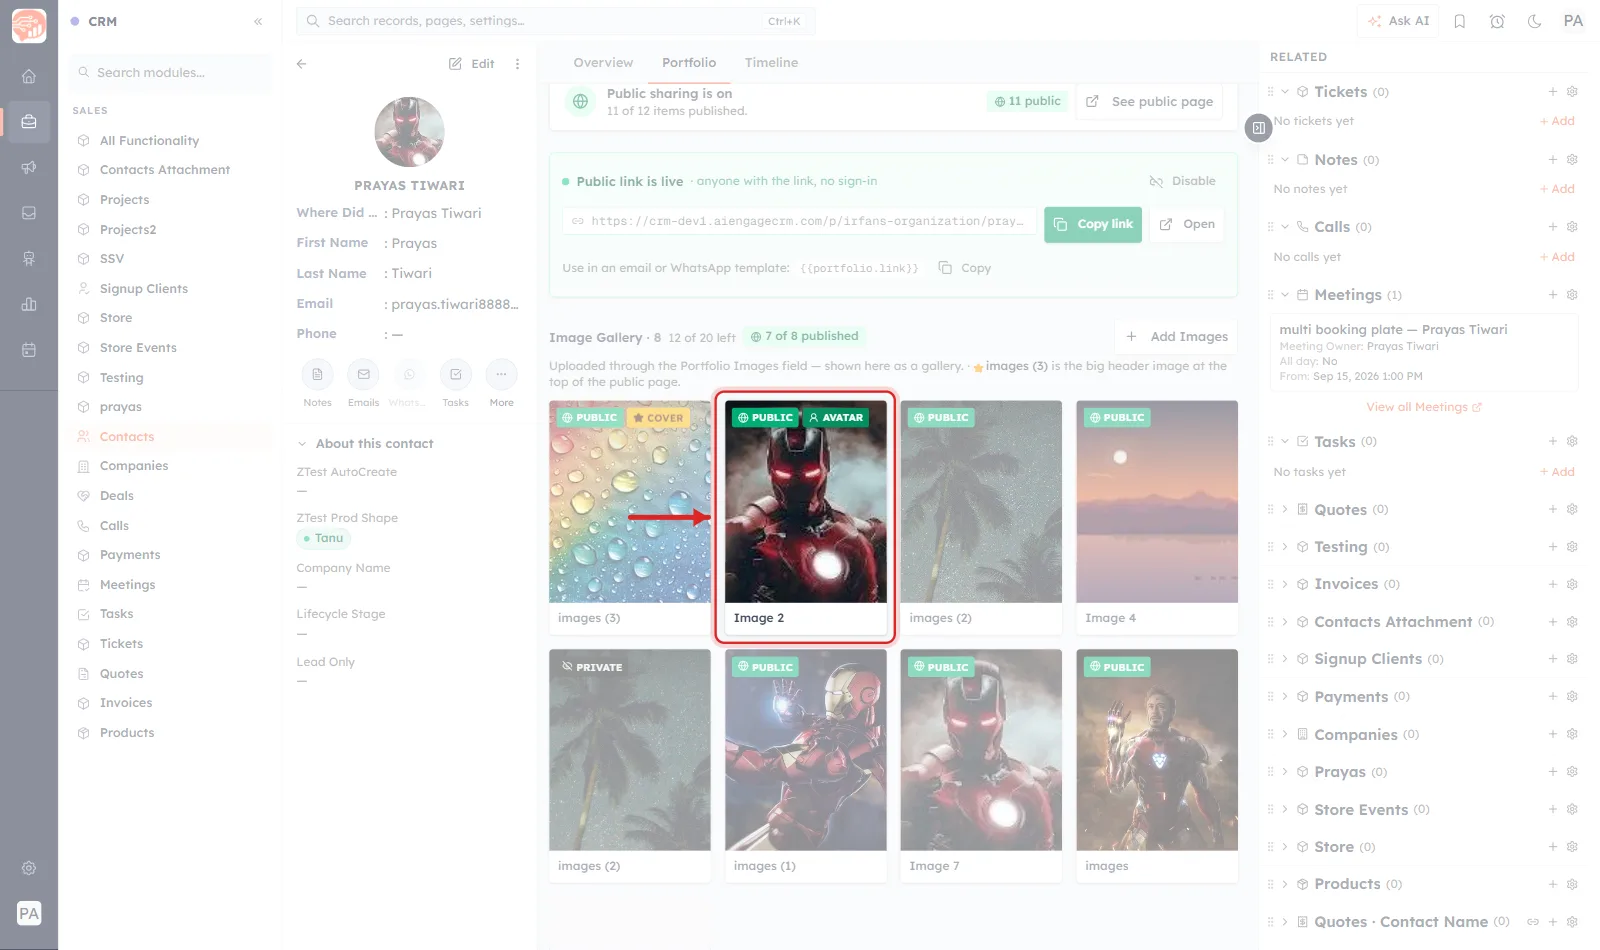
Both tiles keep a badge — COVER and AVATAR — so a glance at the gallery tells you what the top of the public page looks like without opening it.
Step 8 — Add videos and documents#
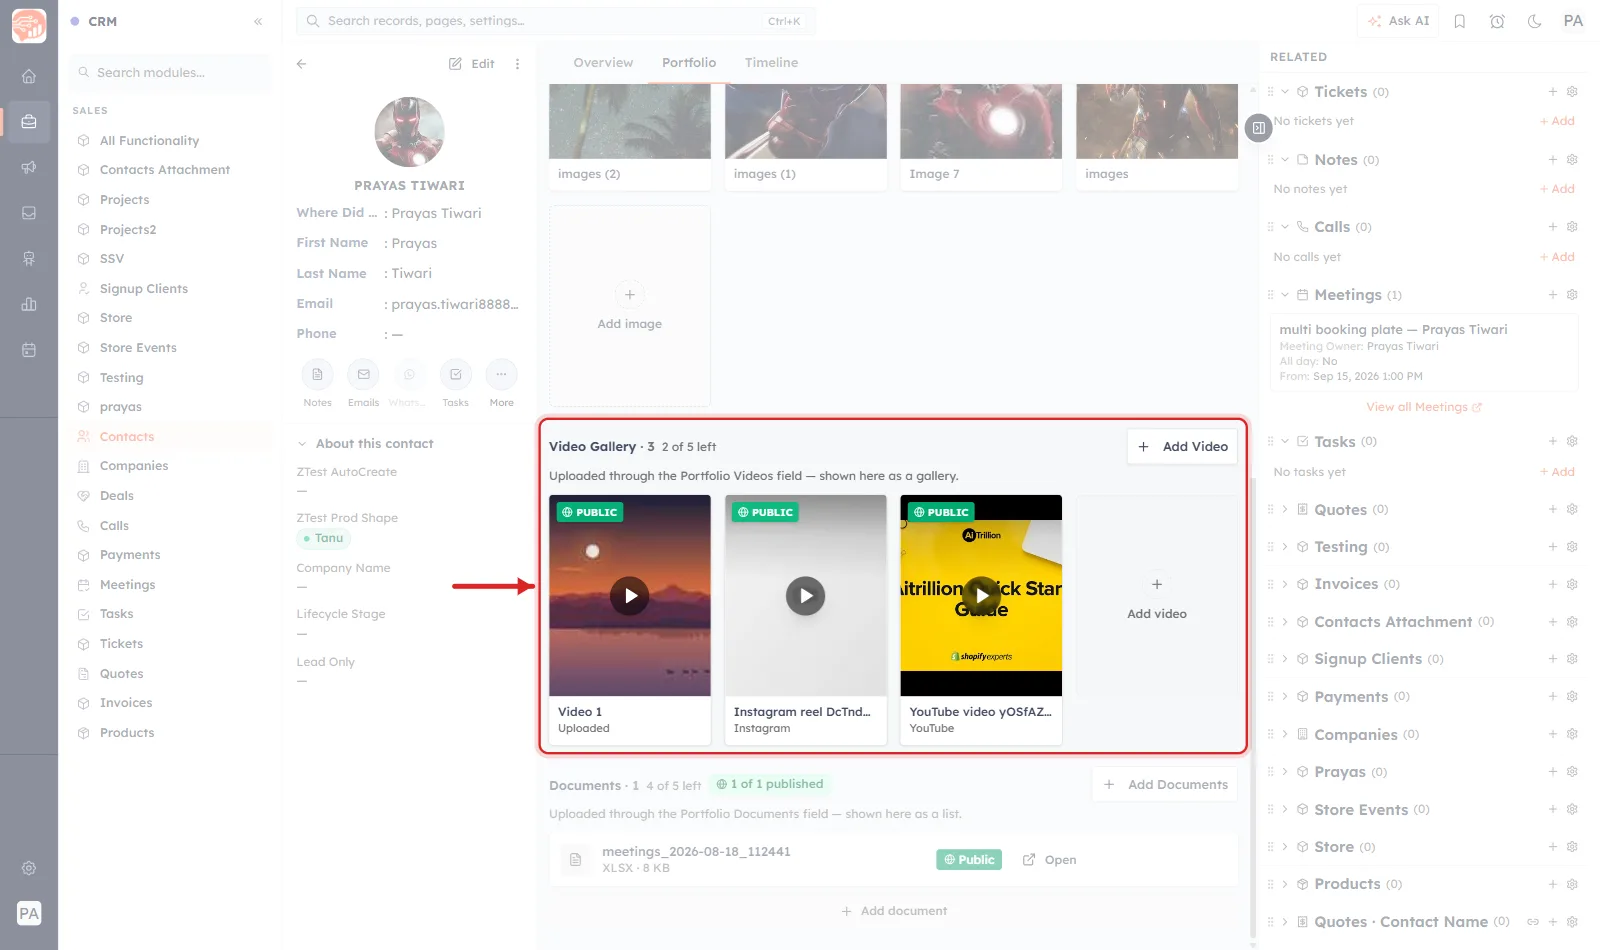
The Video Gallery works the same way. Click Add Video.
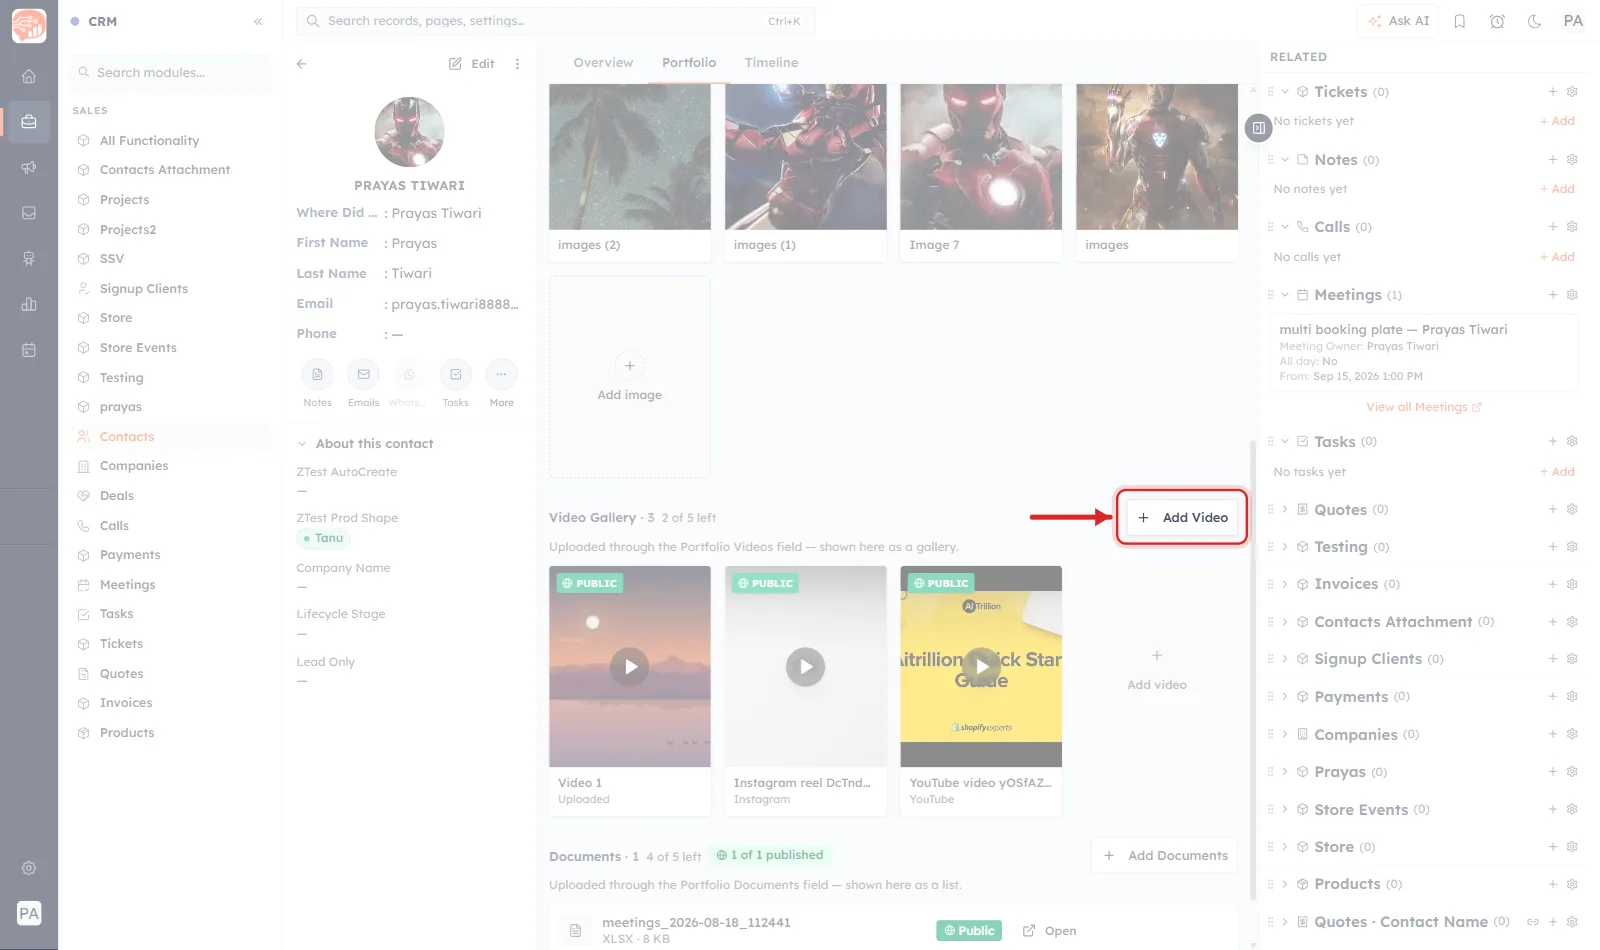
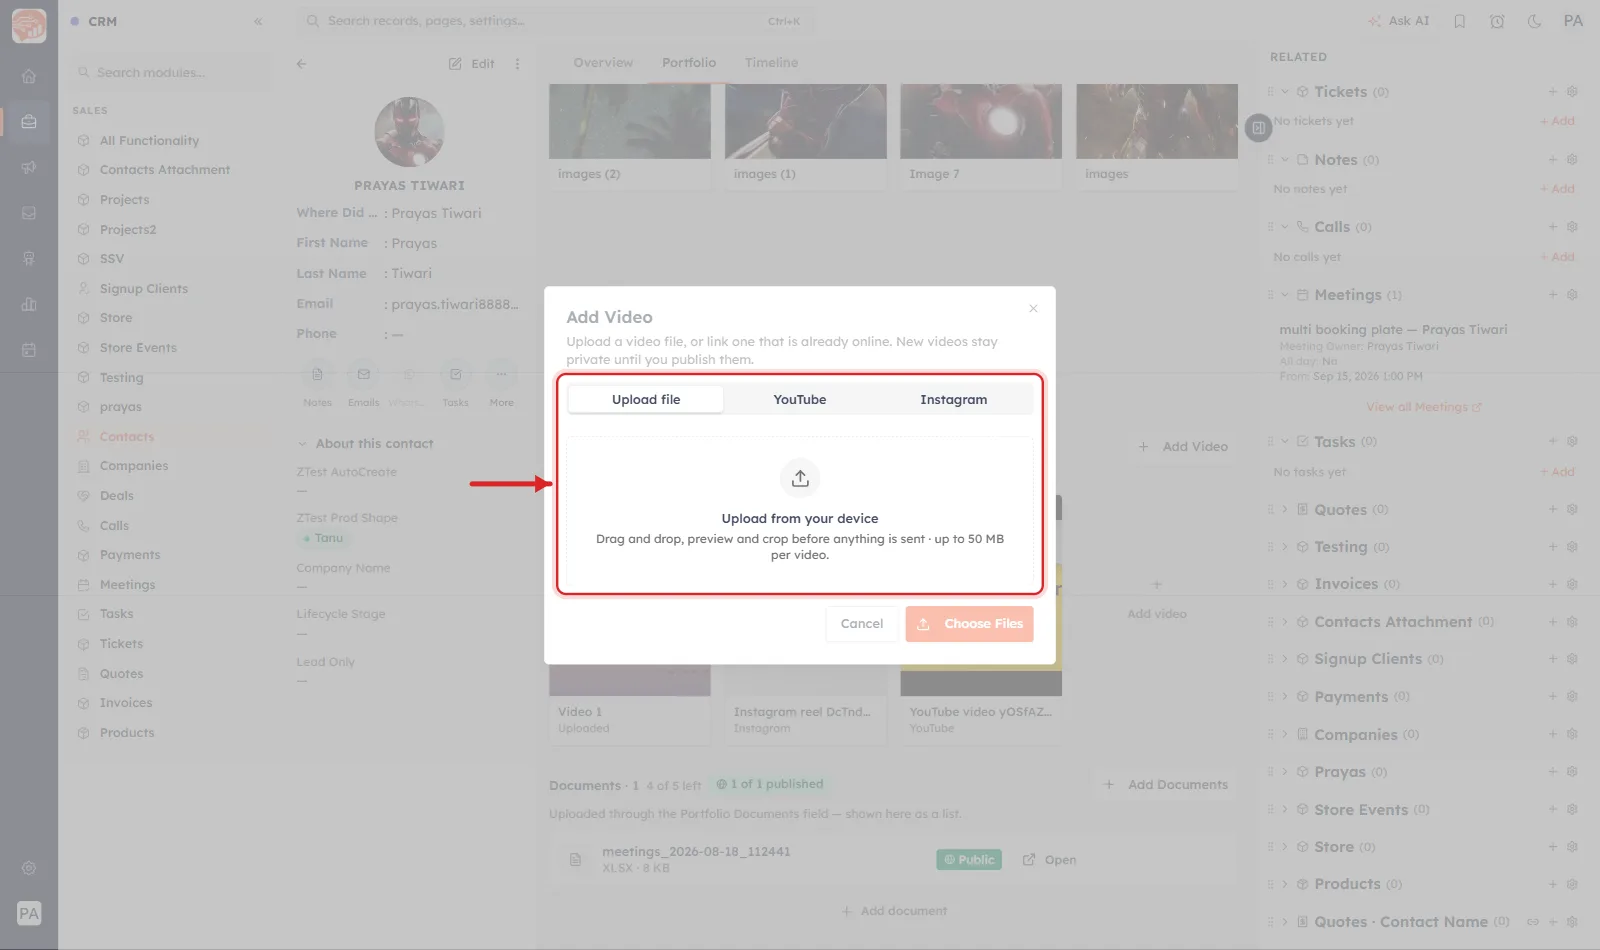
The dialog offers three routes, as tabs: Upload file, YouTube and Instagram.
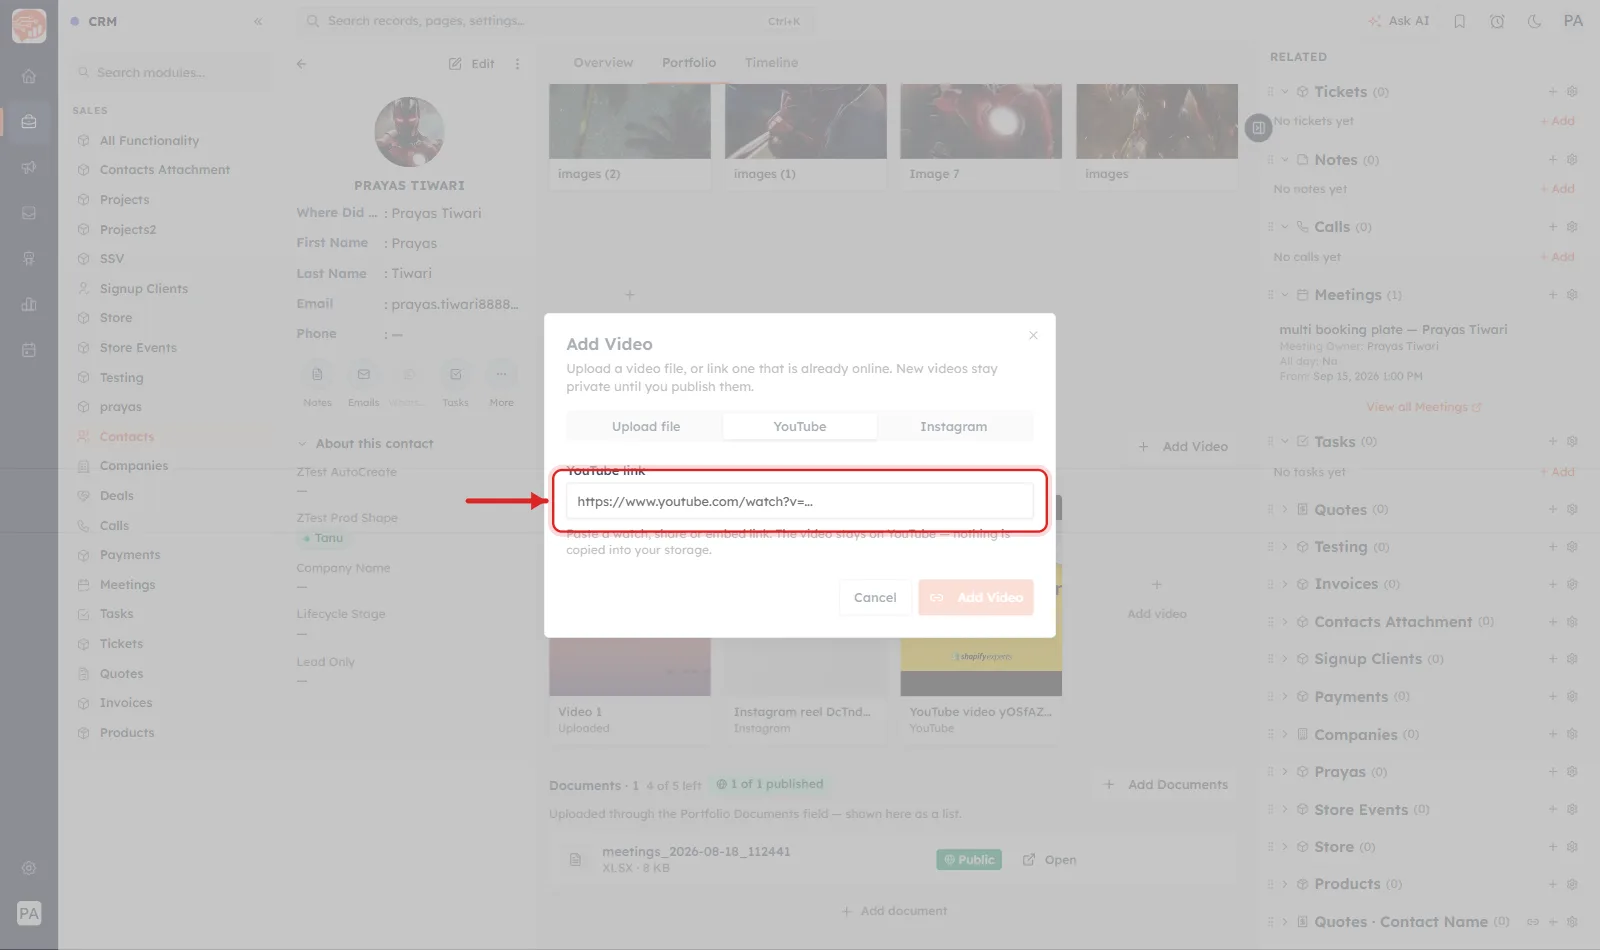
On YouTube or Instagram, paste the link and click Add Video. A watch, share or embed link all work.
ℹ️
A linked video stays on YouTube or Instagram — nothing is copied into your storage, so it does not count against your upload size. An Instagram link shows a placeholder until you add a thumbnail from its tile.
Uploaded and linked videos sit side by side in the gallery, each labelled with where it came from.
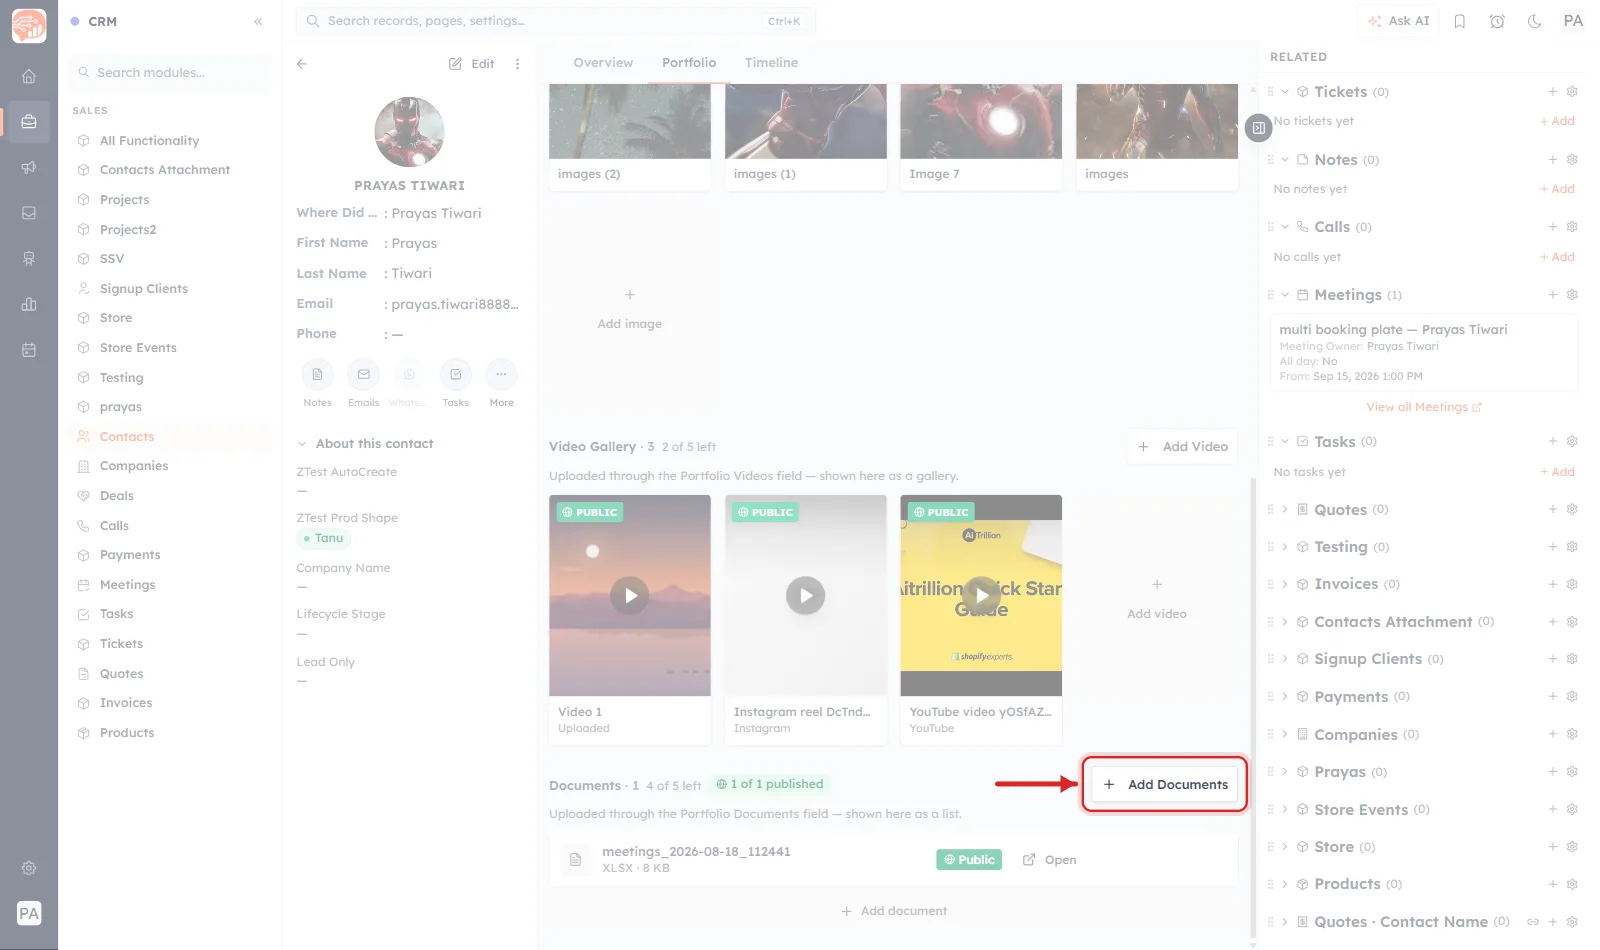
Documents follow the same pattern — click Add Documents.
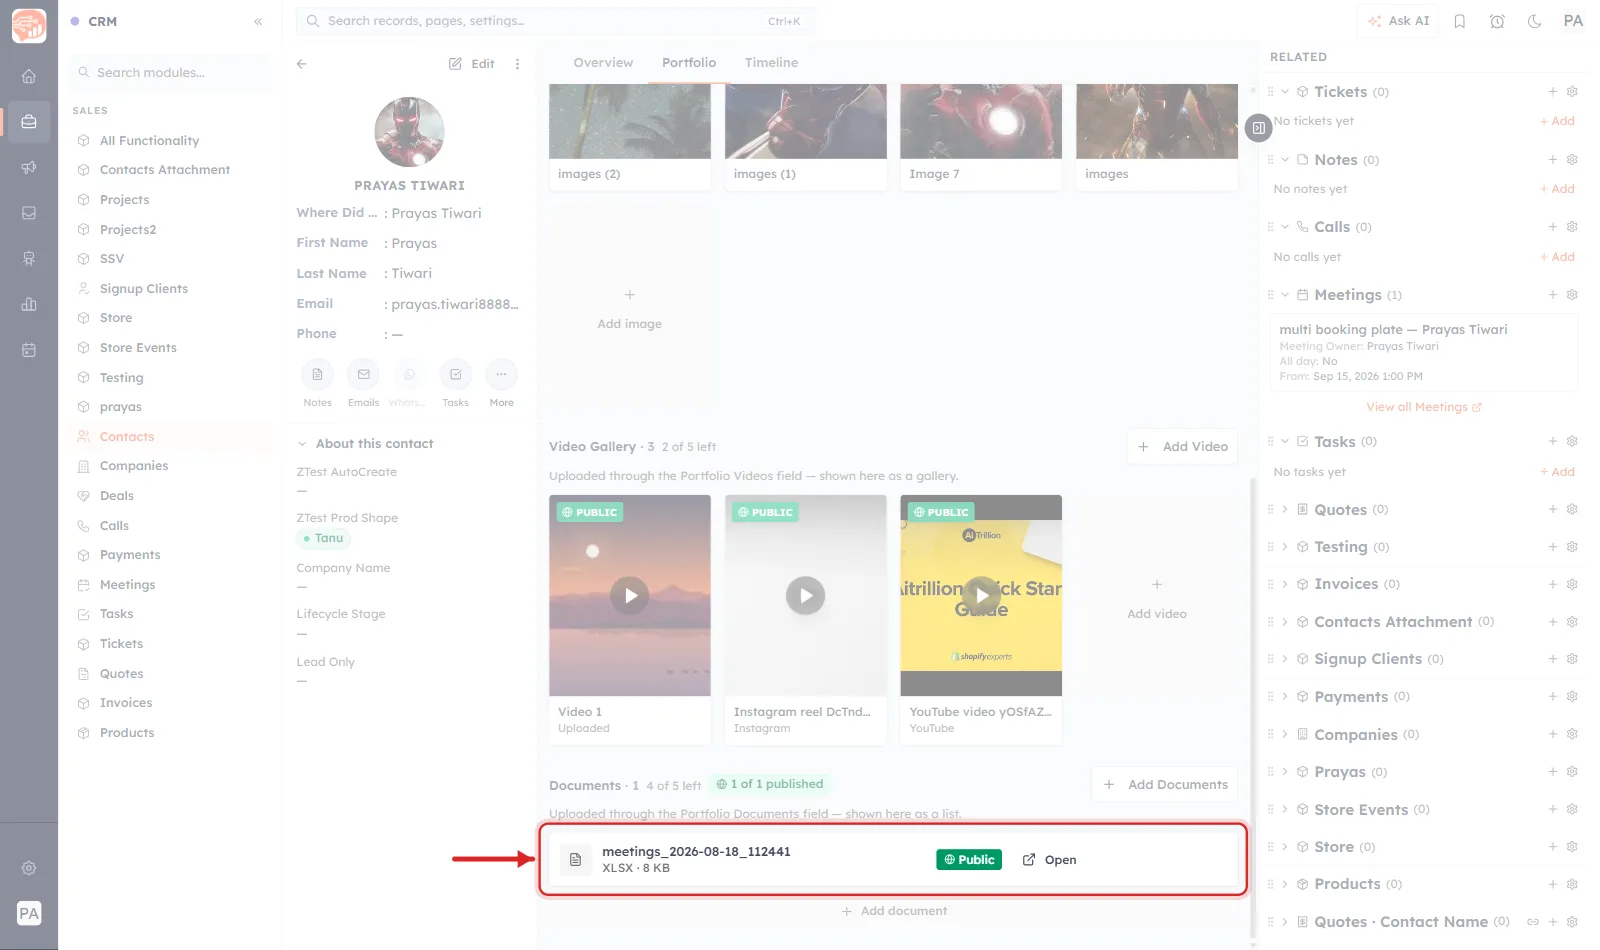
Documents are listed rather than tiled, with the file type and size beside the name, an Open link, and the same publish control as everything else.
Step 9 — Share the link#
With something published, the sharing bar carries a Public link is live block: the URL itself, a Copy link button, and Open to view it as a visitor would.
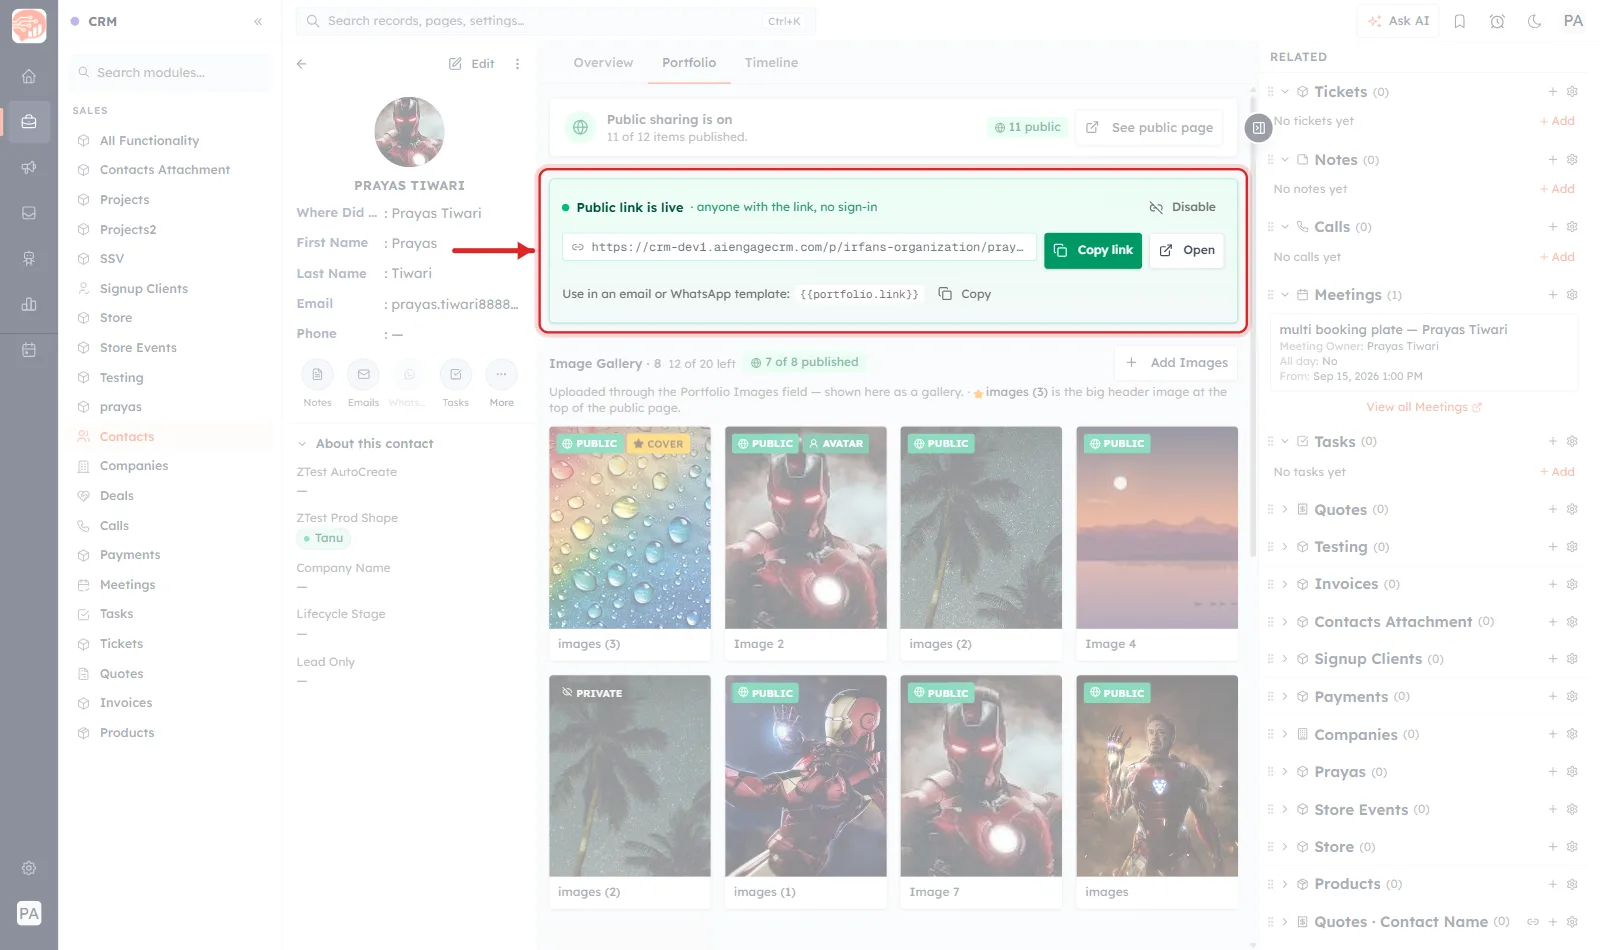
Read the subtitle before you send it: anyone with the link, no sign-in. It is not restricted to people in your CRM, so treat it as public.
Underneath sits a merge tag, {{portfolio.link}}, with its own Copy button.
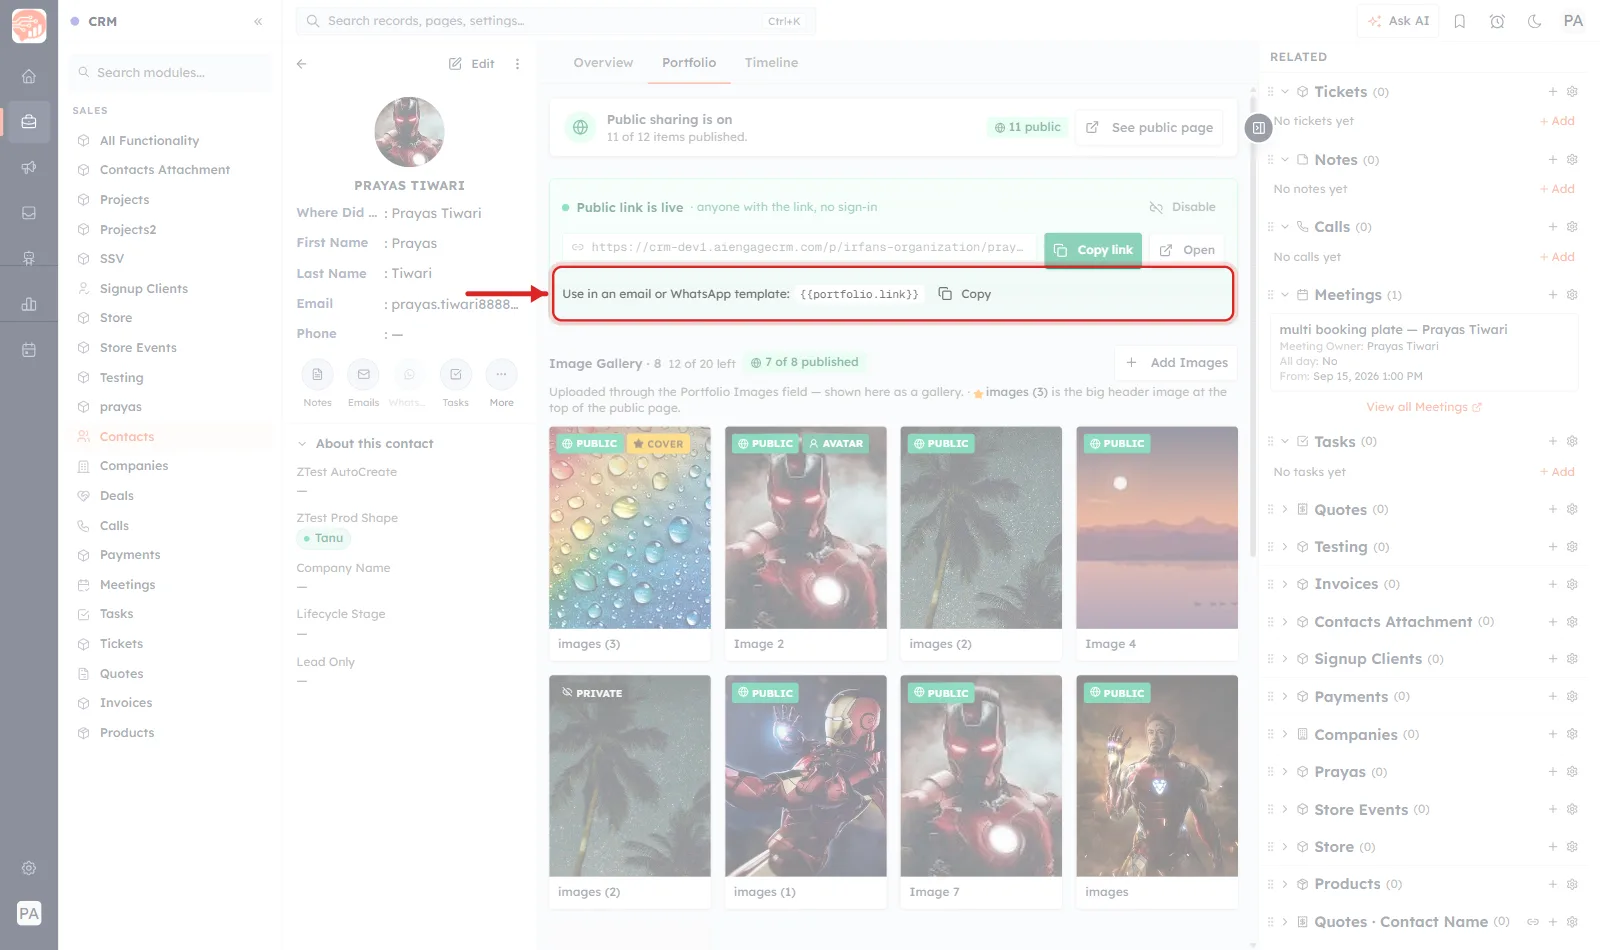
Drop that tag into an email or WhatsApp template and every recipient gets the link to their own portfolio, resolved per contact when the message goes out. That is the difference between sending one page to a hundred people and sending a hundred people their own.
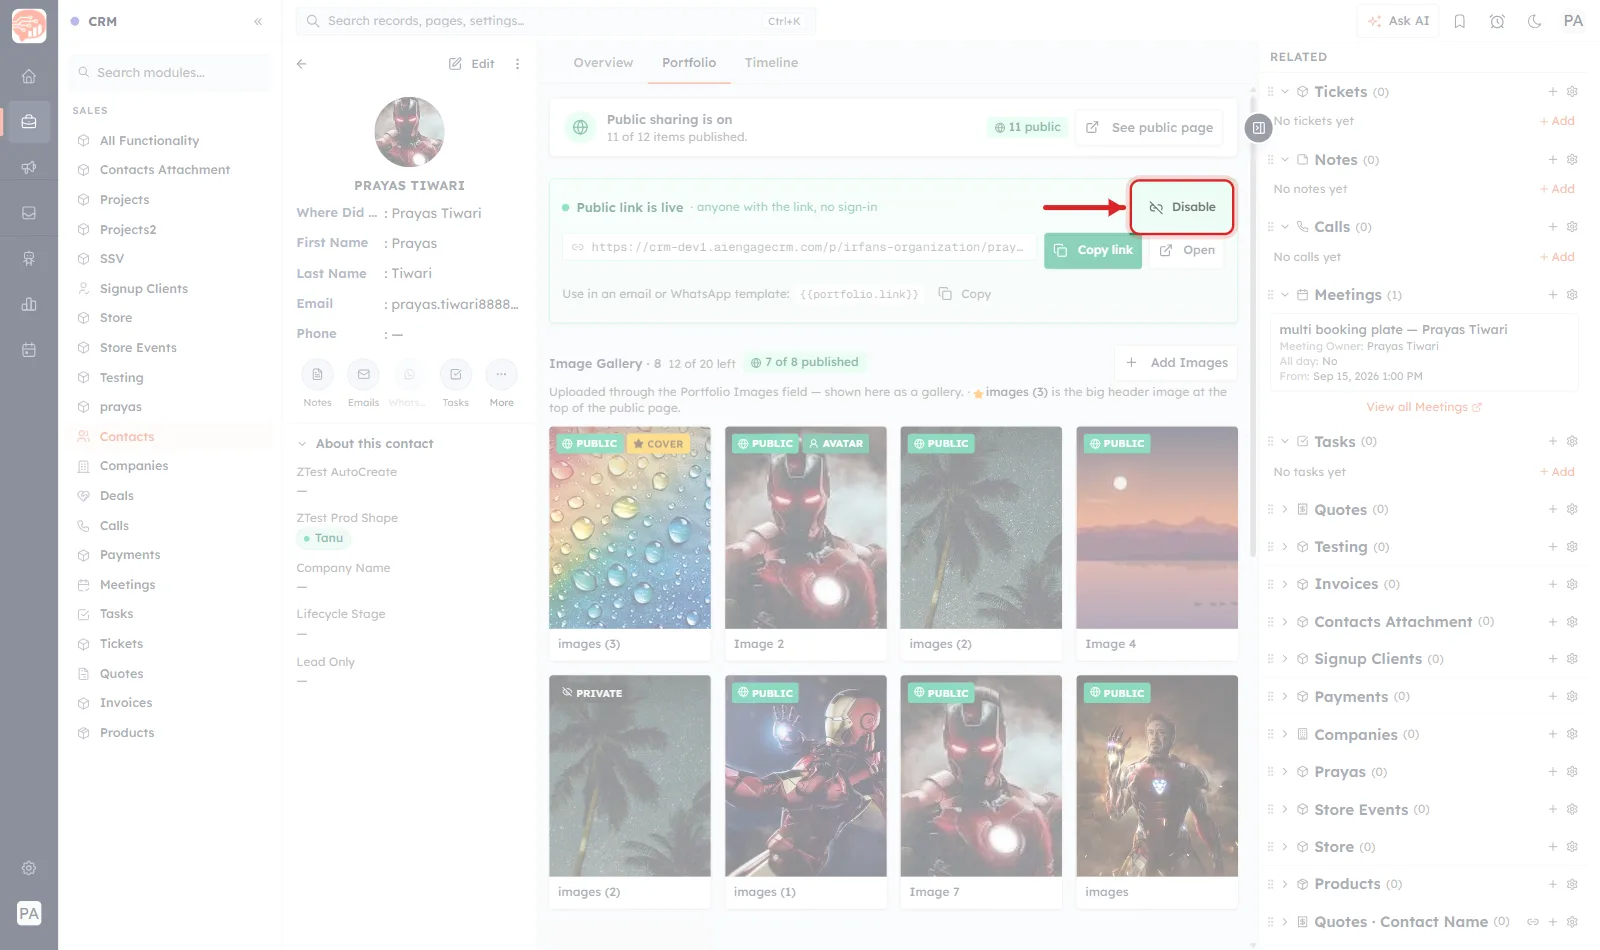
To take it all down again, click Disable. The items stay exactly where they are; the link simply stops working.
Step 10 — Check what a visitor sees#
See public page, or Open beside the link, shows you the page itself. At the top is the cover image with the avatar and the contact's name over it, then a Details block, then the published images, videos and documents under a Portfolio heading.
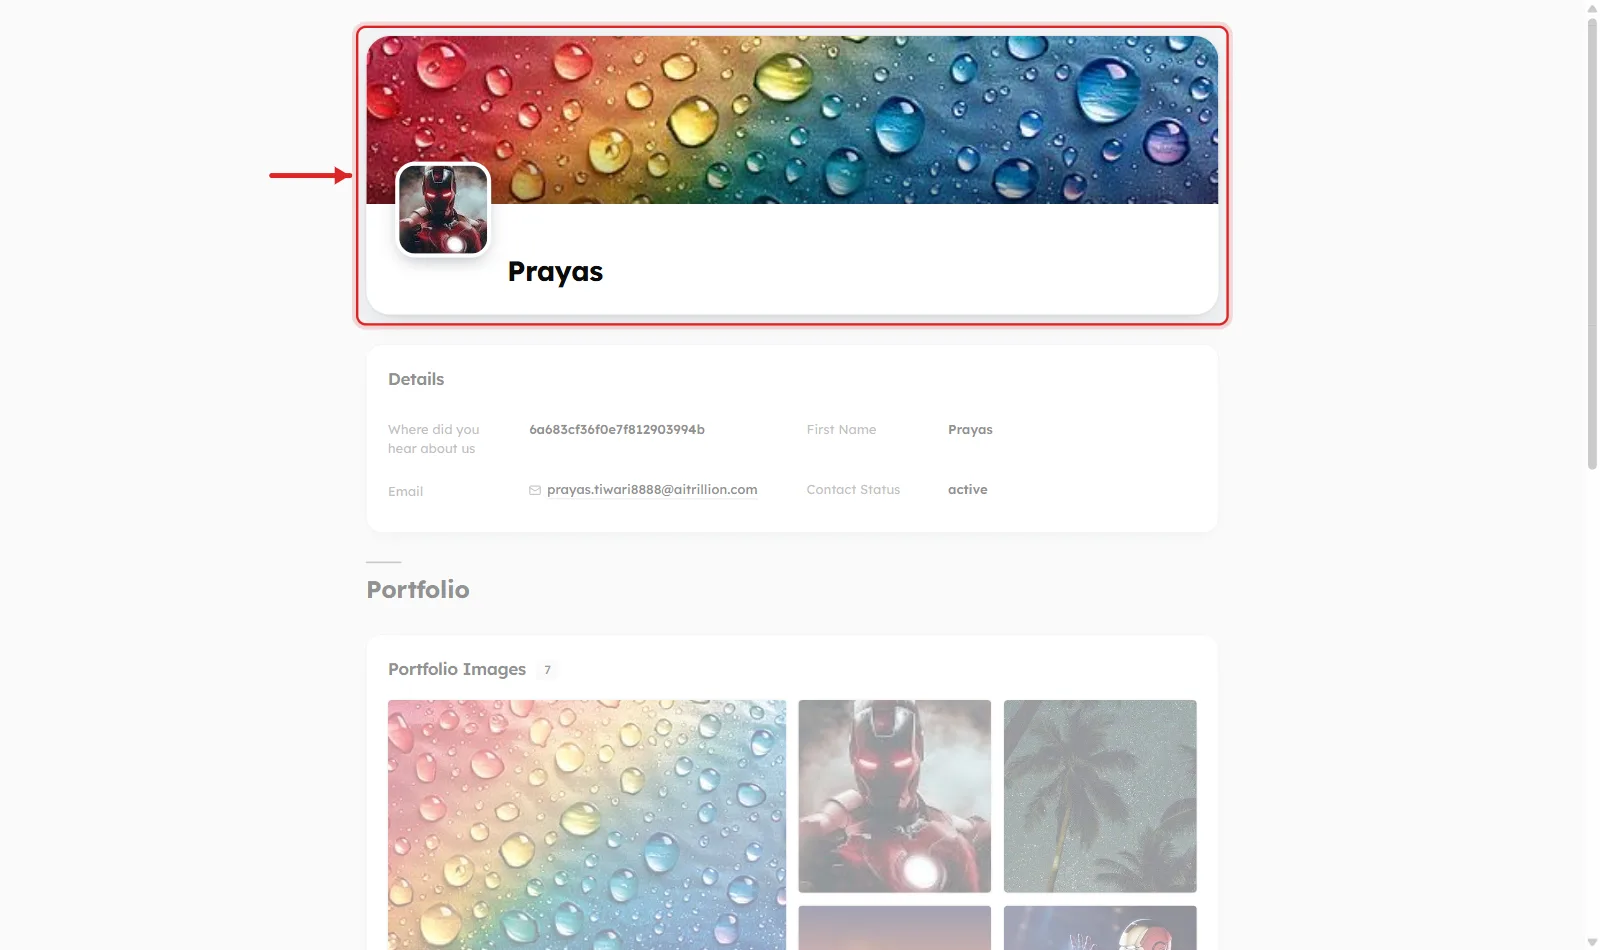
Nothing private appears here. Open it once before you send the link and you will know exactly what you are sharing.
Choosing which contact details appear publicly#
That Details block is not the whole contact record — it is the fields an administrator has marked as public. To change it, open Settings → Modules and Fields, configure Contacts, click the field, and look under Public visibility in the Field Configuration panel.
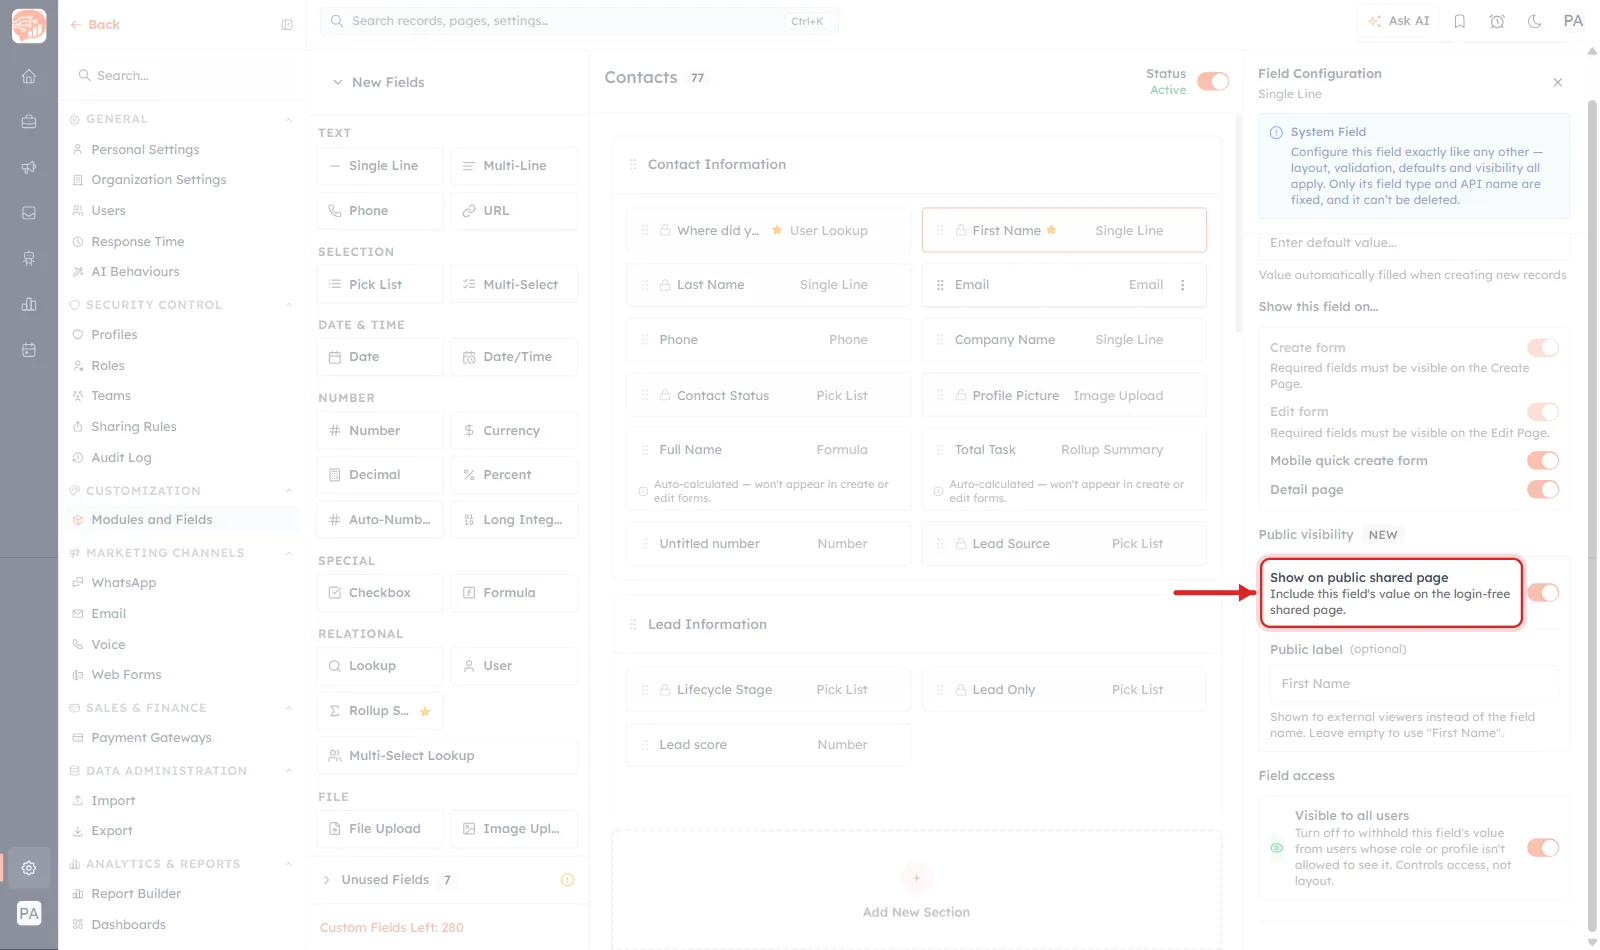
Show on public shared page includes that field's value on the login-free page. Public label under it lets you rename the field for outside readers — an internal name like Lead Source can read as something friendlier without being renamed for your team.
⚠️
This toggle is per field and applies to every contact in your organisation, not just the one you are looking at. Turning it on for a field like a phone number publishes that number on every shared portfolio page.
Things that catch people out#
- You uploaded everything and the page is still empty. Uploading is not publishing. Each item needs the eye control on its tile before it appears, which is what the x of y published badge is counting.
- The public link goes nowhere. Either sharing was disabled, or nothing is published yet. The sharing bar says which.
- The cover image is not the one you expect. The cover is the starred tile, not the first one. The helper line above the gallery names the current cover.
- An Instagram video shows a grey placeholder. Instagram links do not bring a thumbnail with them — add one from the tile.
- The gallery will not take another file. Twenty images, five videos and five documents is the ceiling per contact. Delete something or link it from elsewhere.
- A field you did not expect is on the public page. Check Public visibility on that field in the module builder — the setting is organisation-wide.
Related#
- Create a New Module: Build Custom Modules for Your CRM — when the work itself deserves records of its own, with dates, values and owners.
- Customize Your CRM: Add Custom Fields and Configure Module Layouts — the rest of what the field builder can do, including the public-visibility settings above.
Was this article helpful?
Ready to implement this?
OpenAI Engage and apply what you just learned to your own workspace.
Open AI Engage CRM