Loading…


KnowledgeBase
Mass Update: Change a Field on Many Records at Once (Up to 500 at a Time)
What is Mass Update?#
Mass Update sets the same value in one or more fields on many records at once, instead of opening and editing each record one by one.
Example. Your team met three people from Acme Corp at a trade show. You want all three marked as Sales Qualified Lead, with Trade Show as their Lead Source. With Mass Update, you tick the three contacts, choose both fields and their values, and update them together in a few seconds.
It works in every module with a list view — Contacts, Companies, Deals, Tickets and your own custom modules.
How many records can I update at one time?#
| Records selected | What happens |
|---|---|
| 1 to 100 | Updated straight away. You see “N Contacts updated successfully” within seconds. |
| 101 to 500 | Updated in the background. The window closes and a progress message counts up (for example “25% • 125/500”) until it says “500 Contacts updated successfully”. You can keep working meanwhile. |
| More than 500 | Not possible in one go. 500 is the maximum per Mass Update. Do it in batches (see Part 5). |
| How to select | Most records you can select |
|---|---|
| Tick boxes on individual rows | As many as are on the page |
| Tick box in the list header | Every row on the current page — up to 100 (Rows per page: 10, 20, 30, 50 or 100) |
| Select all … records matching this view link | 500 — every record that matches the current view, filter and search, capped at 500 |
ℹ️
The short version: Mass Update handles up to 500 records at a time. Up to 100 are updated instantly; 101–500 are updated in the background with a progress bar. You can change several fields in one Mass Update, each one set once.
Before you begin#
You need edit permission for the module. The Mass Update button is shown only if your profile allows bulk updates. See Control Permissions with Profiles.
Your edit access still applies. If you can edit only your own or your team’s records, the others in your selection are skipped and the result tells you how many.
Double-check the selection. Every chosen value goes to every selected record, and there is no undo button.
ℹ️
This article uses Contacts. The same steps work in every module. Only the names in the screenshots change.
Part 1: Open the list#
Step 1: Open the Contacts list#
Click the Sales icon (the briefcase) in the dark icon bar on the left.
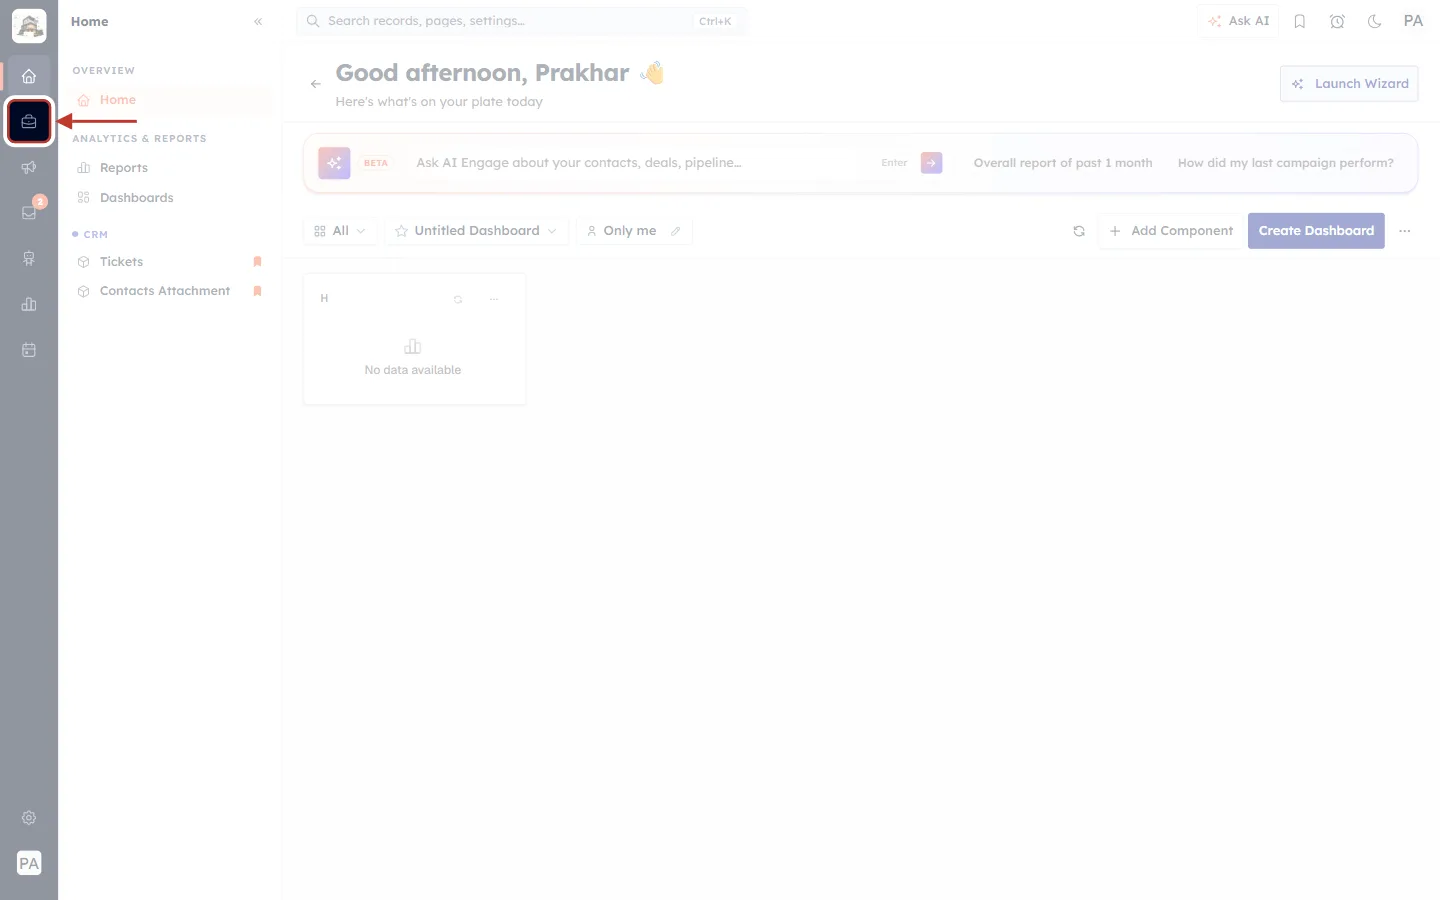
What this screenshot shows. The CRM home page, with the Sales icon ringed.
Sales icon (ringed): opens the menu of your sales modules.
Home menu (currently open): Home, Reports and Dashboards. It switches to the Sales menu when you click the icon.
Then click Contacts in the Sales menu.
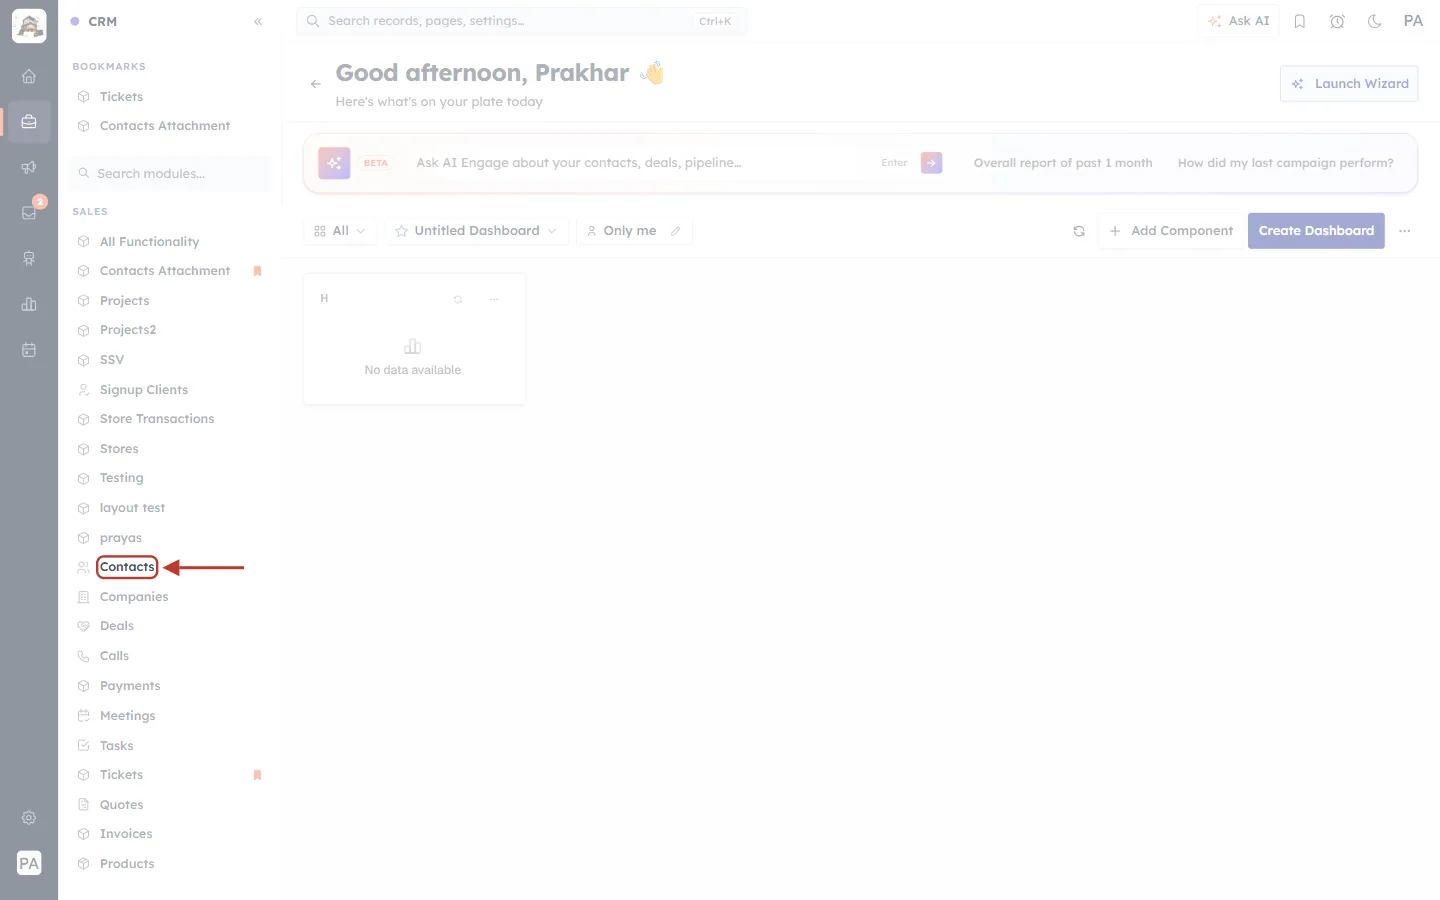
What this screenshot shows. The Sales menu, with Contacts ringed.
Contacts (ringed): opens the Contacts list.
Other entries: Companies, Deals, Tickets and your other modules — Mass Update works the same in each.
✅
To update a particular group, filter the list first (for example by Company Name or Lead Source). That makes it easy to tick the right records and, for big updates, to use Select all matching this view (Part 4).
Part 2: Update a few records#
Step 2: Tick the records#
Tick the box at the start of each row you want to change. We ticked John Smith, Priya Mehta and David Lee.
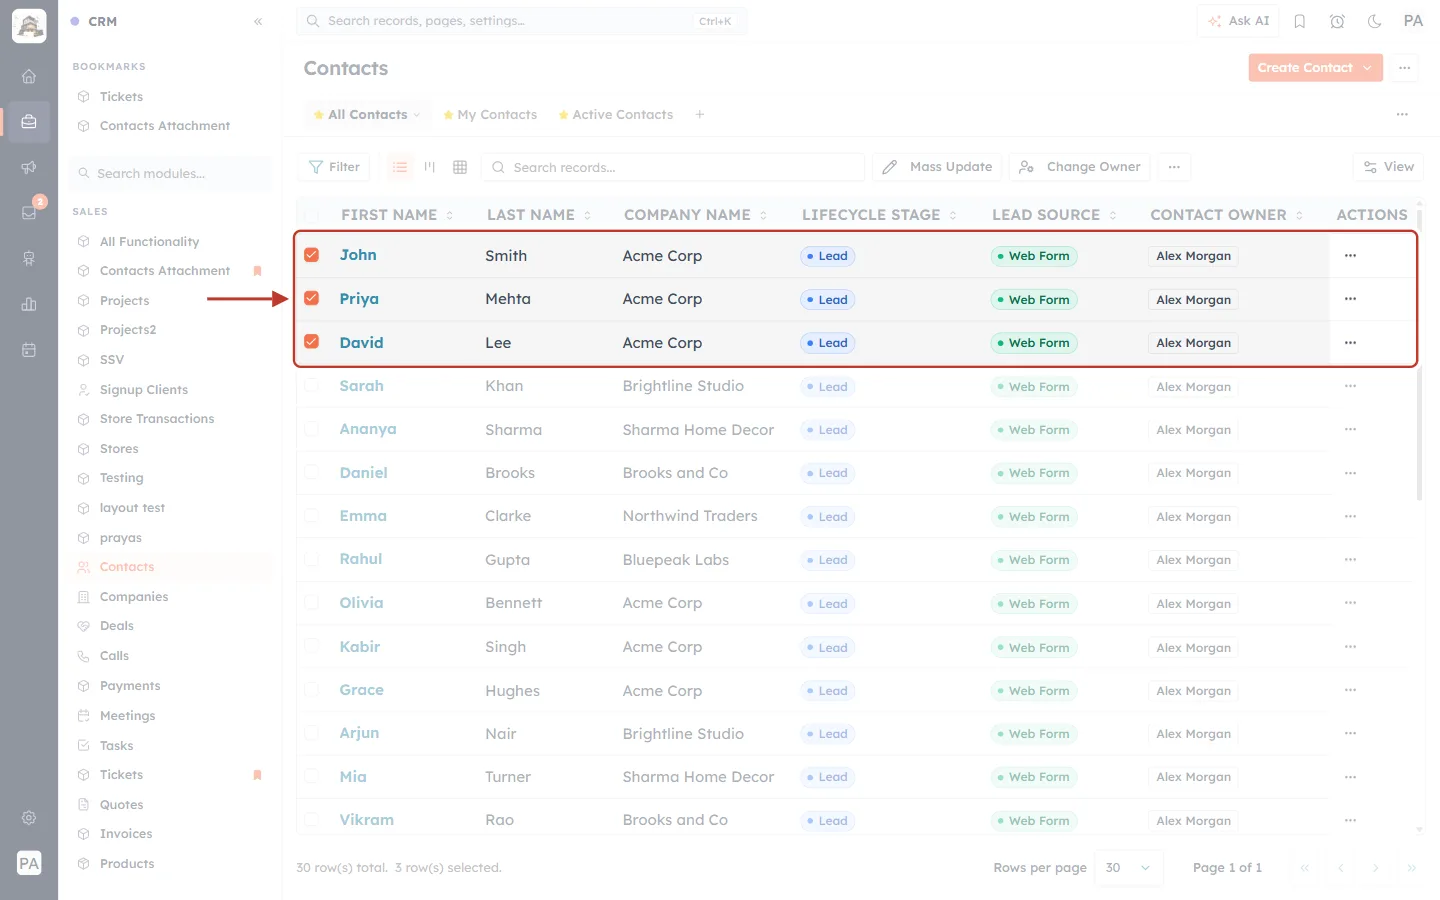
What this screenshot shows. Three ticked rows, ringed.
Ticked rows: John Smith, Priya Mehta and David Lee, each highlighted with an orange tick.
Lifecycle Stage and Lead Source columns: currently “Lead” and “Web Form”. These are the fields we will change.
Bottom of the list: “3 row(s) selected”.
Step 3: Click Mass Update#
As soon as a record is ticked, Mass Update appears in the toolbar above the list.
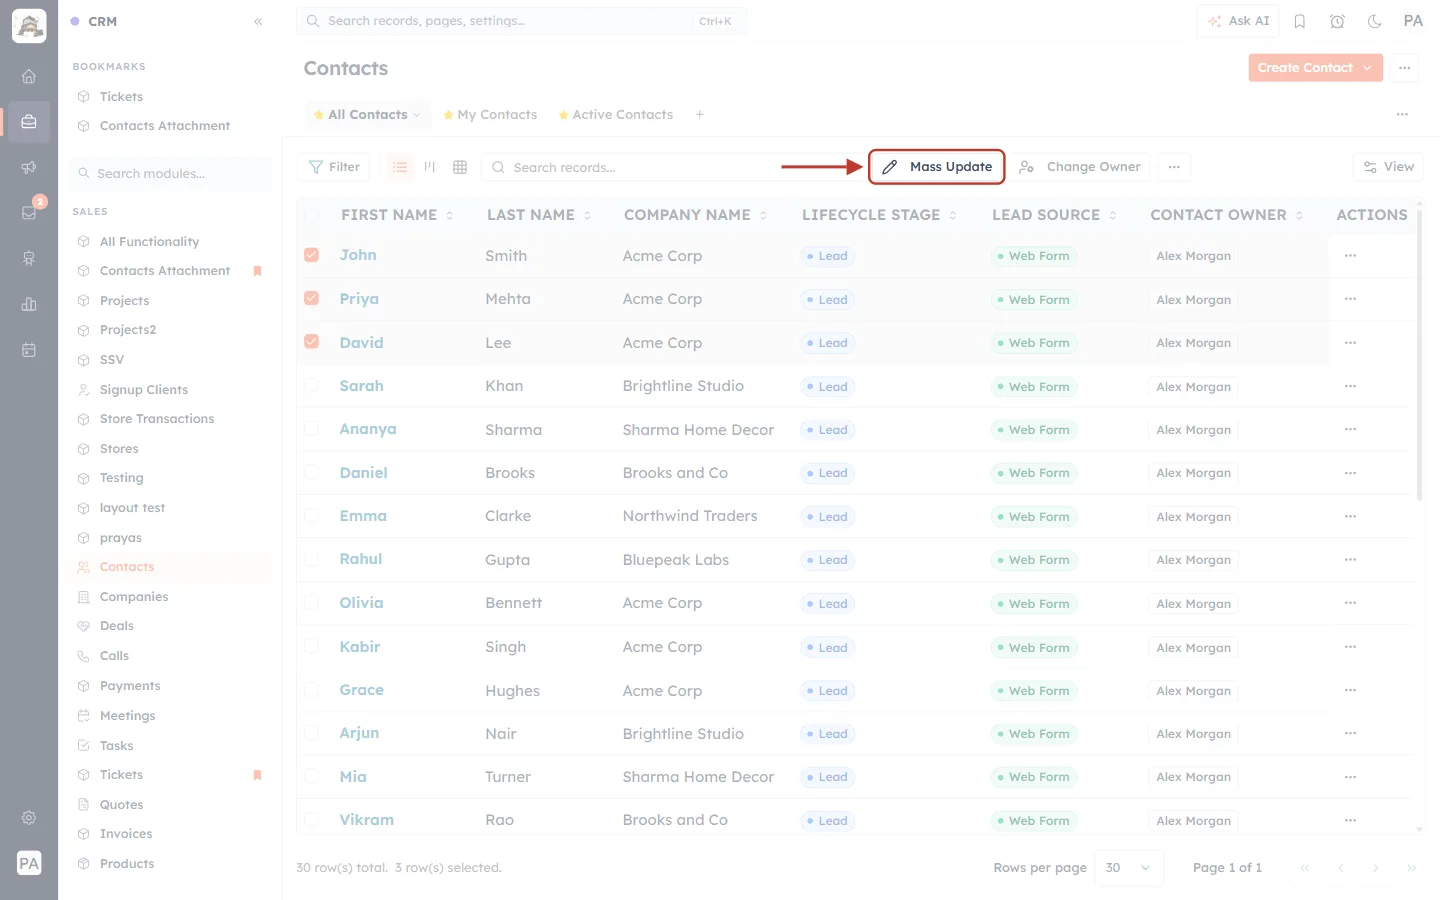
What this screenshot shows. The list toolbar, with Mass Update ringed.
Mass Update (ringed): opens the Mass Update window for the ticked records.
Change Owner (beside it): reassigns records to another teammate, and can move their related records too — see Change Owner.
⋯: more bulk actions, such as export and delete.
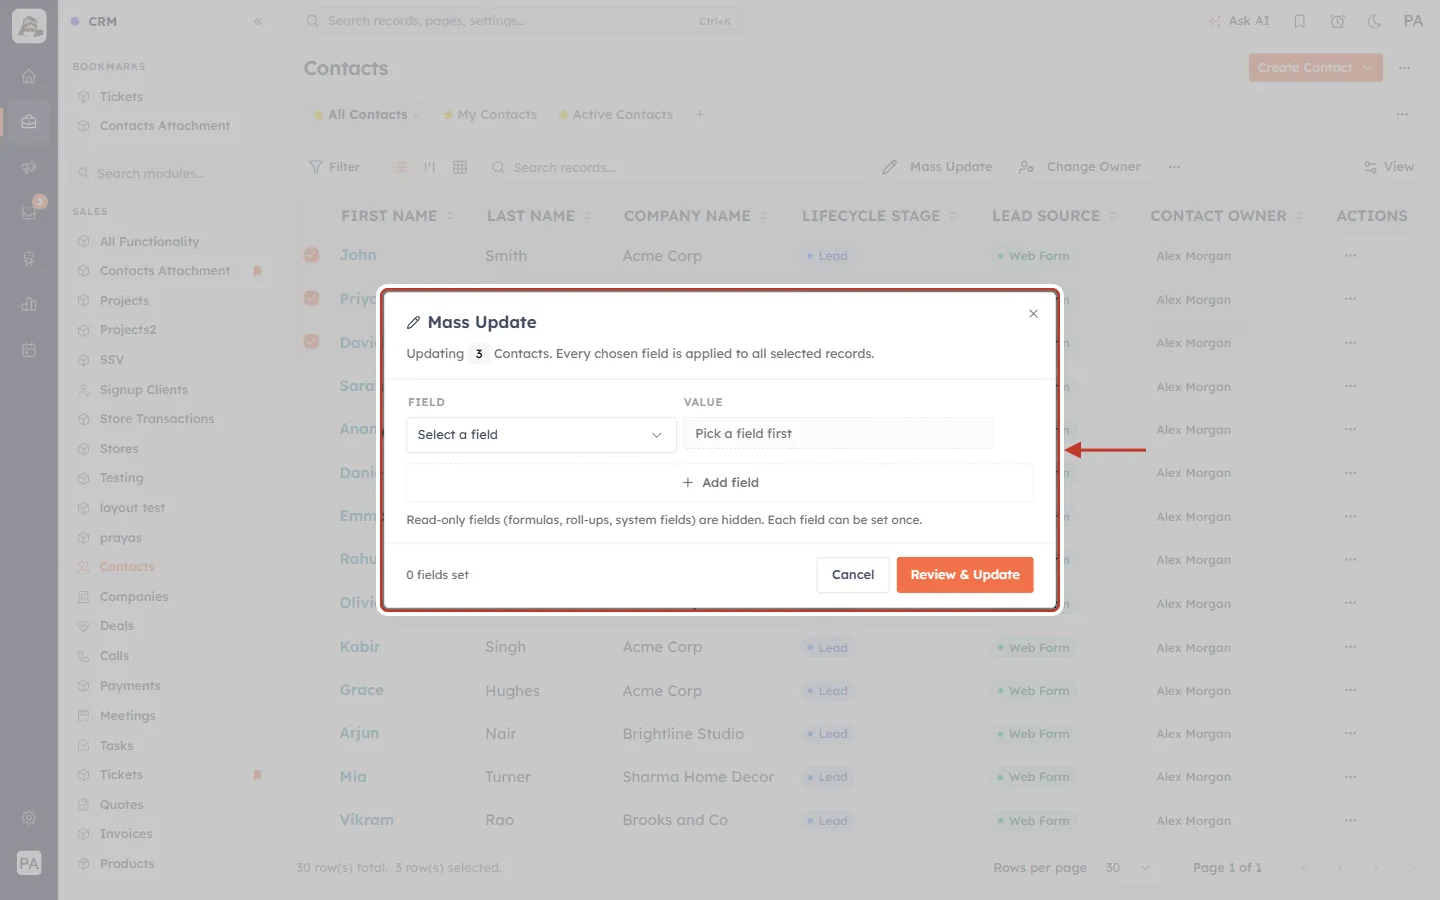
What this screenshot shows. The Mass Update window, ringed, before any field is chosen.
“Updating 3 Contacts. Every chosen field is applied to all selected records.” — how many records will change.
FIELD / VALUE: one row per field you want to change. The first row starts empty: “Select a field” and “Pick a field first”.
+ Add field: adds another row, so you can change several fields in one go.
Note: “Read-only fields (formulas, roll-ups, system fields) are hidden. Each field can be set once.”
Footer: “0 fields set”, Cancel and Review & Update.
Step 4: Choose the first field#
Click Select a field. A searchable list of the fields you can update opens. Type to find one, then click it. We chose Lifecycle Stage.
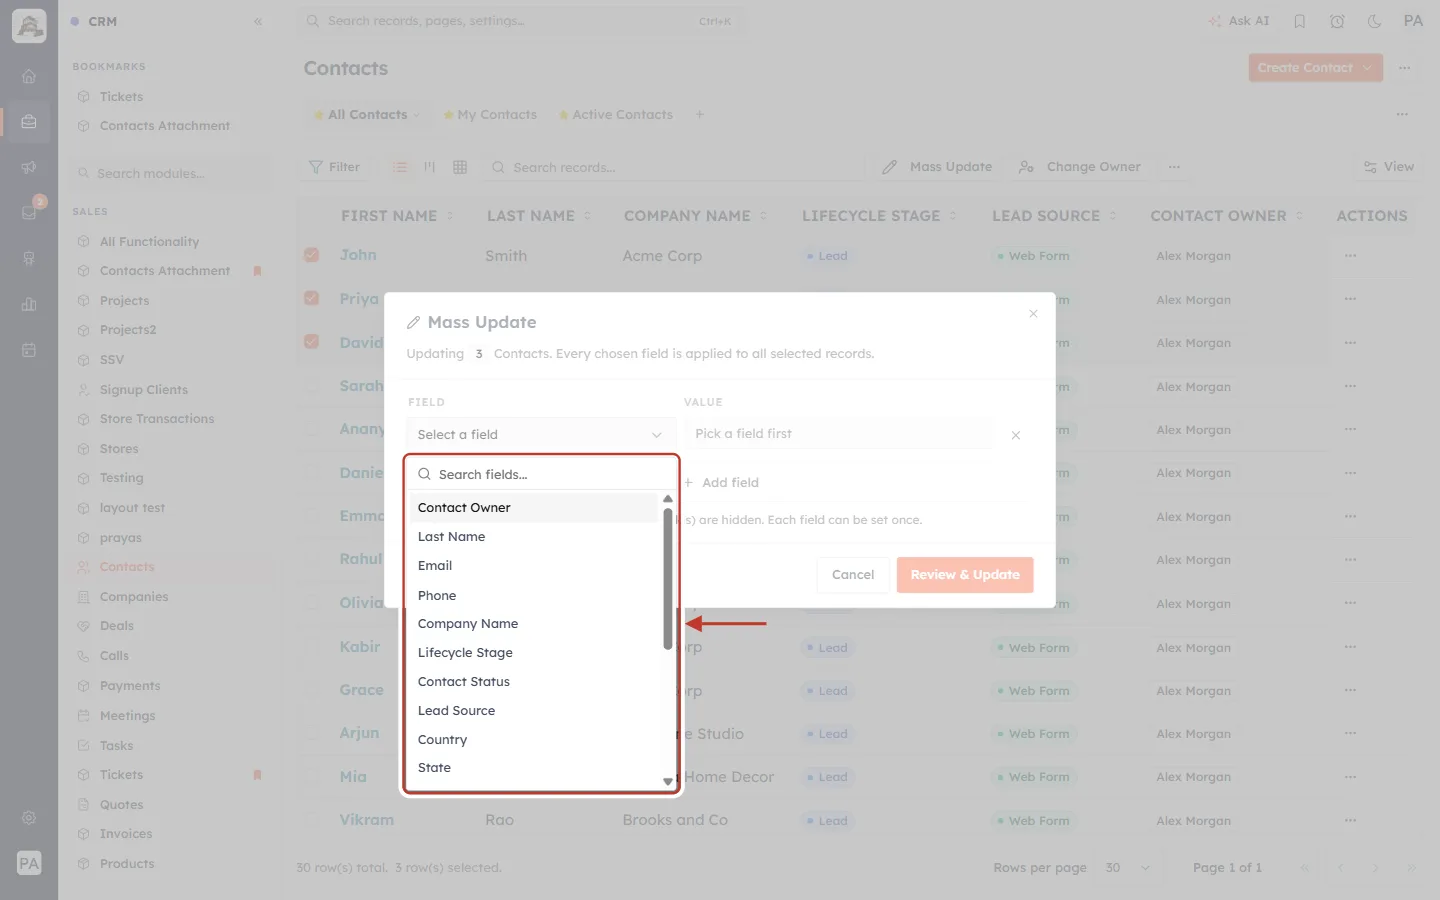
What this screenshot shows. The field list, ringed.
Search fields…: type part of a field name.
The list: every field you can edit in this module — Contact Owner, Last Name, Email, Phone, Company Name, Lifecycle Stage, Contact Status, Lead Source, Country, State, City and more.
Not in the list: fields that can’t be typed into, such as formulas, roll-ups and system fields like Created Date.
Step 5: Choose its new value#
The Value box changes to suit the field: a list for pick lists, a text box for text, a date picker for dates, a user list for owners. Choose the new value. We chose Sales Qualified Lead.
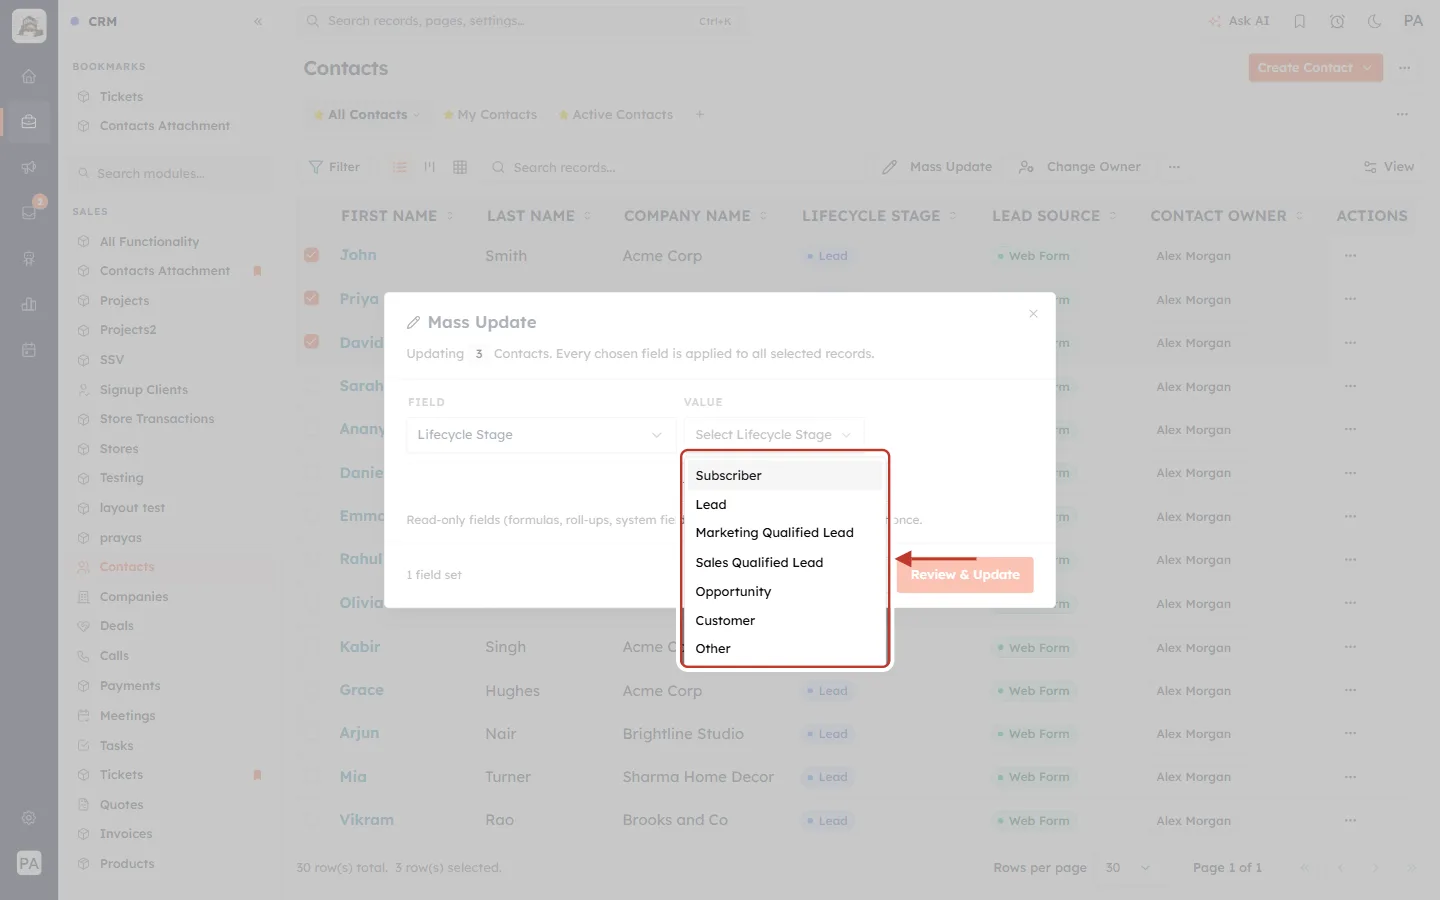
What this screenshot shows. The value list for Lifecycle Stage, ringed.
Options: Subscriber, Lead, Marketing Qualified Lead, Sales Qualified Lead, Opportunity, Customer, Other — the field’s own pick-list options.
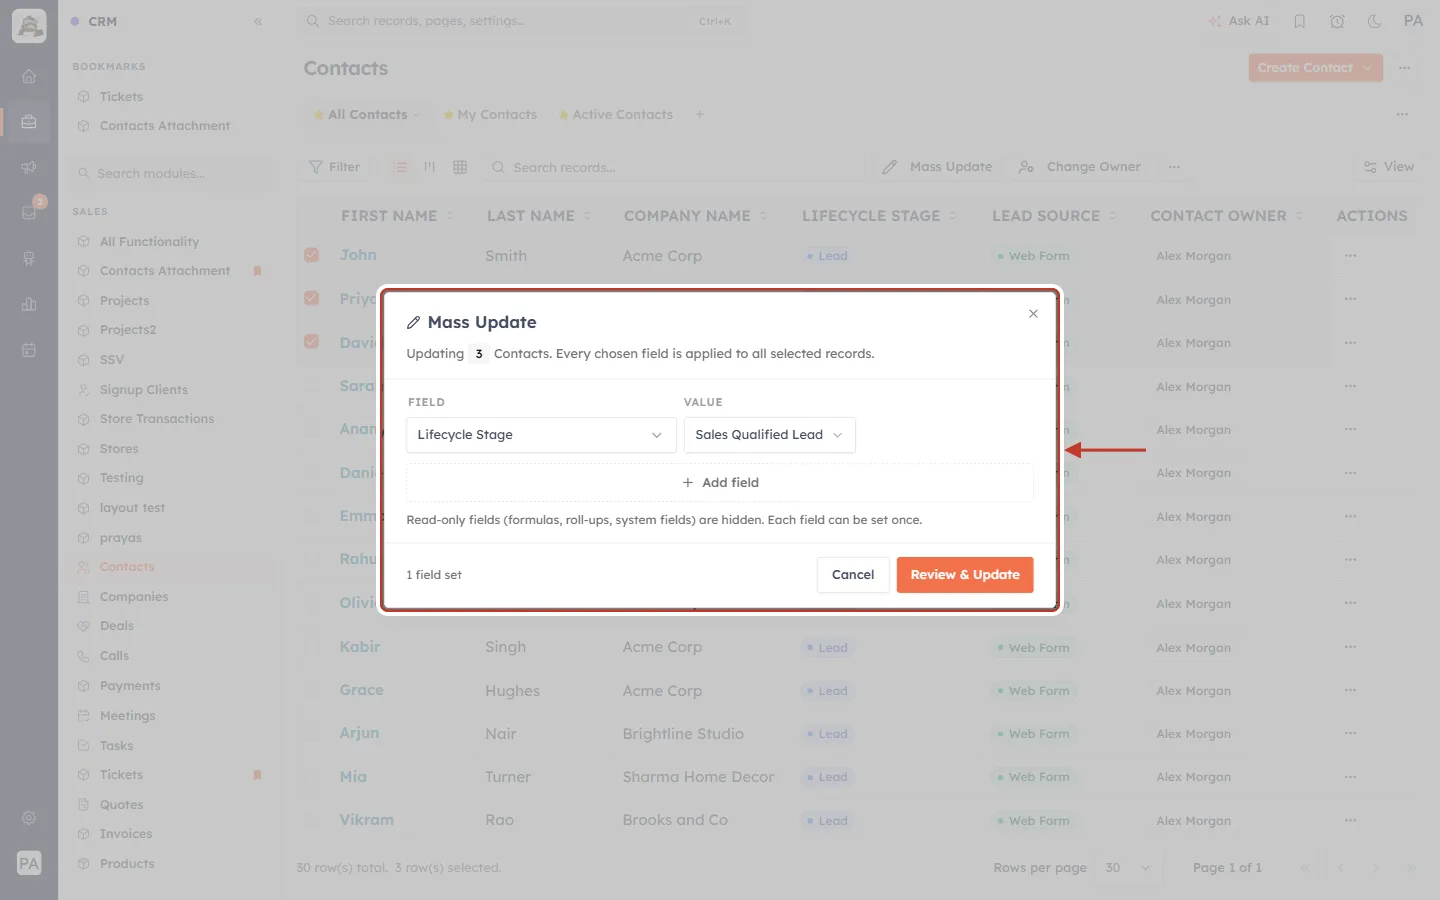
What this screenshot shows. The window, ringed, with the first row filled in.
Row 1: Lifecycle Stage → Sales Qualified Lead.
Footer: “1 field set”.
Step 6: Add more fields (optional)#
To change another field at the same time, click + Add field and repeat Steps 4 and 5. We added Lead Source → Trade Show.
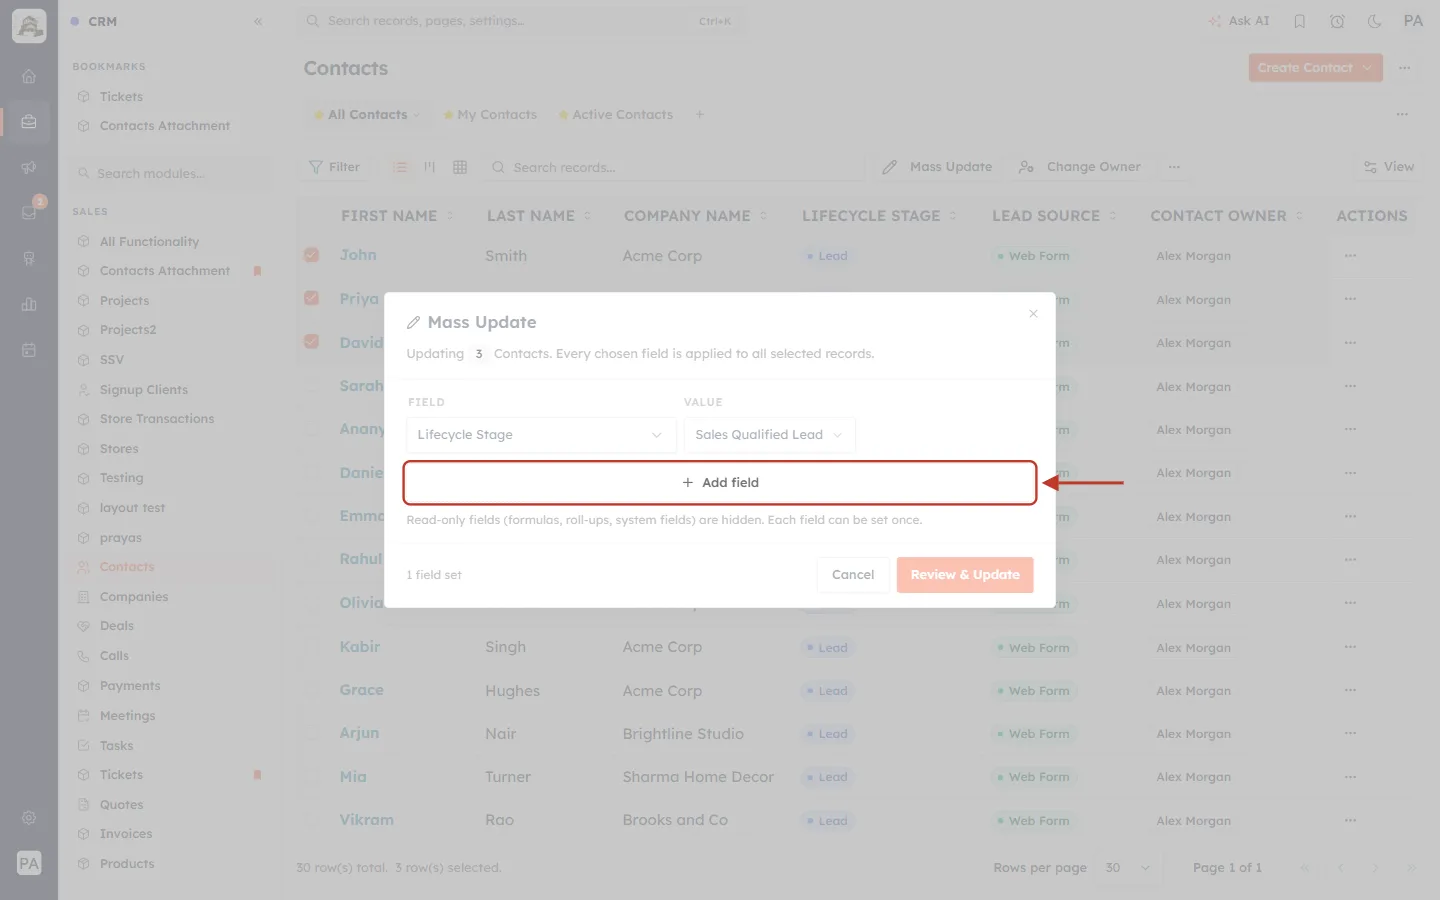
What this screenshot shows. The + Add field button, ringed.
+ Add field: adds a new empty row under the existing ones.
One row per field: a field you have already used is not offered again.
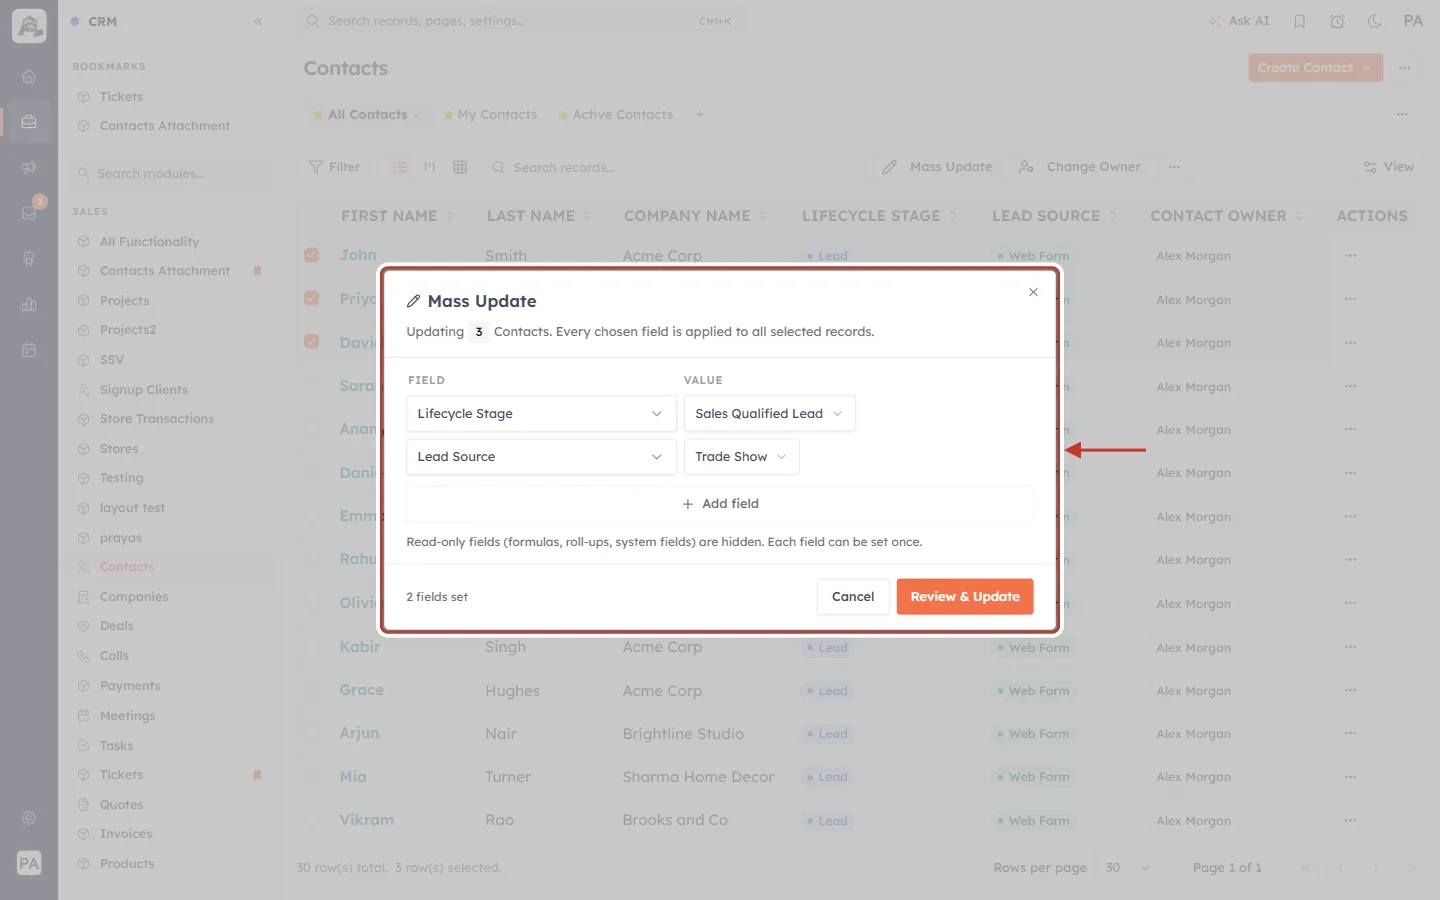
What this screenshot shows. The window, ringed, with two fields set.
Lifecycle Stage → Sales Qualified Lead
Lead Source → Trade Show
“2 fields set” at the bottom left.
Review & Update: the next step.
Step 7: Review the change#
Click Review & Update. A summary appears so you can check everything before anything is saved.
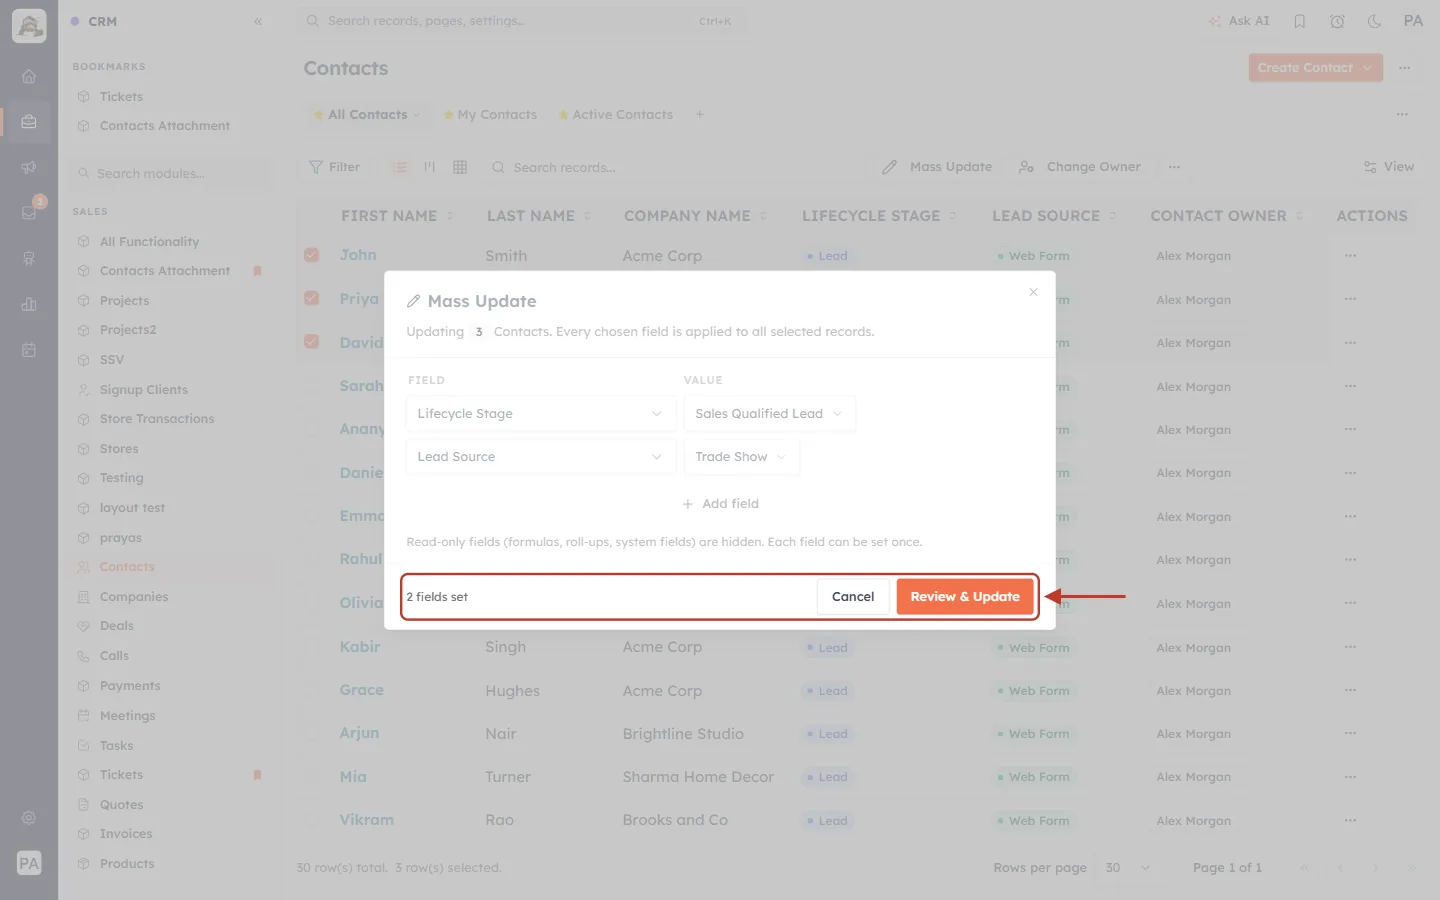
What this screenshot shows. The bottom of the window, ringed.
“2 fields set”: how many fields will change.
Review & Update: opens the summary. Nothing is saved yet.
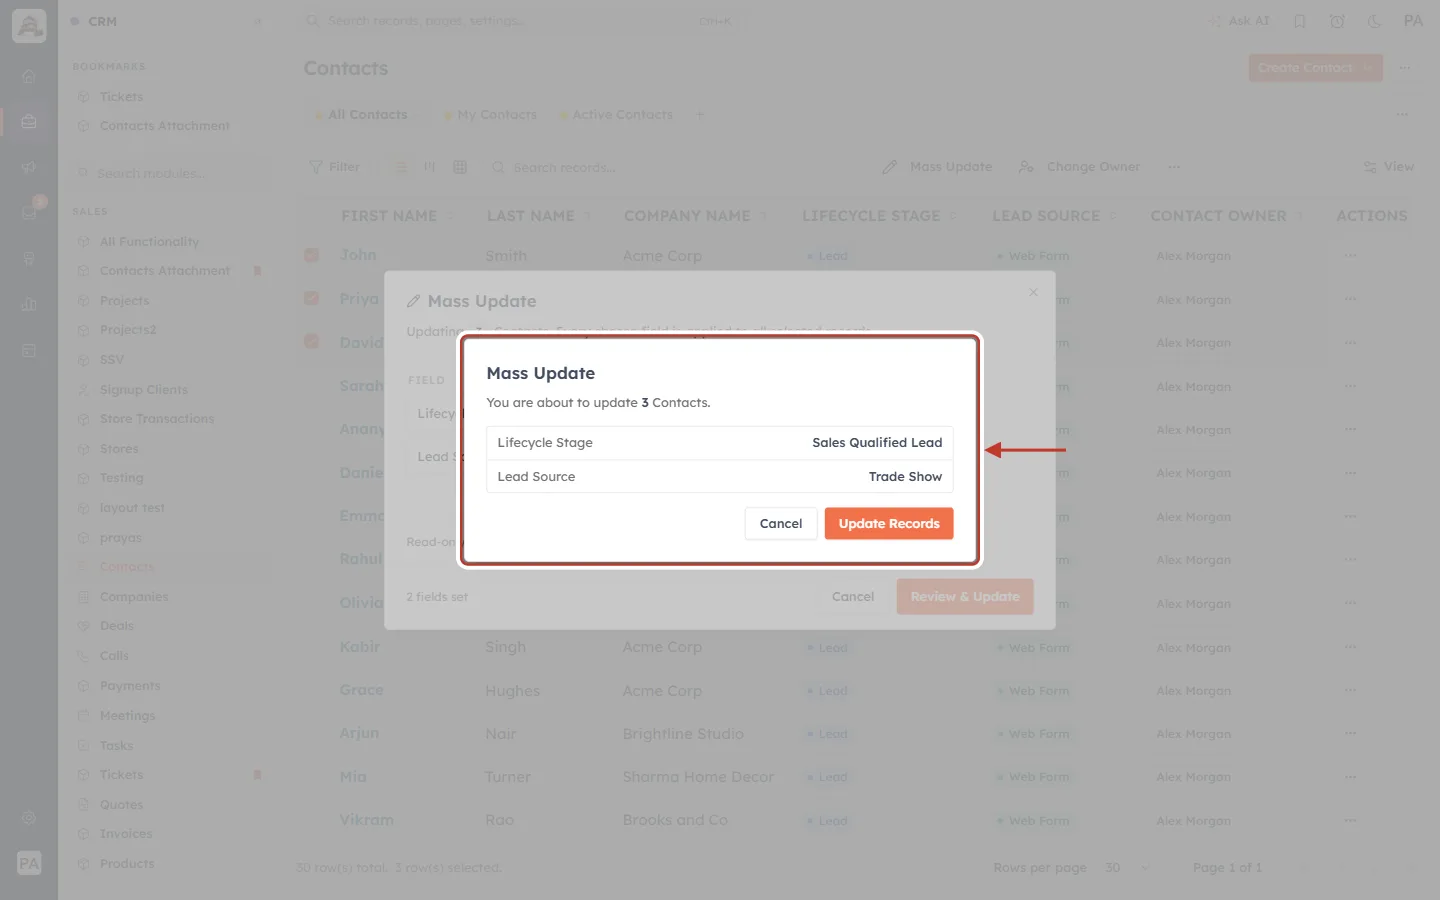
What this screenshot shows. The review summary, ringed.
“You are about to update 3 Contacts.”
Each field and its new value: Lifecycle Stage — Sales Qualified Lead; Lead Source — Trade Show.
Cancel: goes back to the window to change something.
Update Records: saves the change on all selected records.
Step 8: Click Update Records#
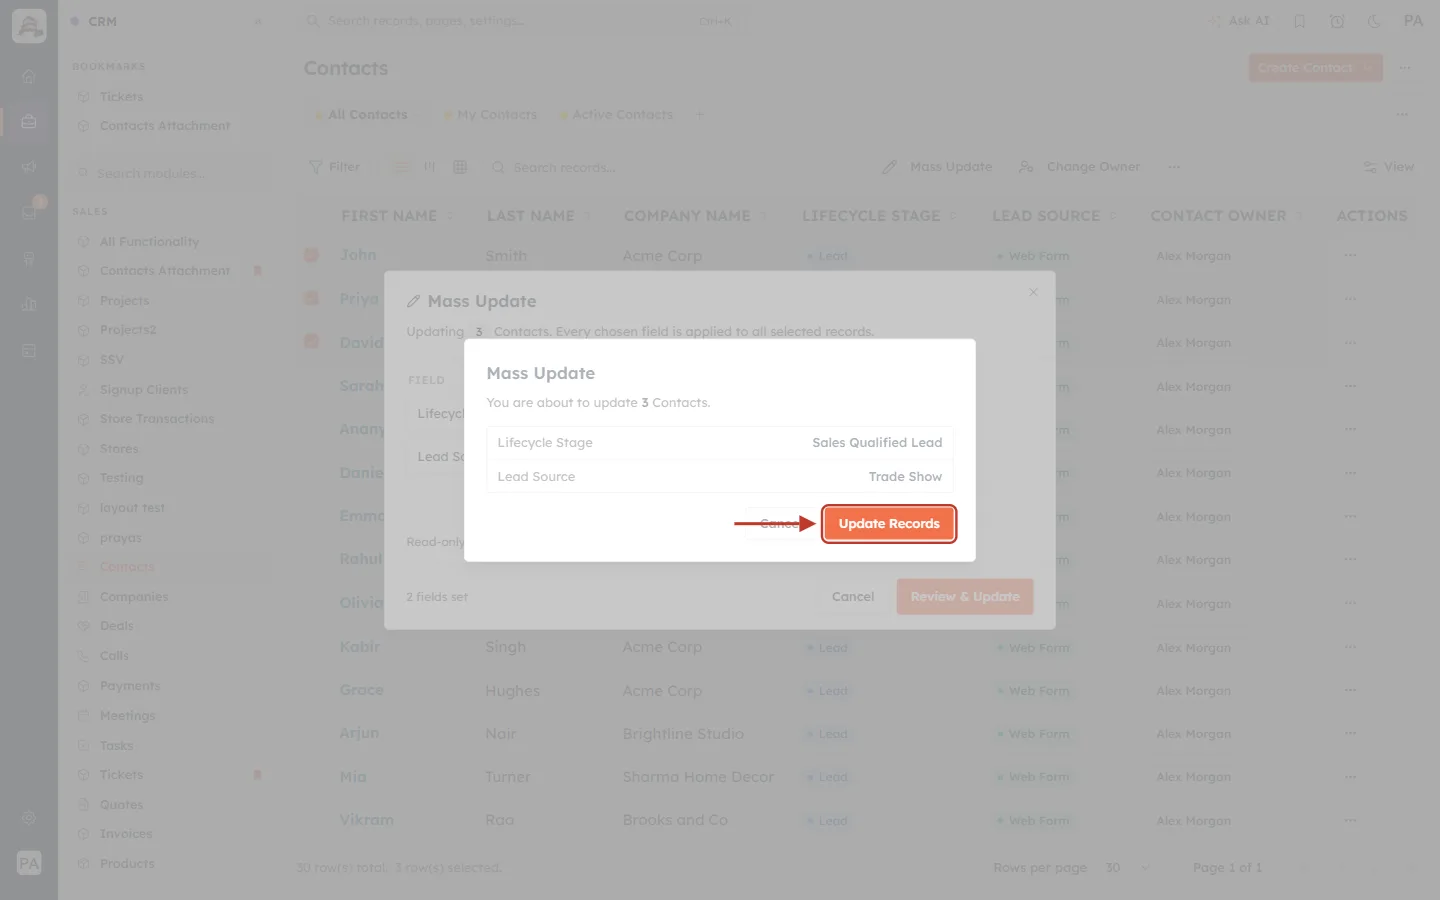
What this screenshot shows. The Update Records button, ringed.
Update Records: applies the change. While it works the button reads “Updating…”.
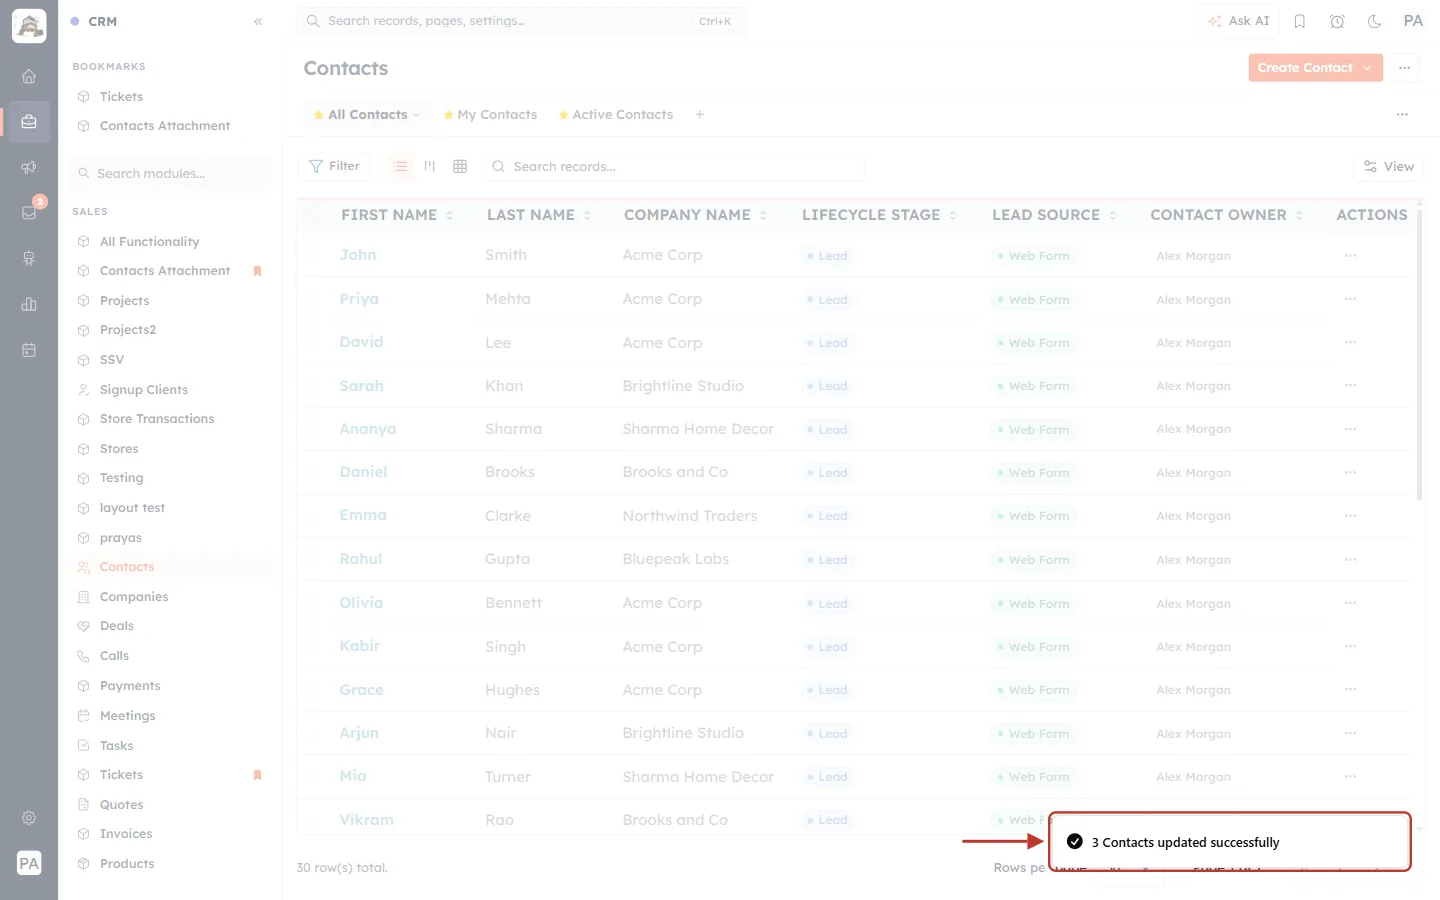
What this screenshot shows. The confirmation message at the bottom right, ringed.
“3 Contacts updated successfully” — every selected record was changed.
If some records couldn’t be changed, you see “N Contacts updated” with “M could not be updated” and the reason underneath.
Step 9: Check the result#
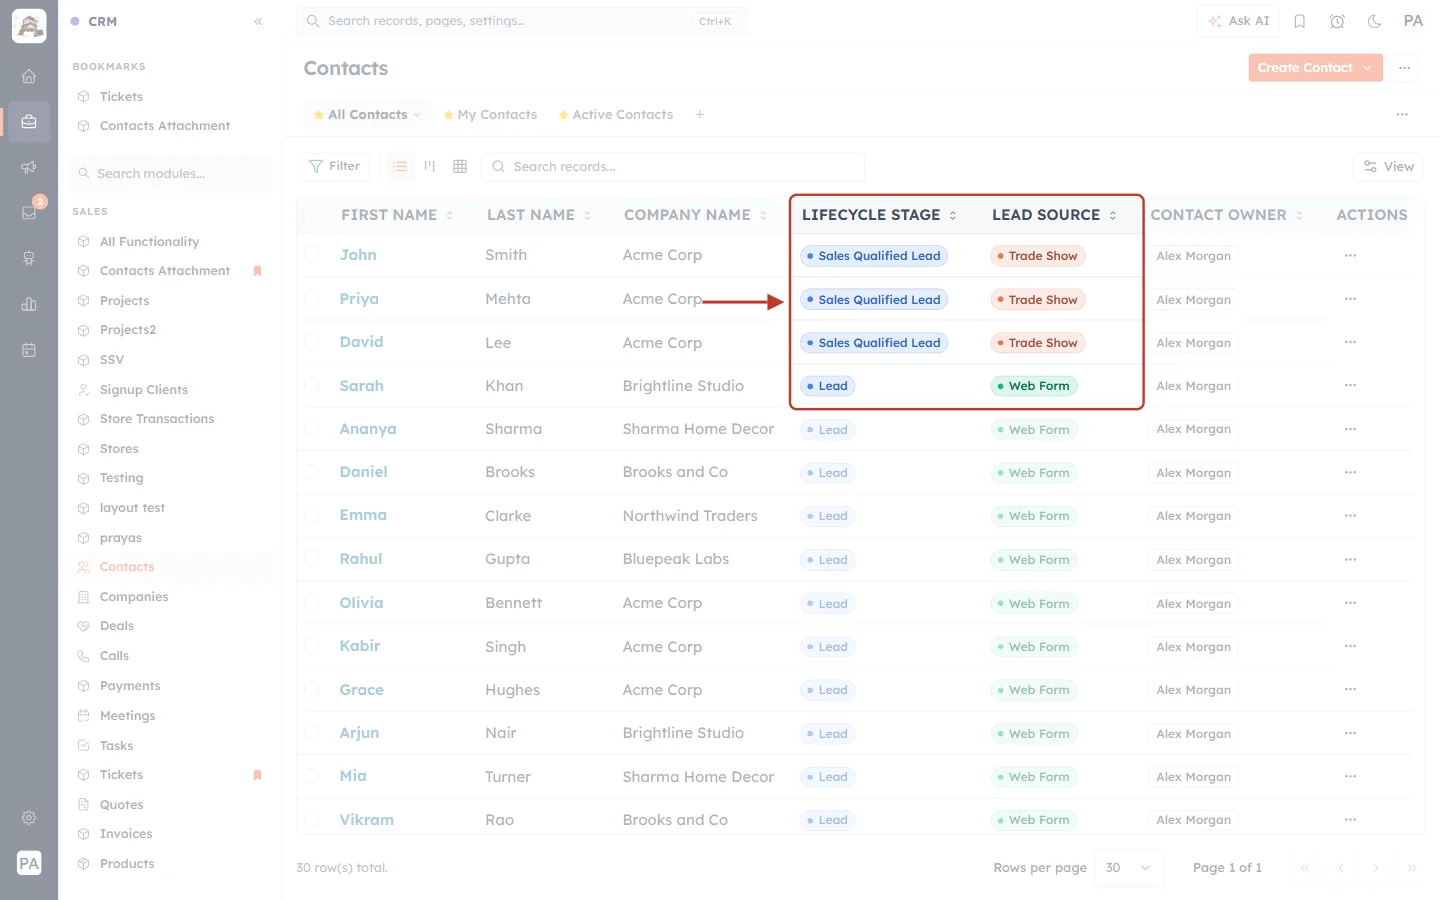
What this screenshot shows. The Lifecycle Stage and Lead Source columns, ringed, after the update.
John, Priya and David: now “Sales Qualified Lead” and “Trade Show”.
The next row (Sarah Khan): unchanged — still “Lead” and “Web Form”, because she wasn’t selected.
Each changed record also gets an entry in its Timeline, showing the old and new value.
Part 3: Rules and checks in the Mass Update window#
The window stops common mistakes before anything is saved.
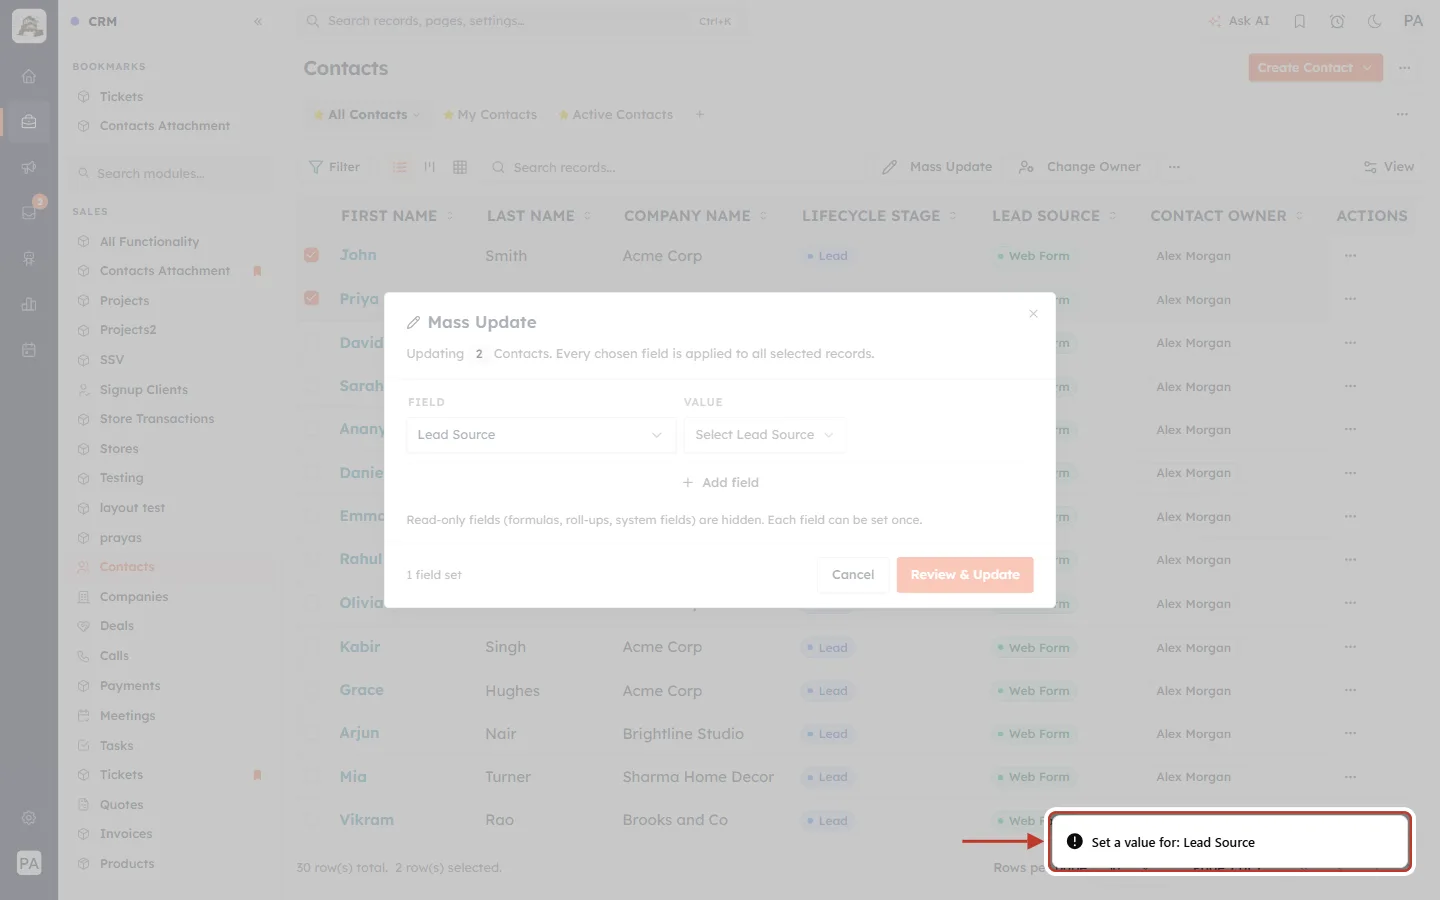
What this screenshot shows. A warning message, ringed, after clicking Review & Update with an empty value.
“Set a value for: Lead Source” — a field was chosen but no value was picked. Choose a value, or remove the row.
If no field is chosen at all, the message is “Add at least one field to update”.
Tick boxes are the exception: leaving a checkbox field unticked is a valid value (it sets it to “No”).
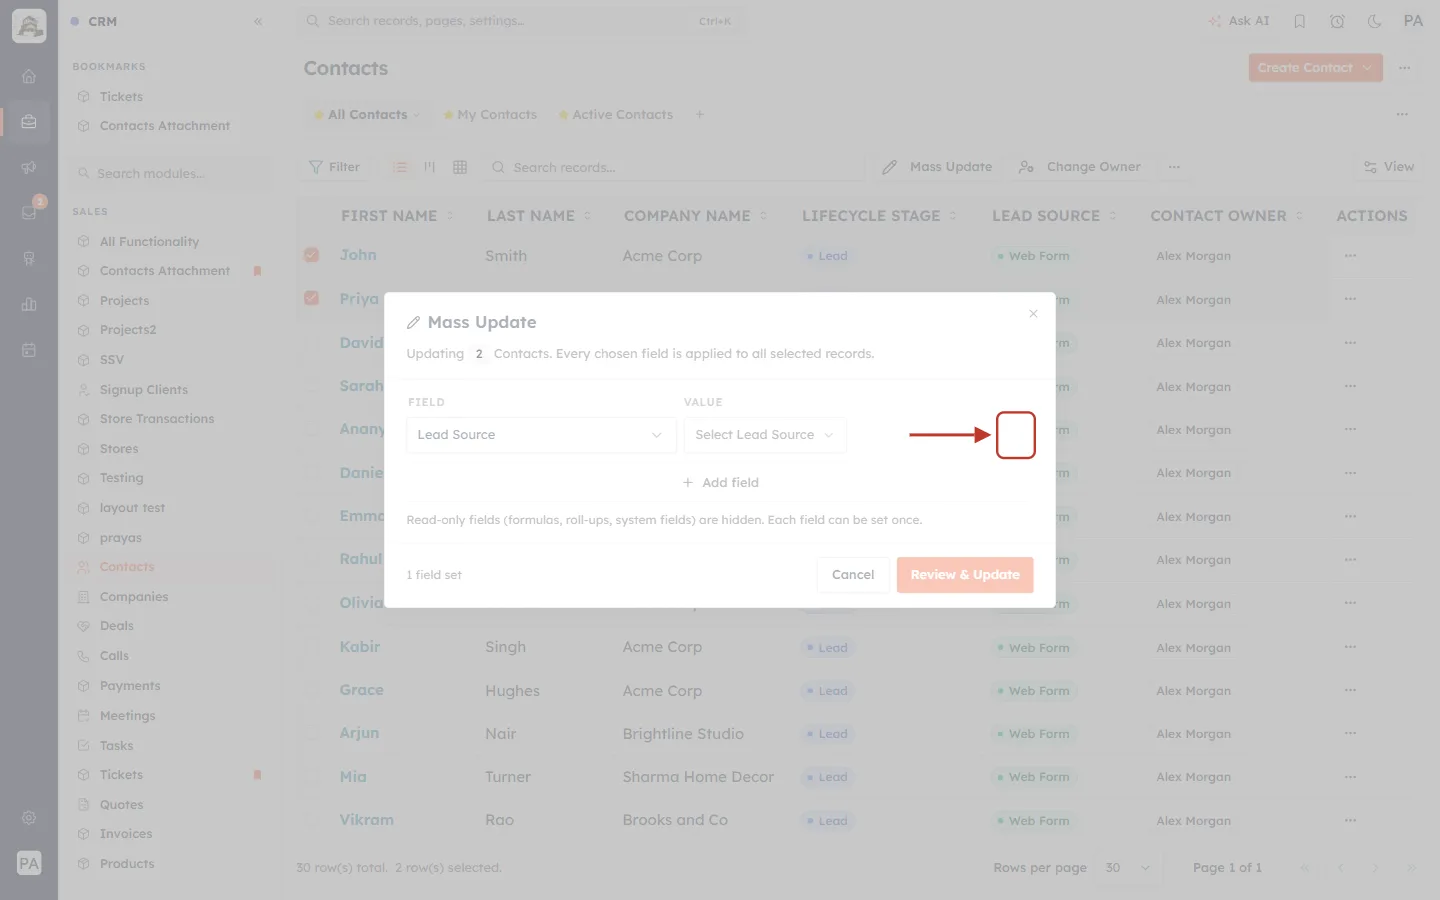
What this screenshot shows. The × at the end of a row, ringed.
× (Remove field): deletes that row from the window. The field won’t be changed.
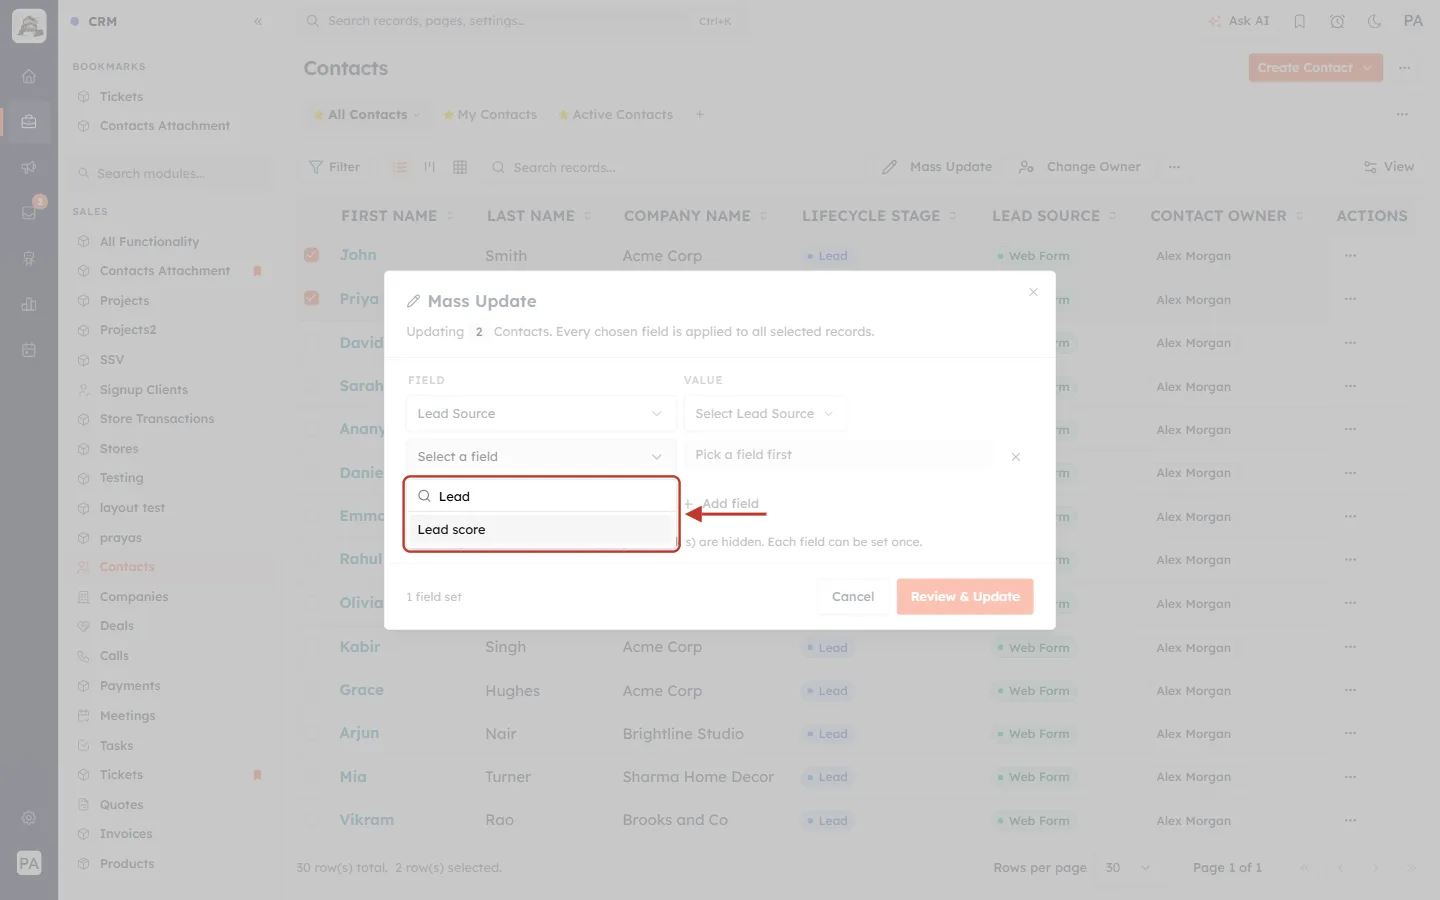
What this screenshot shows. The field list for a second row, ringed, after typing “Lead”.
Only “Lead score” is offered. Lead Source is already used in the first row, so it isn’t listed again — each field can be set once.
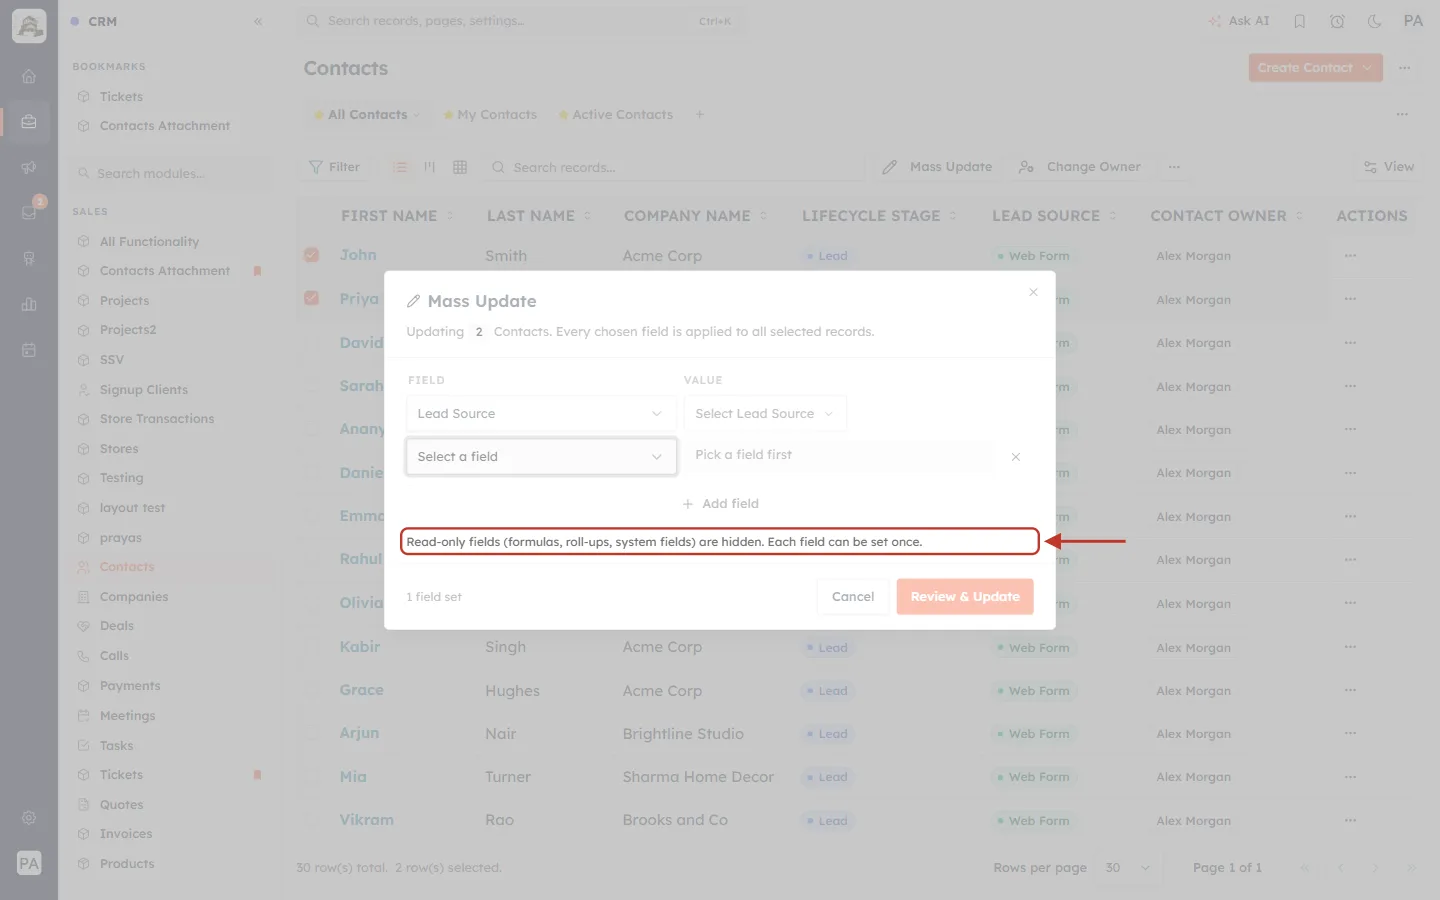
What this screenshot shows. The note under the rows, ringed.
“Read-only fields (formulas, roll-ups, system fields) are hidden. Each field can be set once.” — why some fields never appear in the list.
Part 4: Update up to 500 records at once#
Step 10: Select the whole page, then everything matching the view#
Filter or search the list so it shows the records you want. Then tick the box in the column header. A blue bar appears above the list.
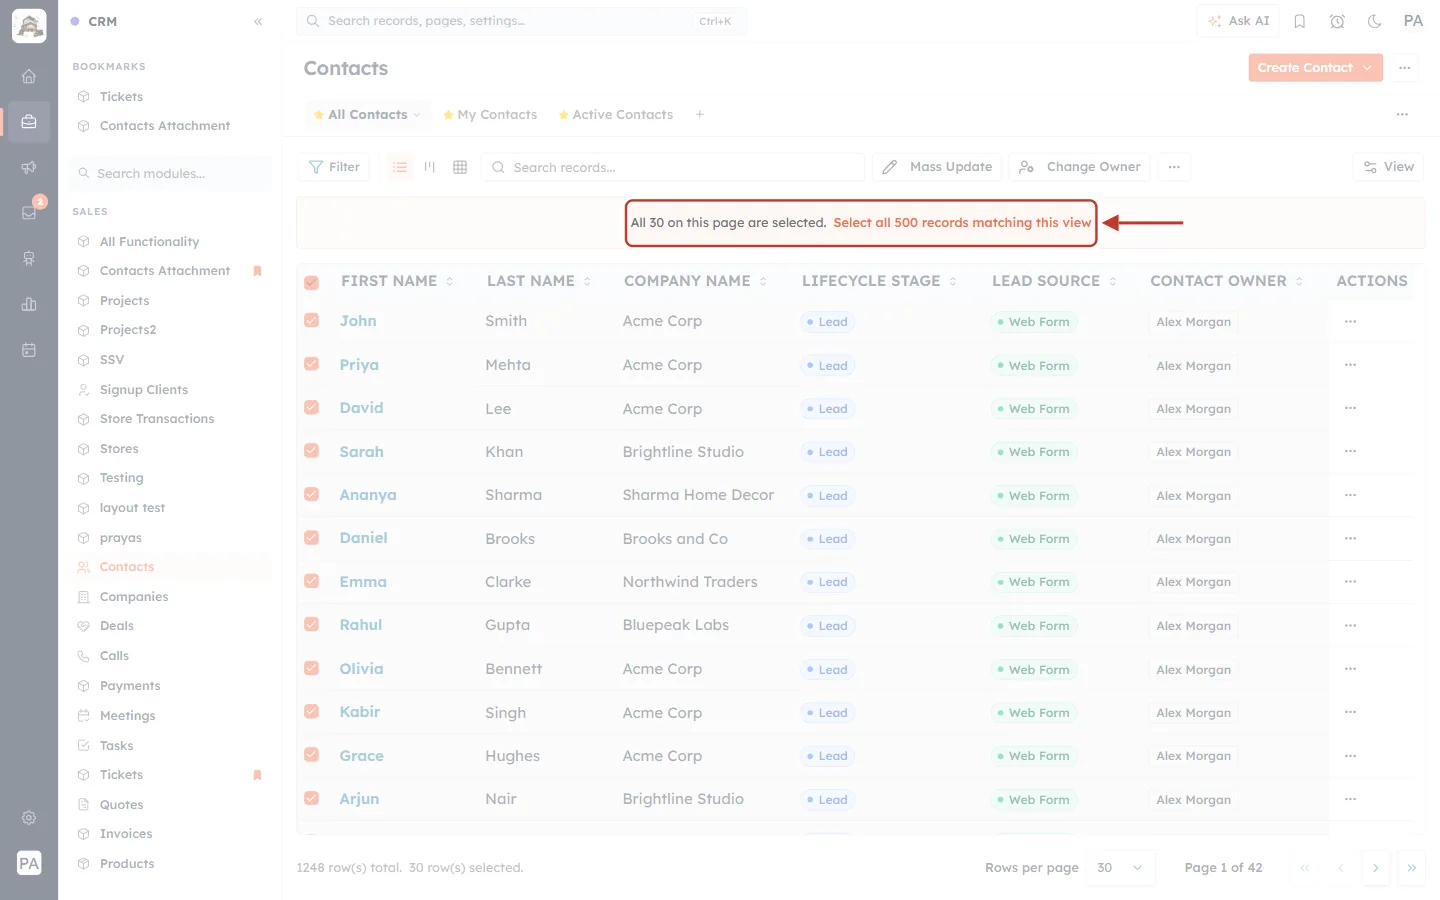
What this screenshot shows. The bar above the list, ringed, after ticking the header box.
“All 30 on this page are selected.” — the header box selects only the rows on this page.
“Select all 500 records matching this view” — click it to select every record that matches the current view, filter and search, up to 500. Here the view has 1,248 contacts, so the link stops at 500.
Click Select all … records matching this view.
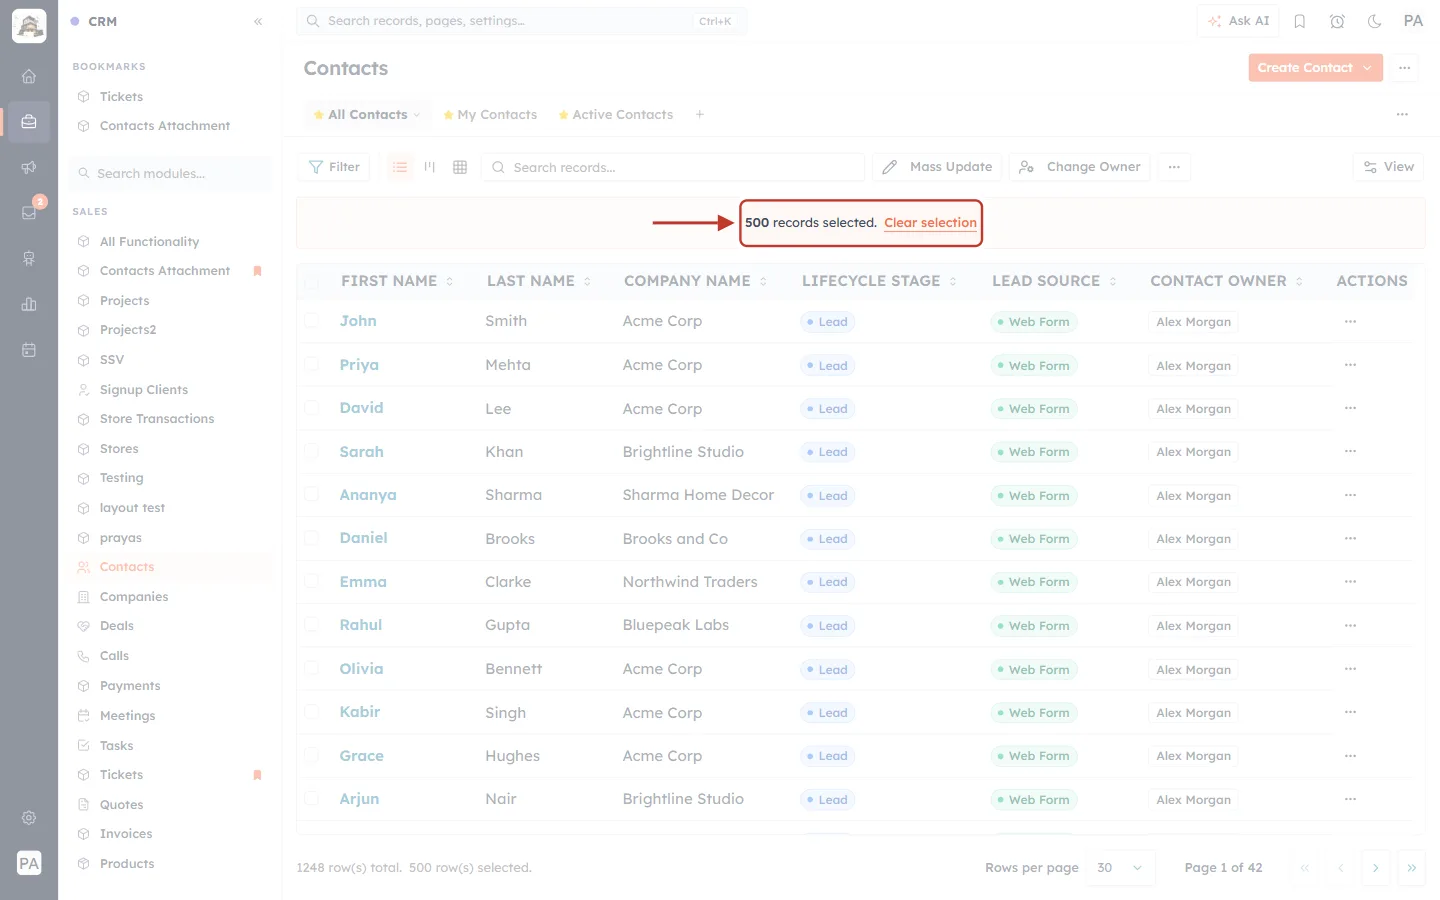
What this screenshot shows. The bar, ringed, after selecting all matching records.
“500 records selected.” — the maximum for one Mass Update.
Clear selection: unticks everything.
Bottom of the list: “1248 row(s) total. 500 row(s) selected.”
Step 11: Set the fields and review#
Click Mass Update, choose the fields and values, and click Review & Update — exactly as in Part 2. We set Email Marketing Status → Subscribed.
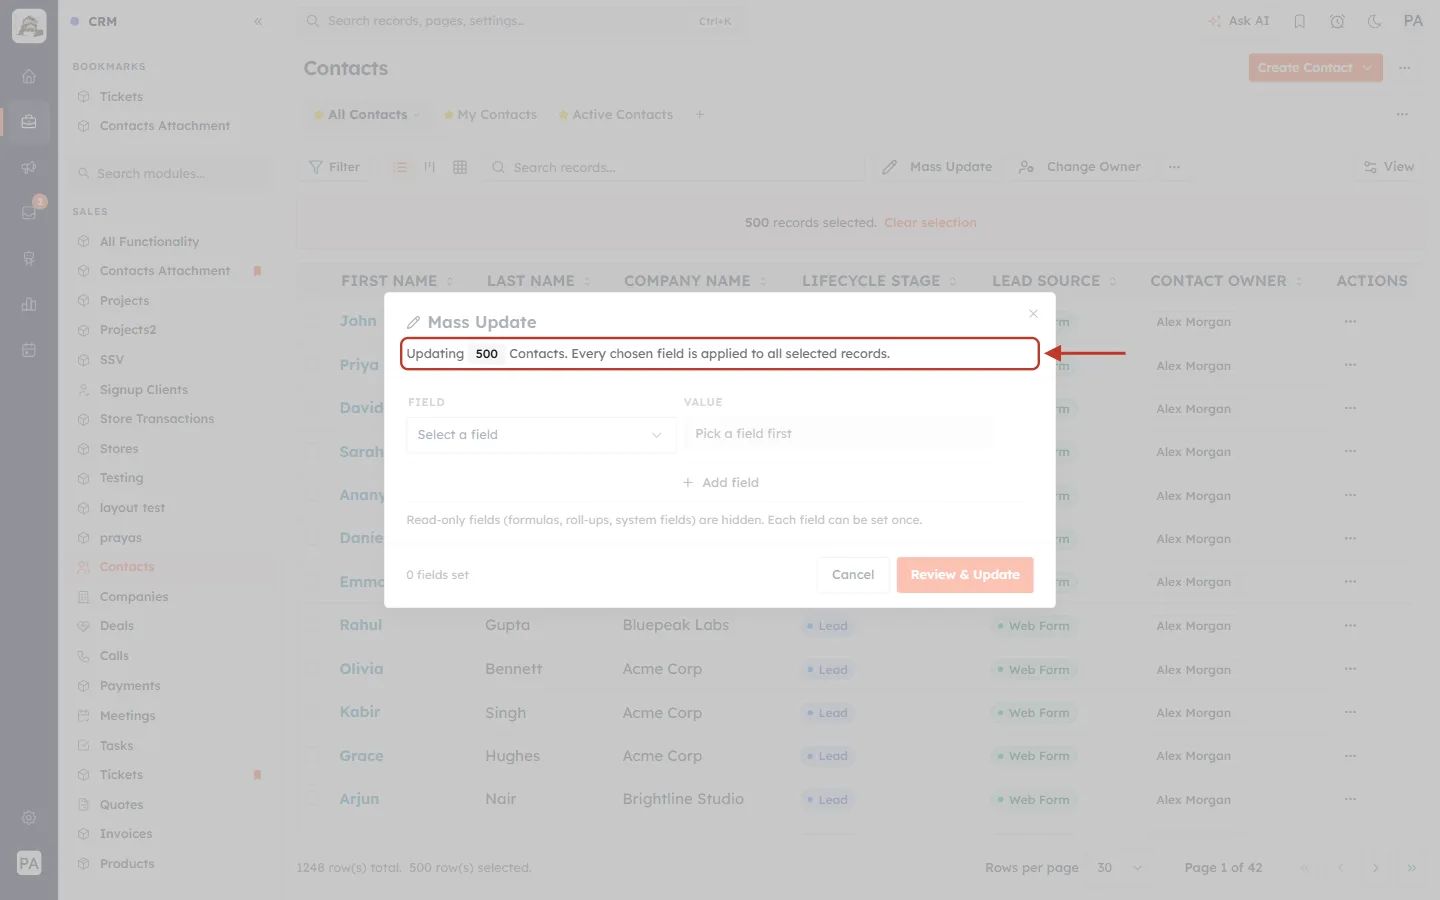
What this screenshot shows. The top of the Mass Update window, ringed.
“Updating 500 Contacts.” — confirms the size of the selection before you choose any field.
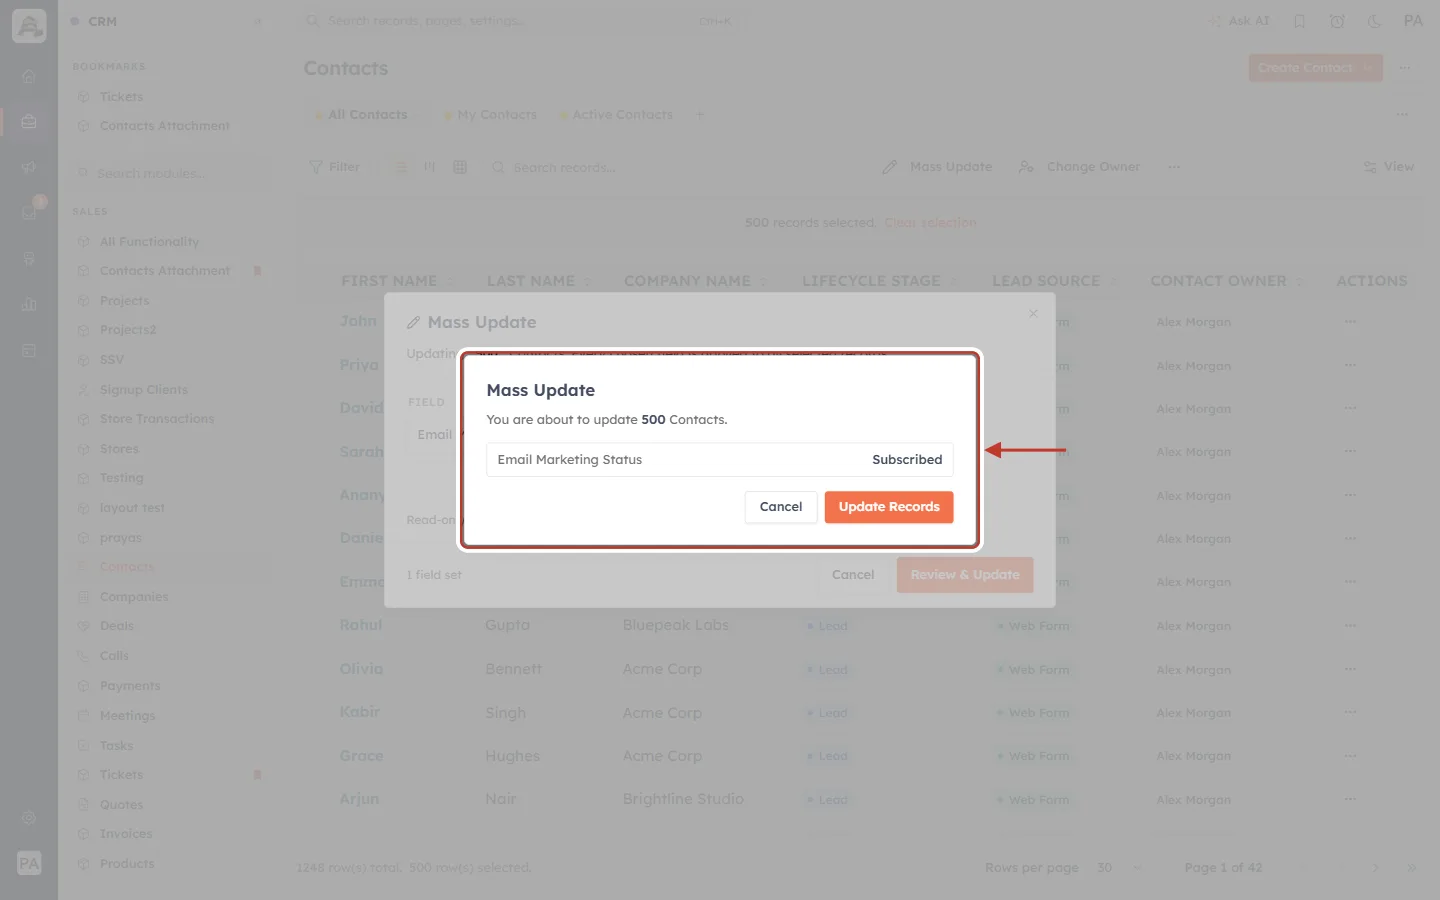
What this screenshot shows. The review summary, ringed.
“You are about to update 500 Contacts.”
Email Marketing Status — Subscribed.
Update Records starts the update.
Step 12: Follow the progress#
Because more than 100 records are selected, the update runs in the background. The window closes and a progress message appears at the bottom right. You can keep working, or even move to another page — the message follows you.
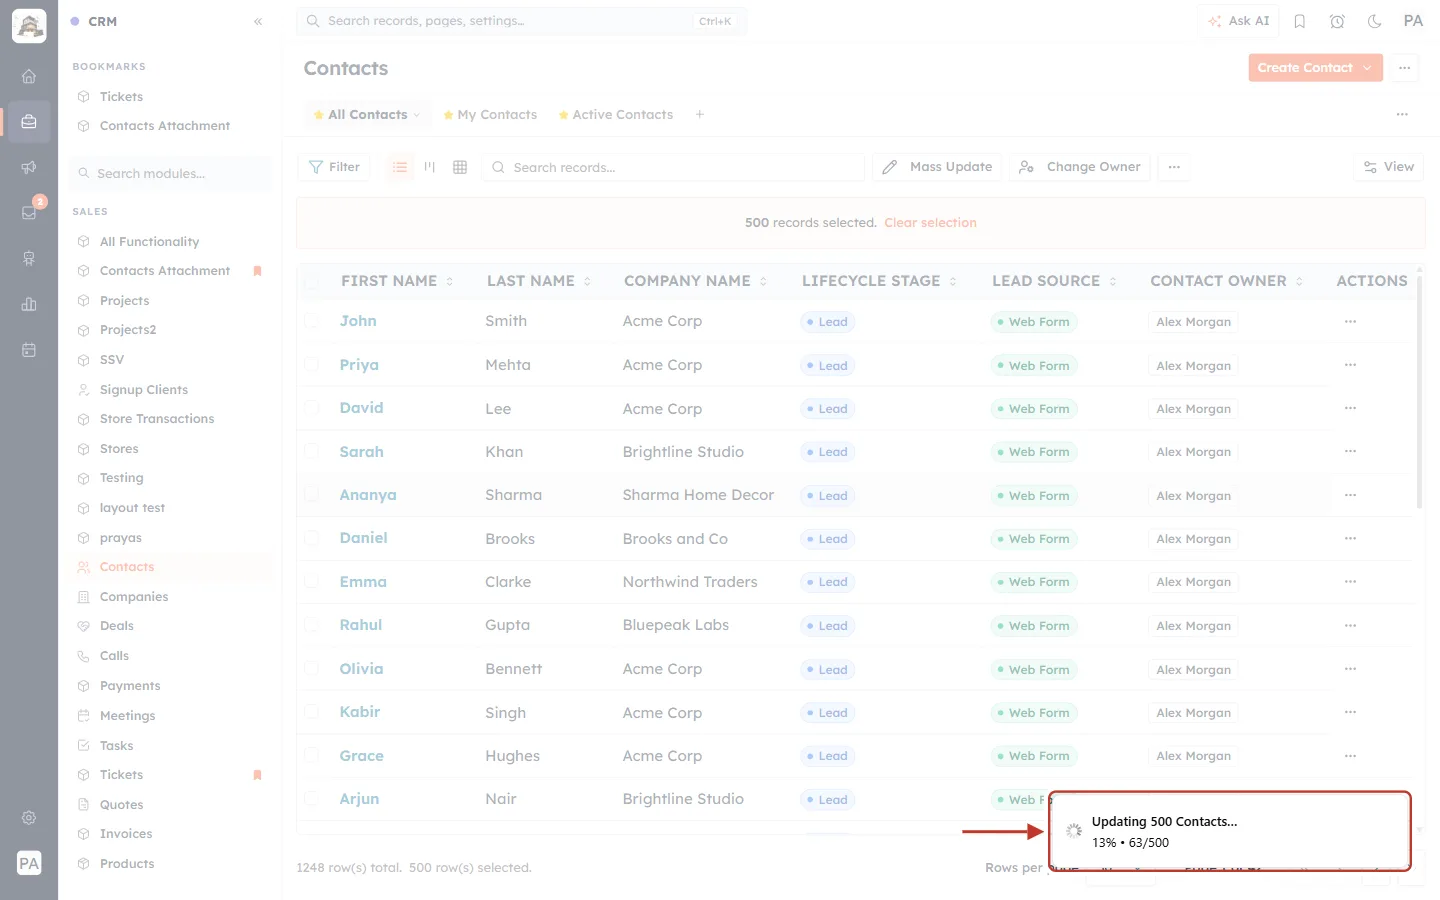
What this screenshot shows. The progress message, ringed, as the update starts.
“Updating 500 Contacts…” with “Starting…” underneath.
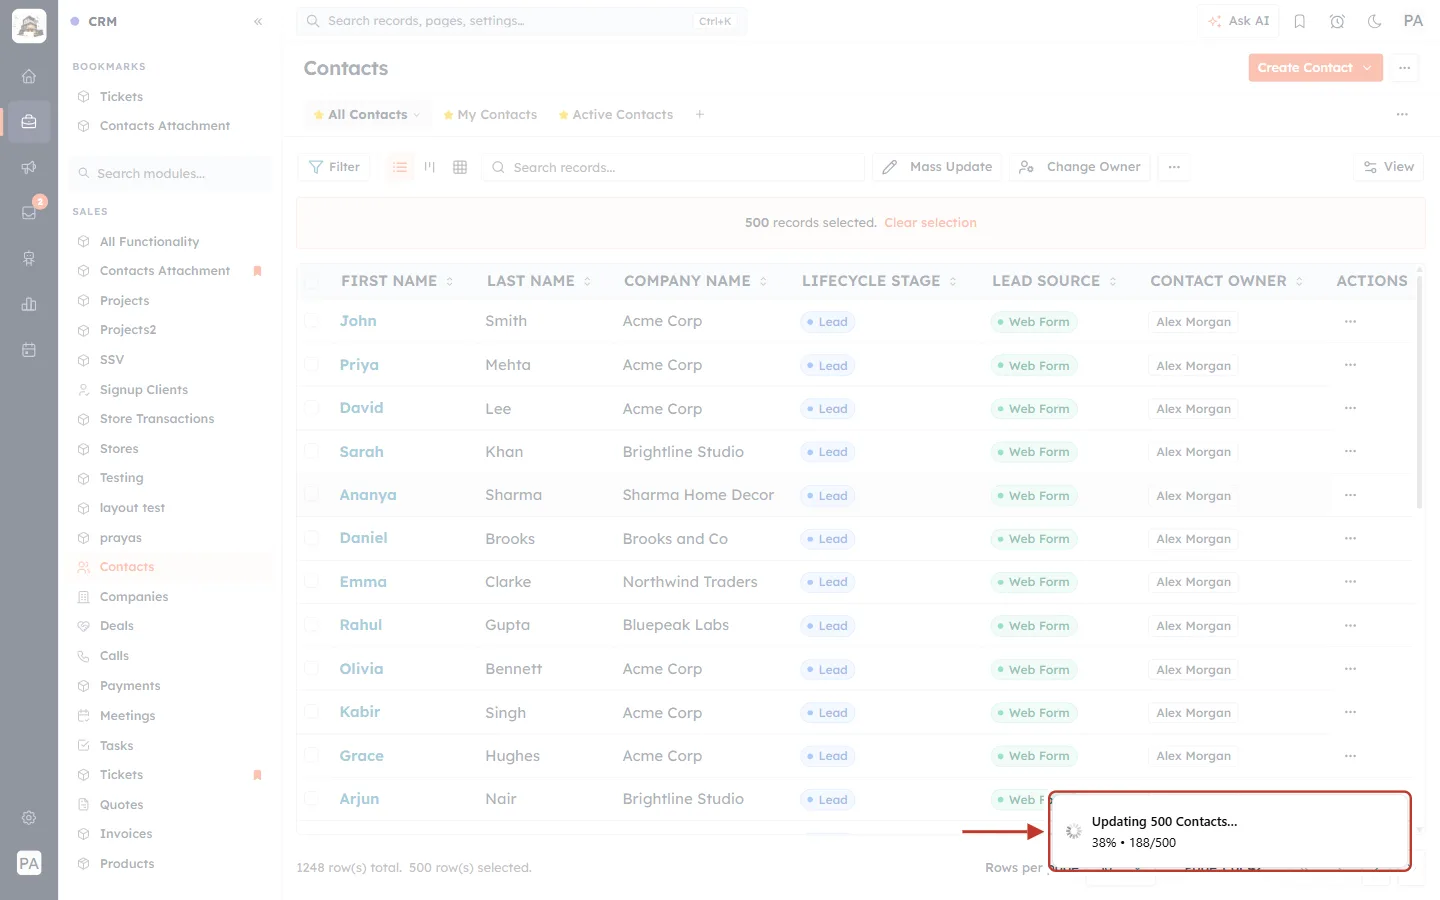
What this screenshot shows. The progress message, ringed, part-way through.
“25% • 125/500” — the percentage done and how many records have been updated so far.
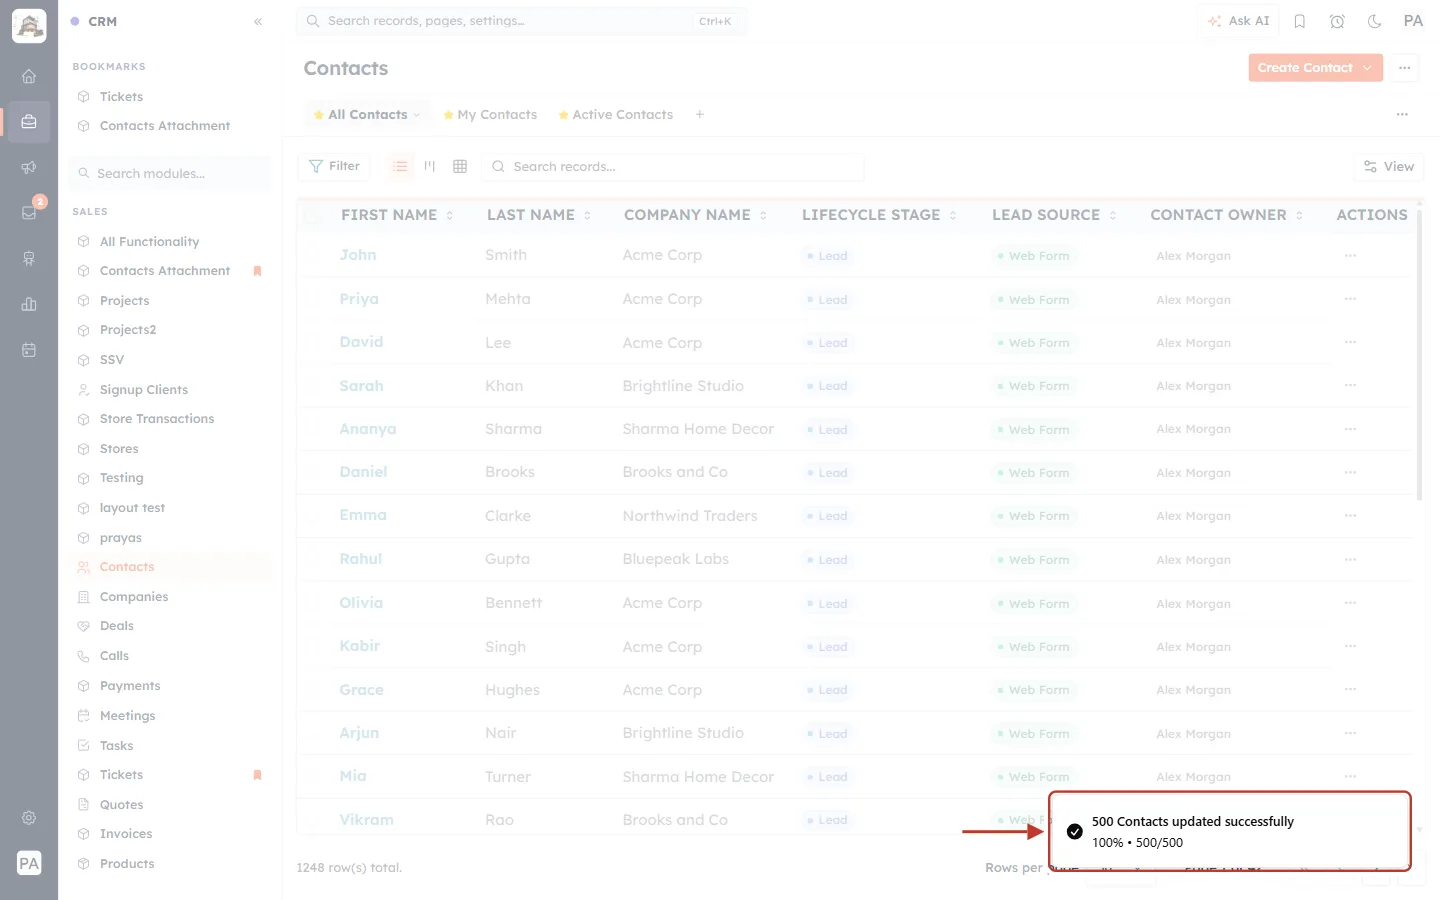
What this screenshot shows. The final message, ringed.
“500 Contacts updated successfully” — all done.
If some records were skipped (for example, ones you can’t edit), you see “N Contacts updated” and “M could not be updated” instead.
ℹ️
A very large update can take a while. If it is still running after about 15 minutes, the message changes to “Still updating Contacts… This is taking a while — it keeps running in the background. Refresh later.” The update carries on — refresh the list later to see the new values.
Part 5: More than 500 records — work in batches#
One Mass Update can change at most 500 records. For more, repeat it in batches. The easiest way is to filter on the value you are changing, so that finished records drop out of the list:
1. Filter the list to the records that still need the change — for example Email Marketing Status is not Subscribed.
2. Tick the header box, then click Select all 500 records matching this view.
3. Run Mass Update and wait for “500 Contacts updated successfully”.
4. Refresh the list. The 500 you just updated no longer match the filter, so the next batch appears. Repeat until the list is empty.
✅
For a one-off change to thousands of records, you can also export them, edit the file, and import it back with Import Mode: Update. See Import Data into Any Module.
Messages you may see#
| Message | What it means |
|---|---|
| N Contacts updated successfully | Every selected record was updated. |
| N Contacts updated · M could not be updated… | Some records were skipped. The reason is shown underneath (often: you can’t edit them). |
| Updating N Contacts… · 40% • 200/500 | A background update (over 100 records) is running. |
| Still updating Contacts… | A big update is taking longer than usual. It keeps running — refresh later. |
| Mass update failed | The update stopped. Try again, and contact support if it keeps happening. |
| Lost track of the mass update | The progress message lost its connection. The update may still be running — refresh to see the latest values. |
| Set a value for: … | A chosen field has no value yet. |
| Add at least one field to update | You clicked Review & Update without choosing a field. |
| No editable fields are available for this module. | There is nothing in this module that you are allowed to change in bulk. |
Good to know#
Limits per Mass Update: up to 500 records; up to 100 are instant, 101–500 run in the background. Each field can be set once, but you can set as many different fields as you like.
It’s a normal edit. Field validation, the record Timeline and automations that react to record or field updates all work just as when you edit one record by hand.
Owners: you can set Contact Owner with Mass Update, but it only changes the owner. To move the old owner’s deals, tasks and other related records too, use Change Owner.
Clearing a value: Mass Update sets values; it doesn’t clear them. To empty a field on many records, use an import or edit the records individually.
Formulas and roll-ups: they are never in the field list. If one of them depends on a field you mass-updated, it may not show the new result straight away.
Troubleshooting#
I don’t see the Mass Update button. Tick at least one record first. If it still isn’t there, your profile doesn’t allow bulk updates in this module — ask your administrator.
The field I want isn’t in the list. It is read-only (formula, roll-up or system field), you have already used it in another row, or your profile can’t edit it.
The “Select all … matching this view” link doesn’t appear. It appears after you tick the box in the column header (not the boxes on individual rows). If every matching record already fits on the page, you have already selected them all.
It says 500 although my view has more. 500 is the most one Mass Update can handle. Work in batches (Part 5).
Some records weren’t updated. You don’t have edit access to them, or a value wasn’t valid for them. The message tells you how many and why.
The progress message disappeared. Refresh the list — a background update keeps running even if the message is closed.
Frequently asked questions#
What is the most I can update at once? 500 records per Mass Update, with as many different fields as you need.
Can I undo a Mass Update? There is no undo button. Run another Mass Update with the old value, or check each record’s Timeline to see what changed.
Can I give different records different values? No — every chosen value goes to every selected record. For different values, run separate Mass Updates, or use an import.
Will automations run? Yes. Workflows that trigger when a record or field is updated run for each updated record, just like a manual edit. Keep this in mind before updating hundreds of records that could send emails.
Does it work for Deals, Companies and custom modules? Yes — every module with a list view.
Previous and next#
Previous: Bulk Actions on Records: Delete, Merge & Update Status
Next: Change the Owner of Records and Move Their Related Records (Up to 20 at a Time)
Related#
Was this article helpful?
Ready to implement this?
OpenAI Engage and apply what you just learned to your own workspace.
Open AI Engage CRM