Loading…


KnowledgeBase
Quick Create Fields per Layout: Choose the Short Form for “+ New” (Step-by-Step)
What is the Quick Create form?#
Your team often needs to add a record while working on another one. For example, while creating a deal, a salesperson picks the deal’s contact — and the contact doesn’t exist yet. Instead of leaving the deal, they click + New Record in the contact picker, fill in a short form, and carry on. That short form is the Quick Create form.
Every layout has its own Quick Create form, set up on the Quick Create tab of the Layout Builder. Keep it to the fields people must fill in on the spot; everything else can be added later on the full record.
Example used in this guide. The Contacts module’s Sales layout has a Quick Create form with Contact Owner, First Name, Last Name, Email and Phone. Your sales team wants Company Name and Lifecycle Stage there instead of Phone. You add the two fields, move Company Name up, remove Phone, save — and check that the Standard layout’s form is unchanged.
Key words used in this guide#
| Term | What it means |
|---|---|
| Quick Create form | The short form shown when someone adds a record with + New Record from a lookup field on another record. |
| Quick Create tab | The Layout Builder tab where you choose the fields of that form, for the layout you have open. |
| Available Fields | The fields you can add: the fields already on this layout’s Create form that are not yet on the Quick Create form. |
| Lookup field | A field that links to a record in another module, for example a deal’s Contact Name. |
Before you begin#
You need permission to customise modules (the Administrator profile has it).
A field must be on the layout’s Create form before you can add it to Quick Create. New fields are created on the Create tab — see Edit a Layout in the Layout Builder.
Each layout has its own Quick Create form, so open the layout whose form you want to change.
Part 1: Open the Quick Create tab#
Step 1: Open the layout in the Layout Builder#
Click the gear icon at the bottom of the left menu bar (Setup), click Modules and Fields, click Configure on the module, then click the gear (Open in Layout Builder) on the layout’s row.
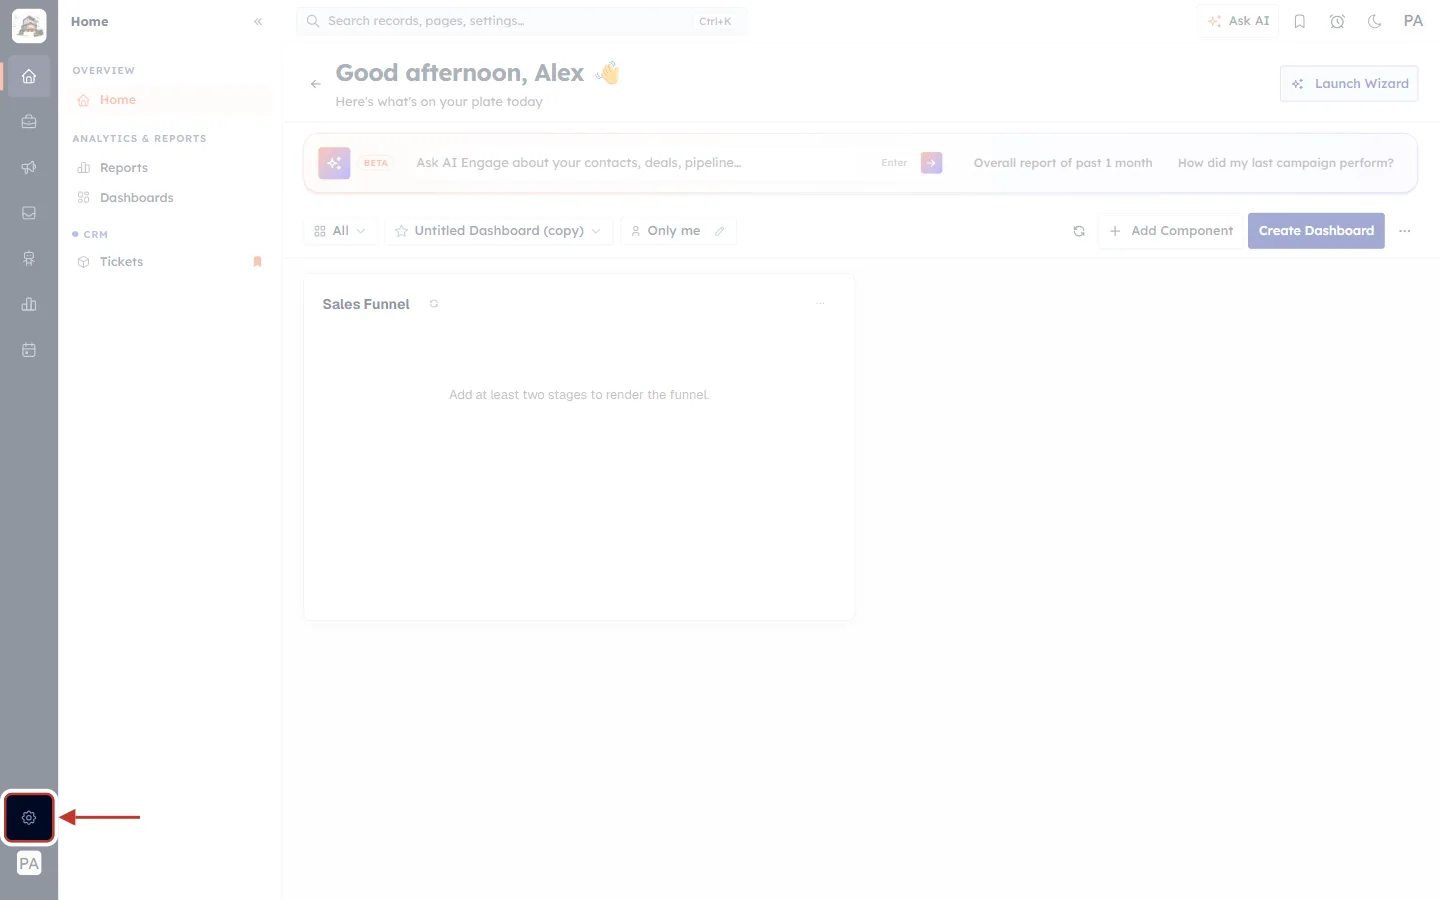
What this screenshot shows. The CRM home page with the gear icon ringed at the bottom of the narrow dark menu bar.
It opens Setup.
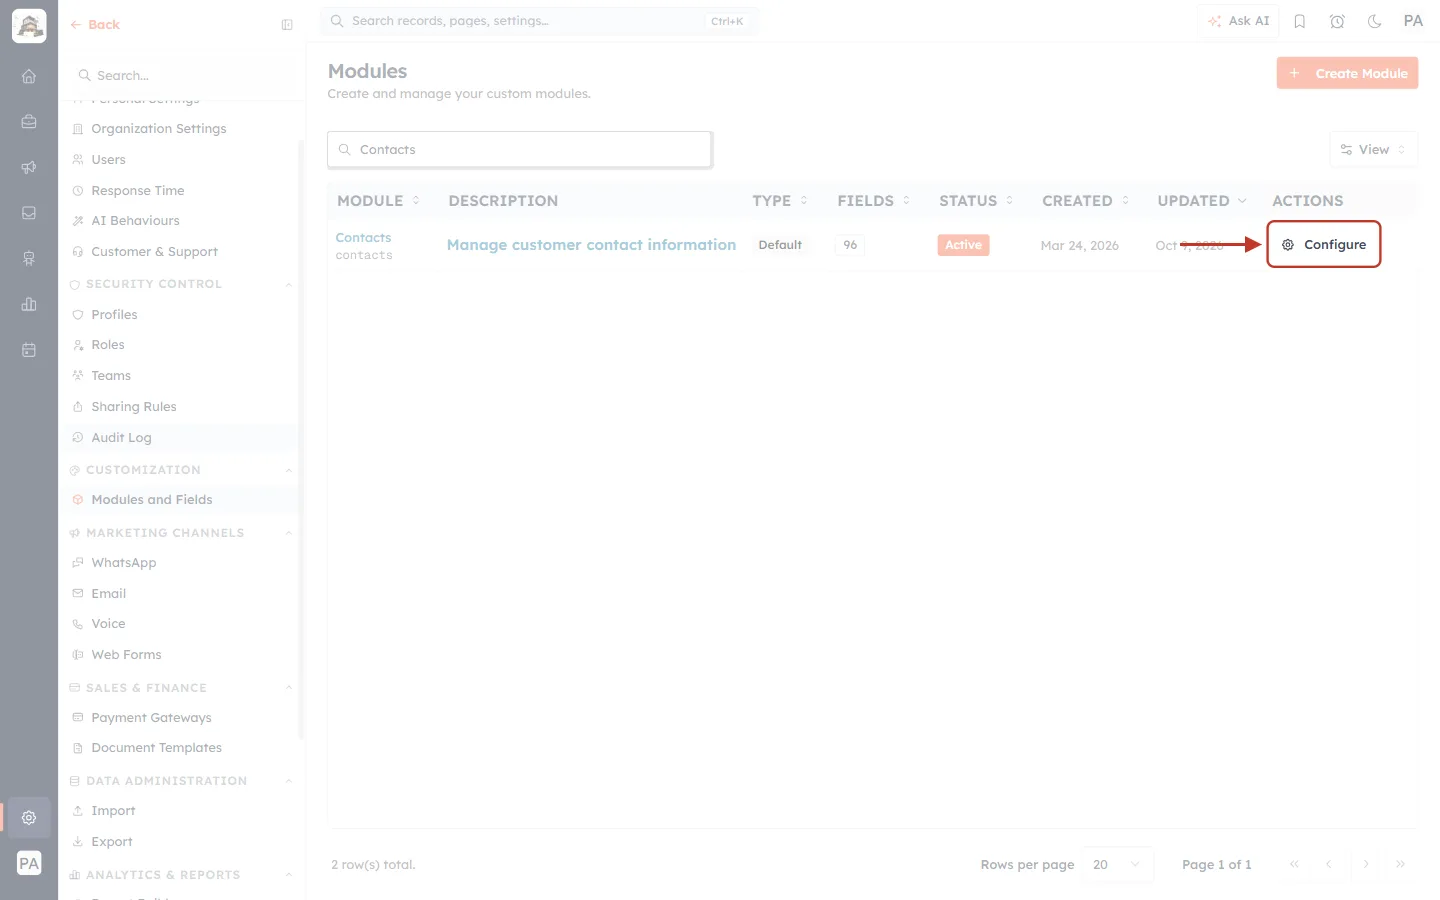
What this screenshot shows. The Modules page filtered to “Contacts”, with Configure ringed.
It opens the module’s Layouts page.
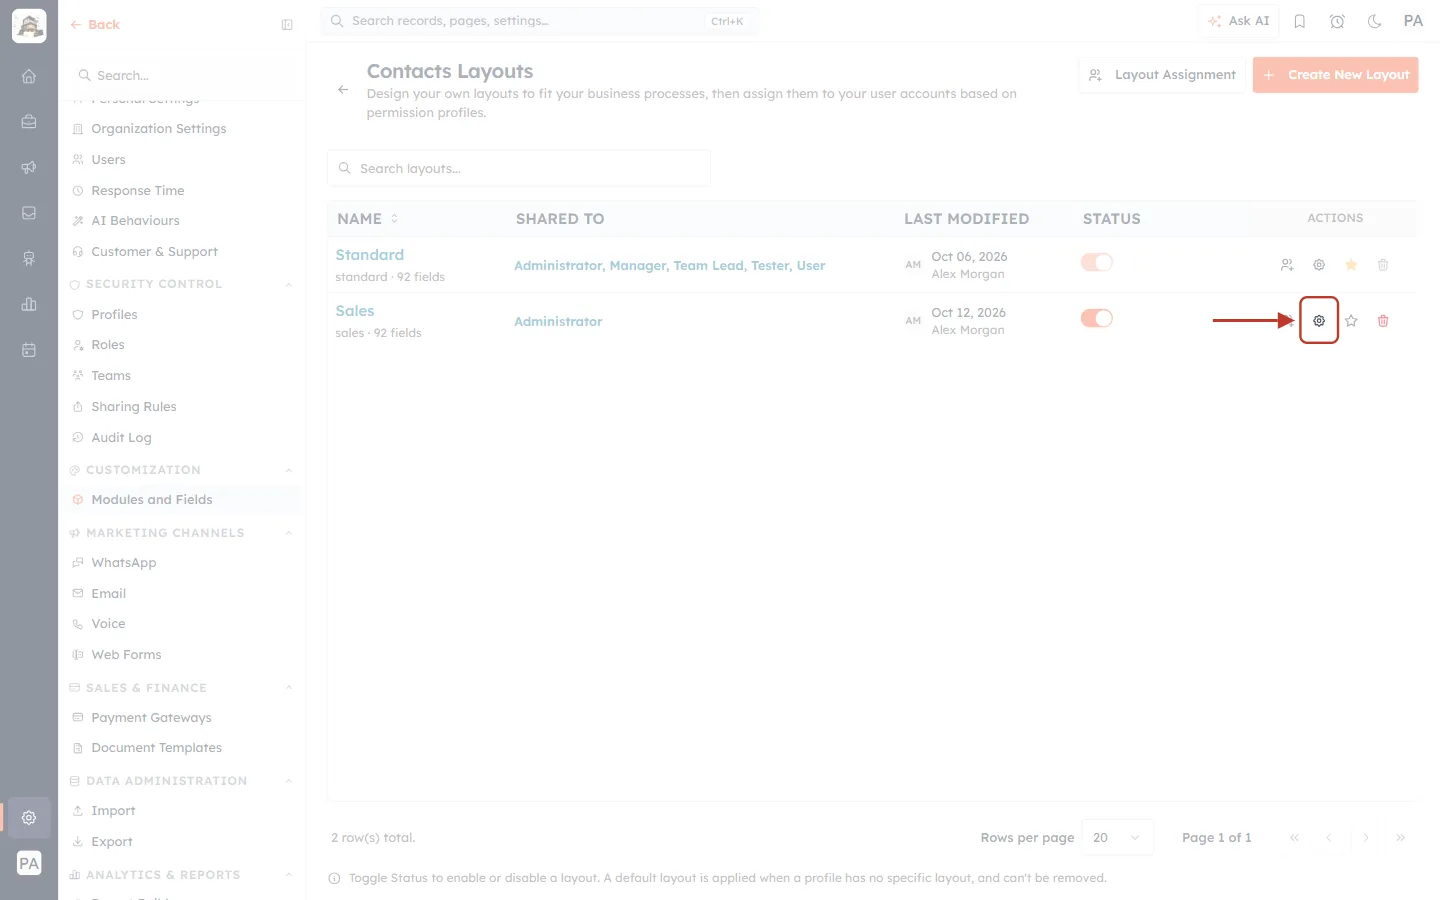
What this screenshot shows. The Contacts Layouts page with the gear on the Sales row ringed.
The builder opens on the layout’s Create tab.
Step 2: Click the Quick Create tab#
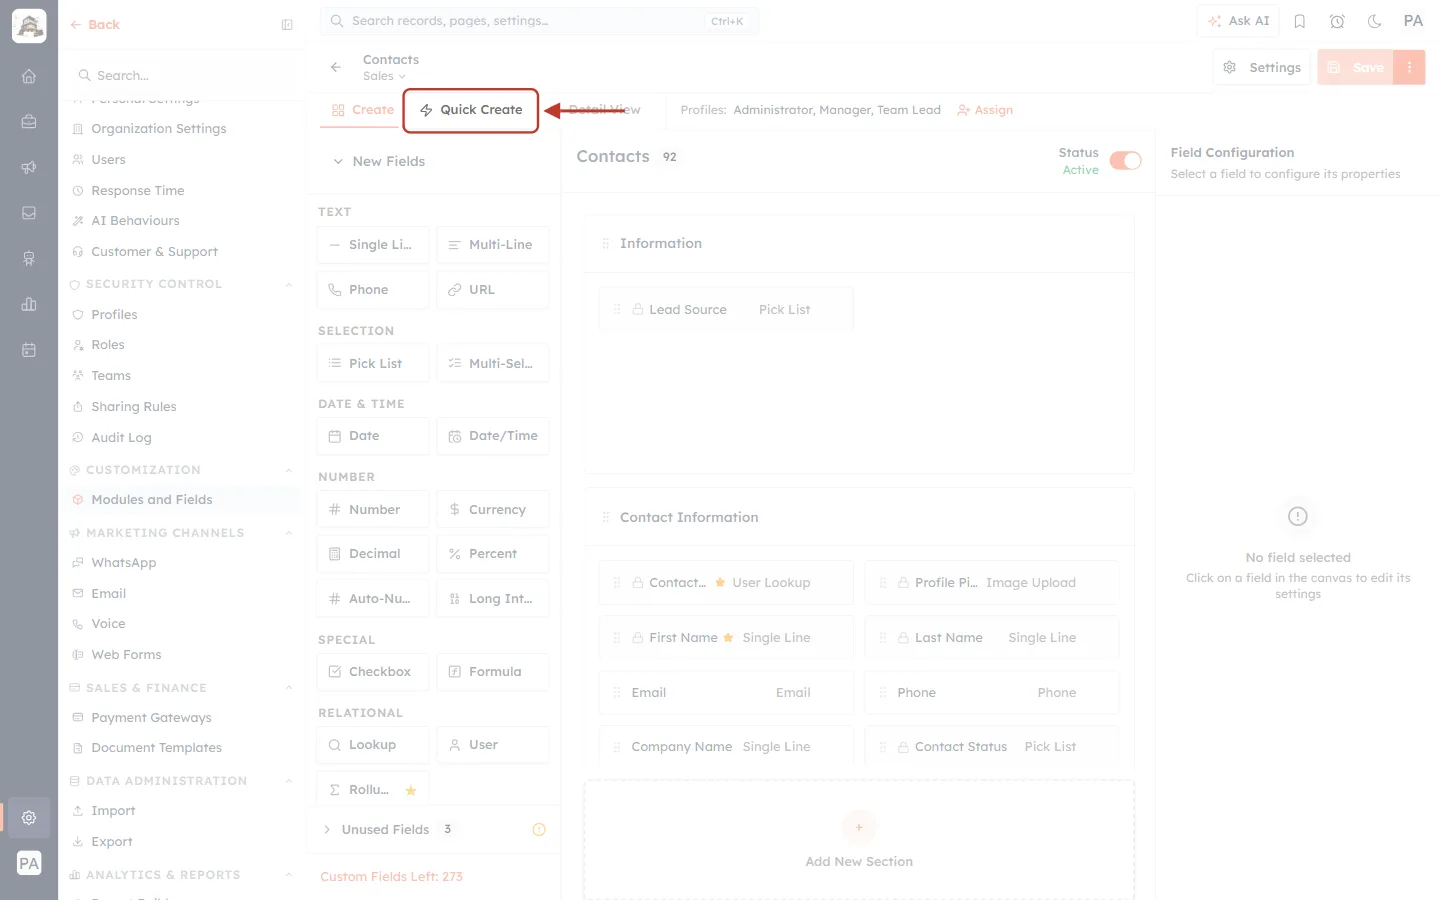
What this screenshot shows. The tabs under the builder’s header, with Quick Create (lightning icon) ringed.
The header still shows Contacts / Sales, the layout you are editing.
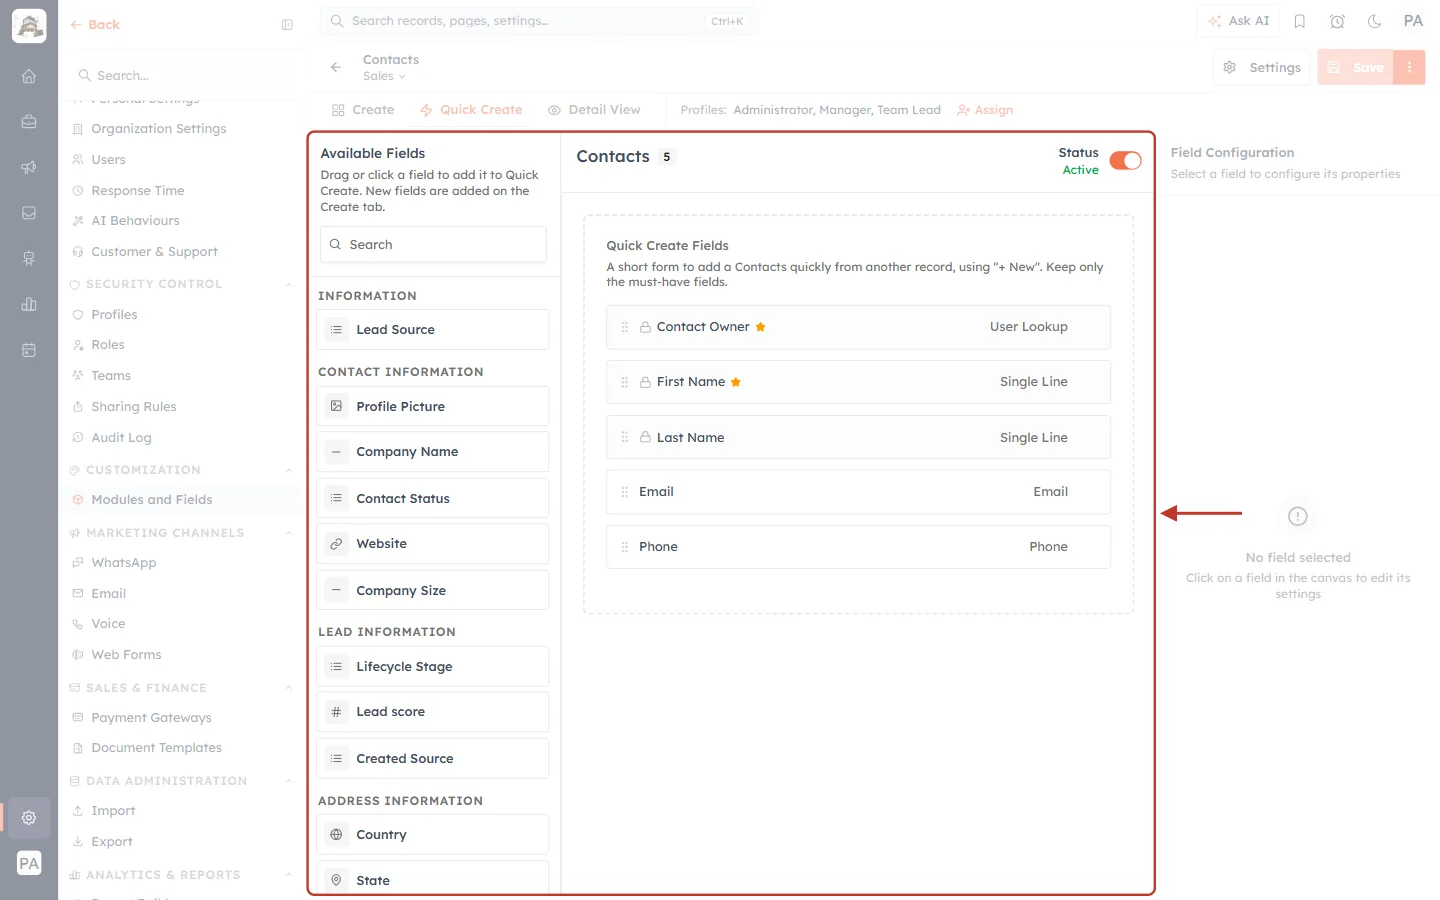
What this screenshot shows. The Quick Create tab, ringed. It has two parts.
Left — Available Fields: the fields you can add, grouped under the Create form’s section names (INFORMATION, CONTACT INFORMATION, LEAD INFORMATION, ADDRESS INFORMATION…).
Middle — Quick Create Fields: the fields on the Quick Create form now, in order. The count next to Contacts (5) is how many there are.
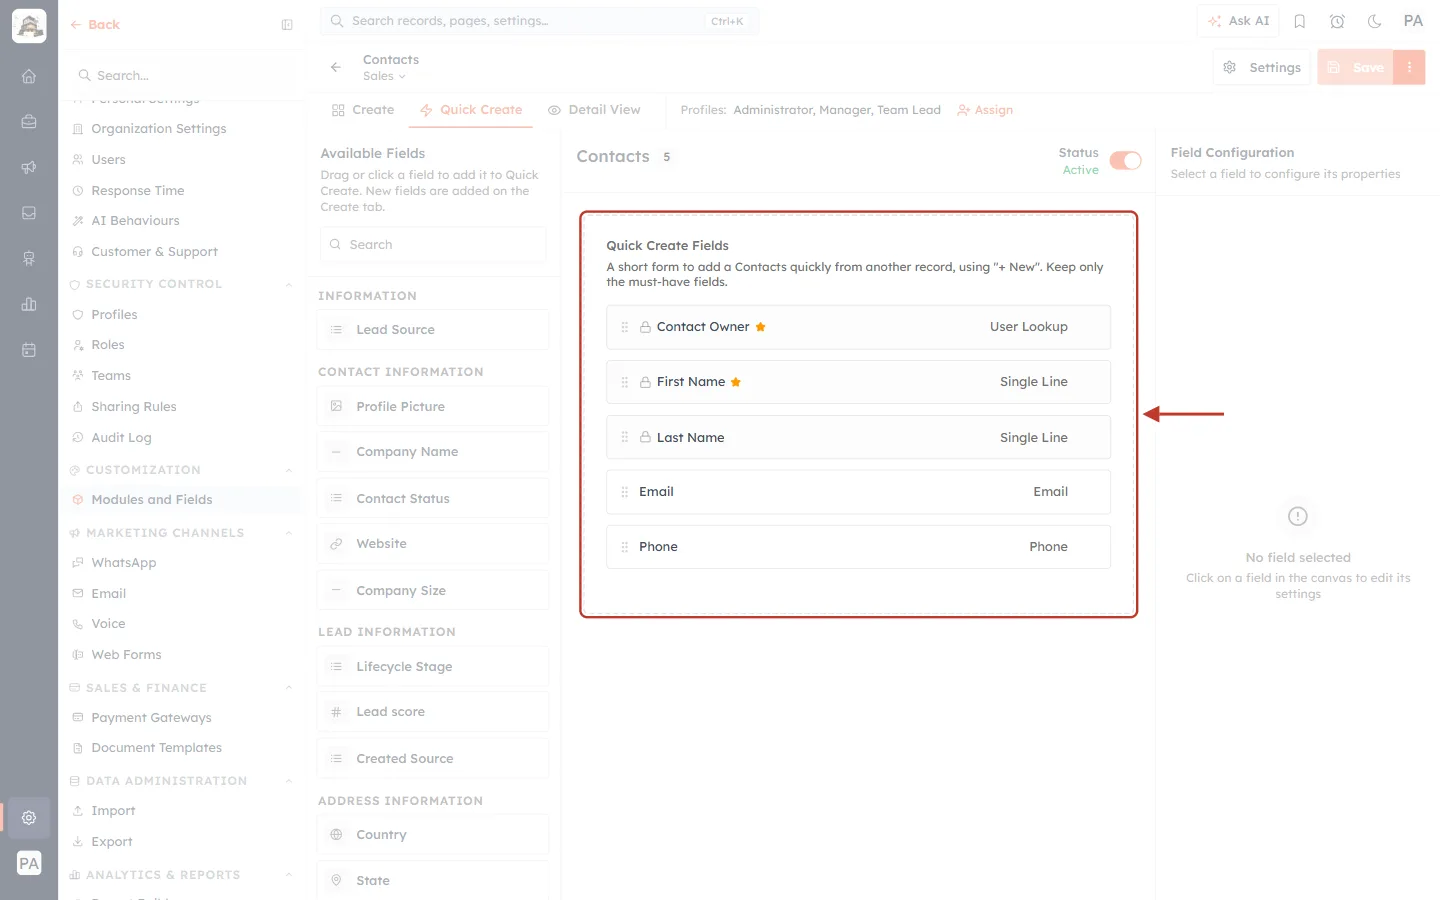
What this screenshot shows. The Quick Create Fields box, ringed.
The note reads: “A short form to add a Contacts quickly from another record, using “+ New”. Keep only the must-have fields.”
The form has Contact Owner and First Name (required, marked with ★), Last Name, Email and Phone, each with its type on the right.
A small lock marks a system field.
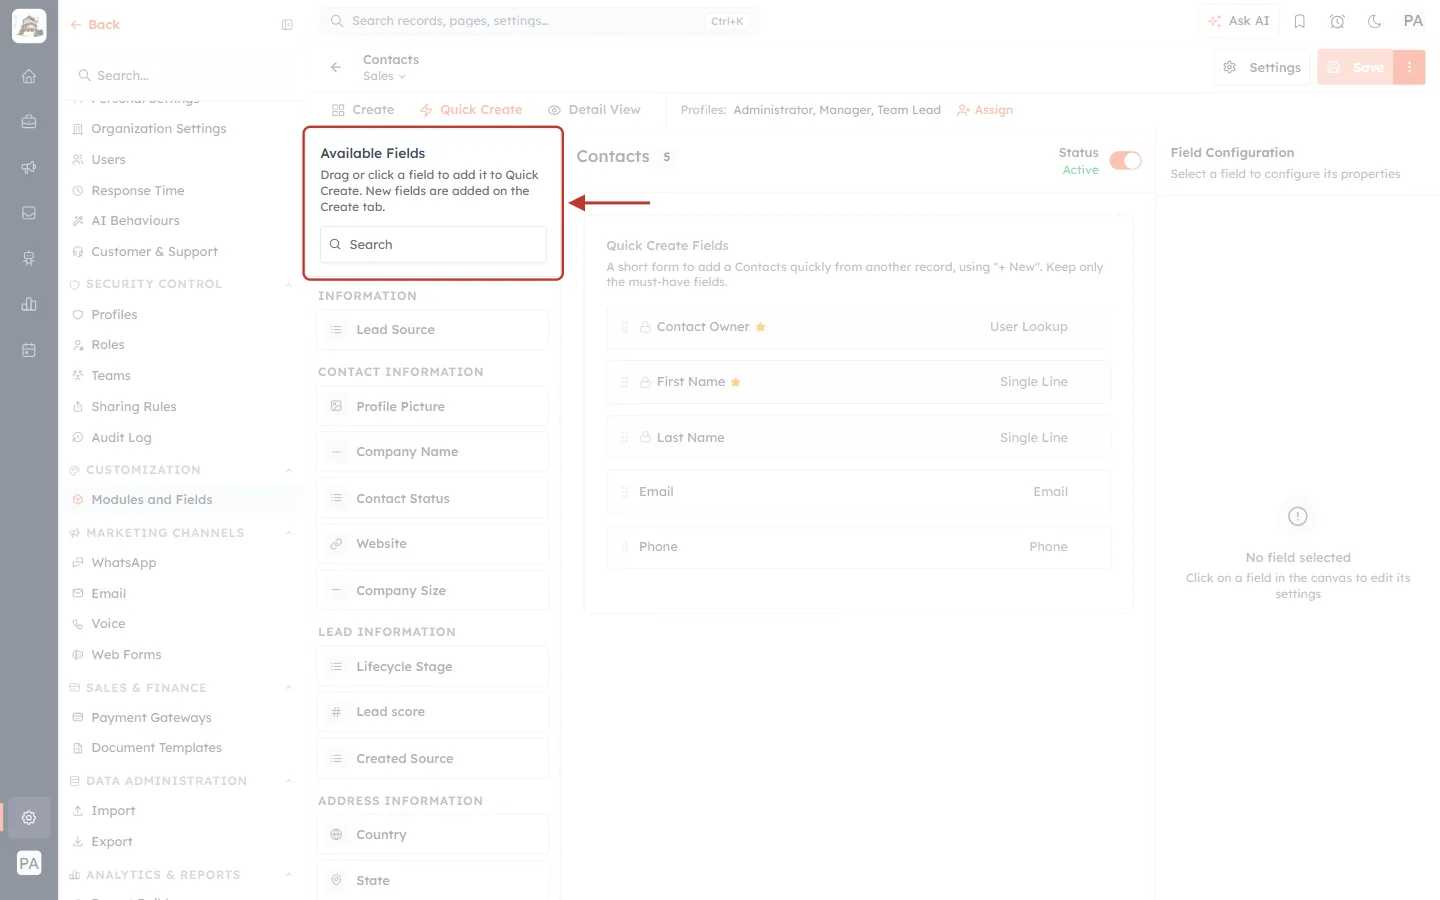
What this screenshot shows. The top of the Available Fields panel, ringed.
The note reads: “Drag or click a field to add it to Quick Create. New fields are added on the Create tab.”
Search filters the list by field name.
Only fields already on this layout’s Create form are listed, and none that are already on Quick Create. Automatic fields (auto-number, formula, rollup) and system stamps (created/modified by and dates) are never offered.
Part 2: Add fields#
Step 3: Click a field to add it#
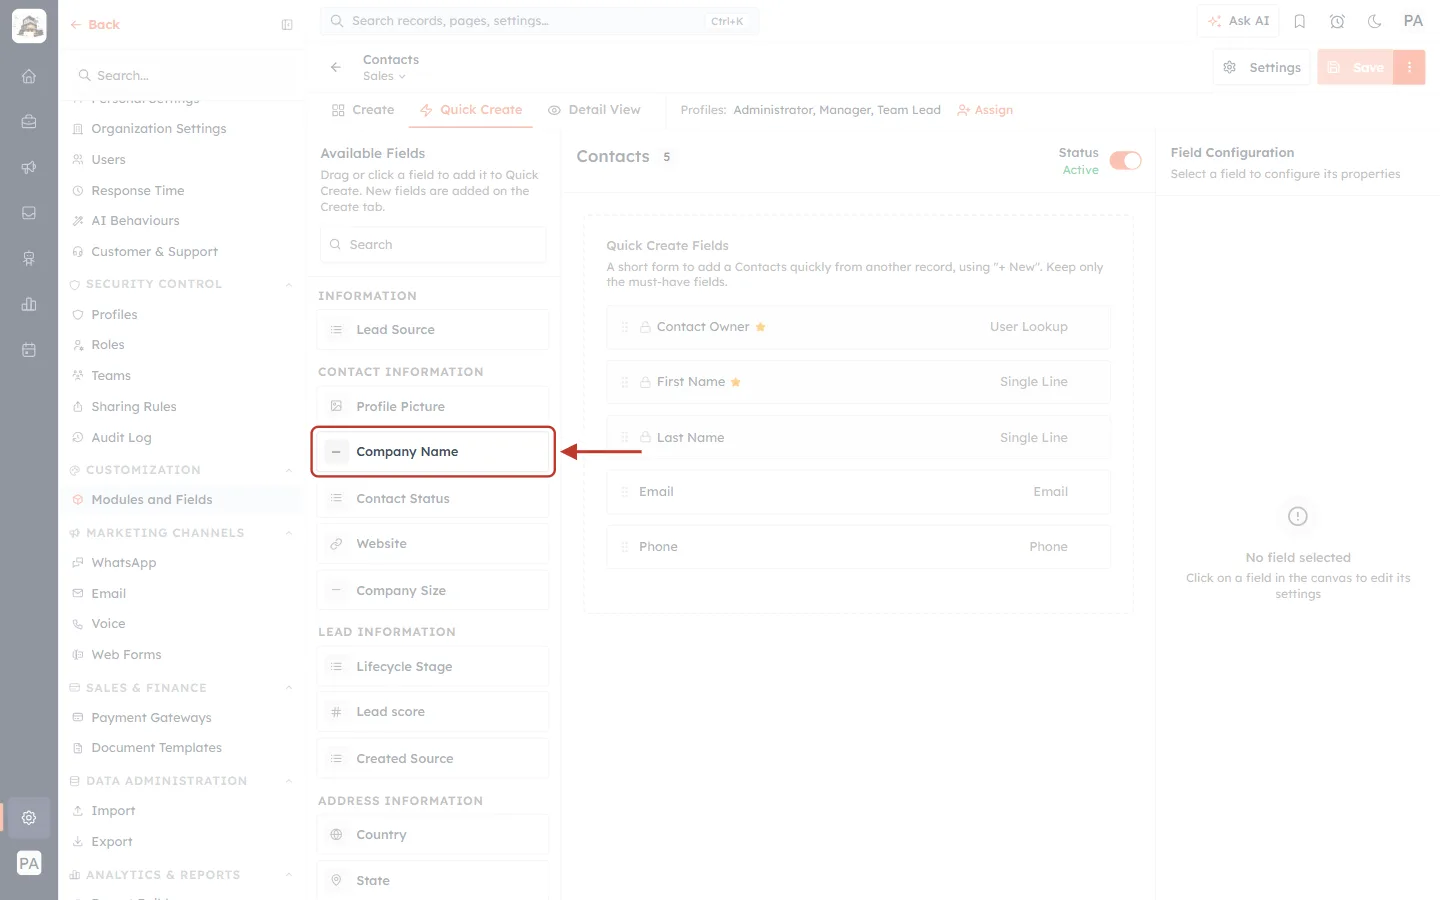
What this screenshot shows. Company Name under CONTACT INFORMATION in Available Fields, ringed. Pointing at it shows the tooltip Add “Company Name” to Quick Create.
Click it — or drag it onto the Quick Create Fields box to drop it in a particular place.
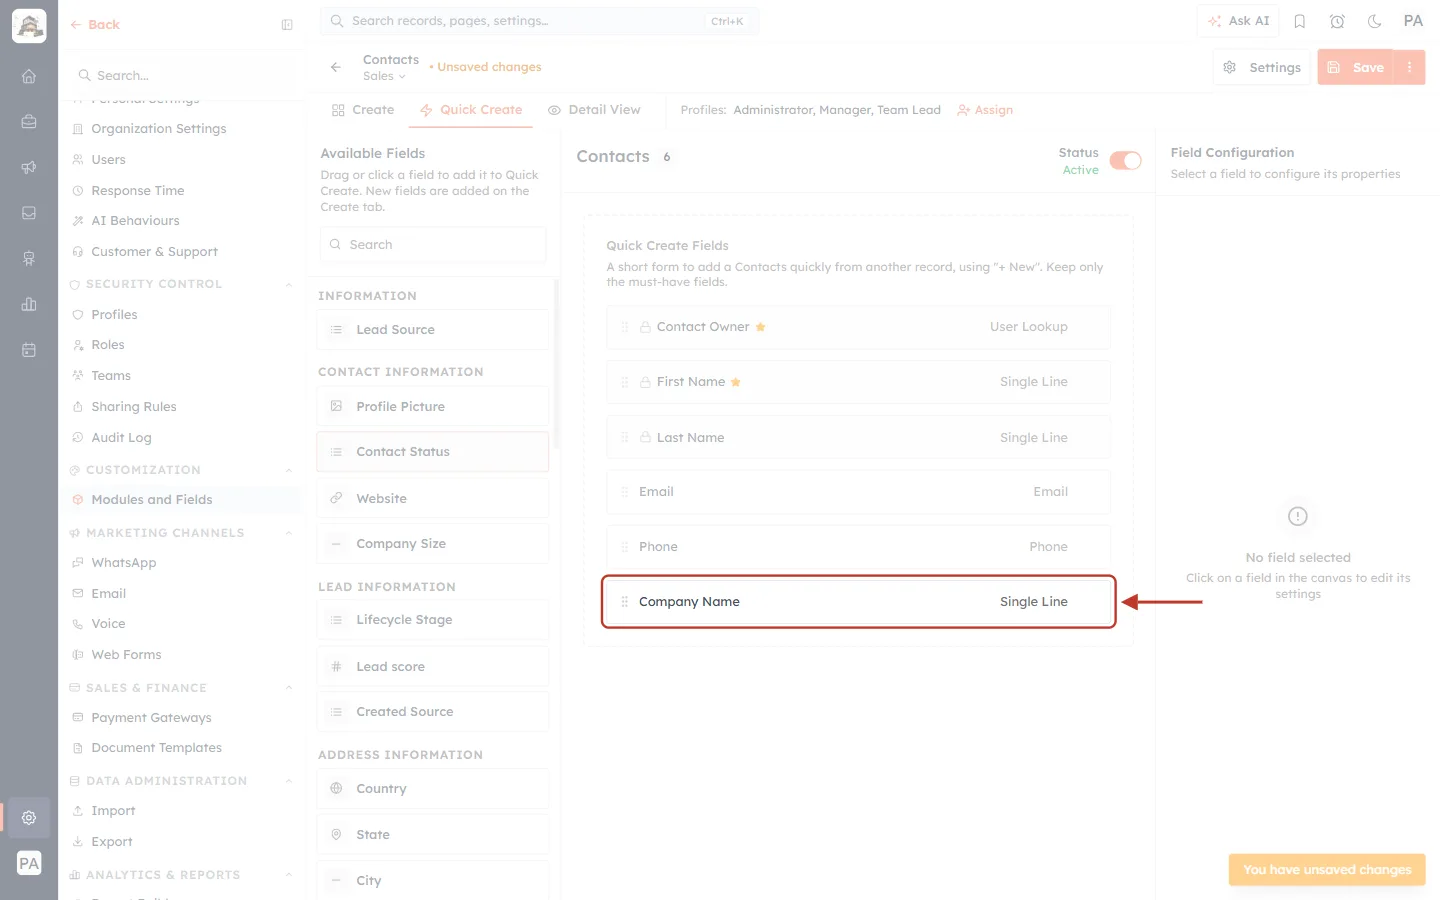
What this screenshot shows. The new Company Name row at the bottom of Quick Create Fields, ringed.
A clicked field is added at the end. The count next to Contacts goes up to 6.
Company Name disappears from Available Fields, because it is now on the form.
Step 4: Search for a field#
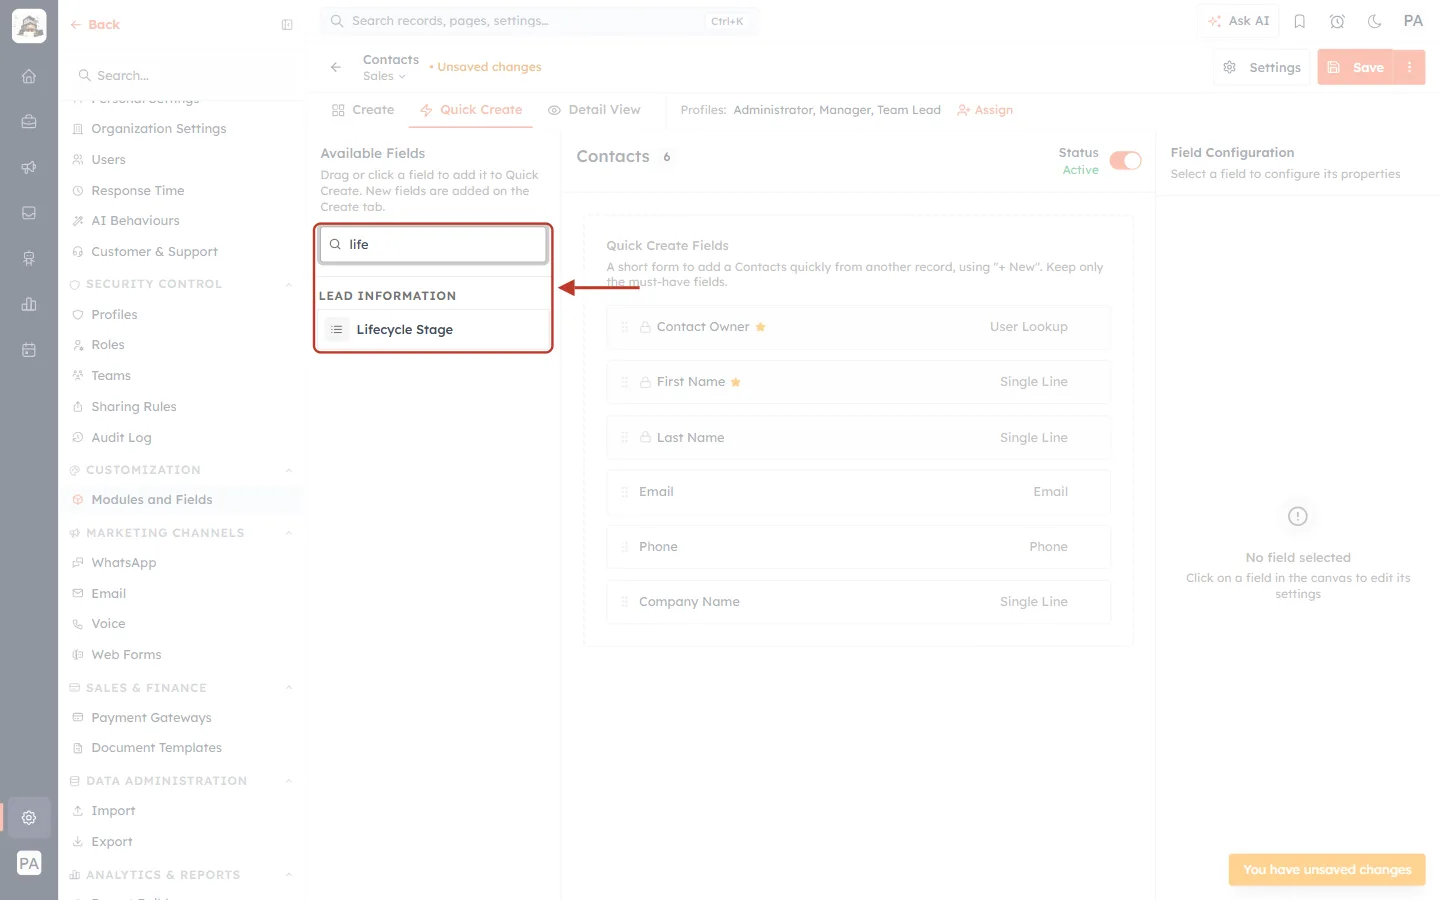
What this screenshot shows. The Search box of Available Fields with life typed in, ringed with the result: Lifecycle Stage under LEAD INFORMATION.
Click the result to add it. Clear the search box to see every field again.
If nothing matches, the panel reads “No field matches.”
Part 3: Reorder and remove fields#
Step 5: Drag fields into the right order#
Hold a field by the dots at its left edge and drag it up or down. The popup shows the fields in this order, two per row. In this example, Company Name is dragged above Email.
Step 6: Remove a field from the Quick Create form#
Point at the field, click the three dots ⋮ at its right end and choose Remove from Quick Create. Here, Phone is removed.
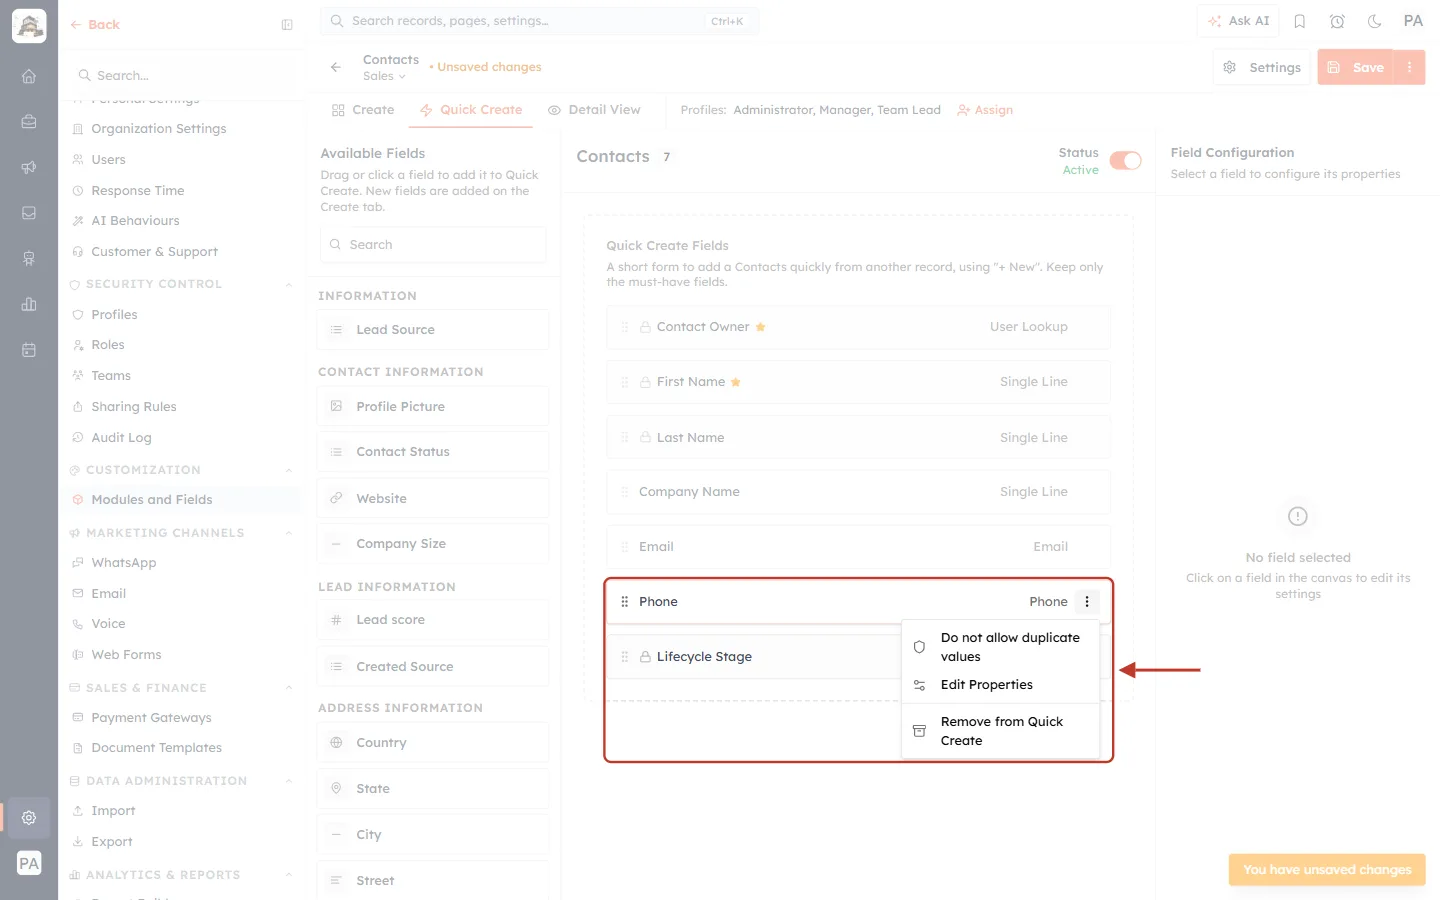
What this screenshot shows. The Phone row with its menu open, ringed.
Do not allow duplicate values and Edit Properties work as they do on the Create tab.
Remove from Quick Create takes the field off this short form only. It stays on the layout’s Create form and keeps its data.
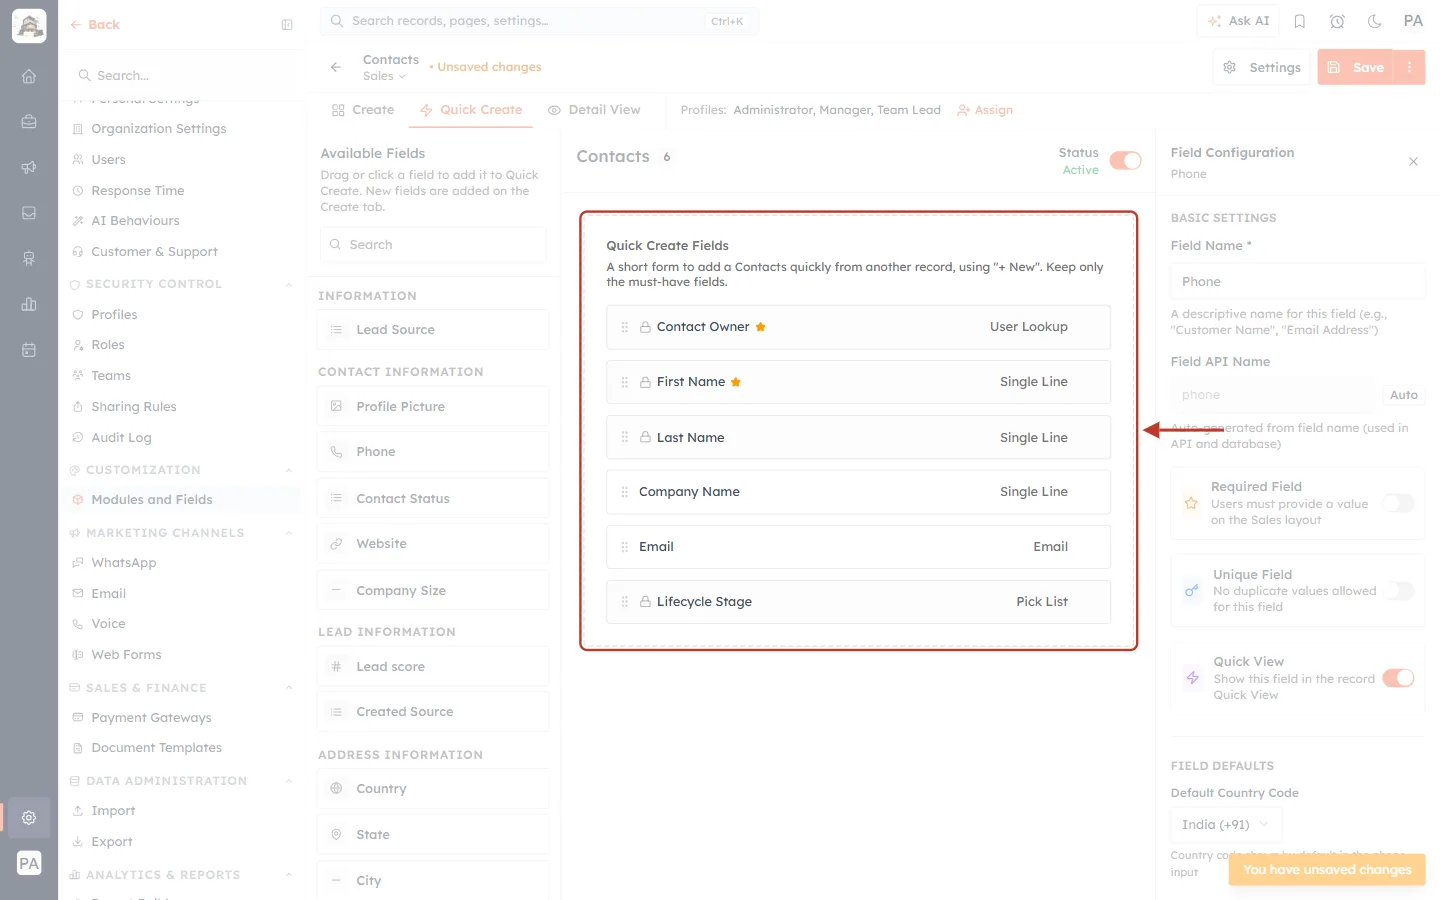
What this screenshot shows. The Quick Create Fields box after the changes, ringed.
The order is now Contact Owner, First Name, Last Name, Company Name, Email, Lifecycle Stage.
Phone is back in Available Fields, ready to be added again if you change your mind.
Step 7: Know which fields can’t be removed#
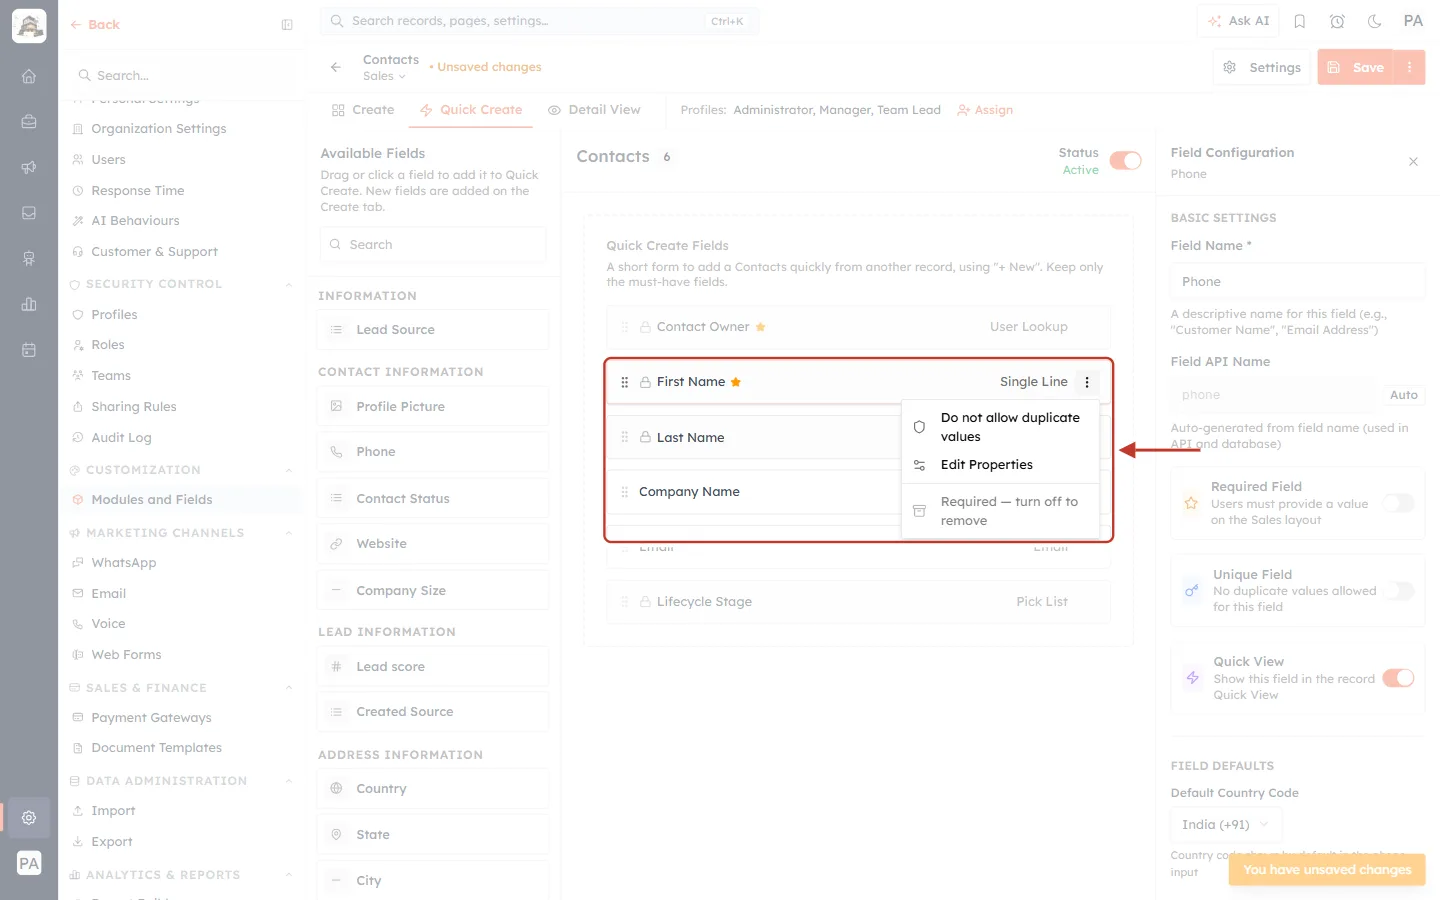
What this screenshot shows. The menu of First Name, ringed. Its last item is greyed out: Required — turn off to remove.
A field that is required on this layout stays on the Quick Create form, because the record can’t be saved without it.
To remove it, first turn Required Field off on the Create tab — see Make a Field Required on One Layout Only.
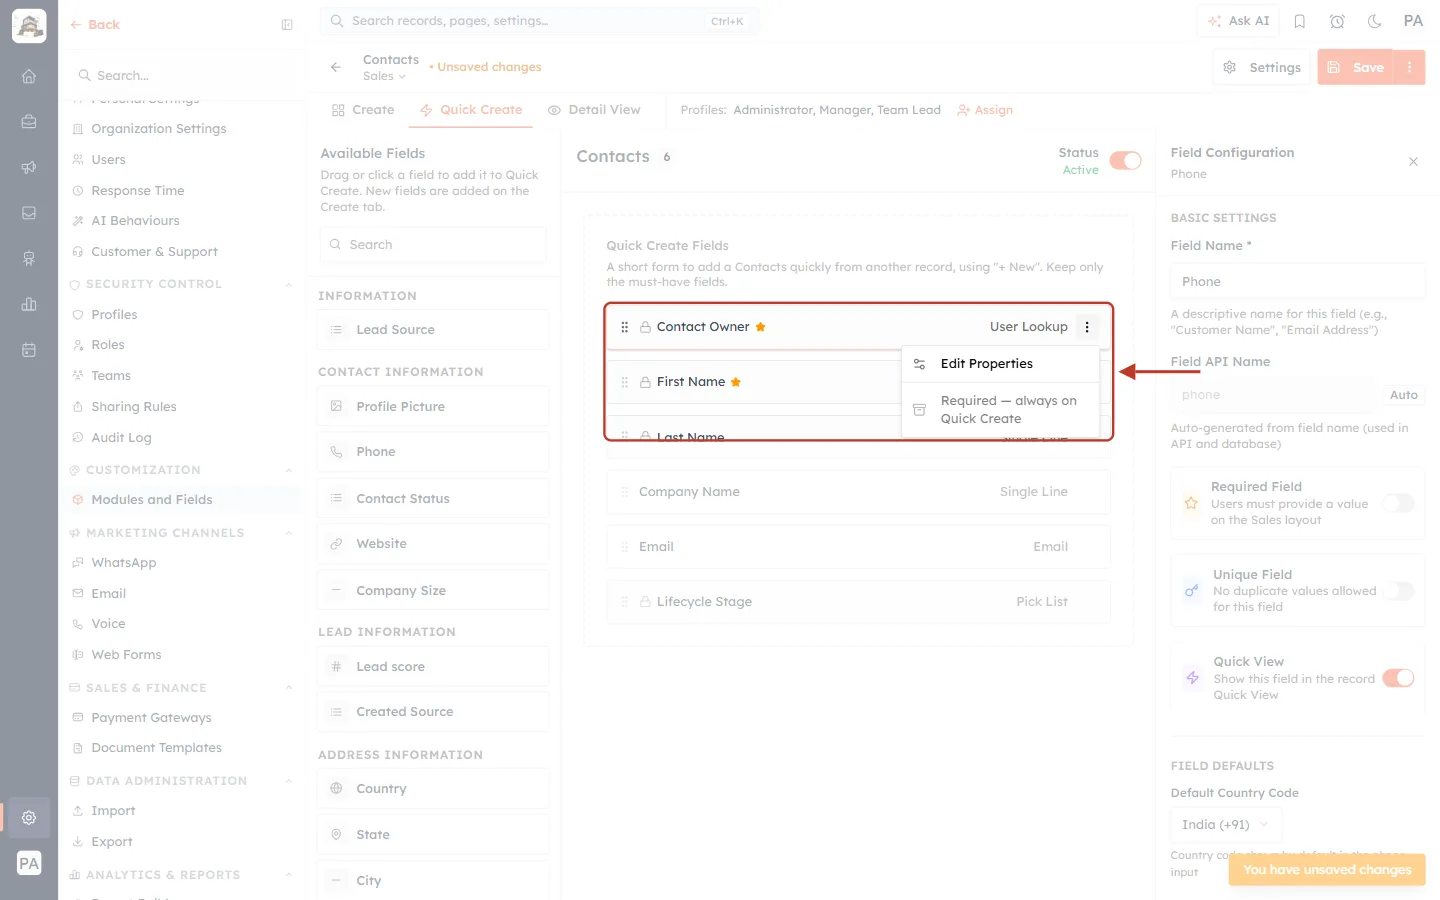
What this screenshot shows. The menu of Contact Owner, ringed: Required — always on Quick Create.
The record owner is always required and is always on the Quick Create form.
ℹ️
Even if a required field is missing from the list, the popup adds it back automatically, so people can always save the record.
Part 4: Save and check#
Step 8: Save the layout#
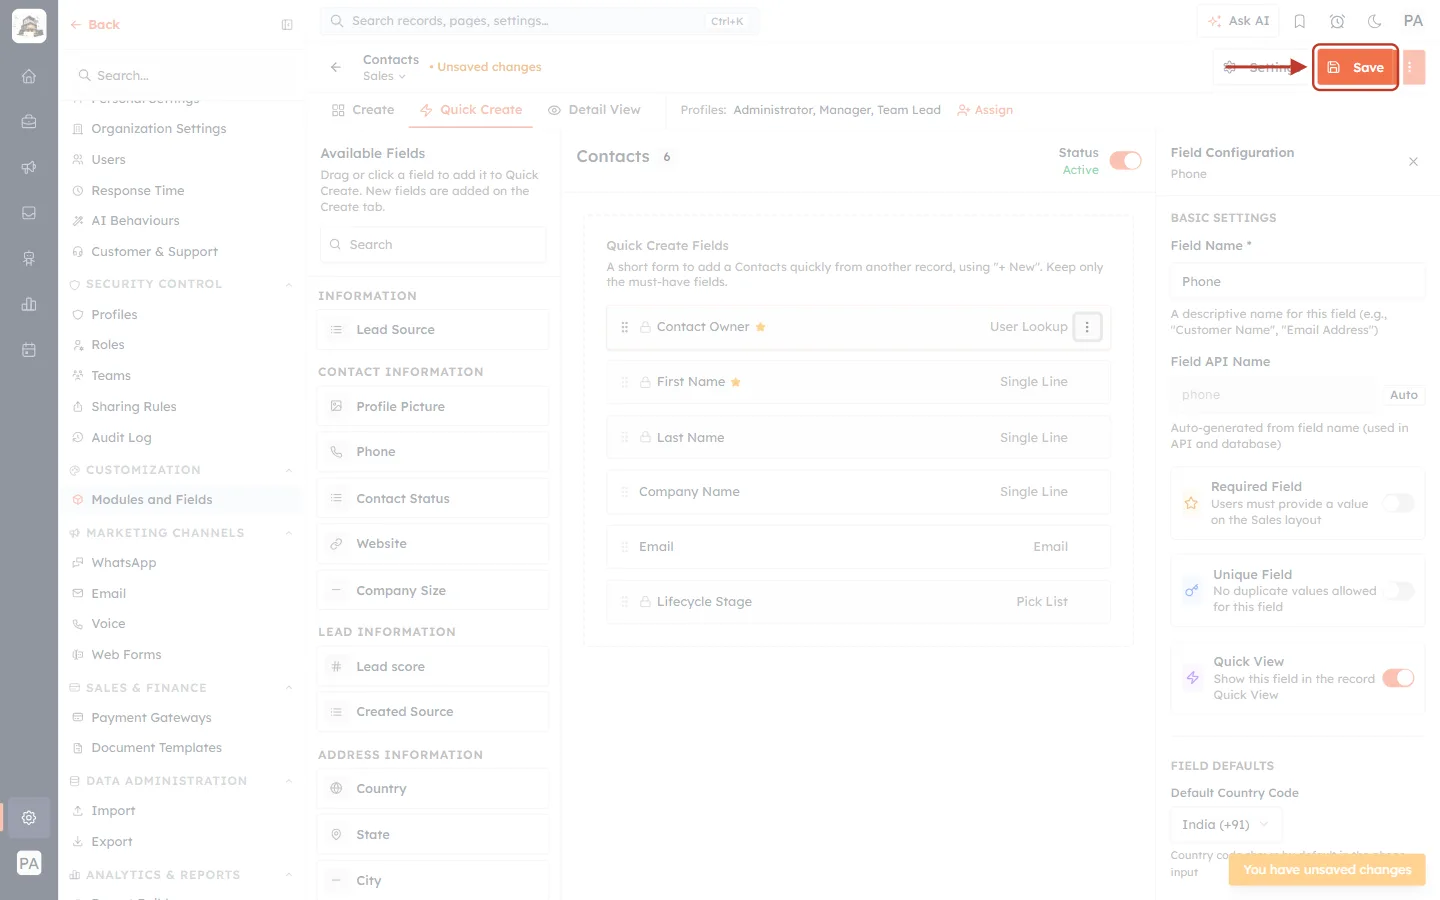
What this screenshot shows. The orange Save button at the top right of the builder, ringed.
It saves the Quick Create form together with any other change to the layout. Discard Changes (in the menu next to it) throws the changes away.
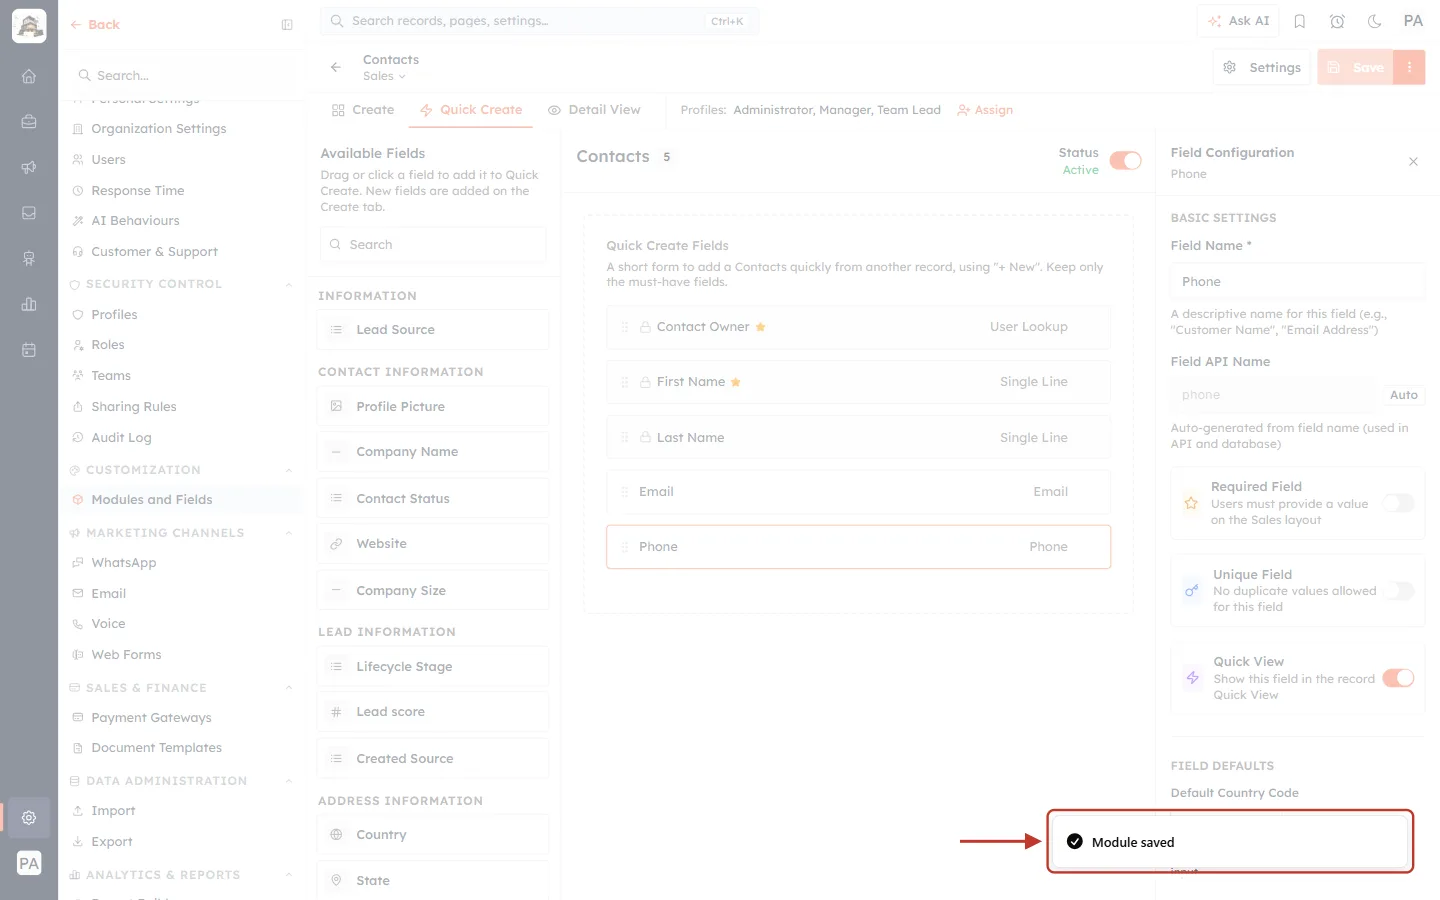
What this screenshot shows. The confirmation at the bottom right, ringed: Module saved.
From now on, everyone who gets the Sales layout sees the new Quick Create form.
Step 9: Check another layout#
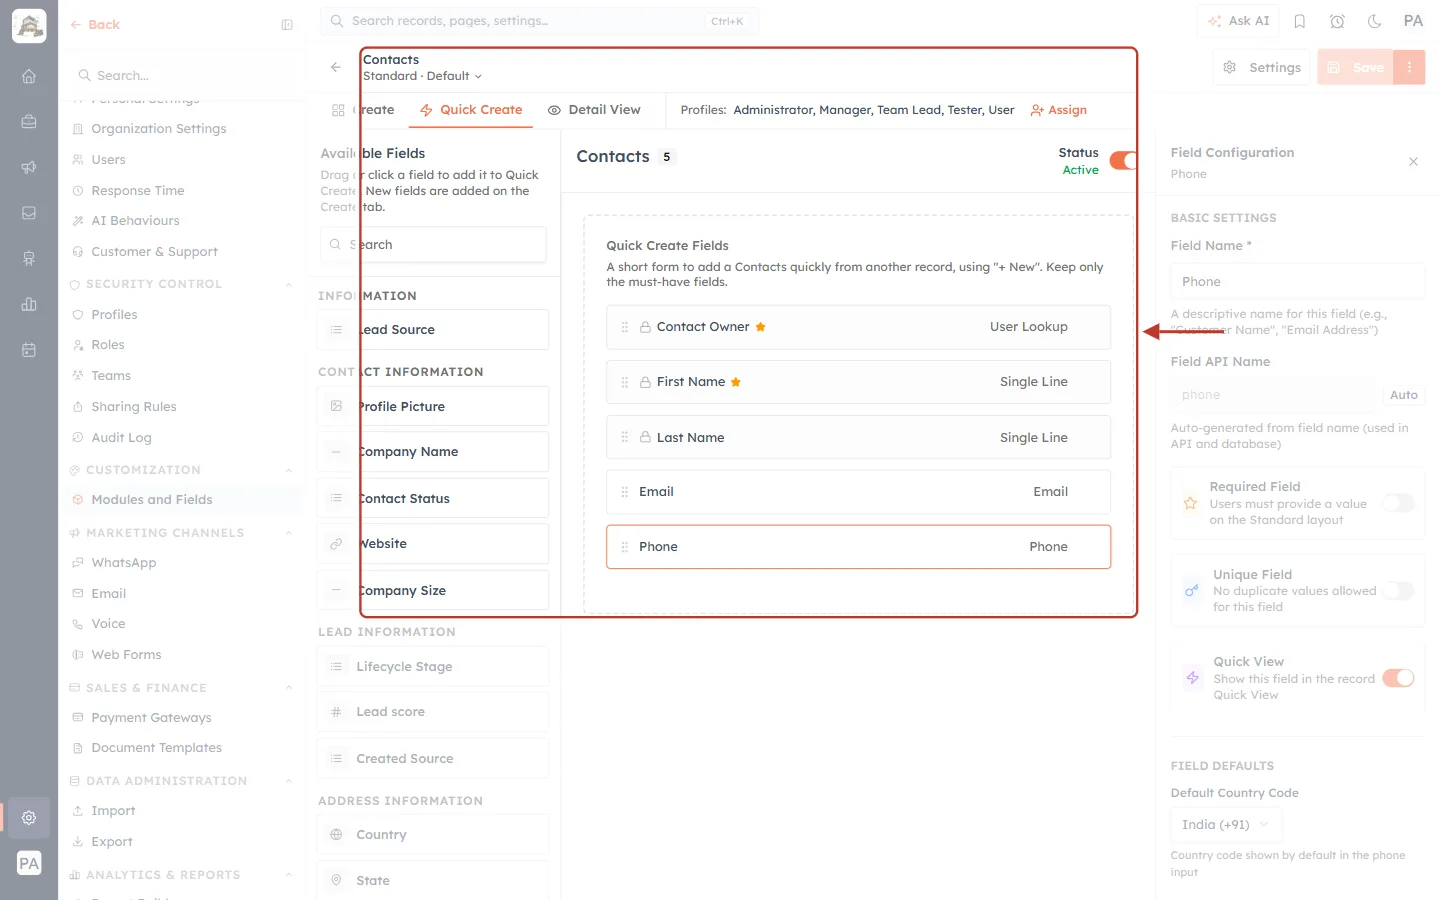
What this screenshot shows. The builder switched to Standard · Default (top left) and its Quick Create tab, ringed.
Standard still has its own five fields — Contact Owner, First Name, Last Name, Email and Phone.
Changing the Sales Quick Create form did not change Standard.
Part 5: What your team sees#
Here is the result for someone whose profile uses the Sales layout of Contacts. They are creating a deal and click the deal’s Contact Name field to pick a contact.
Step 10: Click New Record in the record picker#
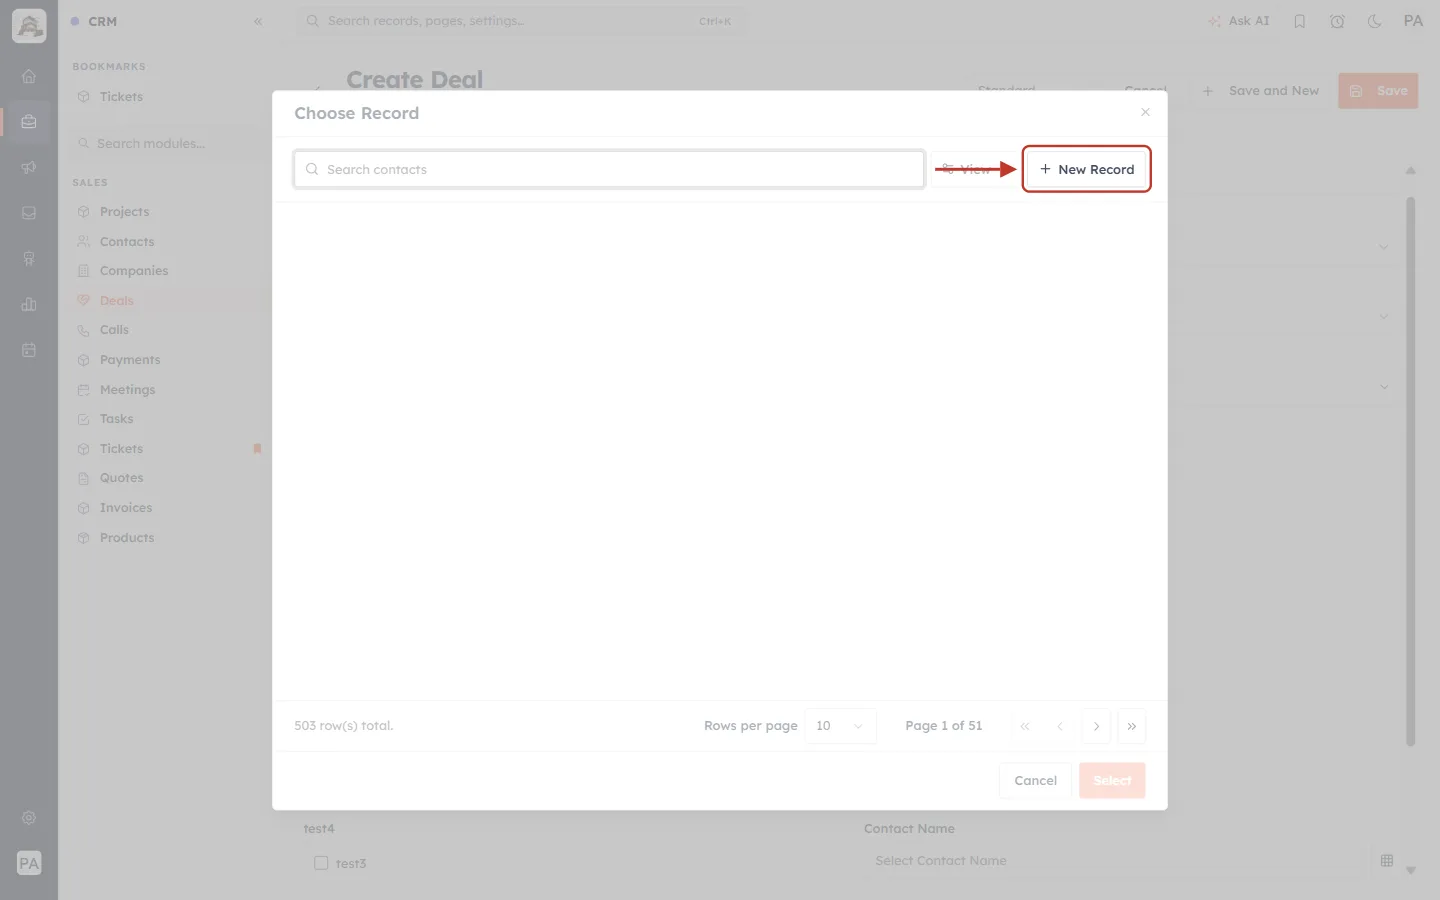
What this screenshot shows. The Choose Record window that opens from the Contact Name field, with + New Record ringed at the top right.
The window lists existing contacts to pick from (hidden in this picture), with a search box and a View menu.
When the contact doesn’t exist yet, click + New Record.
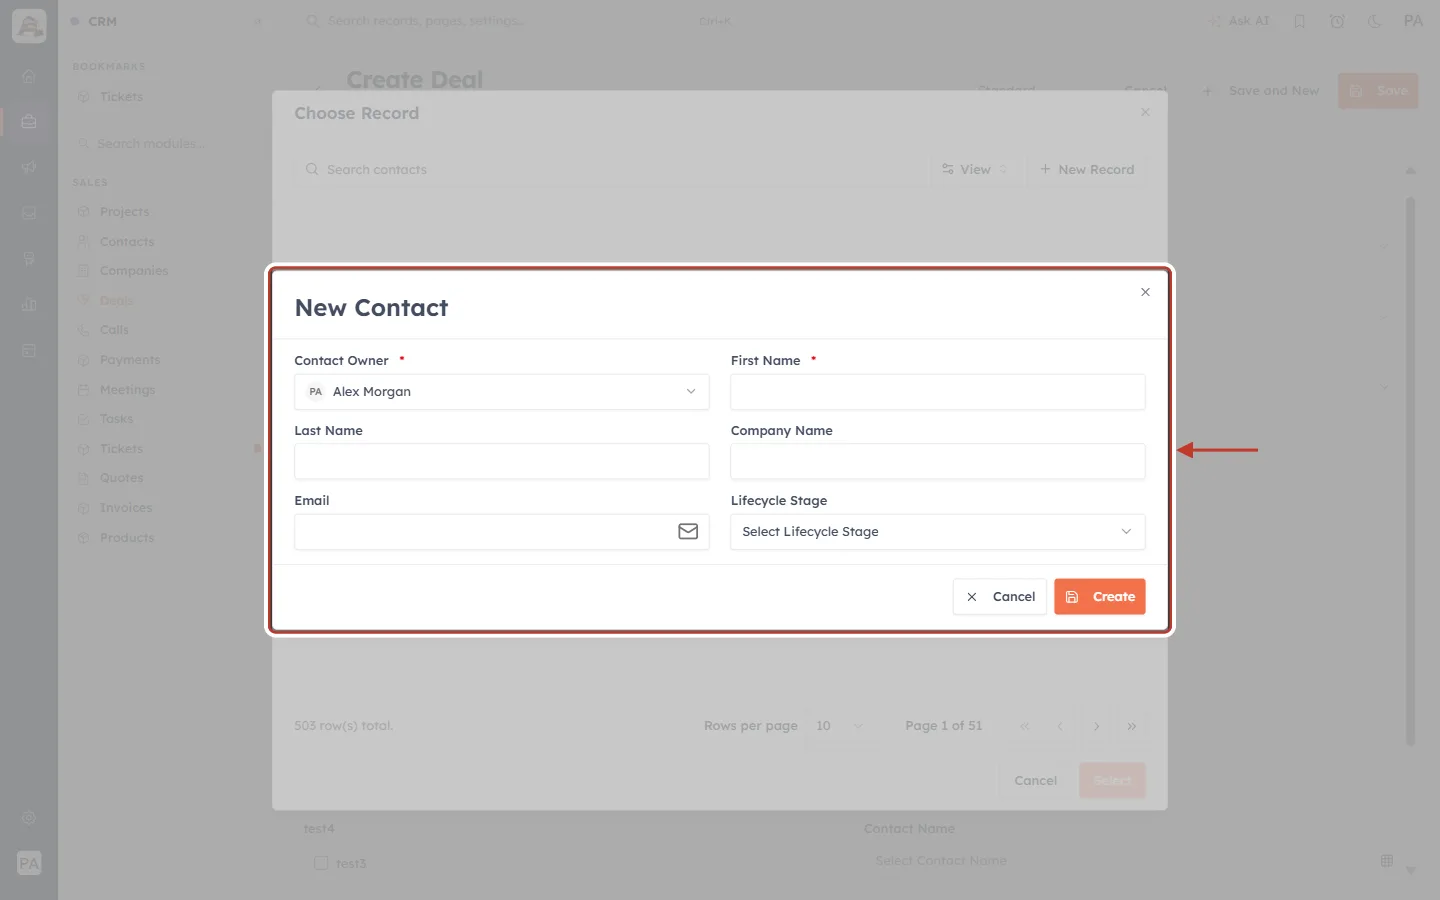
What this screenshot shows. The New Contact popup, ringed. It shows exactly the Sales layout’s Quick Create fields, in the same order.
Contact Owner and First Name (required, red asterisk), Last Name, Company Name, Email and Lifecycle Stage. Phone is no longer there.
Clicking Create saves the contact and picks it straight away in the deal’s Contact Name field; the person never leaves the deal.
✅
Which Quick Create form someone gets depends on the layout their profile uses for that module. If a layout’s Quick Create form is empty, the popup shows the full Create form instead.
Common questions#
Why isn’t a field listed in Available Fields?#
It is either already on the Quick Create form, not on this layout’s Create form (it may be in Unused Fields), or a type that is filled in automatically. Add it to the Create form first; it then appears in Available Fields.
Can I create a new field on the Quick Create tab?#
No. Add new fields on the Create tab. The Quick Create form is a shorter version of the Create form, not a separate set of fields.
Does removing a field from Quick Create delete it?#
No. It only takes the field off the short form. The field stays on the layout’s Create form, with its data.
Is there a limit to how many fields I can add?#
No fixed limit, but keep the form short: it is meant for the few fields people must fill in on the spot.
Does Quick Create change the full Create form?#
No. People who create a record from the module itself still get the layout’s full Create form.
Previous and next#
Previous: Choose Which Related Lists Each Layout Shows: Show, Rename and Pick Columns per Layout
Next: Importing Records When a Module Has Several Layouts: What Happens and How to Move Records
Related articles#
Was this article helpful?
Ready to implement this?
OpenAI Engage and apply what you just learned to your own workspace.
Open AI Engage CRM