Loading…


KnowledgeBase
Create Roles Step by Step: Build, Edit and Delete Your Role Hierarchy
Introduction#
Roles decide whose records each user can see. Managers see the records of the people who report to them. This guide builds a real three-level hierarchy, screen by screen:
Order | Role | Parent Role | Level after saving |
|---|---|---|---|
1 | Sales Director | No Parent (Top Level) | 0 |
2 | Sales Manager | Sales Director | 1 |
3 | Sales Representative | Sales Manager | 2 |
Then you give users their roles, edit a role, and learn the rules for deleting one. Each screenshot is followed by a description of the whole screen.
ℹ️
New to roles? Read Understanding the Role Hierarchy: How Roles Decide Whose Records Each User Can See first. It explains parent roles, levels and visibility.
Before You Begin#
Sketch your org chart. Each box becomes a role, and each line to a manager becomes a parent.
Build top-down. A parent must exist before you can pick it, so create the top role first.
You need access to Settings → Security Control → Roles. The account owner and administrators have it.
Keep it simple. For a small sales team, three levels is enough. You can add more later without affecting existing data.
Part 1: Open the Roles Page#
Step 1: Open Settings#
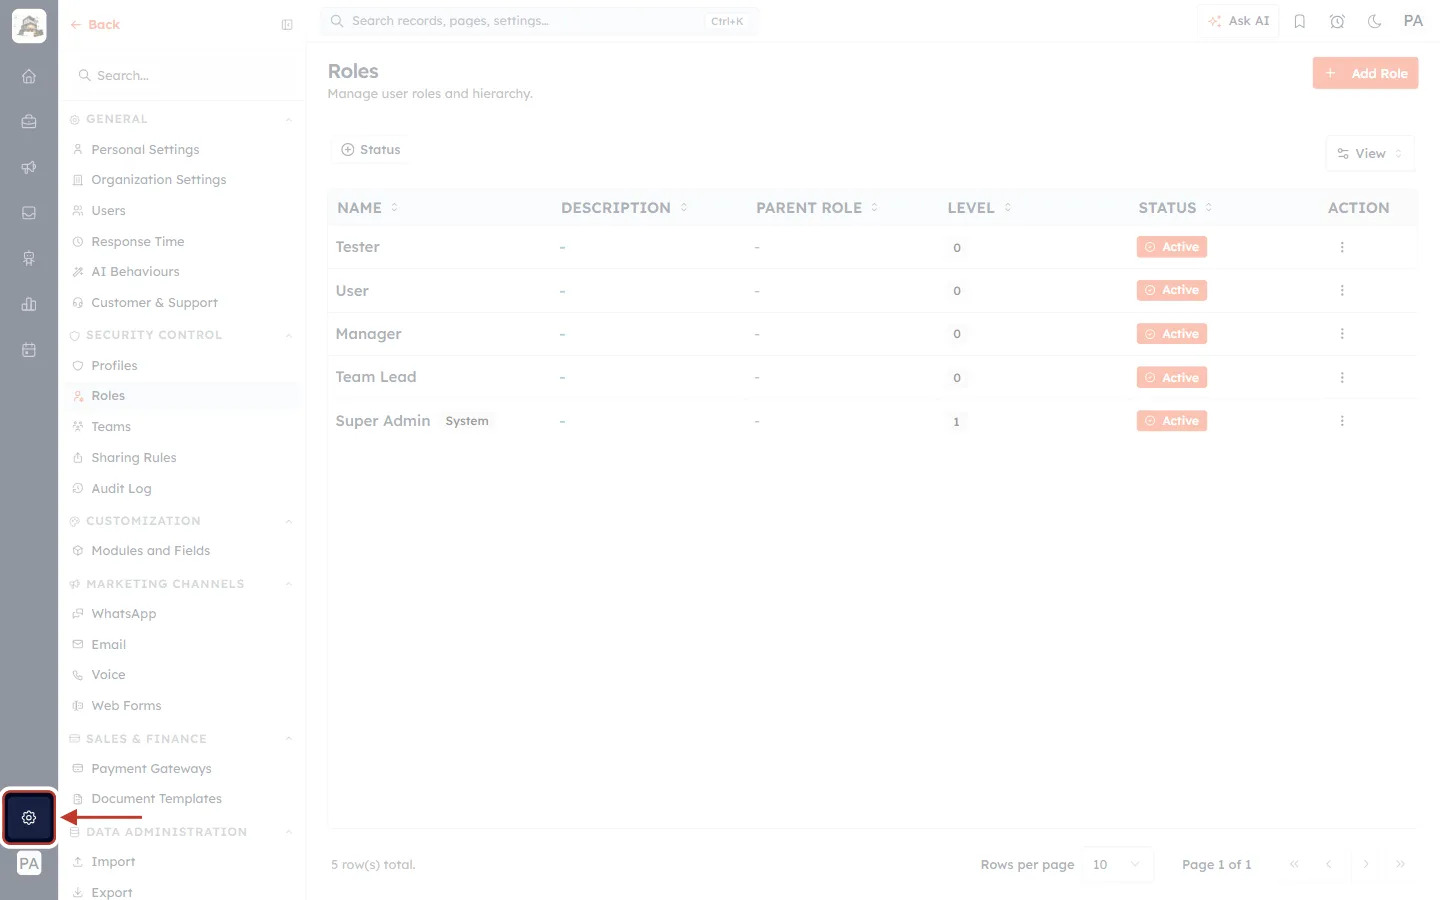
What this screenshot shows. The ringed gear at the bottom of the dark icon bar on the far left opens Settings.
It sits just above your initials. The Settings menu opens in the second column.
Step 2: Click Roles under Security Control#
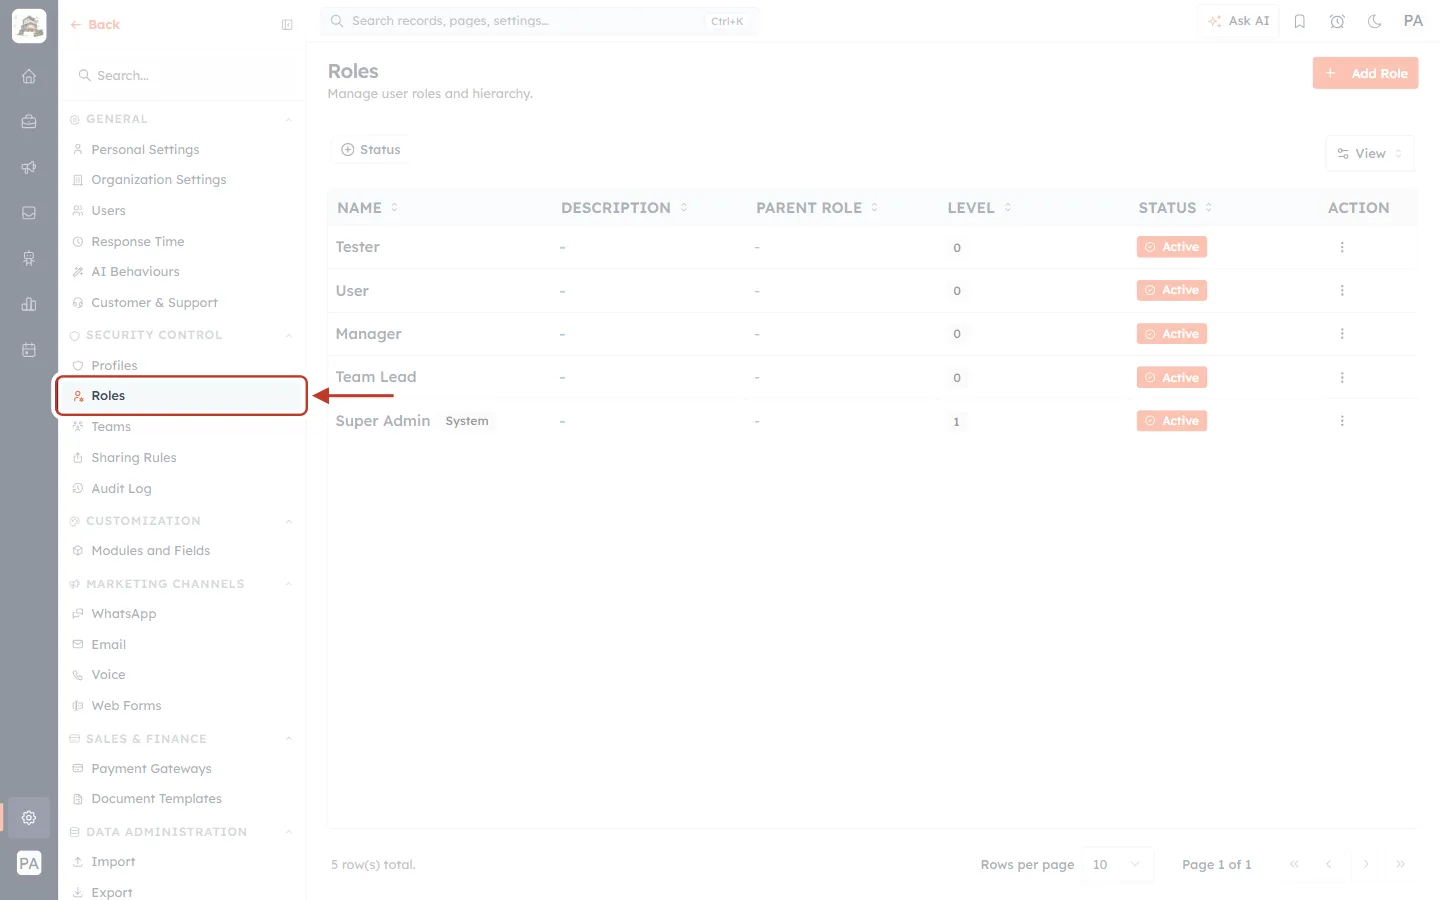
What this screenshot shows. Roles is ringed in the SECURITY CONTROL group.
The same group holds Profiles, Teams, Sharing Rules and Audit Log.
The Roles page opens on the right.
Step 3: Read the Roles list#
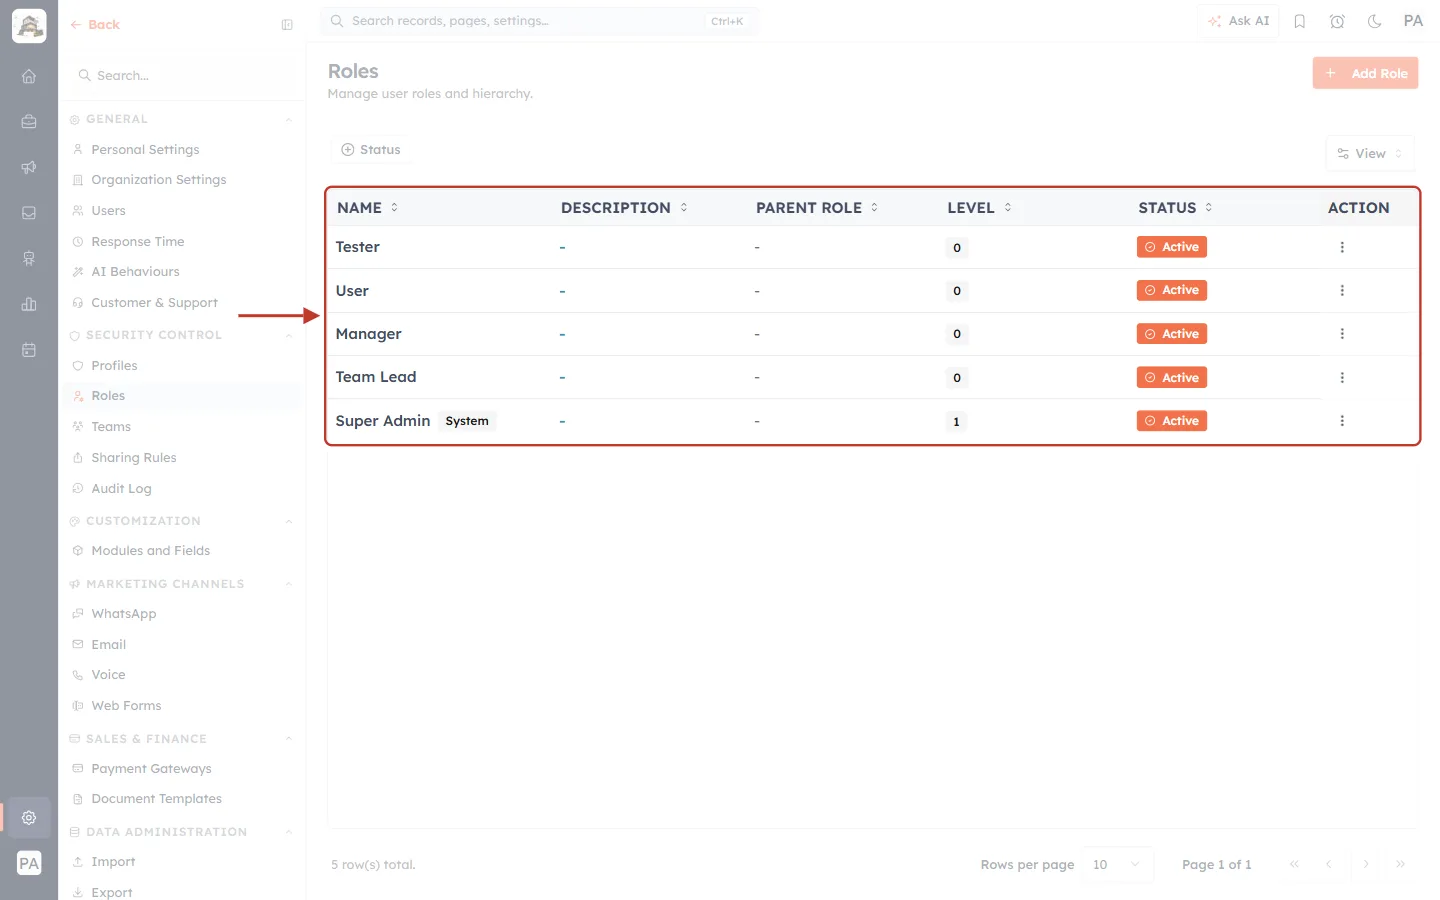
What this screenshot shows. The ringed table lists every role. The heading reads Roles, Manage user roles and hierarchy.
NAME: the role. Super Admin carries a System badge and can’t be deleted.
DESCRIPTION: what the role is for (a dash if empty).
PARENT ROLE: the role above it. A dash means a top-level role.
LEVEL: how deep the role sits. Lower numbers mean more authority.
STATUS: Active or Inactive. ACTION: the ⋮ menu.
Above the table, Status filters by status and View chooses columns. Below it, 5 row(s) total counts the roles.
Part 2: Create the Top-Level Role#
Step 4: Click Add Role#
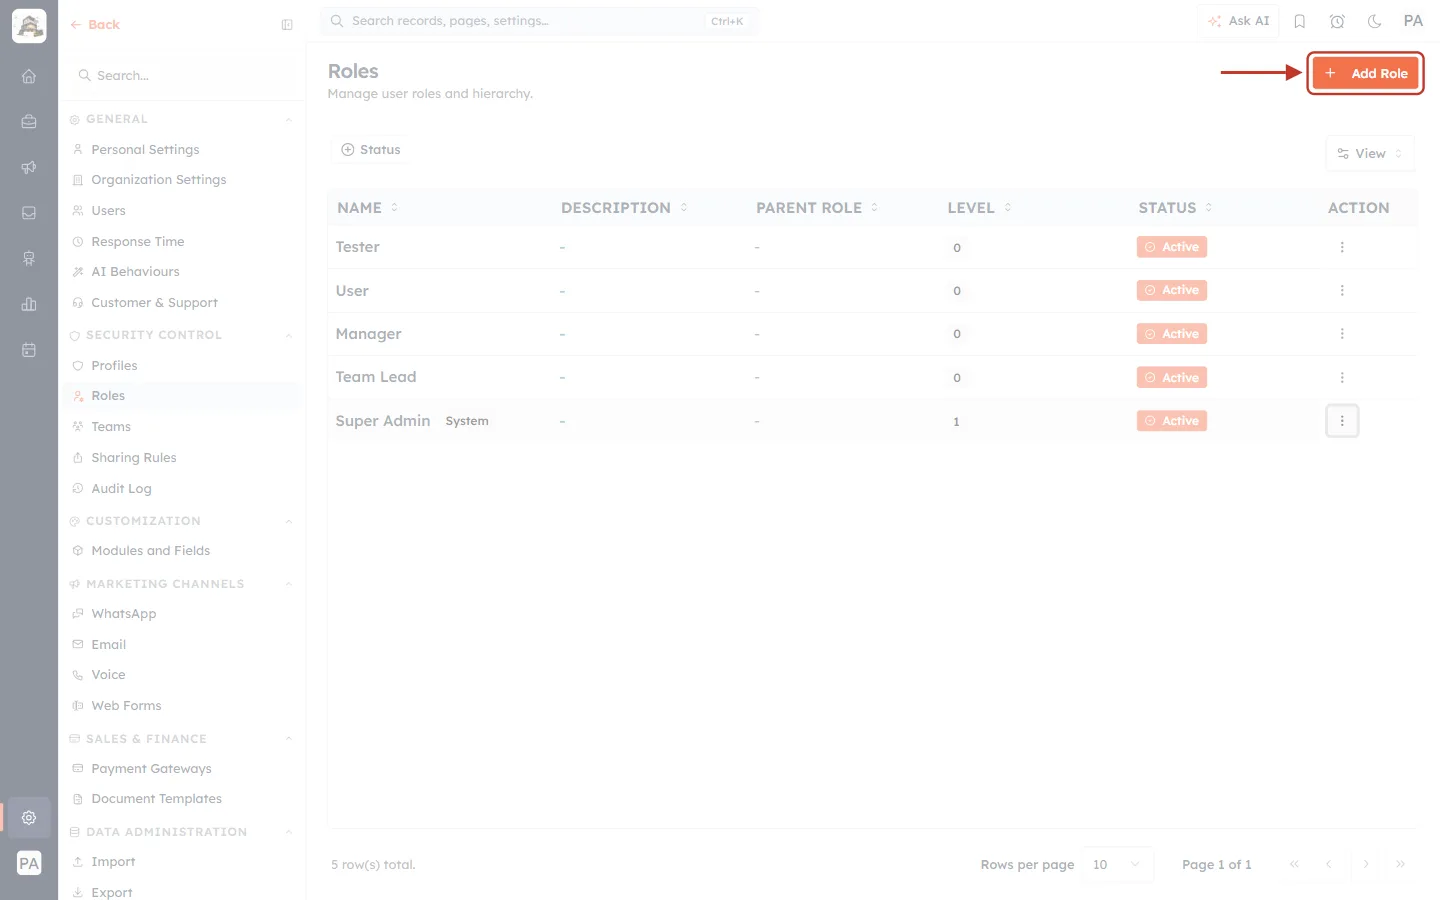
What this screenshot shows. The orange + Add Role button at the top right is ringed.
It opens the Create Role page (Add a new role to the system.).
Step 5: Look over the Create Role form#
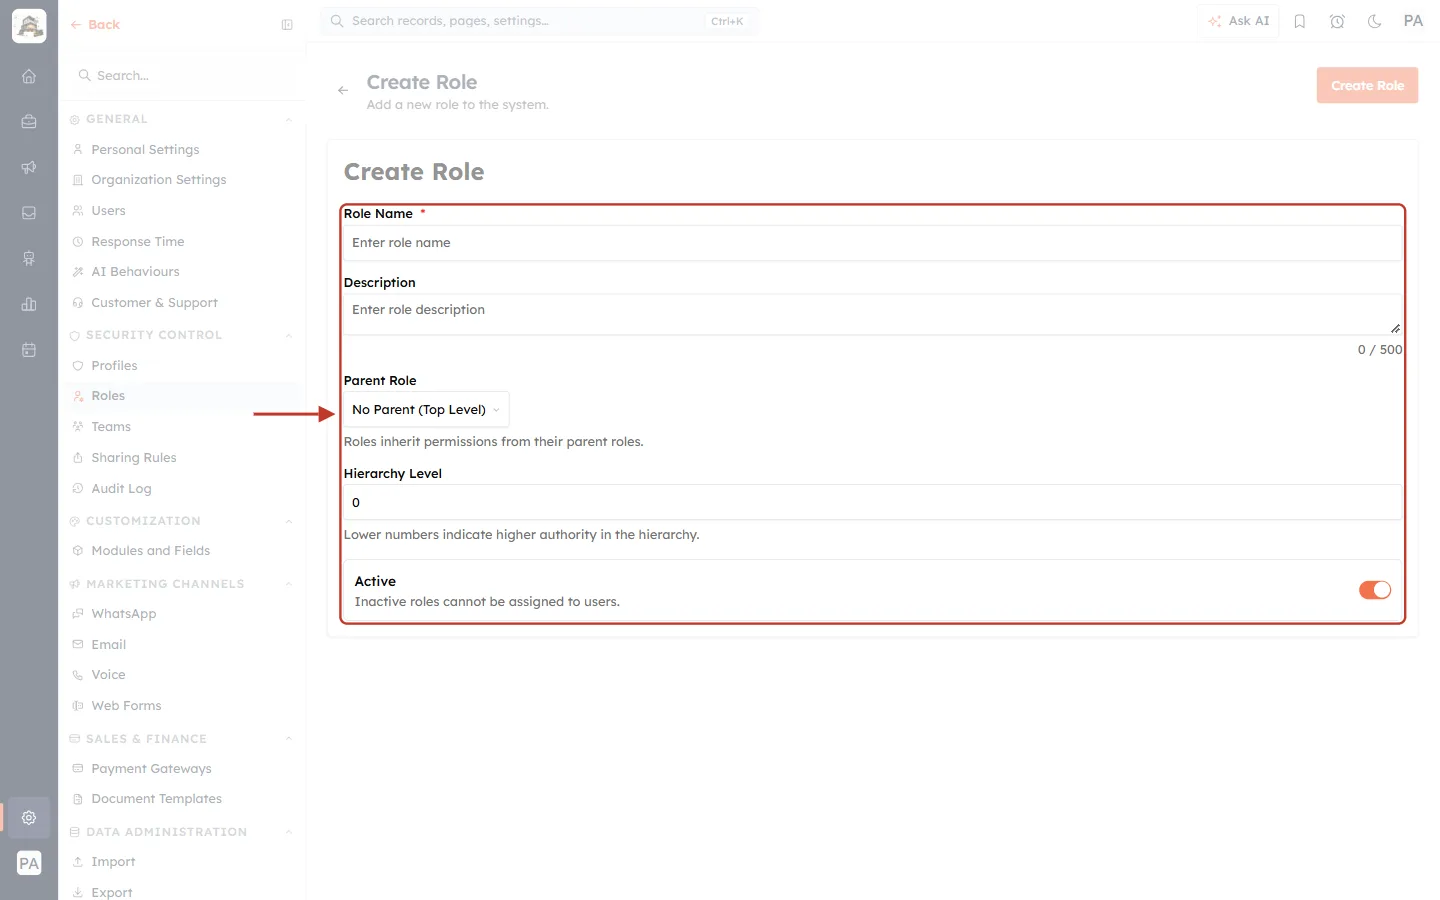
What this screenshot shows. The ringed form holds every setting of a role.
Role Name * (required): Enter role name.
Description: optional, up to 500 characters (0 / 500).
Parent Role: starts at No Parent (Top Level). The hint reads Roles inherit permissions from their parent roles.
Hierarchy Level: starts at 0. Lower numbers indicate higher authority in the hierarchy.
Active (on): Inactive roles cannot be assigned to users.
Step 6: Enter the Role Name and Description#
The name is required. If you click Create Role without one, the form stops you:
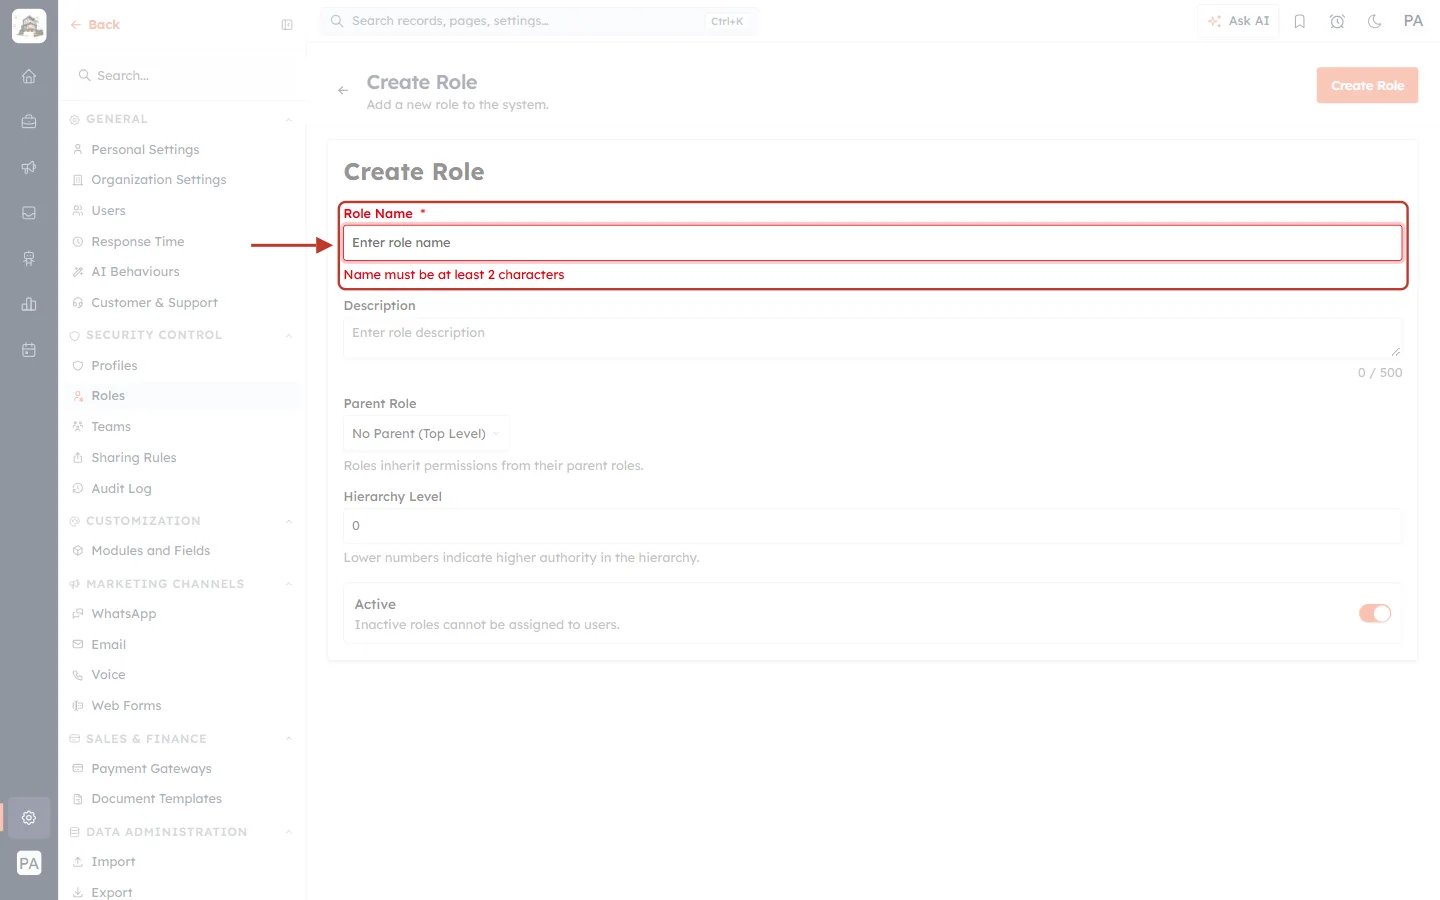
What this screenshot shows. The Role Name field is ringed in its error state.
The label and box turn red, and Name must be at least 2 characters appears underneath.
Nothing is saved until a name of at least two characters is entered.
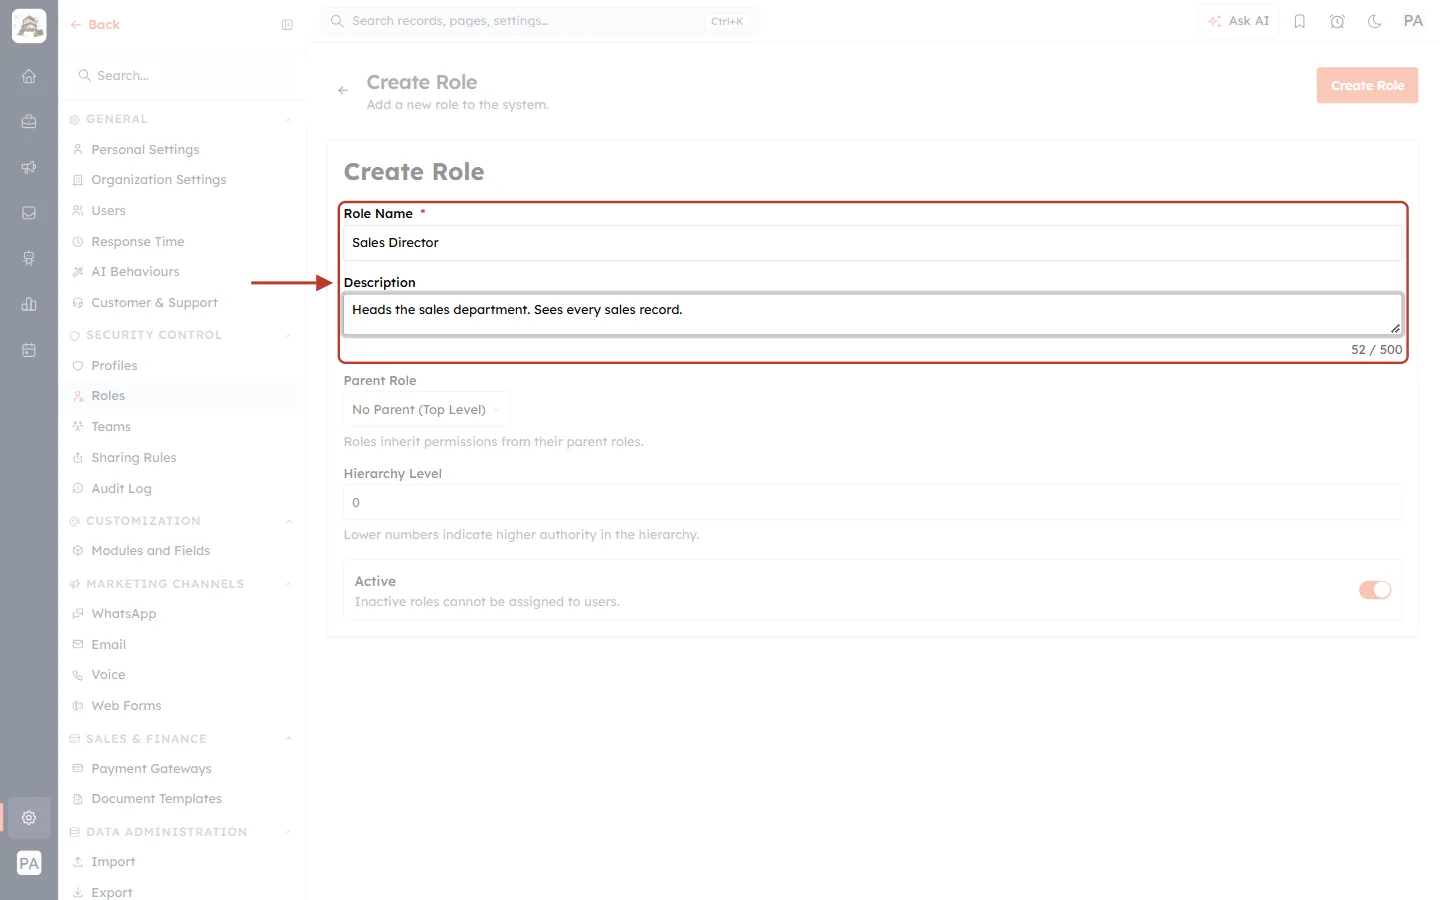
What this screenshot shows. The ringed fields are filled in for the first role.
Role Name: Sales Director. Use the job title as it appears in your organisation, because this name shows in user assignments and sharing rules.
Description: Heads the sales department. Sees every sales record. (52 / 500).
Step 7: Leave Parent Role at the top, and check Level and Active#
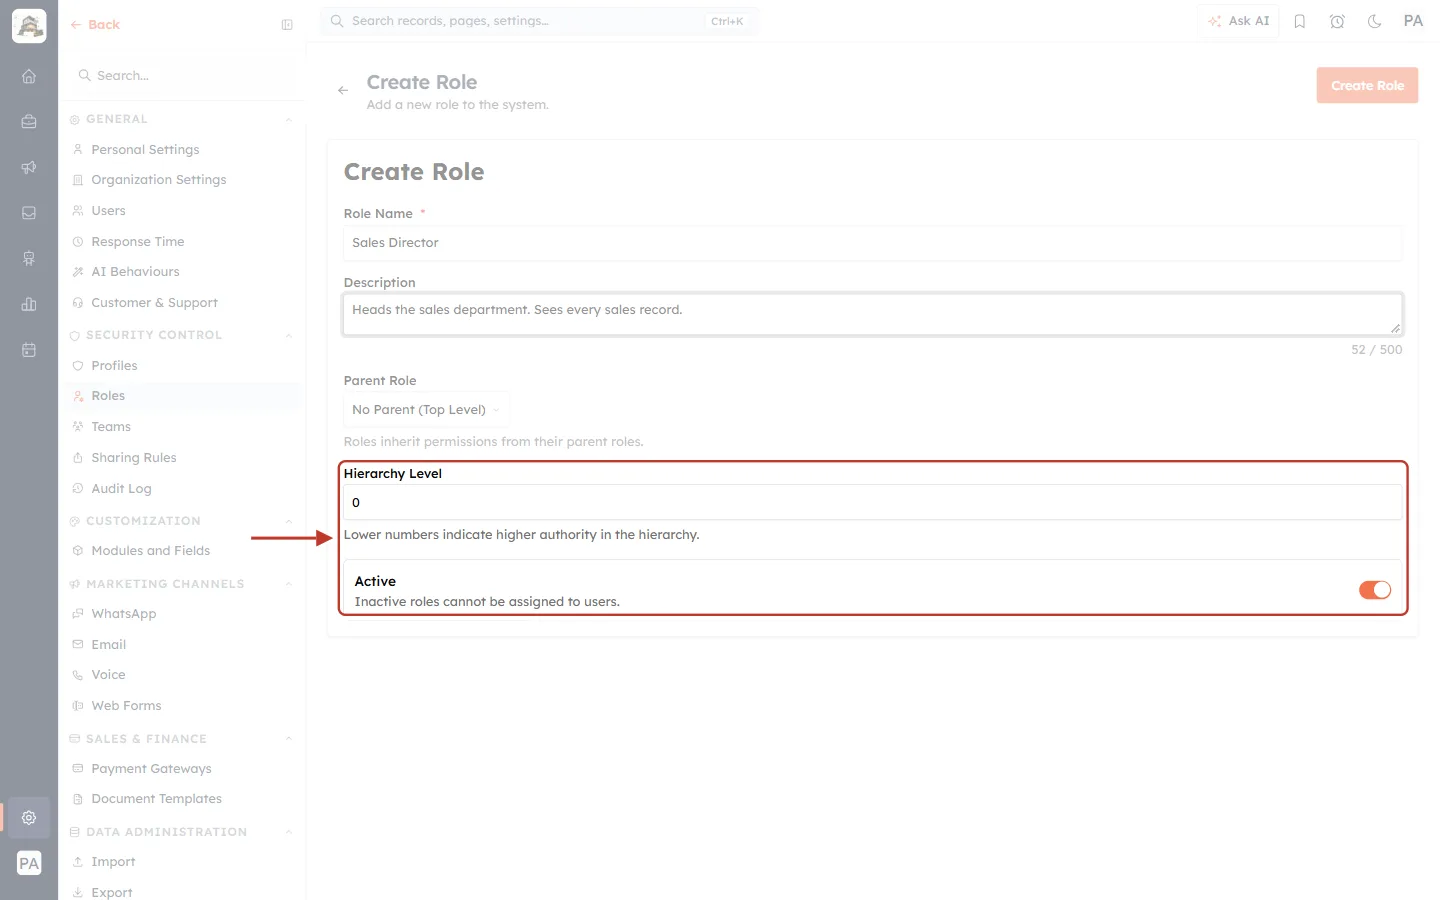
What this screenshot shows. The ringed settings complete the top-level role.
Parent Role (above, not ringed) stays at No Parent (Top Level), because Sales Director reports to nobody in this tree.
Hierarchy Level: 0, the top of the tree. For a top-level role, the number you enter here is the level it gets.
Active: leave it on so the role can be given to users.
Step 8: Click Create Role#
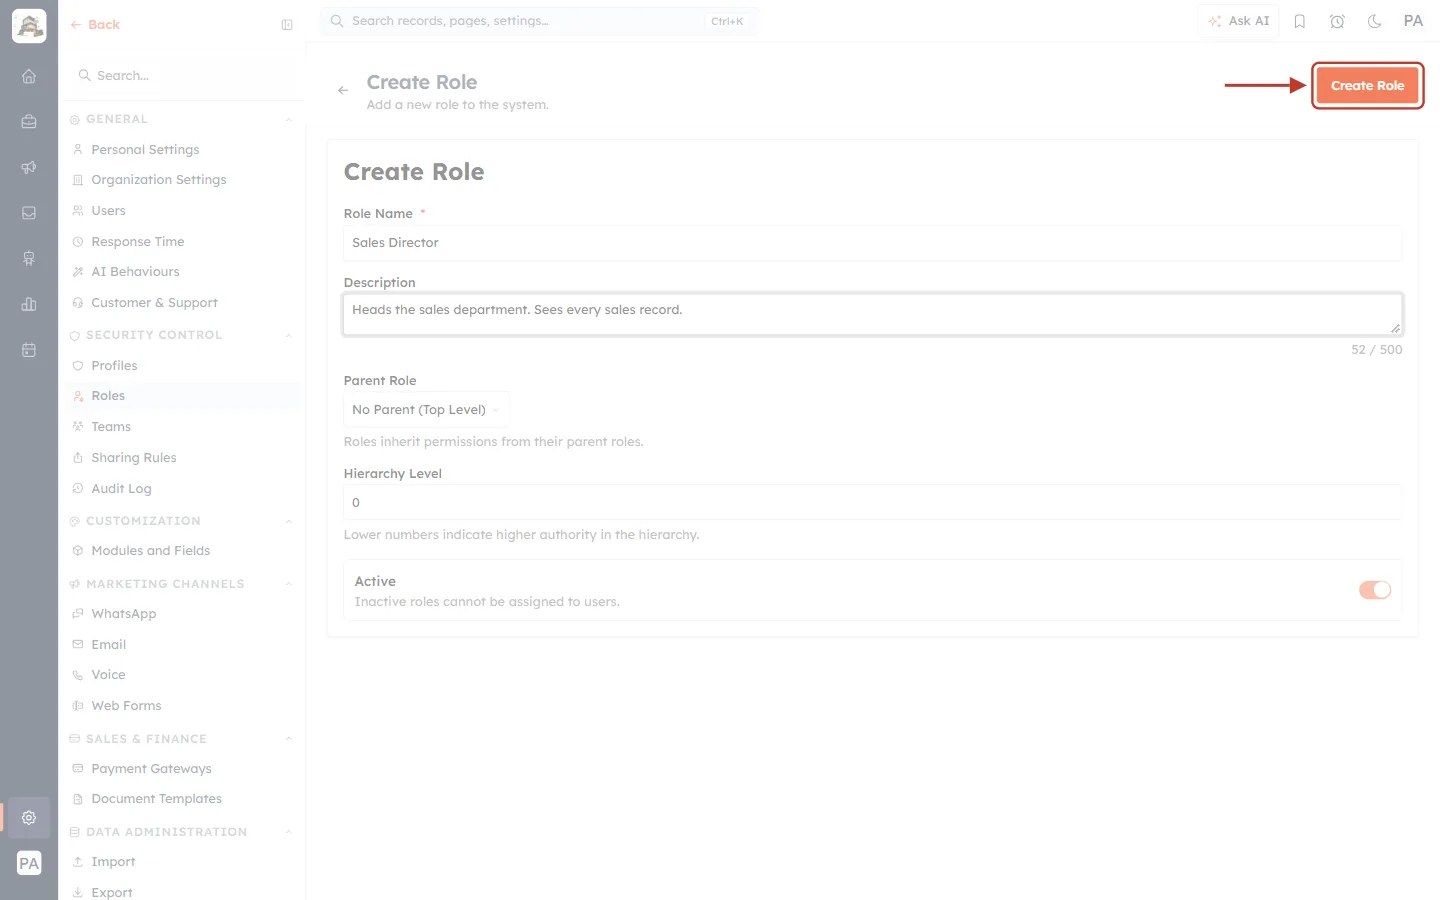
What this screenshot shows. The orange Create Role button at the top right is ringed.
Click it to save. The button briefly reads Creating…, then you return to the list.
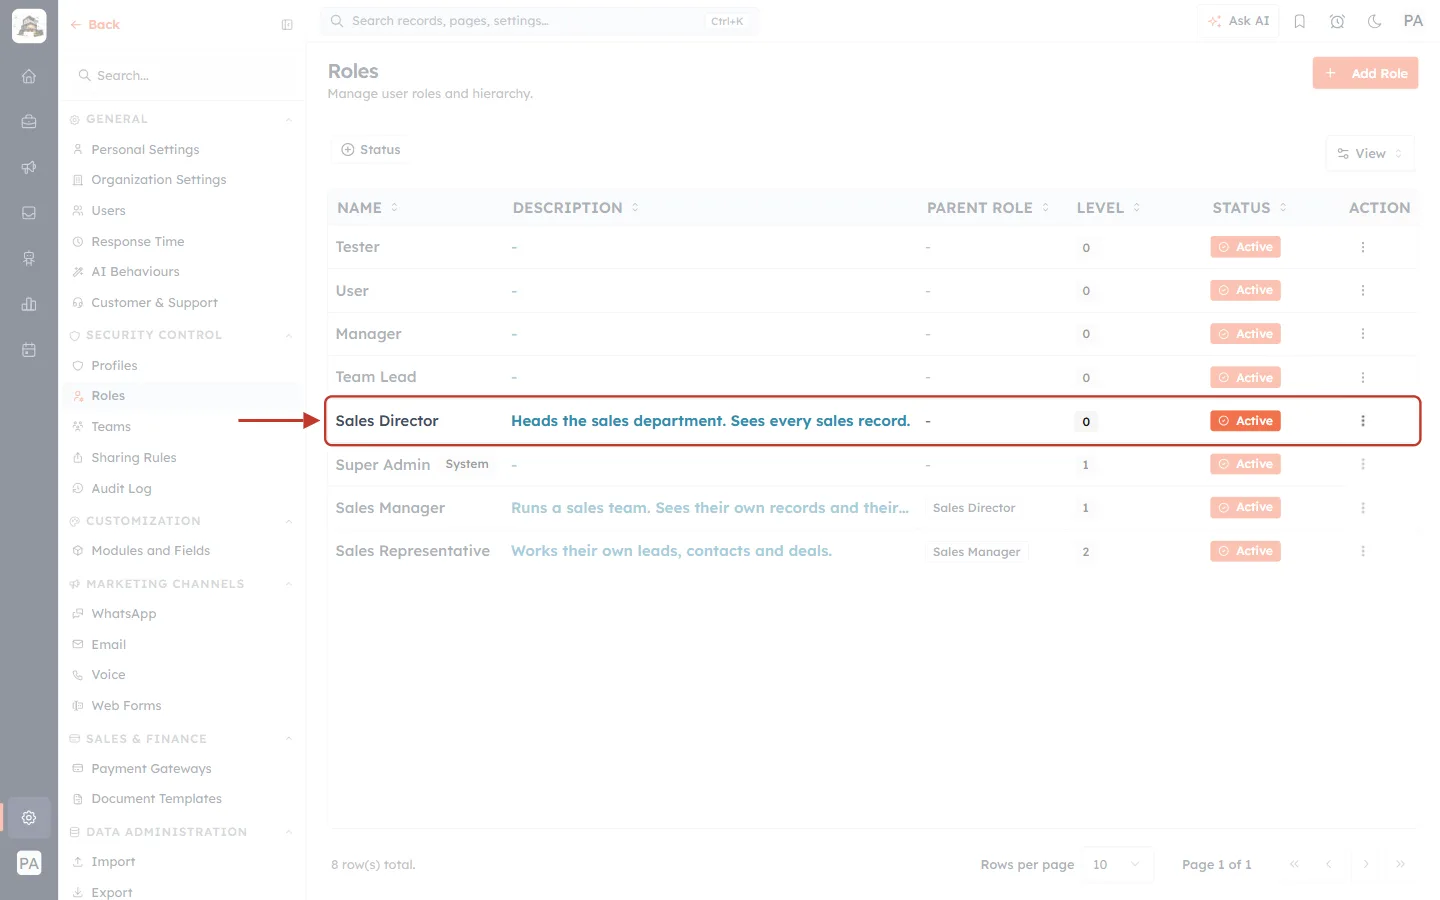
What this screenshot shows. The new Sales Director row is ringed on the Roles list.
DESCRIPTION shows the text you entered. PARENT ROLE is a dash (top level). LEVEL is 0. STATUS is Active.
Part 3: Add Roles Beneath It#
Step 9: Create Sales Manager and choose its parent#
Click + Add Role again, enter Sales Manager and a description, then open Parent Role.
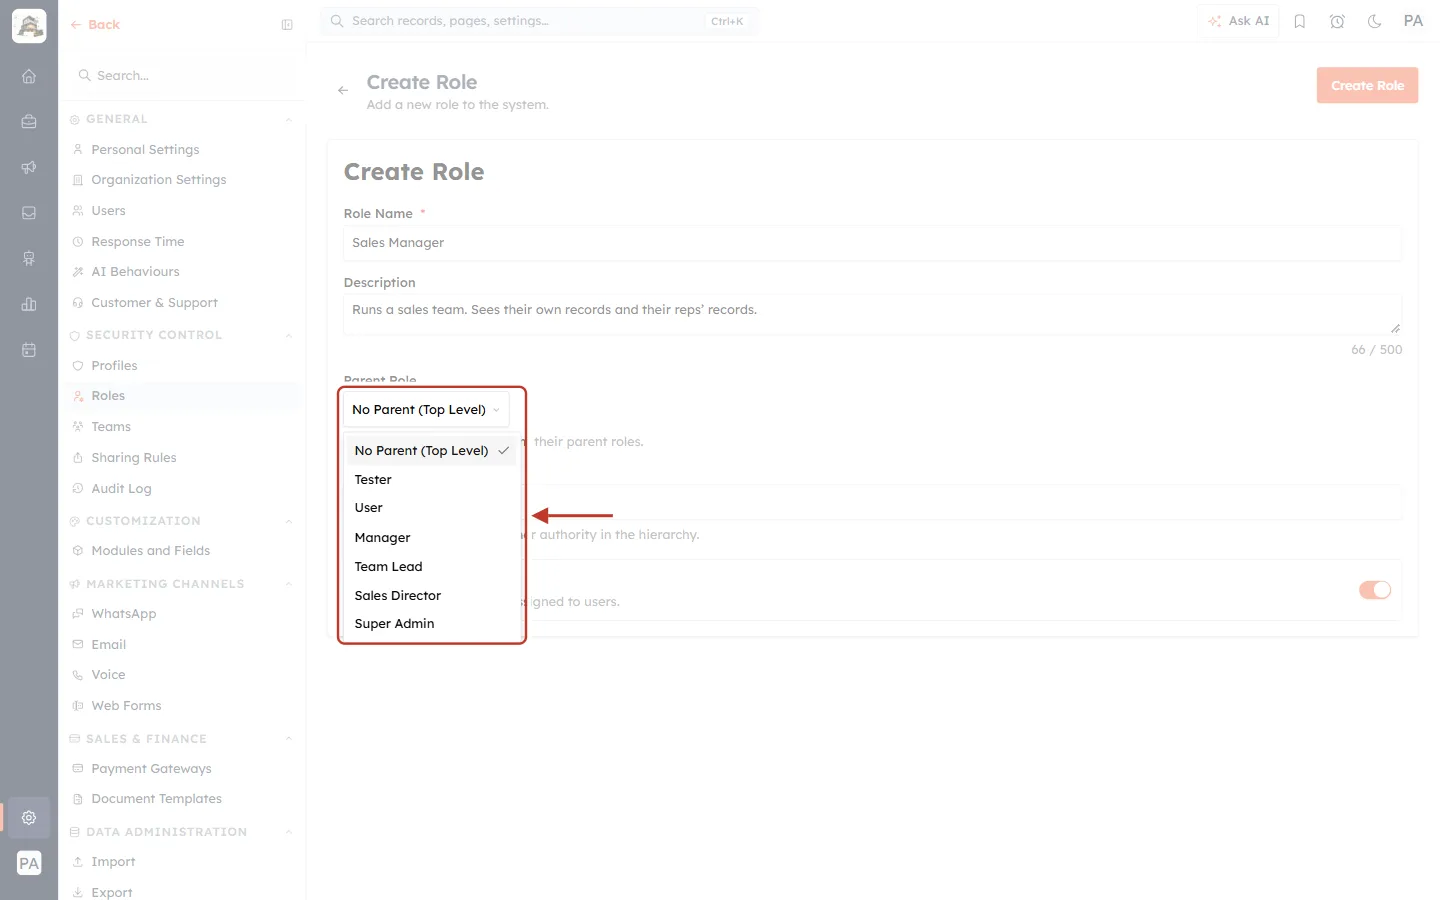
What this screenshot shows. The Parent Role drop-down is open and ringed.
It lists No Parent (Top Level) (ticked, the current choice) and every existing role: Tester, User, Manager, Team Lead, Sales Director and Super Admin.
Choose Sales Director, the role Sales Managers report to.
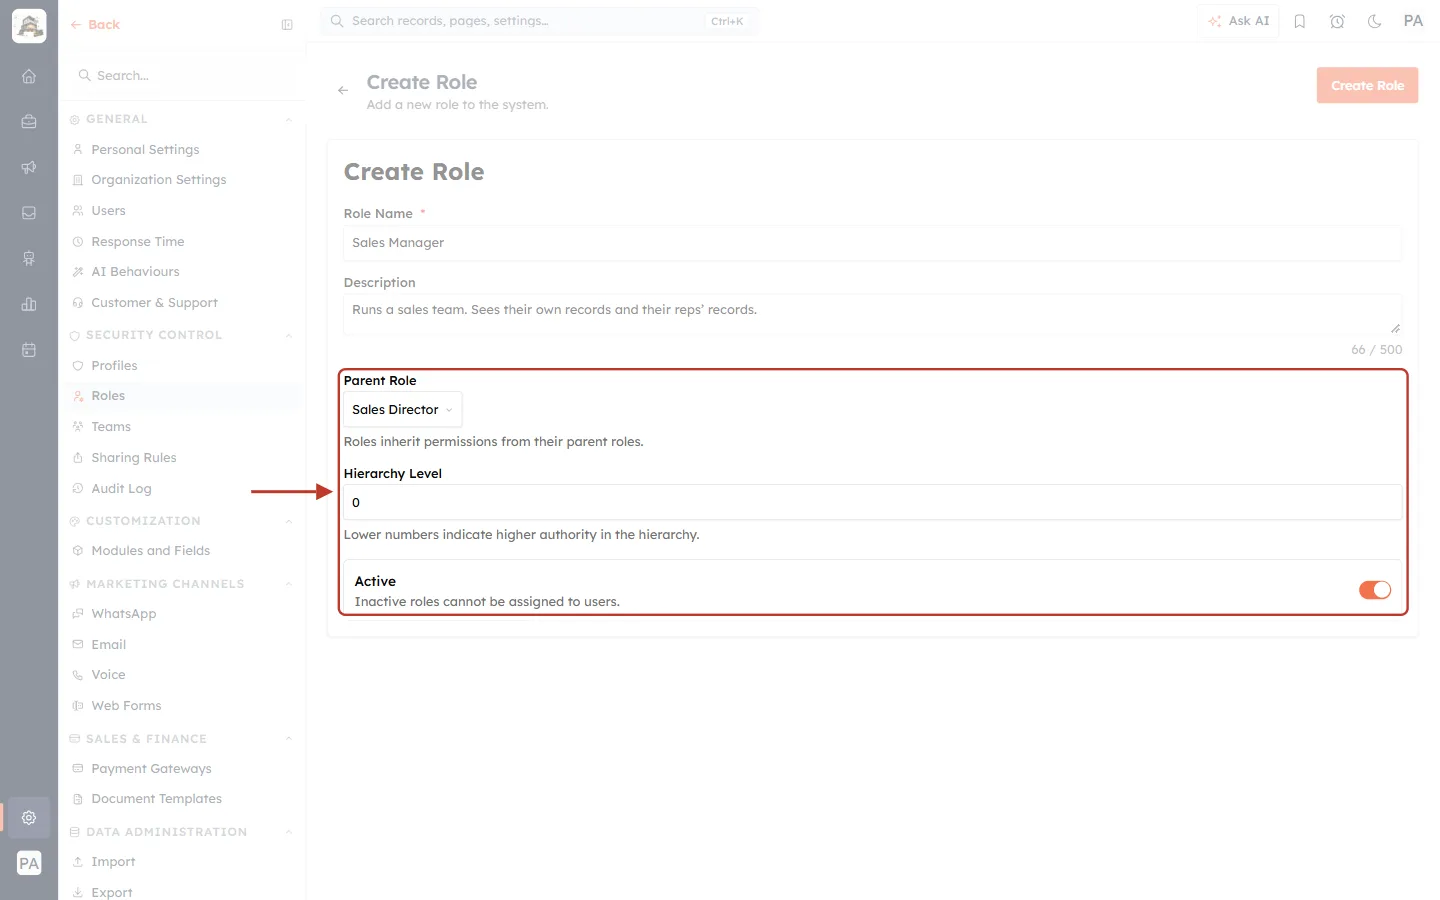
What this screenshot shows. The ringed settings after choosing the parent.
Parent Role: Sales Director.
Hierarchy Level still shows 0. Leave it. When a role has a parent, the CRM saves it as the parent’s level plus one (here 1).
Active stays on. Click Create Role.
Step 10: Create Sales Representative under Sales Manager#
Repeat the same steps for Sales Representative, with Parent Role set to Sales Manager, and click Create Role.
Step 11: Check the finished hierarchy#
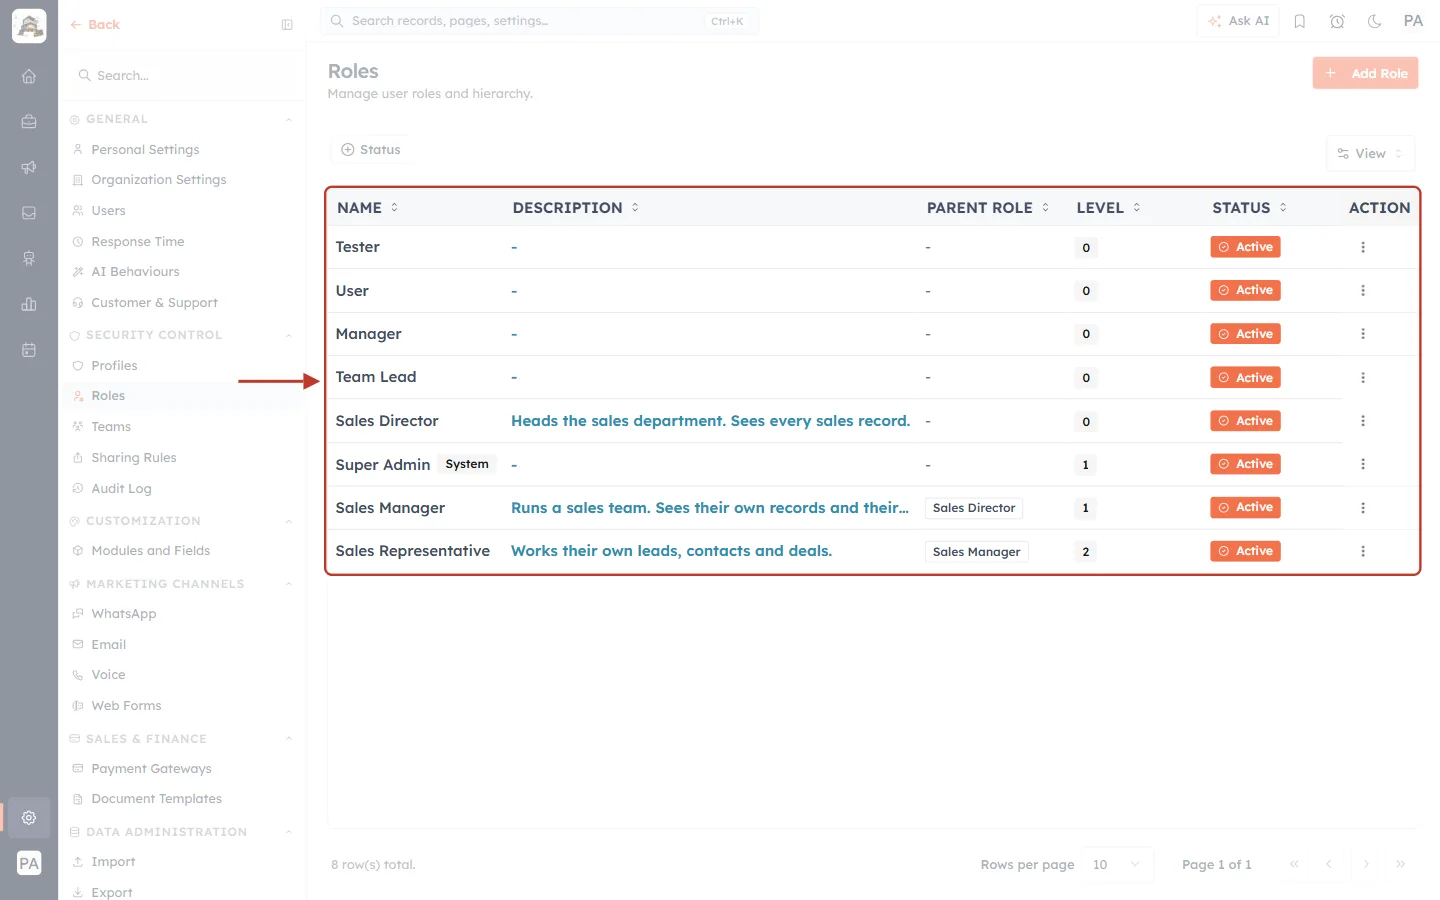
What this screenshot shows. The ringed Roles list now shows all three new roles.
Sales Director: no parent, level 0.
Sales Manager: parent Sales Director, level 1.
Sales Representative: parent Sales Manager, level 2.
The levels were set automatically from the parents. All three are Active, and the list now counts 8 roles.
✅
Read the PARENT ROLE and LEVEL columns from top to bottom. They should match your org chart. If a role is in the wrong place, edit it and change its parent (Part 5).
Part 4: Give Users Their Roles#
The hierarchy takes effect once users hold the roles. Go to Settings → Users.
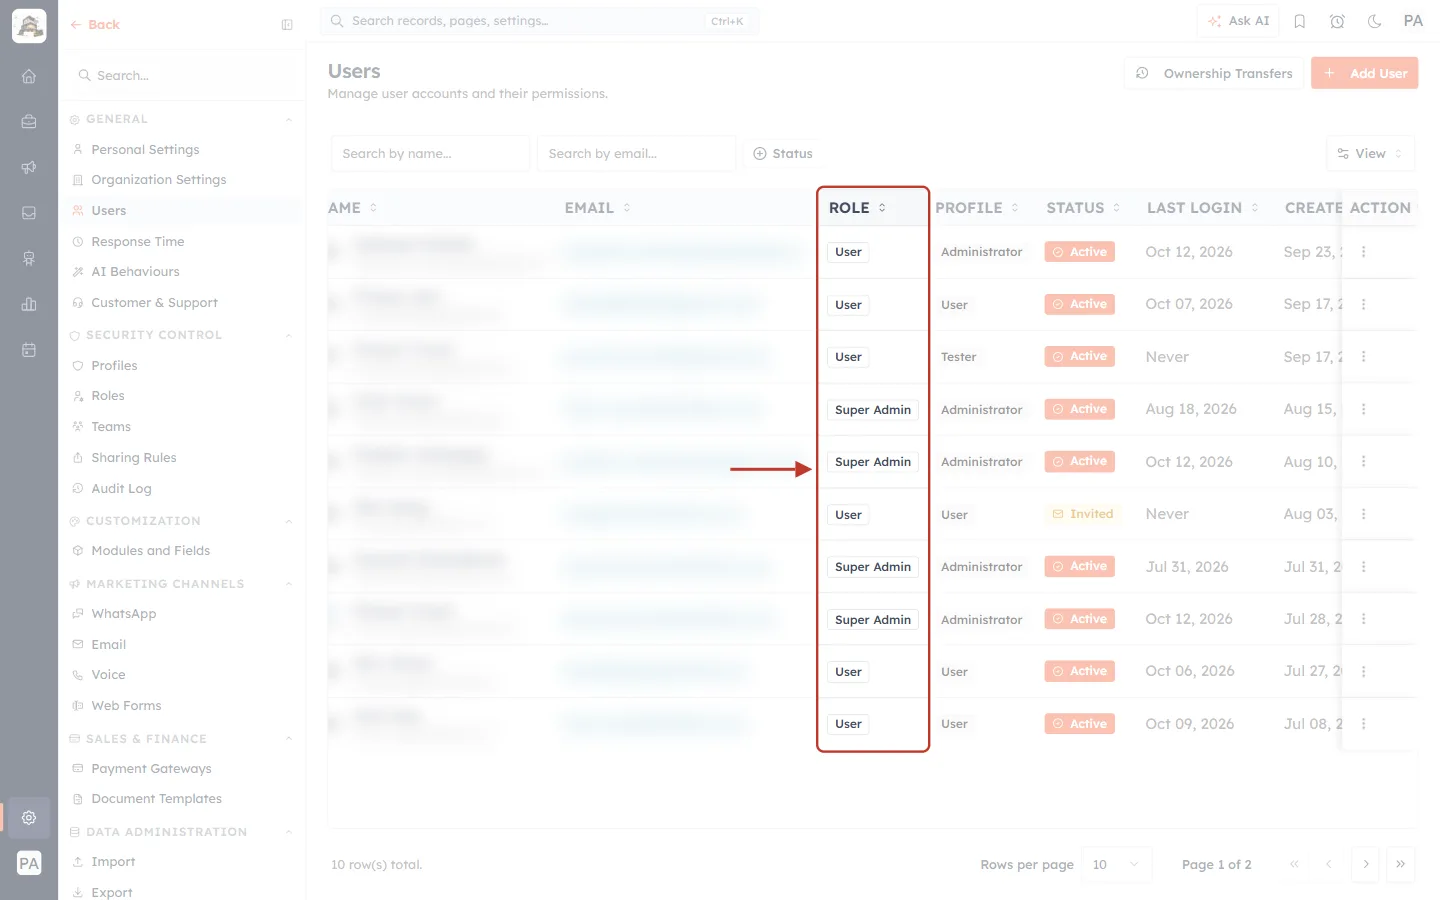
What this screenshot shows. The ROLE column of the Users list is ringed. Names and email addresses are blurred.
Each user shows their current role, for example User or Super Admin.
The PROFILE column beside it is their permission profile, set separately.
Open a user’s ⋮ menu to find Edit, Send Password Reset Email, Deactivate and Delete.
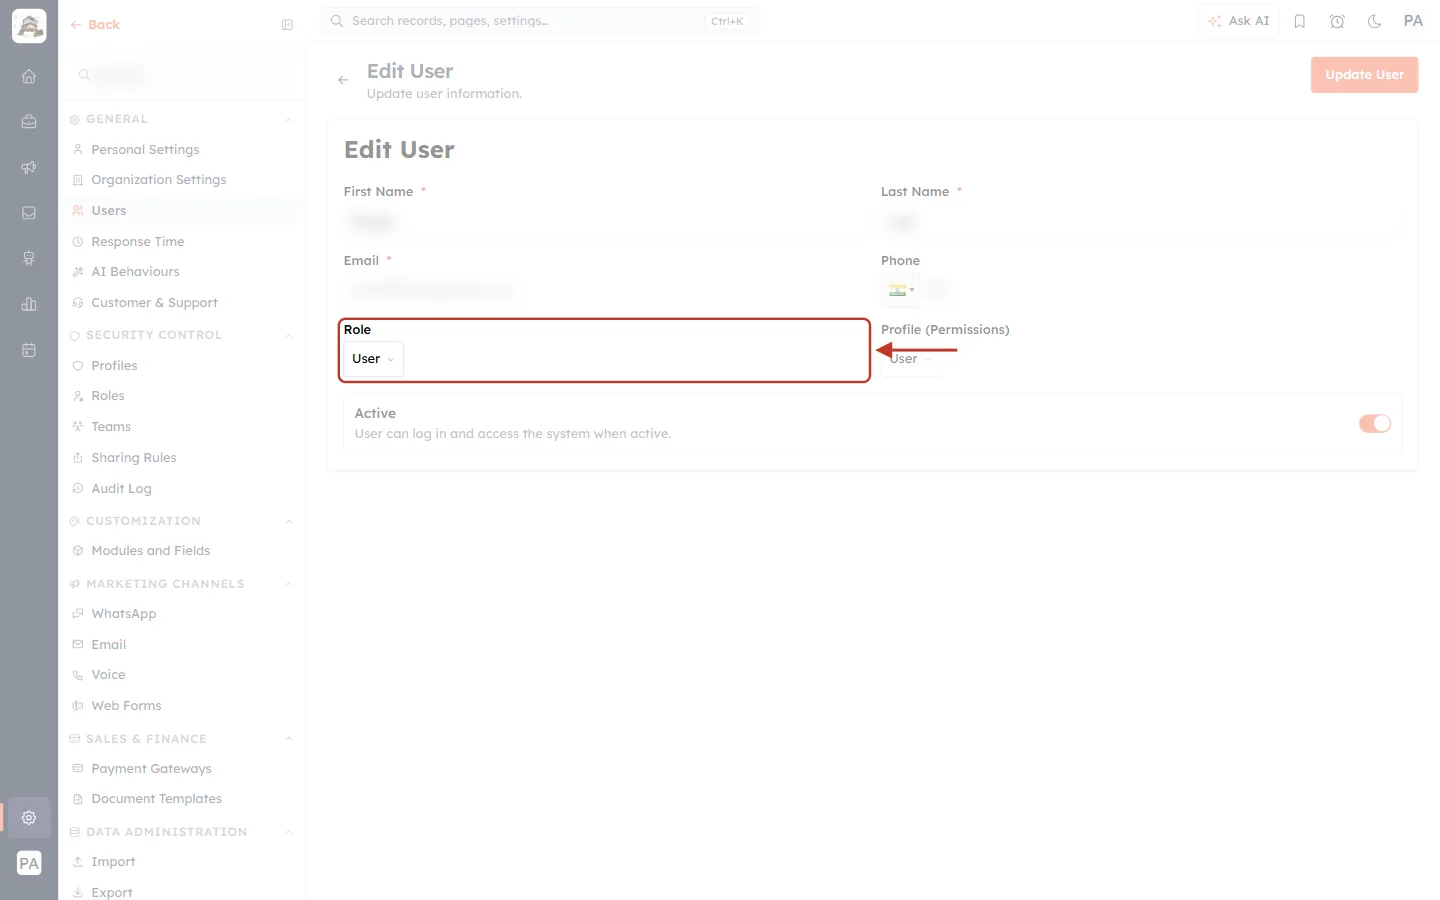
What this screenshot shows. Choosing ⋮ → Edit opens Edit User, with the Role field ringed (personal details are blurred).
Open Role and pick the user’s role, for example Sales Representative. Only active roles are offered.
Profile (Permissions) beside it sets what they can do. Choose it too if needed.
Click Update User (top right) to save.
ℹ️
New users get their role when you invite them. See Invite Your Team: How to Add and Manage Users in AI Engage CRM.
Part 5: Edit a Role#
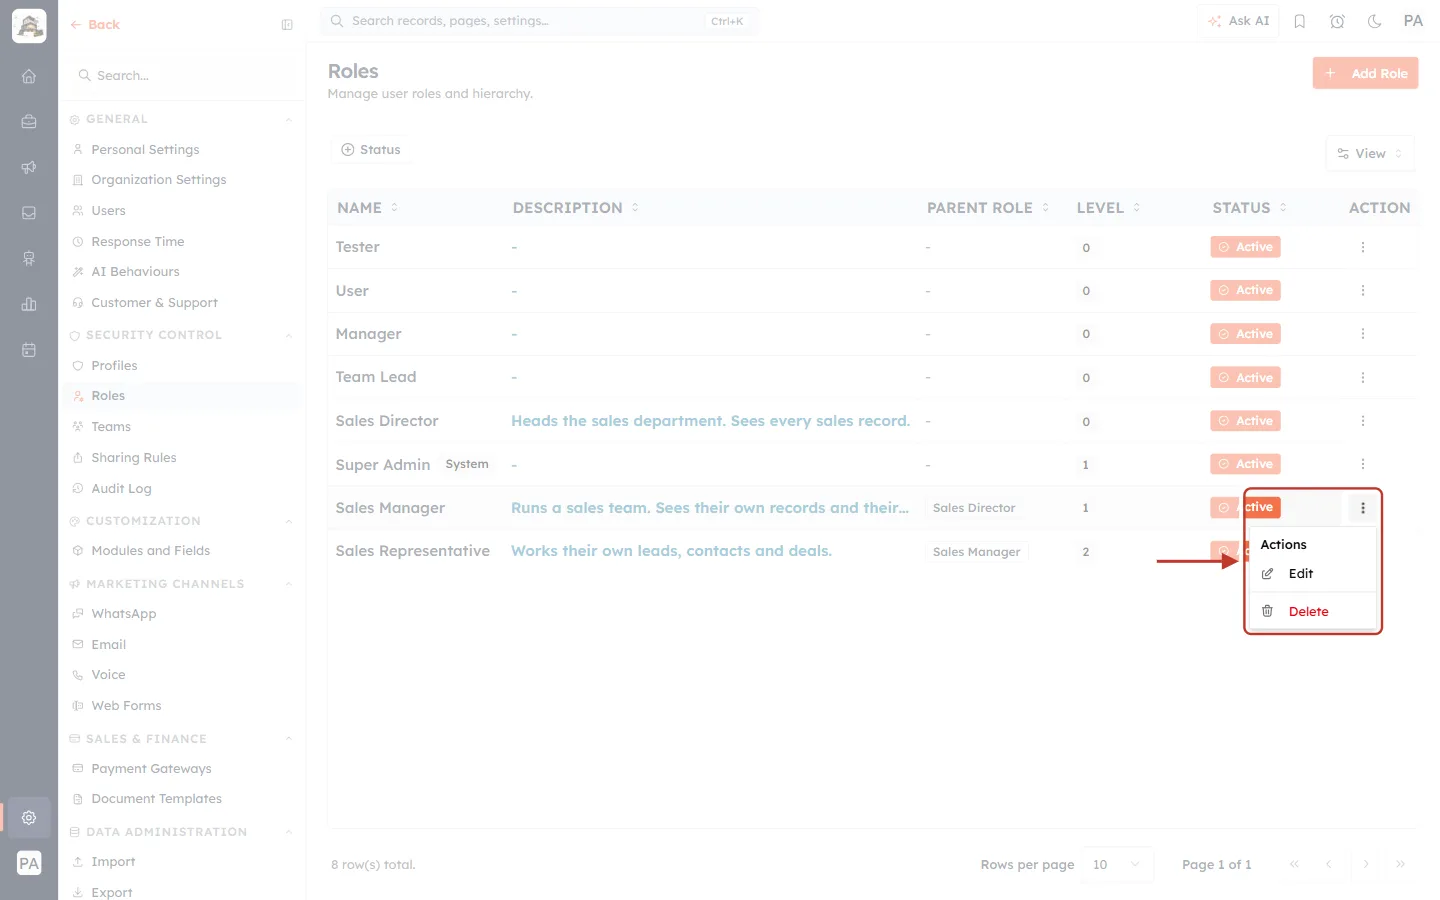
What this screenshot shows. The ⋮ menu of Sales Manager is open and ringed.
Edit: change the name, description, parent, level or status.
Delete (red): remove the role (Part 6).
The built-in Super Admin role offers only Edit.
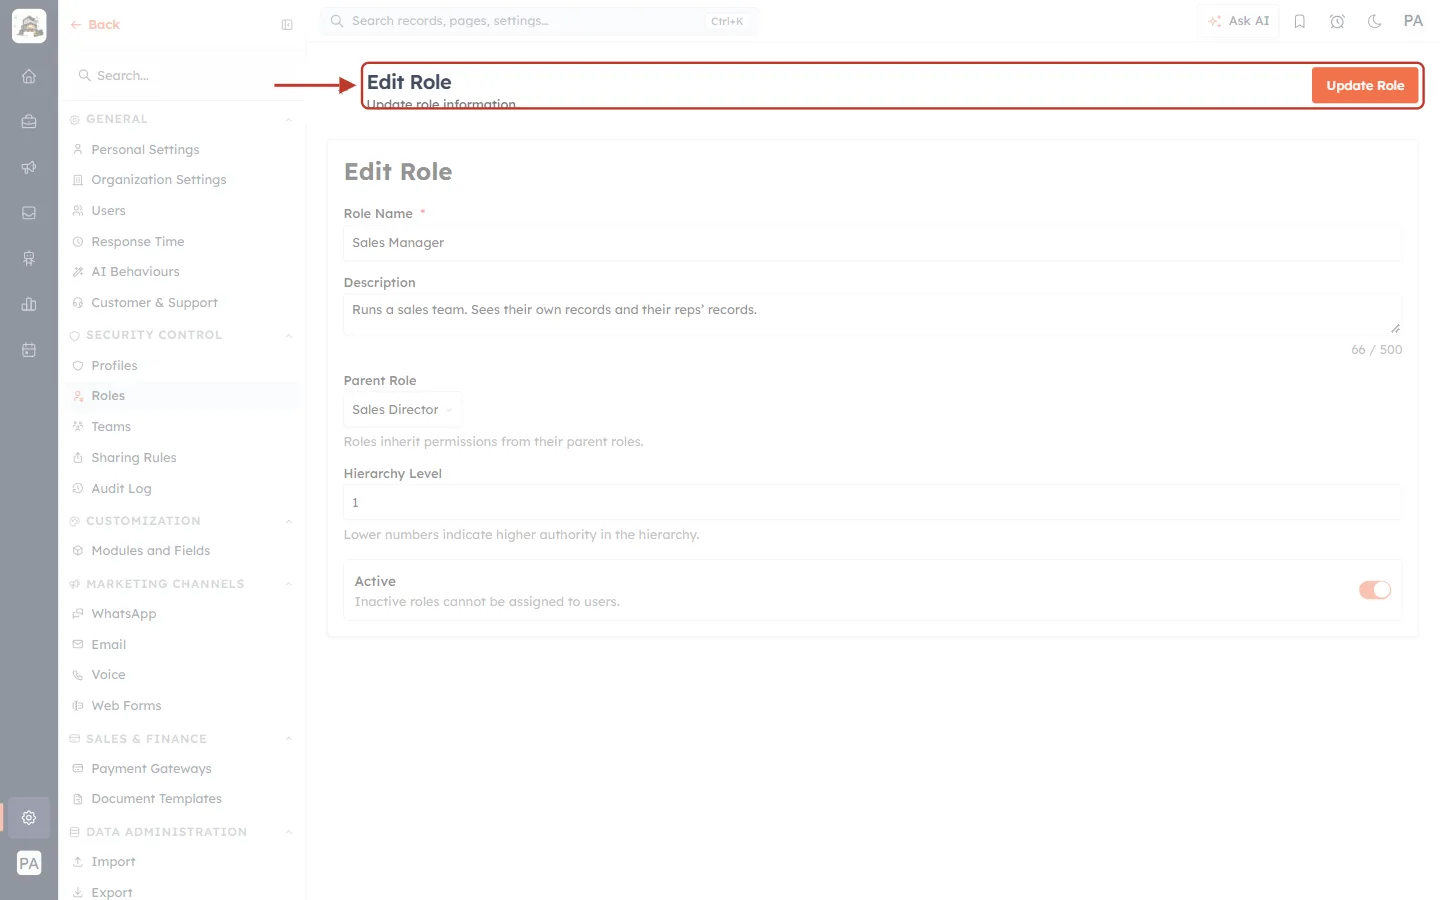
What this screenshot shows. The ringed header shows the Edit Role page (Update role information.).
The form is the same as Create Role, filled in with the role’s current settings.
Update Role (top right) saves your changes.
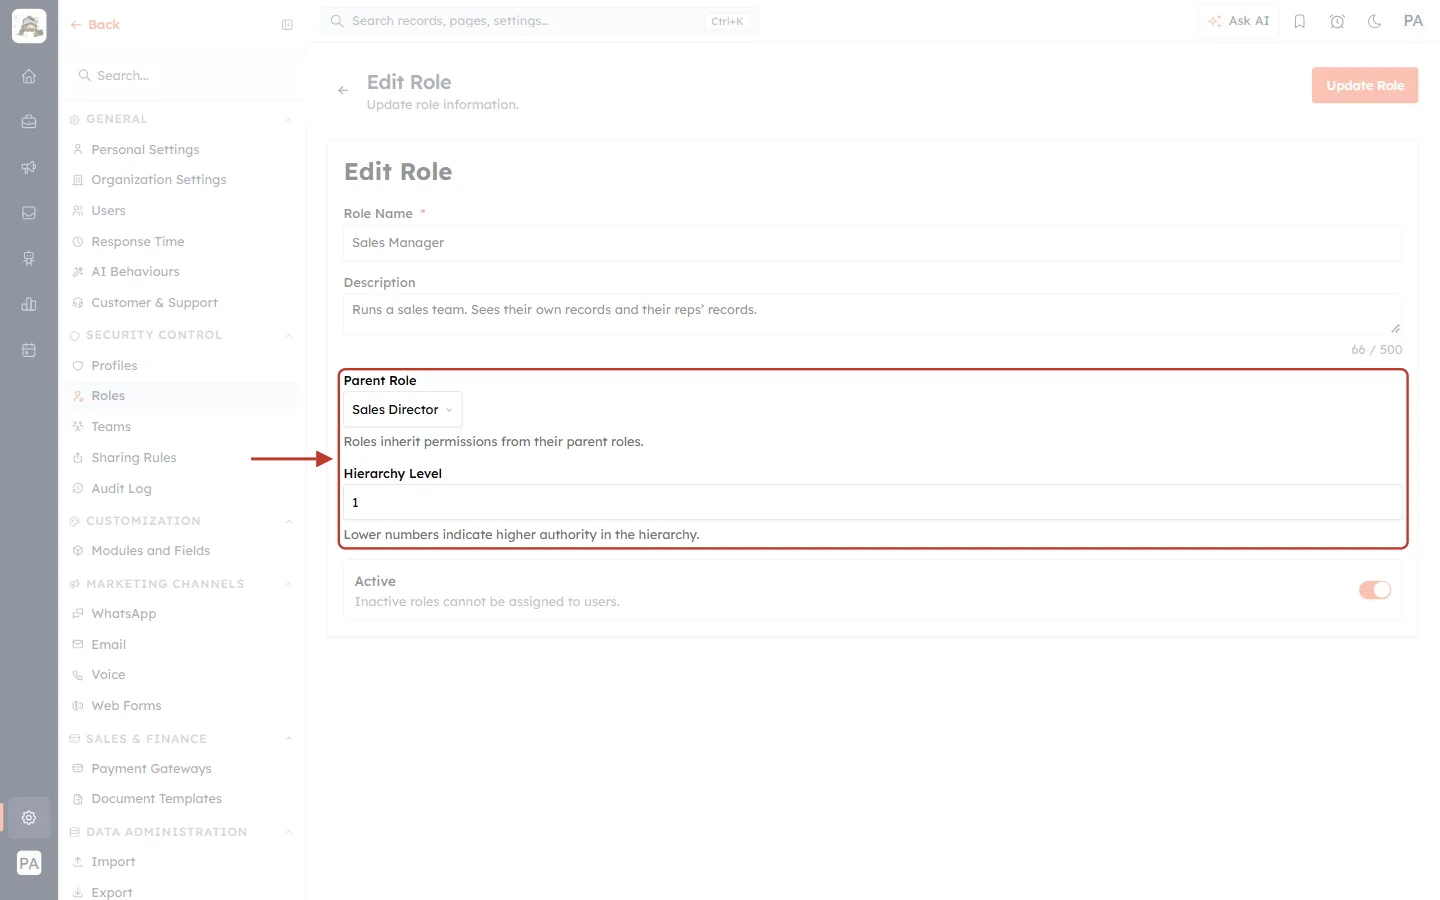
What this screenshot shows. The ringed fields show where Sales Manager sits.
Parent Role: Sales Director. Choose another parent here to move the role to a different place in the tree.
Hierarchy Level: 1, the level the CRM set from the parent.
⚠️
Moving a role changes whose records its users can see, and who can see theirs. Check the PARENT ROLE and LEVEL columns on the Roles list after saving.
Part 6: Delete a Role#
Delete from the bottom of a branch upward: child roles first, then their parent.
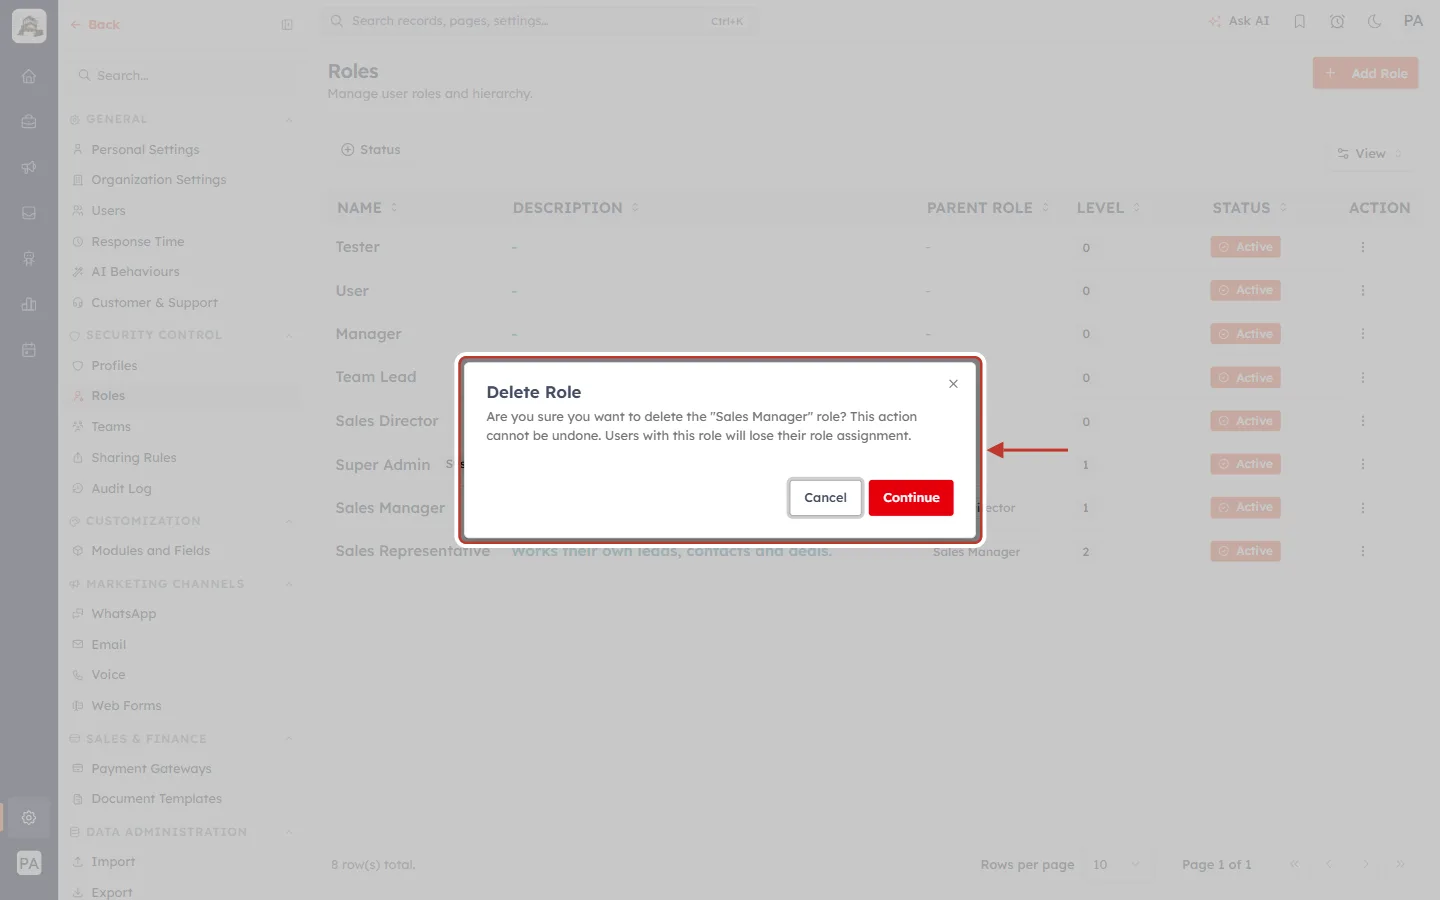
What this screenshot shows. Choosing ⋮ → Delete opens the ringed confirmation.
It reads Are you sure you want to delete the “Sales Manager” role? This action cannot be undone. Users with this role will lose their role assignment.
Click Continue to delete, or Cancel to keep it.
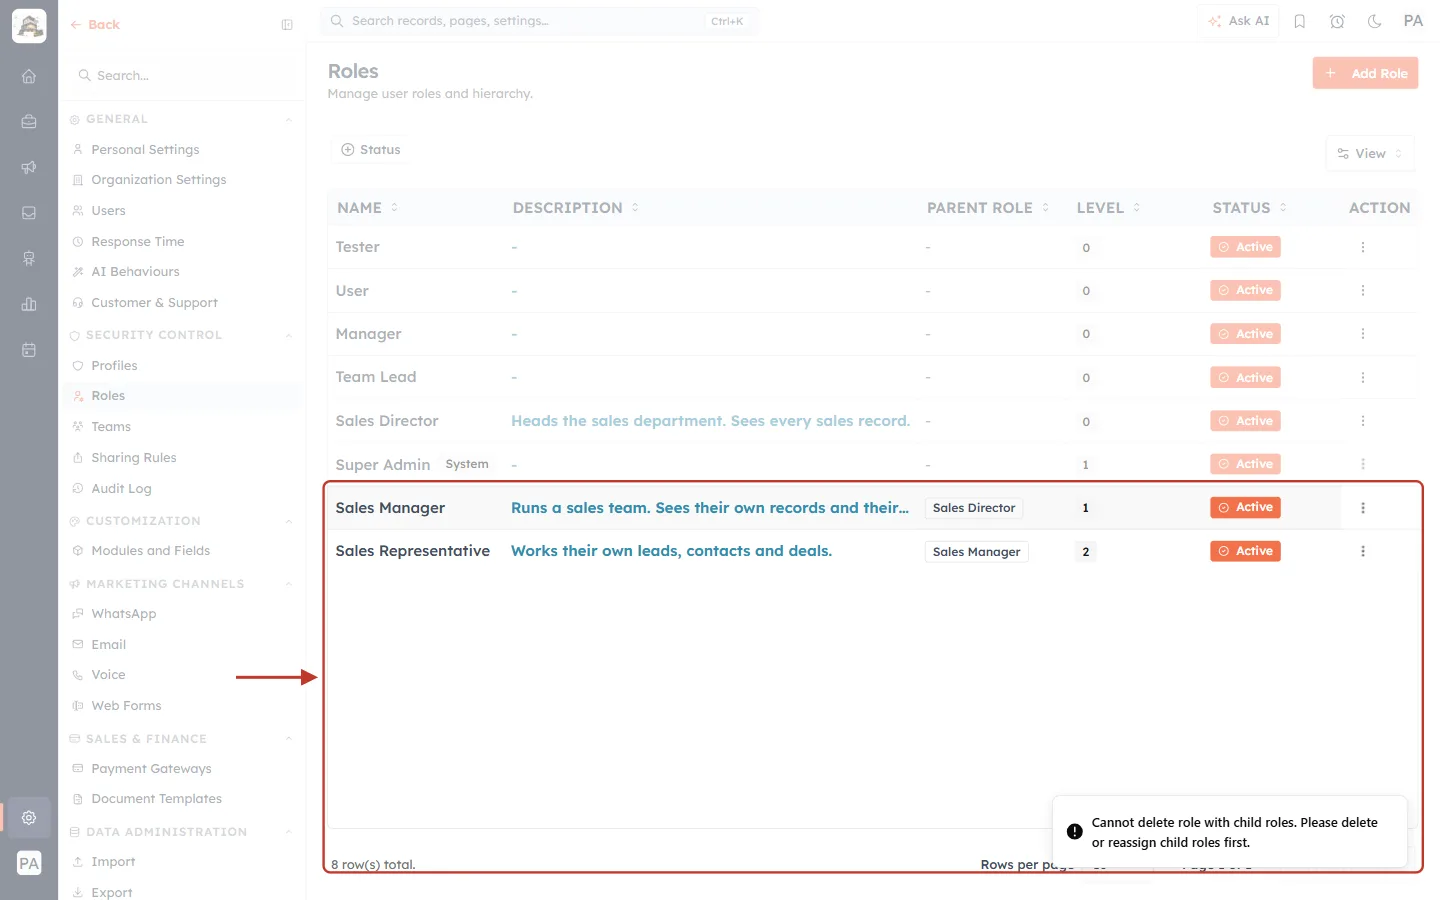
What this screenshot shows. After clicking Continue on Sales Manager, which still has Sales Representative under it. The ringed area shows both rows still listed and the error at the bottom right.
The error reads Cannot delete role with child roles. Please delete or reassign child roles first.
Nothing is deleted. Delete Sales Representative first, or edit it and choose a different parent, then delete Sales Manager.
⚠️
Before deleting a role, move its users to another role in Settings → Users. Otherwise they are left without a role.
Troubleshooting#
“Name must be at least 2 characters”#
Enter a Role Name of at least two characters and click Create Role again.
The parent I need isn’t in the Parent Role list#
It hasn’t been created yet. Create the parent role first and work top-down.
I can’t pick a role when editing a user#
The role may be inactive. Edit the role, switch Active on, and click Update Role.
“Cannot delete role with child roles”#
Delete or reassign the roles beneath it first (Part 6).
A manager can’t see their team’s records#
Check that the team members’ roles have the manager’s role as their parent (PARENT ROLE column), and that each user holds the right role in Settings → Users.
Frequently Asked Questions#
Do I have to set the Hierarchy Level?
Only for top-level roles. Roles with a parent are saved at the parent’s level plus one.
Can I rename a role later?
Yes. Use Edit → Role Name → Update Role. Users keep the role.
Can I delete Super Admin?
No. It is a System role, and its menu offers only Edit.
What comes next?
Group people into teams for the Team access level and lead routing. See Create Teams: Group Users for Lead Routing, Reporting & Sharing.
Previous and Next#
Previous: Understanding the Role Hierarchy: How Roles Decide Whose Records Each User Can See
Next: Create Teams: Group Users for Lead Routing, Reporting & Sharing
Related Articles#
Understanding the Role Hierarchy: How Roles Decide Whose Records Each User Can See
Create a Permission Profile Step by Step: Build, Edit, Clone, Deactivate & Delete
Profile Permissions Explained: What Every Module, Feature & Setup Setting Controls
Create Teams: Group Users for Lead Routing, Reporting & Sharing
Sharing Rules: Share Records Across Teams, Roles & Users (Step-by-Step Guide)
Invite Your Team: How to Add and Manage Users in AI Engage CRM
Was this article helpful?
Ready to implement this?
OpenAI Engage and apply what you just learned to your own workspace.
Open AI Engage CRM