Loading…


KnowledgeBase
Create a Multi-Select Lookup Field: Link One Record to Many Records (Step-by-Step)
What is a Multi-Select Lookup field?#
A Multi-Select Lookup field links one record to several records in another module. It is the “many” version of the ordinary Lookup field, which links to only one record.
Imagine a deal called Website Redesign – Acme Corp. Three people at Acme have a say in it: John Smith (marketing), Priya Mehta (finance) and David Lee (IT). A normal Lookup field such as Contact Name can hold only one of them. A Multi-Select Lookup field called Stakeholders can hold all three. Each one appears as a small name tag (a “chip”) on the deal and links to that person’s contact record.
Lookup | Multi-Select Lookup | |
|---|---|---|
Links to | One record | Many records |
Example | The deal’s main Contact Name | All the deal’s Stakeholders |
On a form | Pick one record | Tick several records in one go |
On the record and in lists | One name | A chip for each linked record |
“Required” means | A record must be chosen | At least one record must be chosen |
When would I use one?#
On this module… | Multi-Select Lookup field | Links to |
|---|---|---|
Deals | Stakeholders / Decision makers | Contacts |
Deals | Products of interest | Products |
Projects | Team contacts | Contacts |
Contacts | Companies worked with | Companies |
Tickets | Affected products | Products |
Quotes | Competitor companies | Companies |
Use a Lookup when a record can only ever belong to one other record, such as one main contact per deal. Use a Multi-Select Lookup when it can relate to several at once.
This article creates the Stakeholders field on Deals, step by step. It then shows how your team fills it in, where the linked contacts appear, and how to filter deals by a stakeholder.
Before you begin#
You need permission to customise modules. Only users whose profile allows module customisation can open Modules and Fields. See Control Permissions with Profiles.
Know the basics of the field builder. If you have never added a field, read Customize Your CRM: Add Custom Fields first.
The field counts toward your plan. A Multi-Select Lookup is a custom field, so it uses one of your plan’s custom fields for that module (see Good to know later in this article).
ℹ️
The same steps work in any module — Contacts, Companies, Deals, Tickets or one of your own custom modules — and the field can point to any active module. Only the names in the screenshots change.
Part 1: Open the field builder for Deals#
Step 1: Open Setup#
Click the gear icon near the bottom of the dark icon bar on the far left of the screen. This opens Setup, where all the CRM settings live.
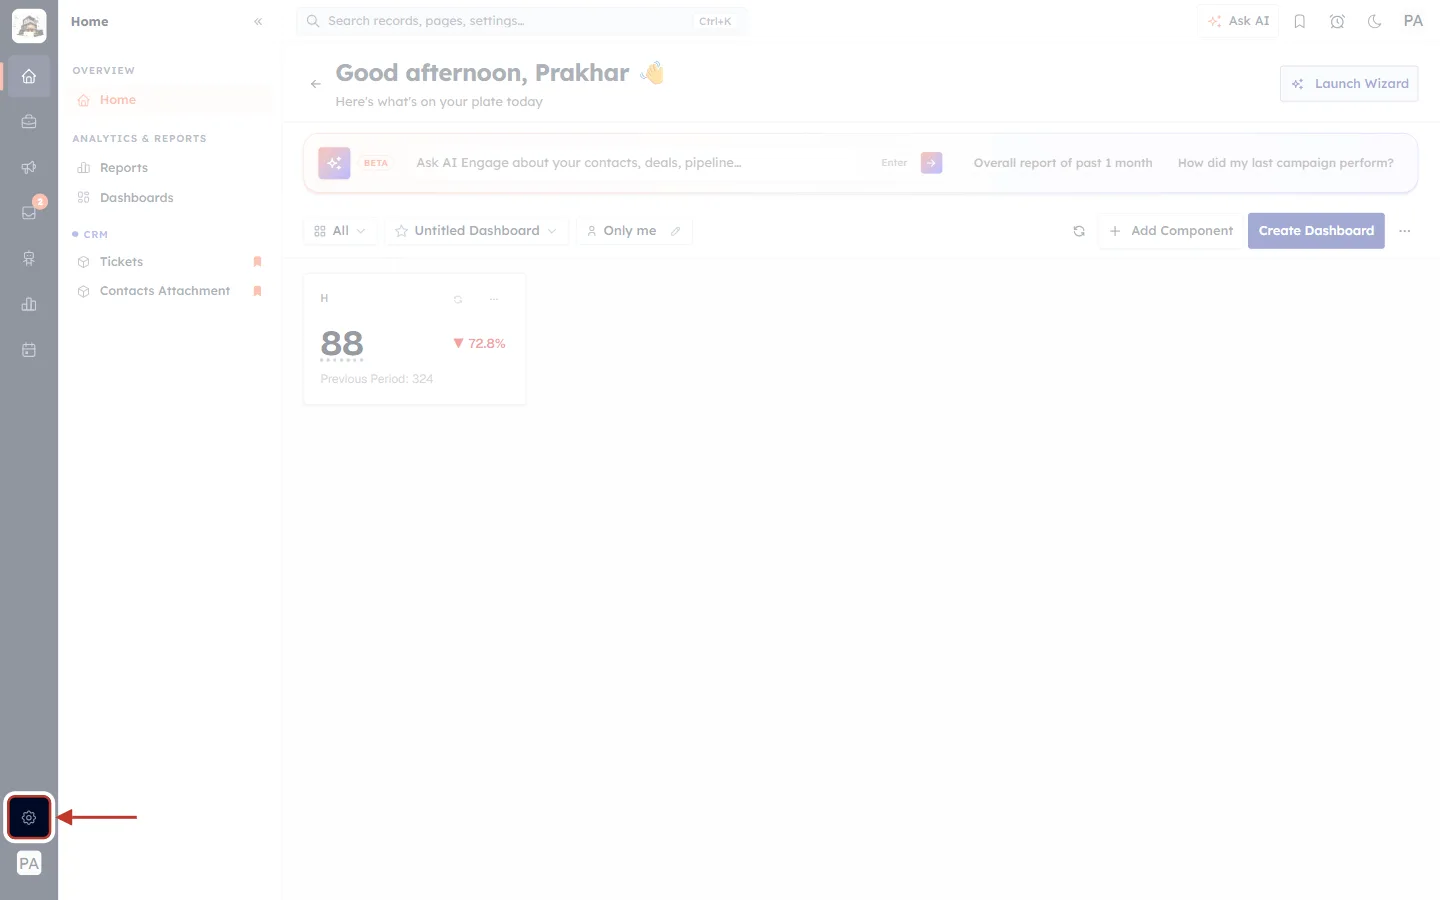
What this screenshot shows. The CRM home page, with the Setup gear icon ringed in red at the bottom of the left icon bar.
Left icon bar (dark): the main areas of the CRM — Home, Sales, Marketing, Inbox and more. The gear sits near the bottom, just above your profile initials.
Ringed icon: click this gear to open Setup.
Rest of the page: your normal home dashboard. It stays as it is; you are only opening a menu.
Step 2: Go to Modules and Fields#
In the Setup menu, under CUSTOMIZATION, click Modules and Fields.
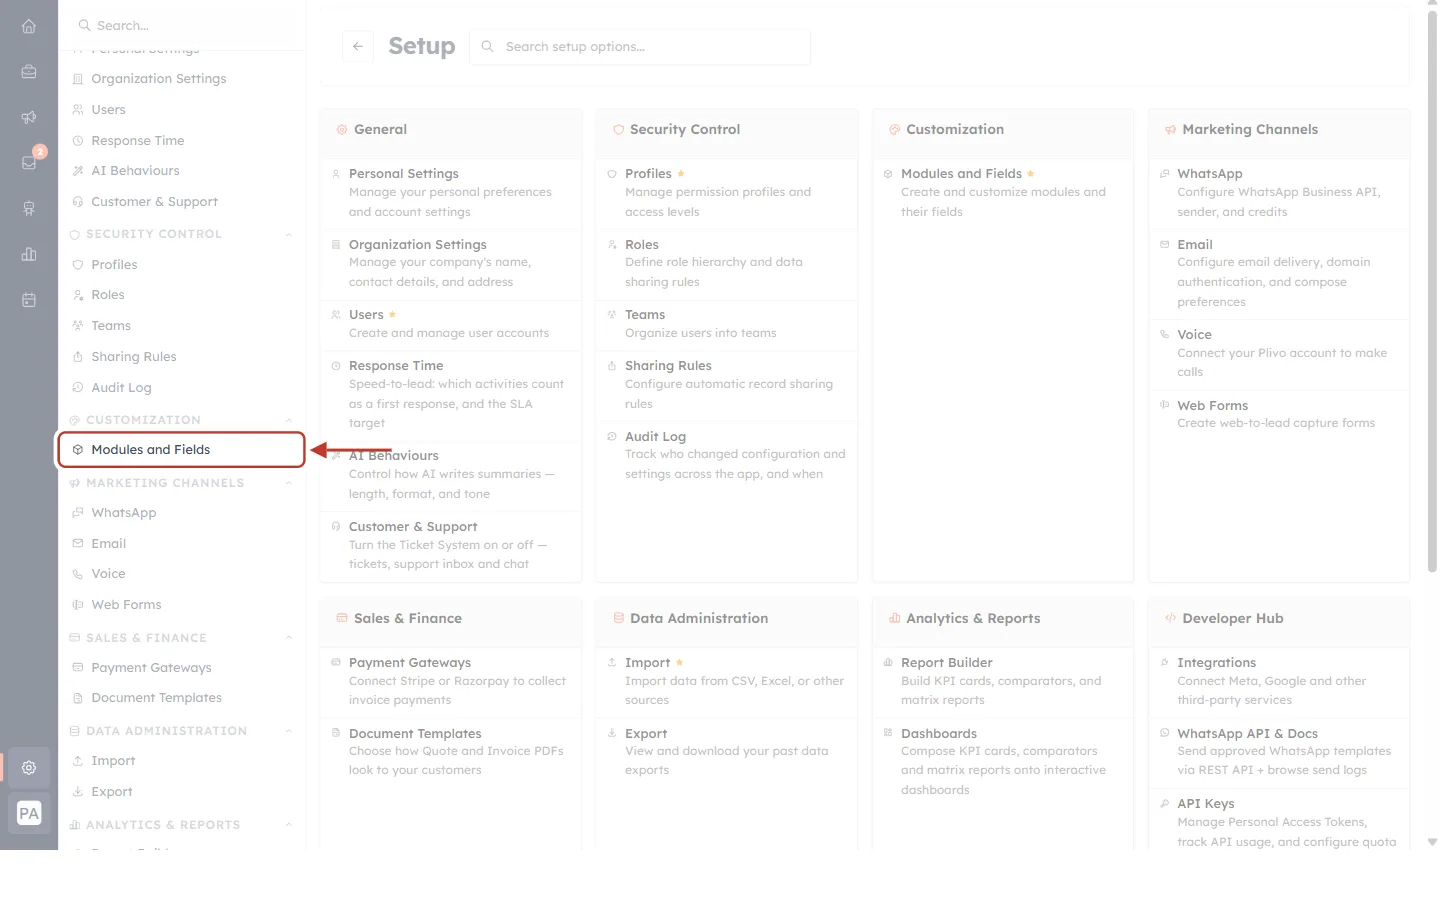
What this screenshot shows. The Setup page, with Modules and Fields ringed in the Customization group.
Setup sidebar (left): settings grouped under headings such as Security Control, Customization, Marketing Channels and Data Administration.
Modules and Fields (ringed): the place to add, edit and arrange the fields of every module.
Main area: the Setup overview tiles. You don’t need them for this task.
Step 3: Find the Deals module and click Configure#
The Modules page lists every module in your CRM. Find the Deals row (its description is “Track sales opportunities and deals”) and click Configure at the end of the row.
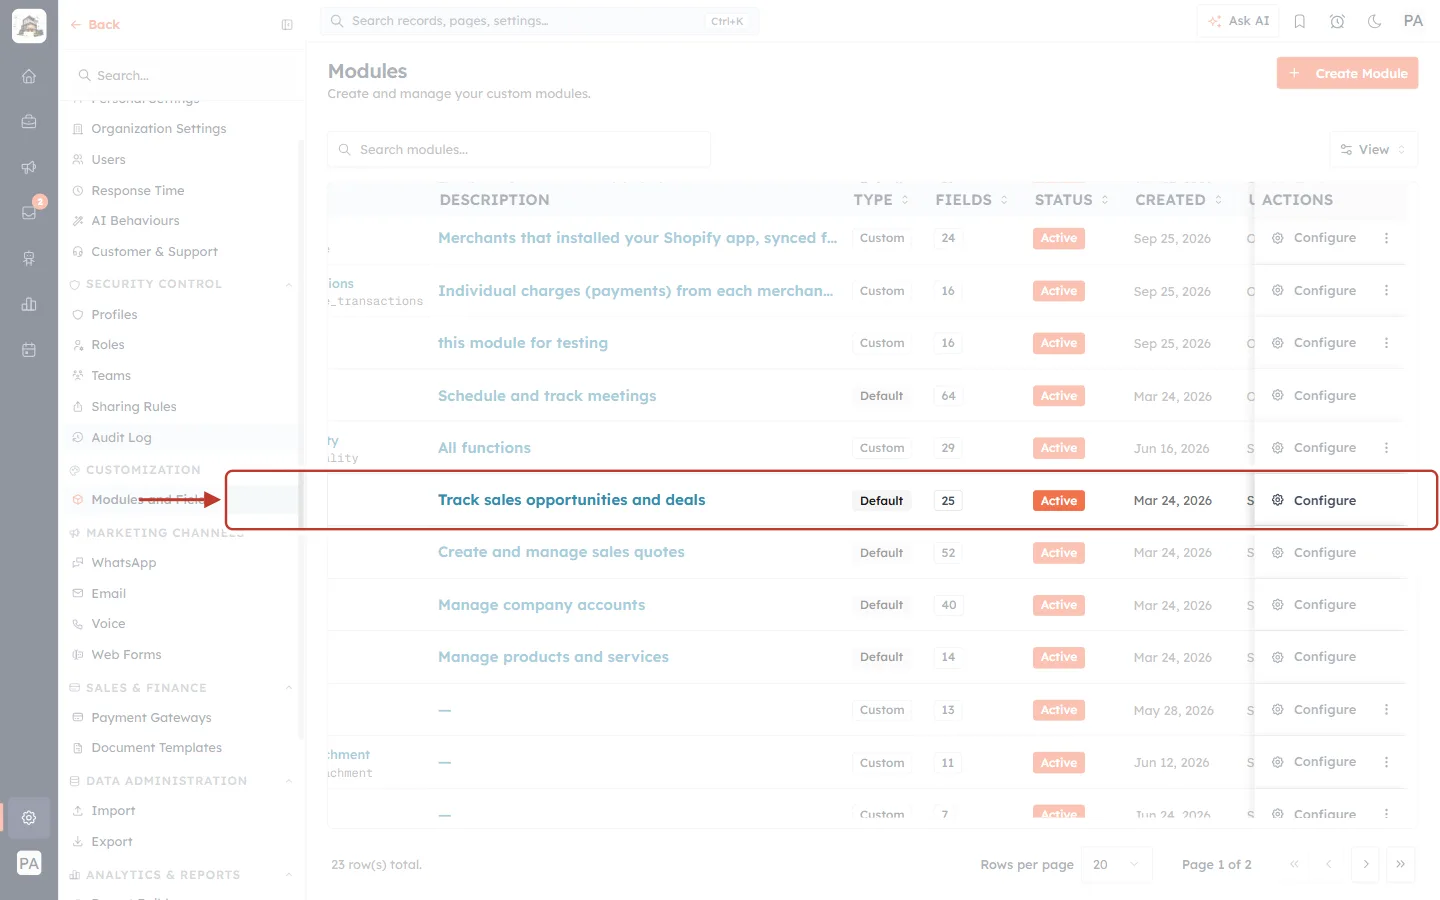
What this screenshot shows. The Modules list, with the Deals row ringed.
Columns: the module name and description, the Type (Default for built-in modules, Custom for ones your team created), the number of fields, the Status, the dates it was created and updated, and the Actions.
Deals row (ringed): the module we are adding the field to.
Other rows: your other modules. To add the field to a different module, use that module’s row instead.
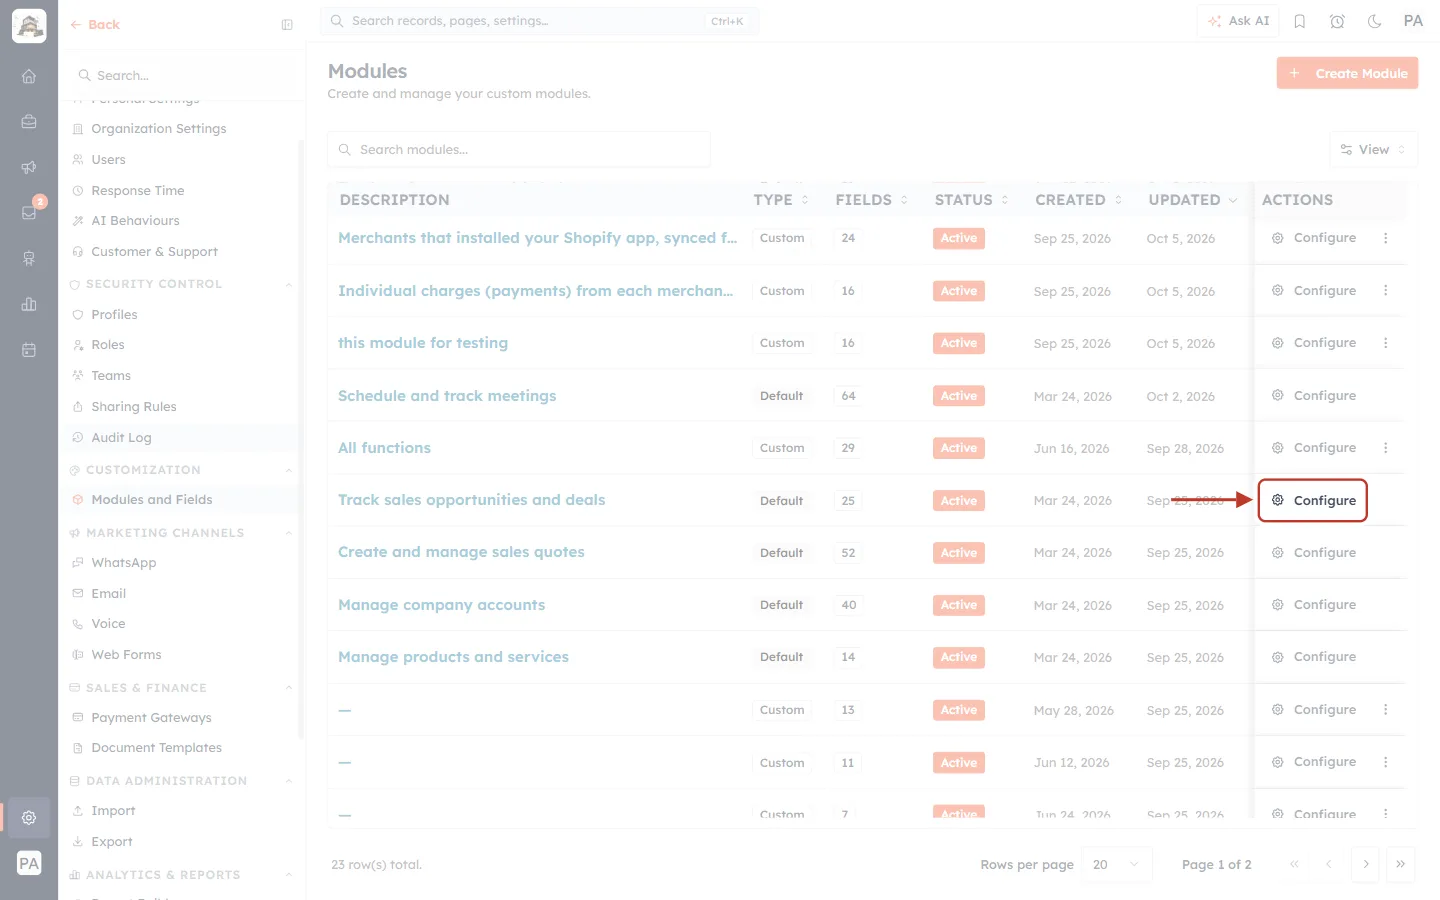
What this screenshot shows. The same list, zoomed to the Configure button at the end of the Deals row.
Configure (ringed): opens the layouts and the field builder for Deals.
⋯ menu beside it: other actions for the module. You don’t need it here.
Step 4: Open the Standard layout#
Configure opens the Deals Layouts page. Click the Standard layout (or the layout your team uses) to open the field builder.
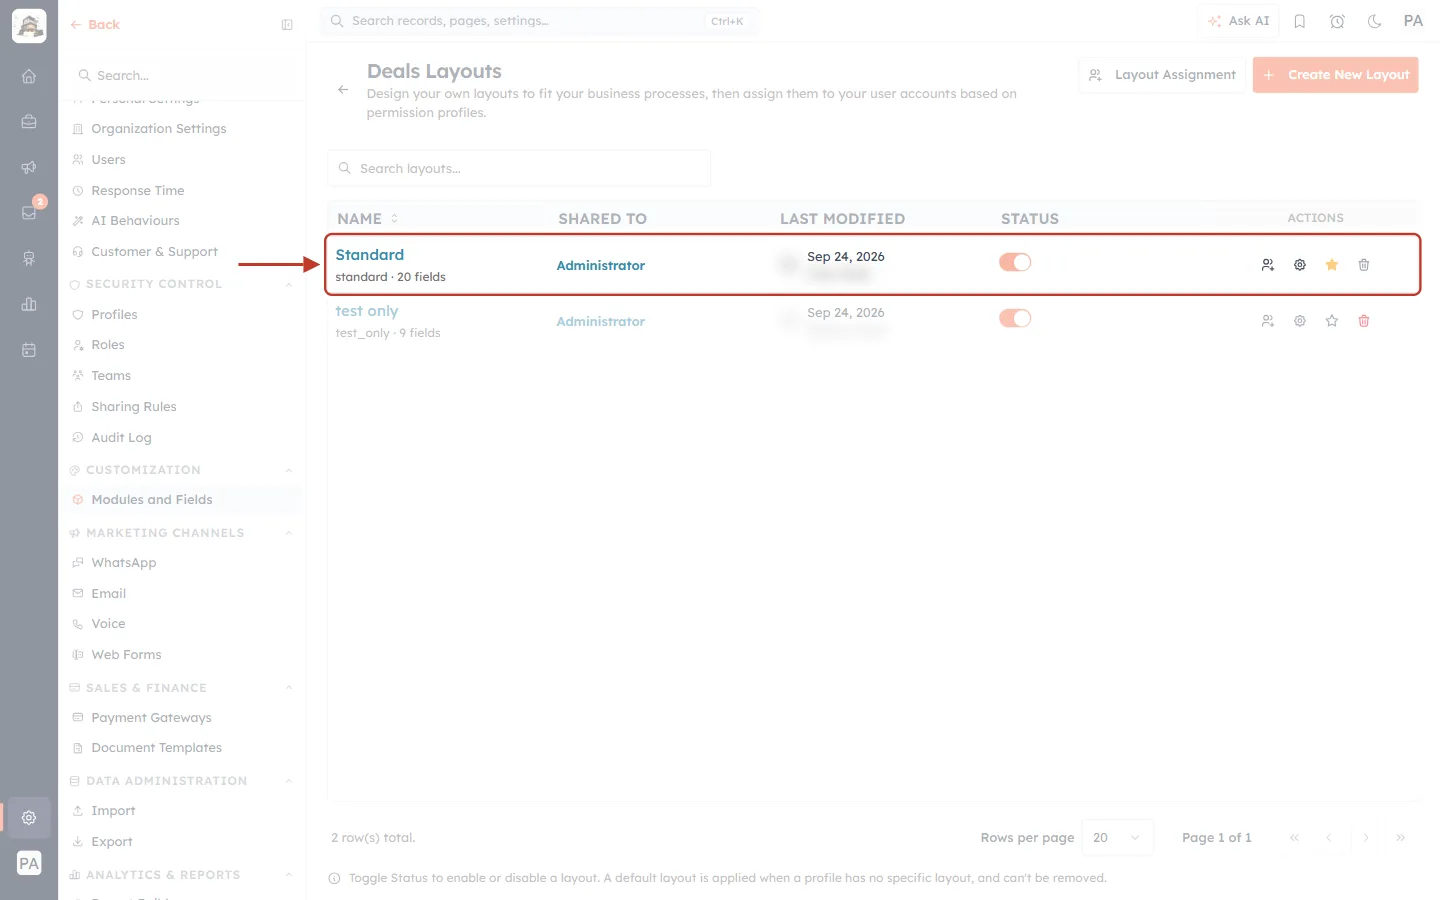
What this screenshot shows. The Deals Layouts page, with the Standard layout ringed.
Name: the layout’s name, with its internal name and number of fields underneath (for example “standard · 20 fields”).
Shared To: the profiles that use this layout (here, Administrator).
Last Modified and Status: when it was last changed and whether it is switched on.
Actions: icons to assign the layout, open its settings, mark it as the default (the star) or delete it.
Create New Layout / Layout Assignment (top right): for teams that use more than one layout. Not needed for this task.
ℹ️
A field you add is shown on the layout you are editing. If your team uses several layouts, you can add the field to the others the same way, or leave it off layouts that don’t need it.
Part 2: Add and set up the Multi-Select Lookup field#
Step 5: Find Multi-Select Lookup in the field palette#
The field builder has three columns: the New Fields palette on the left, the layout (the “canvas”) in the middle, and the Field Configuration panel on the right. In the palette, scroll to the RELATIONAL group and find Multi-Select Lookup.
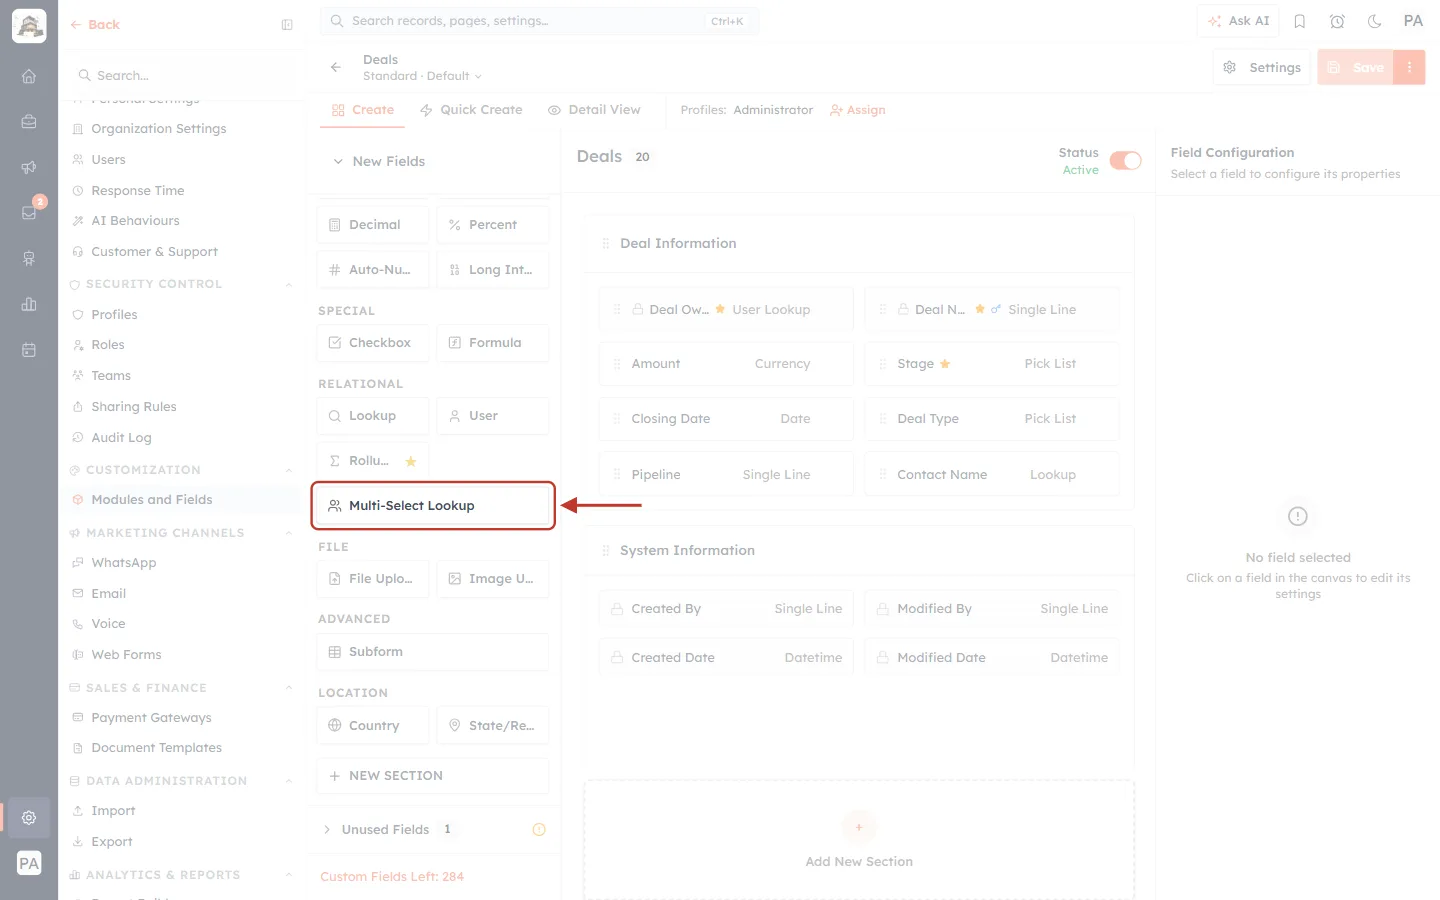
What this screenshot shows. The Deals field builder, with the Multi-Select Lookup tile ringed in the palette.
New Fields palette (left): every field type you can add, grouped as Text, Selection, Date & Time, Number, Special, Relational, File, Advanced and Location.
RELATIONAL group: the field types that link to other records — Lookup (one record), User (a teammate), Rollup Summary (a calculated total) and Multi-Select Lookup (many records, ringed).
Canvas (middle): the Deals layout. The Deal Information section holds Deal Owner, Deal Name, Amount, Stage, Closing Date, Deal Type, Pipeline and Contact Name. System Information holds fields the CRM fills in for you.
Field Configuration (right): empty until you select a field (“No field selected”).
Custom Fields Left (bottom of the palette): a rough count of how many more custom fields you can add.
Step 6: Drag it onto the layout#
Press and hold on the Multi-Select Lookup tile, drag it into the section where you want it, and let go. We dropped it into Deal Information, just after Contact Name. A new card called Untitled multi select lookup appears and is selected.
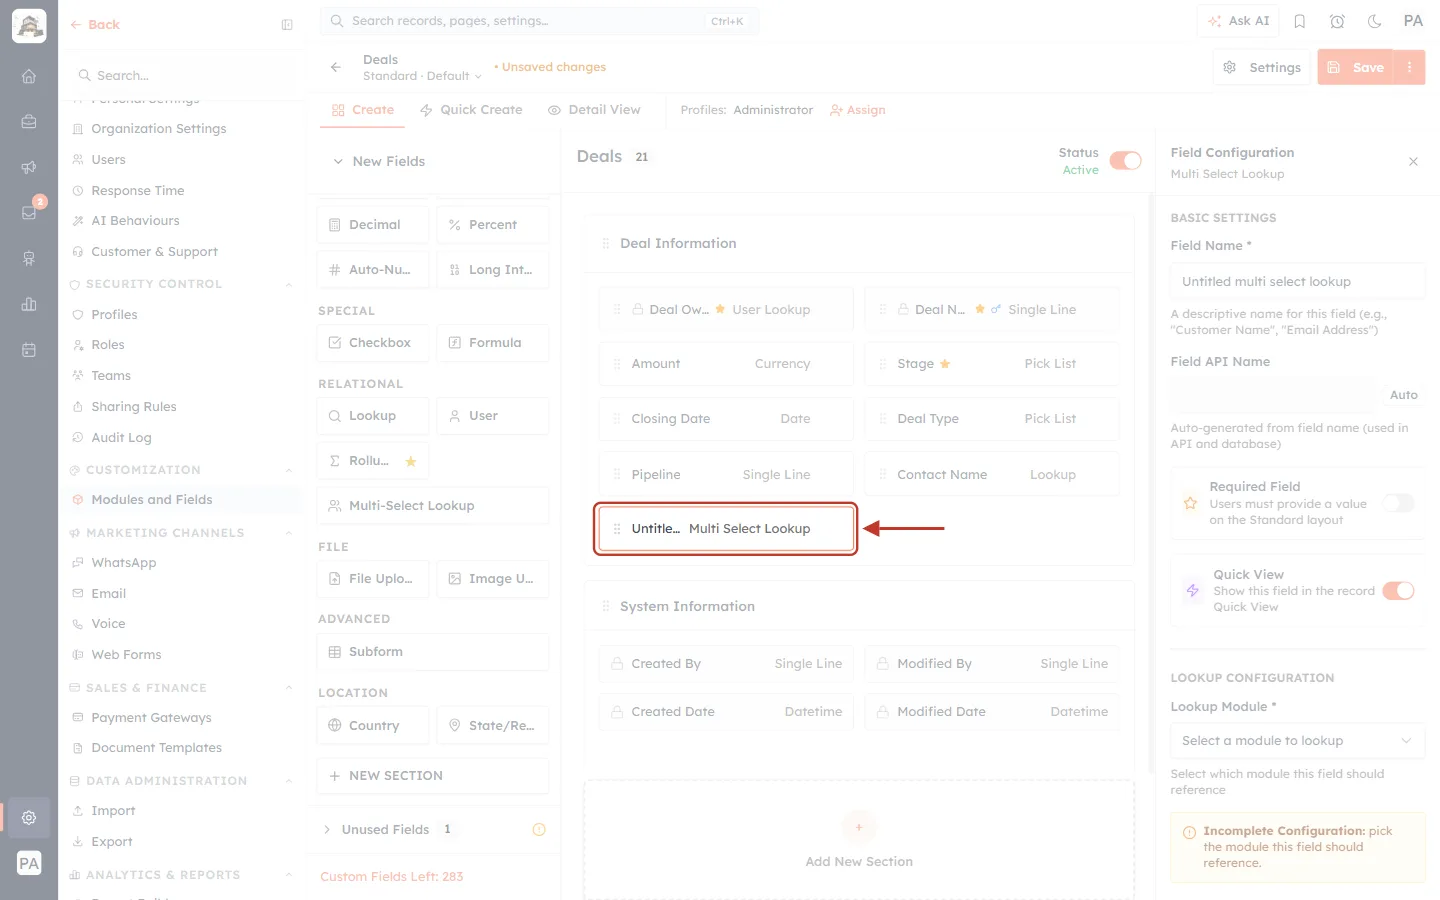
What this screenshot shows. The canvas after the drop, with the new Untitled multi select lookup card ringed.
New card (ringed): the field’s name on the left (shortened to “Untitle…” because it is long) and its type, Multi Select Lookup, on the right.
Where it landed: the empty spot at the end of Deal Information. You can drag the card again later to move it.
Unsaved changes (top, next to the module name): a reminder that nothing is stored until you click Save.
Right-hand panel: now shows this field’s settings. The yellow Incomplete Configuration box at the bottom will disappear once you choose a module in Step 9.
✅
Drag the tile onto an existing card in the section. The new field drops in at that point and the cards after it move along.
Step 7: Look over the settings panel#
With the new card selected, the Field Configuration panel on the right shows its settings. They are grouped into Basic Settings, Lookup Configuration, Validation Rules and Display Settings.
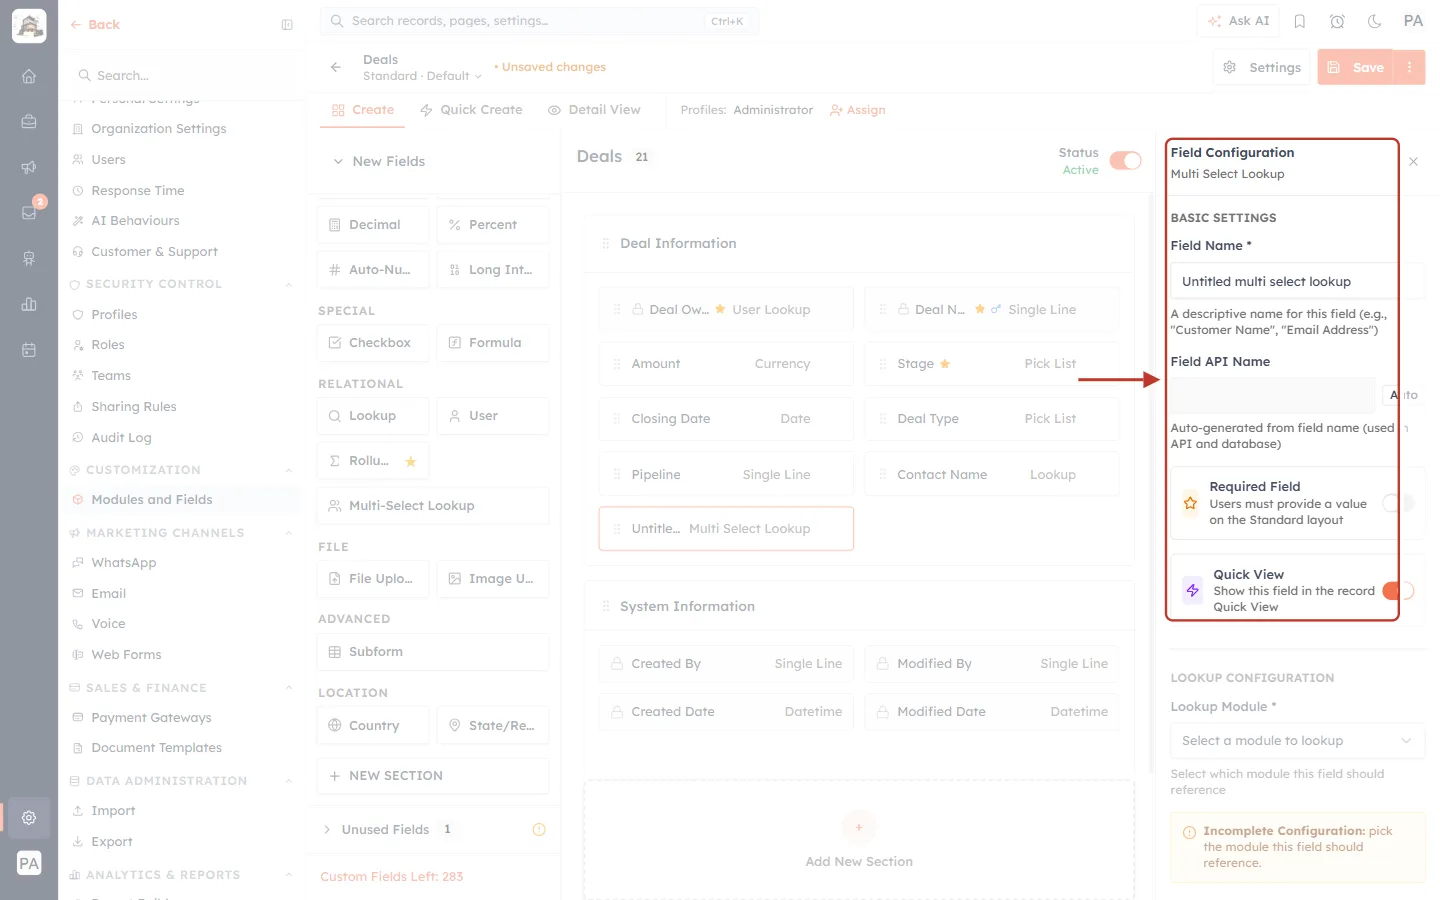
What this screenshot shows. The top of the Field Configuration panel, ringed, for the new field.
Header: “Field Configuration — Multi Select Lookup”, confirming which field type you are editing. The × closes the panel.
Field Name *: the label your team will see. Required.
Field API Name: an internal name used by integrations, imports and the API. It is filled in automatically from the name (the Auto tag).
Required Field: when on, the record can’t be saved until at least one record is picked.
Quick View: when on, the field also shows in the record’s Quick View preview.
Step 8: Name the field#
Click the Field Name box, delete “Untitled multi select lookup” and type a clear name. We typed Stakeholders. The Field API Name fills itself in as stakeholders.
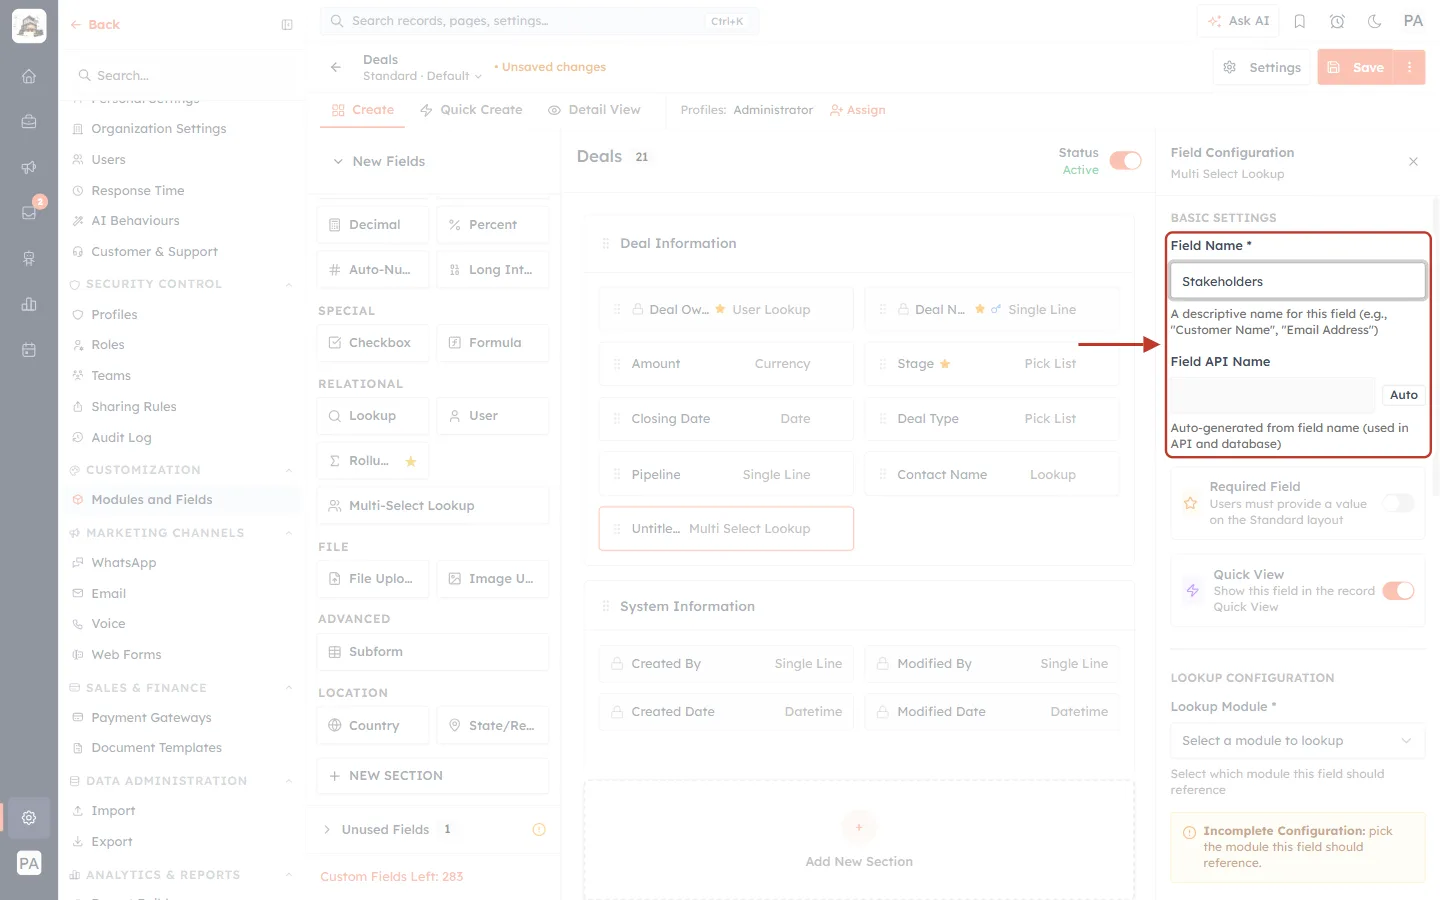
What this screenshot shows. The Field Name and Field API Name boxes, ringed, after typing the name.
Field Name: now reads “Stakeholders”. This is the label on forms, on the record, in list columns and in filters.
Field API Name: “stakeholders”, generated from the name. You can’t type in it — leave it as it is.
Hint text: under each box, a short description of what it is for.
✅
Choose a name that says who or what is linked, in the plural — Stakeholders, Products of Interest, Affected Products. It makes forms and filters easy to read.
Step 9: Choose the module to link to (Lookup Module)#
Scroll down the panel to LOOKUP CONFIGURATION. Until you pick a module, the field is incomplete.
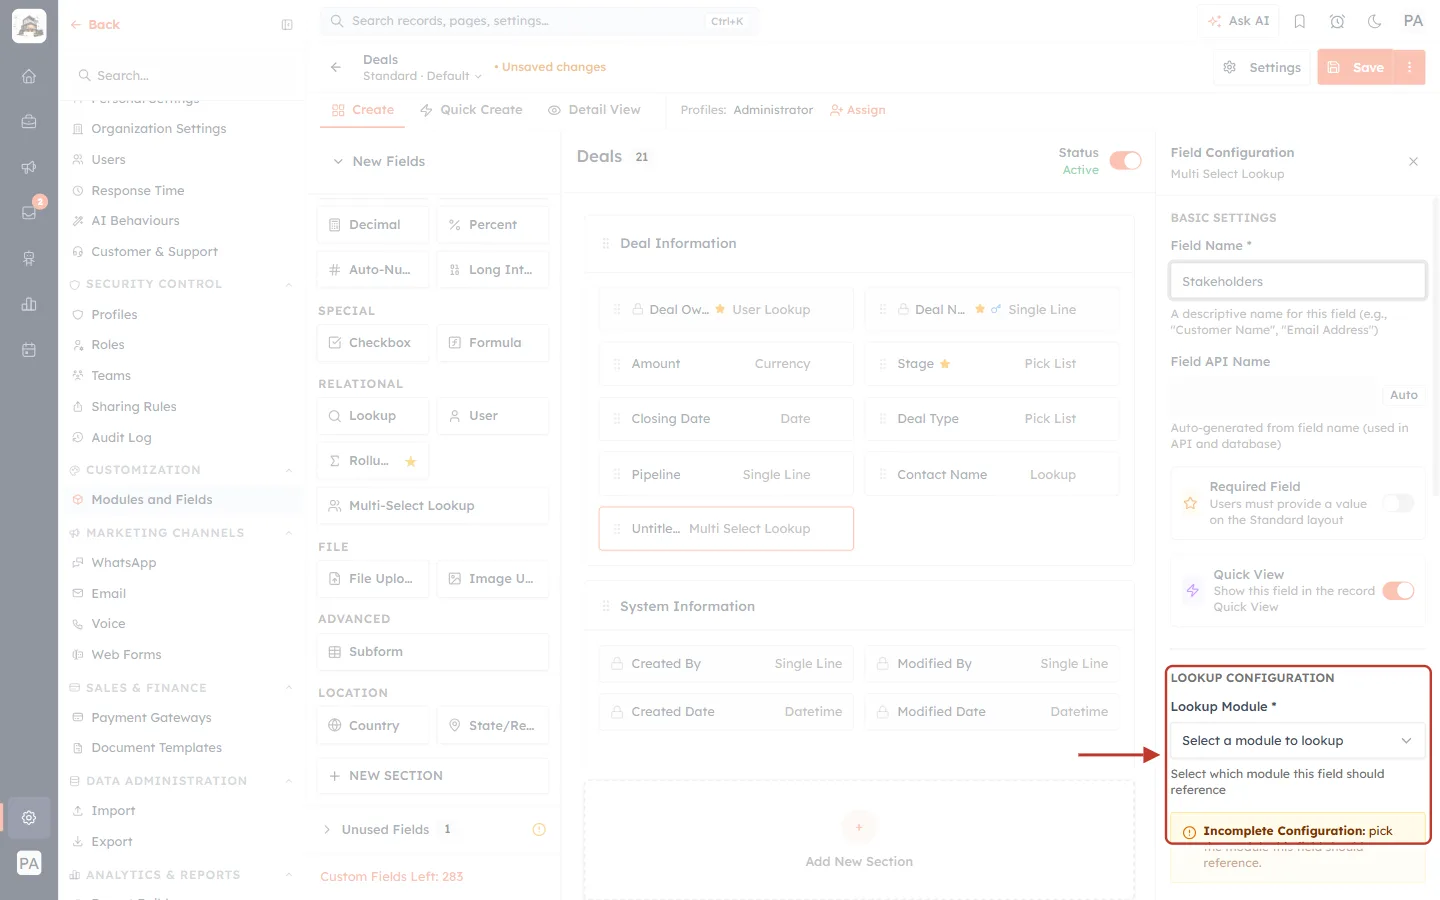
What this screenshot shows. The Lookup Configuration section, ringed, before a module is chosen.
Lookup Module *: shows “Select a module to lookup”. This is the module whose records the field will hold.
Hint: “Select which module this field should reference”.
Incomplete Configuration (yellow): “pick the module this field should reference”. You can’t use the field until you do.
Click Select a module to lookup. A list of your active modules opens, with a search box at the top.
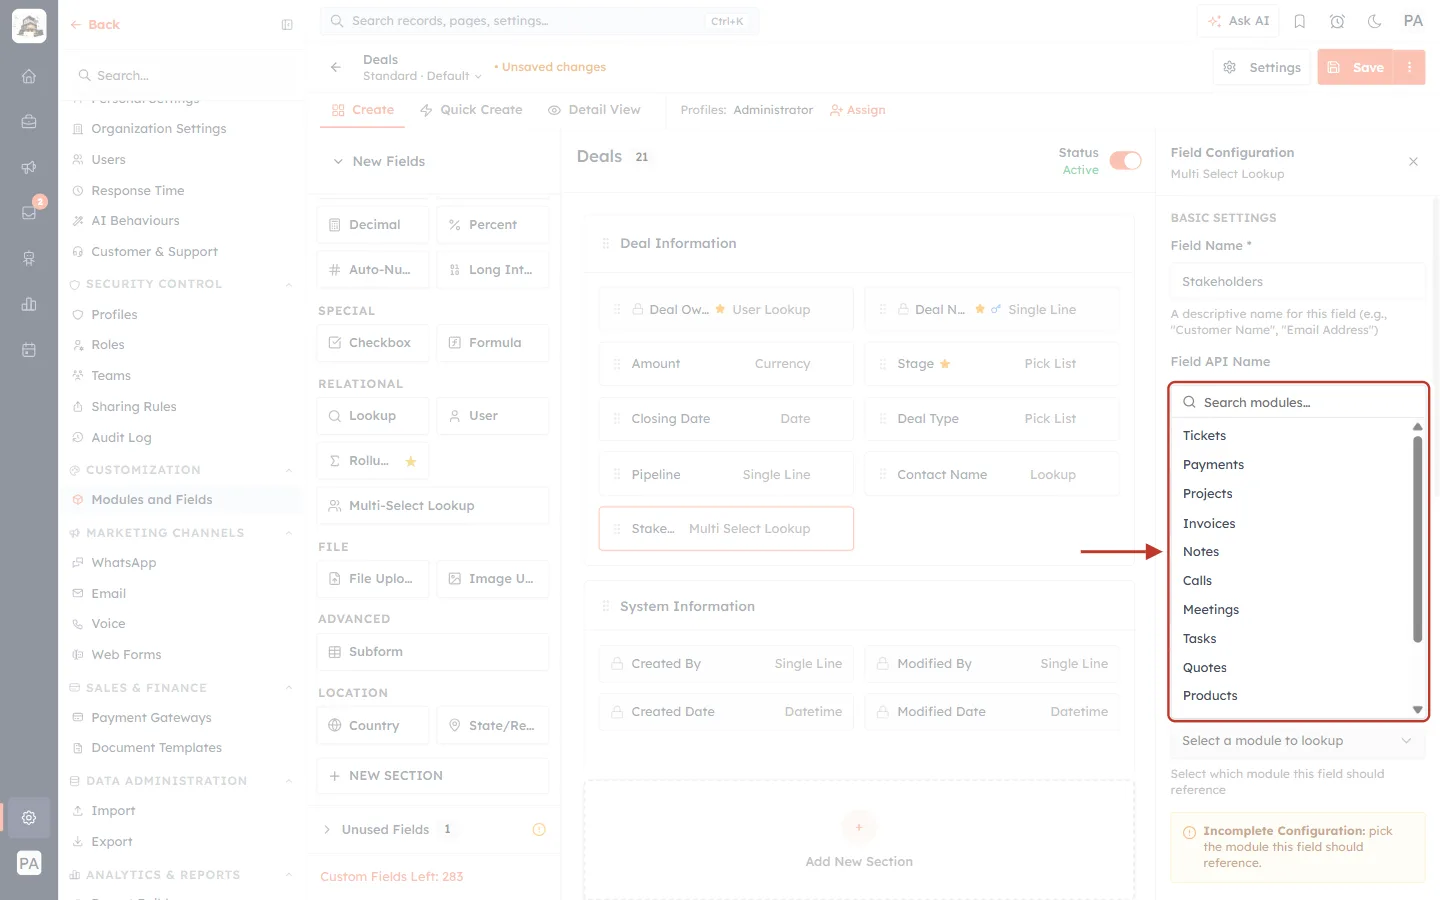
What this screenshot shows. The open Lookup Module list, ringed.
Search modules…: type to narrow the list.
The list: every active module in your CRM — built-in ones such as Tickets, Payments, Projects, Invoices, Notes, Calls, Meetings, Tasks, Quotes and Products, plus any custom modules. Scroll for more, including Deals, Companies and Contacts.
Type the module’s name to find it quickly. We typed Contacts, then clicked Contacts in the list.
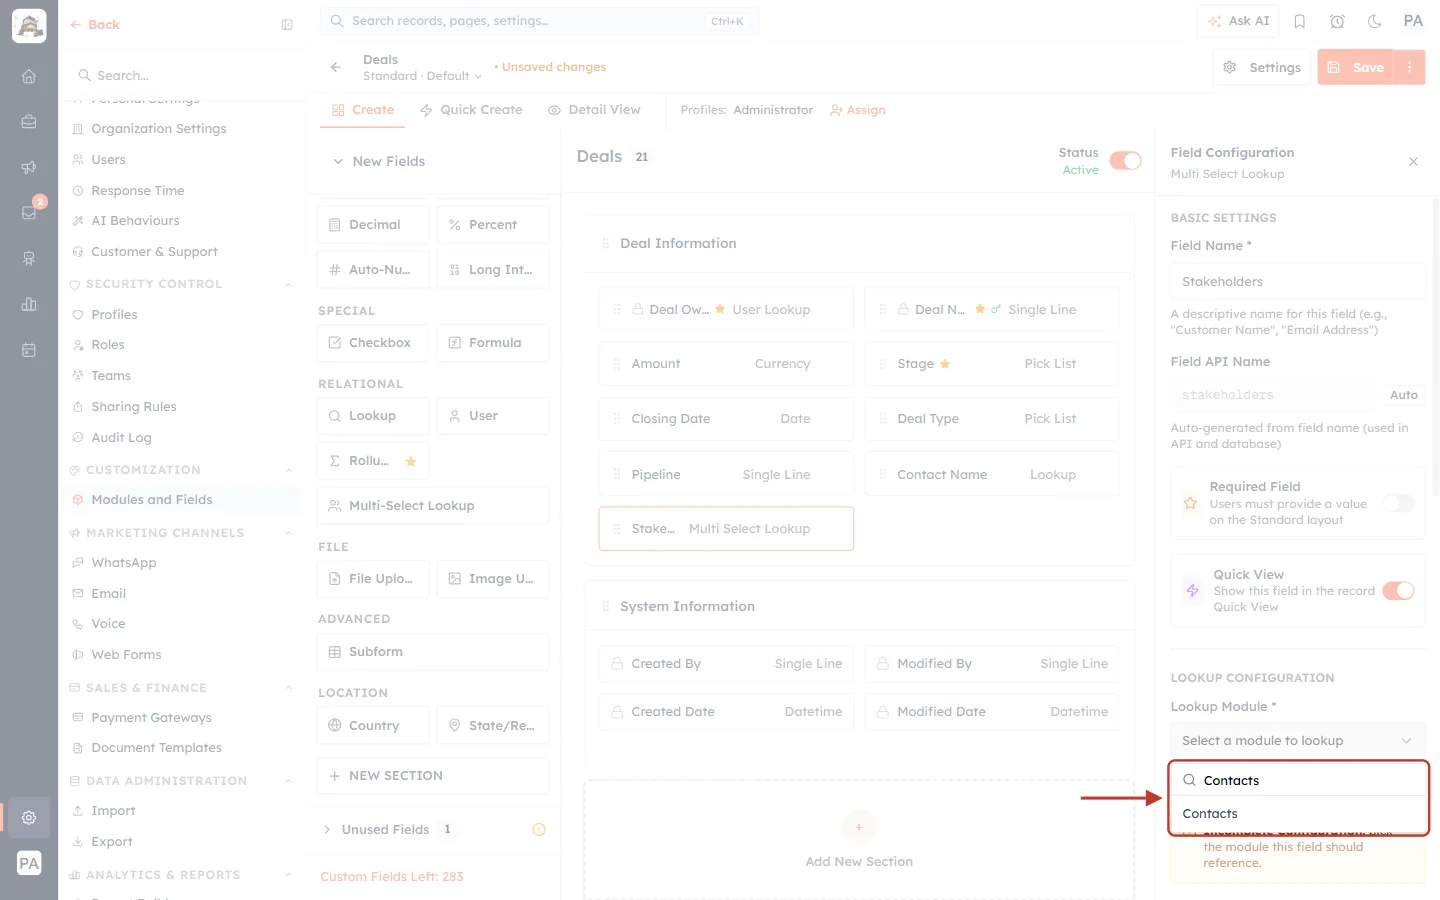
What this screenshot shows. The same list after typing “Contacts” in the search box.
Search box: “Contacts” has been typed.
Matches: only modules whose names contain the search text remain. Click the exact module you want — here, Contacts.
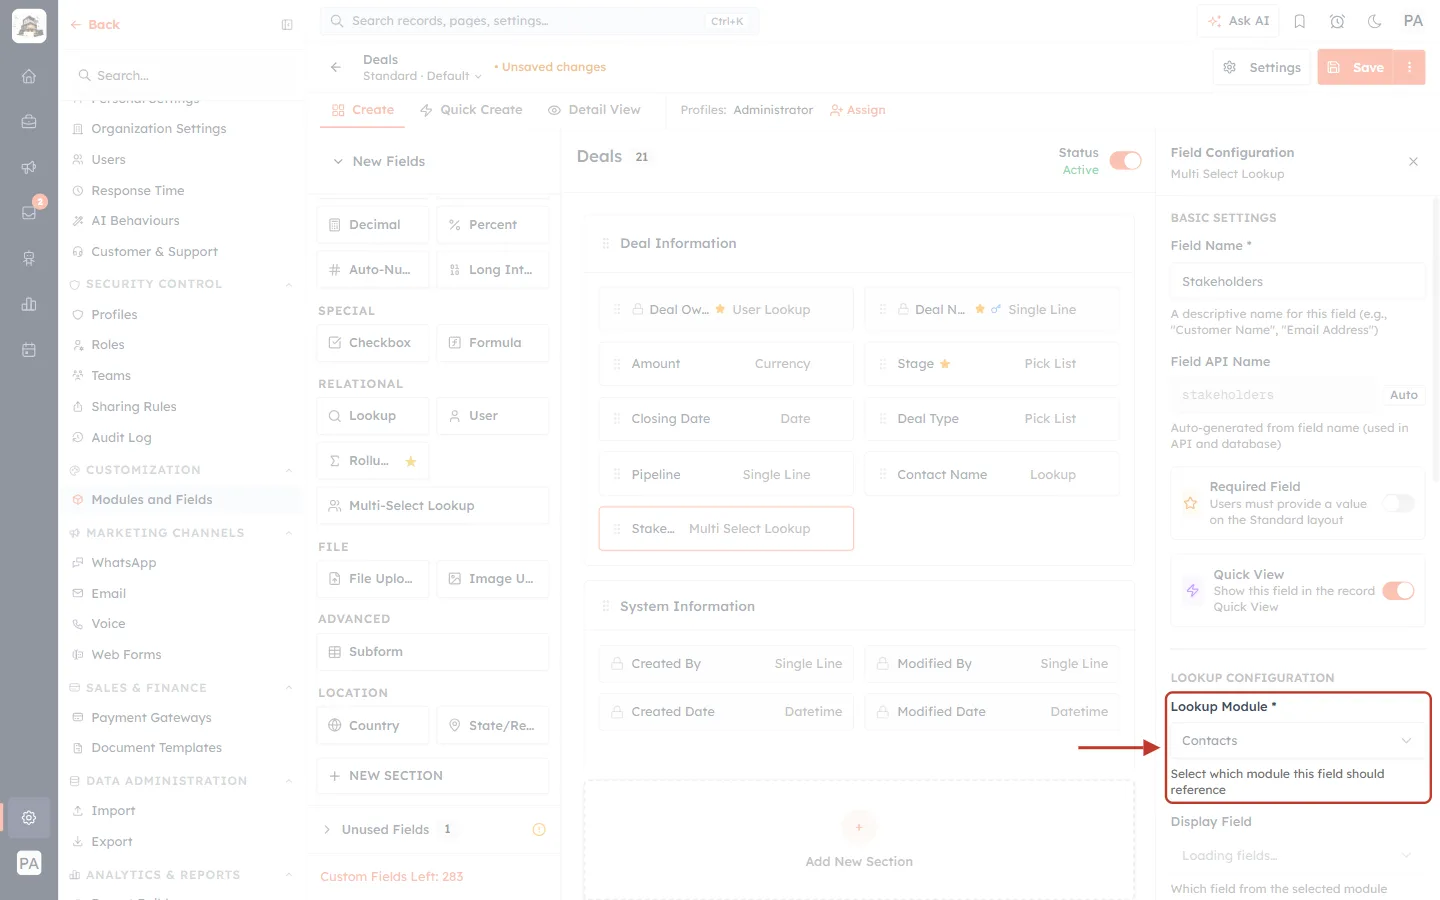
What this screenshot shows. The Lookup Module setting, ringed, now set to Contacts.
Lookup Module: shows “Contacts”. The Stakeholders field will hold contact records.
Incomplete Configuration: the yellow warning has gone — the field now has everything it needs.
Display Field (just below): an optional setting, covered in the next step.
⚠️
Choose the module carefully. Once records have contacts saved in this field, the Lookup Module is locked and can’t be changed — otherwise the field would hold a mix of record types. If you later need it to point somewhere else, create a new Multi-Select Lookup field instead.
Step 10: Choose a Display Field (optional)#
The Display Field decides which piece of information is shown for each linked record. If you leave it empty, each record shows its default name — for contacts, their full name. That is what we want for Stakeholders, so we left it empty.
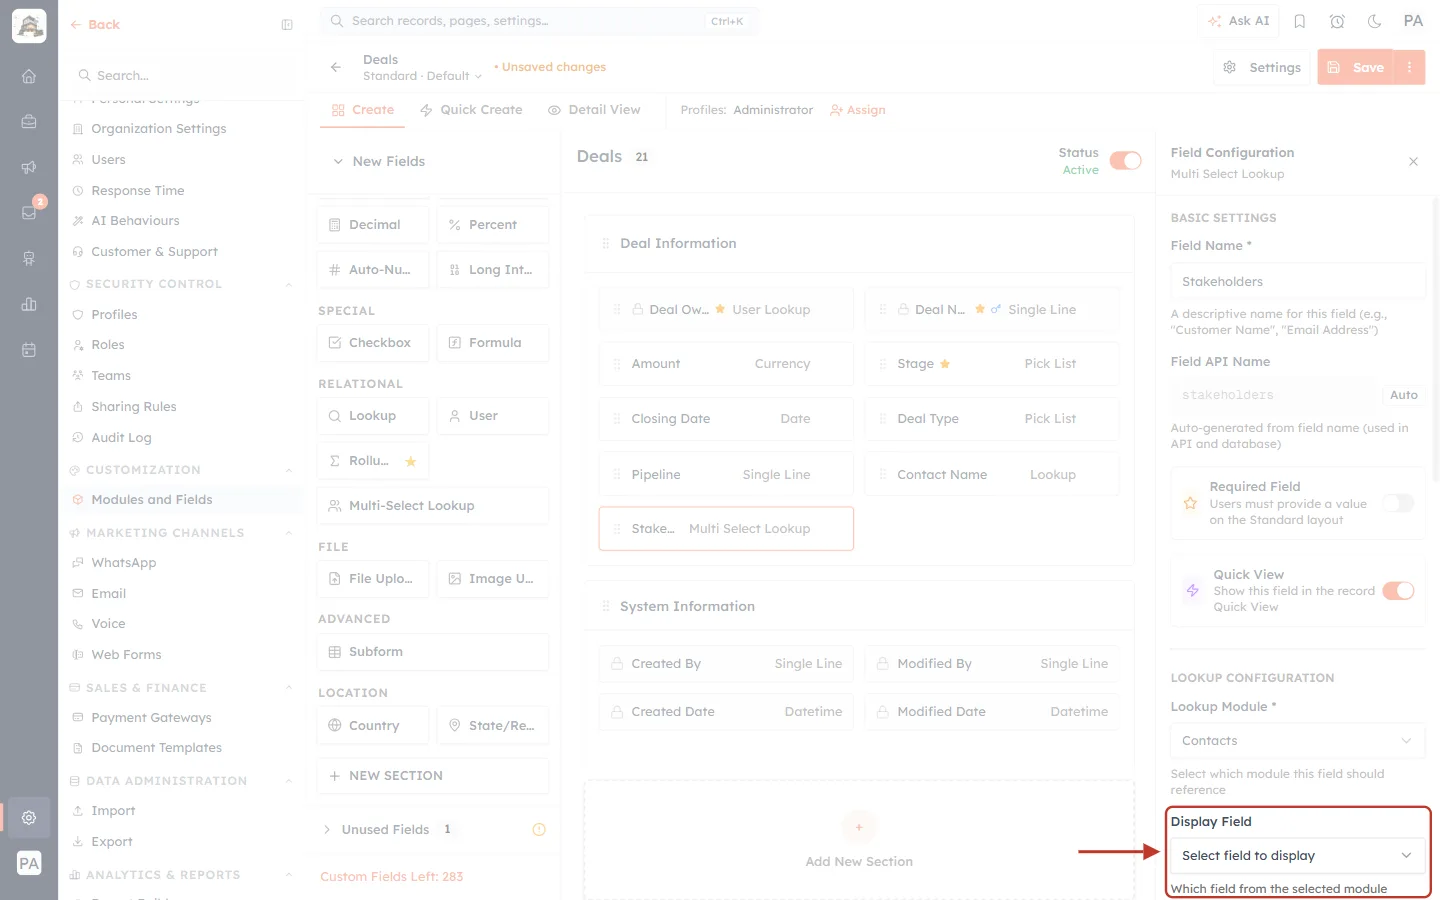
What this screenshot shows. The Display Field setting, ringed, with nothing chosen.
Display Field: “Select field to display” — nothing chosen.
Hint: “Which field from the selected module should be displayed?”
Note: “No display field chosen — records show their default name.” Linked contacts will show as John Smith, Priya Mehta and so on.
To show something else instead, click Select field to display and pick a field from the list.
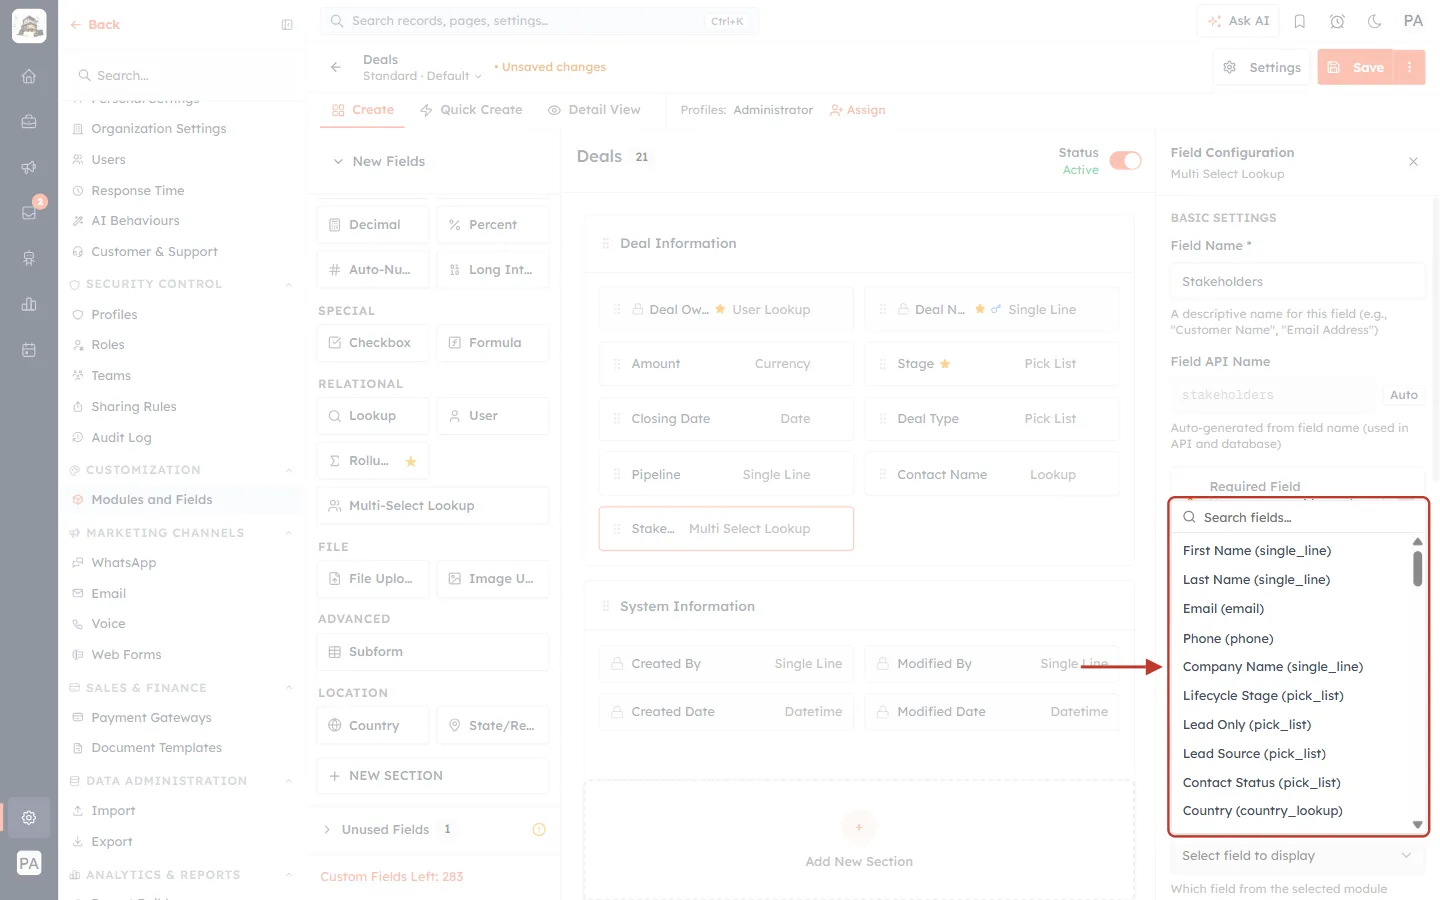
What this screenshot shows. The open Display Field list, ringed.
Search fields…: type to find a field quickly.
The list: the Contacts fields you can display, each with its type in brackets — First Name (single_line), Last Name (single_line), Email (email), Phone (phone), Company Name (single_line), Lifecycle Stage (pick_list) and more.
Not in the list: fields that can’t be shown as a simple label, such as multi-line text, files and images, formulas, rollups, and other lookup fields.
✅
Pick a field that tells records apart. For Products, Product Code can be clearer than the name. For Contacts, the default full name is usually best — choose Email only if you have many people with the same name.
Step 11: Decide whether the field is required#
Back near the top of the panel are two switches.
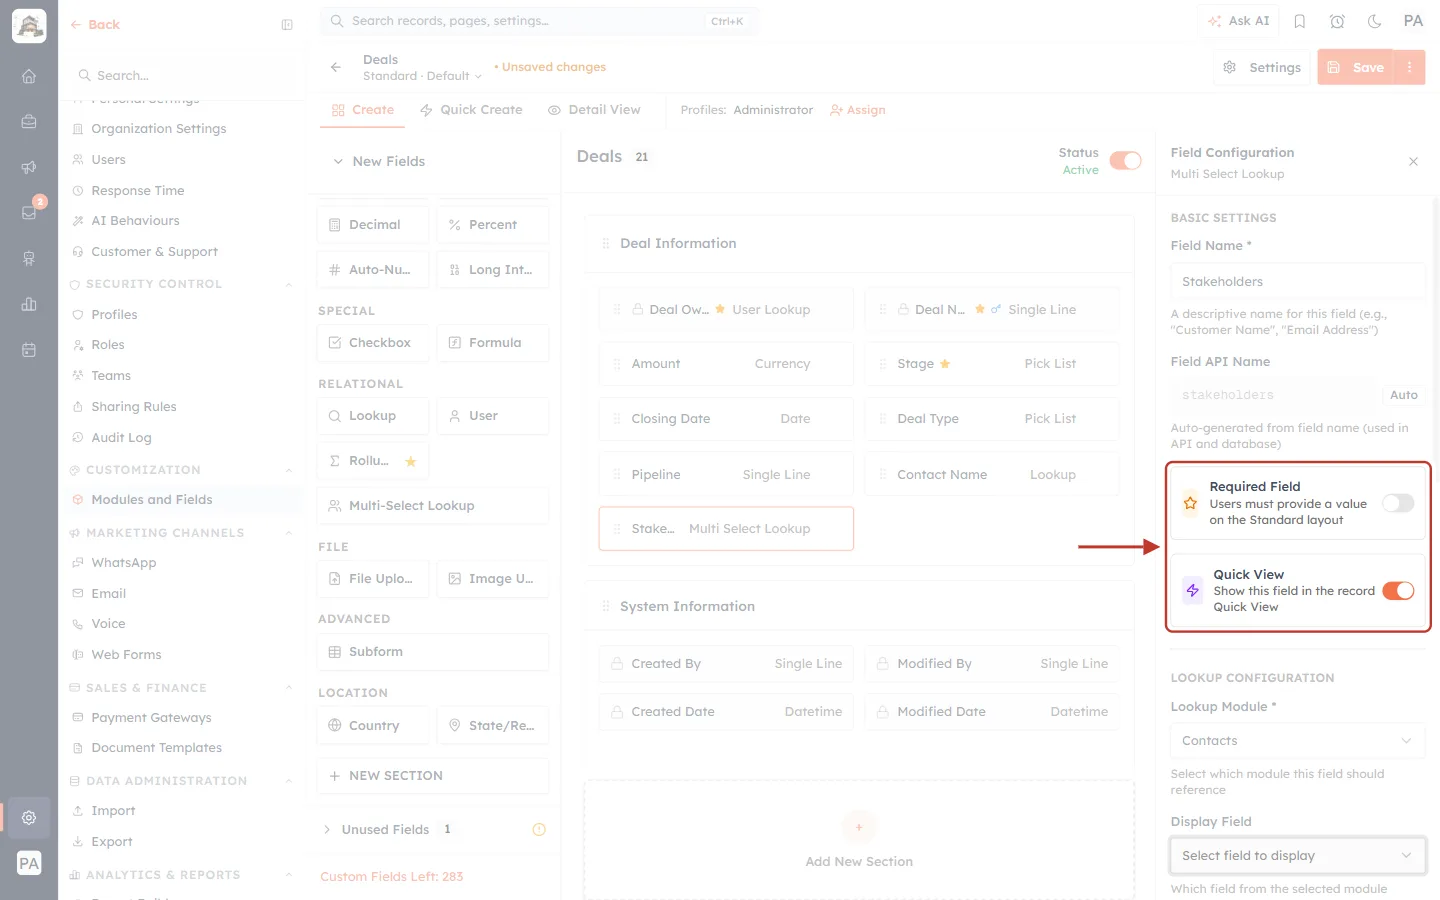
What this screenshot shows. The Required Field and Quick View switches, ringed.
Required Field (off): “Users must provide a value on the Standard layout”. Turn it on if every deal must have at least one stakeholder. With it on, the deal can’t be saved until at least one contact is picked.
Quick View (on): “Show this field in the record Quick View”. Leave it on to see the stakeholders when you preview a deal without opening it fully.
ℹ️
Required applies to the layout you are editing (here, Standard).
Step 12: Check where the field appears#
Scroll to DISPLAY SETTINGS. These control the hint text and which screens show the field. The defaults suit most teams.
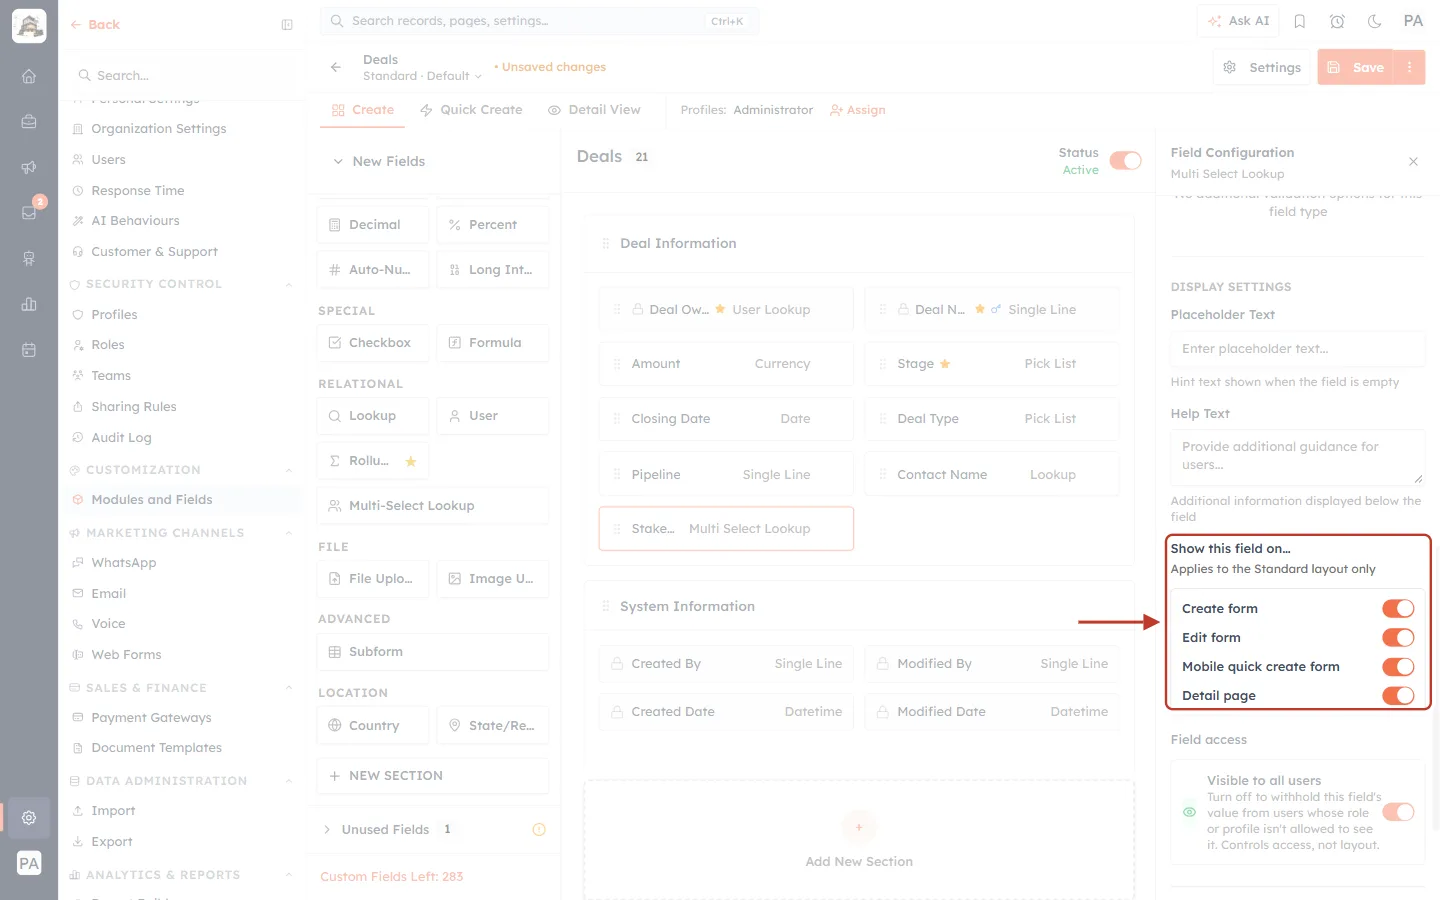
What this screenshot shows. The Show this field on… switches, ringed, inside Display Settings.
Placeholder Text (above): the grey hint inside the empty box on forms. If you leave it empty, the form shows “Select Stakeholders”.
Help Text (above): an extra line of guidance shown under the field.
Show this field on… (ringed; Standard layout only): Create form, Edit form, Mobile quick create form and Detail page. All are on by default. Turn one off to hide the field from that screen only.
Field access (below): “Visible to all users”. Turn it off to hide the field’s value from users whose role or profile isn’t allowed to see it.
Step 13: Save the layout#
Check that the new card now reads Stakeholders · Multi Select Lookup. Then click Save at the top right of the builder.
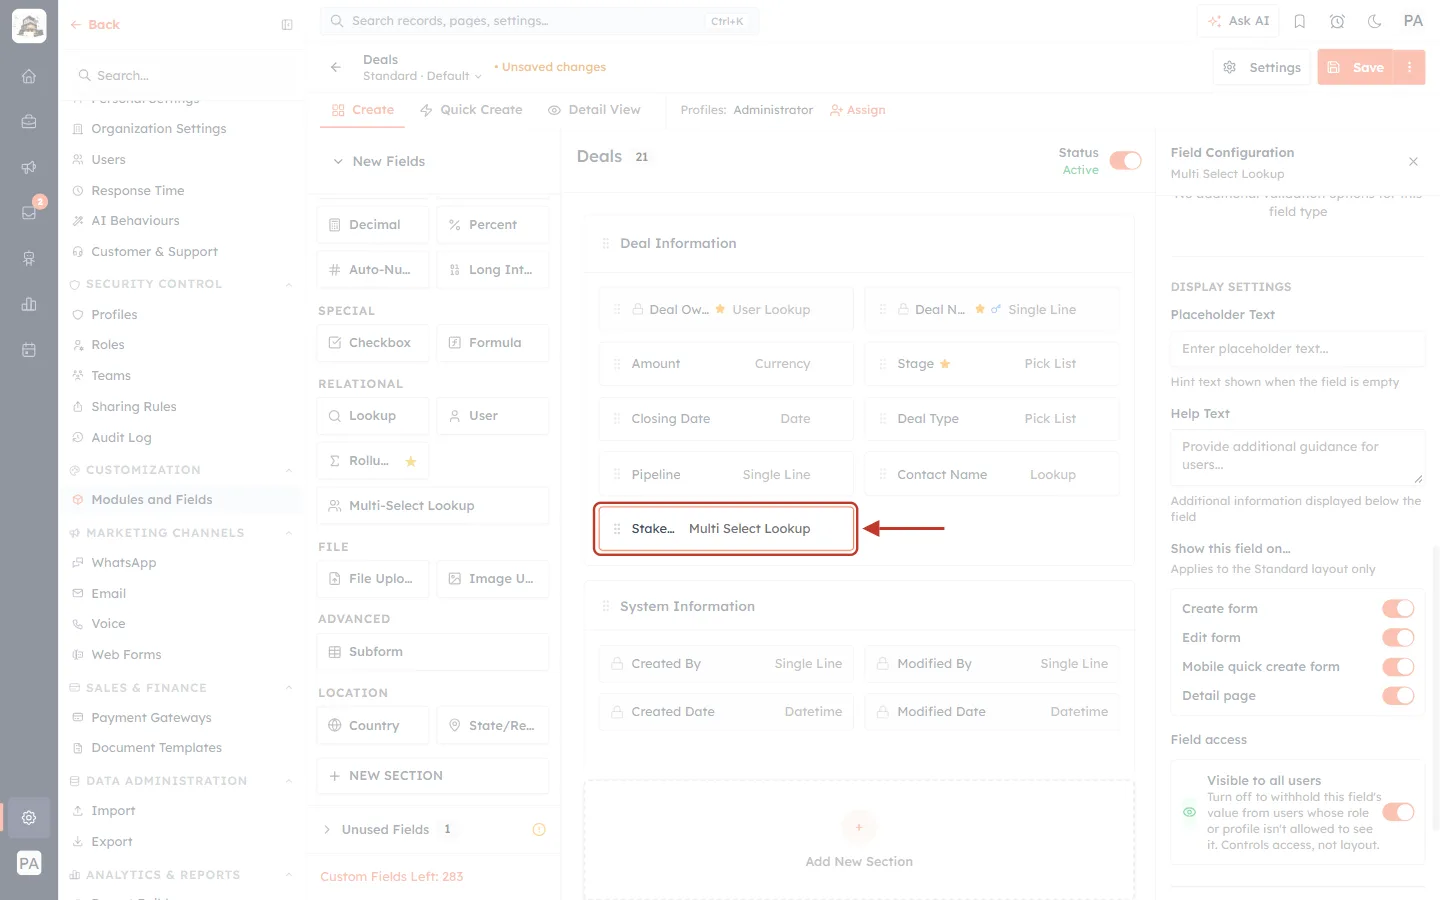
What this screenshot shows. The canvas, with the finished Stakeholders card ringed in Deal Information.
Card (ringed): “Stake…” (the name, shortened to fit) and its type, Multi Select Lookup.
Its position: after Pipeline and Contact Name. This is where it will appear on the Create Deal and Edit Deal forms.
Right panel: the lower half of this field’s settings (Display Settings and Field access).
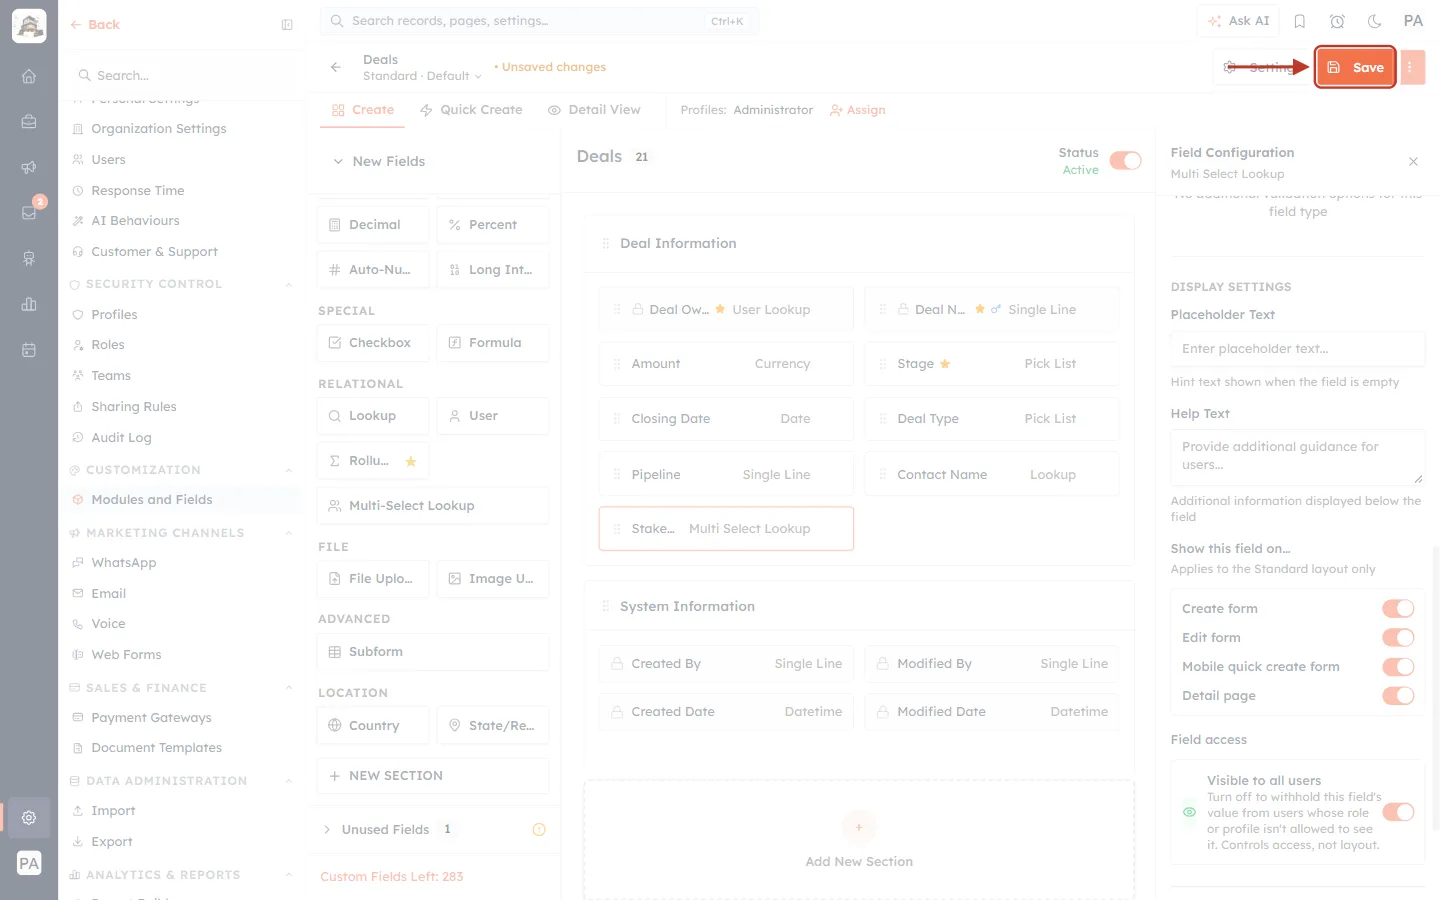
What this screenshot shows. The top of the builder, with the orange Save button ringed.
Save (ringed): stores the new field and the layout. Until you click it, the field exists only on your screen.
Settings (left of Save): module-wide settings — not needed here.
⋮ (right of Save): more layout actions.
⚠️
If you leave the builder without clicking Save, the new field is lost. If Save is refused with a plan-limit message, the module has used all the custom fields your plan allows — see Good to know.
Part 3: Link several records on a deal#
Your team fills in the new field like any other field — on the Create and Edit forms.
Step 14: Start a new deal#
Open Deals from the Sales menu. Click Create Deal at the top right, then Create Single.
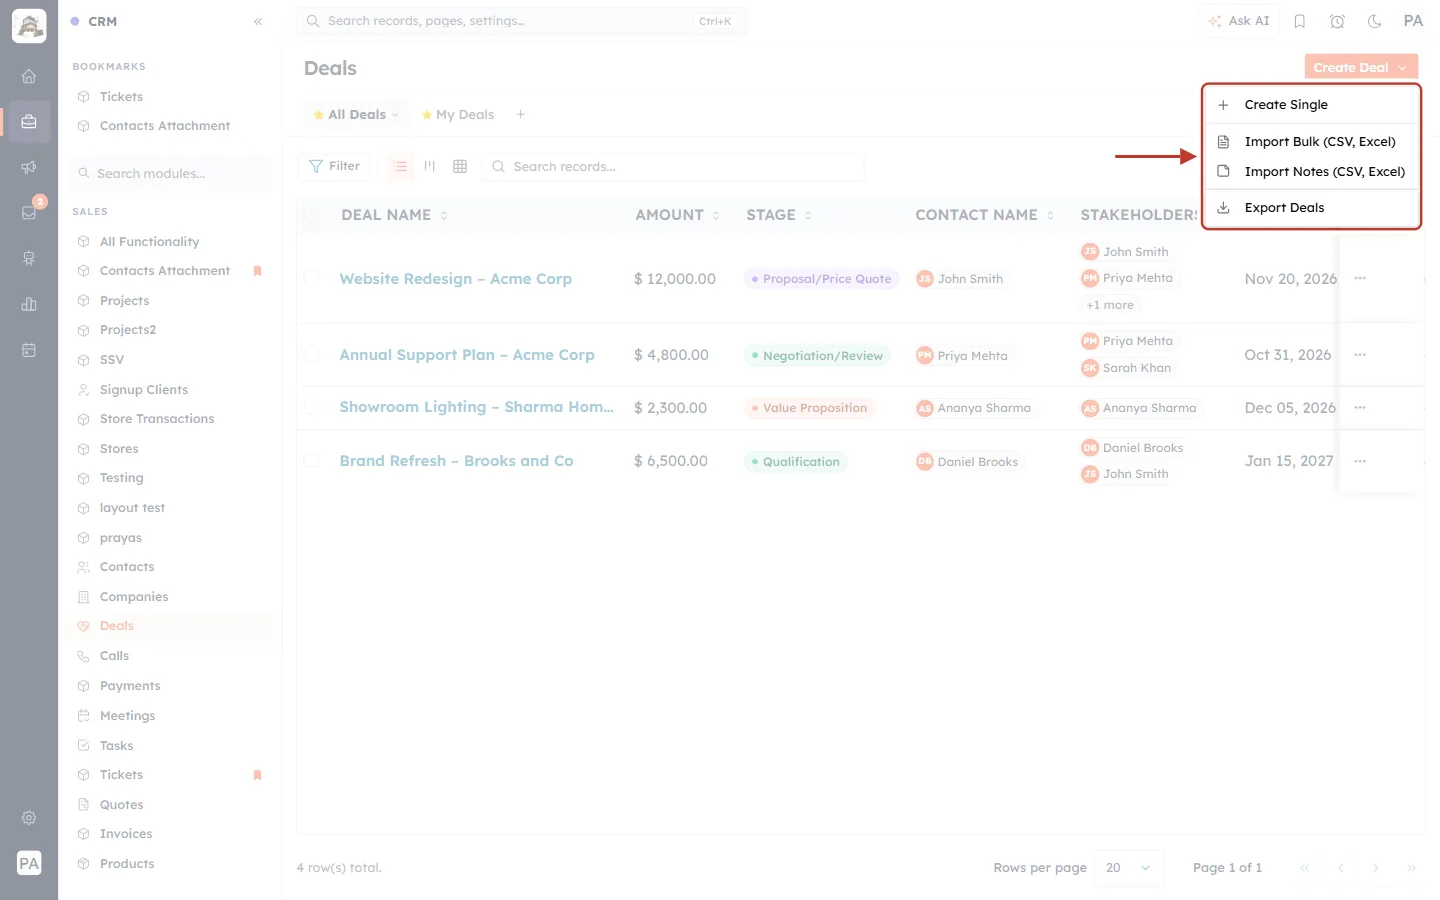
What this screenshot shows. The Deals list with the Create Deal menu open and ringed.
Create Single: opens the form to add one deal. This is the option we use.
Import Bulk (CSV, Excel) and Import Notes (CSV, Excel): bring in many records or notes from a file.
Export Deals: download your deals.
The list behind it: existing deals. The Stakeholders column already shows linked contacts as chips — more on that in Part 4.
Step 15: Find the Stakeholders field on the form#
Fill in the deal as usual (Deal Name, Stage and so on). The Stakeholders field sits where you placed it in the builder — here, under Pipeline.
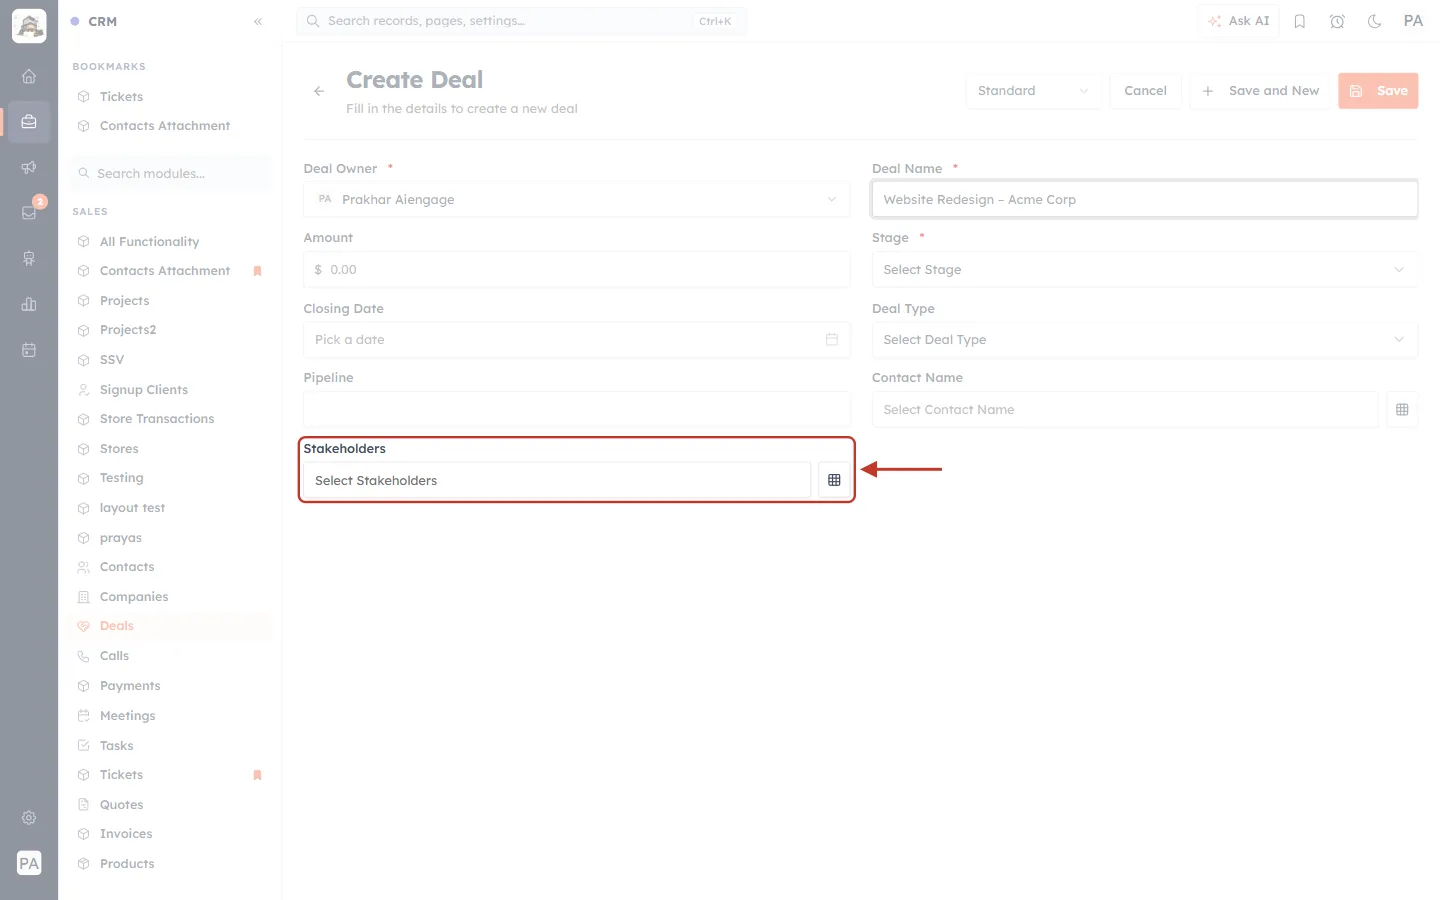
What this screenshot shows. The Create Deal form, with the empty Stakeholders field ringed.
Label: “Stakeholders” (with a red * if you made it required).
Box: shows “Select Stakeholders” while empty. Click it to choose contacts.
Grid button (to the right of the box): opens the same chooser.
Contact Name (top right): the deal’s ordinary single Lookup. It holds one contact; Stakeholders holds many.
Top right: the layout picker (Standard), Cancel, Save and New, and Save.
Step 16: Open the chooser#
Click the Stakeholders box (or the grid button). The Choose Record window opens, listing records from the module you linked — here, Contacts.
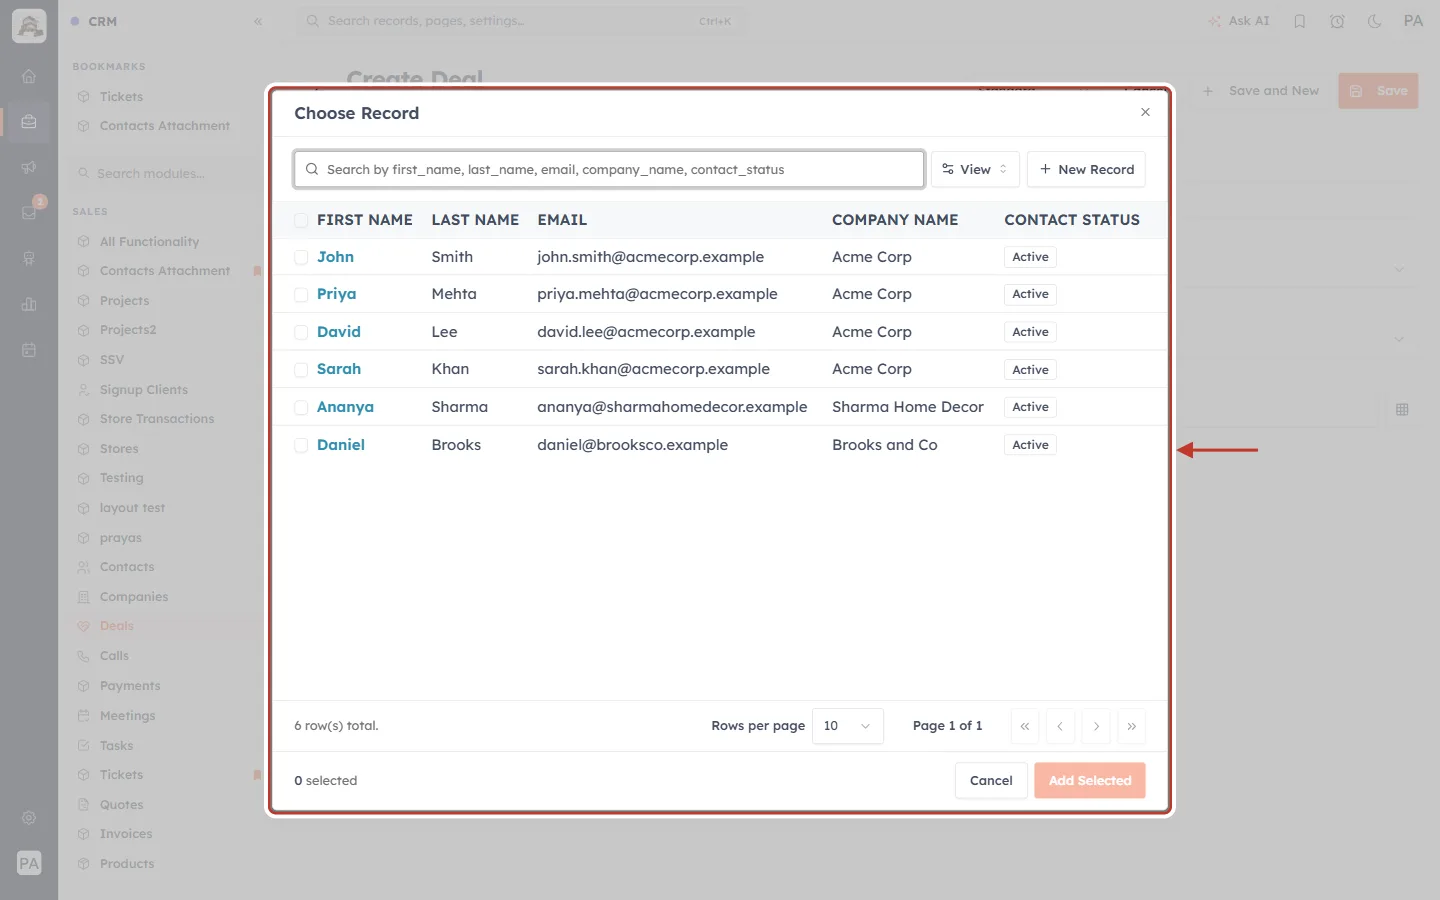
What this screenshot shows. The Choose Record window, ringed.
Search box (top left): find contacts by name, email, company or status.
View: choose which columns the window shows.
New Record: create a contact on the spot if the person isn’t in the CRM yet.
Table: one row per contact — First Name, Last Name, Email, Company Name and Contact Status — each with a tick box on the left.
Footer: the number of rows, Rows per page (10 by default) and page arrows; then “0 selected”, Cancel and Add Selected.
Step 17: Search for the people you want (optional)#
With a long list, type in the search box. We typed Acme to show only the contacts from Acme Corp.
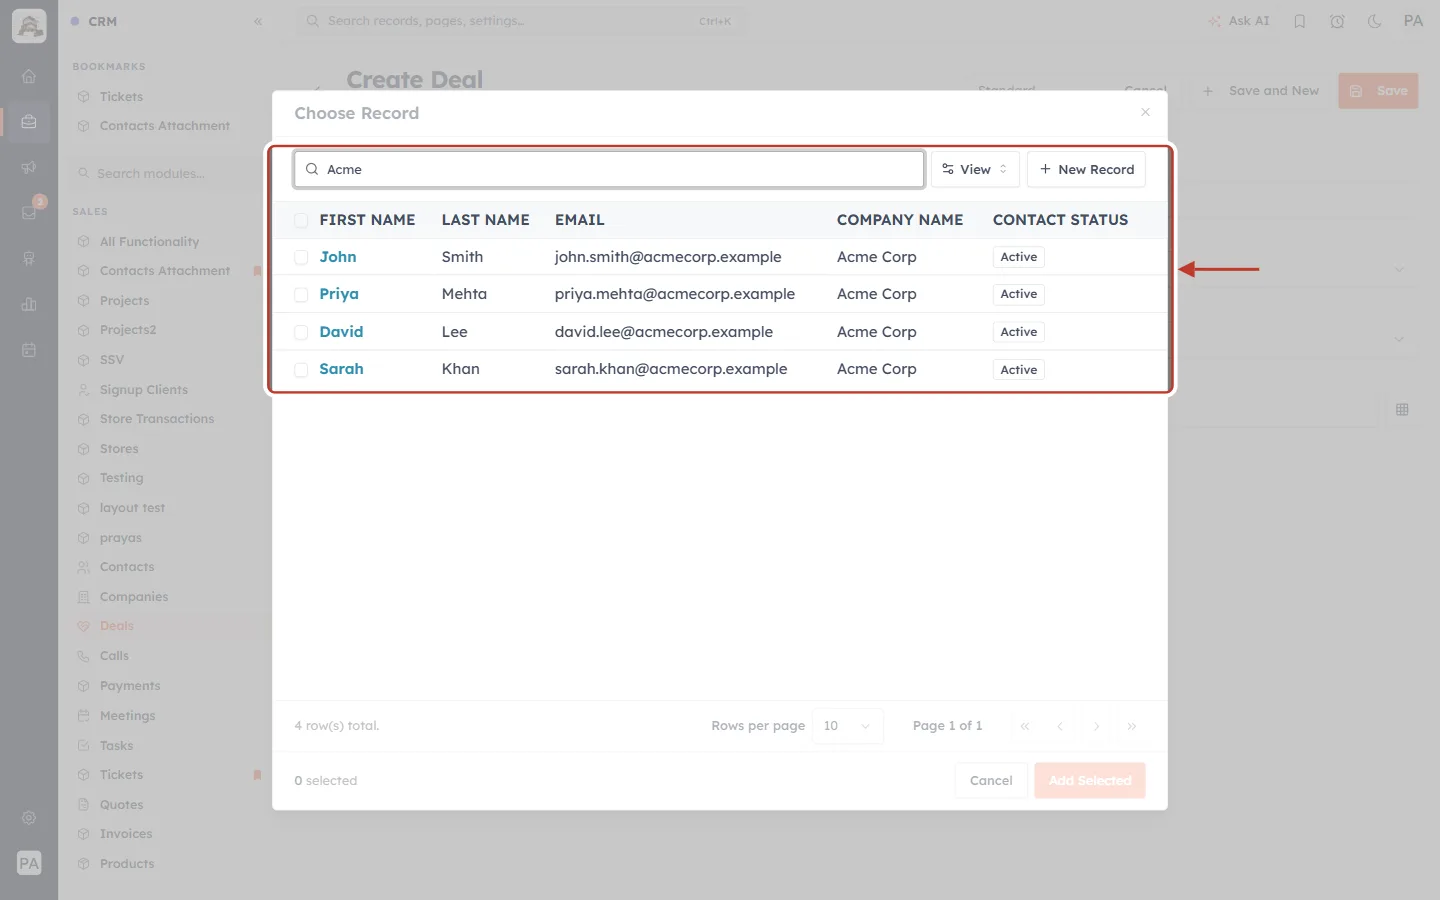
What this screenshot shows. The chooser after typing “Acme”, with the search box and results ringed.
Search box: “Acme”.
Results: the four Acme Corp contacts — John Smith, Priya Mehta, David Lee and Sarah Khan. The search matches any of the columns shown, including Company Name.
Footer: “4 row(s) total”.
If you need more information to choose the right person, click View and tick the columns you want to see.
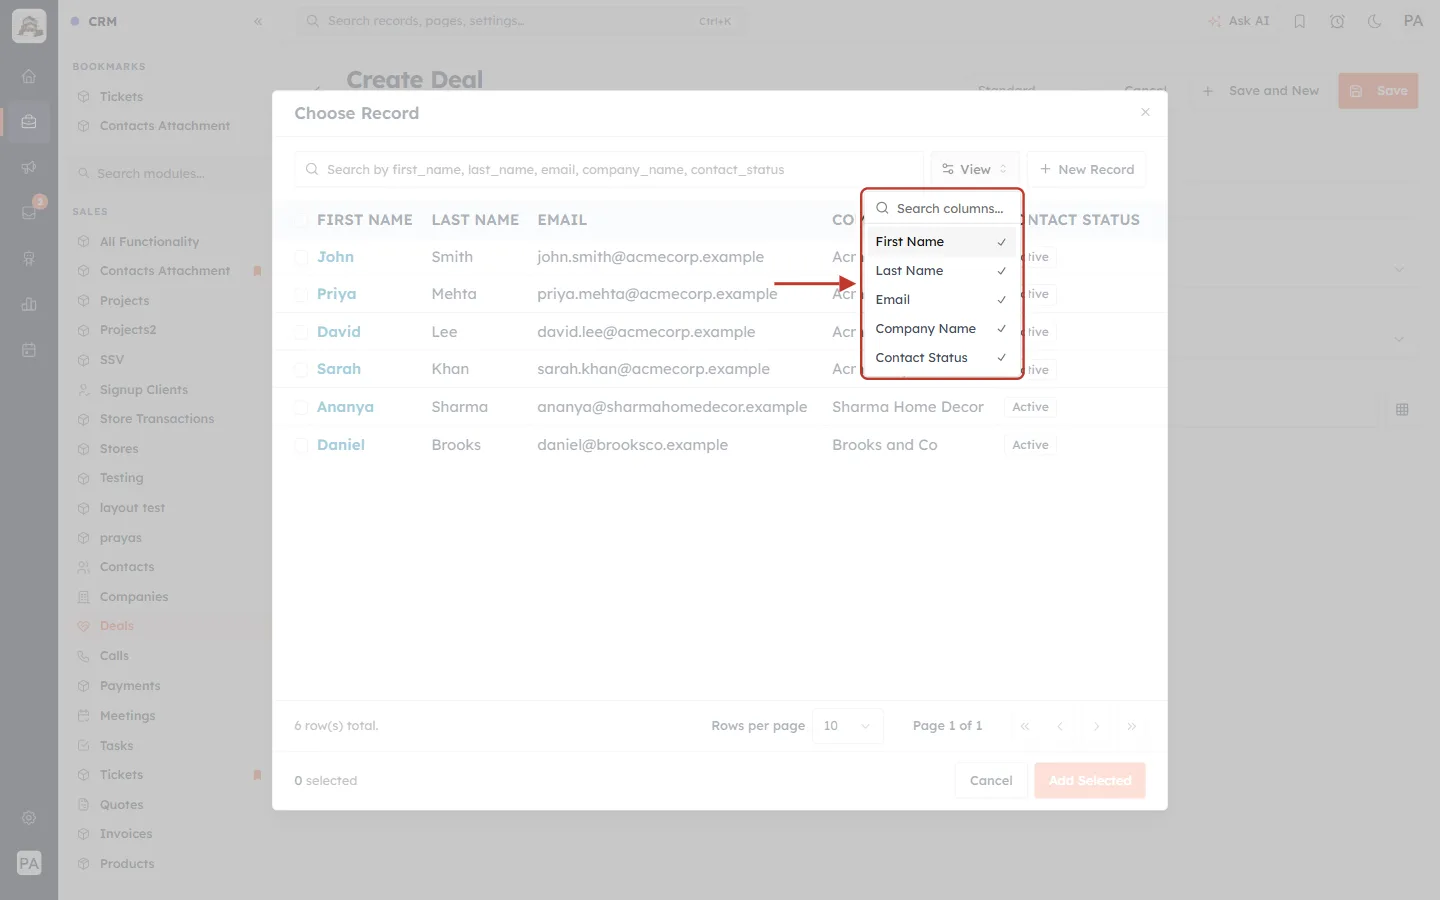
What this screenshot shows. The View menu in the chooser, ringed.
Search columns…: find a column by name.
Column list: First Name, Last Name, Email, Company Name and Contact Status — the ticked ones are shown in the table.
Click outside the menu to close it and return to the list.
Step 18: Tick every record you want to link#
Tick the box at the start of each row you want. You can tick as many as you need. We ticked John Smith, Priya Mehta and David Lee.
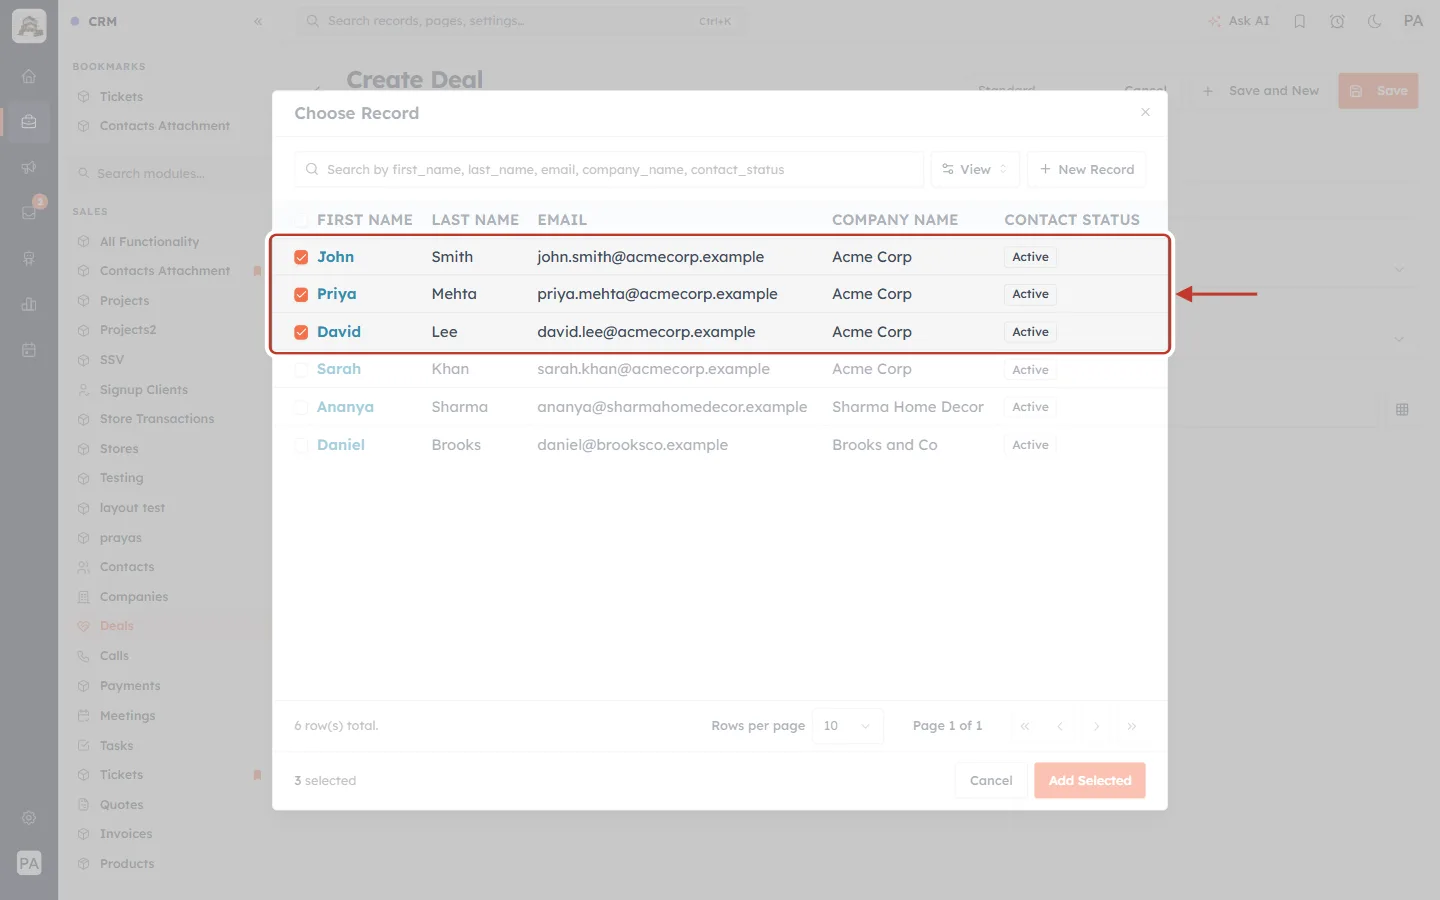
What this screenshot shows. The chooser with three rows ticked, ringed.
Ticked rows: John Smith, Priya Mehta and David Lee, each with an orange tick and a shaded row.
Unticked rows: Sarah Khan, Ananya Sharma and Daniel Brooks — not linked.
Header tick box: ticks every row on the current page at once.
Step 19: Click Add Selected#
Check the count at the bottom left, then click Add Selected.
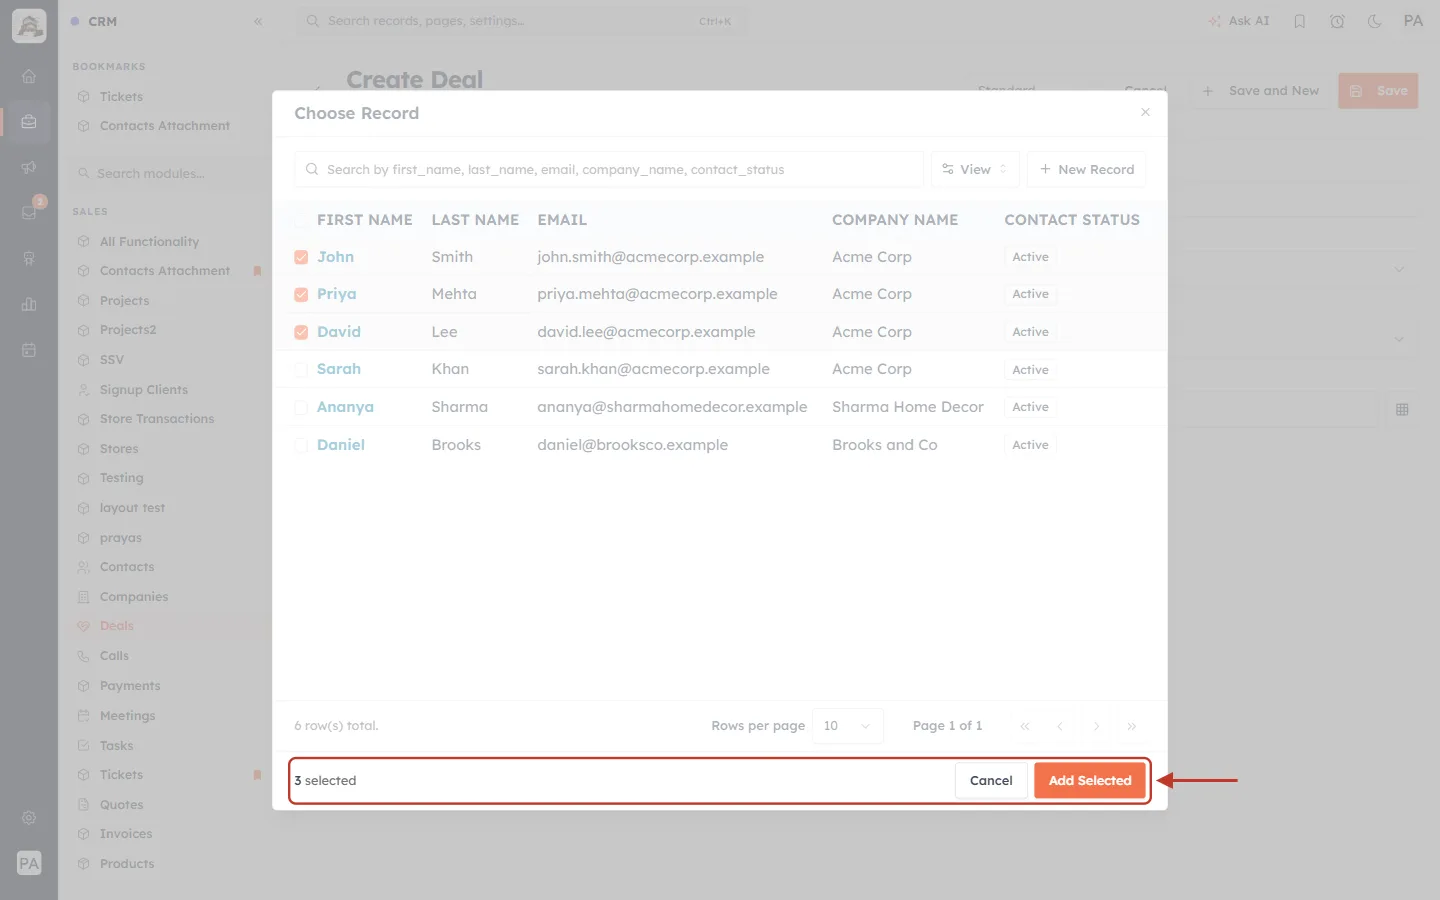
What this screenshot shows. The footer of the chooser, ringed.
“3 selected”: how many records you have ticked.
Cancel: closes the window without changing the field.
Add Selected (orange): adds the ticked records to the field and closes the window.
Step 20: Check the chips, then save the deal#
The chosen contacts now appear in the field — as a list in the box and as a chip for each person underneath.
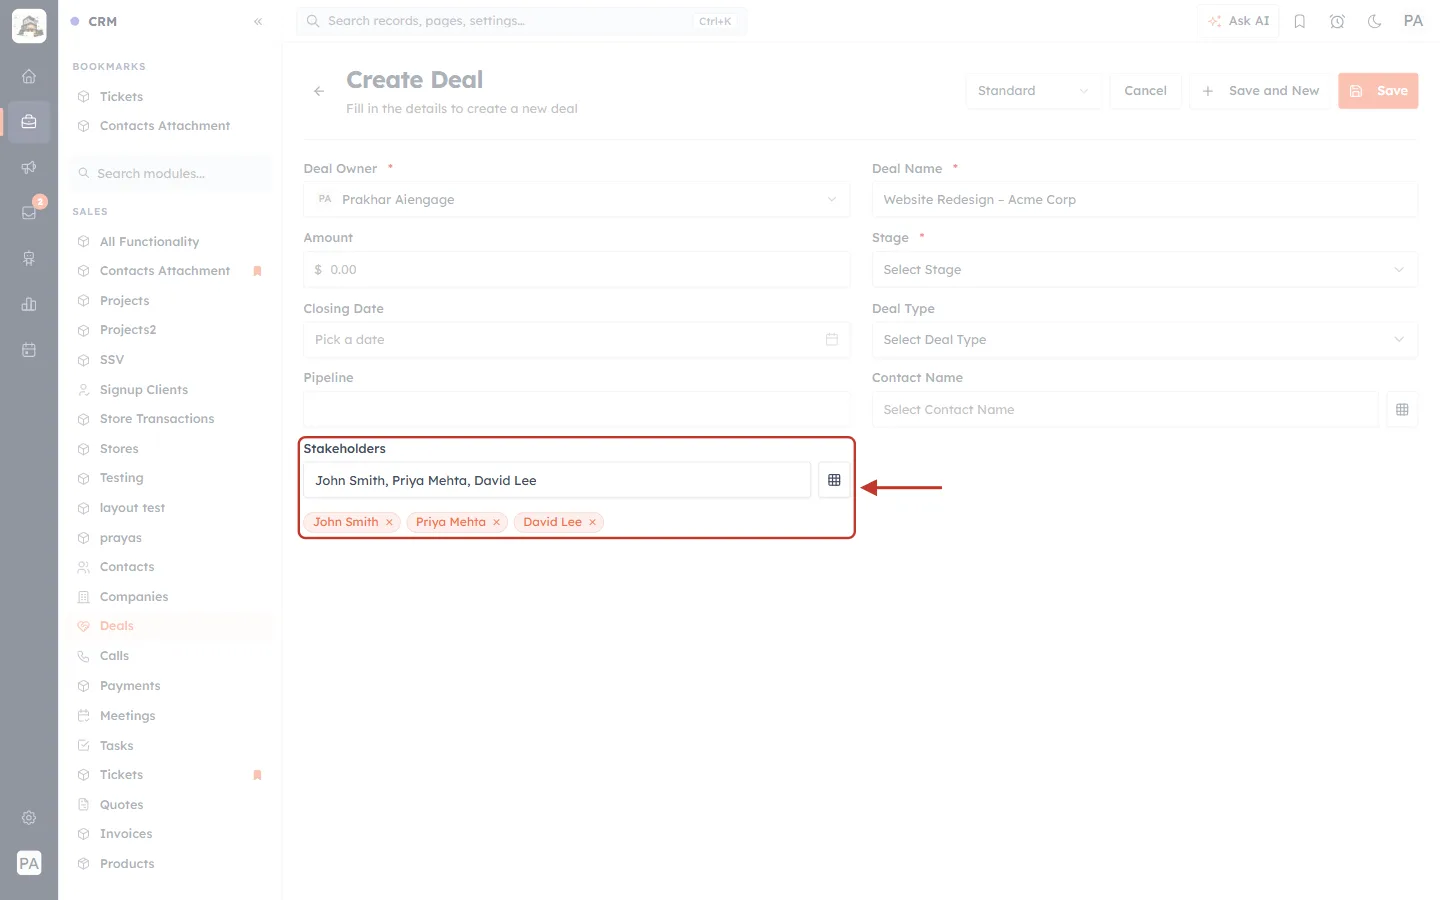
What this screenshot shows. The Stakeholders field, ringed, after adding three contacts.
Box: “John Smith, Priya Mehta, David Lee”. Click it again if you need to open the chooser and add someone else.
Chips (underneath): one orange chip per linked contact.
× on each chip: removes that person from the field.
To remove someone, click the × on their chip.
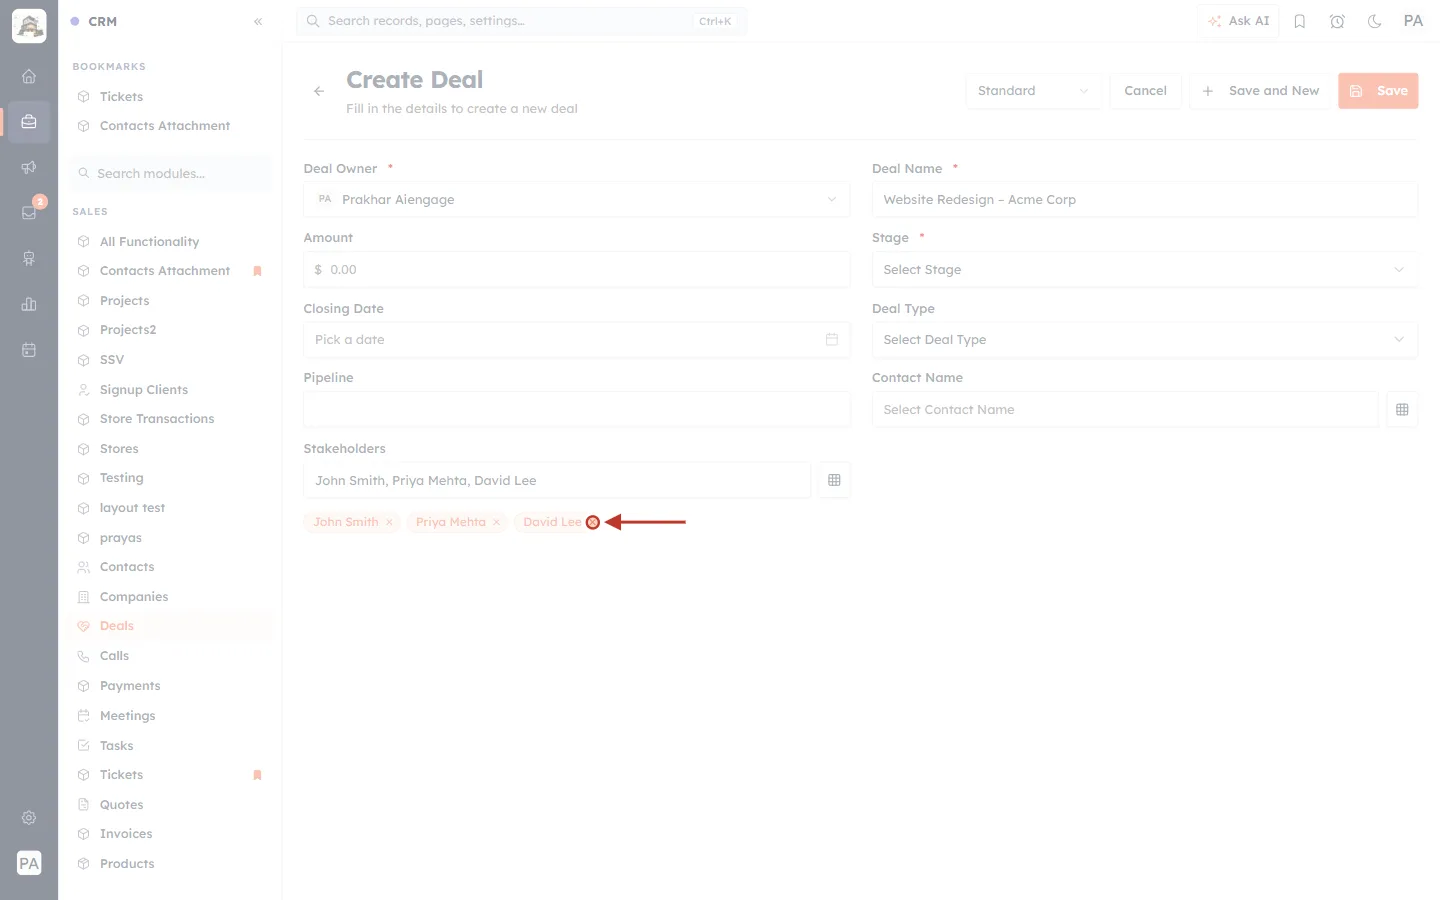
What this screenshot shows. The × on David Lee’s chip, ringed.
× (ringed): removes David Lee from Stakeholders straight away. Nothing is deleted from Contacts — the person is only unlinked from this deal.
Other chips: John Smith and Priya Mehta stay linked.
When the form is complete, click Save (or Save and New to start another deal straight away).
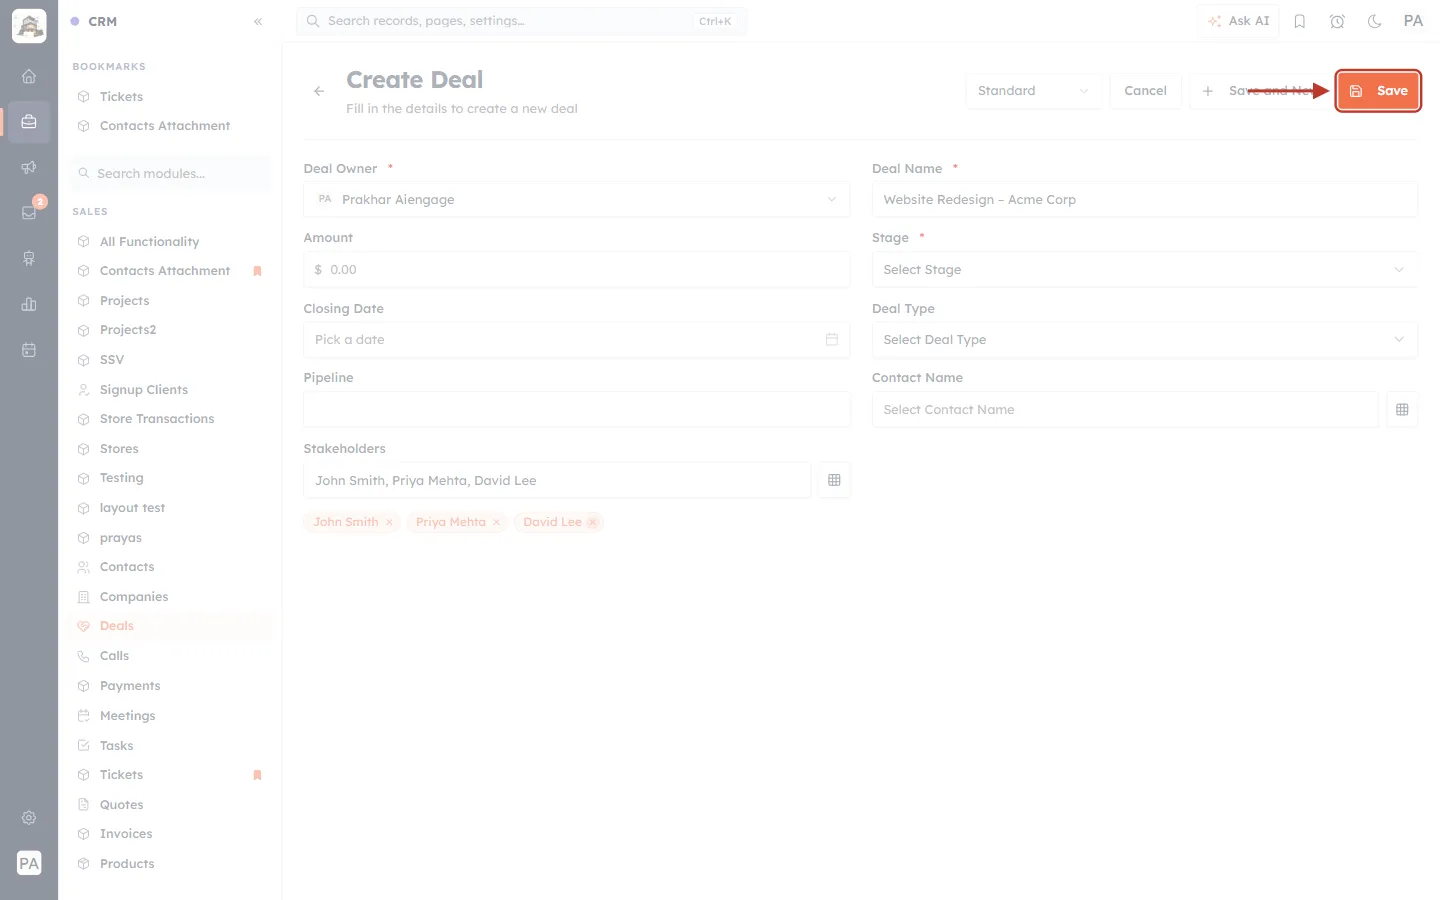
What this screenshot shows. The top of the Create Deal form, with Save ringed.
Save (ringed): creates the deal with its stakeholders.
Save and New: saves and opens an empty form for the next deal.
Cancel: leaves without saving.
ℹ️
Changing the stakeholders later works the same way. Open the deal, click Edit, add people with the chooser or remove them with the ×, then click Save.
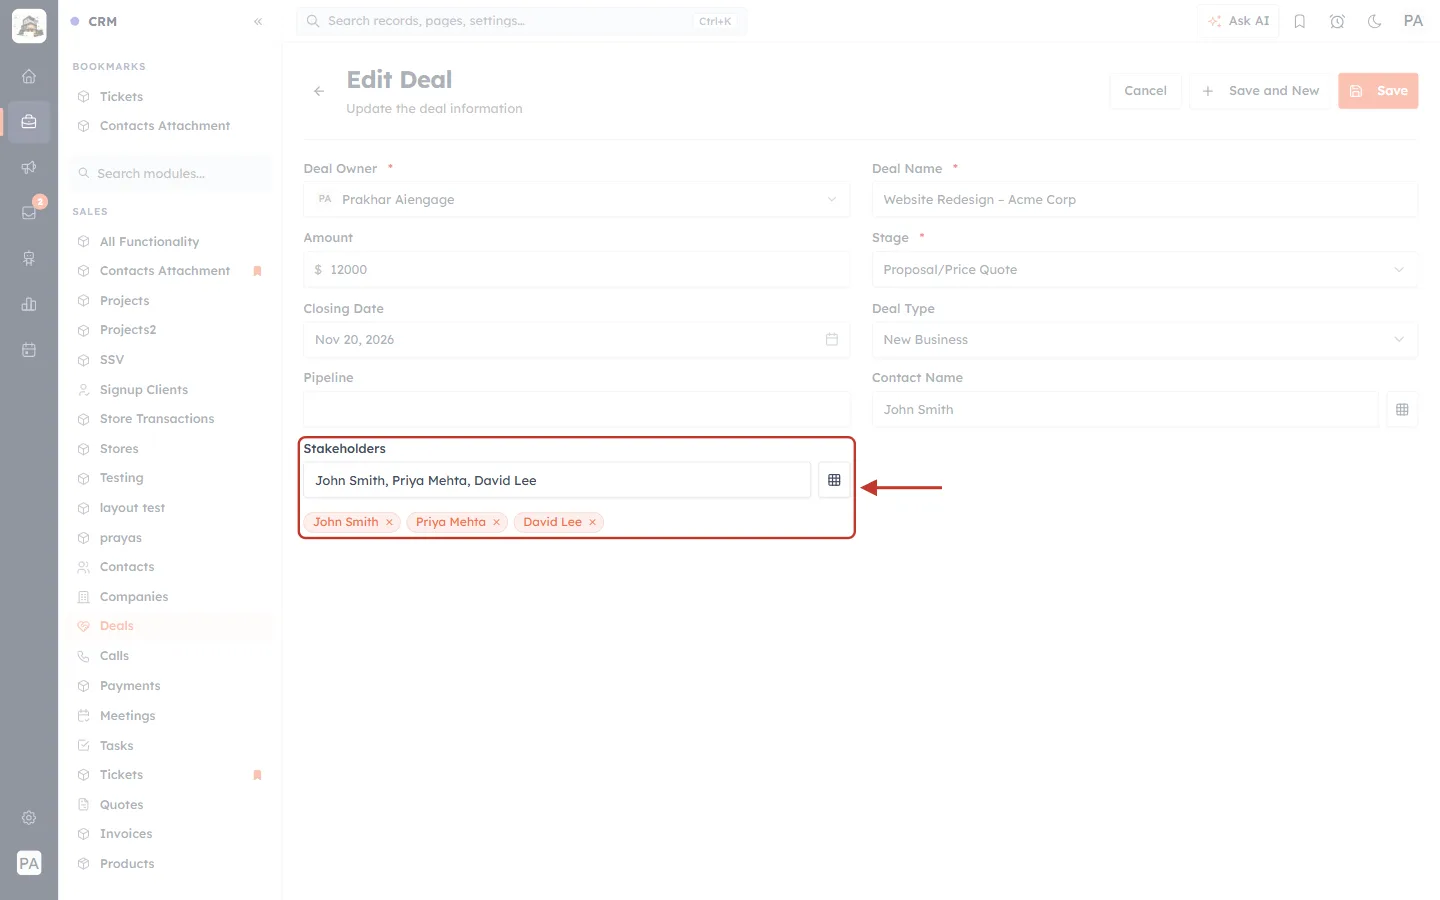
What this screenshot shows. The Edit Deal form, with the filled-in Stakeholders field ringed.
Heading: “Edit Deal — Update the deal information”.
Stakeholders: the three linked contacts, both in the box and as chips — ready to add to or remove from.
Other fields: already filled in with the deal’s saved values.
Part 4: See the linked records#
Step 21: On the deal’s detail page#
Open the deal. In the Deal Information section, Stakeholders shows a chip for every linked contact, each with the person’s initials.
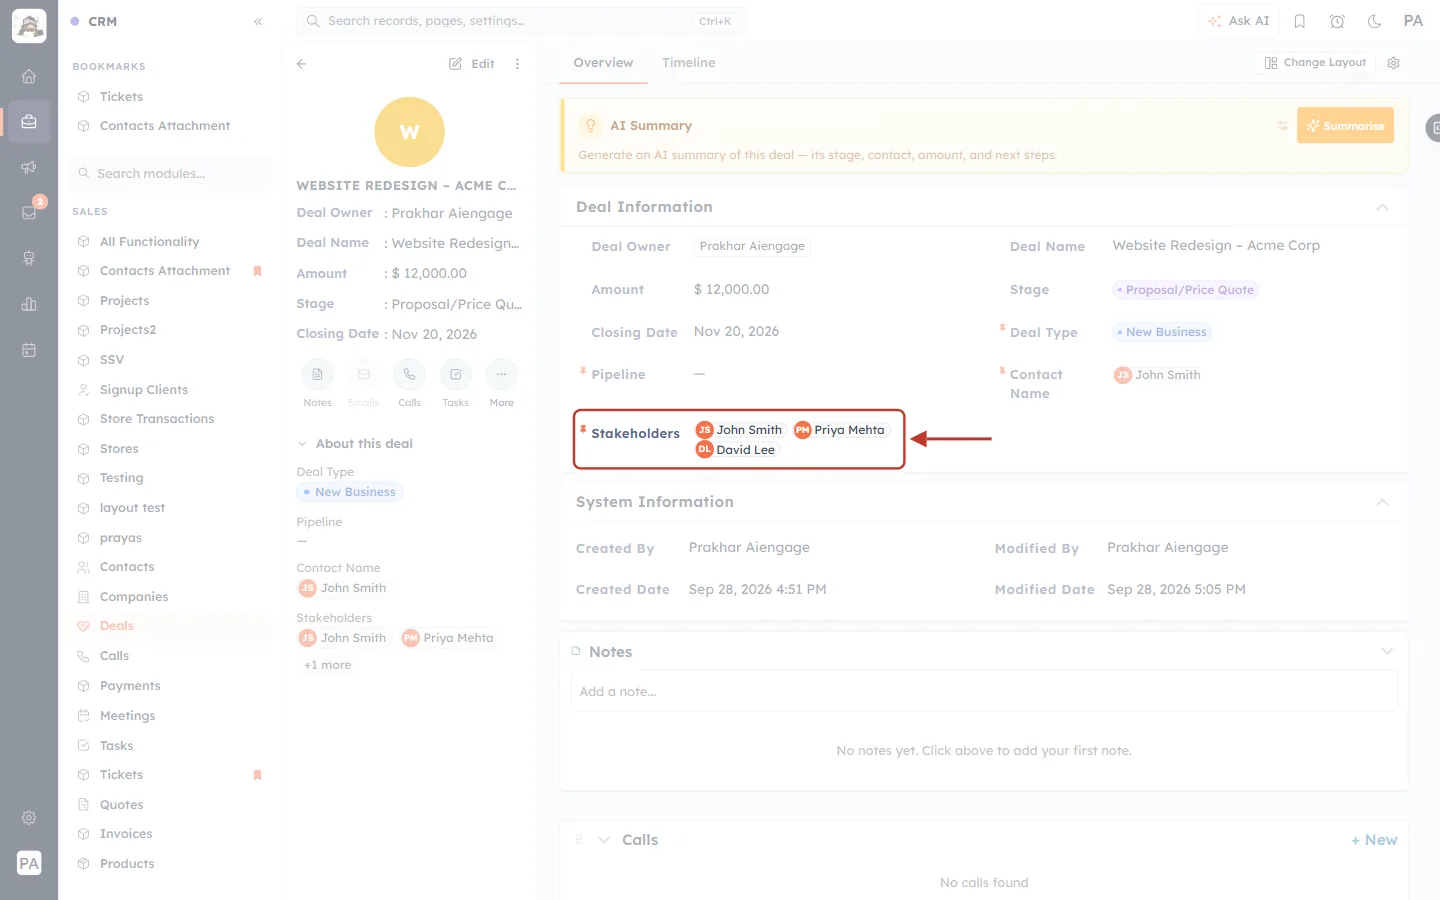
What this screenshot shows. The deal’s Overview tab, with the Stakeholders field ringed in Deal Information.
Stakeholders: John Smith (JS), Priya Mehta (PM) and David Lee (DL). The chips wrap onto a new line when there are many.
Contact Name (above right): the deal’s single main contact, John Smith.
Small pin marks beside some labels: those fields are also pinned to the About this deal card on the left.
Left panel: the deal’s summary — owner, name, amount, stage and closing date — with quick actions (Notes, Emails, Calls, Tasks, More).
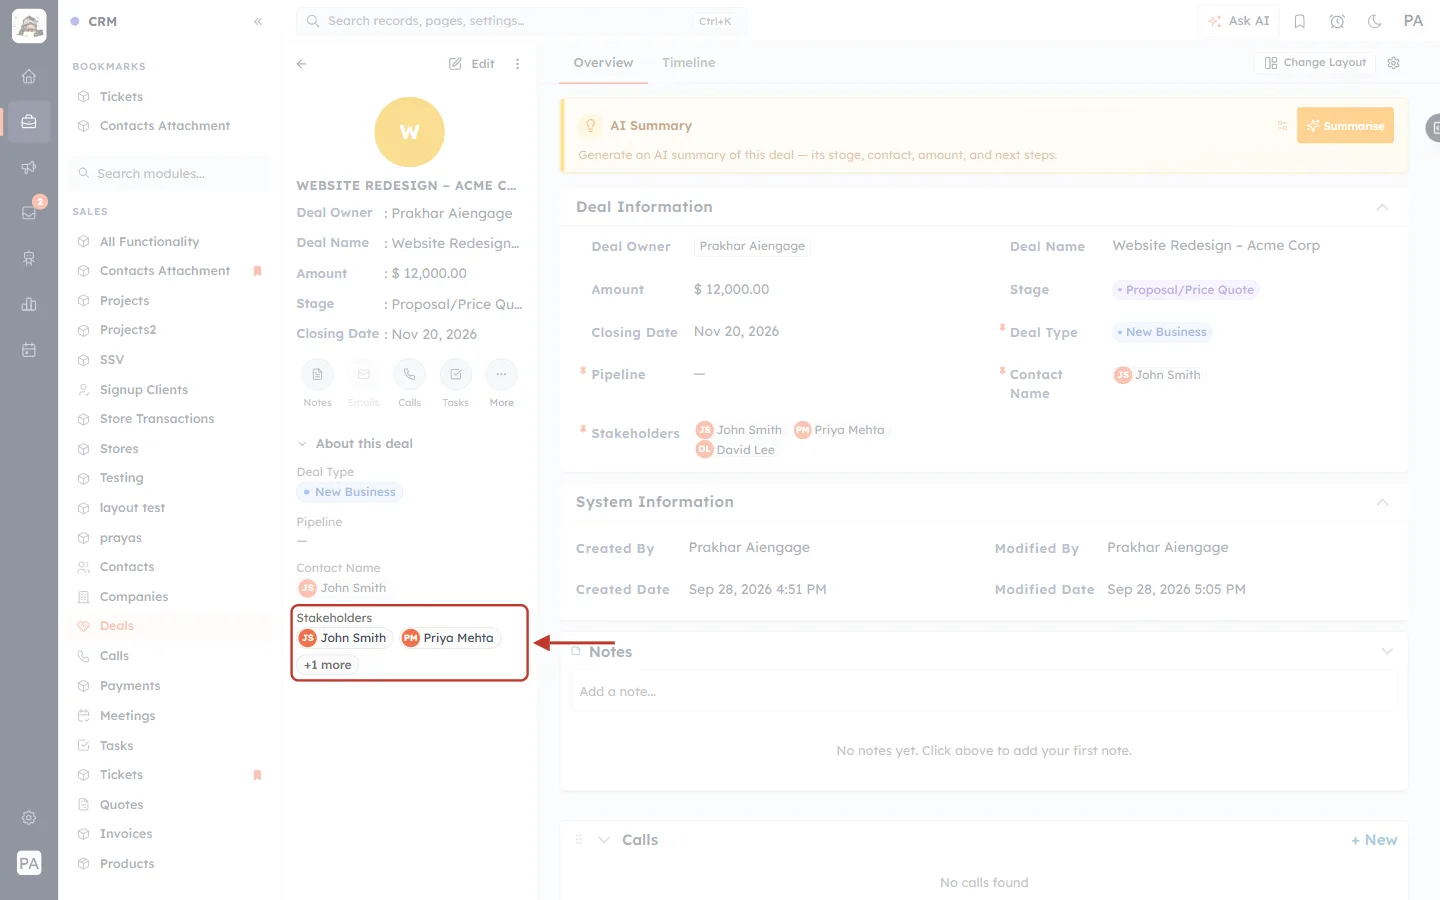
What this screenshot shows. The About this deal card on the left, with the Stakeholders entry ringed.
Stakeholders: the first two chips (John Smith and Priya Mehta) and a +1 more button. In narrow spaces like this, extra records are folded away.
Other entries: Deal Type, Pipeline and Contact Name — the fields pinned to this card.
Click +1 more (or +N more) to see the rest.
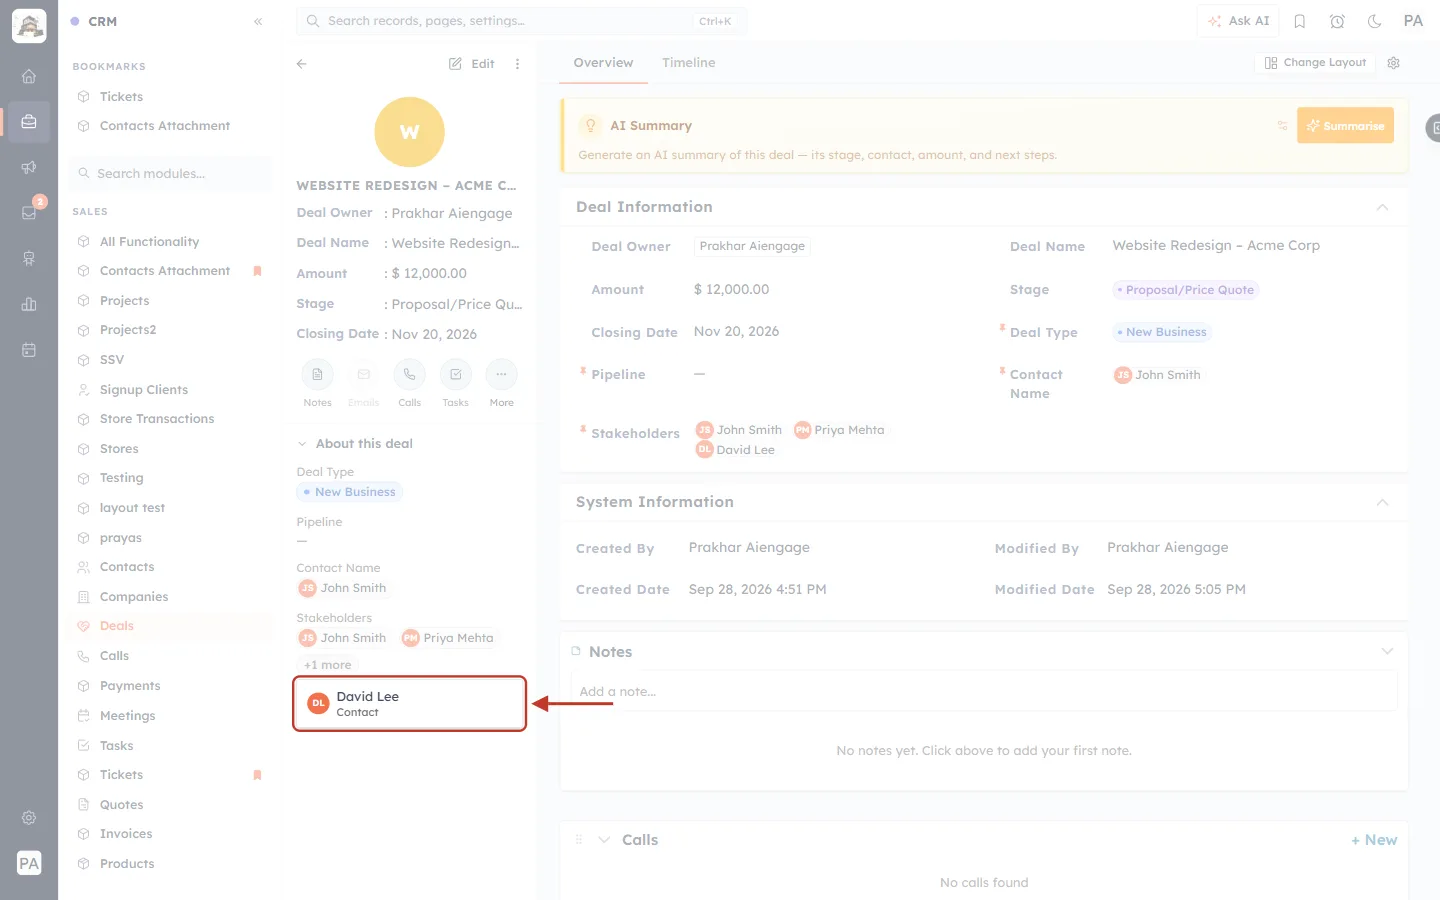
What this screenshot shows. The pop-up that opens from +1 more, ringed.
Pop-up: the hidden record — David Lee — with the module it comes from (Contact).
Click outside the pop-up to close it.
✅
Want a field on the About this deal card? See Record Detail: Related Lists and Pinned Fields.
Step 22: As a column in the Deals list#
The field can also be shown as a column in the list view, so you can see everyone involved in each deal at a glance.
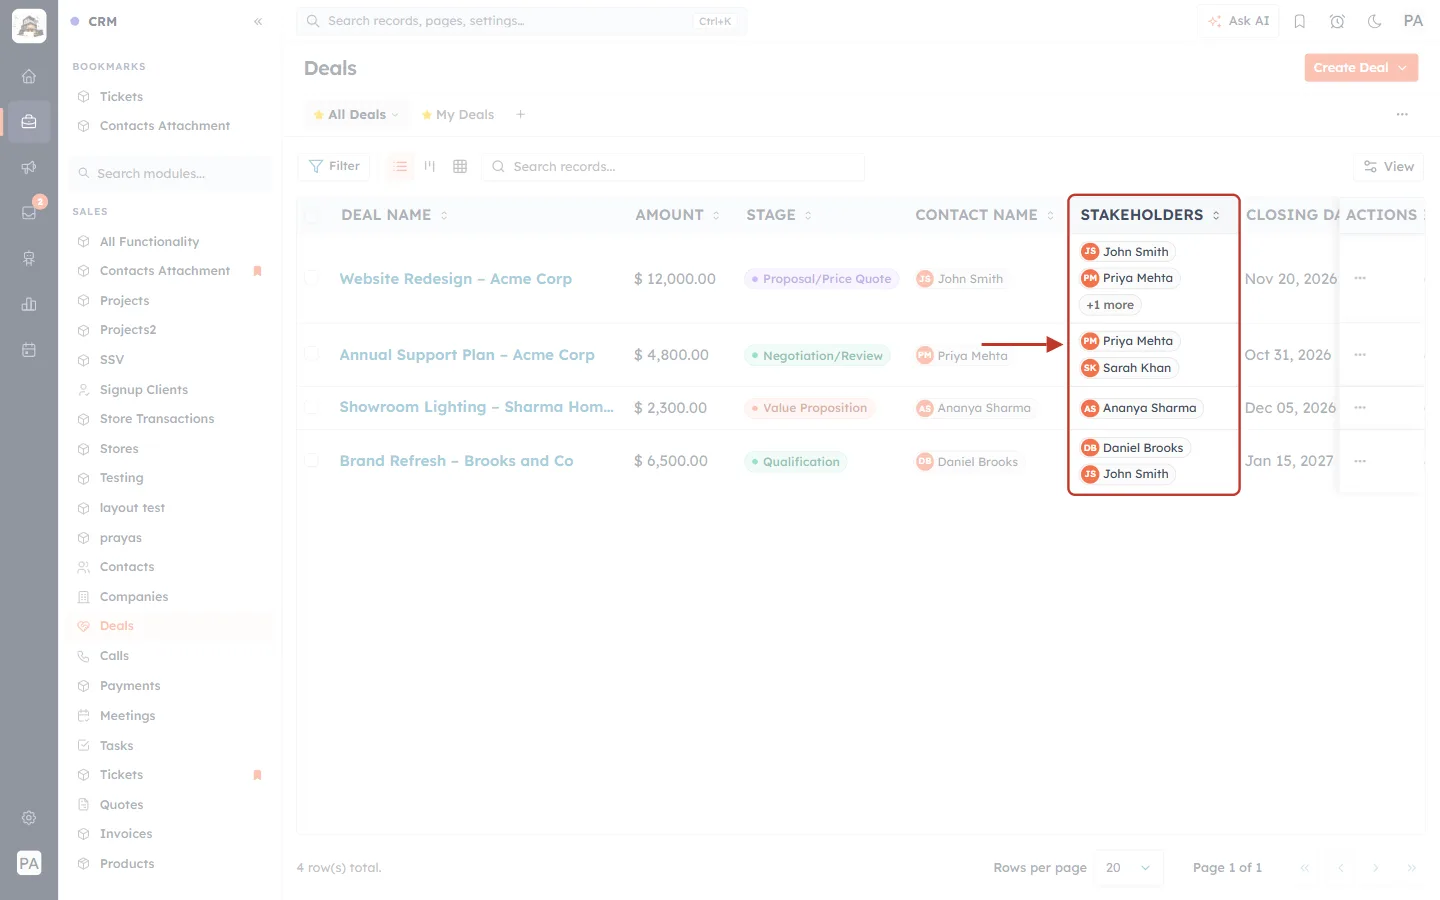
What this screenshot shows. The Stakeholders column, ringed, in the Deals list.
Website Redesign – Acme Corp: John Smith, Priya Mehta and +1 more.
Annual Support Plan – Acme Corp: Priya Mehta and Sarah Khan.
Showroom Lighting – Sharma Home Decor: Ananya Sharma.
Brand Refresh – Brooks and Co: Daniel Brooks and John Smith.
Column header: click it to sort the list by this column.
If the column isn’t there, click View at the top right of the list, search for the field and tick it, then click Save.
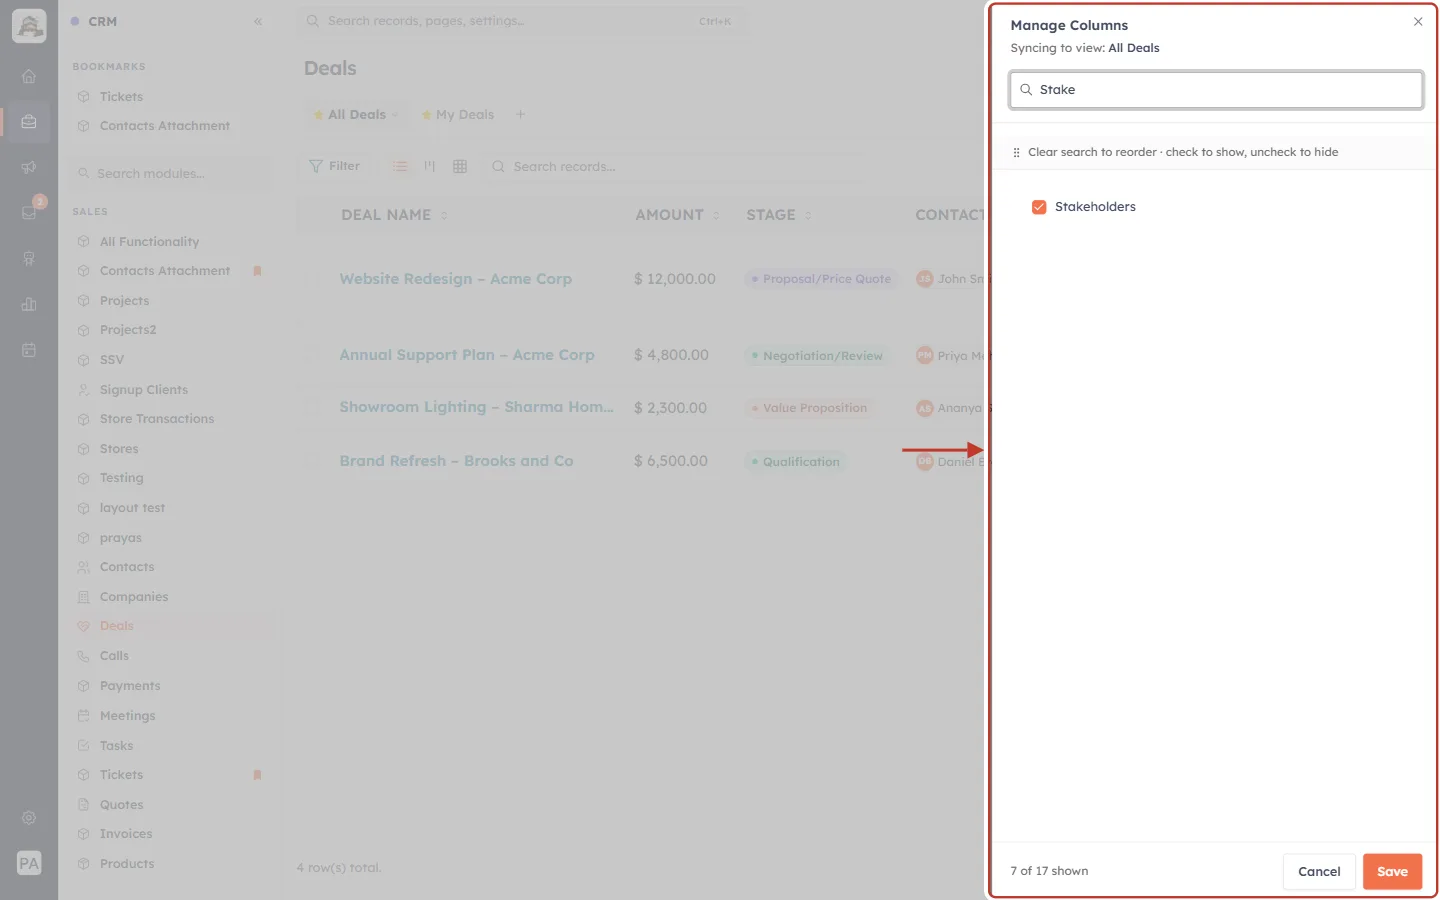
What this screenshot shows. The Manage Columns panel, ringed, with Stakeholders found and ticked.
Syncing to view: All Deals: the list view whose columns you are changing.
Search box: “Stake” finds the Stakeholders field.
Stakeholders (ticked): shown as a column. Untick to hide it.
Footer: how many columns are shown (for example “7 of 17 shown”), Cancel and Save.
For more about columns, see Choose & Reorder Your List Columns.
Part 5: Filter records by a linked record#
A common question is “Which deals is Priya Mehta involved in?” Filter the Deals list by the Stakeholders field to answer it.
Step 23: Open the filter panel#
In the Deals list, click Filter at the top left of the table.
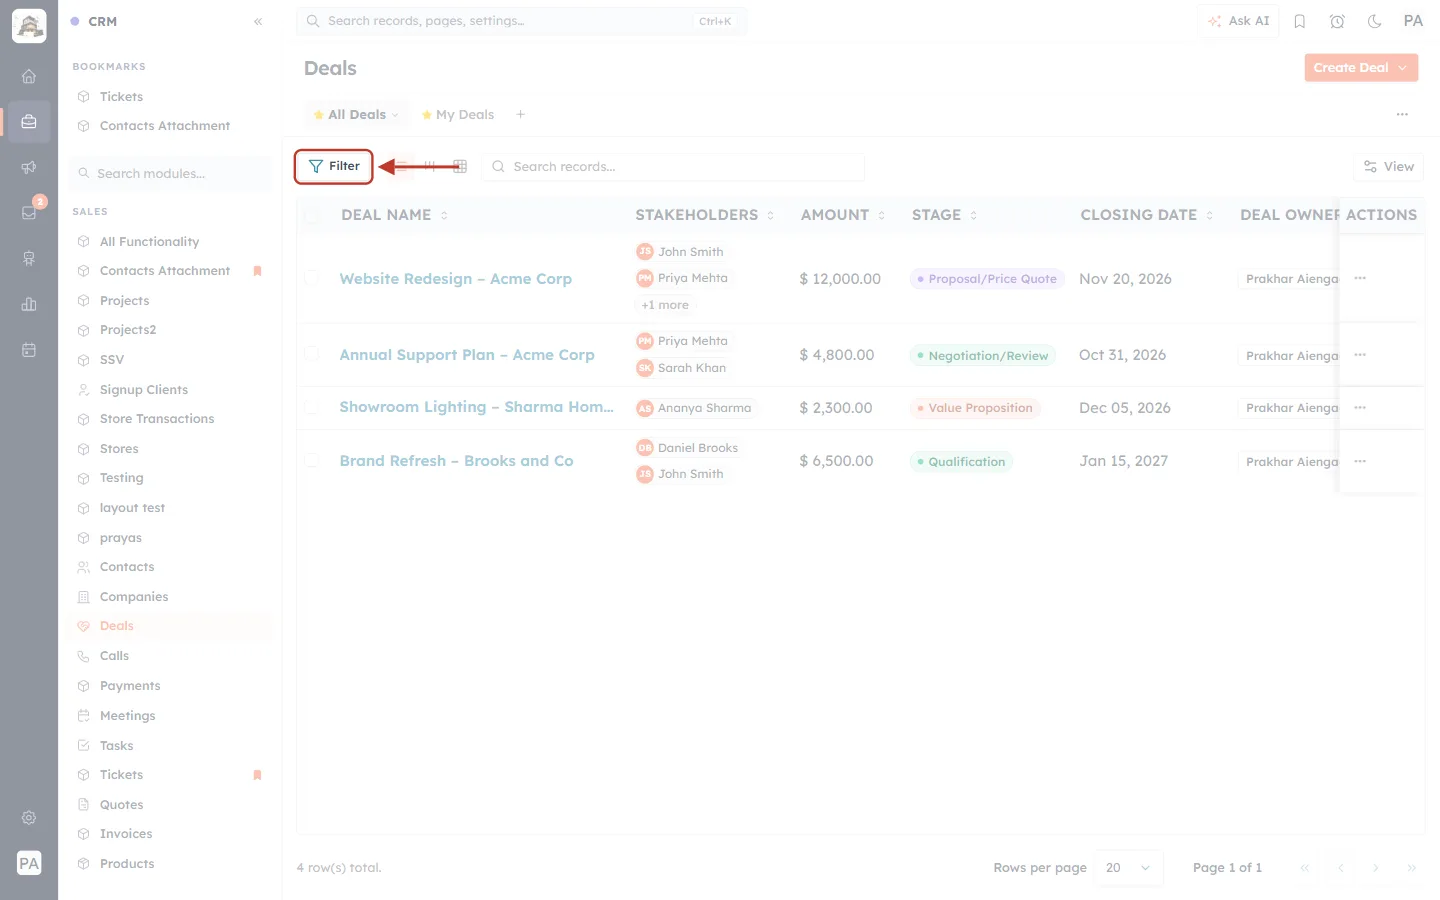
What this screenshot shows. The Deals list toolbar, with the Filter button ringed.
Filter (ringed): opens the Filter Deals panel on the left.
Beside it: the list, kanban and grid view buttons, the record search box and (on the right) View.
Step 24: Pick the Stakeholders field and a condition#
In the panel, under Filter by Fields, tick Stakeholders (type “Stake” in the search box to find it quickly). A condition box and a value box appear. Click the condition (it starts as is) to see the options.
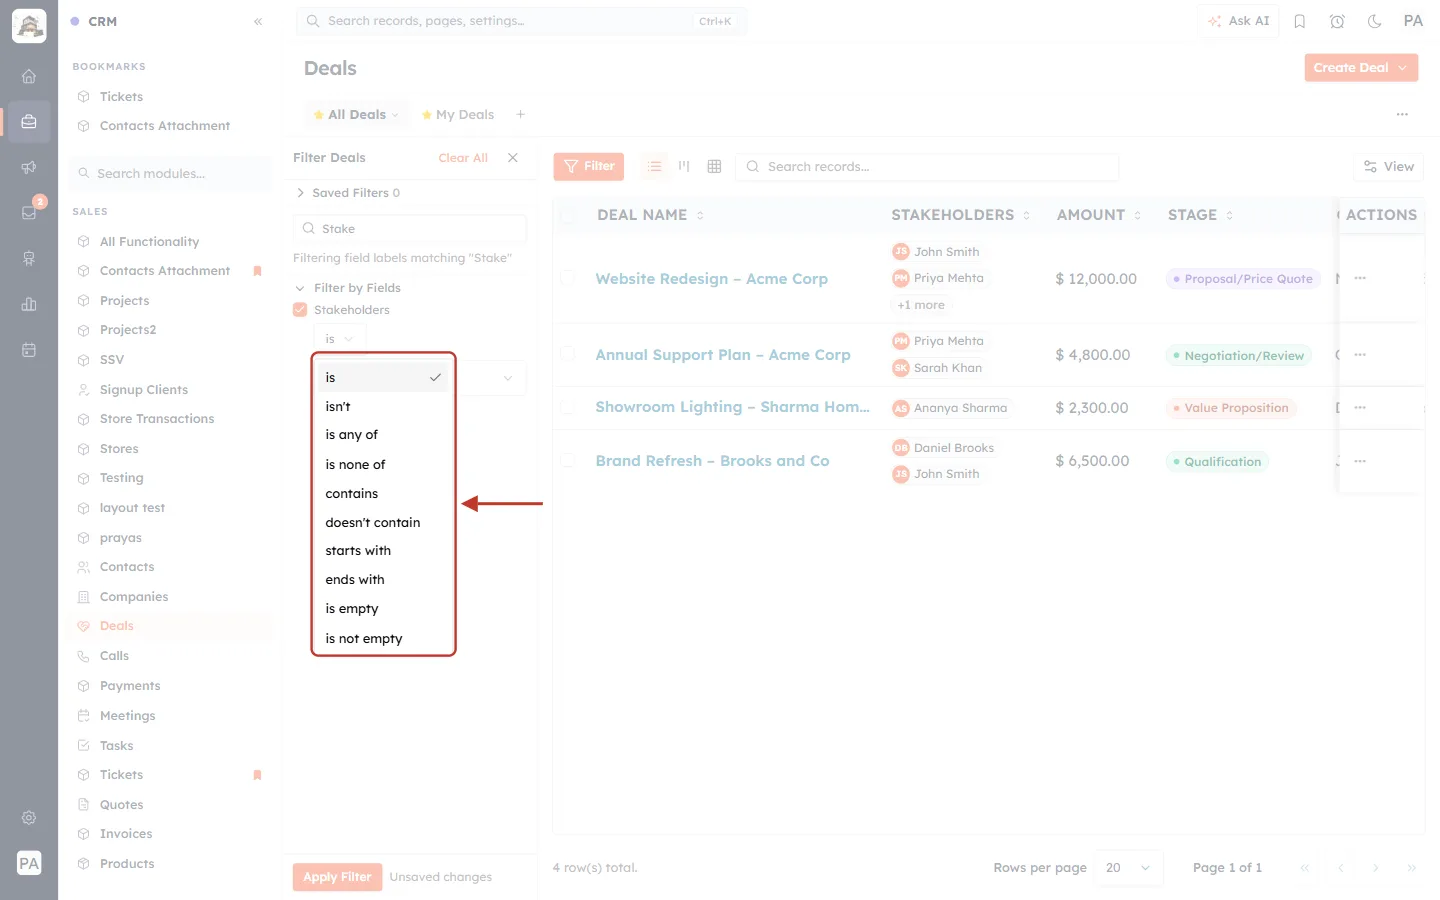
What this screenshot shows. The Filter Deals panel with the condition list open, ringed.
is (ticked): deals where the chosen contact is one of the stakeholders.
isn’t: deals where the chosen contact is not a stakeholder.
is any of / is none of: pick several contacts — deals that include any of them, or none of them.
contains / doesn’t contain / starts with / ends with: text-matching options. For a Multi-Select Lookup, is, isn’t, is any of and is none of are usually the most useful.
is empty / is not empty: deals with no stakeholders at all, or with at least one.
Step 25: Choose the contact#
Keep is selected, then click Select Contacts… and pick the person. Type in Search Contacts… to find them faster.
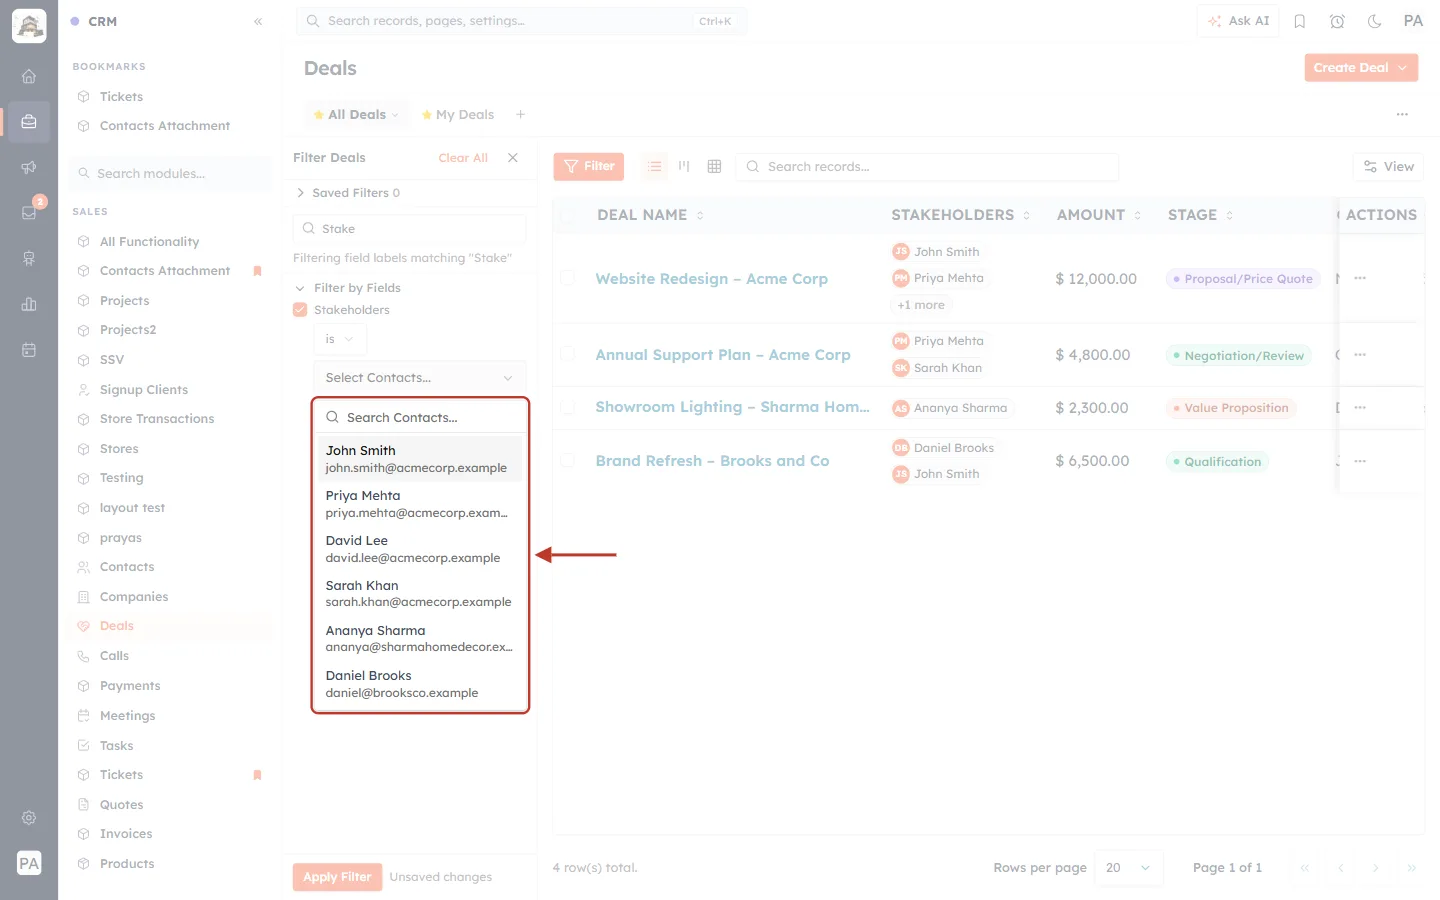
What this screenshot shows. The contact list for the filter value, ringed.
Search Contacts…: type a name to narrow the list.
Each entry: the contact’s name with their email underneath, so you can tell people with the same name apart.
We chose: Priya Mehta.
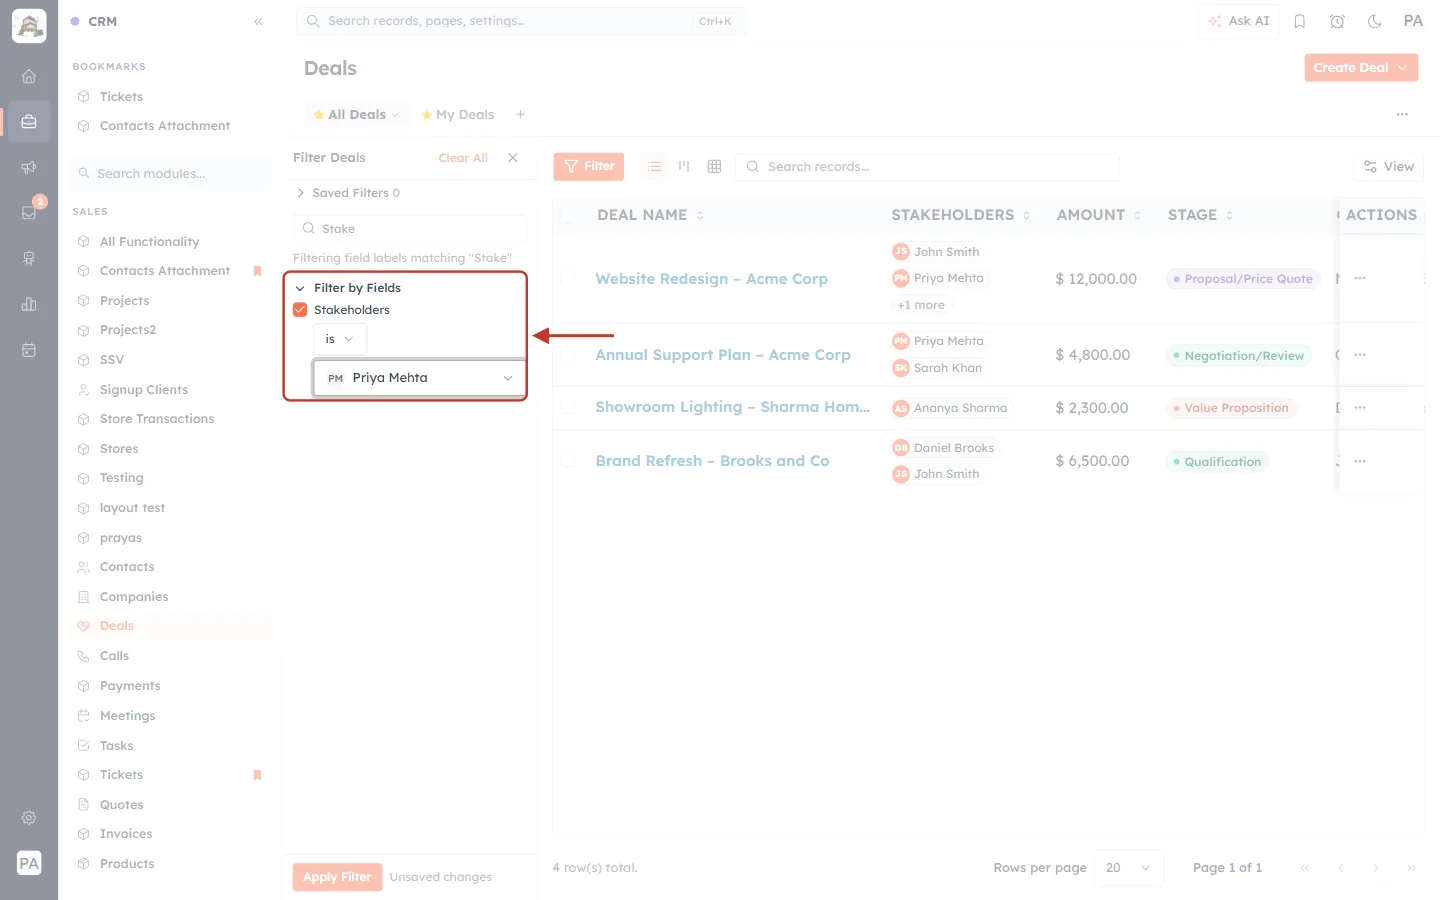
What this screenshot shows. The finished condition, ringed: Stakeholders · is · Priya Mehta.
Stakeholders (ticked): the field being filtered.
is: the condition.
Priya Mehta: the value, shown with her initials.
Step 26: Apply the filter#
Click Apply Filter at the bottom of the panel.
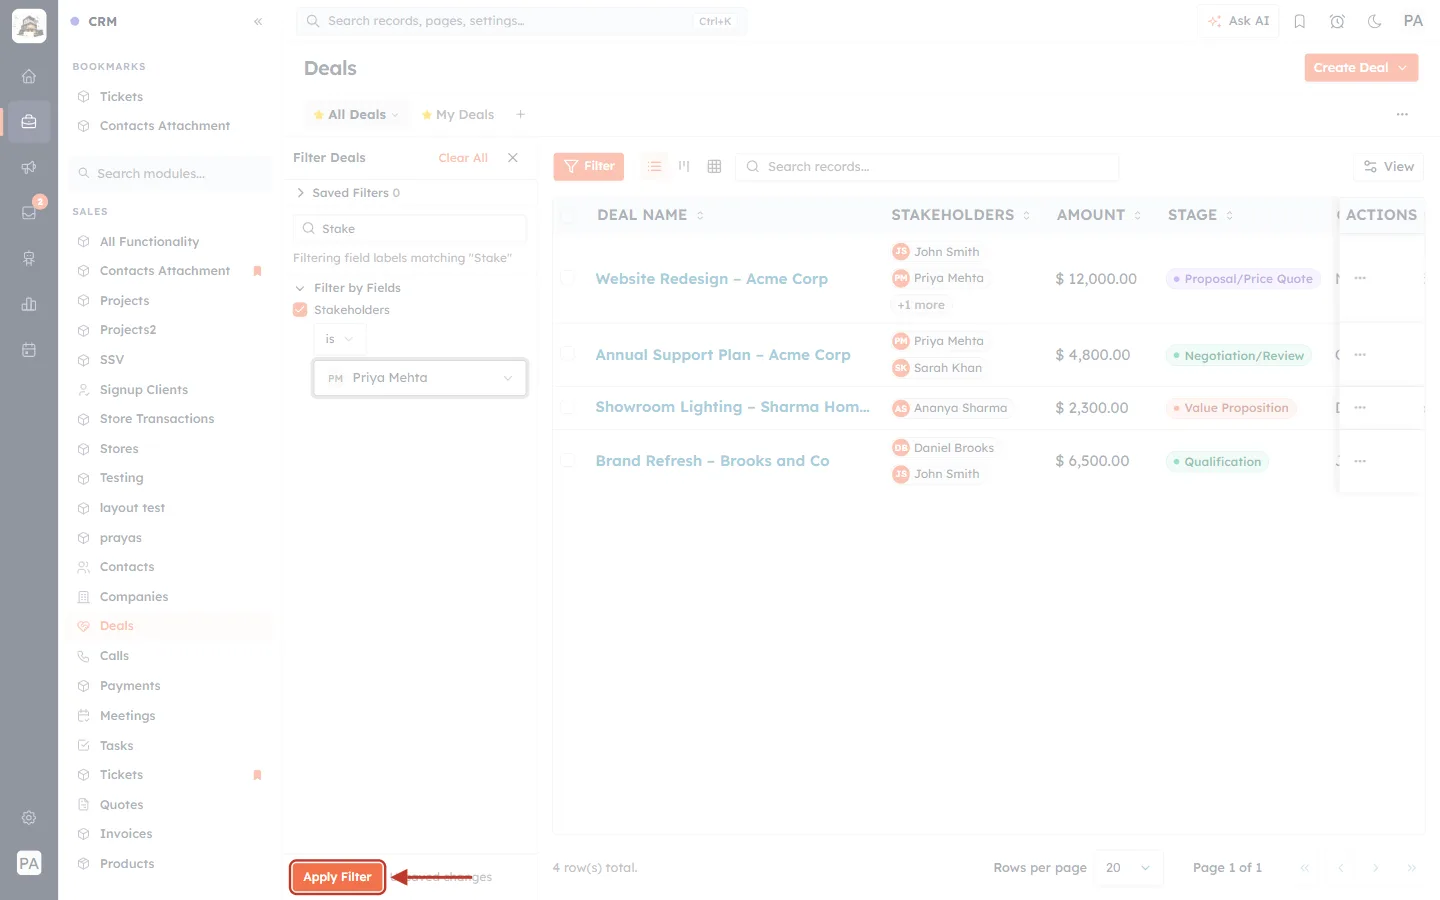
What this screenshot shows. The bottom of the Filter Deals panel, with Apply Filter ringed.
Apply Filter (ringed): runs the filter on the list.
“Unsaved changes” beside it: the filter isn’t saved for later yet. Use Save next to Saved Filters at the top of the panel to keep it.
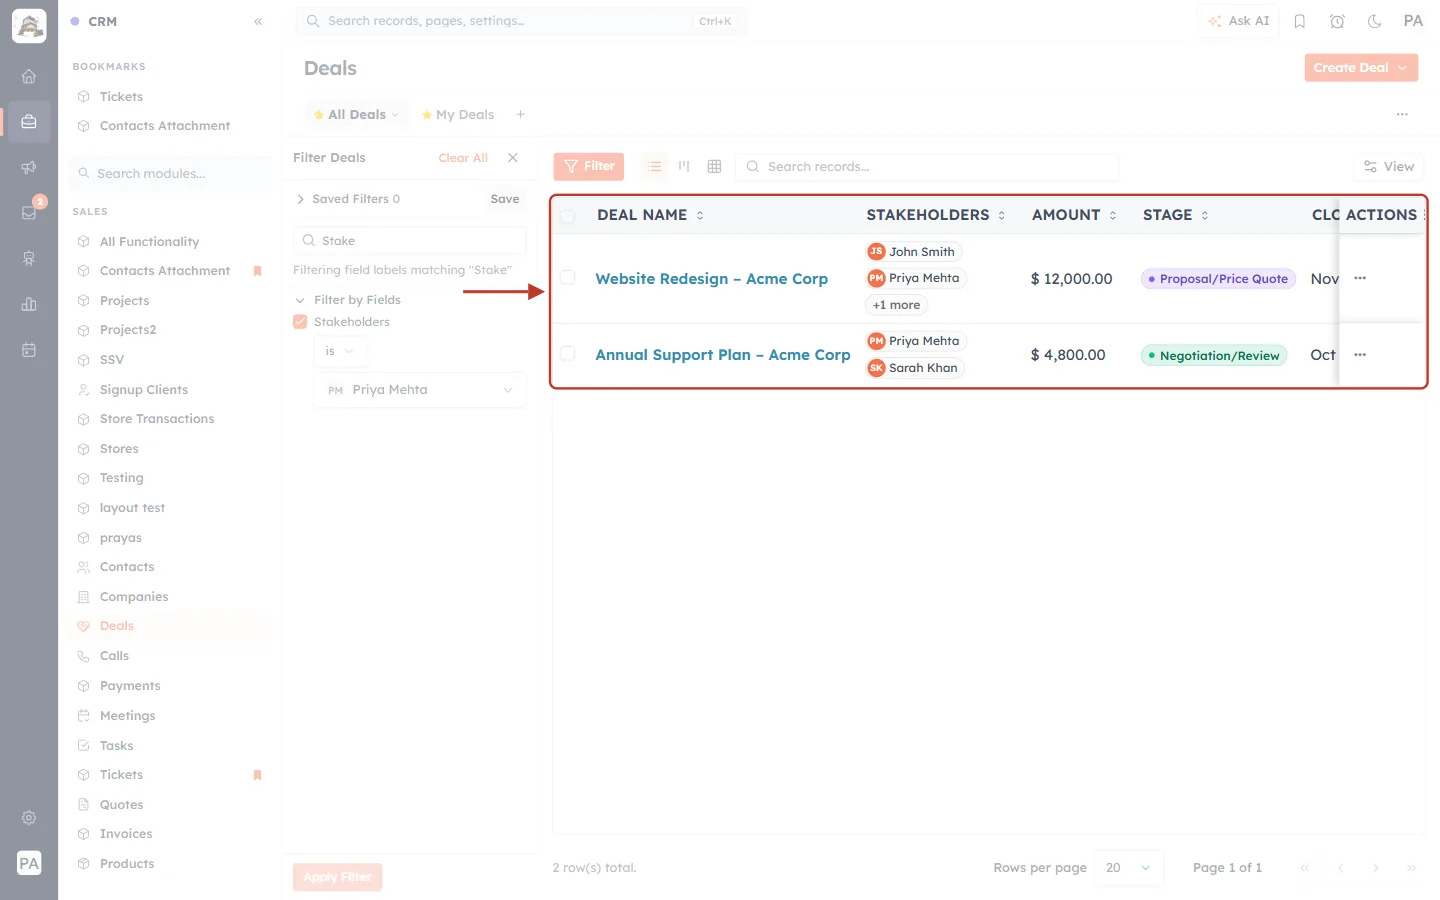
What this screenshot shows. The filtered Deals list, ringed.
Two deals are left — Website Redesign – Acme Corp and Annual Support Plan – Acme Corp — because Priya Mehta is a stakeholder on both.
Stakeholders column: shows that each remaining deal includes Priya Mehta.
Footer: “2 row(s) total”.
Clear All (top of the panel): removes the filter and shows every deal again.
✅
Save the filter, or turn it into a custom view such as “Deals I’m a stakeholder on”, so your team can reuse it. See Create, Share & Manage Custom Views.
Settings reference#
Setting | What it does | Default |
|---|---|---|
Field Name | The label shown on forms, records, list columns and filters. | Untitled multi select lookup |
Field API Name | Internal name for imports, integrations and the API. Generated from the name. | Automatic |
Required Field | At least one record must be picked before the record can be saved (on this layout). | Off |
Quick View | Also show the field in the record’s Quick View preview. | On |
Lookup Module | The module whose records the field holds. Locked once records use the field. | None — must be chosen |
Display Field | Which field of each linked record is shown. | The record’s default name |
Placeholder Text | Grey hint inside the empty box on forms. | “Select <field name>” |
Help Text | Extra guidance under the field on forms. | Empty |
Show this field on… | Create form, Edit form, Mobile quick create form, Detail page (this layout only). | All on |
Field access | Hide the field’s value from users whose role or profile isn’t allowed to see it. | Visible to all users |
Good to know#
One module per field. Each Multi-Select Lookup field links to one module. To link deals to both contacts and products, add two fields (for example Stakeholders and Products of Interest).
Linking never changes the other record. Adding or removing a chip only changes this field. The linked contact itself is not edited or deleted.
The module is locked once used. After records have values in the field, its Lookup Module can’t be changed. Create a new field if you need a different module.
Counts toward your plan. Like every custom field, it uses one of your plan’s custom fields per module: Free 15, Solo 45, Business 50, Business Pro 80. Fields that come with the CRM don’t count.
Folded chips. Where space is tight — the About card or list columns — only the first few chips show, followed by +N more. The detail page’s main section shows them all.
Also on web forms. Lookup and Multi-Select Lookup fields can be added to web forms too. See Lookup & Related-Record Fields on Web Forms.
Troubleshooting#
The yellow “Incomplete Configuration” box won’t go away. No Lookup Module is chosen. Pick one in Lookup Configuration (Step 9).
The module I want isn’t in the Lookup Module list. Only active modules are listed. Check in Modules and Fields that the module is switched on.
I can’t change the Lookup Module. Records already have values in this field, so the module is locked. Create a new Multi-Select Lookup field for the other module.
The field I want isn’t in the Display Field list. Some field types can’t be shown as a label — multi-line text, files and images, formulas, rollups and other lookups. Choose a single-line, email, phone, number, date or pick-list field instead.
The field isn’t on the Create or Edit form. Check the layout: the field must be on the layout your profile uses, and Create form / Edit form must be on under Show this field on… (Step 12). Also check Field access.
The person I need isn’t in the chooser. Search by name, email or company, and check the other pages. If they aren’t in the CRM yet, click New Record in the chooser to add them.
The deal won’t save — “Stakeholders is required”. The field is set as required. Pick at least one record, or turn Required Field off in the builder.
The new field disappeared from the builder. It wasn’t saved. Add it again and click Save before leaving.
Save in the builder is refused with a plan-limit message. The module has used all the custom fields your plan allows. Remove a custom field you no longer need, or upgrade your plan.
Frequently asked questions#
How many records can one field hold? As many as you need. Tick them in the chooser and click Add Selected.
Can I turn an existing Lookup into a Multi-Select Lookup? No. A field’s type can’t be changed after it is created. Add a new Multi-Select Lookup field and, if needed, copy the values across by editing or importing records.
Can I link records from two different modules in one field? No. Each field links to one module. Add one field per module.
What happens if a linked contact is deleted? The rest of the deal is not affected, but that contact can no longer be opened from its chip. Remove the chip when you next edit the deal.
Can I remove the field? Yes. Select it in the builder and click Remove from this layout, then Save. As the panel notes, other layouts keep the field and its data. The linked records themselves are never changed.
What is the difference between a Multi-Select and a Multi-Select Lookup? A Multi-Select lets you pick several values from a fixed list of options that you type in the builder (for example colours). A Multi-Select Lookup picks several real records from another module, and each one links to that record.
Previous and next#
Previous: Create a Rollup Summary Field: Show Deal Totals, Counts & Latest Dates on a Record (Step-by-Step)
Next: Add Your First Contact: Creating Contact Records Step by Step
Related#
Was this article helpful?
Ready to implement this?
OpenAI Engage and apply what you just learned to your own workspace.
Open AI Engage CRM