Loading…


KnowledgeBase
Manage Profiles Step by Step: Clone, Rename, Mark Inactive, Reactivate and Delete Permission Profiles
Introduction#
Once your team has a few permission profiles, you will need to look after them: copy one to start a new job type, rename one when a job title changes, retire one you no longer use, and remove one for good. This guide covers each of these tasks, step by step:
Task | When to use it | Menu item |
|---|---|---|
Clone | Start a new profile from one that is almost right. | ⋮ → Clone |
Rename / edit | A job title changes, or the description needs updating. | ⋮ → Edit |
Mark Inactive | Retire a profile but keep its settings, in case you need it again. | ⋮ → Mark Inactive |
Mark Active | Bring a retired profile back. | ⋮ → Mark Active |
Delete | Remove a profile you will never need again. | ⋮ → Delete |
Every step was carried out on a demo copy, Sales Representative, so you can follow along. Each screenshot is followed by a description of the whole screen.
ℹ️
To build a profile from scratch and set its permissions, see Create a Permission Profile Step by Step: Build, Edit, Clone, Deactivate & Delete. For what each permission means, see Profile Permissions Explained: What Every Module, Feature & Setup Setting Controls.
Before You Begin#
You need access to Settings → Security Control → Profiles. The account owner and administrators have it.
Check a profile’s USERS count before changing or removing it. Every user holding it is affected.
Part 1: The Profiles List and Its Menus#
Step 1: Open Profiles#
Click the gear (Settings) at the bottom of the left icon bar, then Security Control → Profiles.
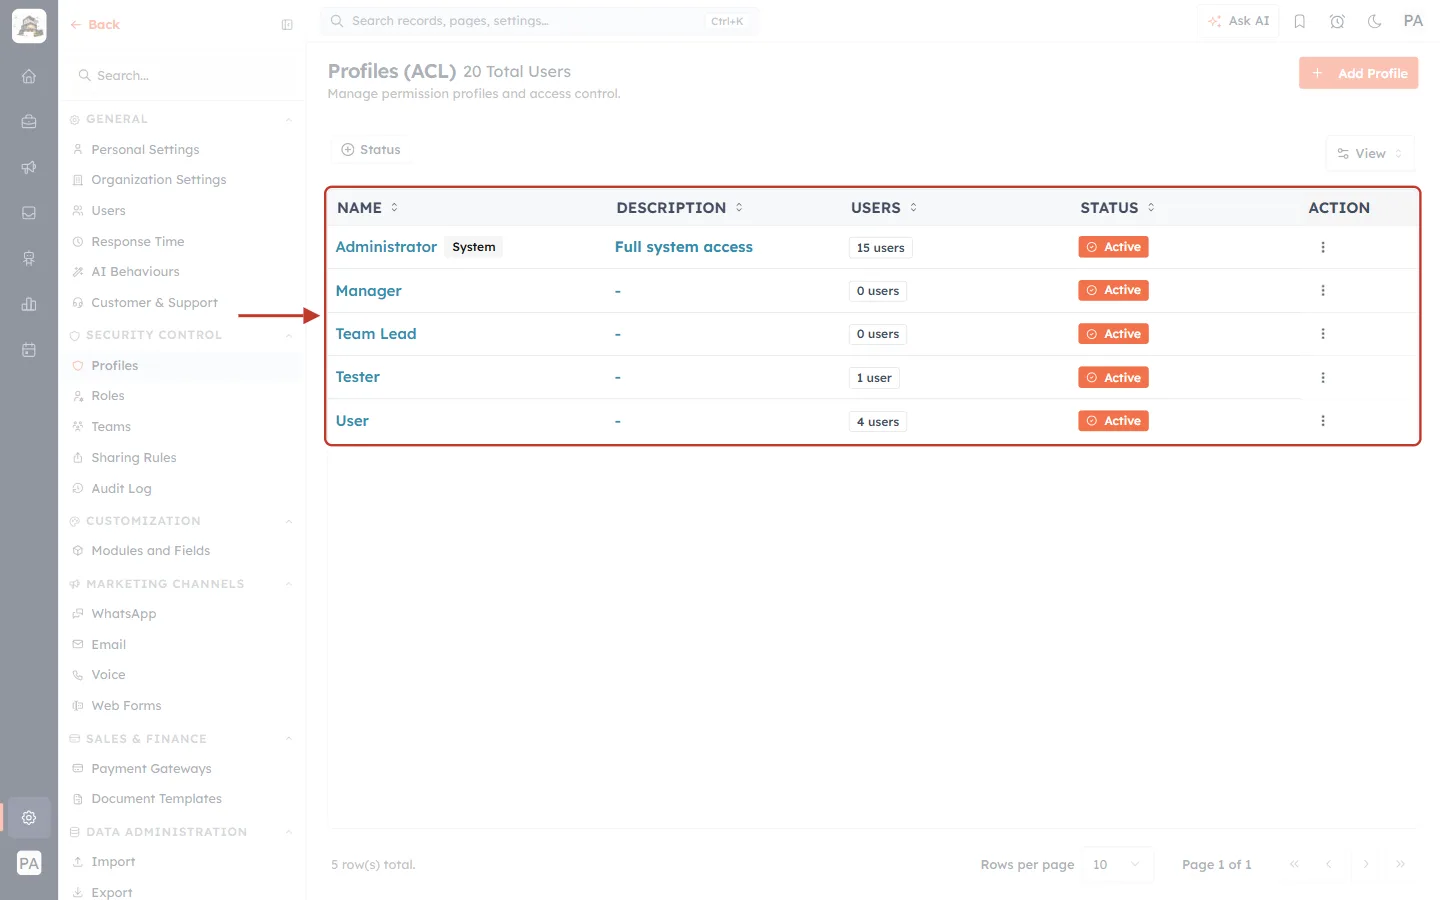
What this screenshot shows. The ringed table lists every profile. The heading reads Profiles (ACL) with the organisation’s user count (20 Total Users).
NAME: the profile. Administrator carries a System badge.
DESCRIPTION, USERS (how many people hold it) and STATUS (Active or Inactive).
ACTION: the ⋮ menu used throughout this guide.
Above the table are the Status filter and View. At the top right is + Add Profile.
Step 2: Open a profile’s menu#
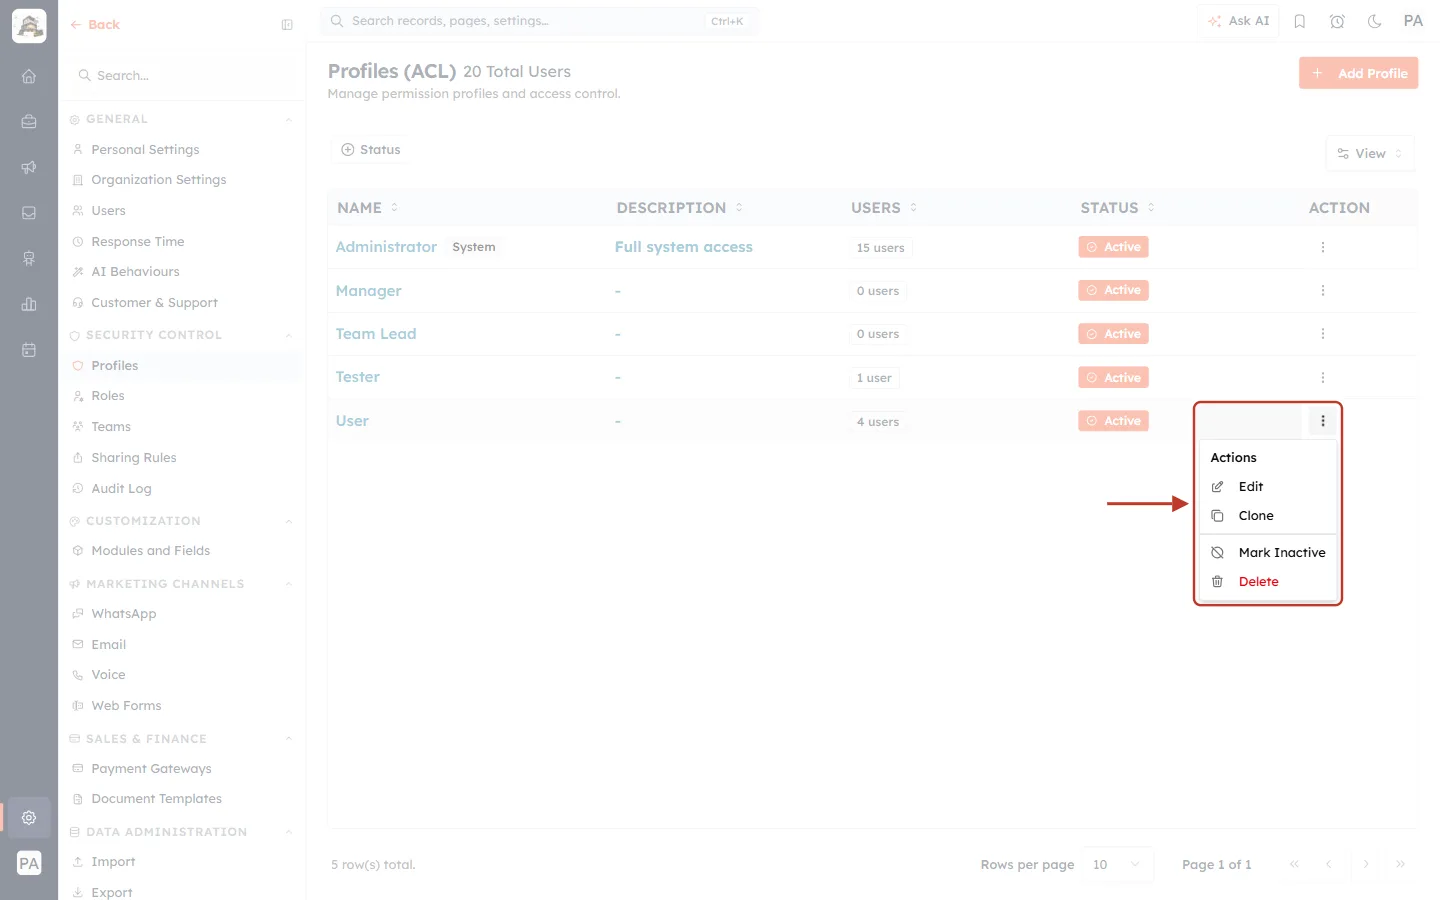
What this screenshot shows. The ⋮ menu of the User profile is open and ringed.
Edit: change the name, description, status or any permission.
Clone: copy the profile.
Mark Inactive: retire it without losing its settings.
Delete (red): remove it permanently.
About the Administrator profile#
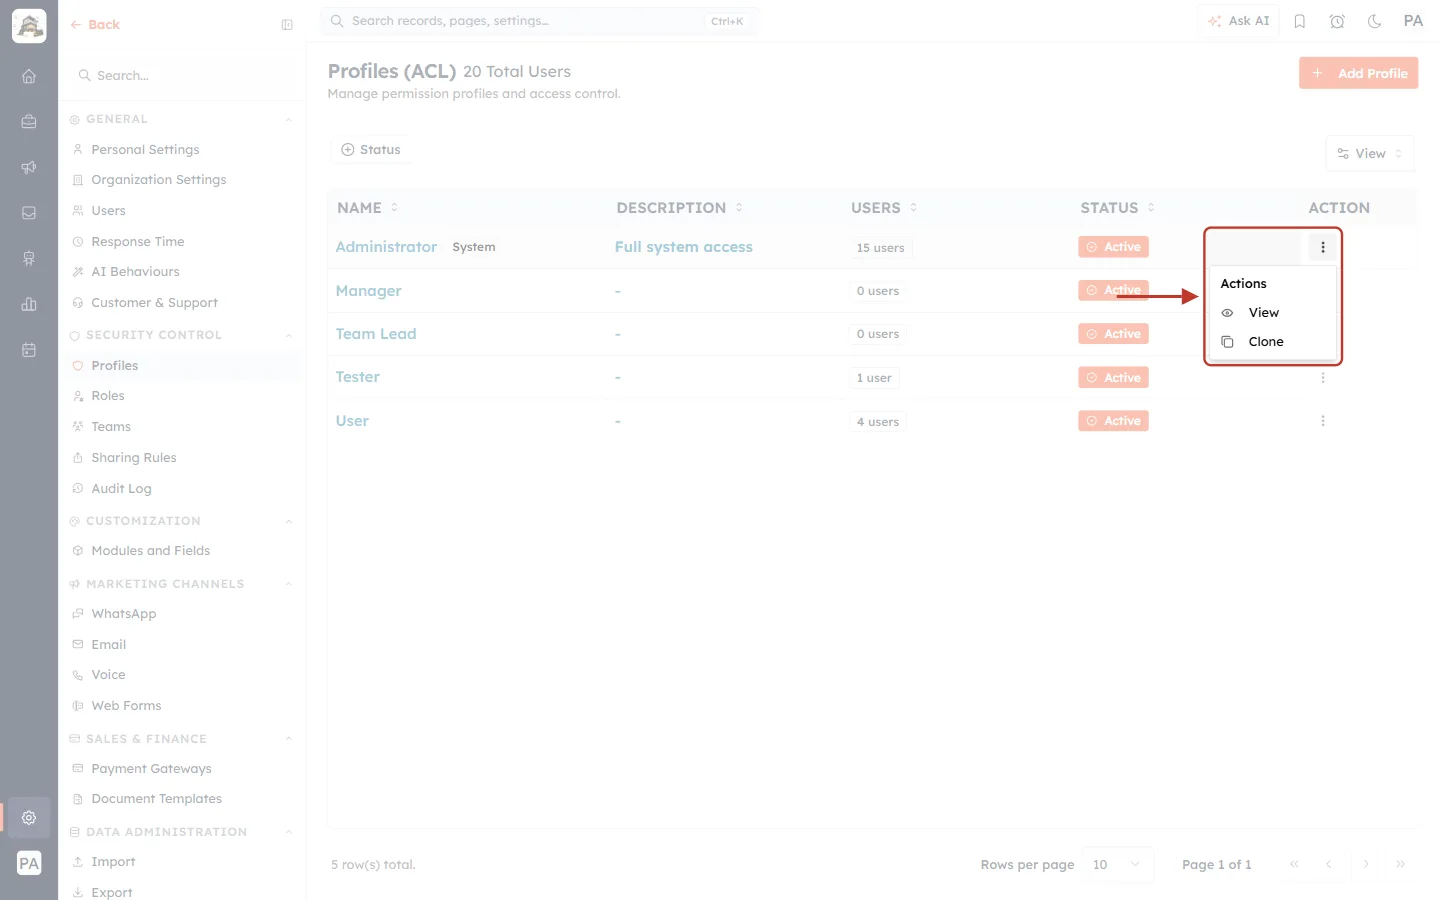
What this screenshot shows. The ⋮ menu of Administrator offers only two items.
View: look at its settings.
Clone: copy it.
There is no Edit, Mark Inactive or Delete. The system profile always stays as it is.
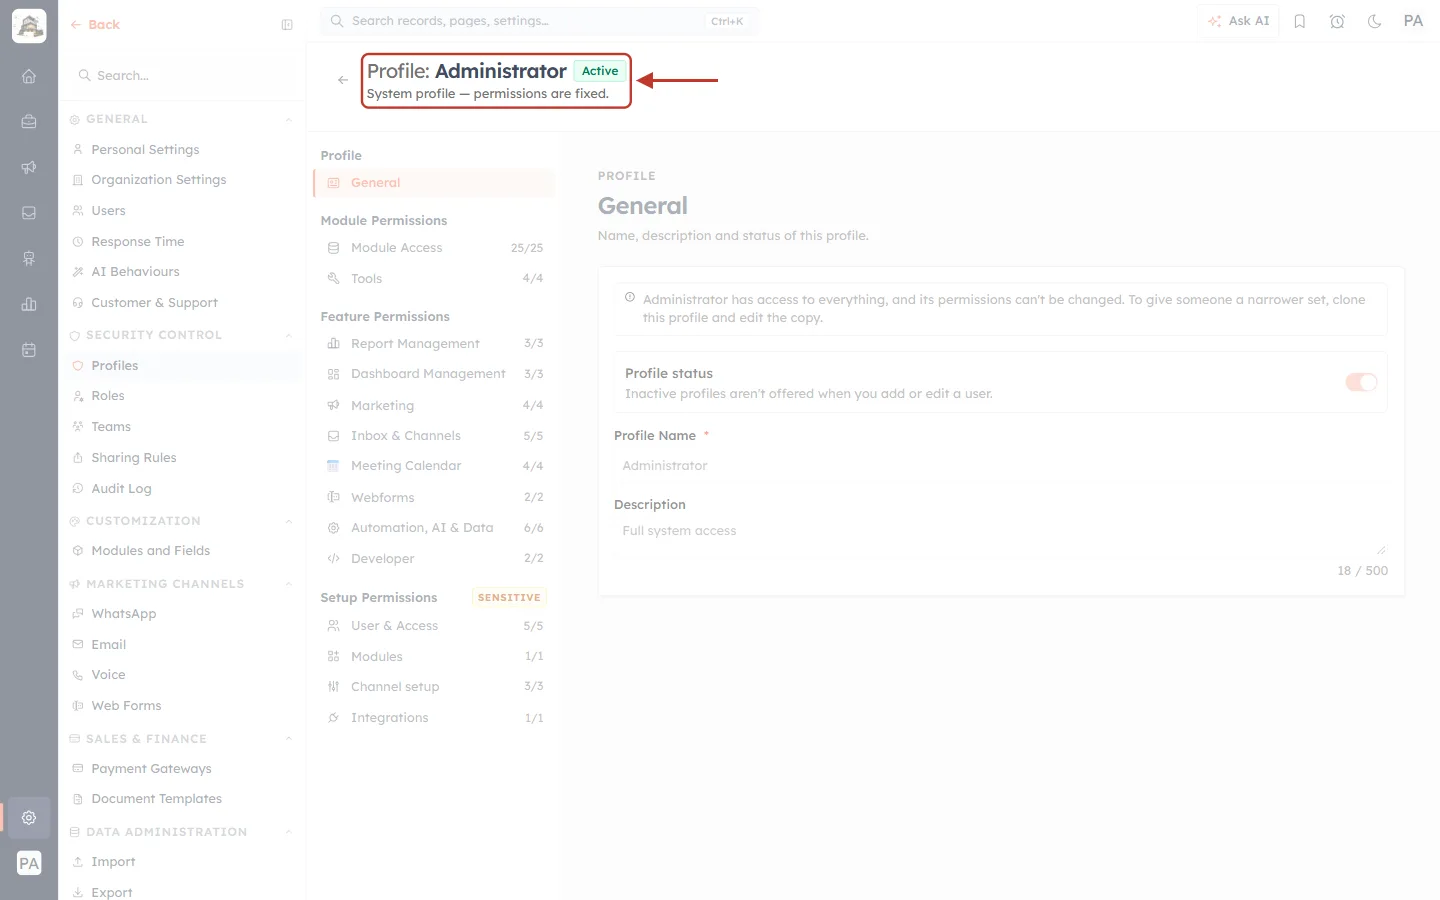
What this screenshot shows. The ringed header of the Administrator profile reads System profile — permissions are fixed.
Profile: Administrator with an Active badge.
The note on the page explains: Administrator has access to everything, and its permissions can’t be changed. To give someone a narrower set, clone this profile and edit the copy.
The name and other fields are locked, and there is no Update Profile button.
Part 2: Clone a Profile#
Cloning is the quickest way to make a new profile. You start with every permission of an existing one and change only what differs.
Step 3: Choose Clone#
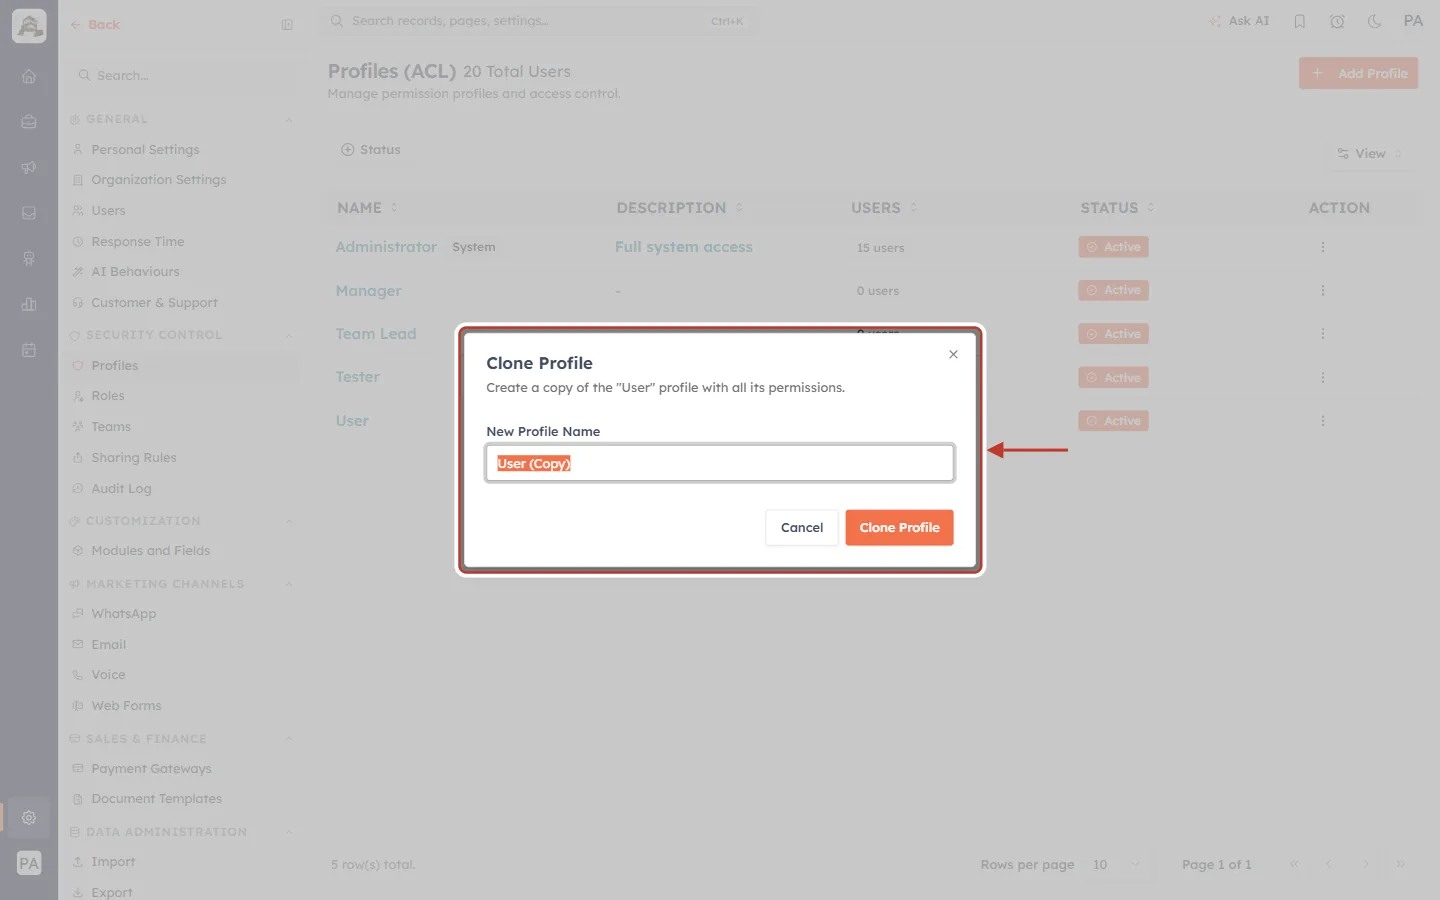
What this screenshot shows. Choosing ⋮ → Clone on the User profile opens the ringed Clone Profile dialog.
It reads Create a copy of the “User” profile with all its permissions.
New Profile Name is filled in as User (Copy) and selected, ready for you to type over.
Clone Profile makes the copy. Cancel or × closes the dialog.
Step 4: Name the copy and click Clone Profile#
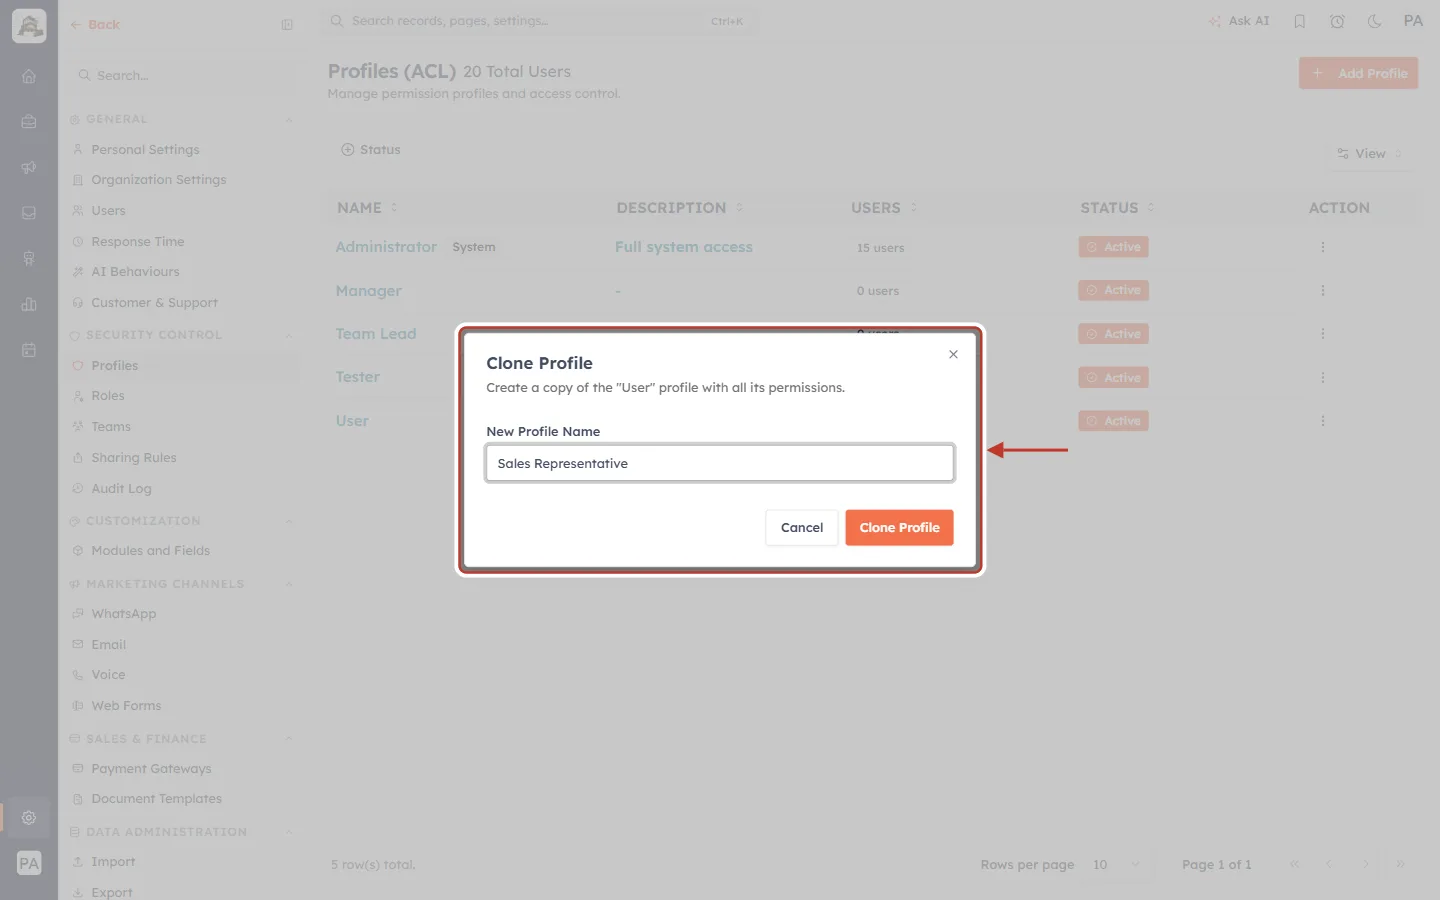
What this screenshot shows. The dialog with the new name typed in.
New Profile Name: Sales Representative. Name it after the job, not the person.
Click Clone Profile. The message Profile cloned successfully appears.
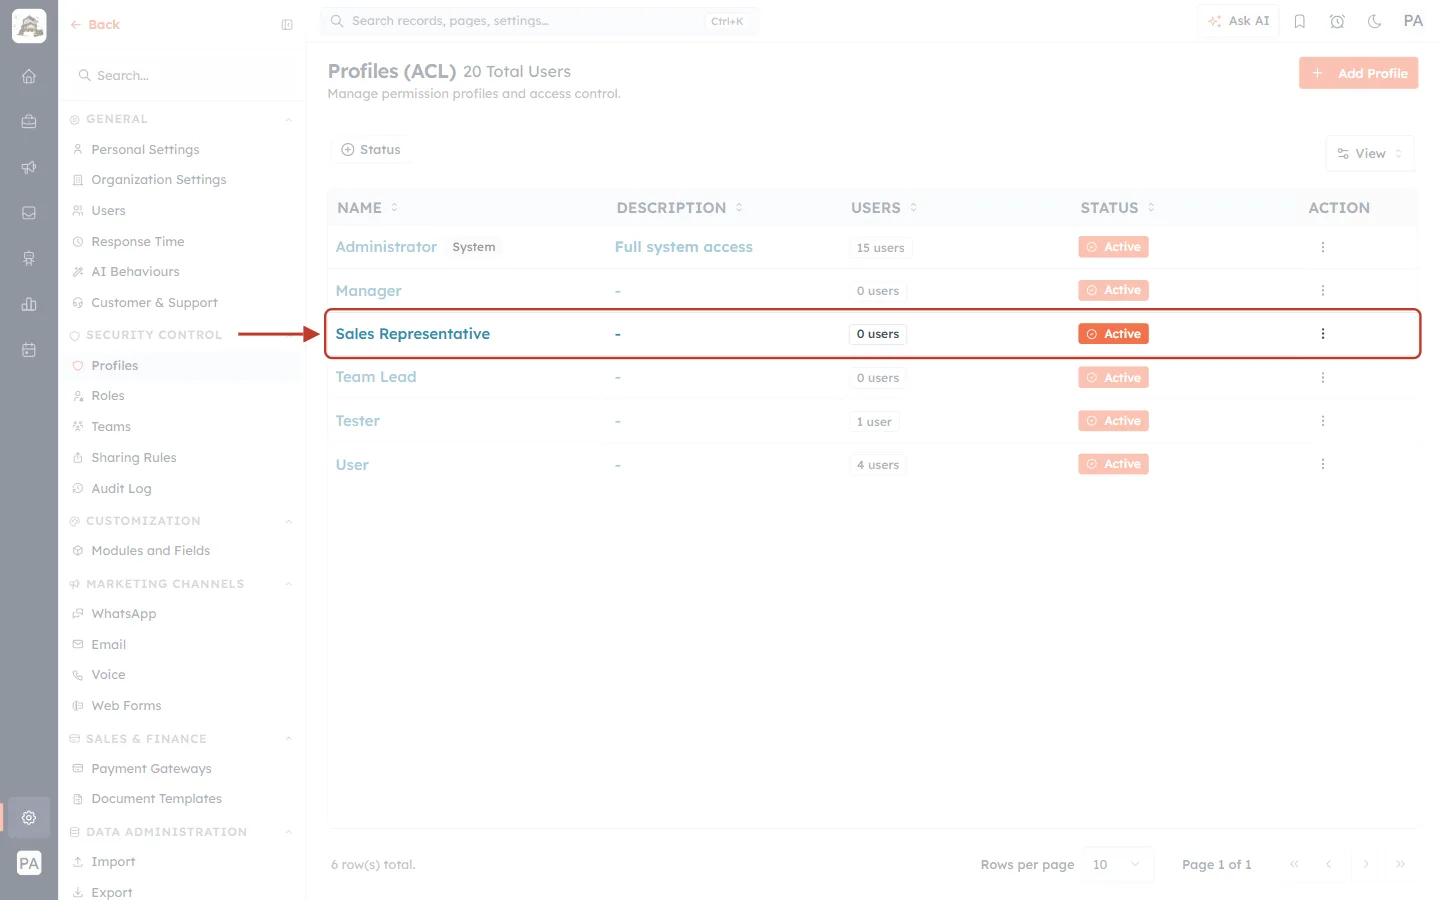
What this screenshot shows. The new Sales Representative row is ringed.
It has 0 users and is Active.
It has every permission of the profile it was copied from. Open it with Edit to change what is different (Part 3).
The copy is independent. Later changes to the original don’t affect it.
✅
To make a profile with almost full access, clone Administrator and switch off what you don’t want. The Administrator profile itself can’t be edited.
Part 3: Rename a Profile and Update Its Description#
Step 5: Open the profile with Edit#
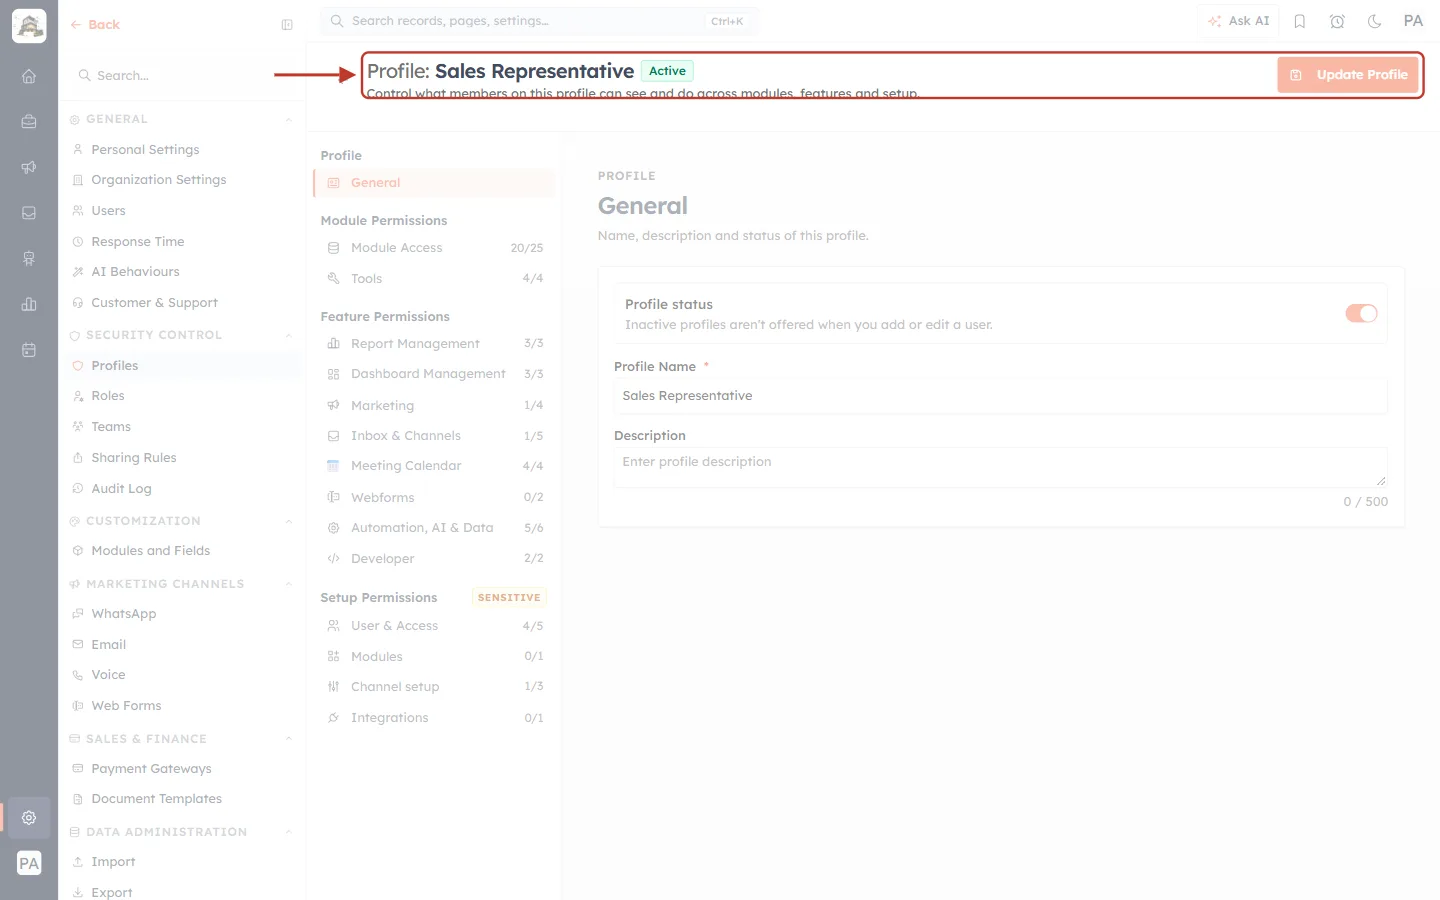
What this screenshot shows. Choosing ⋮ → Edit opens the profile. The ringed header confirms which one.
Profile: Sales Representative with an Active badge, and the line Control what members on this profile can see and do across modules, features and setup.
Update Profile (top right) is faded until you change something.
The General section is open, with Profile status, Profile Name and Description.
Step 6: Change the name and description#
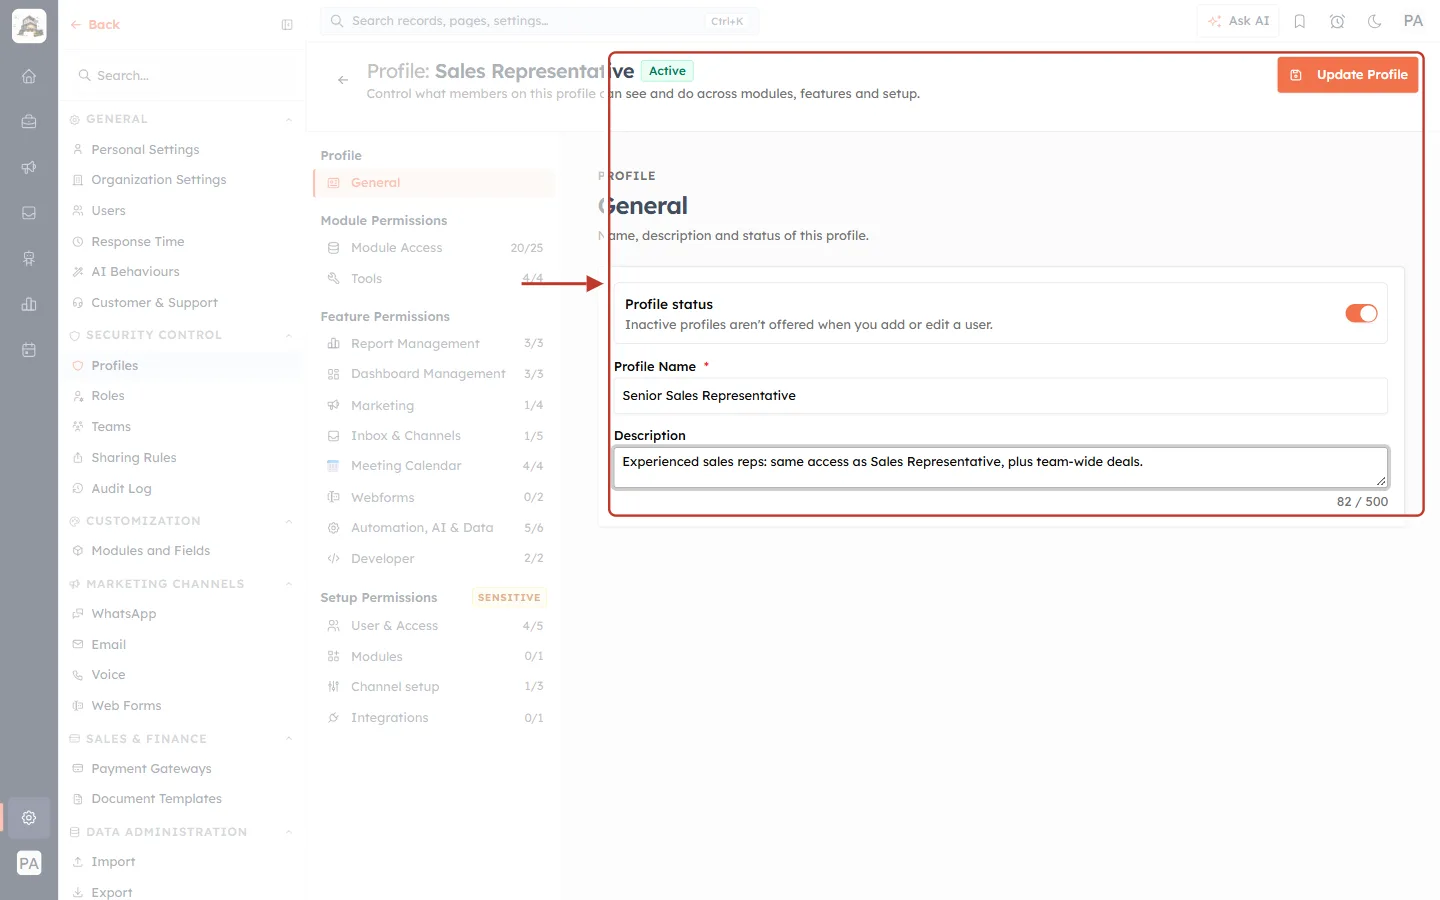
What this screenshot shows. The ringed area shows the changed fields and the save button.
Profile Name: Senior Sales Representative.
Description: Experienced sales reps: same access as Sales Representative, plus team-wide deals. (82 / 500).
Update Profile is now bright orange. Click it to save.
You can also change any permission in the other sections before saving.
Step 7: Check the change#
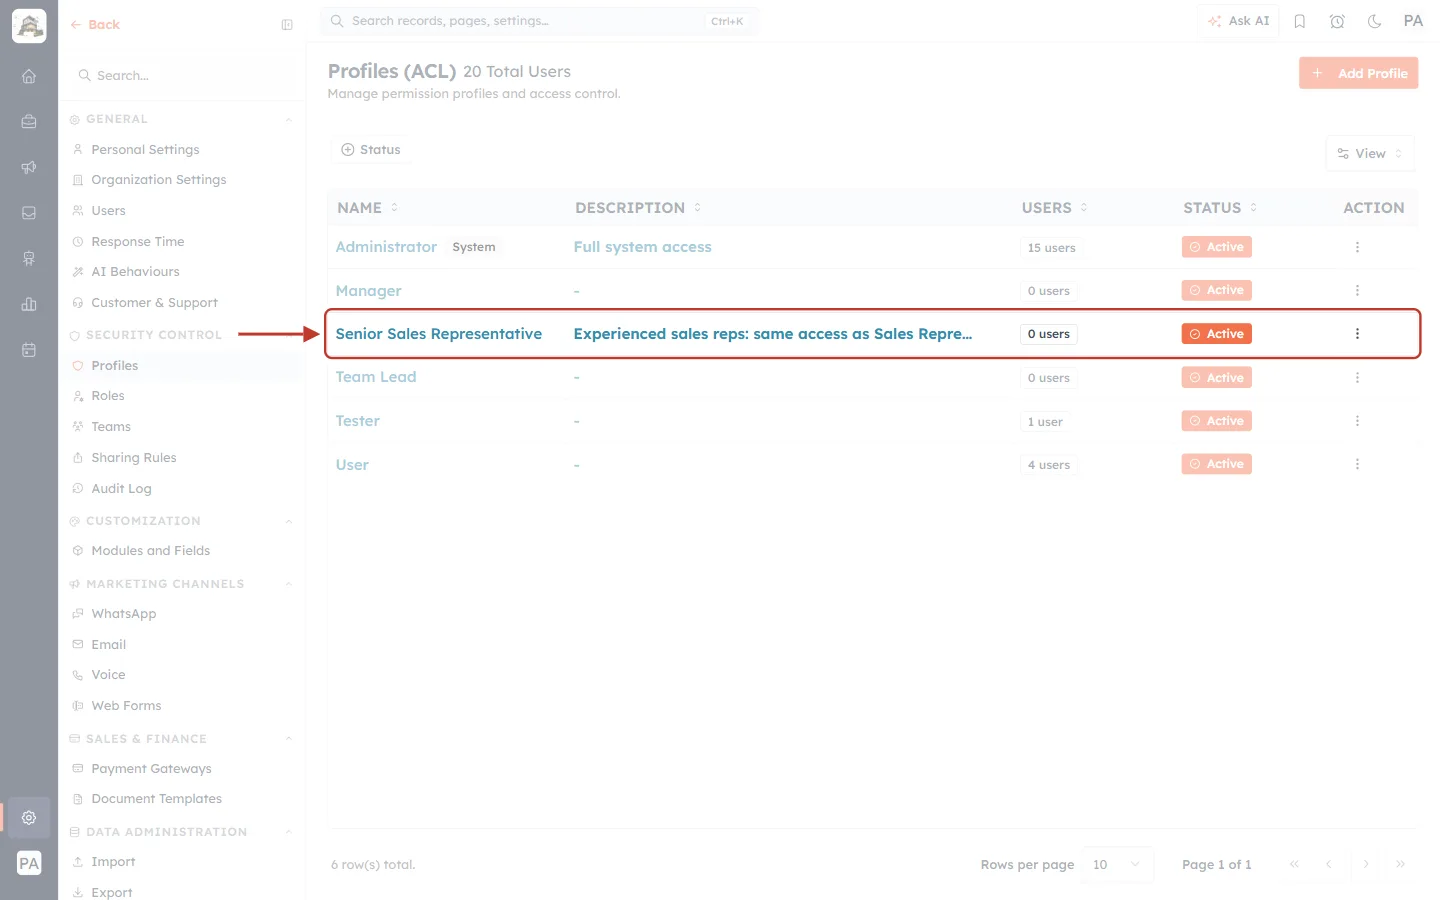
What this screenshot shows. After Profile updated successfully, the ringed row shows the new name and description.
Everyone who holds the profile keeps it. Only its name and description changed.
Changes to permissions apply to all of them. Ask them to refresh their browser.
Part 4: Mark a Profile Inactive#
Marking a profile inactive retires it. It keeps all its settings, but you can no longer give it to a user.
Step 8: Choose Mark Inactive and confirm#
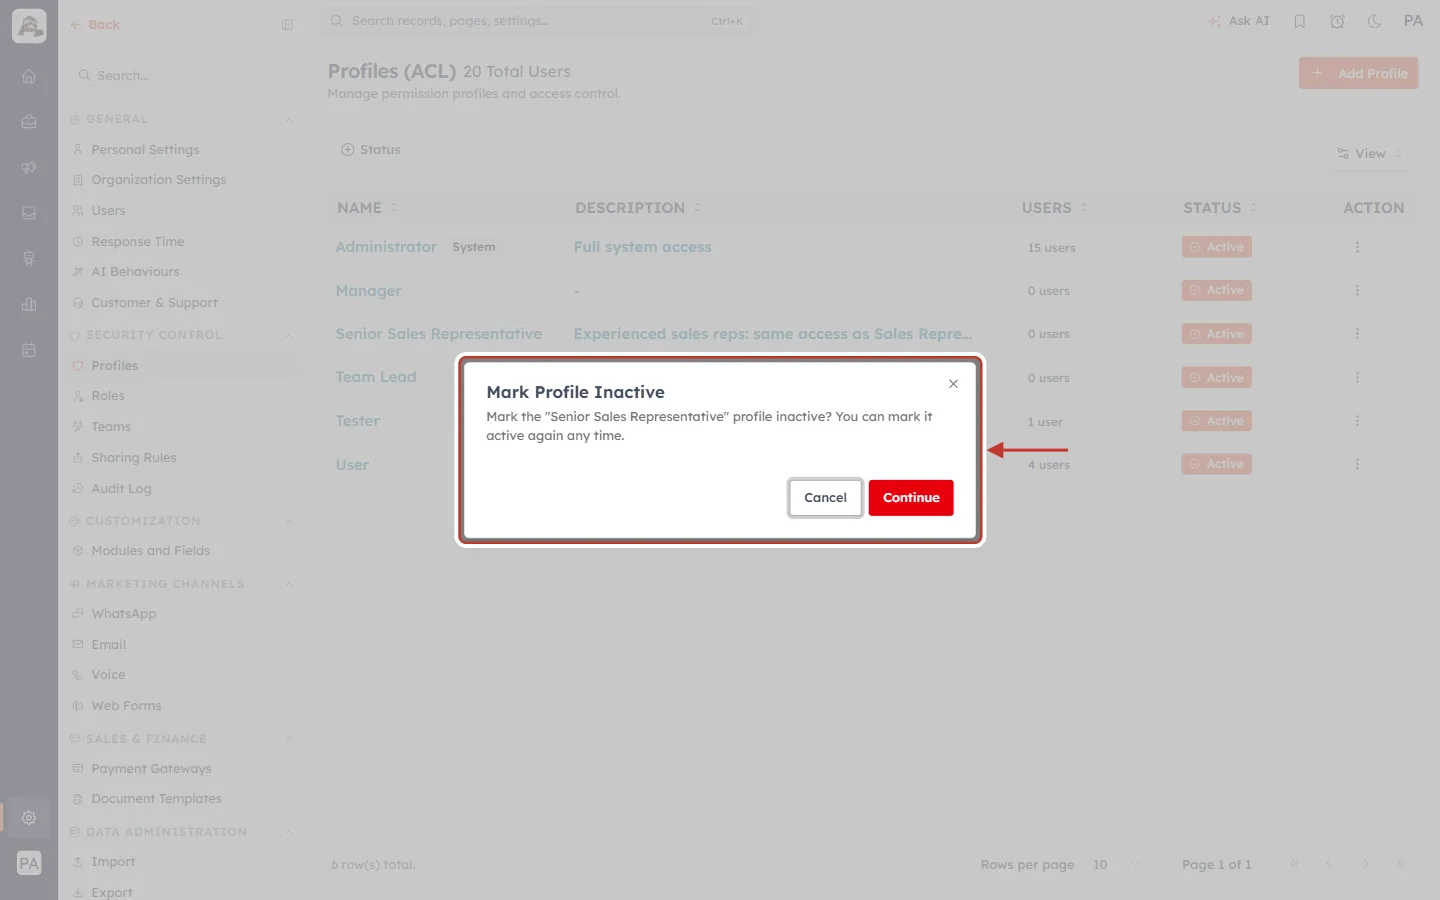
What this screenshot shows. Choosing ⋮ → Mark Inactive opens the ringed confirmation.
It reads Mark the “Senior Sales Representative” profile inactive? You can mark it active again any time.
Click Continue to confirm, or Cancel to leave it active.
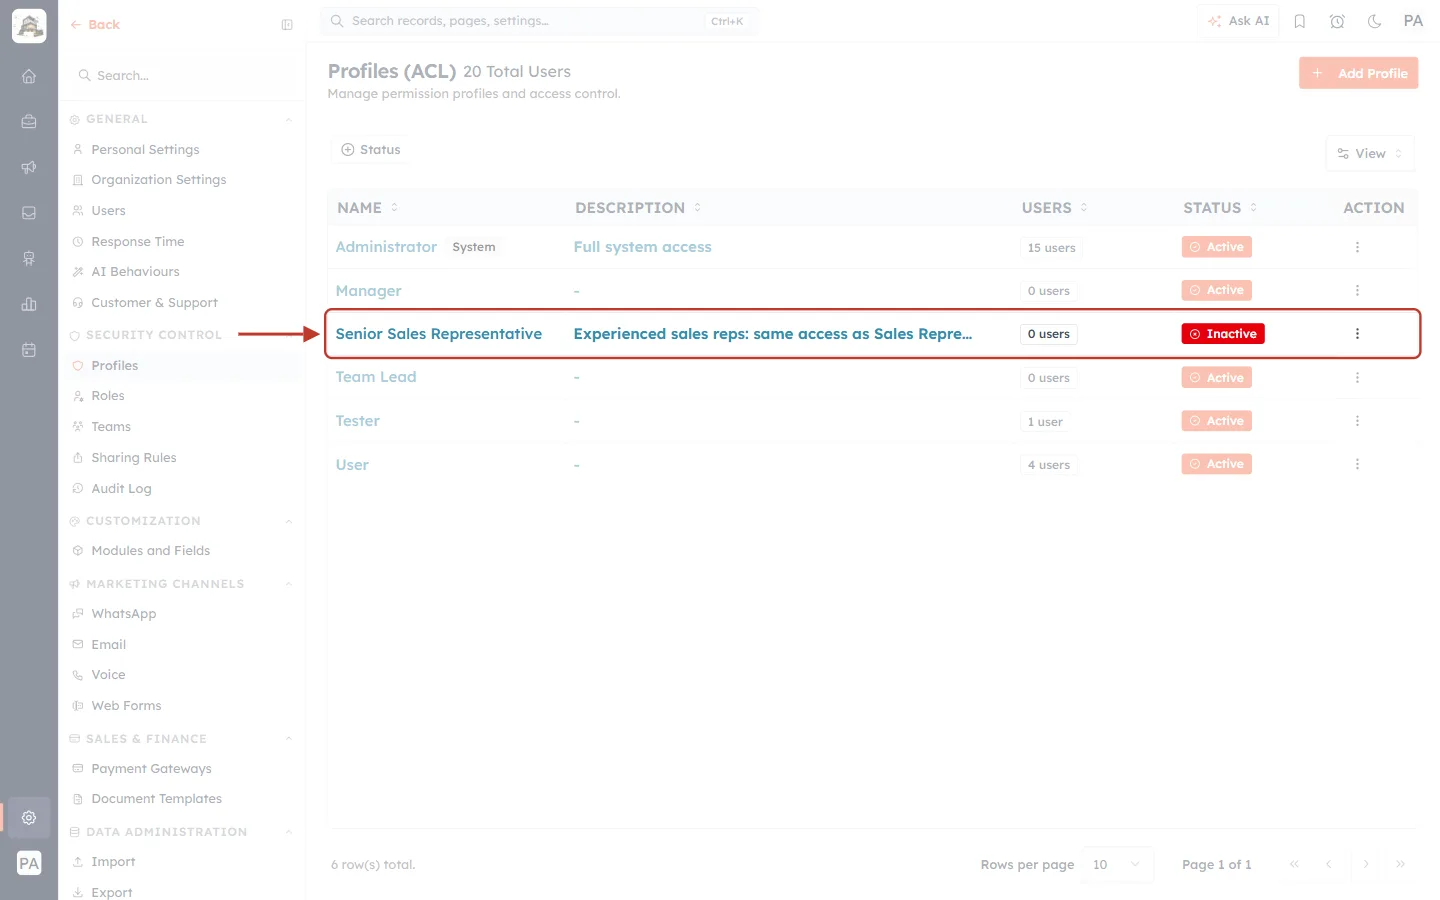
What this screenshot shows. After Profile marked inactive, the ringed row shows a red Inactive status.
The name, description and every permission are kept.
What “inactive” means for your users#
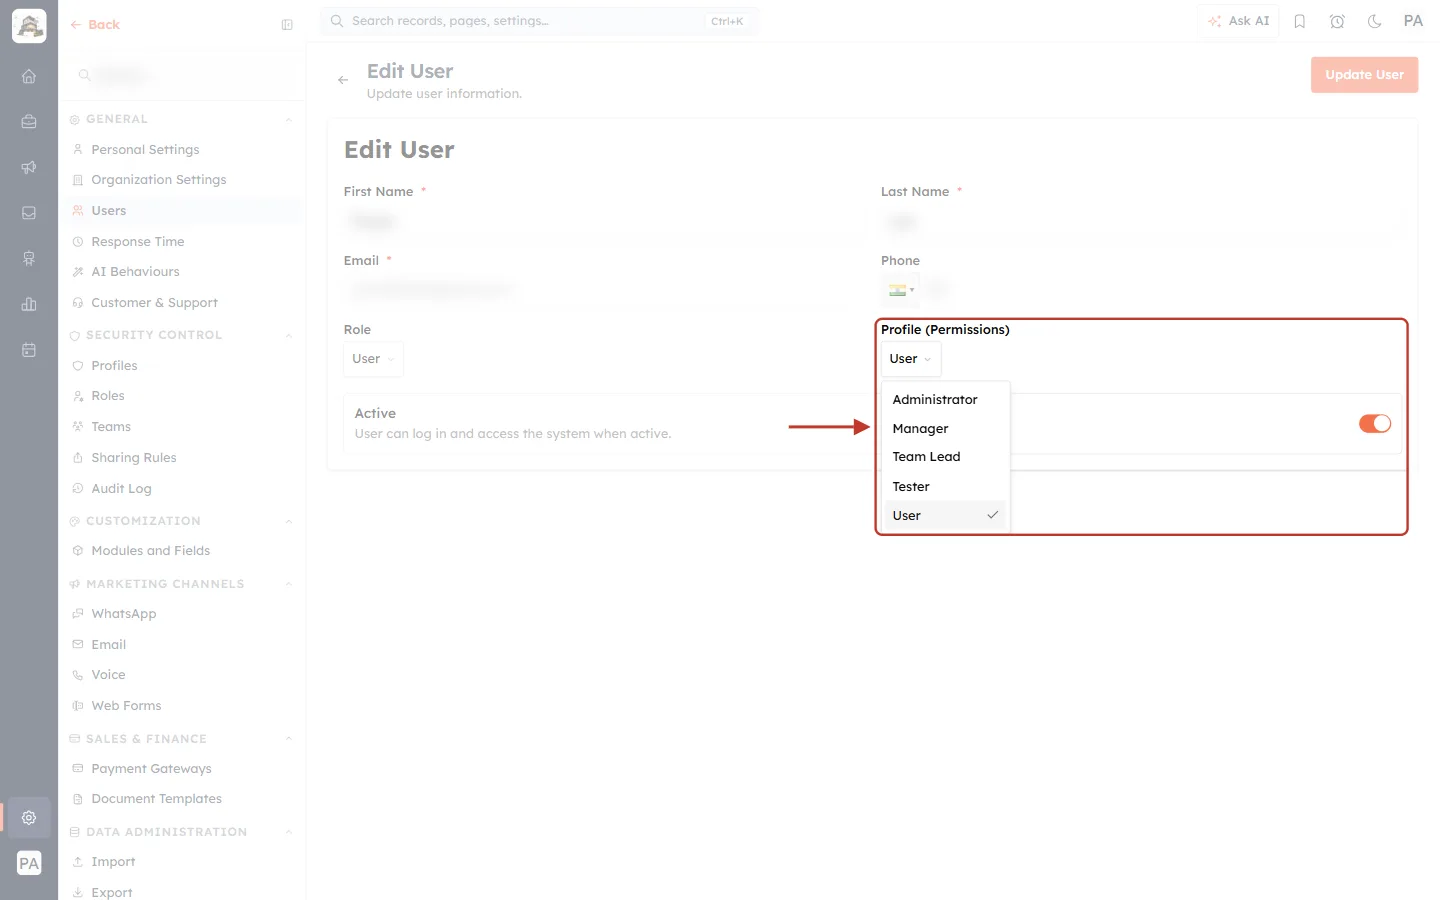
What this screenshot shows. In Settings → Users → Edit User, the Profile (Permissions) drop-down is open and ringed. Personal details are blurred.
It lists Administrator, Manager, Team Lead, Tester and User. The inactive Senior Sales Representative isn’t there.
This matches the hint on every profile: Inactive profiles aren’t offered when you add or edit a user.
⚠️
Before marking a profile inactive, check its USERS count. If people still hold it, move them to another profile in Settings → Users.
Step 9: Find inactive profiles#
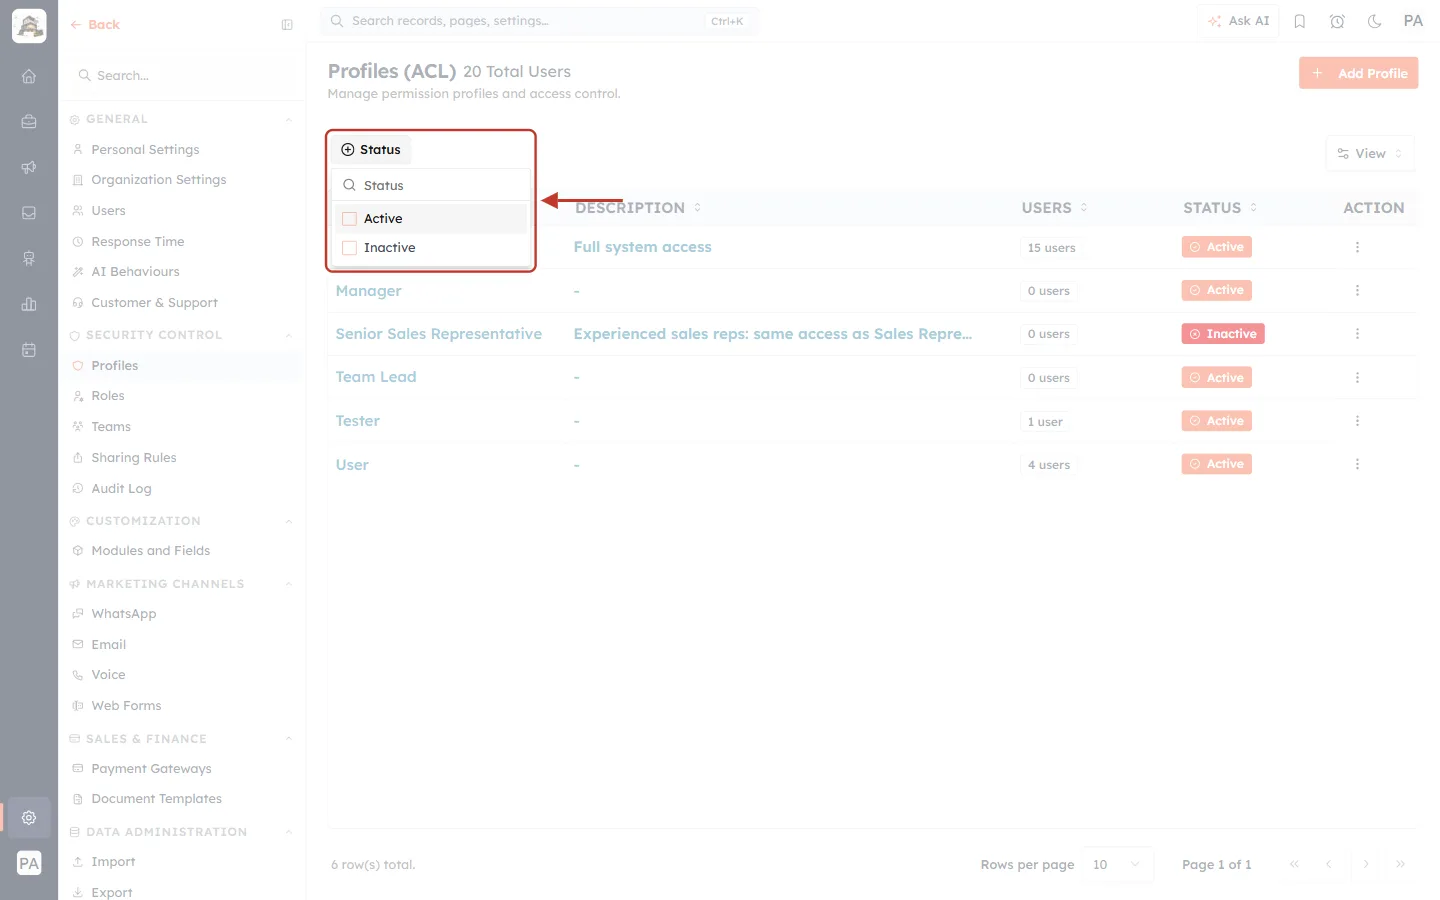
What this screenshot shows. The Status filter above the list is open and ringed.
Tick Inactive to show only retired profiles, or Active for the ones in use.
The small search box at the top filters the options.
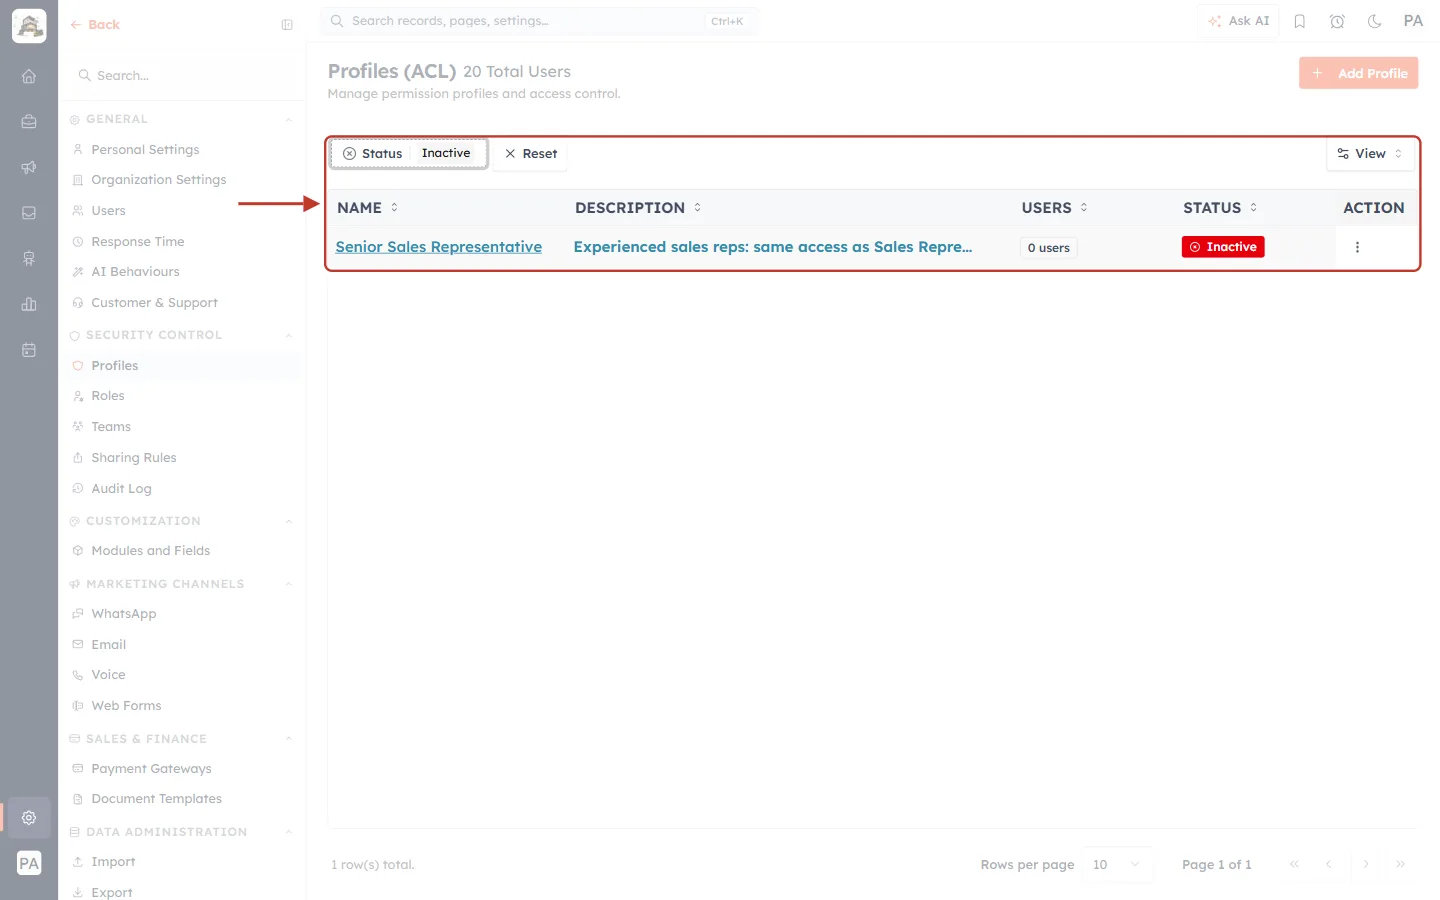
What this screenshot shows. With Inactive ticked, the ringed list shows only inactive profiles.
The filter shows as Status: Inactive. Click Reset to clear it.
Here only Senior Sales Representative is listed (1 row(s) total).
Part 5: Make a Profile Active Again#
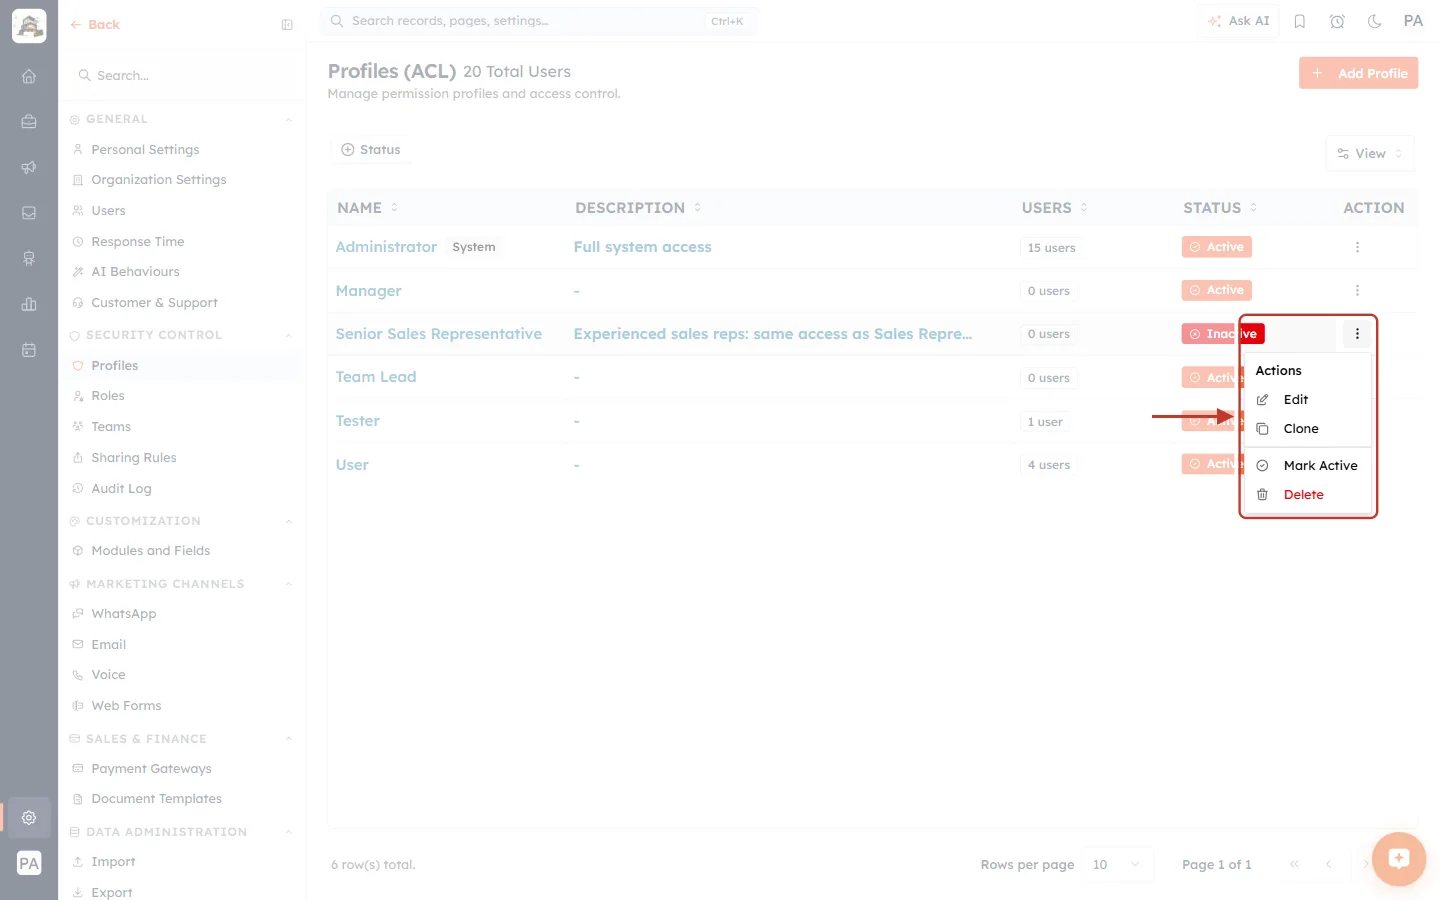
What this screenshot shows. The ⋮ menu of the inactive profile is open and ringed.
Mark Inactive has become Mark Active.
Edit, Clone and Delete are still available.
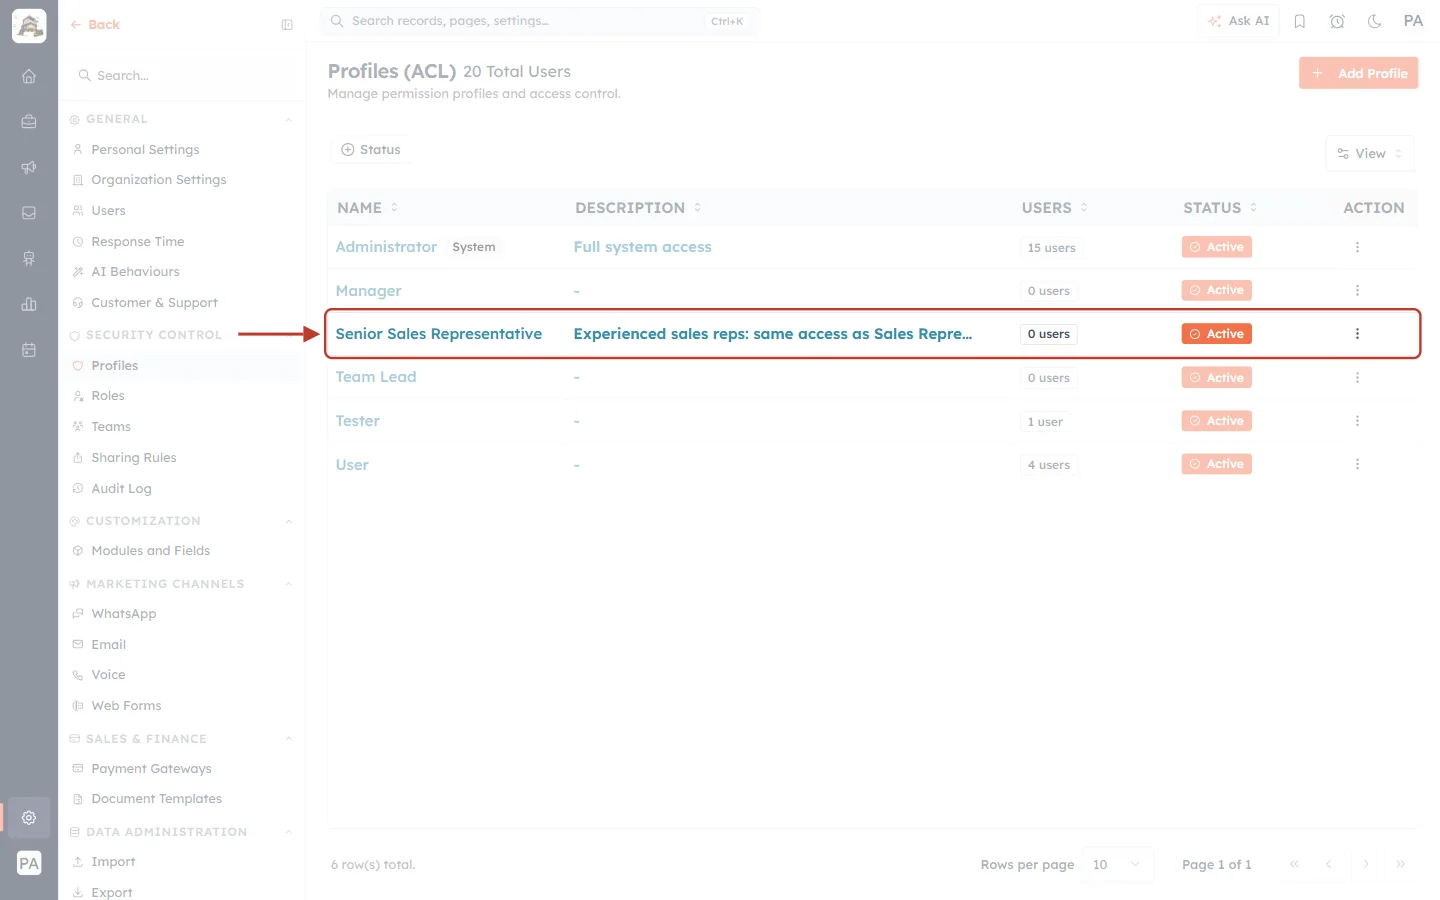
What this screenshot shows. After clicking Mark Active, which needs no confirmation, the ringed row is Active again.
The profile can be given to users again, with all its earlier settings.
Part 6: Delete a Profile#
Step 10: Choose Delete and confirm#
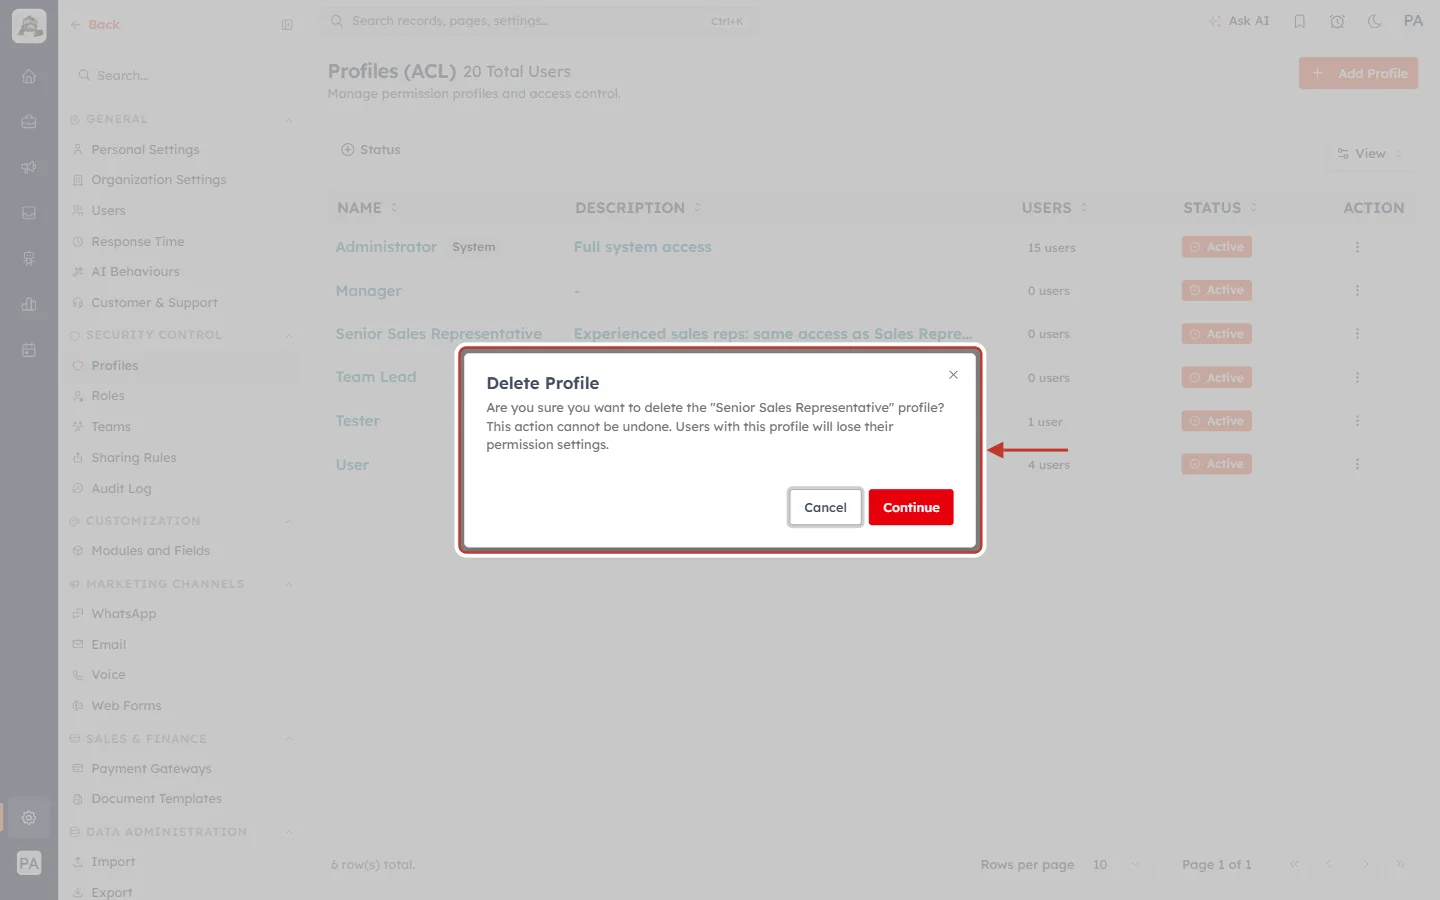
What this screenshot shows. Choosing ⋮ → Delete opens the ringed confirmation.
It reads Are you sure you want to delete the “Senior Sales Representative” profile? This action cannot be undone. Users with this profile will lose their permission settings.
Click Continue to delete, or Cancel to keep it.
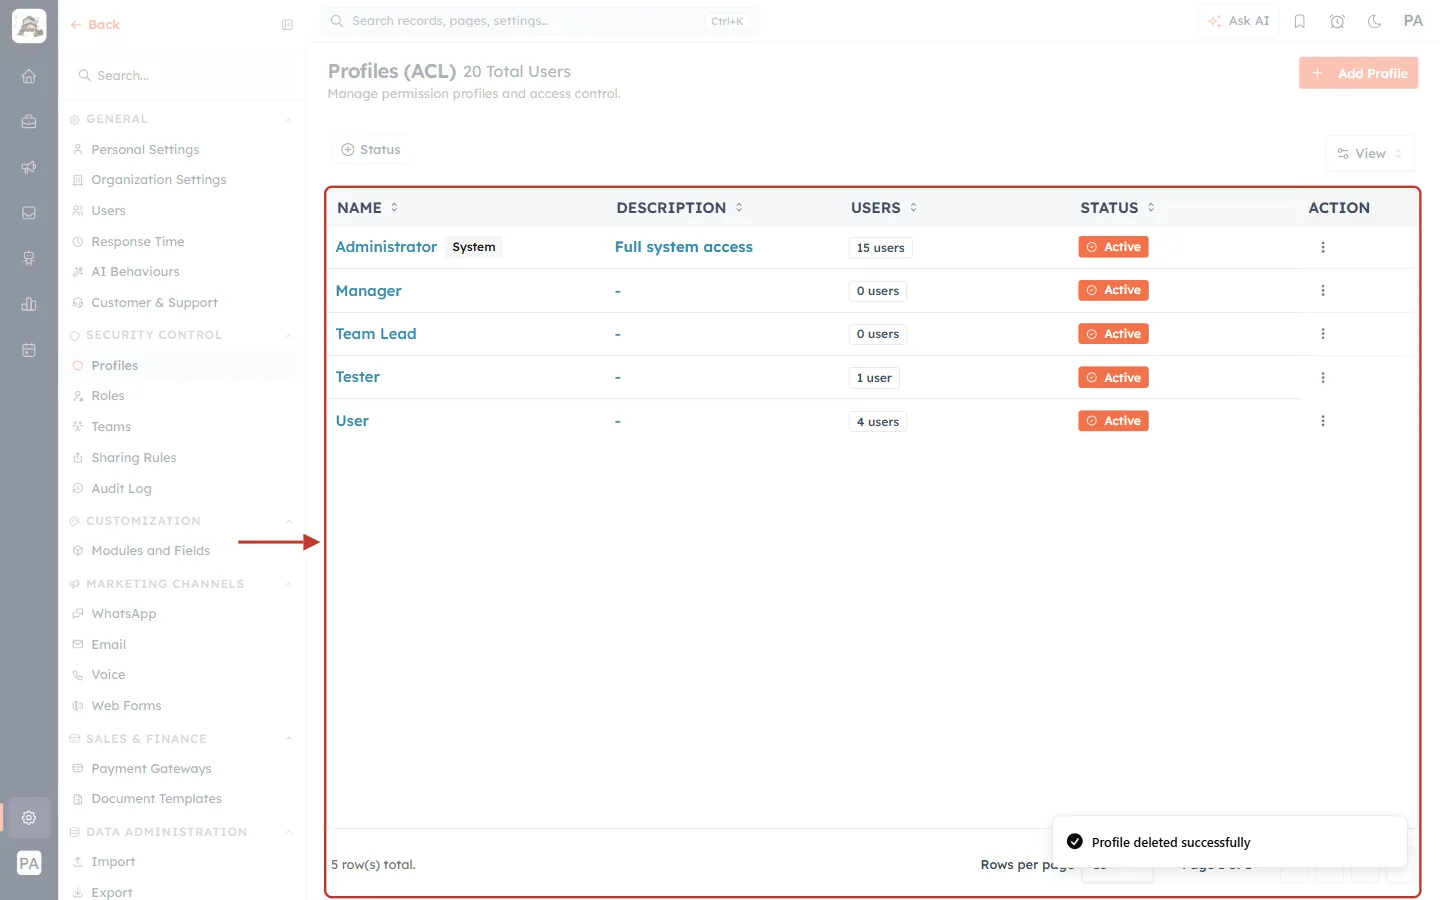
What this screenshot shows. The ringed list after deleting shows the profile gone, with the confirmation Profile deleted successfully at the bottom right.
The list is back to the five original profiles (5 row(s) total).
⚠️
Deleting can’t be undone, and anyone still holding the profile loses their permission settings. Move users to another profile first, or mark the profile inactive instead if you might need it again.
Which Should I Use?#
You want to… | Use |
|---|---|
Create a similar profile quickly | Clone, then Edit the copy |
Follow a job-title change | Edit → Profile Name → Update Profile |
Stop a profile being given out, but keep it | Mark Inactive |
Use a retired profile again | Mark Active |
Remove a profile for good | Move its users, then Delete |
Change the Administrator profile | Not possible: Clone it and edit the copy |
Best Practices#
Clone, don’t start from scratch. New profiles otherwise begin with full Administrator access.
Prefer Mark Inactive to Delete when you are unsure. It is reversible.
Keep descriptions current so the next admin knows who each profile is for.
Check the USERS count before marking inactive or deleting.
Review changes later in the audit log. See Audit Log: See Who Changed Which Setting in Your CRM, and When.
Troubleshooting#
I can’t find Edit or Delete for Administrator#
That is by design. The system profile offers only View and Clone.
A profile isn’t offered when I edit a user#
It is inactive. Filter the list by Inactive, open its ⋮ menu and click Mark Active.
Update Profile stays greyed out#
It only becomes active after you change something on the profile.
I deleted a profile by mistake#
Deleting can’t be undone. Clone a similar profile, set it up again, and give it back to the affected users in Settings → Users.
Frequently Asked Questions#
Does a clone copy the users too?
No. A clone copies the permissions only, and starts with 0 users.
If I rename a profile, do users keep it?
Yes. Renaming changes only the label.
Can I make a profile inactive while people hold it?
Move them to another profile first. An inactive profile can’t be chosen when you add or edit a user.
Previous and Next#
Previous: Create a Permission Profile Step by Step: Build, Edit, Clone, Deactivate & Delete
Next: Assign a Profile to a User Step by Step: Give, Change and Check Each Person’s Permissions
Related Articles#
Create a Permission Profile Step by Step: Build, Edit, Clone, Deactivate & Delete
Profile Permissions Explained: What Every Module, Feature & Setup Setting Controls
Assign a Profile to a User Step by Step: Give, Change and Check Each Person’s Permissions
Understanding the Role Hierarchy: How Roles Decide Whose Records Each User Can See
Invite Your Team: How to Add and Manage Users in AI Engage CRM
Audit Log: See Who Changed Which Setting in Your CRM, and When
Was this article helpful?
Ready to implement this?
OpenAI Engage and apply what you just learned to your own workspace.
Open AI Engage CRM