Loading…


KnowledgeBase
Layouts FAQ and Troubleshooting: Answers to the Most Common Layout Questions
About this page#
This page collects the questions people ask most about module layouts — the named forms (such as Standard and Sales) that decide which fields a record shows. Each answer says why something happens and how to fix it, with a screenshot of what to look for, and links to the step-by-step guide for that topic.
Jump to a topic:
1. Getting started — where layouts live and the words to know
2. Who sees which layout
3. Creating and editing layouts
4. Required fields per layout
5. Default layout, switching off and deleting
6. Records on the wrong layout
7. Related lists, Quick Create and imports
8. Error messages
1. Getting started#
Where do I manage a module’s layouts?#
Click the gear icon at the bottom of the left menu bar to open Setup, click Modules and Fields under CUSTOMIZATION, then click Configure on the module. This opens the module’s Layouts page.
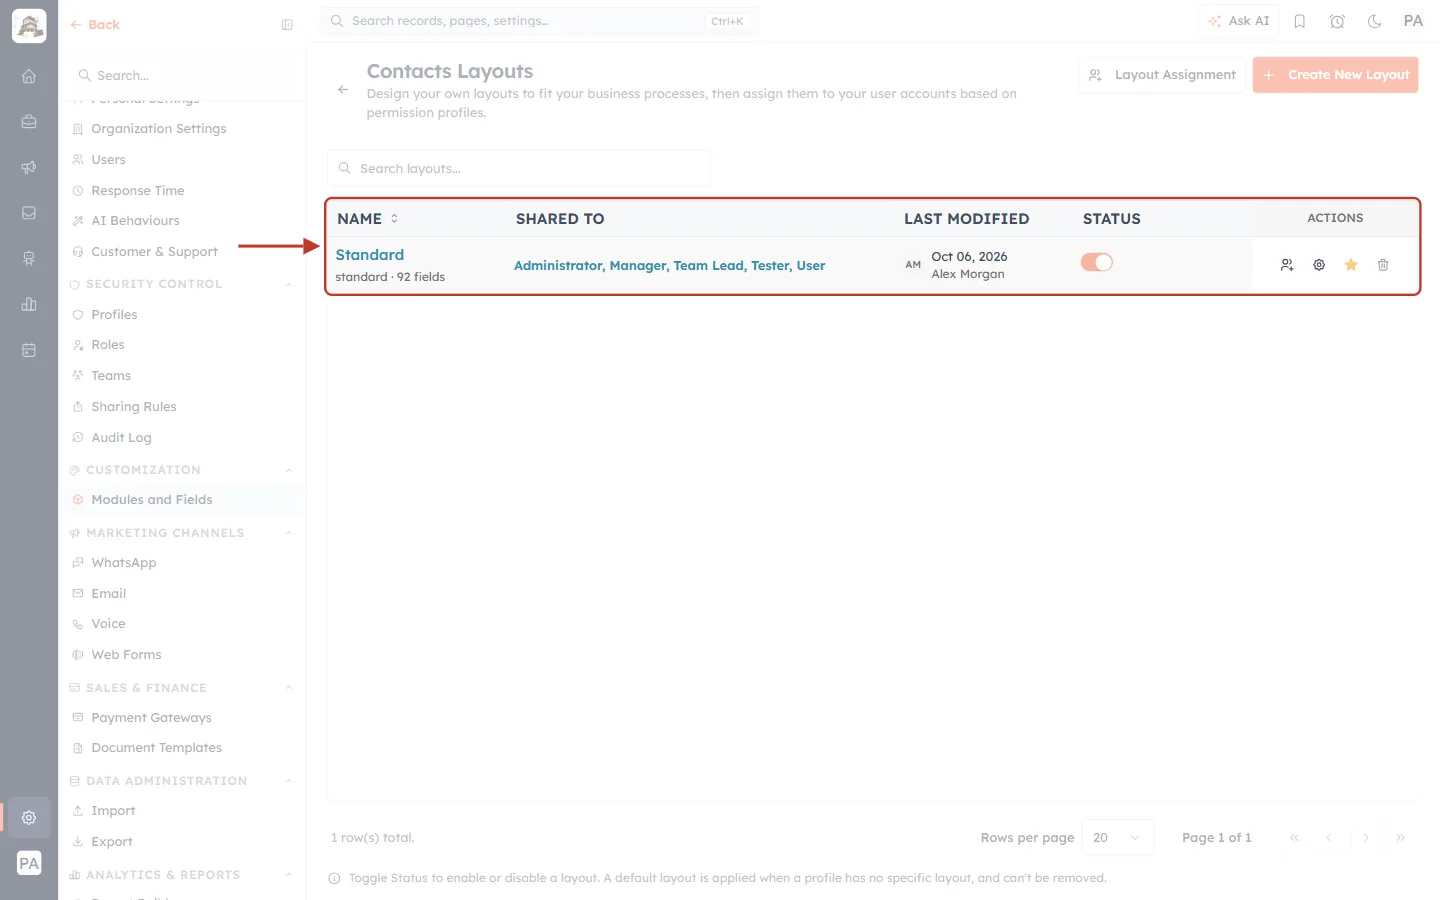
What this screenshot shows. The Contacts Layouts page, with the layouts table ringed. Here the module has one layout, Standard.
NAME — the layout, its short code and field count. Click it to open the Layout Builder.
SHARED TO — the profiles that can use it.
STATUS — whether the layout is switched on.
ACTIONS — Assign profiles, Open in Layout Builder (gear), the default-layout star, and Delete (bin).
At the top right: Layout Assignment and Create New Layout.
I don’t see Modules and Fields in Setup.#
Why it happens: Managing layouts needs permission to customise modules. Only profiles with that permission (such as Administrator) see Modules and Fields.
How to fix it:
Ask an administrator to do the change, or to give your profile the module customisation permission. See Control Permissions with Profiles.
What is the difference between Standard, the module default and a profile’s Default Layout?#
Term | What it is | Where you set it |
|---|---|---|
Standard | The layout every module starts with. Always active, can never be deleted. | — |
Module default layout | The layout used for anyone whose profile has no active layout of its own. Marked with a filled orange star. | The star on the Layouts page — Set the Module Default Layout |
A profile’s Default Layout | The layout that opens first for people with that profile when they create a record. | Layout Assignment on the Layouts page |
2. Who sees which layout#
Which layout does a person get?#
For each person and module, the CRM goes down this list and stops at the first answer:
The Default Layout of their profile (set in Layout Assignment), if that layout is active.
Otherwise, the first active layout assigned to their profile.
Otherwise, the module default layout.
An existing record always opens on the layout it was created on (or moved to with Change Layout), for everyone.
I created a layout, but my team doesn’t see it.#
Why it happens: A new layout is shared only with the Administrator profile, so nobody else gets it yet.
How to fix it:
On the Layouts page, click the layout’s Assign profiles icon and add your team’s profiles — or use Layout Assignment to set every profile at once.
Check that the layout’s Status switch is on.
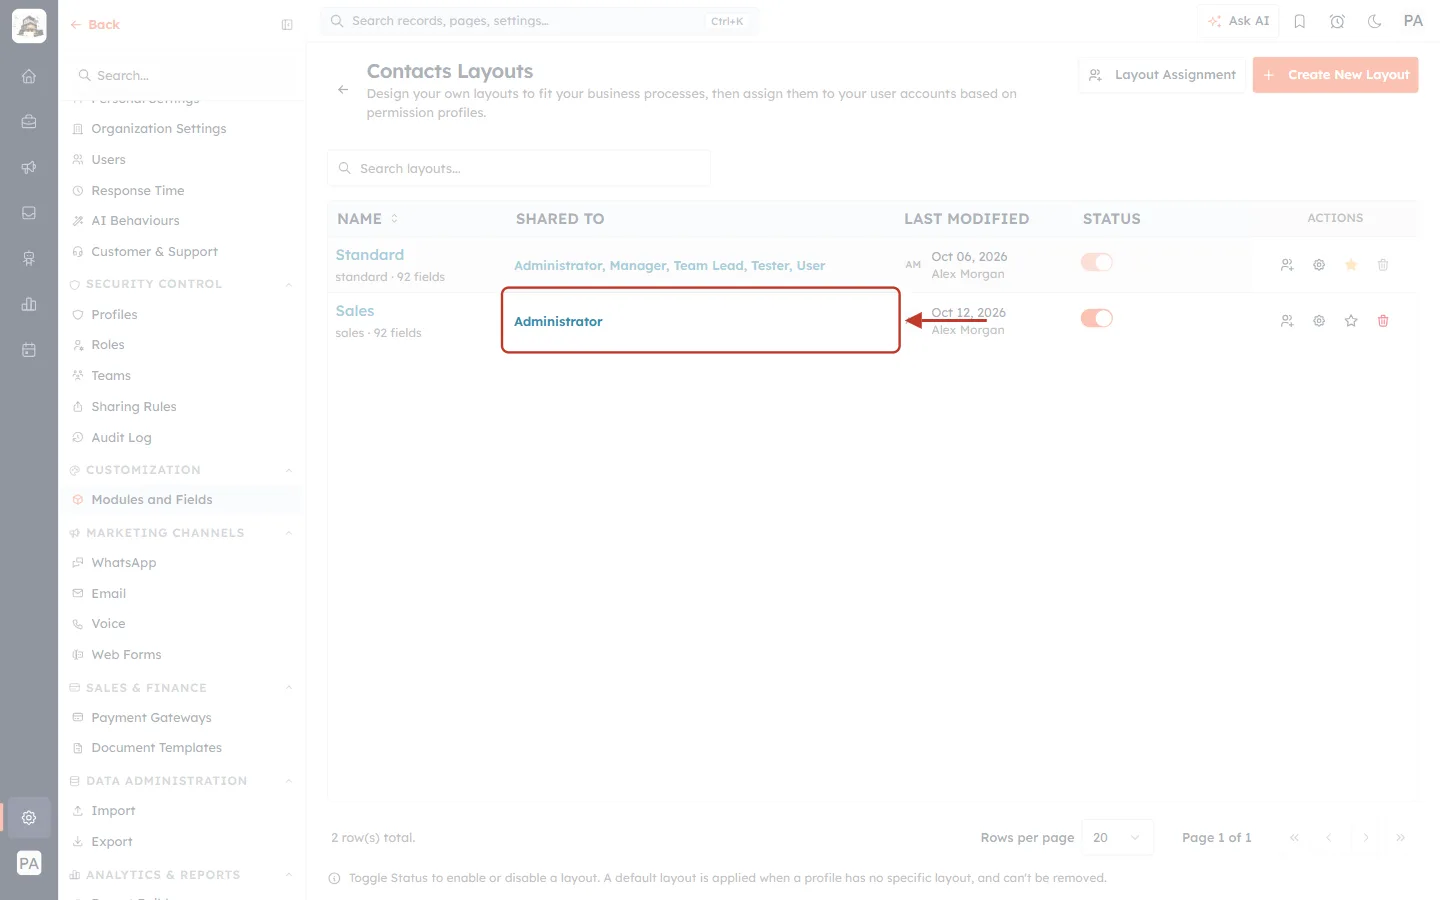
What this screenshot shows. The SHARED TO cell of a new Sales layout, ringed: Administrator.
Until you add profiles here, only administrators can use the layout.
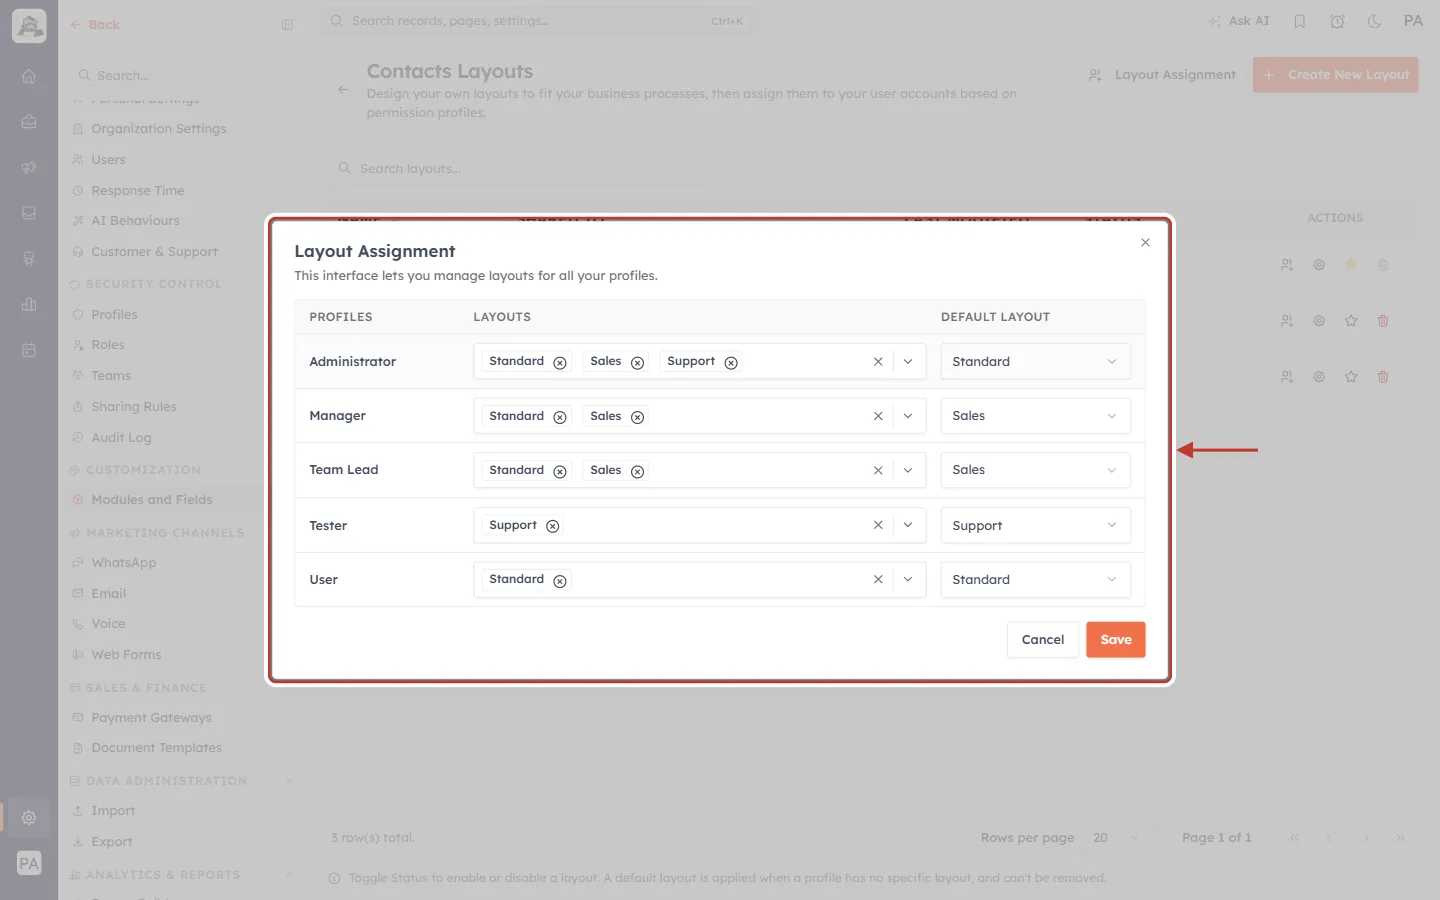
What this screenshot shows. The Layout Assignment window, ringed. Each row is a profile.
Layouts — the layouts the profile may use, shown as chips.
Default Layout — the one that opens first for that profile.
Click Save to apply every row at once.
Layout Assignment won’t let me remove a layout from a profile.#
Why it happens: A profile’s Default Layout must be one of its own layouts, and Administrator is always on every layout.
How to fix it:
To remove the layout that is a profile’s default, first pick another Default Layout on that row, then remove the chip.
Administrator can’t be taken off a layout.
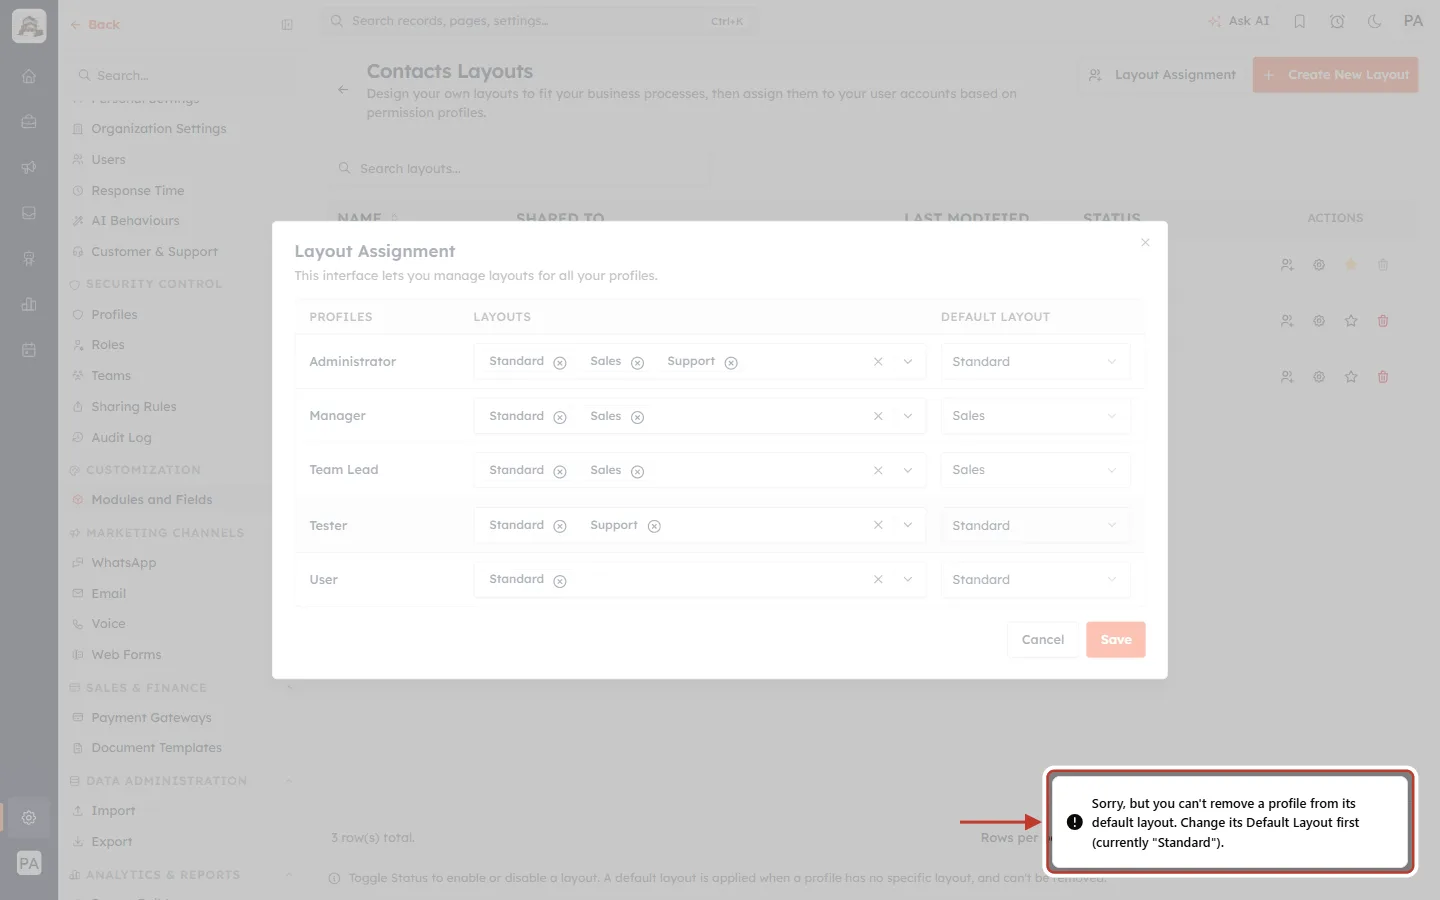
What this screenshot shows. The message shown when you try to remove the layout that is still the row’s Default Layout, ringed.
Change the Default Layout on that row first, then remove the layout.
There is no layout picker on the Create form, and no Change Layout button on records.#
Why it happens: Both only appear when the module has two or more active layouts and your profile can use more than one of them.
How to fix it:
Check that a second layout exists and is switched on.
Check that your profile is assigned more than one layout (Layout Assignment).
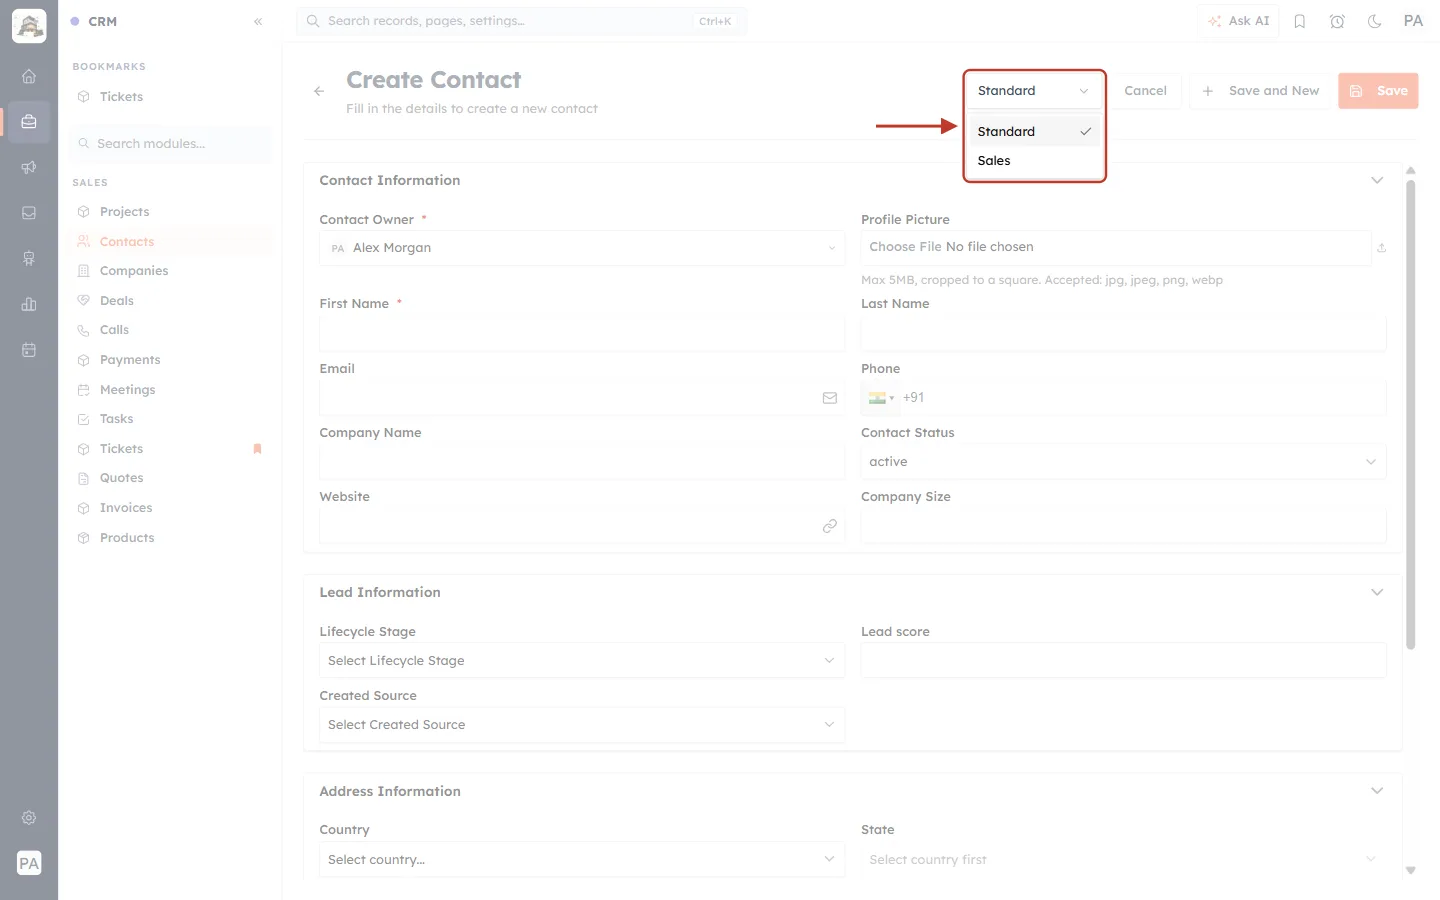
What this screenshot shows. The layout picker at the top right of the Create Contact form, opened and ringed, listing Standard and Sales.
People pick the layout to fill in here. A switched-off layout is not listed.
I switched a layout back on, but nobody gets it.#
Why it happens: Switching a layout off moved its profiles to another layout. Switching it on again does not bring them back, so it is shared with nobody (“—”).
How to fix it:
Share it again with Assign profiles or Layout Assignment. See Activate or Deactivate a Layout.
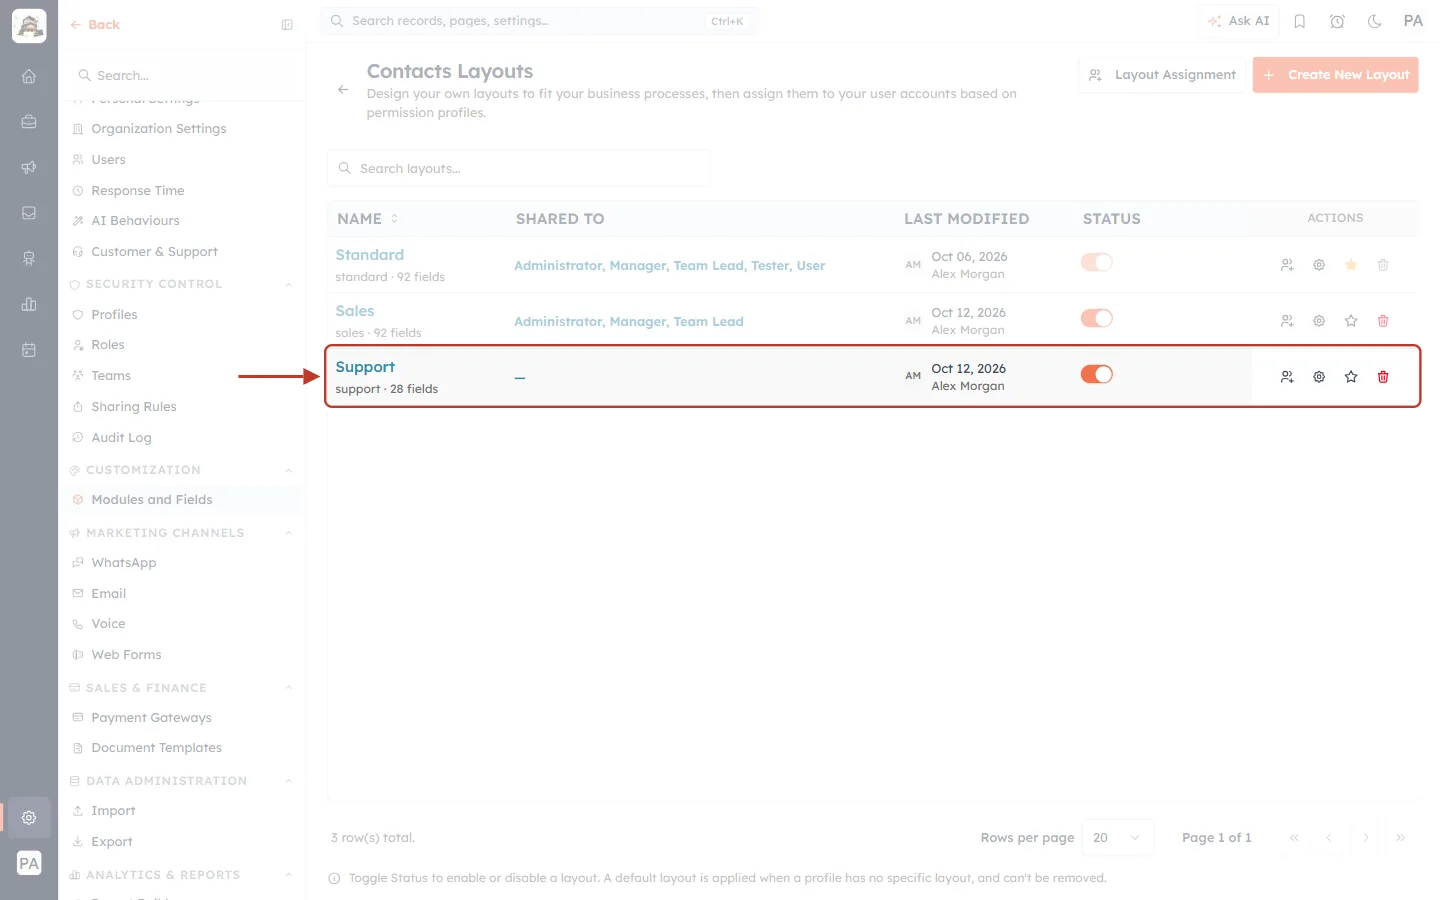
What this screenshot shows. A Support layout switched back on, ringed. Its Status is on, but SHARED TO shows “—”.
3. Creating and editing layouts#
The Create Layout button is faded.#
Why it happens: The Layout Name is empty, or another layout in the module already has that name (capital letters and spaces don’t count as a difference).
How to fix it:
Type a name that isn’t used yet.
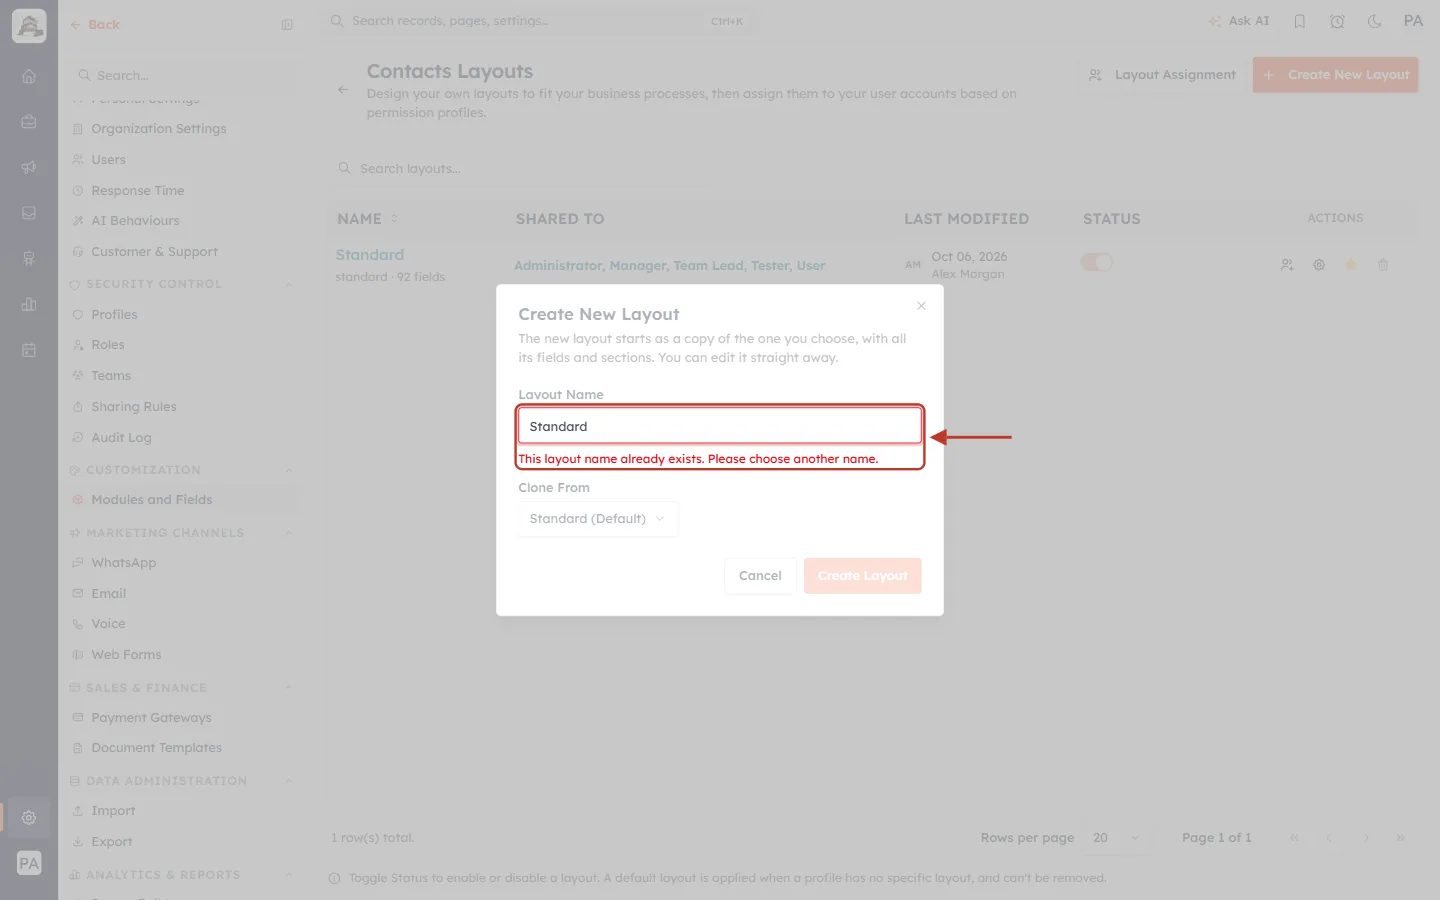
What this screenshot shows. The Layout Name box with Standard typed in, ringed with the red message “This layout name already exists. Please choose another name.”
My changes in the Layout Builder didn’t show up.#
Why it happens: Builder changes are only kept when you click Save. You may also have edited another layout, or another tab (Create, Quick Create or Detail View).
How to fix it:
Look for the orange • Unsaved changes label next to the layout name — if it is there, click Save.
Check the layout name under the module name at the top left.
Check you edited the right tab: Create for the form, Detail View for how an opened record reads, Quick Create for the “+ New” form. See Edit a Layout in the Layout Builder.
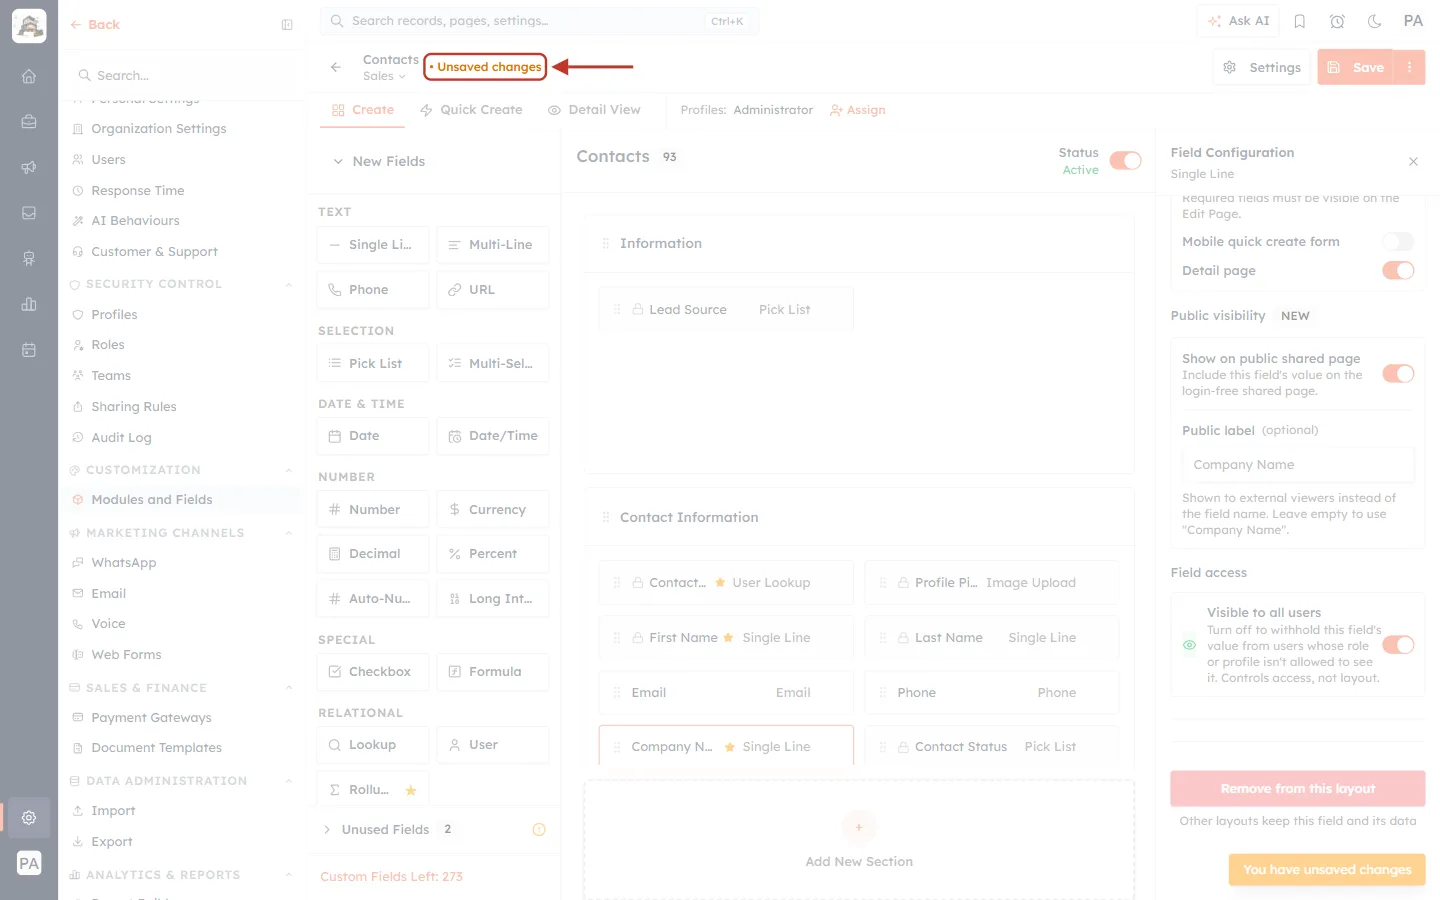
What this screenshot shows. The orange • Unsaved changes label next to Contacts / Sales, ringed.
It disappears once you click Save (or Discard Changes).
Does removing a field from a layout delete its data?#
Action | Where | What happens to the field and its data |
|---|---|---|
Move to Unused Fields | The field’s ⋮ menu on the canvas | Off this layout only; field and data kept. Saved when you click Save. |
Remove from this layout | Bottom of Field Configuration | Off this layout only; other layouts keep it; data kept. Saved straight away. |
Bin in Unused Fields | Unused Fields list | Deleted from the module and every layout, with its data, when you next click Save. |
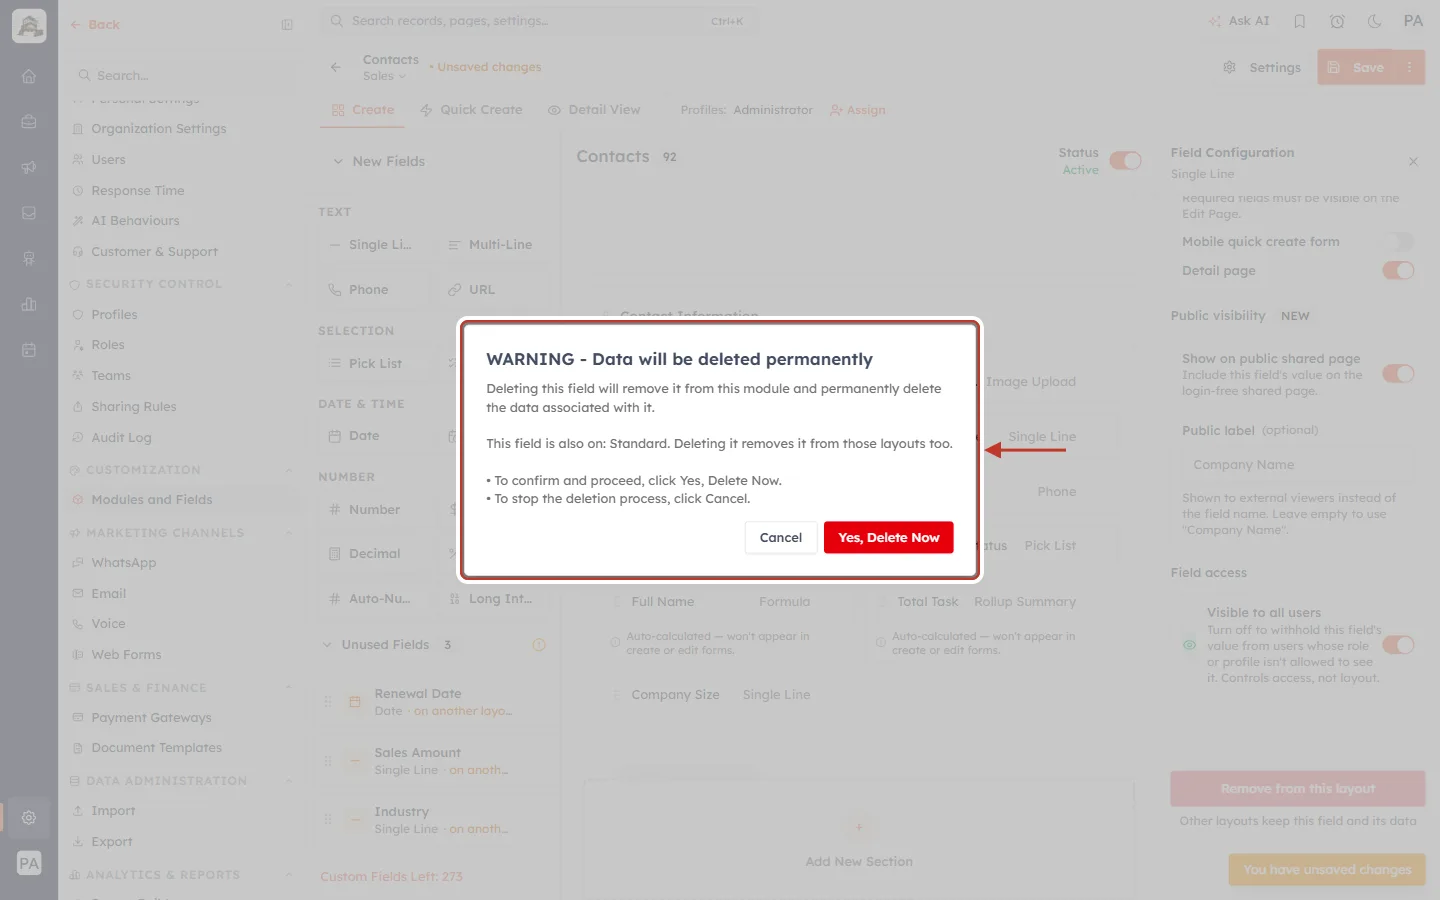
What this screenshot shows. The window shown when you click the bin of a field in Unused Fields, ringed.
Click Cancel unless you really want the field and its data gone. If you clicked Yes, Delete Now by mistake, use Discard Changes before saving.
A field’s menu says “Required — turn off to move to Unused”.#
Why it happens: A field that is required on this layout can’t be taken off it — records couldn’t be saved without it.
How to fix it:
Click the field, turn Required Field off, then move it. See Make a Field Required on One Layout Only.
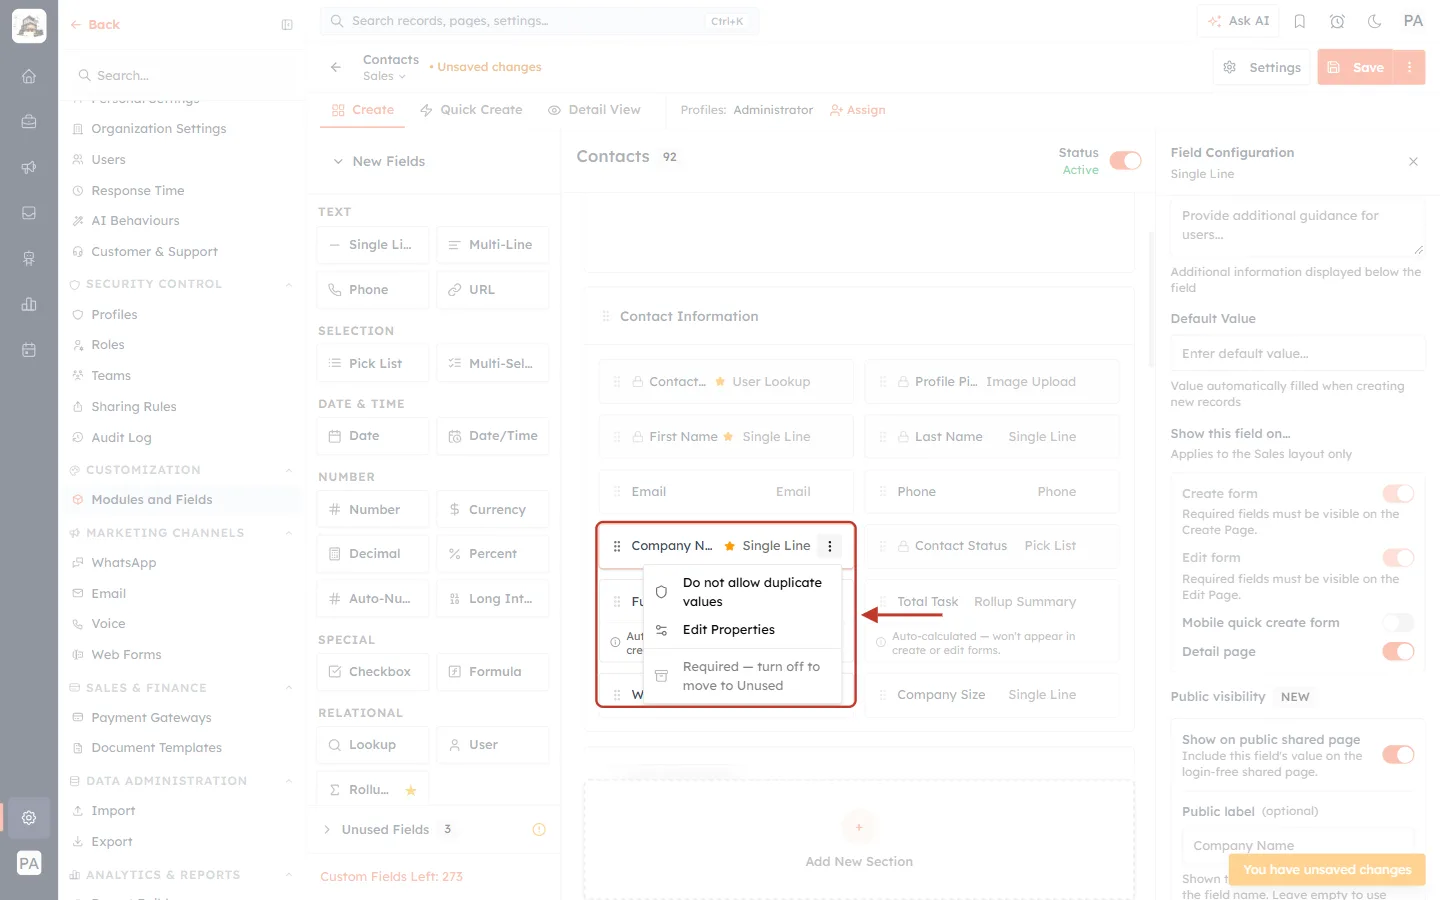
What this screenshot shows. The ⋮ menu of a required field, ringed. The last item is greyed out: Required — turn off to move to Unused.
I can’t delete a section.#
Why it happens: A section that holds system fields (with a lock icon) or required fields can’t be deleted — the CRM shows “Can’t delete this section yet”.
How to fix it:
Drag those fields to another section (or turn Required off), then delete the section. Its other fields move to Unused Fields.
4. Required fields per layout#
How do I make a field required for one team only?#
Open that team’s layout in the Layout Builder, click the field and turn on Required Field. The line under it names the layout: “Users must provide a value on the Sales layout”. Other layouts keep their own setting. See Make a Field Required on One Layout Only.
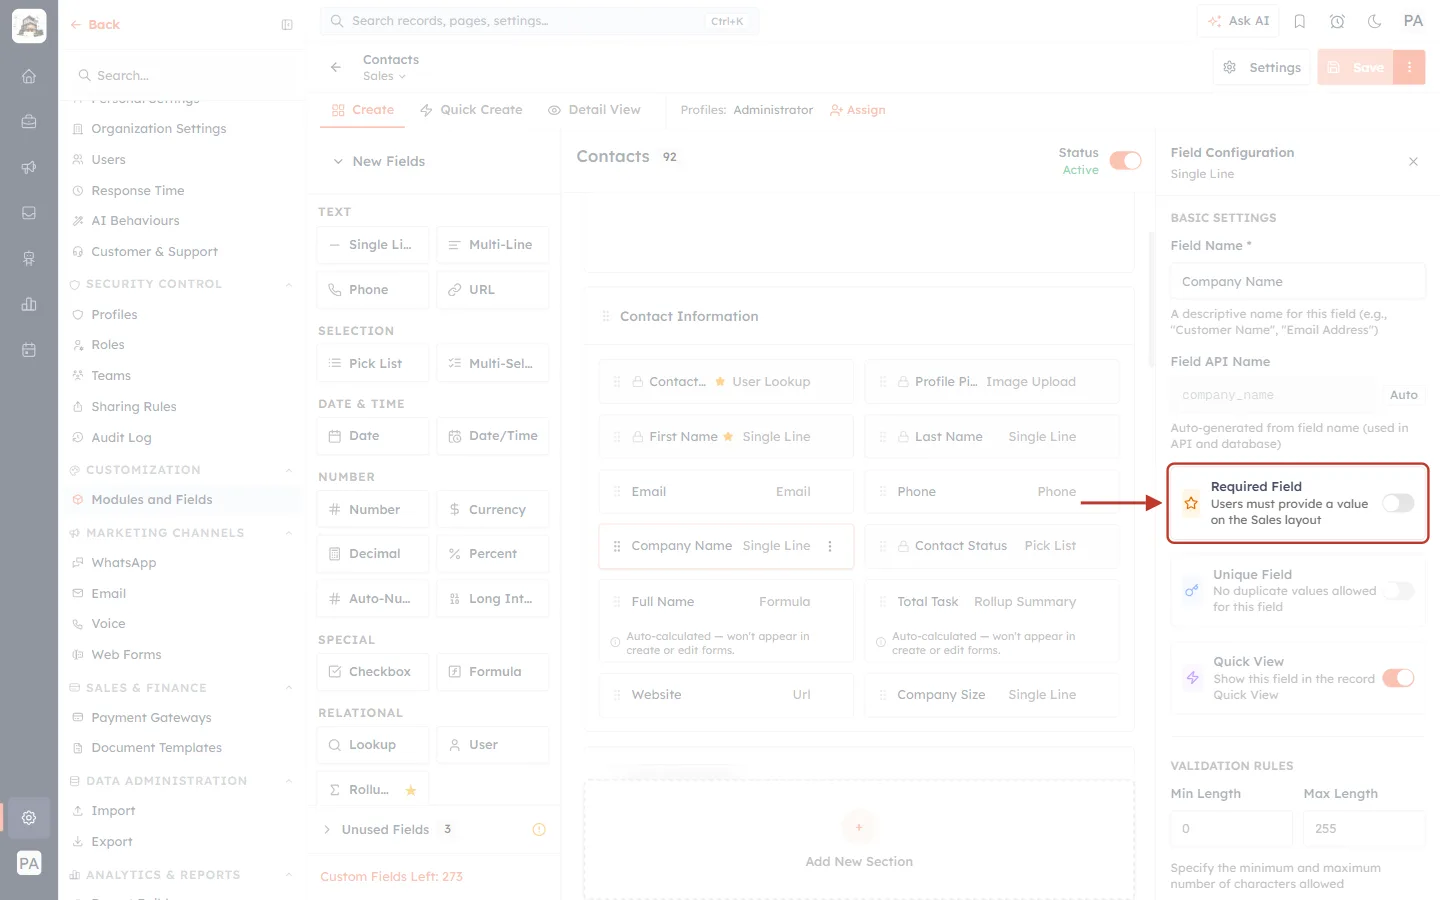
What this screenshot shows. The Required Field box for a field on the Sales layout, ringed, reading “Users must provide a value on the Sales layout”.
If it says “for this field” instead, the module has only one layout and the setting applies everywhere.
The Required switch is greyed out.#
Why it happens: A field can only be required on a layout that shows it on its Create form. A field in Unused Fields, or only on Quick Create / Detail View, can’t be made required there.
How to fix it:
Drag the field into a section on the Create tab, then turn Required on.
People get “… is required” on one layout but not another.#
Why it happens: That is per-layout Required working as intended: the field is required on the layout they picked.
How to fix it:
If it shouldn’t be required there, open that layout and turn the field’s Required switch off.
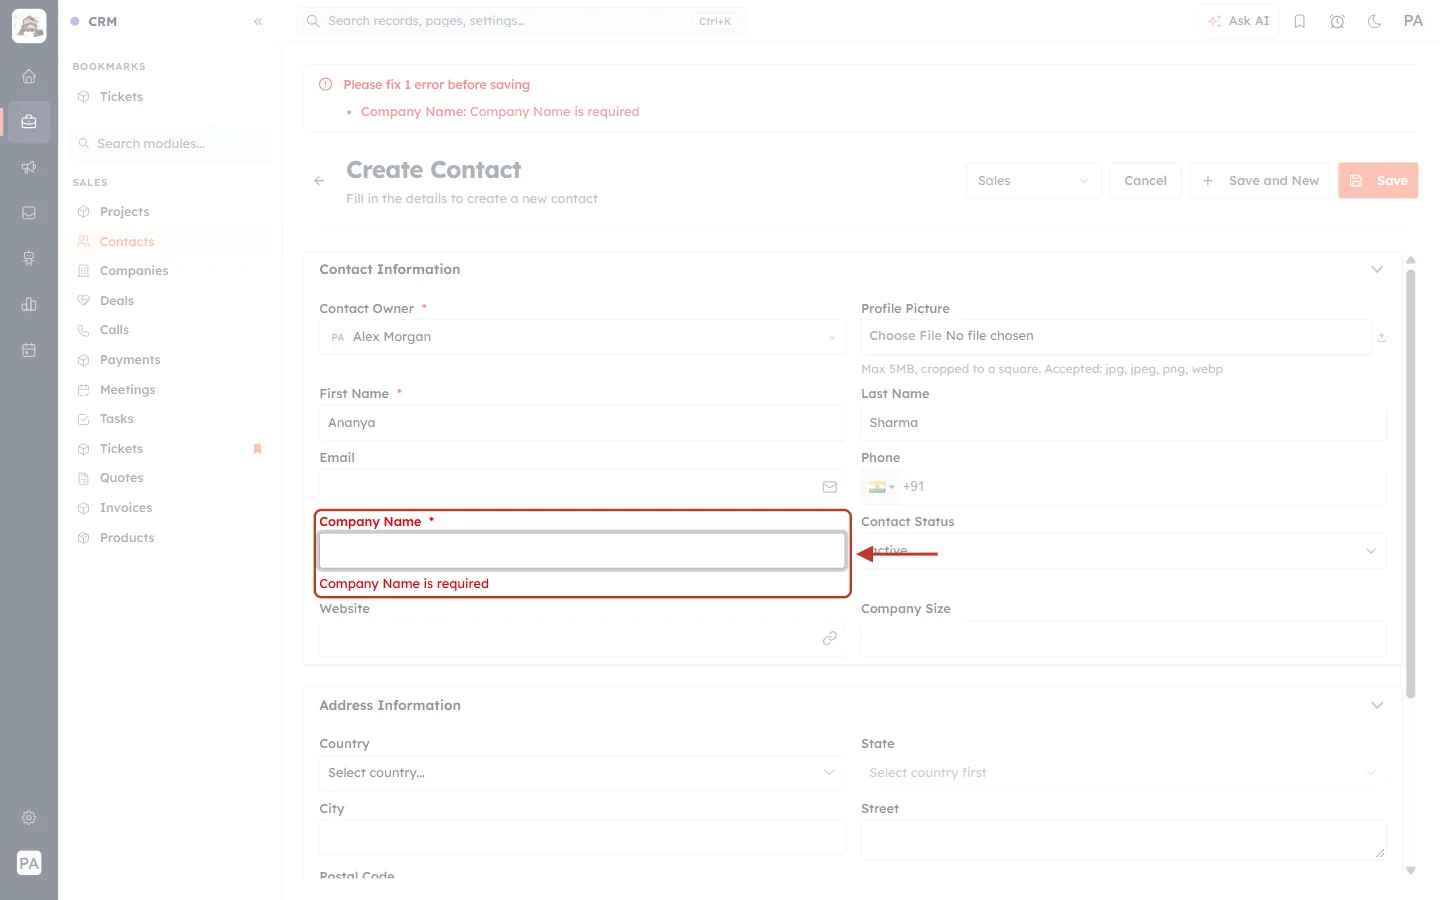
What this screenshot shows. A Create Contact form on the Sales layout, with Company Name ringed: red border and “Company Name is required”.
5. Default layout, switching off and deleting#
I can’t switch a layout off — the Status switch is faded.#
Why it happens: Standard is always active, and the module default layout can’t be switched off.
How to fix it:
To switch off the current default, first make another layout the default (click its star). See Set the Module Default Layout.
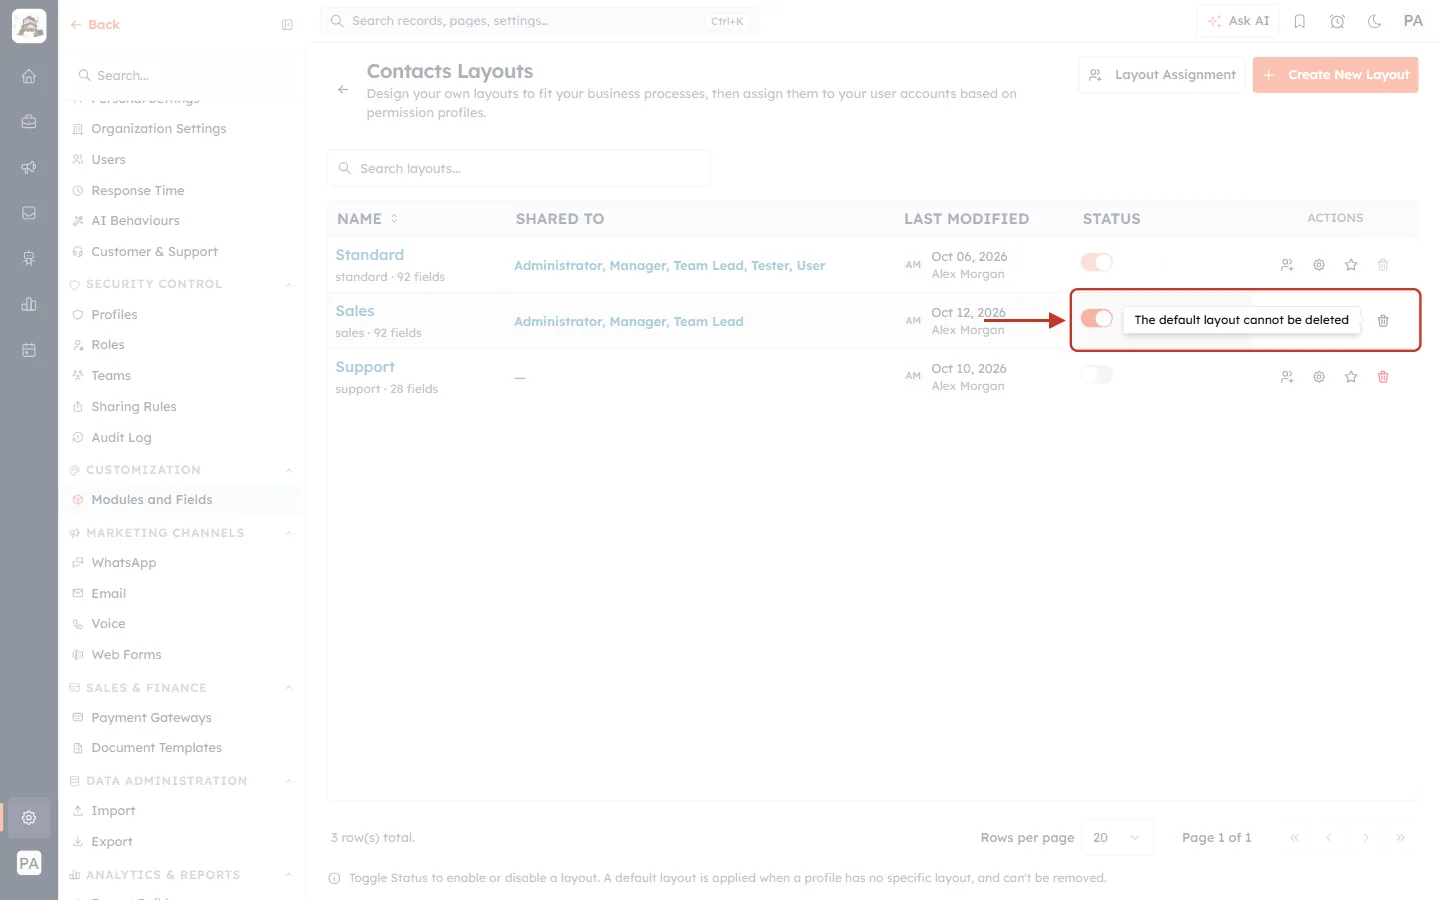
What this screenshot shows. The Status switch and action icons of the default layout, ringed, with the bin’s tooltip The default layout cannot be deleted.
The Status switch tooltip reads: “The default layout is always active. Make another layout the default first.”
Clicking a star says “An inactive layout cannot be made the default”.#
Why it happens: Only an active layout can be the module default.
How to fix it:
Turn the layout’s Status switch on, then click its star.
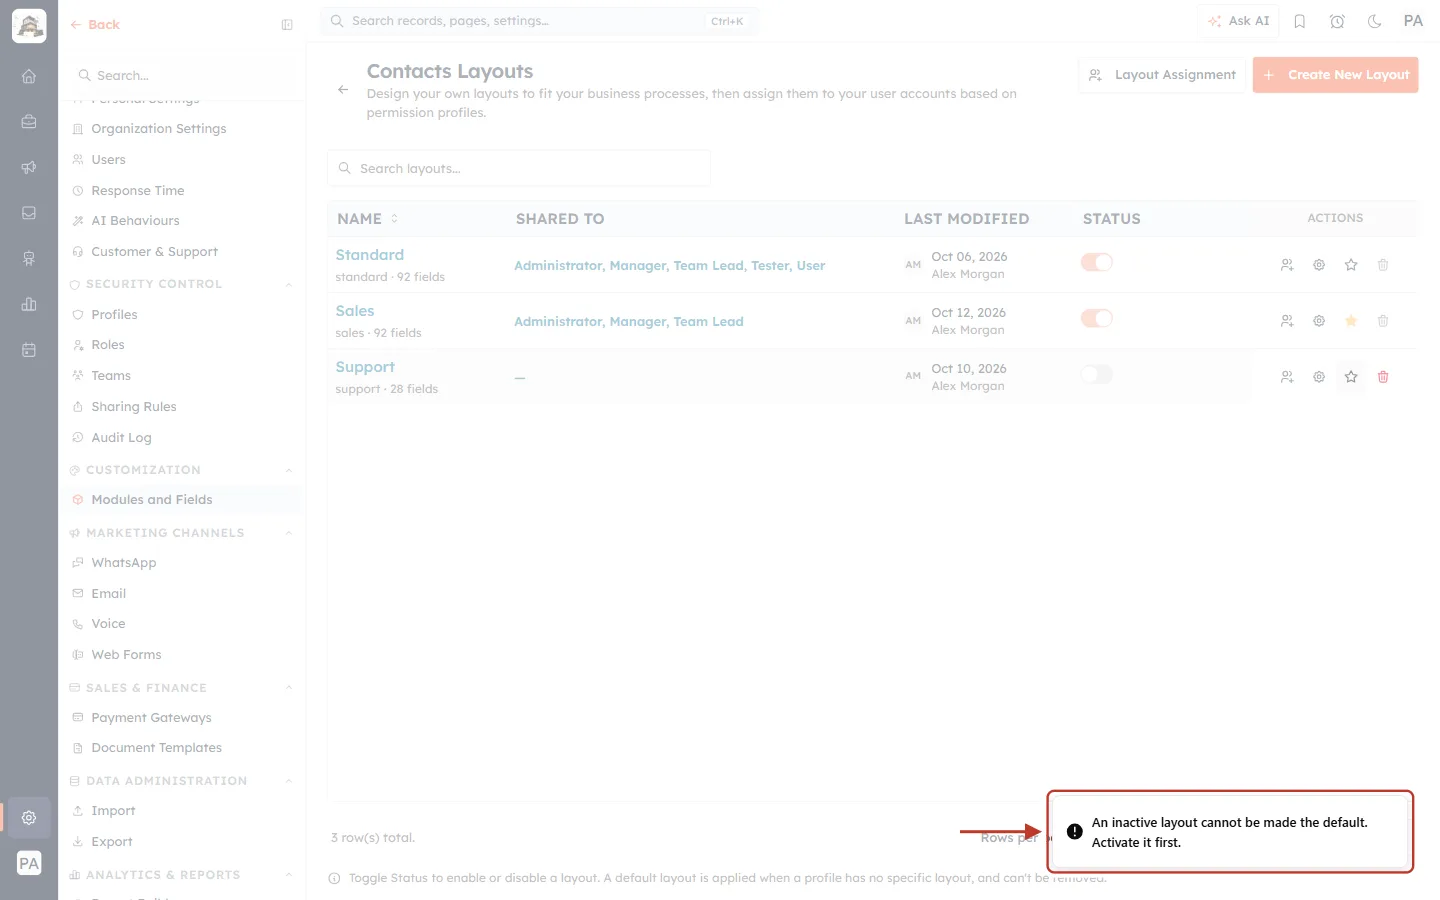
What this screenshot shows. The message after clicking the star of a switched-off layout, ringed: “An inactive layout cannot be made the default. Activate it first.”
The bin is greyed out on a layout.#
Why it happens: Standard can never be deleted (“System-Defined Layout”), and the module default can’t be deleted while it is the default.
How to fix it:
Make another layout the default first if you want to delete the current one. See Delete a Layout and Move Its Records.
“Transfer and Delete Now” is faded in the Delete Layout window.#
Why it happens: You haven’t picked where the layout’s records go yet, or the CRM is still checking which fields will move.
How to fix it:
Choose a layout in Transfer records to and wait for the line about fields to appear.
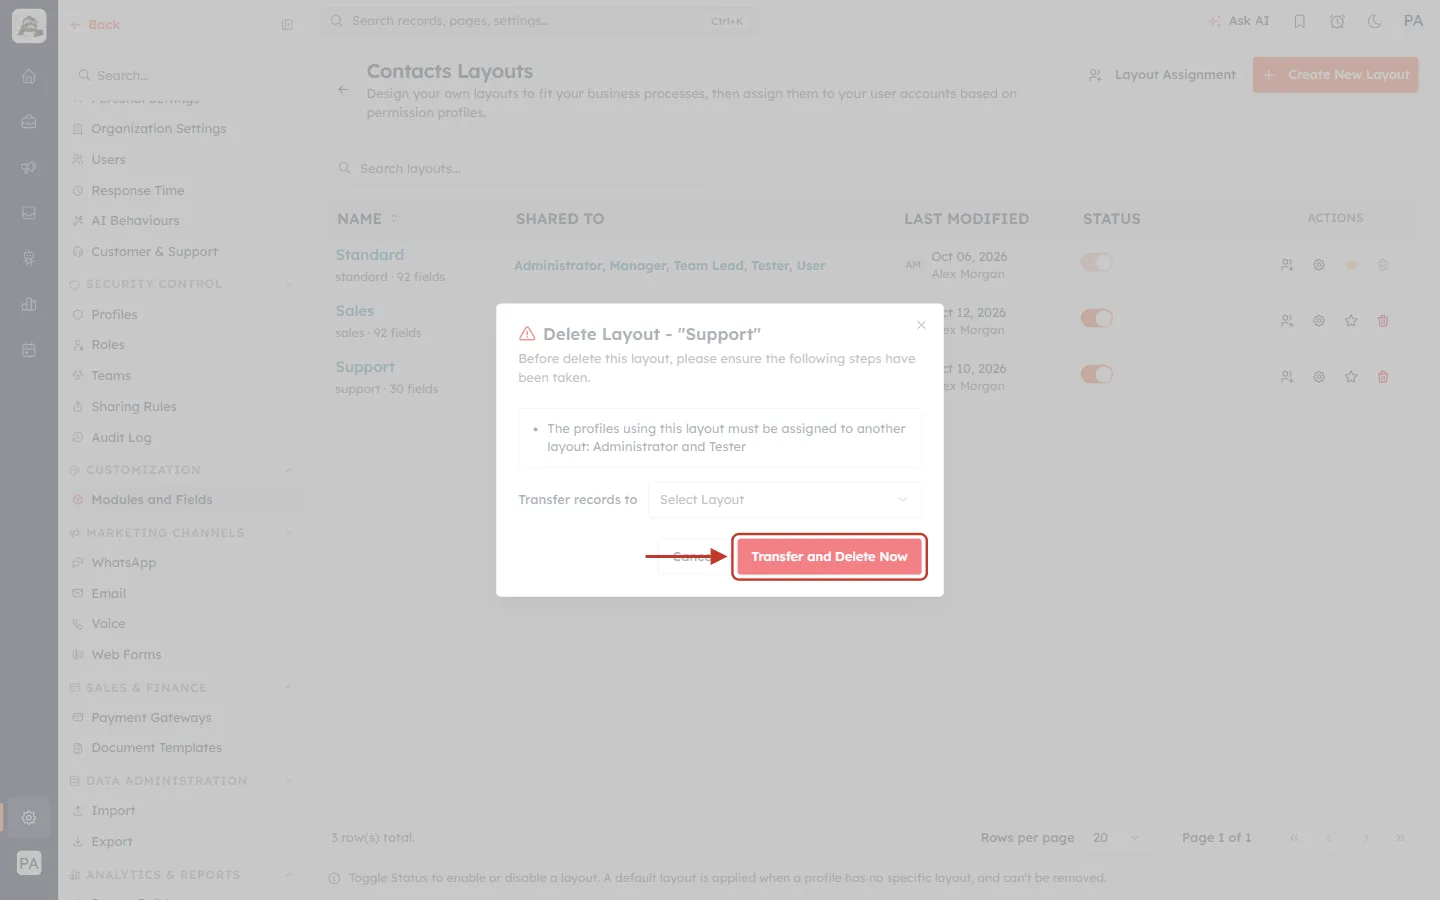
What this screenshot shows. The Delete Layout window with Transfer records to still on “Select Layout”, and the faded Transfer and Delete Now button ringed.
Can I get a deleted layout back?#
No. Deleting a layout can’t be undone (its records were moved to the layout you picked, so no data is lost). If you might need a layout again, deactivate it instead. See Activate or Deactivate a Layout.
6. Records on the wrong layout#
A record was created on the wrong layout.#
Why it happens: A record stays on the layout it was created on, for everyone who opens it.
How to fix it:
Open the record and click Change Layout (top right, on the tabs row).
Pick the right layout and click Change Layout. No values are deleted.
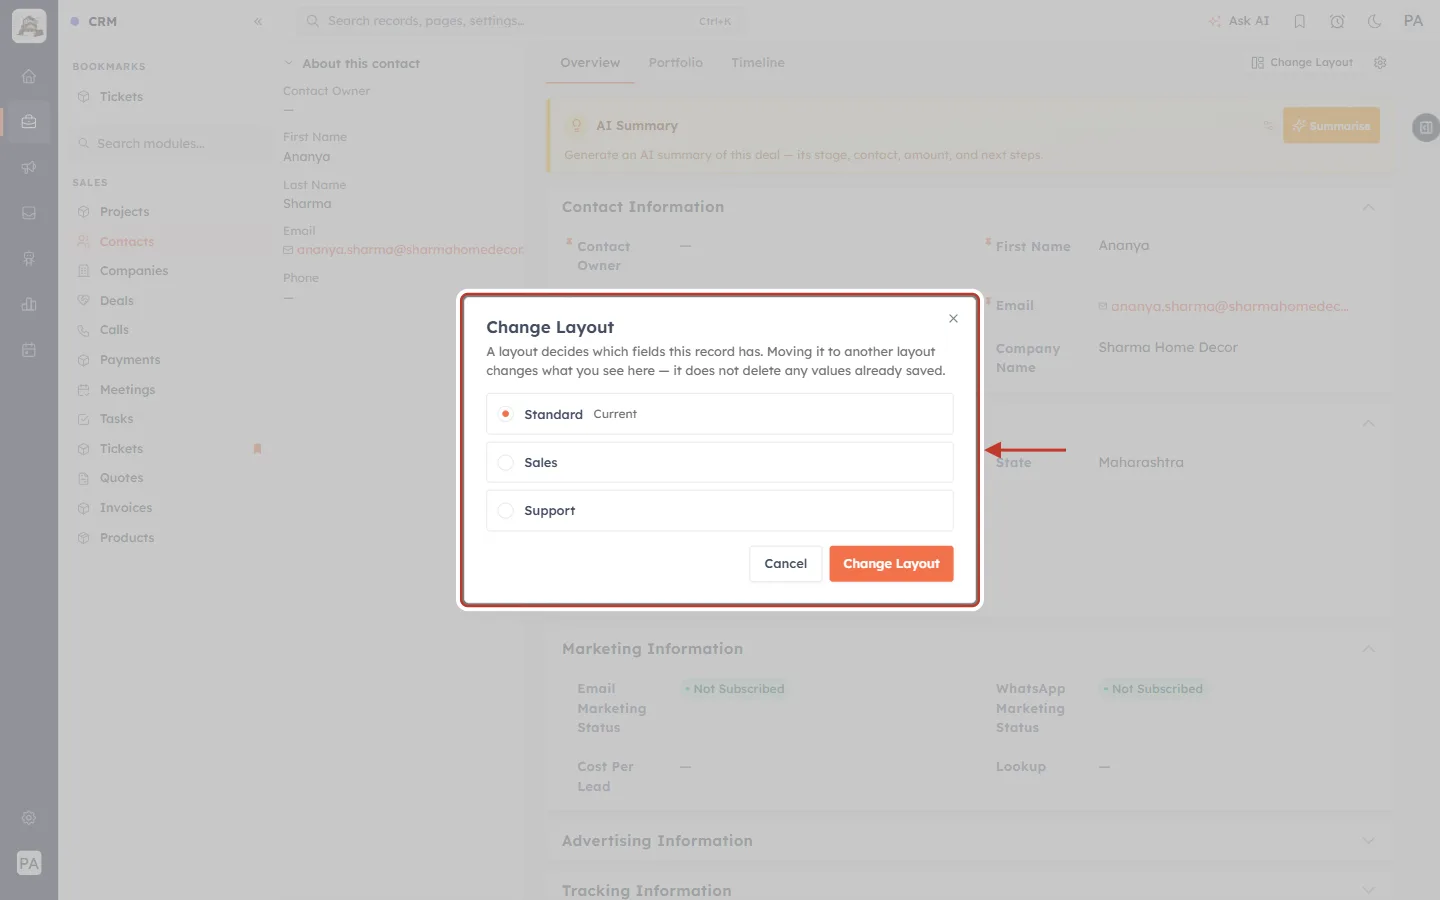
What this screenshot shows. The Change Layout window on a record, ringed. The record’s current layout is marked Current.
Pick another layout and confirm; you get “Layout changed to …”.
After Change Layout some values seem to be missing.#
Why it happens: The values are kept, but the new layout may not show those fields.
How to fix it:
Add the fields to that layout in the Layout Builder, or move the record back.
7. Related lists, Quick Create and imports#
A related list (for example Deals) is missing on a record.#
Why it happens: Related lists are chosen per layout. The list may be switched off on the layout the record uses — or no other module has a lookup field pointing at this one.
How to fix it:
Open the layout, go to Detail View, scroll to Related Records Columns and switch the list on. Then click Save. See Choose Which Related Lists Each Layout Shows.
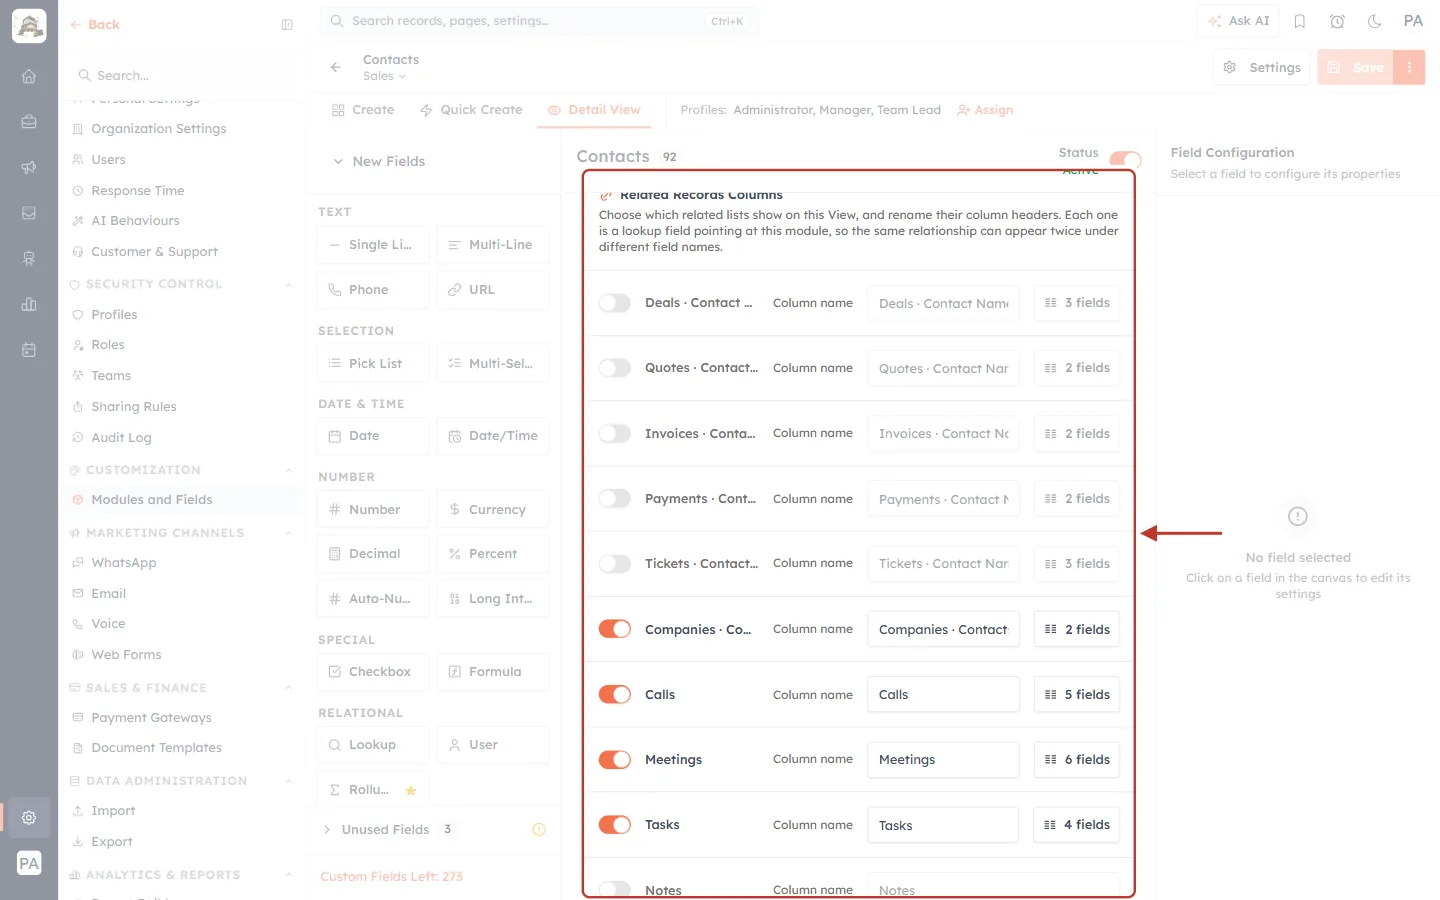
What this screenshot shows. The Related Records Columns panel at the bottom of the Detail View tab, ringed. Each row has an on/off switch, a name box and a fields button.
I can’t tick more than 8 columns for a related list.#
Why it happens: A related list is a short summary card, so it shows at most 8 columns (“A related card can show at most 8 columns.”).
How to fix it:
Untick a column before ticking another.
“+ New Record” in a lookup shows the full form instead of a short one.#
Why it happens: That layout’s Quick Create form is empty, so the CRM falls back to the full Create form.
How to fix it:
Open the layout’s Quick Create tab and add the fields people need. See Quick Create Fields per Layout.
A field isn’t listed in Quick Create’s Available Fields.#
Why it happens: Only fields already on this layout’s Create form are offered (and not ones already on Quick Create or filled in automatically).
How to fix it:
Add the field to the Create form first.
Can an import put records on a specific layout?#
No. The import wizard has no layout setting and a “Layout” column in your file is ignored (it can’t be mapped). Check an imported record’s layout with Change Layout and move it if needed. See Importing Records When a Module Has Several Layouts.
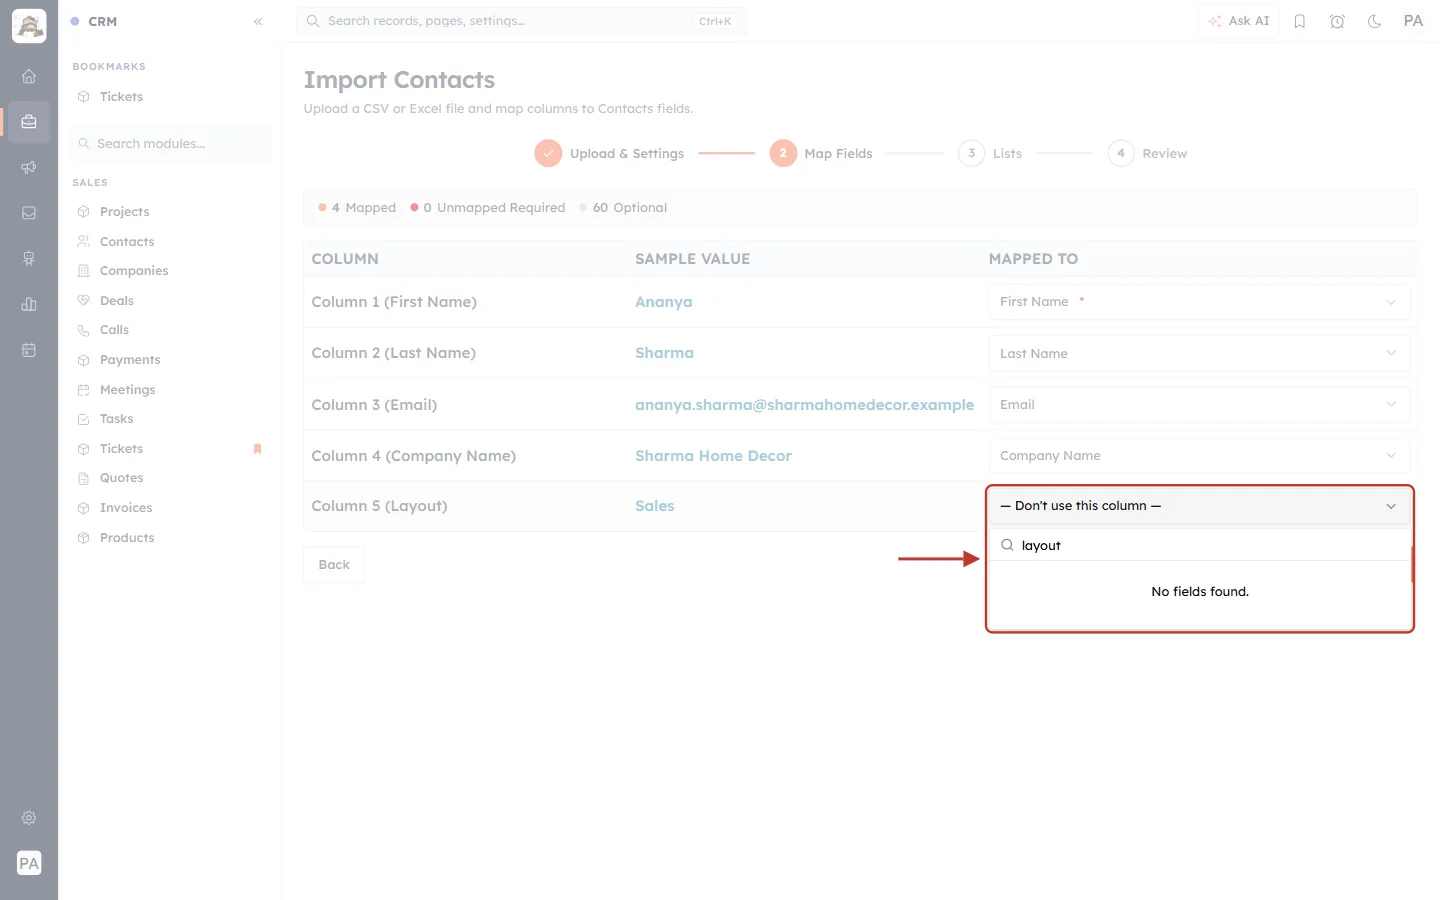
What this screenshot shows. The field list of a Layout column in the import’s Map Fields step, ringed: searching “layout” finds No fields found.
8. Error messages#
Message | What it means | What to do |
|---|---|---|
“Someone else changed this module’s layouts. Reload and try again.” | Another admin saved a layout change while you were editing. | Reload the page, check their change, and make yours again. |
“This layout name already exists. Please choose another name.” | Two layouts in a module can’t share a name. | Pick another name. |
“An inactive layout cannot be made the default. Activate it first.” | Only active layouts can be the default. | Switch the layout on, then click its star. |
“The default layout is always active. Make another layout the default first.” | The default can’t be switched off. | Make another layout the default first. |
“The default layout cannot be deleted” | The default can’t be deleted. | Make another layout the default first. |
“Save or discard your changes before creating a layout” | You clicked Create New Layout in the builder with unsaved changes. | Save or discard, then create the layout. |
“A related card can show at most 8 columns.” | Related lists show up to 8 columns. | Untick a column first. |
“… is not on this layout, so it cannot be required here. Add it to a section first.” | A field must be on the layout to be required there. | Place the field in a section on the Create tab. |
✅
Still stuck? Note the module, the layout name and the exact message, and contact your administrator or our support team.
All layout guides#
Previous and next#
Was this article helpful?
Ready to implement this?
OpenAI Engage and apply what you just learned to your own workspace.
Open AI Engage CRM