Loading…


KnowledgeBase
Import & Export Tickets: Bulk-Import from CSV or Excel, Import Notes and Export Your Tickets (Step-by-Step)
What this article covers#
Moving to AiEngage CRM from another help desk? Logging requests that were collected in a spreadsheet? Or sending ticket data to your finance team? The Tickets module lets you move tickets in and out in bulk:
| Option | What it does | Part |
|---|---|---|
| Import Bulk (CSV, Excel) | Creates (or updates) many tickets at once from a file | 1 and 2 |
| Import Notes (CSV, Excel) | Adds notes to existing tickets from a file | 3 |
| Export Tickets | Downloads your tickets as an Excel or CSV file | 4 |
All three are in the Create Ticket menu at the top right of Sales → Tickets.
Before you begin#
Permission to import or export tickets. Your profile needs the Import and Export rights for the Tickets module — see Control Permissions with Profiles.
Prepare your file (CSV, XLSX or XLS, up to 50 MB). Put one ticket per row and the column names in the first row — for example Subject, Status, Priority, Category, Description.
Use the same values as your CRM for drop-down fields — for example Open, Pending, In Progress, Resolved, Closed for status and Low, Medium, High, Urgent for priority.
The example file used in this article, sample-tickets.csv, contains three tickets:
| Subject | Status | Priority | Category | Contact Email | Description |
|---|---|---|---|---|---|
| Order #6201 arrived late | Open | Medium | General inquiry | emma.clarke@example.com | Parcel arrived 3 days after the promised date. |
| Refund not received for order #6188 | Pending | High | Refund | daniel.brooks@example.com | Refund approved on 28 Sep but not yet received. |
| Cannot reset password | Open | Urgent | Bug report | sophie.turner@example.com | Reset email never arrives. |
Part 1 — Import tickets from a file#
Step 1: Open the Create Ticket menu#
Go to Sales → Tickets and click the small arrow on the orange Create Ticket button.
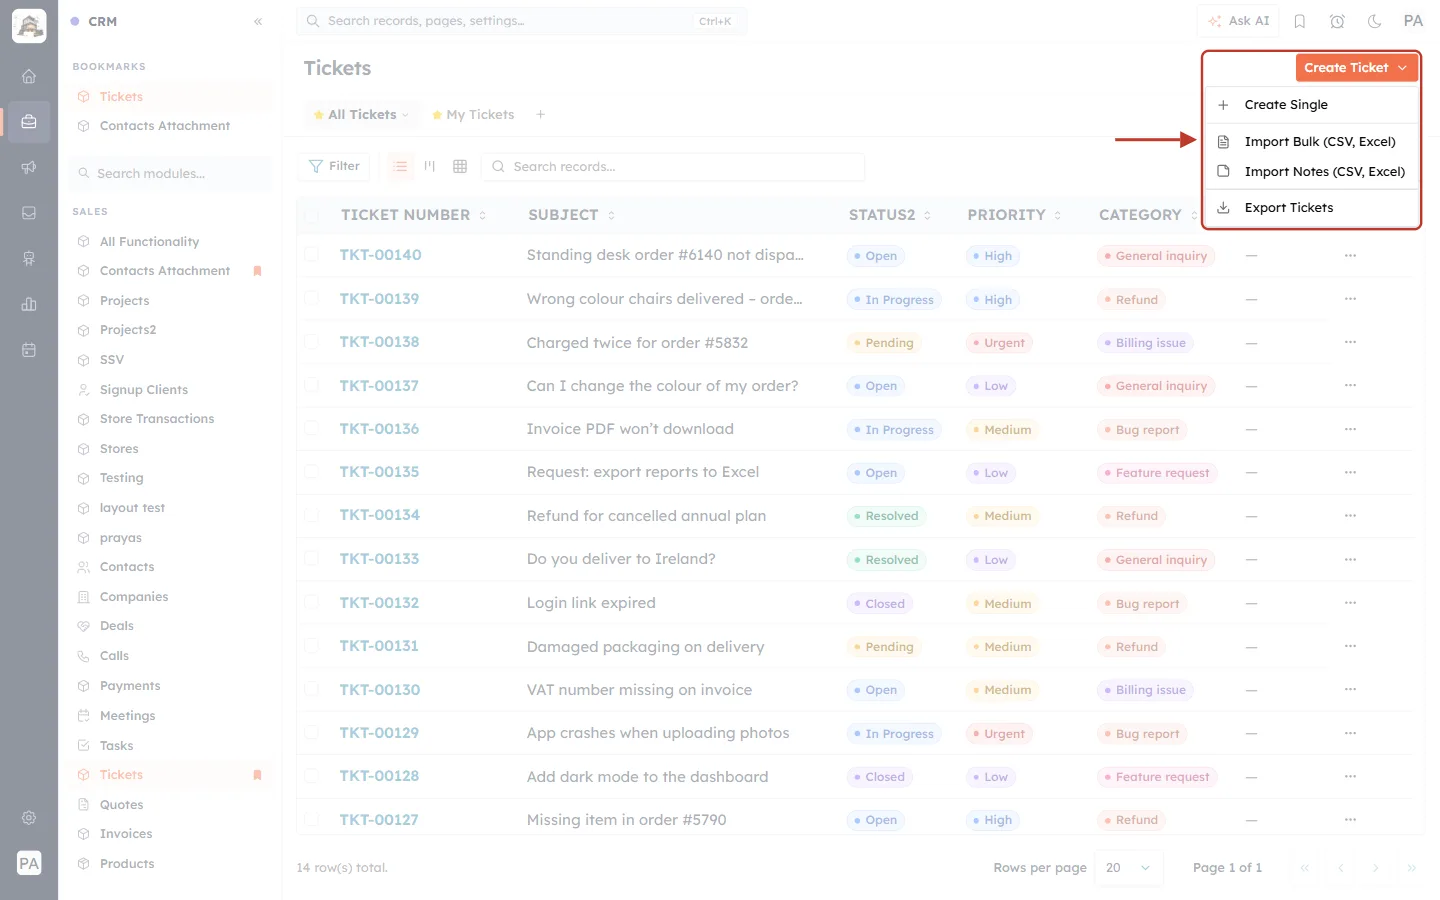
What this screenshot shows. The Create Ticket button and its menu are ringed.
Create Single — the form for one ticket (see Create a Ticket Manually).
Import Bulk (CSV, Excel) — import many tickets from a file. Click it.
Import Notes (CSV, Excel) — add notes to existing tickets (Part 3).
Export Tickets — download your tickets (Part 4).
Step 2: Get to know the import page#
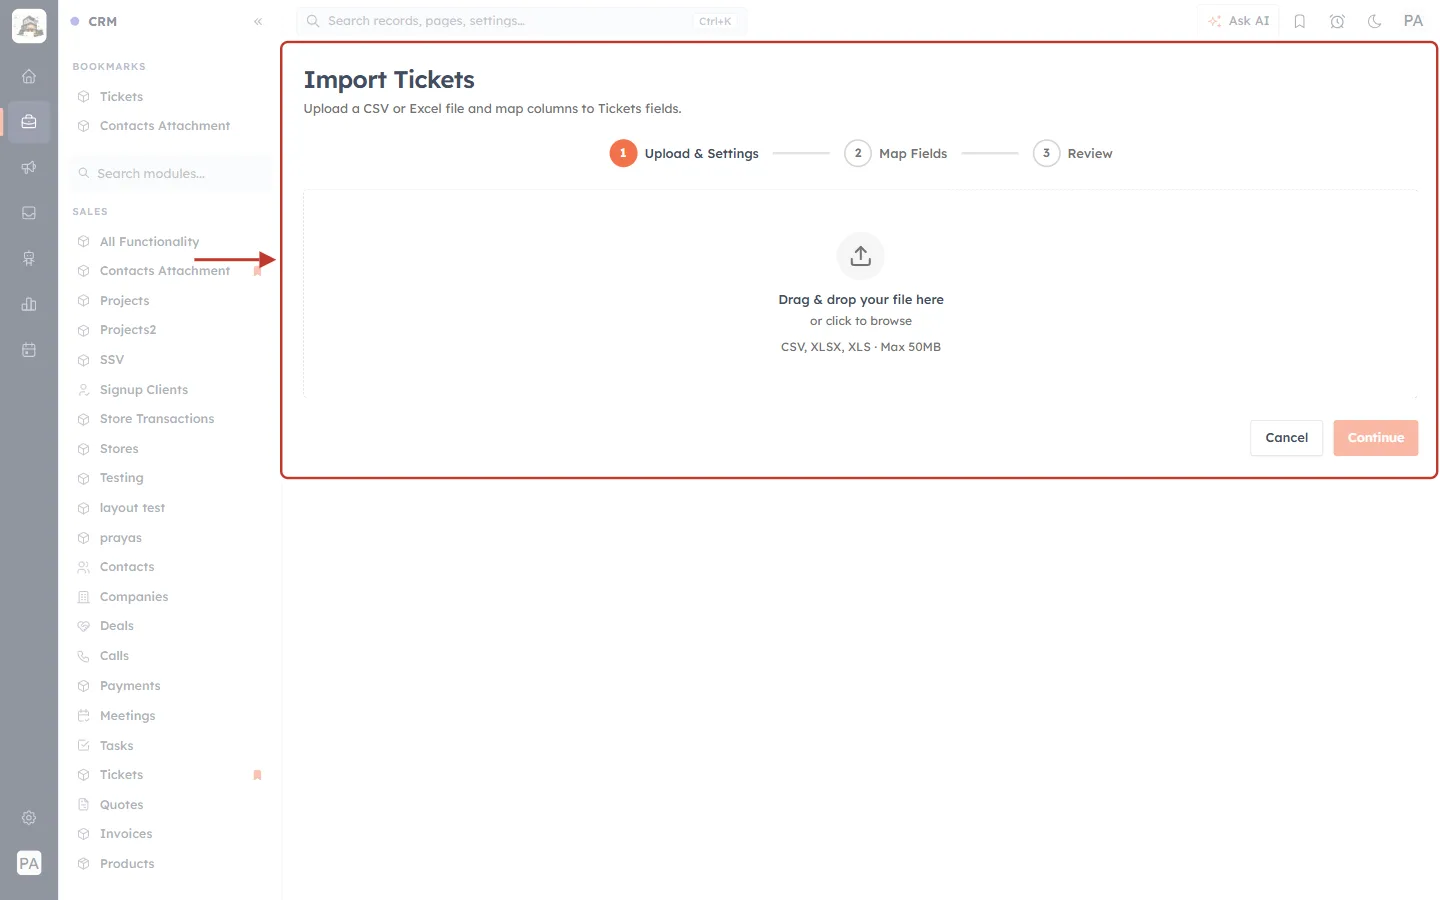
What this screenshot shows. The Import Tickets page is ringed: “Upload a CSV or Excel file and map columns to Tickets fields.”
The three steps across the top (next figure).
A drop zone: Drag & drop your file here or click to browse — CSV, XLSX, XLS · Max 50MB.
Cancel and Continue at the bottom right.
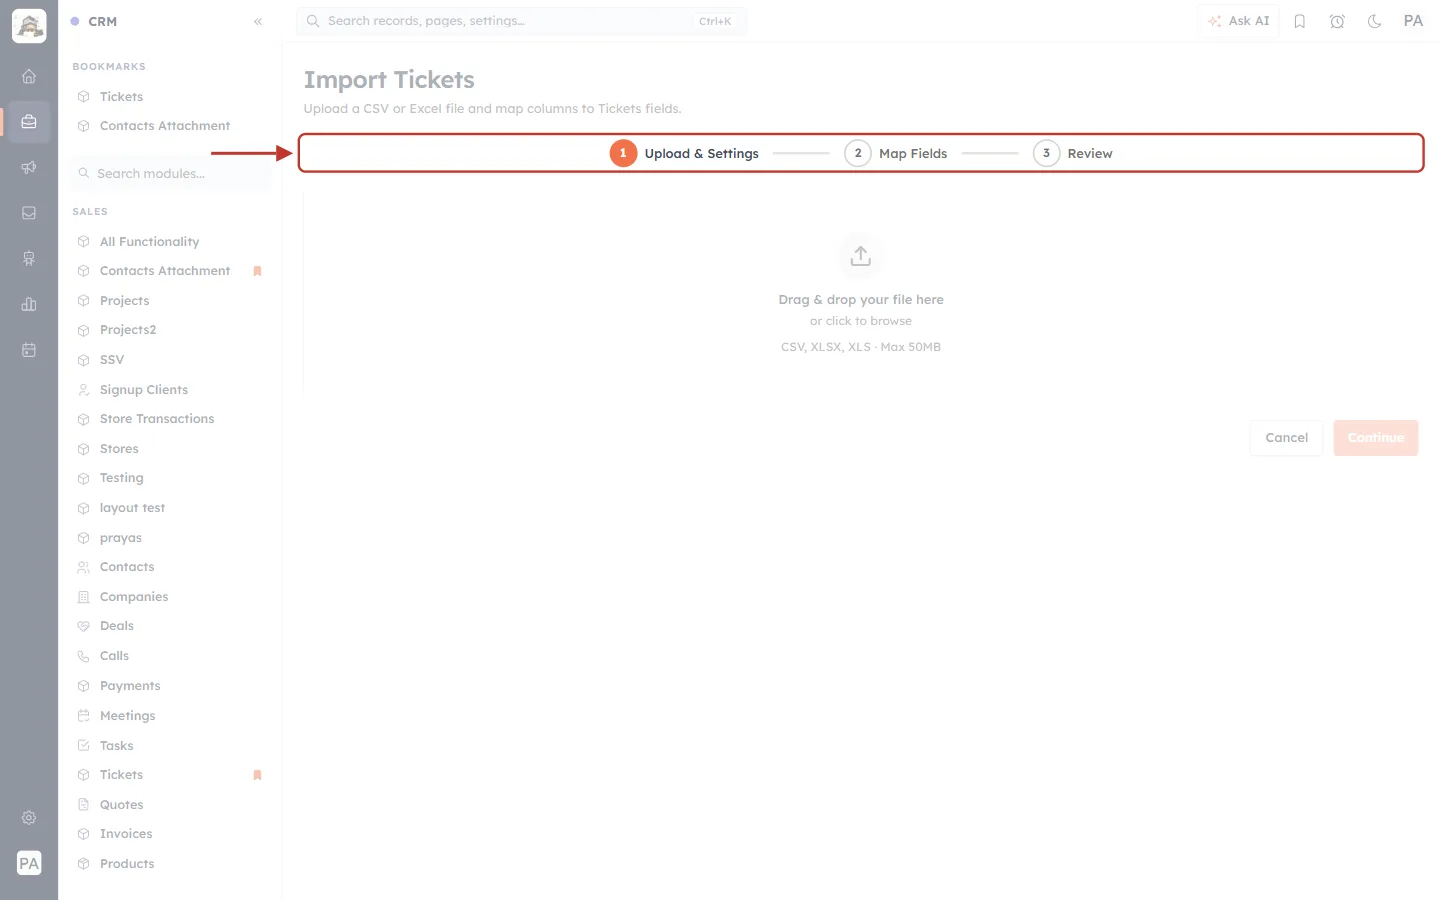
What this screenshot shows. The step bar is ringed.
1 Upload & Settings — choose the file and how to import it.
2 Map Fields — match the file’s columns to ticket fields.
3 Review — check everything, then start the import.
Finished steps get an orange tick, so you always know where you are.
Step 3: Upload your file#
Drag your file onto the drop zone, or click it and choose the file.
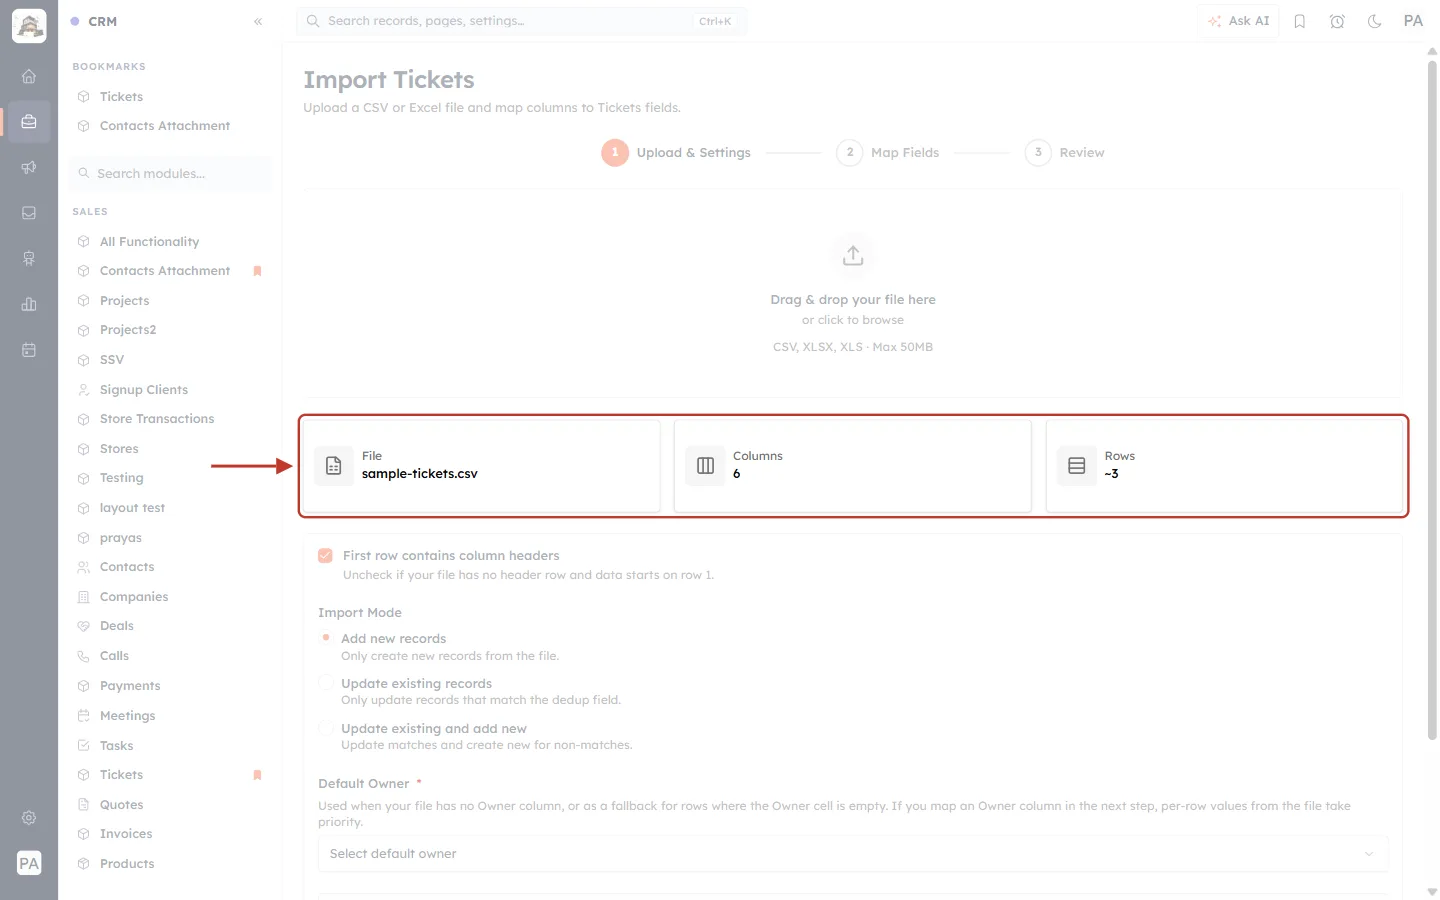
What this screenshot shows. The summary of the uploaded file is ringed.
File — sample-tickets.csv.
Columns — 6 (Subject, Status, Priority, Category, Contact Email, Description).
Rows — ~3, the approximate number of tickets in the file.
If the numbers look wrong, check that you chose the right file.
Step 4: Choose the import settings#
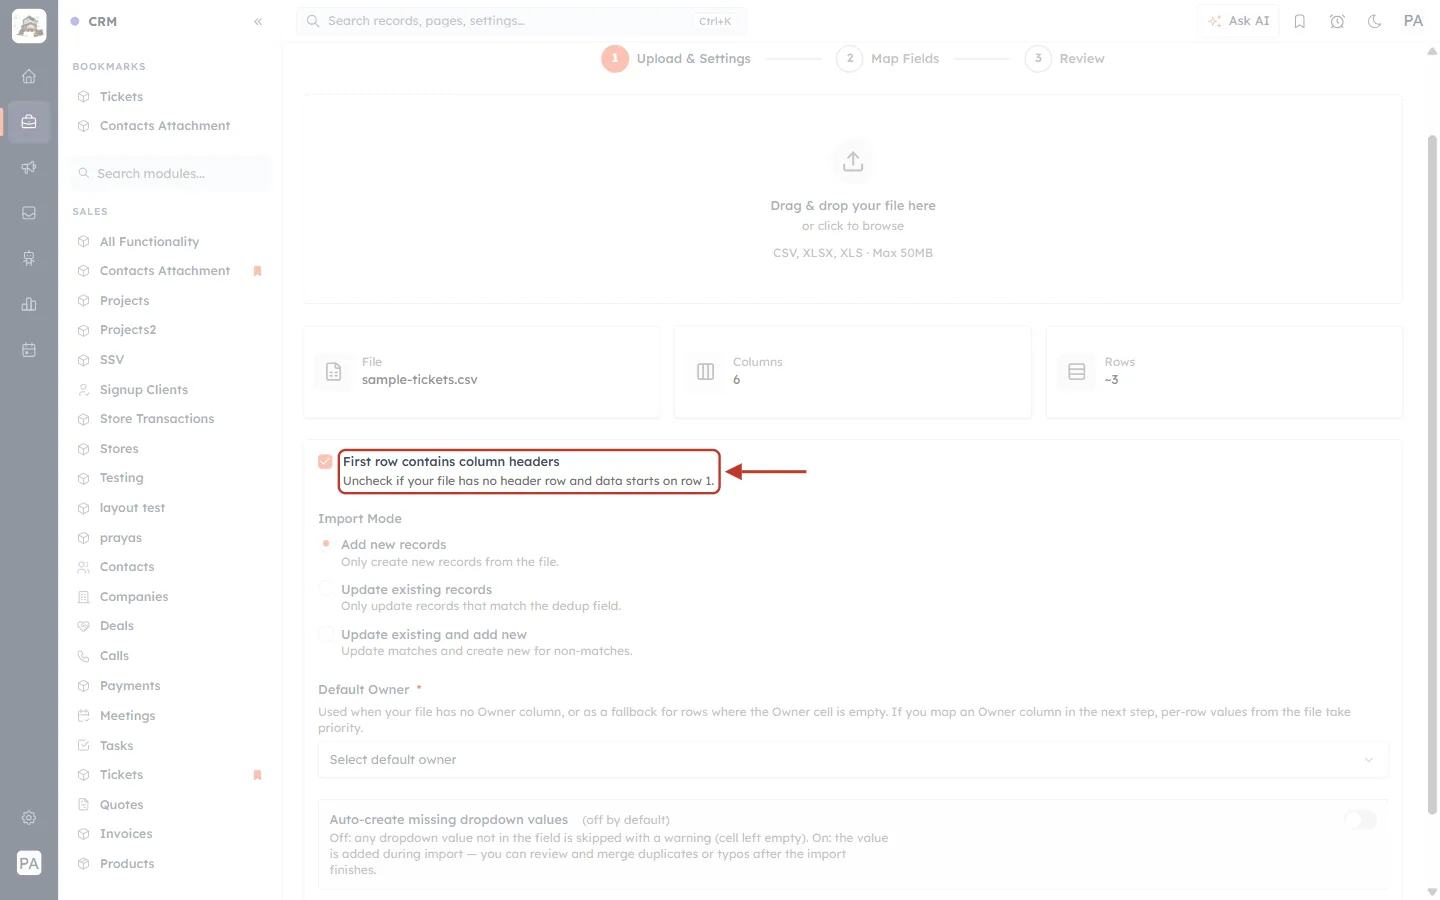
What this screenshot shows. The First row contains column headers tick box is ringed. It is ticked.
Leave it ticked when the first row of your file holds column names (as in our example).
“Uncheck if your file has no header row and data starts on row 1.”
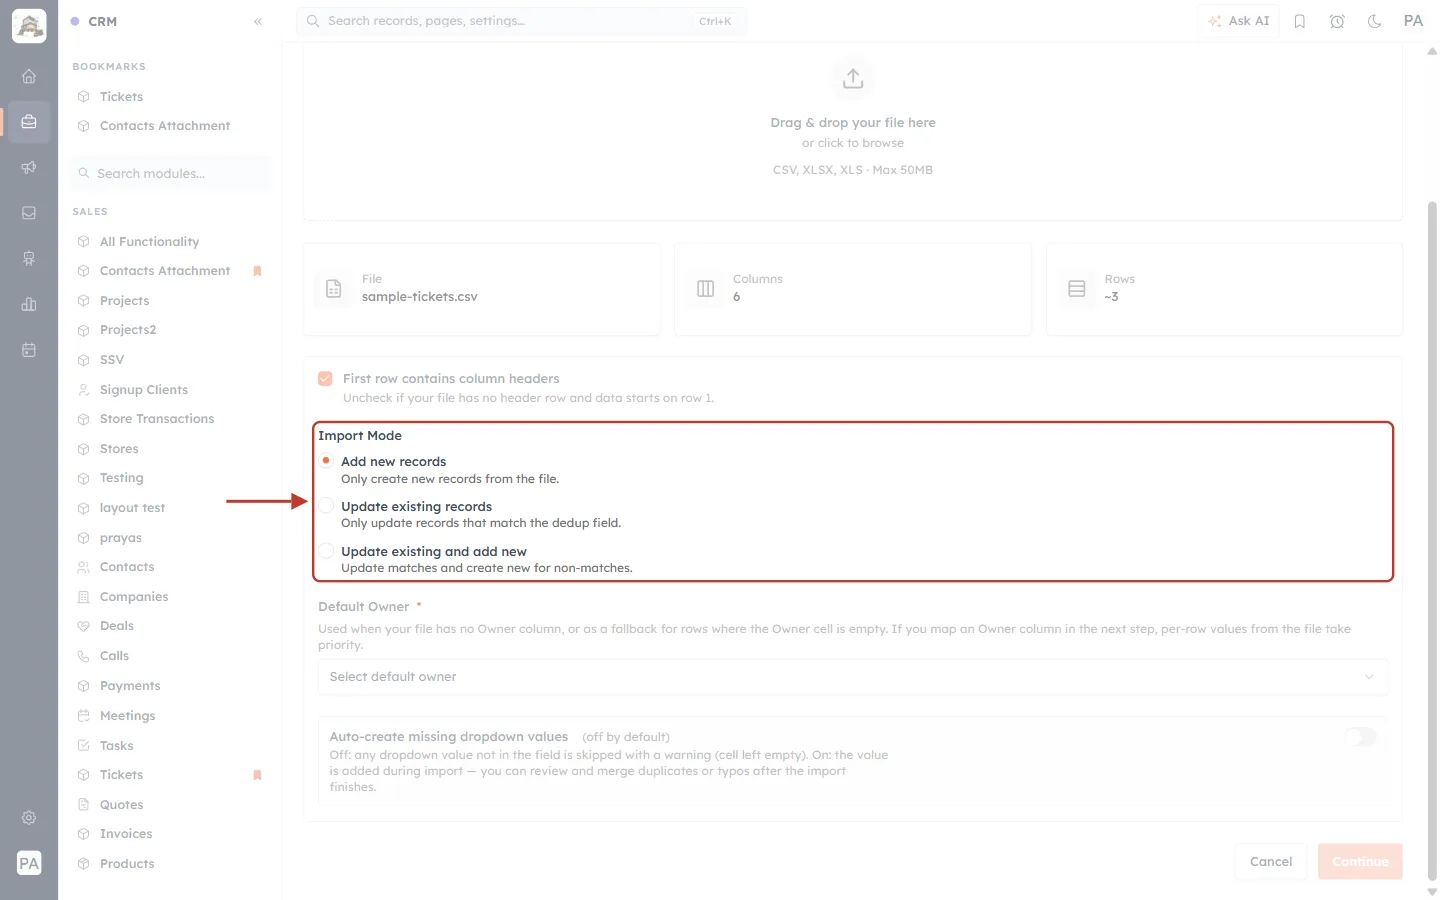
What this screenshot shows. Import Mode is ringed.
Add new records (selected) — “Only create new records from the file.” Use this for new tickets.
Update existing records — “Only update records that match the dedup field.” Use this to correct tickets that are already in the CRM.
Update existing and add new — “Update matches and create new for non-matches.”
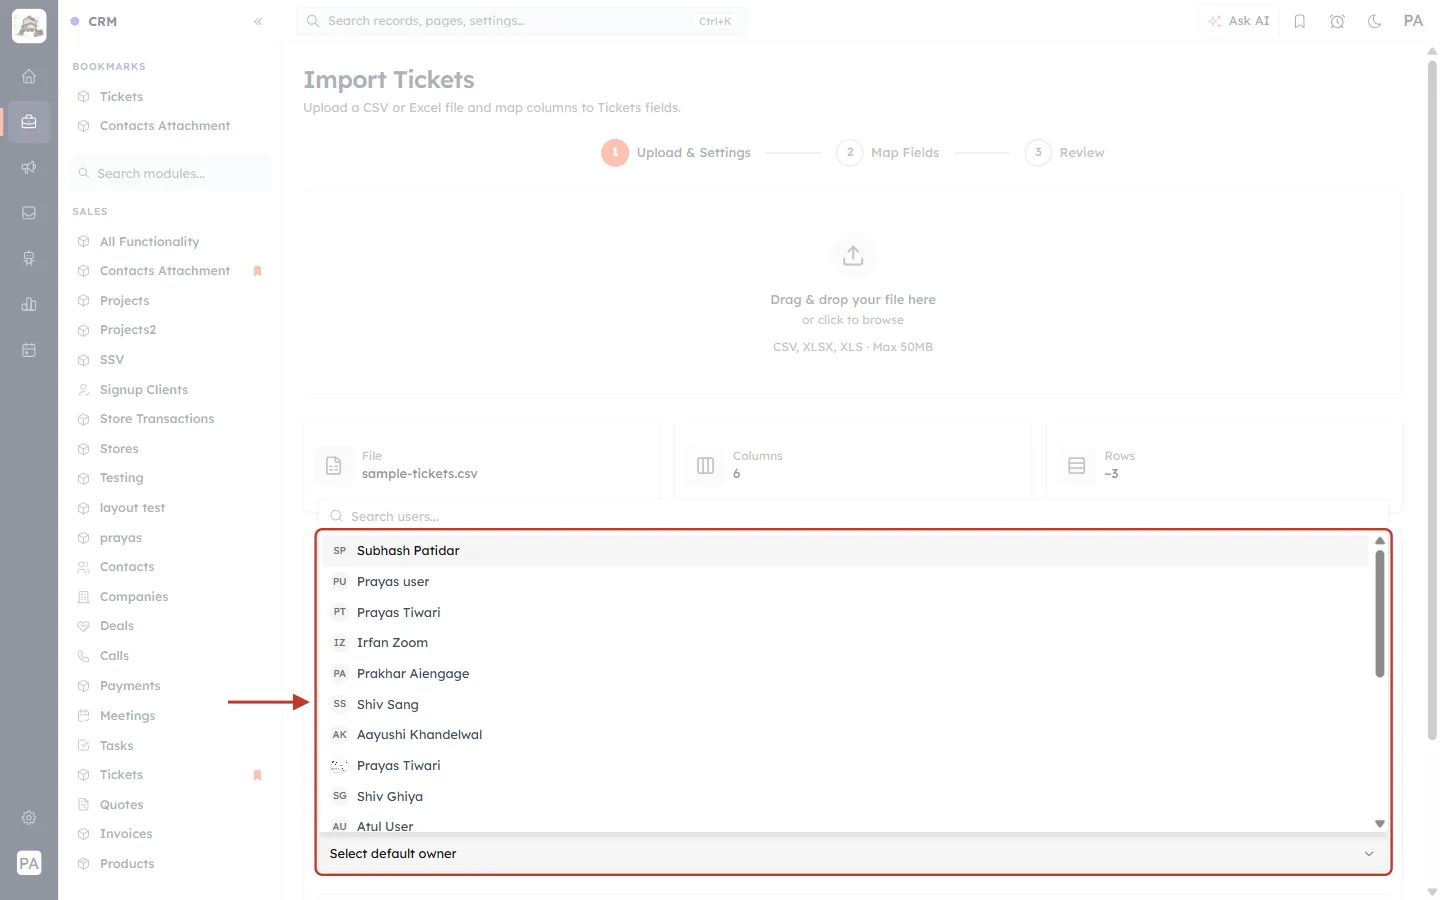
What this screenshot shows. The Default Owner * field and its list of users are ringed.
Required. “Used when your file has no Owner column, or as a fallback for rows where the Owner cell is empty. If you map an Owner column in the next step, per-row values from the file take priority.”
Pick a user from the list (or type in Search users…). In this example: Prakhar Aiengage.
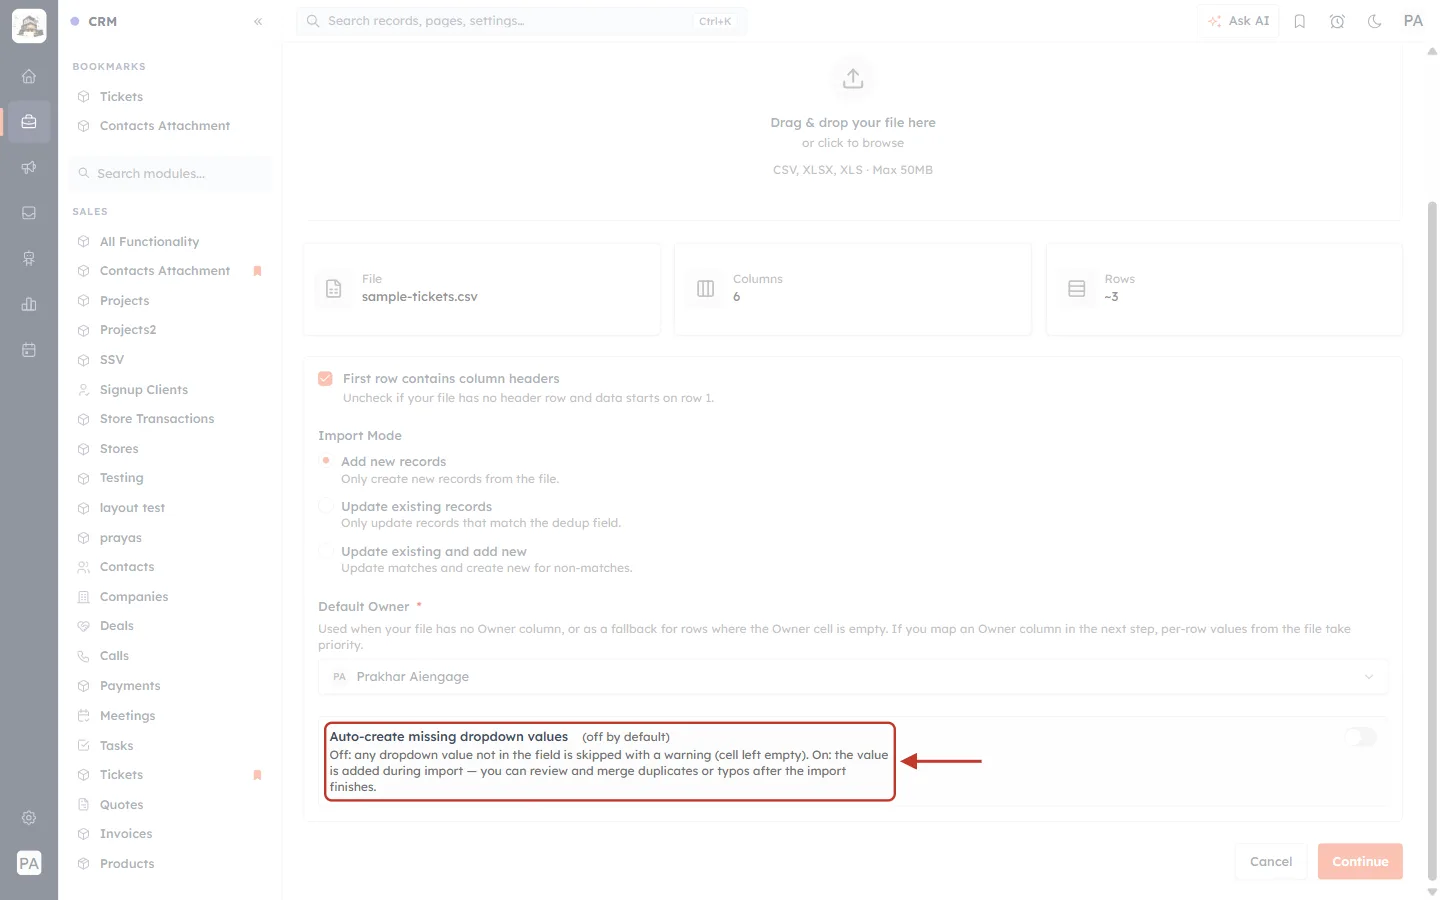
What this screenshot shows. The Auto-create missing dropdown values option is ringed. It is off by default.
Off: “any dropdown value not in the field is skipped with a warning (cell left empty).”
On: “the value is added during import — you can review and merge duplicates or typos after the import finishes.”
Leave it off unless you deliberately want new categories or statuses — it stops typos (like Refnd) becoming new options.
Click Continue.
Step 5: Map the columns to ticket fields#
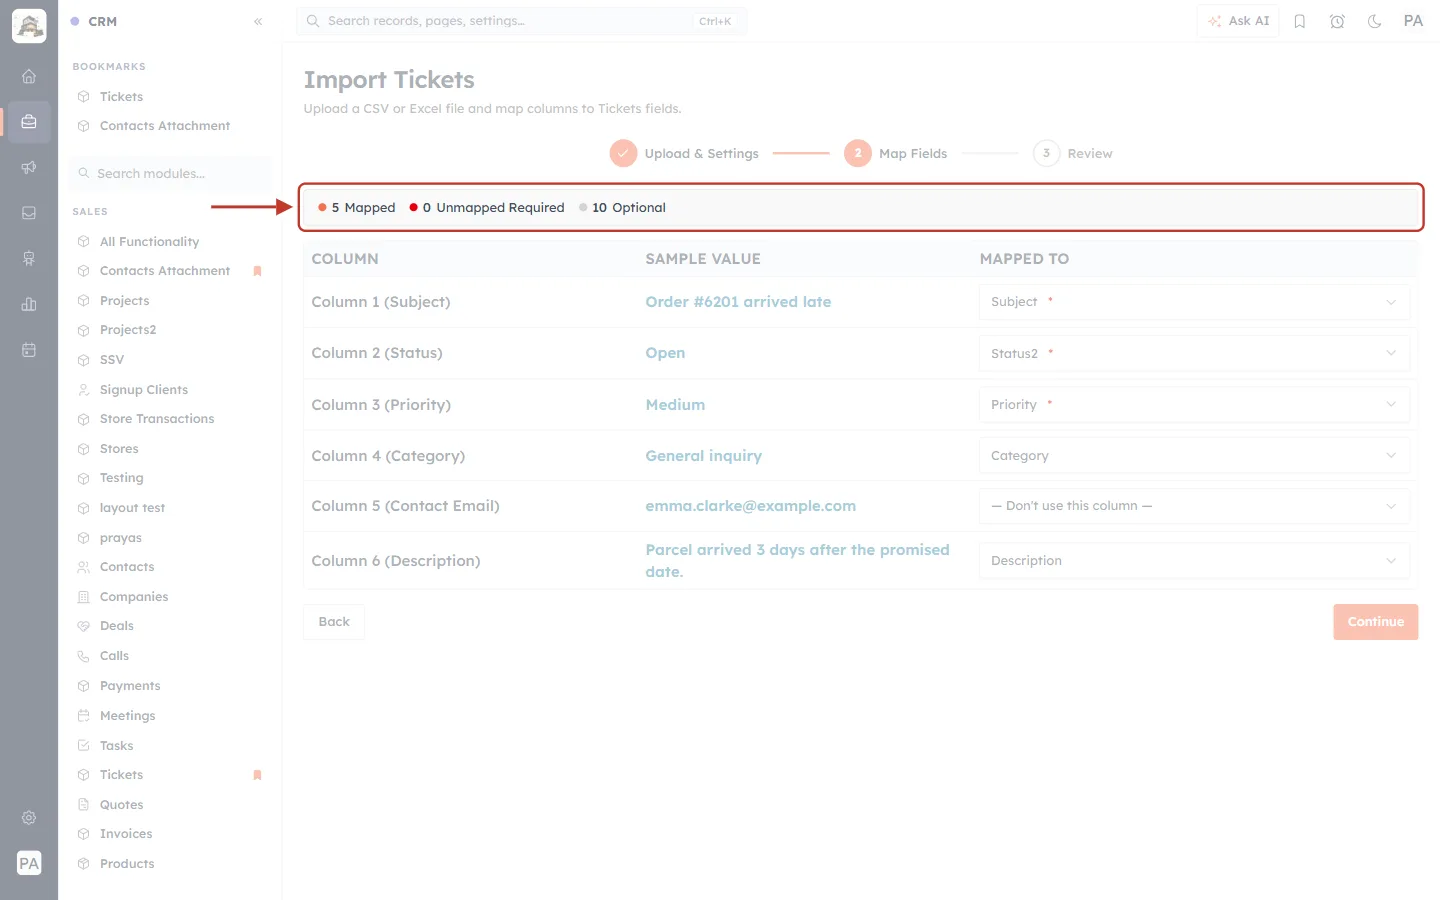
What this screenshot shows. The mapping summary at the top of Map Fields is ringed.
5 Mapped — columns already matched to a ticket field.
0 Unmapped Required — required fields still without a column. This must be 0 to continue.
10 Optional — other ticket fields you could fill from the file.
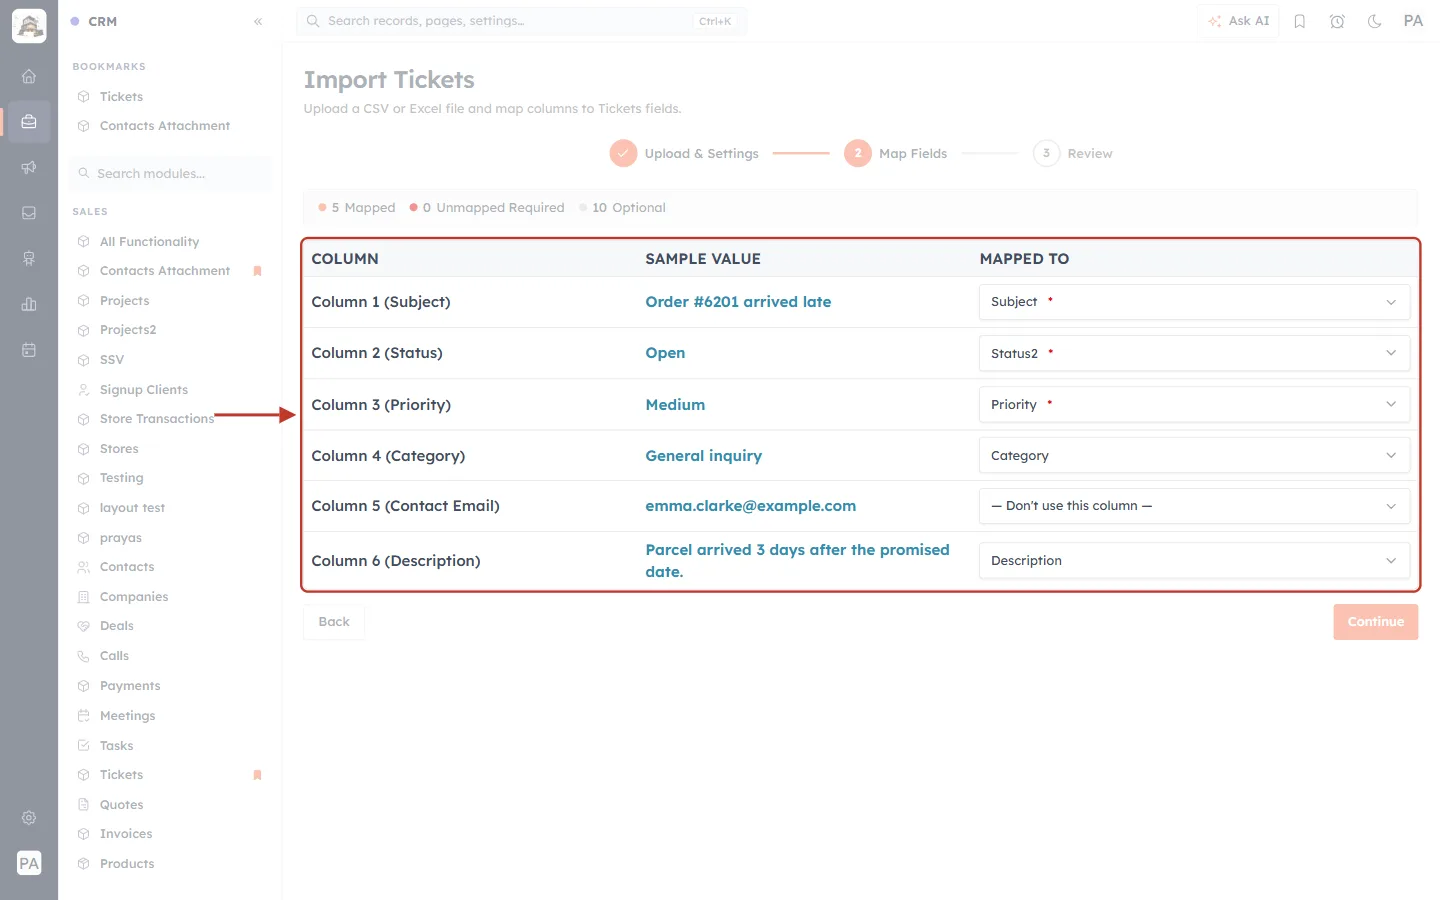
What this screenshot shows. The mapping table is ringed.
COLUMN — each column of your file (Column 1 (Subject) …).
SAMPLE VALUE — the value from the first row, to help you check the match (Order #6201 arrived late).
MAPPED TO — the ticket field the column fills. Columns with matching names are mapped automatically: Subject → Subject *, Status → Status2 *, Priority → Priority *, Category → Category, Description → Description.
Contact Email has no matching field, so it shows — Don’t use this column — and is ignored.
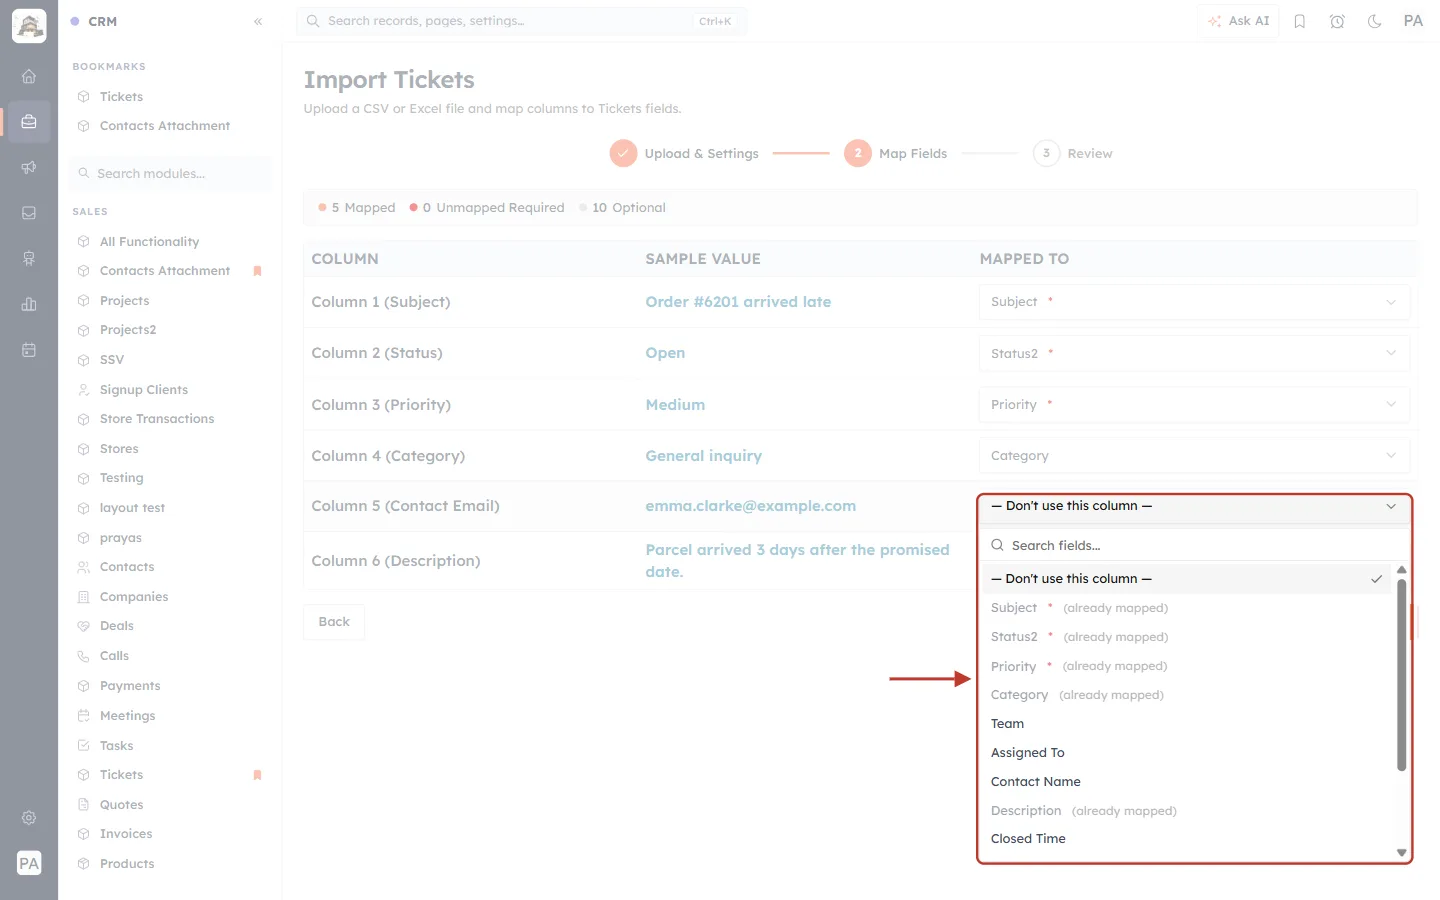
What this screenshot shows. The field list for the Contact Email column is open and ringed.
Click any MAPPED TO box to change the field.
The list shows every ticket field. Fields already used are marked (already mapped); required fields have a *.
Choose — Don’t use this column — to skip a column.
Click Continue.
Step 6: Review and start the import#
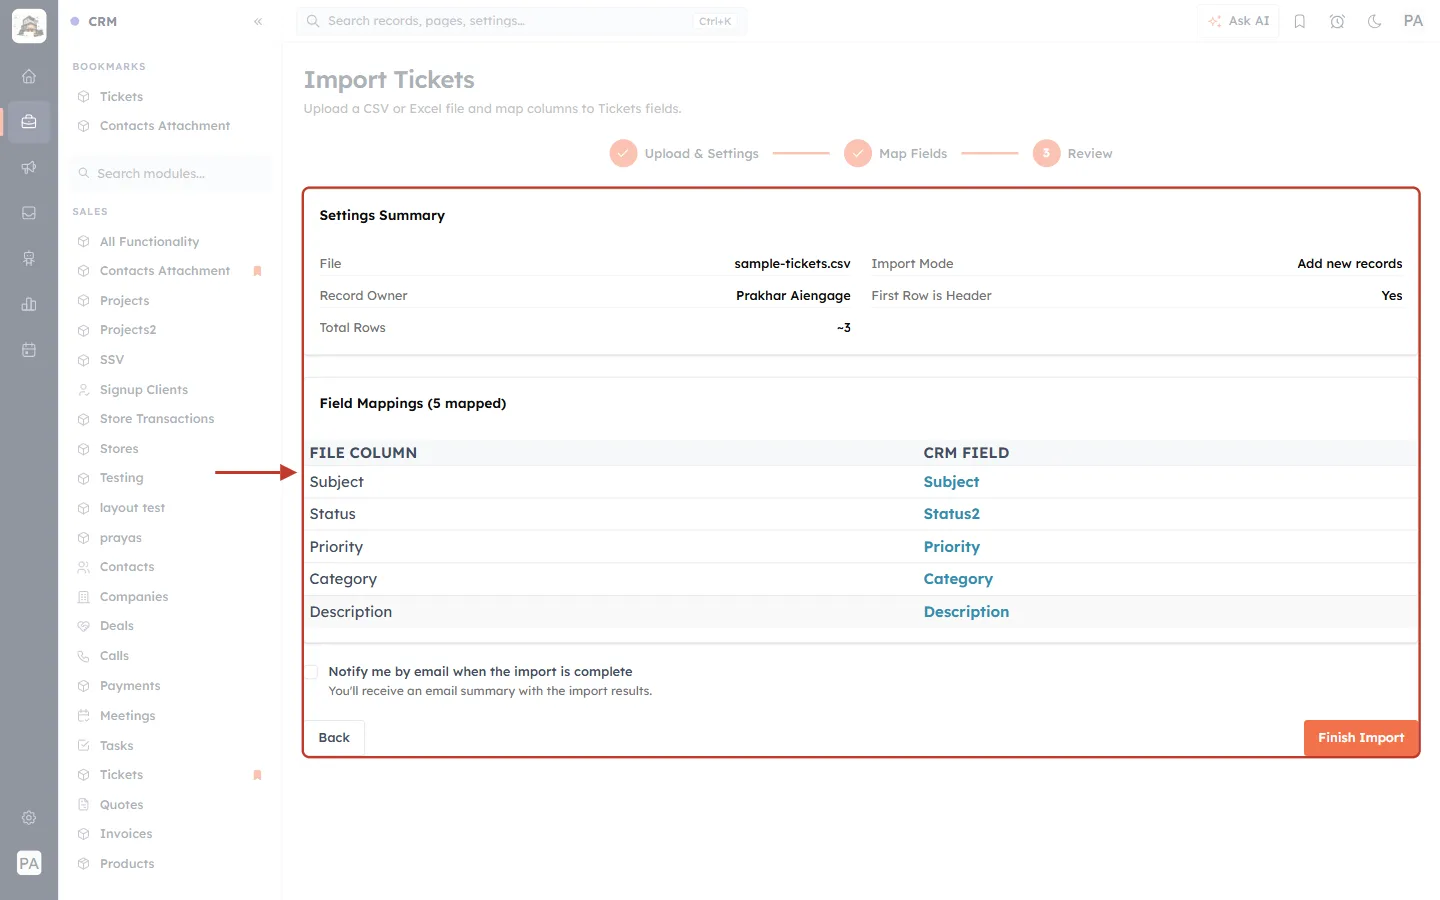
What this screenshot shows. The Review step is ringed.
Settings Summary — File sample-tickets.csv, Import Mode Add new records, Record Owner Prakhar Aiengage, First Row is Header Yes, Total Rows ~3.
Field Mappings (5 mapped) — each FILE COLUMN and the CRM FIELD it fills.
Click Back to change anything.
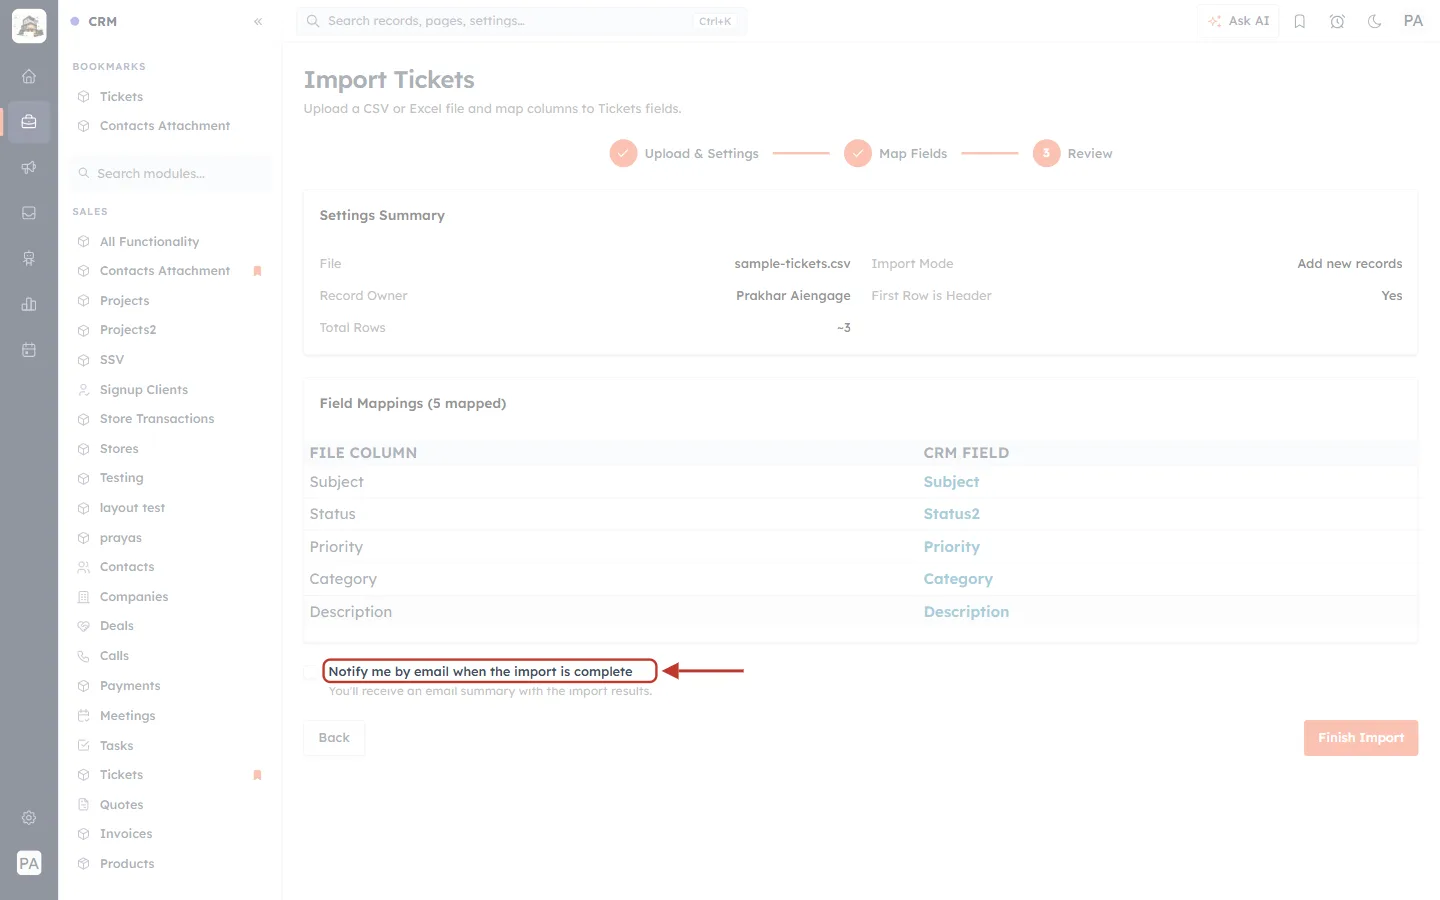
What this screenshot shows. The Notify me by email when the import is complete option is ringed.
Tick it to get “an email summary with the import results” — useful for large files.
It is unticked by default.
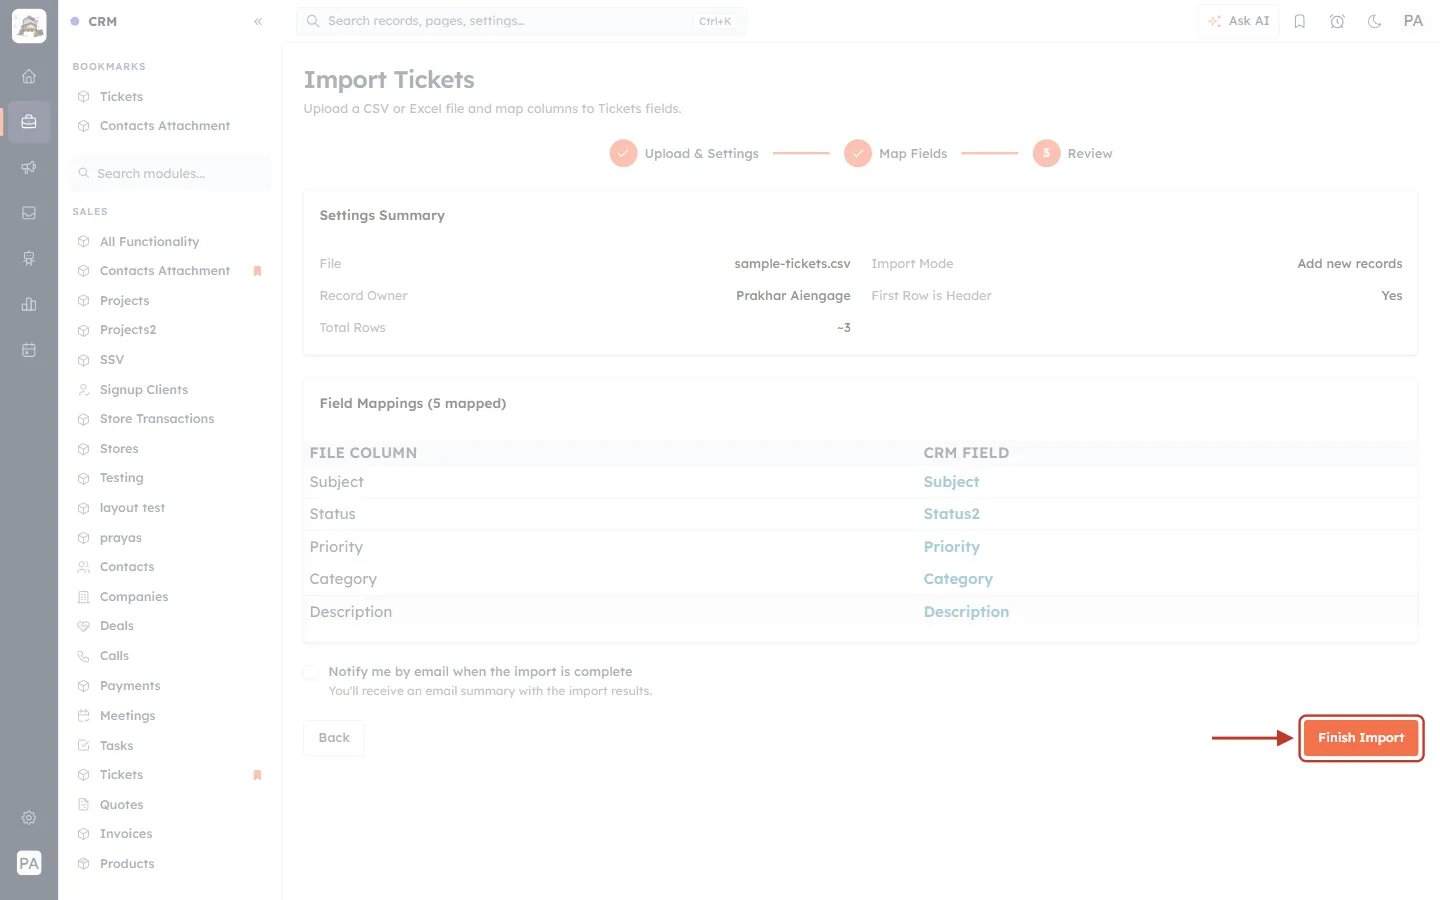
What this screenshot shows. The orange Finish Import button is ringed.
Click it to start the import.
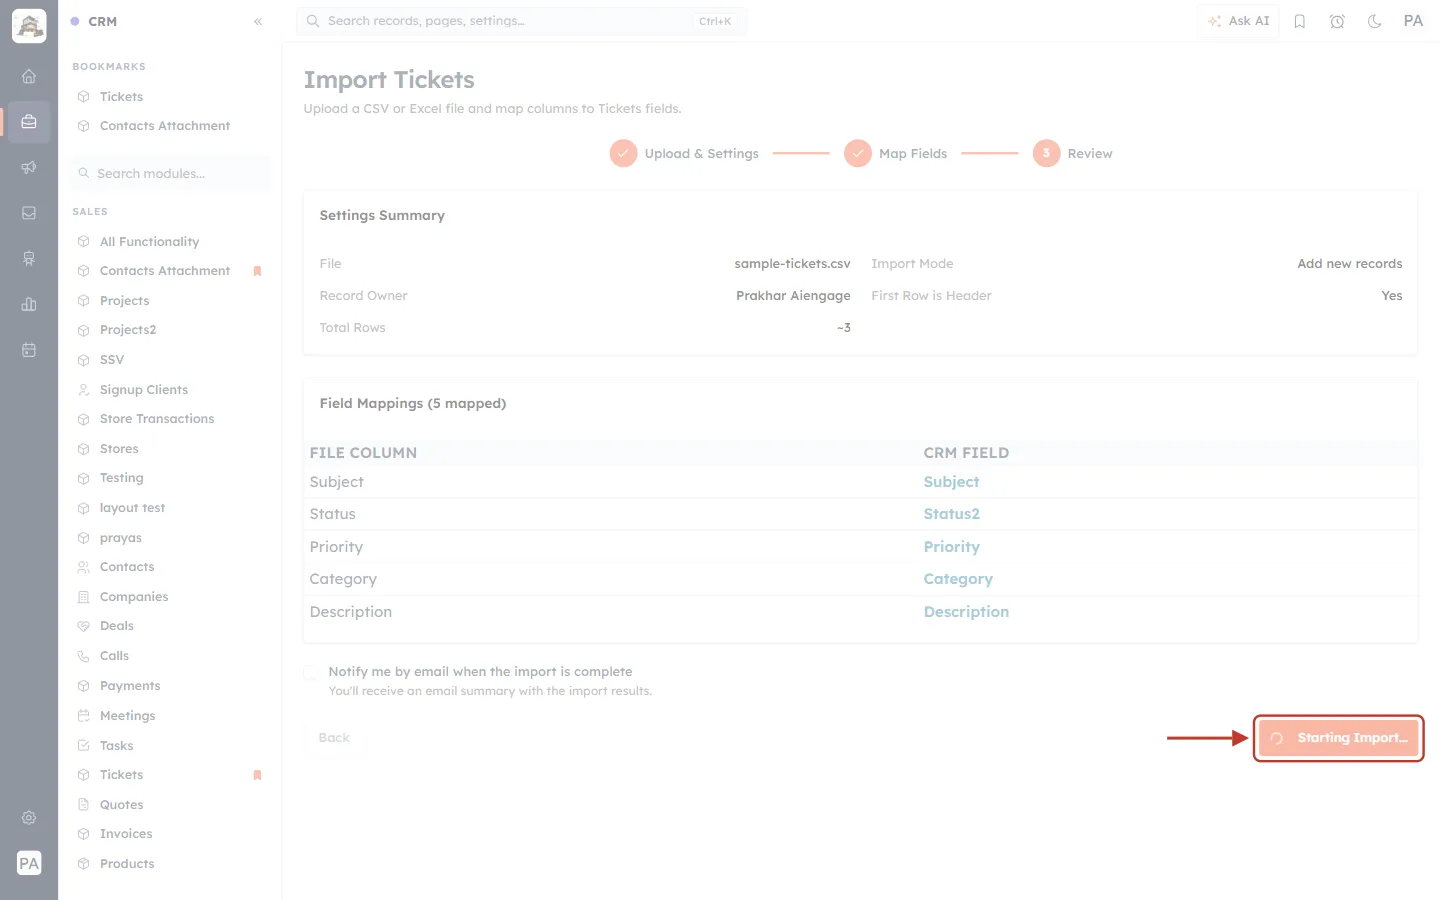
What this screenshot shows. The button now reads Starting Import… (ringed).
A message confirms “Import started! You can track progress from any page.”, and an Importing Tickets… card shows progress at the bottom right while you carry on working.
⚠️
Imported tickets are real tickets. Try a file with two or three rows first, check the result, then import the rest.
Part 2 — Check the import results#
Step 7: Open the import details#
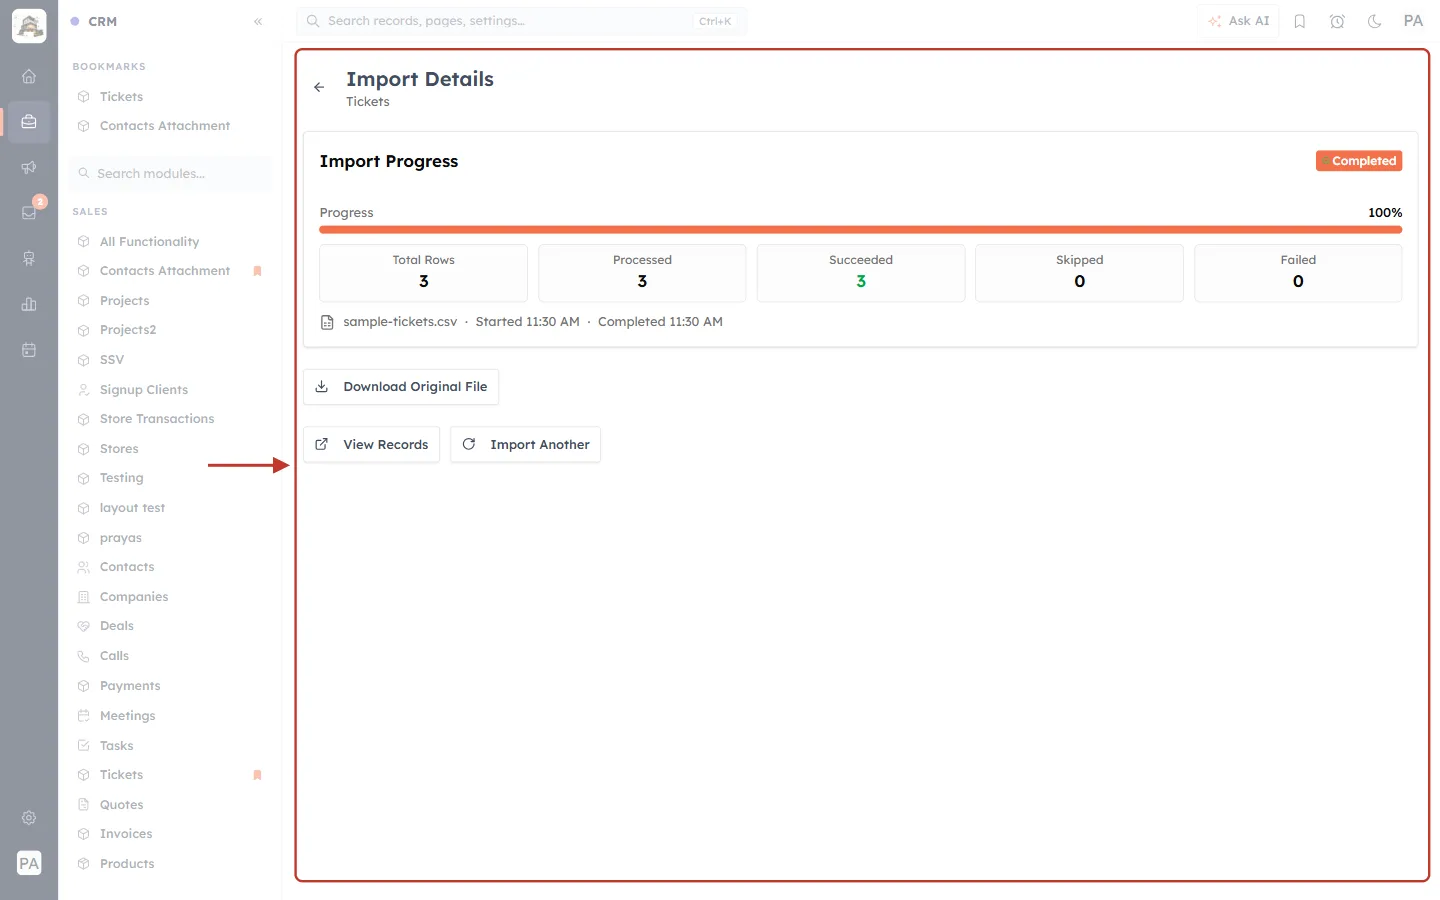
What this screenshot shows. The Import Details page is ringed.
Import Progress — Completed, with the progress bar at 100%.
Five counters: Total Rows 3, Processed 3, Succeeded 3 (green), Skipped 0 and Failed 0.
The file name and when the import started and finished (Started 11:30 AM · Completed 11:30 AM).
Download Original File — get back the file you imported.
View Records — see the imported tickets. Import Another — start a new import.
The ← arrow next to the title opens the list of all past imports (next step).
Step 8: See all past imports#
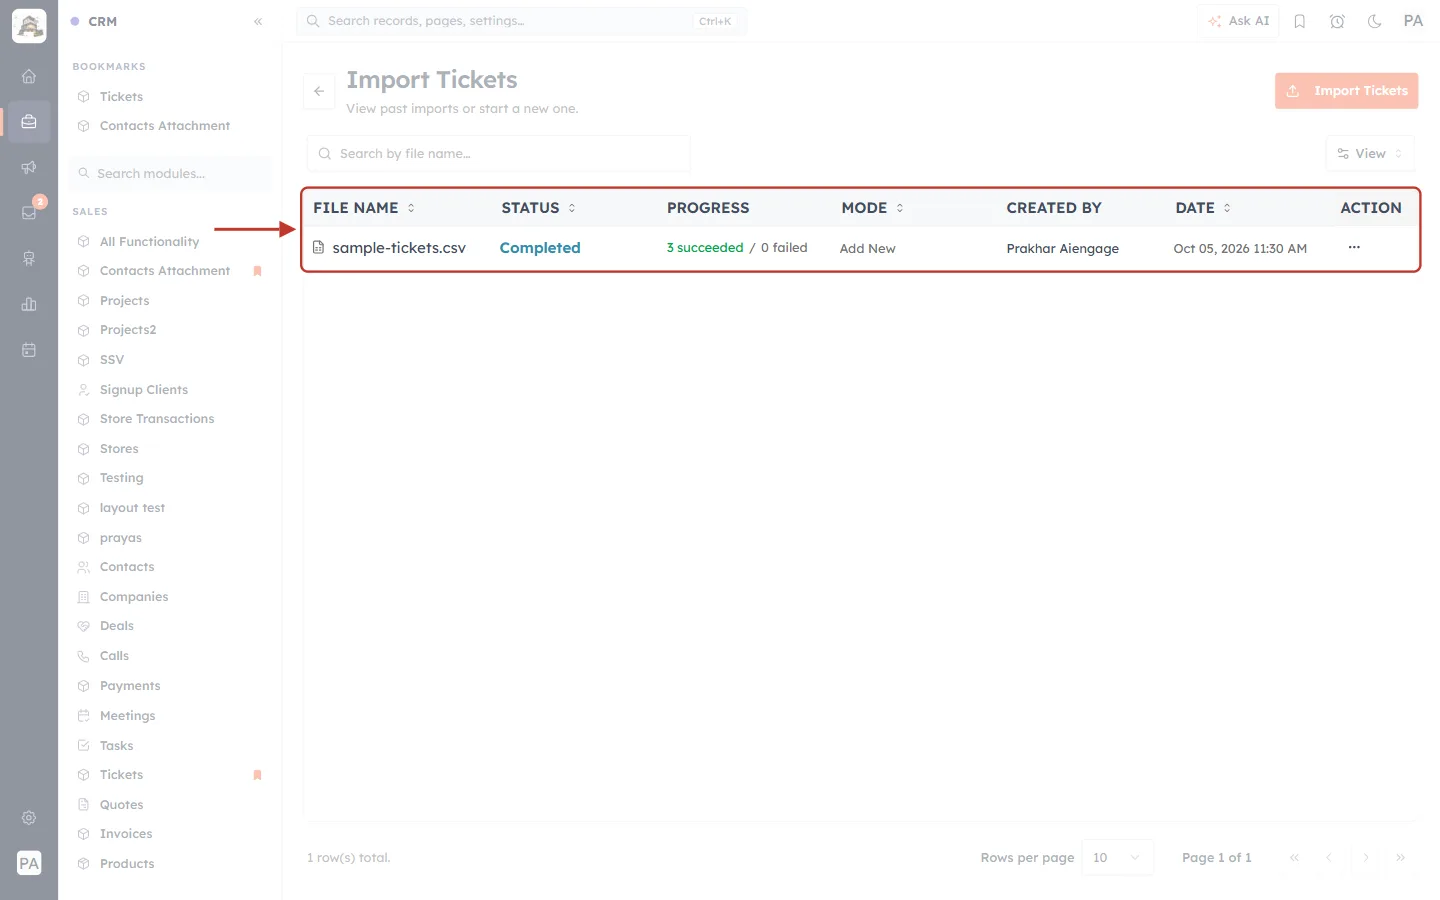
What this screenshot shows. The Import Tickets history list is ringed: “View past imports or start a new one.”
Columns: FILE NAME, STATUS, PROGRESS, MODE, CREATED BY, DATE and ACTION.
The newest import is at the top.
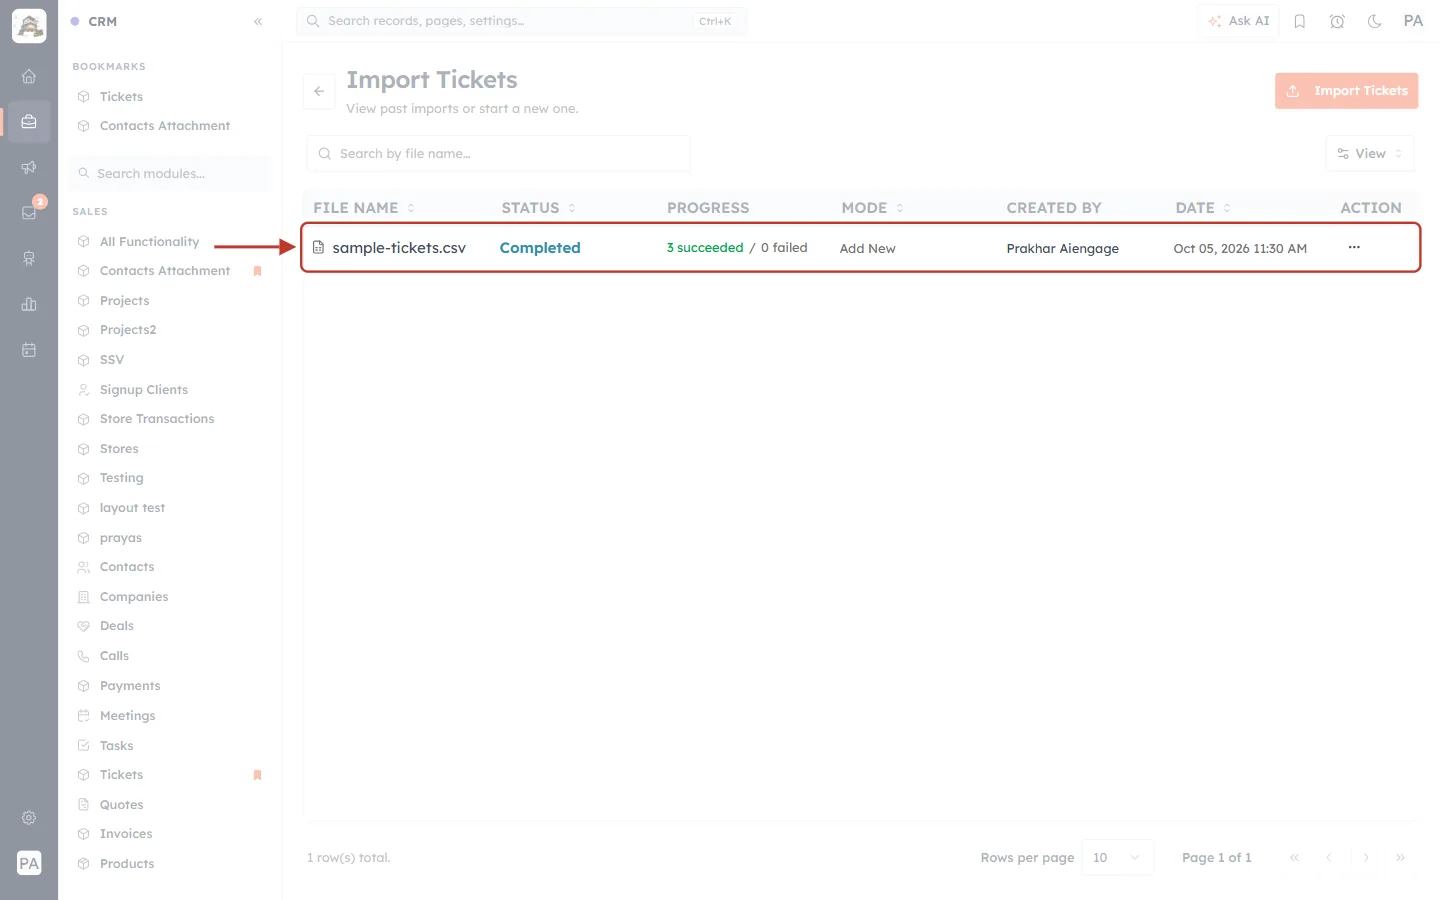
What this screenshot shows. One import is ringed.
sample-tickets.csv — Completed — 3 succeeded / 0 failed — Add New — created by Prakhar Aiengage on Oct 05, 2026 11:30 AM.
If rows failed, the failed count is shown here too — open the details to investigate.
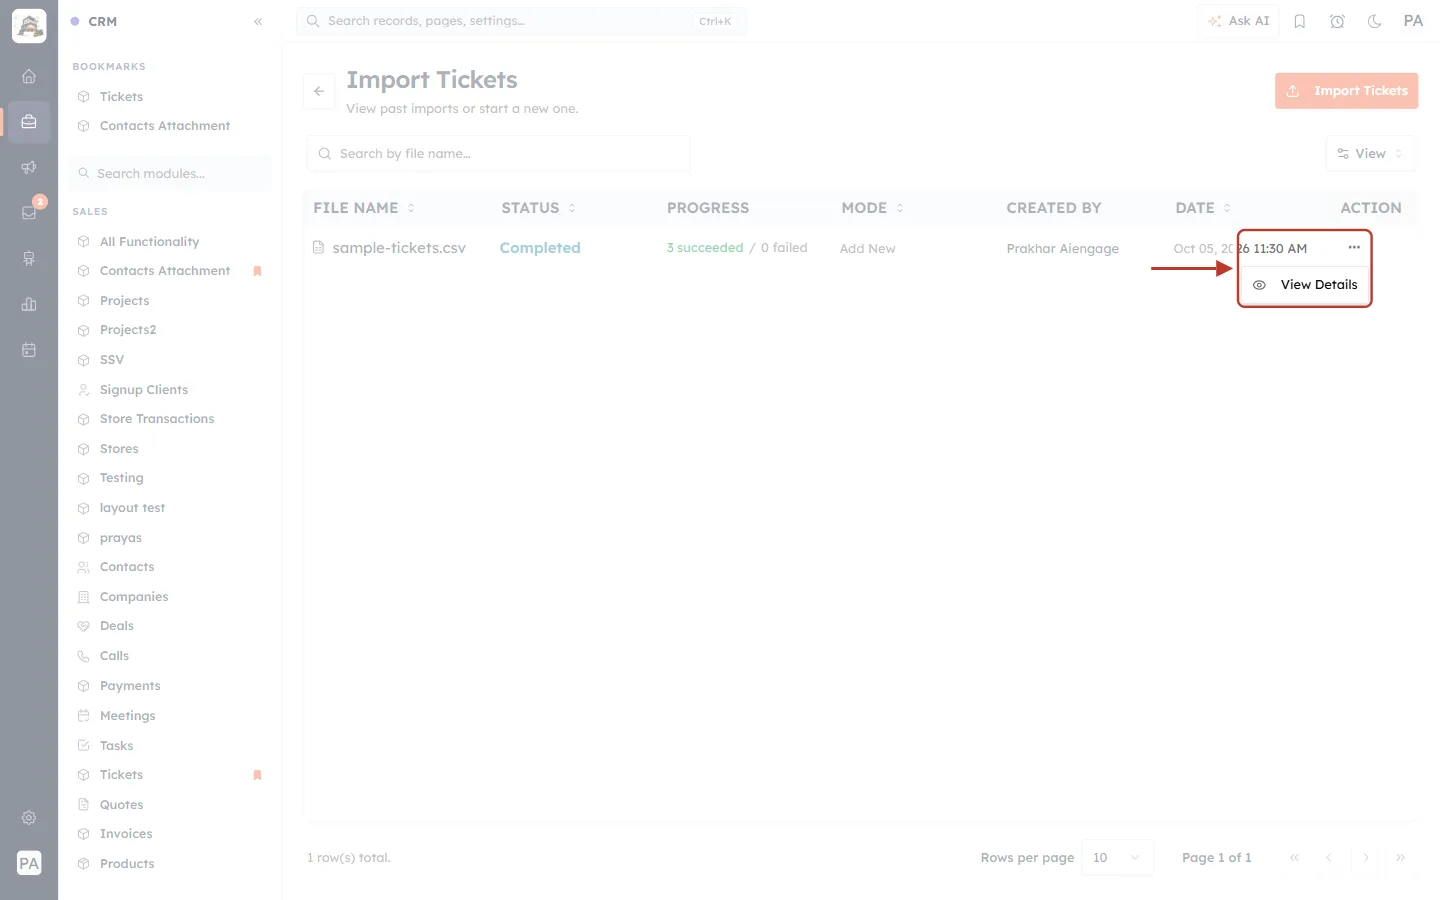
What this screenshot shows. The ⋯ button of the import and its menu are ringed.
View Details — opens the Import Details page (Step 7).
Part 3 — Import notes onto existing tickets#
Use Import Notes to attach notes to tickets that are already in the CRM — for example the comment history from your old help desk. Each row in your file becomes one note, attached to the ticket it names.
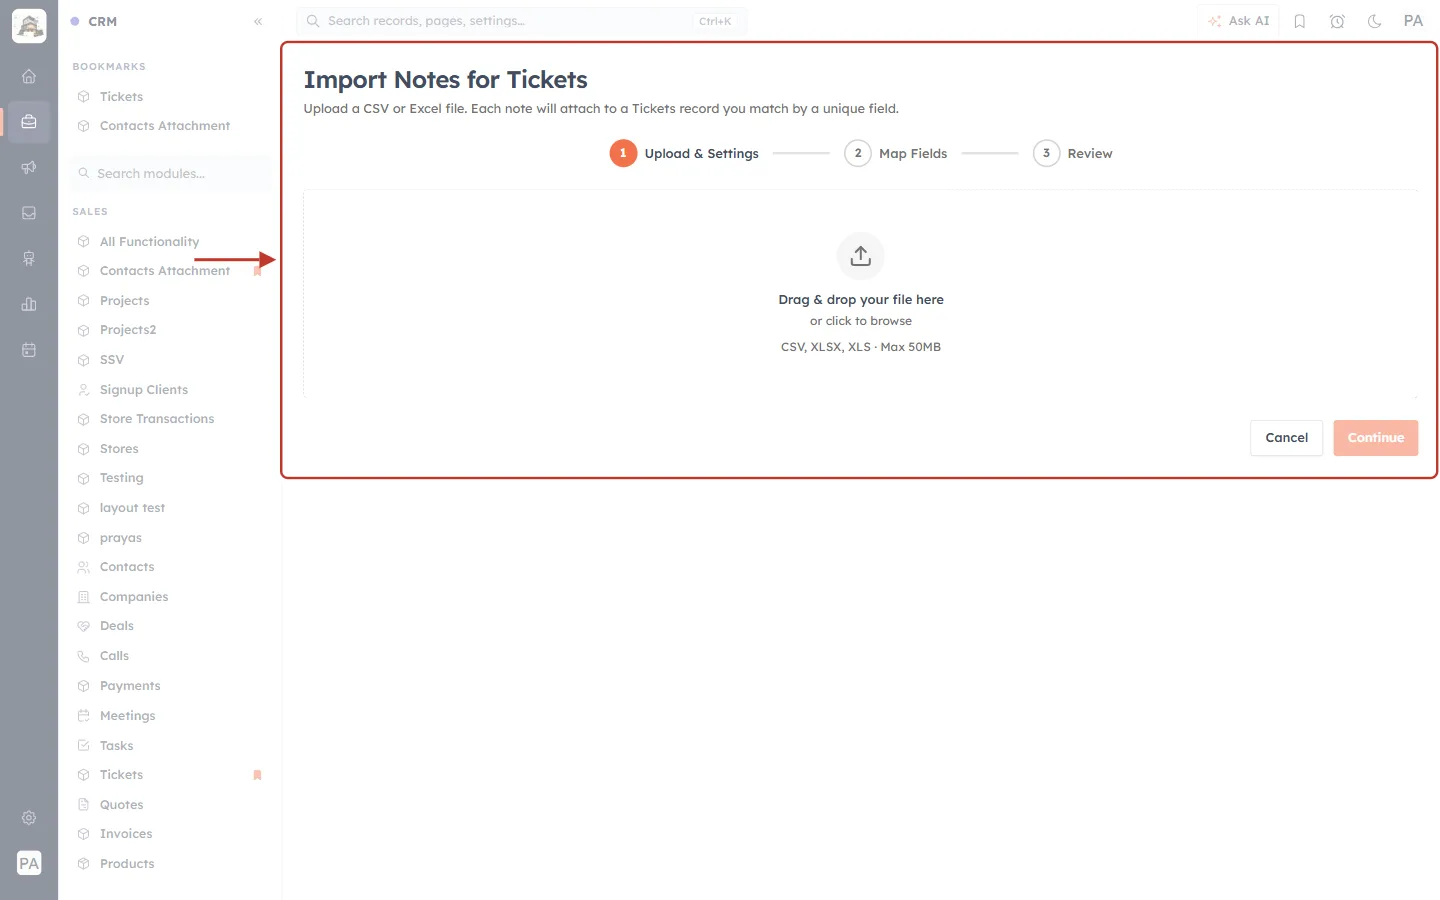
What this screenshot shows. The Import Notes for Tickets page is ringed: “Upload a CSV or Excel file. Each note will attach to a Tickets record you match by a unique field.”
The same three steps (Upload & Settings → Map Fields → Review) and the same drop zone as for tickets.
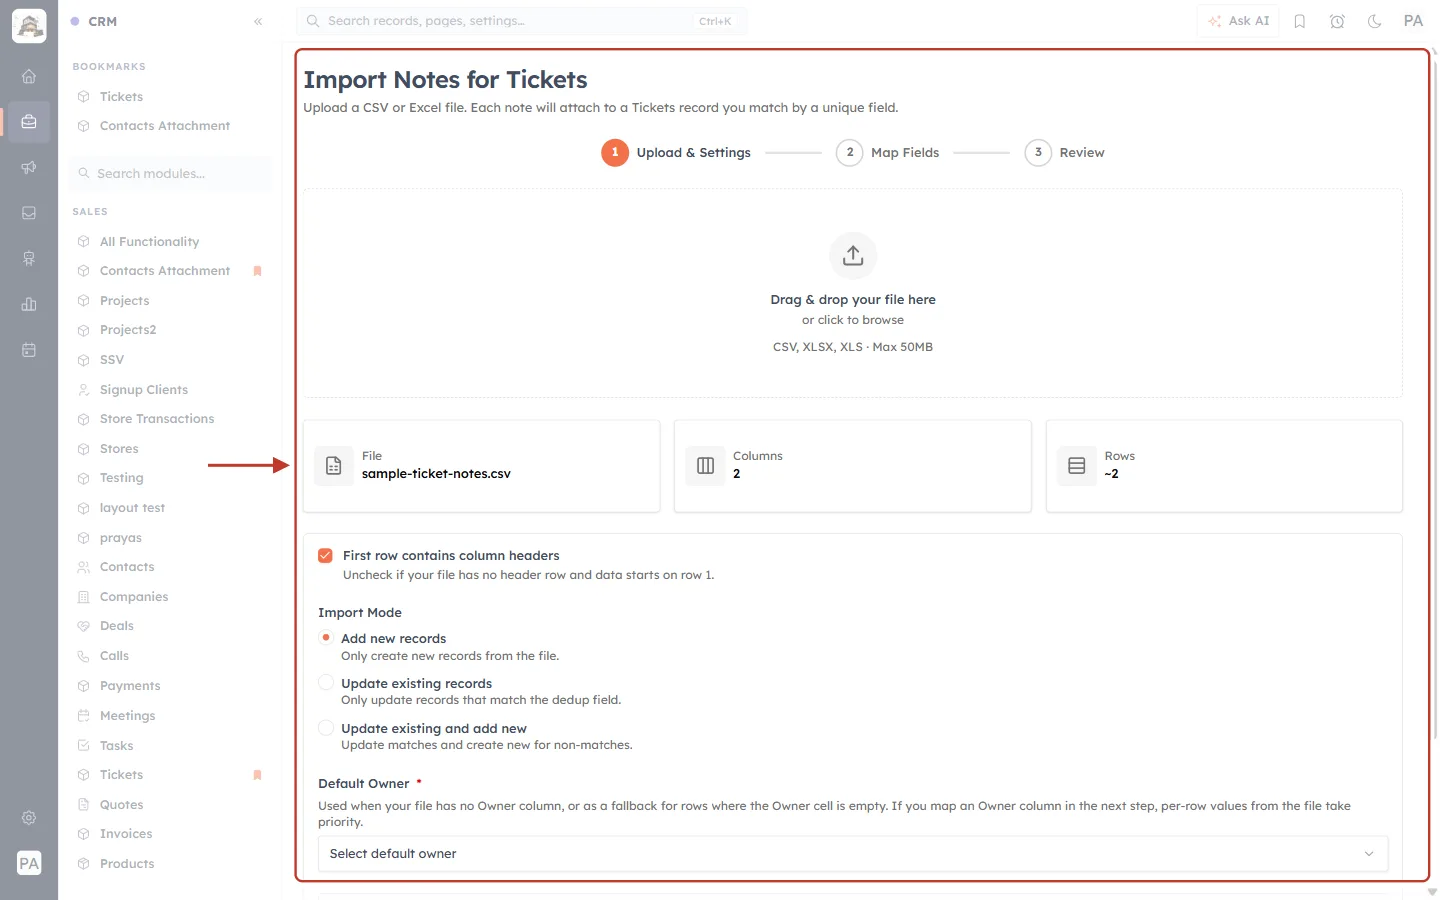
What this screenshot shows. The settings after uploading sample-ticket-notes.csv are ringed.
The file has 2 columns — Ticket Number and Note — and ~2 rows.
The same options as a ticket import: header row, Import Mode, Default Owner * and Auto-create missing dropdown values.
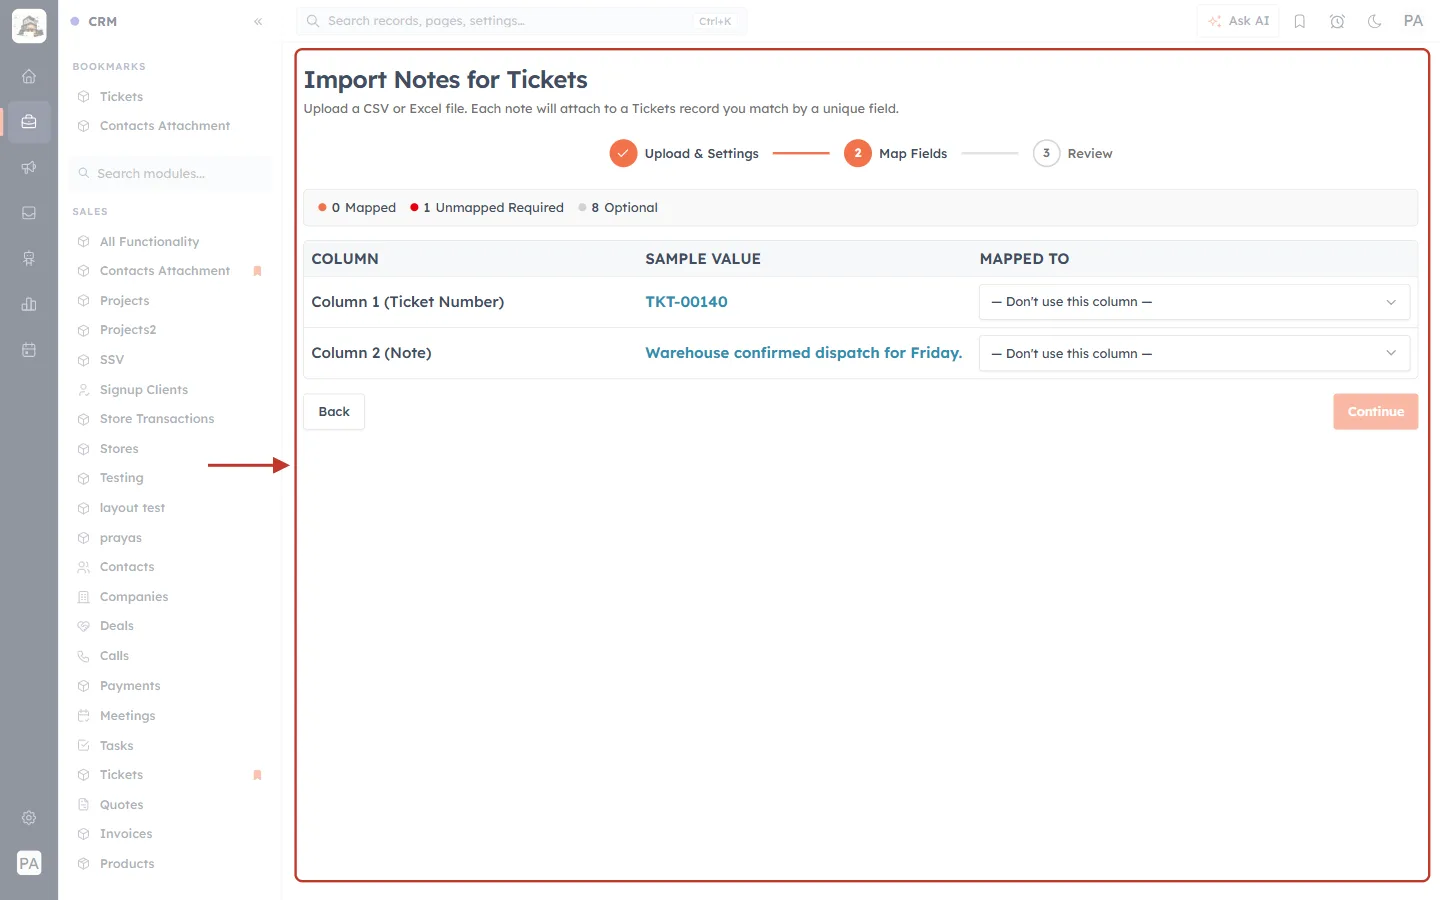
What this screenshot shows. The Map Fields step for notes is ringed.
The columns are not mapped automatically: 0 Mapped · 1 Unmapped Required.
Map Note to Note Content *, and the ticket column to Related To, which links each note to its ticket.
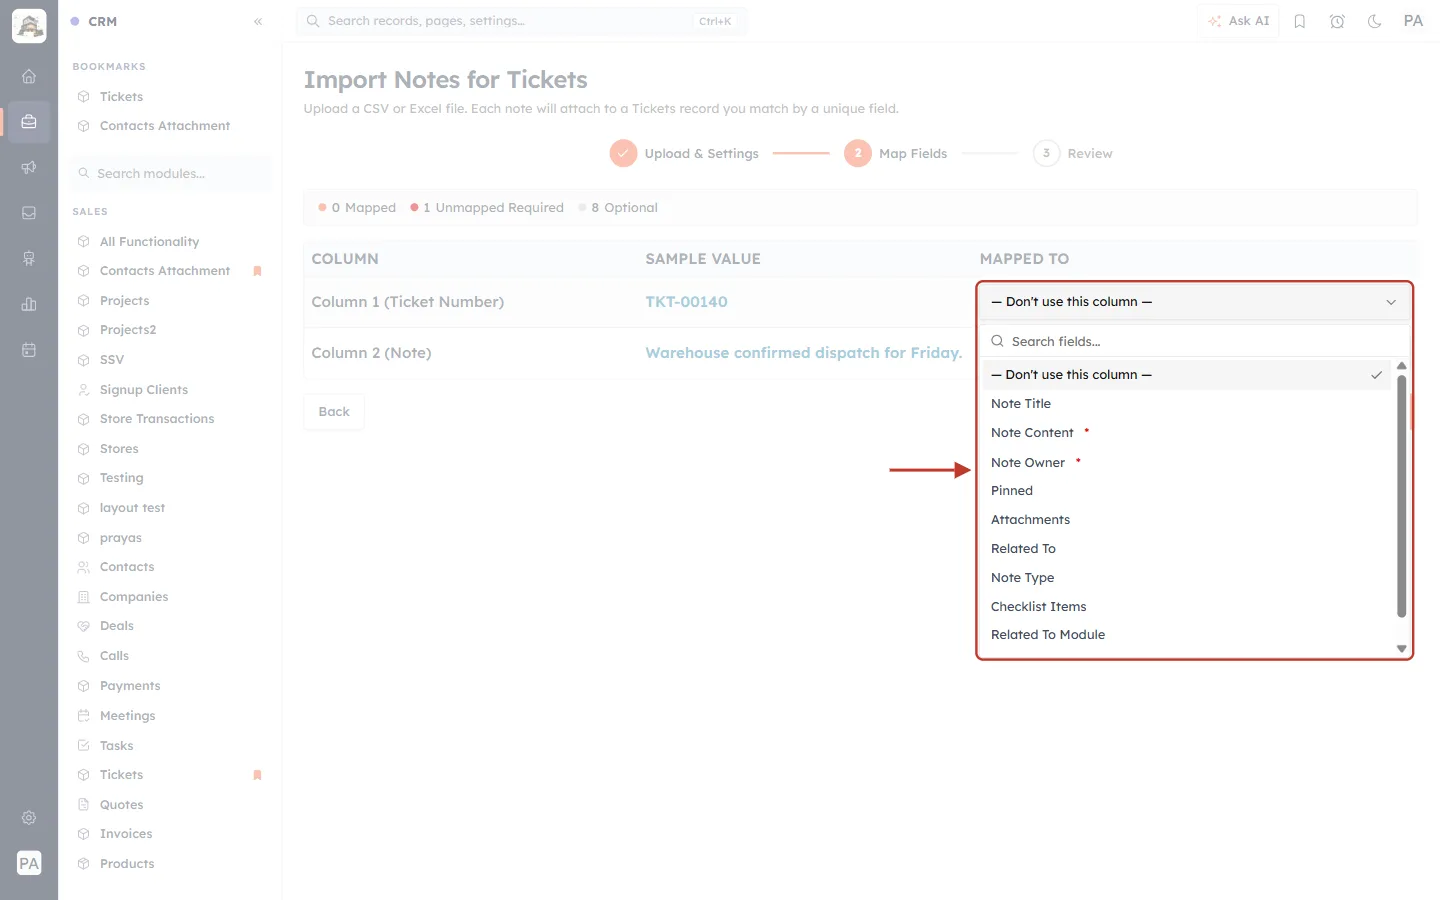
What this screenshot shows. The list of note fields is open and ringed.
Note Title, Note Content *, Note Owner *, Pinned, Attachments, Related To, Note Type, Checklist Items, and more.
Choose Related To for the column that identifies the ticket (here Ticket Number).
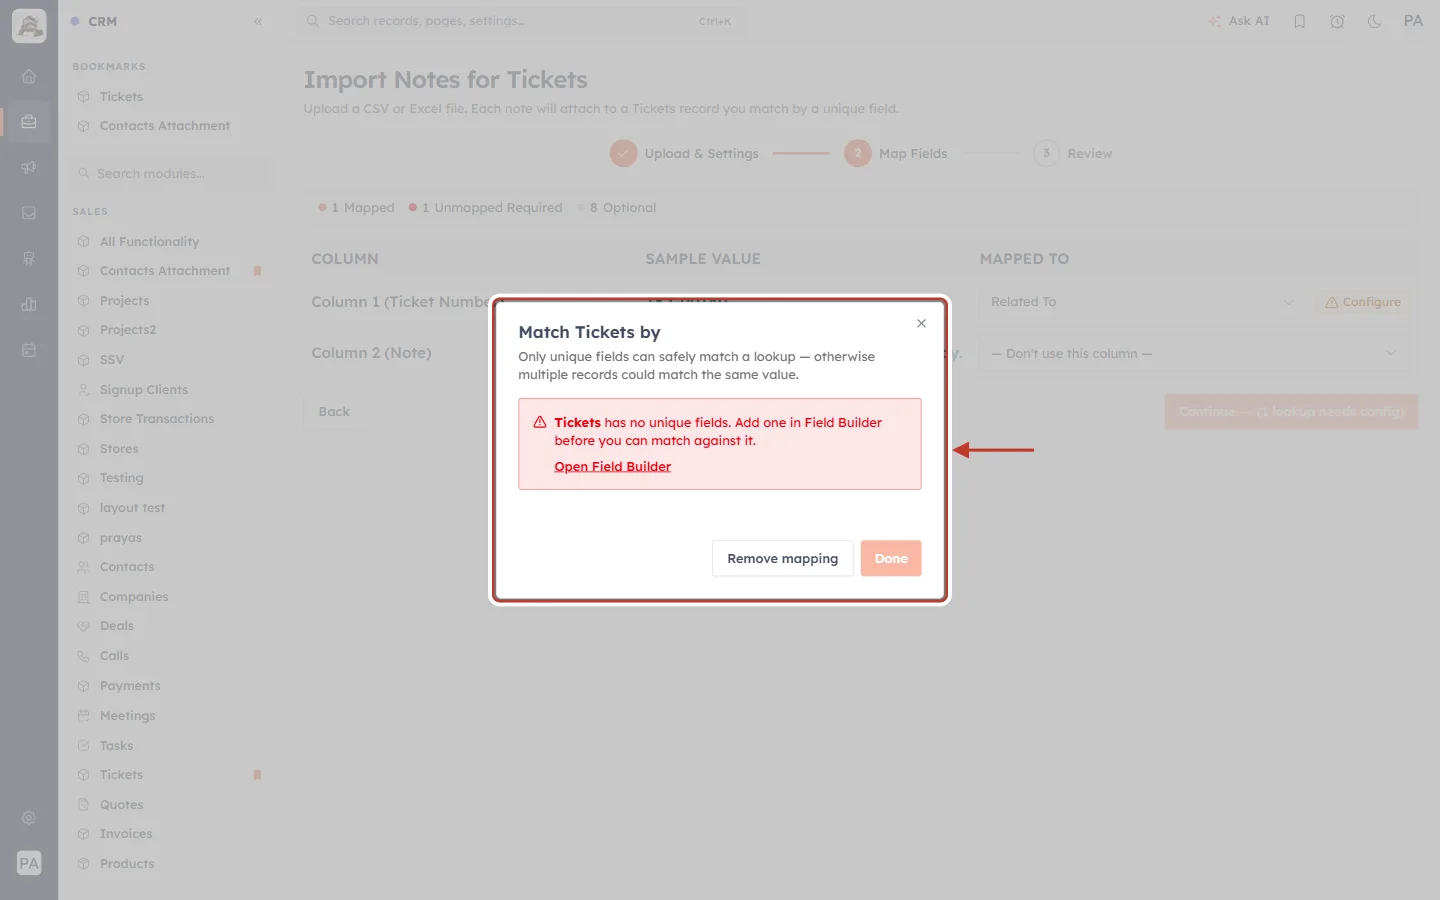
What this screenshot shows. The Match Tickets by window is ringed.
“Only unique fields can safely match a lookup — otherwise multiple records could match the same value.”
Here a red box says: “Tickets has no unique fields. Add one in Field Builder before you can match against it.” with an Open Field Builder link.
Once your Tickets module has a unique field, choose it here and click Done; then map Note to Note Content, click Continue, review, and click Finish Import — just like a ticket import.
Remove mapping takes Related To off the column.
⚠️
To import notes onto tickets, an administrator must first mark a Tickets field as unique (for example the ticket number) in the module’s Field Builder. Without a unique field the CRM can’t tell which ticket each note belongs to.
Part 4 — Export tickets#
Step 9: Open Export Tickets#
Click the arrow on Create Ticket and choose Export Tickets.
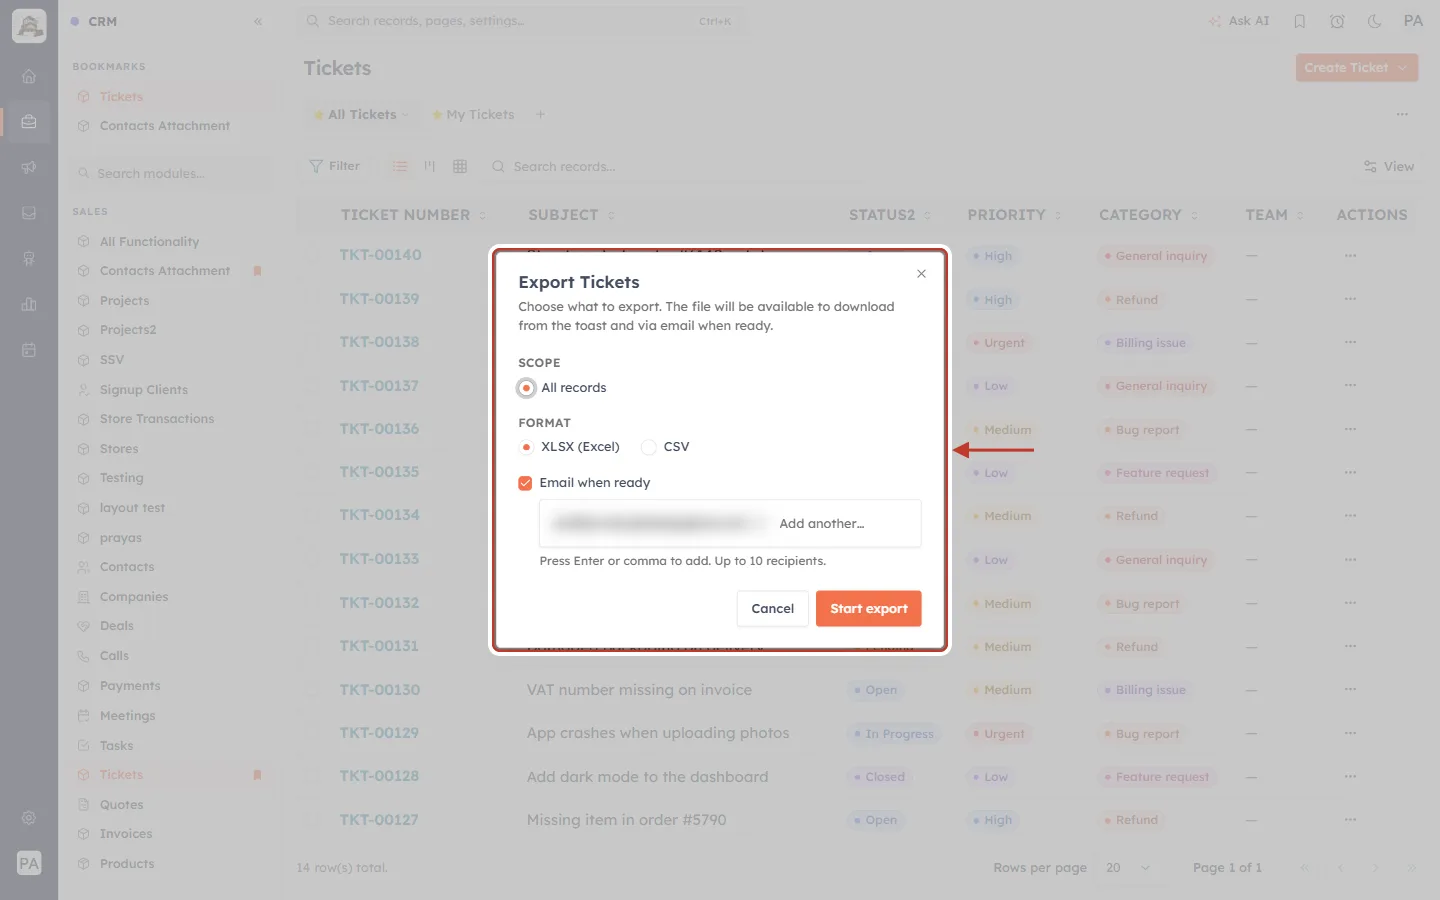
What this screenshot shows. The Export Tickets window is ringed: “Choose what to export. The file will be available to download from the toast and via email when ready.”
SCOPE — All records.
FORMAT — XLSX (Excel) or CSV.
Email when ready — ticked, with your own email address filled in (blurred here).
Cancel and Start export.
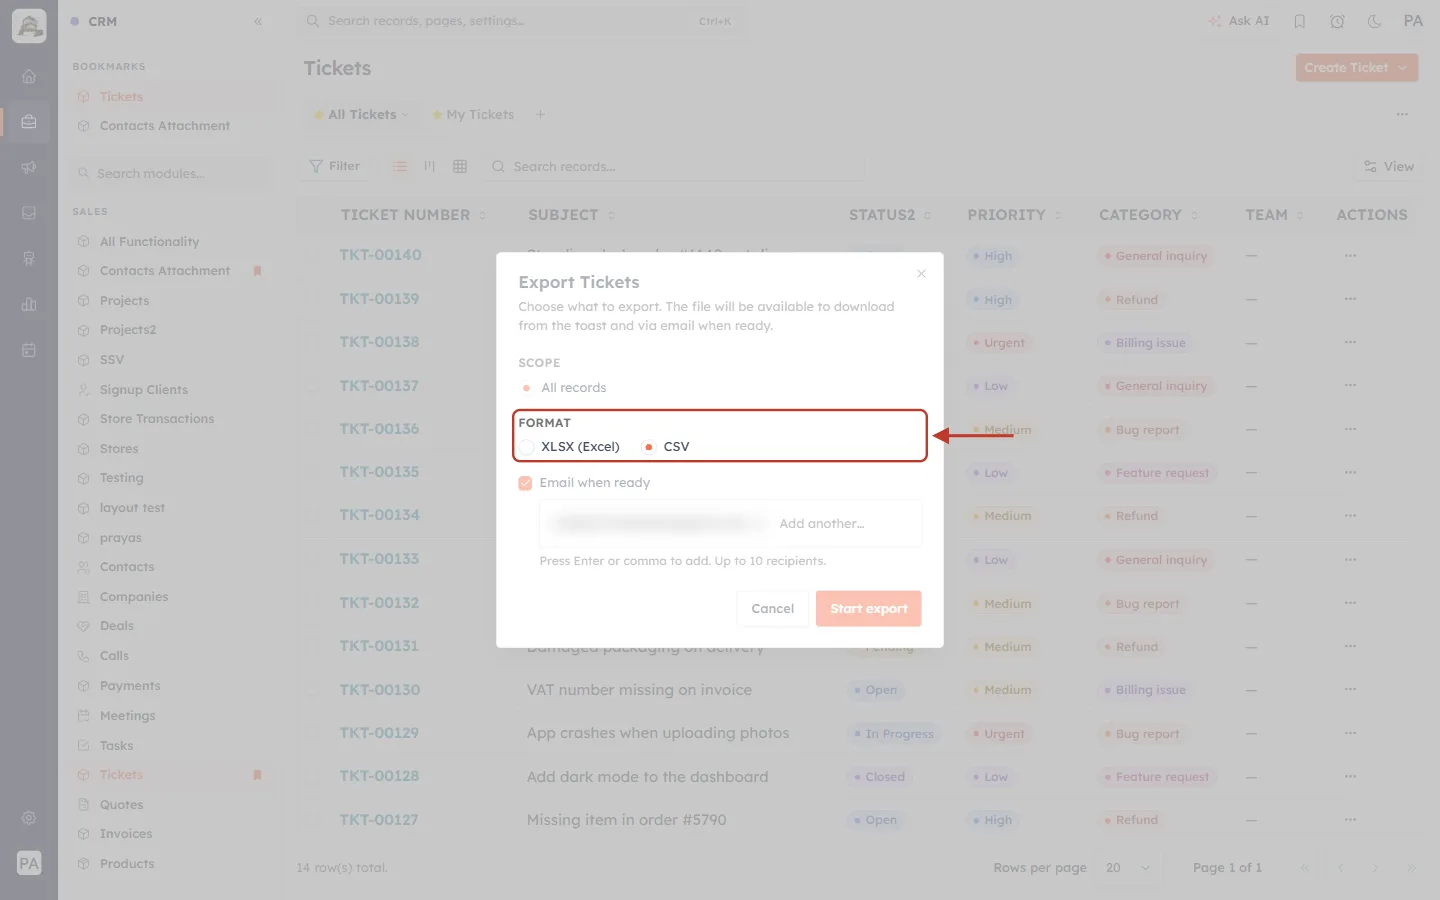
What this screenshot shows. The FORMAT choice is ringed.
XLSX (Excel) — best for opening in Excel or Google Sheets.
CSV — a plain text file, best for importing into other systems.
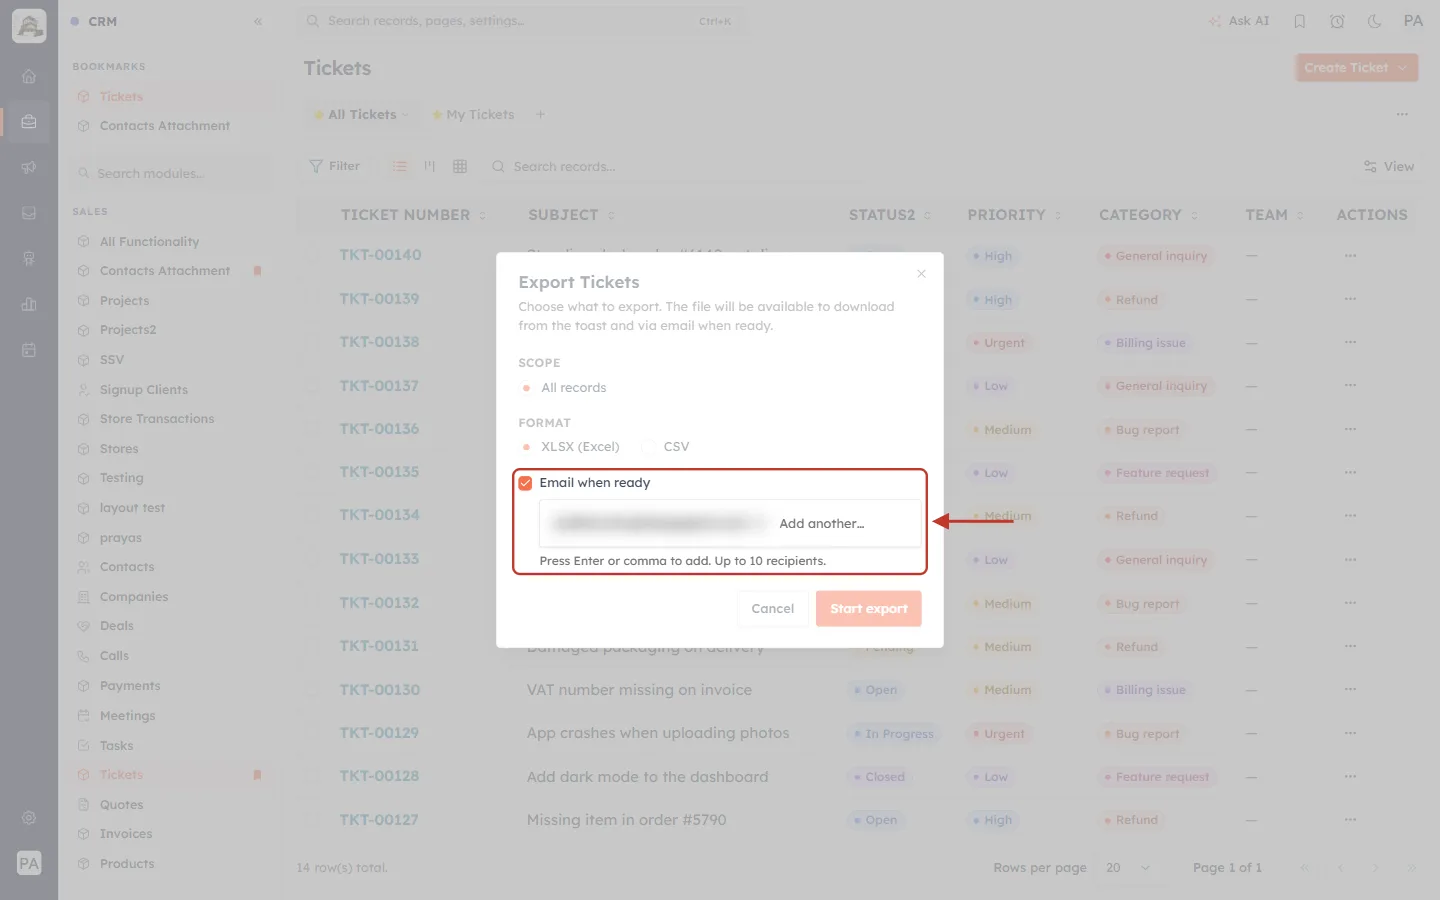
What this screenshot shows. The Email when ready option is ringed.
When ticked, the file is also emailed to the listed addresses. Your own address is added for you.
“Press Enter or comma to add. Up to 10 recipients.” Click the × on an address to remove it.
Untick it if you only want to download the file.
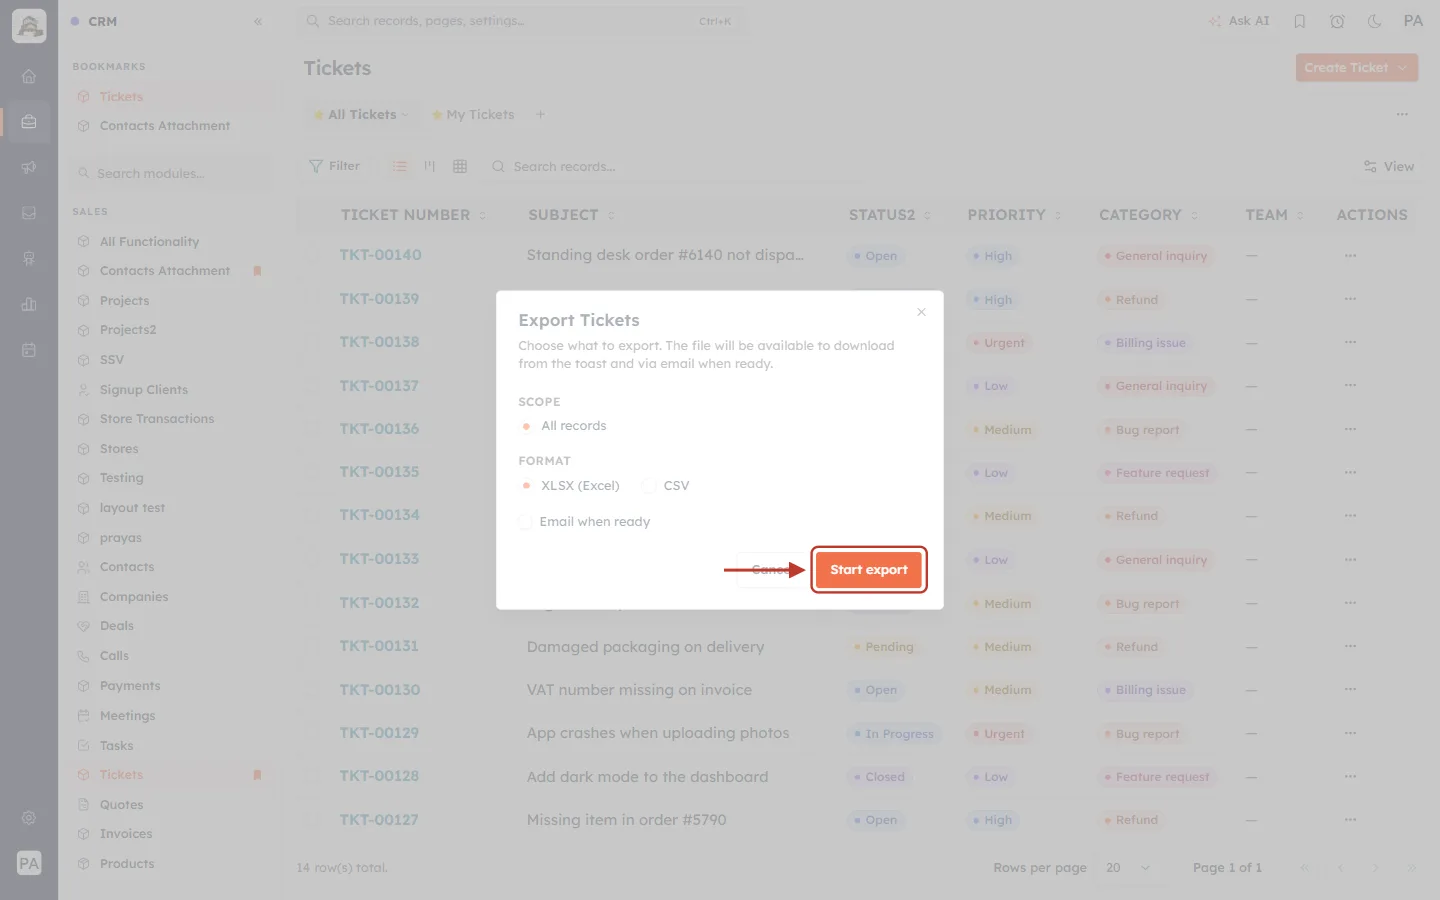
What this screenshot shows. The orange Start export button is ringed.
Click it to build the file. You can keep working while it runs.
Step 10: Download the file#
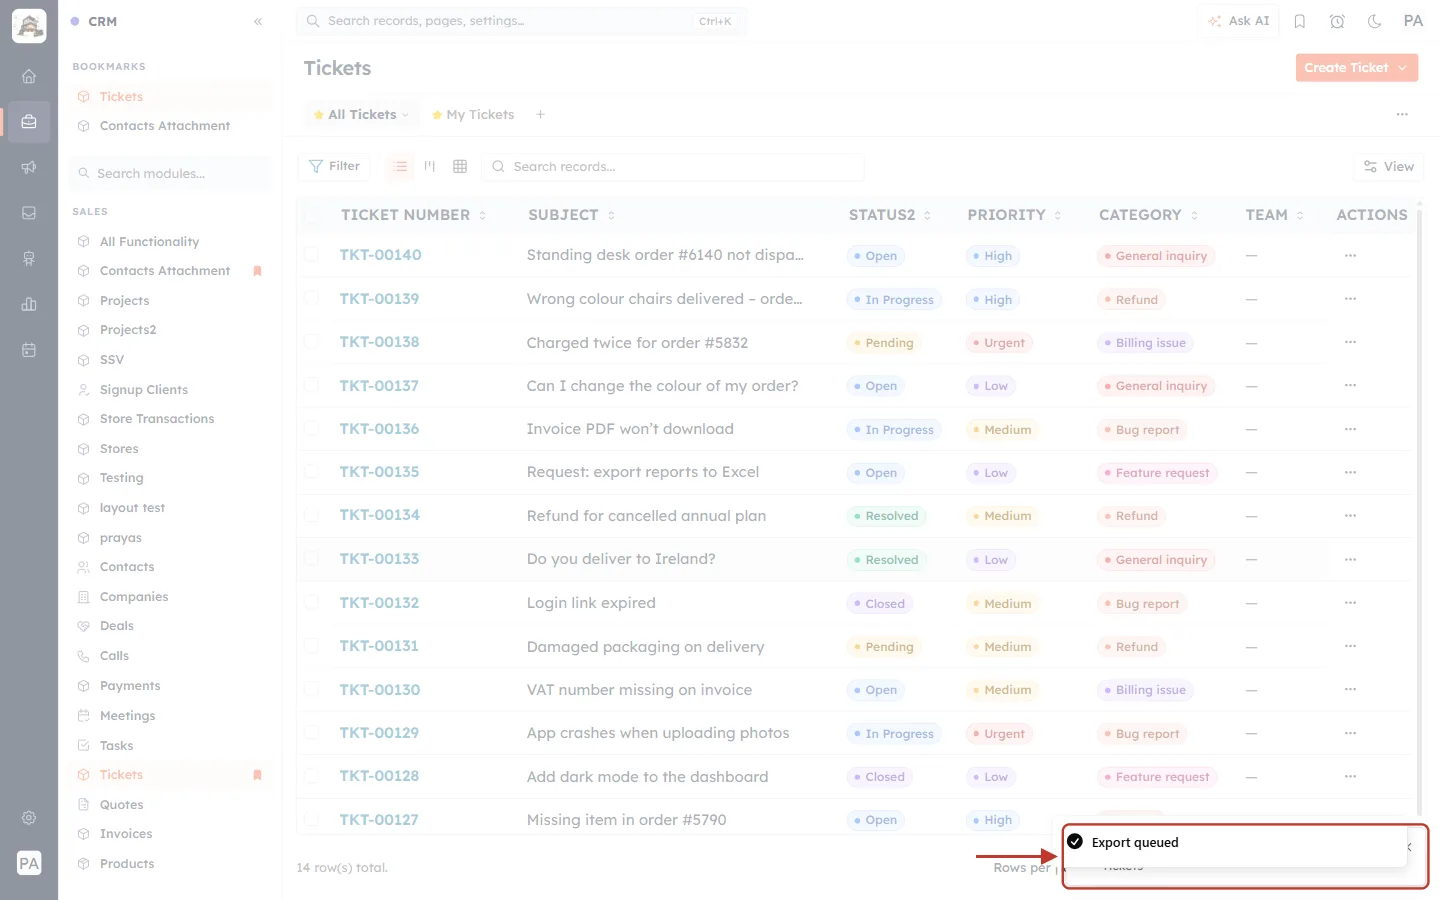
What this screenshot shows. The progress card at the bottom right is ringed: Exporting…
The export runs in the background. Large exports take longer.
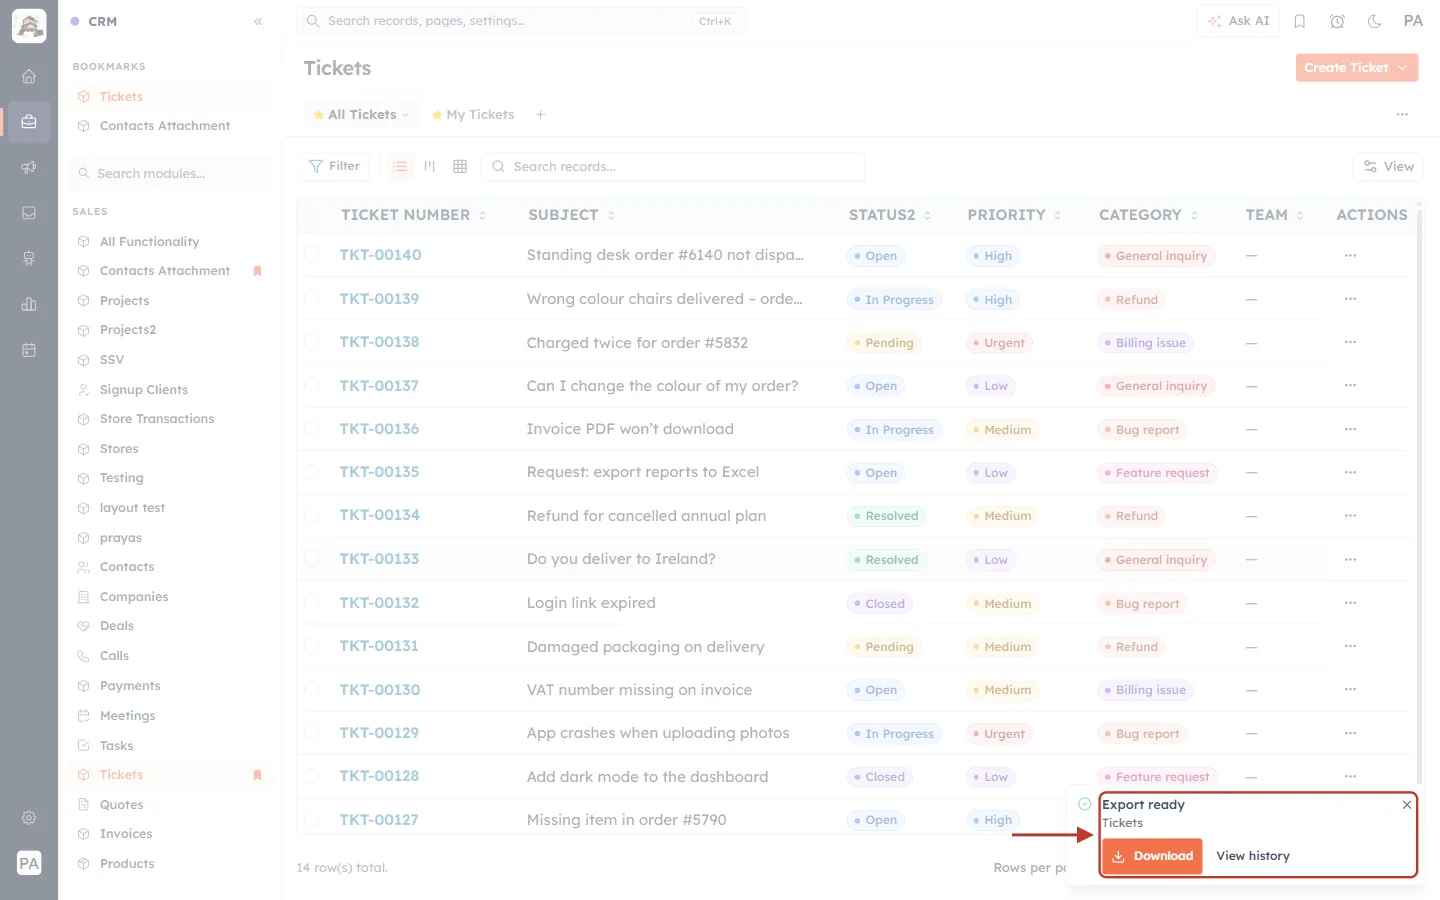
What this screenshot shows. The finished card is ringed: Export ready — Tickets.
Download — save the file to your computer.
View history — see your earlier exports.
If you ticked Email when ready, the file is also emailed to the addresses you chose.
✅
Export tickets regularly as a backup, and before any large import or bulk change.
Troubleshooting#
Continue stays greyed out on Map Fields. A required field has no column (Unmapped Required is above 0). Map a column to every field marked * — Subject, Status2 and Priority for tickets.
Some rows were skipped or failed. Open the import’s details (Step 7). Common causes: an empty required value, or a drop-down value that doesn’t exist (with Auto-create missing dropdown values off, the cell is left empty).
The file is rejected. Only CSV, XLSX and XLS files up to 50 MB are accepted. Split larger files.
“Tickets has no unique fields” when importing notes. Ask an administrator to mark a Tickets field as unique in the Field Builder (see Part 3).
The wrong person owns the imported tickets. Check the Default Owner, or add an Owner column to your file and map it.
Frequently asked questions#
Can I undo an import? There is no undo button. Delete the imported tickets from the list if needed — which is another reason to test with a small file first.
Can I update tickets that are already in the CRM? Yes — choose Update existing records or Update existing and add new as the Import Mode.
Will I get an email about the import? Only if you tick Notify me by email when the import is complete on the Review step.
Where do I find the export later? Use View history on the Export ready card, or the email if you chose Email when ready.
Previous and next#
Previous: Manage Tickets in the CRM: Filter Tickets, Use the Kanban Board & Read the Timeline (Step-by-Step)
Related#
Was this article helpful?
Ready to implement this?
OpenAI Engage and apply what you just learned to your own workspace.
Open AI Engage CRM