Loading…


KnowledgeBase
Ticket Permissions: Control Who Can See, Edit and Reply to Support Tickets (Step-by-Step)
What this article covers#
Not every agent needs to see every support ticket. A new team member may only need the tickets assigned to them, a team lead may need everything their team handles, and a manager may need the full picture. In AiEngage CRM you control this with profiles — a set of permissions you give to each user.
This guide shows, step by step, how to:
Open a profile and set what it can do with Tickets (view, create, edit, delete, export, import).
Choose between the four access levels — All, Team, Own and None.
Control who can see, reply to and close chats in the Team Inbox (the conversations that become tickets).
Check which profile each user has, and how teams fit in.
Share one team’s tickets with another team using a sharing rule.
Hide a single ticket field’s value from users who shouldn’t see it.
ℹ️
Permissions are set by an administrator. If you’re an agent and you can’t see a ticket you expect, ask your administrator to check your profile using this guide.
The four access levels at a glance#
| Level | What the user gets | Ticket views they see in Customer & Support |
|---|---|---|
| All | Every ticket in the organisation. | All tickets, My tickets and the status views |
| Team | Tickets that belong to their team. | My tickets and the status views — no All tickets |
| Own | Only the tickets they own. | My tickets and the status views — no All tickets |
| None | No access to tickets. | No ticket views at all |
Before you begin#
Administrator access. You need to be able to open Settings → Security Control.
Teams set up if you plan to use the Team level — see Create Teams: Group Users for Lead Routing, Reporting & Sharing.
For the full list of profile settings across all modules, see Understanding Profile Permissions: What Every Setting Controls.
Part 1 — Open the profile your agents use#
Step 1: Open Settings#
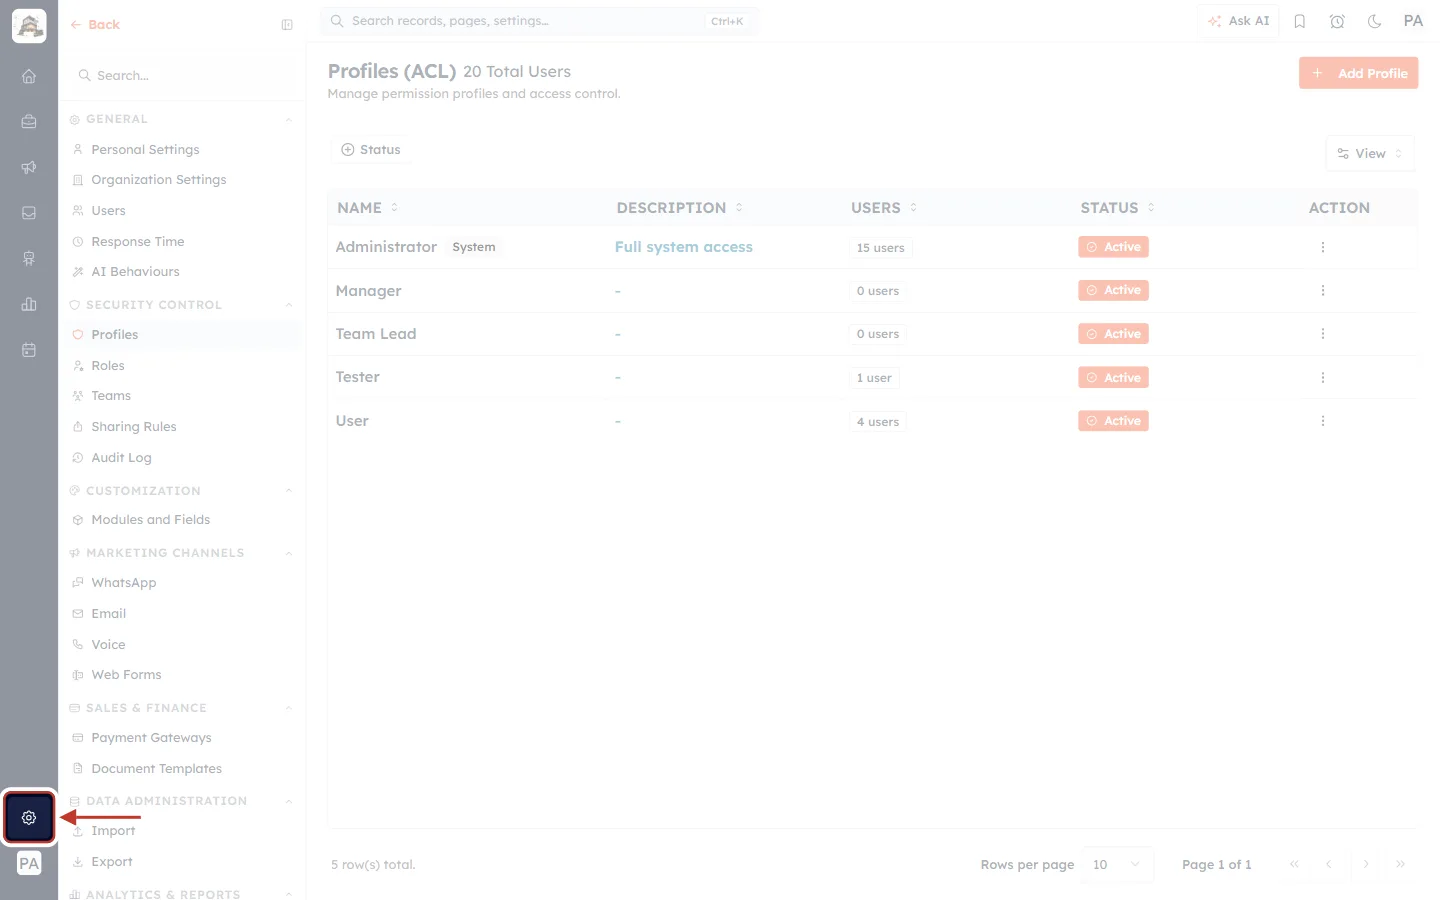
What this screenshot shows. The Settings (gear) icon at the bottom of the dark icon bar on the left is ringed.
Click it to open the settings pages of your CRM.
The settings menu opens on the left, grouped into sections such as General, Security Control and Customization.
Step 2: Go to Security Control → Profiles#
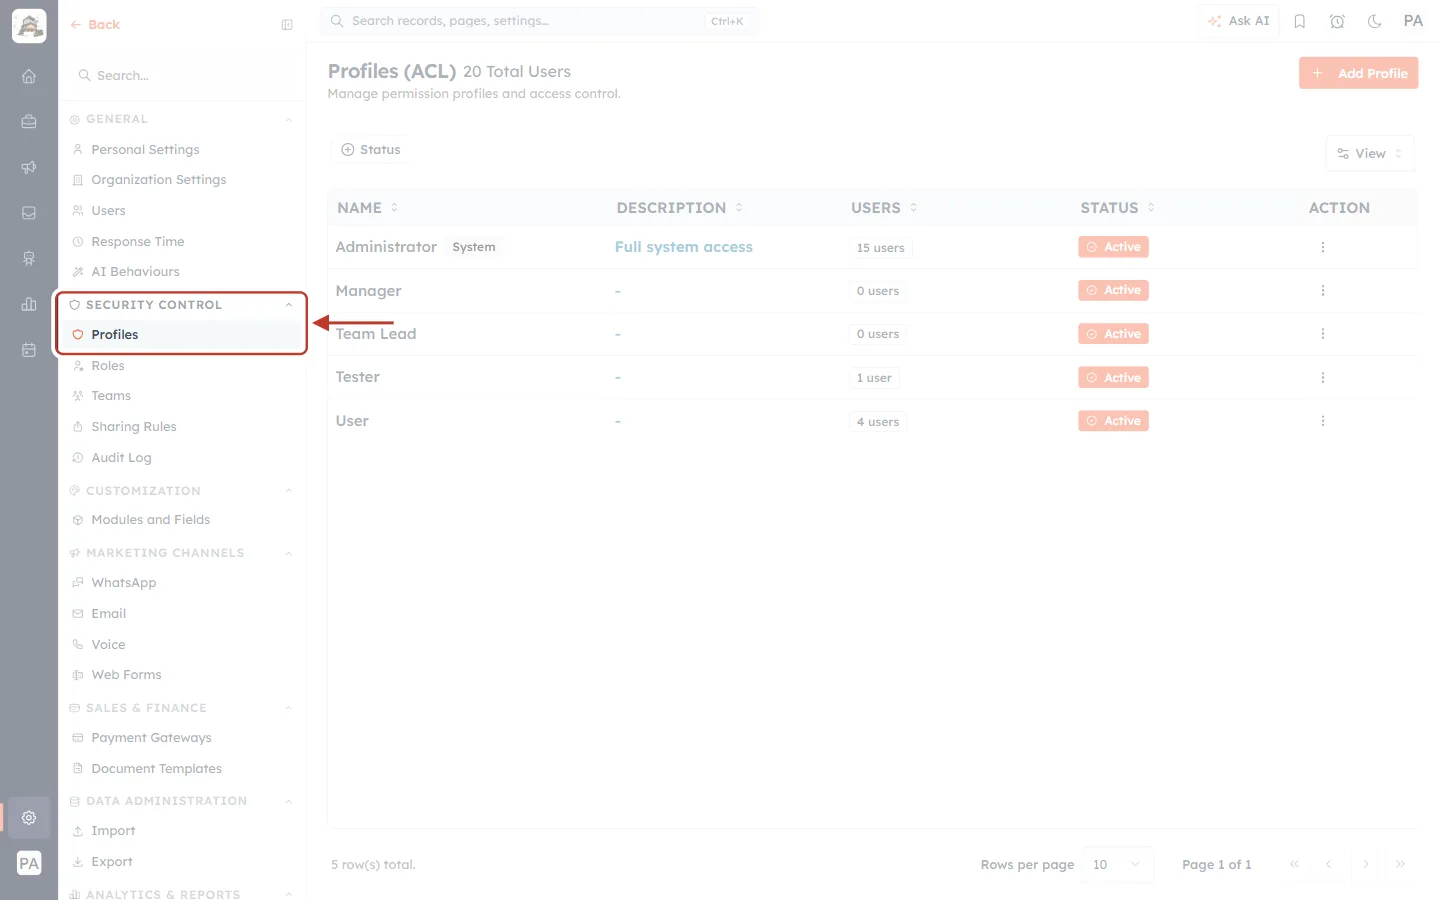
What this screenshot shows. Profiles, under the SECURITY CONTROL heading of the settings menu, is ringed.
Click Profiles. The page title is Profiles (ACL) — “ACL” stands for access control list.
The other items in the same section are the ones you’ll use later in this guide: Users (under General), Teams and Sharing Rules.
Step 3: Find the profile in the list#
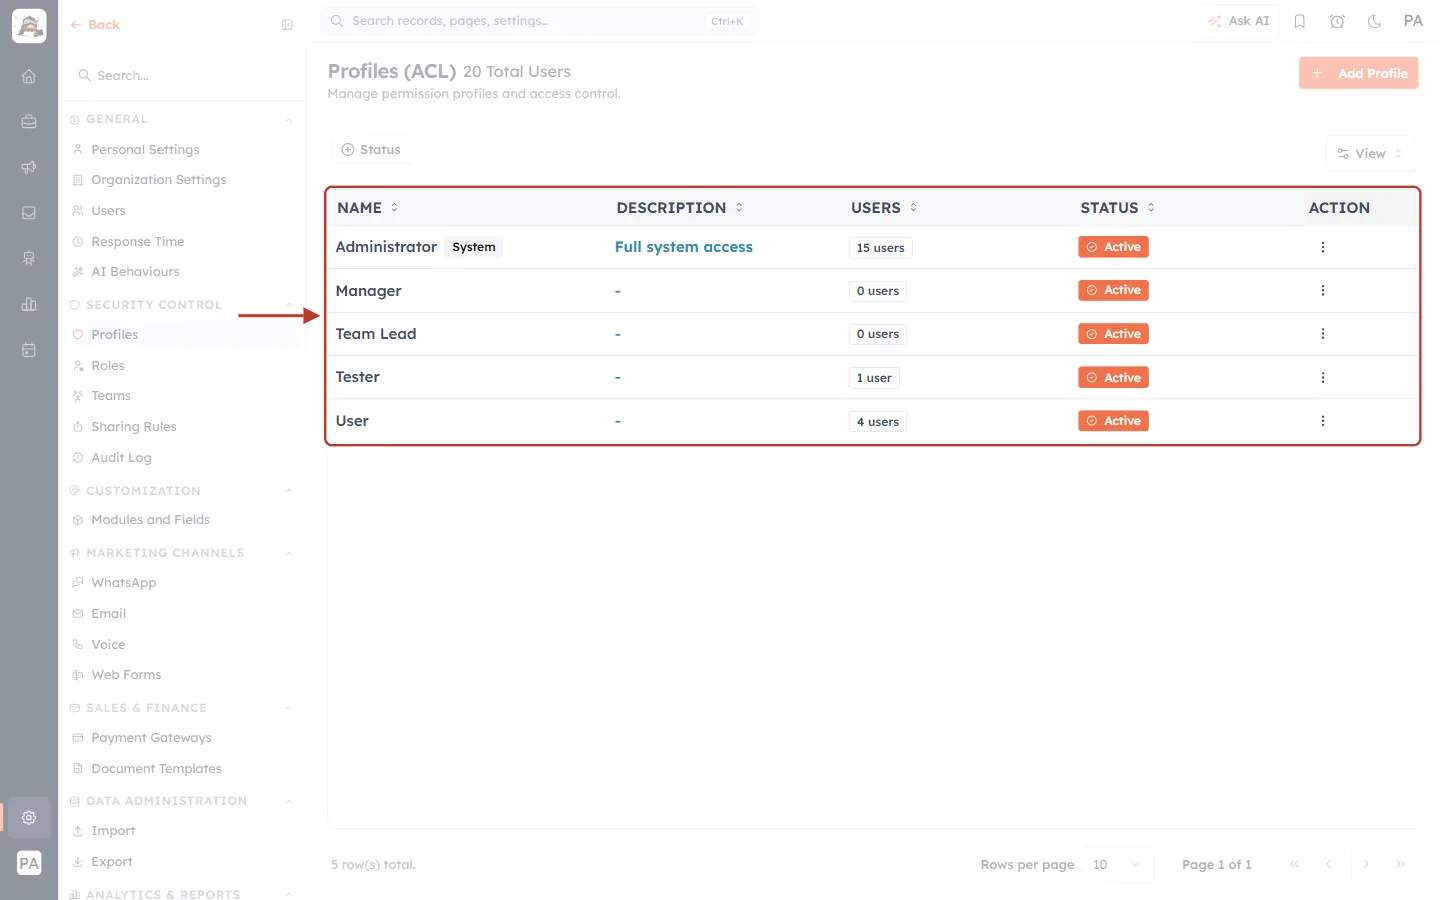
What this screenshot shows. The table of profiles is ringed. Next to the page title you can see the total number of users in your account (here, 20 Total Users).
NAME — the profile. Administrator carries a System badge and is described as Full system access; it can’t be restricted.
DESCRIPTION — an optional note about what the profile is for.
USERS — how many users currently have this profile.
STATUS — Active profiles can be given to users.
ACTION — the ⋮ menu for each profile.
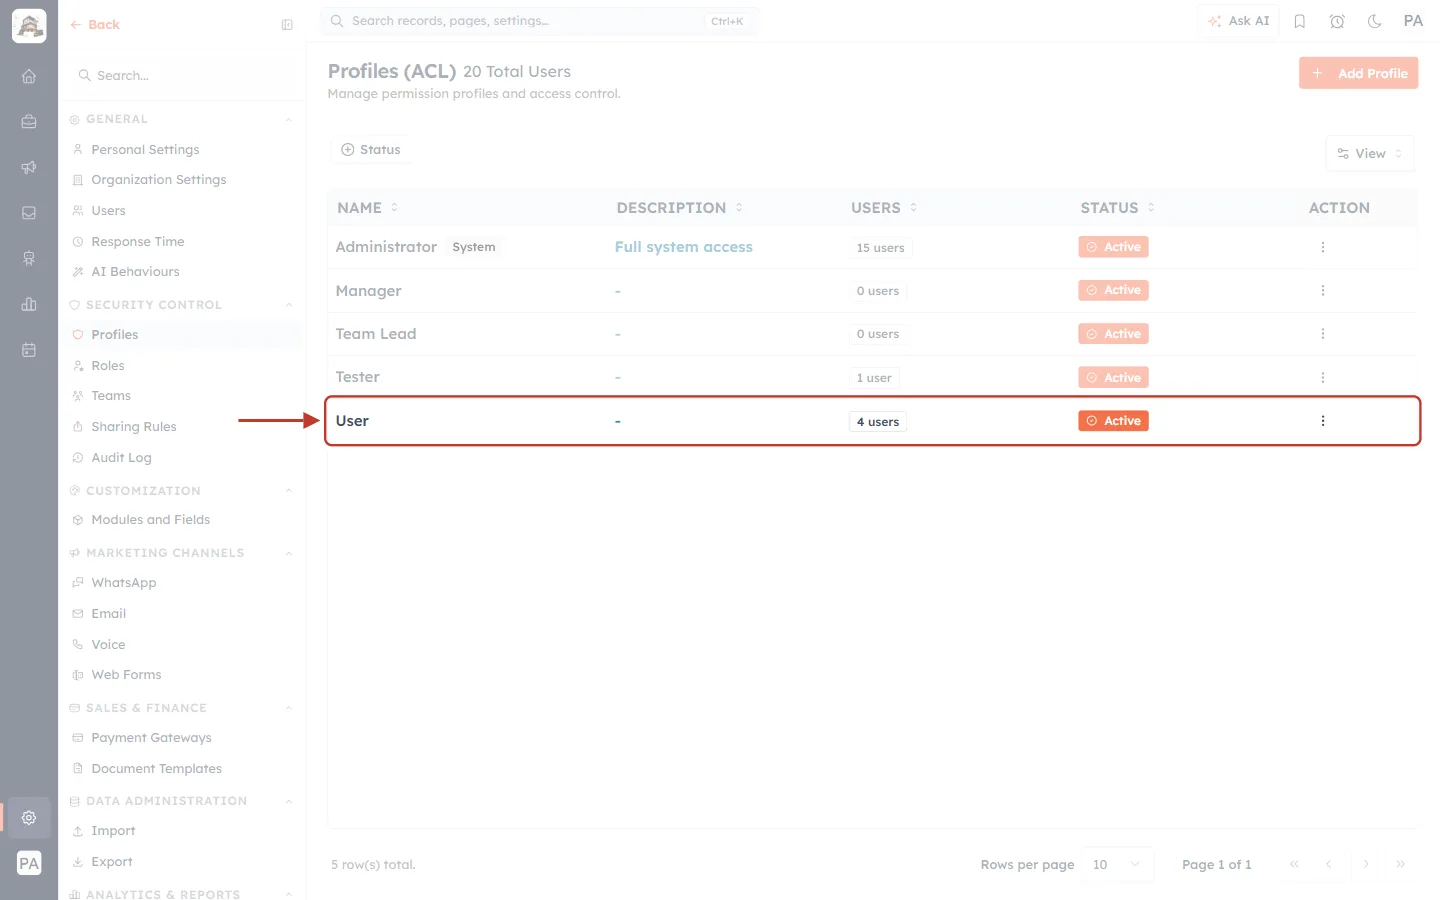
What this screenshot shows. The row of the profile we’ll change — User, which 4 users have — is ringed.
Pick the profile that your support agents have. If you’re not sure, check the Profile column on the Users page (Part 4).
Changing a profile changes access for every user who has it. To give a smaller group different access, use Clone to make a copy and change that instead.
Step 4: Open the profile with Edit#
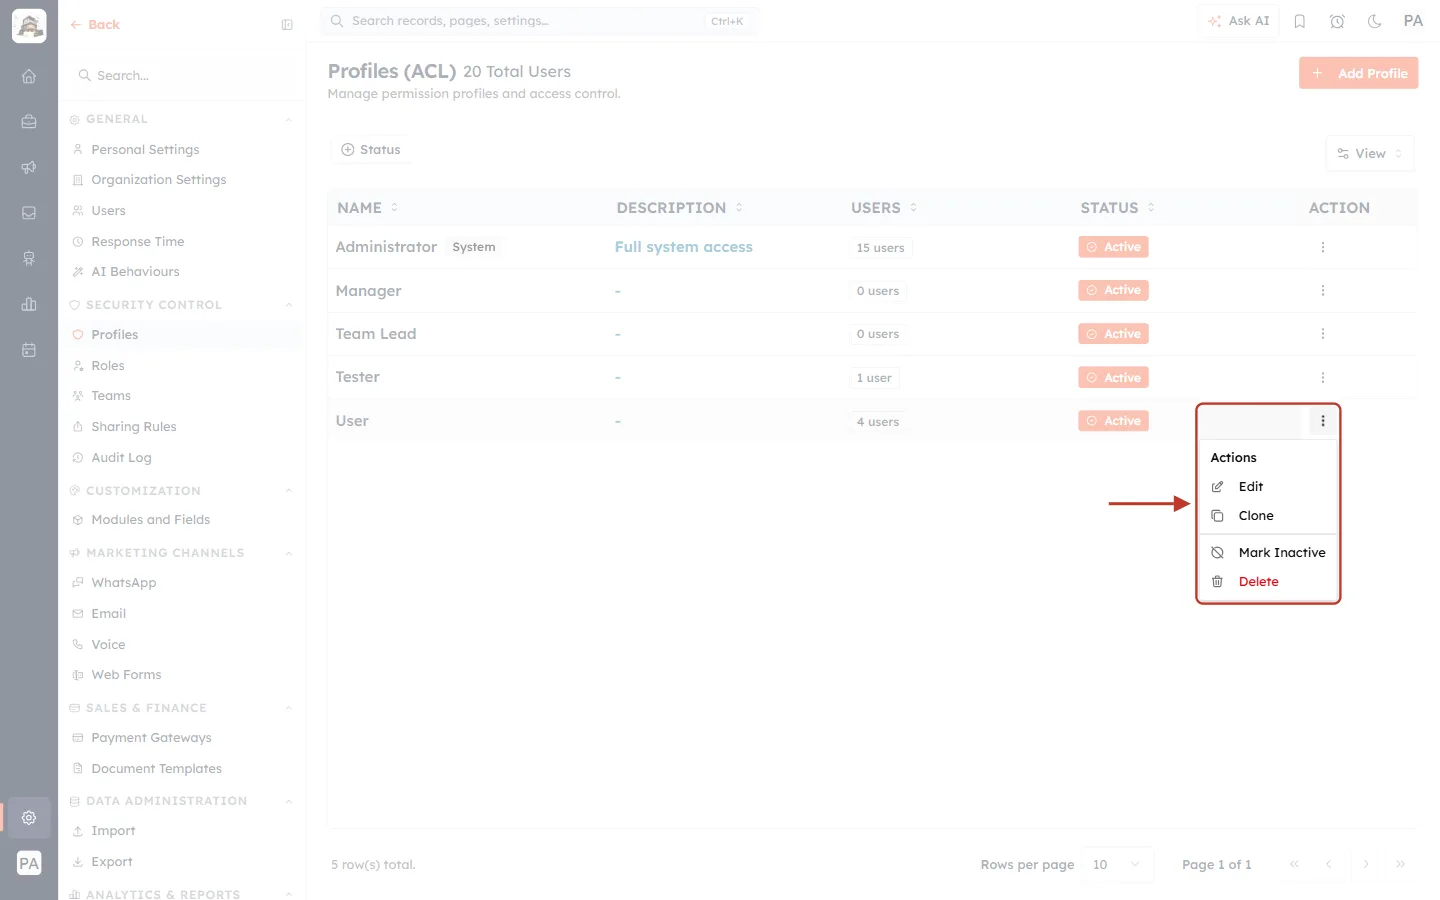
What this screenshot shows. The ⋮ button of the User row and the Actions menu it opens are ringed.
Edit — open the profile’s permissions. Click this.
Clone — make a copy of the profile to start a new one from.
Mark Inactive — stop the profile from being given to users.
Delete (red) — remove the profile.
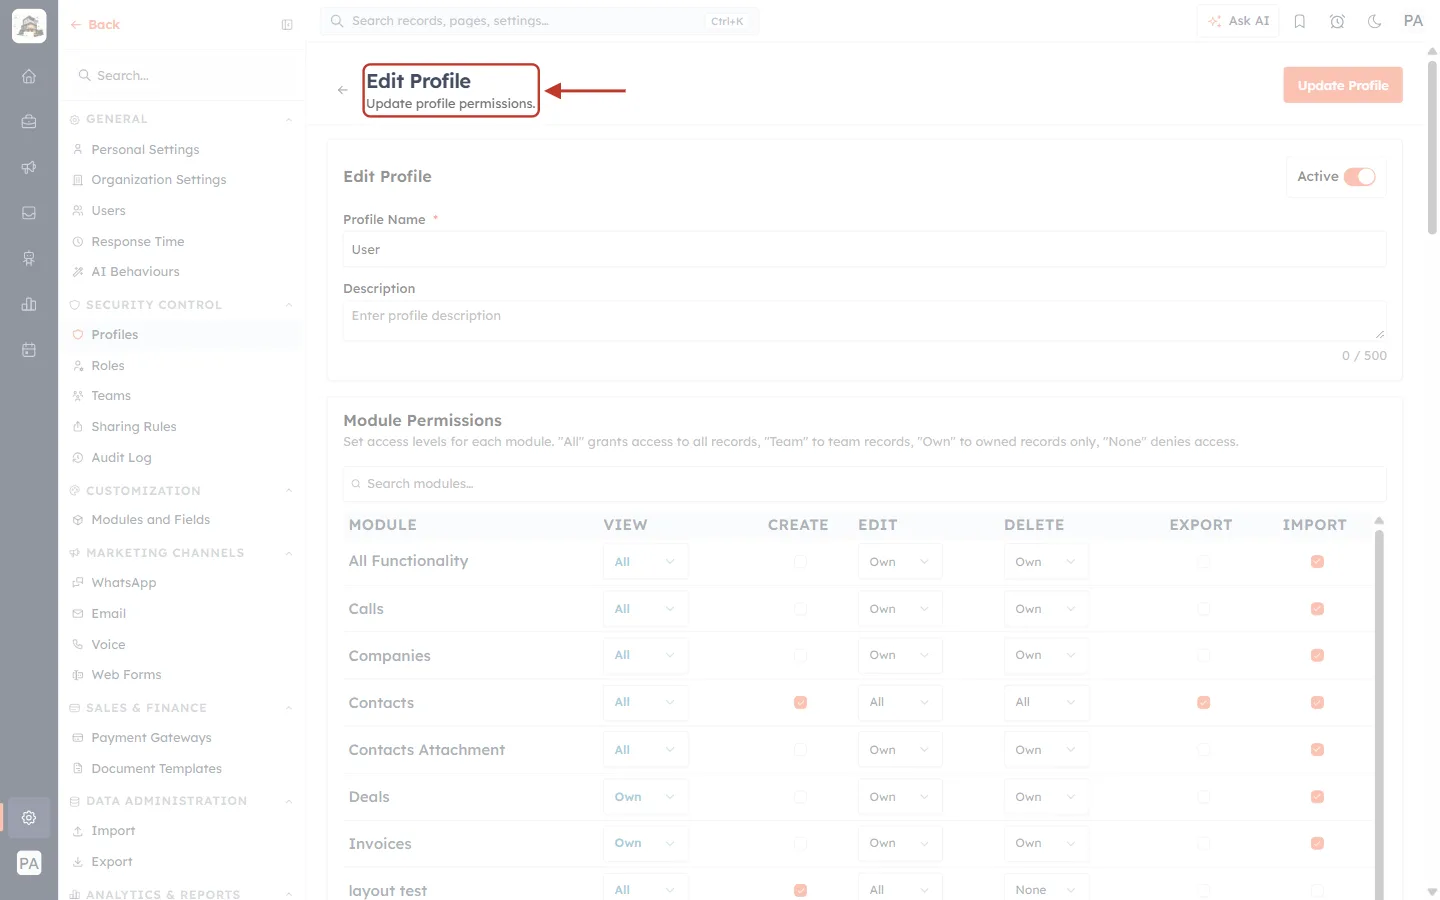
What this screenshot shows. The top of the Edit Profile page is ringed — Update profile permissions.
The page has the profile’s name and description at the top, then Module Permissions, then Feature Permissions.
Nothing you change is applied until you click Update Profile (top right).
Part 2 — Set what the profile can do with Tickets#
Step 5: Read the Module Permissions table#
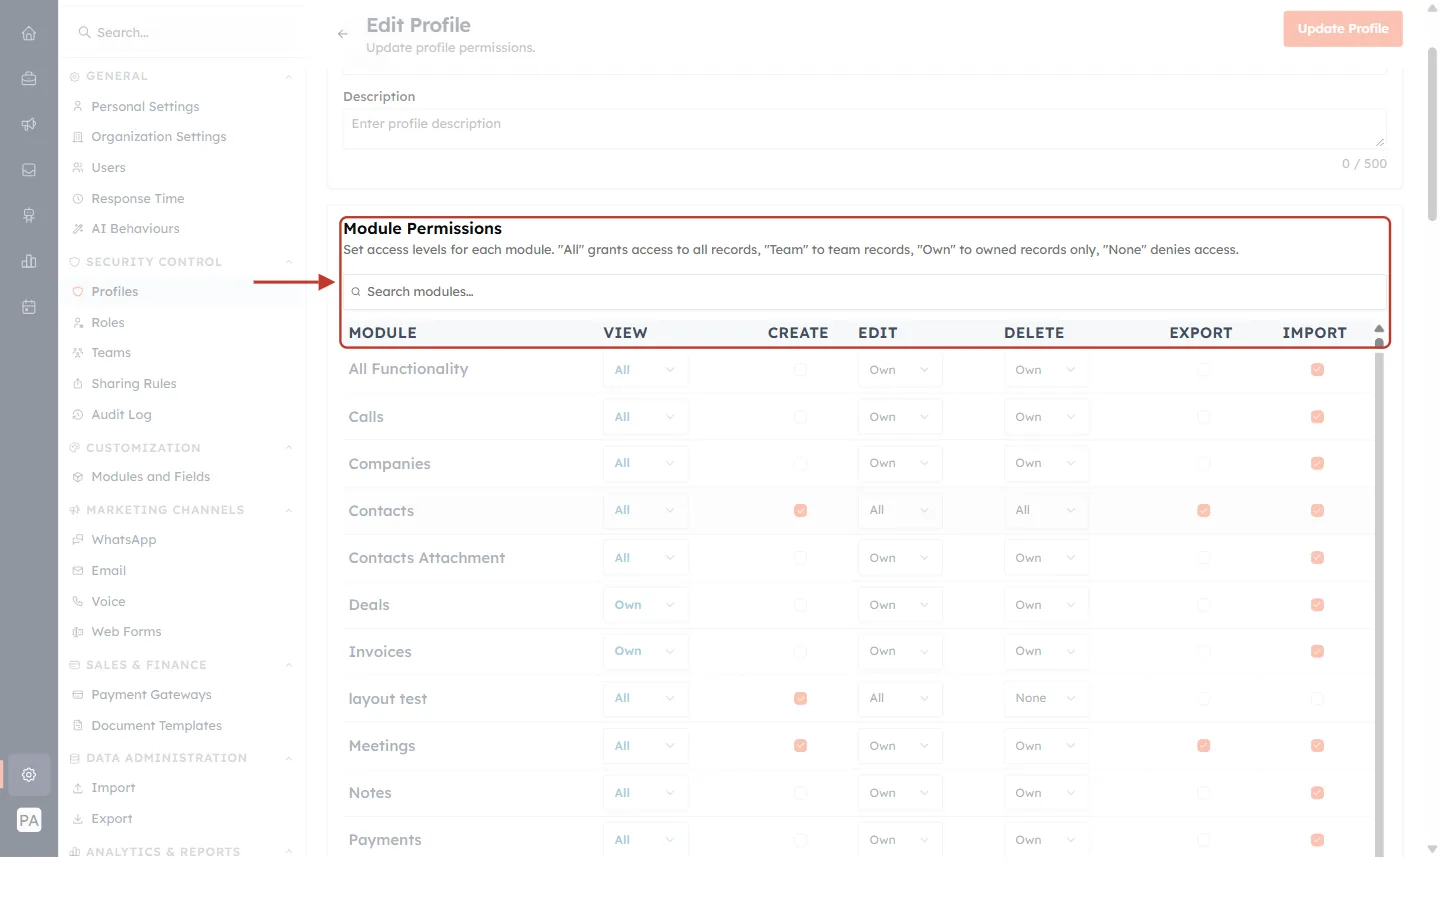
What this screenshot shows. The Module Permissions heading, its explanation and the column headings are ringed.
The explanation reads: Set access levels for each module. “All” grants access to all records, “Team” to team records, “Own” to owned records only, “None” denies access.
Search modules… — type Tickets to jump straight to the row.
VIEW, EDIT and DELETE are drop-downs with the four levels.
CREATE, EXPORT and IMPORT are tick boxes — on or off.
Step 6: Find the Tickets row#
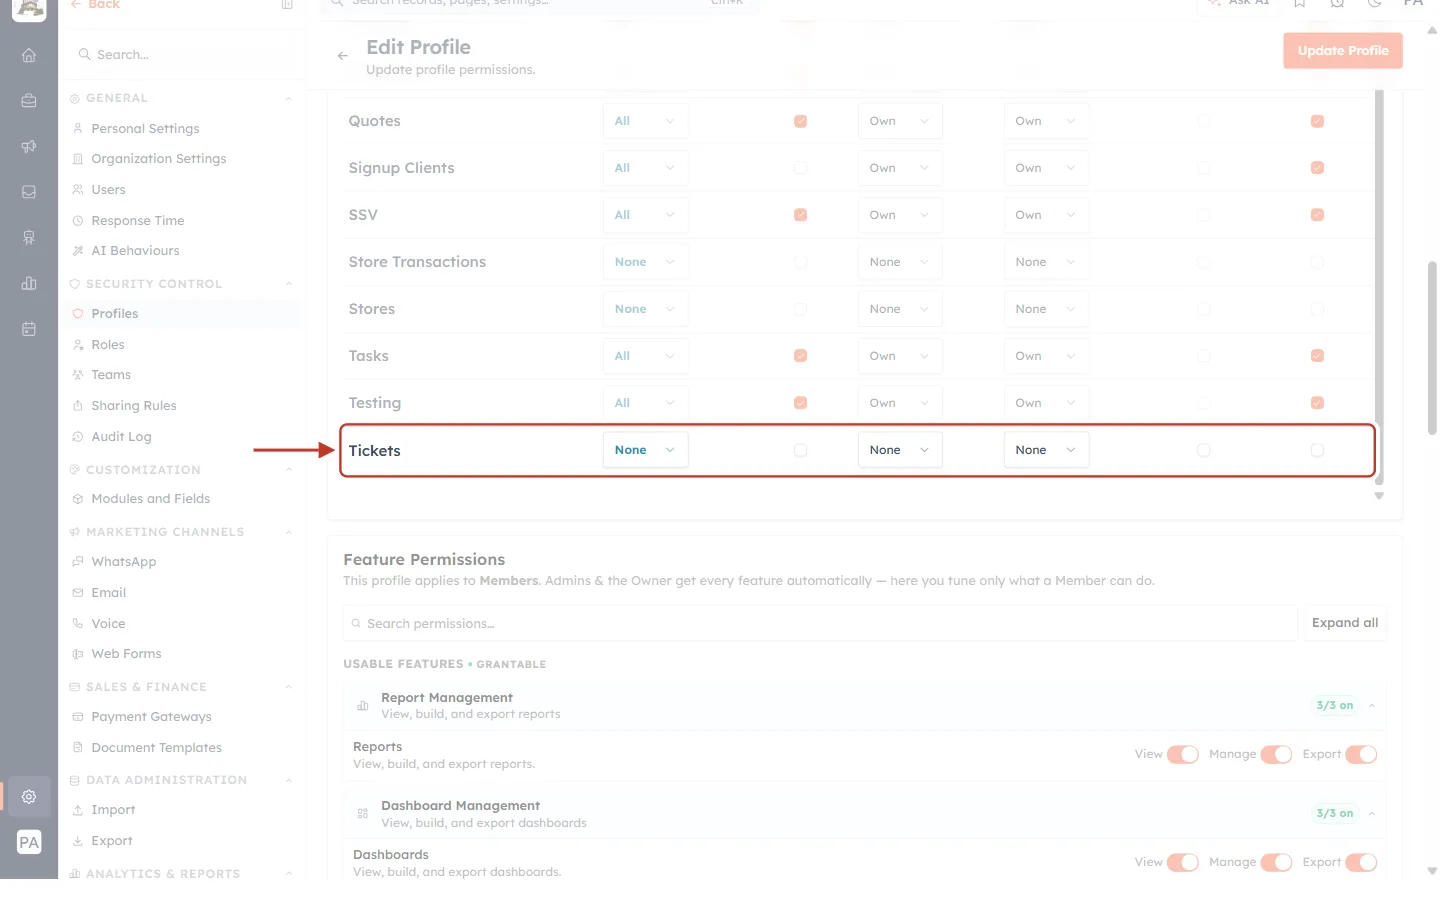
What this screenshot shows. The Tickets row is ringed. In this example the User profile has no ticket access yet.
View: None — users with this profile can’t see any tickets.
Create unticked — they can’t create tickets.
Edit: None and Delete: None — they can’t change or remove tickets.
Export and Import unticked — they can’t download or bulk-upload tickets.
Step 7: Choose who they can view#
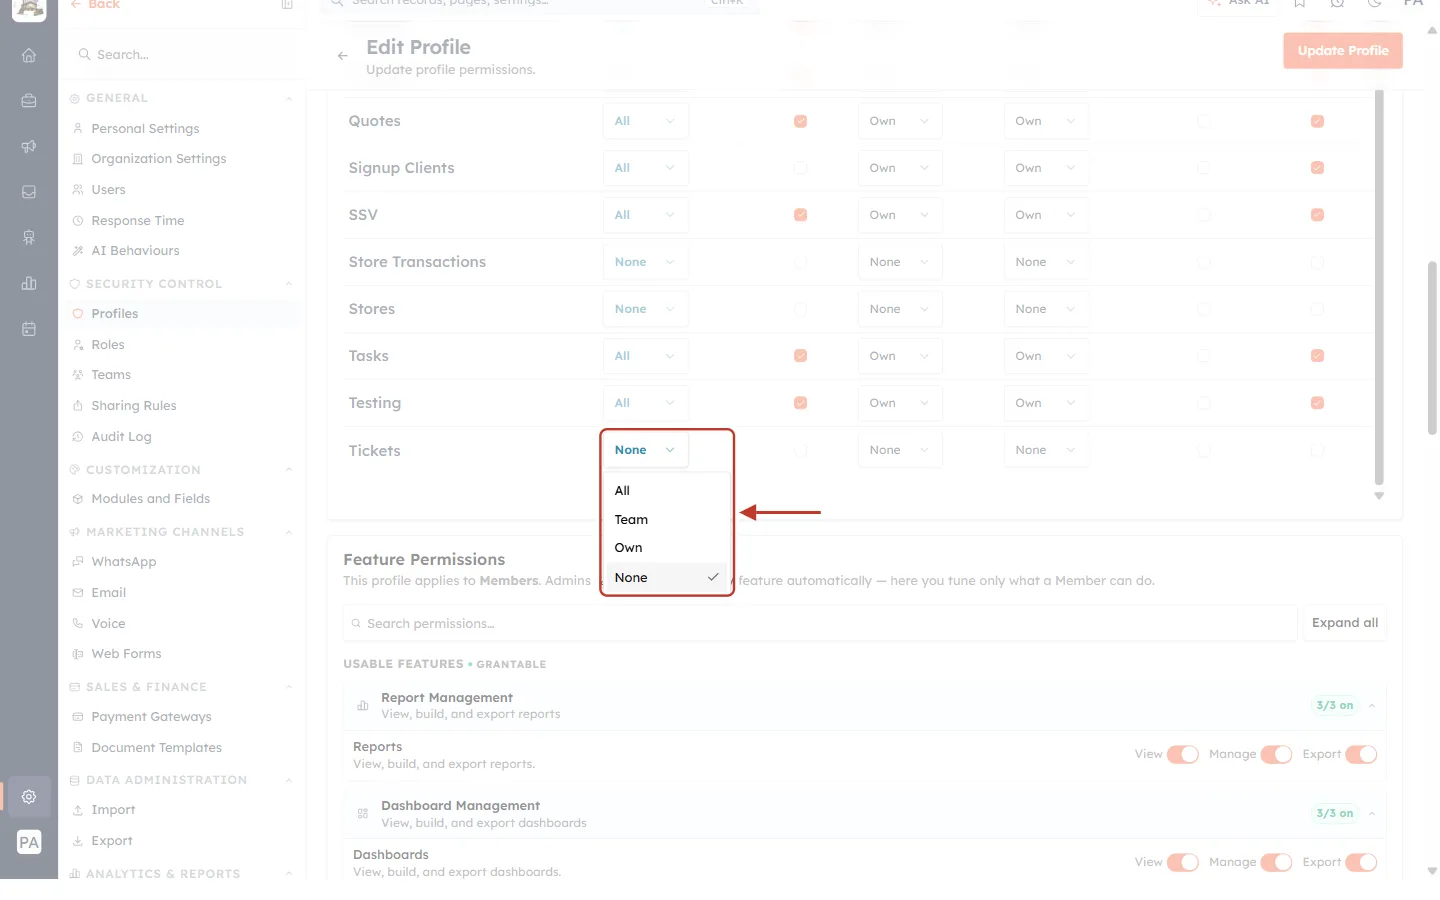
What this screenshot shows. The View drop-down of the Tickets row is open and ringed, showing the four levels.
All — every ticket. Good for managers and support leads.
Team — tickets of the user’s team. Good for team leads, or agents who share a queue.
Own — only their own tickets. Good for new agents or contractors.
None — no tickets at all (the tick shows the current choice).
✅
View is the most important setting: a user can’t edit or delete a ticket they can’t see. Start here, then set Edit and Delete to the same level or lower.
Step 8: Set Create, Edit, Export and Import#
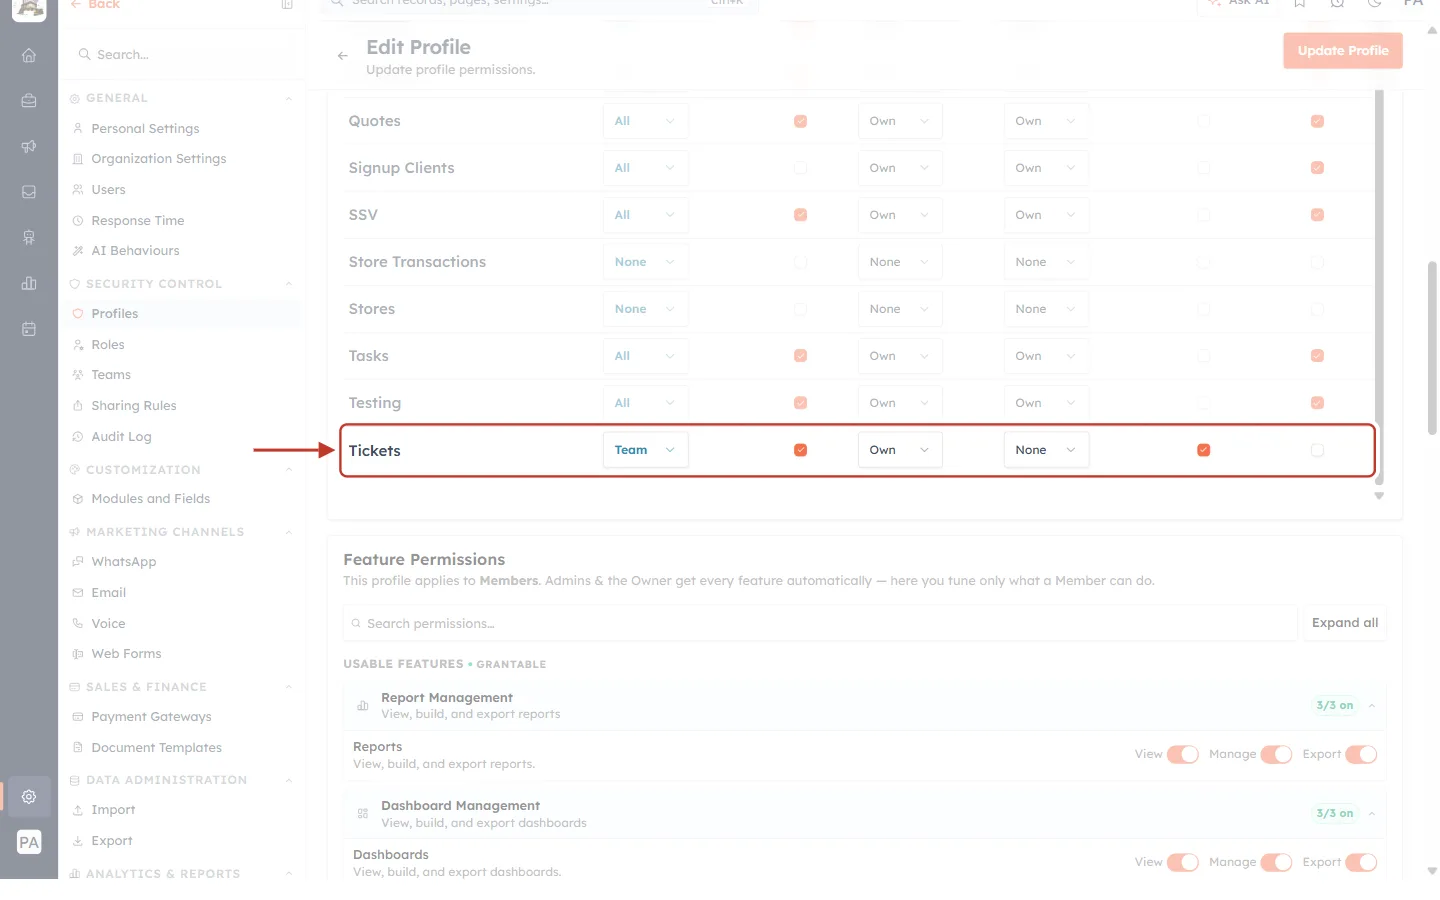
What this screenshot shows. The Tickets row is ringed after setting up a typical agent profile.
View: Team — they see their team’s tickets.
Create ticked — they can create tickets with New ticket.
Edit: Own — they can change only the tickets they own; other team tickets open read-only.
Delete: None — they can’t delete tickets.
Export ticked, Import unticked — they can download tickets but not bulk-upload them.
Step 9: Decide who can delete tickets#
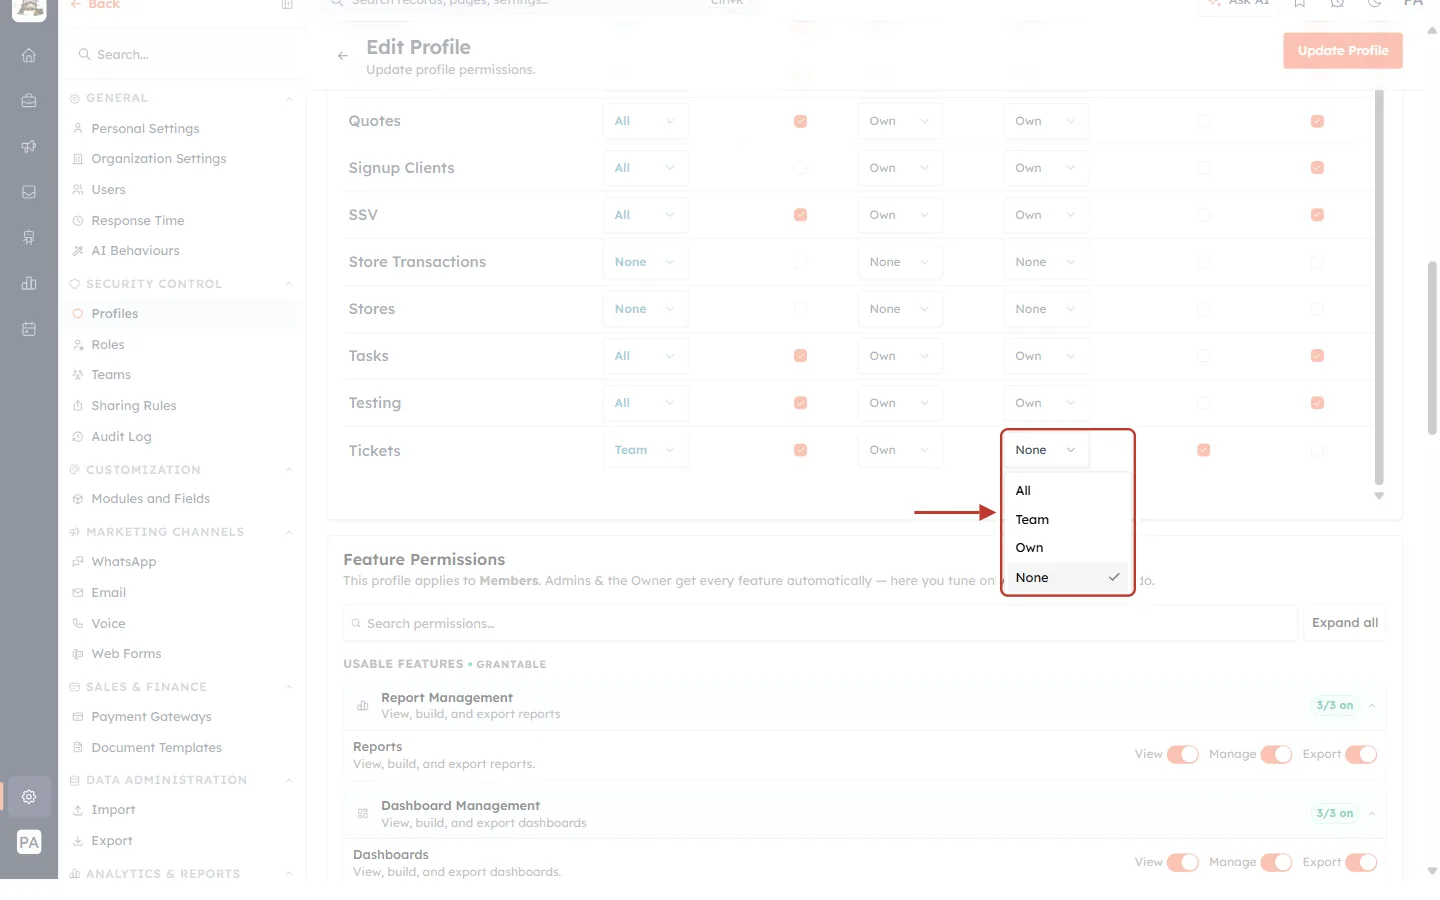
What this screenshot shows. The Delete drop-down of the Tickets row is open and ringed.
It offers the same four levels: All, Team, Own, None.
Deleting a ticket removes its conversation history too, so most teams keep this at None for agents and give it only to leads or administrators.
⚠️
Export lets users download ticket data, including customer details. Turn it on only for people who need it.
Part 3 — Control who can see, reply to and close chats#
Many tickets start as a chat. Access to the chats themselves is set separately, in Feature Permissions on the same page.
Step 10: Scroll down to Feature Permissions#
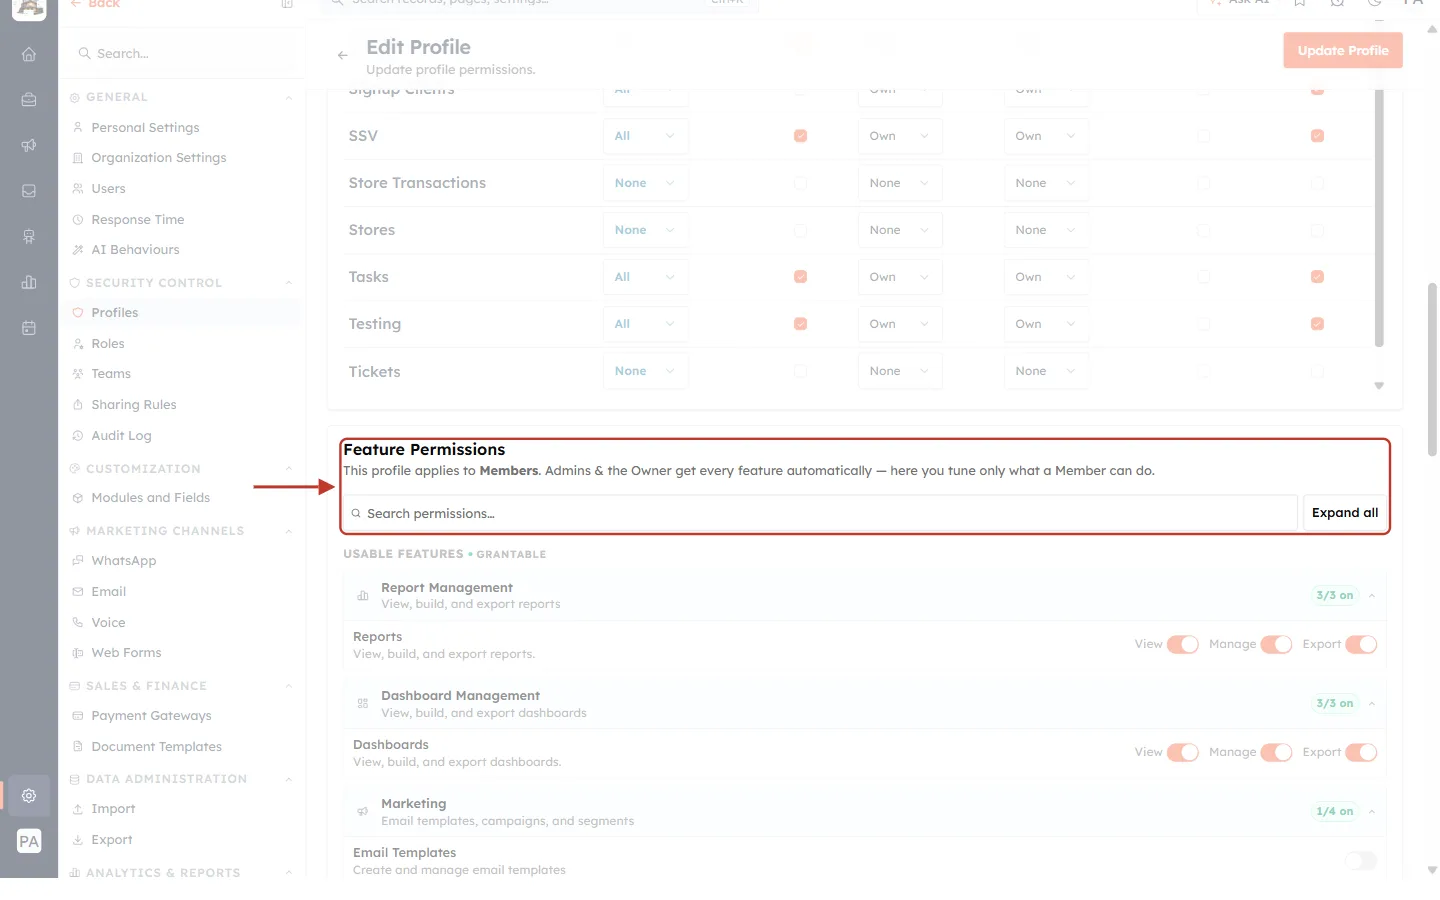
What this screenshot shows. The Feature Permissions heading, its explanation, the search box and Expand all are ringed.
The explanation reads: This profile applies to Members. Admins & the Owner get every feature automatically — here you tune only what a Member can do.
Search permissions… — find a feature by name.
Expand all — open every group so you can see all the switches.
Step 11: Find Inbox & Channels#
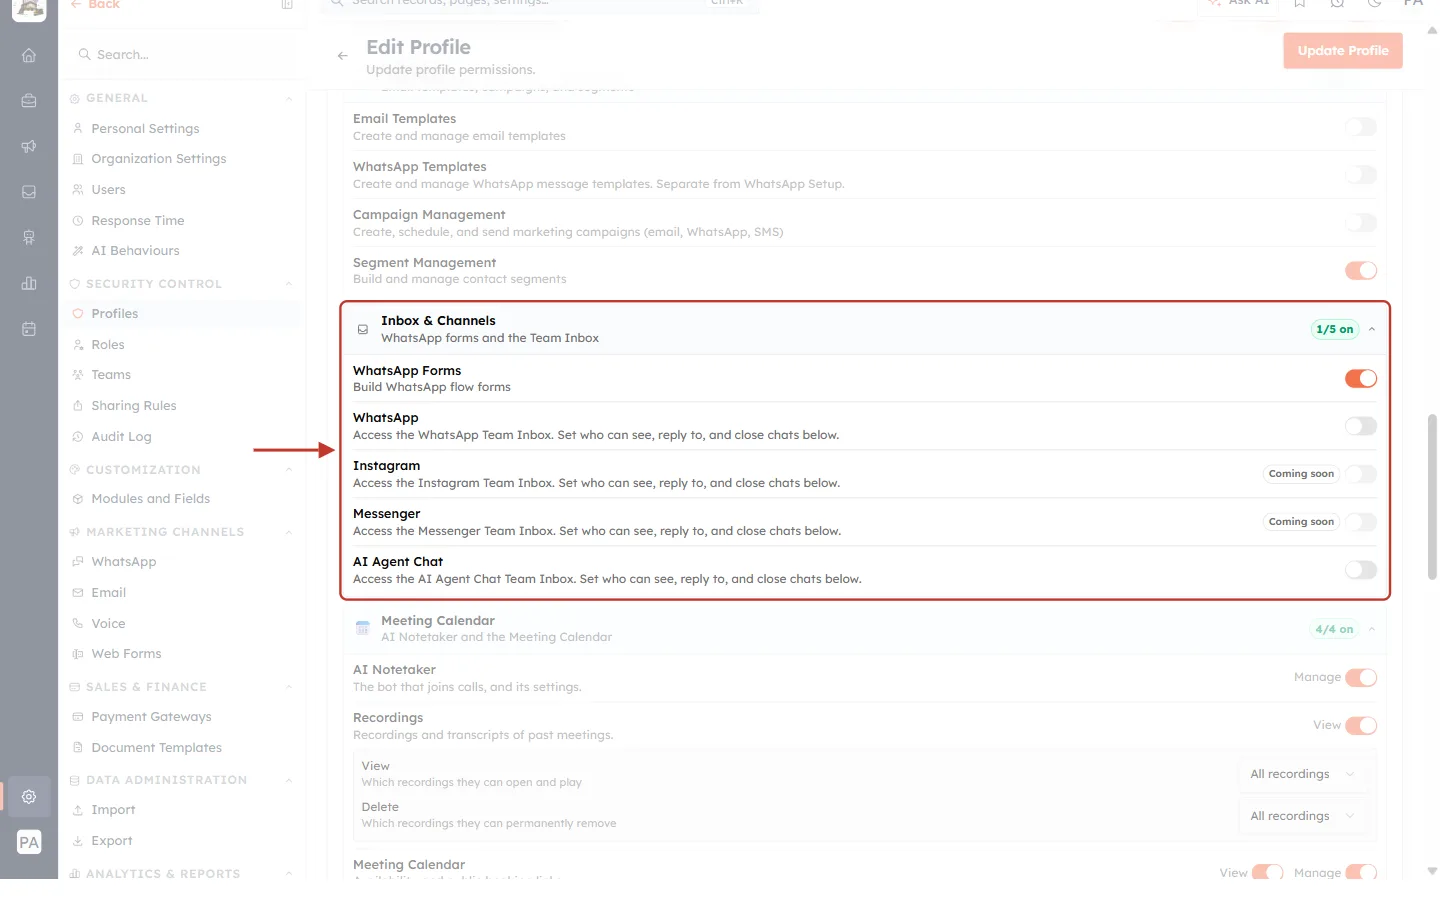
What this screenshot shows. The Inbox & Channels group is ringed. The badge on the right (here 1/5 on) shows how many of its features are switched on.
WhatsApp Forms — build WhatsApp flow forms.
WhatsApp — access the WhatsApp Team Inbox.
Instagram and Messenger — marked Coming soon.
AI Agent Chat — access the AI Agent Chat Team Inbox (the website chat where the AI agent hands over to a person).
Each inbox says: Set who can see, reply to, and close chats below.
Step 12: Switch on the inbox your agents work in#
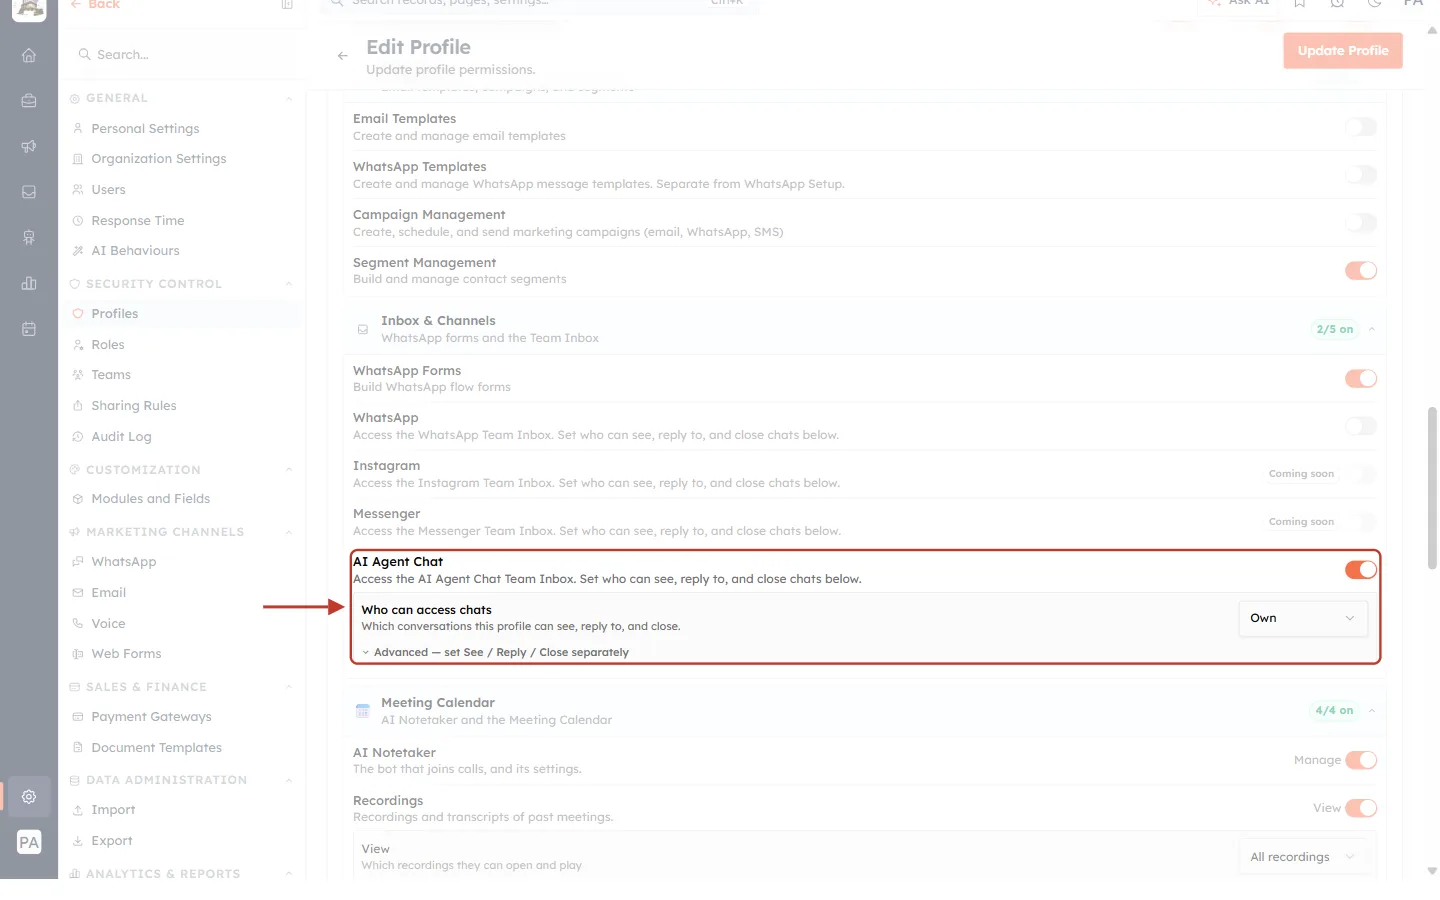
What this screenshot shows. The AI Agent Chat feature is switched on (orange switch) and ringed, with the Who can access chats setting that appears underneath.
Who can access chats — Which conversations this profile can see, reply to, and close.
The drop-down on the right shows the current choice (here Own).
Advanced — set See / Reply / Close separately — open this to give different levels for each action (Step 14).
Step 13: Choose which chats they can access#
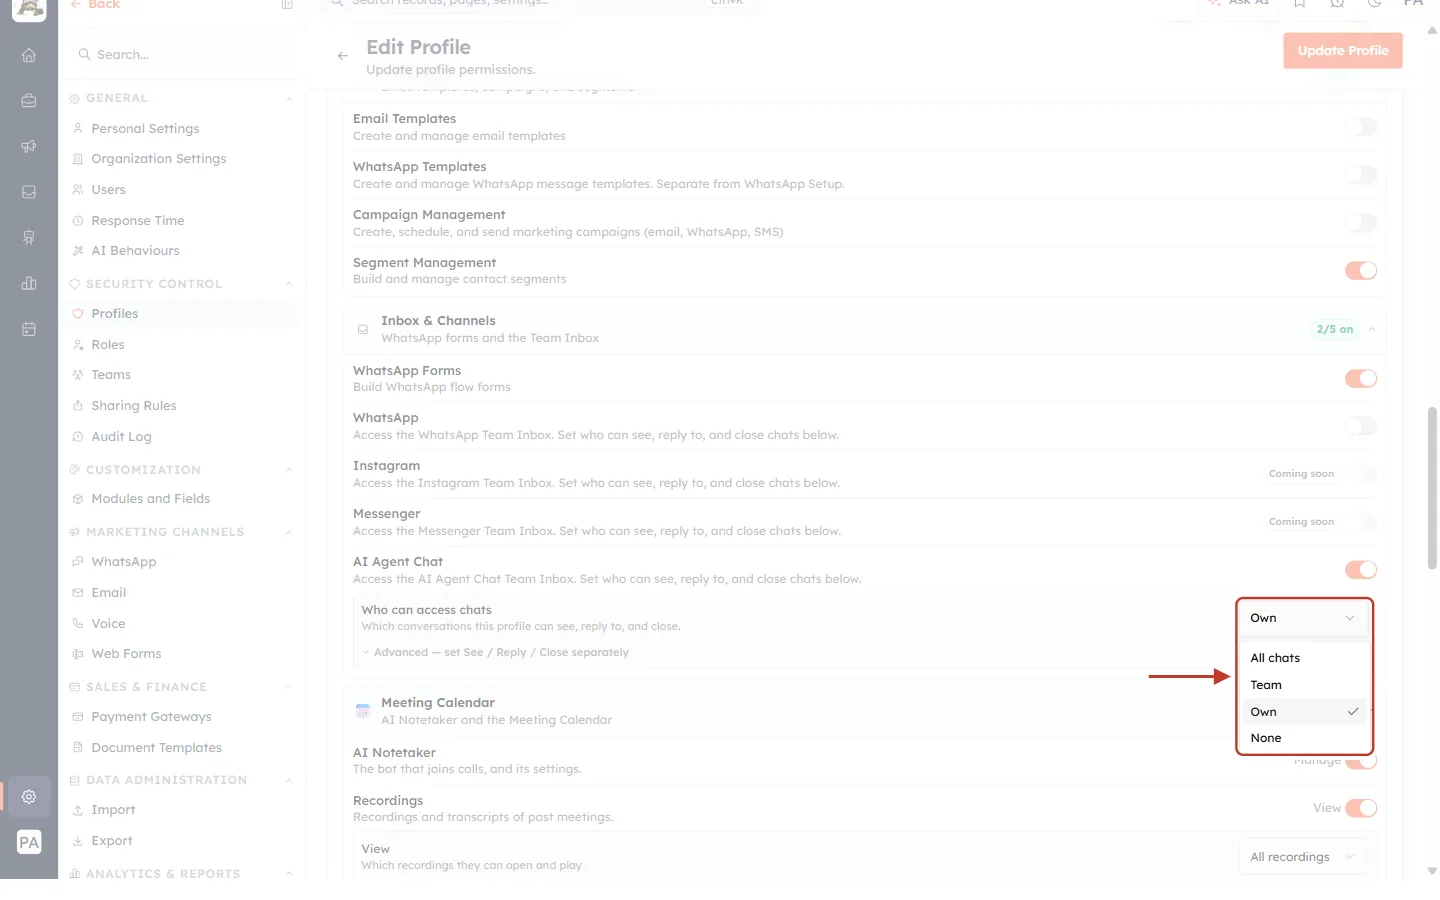
What this screenshot shows. The Who can access chats drop-down is open and ringed.
All chats — every conversation in this inbox.
Team — conversations of the user’s team.
Own — only conversations assigned to them.
None — no conversations.
Step 14: (Optional) Set See, Reply and Close separately#
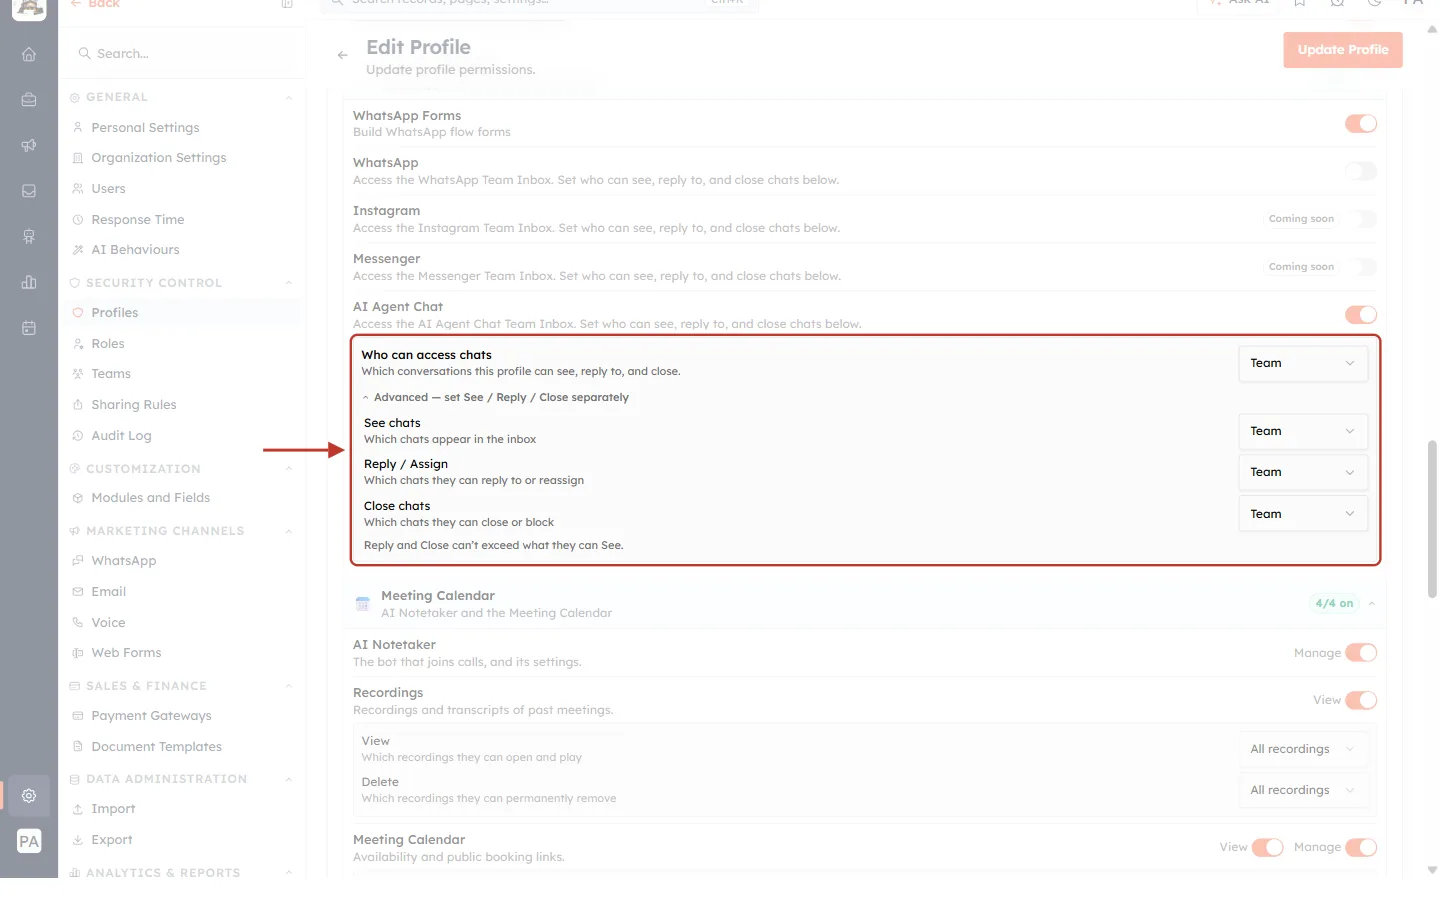
What this screenshot shows. The advanced settings are open and ringed, with Team chosen for all three.
See chats — Which chats appear in the inbox.
Reply / Assign — Which chats they can reply to or reassign.
Close chats — Which chats they can close or block.
The note at the bottom: Reply and Close can’t exceed what they can See. For example, if See is Team, Reply can be Team, Own or None — but not All chats.
A common setup: See: Team, Reply / Assign: Own, Close: Own — agents can follow their team’s conversations but only answer and close their own.
ℹ️
When an agent opens a chat they can see but not answer, the inbox tells them why — for example This conversation is assigned to another agent or You have read-only access to this inbox.
Step 15: Save the profile#
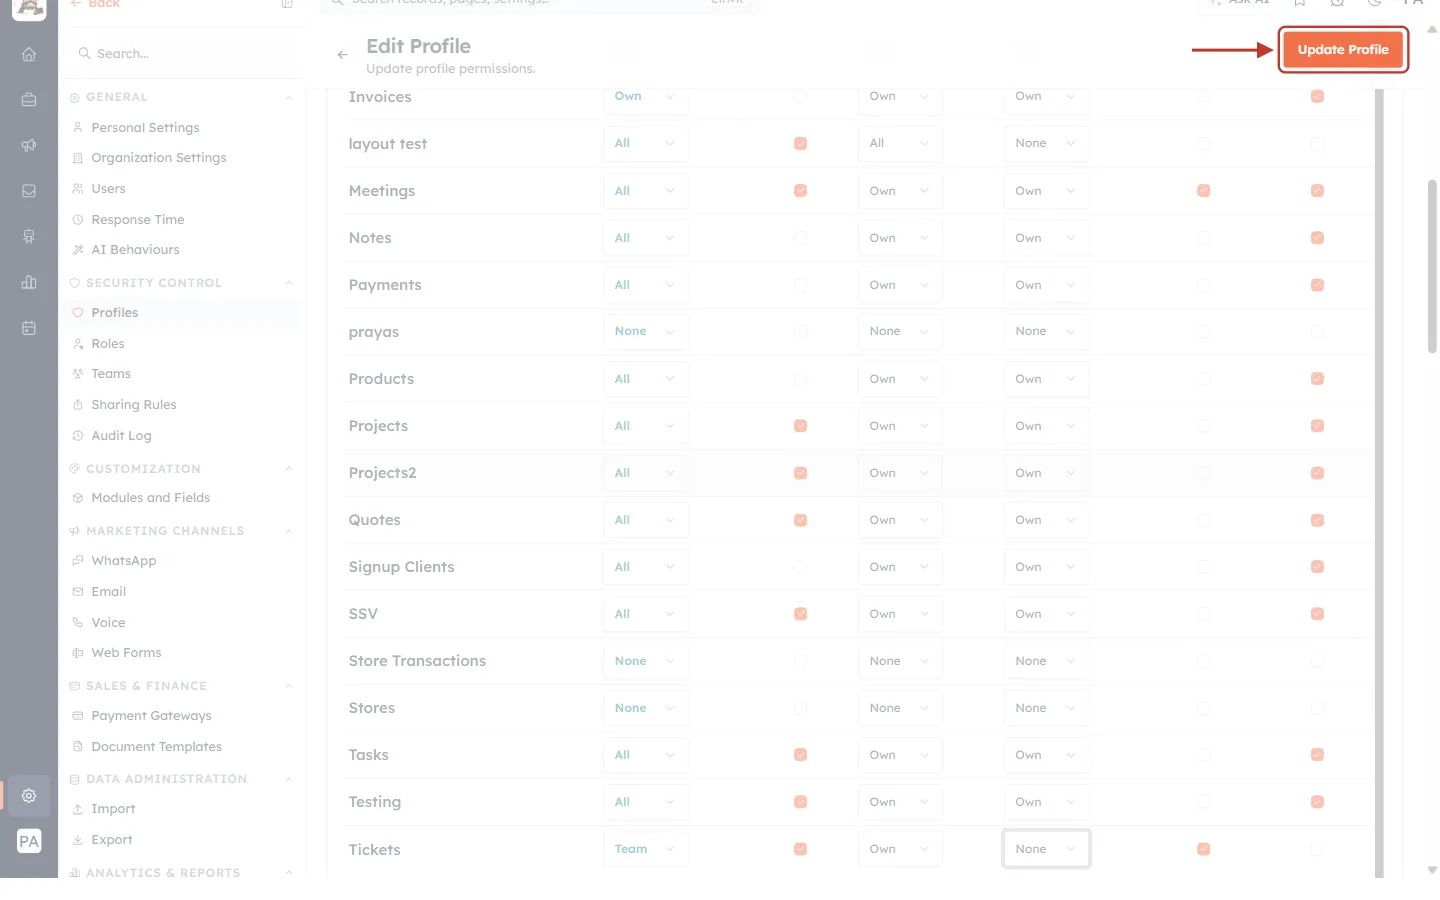
What this screenshot shows. The orange Update Profile button at the top right of the page is ringed.
Click it to save all your changes — module permissions and feature permissions together.
If you leave the page without clicking it, your changes are lost.
The new access applies to everyone with this profile. Ask agents to refresh their browser if they don’t see the change straight away.
Part 4 — Check which profile each user has, and their team#
Step 16: See each user’s profile#
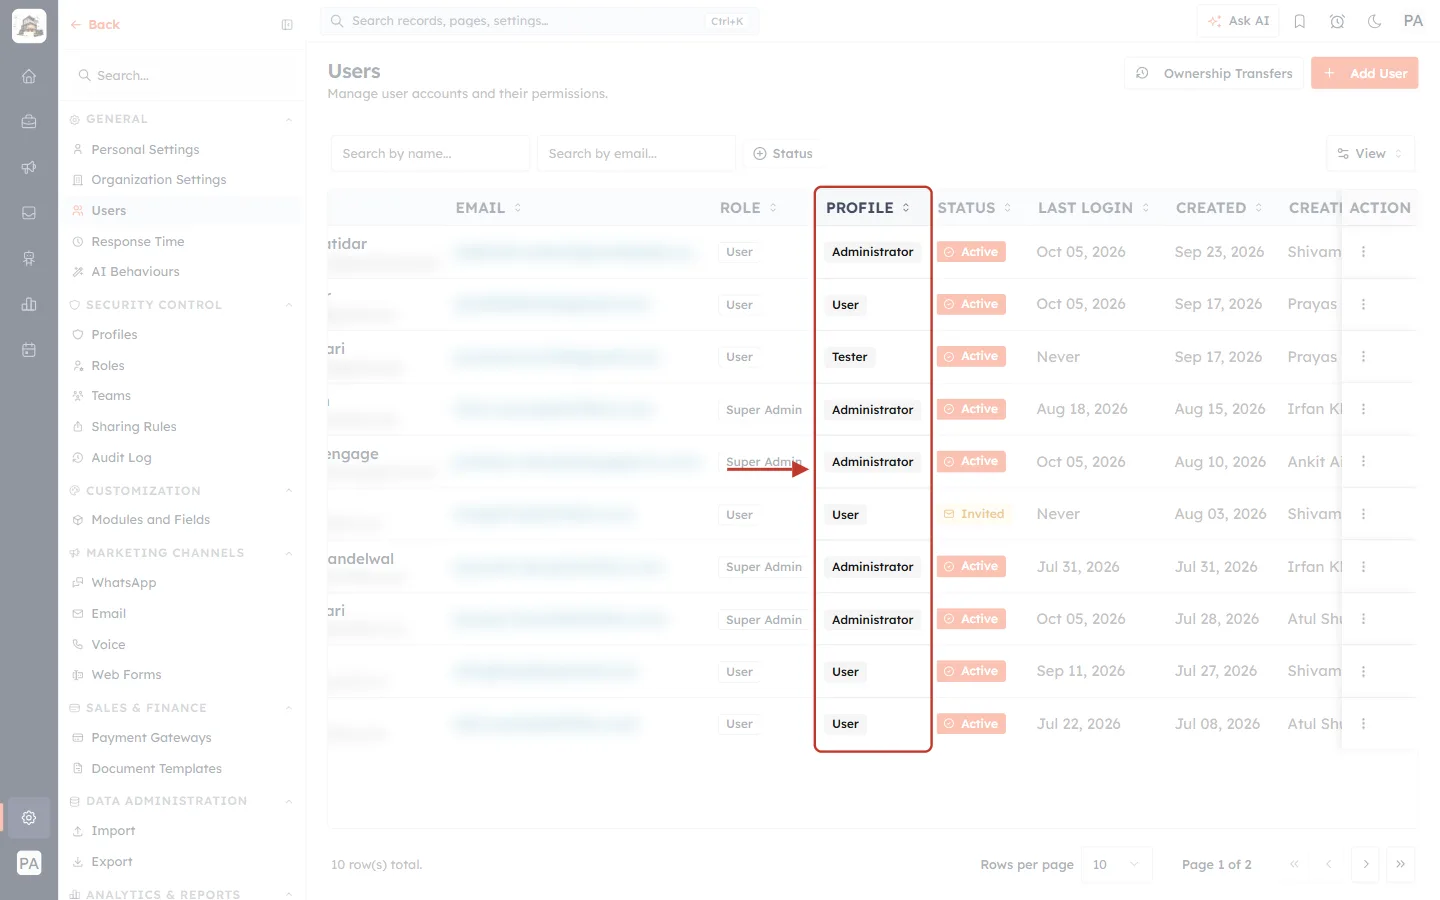
What this screenshot shows. On Settings → Users, the PROFILE column is ringed (email addresses are blurred).
Each user has one profile — for example Administrator, User or Tester. That profile decides what they can do with tickets.
The ROLE column next to it (for example User or Super Admin) places the user in your role hierarchy — see Understanding the Role Hierarchy.
To change a user’s profile, open the ⋮ menu on their row and edit the user — see Invite Your Team: How to Add and Manage Users.
Step 17: Check your teams#
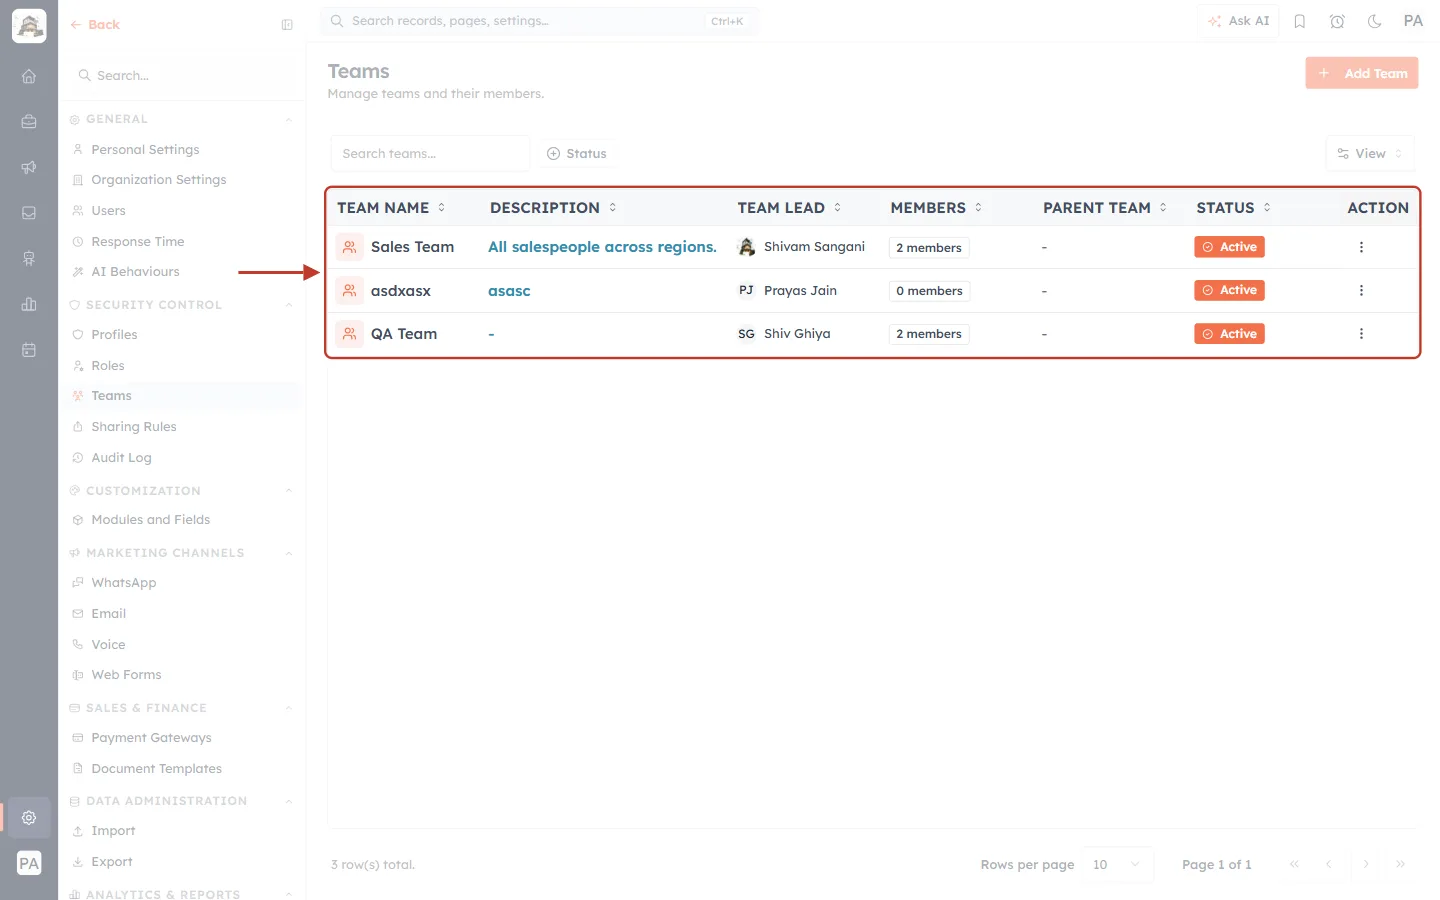
What this screenshot shows. The table on Settings → Teams is ringed.
TEAM NAME and DESCRIPTION — for example Sales Team and QA Team.
TEAM LEAD — the person in charge of the team.
MEMBERS — how many users belong to it.
PARENT TEAM and STATUS.
The Team access level uses these teams: a user with View: Team sees the tickets of the team(s) they belong to. Make sure every agent is in the right team.
Part 5 — What your agents will see#
After you save, the Customer & Support workspace adapts to each agent’s View level.
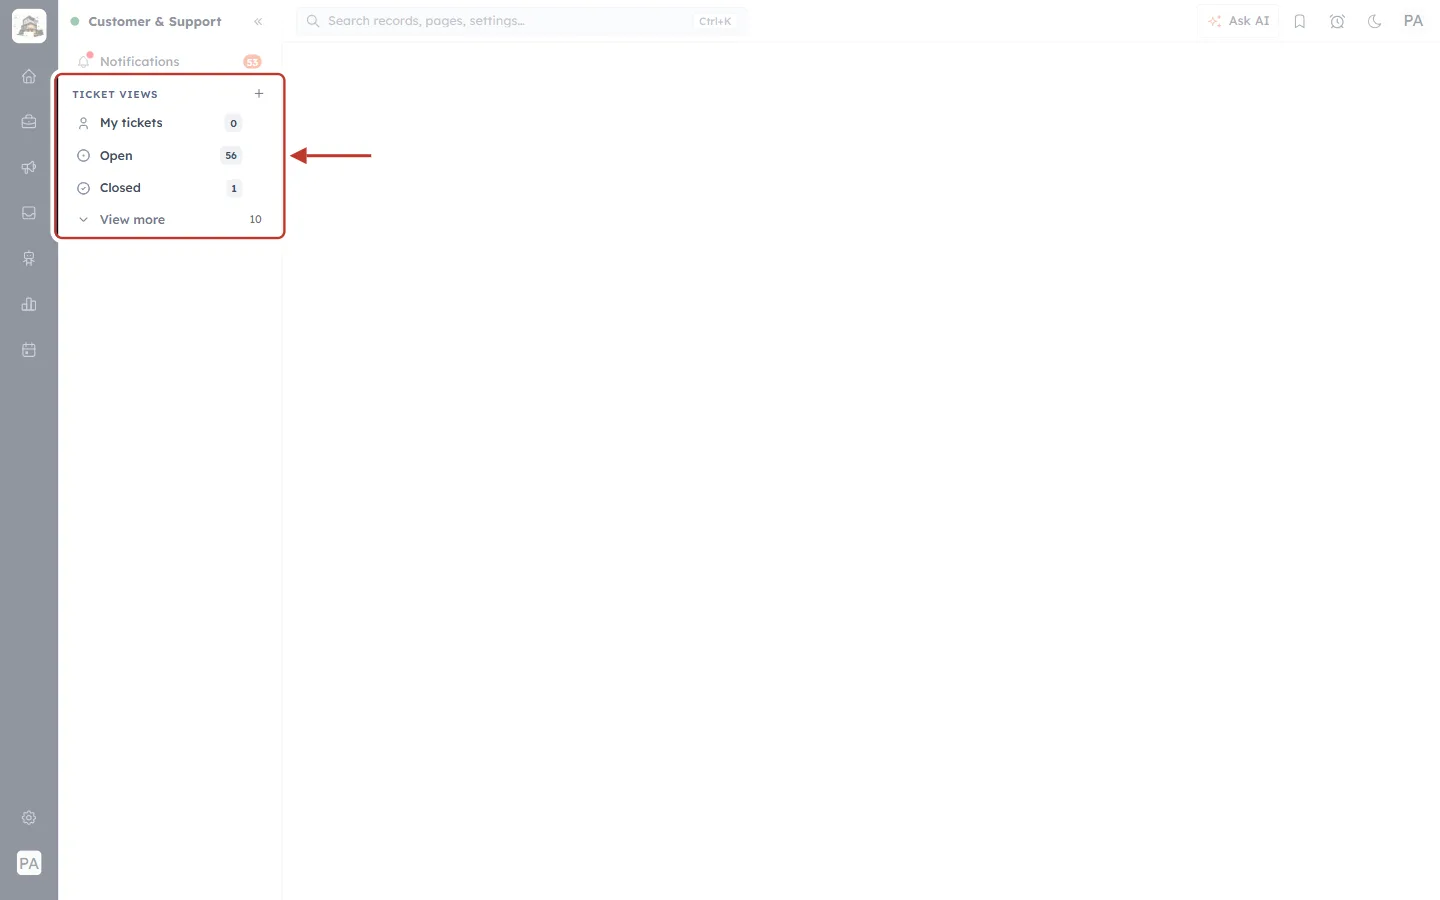
What this screenshot shows. The TICKET VIEWS list in the Customer & Support sidebar is ringed, as it appears for an agent whose View level is Team or Own.
There is no All tickets view — it appears only for users with View: All.
My tickets, the status views (Open, Closed) and View more are still there, and only include tickets the agent is allowed to see.
Tickets the agent can see but not edit open read-only.
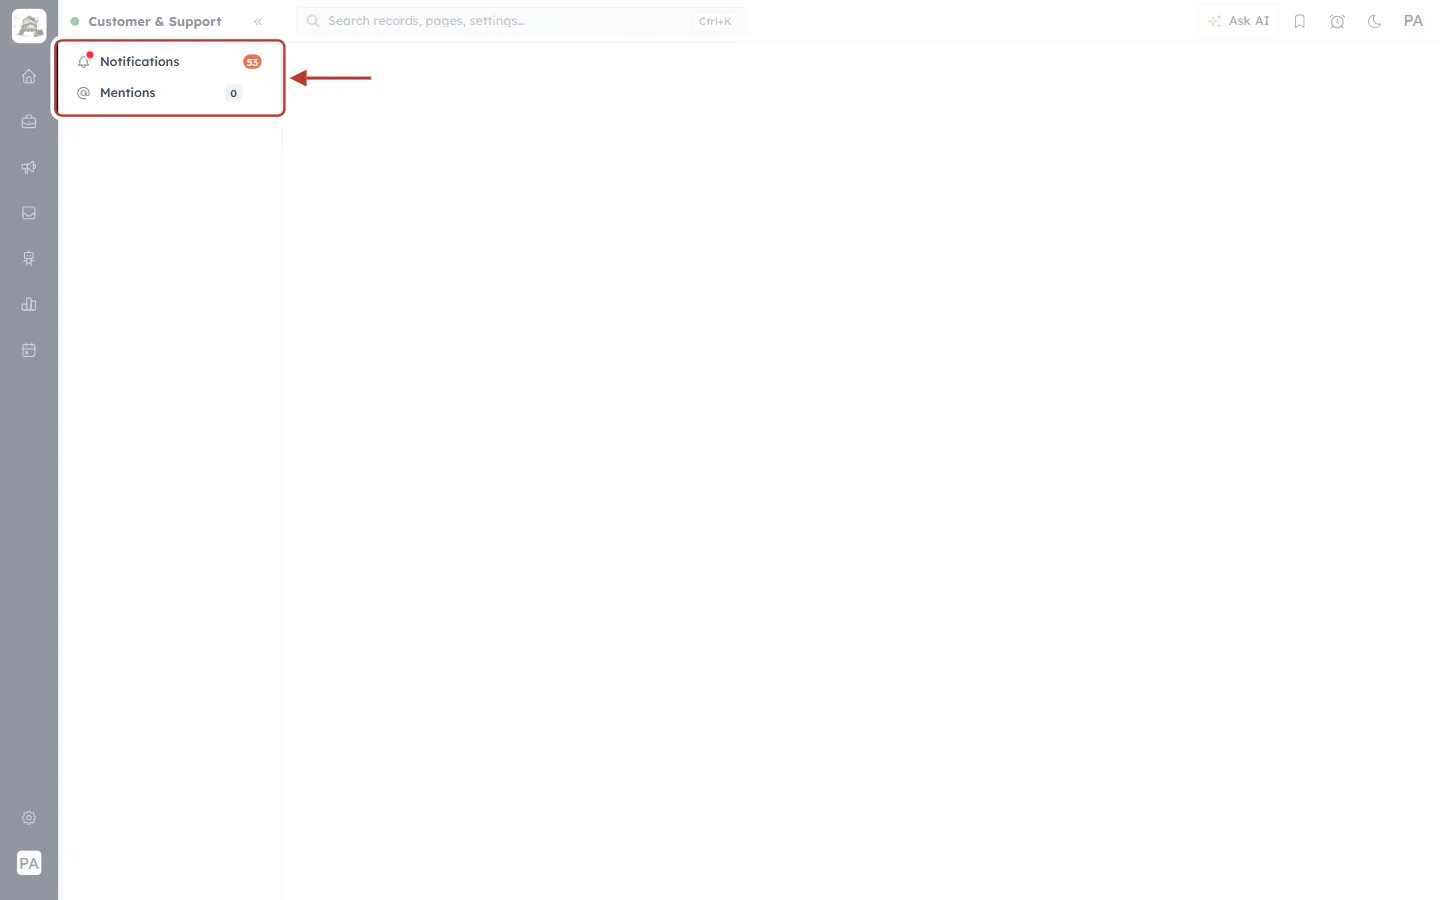
What this screenshot shows. The sidebar of an agent whose View level is None is ringed.
Only Notifications and Mentions are shown — there are no ticket views.
If an agent tells you their ticket views have disappeared, check the View setting of the Tickets row in their profile.
Part 6 — Share one team’s tickets with another team#
Sometimes a profile is right for most tickets, but one group needs to see more — for example the Sales Team should be able to read the tickets the QA Team handles. Instead of giving everyone All, add a sharing rule.
Step 18: Start a new sharing rule for Tickets#
Go to Settings → Security Control → Sharing Rules and click New Sharing Rule.
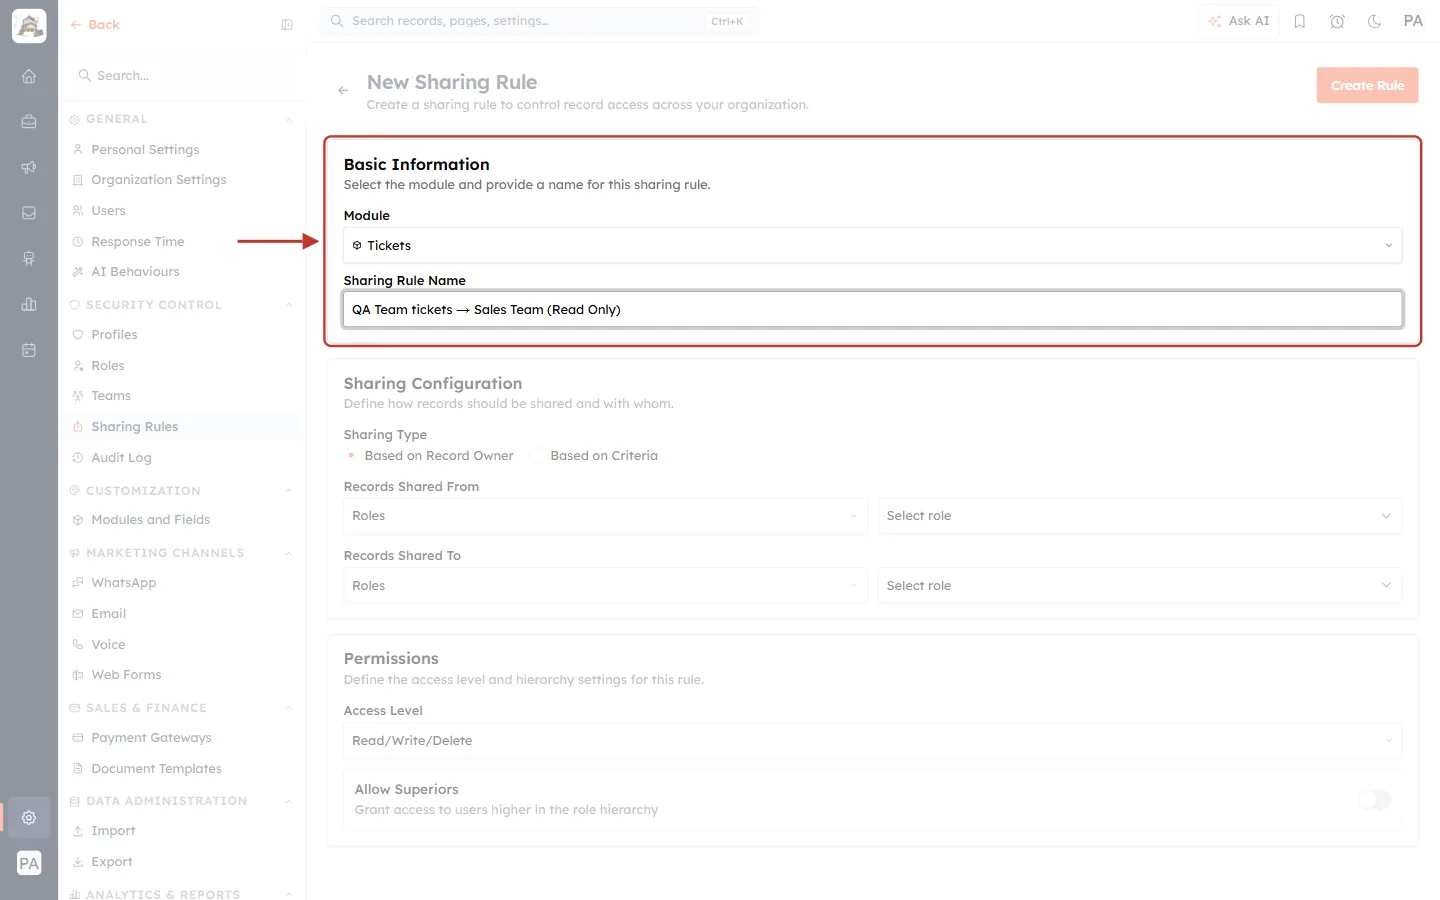
What this screenshot shows. The Basic Information card of the new rule is ringed.
Module — choose Tickets.
Sharing Rule Name — a name that says what it does, for example QA Team tickets → Sales Team (Read Only).
Step 19: Choose whose tickets are shared, with whom, and how#
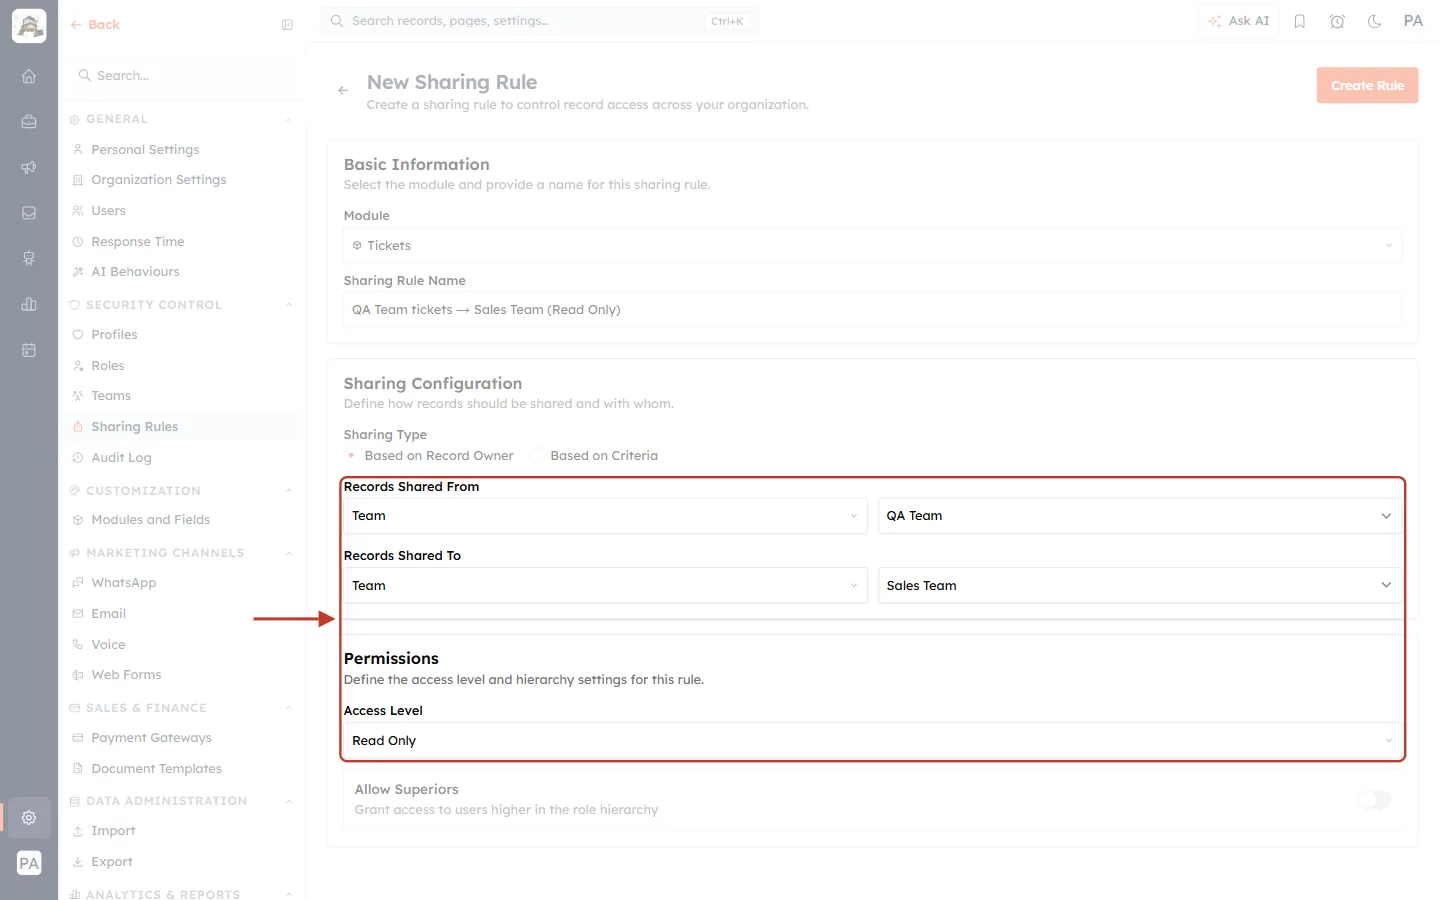
What this screenshot shows. The sharing settings are ringed, with Sharing Type set to Based on Record Owner.
Records Shared From — Team → QA Team: tickets owned by members of the QA Team.
Records Shared To — Team → Sales Team: who gets access.
Access Level — Read Only lets them view the tickets but not change them. (New rules start at Read/Write/Delete, so check this.)
Allow Superiors — also give access to users above them in the role hierarchy.
Click Create Rule (top right) to save.
For criteria-based rules (for example only Urgent tickets) and managing rules, see Sharing Rules: Share Records Across Teams, Roles & Users.
Part 7 — Hide a single ticket field#
If agents may see a ticket but not one of its fields (for example an internal cost or account value), use Field access in the Tickets field builder (Settings → Modules and Fields → Tickets).
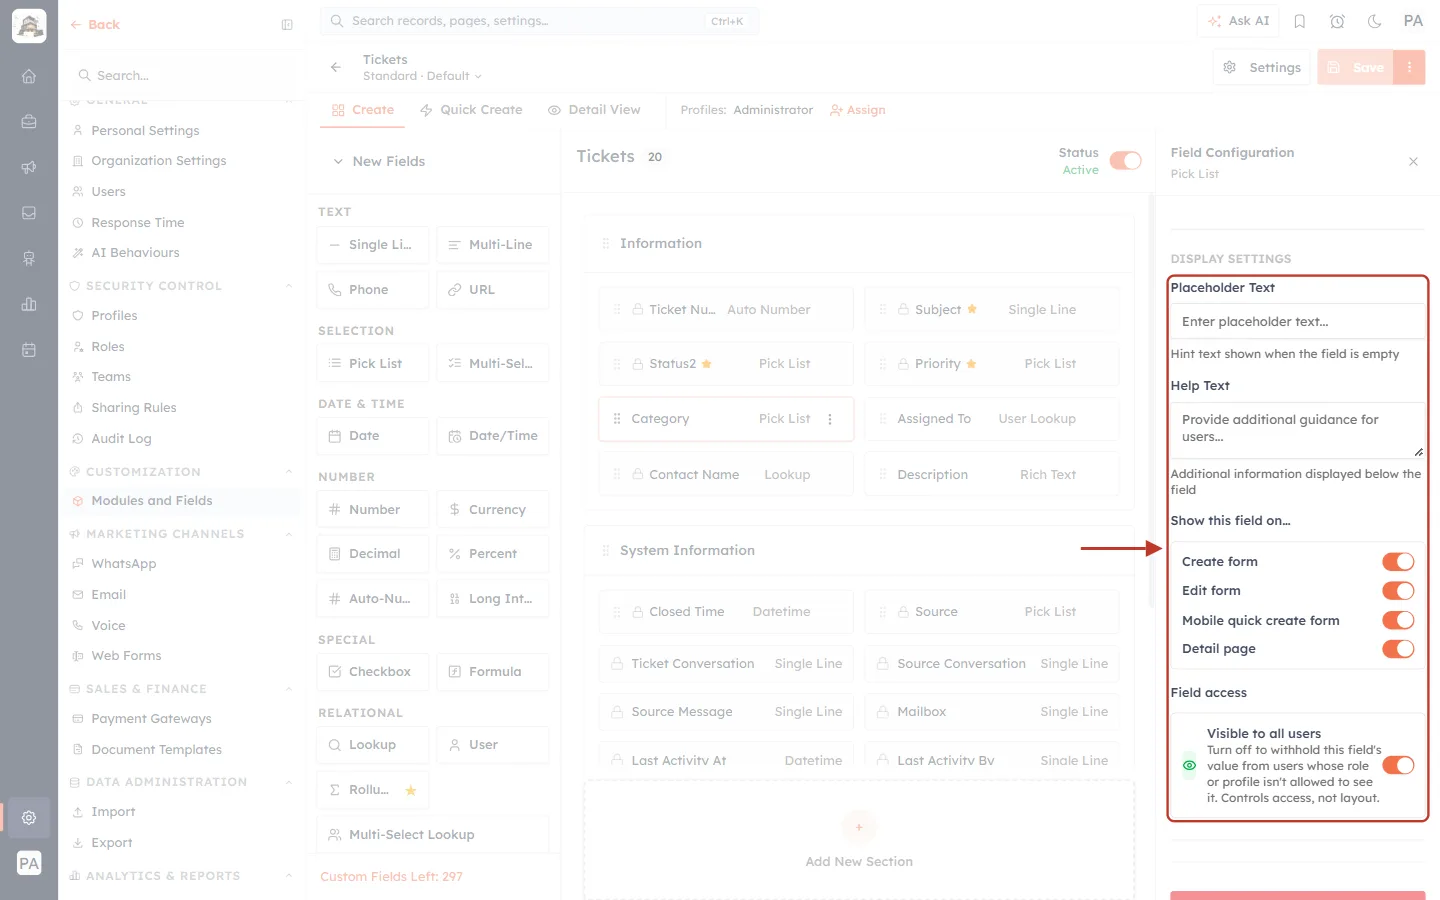
What this screenshot shows. The DISPLAY SETTINGS of a ticket field are ringed, ending with Field access.
Show this field on… — choose the forms and pages the field appears on (Create form, Edit form, Mobile quick create form, Detail page). This controls layout.
Field access → Visible to all users — Turn off to withhold this field’s value from users whose role or profile isn’t allowed to see it. Controls access, not layout.
Click Save in the builder after changing it. See Customise Ticket Fields, Categories & Statuses for the whole builder.
Good practice#
Give the least access that lets people do their job. Start agents on Own or Team; give All to leads and managers.
One profile per job — for example Support Agent, Support Lead, Support Manager. Use Clone to create them.
Keep View, Edit and Delete in step. Edit and Delete should never be wider than View.
Match ticket and chat access. If agents see Team tickets, give them Team on the chat inbox too, so they can follow the conversation behind each ticket.
Use sharing rules for exceptions instead of widening a whole profile.
Test with a real agent account after each change.
Troubleshooting#
An agent can’t see the All tickets view. That view is only for profiles with View: All on Tickets. With Team or Own, use My tickets and the status views.
An agent has no ticket views at all. Their profile has View: None on Tickets. Change it to Own, Team or All and click Update Profile.
An agent can open a ticket but can’t change it. Their Edit level is lower than their View level (for example View: Team, Edit: Own), or the ticket belongs to someone else.
An agent can see a chat but can’t reply. Check Reply / Assign in the advanced chat settings — it may be Own while the chat is assigned to another agent.
The New ticket button is missing. Create is unticked on the Tickets row of their profile.
My changes didn’t apply. Make sure you clicked Update Profile, that you changed the profile the user actually has (Users → Profile column), and ask the user to refresh the page.
Frequently asked questions#
Do these settings limit administrators? No. The Administrator profile has full system access, and Admins and the Owner get every feature automatically.
Can I give two agents with the same profile different access? Not with one profile. Clone the profile, change the copy, and give it to one of them — or use a sharing rule for the extra access.
What is the difference between Team and Own? Own covers only the user’s own tickets. Team also covers tickets that belong to the rest of their team.
Does hiding a field hide the whole ticket? No. Field access hides only that field’s value; the ticket itself follows the profile’s View level.
Previous and next#
Next: Support Reporting: Track Ticket Volume, Backlog & Resolution with Ticket Reports (Step-by-Step)
Related#
Was this article helpful?
Ready to implement this?
OpenAI Engage and apply what you just learned to your own workspace.
Open AI Engage CRM