Loading…


KnowledgeBase
Introduction to Customer & Support: How AiEngage CRM Turns Customer Requests into Tickets
What is Customer & Support?#
Every business gets questions and problems from its customers: “I can’t download my invoice”, “my order hasn’t arrived”, “how do I change my plan?”. When these arrive in personal inboxes, chat windows and phone calls, they are easy to lose, two people answer the same one, and nobody can tell whether a customer was ever helped.
Customer & Support is the helpdesk built into AiEngage CRM that fixes this. Every request becomes a ticket, and every ticket lives in one shared workspace where your team can see it, own it, reply to it, discuss it privately and close it when it is done. Because it is part of the CRM, every ticket is also linked to the contact who raised it, so you always see the whole customer — their details, their deals and their history — next to their problem.
This article is the starting point. It explains the ideas — what a ticket is, where tickets come from and how they move from new to finished — then takes you on a guided tour of the workspace and the settings an admin configures. When you are ready to work tickets day to day, continue with Handle Customer Tickets from First Message to Resolution.
What is a ticket?#
A ticket is one customer request, tracked from the moment it arrives until it is closed. Every ticket has:
A ticket number, such as TKT-00105. It never changes, so you and the customer can both refer to it.
A subject and a description of what the customer needs.
A status that shows where it is in its life: Open, Pending, In Progress, Resolved or Closed.
A priority — Low, Medium, High or Urgent — and an optional category, such as Billing issue.
An owner (the teammate it is assigned to) and the contact who raised it.
A conversation thread: the customer’s messages, your team’s replies and private internal notes, in order.
A source showing how it arrived.
Where tickets come from#
Tickets can be created in four ways. The Source field on each ticket record tells you which one:
| Source | How the ticket is created |
|---|---|
| AI Agent | A visitor chats with you through the chat widget on your website. Your AI agent answers first and raises a ticket when the request needs a person. The chat transcript is copied onto the ticket. |
| The ticket was raised from a WhatsApp conversation with the customer. | |
| A customer emails your support address. Once an admin connects that mailbox, each new email becomes a ticket automatically, and the customer’s replies land on the same ticket. | |
| Manual | A teammate adds the ticket with New ticket — for example, after a phone call or a conversation in person. |
ℹ️
The ticket list in the workspace labels tickets by the channel the conversation came through, so a ticket raised from a website chat shows Chat there, while its record’s Source says AI Agent. Both describe the same ticket.
How a ticket moves from new to finished#
Every ticket has one status at a time. Most tickets move from left to right:
Open → Pending → In Progress → Resolved → Closed
| Status | What it means | Typical next step |
|---|---|---|
| Open | New and not yet dealt with. Every new ticket starts here. | Someone takes ownership and replies. |
| Pending | Waiting — usually for the customer to reply or send more information. | Move it on when the answer arrives. |
| In Progress | Your team is actively working on it. | Resolve it once it is fixed. |
| Resolved | You believe it is sorted and have told the customer. | The customer can still disagree; otherwise it is closed. |
| Closed | Finished. The CRM records the Closed Time automatically. | If the customer replies, the ticket can reopen. |
Two automatic rules keep the queue honest (an admin can change both, see Part 3):
Reopen on reply — if a customer replies to a closed ticket, it reopens, so their message is never left sitting on a ticket marked as done.
Auto-close — resolved tickets that nobody comes back to are closed after a set number of days (7 by default).
The priority works alongside the status: Urgent and High tickets should be handled first, Medium is the default for new tickets, and Low can wait.
The workspace and the Tickets module#
You will meet tickets in two places. They show the same tickets, for different jobs:
| Customer & Support workspace | Tickets module (Sales → Tickets) | |
|---|---|---|
| Best for | Working tickets: reading, replying, internal notes, changing status | Managing tickets as CRM records: filters, Kanban boards, import and export, reports |
| Feels like | A shared support inbox | The Contacts or Deals list |
| Used by | Support agents, every day | Team leads and admins |
A change in one place shows up in the other straight away — close a ticket in the workspace and it shows as Closed in the module.
Before you begin#
Permissions. To see tickets, your profile needs access to the Tickets module; to work them, it also needs edit access. Ask your admin, or see Control Permissions with Profiles.
Teams. Tickets can be grouped by team. If your organisation routes support to a team, your admin creates it first — see Create Teams.
Setup. Email and website chat only create tickets once an admin has set them up (Part 3). Tickets added by hand work straight away.
Part 1 — A tour of the Customer & Support workspace#
Step 1: Open the workspace#
Open Customer & Support at app.aiengagecrm.com/dashboard/tickets and bookmark it, so you can get back in one click. You can also jump in from any ticket record in the CRM by clicking Open ticket thread (Part 2, Step 8).
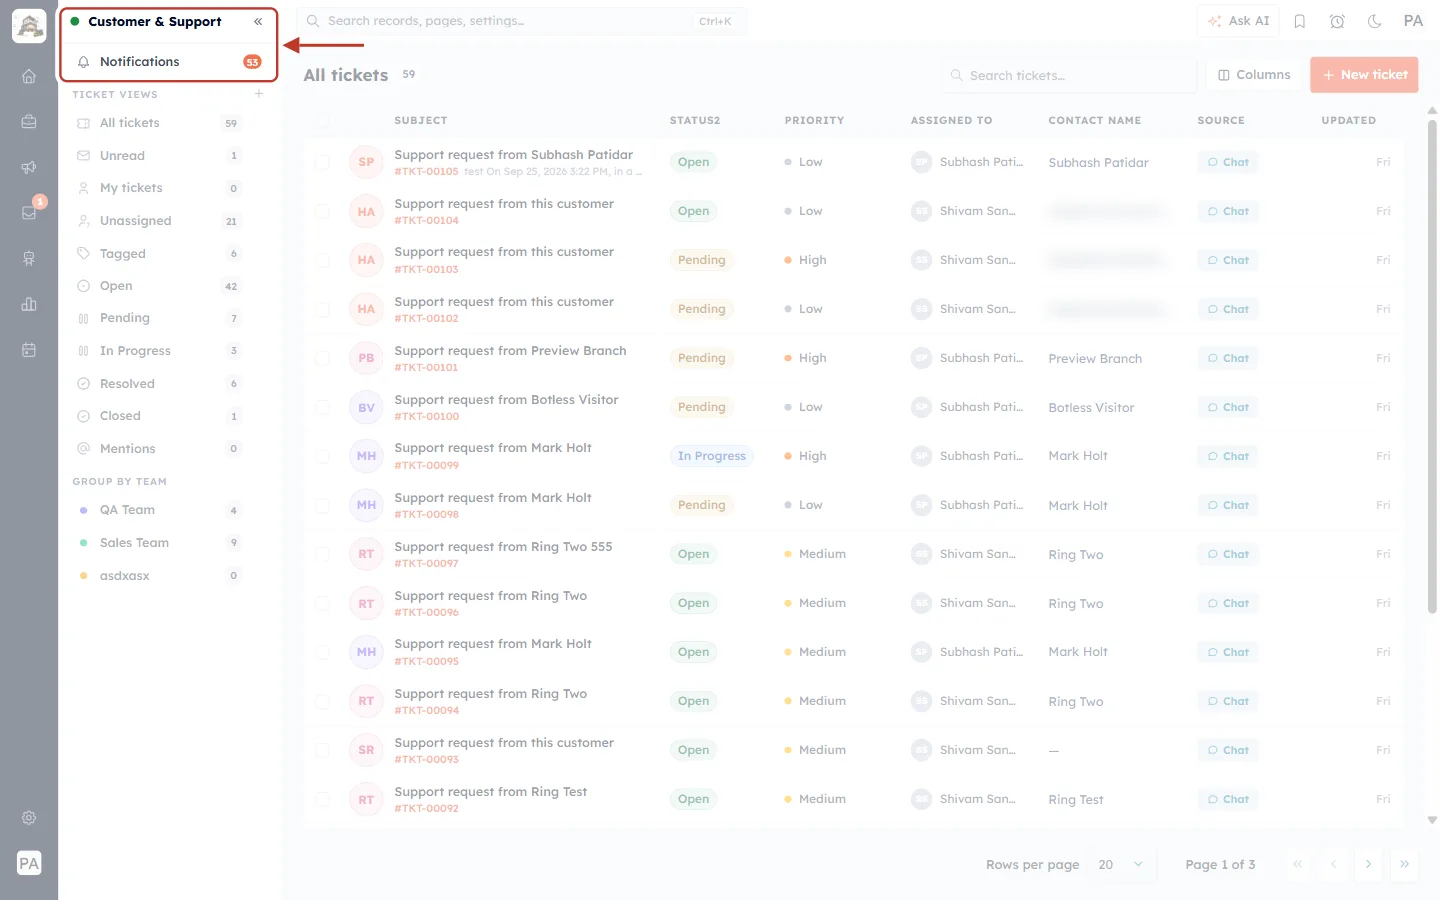
What this screenshot shows. The Customer & Support workspace, with the top of its left-hand sidebar ringed. The rest of the page — the ticket list — is faded.
● Customer & Support — the name of the workspace. The green dot shows you are signed in and connected.
« (double arrow, top right of the sidebar) — collapses the sidebar to give the ticket list more room.
Notifications with an orange number — alerts about your tickets, such as new replies and tickets assigned to you. The number is how many are waiting.
All tickets 59 (faded, right) — the list currently showing, and how many tickets it holds.
+ New ticket (faded, top right) — adds a ticket by hand (Step 5).
Step 2: Use the ticket views to find the right tickets#
The sidebar holds ticket views — ready-made lists that each show one slice of your tickets. Click a view and the list on the right changes to match. The number beside each view is how many tickets are in it.
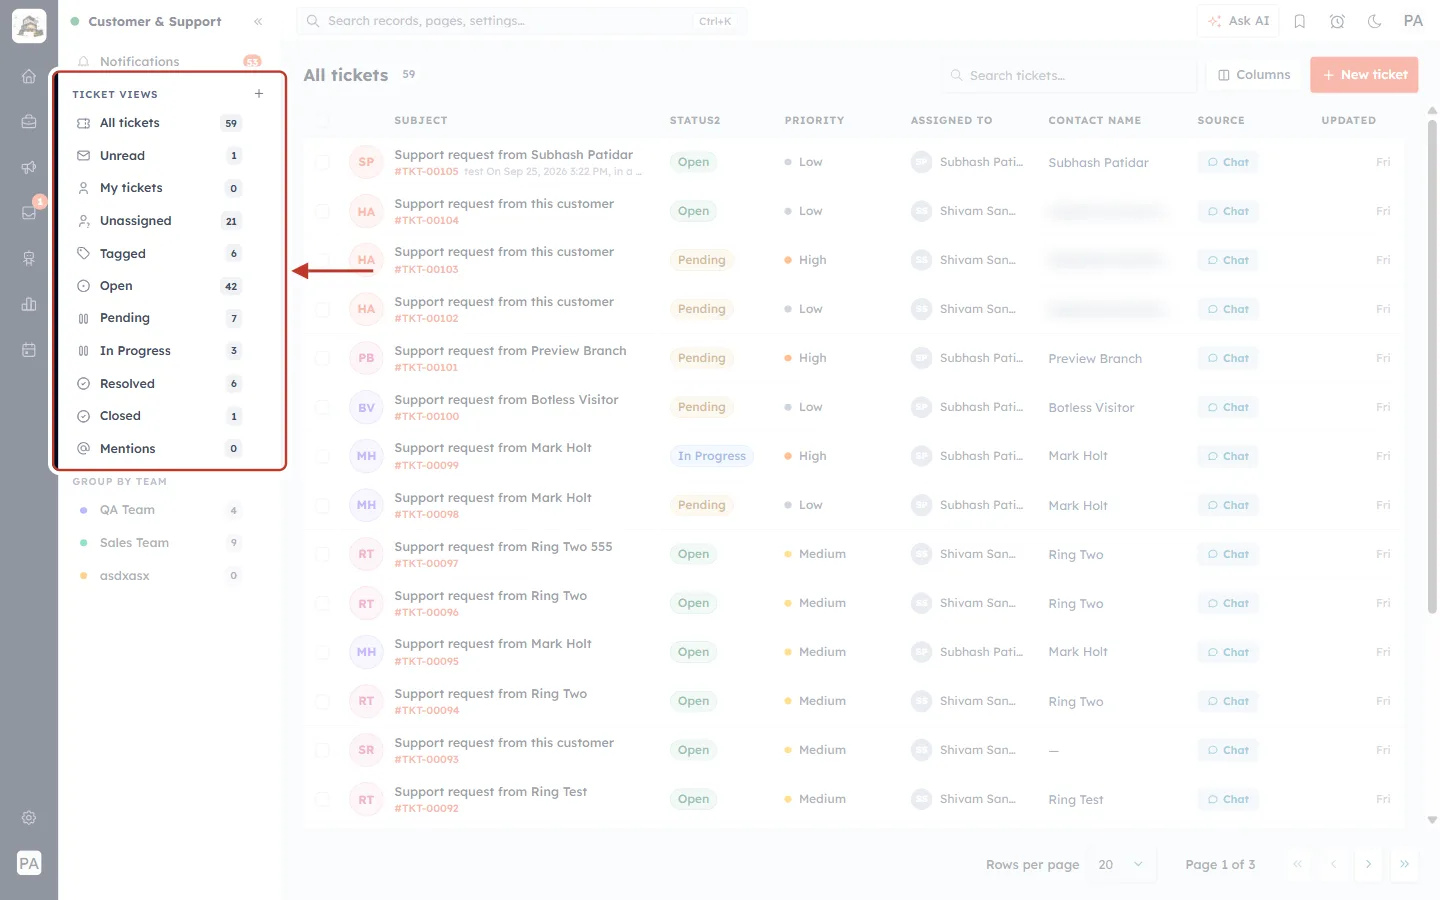
What this screenshot shows. The TICKET VIEWS section of the sidebar is ringed.
All tickets — every ticket you are allowed to see.
Unread — tickets with activity you have not opened yet.
My tickets — tickets assigned to you. Agents usually start their day here.
Unassigned — tickets nobody owns yet. A team lead should check this often and hand them out.
Tagged — tickets that carry at least one tag.
Open, Pending, In Progress, Resolved, Closed — one view per status (Step 3).
Mentions — tickets where a teammate @mentioned you in an internal note.
+ (to the right of the heading) — creates your own view with your own filters.
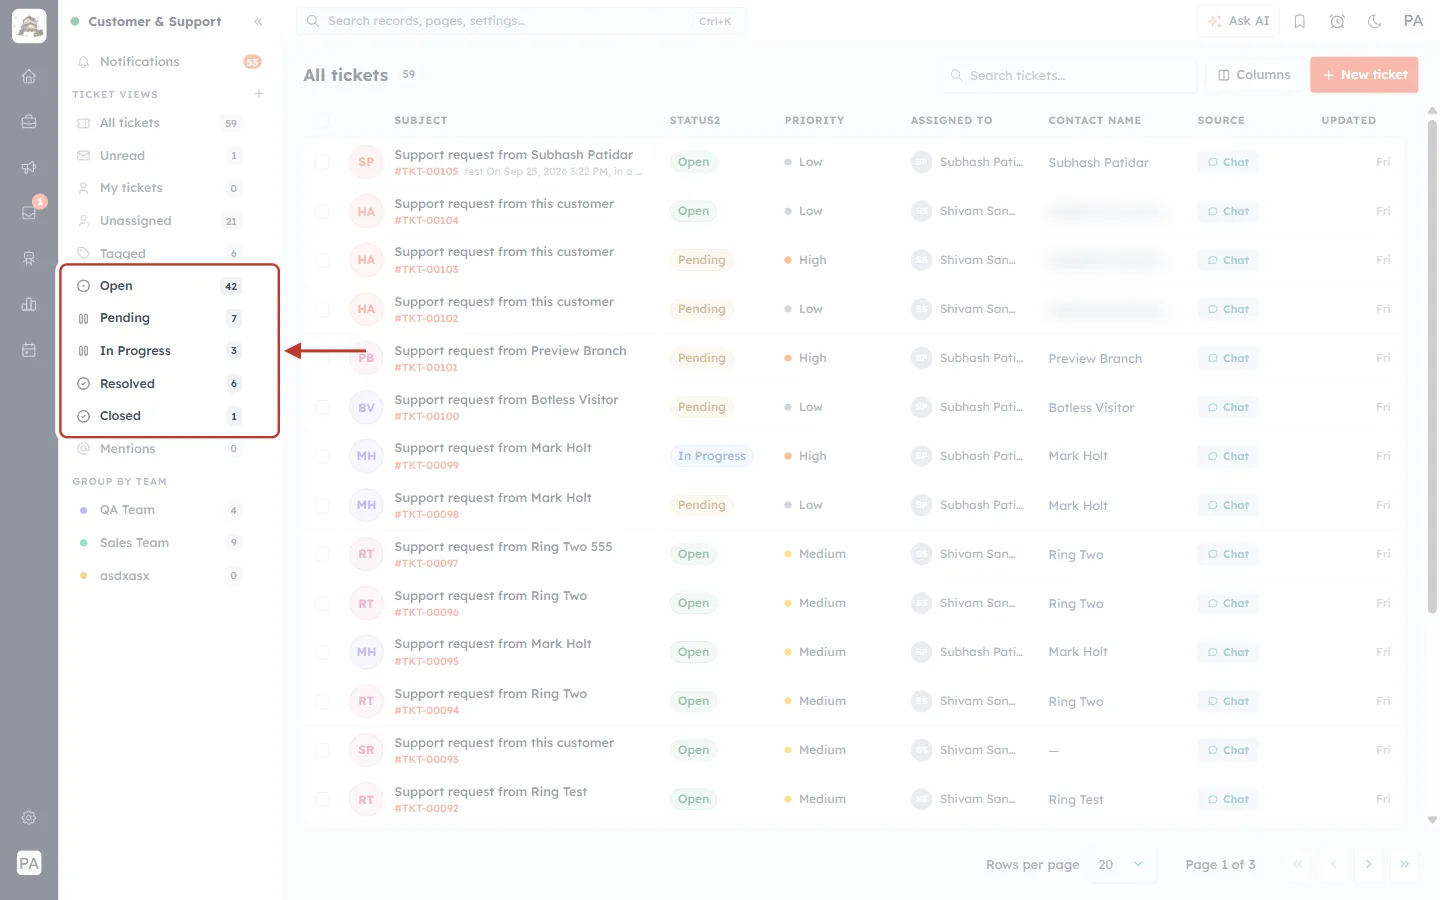
What this screenshot shows. The five status views are ringed. Together they are the ticket lifecycle described above, with a live count for each stage.
Open 42 — new tickets still waiting for someone to deal with them.
Pending 7 — tickets waiting on the customer.
In Progress 3 — tickets your team is working on now.
Resolved 6 — fixed, and the customer has been told.
Closed 1 — finished.
Reading the counts from top to bottom shows at a glance where work is piling up. A long Open list means new requests are waiting; a long Pending list means customers owe you answers.
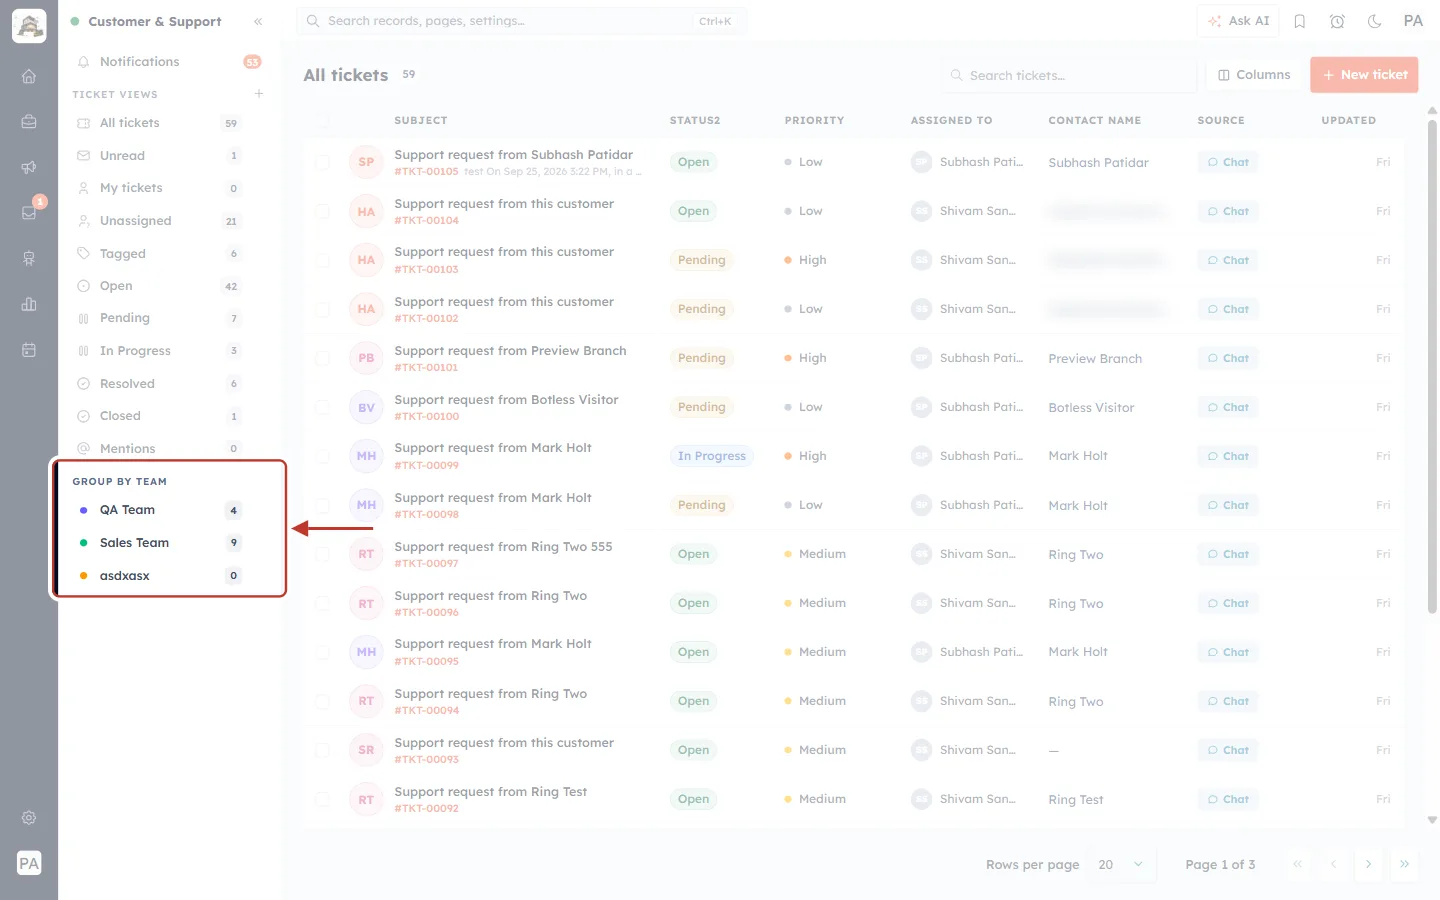
What this screenshot shows. The GROUP BY TEAM section at the bottom of the sidebar is ringed.
One entry per team in your organisation — here QA Team, Sales Team and another team — each with a coloured dot.
The number is how many tickets belong to that team. Click a team to see only its tickets.
Teams are created under Settings → Teams; tickets reach a team through routing or when someone assigns them.
Step 3: Read the ticket list#
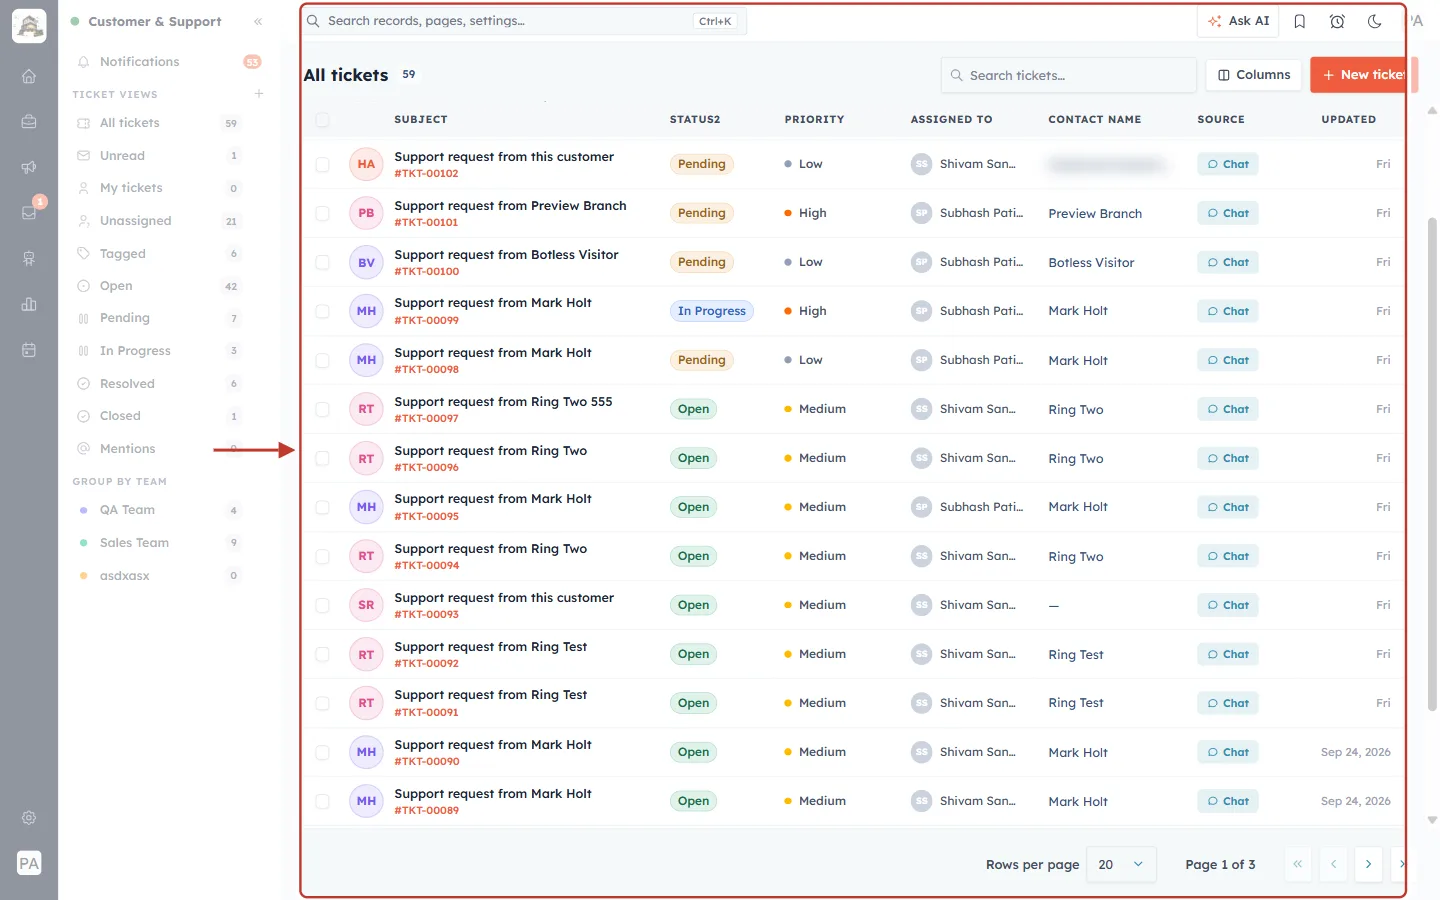
What this screenshot shows. The ticket list for the selected view (All tickets) is ringed. Each row is one ticket, with the most recent activity at the top.
Subject — what the request is about, with the ticket number (such as #TKT-00105) underneath in orange. The round badge on the left shows the contact’s initials.
Status — a coloured label: Open (green), Pending (amber), In Progress (blue).
Priority — Low, Medium, High or Urgent, with a coloured dot.
Assigned to — the teammate who owns the ticket.
Contact name — the customer who raised it. (Email addresses are blurred in these screenshots.)
Source — how the ticket arrived (Step 4).
Updated — when the ticket last changed.
Rows per page and the page arrows at the bottom move through long lists.
Step 4: See where each ticket came from#
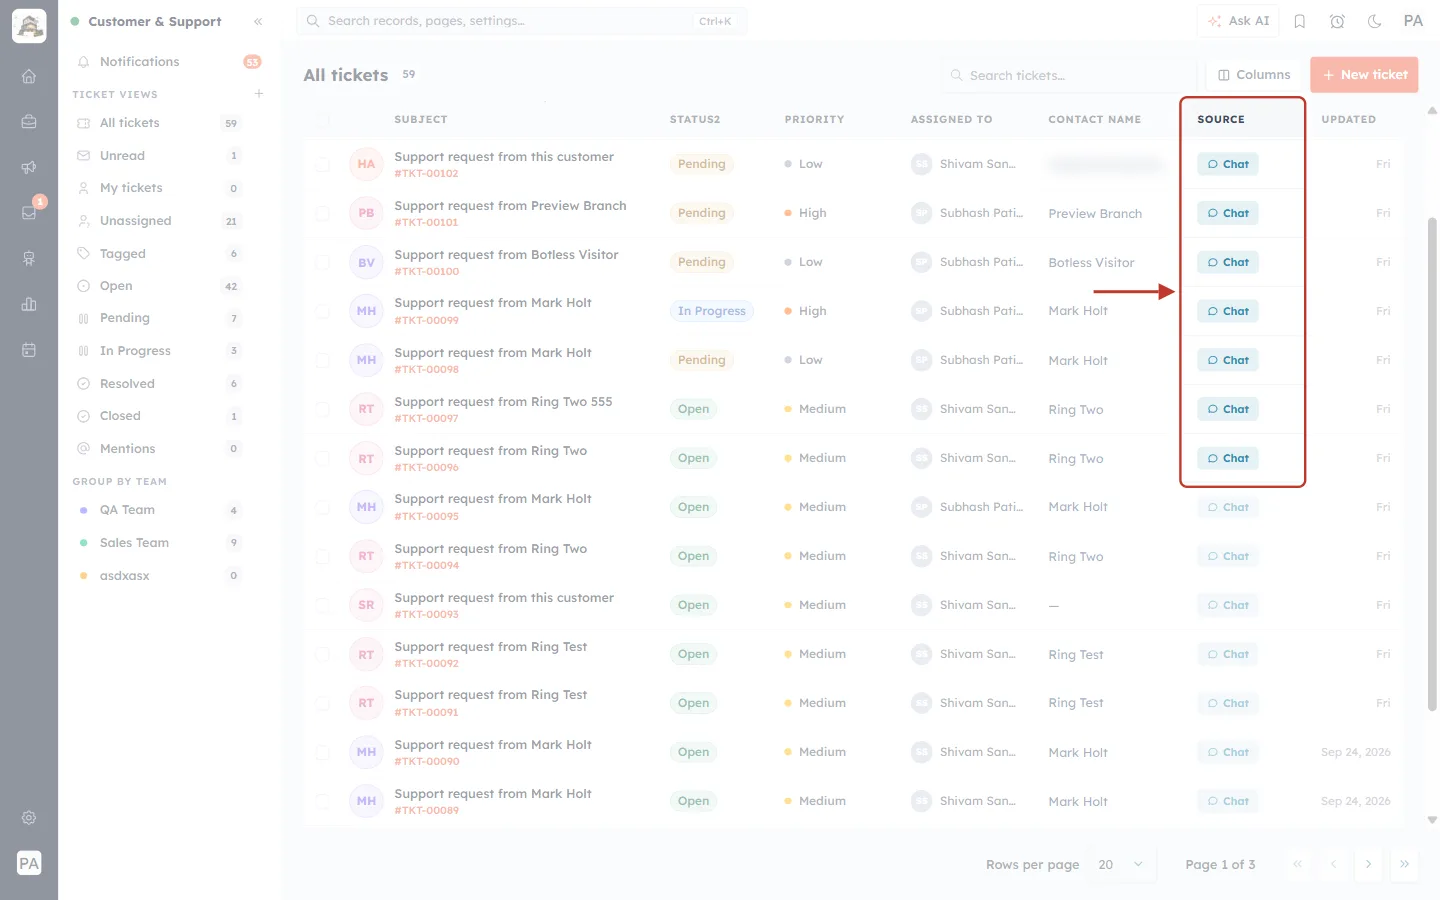
What this screenshot shows. The Source column is ringed. It tells you, for every ticket, which channel the conversation arrived through.
Chat — every ticket in this screenshot came from a chat on the website. On the ticket record, these show the Source AI Agent (Step 8).
Tickets from other routes are labelled by their own channel, such as email, or show as added by hand.
Use it to decide how to answer: a customer who wrote in by chat or email can usually be answered by email, while a ticket added by hand may have started on the phone.
Step 5: Add a ticket yourself#
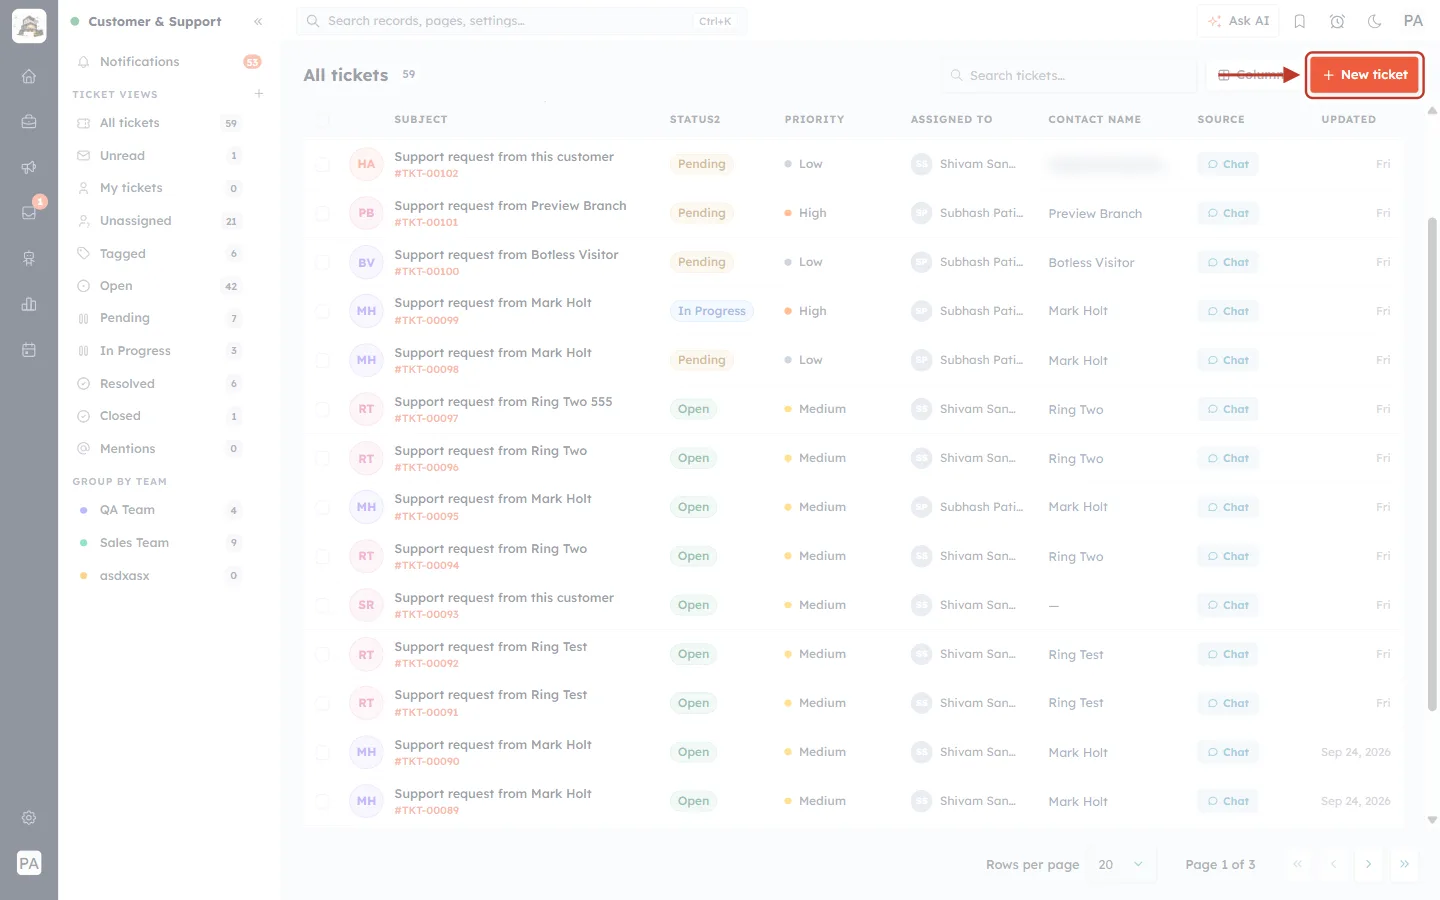
What this screenshot shows. The orange + New ticket button in the top-right corner of the workspace is ringed.
Click it to log a request that did not arrive by chat or email — a phone call, a message on social media, a conversation at your counter.
The form asks for a subject, who handles it, the contact, a description, status and priority. The ticket’s Source is recorded as Manual.
The full form is explained step by step in Handle Customer Tickets, Steps 7–10.
Columns (to the left) — choose which columns the list shows; Search tickets… searches the list.
Part 2 — Inside a ticket#
Click any row in the list to open the ticket. A ticket page has four parts: the header, the conversation, the reply bar and the details panel.
Step 6: The ticket header and conversation#
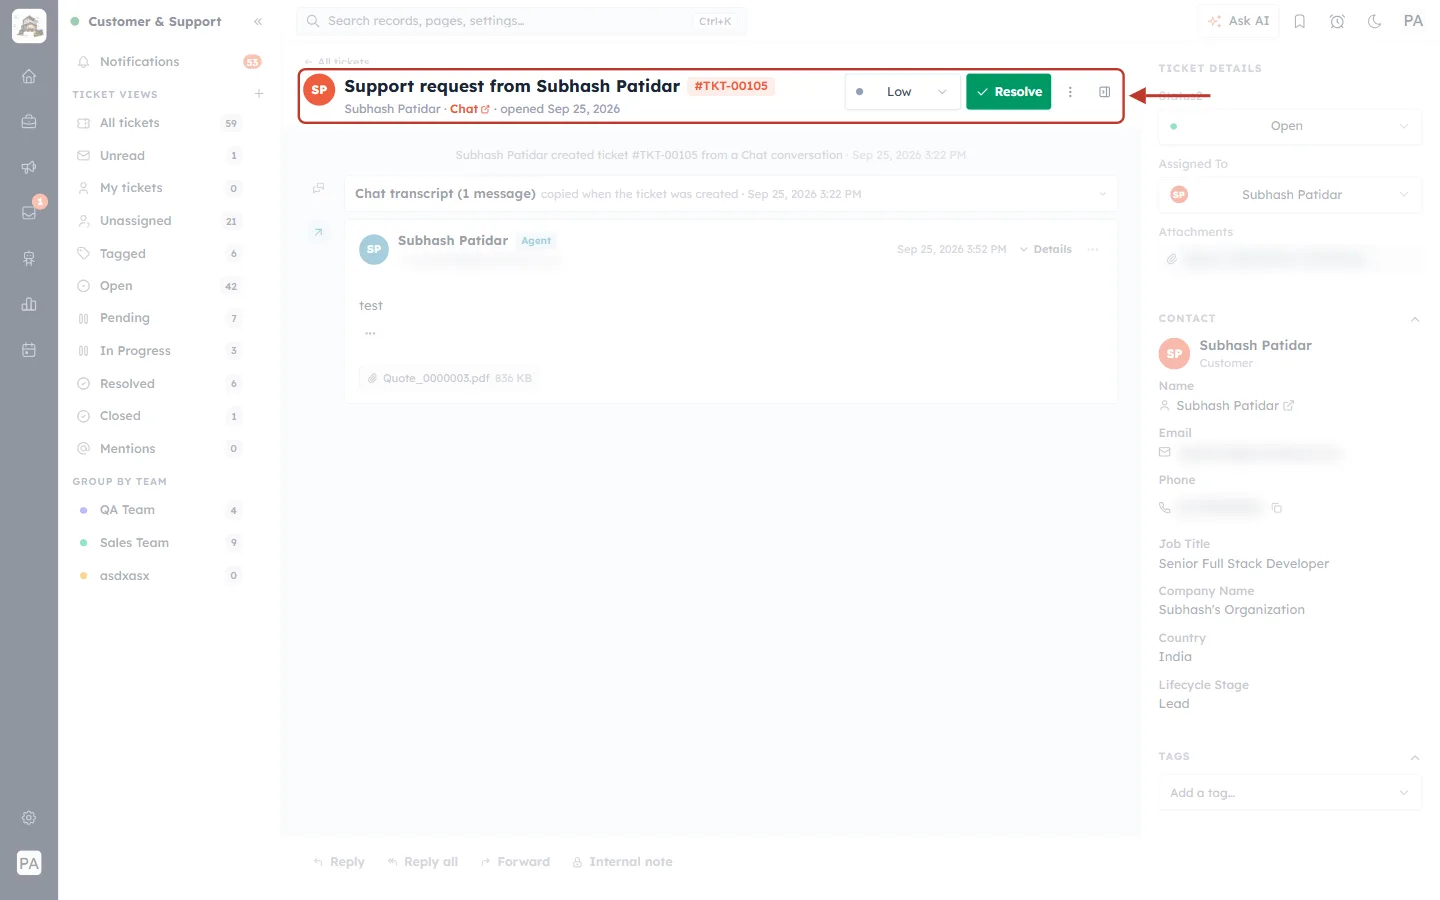
What this screenshot shows. An open ticket, with its header across the top ringed.
Support request from … — the ticket’s subject, and #TKT-00105 — its number, in an orange label.
Contact · Chat · opened Sep 25, 2026 — who raised it, the channel it came through (click Chat to open the original conversation) and when it was opened.
Low — the priority. Click to change it.
✓ Resolve — marks the ticket as resolved in one click. On a resolved ticket it changes to Reopen.
⋮ — more actions, such as Close ticket and Copy link.
The small panel icon on the far right — shows or hides the details panel (Step 7).
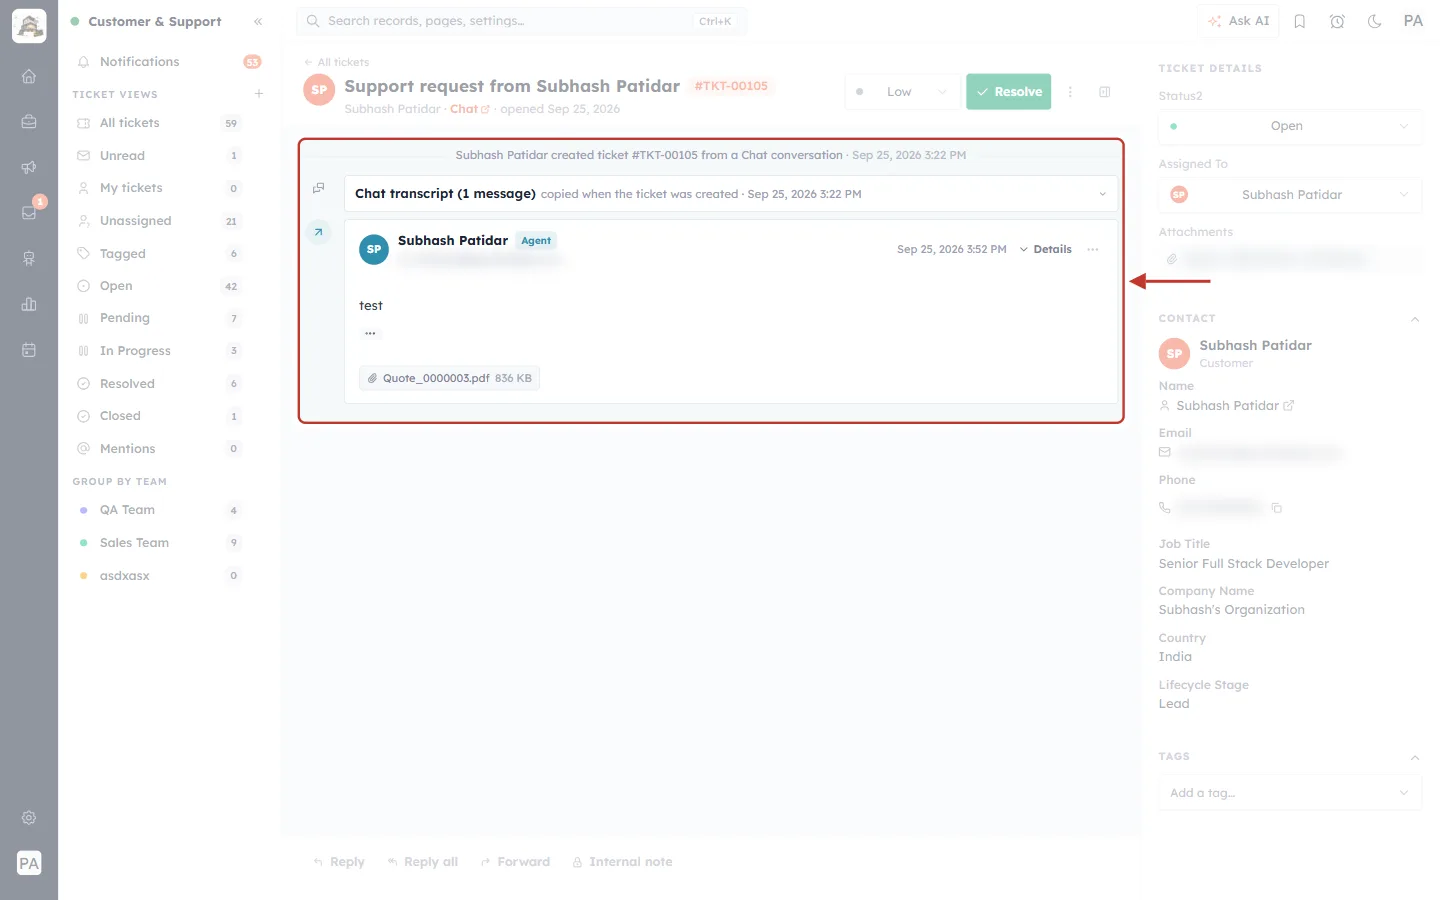
What this screenshot shows. The conversation thread — everything that has happened on this ticket, oldest at the top — is ringed.
“… created ticket #TKT-00105 from a Chat conversation” — a grey line recording how and when the ticket began.
Chat transcript (1 message) — the original chat, copied onto the ticket when it was created. Click it to expand.
A message card — here a reply from an agent (marked Agent), with who sent it, when, the text and any attachment (Quote_0000003.pdf). Details shows the full sender and recipient information.
Customer messages, team replies and internal notes all appear here, so anyone who opens the ticket can catch up in seconds.
Step 7: Reply, and keep the details up to date#
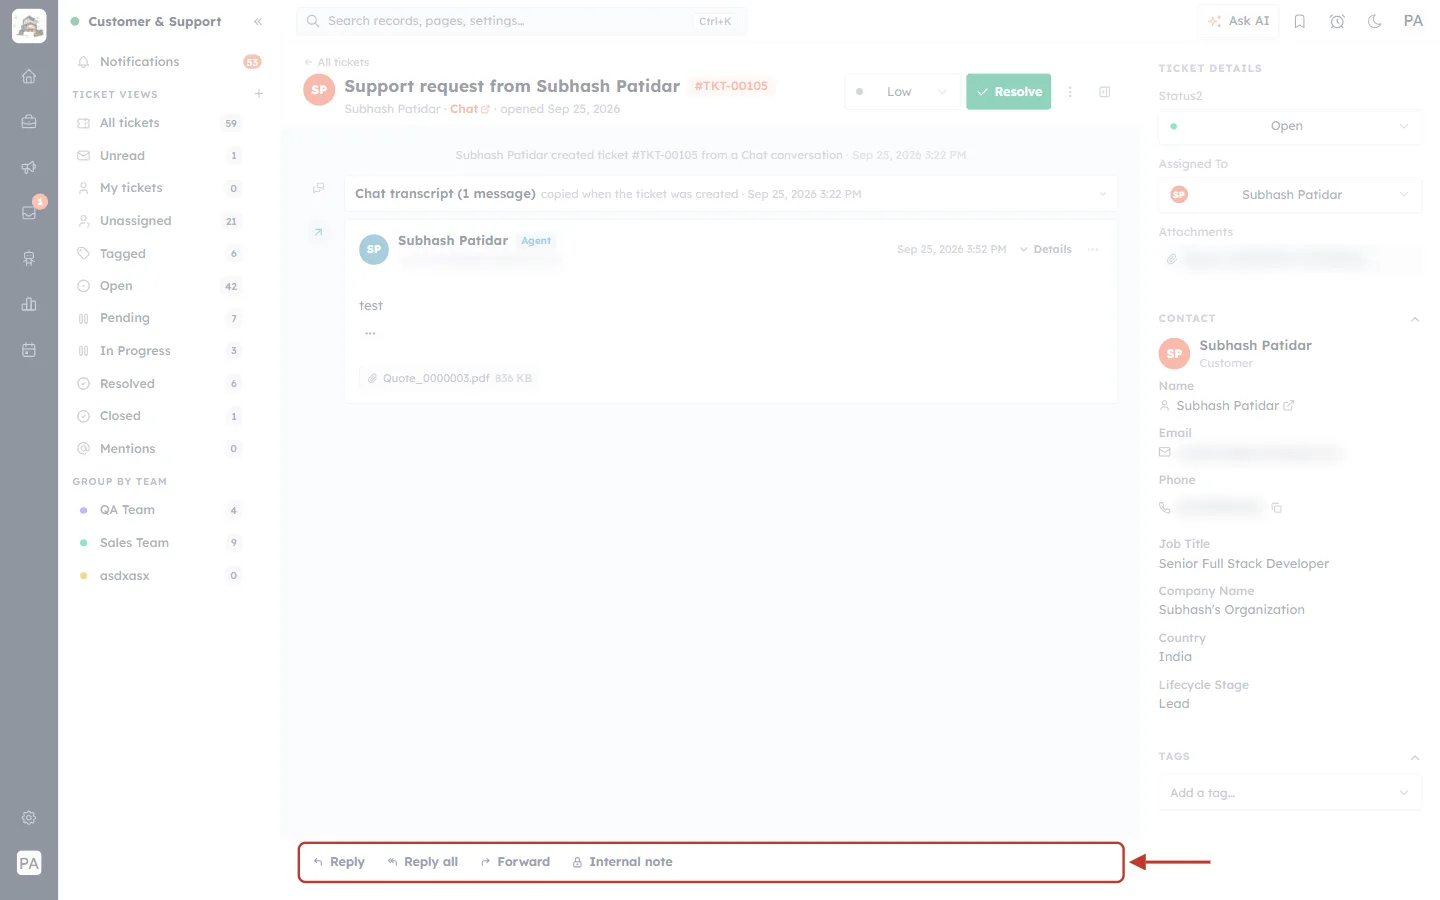
What this screenshot shows. The reply bar along the bottom of the ticket is ringed. This is where you answer.
Reply — email the customer. The reply is added to the thread, and the ticket number in the subject keeps their answer on this ticket.
Reply all — reply to everyone on the conversation.
Forward — send the conversation to someone outside your team, such as a supplier.
Internal note — a private note for your team. The customer never sees it. Type @ and a name to bring a teammate in.
For a contact with no email address, you will see Record reply instead of Reply — use it to log an answer you gave by phone or in person.
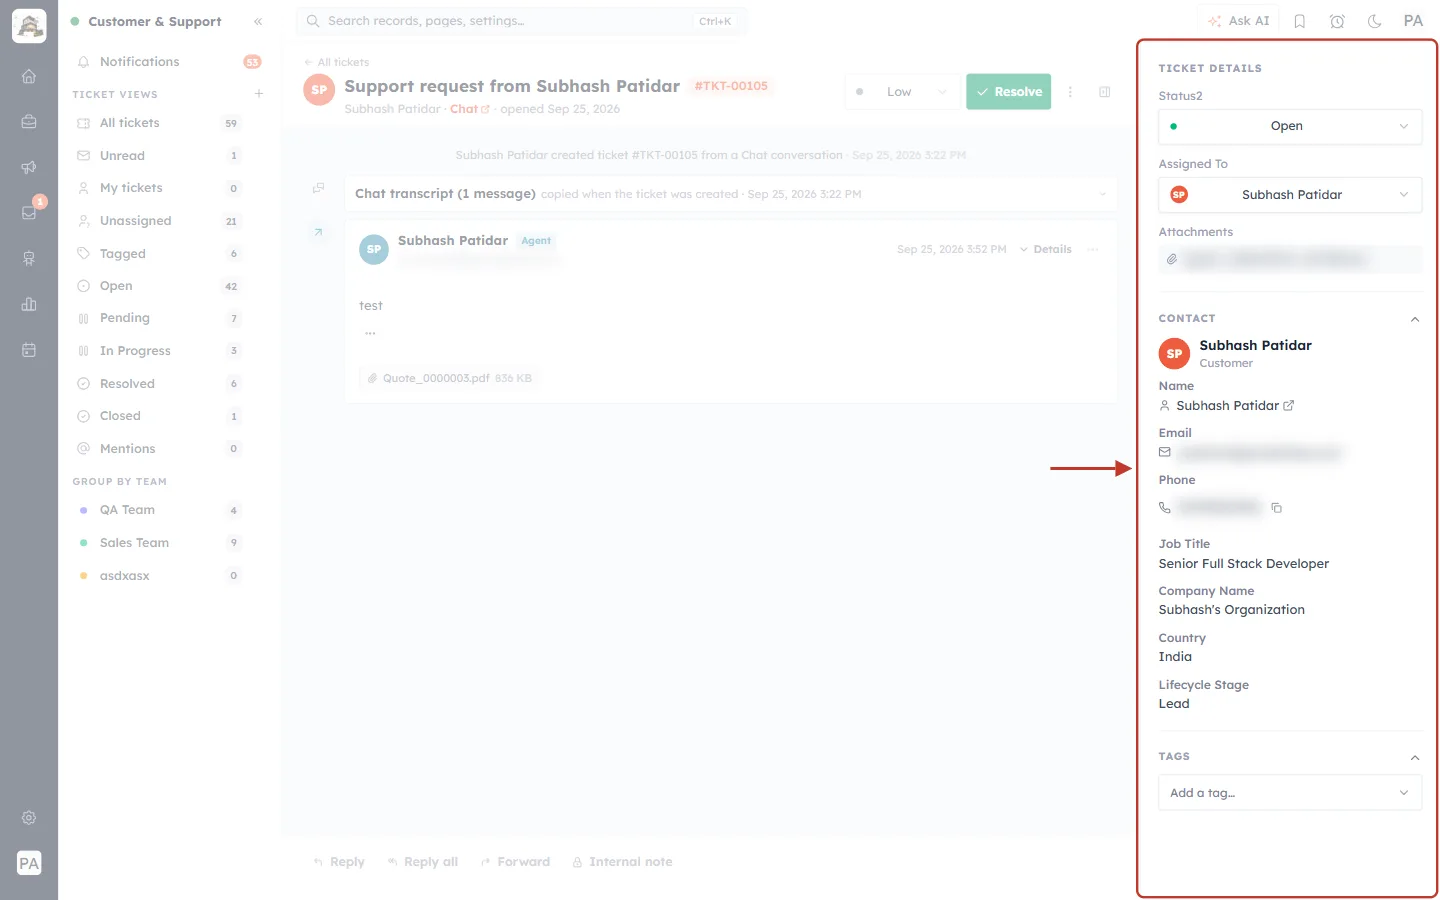
What this screenshot shows. The details panel on the right of the ticket is ringed. It shows the ticket’s settings on top and the customer underneath.
TICKET DETAILS → Status — the current stage (Open). Choose another status here to move the ticket on.
Assigned To — the owner. Pick a teammate to hand the ticket over.
Attachments — files added to the ticket.
CONTACT — the customer from your CRM: name (click the arrow to open their contact record), email and phone (blurred here), job title, company, country and lifecycle stage. No need to search for them elsewhere.
TAGS → Add a tag… — label the ticket, for example refund or bug, so it is easy to find later.
✅
Every one of these actions — replying, notes, statuses, owners, tags, resolving and reopening — is shown screen by screen in Handle Customer Tickets from First Message to Resolution.
Step 8: Find the same tickets in the Tickets module#
Every ticket is also a record in the CRM’s Tickets module, alongside Contacts and Deals. Open it from the CRM menu:
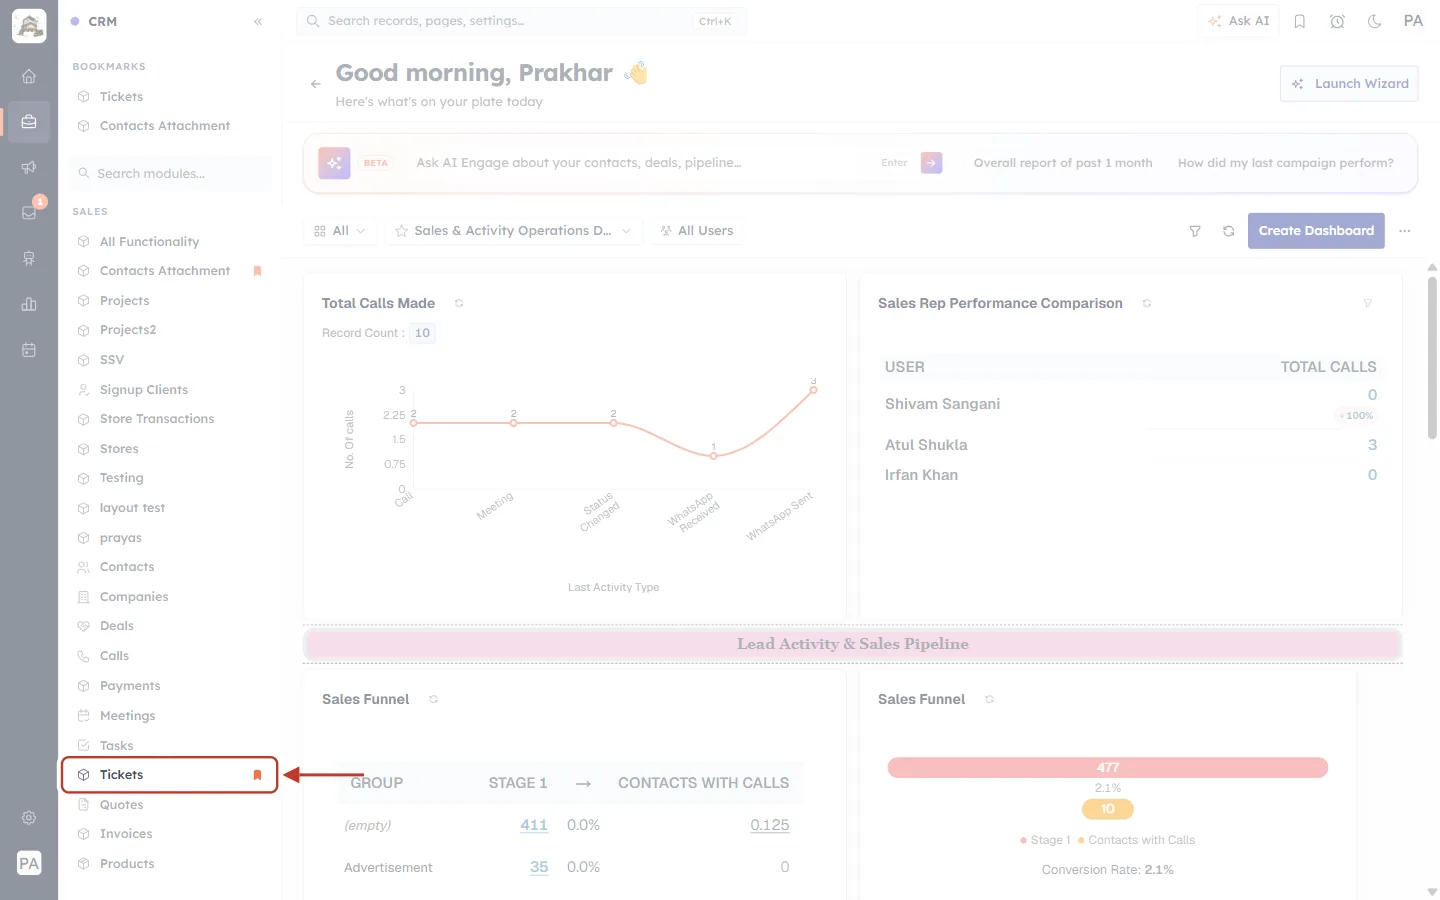
What this screenshot shows. The CRM menu (the briefcase icon in the left-hand rail) is open, and Tickets in the SALES list is ringed.
Tickets — opens the Tickets module list. The orange bookmark means it is also pinned under BOOKMARKS at the top of the menu for one-click access.
The other entries — Contacts, Companies, Deals, Quotes, Invoices and so on — are the rest of your CRM. Tickets work just like them.
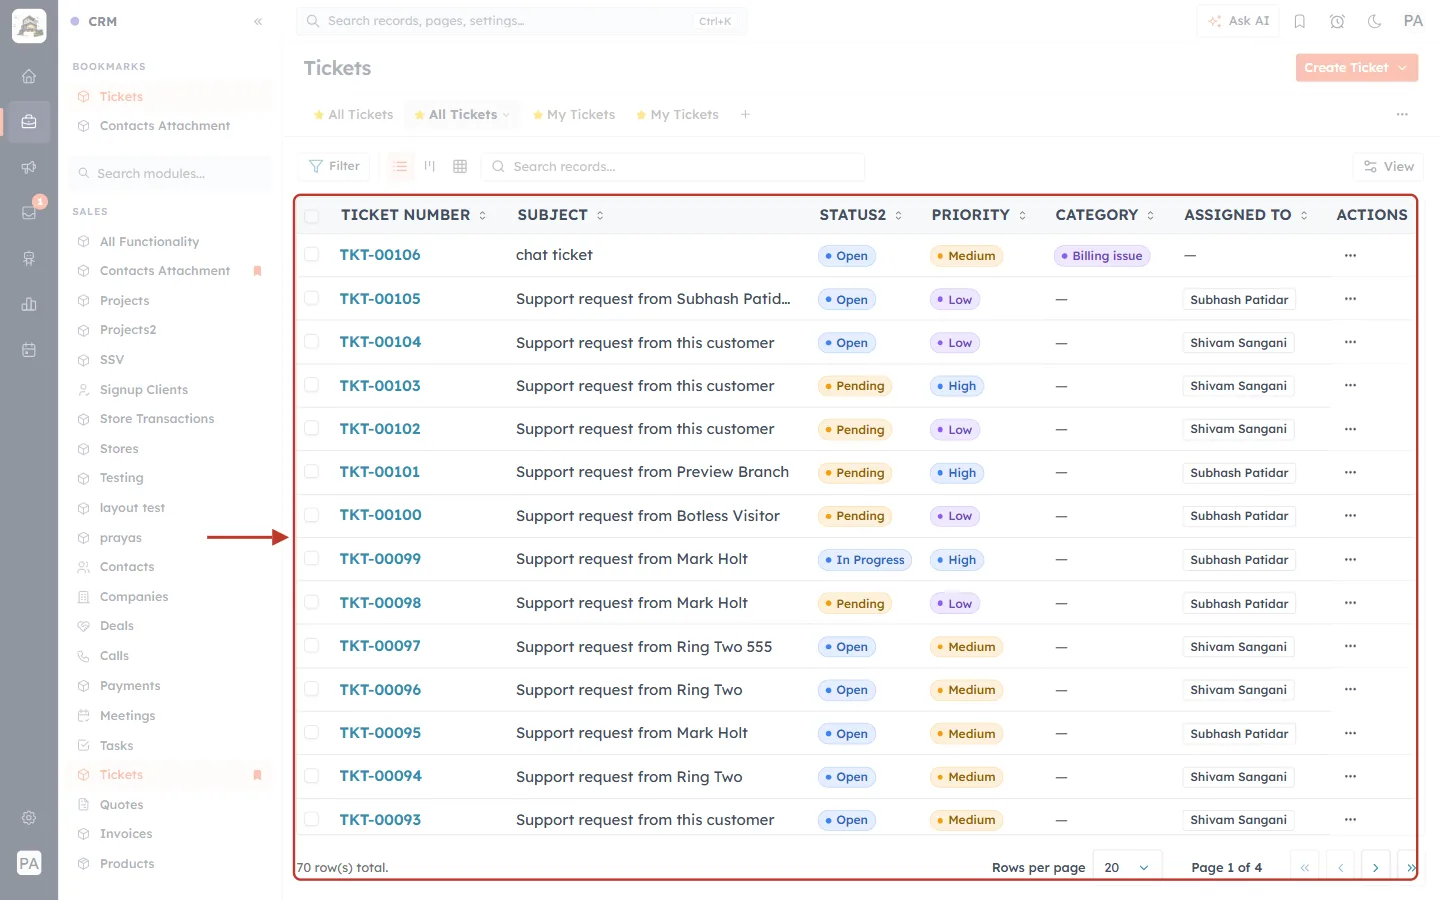
What this screenshot shows. The Tickets module list is ringed. It holds the same tickets as the workspace, laid out as CRM records.
Ticket number (blue link) — opens the ticket record.
Subject, Status, Priority, Category, Assigned to — the same fields you saw in the workspace.
Filter, the list / Kanban / table switches and Search records… (top) — filter on any field, or view tickets as a Kanban board by status.
All Tickets / My Tickets tabs — saved views of the module.
Create Ticket (top right) — adds a ticket record; the ⋯ on each row offers edit, clone and delete.
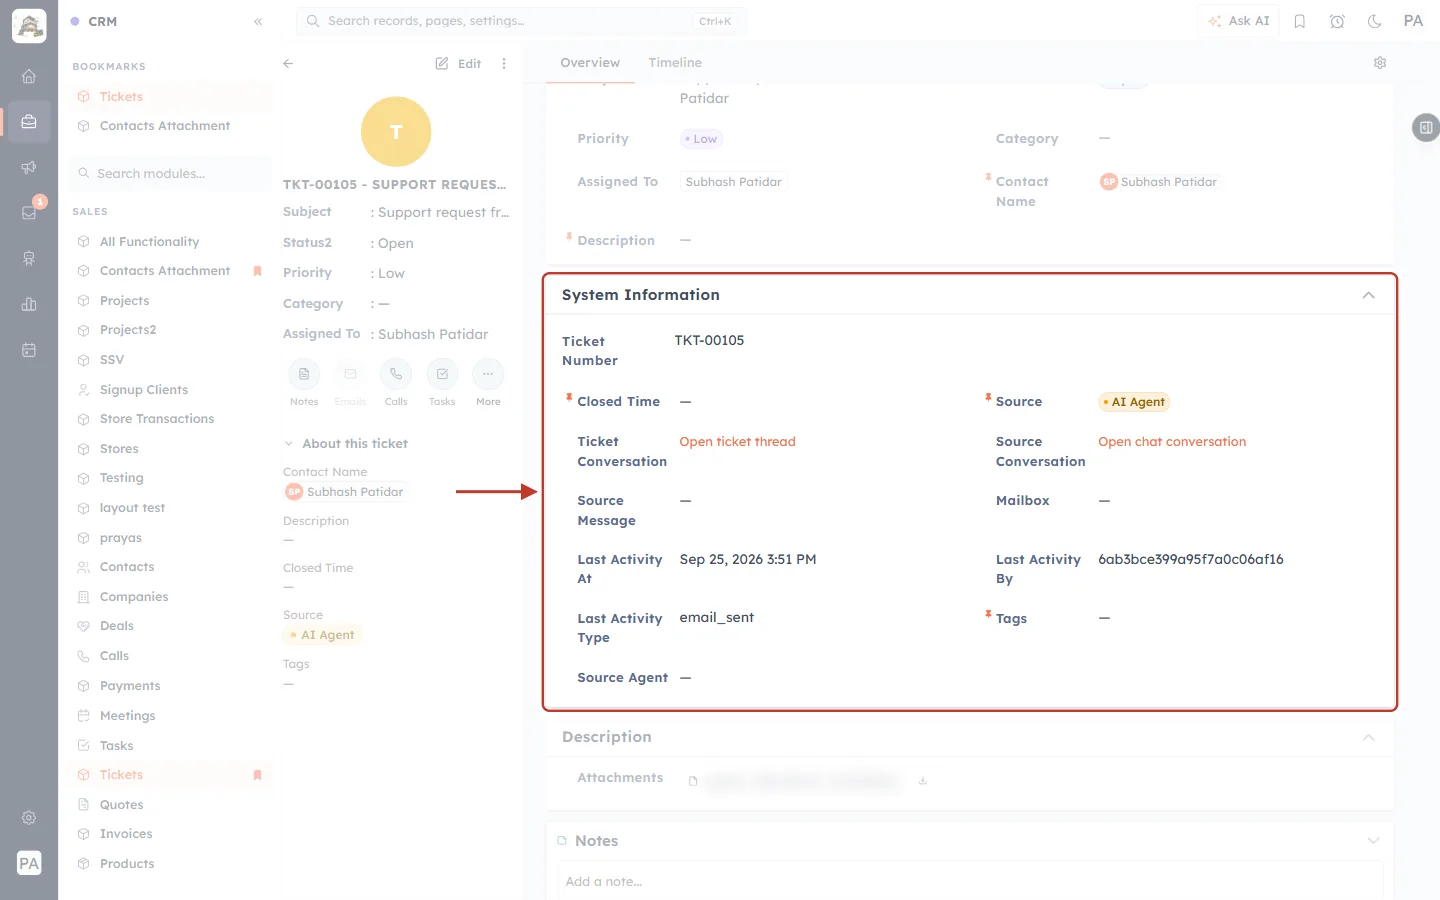
What this screenshot shows. A ticket record opened from the module, with its System Information section ringed. These fields are filled in by the CRM, not by hand.
Ticket Number — TKT-00105.
Closed Time — empty while the ticket is open; filled in automatically when it closes. Useful for measuring how long tickets take.
Source — AI Agent here: the AI agent raised this ticket from a website chat. The other values are WhatsApp, Email and Manual. (In the workspace list this same ticket shows Chat.)
Ticket Conversation → Open ticket thread — jumps to this ticket in the Customer & Support workspace.
Source Conversation → Open chat conversation — opens the original chat.
Mailbox and Source Message — filled for tickets that came from email.
Last Activity At / By / Type — the most recent change and who made it.
Part 3 — For admins: what to set up#
Tickets you add by hand work straight away. To have email and website chat create tickets automatically, and to control what customers are told, an admin configures Service & Support Settings. To get there, press Ctrl + K (Cmd + K on a Mac), type Support Email and choose it from the results.
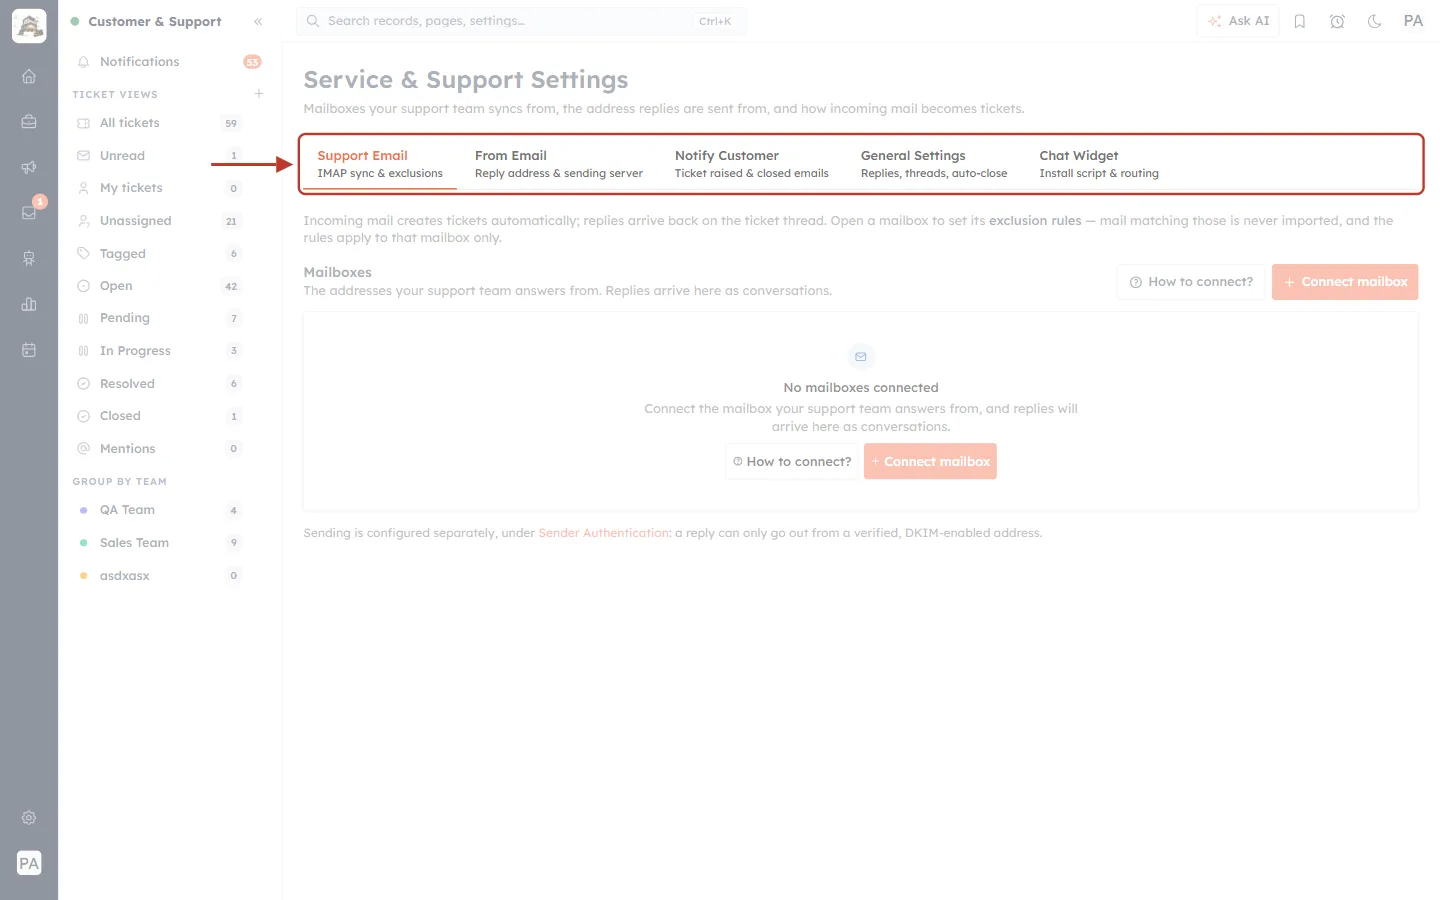
What this screenshot shows. The Service & Support Settings page, with its row of five tabs ringed. Each tab is one area of setup.
Support Email — IMAP sync & exclusions: connect the mailbox customers write to, so emails become tickets.
From Email — Reply address & sending server: which address your team’s replies come from.
Notify Customer — Ticket raised & closed emails: the automatic emails customers receive as their ticket changes.
General Settings — Replies, threads, auto-close: organisation-wide rules for chats, replies, reopening and auto-closing.
Chat Widget — Install script & routing: the chat for your website, and who receives its chats.
Step 9: Connect your support mailbox (email to ticket)#
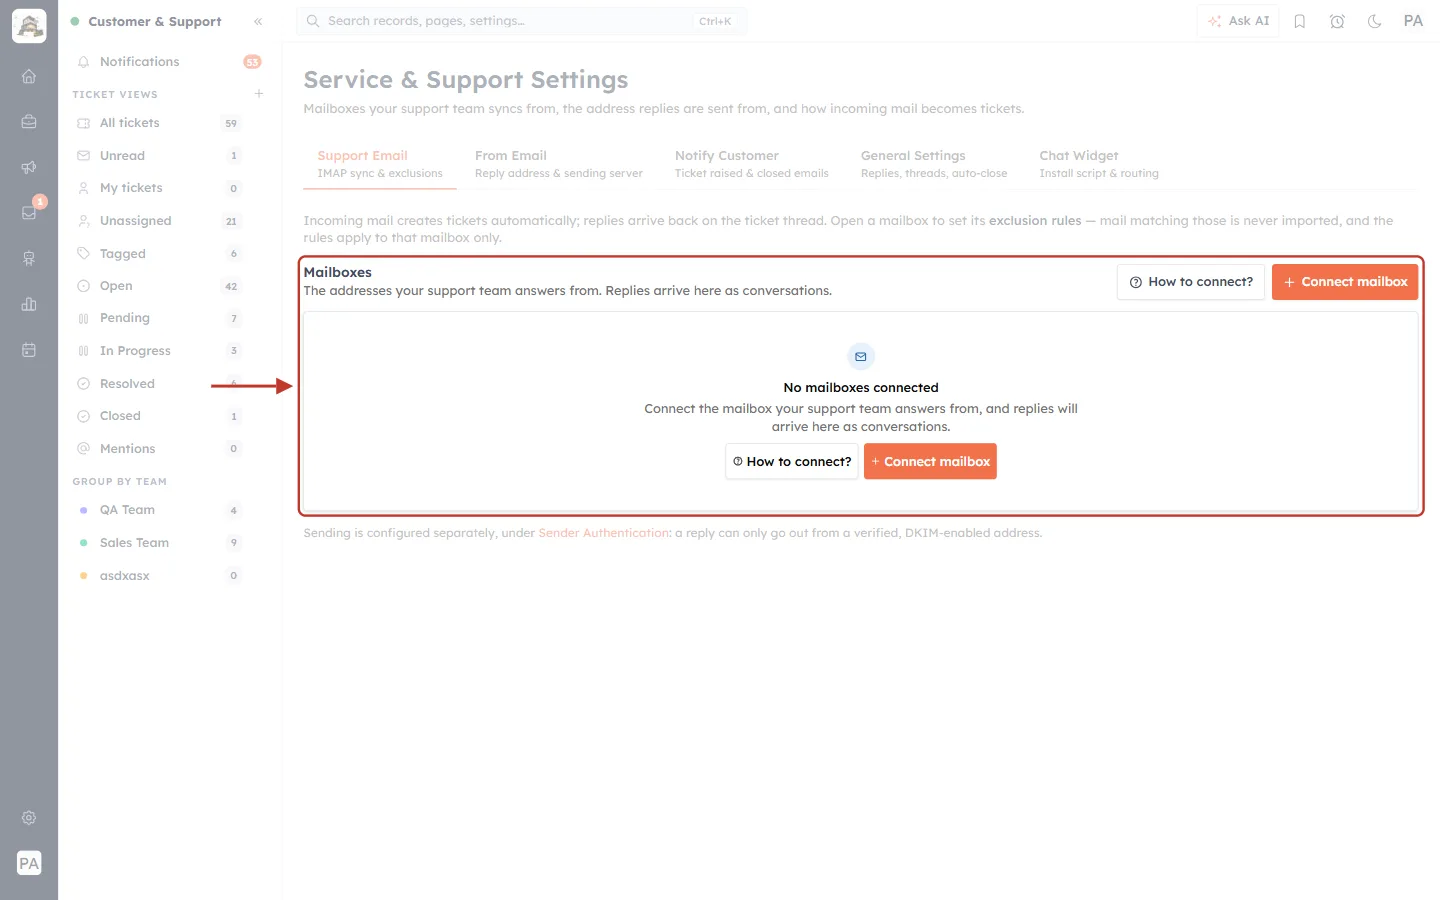
What this screenshot shows. The Mailboxes section of the Support Email tab is ringed. In this account no mailbox is connected yet.
Mailboxes — “The addresses your support team answers from. Replies arrive here as conversations.”
Connect mailbox (orange) — connects a mailbox such as support@yourcompany.com. From then on, each new email to it creates a ticket, and customer replies are added to the existing ticket.
How to connect? — step-by-step help for your email provider.
Once connected, open the mailbox to add exclusion rules — mail that matches them (newsletters, auto-replies) is never turned into tickets.
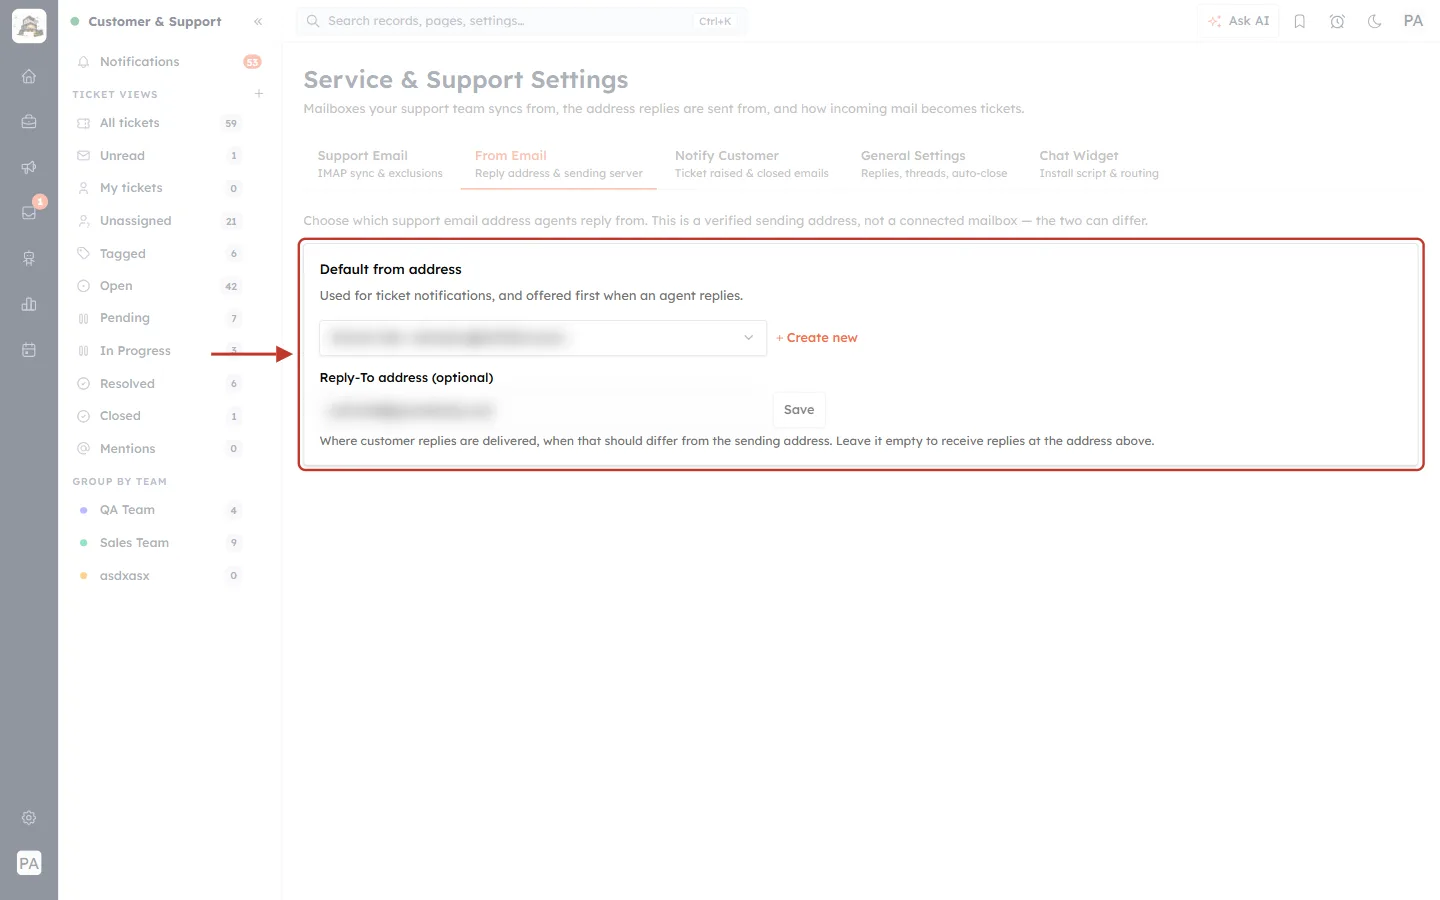
What this screenshot shows. The From Email tab, with the address settings ringed.
Default from address — the verified address used for ticket emails and offered first when an agent replies. + Create new adds another. (The address is blurred here.)
Reply-To address (optional) — where customers’ replies should go, if that is different from the sending address. Leave it empty to receive replies at the address above. Click Save after changing it.
⚠️
Replies can only be sent from a verified address. If yours is not listed, set it up first under Sender Authentication — the From Email tab only offers addresses that have passed verification.
Step 10: Decide what customers are told#
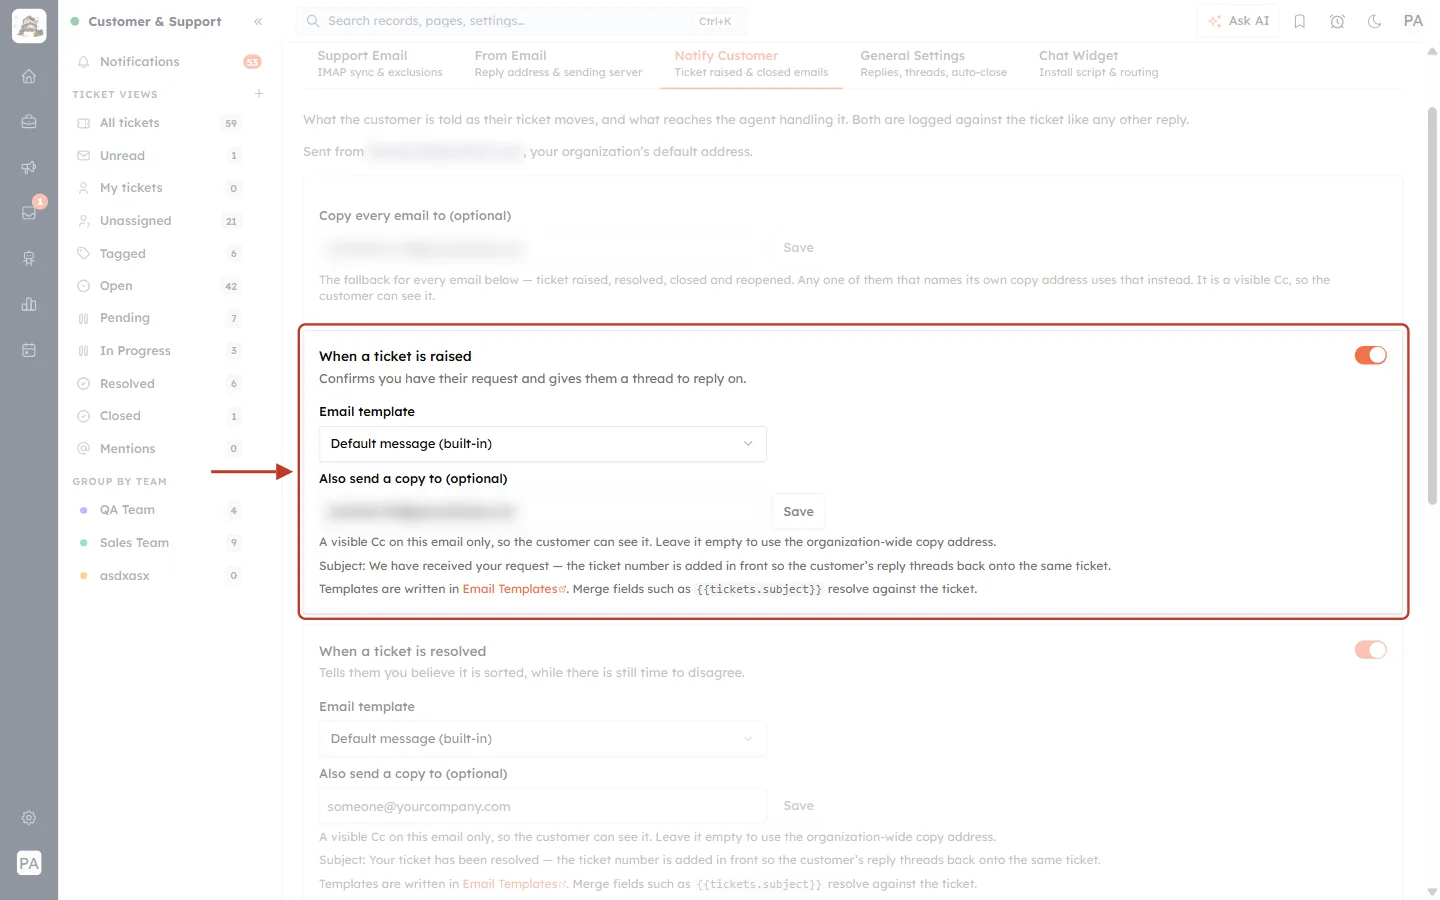
What this screenshot shows. The Notify Customer tab, with the When a ticket is raised email ringed.
The switch (top right, orange = on) — sends the customer a confirmation as soon as their ticket is created.
Email template — Default message (built-in), or one of your own templates from Email Templates.
Also send a copy to (optional) — a visible Cc on this email (blurred here).
Subject: We have received your request — the ticket number is added in front, so when the customer replies, their answer lands back on the same ticket.
Merge fields such as
{{tickets.subject}}fill in the ticket’s details automatically.Below it (faded) are the same settings for When a ticket is resolved, closed and reopened.
Step 11: Set the rules for reopening and auto-closing#
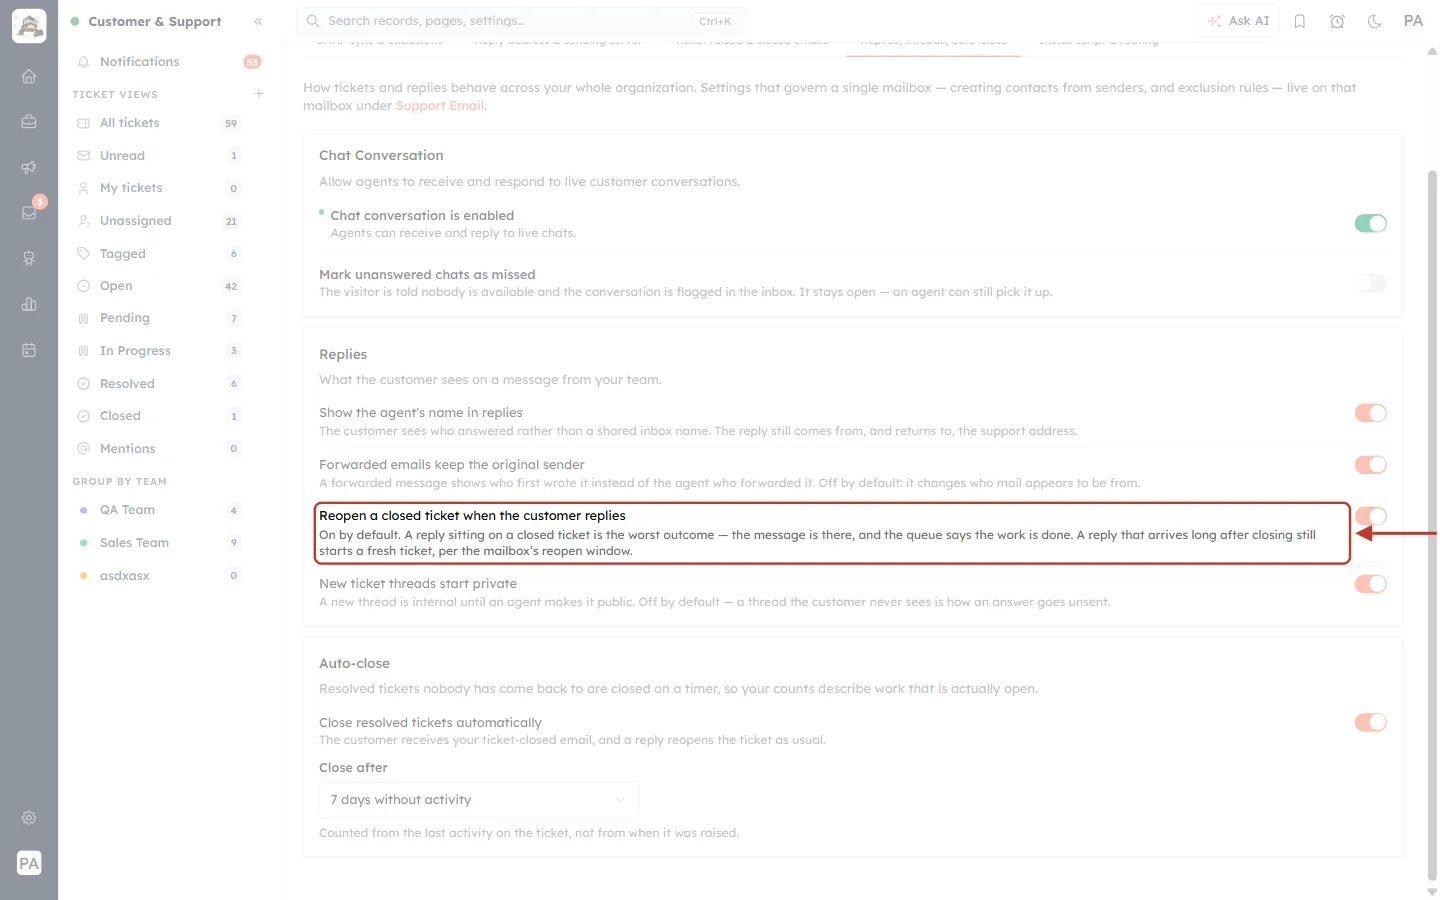
What this screenshot shows. The General Settings tab, with the Reopen a closed ticket when the customer replies setting ringed.
The switch (on by default) — when a customer replies to a closed ticket, the ticket reopens, so the message is never left on a ticket the queue says is done.
A reply that arrives a long time after closing starts a fresh ticket instead.
Above and below (faded): Show the agent’s name in replies, Forwarded emails keep the original sender and New ticket threads start private.
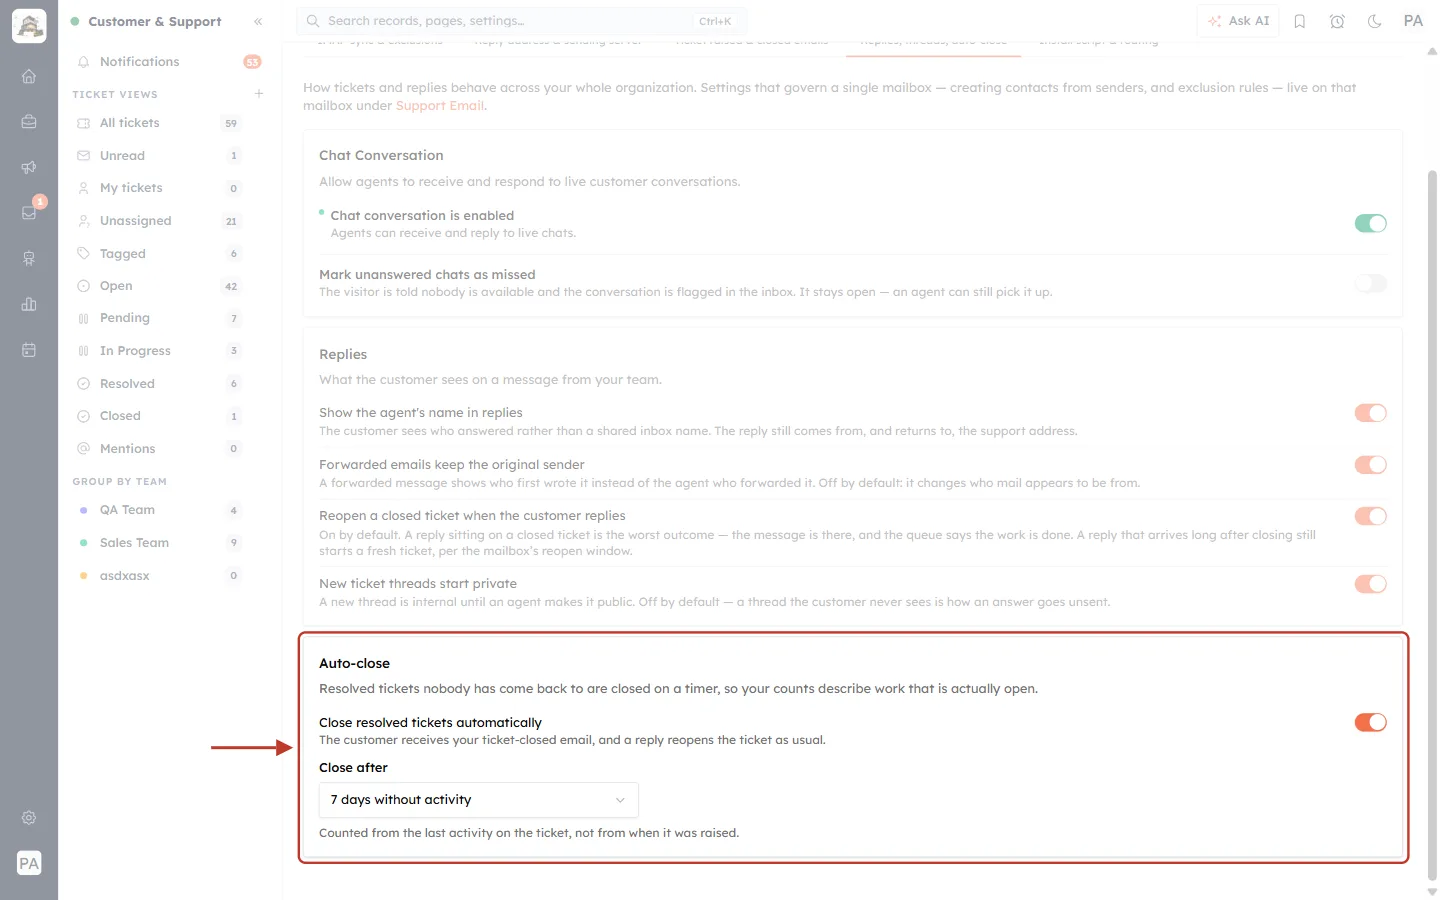
What this screenshot shows. The Auto-close section of General Settings is ringed.
Close resolved tickets automatically — when switched on, resolved tickets that nobody comes back to are closed on a timer, so your counts show only work that is really open.
Close after: 7 days without activity — the waiting period, counted from the last activity on the ticket.
The customer receives your ticket-closed email (if switched on), and a reply still reopens the ticket.
Step 12: Add chat to your website#
The Chat Widget tab creates the chat bubble for your website. Chats from it can become tickets.
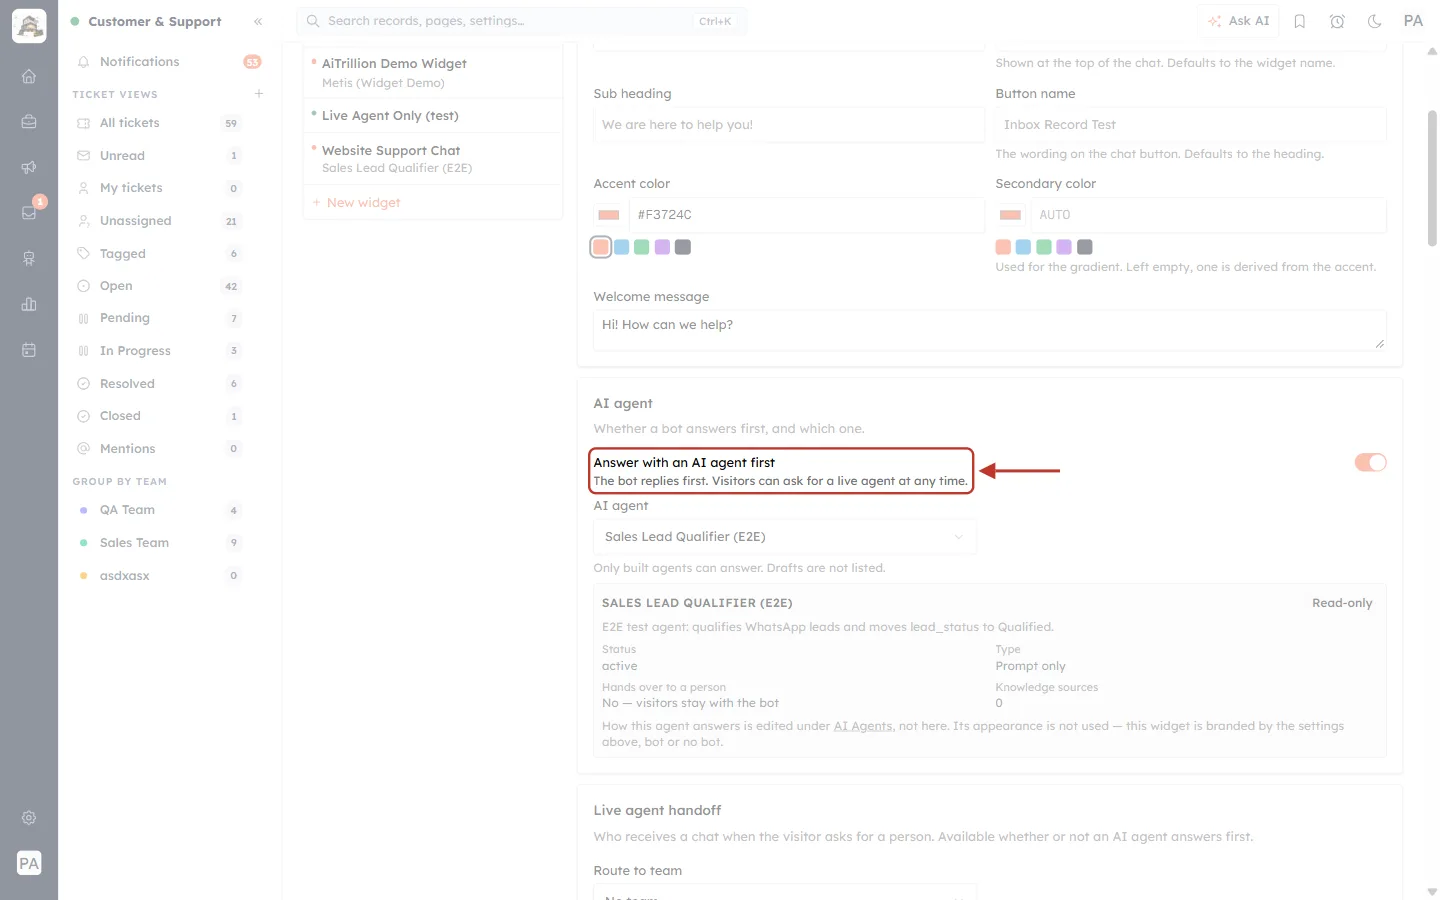
What this screenshot shows. The Chat Widget tab, with the Answer with an AI agent first option ringed.
Answer with an AI agent first — “The bot replies first. Visitors can ask for a live agent at any time.” Turn it on to let one of your AI agents handle common questions before a person is needed.
AI agent (below) — which agent answers. Only built agents are listed, not drafts. How the agent answers is edited under AI Agents.
Above (faded): the widget’s name, heading, button text, colours and welcome message.
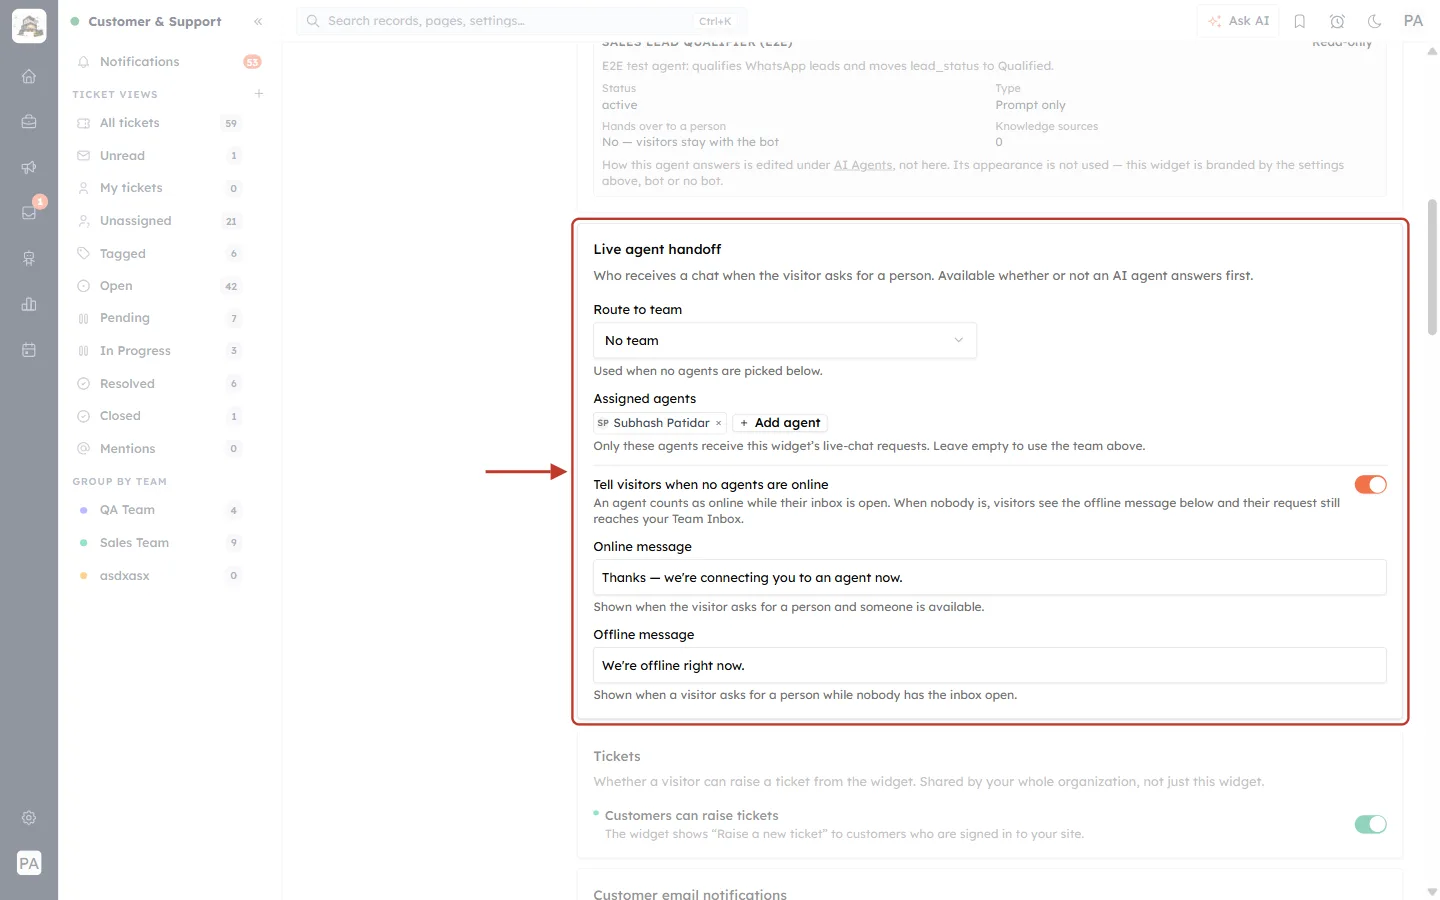
What this screenshot shows. The Live agent handoff section of the Chat Widget tab is ringed. It decides who receives a chat when a visitor asks for a person.
Route to team — send live chats to a team; used when no individual agents are picked.
Assigned agents — or choose specific people with + Add agent. Only they receive this widget’s chats.
Tell visitors when no agents are online — shows an offline message when nobody has their inbox open, so visitors are not left waiting.
Further down (faded): whether customers can raise tickets from the widget, and the install script to paste into your website.
ℹ️
Each tab is explained in detail in its own article in the Customer & Support collection. Set them up in this order: Support Email → From Email → Notify Customer → General Settings → Chat Widget.
Key terms at a glance#
| Term | Meaning |
|---|---|
| Ticket | One customer request, tracked from arrival to closing. |
| Ticket number | The permanent reference, such as TKT-00105. |
| Source | How the ticket arrived: AI Agent (website chat), WhatsApp, Email or Manual. |
| Status | Its stage: Open, Pending, In Progress, Resolved or Closed. |
| Priority | How urgent it is: Low, Medium, High or Urgent. |
| Ticket view | A saved list in the workspace sidebar, such as My tickets or Unassigned. |
| Internal note | A private message for your team on the ticket; the customer never sees it. |
| Resolve / Reopen | Mark a ticket as fixed / make a resolved ticket active again. |
| Auto-close | Closing resolved tickets automatically after a set number of days. |
A simple way to run support#
Admin, once: connect the support mailbox, choose the reply address, switch on the customer emails you want and set auto-close (Part 3).
Team lead, daily: check Unassigned and hand tickets out; watch the Open and Pending counts.
Agents, daily: start in My tickets, highest priority first. Reply, use internal notes to involve colleagues, and set the status as you go.
When fixed: tell the customer, then click Resolve. Auto-close finishes the job.
Troubleshooting#
I can’t see any tickets. Your profile may not have access to the Tickets module, or you are in a view such as My tickets with nothing assigned to you. Click All tickets, and ask your admin to check your permissions.
Emails to our support address are not becoming tickets. Check that the mailbox is connected under Support Email, and that the emails do not match one of the mailbox’s exclusion rules.
There is no Reply button on a ticket. The contact has no email address. Use Record reply to log the answer you gave another way, or add an email address to the contact.
A customer replied, but a new ticket was created. Replies only join the old ticket when the ticket number is still in the email subject, and only within the mailbox’s reopen window. Very late replies start a fresh ticket on purpose.
Resolved tickets never close. Auto-close may be switched off — check General Settings → Auto-close.
Previous and next#
Related#
Was this article helpful?
Ready to implement this?
OpenAI Engage and apply what you just learned to your own workspace.
Open AI Engage CRM