Loading…


KnowledgeBase
Turn Chats into Tickets: Raise a Support Ticket from a Live Chat or a Single Message (Step-by-Step)
What this article covers#
Many problems can be solved inside a live chat. But some can’t: you need to check with the warehouse, wait for a refund, or hand the problem to another team. If the chat simply ends, the promise you made (“I’ll get back to you”) can easily be forgotten.
Turning the chat into a ticket fixes that. In a few clicks you create a ticket that is linked to the chat, carries a copy of the conversation, is linked to the customer’s contact, and has an owner, status and priority — so it sits in your ticket queue until it is properly finished.
| Way | Where | What comes with the ticket |
|---|---|---|
| From the whole chat | Team Inbox → Chat → open a chat → Related tickets → Create ticket | The chat history from the period you choose (last 1 to 30 days) |
| From one message | Hover a message → ⌄ → Create ticket | The chat from that message onwards |
ℹ️
Tickets can also be created from chats in other ways: your AI agent or chat widget can raise them automatically (see Set Up the Website Chat Widget), and the New ticket form lets you attach a recent chat (see Create a Ticket Manually). This article covers raising a ticket by hand from the chat itself.
The example in this article is a website chat with Daniel Brooks of Brooks & Co, whose standing desk (order #6140) has not been dispatched.
Before you begin#
The ticket system is switched on for your account, and your profile is allowed to create tickets. If you don’t see Create ticket in a chat, ask your administrator — see Control Permissions with Profiles.
You can open the chat in the Team Inbox.
It helps if the chat is linked to a CRM contact, so the ticket can be linked to them too.
Part 1 — Open the chat#
Step 1: Open the Chat inbox#
In the dark icon bar on the far left, click the Inbox icon, then click Chat.
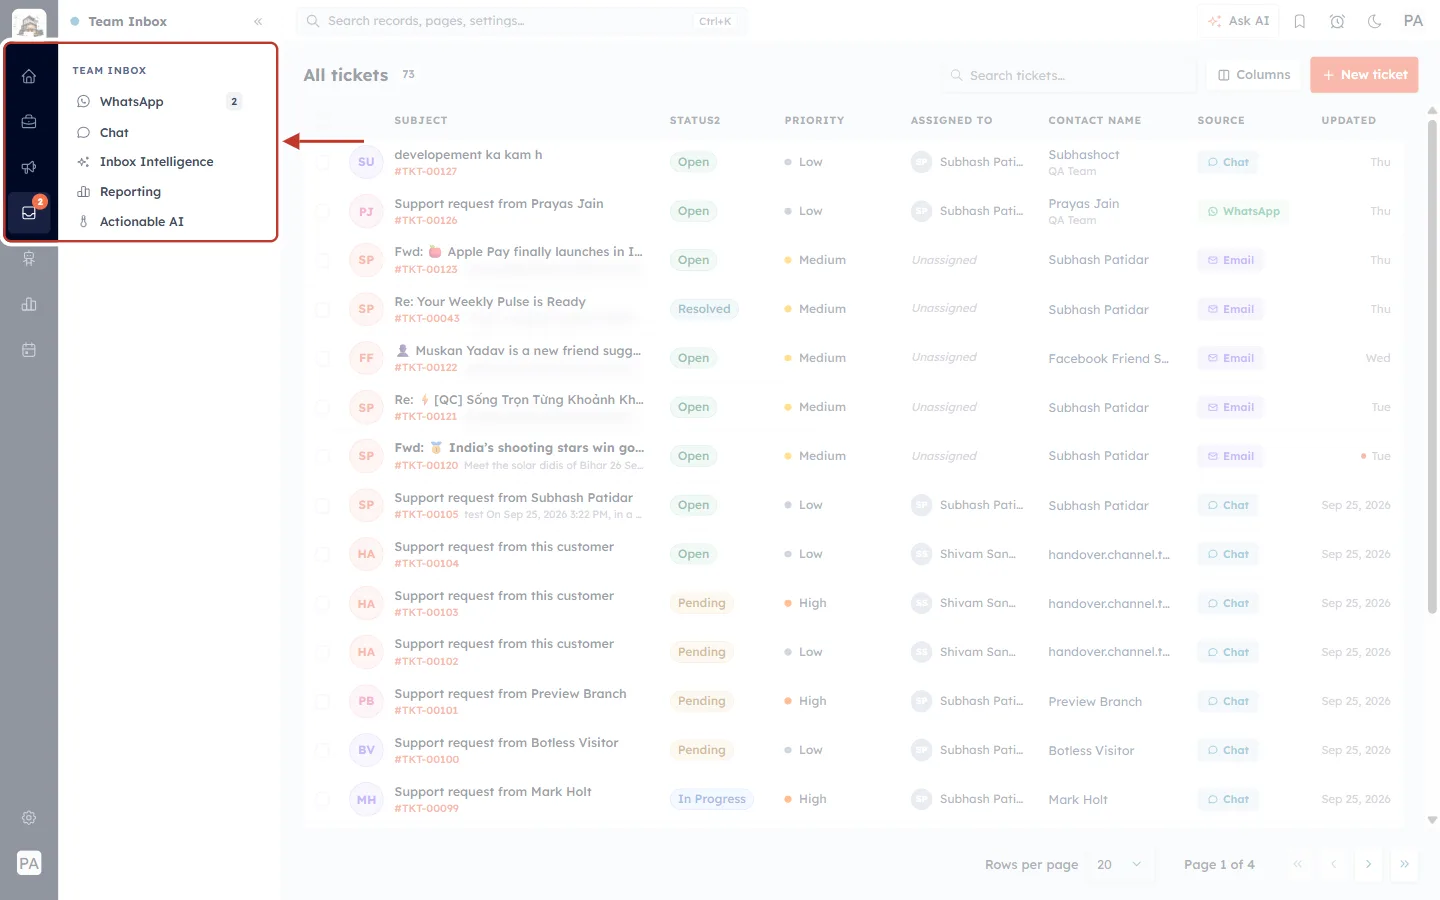
What this screenshot shows. The Inbox icon in the left icon bar and the TEAM INBOX menu it opens are ringed.
The Inbox icon is highlighted, with a red badge showing how many chats are waiting.
TEAM INBOX menu: WhatsApp (WhatsApp conversations, with its own unread count), Chat (live chats from your website chat widget and AI agent), Inbox Intelligence, Reporting and Actionable AI.
Click Chat to open the live-chat inbox.
Behind the menu (faded) is the Customer & Support ticket list.
Step 2: Open the customer’s chat#
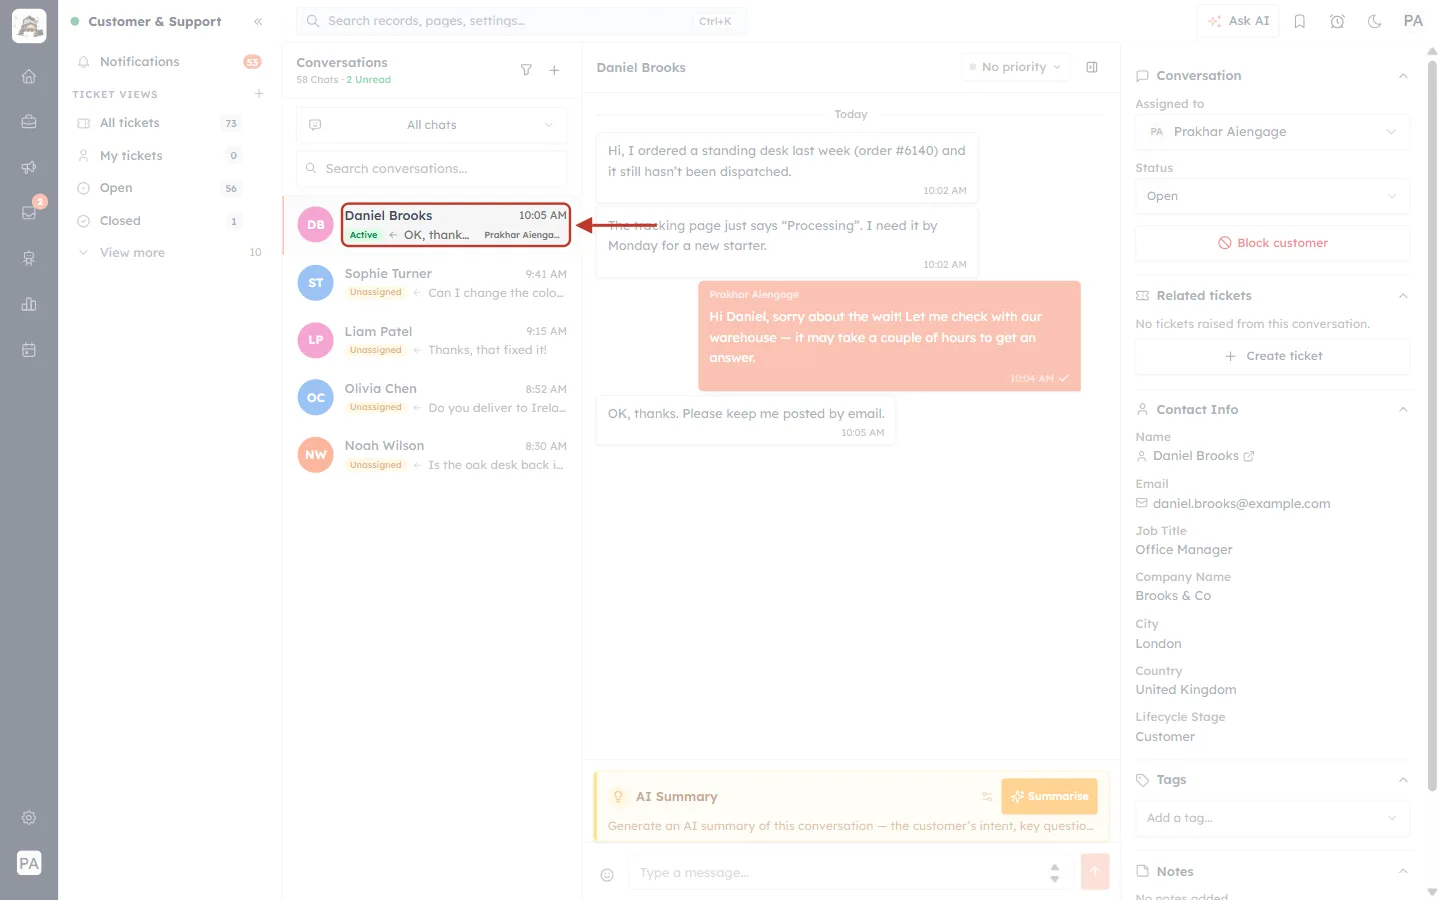
What this screenshot shows. Daniel Brooks’s chat in the Conversations list is ringed.
The customer’s initials (DB) and name, Daniel Brooks.
The time of the last message (10:05 AM).
A green Active label, the start of the last message (OK, thanks…) and who the chat is assigned to (Prakhar Aiengage).
Other chats are listed below it (faded). Click a chat to open it.
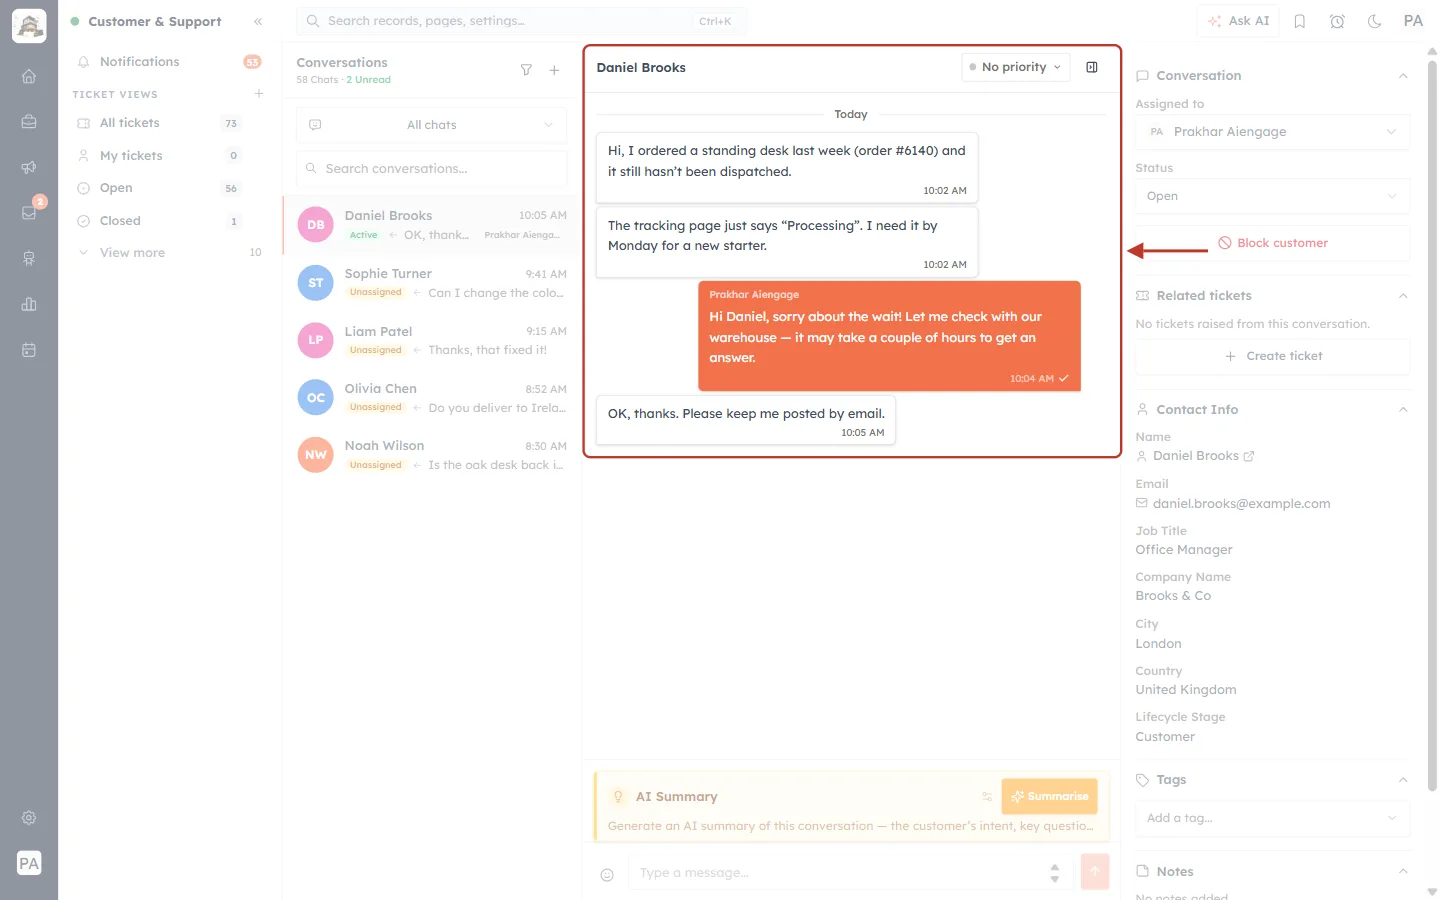
What this screenshot shows. The conversation in the middle of the screen is ringed.
The customer’s name at the top (Daniel Brooks), and the chat’s priority (No priority).
Daniel’s messages on the left: his desk (order #6140) hasn’t been dispatched, the tracking page says “Processing”, and he needs it by Monday.
The agent’s reply in orange on the right: “…Let me check with our warehouse — it may take a couple of hours to get an answer.”
Daniel’s last message: “OK, thanks. Please keep me posted by email.” — the agent has promised a follow-up that can’t be done in the chat. This is exactly when to raise a ticket.
Step 3: Find Related tickets#
On the right of the chat is the customer panel. Find the Related tickets section.
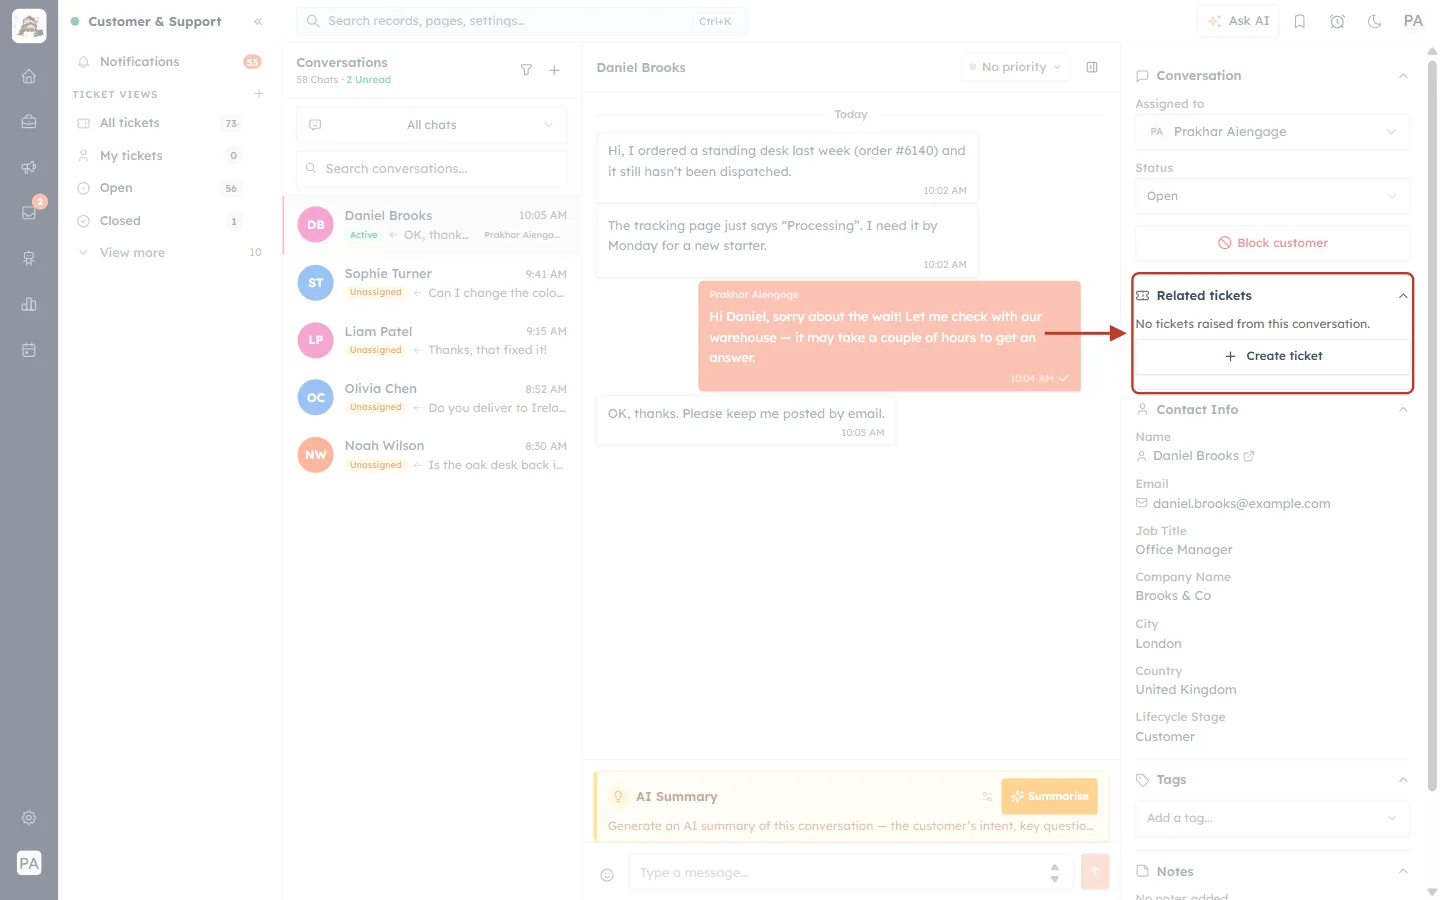
What this screenshot shows. The Related tickets section in the right-hand panel is ringed.
“No tickets raised from this conversation.” — no ticket exists for this chat yet.
+ Create ticket — click it to raise a ticket from this chat.
Above (faded): the chat’s Assigned to and Status. Below (faded): the customer’s Contact Info, Tags and Notes.
Part 2 — Create the ticket#
Step 4: Click Create ticket and get to know the form#
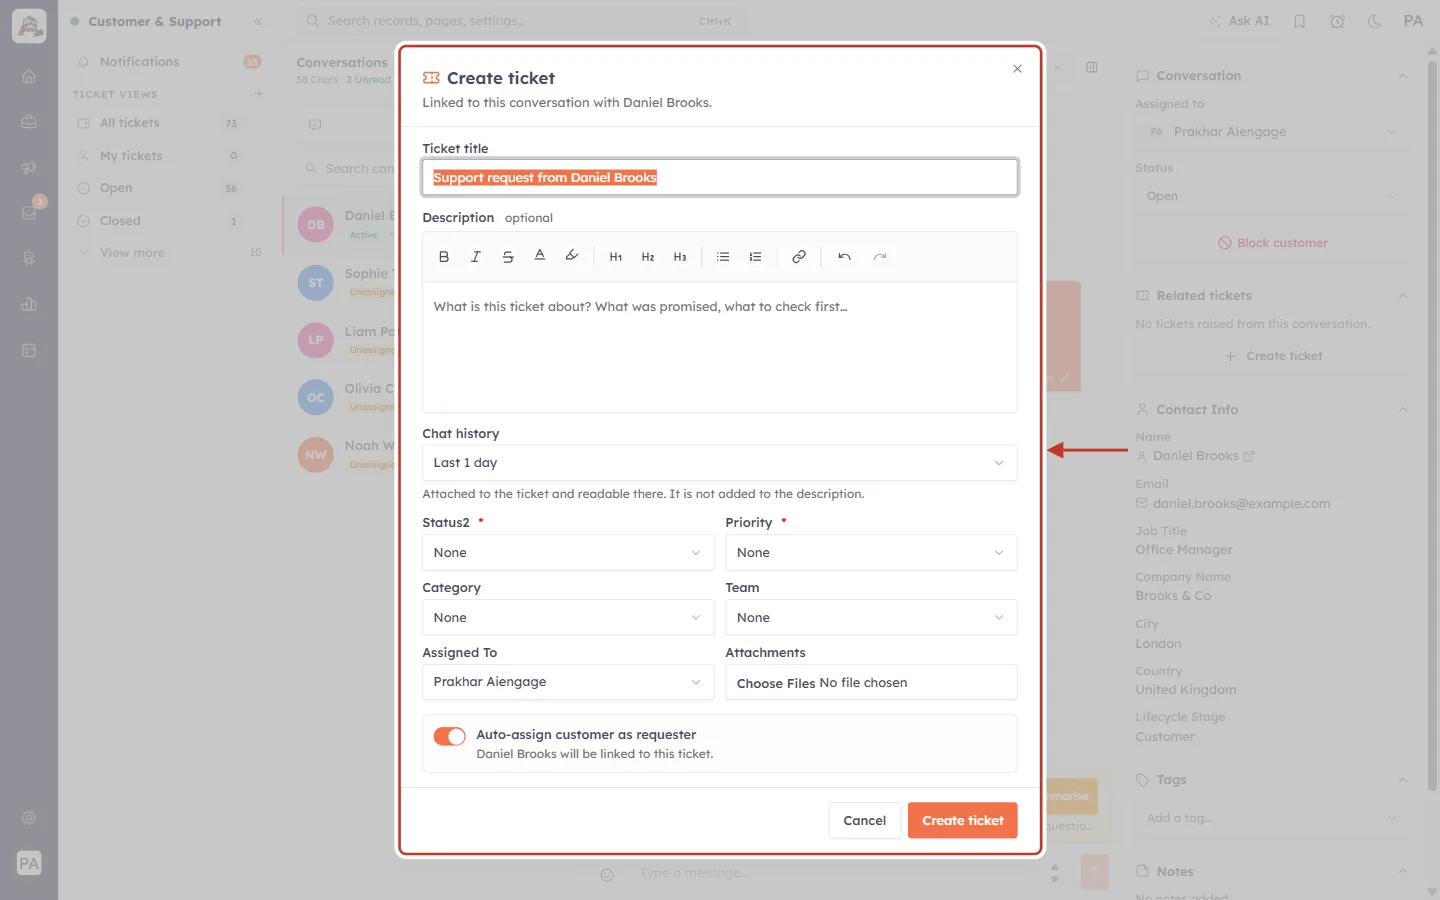
What this screenshot shows. The Create ticket form is ringed. Its subtitle says “Linked to this conversation with Daniel Brooks.”
Ticket title — filled in for you as Support request from Daniel Brooks, and selected so you can type over it straight away.
Description (optional) — a box with a formatting toolbar.
Chat history — Last 1 day: how much of the chat to attach. “Attached to the ticket and readable there. It is not added to the description.”
Status2 * and Priority * — both required, both start as None.
Category, Team — optional, start as None.
Assigned To — filled in with the person the chat is assigned to (Prakhar Aiengage).
Attachments — Choose Files, to add files to the ticket.
Auto-assign customer as requester (switched on) — “Daniel Brooks will be linked to this ticket.”
Cancel and Create ticket at the bottom.
Step 5: Give the ticket a clear title#
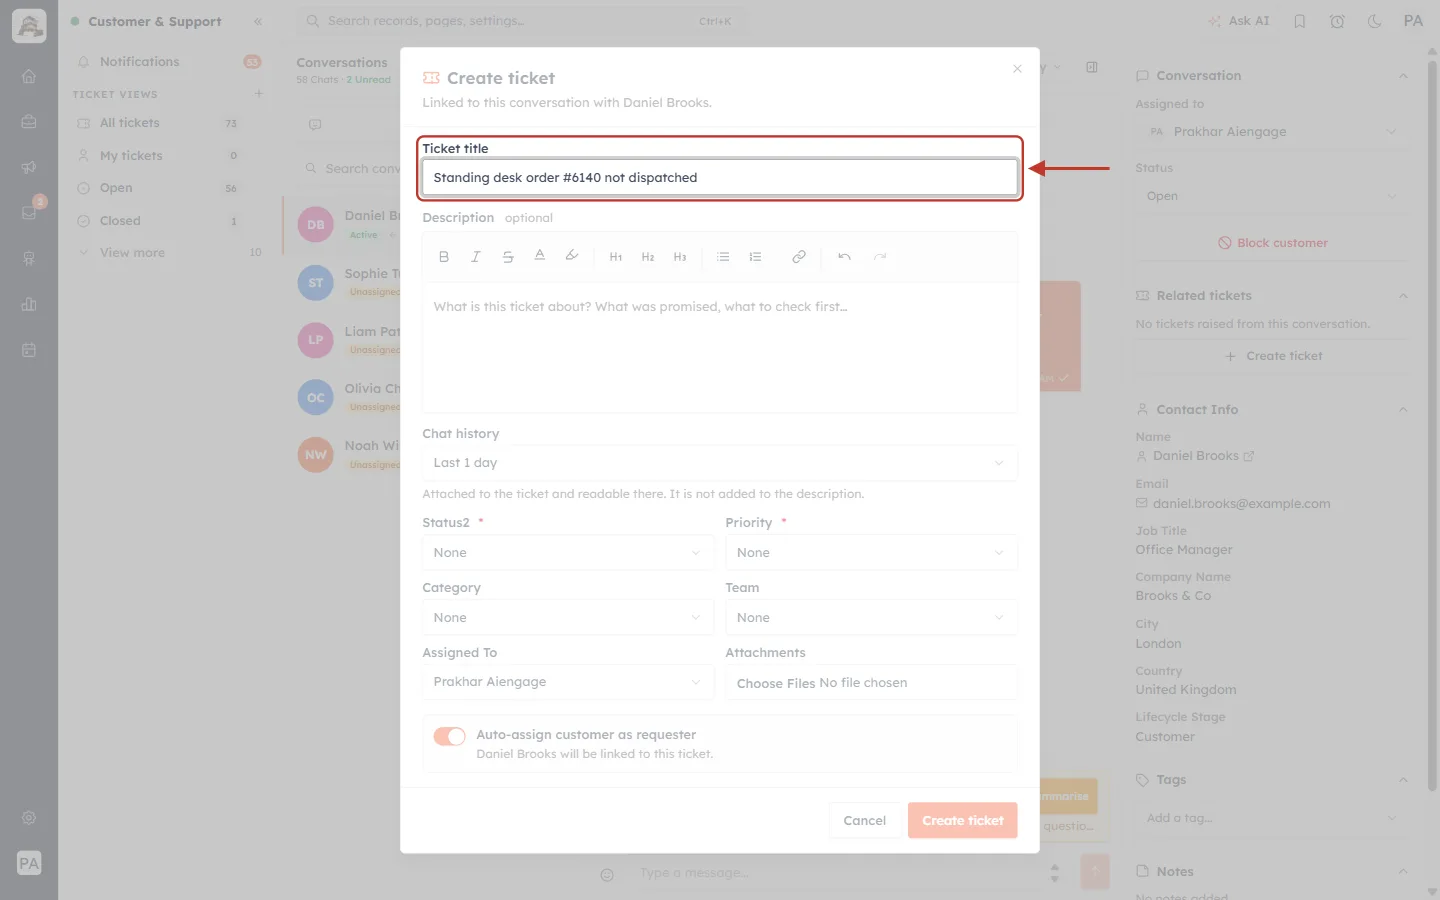
What this screenshot shows. The Ticket title field is ringed, now reading Standing desk order #6140 not dispatched.
Replace the automatic title with one that says what the problem is. It becomes the ticket’s subject in the ticket list and in any email you send from the ticket.
Include an order or invoice number if there is one, so the ticket is easy to find later.
Step 6: Describe what needs to happen (optional)#
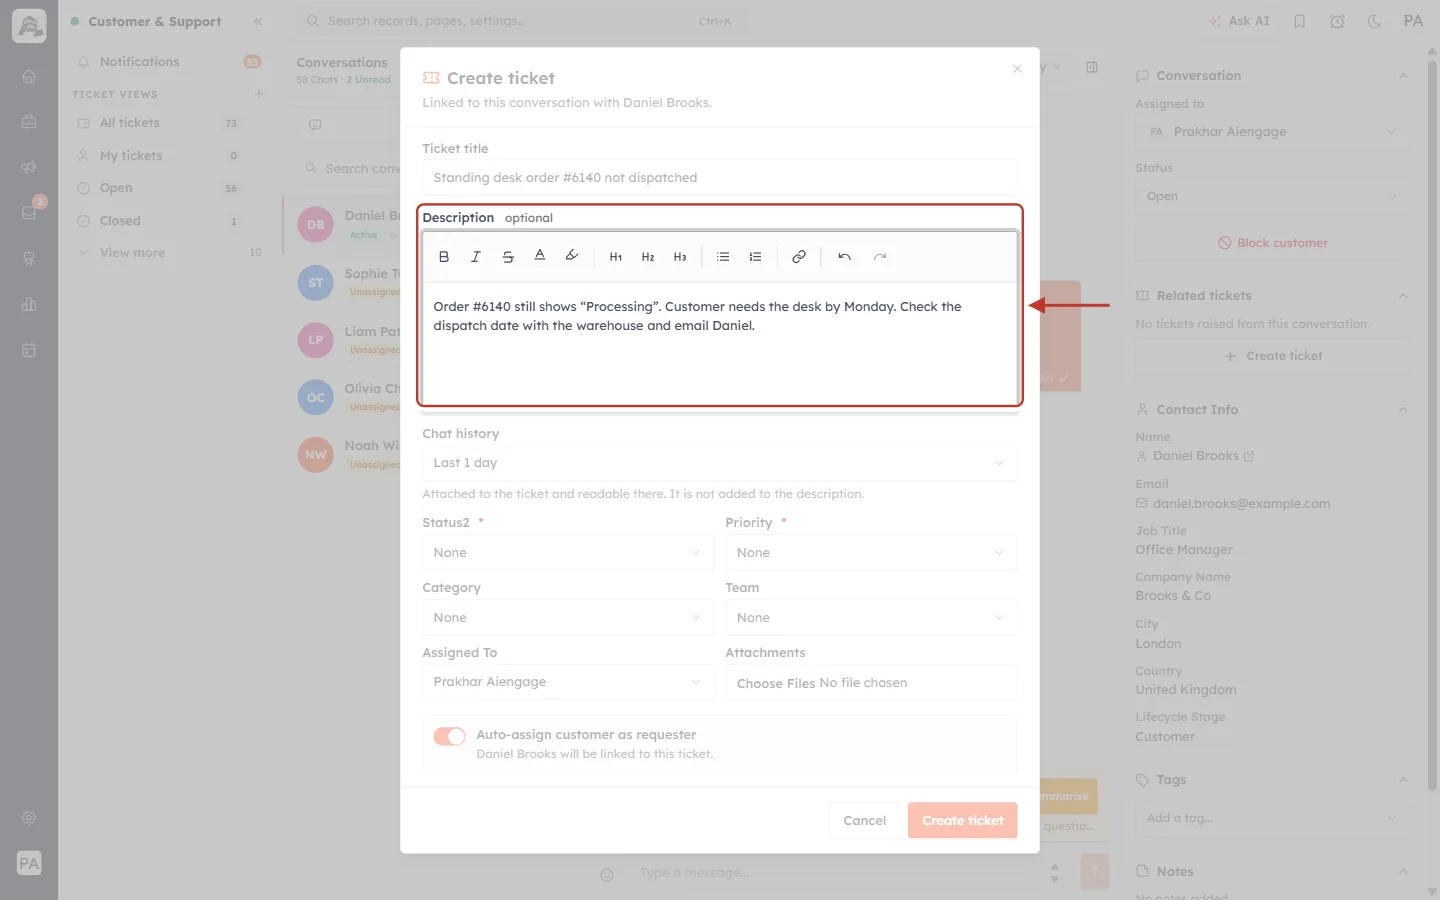
What this screenshot shows. The Description box is ringed, with a short brief written in.
The placeholder suggests what to write: “What is this ticket about? What was promised, what to check first…”
Here: “Order #6140 still shows ‘Processing’. Customer needs the desk by Monday. Check the dispatch date with the warehouse and email Daniel.”
You don’t need to copy the chat here — the chat history is attached separately (next step).
Step 7: Choose how much chat to attach#
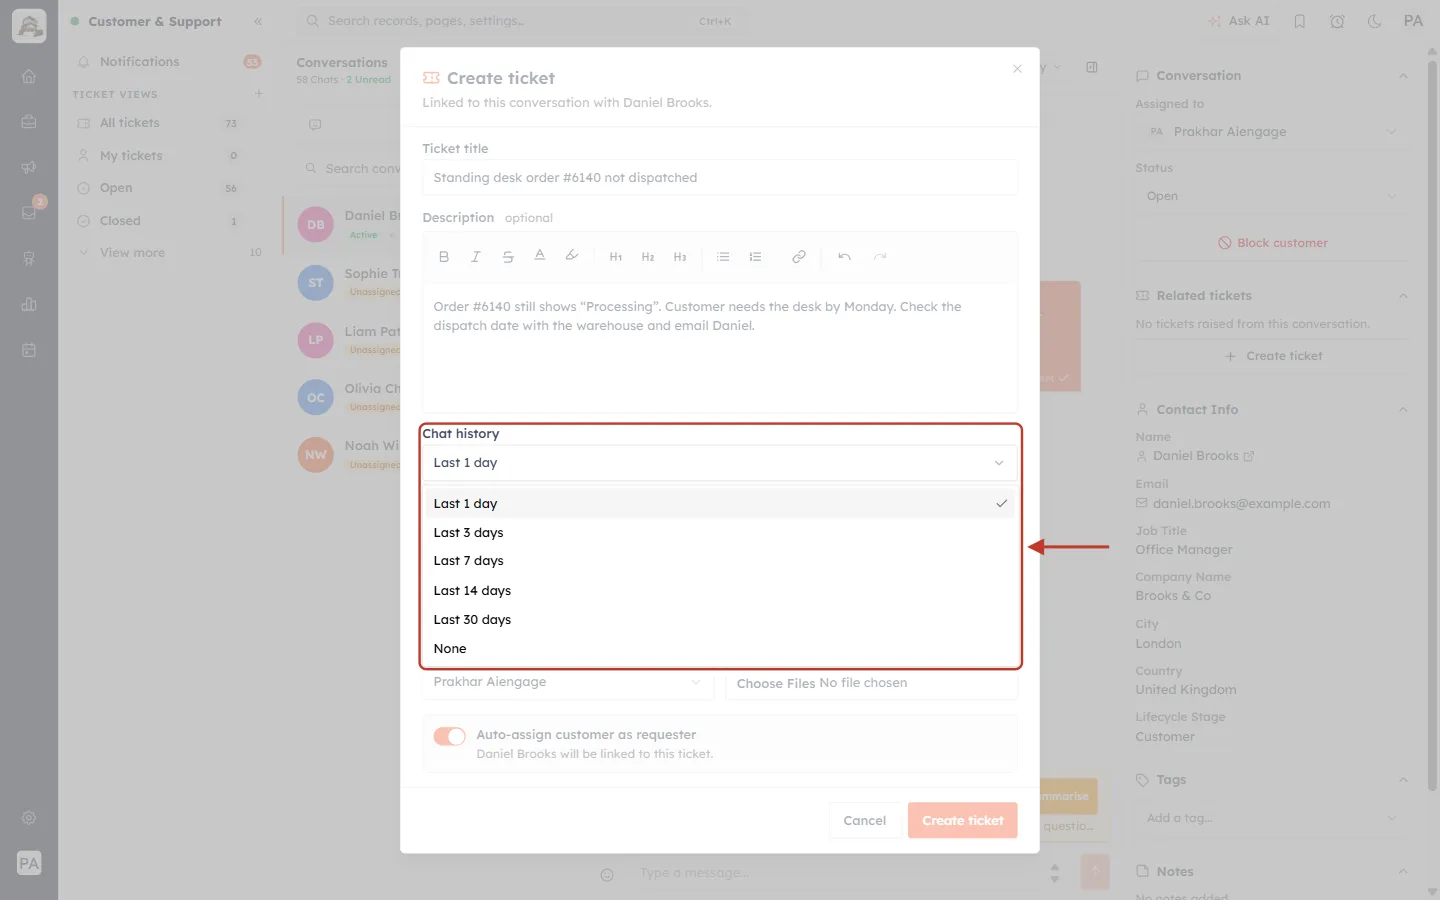
What this screenshot shows. The Chat history field and its list are ringed.
Last 1 day (the default, ticked), Last 3 days, Last 7 days, Last 14 days and Last 30 days — attaches the chat messages from that period.
None — attaches no chat. The form then says “No chat history will be attached to this ticket.”
Choose a longer period if the problem started in an earlier chat with the same customer.
Step 8: Set the status and priority (required)#
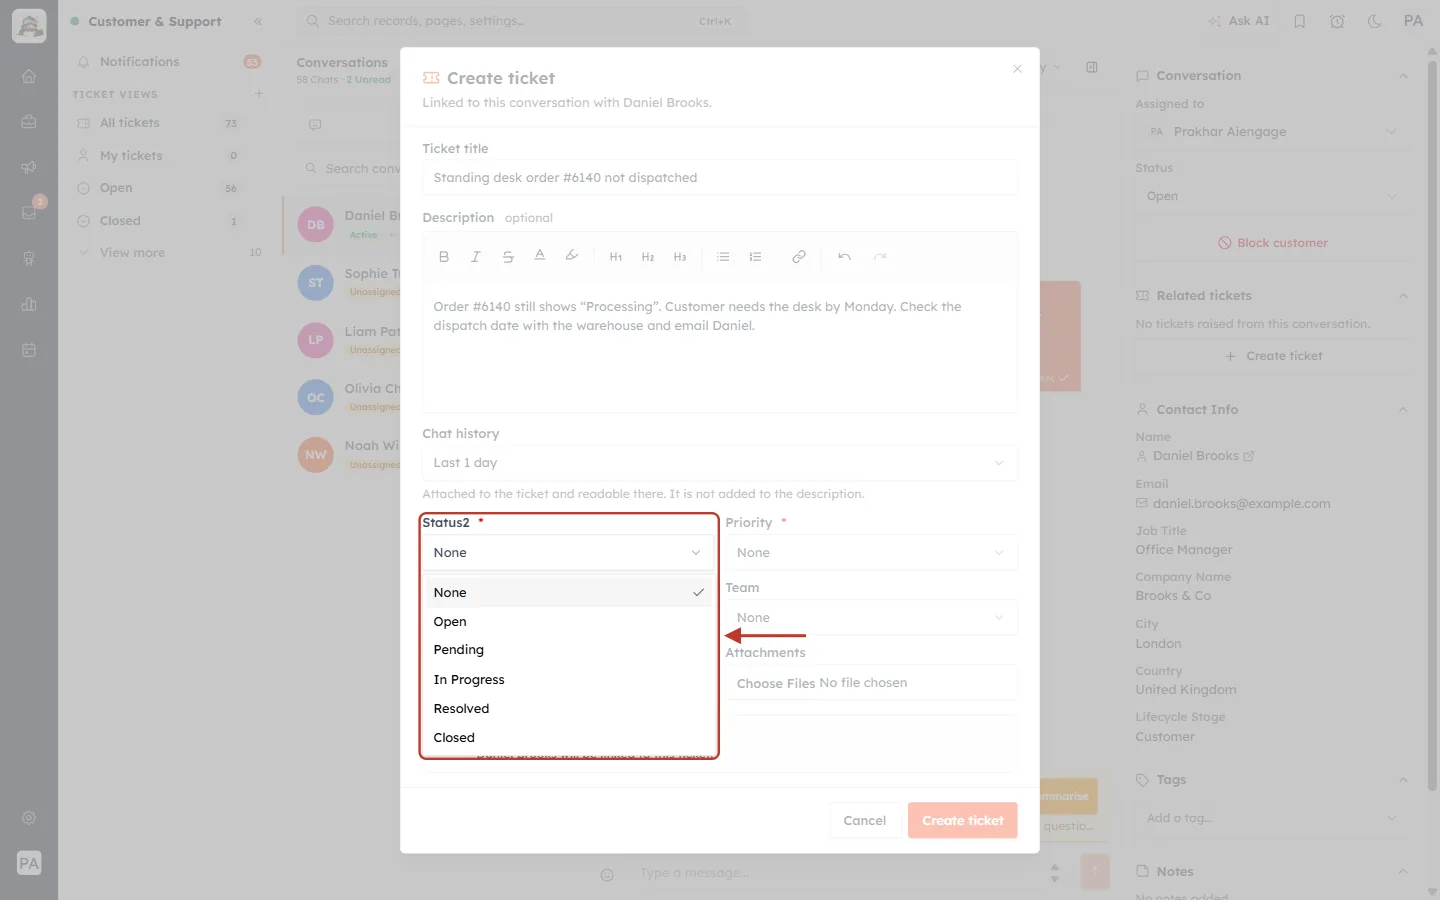
What this screenshot shows. The Status2 field and its list are ringed.
None (current), Open, Pending, In Progress, Resolved and Closed.
Choose Open for a ticket that still needs work — as here.
You must choose a status: if you leave it as None, the form reports that the field is required.
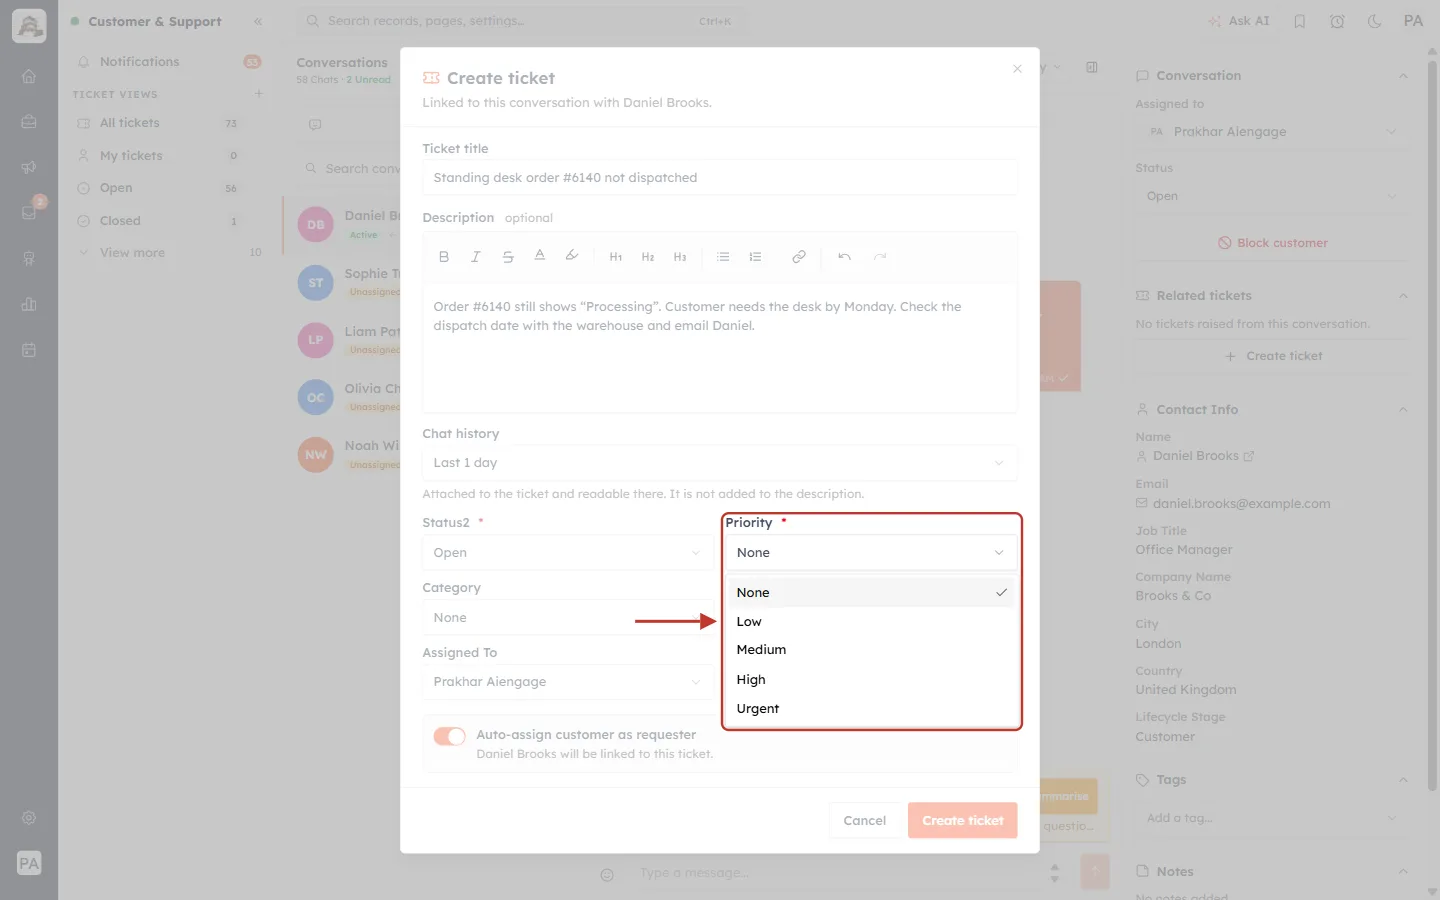
What this screenshot shows. The Priority field and its list are ringed.
None (current), Low, Medium, High and Urgent.
We choose High, because Daniel needs the desk by Monday.
Priority is also required.
Step 9: Check the other fields#
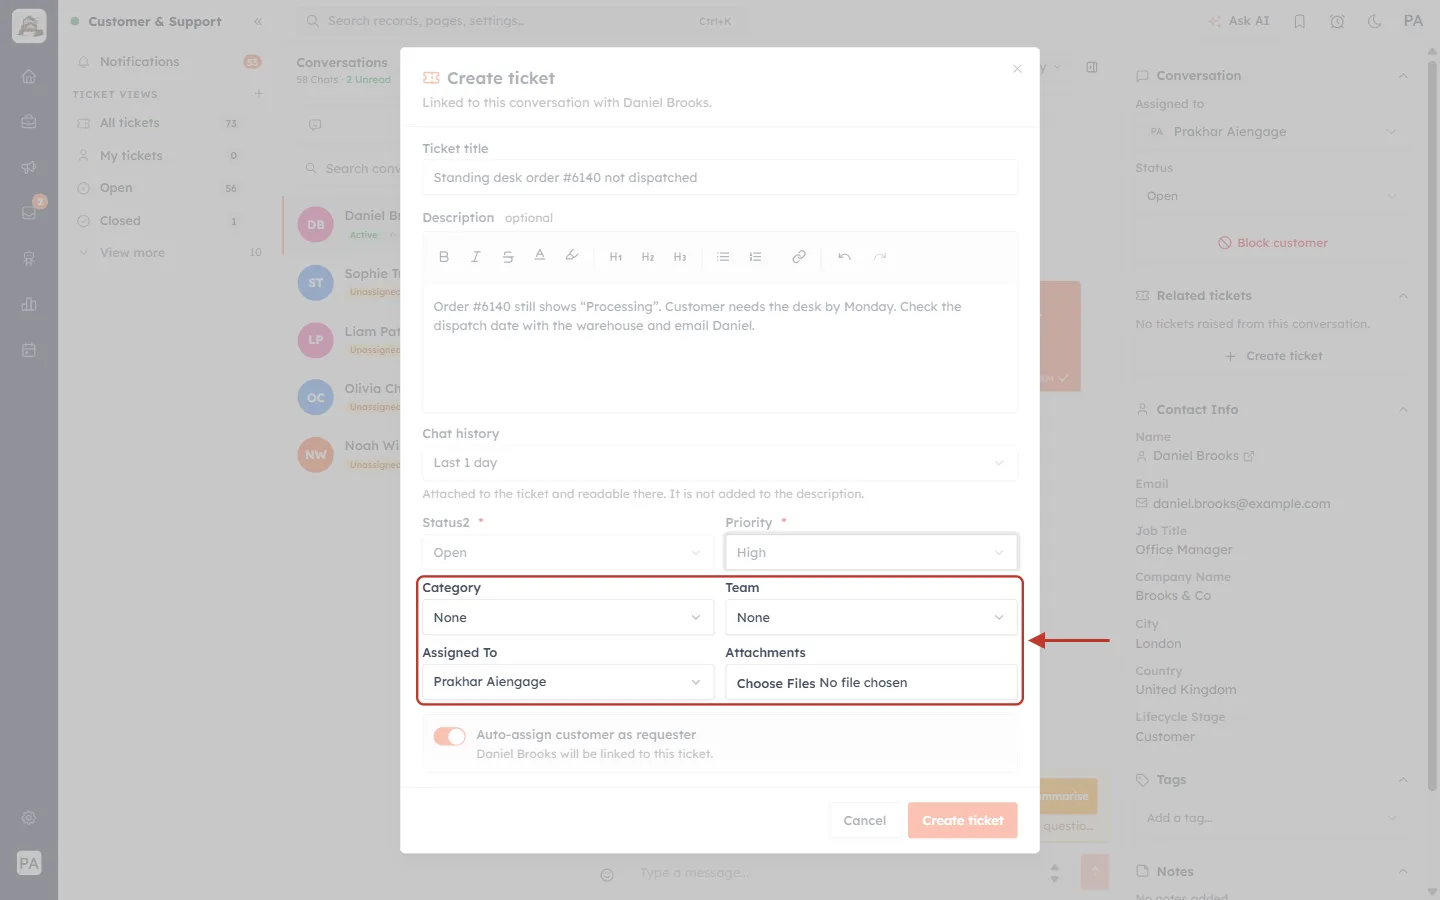
What this screenshot shows. The lower fields of the form are ringed.
Category — the kind of request (for example General inquiry or Billing issue). Optional.
Team — the team that should handle it. Optional.
Assigned To — who owns the ticket. It starts with the chat’s agent; change it to hand the ticket to someone else, or choose Unassigned.
Attachments — add files such as a photo or receipt the customer sent. For safety, scripts and programs cannot be attached.
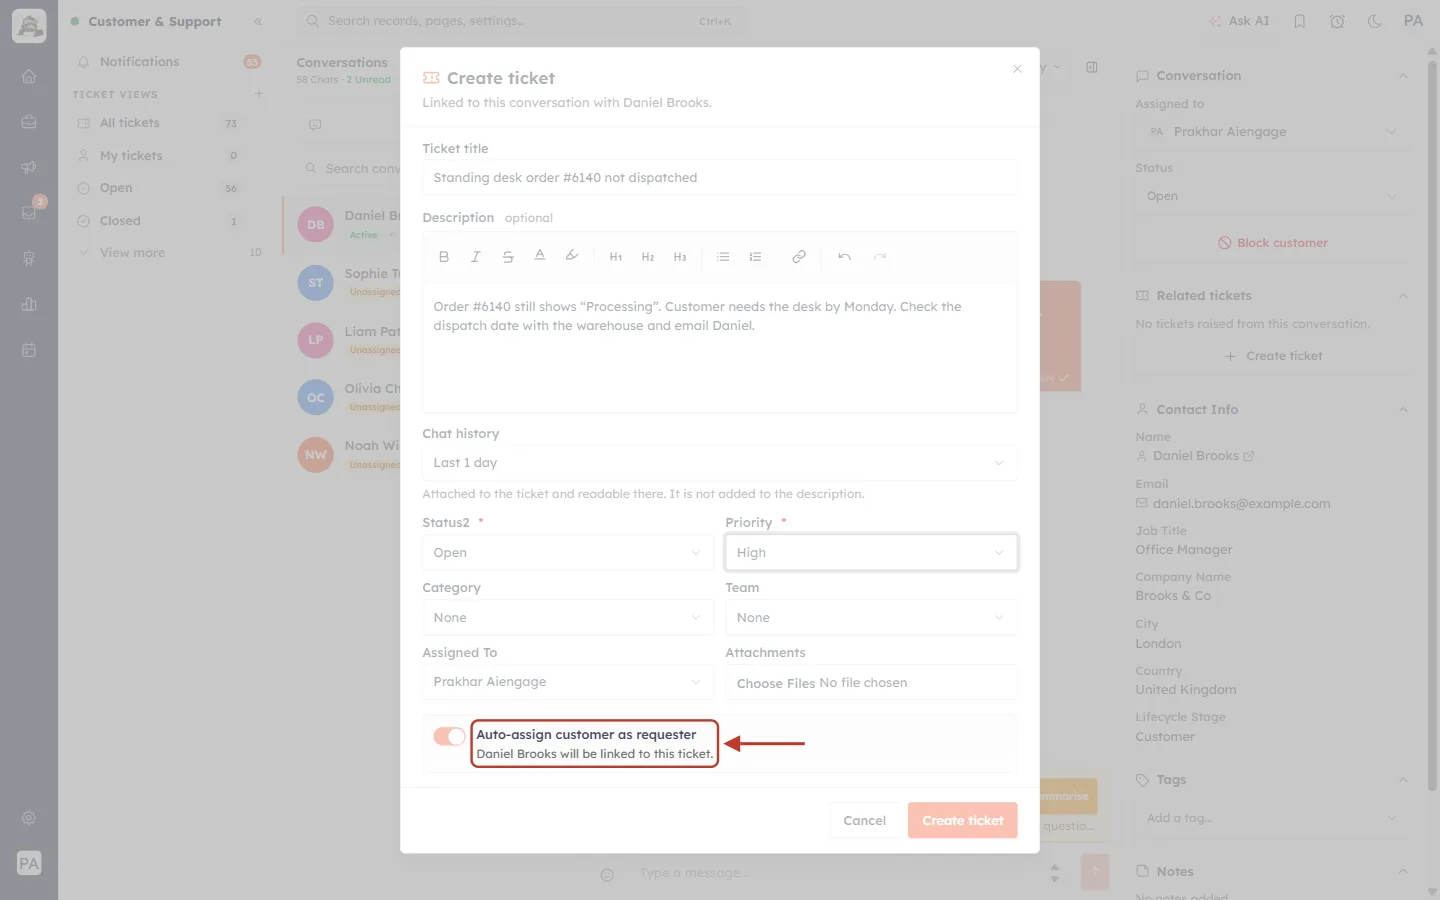
What this screenshot shows. The Auto-assign customer as requester switch is ringed. It is on (orange).
“Daniel Brooks will be linked to this ticket.” — the chat’s contact becomes the ticket’s customer, so their email and details appear on the ticket and the ticket appears on their contact record.
Leave it on in almost every case. If the chat isn’t linked to a CRM contact yet, the form says “No CRM contact is linked to this conversation yet.”
Step 10: Create the ticket#
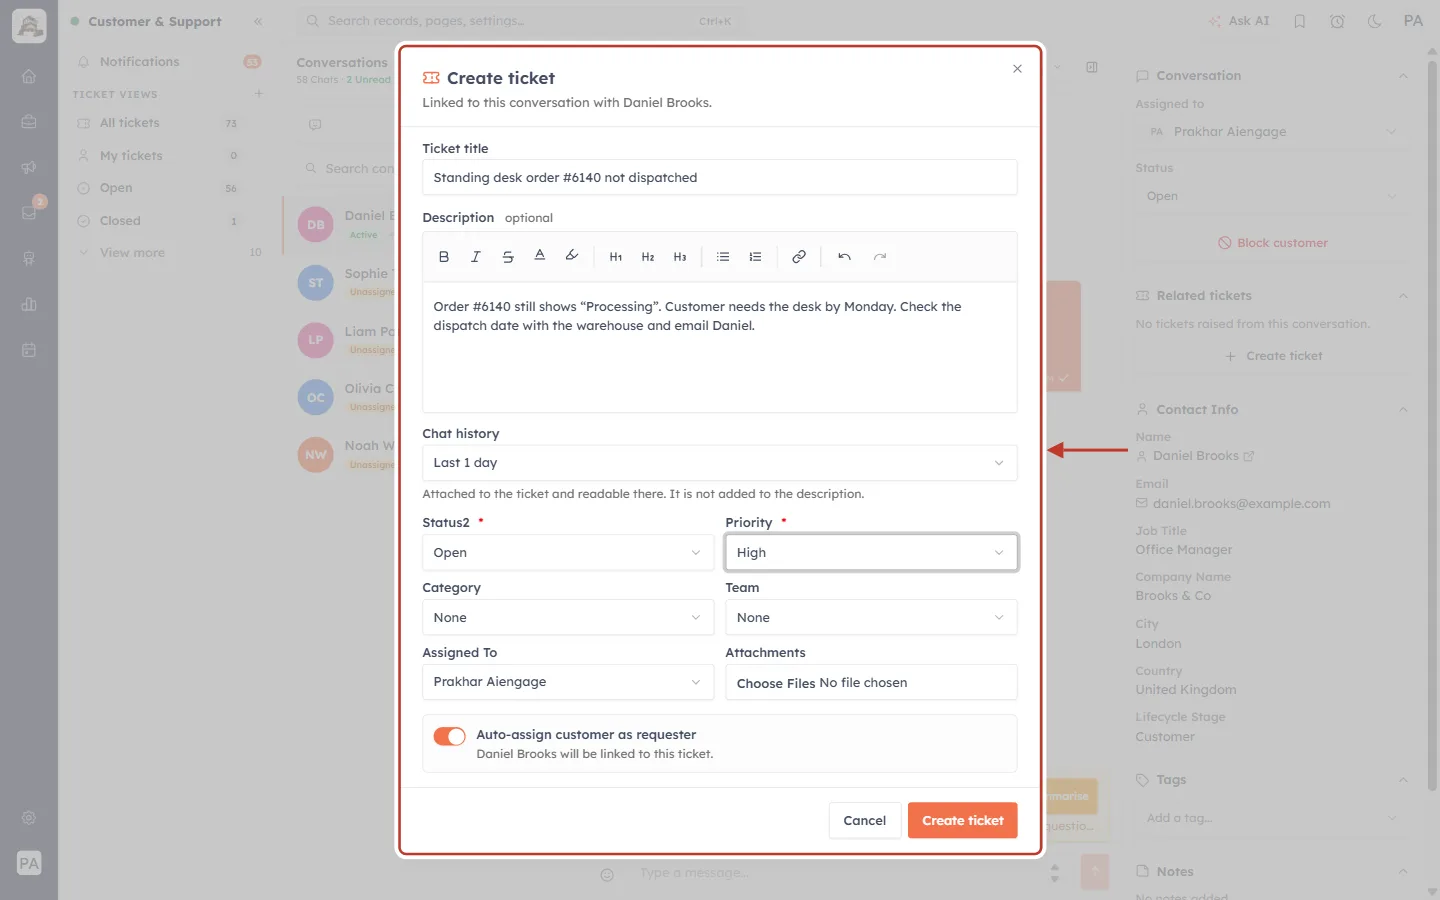
What this screenshot shows. The completed form is ringed.
Title Standing desk order #6140 not dispatched, the description, Chat history Last 1 day.
Status Open, Priority High, assigned to Prakhar Aiengage, customer linked.
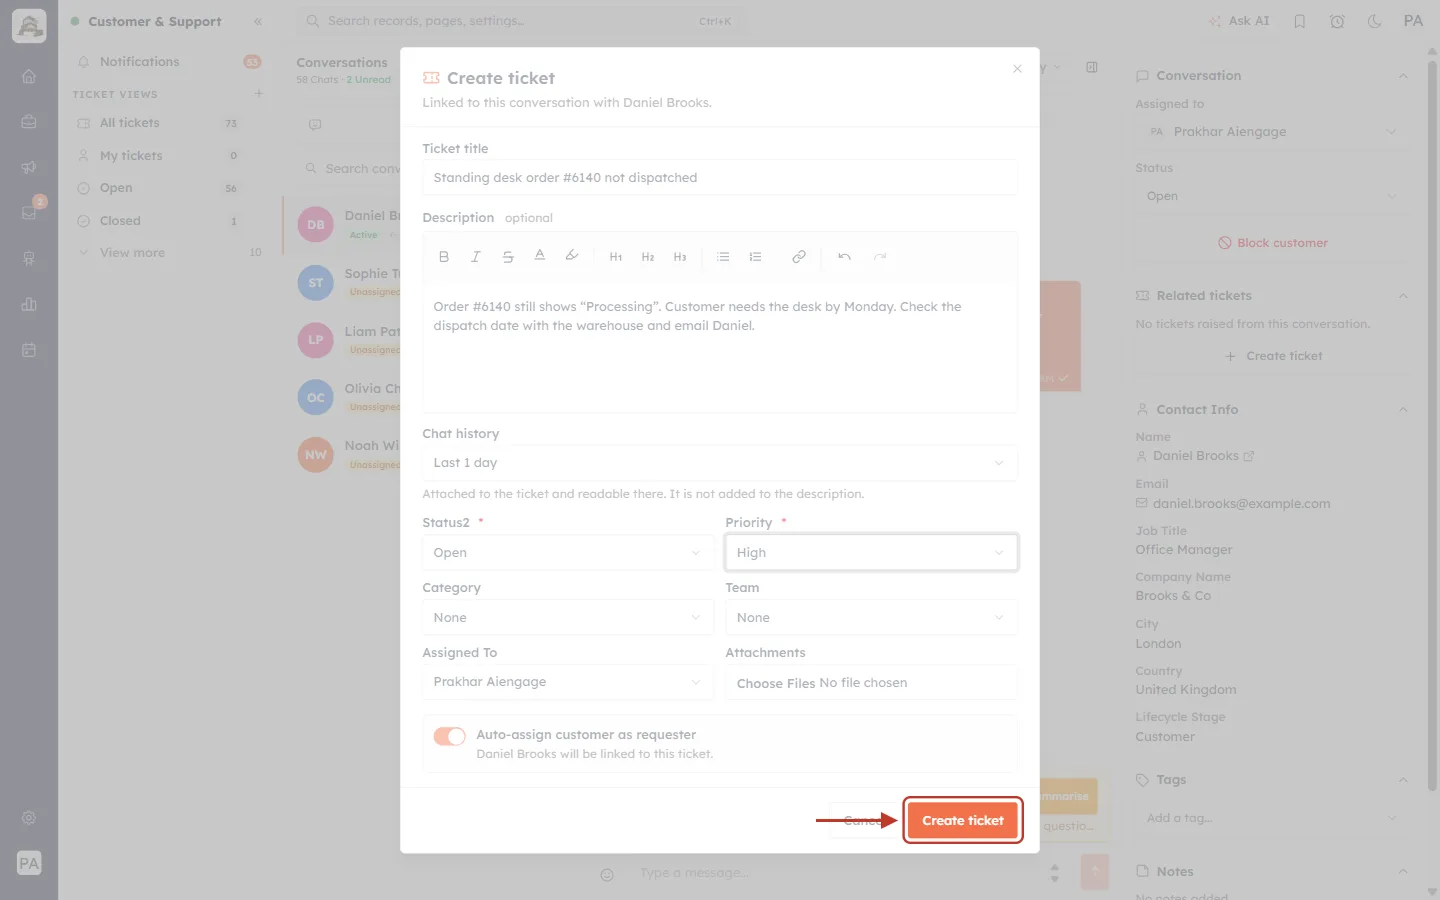
What this screenshot shows. The orange Create ticket button at the bottom right of the form is ringed.
Click it to create the ticket. Cancel closes the form without creating anything.
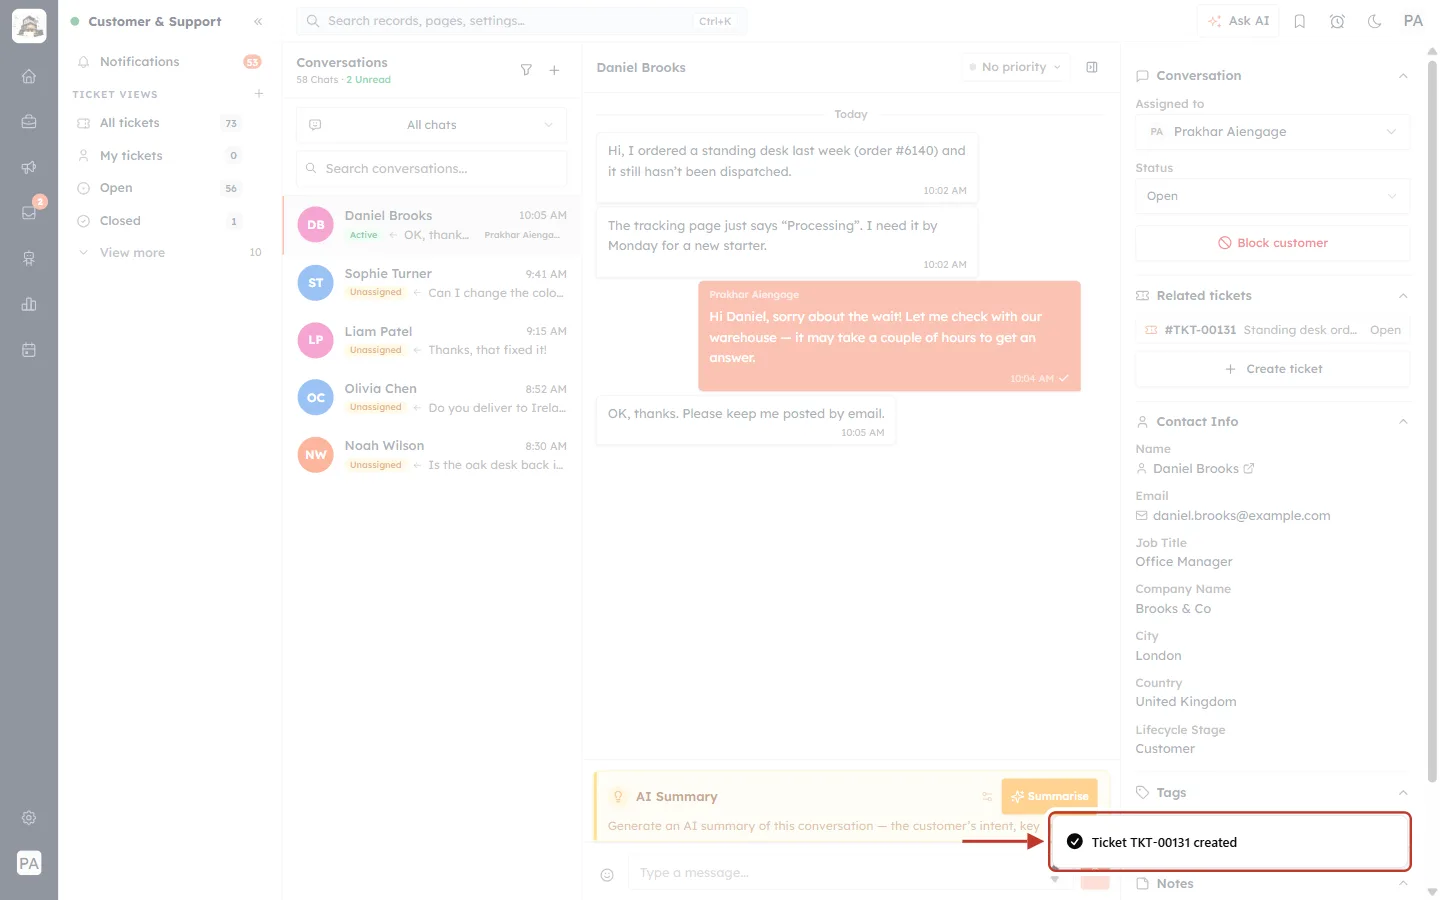
What this screenshot shows. The confirmation at the bottom right of the screen is ringed: “Ticket TKT-00131 created”.
It gives the new ticket number. You can tell the customer this number in the chat, so they can refer to it later.
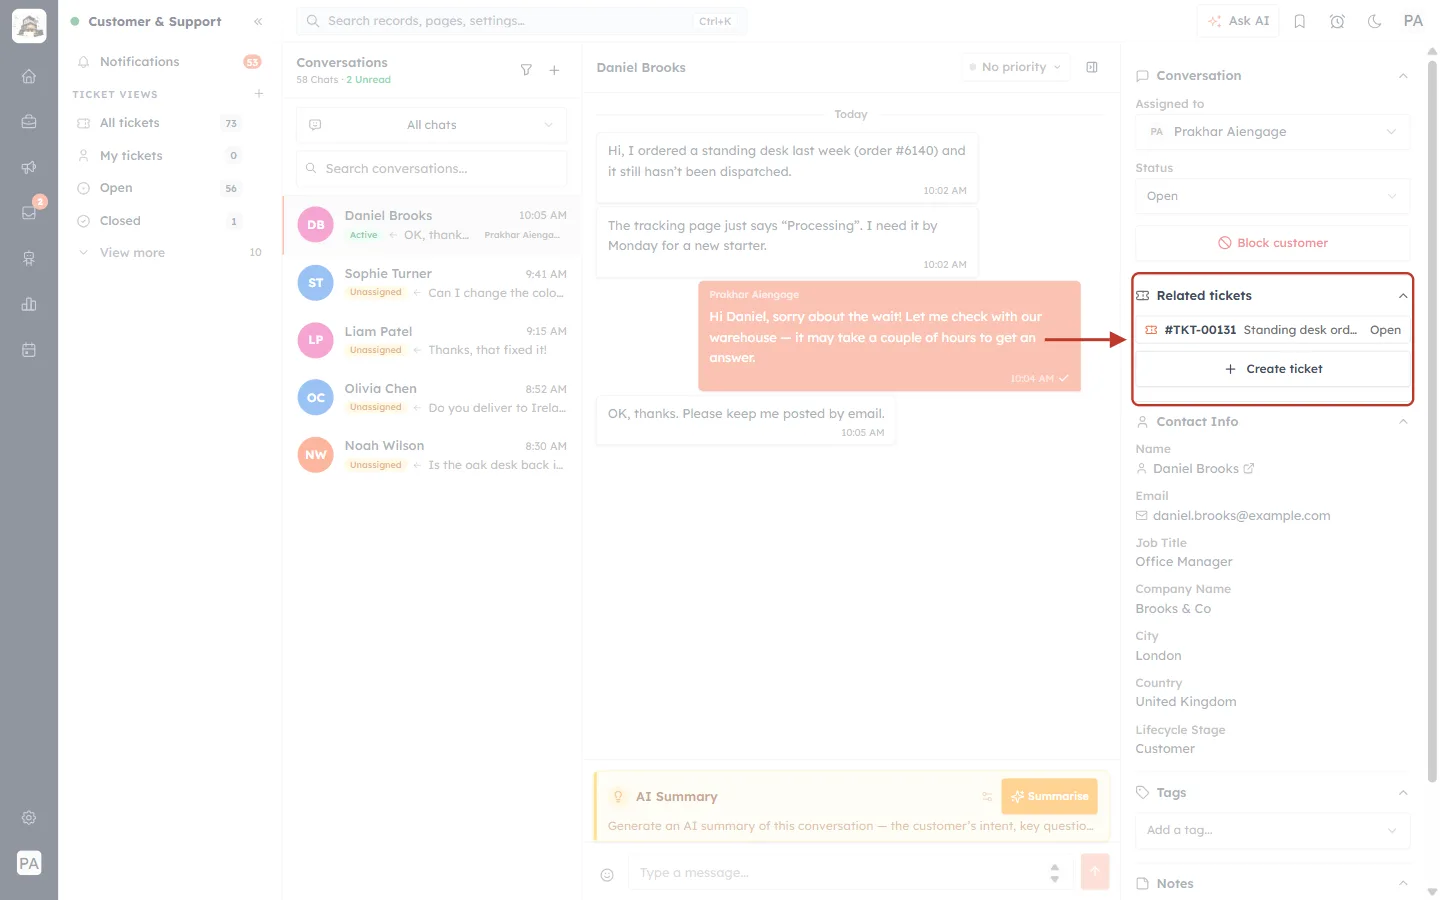
What this screenshot shows. The Related tickets section is ringed, now listing the new ticket.
#TKT-00131, its title (Standing desk order #6140 not dispatched) and its status (Open).
Click the ticket to open it (Part 3).
+ Create ticket is still there: one chat can have more than one ticket — for example if the customer raises a second, unrelated problem.
✅
Before you end the chat, tell the customer what happens next: “I’ve logged this as ticket TKT-00131 and we’ll email you with a dispatch date today.”
Part 3 — Work the ticket#
Step 11: Open the ticket#
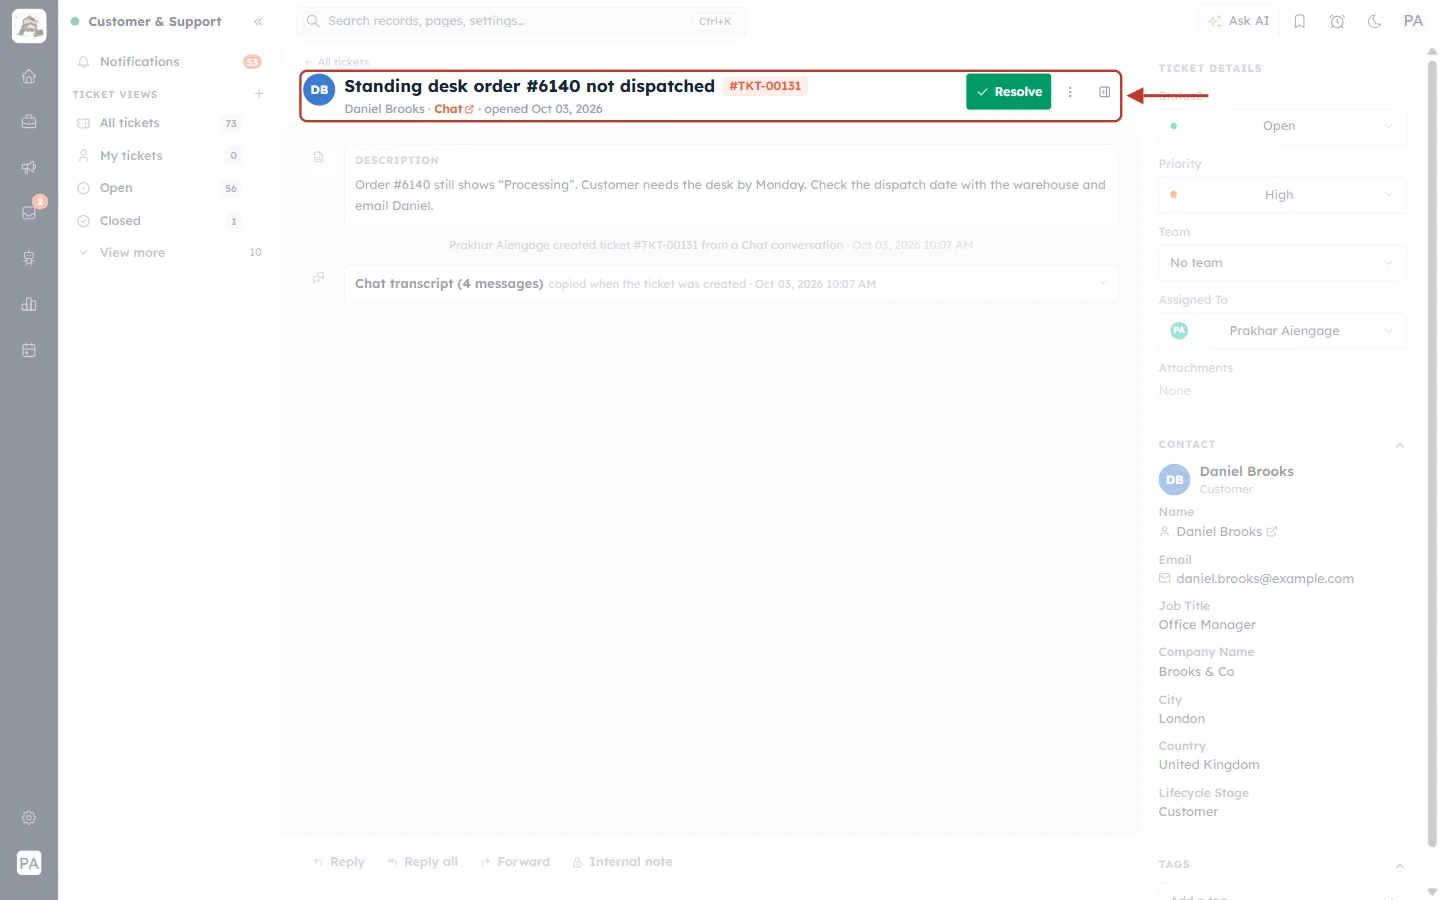
What this screenshot shows. The header of the new ticket is ringed.
The title Standing desk order #6140 not dispatched and the number #TKT-00131.
Underneath: Daniel Brooks · Chat ↗ · opened Oct 03, 2026. Click Chat ↗ to open the original chat in a new tab.
On the right: the green Resolve button, the ⋮ menu and the details-panel button.
Step 12: Read the attached chat#
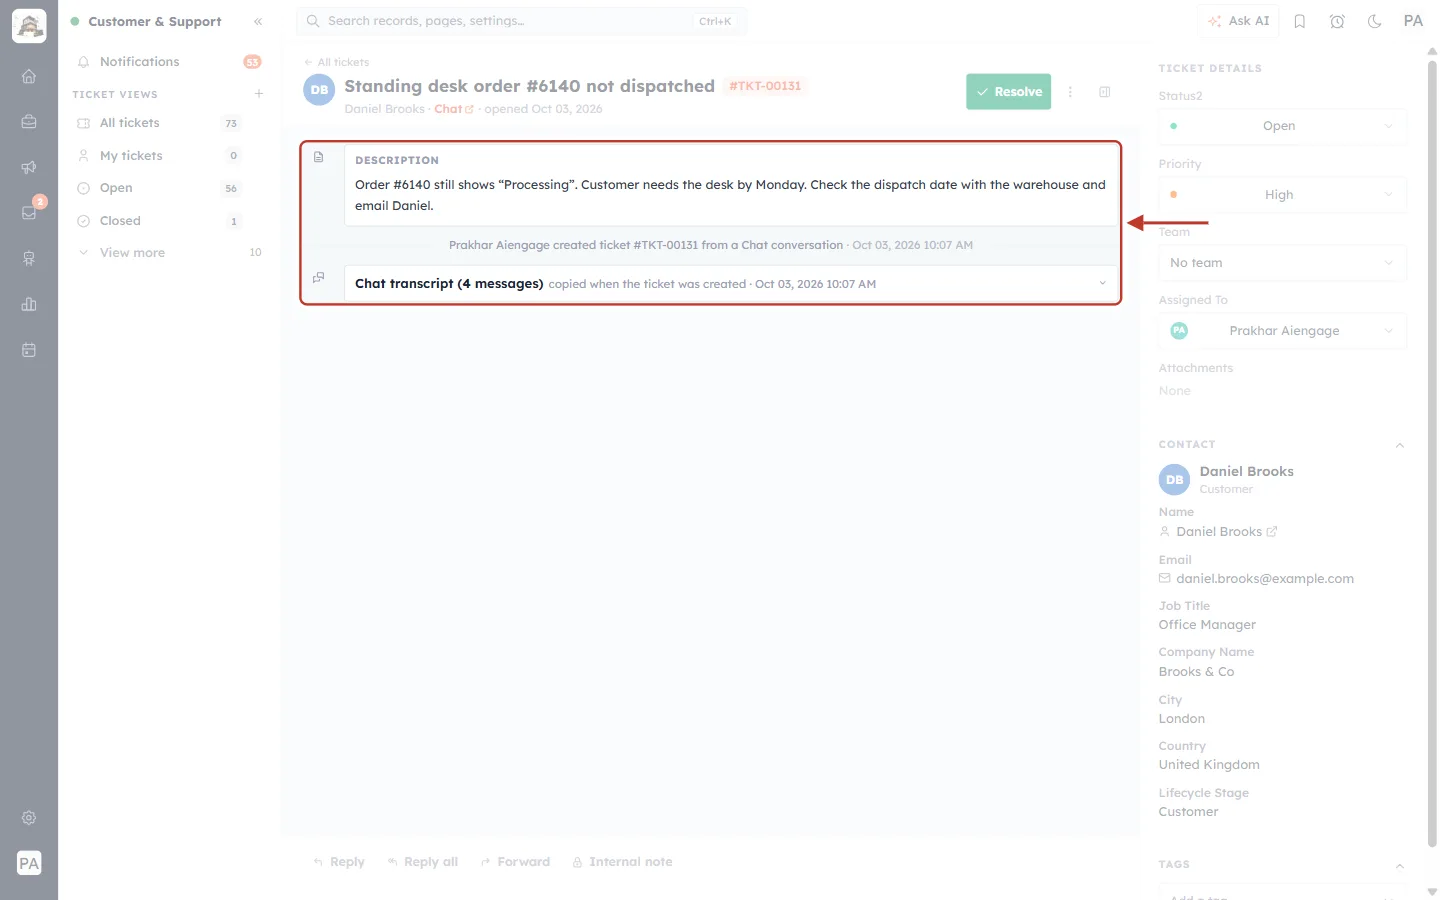
What this screenshot shows. The start of the ticket conversation is ringed.
DESCRIPTION — what you wrote in the form.
A grey line: “Prakhar Aiengage created ticket #TKT-00131 from a Chat conversation”, with the date and time.
Chat transcript (4 messages) — copied when the ticket was created. Click it to open it.
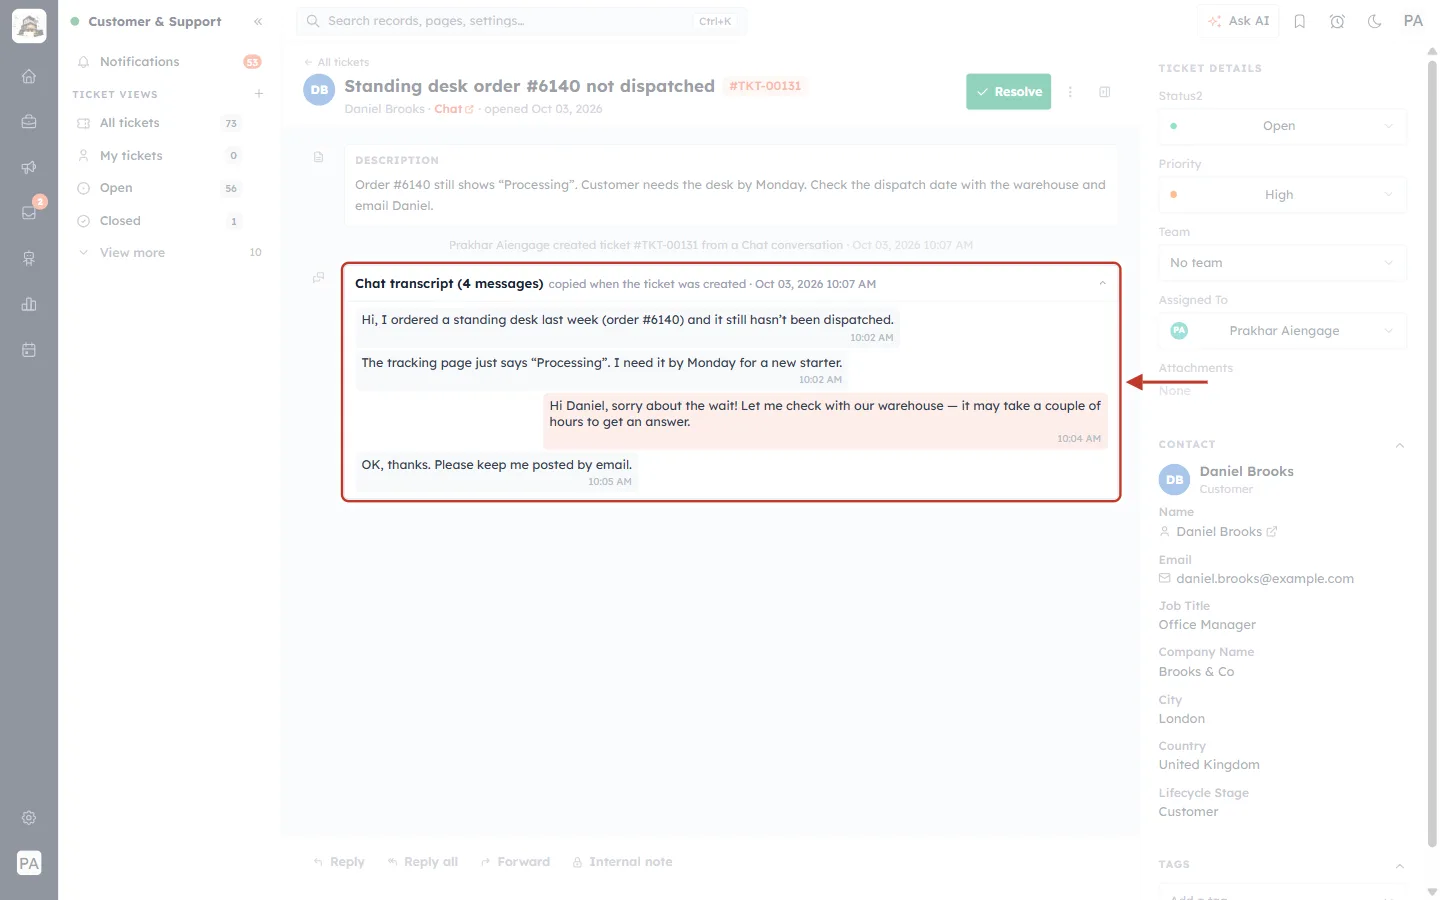
What this screenshot shows. The Chat transcript is open and ringed.
The four chat messages, in order, with their times: the customer’s messages on the left, the agent’s reply on the right in orange.
This is a copy taken when the ticket was created — anyone working on the ticket can read the whole story without opening the chat.
Click the title again to fold it away.
From here, work the ticket as usual: reply to the customer by email, add internal notes, and change its status — see Reply to Customers and Assign, Prioritise, Tag & Change Ticket Status.
Part 4 — Raise a ticket from one message#
In a long chat, the customer may raise a new problem part-way through. Instead of attaching the whole chat, raise the ticket from the message where the problem starts.
Step 13: Open the message’s menu#
Hover over the message. A small ⌄ arrow appears beside it — click it.
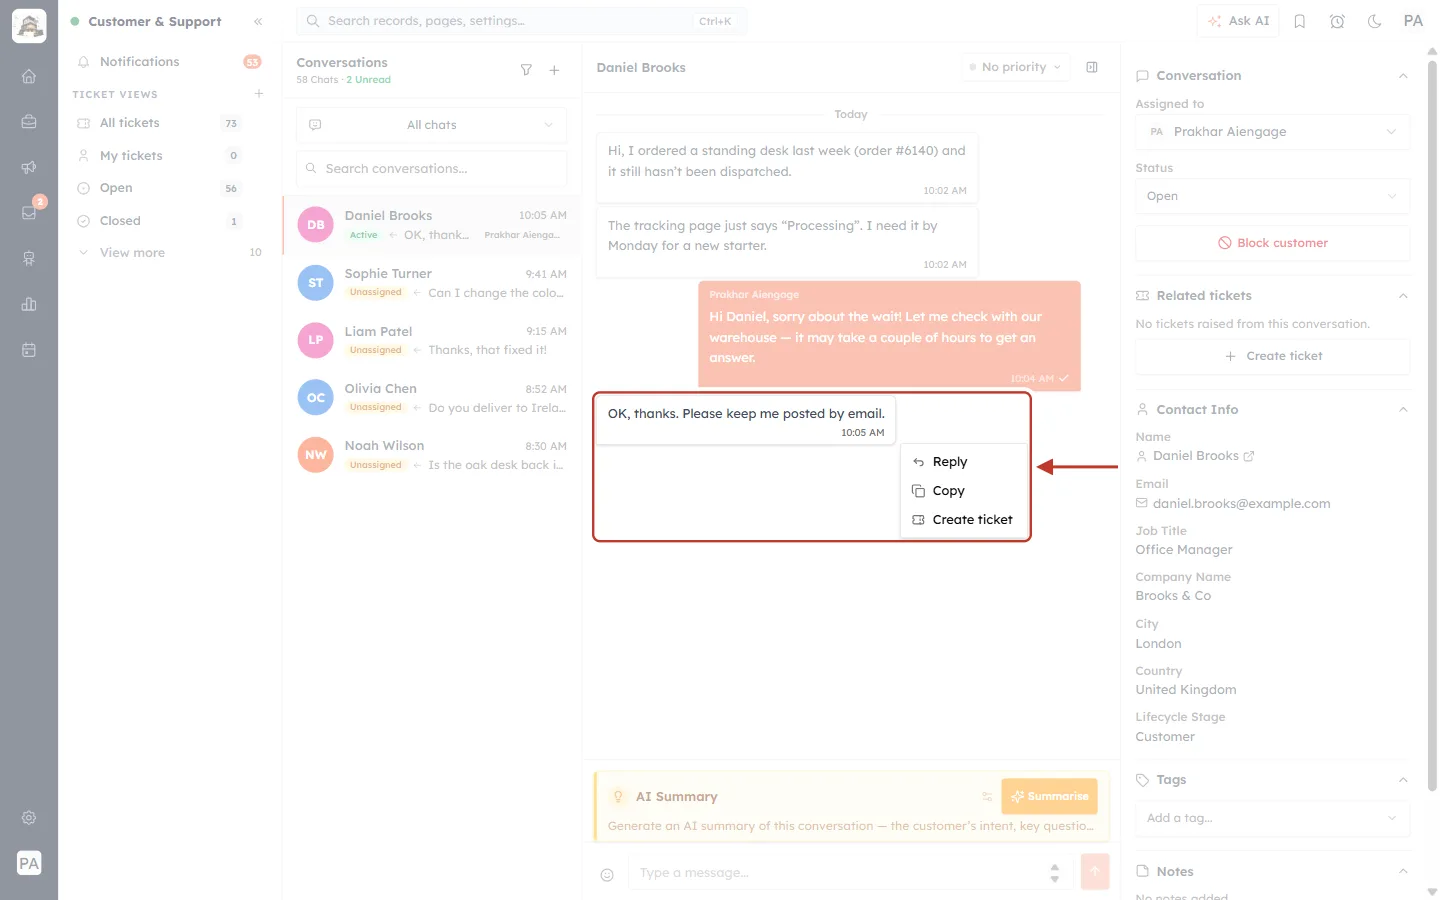
What this screenshot shows. A customer message and its menu are ringed.
Reply — reply to this message in the chat.
Copy — copy the message text.
Create ticket — raise a ticket starting from this message.
Step 14: Create the ticket#
Click Create ticket. The same form opens, with one difference in Chat history.
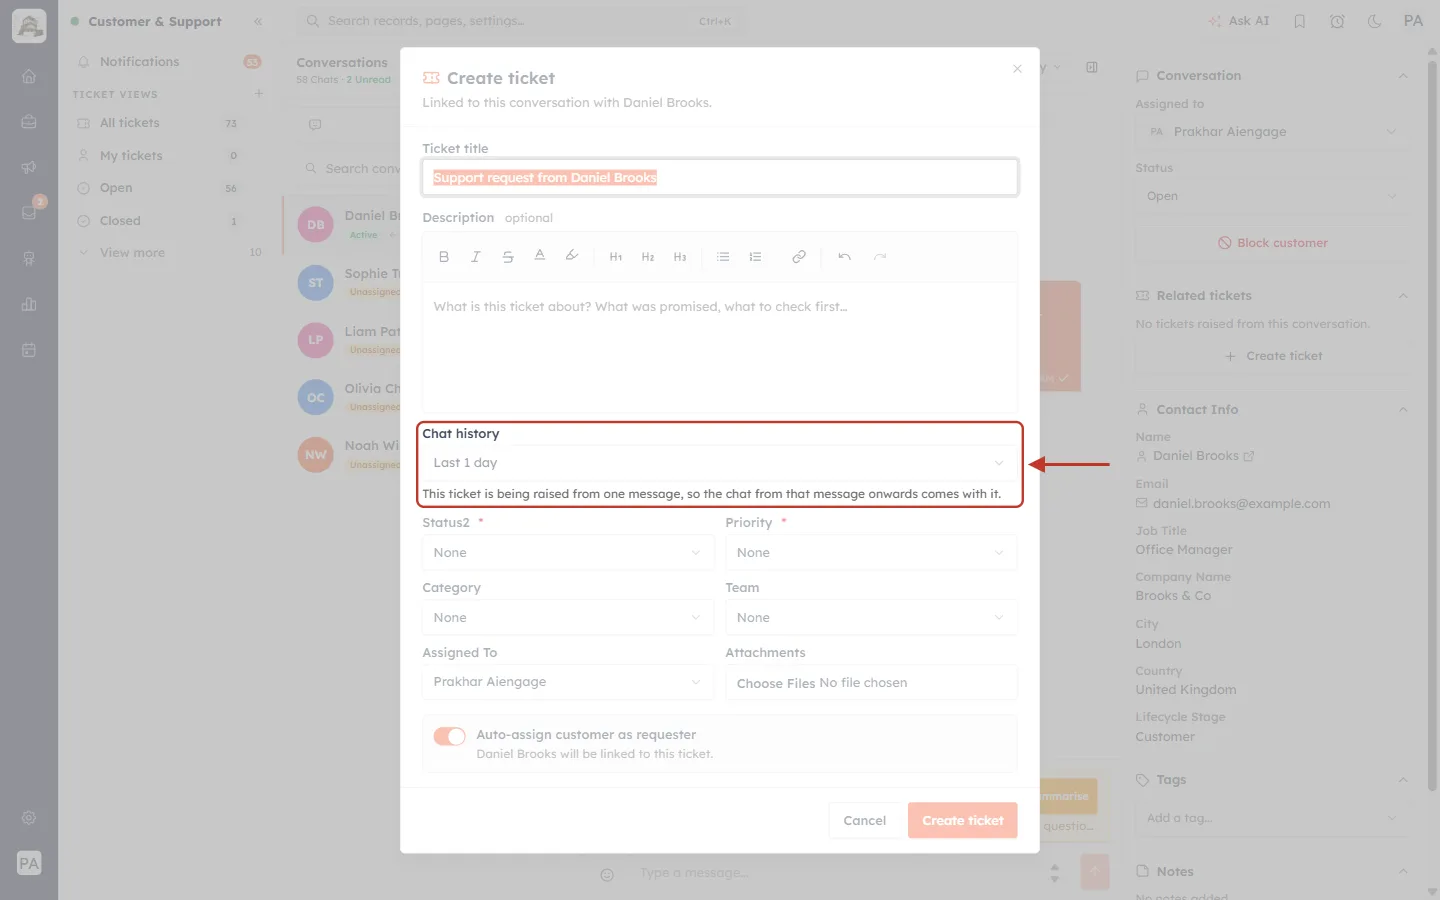
What this screenshot shows. The Chat history part of the form is ringed.
The note under it now reads “This ticket is being raised from one message, so the chat from that message onwards comes with it.”
Fill in the rest of the form as in Part 2 (title, status, priority…) and click Create ticket.
When to turn a chat into a ticket#
You promised to get back to the customer later.
Someone outside the chat must act — the warehouse, billing, a specialist.
The problem will take more than one conversation to solve.
You want the request to count in reports and stay visible in your ticket views until it is done.
Troubleshooting#
I don’t see Create ticket in the chat. The ticket system may be switched off, or your profile can’t create tickets. Ask your administrator.
The form won’t create the ticket. Check Status2 and Priority — both are required. The form names any required field that is still empty.
The customer isn’t linked to the ticket. Either Auto-assign customer as requester was switched off, or the chat had no CRM contact (“No CRM contact is linked to this conversation yet.”). Link the contact from the ticket record.
The ticket has no chat transcript. Chat history was set to None, or there were no messages in the chosen period. Choose a longer period next time.
An attachment was refused. Scripts and programs can’t be attached. Each file also needs a name and a file type.
Frequently asked questions#
Does the customer see the ticket form? No. Raising a ticket happens in your inbox; the customer only sees what you tell them in the chat or by email.
Is the chat added to the description? No. The chat is attached as a separate Chat transcript on the ticket; the description holds only what you write.
Can one chat have several tickets? Yes. Every ticket raised from the chat is listed under Related tickets.
Does the chat continue after the ticket is raised? Yes. The chat and the ticket are separate; you can keep chatting, and open the chat from the ticket with Chat ↗.
Previous and next#
Previous: Bulk Actions on Tickets: Select Several Tickets and Update Them Together (Step-by-Step)
Next: Live Agent Handover from the AI Agent: Accept, Take Over and Hand Back Chats (Step-by-Step)
Related#
Was this article helpful?
Ready to implement this?
OpenAI Engage and apply what you just learned to your own workspace.
Open AI Engage CRM