Loading…


KnowledgeBase
Bulk Actions on Tickets: Select Several Tickets and Update Them Together (Step-by-Step)
What this article covers#
Changing tickets one by one is fine for a handful. But when an agent goes on leave and twenty tickets need a new owner, or a delivery problem is fixed and a whole batch can be resolved, you want to update them all at once. This guide shows how.
You can work on several tickets together in two places:
| Where | What you can do in bulk | Part |
|---|---|---|
| Customer & Support ticket list | Set Status, set Priority, Assign to an agent, Mark read / Mark unread | 1–3 |
| Tickets module list (CRM) | Mass Update Category, Team, Assigned To, Contact Name or Tags; Export or Delete the selected tickets | 4–6 |
ℹ️
To change a single ticket, open it and use the details panel — see Assign, Prioritise, Tag & Change Ticket Status.
Before you begin#
You can only change tickets your profile allows you to edit, and delete tickets it allows you to delete — see Ticket Permissions.
Bulk changes apply straight away to every selected ticket, so check your selection before you pick an action.
Part 1 — Select tickets in Customer & Support#
Step 1: Find the checkboxes#
Open Customer & Support and choose the view that holds the tickets you want (for example All tickets or Unassigned). Use the search box or a ticket view to narrow the list first.
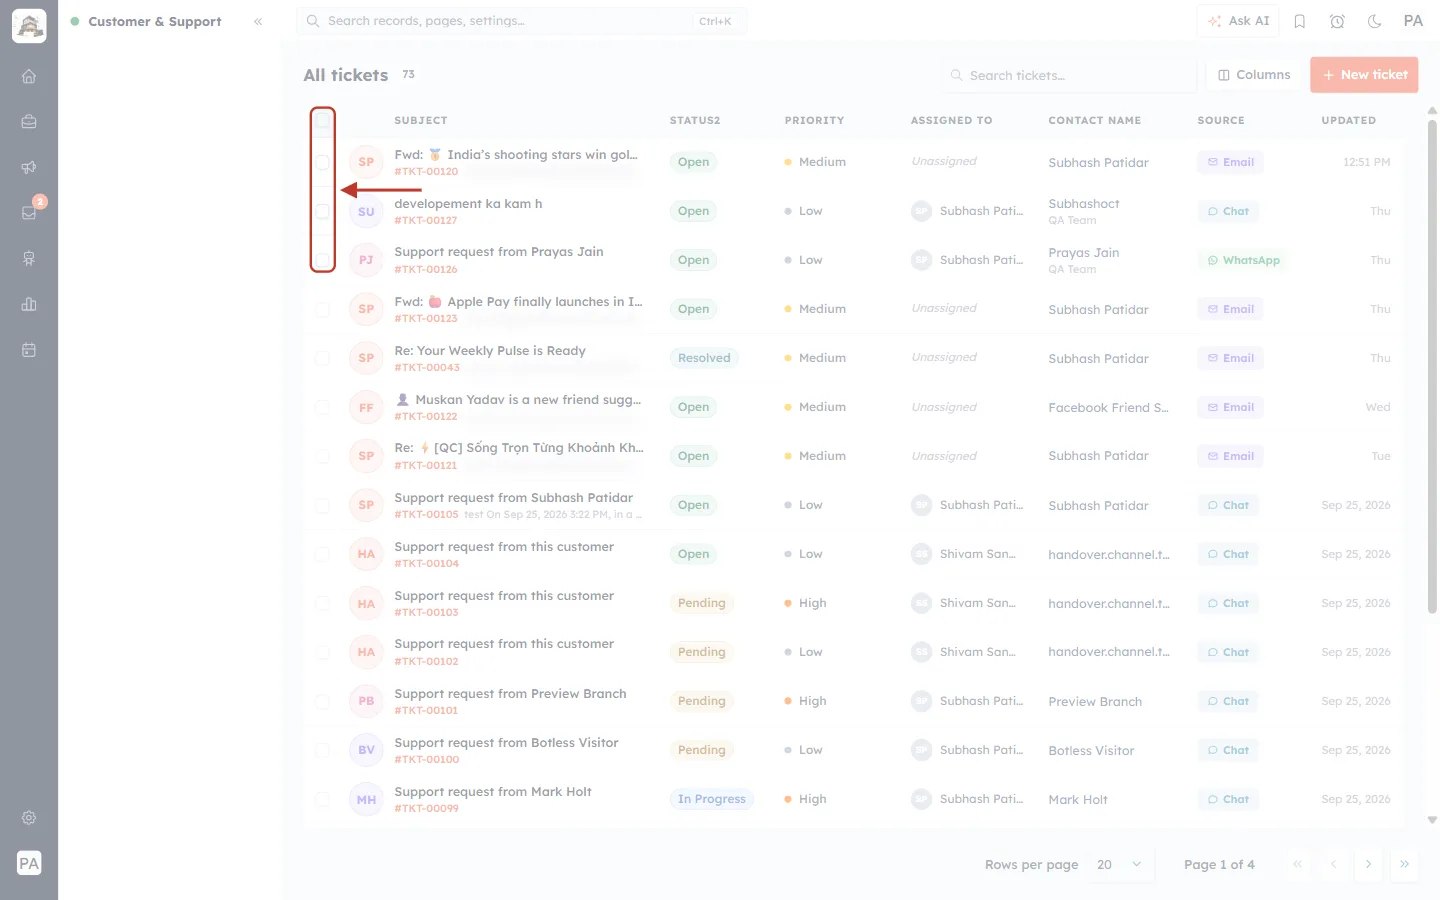
What this screenshot shows. The checkbox column on the left of the ticket list is ringed.
Each row has its own checkbox — Select ticket.
The checkbox in the header row selects every ticket on the current page — Select all tickets on this page.
Ticking a checkbox doesn’t open the ticket; clicking anywhere else on the row does.
Step 2: Tick the tickets you want#
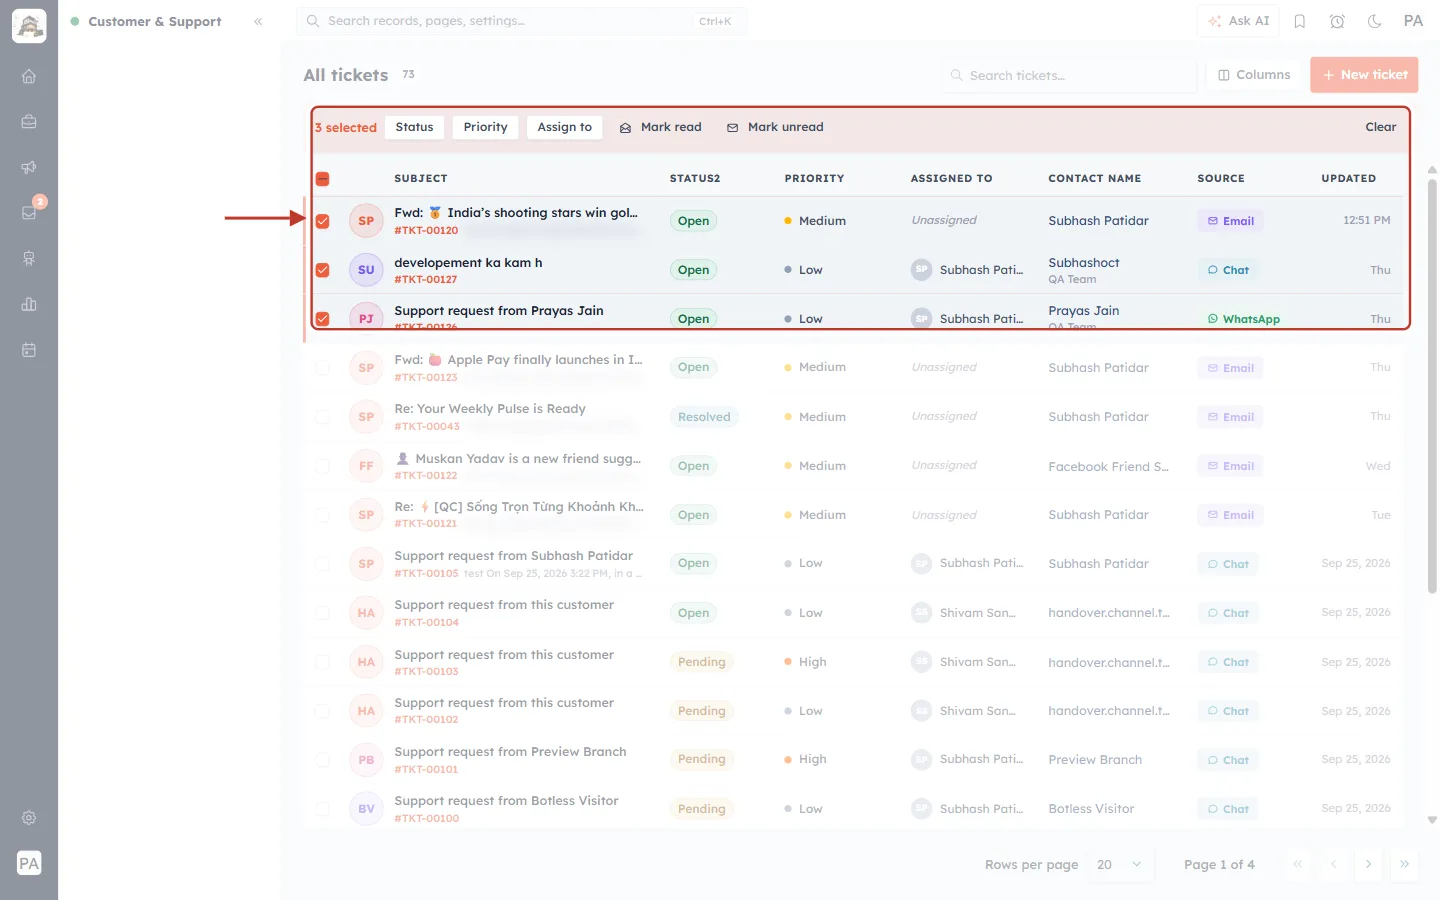
What this screenshot shows. Three ticked tickets and the bulk action bar that appears above the list are ringed.
Selected rows are highlighted and their checkboxes are orange.
The header checkbox shows a dash, meaning some tickets on the page are selected.
The bar replaces the column area and starts with the count — 3 selected.
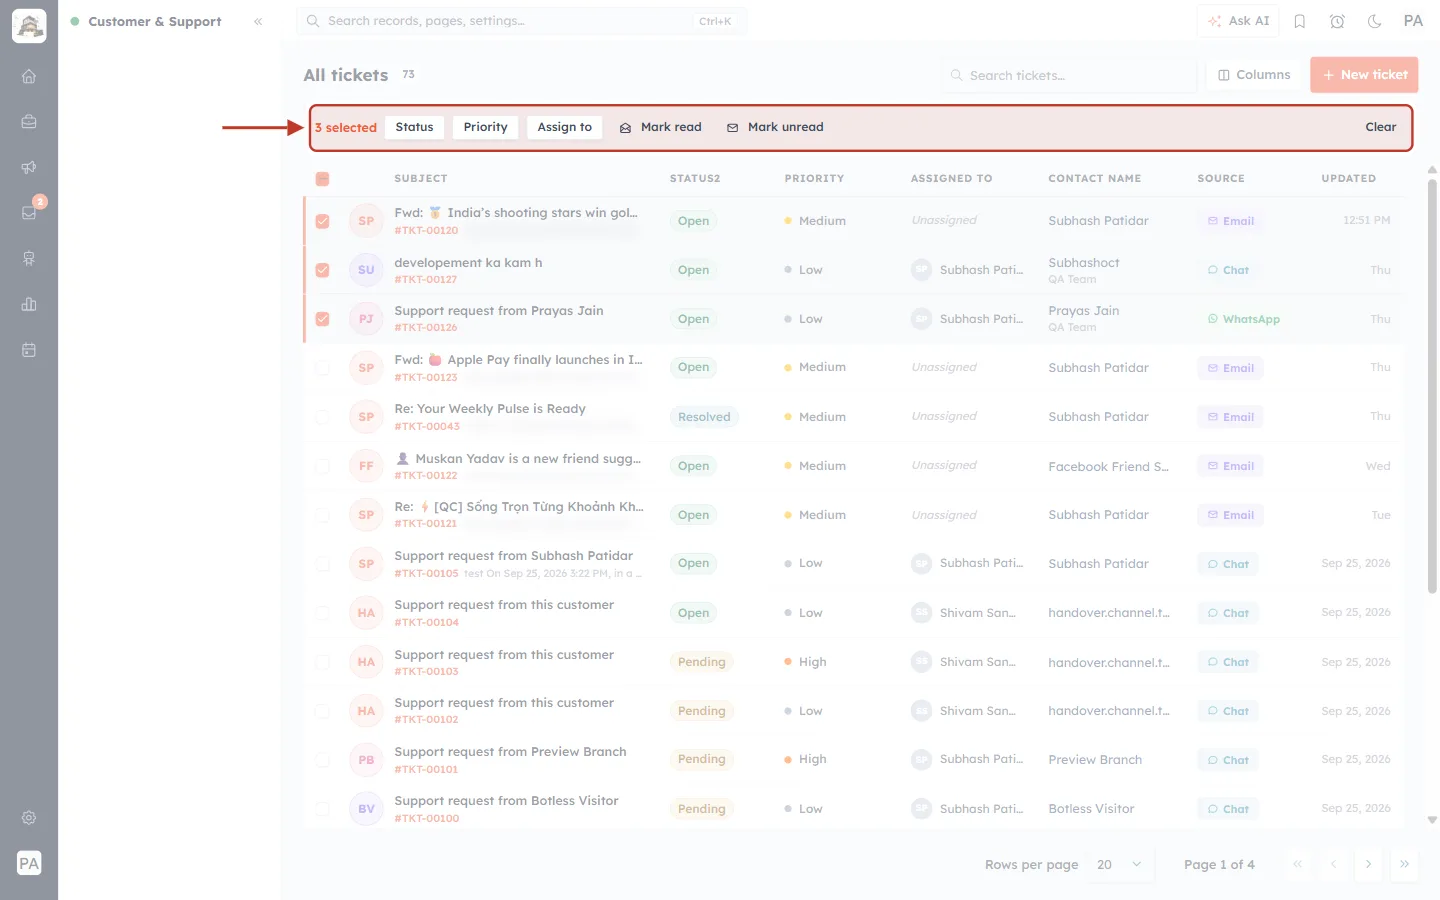
What this screenshot shows. The bulk action bar is ringed.
3 selected — how many tickets your action will change.
Status, Priority and Assign to — menus that change that field on every selected ticket (Part 2).
Mark read and Mark unread — change the unread state (Part 3).
Clear (right) — unticks everything and hides the bar.
Part 2 — Change status, priority or assignee for all selected tickets#
Step 3: Set the status#
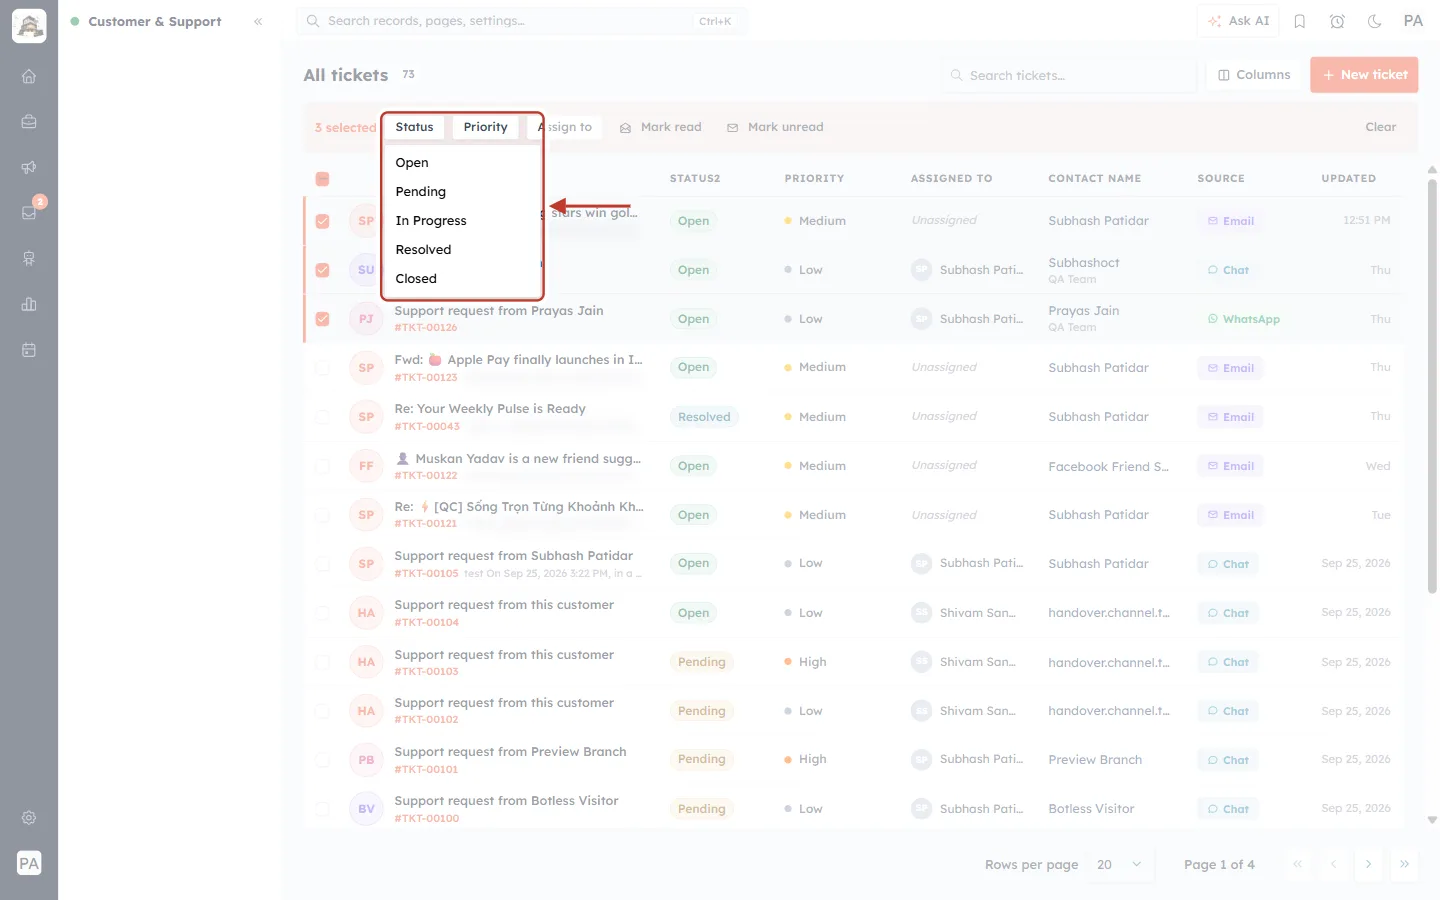
What this screenshot shows. The Status menu of the bulk bar is open and ringed.
It lists your ticket statuses — Open, Pending, In Progress, Resolved and Closed.
Click one to apply it to every selected ticket at once. There is no extra confirmation step.
⚠️
Setting Resolved or Closed from the bulk bar doesn’t show the Don’t notify anyone option you get on a single ticket. If some customers shouldn’t be emailed, resolve those tickets one at a time with that box ticked.
Step 4: Set the priority#
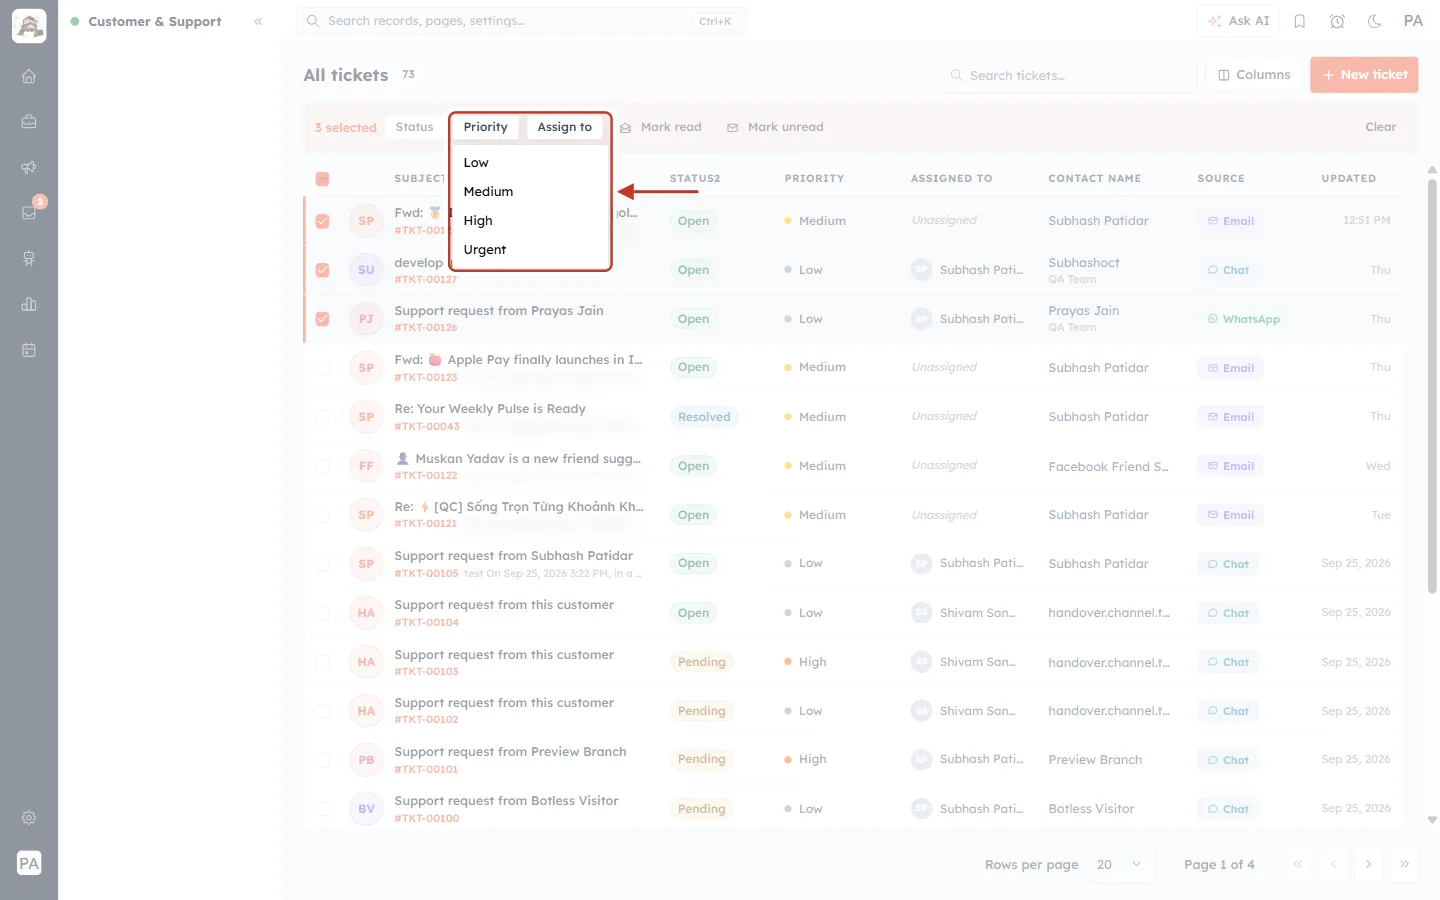
What this screenshot shows. The Priority menu of the bulk bar is open and ringed.
Choose Low, Medium, High or Urgent.
Useful when one problem affects many customers — for example, raise every ticket about an outage to Urgent.
Step 5: Assign the tickets to an agent#
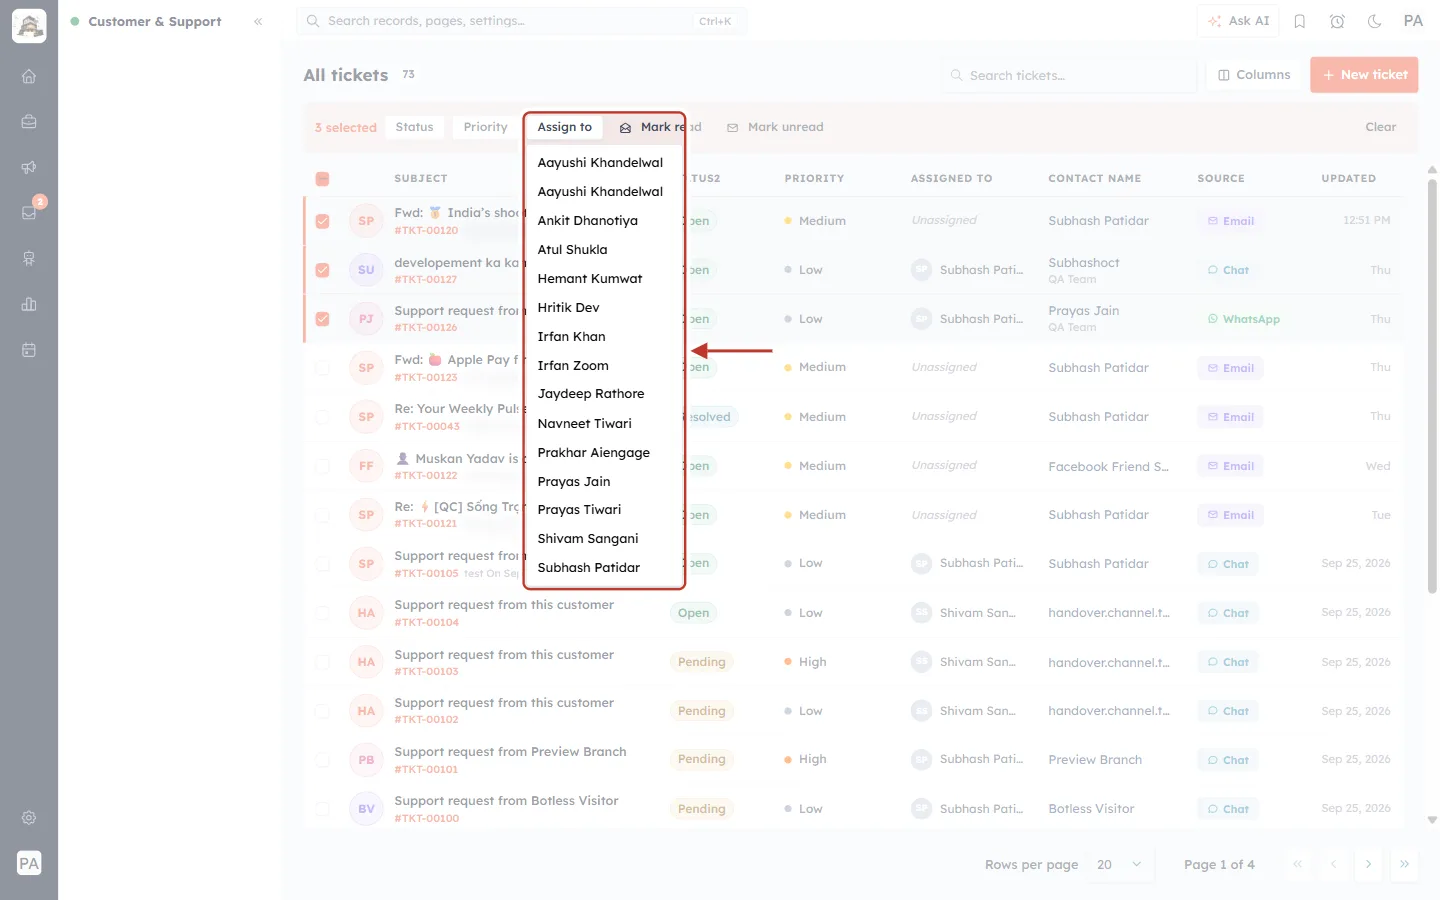
What this screenshot shows. The Assign to menu of the bulk bar is open and ringed.
It lists the users in your account, in alphabetical order.
Click a name to make that person the assignee of every selected ticket — for example, to hand over a colleague’s tickets while they’re away.
Step 6: Check the confirmation#
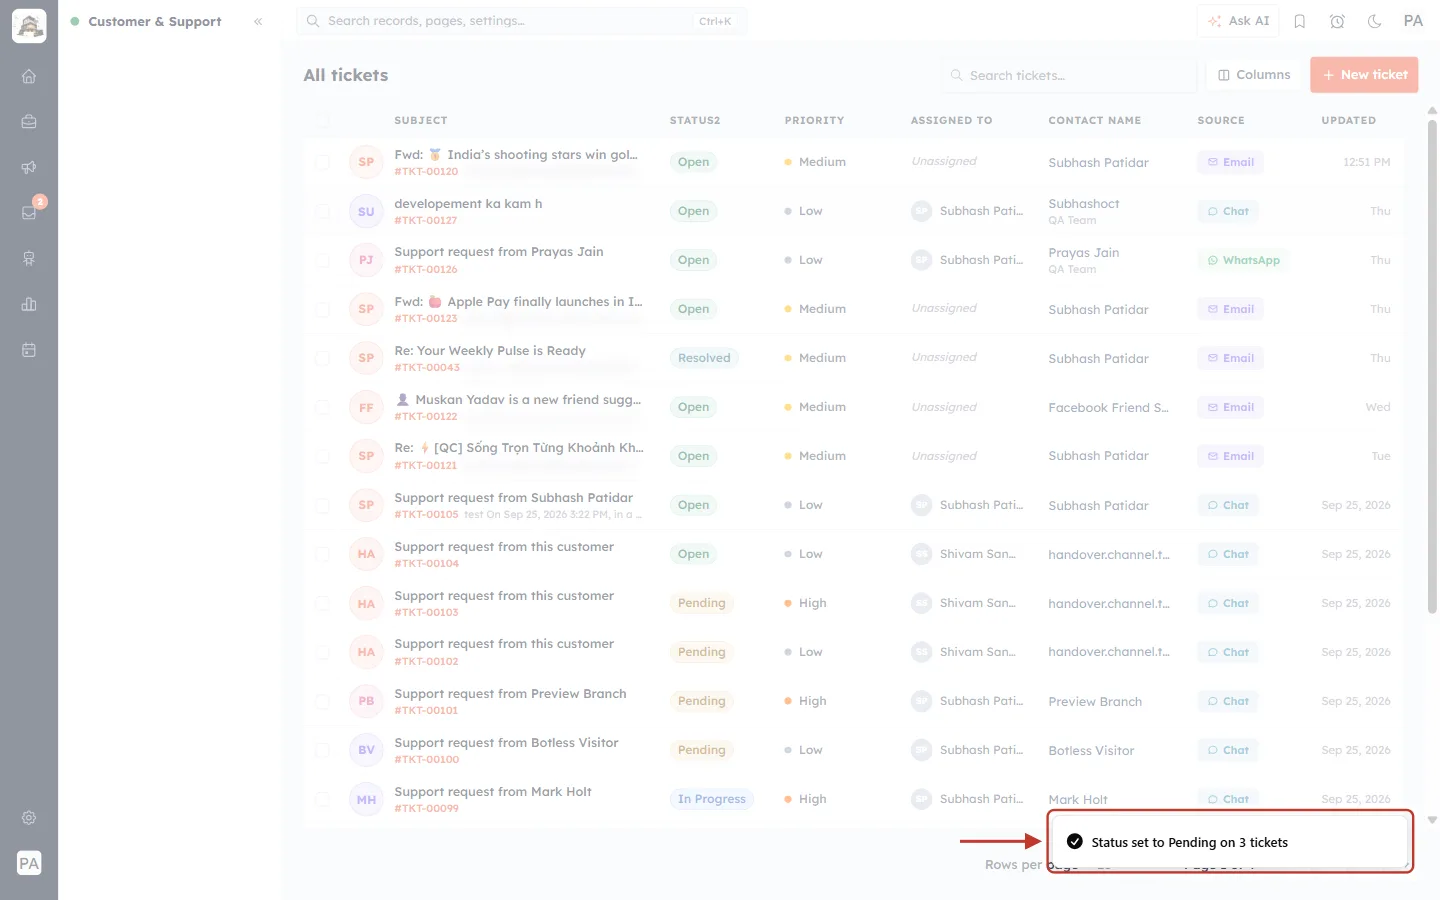
What this screenshot shows. The confirmation at the bottom right is ringed: Status set to Pending on 3 tickets.
The message names the change and how many tickets it was applied to — for priority it reads Priority set to … and for assignment Assigned to ….
If some tickets couldn’t be changed (for example ones you aren’t allowed to edit), a red message says N could not be updated. The others are still updated.
The selection clears and the list refreshes with the new values.
Part 3 — Mark read or unread, select a whole page, and clear#
Step 7: Mark tickets read or unread#
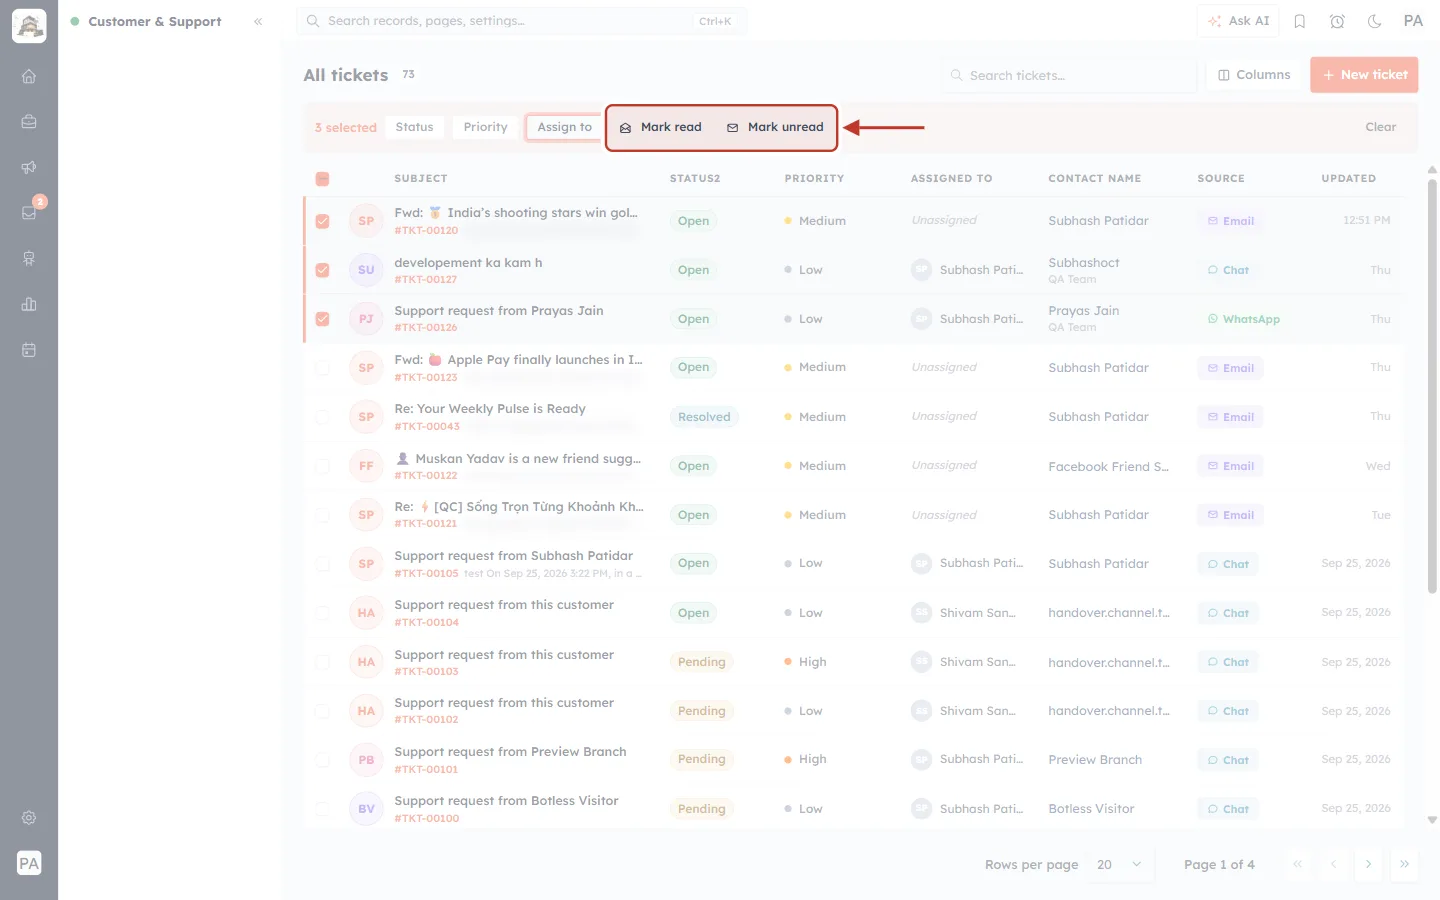
What this screenshot shows. The Mark read and Mark unread buttons of the bulk bar are ringed.
Mark read — clears the unread marker on the selected tickets, for example after you’ve skimmed a batch of notifications. The confirmation says Marked as read on N tickets.
Mark unread — flags them as unread again so they show in the Unread view, for example as a reminder to come back to them. The confirmation says Marked as unread on N tickets.
Step 8: Select every ticket on the page#
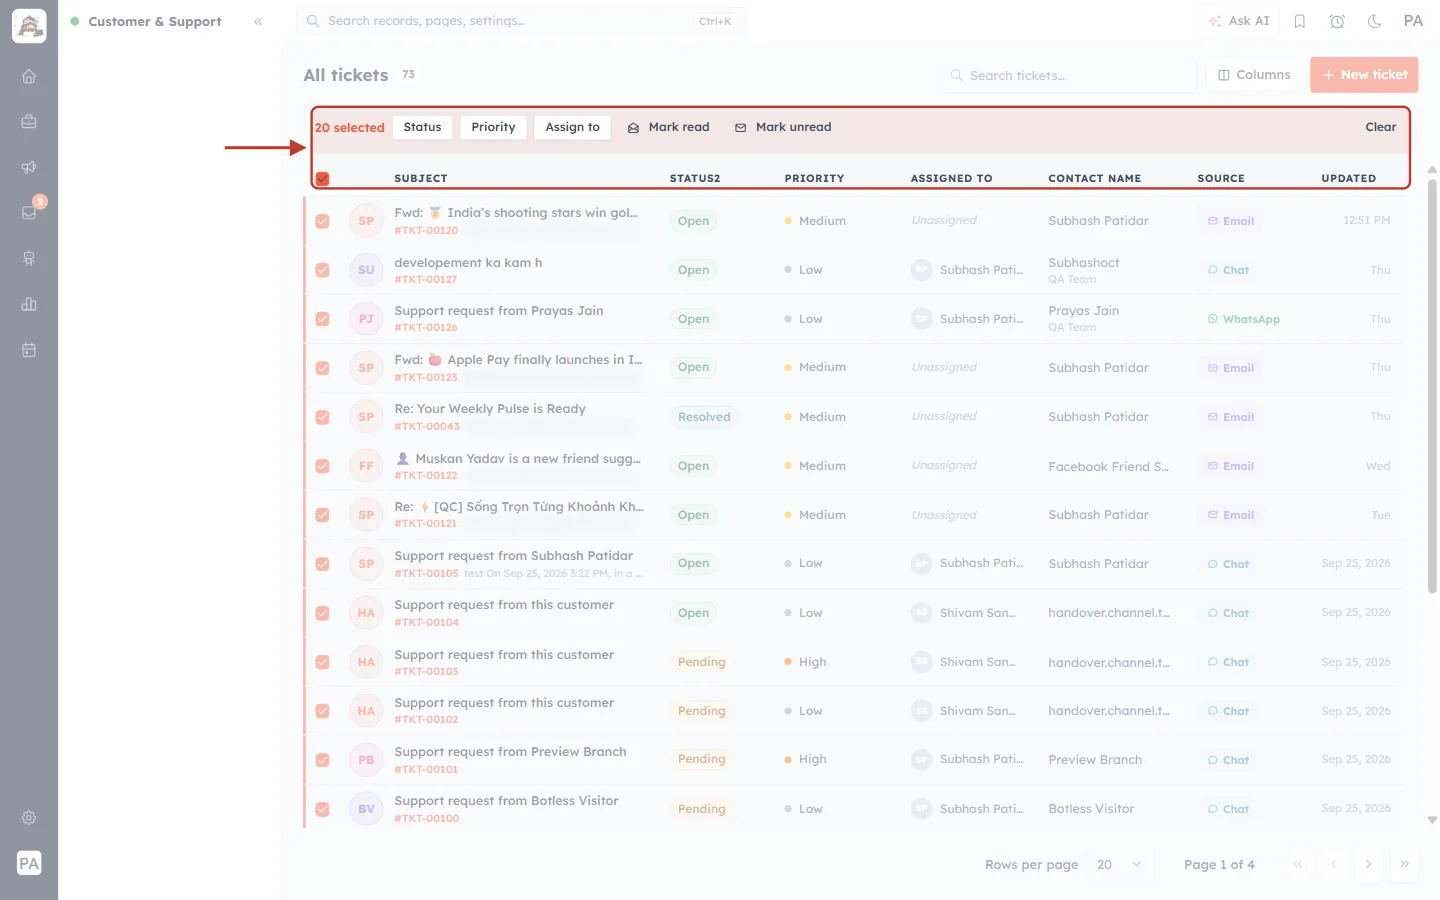
What this screenshot shows. The header checkbox (ticked) and the bulk bar showing 20 selected are ringed.
The header checkbox selects every ticket on the current page — here 20, because Rows per page is 20.
Tickets on other pages are not included. To act on more at once, raise Rows per page at the bottom of the list, or narrow the list with a view or search so the tickets you want fit on one page.
Click the header checkbox again to untick them all.
Step 9: Clear the selection#
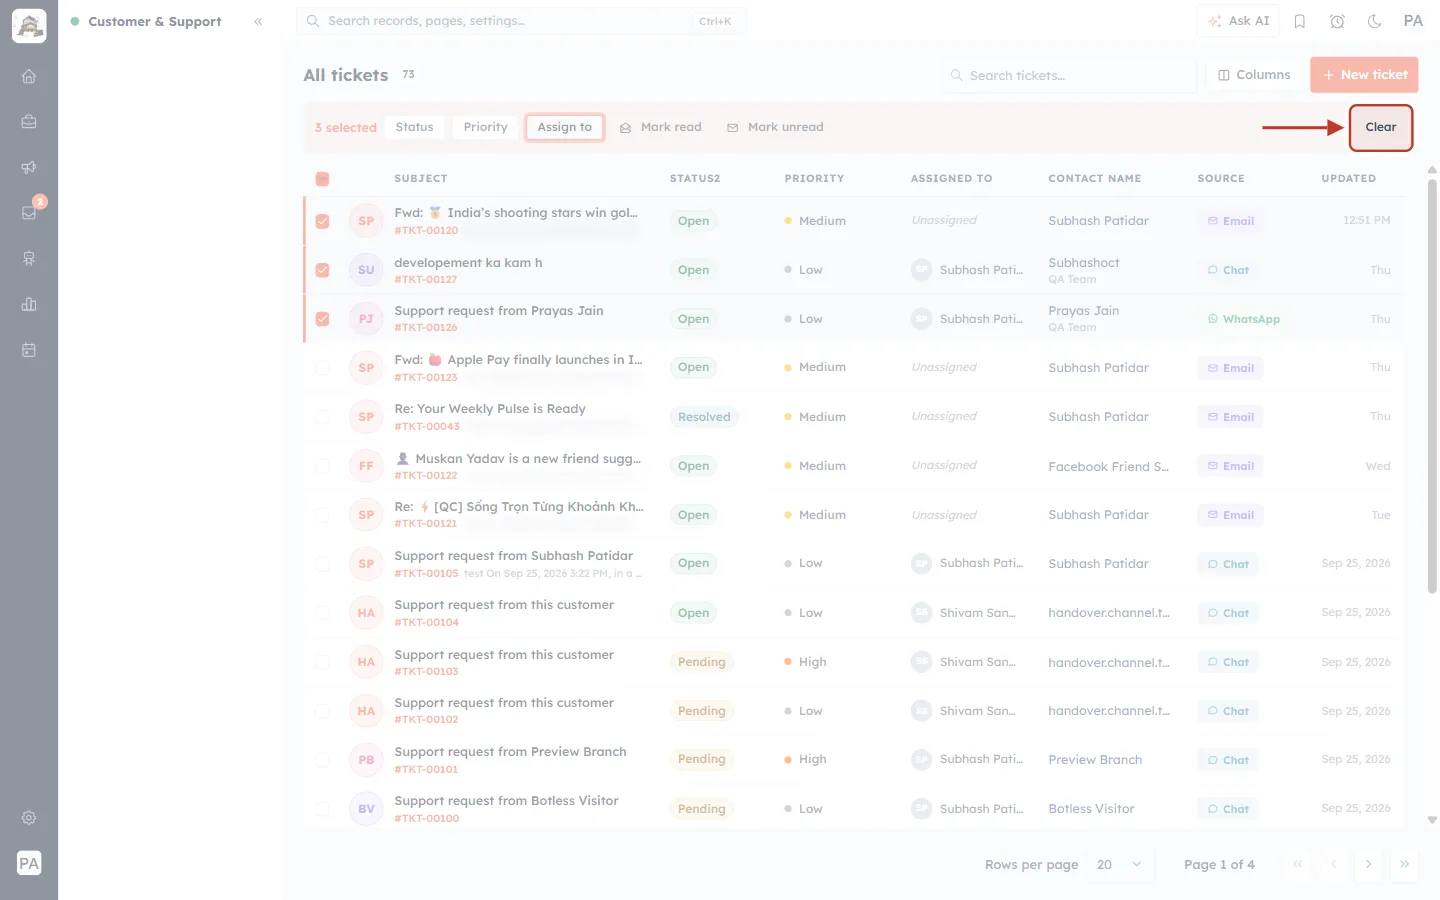
What this screenshot shows. The Clear button at the right end of the bulk bar is ringed.
Click it to untick every ticket and close the bar without changing anything.
The selection also resets by itself after each bulk action and when you switch view, search or page.
✅
Work view by view: open Unassigned, select the page, and Assign to the right agent; then open Pending and update those. Small, focused batches are easier to check than one huge selection.
Part 4 — Mass Update in the Tickets module#
Every ticket is also a record in the CRM’s Tickets module. Its list (open Tickets in the CRM menu) has Mass Update, which can change fields the bulk bar doesn’t — such as Category, Team and Tags. For the module list itself, see Manage Tickets in the CRM.
Step 10: Select tickets in the module list#
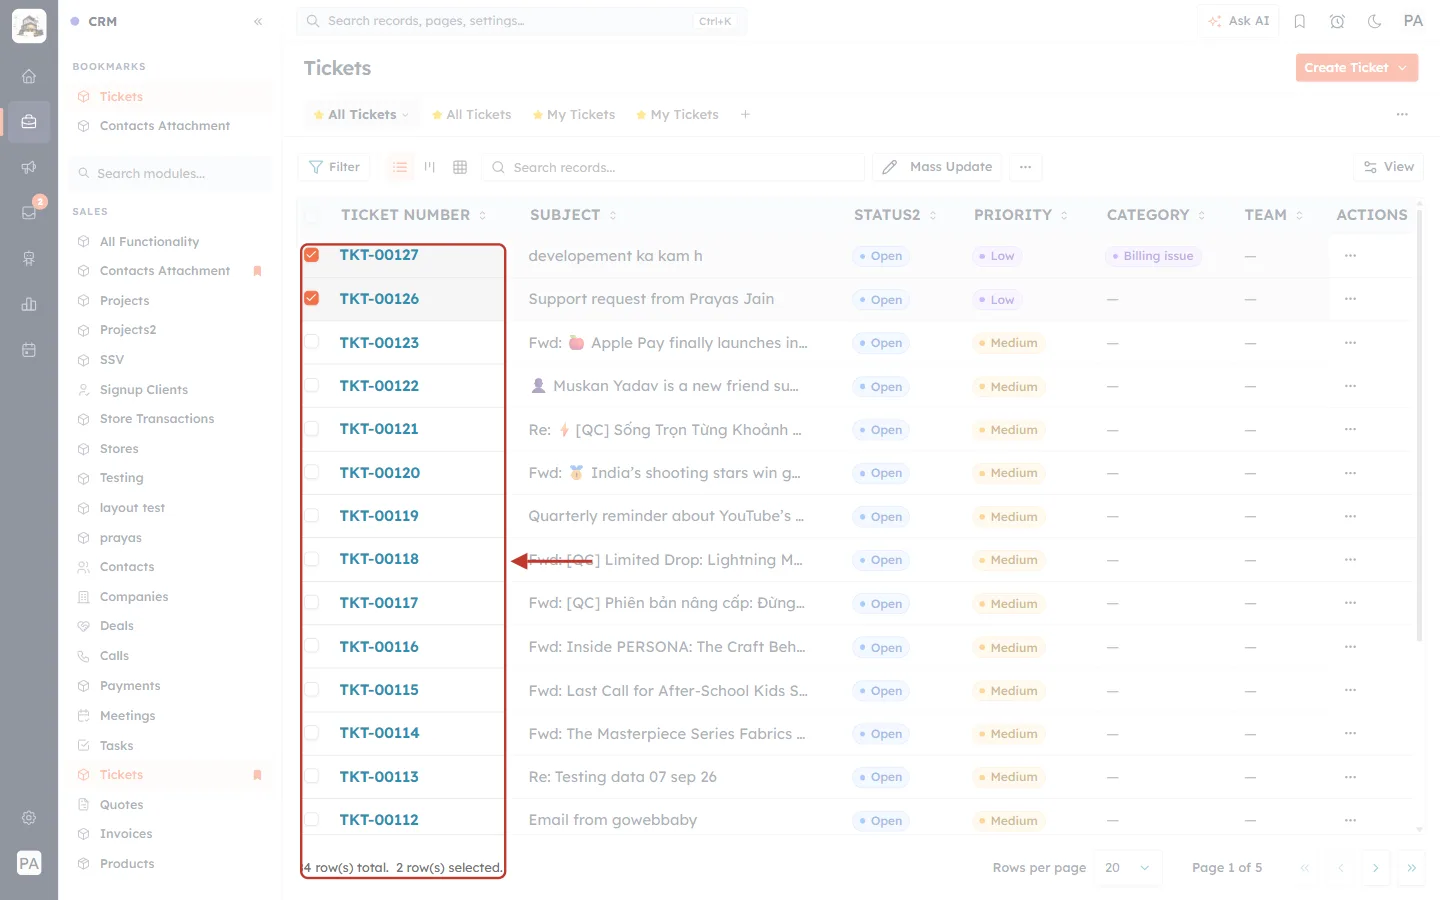
What this screenshot shows. The checkbox column of the Tickets module list is ringed, with two tickets ticked (TKT-00127 and TKT-00126).
Tick the box at the start of each row (Select row), or the header box (Select all) for the whole page.
The footer shows the total and your selection — 84 row(s) total. 2 row(s) selected.
Use Filter first to narrow the list (for example Status is Open and Category is empty).
Step 11: Open Mass Update#
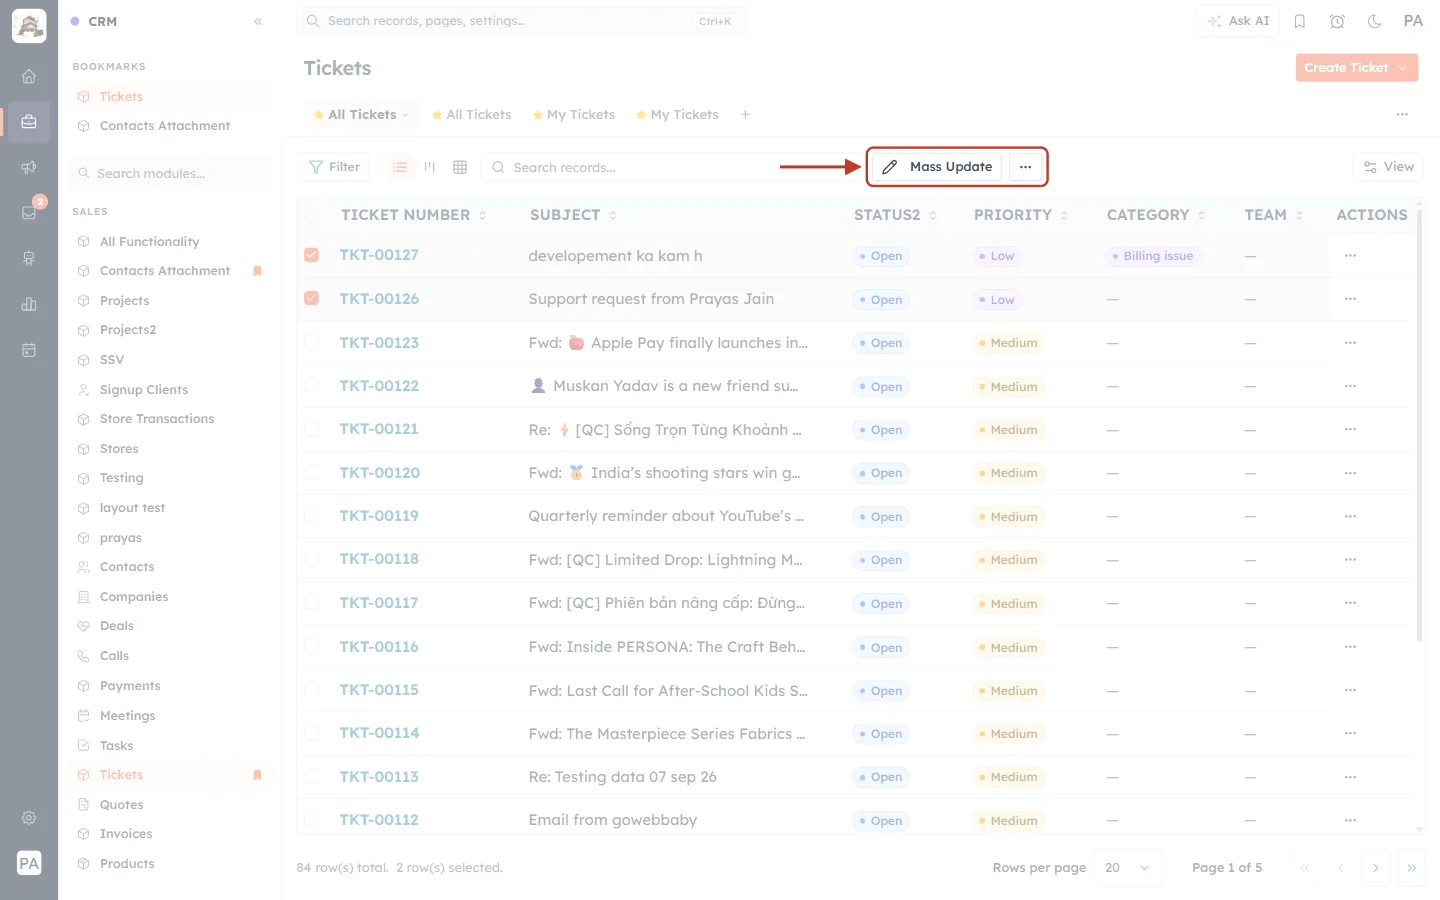
What this screenshot shows. The Mass Update button and the ⋯ (Bulk record actions) button in the toolbar are ringed.
Mass Update — set one or more fields on all selected tickets.
⋯ — more bulk actions: Export and Delete (Part 5 and 6).
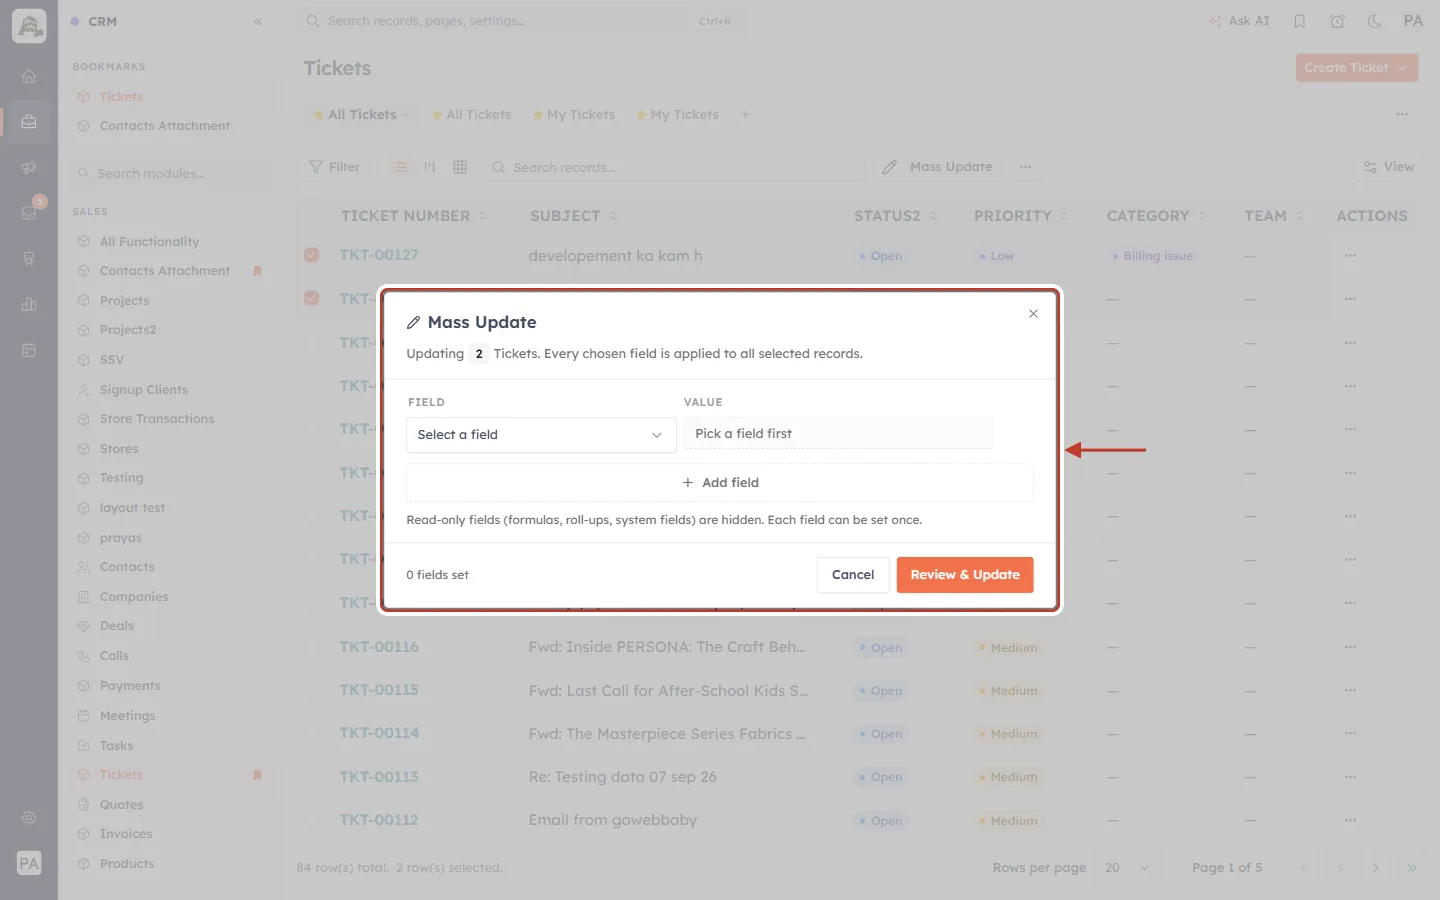
What this screenshot shows. The Mass Update dialog is ringed: Updating 2 Tickets. Every chosen field is applied to all selected records.
FIELD — Select a field; VALUE — Pick a field first.
+ Add field — add another field to change in the same update.
Read-only fields (formulas, roll-ups, system fields) are hidden. Each field can be set once.
The footer counts the fields you’ve set (0 fields set); Review & Update continues.
Step 12: Choose the field#
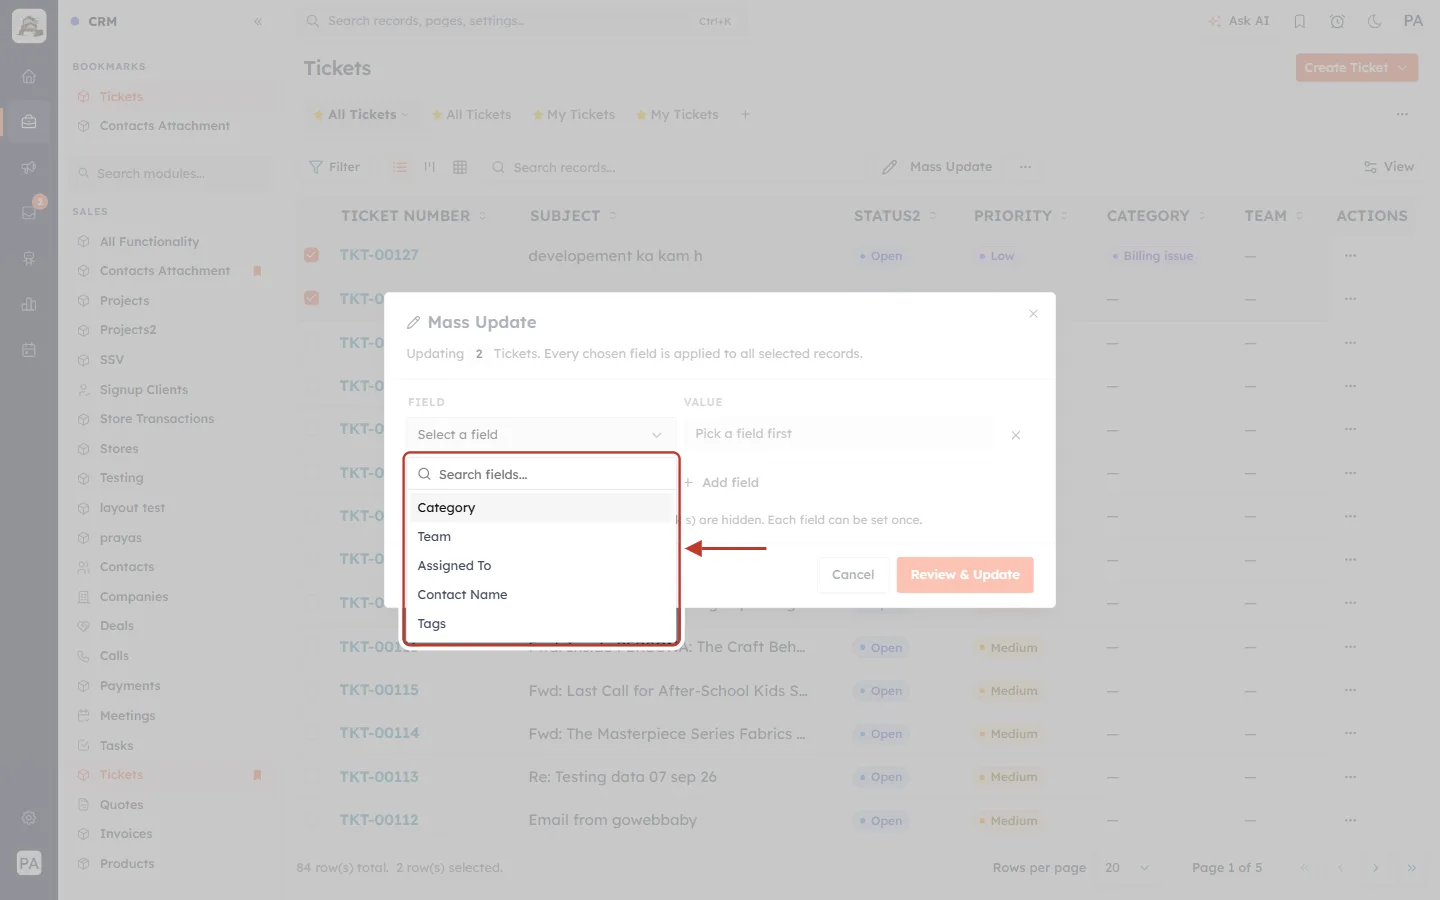
What this screenshot shows. The FIELD list is open and ringed.
Category, Team, Assigned To, Contact Name and Tags can be changed for tickets.
Status and Priority are system fields and aren’t listed here — change them from the Customer & Support bulk bar (Part 2).
Step 13: Choose the value#
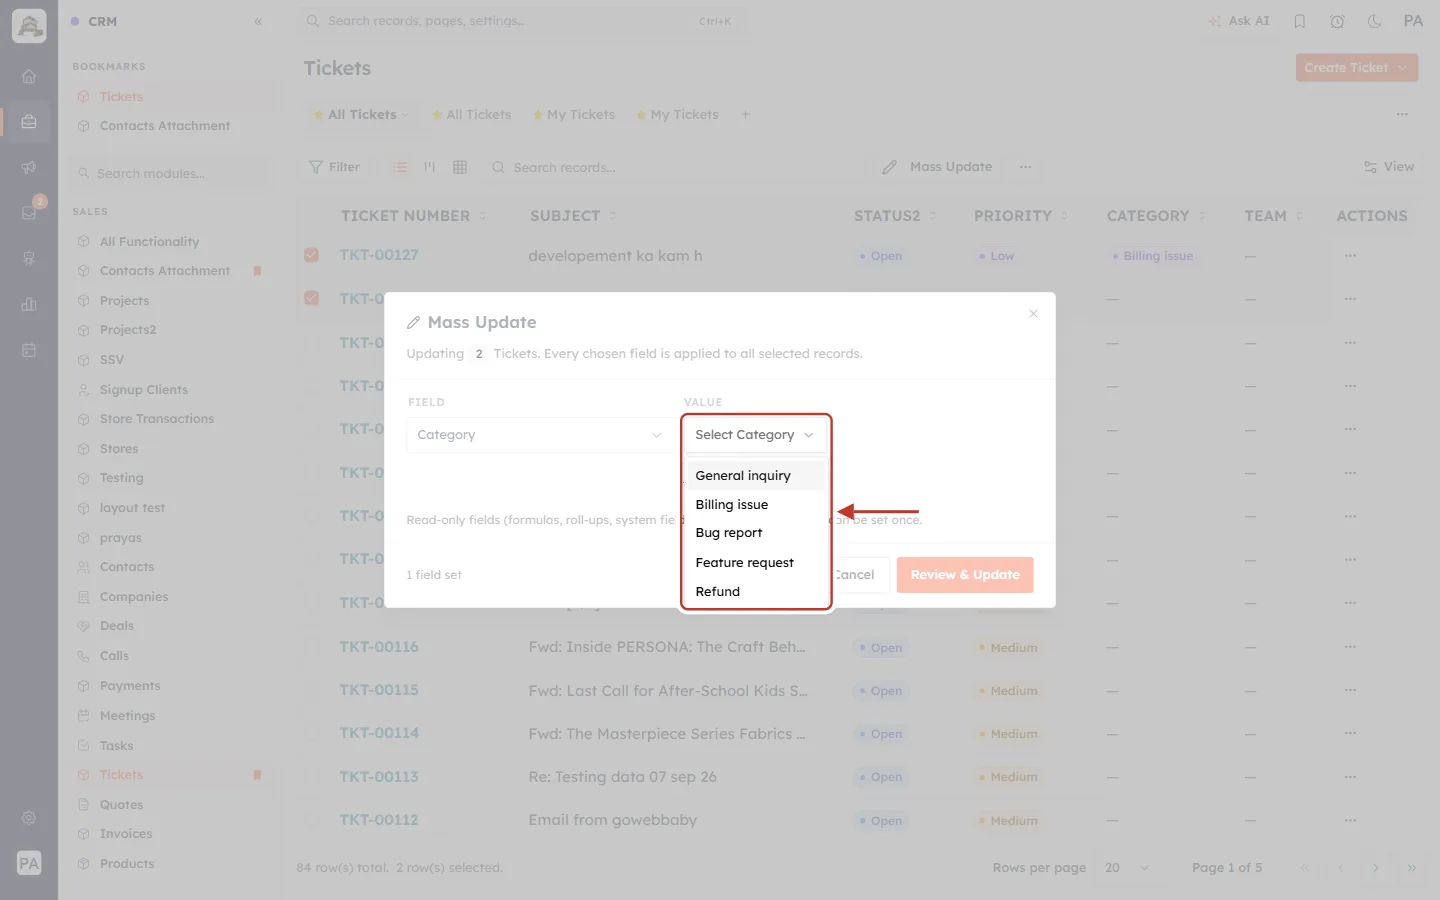
What this screenshot shows. The VALUE list for Category is open and ringed.
It shows the field’s options — General inquiry, Billing issue, Bug report, Feature request and Refund.
Pick the value every selected ticket should get.
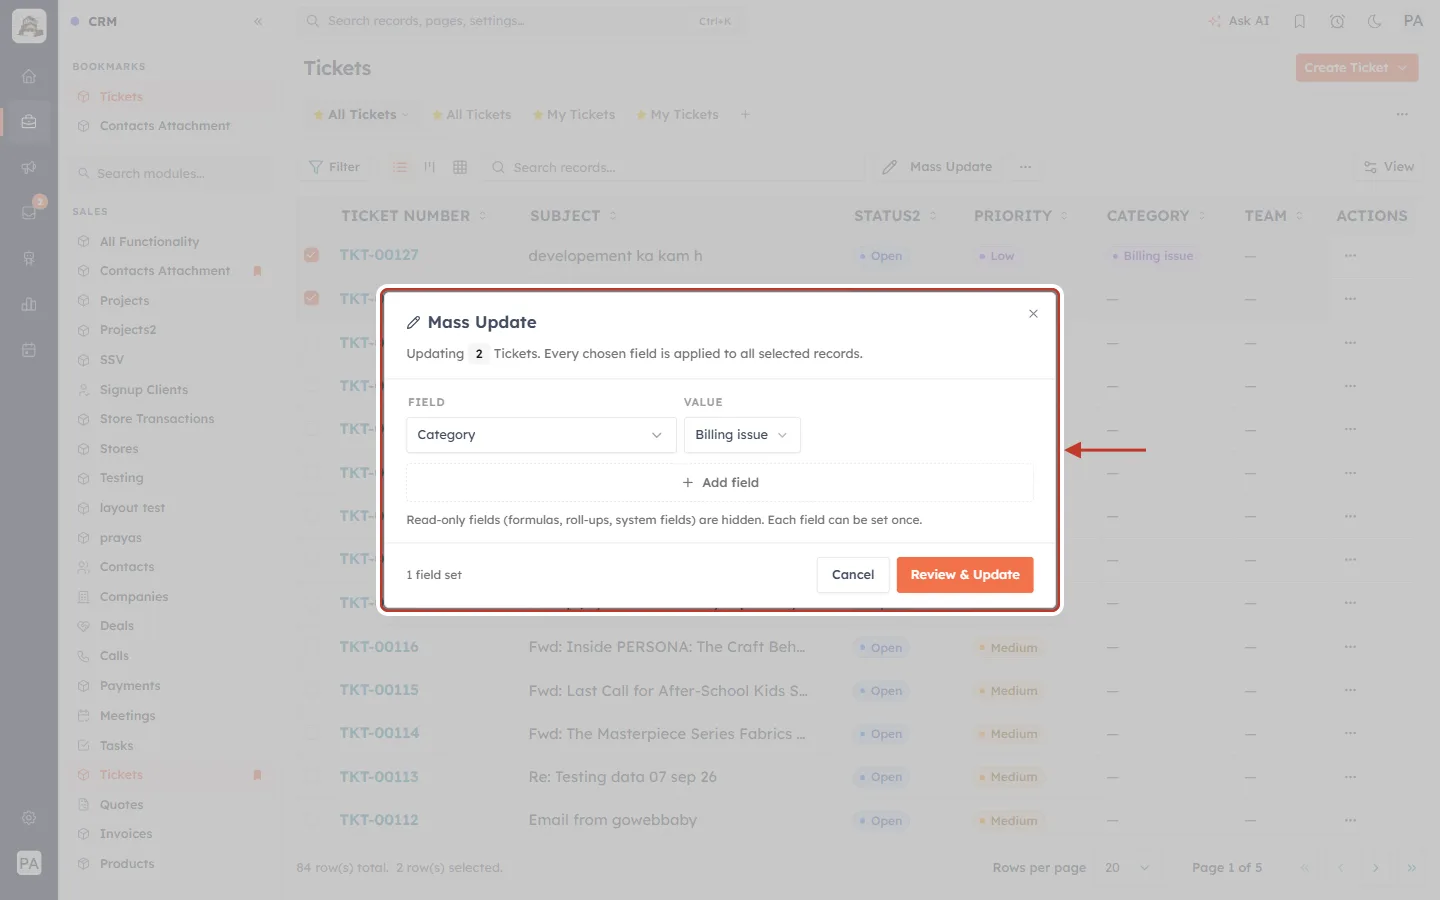
What this screenshot shows. The dialog is ringed with Category → Billing issue set.
The footer now reads 1 field set.
Click + Add field to change another field too (for example Team), or Review & Update to continue.
Fill every row you add — an empty row stops you from continuing.
Step 14: Review and update#
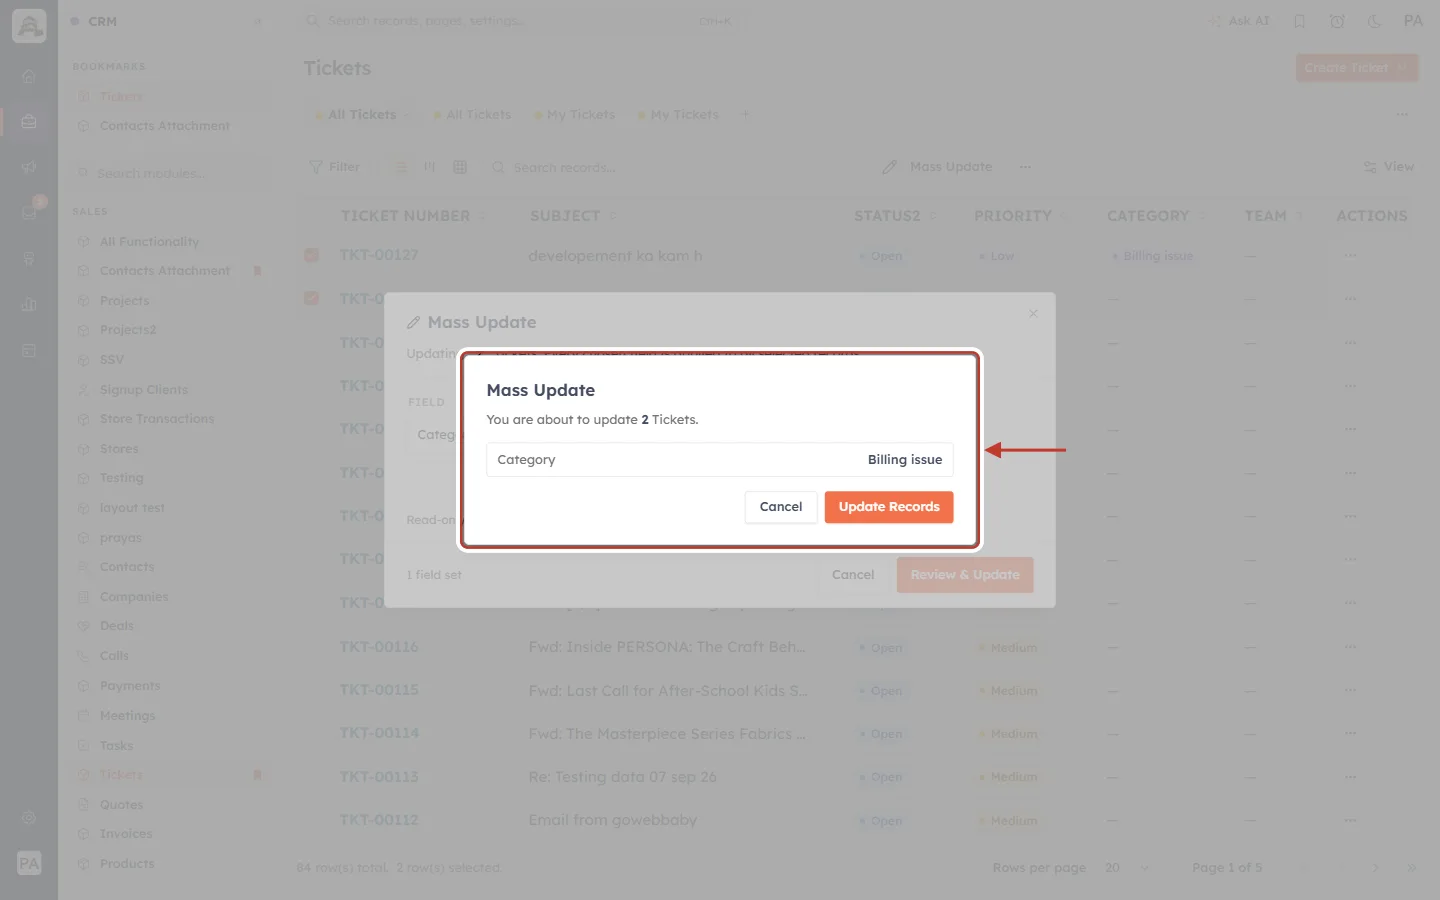
What this screenshot shows. The review step is ringed: You are about to update 2 Tickets.
It lists each change — here Category: Billing issue.
Cancel goes back without changing anything.
Update Records applies the change. It shows Updating… while it works.
When it finishes you’ll see 2 Tickets updated successfully. For a large selection the update runs in the background with a progress message (Updating N Tickets… 45%) that stays on screen until it is done. If some tickets can’t be changed — for example ones you’re not allowed to edit — the message says how many were updated and how many could not be updated.
Part 5 — Export selected tickets#
Step 15: Open the bulk menu#
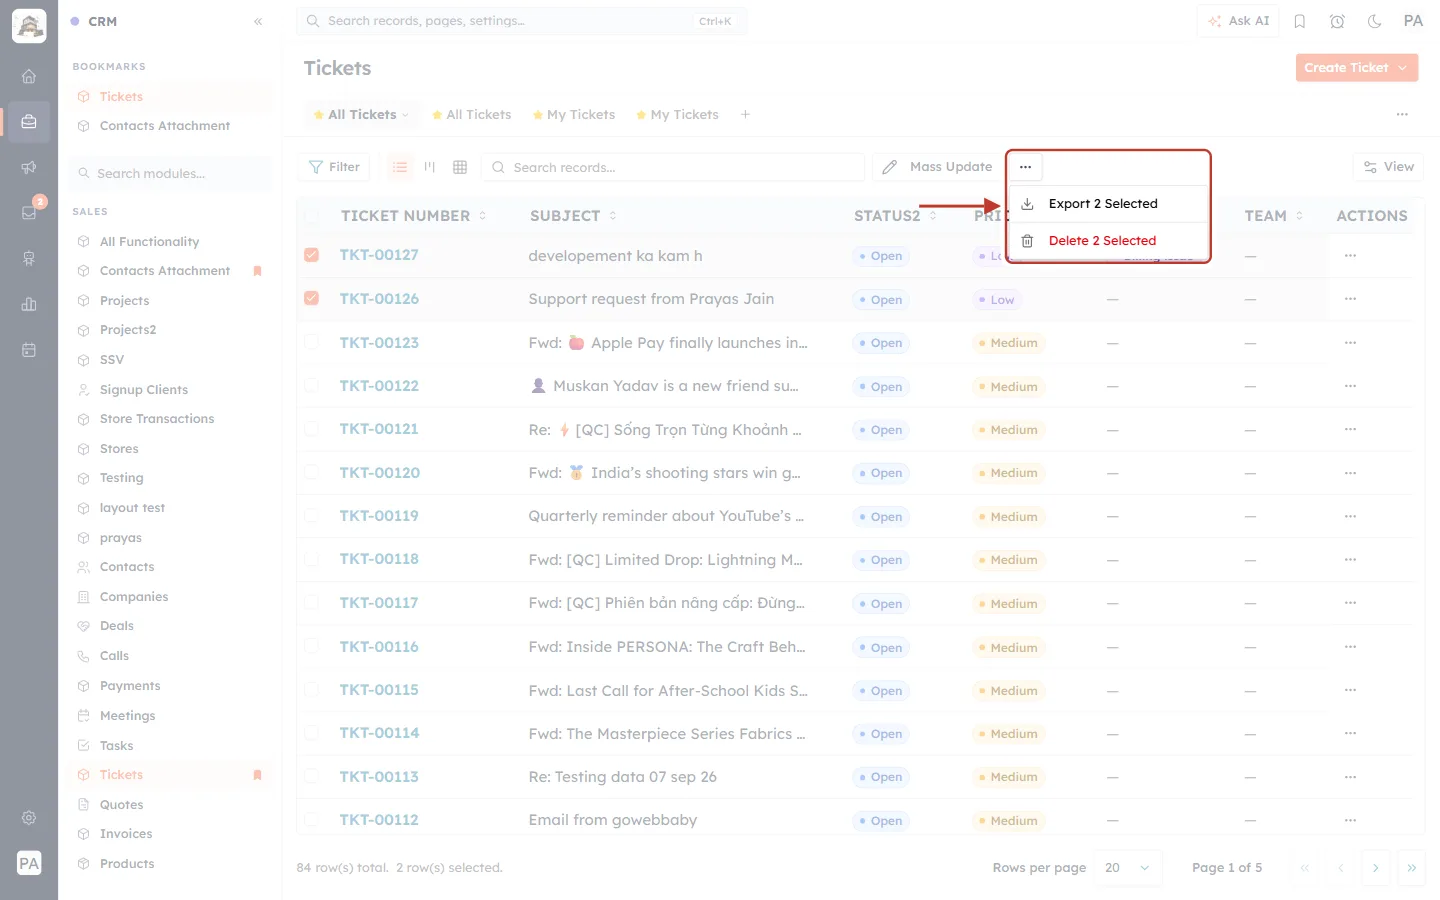
What this screenshot shows. The ⋯ button and its menu are ringed.
Export 2 Selected — download the selected tickets.
Delete 2 Selected (red) — permanently delete them (Part 6).
The number in each item is how many tickets you have selected.
Step 16: Export#
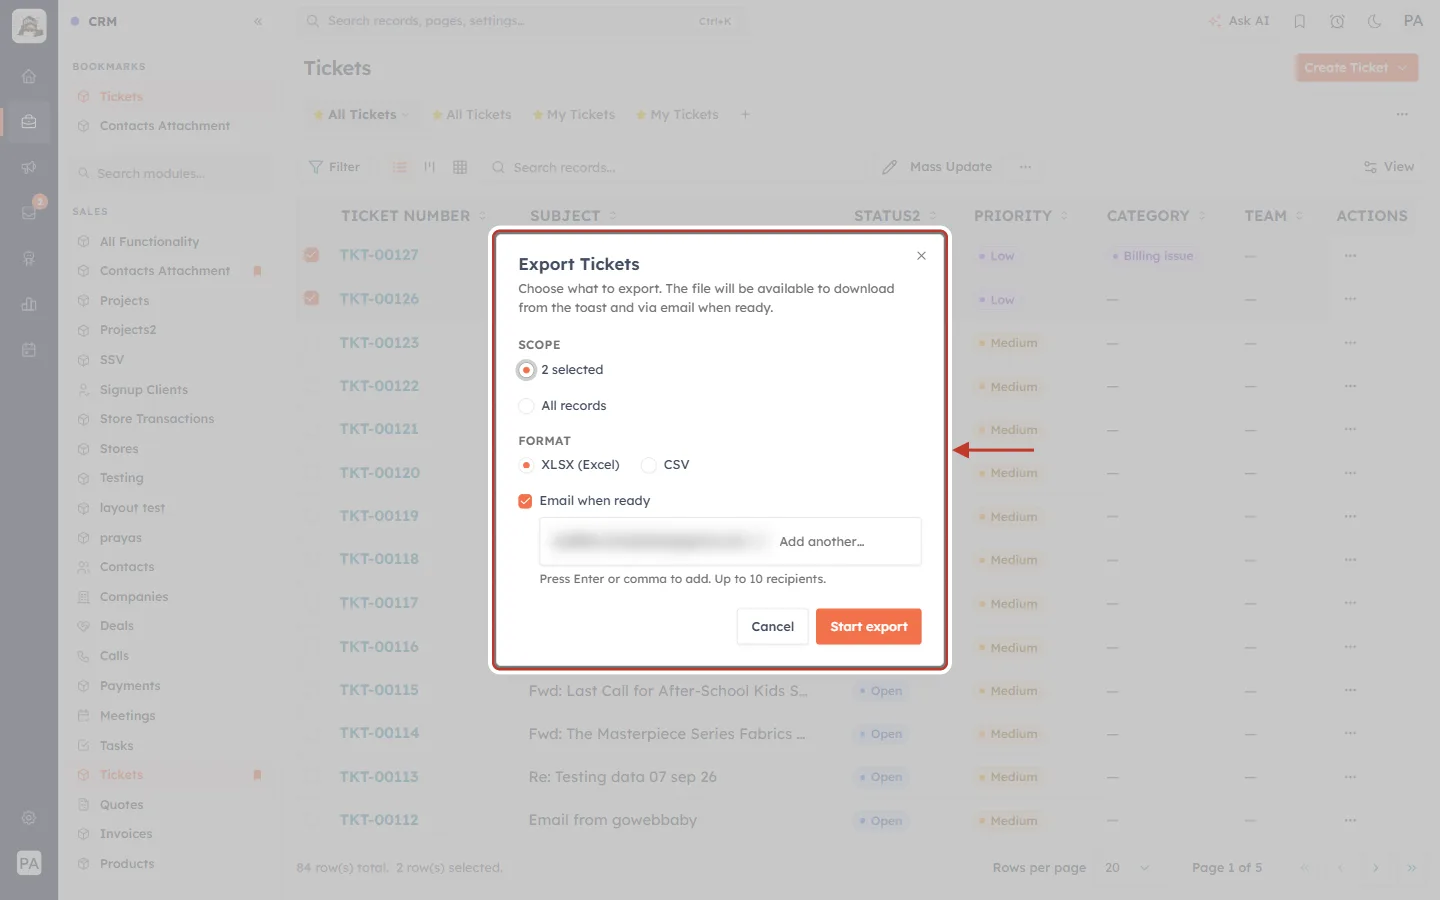
What this screenshot shows. The Export Tickets dialog is ringed: Choose what to export. The file will be available to download from the toast and via email when ready.
SCOPE — 2 selected (only your selection) or All records.
FORMAT — XLSX (Excel) or CSV.
Email when ready — sends the download link to the listed addresses (your own is filled in; add up to 10).
Click Start export. More detail: Import & Export Tickets.
Part 6 — Delete selected tickets#
Step 17: Delete (only when you’re sure)#
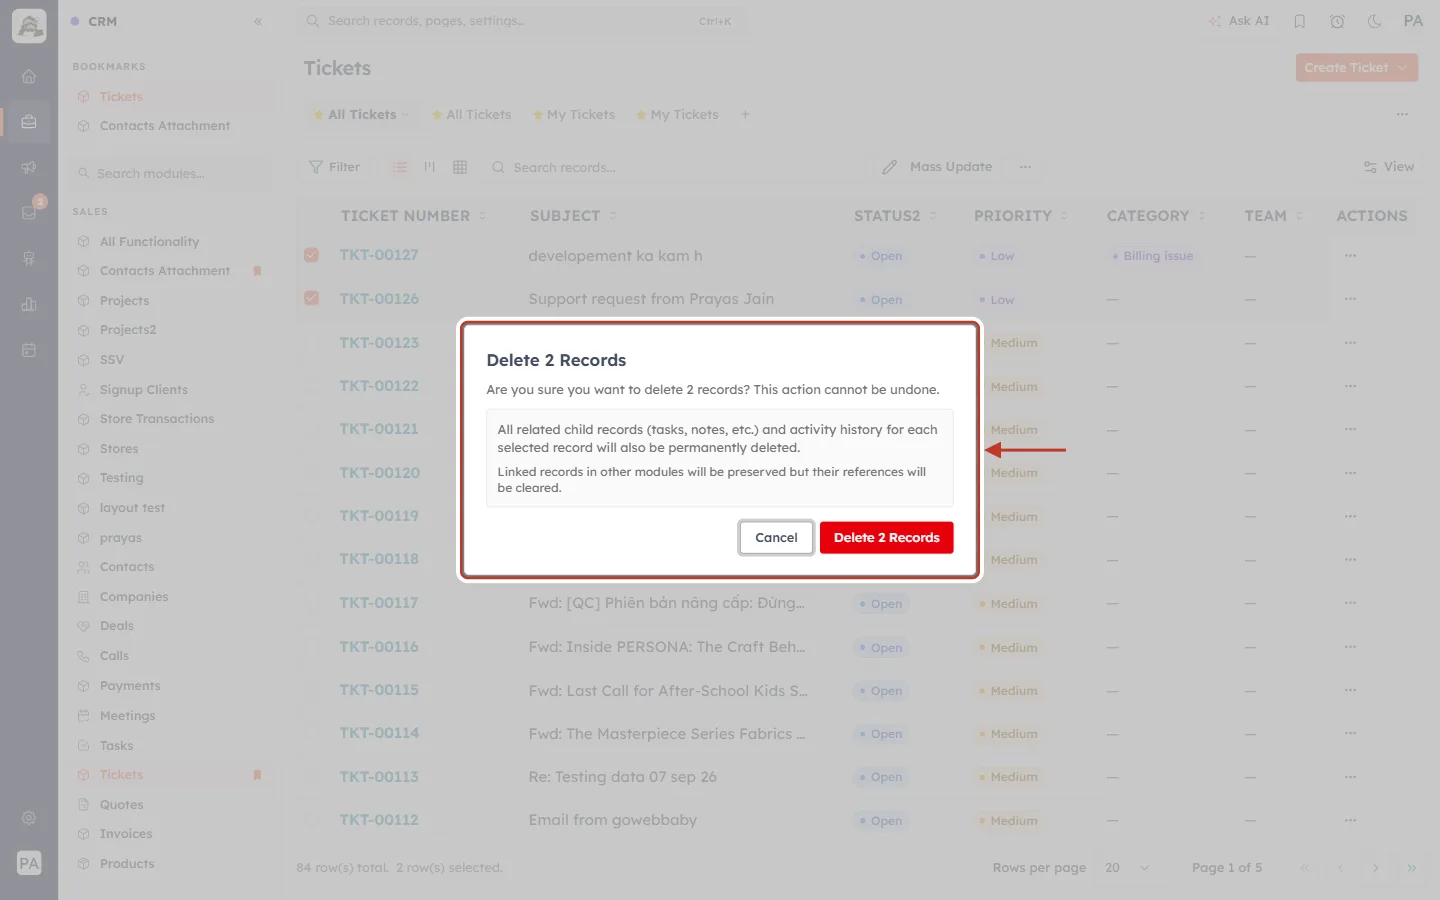
What this screenshot shows. The Delete 2 Records confirmation is ringed.
Are you sure you want to delete 2 records? This action cannot be undone.
All related child records (tasks, notes, etc.) and activity history for each selected record will also be permanently deleted.
Linked records in other modules will be preserved but their references will be cleared.
Cancel keeps the tickets; Delete 2 Records removes them for good.
⚠️
Deleting tickets also removes their conversation, notes and history, and it can’t be undone. To get finished tickets out of the way, close them instead — closed tickets stay searchable and count in your reports. You need delete permission on Tickets to see this option.
Good practice#
Filter first, then select. A focused view (Unassigned, Pending, a team) makes it easy to see exactly what you’re changing.
Check the count in the bar (N selected) before you pick an action.
Use the right tool: status, priority, assignee and read state in Customer & Support; category, team, contact and tags with Mass Update.
Prefer closing to deleting.
Troubleshooting#
The bulk bar doesn’t appear. Tick at least one ticket’s checkbox (not the ticket itself).
“N could not be updated”. You don’t have permission to edit those tickets (for example they belong to another team). The rest were updated. Ask an administrator, or ask the ticket owner to make the change.
My selection disappeared. The selection resets after each action and when you change view, search or page. Select again.
Status or Priority is missing from Mass Update. They’re system fields. Use the bulk bar in Customer & Support.
I can’t see Delete N Selected. Your profile doesn’t allow deleting tickets.
Frequently asked questions#
How many tickets can I update at once? In Customer & Support, the tickets on the current page (up to your Rows per page). In the Tickets module, every ticket you select; large Mass Updates run in the background with a progress message.
Is there an undo? No. To reverse a bulk change, select the same tickets and apply the previous value.
Previous and next#
Previous: Assign, Prioritise, Tag & Change Ticket Status: Organise and Resolve Support Tickets (Step-by-Step)
Next: Turn Chats into Tickets: Raise a Support Ticket from a Live Chat or a Single Message (Step-by-Step)
Related#
Was this article helpful?
Ready to implement this?
OpenAI Engage and apply what you just learned to your own workspace.
Open AI Engage CRM