Loading…


KnowledgeBase
Reply to Customers from a Ticket: Reply, Reply All, Forward & Schedule Emails (Step-by-Step)
What this article covers#
When a customer writes to you, the fastest way to help is to answer straight from their ticket. Every email you send from a ticket is saved in the ticket’s conversation, goes out from your support address, and carries the ticket number — so when the customer answers, their reply lands back on the same ticket and the whole team can see the full history.
This article explains the four ways to send an email from a ticket, with a screenshot of every step:
| Action | Who receives it | Use it when |
|---|---|---|
| Reply | The customer who sent the last email | You are answering the customer (most of the time). |
| Reply all | The customer and everyone they copied (Cc) | Other people from the customer’s side are on the email and need your answer too. |
| Forward | Anyone you choose — the To box starts empty | Someone else (a warehouse, supplier, specialist or manager) needs to see the customer’s email. |
| Schedule | The same people as the email you are writing | The email should go out later — for example at the start of the customer’s working day, or as a follow-up. |
The example in this article is a ticket from Emma Clarke of Clarke Interiors. Her order of 12 dining chairs arrived in the wrong colour, and she copied her office manager, Tom Reed, into her email.
Before you begin#
A sending address is set up. An administrator connects a verified address for support emails — see Set the From and Reply-To Address for Support Emails. If none is set, the email window says “No sending address is configured. Add one in Email settings.”
The customer has an email address. Reply, Reply all and Forward appear on tickets whose contact has an email address (or that already contain emails). If the contact has no email address you see Record reply instead — see Handle Customer Tickets.
You can open the ticket in the Customer & Support workspace — see Ticket Views, Team Groups & Notifications.
⚠️
Everything in this article sends real emails to real people. Read your message through before you click Send. For anything meant only for your team, use an Internal note instead.
Part 1 — Read the customer’s email first#
Step 1: Open the ticket and read the email#
Open the ticket from your ticket list. The customer’s email is shown in the conversation in the middle of the screen.
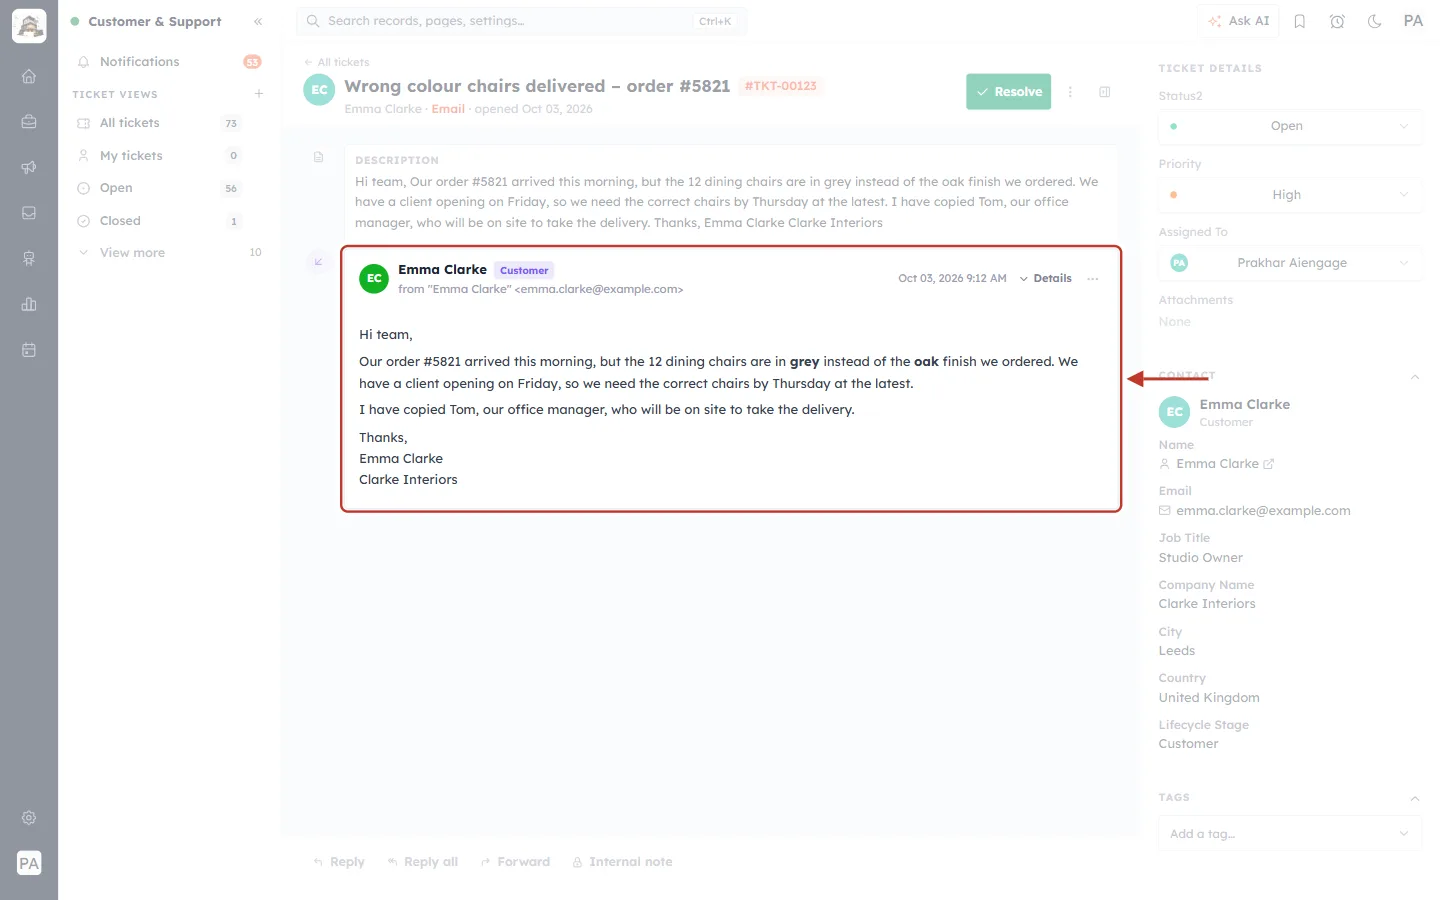
What this screenshot shows. The customer’s email card in the ticket conversation is ringed.
A purple ↙ icon on the left means received (an email that came in from the customer). Emails your team sends show a green ↗ instead.
Emma Clarke with a purple Customer label — who wrote it.
from "Emma Clarke" <emma.clarke@example.com> — the address it came from.
On the right: the date and time it arrived (Oct 03, 2026 9:12 AM), Details and the ⋯ menu.
Below: the email itself. Emma explains that the chairs came in grey instead of oak, that she needs the right chairs by Thursday, and that she has copied in Tom.
Above the card (faded) the DESCRIPTION box holds the same text — it was taken from the first email when the ticket was created.
Step 2: Check who the email was sent to (Details)#
Click Details on the email to see exactly who it was addressed to. This tells you whether anyone was copied in — and so whether you need Reply all.
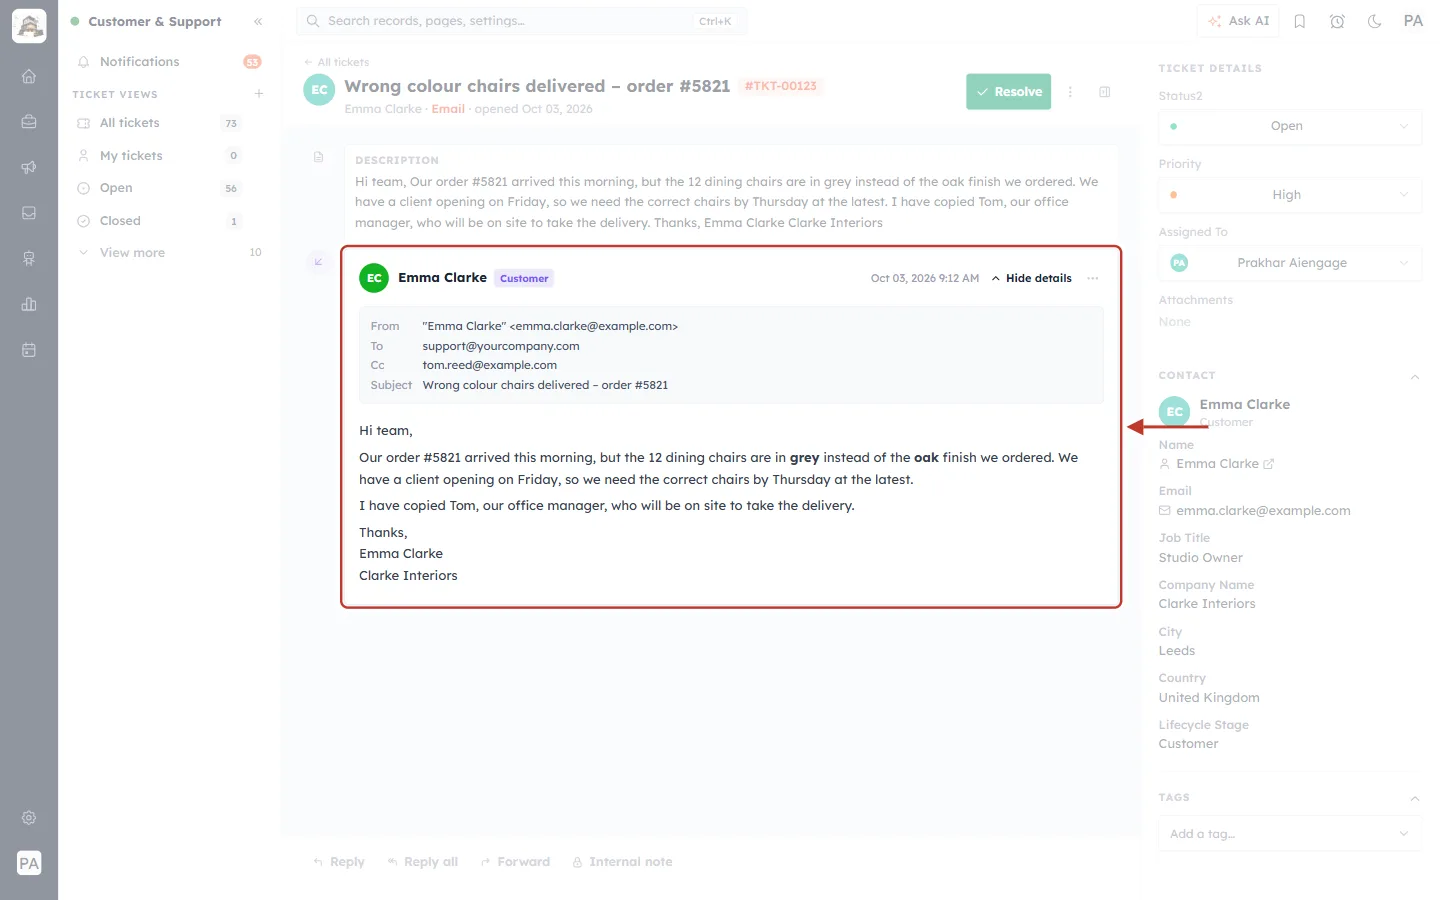
What this screenshot shows. The same email with Details open (ringed). A grey box under the sender lists the email’s addresses.
From — "Emma Clarke" <emma.clarke@example.com>, the customer.
To — support@yourcompany.com, your support address.
Cc — tom.reed@example.com. Emma copied Tom in, so he expects to see your answer too.
Subject — Wrong colour chairs delivered – order #5821.
The link now reads Hide details; click it to close the box.
Step 3: Know where the reply buttons are#
There are two places to start an email: the bar at the bottom of the conversation, and the ⋯ menu on each email.
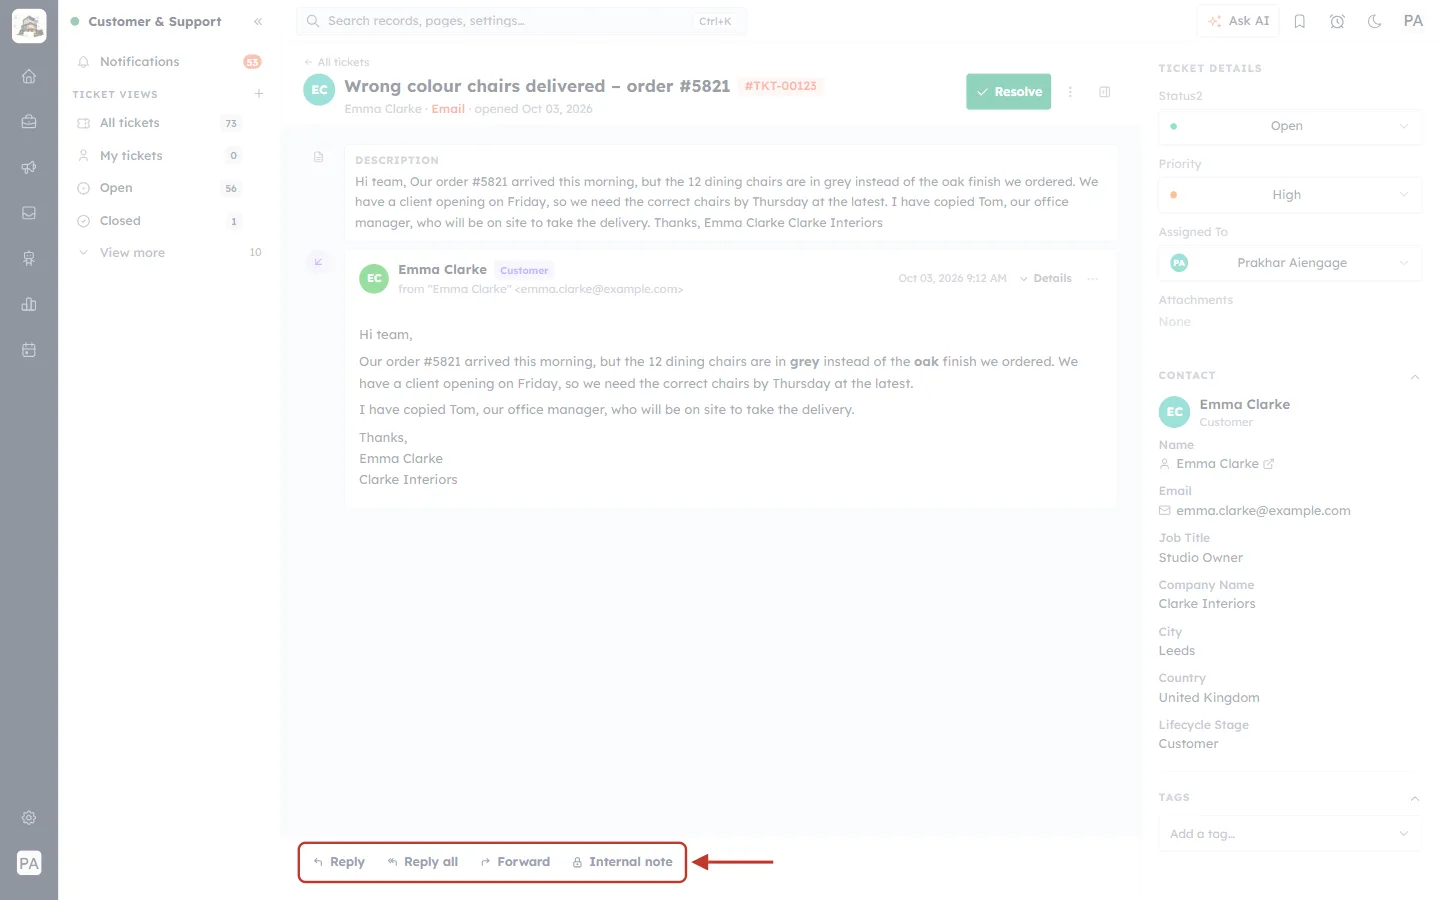
What this screenshot shows. The reply bar at the bottom of the conversation is ringed.
Reply — email the customer.
Reply all — email the customer and everyone they copied in.
Forward — send the conversation to someone else.
Internal note (with a padlock) — a private note for your team. It is never emailed to the customer.
These buttons always answer the most recent email from the customer.
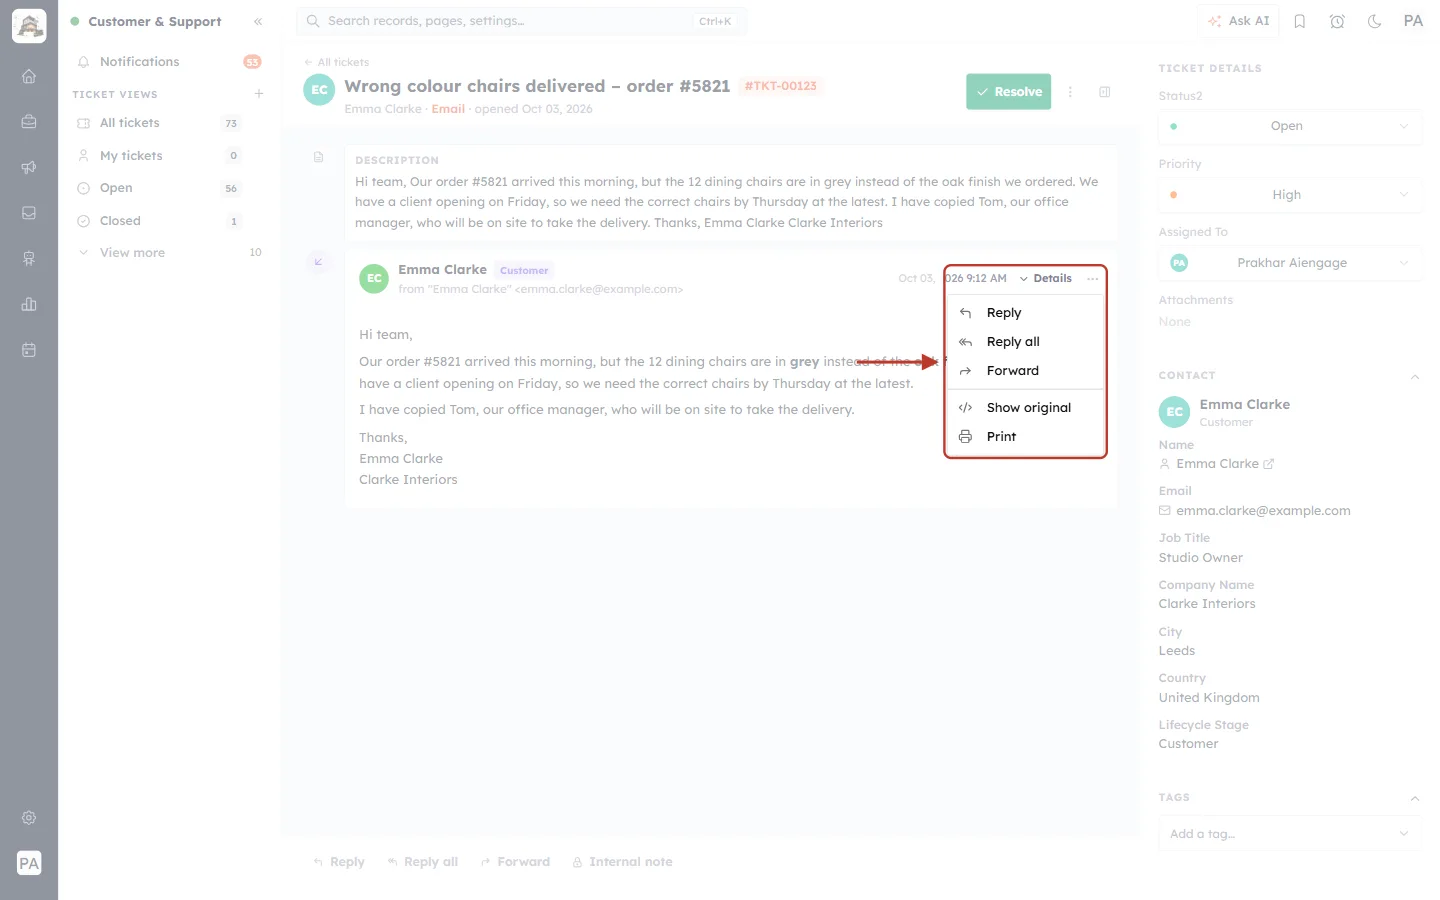
What this screenshot shows. The ⋯ (Email actions) button on the email and its menu are ringed.
Reply, Reply all and Forward — the same actions, but for this particular email. Use them when a ticket has several emails and you want to answer an older one.
Show original — view the email exactly as it was received.
Print — print the email.
Part 2 — Reply to the customer#
Step 4: Click Reply and get to know the email window#
Click Reply. An email window opens at the bottom of the conversation, already addressed to the customer.
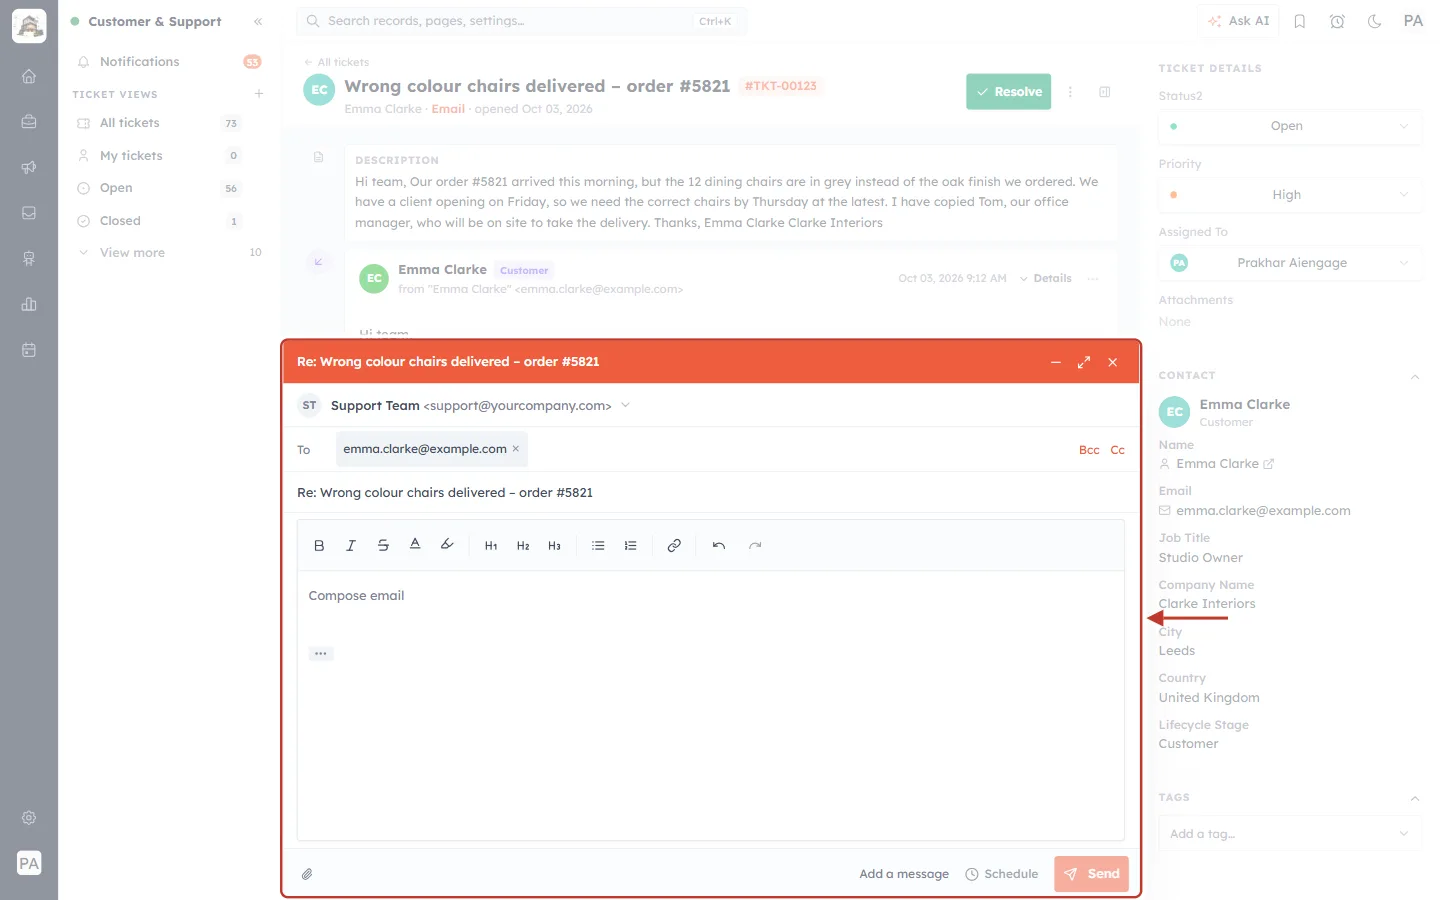
What this screenshot shows. The whole reply window is ringed. Everything is filled in for you except the message.
Orange title bar — the subject of your email (Step 5).
From — Support Team <support@yourcompany.com>, the address the email goes out from (Step 6).
To — emma.clarke@example.com, plus the Bcc and Cc links on the right (Step 7).
Subject — Re: Wrong colour chairs delivered – order #5821 (Step 8).
Formatting toolbar and the message box, which says Compose email until you type (Steps 9–10).
… under the message — shows the email you are replying to (Step 11).
Bottom bar — the paperclip for attachments on the left; Add a message, Schedule and Send on the right.
Step 5: Use the title bar#
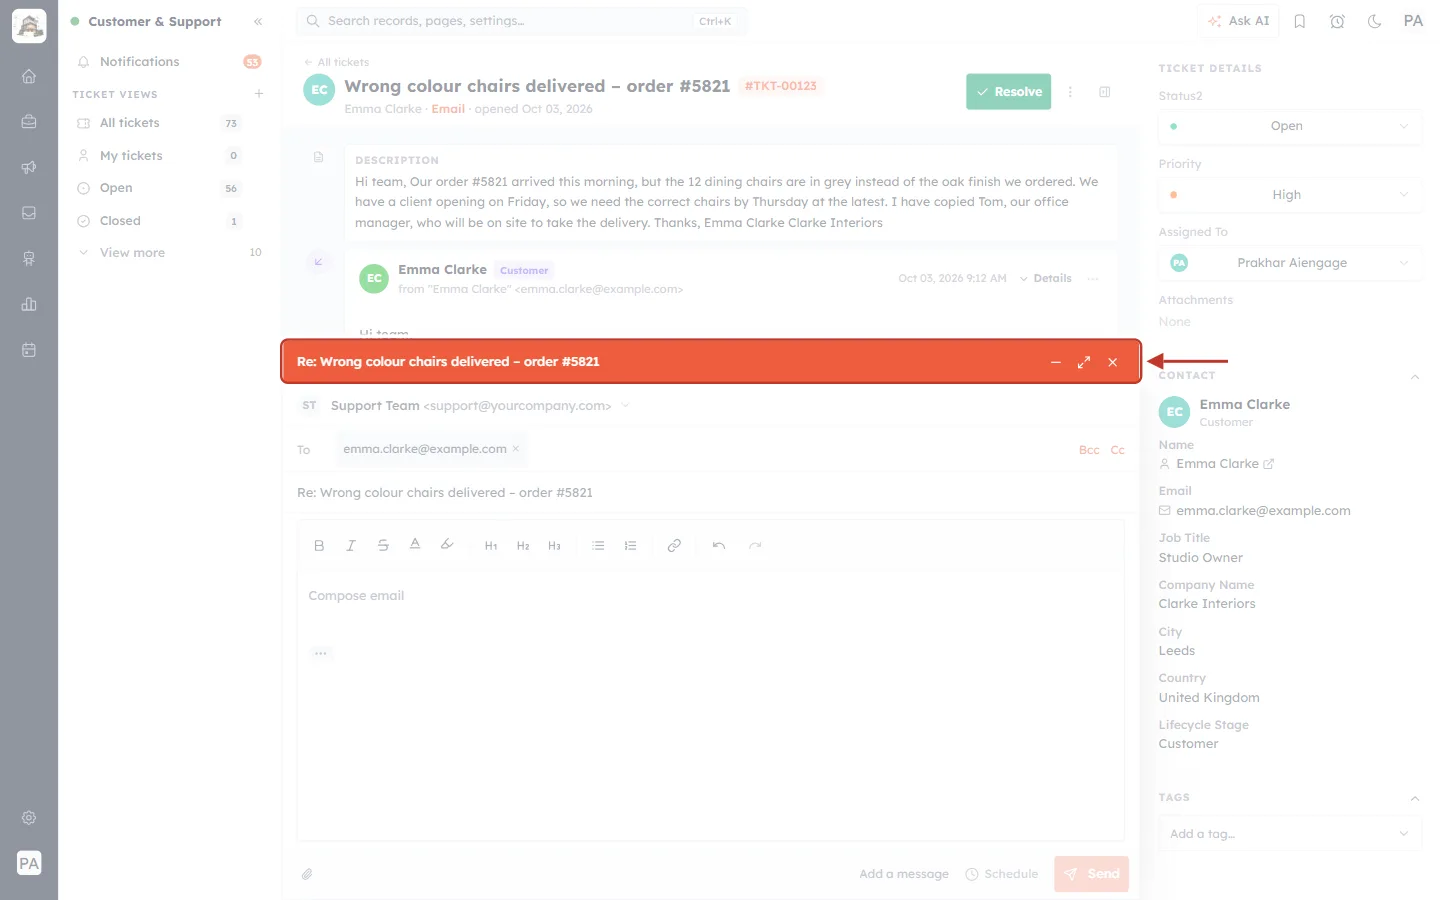
What this screenshot shows. The orange title bar at the top of the email window is ringed.
It shows the subject: Re: Wrong colour chairs delivered – order #5821.
— (Minimize) — shrink the window to a bar so you can read the conversation behind it. Click the bar to bring the window back (Restore).
⤢ (Maximize) — make the window bigger for a long email.
× (Close) — close the window without sending.
Step 6: Check the From address#
The email goes out from your organisation’s default support address. If your team uses more than one address (for example a separate billing address), click the From line to choose another.
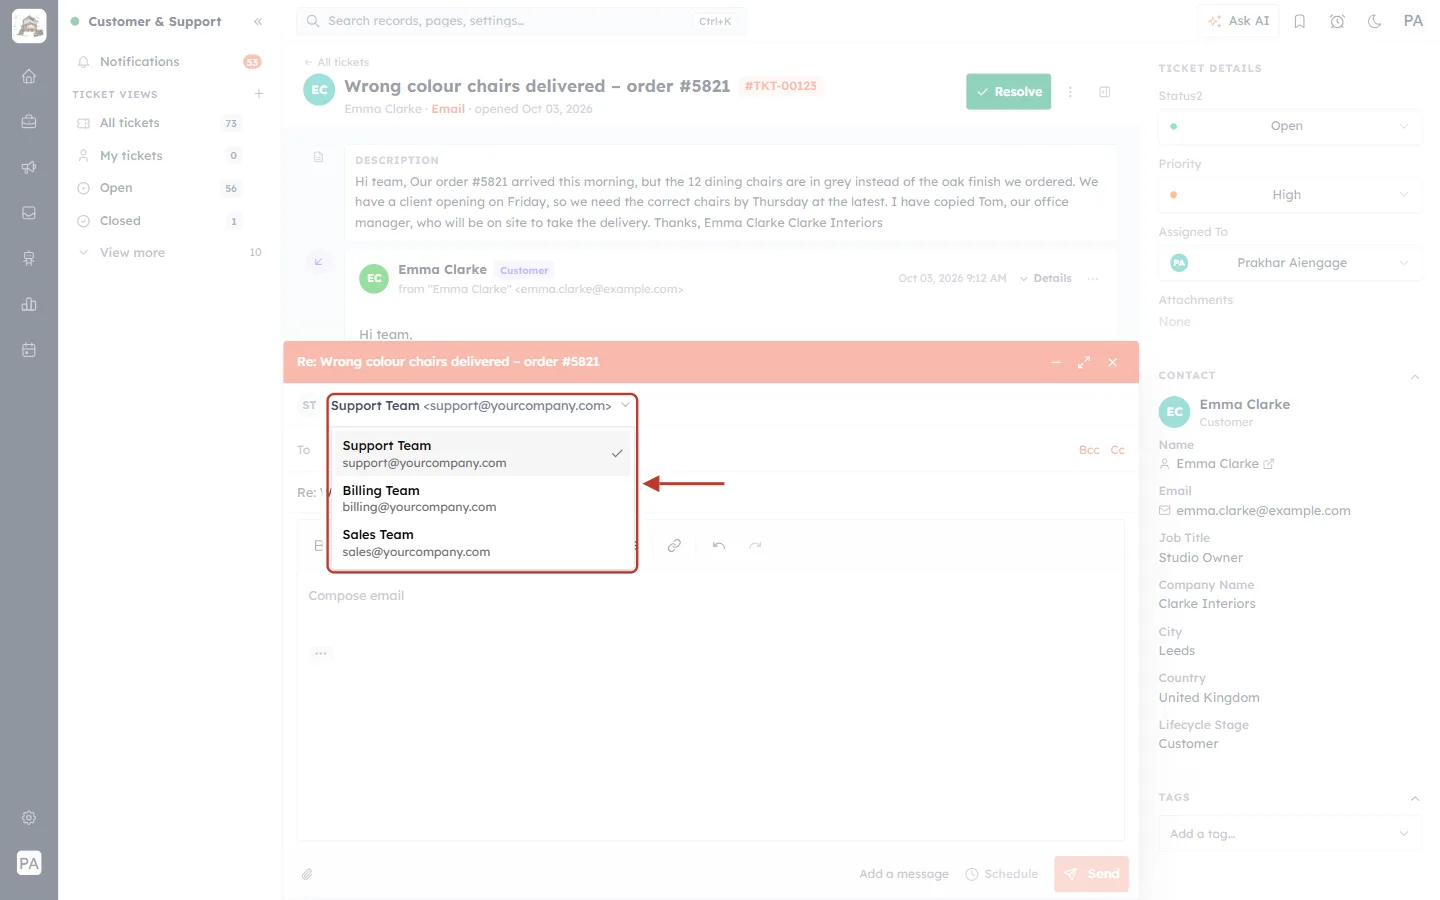
What this screenshot shows. The From line and its list of addresses are ringed.
Each address shows a name and an email: Support Team — support@yourcompany.com, Billing Team — billing@yourcompany.com and Sales Team — sales@yourcompany.com.
Only addresses your administrator has set up and allowed you to use are listed. An address you may not use is marked “— you can’t send from this”.
For most replies keep the default, so the customer always hears from the same support address.
Step 7: Check who it goes to (To, Cc, Bcc)#
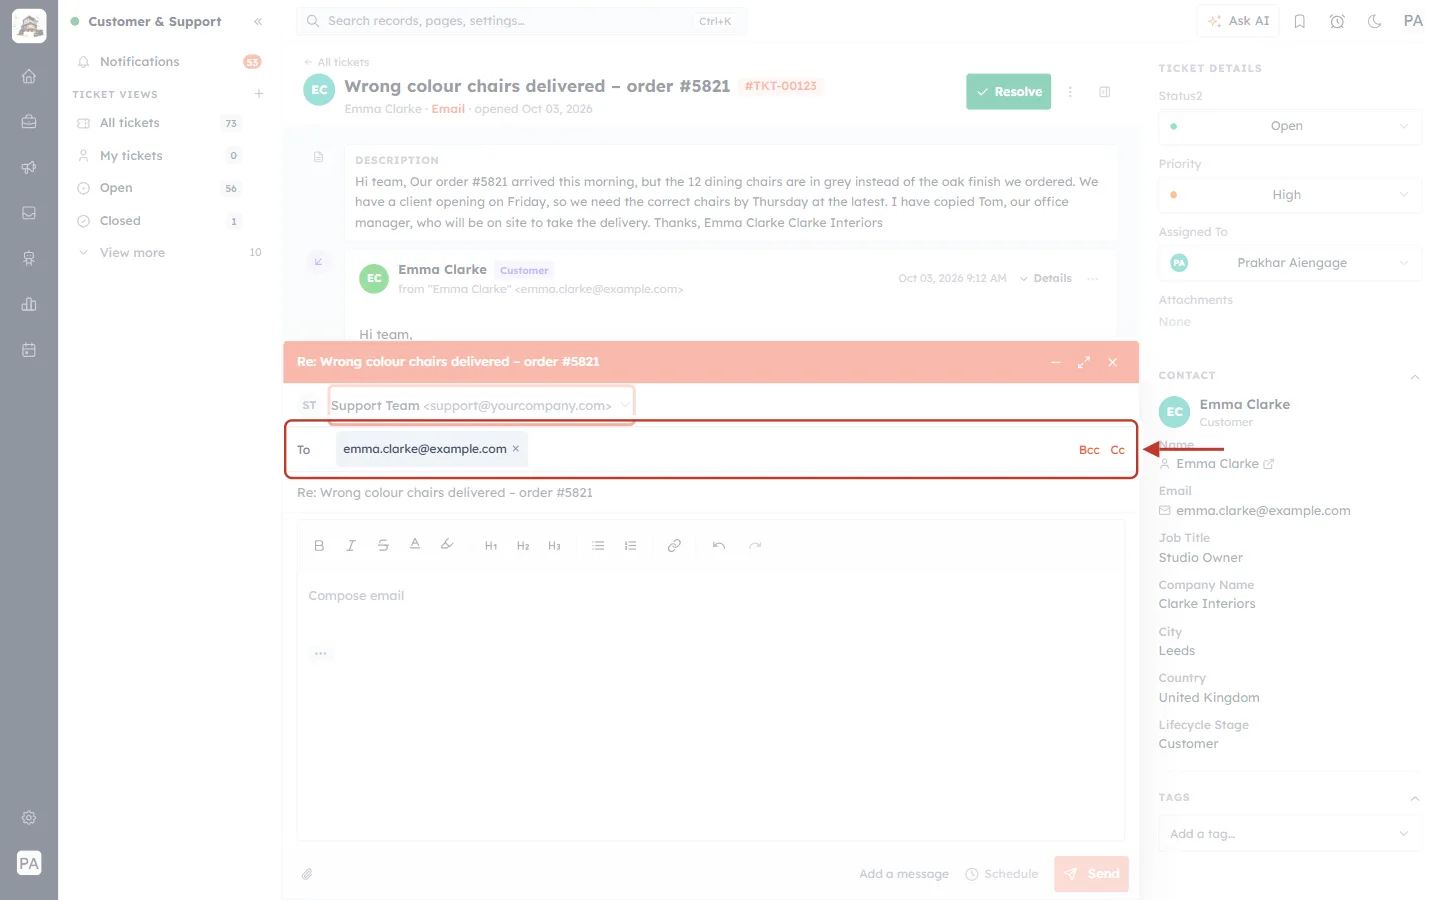
What this screenshot shows. The To line is ringed.
To — the customer’s address, emma.clarke@example.com, as a chip. Click the × on a chip to remove an address; click in the empty space and type to add another.
Bcc and Cc (orange, on the right) — click to add a Cc or Bcc line (see Part 3).
Reply only addresses the customer. Tom, who was copied on Emma’s email, is not included — for that, use Reply all (Part 3).
Step 8: Check the subject#
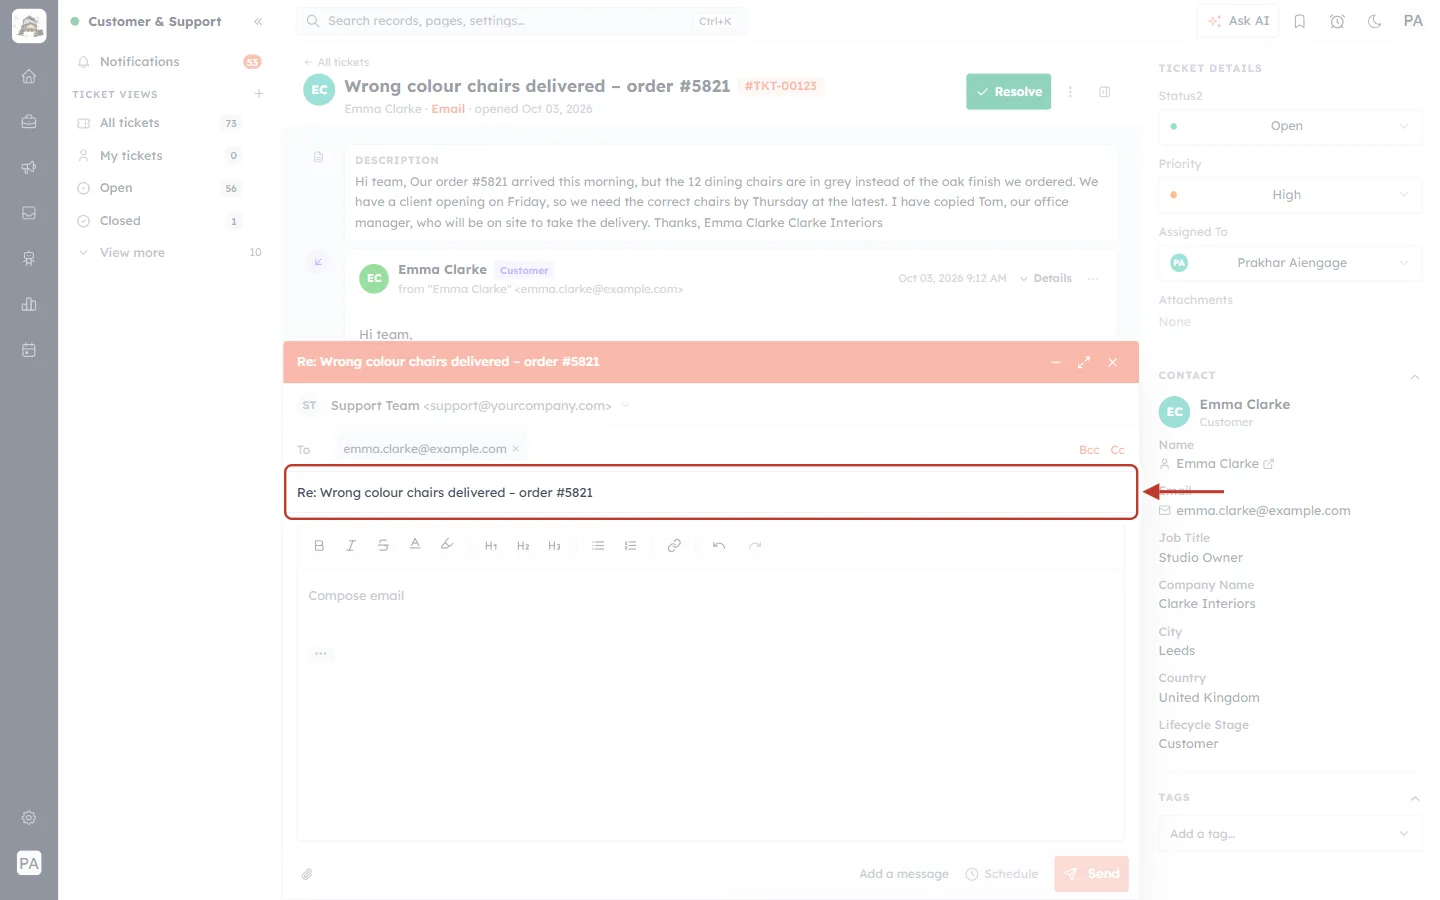
What this screenshot shows. The Subject line is ringed: Re: Wrong colour chairs delivered – order #5821.
It is the subject of the customer’s email with Re: in front, so the customer’s email program keeps your answer in the same conversation.
When the email is sent, the ticket number is added in square brackets — for example [#TKT-00123] (see Step 14). This is how the customer’s next reply is matched to this ticket. Don’t remove it if you see it in a subject.
You can change the wording of the subject if you need to.
Step 9: Know the formatting toolbar#
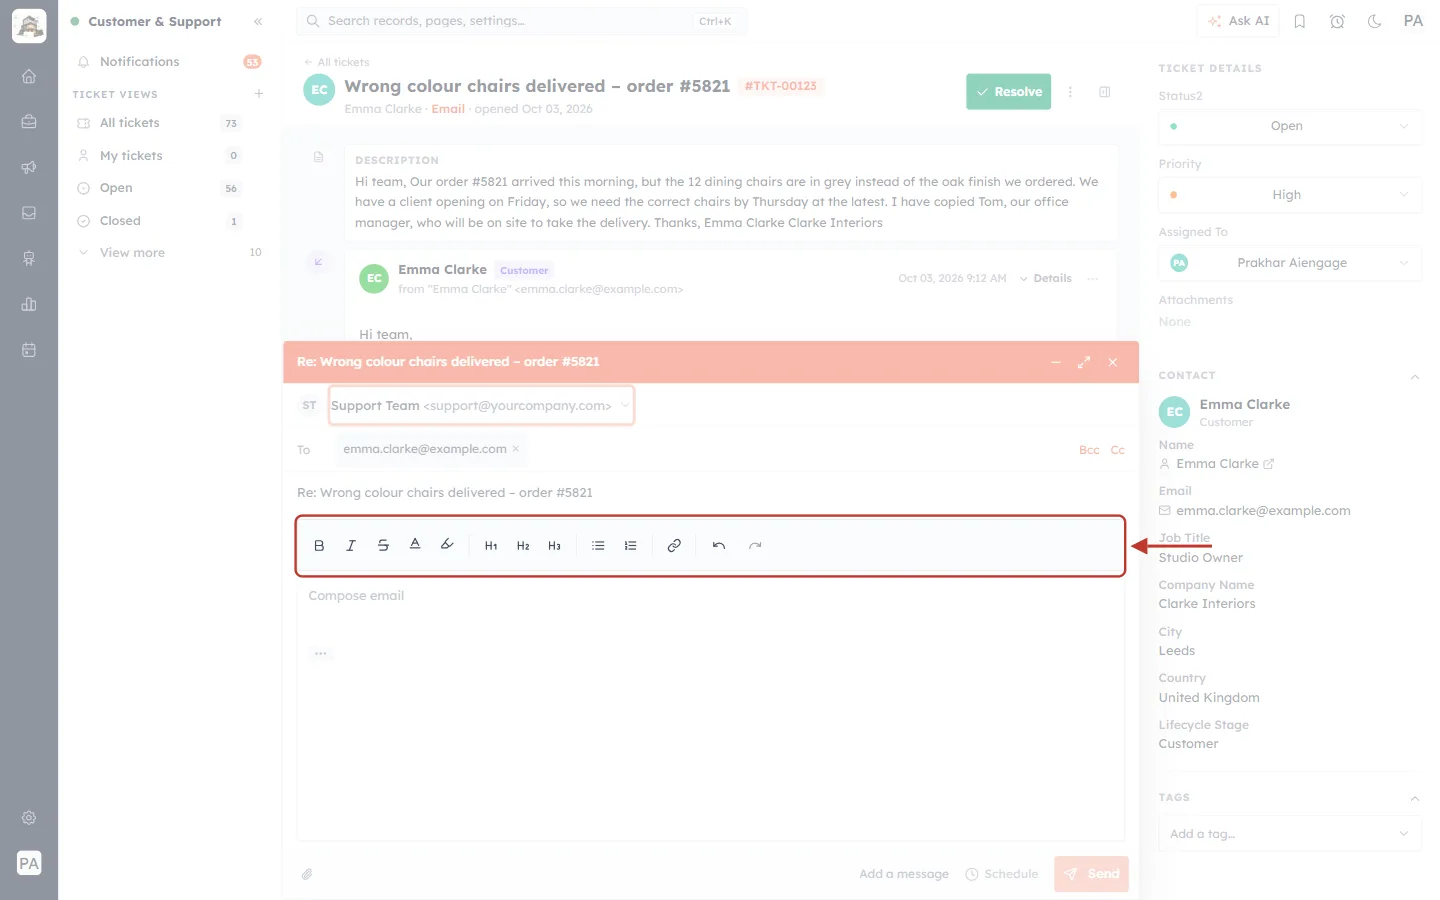
What this screenshot shows. The formatting toolbar above the message box is ringed.
From left to right: B bold, I italic,
Sstrikethrough, A text colour and the highlighter.H1, H2, H3 — headings, for long emails with sections.
Bulleted list and numbered list — ideal for steps the customer should follow.
The chain icon — add a link. Select some text first, then click it.
The curved arrows — undo and redo.
Step 10: Write your message#
Until you type a message, the email cannot be sent.
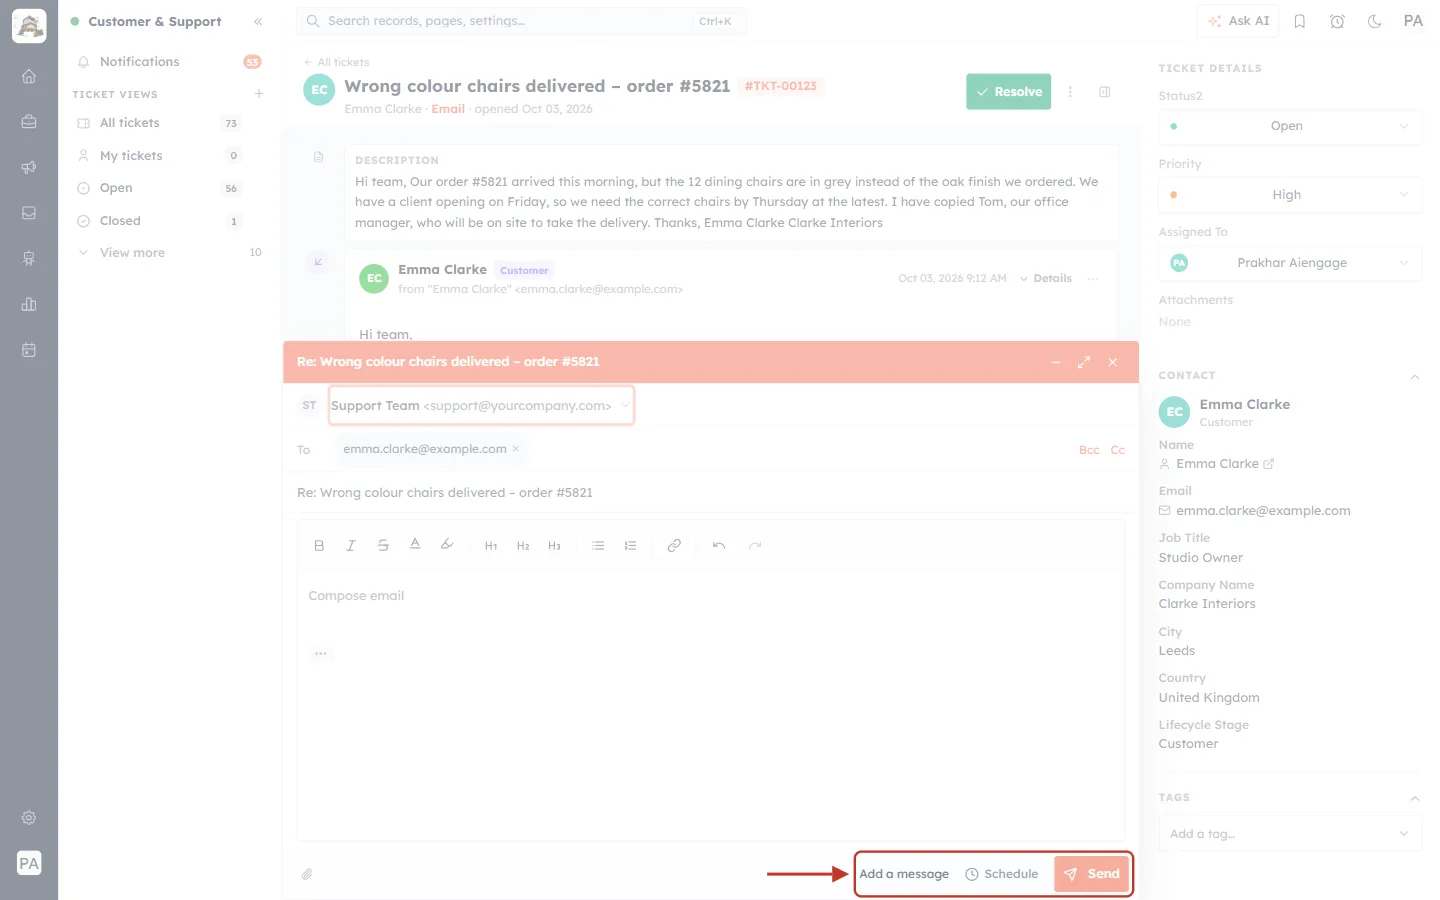
What this screenshot shows. The bottom right of the window is ringed while the message is still empty.
Add a message — a reminder of what is missing.
Schedule and Send are pale (disabled) until you write something.
You may see other reminders here too: Add at least one recipient if the To box is empty, or Add a subject if the subject is empty.
Click in the message box and write your answer.
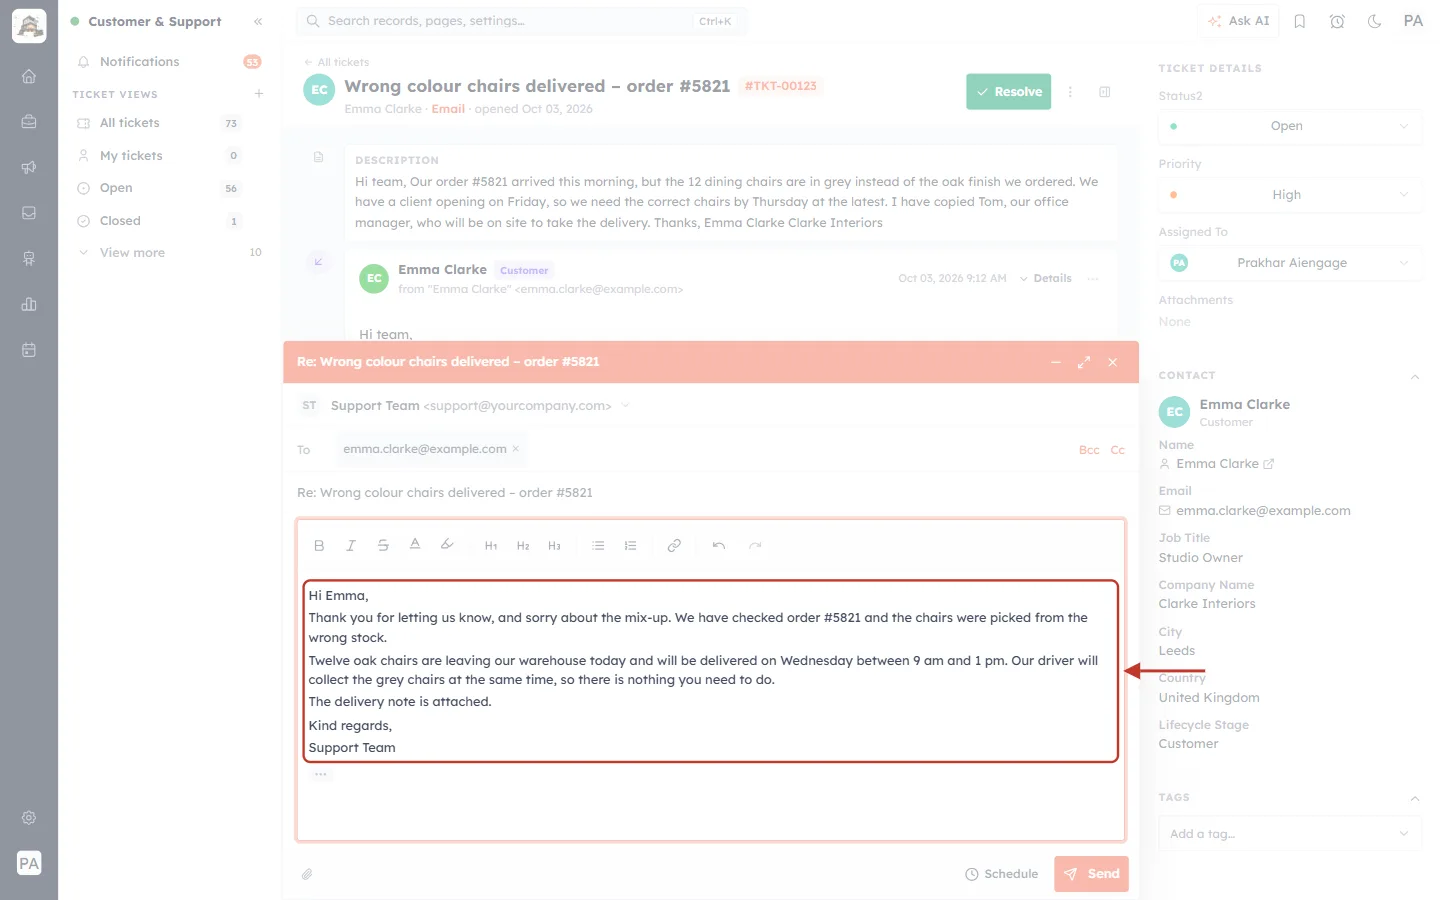
What this screenshot shows. The message box is ringed, with the reply written in.
The reply greets the customer, apologises, explains what went wrong (the chairs were picked from the wrong stock), says exactly what will happen and when (delivered on Wednesday between 9 am and 1 pm), and tells her she does not need to do anything.
Each line becomes its own paragraph. Use the toolbar to add bold text or a list.
Under the message, the … button stands for the earlier email (next step).
✅
A good support reply answers the question, says what happens next and when, and tells the customer whether they need to do anything. Keep it short enough to read on a phone.
Step 11: See the email you are replying to (…)#
Click the … under your message to show the customer’s original email.
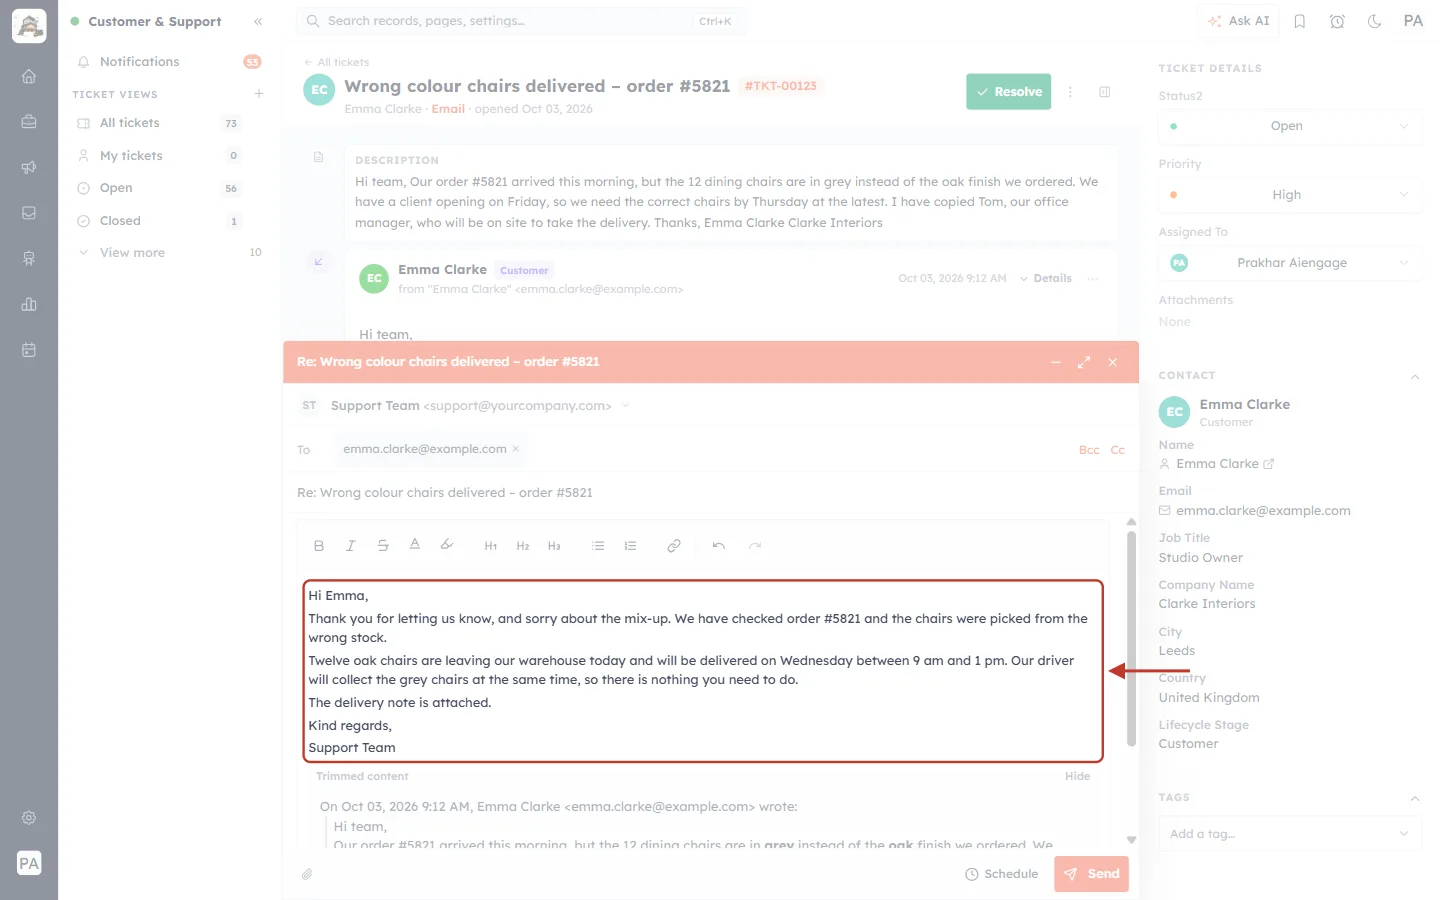
What this screenshot shows. The message box is ringed, now showing your reply and the original email underneath.
A grey line introduces the original: On Oct 03, 2026 9:12 AM, Emma Clarke <emma.clarke@example.com> wrote:
Below it, Emma’s email, set off by a line on the left.
The original is sent along with your reply, the way most email programs do, so the customer can see what you are answering. Click … again to hide it while you write.
Step 12: Attach a file (optional)#
Click the paperclip at the bottom left of the window and choose the file — for example a delivery note, an invoice or a screenshot.
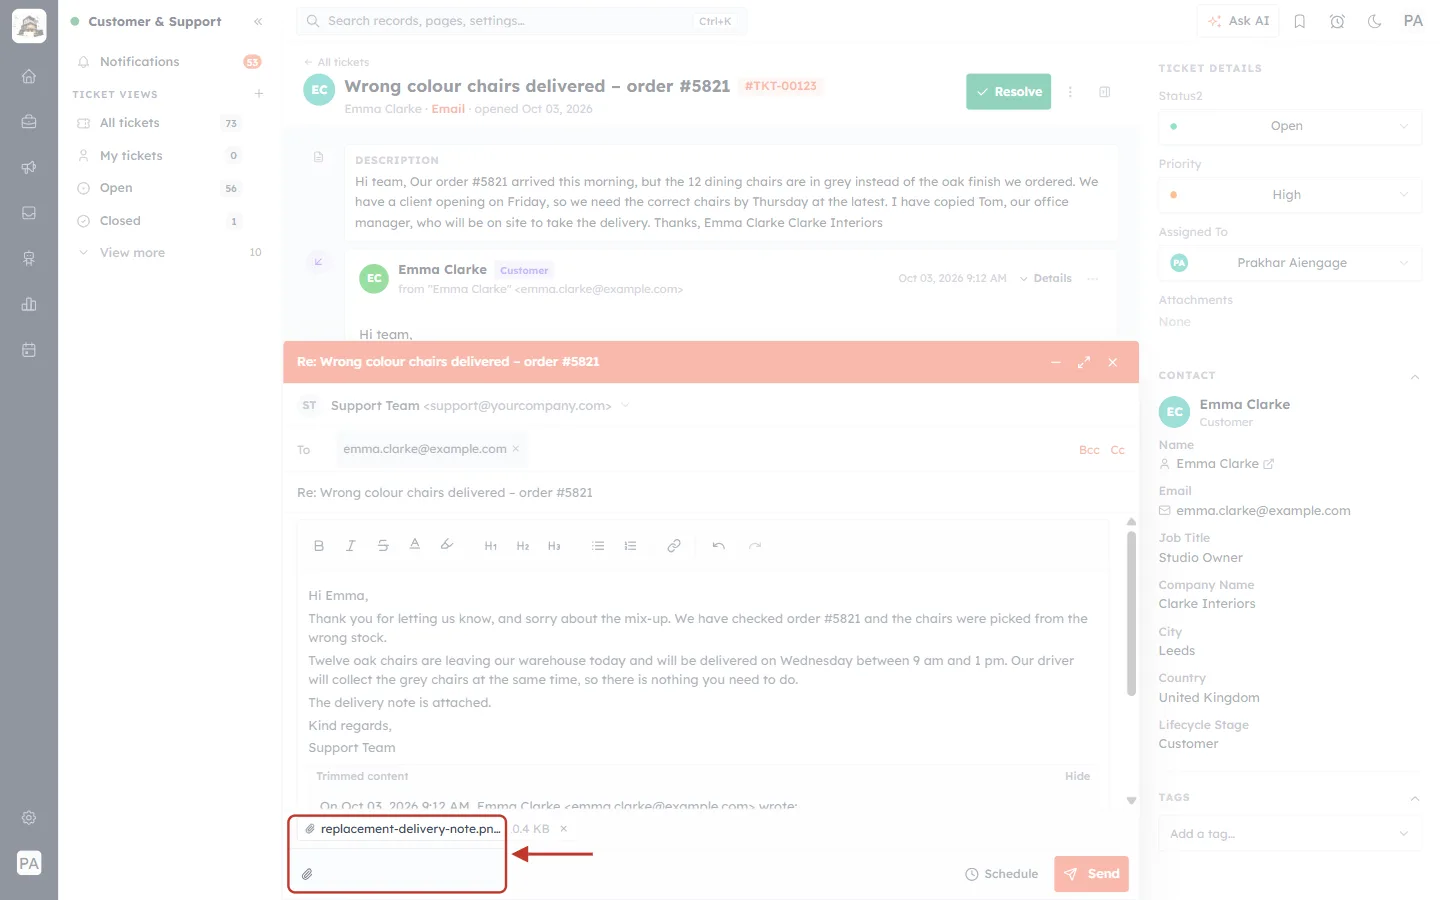
What this screenshot shows. The paperclip and the attached file are ringed.
The file appears as a chip above the paperclip: replacement-delivery-note.png with its size.
Click the × on the chip (Remove attachment) to take it off again.
You can attach more than one file.
Step 13: Send the reply#
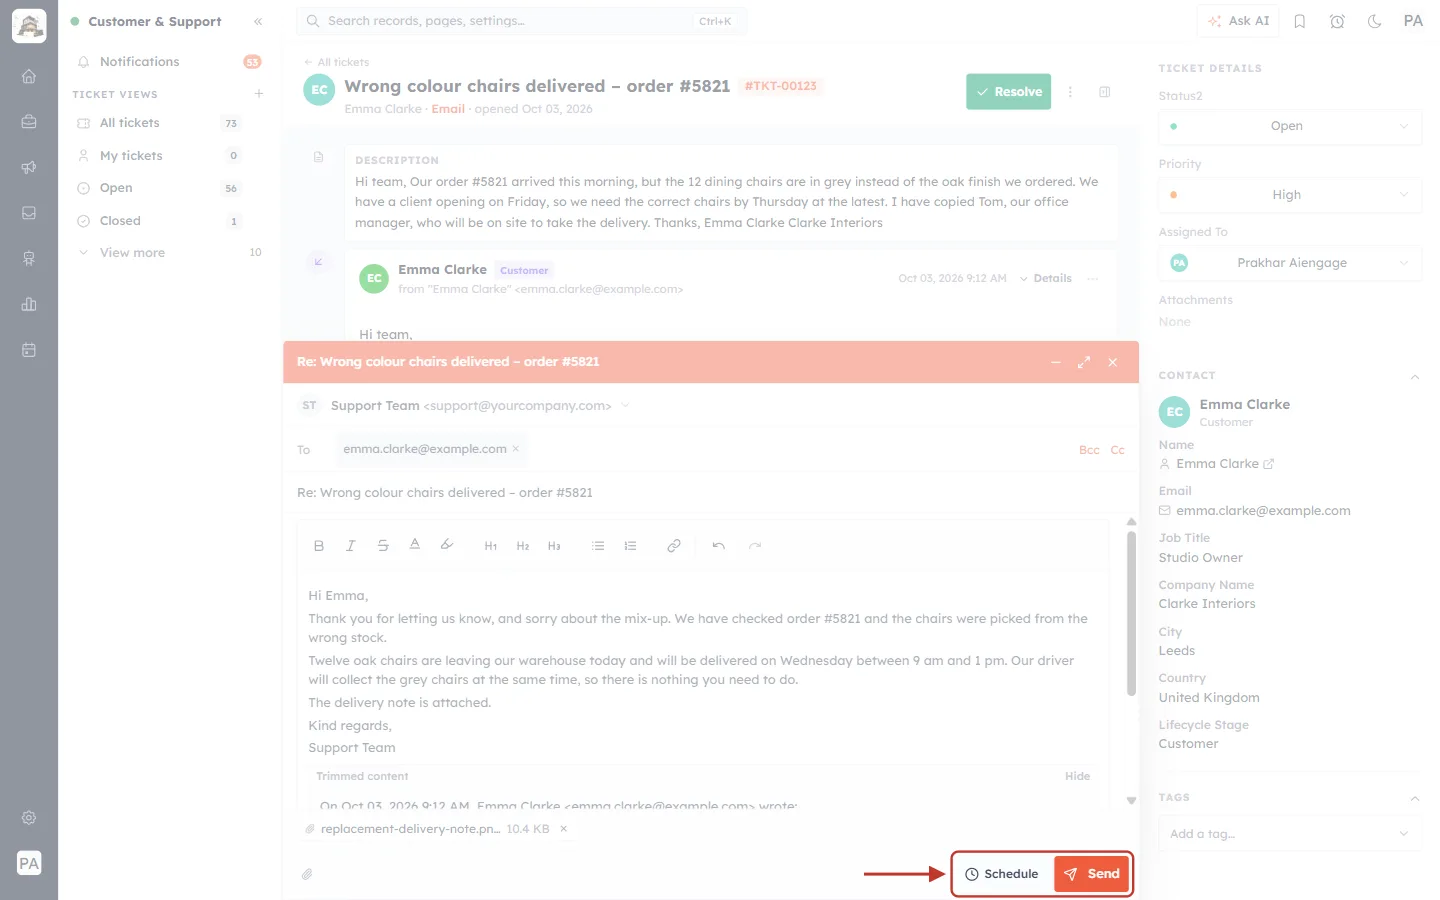
What this screenshot shows. The Schedule and Send buttons at the bottom right are ringed. Both are now active, because the email has a recipient, a subject and a message.
Send (orange, paper-plane icon) — sends the email now. While it is going out, the button reads Sending….
Schedule (clock icon) — sends it later instead (Part 5).
Click Send.
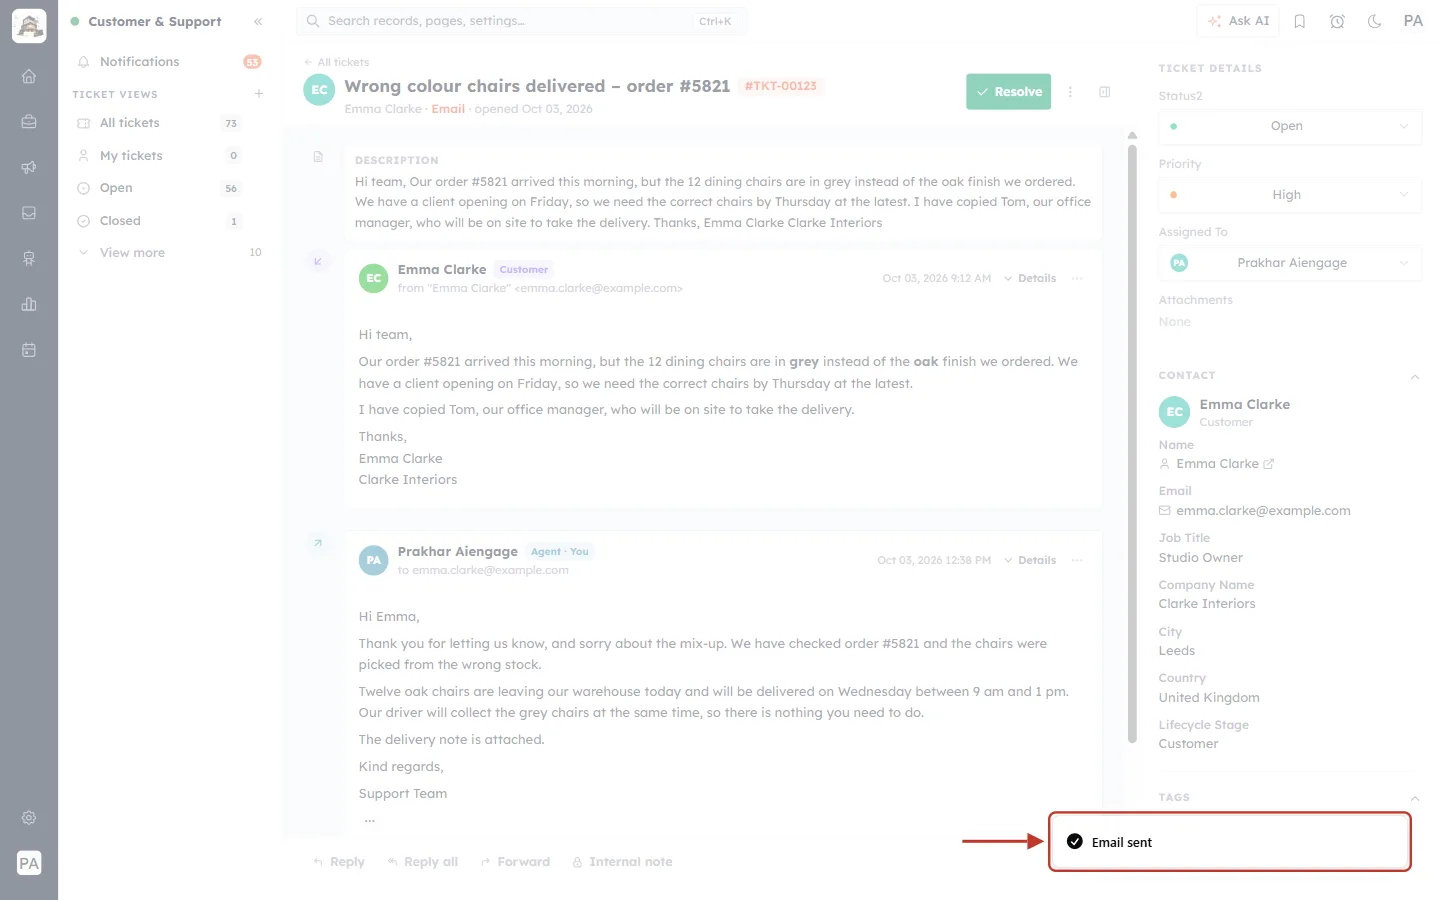
What this screenshot shows. A confirmation at the bottom right of the screen is ringed: “Email sent”.
The email window closes.
Your email is added to the ticket’s conversation straight away (next step).
Step 14: Check the sent email in the conversation#
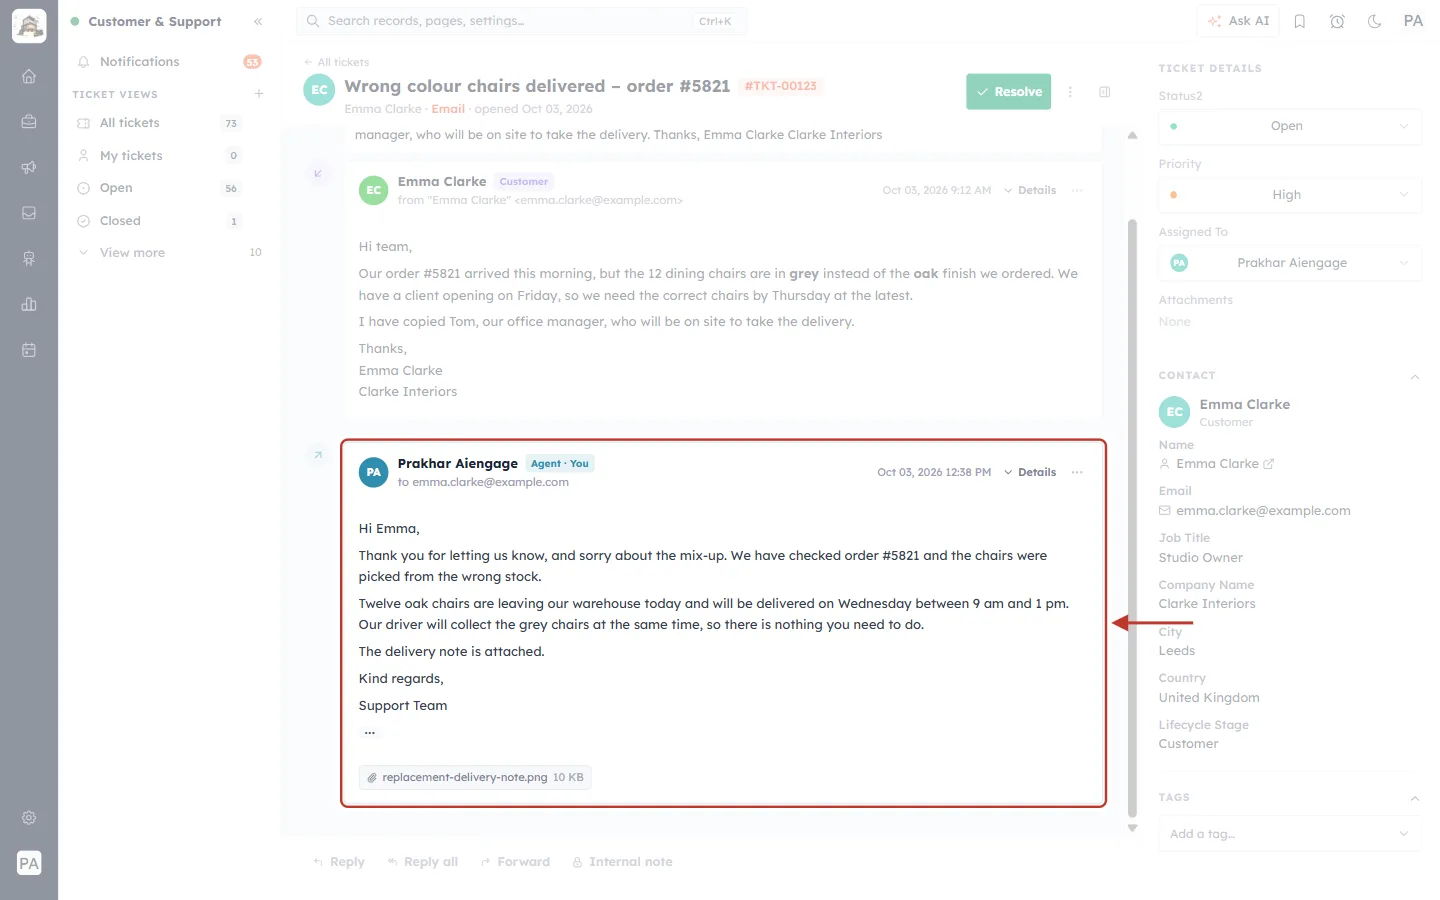
What this screenshot shows. Your reply in the conversation is ringed, under the customer’s email.
A green ↗ icon on the left means sent.
Your name with a green Agent · You label (teammates see Agent).
to emma.clarke@example.com — who it went to — and the time it was sent.
The message, and the attached file (replacement-delivery-note.png, 10 KB) at the bottom.
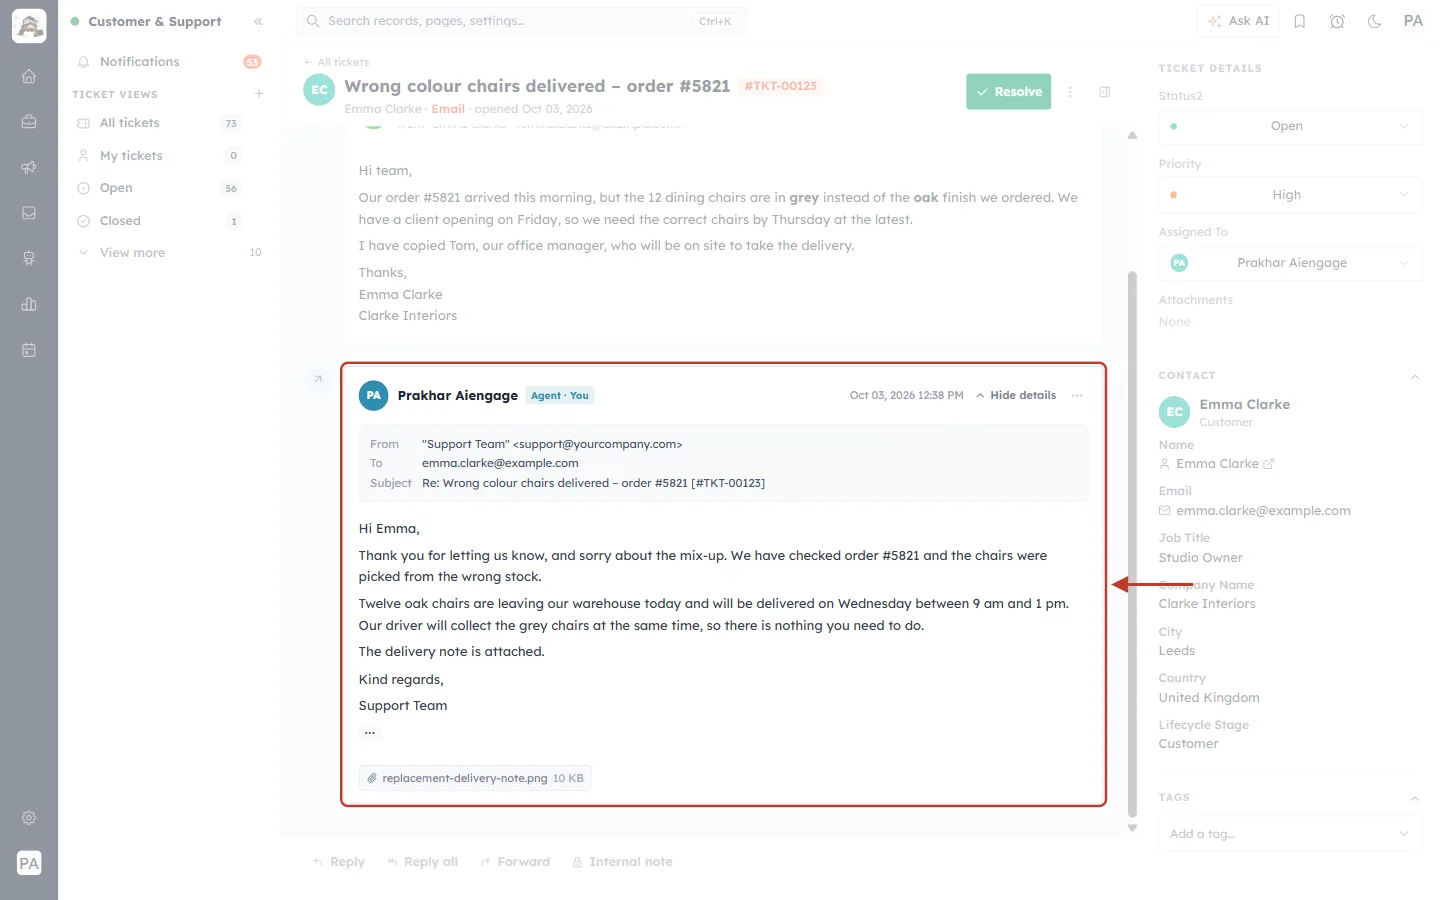
What this screenshot shows. The sent reply with Details open (ringed).
From — "Support Team" <support@yourcompany.com>. The customer sees your team’s name and support address.
To — emma.clarke@example.com.
Subject — Re: Wrong colour chairs delivered – order #5821 [#TKT-00123]. The ticket number has been added at the end. When Emma answers this email, her reply is filed on this same ticket.
ℹ️
The customer sees your team’s name (here Support Team) as the sender. Whether your own name also appears depends on Show the agent’s name in replies — see Support General Settings.
Part 3 — Reply all: include everyone on the email#
Emma copied Tom into her email, and Tom will be on site for the delivery. To make sure he gets your answer too, use Reply all.
Step 15: Click Reply all#
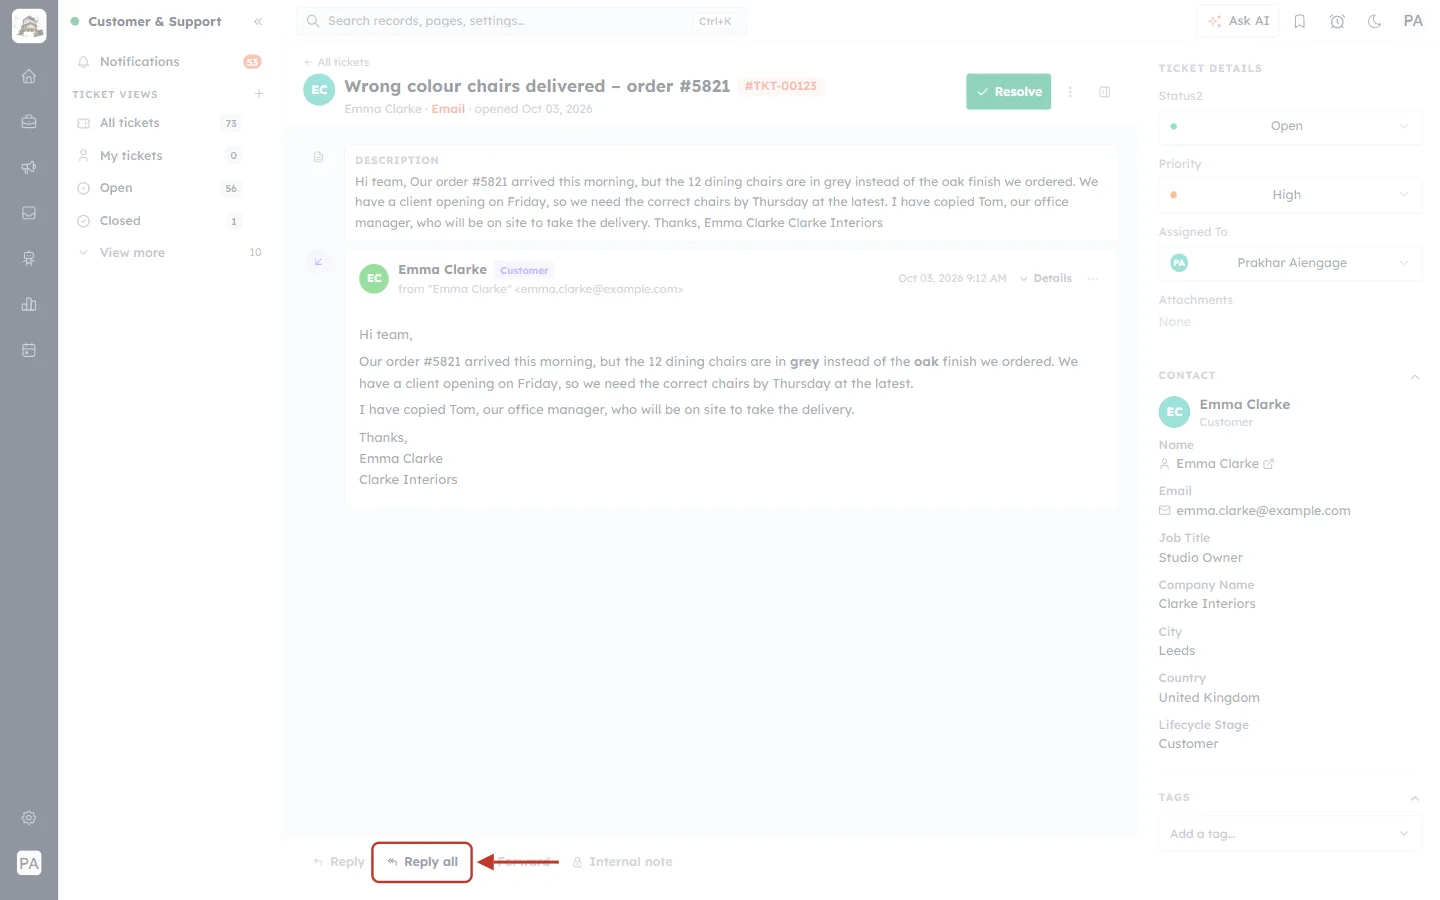
What this screenshot shows. The Reply all button in the reply bar is ringed.
It answers the customer’s latest email and keeps everyone who was copied on it.
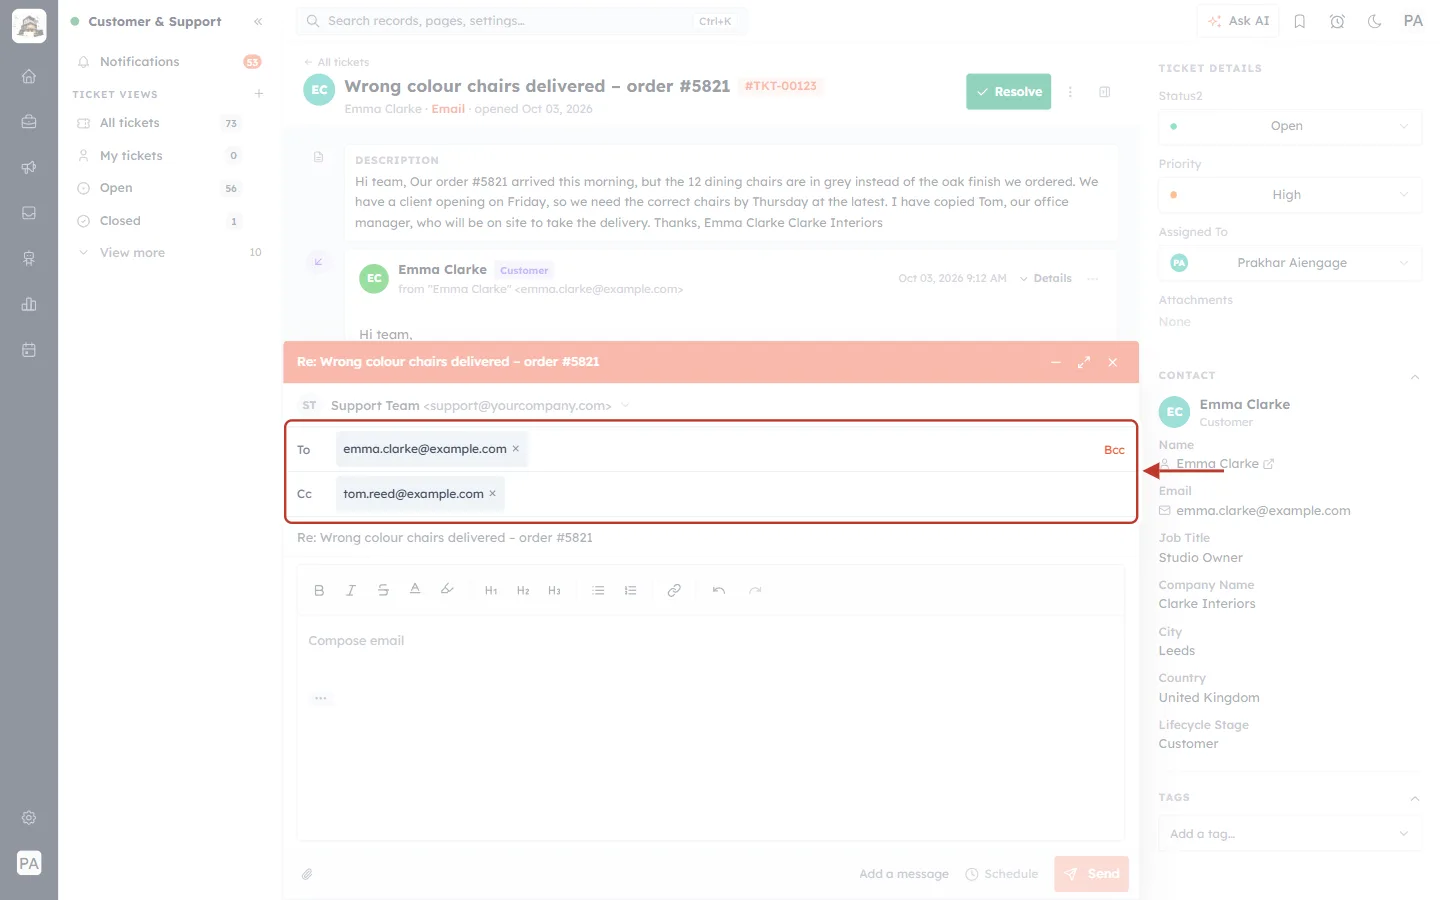
What this screenshot shows. The address lines of the Reply all window are ringed.
To — emma.clarke@example.com, the customer who wrote.
Cc — tom.reed@example.com, filled in automatically because he was copied on Emma’s email.
Only Bcc is left as a link on the right, because the Cc line is already showing.
Remove anyone who should not get your answer by clicking the × on their chip.
Step 16: Add a Bcc (optional)#
Use Bcc (blind copy) to send a copy to someone without the customer seeing it — for example your accounts team. Click Bcc, click in the new line, type the address and press Enter.
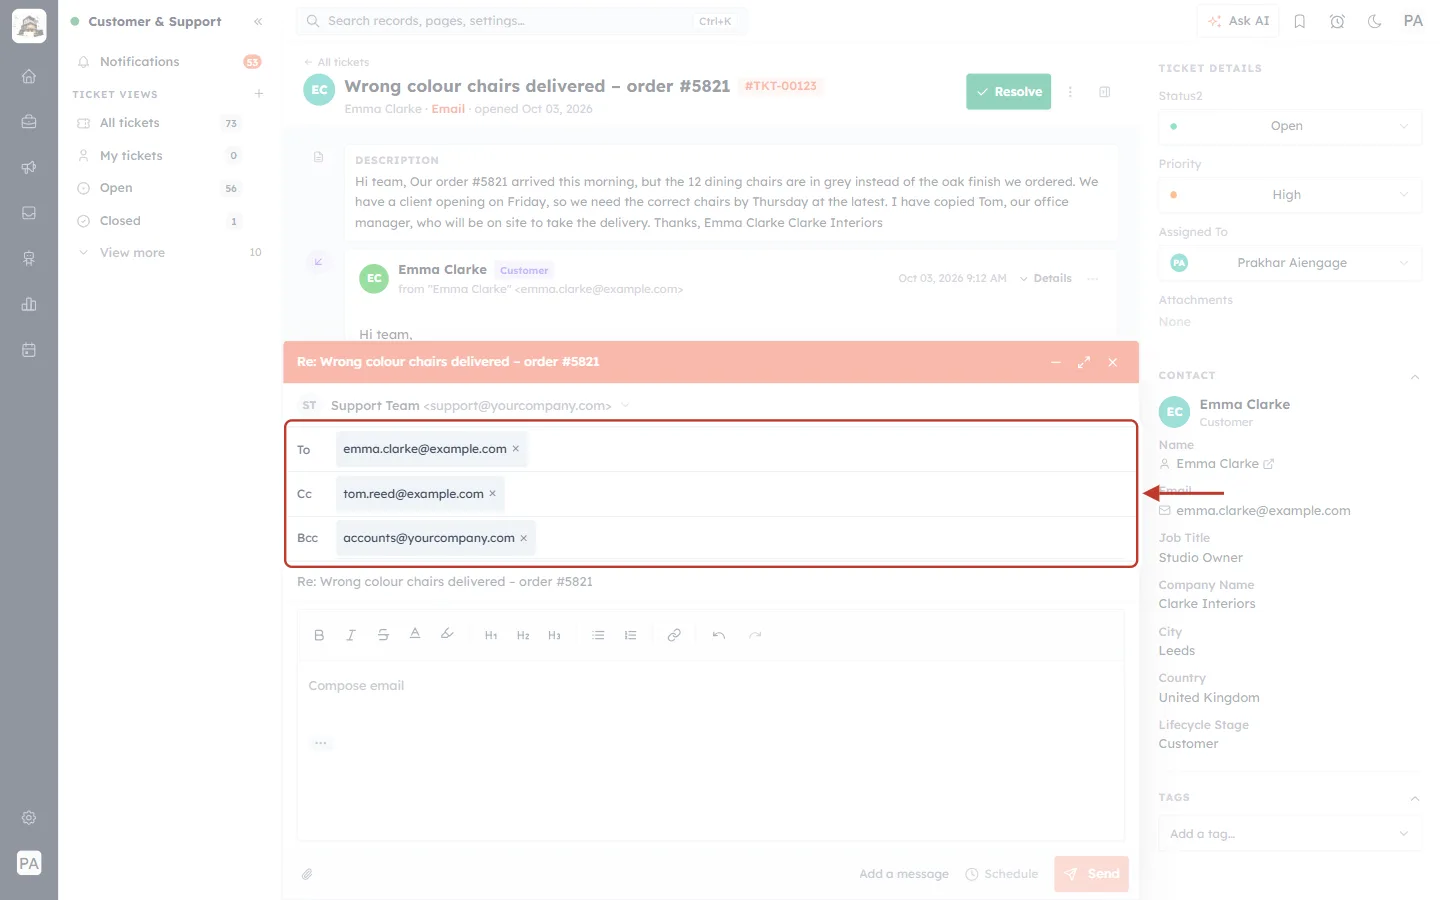
What this screenshot shows. The To, Cc and Bcc lines are ringed.
To — emma.clarke@example.com.
Cc — tom.reed@example.com. Everyone can see who is copied.
Bcc — accounts@yourcompany.com. This person gets a copy, but Emma and Tom do not see it.
Each address becomes a chip when you press Enter.
✅
Cc is for people who should openly see the conversation. Bcc is for a quiet copy — never put a customer in Bcc if they might use “Reply all”.
Write the message and click Send, as in Part 2.
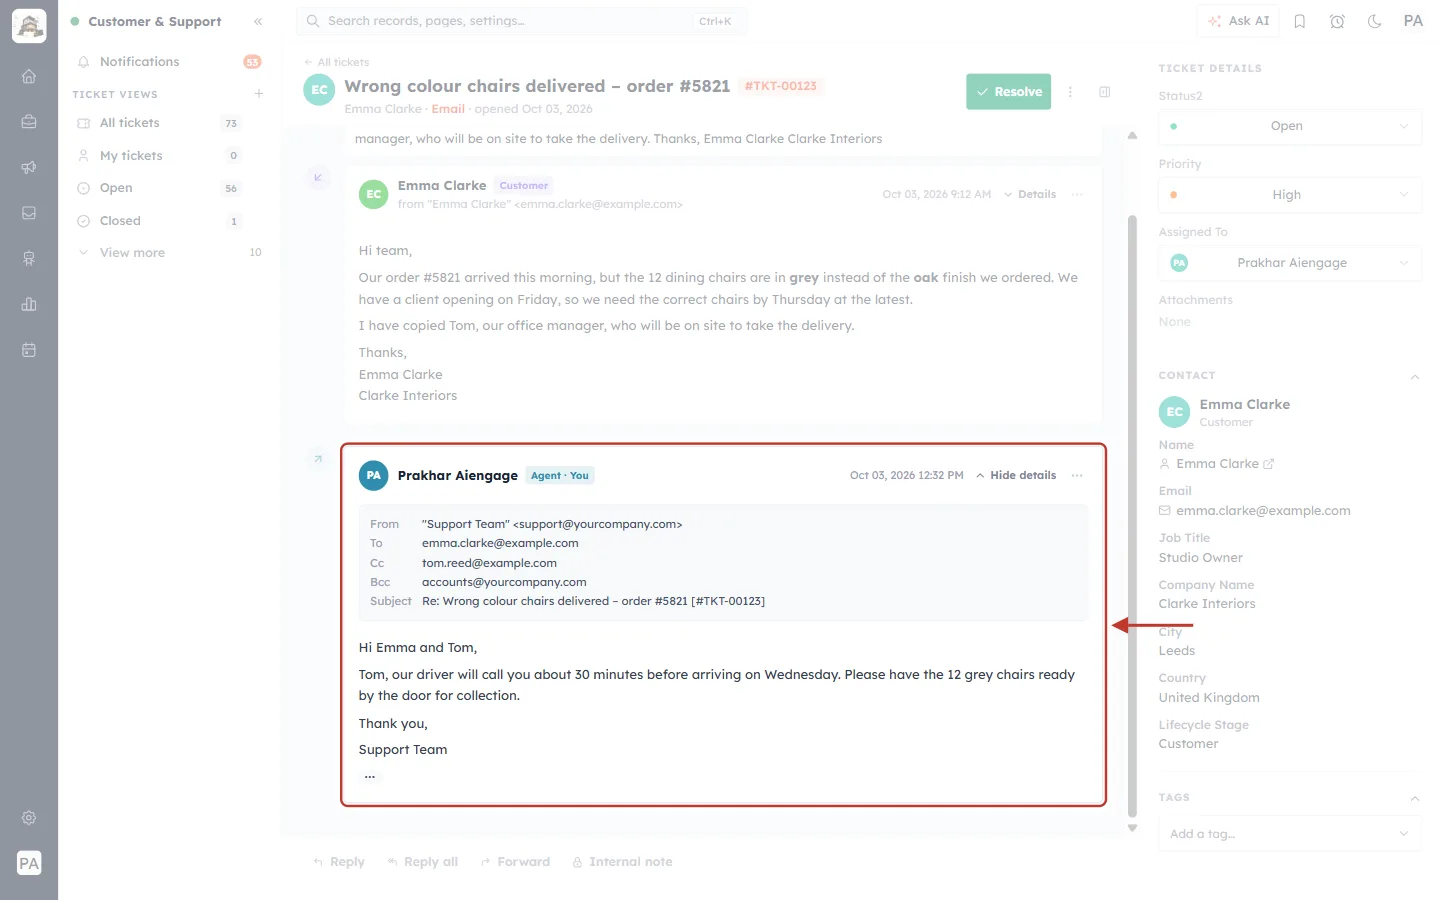
What this screenshot shows. The sent Reply all email in the conversation, with Details open, is ringed.
From — "Support Team" <support@yourcompany.com>.
To — emma.clarke@example.com. Cc — tom.reed@example.com. Bcc — accounts@yourcompany.com (only your team sees this line).
Subject — ends with the ticket number, [#TKT-00123].
The message is addressed to both: “Hi Emma and Tom, … our driver will call you about 30 minutes before arriving on Wednesday.”
Part 4 — Forward the email to someone else#
To fix Emma’s problem, the warehouse needs to send the right chairs. Forward sends them her email, with a note from you on top.
Step 17: Click Forward#
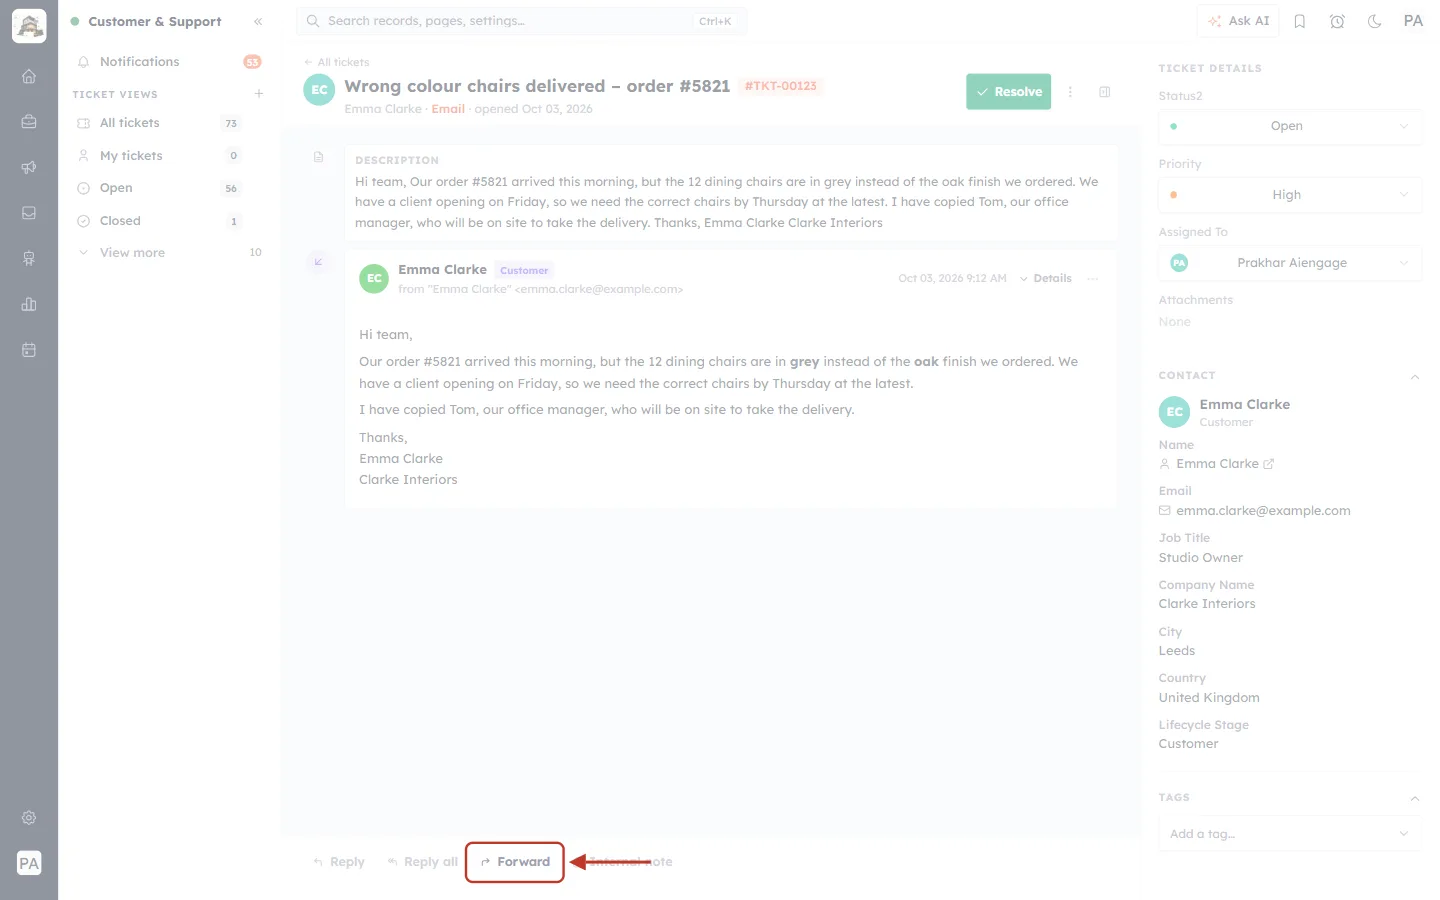
What this screenshot shows. The Forward button in the reply bar is ringed.
It forwards the customer’s latest email. To forward a different email, use ⋯ → Forward on that email (Step 3).
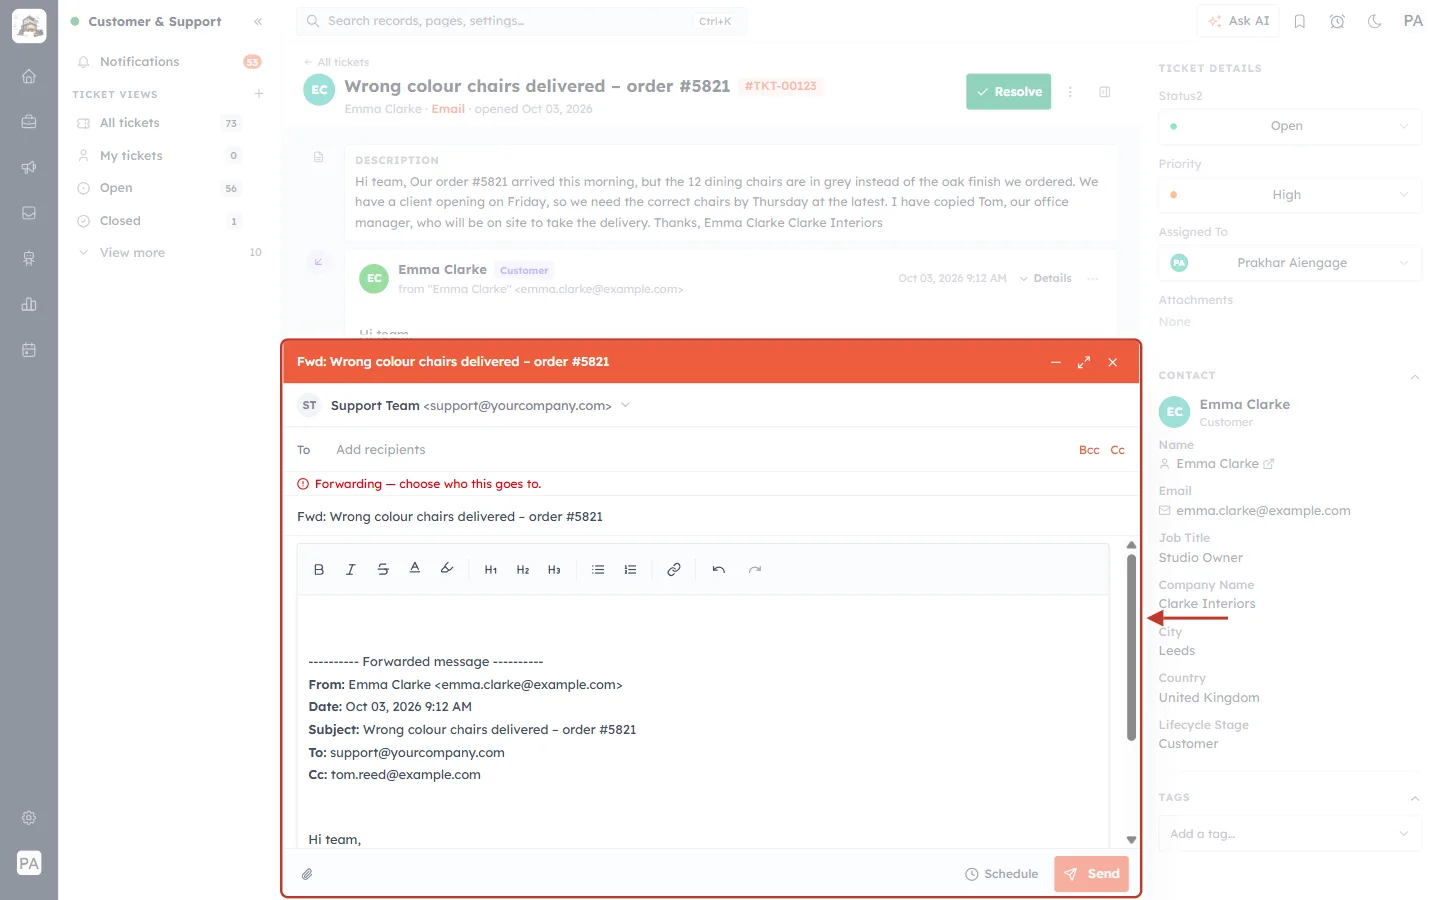
What this screenshot shows. The Forward window is ringed.
The title and subject start with Fwd: — Fwd: Wrong colour chairs delivered – order #5821.
To is empty and says Add recipients — a forward never goes to the customer automatically. Bcc and Cc links sit on the right.
A red reminder under the To line: “Forwarding — choose who this goes to.”
The message box already holds the forwarded email: a ---------- Forwarded message ---------- line, then From, Date, Subject, To and Cc of the original, then Emma’s email.
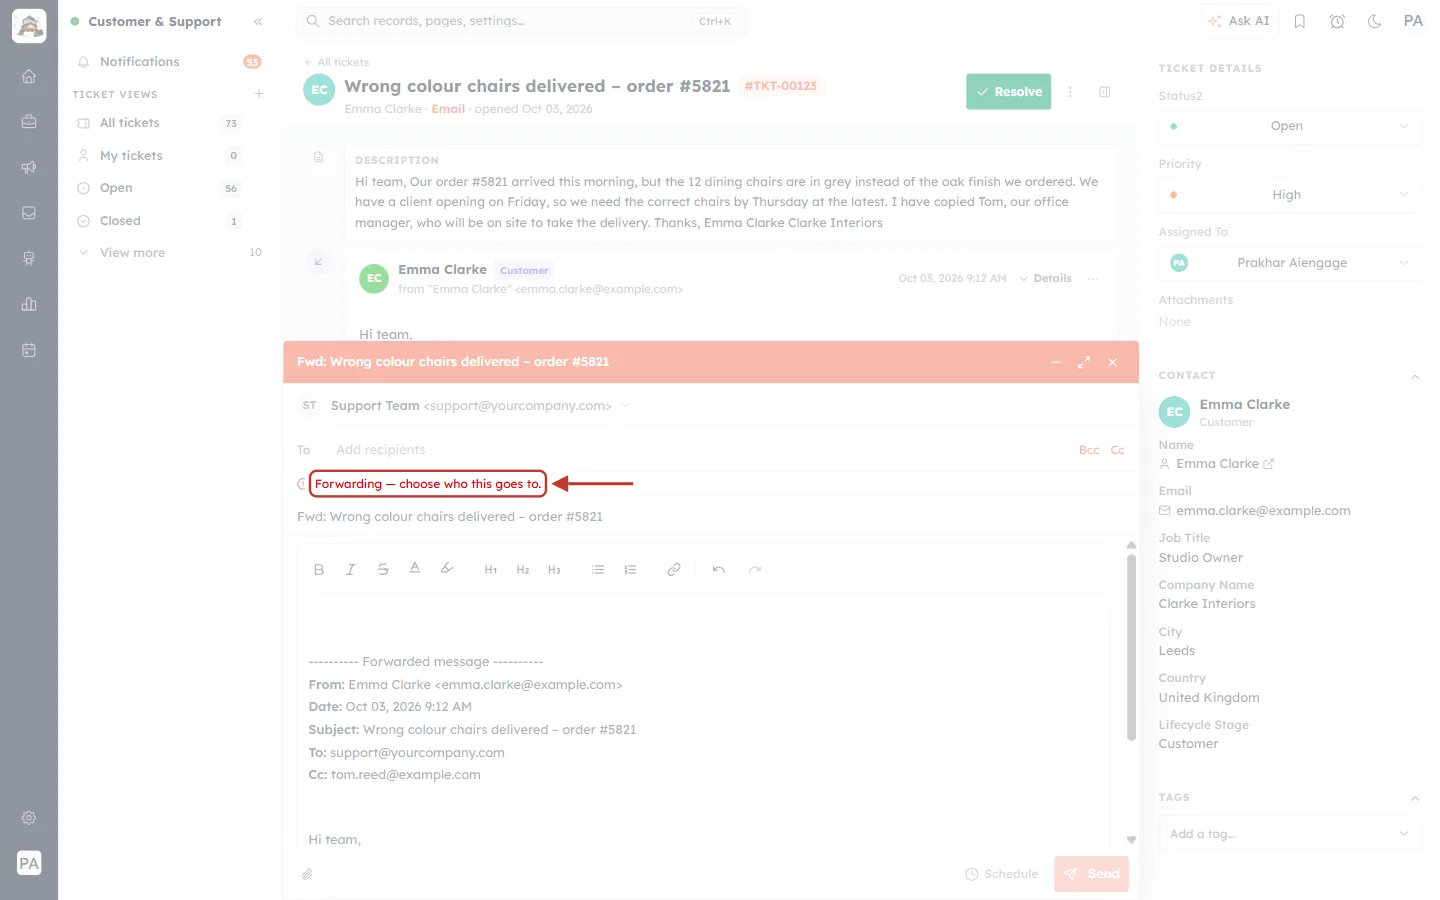
What this screenshot shows. The red reminder “Forwarding — choose who this goes to.” is ringed.
It stays until you add at least one address in To.
Step 18: Choose who it goes to#
Click in the To line, type the address and press Enter.
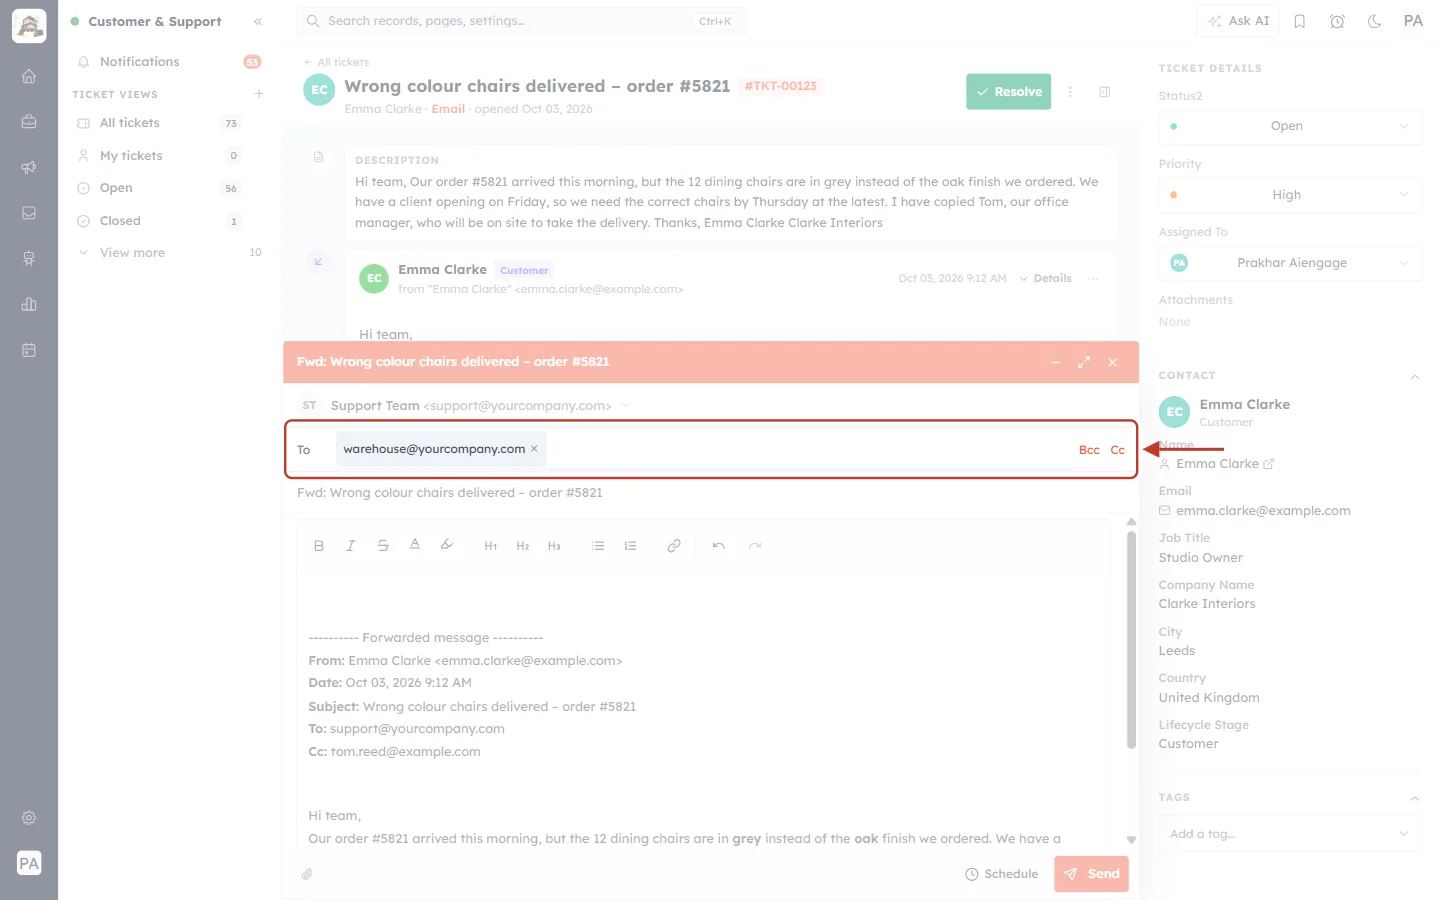
What this screenshot shows. The To line is ringed, with warehouse@yourcompany.com added as a chip.
You can add several addresses, and use Cc or Bcc as usual.
Double-check the address: a forward shares the customer’s email, including their contact details.
Step 19: Add a note above the forwarded email#
Click at the very top of the message box and write a short note telling the person what you need from them.
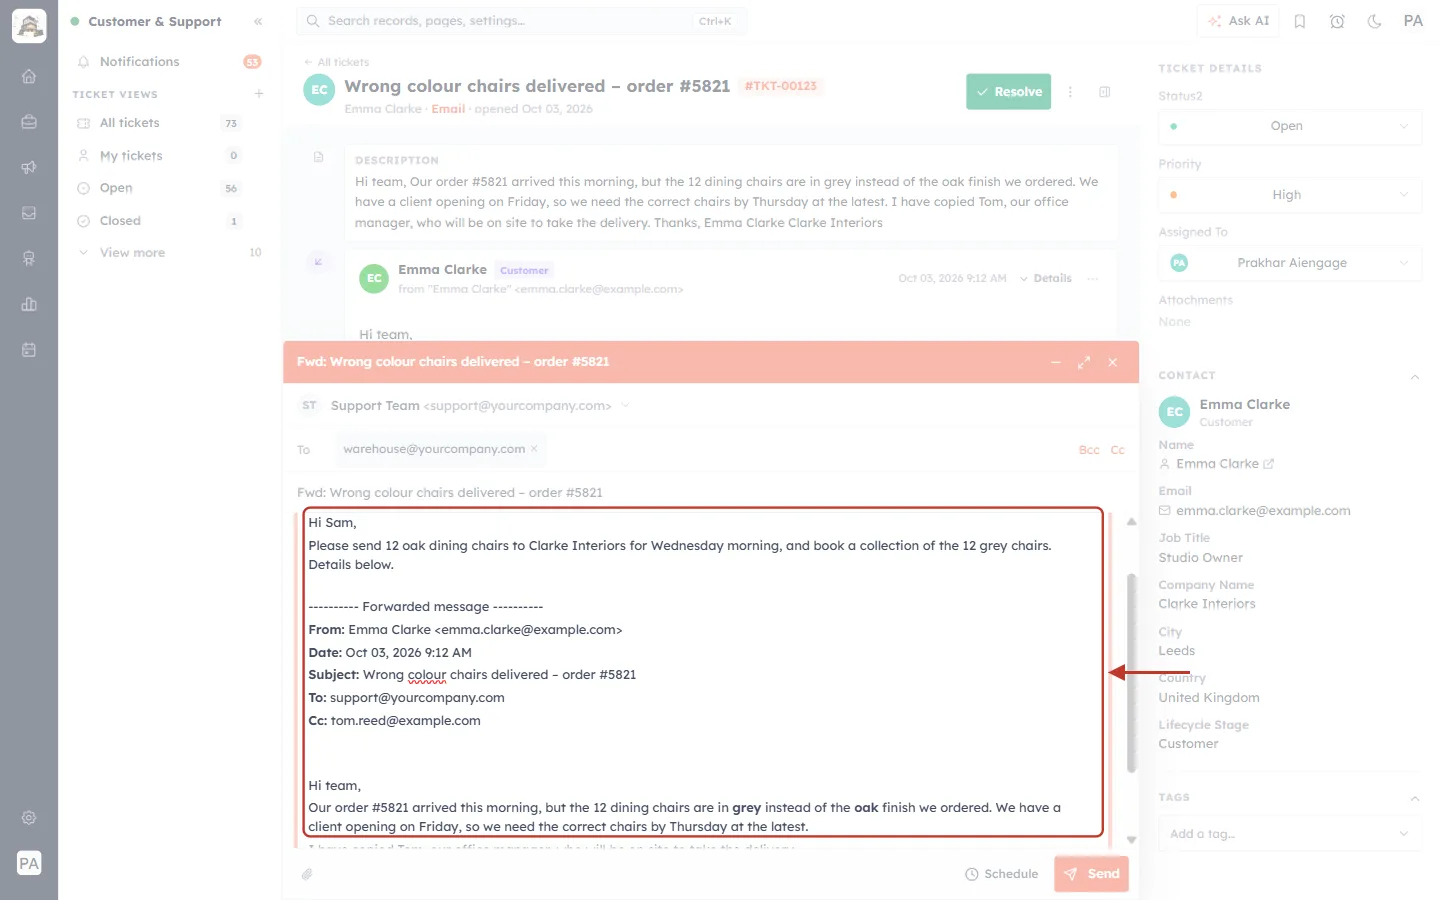
What this screenshot shows. The message box is ringed.
At the top, your note: “Hi Sam, Please send 12 oak dining chairs to Clarke Interiors for Wednesday morning, and book a collection of the 12 grey chairs. Details below.”
Under it, the forwarded message with Emma’s original email, so Sam has all the details.
Click Send.
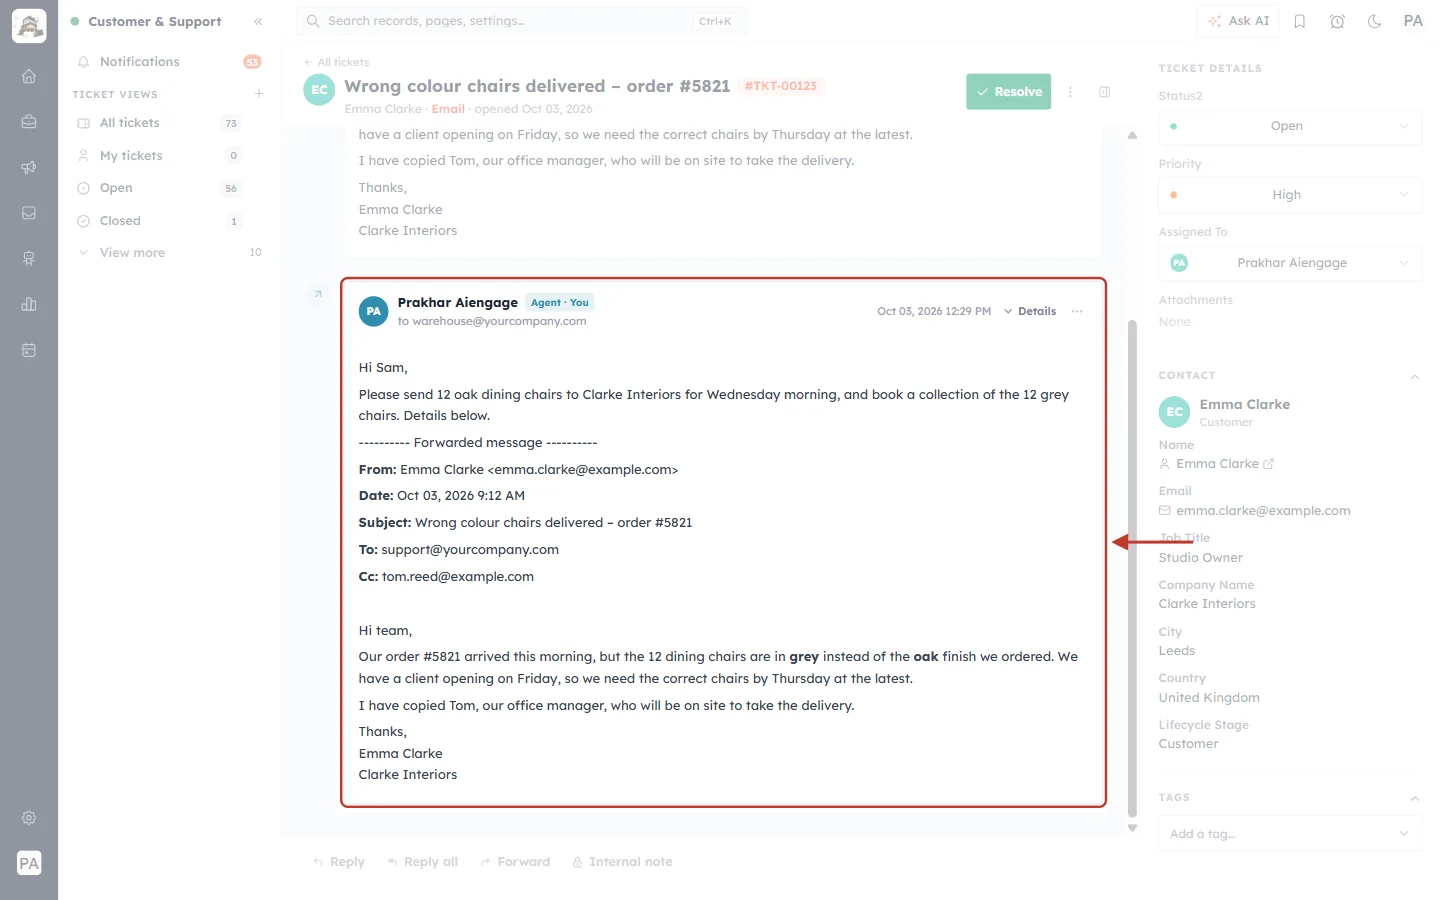
What this screenshot shows. The forwarded email in the ticket conversation is ringed.
It shows Agent · You and to warehouse@yourcompany.com, so the team can see that the warehouse was asked to act.
Your note is at the top, followed by the forwarded message.
The customer does not receive a forward unless you add their address.
ℹ️
Forwarding keeps everything on the ticket. Anyone who opens the ticket later can see that the warehouse was contacted, when, and what they were asked to do.
Part 5 — Schedule an email to send later#
Sometimes the right moment to send is later: a follow-up the morning after a delivery, or an answer timed for the start of the customer’s working day. Write the email as usual, then use Schedule instead of Send. In this example we schedule a follow-up to Emma for the morning of the delivery.
Step 20: Write the email#
Click Reply (or Reply all or Forward) and write your message. Schedule works only once the email has a message.
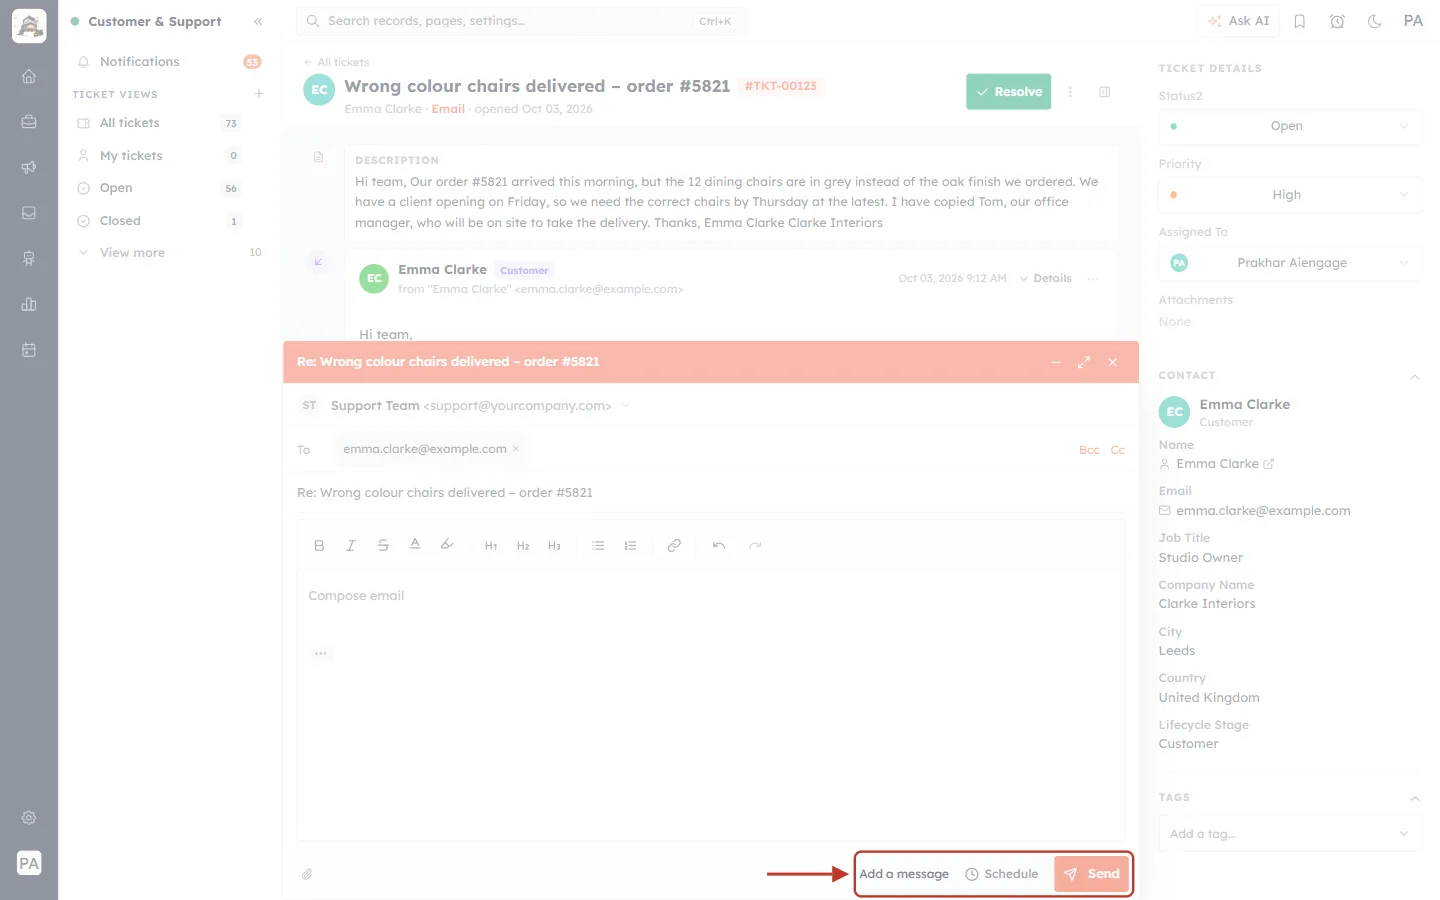
What this screenshot shows. The bottom right of an empty email window is ringed: Add a message, a pale Schedule and a pale Send.
Both buttons wake up as soon as you type a message.
Step 21: Click Schedule#
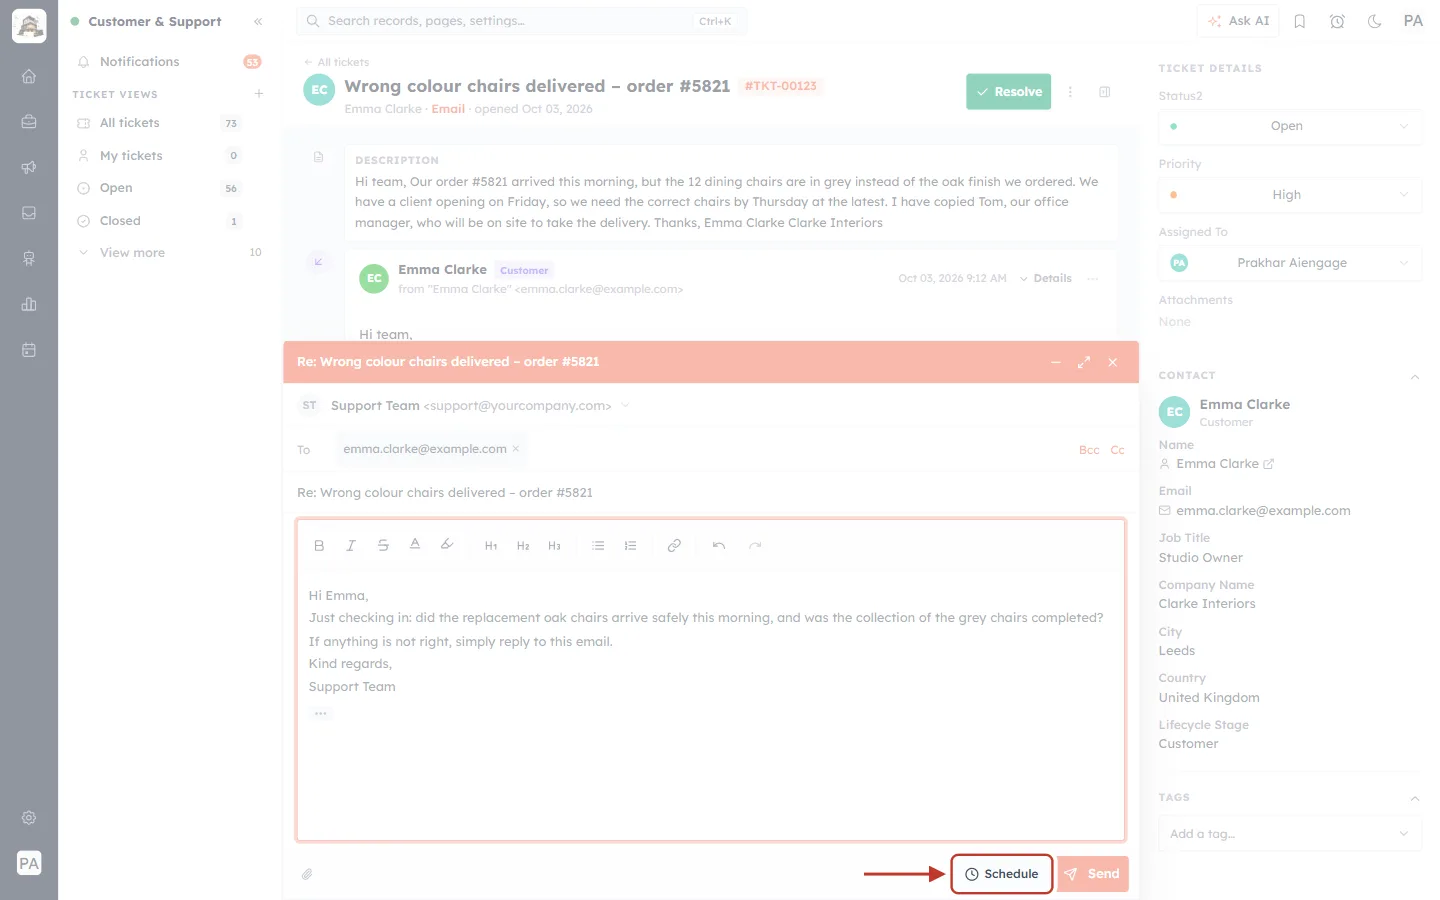
What this screenshot shows. The Schedule button (clock icon), next to Send, is ringed. A follow-up message has been written above it (faded).
The message asks whether the replacement chairs arrived safely, and invites the customer to reply if anything is wrong.
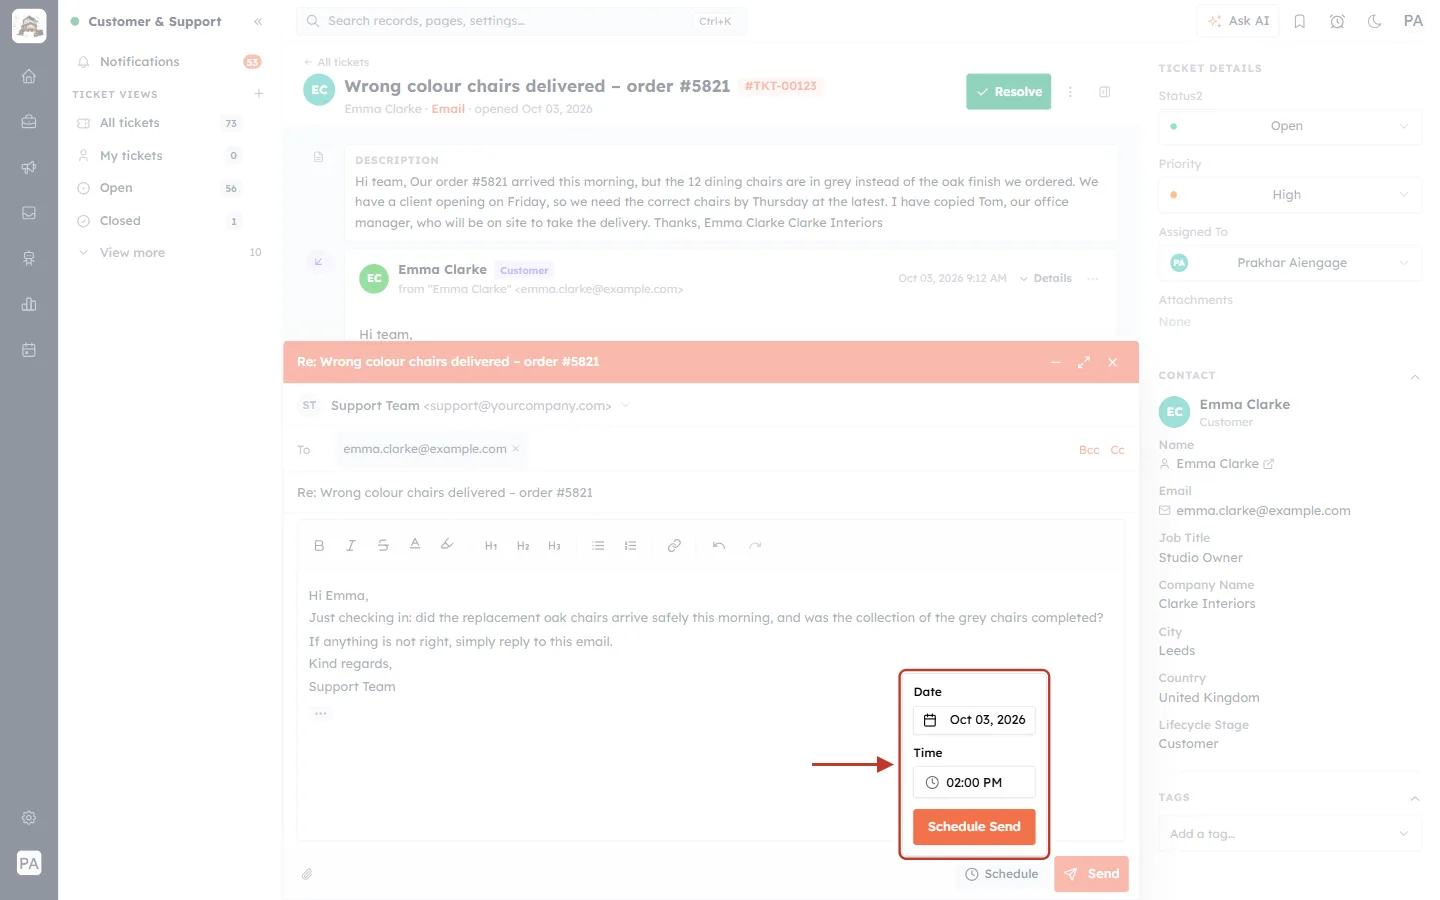
What this screenshot shows. The Schedule panel that opens above the button is ringed.
Date — starts on today (Oct 03, 2026). Click it to choose another day.
Time — starts at the next half hour that is at least one hour from now (here 01:30 PM). Click it to change it.
Schedule Send — confirms the date and time.
Step 22: Choose the date#
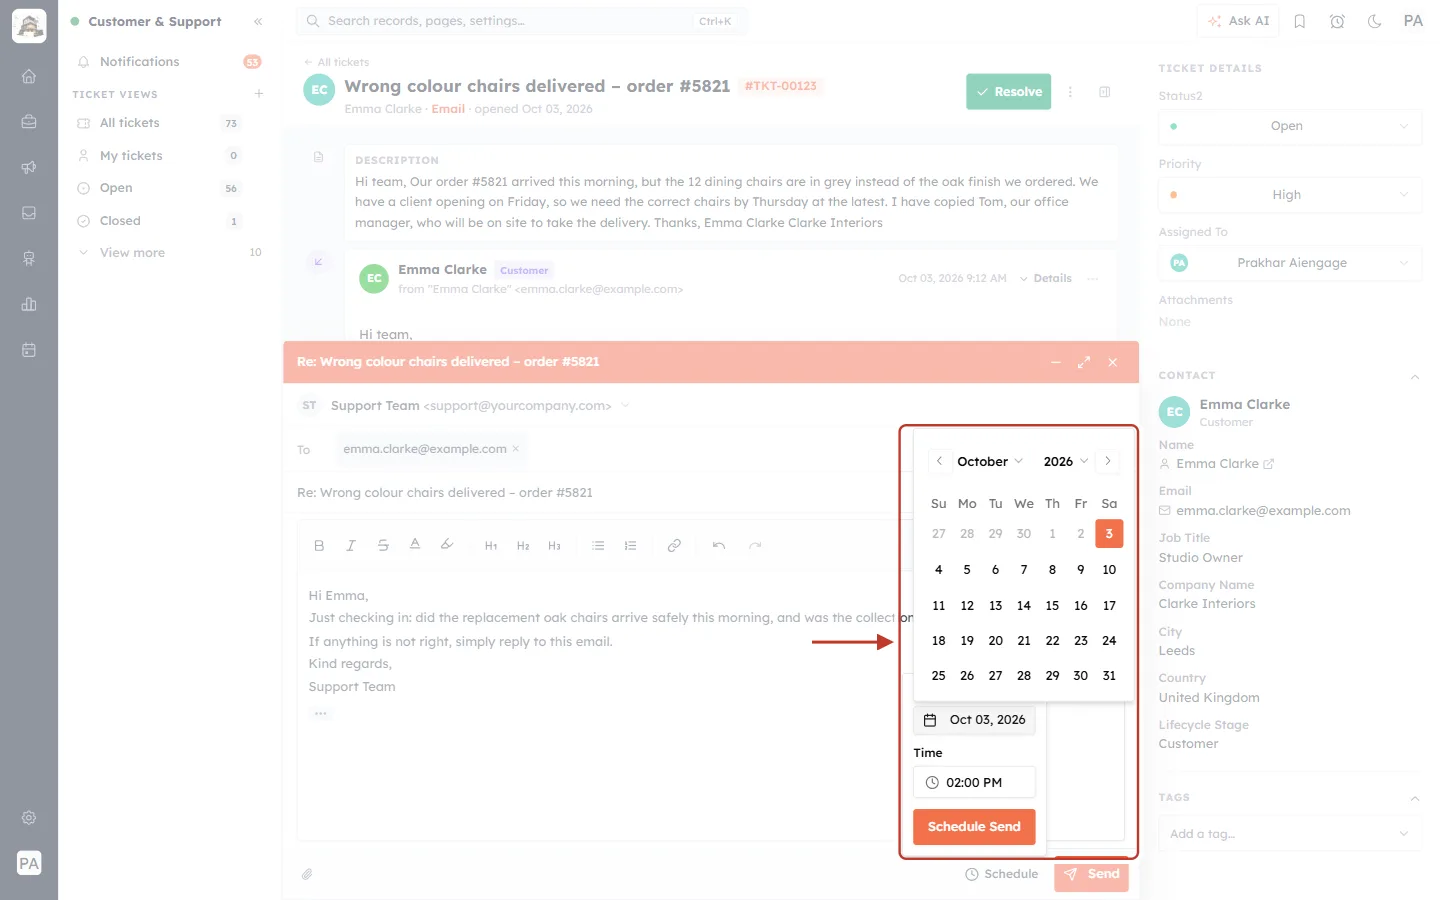
What this screenshot shows. The calendar and the Schedule panel are ringed.
Use the month and year lists, or the ‹ › arrows, to move between months.
Today is highlighted in orange. Days in the past are greyed out and cannot be chosen.
Click a day to pick it. In this example we pick Wednesday 7 October, the delivery day.
Step 23: Choose the time#
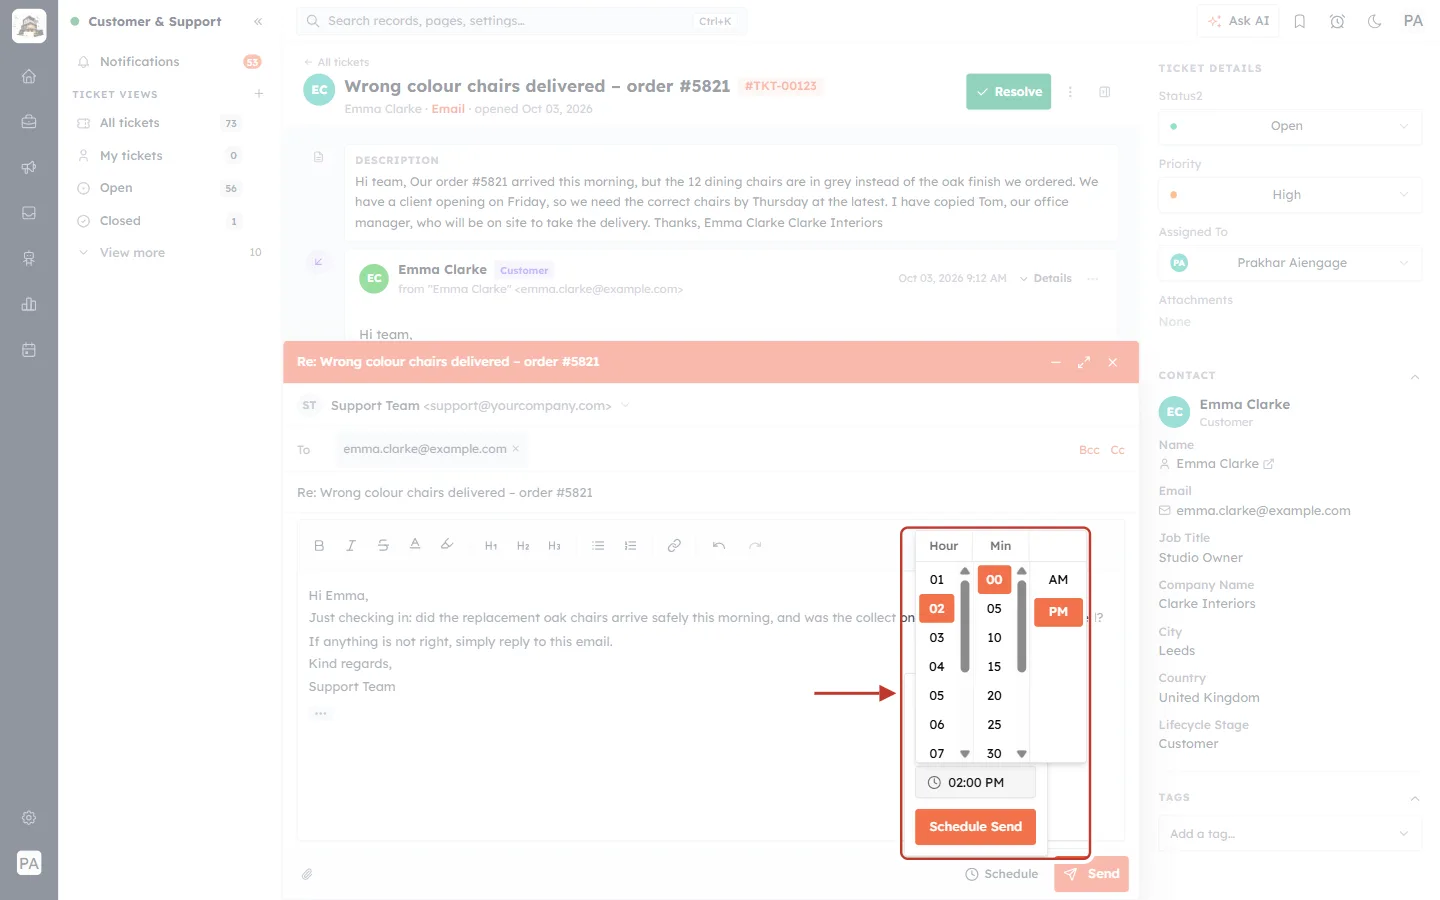
What this screenshot shows. The time picker and the Schedule panel are ringed.
Hour — 01 to 12.
Min — in steps of five minutes, 00 to 55.
AM / PM.
Click one value in each column. In this example: 09 : 30 AM.
ℹ️
The time is in your computer’s time zone. If your customer is in another time zone, work out their local time first — for example, 9:30 AM in Leeds is 2:00 PM in India.
Step 24: Click Schedule Send#
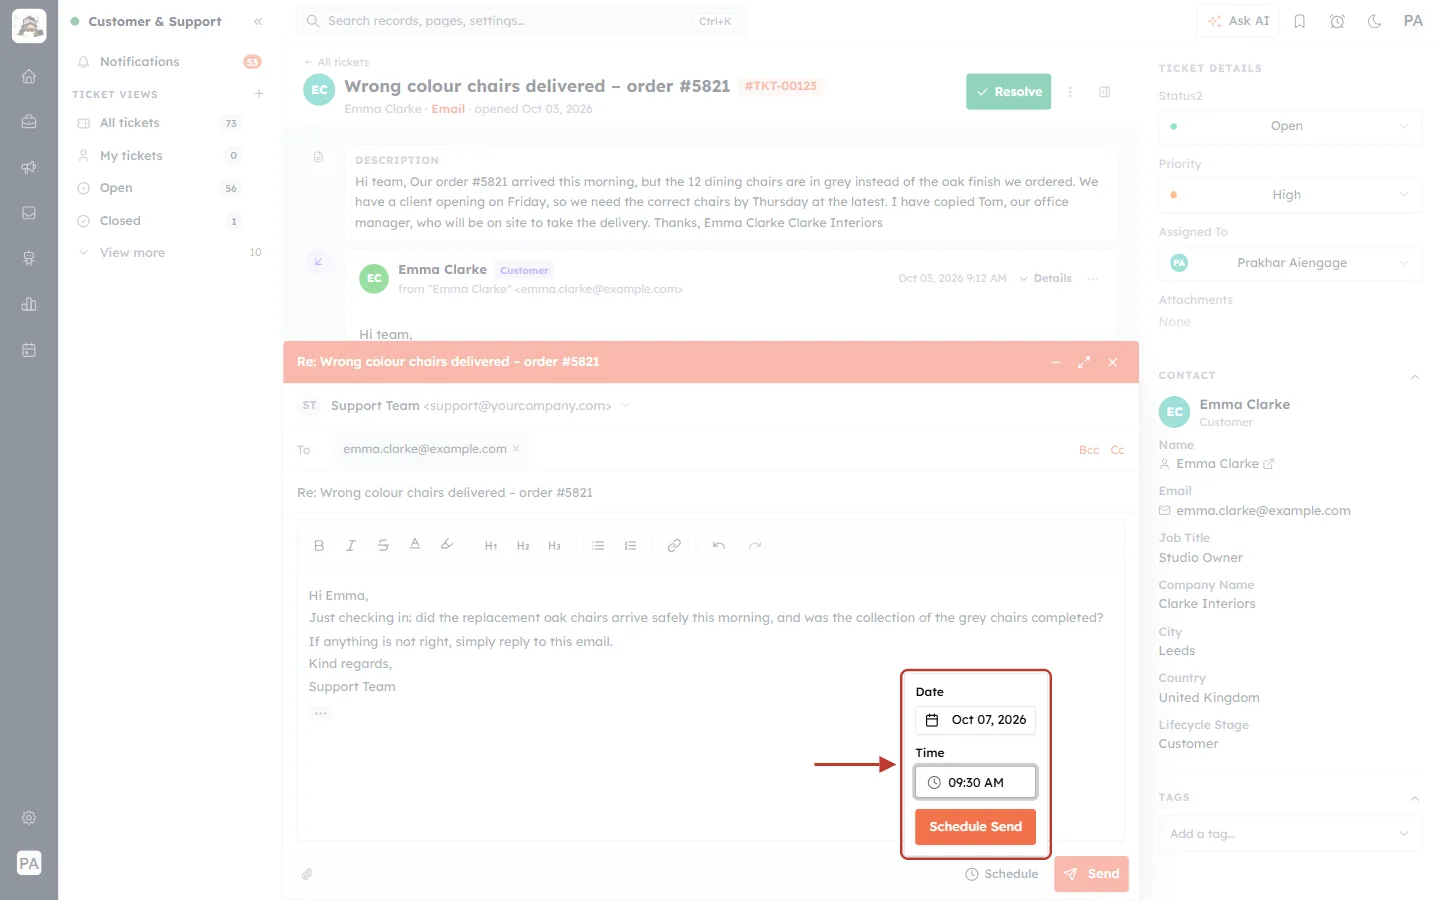
What this screenshot shows. The Schedule panel is ringed, showing the chosen date and time: Oct 07, 2026 at 09:30 AM.
Click the orange Schedule Send button to confirm.
The email window closes. The email is not sent now — it goes out automatically at the date and time you chose.
If you pick a time that has already passed, the panel tells you:
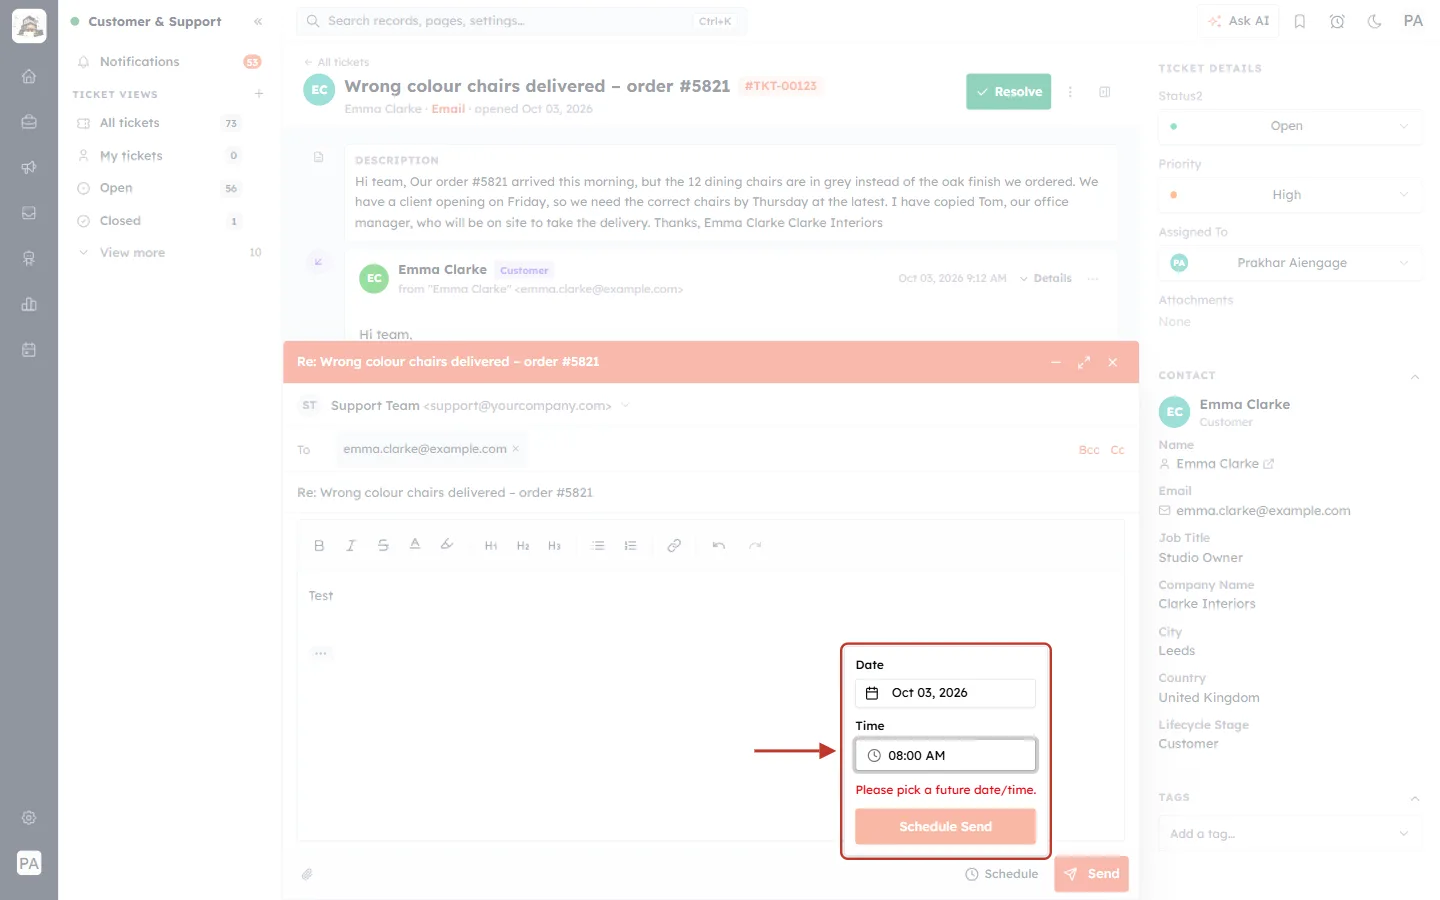
What this screenshot shows. The Schedule panel is ringed, with today’s date and a time that has already passed (08:00 AM).
A red message says “Please pick a future date/time.”
Schedule Send stays pale until you choose a later time or another day.
⚠️
Check the date, time and message carefully before you click Schedule Send — the email goes out on its own at that time, even if nobody is online.
Good practice for support emails#
Reply all when others are copied. If the customer copied colleagues, they usually expect them to hear your answer. Check Details first (Step 2).
Keep the ticket number in the subject. It is what links the customer’s next reply to this ticket.
Forward with a note. One or two lines on top saying what you need and by when gets a faster answer.
Use Bcc sparingly. It is for quiet copies to your own team, not for customers.
Schedule follow-ups. A friendly check-in after a delivery or a fix, scheduled for the right moment, is a simple way to delight customers.
Update the ticket after you reply. Change the status (for example to Pending while you wait for the customer, or Resolved once fixed) so your ticket views stay accurate.
Troubleshooting#
I don’t see Reply, Reply all or Forward — only Record reply. The ticket’s contact has no email address. Add one to the contact (click the ↗ next to their name in the CONTACT panel), or use Record reply to log an answer given by phone or in person.
Send and Schedule are greyed out. Read the hint next to them: Add a message, Add at least one recipient or Add a subject.
“No sending address is configured. Add one in Email settings.” No From address is set up yet. Ask an administrator — see Set the From and Reply-To Address for Support Emails.
“You can’t send from this address. Choose one you’re allowed to use.” The selected From address is not available to you. Pick another one from the From list, or ask an administrator to give you access.
Reply all only shows the customer. Nobody was copied on the customer’s latest email, so there is nobody else to include.
“Please pick a future date/time.” The date and time you chose for Schedule has already passed. Choose a later time.
The customer’s answer created a new ticket instead of landing on this one. Make sure the ticket number in square brackets (for example [#TKT-00123]) stays in the subject when you reply.
Frequently asked questions#
Does the customer see my internal notes? No. Internal notes are only visible to your team. Only Reply, Reply all, Forward and scheduled emails are emailed.
Which email does Reply answer if there are several? The buttons at the bottom answer the customer’s most recent email. To answer an older one, use the ⋯ menu on that email.
Can I send from my own address? You can choose any From address your administrator has made available to you. Using the shared support address means customer replies come back to the team, not to one person’s inbox.
Can I forward to several people? Yes — add as many addresses as you need in To, Cc and Bcc.
Can I schedule a Reply all or a Forward? Yes. Schedule works the same way in all three kinds of email.
Previous and next#
Previous: Create a Ticket Manually: Log Phone, Email & Walk-In Requests as Support Tickets (Step-by-Step)
Next: Internal Notes & @Mentions: Talk to Your Team Privately on a Ticket (Step-by-Step)
Related#
Was this article helpful?
Ready to implement this?
OpenAI Engage and apply what you just learned to your own workspace.
Open AI Engage CRM