Loading…


KnowledgeBase
Customer & Support: Handle Customer Tickets from First Message to Resolution (Step-by-Step)
Overview#
When a customer needs help, such as a refund, a bug, a billing question or a missing order, your team needs one place to log the request, work on it together and close it off. In AiEngage CRM that place is Customer & Support.
Every request becomes a ticket. A ticket has:
a unique ticket number, such as TKT-00111, that you and the customer can quote;
a subject and description saying what the customer needs;
a status (Open, Pending, In Progress, Resolved or Closed) showing where it is;
a priority (Low, Medium, High or Urgent) and an optional category, such as Billing issue or Bug report;
the teammate it is assigned to and the contact who raised it;
a conversation thread holding the customer’s messages, your replies and your team’s private notes.
Tickets can be raised in three ways: your AI agent or the chat widget creates them from a chat, incoming support email creates them automatically once a mailbox is connected, or a teammate adds one by hand. Whichever way a ticket arrives, it lands in the same Customer & Support list, so nothing gets lost.
This article walks through the whole support workflow with a screenshot for every step. It shows how to find your way around the workspace, create a ticket, read and answer it, keep private notes, change status, priority and owner, resolve and reopen tickets, and find tickets again later in the CRM’s Tickets module.
Before you begin#
Access to Tickets. Your profile needs permission to view tickets, and to edit them if you will be working them. See Control Permissions with Profiles.
Your team is set up. Tickets are assigned to users, and the workspace groups tickets by team. See Invite Your Team and Create Teams.
To email customers from a ticket, an admin connects a support mailbox and a verified sending address first (see Part 6). Without that you can still record replies and notes on the ticket.
ℹ️
In the screenshots, the status field is labelled Status2. That is just the field name in our demo account. In your account it may simply say Status. It works the same way.
Part 1 — Find your way around Customer & Support#
Step 1: Open the Customer & Support workspace#
Open Customer & Support at app.aiengagecrm.com/dashboard/tickets. Bookmark it in your browser so you can get back in one click. You can also jump in from any ticket record in the CRM: on the record’s Overview tab, under System Information, click Open ticket thread next to Ticket Conversation.
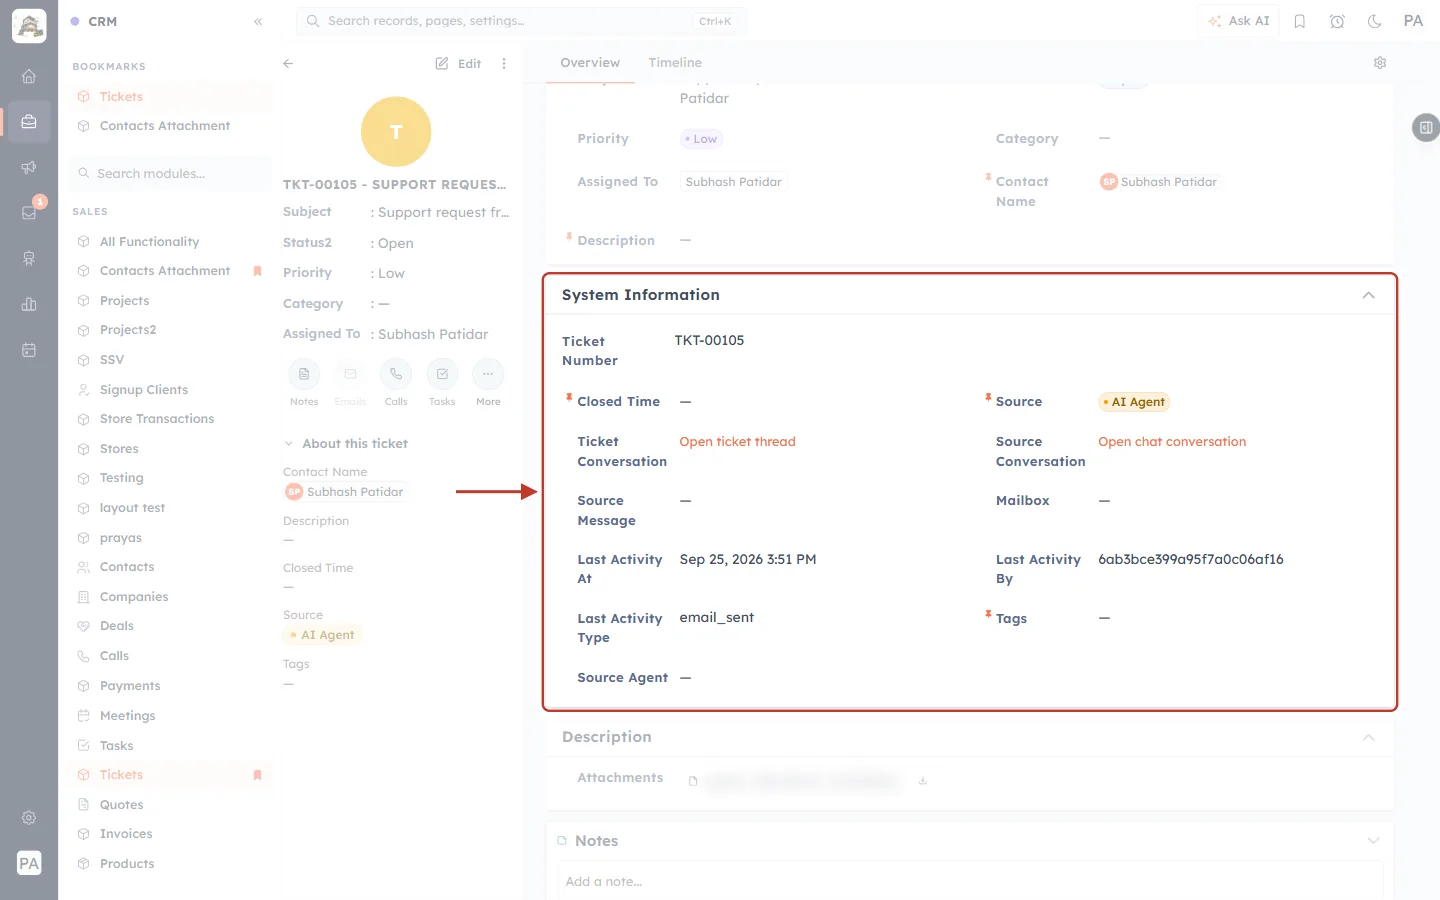
What this screenshot shows. A ticket record in the CRM (Sales → Tickets → a ticket). The System Information section is ringed. It holds the fields the CRM fills in for you.
Ticket Number — the unique reference, here TKT-00105.
Closed Time — empty while the ticket is open. It is filled in automatically when the ticket is closed.
Source — where the ticket came from. This one says AI Agent, because the AI agent raised it from a chat. Tickets you add yourself show Manual.
Ticket Conversation → Open ticket thread — opens this ticket in the Customer & Support workspace, where you reply and add notes.
Source Conversation → Open chat conversation — opens the original chat in the Team Inbox, so you can read exactly what the customer wrote.
Source Message, Mailbox — filled when the ticket came from an email: the original message and the mailbox it arrived in.
Last Activity At / By / Type — when the ticket last changed, who changed it and what kind of change it was (for example email_sent or status_changed).
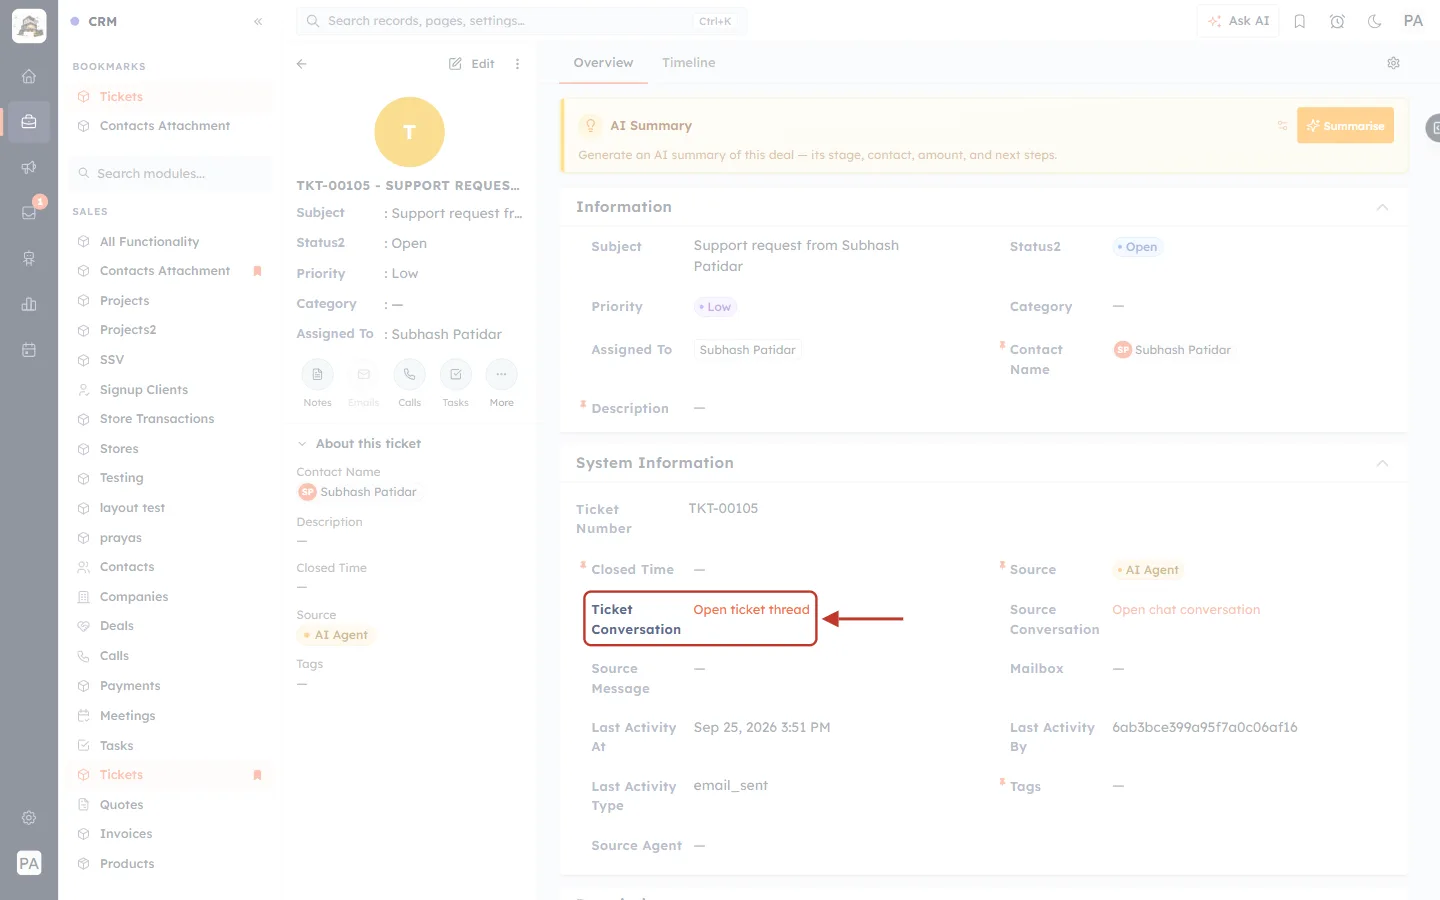
What this screenshot shows. The same record, with the Ticket Conversation row and its orange Open ticket thread link ringed.
Click Open ticket thread to go straight to this ticket inside Customer & Support.
The link appears on tickets that have a thread, such as tickets raised from a chat or from the workspace’s New ticket button.
Step 2: Get to know the sidebar#
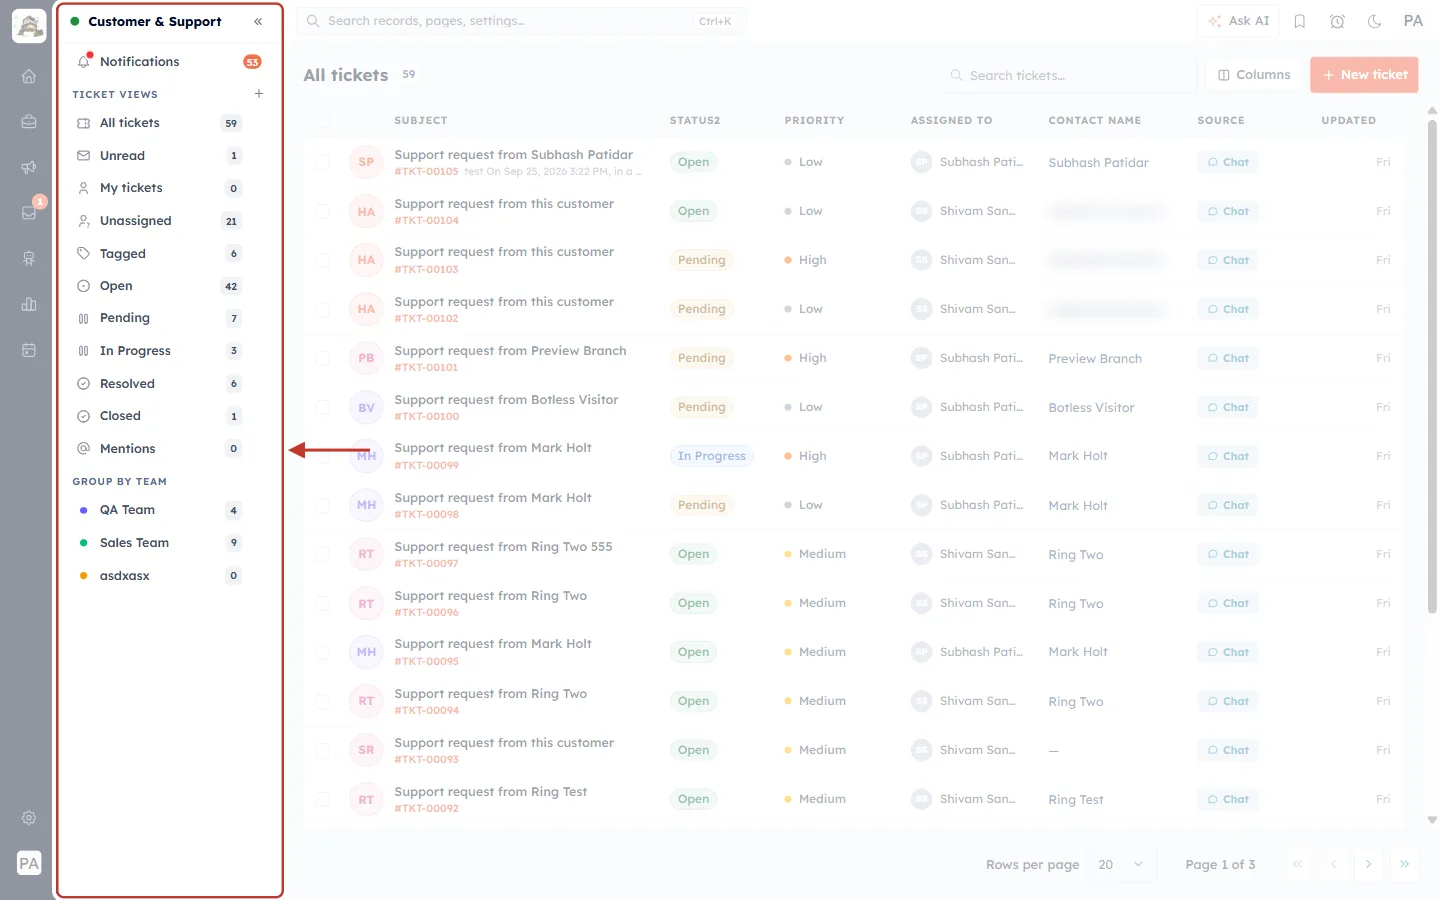
What this screenshot shows. The Customer & Support workspace. The left-hand sidebar is ringed. This is how you move between groups of tickets.
Customer & Support (top, with a green dot) — the name of the workspace you are in.
Notifications — alerts for your team, with an unread count in the orange badge (Step 5).
TICKET VIEWS — ready-made lists of tickets, each with a live count (Step 3). The + beside the heading adds your own view (Step 6).
GROUP BY TEAM — one entry per team, with the number of tickets that team is handling.
The right-hand side lists the tickets in whichever view is selected. Here it is All tickets.
Step 3: Use the ticket views#
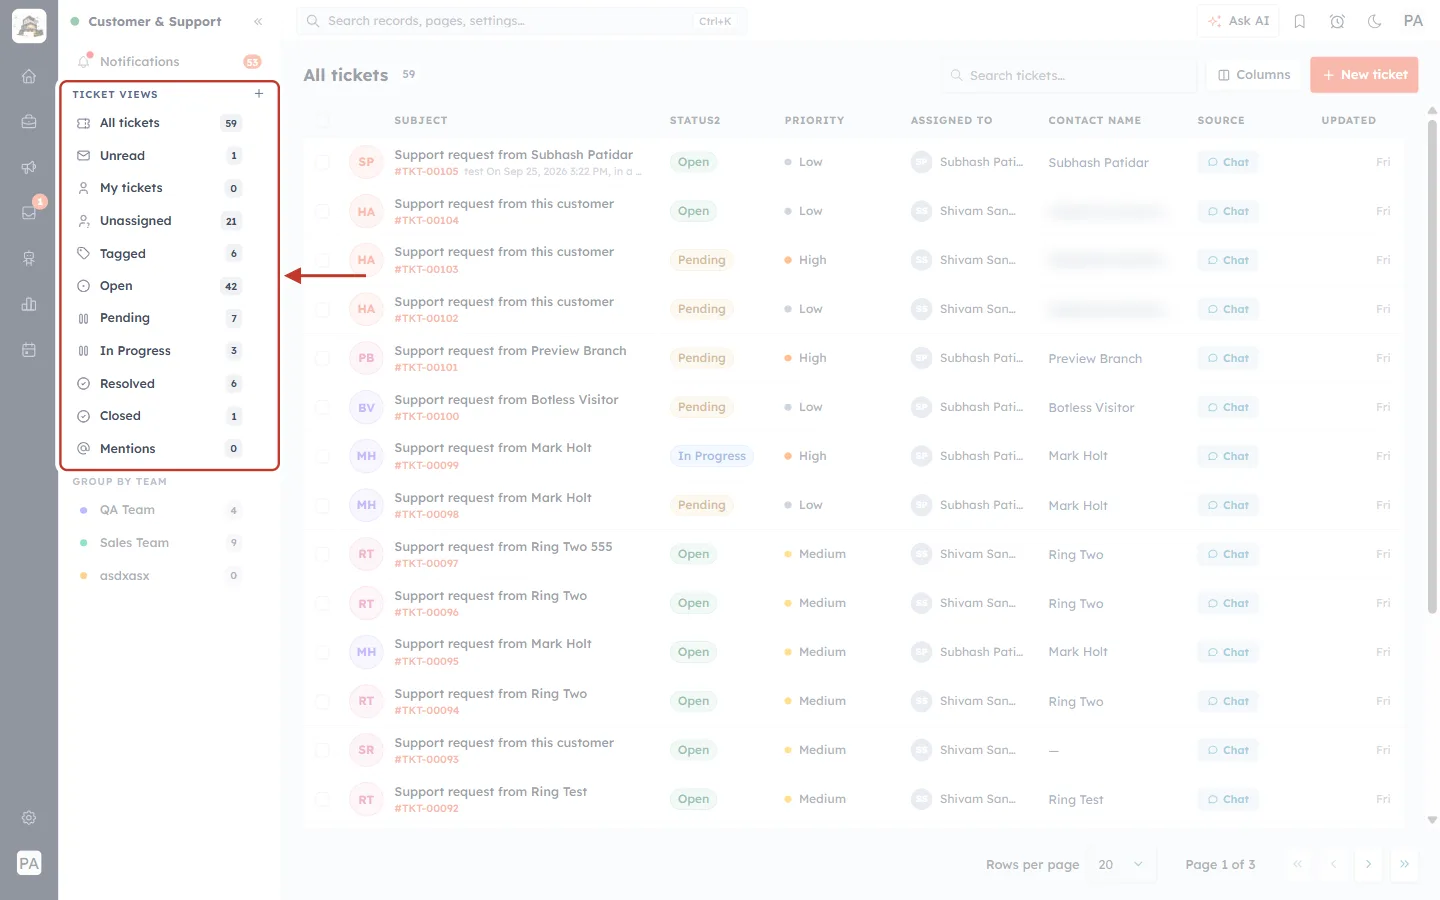
What this screenshot shows. The TICKET VIEWS list is ringed. Click any view to show only those tickets. The number on the right is how many tickets match right now.
All tickets — every ticket you are allowed to see.
Unread — tickets with activity you have not opened yet.
My tickets — tickets assigned to you. Start your day here.
Unassigned — tickets nobody owns yet. A team lead should check this regularly and hand them out.
Tagged — tickets that carry at least one tag.
Open, Pending, In Progress, Resolved, Closed — one view per status, so you can see, for example, everything still waiting on the customer (Pending).
Mentions — tickets where a teammate @mentioned you in an internal note.
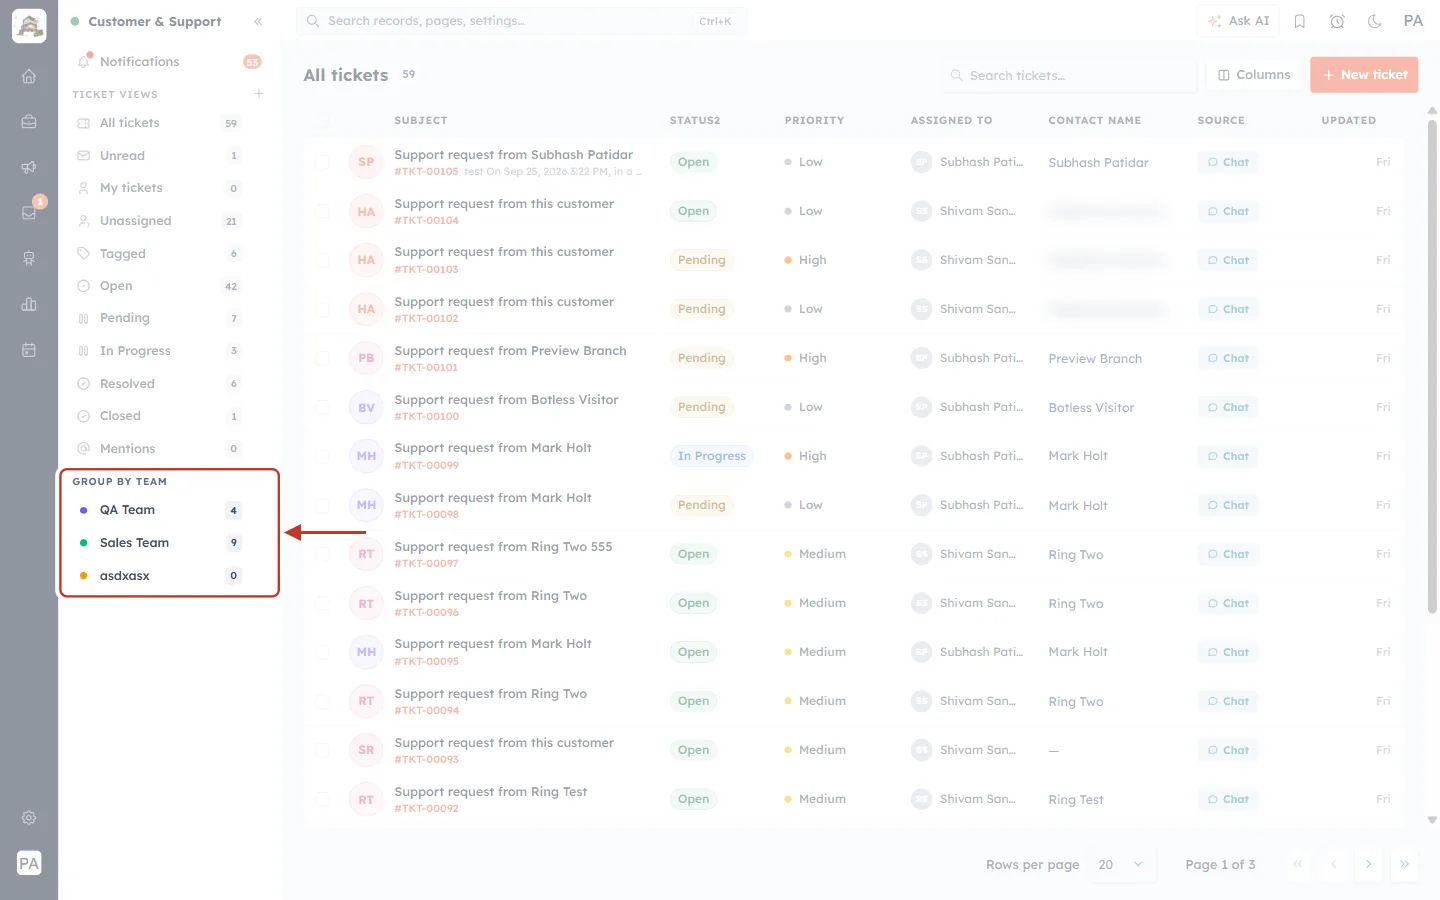
What this screenshot shows. The GROUP BY TEAM section is ringed. It lists each team in your account with its own coloured dot and ticket count.
Click a team, for example Sales Team, to list only the tickets that team is handling.
Teams come from your CRM team setup. To add or change teams, see Create Teams.
Step 4: Read the ticket list#
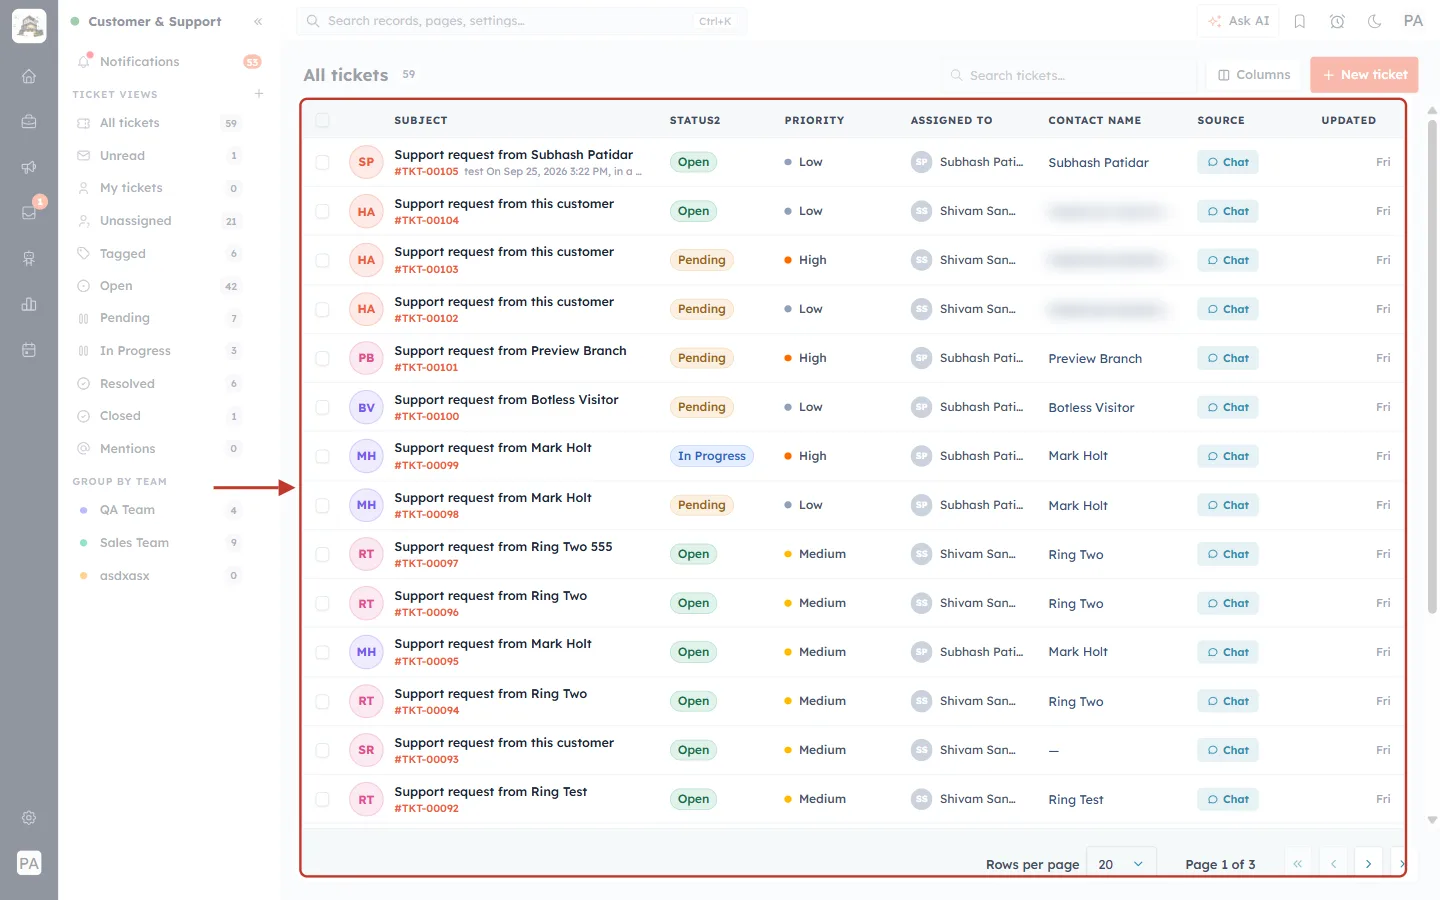
What this screenshot shows. The ticket list for the selected view is ringed. Each row is one ticket, newest activity first.
Subject — what the request is about, with the ticket number (for example #TKT-00105) underneath in orange, plus a preview of the latest message. The round badge on the left shows the contact’s initials.
Status — a coloured label: Open (green), Pending (amber), In Progress (blue), and so on.
Priority — Low, Medium, High or Urgent, with a coloured dot.
Assigned To — the teammate who owns the ticket.
Contact Name — the customer who raised it. (Email addresses are blurred in this screenshot.)
Source — how the ticket arrived. Chat means it came from a chat conversation.
Updated — when the ticket last changed.
At the bottom, Rows per page and the page arrows move through long lists.
Click anywhere on a row to open the ticket.
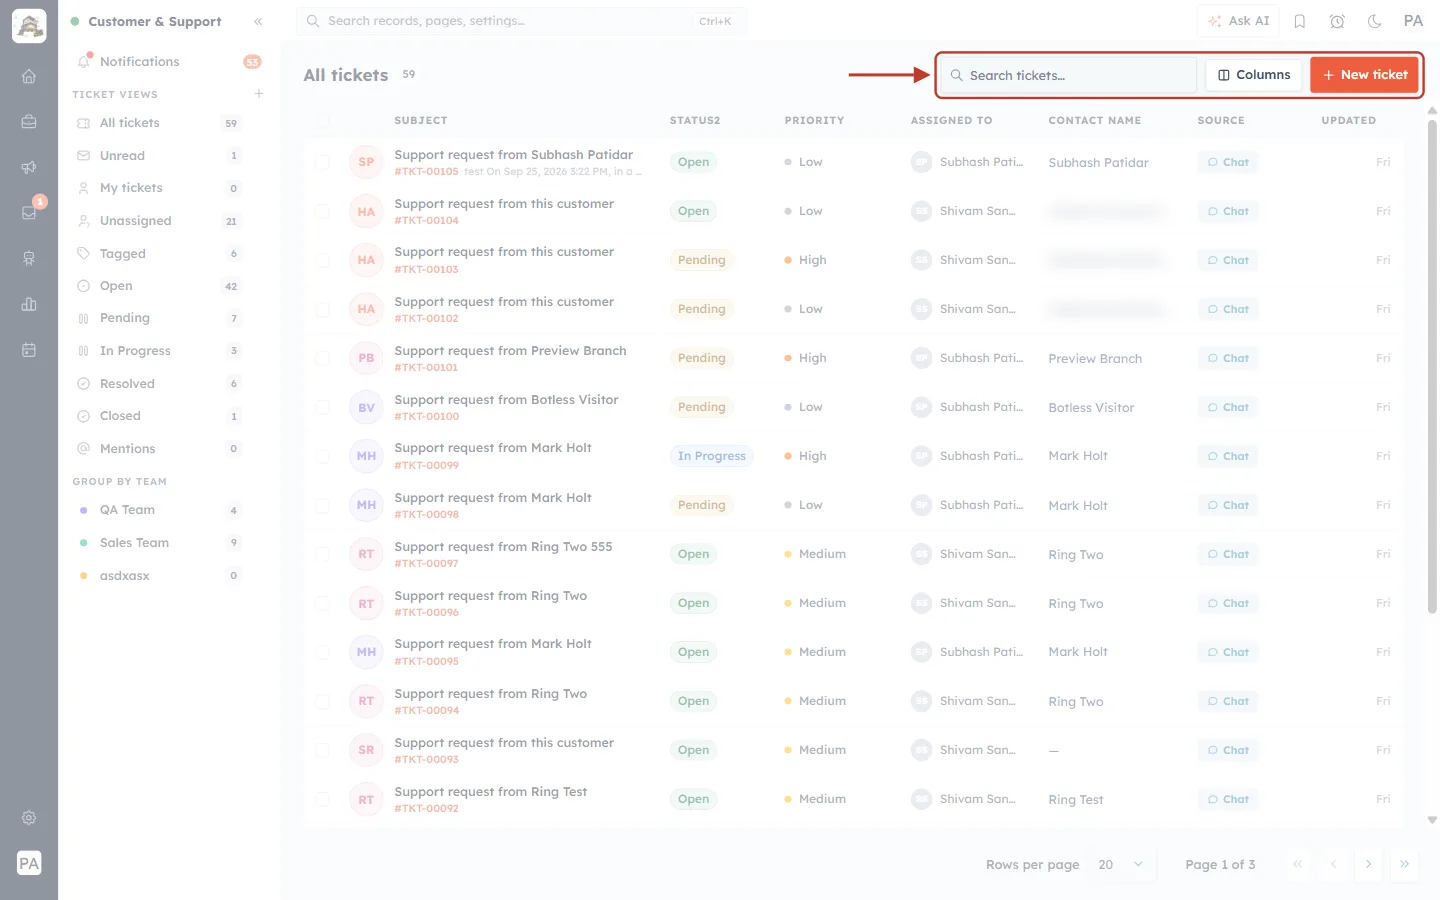
What this screenshot shows. The toolbar above the list is ringed.
Search tickets… — type a word from the subject, a contact’s name or a ticket number to find a ticket quickly.
Columns — choose which columns the list shows.
New ticket (orange) — log a new request yourself (Part 2).
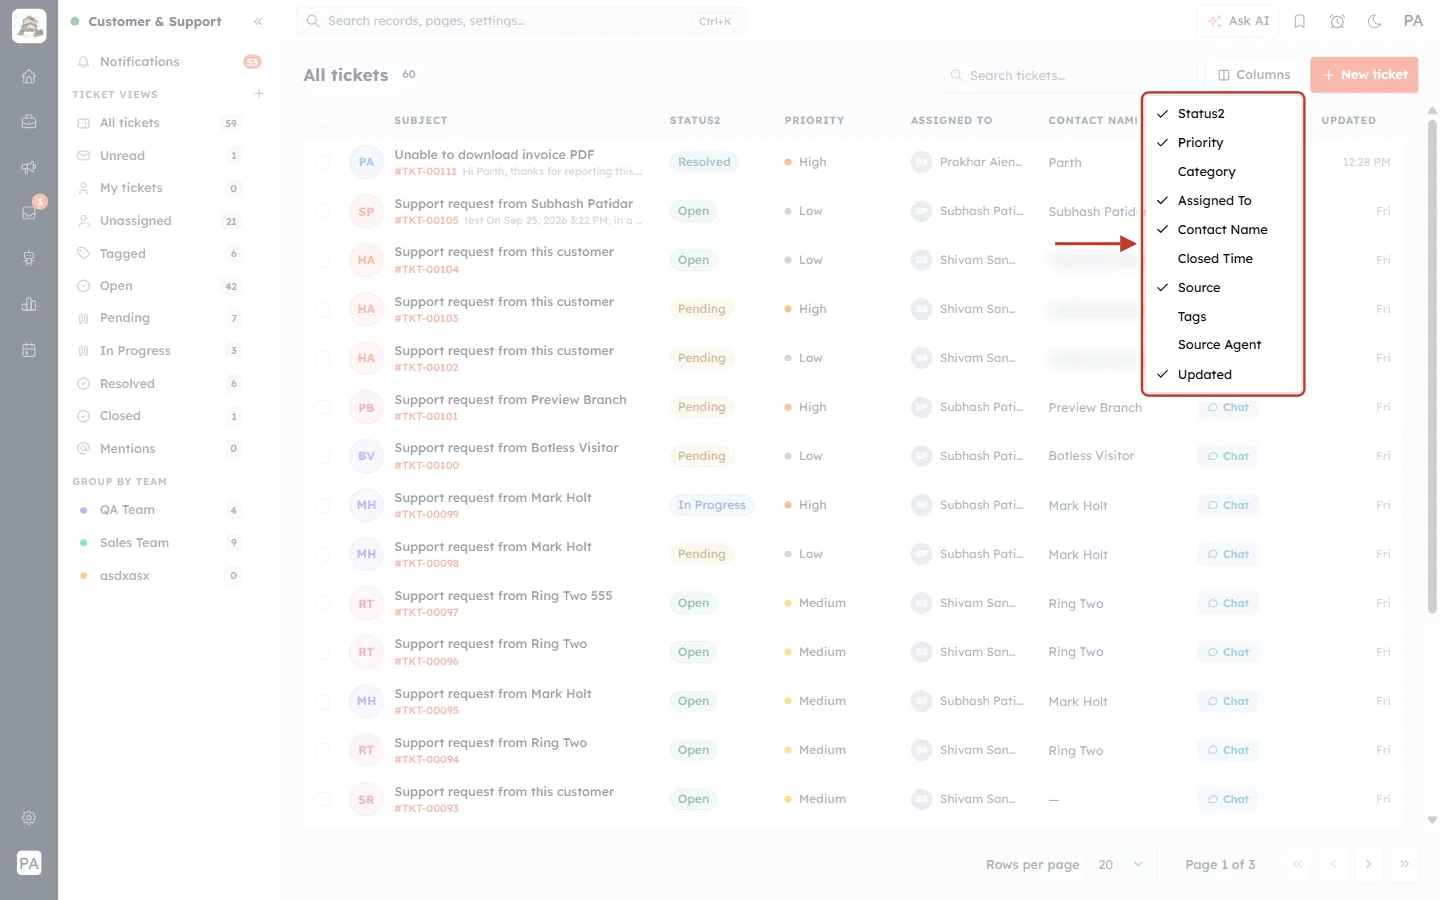
What this screenshot shows. The Columns menu is open and ringed. Ticked columns are shown in the list; click a name to show or hide it.
Available columns: Status, Priority, Category, Assigned To, Contact Name, Closed Time, Source, Tags, Source Agent and Updated.
Turn on Category and Tags if your team sorts work by topic. Turn on Closed Time when you review finished tickets.
Step 5: Check your notifications#
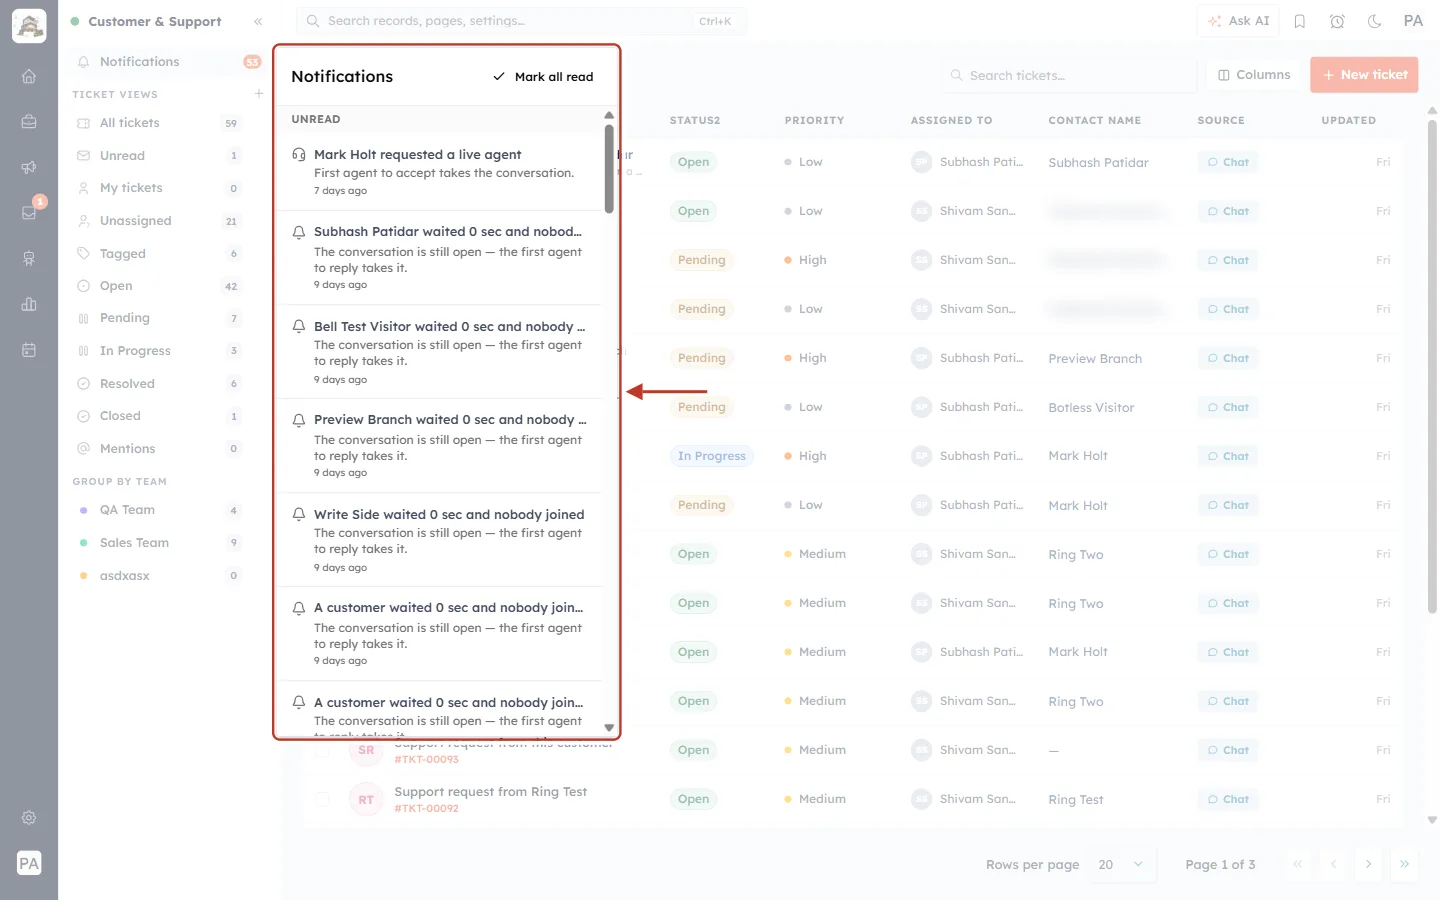
What this screenshot shows. Clicking Notifications in the sidebar opens this panel (ringed). Unread alerts are listed under UNREAD, newest first.
“… requested a live agent” — a customer chatting with your AI agent asked for a human. The first agent to accept takes the conversation.
“… waited 0 sec and nobody joined” — a customer is waiting in a chat that no agent has picked up yet. The conversation is still open — the first agent to reply takes it.
Each alert shows how long ago it happened.
Mark all read (top right) clears the unread badge once you have caught up.
Step 6: Create your own ticket view (optional)#
If you keep looking for the same set of tickets, for example urgent billing problems, save them as a view. Click the + next to TICKET VIEWS in the sidebar.
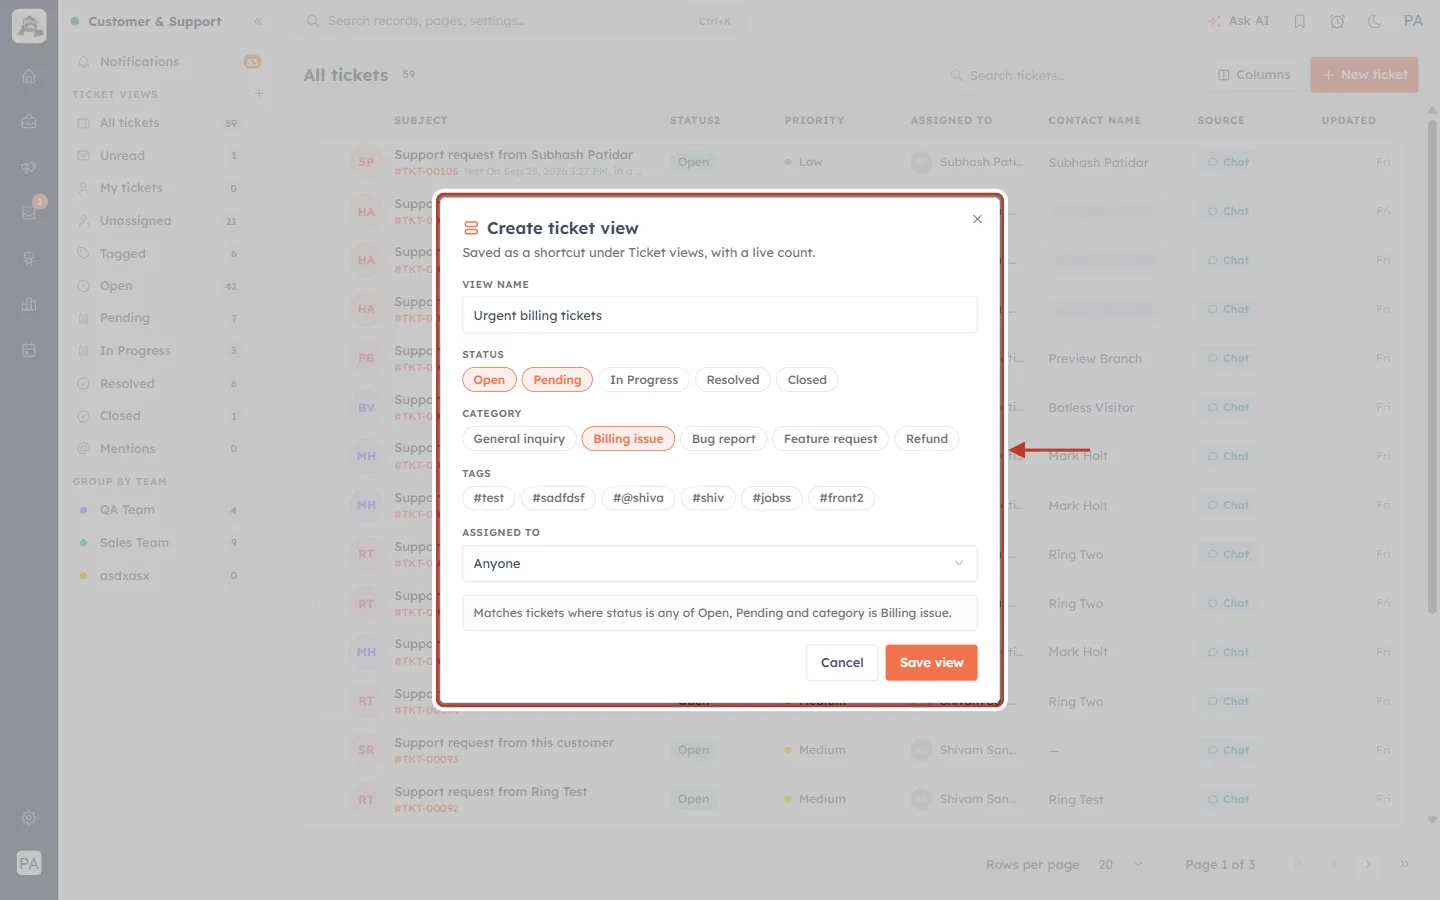
What this screenshot shows. The Create ticket view dialog (ringed), filled in for a view called Urgent billing tickets. “Saved as a shortcut under Ticket views, with a live count.”
VIEW NAME — the name shown in the sidebar.
STATUS — click one or more statuses to include. Here Open and Pending are selected (highlighted in orange).
CATEGORY — limit the view to categories, here Billing issue.
TAGS — limit the view to tickets carrying particular tags.
ASSIGNED TO — Anyone, or one teammate.
The grey box under the filters sums up what the view will match in plain words. With nothing selected it says “No filters yet — this view will match every ticket.”
Click Save view. The view appears under TICKET VIEWS with its own live count.
Part 2 — Create a ticket#
Most tickets are created for you from chats and emails. Add one yourself when a customer phones in, mentions a problem in a meeting, or writes to you personally.
Step 7: Click New ticket#
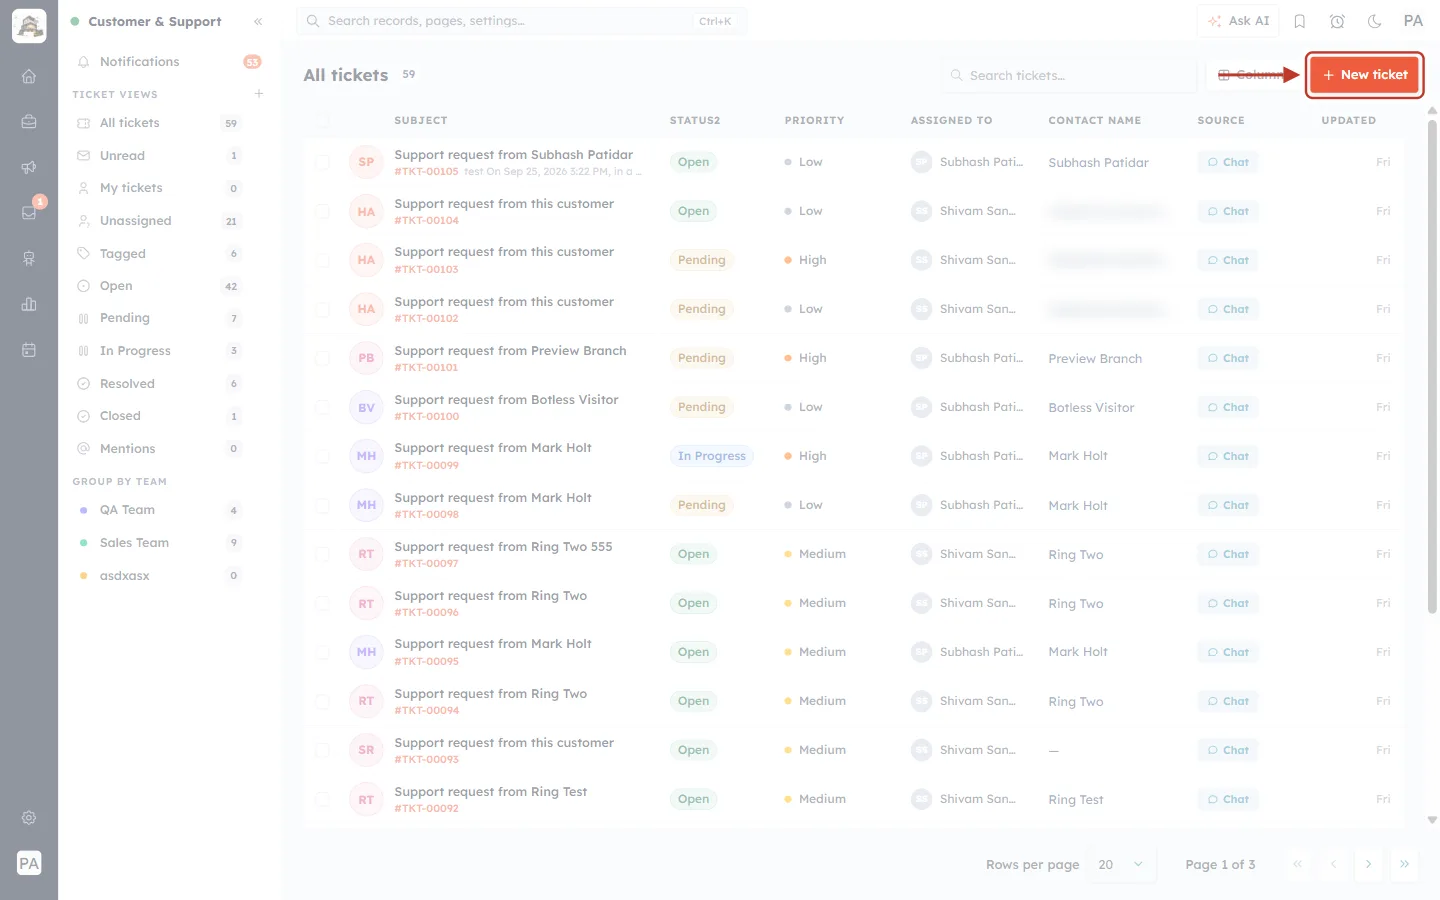
What this screenshot shows. The orange New ticket button at the top right of the ticket list is ringed.
Click it to open the New ticket form.
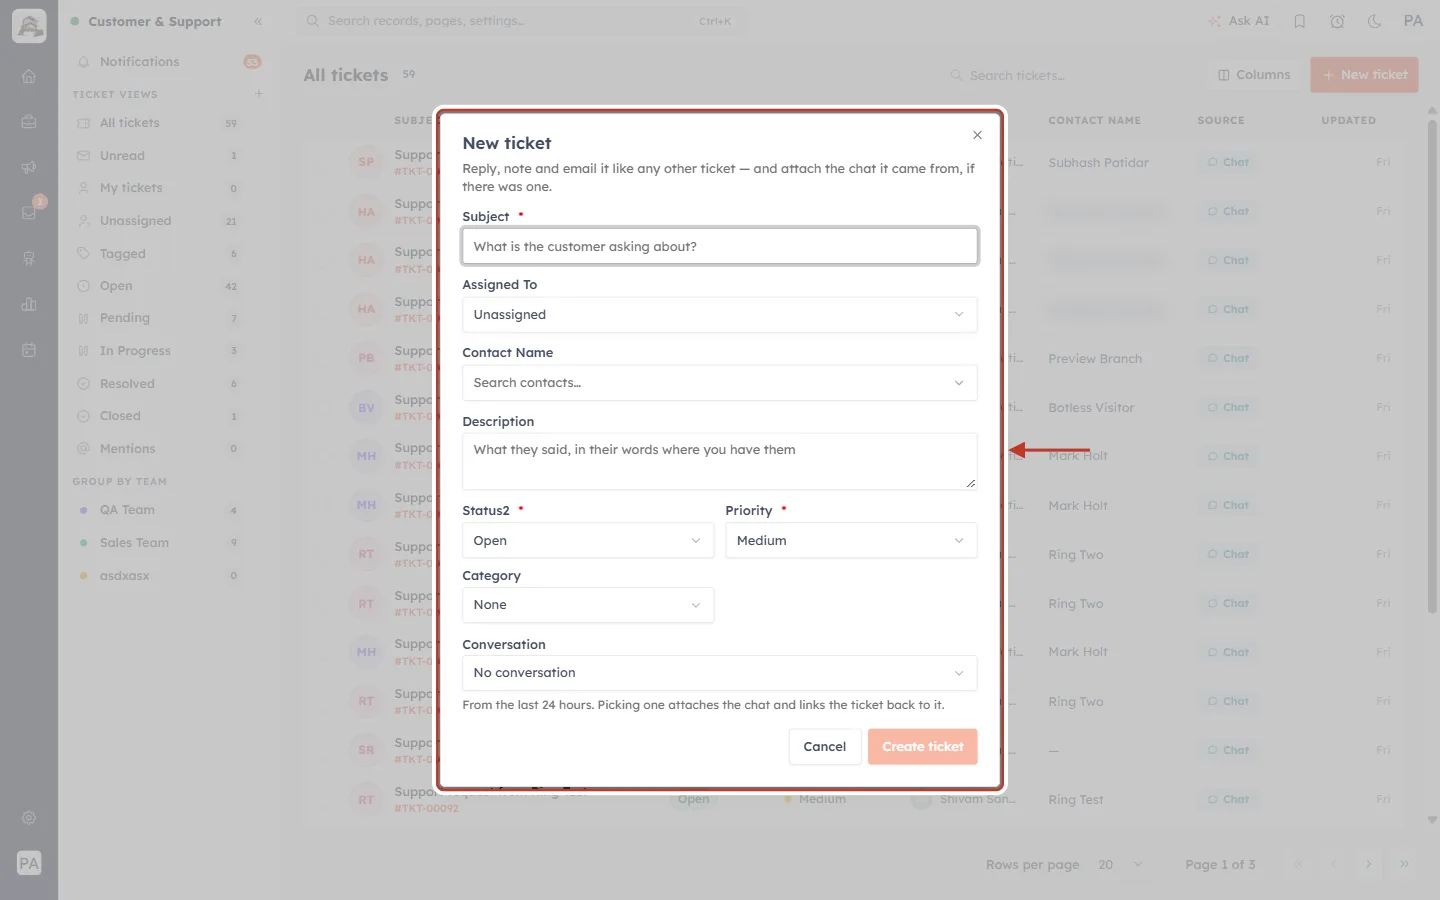
What this screenshot shows. The empty New ticket form (ringed). “Reply, note and email it like any other ticket — and attach the chat it came from, if there was one.” Fields marked with a red * are required.
Subject * — a short summary of the problem (What is the customer asking about?).
Assigned To — who will handle it. It starts as Unassigned.
Contact Name — the customer.
Description — the details, in the customer’s own words where you have them.
Status * — starts as Open. Priority * — starts as Medium.
Category — starts as None.
Conversation — attach a recent chat, if the request came from one (Step 10).
Cancel closes the form without saving. Create ticket stays greyed out until the required fields are filled in.
Step 8: Enter the subject and choose who handles it#
Type a clear subject, for example Unable to download invoice PDF. Then click Assigned To and pick the teammate who should own the ticket.
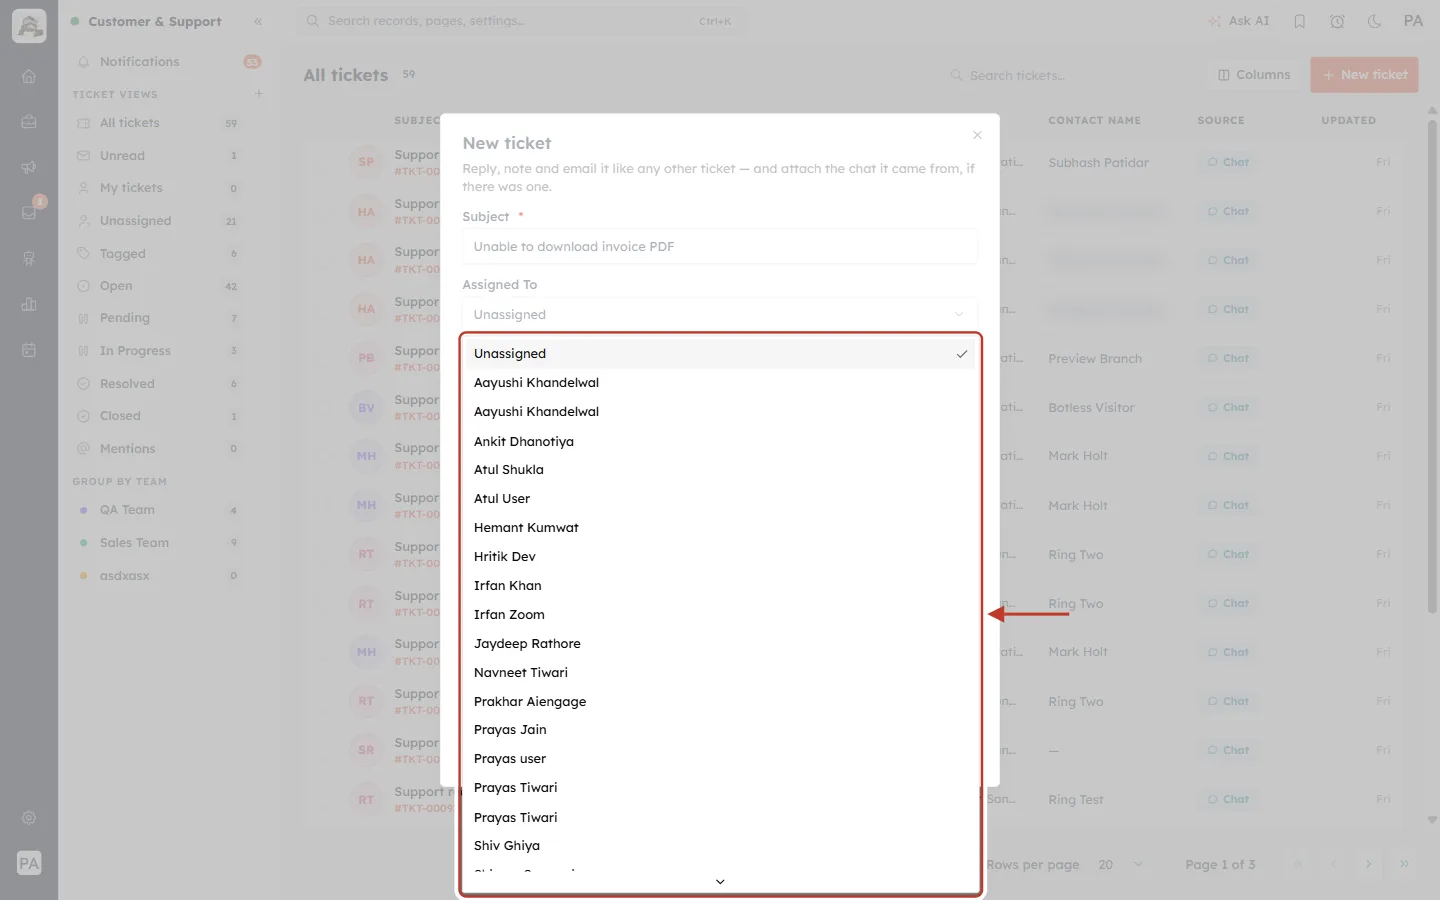
What this screenshot shows. The Assigned To list is open and ringed. It lists every active user in your account. The current choice, Unassigned, has a tick.
Scroll and click a name to assign the ticket. In this example it goes to Prakhar Aiengage.
Leave it Unassigned if a team lead hands out work from the Unassigned view.
Step 9: Link the customer#
Click Contact Name. A Choose Record window opens over the form. Type the customer’s name in the search box, tick their row, and click Add Selected.
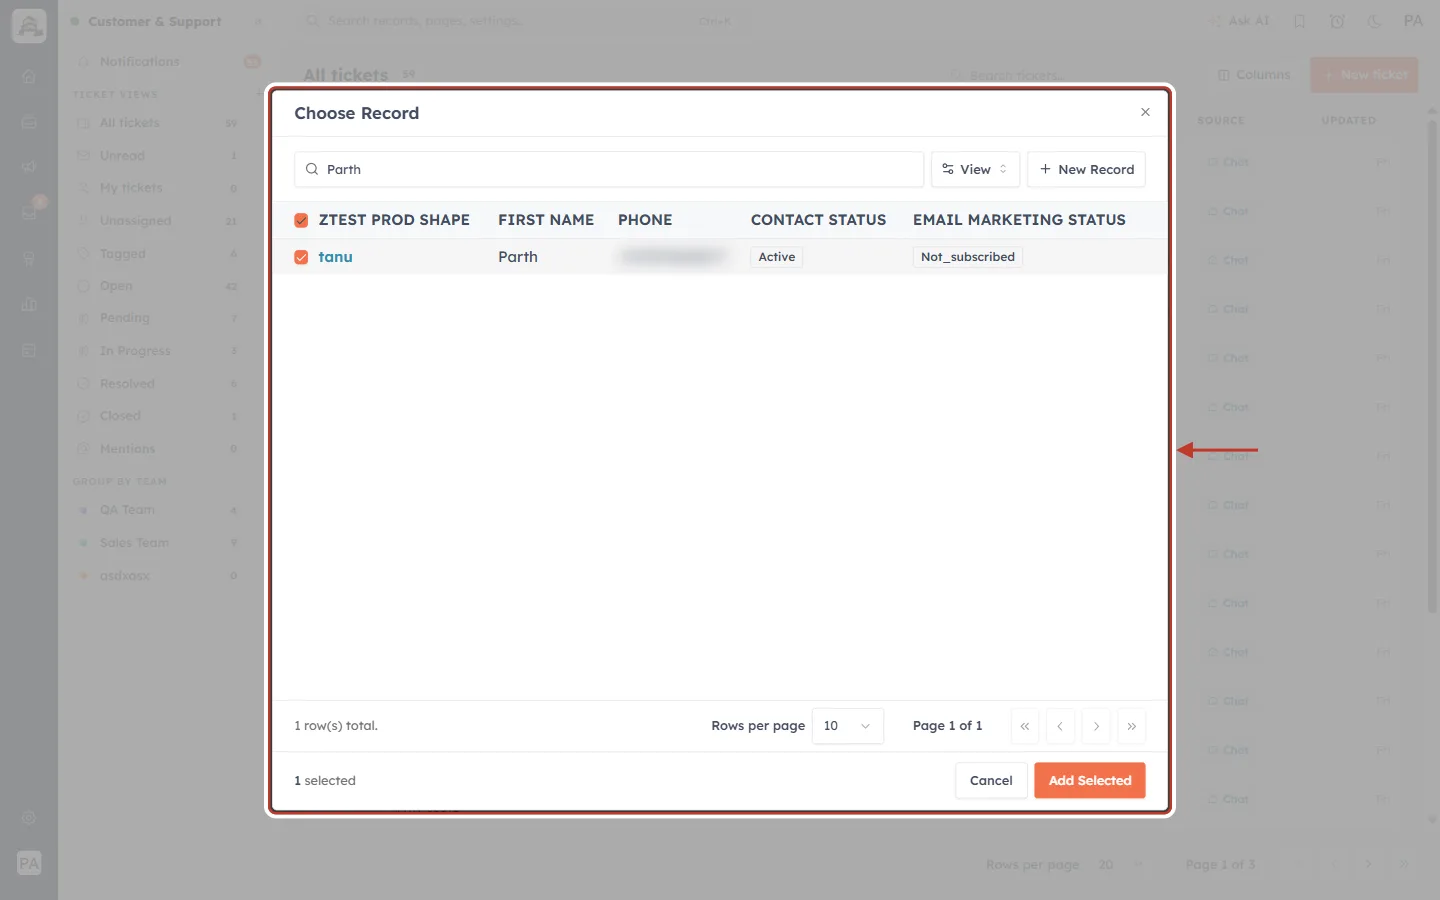
What this screenshot shows. The Choose Record window (ringed), searching for Parth. One matching contact is found and its row is ticked. (The phone number is blurred.)
Search box — searches your contacts by name, phone and other key fields.
The table shows a few columns from each contact (first name, phone, contact status, email marketing status) so you can pick the right person when names are similar.
View changes which columns are shown. + New Record creates the contact on the spot if they are not in the CRM yet.
The footer shows how many rows are selected. Add Selected puts the ticked contact on the ticket; Cancel goes back without choosing.
✅
Always link the contact. It puts the customer’s email, phone and company on the ticket, lets you email them from the ticket, and shows the ticket on their contact record.
Step 10: Describe the problem, set priority and category, and create the ticket#
Write the details in Description. Set Priority to how urgent it is, and choose a Category. If the request came from a recent chat, choose it under Conversation. Then click Create ticket.
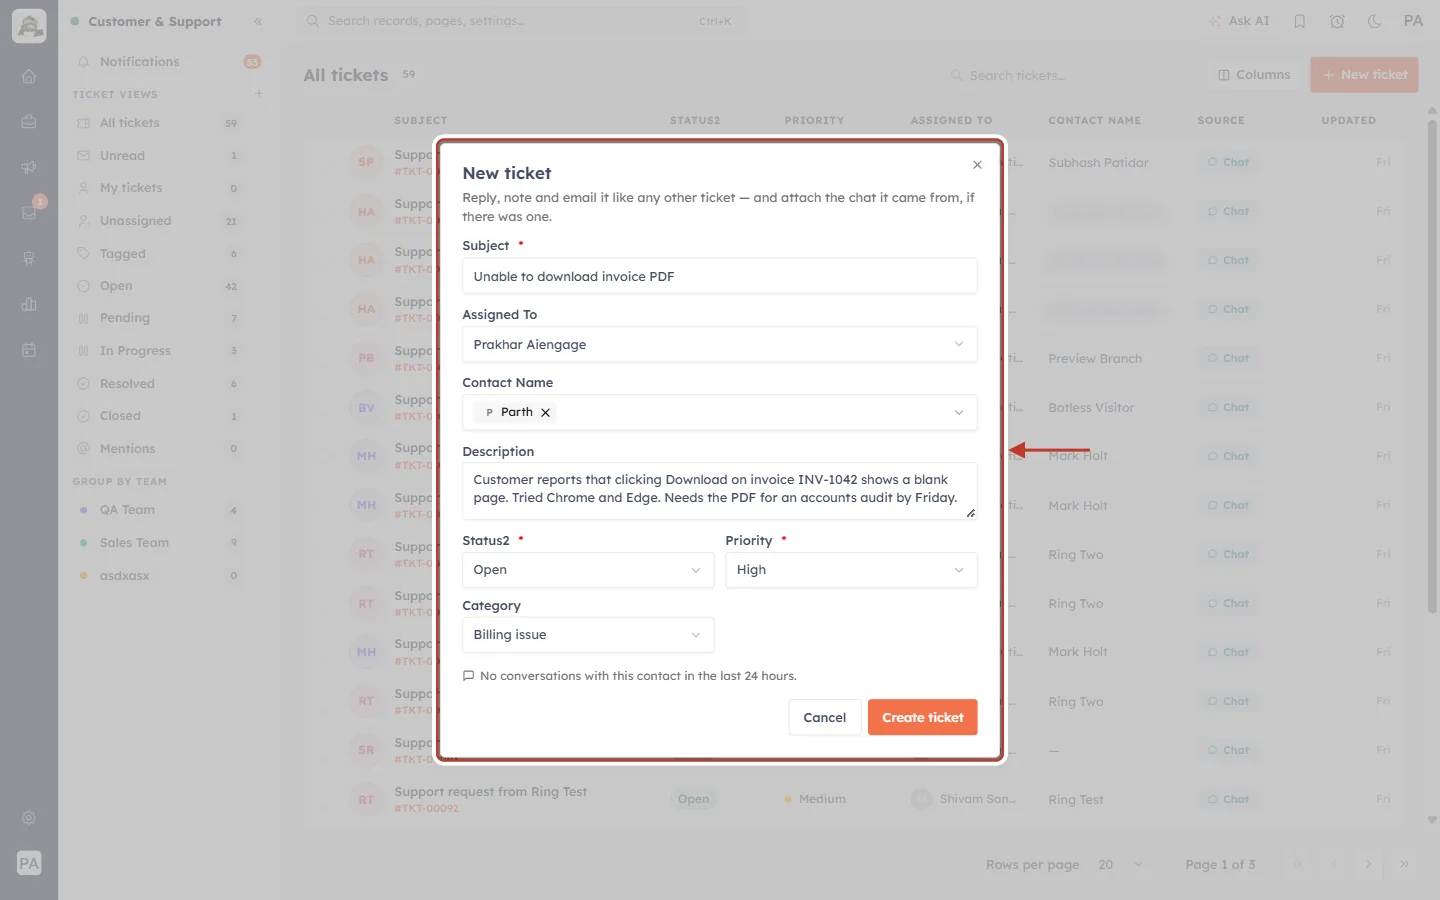
What this screenshot shows. The completed form (ringed), ready to save.
Subject: Unable to download invoice PDF.
Assigned To: Prakhar Aiengage. Contact Name: Parth, shown as a chip with an × to remove it.
Description: what happened, what the customer has already tried, and any deadline (needs the PDF for an accounts audit by Friday). The more detail here, the less you need to ask the customer again.
Status: Open. Priority: High, because the customer has a deadline. Category: Billing issue.
At the bottom: “No conversations with this contact in the last 24 hours.” Once a contact is chosen, the Conversation field lists only that contact’s chats from the last 24 hours. Picking one attaches the chat transcript and links the ticket back to it. Here there is none, so nothing is attached.
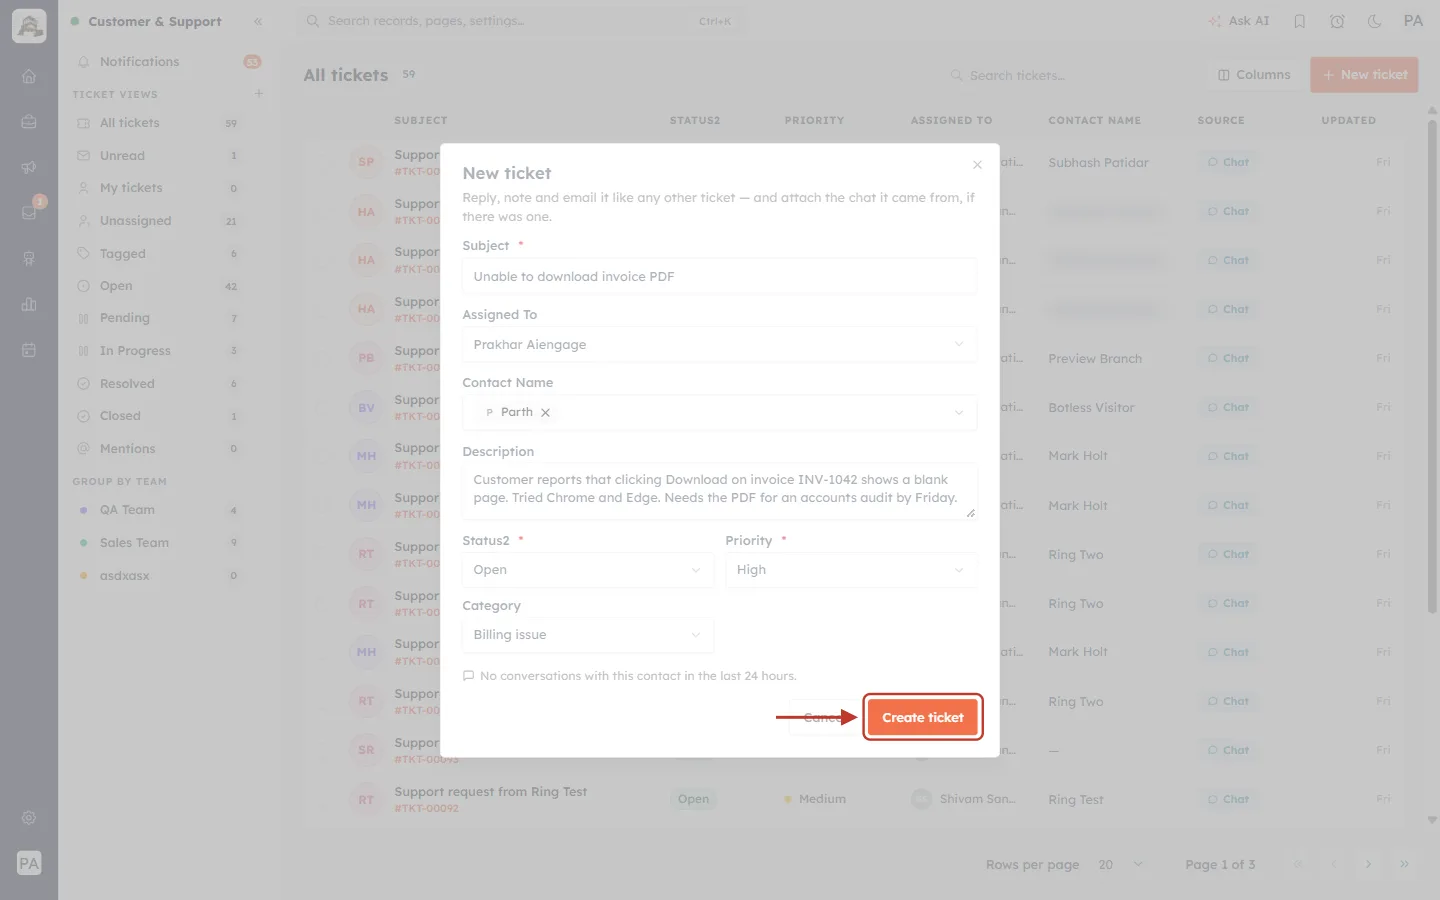
What this screenshot shows. The orange Create ticket button is ringed.
Click it to save. A message at the bottom right confirms the new number, for example “Ticket #TKT-00111 created”.
The ticket appears at the top of the list straight away.
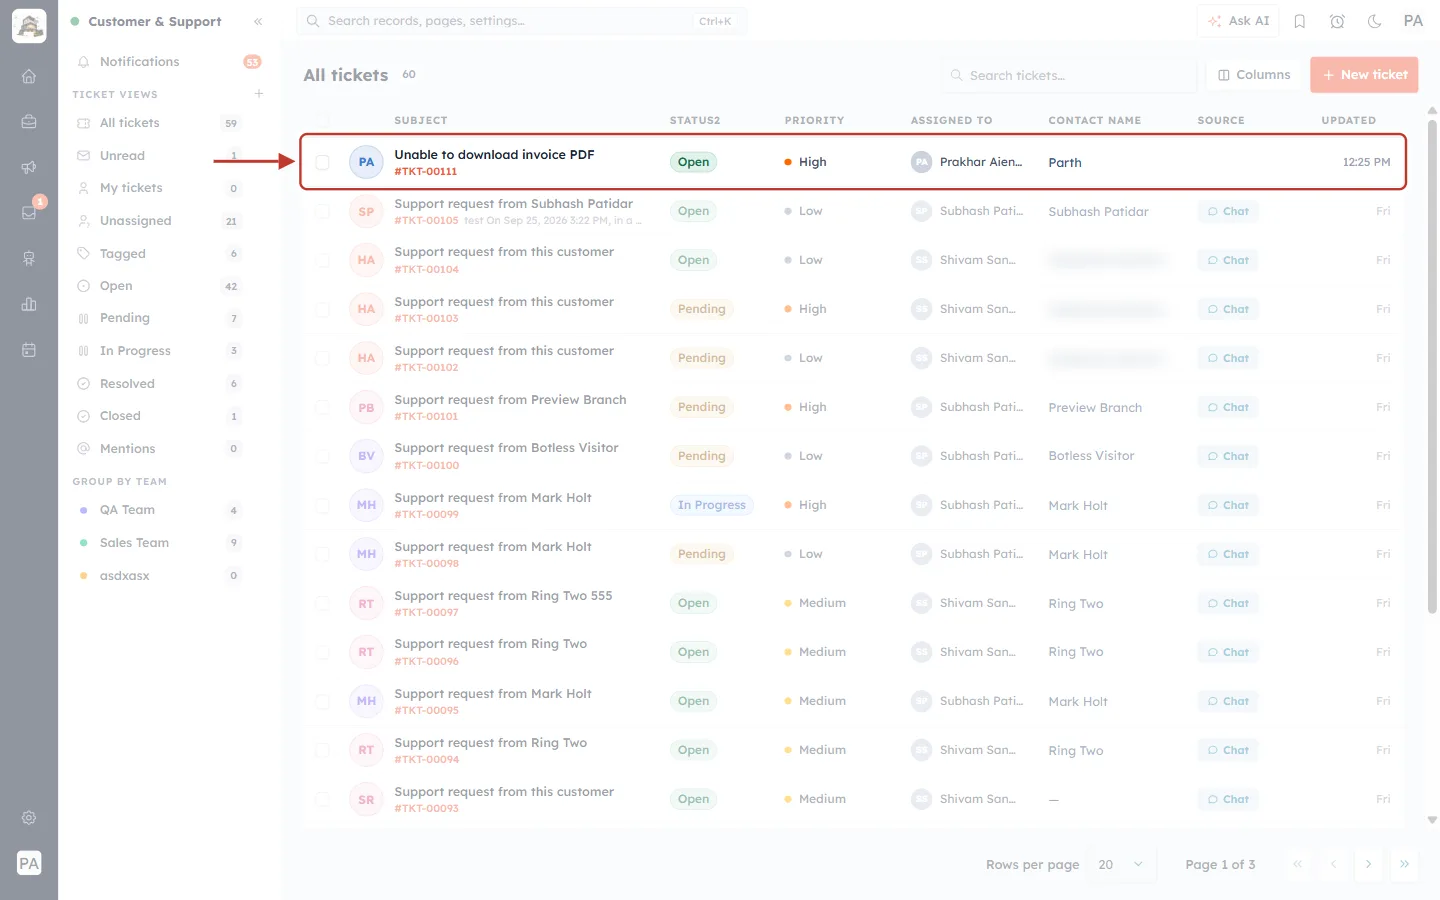
What this screenshot shows. The new ticket (ringed) at the top of All tickets.
Subject Unable to download invoice PDF with its number underneath.
Status Open, Priority High, assigned to Prakhar Aiengage, contact Parth.
Click the row to open it.
Part 3 — Open a ticket and reply to the customer#
Step 11: Read the ticket#
Clicking a ticket opens it full screen. It has three areas: the header along the top, the conversation in the middle, and the details panel on the right.
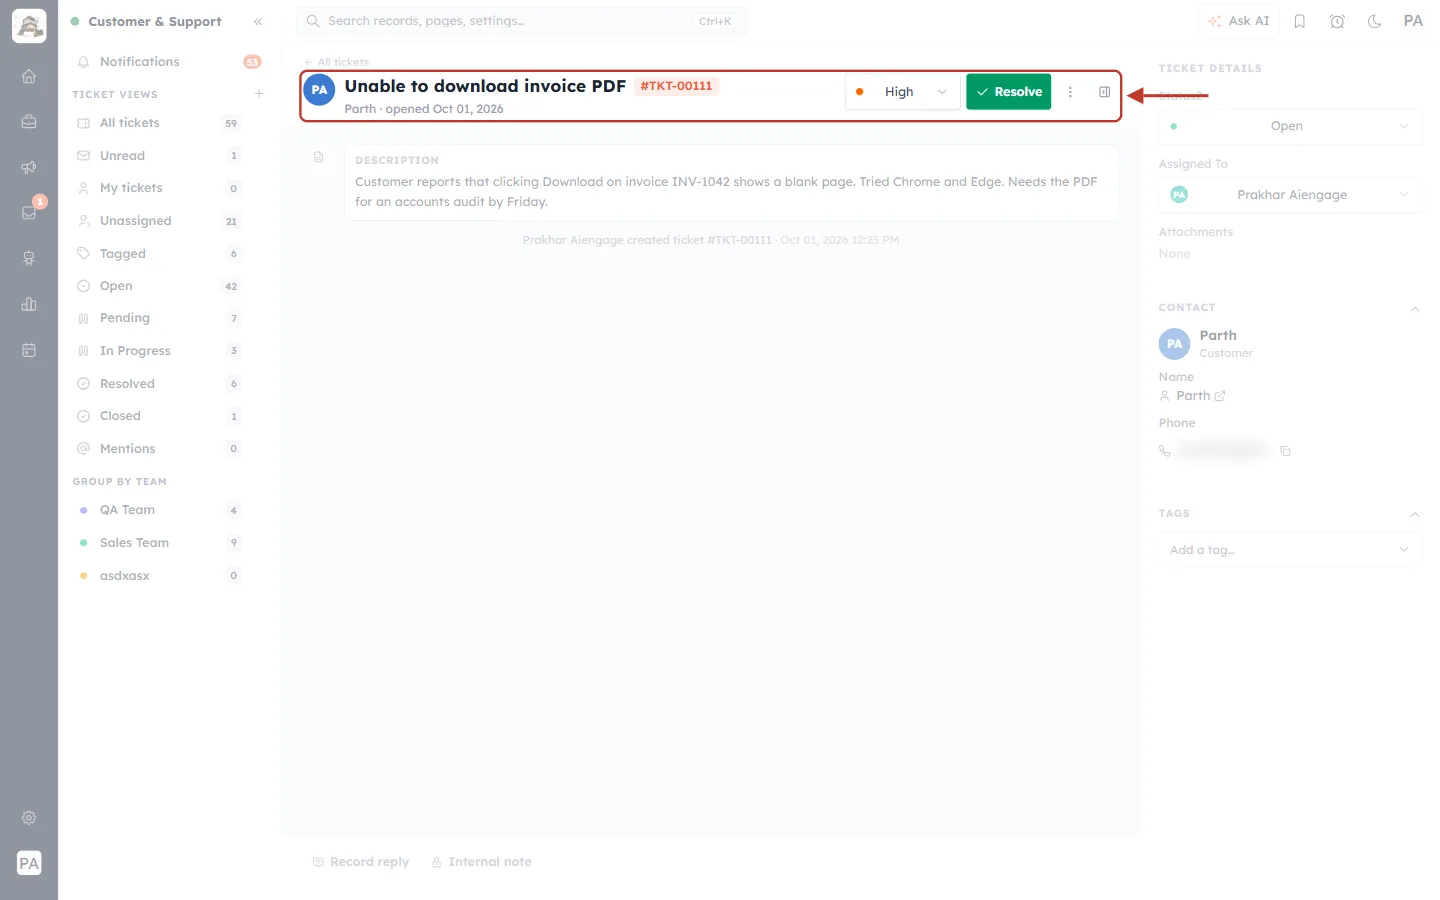
What this screenshot shows. The ticket header is ringed.
← All tickets (above the title) — back to the list you came from.
The contact’s initials, the subject and the orange ticket number (#TKT-00111).
Underneath: the contact’s name, the source (on chat tickets a Chat ↗ link opens the original conversation) and the date the ticket was opened.
Priority drop-down (here High, with an orange dot) — change priority in one click (Step 16).
Resolve (green) — mark the ticket as solved (Step 19).
⋮ (more) — Close ticket and Copy link (Step 18).
The last icon shows or hides the details panel on the right.
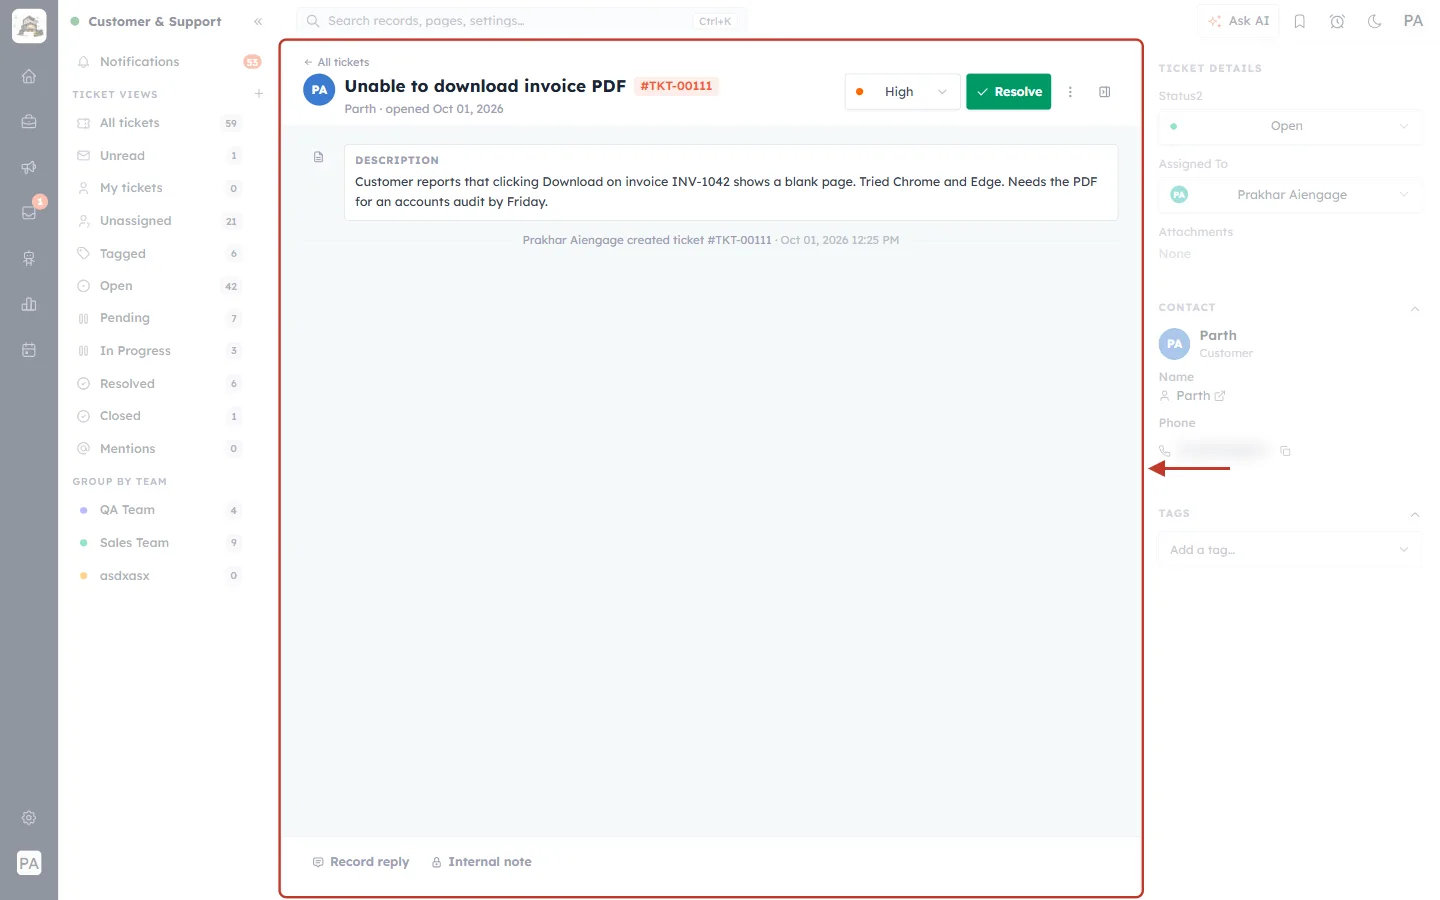
What this screenshot shows. The conversation area is ringed. Everything that happens on the ticket is listed here in time order, oldest at the top.
DESCRIPTION — the details entered when the ticket was created.
A grey line records the event: “Prakhar Aiengage created ticket #TKT-00111 · Oct 01, 2026 12:25 PM”.
Replies, recorded replies and internal notes appear below as you add them. On tickets raised from a chat, a Chat transcript box appears at the top (copied when the ticket was created). Click it to expand the customer’s original messages.
The reply bar sits at the bottom of this area (Step 12).
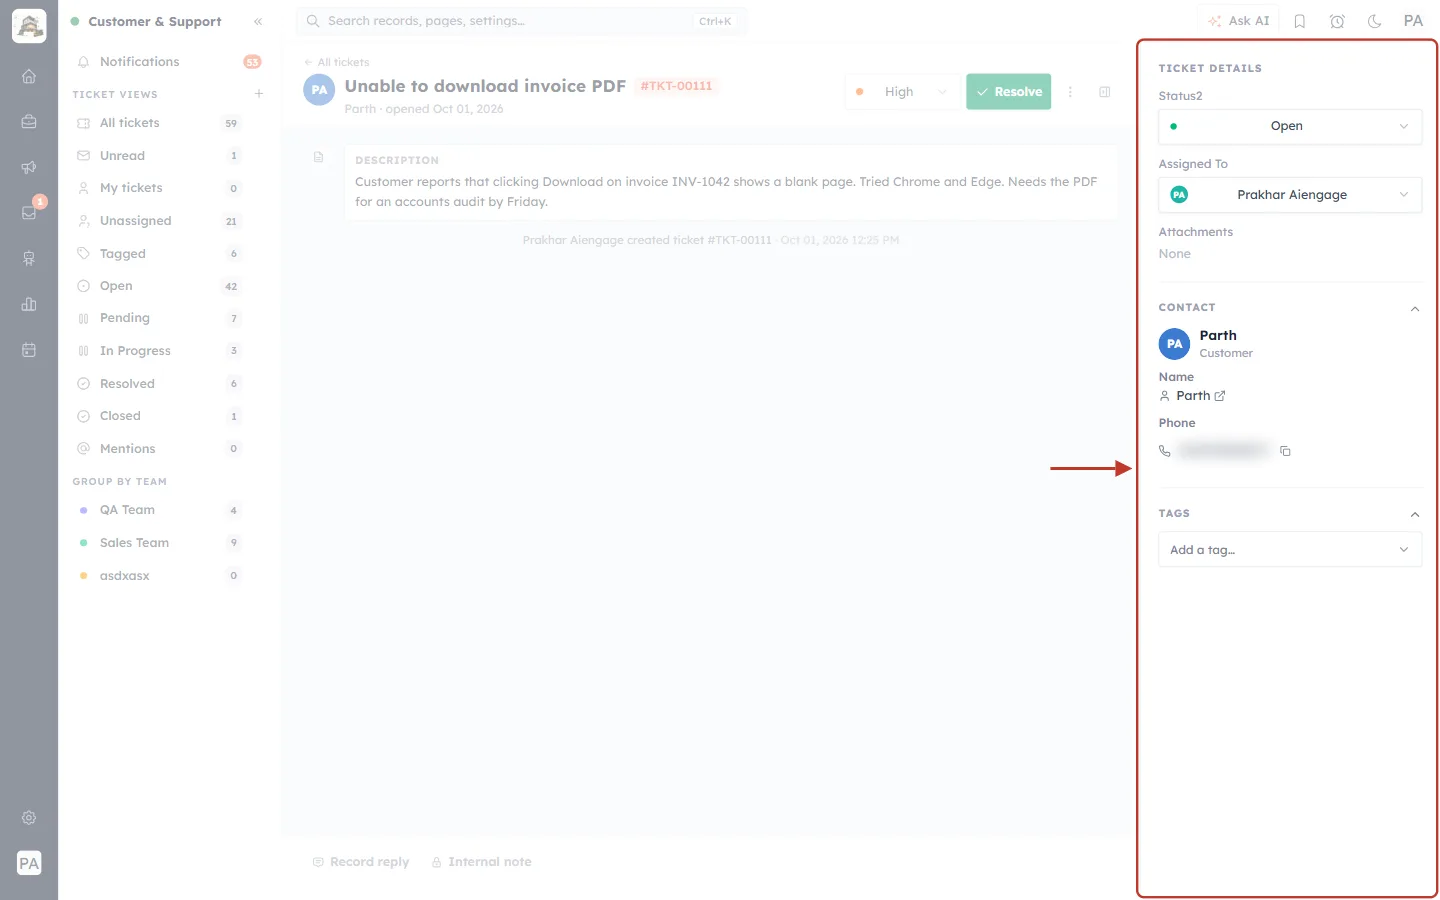
What this screenshot shows. The details panel on the right is ringed.
TICKET DETAILS — Status (here Open) and Assigned To (here Prakhar Aiengage), each a drop-down you can change on the spot, plus any Attachments on the ticket.
CONTACT — who raised the ticket (next figure).
TAGS — labels for sorting and reporting (Step 17).
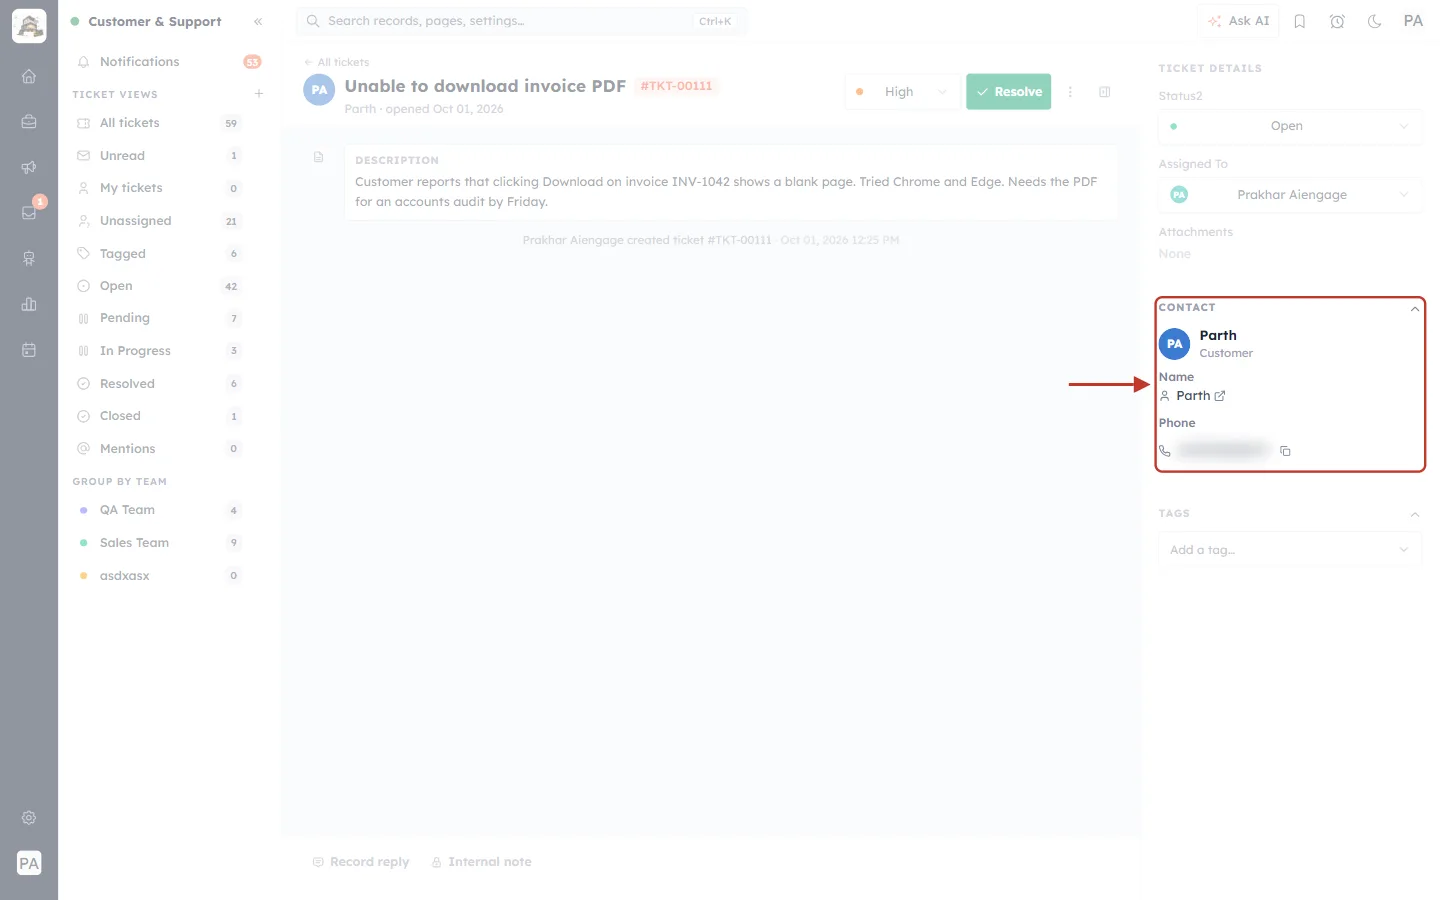
What this screenshot shows. The CONTACT card is ringed. It shows the customer’s details from their CRM contact record, so you don’t have to look them up.
The contact’s name and role (Customer).
Name with a ↗ link that opens their full contact record.
Phone (blurred here) with a copy button. When the contact has them, you also see Email, Job Title, Company Name, Country and Lifecycle Stage.
Step 12: Choose how to answer#
The bar at the bottom of the conversation changes depending on whether the contact has an email address.
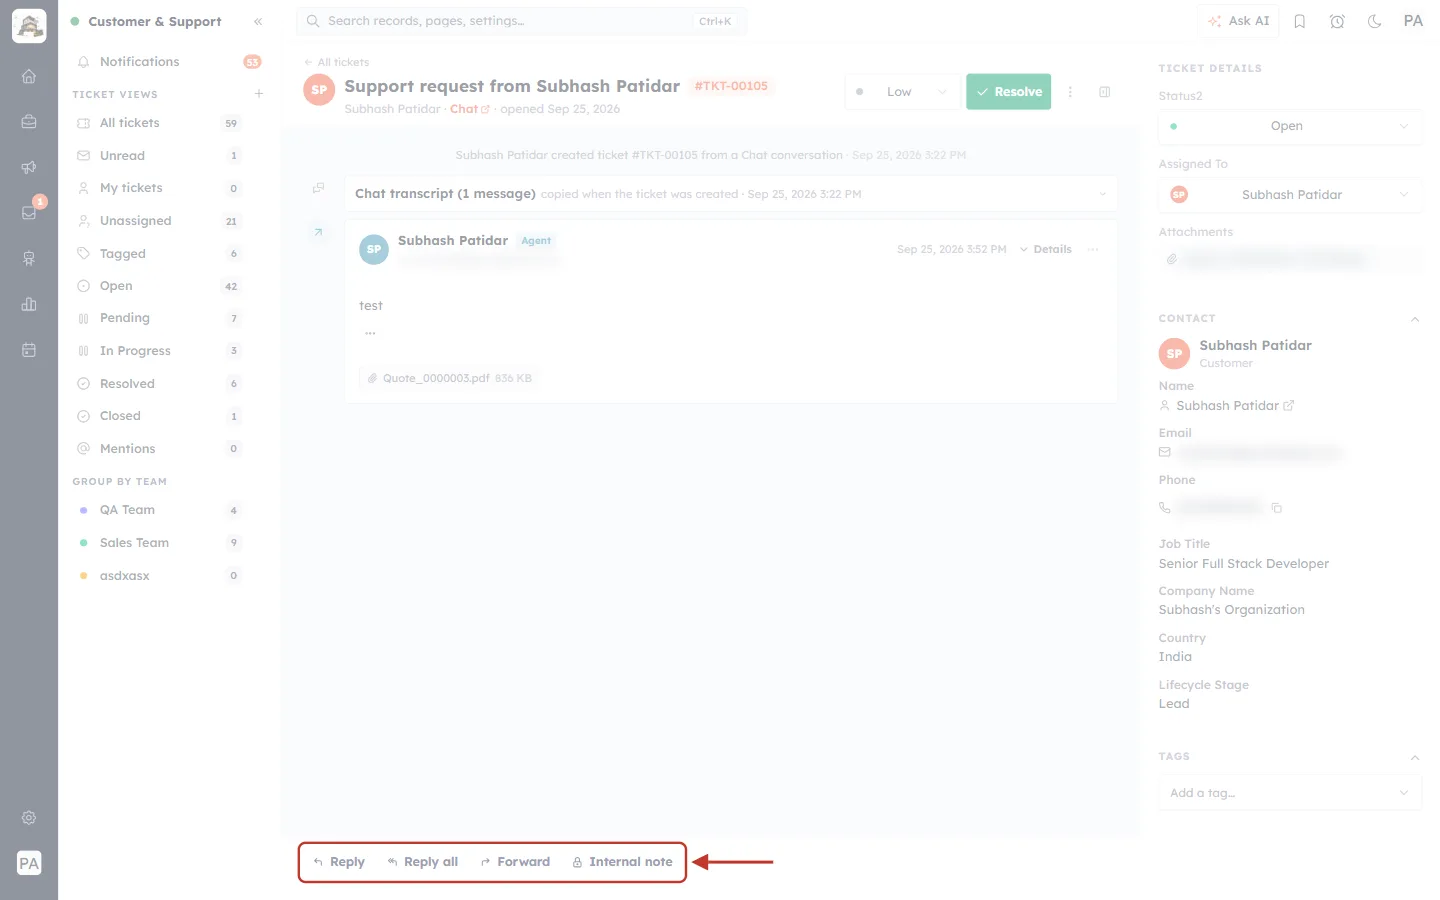
What this screenshot shows. On a ticket whose contact has an email address, the reply bar (ringed) offers four actions.
Reply — email the customer from the ticket.
Reply all — reply to everyone on the last email, including anyone copied in.
Forward — send the conversation to someone else, for example a supplier.
Internal note — a private note that only your team can see (Step 14).
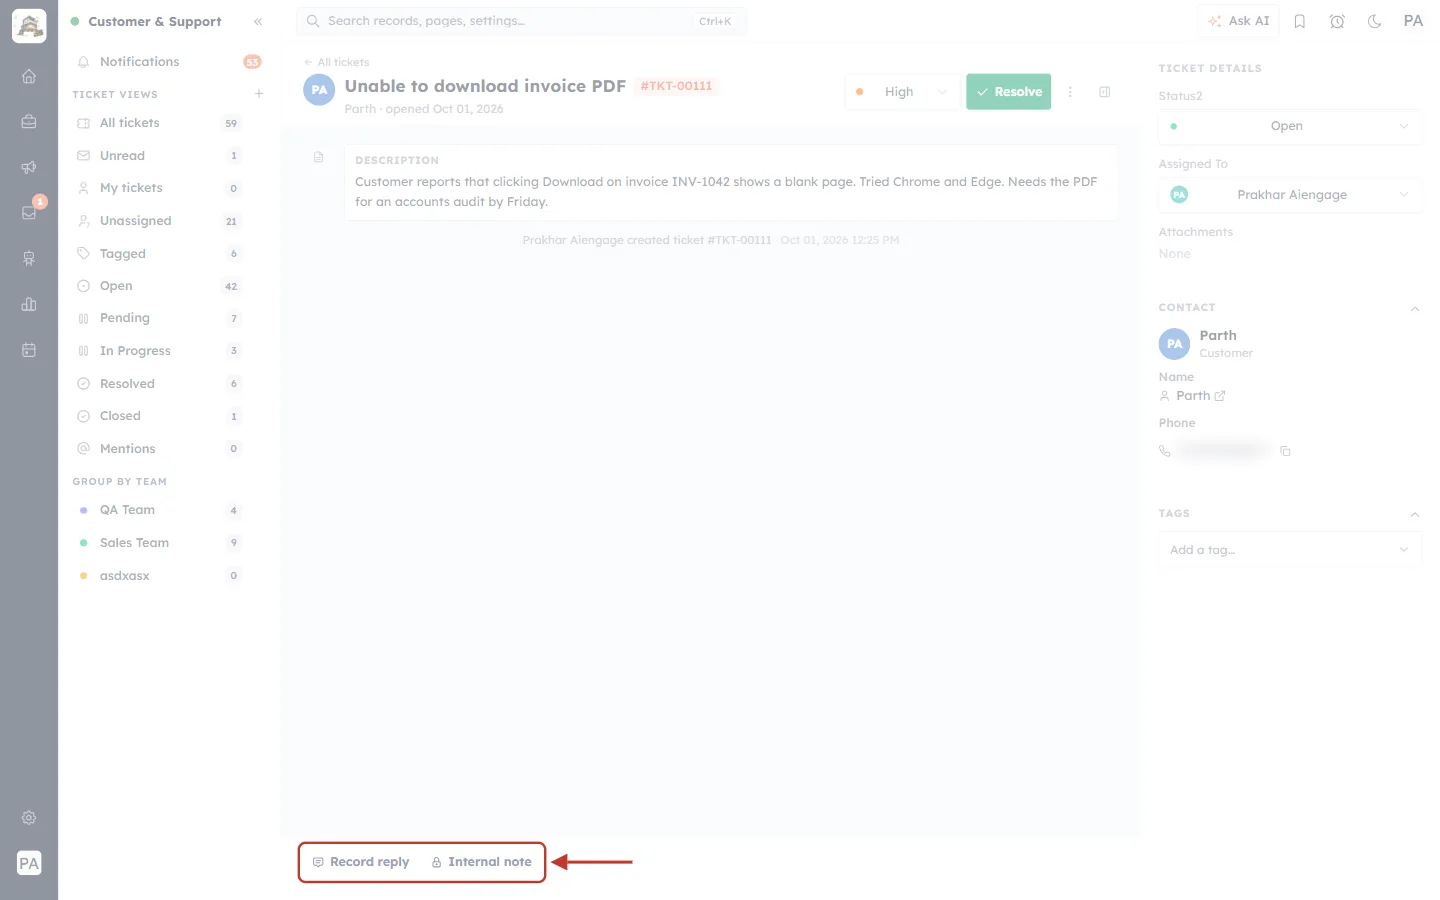
What this screenshot shows. On a ticket whose contact has no email address (our demo contact Parth has only a phone number), the bar (ringed) offers two actions instead.
Record reply — log the answer you gave by phone, WhatsApp or in person, so the ticket shows what the customer was told (Step 15).
Internal note — a private note for your team.
Step 13: Email the customer#
Click Reply. A reply window opens over the conversation. Write your answer and click Send.
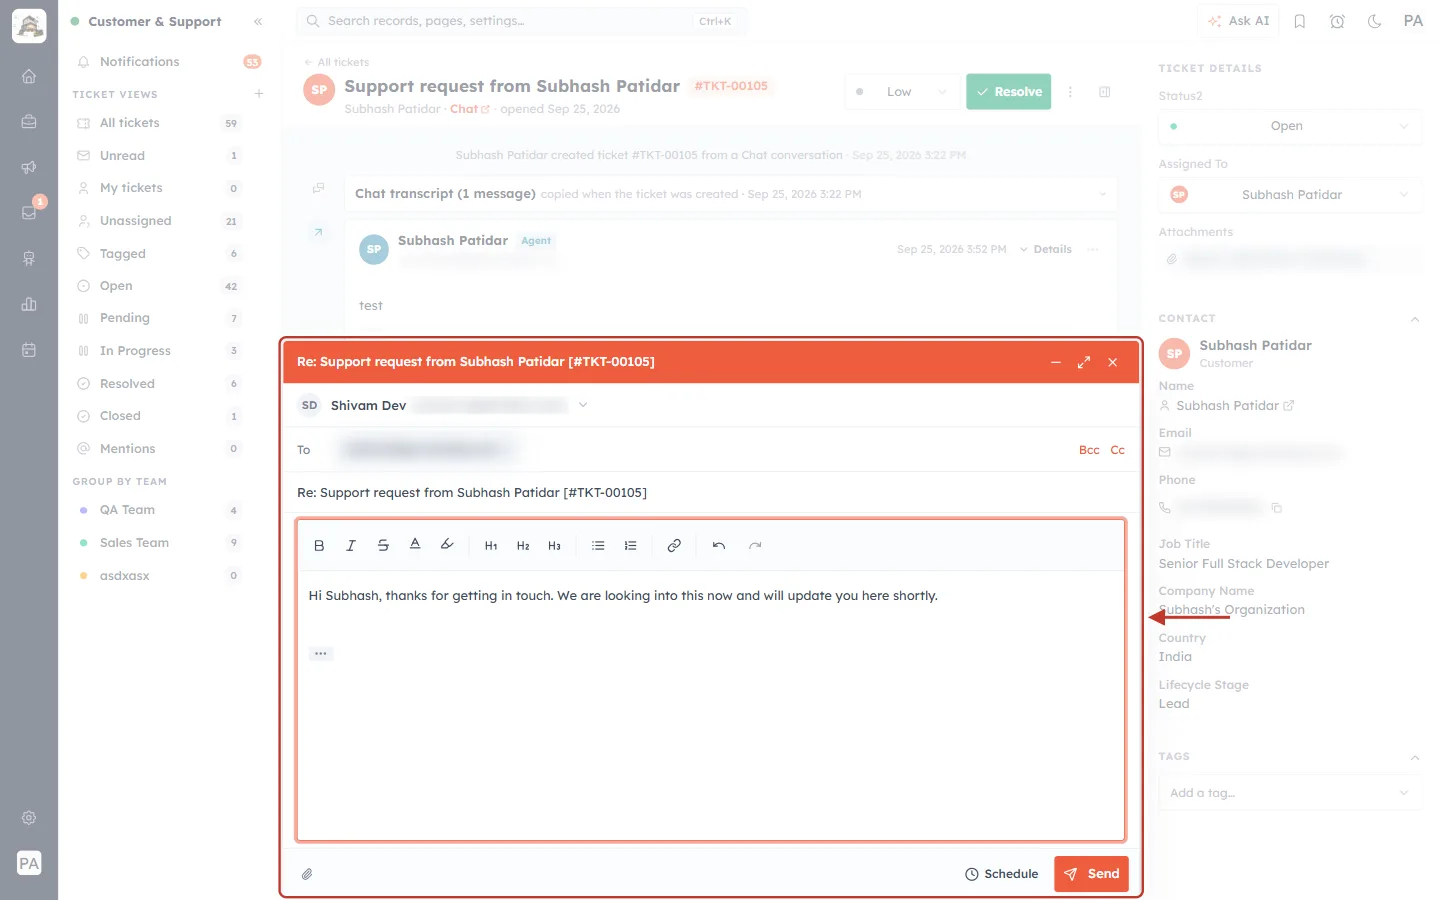
What this screenshot shows. The reply window (ringed), opened on a ticket from a contact who has an email address. (Email addresses are blurred.)
Orange title bar — the subject of your reply: Re: Support request from Subhash Patidar [#TKT-00105]. The ticket number in square brackets matters: when the customer answers, their reply is filed back on this same ticket. Leave it in the subject. The buttons on the right minimise, enlarge and close the window.
From — the address the email is sent from. Click the arrow to choose another of your sending addresses.
To — the customer’s address, filled in for you. Cc and Bcc (right) add more people.
The subject line again, which you can edit.
Editor — bold, italic, strikethrough, text colour, highlight, headings, lists, links, undo and redo, then the message itself.
At the bottom: the paperclip attaches files, and Schedule and Send sit on the right (next figure).
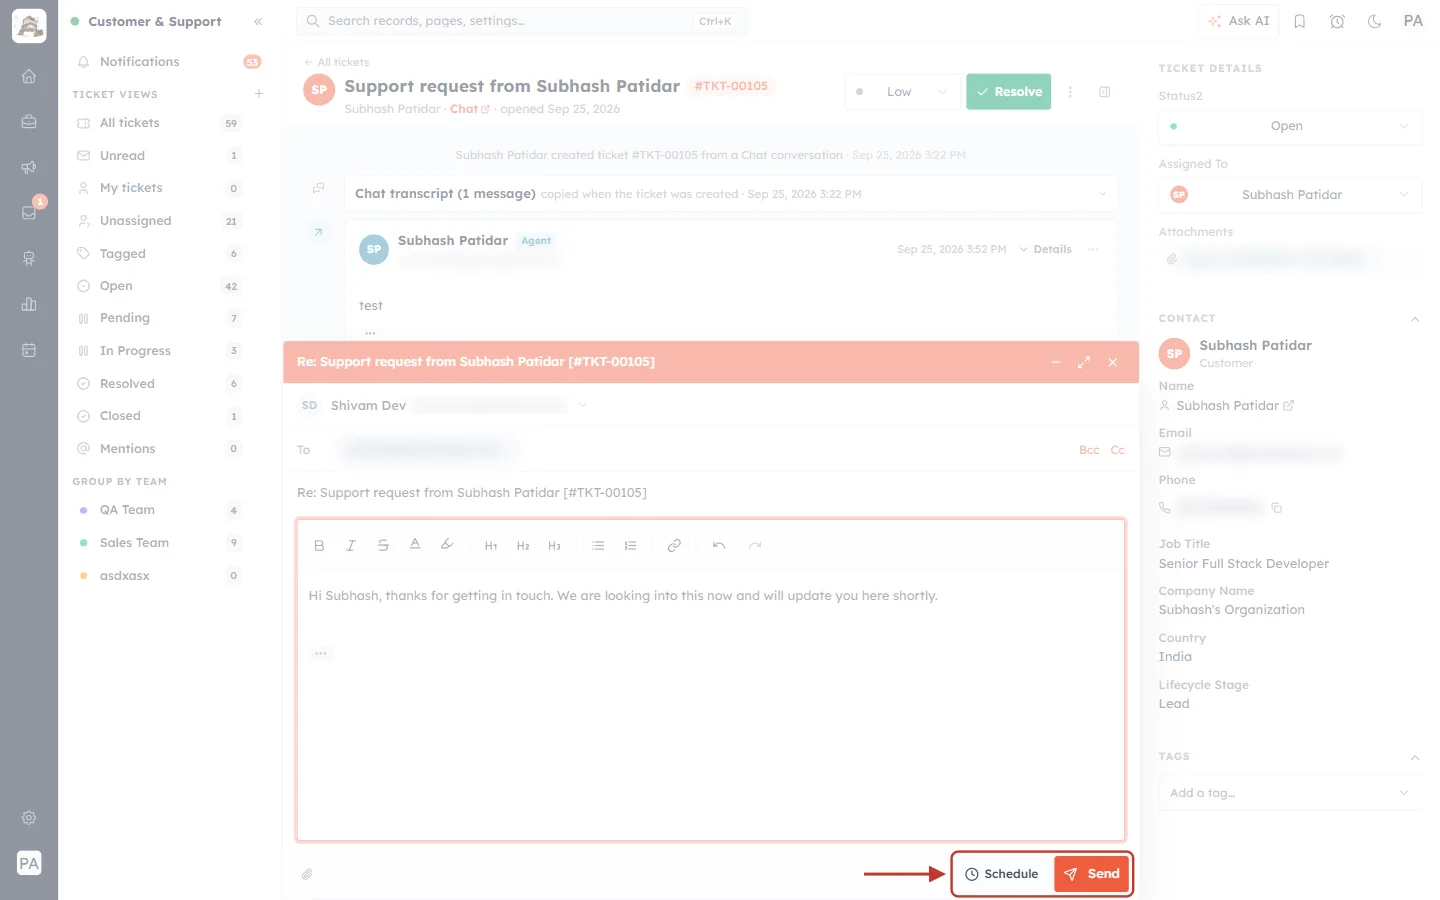
What this screenshot shows. The Schedule and Send buttons are ringed.
Send — emails the customer now. The email is added to the ticket’s conversation.
Schedule — send the email at a later time instead of now, for example at the start of the customer’s working day.
To close the window without sending, click the × in the orange title bar.
⚠️
Replies are real emails to your customer. Read the message through before you click Send, and use an Internal note for anything meant only for your team.
Step 14: Add an internal note for your team#
Click Internal note, write the note and click Add note. Notes are for your team only. The customer never sees them. Type @ followed by a name to mention a teammate. The ticket then appears in that person’s Mentions view.
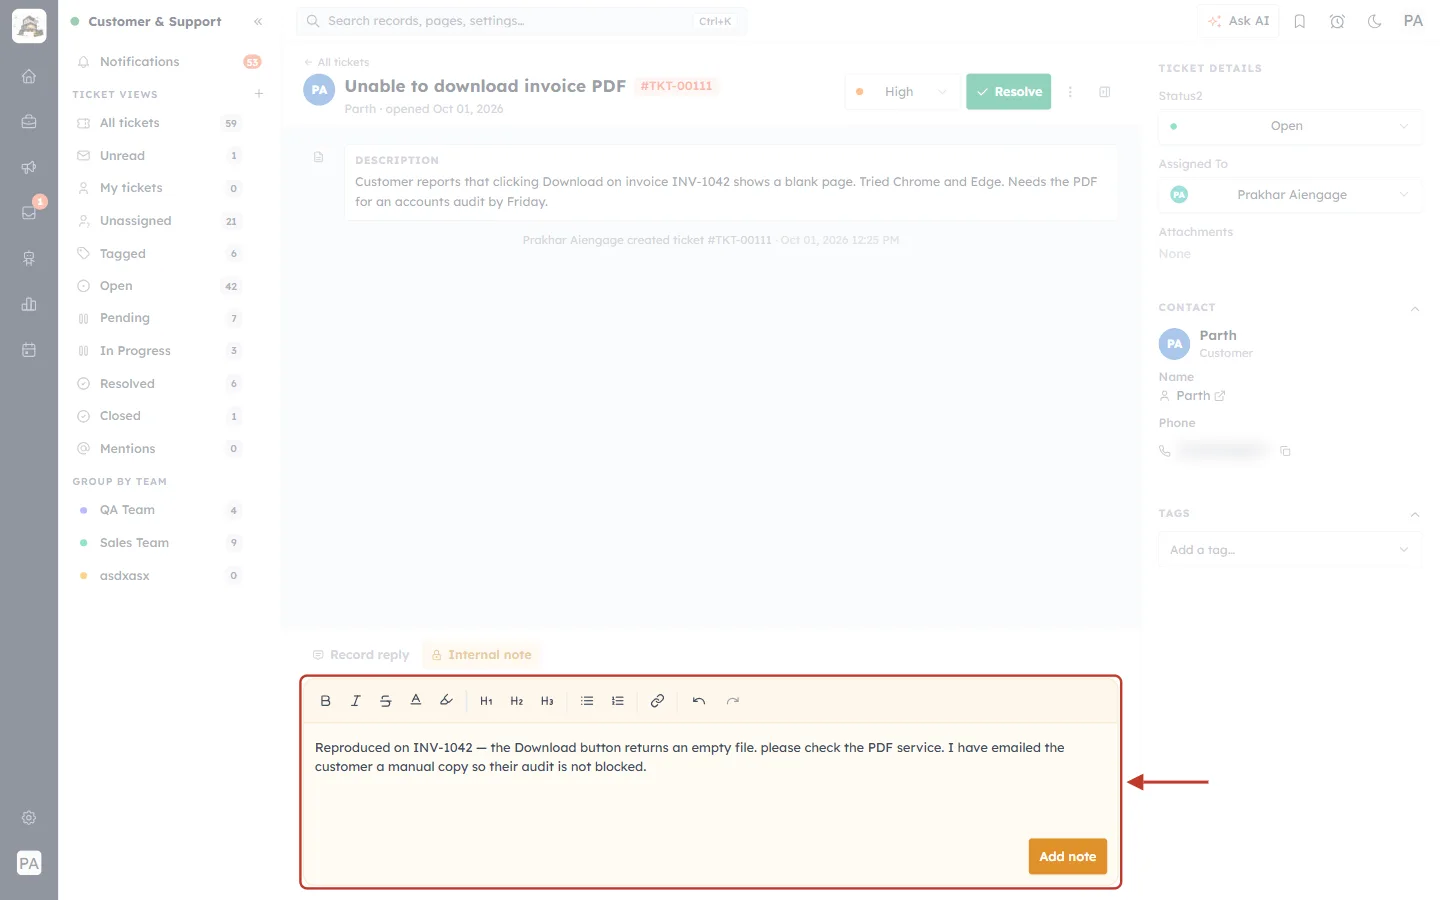
What this screenshot shows. The internal note editor (ringed). Its yellow background is a reminder that this is private. The empty box reads “Write an internal note — type @ to mention a teammate”.
The same formatting tools as an email: bold, italic, lists, links and so on.
The note here records what was found (the Download button returns an empty file) and what has been done (emailed the customer a manual copy), so anyone picking up the ticket knows where it stands.
Add note (bottom right) saves the note to the conversation.
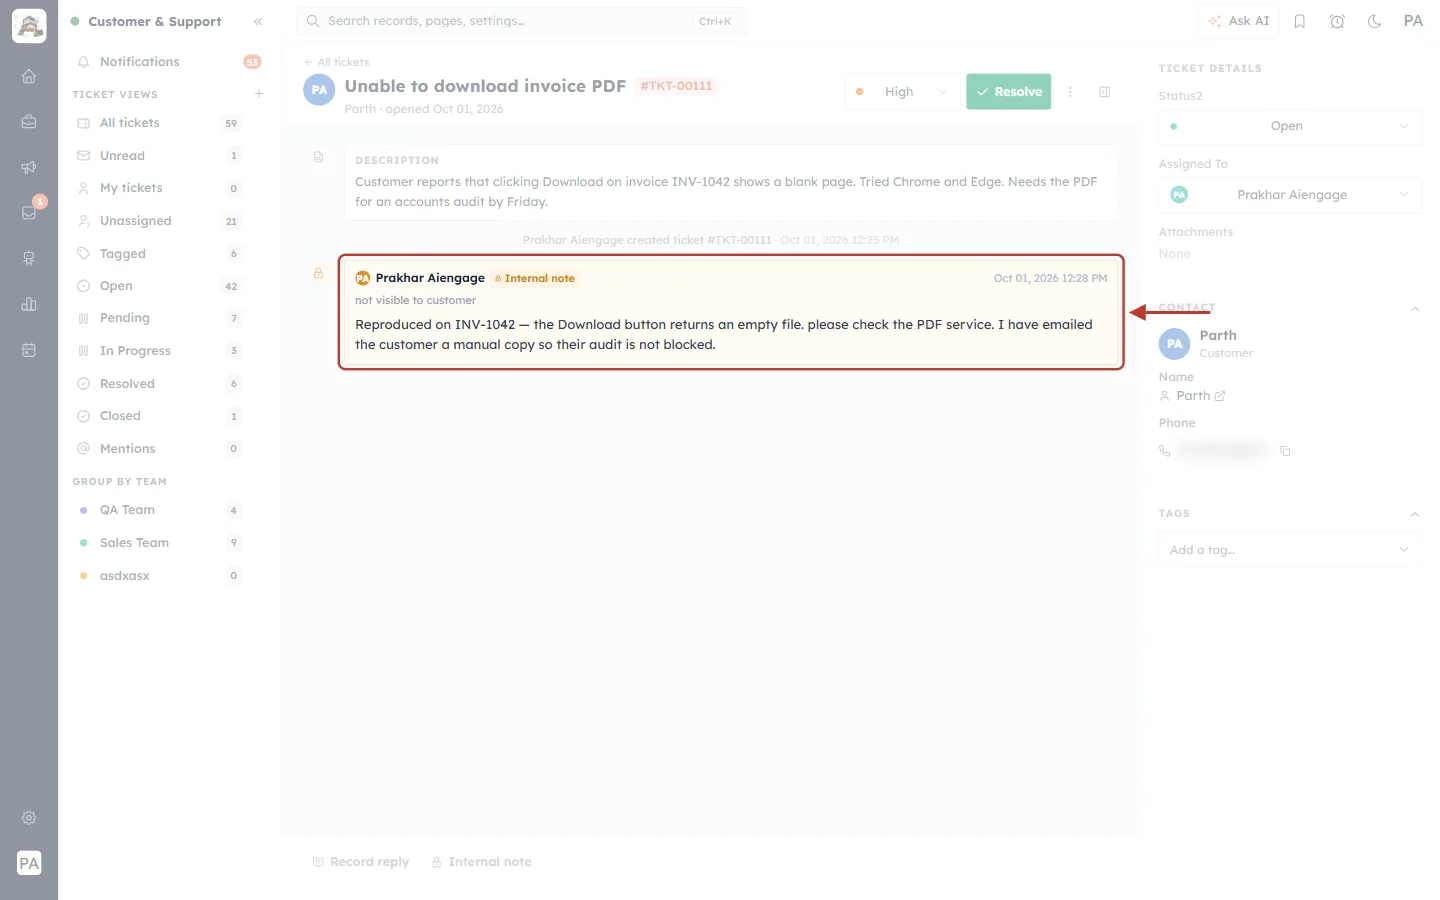
What this screenshot shows. The saved note (ringed) in the conversation.
It shows who wrote it (Prakhar Aiengage) and a yellow Internal note badge.
“not visible to customer” — confirms that it was not emailed.
The date and time are on the right. The padlock icon on the left also marks it as private.
Step 15: Record a reply you gave outside email#
If you answered the customer by phone, WhatsApp or in person, click Record reply, type what you told them and click Save reply. This keeps the ticket’s history complete.
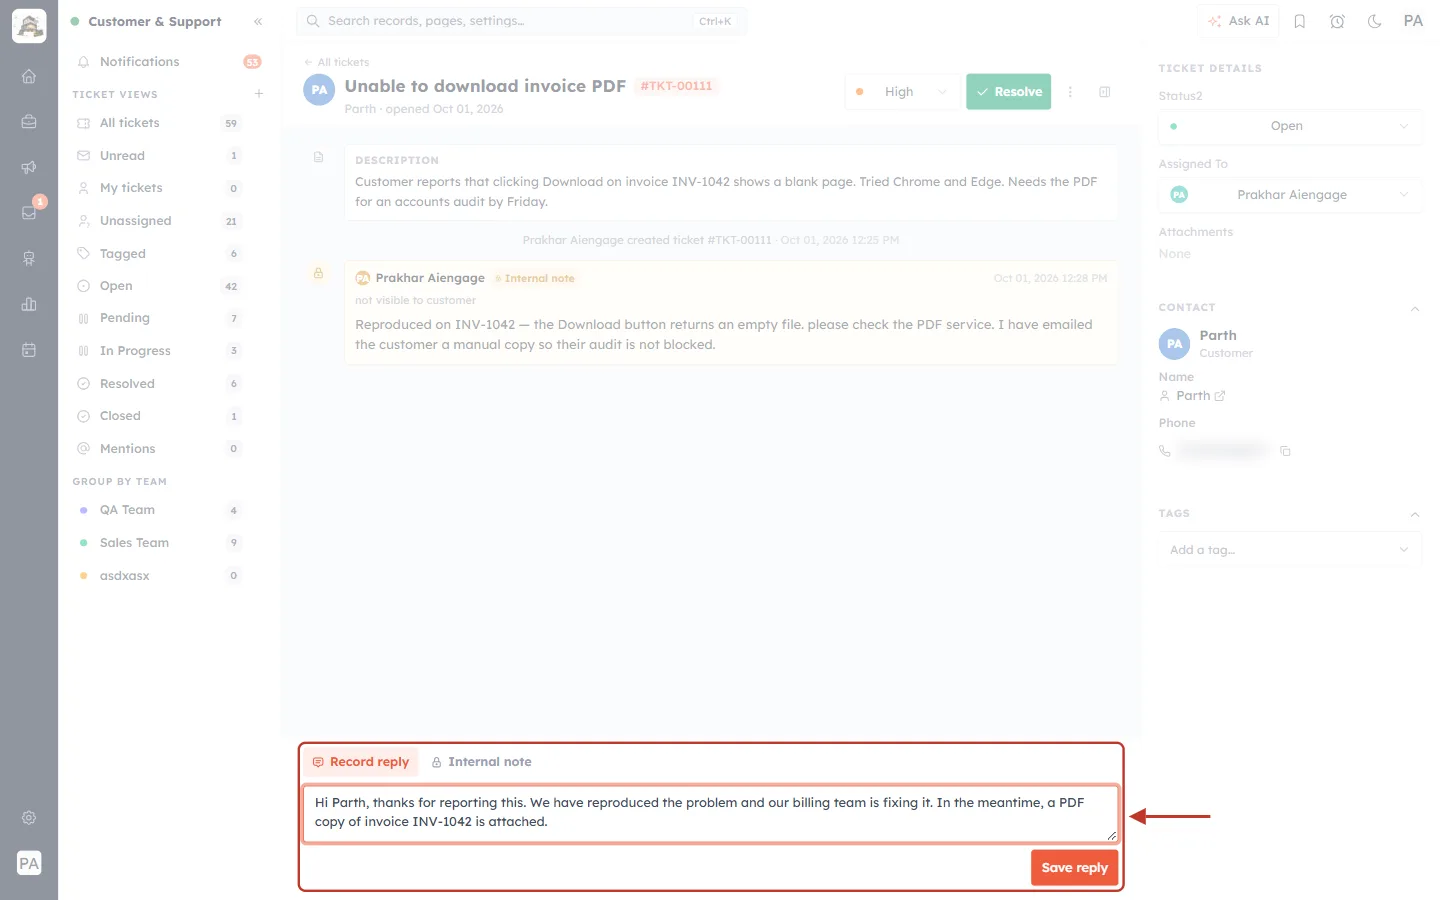
What this screenshot shows. The Record reply box (ringed). Its placeholder says exactly what it does: “This requester has no email address — the reply is saved on the ticket, not sent.”
Type the answer the customer was given.
Save reply (orange, bottom right) adds it to the conversation.
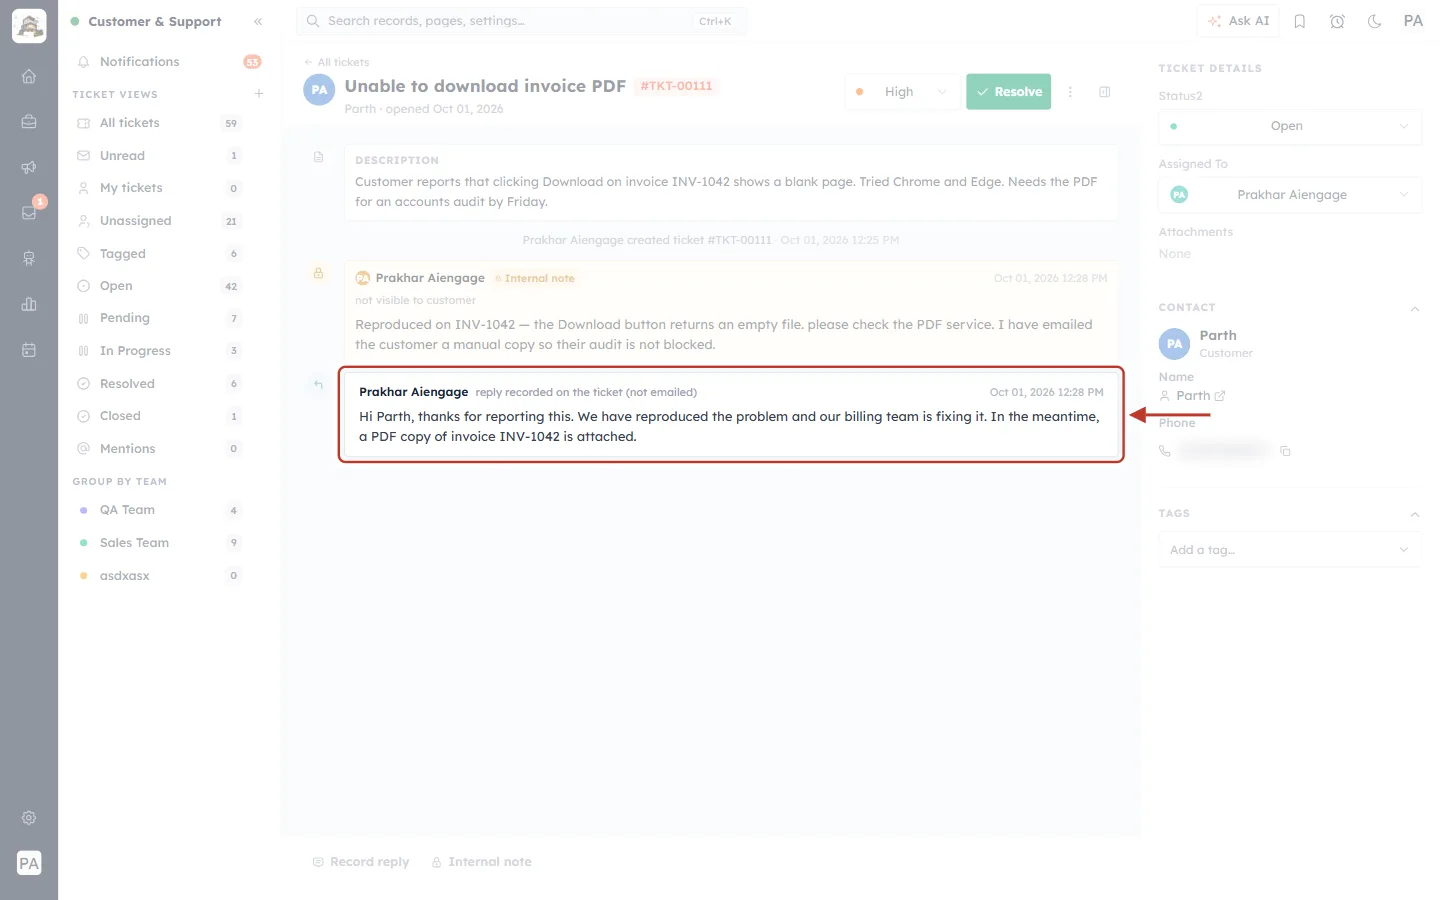
What this screenshot shows. The recorded reply (ringed) under the internal note.
It shows who recorded it and the label “reply recorded on the ticket (not emailed)”, so nobody assumes an email went out.
Unlike an internal note, this is part of the customer-facing history: it is what the customer was told.
Part 4 — Update status, priority, owner and tags#
Step 16: Change the priority#
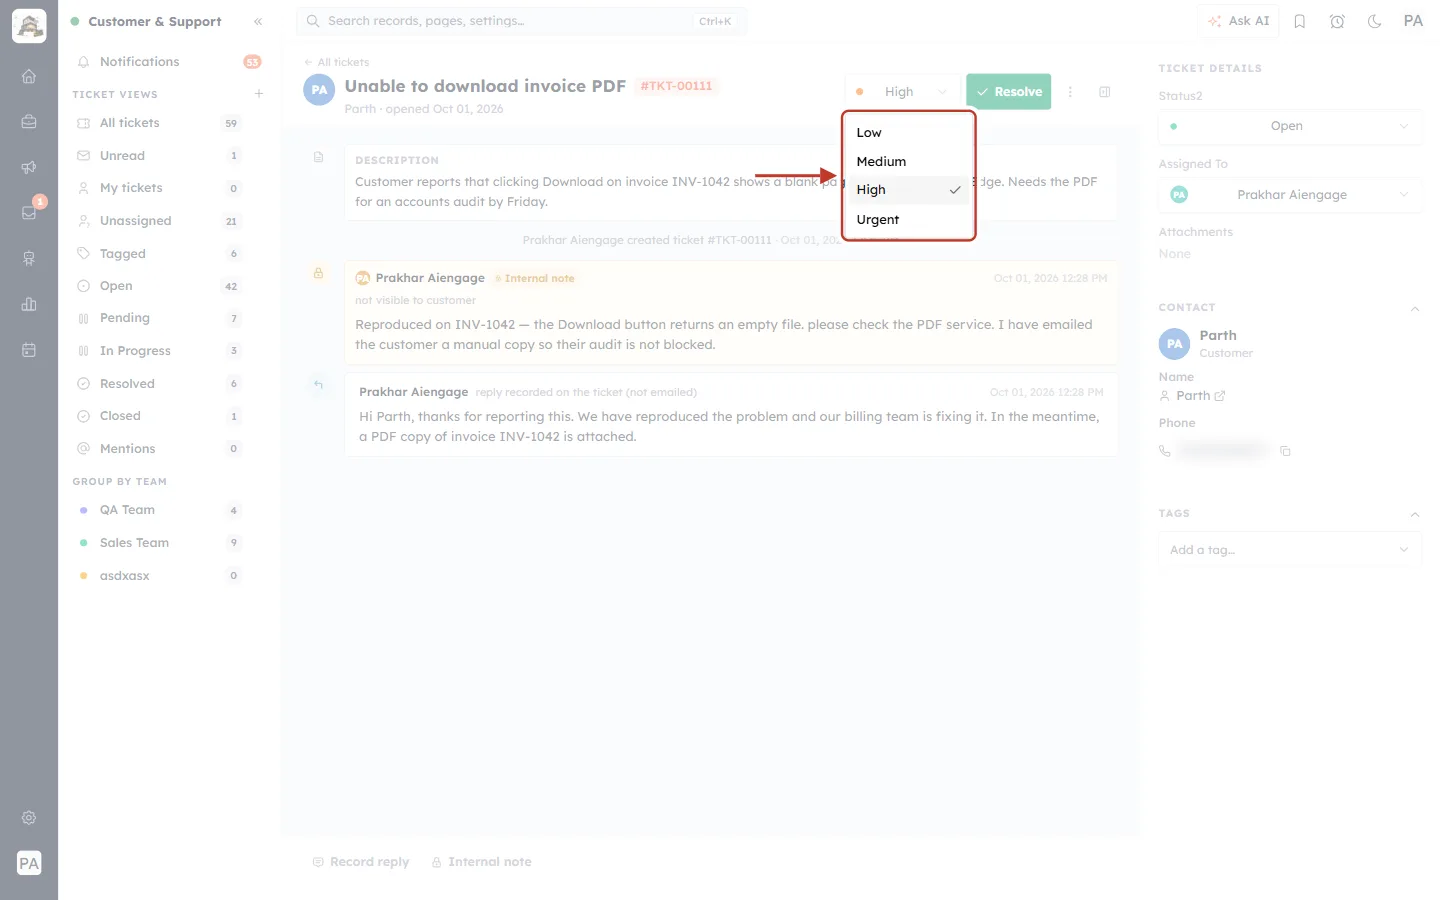
What this screenshot shows. The priority drop-down in the ticket header is open and ringed.
Choose Low, Medium, High or Urgent. The current one is ticked (here High).
Use Urgent sparingly, for example when a customer cannot work at all or money is at stake, so it keeps its meaning for the team.
| Priority | Use it when… |
|---|---|
| Urgent | The customer is blocked completely, or there is a payment, security or legal risk. |
| High | Something important is broken, or there is a close deadline (like the audit in our example). |
| Medium | A normal question or problem with a workaround. This is the default. |
| Low | Feedback, feature requests and “nice to have” questions. |
Step 17: Reassign the ticket or add tags#
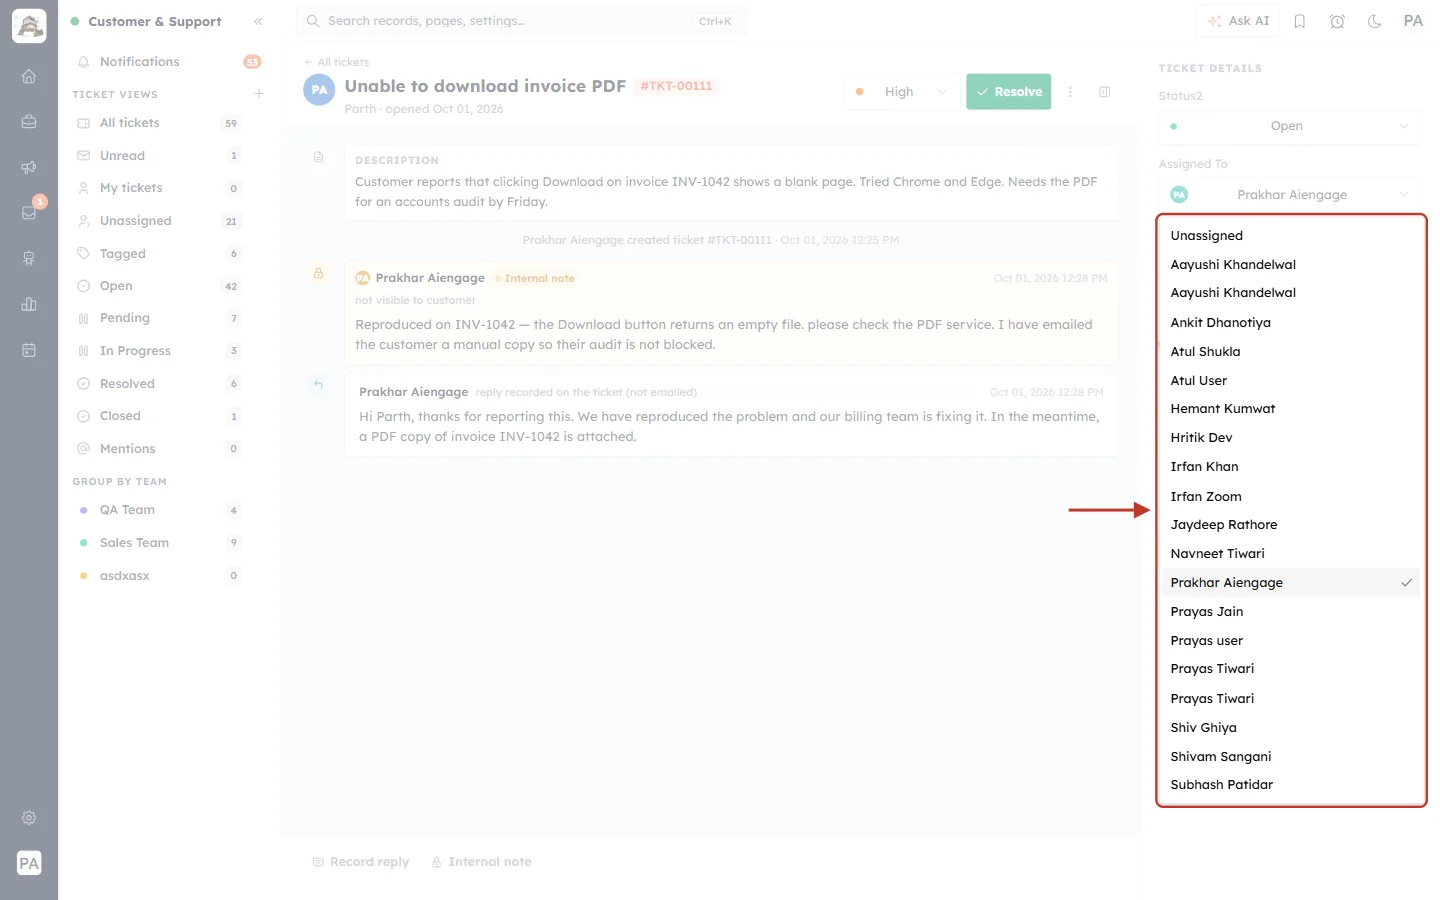
What this screenshot shows. The Assigned To drop-down in the details panel is open and ringed.
Pick a teammate to hand the ticket over. It moves to their My tickets view.
Choose Unassigned to put it back in the shared queue.
Add an internal note when you hand a ticket over, explaining what has been done so far.
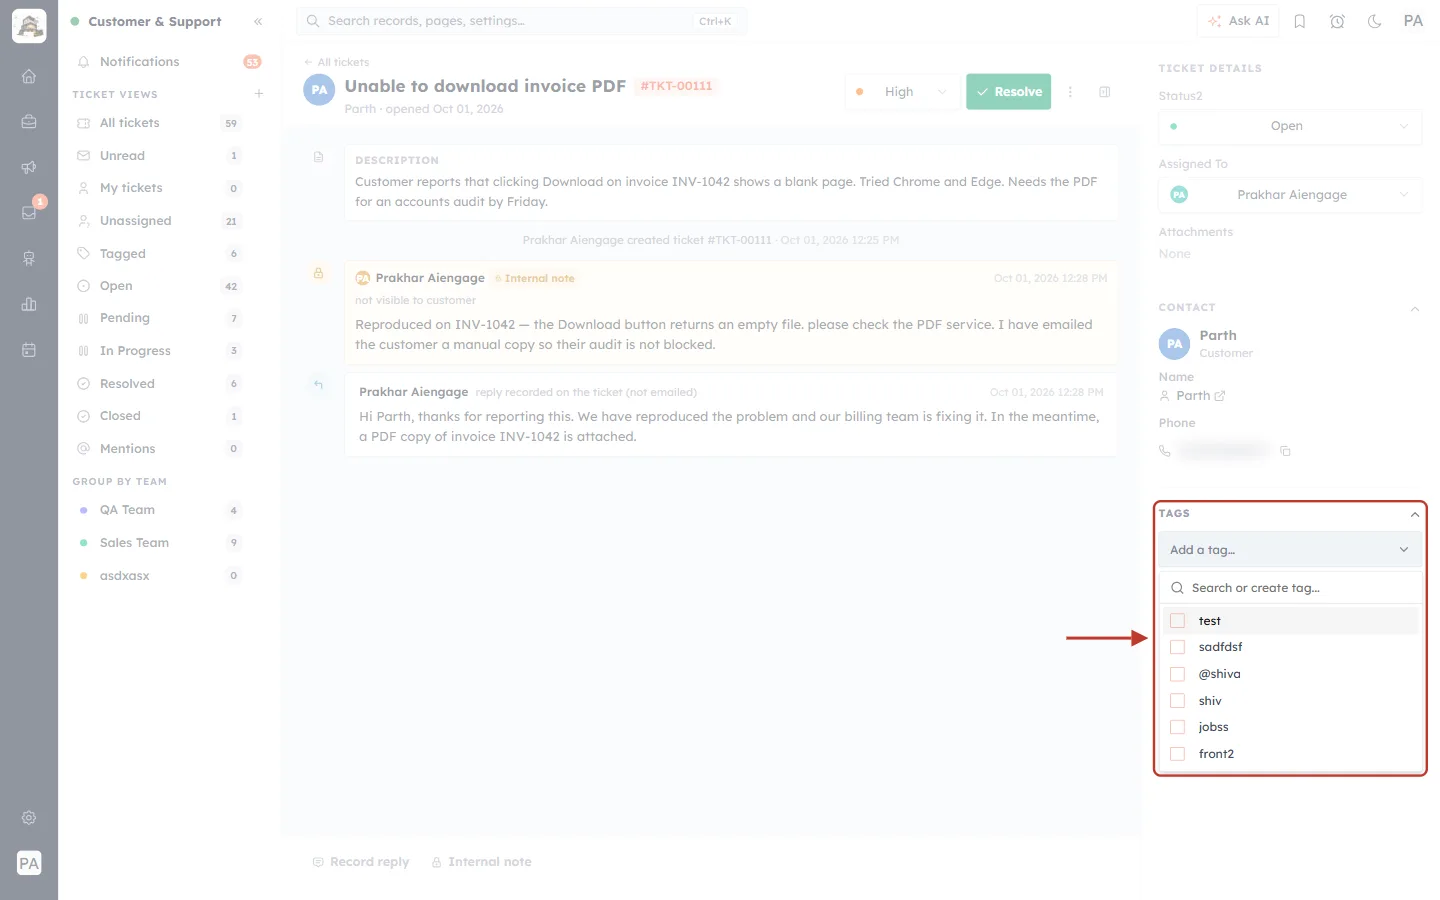
What this screenshot shows. The TAGS box is open and ringed, with a search box (Search or create tag…) and the tags already used in your account.
Tick a tag to add it to the ticket. Tags appear in the Tagged view, can be shown as a column, and can be used in your own ticket views.
Agree a short list of tags as a team (for example refund, shipping, vip) so they stay useful for reporting.
Step 18: Move the ticket through its statuses#
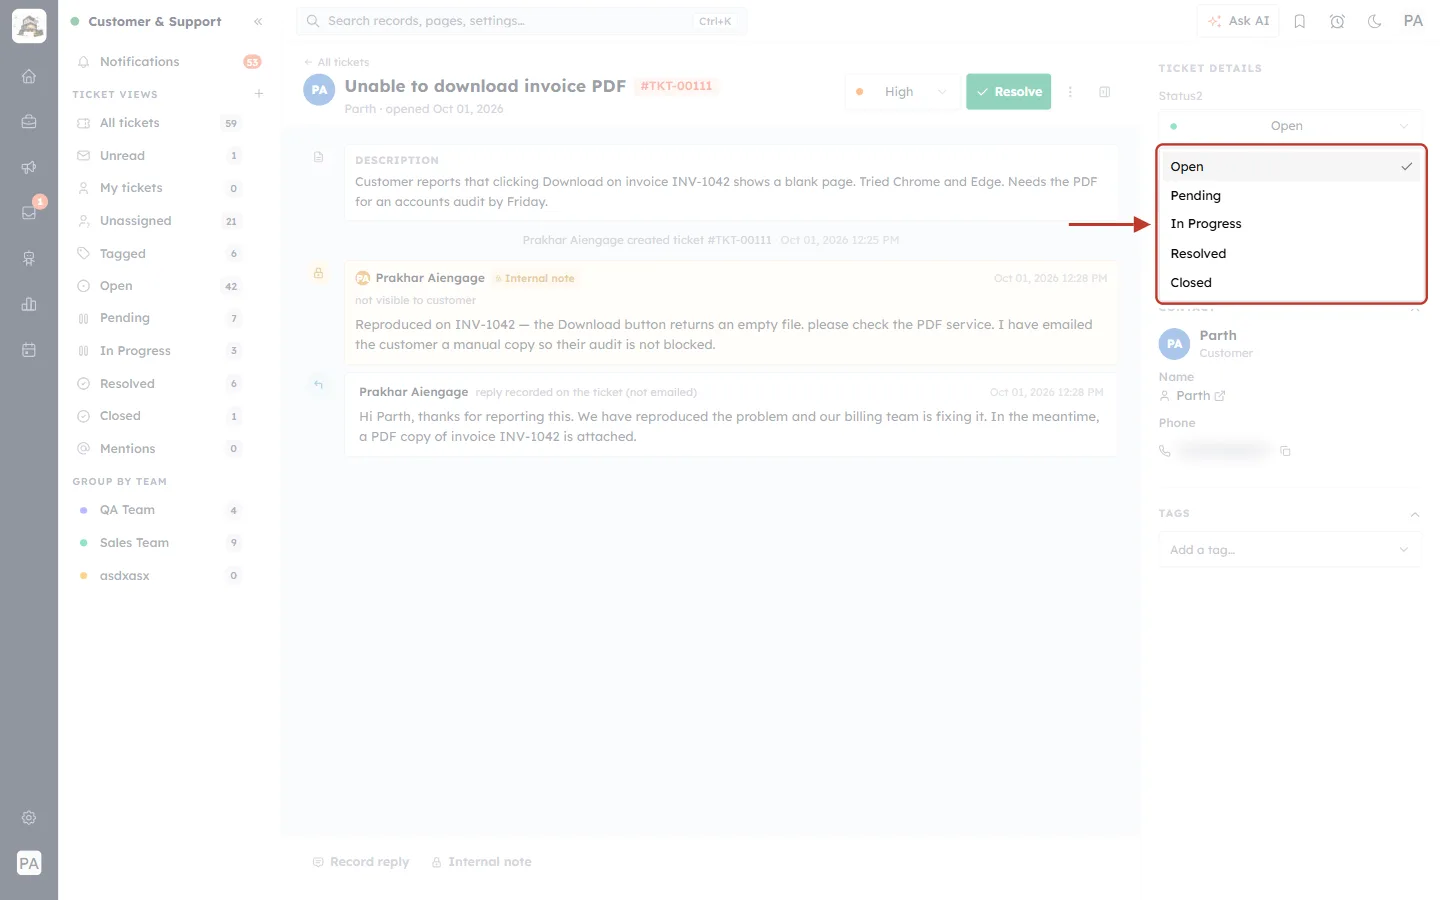
What this screenshot shows. The Status drop-down in the details panel is open and ringed, listing every status.
Open — new and waiting for your team.
Pending — waiting for the customer or a third party (for example, you asked for a screenshot).
In Progress — someone is actively working on it.
Resolved — you believe it is fixed (Step 19).
Closed — finished, with nothing more to do.
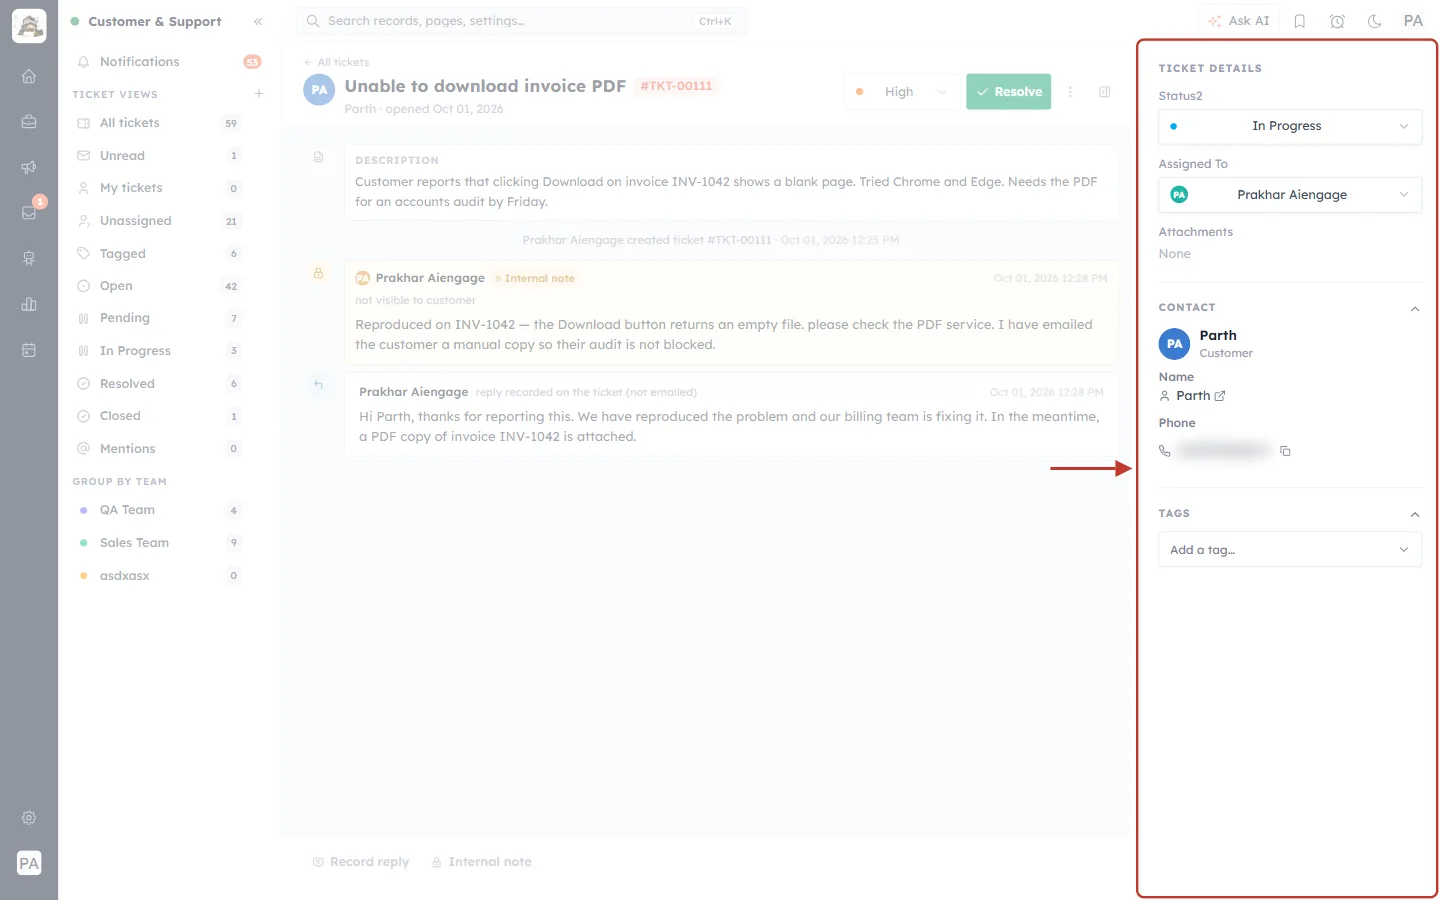
What this screenshot shows. The details panel (ringed) after choosing In Progress. The status now reads In Progress with a blue dot.
The change is saved straight away. There is no separate Save button.
The ticket moves out of the Open view and into In Progress, and the counts in the sidebar update.
The change is also recorded in the ticket’s Timeline in the CRM (Part 5).
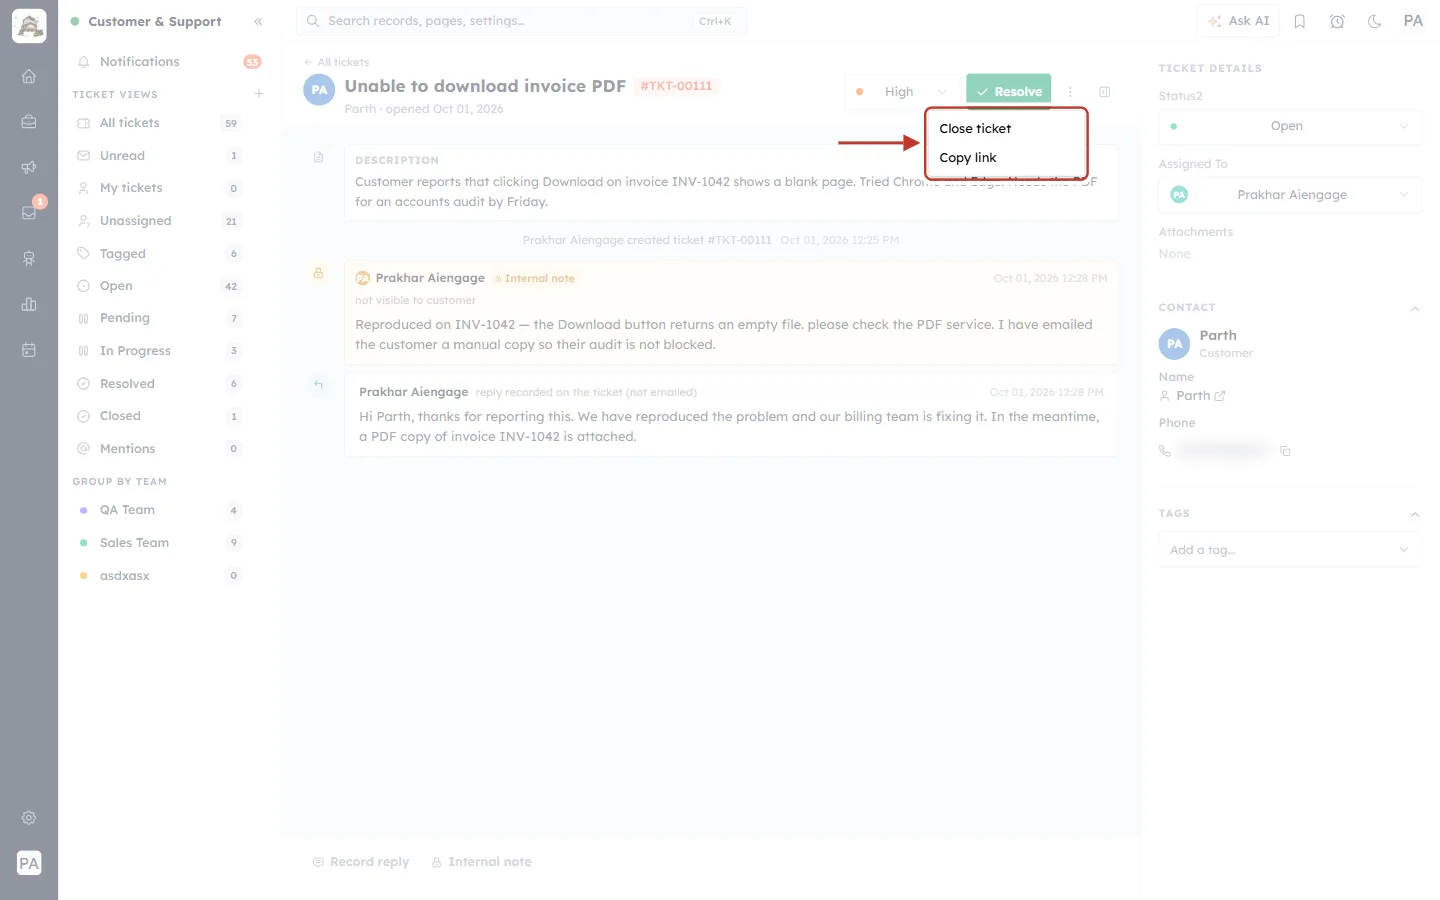
What this screenshot shows. The ⋮ (more) menu in the header is open and ringed.
Close ticket — sets the status to Closed in one click, for tickets that need no further action.
Copy link — copies a direct link to this ticket, ready to paste into a chat with a colleague.
Step 19: Resolve the ticket (and reopen it if needed)#
When the problem is fixed, click the green Resolve button in the header.
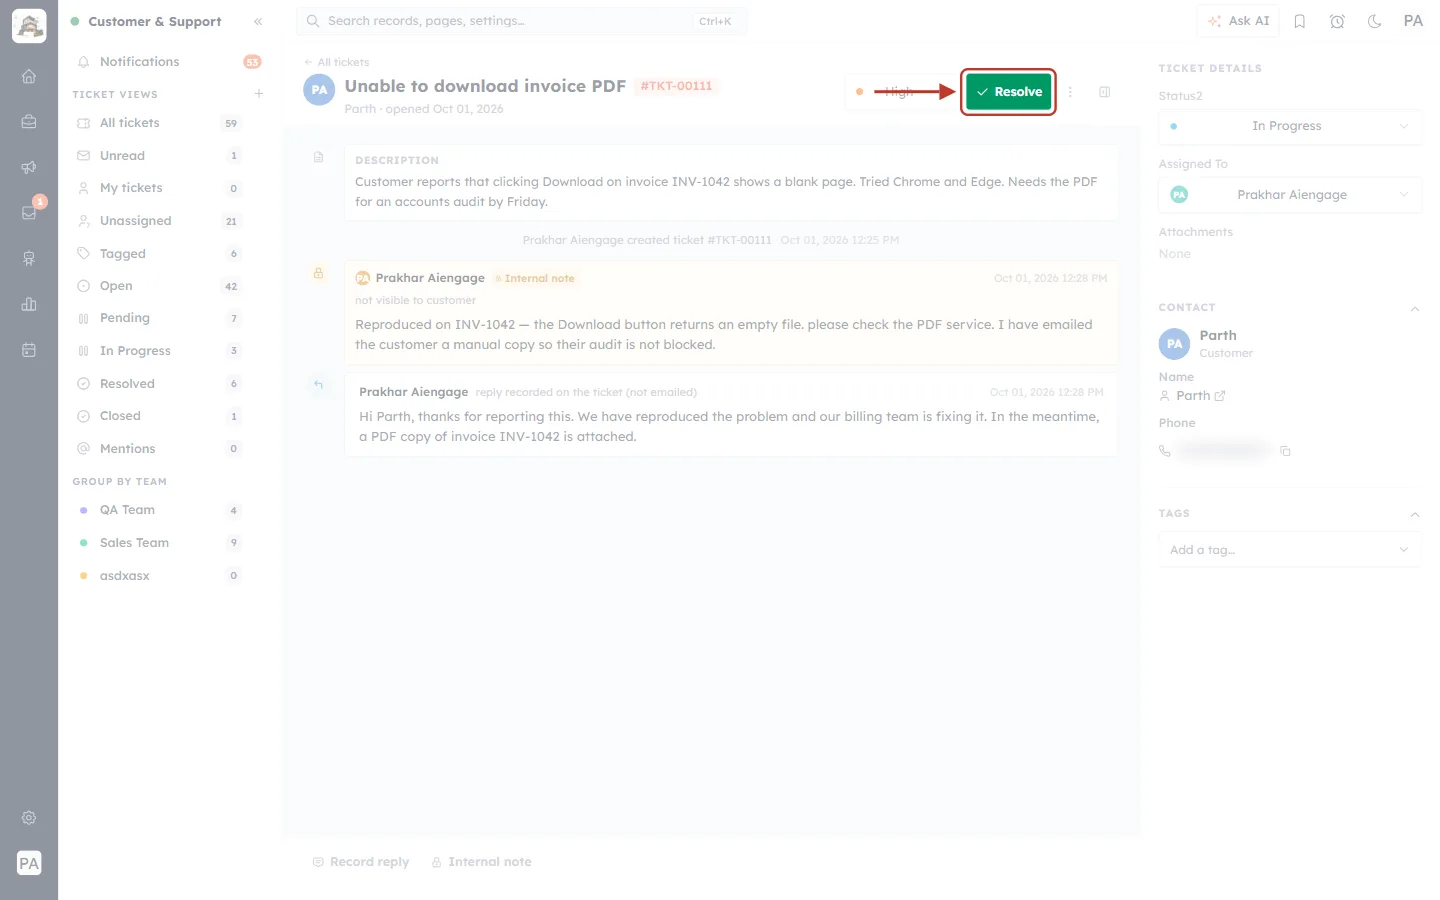
What this screenshot shows. The green Resolve button is ringed.
One click sets the status to Resolved.
Resolve a ticket only once you have told the customer what was done, using Reply (Step 13) or Record reply (Step 15).
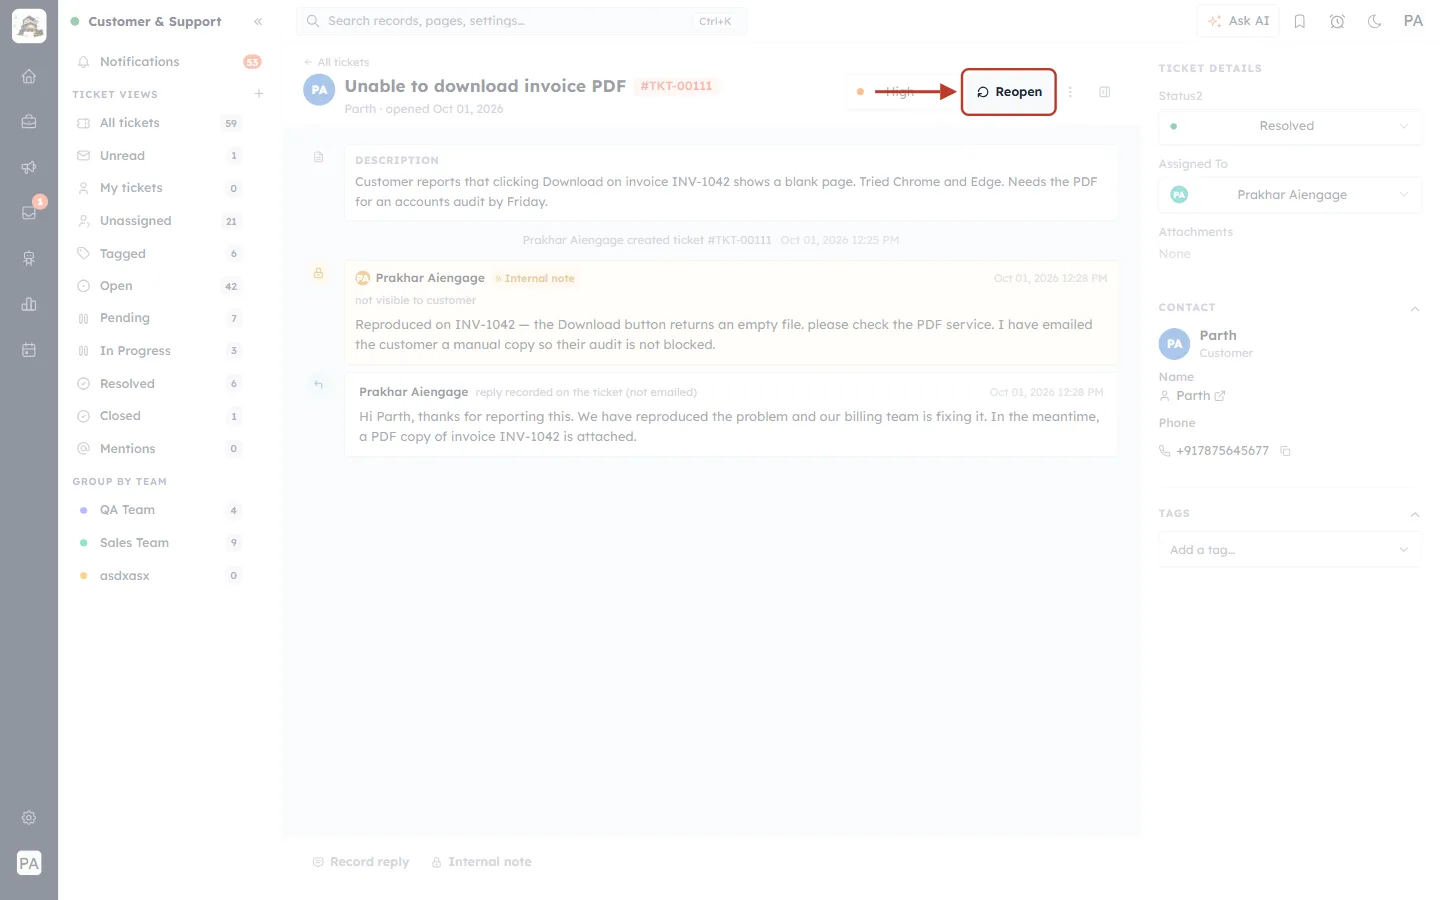
What this screenshot shows. After resolving, the Resolve button is replaced by Reopen (ringed).
If the customer comes back and says the problem is not fixed, click Reopen to make the ticket active again.
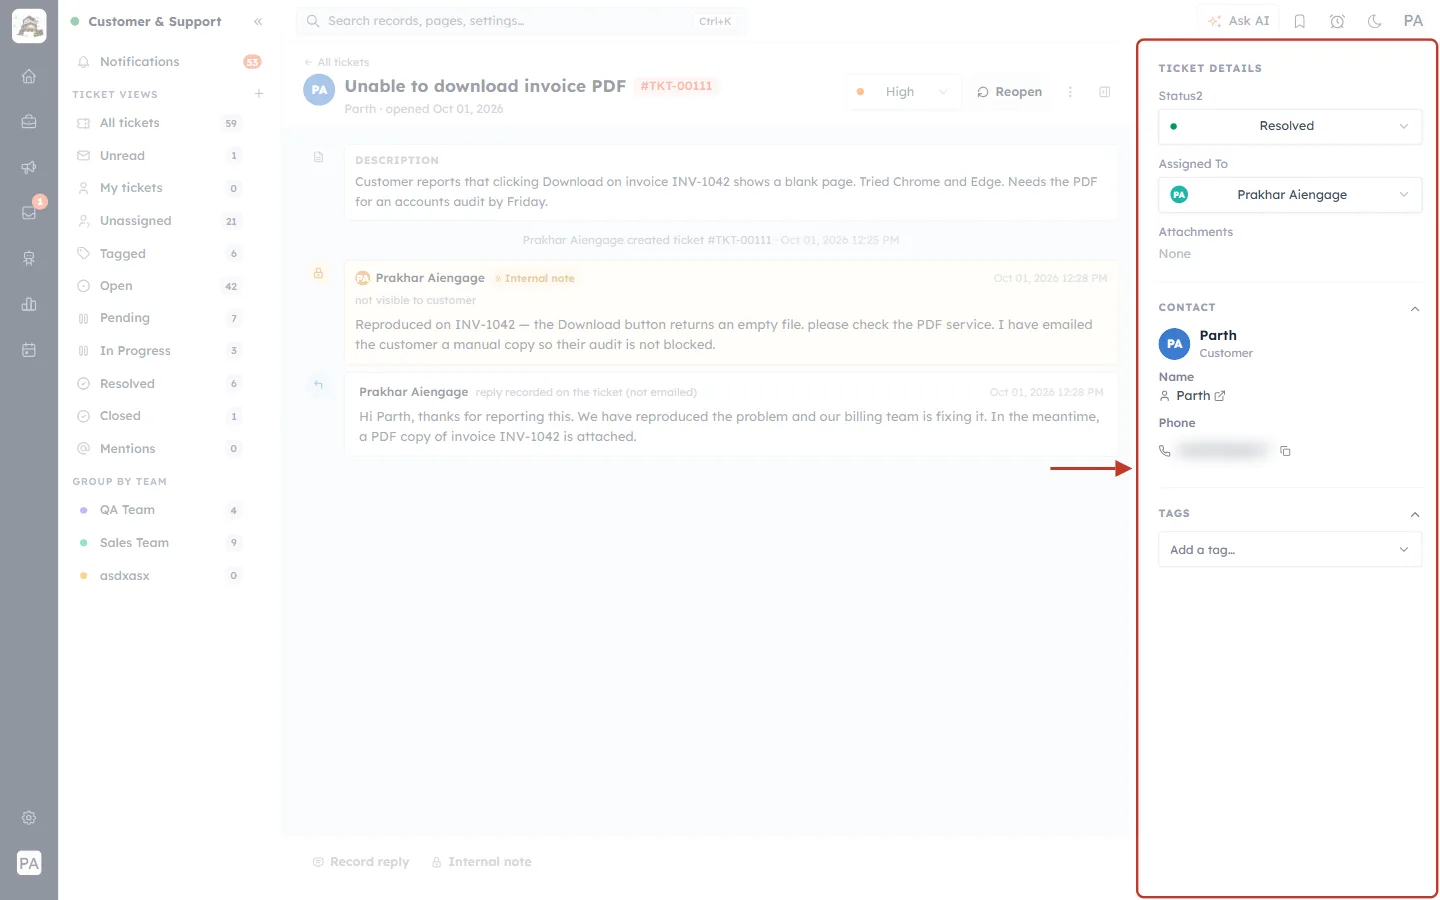
What this screenshot shows. The details panel (ringed) now shows Status: Resolved.
The assignee and contact stay the same, so the history of who handled the ticket is kept.
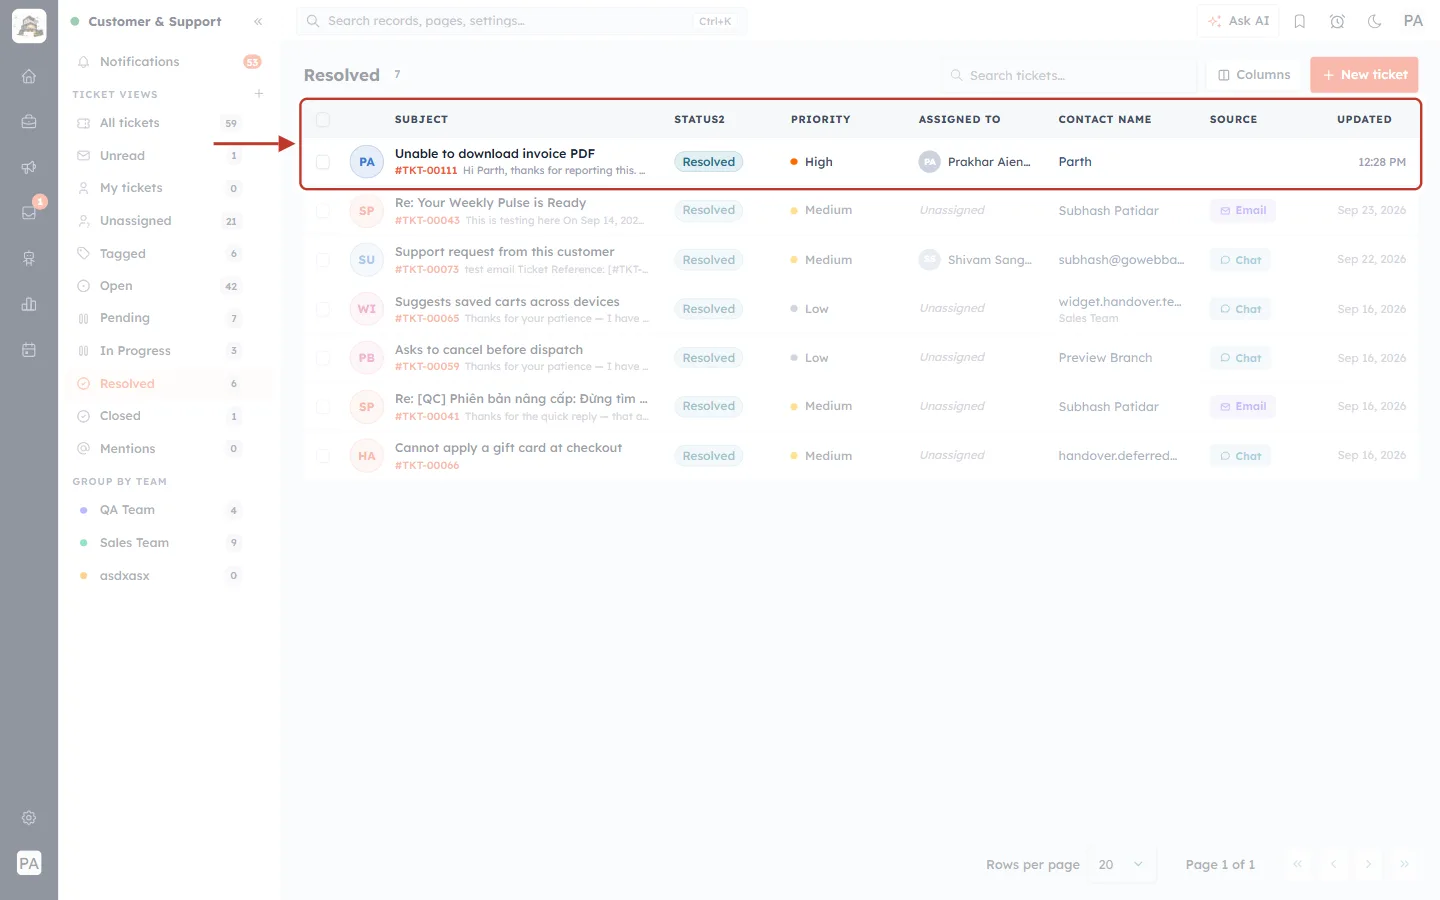
What this screenshot shows. The Resolved view, with the column headings and our resolved ticket (ringed) in the list.
The ticket shows the Resolved status label.
Use this view at the end of the day or week to check what your team has finished, and to close tickets that need nothing more.
ℹ️
Resolved or Closed? Use Resolved when you have fixed the problem but the customer may still reply. Use Closed when the ticket is completely finished. When a ticket is closed, the CRM fills in its Closed Time automatically (Step 21).
Part 5 — Find and manage tickets in the CRM (Sales → Tickets)#
Every ticket is also a record in the CRM’s Tickets module. This is useful for filtering on any field, building a Kanban board, importing or exporting tickets in bulk, and seeing the full timeline of changes.
Step 20: Open the Tickets module#
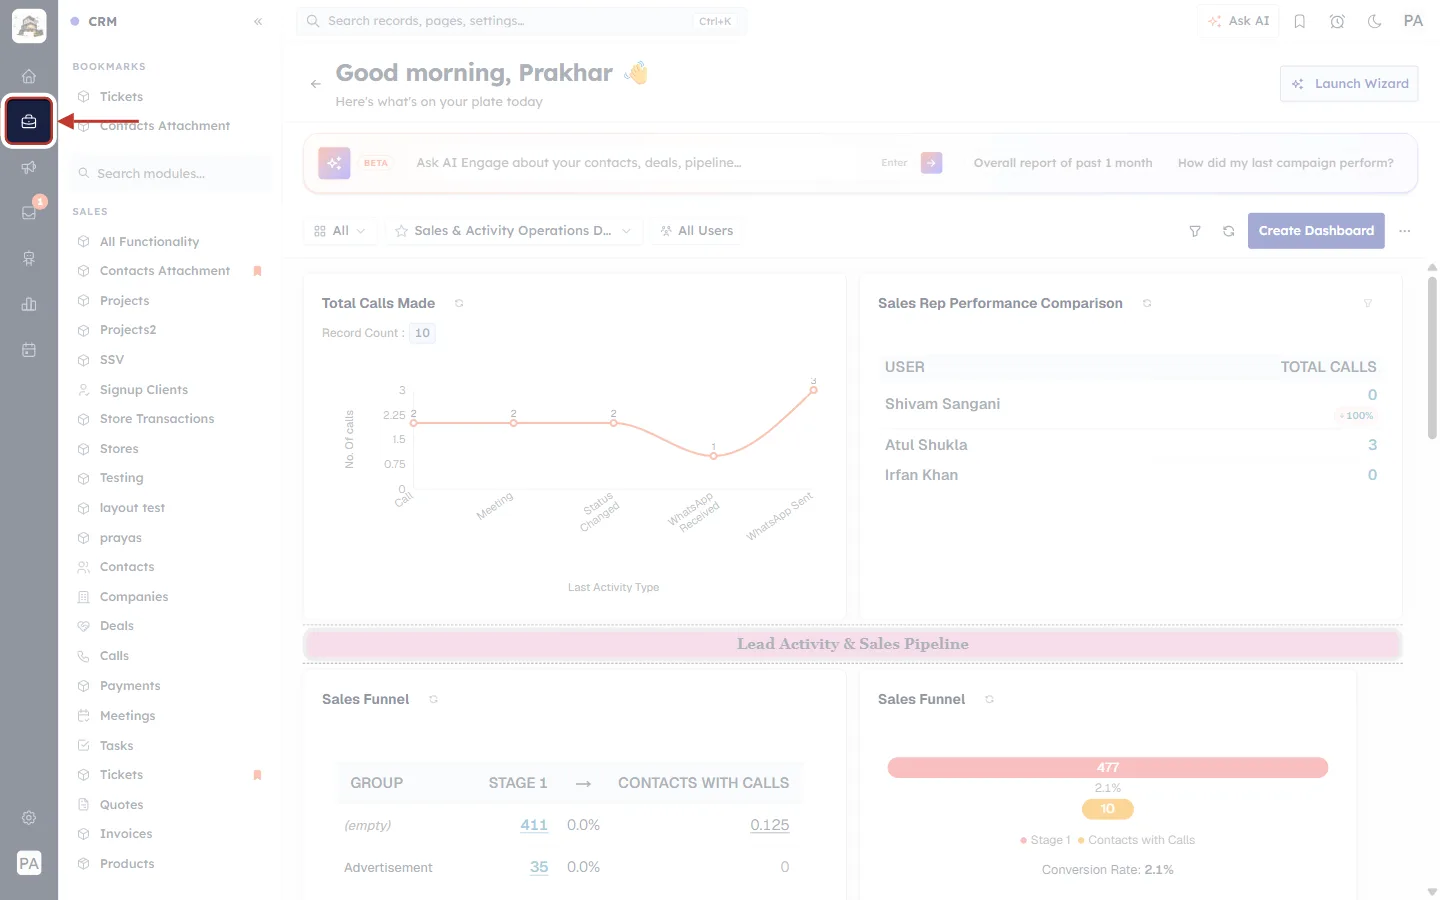
What this screenshot shows. The CRM icon (a briefcase) in the dark left-hand rail is ringed.
Click it to open the CRM menu of modules (Sales).
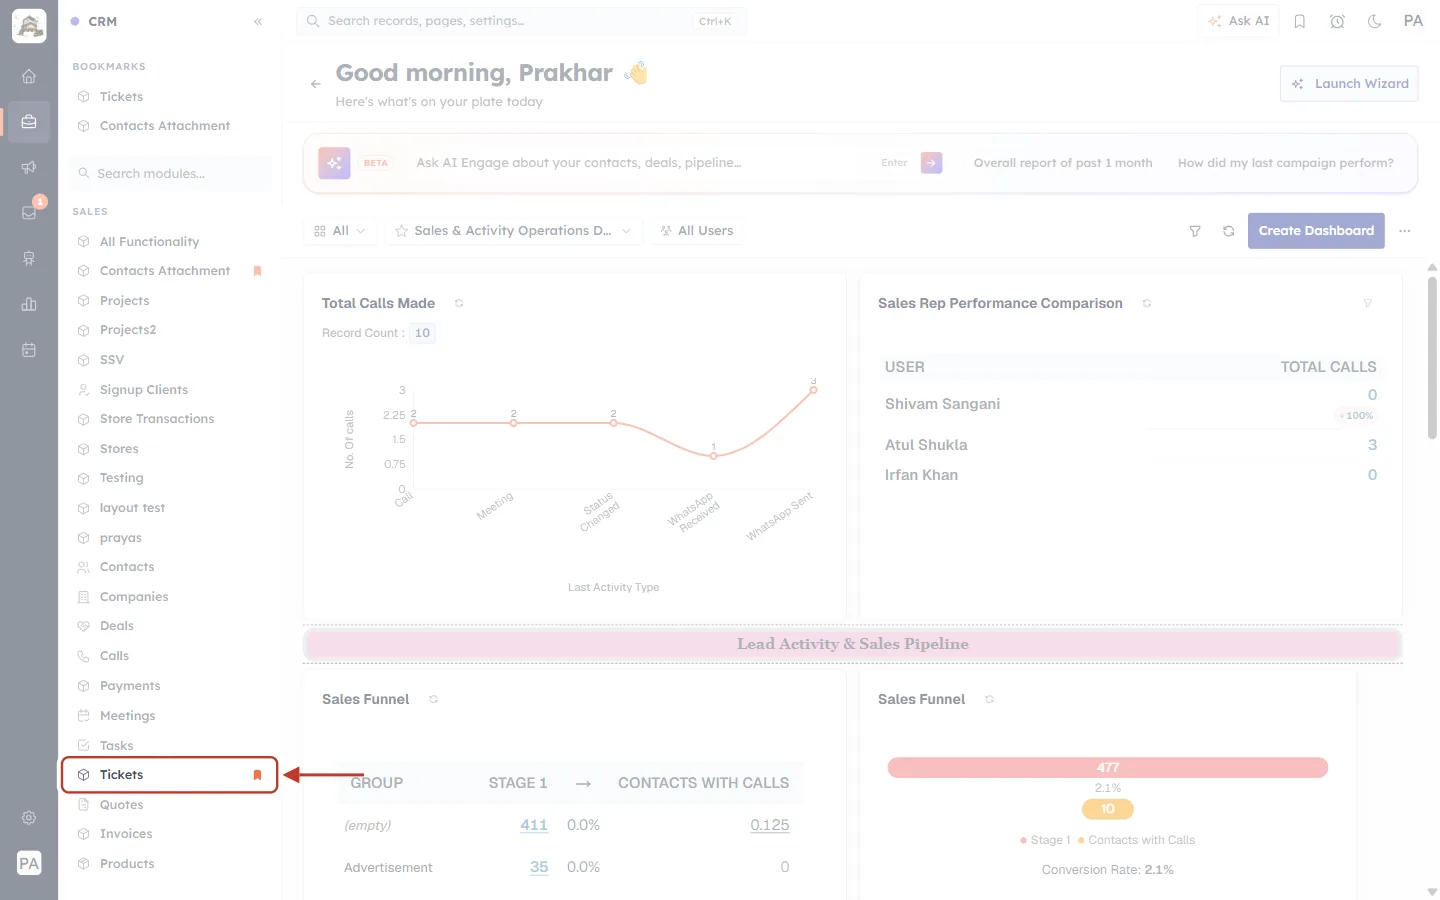
What this screenshot shows. The SALES menu, with Tickets ringed.
Click Tickets to open the module list.
The red bookmark icon beside Tickets shows it is also pinned under BOOKMARKS at the top of the menu, so it is always one click away.
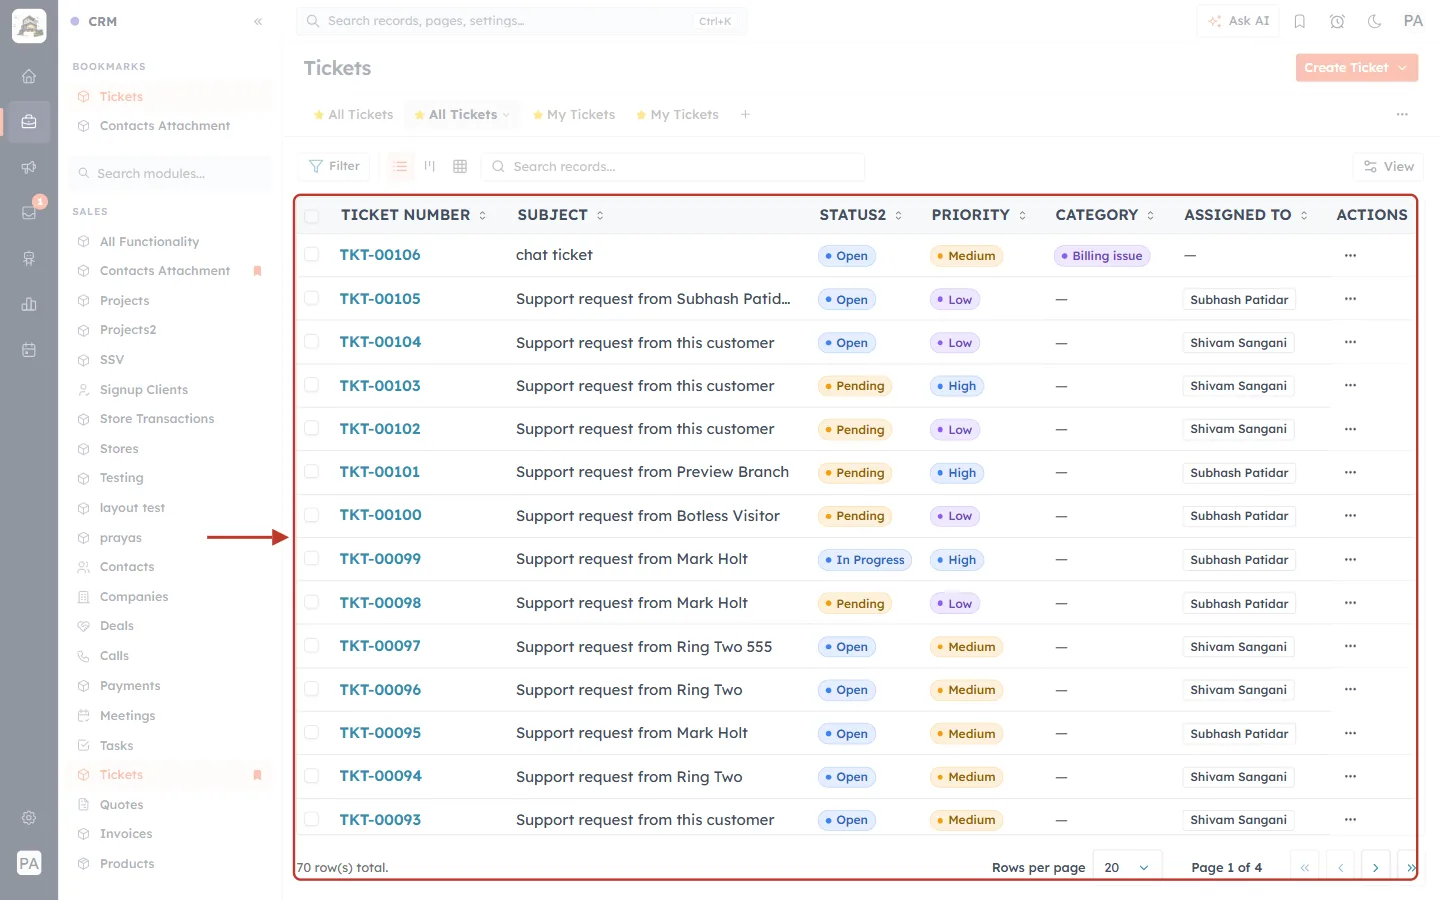
What this screenshot shows. The Tickets module list (ringed). Each row is a ticket record.
Ticket Number (blue link) — click to open the record.
Subject, Status, Priority, Category and Assigned To columns.
Actions (⋯) at the end of each row (Step 24).
Above the list: saved view tabs (All Tickets, My Tickets), Filter, the list / Kanban / grid layout icons, and Search records….
At the bottom: the total number of rows, rows per page and page navigation.
Step 21: Read the ticket record and its timeline#
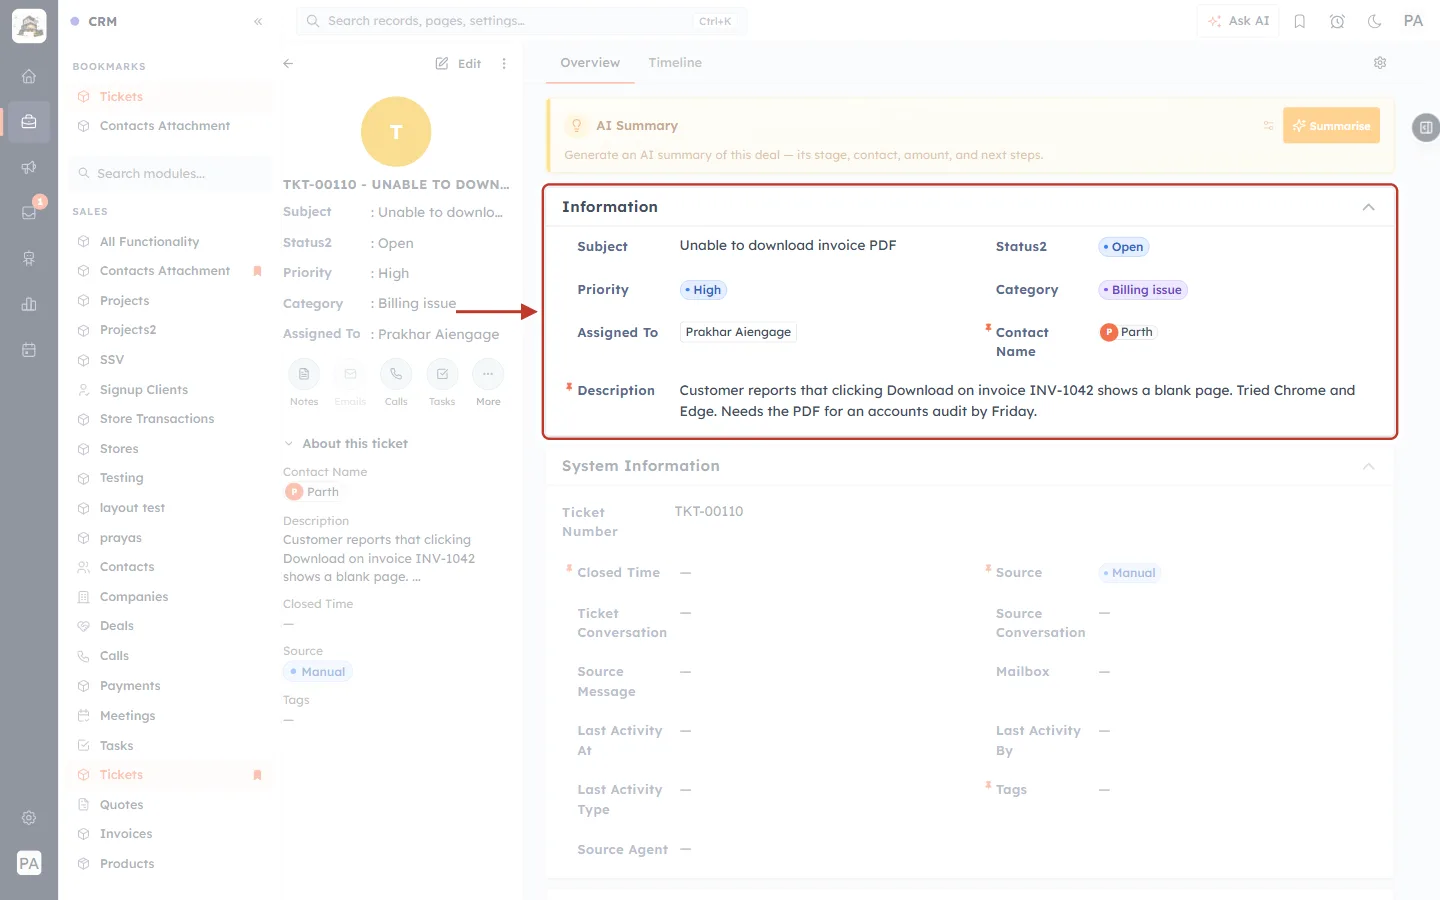
What this screenshot shows. A ticket record’s Information section (ringed): the same fields you filled in on the New ticket form.
Subject, Status, Priority, Category, Assigned To, Contact Name (click it to open the contact) and Description.
Click Edit at the top of the left-hand panel to change any of them.
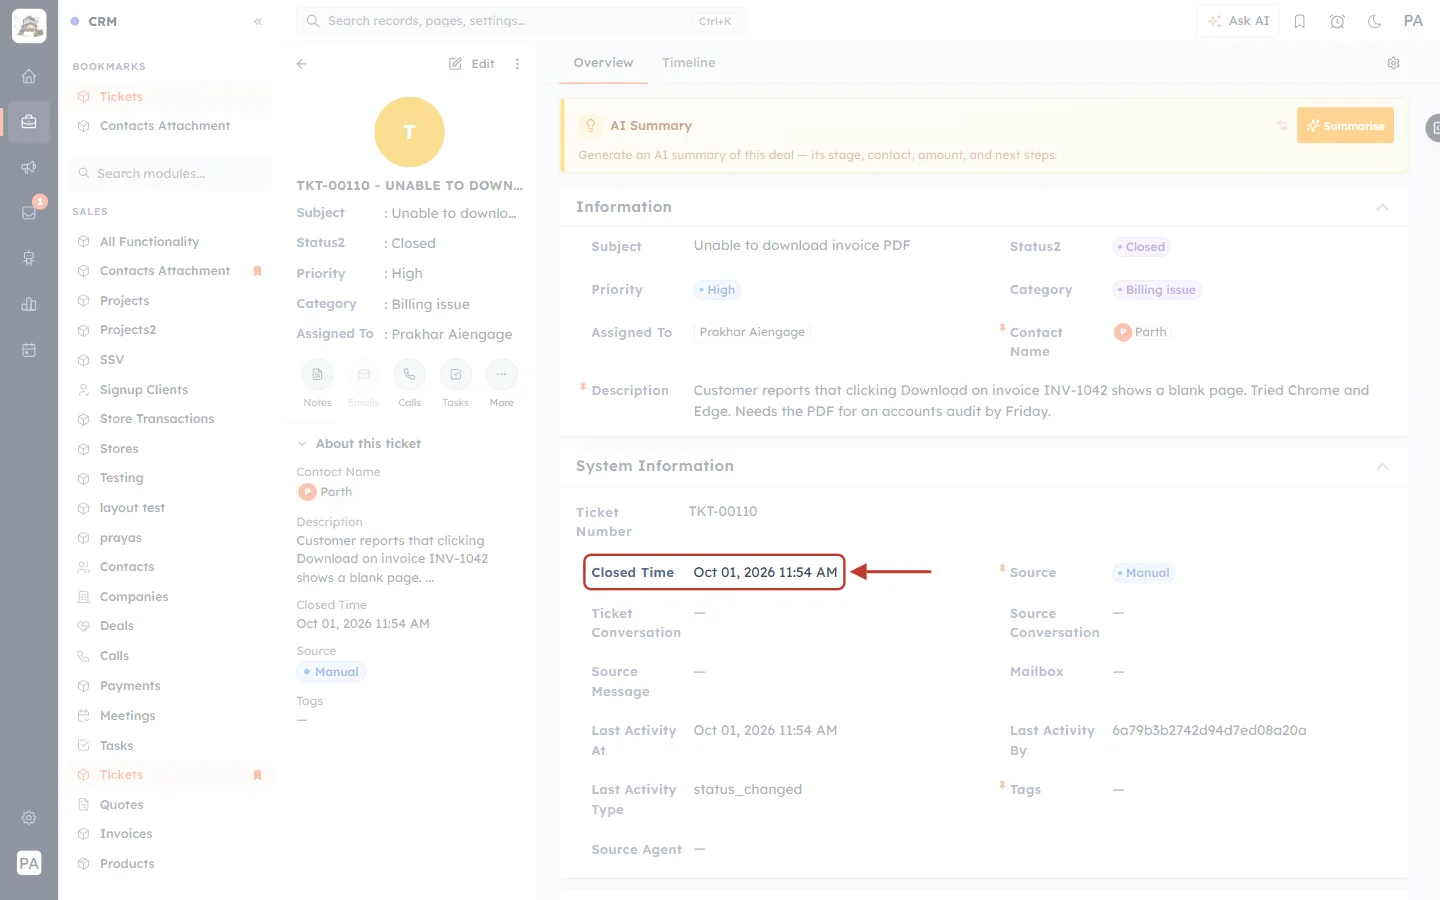
What this screenshot shows. On a ticket set to Closed, the Closed Time field (ringed) has been filled in automatically: Oct 01, 2026 11:54 AM.
You never need to type it. Turn on the Closed Time column (Step 4) to see how long tickets take to close.
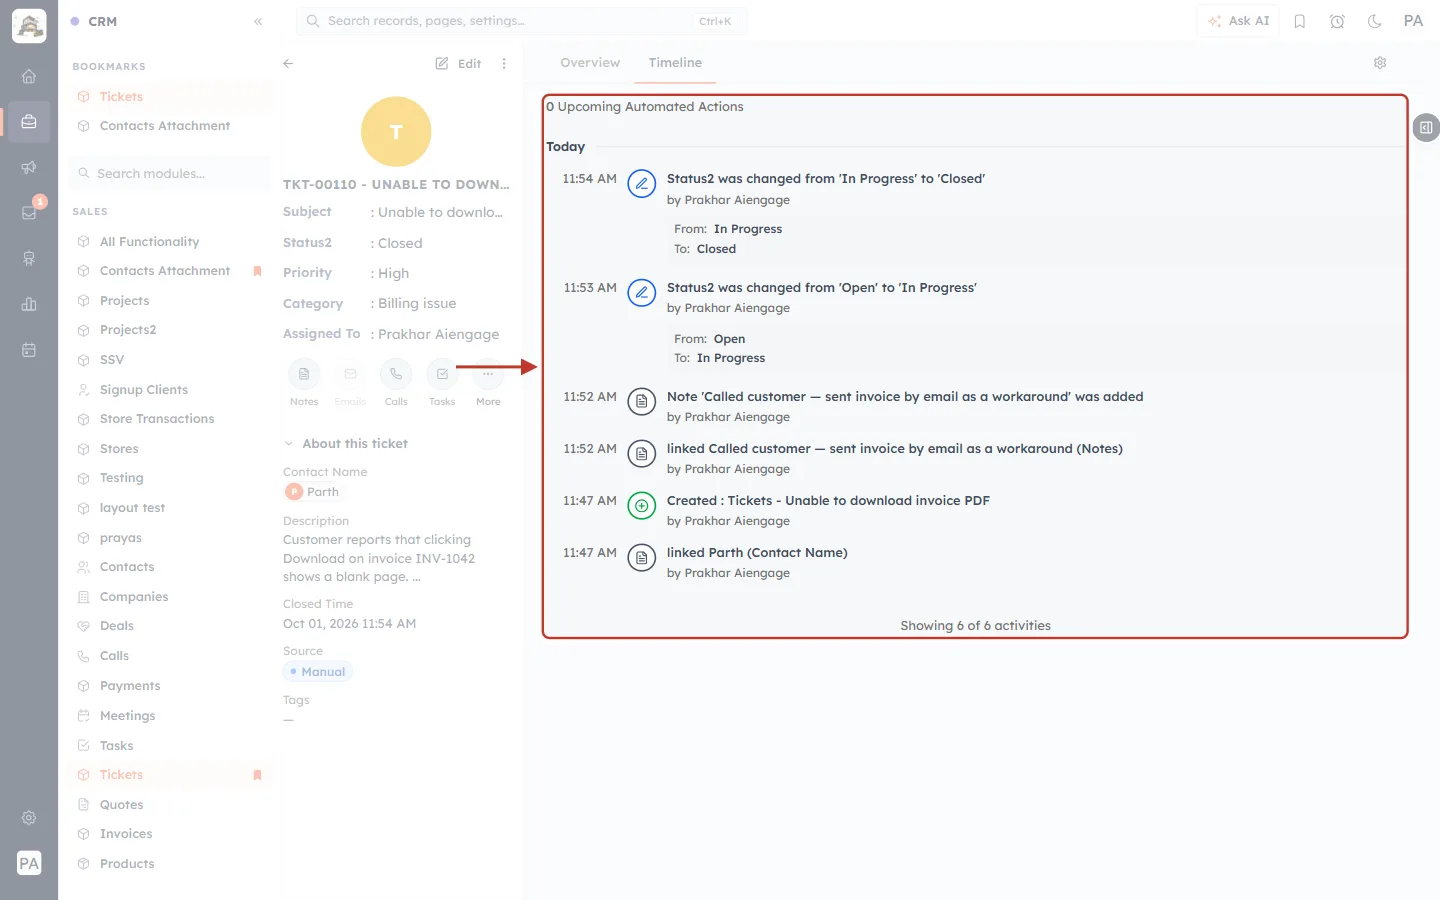
What this screenshot shows. The record’s Timeline tab (ringed) lists every change to the ticket, newest first.
“Status was changed from ‘In Progress’ to ‘Closed’” and “from ‘Open’ to ‘In Progress’”, each with a From / To box and the person who made the change.
“Note … was added” — notes added on the record.
“Created : Tickets - Unable to download invoice PDF” and “linked Parth (Contact Name)” — when the ticket was created and the contact linked.
At the top, Upcoming Automated Actions lists any workflow steps still due to run on this ticket (none here). A count of activities appears at the bottom.
See Track Activity with the Record Timeline for more.
Step 22: Filter tickets by any field#
Click Filter above the list. Tick a field under Filter by Fields, choose values, and click Apply Filter.
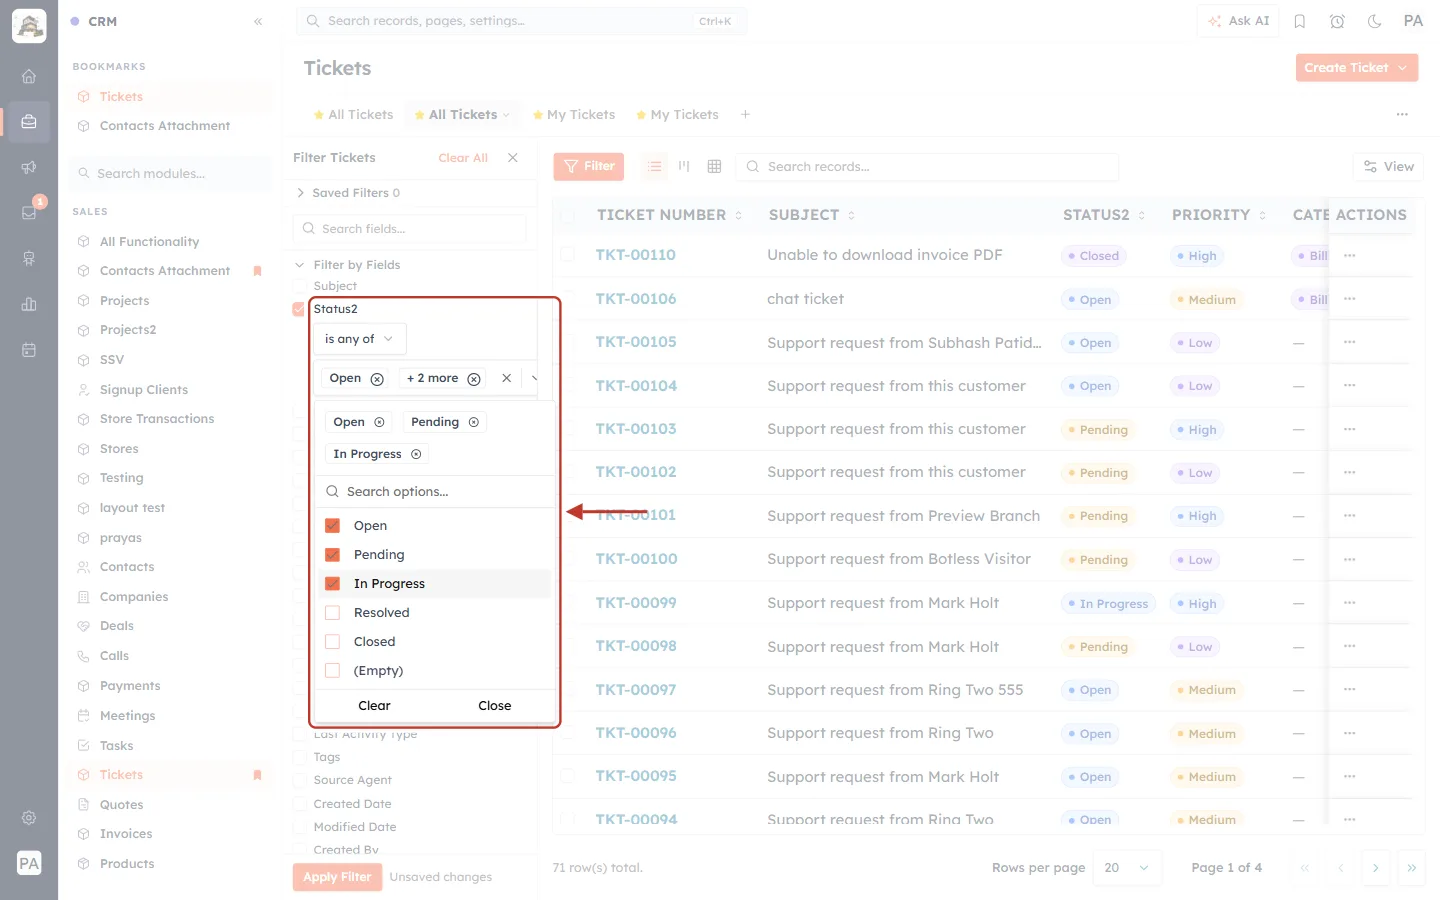
What this screenshot shows. The Filter Tickets panel with Status ticked and its value list open (ringed).
The rule reads is any of, followed by the values you pick.
Open, Pending and In Progress are ticked here, so the filter shows every ticket that is not yet resolved or closed.
(Empty) at the bottom matches tickets with no value. Clear and Close are at the foot of the list.
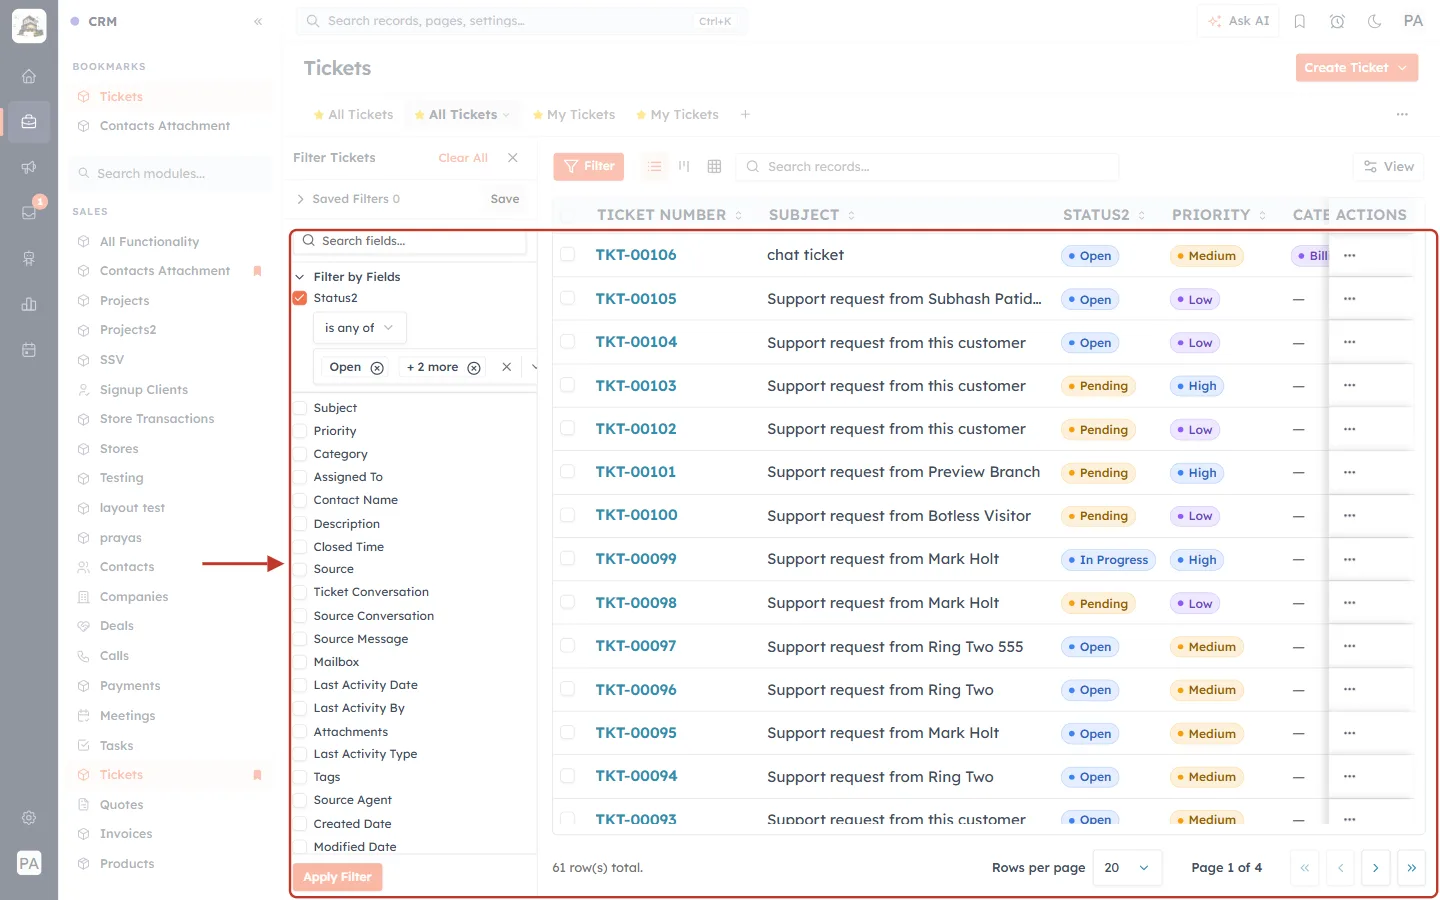
What this screenshot shows. The list after clicking Apply Filter (ringed).
The Filter button is highlighted to show that a filter is on.
Only Open, Pending and In Progress tickets are listed, and the total at the bottom shows how many match.
Save (next to Saved Filters) keeps the filter for next time. Clear All removes it.
You can filter on any ticket field, including Source, Tags, Closed Time and Created Date, and on related modules.
Step 23: See tickets on a Kanban board#
Click the Kanban icon (the middle of the three layout icons next to Filter). The first time, the CRM asks you to set up the board.
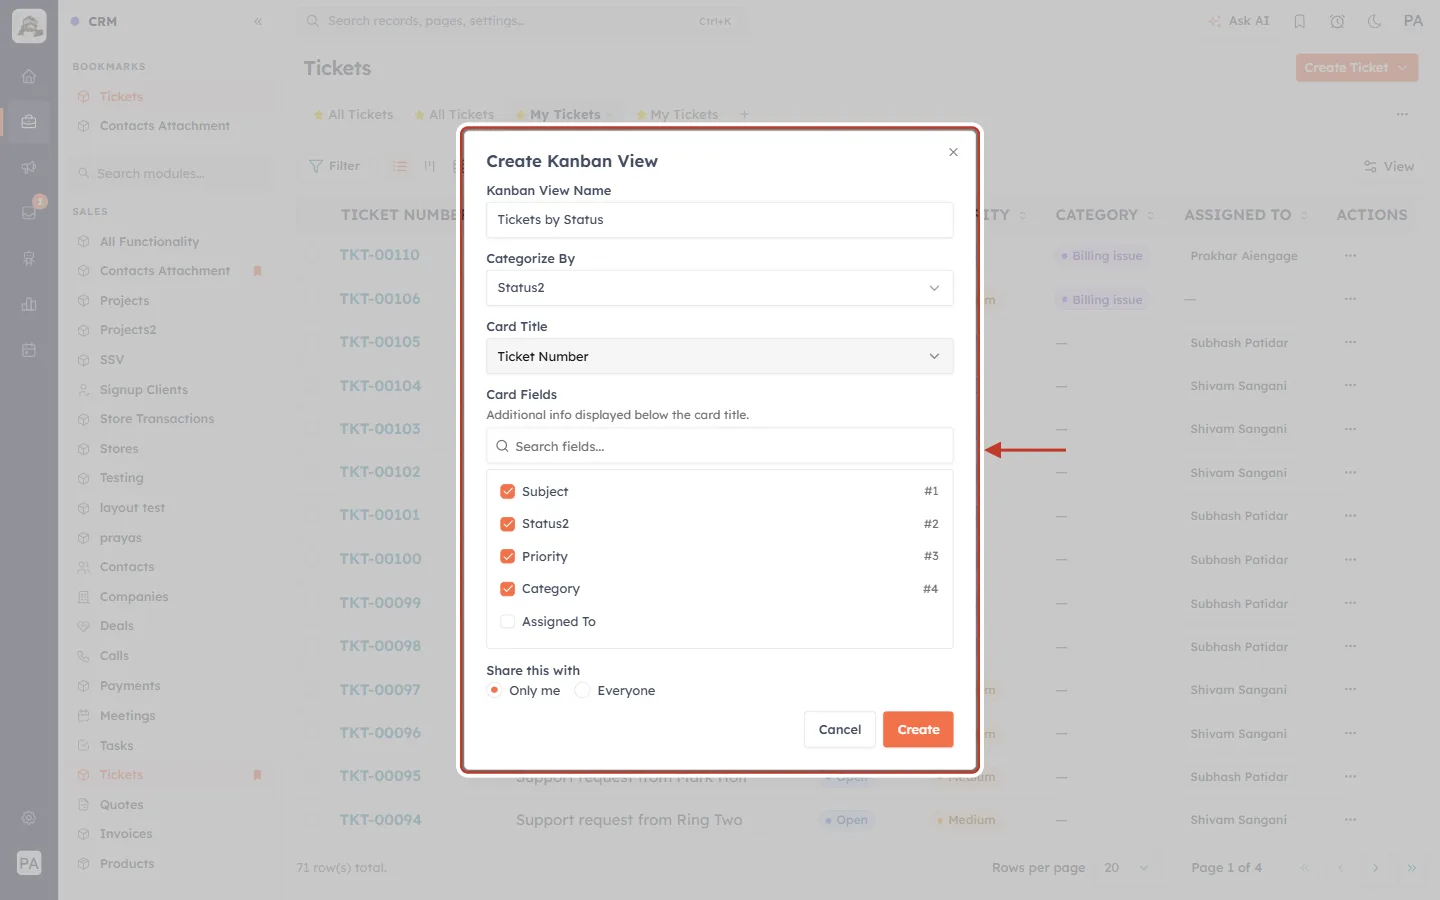
What this screenshot shows. The Create Kanban View dialog (ringed), set up as Tickets by Status.
Kanban View Name — the board’s name.
Categorize By — the pick-list field that becomes the columns. Choose Status for a support board.
Card Title — the main line on each card (Ticket Number).
Card Fields — extra fields shown on each card, in the order numbered on the right (#1 Subject, #2 Status, #3 Priority, #4 Category).
Share this with — Only me or Everyone.
Click Create.
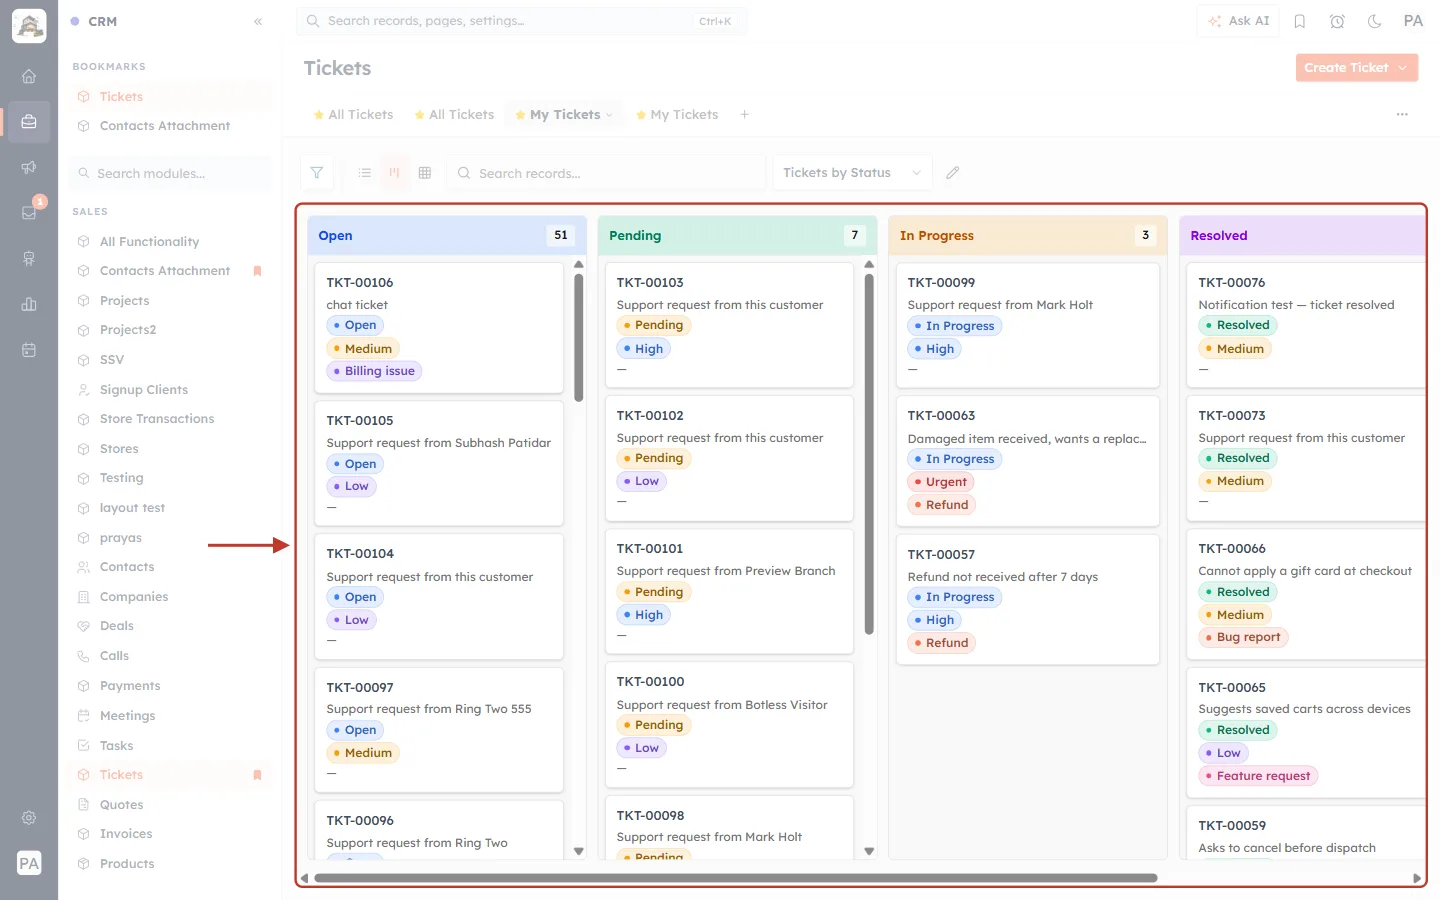
What this screenshot shows. The board (ringed): one column per status, each with its ticket count.
Open, Pending, In Progress, Resolved and more to the right (scroll sideways).
Each card shows the ticket number, subject and coloured status, priority and category labels. Click a card to open the ticket.
A board makes it easy to spot a pile-up, for example many tickets stuck in Pending.
Step 24: Import, export, clone or delete tickets#
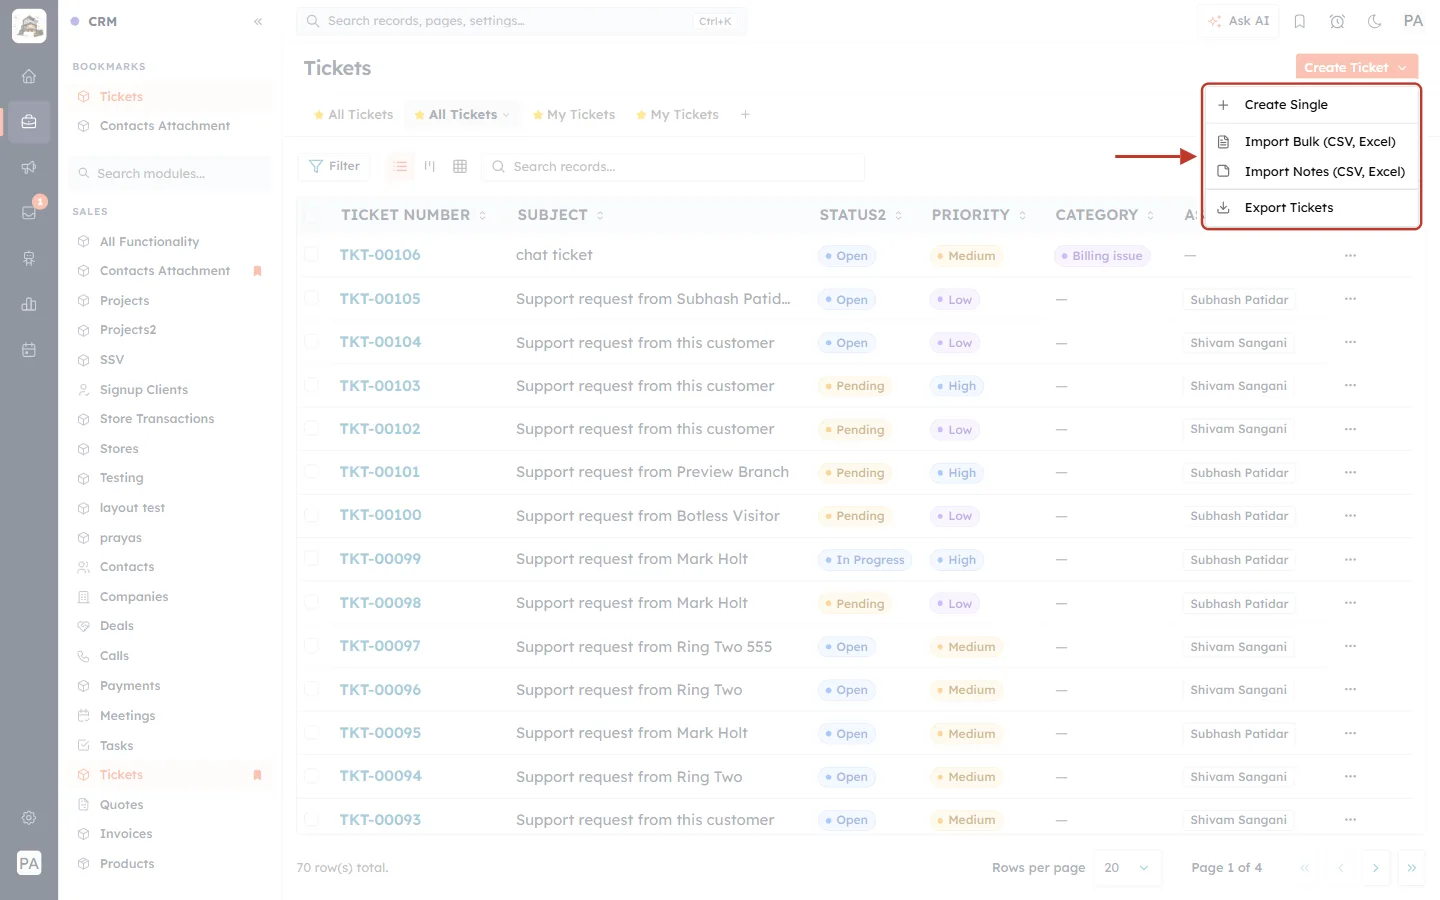
What this screenshot shows. The arrow on the Create Ticket button opens this menu (ringed).
Create Single — the full ticket form.
Import Bulk (CSV, Excel) — bring in tickets from another help desk or a spreadsheet.
Import Notes (CSV, Excel) — add notes to existing tickets in bulk.
Export Tickets — download tickets for reporting or backup.
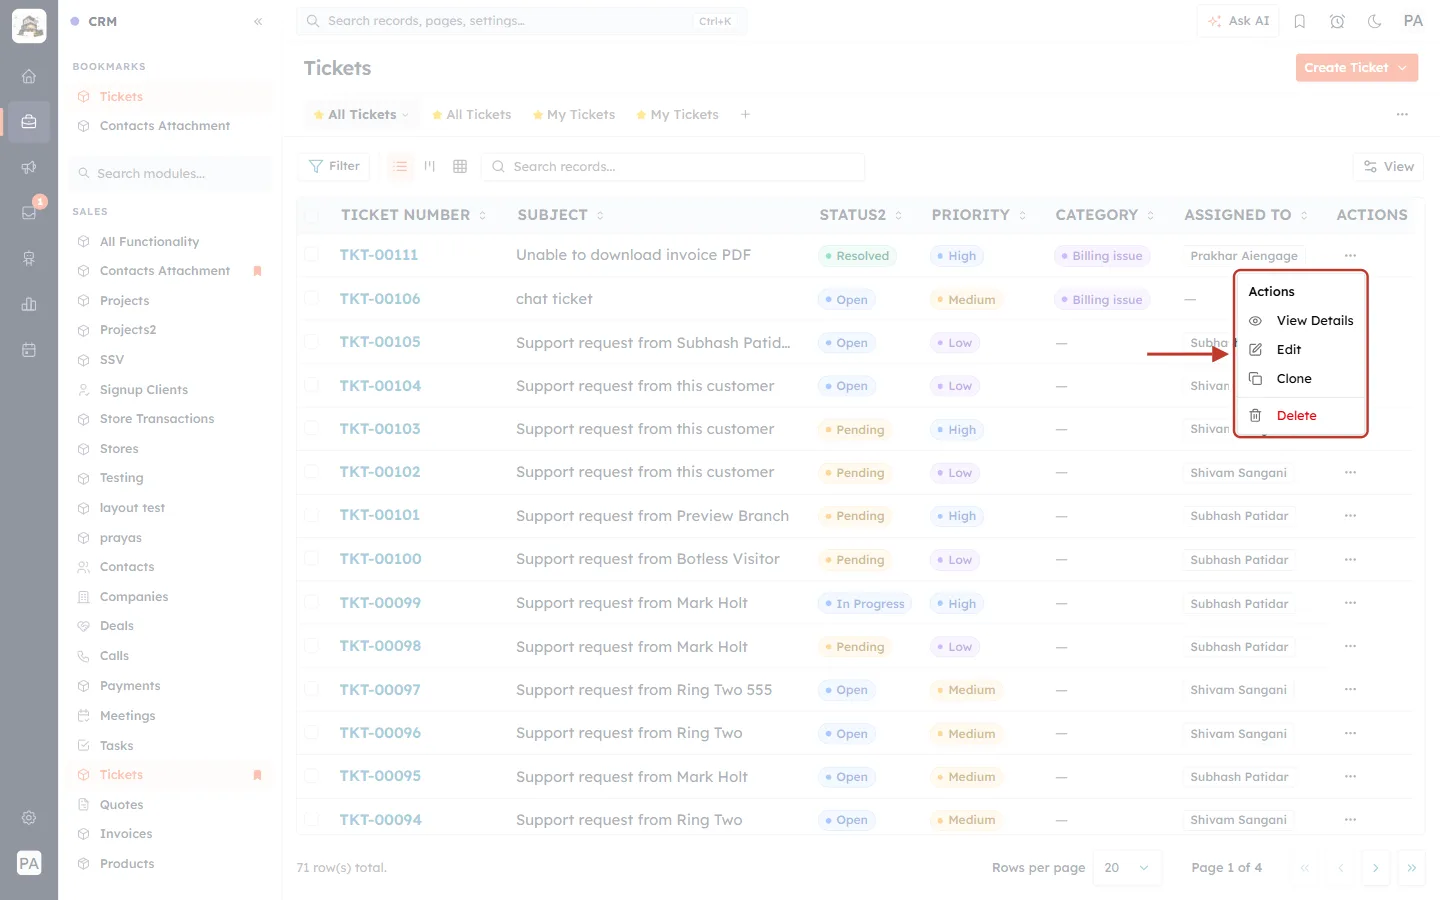
What this screenshot shows. The ⋯ menu at the end of a ticket row is open (ringed).
View Details — open the record.
Edit — change its fields.
Clone — copy it as a starting point for a similar ticket.
Delete — remove it permanently (next figure).
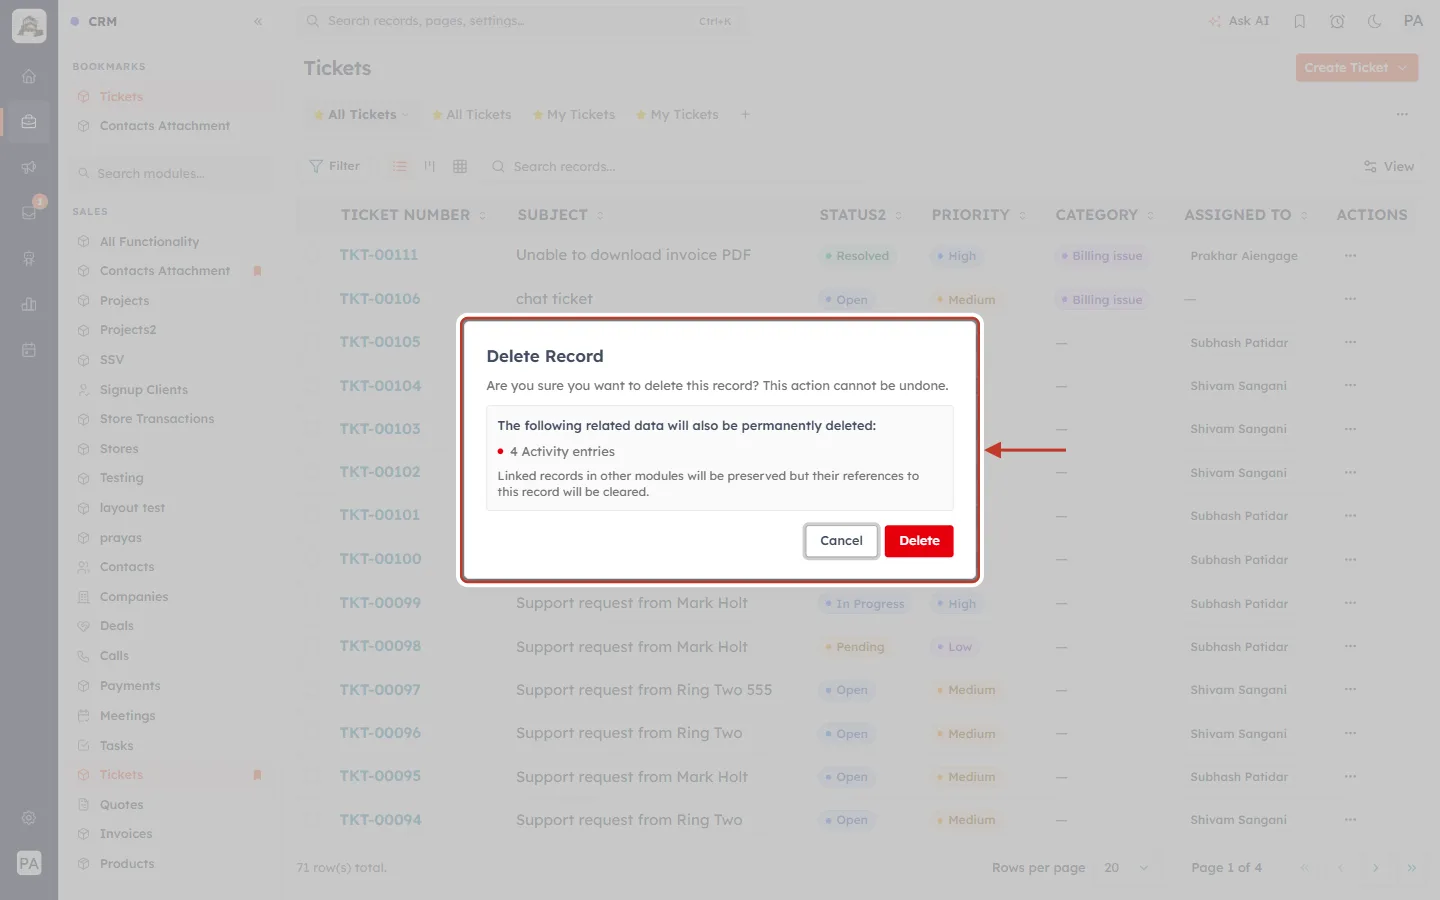
What this screenshot shows. The Delete Record confirmation (ringed).
“Are you sure you want to delete this record? This action cannot be undone.”
It lists the related data that will be deleted with it, here 4 Activity entries. Notes on the ticket are listed too, when there are any.
“Linked records in other modules will be preserved but their references to this record will be cleared.” The contact is kept. Only its link to this ticket goes.
Cancel keeps the ticket; Delete removes it.
⚠️
Deleting a ticket also deletes its notes and history, and it cannot be undone. To finish a ticket, set it to Closed instead. Delete only tickets created by mistake, such as duplicates or tests.
Part 6 — For admins: where support is set up#
Email-to-ticket, the reply address, customer notifications and the chat widget are configured under Service & Support Settings. To get there, press Ctrl+K (Cmd+K on a Mac), type Support Email and choose Support Email (Mailboxes).
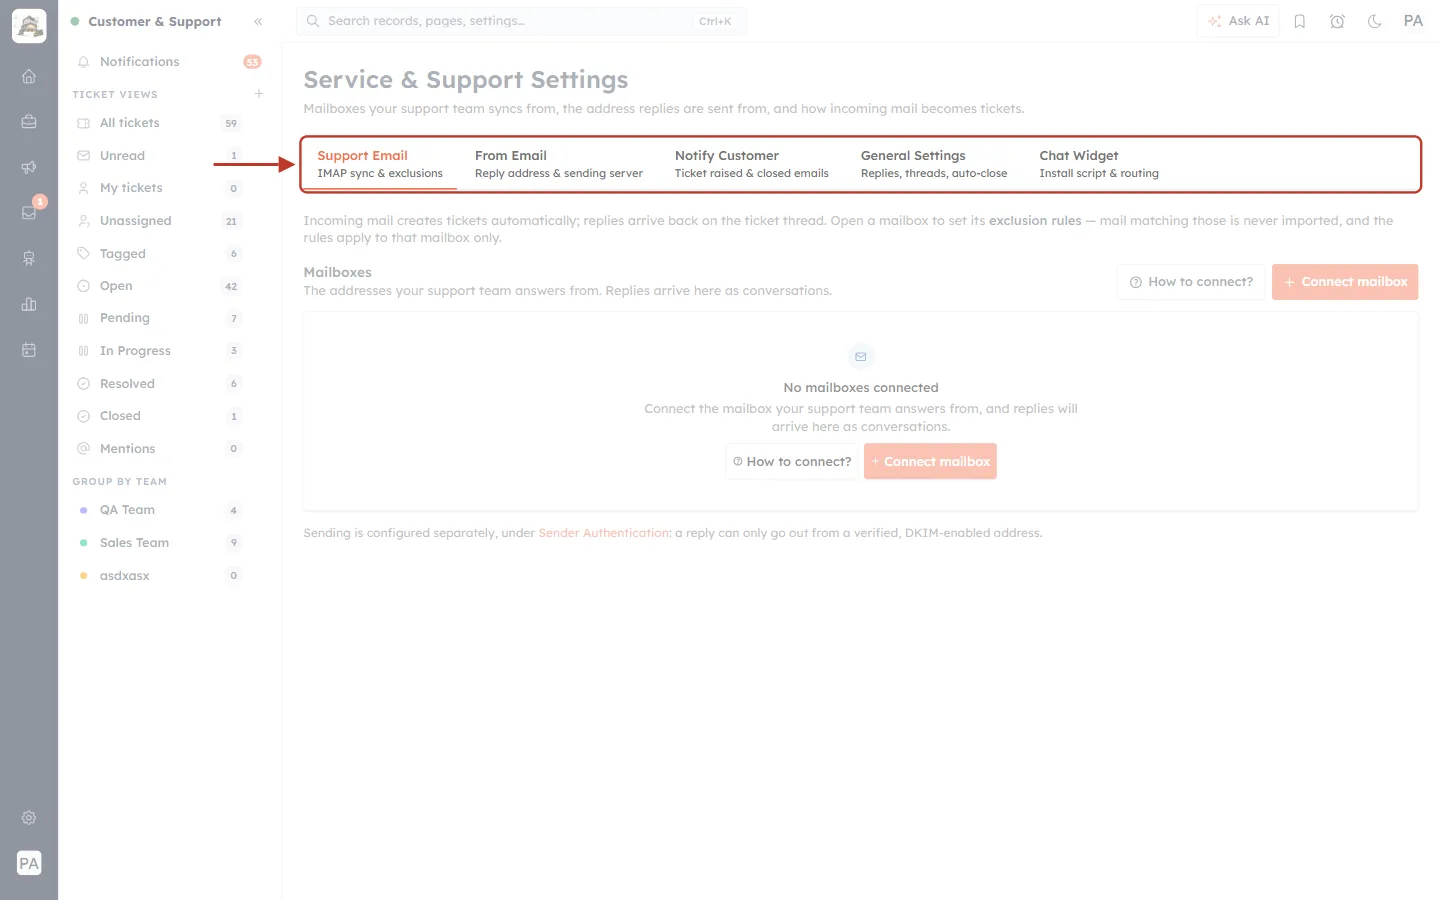
What this screenshot shows. The Service & Support Settings tabs (ringed). “Incoming mail creates tickets automatically; replies arrive back on the ticket thread.”
Support Email — IMAP sync & exclusions: connect the mailbox your team answers from. Each email that arrives becomes a ticket. Open a mailbox to set exclusion rules; matching mail is never imported.
From Email — Reply address & sending server: the address your replies come from. A reply can only go out from a verified, DKIM-enabled address (set up under Sender Authentication).
Notify Customer — Ticket raised & closed emails: the automatic emails customers get when a ticket is opened or closed.
General Settings — Replies, threads, auto-close.
Chat Widget — Install script & routing: the website chat that can raise tickets.
A good day-to-day routine#
Start in My tickets and work through them from the highest priority down.
Team leads check Unassigned and hand tickets out with Assigned To.
Glance at Notifications for customers waiting in chat or asking for a live agent.
When you are waiting on the customer, set the ticket to Pending so it leaves your active list.
Leave an Internal note whenever you hand over or pause a ticket.
Tell the customer what was done, then click Resolve. Close tickets that need nothing more.
Troubleshooting#
I can’t see Reply, Reply all or Forward, only Record reply. The ticket’s contact has no email address. Add an email address to the contact record (click the ↗ next to their name in the CONTACT card), or use Record reply to log an answer given another way.
The Create ticket button stays grey. A required field is empty. Subject, Status and Priority are required.
The Conversation field says there are no conversations. Only chats with the chosen contact from the last 24 hours are listed. Older chats can’t be attached, but you can still open them from the Team Inbox.
A ticket I expected is missing from a view. Check the view’s status. For example, resolved tickets leave Open and appear under Resolved. Also check that you are allowed to see tickets assigned to others, which depends on your profile and sharing rules.
My reply was sent but the customer’s answer created a new ticket. Keep the ticket number in square brackets (for example [#TKT-00105]) in the email subject. That is how incoming replies are matched to the right ticket.
I clicked Resolve by mistake. Click Reopen in the ticket header, or change the Status back in the details panel.
Related#
Was this article helpful?
Ready to implement this?
OpenAI Engage and apply what you just learned to your own workspace.
Open AI Engage CRM