Loading…


KnowledgeBase
Customer & Support FAQ & Troubleshooting: Fix Common Ticket, Email, Chat and Permission Problems
How to use this page#
This page collects the questions support teams ask most often about Customer & Support in AiEngage CRM, and the fix for each one. Every answer explains why it happens, gives the steps to fix it, shows a screenshot of the exact setting or screen, and links to the full step-by-step guide.
Find your problem in the table, then jump to that section.
| Area | Typical questions | Section |
|---|---|---|
| Finding your way | Where are the settings? Why don’t the counts match? Where did the details panel go? | 1 |
| Emails don’t become tickets · mailbox won’t connect · replies go from the wrong address | 2 | |
| Customer notifications | Customer not told the ticket was closed · resolve without emailing | 3 |
| Replies | Only “Record reply” is shown · can’t schedule an email | 4 |
| Ticket lifecycle | Ticket reopened by itself · ticket closed by itself | 5 |
| Chat | Widget not on the website · customer asked for an agent and nobody came · turn a message into a ticket | 6 |
| Team & permissions | Agent can’t see All tickets · can’t reply to a chat · missed @mentions | 7 |
| Fields, import & reports | “Status2” label · Import Notes stuck · closed tickets missing from a report | 8 |
ℹ️
Most fixes in sections 2, 3, 5 and 6 are made by an administrator in Settings (gear) → Service & Support Settings. If you’re an agent, send this page to your admin.
1. Finding your way around#
Where are the Customer & Support settings?#
All support settings are in one place, Settings (gear) → Service & Support Settings. The page has five tabs.
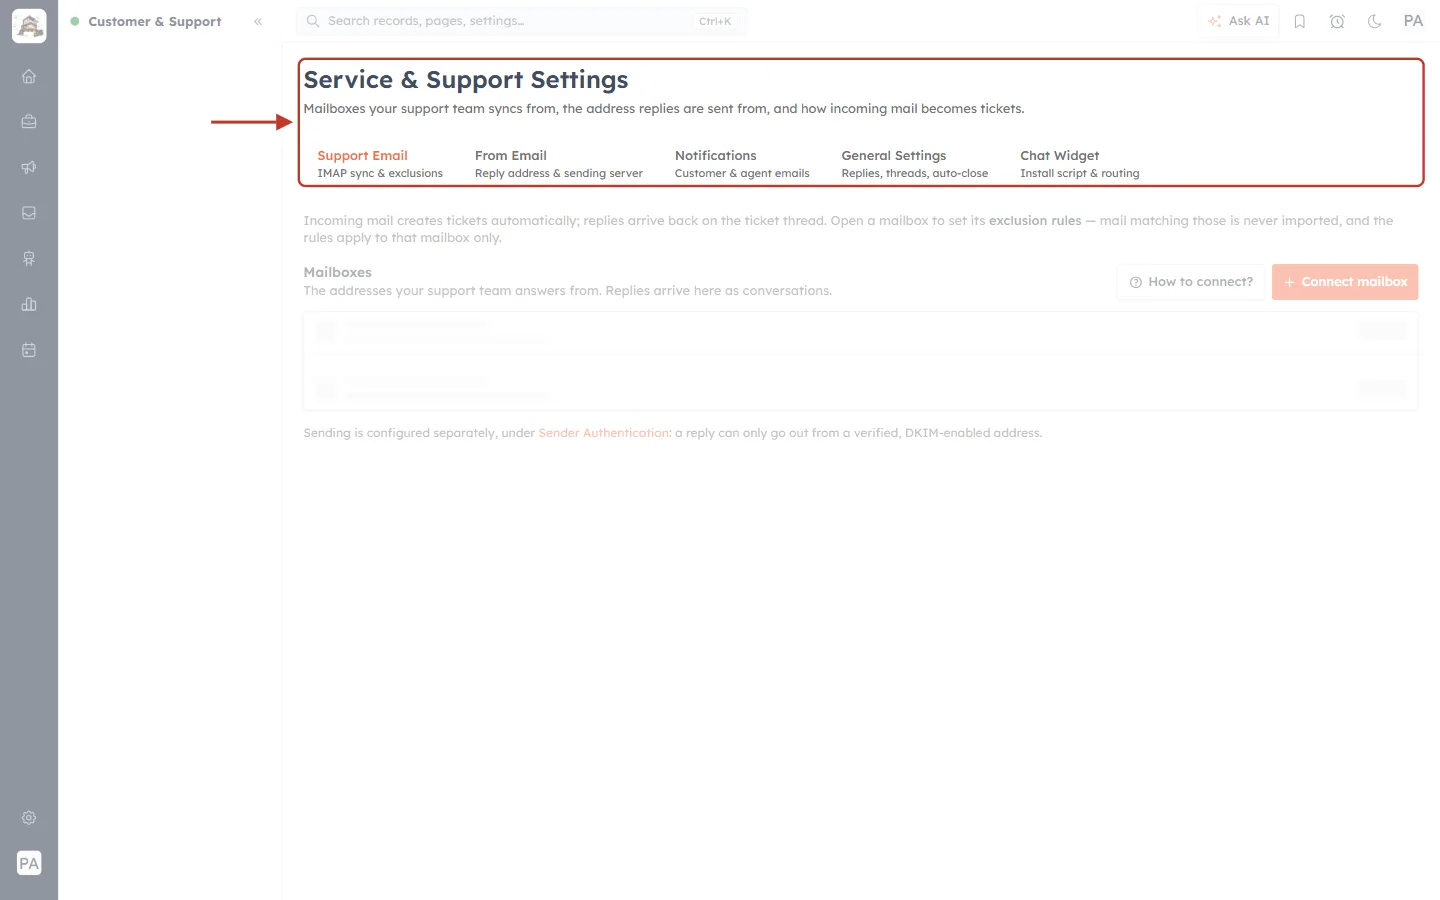
What this screenshot shows. The heading Service & Support Settings and its five tabs are ringed.
Support Email — IMAP sync & exclusions: connect the mailbox customers write to (section 2).
From Email — Reply address & sending server: the address your replies are sent from.
Notifications — Customer & agent emails: the automatic emails customers and agents get (section 3). In older versions this tab is called Notify Customer, as in some screenshots below.
General Settings — Replies, threads, auto-close: reopen and auto-close rules (section 5).
Chat Widget — Install script & routing: the website chat (section 6).
Why don’t the sidebar counts match the list?#
Why it happens: the numbers next to each view in the sidebar are refreshed separately from the ticket list, so for a short time they can be behind — for example the sidebar says All tickets 59 while the list header says All tickets 71.
How to fix it: nothing is wrong with your tickets. Reload the page to refresh the counts. The list itself is always up to date.
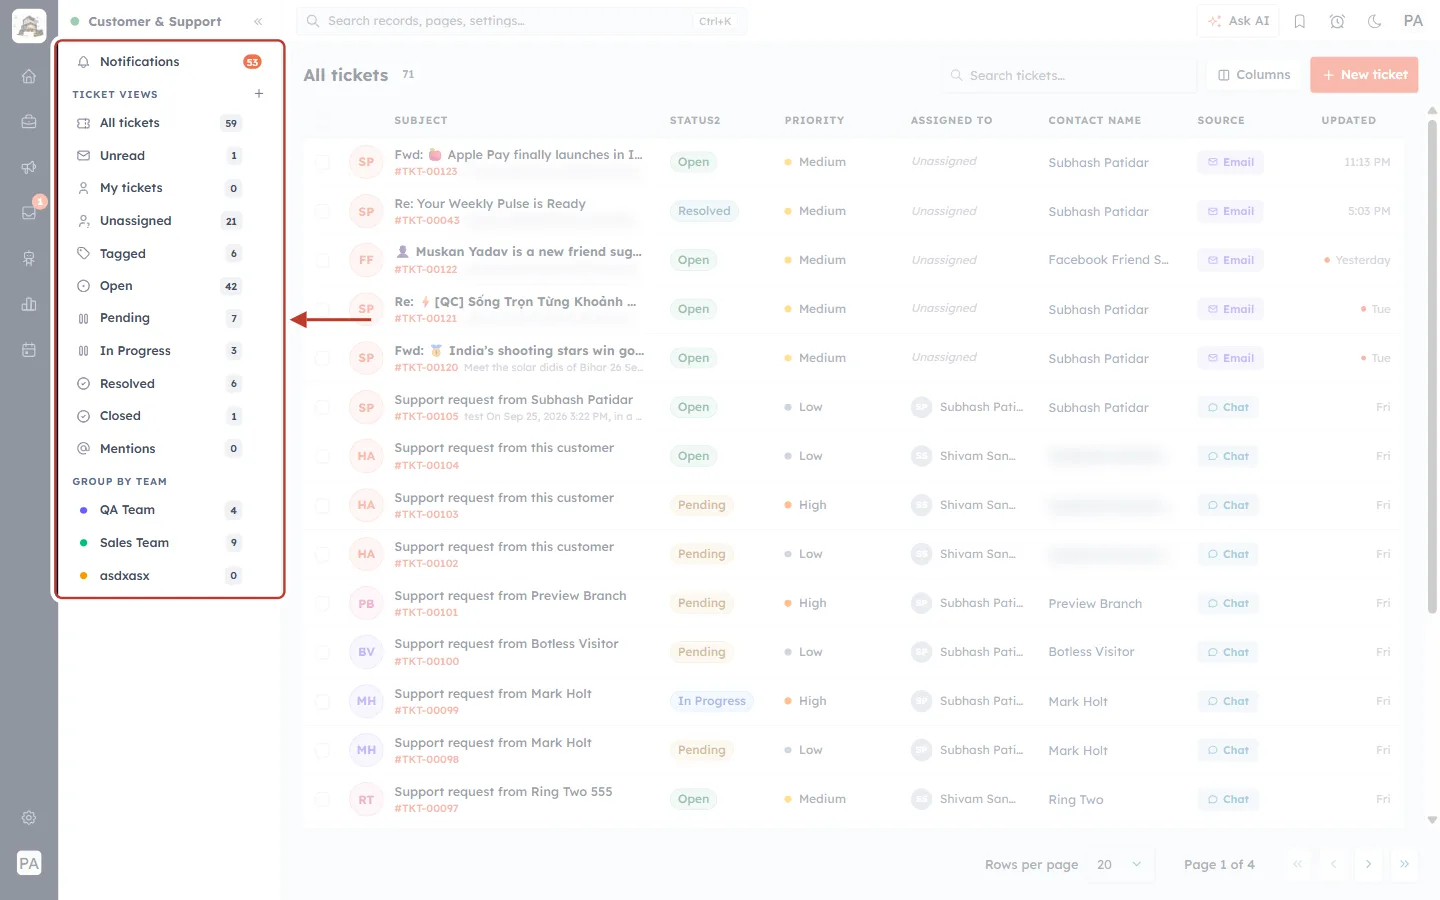
What this screenshot shows. The sidebar of the Customer & Support workspace is ringed.
Notifications with its unread badge, then TICKET VIEWS: All tickets, Unread, My tickets, Unassigned, Tagged, one view per status (Open, Pending, In Progress, Resolved, Closed) and Mentions.
GROUP BY TEAM — one entry per team (here QA Team, Sales Team, asdxasx).
Compare All tickets 59 in the sidebar with All tickets 71 above the list — a count that lags behind the list.
See Find the Right Tickets Fast: Ticket Views, Team Groups & Notifications.
Where did the ticket details panel go?#
Why it happens: the right-hand TICKET DETAILS panel (status, priority, team, assignee, contact, tags) can be hidden with the panel button in the ticket header, and the CRM remembers your choice.
How to fix it: open any ticket and click the panel button at the right of the ticket header (just right of the ⋮ menu). Click it again to hide the panel. The setting sticks — if the panel is missing on every ticket, it was hidden once.
How do I find a specific ticket quickly?#
Use the search box above the ticket list — type a ticket number (for example TKT-00123), a subject word or the customer’s name.
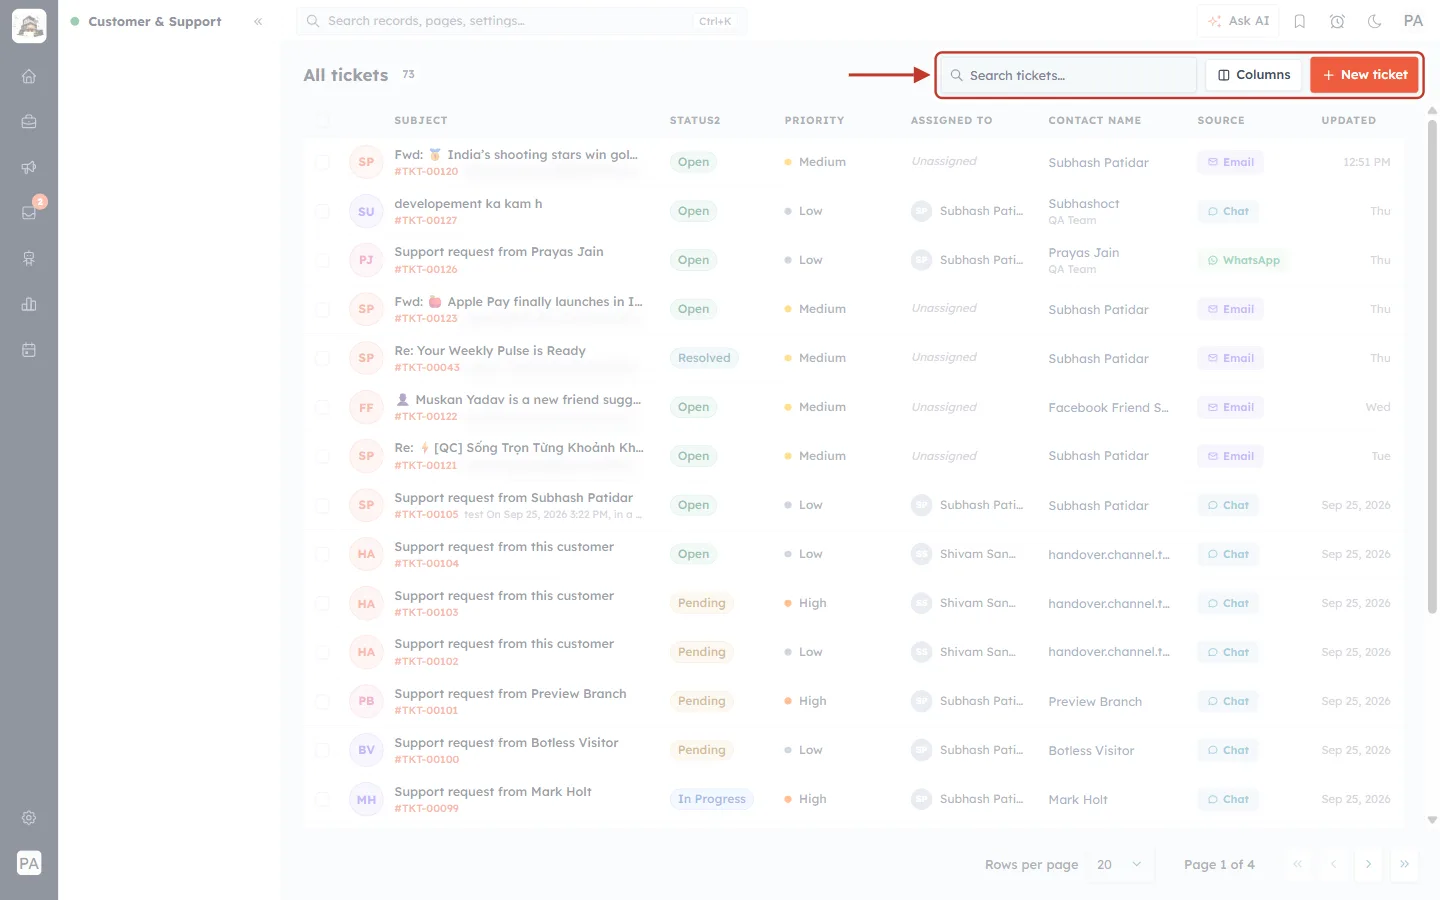
What this screenshot shows. The tools at the top right of the ticket list are ringed.
Search tickets… — search the current view by ticket number, subject or customer.
Columns — choose which columns the list shows (for example Category, Closed Time or Tags, which are hidden at first).
+ New ticket — log a ticket yourself, for example from a phone call — see Create a Ticket Manually.
The header on the left shows the view and its total — here All tickets 73.
2. Email problems#
Customer emails arrive, but no tickets are created#
Why it happens: connecting a support mailbox only fetches mail. Each mailbox has a separate Auto-create ticket switch, and it is off by default — so mail is imported as conversations but no tickets are raised.
How to fix it:
Go to Settings (gear) → Service & Support Settings → Support Email.
Open the mailbox (for example support@yourcompany.com).
Under What arriving mail creates, switch on Auto-create ticket.
Optionally add Exclusion rules (senders, subjects) so newsletters and one-off emails don’t become tickets too.
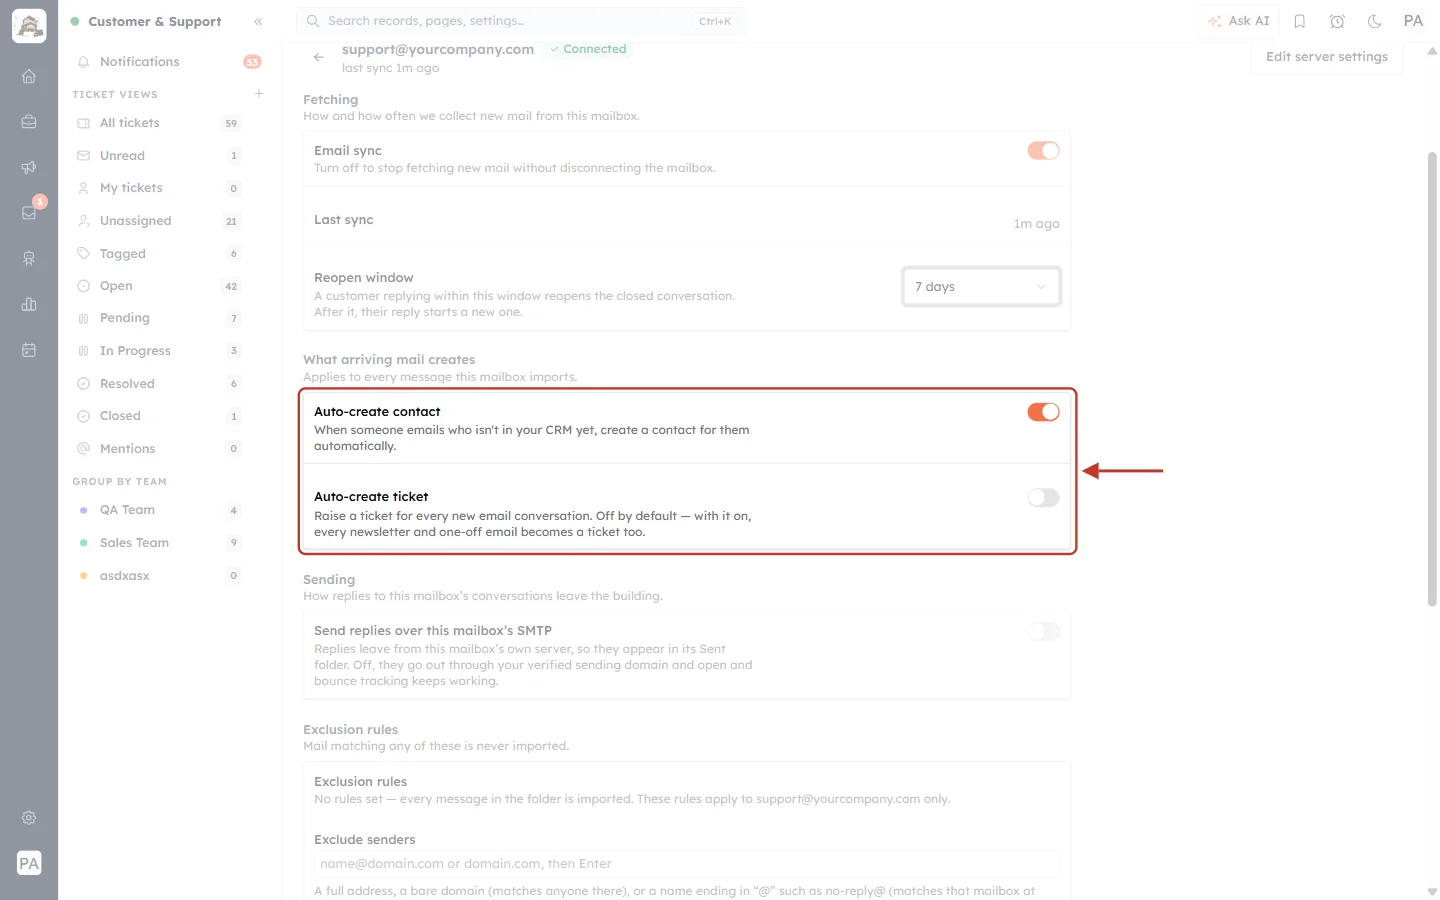
What this screenshot shows. The What arriving mail creates settings of a connected mailbox are ringed.
Auto-create contact (on) — When someone emails who isn’t in your CRM yet, create a contact for them automatically.
Auto-create ticket (off) — Raise a ticket for every new email conversation. Off by default — with it on, every newsletter and one-off email becomes a ticket too.
Above it you can also check Email sync is on and when the Last sync happened.
Full guide: Connect a Support Mailbox: Turn Customer Emails into Tickets Automatically.
“The server refused the login” when connecting a mailbox#
Why it happens: the email provider rejected the username or password. Gmail, Outlook and similar providers usually need an App Password (not your normal password), and two-factor authentication must be switched on for the account first.
How to fix it:
In your email provider’s security settings, turn on two-factor authentication and create an App Password.
In Connect mailbox, check the IMAP and SMTP servers, ports and security (the CRM fills these in for known providers — Settings found for gmail.com).
Paste the App Password into Password and click Test connection.
When the test passes, click Connect.
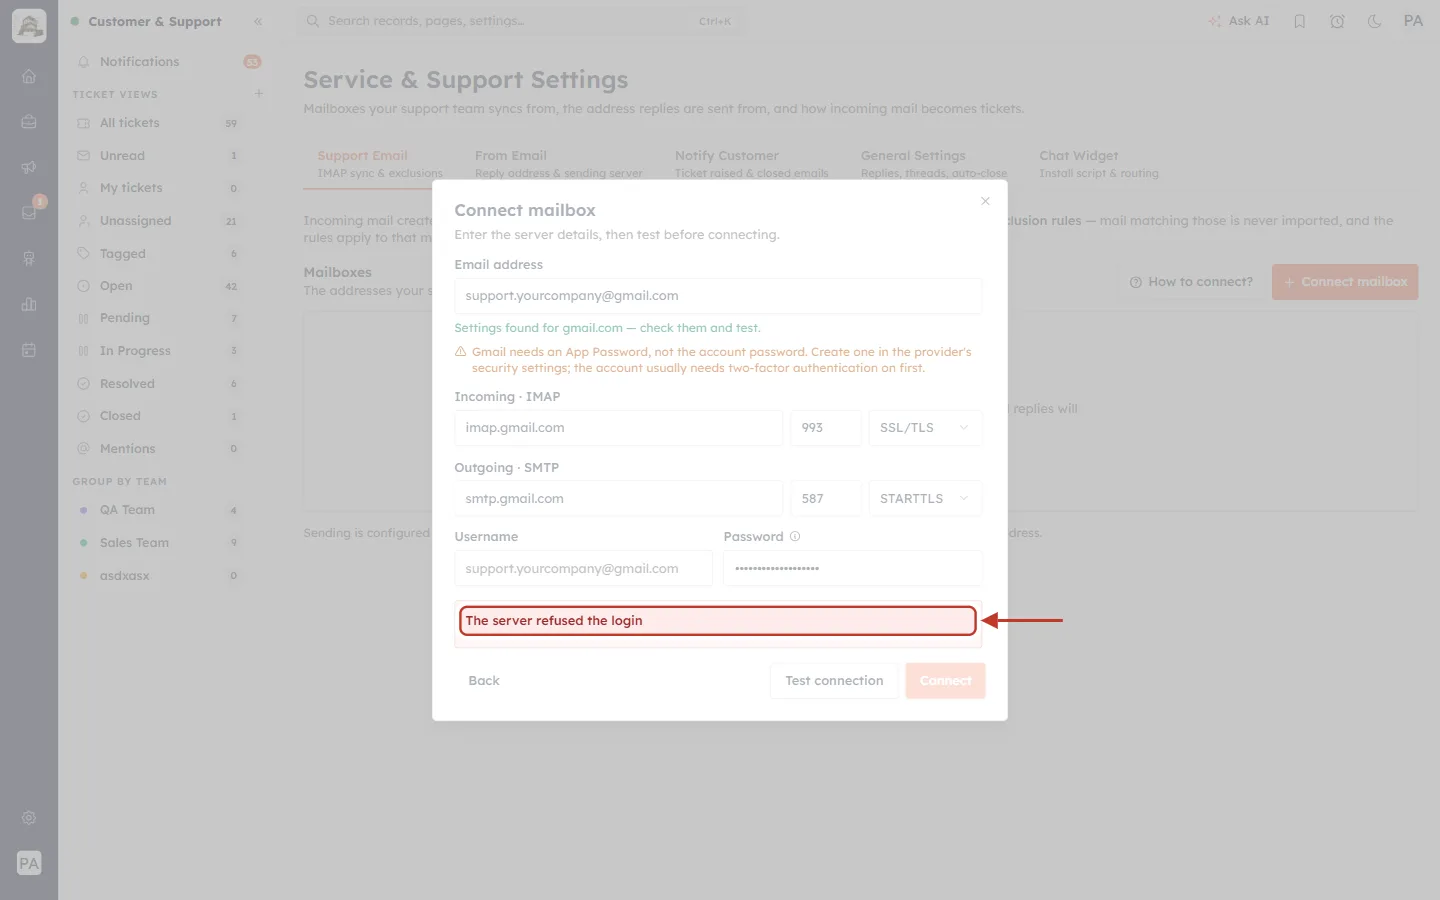
What this screenshot shows. The red result of Test connection — The server refused the login — is ringed in the Connect mailbox dialog.
The orange hint above warns: Gmail needs an App Password, not the account password…
Incoming · IMAP (imap.gmail.com, 993, SSL/TLS) and Outgoing · SMTP (smtp.gmail.com, 587, STARTTLS) are the server settings.
Connect stays disabled until the test passes.
Replies go out from each agent’s own address instead of the support address#
Why it happens: the chosen support From address can’t send right now — it is disabled, or its domain is no longer verified. Until that is fixed, replies fall back to each agent’s own address.
How to fix it:
Go to Settings (gear) → Service & Support Settings → From Email and read the red message.
Click Sender Authentication in the message and re-verify the domain (DKIM / SPF records).
Or choose another, working address under Default from address.
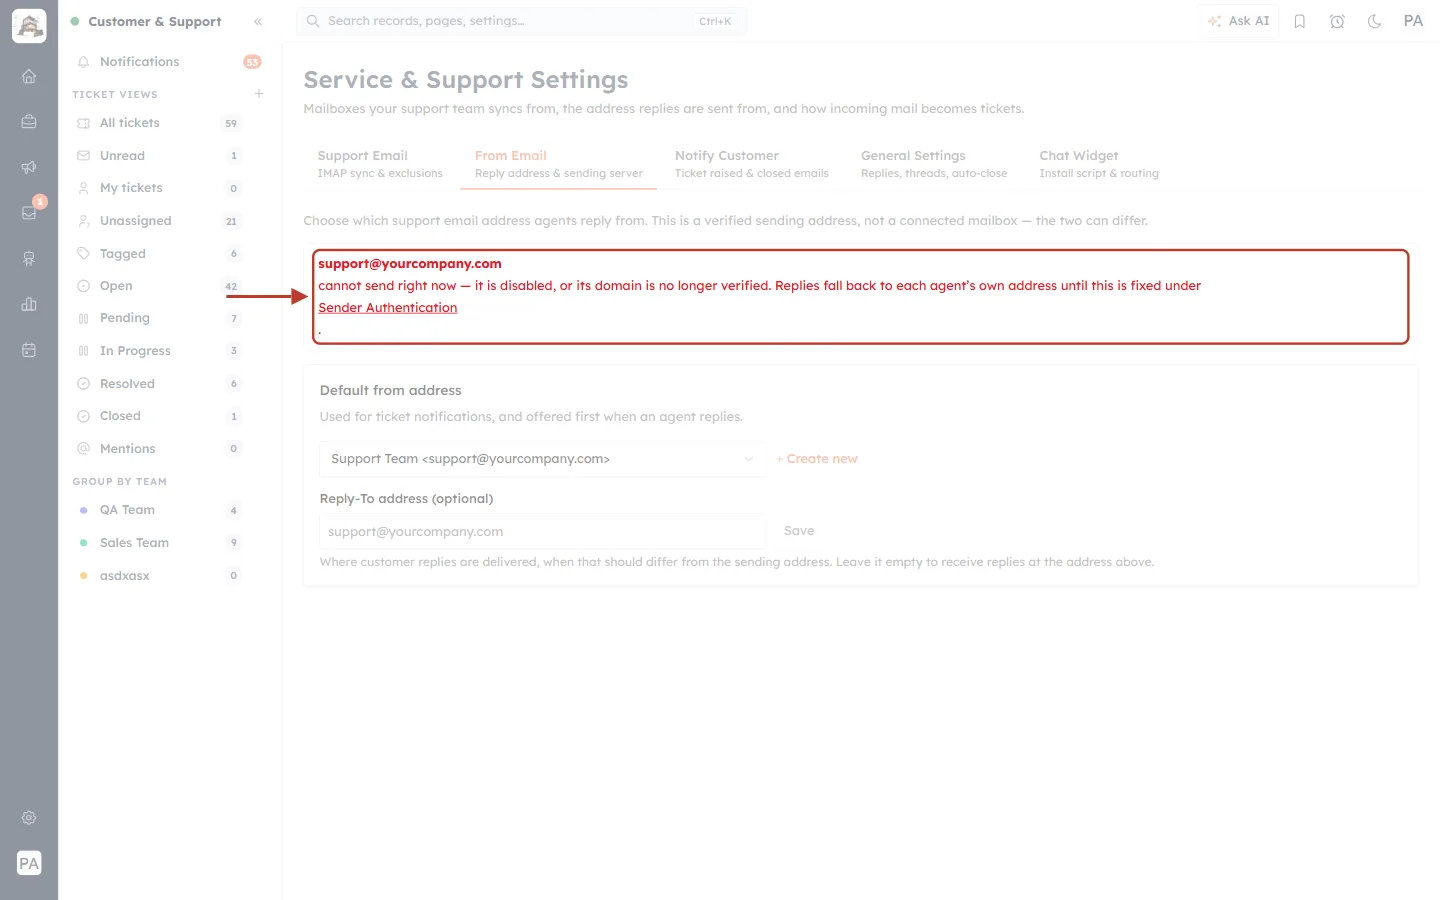
What this screenshot shows. The red warning on the From Email tab is ringed.
support@yourcompany.com cannot send right now — it is disabled, or its domain is no longer verified. Replies fall back to each agent’s own address until this is fixed under Sender Authentication.
Default from address — used for ticket notifications and offered first when an agent replies.
Reply-To address (optional) — where customer replies are delivered if different from the sending address.
Full guide: Set the From and Reply-To Address for Support Emails.
3. Customer notification problems#
The customer isn’t told when their ticket is closed#
Why it happens: of the automatic customer emails, When a ticket is closed is the only one that is off by default. Raised, resolved and reopened emails are on.
How to fix it:
Go to Settings (gear) → Service & Support Settings → Notifications (called Notify Customer in older versions).
Scroll to When a ticket is closed and switch it on.
Pick an Email template (or keep the built-in default message) and click Save if you add a copy address.
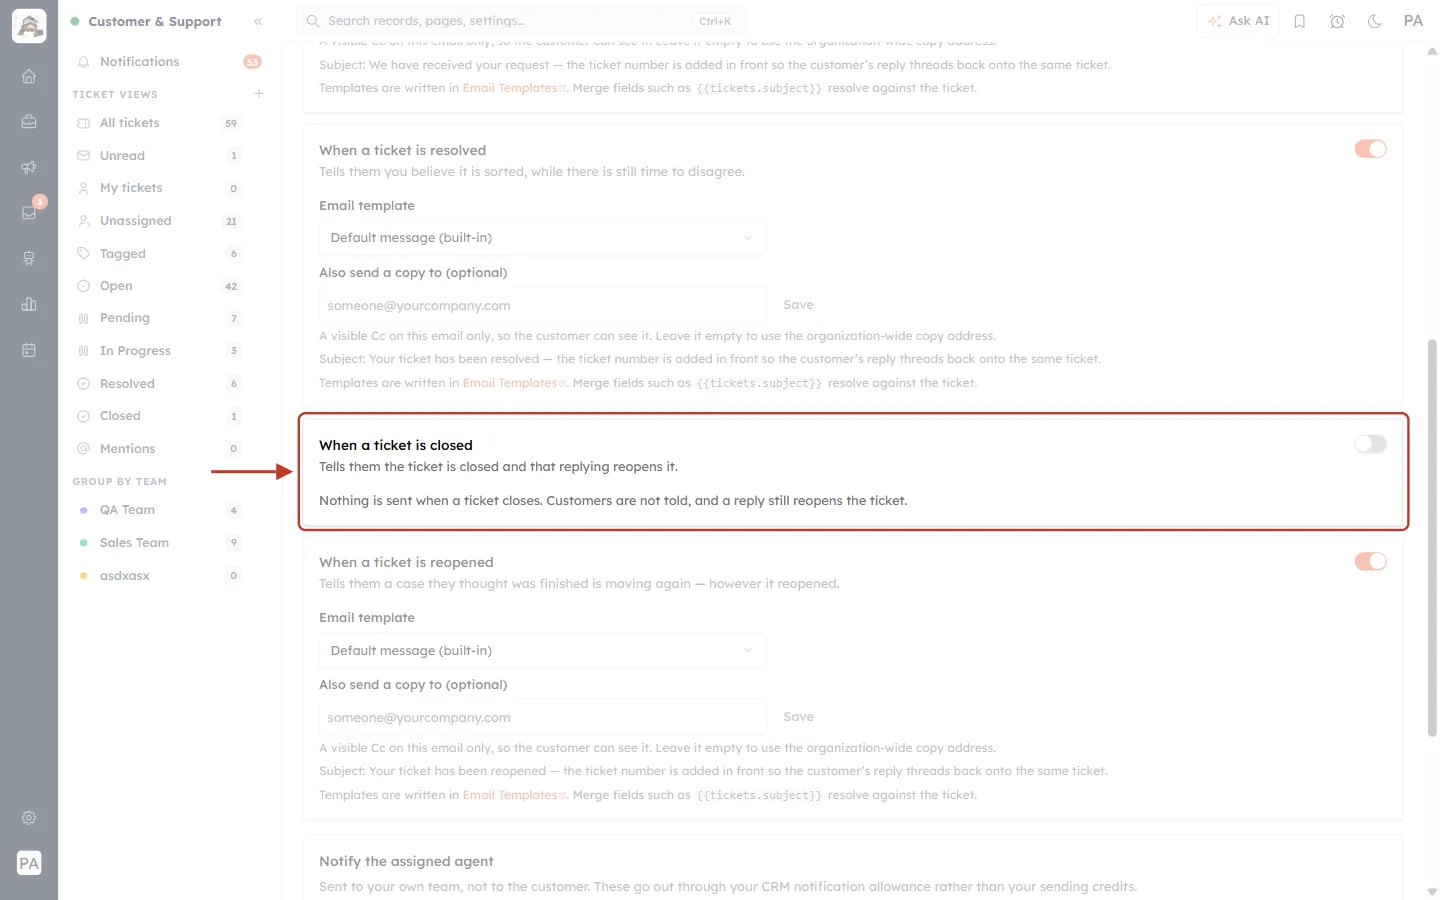
What this screenshot shows. The When a ticket is closed card is ringed, with its switch off.
Tells them the ticket is closed and that replying reopens it.
While off: Nothing is sent when a ticket closes. Customers are not told, and a reply still reopens the ticket.
Above and below it, When a ticket is resolved and When a ticket is reopened are on, each with an Email template and an optional Also send a copy to address.
Full guide: Automatic Customer Emails: Notify Customers When a Ticket Is Raised, Resolved, Closed or Reopened.
How do I resolve a ticket without emailing the customer?#
Why it happens: resolving normally sends the customer the “ticket resolved” email and alerts the assignee. Sometimes — duplicates, spam, internal tickets — you don’t want that.
How to fix it:
Open the ticket and click Resolve (or choose Resolved / Closed in the Status list).
In Mark this ticket Resolved?, tick Don’t notify anyone.
Click the button, which now reads Resolved quietly.
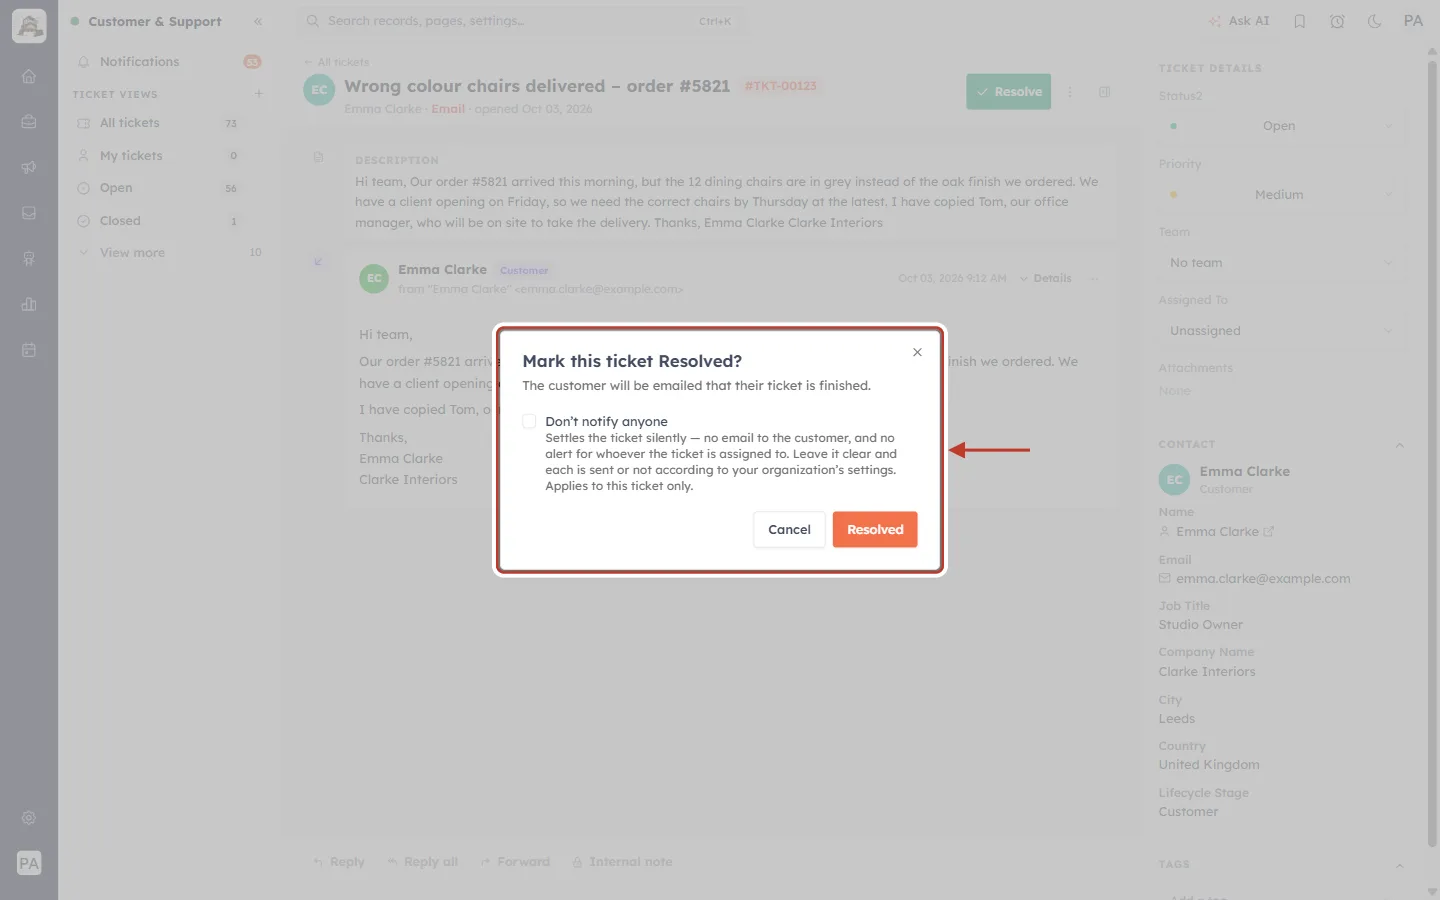
What this screenshot shows. The Mark this ticket Resolved? dialog is ringed — The customer will be emailed that their ticket is finished.
Don’t notify anyone — Settles the ticket silently — no email to the customer, and no alert for whoever the ticket is assigned to. Leave it clear and each is sent or not according to your organization’s settings. Applies to this ticket only.
Cancel keeps the ticket as it is; Resolved confirms.
Full guide: Assign, Prioritise, Tag & Change Ticket Status.
4. Reply problems#
I only see “Record reply”, not Reply, Reply all or Forward#
Why it happens: the ticket’s contact has no email address (for example a ticket logged from a phone call). Without an address there is nowhere to send an email, so the CRM offers Record reply instead — it saves what you told the customer on the ticket, but sends nothing.
How to fix it:
In the ticket’s CONTACT section, click the contact’s name to open their record.
Add their email address and save.
Open the ticket again — Reply, Reply all and Forward now appear.
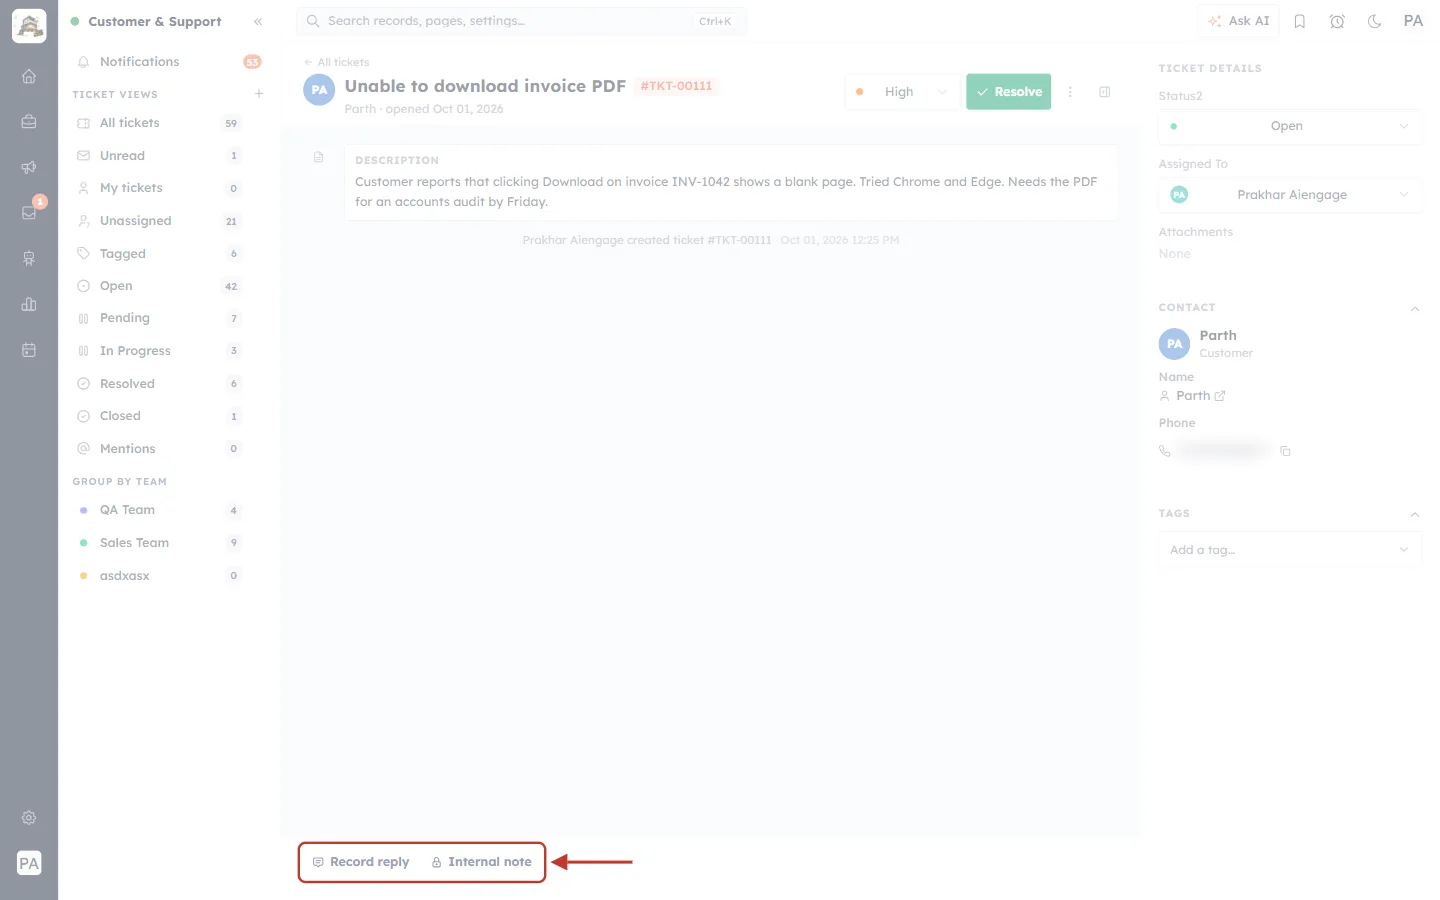
What this screenshot shows. The reply bar at the bottom of a ticket whose contact has no email is ringed: only Record reply and Internal note.
The CONTACT panel on the right shows a name (Parth) and a phone number, but no email.
Record reply keeps a record of a reply given by phone or in person; Internal note is visible to your team only.
Full guides: Reply to Customers from a Ticket and Internal Notes & @Mentions.
“Please pick a future date/time” when scheduling an email#
Why it happens: the date and time you chose are already in the past. Scheduled emails must be in the future (past days are greyed out in the calendar).
How to fix it:
In the Schedule pop-up, choose today or a later date.
Set a Time later than now (hours, 5-minute steps and AM/PM).
Click Schedule Send.
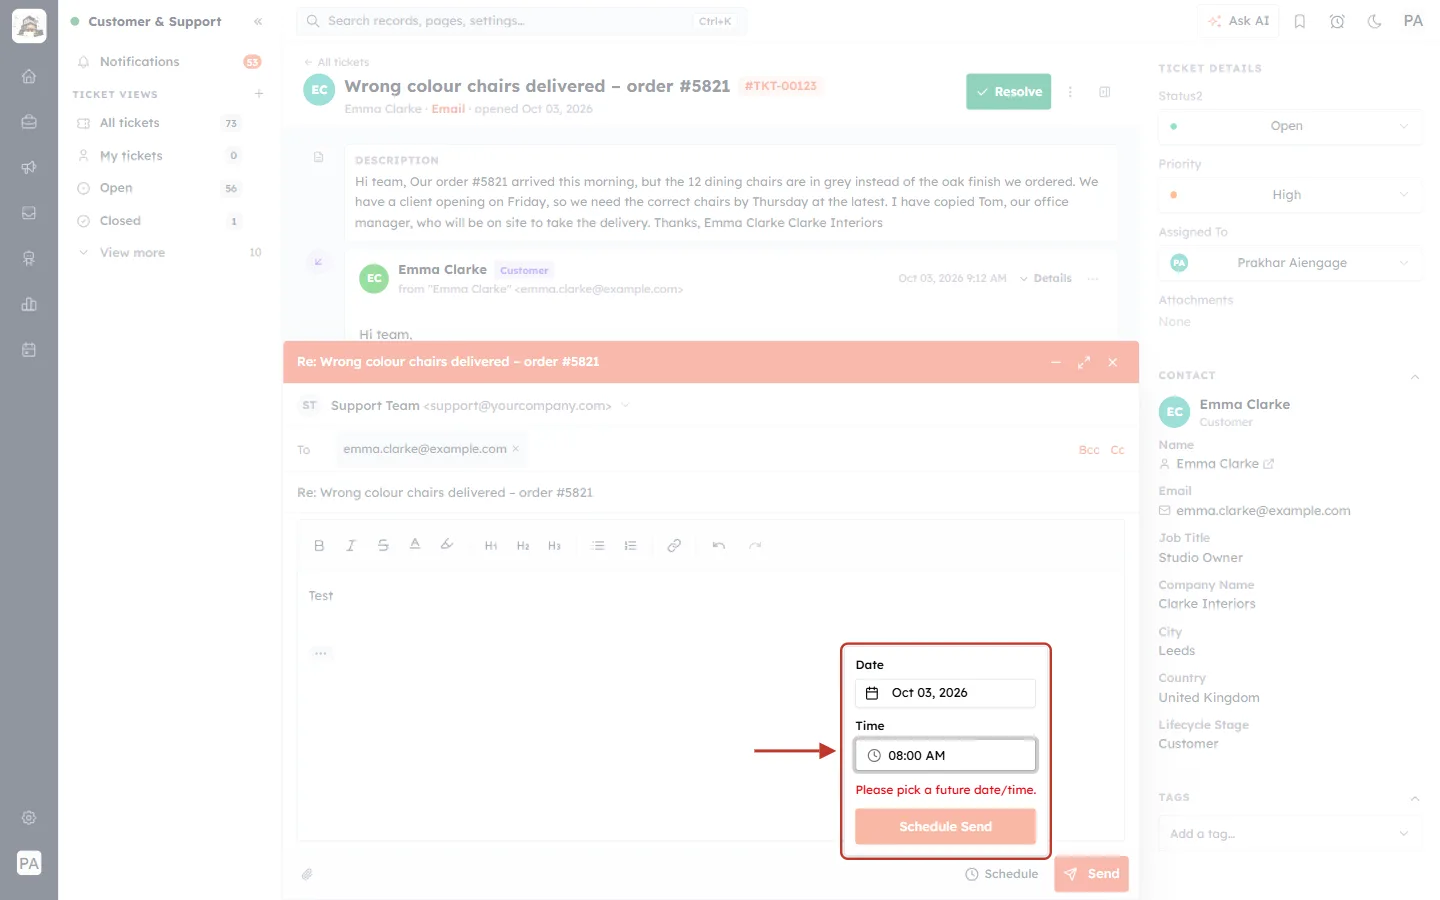
What this screenshot shows. The Schedule pop-up of the email composer is ringed.
Date — Oct 03, 2026 and Time — 08:00 AM, which had already passed.
The red message Please pick a future date/time. and the faded Schedule Send button show it can’t be scheduled yet.
The default time is about an hour from now, rounded to the next half hour.
5. Ticket lifecycle surprises#
A closed ticket reopened by itself#
Why it happens: the customer replied. Reopen a closed ticket when the customer replies is on by default, so the reply isn’t left sitting on a closed ticket. A reply that arrives long after closing starts a fresh ticket instead, according to the mailbox’s Reopen window (for example 7 days).
How to fix it:
This is usually what you want — read the reply and answer it.
To change it, go to Settings (gear) → Service & Support Settings → General Settings → Replies and switch Reopen a closed ticket when the customer replies off.
To change how long the reopen window is, open the mailbox under Support Email and change Reopen window.
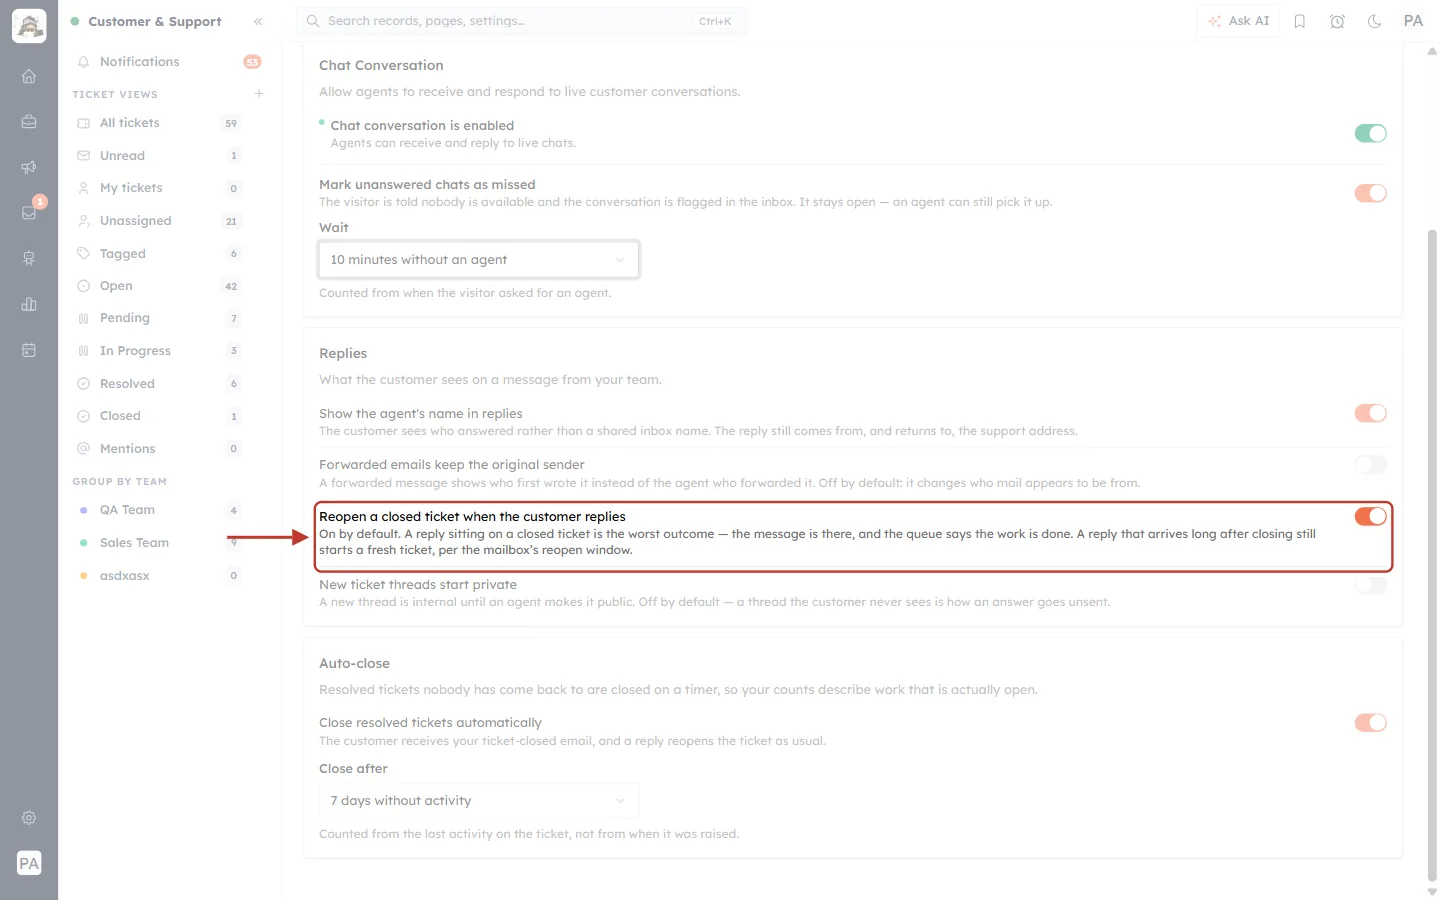
What this screenshot shows. The Reopen a closed ticket when the customer replies switch (on) is ringed in General Settings → Replies.
On by default. A reply sitting on a closed ticket is the worst outcome — the message is there, and the queue says the work is done. A reply that arrives long after closing still starts a fresh ticket, per the mailbox’s reopen window.
Nearby: Show the agent’s name in replies, Forwarded emails keep the original sender and New ticket threads start private.
A resolved ticket was closed automatically#
Why it happens: Close resolved tickets automatically closes resolved tickets that nobody has come back to after a set time, so your counts show only work that is really open.
How to fix it:
Go to Settings (gear) → Service & Support Settings → General Settings → Auto-close.
Change Close after to a longer period, or switch Close resolved tickets automatically off.
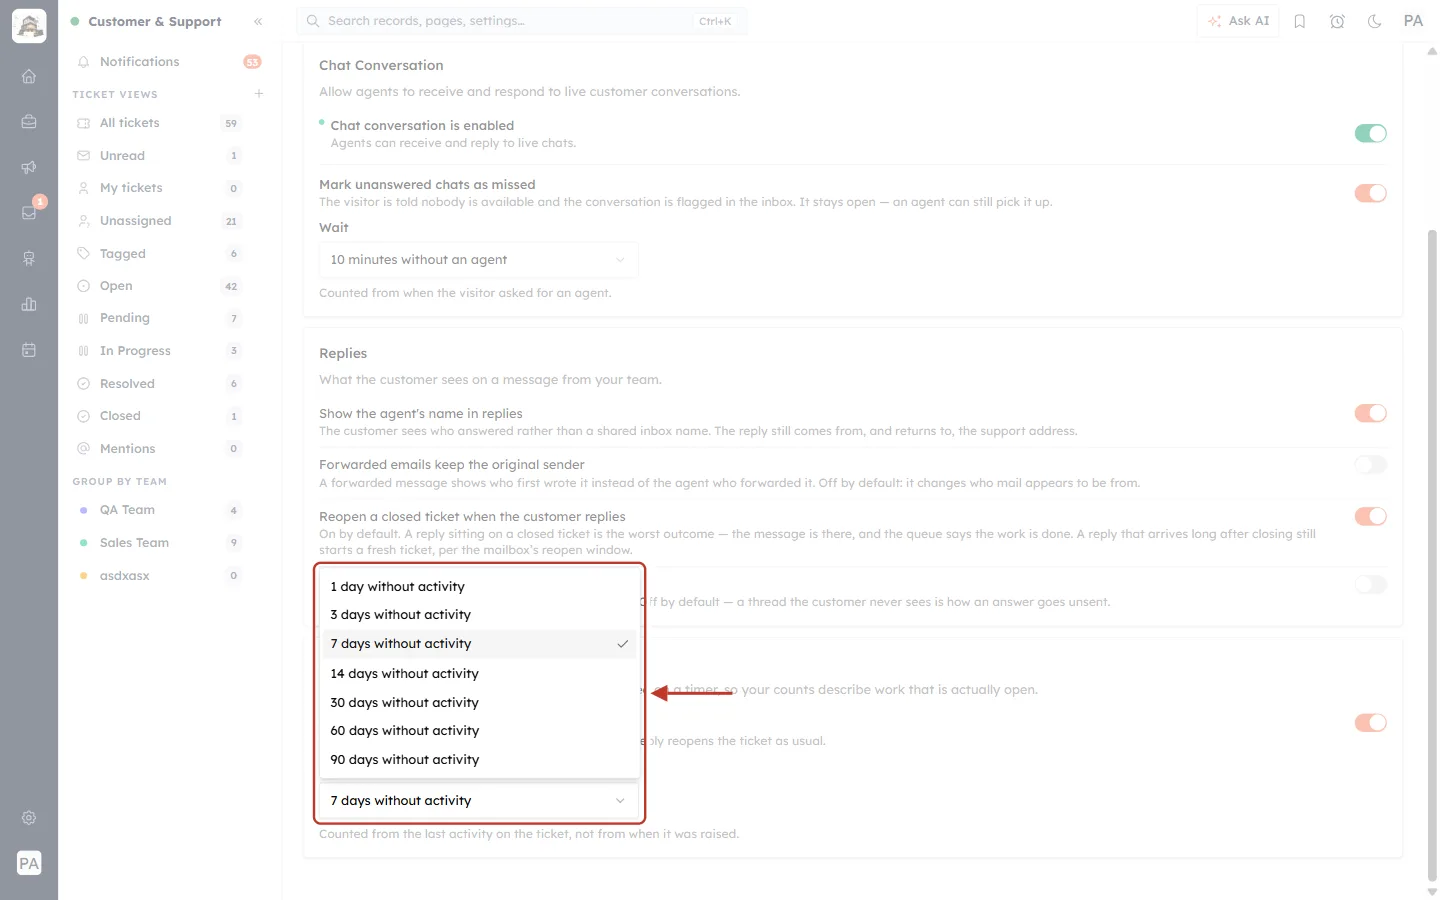
What this screenshot shows. The Close after list is open and ringed.
Choose 1, 3, 7 (selected), 14, 30, 60 or 90 days without activity.
The time is counted from the last activity on the ticket, not from when it was raised.
When a ticket auto-closes, the customer receives your ticket-closed email (if that email is on), and a reply reopens the ticket as usual.
Full guide: Support General Settings: Live Chat, Reply Display, Reopen on Reply & Auto-Close.
6. Chat problems#
The chat widget doesn’t appear on our website#
Why it happens: a widget only shows on your site when its status is Active. New widgets start as Draft, and Draft or Inactive widgets stay hidden. The other common cause is that the install script isn’t on the page.
How to fix it:
Go to Settings (gear) → Service & Support Settings → Chat Widget and open your widget.
Change the status (top right of the widget) to Active and save.
Check the script is pasted on every page, just before the closing body tag — see Install the Chat Widget on Your Website.
Reload your website (clear the cache if needed).
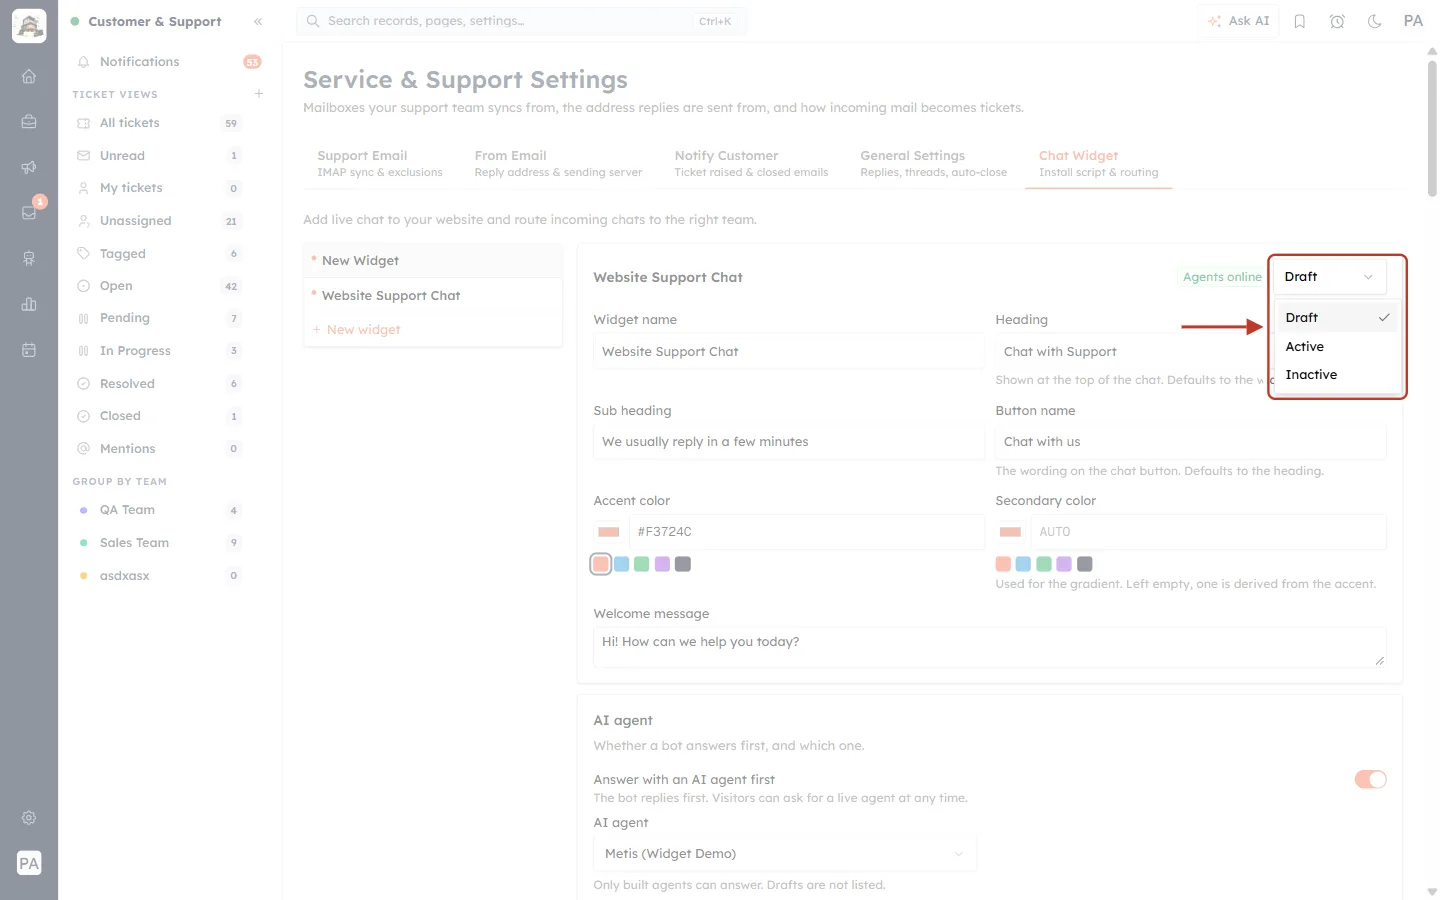
What this screenshot shows. The status list of the Website Support Chat widget is open and ringed.
Draft (current) — still being set up; not shown on your site.
Active — live on every page where the script is installed.
Inactive — switched off; hidden again.
Full guide: Set Up the Website Chat Widget for Support.
A customer asked for a live agent and nobody answered#
Why it happens: when a visitor asks for a person, the AI stops replying and the chat waits for an agent. If nobody accepts within the Mark unanswered chats as missed wait time (for example 10 minutes), the chat is flagged as missed and the visitor is told to expect an email.
How to fix it:
Open the chat in the Team Inbox — missed chats carry a Missed label.
Click Accept conversation. You can still pick it up and reply.
To give agents more time, change the wait under Settings (gear) → Service & Support Settings → General Settings → Mark unanswered chats as missed.
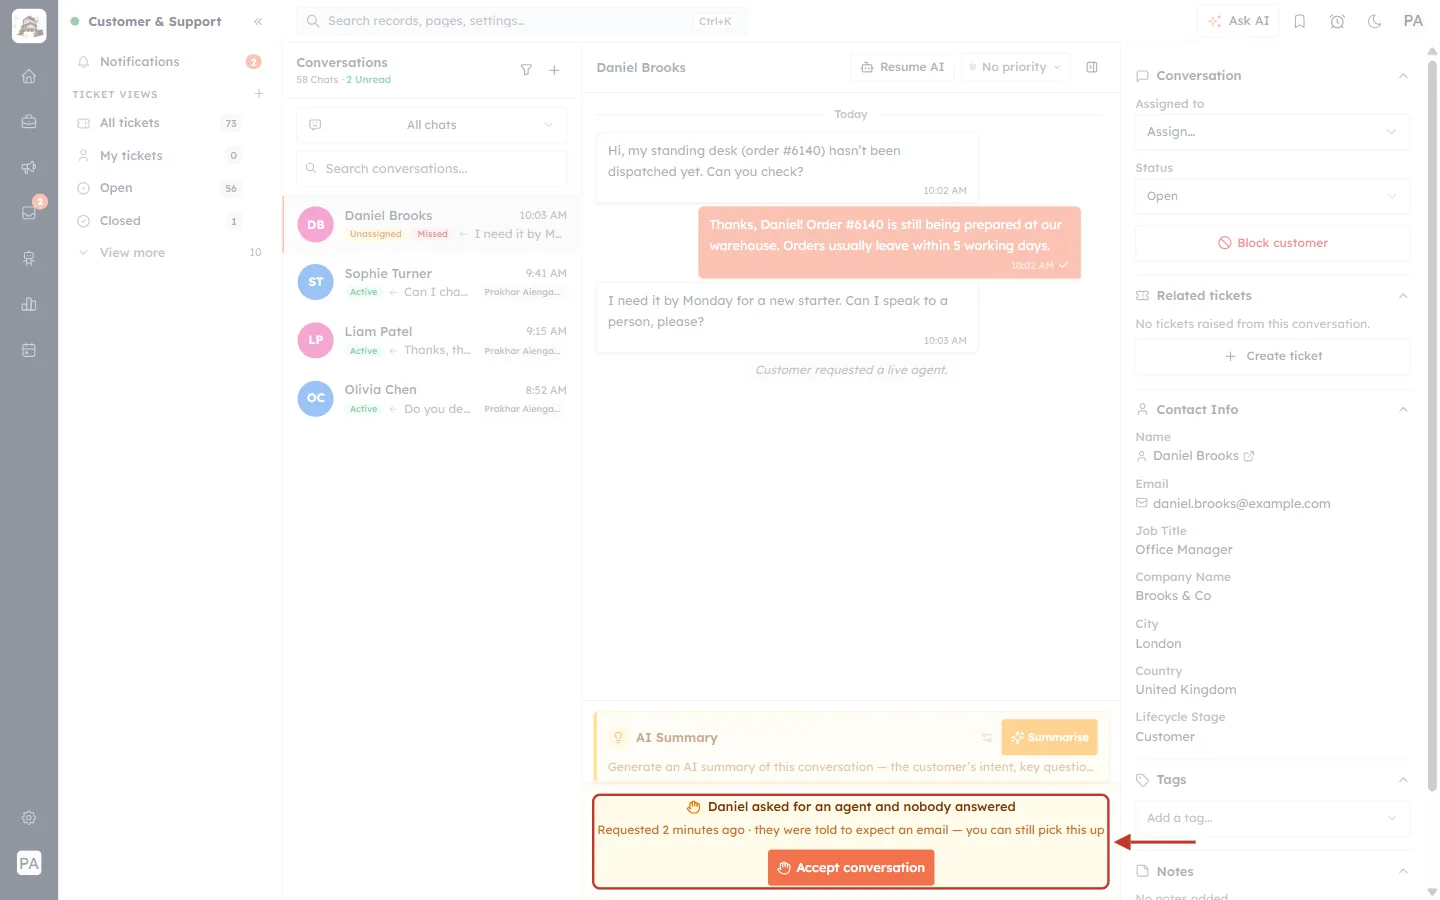
What this screenshot shows. The orange banner at the bottom of a missed chat is ringed.
Daniel asked for an agent and nobody answered · Requested 2 minutes ago · they were told to expect an email — you can still pick this up.
Accept conversation assigns the chat to you and opens the message box.
In the list on the left, the chat shows the Unassigned and Missed labels; the thread shows Customer requested a live agent.
Full guide: Live Agent Handover from the AI Agent.
A chat closed by itself after my reply#
Why it happens: Auto-close quiet chats closes a chat after your agent replied and the customer never came back (for example 24 hours after the reply). A chat that is still waiting on an agent is never closed this way, however long it has been quiet.
How to fix it:
Nothing is lost — if the customer replies, the chat reopens, exactly as it does when an agent closes one by hand.
To change the timing, go to Settings (gear) → Service & Support Settings → General Settings → Chat Conversation and change Close under Auto-close quiet chats, or switch it off.
The clock runs from the newest message, so anything either side says starts it again.
How do I turn a chat message into a ticket?#
Why it happens: a chat can be answered in the inbox, but a problem that needs follow-up belongs in a ticket so it can be assigned, prioritised and tracked.
How to fix it:
Hover over the customer’s message and click the small arrow.
Choose Create ticket — the chat from that message onwards comes with the ticket.
Or use Related tickets → Create ticket in the right panel to raise one for the whole chat.
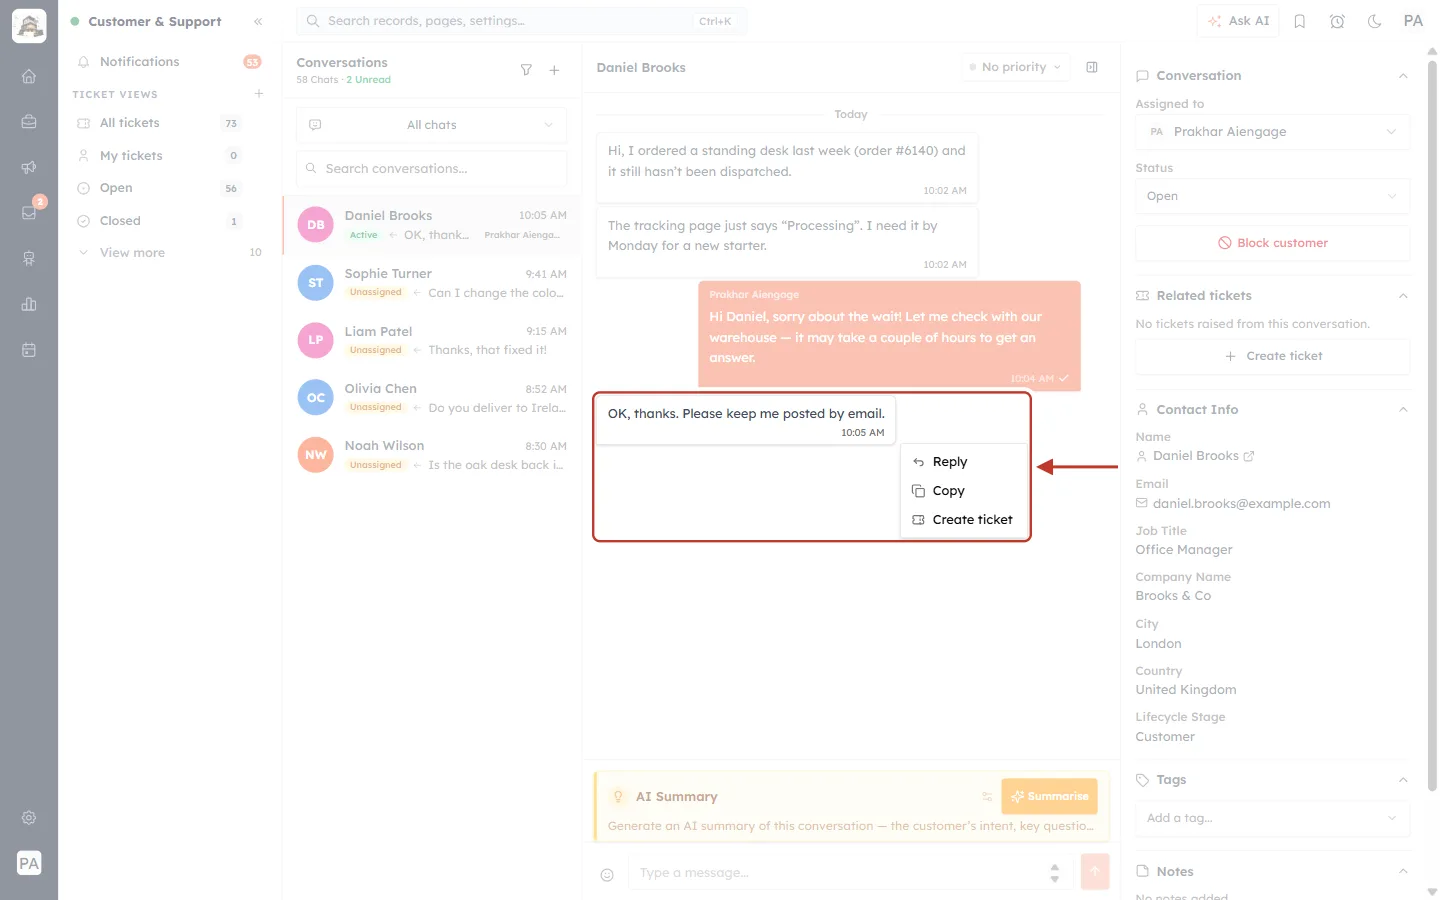
What this screenshot shows. A customer message and its menu are ringed.
Reply — quote the message in your answer.
Copy — copy its text.
Create ticket — raise a ticket starting from this message.
On the right, Related tickets shows No tickets raised from this conversation and its own + Create ticket button.
Full guide: Turn Chats into Tickets.
7. Team & permission problems#
An agent can’t see the “All tickets” view (or any ticket views)#
Why it happens: the All tickets view only appears for users whose profile has View: All on Tickets. With Team or Own they see My tickets and the status views; with None they see no ticket views at all.
How to fix it:
Go to Settings → Users and check which Profile the agent has.
Go to Settings → Security Control → Profiles, open that profile with Edit.
In the Tickets row, set View to the right level (All, Team or Own).
Click Update Profile and ask the agent to reload.
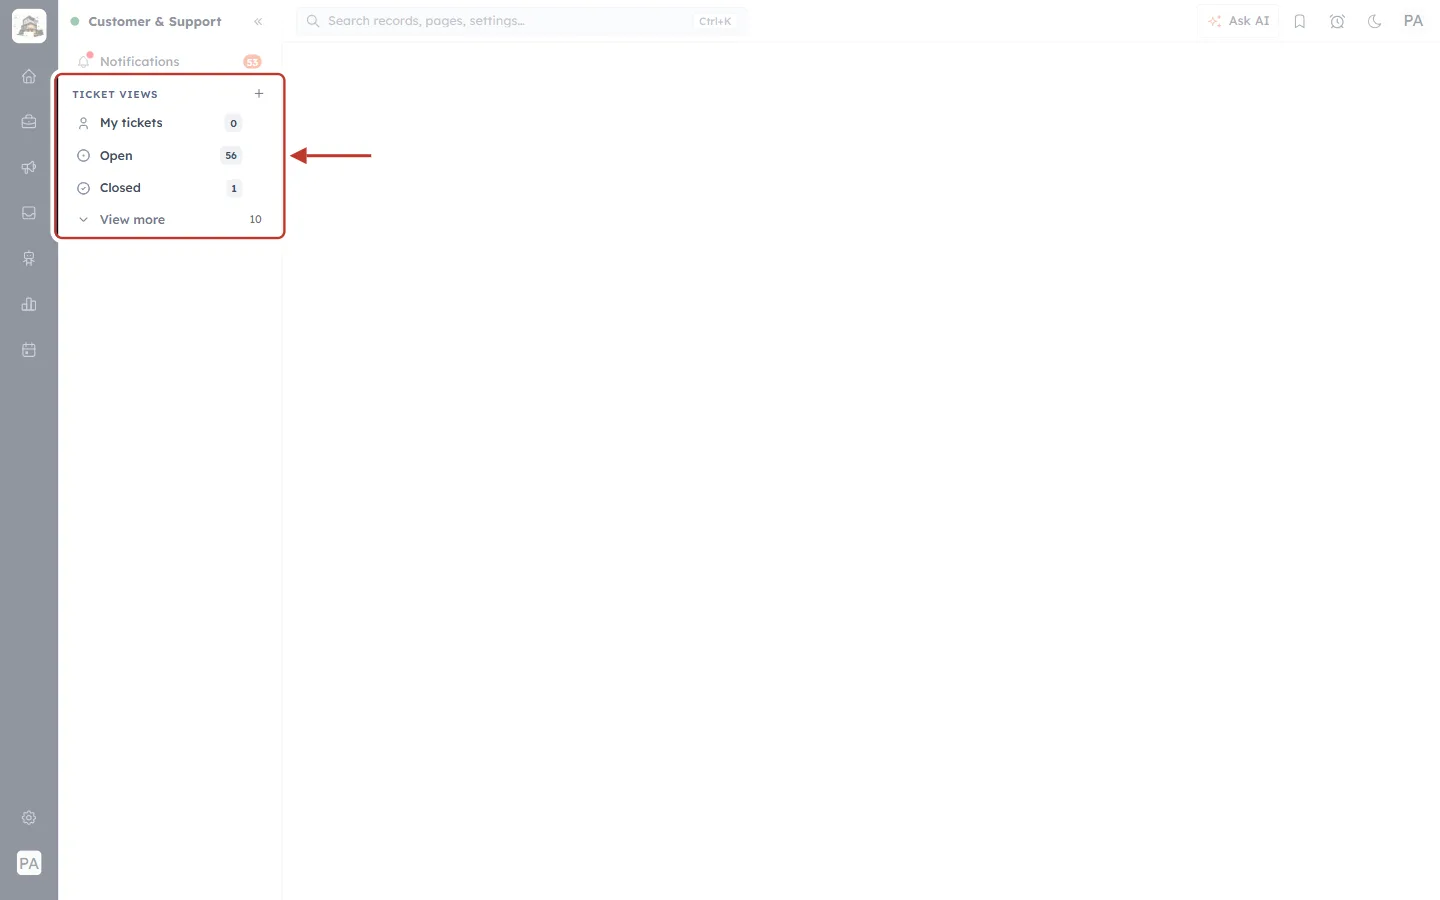
What this screenshot shows. The TICKET VIEWS list of an agent with View: Team or Own is ringed.
There is no All tickets view — only My tickets, Open, Closed and View more.
Each view only includes tickets the agent is allowed to see.
Full guide: Ticket Permissions: Control Who Can See, Edit and Reply to Support Tickets.
An agent can see a chat but can’t reply to it#
Why it happens: chat access has three separate levels — See, Reply / Assign and Close. An agent may be allowed to see their team’s chats but only reply to their own, or the chat may be assigned to another agent.
How to fix it:
Open the agent’s profile (Settings → Security Control → Profiles → Edit).
Under Feature Permissions → Inbox & Channels, find the inbox (for example AI Agent Chat) and open Advanced — set See / Reply / Close separately.
Raise Reply / Assign to the level they need, then click Update Profile.
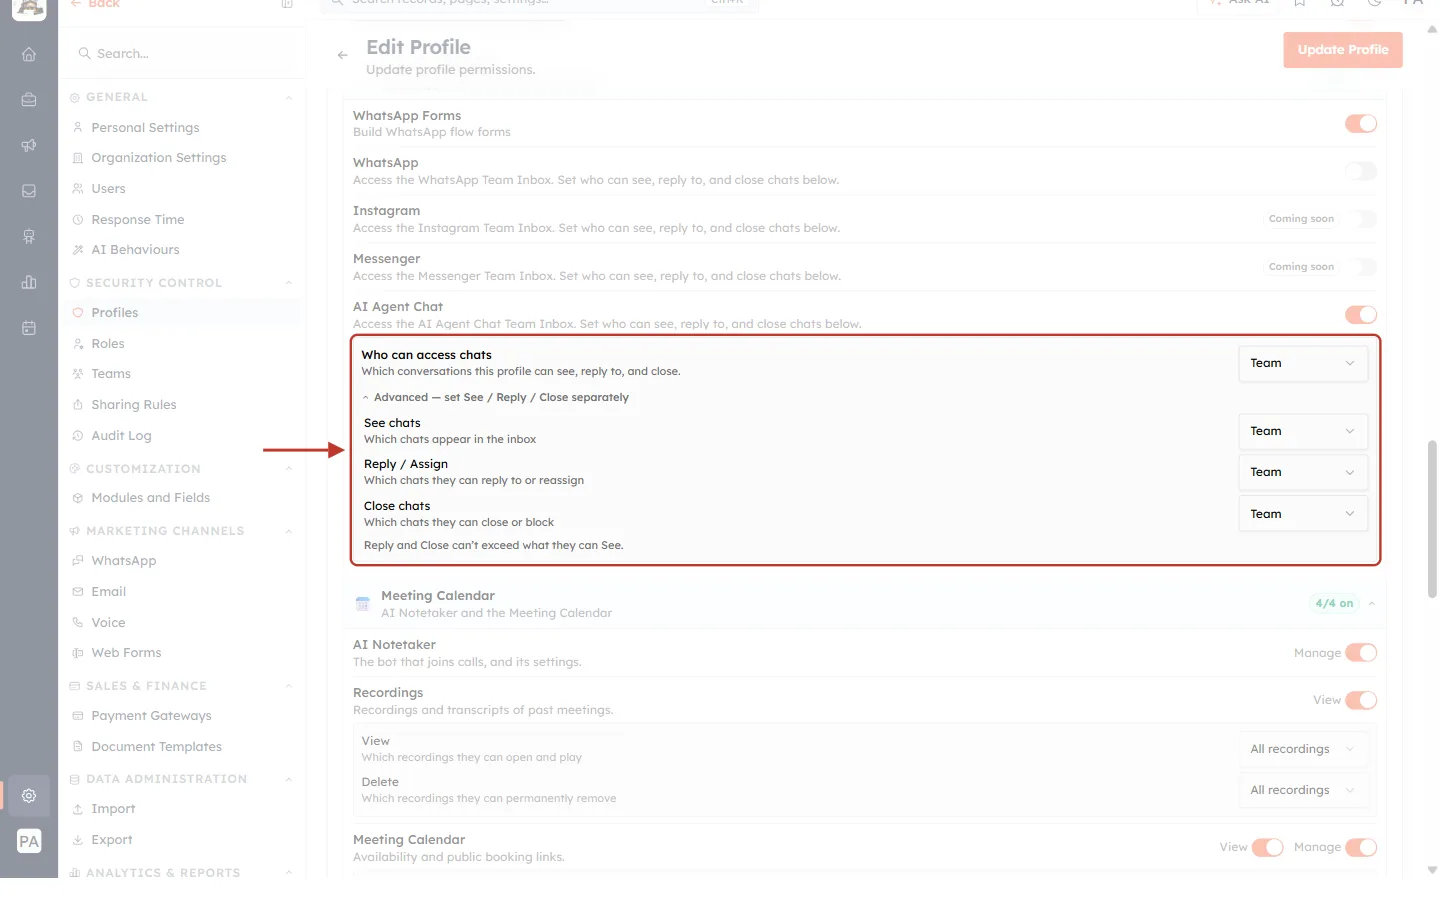
What this screenshot shows. The advanced chat permissions of a profile are ringed.
Who can access chats — one level for everything (here Team).
See chats — which chats appear in the inbox.
Reply / Assign — which chats they can reply to or reassign.
Close chats — which chats they can close or block.
Reply and Close can’t exceed what they can See.
Where do I find the notes where someone @mentioned me?#
Why it happens: @mentions in internal notes are collected on the Mentions page, so you don’t have to open every ticket.
How to fix it:
Click Mentions in the Customer & Support sidebar (under the ticket views).
Unread mentions have a red dot; the N unread badge filters to unread ones.
Click a mention to open the ticket — it is then marked read.
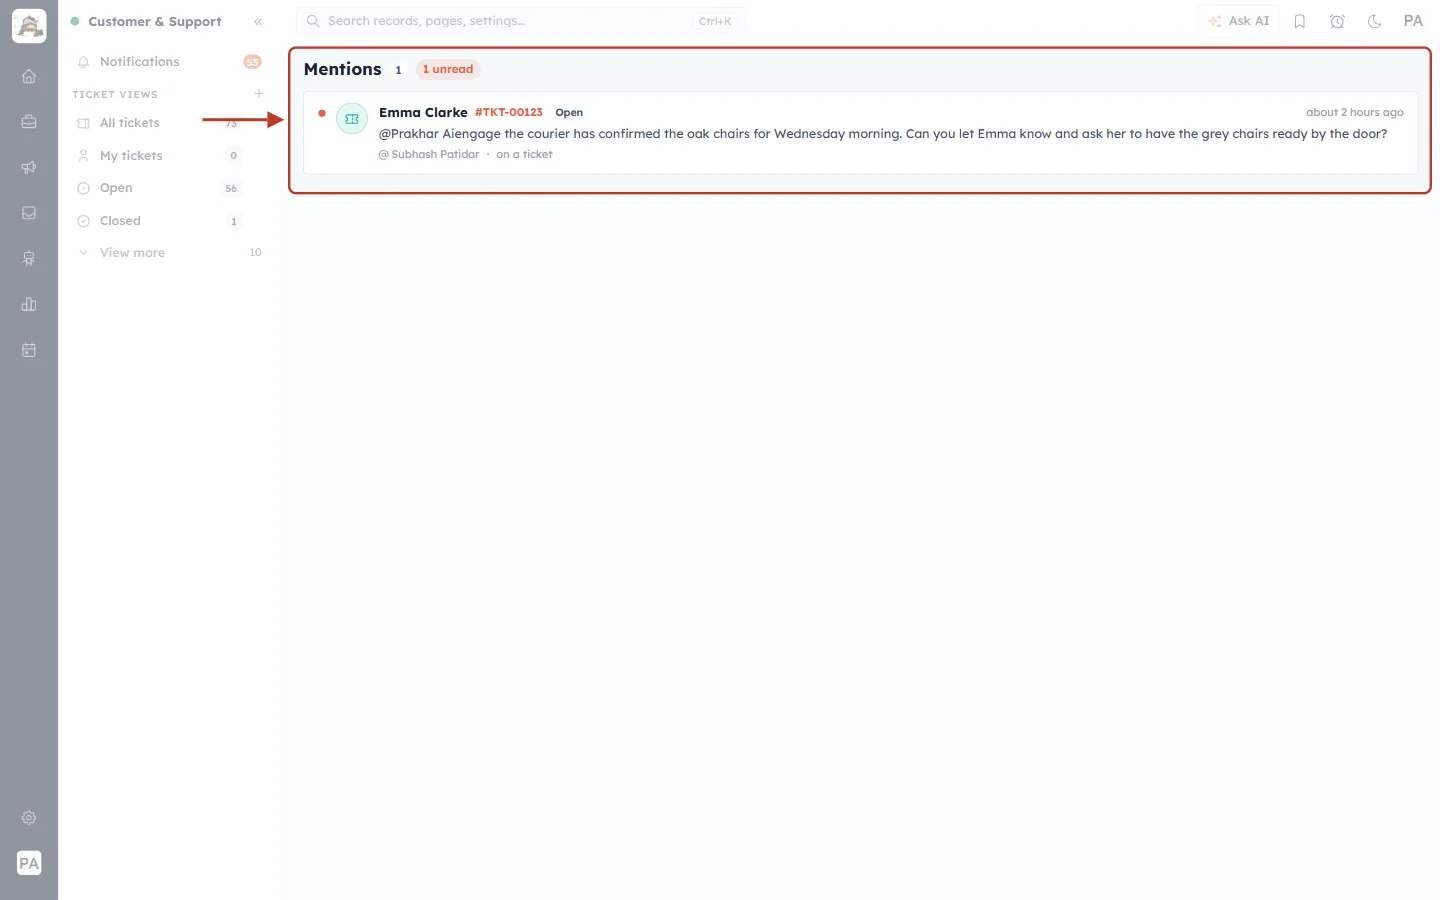
What this screenshot shows. The Mentions page is ringed, with 1 unread.
Each row shows the customer (Emma Clarke), the ticket number (#TKT-00123) and its status (Open).
Below is the note text with your @name, and who mentioned you — @Subhash Patidar · on a ticket.
On the right, how long ago it was written.
Full guide: Internal Notes & @Mentions.
8. Fields, import and report problems#
Why is the Status field called “Status2”?#
Why it happens: the field’s label was changed in your account. Only the label is affected — the field, its values and every workflow that uses it keep working, because they use the internal API name status, which never changes.
How to fix it:
Go to Settings → Modules and Fields → Tickets → Configure and open the layout.
Click the Status2 field.
Change Field Name to Status and click Save.
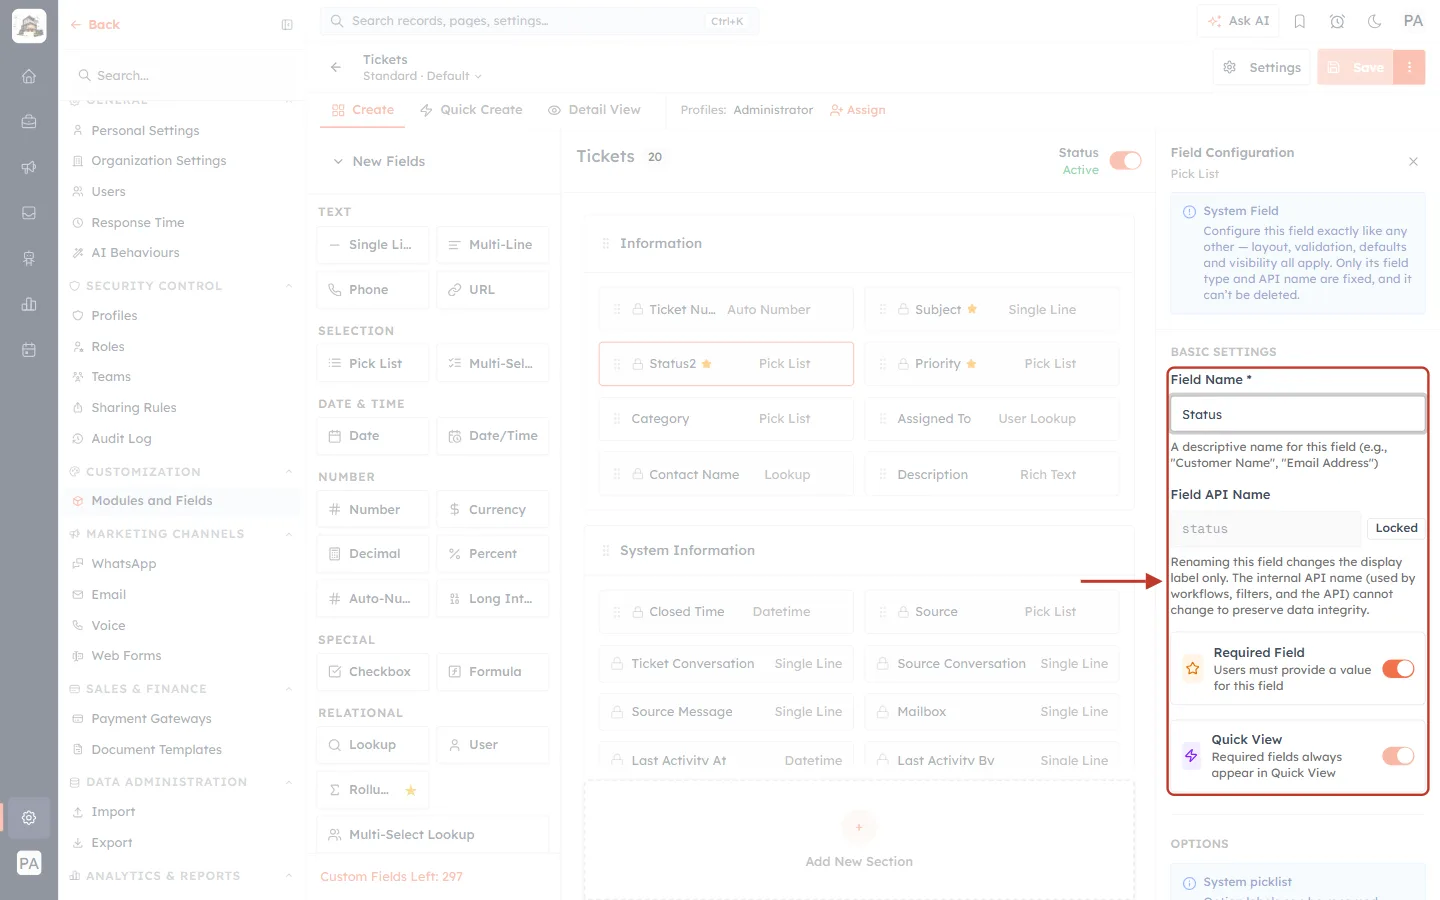
What this screenshot shows. The BASIC SETTINGS of the Status field are ringed, with the name changed to Status.
Field Name — the label everyone sees.
Field API Name — status, marked Locked: Renaming this field changes the display label only. The internal API name … cannot change to preserve data integrity.
Required Field and Quick View are on for this system field.
Full guide: Customise Ticket Fields, Categories & Statuses.
Import Notes for Tickets says the ticket can’t be matched#
Why it happens: each note has to attach to a ticket, and tickets are matched by a unique field. If no ticket field is marked unique, the note’s Related To column has nothing to match on (Tickets has no unique fields), so the import can’t continue.
How to fix it:
Ask an administrator to open the Tickets field builder and select Ticket Number.
Switch on Unique Field and click Save.
Start Import Notes again and map your ticket-number column to Related To, matched by Ticket Number.
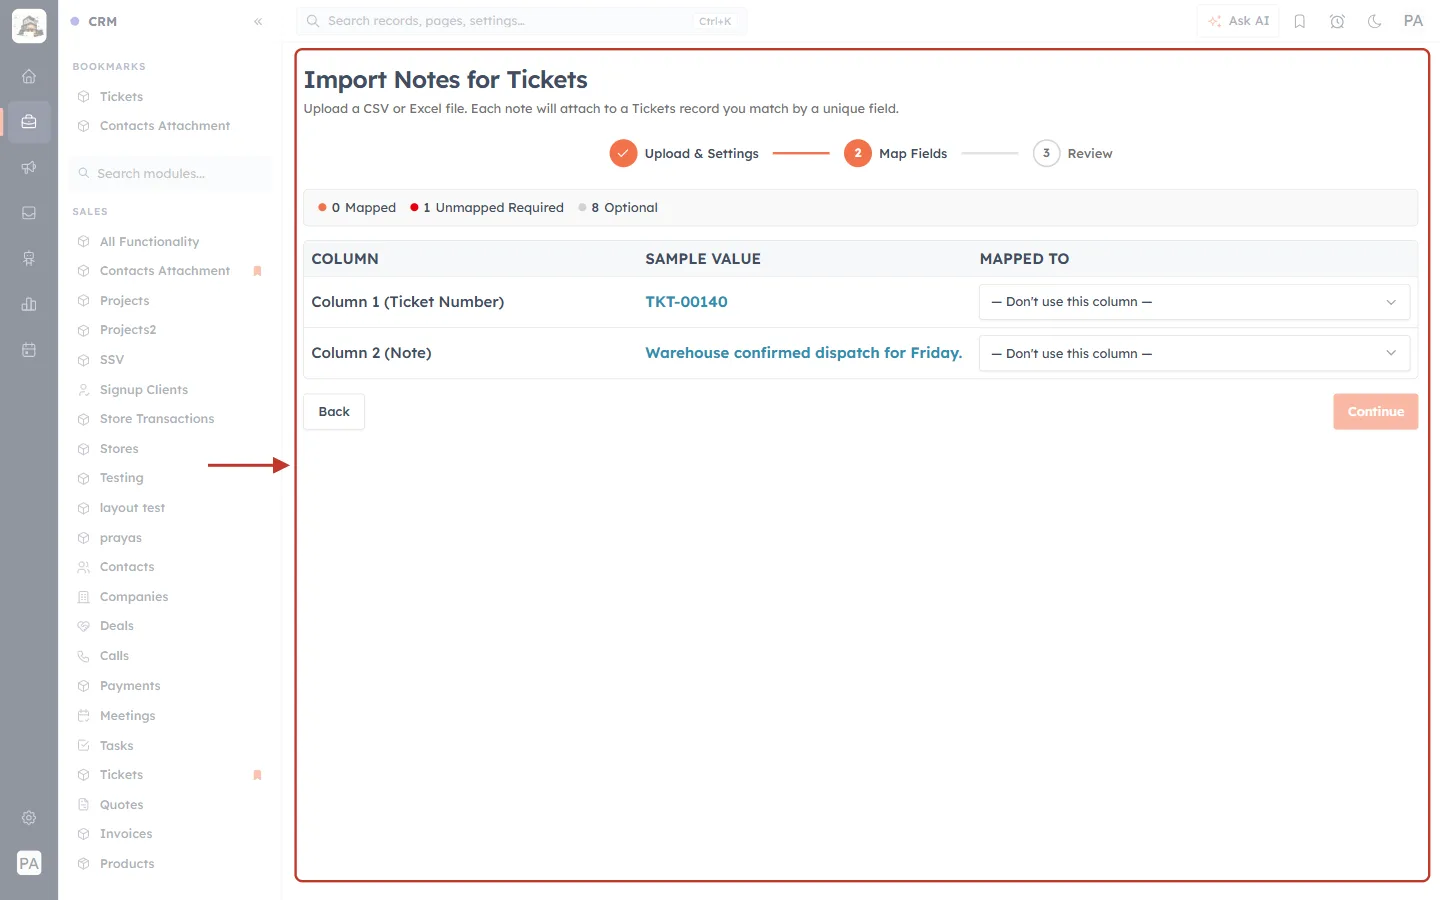
What this screenshot shows. The Map Fields step of Import Notes for Tickets is ringed — Each note will attach to a Tickets record you match by a unique field.
The summary shows 0 Mapped · 1 Unmapped Required · 8 Optional, so Continue is disabled.
Column 1 (Ticket Number) — sample TKT-00140 — and Column 2 (Note) are both on — Don’t use this column —.
Full guide: Import & Export Tickets.
Resolved tickets are missing from my “closed tickets” report#
Why it happens: a ticket only gets a Closed Time when its status is set to Closed. Tickets that are only Resolved have no Closed Time, so a report filtered on Closed Time leaves them out.
How to fix it:
To count everything your team finished, group a ticket report by Status and read the Resolved and Closed groups.
Or close tickets once the customer confirms (or let auto-close do it — section 5), so they get a Closed Time.
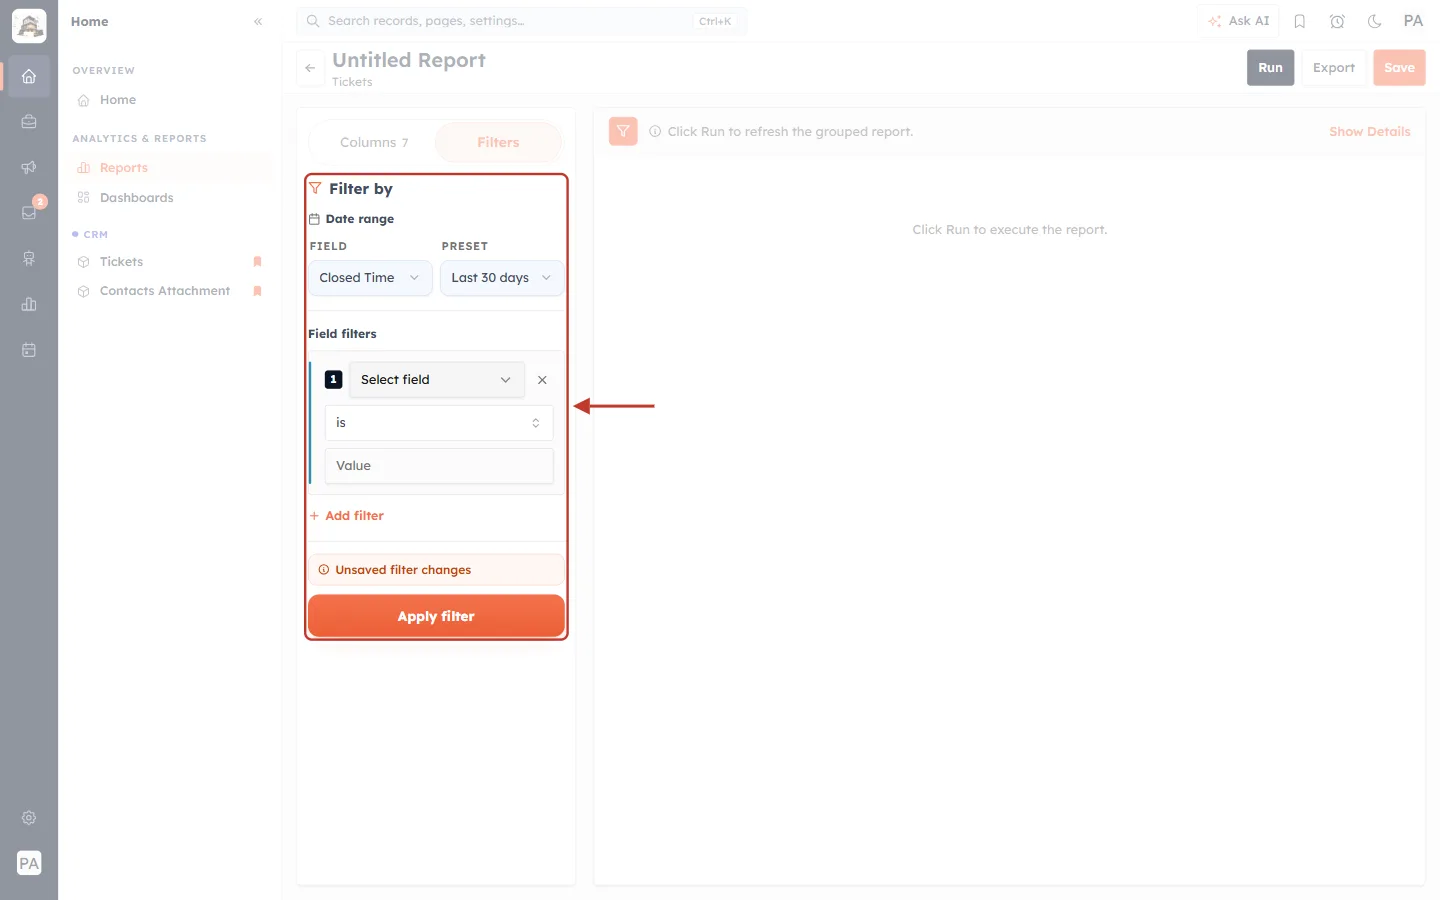
What this screenshot shows. The Filters tab of a ticket report is ringed, with FIELD: Closed Time and PRESET: Last 30 days.
Only tickets closed in the last 30 days are counted.
Field filters let you add more conditions; Apply filter turns the filter on.
Full guide: Support Reporting: Track Ticket Volume, Backlog & Resolution.
Quick reference: default settings#
Many “problems” are simply defaults. Here they are in one place.
| Setting | Default | Where |
|---|---|---|
| Auto-create ticket (per mailbox) | Off | Support Email → mailbox |
| Auto-create contact (per mailbox) | On | Support Email → mailbox |
| Email when a ticket is raised / resolved / reopened | On | Notifications |
| Email when a ticket is closed | Off | Notifications |
| Reopen a closed ticket when the customer replies | On | General Settings → Replies |
| Forwarded emails keep the original sender | Off | General Settings → Replies |
| New ticket threads start private | Off | General Settings → Replies |
| New chat widget status | Draft (hidden) | Chat Widget |
| Pre-chat form on a new widget | Off | Chat Widget |
Still stuck?#
Check the full step-by-step guide linked under each answer.
Note the ticket number (for example #TKT-00123) and what you expected to happen, and contact AiEngage support.
✅
Reload the page first — many display issues (counts, panels, new permissions) clear after a refresh.
Previous and next#
Previous: Support Reporting: Track Ticket Volume, Backlog & Resolution with Ticket Reports (Step-by-Step)
Next: Customer & Support: Handle Customer Tickets from First Message to Resolution (Step-by-Step)
Related#
Was this article helpful?
Ready to implement this?
OpenAI Engage and apply what you just learned to your own workspace.
Open AI Engage CRM