Loading…


KnowledgeBase
Connect a Support Mailbox: Turn Customer Emails into Tickets Automatically (Email-to-Ticket)
What this article covers#
Most customers ask for help by email. Instead of reading those emails in a shared inbox, you can connect your support mailbox — for example support@yourcompany.com — to AiEngage CRM. From then on the CRM checks the mailbox every couple of minutes, brings each new email in, and (once you switch it on) turns it into a ticket in Customer & Support. When the customer replies to your answer, their reply lands back on the same ticket, so the whole conversation stays in one place.
This is called email-to-ticket. This article walks you through it from start to finish:
Prepare your mailbox — turn on IMAP and create an App Password, using the built-in guide (Part 1).
Connect it — enter the address, test the connection and connect (Part 2).
Make emails become tickets — switch on Auto-create ticket and choose the reopen window (Part 3).
Keep out the noise — exclusion rules for newsletters and auto-replies (Part 4).
Look after it — status, re-testing, changing server settings and disconnecting (Part 5).
⛔
Connecting a mailbox does not create tickets on its own. Auto-create ticket is off by default. Until you switch it on (Step 13), emails are imported as conversations but no tickets are raised.
Before you begin#
Admin access. You need permission to manage Service & Support Settings.
A support mailbox that customers write to, and the right to change its security settings (or someone who has).
About 10 minutes. Most of it is spent in your email provider, creating the App Password.
A verified sending domain if you want replies to go out from your own domain — see Email Deliverability: Set Up DKIM and Domain Authentication. Receiving mail does not need it.
How email-to-ticket works#
| When… | What happens in AiEngage CRM |
|---|---|
| A customer emails your support address | Within a few minutes the email is imported. With Auto-create ticket on, a new ticket is raised. With Auto-create contact on, an unknown sender becomes a new contact. |
| An agent replies from the ticket | The reply is emailed to the customer. The ticket number is added to the subject, so the answer can be matched back. |
| The customer replies | The reply is added to the same ticket. If the ticket was closed within the reopen window, it reopens. |
| An email matches an exclusion rule | It is never imported — no ticket, no conversation, no message. |
Part 1 — Prepare your mailbox#
Step 1: Open Support Email#
Press Ctrl + K (Cmd + K on a Mac), type Support Email and open it. You land on Service & Support Settings, on the Support Email — IMAP sync & exclusions tab.
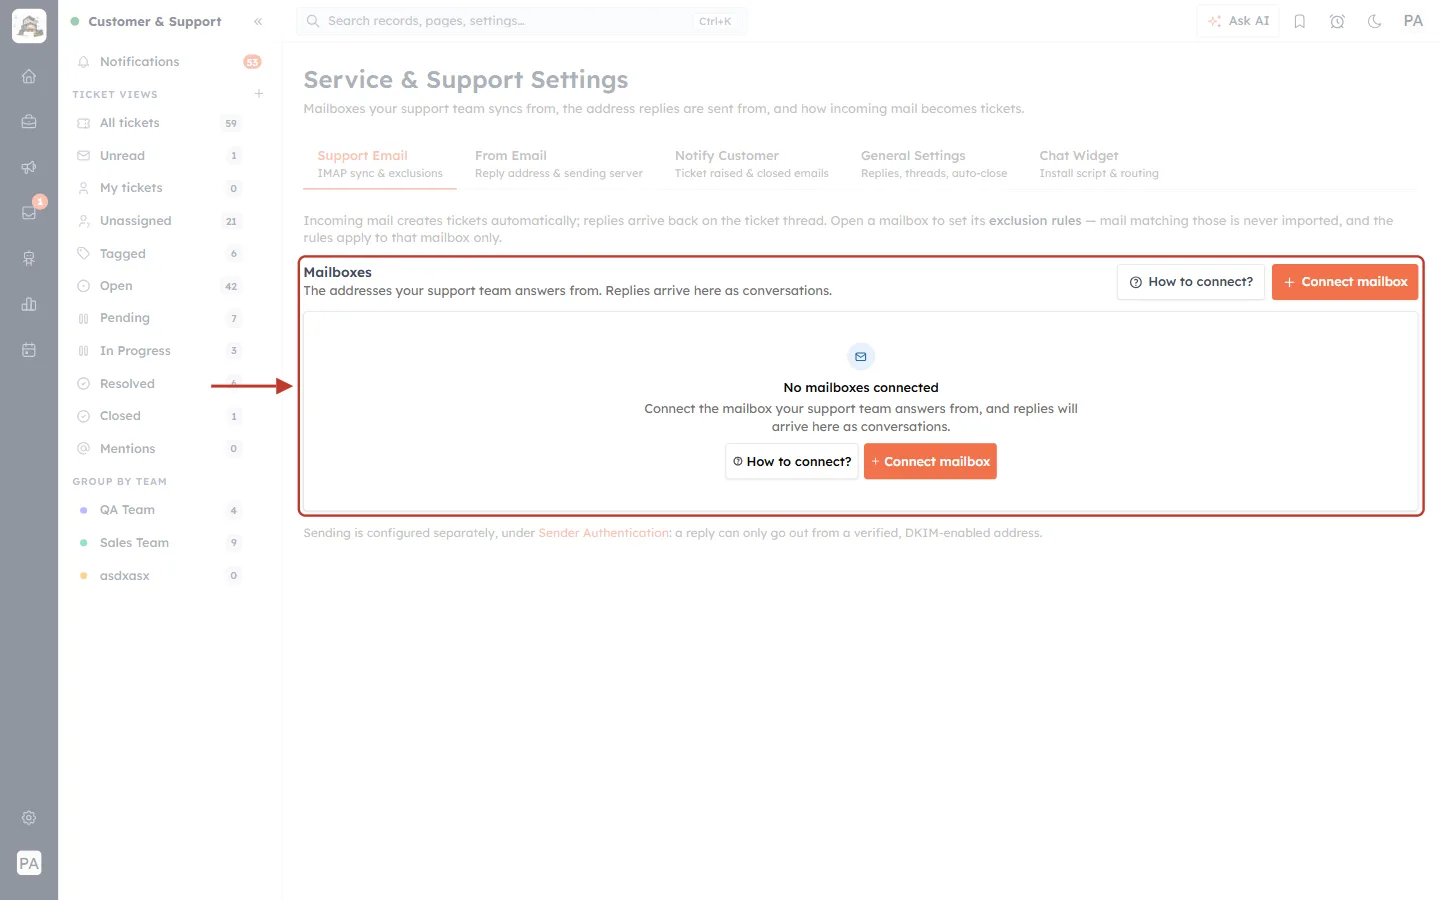
What this screenshot shows. The Support Email tab. The Mailboxes section is ringed; no mailbox has been connected yet.
Mailboxes — “The addresses your support team answers from. Replies arrive here as conversations.” Each connected mailbox will be listed here.
No mailboxes connected — the empty state you see before your first connection.
How to connect? — opens a five-step guide (Step 2).
+ Connect mailbox (orange) — opens the connect form (Step 7). It appears twice: top right and in the middle of the empty box.
Above it (faded): “Incoming mail creates tickets automatically; replies arrive back on the ticket thread.” Below it: a reminder that sending is set up separately under Sender Authentication.
Step 2: Open the How to connect? guide#
Before you connect, collect what you need from your email provider. The built-in guide tells you exactly what. It never asks for your password.
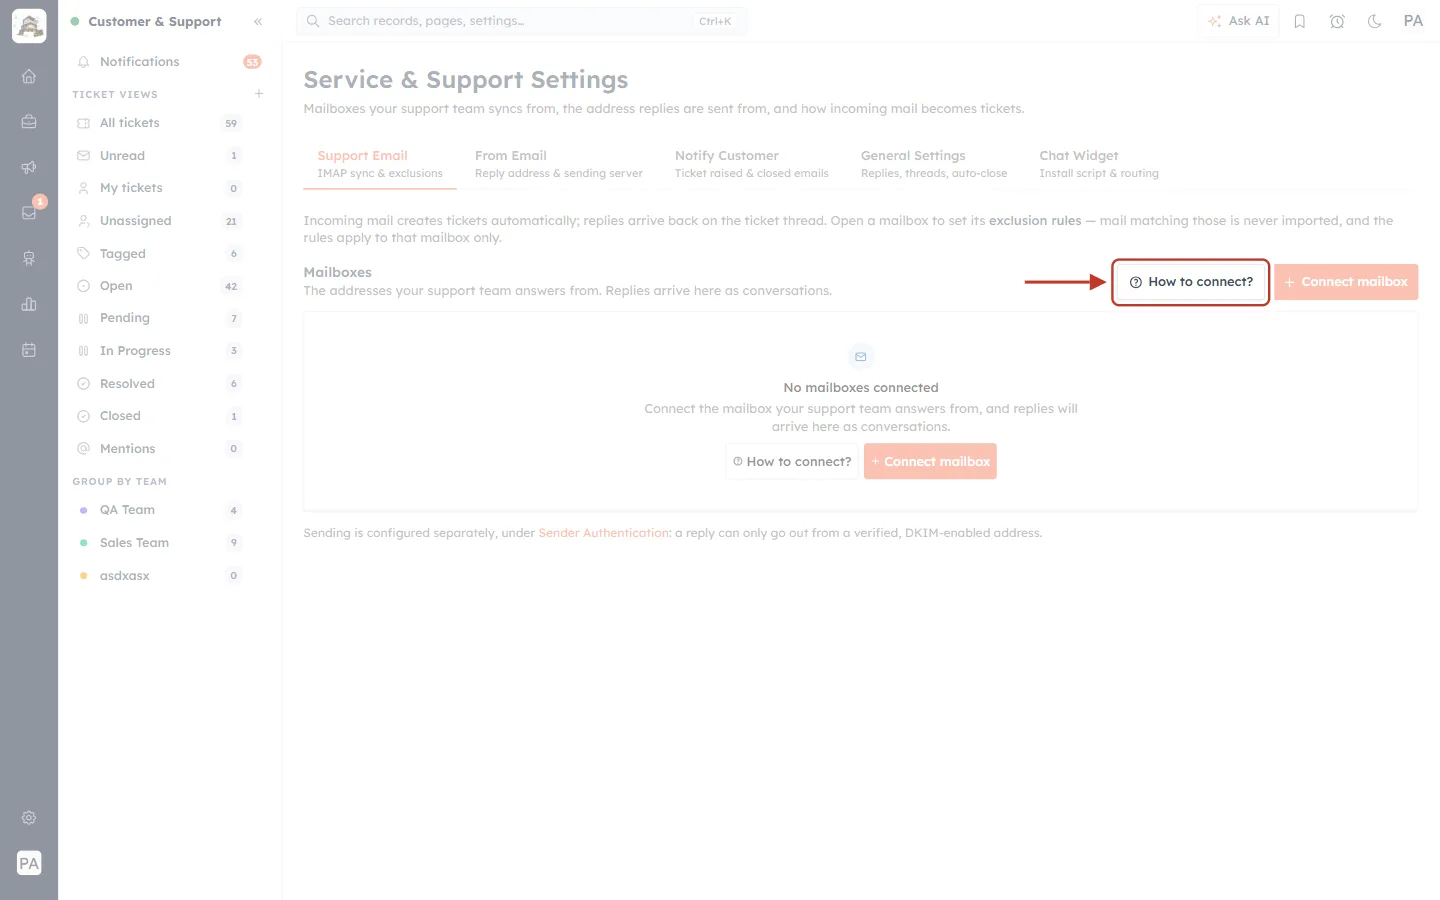
What this screenshot shows. The How to connect? button (with a question-mark icon) is ringed, next to + Connect mailbox.
Click it to open Connect an email inbox, a five-step checklist you can work through in another browser tab.
You can open it any time; it does not change anything.
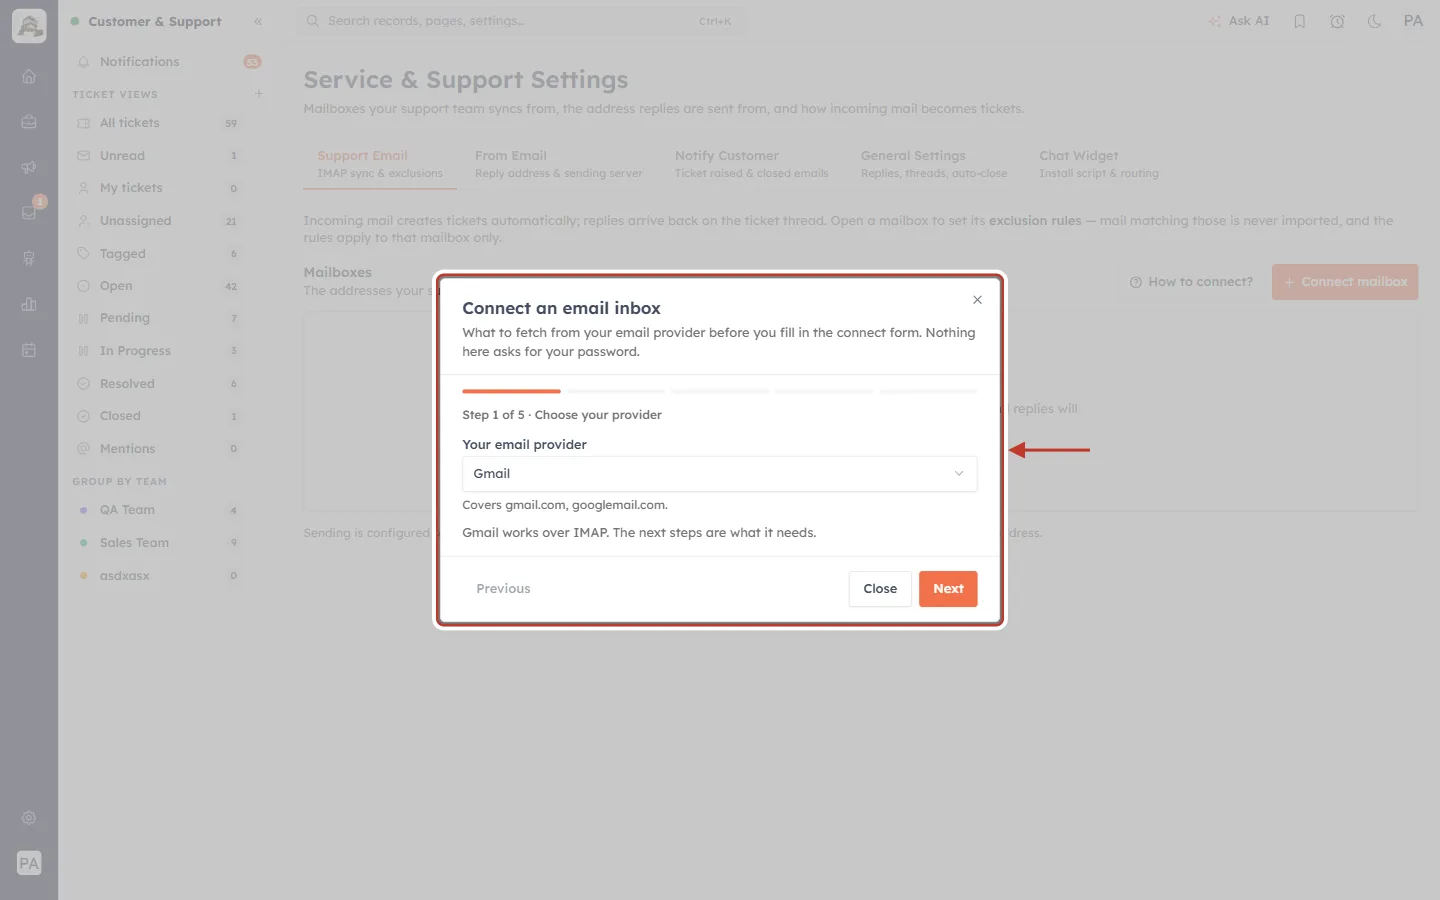
What this screenshot shows. The guide is open on Step 1 of 5 · Choose your provider.
Your email provider — a drop-down, set to Gmail here. “Covers gmail.com, googlemail.com.”
Gmail works over IMAP. The next steps are what it needs. — IMAP is the standard way for an app to read a mailbox.
Previous / Next — move between steps. Close or ✕ — close the guide.
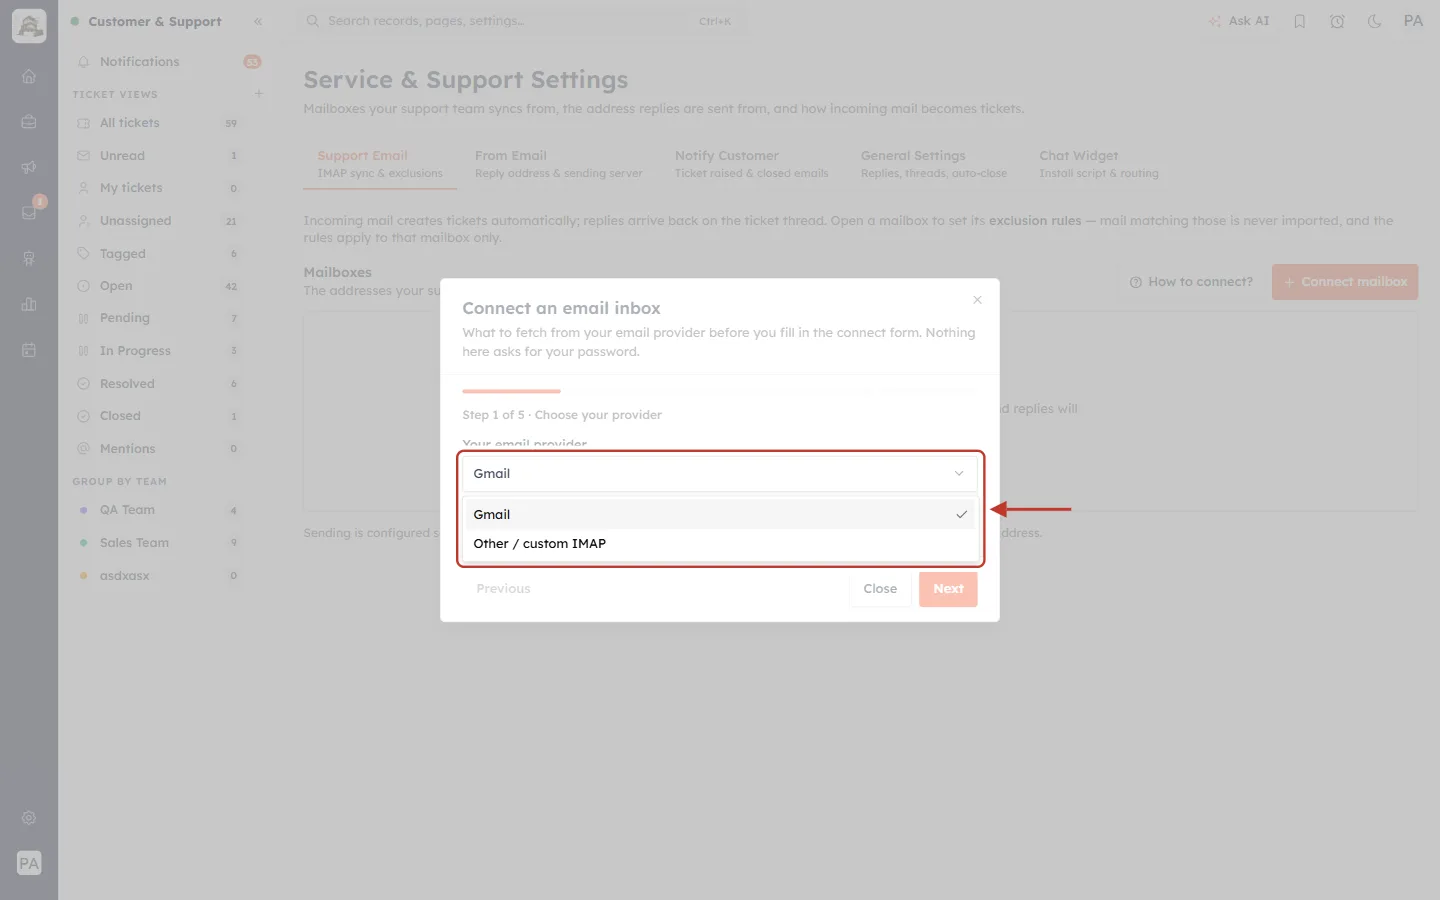
What this screenshot shows. The provider drop-down is open and ringed.
Gmail — Google Workspace and personal Gmail addresses. The guide fills in Google’s server settings for you.
Other / custom IMAP — any other provider (Outlook, Zoho, your web host, your own server). “Any IMAP server works. You will need its host name, port and encryption from whoever runs it.”
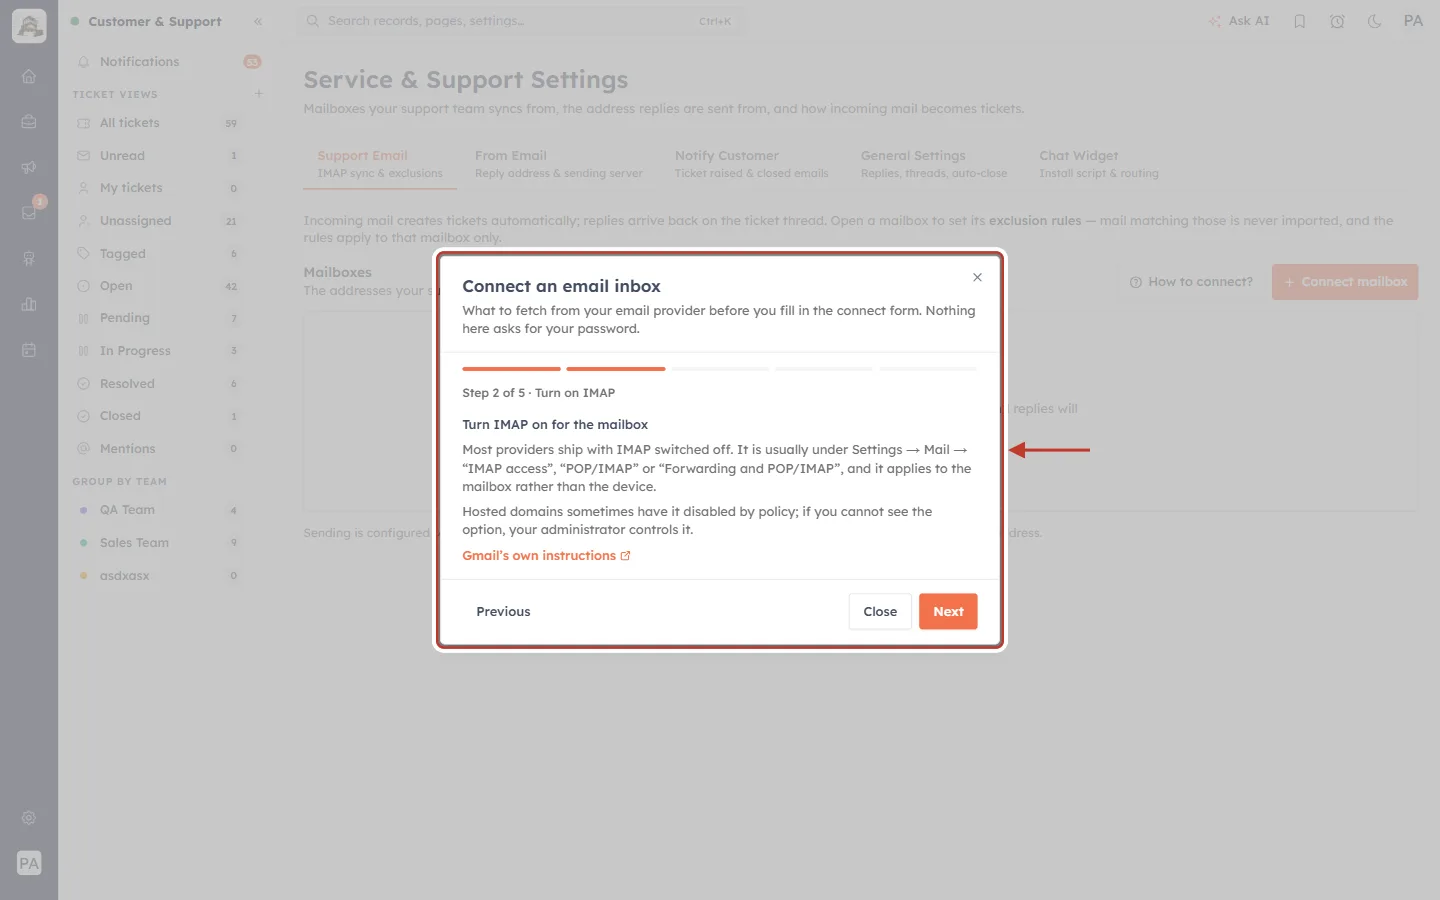
What this screenshot shows. Step 2 of 5 · Turn on IMAP.
Turn IMAP on for the mailbox — most providers ship with IMAP switched off. Look under Settings → Mail → “IMAP access”, “POP/IMAP” or “Forwarding and POP/IMAP”. It is a mailbox setting, not a phone or computer setting.
On company (hosted) domains your administrator may control this option. If you cannot see it, ask them.
Gmail’s own instructions — a link to Google’s help page.
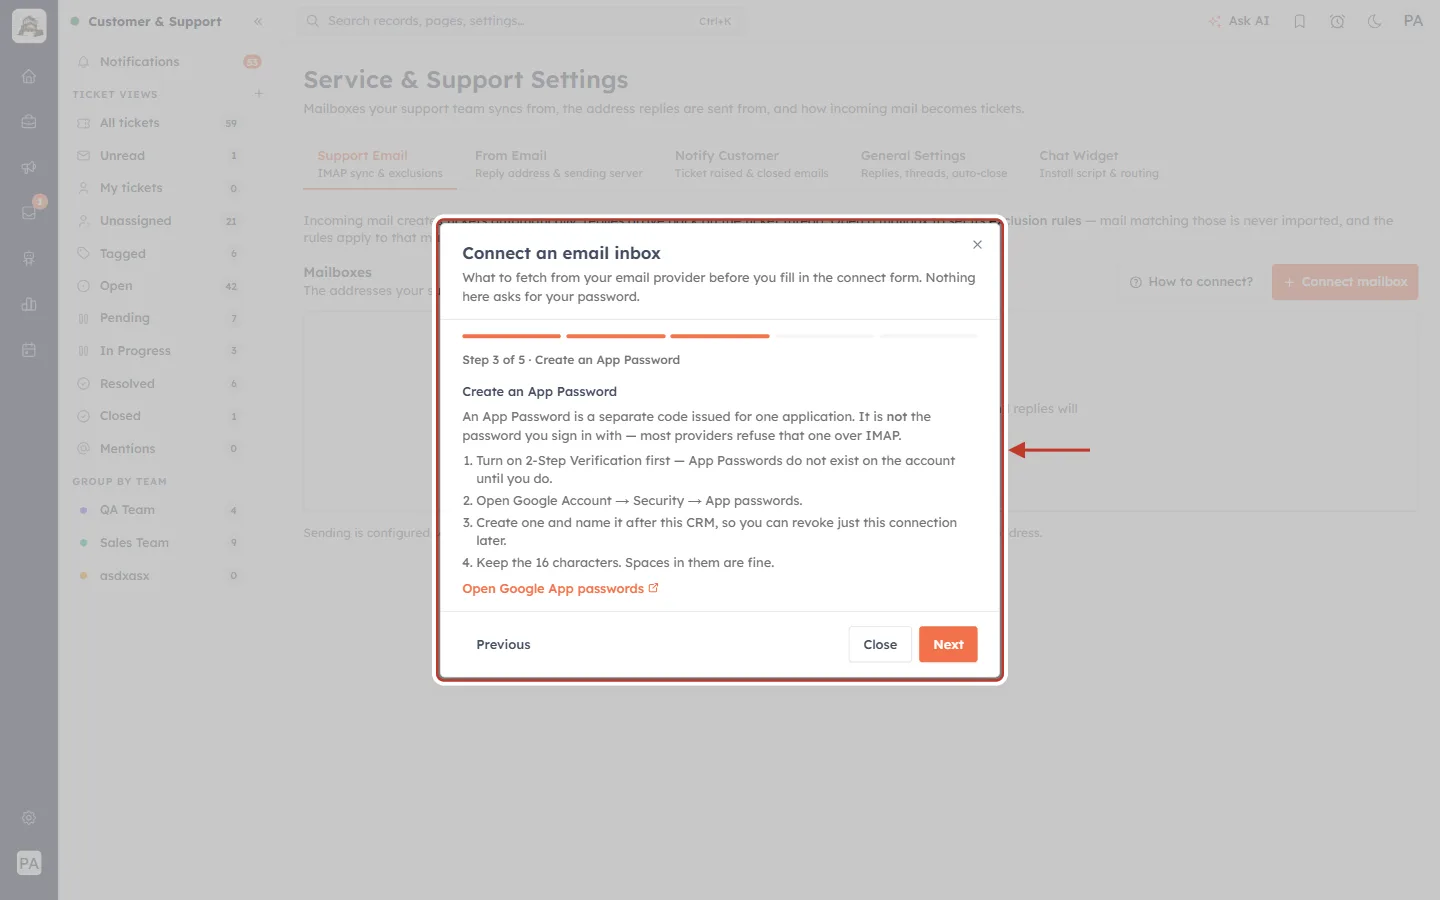
What this screenshot shows. Step 3 of 5 · Create an App Password — the step people most often miss.
An App Password is a separate code issued for one application. It is not the password you sign in with — most providers refuse that one over IMAP.
1. Turn on 2-Step Verification first — App Passwords do not exist on the account until you do.
2. Open Google Account → Security → App passwords.
3. Create one and name it after this CRM (for example “AiEngage CRM”), so you can revoke just this connection later.
4. Keep the 16 characters. Spaces in them are fine.
Open Google App passwords — a direct link to the right Google page.
ℹ️
Not using Gmail? Look for “App password”, “App-specific password” or “Mail app password” in your account’s security settings; two-factor authentication usually has to be on first. A server you run yourself may accept the ordinary mailbox password — try it, and fall back to an app password if the connection test refuses it.
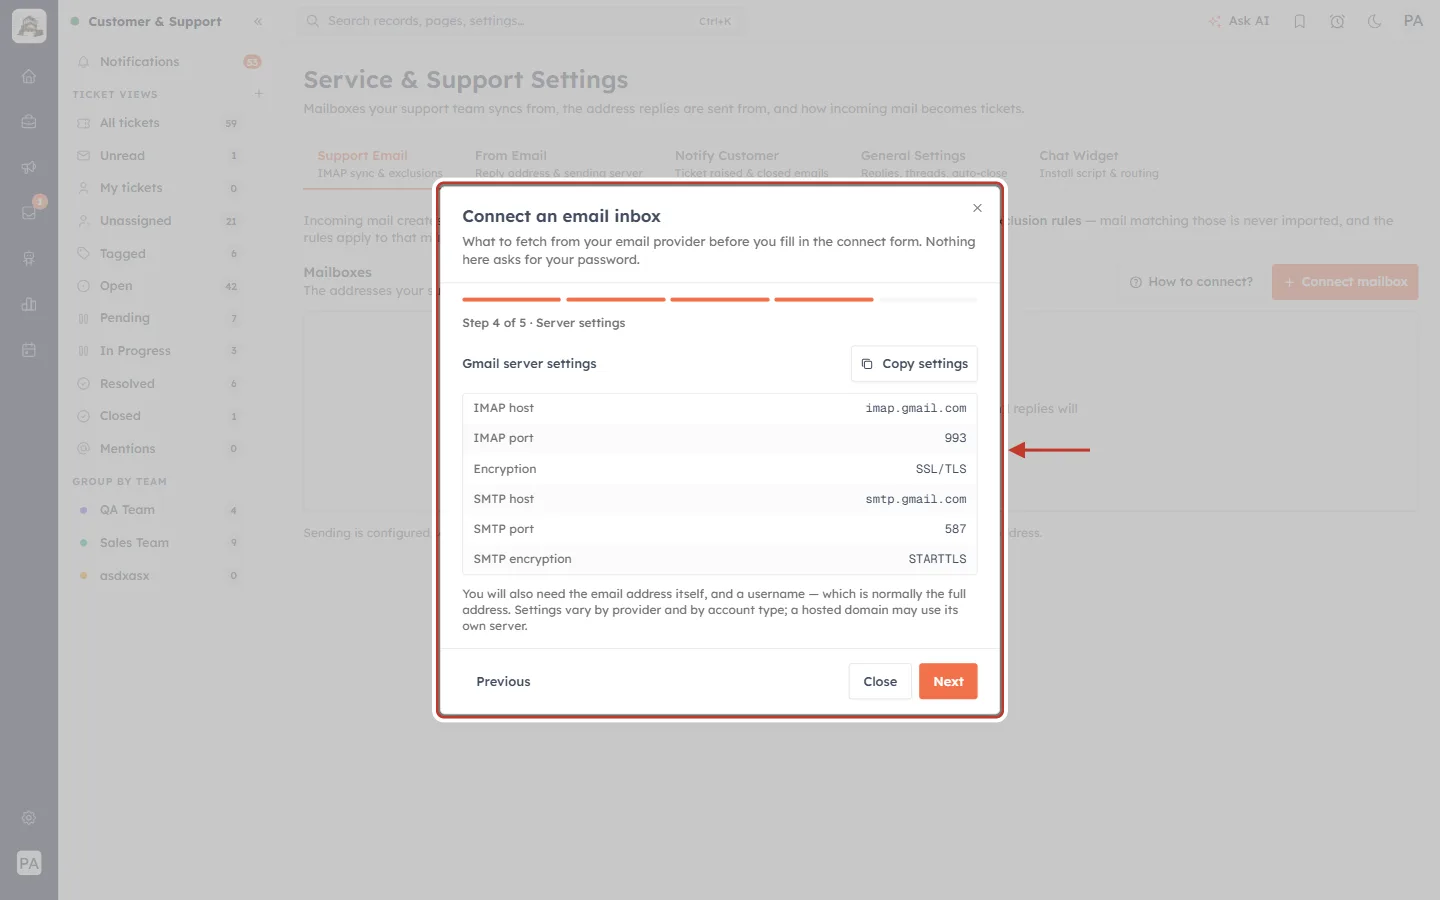
What this screenshot shows. Step 4 of 5 · Server settings, with the values for Gmail.
IMAP host
imap.gmail.com· IMAP port993· Encryption SSL/TLS — used to read the mailbox.SMTP host
smtp.gmail.com· SMTP port587· SMTP encryption STARTTLS — used to send through the mailbox, if you choose to.Copy settings — copies all six values at once.
You will also need the email address itself and a username, which is normally the full address. For other providers the guide suggests the usual pattern — often
imap.yourdomain.comandsmtp.yourdomain.com— but check with your provider.
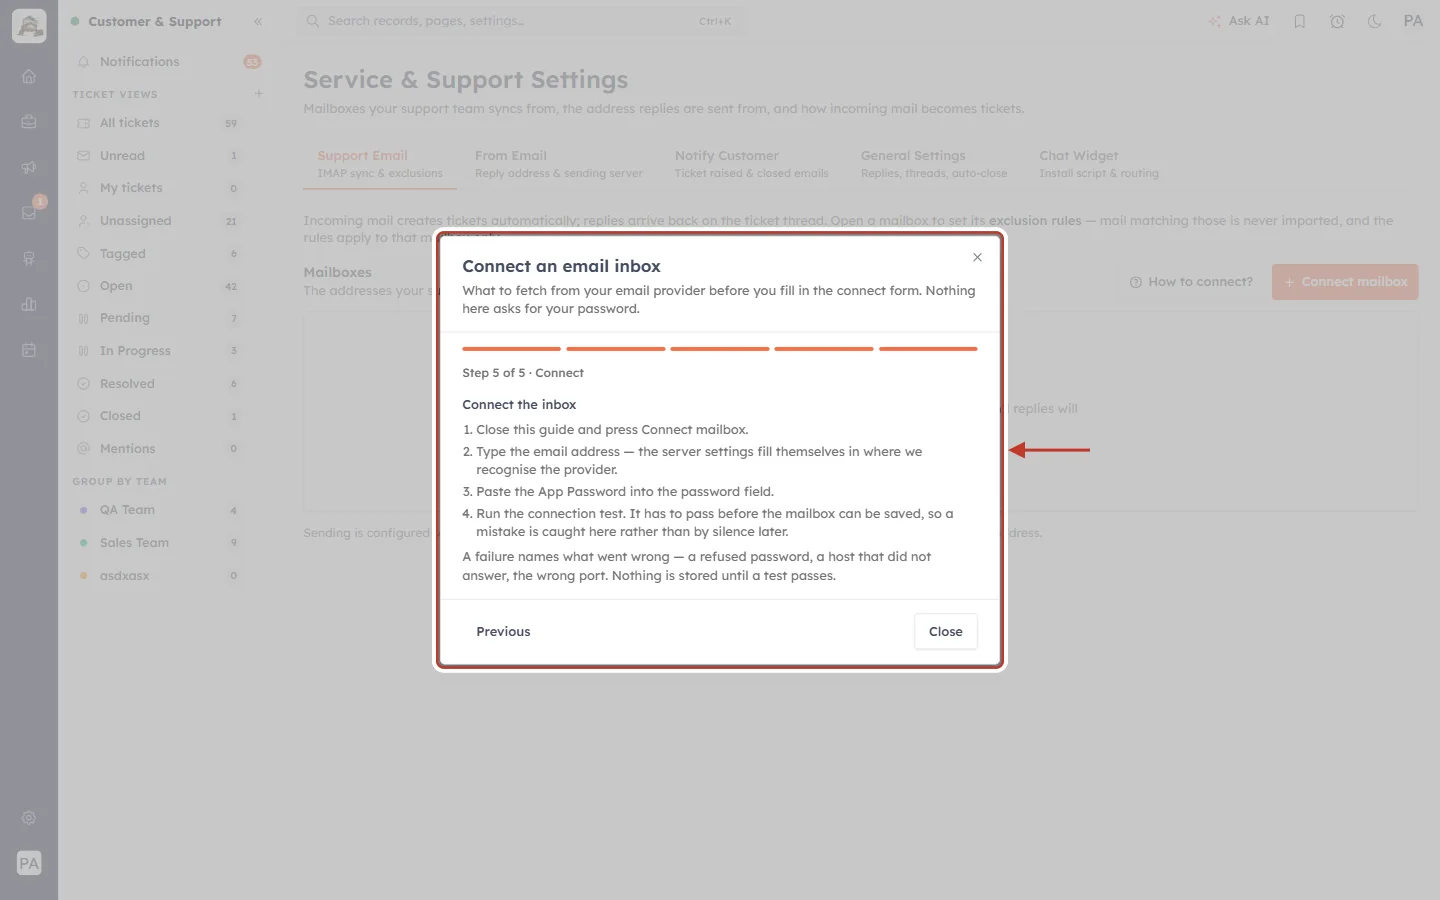
What this screenshot shows. Step 5 of 5 · Connect — a summary of Part 2 of this article.
Close this guide and press Connect mailbox.
Type the email address — the server settings fill themselves in where the provider is recognised.
Paste the App Password into the password field.
Run the connection test. It has to pass before the mailbox can be saved. “A failure names what went wrong — a refused password, a host that did not answer, the wrong port. Nothing is stored until a test passes.”
Part 2 — Connect the mailbox#
Step 3: Click Connect mailbox#
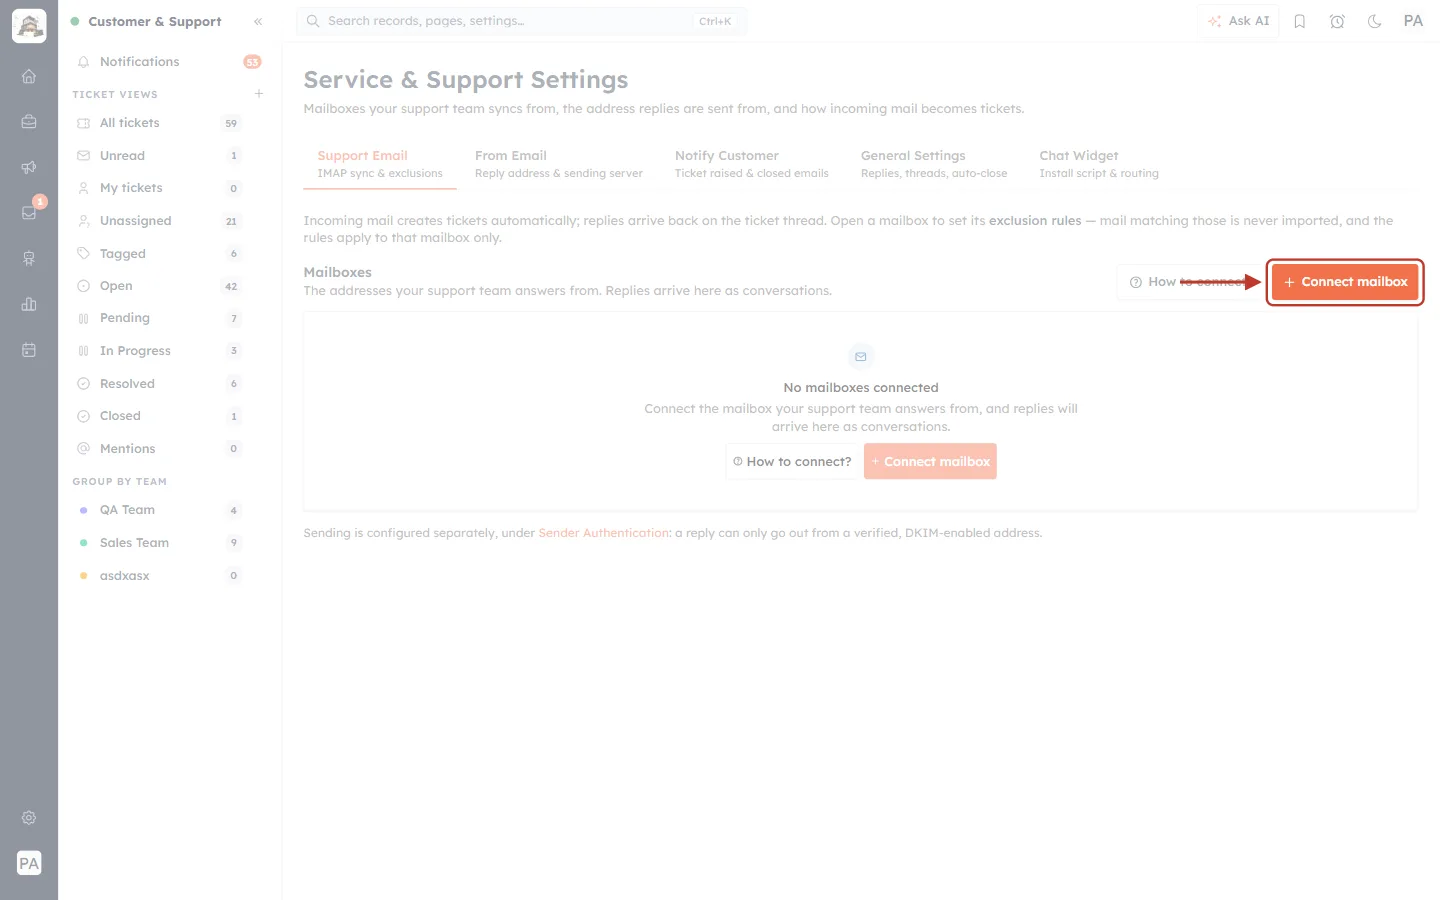
What this screenshot shows. The orange + Connect mailbox button in the top-right of the Mailboxes section is ringed.
Click it to open the Connect mailbox window.
Step 4: Choose the connection type and how much history to import#
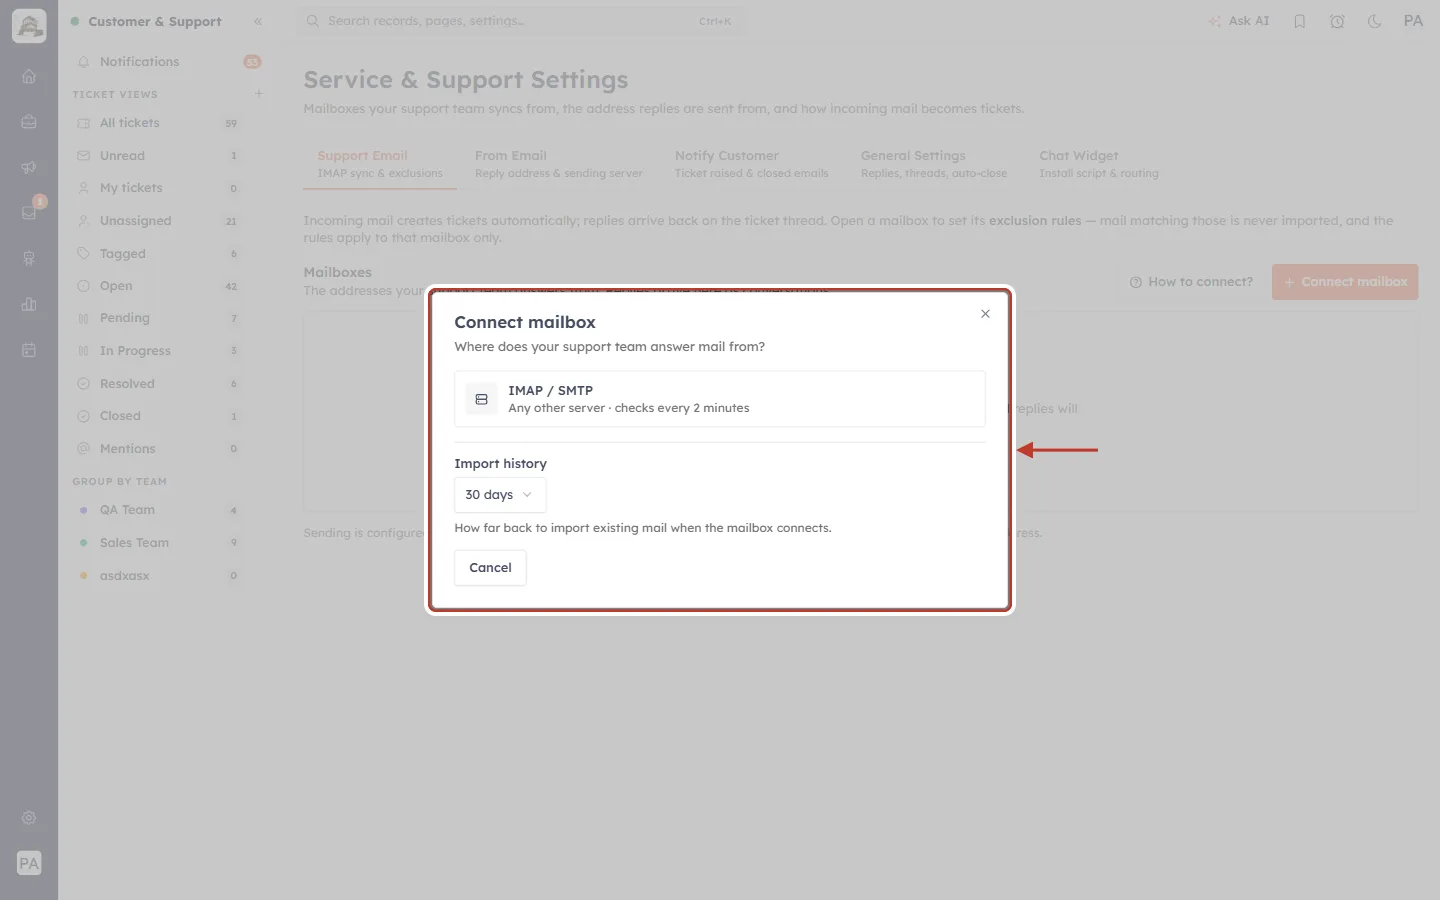
What this screenshot shows. The first screen of Connect mailbox — “Where does your support team answer mail from?” — is ringed.
IMAP / SMTP — “Any other server · checks every 2 minutes”. This works with Gmail and every standard mail server. Click it to continue to the form (Step 5).
Import history — how far back to bring in existing mail when the mailbox connects (set it before you click IMAP / SMTP).
Cancel — close without connecting.
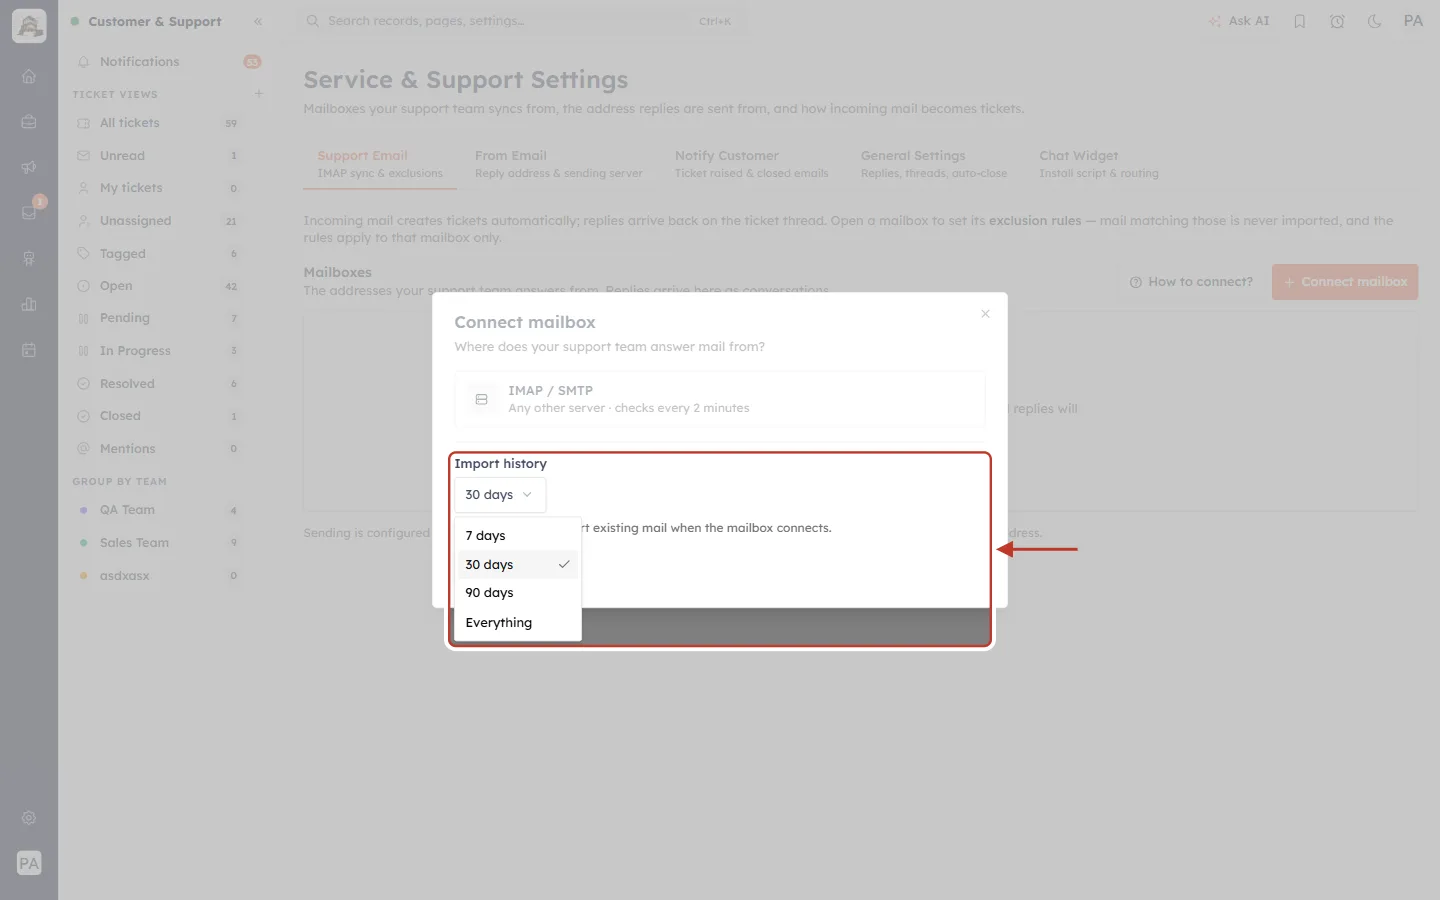
What this screenshot shows. The Import history list is open and ringed.
7 days, 30 days (the default), 90 days or Everything.
Choose a short period if your old mail is already dealt with — every imported conversation can become a ticket once Auto-create ticket is on. Choose more if you want past conversations available in the CRM.
⚠️
Importing Everything from a busy mailbox can bring in thousands of old emails. While it runs, the mailbox shows Syncing · imported / total.
Step 5: Enter the email address#
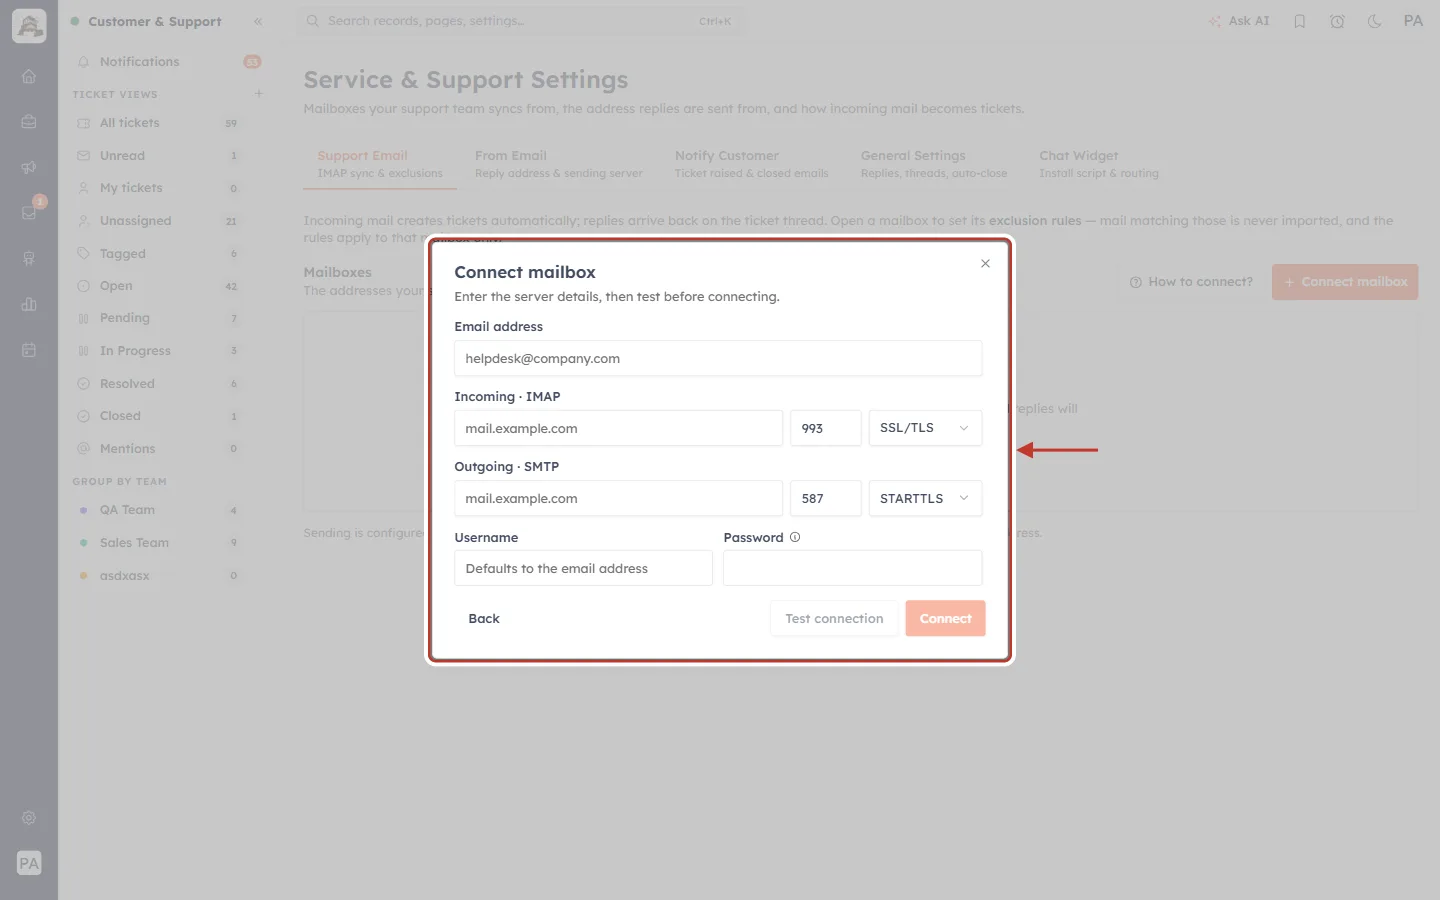
What this screenshot shows. The connect form — “Enter the server details, then test before connecting.” — is ringed.
Email address — the support address customers write to (placeholder helpdesk@company.com).
Incoming · IMAP — host, port (993) and encryption (SSL/TLS).
Outgoing · SMTP — host, port (587) and encryption (STARTTLS).
Username — “Defaults to the email address”. Leave it empty unless your provider says otherwise.
Password — the App Password from Step 2.
Back · Test connection · Connect — Connect stays greyed out until a test passes.
Type the address and move to the next field. For a recognised provider such as Gmail, the CRM fills in the server settings for you. Then paste the App Password.
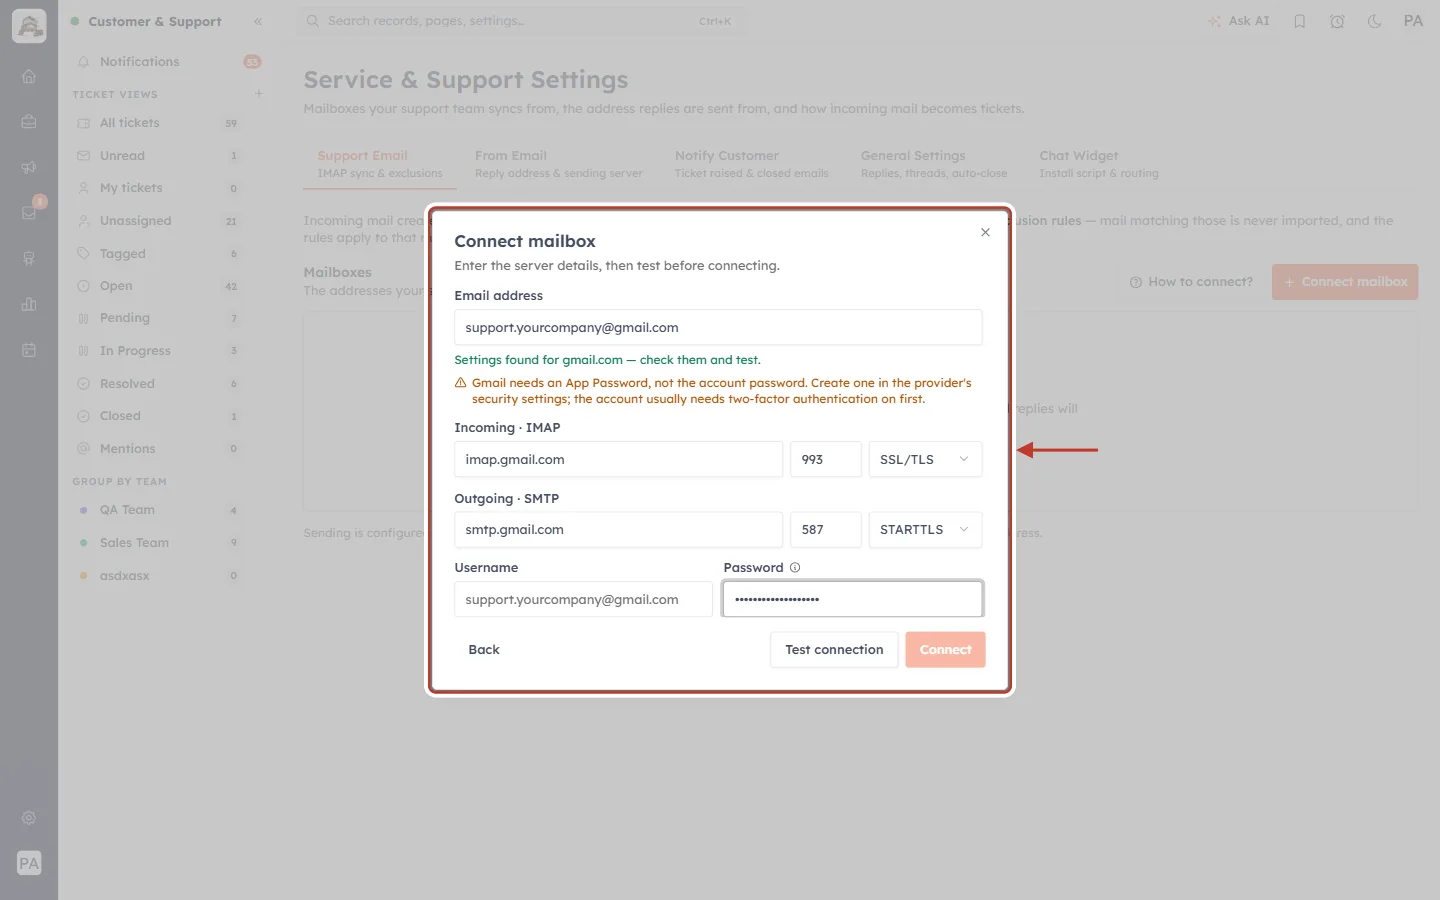
What this screenshot shows. The form after typing support.yourcompany@gmail.com and pasting the App Password. The whole form is ringed.
Settings found for gmail.com — check them and test. (green) — the CRM recognised Gmail and filled in the servers.
⚠ Gmail needs an App Password, not the account password. — a reminder of Step 2. The ⓘ next to Password opens the same instructions.
Incoming · IMAP —
imap.gmail.com,993, SSL/TLS.Outgoing · SMTP —
smtp.gmail.com,587, STARTTLS.Username — filled in with the email address.
Password — the App Password, shown as dots.
For a provider that is not recognised, copy the six server values from your provider’s help page into these boxes.
Step 6: Test the connection#
Click Test connection. The CRM signs in to the mailbox with these details and reports the result. Nothing is stored until a test passes.
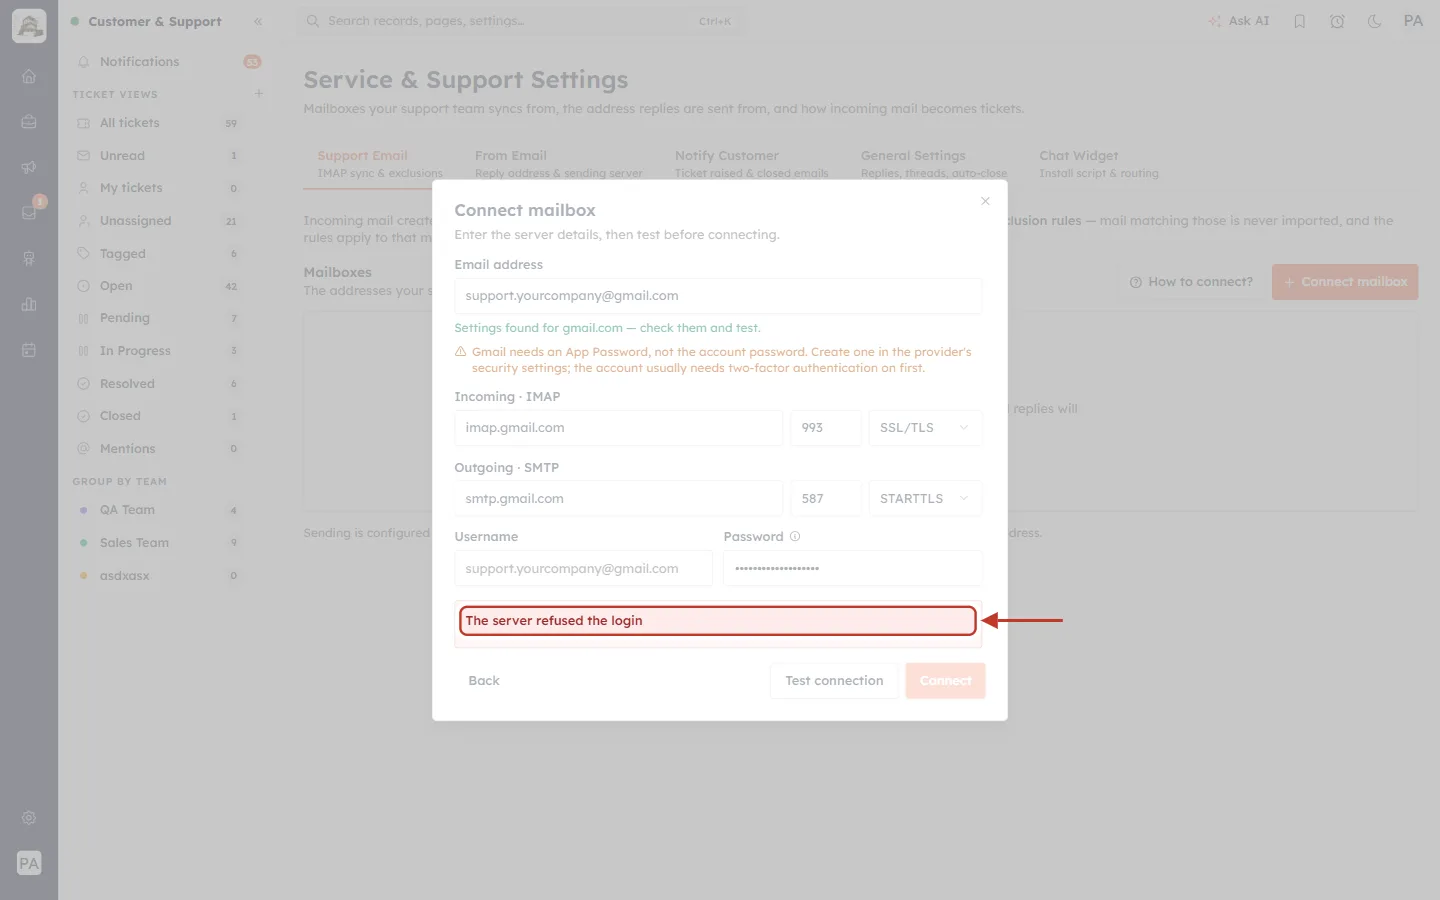
What this screenshot shows. A failed test. The red result box is ringed.
The server refused the login — the address or password was not accepted. By far the most common cause is using the normal account password instead of an App Password, or 2-Step Verification not being on.
Other results you may see: Could not reach the server (wrong host or port, or the server is down) and The saved credentials could not be read.
Correct the details and click Test connection again.
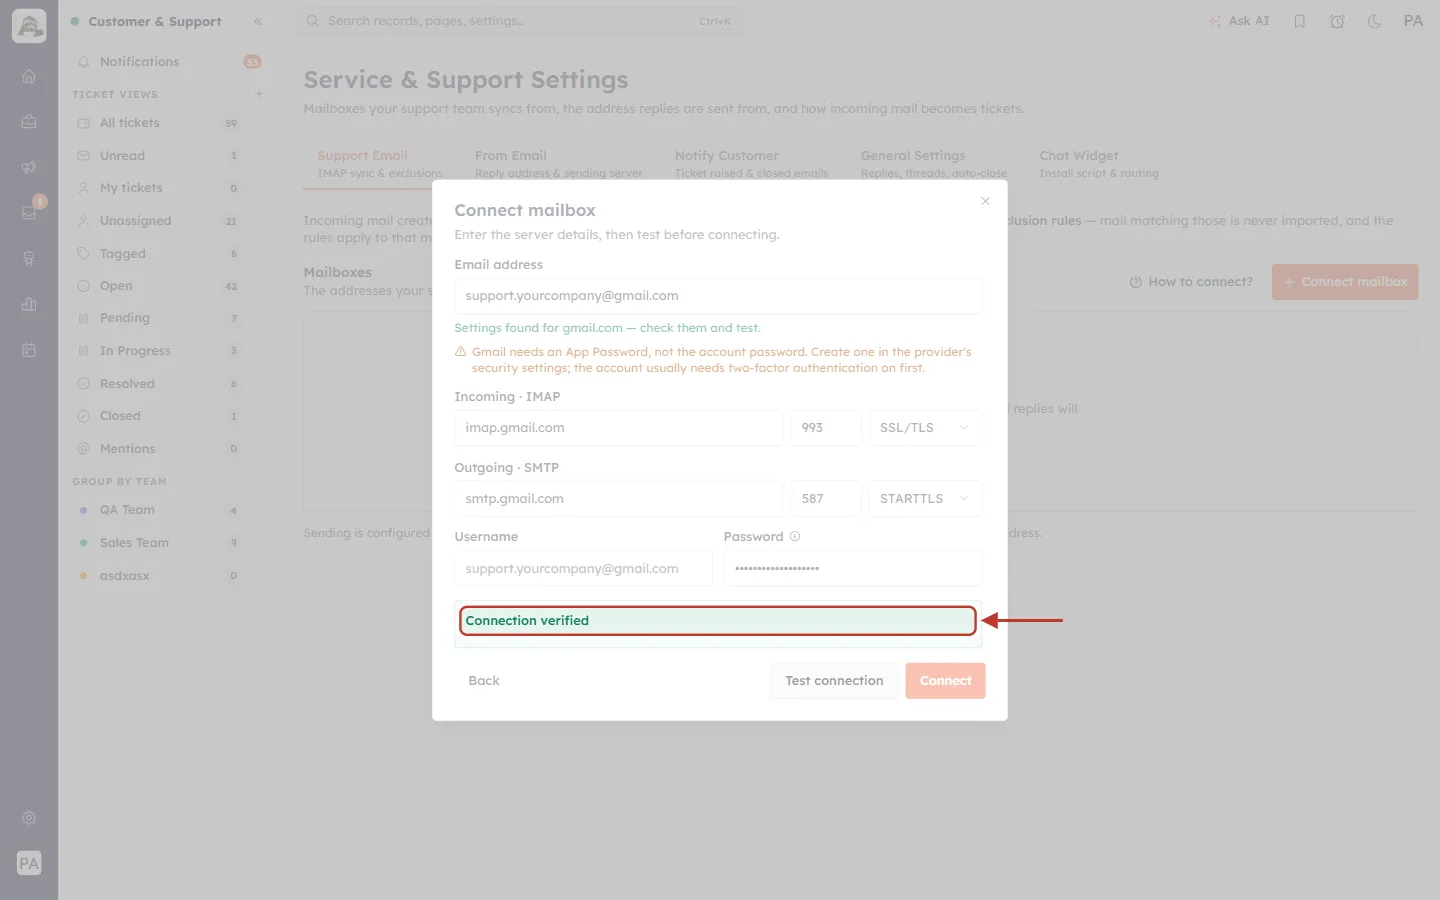
What this screenshot shows. A successful test. The green Connection verified box is ringed.
Connection verified — the CRM signed in and can read the mailbox.
If the CRM cannot work out which folder holds your sent mail, it asks you to Pick your Sent folder here, so replies you send from other email apps still appear on the ticket.
Step 7: Connect#
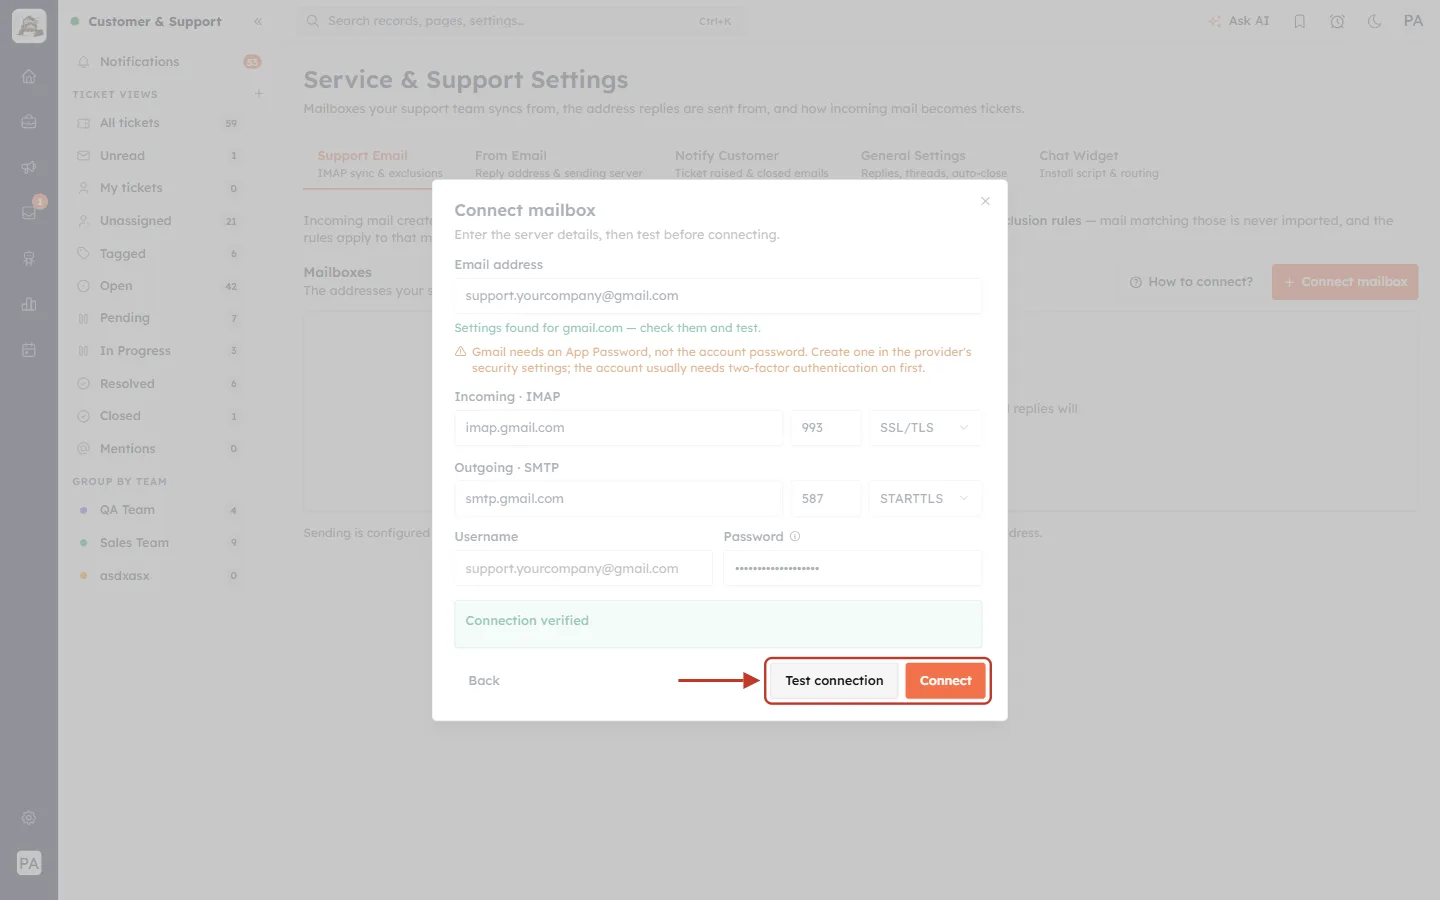
What this screenshot shows. The bottom of the form, with Test connection and Connect ringed. After a passing test, Connect turns solid orange.
Connect — saves the mailbox and starts importing mail. You will see “Mailbox connected.”
If you change any detail after testing, test again before connecting.
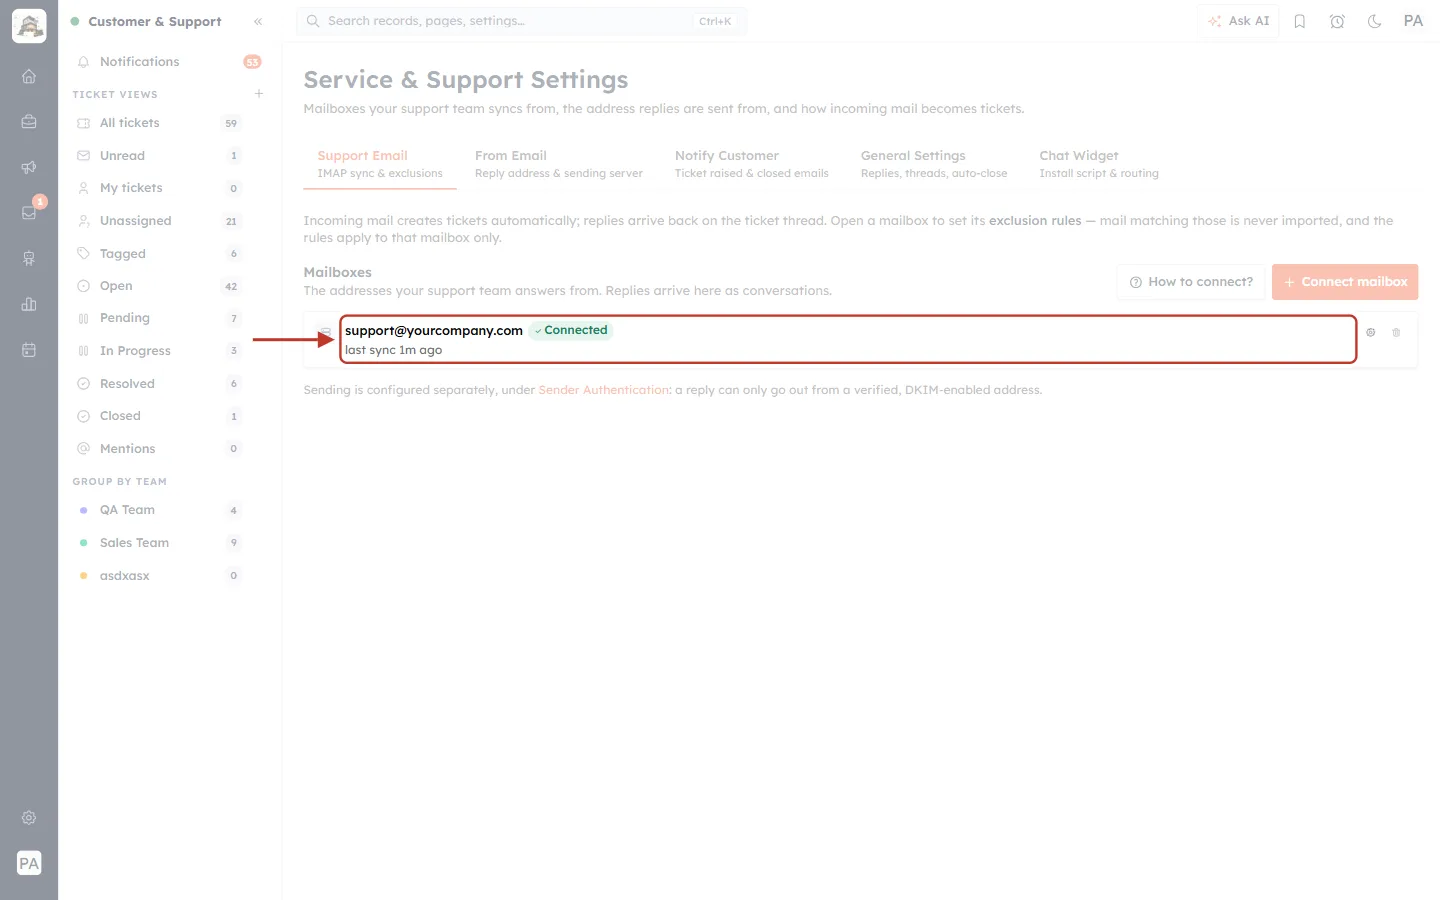
What this screenshot shows. Back on Support Email, the new mailbox appears in the Mailboxes list (ringed).
support@yourcompany.com — the connected address.
✓ Connected — its status (see the table in Part 5).
last sync 1m ago — when the CRM last checked it for new mail.
Click the mailbox to open its settings — that is where you switch ticket creation on (Part 3).
Part 3 — Make incoming emails become tickets#
Step 8: Open the mailbox settings#
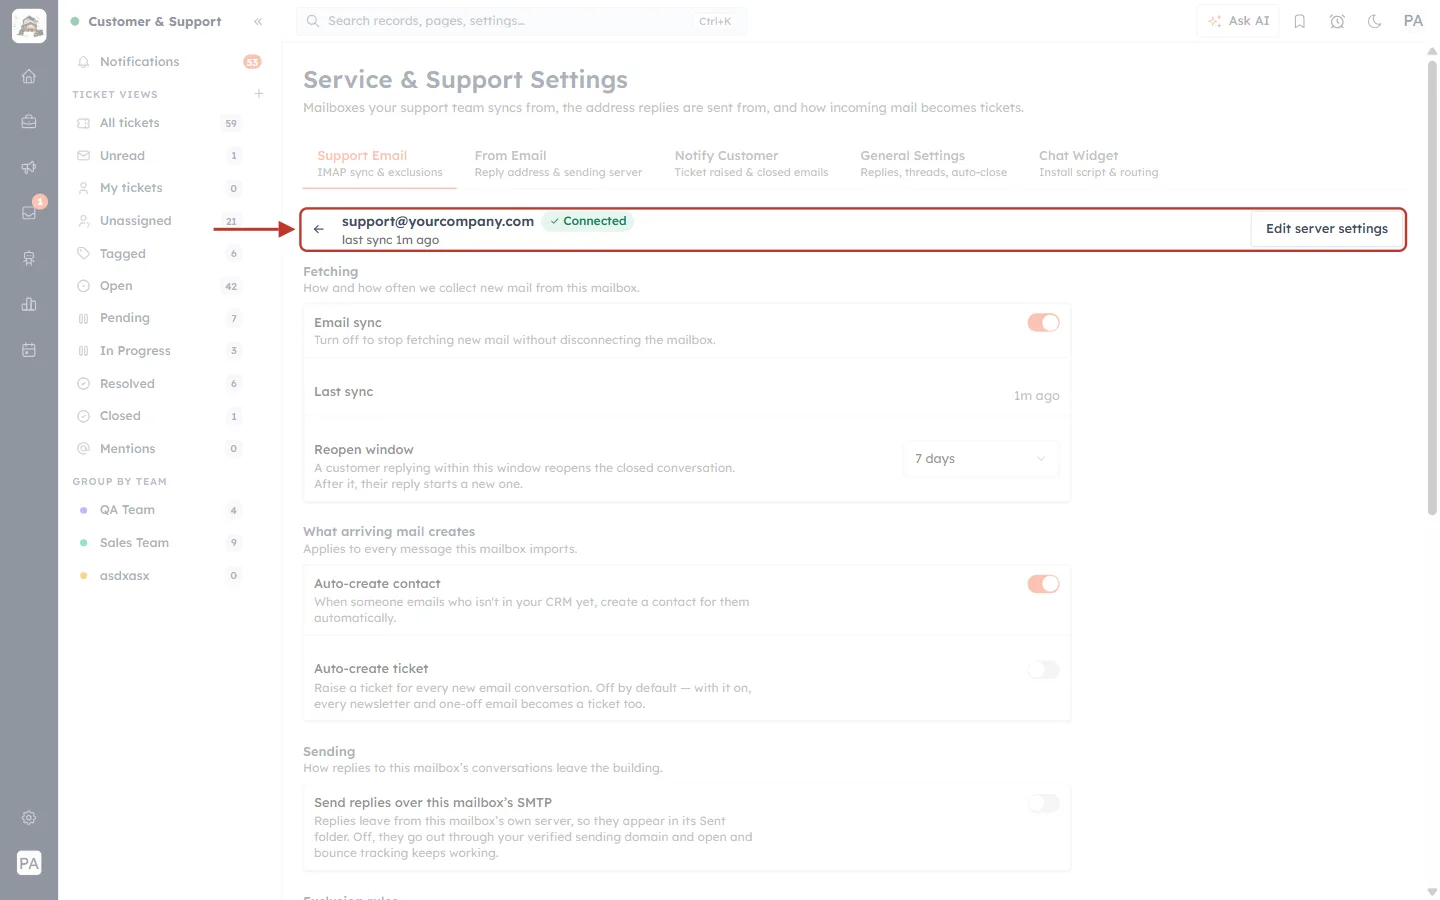
What this screenshot shows. The mailbox’s own settings page. The header is ringed.
← — back to the list of mailboxes.
support@yourcompany.com with ✓ Connected and last sync 1m ago.
Edit server settings — change the host, port, username or password later (Step 18).
Below (faded): the sections Fetching, What arriving mail creates, Sending, Exclusion rules, Diagnostics and Danger zone, covered in the next steps.
Step 9: Check the Fetching settings#
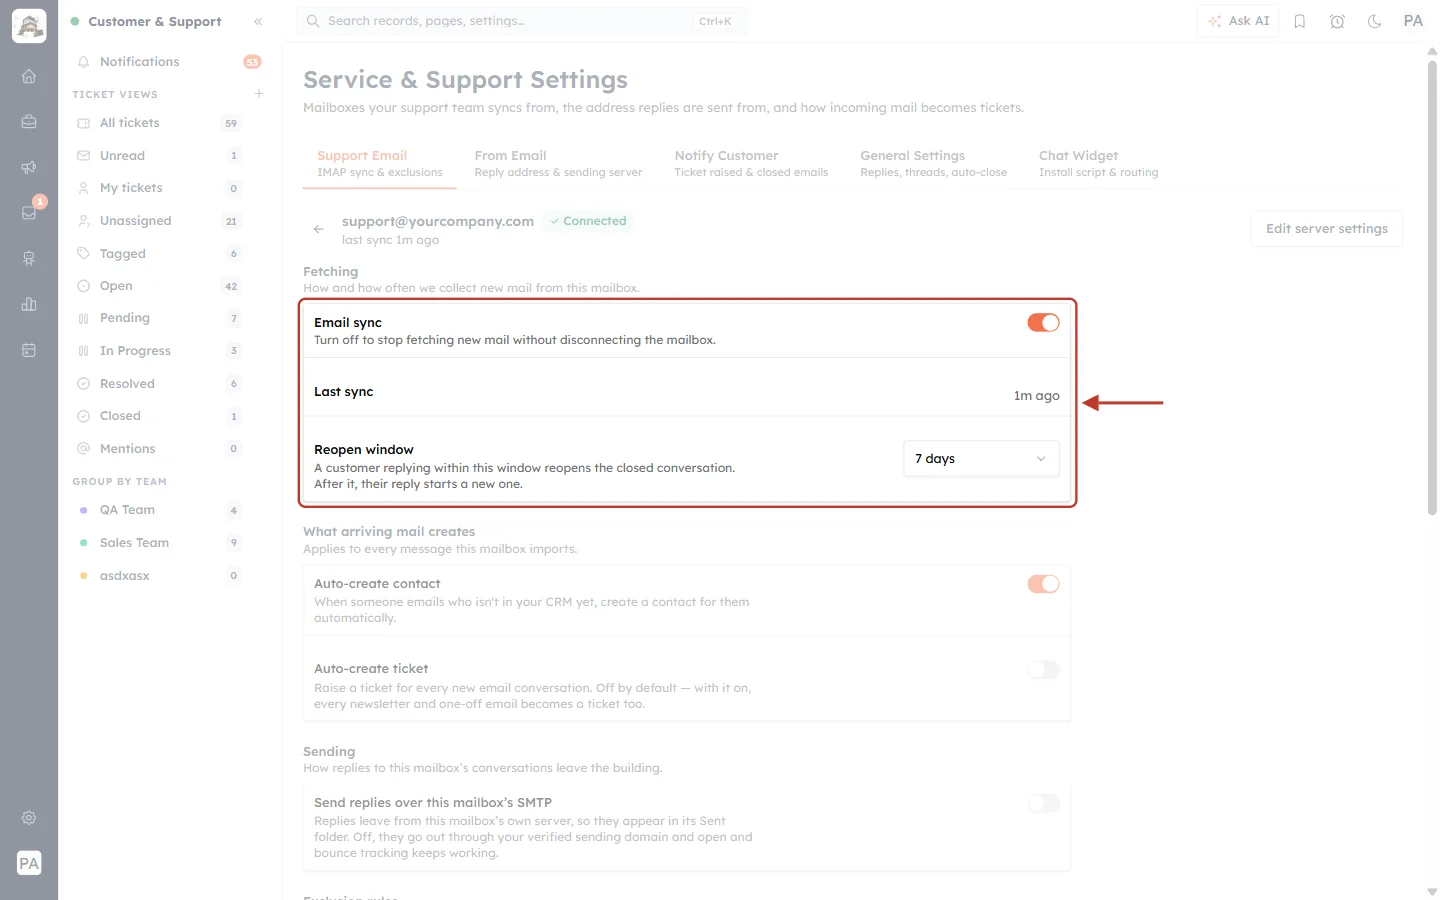
What this screenshot shows. The Fetching section — “How and how often we collect new mail from this mailbox.” — is ringed.
Email sync (switch, on) — “Turn off to stop fetching new mail without disconnecting the mailbox.” Useful to pause imports, for example during a migration.
Last sync — 1m ago: when new mail was last checked for.
Reopen window — 7 days. See Step 10.
Step 10: Choose the reopen window#
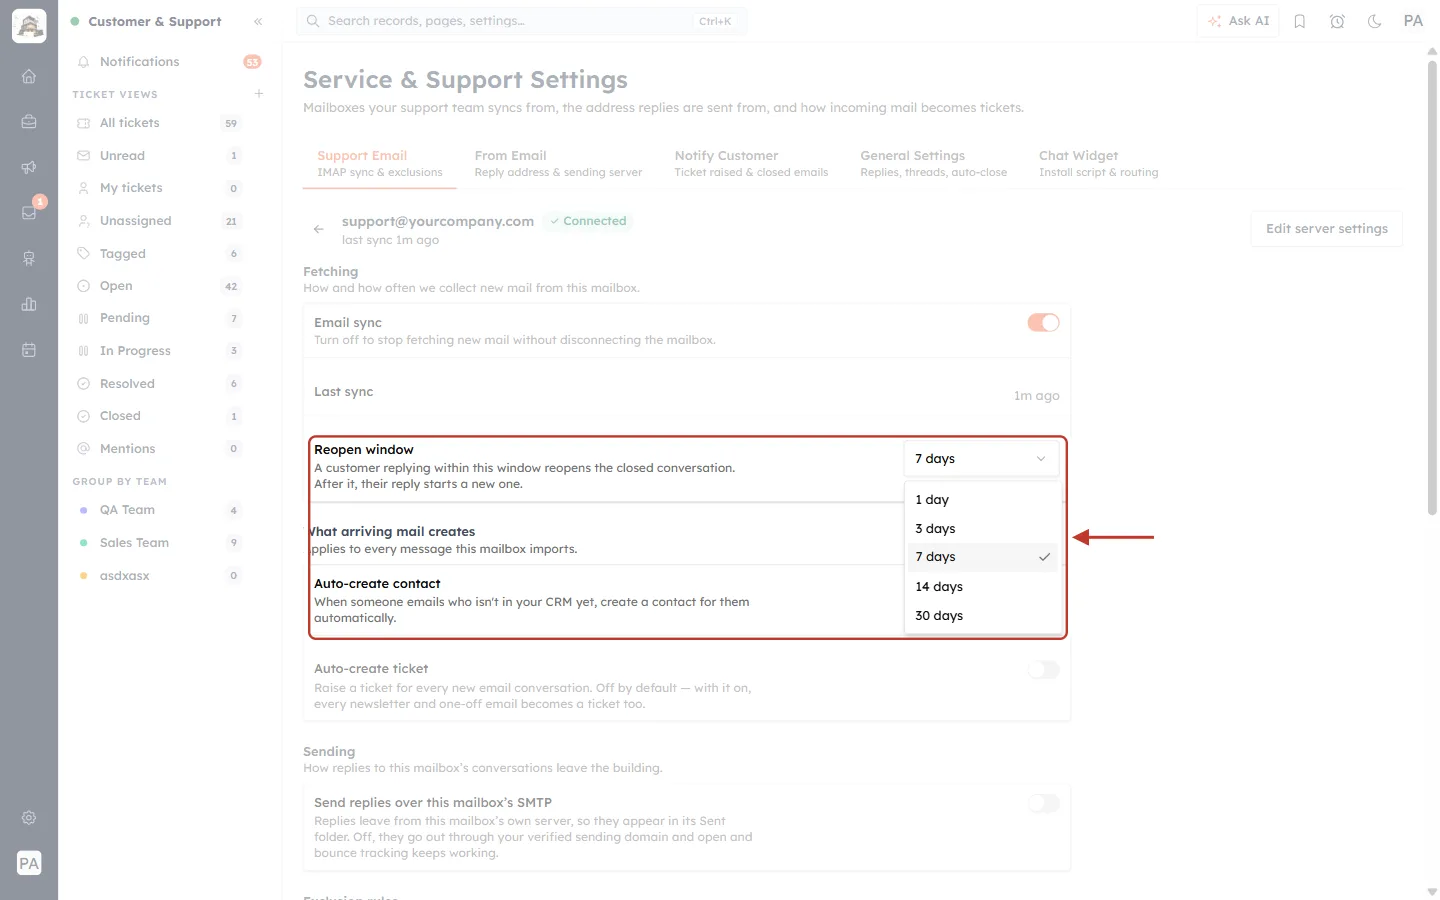
What this screenshot shows. The Reopen window list is open and ringed.
“A customer replying within this window reopens the closed conversation. After it, their reply starts a new one.”
Choose 1 day, 3 days, 7 days (the default), 14 days or 30 days. The change saves at once (“Reopen window saved.”).
Short windows suit quick, one-off questions; longer windows suit issues that customers often come back to.
Step 11: Decide what arriving mail creates#
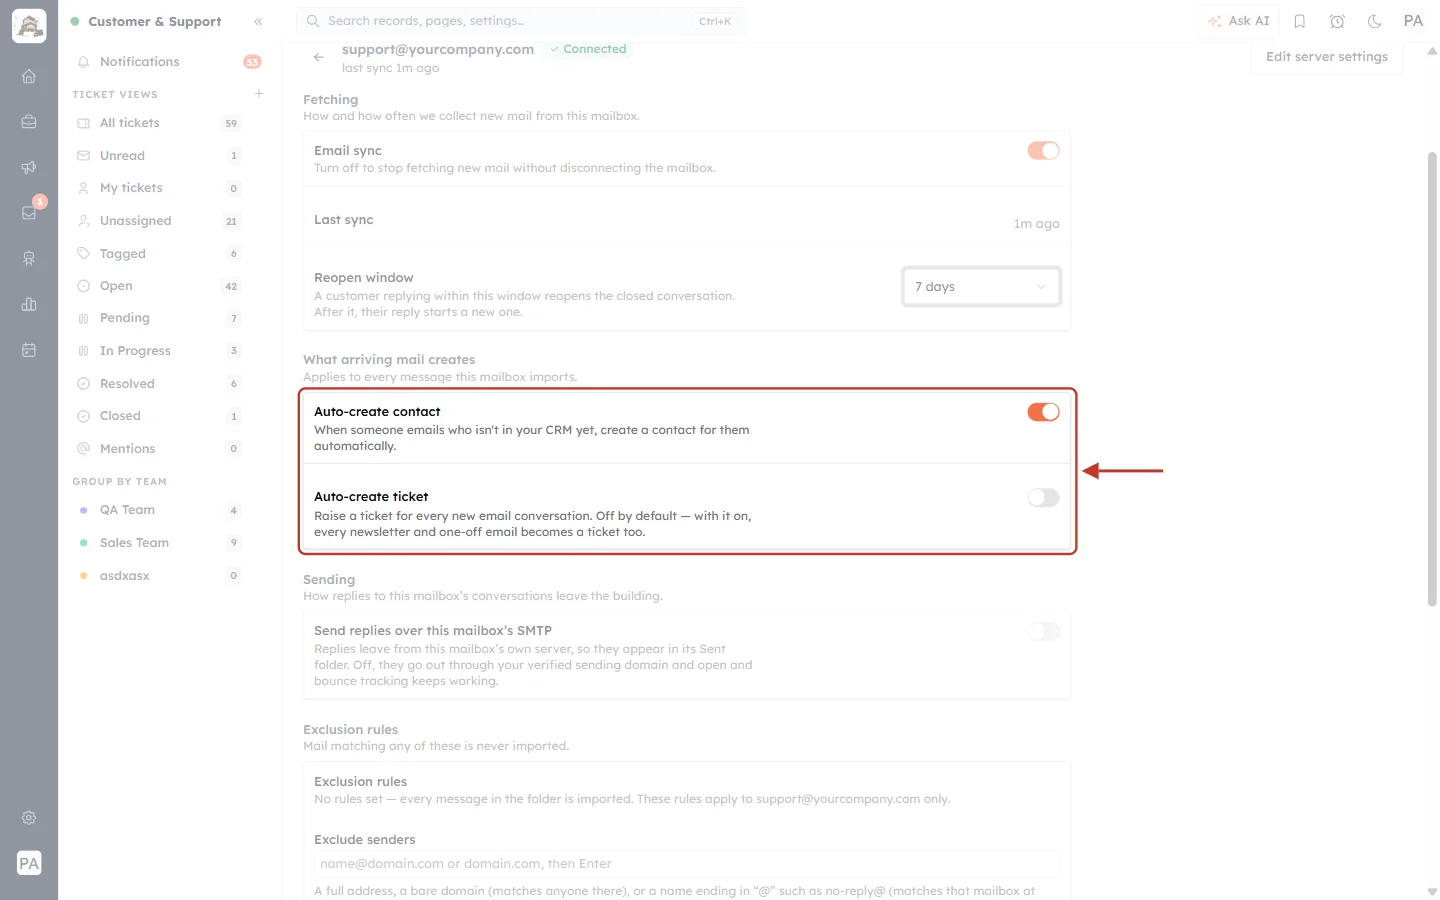
What this screenshot shows. The What arriving mail creates section, as a new mailbox starts. It is ringed. “Applies to every message this mailbox imports.”
Auto-create contact (on) — “When someone emails who isn’t in your CRM yet, create a contact for them automatically.” Every ticket is then linked to a real contact.
Auto-create ticket (off) — “Raise a ticket for every new email conversation. Off by default — with it on, every newsletter and one-off email becomes a ticket too.”
Step 12: Add exclusion rules first (recommended)#
Because Auto-create ticket turns every new email into a ticket, set up the exclusion rules in Part 4 before switching it on. Otherwise newsletters, delivery notices and out-of-office replies will fill your ticket queue.
Step 13: Switch on Auto-create ticket#
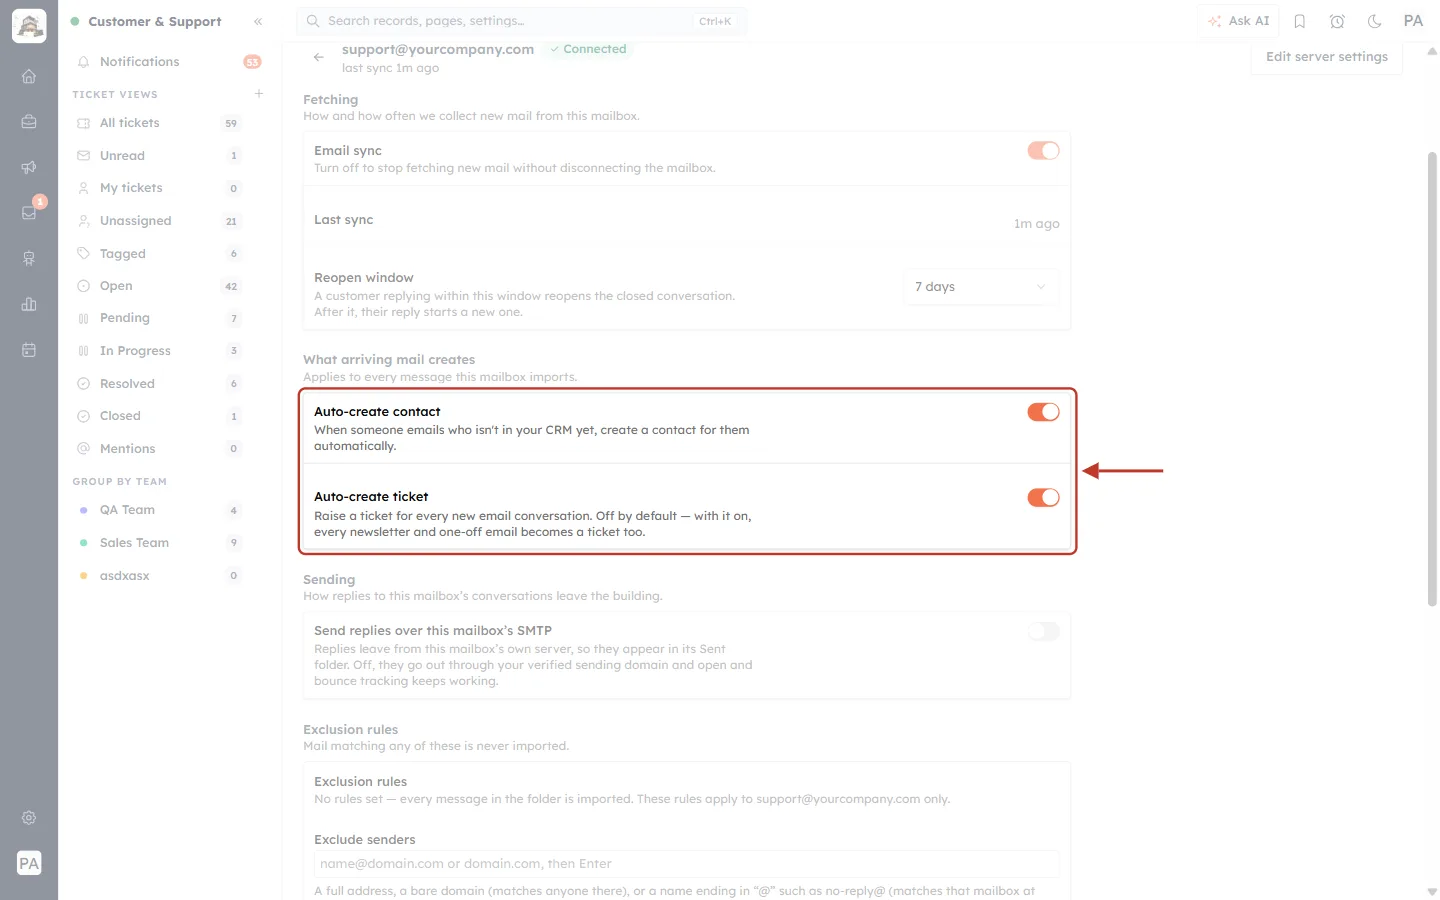
What this screenshot shows. The same section after clicking the Auto-create ticket switch. Both switches are now on (orange).
Auto-create ticket (on) — from now on, each new email conversation raises a ticket in Customer & Support, with Source Email and the mailbox recorded on the ticket.
Replies to an existing conversation are added to its ticket instead of creating another.
The change saves as soon as you click.
✅
Check it works. From a personal address, email your support address. Within a few minutes the email appears as a new ticket in Customer & Support → All tickets. Reply to it from the ticket, then reply again from your personal inbox — the second message should land on the same ticket.
Step 14: Decide how replies are sent#
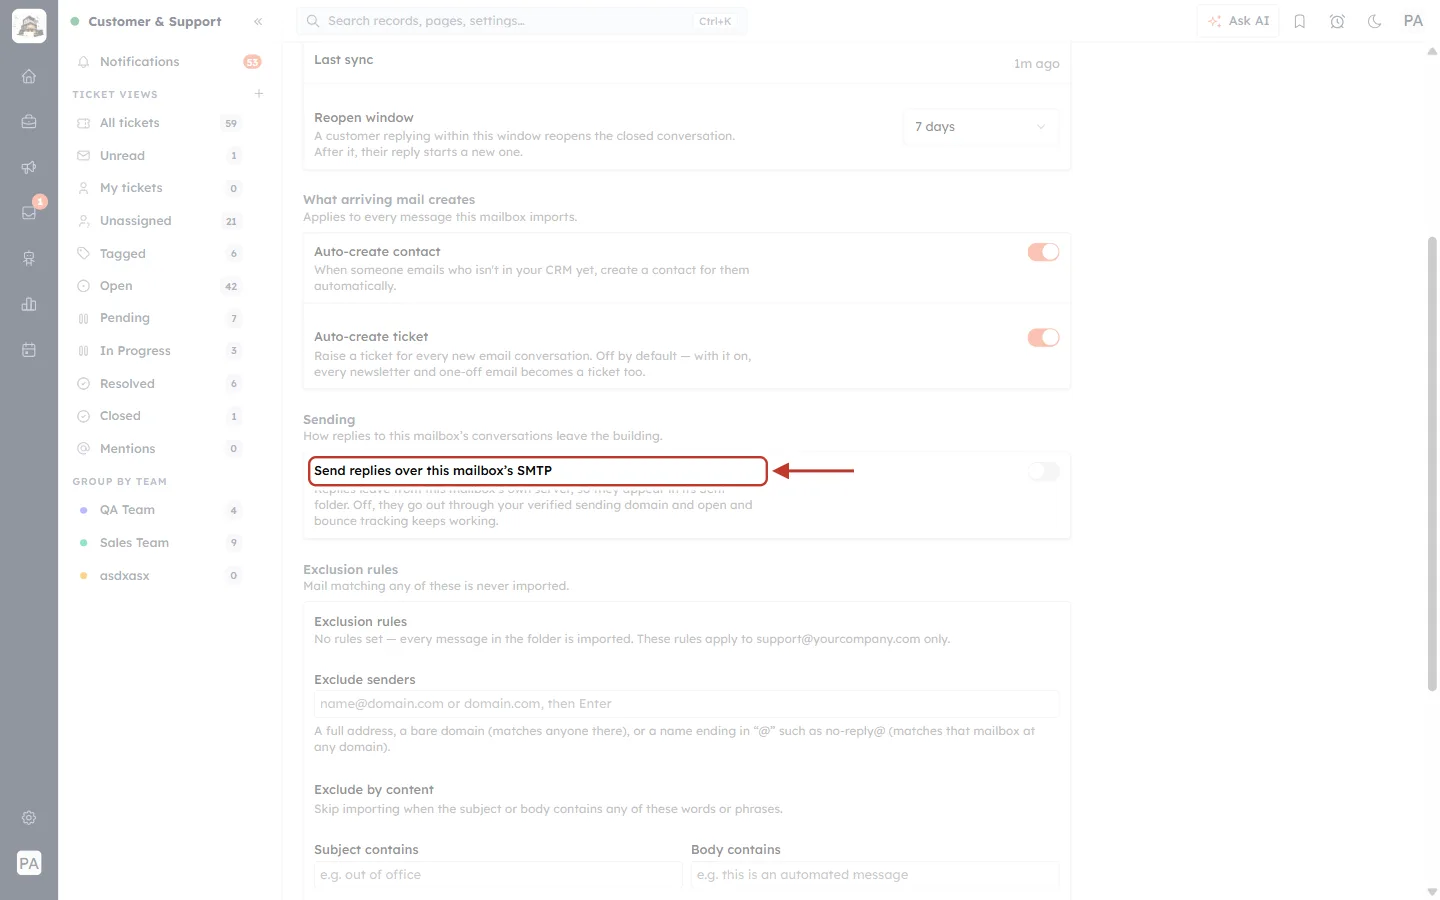
What this screenshot shows. The Sending section — “How replies to this mailbox’s conversations leave the building.” — is ringed.
Off (the default) — replies go out through your verified sending domain, and open and bounce tracking keep working.
On — replies leave from this mailbox’s own server, so they also appear in its Sent folder. The switch only works once SMTP settings have been added and tested; until then replies use your sending domain.
Most teams leave it off. Turn it on if your team also works in the mailbox directly and wants every reply in its Sent folder.
Part 4 — Keep unwanted email out#
Step 15: Open Exclusion rules#
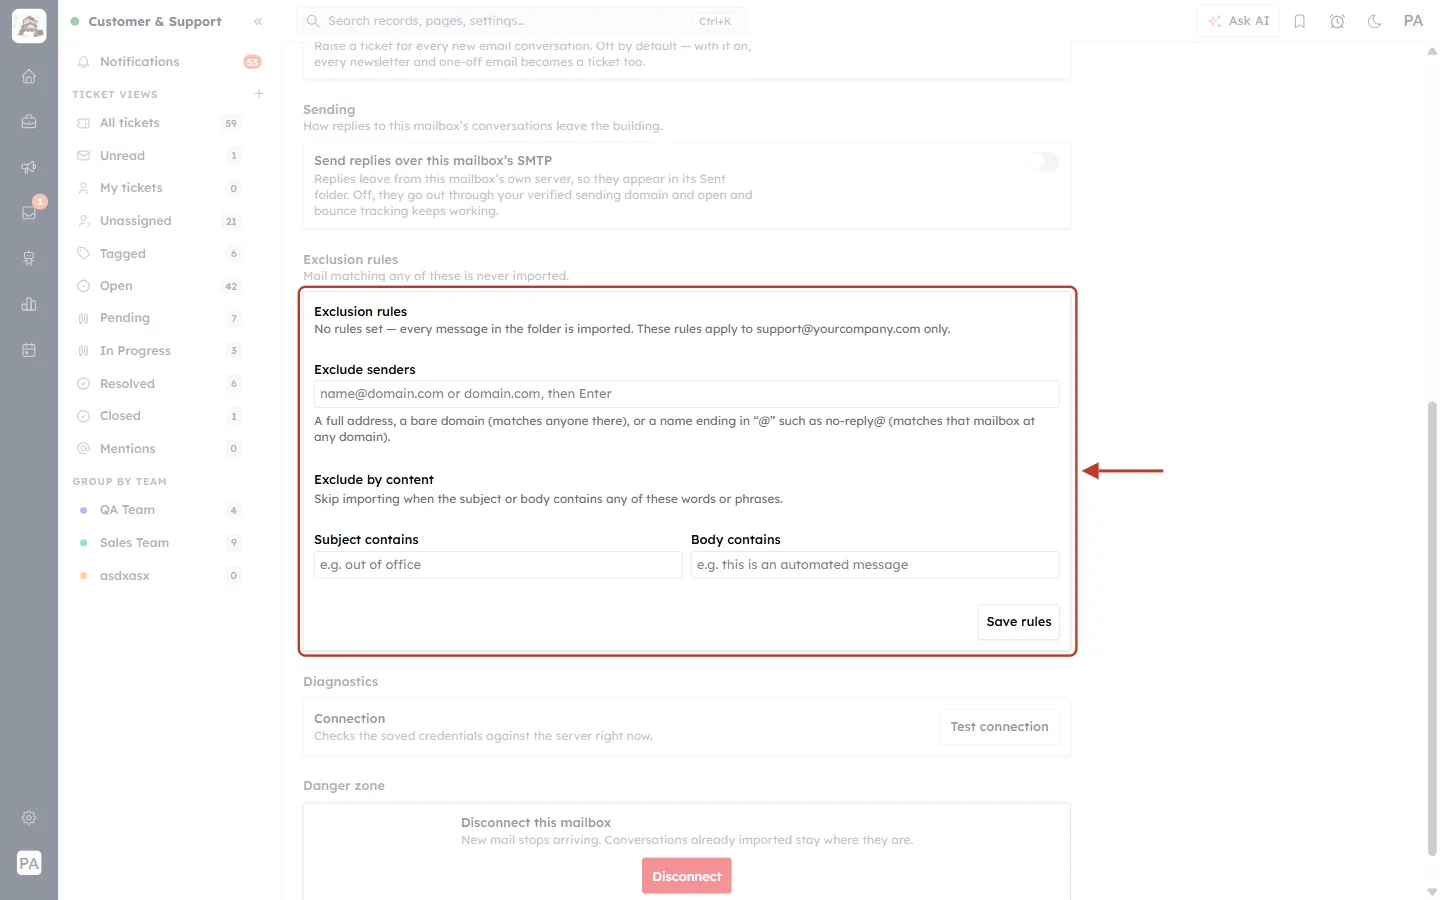
What this screenshot shows. The Exclusion rules section — “Mail matching any of these is never imported.” — is ringed. No rules are set yet.
“No rules set — every message in the folder is imported. These rules apply to support@yourcompany.com only.” Each mailbox has its own rules.
Exclude senders — addresses or domains to ignore.
Exclude by content — words or phrases in the Subject contains or Body contains boxes.
Save rules — saves all three lists.
Step 16: Add rules and save#
Type a value and press Enter to turn it into a tag. Add as many as you need, then click Save rules.
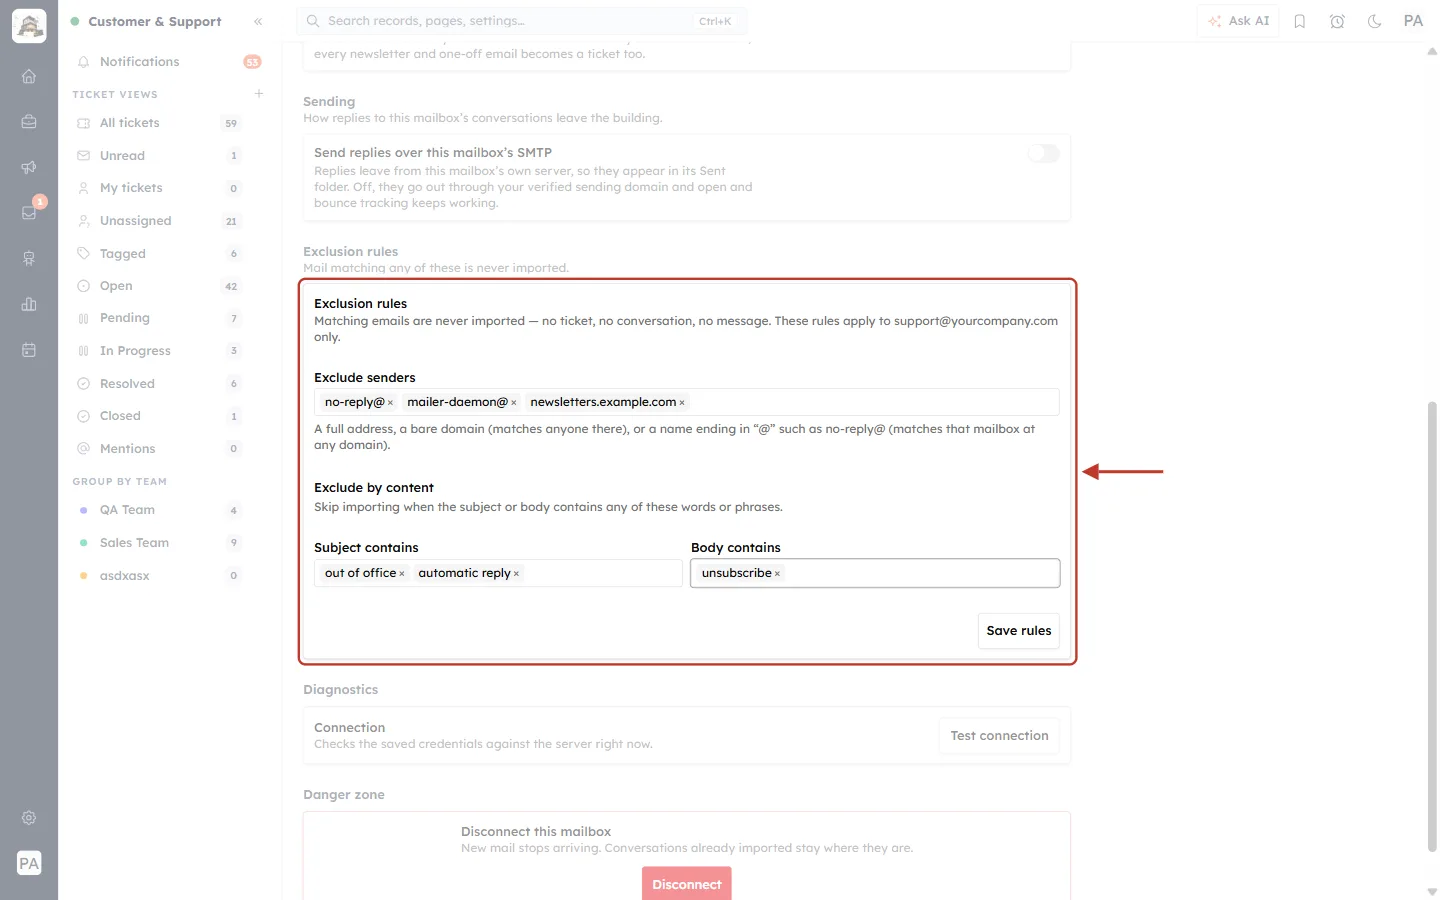
What this screenshot shows. The same section with example rules entered. It is ringed.
Exclude senders: no-reply@ and mailer-daemon@ — a name ending in “@” matches that mailbox at any domain, so this blocks every no-reply sender and bounce notice. newsletters.example.com — a bare domain blocks everyone at that domain. A full address (such as alerts@example.com) blocks just that sender.
Subject contains: out of office, automatic reply — skips auto-replies.
Body contains: unsubscribe — skips most marketing emails.
Each tag has an × to remove it. Click Save rules (“Exclusion rules saved.”).
“Matching emails are never imported — no ticket, no conversation, no message.” Rules only affect new mail; anything already imported stays.
⚠️
Be careful with broad words. A body rule such as invoice would also block customers writing about their invoice. Prefer sender rules, and test with a real email after saving.
Part 5 — Look after the mailbox#
Step 17: Read the mailbox status#
| Status badge | What it means | What to do |
|---|---|---|
| Connected | Working normally; new mail is checked every couple of minutes. | Nothing. |
| Syncing · 120 / 800 | Importing past mail (Import history). | Wait — it finishes on its own. |
| Needs reconnect | The mailbox no longer accepts the saved login — usually the App Password was revoked or the account password changed. | Create a new App Password and update it in Edit server settings. |
| Retrying | A temporary error; the CRM keeps trying. | Usually nothing. If it lasts, run Test connection (Step 19). |
| Disconnected | The mailbox has been disconnected. | Connect it again (Part 2). |
Step 18: Change server settings or the password#
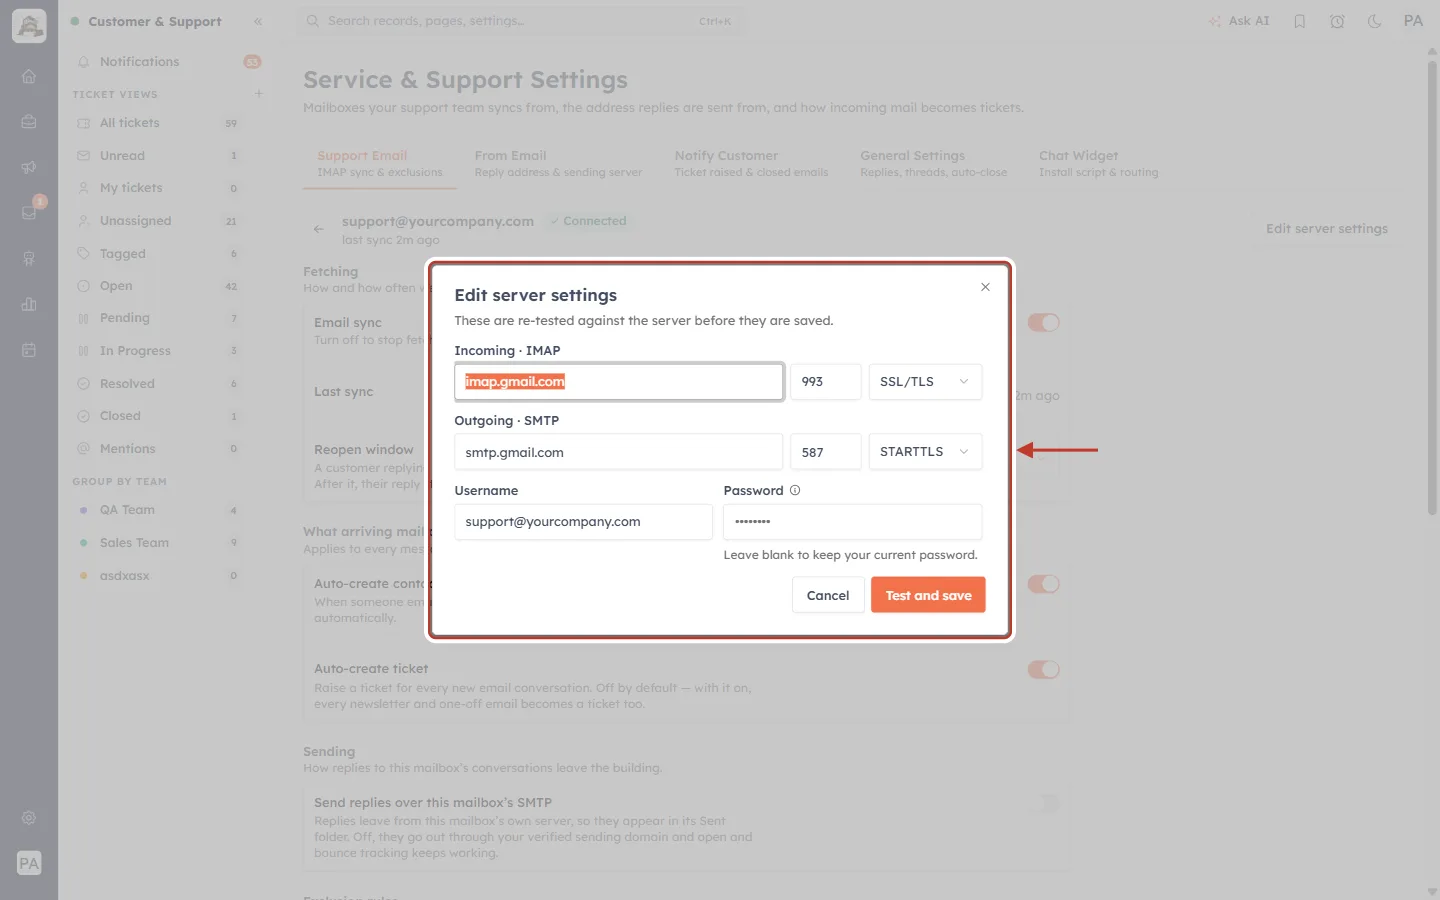
What this screenshot shows. The Edit server settings window, opened from the top of the mailbox page, is ringed. “These are re-tested against the server before they are saved.”
Incoming · IMAP and Outgoing · SMTP — host, port and encryption.
Username — normally the email address.
Password — “Leave blank to keep your current password.” Paste a new App Password here if the mailbox shows Needs reconnect.
Test and save — tests the new details first and only saves if they work. Cancel closes without changes.
Step 19: Test the saved connection#
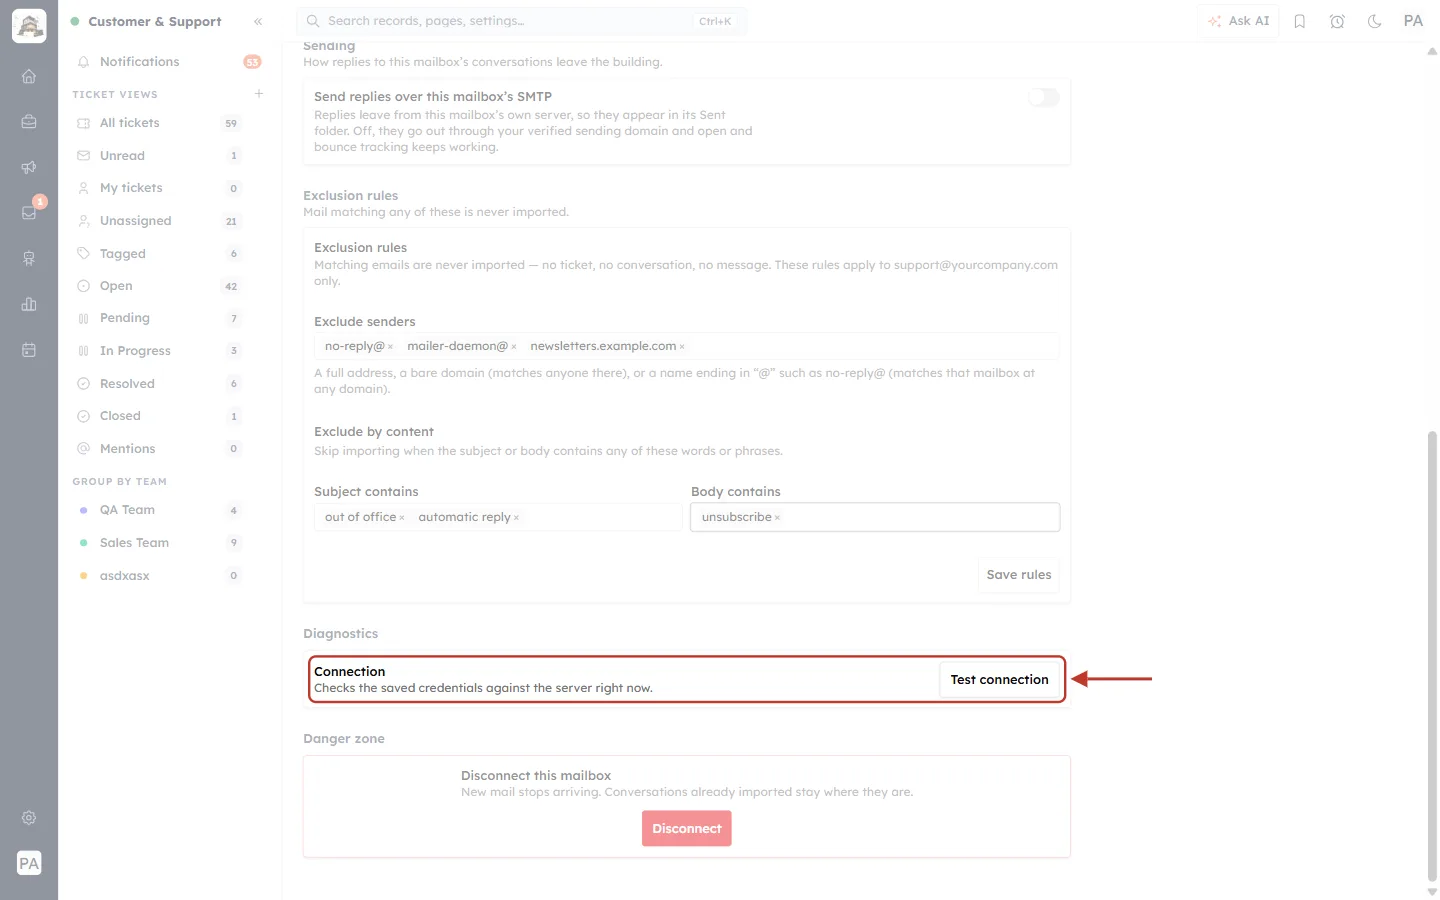
What this screenshot shows. The Diagnostics section is ringed.
Connection — “Checks the saved credentials against the server right now.”
Test connection — run it whenever emails seem to have stopped arriving. It reports the same results as in Step 6.
Step 20: Disconnect a mailbox#
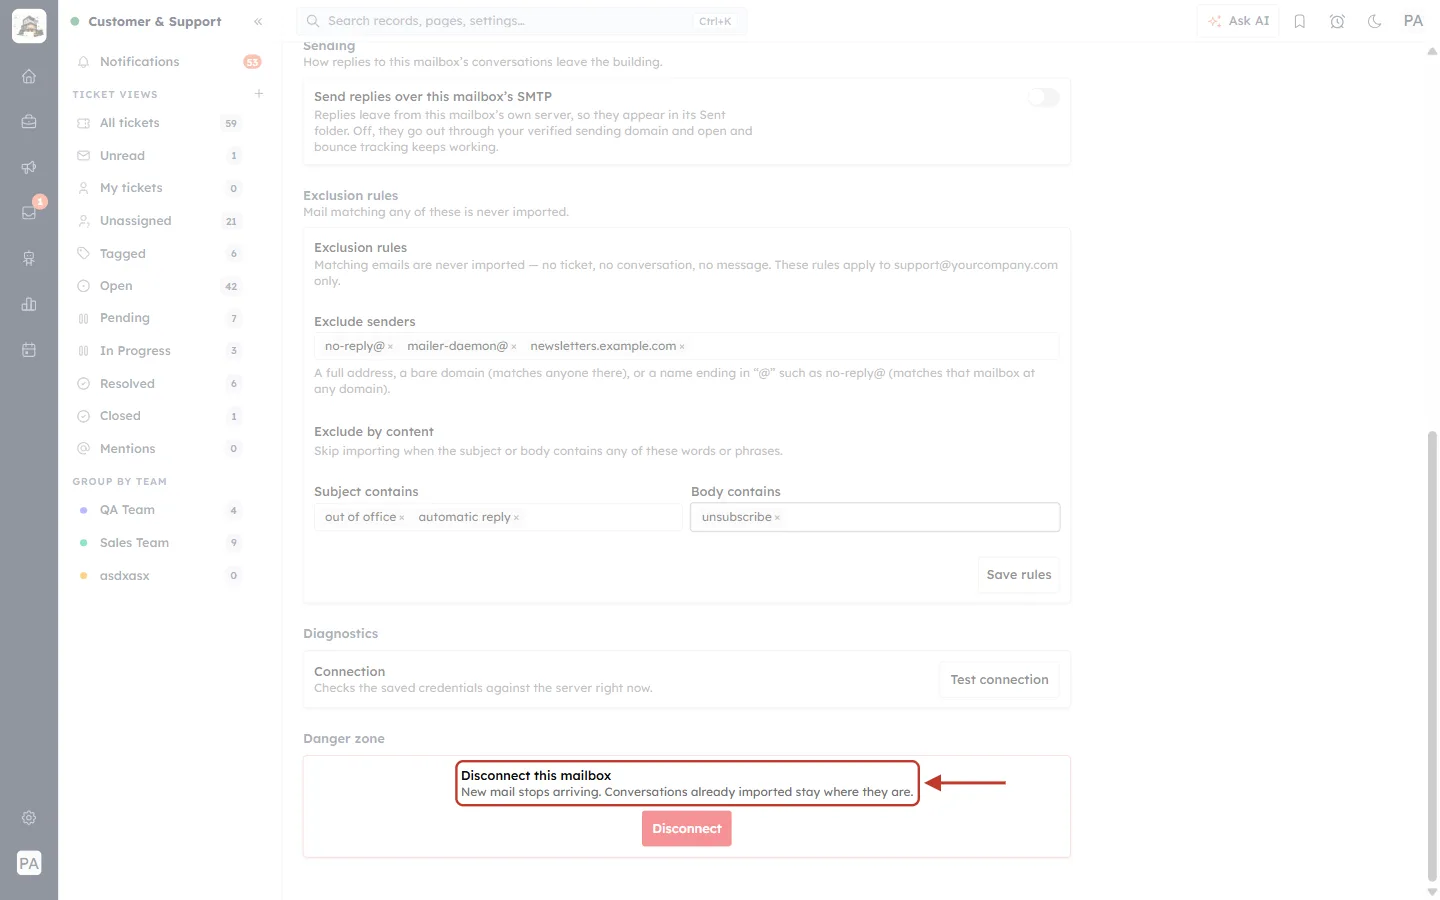
What this screenshot shows. The Danger zone at the bottom of the page is ringed.
Disconnect this mailbox — “New mail stops arriving. Conversations already imported stay where they are.”
Disconnect (red) — nothing is deleted, and reconnecting the same address later picks up where it left off.
To stop imports only for a while, switch off Email sync (Step 9) instead.
Quick checklist#
IMAP is switched on in the mailbox.
2-Step Verification is on, and an App Password named after AiEngage CRM is created.
The mailbox is connected and shows Connected.
Exclusion rules are saved for no-reply senders, auto-replies and newsletters.
Auto-create ticket is switched on.
The reopen window suits your team.
A test email arrived as a ticket, and a reply landed on the same ticket.
Customer notification emails are set up — see Notify Customer in Introduction to Customer & Support.
Troubleshooting#
“The server refused the login.” Use an App Password, not your normal password, and make sure 2-Step Verification is on. Copy the App Password again — spaces are fine, missing characters are not.
“Could not reach the server.” Check the host and port with your provider (Gmail: imap.gmail.com, port 993, SSL/TLS) and that IMAP is switched on.
The mailbox is connected, but no tickets appear. Switch on Auto-create ticket (Step 13) — it is off by default. Also check that the email does not match an exclusion rule and that Email sync is on.
Every newsletter is becoming a ticket. Add sender and content exclusion rules (Part 4).
A customer’s reply created a new ticket. The reply arrived after the reopen window, or the ticket number was removed from the subject. Lengthen the reopen window if this happens often.
The status says “Needs reconnect”. The App Password was revoked or the password changed. Create a new App Password and paste it in Edit server settings.
Replies are not in the mailbox’s Sent folder. That is expected while Send replies over this mailbox’s SMTP is off — replies go through your sending domain. Turn it on if you need them there (Step 14).
Previous and next#
Previous: Customer & Support: Handle Customer Tickets from First Message to Resolution (Step-by-Step)
Related#
Was this article helpful?
Ready to implement this?
OpenAI Engage and apply what you just learned to your own workspace.
Open AI Engage CRM