Loading…


KnowledgeBase
Create a Ticket Manually: Log Phone, Email & Walk-In Requests as Support Tickets (Step-by-Step)
What this article covers#
Most tickets in AiEngage CRM are created automatically: an email to your support mailbox becomes a ticket, and the chat widget or AI agent raises one when a visitor needs help. But many requests never arrive that way. A customer phones you, stops by your shop, mentions a problem in a meeting, or writes to a teammate’s personal inbox. If nobody logs those requests, they are easy to forget.
Creating a ticket manually puts these requests in the same queue as every other ticket. Each one gets a ticket number, an owner, a status and a priority, and nothing is forgotten. This article shows the two places you can do it, with a screenshot of every step:
Part 1 — the Customer & Support workspace, using the New ticket button. A quick pop-up form; the new ticket opens straight away so you can start working on it.
Part 2 — the Tickets module (Sales → Tickets), using Create Ticket → Create Single. A full-page form that also lets you attach files and add several tickets in a row.
Both create the very same kind of ticket — a ticket made in one place appears in the other too.
Which way should I use?#
| Workspace: New ticket | Tickets module: Create Single | |
|---|---|---|
| Best for | Agents working the support queue | Admins, sales and account teams, or anyone already in the CRM |
| Form | Small pop-up over the ticket list | Full page with an Information and a Description section |
| Attach files | No (add them later on the ticket) | Yes — Attachments, up to 10 MB per file |
| Link a recent chat | Yes — the Conversation field | No |
| Description | Plain text | Rich text (bold, lists, links, headings) |
| Several tickets in a row | One at a time | Save and New keeps the form open for the next one |
| After saving | The ticket conversation opens | You return to the Tickets list |
ℹ️
Every manually created ticket gets the next ticket number (for example TKT-00125) and its Source is recorded as Manual, so you can always tell it apart from tickets that came in by email or chat.
Before you begin#
Permission to create tickets. Your profile needs Create access to the Tickets module. If you cannot see the New ticket or Create Ticket button, ask your administrator — see Control Permissions with Profiles.
The customer is a contact in the CRM (recommended). You can also create the contact from inside the form if they are new.
Your teammates are users in the CRM, so you can assign the ticket to them — see Invite Your Team.
Have the details ready: what the customer asked for, when, what they have already tried, and any deadline.
Part 1 — Create a ticket from the Customer & Support workspace#
In this example, a customer named Parth has just phoned to say he was charged twice for the same order. We log the call as a ticket so the billing team can refund him.
Step 1: Open the workspace and click New ticket#
Open Customer & Support (app.aiengagecrm.com/dashboard/tickets — bookmark it for one-click access). Any ticket view works; here we are on All tickets. Click the orange + New ticket button at the top right.
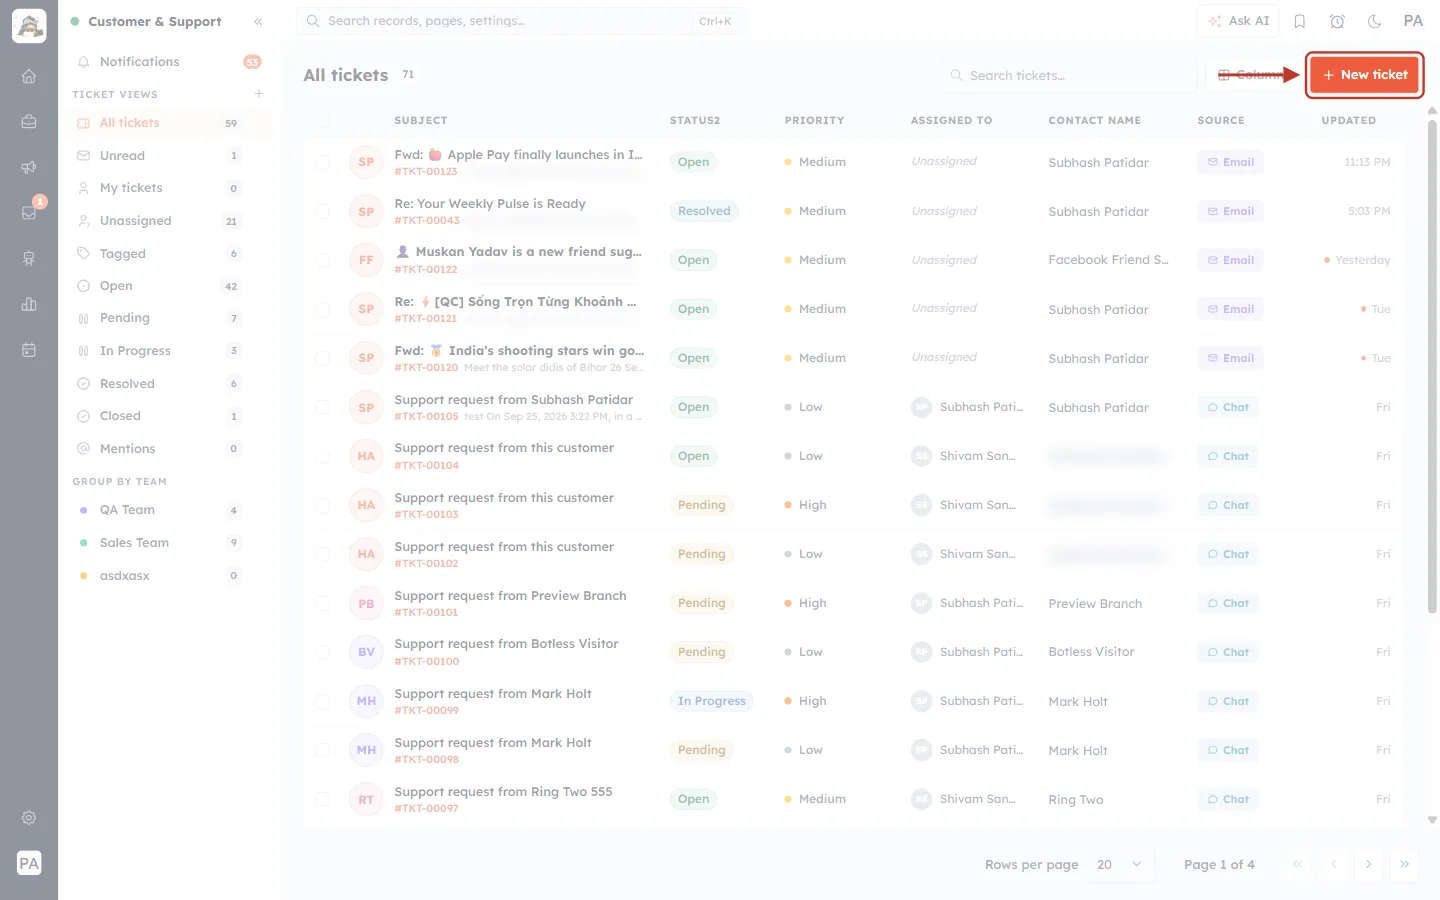
What this screenshot shows. The Customer & Support workspace on All tickets. The orange + New ticket button at the top right is ringed, and the arrow points to it.
Left sidebar (faded) — Notifications, the TICKET VIEWS (All tickets, Unread, My tickets, Unassigned, Tagged, each status and Mentions) and GROUP BY TEAM. The numbers show how many tickets each view holds.
Middle (faded) — the ticket list, with columns Subject, Status, Priority, Assigned To, Contact Name, Source and Updated.
Top right — Search tickets…, Columns, and the ringed + New ticket button.
The button is available in every view, so you never have to leave the list you are working on.
Step 2: Get to know the New ticket form#
A New ticket form opens over the list. Take a moment to look at it before filling it in.
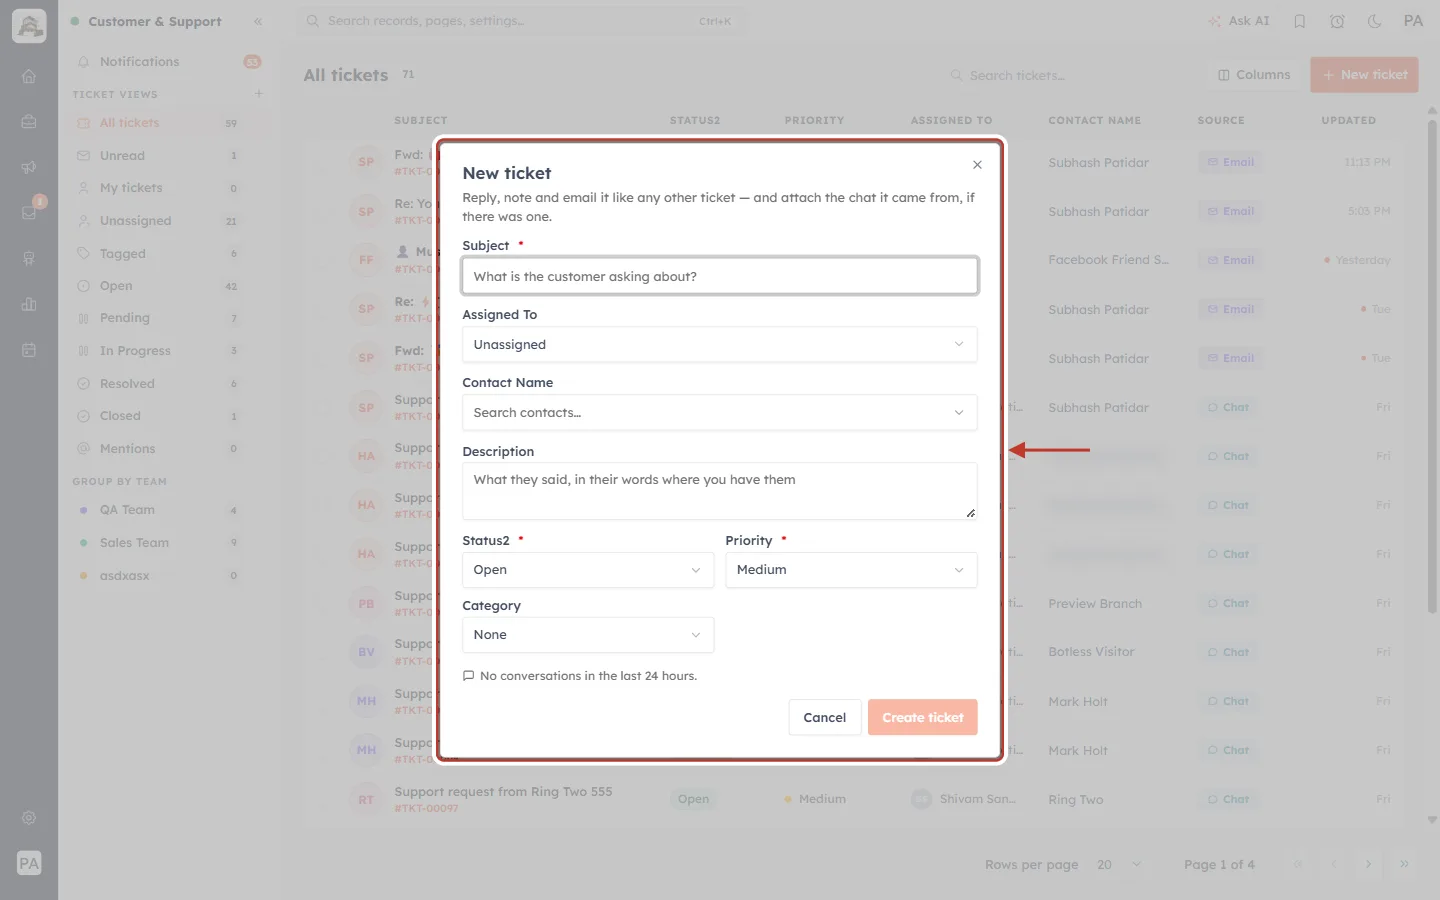
What this screenshot shows. The empty New ticket form is ringed. Its subtitle explains what you can do with the result: “Reply, note and email it like any other ticket — and attach the chat it came from, if there was one.”
Subject * — a short summary of the request. The placeholder asks “What is the customer asking about?”
Assigned To — who will handle the ticket. It starts as Unassigned.
Contact Name — the customer. It shows Search contacts… until you choose one.
Description — the details, “What they said, in their words where you have them”.
Status2 * (the ticket status) — starts as Open. Priority * — starts as Medium.
Category — starts as None.
At the bottom, a speech-bubble line about recent conversations (Step 9).
Cancel closes the form without saving. Create ticket is pale orange (disabled) until the required fields are filled in. The × at the top right also closes the form.
Fields marked with a red * are required. Status and Priority already have values, so in practice only the Subject must be typed.
Step 3: Type the subject#
Click Subject and type a short, specific summary. Write it so a teammate understands the problem from the ticket list alone.
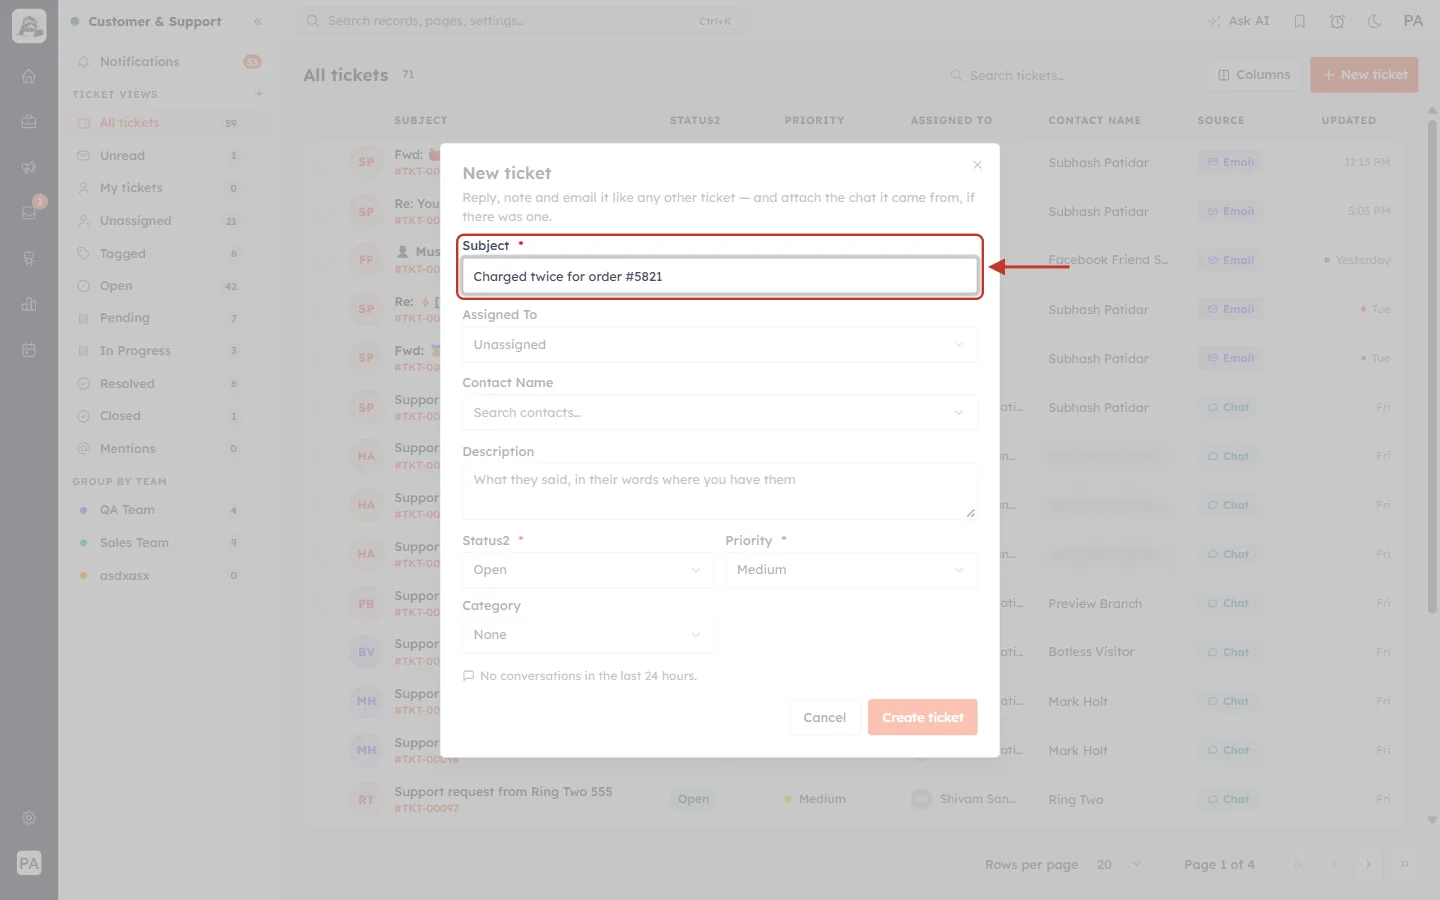
What this screenshot shows. The Subject label and its box are ringed. The subject Charged twice for order #5821 has been typed in.
Good subjects name the problem and the thing it affects: Charged twice for order #5821 is better than Billing problem or Call from Parth.
Include an order, invoice or account number if there is one — it makes the ticket easy to find with Search tickets… later.
The subject becomes the ticket’s title everywhere: in the list, at the top of the ticket and in any email you send from it.
✅
Keep subjects under about 60 characters. Longer subjects are cut off with “…” in the ticket list.
Step 4: Choose who handles it#
Click Assigned To. A list of every active user in your account opens. Click the teammate who should own the ticket.
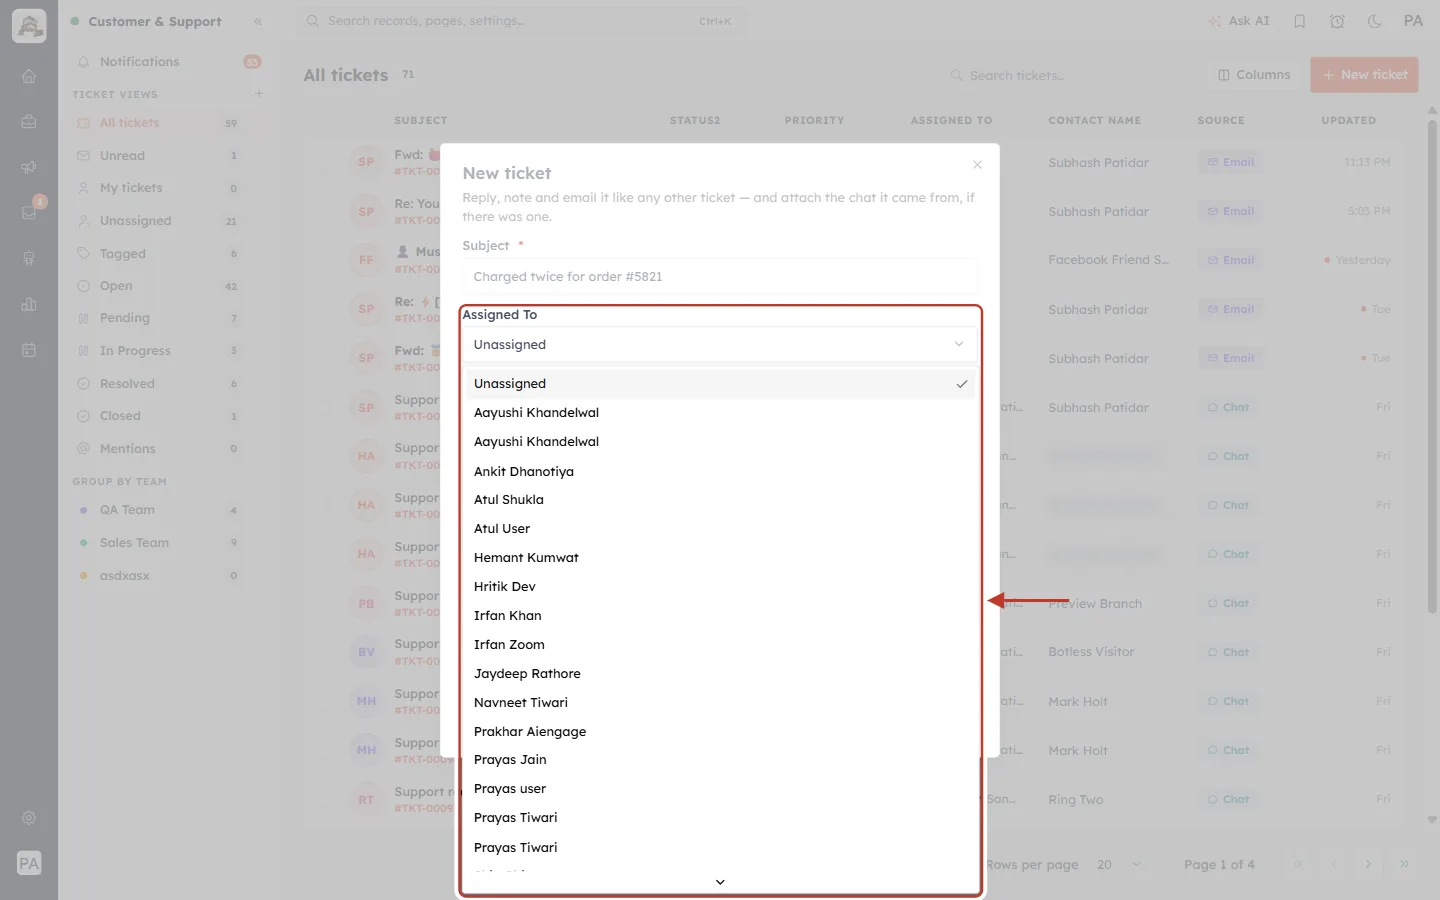
What this screenshot shows. The Assigned To field and its open list are ringed. The arrow points at the list of users.
Unassigned is at the top, with a tick because it is the current choice.
Below it, every active user in your CRM, in alphabetical order. Scroll to see more.
Click a name to assign the ticket. In this example we pick Prakhar Aiengage, who handles billing.
Leave it Unassigned if a team lead hands out work: the ticket then appears in the Unassigned view for them to pick up.
The person you choose sees the ticket in their My tickets view.
Step 5: Link the customer (Contact Name)#
Click Contact Name (Search contacts…). A Choose Record window opens over the form, listing your contacts.
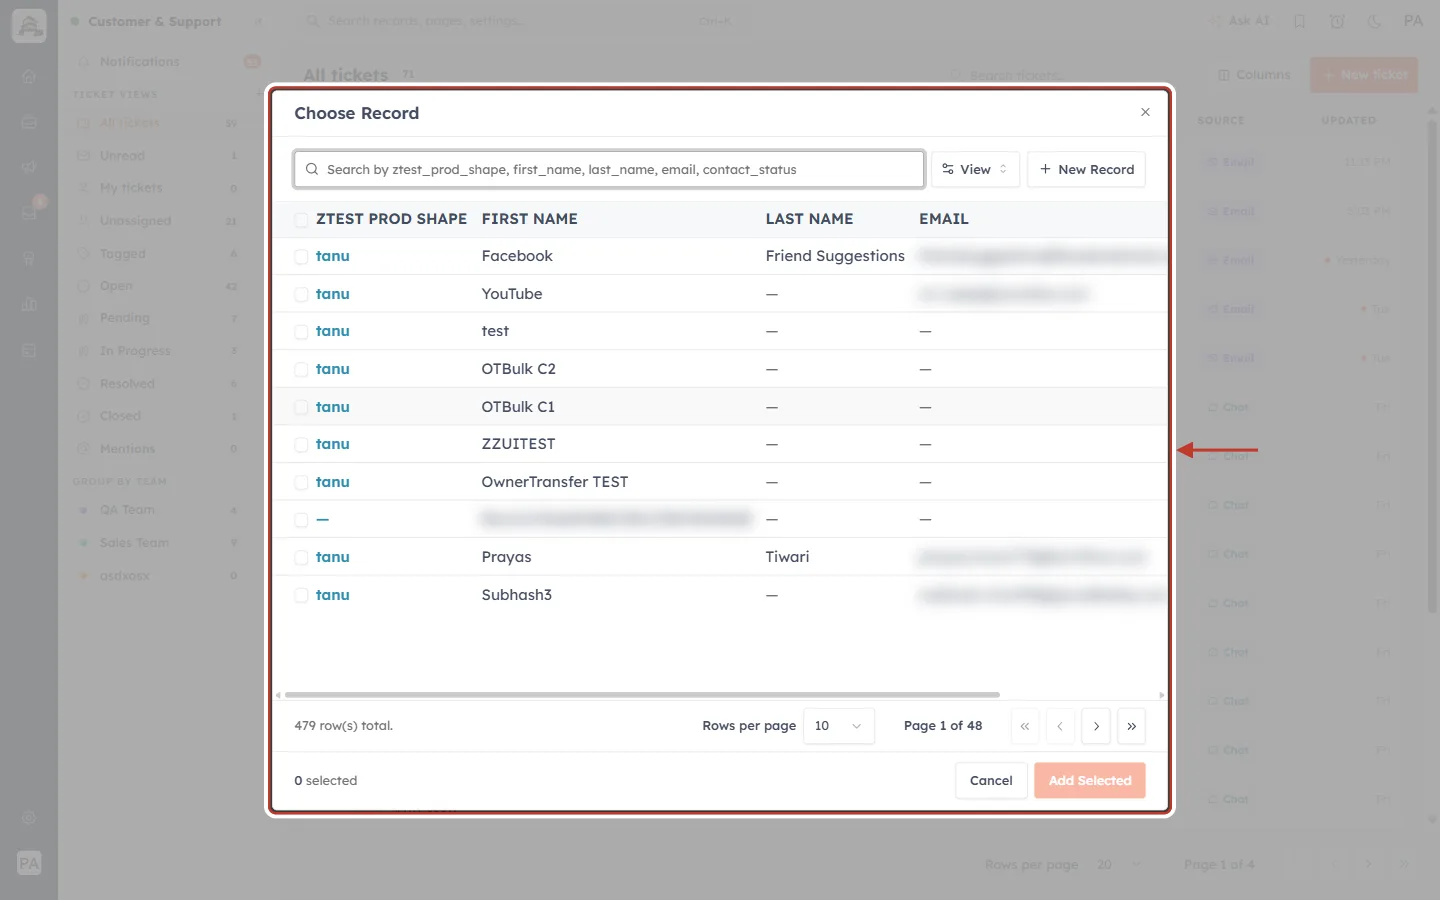
What this screenshot shows. The Choose Record window is ringed. It lists all your contacts, ten per page. Email addresses are blurred in this screenshot.
Search box at the top — the placeholder lists the fields it searches (here first name, last name, email and contact status, plus any key fields your account has).
View — choose which columns the table shows.
+ New Record — create a brand-new contact without leaving the ticket, for a caller who is not in your CRM yet.
The table — a tick box on each row, then key contact fields such as first name, last name and email. Your columns may differ, depending on your contact layout.
Footer — the total number of contacts (479 row(s) total), Rows per page, the page number and the page arrows.
0 selected at the bottom left; Add Selected stays pale until you tick a contact.
Type the customer’s name (or email or phone) in the search box, then tick their row.
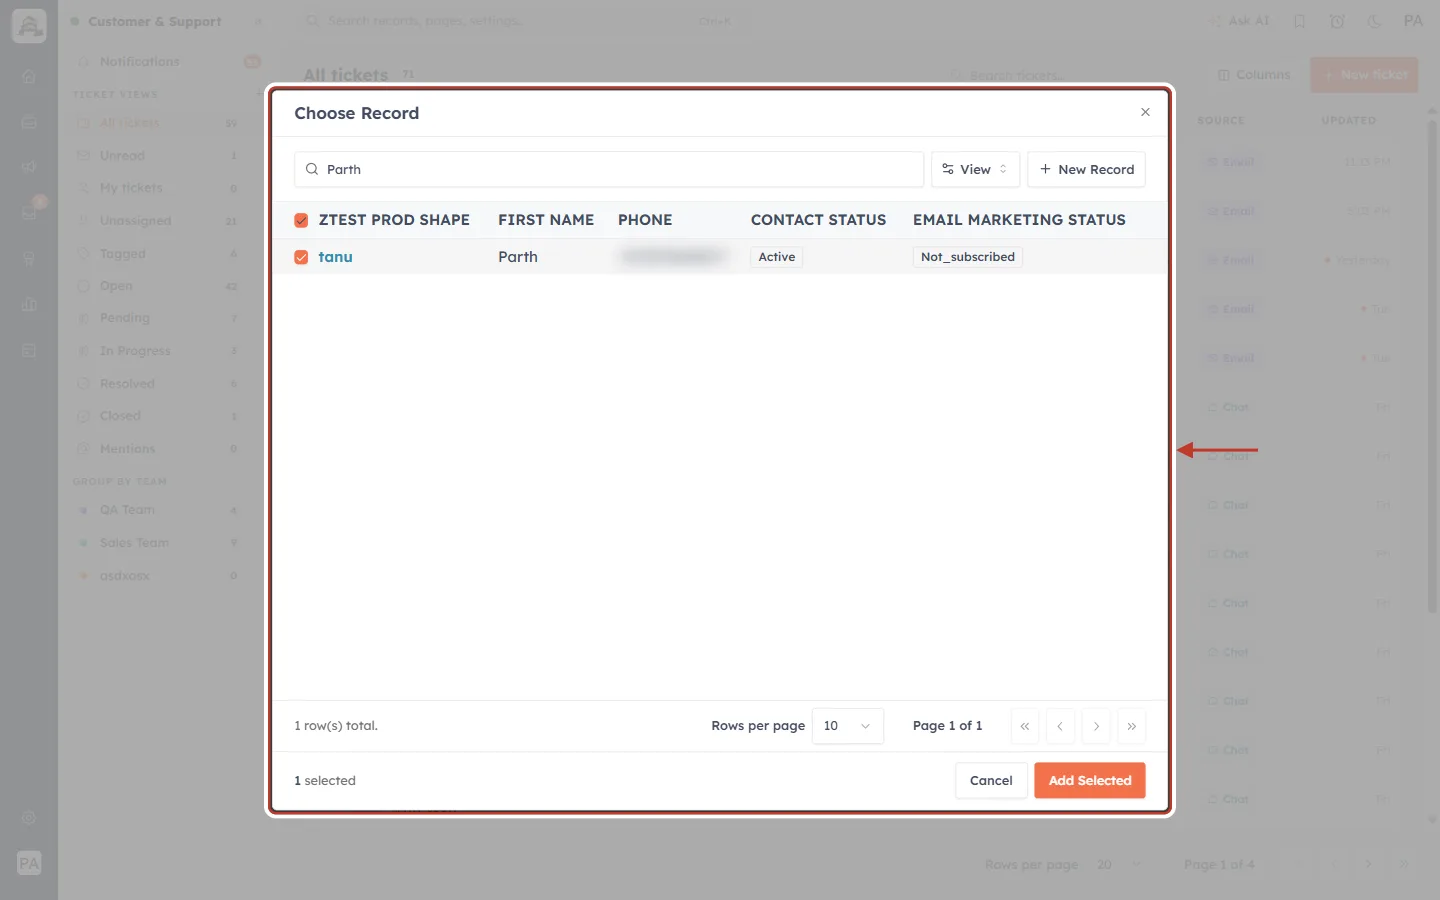
What this screenshot shows. The Choose Record window (ringed) after searching for Parth. One contact matches, and its row is ticked. The phone number is blurred.
The table now shows the matching contact, with columns such as first name, PHONE, CONTACT STATUS (Active) and EMAIL MARKETING STATUS (Not_subscribed). Use them to pick the right person when two customers have similar names.
The tick box on the left of the row is orange — the contact is selected.
The footer says 1 row(s) total and 1 selected.
Add Selected is now bright orange and can be clicked.
Click Add Selected.
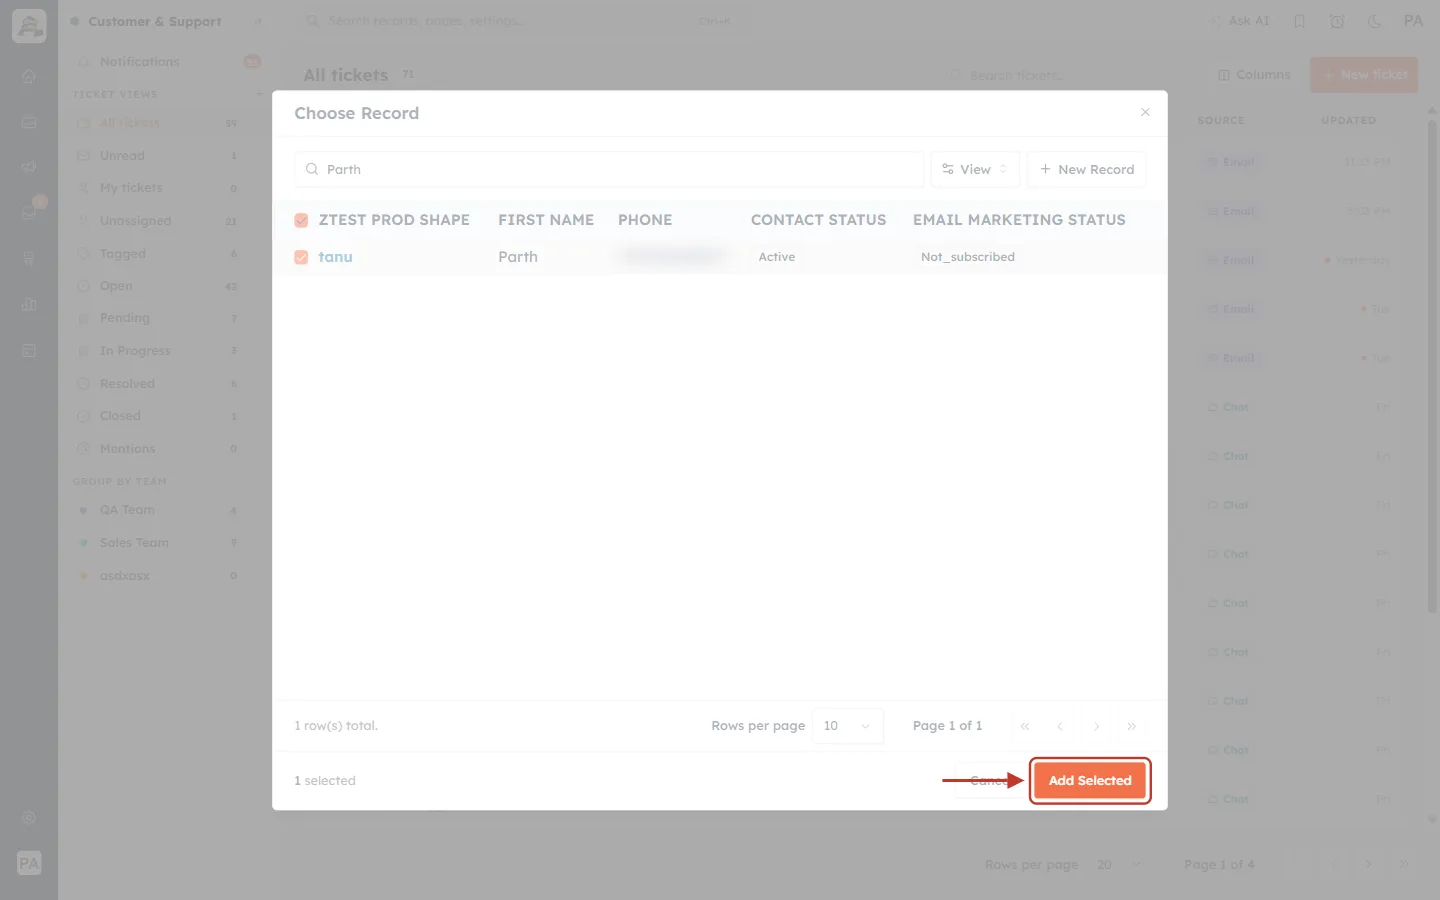
What this screenshot shows. The orange Add Selected button at the bottom right of the window is ringed, with the arrow pointing at it.
Click it to put the ticked contact on the ticket and return to the New ticket form.
Cancel, next to it, goes back to the form without choosing anyone.
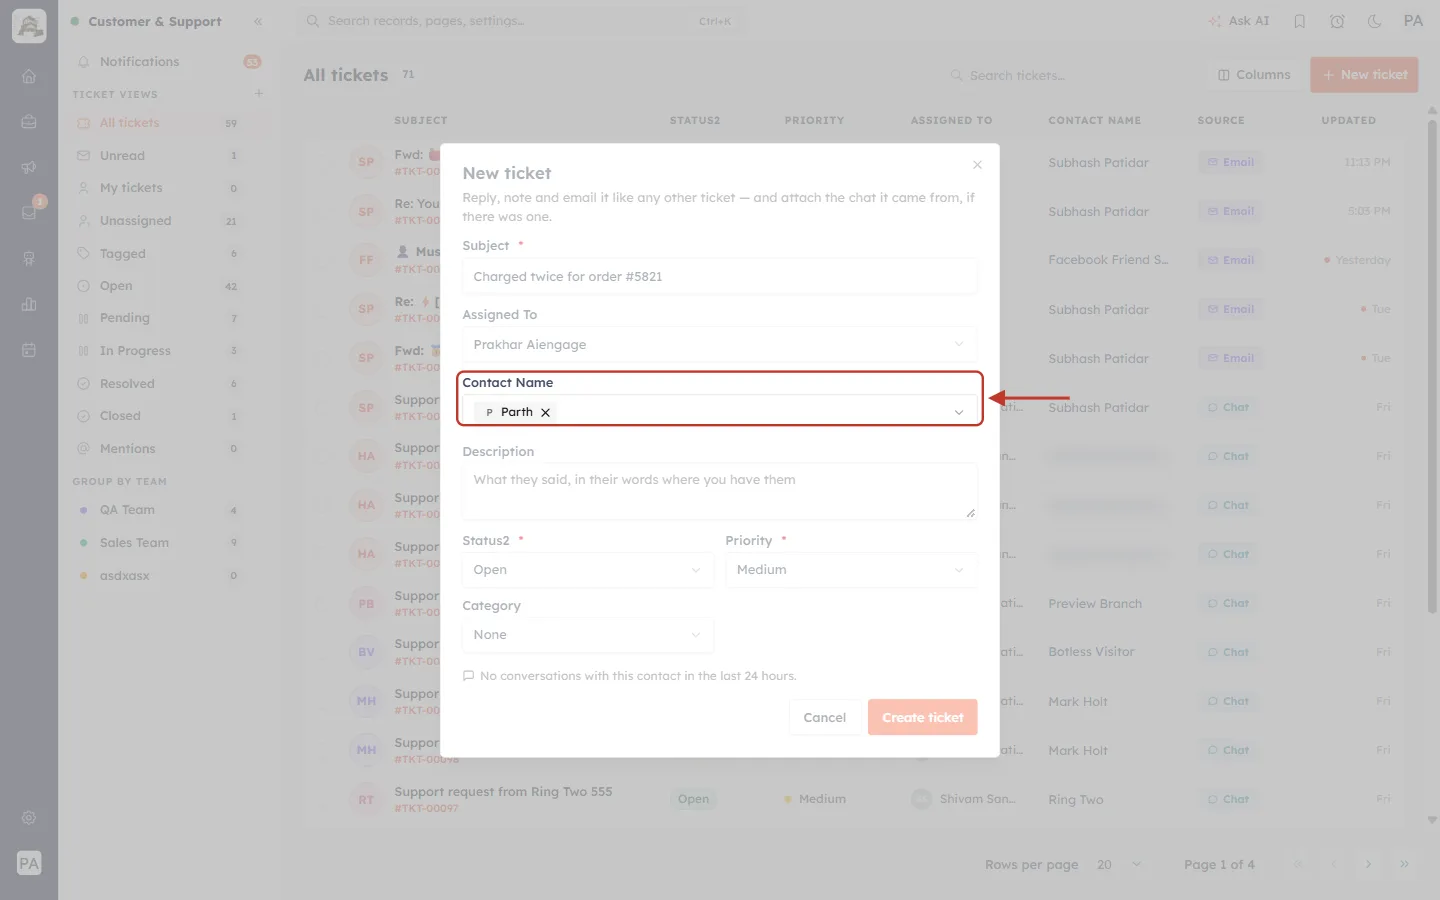
What this screenshot shows. Back on the New ticket form, the Contact Name field is ringed. It now shows the customer, Parth, as a chip with his initial.
The chip confirms which contact is linked. Click the field again to change it.
The other fields keep what you already entered: the subject and Prakhar Aiengage under Assigned To.
✅
Always link the contact. It puts the customer’s phone, email and company in the ticket’s side panel, lets you email them from the ticket, and lists the ticket on their contact record so the whole team sees their history.
Step 6: Describe the request#
In Description, write what the customer told you. The more detail you add now, the fewer questions anyone has to ask the customer later.
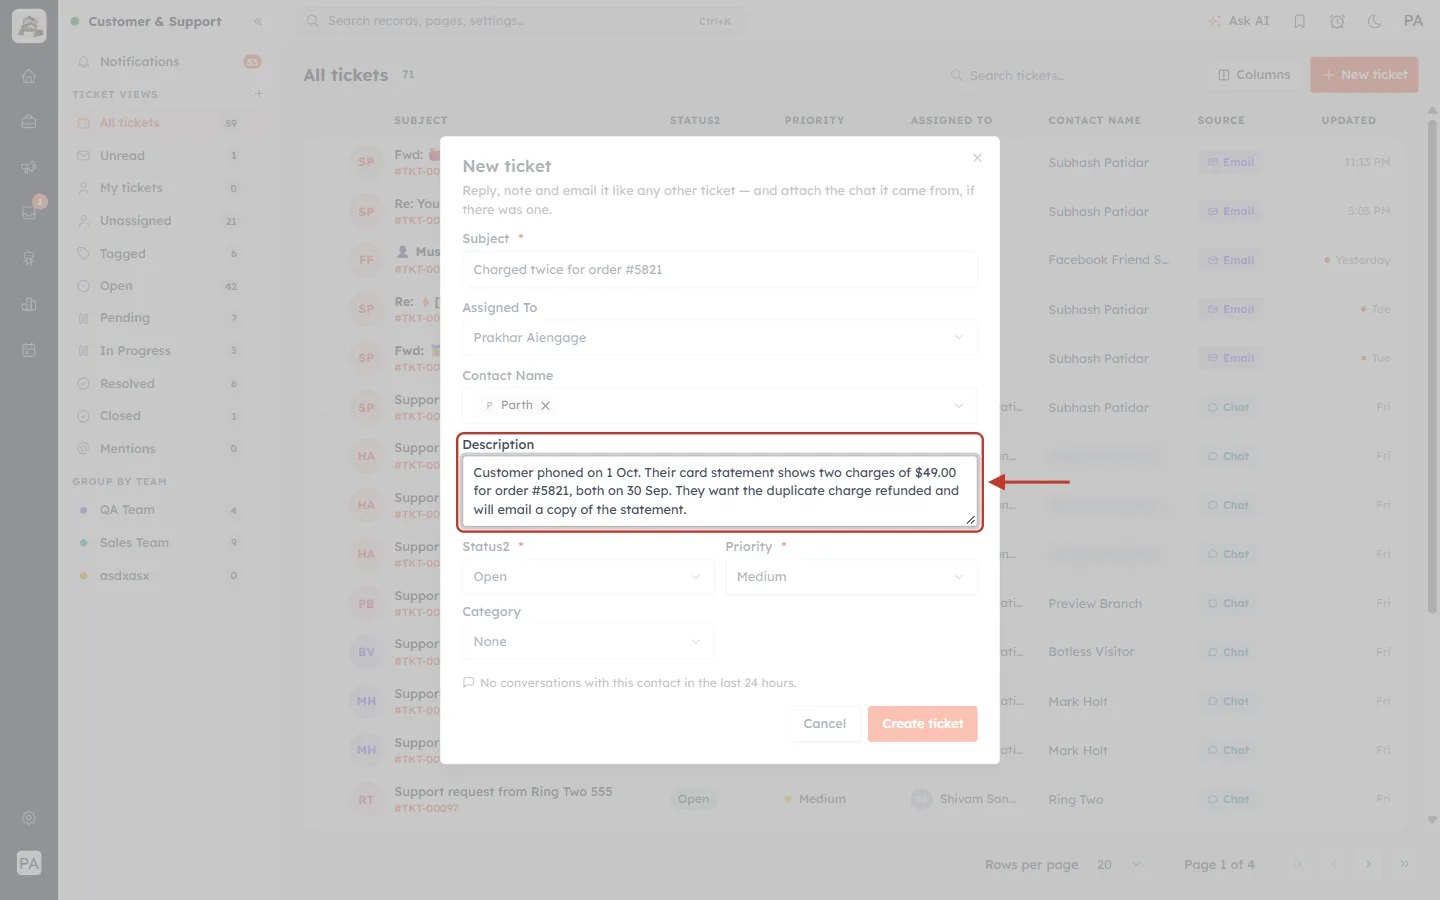
What this screenshot shows. The Description label and box are ringed. The description of the phone call has been typed in.
The example says how the request came in (Customer phoned on 1 Oct), what is wrong (two charges of $49.00 for order #5821, both on 30 Sep), what the customer wants (the duplicate charge refunded) and what happens next (will email a copy of the statement).
Drag the small handle at the bottom right of the box to make it taller for long notes.
The description appears at the top of the ticket conversation, under the heading DESCRIPTION (see Step 11).
Step 7: Set the status and priority#
New tickets usually stay Open. Click the status box only if the ticket should start somewhere else.
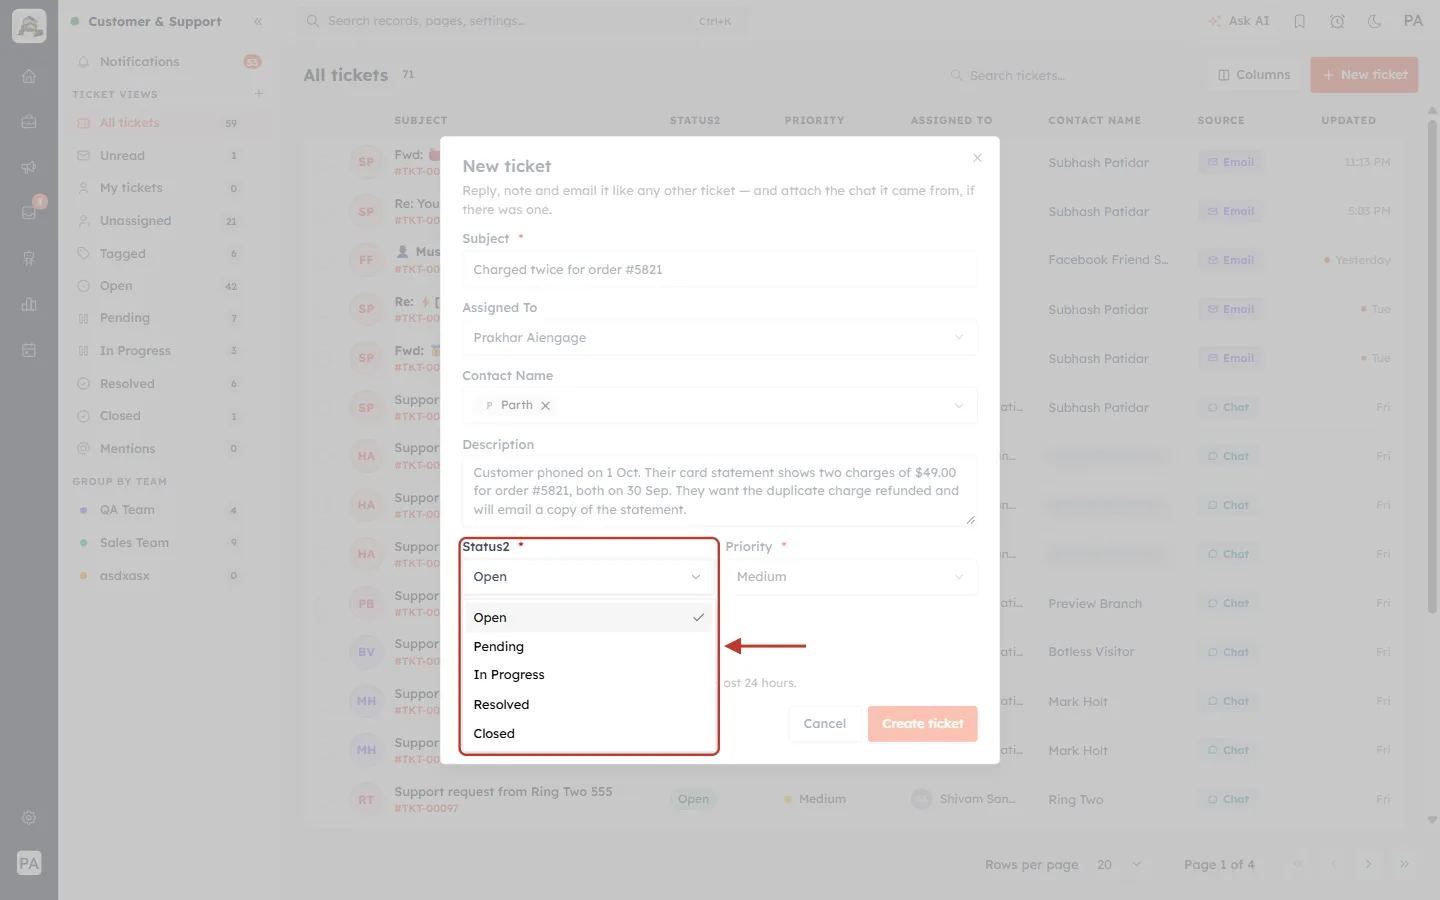
What this screenshot shows. The Status2 field and its open list are ringed. The arrow points at the five statuses.
Open (ticked) — new and waiting for your team. Use this for almost every new ticket.
Pending — waiting on the customer or someone outside your team.
In Progress — someone is actively working on it.
Resolved — the problem is fixed. Use this if you solved the request on the phone and only want a record of it.
Closed — finished and filed away.
Then click Priority and choose how urgent the request is.
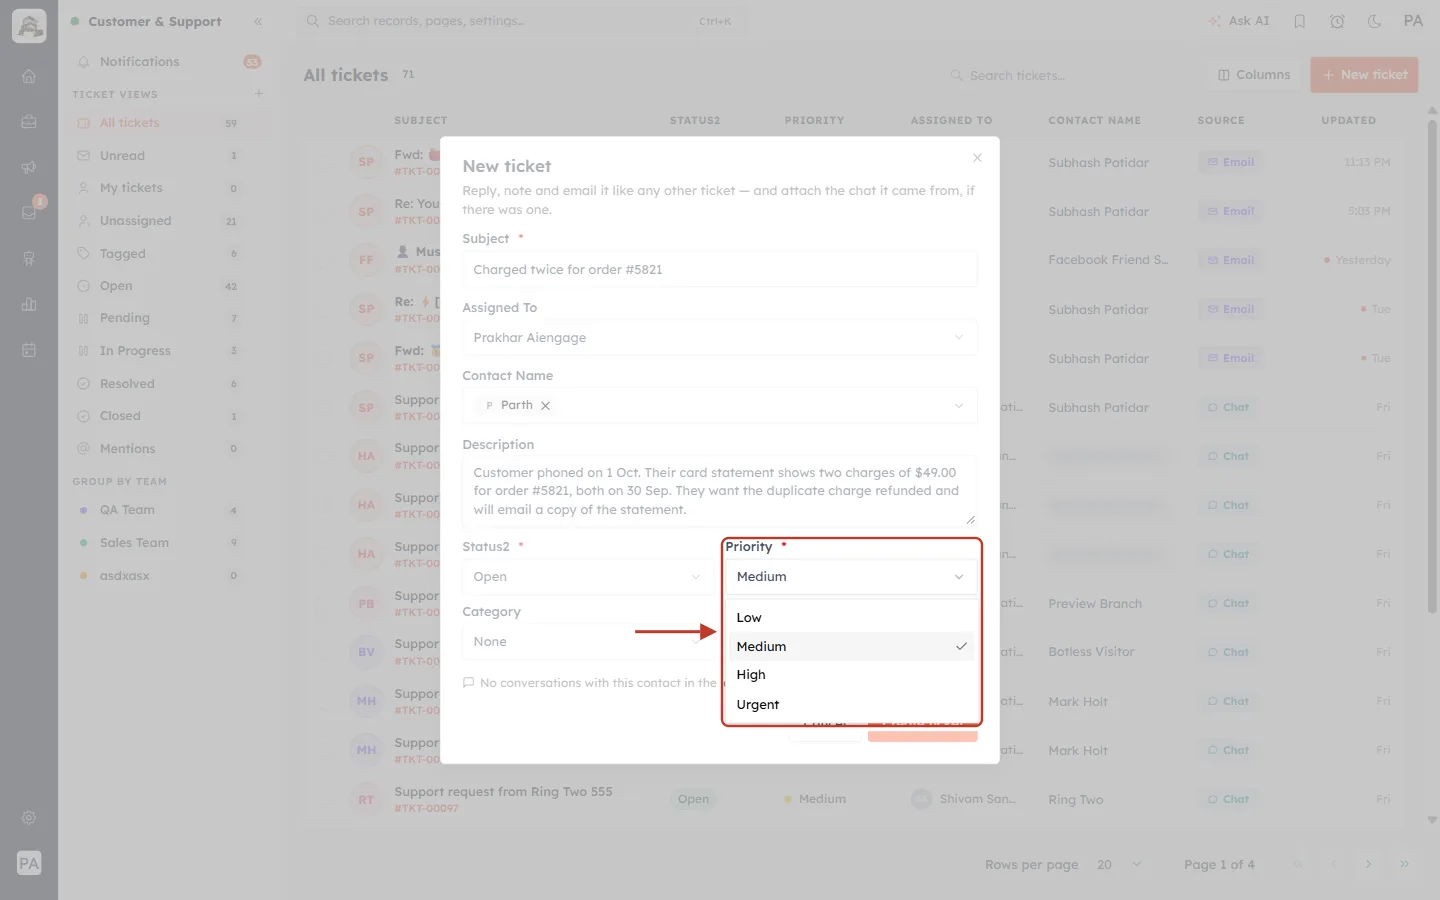
What this screenshot shows. The Priority field and its open list are ringed, with the arrow pointing at the four levels.
Low — questions and small requests with no deadline.
Medium (the default) — normal requests.
High — the customer is blocked or has a deadline. We choose High here, because the customer has been charged money he should not have been.
Urgent — many customers are affected, or there is a serious business or legal risk.
The priority is shown with a coloured dot in the ticket list, so high-priority tickets stand out.
Step 8: Choose a category#
Click Category and pick the kind of request. Categories make it easy to report on what customers contact you about.
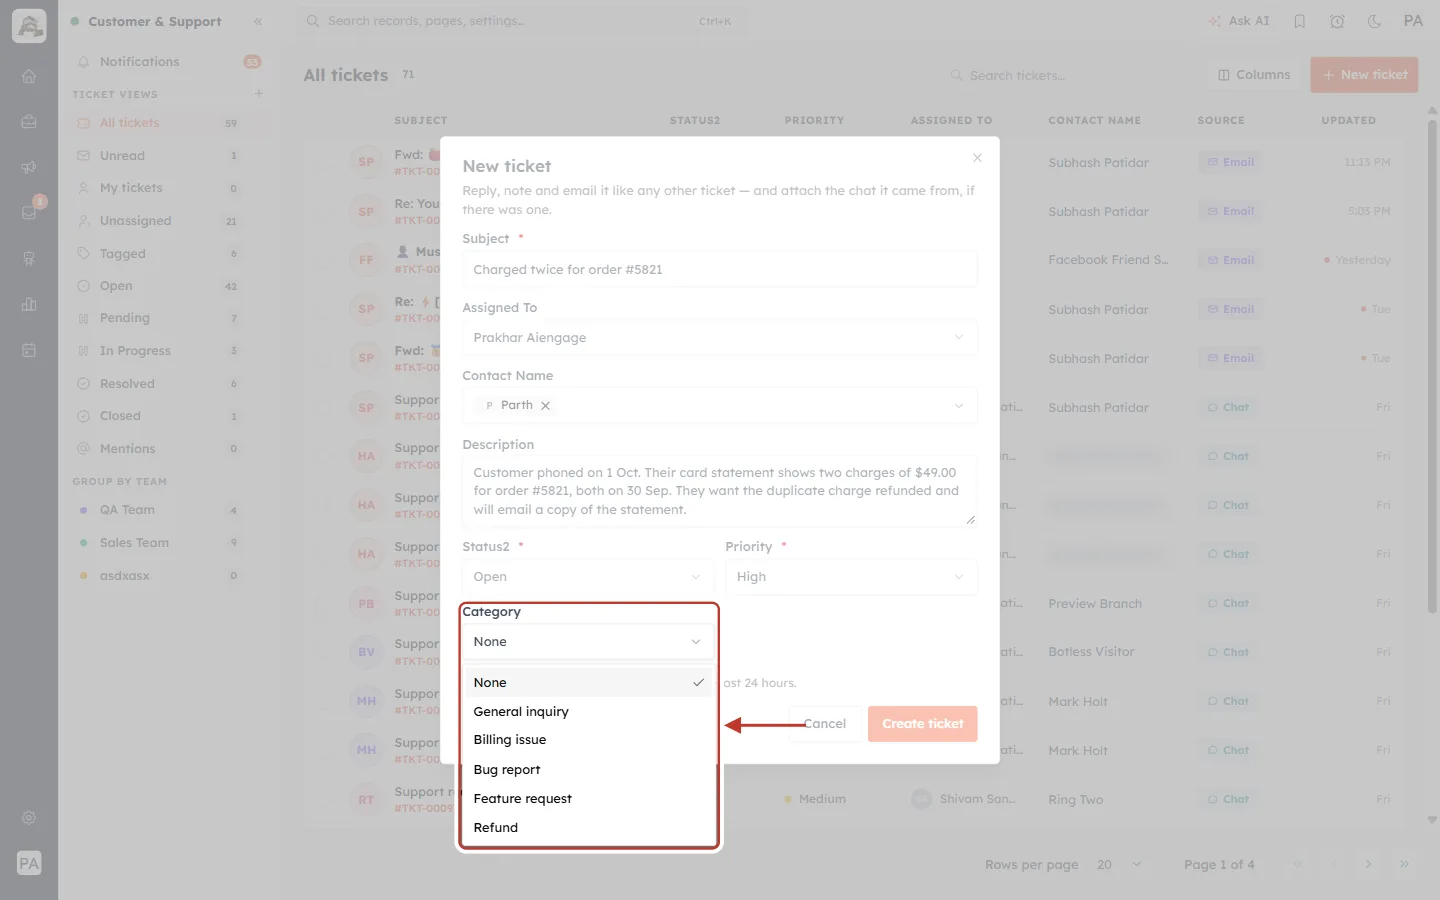
What this screenshot shows. The Category field and its open list are ringed. The arrow points at the categories.
None — no category (the default).
General inquiry, Billing issue, Bug report, Feature request and Refund.
We choose Billing issue for the double charge.
Your administrator can change this list in the Tickets module’s field settings, so your categories may be different.
Step 9: Attach the chat it came from (if there is one)#
Below Category, the form looks for recent conversations with the customer. If the request started in a chat, you can attach that chat to the ticket here.
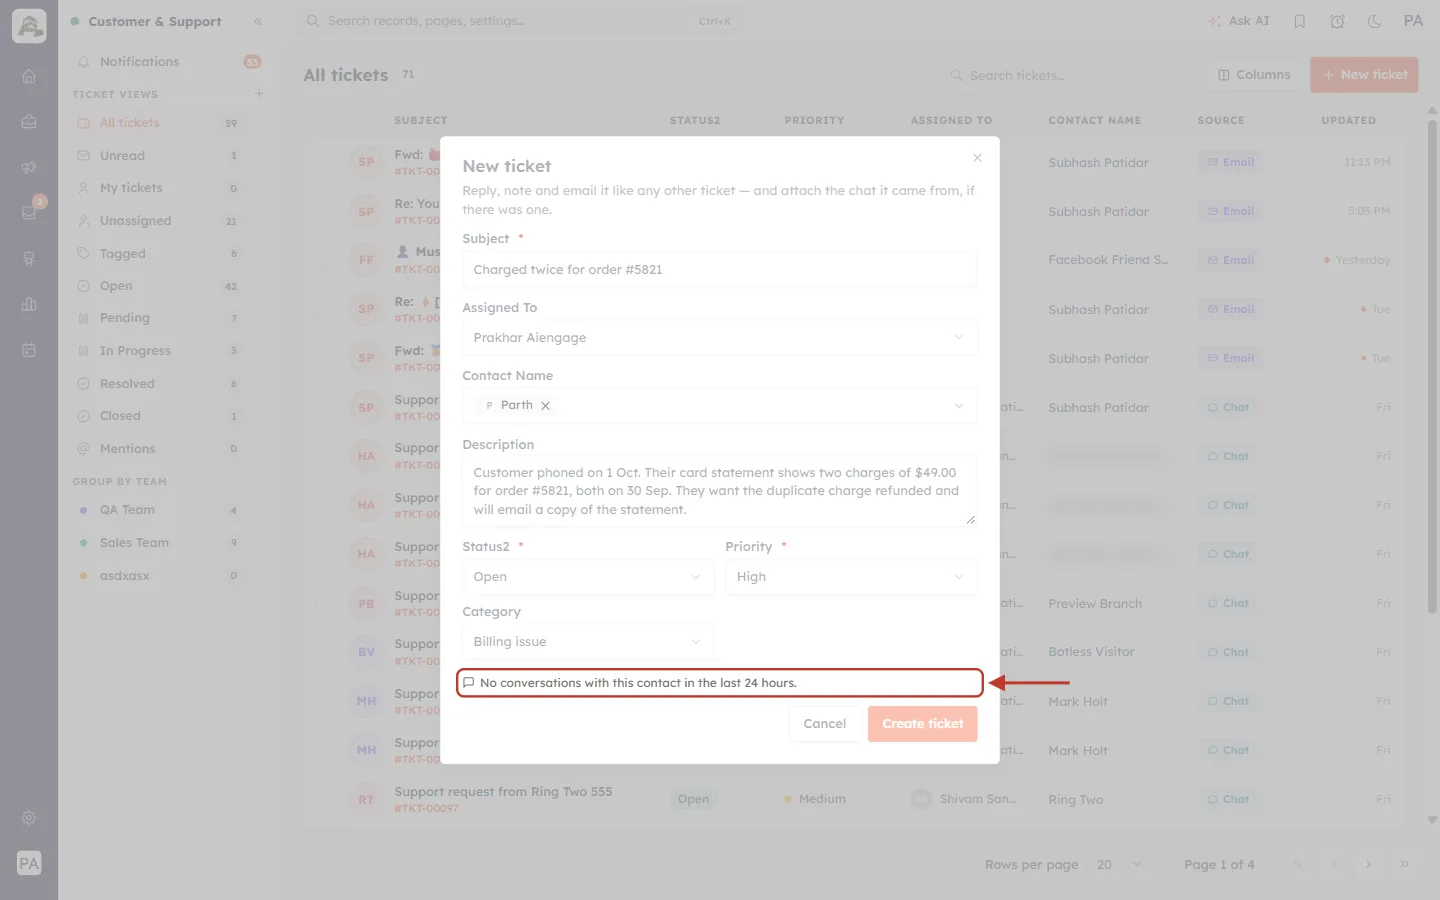
What this screenshot shows. The conversation line at the bottom of the form is ringed. It reads “No conversations with this contact in the last 24 hours.”
Once a contact is chosen, the form lists only that contact’s chats from the last 24 hours.
If there is one, choose it: the chat transcript is copied onto the ticket and the ticket is linked back to the chat, so nobody has to ask the customer to repeat themselves.
Here the customer phoned rather than chatted, so there is nothing to attach — the line is for information only, and you can carry on.
Step 10: Check the form and click Create ticket#
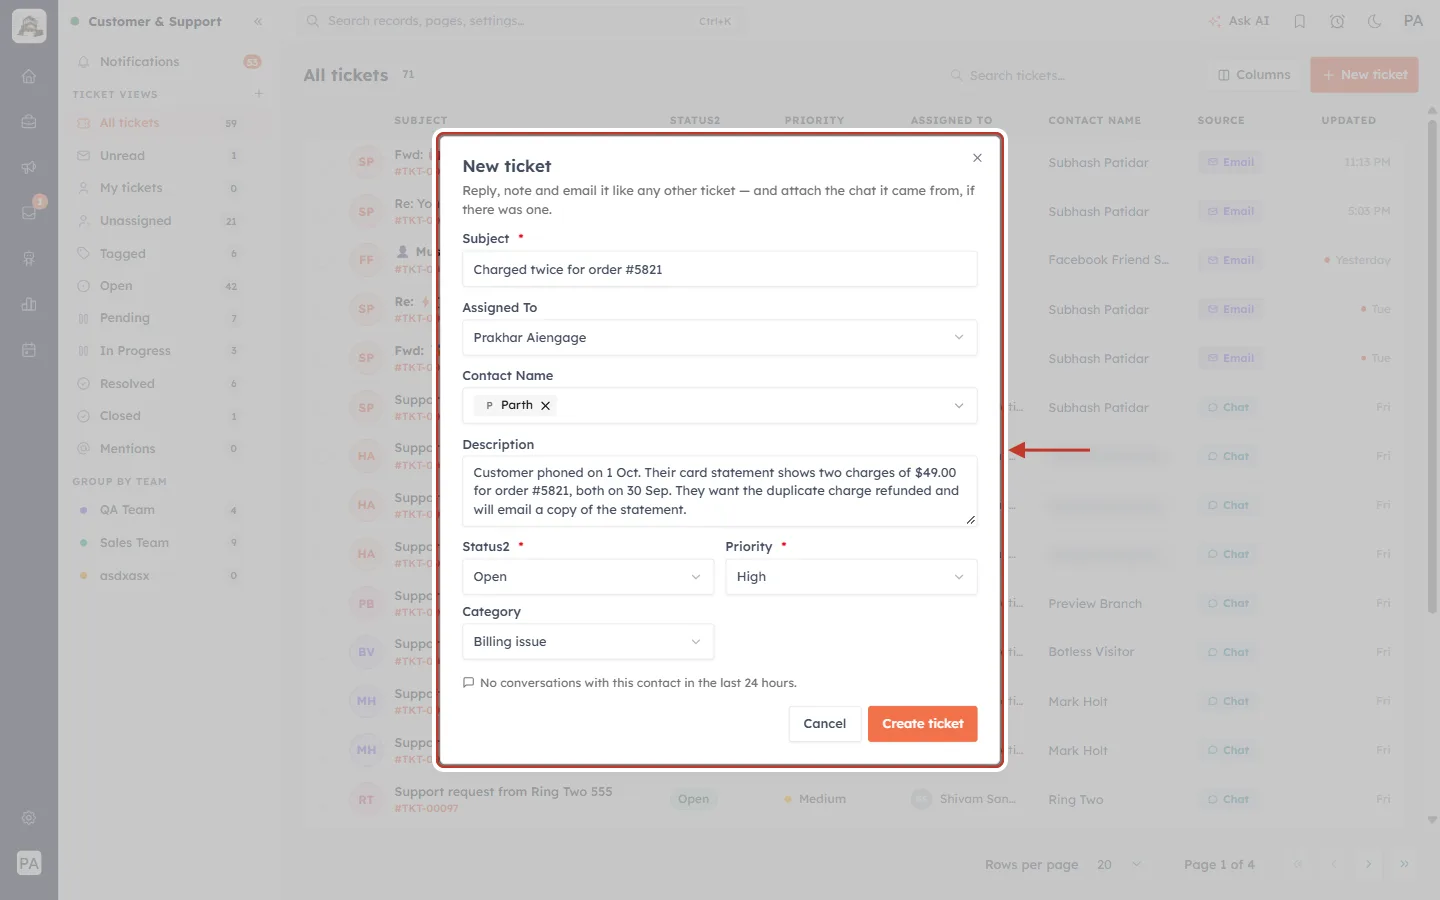
What this screenshot shows. The completed New ticket form is ringed, ready to save.
Subject: Charged twice for order #5821.
Assigned To: Prakhar Aiengage.
Contact Name: Parth, shown as a chip.
Description: the notes from the phone call.
Status2: Open. Priority: High. Category: Billing issue.
No conversation attached, because there was no recent chat.
Create ticket is now bright orange — all the required fields are filled in.
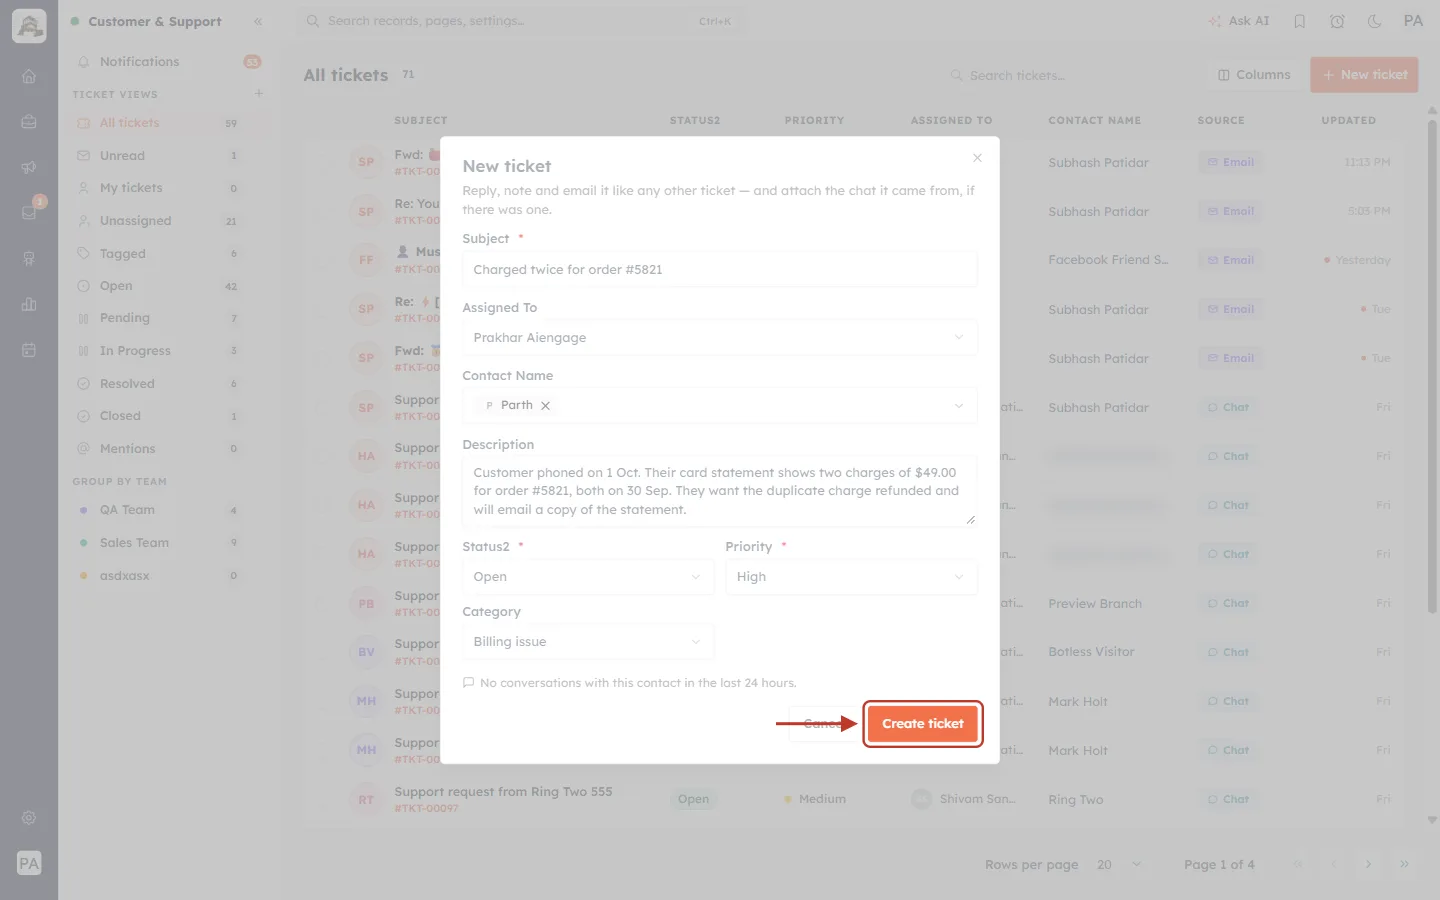
What this screenshot shows. The orange Create ticket button at the bottom right of the form is ringed, with the arrow pointing at it.
Click it to save the ticket.
If it stays pale, a required field is empty — usually the Subject.
To throw the ticket away instead, click Cancel.
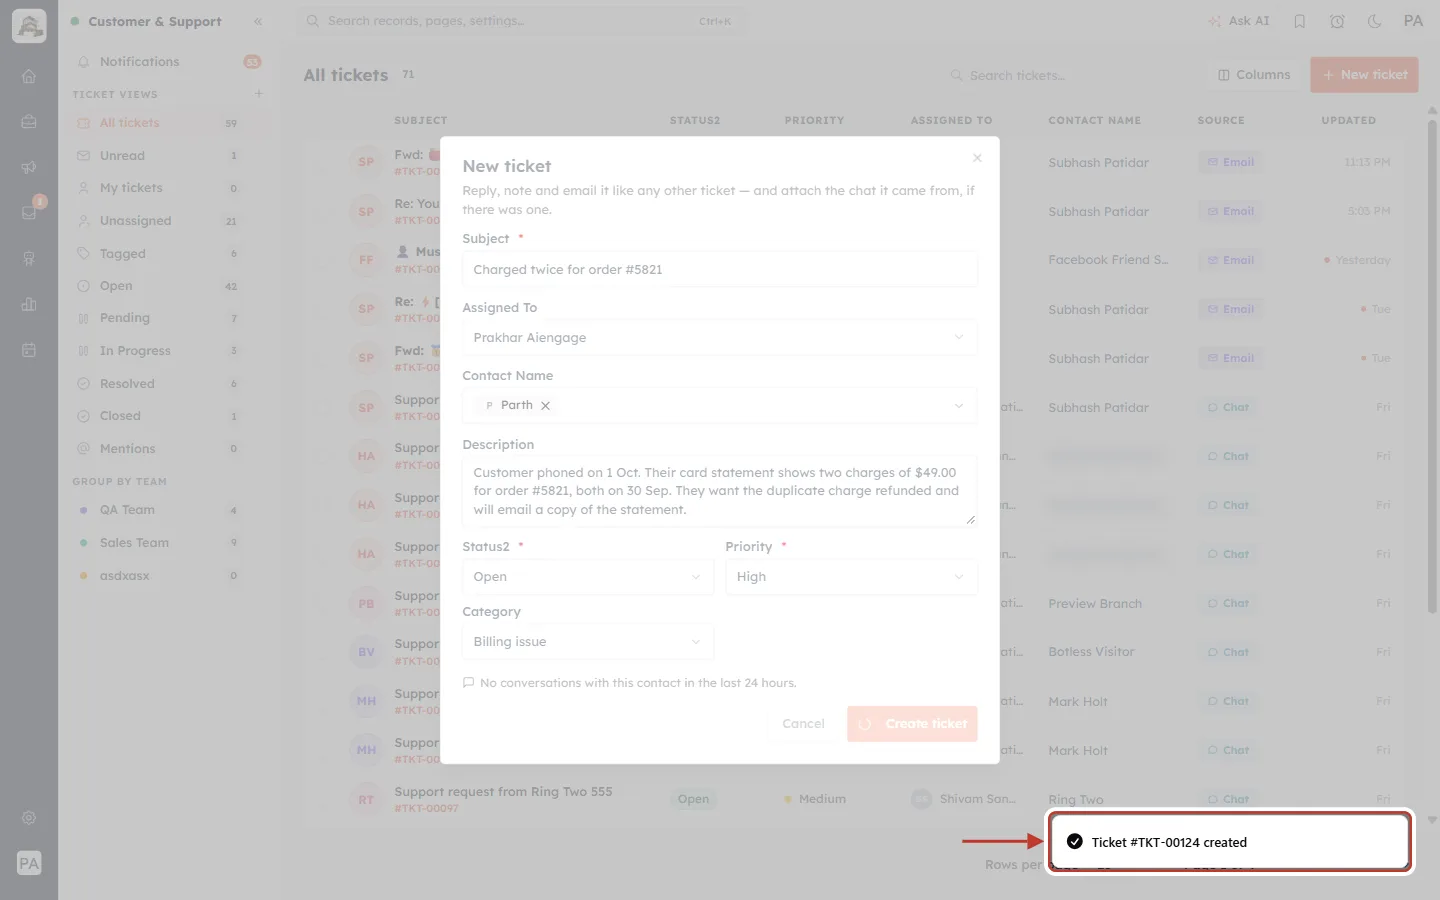
What this screenshot shows. A confirmation message at the bottom right of the screen is ringed: “Ticket #TKT-00124 created”.
The message gives the new ticket number. Tell the customer this number if they are still on the phone — it is the quickest way to find the ticket later.
The message disappears after a few seconds.
Step 11: Check the new ticket#
The new ticket opens straight away, so you can carry on working on it.
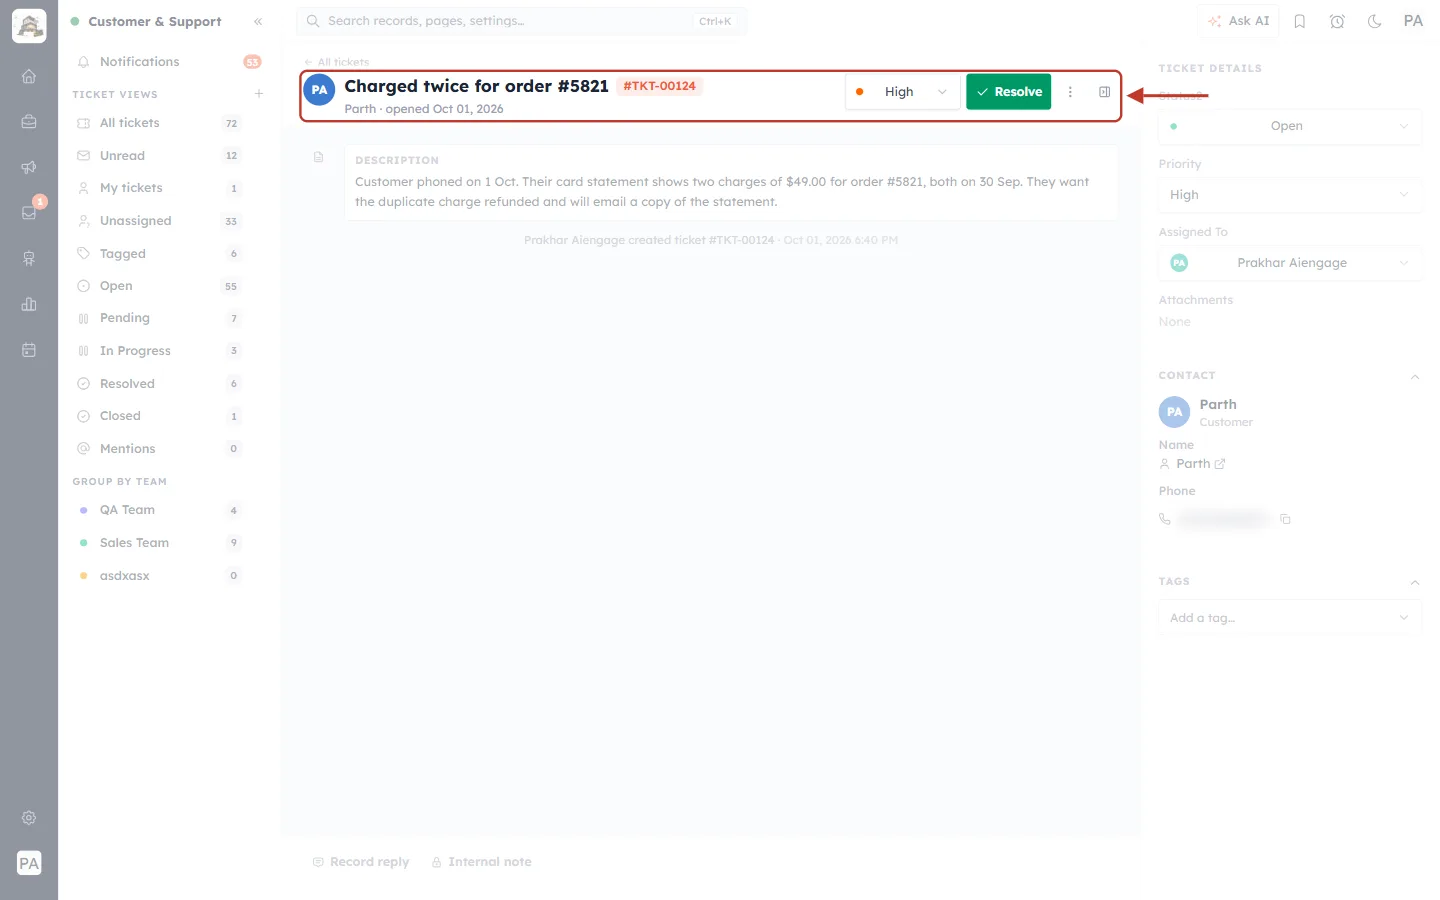
What this screenshot shows. The header of the new ticket is ringed.
The customer’s initials in a blue circle, the subject Charged twice for order #5821 and the ticket number #TKT-00124 in orange.
Underneath: Parth · opened Oct 01, 2026 — the customer and the day the ticket was created.
On the right: the priority (High, with an orange dot — click it to change), the green Resolve button, the ⋮ menu (Close ticket, Copy link) and the button that shows or hides the details panel.
← All tickets above the subject takes you back to the list.
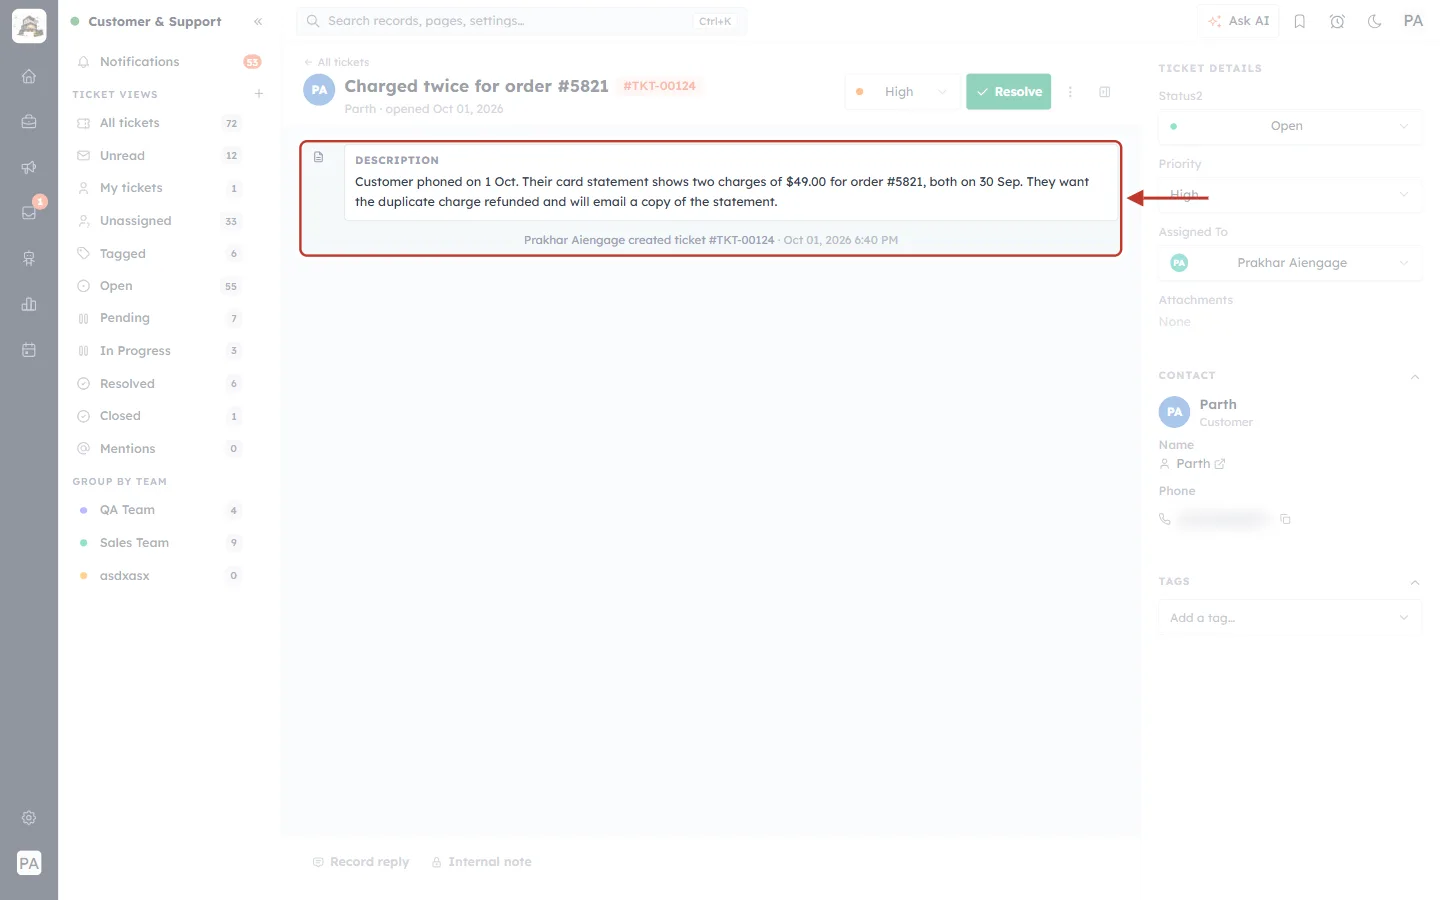
What this screenshot shows. The start of the ticket conversation is ringed.
The DESCRIPTION box shows exactly what you typed in Step 6.
Under it, a grey line records who created the ticket and when: “Prakhar Aiengage created ticket #TKT-00124 · Oct 01, 2026 6:40 PM”.
Replies, recorded replies and internal notes will appear below this as the ticket is worked.
At the bottom of the screen (faded) are the reply options. This customer has no email address in the CRM, so the ticket offers Record reply (saved on the ticket, not sent) and Internal note. For a customer with an email address you would also see Reply, Reply all and Forward.
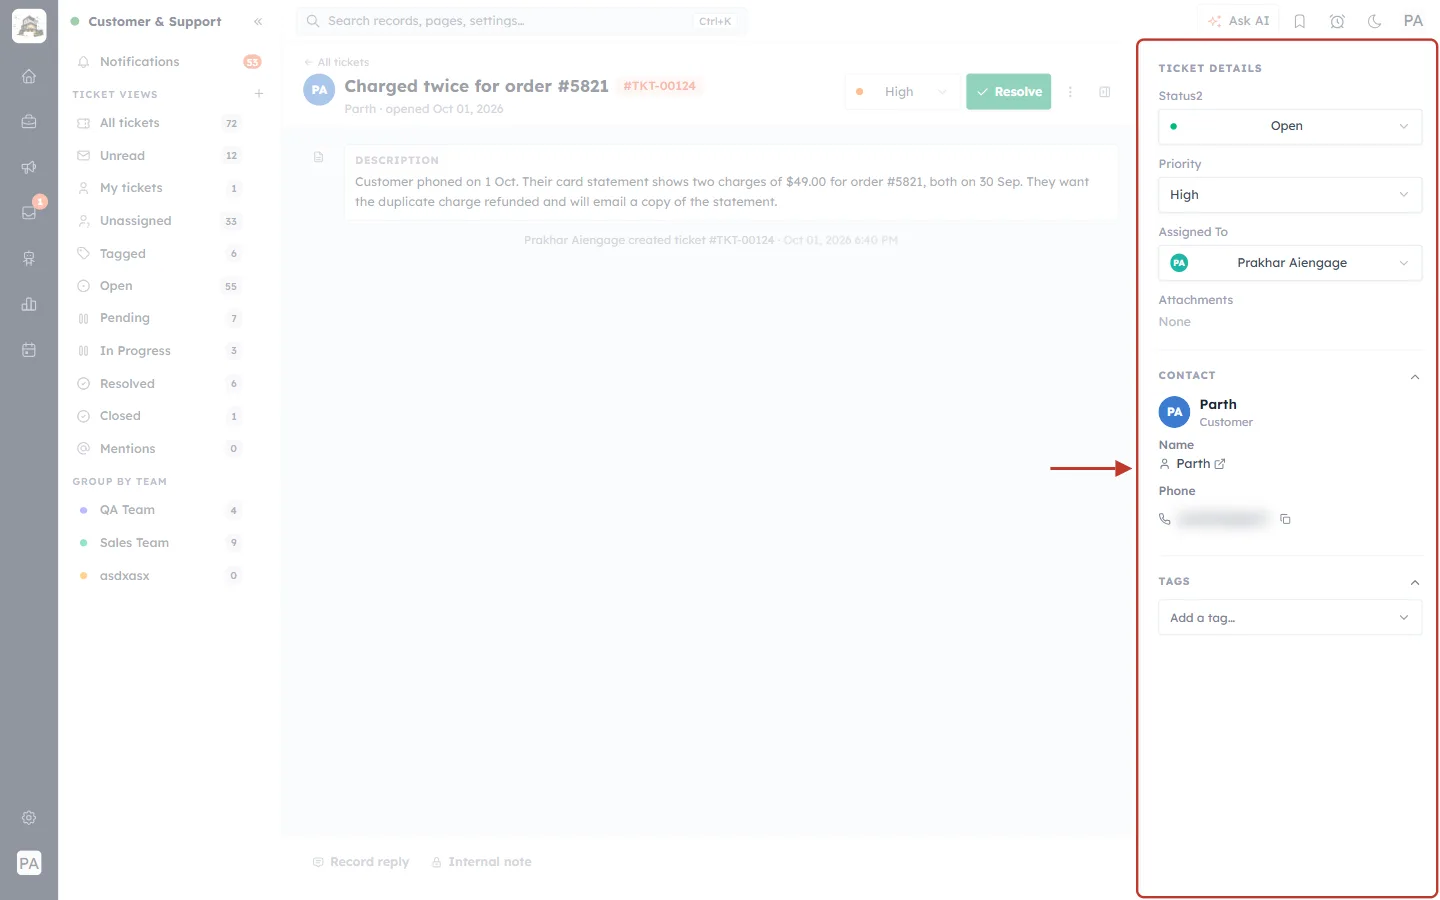
What this screenshot shows. The details panel on the right of the ticket is ringed. The customer’s phone number is blurred.
TICKET DETAILS — Status2 (Open), Priority (High) and Assigned To (Prakhar Aiengage), each a drop-down you can change at any time. Attachments: None.
CONTACT — the linked customer, Parth (Customer), with his name (click the arrow icon to open his contact record) and phone number (with a copy button).
TAGS — Add a tag… to label the ticket, for example refund or VIP.
Everything you chose in the form is here, which is a quick way to check you entered it correctly.
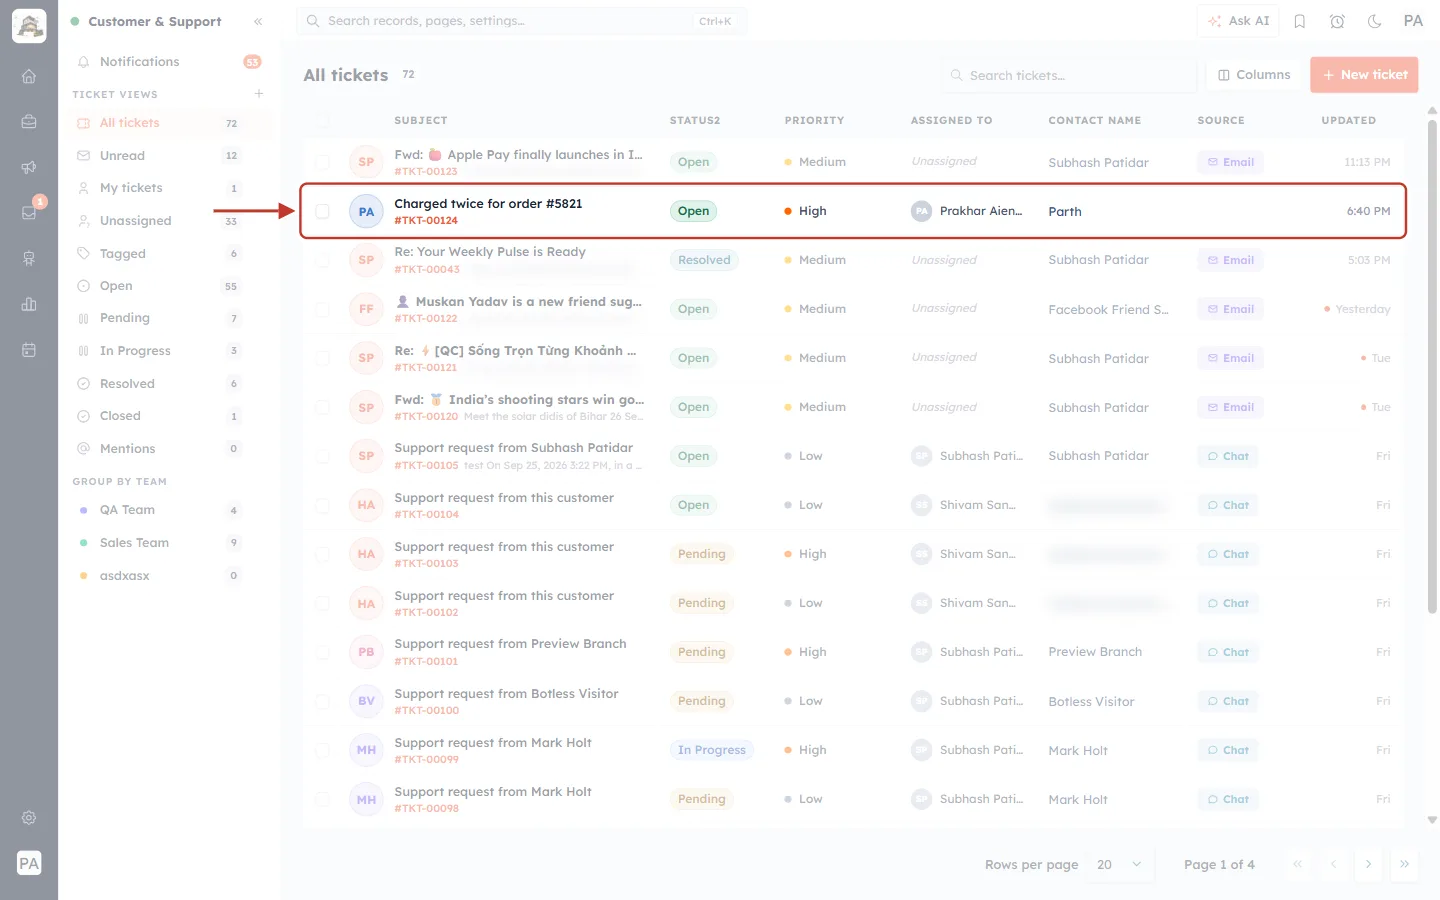
What this screenshot shows. Back on All tickets, the new ticket’s row is ringed, near the top of the list.
Subject — Charged twice for order #5821, with #TKT-00124 underneath.
Status2 — a green Open label. Priority — High with an orange dot.
Assigned To — Prakhar Aiengage. Contact Name — Parth.
Source — empty for a manually created ticket (tickets from email or chat show an Email or Chat label here).
Updated — 6:40 PM, the time it was created.
The counts in the sidebar have gone up by one (All tickets, Open and the assignee’s My tickets).
Part 2 — Create a ticket from the Tickets module (Create Single)#
Use this way when you want to attach a file, add several tickets one after another, or you are already working in the CRM’s Sales area. In this example a customer has emailed a teammate’s personal inbox asking for a refund, with a screenshot of their cancellation confirmation.
Step 1: Open Sales → Tickets#
In the dark icon bar on the far left, click the Sales icon (the briefcase).
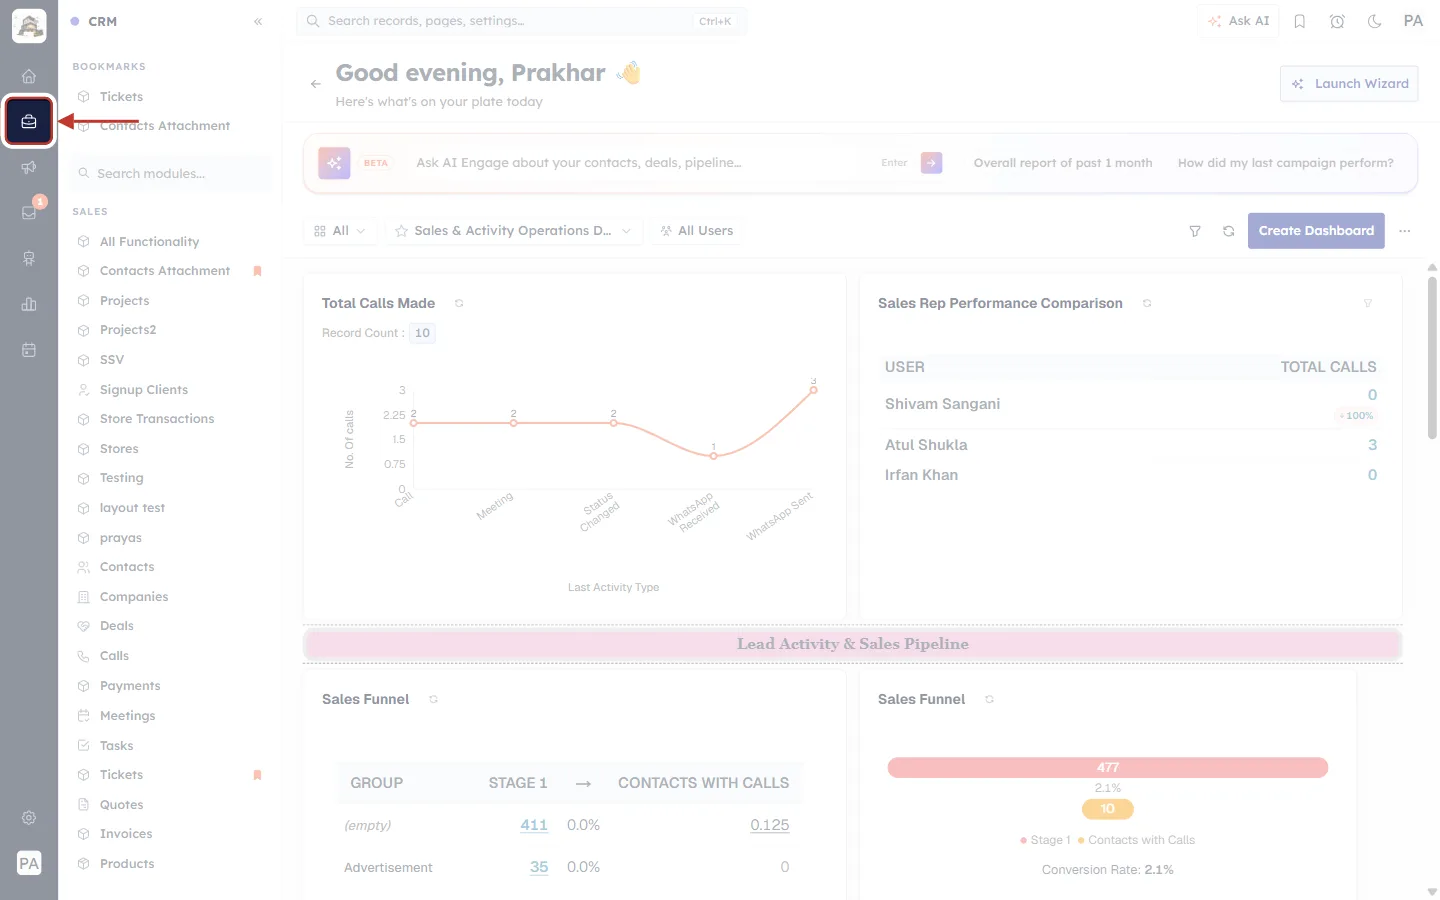
What this screenshot shows. The Sales icon (a briefcase) in the dark icon bar on the far left is ringed, and the arrow points at it.
The icon bar is on every CRM page. From top to bottom: Home, Sales, Marketing, Inbox and the other areas of the CRM.
Clicking Sales opens the Sales menu in the light-coloured column next to it.
In the Sales menu, click Tickets.
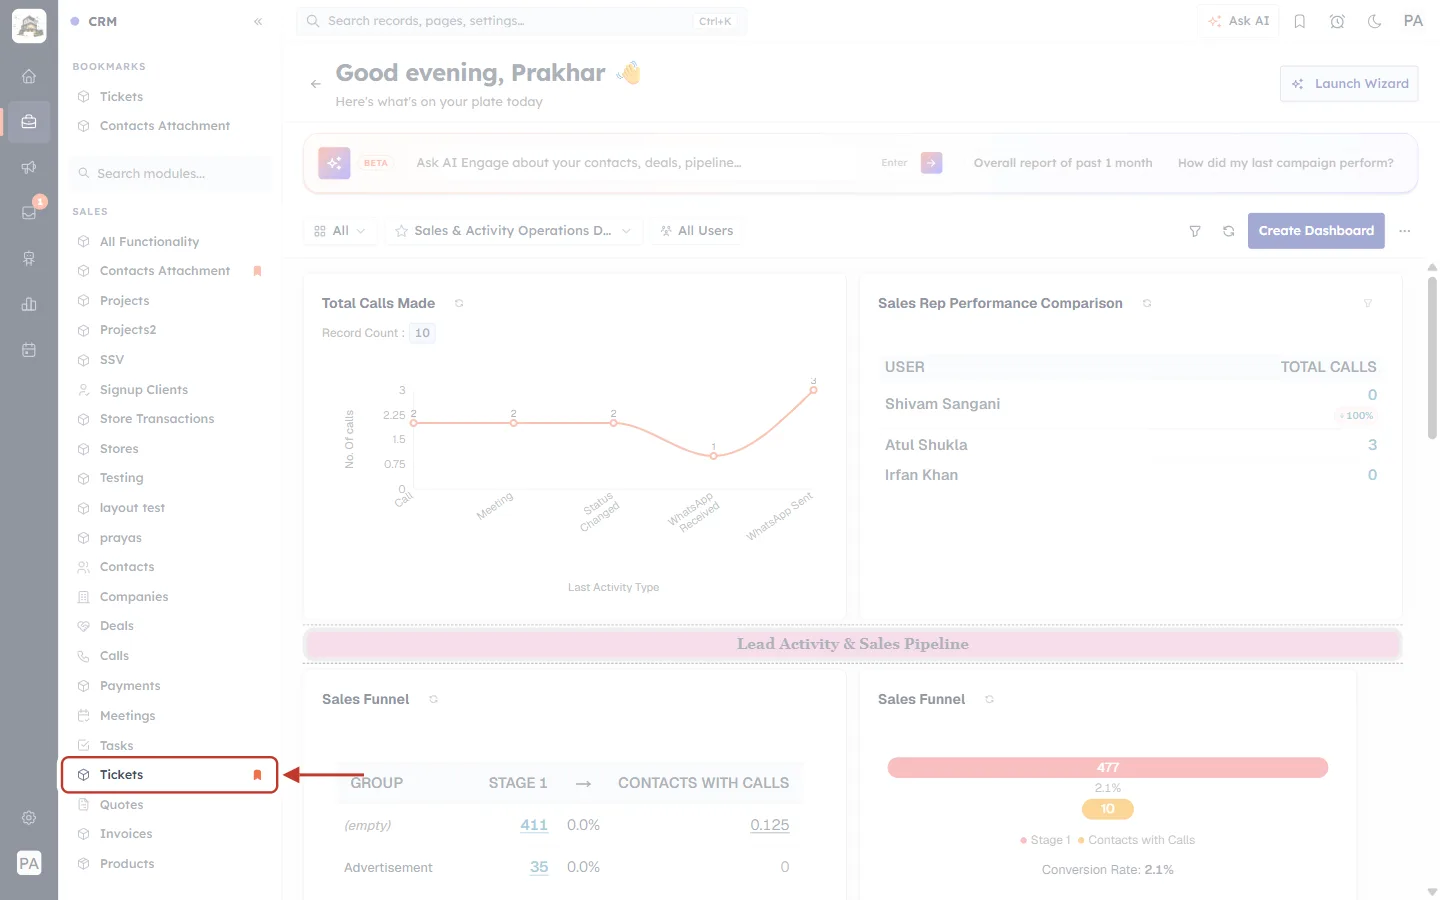
What this screenshot shows. The Sales menu is open, and Tickets near the bottom of the list is ringed.
The menu lists every Sales module in your account — Contacts, Companies, Deals, Calls, Payments, Meetings, Tasks, Tickets, Quotes, Invoices, Products and any custom modules.
Can’t find it? Type Tickets in the Search modules… box at the top of the menu.
Click the bookmark icon next to Tickets to pin it under BOOKMARKS at the top of the menu for quicker access.
Step 2: Click Create Ticket and choose Create Single#
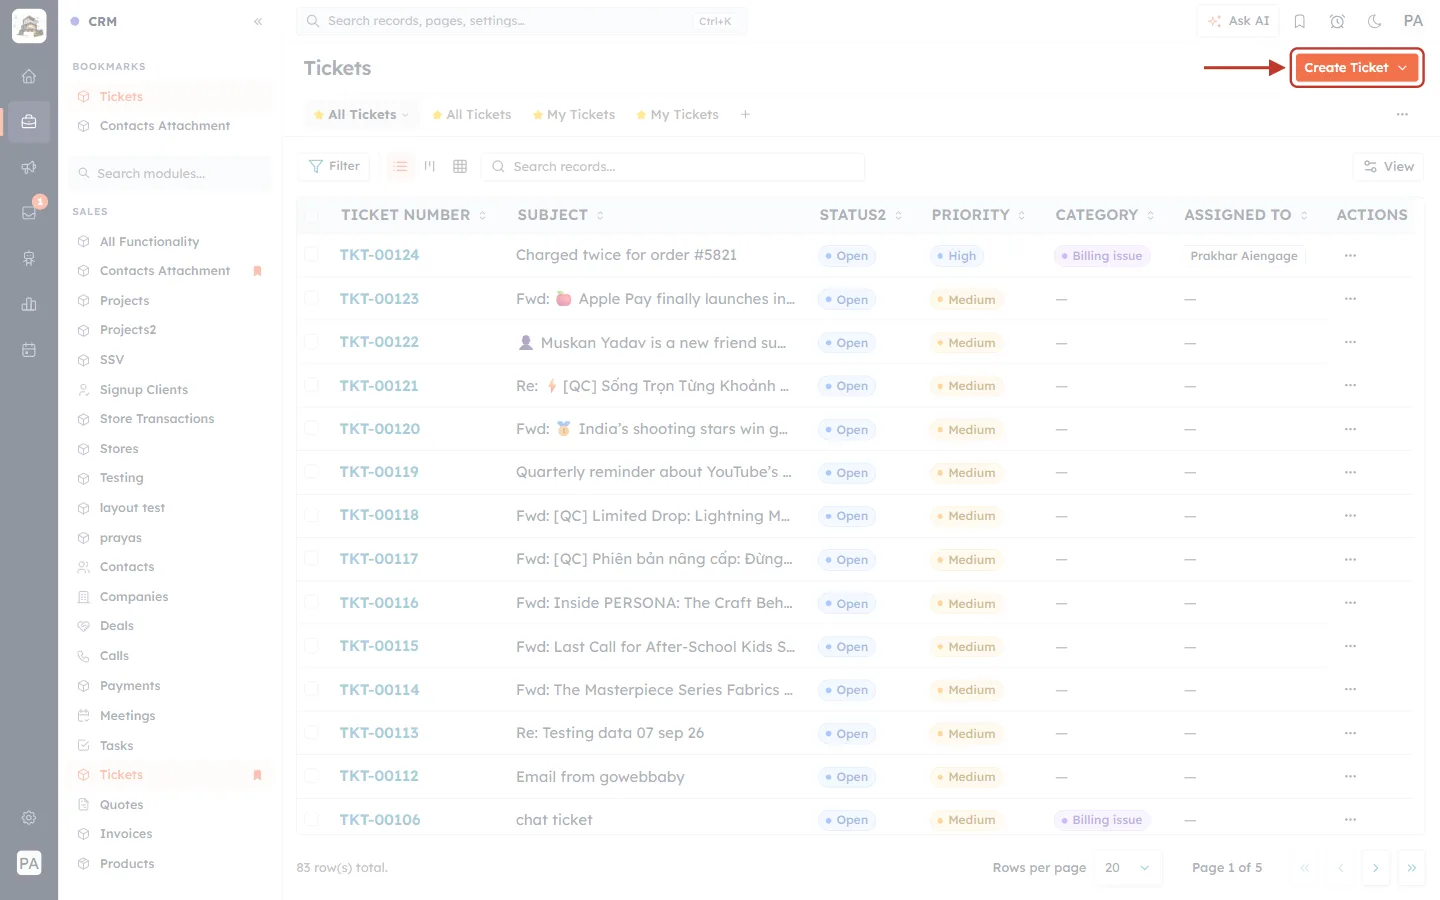
What this screenshot shows. The Tickets list, with the orange Create Ticket button at the top right ringed.
The list (faded) shows every ticket with its ticket number, subject, status, priority, category and assignee.
The Create Ticket button has an arrow on its right side that opens a menu of options.
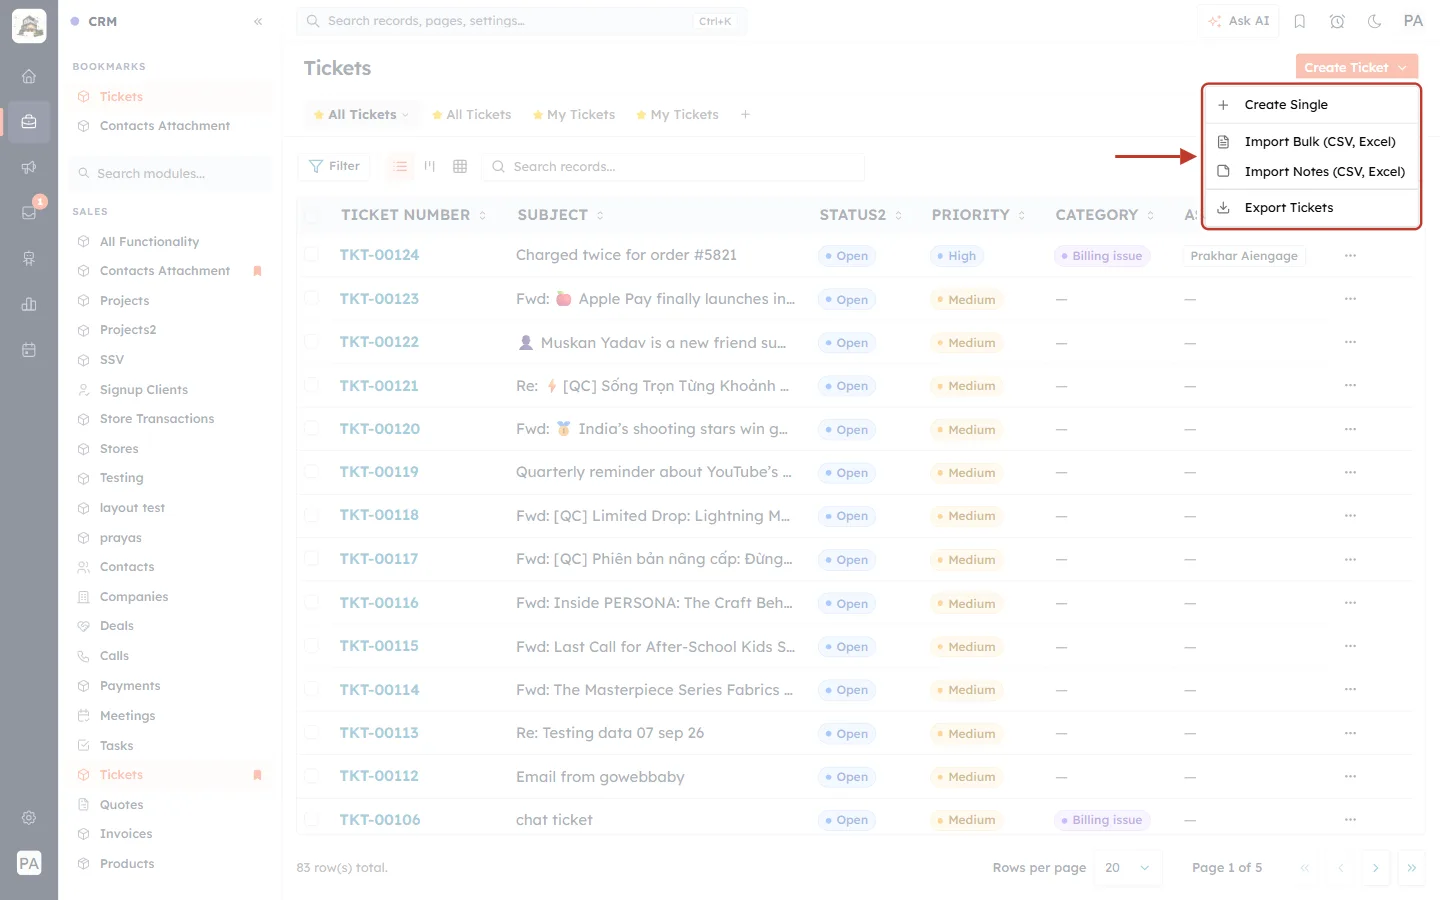
What this screenshot shows. The Create Ticket menu is open and ringed.
Create Single — opens the full form to create one ticket. This is the option we use.
Import Bulk (CSV, Excel) — bring in many tickets at once, for example from another help desk.
Import Notes (CSV, Excel) — add notes to existing tickets in bulk.
Export Tickets — download your tickets to a file.
Step 3: Get to know the Create Ticket form#
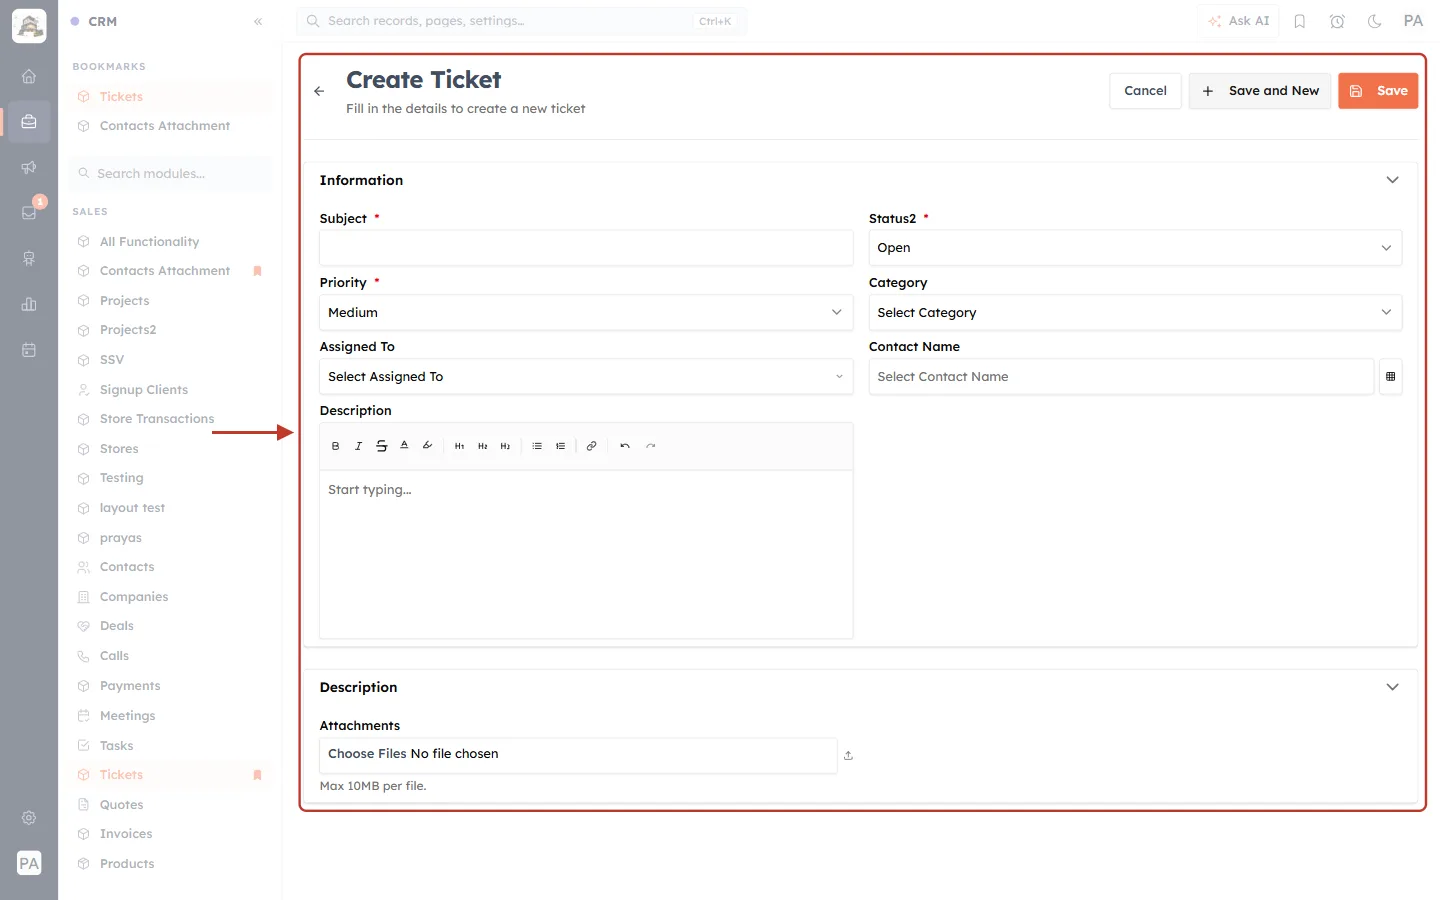
What this screenshot shows. The full Create Ticket page is ringed: “Fill in the details to create a new ticket.”
Top right — Cancel (leave without saving), + Save and New (save and open a blank form for the next ticket) and the orange Save.
Information section — Subject *, Status2 * (starts as Open), Priority * (starts as Medium), Category (Select Category), Assigned To (Select Assigned To), Contact Name (Select Contact Name, with a table icon on the right) and a Description box with a formatting toolbar.
Description section — Attachments (Choose Files, max 10 MB per file).
The small ⌄ arrow on each section header folds the section away.
If your administrator added extra ticket fields, they appear in these sections too.
Step 4: Enter the subject and set Status, Priority and Category#
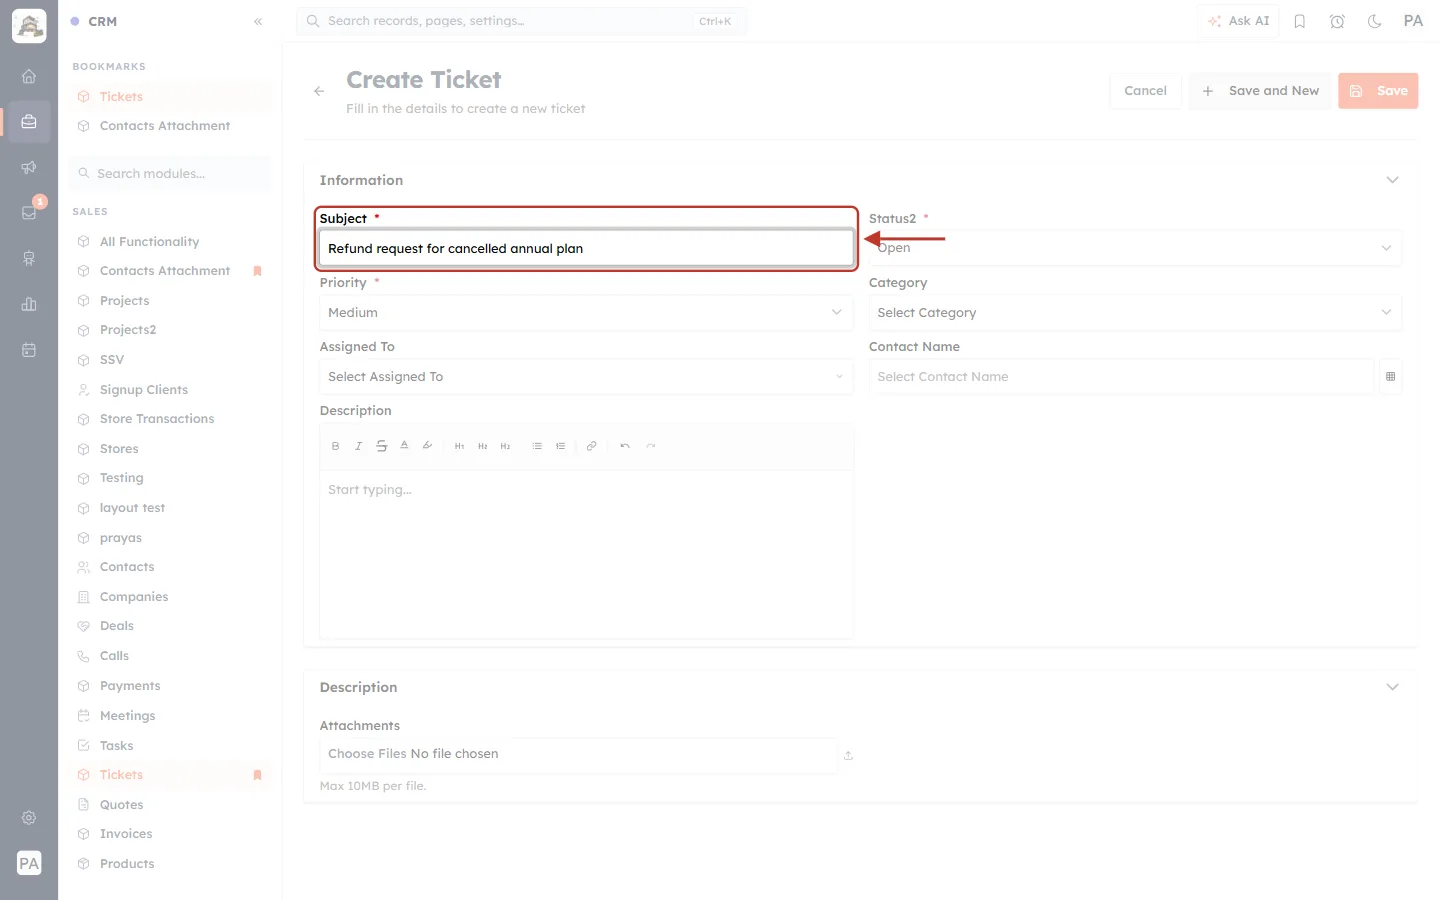
What this screenshot shows. The Subject * label and box are ringed, with Refund request for cancelled annual plan typed in.
As in Part 1, keep it short and specific.
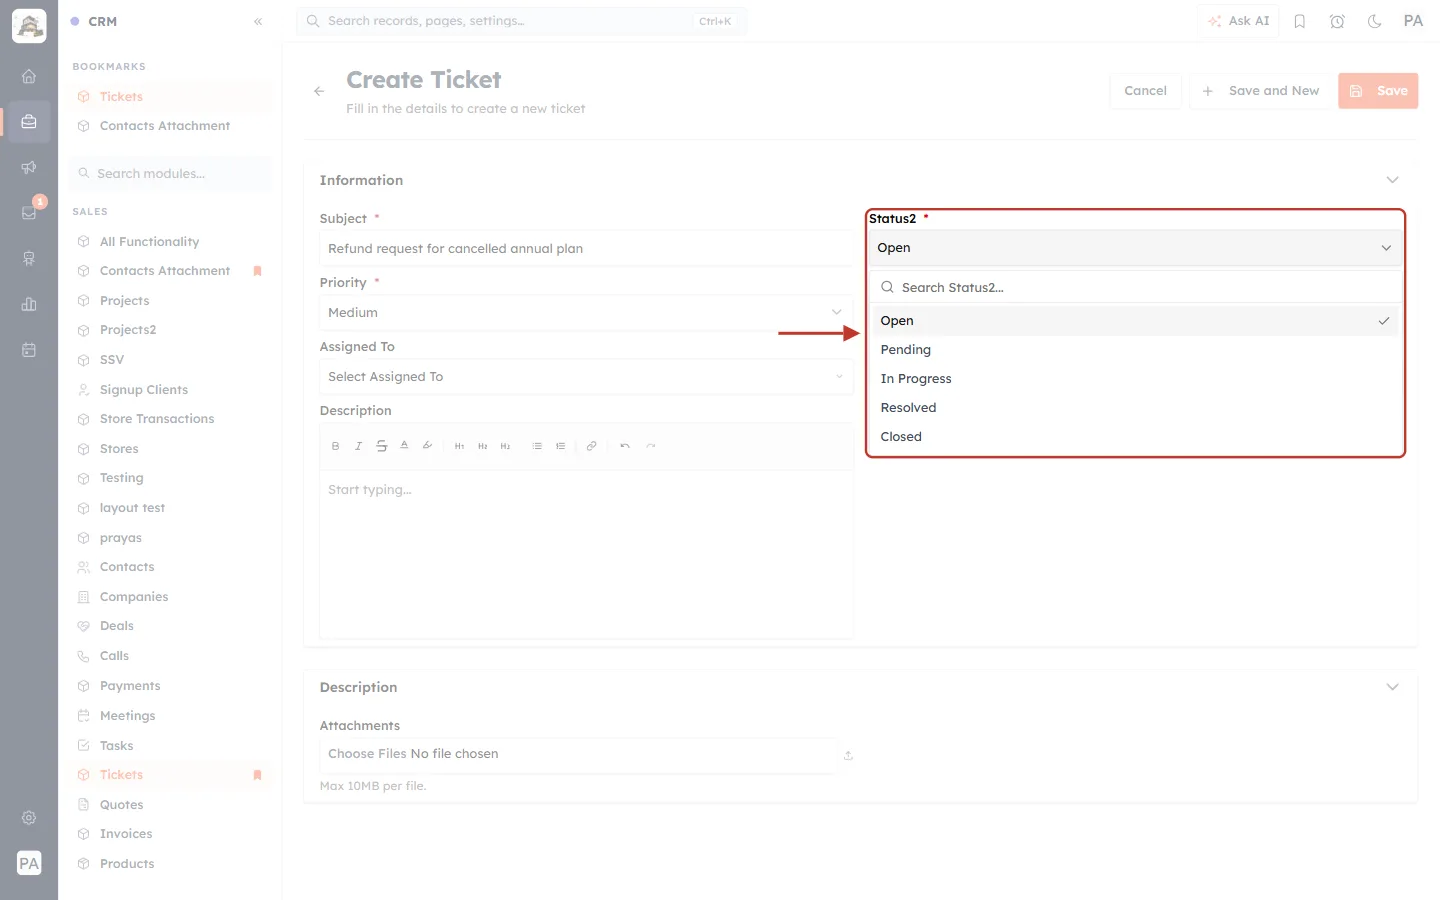
What this screenshot shows. The Status2 field is open and ringed, showing Open, Pending, In Progress, Resolved and Closed.
A search box at the top of the list filters it as you type — handy if your account has many statuses.
We keep Open.
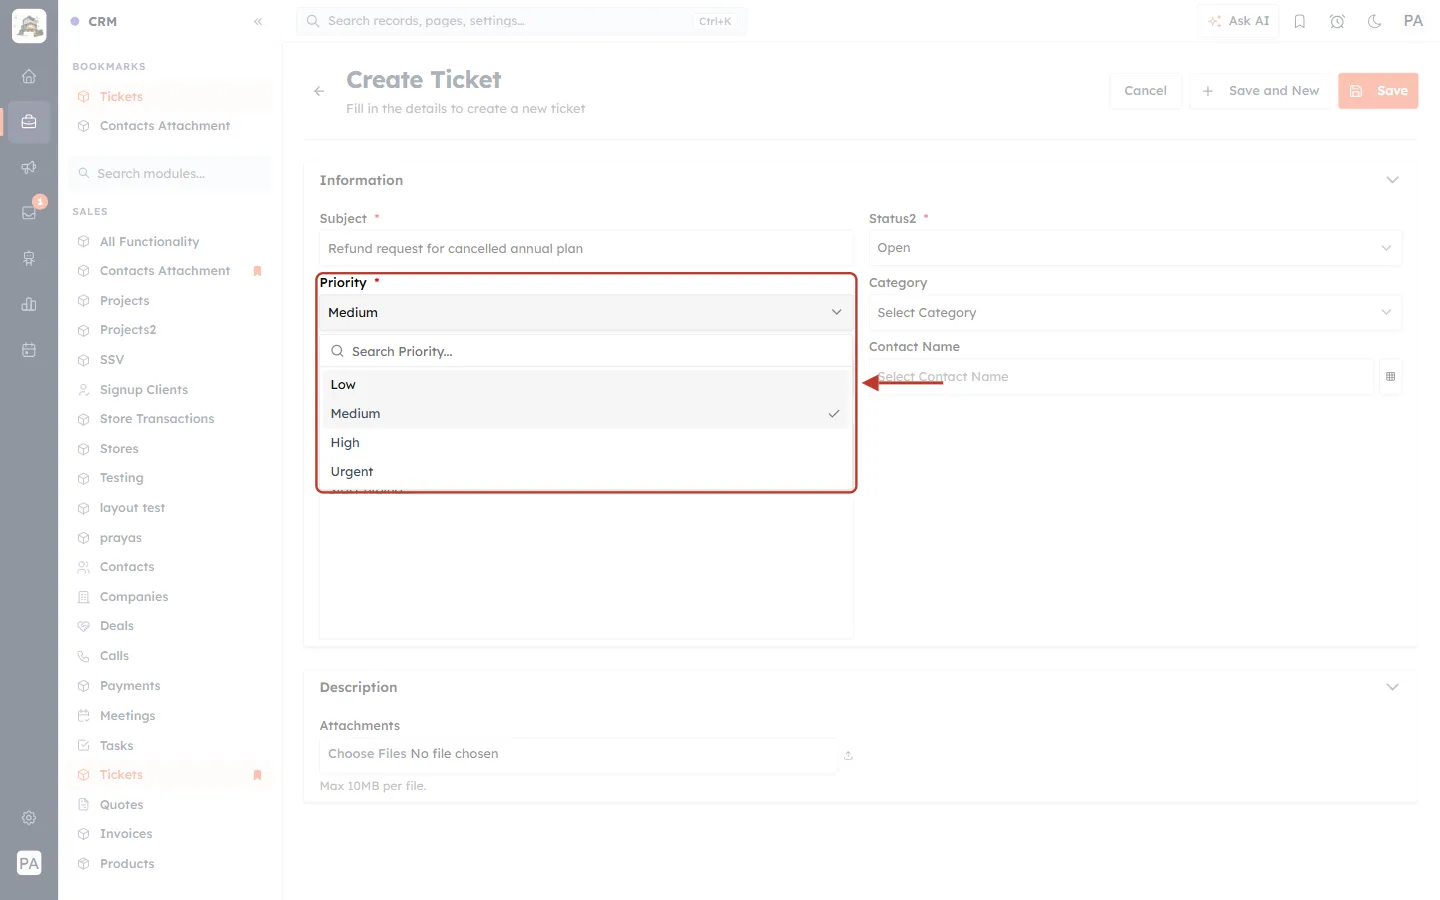
What this screenshot shows. The Priority field is open and ringed, showing Low, Medium, High and Urgent, with a Search Priority… box.
We keep Medium — the refund is important but not time-critical.
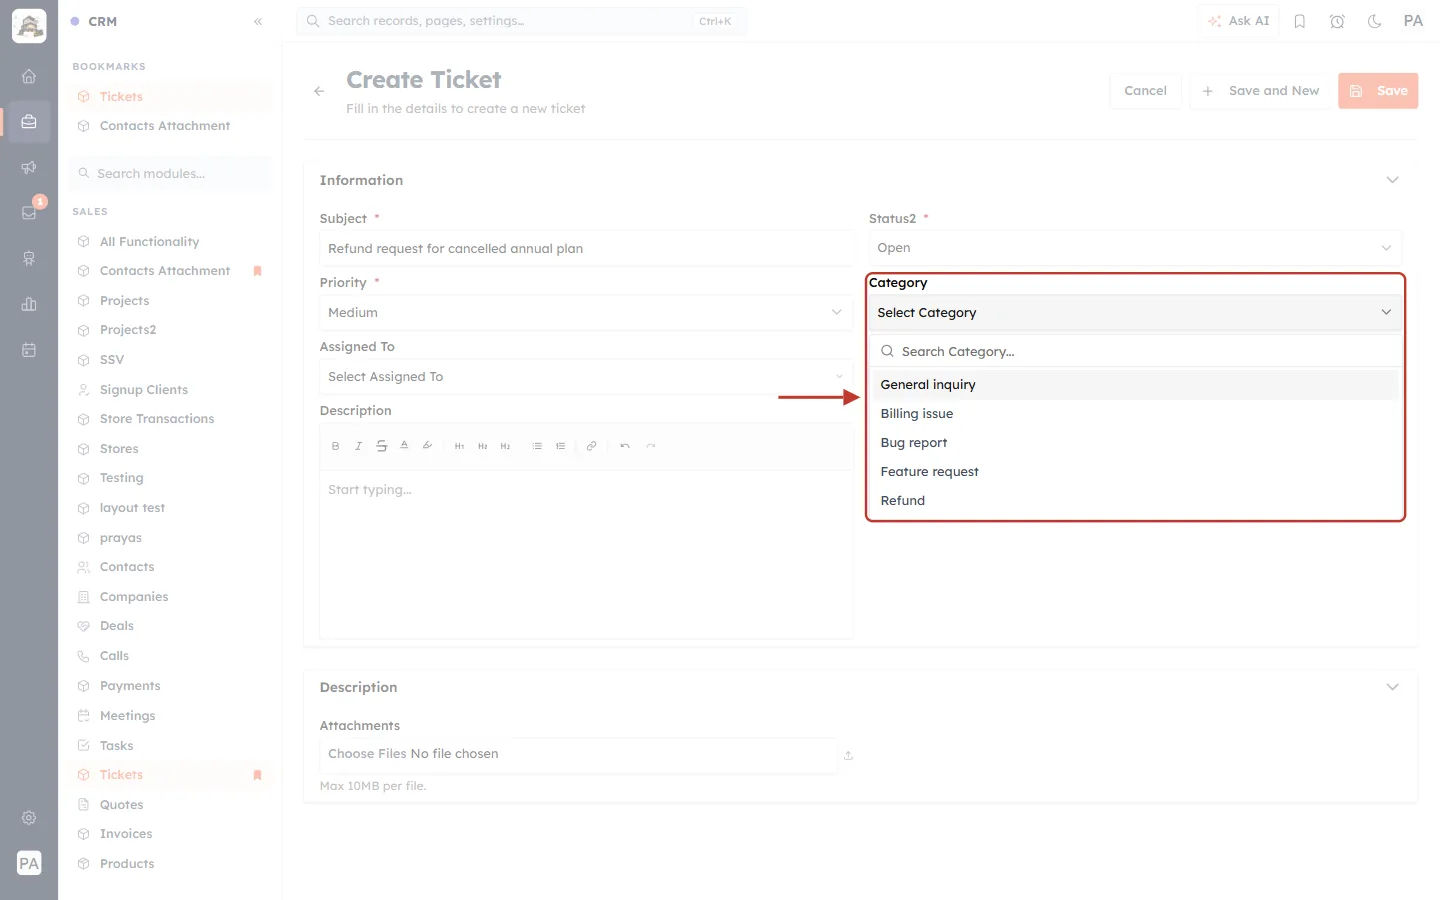
What this screenshot shows. The Category field is open and ringed, showing General inquiry, Billing issue, Bug report, Feature request and Refund.
We choose Refund.
Here the field starts empty (Select Category) rather than None; leaving it empty means no category.
Step 5: Assign the ticket#
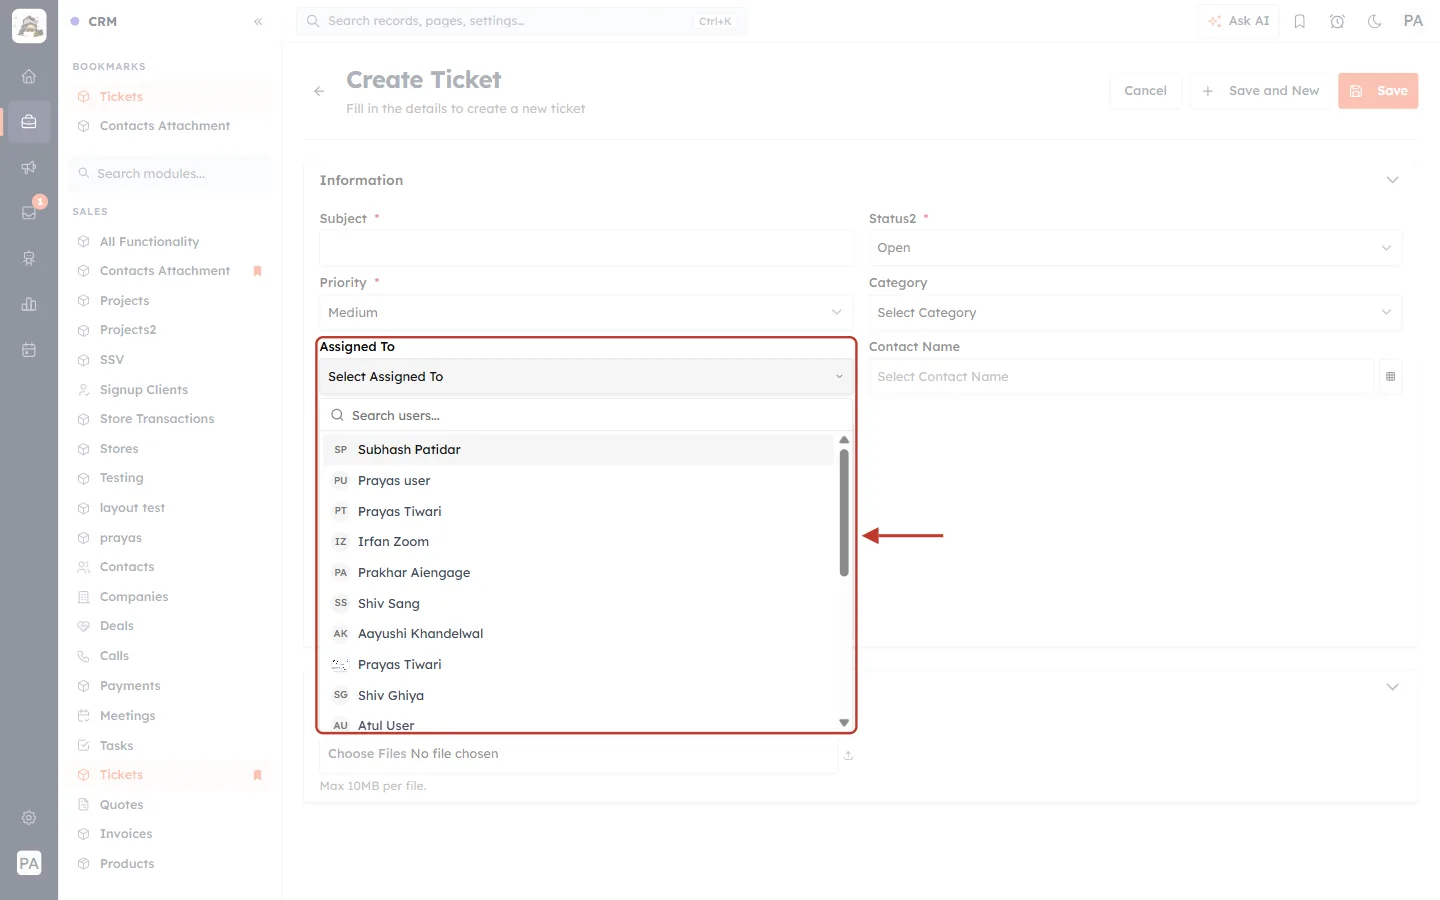
What this screenshot shows. The Assigned To field is open and ringed. The arrow points at the list of users.
A Search users… box at the top — type part of a name to find someone quickly.
Each user is shown with their initials and full name. Scroll for more.
We choose Prakhar Aiengage. Leave it empty to keep the ticket unassigned.
Step 6: Choose the contact#
Click Contact Name (or the small table icon on its right). A Choose Contacts window opens. Search for the customer, click the round button on their row, then click Select.
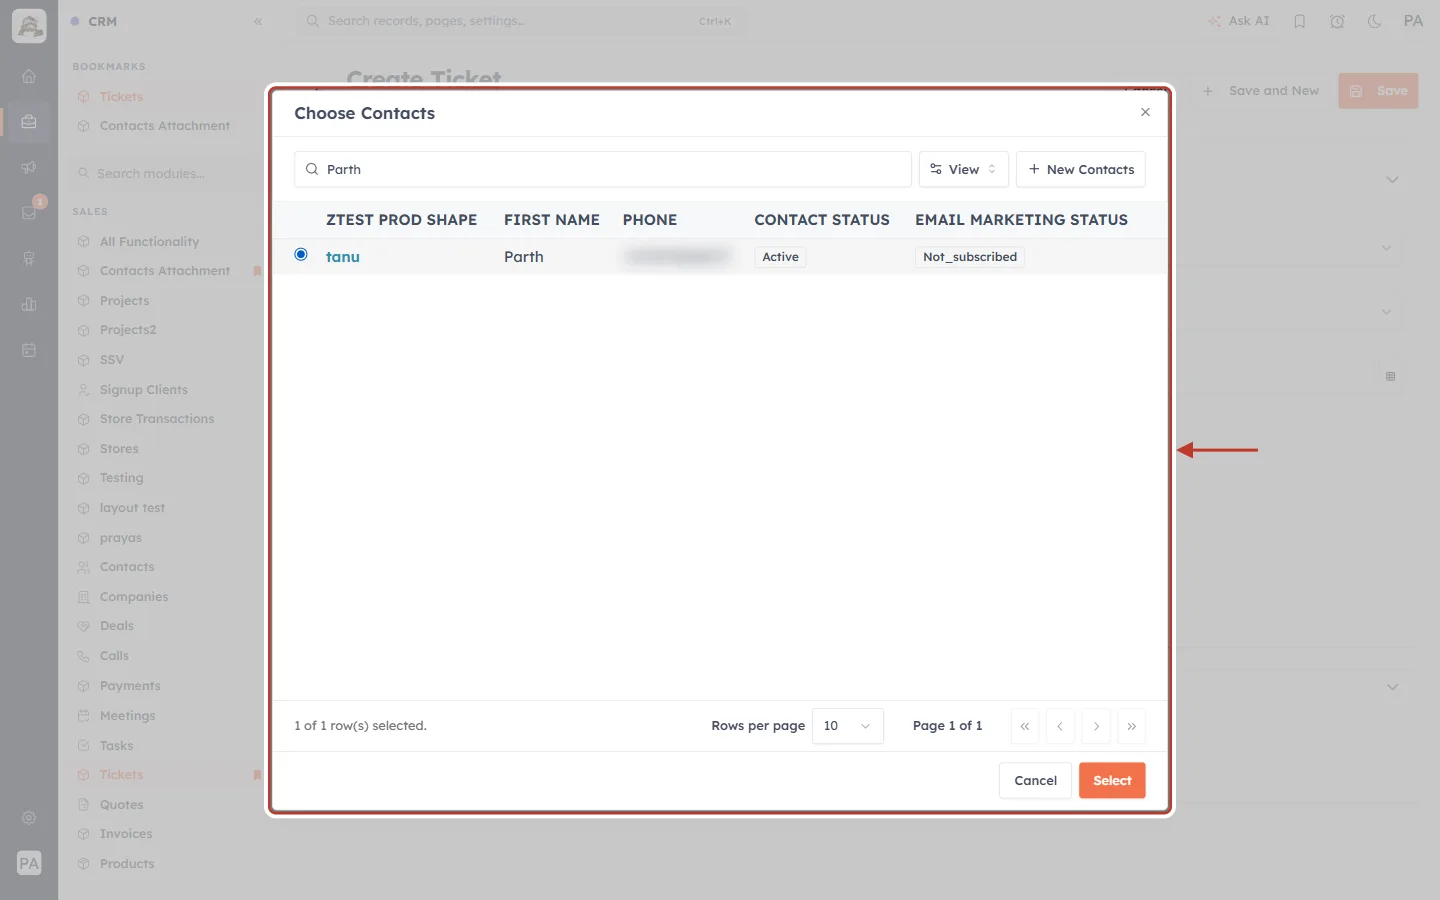
What this screenshot shows. The Choose Contacts window is ringed, after searching for Parth. The phone number is blurred.
It works like the window in Part 1, but you pick one contact with a round button instead of a tick box.
The search box, View (choose columns) and + New Contacts (create a contact on the spot) are at the top.
The matching contact is selected (blue round button). The footer says 1 of 1 row(s) selected.
Click the orange Select button to use this contact, or Cancel to go back.
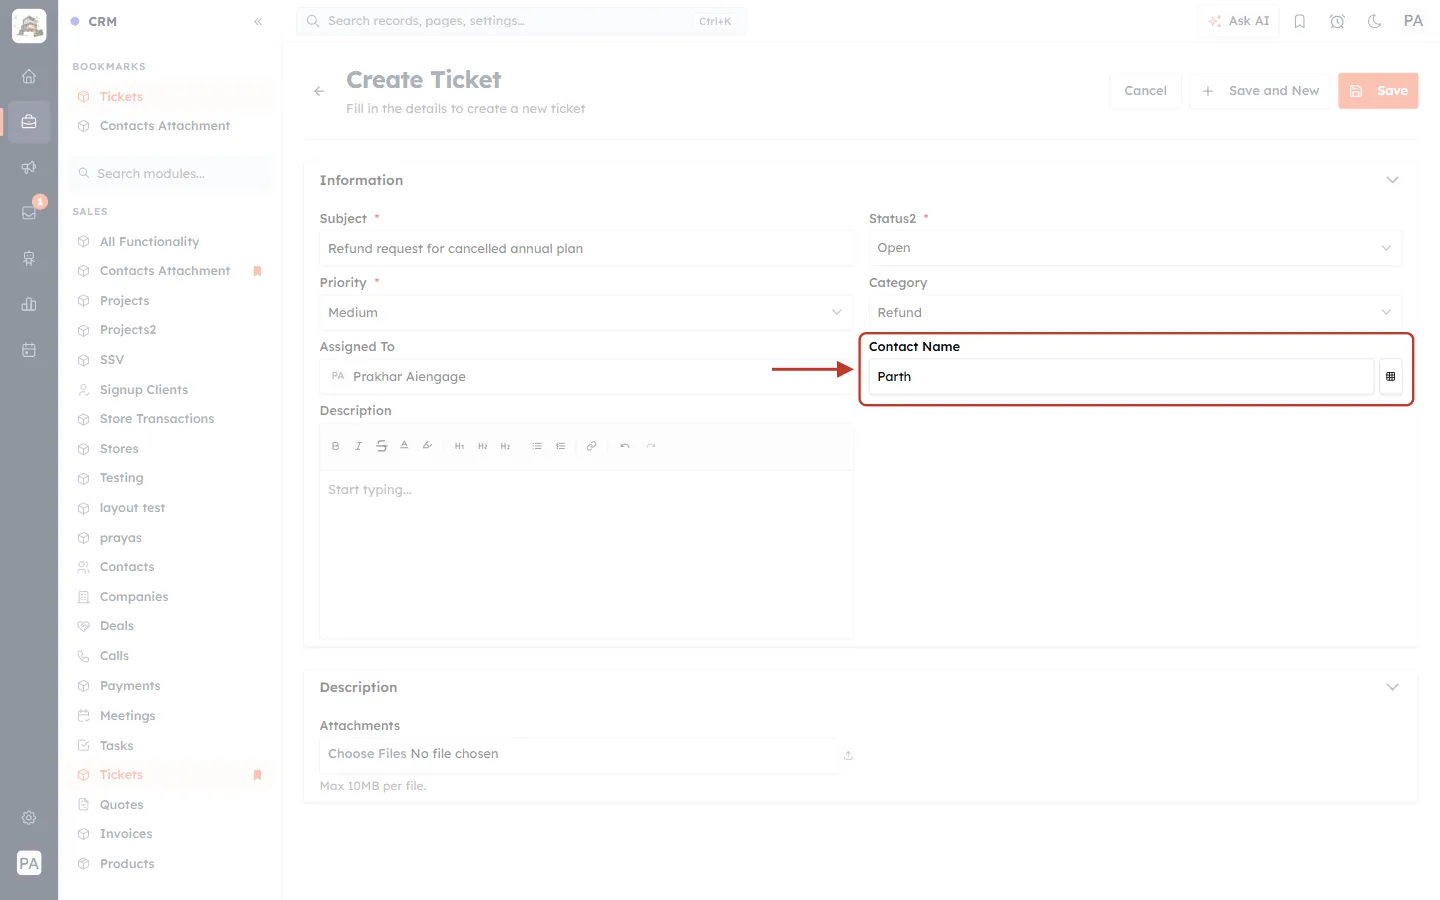
What this screenshot shows. The Contact Name field is ringed and now shows Parth.
Click the field again to choose a different contact.
Step 7: Write the description#
Click in the Description box and type the details. Use the toolbar to format longer notes.
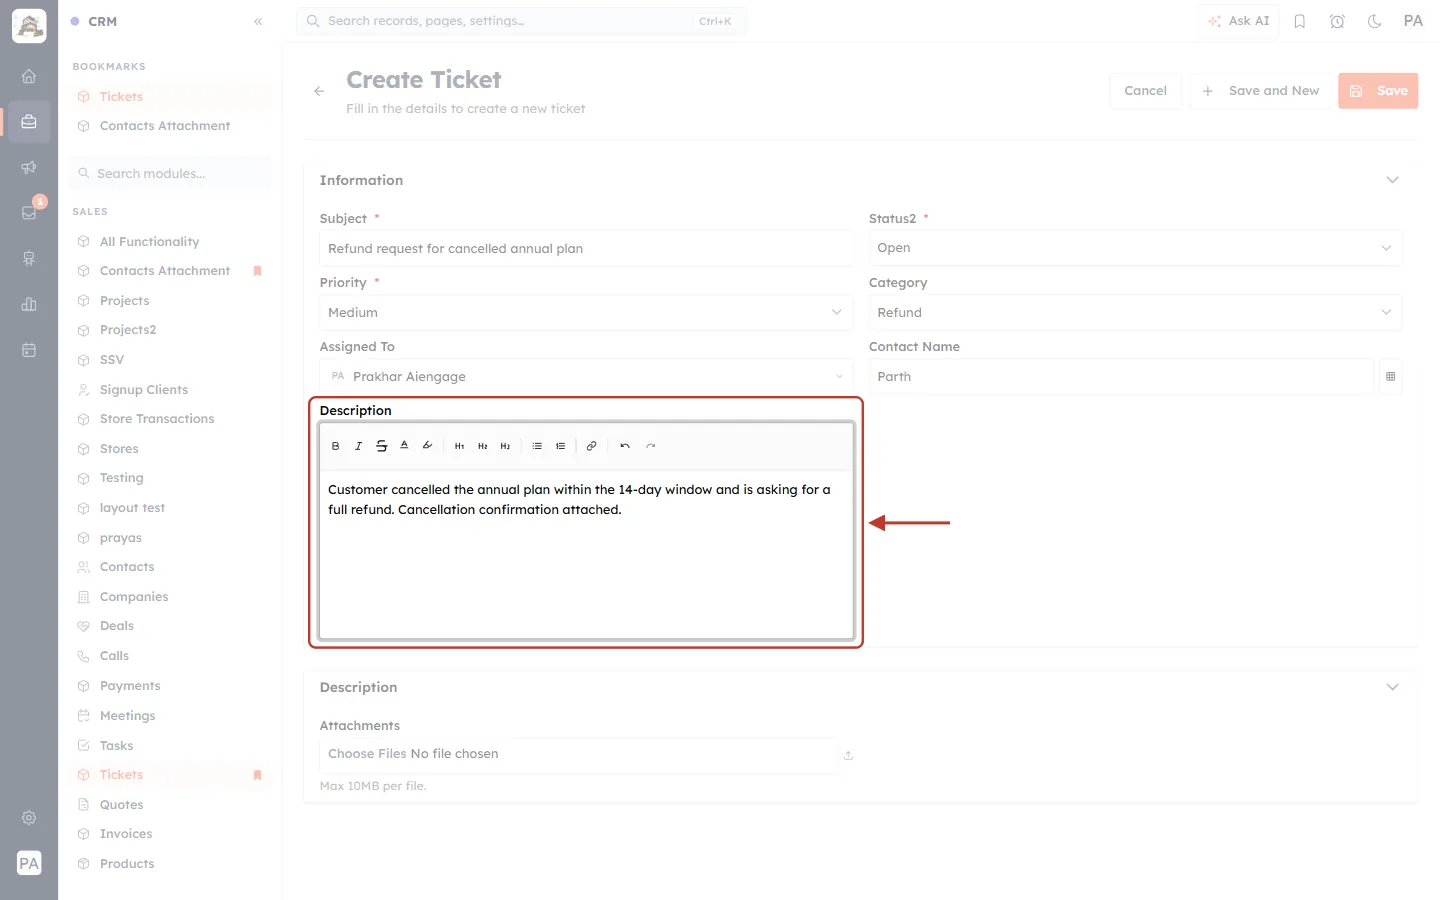
What this screenshot shows. The Description box is ringed, with the customer’s request typed in: “Customer cancelled the annual plan within the 14-day window and is asking for a full refund. Cancellation confirmation attached.”
The toolbar, left to right: bold, italic, strikethrough, text colour, highlight, headings H1–H3, bulleted and numbered lists, link, and undo/redo.
Lists are useful for steps the customer already tried, or a list of affected orders.
Step 8: Attach files (optional)#
Under Attachments, click Choose Files and pick the file(s) from your computer — for example a screenshot, a receipt or a photo of a damaged product.
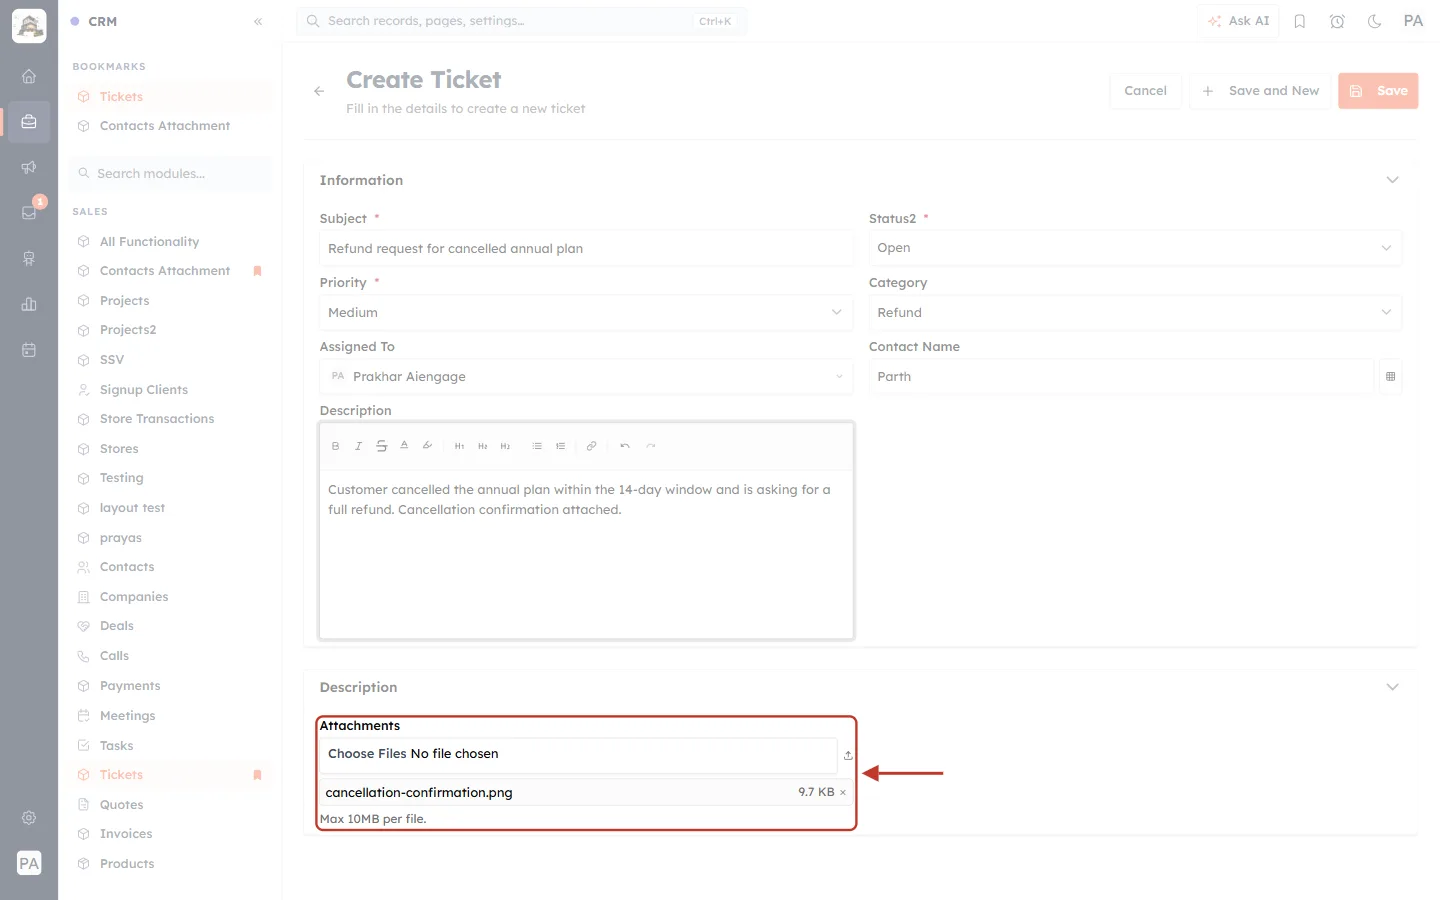
What this screenshot shows. The Attachments area is ringed. A file has been added.
The file is listed by name and size: cancellation-confirmation.png · 9.7 KB.
Max 10MB per file. — larger files are not accepted. You can attach more than one file.
Attachments are saved with the ticket and appear in the ticket’s Attachments on its record page and in the workspace’s details panel.
Step 9: Check the form and save#
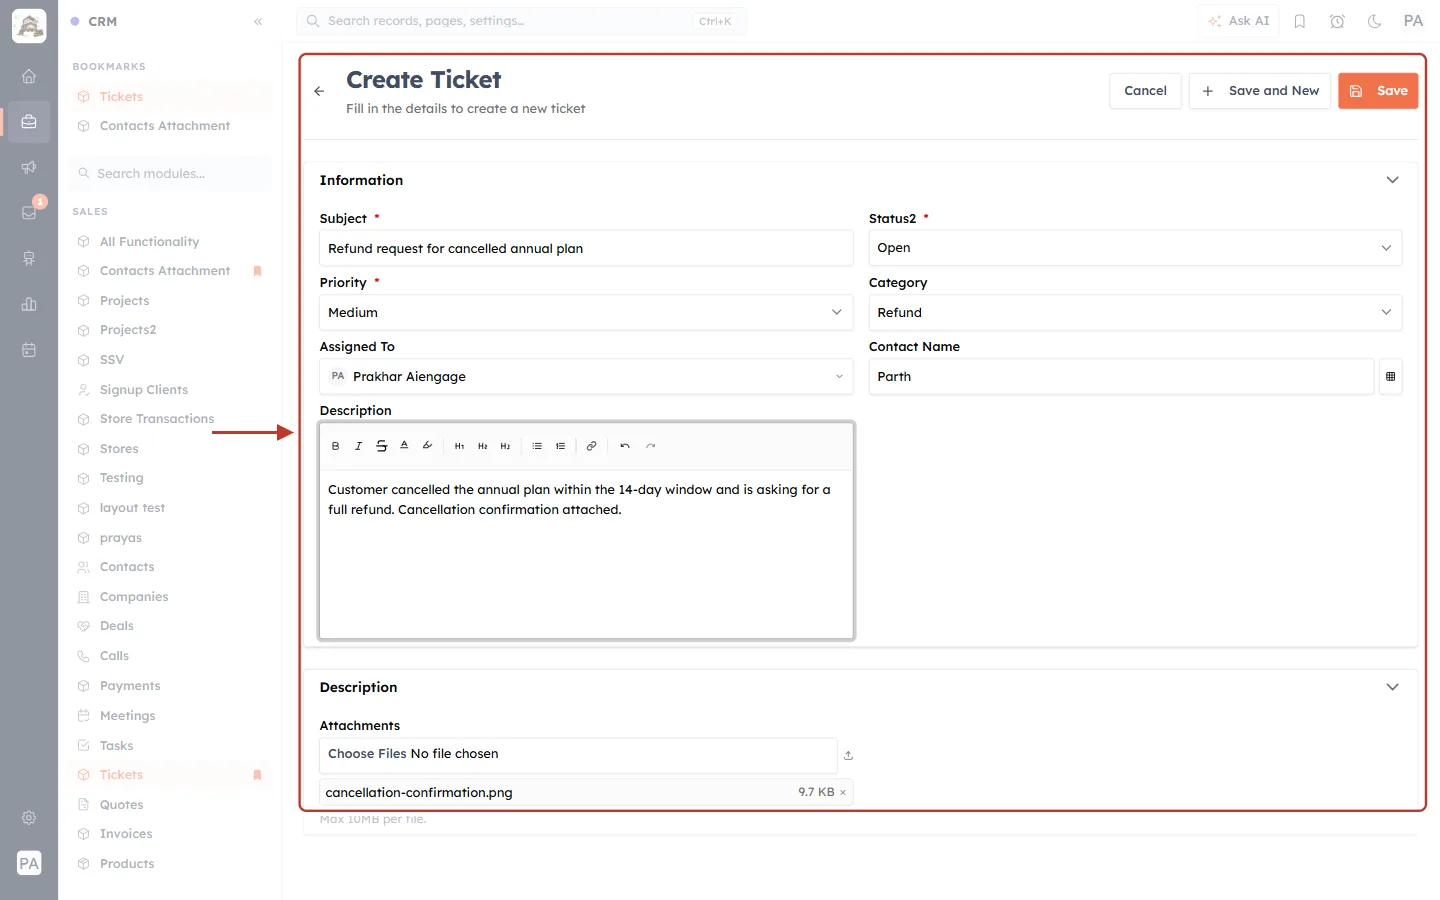
What this screenshot shows. The whole completed form is ringed.
Subject: Refund request for cancelled annual plan. Status2: Open.
Priority: Medium. Category: Refund.
Assigned To: Prakhar Aiengage. Contact Name: Parth.
Description filled in, and one attachment in the Description section.
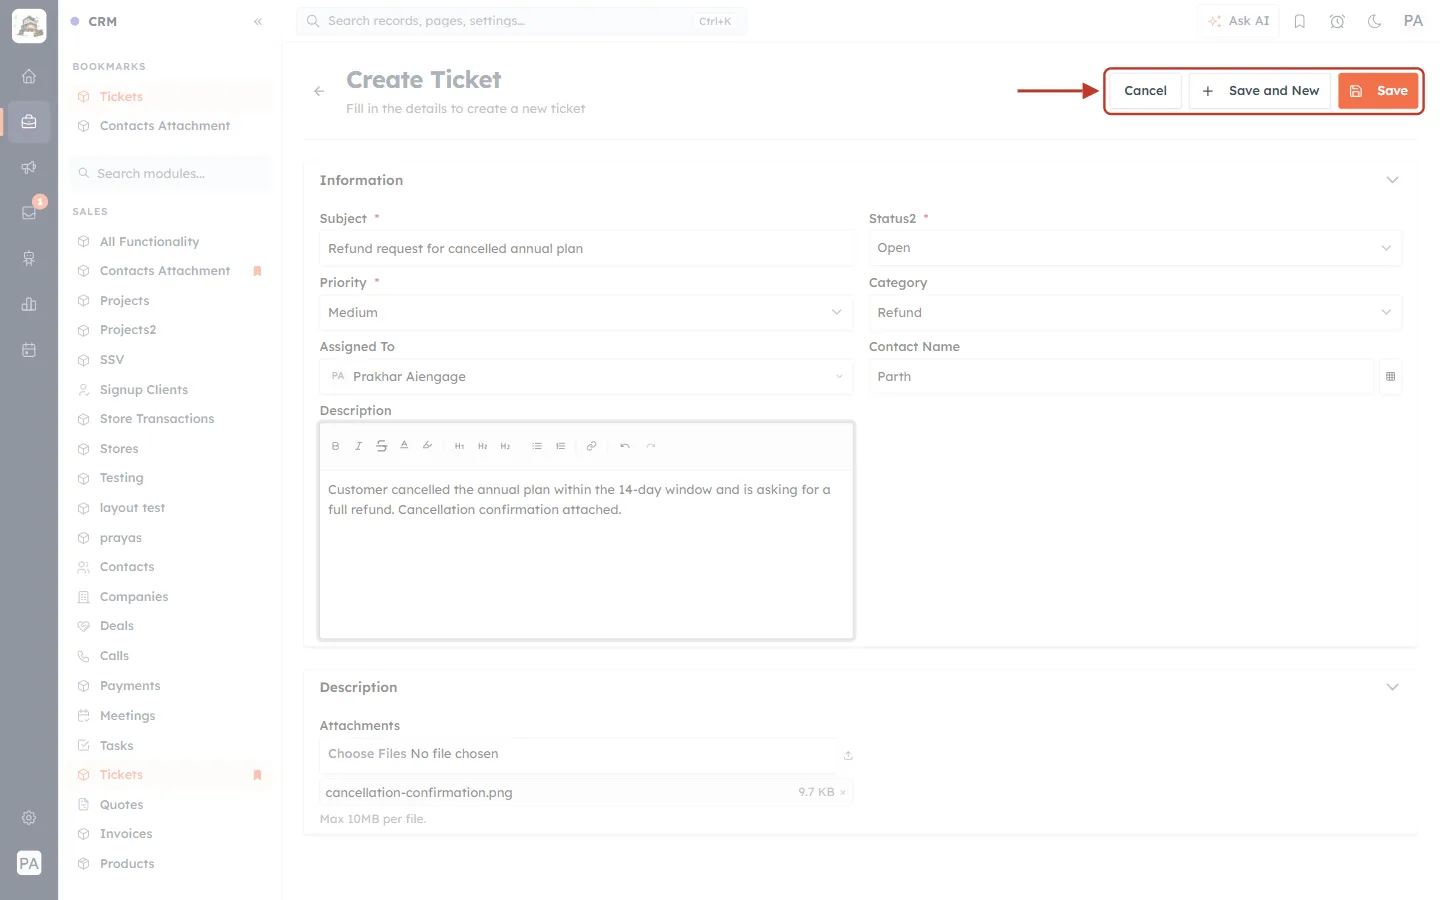
What this screenshot shows. The three buttons at the top right of the form are ringed.
Cancel — leave without saving.
+ Save and New — save this ticket and open an empty form straight away. Use it when you have several requests to log, for example after a busy phone shift.
Save (orange) — save this ticket and go back to the Tickets list. We click Save.
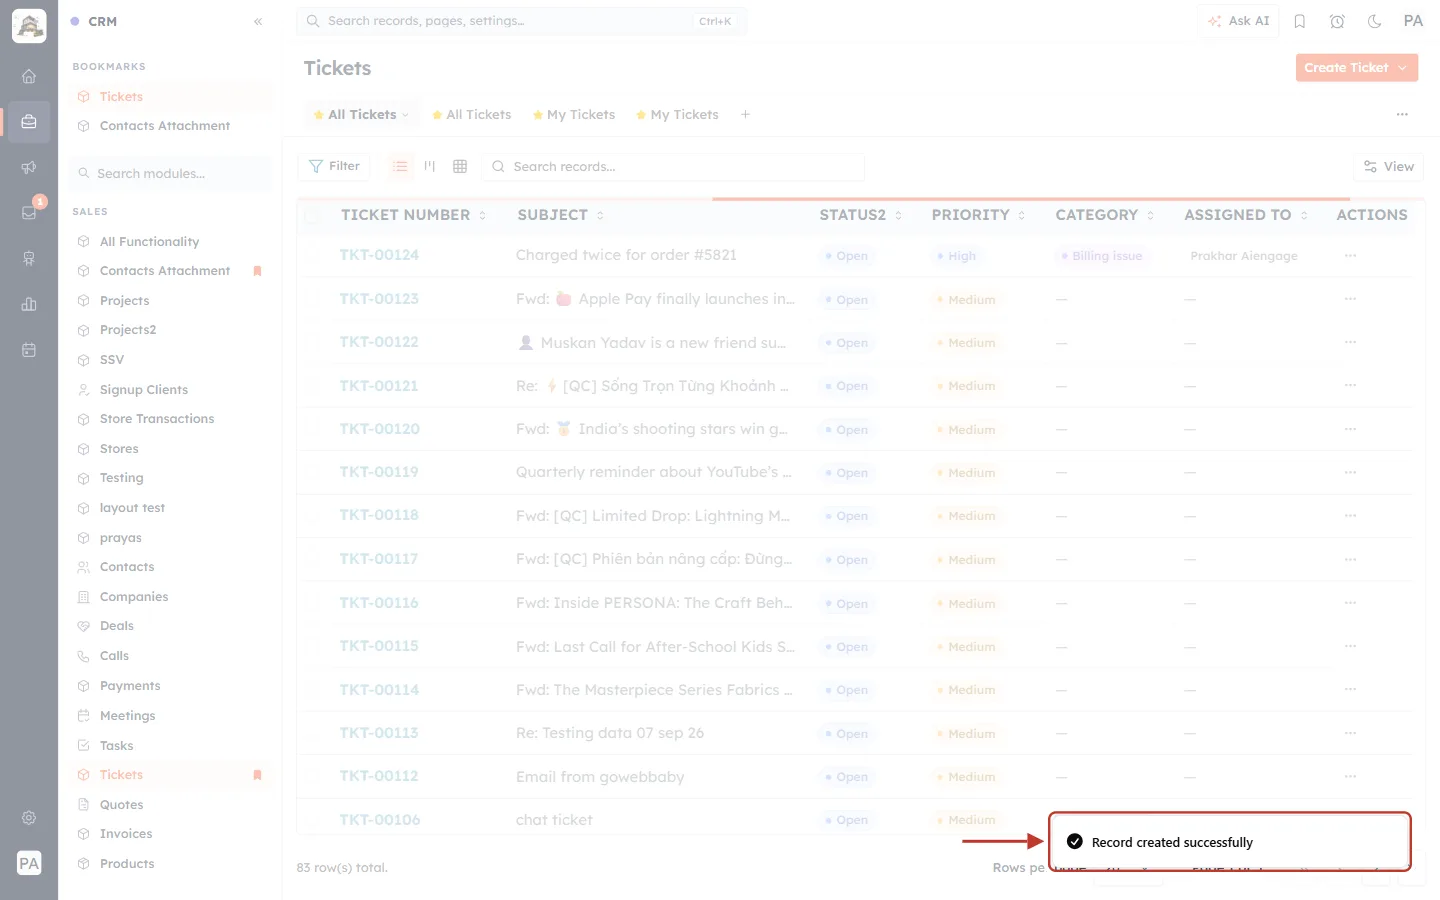
What this screenshot shows. A confirmation message at the bottom right of the Tickets list is ringed: “Record created successfully”.
You are back on the Tickets list, and the new ticket is already in it.
Step 10: Find and open the new ticket#
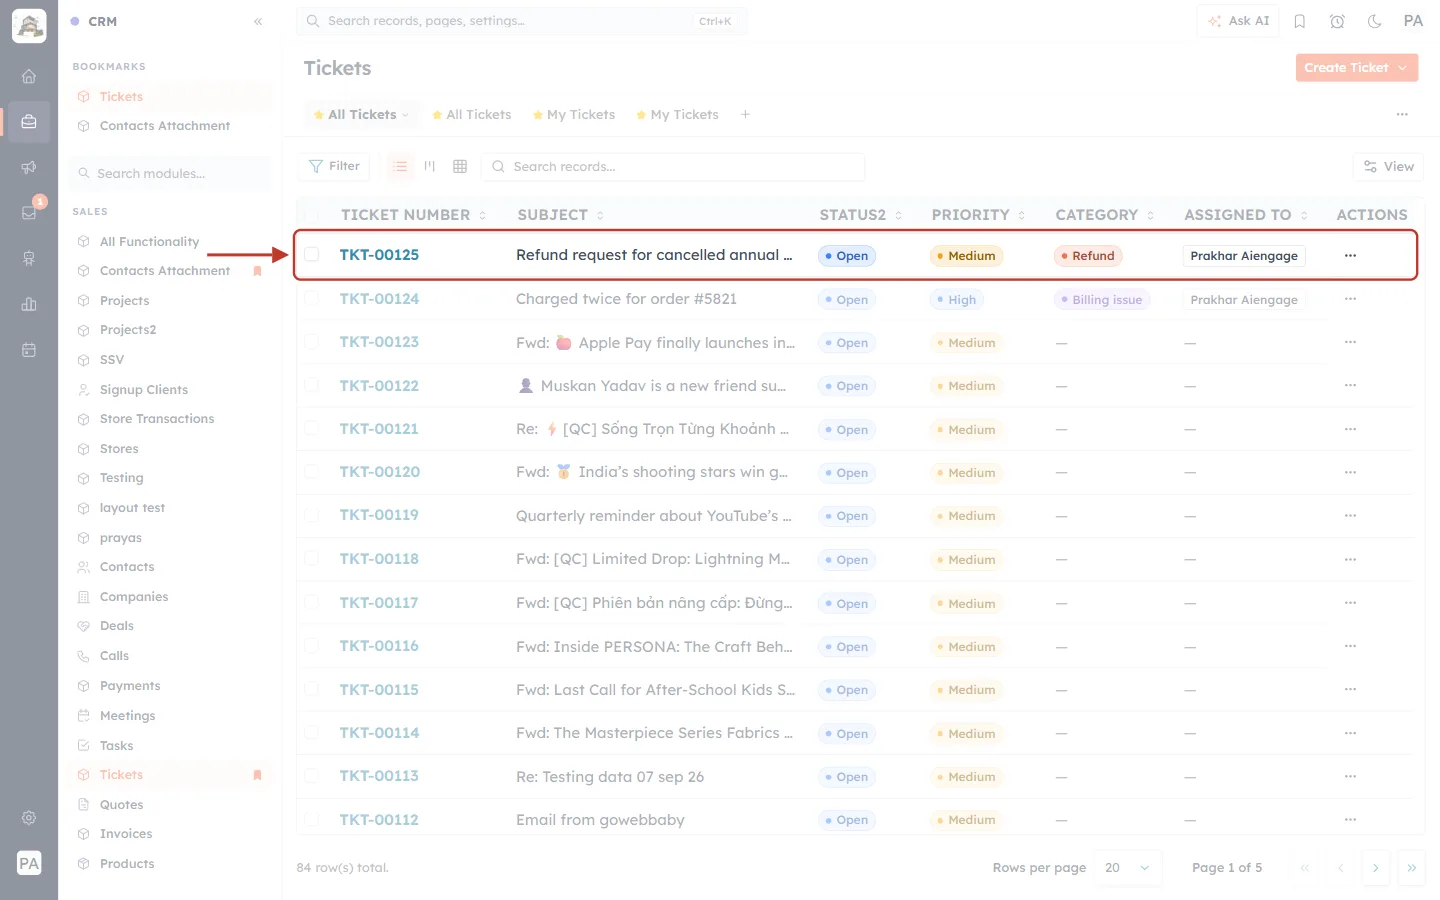
What this screenshot shows. The new ticket’s row at the top of the list is ringed.
Ticket number — TKT-00125, the next number in sequence.
Subject — Refund request for cancelled annual plan.
Status Open, Priority Medium, Category Refund, Assigned To Prakhar Aiengage.
Click the subject to open the ticket record.
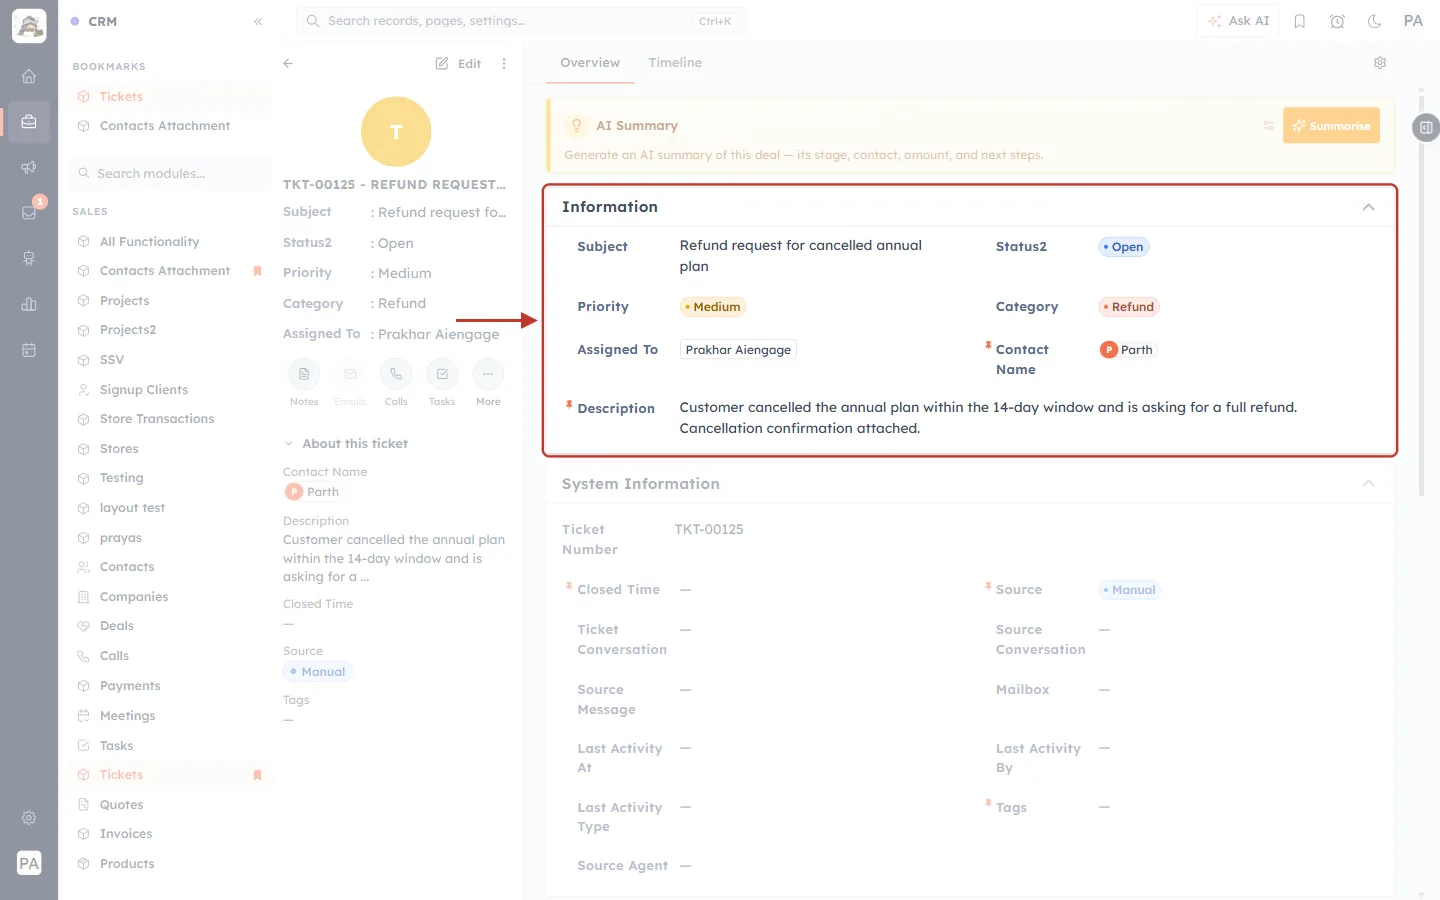
What this screenshot shows. The ticket’s record page, with the Information section ringed.
Every value you entered: Subject, Status2 Open, Priority Medium, Category Refund, Assigned To Prakhar Aiengage, Contact Name Parth and the Description.
On the left (faded): a summary card headed TKT-00125 - REFUND REQUEST…, with buttons for Notes, Emails, Calls, Tasks and More, and an About this ticket panel.
At the top: Edit (change any field) and the Overview and Timeline tabs. Timeline shows every change made to the ticket.
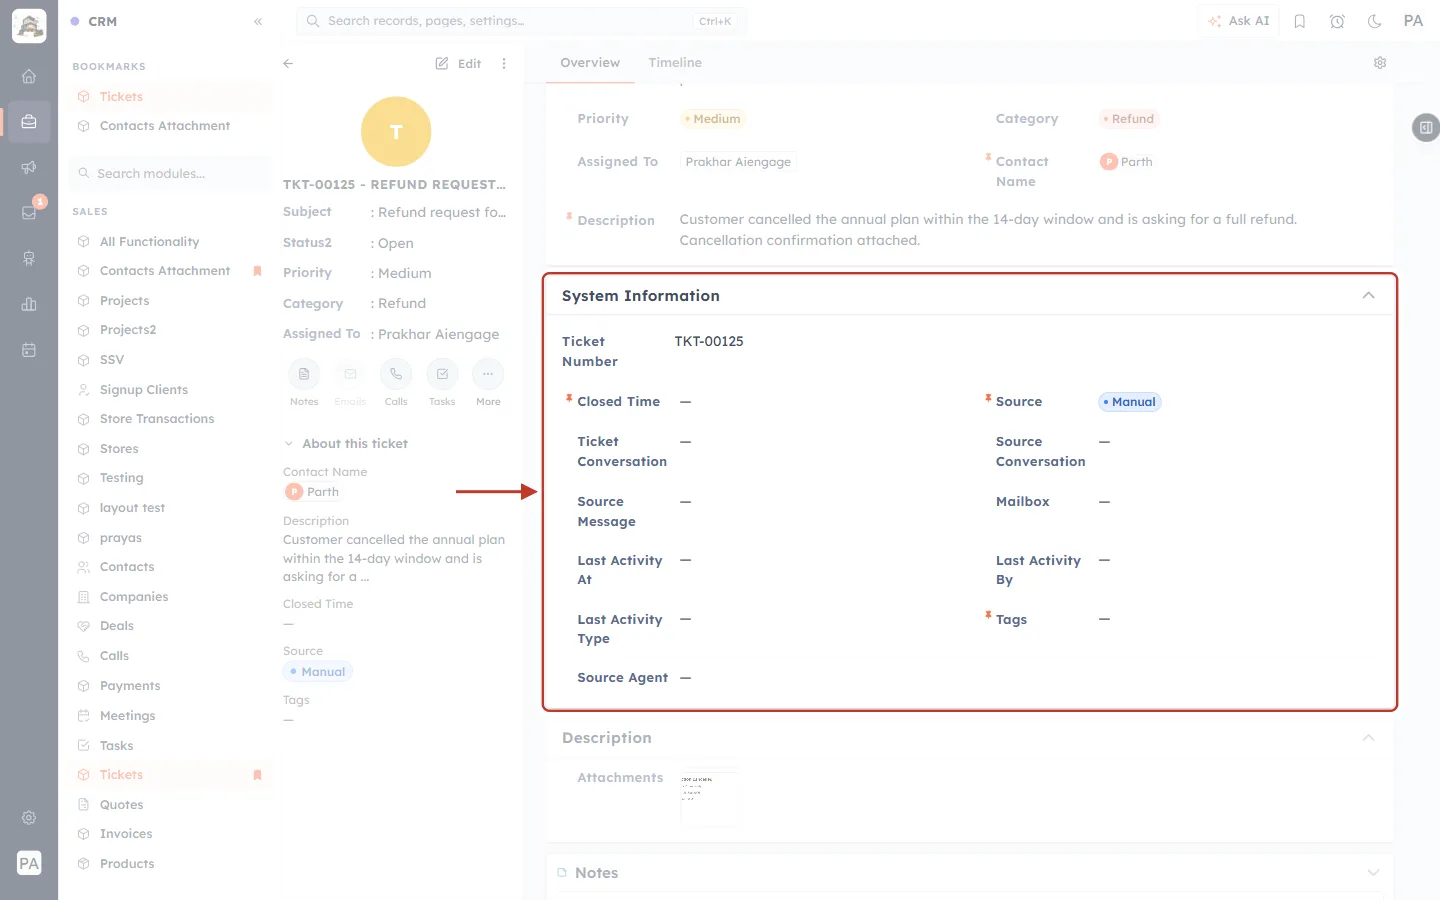
What this screenshot shows. Further down the record, the System Information section is ringed.
Ticket Number — TKT-00125, given automatically.
Source — Manual, because a person created it. Tickets created automatically show Email, WhatsApp or AI Agent instead.
Closed Time — empty until the ticket is closed; it fills in automatically then.
Ticket Conversation, Source Conversation, Source Message, Mailbox and Source Agent — empty for a manual ticket; they are filled in for tickets that came from a chat, an email or the AI agent.
Last Activity At / By / Type — fill in as soon as someone works on the ticket.
Below (faded), the Description section shows a preview of the attached file.
✅
To filter for tickets your team logged by hand, open the Tickets list’s Filter and choose Source is Manual. It is a quick way to see how many requests arrive by phone or in person.
What happens after you create a ticket#
It is in both places. A ticket made in the workspace is a record in Sales → Tickets, and a ticket made with Create Single appears in the Customer & Support workspace (open it with Open ticket thread on the record, or find it in All tickets).
The assignee sees it under My tickets. If you left it unassigned, it shows under Unassigned.
It is on the customer’s contact record, so anyone who opens the contact sees the request.
The customer may get a confirmation email. If the linked contact has an email address and the Ticket raised email is switched on under Service & Support Settings → Notify Customer (it is on by default), the customer is emailed that you have received their request, with the ticket number. See Automatic Customer Emails. A contact with no email address gets nothing, so tell them the ticket number yourself.
You work it like any other ticket: reply, add internal notes, change status and priority, then resolve and close it — see the next article.
Tips for good manual tickets#
Log it while it is fresh. Create the ticket during or straight after the call, while you remember the details.
One problem, one ticket. If a customer raises two unrelated issues, create two tickets so each can be assigned and closed separately.
Search before you create. Use Search tickets… to check the customer does not already have an open ticket about the same thing, and add to that one instead.
Write the description for someone else. Assume the person who picks it up has never spoken to the customer.
Tell the customer the ticket number, so they can quote it if they get in touch again.
Troubleshooting#
I can’t see the New ticket or Create Ticket button. Your profile does not have permission to create tickets. Ask your administrator to give your profile Create access to Tickets.
The Create ticket button stays pale. A required field is empty — usually the Subject. Subject, Status2 and Priority are required.
The customer is not in the contact list. Check the spelling, or search by phone number or email. If they really are new, click + New Record (workspace) or + New Contacts (Create Single) in the contact window to add them.
The teammate I want is not in Assigned To. Only active users are listed. Check under Settings → Users that they have been invited and accepted.
My attachment did not upload. Each file must be 10 MB or smaller. Compress large images or PDFs, or share a link in the description instead.
There is no Conversation to attach. Only that contact’s chats from the last 24 hours are offered. For an older chat, mention it in the description.
The ticket offers Record reply instead of Reply. The linked contact has no email address. Add one to the contact record, then reload the ticket.
Frequently asked questions#
Is a manual ticket different from an automatic one? No — it works in exactly the same way. The only difference is its Source, which is recorded as Manual.
Can I create a ticket without a contact? Yes, Contact Name is optional. But without a contact you cannot email the customer from the ticket, and the ticket does not appear on any contact record, so link one whenever you can.
Can I change the fields after creating the ticket? Yes. In the workspace, change Status, Priority and Assigned To in the details panel. On the record page, click Edit to change any field.
Can I create a ticket by mistake and remove it? Yes — delete it from the Tickets list (row menu ⋯ → Delete). Deleting cannot be undone, so for real requests that are finished, close the ticket instead.
How do I add many tickets at once? Use Create Ticket → Import Bulk (CSV, Excel) in the Tickets module.
Previous and next#
Previous: Find the Right Tickets Fast: Ticket Views, Team Groups & Notifications in Customer & Support
Next: Reply to Customers from a Ticket: Reply, Reply All, Forward & Schedule Emails (Step-by-Step)
Related#
Was this article helpful?
Ready to implement this?
OpenAI Engage and apply what you just learned to your own workspace.
Open AI Engage CRM