Loading…


KnowledgeBase
Connect a Gmail Support Mailbox with “Sign in with Google”: No App Password, Read-Only Email-to-Ticket (Step-by-Step)
Introduction#
AiEngage CRM can read your support mailbox — for example support@yourcompany.com — and turn every customer email into a conversation or ticket. If that mailbox is on Gmail or Google Workspace, you can now connect it with Sign in with Google instead of creating and pasting an App Password.
App Password (old way) | Sign in with Google (new way) | |
|---|---|---|
What you enter | A 16-character App Password and server details | Nothing — you sign in on Google’s own page |
Access given | Full mailbox access to whoever holds the password | Read-only (“Read all your email”) |
Needs 2-Step Verification and App Passwords allowed | Yes — sync breaks if either is switched off | No |
Who can remove access | Only by deleting the App Password | The mailbox owner, any time, from their Google account |
Renewal | Never expires | Renewed automatically by AiEngage |
How fast new mail arrives | About every 2 minutes | About every 2 minutes, or within seconds with real-time delivery |
Important things to know before you start:
Receiving only. AiEngage only reads the mailbox. Replies to customers are still sent through your From Email settings, which this connection does not change.
No old mail is imported. Syncing starts from the moment you connect, so years of old email do not become tickets.
No password is stored. No App Password is created, and the Google sign-in details stay on AiEngage’s servers, encrypted.
In this guide you will, step by step:
Turn on IMAP in the Gmail account.
Open the Support Email settings in AiEngage.
Read the built-in “How to connect?” guide.
Connect the mailbox with Sign in with Google.
Approve access on Google’s page.
Check the connected mailbox and its settings.
Reconnect, move an old App-Password mailbox, or disconnect.
Fix common problems.
All screenshots are from AiEngage CRM. Each has a red ring and arrow on the part to look at, followed by a description of the whole screen. Google’s own sign-in and approval pages are described in text, because they belong to Google and look slightly different for every account. The example mailbox is shown as support@yourcompany.com.
Before You Begin#
You need permission to manage Customer Support settings in AiEngage (usually an administrator).
You need to be able to sign in to the support mailbox’s own Google account (for example
support@yourcompany.com) — not just your personal account that has access to it.For Google Workspace, your Workspace administrator must allow IMAP for your organization (Step 1).
To send replies from this address, it must also be set up as a verified sending address. See Set the From and Reply-To Address for Support Emails and Authenticate Your Email Domain (DKIM) Step by Step.
Step 1: Turn On IMAP in the Gmail Account#
Do this first, in the support mailbox’s Gmail account. Sign-in still works without it, but mail will then fail to sync with an authentication error until IMAP is on.
Sign in to Gmail as the support mailbox (for example
support@yourcompany.com).Click the gear icon (top right) and choose See all settings.
Open the Forwarding and POP/IMAP tab.
Under IMAP access, select Enable IMAP.
Scroll down and click Save Changes.
ℹ️
Google Workspace: if you cannot see the IMAP option, an administrator has turned it off for your organization. Ask them to allow IMAP in the Google Admin console. See also Google’s IMAP instructions.
Step 2: Open the Support Email Settings#
In the left rail, click the Customer Support (headset) icon.
At the bottom of the Customer Support menu, click Settings.
Make sure the Support Email tab is selected.
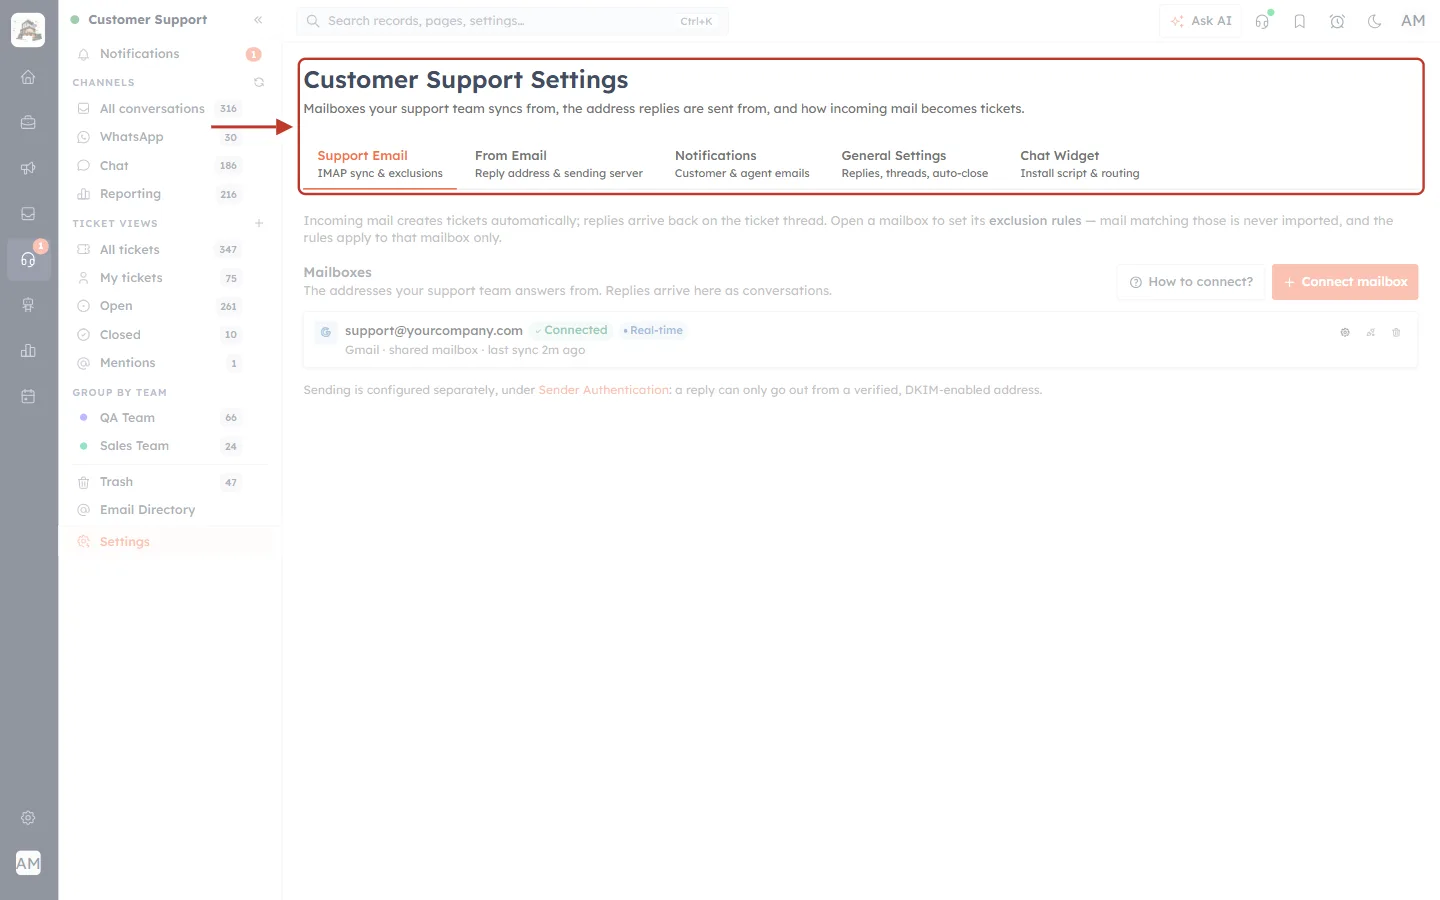
What this screenshot shows. The top of Customer Support Settings, ringed, with the Support Email tab selected.
The page subtitle: “Mailboxes your support team syncs from, the address replies are sent from, and how incoming mail becomes tickets.”
Support Email (IMAP sync & exclusions) — where you connect the mailbox. This is the tab for this guide.
From Email (Reply address & sending server) — where replies are sent from.
Notifications, General Settings and Chat Widget hold the other support settings.
On the left is the Customer Support menu: channels (All conversations, WhatsApp, Chat, Reporting), ticket views, team groups, Trash, Email Directory and Settings (highlighted).
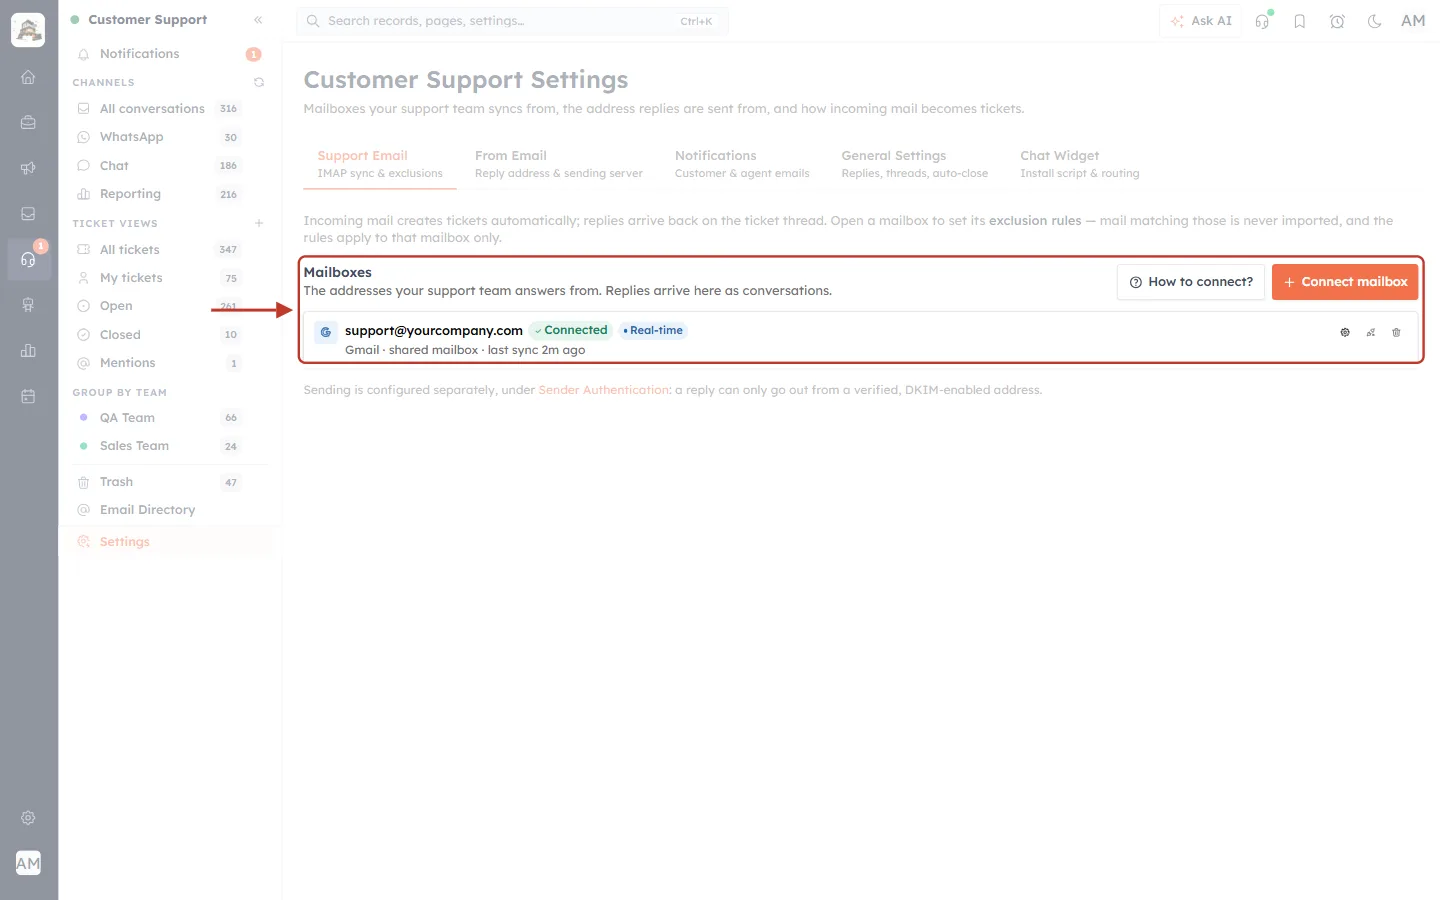
What this screenshot shows. The Mailboxes section of the Support Email tab, ringed.
“The addresses your support team answers from. Replies arrive here as conversations.”
How to connect? opens a short guide (Step 3). Connect mailbox starts the connection (Step 4).
Each connected mailbox is a row. This example shows a Gmail mailbox connected with Google: a Google G icon, the address, a green Connected badge, a blue Real-time badge, and “Gmail · shared mailbox · last sync 2m ago”.
The small icons at the right end of the row open the mailbox settings, reconnect and delete it.
Below: “Sending is configured separately, under Sender Authentication: a reply can only go out from a verified, DKIM-enabled address.”
Step 3: Read the “How to Connect?” Guide#
Click How to connect?. A short guide opens.
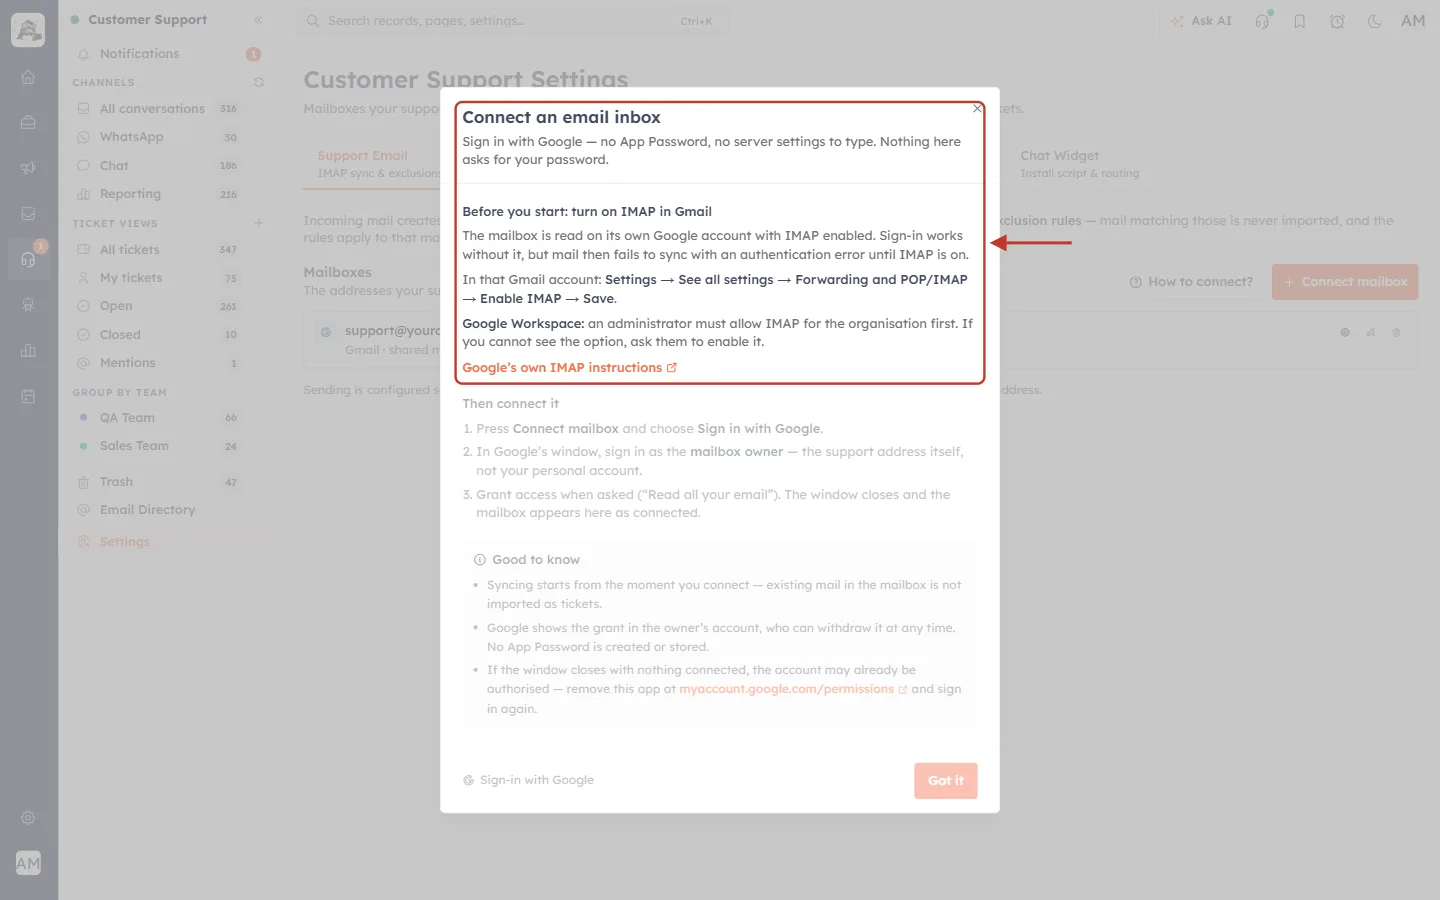
What this screenshot shows. The top of the Connect an email inbox guide, ringed.
“Sign in with Google — no App Password, no server settings to type. Nothing here asks for your password.”
Before you start: turn on IMAP in Gmail — the same step as Step 1 above, with the path Settings → See all settings → Forwarding and POP/IMAP → Enable IMAP → Save.
Google Workspace: an administrator must allow IMAP for the organisation first.
Google’s own IMAP instructions opens Google’s help page in a new tab.
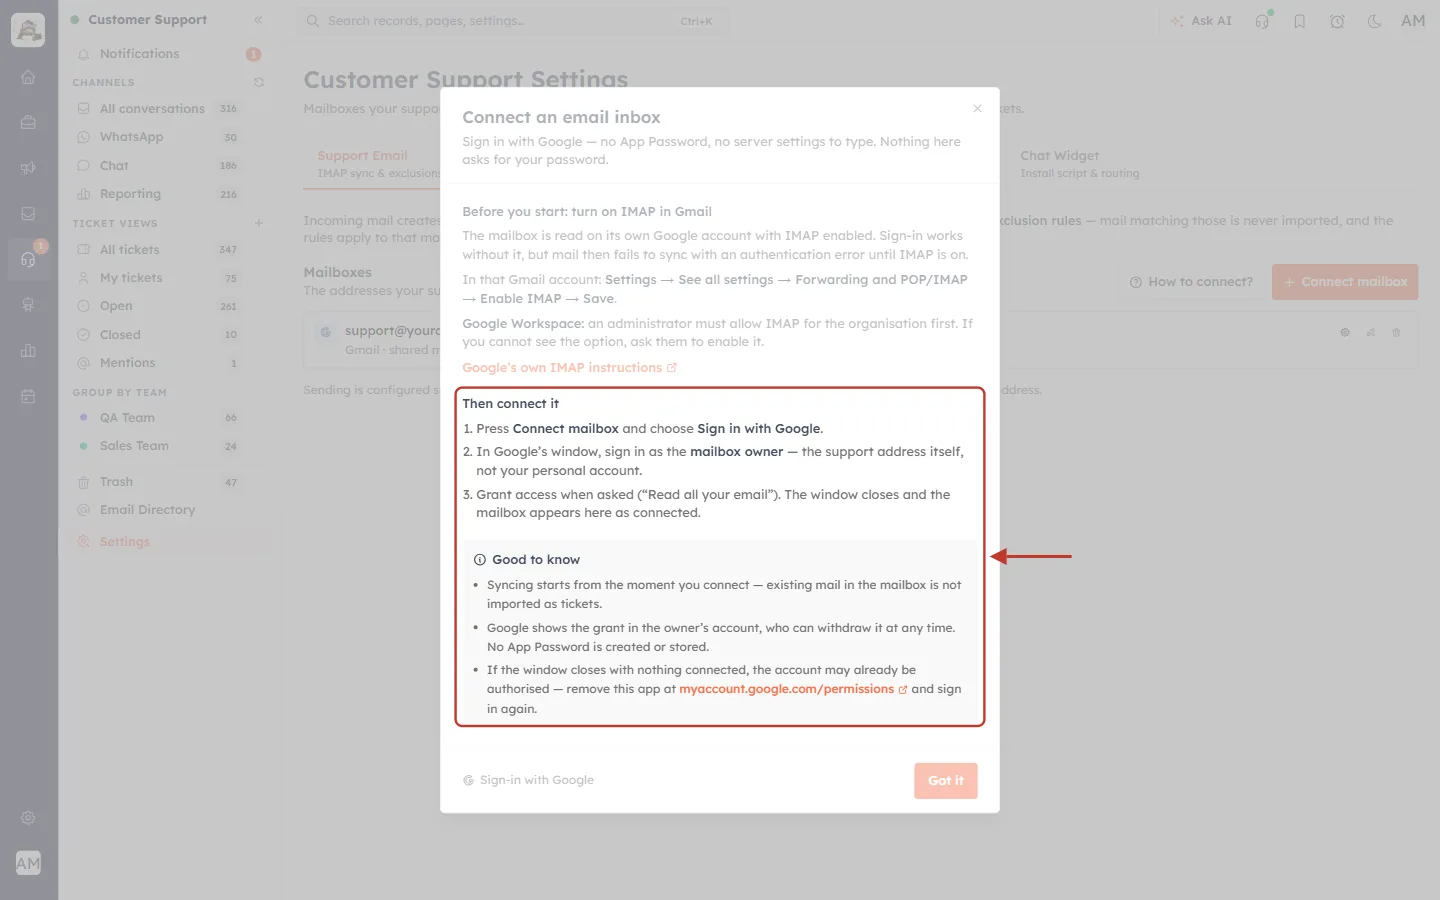
What this screenshot shows. The lower part of the guide, ringed.
Then connect it: 1) press Connect mailbox and choose Sign in with Google; 2) in Google’s window, sign in as the mailbox owner — the support address itself, not your personal account; 3) grant access when asked (“Read all your email”). The window closes and the mailbox appears as connected.
Good to know: syncing starts from the moment you connect (existing mail is not imported); Google shows the grant in the owner’s account, who can withdraw it at any time; no App Password is created or stored.
If the window closes with nothing connected, the account may already be authorised — remove the app at myaccount.google.com/permissions and sign in again.
Click Got it to close the guide.
Step 4: Connect the Mailbox with Sign in with Google#
Click Connect mailbox.
Open the Email provider list.
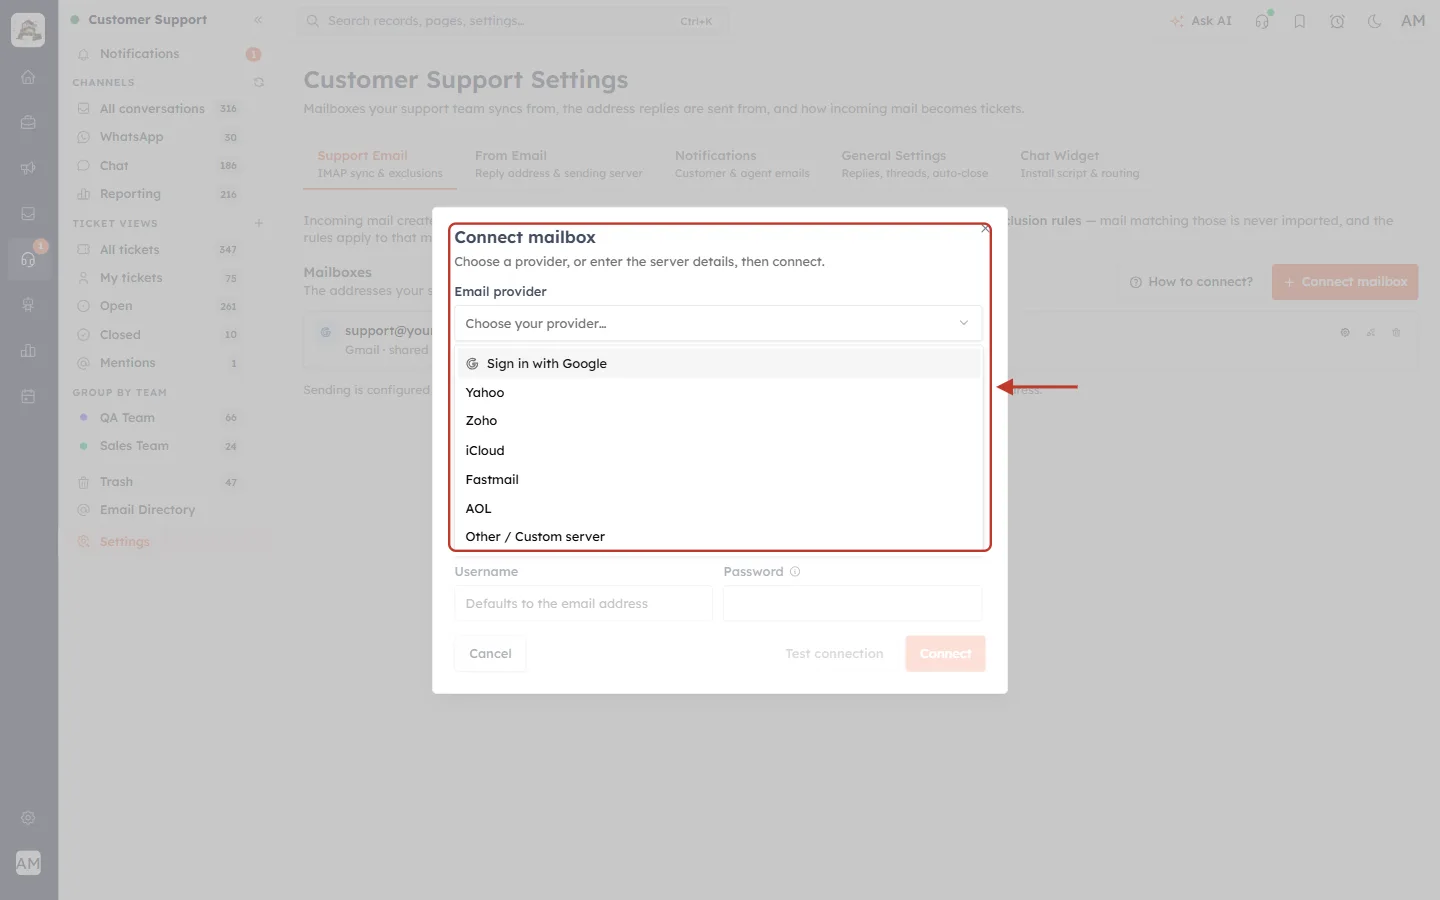
What this screenshot shows. The Connect mailbox dialog with the Email provider list open, ringed.
“Choose a provider, or enter the server details, then connect.”
Sign in with Google (with the Google icon) is the first option — choose it for any Gmail or Google Workspace address.
The other options — Yahoo, Zoho, iCloud, Fastmail, AOL and Other / Custom server — still use a password or App Password with IMAP server details.
Behind the list are the server fields (Username, Password) used only by those other options.
Click Sign in with Google. The dialog changes:
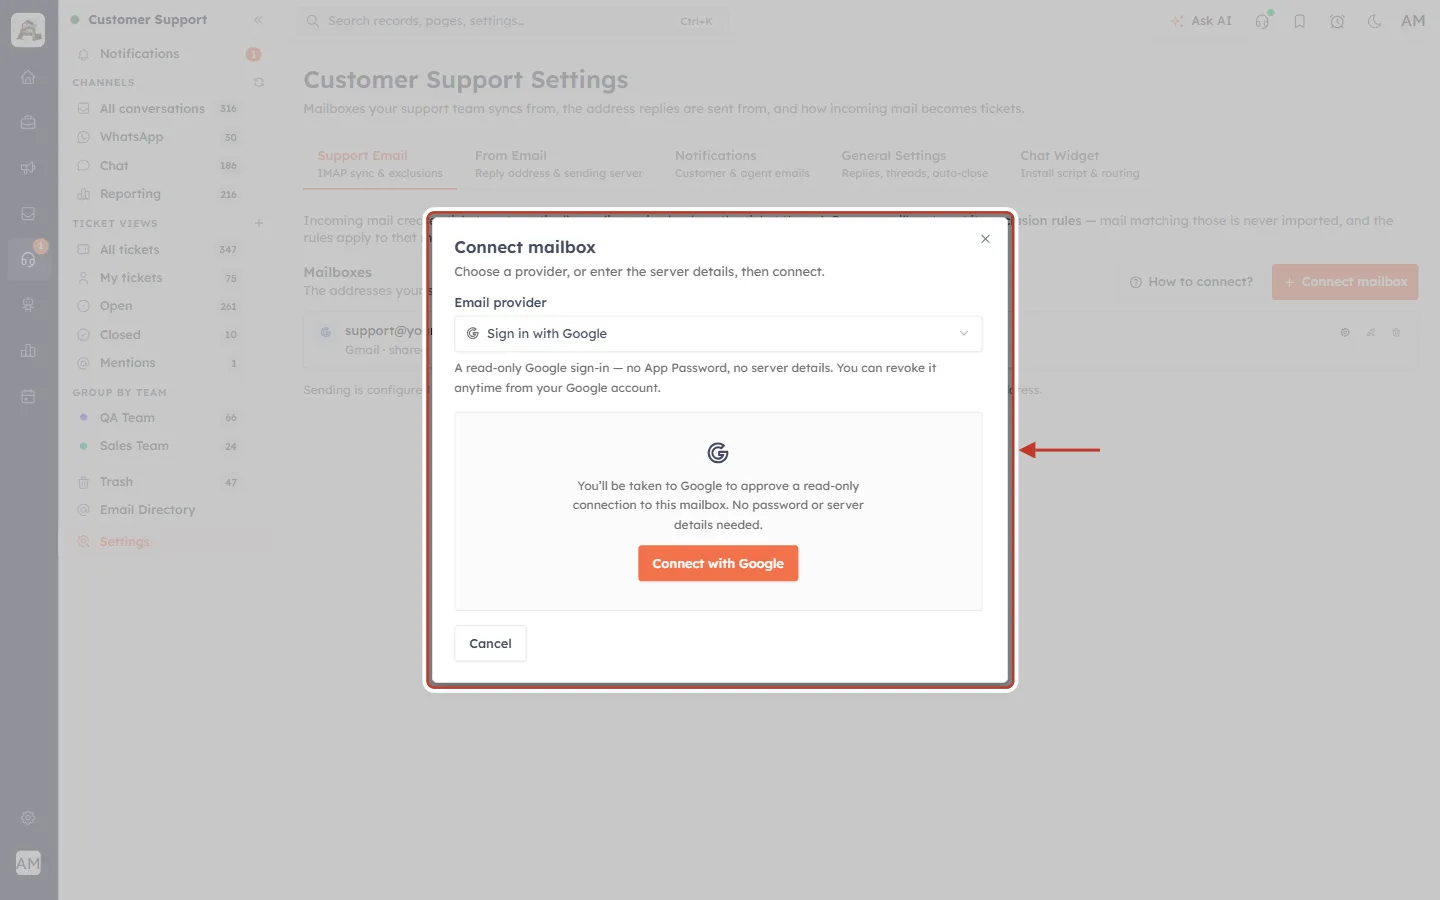
What this screenshot shows. The Connect mailbox dialog after choosing Sign in with Google, ringed.
Email provider now shows Sign in with Google.
The note: “A read-only Google sign-in — no App Password, no server details. You can revoke it anytime from your Google account.”
The box explains: “You’ll be taken to Google to approve a read-only connection to this mailbox. No password or server details needed.”
Click the orange Connect with Google button to continue, or Cancel to close the dialog without changing anything.
✅
If your browser blocks pop-ups, allow them for AiEngage before clicking Connect with Google — the Google sign-in opens in a small pop-up window.
Step 5: Approve Access on Google’s Page#
A Google window opens. These pages belong to Google:
Choose an account — pick (or sign in to) the support mailbox’s account, for example
support@yourcompany.com. Do not pick your personal account.Google shows that the AiEngage app wants access to your Google Account, including “Read all your email” (read-only Gmail access) and your email address. Check the account shown at the top is the support mailbox.
Click Continue / Allow.
The window closes by itself and you return to AiEngage. A message confirms “Connected support@yourcompany.com.” and the mailbox appears in the Mailboxes list with a Connected badge.
ℹ️
“Read all your email” is the narrowest permission Google offers for reading a mailbox. AiEngage cannot send, change or delete anything in the mailbox with it.
If something goes wrong in this step, AiEngage shows one of these messages:
Message | What it means | What to do |
|---|---|---|
“Google access was declined.” | Cancel or Deny was clicked on Google’s page. | Start again and click Allow. |
“Google did not return a refresh token. Remove this app at myaccount.google.com/permissions, then try again.” | An earlier approval for this account is in the way. | Open myaccount.google.com/permissions as the mailbox owner, remove the app, then connect again. |
“Could not read which address was authorised. Try again.” | Google did not return the account’s email address. | Start again and allow all requested access. |
“That sign-in link expired. Try again.” | The Google window was left open too long. | Start again and finish in one go. |
“That sign-in could not be verified. Try again.” | The security check on the sign-in failed (for example the window was reused). | Close all Google windows and start again from Connect mailbox. |
Step 6: Check the Connected Mailbox#
Click the connected mailbox (or its gear icon) to open its page.
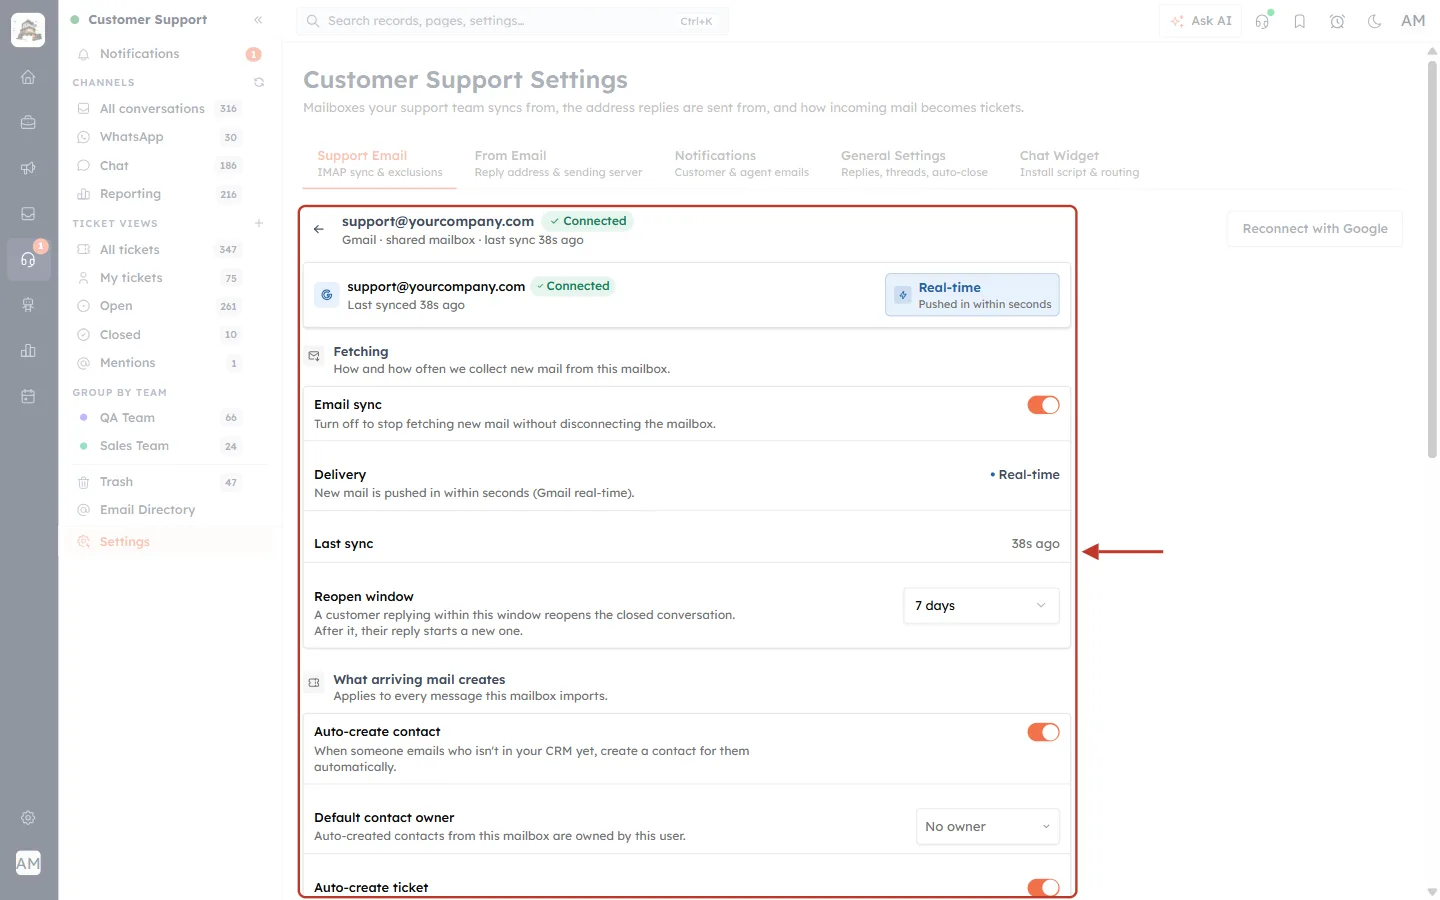
What this screenshot shows. The top of the mailbox page, ringed.
The header shows the address, a green Connected badge and “Gmail · shared mailbox · last sync 38s ago”.
The status card repeats Connected and Last synced, with a blue Real-time — Pushed in within seconds badge when real-time delivery is active.
Fetching — how new mail is collected: Email sync (switch off to pause fetching without disconnecting), Delivery (“New mail is pushed in within seconds (Gmail real-time)”), Last sync, and Reopen window (a customer replying within this time, here 7 days, reopens a closed conversation).
What arriving mail creates — Auto-create contact for unknown senders, Default contact owner, and Auto-create ticket for every new email conversation.
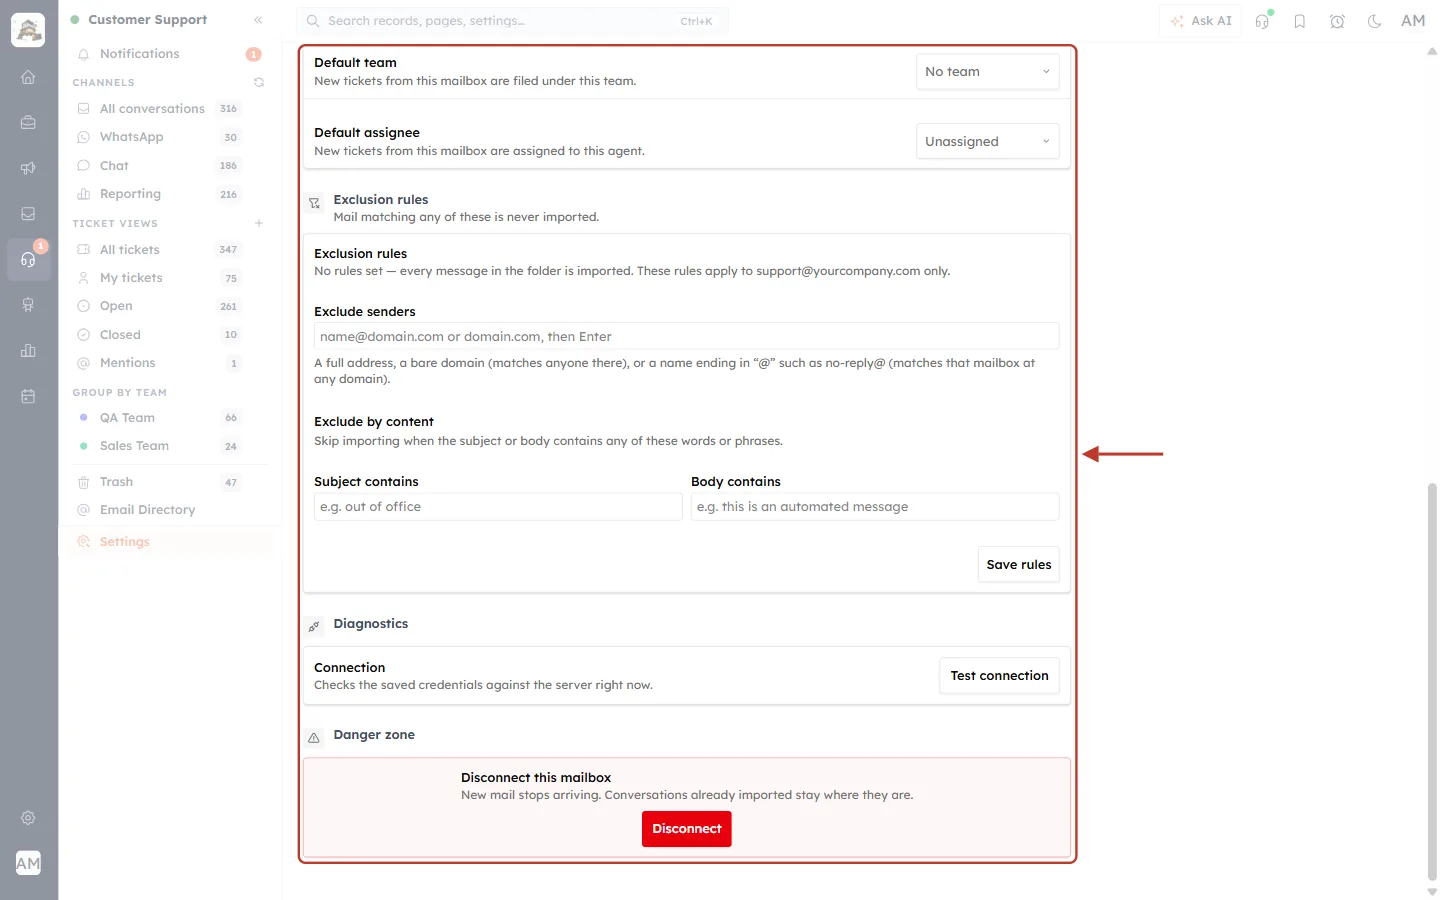
What this screenshot shows. The lower part of the mailbox page, ringed.
Default team and Default assignee — where new tickets from this mailbox go.
Exclusion rules — mail matching these is never imported: Exclude senders (a full address, a domain, or a name ending in “@” such as
no-reply@) and Exclude by content (Subject contains / Body contains). Click Save rules after changing them.Diagnostics → Test connection checks the Google connection right now.
Danger zone → Disconnect stops new mail from arriving. Conversations already imported stay where they are.
Send a test email from another address to the support mailbox. With real-time delivery it appears as a conversation within seconds; otherwise within about 2 minutes.
Step 7: Reconnect, Move an Old Mailbox, or Disconnect#
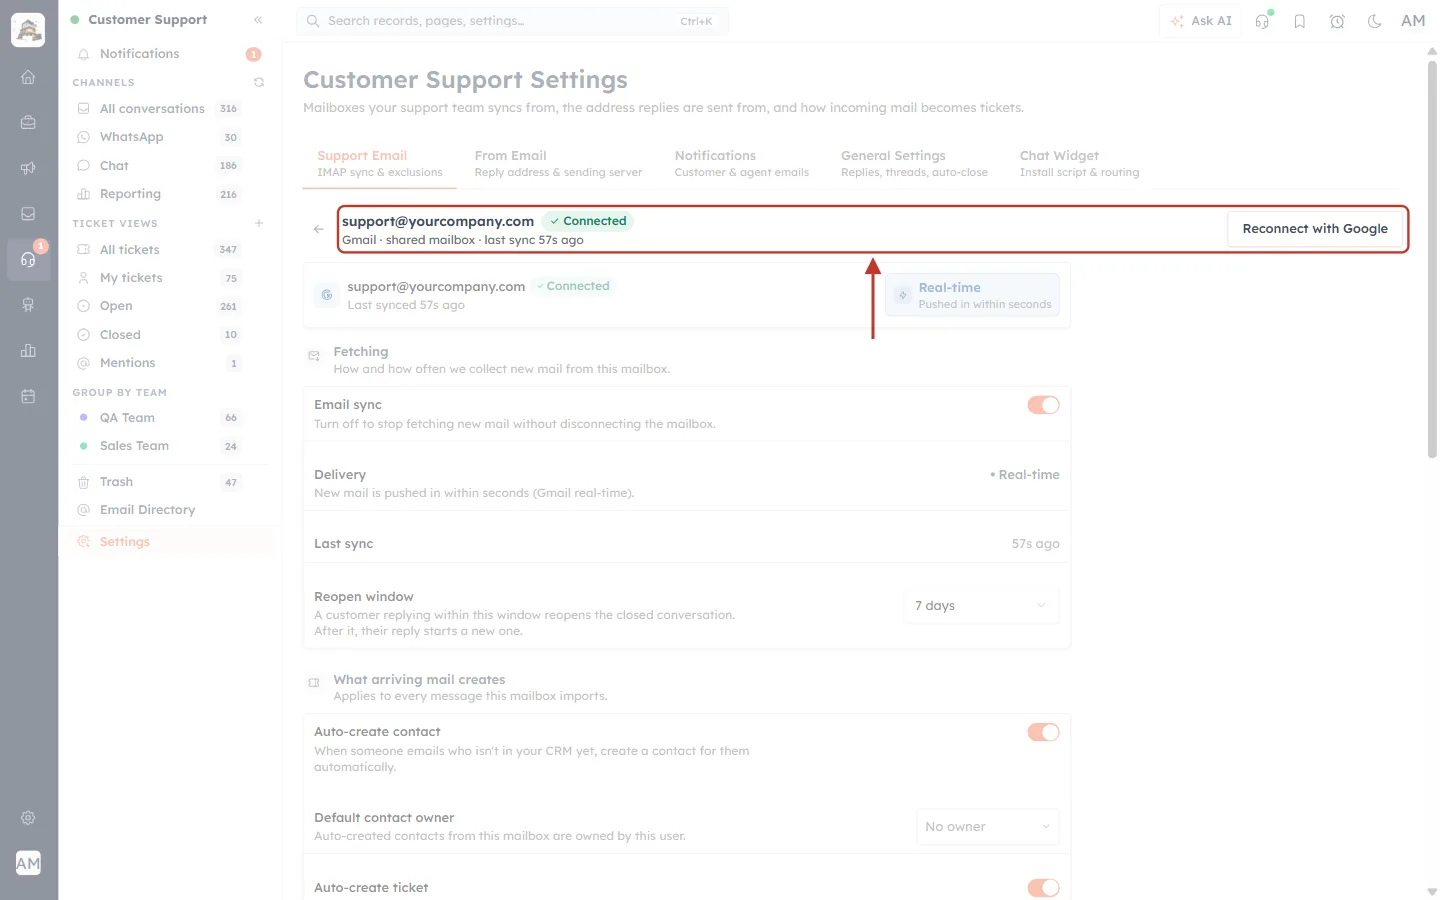
What this screenshot shows. The mailbox header with the Reconnect with Google button, ringed.
Use Reconnect with Google when the mailbox shows an error, or after the owner removed AiEngage’s access in their Google account.
Reconnecting repeats Steps 4–5 for the same address. The mailbox keeps its settings, rules and history, and nothing is imported twice.
Mailbox connected earlier with an App Password? It keeps working as before. To switch it to Sign in with Google, open it and reconnect with Google. Its sync position is kept, so no mail is imported twice.
Remove access completely: click Disconnect on the mailbox page. The mailbox owner can also remove AiEngage at myaccount.google.com/permissions; the mailbox then shows that it needs reconnecting.
Step 8: Fix Common Problems#
Problem | Likely cause | Solution |
|---|---|---|
Connected, but no mail arrives and the mailbox shows an authentication error. | IMAP is turned off in Gmail. | Turn on IMAP (Step 1), then click Test connection or Reconnect with Google. |
The Google window closes and nothing is connected. | The account was already authorised, or the pop-up was blocked. | Remove the app at myaccount.google.com/permissions, allow pop-ups, and connect again. |
The wrong address was connected. | You picked your personal account in Google’s window. | Disconnect it, then connect again and choose the support mailbox’s account. |
IMAP option missing in Gmail settings. | Google Workspace admin has disabled IMAP. | Ask your Workspace administrator to allow IMAP. |
Old emails did not become tickets. | By design — syncing starts at the moment of connection. | Forward important old emails to the mailbox if they need tickets. |
Emails arrive, but tickets are not created. | Auto-create ticket is off, or an exclusion rule matches. | Turn on Auto-create ticket and check the Exclusion rules. |
Replies to customers fail. | Sending is configured separately. | Set up From Email and domain authentication: Set the From and Reply-To Address for Support Emails. |
The mailbox suddenly needs reconnecting. | The owner removed access, or Google cancelled the approval. | Click Reconnect with Google and approve again. |
Best Practices#
Use a shared support address (support@, help@), not a person’s own mailbox, so the connection does not depend on one employee.
Sign in as the mailbox owner — the support account itself.
Turn on IMAP before connecting to avoid an authentication error right after connecting.
Add exclusion rules for newsletters and automated senders (for example
no-reply@) so they do not become tickets.Check the mailbox page now and then — Last sync and the Connected badge tell you at a glance that mail is flowing.
Frequently Asked Questions#
Can AiEngage send email from my Gmail account with this connection?
No. The connection is read-only. Replies go out through your From Email settings.
Do I still need an App Password?
No. Sign in with Google replaces it. Existing App-Password mailboxes keep working until you reconnect them with Google.
Will my old emails be imported?
No. Only mail that arrives after you connect is imported.
Does it work with personal @gmail.com addresses?
Yes, as long as you can sign in to that account and IMAP is on. For business use, a Google Workspace support address is recommended.
Can I connect Outlook / Microsoft 365 this way?
Not yet. Sign in with Google is for Gmail and Google Workspace only.
How do I stop AiEngage reading the mailbox?
Click Disconnect on the mailbox page, or remove the app from the Google account at myaccount.google.com/permissions.
Previous and Next Articles#
Related Articles#
Was this article helpful?
Ready to implement this?
OpenAI Engage and apply what you just learned to your own workspace.
Open AI Engage CRM