Loading…


KnowledgeBase
What Customers See in the Chat Widget: Chatting with the AI Agent, Reaching a Person, Offline Messages and Raising Tickets (Step-by-Step)
Overview#
Once the chat widget is installed on your website, your customers see a small chat button in the corner of every page. This article walks through the widget from your customer’s side: what each screen looks like, what the messages mean and what happens behind the scenes. Use it to check your setup, train your team, or explain the chat to customers.
The customer can… | Your team sees… |
|---|---|
Ask a question and get an instant answer from your AI agent | The conversation in Customer Support → Chat |
Click Connect with live agent to talk to a person | A “requested a live agent” alert and a chat waiting to be accepted |
Leave a message when nobody is available | A missed chat to follow up by email |
Raise and follow a ticket (signed-in visitors) | A new ticket in Customer Support |
ℹ️
The screenshots show a sample website (“YourCompany”) and sample people (Emma Clarke as the customer, Riya Kapoor as the agent). Your widget uses your own name, logo, colour, greeting and wording, set in Customer Support → Settings → Chat Widget (see Set Up the Website Chat Widget for Support).
Before you begin#
The widget must be installed and set to Active (see Install the Chat Widget on Your Website).
For customers to reach a person, Chat Conversation must be switched on in General Settings, and at least one agent must be available (see Support General Settings).
To test, open your website in a private (incognito) browser window, so you see it exactly as a new visitor does.
Step 1: The chat button on your website#
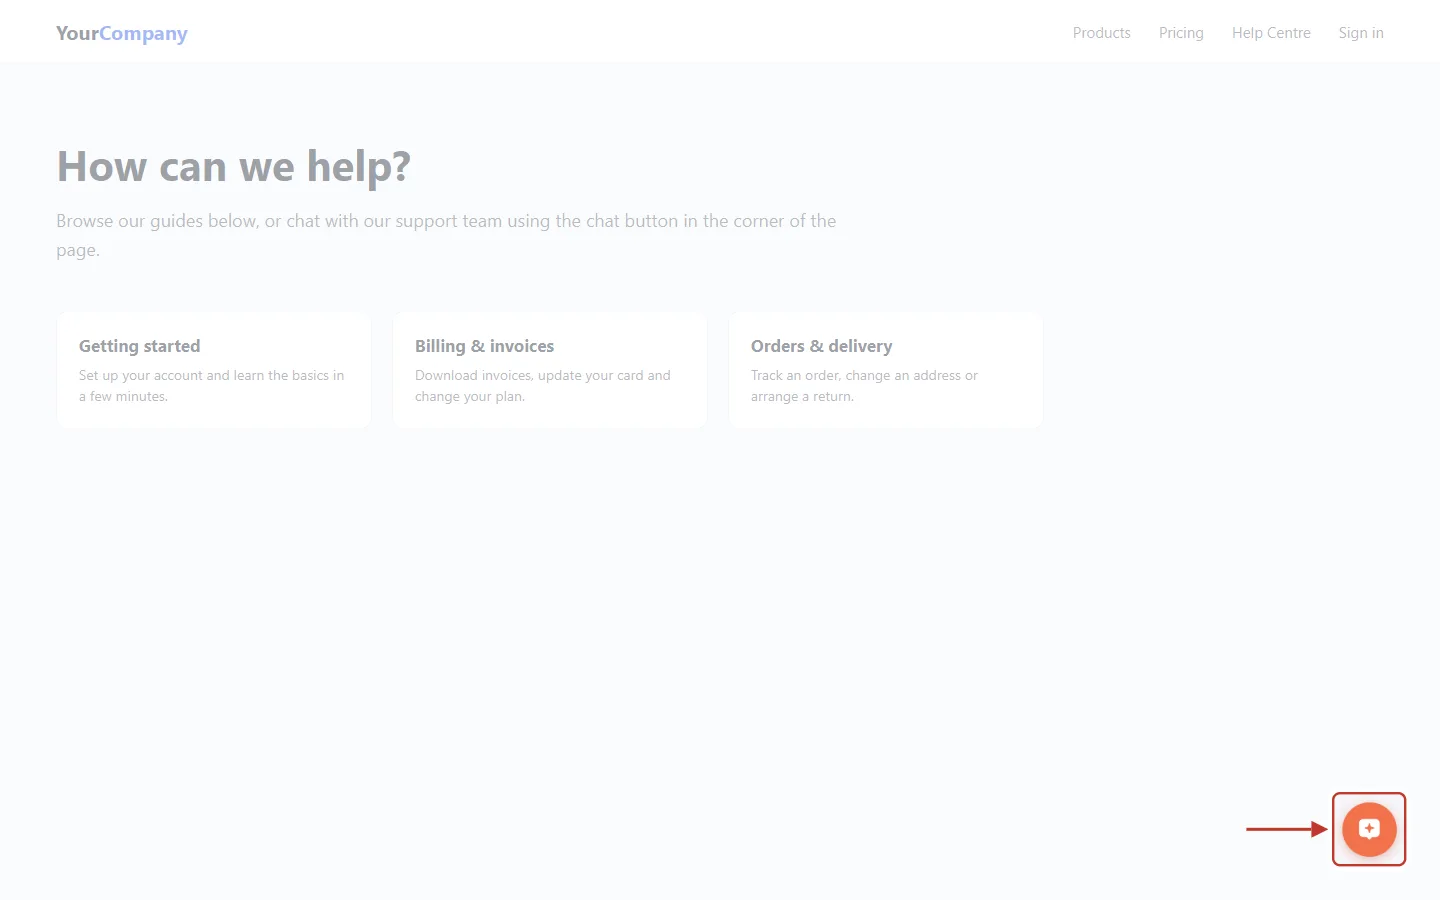
What this screenshot shows. The chat button (launcher) at the bottom right of the sample website.
It appears on every page where the widget code is installed, in your widget’s accent colour (orange here).
Its corner and spacing come from the widget settings (bottom right by default).
When an agent replies while the widget is closed, the button shows a dot so the customer knows there is a new message.
Step 2: The home screen#
When the customer clicks the button, the widget opens on its home screen.
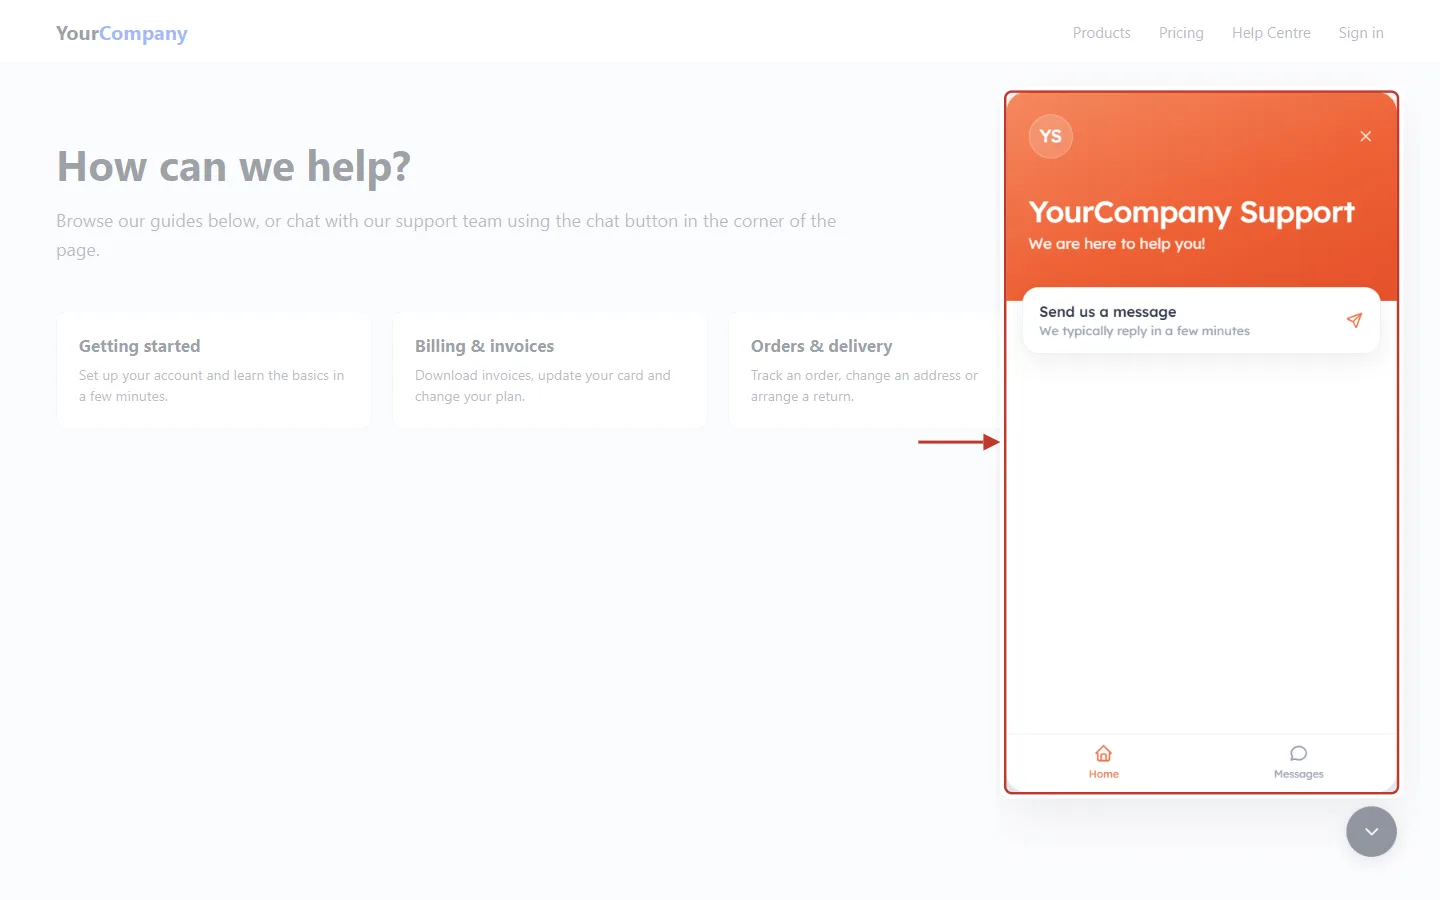
What this screenshot shows. The widget’s home screen.
The coloured header shows your logo (or your initials, here YS), the widget heading YourCompany Support and We are here to help you!.
The × at the top right closes the widget. So does the round ˅ button that replaces the launcher.
The Send us a message card starts a chat (next screenshot).
The tabs at the bottom switch between Home and Messages (and Tickets, when available; see Step 9).
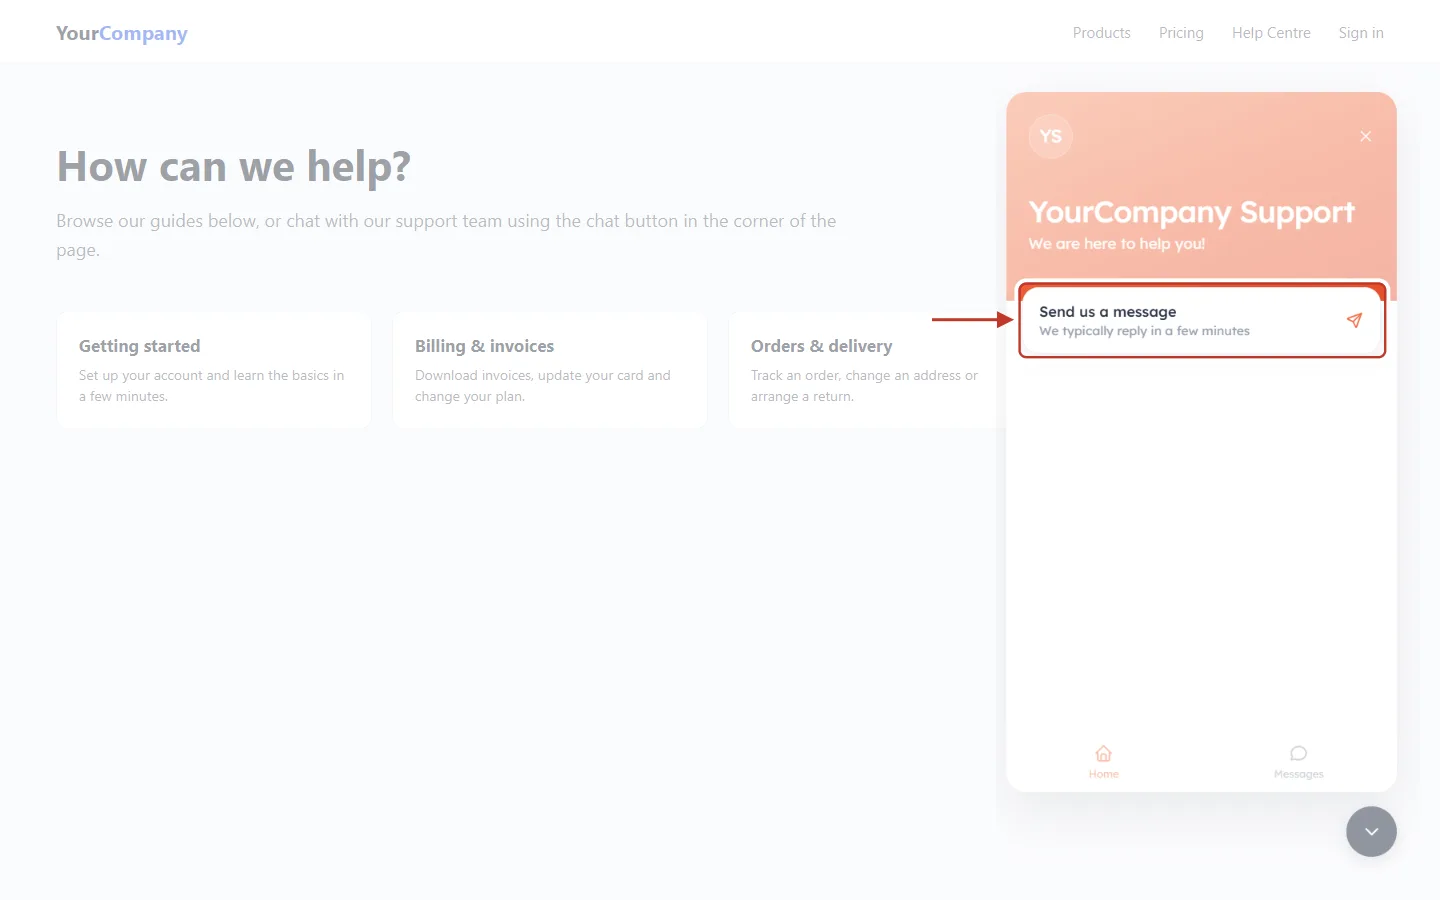
What this screenshot shows. The Send us a message card.
Its title and the line underneath (We typically reply in a few minutes) are set in the widget settings. Clicking anywhere on the card opens a new chat.
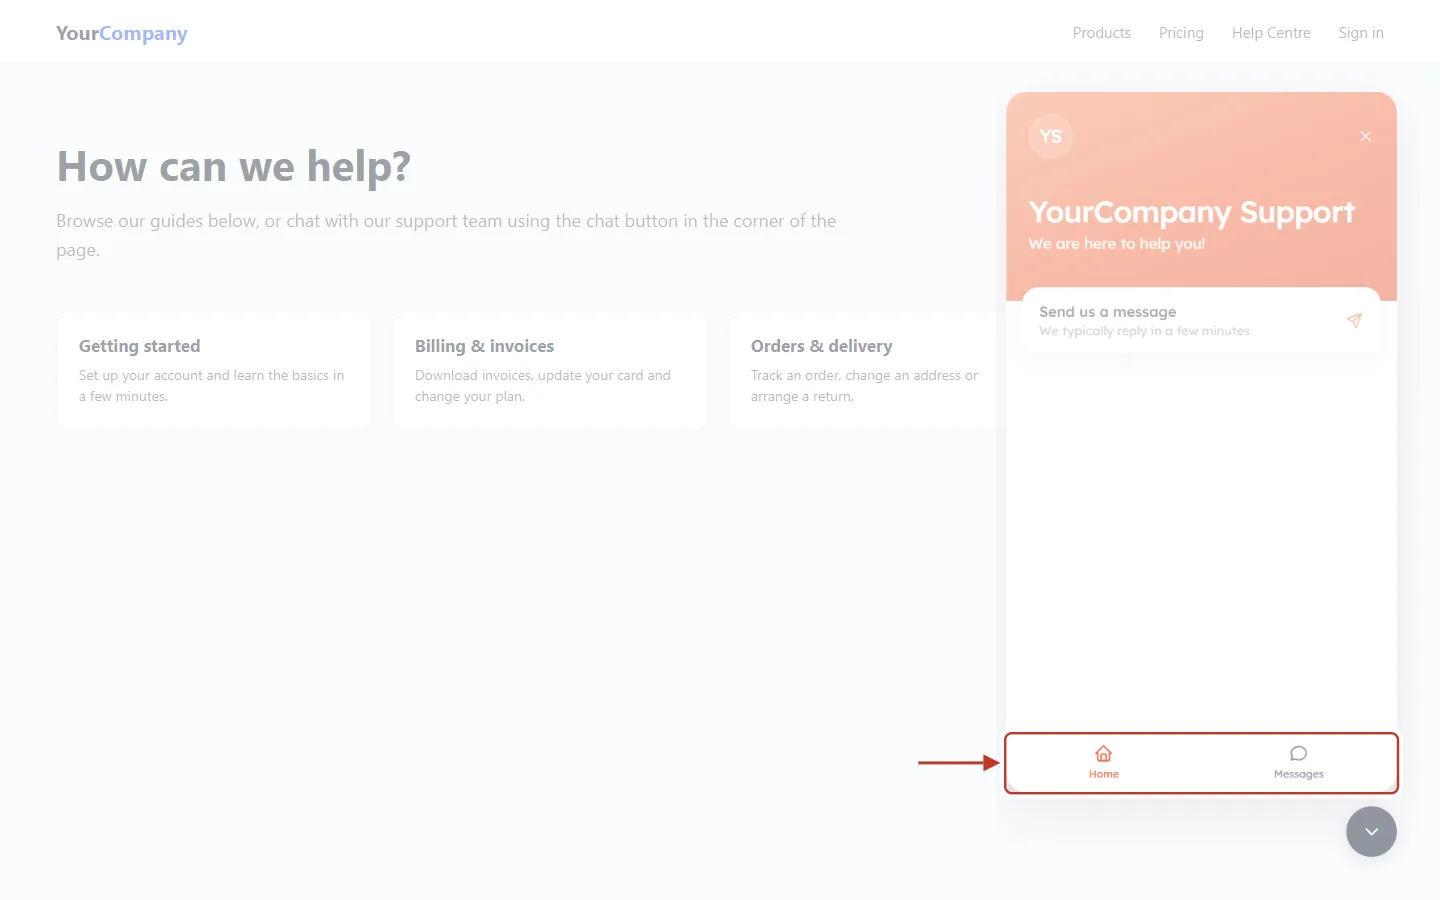
What this screenshot shows. The tabs at the bottom of the widget.
Home (the start screen) and Messages (the customer’s conversations, Step 8). The selected tab is shown in your accent colour.
Step 3: Start a chat and ask a question#
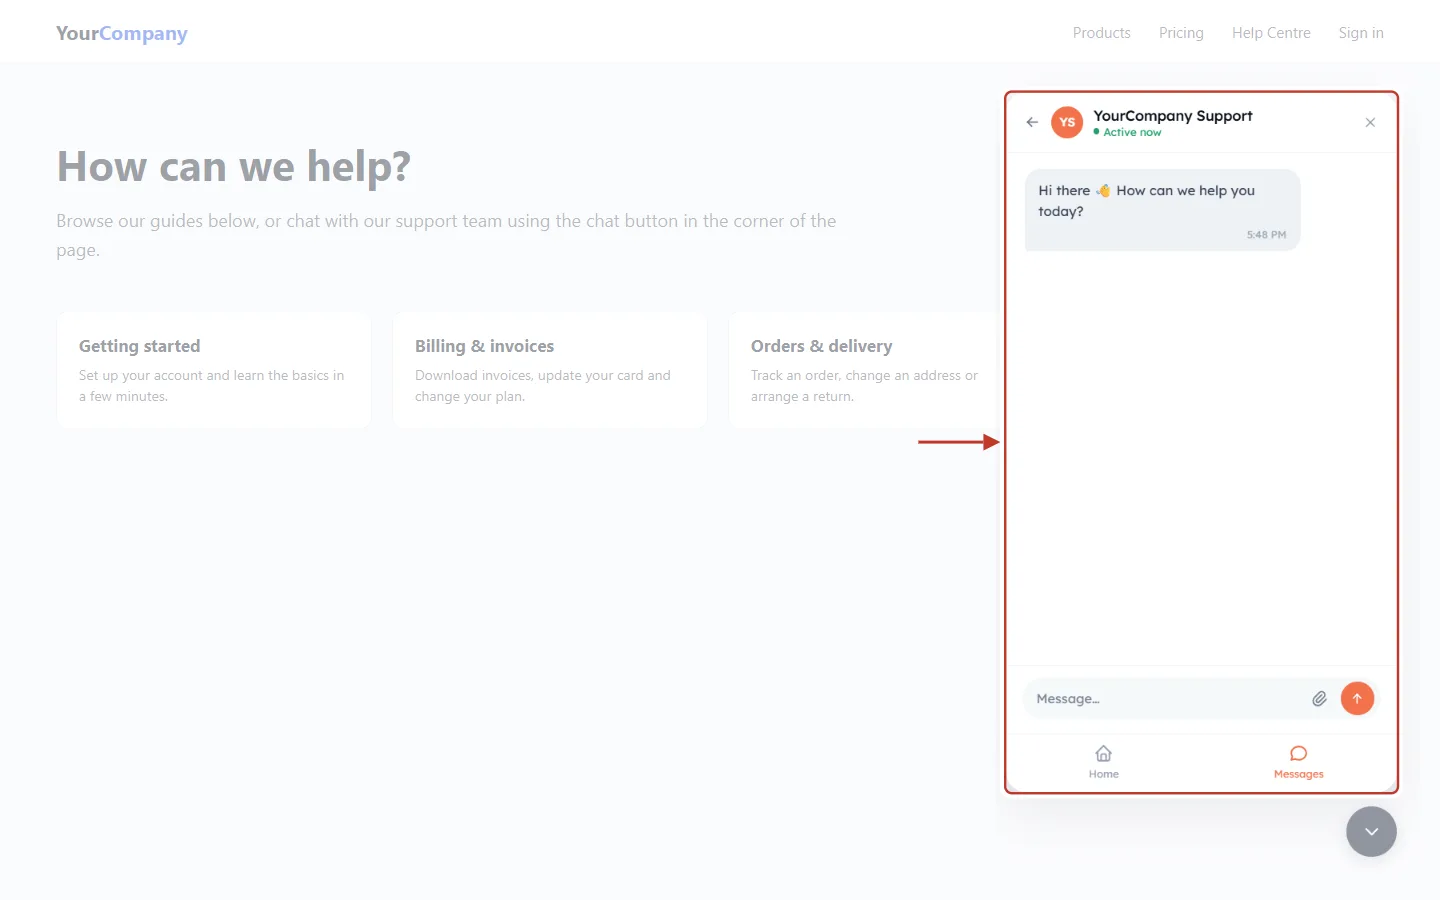
What this screenshot shows. A new chat.
The header shows the widget name and a green Active now dot (or Offline, Step 7). The ← goes back to the home screen.
The greeting (Hi there 👋 How can we help you today?) is the first message. It comes from your widget or AI agent settings.
The message box at the bottom reads Message….
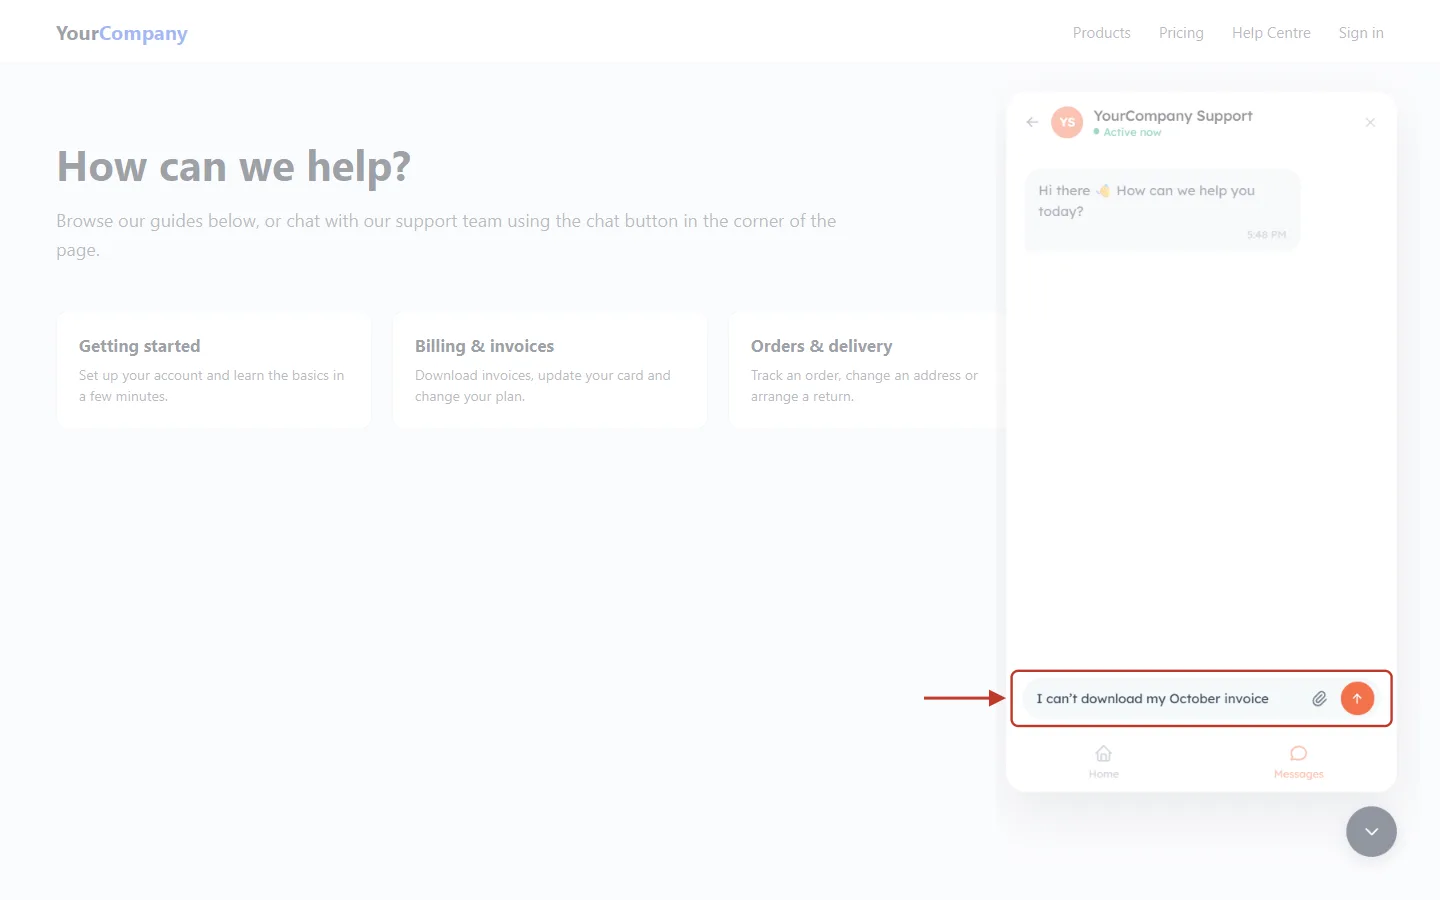
What this screenshot shows. The customer typing a question in the message box.
Press Enter or the round orange arrow to send.
The paper-clip attaches a file or screenshot to the message.
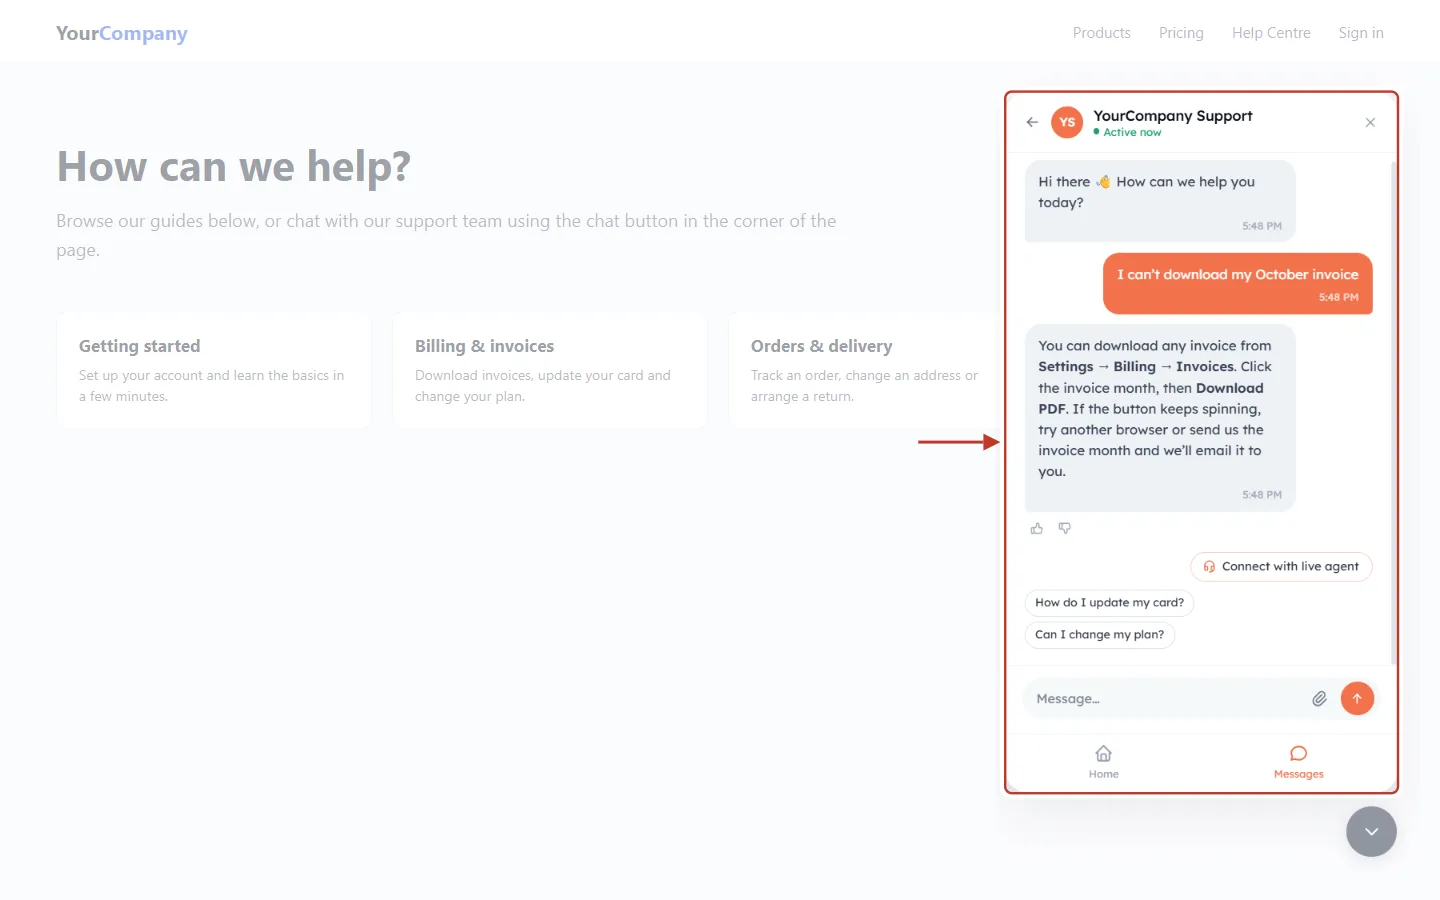
What this screenshot shows. The AI agent’s answer.
The customer’s message is on the right in orange, and the AI’s answer is on the left in grey. The answer appears word by word as it is written.
The answer can include formatting, such as the bold menu path Settings → Billing → Invoices.
The 👍 / 👎 under the answer let the customer rate it (Good response / Needs improvement). Ratings help you improve your AI agent.
Connect with live agent appears when a person is available (Step 4).
The suggested questions (How do I update my card?, Can I change my plan?) are follow-ups the customer can send with one click.
Step 4: Ask for a person#
The customer clicks Connect with live agent.
If the widget doesn’t know their email yet, it asks for one.
They type it and click Connect.
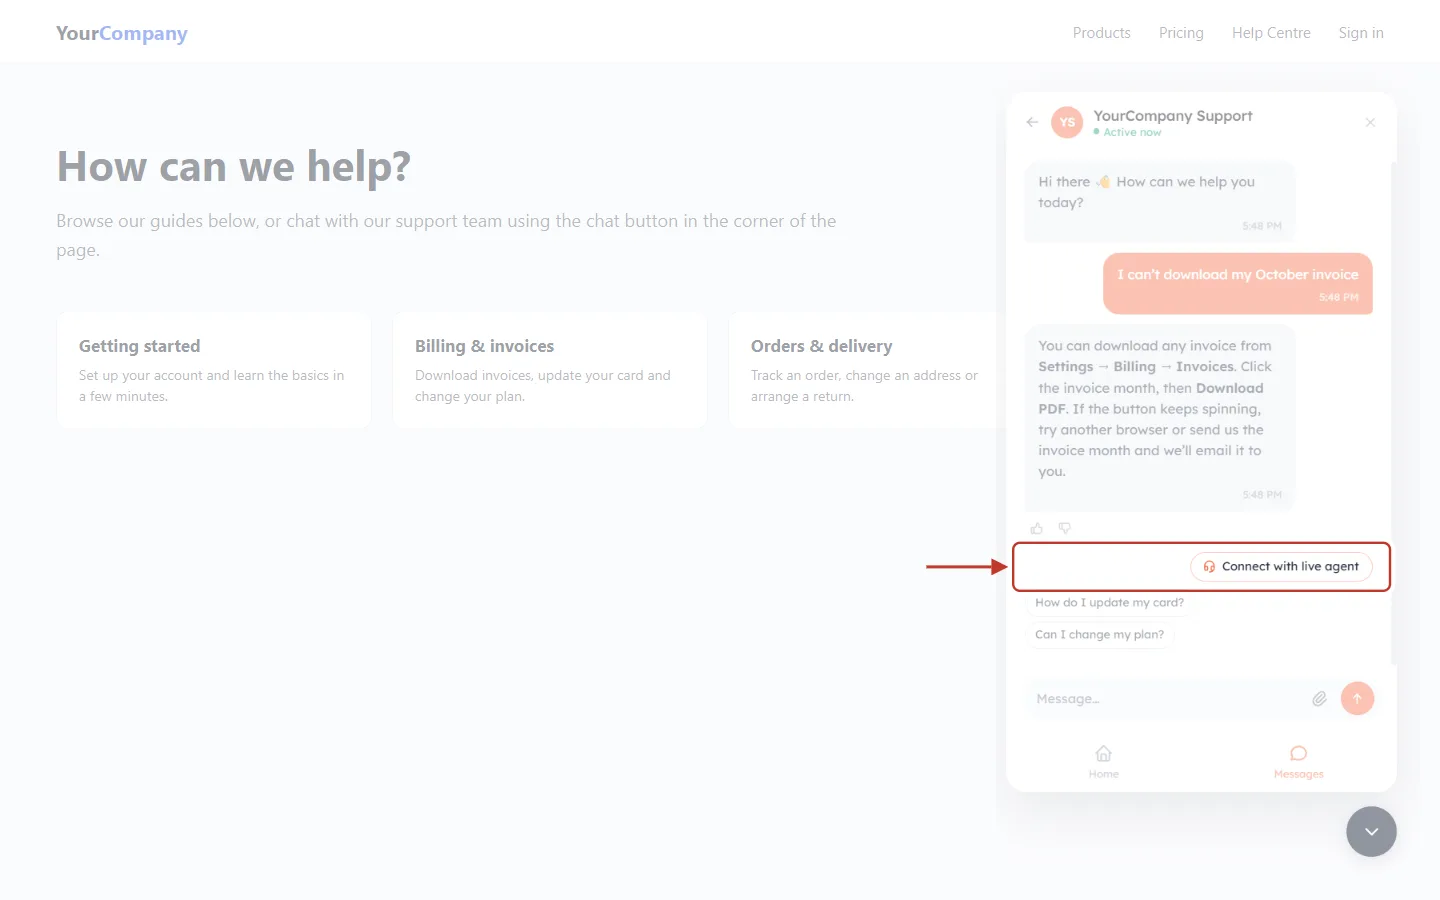
What this screenshot shows. The Connect with live agent button (headset icon).
It is shown only when live chat is switched on for your organization and your team is online.
When you are offline, it is hidden and the customer can still leave a message (Step 7).
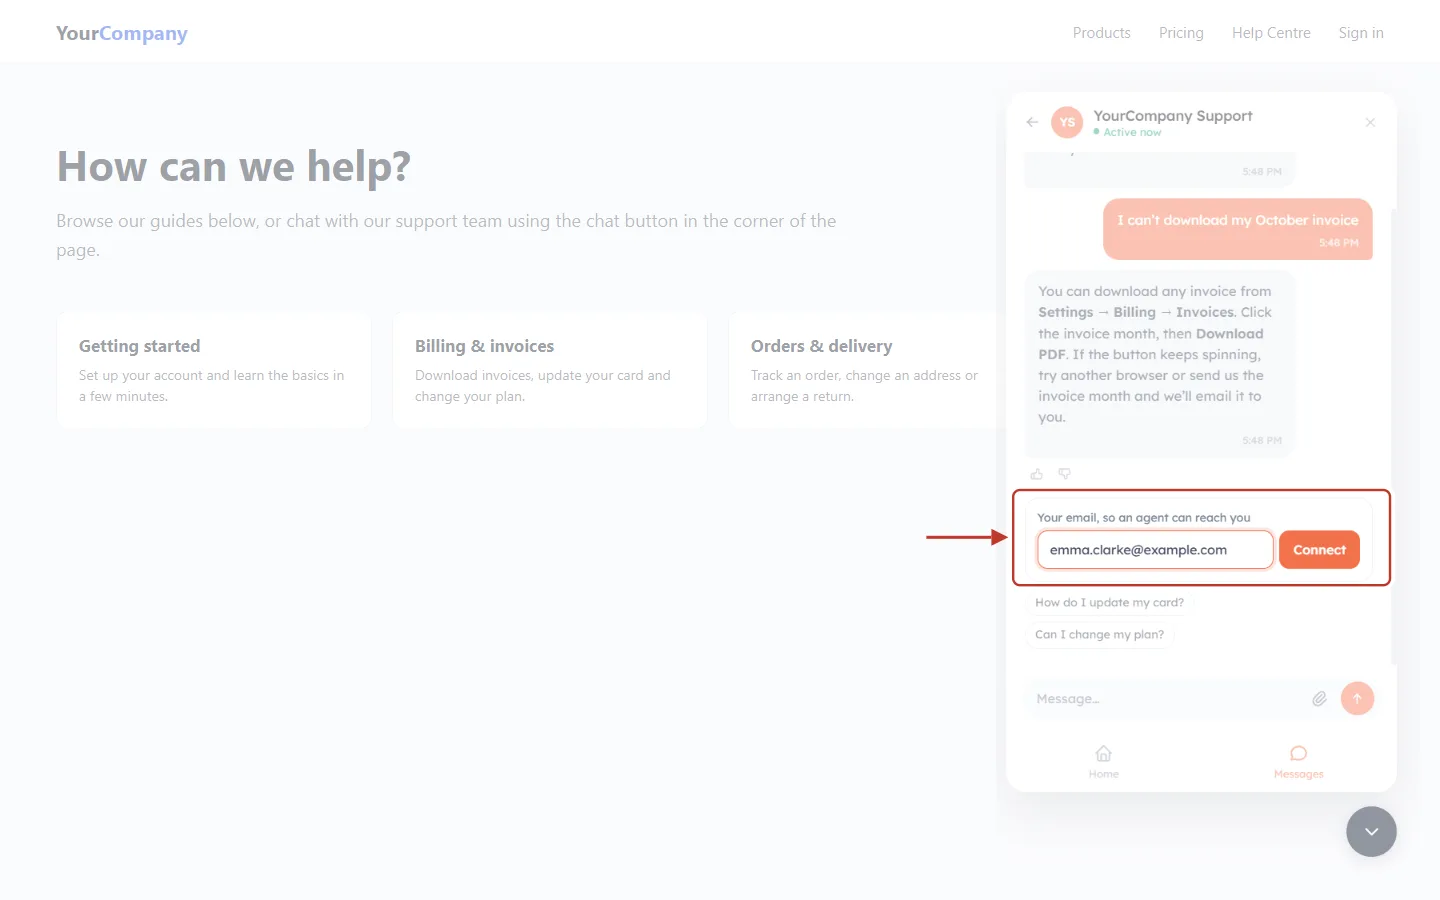
What this screenshot shows. The email question.
“Your email, so an agent can reach you”: the customer types their address (here emma.clarke@example.com) and clicks Connect.
An email (or phone number) is required, so your team can link the chat to a contact and follow up if the chat ends.
If the customer already gave their email, for example in a pre-chat form or because your site signed them in, this question is skipped.
Step 5: Waiting for an agent, then chatting with a person#
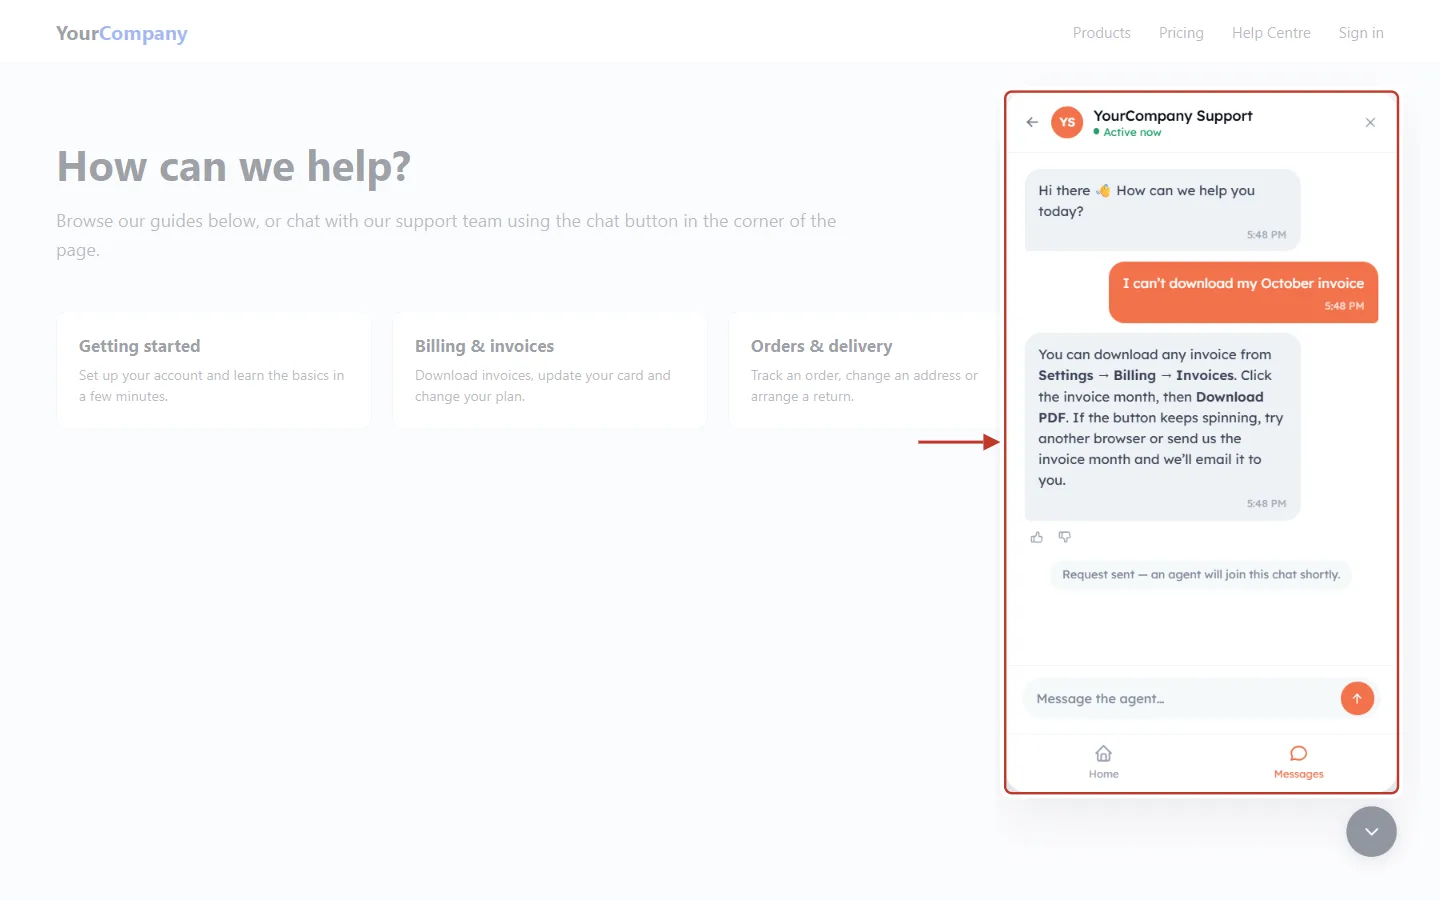
What this screenshot shows. Right after clicking Connect.
A grey note reads “Request sent — an agent will join this chat shortly.” The AI stops answering from this point.
At the same moment, your team gets a “requested a live agent” alert, and the chat waits in Customer Support to be accepted (see Live Agent Handover from the AI Agent).
The customer can keep typing. Their messages are waiting for the agent when they join.
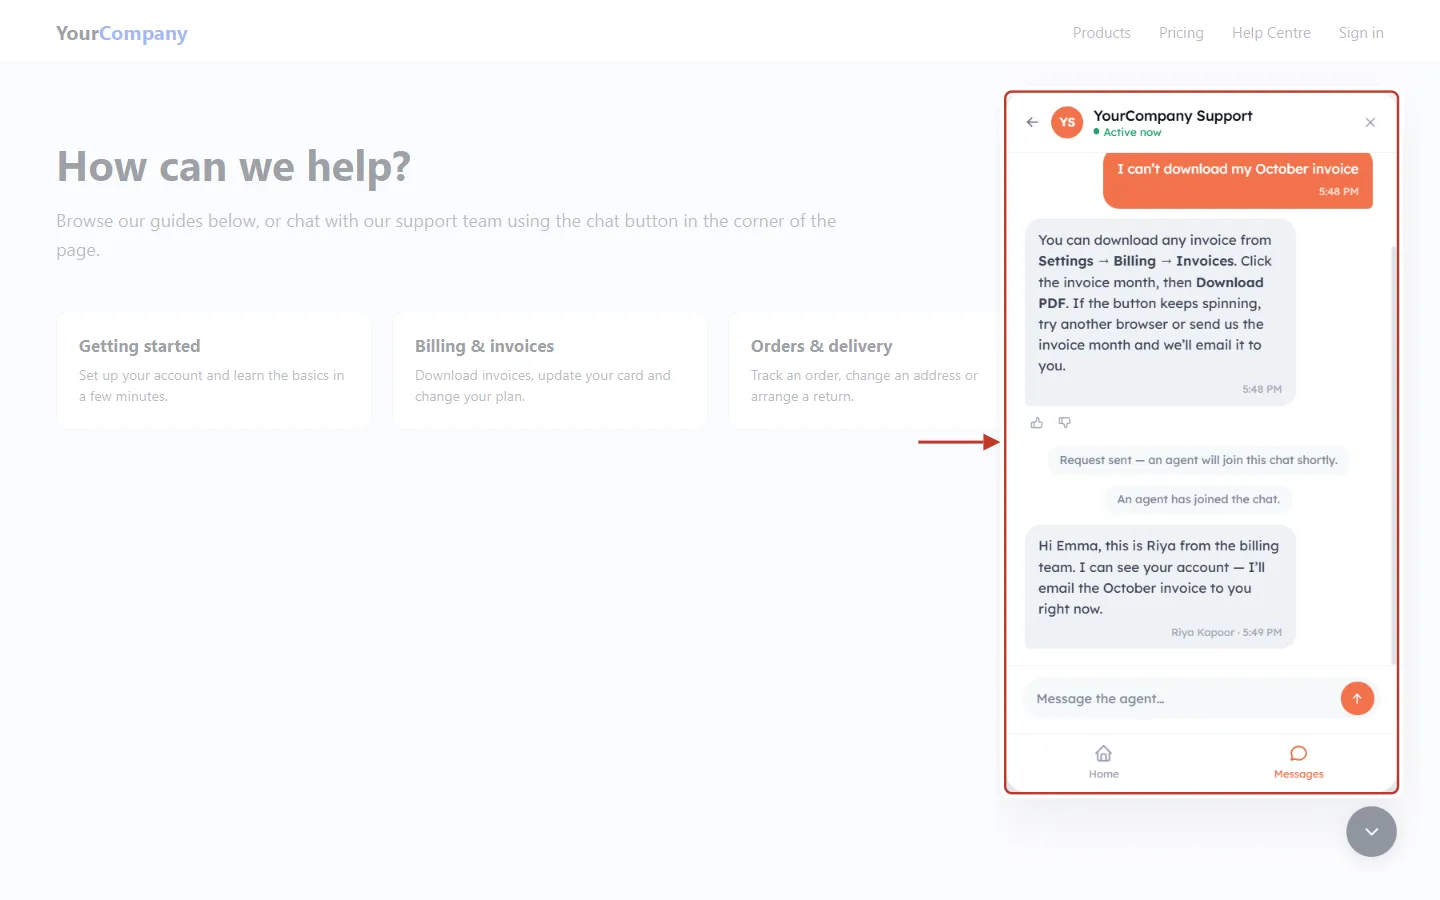
What this screenshot shows. When an agent accepts the chat.
A note says “An agent has joined the chat.”
The agent’s reply appears with their name and the time (Riya Kapoor · 5:49 PM), so the customer knows they are talking to a person.
The message box changes to Message the agent….
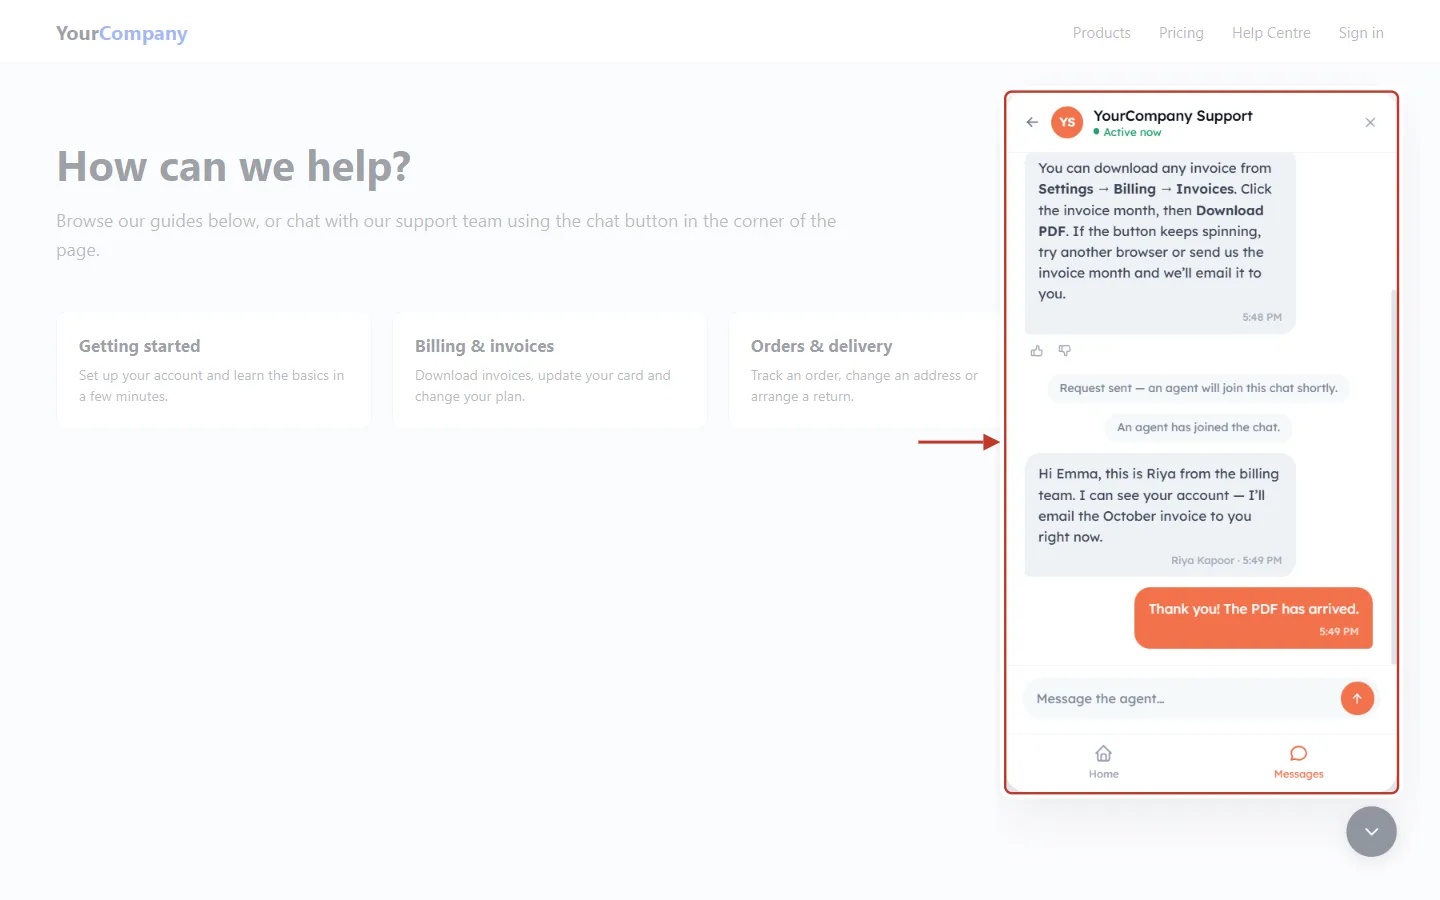
What this screenshot shows. The customer replying to the agent.
Messages now go straight to the agent in real time, and the agent’s replies appear here as they are sent.
If the customer closes the widget, the conversation is kept. When they reopen it, or when the agent replies, they can carry on.
Step 6: When nobody is available in time#
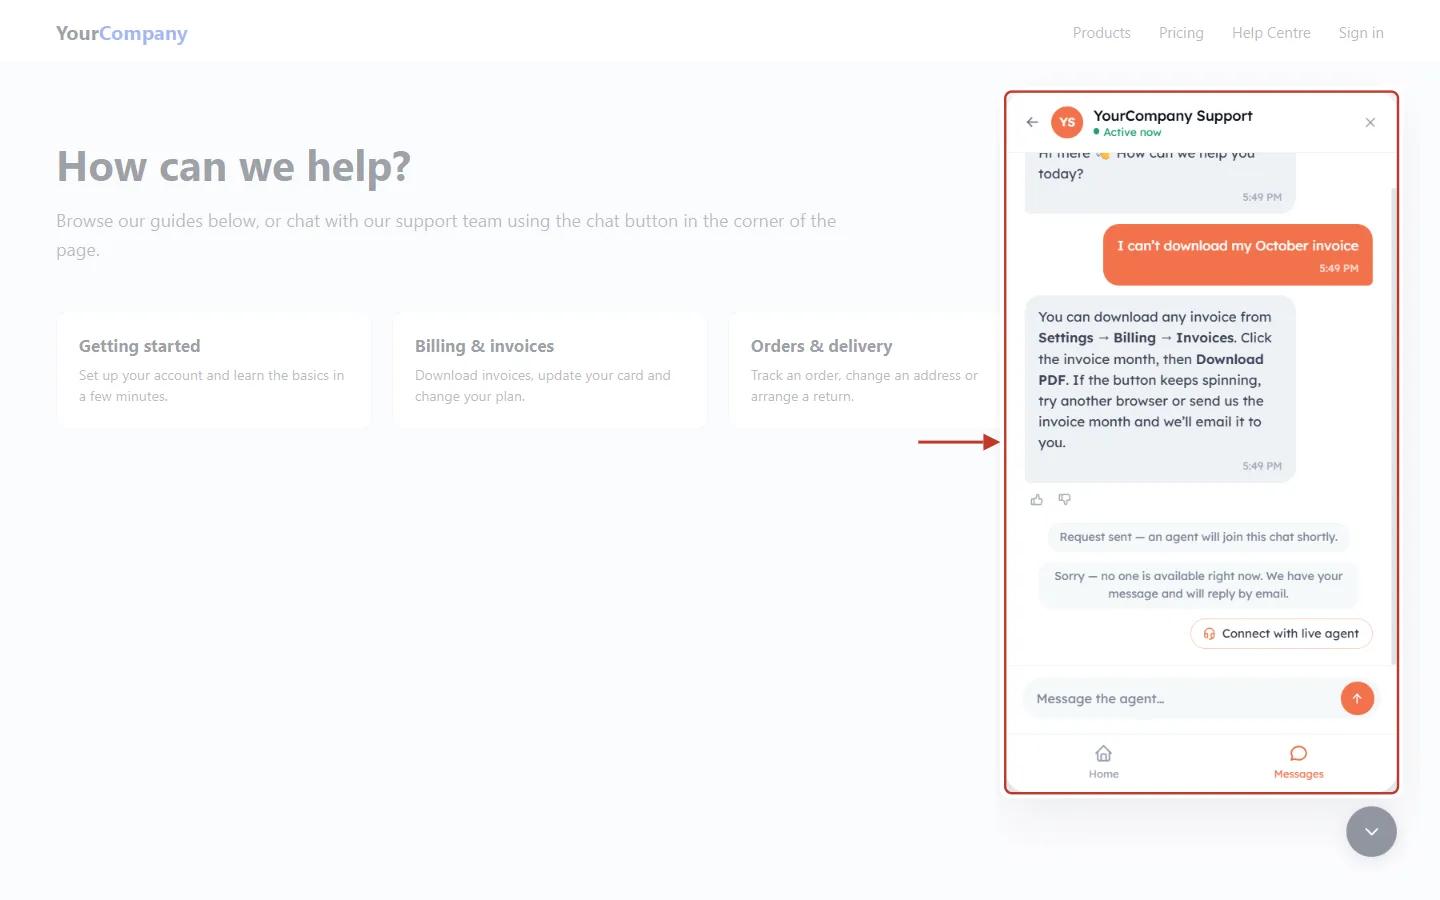
What this screenshot shows. What the customer sees if no agent accepts the request in time.
“Sorry — no one is available right now. We have your message and will reply by email.”
The conversation stays open, and your team sees it marked as missed, ready to follow up by email.
Connect with live agent appears again, so the customer can try once more.
How long the widget waits, and who is told about missed chats, is set in General Settings → Mark unanswered chats as missed (see Support General Settings).
Step 7: When your team is offline#
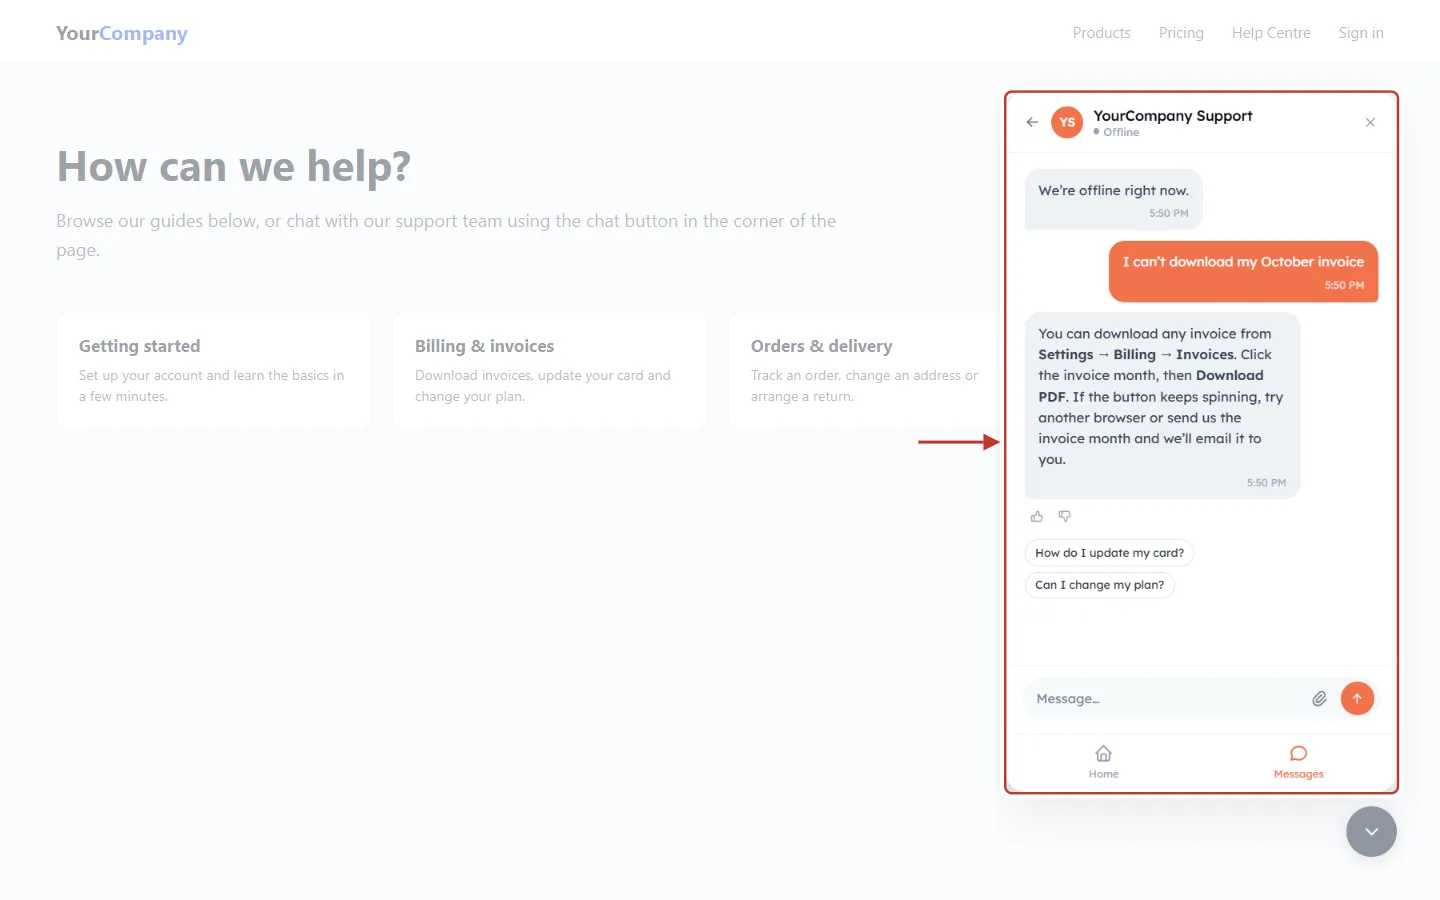
What this screenshot shows. The widget when your team is offline.
The header shows a grey Offline dot instead of Active now.
The greeting is replaced by your offline message (We’re offline right now.), set in the widget settings.
The AI agent still answers, so customers get help at any hour. Connect with live agent isn’t offered.
If a customer asks for a person while you are offline, they are told their request is with your team and someone will get back to them as soon as they can.
Step 8: Past conversations (Messages tab)#
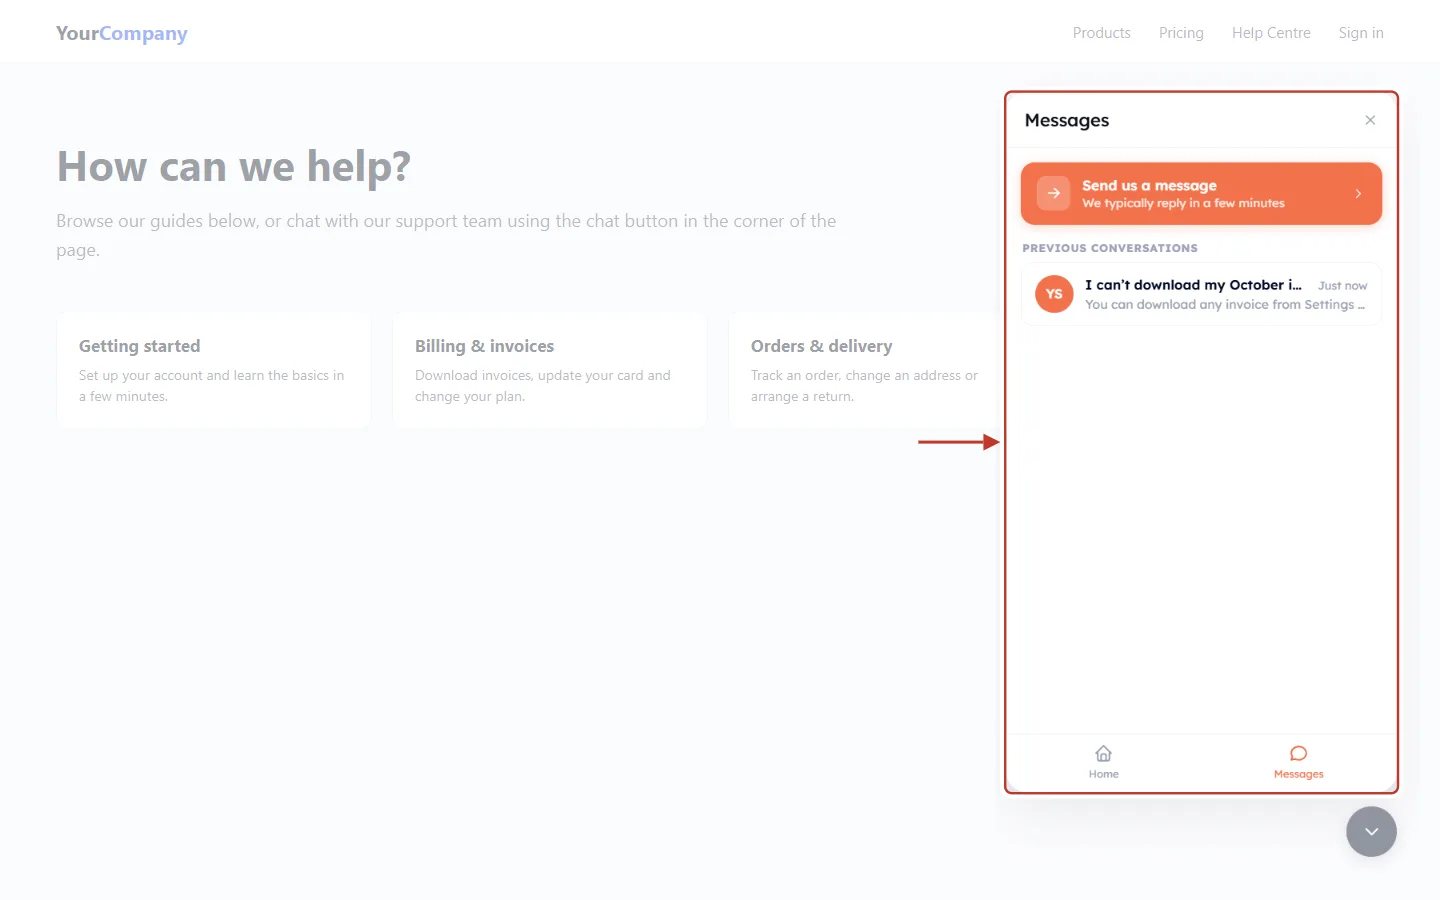
What this screenshot shows. The Messages tab.
Send us a message at the top starts a new chat.
PREVIOUS CONVERSATIONS lists the customer’s chats with the first line, the latest reply and how long ago (Just now). Click one to reopen it.
Conversations are remembered in the customer’s browser. A customer your site signs in also sees their chats on other devices.
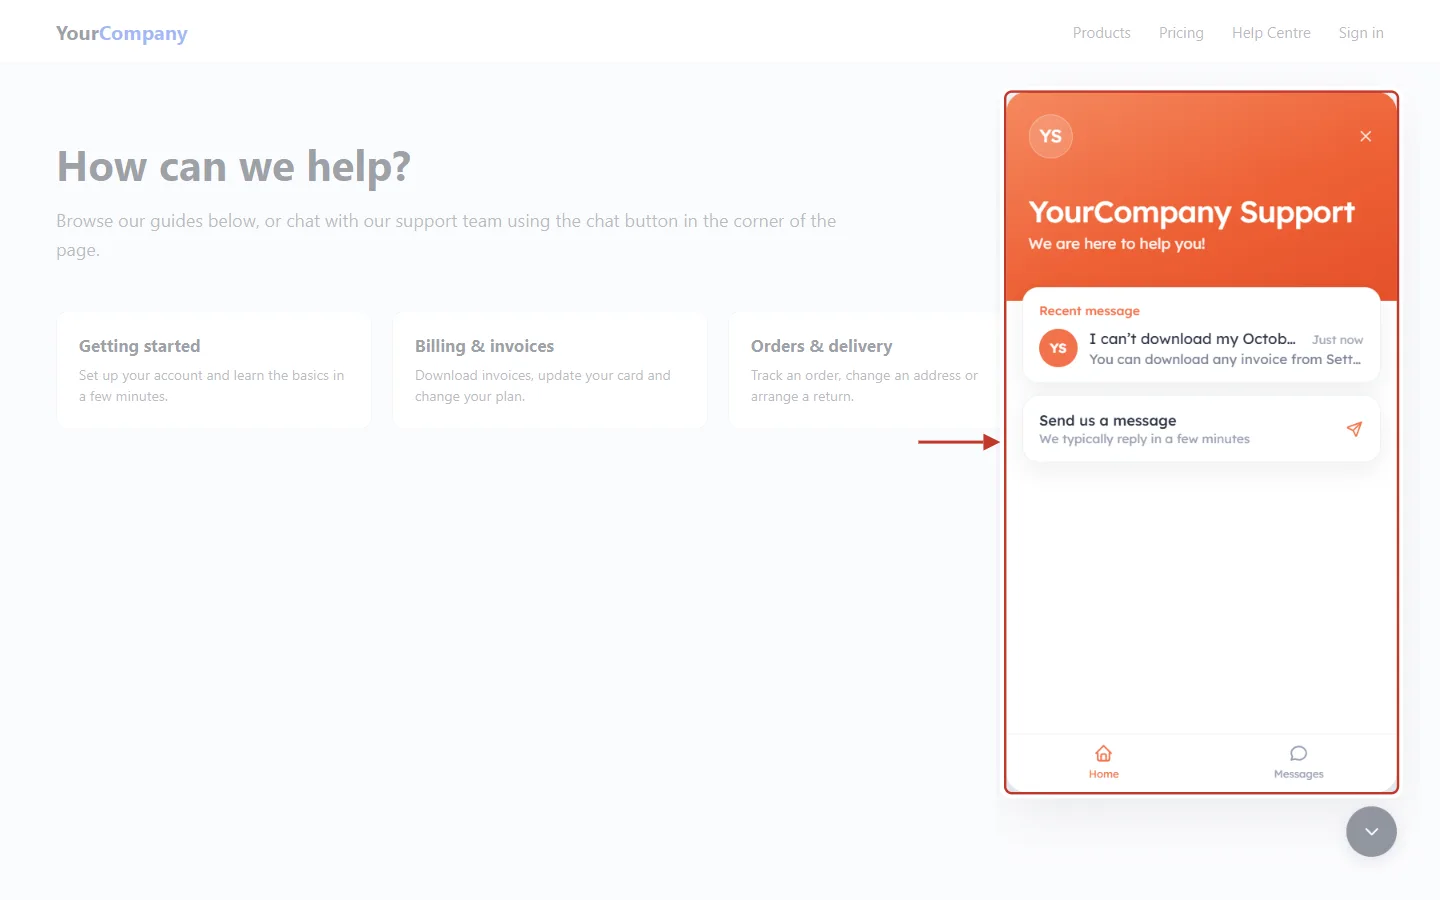
What this screenshot shows. The home screen after a chat.
The latest conversation is shown on the home screen too, so the customer can jump straight back into it.
Step 9: Raise and follow a ticket (Tickets tab)#
For a request that needs more time, such as a refund or a bug, customers can raise a ticket from the widget. The Tickets tab appears only when your organization allows customers to raise tickets and the visitor is known: signed in to your website (visitor identity), or recognised from the pre-chat form.
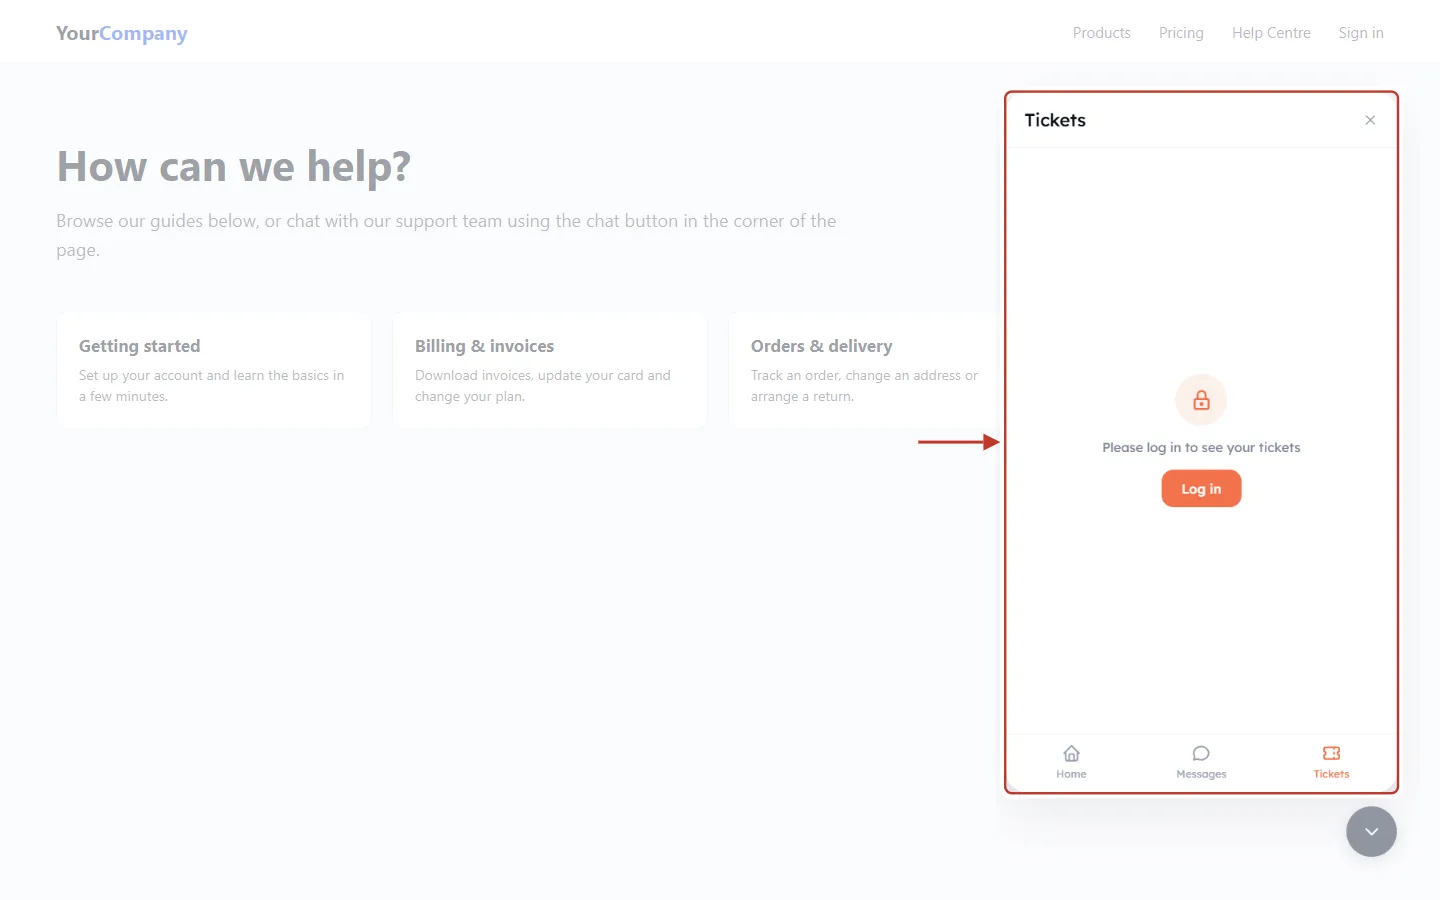
What this screenshot shows. The Tickets tab for a visitor who isn’t signed in.
“Please log in to see your tickets” with a Log in button that takes them to your website’s sign-in page (set in the widget’s visitor identity settings).
This protects customers’ tickets: only the person who raised them can see them.
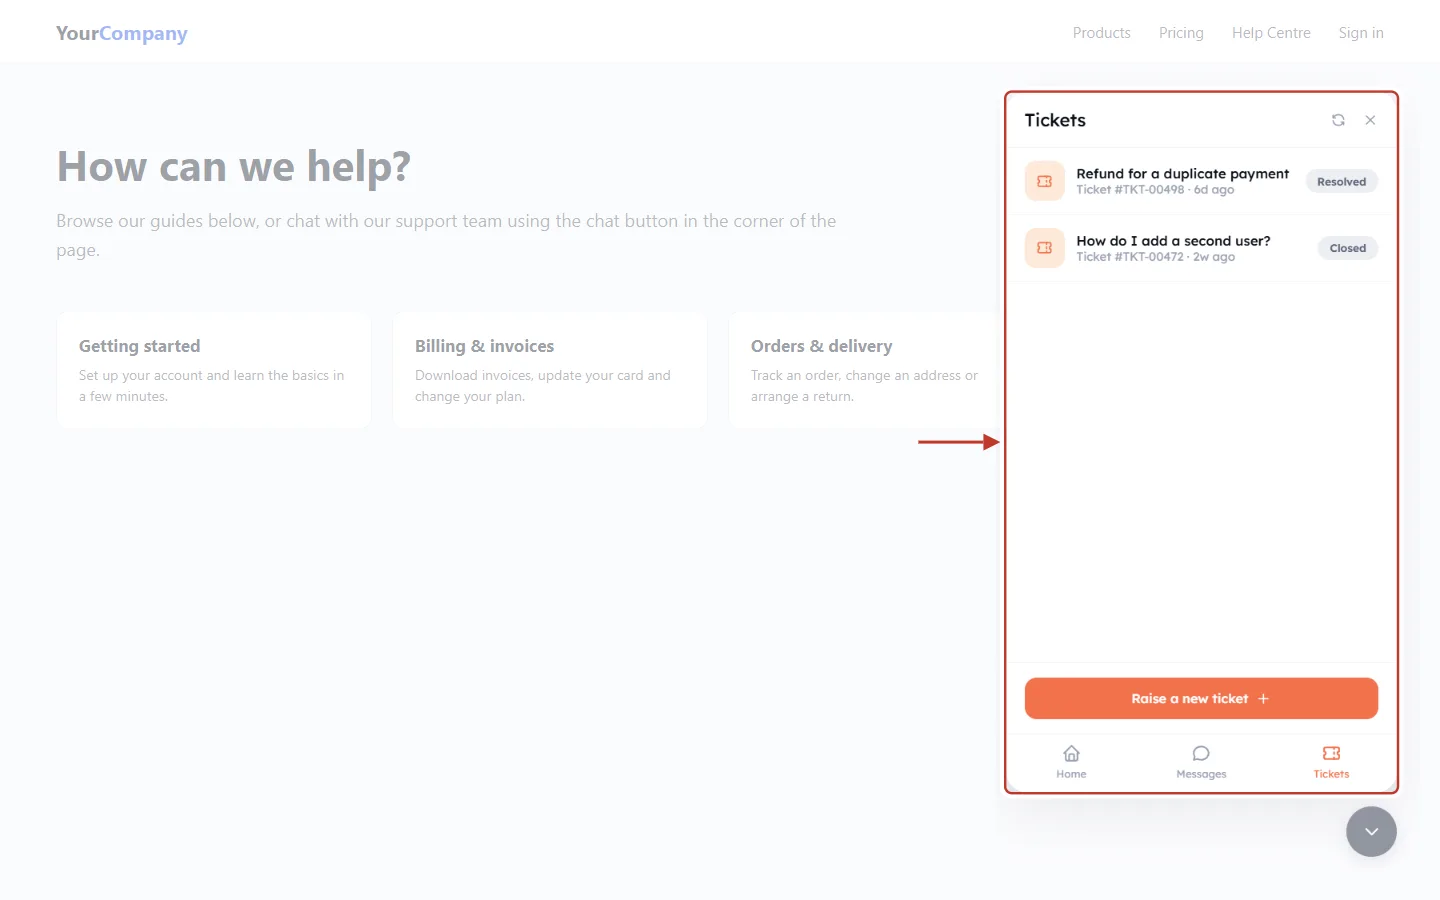
What this screenshot shows. The Tickets tab for a signed-in customer.
Each past ticket shows its subject, number and age (Ticket #TKT-00498 · 6d ago) and its status (Resolved, Closed). Click one to read the replies.
Raise a new ticket at the bottom opens the form.
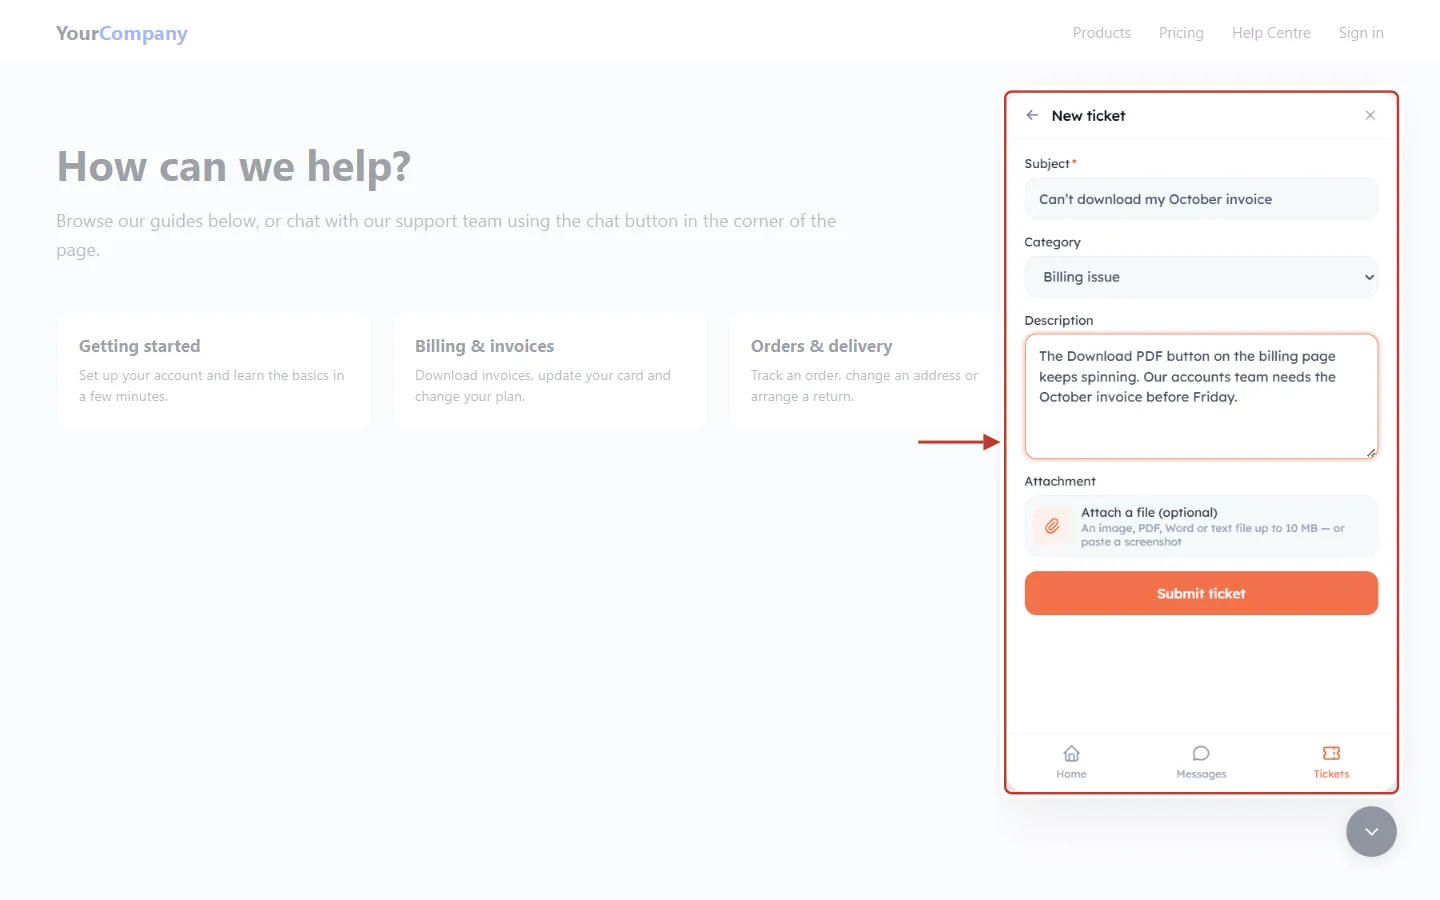
What this screenshot shows. The New ticket form, filled in.
Subject (required, marked *): a short summary.
Category: optional, from your ticket categories (here Billing issue).
Description: the details, up to 5,000 characters.
Attachment: optional, one image, PDF, Word or text file up to 10 MB. Customers can also paste a screenshot.
Submit ticket sends it.
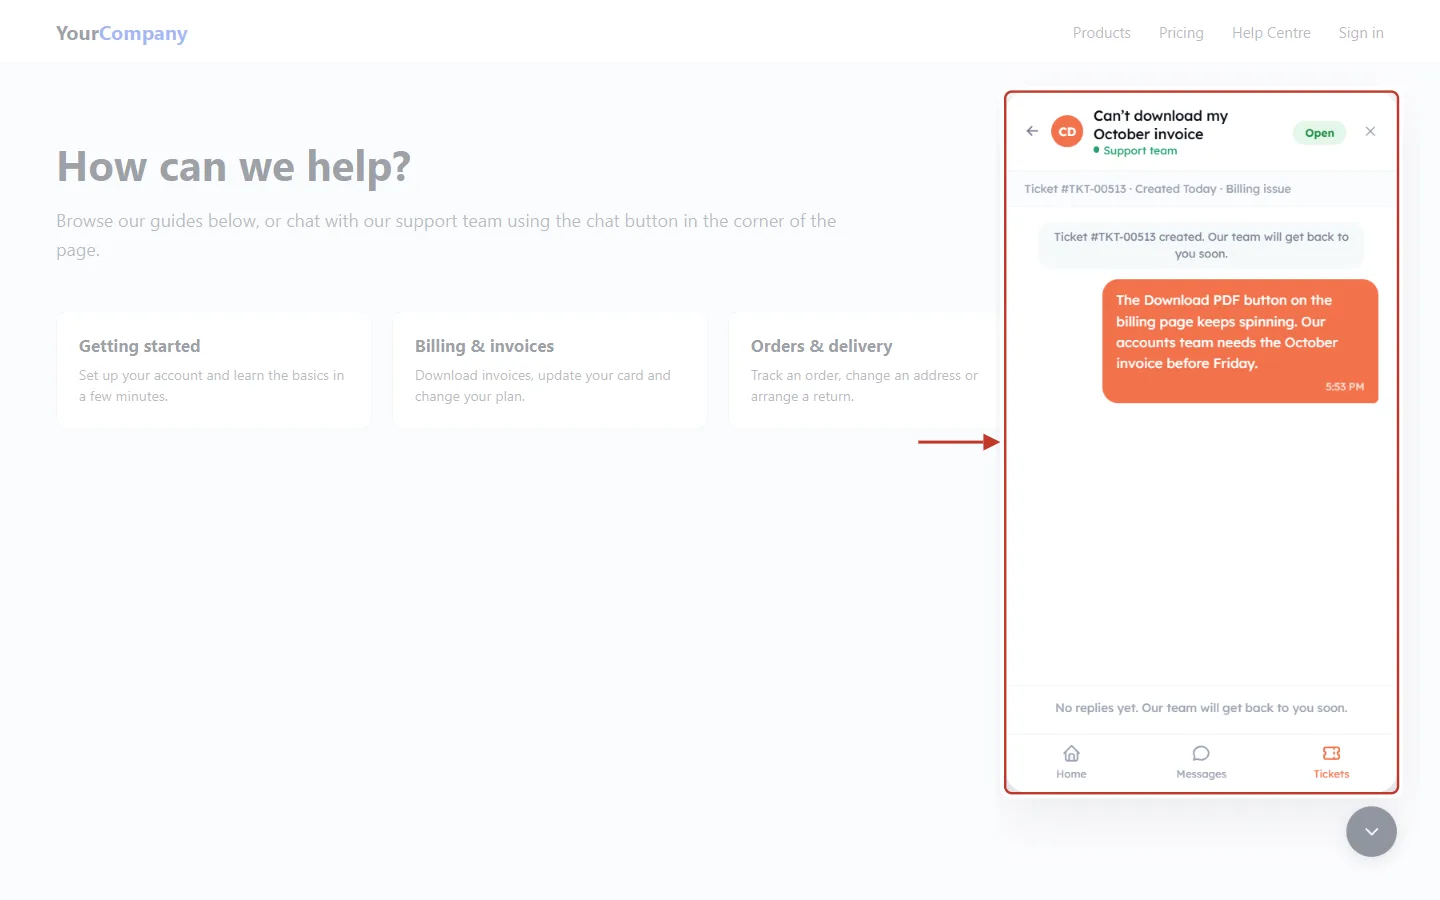
What this screenshot shows. The ticket after submitting.
The header shows the subject, the Open status and Support team. Under it: Ticket #TKT-00513 · Created Today · Billing issue.
A note confirms “Ticket #TKT-00513 created. Our team will get back to you soon.” The customer’s description is shown as their first message.
“No replies yet. Our team will get back to you soon.” at the bottom. When an agent replies on the ticket, the reply appears here (and by email).
In Customer Support, your team sees the new ticket at the top of the list (see Handle Customer Tickets End to End).
What your customers will see: quick reference#
Message in the widget | What it means |
|---|---|
Active now / Offline | Whether anyone on your team is available for live chat. |
Request sent — an agent will join this chat shortly. | The customer asked for a person; the chat is waiting for an agent to accept. |
An agent has joined the chat. | An agent accepted; the customer is now talking to a person. |
Sorry — no one is available right now. We have your message and will reply by email. | Nobody accepted in time; the chat is marked missed for your team. |
Your request is with our team, and someone will get back to you as soon as they can. | The customer asked for a person while you were offline. |
This conversation is closed. | An agent closed the chat, or it closed itself after a quiet period. |
Live chat is currently unavailable. Please check back later. | Chat Conversation is switched off in General Settings. |
Troubleshooting#
What you see | What to do |
|---|---|
No chat button on the website | Check the widget code is installed and the widget is Active (see Install the Chat Widget on Your Website). |
No Connect with live agent button | Your team is offline, or Chat Conversation is switched off in General Settings, or the widget has no team or agents to route to. |
Customers always get the “no one is available” message | Make sure agents accept chats in time, or lengthen the wait in General Settings. |
No Tickets tab | Raising tickets must be allowed for the widget, and the visitor must be signed in to your site (visitor identity) or recognised by the pre-chat form. |
The widget shows the wrong name, colour or greeting | Change them in Customer Support → Settings → Chat Widget. |
✅
Test the full journey yourself before launch: open your site in a private window, ask a question, click Connect with live agent, and have a colleague accept the chat in Customer Support.
More answers: Customer & Support FAQ & Troubleshooting.
Previous and next#
Related#
Was this article helpful?
Ready to implement this?
OpenAI Engage and apply what you just learned to your own workspace.
Open AI Engage CRM