Loading…


KnowledgeBase
Import Conversations: Bring Past Messages from a CSV or Excel File onto Your Existing Tickets (Step-by-Step)
Introduction#
When you move to AiEngage CRM from another help desk (for example Zendesk or Freshdesk), or from a shared inbox or spreadsheet, you usually want to keep the conversation history of each ticket: what the customer wrote, what your team replied, and the notes your agents left for each other.
Import Conversations does exactly that. You upload a CSV or Excel file in which each row is one message, and AiEngage CRM adds every row to the thread of the ticket named in that row. The messages appear in the ticket in the order they were sent, marked as imported, so your team can read the whole story in one place.
ℹ️
Import Conversations adds messages to tickets that already exist. It doesn’t create tickets. Import (or create) the tickets first, using Import Tickets (CSV, Excel), then import their conversations. See Import & Export Tickets: Bulk-Import from CSV or Excel, Import Notes and Export Your Tickets.
This guide has six parts:
Part | What you’ll learn |
|---|---|
Part 1 | Prepare your file: the columns you can use, and the rules for each |
Part 2 | Open Import Conversations |
Part 3 | Step 1 of the wizard: upload your file |
Part 4 | Step 2 of the wizard: map your columns |
Part 5 | Step 3 of the wizard: review and start the import, then check the results |
Part 6 | See the imported messages on the ticket, and find past imports in the history |
The screenshots use a sample file of past messages for the customer Emma Clarke and her ticket #TKT-00512 (wrong colour chairs on order #5821). Your names, ticket numbers and file will be different.
ℹ️
Who can do this: the Import Conversations menu items only appear if your profile has the Import permission for Tickets. You can also only add messages to tickets your profile lets you edit. See Ticket Permissions: Set Who Can View, Edit, Delete and Reply to Support Tickets.
Part 1: Prepare your file#
Your file can be CSV, XLSX or XLS, up to 50 MB. Put the column names in the first row, then one message per row. These are the columns AiEngage CRM understands (your own column names can be different, because you match them up in Part 4):
Column | Required? | What to put in it |
|---|---|---|
Ticket Number | Ticket Number or External Ticket ID | The AiEngage CRM ticket the message belongs to, for example |
External Ticket ID | Ticket Number or External Ticket ID | Your old help desk’s ticket ID. It is matched against the custom Ticket ID field on your tickets, so you only need it if you stored the old ID in that field when you imported the tickets. Each row needs one of the two columns. |
Message | Yes | The text of the message, as plain text. Up to 20,000 characters per message (anything longer is cut off). |
Direction | No | Who the message is from: |
Sender Name | No | The name shown on the message, for example Emma Clarke or Riya Kapoor. |
Sender Email | No | The sender’s email address. If it isn’t a valid email address, it is left empty and the row still imports (with a warning). |
Sent At | No | When the message was originally sent, in the format |
Attachment | No | Public web links (http or https) to files that belonged to the message. Separate several links with a comma or a new line. Up to 10 files per message, 10 MB each. Private or internal addresses are refused. |
What the Direction column accepts#
The message is… | Words you can use in Direction | How it shows on the ticket |
|---|---|---|
From the customer | Customer, Inbound, Incoming, Received, Requester, Contact | Received (↙ arrow) |
From your team | Agent, Outbound, Outgoing, Sent, Reply, Staff, Support | Sent (↗ arrow) |
An internal note (never shown to the customer) | Internal Note, Internal, Note, Private | Internal note (🔒 padlock, yellow card) |
Upper or lower case doesn’t matter. If the Direction cell is empty or has a word not in this table, AiEngage CRM decides from the Sender Email. If the address is one of your own sending addresses, one of your support mailboxes or a user in your CRM, the message counts as from your team. Anything else counts as from the customer.
An example file#
This is the sample file used in this guide. It has eight messages: five for #TKT-00512, one row repeated by mistake, one for #TKT-00517, and one for a ticket number that doesn’t exist.
Ticket Number | Message | Direction | Sender Name | Sender Email | Sent At | Attachment |
|---|---|---|---|---|---|---|
TKT-00512 | Hi, our order #5821 arrived today but the 12 dining chairs are grey, not oak. Photo attached. | Customer | Emma Clarke | emma.clarke@example.com | 2026-10-03 09:12 | https://example.com/files/grey-chairs.jpg |
TKT-00512 | Sorry about that, Emma. I’ve asked the warehouse to check the order and will update you by 3 PM. | Agent | Riya Kapoor | support@yourcompany.com | 2026-10-03 10:05 | |
TKT-00512 | Warehouse confirms oak chairs are in stock. Book the courier for Thursday morning. | Internal Note | Riya Kapoor | 2026-10-03 11:40 | ||
TKT-00512 | Good news: the oak chairs leave our warehouse tomorrow and will reach you on Thursday morning. | Agent | Riya Kapoor | support@yourcompany.com | 2026-10-03 14:20 | |
TKT-00512 | Thank you! Thursday works. Tom will be on site to take the delivery. | Customer | Emma Clarke | emma.clarke@example.com | 2026-10-03 15:02 | |
TKT-00512 | (the same message again — a duplicate) | Customer | Emma Clarke | emma.clarke@example.com | 2026-10-03 15:02 | |
TKT-00517 | Could you send me a copy of our October invoice? | Customer | Daniel Brooks | daniel.brooks@example.com | 2026-10-28 09:30 | |
TKT-09999 | Please cancel my order. | Customer | Kavya Rao | kavya.rao@example.com | 2026-10-29 16:45 |
✅
Re-running a file is safe. A row is skipped (not added twice) when the same ticket already has a message with the same direction, text and sent time. So if an import stops halfway, or you fix a few rows and upload the whole file again, the messages that are already there aren’t duplicated.
⚠️
Imported messages are not sent to anyone. They are a record of past conversations. Nothing is emailed to the customer when you import, whatever the Direction says.
Part 2: Open Import Conversations#
Step 1: Open the Create Ticket menu#
Click the headset icon in the left icon bar to open Customer Support, and go to All tickets. At the top right of the ticket list, click the orange Create Ticket button (with the small ▾ arrow).
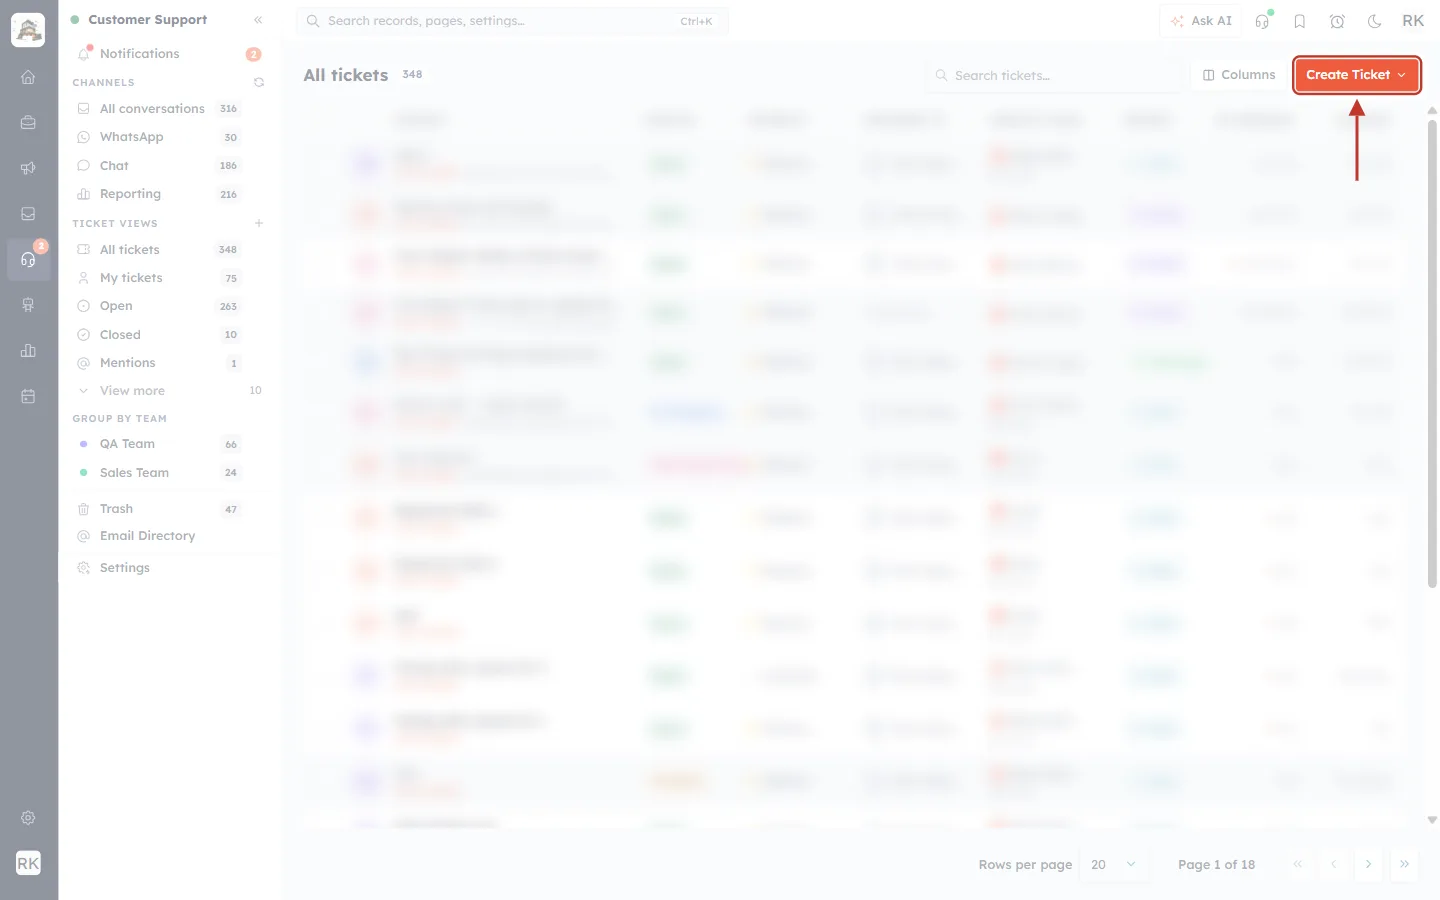
What this screenshot shows. The All tickets page in Customer Support. The orange Create Ticket ▾ button at the top right is ringed, with the red arrow pointing to it. The ticket rows behind are blurred.
The button opens a menu of ways to add tickets and conversations. It doesn’t create a ticket straight away.
If your profile can import but not create tickets, the same button is called Actions ▾.
Next to it are Columns (choose the list’s columns) and Search tickets….
Step 2: Choose Import Conversations (CSV, Excel)#
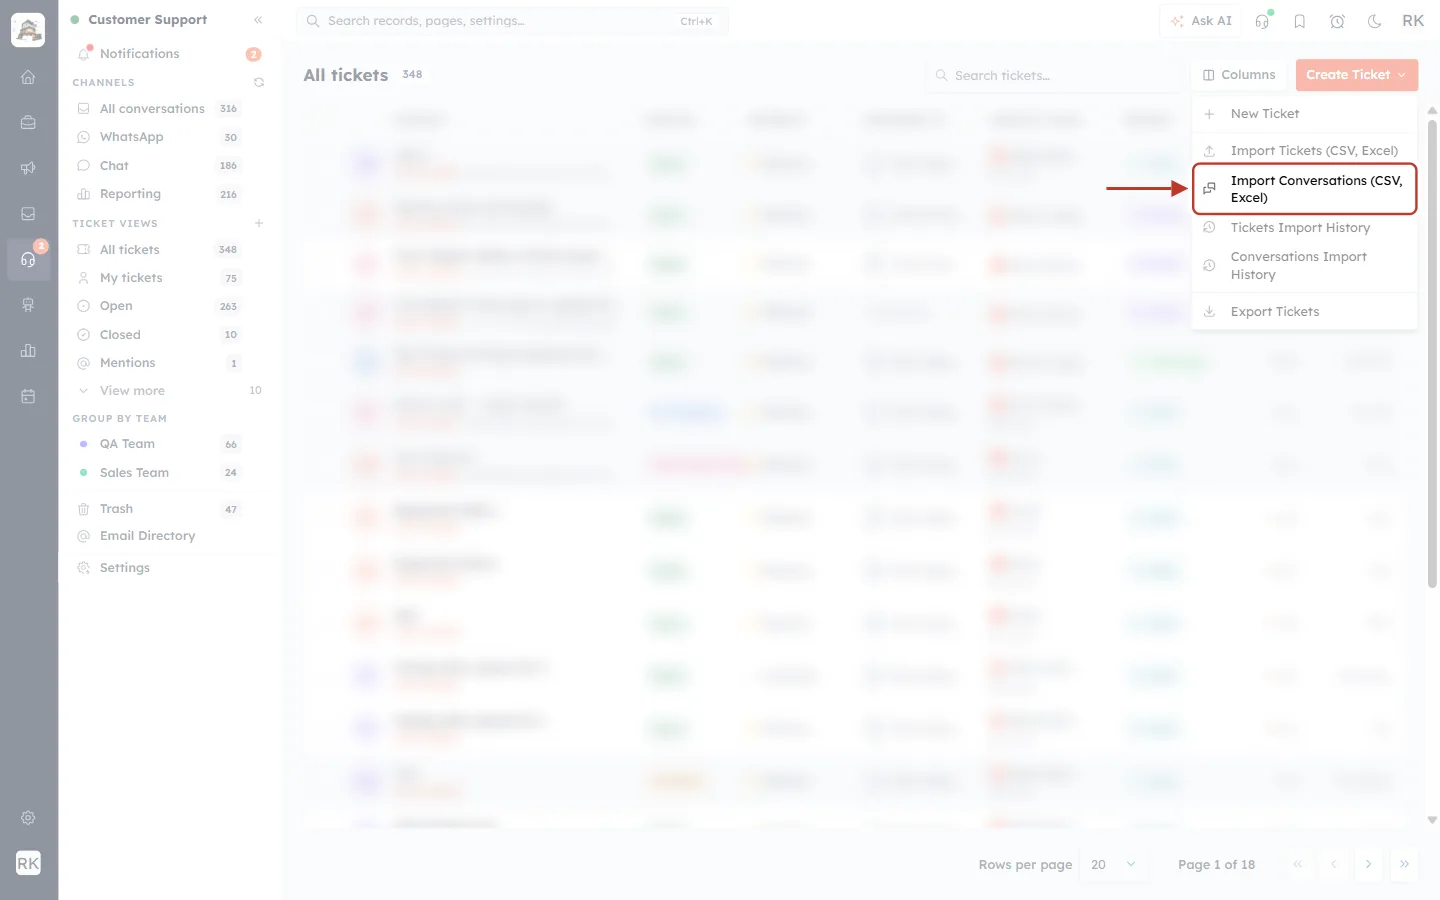
What this screenshot shows. The open Create Ticket menu. It lists New Ticket, Import Tickets (CSV, Excel), Import Conversations (CSV, Excel), Tickets Import History, Conversations Import History and Export Tickets. Import Conversations (CSV, Excel) is ringed, with the red arrow pointing to it.
New Ticket: create one ticket by hand.
Import Tickets (CSV, Excel): create many tickets from a file. Do this first if the tickets don’t exist yet.
Import Conversations (CSV, Excel): add messages to existing tickets. This is the option this guide covers.
Tickets Import History / Conversations Import History: lists of your past imports (Part 6).
Export Tickets: download your tickets as a file.
Part 3: Step 1 of the wizard: upload your file#
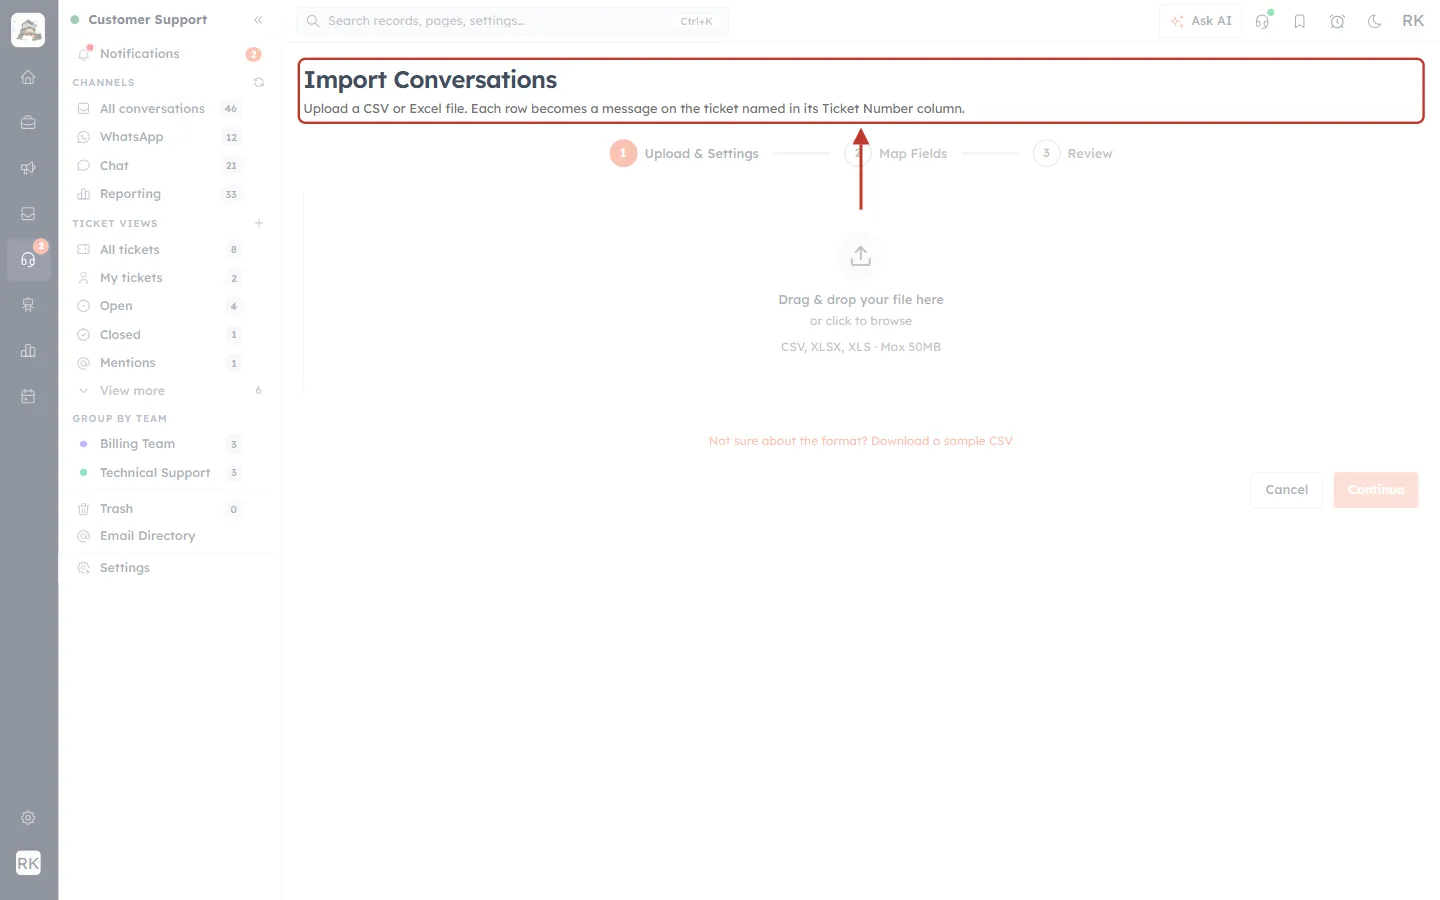
What this screenshot shows. The top of the Import Conversations page, ringed: the title Import Conversations and the line “Upload a CSV or Excel file. Each row becomes a message on the ticket named in its Ticket Number column.”
The description sums up the whole feature: one row in your file becomes one message on a ticket.
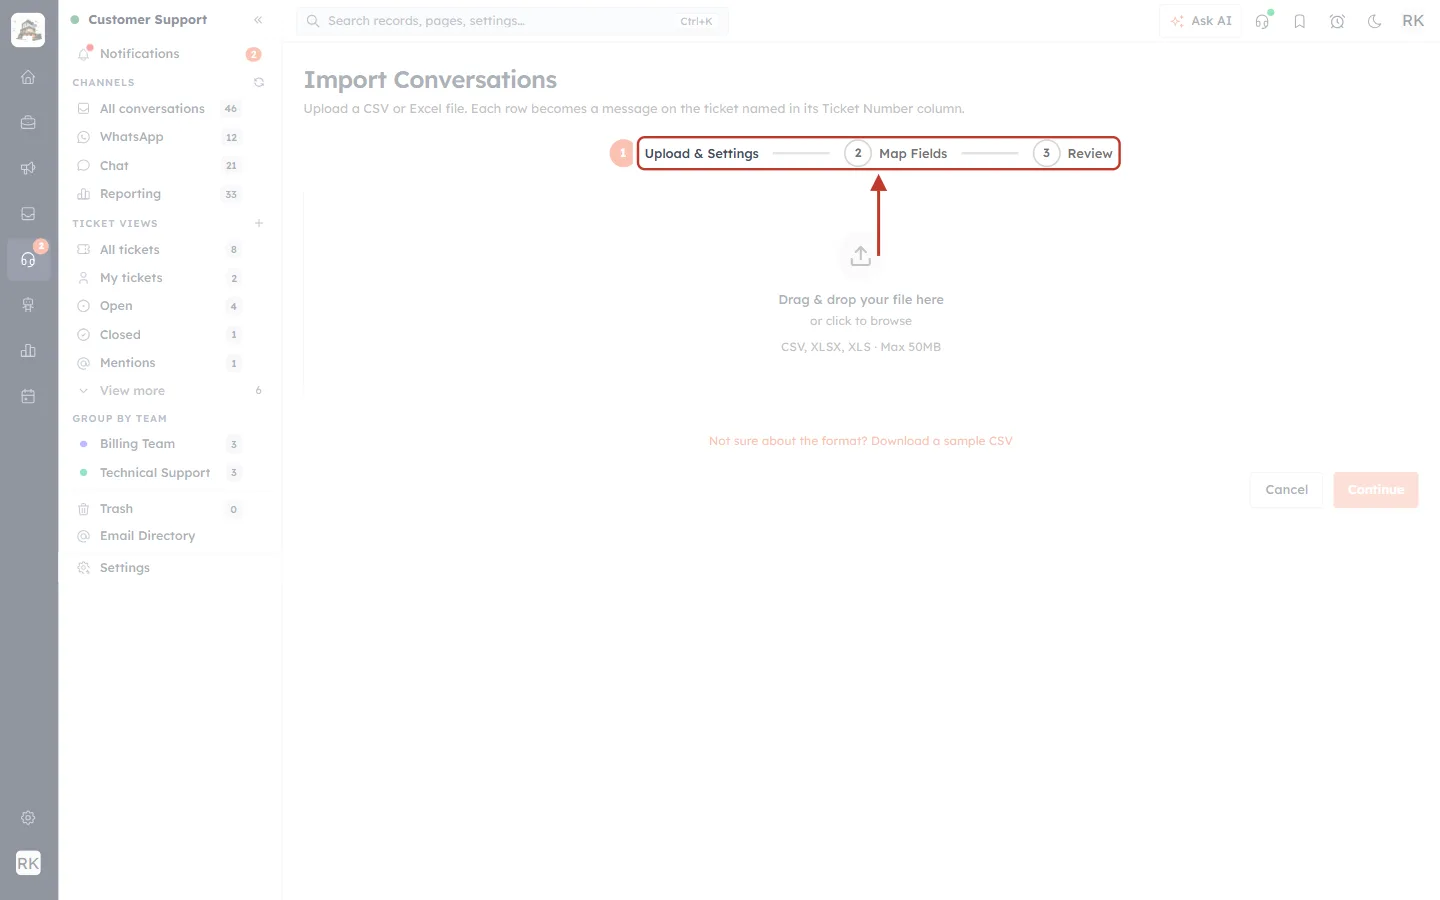
What this screenshot shows. The progress bar of the wizard, ringed: 1 Upload & Settings, 2 Map Fields and 3 Review. Step 1 is highlighted in orange because it is the current step.
A finished step turns into an orange tick, so you always know where you are.
You can go back to an earlier step with the Back button at the bottom of steps 2 and 3.
Step 1: Add your file#
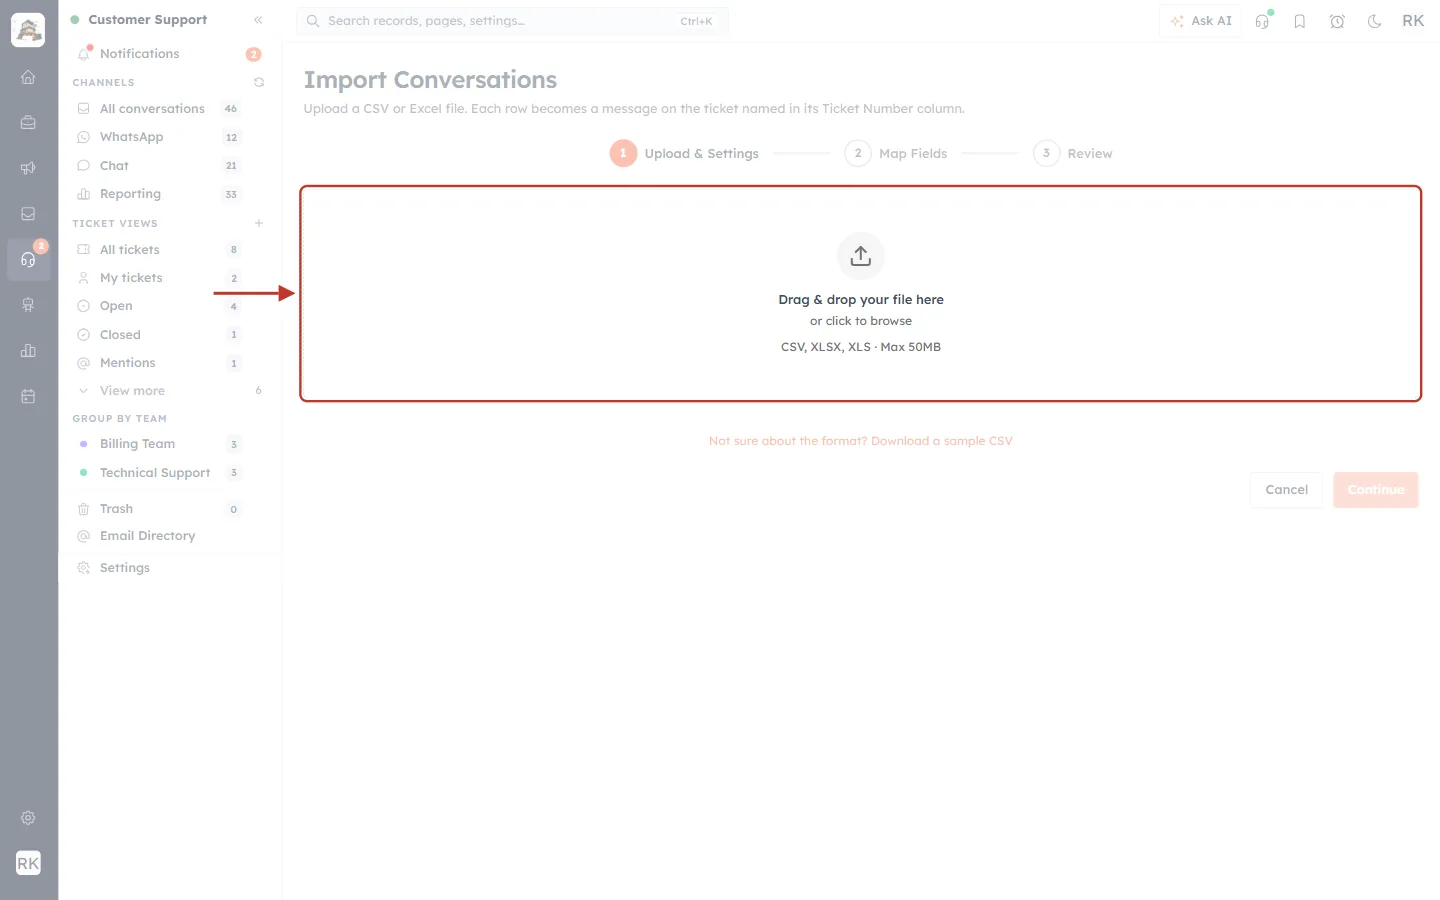
What this screenshot shows. The upload box, ringed. It shows an upload icon, “Drag & drop your file here”, “or click to browse” and “CSV, XLSX, XLS · Max 50MB”.
Drag your file from your computer onto this box, or click the box to pick the file.
Only CSV, XLSX and XLS files up to 50 MB are accepted.
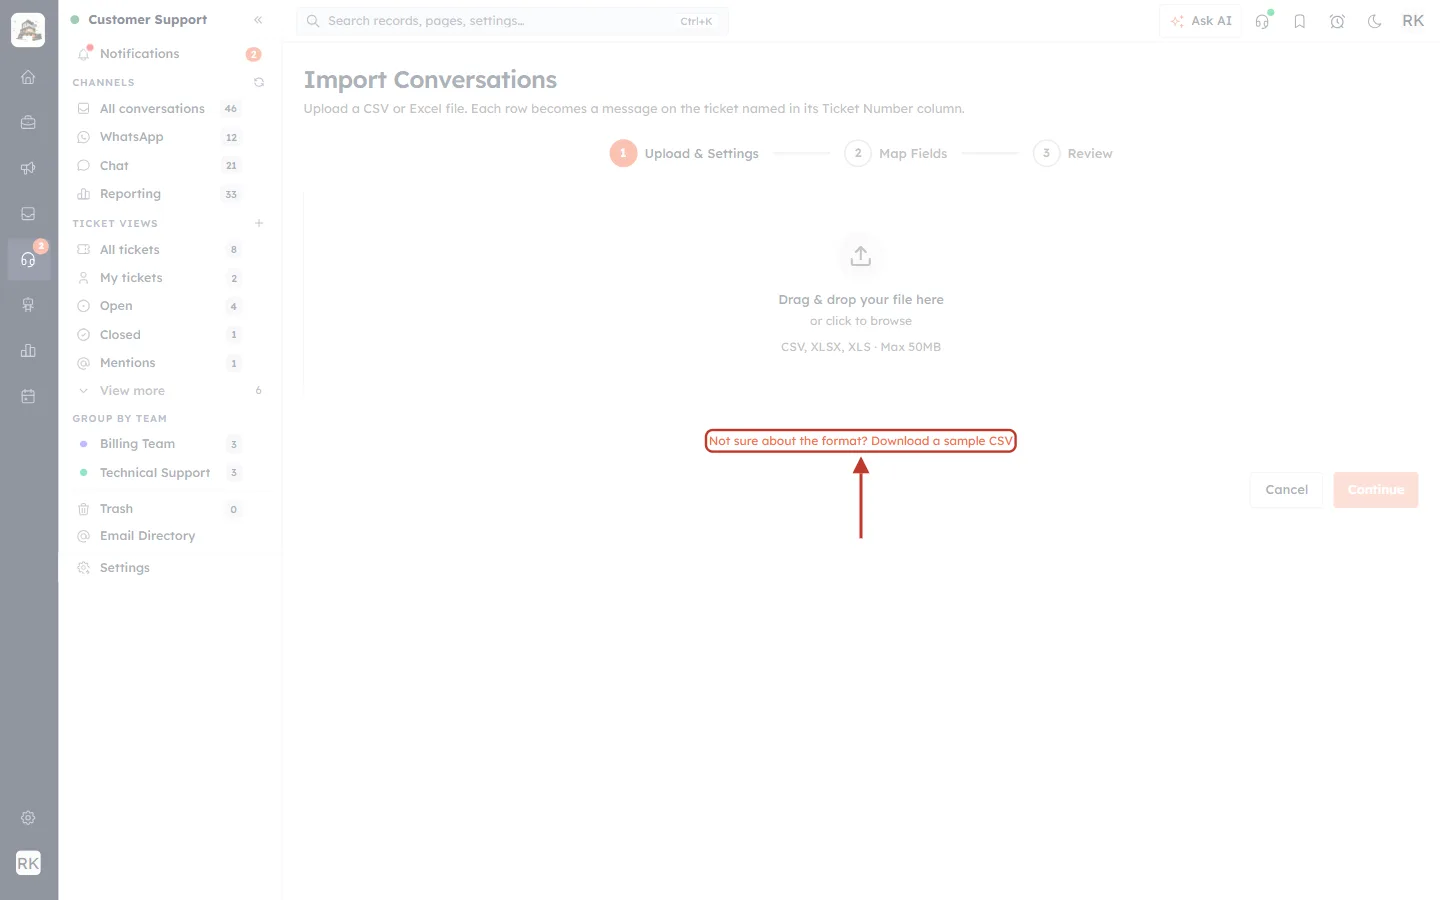
What this screenshot shows. Under the upload box, the orange link “Not sure about the format? Download a sample CSV” is ringed.
Click it to download a ready-made CSV with the right columns and an example row. It’s the easiest way to start: fill it in with your own messages and upload it.
Step 2: Check the file details and the header setting#
Once the file is read, three cards appear under the upload box, with a header setting below them.
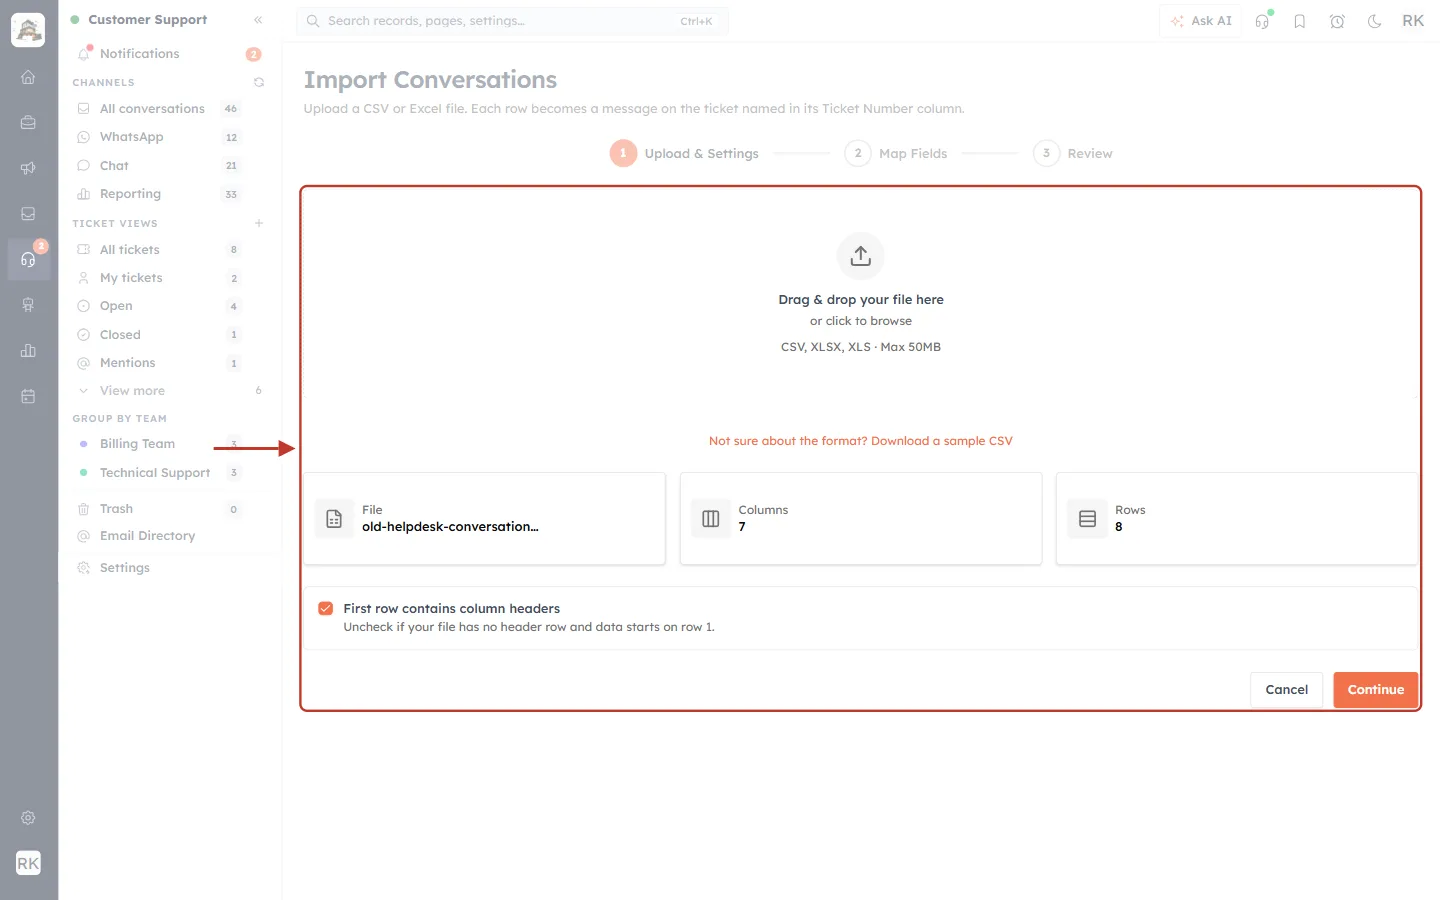
What this screenshot shows. Step 1 after uploading, ringed. Under the upload box are three cards: File (old-helpdesk-conversation…), Columns (7) and Rows (8). Below them, the box “First row contains column headers” is ticked, with the hint “Uncheck if your file has no header row and data starts on row 1.” Cancel and Continue are at the bottom right.
File: the name of the file you uploaded. To use a different file, drop it on the upload box again.
Columns: how many columns were found (our sample has 7).
Rows: how many messages will be imported (8). The header row isn’t counted.
First row contains column headers: keep it ticked when row 1 holds column names, as in the sample. Untick it only if your file starts straight away with messages.
Cancel leaves the wizard without importing anything.
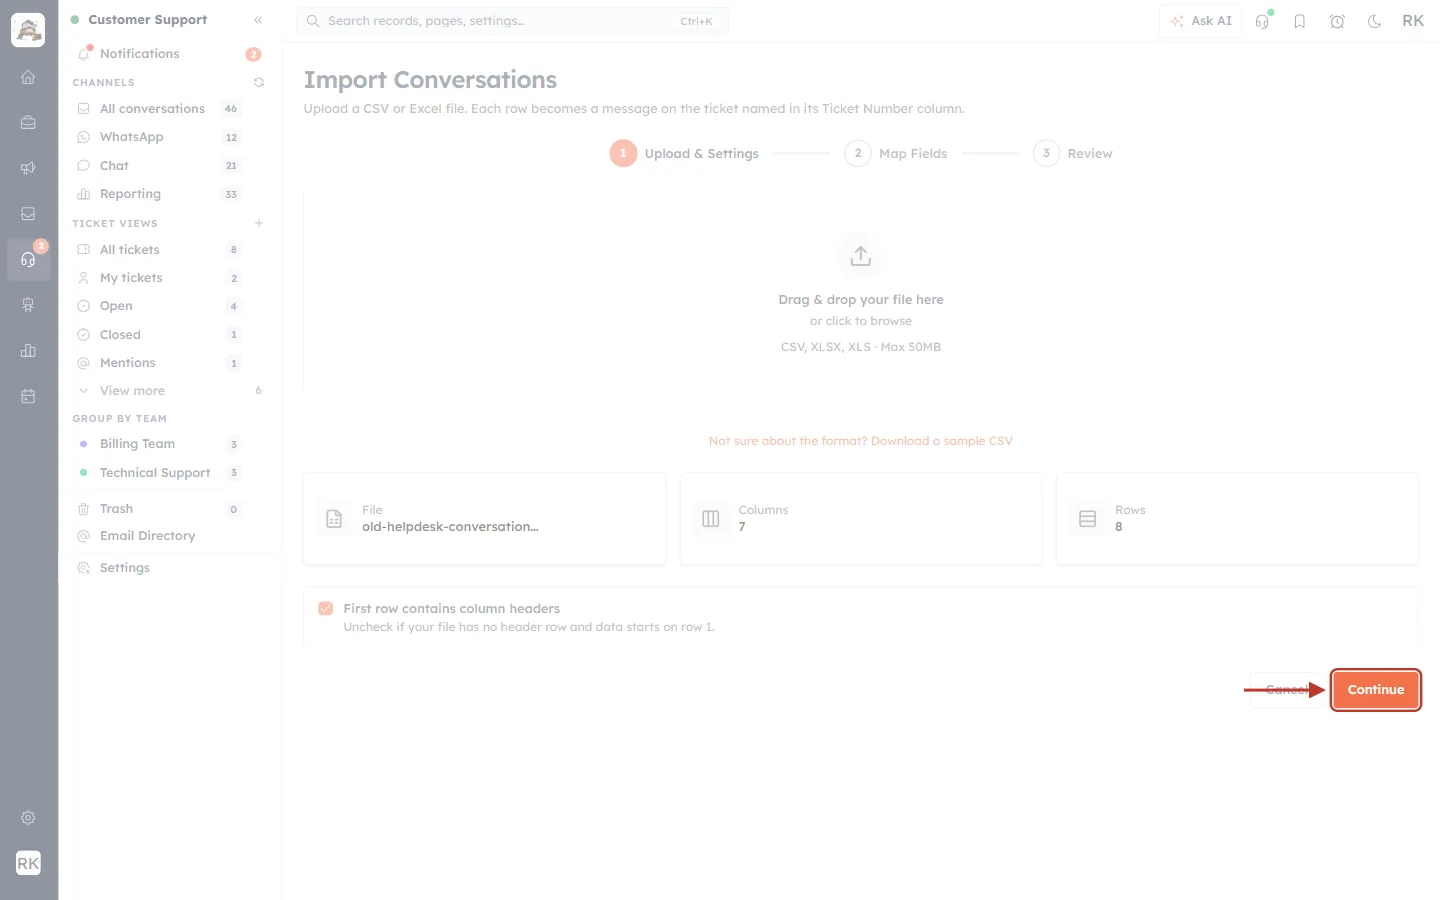
What this screenshot shows. The orange Continue button at the bottom right of step 1, ringed.
Click Continue to go to Map Fields.
Part 4: Step 2 of the wizard: map your columns#
On Map Fields you tell AiEngage CRM what each column in your file contains. Columns whose names match (like the sample’s) are matched up for you automatically.
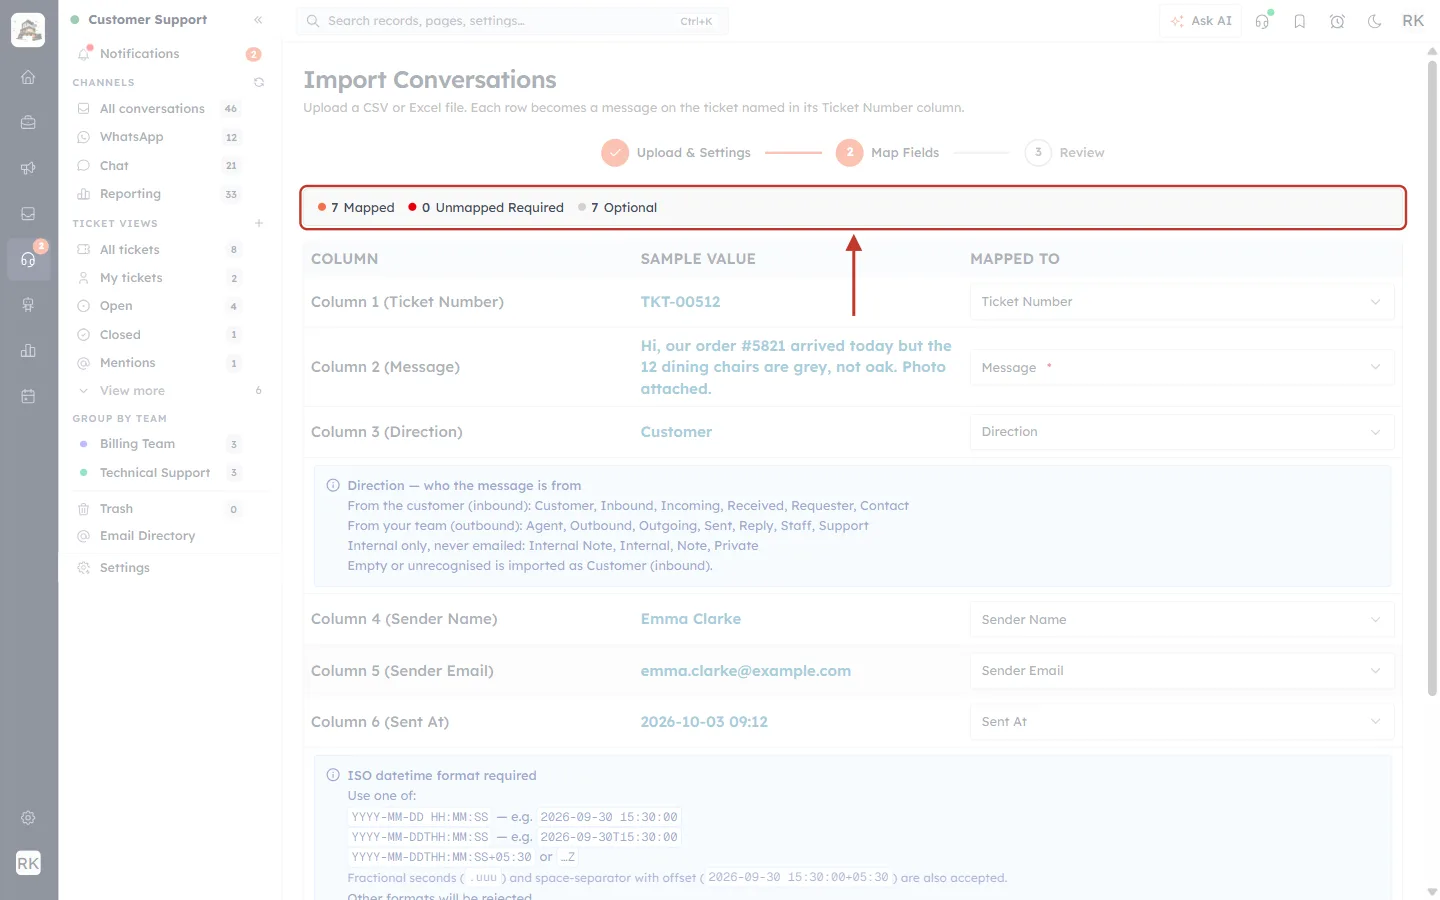
What this screenshot shows. The bar above the mapping table, ringed: 7 Mapped (orange dot), 0 Unmapped Required (red dot) and 7 Optional (grey dot).
Mapped: how many of your columns are matched to a field.
Unmapped Required: required fields that no column is matched to yet. This must be 0 before you can continue. Message is always required.
Optional: fields you can use but don’t have to.
You also need a column mapped to Ticket Number or External Ticket ID, or the import refuses to start with “Map a column to Ticket Number or External Ticket ID.”
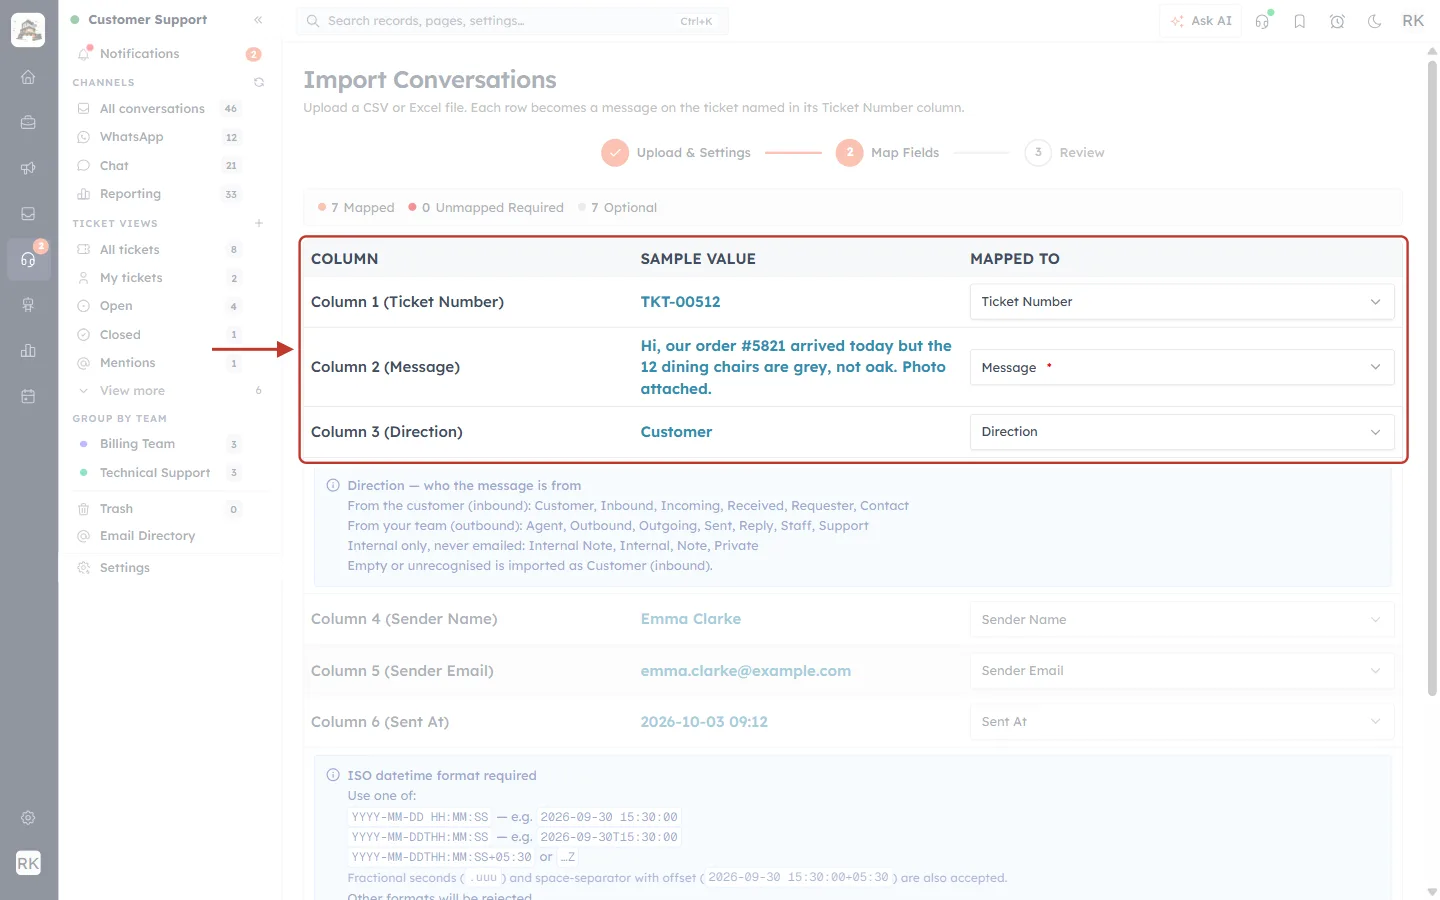
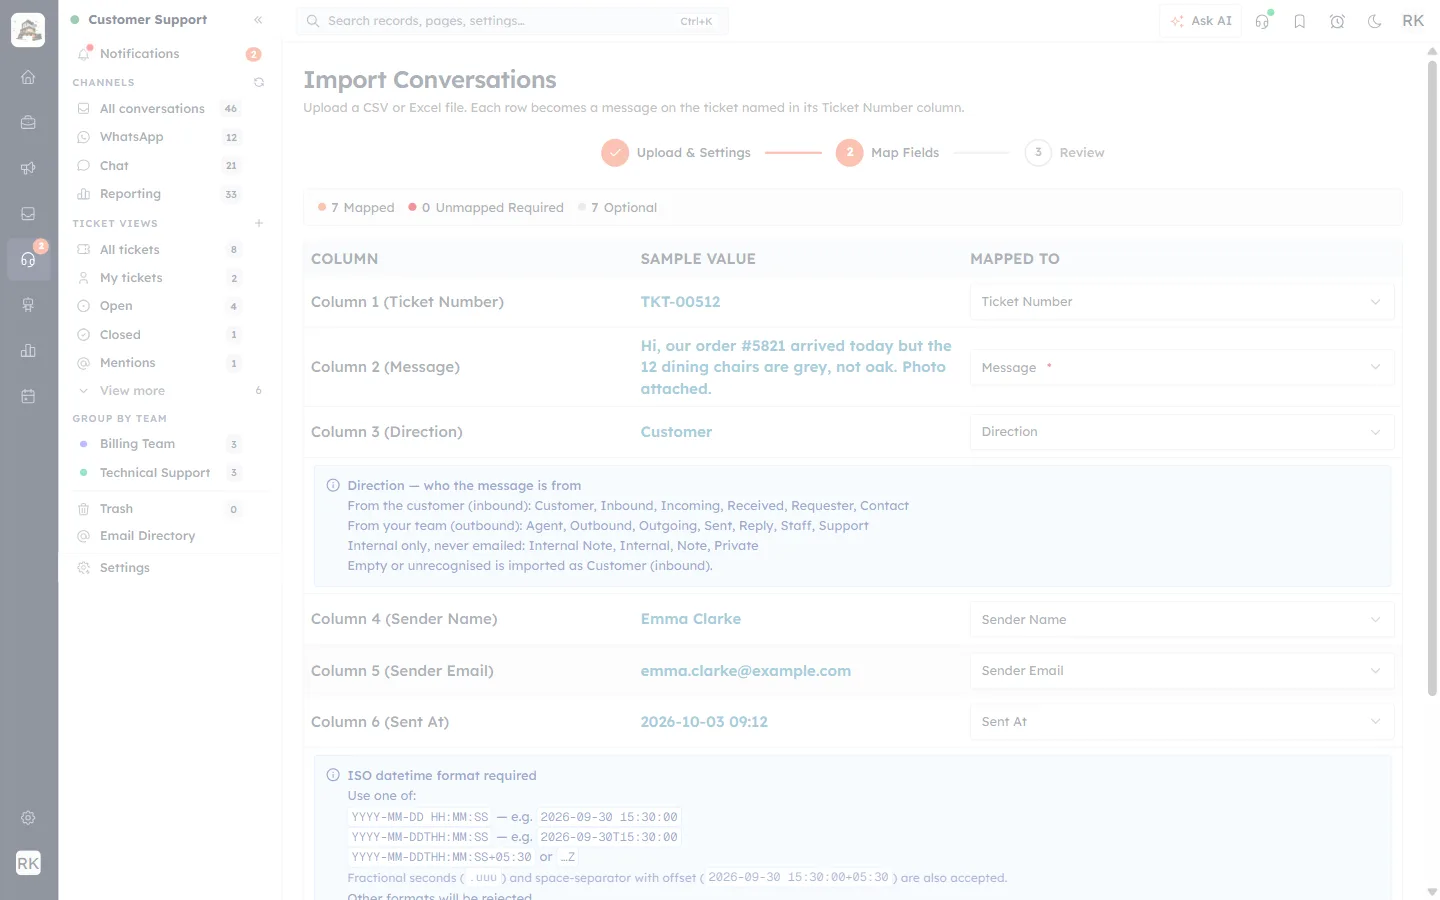
What this screenshot shows. The top of the mapping table, ringed. The headings are Column, Sample Value and Mapped To. The rows read: Column 1 (Ticket Number) · TKT-00512 · Ticket Number; Column 2 (Message) · “Hi, our order #5821 arrived today…” · Message *; Column 3 (Direction) · Customer · Direction.
Column: the column number and its name from your file’s header row.
Sample Value: the value from the first message row, so you can check you’ve picked the right column.
Mapped To: the field it will fill. Click the box to choose a different field, or choose not to use the column.
The red * after Message marks it as required.
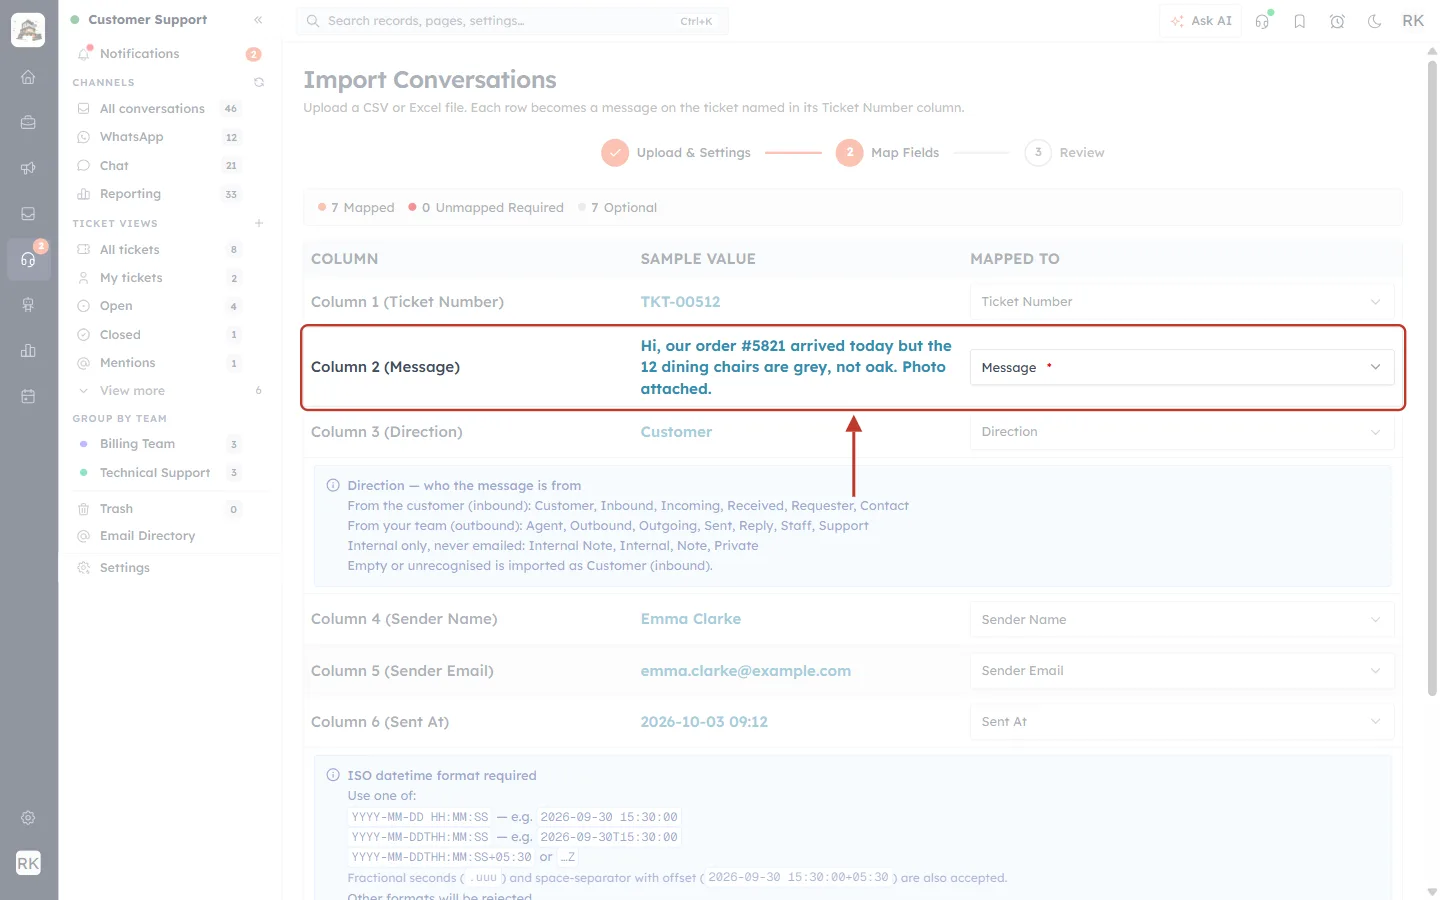
What this screenshot shows. The row Column 2 (Message), ringed. Its sample value is the first message text, and it is mapped to Message *.
Check that Message is matched to the column that holds the message text itself, not a subject or summary column.
Each field can be used by only one column. Mapping two columns to the same field is refused.
Some fields show a blue help box under their row to explain what values they accept:
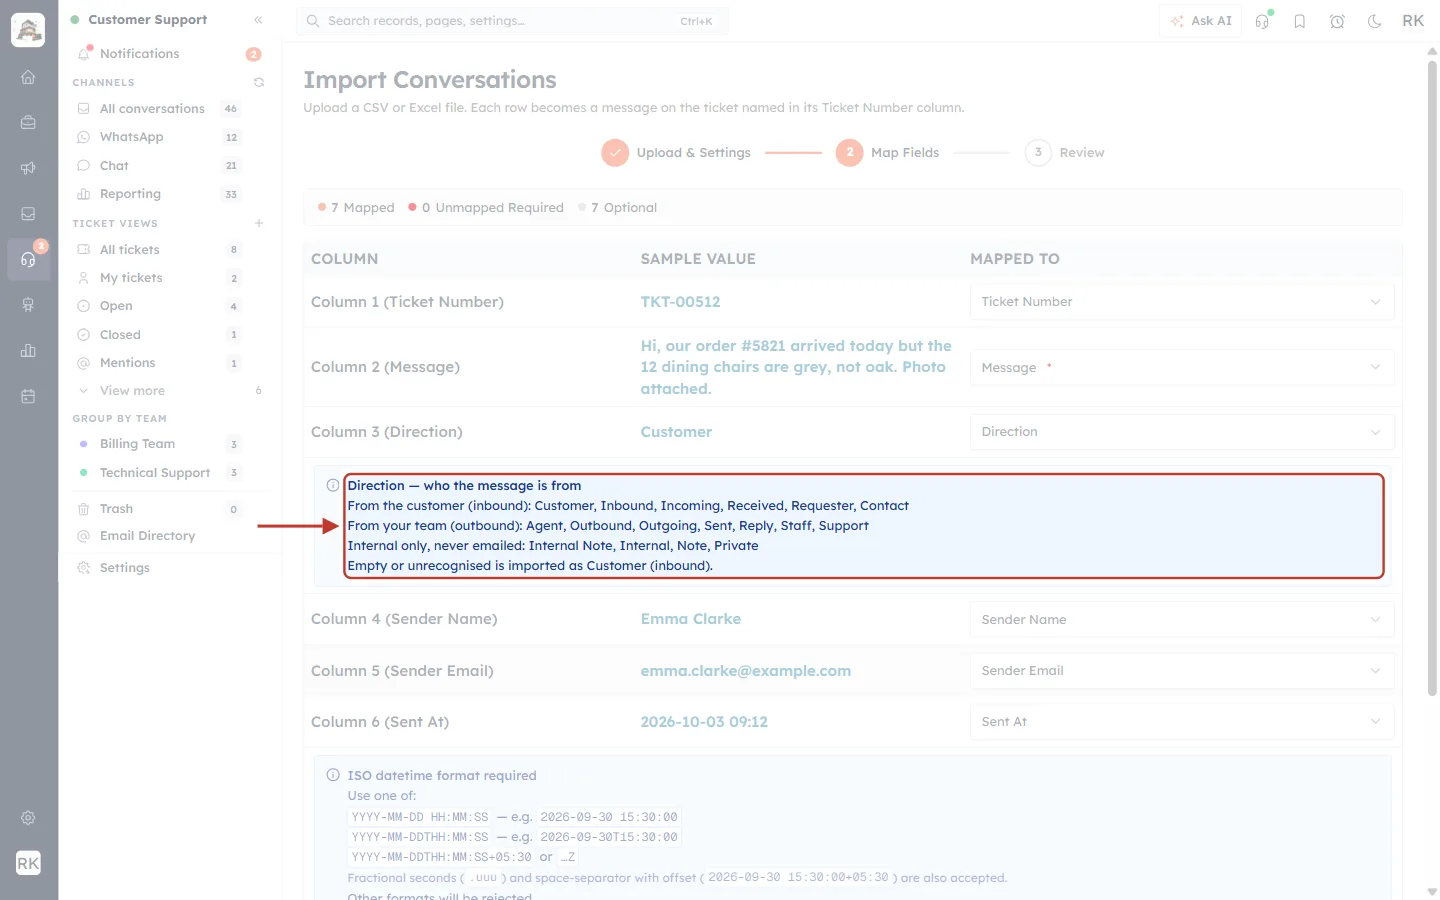
What this screenshot shows. The blue box under the Direction row, ringed: “Direction — who the message is from. From the customer (inbound): Customer, Inbound, Incoming, Received, Requester, Contact. From your team (outbound): Agent, Outbound, Outgoing, Sent, Reply, Staff, Support. Internal only, never emailed: Internal Note, Internal, Note, Private. Empty or unrecognised is imported as Customer (inbound).”
These are the words your Direction column can use (the same list as the table in Part 1).
If the cell is empty or unrecognised and you’ve mapped a Sender Email column, the sender’s address is used to decide. An address belonging to your team counts as an agent message (see Part 1).
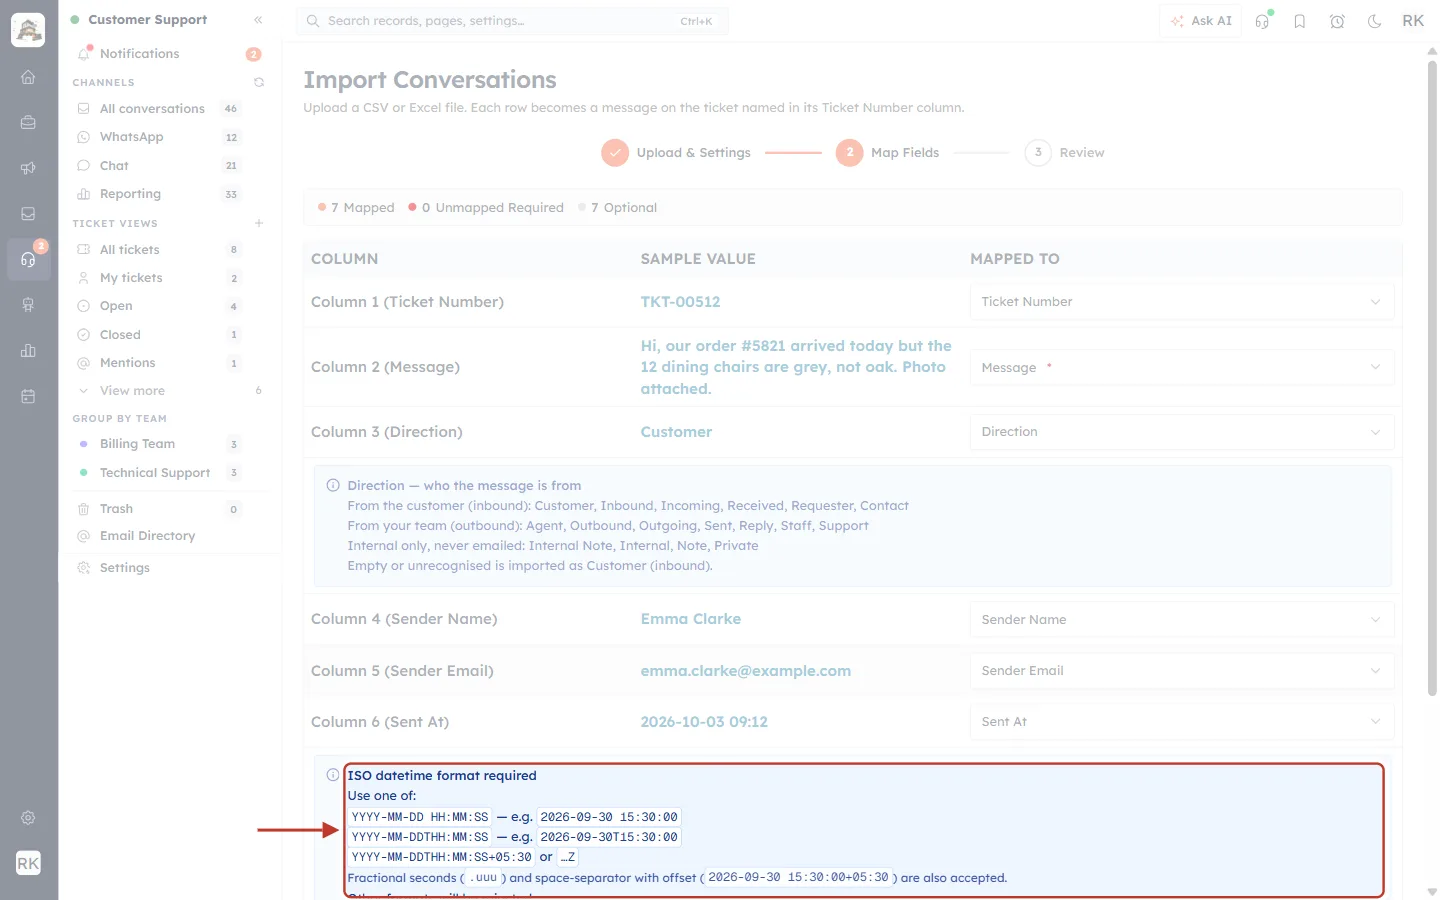
What this screenshot shows. The blue box under the Sent At row, ringed: “ISO datetime format required. Use one of: YYYY-MM-DD HH:MM:SS (e.g. 2026-09-30 15:30:00), YYYY-MM-DDTHH:MM:SS (e.g. 2026-09-30T15:30:00), YYYY-MM-DDTHH:MM:SS+05:30 or …Z.”
Write dates as year-month-day, then the time in 24-hour format, for example 2026-10-03 14:20:00.
You can add a time-zone offset (+05:30) or Z for UTC. Without one, the time is read in your own time zone.
In Excel, format the Sent At column as text (or use a custom format yyyy-mm-dd hh:mm:ss) before saving, so the dates keep this format.
What this screenshot shows. The blue box under the Attachment row, ringed: “Media import — public URLs only. Put a public URL per file. Separate multiple with a comma or new line. Files download in the background after the import finishes. Max 10 files, 10 MB each. Private IPs are rejected.”
The links must open without a login, because AiEngage CRM downloads each file from the link and stores it with the message.
Links to private or internal network addresses are refused for security reasons.
When Unmapped Required shows 0, click Continue at the bottom right.
Part 5: Step 3 of the wizard: review, start and check the results#
Step 1: Check the summary#
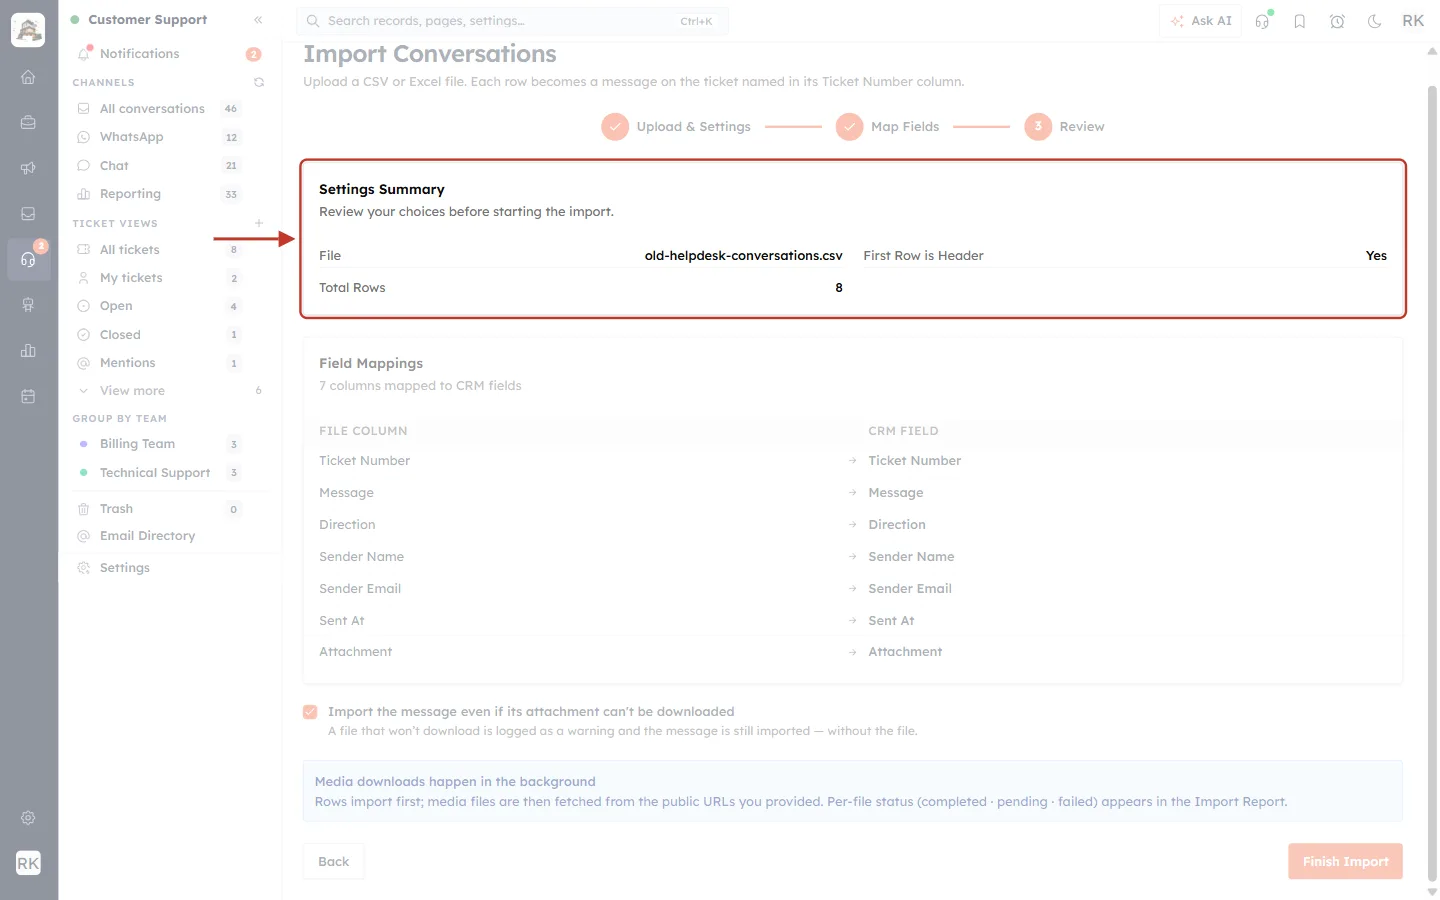
What this screenshot shows. The Settings Summary card, ringed: “Review your choices before starting the import.” File: old-helpdesk-conversations.csv · First Row is Header: Yes · Total Rows: 8.
Make sure it is the right file and the row count is what you expect.
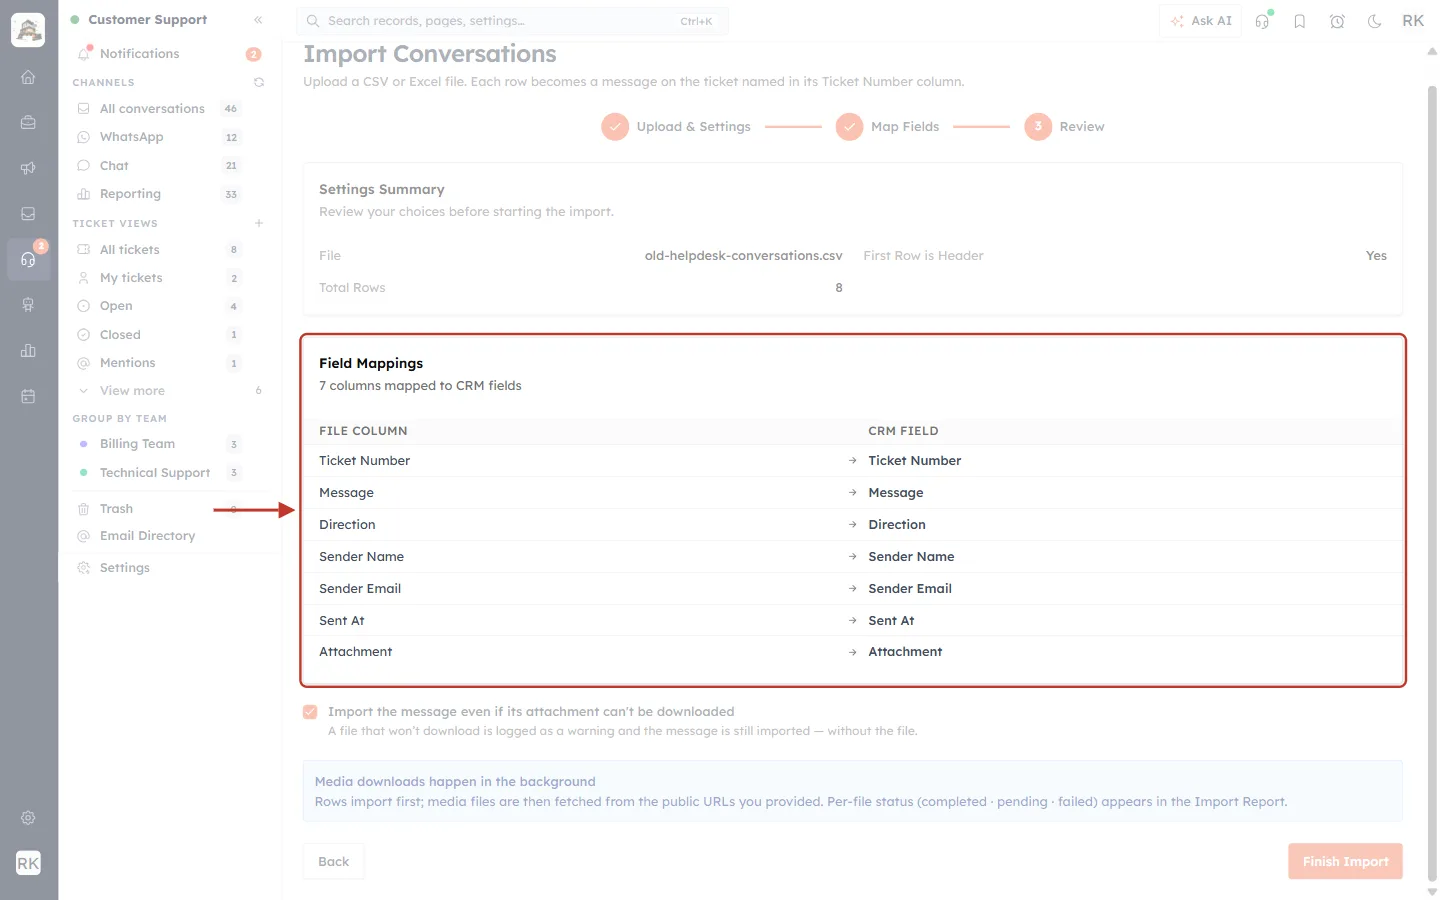
What this screenshot shows. The Field Mappings card, ringed: “7 columns mapped to CRM fields”, with a two-column list of File Column → CRM Field: Ticket Number → Ticket Number, Message → Message, Direction → Direction, Sender Name → Sender Name, Sender Email → Sender Email, Sent At → Sent At, Attachment → Attachment.
Read down the list once more. If something is wrong, click Back and change it on Map Fields.
Step 2: Decide what happens if an attachment won’t download#
This option only appears when you’ve mapped an Attachment column.
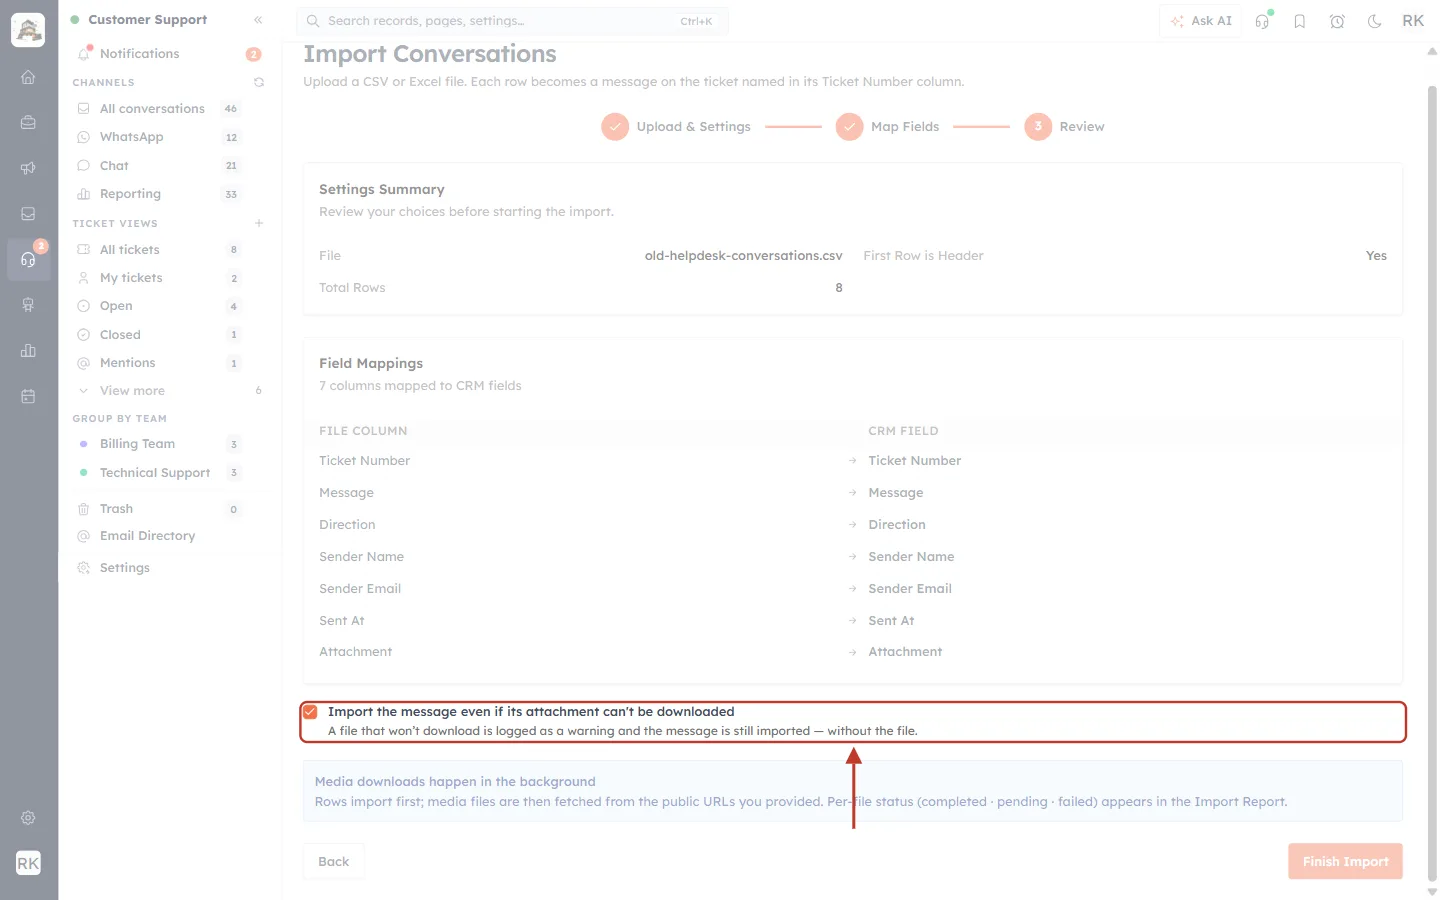
What this screenshot shows. The ticked box “Import the message even if its attachment can’t be downloaded”, ringed, with the note “A file that won’t download is logged as a warning and the message is still imported — without the file.”
Ticked (the default): if a link is broken or too big, the message is still imported without that file, and the problem is listed as a warning.
Unticked: a file that won’t download makes that whole row fail. The message isn’t imported, and the reason appears in the import report. Choose this if a message makes no sense without its file.
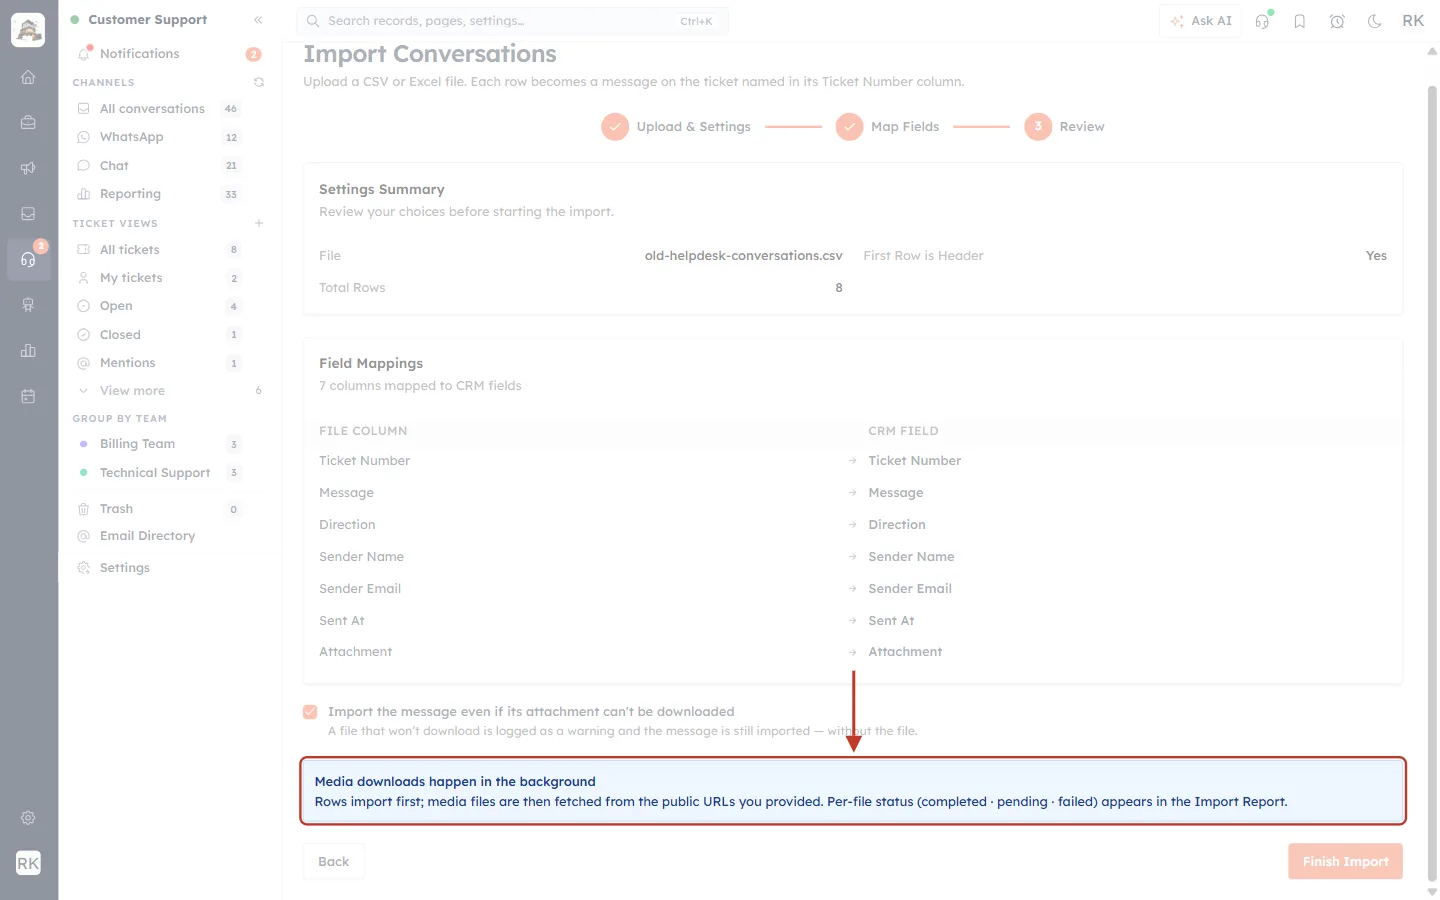
What this screenshot shows. The blue notice, ringed: “Media downloads happen in the background. Rows import first; media files are then fetched from the public URLs you provided. Per-file status (completed · pending · failed) appears in the Import Report.”
Large files can take a little longer to appear on the messages than the text itself.
Step 3: Click Finish Import#
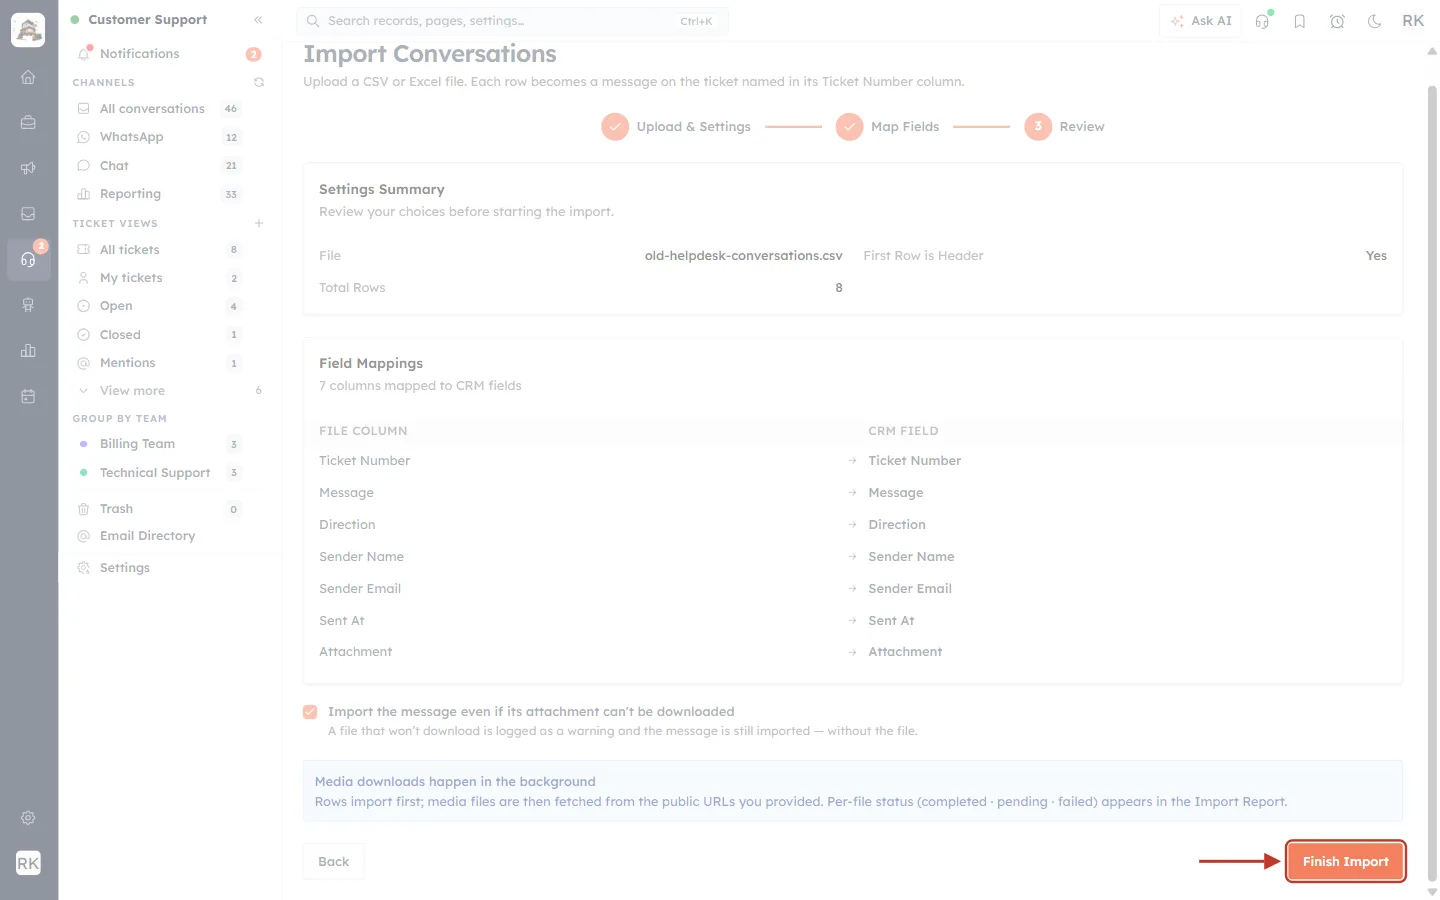
What this screenshot shows. The orange Finish Import button at the bottom right of the Review step, ringed. Back is on the left.
Click Finish Import to start. The import runs in the background, so you can keep working on other pages.
Step 4: Follow the progress#
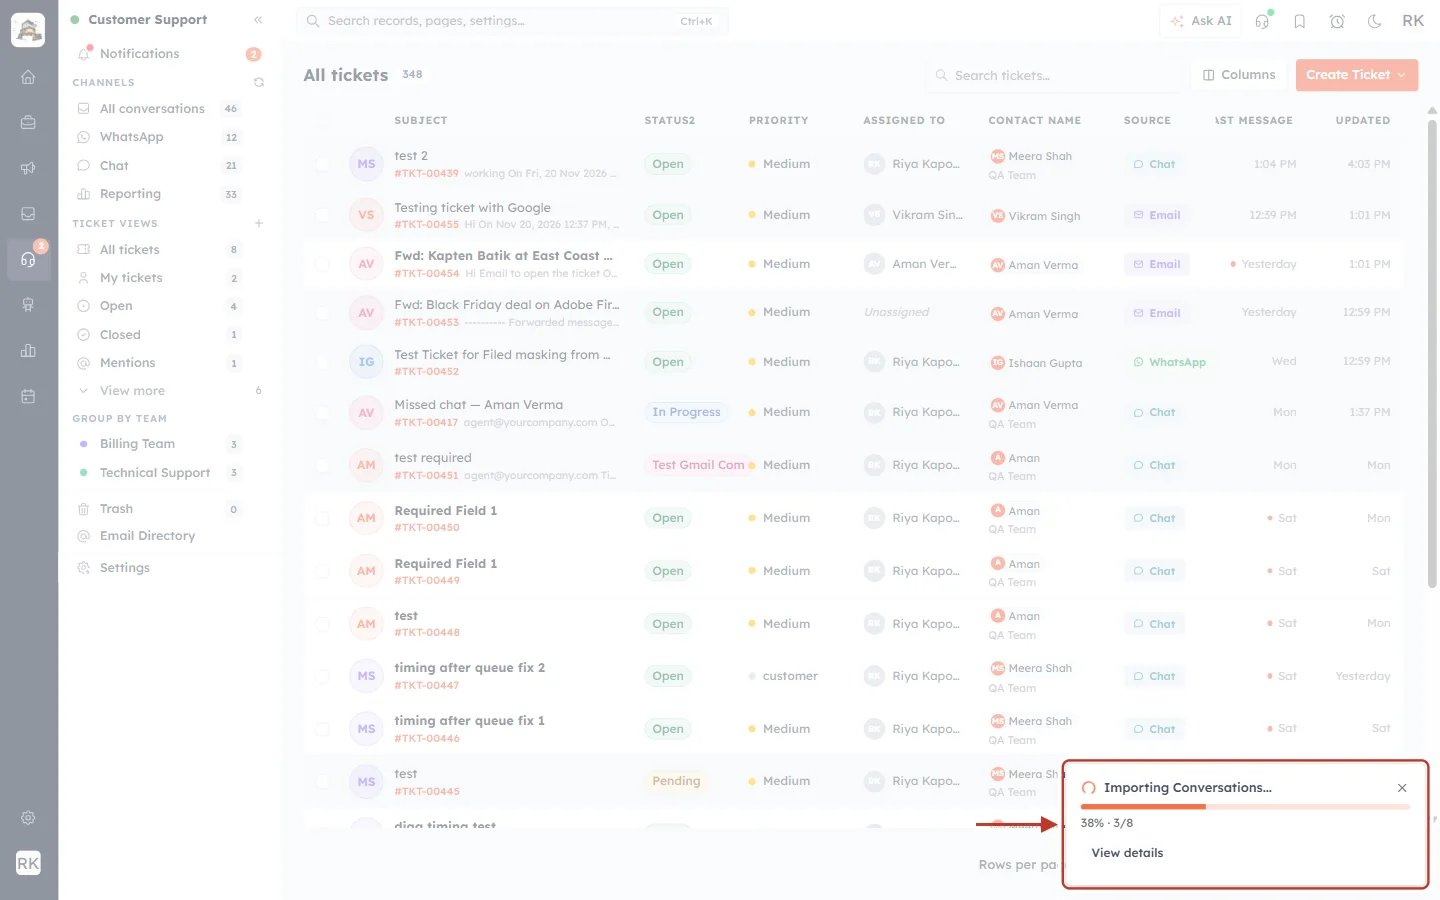
What this screenshot shows. A progress card in the bottom-right corner of the screen, ringed: “Importing Conversations…” with a progress bar, “38% · 3/8” and a View details link.
38% · 3/8: 3 of the 8 rows have been processed so far.
The card stays visible on every page until the import finishes, so you can carry on working.
View details opens the full import details page (Step 5).
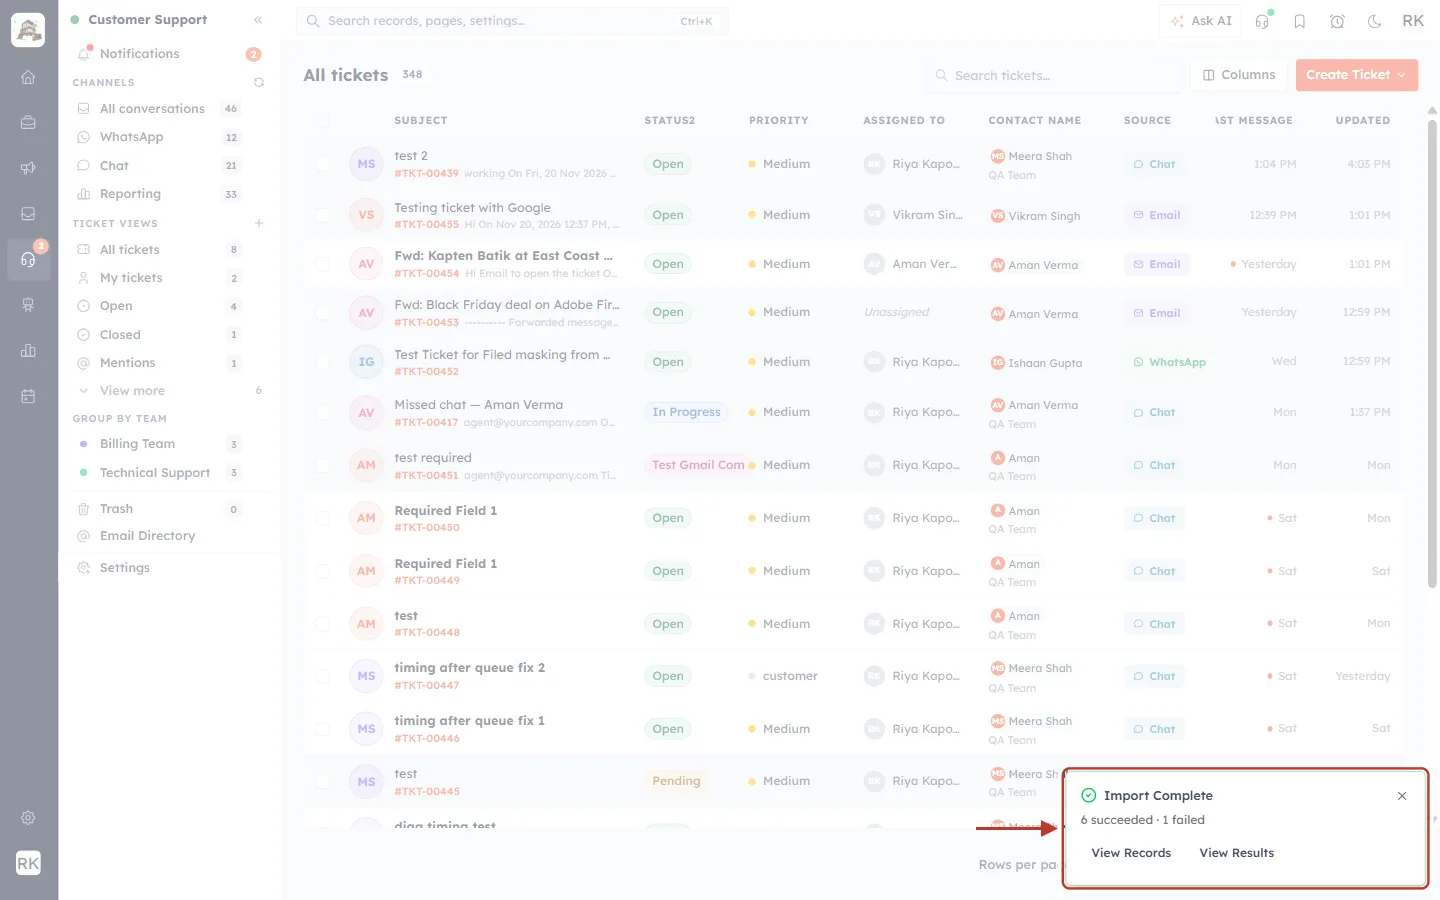
What this screenshot shows. The same card when the import has finished, ringed: a green tick, “Import Complete”, “6 succeeded · 1 failed”, and the links View Records and View Results.
6 succeeded: six messages were added to tickets.
1 failed: one row couldn’t be imported. View Results shows why.
View Records takes you to the ticket list. View Results opens the import details.
Close the card with the × in its corner when you’ve finished with it.
Step 5: Read the import details#
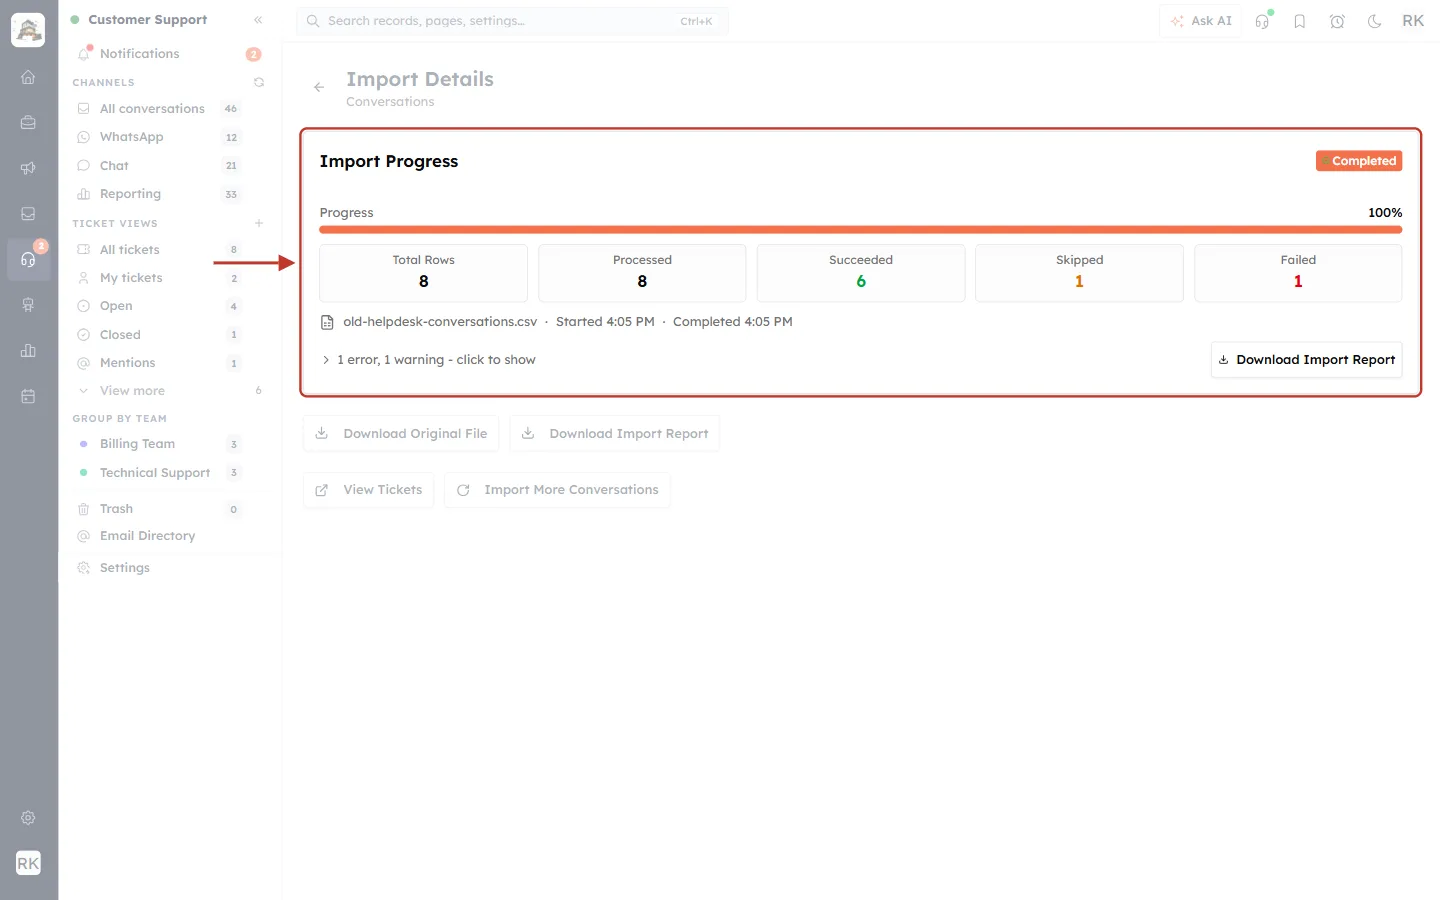
What this screenshot shows. The Import Details page, with the Import Progress card ringed. It shows a Completed badge, a full progress bar (100%) and five boxes: Total Rows 8, Processed 8, Succeeded 6, Skipped 1, Failed 1. Below them: “old-helpdesk-conversations.csv · Started 4:05 PM · Completed 4:05 PM”.
Total Rows / Processed: how many rows the file had, and how many were worked through.
Succeeded: messages added to tickets.
Skipped: rows left out on purpose, for example a duplicate message already on the ticket, or an empty Message.
Failed: rows that couldn’t be imported because of a problem you need to fix.
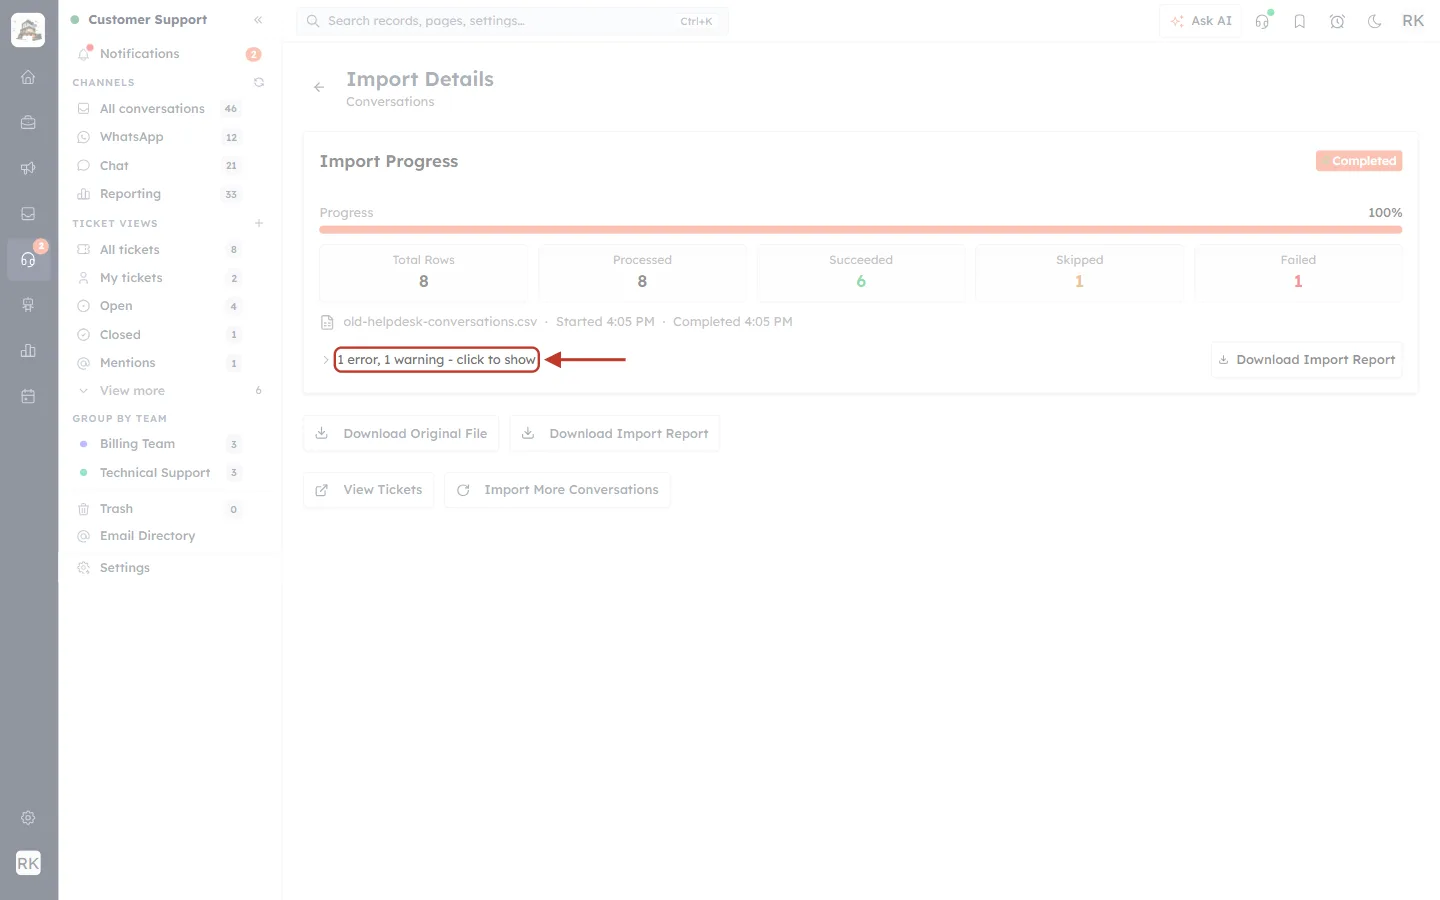
What this screenshot shows. The line “1 error, 1 warning - click to show” under the progress figures, ringed.
Click it to list every problem row (Step 6). Click it again to hide the list.
Step 6: Fix the rows that didn’t import#
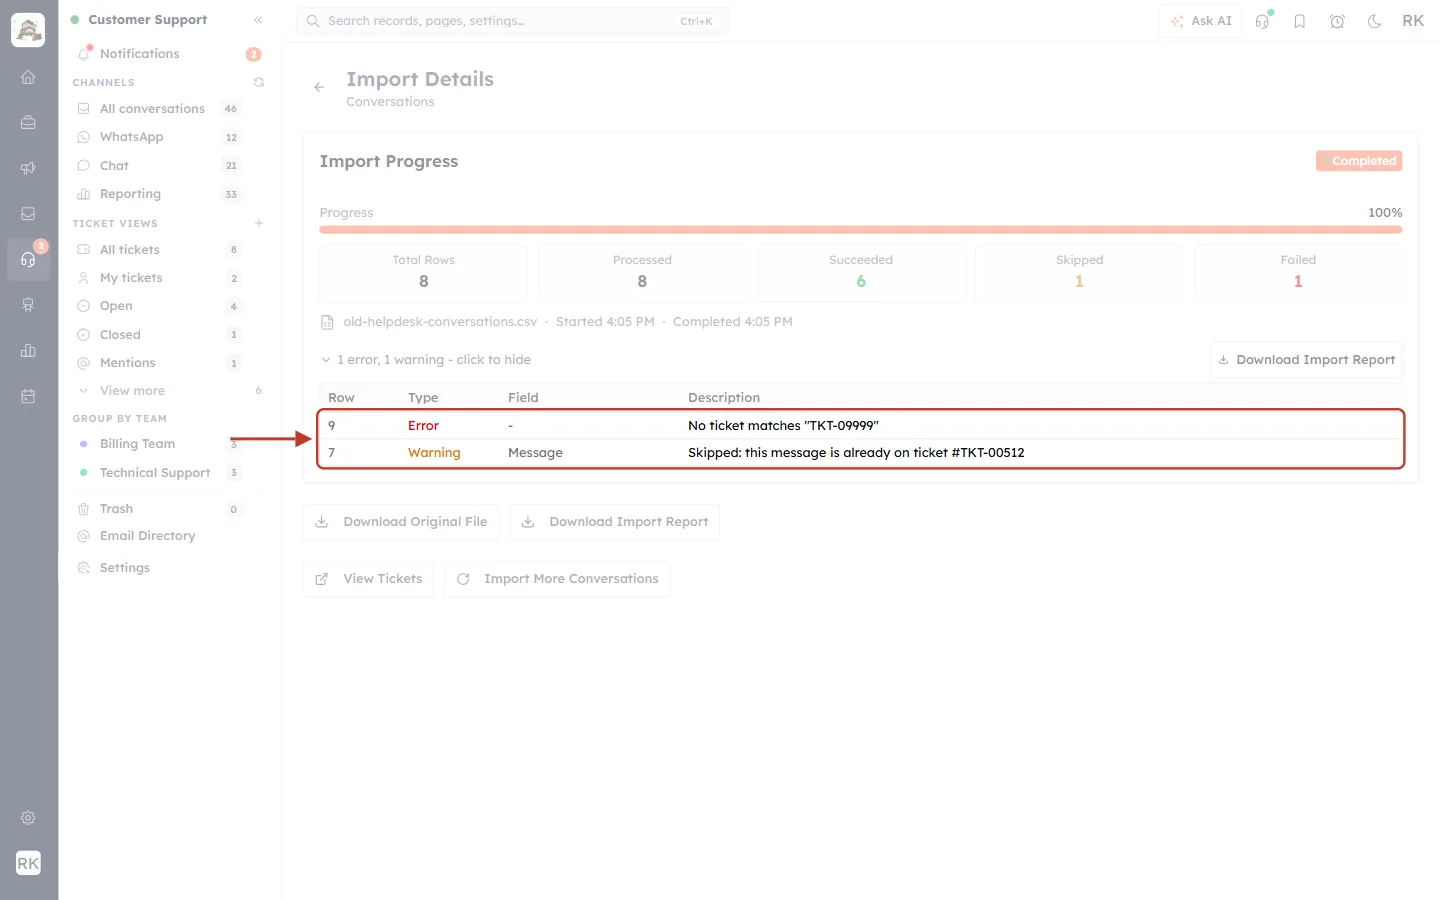
What this screenshot shows. The opened list, with its two rows ringed. Its columns are Row, Type, Field and Description. Row 9 · Error · – · No ticket matches “TKT-09999”. Row 7 · Warning · Message · Skipped: this message is already on ticket #TKT-00512.
Row is the line number in your file, counting the header as line 1. Row 9 is the eighth message.
Error (red) means the row was not imported. Here the ticket number TKT-09999 doesn’t exist, so there was nowhere to put the message.
Warning (orange) means the row was skipped, or imported with something left out. Here the repeated row was skipped because the same message was already on #TKT-00512.
Message you may see | What it means and how to fix it |
|---|---|
No ticket matches “…” | The ticket number or External Ticket ID doesn’t match any ticket. Check the number, or import the ticket first. |
“…” matches more than one ticket — use the full ticket number | A short number such as “12” matched several tickets. Use the full number, for example TKT-00012. |
You do not have access to edit ticket #… | Your profile can’t edit that ticket (for example, it belongs to another team). Ask someone with access, or your admin. |
Missing required field(s): Message | The Message cell is empty. Fill it in, or leave the row out. |
Give a Ticket Number or an External Ticket ID. | Both ticket columns are empty on that row. |
Skipped: this message is already on ticket #… | A duplicate. Nothing to fix. The message is already on the ticket. |
Invalid email “…” — left empty | The Sender Email isn’t a valid address. The message was imported without it. |
Unreadable date “…” — the import time was used | Sent At wasn’t in a format AiEngage CRM recognises. Fix the date format (see Part 4) if the order matters. |
To fix failed rows, correct them in your file and import the file again. Rows that already imported are skipped automatically as duplicates, so only the fixed rows are added.
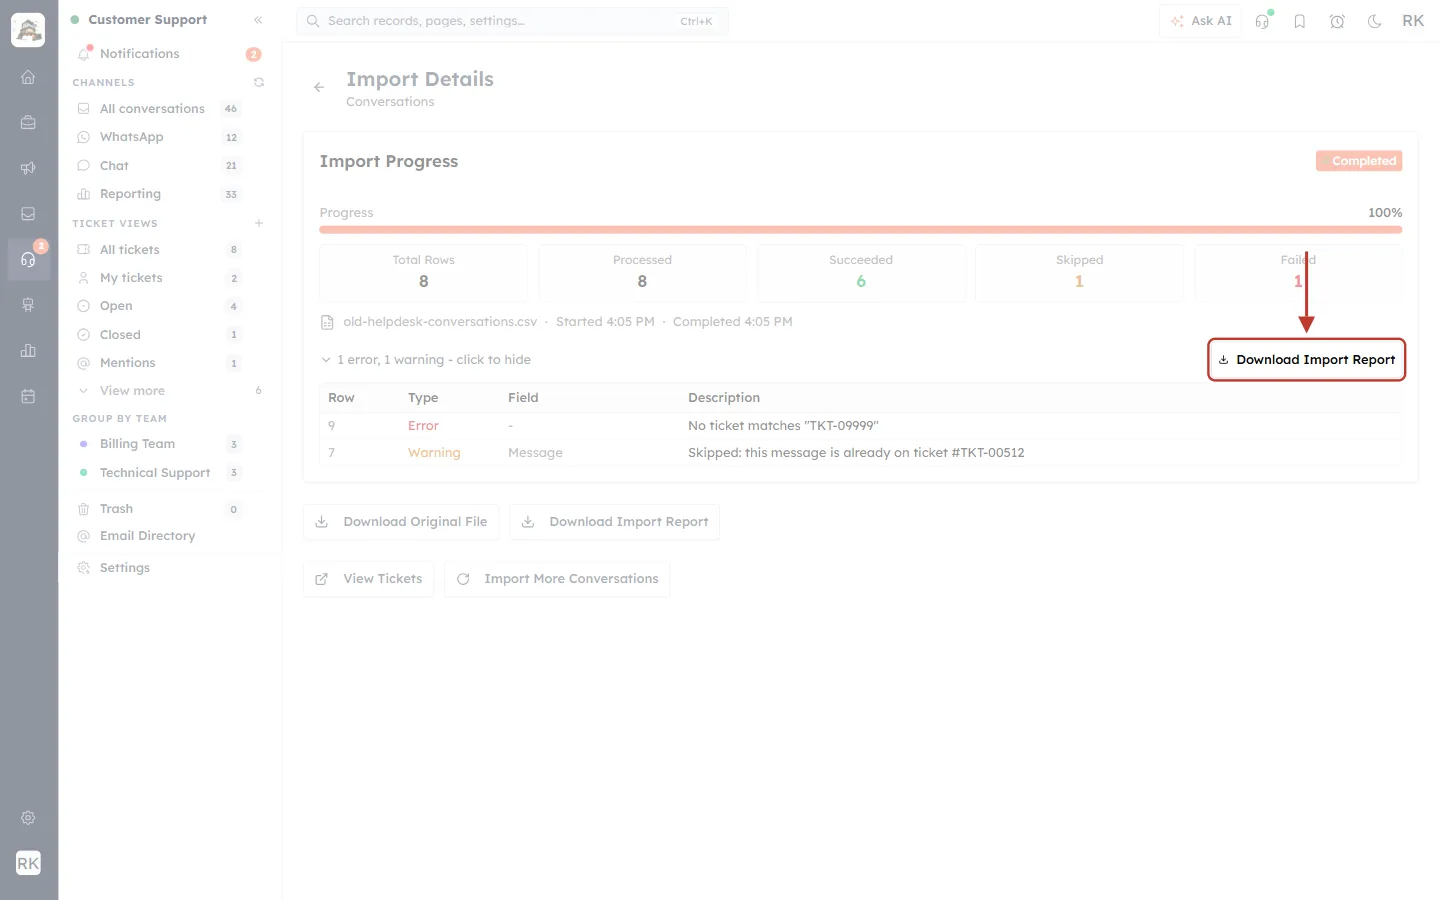
What this screenshot shows. The Download Import Report button, ringed.
Downloads a file listing every row with an error or warning and the reason, which is handy for fixing a large file.
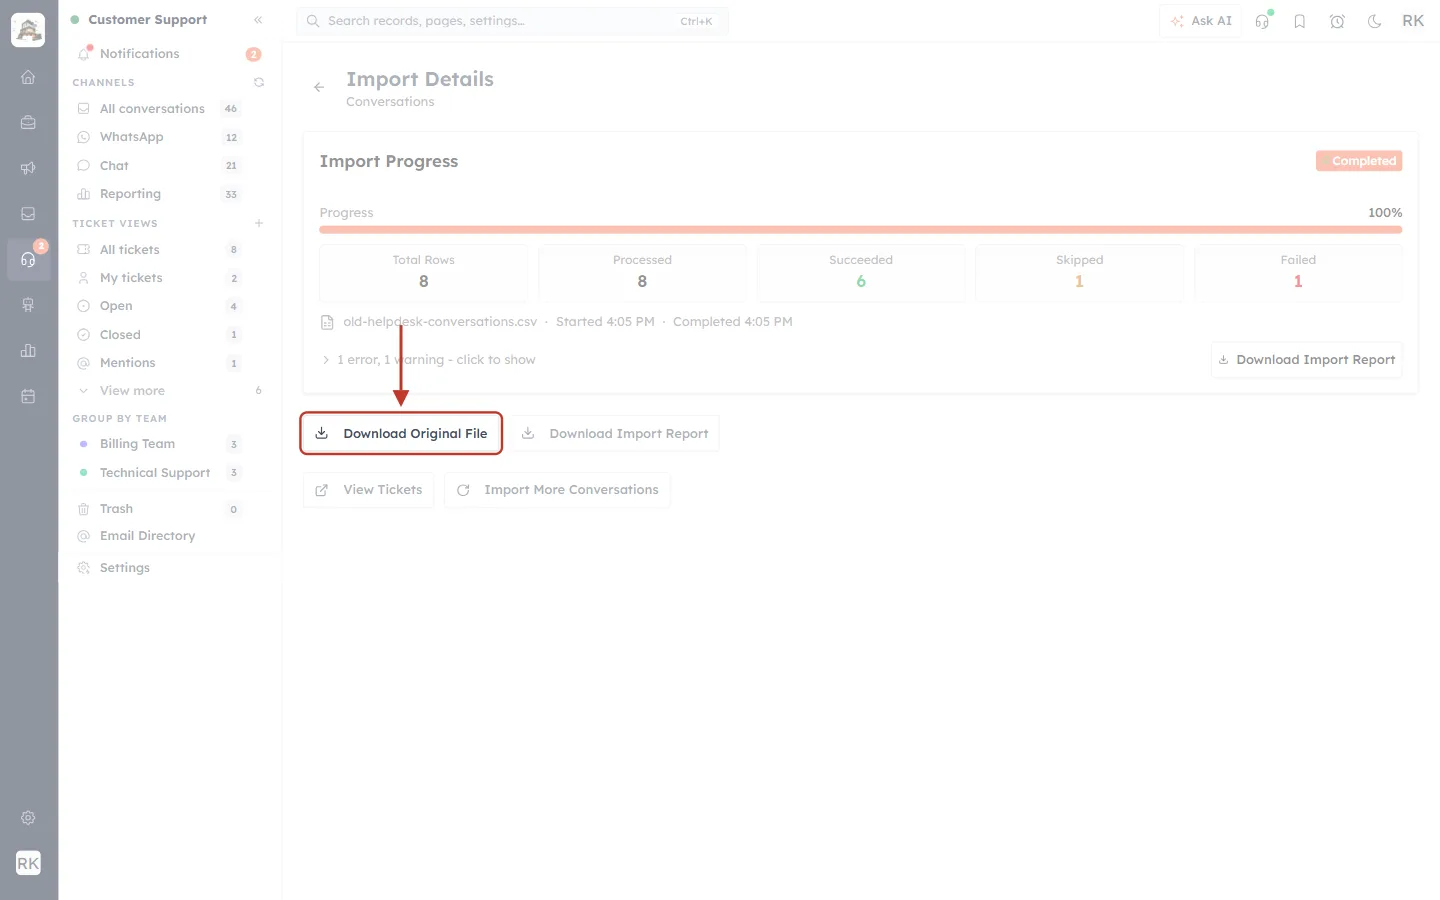
What this screenshot shows. The buttons under the progress card. Download Original File is ringed.
Downloads the exact file you uploaded, so you can fix it and import it again.
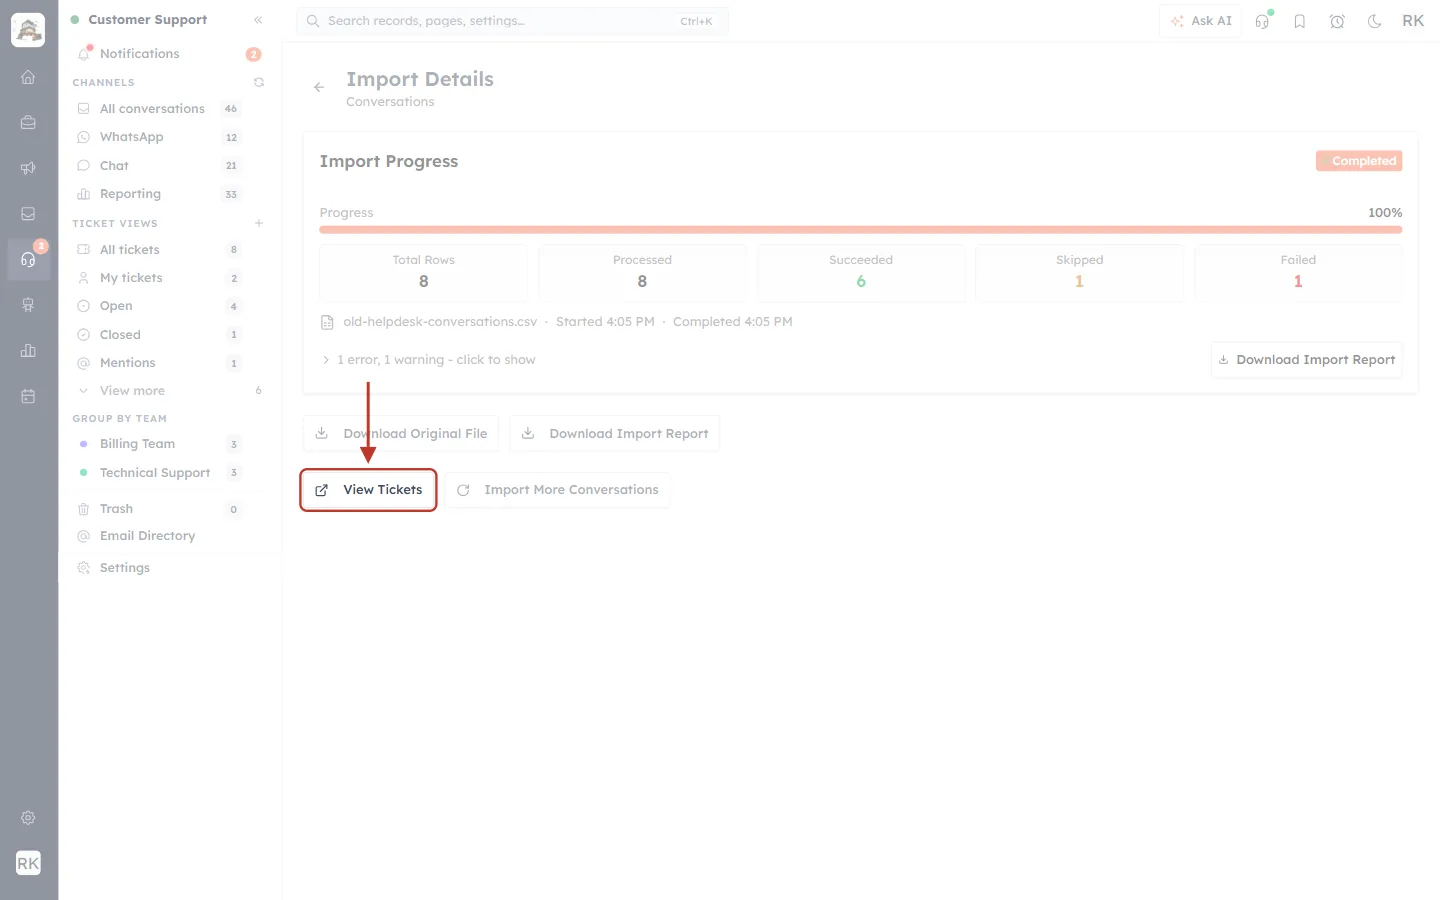
What this screenshot shows. The View Tickets button is ringed.
Opens your ticket list, so you can open a ticket and check its imported messages (Part 6).
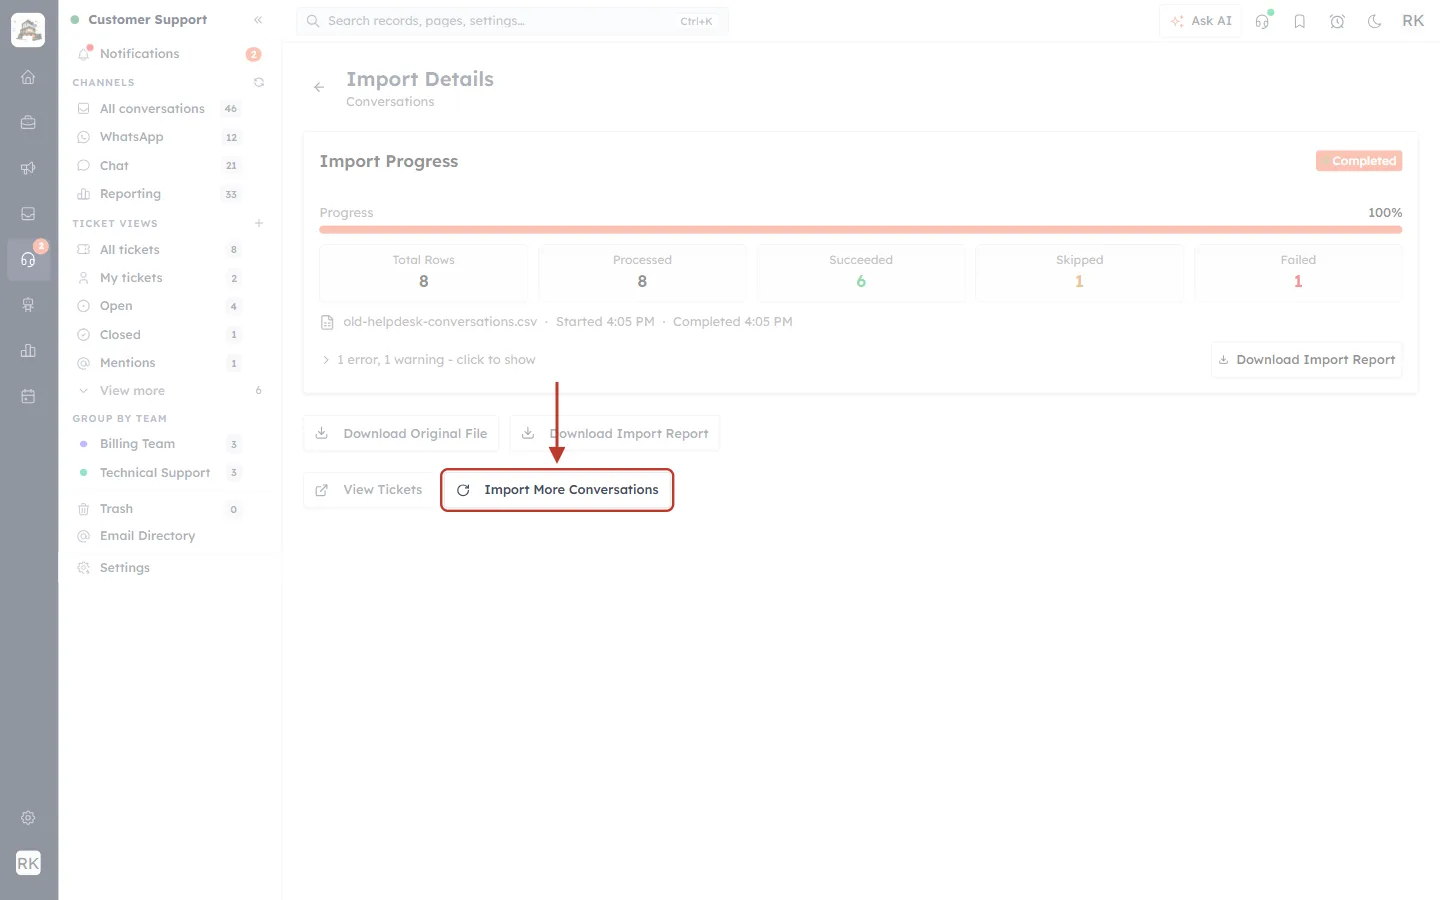
What this screenshot shows. The Import More Conversations button is ringed.
Starts the wizard again for your next file.
Part 6: See the imported messages, and find past imports#
Open the ticket#
Open any ticket you imported messages into, for example from View Tickets or by searching for its number in the ticket list.
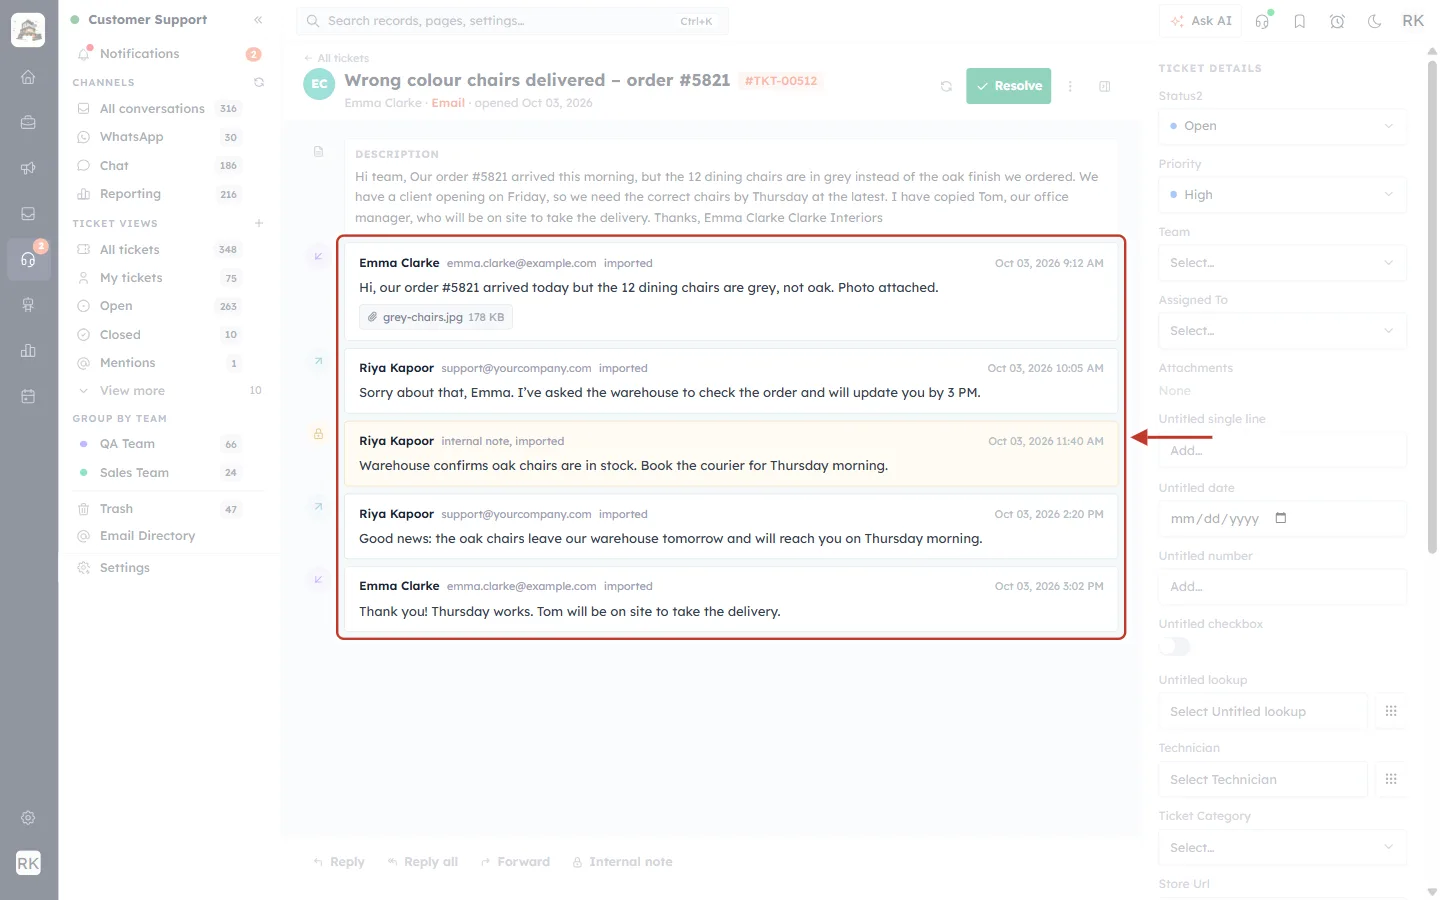
What this screenshot shows. Ticket #TKT-00512 · Wrong colour chairs delivered – order #5821. The ring surrounds the five imported messages, in the order they were sent on Oct 03, 2026: Emma Clarke 9:12 AM (with the file grey-chairs.jpg), Riya Kapoor 10:05 AM, Riya Kapoor’s internal note 11:40 AM (yellow), Riya Kapoor 2:20 PM and Emma Clarke 3:02 PM.
Each imported message shows the sender name, the sender email (when there was one), the word imported and the original sent time on the right.
The small icon to the left of each card shows the direction: ↙ received from the customer, ↗ sent by your team, 🔒 internal note.
Imported messages are a record only. They have no Reply or Forward buttons of their own. To answer the customer, use Reply at the bottom of the ticket as usual.
The ticket’s own details (status, priority, assignee) on the right aren’t changed by the import.
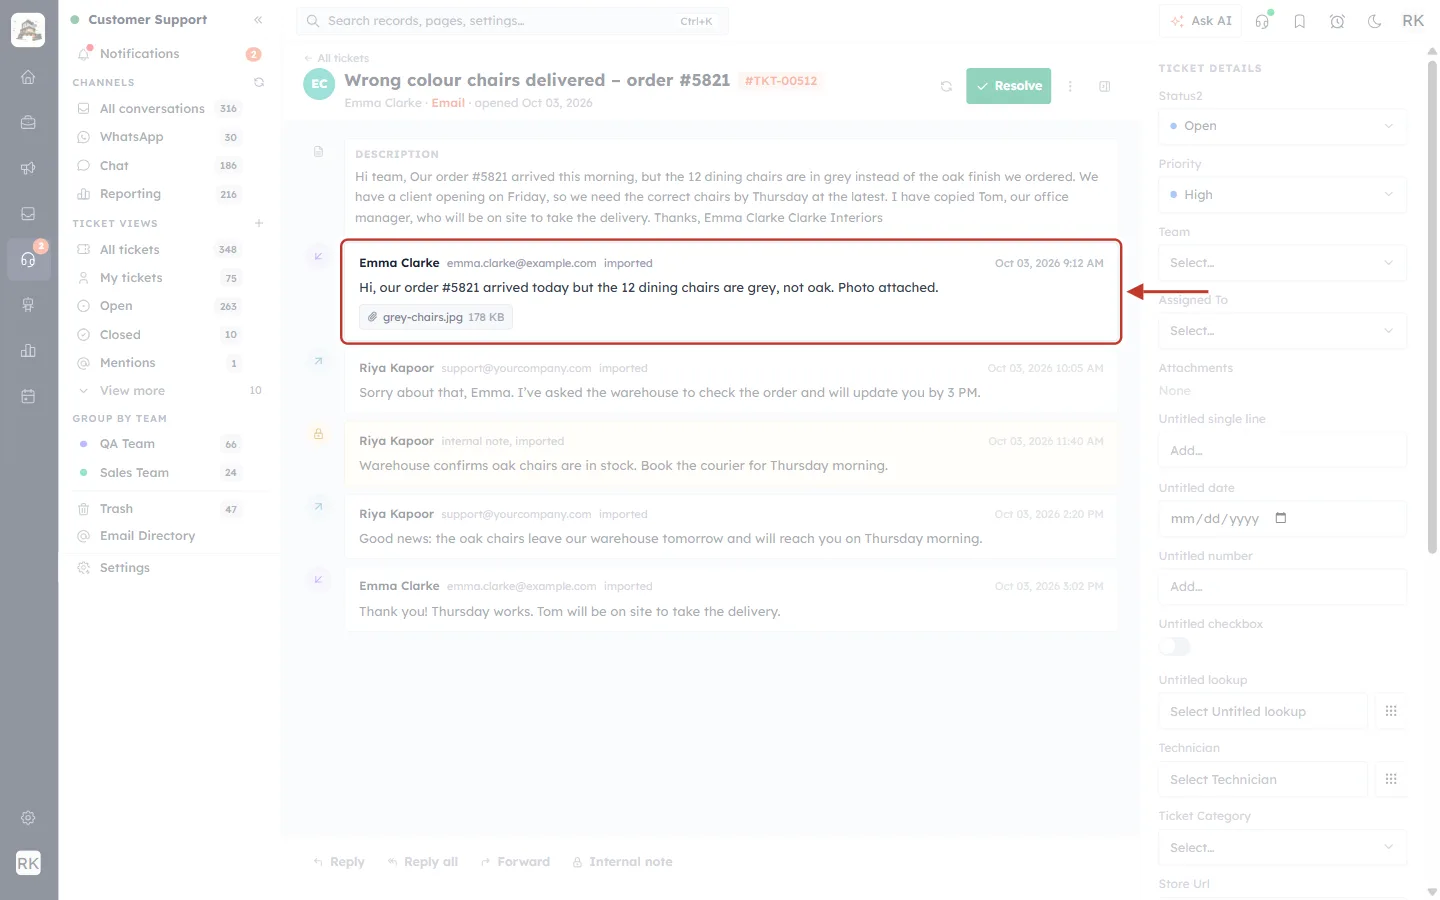
What this screenshot shows. The first imported message, ringed: “Emma Clarke emma.clarke@example.com imported · Oct 03, 2026 9:12 AM — Hi, our order #5821 arrived today but the 12 dining chairs are grey, not oak. Photo attached.” Under the text is the file chip grey-chairs.jpg 178 KB.
A message whose Direction was Customer (or similar) shows as received, with the purple ↙ icon.
Files from the Attachment column appear as chips under the text. Click a chip to open the file.
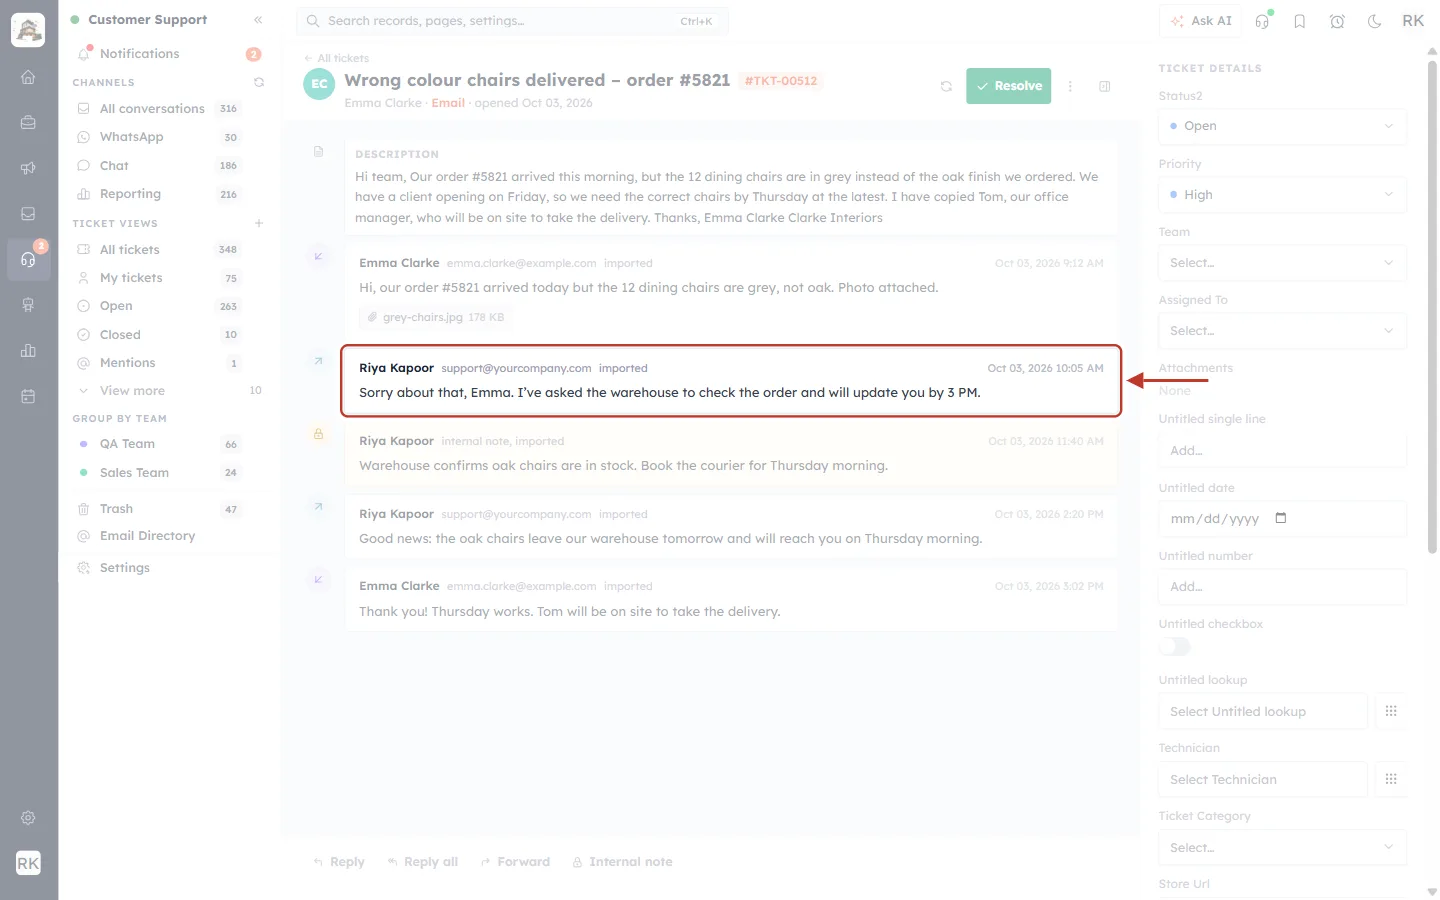
What this screenshot shows. The second imported message, ringed: “Riya Kapoor support@yourcompany.com imported · Oct 03, 2026 10:05 AM — Sorry about that, Emma. I’ve asked the warehouse to check the order and will update you by 3 PM.”
A message whose Direction was Agent (or similar) shows as sent by your team, with the teal ↗ icon.
If the Sender Email belongs to one of your CRM users, the message is credited to that user.
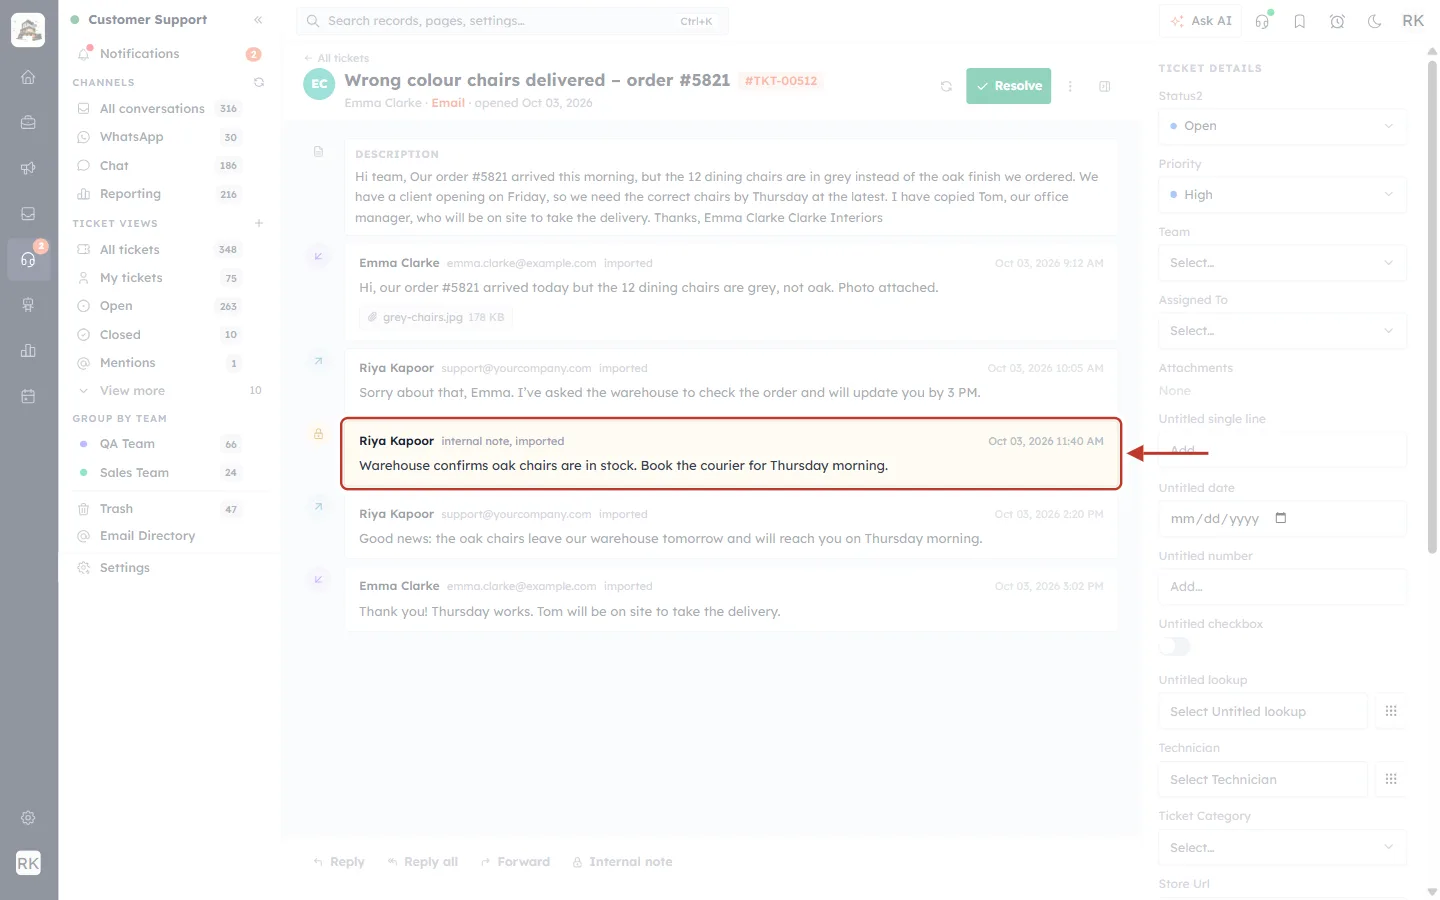
What this screenshot shows. The third imported message, ringed: a yellow card “Riya Kapoor internal note, imported · Oct 03, 2026 11:40 AM — Warehouse confirms oak chairs are in stock. Book the courier for Thursday morning.”
A message whose Direction was Internal Note shows on a yellow card with a padlock, labelled “internal note, imported”.
Internal notes are only for your team and are never shown or emailed to the customer. See Internal Notes & @Mentions on Tickets for more on notes.
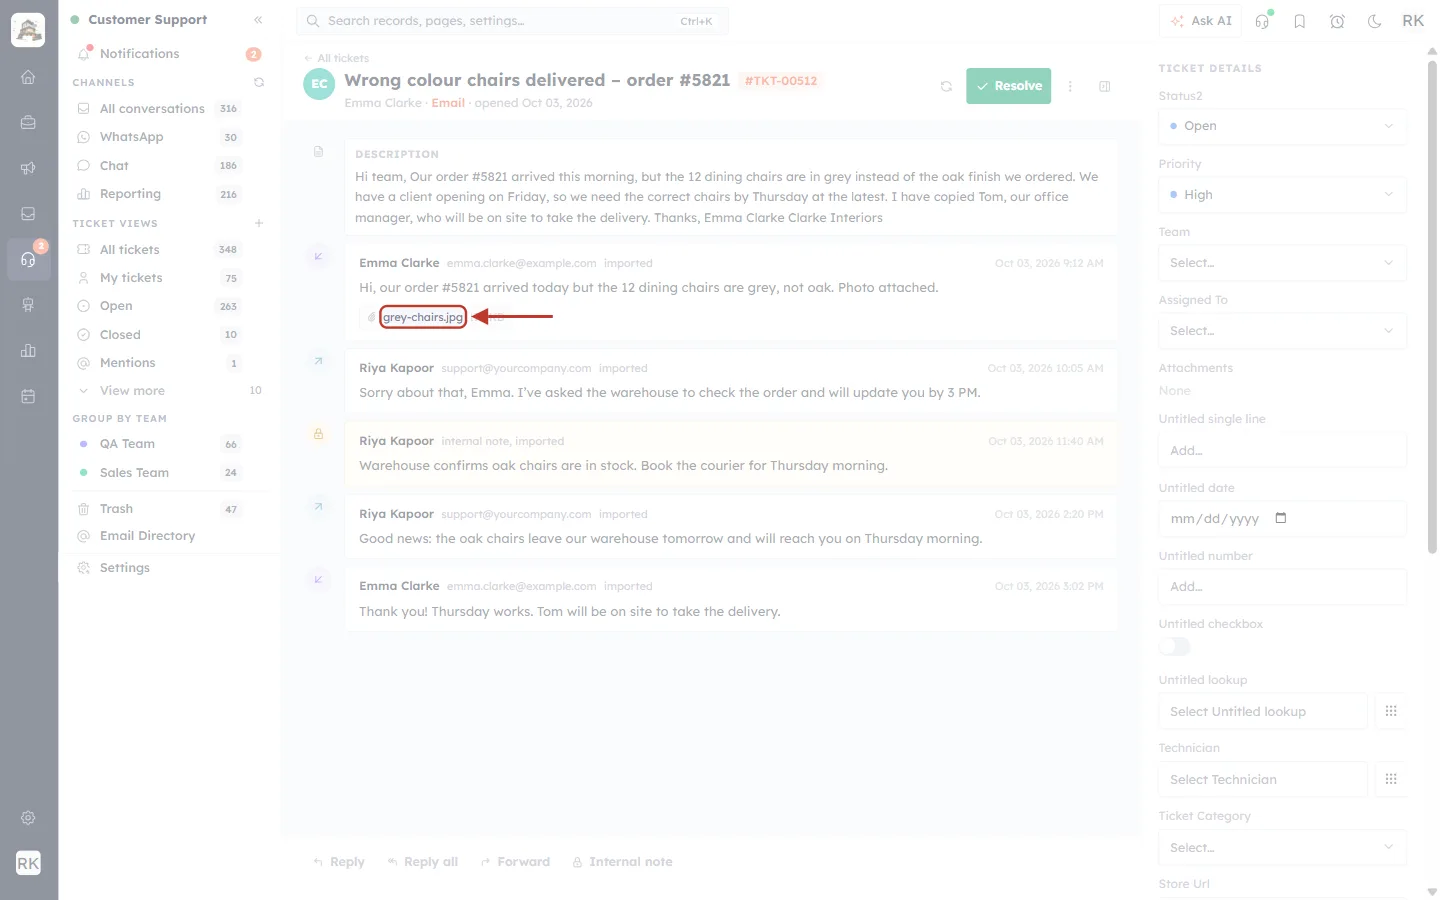
What this screenshot shows. The file chip grey-chairs.jpg 178 KB on Emma’s first message, ringed.
The file name and size come from the downloaded file.
If a link couldn’t be downloaded and you kept the default setting (Part 5, Step 2), the message is there without the chip, and the problem is in the import report.
Find past imports in Conversations Import History#
Open Create Ticket ▾ → Conversations Import History to see every conversation import your team has run.
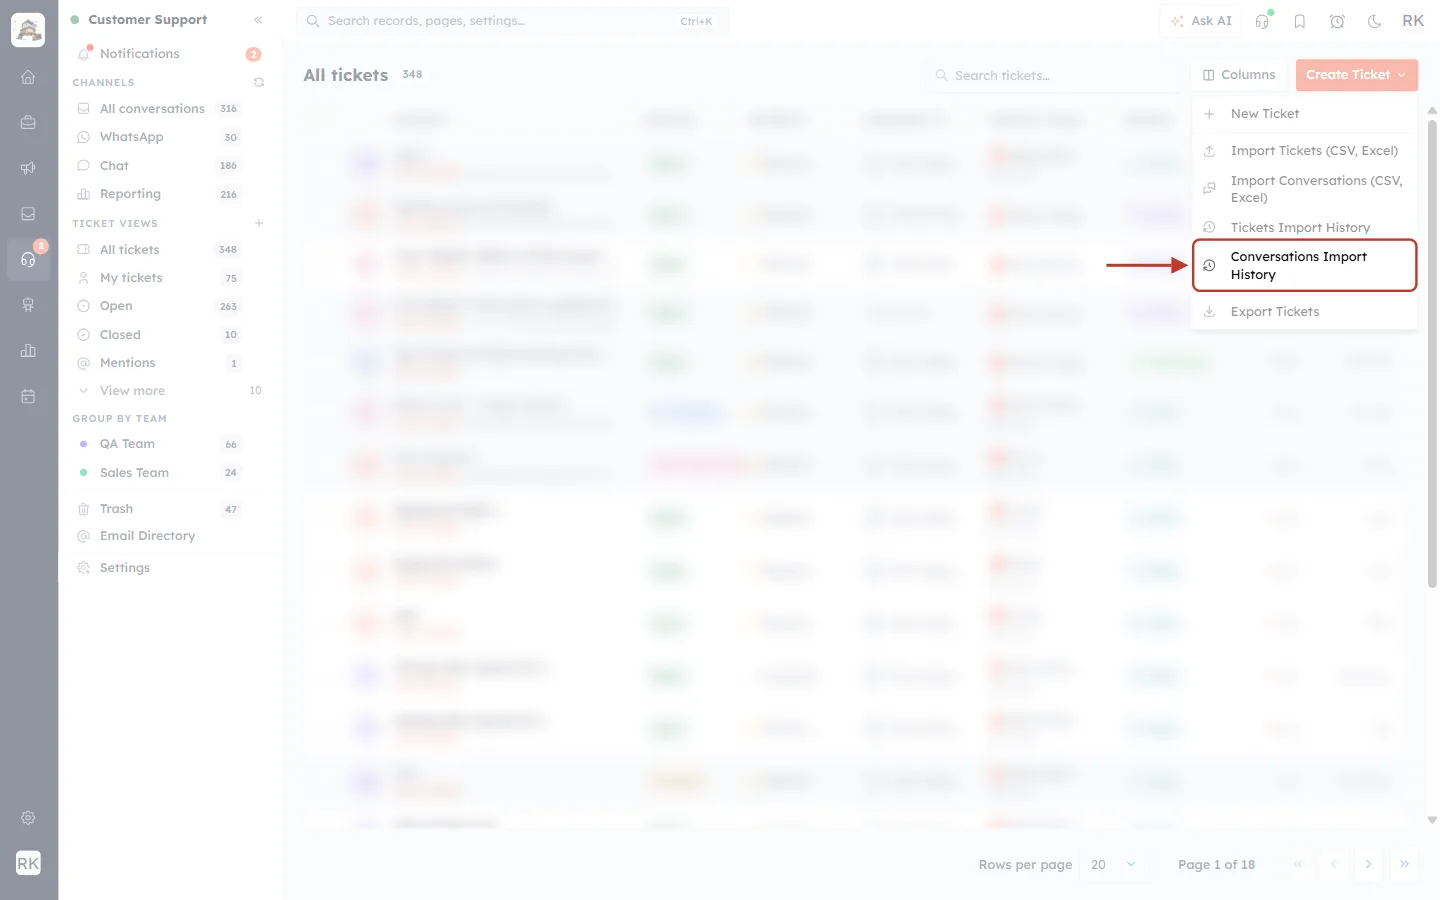
What this screenshot shows. The Create Ticket menu with Conversations Import History ringed.
Don’t confuse it with Tickets Import History, which lists imports of tickets rather than messages.
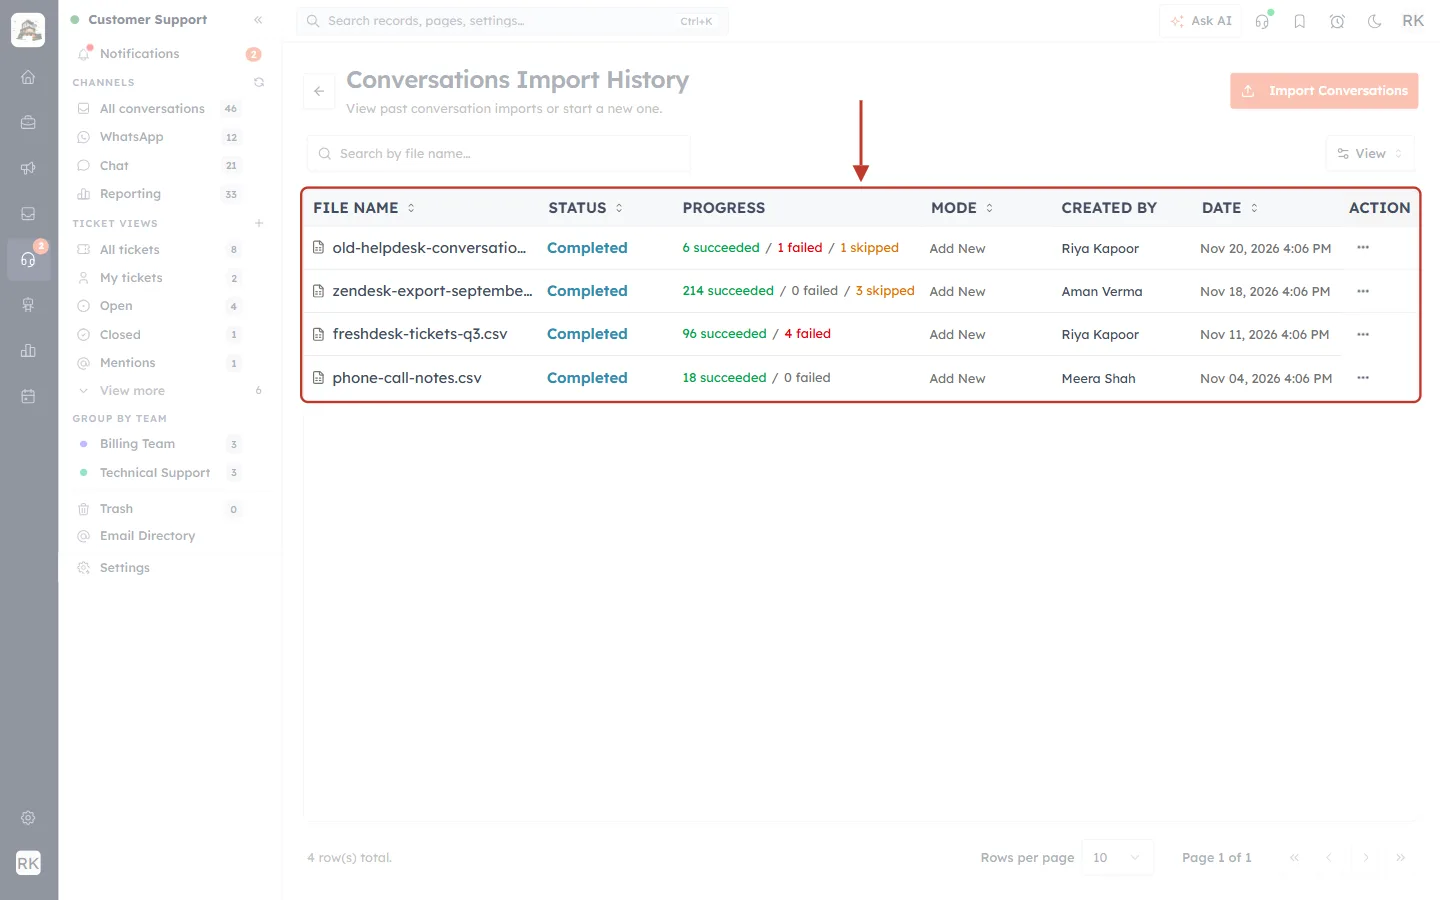
What this screenshot shows. The Conversations Import History page (“View past conversation imports or start a new one.”), with its table ringed. Columns: File Name, Status, Progress, Mode, Created By, Date and Action. Four imports are listed, newest first, starting with old-helpdesk-conversations.csv.
Status: Completed, or still in progress for a running import.
Progress: how many rows succeeded, failed and were skipped.
Mode: always Add New, because a conversation import only adds messages and never changes existing ones.
Created By / Date: who ran the import and when.
The orange Import Conversations button at the top right starts a new import.
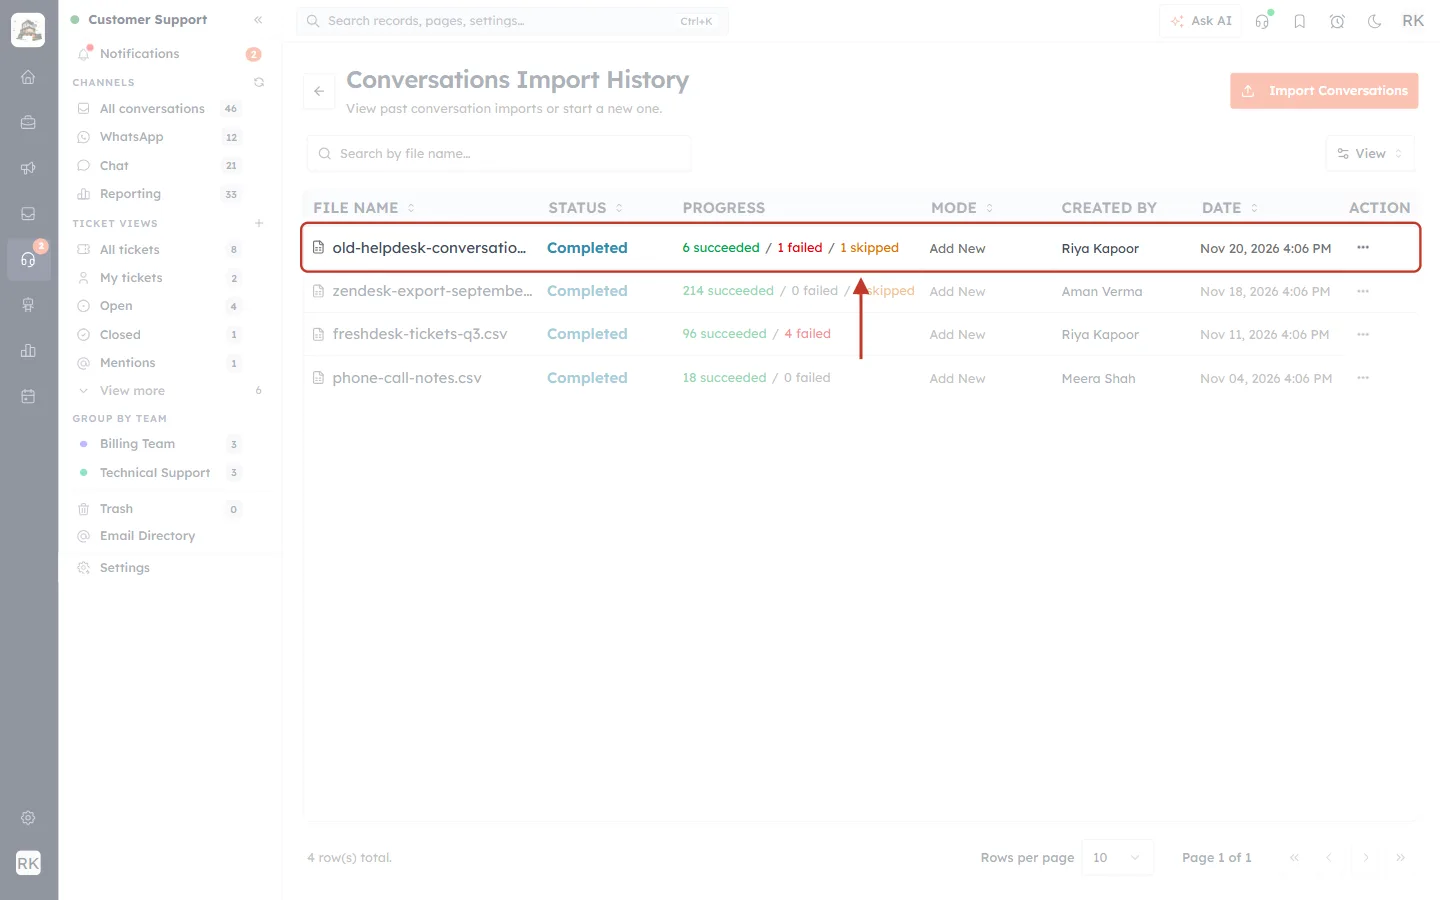
What this screenshot shows. The row for old-helpdesk-conversations.csv, ringed: Completed · 6 succeeded / 1 failed / 1 skipped · Add New · Riya Kapoor · Nov 20, 2026 4:06 PM · ⋯.
The figures match the Import Complete card and the details page.
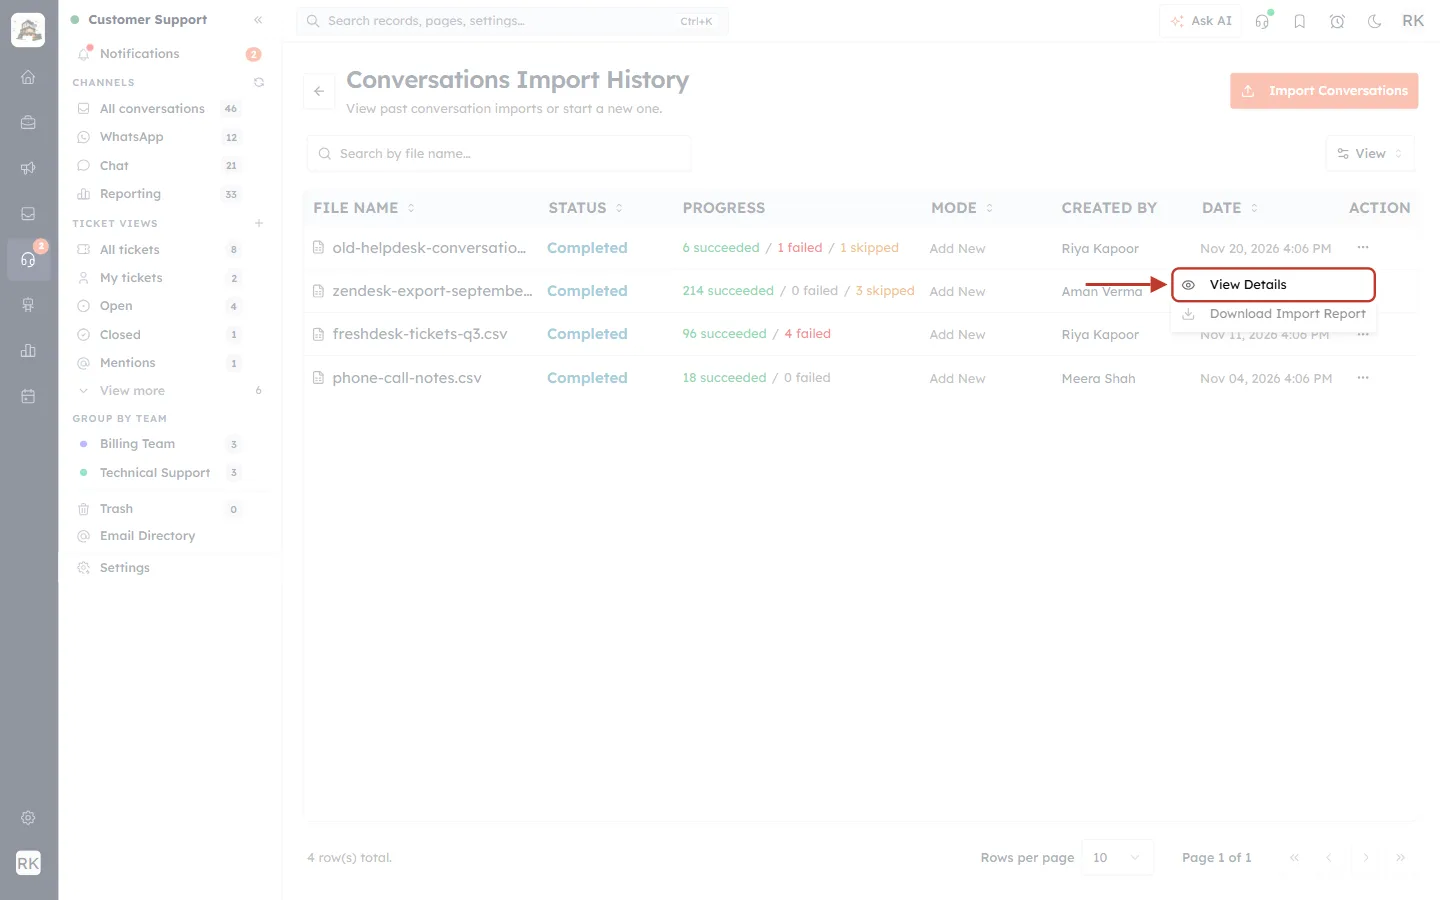
What this screenshot shows. The ⋯ menu at the end of the row is open, with its View Details option ringed.
Click View Details to open the Import Details page for that import again, including its errors, warnings and downloads.
Tips and common questions#
Question | Answer |
|---|---|
Can Import Conversations create tickets? | No. Every row must point to a ticket that already exists. Import the tickets first with Import Tickets (CSV, Excel). |
Will customers receive the imported messages? | No. Imported messages are only added to the ticket’s history. Nothing is emailed. |
What order do the messages appear in? | By their Sent At time, so the conversation reads as it happened. Rows without a Sent At get the time of the import. |
I imported the same file twice. Are the messages doubled? | No. A message with the same ticket, direction, text and sent time is skipped as a duplicate. |
My old help desk export has no Direction column. | That’s fine. Map Sender Email: messages from your team’s addresses or your CRM users are treated as agent replies, and the rest as customer messages. |
My old system’s ticket IDs are different from the TKT numbers. | Store the old ID in your tickets’ custom Ticket ID field when you import the tickets, then map that column to External Ticket ID here. |
Can I undo an import? | There is no undo button for a conversation import, so try a small file with a few rows first and check the ticket before importing everything. |
I can’t see Import Conversations in the menu. | Your profile needs the Import permission for Tickets. Ask your admin. |
Previous and next#
Previous: Import & Export Tickets: Bulk-Import from CSV or Excel, Import Notes and Export Your Tickets
Related articles#
Import & Export Tickets: Bulk-Import from CSV or Excel, Import Notes and Export Your Tickets
Customer & Support: Handle Customer Tickets from First Message to Resolution
Ticket Permissions: Set Who Can View, Edit, Delete and Reply to Support Tickets
Merge Tickets: Combine Duplicate Support Tickets from the Same Customer into One
Was this article helpful?
Ready to implement this?
OpenAI Engage and apply what you just learned to your own workspace.
Open AI Engage CRM