Loading…


KnowledgeBase
Customise Ticket Fields, Categories & Statuses: Tailor Your Support Tickets in the Field Builder (Step-by-Step)
What this article covers#
Every team handles support a little differently. One team needs a Waiting on Customer status, another a Delivery issue category, a third a Product Line field on every ticket. In AiEngage CRM you can change all of this yourself in the field builder for the Tickets module — no developer needed.
| You want to… | Field | Part |
|---|---|---|
| Rename, reorder, colour or add statuses | Status (shown as Status2 in some accounts) | 2 |
| Change the list of categories | Category | 3 |
| Adjust priority levels | Priority | 4 |
| Make ticket numbers unique or change their format | Ticket Number | 5 |
| Add your own ticket field | New field from the palette | 6 |
| Control where a field appears and who can see it | Display settings of any field | 7 |
Your changes appear everywhere tickets are used: the Customer & Support workspace, the ticket details panel, the Tickets module, filters, the Kanban board and imports.
⚠️
Changing fields affects your whole team. Make changes outside busy hours, and tell your agents what changed.
Before you begin#
Administrator access. You need a profile that is allowed to customise modules to use Modules and Fields.
For a general introduction to fields and layouts, see Customize Your CRM: Add Custom Fields and Configure Module Layouts and Field Layouts and Required Fields.
Part 1 — Open the Tickets field builder#
Step 1: Open Setup → Modules and Fields#
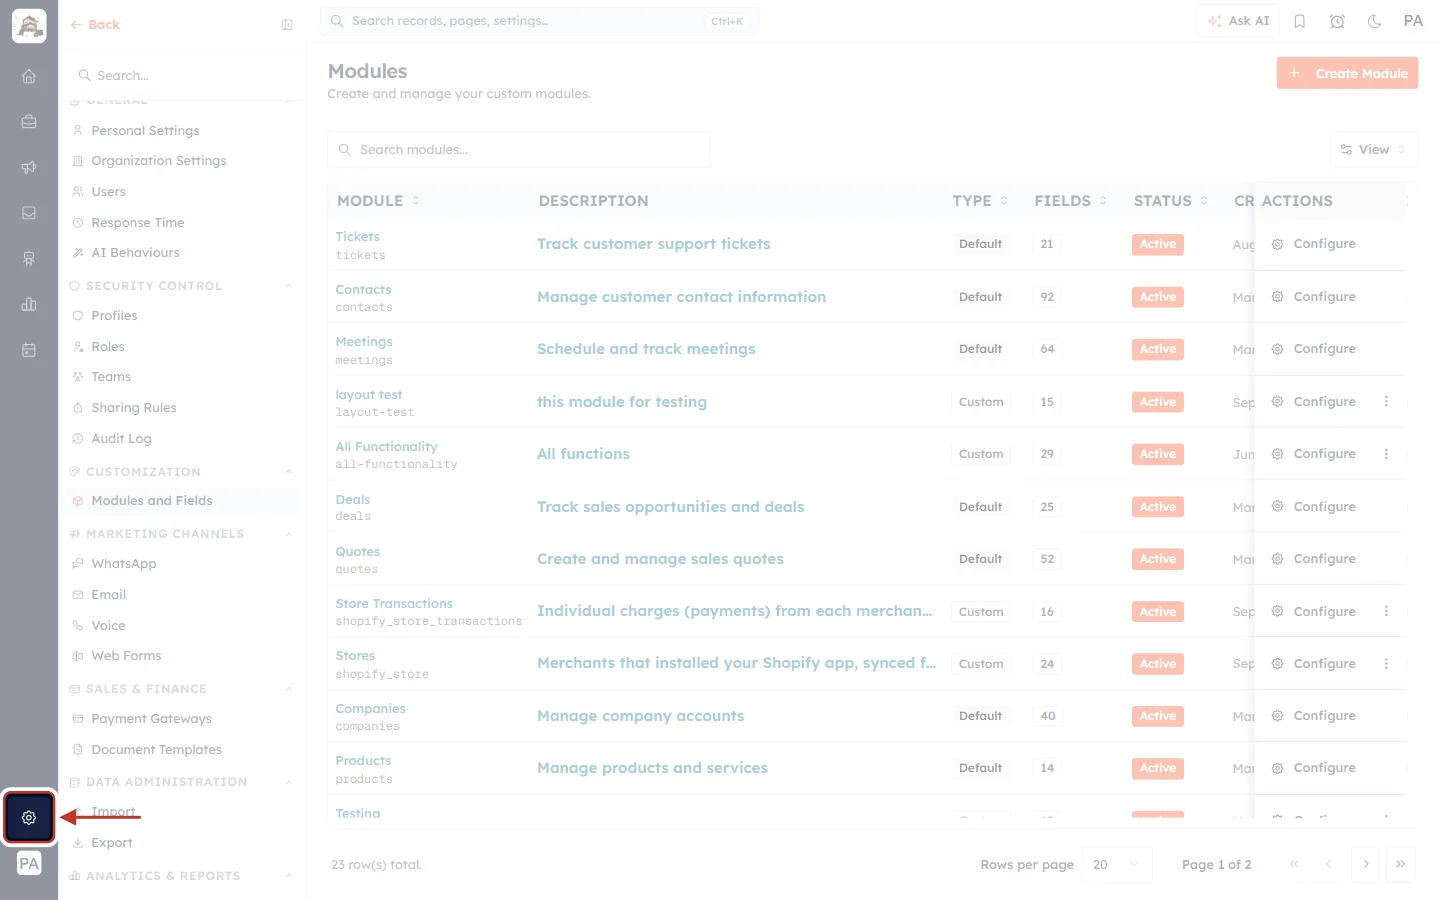
What this screenshot shows. The Setup (gear) icon at the bottom of the dark icon bar on the left is ringed.
Click it to open your CRM settings.
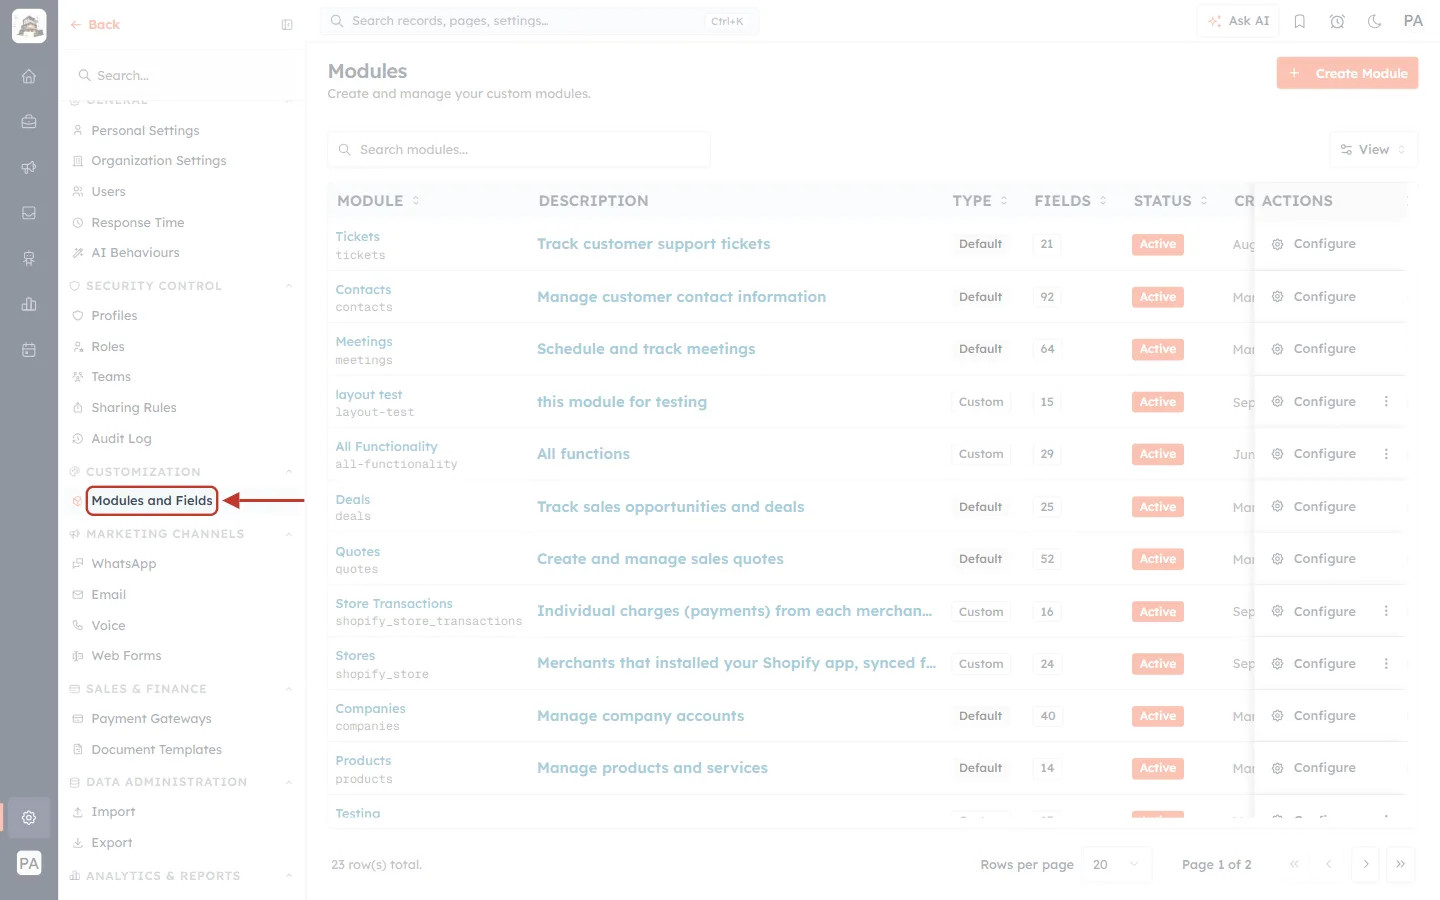
What this screenshot shows. Modules and Fields, under CUSTOMIZATION in the settings menu, is ringed.
Click it to see all the modules in your CRM.
Other sections (faded) include General, Security Control, Marketing Channels, Sales & Finance and Data Administration.
Step 2: Configure the Tickets module#
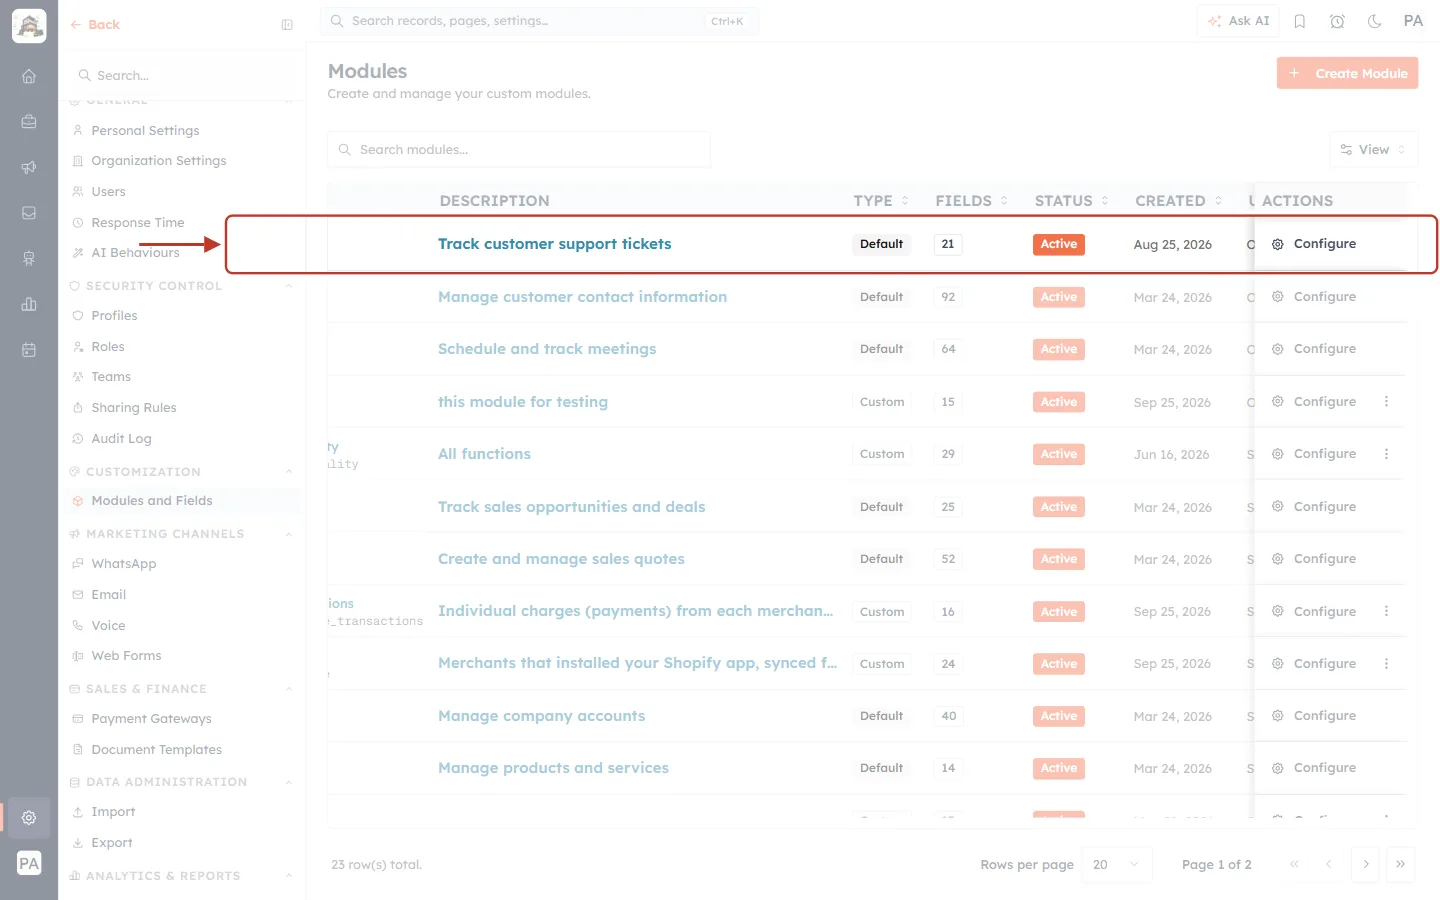
What this screenshot shows. The Tickets row in the Modules list is ringed.
Name Tickets, API name tickets, description Track customer support tickets.
Its type (Default), number of fields, status (Active), and when it was created and last changed.
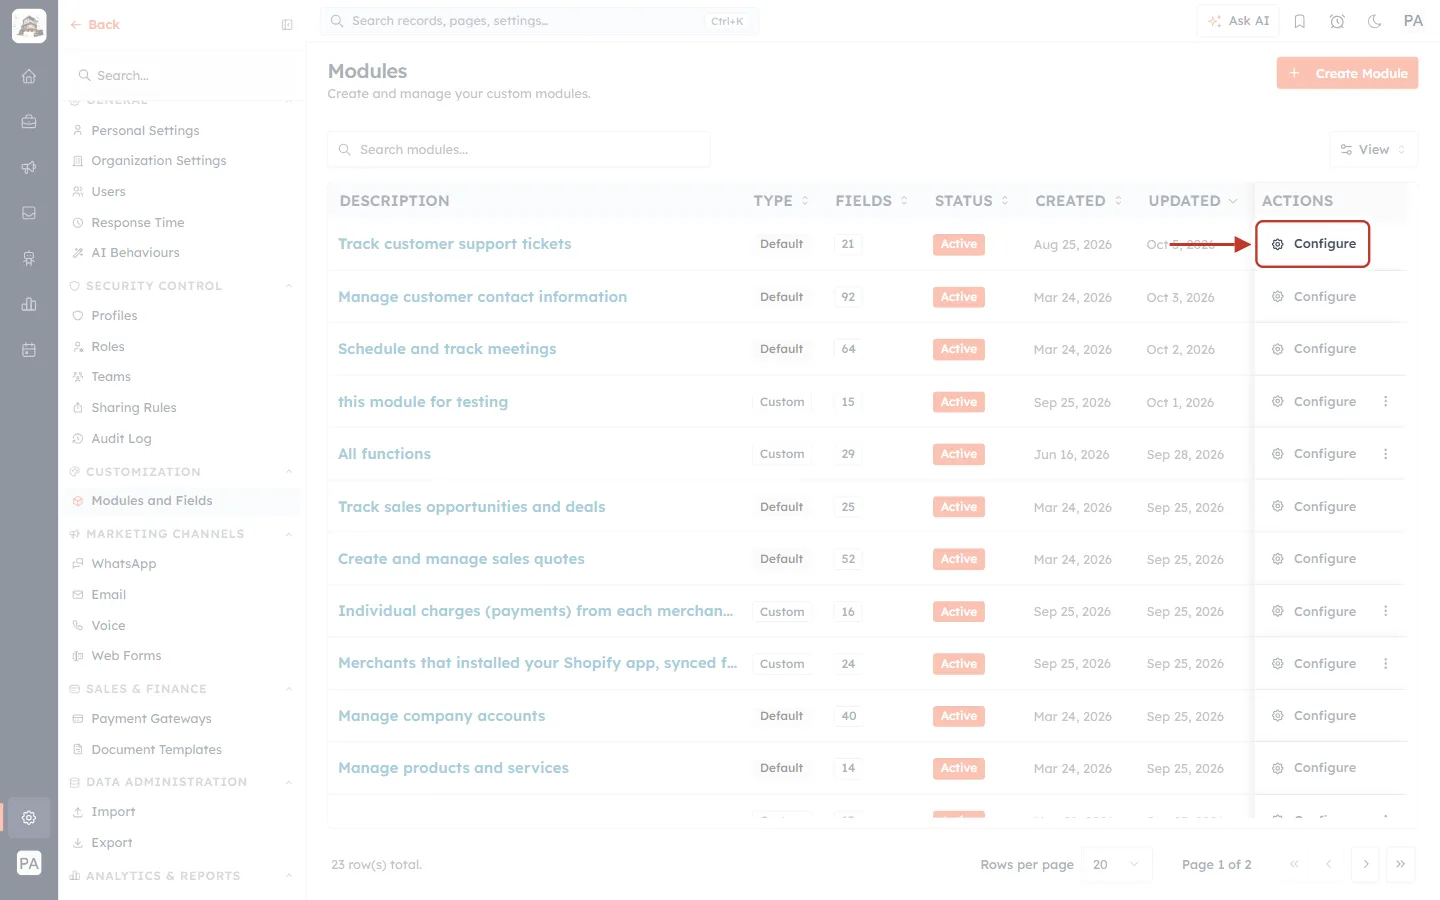
What this screenshot shows. The Configure button at the end of the Tickets row is ringed.
Click it to open the module’s layouts.
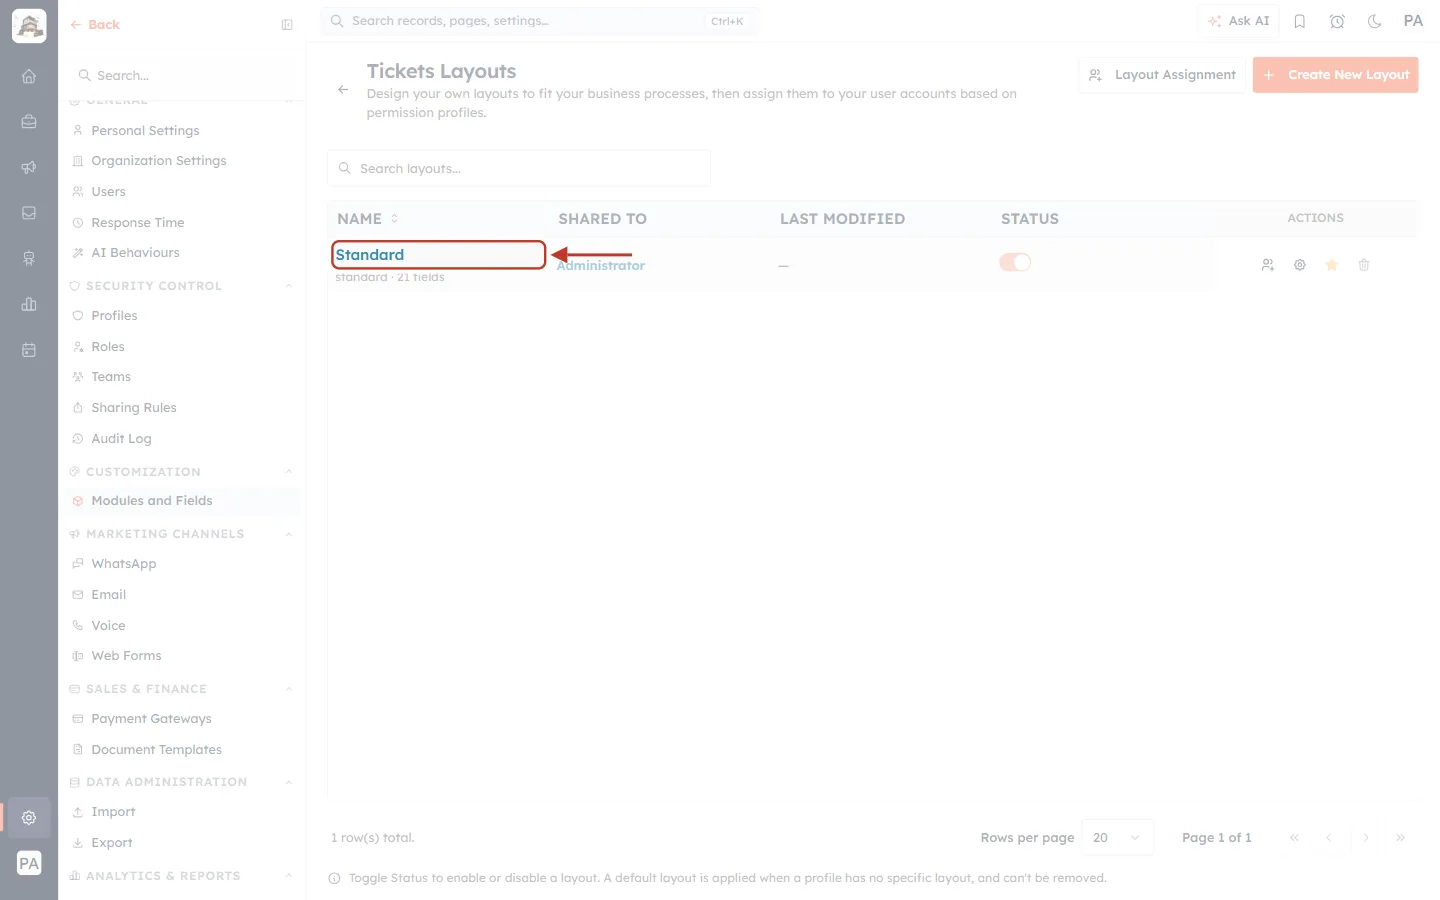
What this screenshot shows. The Standard layout in the Tickets Layouts list is ringed.
“Design your own layouts to fit your business processes, then assign them to your user accounts based on permission profiles.”
Standard — standard · 21 fields, shared to Administrator. This is the default layout.
Layout Assignment and Create New Layout at the top let you build different forms for different teams.
Click Standard to open the field builder.
Step 3: Get to know the field builder#
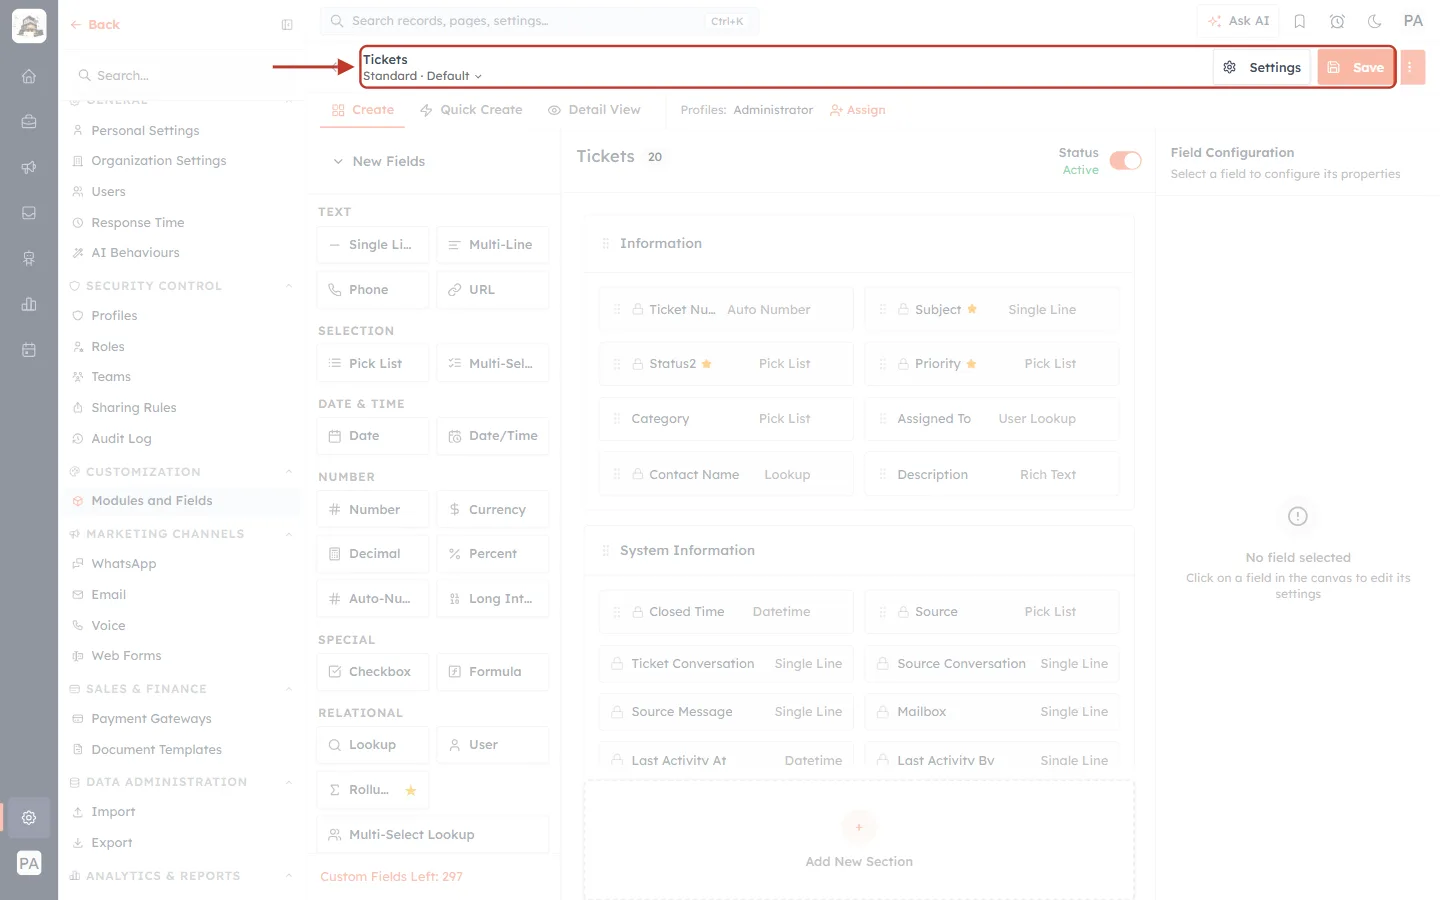
What this screenshot shows. The header of the field builder is ringed.
Tickets — Standard · Default: the module and the layout you are editing (the ⌄ switches layout).
Settings — module-wide settings.
Save (orange) — saves your changes. It is pale until you change something.
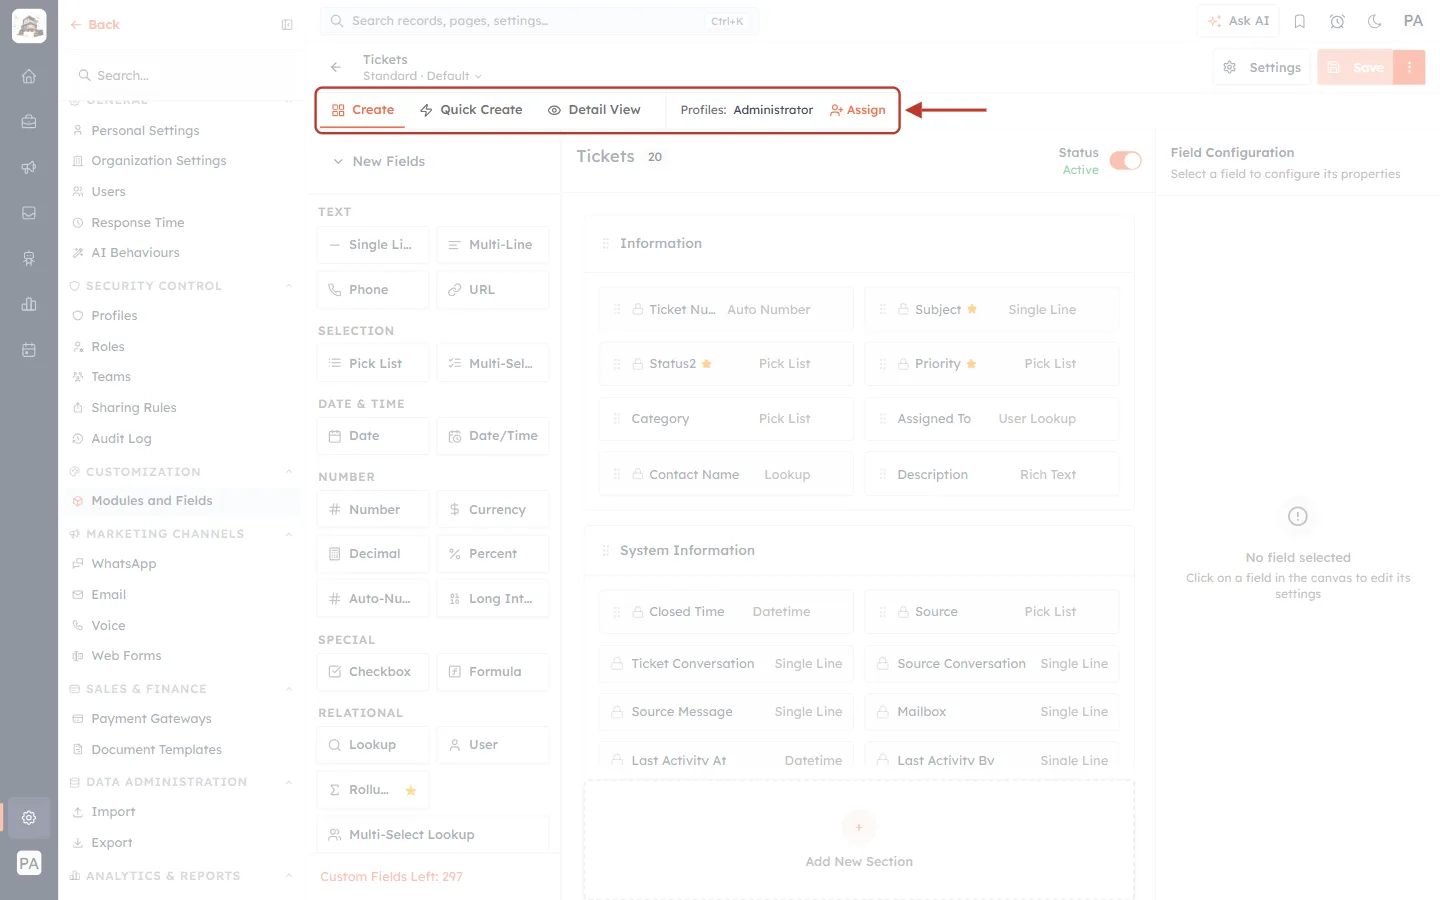
What this screenshot shows. The tabs under the header are ringed.
Create (selected), Quick Create and Detail View — the forms whose layout you are designing.
Profiles: Administrator — who uses this layout. Assign changes it.
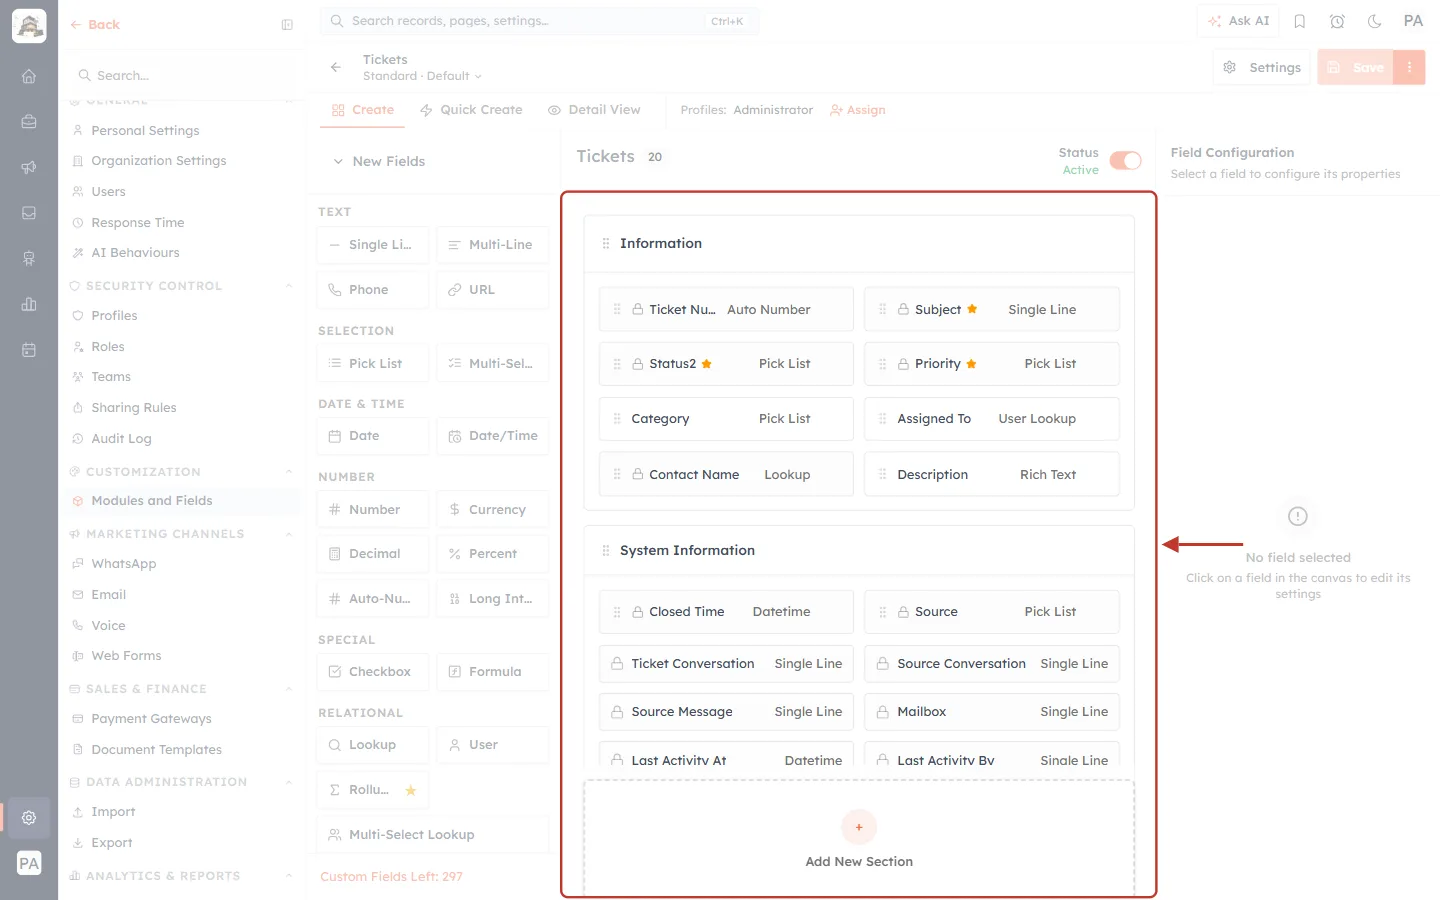
What this screenshot shows. The ticket form in the middle of the builder is ringed.
Tickets 20 — the number of fields, and the layout’s Status switch (Active).
Sections: Information (Ticket Number, Subject, Status2, Priority, Category, Assigned To, Contact Name, Description), System Information (Closed Time, Source, Mailbox, Last Activity… — filled in automatically) and Description (Attachments).
Each field shows its type on the right (Pick List, Single Line, User Lookup…). A padlock marks a built-in system field; an orange ★ marks a required field.
Drag the ⋮⋮ handle to move a field. + Add New Section at the bottom adds a section.
Click any field to open its settings on the right.
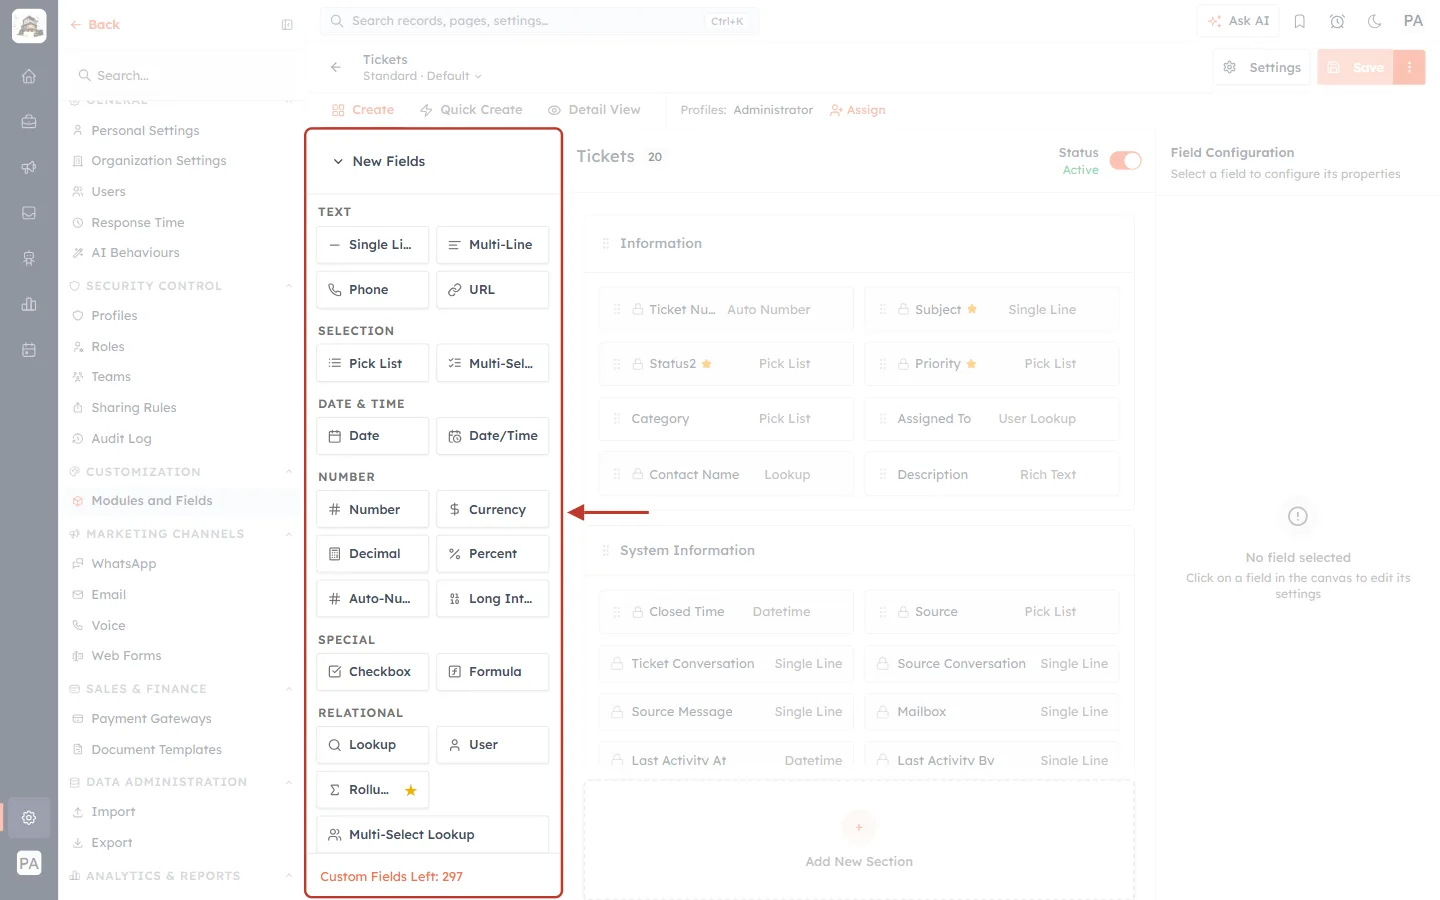
What this screenshot shows. The New Fields palette on the left is ringed.
Field types grouped as TEXT (Single Line, Multi-Line, Phone, URL), SELECTION (Pick List, Multi-Select), DATE & TIME, NUMBER (Number, Currency, Decimal, Percent, Auto-Number, Long Integer), SPECIAL (Checkbox, Formula), RELATIONAL (Lookup, User, Rollup Summary, Multi-Select Lookup) and more.
Custom Fields Left: 297 at the bottom — how many more fields you can add.
Drag a type onto the form to add a field (Part 6).
Part 2 — Customise ticket statuses#
Step 4: Open the Status field#
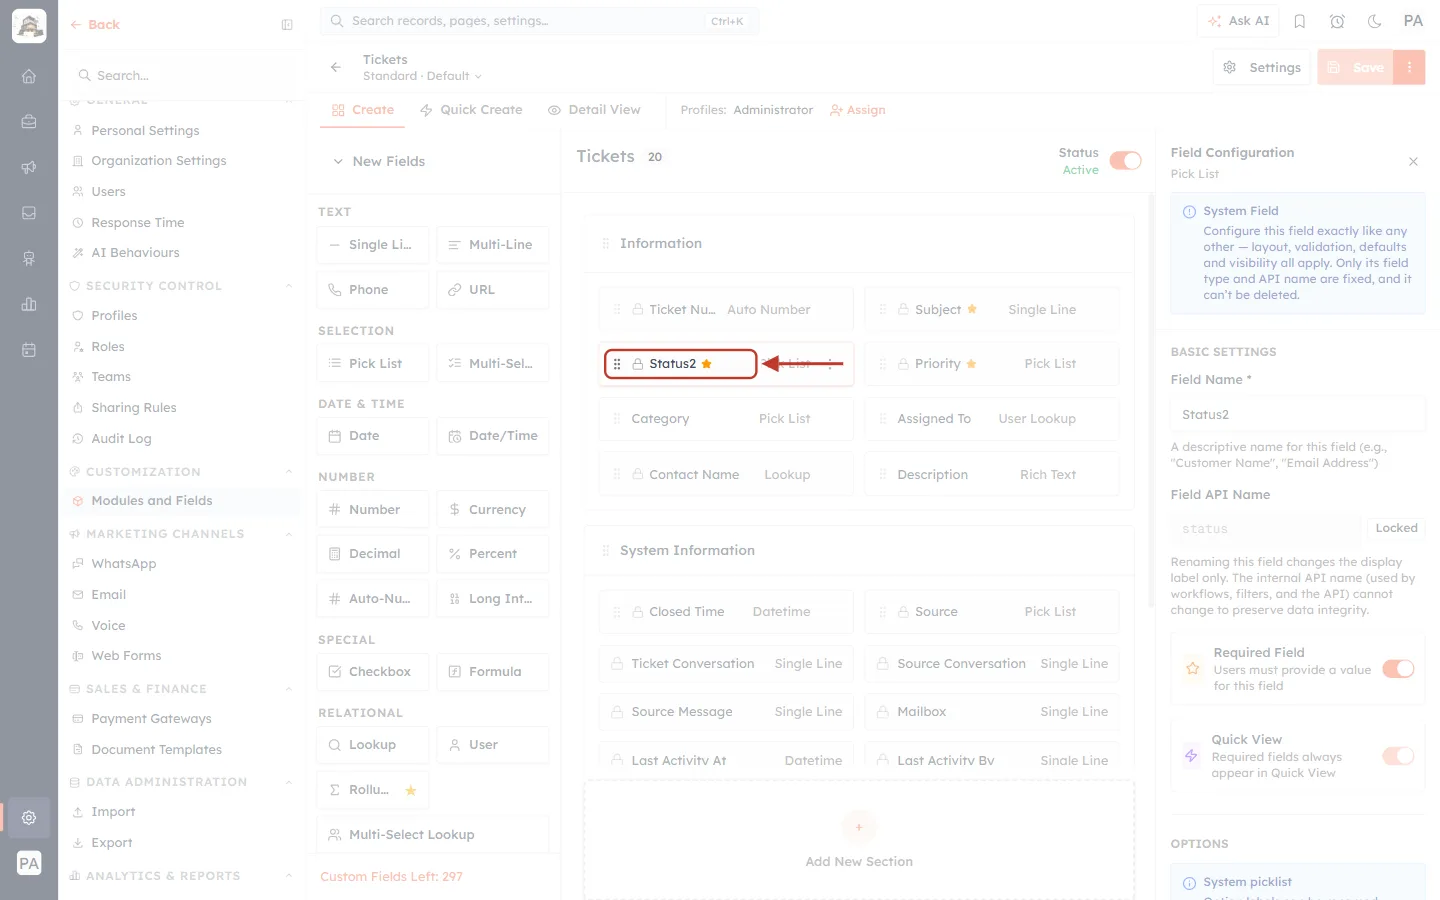
What this screenshot shows. The status field on the form is ringed. In this account it is labelled Status2.
Type Pick List; the ★ means it is required, and the padlock means it is a built-in field.
Click it to open its settings.
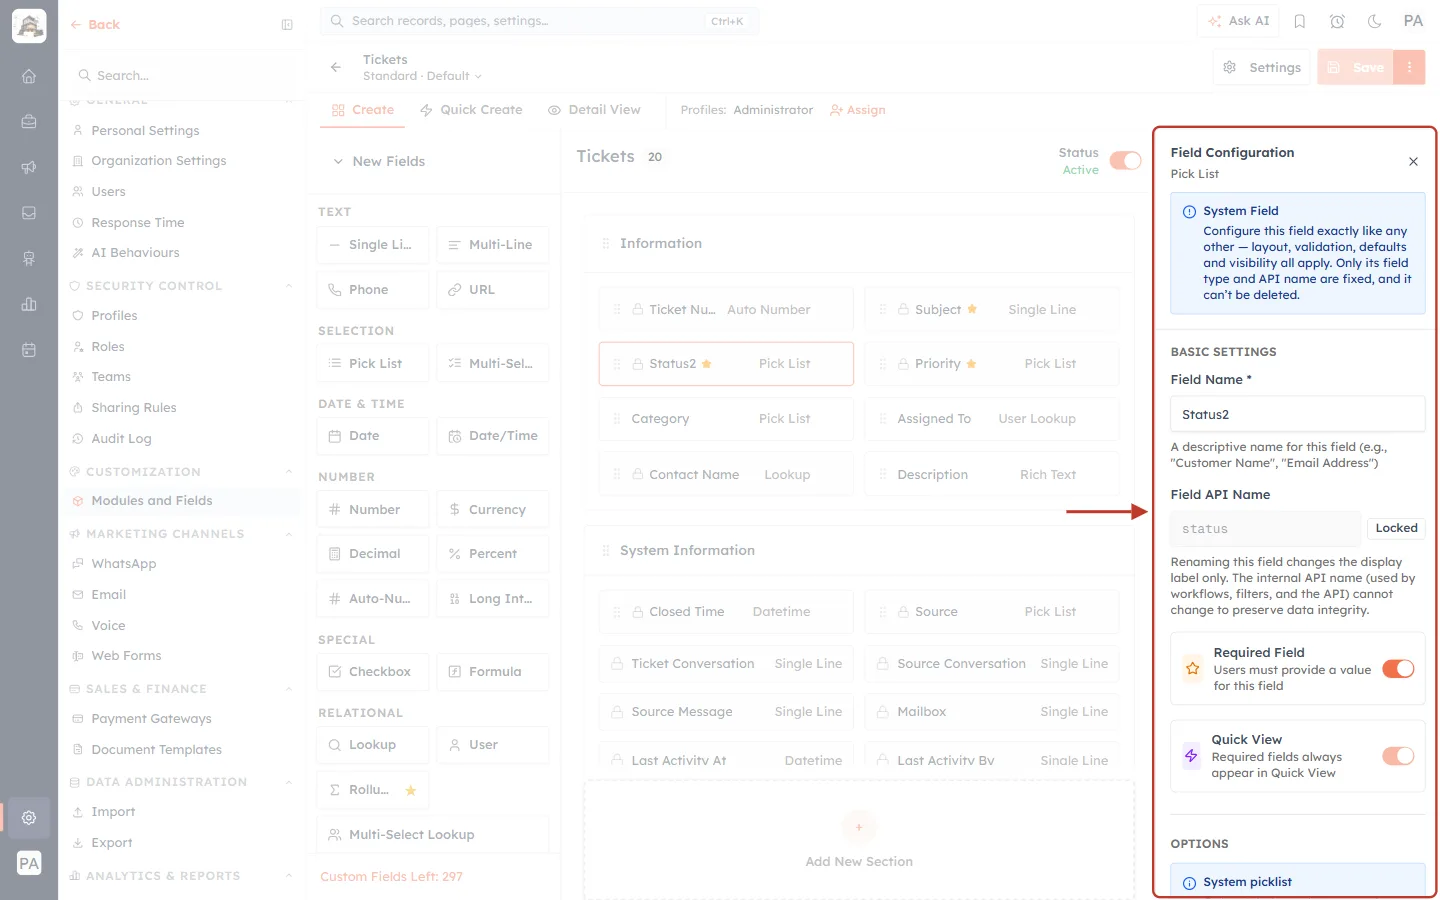
What this screenshot shows. The top of the Field Configuration panel is ringed.
System Field — “Configure this field exactly like any other — layout, validation, defaults and visibility all apply. Only its field type and API name are fixed, and it can’t be deleted.”
Field Name * — the label people see.
Field API Name — status, marked Locked.
Step 5: Rename the field (optional)#
If your status field has an unclear label (such as Status2), type a better one in Field Name — for example Status.
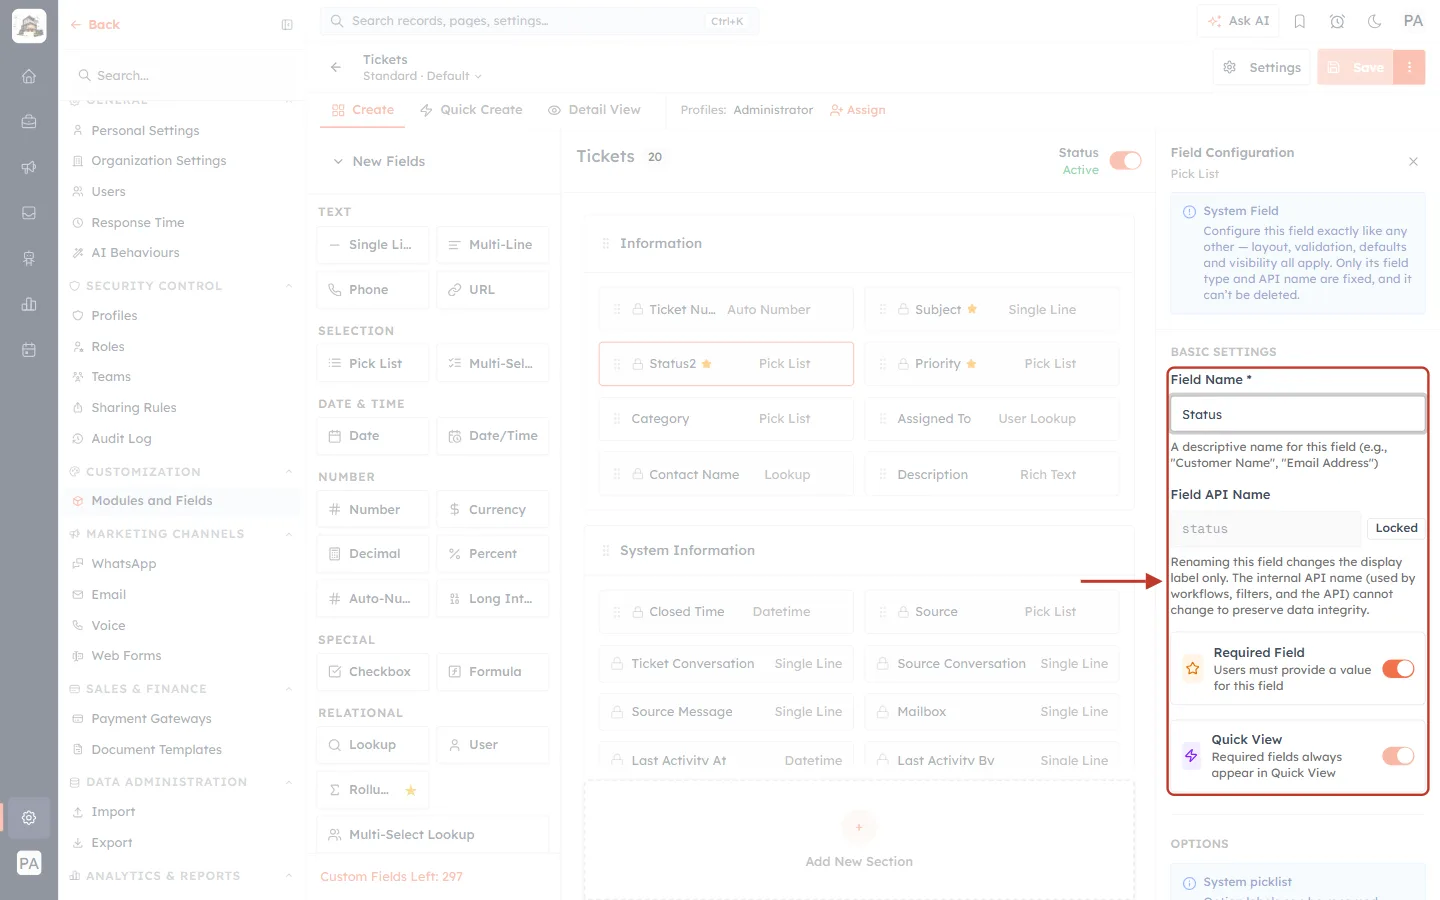
What this screenshot shows. The Field Name and Field API Name are ringed, with the name changed to Status.
“Renaming this field changes the display label only. The internal API name (used by workflows, filters, and the API) cannot change to preserve data integrity.”
So renaming is safe: workflows, filters and integrations keep working.
The field on the form updates straight away to the new name.
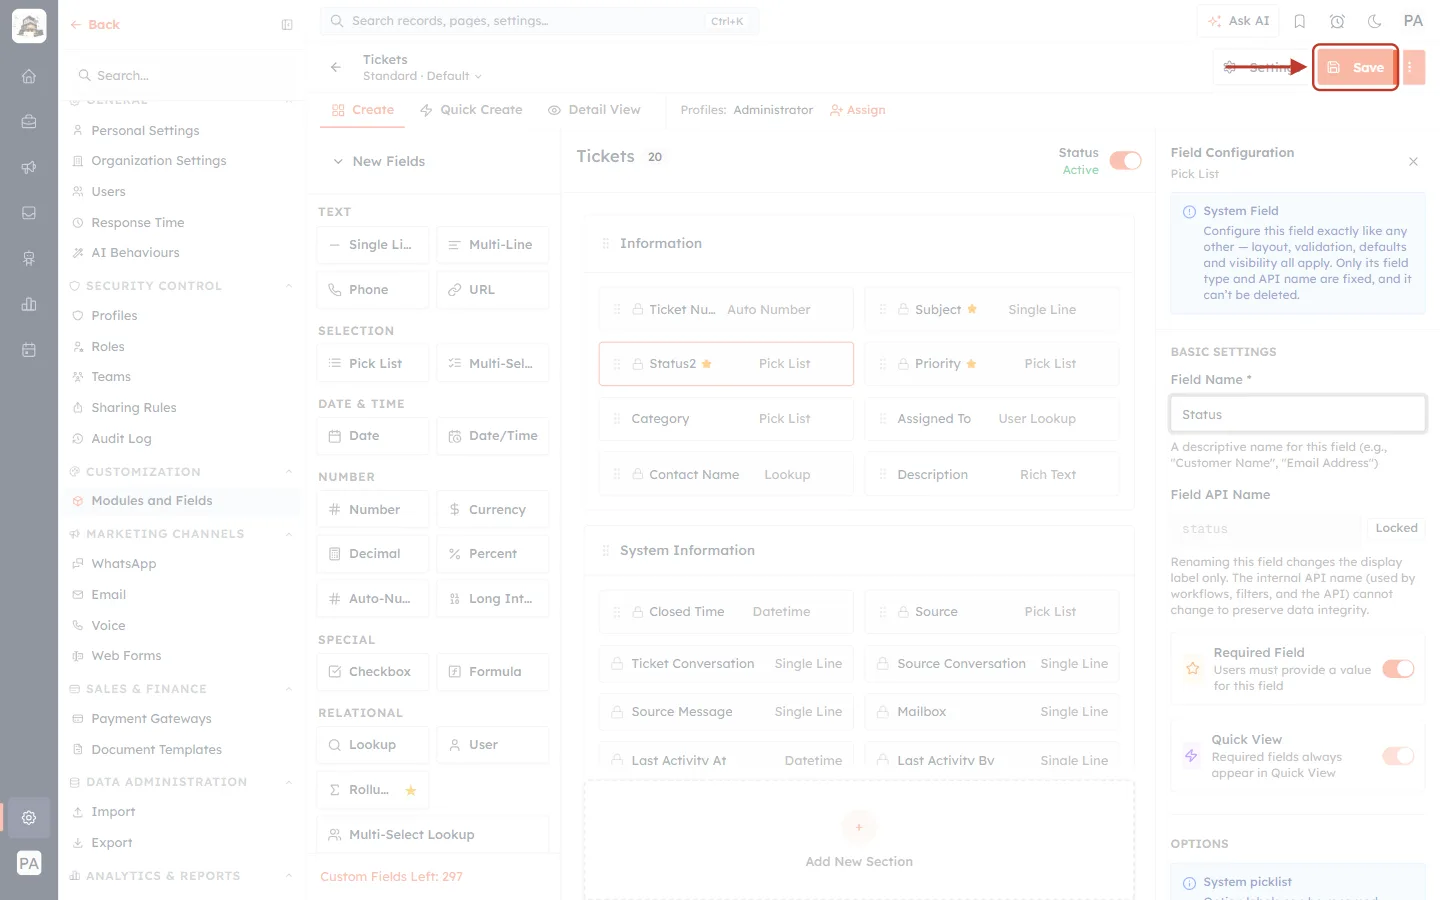
What this screenshot shows. The Save button at the top right is ringed.
After any change, Unsaved changes appears next to the layout name and Save becomes orange.
Click Save to apply your changes for everyone. Leave the page without saving to discard them.
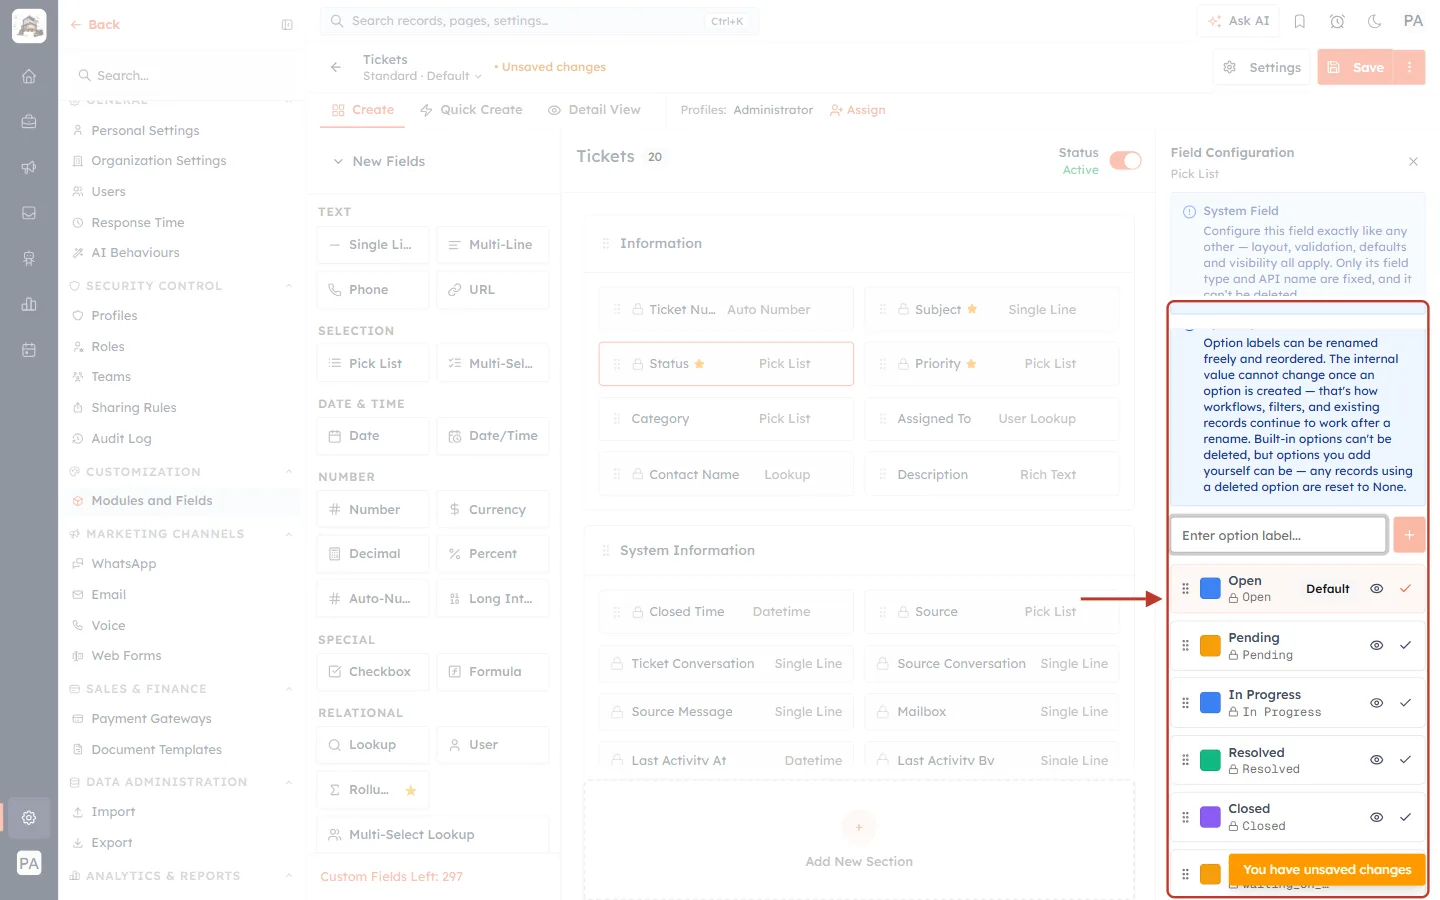
Step 6: Understand the status options#
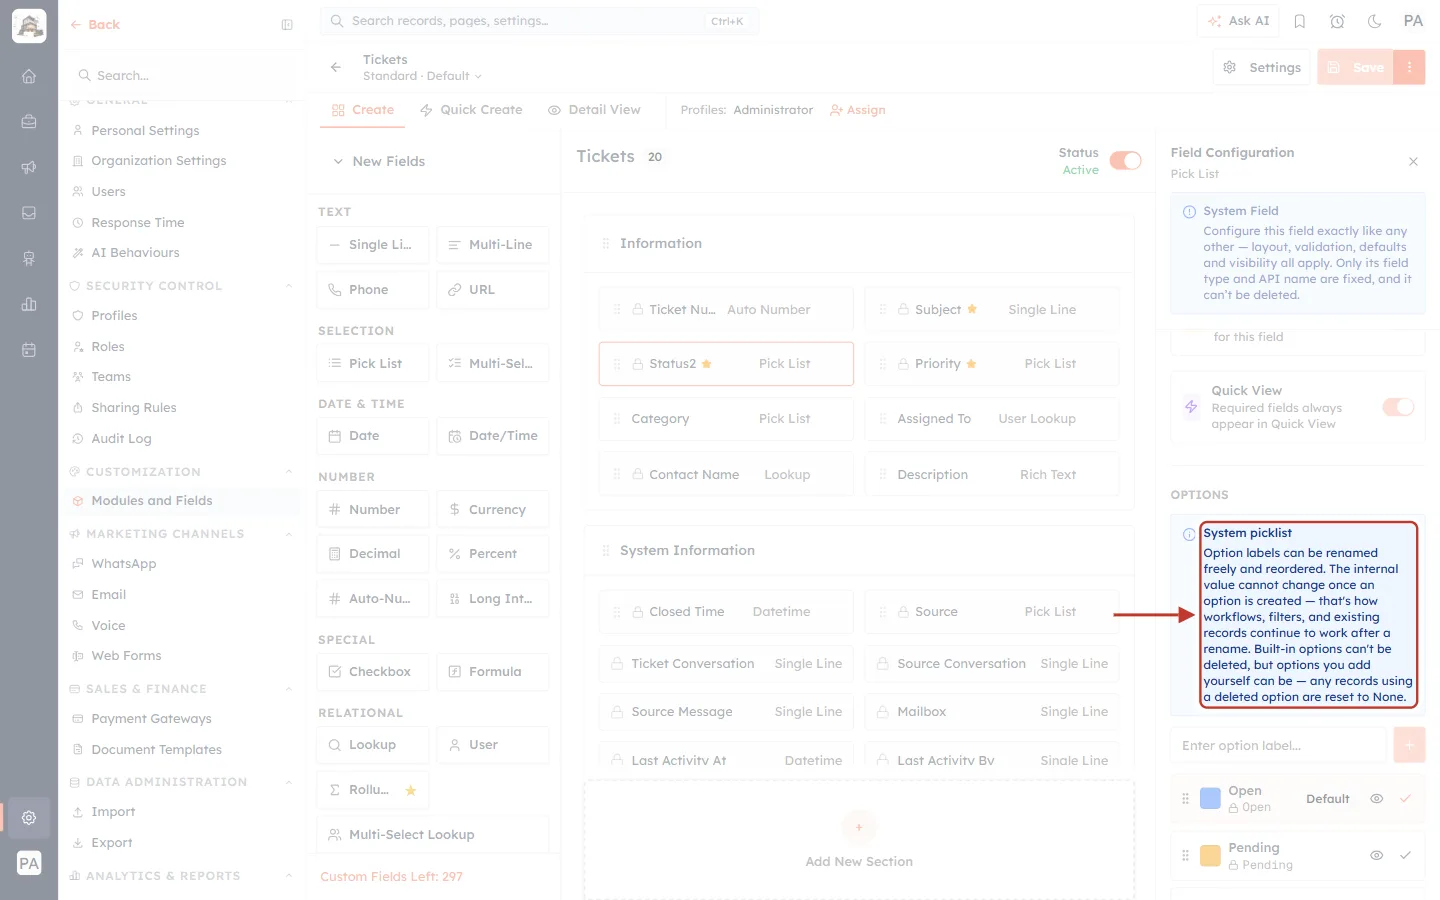
What this screenshot shows. The System picklist notice in the OPTIONS section is ringed.
“Option labels can be renamed freely and reordered.”
“The internal value cannot change once an option is created — that’s how workflows, filters, and existing records continue to work after a rename.”
“Built-in options can’t be deleted, but options you add yourself can be — any records using a deleted option are reset to None.”
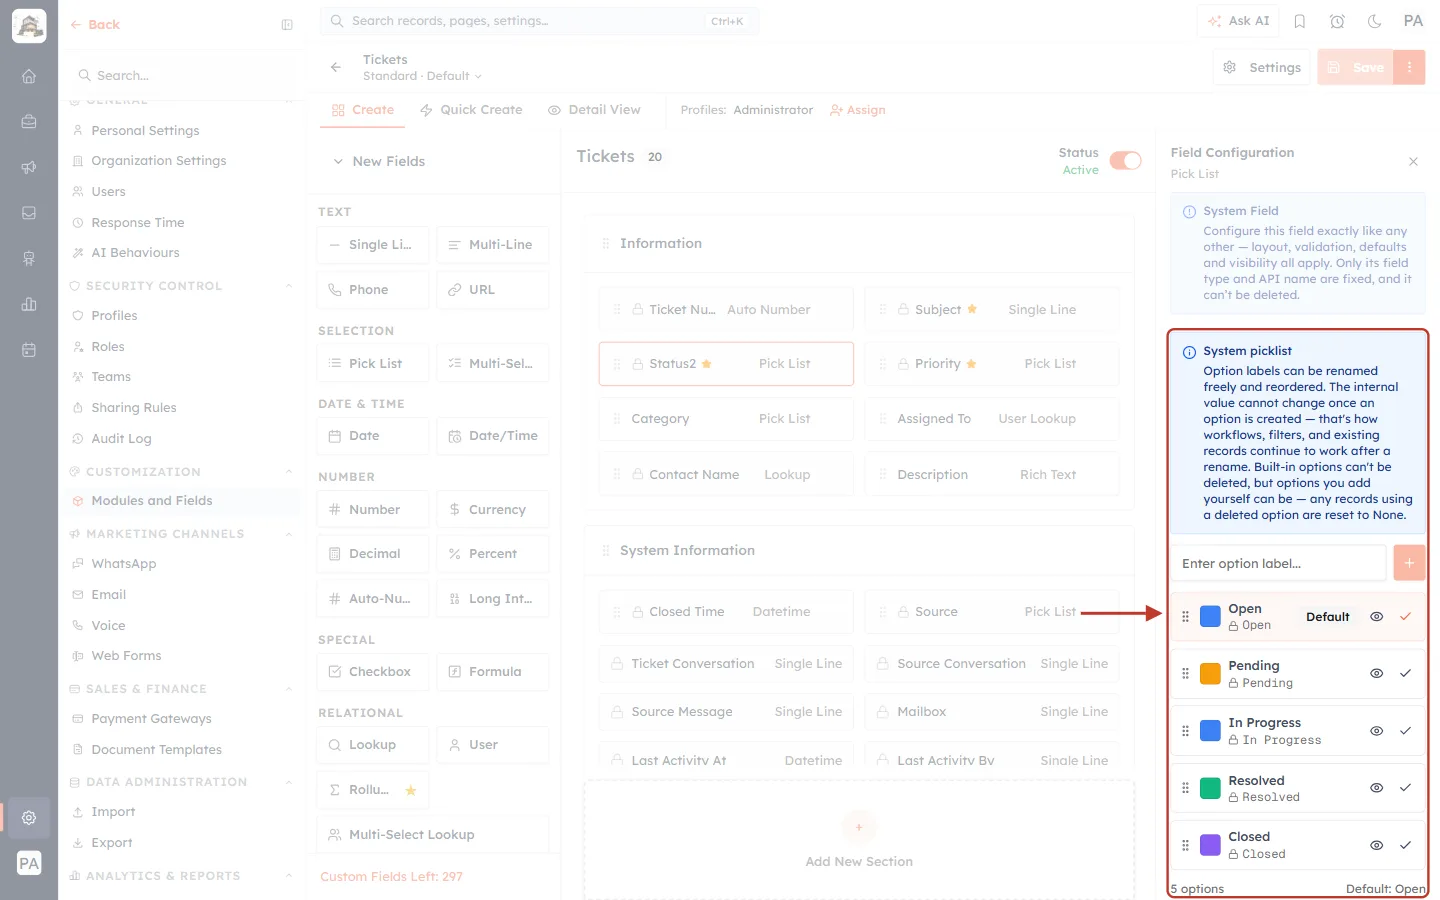
What this screenshot shows. The list of status options is ringed.
Each row shows a ⋮⋮ drag handle (to reorder), a colour swatch, the label in bold and the internal value underneath. A padlock next to the value marks a built-in option.
Open is marked Default — new tickets start with this status.
On the right of each row: the eye (Hide option) hides an option from the list without deleting it, and the tick (Set as default) makes it the default.
At the bottom: 5 options · Default: Open.
Step 7: Add a status#
Type the new status in Enter option label… at the top of the list and press Enter (or click +).
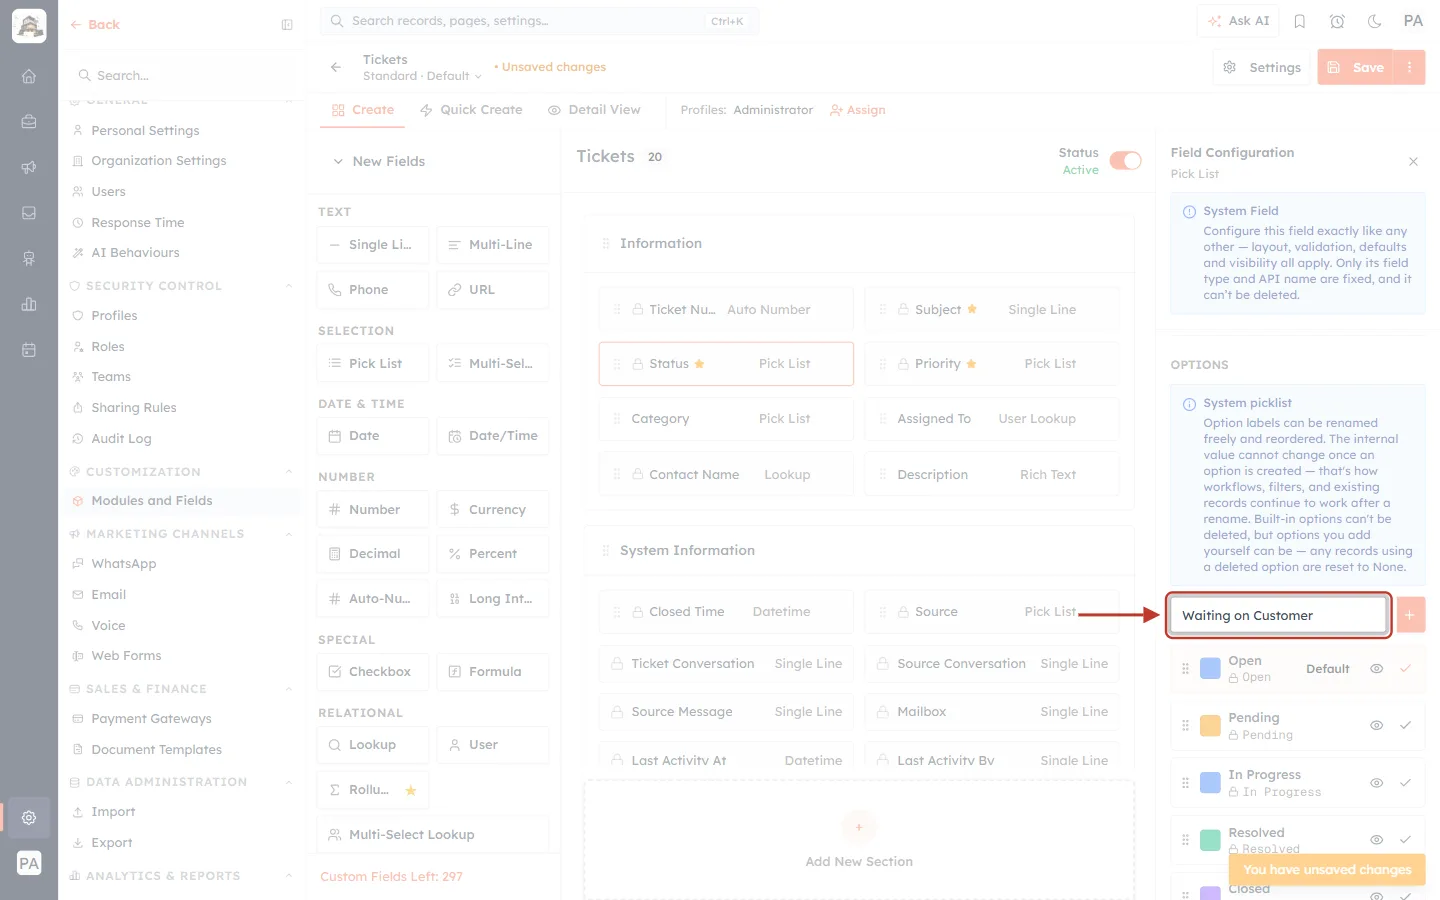
What this screenshot shows. The Enter option label… box is ringed, with Waiting on Customer typed in.
Use a clear, short label that everyone on the team understands.
What this screenshot shows. The status options are ringed after adding Waiting on Customer.
The new option is added at the bottom of the list; drag it by its ⋮⋮ handle to where it belongs (for example after Pending).
Unlike the built-in statuses, an option you add can be deleted later.
A “You have unsaved changes” reminder appears — click Save to keep the new status.
ℹ️
Resolve, Reopen and Close ticket use the built-in statuses Resolved, Open and Closed. You can rename these statuses, but they can’t be deleted.
Part 3 — Customise ticket categories#
Step 8: Open the Category field#
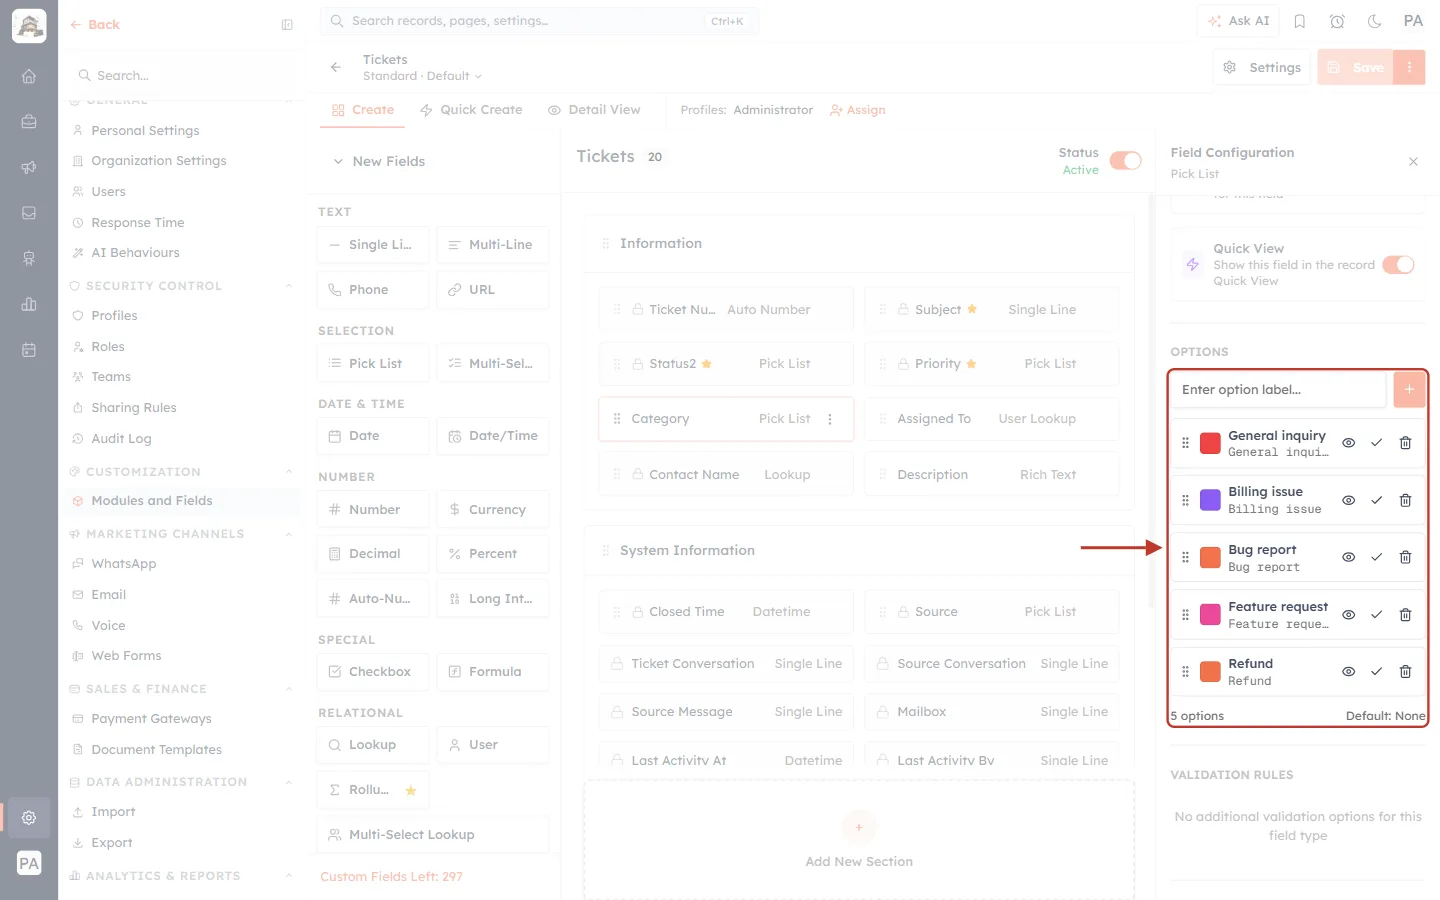
What this screenshot shows. The Category options are ringed.
Five categories: General inquiry, Billing issue, Bug report, Feature request and Refund, each with its own colour.
Each row also has a bin icon — Category is not a system field, so every option can be deleted.
5 options · Default: None — new tickets have no category until someone picks one.
Step 9: Add a category and choose its colour#
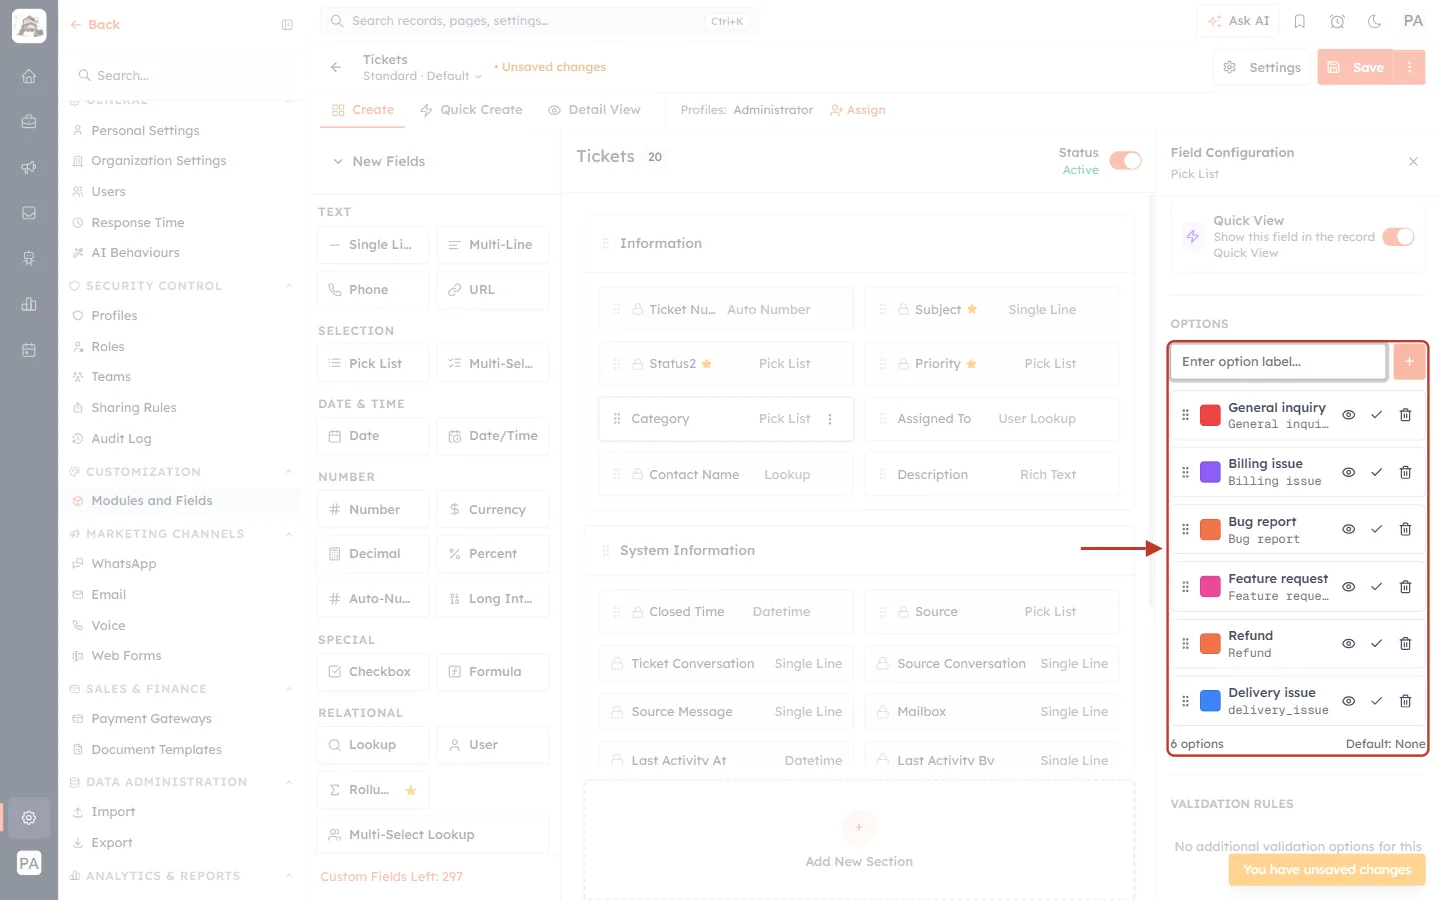
What this screenshot shows. The category list is ringed after adding Delivery issue.
Type it in Enter option label… and press Enter. The list now shows 6 options.
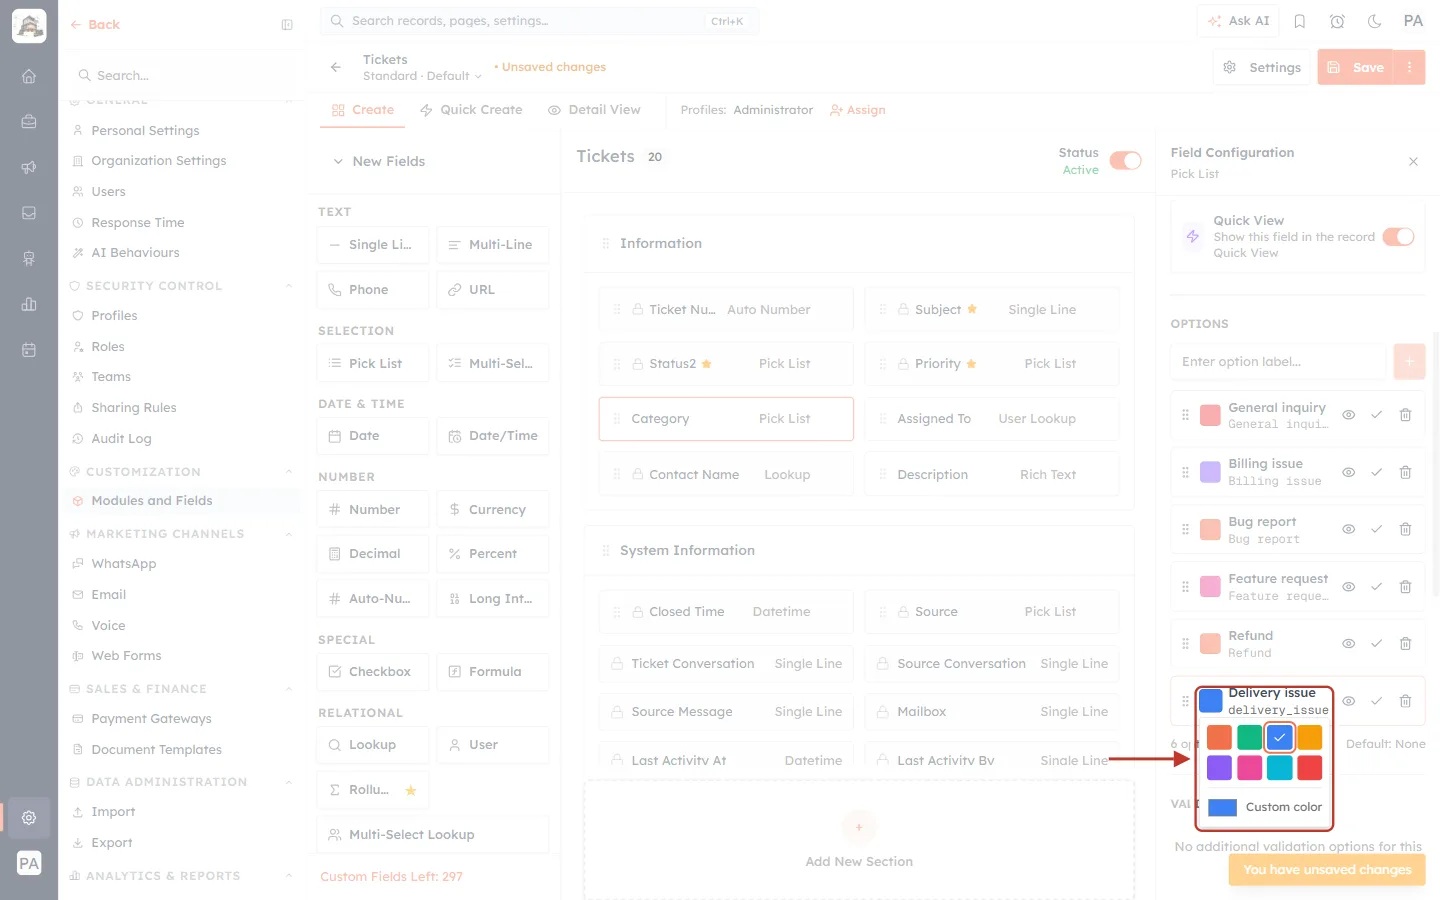
What this screenshot shows. The colour swatch of the new category and its colour picker are ringed.
Click a swatch to choose the colour of the label shown on tickets, in lists and on the Kanban board.
Give related categories similar colours, and urgent ones a strong colour, so they stand out.
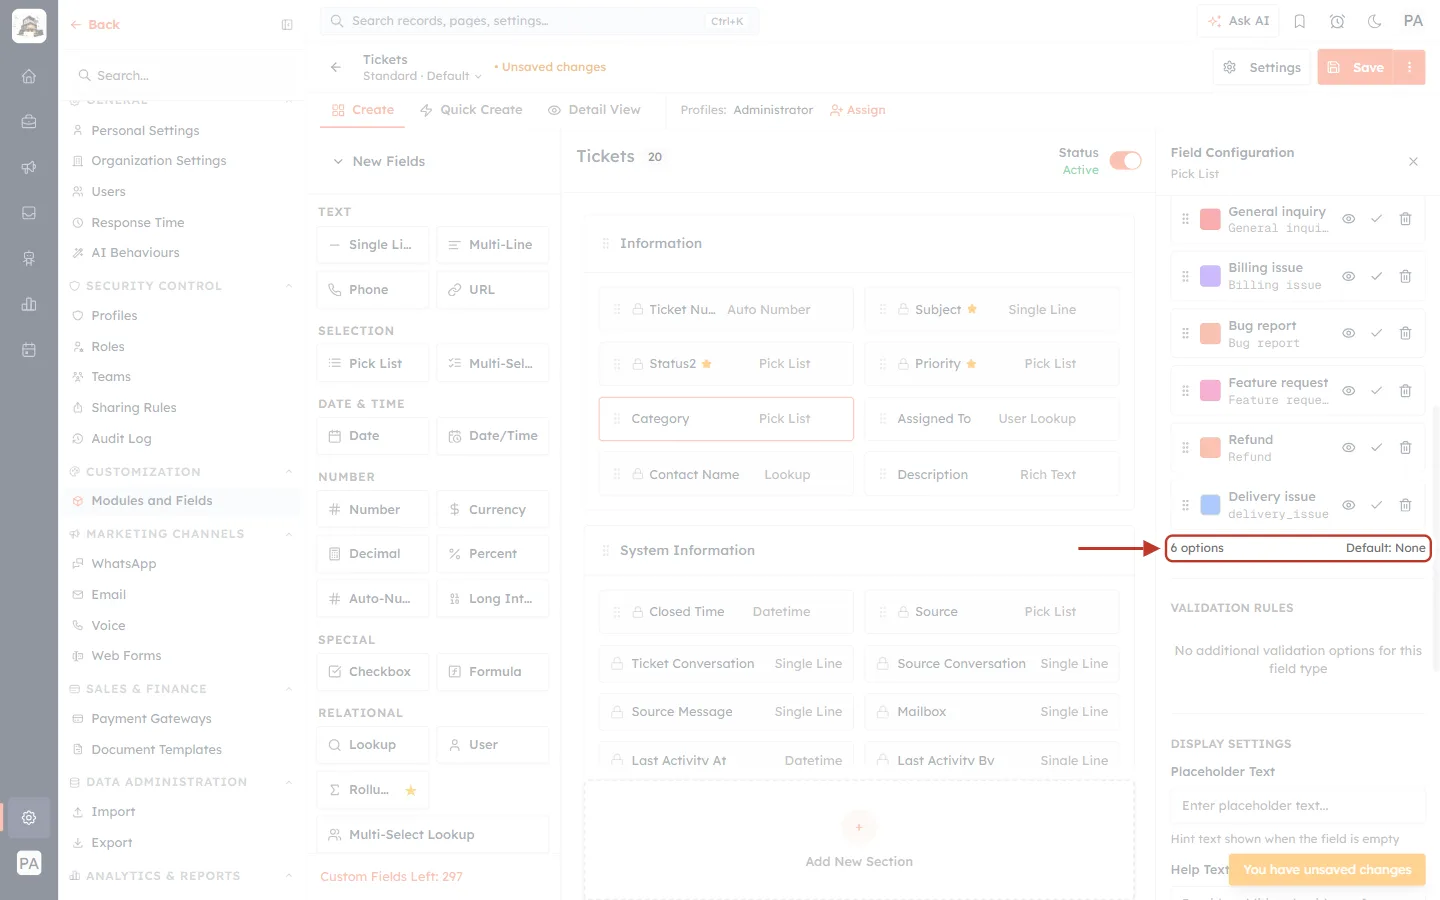
What this screenshot shows. The footer of the category list is ringed: 6 options · Default: None.
To pre-select a category on new tickets, click the tick (Set as default) on that option.
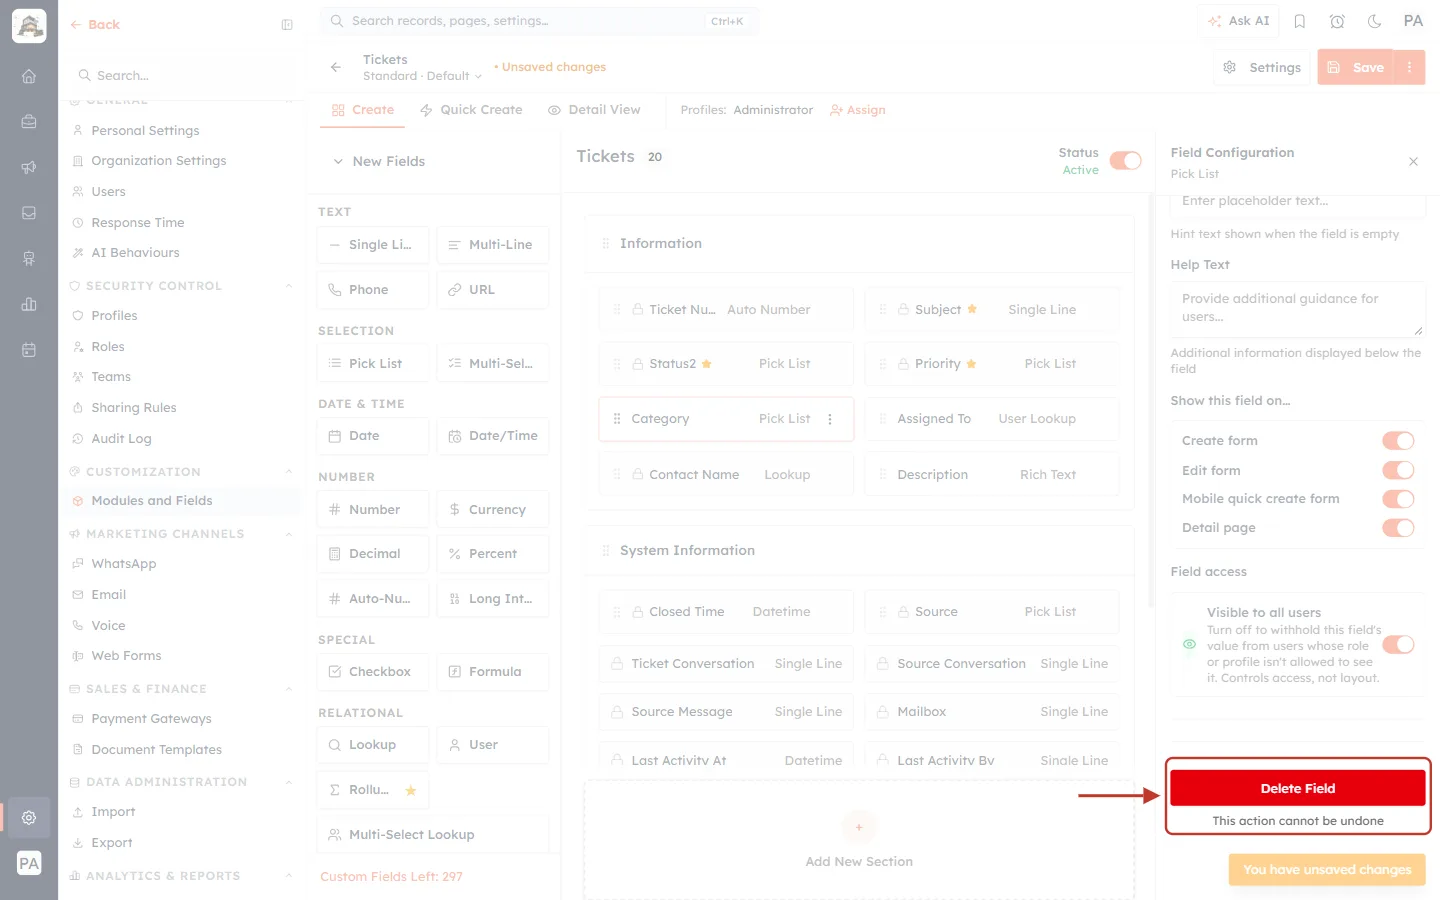
What this screenshot shows. Delete Field at the bottom of the Category settings is ringed — “This action cannot be undone.”
Only fields you can delete show this button; built-in system fields such as Status and Priority do not.
To remove a single category, use the bin icon on that option instead.
⚠️
Deleting a category option resets every ticket that used it to None. To retire a category but keep the history, rename it (for example Billing issue (old)) or hide it with the eye icon instead.
Part 4 — Adjust priority levels#
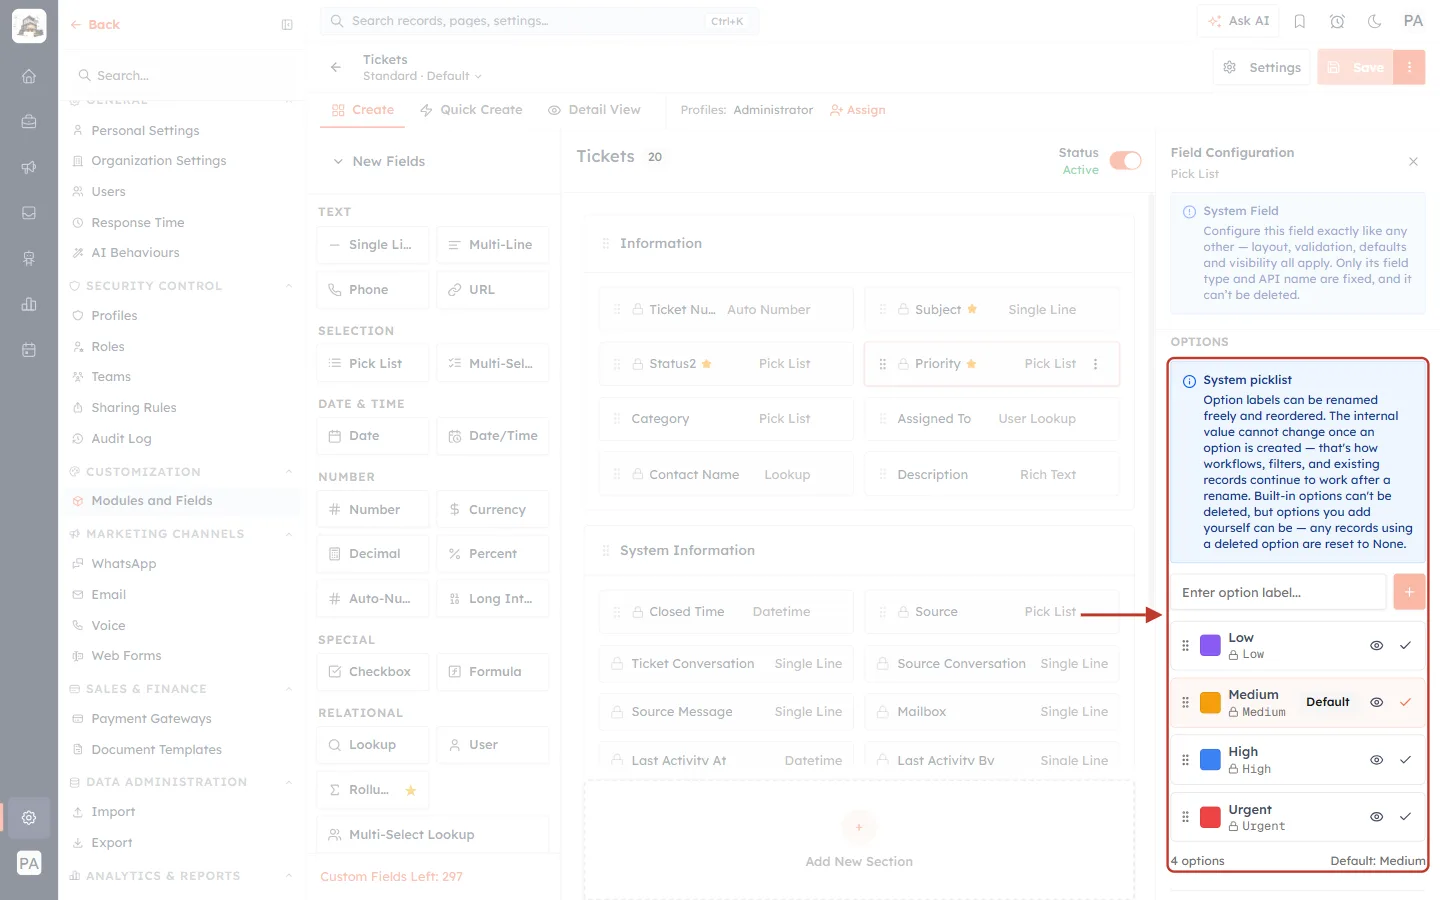
What this screenshot shows. The Priority options are ringed.
Priority is also a system picklist: Low, Medium, High and Urgent, with Medium as the default.
You can rename, reorder, recolour, hide and add levels — but not delete the four built-in ones.
Keep the list short: four or five levels are easier to use consistently than ten.
Part 5 — Ticket numbers: unique values and format#
Step 10: Make the ticket number unique#
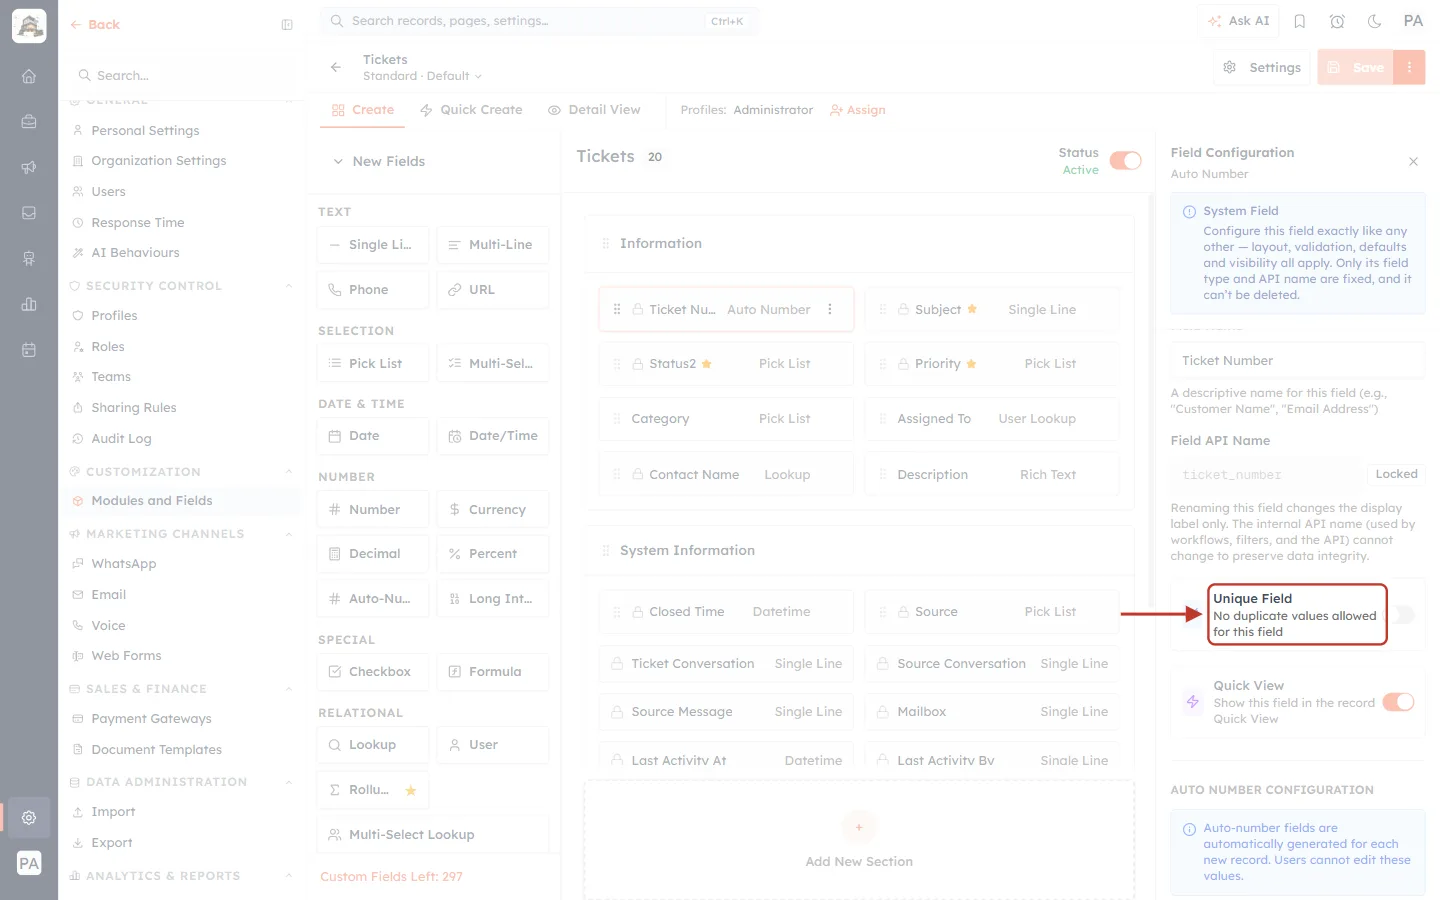
What this screenshot shows. The Unique Field option of the Ticket Number field is ringed: “No duplicate values allowed for this field.”
Switch it on so no two tickets can share a number.
A unique field is also what Import Notes needs to match each note to the right ticket — see Import & Export Tickets.
Step 11: Choose the number format#
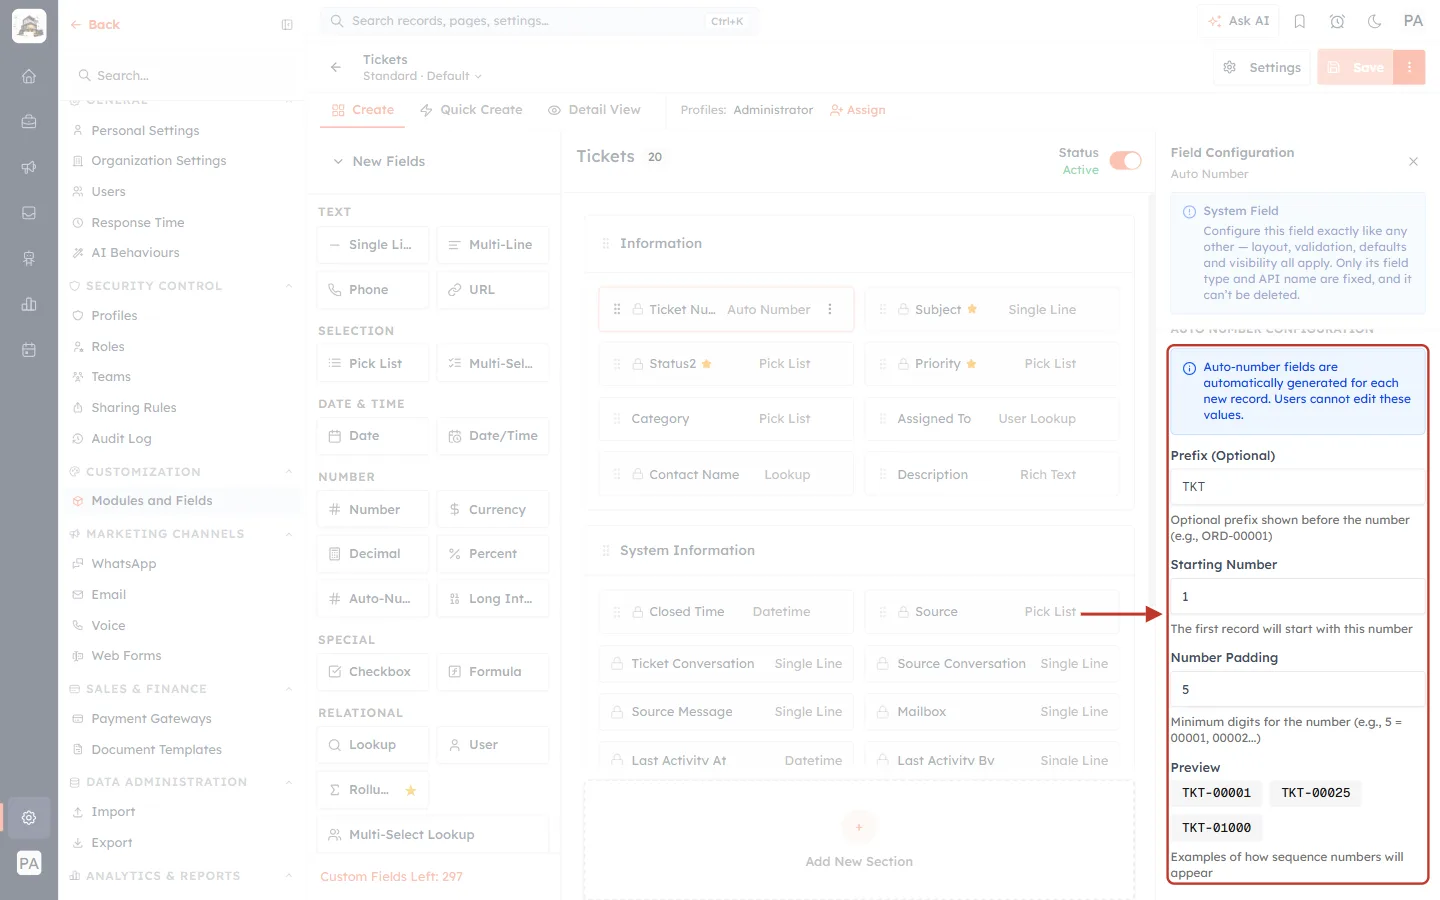
What this screenshot shows. The AUTO NUMBER CONFIGURATION settings are ringed.
“Auto-number fields are automatically generated for each new record. Users cannot edit these values.”
Prefix (Optional) — TKT, shown before the number.
Starting Number — 1, the number of the first ticket.
Number Padding — 5, the minimum number of digits (5 gives 00001, 00002…).
Preview — TKT-00001, TKT-00025, TKT-01000: examples of how numbers will look.
✅
Choose the format once, before you have many tickets. Customers quote ticket numbers in emails, so a stable format avoids confusion.
Part 6 — Add your own ticket field#
In this example we add a Product Line pick list, so every ticket records which product range it is about.
Step 12: Drag a field type onto the form#
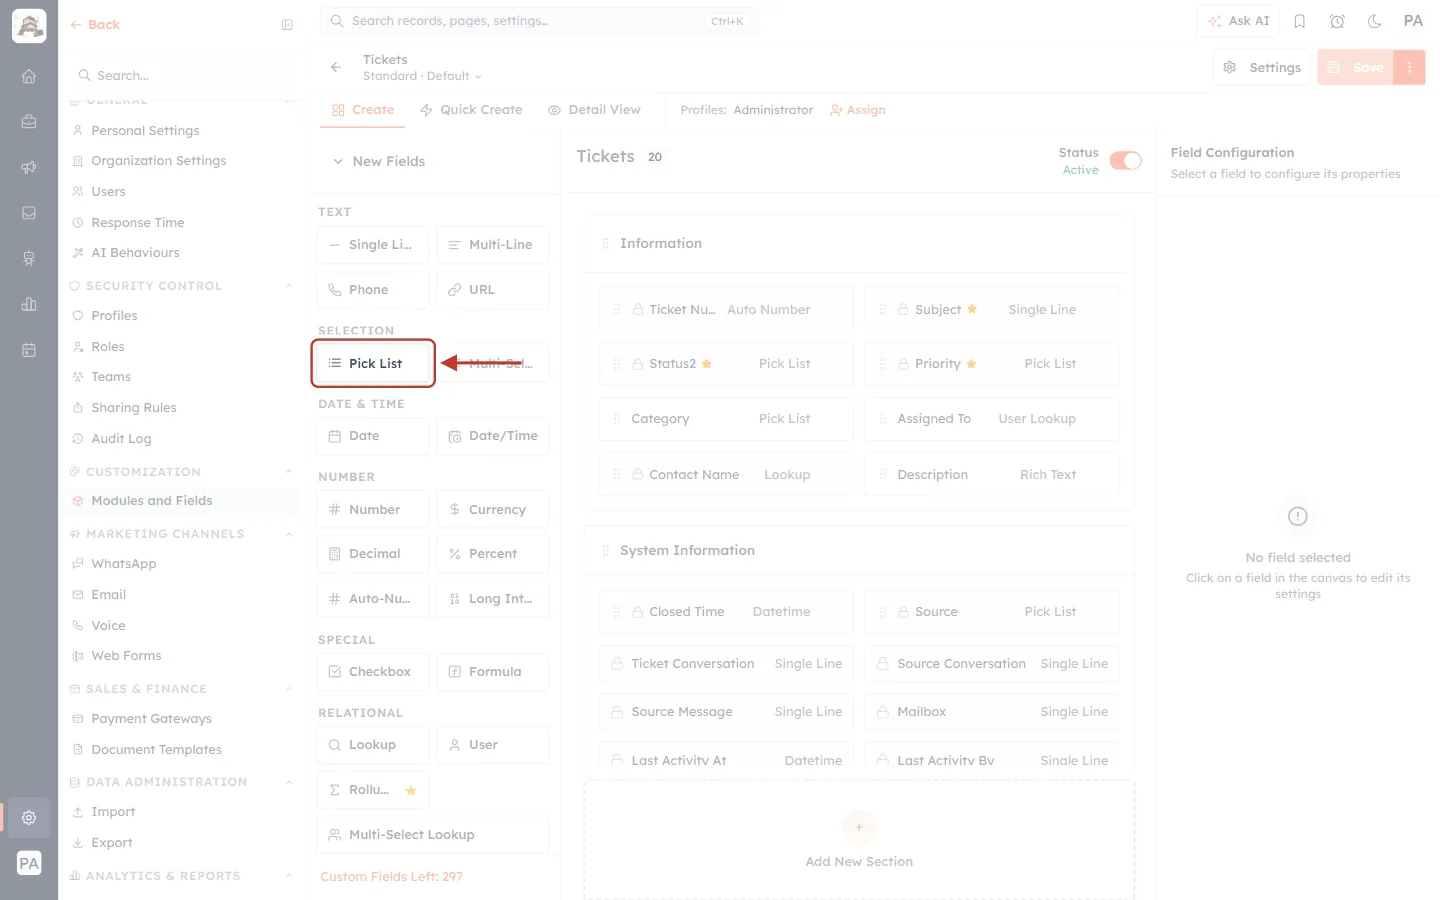
What this screenshot shows. Pick List in the SELECTION group of the palette is ringed.
Press and hold it, drag it onto the form, and drop it in the section where it belongs.
Choose the type that fits the information: a Pick List for a fixed list of choices, Single Line for short text, Date for dates, User for a team member, and so on.
Step 13: Name the field and add its options#
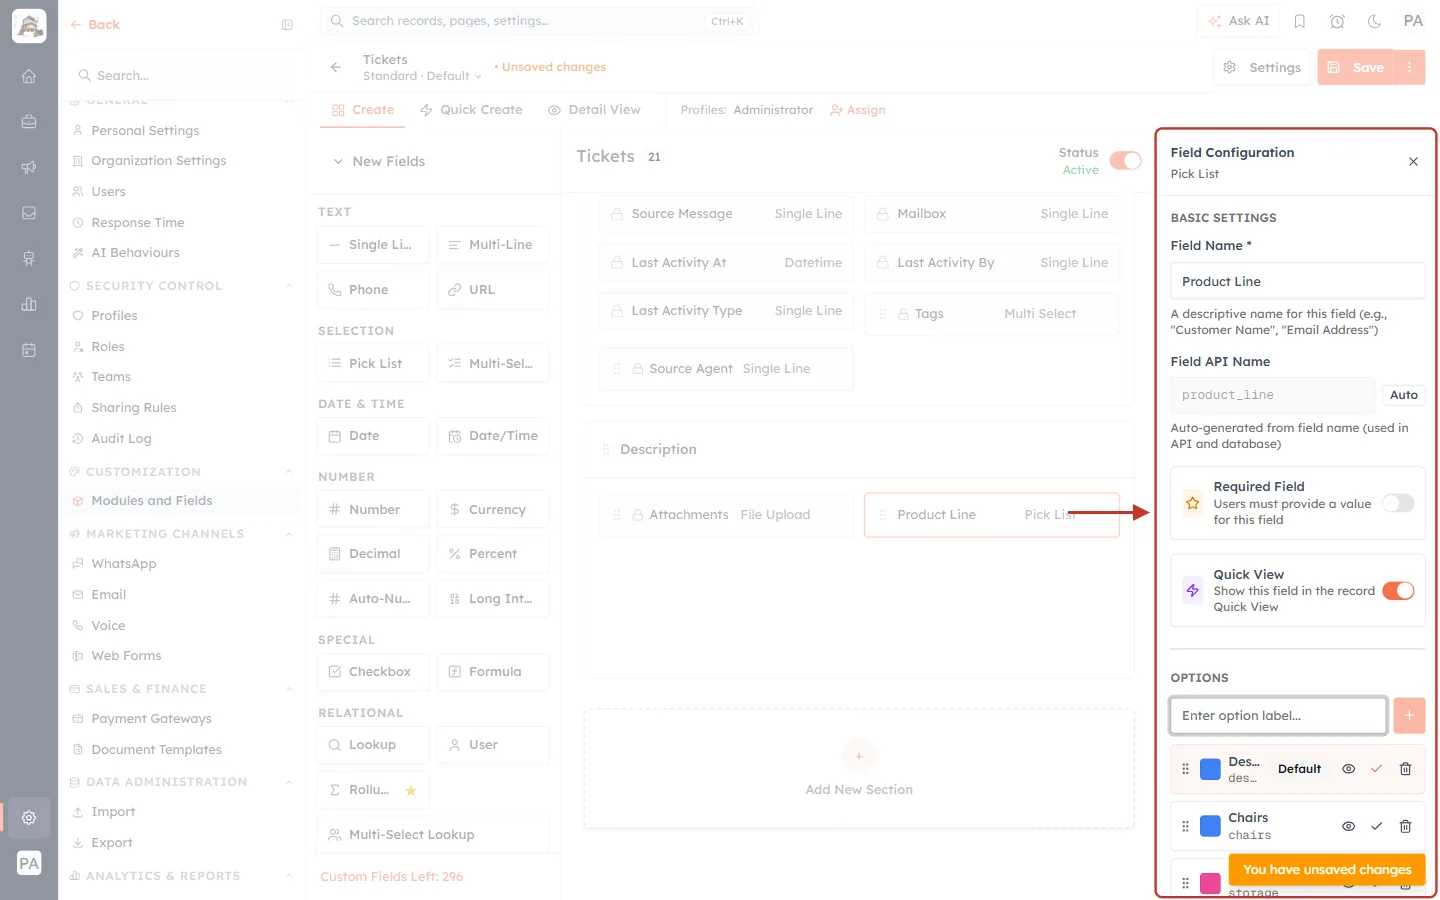
What this screenshot shows. The Field Configuration panel of the new field is ringed.
Field Name * — Product Line. The Field API Name (product_line) is generated automatically (Auto).
Required Field — switch on if every ticket must have a value.
Quick View — show the field in the record’s Quick View.
OPTIONS — Desks (Default), Chairs, Storage, each with a colour, eye, tick and bin icon.
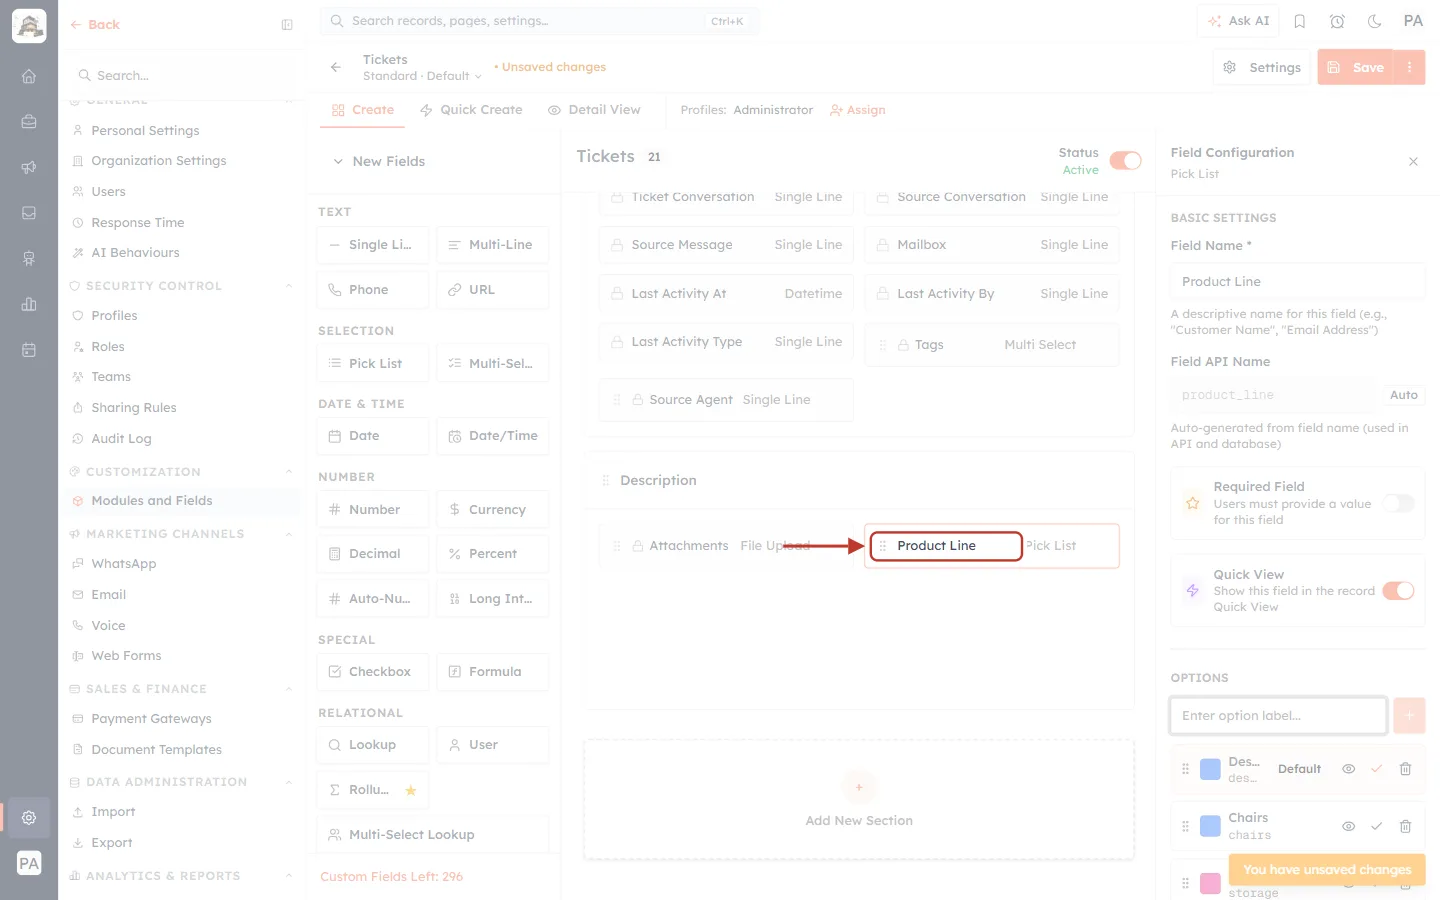
What this screenshot shows. The new Product Line field on the form is ringed (type Pick List).
The field count at the top goes up by one, and Custom Fields Left goes down by one.
Click Save to add the field for everyone.
Part 7 — Control where a field appears and who can see it#
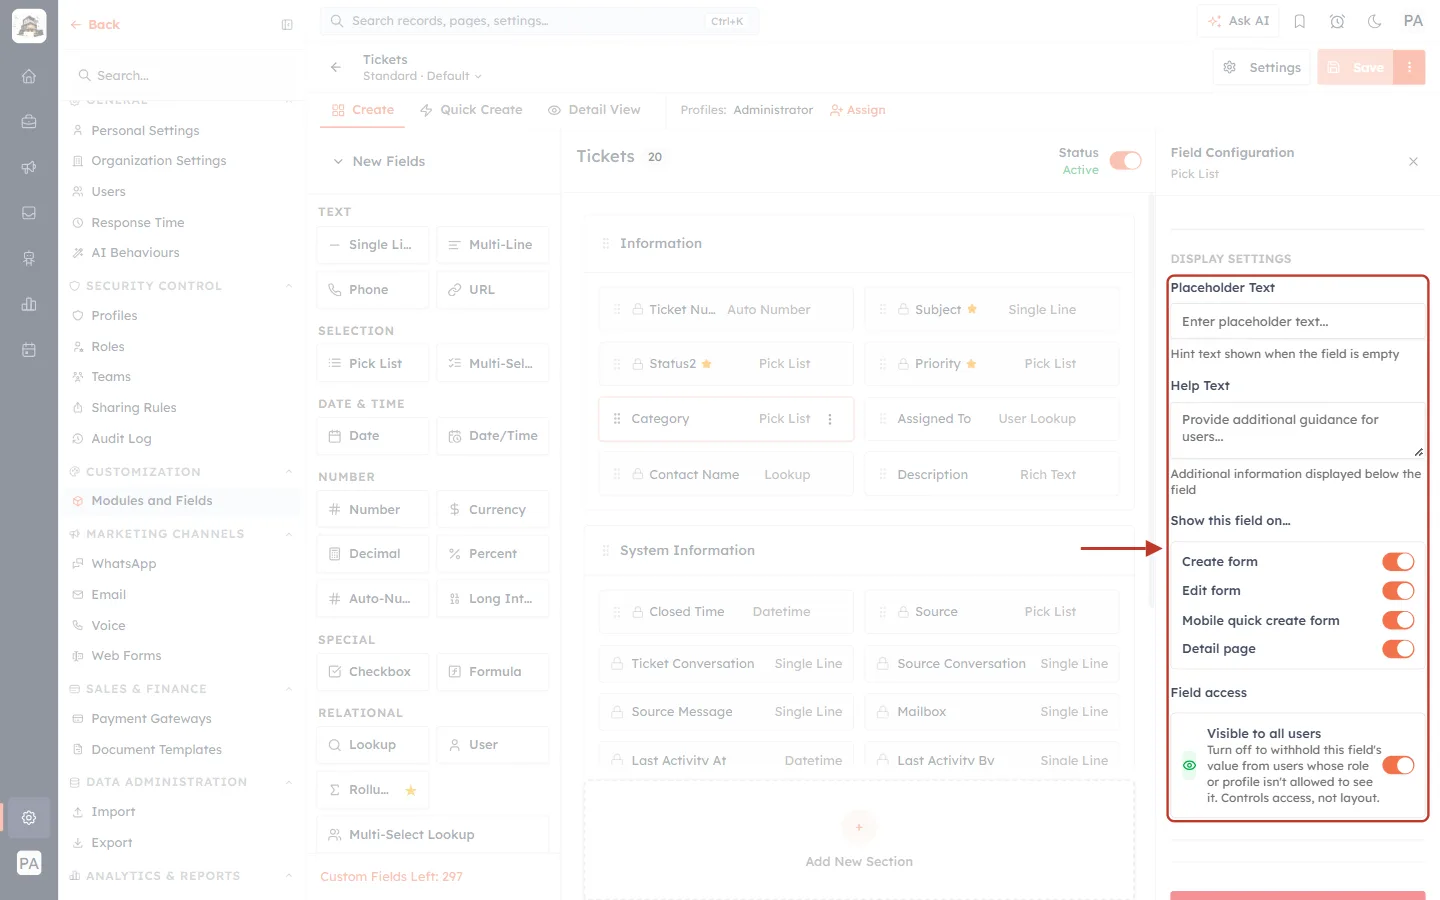
What this screenshot shows. The DISPLAY SETTINGS of a field are ringed.
Placeholder Text — hint text shown in the empty field (for example Choose the product range).
Help Text — extra guidance shown under the field.
Show this field on… — switch the field on or off for the Create form, Edit form, Mobile quick create form and Detail page. Required fields must stay on the Create and Edit pages.
Field access — Visible to all users. “Turn off to withhold this field’s value from users whose role or profile isn’t allowed to see it. Controls access, not layout.”
Good practice#
Rename rather than delete. Renaming keeps history and reports intact.
Keep lists short. Five to eight categories are easier to use consistently than twenty.
Use colours on purpose — for example red only for Urgent.
Agree definitions with your team (what counts as High? when is a ticket Pending?).
Update related settings after big changes: saved views, filters, workflows and import templates that use the old values.
Troubleshooting#
I can’t see Modules and Fields. Your profile doesn’t allow customising modules. Ask an administrator.
I can’t delete a status or priority. Built-in options of system picklists can’t be deleted. Rename or hide them instead.
My changes disappeared. They weren’t saved. Look for Unsaved changes and click Save before leaving the page.
The field name changed but a workflow still shows the old name. Workflows use the API name, which never changes — the workflow still works.
Import Notes says “Tickets has no unique fields”. Switch on Unique Field for Ticket Number (Step 10) and save.
Frequently asked questions#
Will renaming a status change existing tickets? They keep the same status — only the label changes, everywhere at once.
What happens to tickets if I delete an option? Tickets that used it are reset to None.
Can different teams see different fields? Yes — create another layout and assign it to their profiles, or use Field access to hide a field’s value from certain profiles.
How many custom fields can I add? The palette shows how many are left (Custom Fields Left).
Previous and next#
Related#
Was this article helpful?
Ready to implement this?
OpenAI Engage and apply what you just learned to your own workspace.
Open AI Engage CRM