Loading…


KnowledgeBase
Manage Tickets in the CRM: Filter Tickets, Use the Kanban Board & Read the Timeline (Step-by-Step)
What this article covers#
Every support ticket in AiEngage CRM is also a record in the Tickets module (under Sales). The Customer & Support workspace is built for answering customers one ticket at a time; the Tickets module is built for looking across all of them — finding the right tickets, seeing where work is piling up, moving tickets along, and checking the history of any ticket.
| Tool | Use it to | Part |
|---|---|---|
| Views & columns | Switch between saved lists and choose which details you see | 1 |
| Filter | Show only the tickets that match conditions — for example Open and Pending | 2 |
| Kanban board | See tickets as cards in a column per status, and drag them to change status | 3 |
| Grid view | See more columns at once, spreadsheet-style | 3 |
| Timeline | See every change made to one ticket: who, what and when | 4 |
The screenshots use a set of sample tickets (TKT-00127 to TKT-00140) — for example a delayed desk order, a double charge and a refund request.
Before you begin#
Access to the Tickets module. Your profile needs permission to view tickets — and to edit them if you will drag cards on the Kanban board. See Control Permissions with Profiles.
It helps to know the ticket statuses (Open, Pending, In Progress, Resolved, Closed) — see Assign, Prioritise, Tag & Change Ticket Status.
Part 1 — Open the Tickets module#
Step 1: Go to Sales → Tickets#
In the dark icon bar on the far left, click the Sales icon (the briefcase). In the menu that opens, click Tickets.
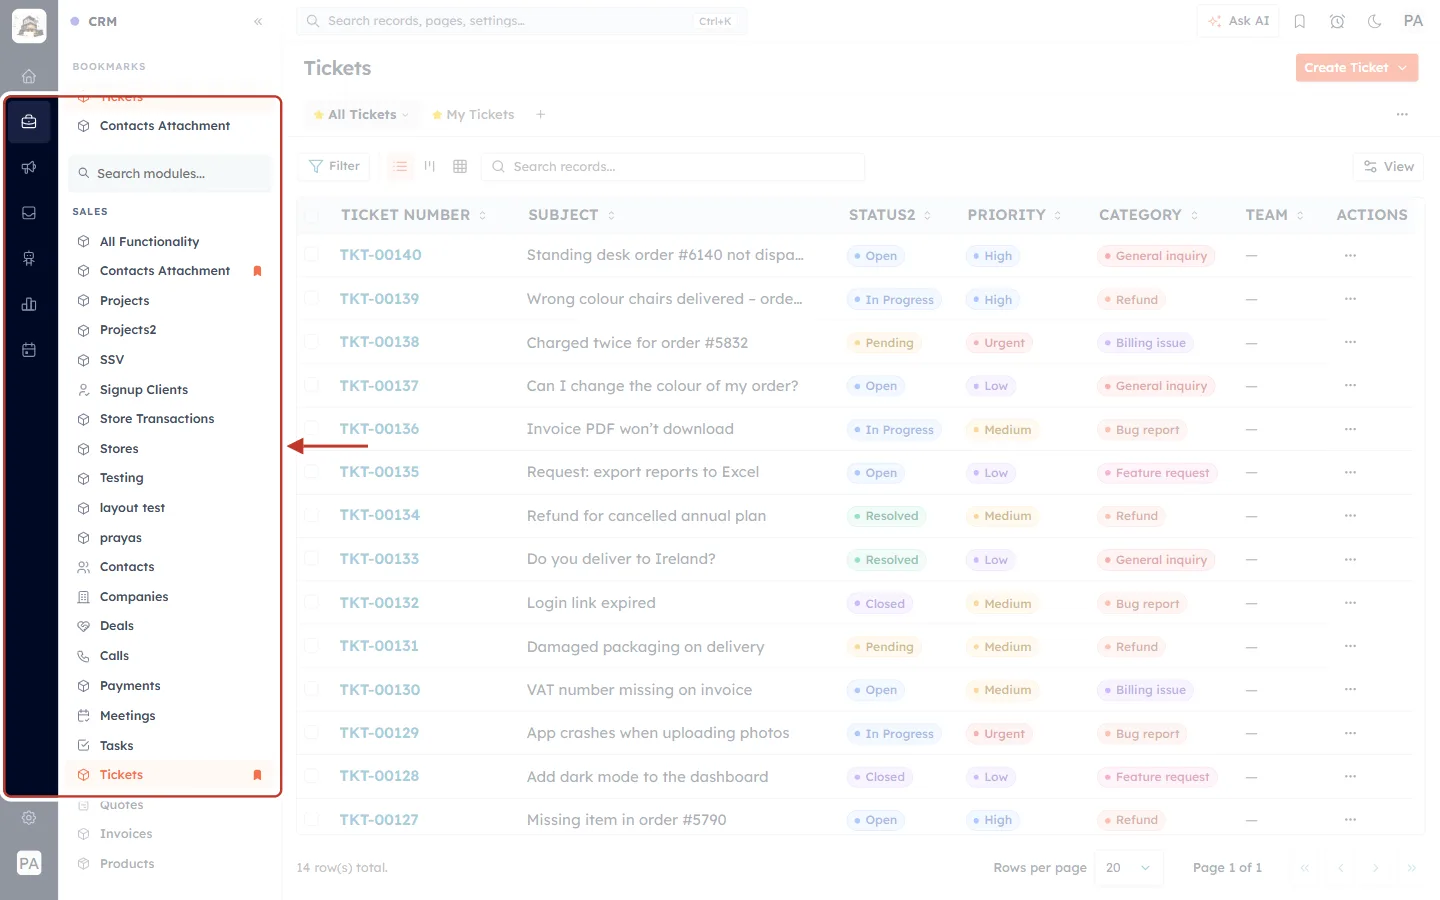
What this screenshot shows. The Sales icon in the icon bar and the Sales menu, down to Tickets, are ringed.
The Sales menu lists all your Sales modules: Contacts, Companies, Deals, Calls, Payments, Meetings, Tasks, Tickets, Quotes, Invoices and so on.
Under BOOKMARKS at the top, Tickets is bookmarked for one-click access. Click the bookmark icon next to any module to add it there.
Can’t find it? Type Tickets in Search modules….
Step 2: Choose a view#
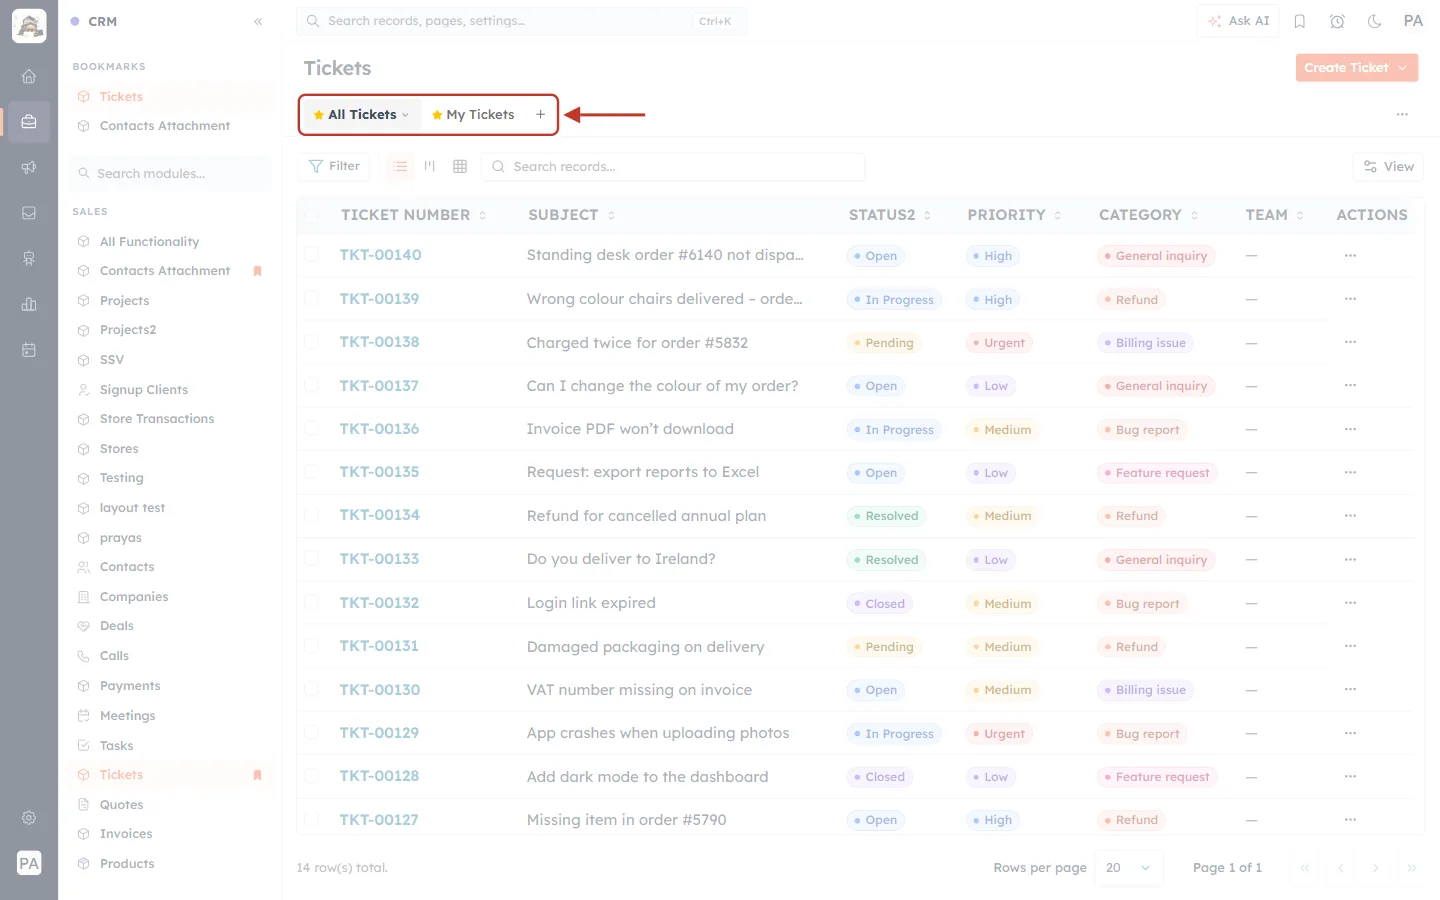
What this screenshot shows. The view tabs at the top of the Tickets page are ringed.
All Tickets — every ticket you can see. It is highlighted because it is the current view; the small ⌄ next to it opens the list of all your views.
My Tickets — only tickets assigned to you.
+ (Create new view) — save your own list, with its own filters and columns.
A view remembers its filters and columns, so you can switch between, say, “All open tickets” and “My urgent tickets” in one click.
Step 3: Get to know the toolbar#
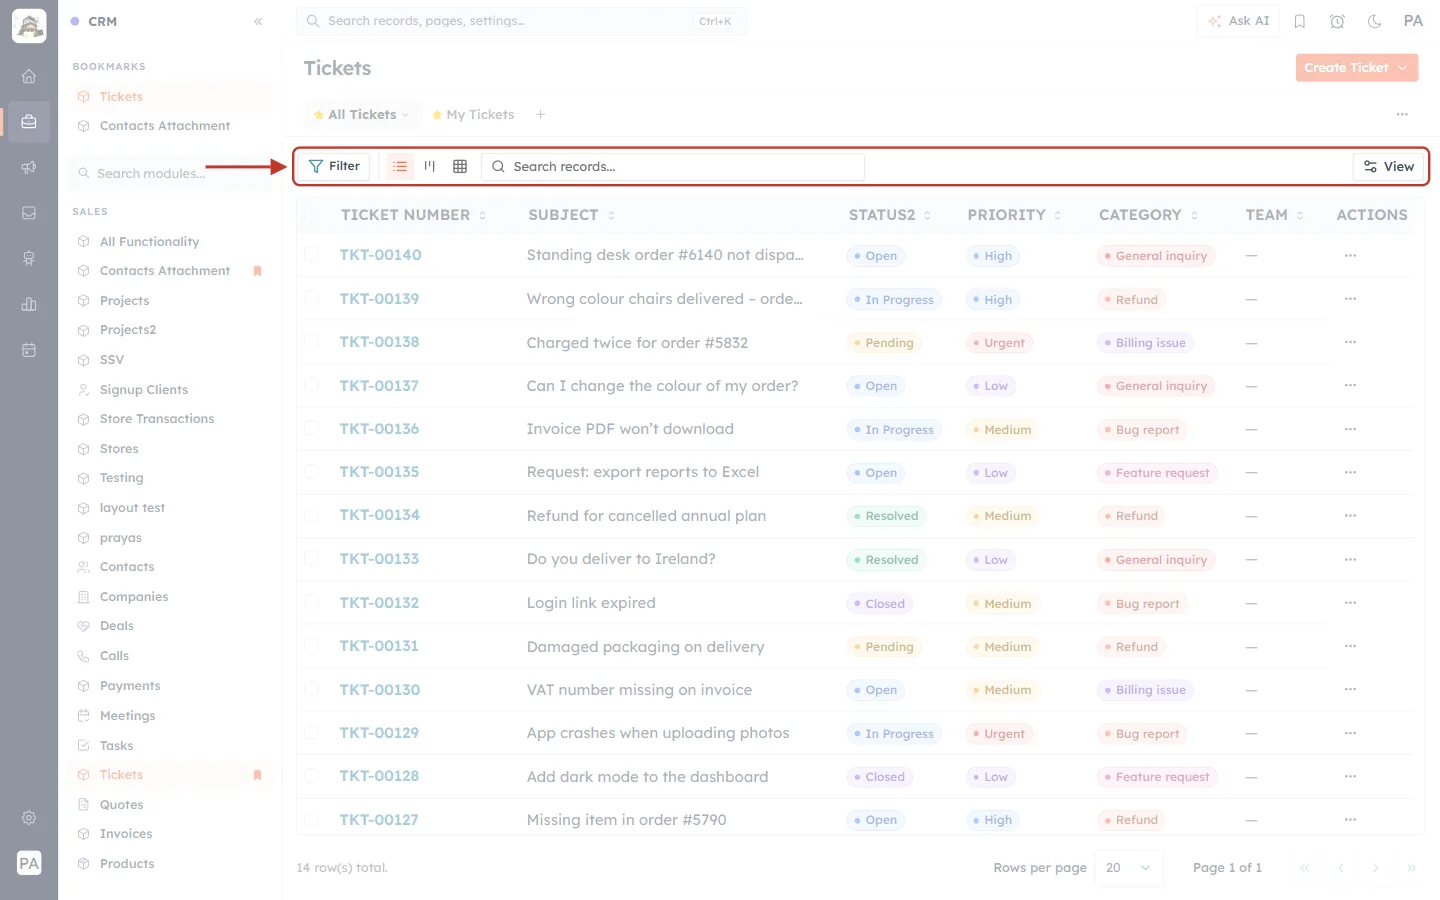
What this screenshot shows. The toolbar above the list is ringed.
Filter — open the Filter panel (Part 2).
Three layout buttons: List View (lines, the current one, highlighted), Kanban View (columns) and Grid View (a grid) — see Part 3.
Search records… — type a word from the subject or a ticket number to find a ticket quickly.
View (on the right) — choose which columns appear (Step 5).
Step 4: Read the ticket list#
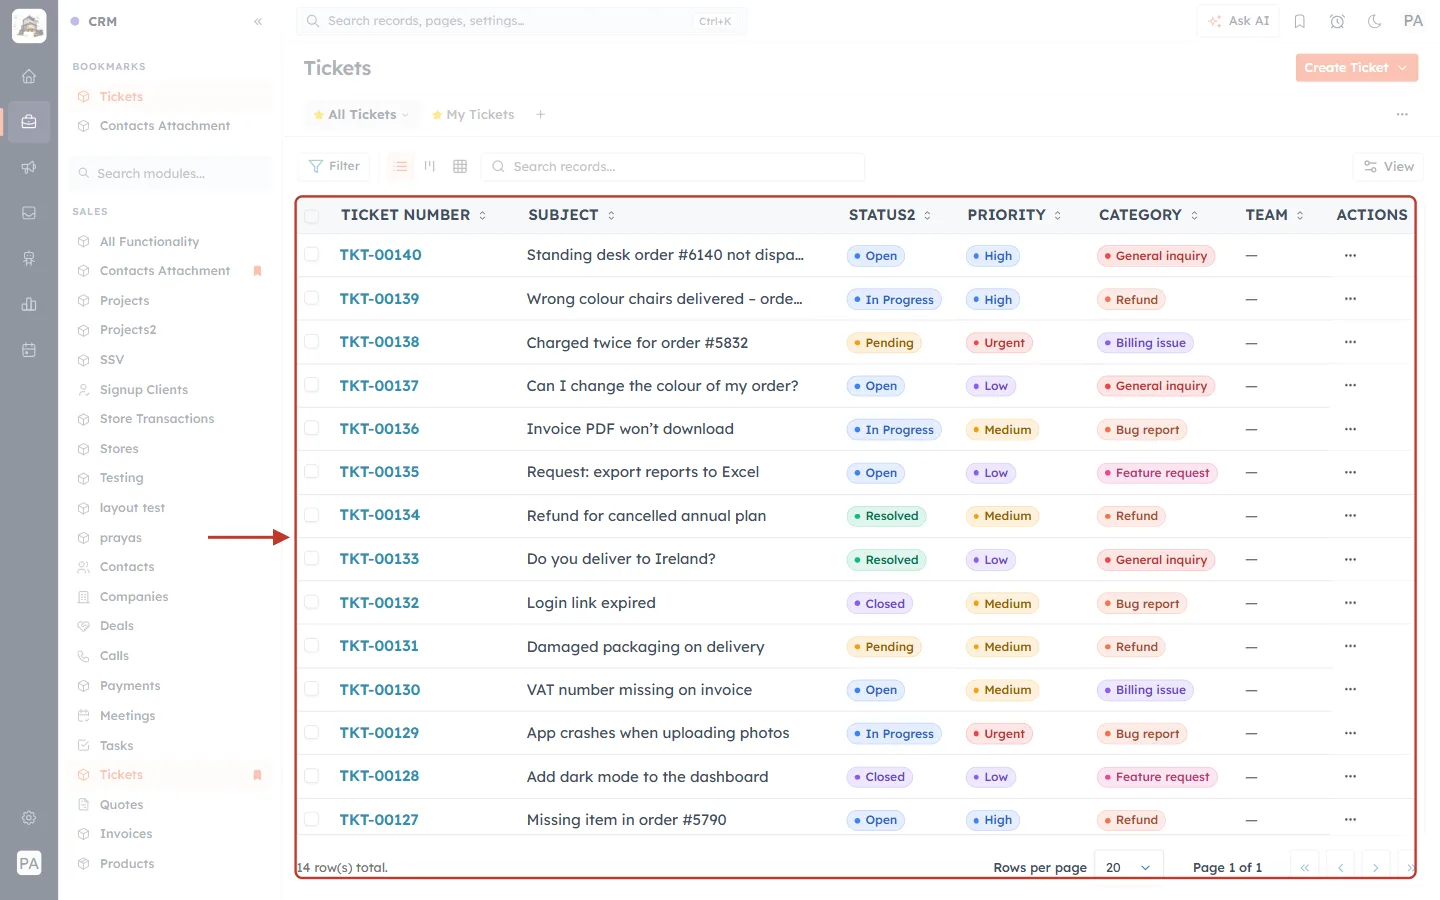
What this screenshot shows. The ticket list is ringed, from the column headings to the page controls.
Columns: TICKET NUMBER (click it to open the ticket), SUBJECT, STATUS2, PRIORITY, CATEGORY, TEAM and ACTIONS (⋯).
Status, priority and category are coloured labels, so you can scan the list quickly — for example the red Urgent on TKT-00138.
Click a column heading to sort by it (the small arrows).
Tick the box at the start of a row to select tickets.
At the bottom: the total (14 row(s) total), Rows per page and the page arrows.
Step 5: Choose your columns (View)#
Click View on the right of the toolbar.
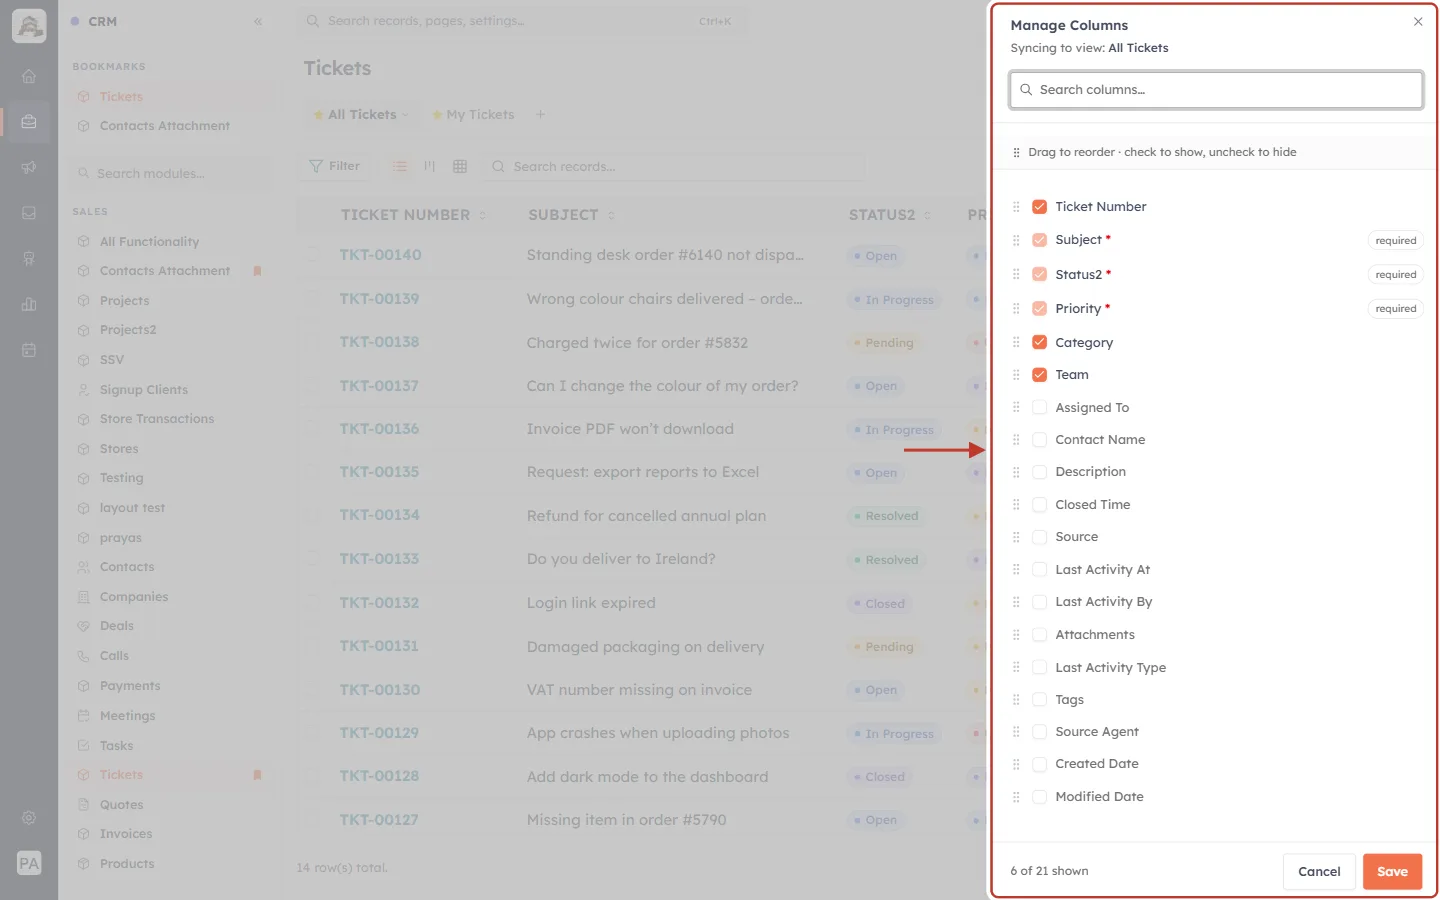
What this screenshot shows. The Manage Columns panel that slides in from the right is ringed.
Syncing to view: All Tickets — your column choice is saved with the current view.
Search columns… — find a field quickly.
Drag to reorder · check to show, uncheck to hide: tick a field to show it as a column, untick to hide it, and drag the ⋮⋮ handle to change the order.
Subject, Status2 and Priority are marked required and always shown.
Other fields you can add include Assigned To, Contact Name, Closed Time, Source, Last Activity At / By / Type, Tags, Created Date and Modified Date.
At the bottom: how many are shown (6 of 21 shown), Cancel and Save.
✅
Add Assigned To and Last Activity At to your main view — together they show at a glance who owns each ticket and which ones have gone quiet.
Part 2 — Filter tickets#
Filters narrow the list down to the tickets you need right now. In this example we show only tickets that still need work: those with status Open or Pending.
Step 6: Open the Filter panel#
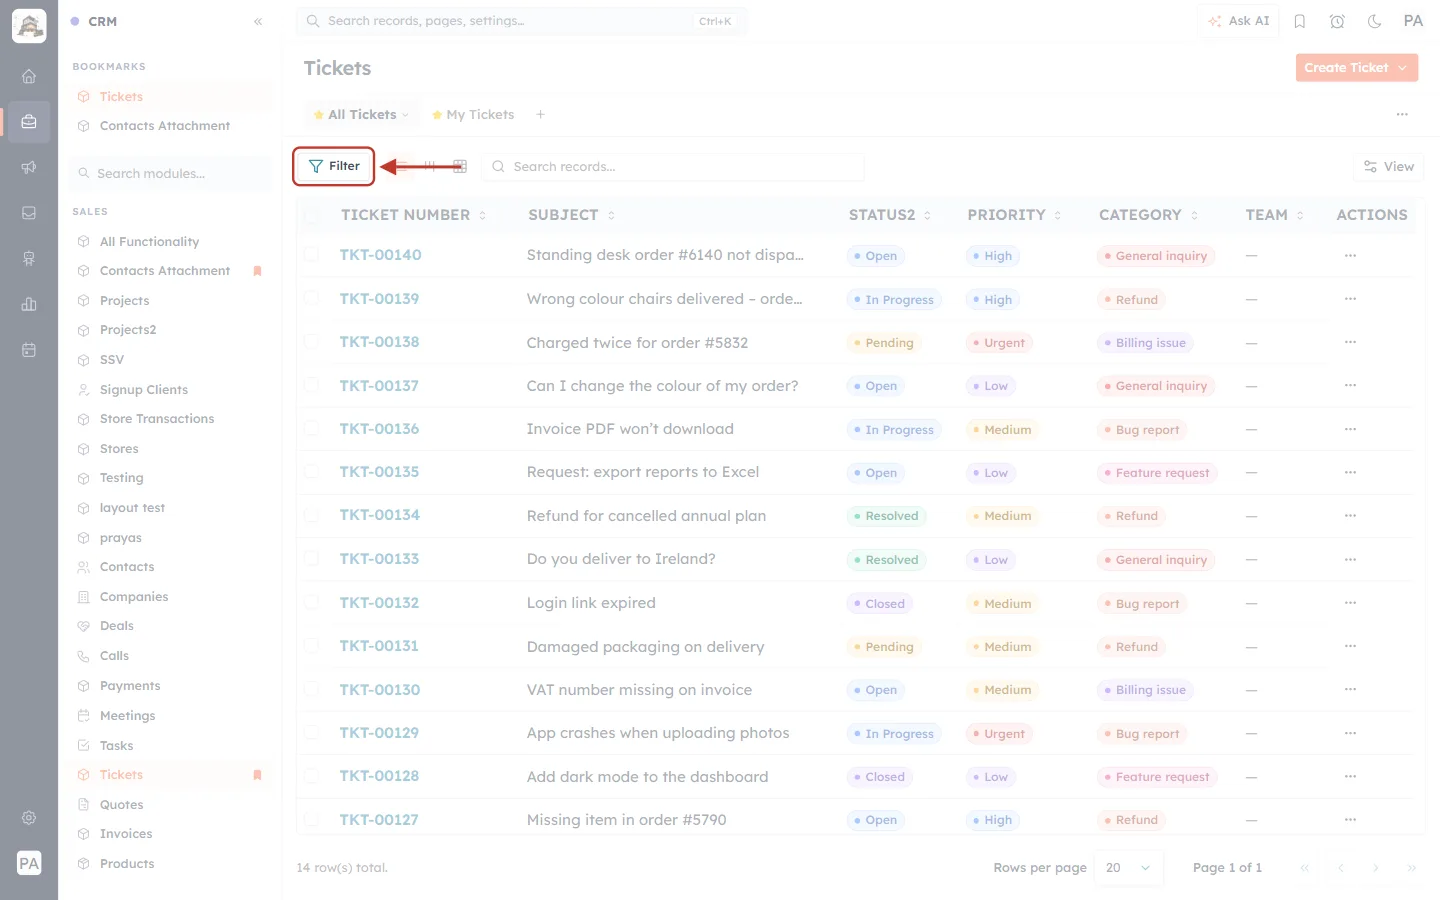
What this screenshot shows. The Filter button at the left of the toolbar is ringed.
Click it to open the Filter panel on the left of the list.
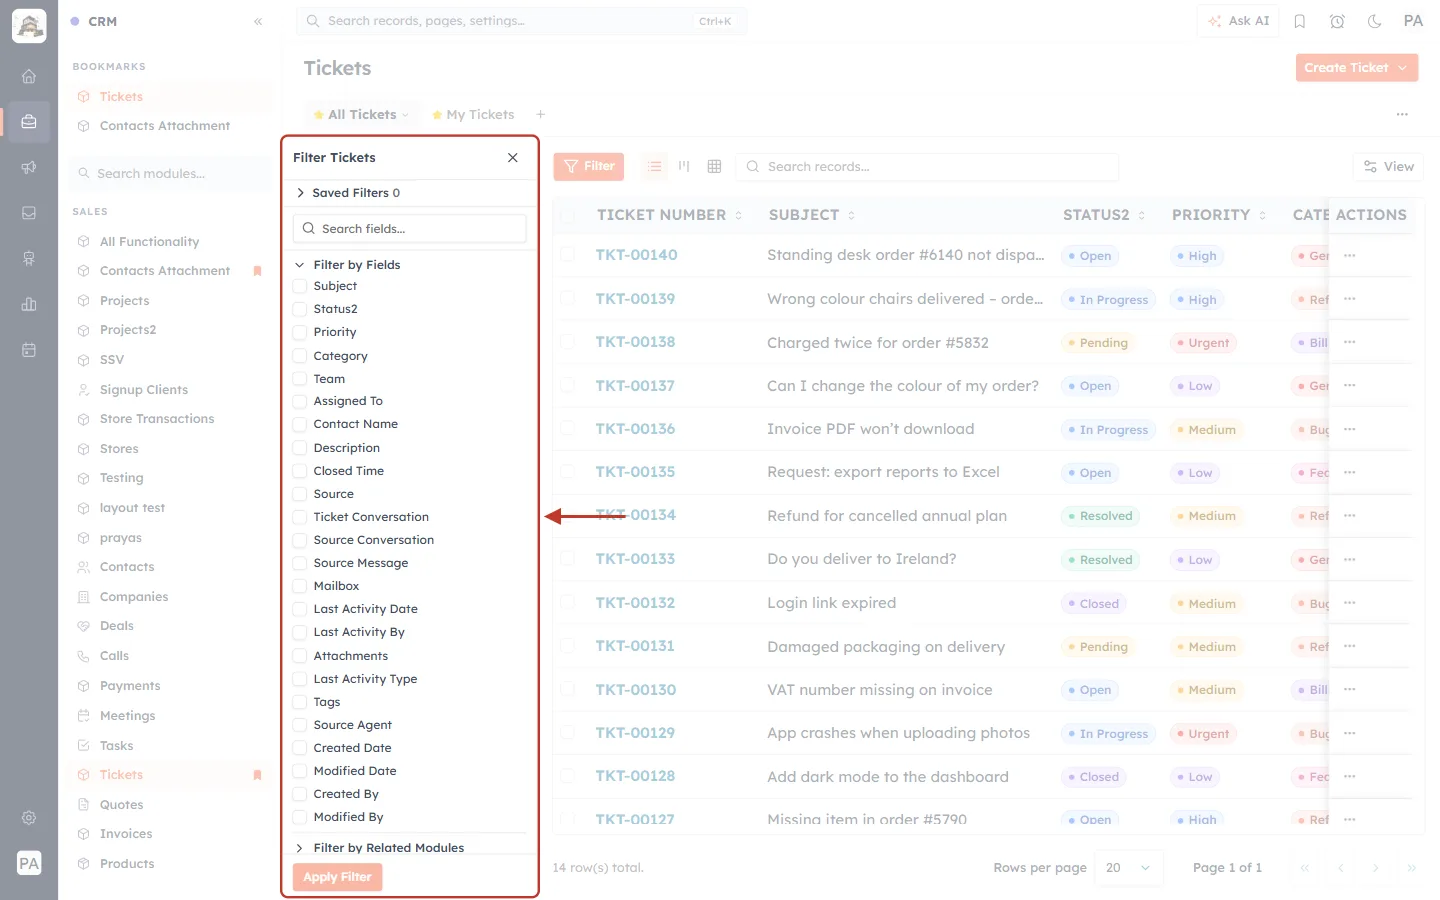
What this screenshot shows. The Filter Tickets panel is ringed.
Clear All and × (close) at the top.
Saved Filters — filters you have saved for re-use, with a Save button to save the current one.
Search fields… — find a field quickly.
Filter by Fields — every ticket field, each with a tick box: Subject, Status2, Priority, Category, Team, Assigned To, Contact Name, Description, Closed Time, Source, Mailbox, Last Activity Date, Tags, Created Date and more.
Filter by Related Modules — filter by details of linked records, such as the contact.
Apply Filter at the bottom.
Step 7: Choose a field and condition#
Tick the field you want to filter on — here Status2. A condition and a value box appear under it.
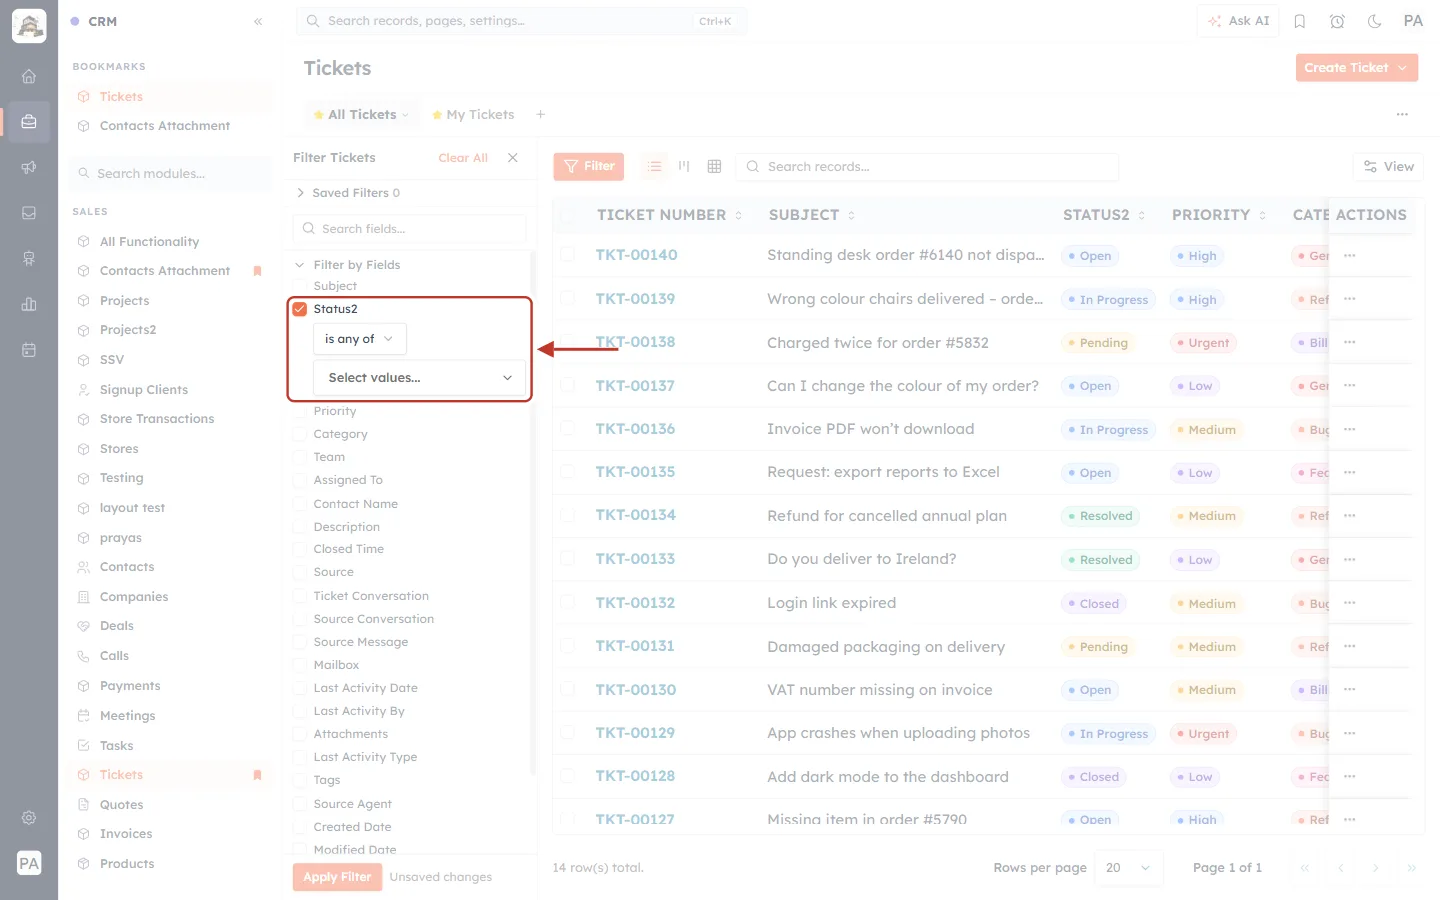
What this screenshot shows. The Status2 filter is ringed.
The condition: is any of (the default for this field).
Select values… — where you choose the statuses.
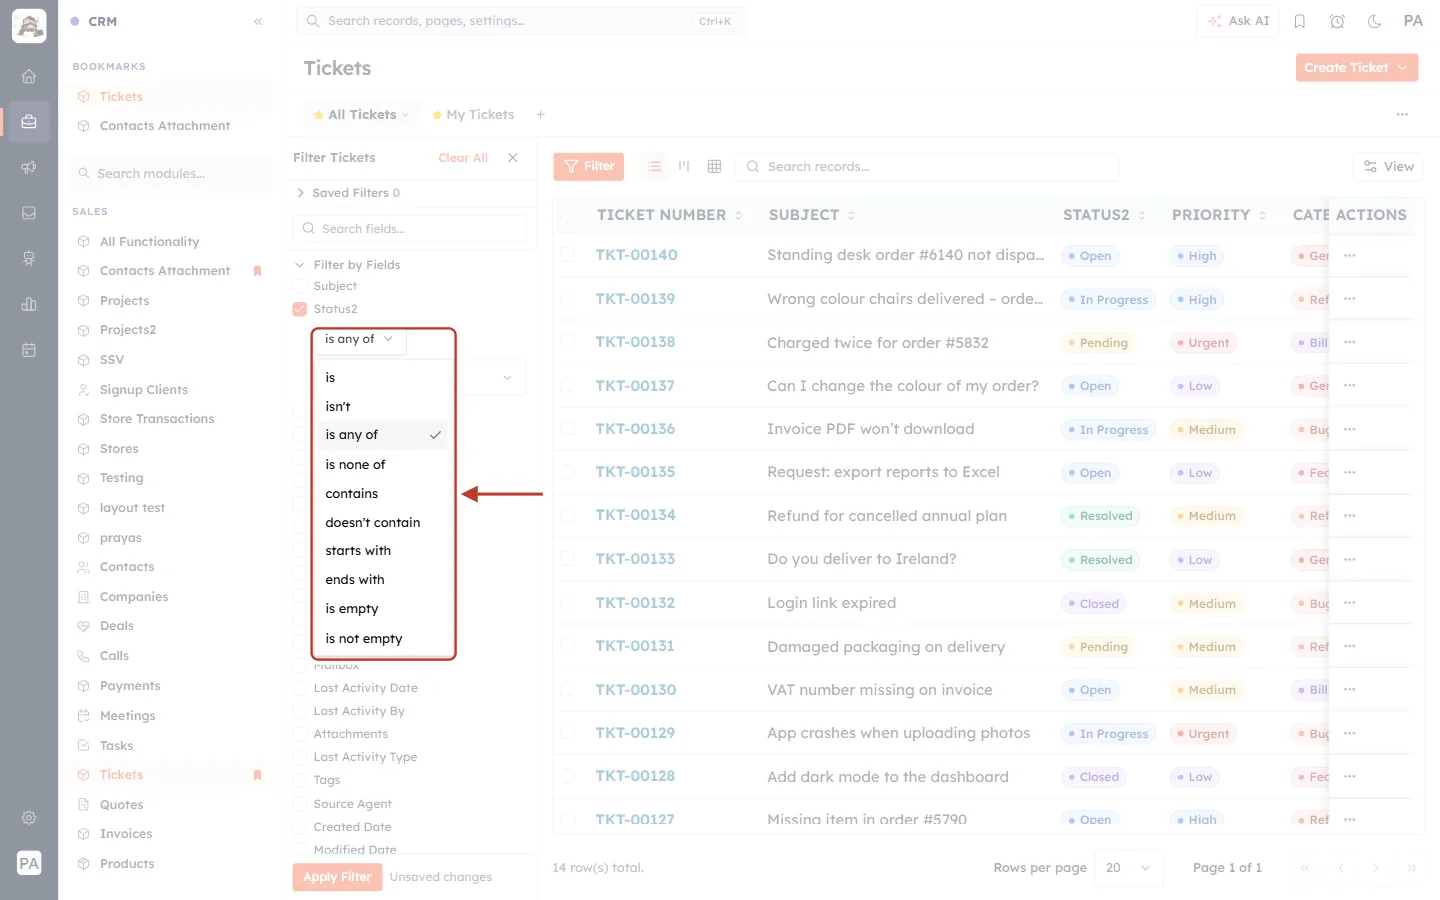
What this screenshot shows. The condition list is open and ringed.
is / isn’t — exactly one value, or anything except it.
is any of / is none of — a list of values.
contains / doesn’t contain, starts with / ends with — part of the text.
is empty / is not empty — whether the field has a value at all (for example tickets with no assignee).
Step 8: Choose the values#
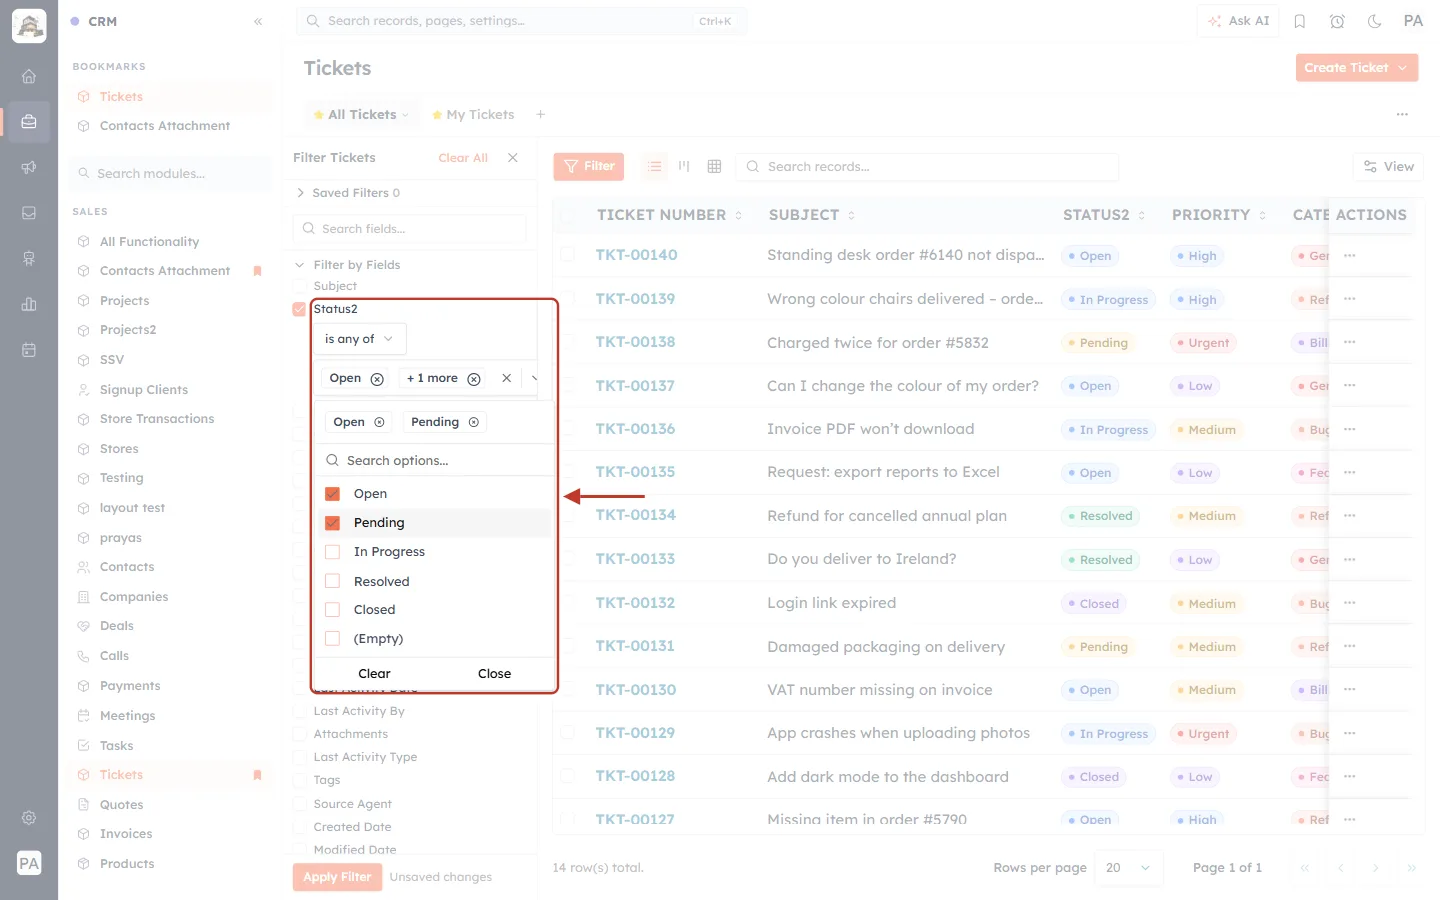
What this screenshot shows. The value list for Status2 is ringed, with two statuses chosen.
Search options… at the top.
Tick boxes for each status: Open ✓, Pending ✓, In Progress, Resolved, Closed, and (Empty) for tickets with no status.
The chosen values appear as chips above the list (Open ×, Pending ×) and in the box (Open +1 more).
Clear unticks everything; Close closes the list.
At the bottom of the panel, Unsaved changes reminds you to apply the filter.
Step 9: Apply the filter#
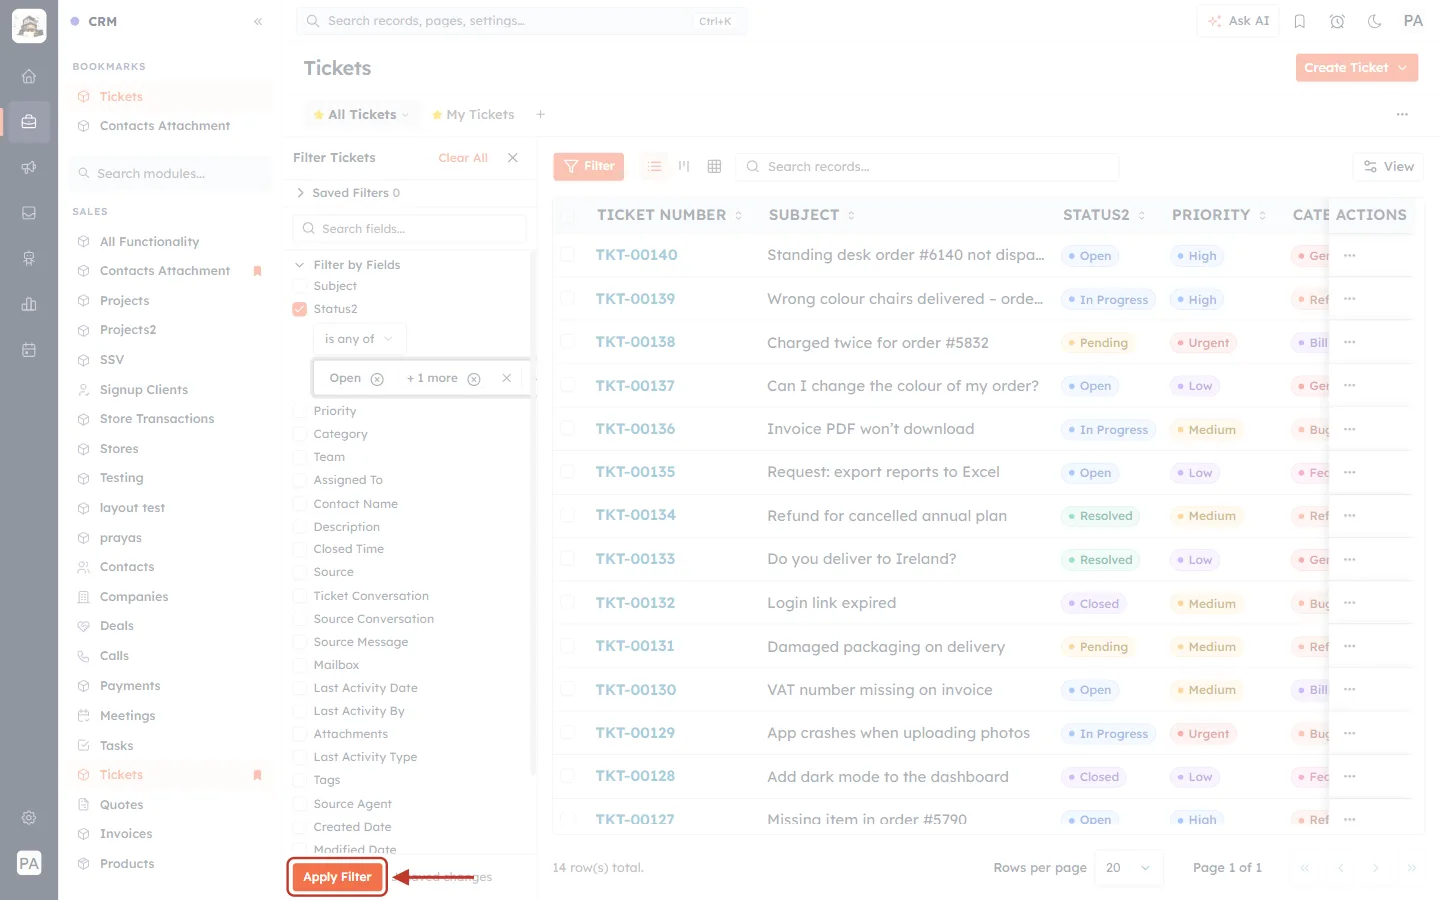
What this screenshot shows. The Apply Filter button at the bottom of the panel is ringed.
Click it to update the list.
You can tick more fields before applying — tickets must match all the conditions.
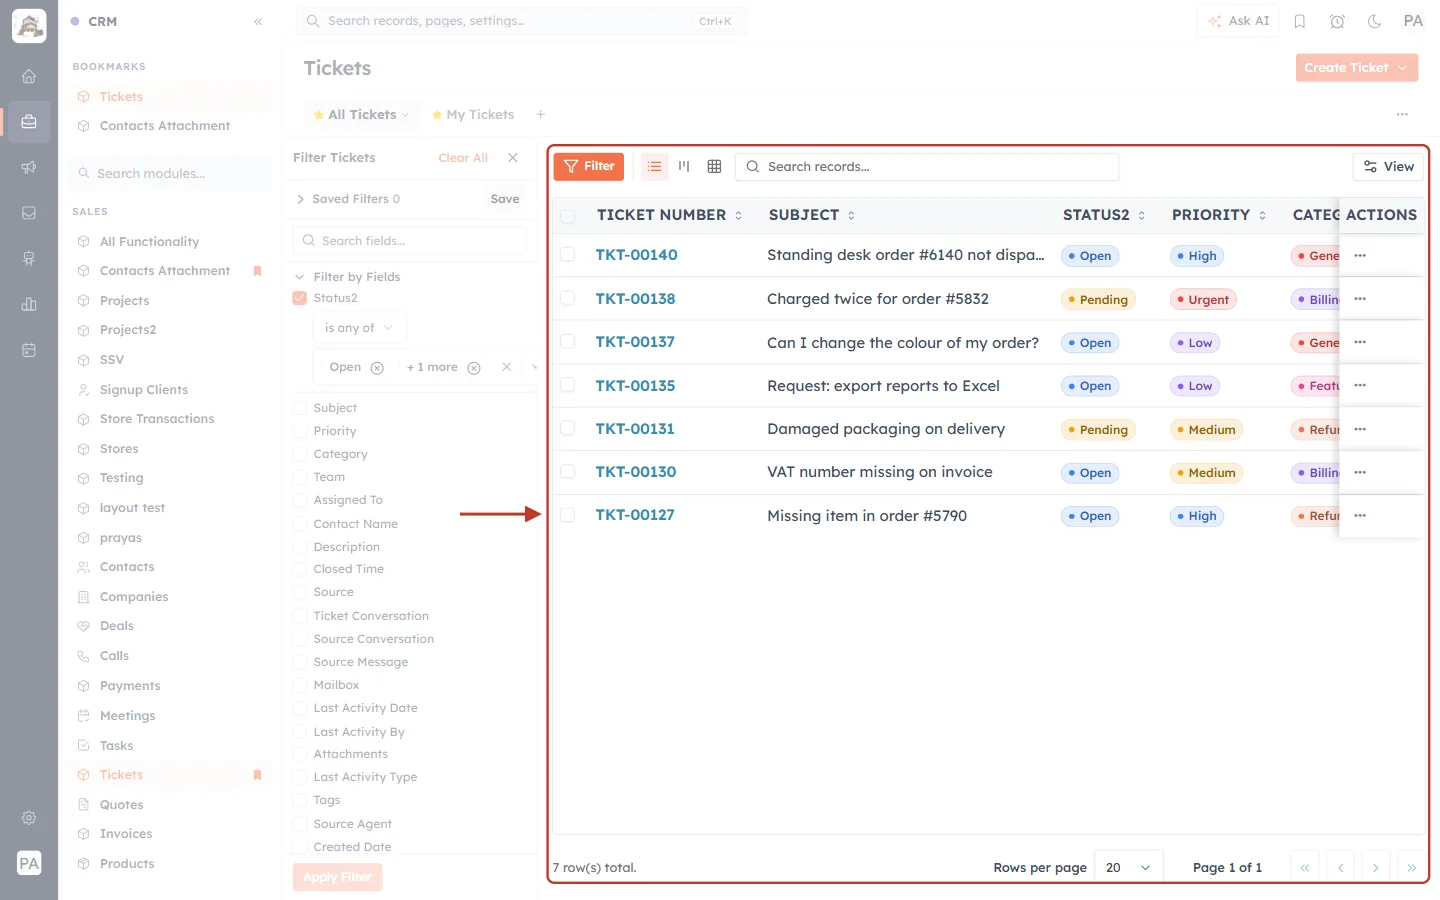
What this screenshot shows. The ticket list after applying the filter is ringed. The Filter panel stays open on the left (faded).
The Filter button is now orange — a filter is active.
Only Open and Pending tickets are listed: TKT-00140, 00138, 00137, 00135, 00131, 00130 and 00127.
The footer says 7 row(s) total.
Step 10: Clear the filter#
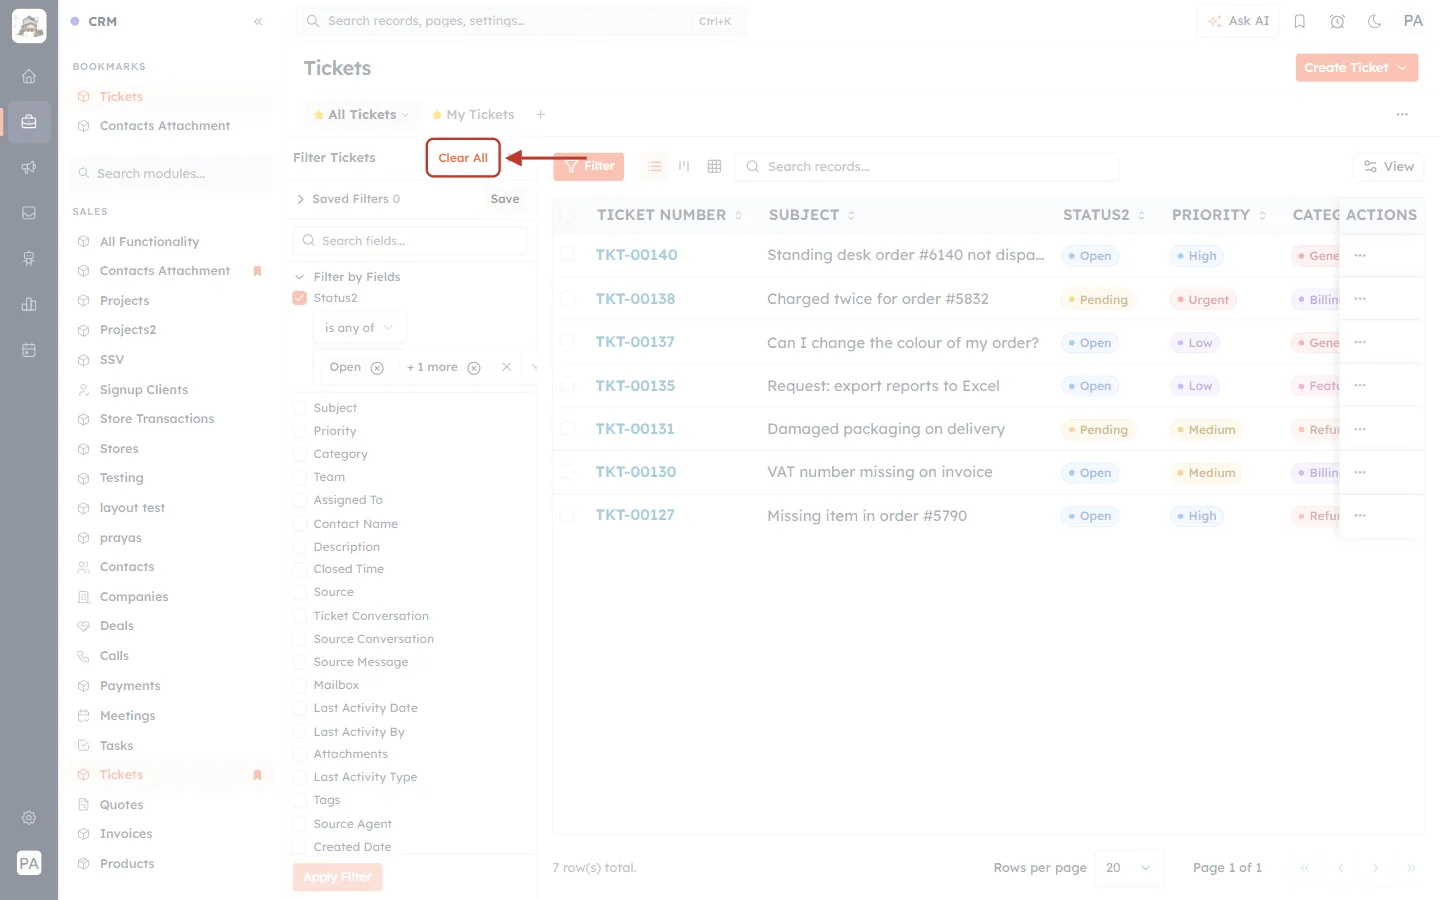
What this screenshot shows. Clear All at the top of the Filter panel is ringed.
Click it, then Apply Filter, to show all tickets again.
To keep a filter for later, use Save next to Saved Filters, or create a view (Step 2) with the filter applied.
ℹ️
A filter stays in place when you leave the page and come back. If the list looks shorter than expected, check whether the Filter button is orange.
Part 3 — See tickets on a Kanban board#
The Kanban board shows tickets as cards in one column per status. It is the quickest way to see where work is piling up — and you can move a ticket to another status by dragging its card.
Step 11: Switch to the Kanban view#
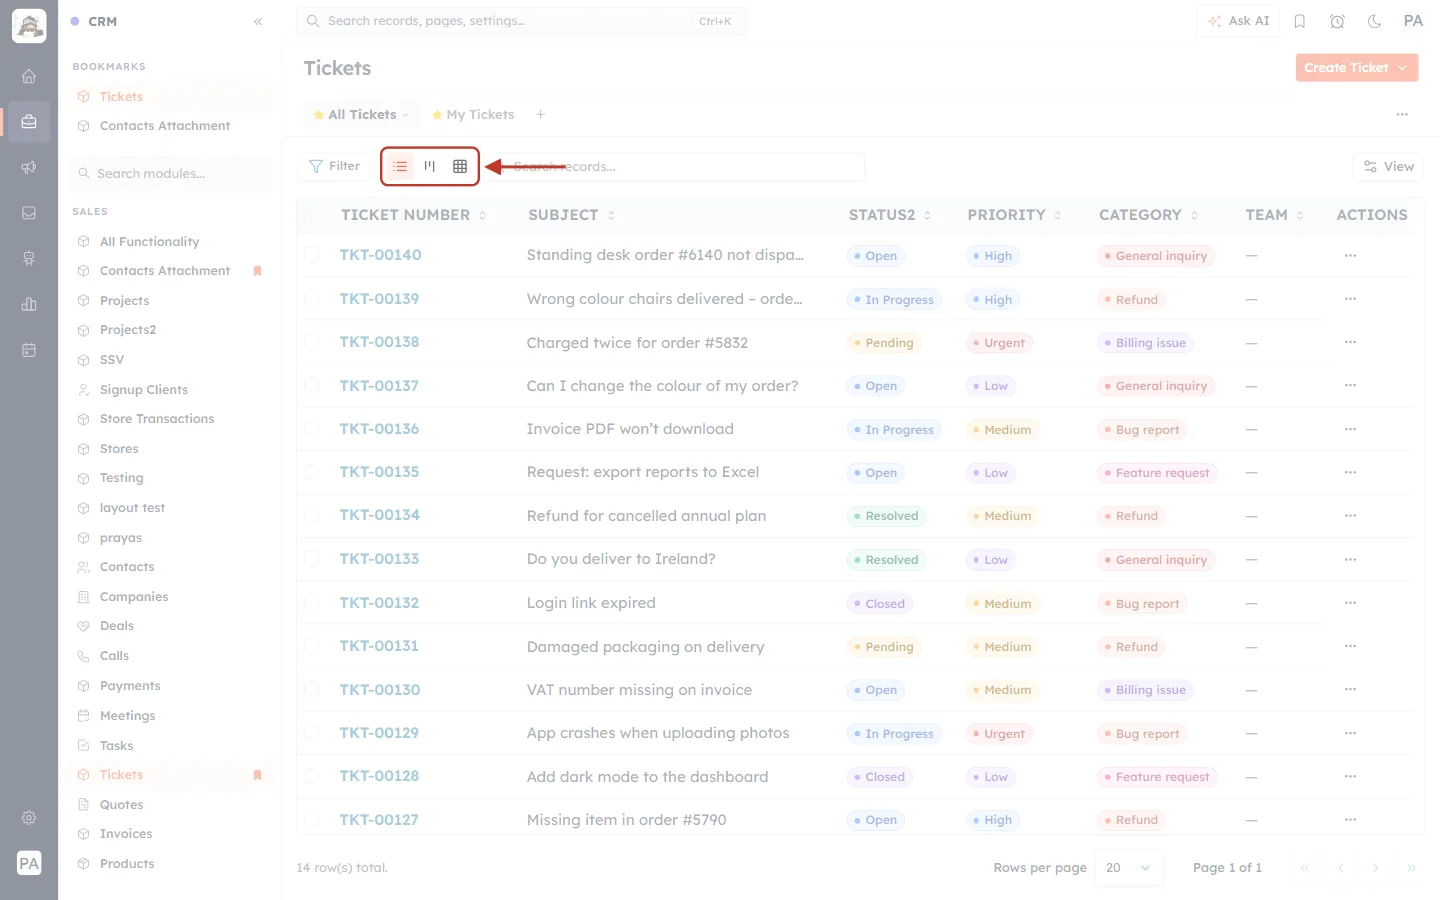
What this screenshot shows. The three layout buttons next to Filter are ringed.
The middle button (Kanban View, three vertical bars) switches to the board. The first is List View, the last Grid View.
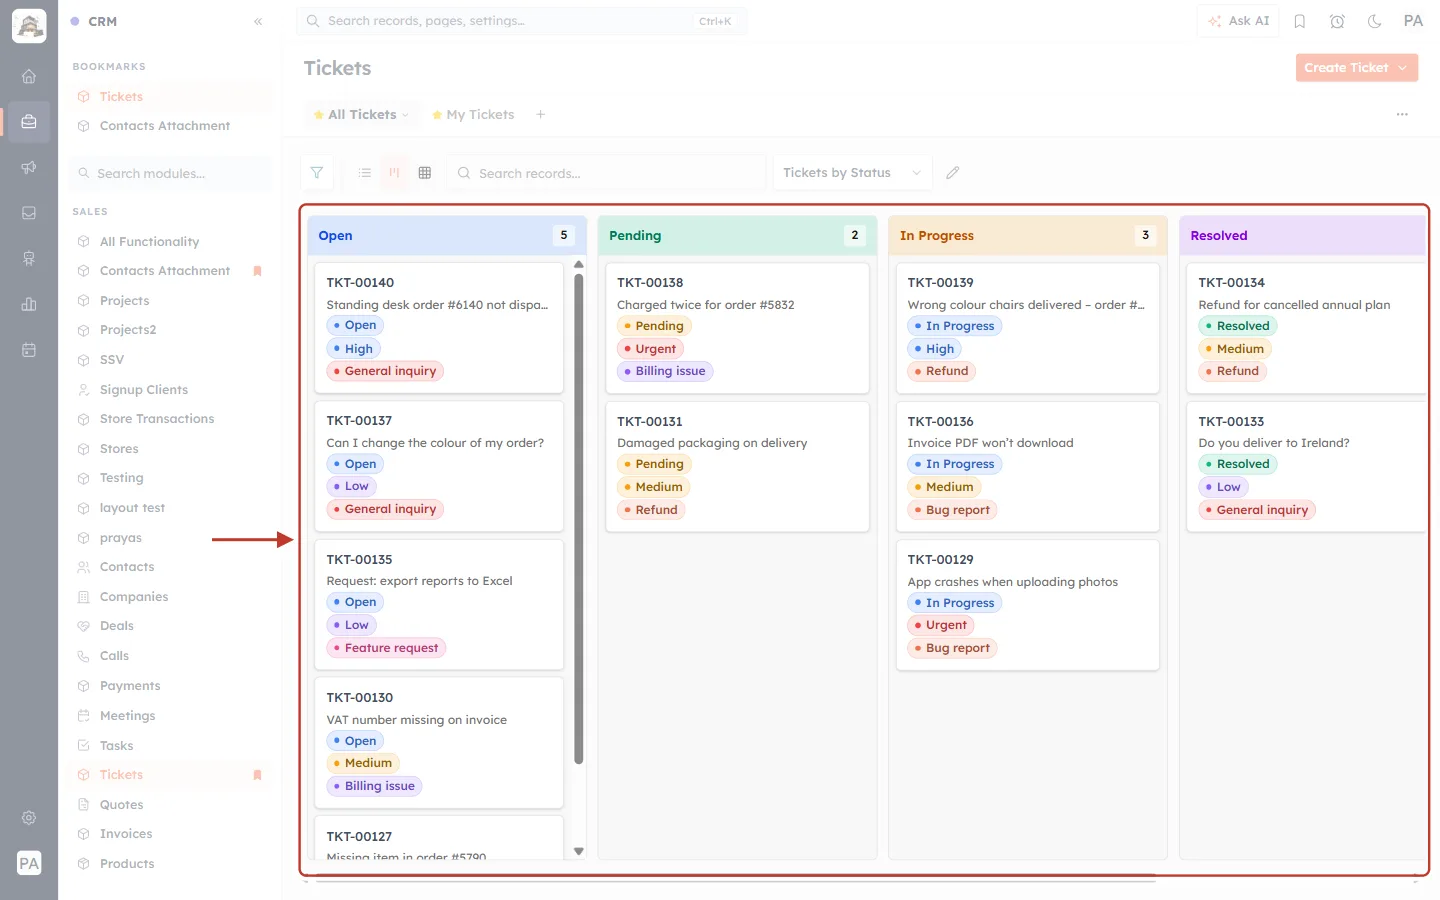
What this screenshot shows. The Kanban board is ringed.
One column per status: Open (blue), Pending (green), In Progress (orange), Resolved (purple) and — scroll right with the bar at the bottom — Closed.
Each column header shows how many tickets it holds (Open 5, Pending 2, In Progress 3…).
Each card is a ticket. Scroll inside a column to see more cards.
Filters still apply on the board, so you can, for example, show only your own tickets.
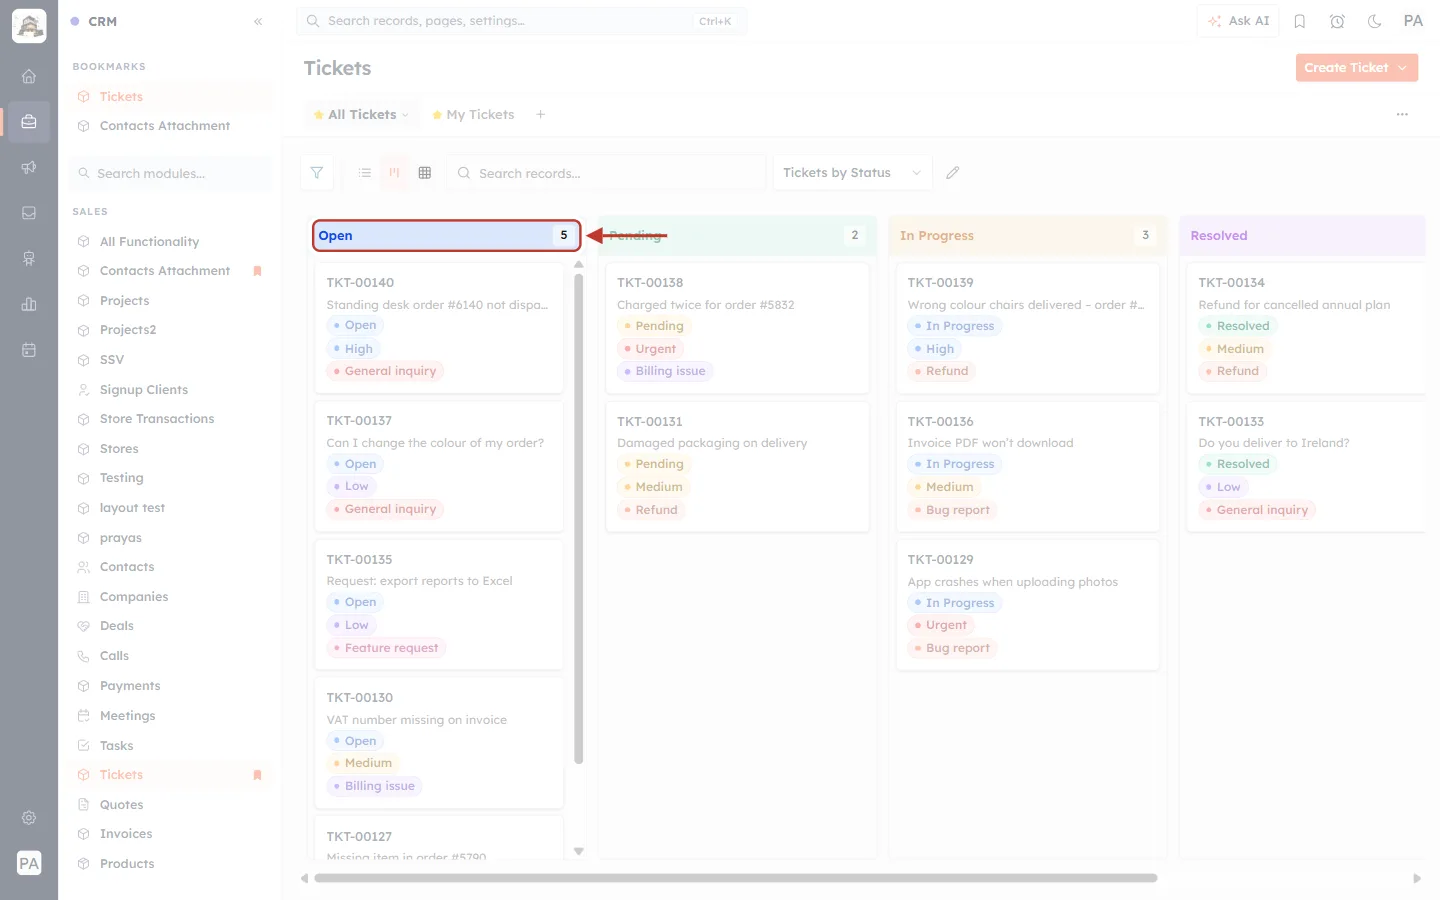
What this screenshot shows. The Open column header is ringed, with its count of 5.
Use the counts to spot problems — a growing Pending column means many customers are waiting on someone.
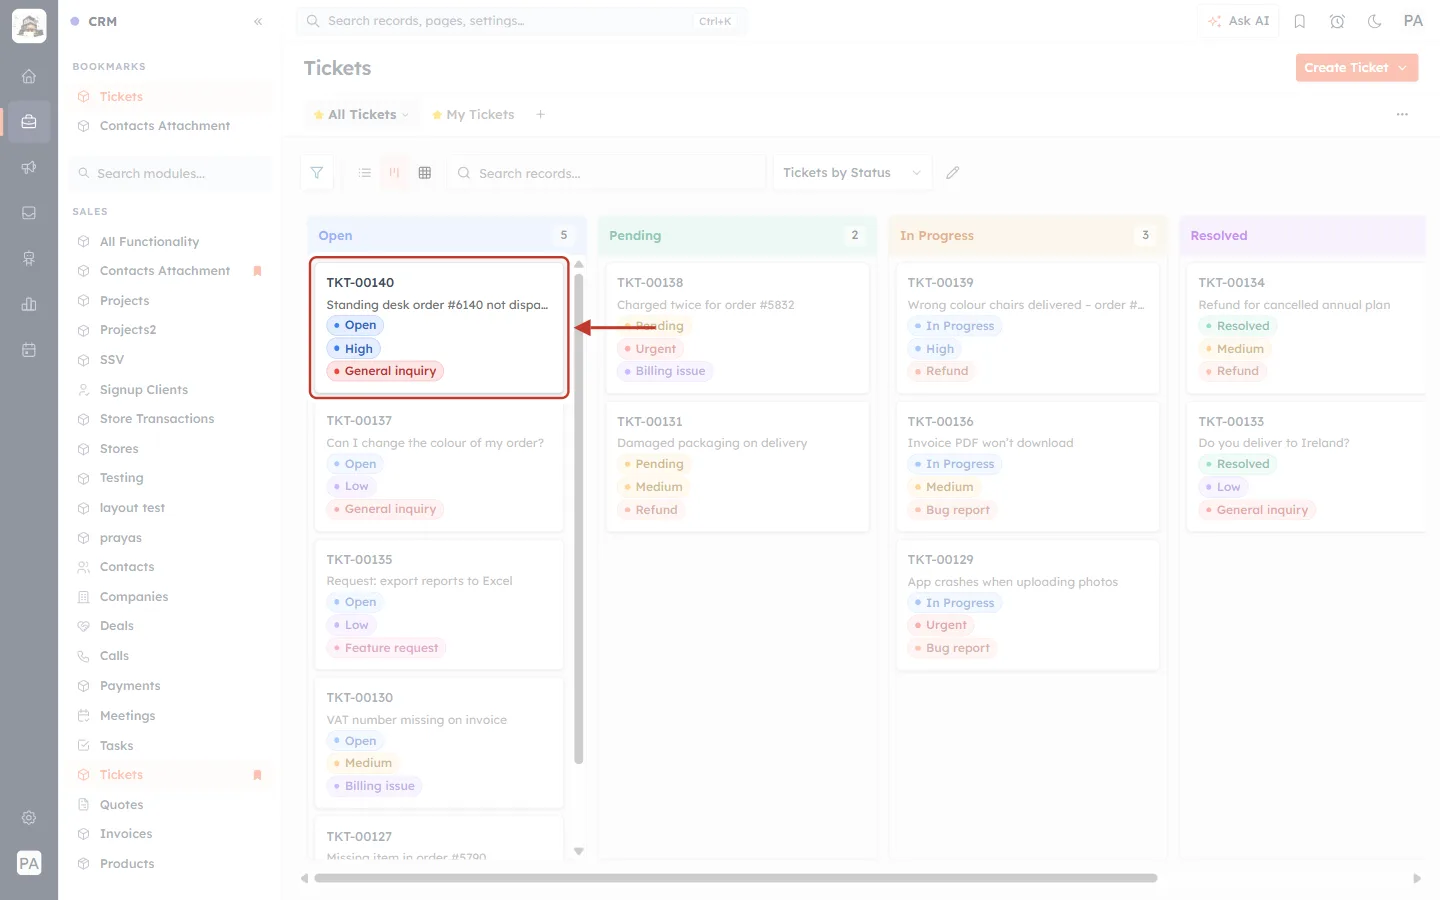
What this screenshot shows. One card is ringed: TKT-00140.
The ticket number and subject: Standing desk order #6140 not dispatched.
Labels for its status (Open), priority (High) and category (General inquiry).
Click the card to open the ticket.
Step 12: Choose or create a Kanban view#
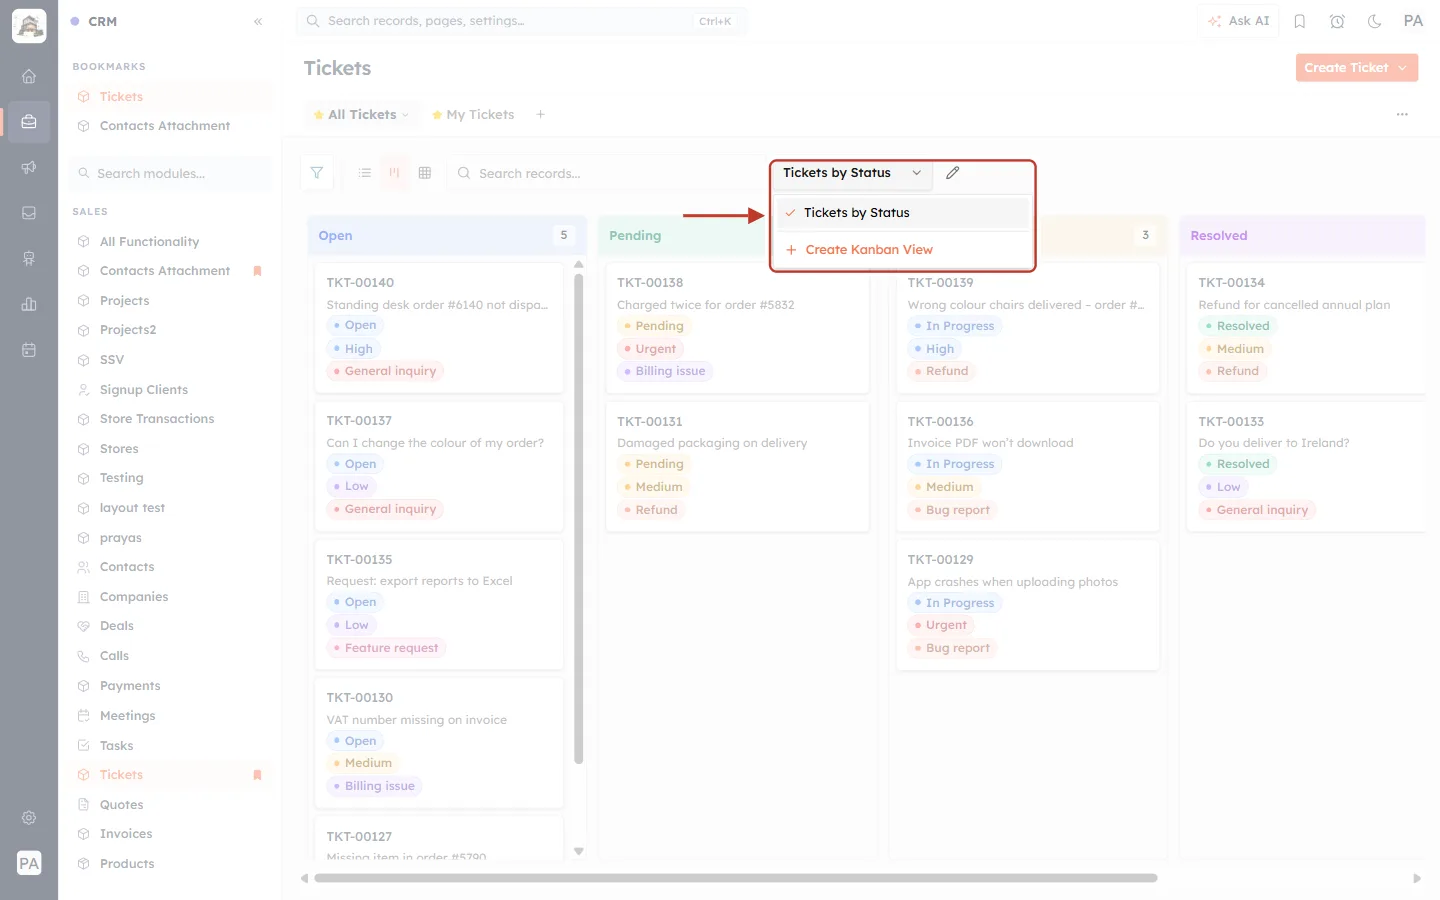
What this screenshot shows. The Kanban view selector and its list are ringed.
Tickets by Status (ticked) — the current board, grouped by status.
+ Create Kanban View — make another board: give it a name and choose the pick-list field to group by (for example Priority or Category).
The pencil next to the selector edits the current board.
Step 13: Drag a card to change its status#
Press and hold a card, drag it to another column, and let go. In this example TKT-00137 (Can I change the colour of my order?) moves from Open to Pending, because we are waiting for the customer to reply.
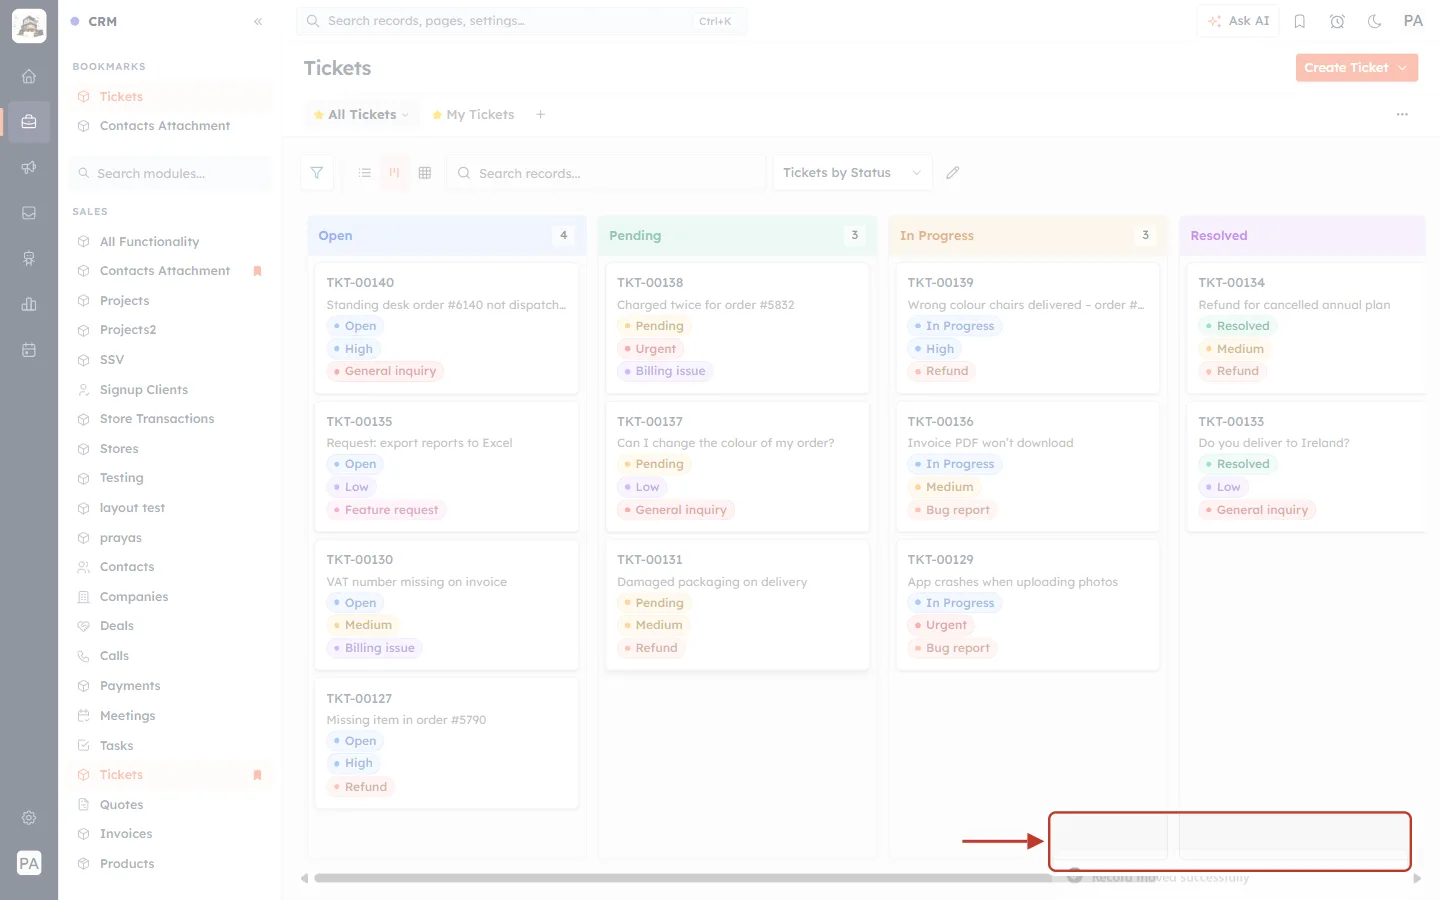
What this screenshot shows. The confirmation at the bottom right is ringed: “Record moved successfully”.
The ticket’s status has been changed and saved.
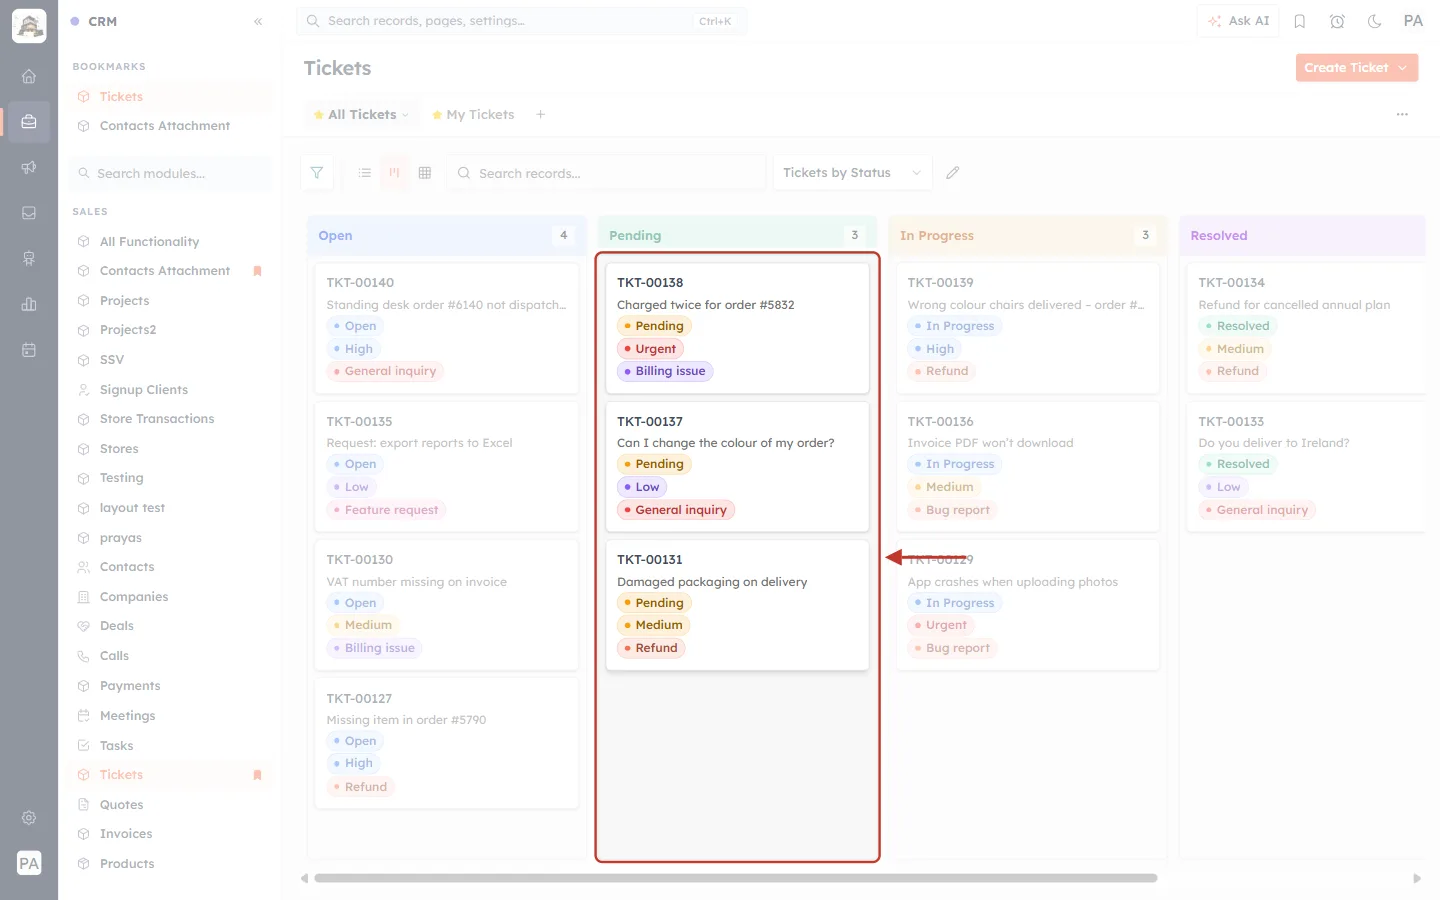
What this screenshot shows. The Pending column is ringed, now holding TKT-00137.
TKT-00137 is in Pending, and its status label now reads Pending.
The column counts update.
The change is recorded in the ticket’s Timeline (Part 4), like any other edit.
⚠️
Dragging a card changes the ticket for real. If you drop a card in the wrong column, drag it back.
Step 14: Use the Grid view (optional)#
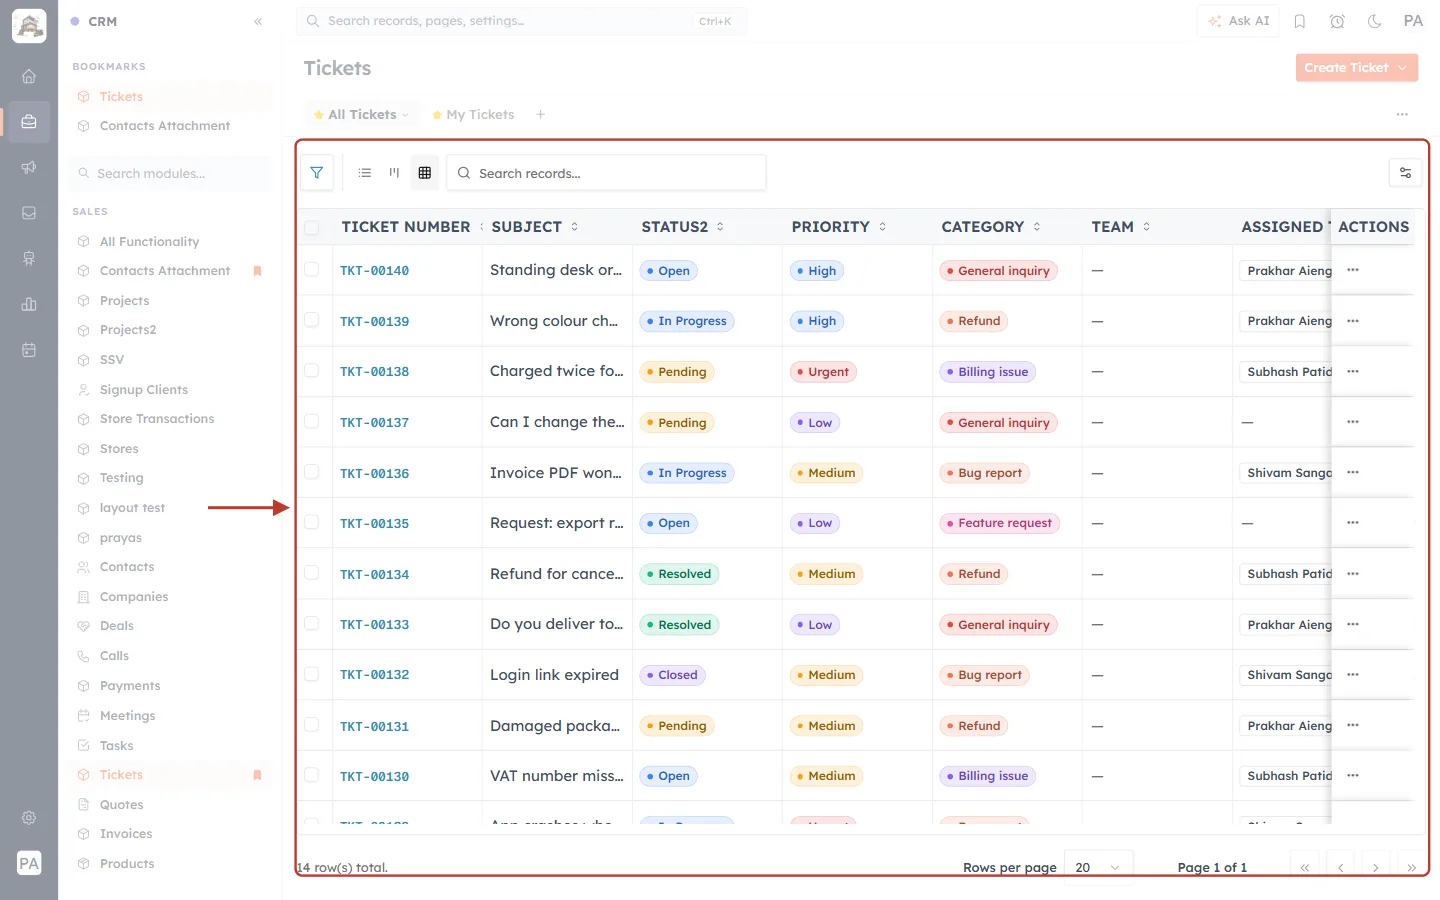
What this screenshot shows. The Grid view is ringed.
A compact, spreadsheet-style table with fixed-width columns, so more columns fit — here including ASSIGNED TO.
Ticket numbers, statuses, priorities and categories look the same as in the list.
The settings button at the top right opens the grid’s settings.
Click List View to return to the normal list.
Part 4 — Read a ticket’s Timeline#
Every ticket keeps a complete history: when it was created, every field change (with the old and new value), notes and linked records. Use it to answer questions such as “who changed the priority?” or “when did this ticket move to In Progress?”.
Step 15: Open a ticket and click Timeline#
Click a ticket number in the list (or a card on the board) to open the ticket. At the top of the ticket you will see two tabs.
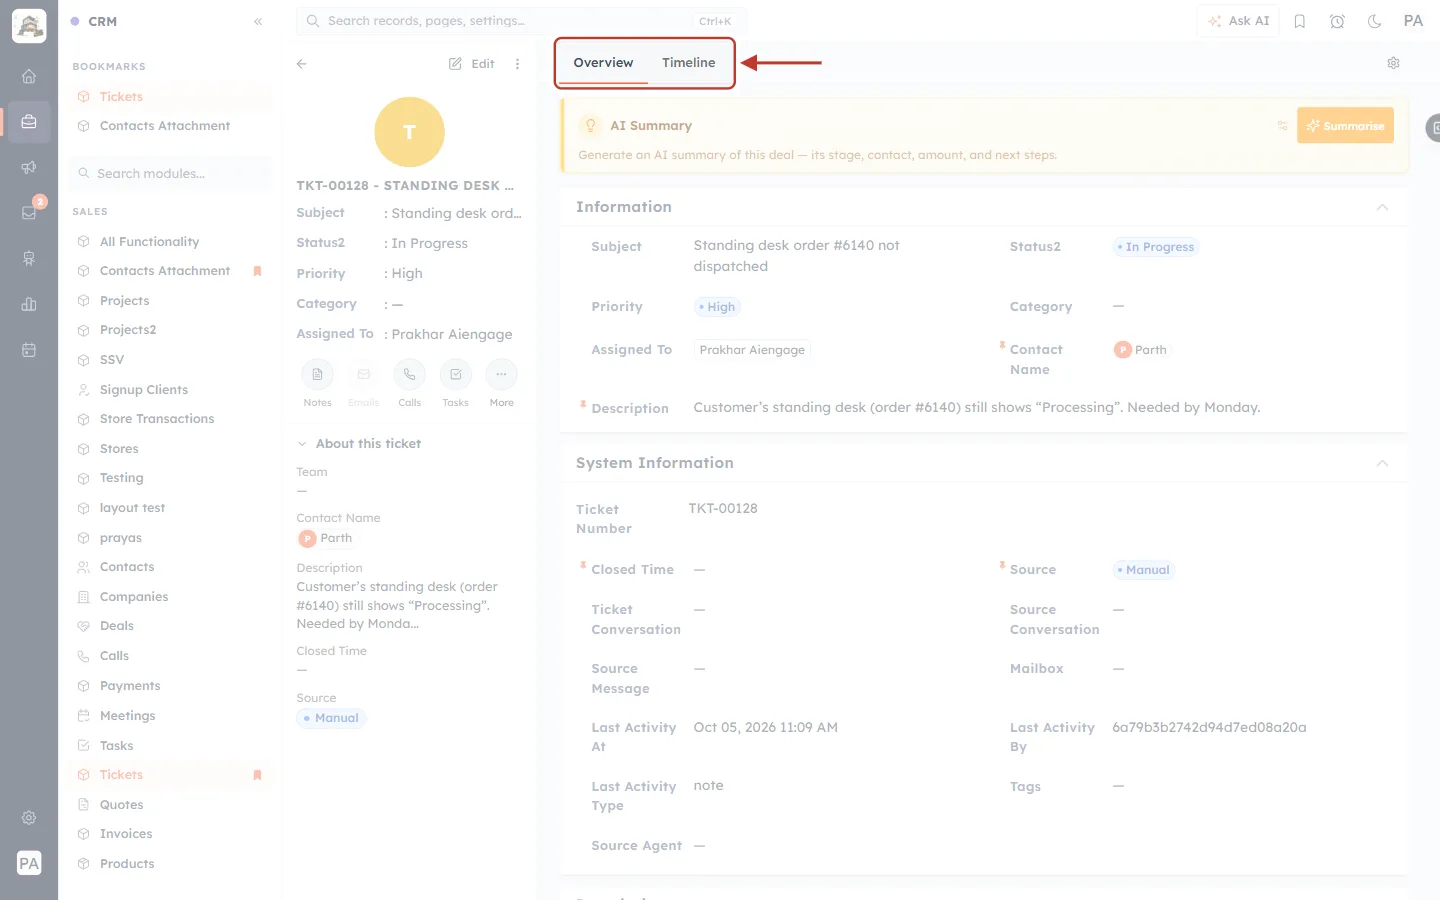
What this screenshot shows. The Overview and Timeline tabs at the top of the ticket are ringed.
Overview (the default) — the ticket’s fields, description, notes, calls, meetings and tasks.
Timeline — the ticket’s history. Click it.
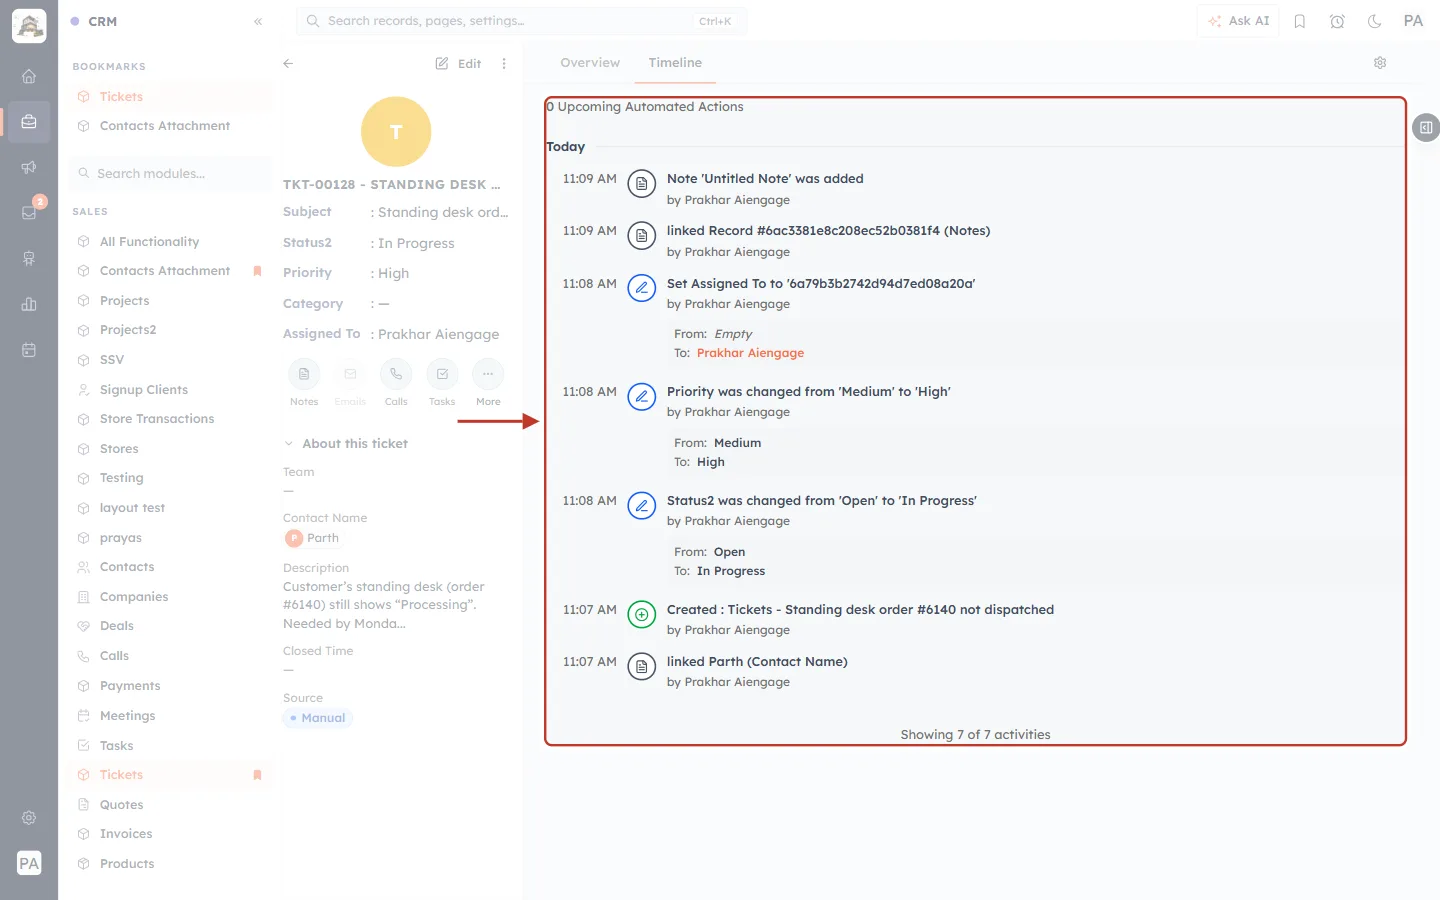
What this screenshot shows. The whole Timeline of a ticket is ringed, newest entry first.
0 Upcoming Automated Actions at the top — scheduled workflow actions for this ticket, if any.
Entries are grouped by day (Today). Each one shows the time on the left, an icon, what happened and by whom.
Note ‘Untitled Note’ was added and linked Record #… (Notes) — a note was added to the ticket. (this note was added without a title).
Set Assigned To to ‘…’ — the ticket was assigned; the box underneath shows From: Empty → To: Prakhar Aiengage.
Priority was changed from ‘Medium’ to ‘High’ and Status2 was changed from ‘Open’ to ‘In Progress’, each with a From / To box.
Created : Tickets - Standing desk order #6140 not dispatched (green +) and linked Parth (Contact Name) — when the ticket was created and the contact linked.
At the bottom: Showing 7 of 7 activities — how many entries are shown out of the total.
Step 16: Read a change in detail#
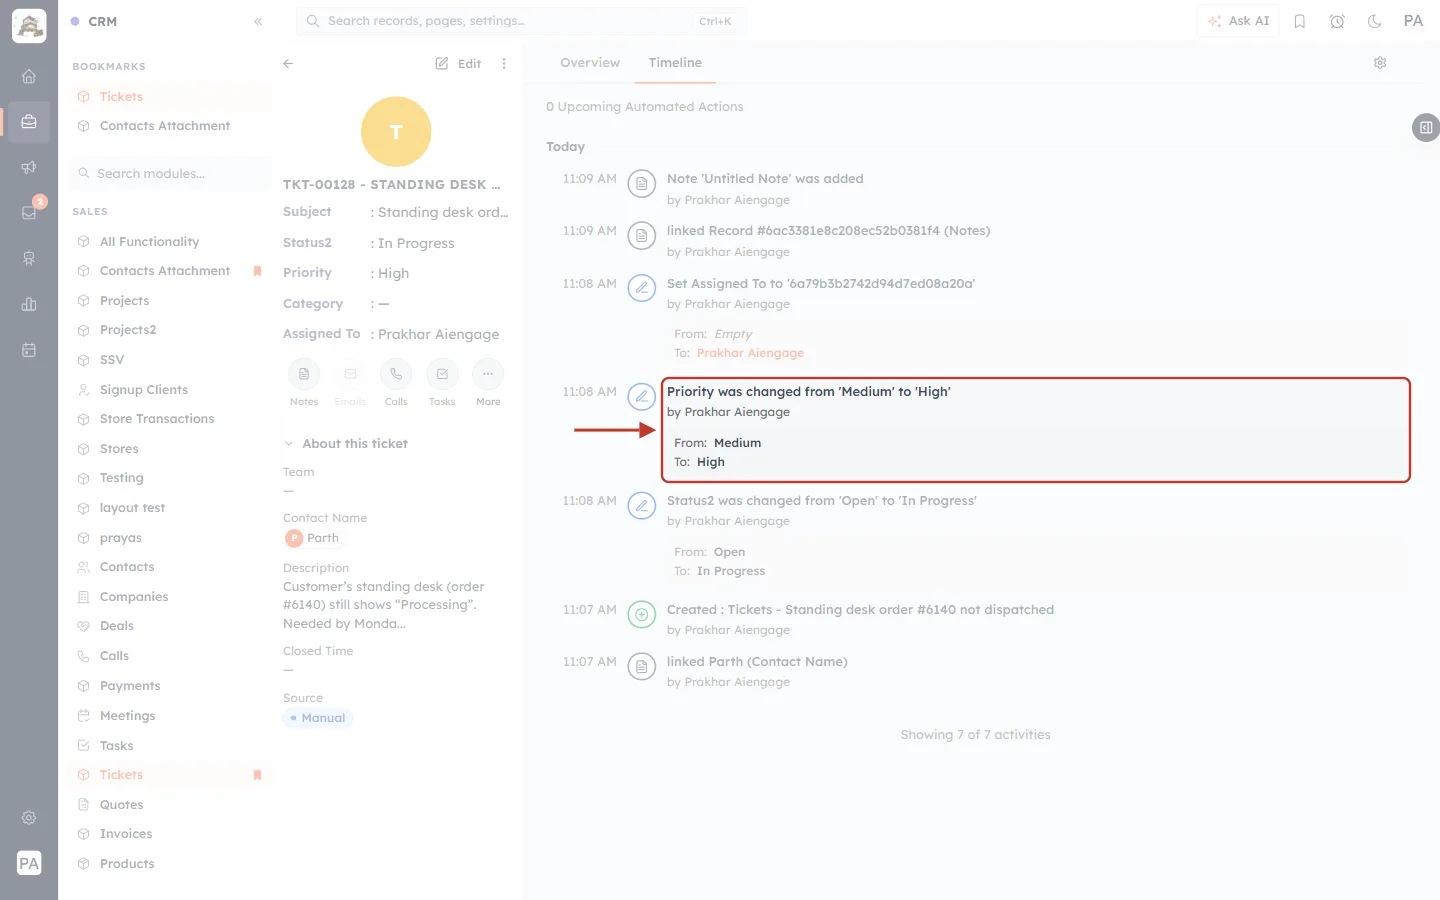
What this screenshot shows. One change entry is ringed.
11:08 AM — when the change was made. Hover the time to see the full date and time.
The blue pencil icon marks an edit.
Priority was changed from ‘Medium’ to ‘High’, by Prakhar Aiengage.
From: Medium → To: High.
✅
Before you ask a teammate what happened on a ticket, check the Timeline — it usually answers the question.
Troubleshooting#
The list shows fewer tickets than I expect. A filter is probably active (the Filter button is orange) or you are in My Tickets. Click Clear All and Apply Filter, or switch to All Tickets.
I can’t drag cards on the Kanban board. Your profile can view tickets but not edit them. Ask your administrator.
A column I need is missing. Click View and tick the field in Manage Columns, then Save.
The Closed column isn’t visible on the board. Scroll right with the bar under the board.
The Timeline shows an id instead of a name. Some entries (for example Set Assigned To to ‘…’) show the stored value in the title; the From / To box underneath shows the name.
Frequently asked questions#
Are tickets in the Tickets module the same as in Customer & Support? Yes — they are the same tickets. Changes in one place appear in the other.
Can I save a filter? Yes — use Save next to Saved Filters in the Filter panel, or create a view with the filter applied.
Can I group the board by something other than status? Yes — create a Kanban view and group it by another pick-list field, such as Priority or Category.
Can I undo a change? There is no undo button, but the Timeline shows the old value, so you can change it back.
Previous and next#
Previous: Live Agent Handover from the AI Agent: Accept, Take Over and Hand Back Chats (Step-by-Step)
Related#
Was this article helpful?
Ready to implement this?
OpenAI Engage and apply what you just learned to your own workspace.
Open AI Engage CRM