Loading…


KnowledgeBase
Set the From and Reply-To Address for Support Emails: Choose Which Address Your Team Replies From
What this article covers#
When your team answers a ticket by email, or the CRM sends a customer an automatic “we’ve received your request” message, the email needs a From address — the name and address the customer sees, such as Support Team <support@yourcompany.com>. You can also choose a separate Reply-To address, where the customer’s answers are delivered.
Choosing these well matters. A shared address like support@ looks professional, keeps the conversation with the team instead of one person, and makes sure customer replies come back into your support mailbox — and from there onto the same ticket.
In this article you will:
Open the From Email tab and choose the default From address (Part 1).
Optionally set a Reply-To address (Part 1).
Create a shared sending address in Organization Emails if the one you want is not in the list (Part 2).
See where agents use it, in the From line of a ticket reply (Part 3).
From, Reply-To and the support mailbox — what is the difference?#
| What it is | Where you set it | |
|---|---|---|
| From address | The address your emails are sent from — what the customer sees as the sender. | Service & Support Settings → From Email (this article) |
| Reply-To address | Where the customer’s reply is delivered, if it should differ from the From address. Optional. | Service & Support Settings → From Email (this article) |
| Support mailbox | The inbox the CRM reads to turn incoming email into tickets. | Service & Support Settings → Support Email — see Connect a Support Mailbox. |
ℹ️
In the CRM’s own words: the From address “is a verified sending address, not a connected mailbox — the two can differ.” Many teams use the same address for both (for example support@yourcompany.com), but they are set up separately.
Before you begin#
Admin access to Service & Support Settings and Email settings.
A verified domain. An address can only send once its domain is authenticated under Sender Authentication — see Email Deliverability: Set Up DKIM and Domain Authentication.
Optional but recommended: a connected support mailbox, so replies sent to your Reply-To address come back as tickets — see Connect a Support Mailbox.
Part 1 — Choose the From and Reply-To address#
Step 1: Open the From Email tab#
Press Ctrl + K (Cmd + K on a Mac), type Support Email and open it, then click the From Email tab.
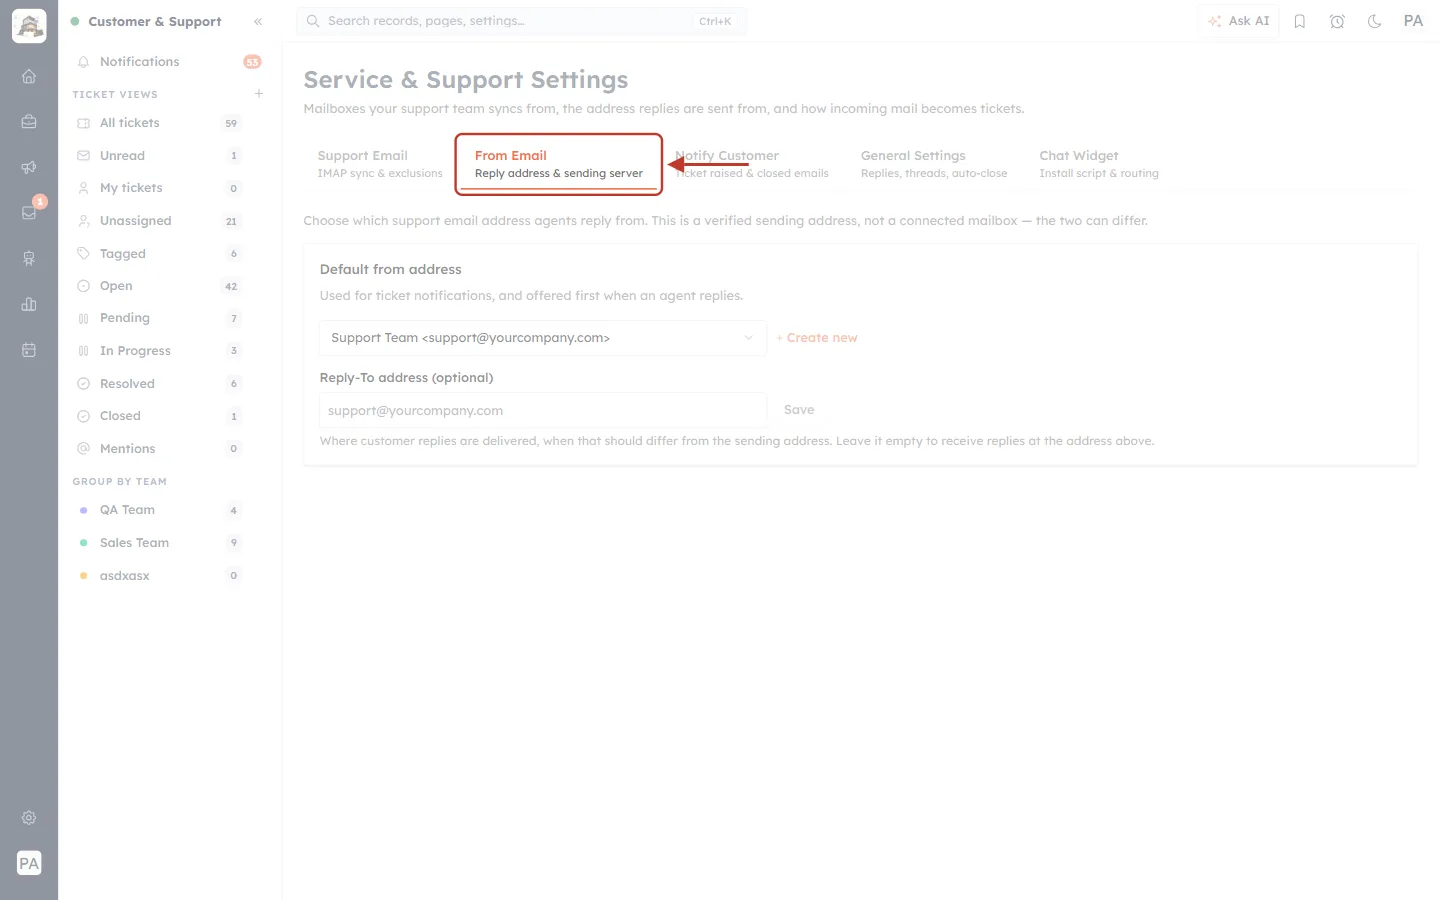
What this screenshot shows. Service & Support Settings, with the From Email tab ringed.
From Email — Reply address & sending server — the tab this article is about. It turns orange when selected.
The other tabs (faded): Support Email (the mailbox the CRM reads), Notify Customer (automatic customer emails), General Settings and Chat Widget.
Below the tabs: the From Email settings, explained in the next steps.
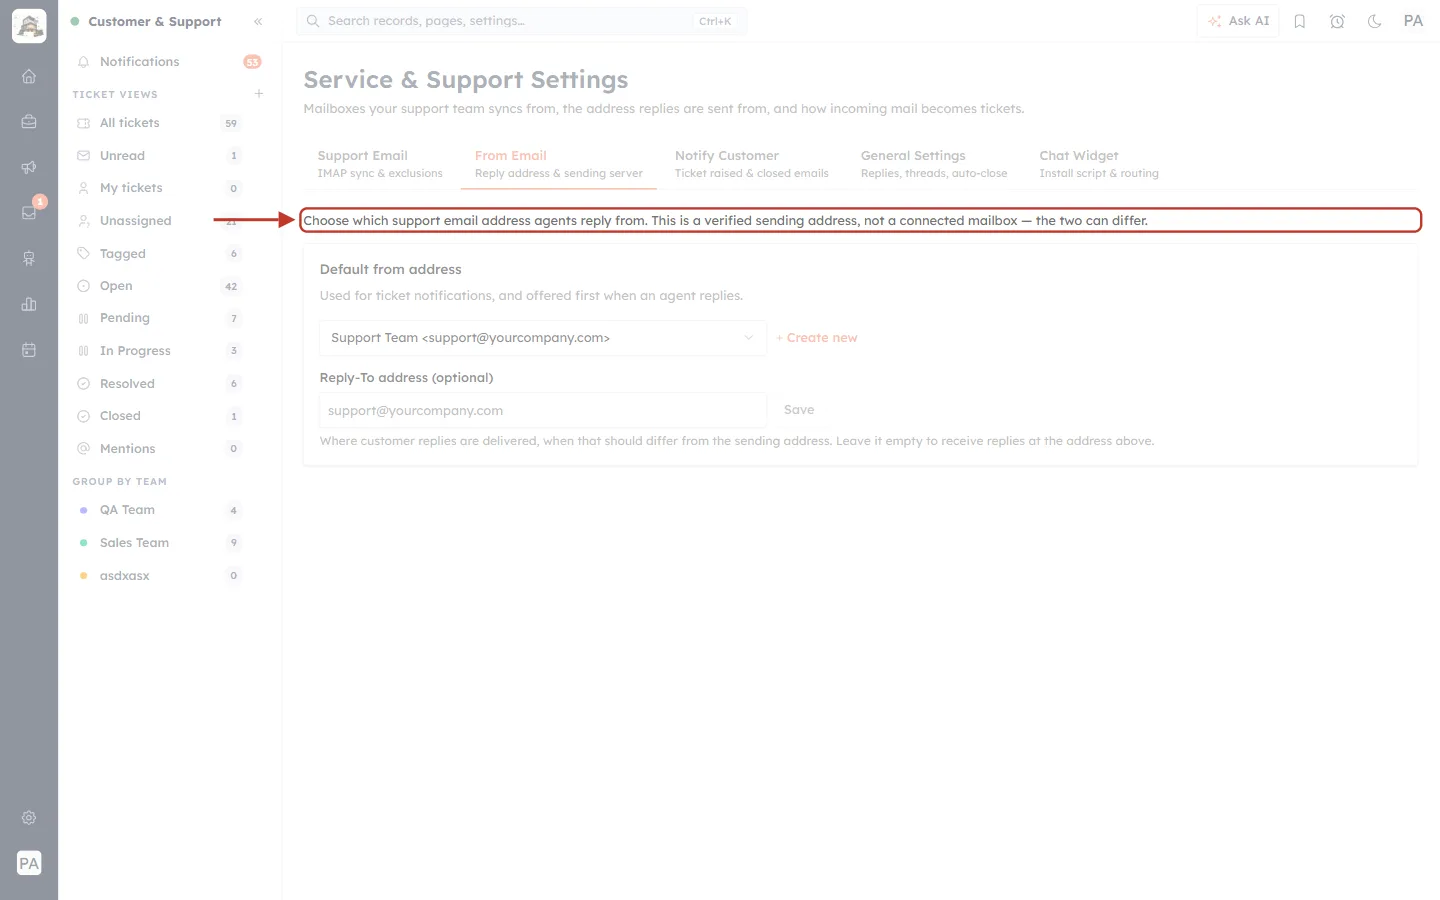
What this screenshot shows. The line at the top of the tab is ringed.
“Choose which support email address agents reply from. This is a verified sending address, not a connected mailbox — the two can differ.”
In other words, this tab controls how your emails go out; the Support Email tab controls how emails come in.
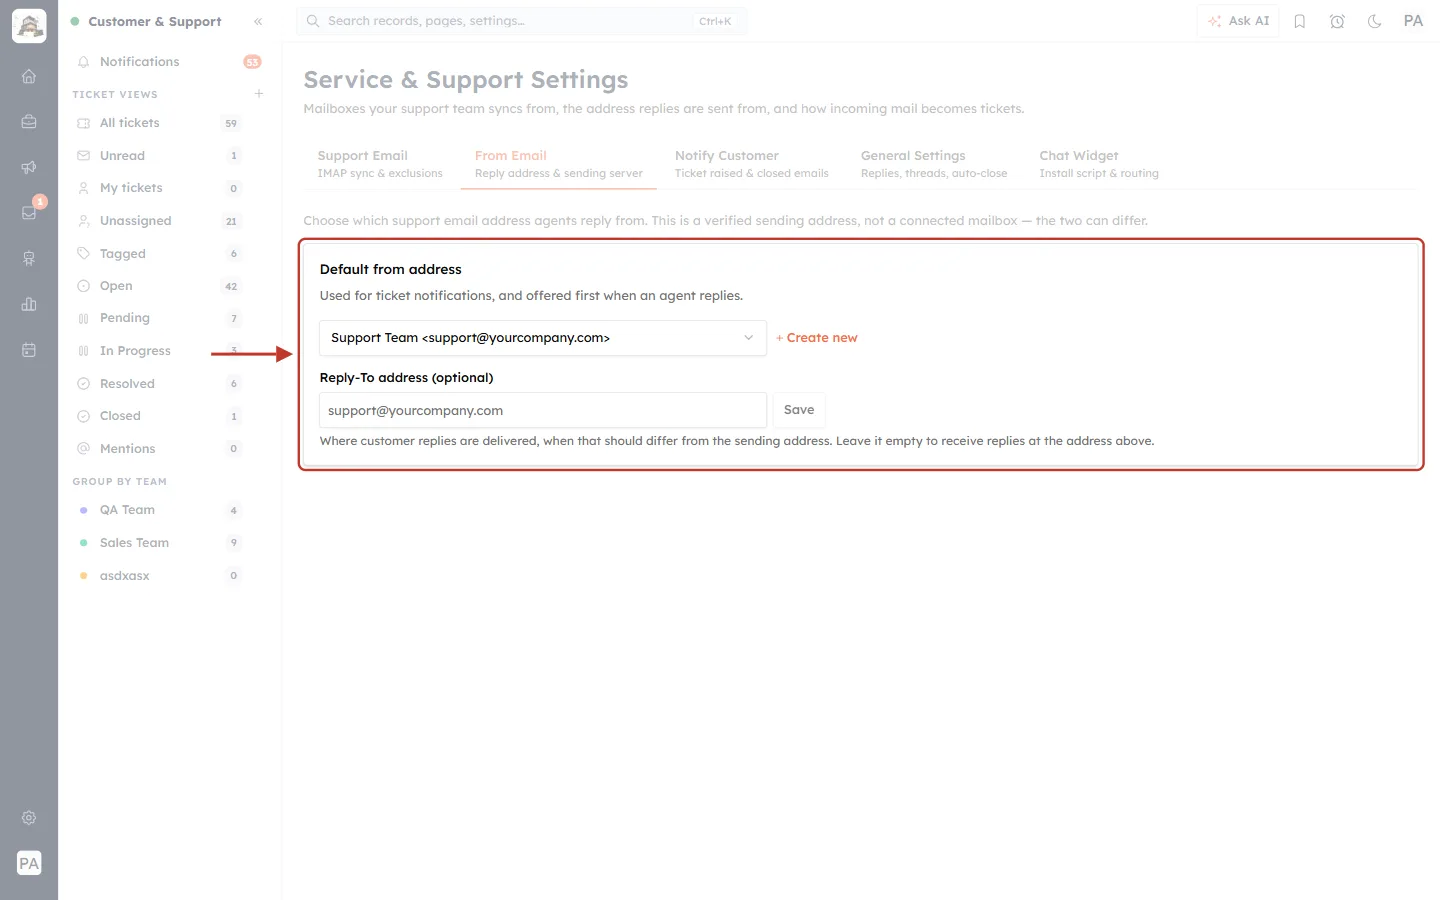
What this screenshot shows. The settings card is ringed. It holds both settings on this tab.
Default from address — “Used for ticket notifications, and offered first when an agent replies.” Here it is set to Support Team <support@yourcompany.com>.
+ Create new — opens Organization Emails to add another sending address (Part 2).
Reply-To address (optional) — an address box with a Save button.
The help text underneath: “Where customer replies are delivered, when that should differ from the sending address. Leave it empty to receive replies at the address above.”
Step 2: Choose the default From address#
Click the Default from address box and pick an address. The choice is saved straight away — there is no separate Save button for it.
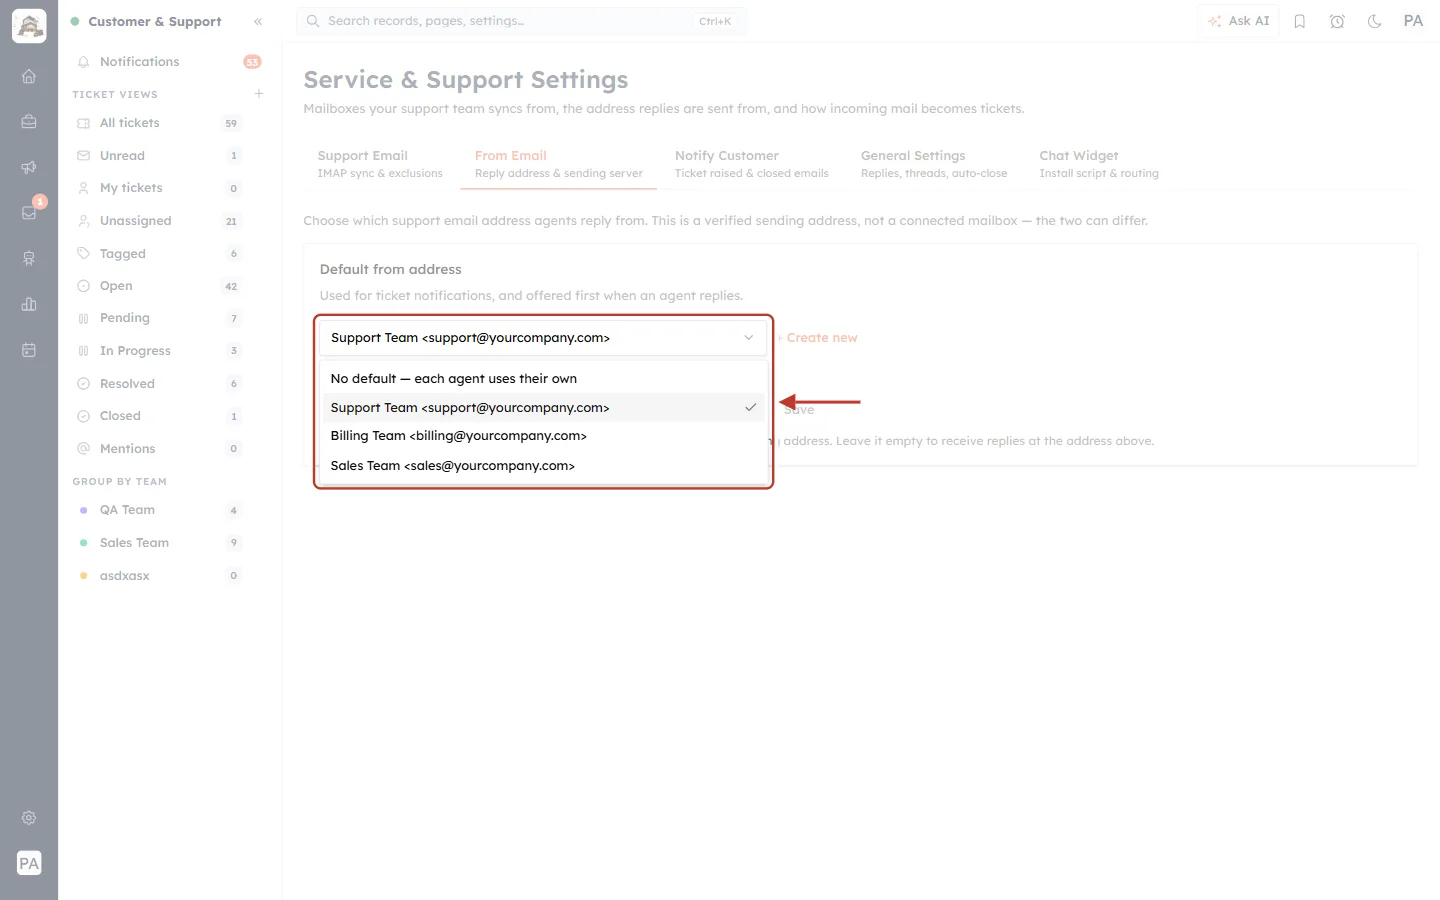
What this screenshot shows. The list is open and ringed.
No default — each agent uses their own — no shared address; each agent’s replies go out from the address they are allowed to use.
Support Team <support@yourcompany.com> (ticked) — the current default.
Billing Team, Sales Team — the other sending addresses in your organisation. Each line shows the display name (what customers see) and the address.
Only addresses that already exist in Organization Emails appear here. If yours is missing, create it first (Part 2).
| Choose… | When it suits you |
|---|---|
| A shared address, such as Support Team <support@…> | Most teams. Customers always see one consistent support address, and the conversation stays with the team. |
| No default — each agent uses their own | Small teams or account managers who want customers to reply to them personally. |
✅
The default is also used for the automatic customer emails — ticket raised, resolved, closed and reopened — set up on the Notify Customer tab. Pick the address you want customers to recognise.
Step 3: Find the Create new link (if your address is missing)#
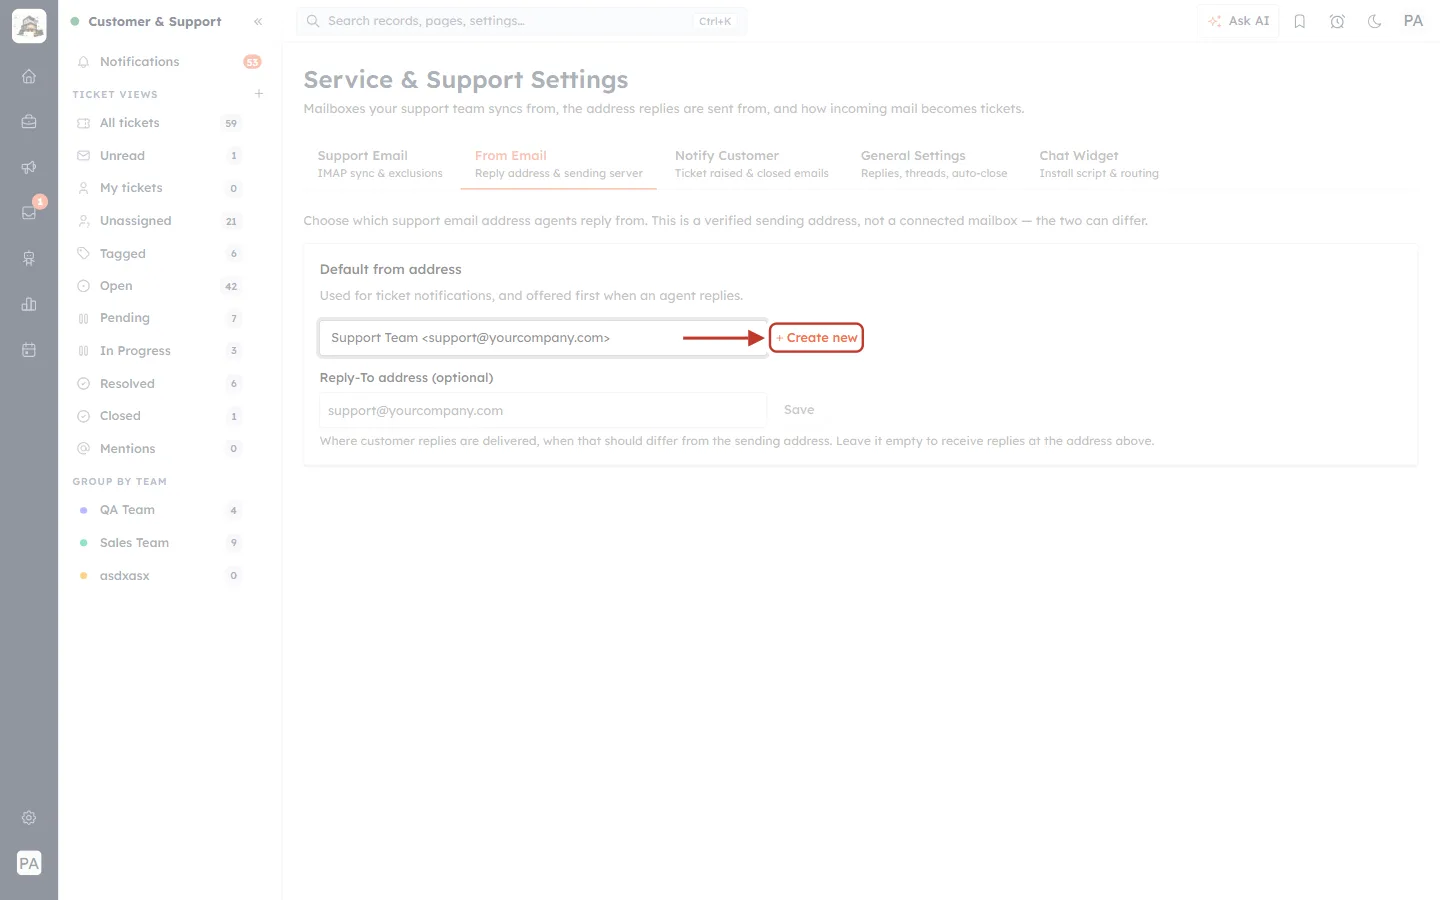
What this screenshot shows. The orange + Create new link, to the right of the drop-down, is ringed.
Click it to go to Settings → Email → Organization Emails, where sending addresses are created (Part 2).
If no sending address exists at all, the tab says: “No sending address yet. Create one under Organization Emails. Its domain must be authenticated in Sender Authentication first — an address cannot send until then.”
Step 4: Set a Reply-To address (optional)#
Leave this empty if customers should reply to the From address — that is the usual setup. Fill it in only when replies should go somewhere else, for example a help desk inbox that is different from your sending address.
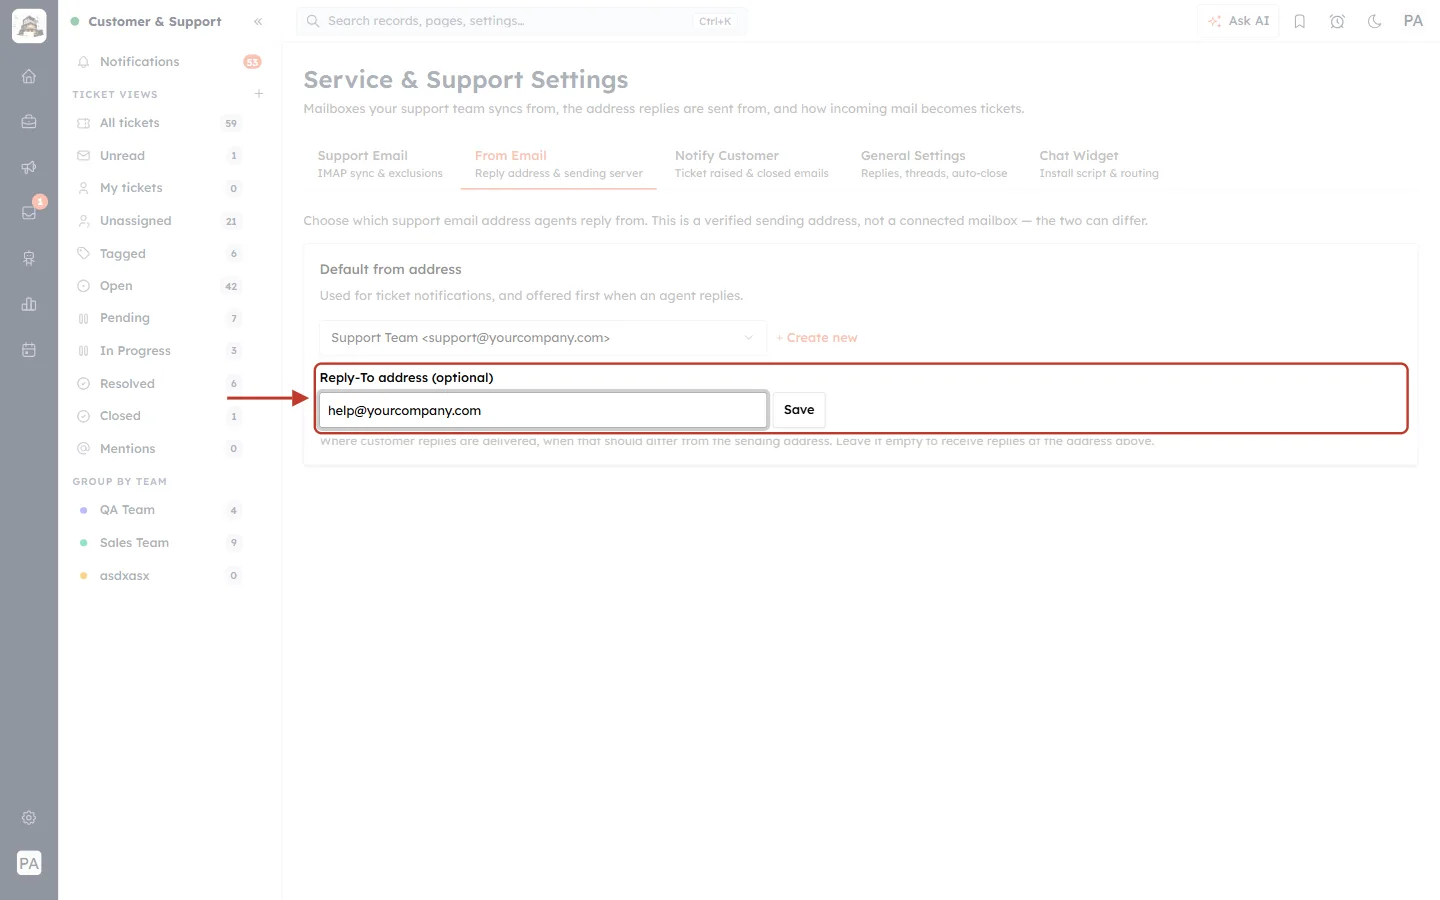
What this screenshot shows. The Reply-To address (optional) field and its Save button are ringed, with help@yourcompany.com typed in.
Type the full address that should receive customer replies.
Save becomes clickable once you change the address. Click it to save.
To go back to replies arriving at the From address, clear the box and click Save.
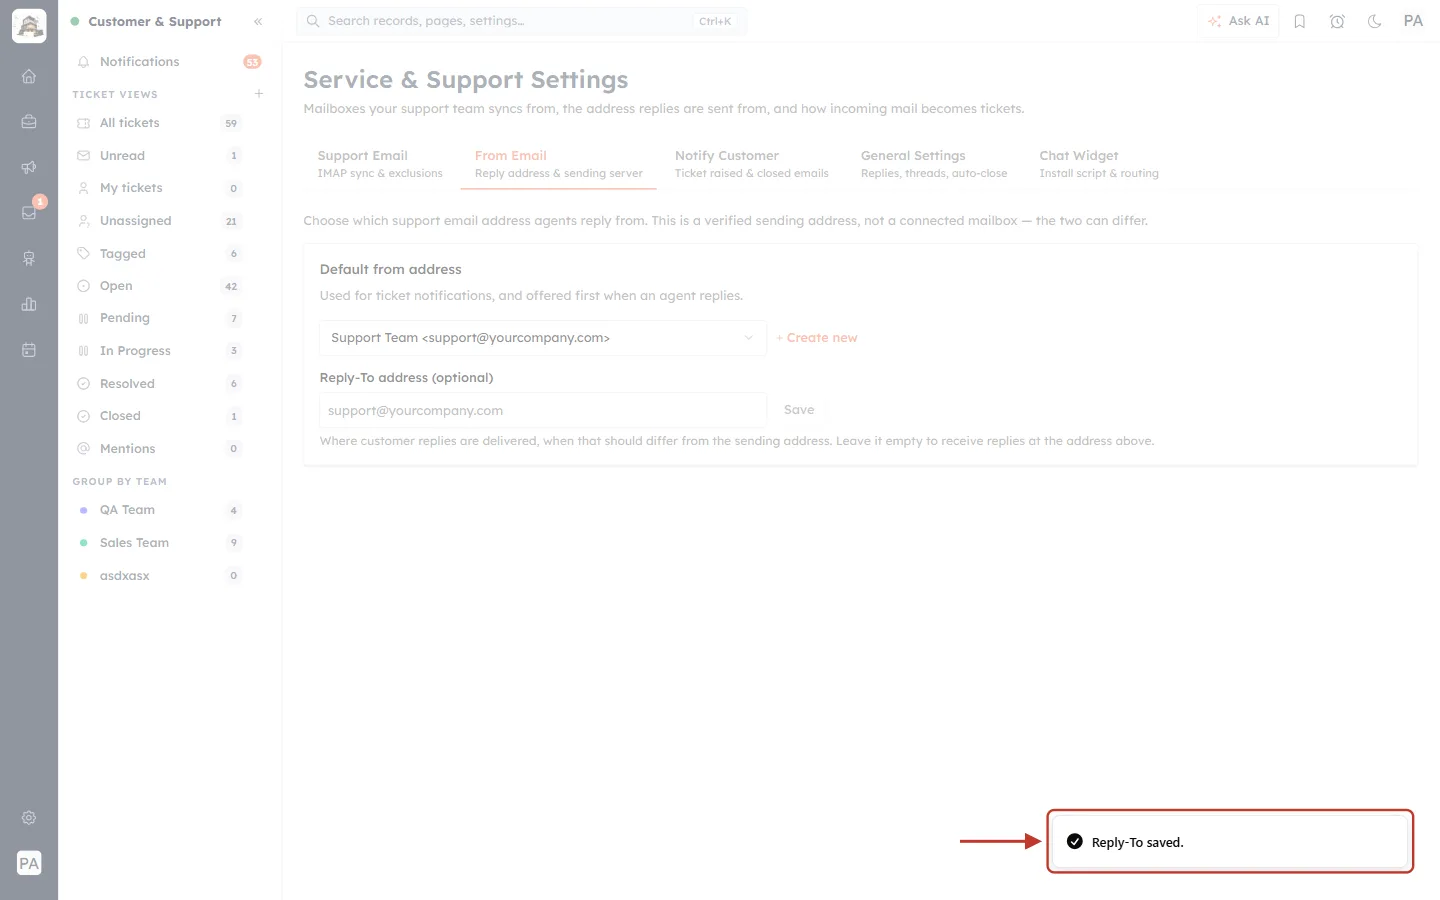
What this screenshot shows. The confirmation message in the bottom-right corner of the screen is ringed.
✓ Reply-To saved. — the address is stored. It applies to support emails from now on.
If something goes wrong you will see “Could not save that setting.” instead — try again, and check the address is typed correctly.
⚠️
If you use a Reply-To address, make sure that inbox is your connected support mailbox (or forwards to it). Otherwise customer replies will not reach the CRM and will not be added to their tickets.
Part 2 — Create a shared sending address#
Sending addresses are managed in Settings → Email → Organization Emails (the + Create new link takes you there). The domain of the address must be verified first.
Step 5: Open Organization Emails#
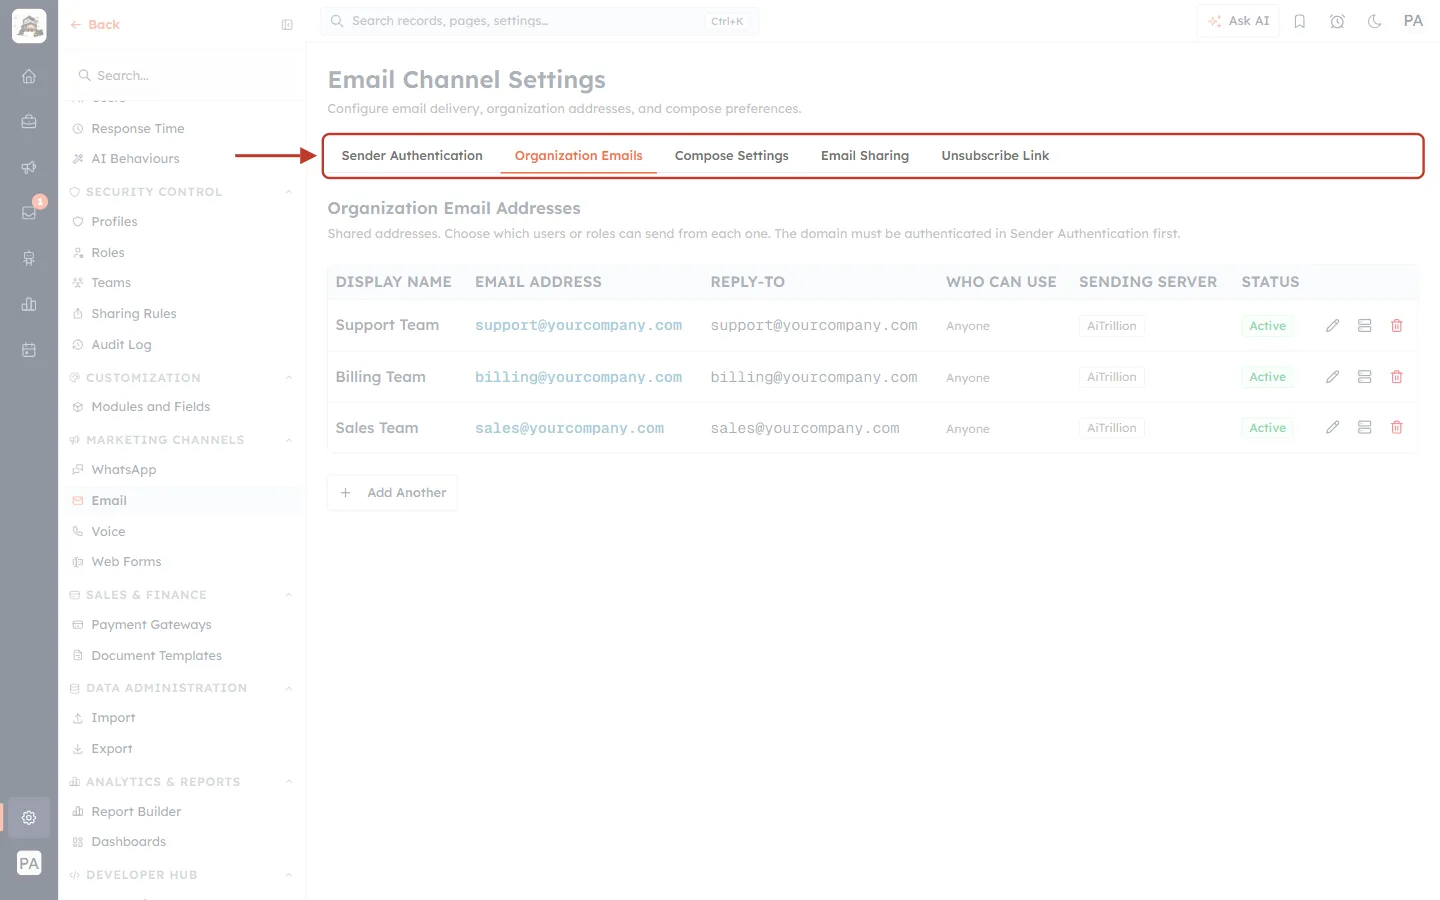
What this screenshot shows. The Email Channel Settings page, with its row of tabs ringed.
Sender Authentication — verify your domain (DKIM and related records). This must be done before any address on that domain can send.
Organization Emails (selected) — shared sending addresses.
Compose Settings, Email Sharing, Unsubscribe Link — other email options, not needed for this article.
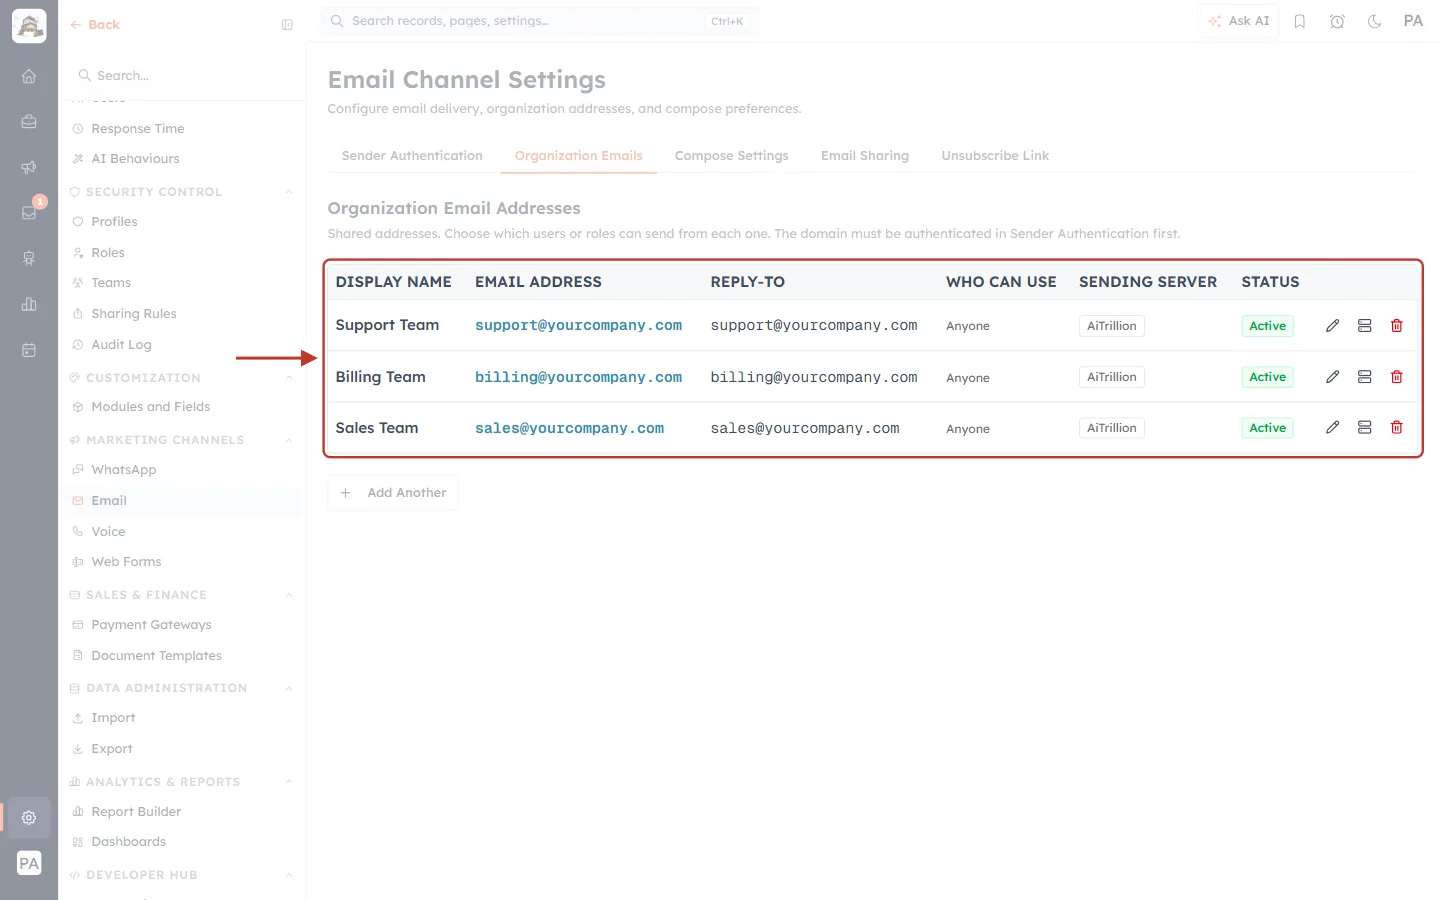
What this screenshot shows. The Organization Email Addresses table is ringed. “Shared addresses. Choose which users or roles can send from each one.”
Display name — the name customers see, such as Support Team.
Email address — the sending address.
Reply-to — the address’s own reply-to.
Who can use — Anyone, or only the users and roles you chose.
Sending server — how the email is sent.
Status — Active means it can send.
The icons at the end of each row edit or delete the address.
Step 6: Add a new address#
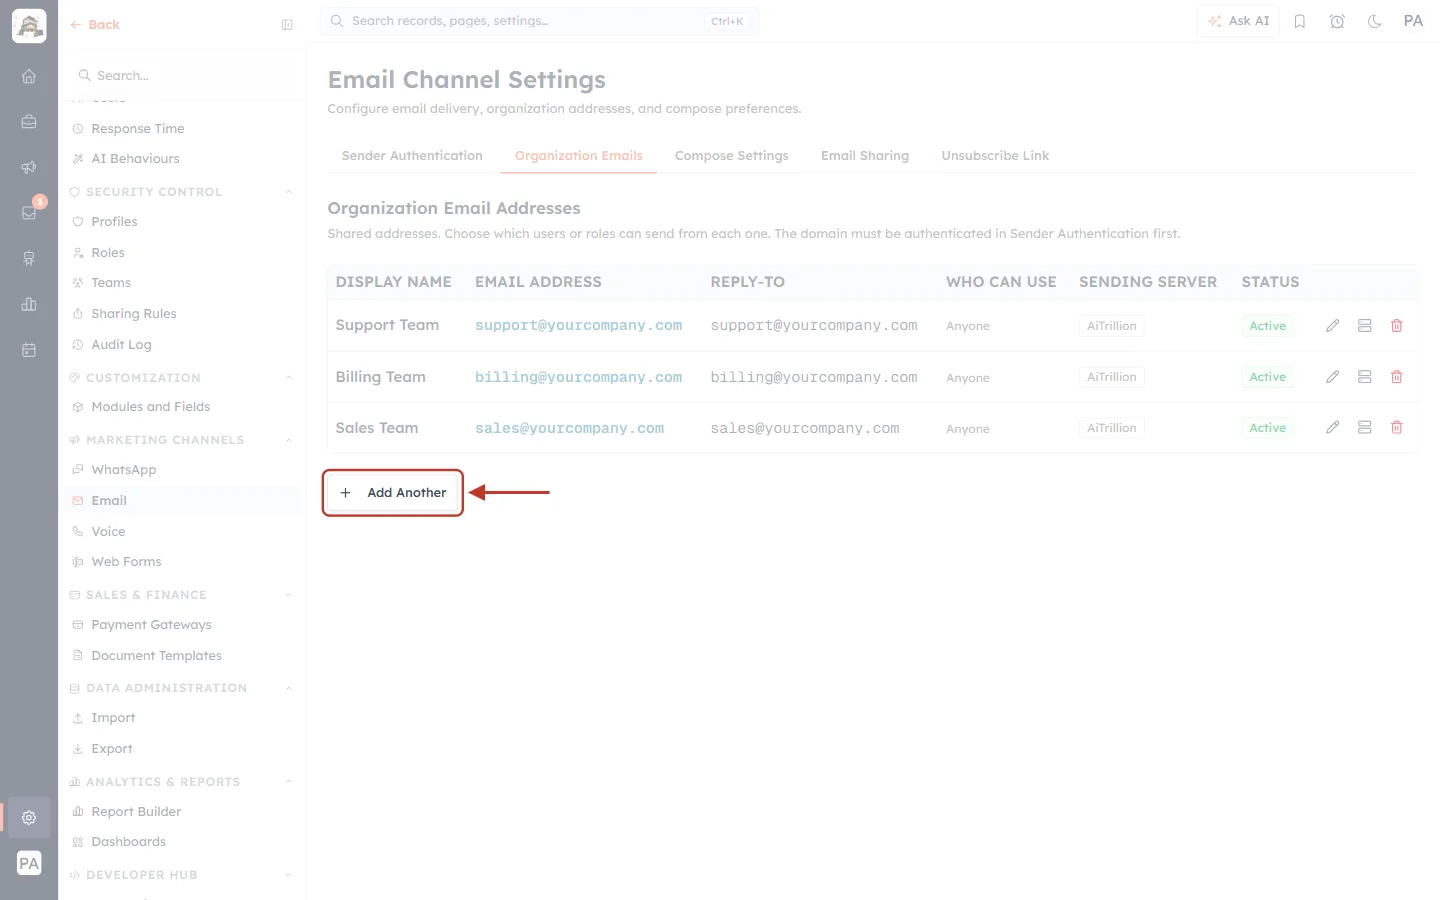
What this screenshot shows. The + Add Another button under the table is ringed.
Click it to open the Add Organization Email form.
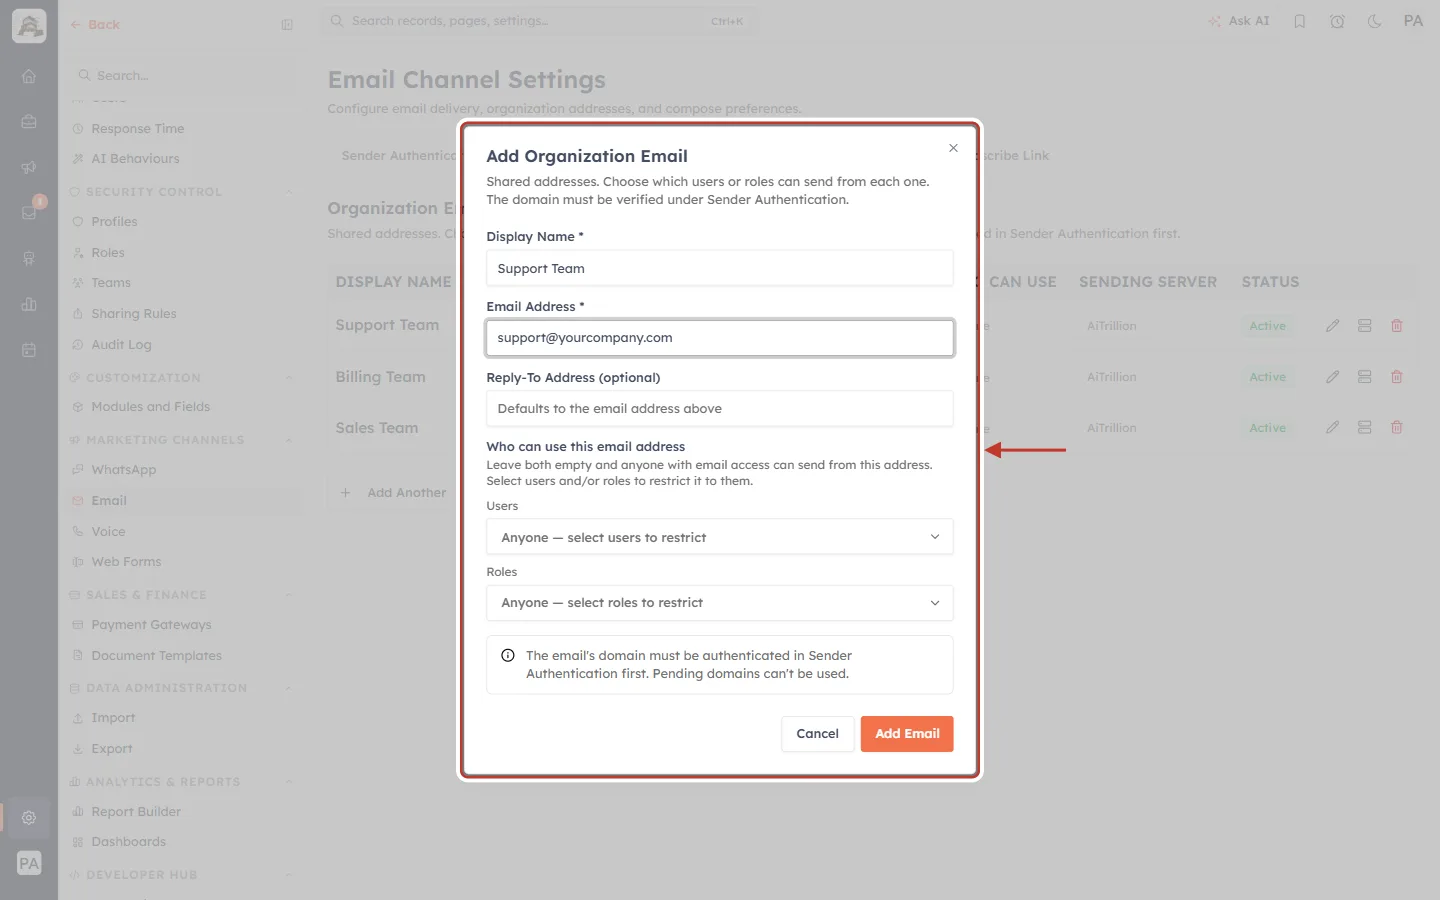
What this screenshot shows. The Add Organization Email form, filled in for a support address, is ringed.
Display Name * — Support Team. This is what customers see next to the address, so use your team or company name.
Email Address * — support@yourcompany.com.
Reply-To Address (optional) — “Defaults to the email address above.”
Who can use this email address — Users and Roles. “Leave both empty and anyone with email access can send from this address. Select users and/or roles to restrict it to them.” For a support address, choose your support agents or their role.
The note at the bottom: “The email’s domain must be authenticated in Sender Authentication first. Pending domains can’t be used.”
Click Add Email to save, then return to From Email and choose it as the default (Step 2).
Part 3 — Where agents see it#
Step 7: Check the From line when replying to a ticket#
Open any ticket in Customer & Support and click Reply. The default address is already filled in.
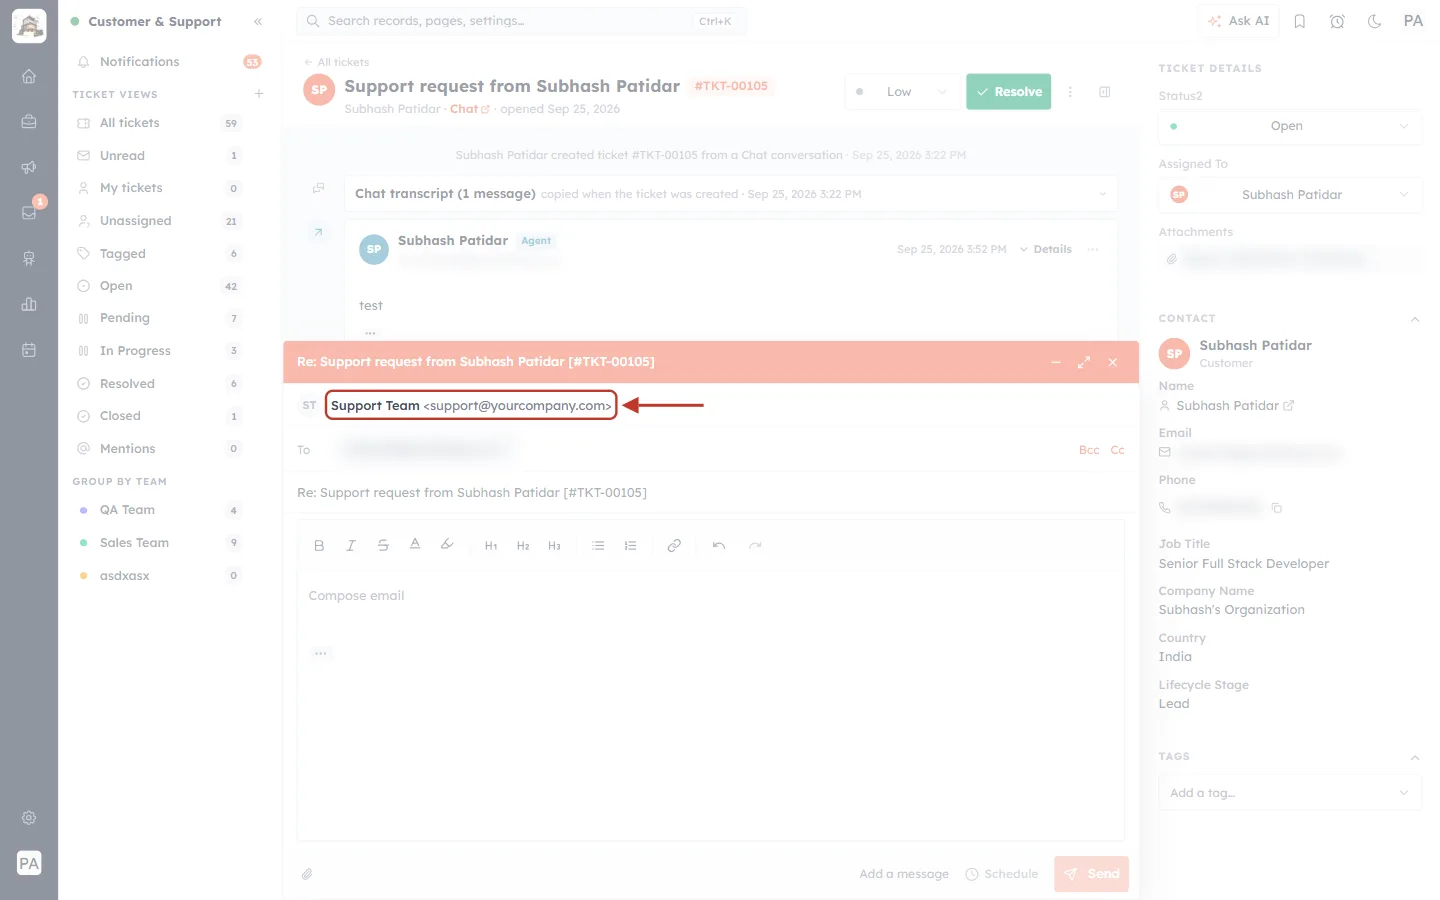
What this screenshot shows. An email reply open on a ticket. The From line at the top of the reply is ringed.
ST Support Team <support@yourcompany.com> — the default From address, “offered first when an agent replies”.
To (below, faded) — the customer’s address (blurred here).
The orange bar above is the reply’s subject (Step 8).
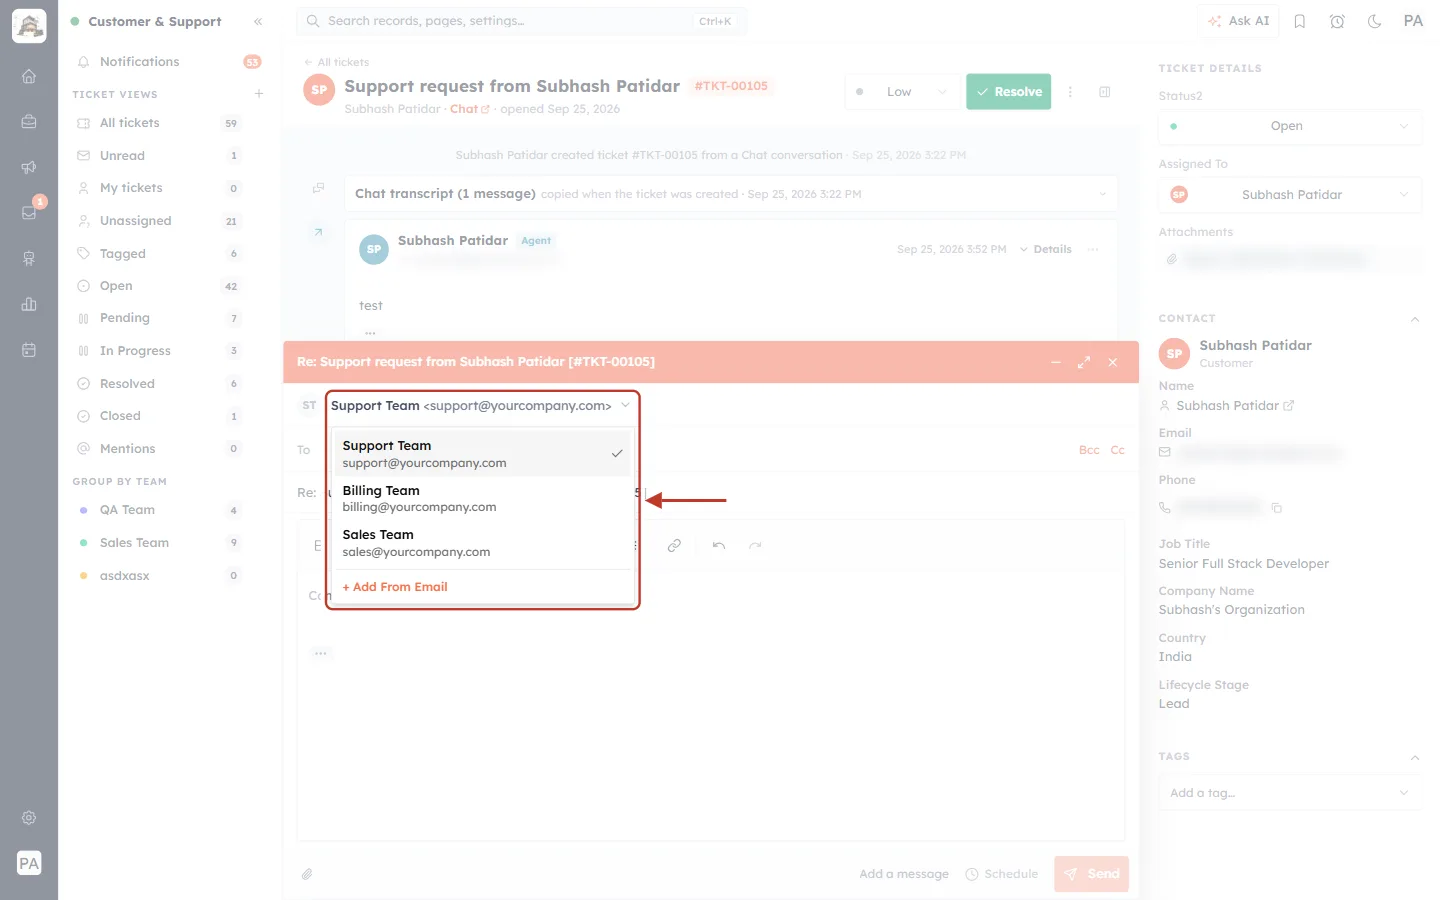
What this screenshot shows. The From line has been clicked; the list of addresses this agent may send from is ringed.
Support Team (ticked), Billing Team, Sales Team — an agent can switch address for this one reply, for example to answer a billing question from the billing address.
The list only shows addresses the agent is allowed to use (see Who can use in Step 6).
+ Add From Email — a shortcut to add another sending address.
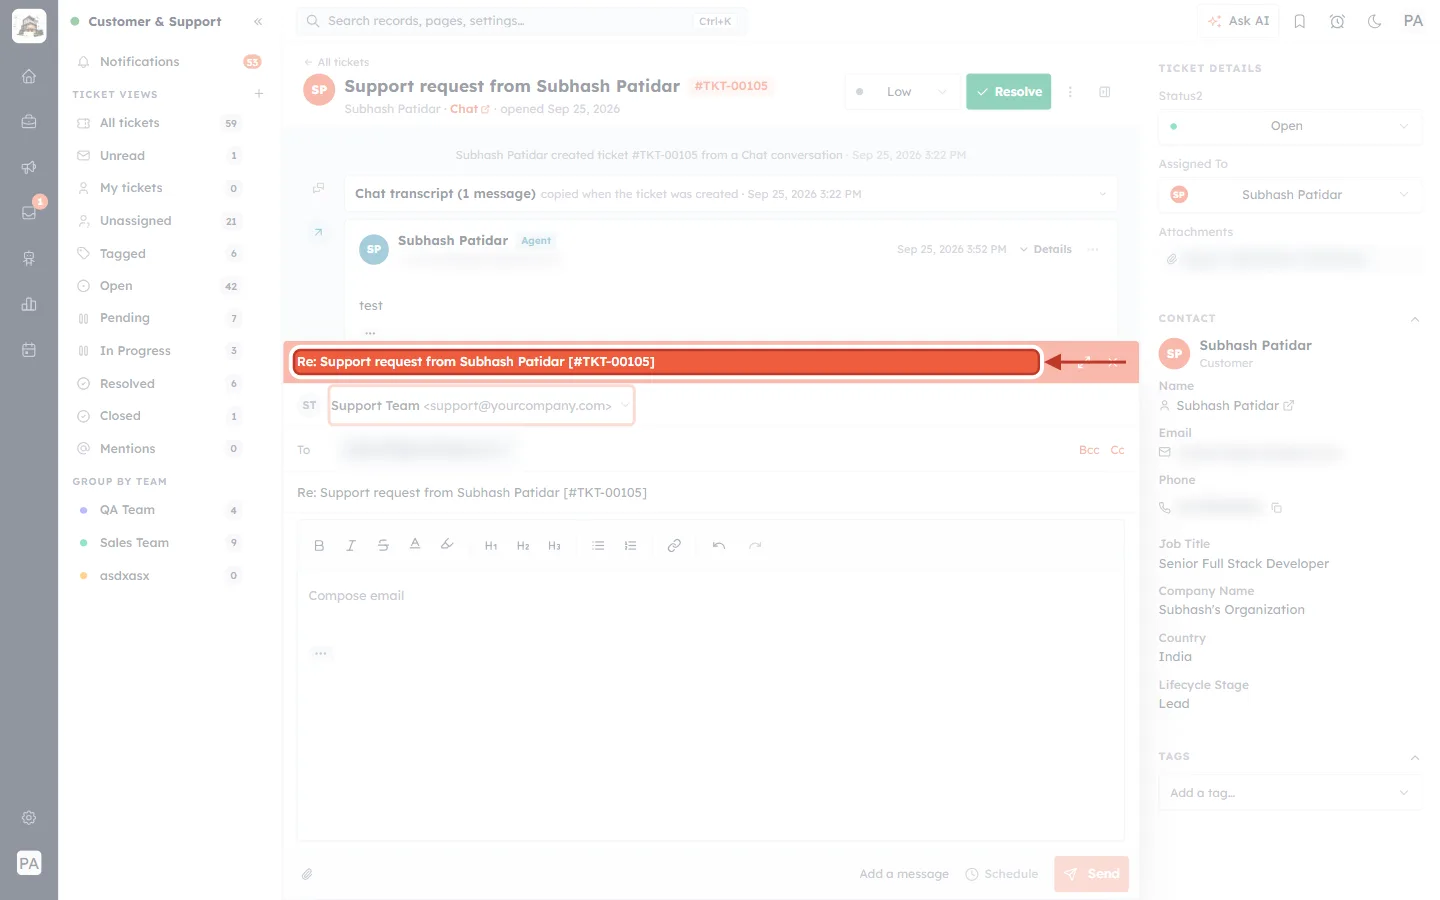
What this screenshot shows. The orange title bar of the reply is ringed: Re: Support request from … [#TKT-00105].
The ticket number in square brackets is added for you. When the customer replies, it lets the CRM put their answer on the same ticket — so keep it in the subject.
The icons on the right minimise, enlarge or close the reply. Closing it does not send anything.
When the address cannot send#
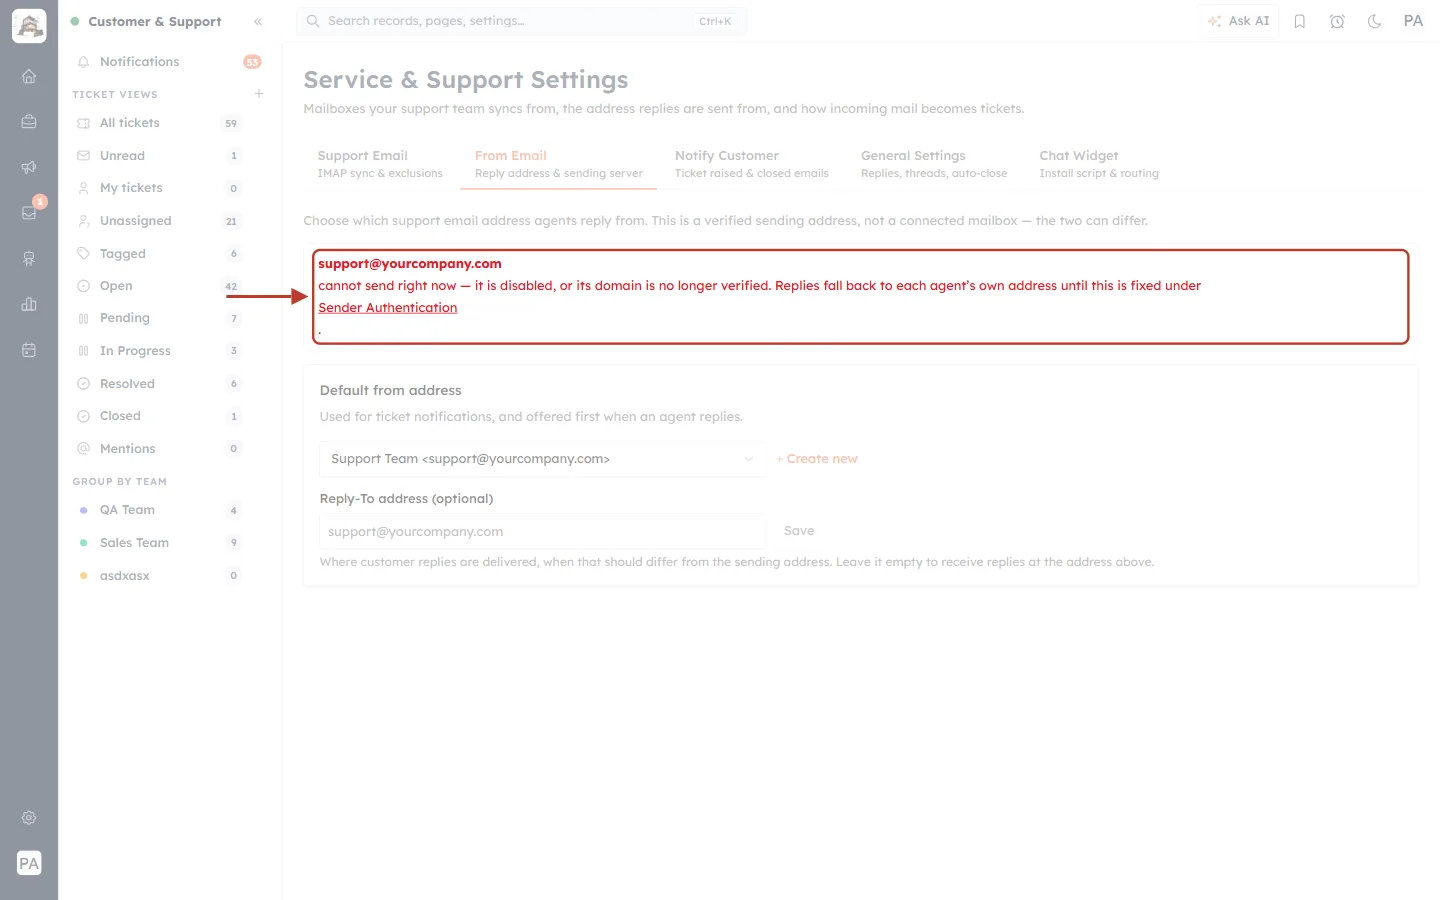
What this screenshot shows. A red warning at the top of the From Email tab is ringed.
support@yourcompany.com cannot send right now — it is disabled, or its domain is no longer verified.
“Replies fall back to each agent’s own address until this is fixed under Sender Authentication.” Customers will still get answers, but not from your support address.
Click Sender Authentication to check the domain, or check in Organization Emails that the address is Active.
Troubleshooting#
My address is not in the Default from address list. It has not been added under Organization Emails yet, or its domain is not verified. Add it (Part 2) after verifying the domain in Sender Authentication.
I see “Couldn’t load your sending addresses.” Reload the page. If it keeps happening, your account may not have access to the email channel — ask your admin.
Customer replies are not appearing on tickets. Replies must reach your connected support mailbox. Check that the Reply-To address (or, if it is empty, the From address) is that mailbox, and that the ticket number is still in the subject.
An agent cannot pick the support address when replying. In Organization Emails, check Who can use for that address — the agent, or their role, must be included (or leave both empty for anyone).
Customers see a person’s name instead of the team. Either the default is set to No default — each agent uses their own, or the agent changed the From line on that reply. Also check the Show the agent’s name in replies option on the General Settings tab.
Quick checklist#
The domain is verified in Sender Authentication.
A shared address such as support@yourcompany.com exists in Organization Emails, with the right people allowed to use it.
It is chosen as the Default from address on the From Email tab.
Reply-To is empty, or points to your connected support mailbox.
A test reply from a ticket shows the right From address, and the customer’s answer lands on the same ticket.
Previous and next#
Previous: Connect a Support Mailbox: Turn Customer Emails into Tickets Automatically (Email-to-Ticket)
Next: Automatic Customer Emails: Notify Customers When a Ticket Is Raised, Resolved, Closed or Reopened
Related#
Was this article helpful?
Ready to implement this?
OpenAI Engage and apply what you just learned to your own workspace.
Open AI Engage CRM