Loading…


KnowledgeBase
Assign, Prioritise, Tag & Change Ticket Status: Organise and Resolve Support Tickets (Step-by-Step)
What this article covers#
A support queue only works if every ticket answers four questions at a glance: who is handling it, how urgent it is, what kind of problem it is, and where it is in its life. In AiEngage CRM you set all four from the Ticket details panel on the right of every ticket — and the ticket views in the sidebar (My tickets, Unassigned, Open, Pending and so on) update to match.
| Setting | What it answers | Where |
|---|---|---|
| Assigned To | Who is responsible for the ticket | Ticket details panel |
| Team | Which team the ticket belongs to | Ticket details panel |
| Priority | How urgent it is: Low, Medium, High or Urgent | Ticket details panel |
| Tags | Labels for grouping and finding tickets (VIP, refund…) | Tags section of the panel |
| Status | Where the ticket is: Open, Pending, In Progress, Resolved or Closed | Ticket details panel, plus the Resolve / Reopen button and ⋮ → Close ticket |
The example in this article continues the ticket from Emma Clarke of Clarke Interiors, whose 12 dining chairs arrived in the wrong colour. It starts as a new ticket: unassigned, no team, Medium priority and no tags.
ℹ️
Every change you make in the panel is saved straight away — there is no Save button. A short “Ticket updated” message confirms each change.
Before you begin#
Edit access to tickets. If the fields in the panel are greyed out, your profile can view tickets but not change them — see Control Permissions with Profiles.
Your teammates and teams exist in the CRM — see Invite Your Team and Create Teams.
You can open the ticket in the Customer & Support workspace — see Ticket Views, Team Groups & Notifications.
Part 1 — The Ticket details panel#
Step 1: Find the Ticket details panel#
Open the ticket. The Ticket details panel is on the right. If you can’t see it, click the panel button at the top right of the ticket, next to the ⋮ menu.
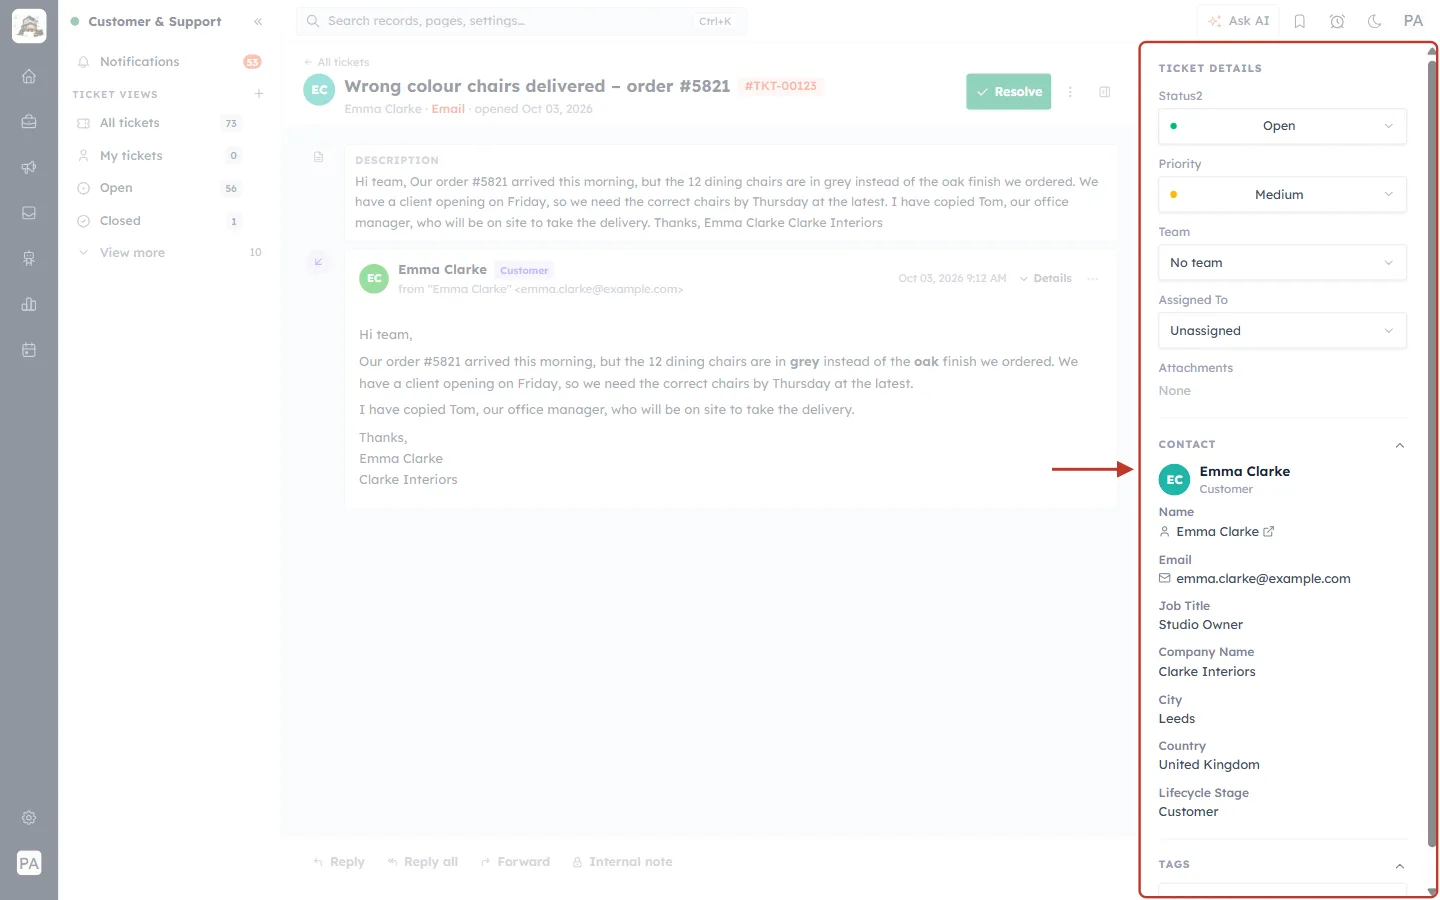
What this screenshot shows. The panel on the right of the ticket is ringed.
TICKET DETAILS at the top, with the fields you can change:
Status2 (the ticket status) — Open, with a green dot.
Priority — Medium, with a yellow dot.
Team — No team.
Assigned To — Unassigned.
Attachments — files on the ticket (None here).
CONTACT — the customer: Emma Clarke, with her email, job title, company, city, country and lifecycle stage.
TAGS — at the bottom (scroll down): Add a tag…
The fields in your account may differ slightly — your administrator can add or hide ticket fields.
Part 2 — Assign the ticket to a person and a team#
Step 2: Choose who handles it (Assigned To)#
Click the Assigned To box and pick the teammate who will own the ticket.
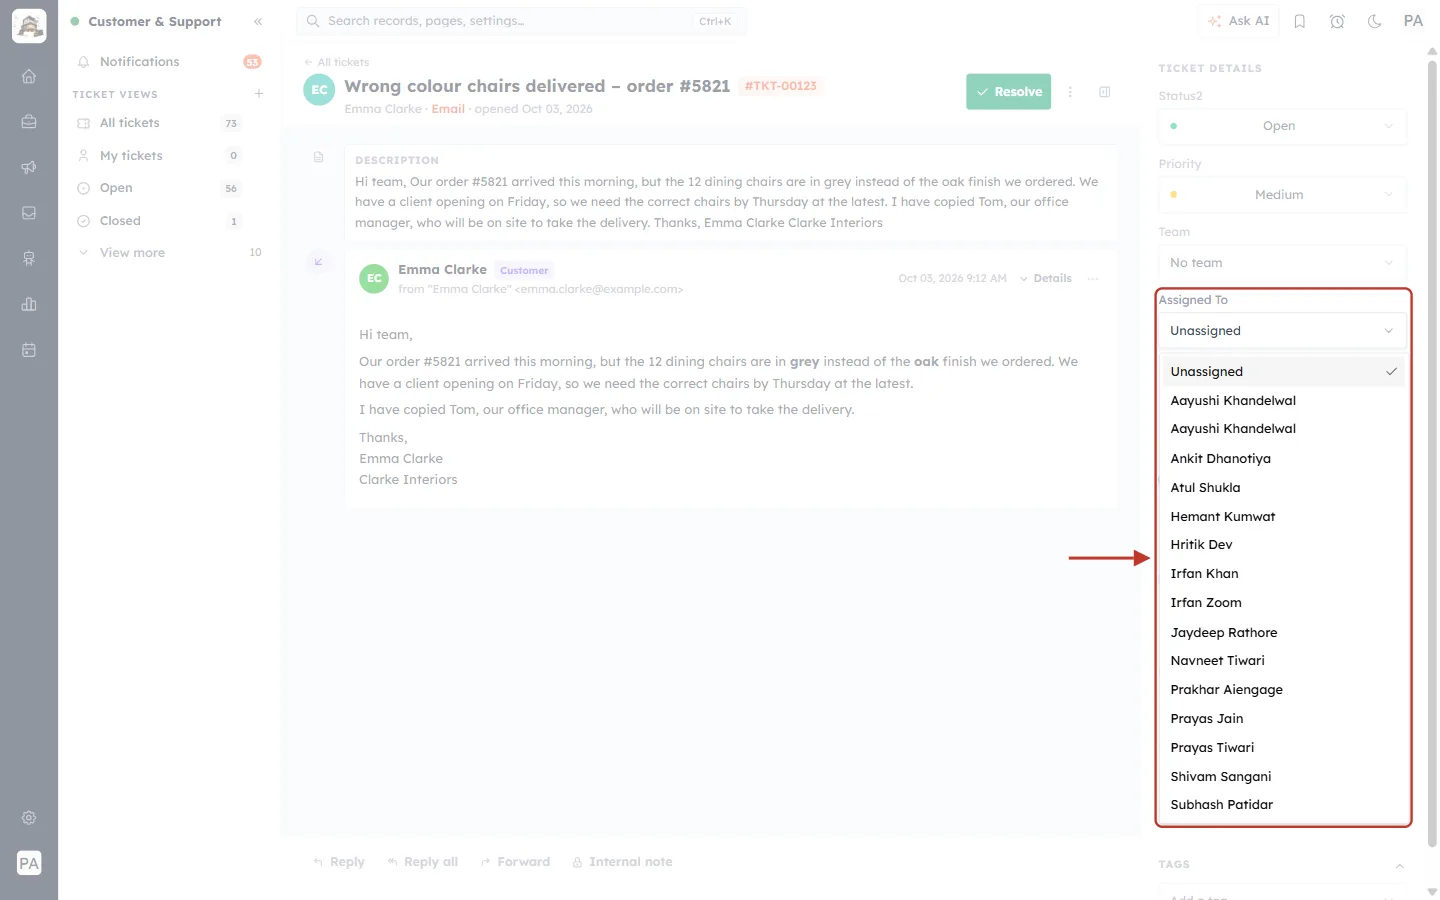
What this screenshot shows. The Assigned To field and its open list are ringed. The arrow points at the list.
Unassigned at the top, with a tick because it is the current value.
Below it, every user in your CRM in alphabetical order. Scroll to see more.
Click a name to assign the ticket. In this example we pick Prakhar Aiengage.
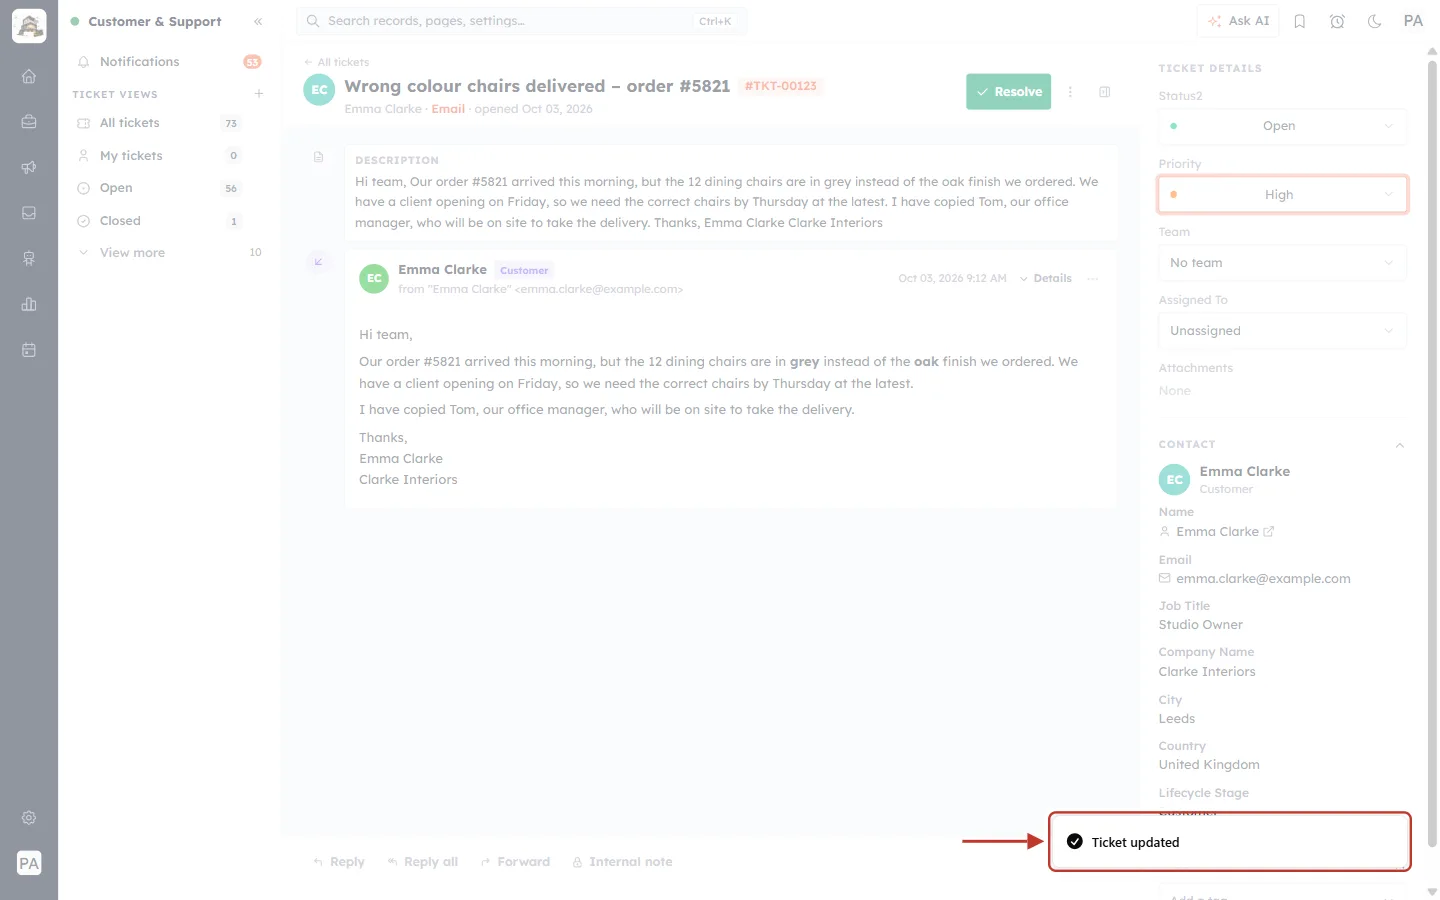
What this screenshot shows. The confirmation at the bottom right of the screen is ringed: “Ticket updated”.
It appears for a few seconds after every change in the panel, to confirm the change was saved.
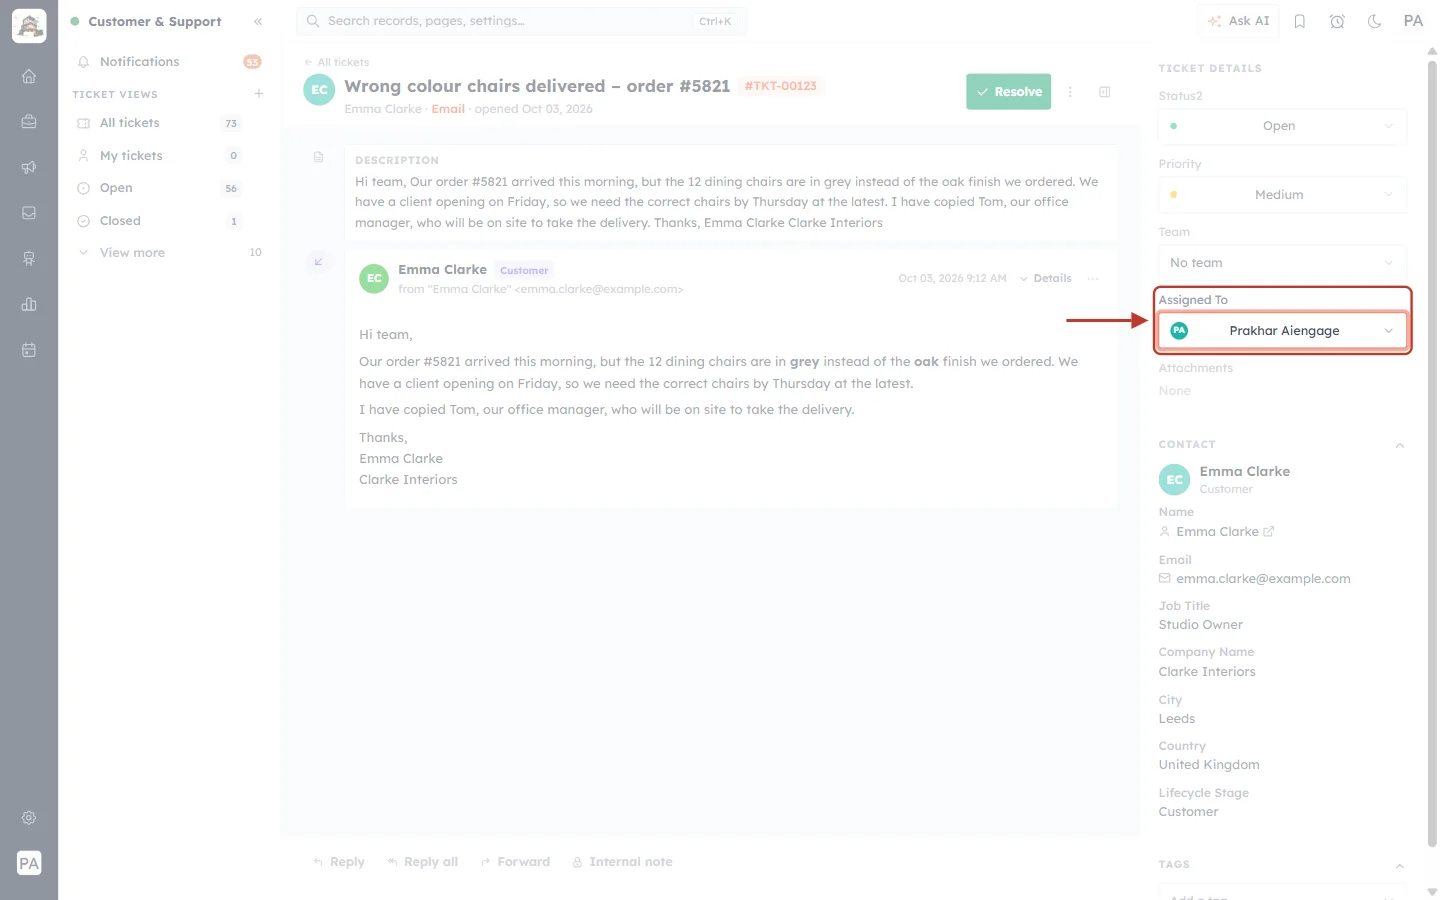
What this screenshot shows. The Assigned To field is ringed, now showing Prakhar Aiengage with his initials.
The ticket now appears in Prakhar’s My tickets view and leaves the Unassigned view.
To hand the ticket to someone else, simply pick another name. To take it off everyone, choose Unassigned.
✅
Assign every ticket as soon as it arrives — even to yourself. An unassigned ticket is a ticket nobody has promised to answer.
Step 3: Choose the team (Team)#
Click the Team box to put the ticket with a team. This is useful when a team, rather than one person, is responsible — for example billing questions go to the billing team.
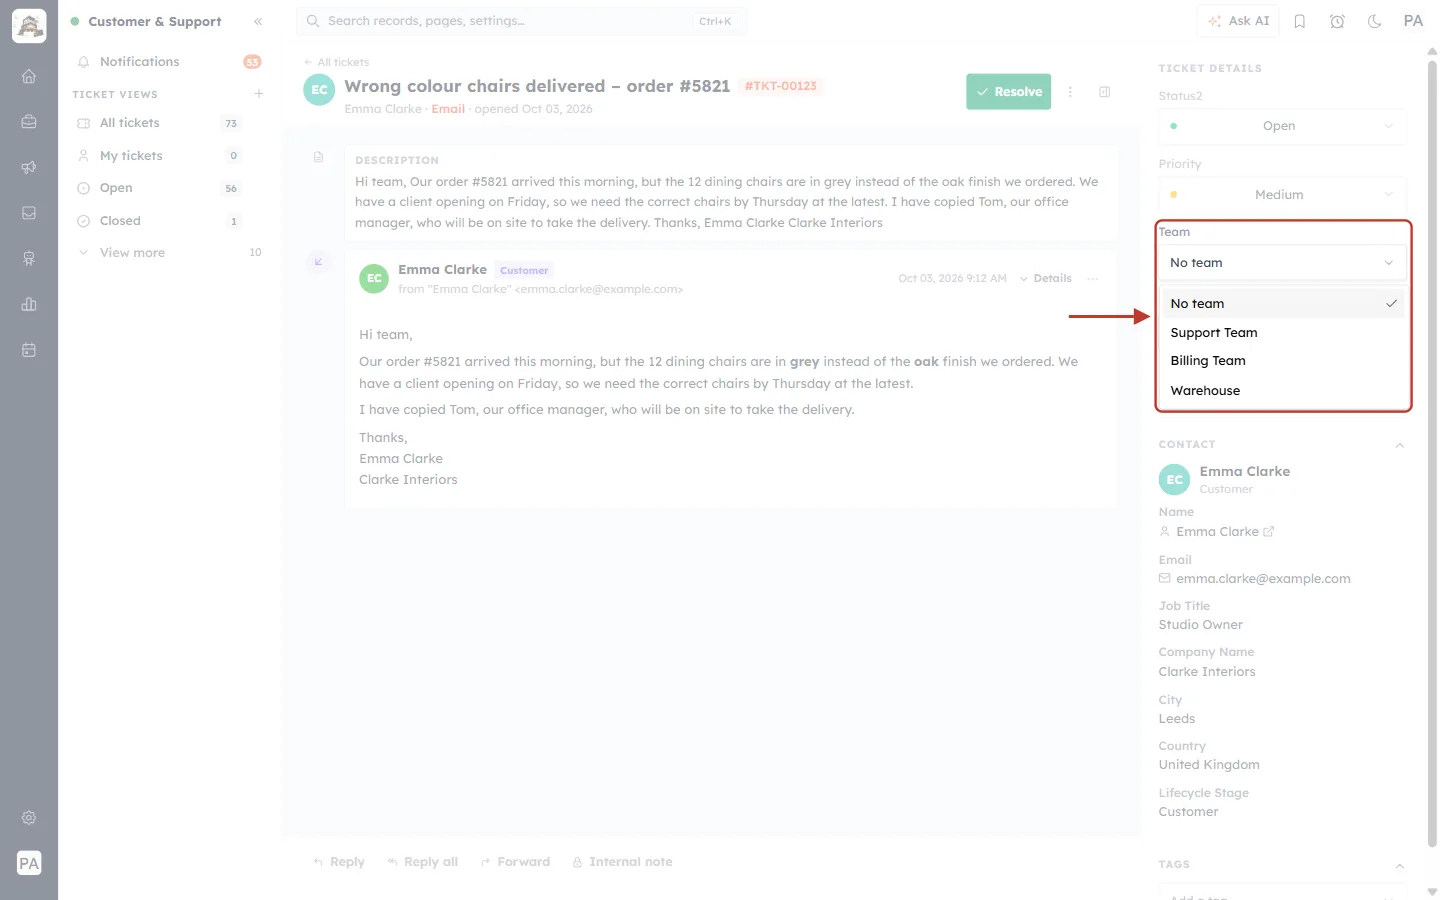
What this screenshot shows. The Team field and its open list are ringed.
No team (the current value, ticked) and your teams — here Support Team, Billing Team and Warehouse.
We choose Support Team.
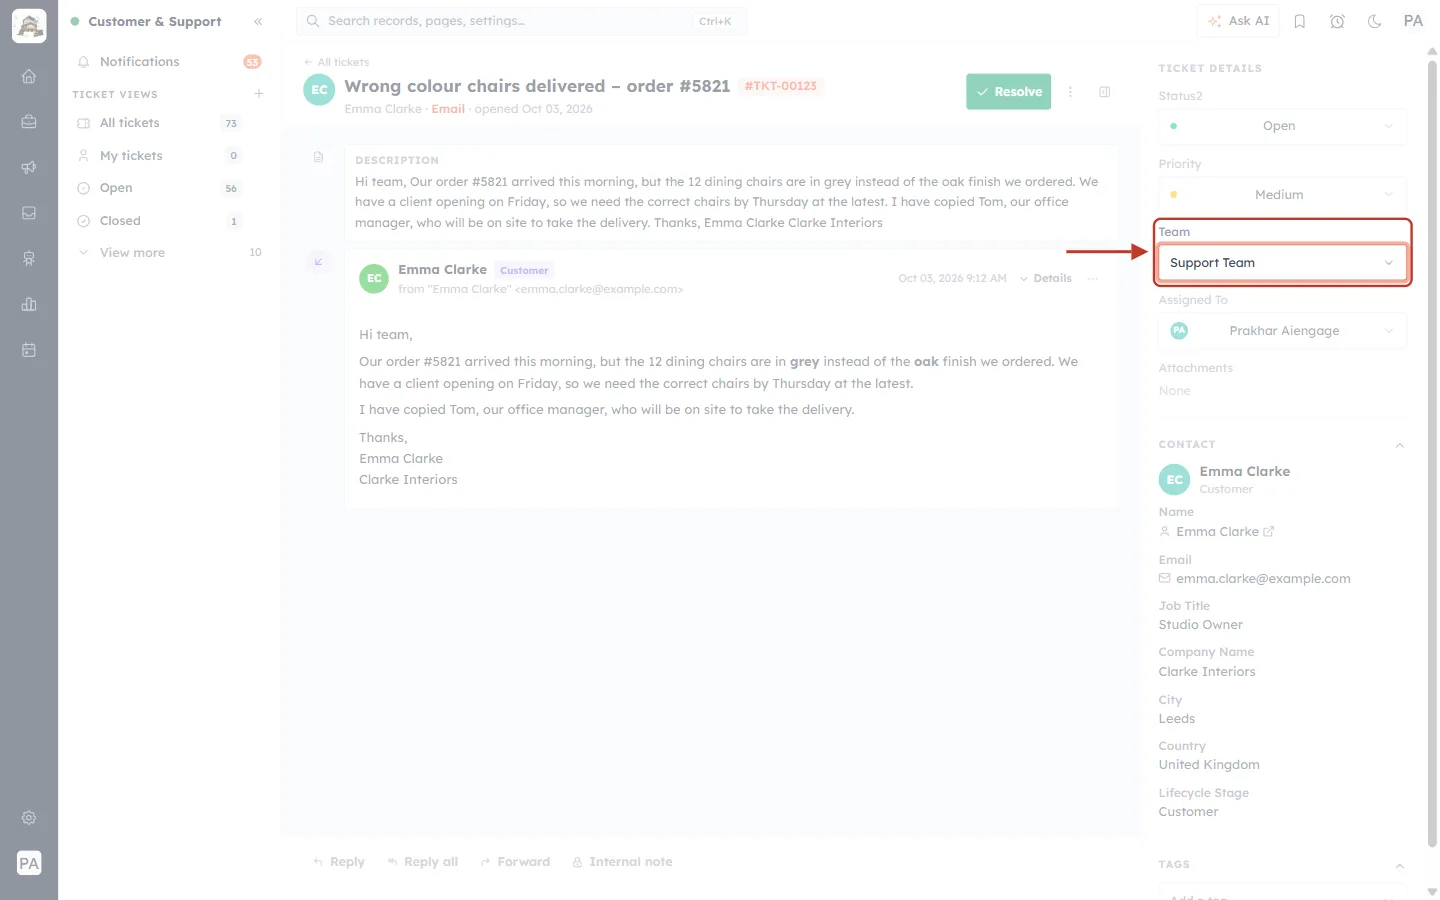
What this screenshot shows. The Team field is ringed, now showing Support Team.
The ticket is now counted under that team in the sidebar’s GROUP BY TEAM section, so the whole team can see it.
Part 3 — Set the priority#
Step 4: Choose how urgent the ticket is#
Click the Priority box and choose a level. Emma has a client opening on Friday, so her ticket is more urgent than a normal one.
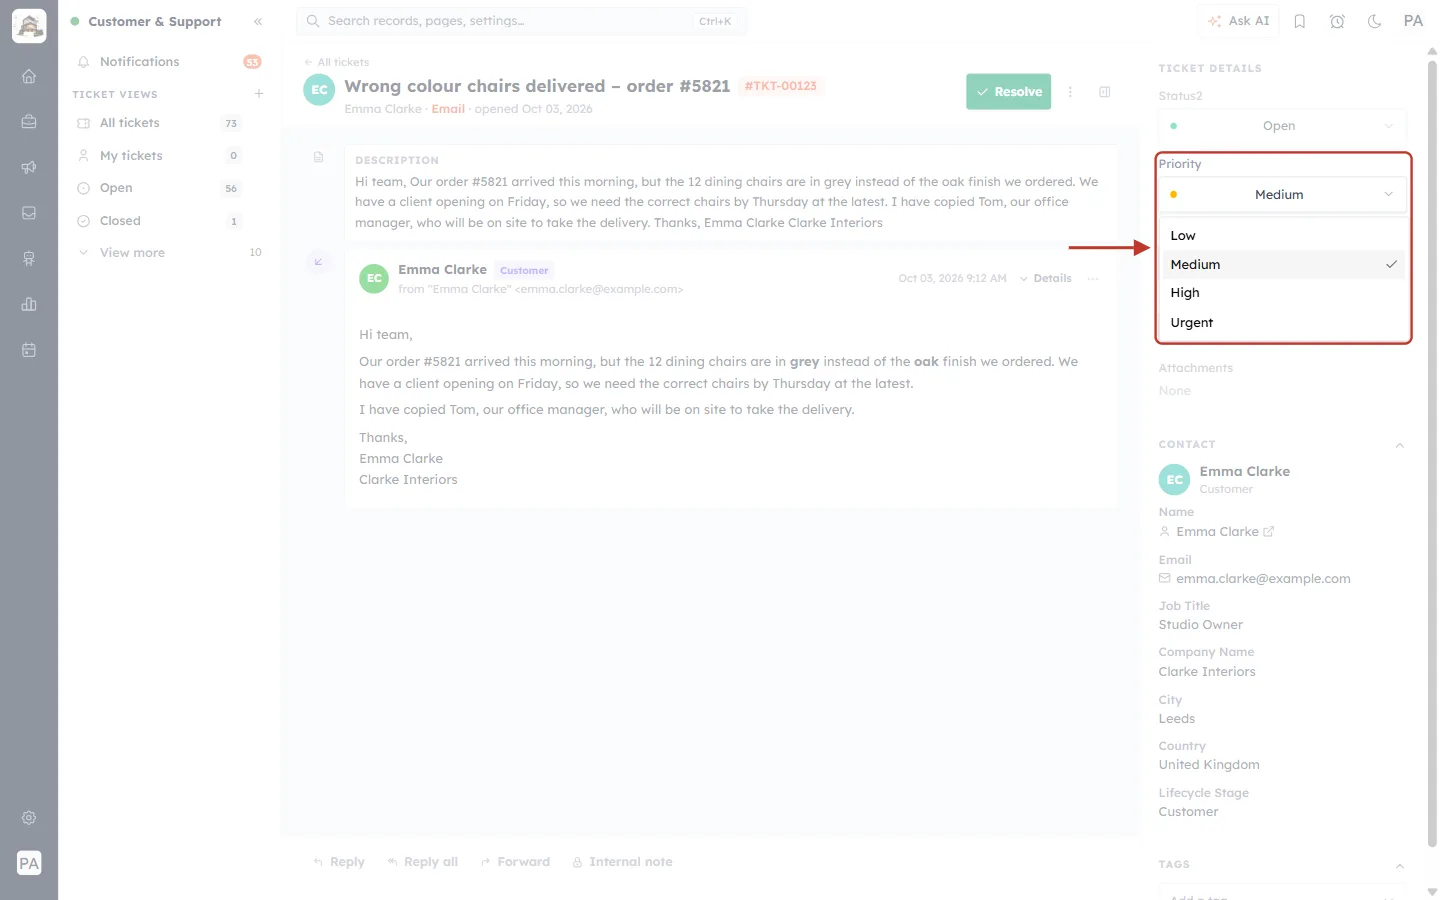
What this screenshot shows. The Priority field and its open list are ringed. The arrow points at the four levels.
Low (grey dot) — questions and small requests with no deadline.
Medium (yellow dot) — normal requests. This is the current value, so it is ticked.
High (orange dot) — the customer is blocked or has a deadline. We choose High.
Urgent (red dot) — many customers are affected, or there is a serious business or legal risk.
The coloured dot is also shown in the ticket list, so urgent work stands out.
✅
Agree as a team what each priority means — for example “High: reply within 4 hours”. Priorities are only useful if everyone uses them the same way.
Part 4 — Tag the ticket#
Tags are short labels you add to tickets so you can find and count similar ones later — for example every refund, every VIP customer, or every wrong-item delivery. A ticket can have as many tags as you like, and tagged tickets appear in the sidebar’s Tagged view.
Step 5: Add an existing tag#
Scroll to TAGS at the bottom of the panel and click Add a tag….
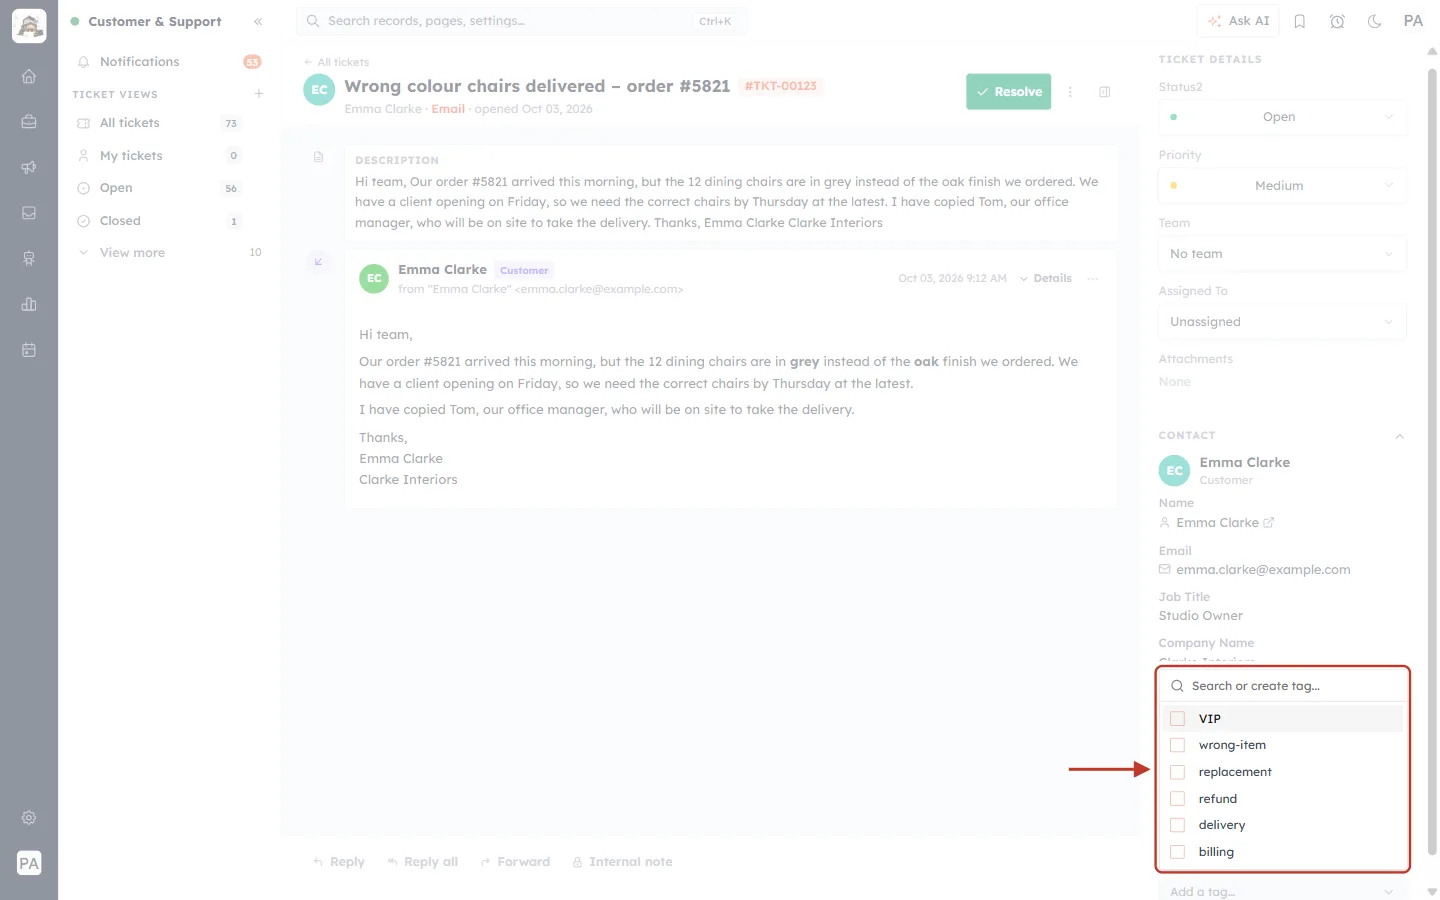
What this screenshot shows. The TAGS section and the tag picker that opens above it are ringed.
A search box at the top: Search or create tag…
Below it, the tags already used in your account — here VIP, wrong-item, replacement, refund, delivery and billing.
Click a tag to add it. We click wrong-item. The picker stays open so you can add more.
Step 6: Create a new tag#
If the tag you need doesn’t exist yet, type it in the search box and choose Create.
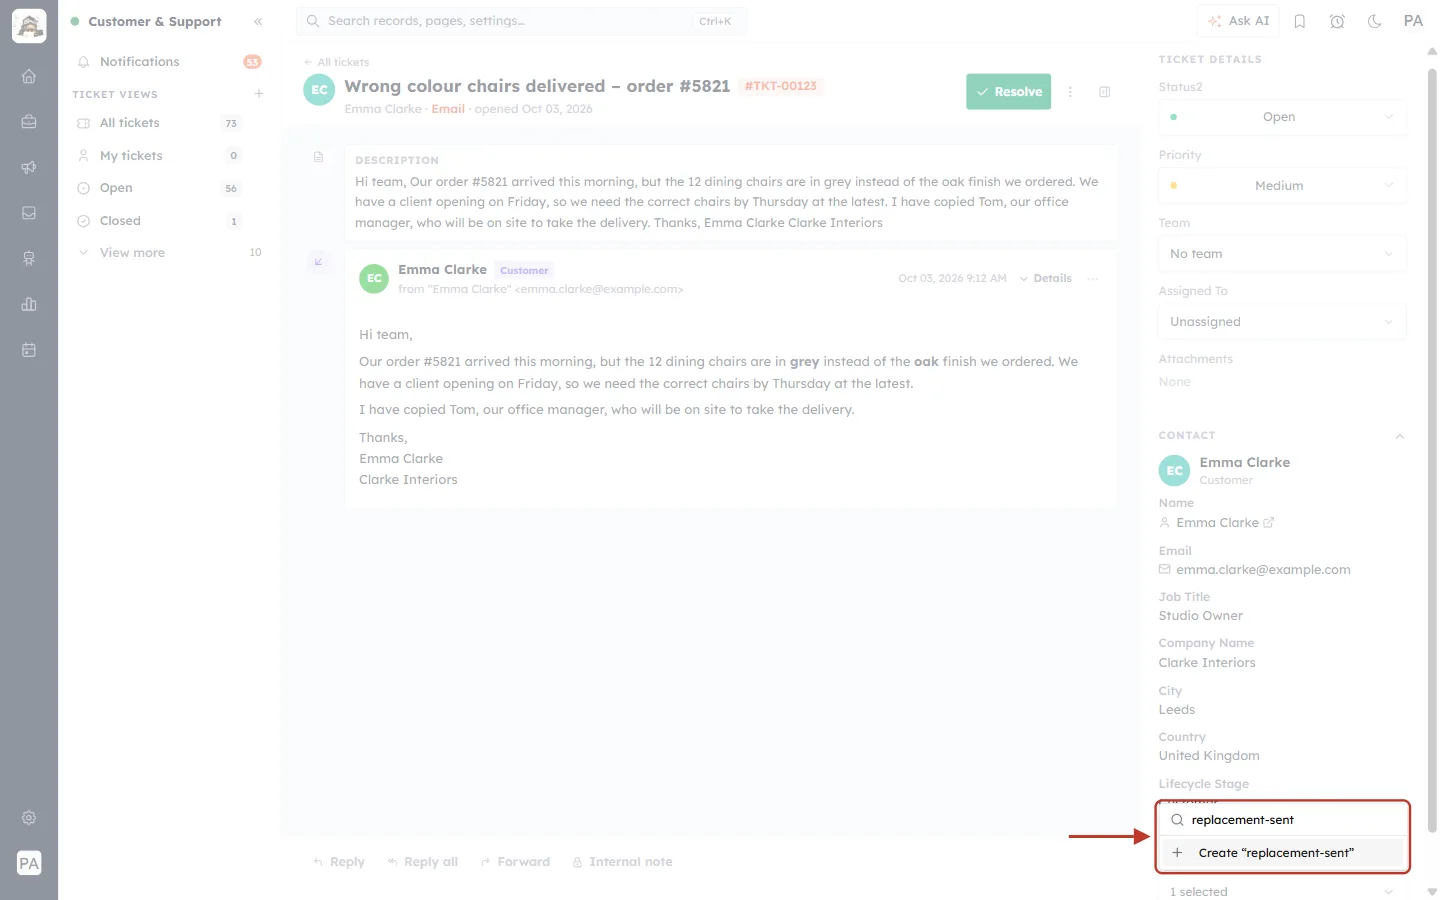
What this screenshot shows. The tag picker is ringed after typing replacement-sent in the search box.
No existing tag matches, so the picker offers Create “replacement-sent”.
Click it to create the tag and add it to the ticket in one go.
If a matching tag already exists, it is shown instead — pick that one rather than creating a near-duplicate.
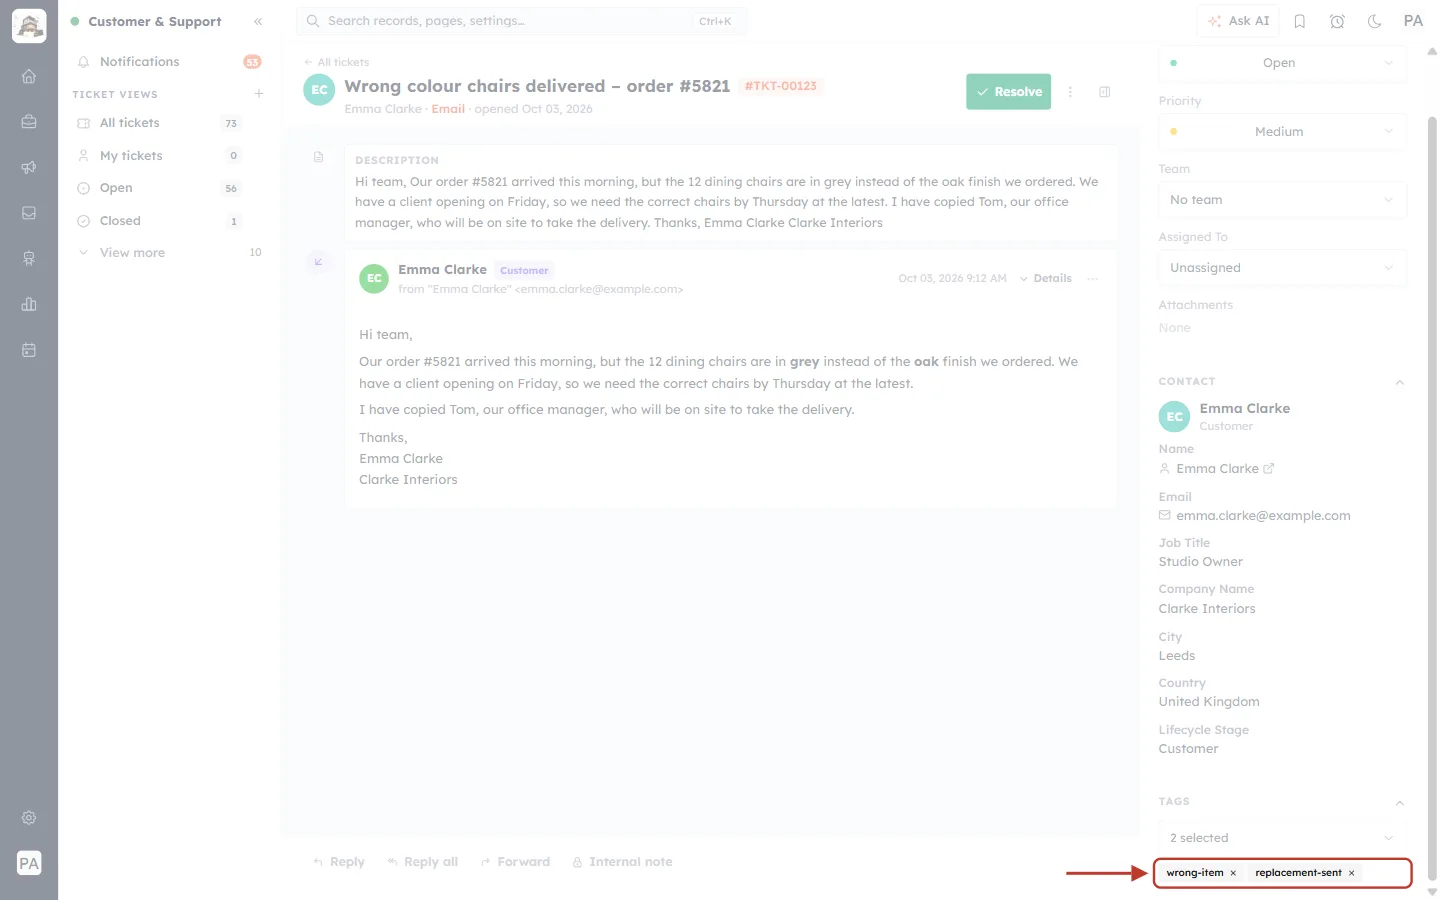
What this screenshot shows. The tags on the ticket are ringed, after clicking away from the picker.
The box reads 2 selected.
Under it, each tag is a chip: wrong-item × and replacement-sent ×.
Click the × on a chip to remove that tag from the ticket.
✅
Keep tags short, lower-case and consistent (for example always refund, never Refunds or refund-request). A small, tidy set of tags makes reports and searches far more useful.
Part 5 — Move the ticket through its statuses#
The status tells everyone where a ticket is in its life. Change it as the work moves on, so the ticket views (Open, Pending, In Progress…) stay accurate.
| Status | Dot | Use it when |
|---|---|---|
| Open | Green | The ticket is new or waiting for your team to act. |
| Pending | Yellow | You are waiting for the customer or someone outside your team (a supplier, a courier). |
| In Progress | Blue | Someone is actively working on it. |
| Resolved | Green | The problem is fixed. The customer can still reply. |
| Closed | Grey | The ticket is completely finished and filed away. |
Step 7: Change the status#
Click the Status2 box and choose the new status.
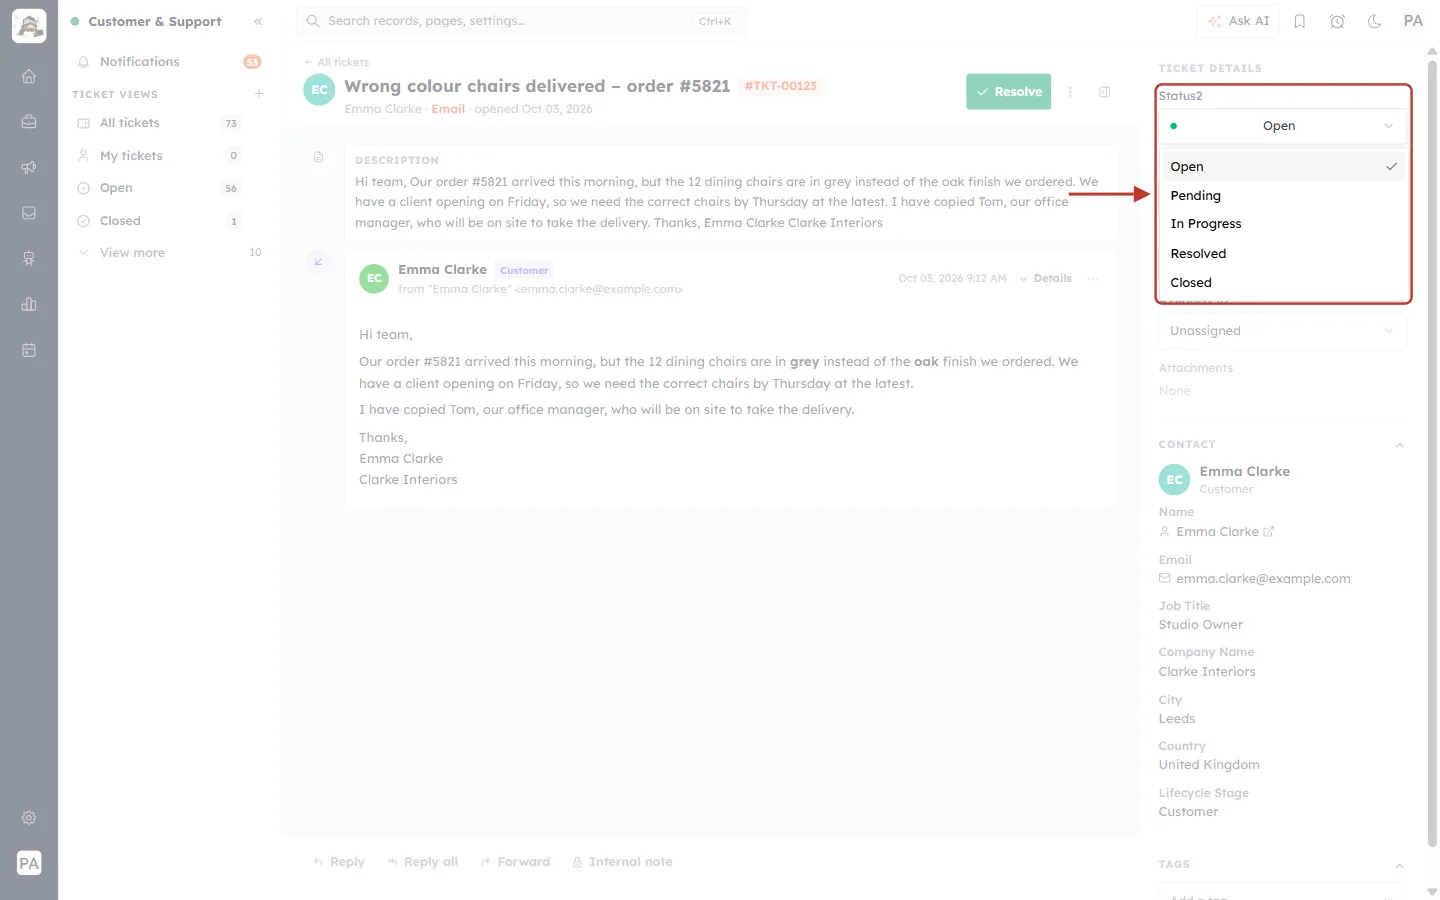
What this screenshot shows. The Status2 field and its open list are ringed.
The five statuses: Open (current, ticked), Pending, In Progress, Resolved and Closed.
We choose In Progress, because the replacement chairs are being arranged.
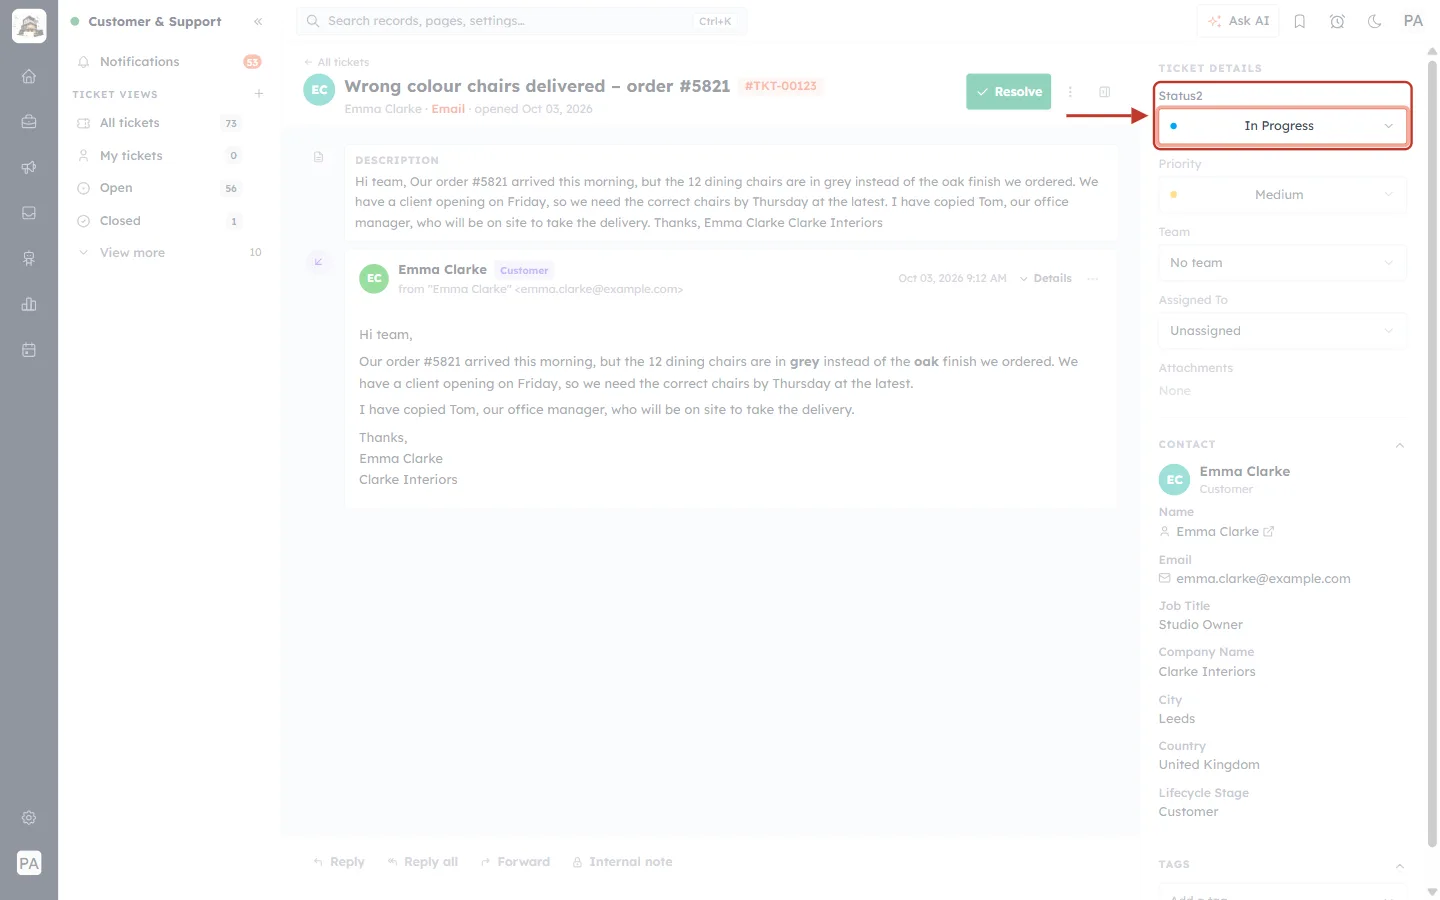
What this screenshot shows. The Status2 field is ringed, now showing In Progress with a blue dot.
The ticket moves from the Open view to the In Progress view in the sidebar.
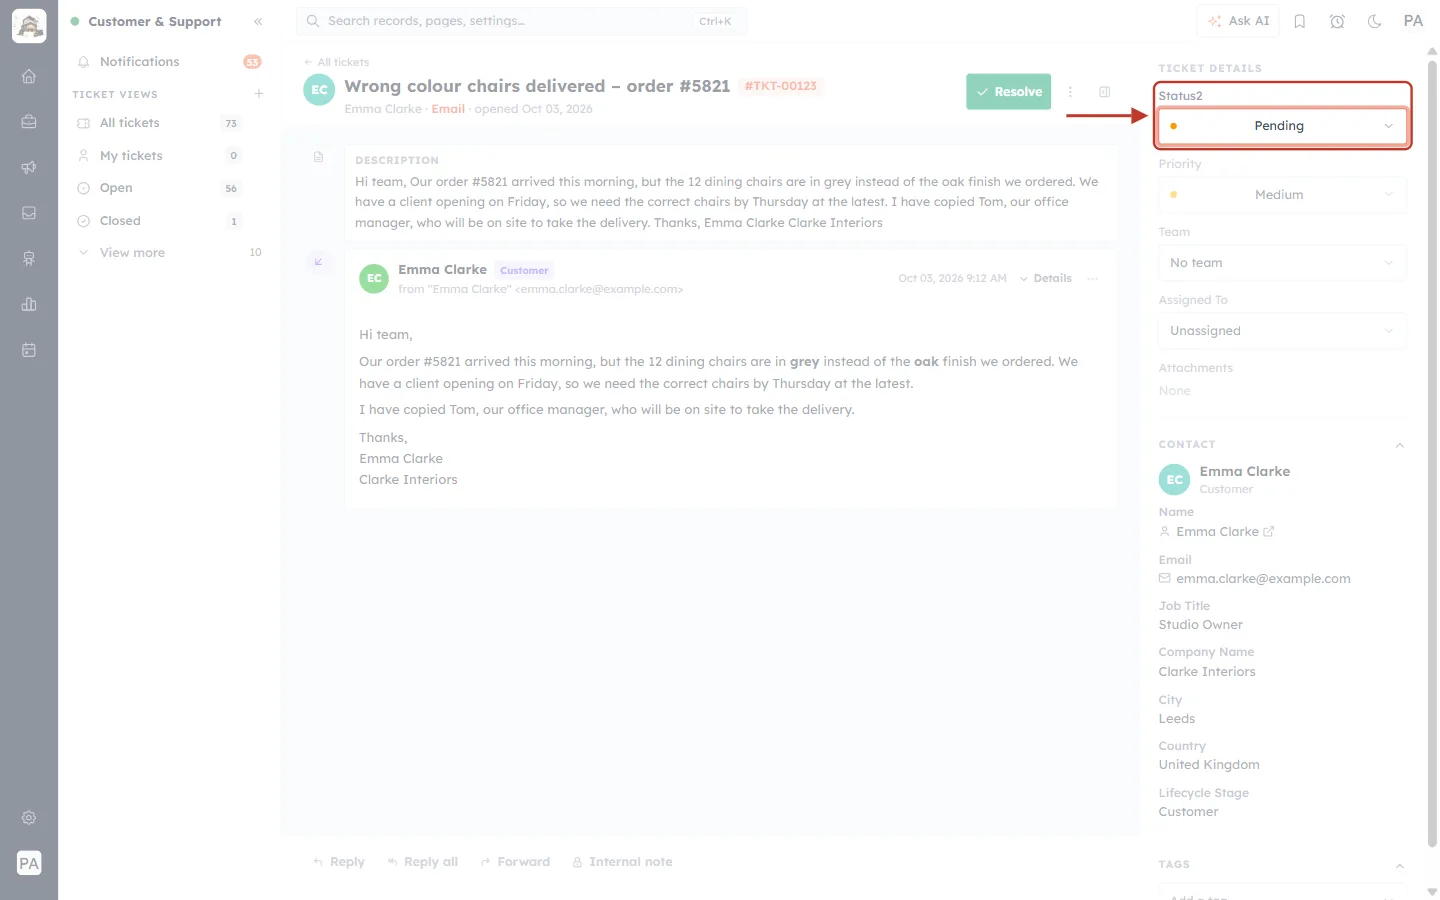
What this screenshot shows. The Status2 field is ringed, now showing Pending with a yellow dot.
Use Pending while you wait — here, for Emma to confirm she will be on site for the delivery.
Pending tickets are easy to find in the Pending view, so you can chase them.
Part 6 — Resolve, and reopen if needed#
Step 8: Click Resolve#
When the problem is fixed, click the green Resolve button at the top right of the ticket.
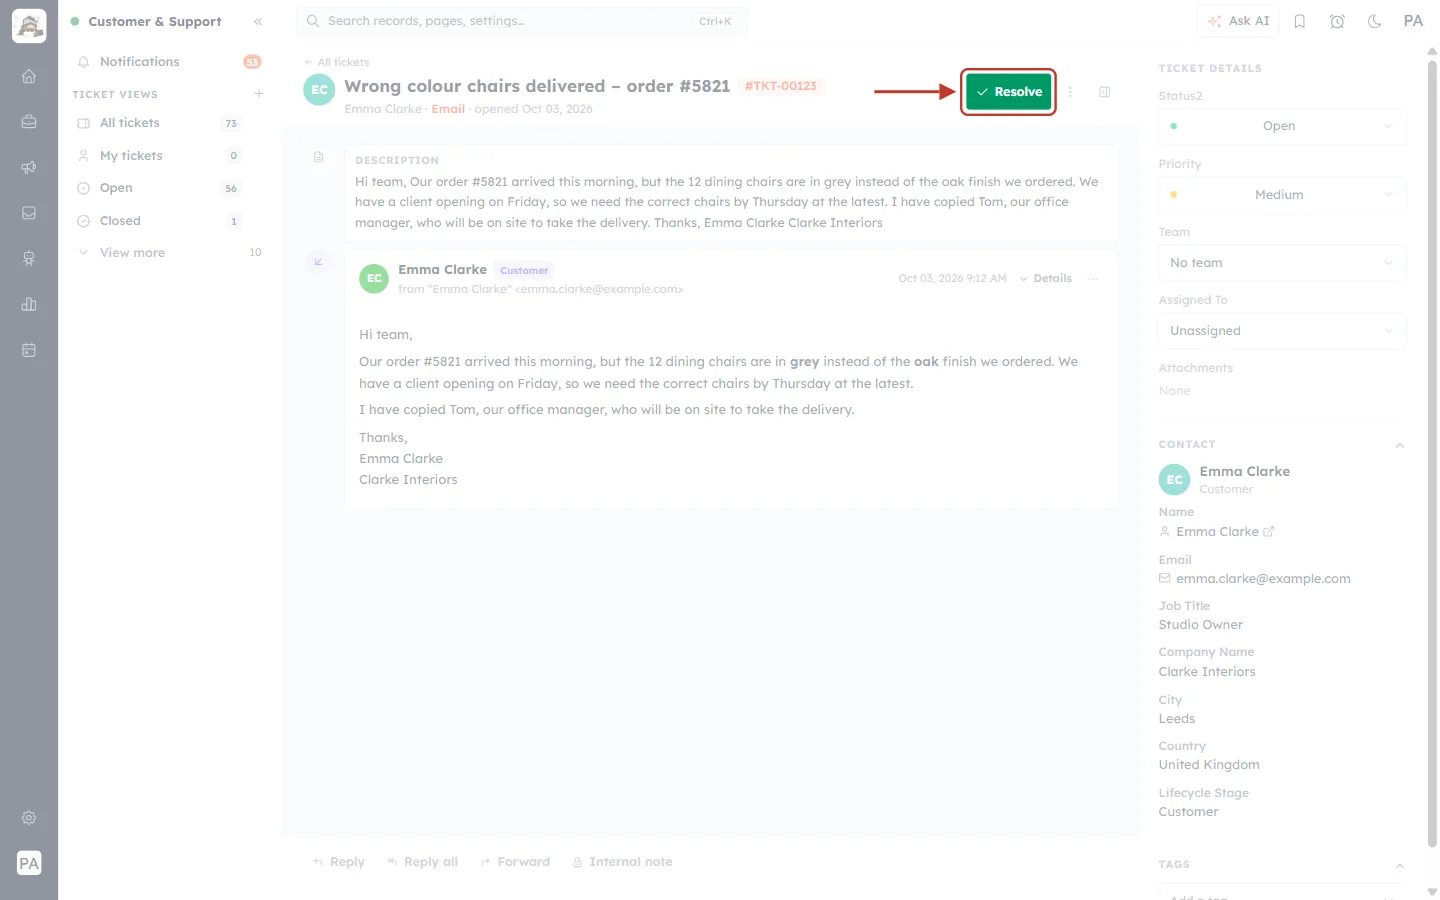
What this screenshot shows. The green ✓ Resolve button in the ticket header is ringed.
It sits next to the ⋮ (More actions) menu and the panel button.
Choosing Resolved in the status list does the same thing.
Step 9: Decide whether to tell the customer#
Before the ticket is resolved, a box asks you to confirm — and lets you decide whether anyone is notified.
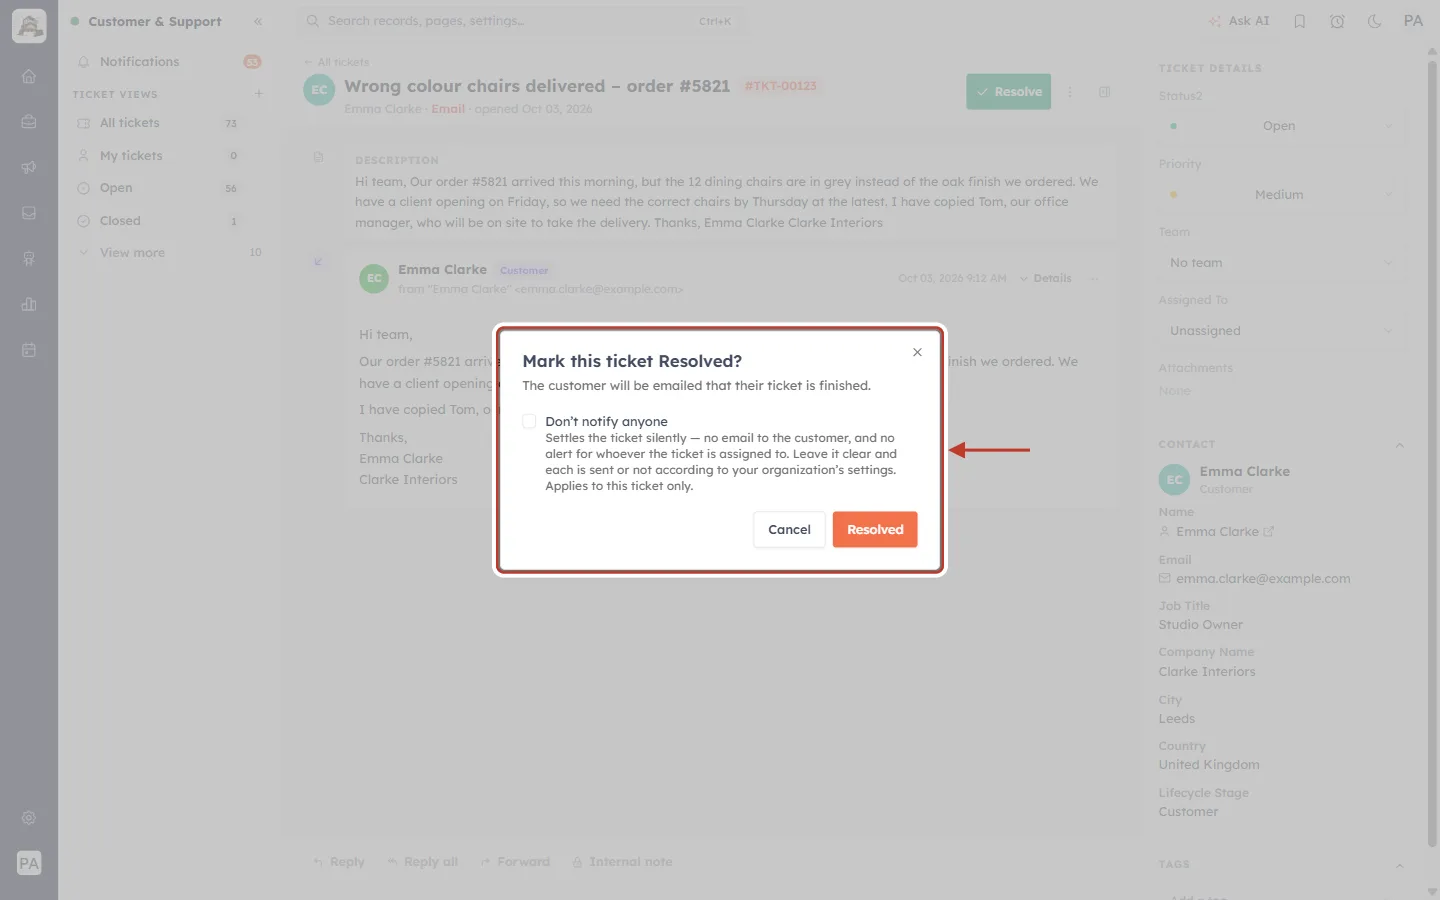
What this screenshot shows. The Mark this ticket Resolved? box is ringed.
The line under the title says what will happen: “The customer will be emailed that their ticket is finished.”
Don’t notify anyone (unticked) — “Settles the ticket silently — no email to the customer, and no alert for whoever the ticket is assigned to. Leave it clear and each is sent or not according to your organization’s settings. Applies to this ticket only.”
Cancel leaves the ticket as it was. Resolved (orange) resolves it.
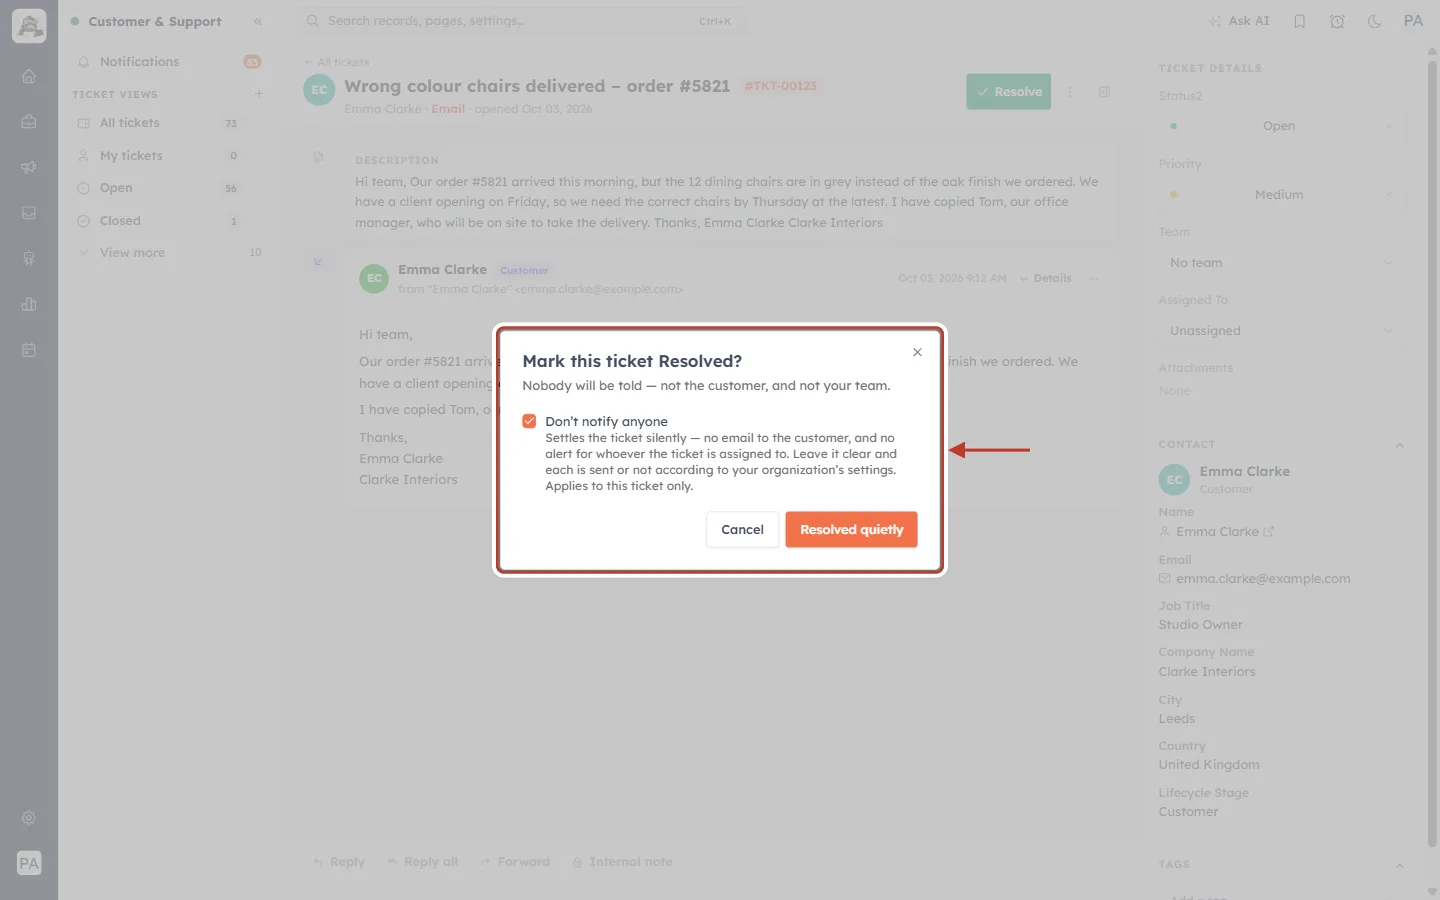
What this screenshot shows. The same box with Don’t notify anyone ticked.
The line under the title changes to “Nobody will be told — not the customer, and not your team.”
The button changes to Resolved quietly.
Use this for tickets that need no message — for example a duplicate, a test, or a request you already confirmed by phone.
ℹ️
Whether the customer is emailed when you leave the box clear depends on your Notify Customer settings — see Automatic Customer Emails. The box always tells you what is about to happen.
In this example we leave the box clear and click Resolved.
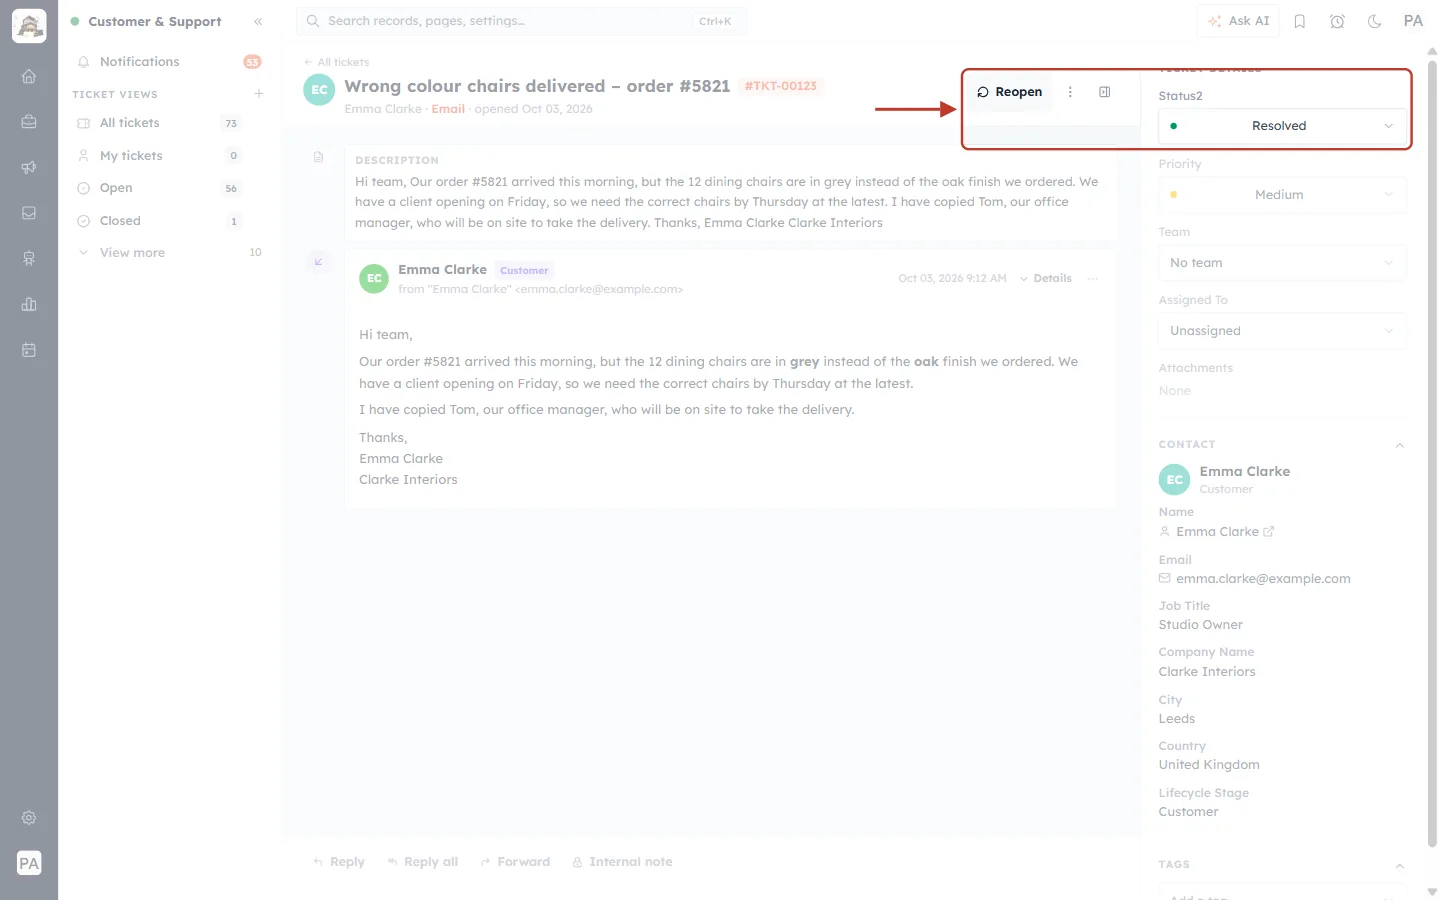
What this screenshot shows. The ticket header and the status are ringed after resolving.
Status2 now shows Resolved.
The green Resolve button has become a grey ↻ Reopen button.
If the customer replies to a resolved ticket, it can reopen automatically — see Support General Settings. Resolved tickets can also close automatically after a few days.
Step 10: Reopen the ticket (if needed)#
If it turns out the problem isn’t fixed, click Reopen.
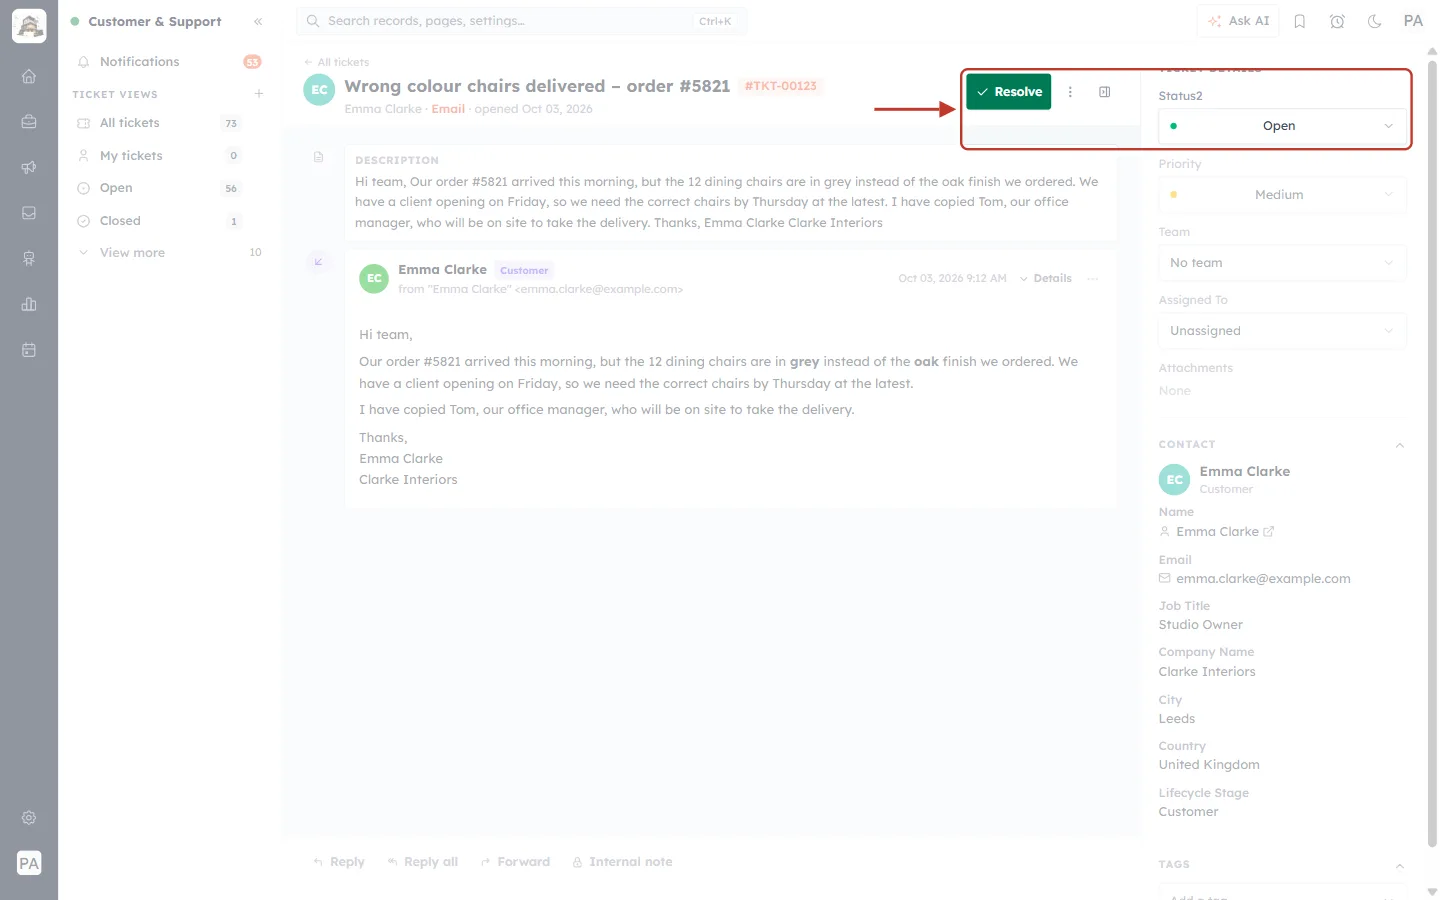
What this screenshot shows. The ticket header and status are ringed after clicking Reopen.
Status2 is back to Open, with a green dot.
The button is the green ✓ Resolve button again.
Reopening does not ask for confirmation.
Part 7 — Close the ticket#
Closed means the ticket is completely finished. There are two ways to close a ticket, and they behave slightly differently.
Step 11: Close from the ⋮ menu#
Click the ⋮ (More actions) button at the top right of the ticket.
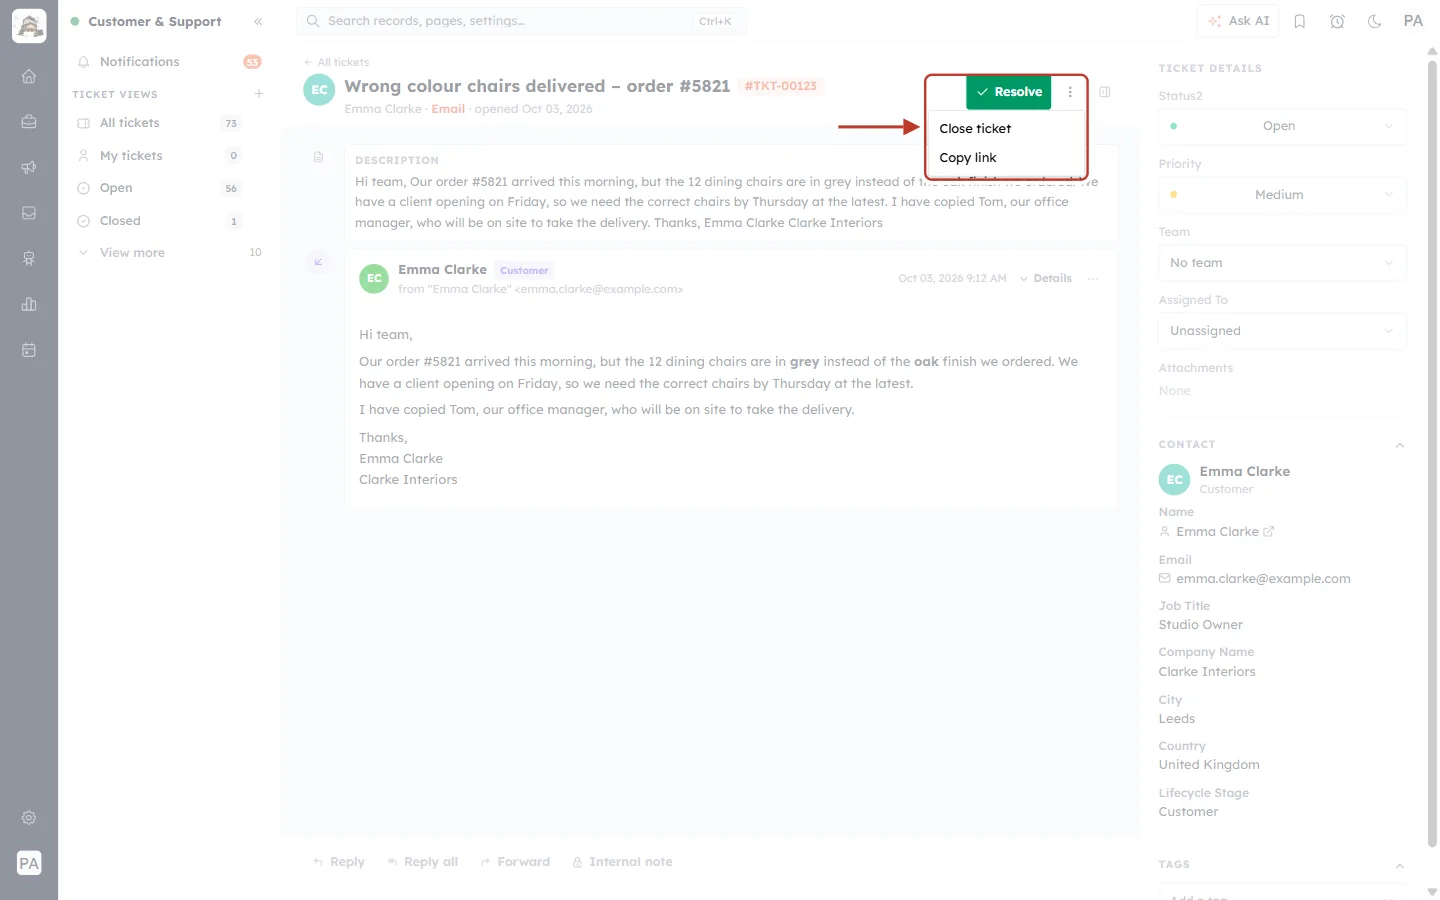
What this screenshot shows. The ⋮ button and its menu are ringed.
Close ticket — closes the ticket straight away, without the confirmation box. It is greyed out if the ticket is already closed.
Copy link — copies the ticket’s web address so you can paste it to a teammate (a “Link copied” message confirms it).
Step 12: Or close from the status list#
Choosing Closed in the Status2 list asks first, just like Resolve.
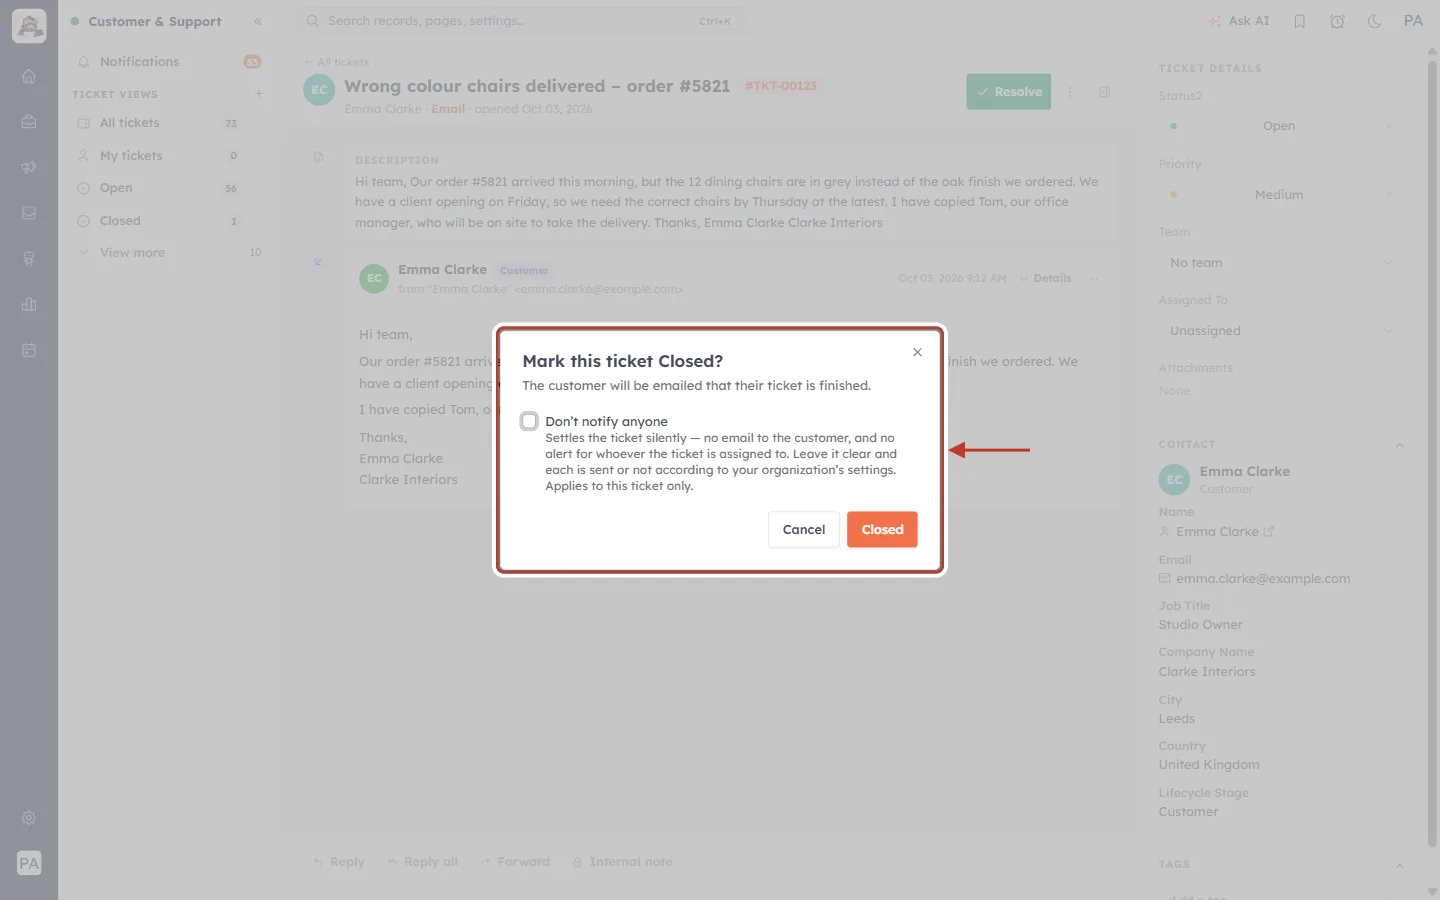
What this screenshot shows. The Mark this ticket Closed? box is ringed.
It works exactly like the Resolve box: it says whether the customer will be emailed, and offers Don’t notify anyone to close silently.
Click Closed to close the ticket, or Cancel to leave it as it is.
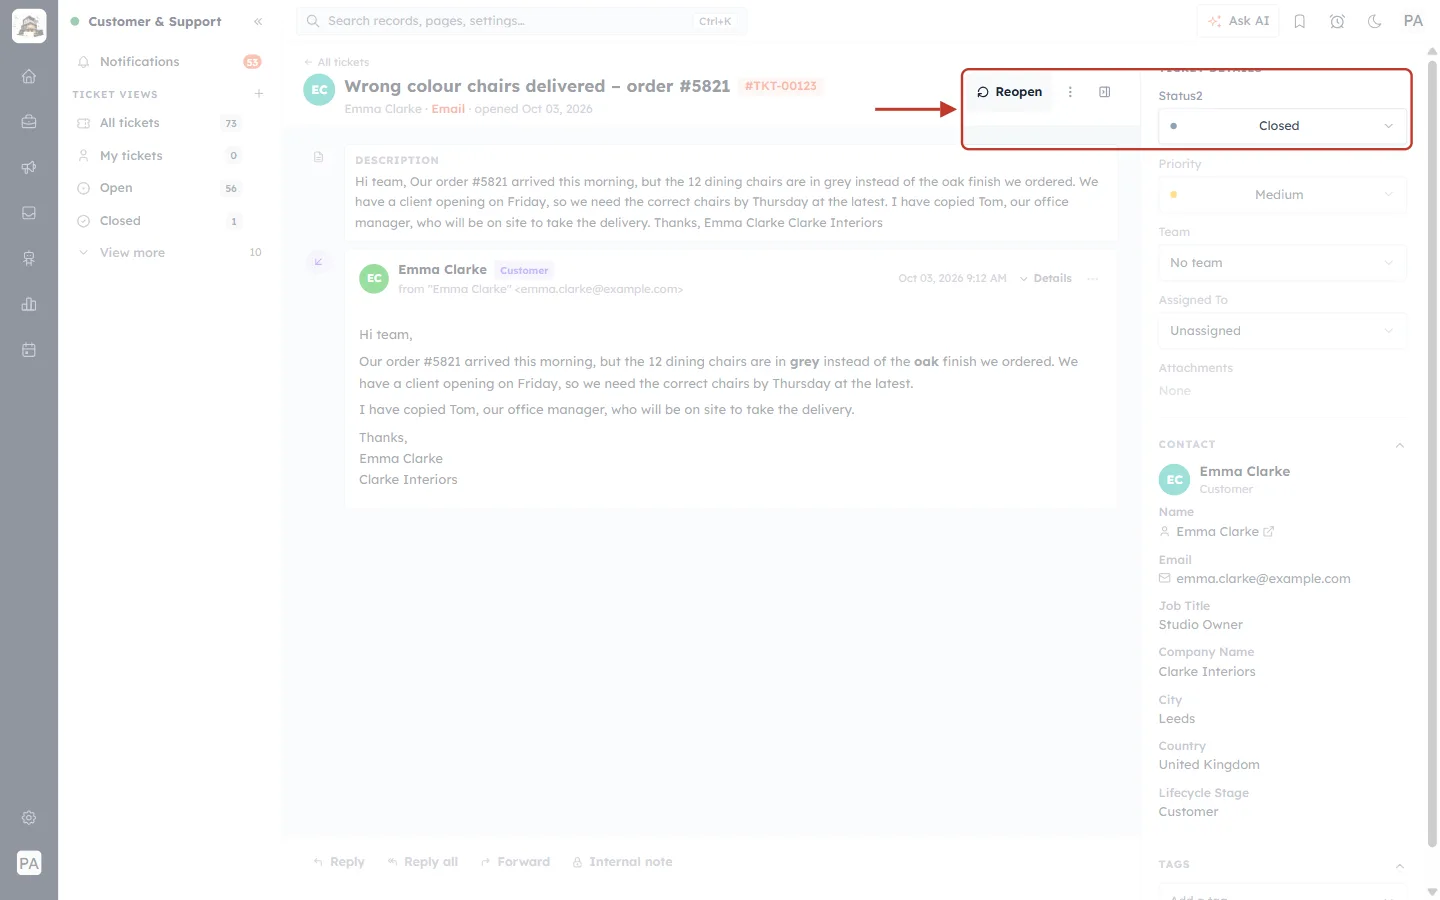
What this screenshot shows. The ticket header and status are ringed after closing.
Status2 shows Closed, with a grey dot.
The header shows ↻ Reopen, in case the ticket needs more work.
The CRM fills in the ticket’s Closed Time automatically.
⚠️
Close a ticket only when you are sure nothing else needs doing. If you have just fixed a problem and the customer may still reply, use Resolve instead.
A simple ticket workflow#
1. Triage each new ticket: assign it, set the team and priority, add tags.
2. Work it: set In Progress while you are on it, and Pending while you wait for someone.
3. Resolve when it is fixed, letting the customer know unless there is a reason not to.
4. Close when it is completely finished — or let resolved tickets close automatically.
Troubleshooting#
The fields in the panel are greyed out. Your profile can view tickets but not edit them, or the ticket has been deleted. Ask your administrator for edit access.
I can’t see the Ticket details panel. Click the panel button at the top right of the ticket (next to ⋮) to show it.
The teammate I want is not in Assigned To. Only users in your CRM are listed. Check that they have been invited and have accepted.
A team is missing from the Team list. Teams are created under Settings → Teams — see Create Teams.
The customer wasn’t emailed when I resolved the ticket. Either Don’t notify anyone was ticked, your Notify Customer settings don’t send that email, or the customer has no email address.
A resolved ticket opened again by itself. The customer replied, and your settings reopen tickets on a customer reply — that is intended, so no reply is missed.
Frequently asked questions#
Is there a Save button? No. Every change in the panel saves immediately and shows “Ticket updated”.
What is the difference between Resolved and Closed? Resolved means fixed, but the customer may still reply. Closed means completely finished. Both show the Reopen button.
Does Close ticket in the ⋮ menu email the customer? It closes the ticket straight away without the confirmation box, so the email (if any) follows your Notify Customer settings. To close silently, choose Closed in the status list and tick Don’t notify anyone.
Can I find all tickets with a tag? Yes — use the Tagged view in the sidebar, or filter by Tags in the Tickets module.
Previous and next#
Related#
Was this article helpful?
Ready to implement this?
OpenAI Engage and apply what you just learned to your own workspace.
Open AI Engage CRM