Loading…


KnowledgeBase
Email Signature & Permissions: Create Your Signature, Link It to From Addresses and Control Who Can Edit It (Step-by-Step)
An email signature is the block at the bottom of your emails with your name, company, contact details and often a logo. In AiEngage CRM, every user can save their own signature, and the CRM adds it automatically to the emails they write:
Emails you compose from a contact (or any record with an email address).
Your replies, reply-alls and forwards on support tickets.
The emails that send a quote or an invoice.
The signature goes where people expect it: under your own words, and above the quoted email on a reply or the forwarded message on a forward. Signatures are personal: only you can see and change yours.
This guide has three parts:
Part 1 — Permissions: who can edit a signature, and who can keep several signatures (for admins).
Part 2 — Create your signature: the suggested signature, writing and formatting it, adding your logo or an image, pasting a designed HTML signature, and keeping different signatures for different From addresses.
Part 3 — Your signature in emails: what you see in the email composer, how it changes with the From address, and how to leave it off one email.
ℹ️
Not added to: email campaigns and email templates, scheduled emails, and automatic emails sent by workflows. These are unchanged, so put any sign-off you need for them directly into the template.
Before you start#
Your plan must include the Email channel.
At least one email address you can send from must be set up. See Set Up Your Organisation Email Address in AI Engage CRM.
To change who can edit or manage signatures (Part 1), you need to be an Admin or the Owner.
Part 1: Permissions — who can edit and manage signatures#
Two permissions control signatures. Both live in each Profile, under Setup Permissions → Channel setup:
Permission | What the user can do | Default |
|---|---|---|
Edit Own Email Signature | See and edit one signature of their own. It is added to the emails they compose, from every address they can send from. | On for every profile |
Manage Email Signatures | Everything above, plus keep up to five named signatures and choose which From addresses each one is used for. | Off for members |
Admins and the Owner get both automatically, whatever the profile says.
A user with neither permission doesn’t see the signature settings, and their emails go without a signature.
If you turn Manage off for someone who already has several signatures, the extra ones are hidden, not deleted. The user keeps editing their first signature, and the others come back if Manage is turned on again.
Step 1: Open the profile#
Go to Settings (the gear icon at the bottom of the left rail) → Security Control → Profiles. Open the menu (⋮) on the profile you want to change and choose Edit. Here we edit the User profile, used by six team members.
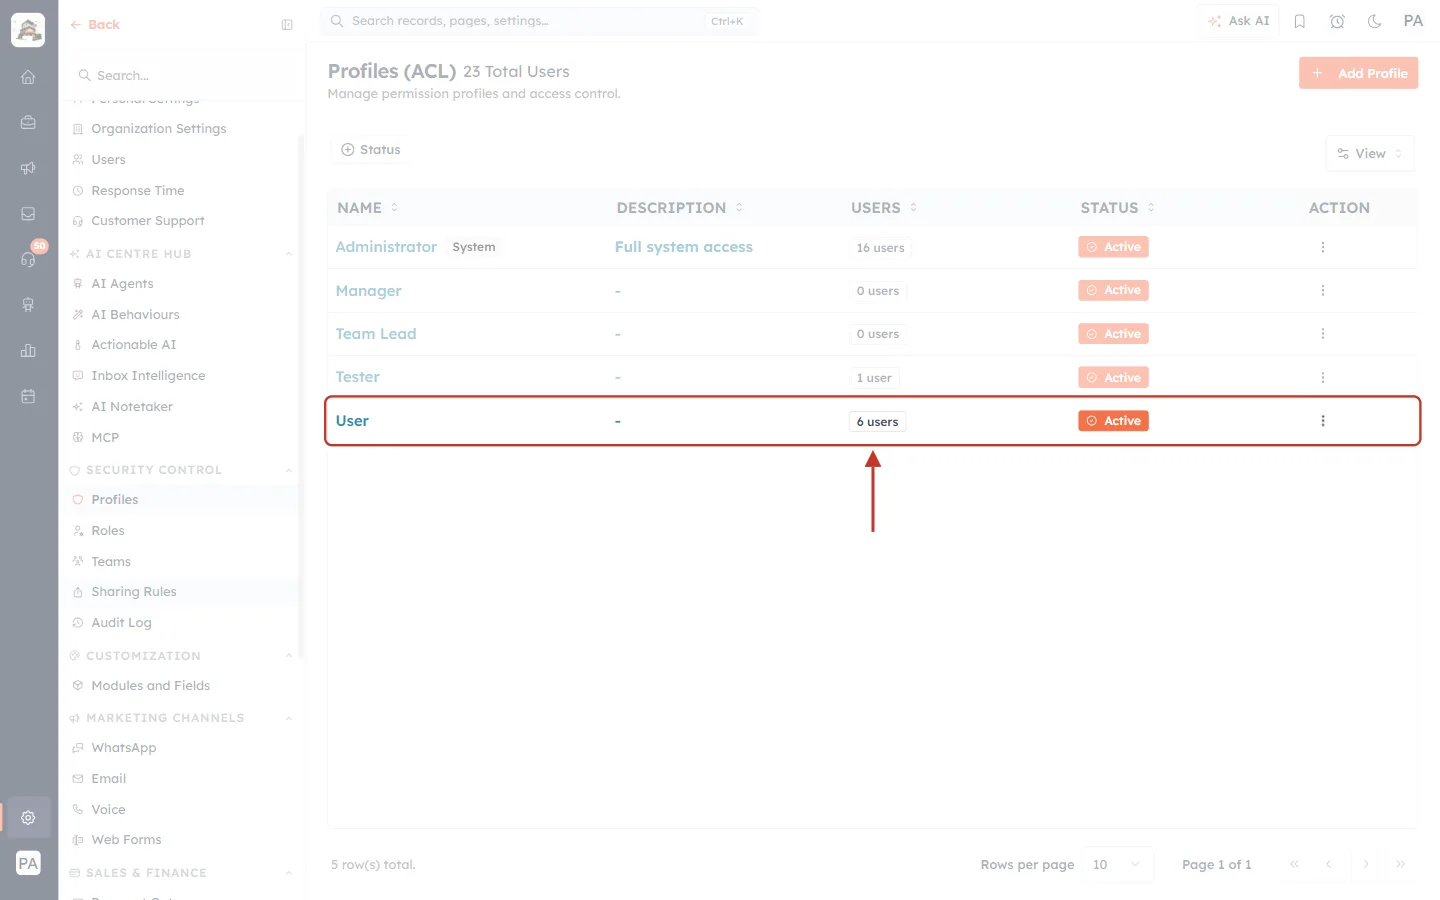
What this screenshot shows. The Profiles (ACL) page with the User profile ringed.
NAME: the profile. Administrator is the built-in System profile with full access.
USERS: how many people use the profile. A change here affects all of them (6 users).
STATUS: only Active profiles can be assigned.
ACTION (⋮): opens the menu with Edit.
Step 2: Go to Channel setup#
In the list of sections on the left of the profile, under Setup Permissions, click Channel setup.
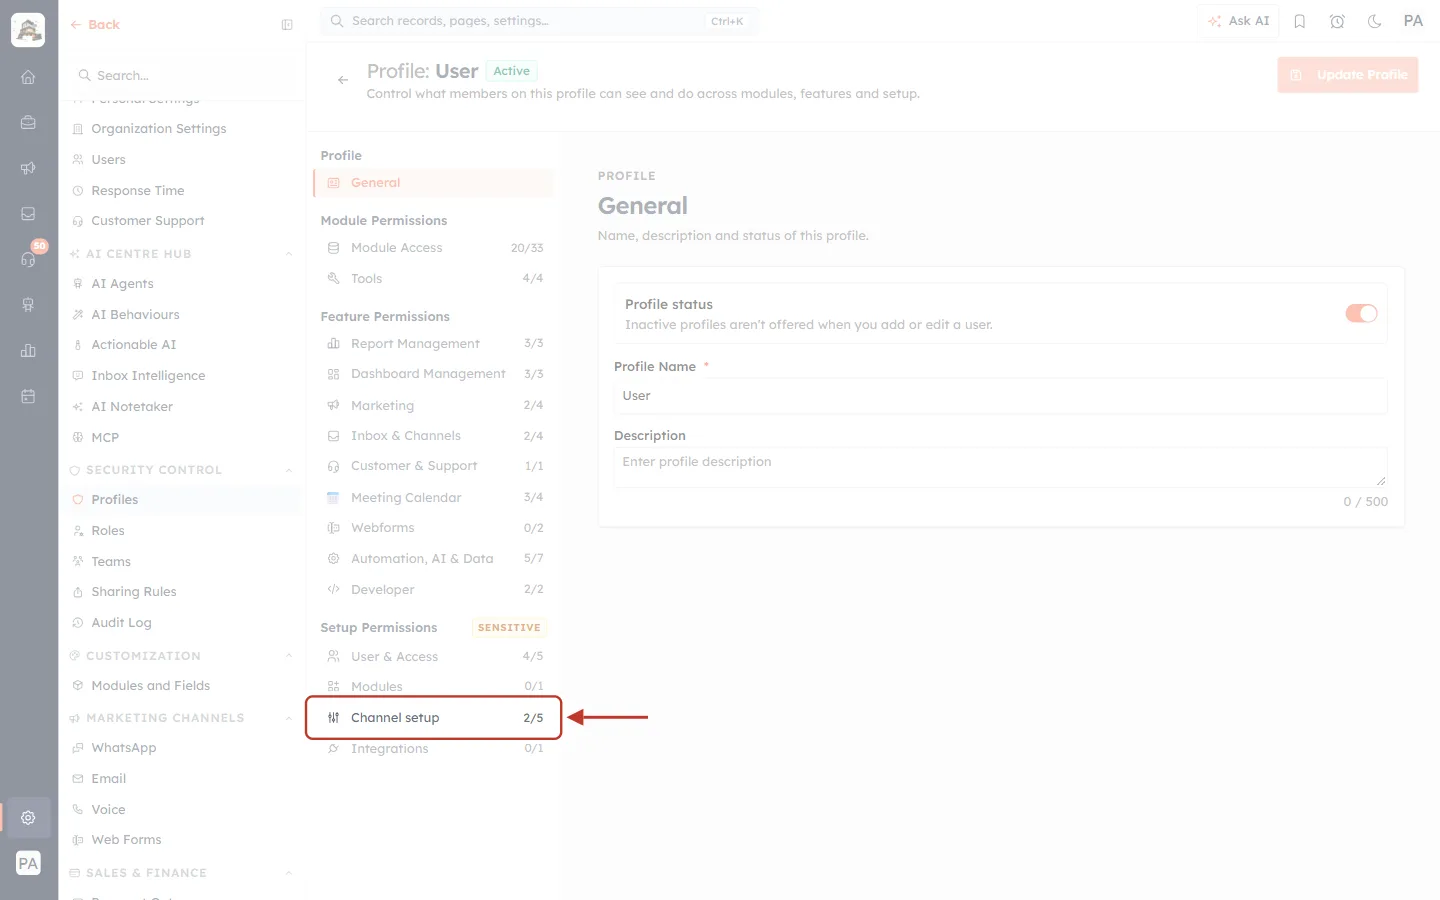
What this screenshot shows. The profile’s section list, with Channel setup ringed.
Setup Permissions carries a SENSITIVE badge: these settings control how the organization is set up.
The counter (for example 2/5) shows how many of the section’s permissions are on.
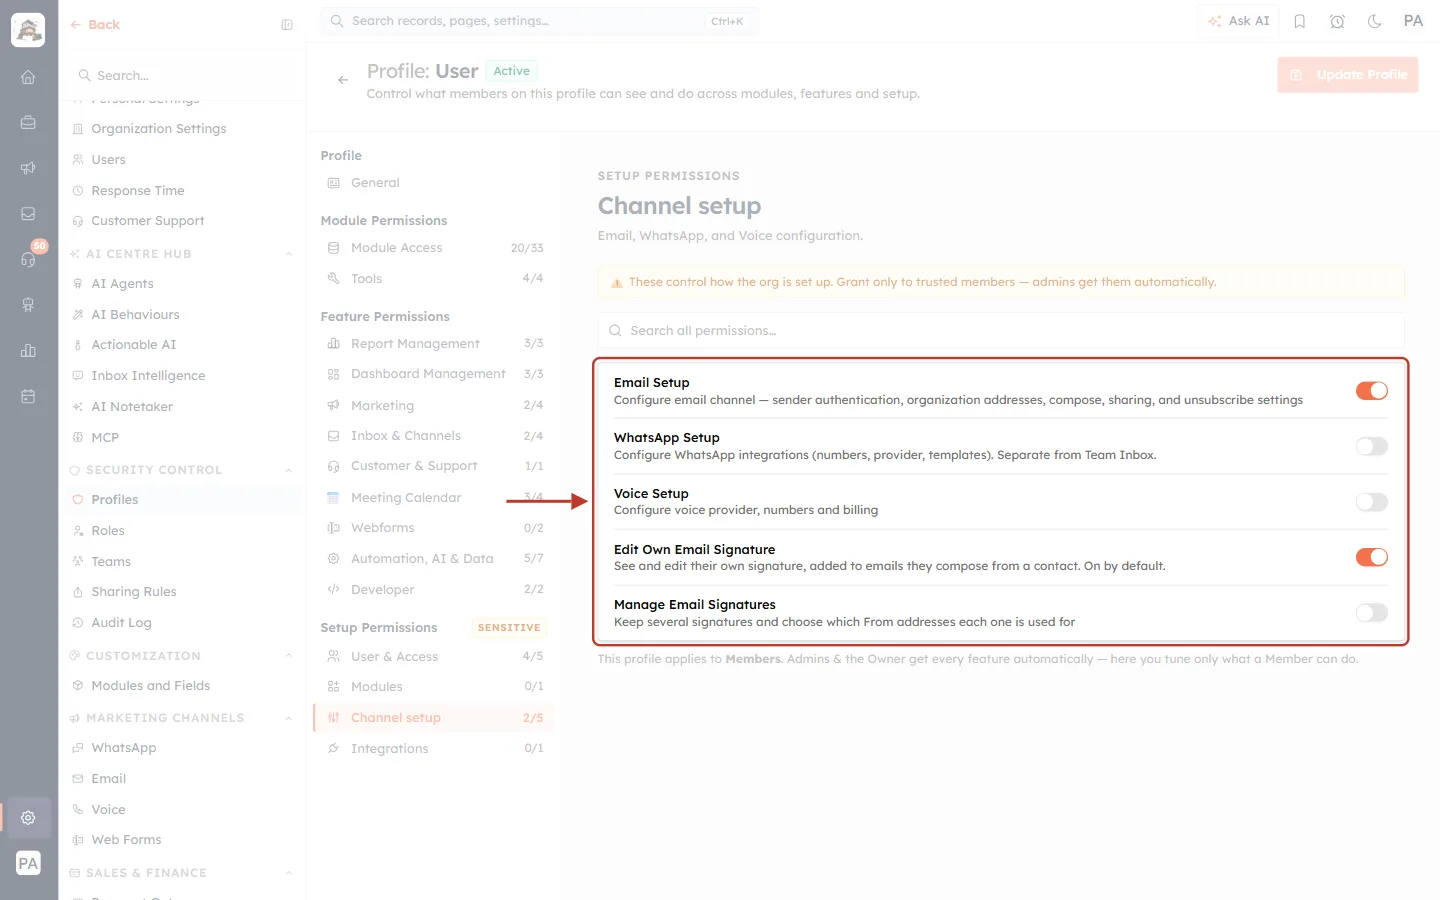
What this screenshot shows. The Channel setup permissions of the User profile.
Email Setup: access to the email channel settings (sender authentication, organization addresses, compose, sharing, unsubscribe).
WhatsApp Setup and Voice Setup: the other channel settings.
Edit Own Email Signature — “See and edit their own signature, added to emails they compose from a contact. On by default.” It is on here.
Manage Email Signatures — “Keep several signatures and choose which From addresses each one is used for.” It is off here.
The note under the card: this profile applies to Members; Admins & the Owner get every feature automatically.
Step 3: Turn the permissions on or off#
Click a switch to change it. Here we turn Manage Email Signatures on, so people on the User profile can keep a separate signature for each address.
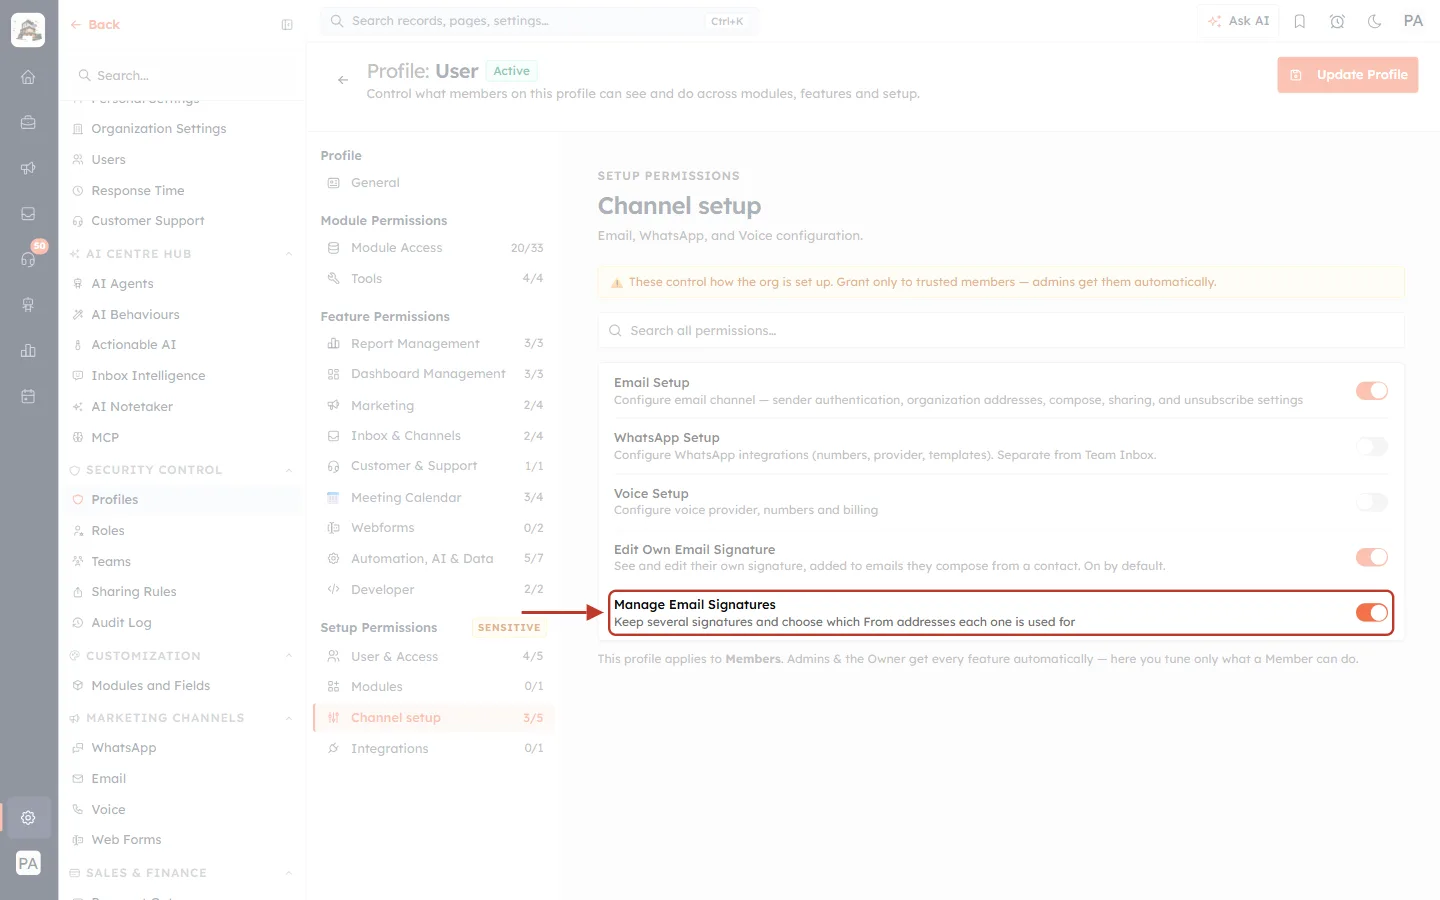
What this screenshot shows. The Manage Email Signatures row after switching it on.
The switch is orange (on).
The Channel setup counter on the left goes from 2/5 to 3/5.
✅
To stop someone changing their signature at all (for example, to keep one approved company signature), turn Edit Own Email Signature off and make sure Manage Email Signatures is off. Remember that this also removes the signature from their emails.
Click Update Profile at the top-right to save. The change applies to everyone on the profile.
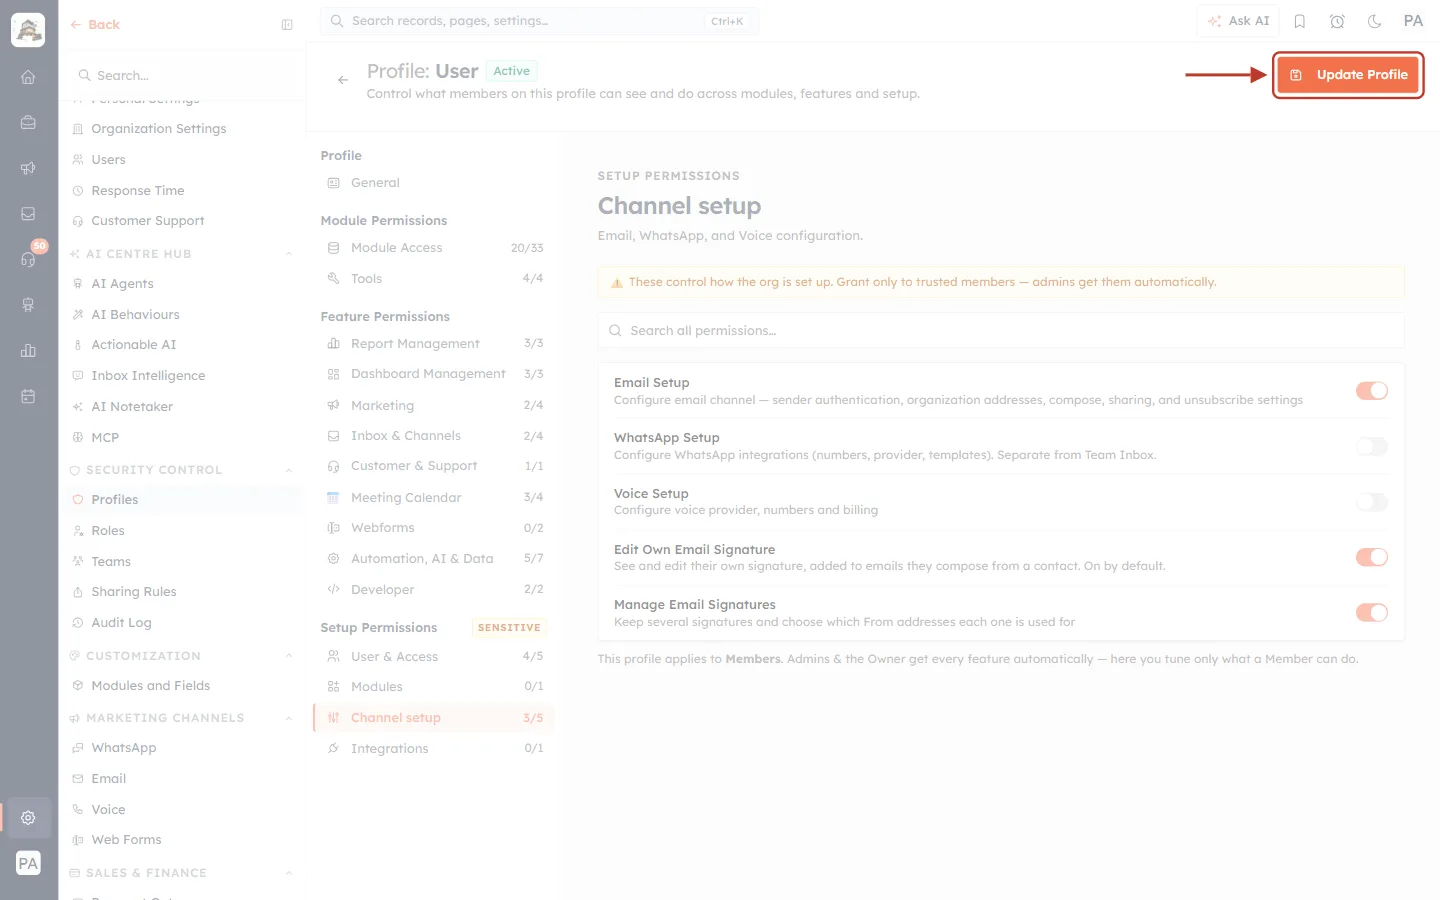
What this screenshot shows. The Update Profile button, ringed.
It becomes clickable once you change something.
To give a person a different profile instead, see Assign a Profile to a User Step by Step.
Part 2: Create your signature#
Step 1: Open the Email Signature settings#
Go to Settings → Marketing Channels → Email and open the Compose Settings tab. Click Go to Email Signature; the page scrolls down to your signature.
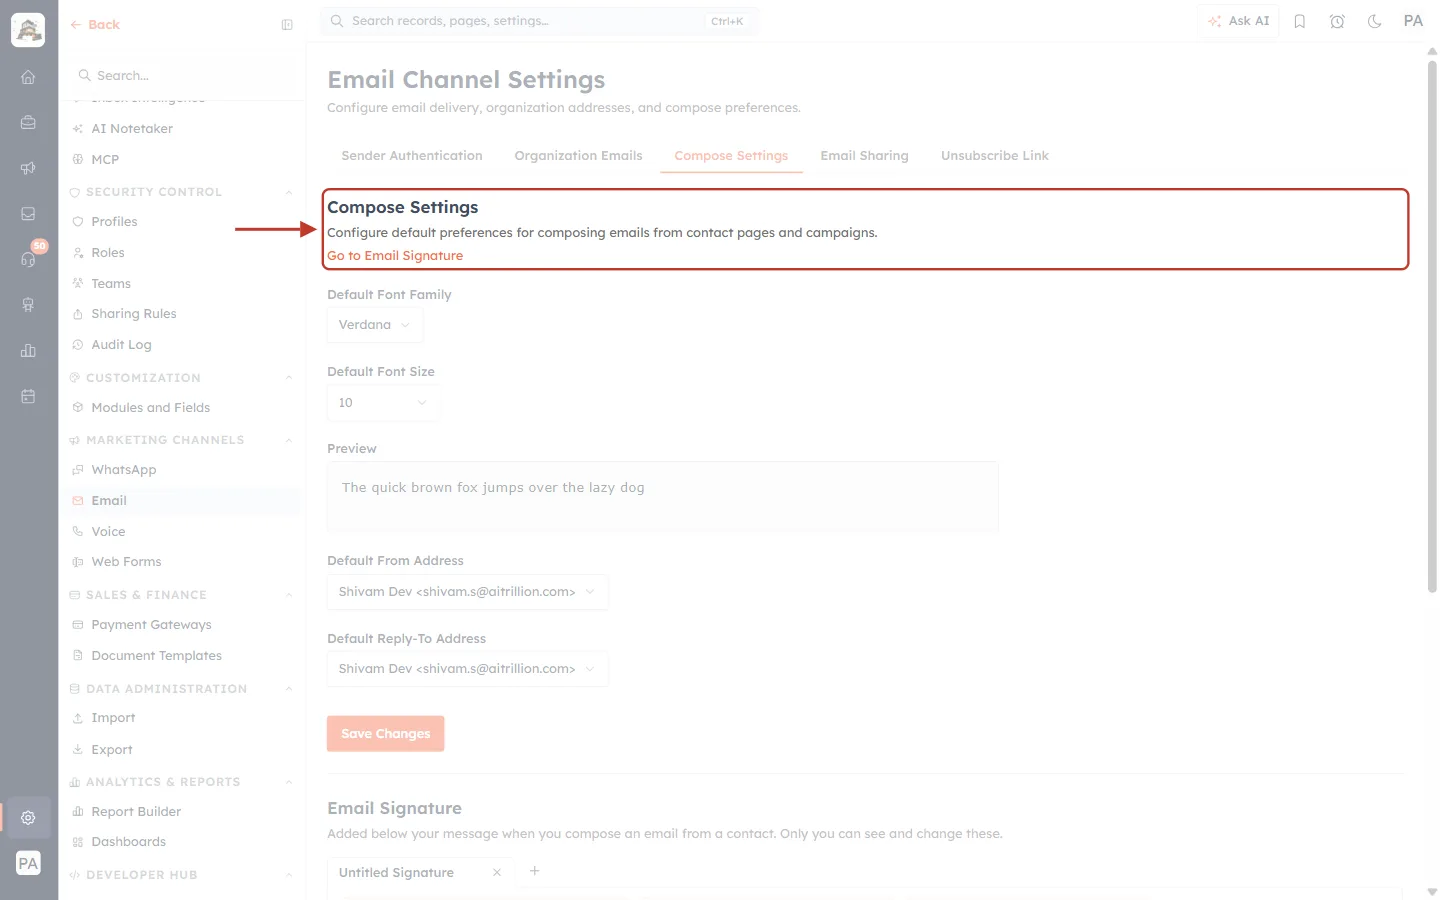
What this screenshot shows. The Email Channel Settings page on the Compose Settings tab.
The tabs across the top: Sender Authentication, Organization Emails, Compose Settings, Email Sharing, Unsubscribe Link.
Go to Email Signature: jumps to the signature section further down the page.
Default Font, From and Reply-To are covered in Email Compose Defaults: Font, Default From & Reply-To.
The Email Signature section starts at the bottom of the screen.
ℹ️
Don’t have the Email settings? If your profile doesn’t include Email Setup, you’ll find a separate Email Signature item in Settings instead. It opens the same signature section.
Step 2: Start from the suggested signature#
The first time you open it, the CRM suggests a signature built from your profile: your organization logo, your name, the organization name, your email and your phone (if set).
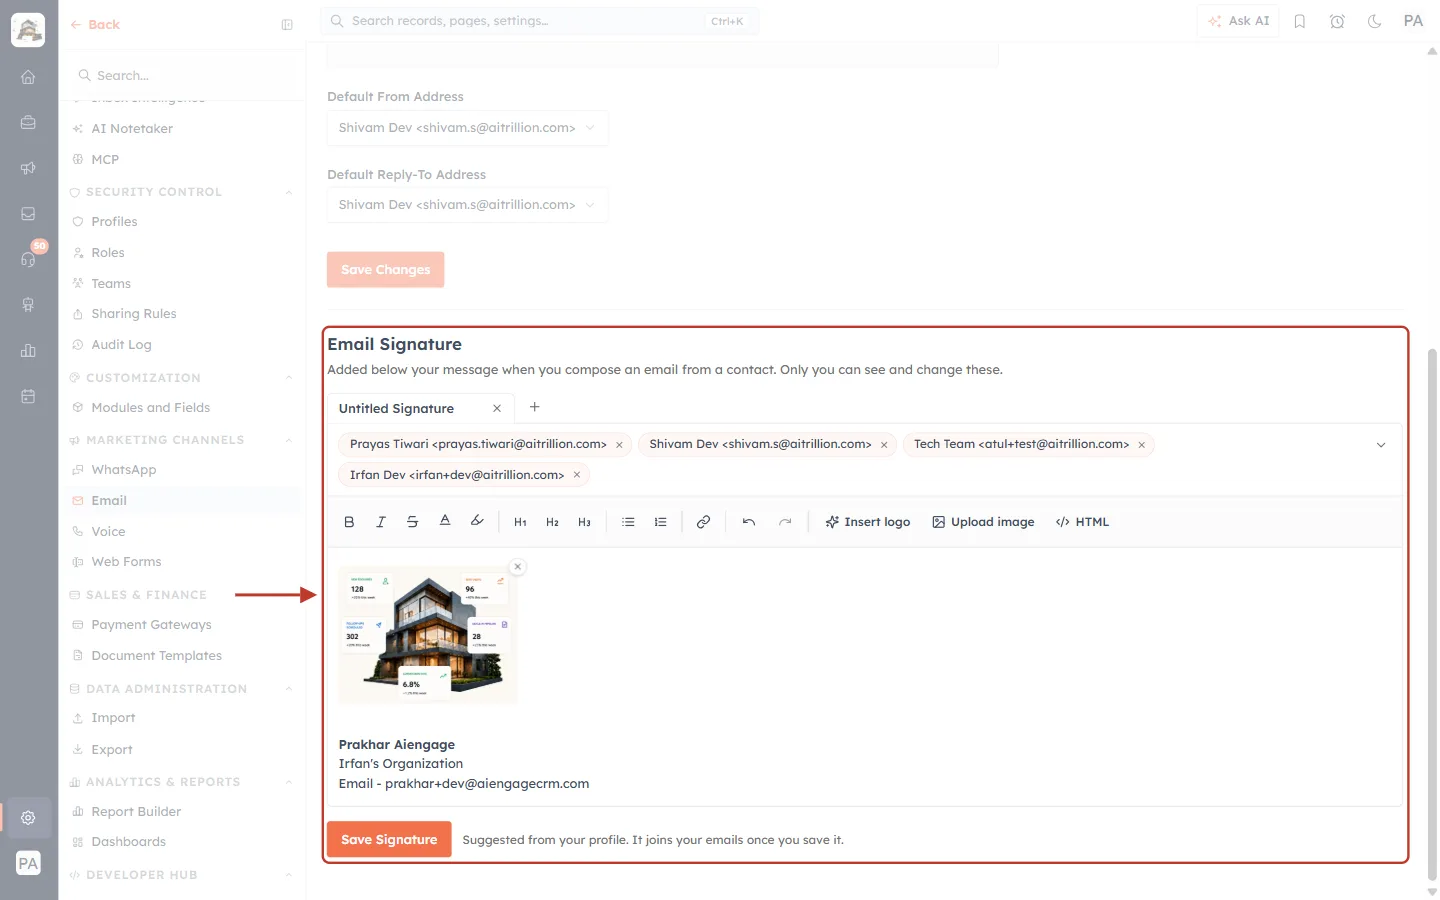
What this screenshot shows. The Email Signature section showing the suggested signature (this is what an Admin, or a user with Manage Email Signatures, sees).
“Added below your message when you compose an email from a contact. Only you can see and change these.”
Untitled Signature: the signature’s tab. The × deletes it and the + adds another (Step 6).
Address chips (Prayas Tiwari, Shivam Dev, Tech Team, Irfan Dev): the From addresses this signature is used for. The suggestion is linked to all of them.
The toolbar: text formatting plus Insert logo, Upload image and HTML.
The signature itself: logo, name, organization, email.
Save Signature and the note “Suggested from your profile. It joins your emails once you save it.”
⚠️
The suggestion is not used until you save it. Until you click Save Signature, your emails go without a signature.
Step 3: Name the signature#
Click the tab name and type a new one (up to 60 characters). A clear name helps when you keep several, for example “Sales Team” and “Support Desk”.
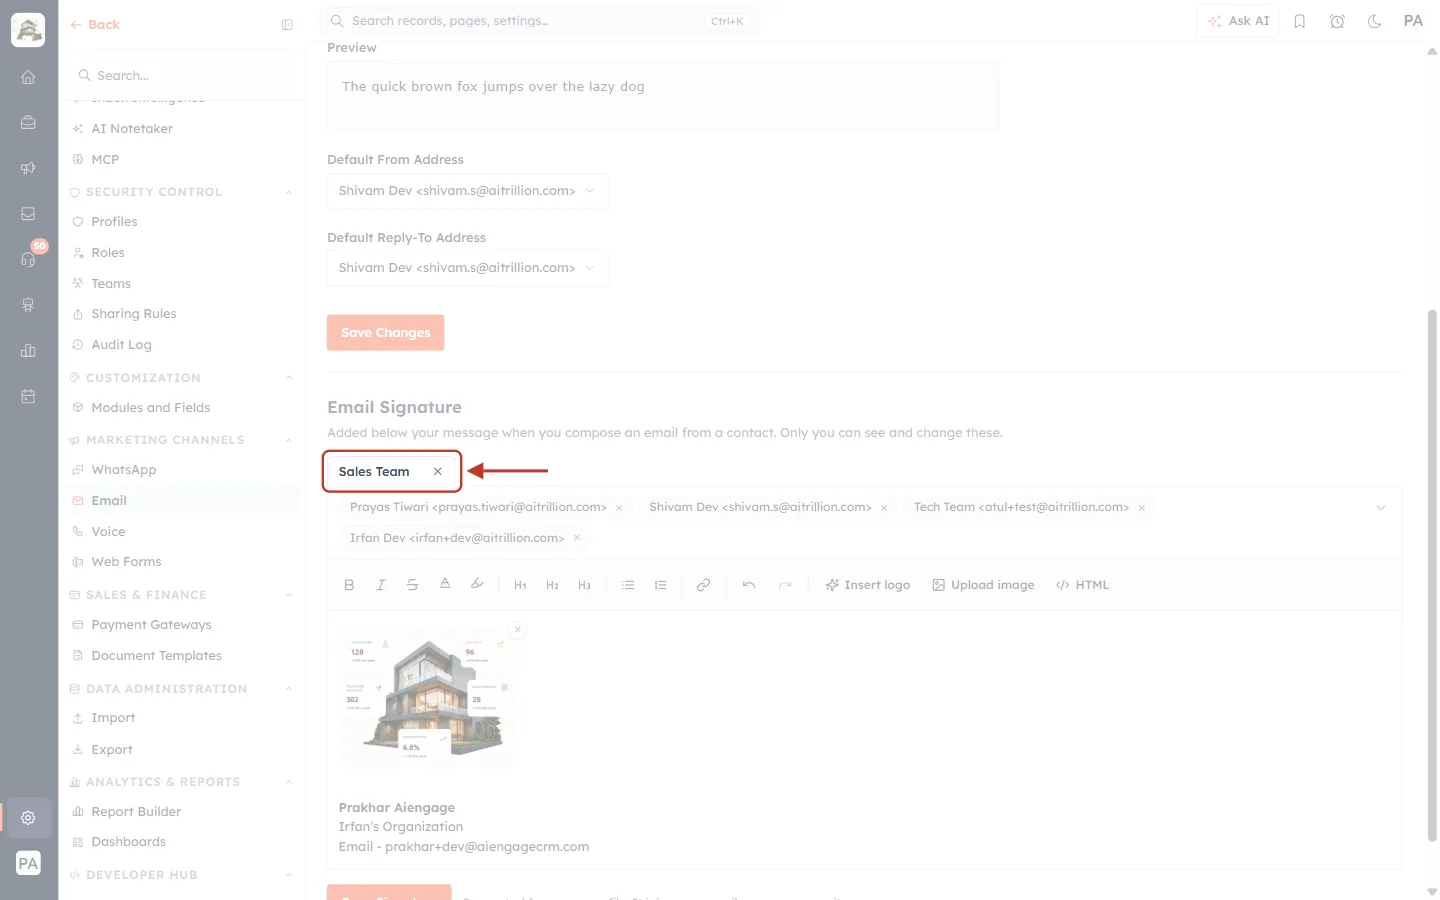
What this screenshot shows. The signature’s tab after renaming it to Sales Team.
Click directly on the name to edit it. The name is only for you; recipients never see it.
Every signature needs a name. Saving with an empty name shows “Give every signature a name.”
Step 4: Edit the text and images#
Click into the signature and type, just like in an email. The toolbar works like the email editor.
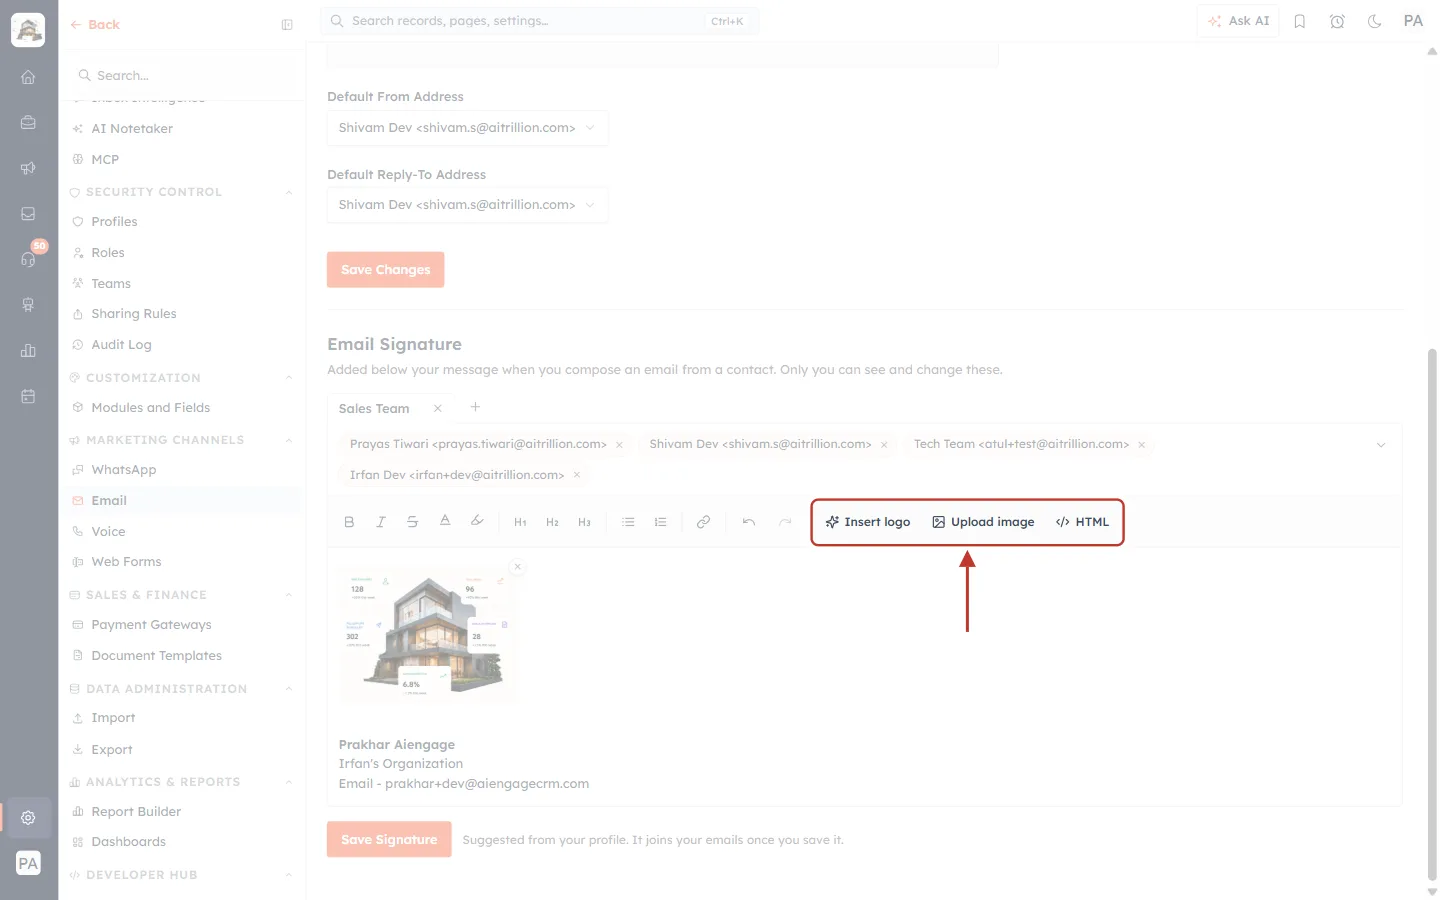
What this screenshot shows. The signature toolbar, ringed.
B, I, strikethrough, text colour, highlight: format selected text.
H1 H2 H3, bulleted and numbered lists, link (for your website or booking page), undo and redo.
Insert logo: adds your organization’s logo at the top (shown only when your organization has a logo).
Upload image: adds a picture from your computer, such as your photo or a badge. JPG, PNG or GIF, up to 2 MB.
HTML: paste or edit the signature as HTML code (Step 5).
The logo can only be added once. Clicking Insert logo again shows a reminder:
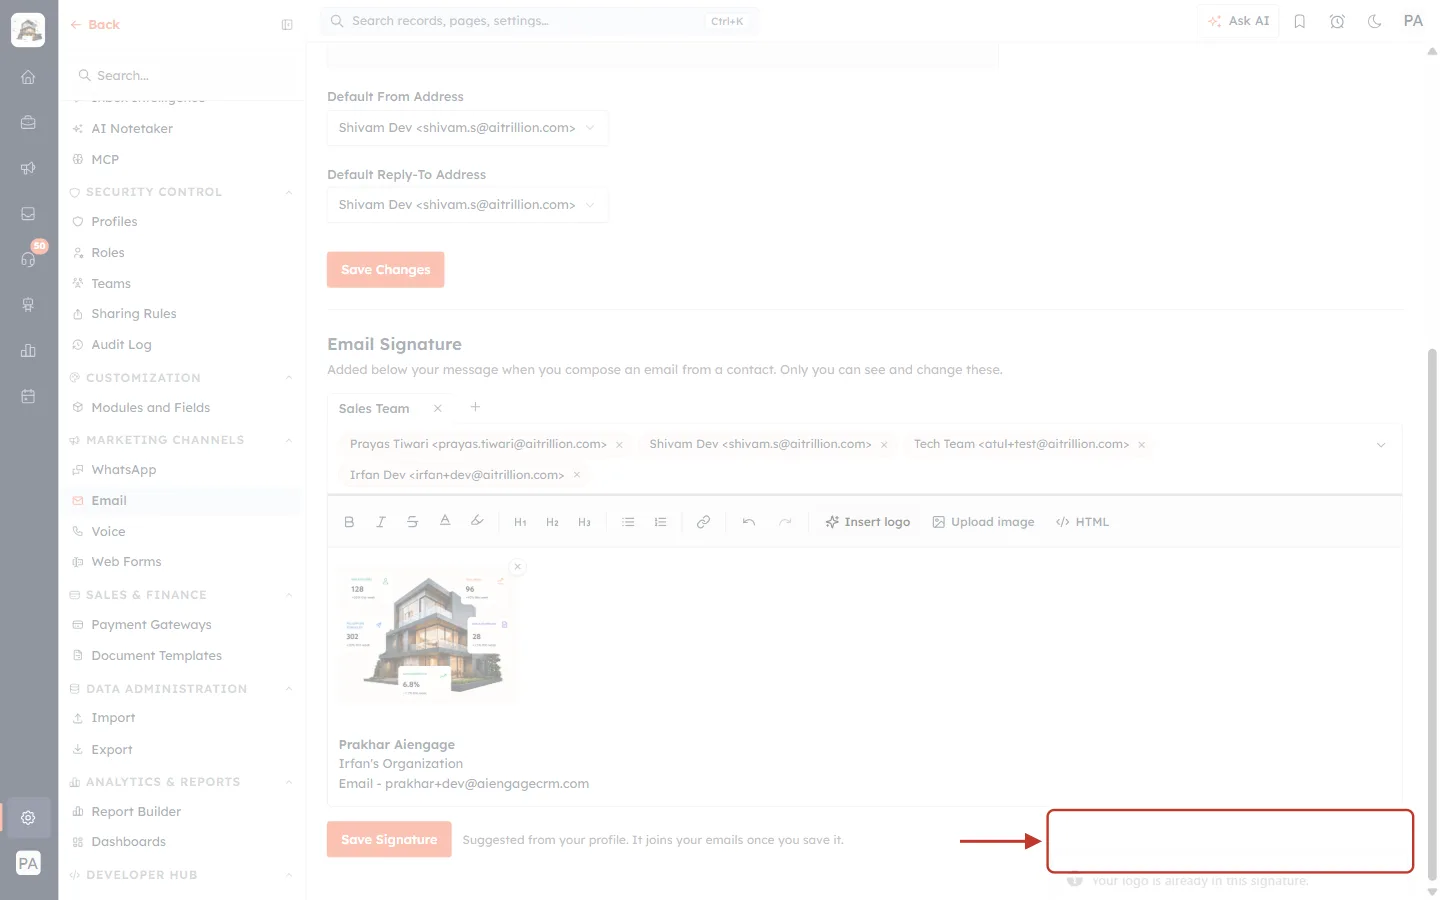
What this screenshot shows. The message that appears when the logo is already in the signature.
“Your logo is already in this signature.” Nothing is added twice.
Here we added a line with the job title and phone number under the email address:
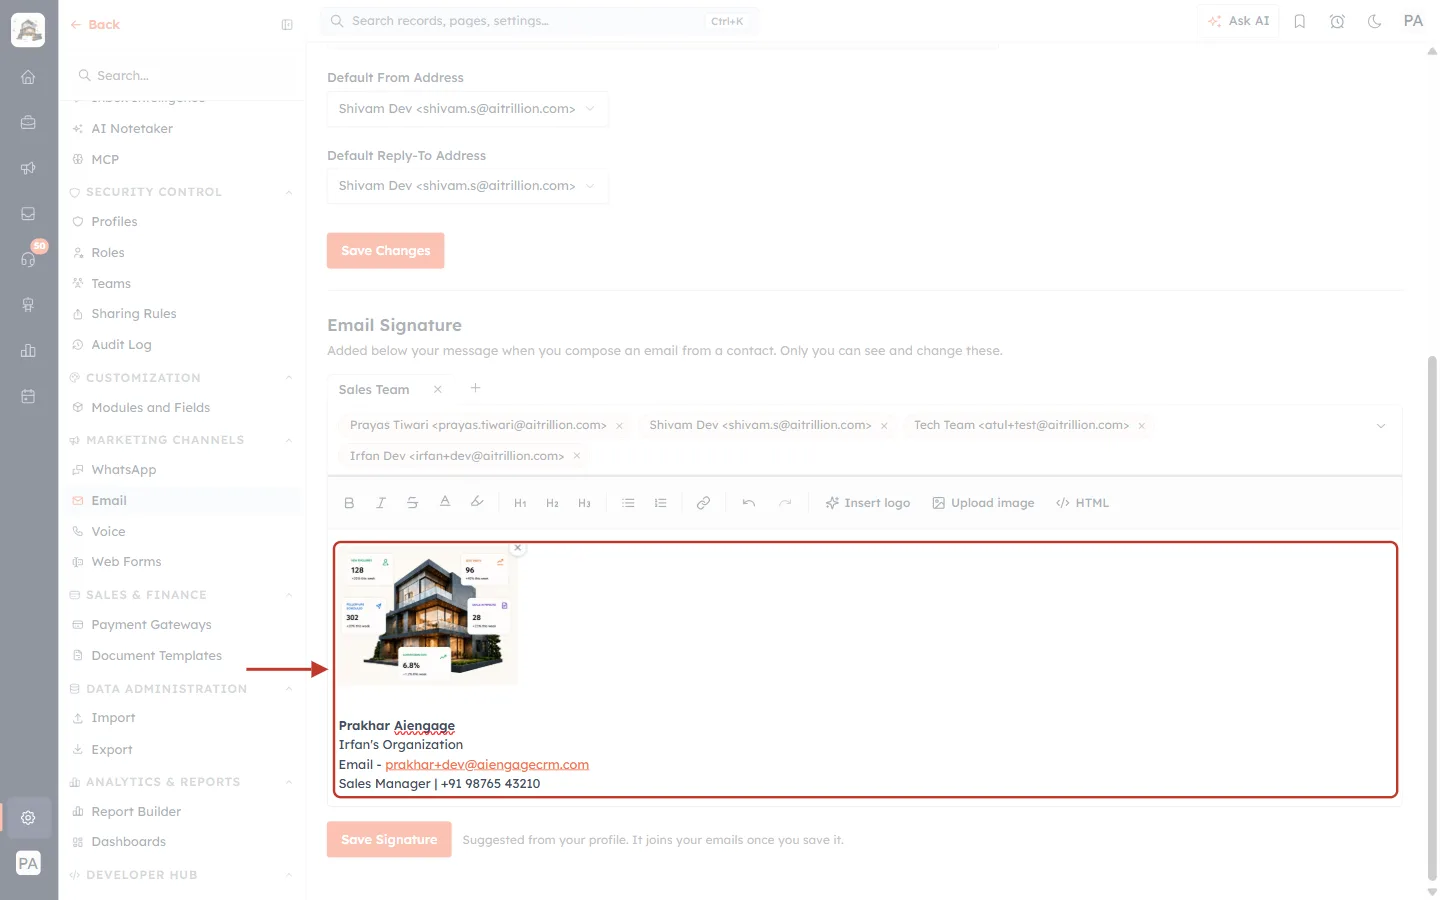
What this screenshot shows. The signature after typing a new line.
The logo at the top, then Prakhar Aiengage, the organization name and the email link.
The new line Sales Manager | +91 98765 43210.
To remove a picture, hover over it and click the small × on its top-right corner.
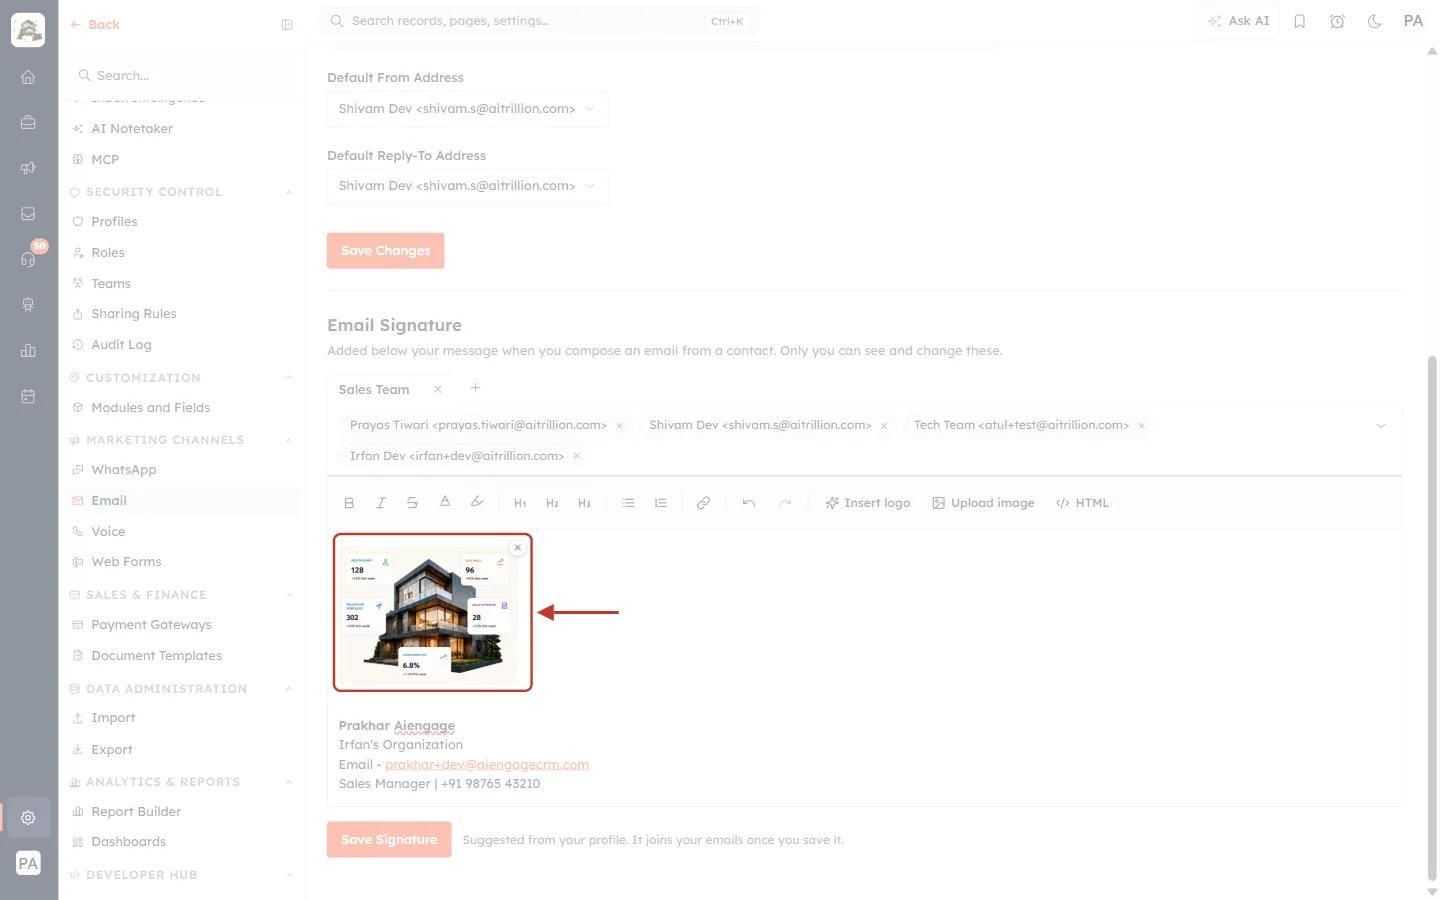
What this screenshot shows. The logo in the signature, ringed, with its × button on the corner.
The × removes just that image. It is not part of the signature and never appears in your emails.
Very small images (under 48 pixels wide, such as social media icons) have no ×, so a design’s icons aren’t covered. Remove those through HTML.
Step 5 (optional): Paste a designed HTML signature#
If you have a signature designed in an email-signature tool, or one your marketing team made, click HTML and paste its code. The right side shows a live preview as you type.
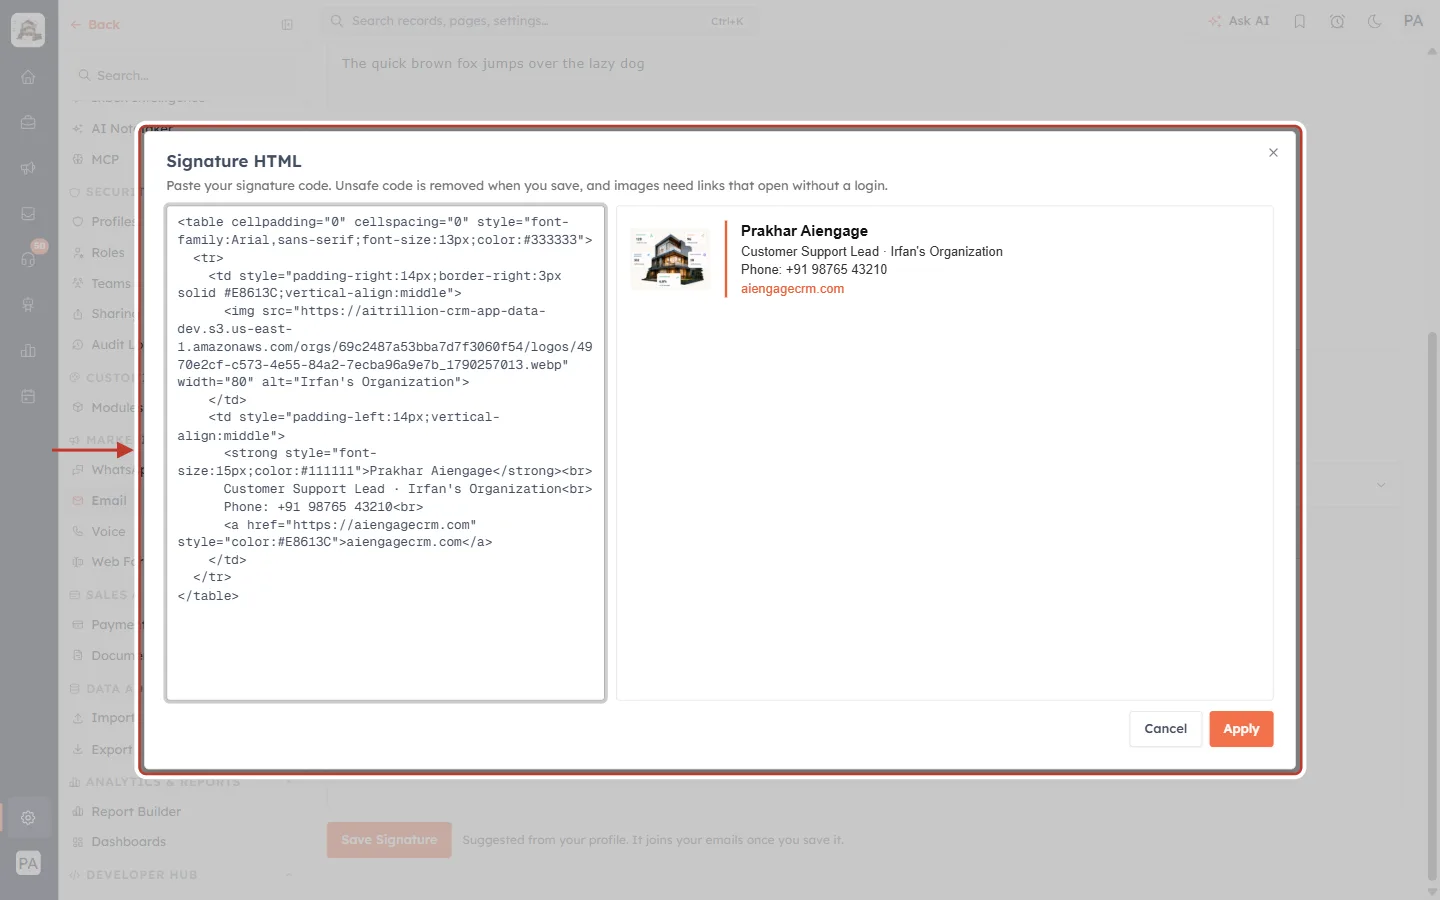
What this screenshot shows. The Signature HTML window with a designed signature pasted in.
Left: the HTML code. This example is a two-column layout: logo on the left, a coloured divider, and the name, job title, phone and website on the right.
Right: the live preview, exactly as recipients will see it.
“Unsafe code is removed when you save, and images need links that open without a login.” Use image links that anyone can open (not links from a private drive).
Apply puts the code into the signature; Cancel leaves the signature unchanged.
After you click Apply, a layout that the visual editor can’t hold (such as a table) is shown as a preview. Change it with HTML, or click Start over to clear it and write a new signature in the editor.
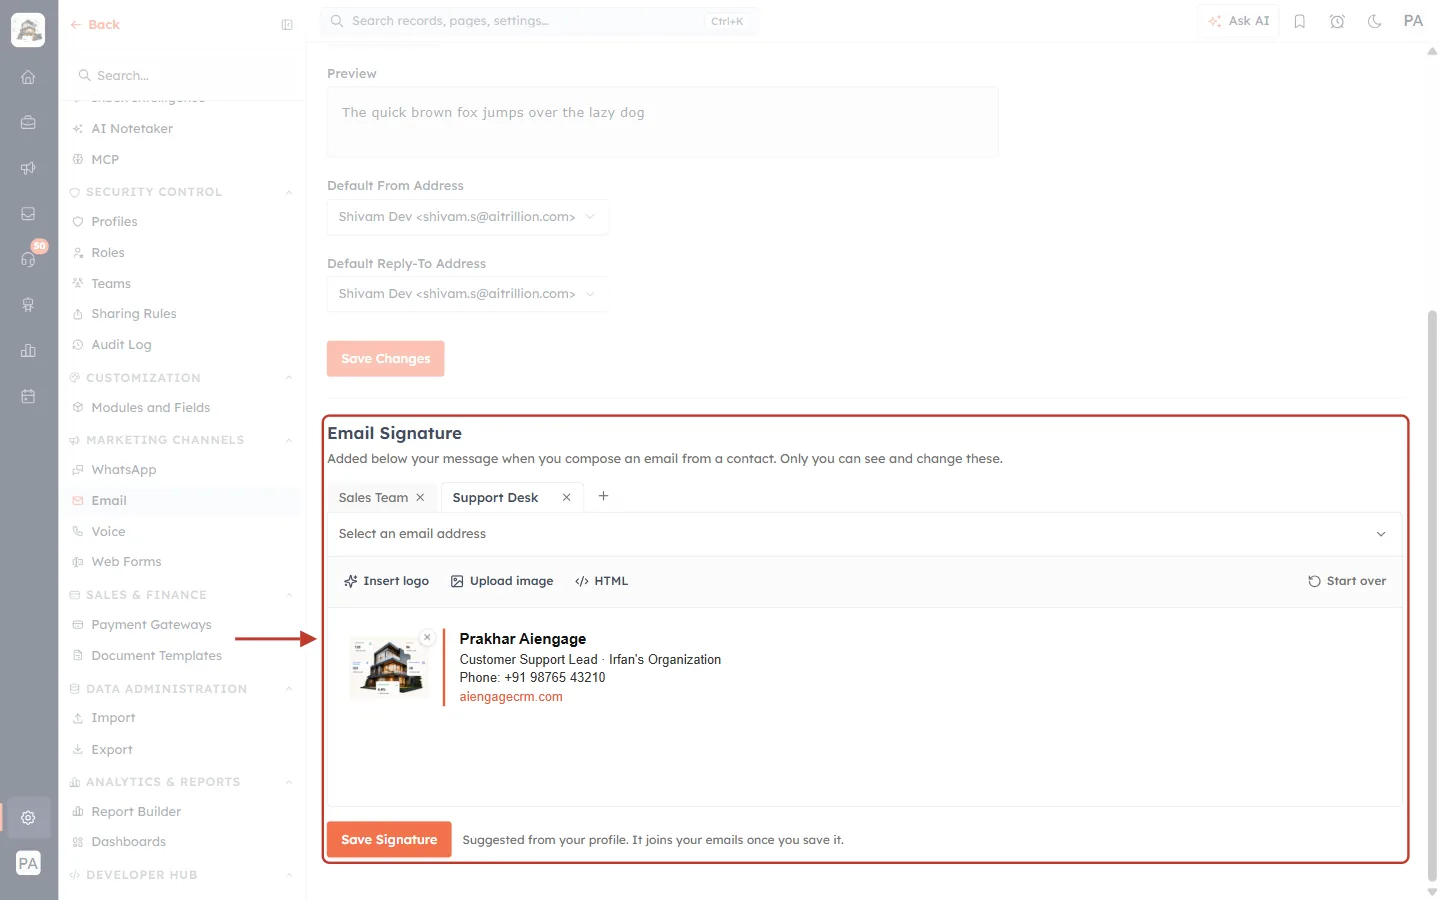
What this screenshot shows. The Support Desk signature after applying the HTML layout.
Two tabs now: Sales Team and Support Desk.
Select an email address: this new signature isn’t linked to any address yet (Step 7).
The toolbar shows only Insert logo, Upload image and HTML, plus Start over on the right.
Below, the designed signature exactly as recipients will see it.
Step 6: Add more signatures (Manage Email Signatures)#
With Manage Email Signatures (or as an Admin), you can keep up to five signatures, for example one for sales emails and one for support. Click the + next to the tabs. The new signature starts empty and is called Untitled Signature; give it a name (we used Support Desk).
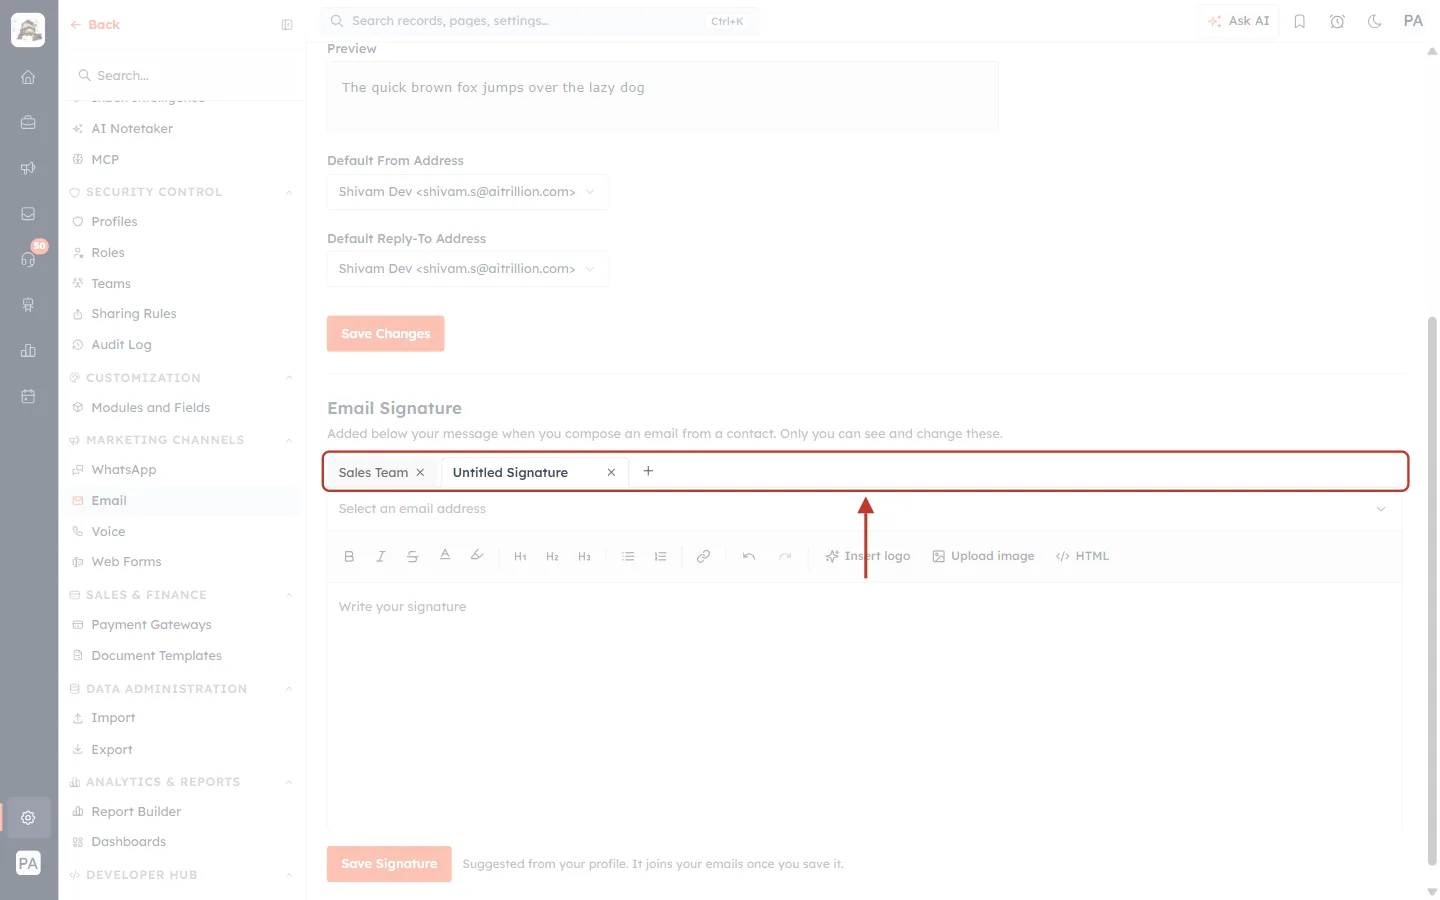
What this screenshot shows. The signature tabs after clicking +.
Sales Team: the first signature.
Untitled Signature: the new one, now open. The editor below is empty and says Write your signature.
+: adds another. After five signatures it is greyed out (Up to 5 signatures).
× on a tab deletes that signature when you save.
Step 7: Choose which From addresses use each signature#
Each signature is used for the From addresses shown as chips above it. One address can belong to only one signature. Click Select an email address (or the ⌄ on the right) to open the list.
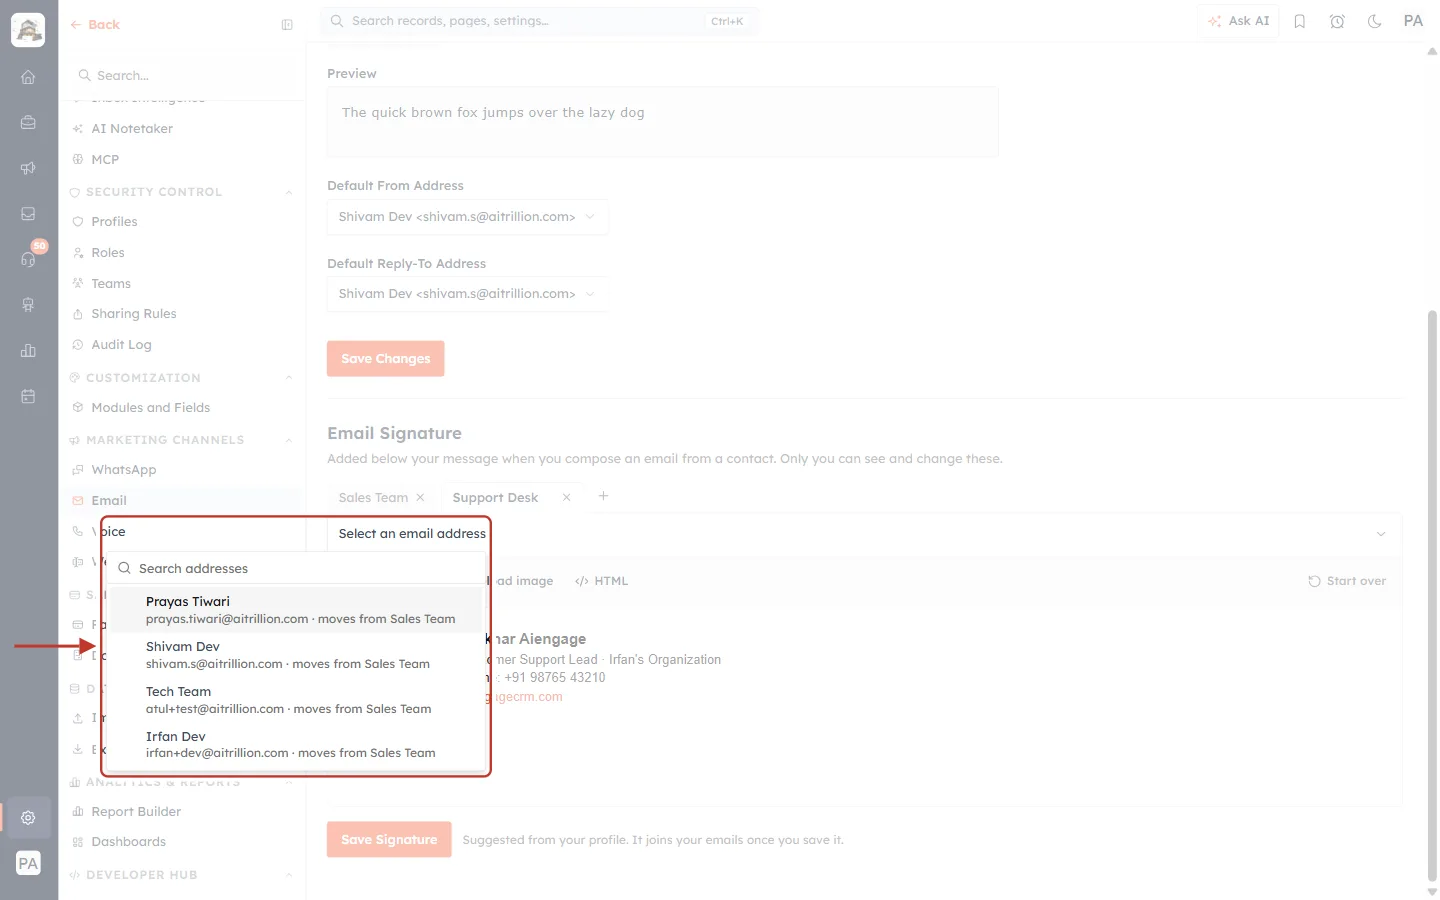
What this screenshot shows. The address list for the Support Desk signature.
Every address you can link: Prayas Tiwari, Shivam Dev, Tech Team and Irfan Dev, with a search box at the top.
“· moves from Sales Team”: the address is already linked to Sales Team. Choosing it here moves it to Support Desk.
Admins can link any of the organization’s shared addresses. Other users can link only the addresses they are allowed to send from.
We chose Prayas Tiwari, so emails sent from that address get the Support Desk signature:
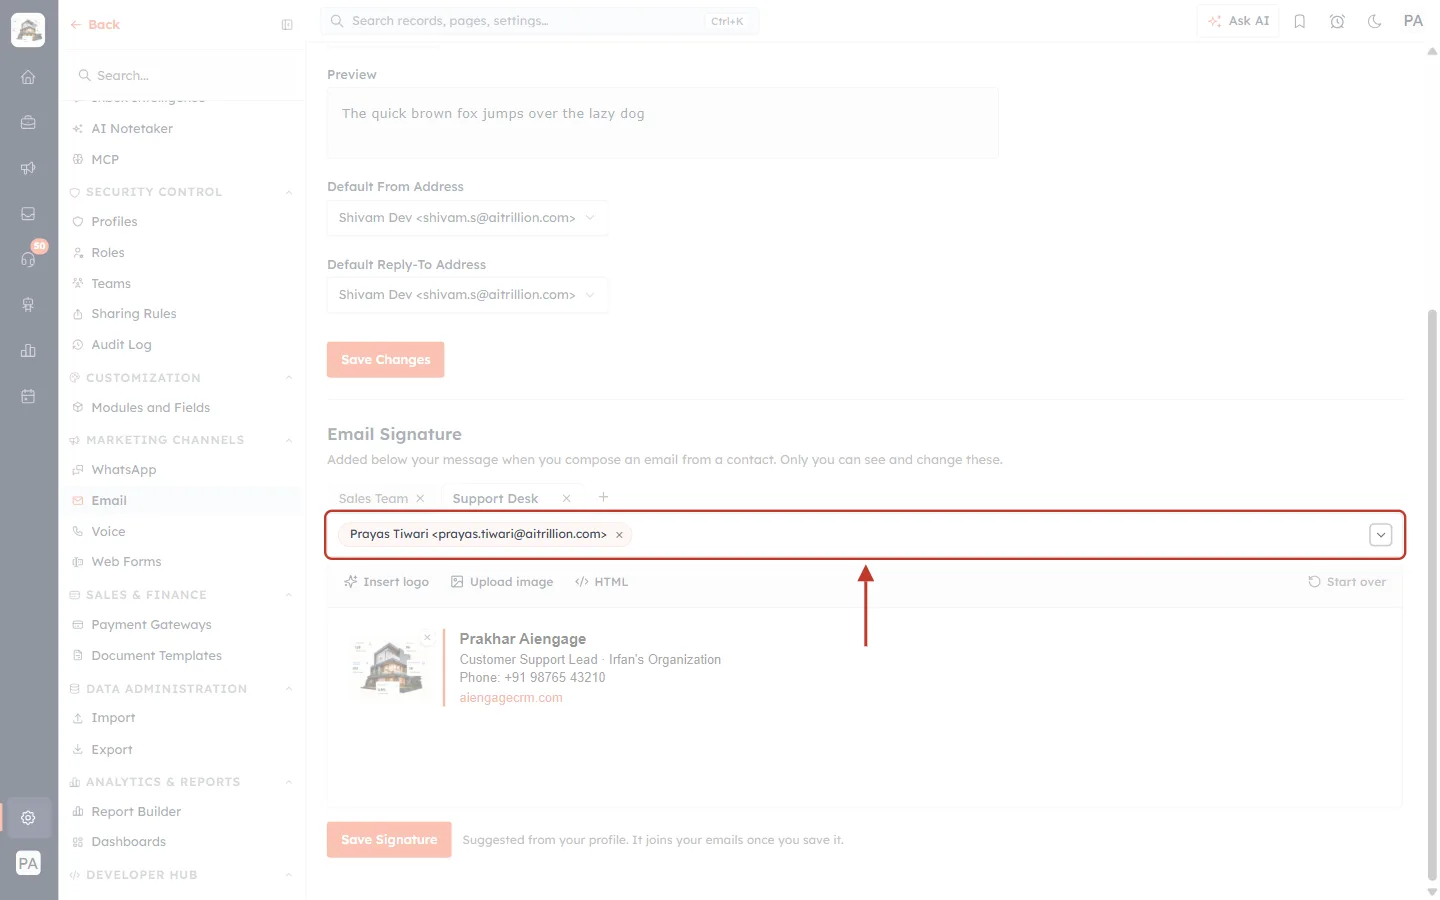
What this screenshot shows. The Support Desk signature now linked to one address.
The chip Prayas Tiwari <prayas.tiwari@…>. Click its × to unlink it.
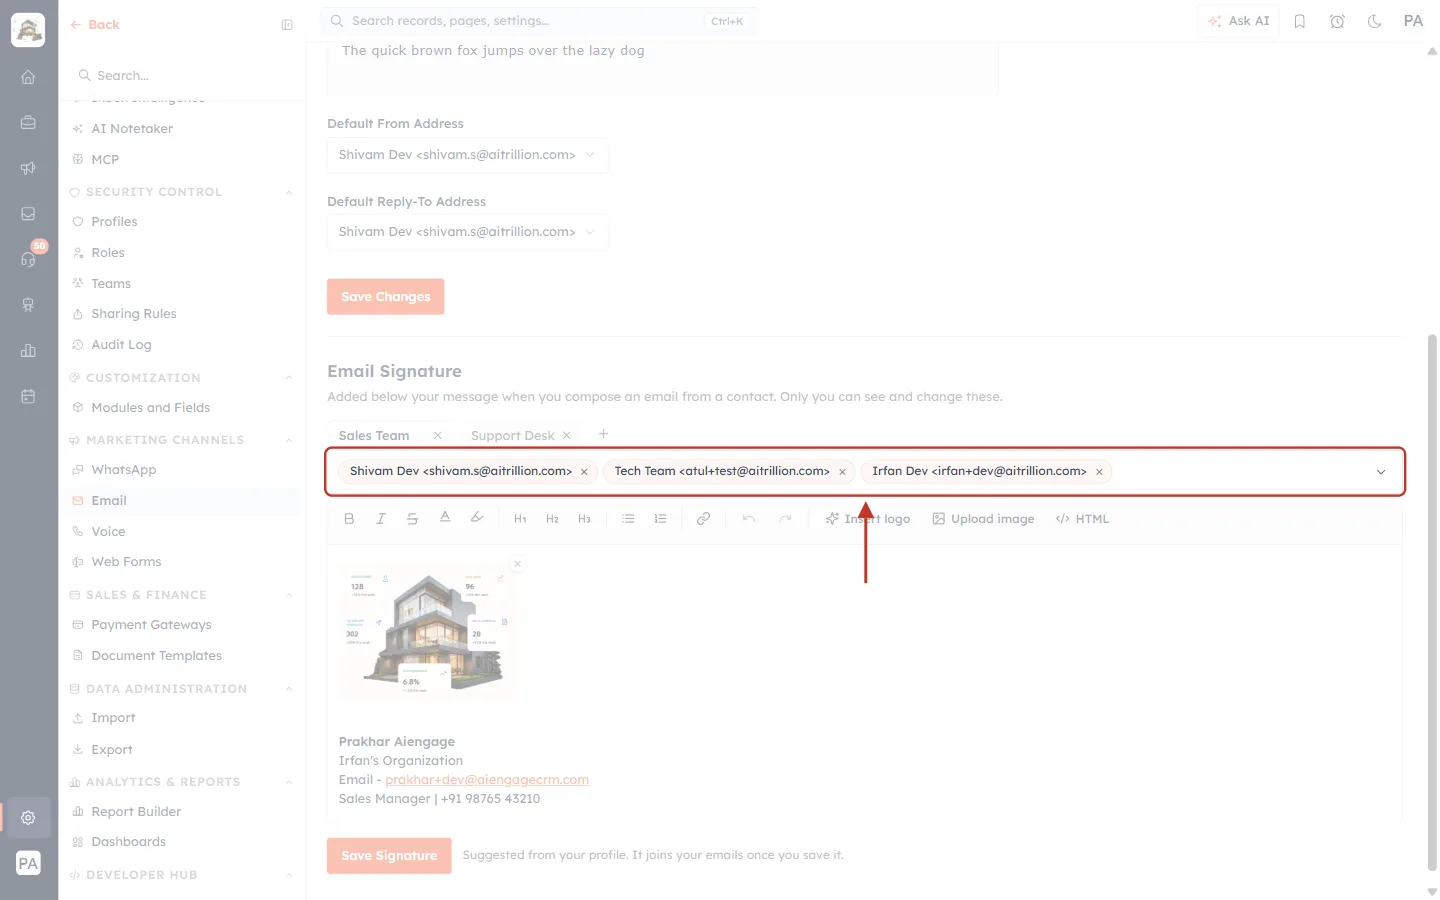
What this screenshot shows. Back on the Sales Team tab: the address has moved.
Sales Team keeps Shivam Dev, Tech Team and Irfan Dev. Prayas Tiwari is no longer here.
Step 8: Save#
Click Save Signature. All your signatures, their names and their addresses are saved together.
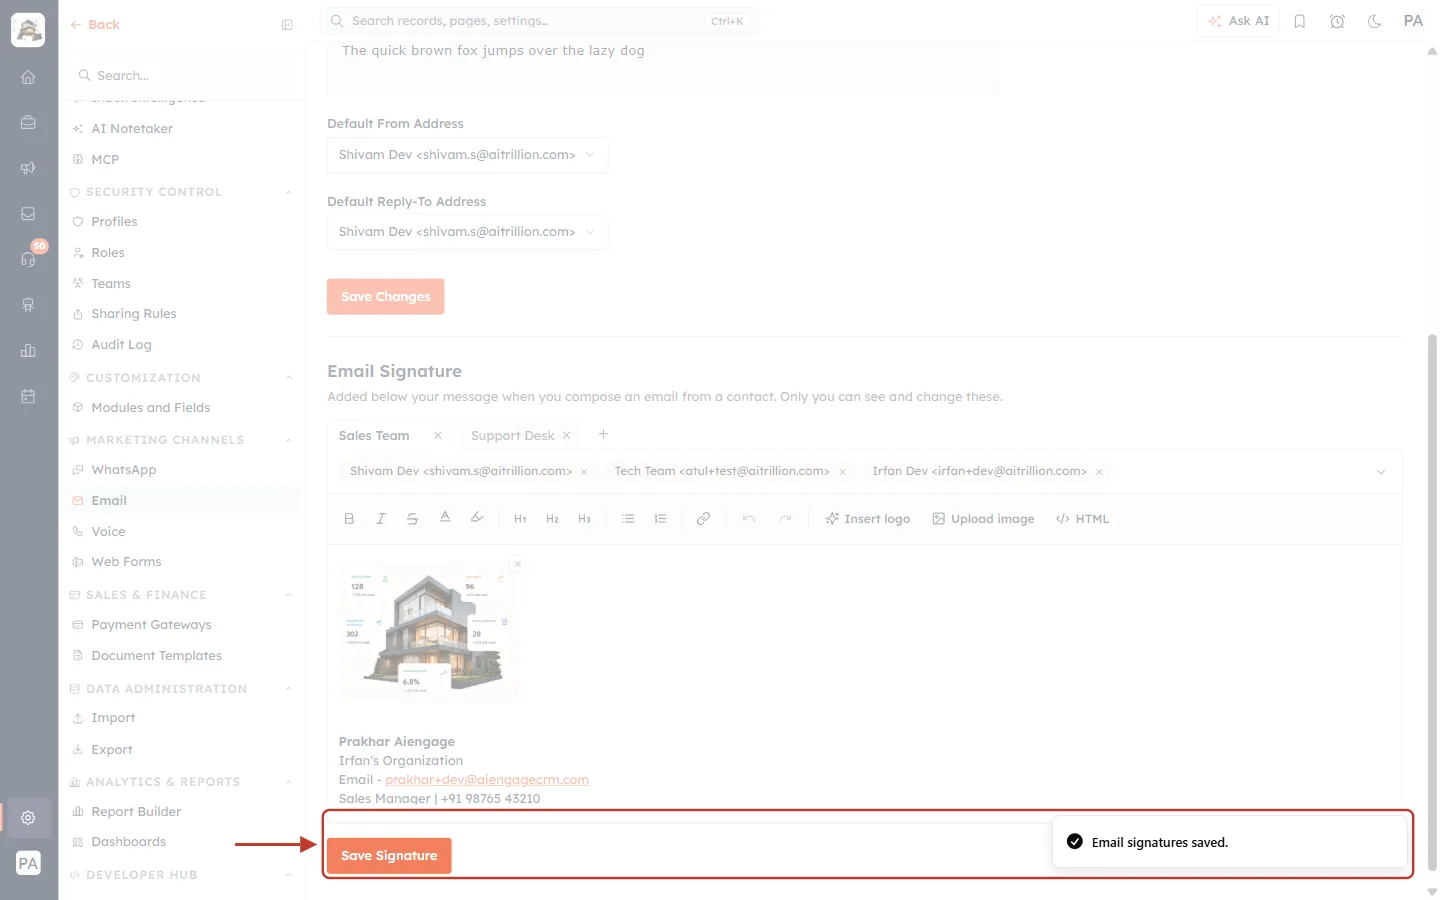
What this screenshot shows. The Save Signature button and the confirmation.
“Email signatures saved.” appears at the bottom-right.
From now on, the signatures are added to your emails.
If you see “An image is still uploading or could not be uploaded…”, wait for the upload or delete the “Uploading image” text, then save again.
What a user without “Manage Email Signatures” sees#
A user with only Edit Own Email Signature (the default for members) gets a simpler screen: one signature, with no tabs and no address chips.
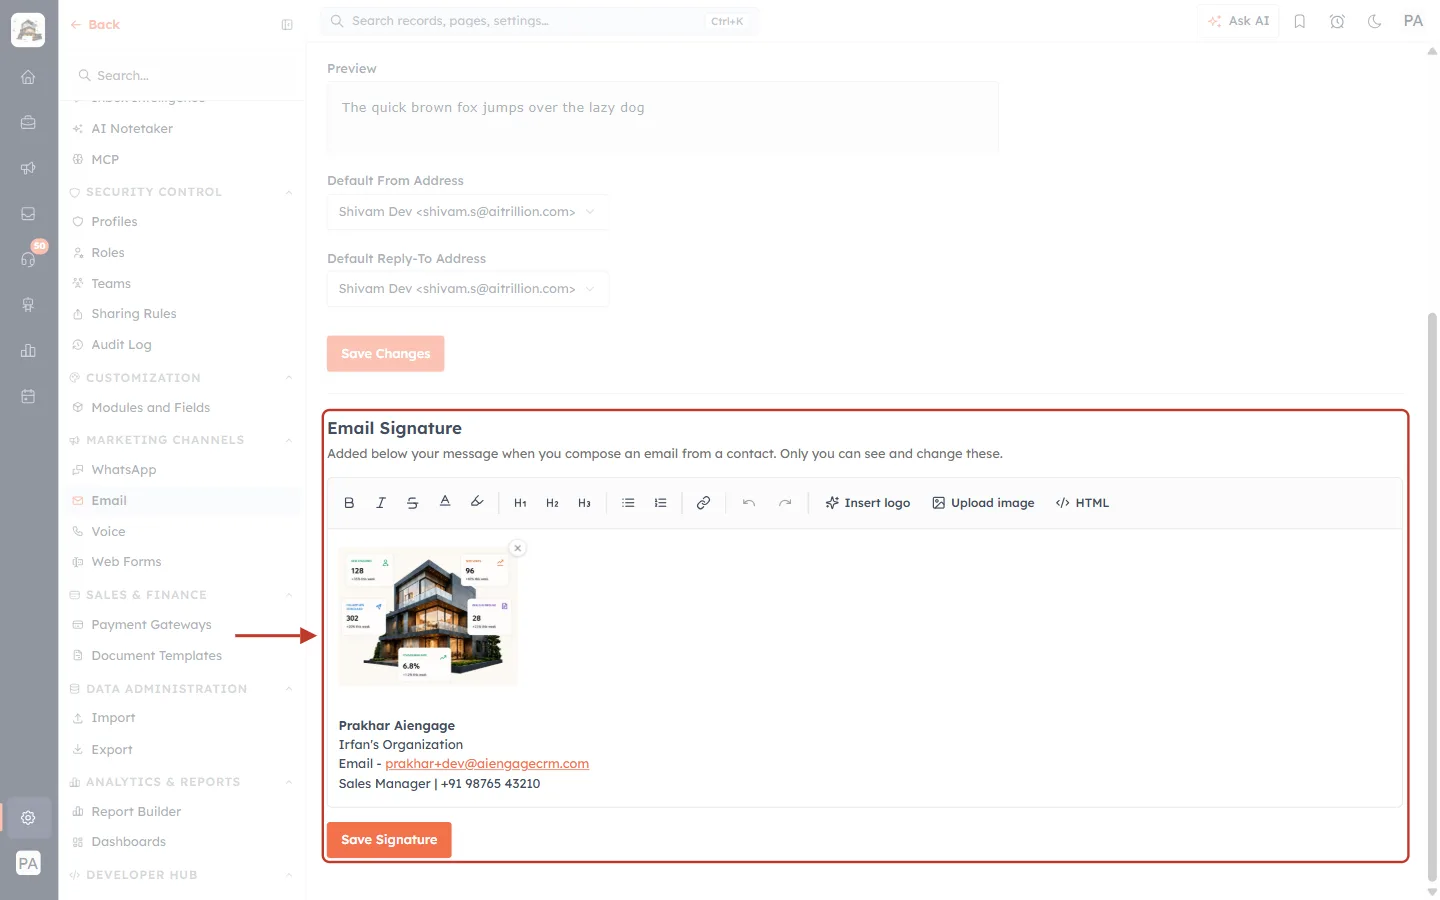
What this screenshot shows. The Email Signature section for a user without Manage Email Signatures.
No tabs and no +: there is exactly one signature.
No address chips: the signature is used on every address the user sends from, including any added later.
The same toolbar (Insert logo, Upload image, HTML) and the Save Signature button.
Part 3: Your signature in your emails#
Emails from a contact#
Open a contact and start a new email (see Send an Email from a Contact or Lead Record). The signature linked to the From address appears under the message area as soon as the composer opens.
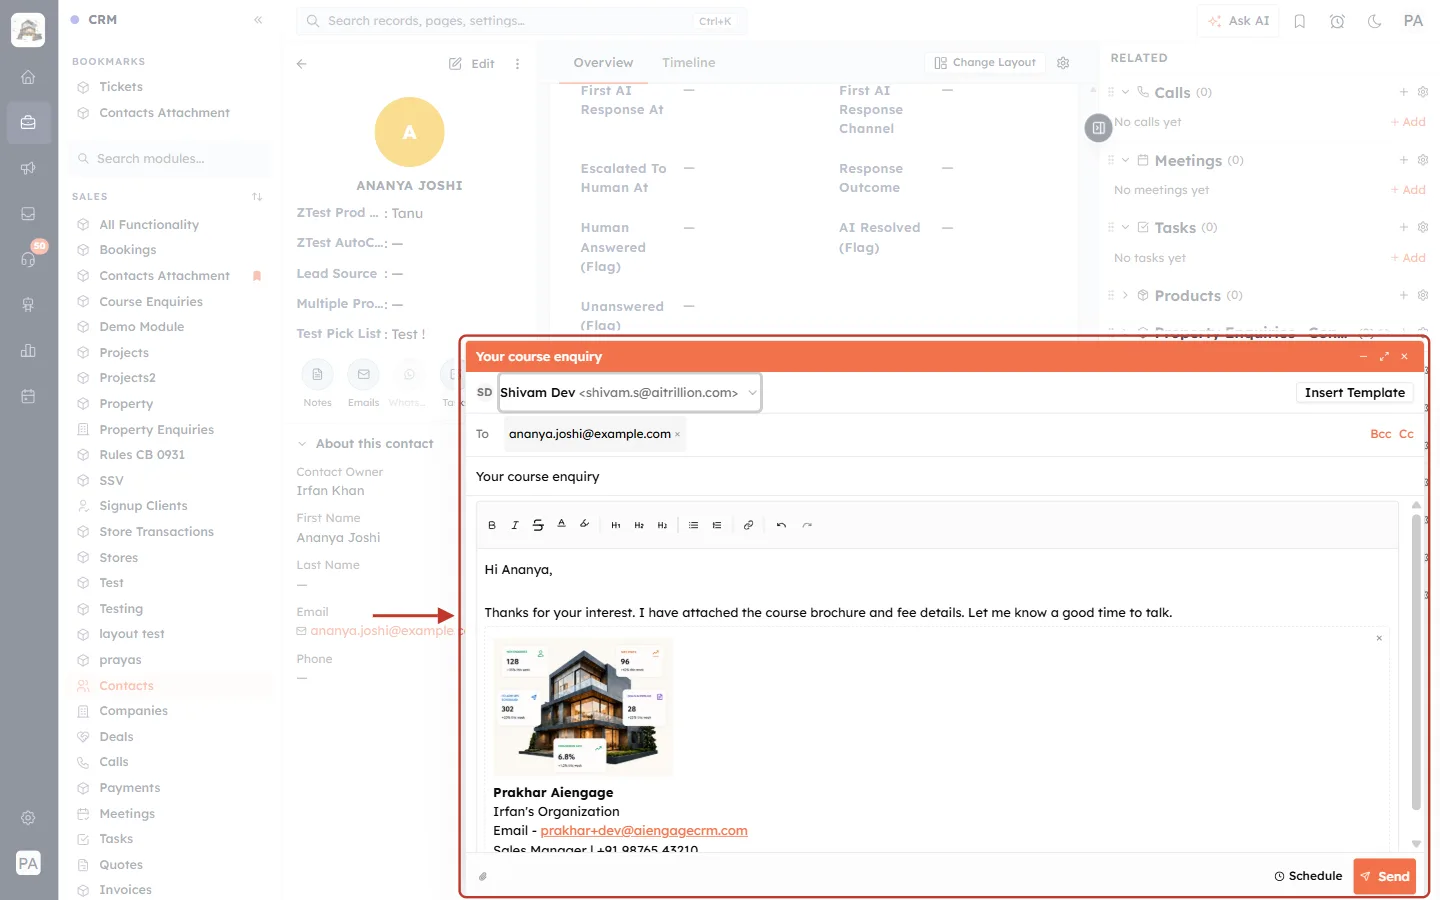
What this screenshot shows. The email composer on a contact, ringed.
From (top): Shivam Dev, which is linked to the Sales Team signature.
To and the subject Your course enquiry.
The message you type.
Under it, the Sales Team signature (logo, name, organization, email, “Sales Manager” line), inside a dashed box.
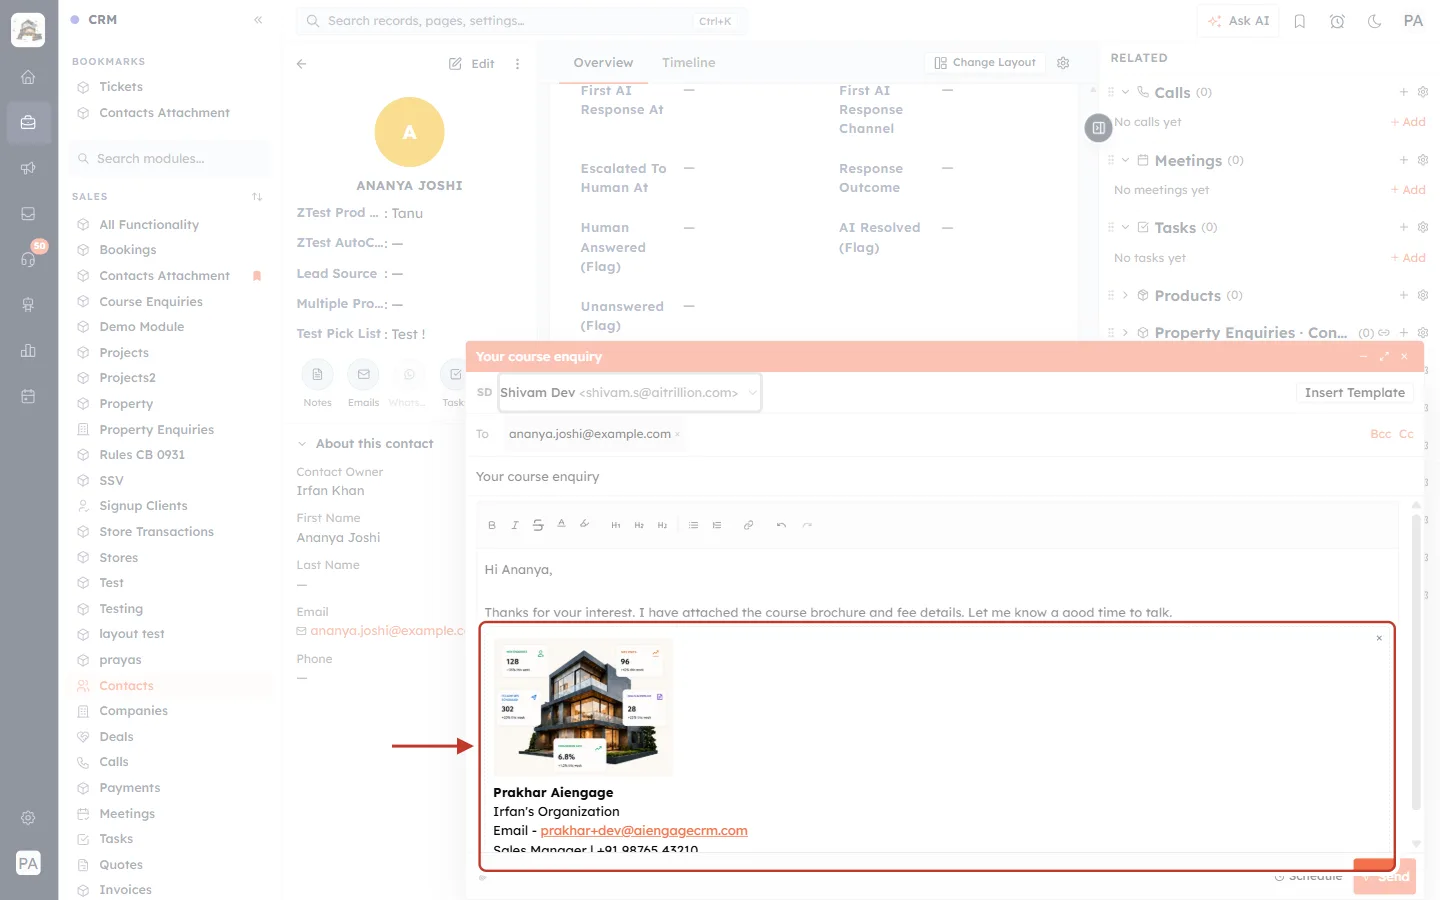
What this screenshot shows. Close-up of the signature in the composer.
The dashed box shows what will be added under your message.
The signature is not part of the text you type, so you can’t accidentally edit or delete part of it.
The × at the top-right removes it from this email only.
Change the From address and the signature changes with it:
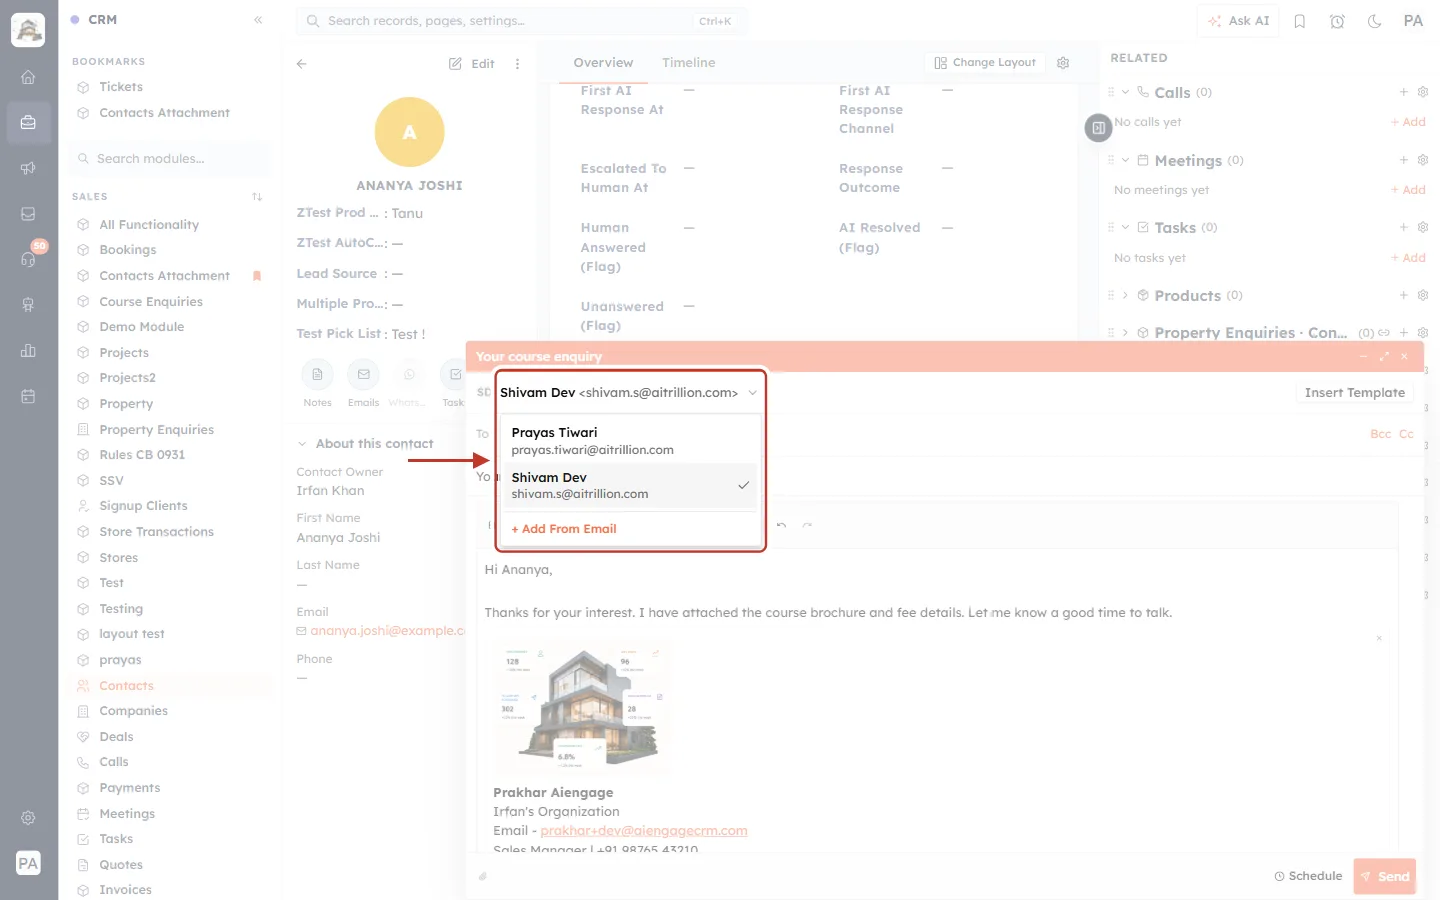
What this screenshot shows. The From drop-down open.
Only the addresses you are allowed to send from are listed (here, Prayas Tiwari and Shivam Dev).
The tick shows the current From address.
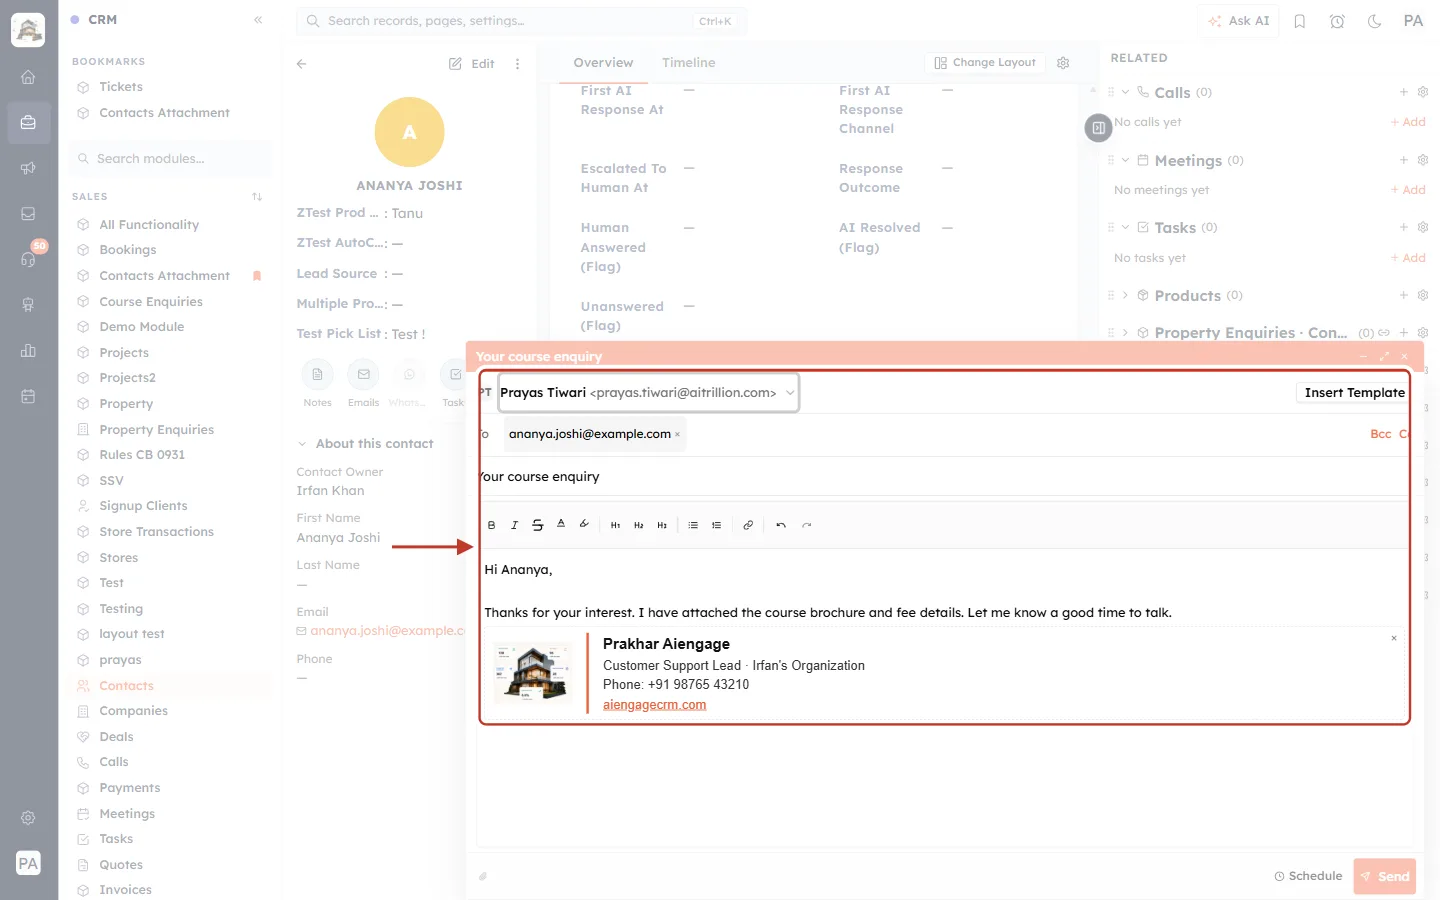
What this screenshot shows. The composer after choosing Prayas Tiwari.
From is now Prayas Tiwari, which is linked to Support Desk.
The signature has switched to the designed Support Desk layout. Your message stays exactly as you typed it.
To send one email without a signature, click the × on the signature box. Only this email is affected; your saved signature doesn’t change.
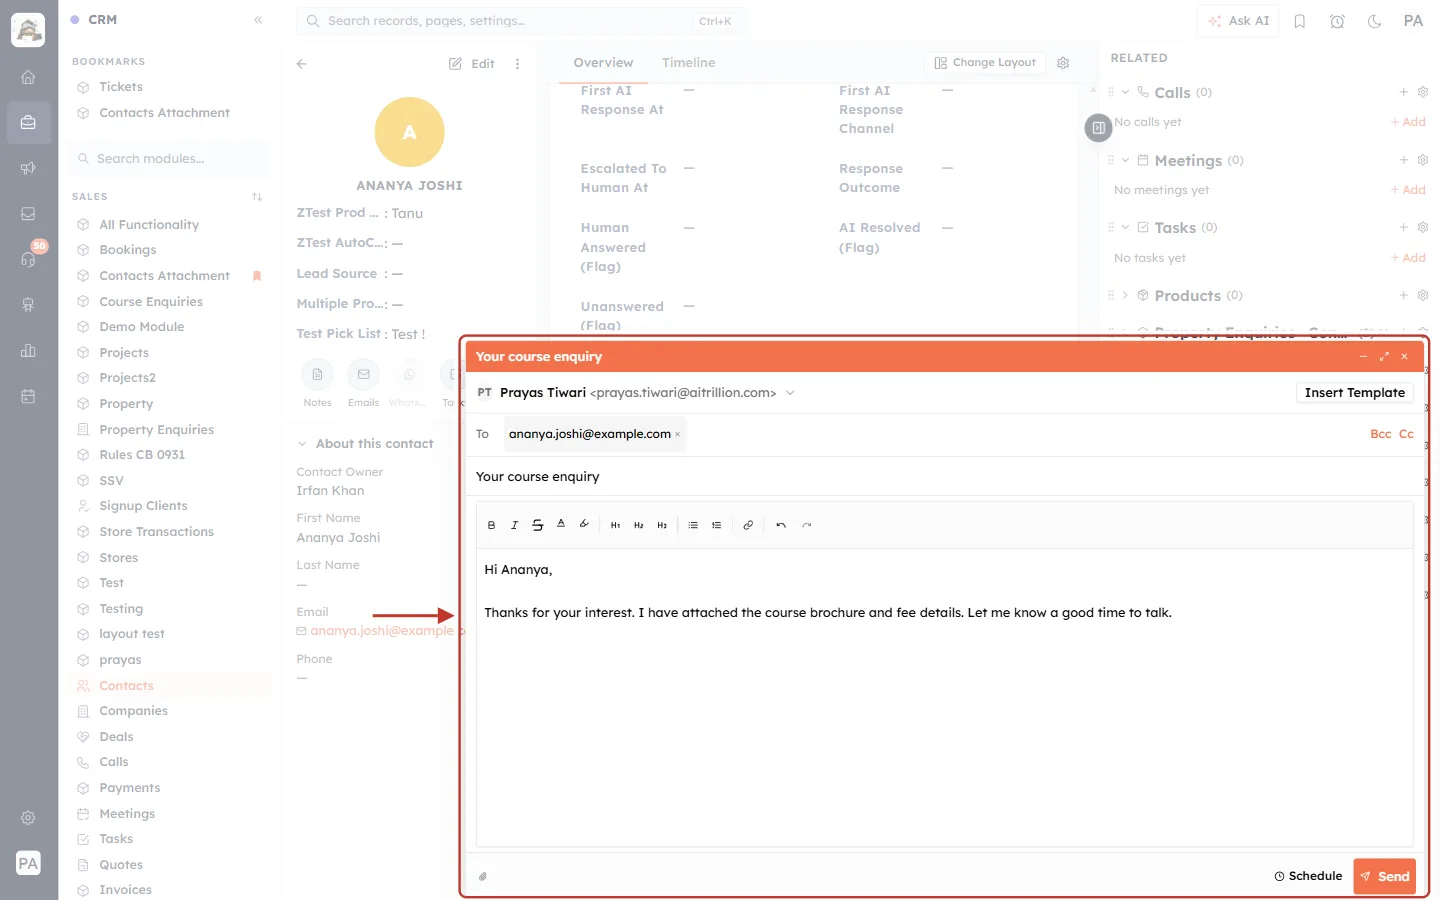
What this screenshot shows. The composer after clicking the signature’s ×.
The signature box is gone; the email will be sent with only your message.
The next email you write gets the signature again.
Two notes you may see in the composer: “Loading your signature…” while it loads (wait a moment before sending), and “Your signature couldn’t be loaded, so this email will go without it.” if it fails to load.
Ticket replies, quotes and invoices#
Ticket replies (Reply, Reply All, Forward): your signature goes under your words, above the customer’s quoted email, or above the forwarded message. See Reply to Customers from a Ticket: Reply, Reply All, Forward & Schedule Emails.
Quote and invoice emails: your signature is added under the email text. See Create and Send a Quote and Create and Manage Invoices.
These emails are sent from an address you don’t choose (for example, the support mailbox). The CRM uses the signature linked to that address; if none is linked, it uses your first signature. Admins can link the organization’s shared addresses (such as a support address) to the right signature.
Contact emails are different: they use only the signature linked to the chosen From address. If no signature is linked to it, the email has no signature.
Troubleshooting#
Problem | What to check |
|---|---|
No Email Signature section or menu item | Your profile needs Edit Own Email Signature or Manage Email Signatures (Part 1), and your plan must include Email. Ask your Admin. |
The signature doesn’t appear when I write to a contact | Did you click Save Signature? A suggested signature isn’t used until saved. With several signatures, check that one is linked to the From address you chose. |
The wrong signature appears | Check which signature the From address is linked to (its chips). An address can belong to only one signature. |
I can’t add a second signature or choose addresses | You need Manage Email Signatures. Without it you have one signature, used on all your addresses. |
My other signatures disappeared | Manage Email Signatures was turned off for your profile. They are hidden, not deleted, and return when it’s turned on again. |
An image doesn’t show in sent emails | Uploaded images must be JPG, PNG or GIF up to 2 MB. In HTML signatures, image links must open without a login. |
The image upload fails | The file is too large or not a JPG, PNG or GIF. Resize or convert it and try again. |
Campaign or workflow emails have no signature | Expected: signatures are only added to emails you write yourself. Add a sign-off to the template instead. |
Frequently asked questions#
Can an admin set one signature for everybody?
No. Signatures are personal: each user saves their own, and only they can see it. Admins control who may edit or manage signatures through profiles.
How many signatures can I keep?
Up to five, with Manage Email Signatures. Without it, one.
Can two addresses use the same signature?
Yes. A signature can be linked to many addresses, but each address can be linked to only one signature.
Can I add my meeting booking link?
Yes. Select some text in the signature, click the link button and paste your booking link. See Share Your Booking Link (and Add It to Your Email Signature).
Does deleting a signature change emails already sent?
No. Emails already sent keep the signature they were sent with.
Previous and next#
Related#
Was this article helpful?
Ready to implement this?
OpenAI Engage and apply what you just learned to your own workspace.
Open AI Engage CRM