Loading…


KnowledgeBase
Send an Email Campaign: Broadcast Emails to Your Contacts
What is an Email Campaign?#
An email campaign sends a single email to a large group of contacts at once — also called a broadcast or bulk email. Use campaigns for newsletters, promotional offers, product announcements, event invitations, and follow-up sequences.
💡
Before creating your first campaign, make sure you have a verified Email. To learn more, you can check the article: Click here and set up DKIM for your domain. Campaigns sent without these will not be sent.
Step 1 — Go to Campaigns#
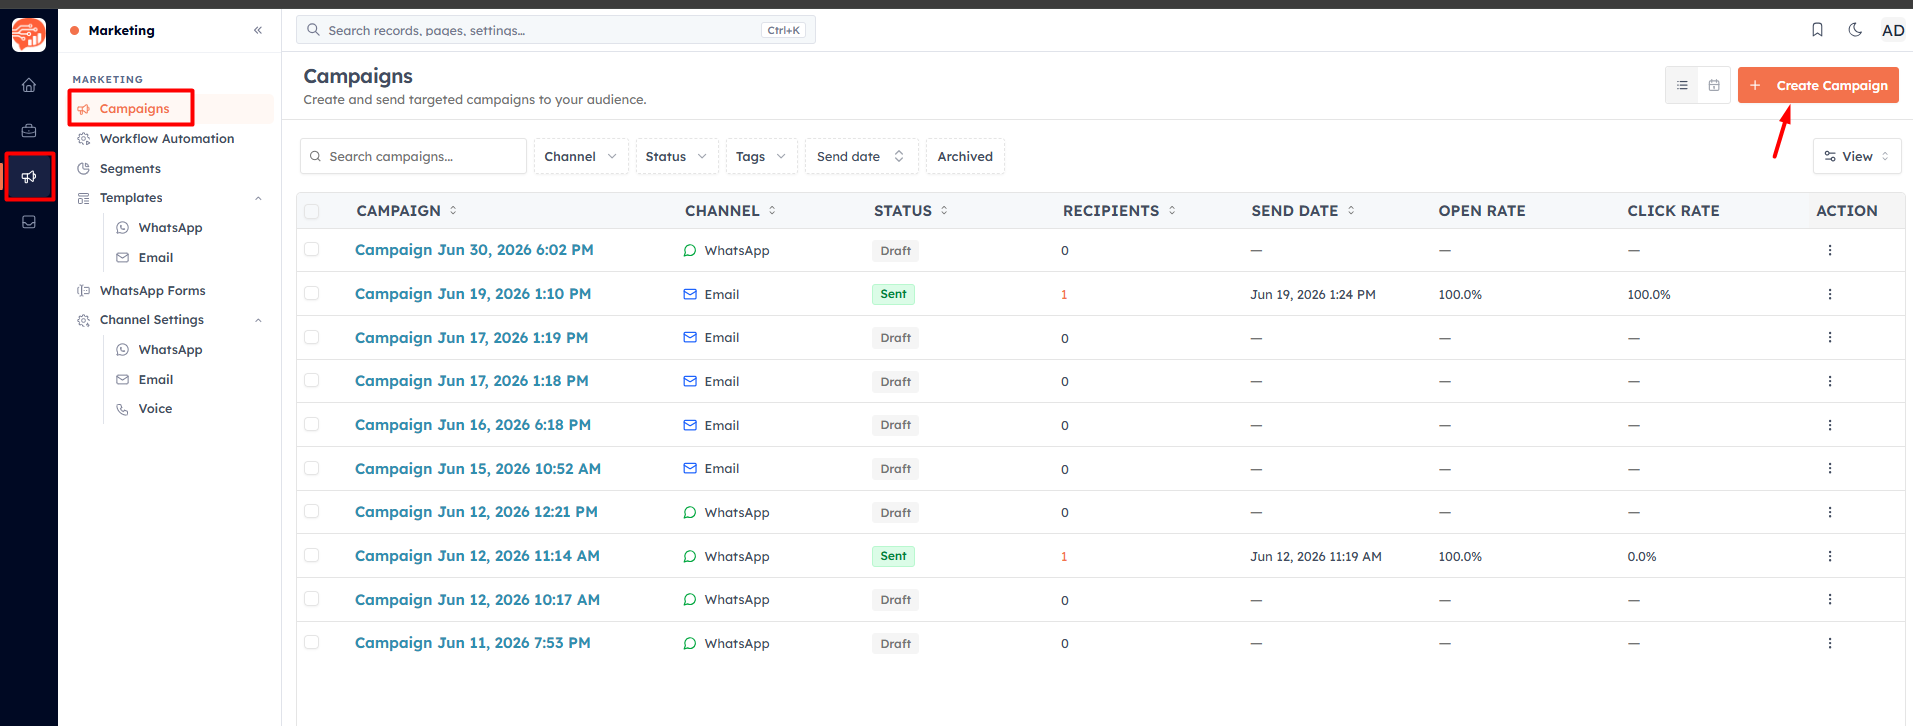
Navigate to Marketing → Campaigns and click + Create Campaign.
Step 2 — Fill in the Create Campaign sidebar#
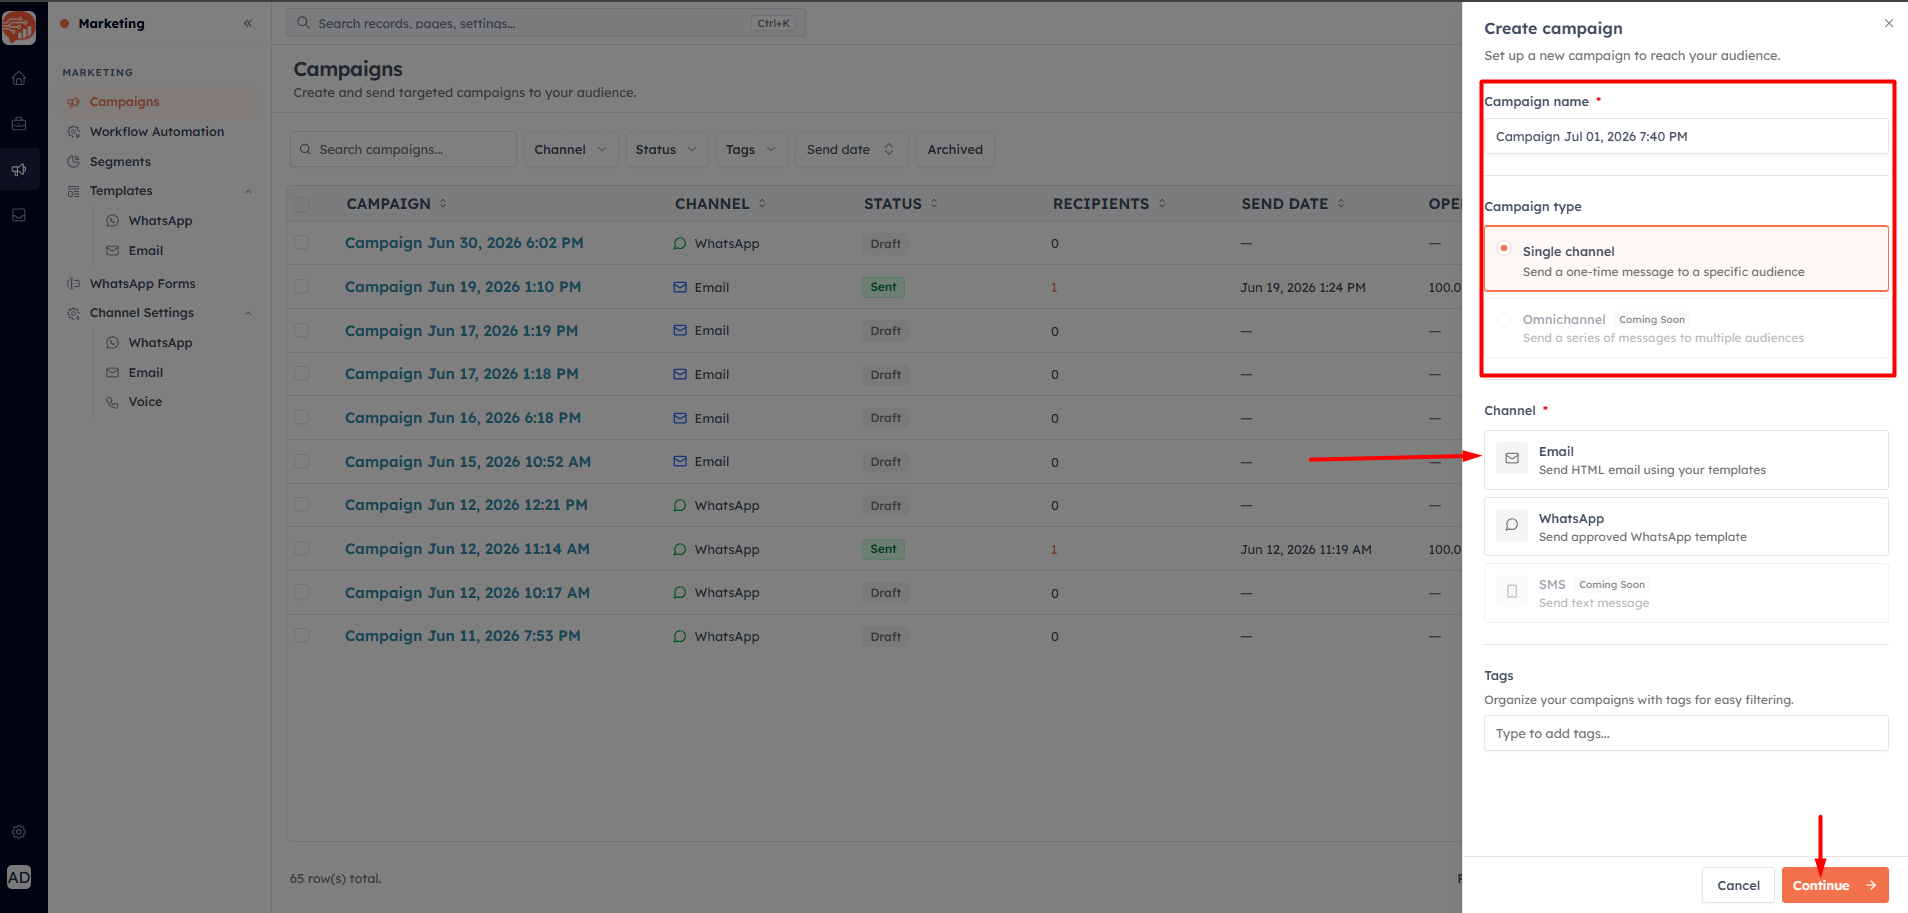
A sidebar opens on the right side of the screen. You enter the basics first, then click Continue to reach the audience step. Across these steps you will set:
Campaign Name — an internal name for this campaign, visible only to your team.
Campaign Type — choose Single channel (Omnichannel is coming soon).
Channel — select Email from the channel options. Only channels connected to your CRM are shown here.
Send To — choose the segment or contact list this campaign will be sent to. The estimated recipient count updates as you select.
Exclude Audience — optionally select a segment or list to exclude from this campaign. Contacts in the excluded list will not receive the email even if they are in the Send To audience. Useful for excluding recent buyers, already-emailed leads, or unsubscribed contacts.
Smart Sending — when enabled, the CRM automatically skips contacts who have already received a campaign recently, preventing over-messaging. Recommended to keep this on for all broadcast campaigns.
UTM Tracking — when enabled, UTM parameters are automatically appended to all links in your email. This lets you track campaign traffic in Google Analytics without adding UTM codes manually to each link.
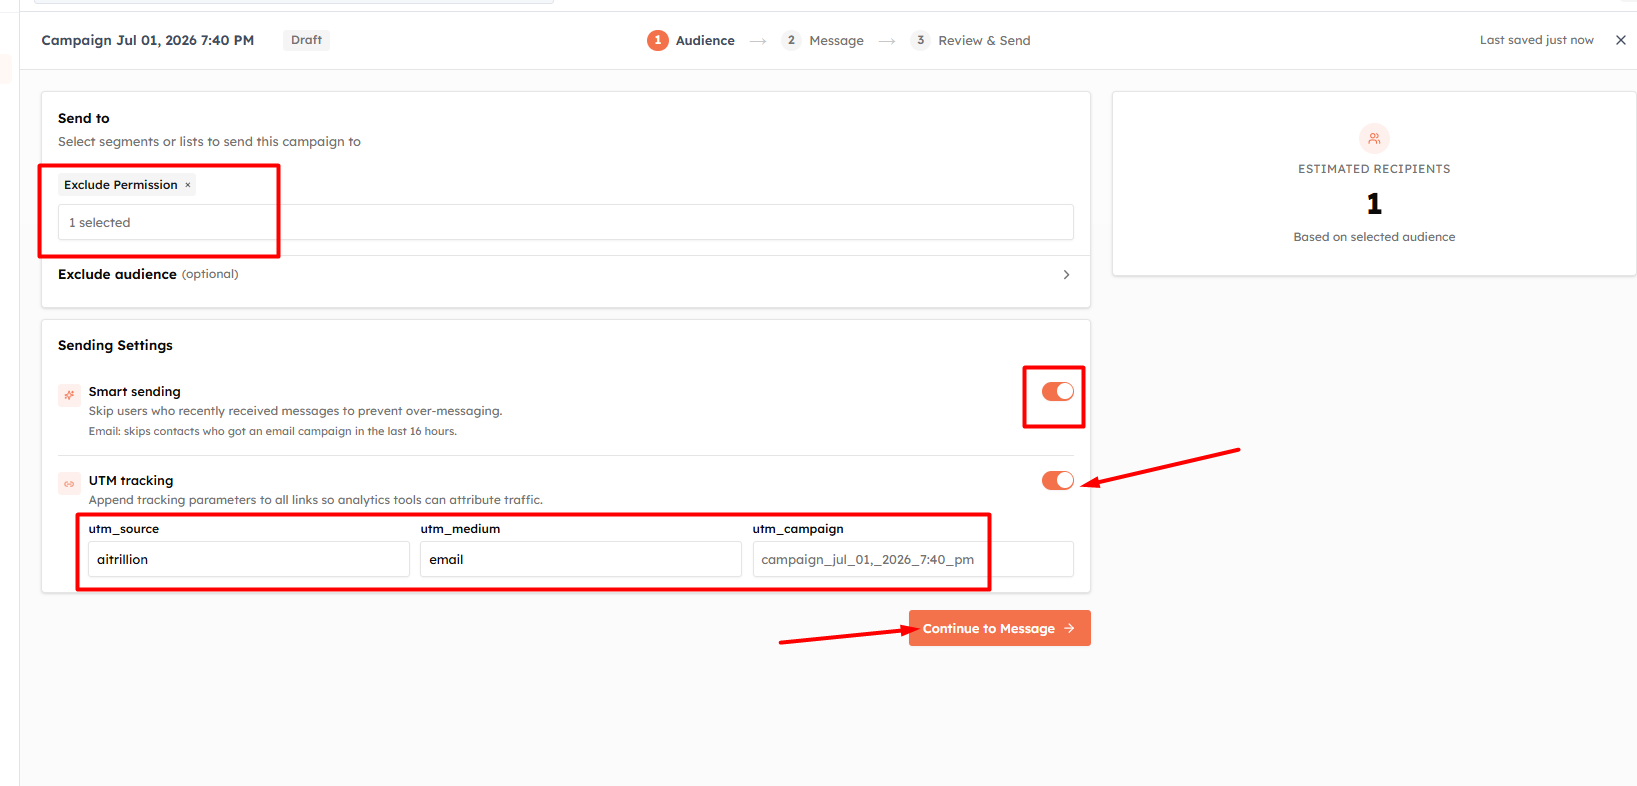
Once all fields are filled, click Create to open the email builder.
💡
Build your segment in Marketing → Segments before creating the campaign. Filter contacts by field values, list membership, tags, or recent activity to reach exactly the right audience.
Step 3 — Choose or build your email#
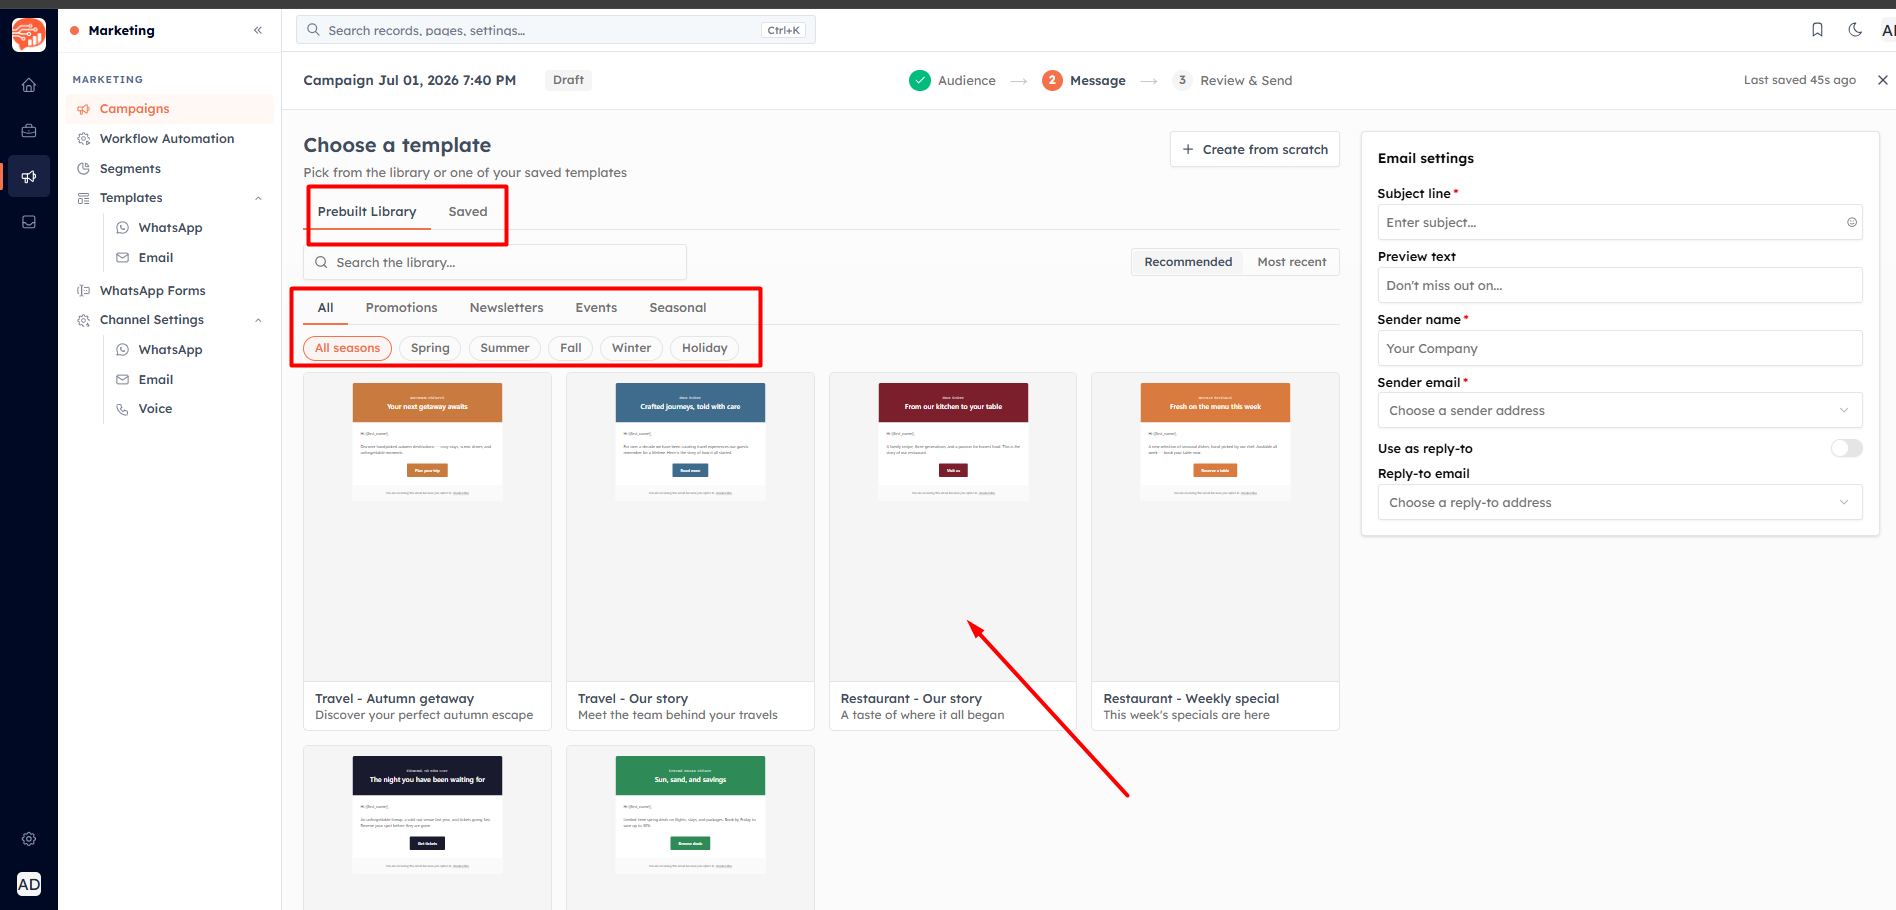
The message step opens the template picker with two tabs:
Saved — your team's custom templates
Prebuilt Library — professionally designed templates filtered by category (Promotions, Newsletters, Events, Seasonal)
Select a template to start from, or click Create from scratch for a blank canvas. Either way, the full drag-and-drop email editor opens.
Step 4 — Design the email#
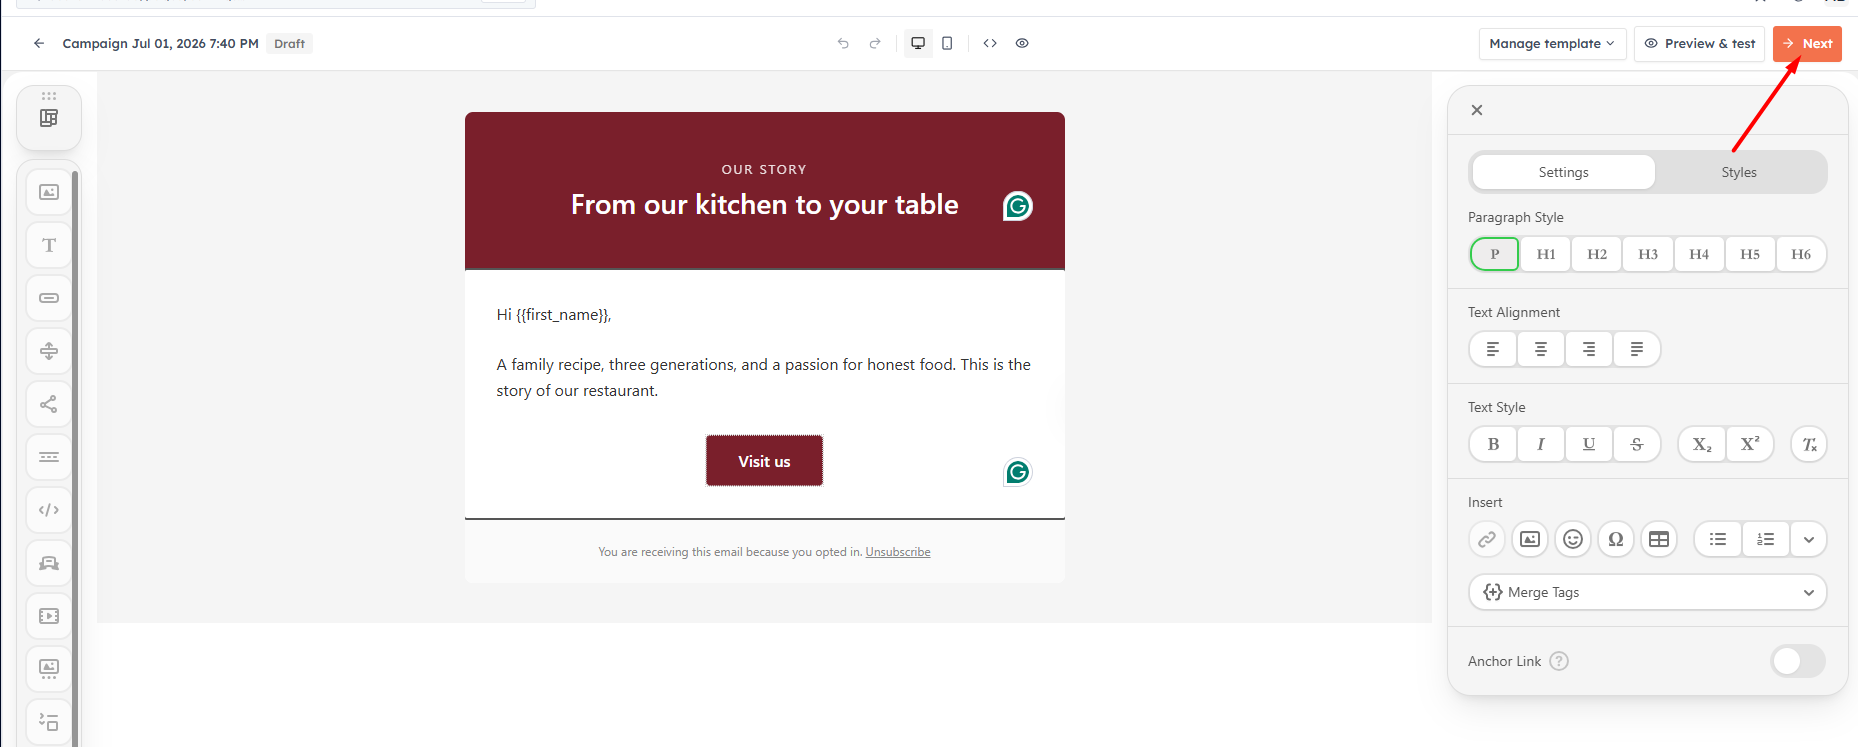
The email editor is a full-featured drag-and-drop builder. Add content blocks from the left panel — text, images, buttons, dividers, social icons — and arrange them into your layout. Use the Desktop and Mobile preview toggles to check how the email looks on different screen sizes.
Use merge fields to personalise the email with each recipient's data — for example, {{contact.first_name}} in the subject line or opening sentence.
When the email design is ready, click Next in the editor toolbar to return to the campaign builder.
Step 5 — Configure sender settings#
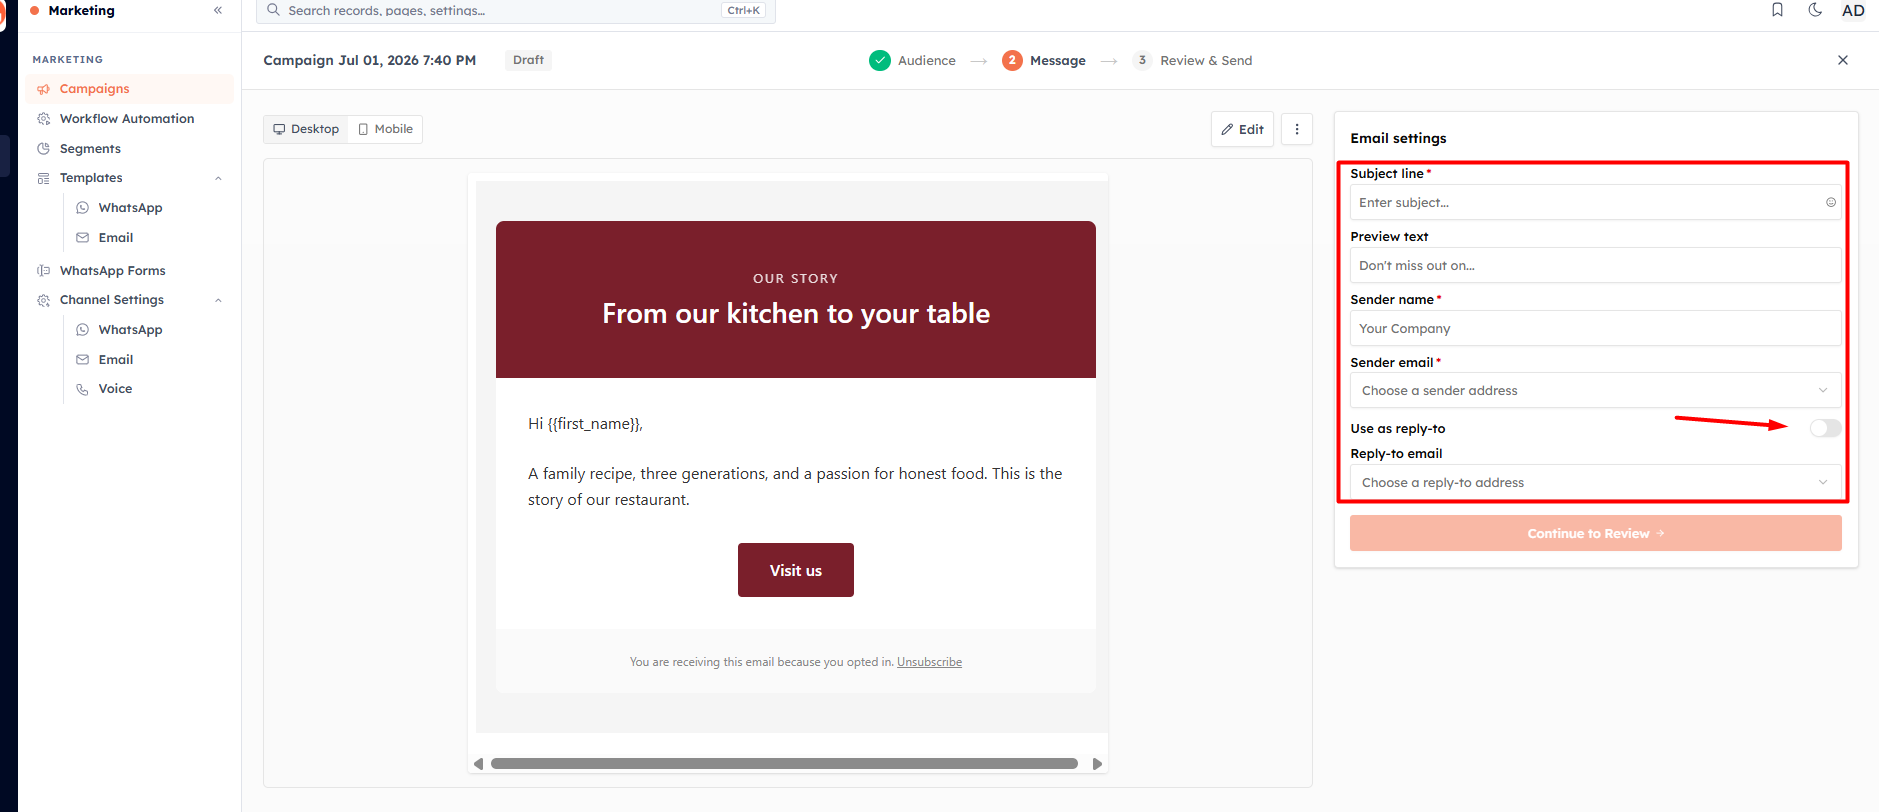
In the email settings panel on the right, fill in:
Subject line — what recipients see in their inbox. Use the emoji picker to add an emoji. Keep it under 50 characters for best mobile display.
Preview text — the short snippet shown after the subject line in most email clients. Treat it as a second subject line.
Sender name — the display name contacts see (e.g., Sarah from Acme Corp)
Sender email — select from your verified Organisation Emails. If no addresses appear, add one first.
Reply-to — optional. Replies from contacts go to this address. Enable the toggle to use the sender address as reply-to, or enter a different address.
💡
A/B test your subject lines by creating two campaigns to similar-sized audience segments with different subjects. Track open rates to find what resonates with your audience.
Step 6 — Review and send#
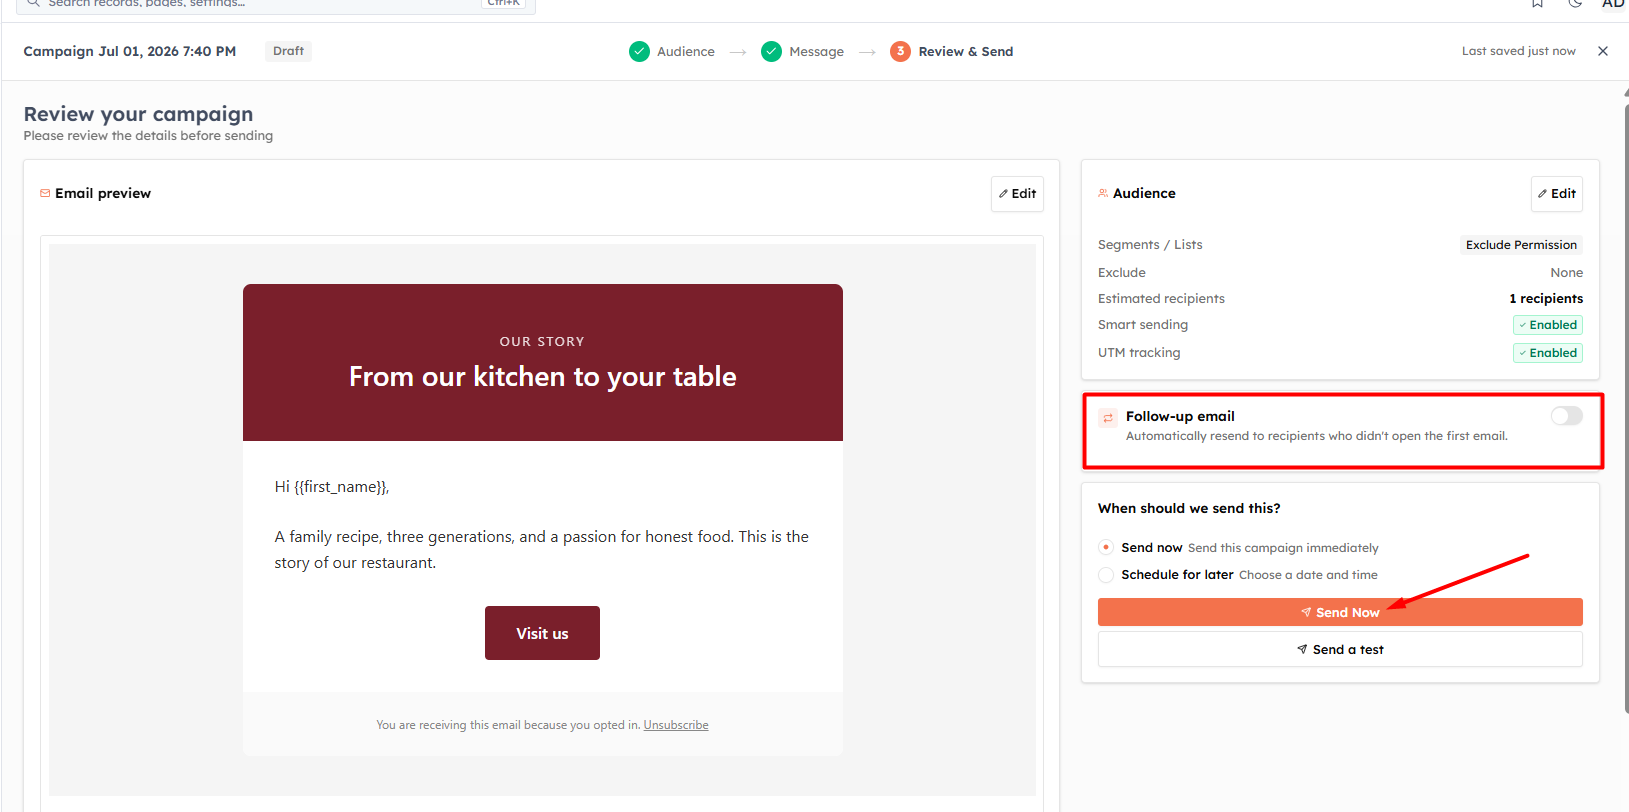
The Review step shows a summary of your audience, the email preview, and the send schedule. Before clicking Send:
Click Preview & Test to send the email to yourself — check it on both desktop and mobile
Verify the subject line, sender name, and sender email are correct
Confirm the recipient count matches your expected audience
Choose Send Now to send immediately, or pick a date and time to schedule for later.
💡
You cannot recall or edit an email campaign after clicking Send Now. Always use Preview & Test to verify the email looks correct before sending to your full audience.
Campaign analytics#
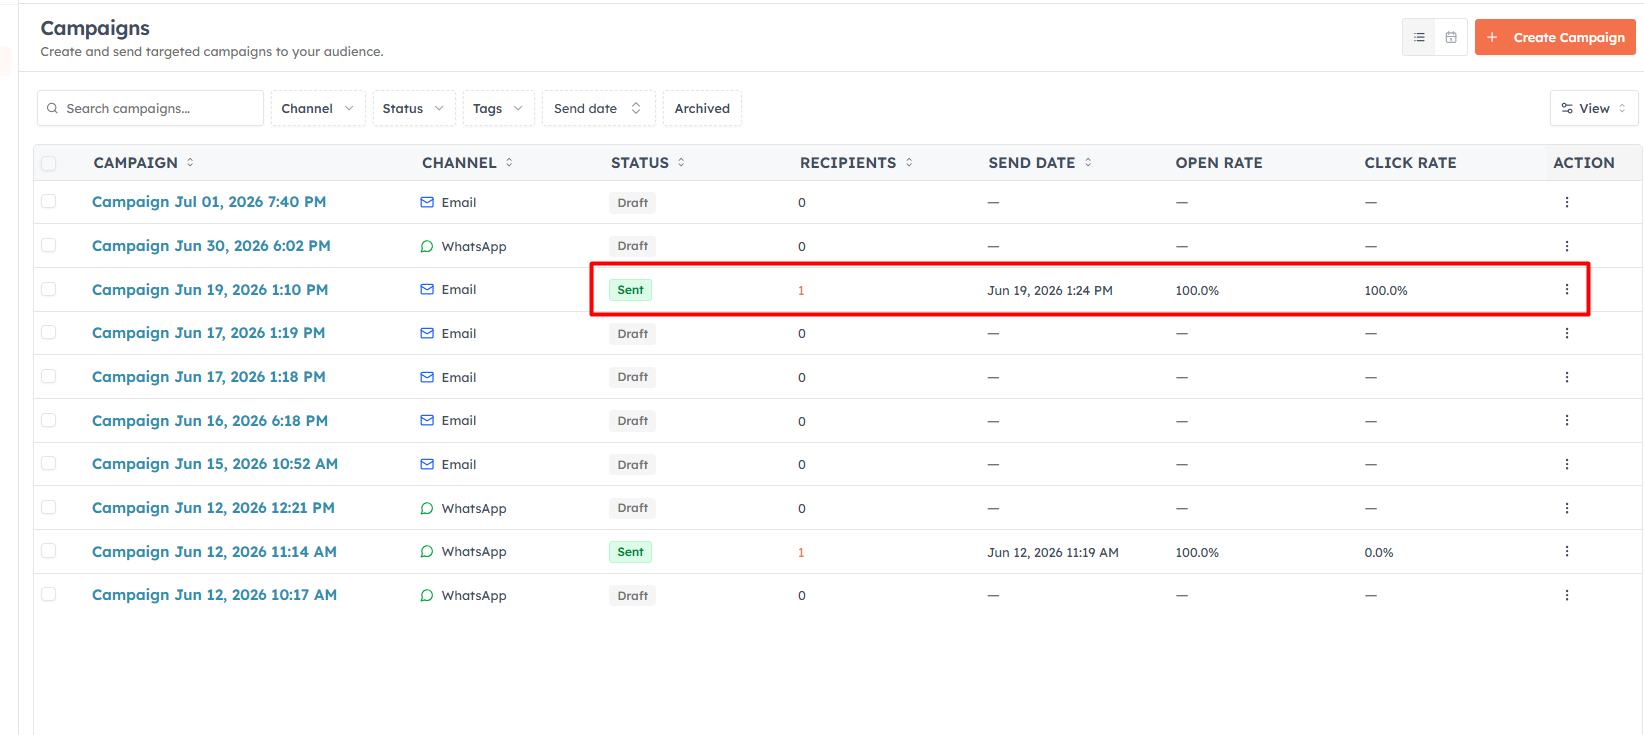
After sending, click the campaign name to view delivery and engagement metrics:
Sent — total emails submitted
Delivered — successfully delivered to inbox
Opened — recipient opened the email
Clicked — recipient clicked a link
Bounced — delivery failed (hard bounce = invalid address; soft bounce = temporary failure)
Unsubscribed — contacts who opted out via the unsubscribe link
💡
A healthy email campaign has an open rate above 20% and a click rate above 2%. If your numbers are lower, try improving your subject line, segment targeting, or sending time.
Was this article helpful?
Ready to implement this?
OpenAI Engage and apply what you just learned to your own workspace.
Open AI Engage CRM