Loading…


KnowledgeBase
Zoom Integration: Connect, Use and Disconnect Zoom for Booking Calendars and Meetings (Step-by-Step)
Introduction#
AiEngage CRM can create your Zoom meetings for you. Connect your Zoom account once, and every booking someone makes on your calendar (and every Zoom meeting you schedule yourself) gets its own Zoom join link, sent with the invite. Nobody copies links around, and no two people land in the same room by accident.
This guide covers the whole life of the connection, step by step with a screenshot of each screen: connecting, using it, fixing an expired connection, and disconnecting.
ℹ️
The connection is personal. Each person who hosts meetings connects their own Zoom account, and meetings are created in that account. If you build a calendar for a colleague, it is their Zoom connection that counts (see Choose the Host and Meeting Type).
Before you start#
A Zoom account. A free account can connect; your Zoom plan decides meeting length and participant limits.
Permission to add apps to that Zoom account. On business or education accounts an administrator may need to approve the AiEngageCRM app first.
Pop-ups allowed for the CRM in your browser. Zoom’s sign-in opens in a pop-up window.
Where | What you can do there |
|---|---|
Meetings → Settings | Connect or disconnect Zoom (Steps 1 and 9) |
Calendar → New calendar → Platform step | Connect, check the connection, use your own room (Steps 2–6) |
Meetings → Create Meeting | See the connection, connect from the form (Step 7) |
Step 1: Connect from Meetings → Settings#
Open Meetings from the left rail and click Settings. Find the Zoom card.
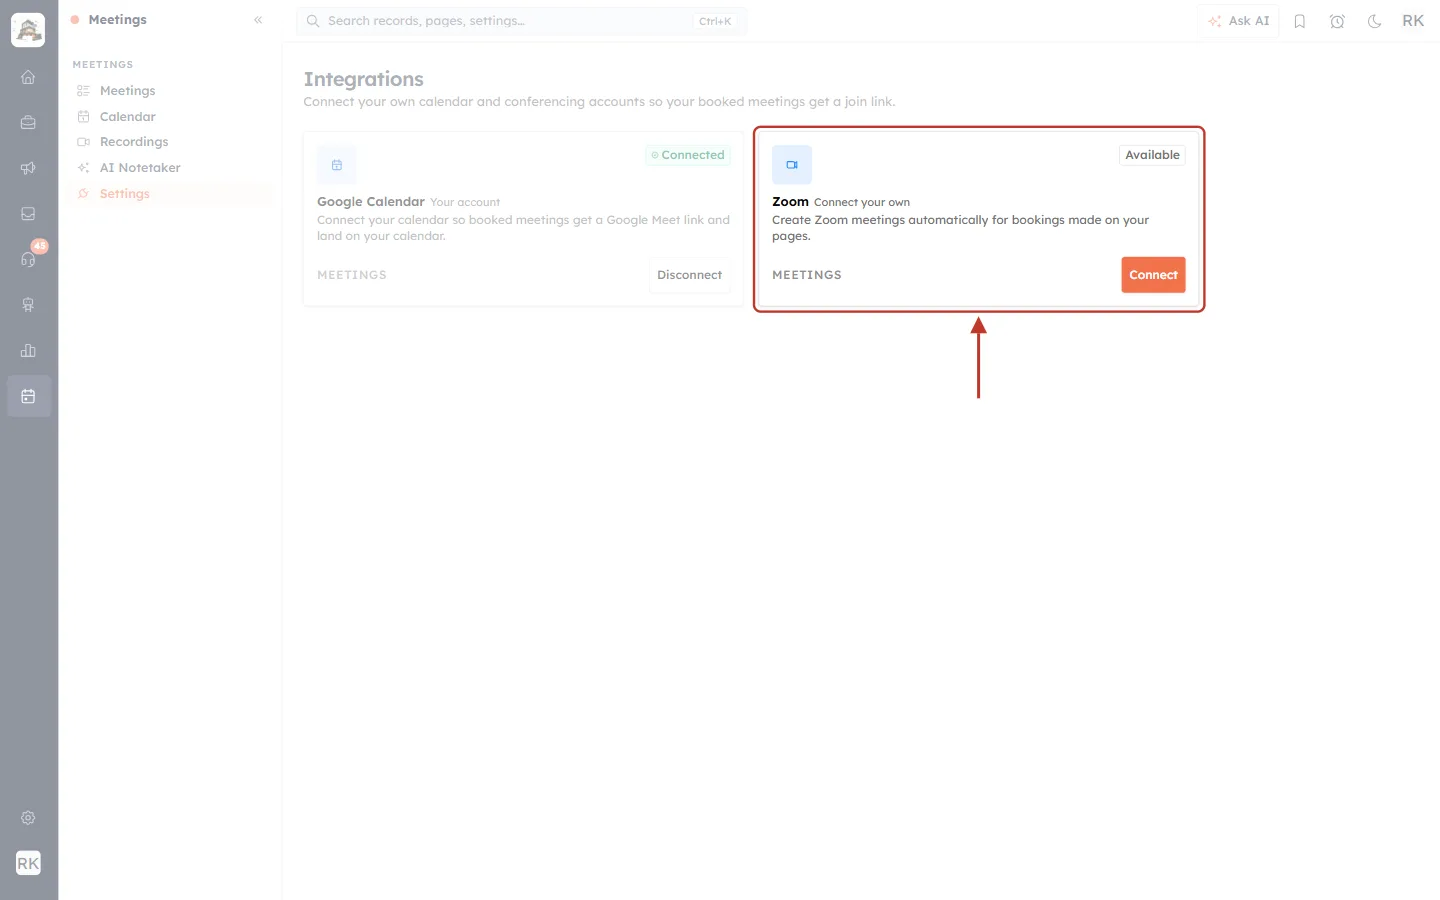
What this screenshot shows. The Zoom card is ringed. It is not connected yet.
The badge reads Available and the tag reads Connect your own.
The description: “Create Zoom meetings automatically for bookings made on your pages.”
Click the orange Connect button to open Zoom’s sign-in.
Sign in to Zoom#
A pop-up opens on Zoom’s own sign-in page.
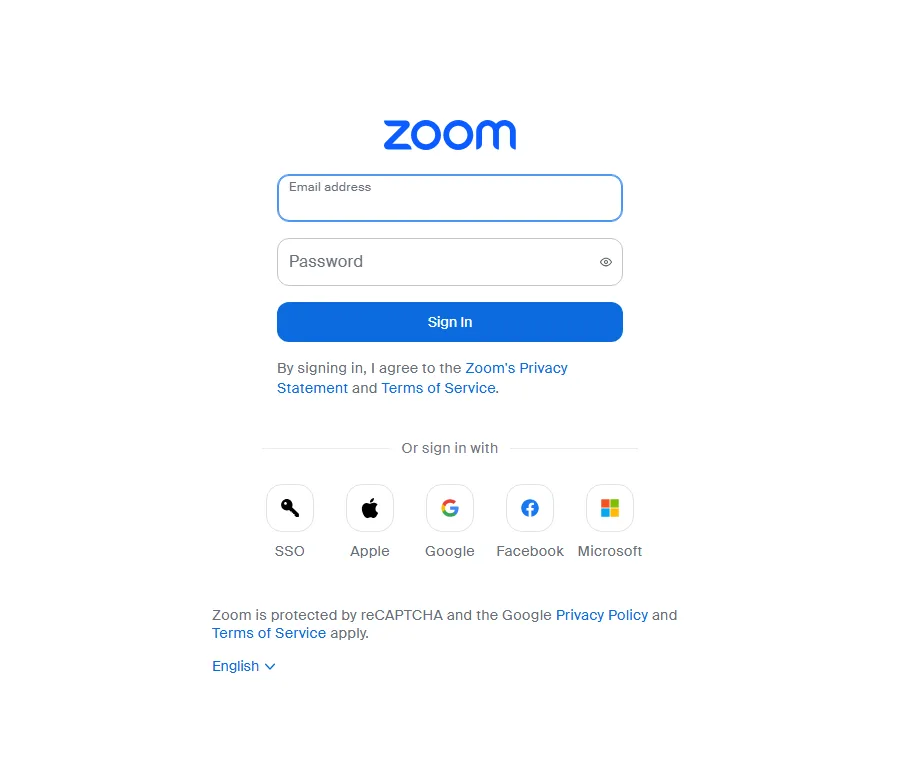
What this screenshot shows. Zoom’s sign-in window, served by Zoom itself.
Enter your Zoom Email address and Password and click Sign In.
Or use SSO, Apple, Google, Facebook or Microsoft if that is how you normally sign in to Zoom.
AiEngage CRM never sees your Zoom password. Check that the window’s address starts with zoom.us before typing.
Allow the app#
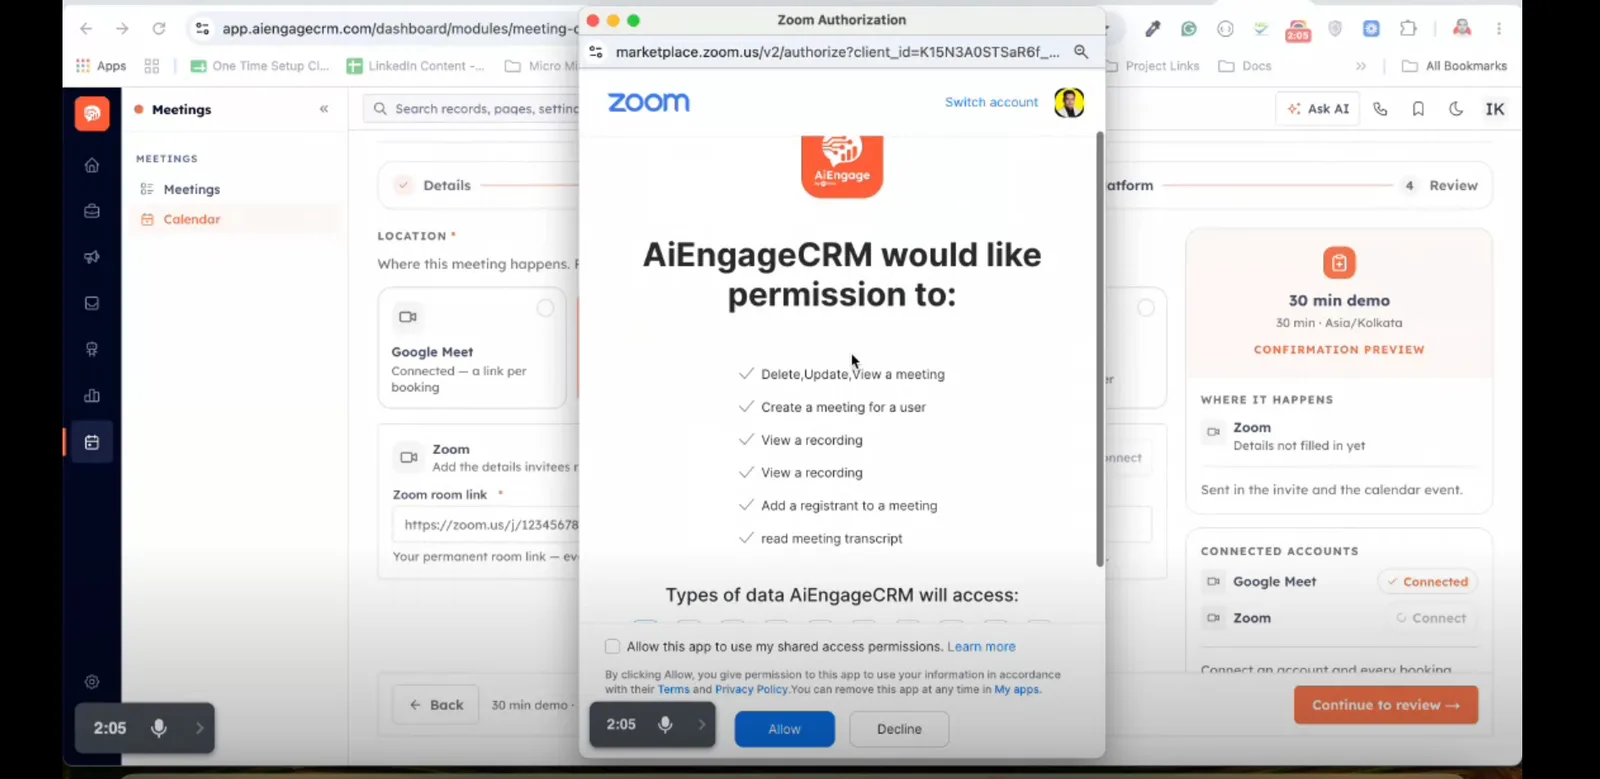
What this screenshot shows. Zoom’s authorization screen: “AiEngageCRM would like permission to:”, opened over the CRM.
Zoom lists what the app asks for (see the table below).
Click Allow to connect. Decline cancels cleanly and nothing is connected.
The window closes itself, and the CRM shows Zoom as Connected.
Permission | What it is used for |
|---|---|
Delete, Update, View a meeting | Editing or cancelling the Zoom meeting when a booking is changed or cancelled, and reading its details. |
Create a meeting for a user | Creating a new Zoom meeting for each booking or meeting. |
View a recording | Reading details of Zoom cloud recordings for the meeting. |
Add a registrant to a meeting | Registering the person who booked as an attendee. |
Read meeting transcript | Reading the transcript of a recorded or transcribed meeting. |
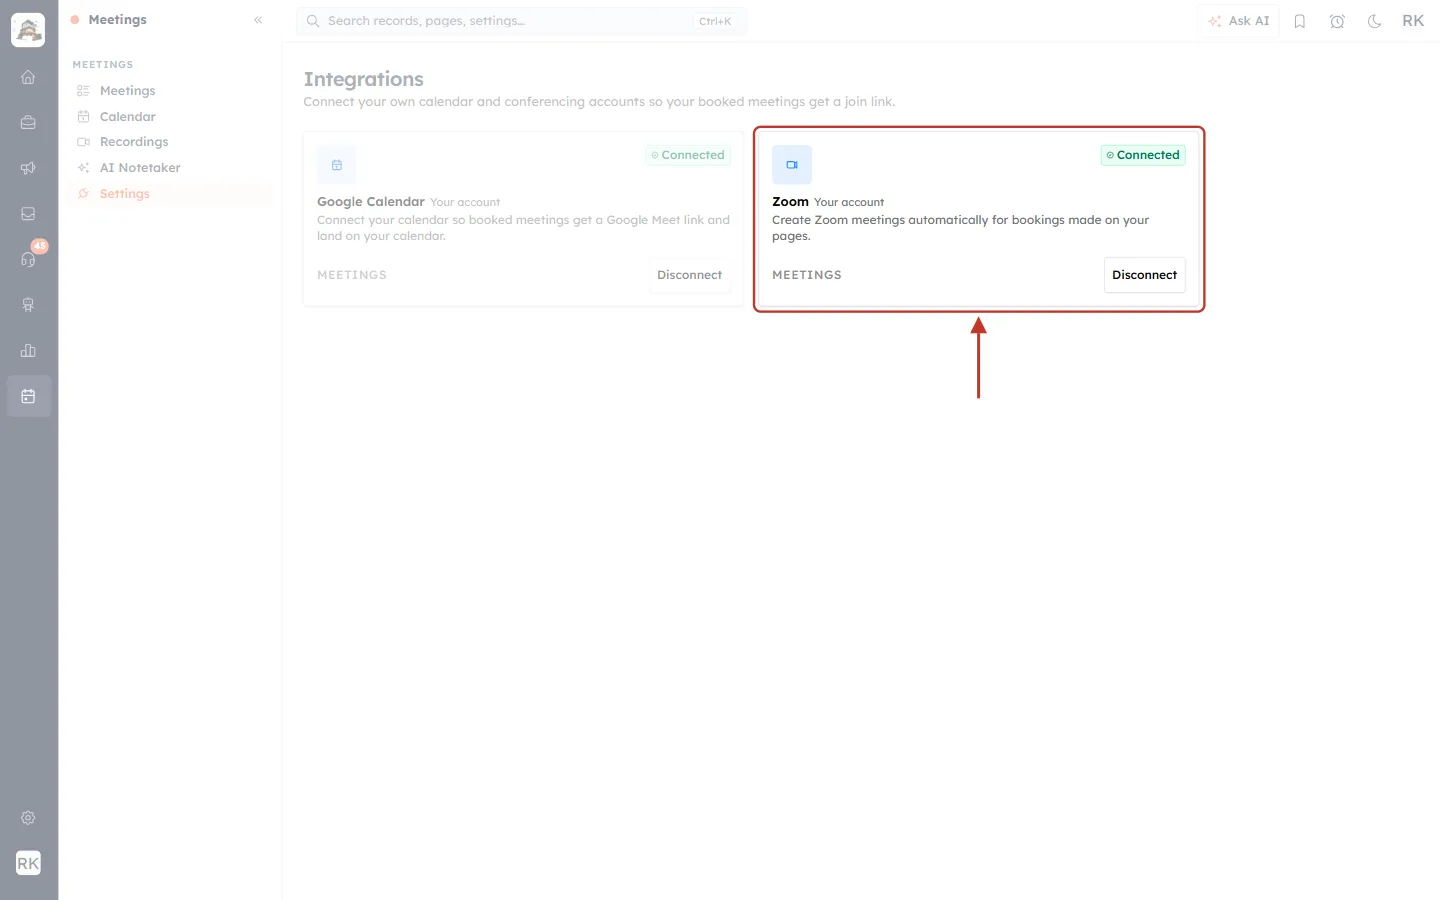
What this screenshot shows. The Zoom card after connecting.
The badge reads Connected (green) and the tag reads Your account.
The button changes to Disconnect (Step 9).
⚠️
If nothing happens when you click Connect, the pop-up was blocked. Allow pop-ups for the CRM and click again. If Zoom says an administrator must approve the app, ask your Zoom admin to approve AiEngageCRM, then connect again.
Step 2: Choose Zoom on a booking calendar#
Open Meetings → Calendar, click + New calendar, fill in Details and Availability, and on step 3, Platform, click the Zoom tile. If Zoom isn’t connected yet, you can connect right here.
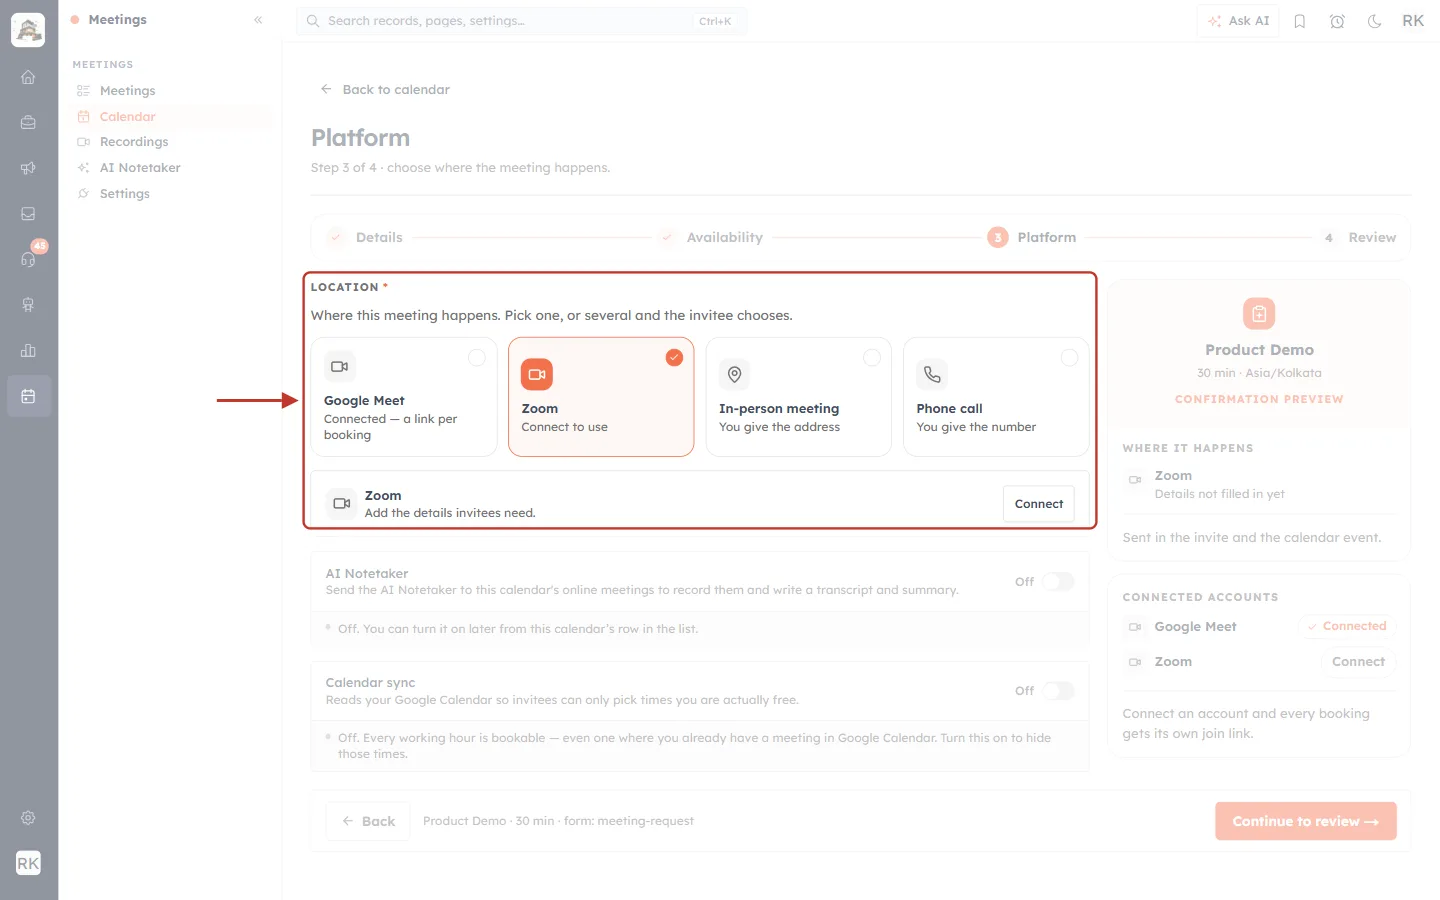
What this screenshot shows. Zoom is selected but not connected. The location tiles and the Zoom card are ringed.
The Zoom tile reads “Connect to use”.
The card underneath reads “Add the details invitees need” with a Connect button. It opens the same Zoom pop-up as Step 1; the calendar you are building stays open.
Connected accounts on the right also offers Connect beside Zoom; either button works.
A new calendar can’t use Zoom until Zoom is connected. If you click Continue to review first, a message explains why.
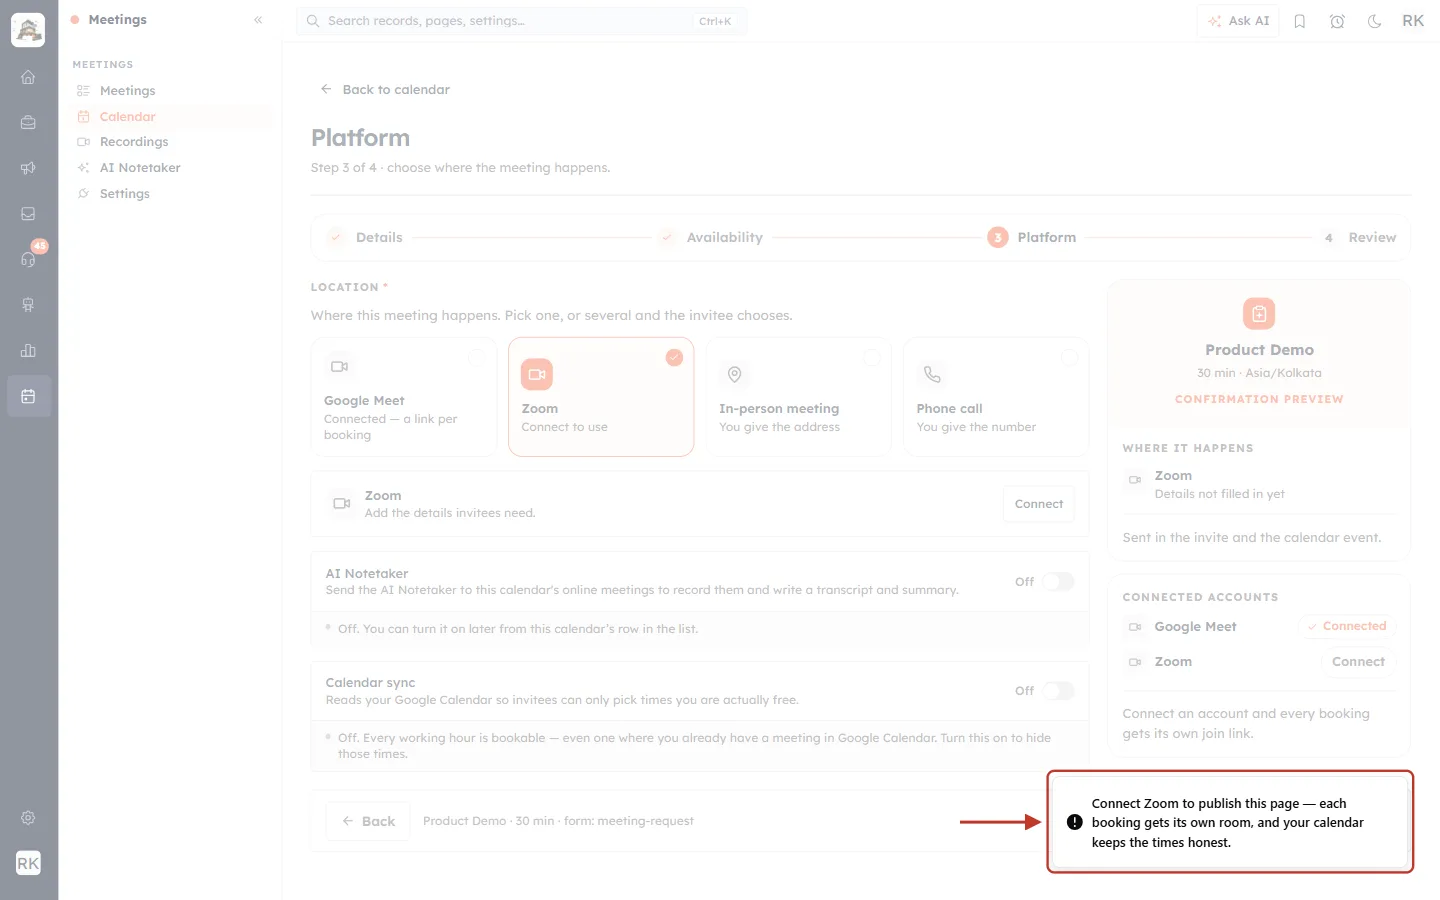
What this screenshot shows. The message at the bottom right is ringed.
“Connect Zoom to publish this page — each booking gets its own room, and your calendar keeps the times honest.”
Connect Zoom (or choose another location), then continue.
Step 3: Check the Zoom card#
Once connected, the tile and card change.
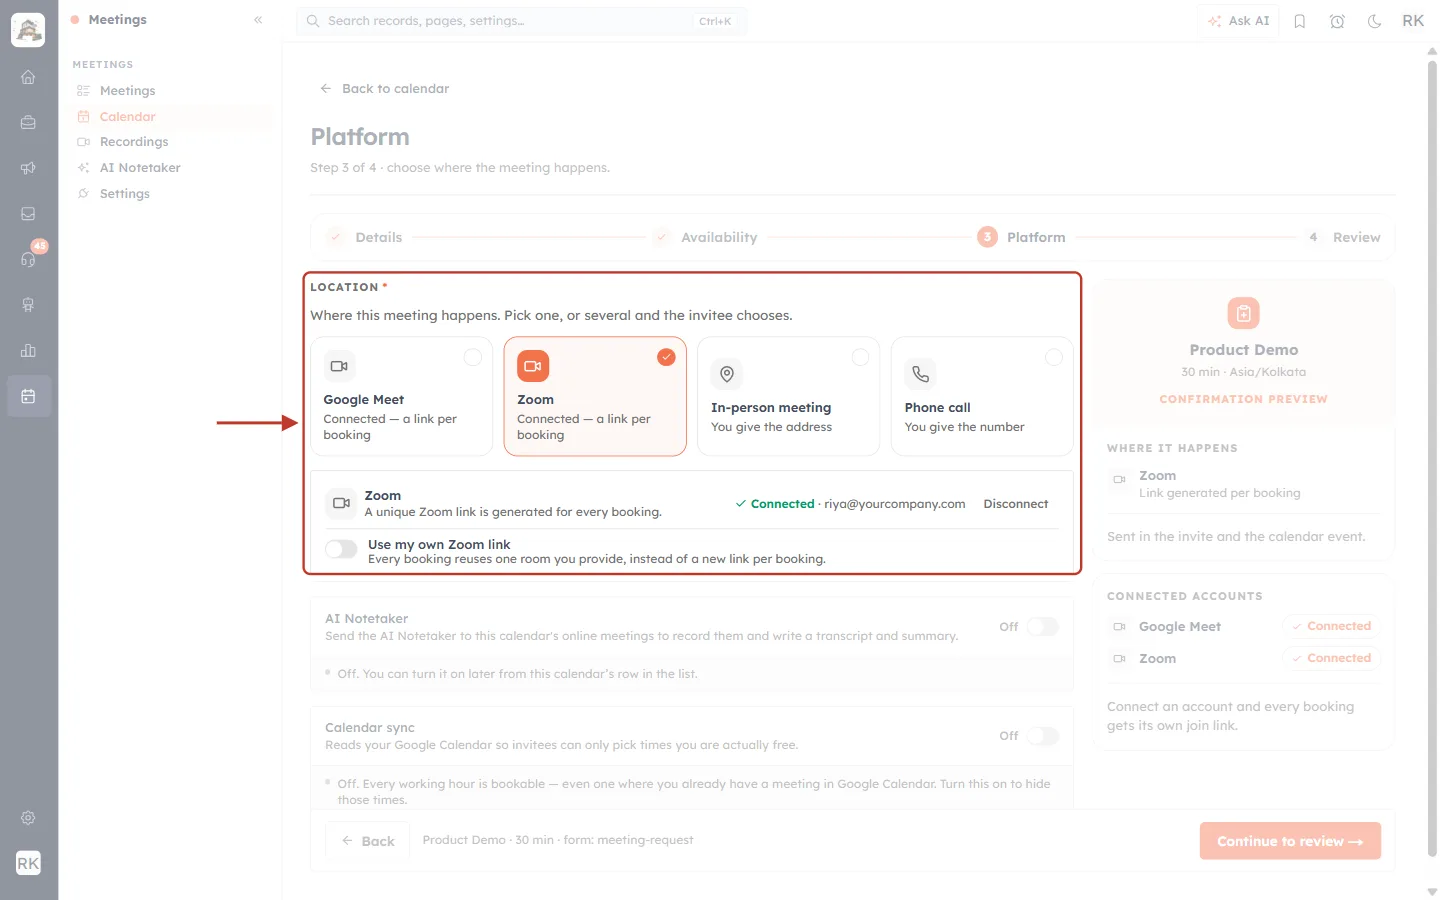
What this screenshot shows. The location tiles and the Zoom card are ringed. Zoom is selected and connected.
The tile reads “Connected — a link per booking”.
The card: “A unique Zoom link is generated for every booking.” On the right: Connected, the Zoom account (riya@yourcompany.com) and Disconnect.
Use my own Zoom link is off, which is what you want almost always (Step 4).
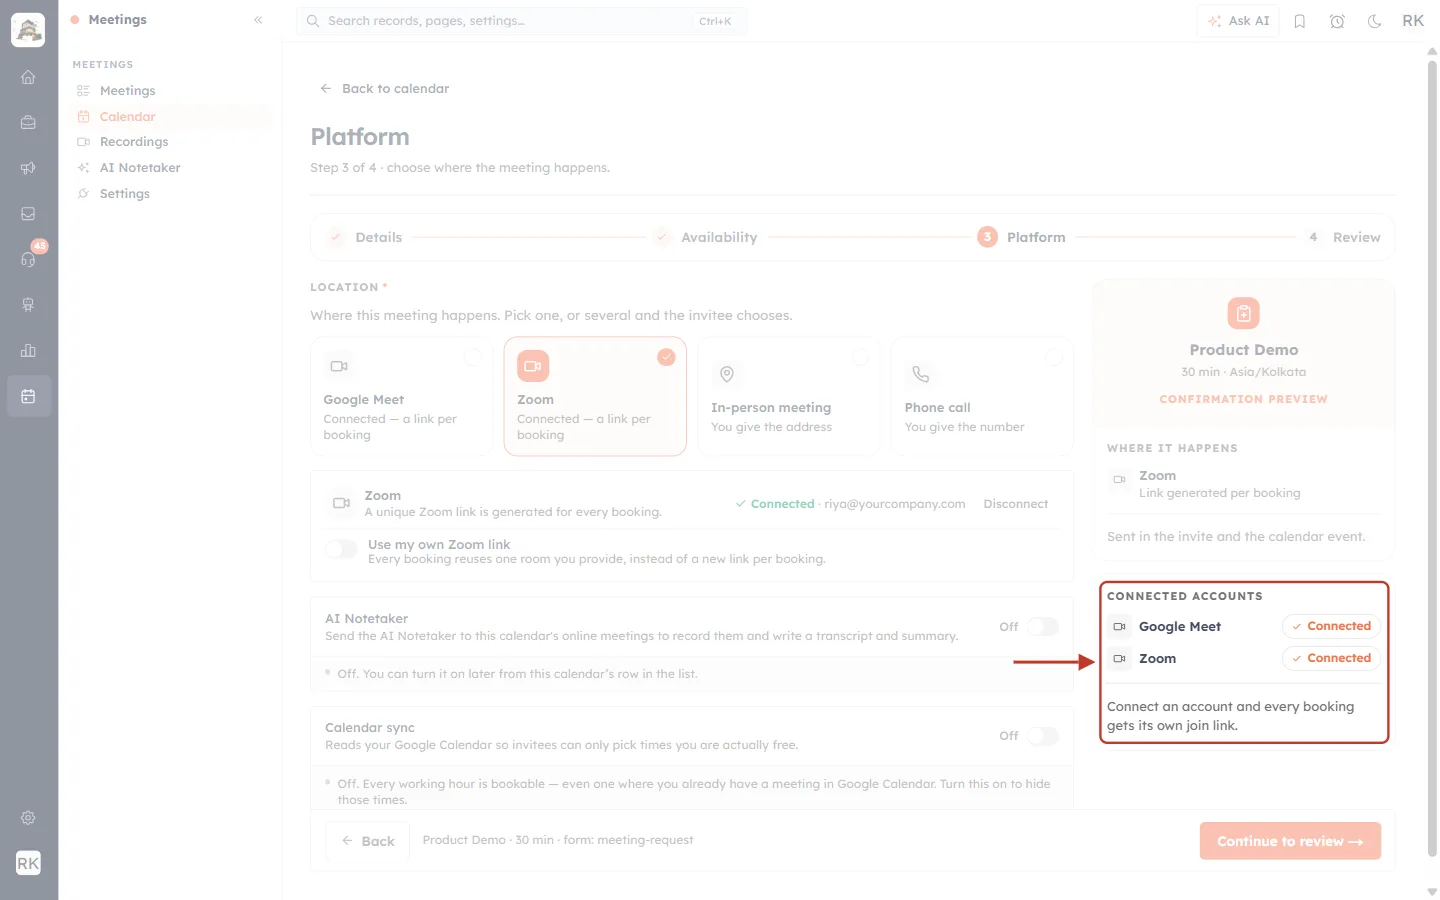
What this screenshot shows. The CONNECTED ACCOUNTS panel is ringed.
Google Meet and Zoom both show Connected. A button reading Connect or Reconnect means that service needs attention.
These are the host’s accounts.
“Connect an account and every booking gets its own join link.”
Step 4: Use your own Zoom room (optional)#
If you really want every booking to use one permanent room, turn on Use my own Zoom link.
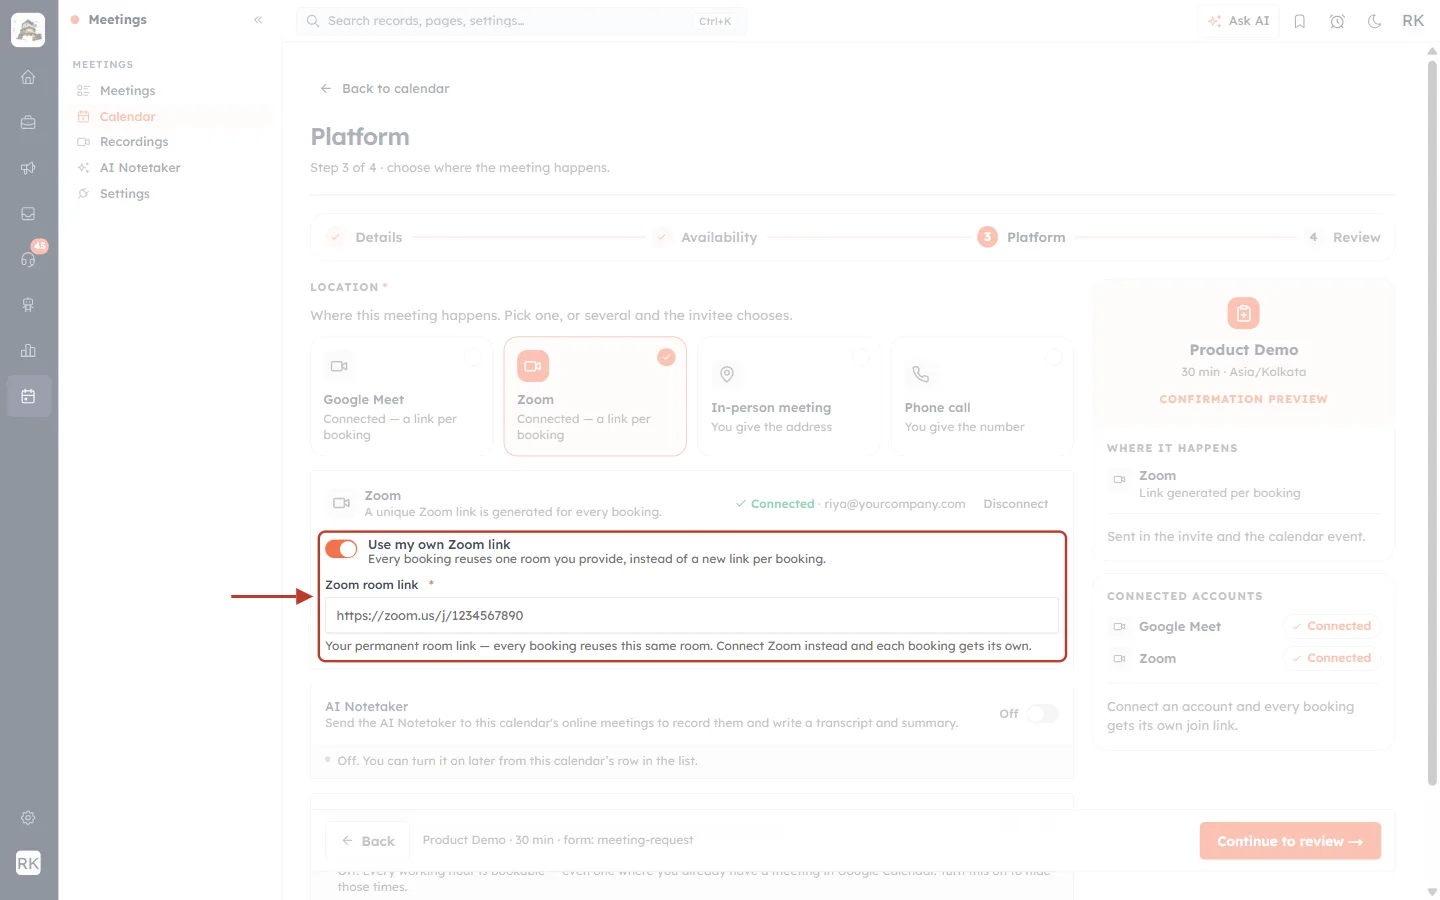
What this screenshot shows. The switch is on and the Zoom room link field is ringed.
Paste your permanent room address, for example https://zoom.us/j/1234567890.
The hint explains the trade-off: “Your permanent room link — every booking reuses this same room. Connect Zoom instead and each booking gets its own.”
With one shared room, two back-to-back invitees can walk in on each other. Turn the switch off to go back to a fresh link per booking.
ℹ️
Older calendars created before this rule can still run on a pasted room link without a connection; their tile reads “Not connected — paste a link”. New calendars need Zoom connected.
Step 5: When Zoom needs reconnecting#
A Zoom connection can stop working, for example if the app is removed in Zoom or access expires. The CRM checks it live.
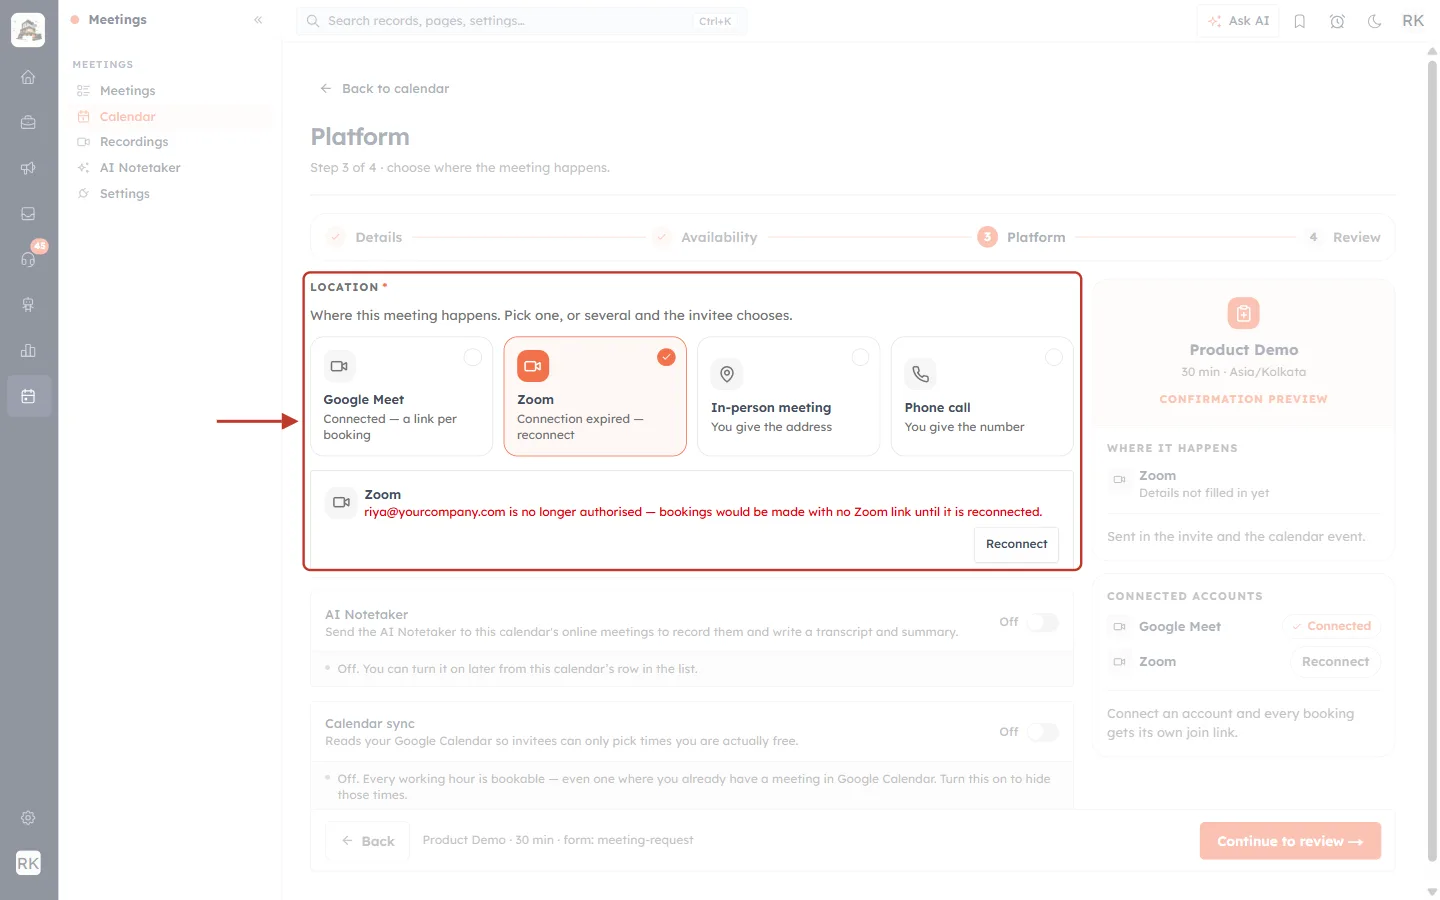
What this screenshot shows. The tile and card for an expired Zoom connection are ringed.
The tile reads “Connection expired — reconnect”.
The card explains that the account is no longer authorised and bookings would be made without a Zoom link until it is reconnected.
Click Reconnect and sign in to Zoom again.
Step 6: Publish the calendar#
Click Continue to review and Publish calendar. Each person who books now gets their own Zoom meeting, created at the moment they book. The join link is sent with their confirmation and added to the calendar invite. See Create a Booking Calendar (Booking Link) Step by Step for the whole wizard.
✅
A calendar can offer Zoom alongside other locations (for example Phone call), and the invitee chooses when booking.
Step 7: Zoom on a meeting you create yourself#
Open Meetings → Meetings, click Create Meeting → Create Single, and under How will you meet? choose Zoom.
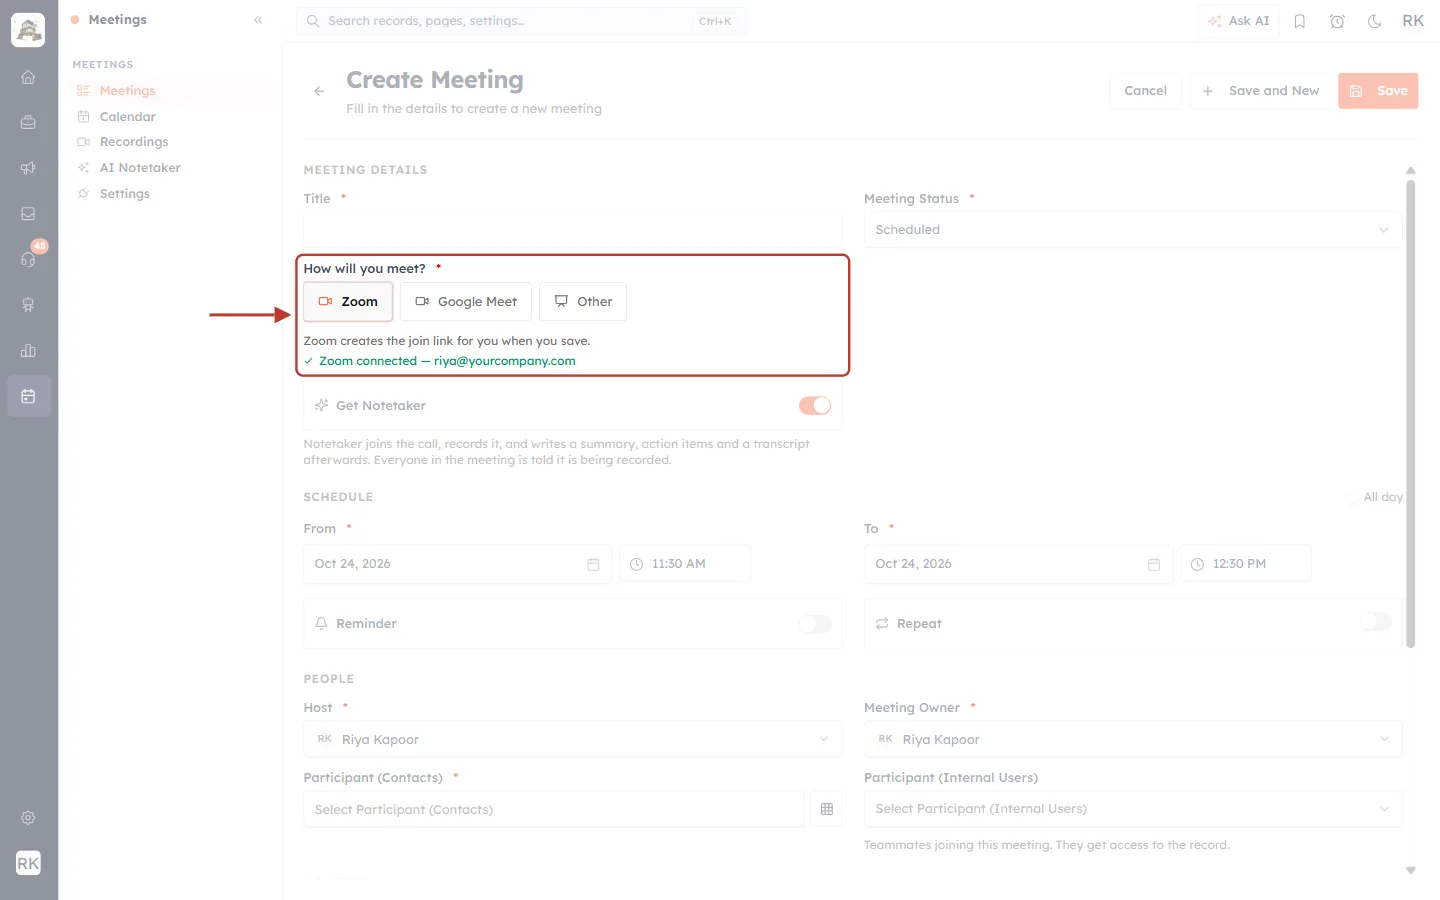
What this screenshot shows. The How will you meet? field is ringed, with Zoom selected.
“Zoom creates the join link for you when you save.”
Green tick: “Zoom connected — riya@yourcompany.com”, the account that will create the meeting.
The link is added to the record and to the invite that goes to everyone you listed.
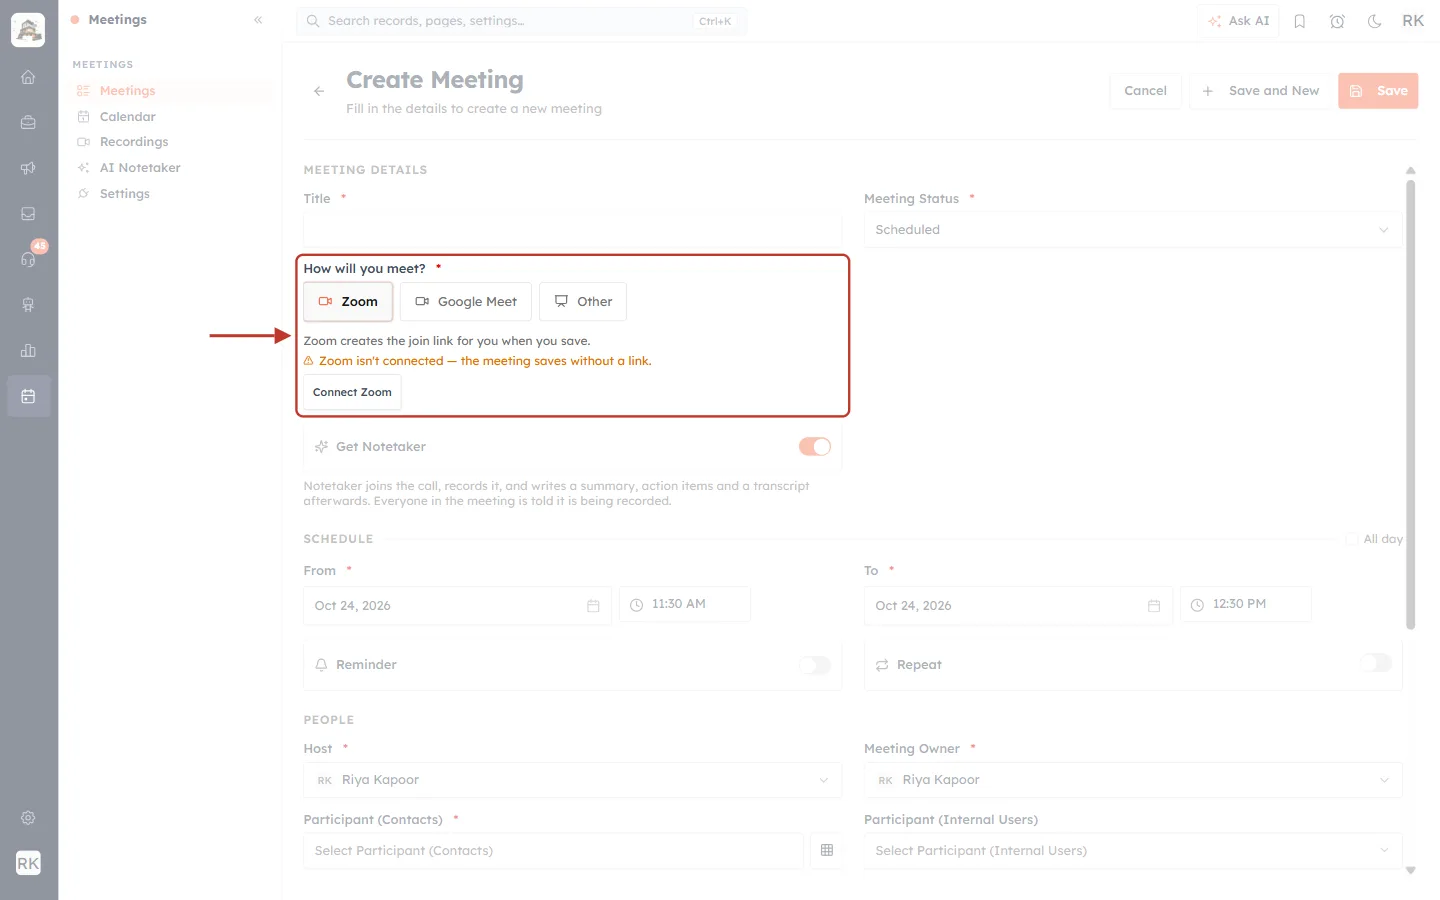
What this screenshot shows. The same field when Zoom is not connected.
An amber warning: “Zoom isn’t connected — the meeting saves without a link.”
Connect Zoom opens the Zoom pop-up without leaving the form.
You can still save, but the meeting will have no Zoom link. More in Create a Meeting from the Meetings Module.
Step 8: The Zoom link on the meeting record#
Open the meeting under Meetings after it is saved or booked.
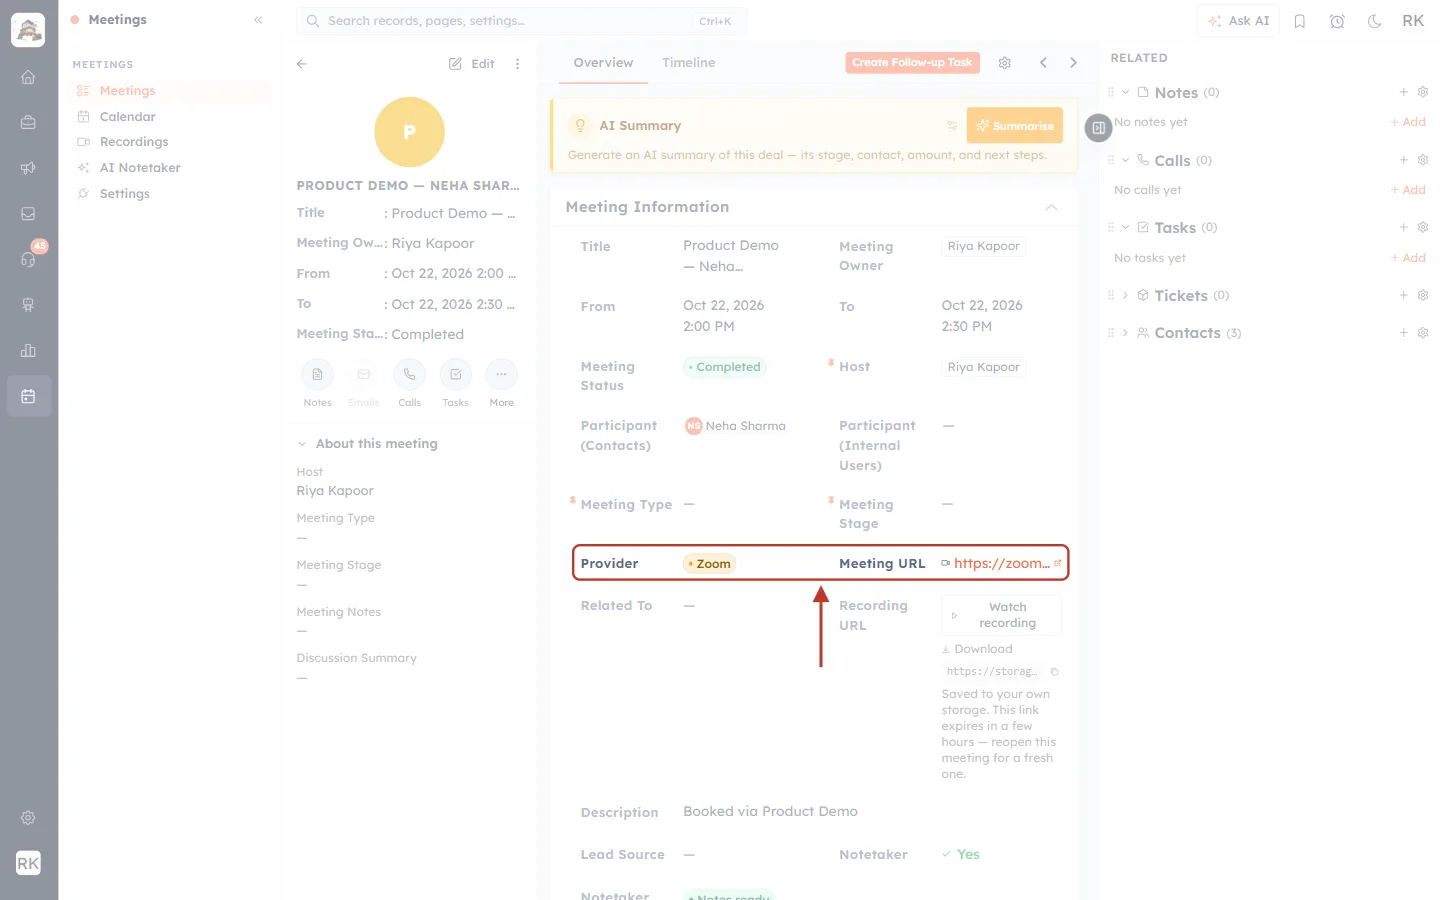
What this screenshot shows. Provider and Meeting URL are ringed on a sample meeting.
Provider: Zoom.
Meeting URL: the Zoom meeting created for this one meeting. The small icon opens it.
Recordings, transcripts and summaries on the record come from the AI Notetaker; see AI Note Taker: Recordings, Transcripts, Credits & Storage. Everything else on the record is explained in Reading a Meeting Record.
Step 9: Disconnect Zoom#
To stop using Zoom, click Disconnect on the Zoom card in Meetings → Settings (or on the Zoom card in a calendar’s Platform step). The CRM asks you to confirm.
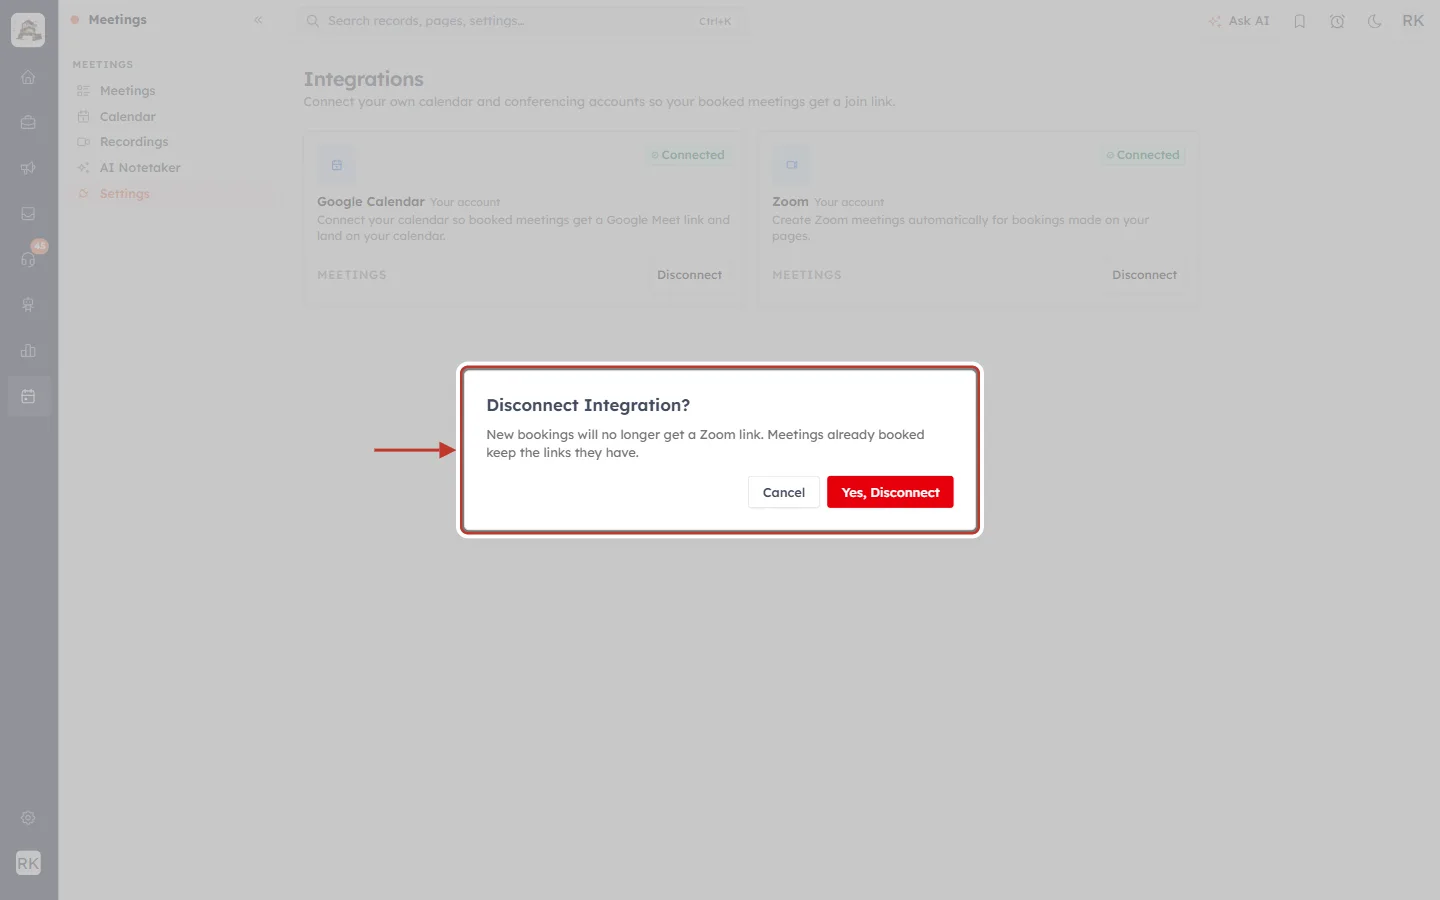
What this screenshot shows. The Disconnect Integration? window is ringed.
“New bookings will no longer get a Zoom link. Meetings already booked keep the links they have.”
Yes, Disconnect removes the connection; the CRM also withdraws its access in Zoom. Cancel keeps it.
What changes after you disconnect#
The Zoom card shows Connect again, and Connected accounts shows Connect beside Zoom.
New bookings on a calendar set to Zoom no longer get a Zoom meeting. Reconnect, or switch the calendar to another location, so invitees aren’t left without a link.
New meetings saved with Zoom picked save without a join link.
Zoom meetings already created keep working, because they live in your Zoom account.
Nothing in the CRM is deleted: calendars, meetings, contacts and past links stay as they were.
Google Meet is not affected, and colleagues’ Zoom connections are not affected.
Or remove the app from Zoom’s side#
You can also remove access from your Zoom account. Sign in at marketplace.zoom.us, click Manage, then Added apps.
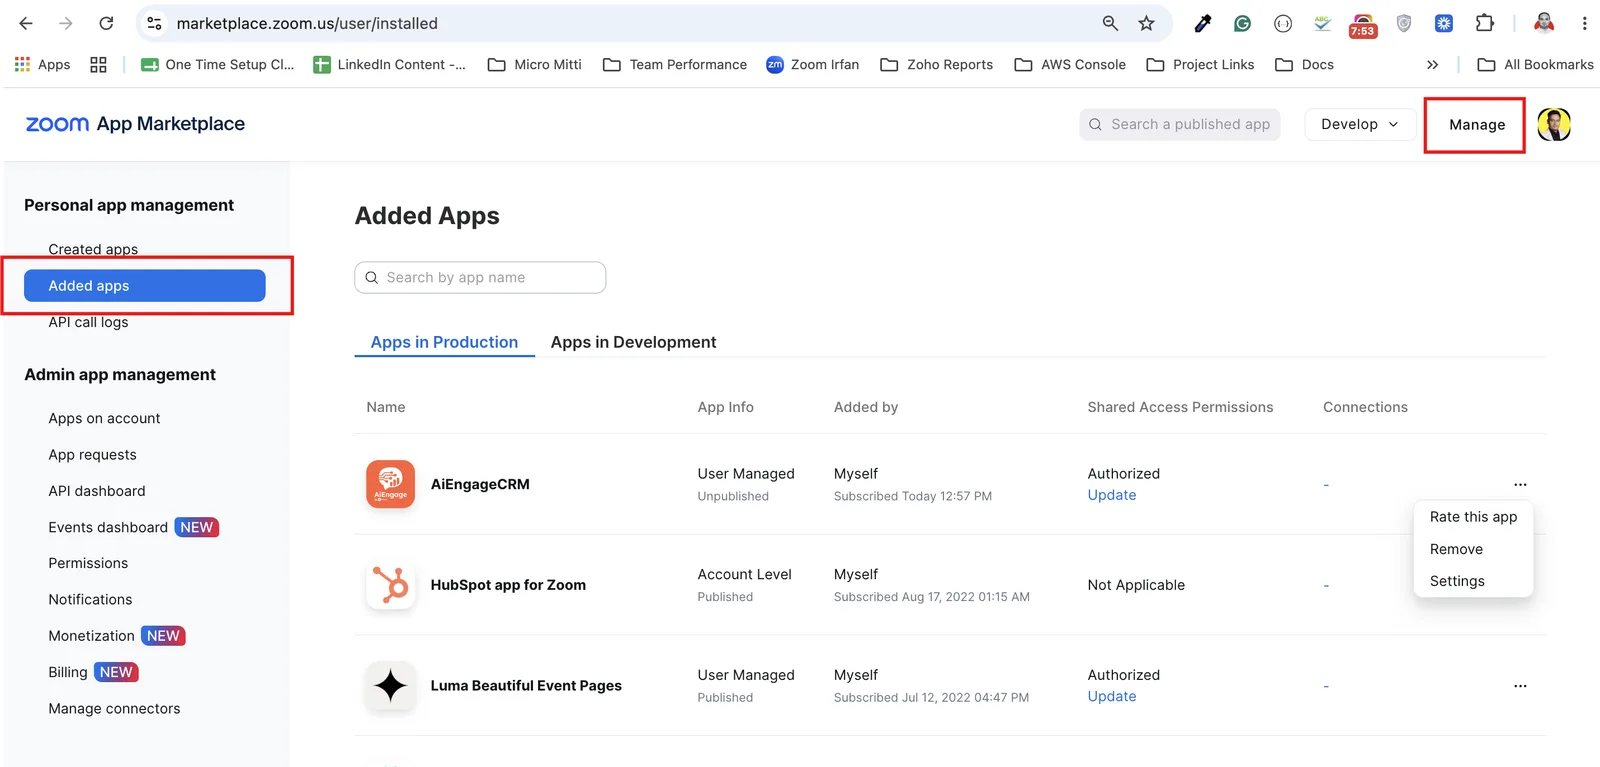
What this screenshot shows. Zoom’s App Marketplace, with Manage (top right) and Added apps (left) ringed.
Under Personal app management, Added apps lists every app connected to your Zoom account.
On the Apps in Production tab, find AiEngageCRM.
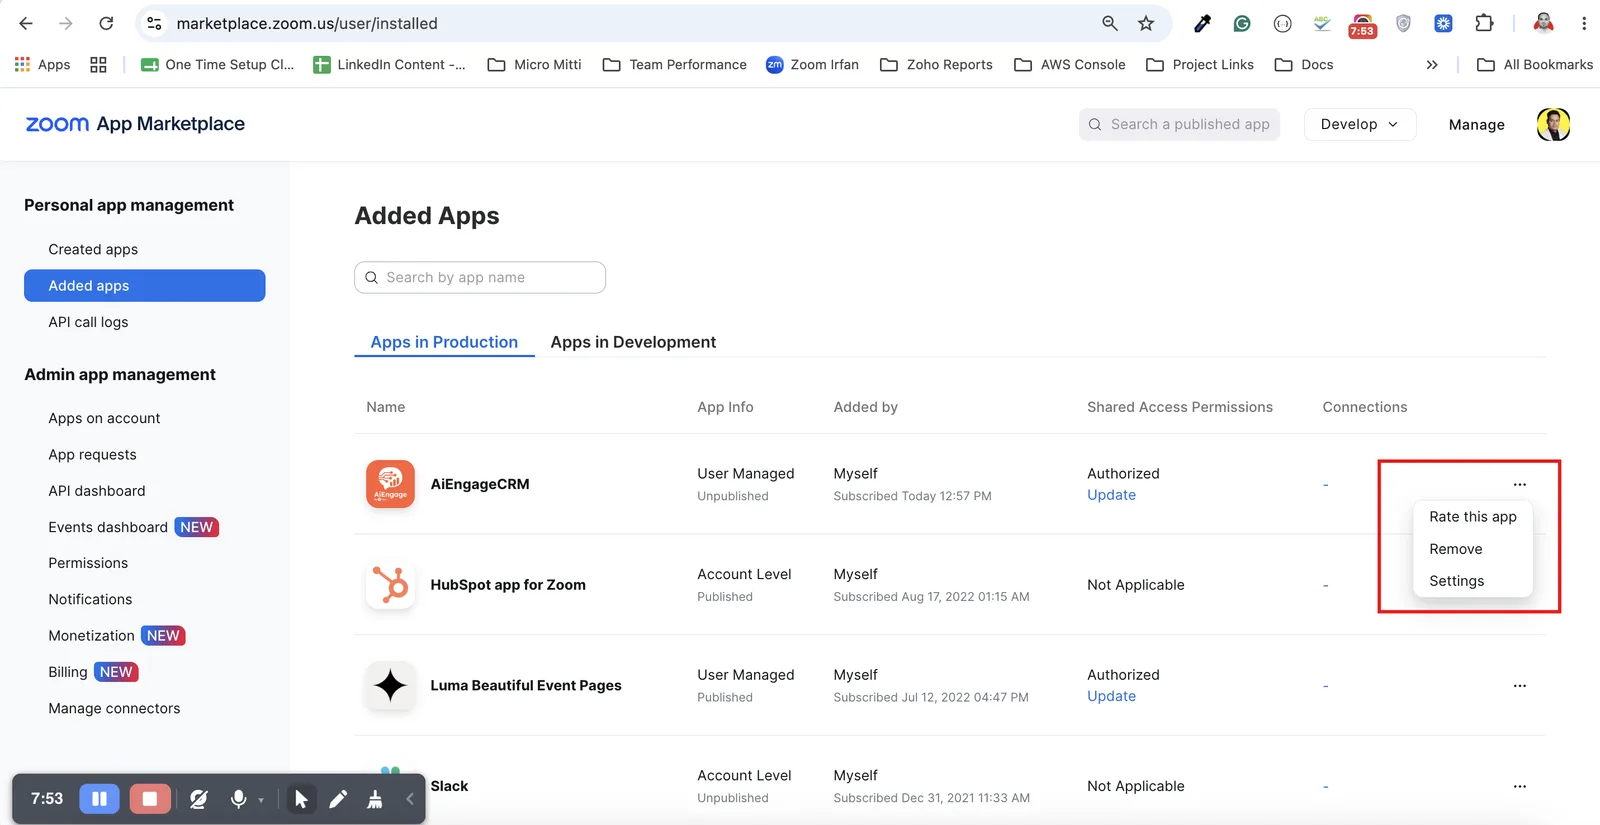
What this screenshot shows. The ••• menu on the AiEngageCRM row is open and ringed.
Click Remove and confirm.
Zoom tells AiEngage CRM, which drops the connection. The CRM then shows Zoom as needing to connect again.
Troubleshooting#
Problem | What to do |
|---|---|
Nothing happens when I click Connect | Allow pop-ups for the CRM and click again. |
I signed in, but Zoom still shows Connect | Reload the page. If it still shows Connect, the authorization didn’t finish (or you clicked Decline): connect again. |
“Connect Zoom to publish this page” | New calendars need a connected Zoom account. Connect, or choose another location. |
My meeting saved without a Zoom link | Zoom wasn’t connected when you saved. Connect, then edit the meeting, pick Zoom again and save. |
Everyone lands in the same Zoom room | Use my own Zoom link is on. Turn it off for a link per booking. |
Zoom says an administrator must approve the app | Ask your Zoom admin to approve AiEngageCRM, then connect again. |
I connected the wrong Zoom account | Disconnect (Step 9), then connect again with the right account. |
The meeting ends after 40 minutes | That is your Zoom plan’s limit, not the CRM. |
Still stuck? Contact support@aitrillion.com with the calendar or meeting involved and roughly when it happened.
Previous and next#
Related#
Was this article helpful?
Ready to implement this?
OpenAI Engage and apply what you just learned to your own workspace.
Open AI Engage CRM