Loading…


KnowledgeBase
Create an Event in the Calendar
What this covers#
An event in AI Engage is a booking link. You set it up once — how long the meeting runs, when you are free, how many people may take each slot, and where the meeting happens — and then you share the link. Anyone who opens it sees only your open times, picks one, and fills in a short form. The booking lands on your calendar and their answers create a contact.
ℹ️
An event is not the same thing as a meeting. A meeting is one dated record you create yourself, for a specific person, at a specific time. An event is a reusable link that lets other people put meetings on your calendar without emailing you back and forth.
Creating one takes four steps: Details, Availability, Platform and Review. Nothing goes live until you click Publish calendar on the last step.
New in this release#
Three things have been added to the wizard since this guide was first written. Each one is covered in full in its step below, but here is the short version:
- Public link (step 1) — the web address of your booking page is now shown beside the name, and you can edit the last part of it. The address is
/meet/<your-link>. - Booking per slot (step 2) — one time slot can now hold more than one booking. Set it to 2, 5, 10 or a number of your own, and everyone who books that slot joins the same meeting.
- Calendar sync (step 3) — a required switch that reads your Google Calendar and hides any time you are already busy. The wizard will not let you reach Review, or publish, while it is off.
⚠️
Calendar sync is the one that will stop you. If Continue to review seems to do nothing on the Platform step, this is almost always why — see New — Calendar sync (required) further down.
Before you start#
You need one thing ready: a contact form for invitees to fill in when they book. Step 1 will not let you continue without it, because the form is what turns a booking into a contact record. If the dropdown is empty, create a form first and come back.
It also helps to connect Google Calendar before you begin, since step 3 now requires it. If it is not connected yet, do not worry — you can stop at step 3, connect, and carry on.
Step 1 — Open the Calendar and start a new event#
In the left sidebar, open the Meetings section. It lists Meetings, Calendar, Recordings, AI Notetaker and Settings. Click Calendar.
This opens the Events screen, described on the page as “Booking links people can use to schedule time with you.”
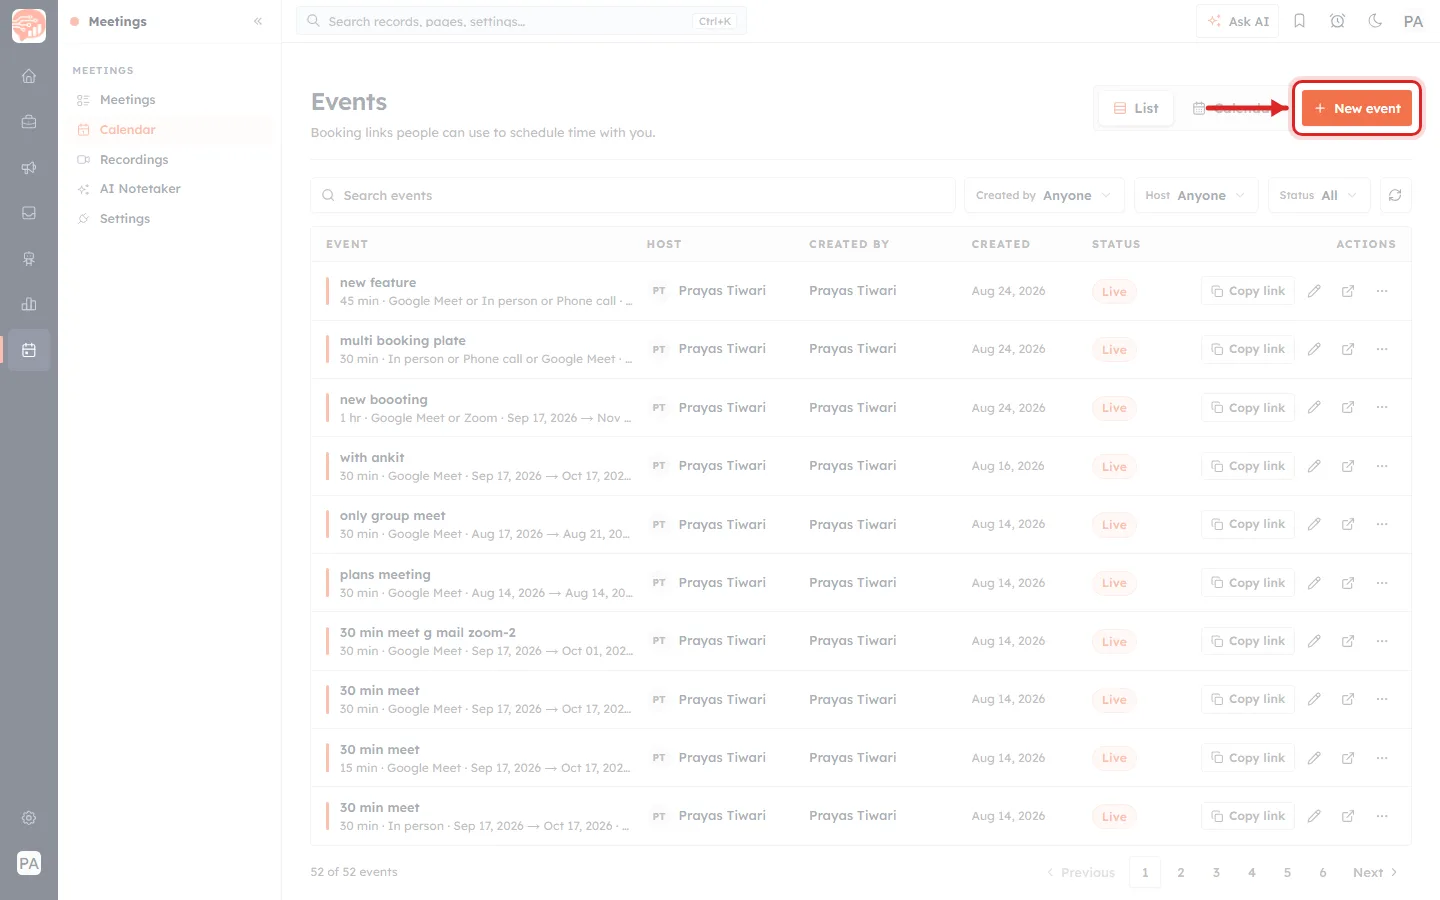
The Events screen, with the button you need ringed in red and an arrow pointing at it. Everything else on the page has been faded back so the target is unmistakable.
What you are looking at. Reading the screenshot from the top:
- Events, the page title, with the one-line explanation underneath.
- Top right, three controls sit together: List and Calendar — two ways to look at the same events, with List being the table you land on — and then the orange New event button, ringed in red above. That button is what starts the wizard.
- A Search events box, then three dropdown filters — Created by, Host and Status, each set to show everything by default — and a circular refresh button at the end of the row.
- The table itself, with columns EVENT, HOST, CREATED BY, CREATED, STATUS and ACTIONS.
- Each row shows the event name, and beneath it a summary line: the duration, the locations on offer, the dates the link currently covers, and how many bookings it has taken — for example “45 min · Google Meet or In person or Phone call · Sep 17, 2026 → Nov 16, 2026 · 27 booked”.
- STATUS shows Live for a published link. Under ACTIONS sit Copy link, a pencil to edit, an open-in-new-tab icon to view the booking page, and a … menu.
- At the bottom left, a count — 52 of 52 events — and page numbers with Previous and Next on the right.
Click New event.
💡
If this is your first booking link the table shows its empty state, “No events yet”, instead of rows. The New event button is in the same place either way.
Step 2 — Details: name it, size it, pick the form#
Step 1 of 4 is headed Details, with the subtitle “name it, size it, and pick the form invitees fill in.” A four-stage rail across the top — 1 Details, 2 Availability, 3 Platform, 4 Review — tracks where you are. Fields marked with a red asterisk (*) are required.
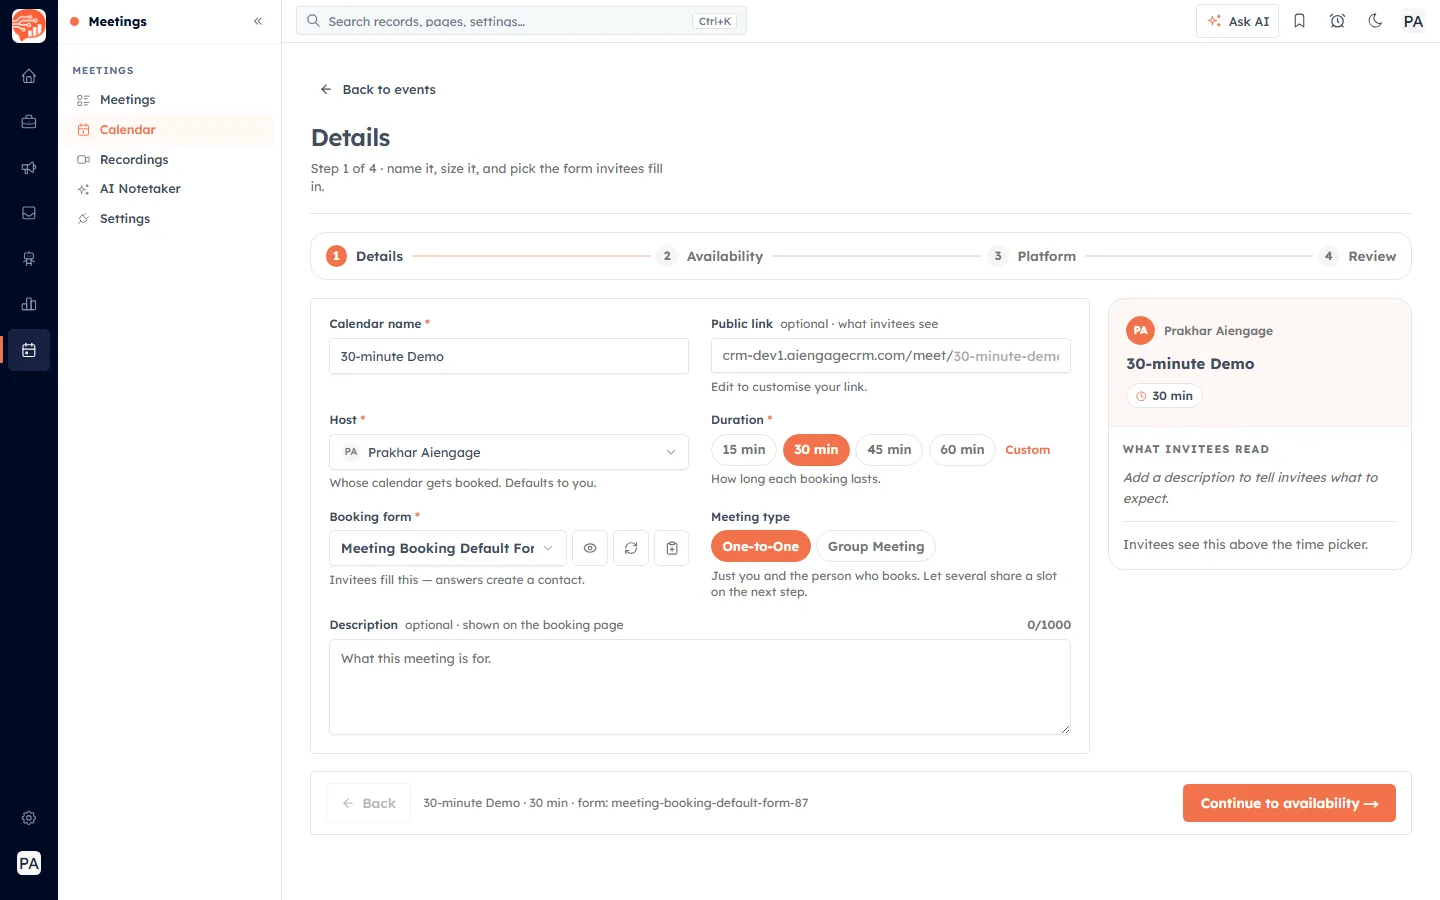
The Details step with everything filled in. Note the two columns: form fields on the left and centre, and on the far right a live preview headed WHAT INVITEES READ that redraws as you type.
Walking through the screenshot, field by field:
- Calendar name (required) — top left, here reading 30-minute Demo. This is the heading invitees see on the booking page.
- Public link — top right, showing the address the name produced. This is new; see the next section.
- Host (required) — a picker showing the host’s initials and name, with the note “Whose calendar gets booked. Defaults to you.” Change it only if you are setting a link up on a colleague’s behalf.
- Duration (required) — five chips: 15 min, 30 min, 45 min, 60 min and Custom. The selected one is filled orange — 30 min in the shot. Underneath: “How long each booking lasts.” This also decides how your free time is sliced into slots.
- Booking form (required) — a dropdown reading Select a contact form until you choose one. Three small icon buttons sit to its right: an eye to preview the form, a refresh to reload the list after you build a new form in another tab, and a clipboard. The helper line explains why the field matters: “Invitees fill this — answers create a contact.”
- Meeting type — two chips, One-to-One (the default) and Group Meeting. The line beneath now reads “Just you and the person who books. Let several share a slot on the next step.” — that last clause points at the new capacity control on Availability.
- Description — optional, up to 1,000 characters, with a live 0/1000 counter in the corner. It is shown on the booking page above the time picker.
- Bottom bar — Back on the left, a running summary in the middle (“30-minute Demo · 30 min · form: meeting-booking-default-form-87”), and Continue to availability → on the right. That button stays faded until the required fields are filled.
New — the Public link#
The booking page now has a visible, editable web address, sitting directly to the right of the calendar name.
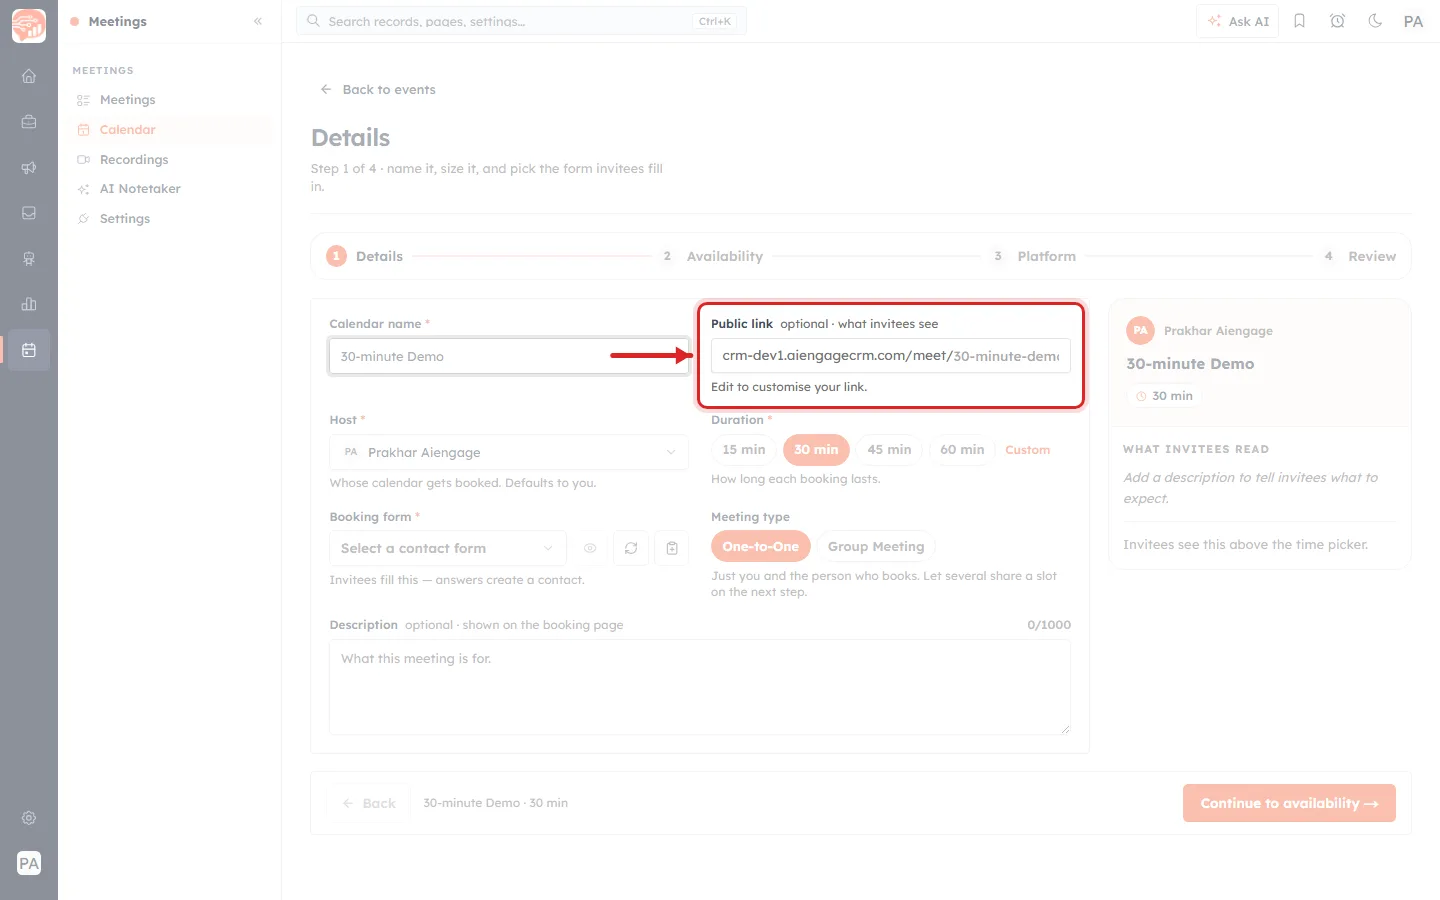
The Public link field, ringed in red with an arrow running to it from the calendar name — because that is where the link comes from. Type a name on the left and the address on the right fills itself in.
Reading the ringed area:
- The label Public link, followed by the grey note optional · what invitees see. Optional means you can leave it exactly as generated.
- The field itself, holding the full address. The first part is your CRM’s own web address followed by
/meet/; the last part is the slug made from your calendar name. In the screenshot the whole thing readscrm-dev1.aiengagecrm.com/meet/30-minute-demo— crm-dev1 is the demo account used for these captures, so yours will show your own address. - Beneath it, the instruction “Edit to customise your link.”
The domain part is fixed. Only the tail — the slug after /meet/ — can be typed over, and that is the part invitees read. 30-minute Demo becomes 30-minute-demo automatically: lower case, spaces turned into hyphens.
💡
Edit the slug when the name is longer than the link should be. A calendar called “Quarterly Business Review with the Onboarding Team” produces a link nobody can read out over the phone — shorten it to
/meet/qbr. Keep it short, lower case, and made of words rather than numbers.ℹ️
Change the slug before you share the link, not after. The address is what people bookmark and what sits in your email signature — editing it later leaves the old one pointing nowhere.
Choosing the booking form#
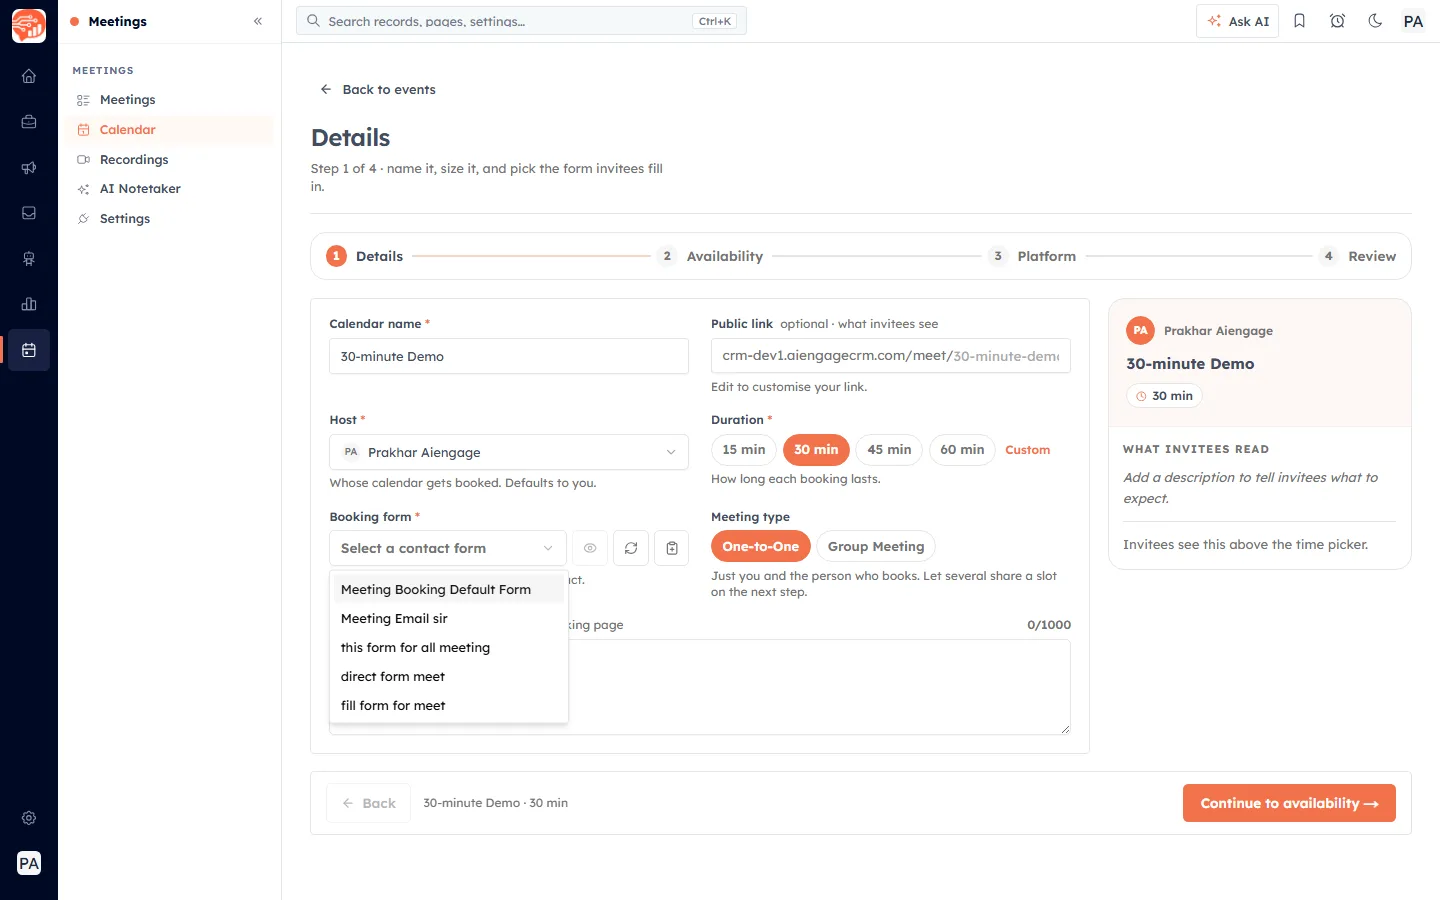
The Booking form dropdown, open. It lists every contact form already built in your account, the first one highlighted. The names in this screenshot belong to the demo account — yours will be your own.
Pick the form whose questions you actually want answered at booking time. Whatever an invitee types into it is written to a new contact record, so a form asking for company and phone number gives you a far more useful contact than one asking only for an email address.
💡
Leaving Description blank is allowed, but the preview nudges you: “Add a description to tell invitees what to expect.” A sentence or two about what the call covers noticeably reduces no-shows.
When the required fields are filled, the bar at the bottom summarises what you have so far and Continue to availability → turns solid orange. Click it.
Step 3 — Availability: when people can book, and how many at a time#
Step 2 of 4 sets “the booking window, the notice you need, and your weekly hours.” This is the step that decides which slots invitees actually see.
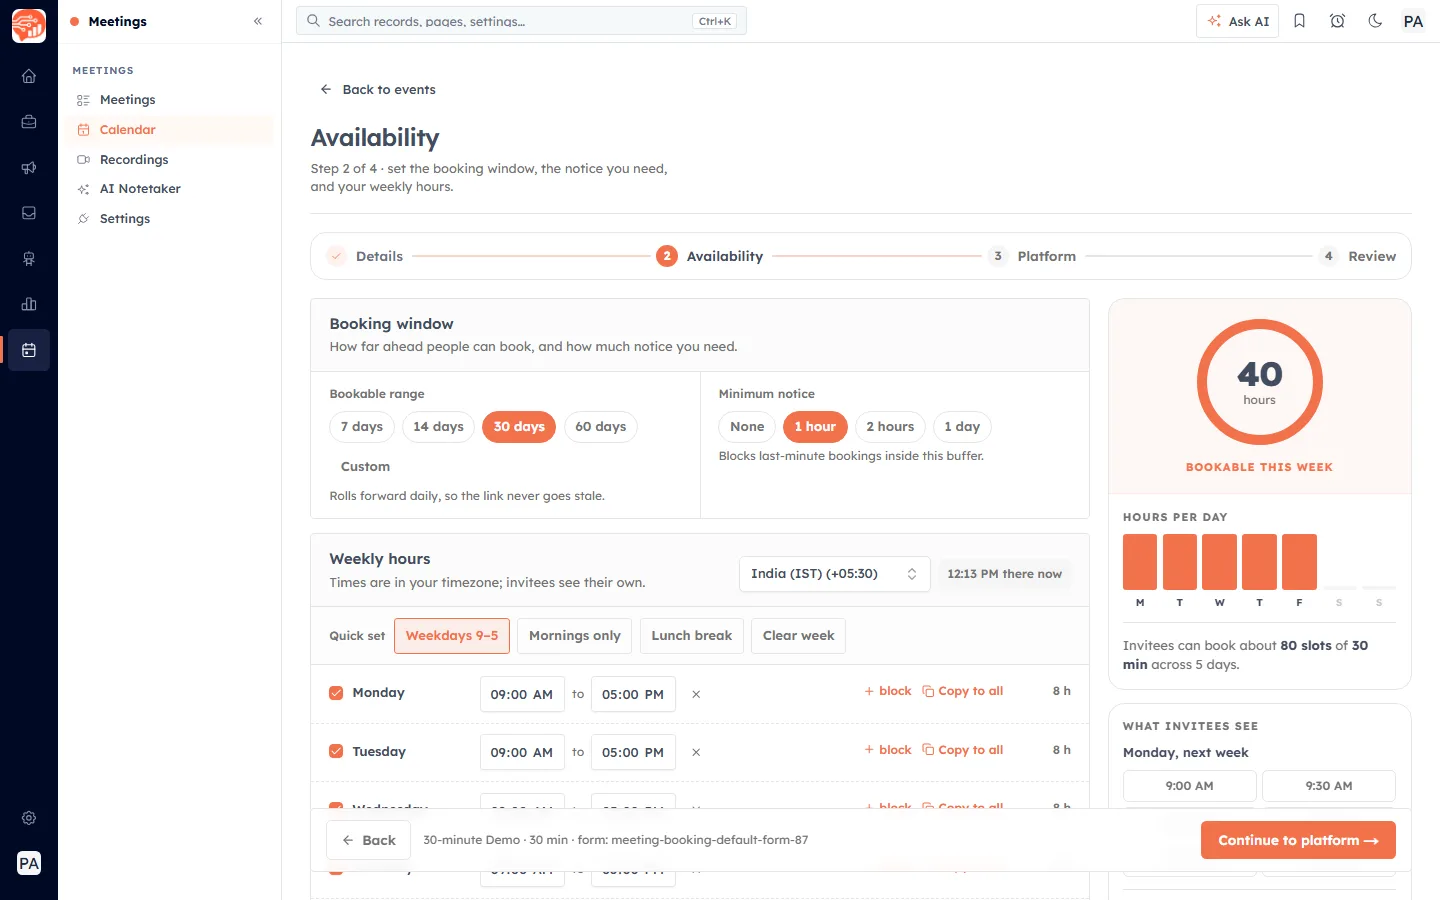
The Availability step. Two cards stack on the left — Booking window then Weekly hours — while the right-hand column keeps a running tally of what you have set.
The Booking window card, at the top of the screenshot, holds two chip rows:
- Bookable range — 7 days, 14 days, 30 days, 60 days or Custom; 30 days is selected and filled orange in the shot. Underneath: “Rolls forward daily, so the link never goes stale.” A 30-day range always means the next 30 days from today, not a fixed end date.
- Minimum notice — None, 1 hour, 2 hours or 1 day, with 1 hour selected. It “blocks last-minute bookings inside this buffer”, so nobody can drop a call into your next ten minutes.
The Weekly hours card below it is your recurring working pattern. The line under the heading is the important one: “Times are in your timezone; invitees see their own.” To its right sits the timezone selector — India (IST) (+05:30) in the shot — and beside that a grey pill showing the current local time there, 12:13 PM there now, so you can sanity-check the setting at a glance.
- Quick set — four shortcuts: Weekdays 9–5 (active in the screenshot, outlined orange), Mornings only, Lunch break and Clear week. Start from one of these rather than filling seven rows by hand.
- Each day is a row: a tick box, a from time, to, a to time, an × to remove that block, then + block, Copy to all, and the day’s total on the far right — 8 h for each weekday here.
- Unticked days read Closed — not bookable and are greyed out. Saturday and Sunday start that way.
- + block adds a second window to a day — use it to keep a lunch hour free by splitting the day in two.
- Copy to all applies that day’s hours to every other open day.
The right-hand column keeps score while you work. At the top, a large orange dial reads 40 hours above the caption BOOKABLE THIS WEEK. Below it, HOURS PER DAY draws a small bar chart — five full bars for Monday to Friday, nothing for the weekend — and a sentence translating hours into slots: “Invitees can book about 80 slots of 30 min across 5 days.” Under that, WHAT INVITEES SEE shows a sample day with real time buttons (9:00 AM, 9:30 AM, and so on), footnoted “Converted to each invitee’s timezone.”
ℹ️
Set the timezone before the hours, not after. Every time you enter here is read in the timezone shown in that selector, so changing it later shifts your whole week.
New — Booking per slot#
At the bottom of this step is a card that did not exist before: Booking per slot. It decides how many people may claim the same time.
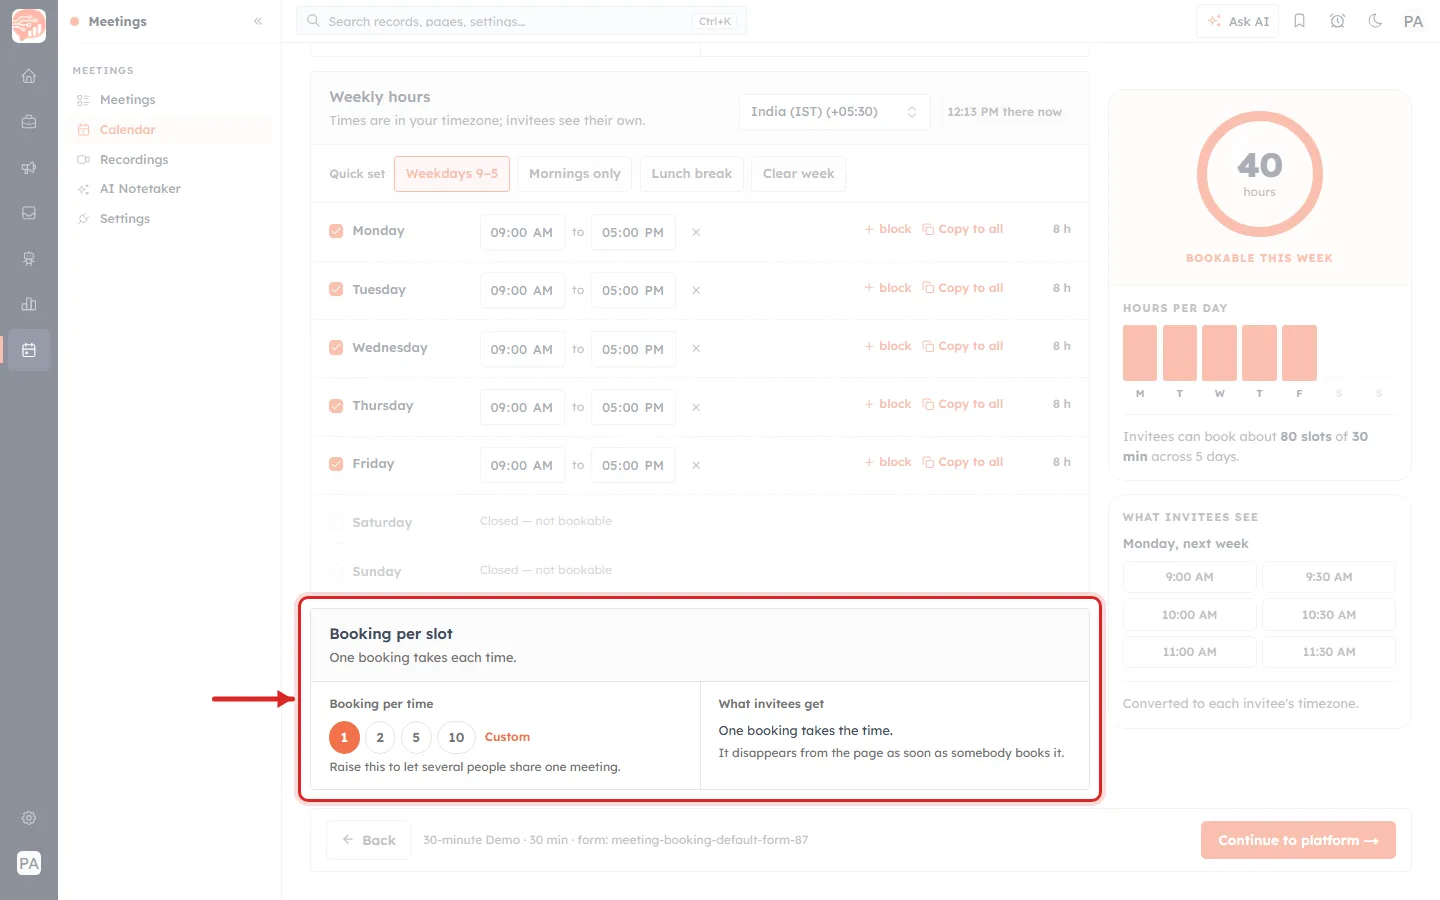
The Booking per slot card at its default of 1, ringed in red with an arrow pointing in from the left. The card is split in two: the control on the left, and a plain-English explanation of its effect on the right.
At the default setting of 1, the card reads:
- Heading Booking per slot, and under it the current state in words: “One booking takes each time.”
- Left half — Booking per time, with round chips 1, 2, 5, 10 and a Custom link. 1 is filled orange. Beneath them: “Raise this to let several people share one meeting.”
- Right half — What invitees get: “One booking takes the time. It disappears from the page as soon as somebody books it.”
That is the classic behaviour: first come, first served, and the slot vanishes.
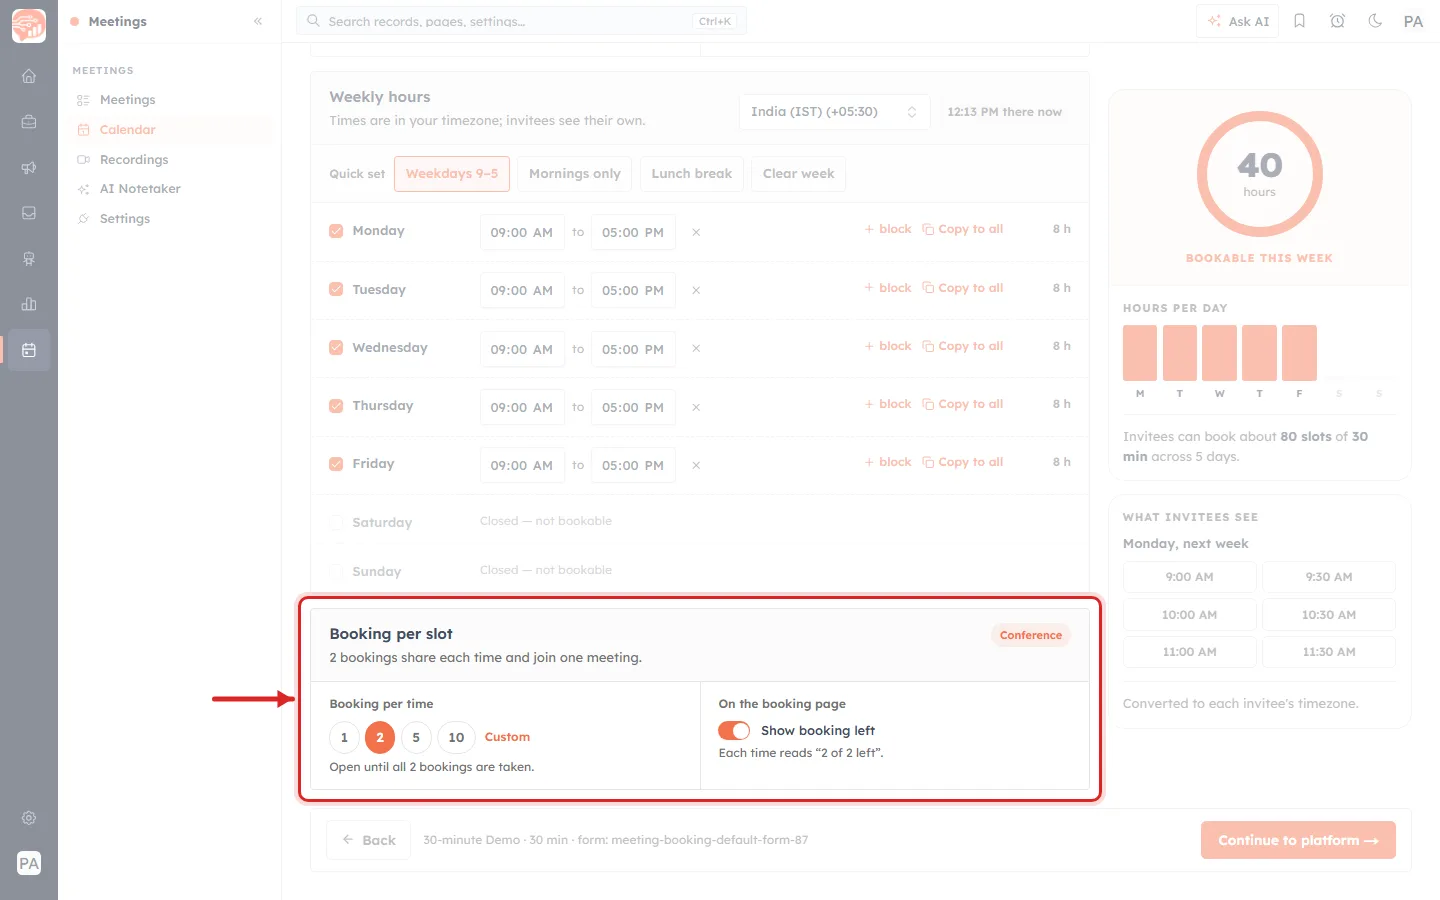
The same card after clicking 2. Three things changed at once — the badge, the description, and the whole right-hand half of the card.
Compare the two screenshots. Clicking 2 changes:
- A Conference badge appears in the top-right corner of the card. It is a label, not a button — it is telling you this link is now a group booking.
- The description under the heading becomes “2 bookings share each time and join one meeting.” Everyone who takes that slot lands in the same meeting, not two back-to-back ones.
- The helper line under the chips becomes “Open until all 2 bookings are taken.” — the slot stays on the booking page until it is full.
- The right half changes from What invitees get to On the booking page, and gains a switch: Show booking left, on by default, explained as “Each time reads ‘2 of 2 left’.”
Show booking left puts a live counter next to every time on the public page. Leave it on when scarcity helps — a workshop with three places left fills faster than one with an unknown number. Turn it off when you would rather not advertise that only one person has signed up.
💡
Custom takes any number you like, for when none of 2, 5 or 10 fits — a 12-seat training room, say.
ℹ️
This is the setting the step-1 hint was pointing at: “Let several share a slot on the next step.” You do not have to switch Meeting type to Group Meeting to use it — raising the number here is what actually makes a slot shareable.
💡
Raising the capacity does not change your hours, so the dial on the right still reads 40 hours and 80 slots. What changes is how many people those 80 slots can hold — at 2 per slot, 160.
When the week looks right, click Continue to platform →.
Step 4 — Platform: where the meeting happens#
Step 3 of 4 asks you to “choose where the meeting happens.” LOCATION is required, and the instruction allows more than one: “Pick one, or several and the invitee chooses.”
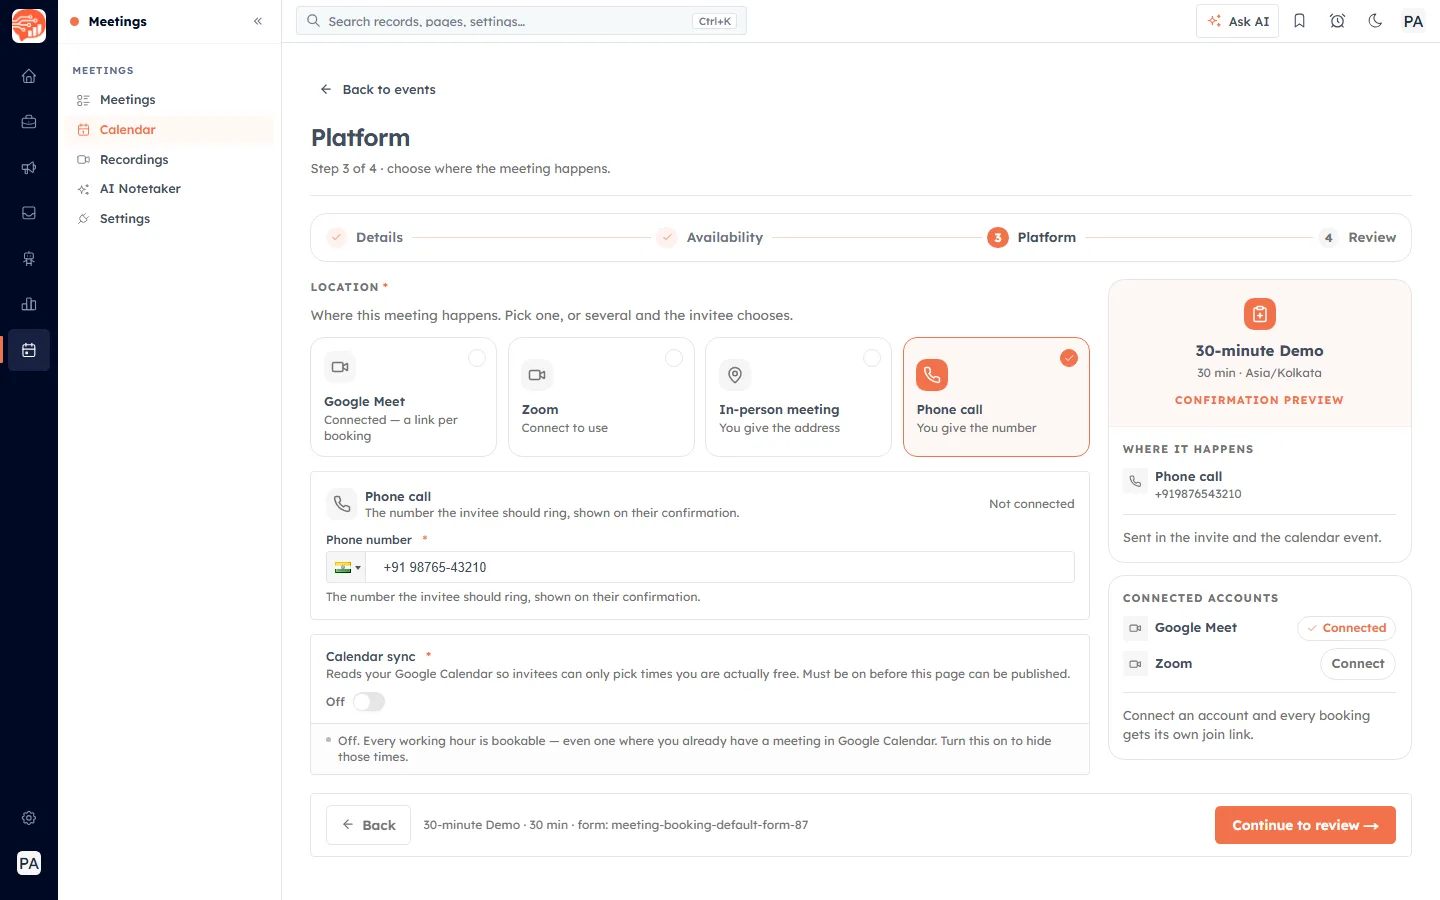
The Platform step with Phone call chosen. The selected tile is outlined orange with a tick in its corner, and a matching details card has opened underneath it.
The four tiles, left to right across the top of the screenshot, each with a one-line status underneath:
- Google Meet — Connected — a link per booking in this account, because the Google account has already been linked. On an account that has not linked one, the tile reads Connect to use instead.
- Zoom — Connect to use.
- In-person meeting — You give the address.
- Phone call — You give the number.
Selecting a tile opens its own card below the row. In the shot, Phone call is selected and the card that opened shows the heading Phone call, the note “The number the invitee should ring, shown on their confirmation”, and a required Phone number field with a country-flag selector — filled here with +91 98765-43210.
The right-hand column carries two panels:
- CONFIRMATION PREVIEW — the event name and 30 min · Asia/Kolkata at the top, then WHERE IT HAPPENS, which mirrors your choice back immediately: a phone icon, the words Phone call, and the number you typed. Footnote: “Sent in the invite and the calendar event.” Before you pick anything it reads “Pick a location to see what the invitee is sent.”
- CONNECTED ACCOUNTS — Google Meet and Zoom, each with either a green Connected pill or a Connect button. Underneath: “Connect an account and every booking gets its own join link.”
⚠️
If Continue to review refuses to move and you see Pick at least one meeting platform under the tiles, no location is selected. Click a tile and fill in whatever it asks for.
Google Meet: a fresh link for every booking#
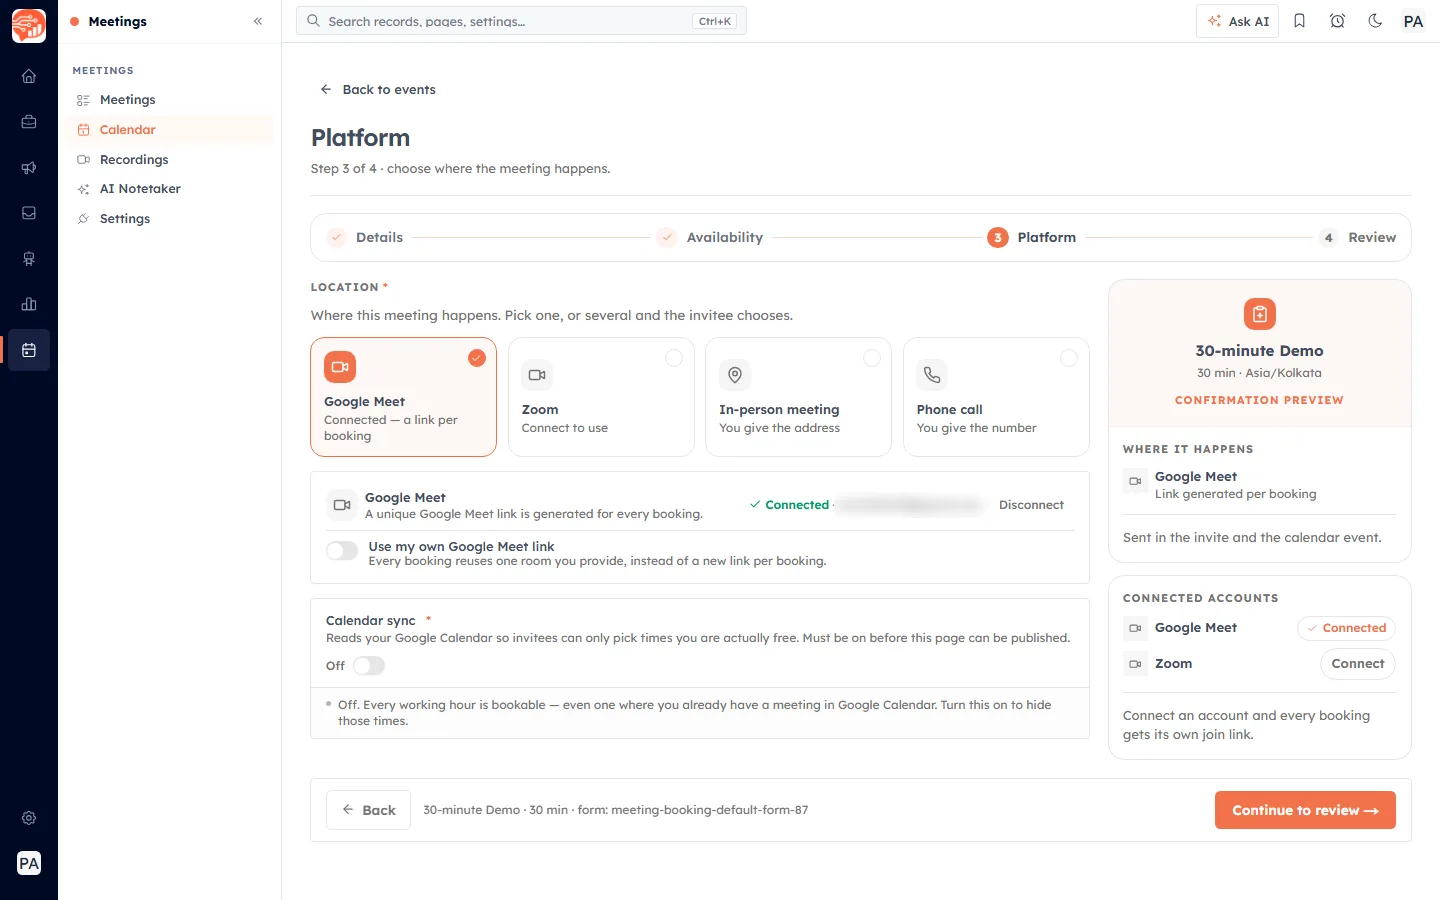
Google Meet selected on an account that has already been connected. The tile is outlined orange with a tick, and the card below it reports the connection rather than asking for a link. The connected address is blurred here — on your own screen it shows the Google account you linked.
The card under the tiles shows, on one line: the heading Google Meet, the explanation “A unique Google Meet link is generated for every booking”, then on the right a green tick with Connected, the Google address it is connected to (blurred in the screenshot), and a Disconnect link.
Below that sits a switch, Use my own Google Meet link, described as “Every booking reuses one room you provide, instead of a new link per booking.” It is off in the screenshot, which is the setting you want almost always:
- Off (default) — every booking gets its own Meet link. Two people booking back-to-back slots never see each other.
- On — every booking reuses one standing room you supply. If two bookings run back to back, the second person can walk in on the first.
Meanwhile the WHERE IT HAPPENS preview on the right reads Google Meet — Link generated per booking.
🔗
You connect Google Meet once for your account, not once per event. Every booking link you build afterwards can use it. The full walkthrough — the sign-in pop-up, what Google is asked to grant, and how to check it worked — is in Connect Google Meet: Automatic Links, Calendar Events & Status.
Zoom: connect it, there is no link to paste#
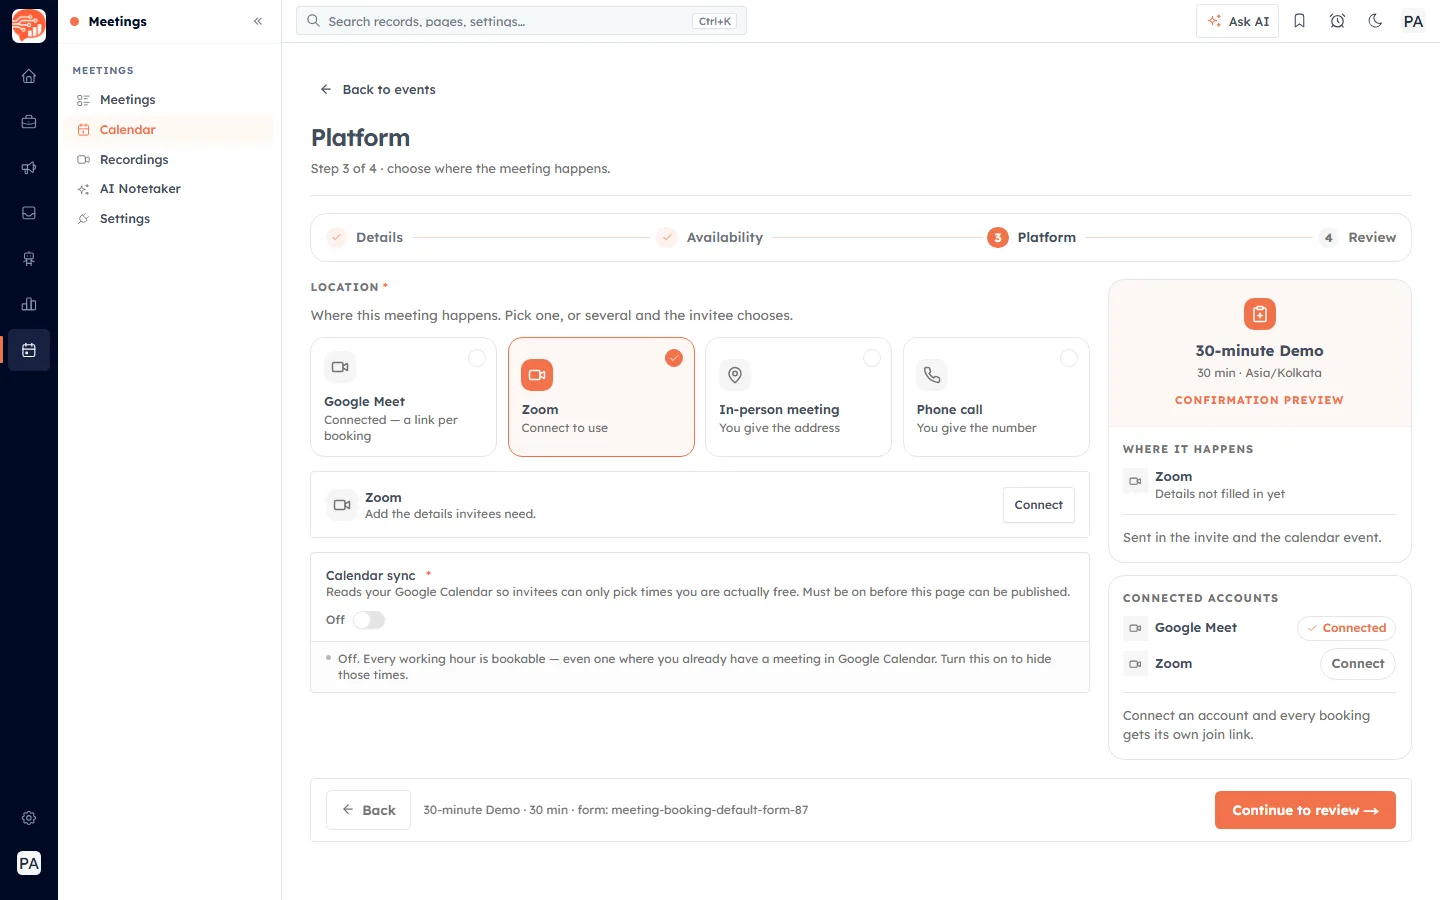
Zoom selected on an account that has not linked Zoom. The card offers exactly one thing to do — Connect — and the preview on the right says the details are not filled in yet.
The card reads Zoom / “Add the details invitees need” with a Connect button on the right, and nothing else. There is no field to paste a personal meeting room into.
Until you connect, the WHERE IT HAPPENS preview reads Zoom — Details not filled in yet, and CONNECTED ACCOUNTS on the right still offers Connect beside Zoom. Either Connect button does the same job, so use whichever is nearer.
🔗
Adding the Zoom app, signing in, and removing it again are covered end to end in Zoom Integration: Add, Use and Remove the App.
💡
If nothing happens when you click Connect, it is almost always your browser’s pop-up blocker — both flows open in a pop-up rather than redirecting the page. Allow pop-ups for the CRM and click again.
New — Calendar sync (required)#
Below the location card is a block that is new, and unlike anything else on this step: it is a switch, it is required, and until it is on the wizard will not let you go any further.
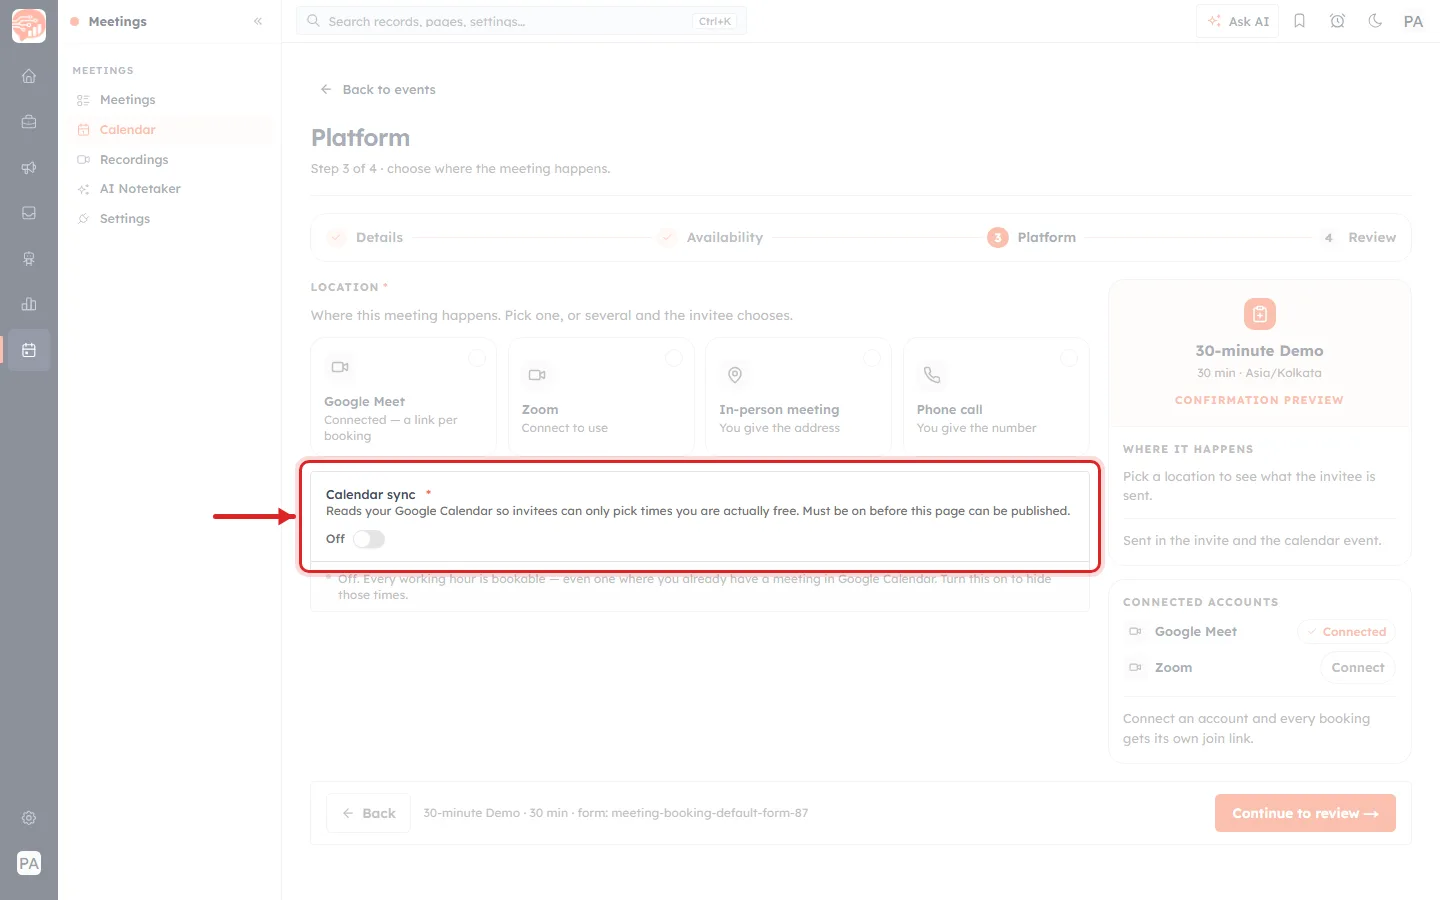
The Calendar sync block in its starting state, ringed in red with an arrow pointing at it. Note the red asterisk beside the label — the same mark the required fields on step 1 carry.
Inside the ringed area:
- The label Calendar sync with a red * — required.
- The explanation: “Reads your Google Calendar so invitees can only pick times you are actually free. Must be on before this page can be published.”
- The switch itself, grey and to the left, with the word Off beside it.
- Just below the ring, the consequence spelled out: “Off. Every working hour is bookable — even one where you already have a meeting in Google Calendar. Turn this on to hide those times.”
What it actually does. Step 2 told the CRM which hours you are willing to work. Calendar sync tells it which of those hours are already taken. With it off, your 9–5 is offered whole, every day, no matter what is in your diary — so an invitee can book straight over a meeting you already have. With it on, the CRM reads your Google Calendar and quietly removes any time you are busy from the booking page.
Calendar sync — what happens if you skip it#
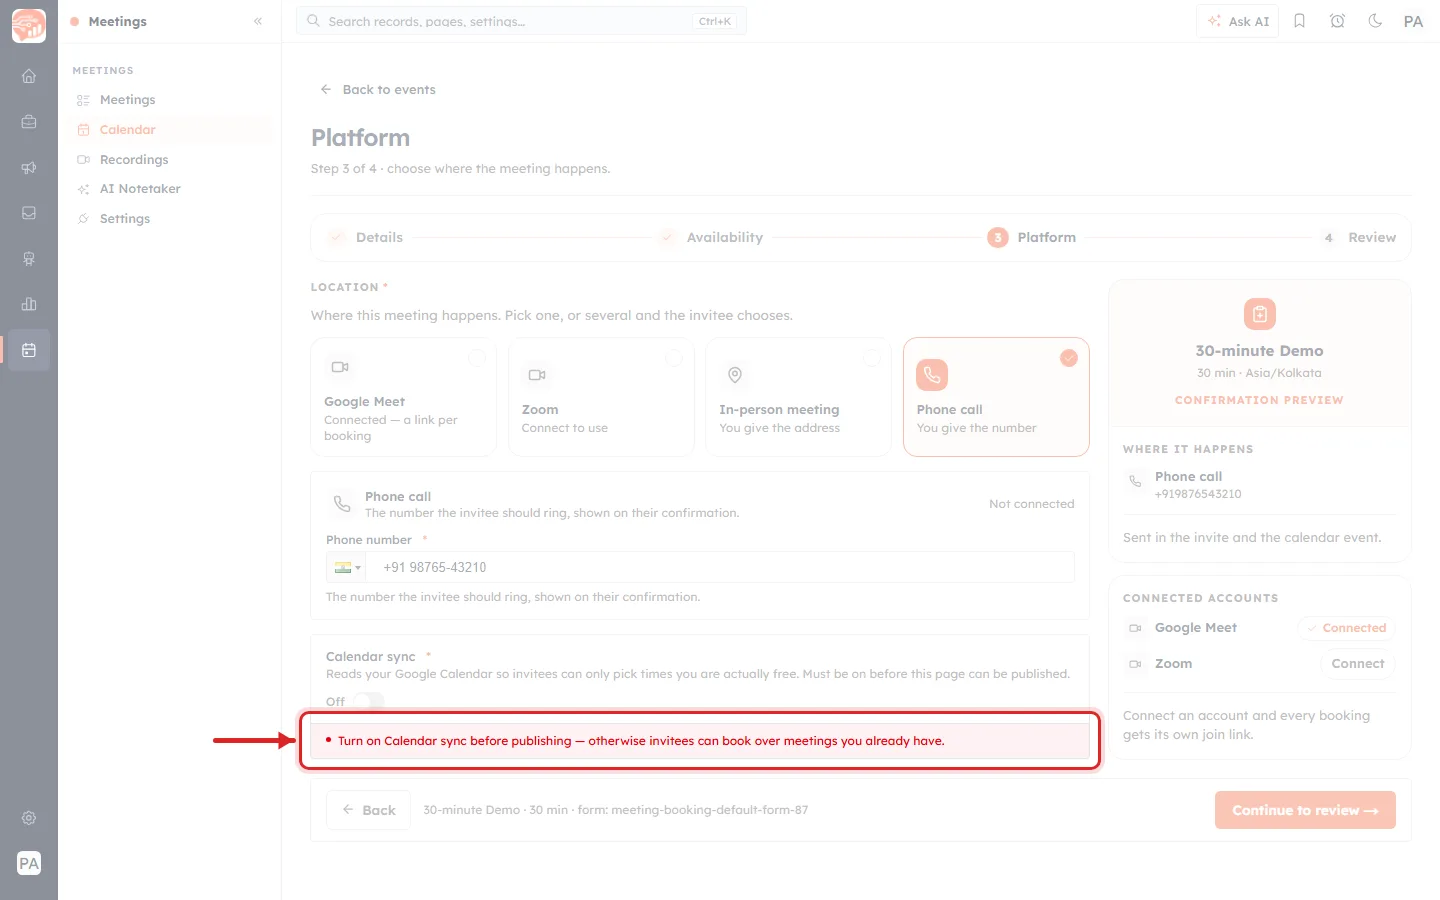
Clicking Continue to review with the switch off. The page does not move; instead this red bar appears under the Calendar sync block, ringed here with an arrow pointing straight at it.
The message reads: “Turn on Calendar sync before publishing — otherwise invitees can book over meetings you already have.” It replaces the grey explanation that was there a moment ago.
This is easy to miss, because the error appears below the fold of what you were looking at while the Continue to review button simply stays put. If clicking Continue seems to do nothing, scroll down to the Calendar sync block.
Calendar sync — turning it on#
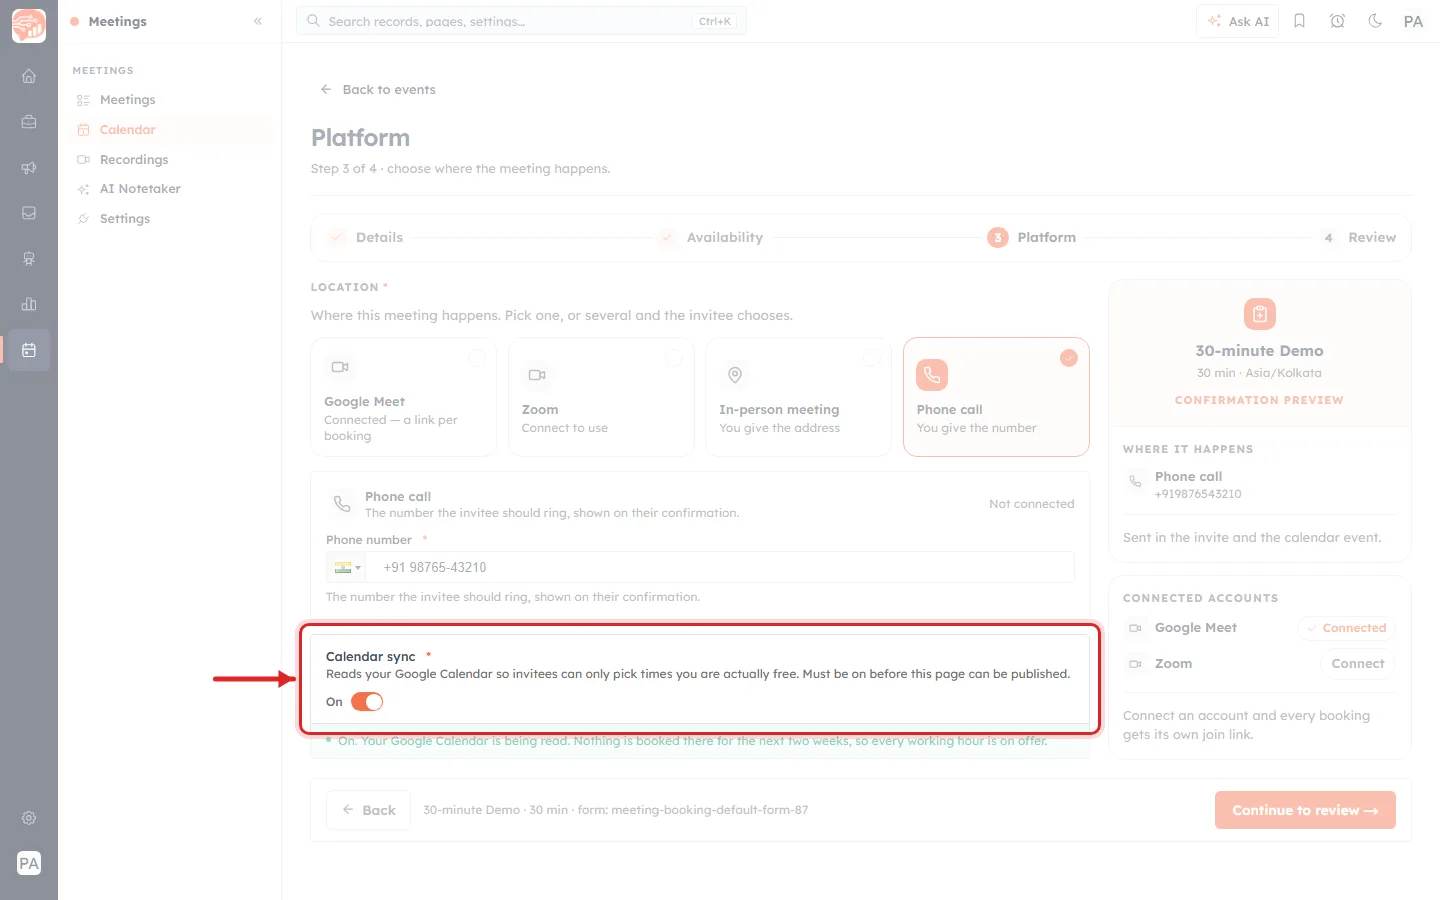
The same block after clicking the switch. The toggle is now orange and reads On, and the line underneath turns green and tells you what it found.
Click the switch. Three things change:
- The toggle turns orange and the word beside it changes from Off to On.
- The red error, if it was showing, disappears.
- The line underneath goes green and reports what the sync found — in this screenshot: “On. Your Google Calendar is being read. Nothing is booked there for the next two weeks, so every working hour is on offer.” On a busier calendar it will say so instead.
That green line is worth reading rather than skimming. It is the quickest confirmation that the CRM is looking at the calendar you expected it to look at.
ℹ️
Calendar sync needs a connected Google account. If the switch will not turn on, connect Google from the CONNECTED ACCOUNTS panel on the right of this same step, then try again.
💡
Sync is read-only in one direction only: it reads your Google Calendar to hide busy times. Writing the booking into your calendar happens anyway when someone books.
With a location chosen and the switch on, Continue to review → works.
Step 5 — Review, then publish#
Step 4 of 4 is your last look: “check everything before the link goes live.”
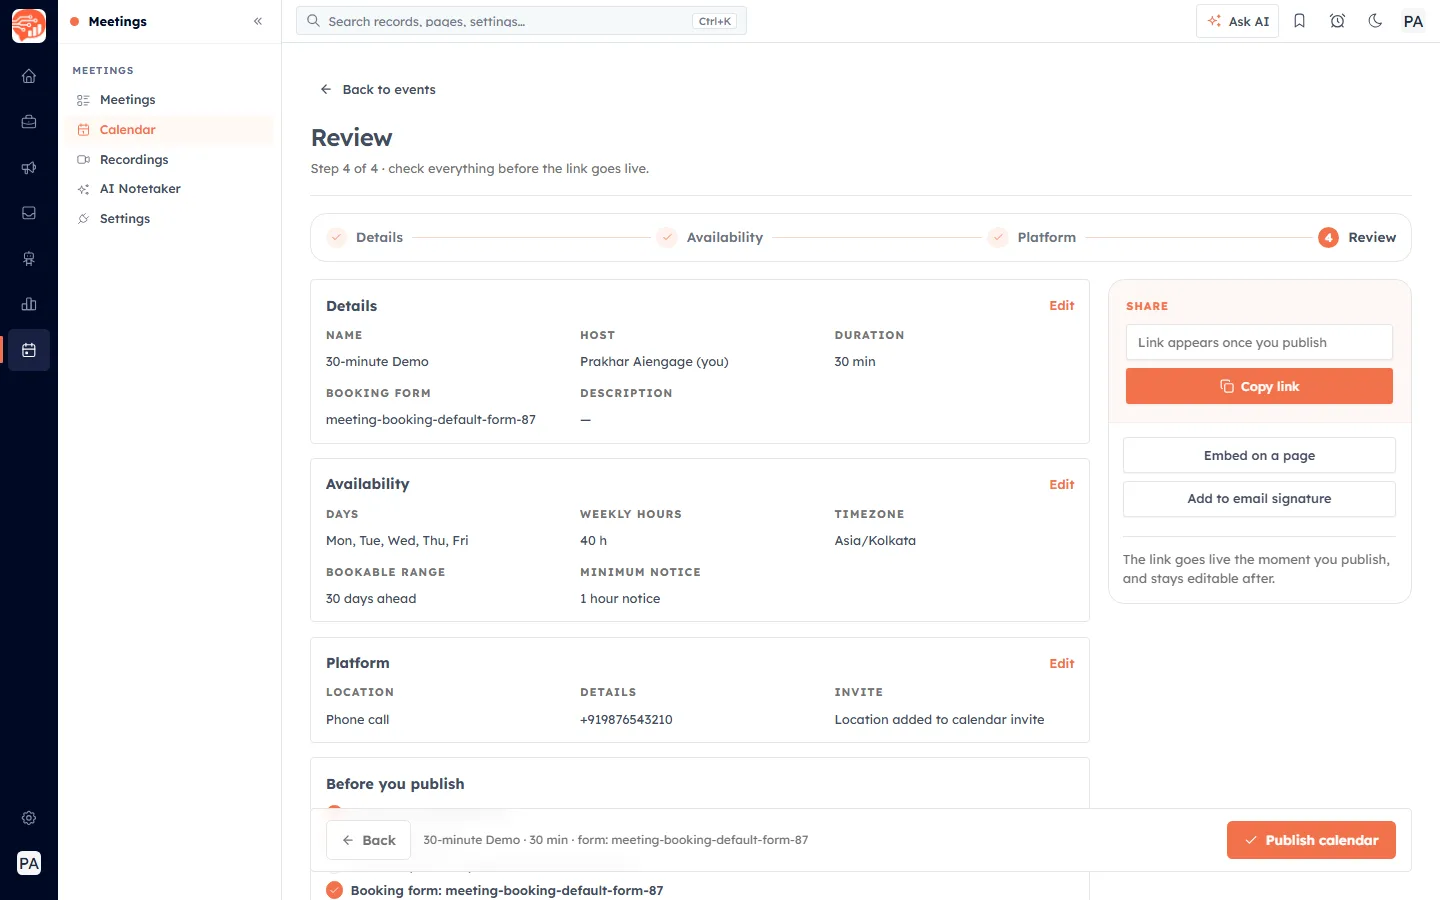
The Review step. Three summary cards stack down the left; the SHARE panel sits on the right. Each card carries its own Edit link in the top-right corner.
The three summary cards restate everything you set, so you can check it in one place:
- Details — NAME, HOST (with “(you)” appended when it is your own calendar), DURATION, BOOKING FORM and DESCRIPTION. Anything left empty shows as a dash, as the description does here.
- Availability — DAYS (Mon, Tue, Wed, Thu, Fri), WEEKLY HOURS (40 h), TIMEZONE (Asia/Kolkata), BOOKABLE RANGE (30 days ahead) and MINIMUM NOTICE (1 hour notice).
- Platform — LOCATION, the DETAILS you typed, and INVITE, confirming “Location added to calendar invite.”
Each Edit link jumps straight back to that step — you never have to click backwards through the wizard to fix one field, and you come back to Review when you are done.
The SHARE panel on the right holds a link box reading “Link appears once you publish”, a faded Copy link button, and two more options — Embed on a page and Add to email signature. All of them stay inactive until you publish. The note underneath explains why: “The link goes live the moment you publish, and stays editable after.”
The “Before you publish” checklist#
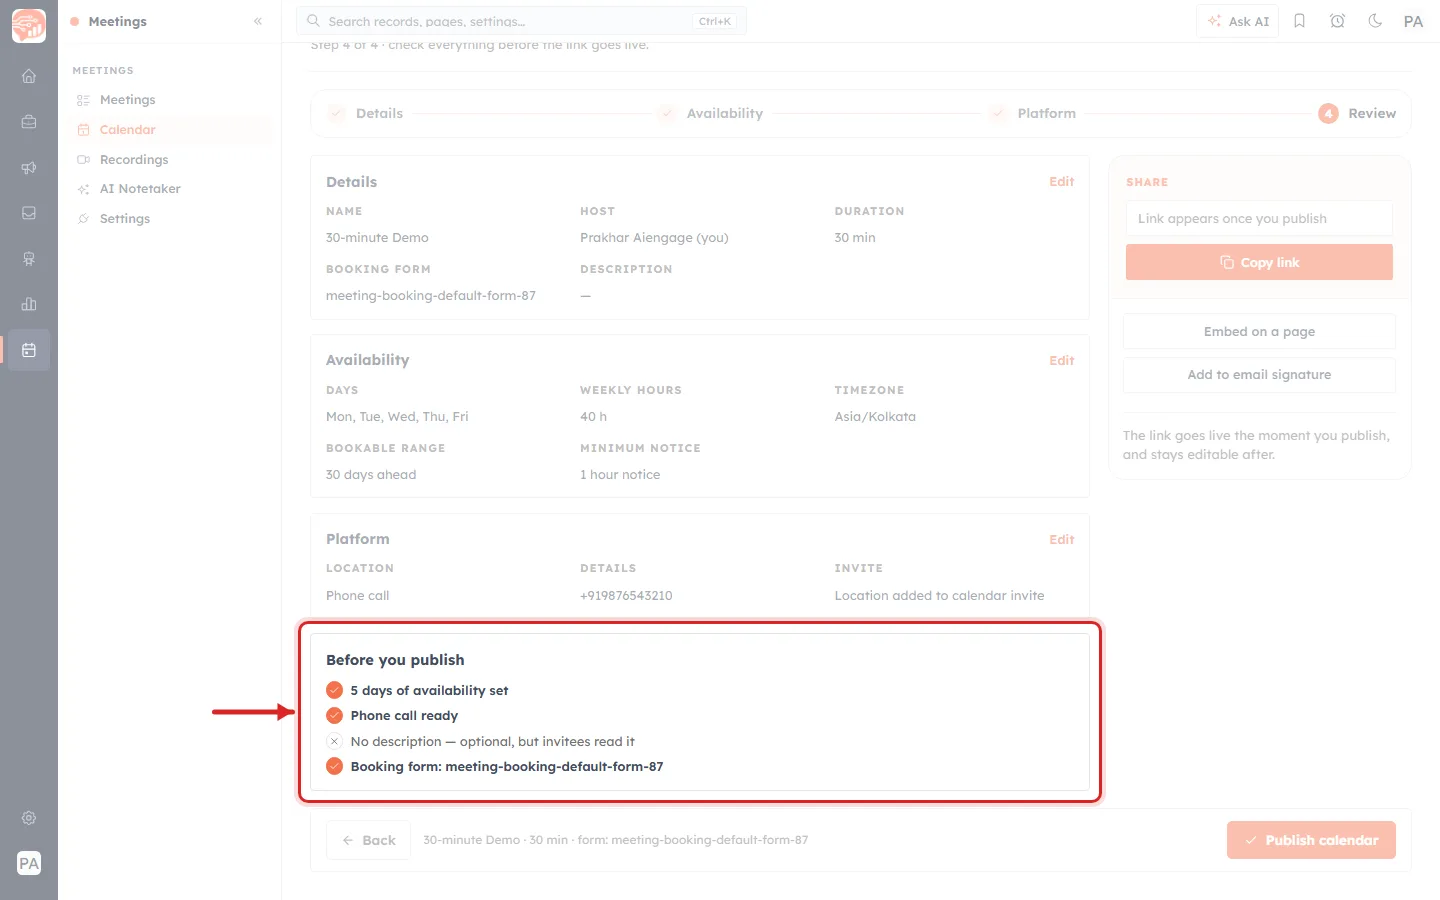
The checklist at the bottom of the Review step, ringed in red. Orange ticks mark what is ready; a grey × marks what is missing.
In the screenshot the four lines read:
- ✔ 5 days of availability set — orange tick.
- ✔ Phone call ready — orange tick; it names whichever location you picked.
- ✖ No description — optional, but invitees read it — grey cross and grey text, because the description was left blank.
- ✔ Booking form: meeting-booking-default-form-87 — orange tick, naming the form chosen on step 1.
This checklist flags gaps rather than blocking you. The grey cross on the description is a nudge, not an error — you can publish with it showing. The hard requirements were enforced earlier, on the steps themselves.
Publishing#
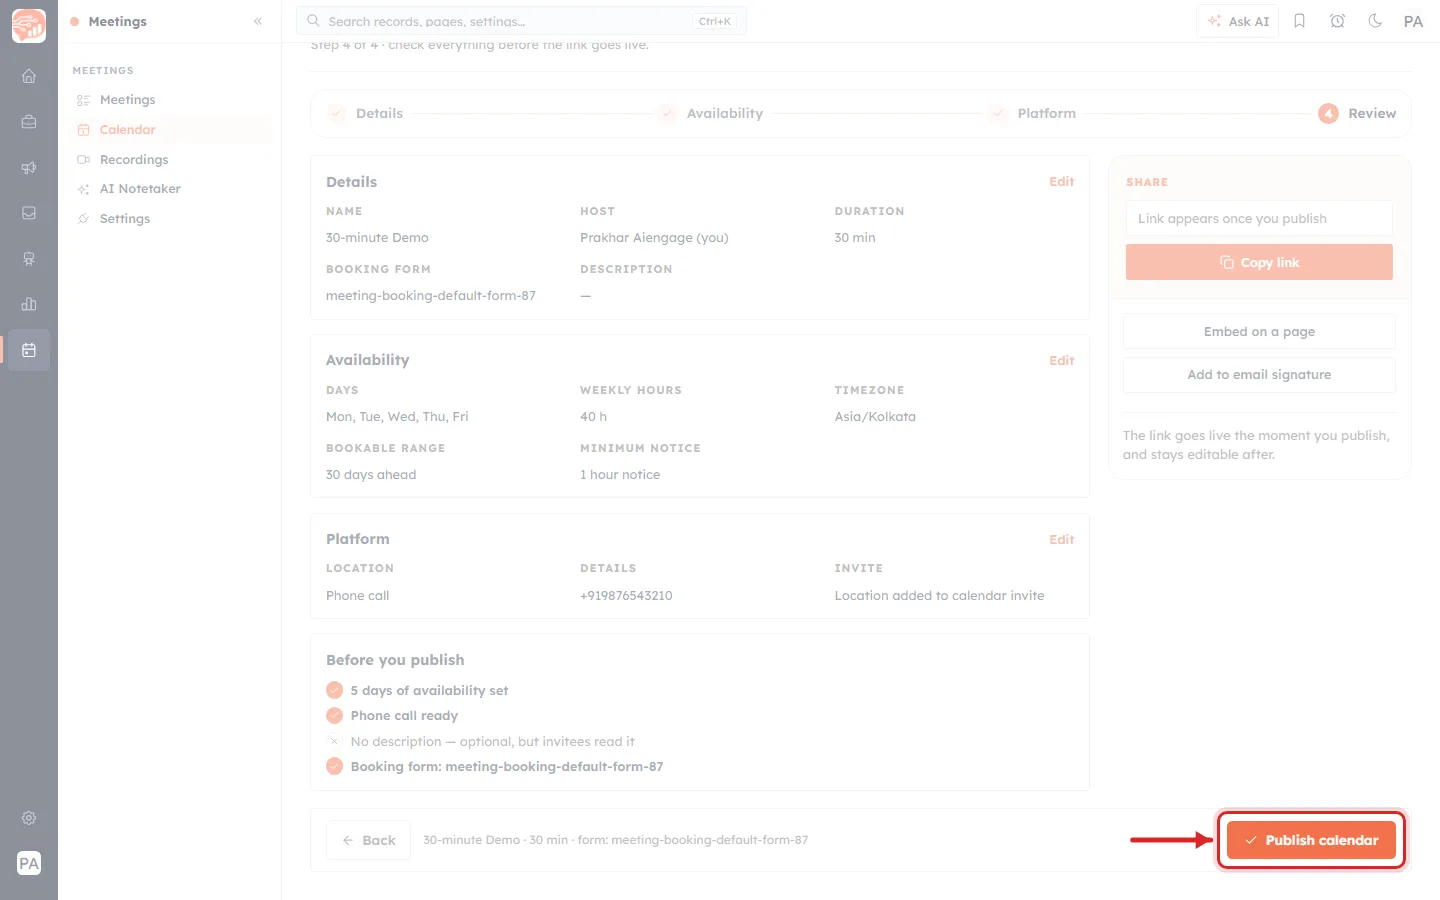
The last click. Publish calendar sits in the bottom-right corner of the sticky bar that has followed you through all four steps — ringed in red here, with an arrow pointing at it.
Click Publish calendar. The bottom bar still shows Back on the left and your running summary in the middle, so you can retreat right up to the last moment.
ℹ️
Nothing is created until that click. The whole wizard is a draft you can abandon with Back to events at any point, and as the Share panel says, the link “goes live the moment you publish, and stays editable after.”
What happens after you publish#
- The event appears at the top of the Events list with status Live, its host, creator and created date, and a summary line showing the duration, the locations and the date range it currently covers.
- The SHARE panel fills in. Copy the link, embed it on a page, or drop it into your email signature. The same Copy link button also appears on the event’s row in the list.
- Someone who opens the link sees only the times you are free — minus anything Calendar sync found in your diary, and minus anything inside your minimum-notice buffer.
- If you raised Booking per slot, each time can be claimed more than once, and shows “2 of 2 left” when Show booking left is on.
- They pick a slot in their own timezone and fill in your booking form. Their answers create a contact.
- The booking is added to your calendar with the location you chose, and shows up as a meeting record. With Google Meet connected, it carries its own join link.
A quick checklist#
- Have a contact form ready before you start — step 1 needs one.
- Keep the Calendar name short, and tidy the Public link slug before you share it.
- Check the timezone before you set your weekly hours.
- Set a minimum notice so nobody books your next ten minutes.
- Raise Booking per slot only when you genuinely want people sharing one meeting.
- Pick at least one location, or Review stays out of reach.
- Turn Calendar sync on — it is required, and it is what stops double bookings.
- Use each card’s Edit link on Review rather than stepping back.
Where to go next#
- Choose the Host and Meeting Type — step 1’s two trickiest fields, in depth.
- Set Your Availability for Bookings — everything on step 2, including split blocks and date overrides.
- Connect Google Meet: Automatic Links, Calendar Events & Status — the full connection walkthrough.
- Zoom Integration: Add, Use and Remove the App — the same for Zoom.
- Share Your Booking Link — what to do with the link once it is live.
Was this article helpful?
Ready to implement this?
OpenAI Engage and apply what you just learned to your own workspace.
Open AI Engage CRM