Loading…


KnowledgeBase
AI Notetaker: Turn It On, Choose What It Saves, and Manage Recordings, Storage and Credits (Step-by-Step)
Introduction#
The AI Notetaker is a bot that joins your online meetings on Google Meet or Zoom. It sits in the call under a name you choose and, when the call ends, hands you up to three things: a recording, a written transcript of what was said, and an AI summary with key points, action items and next steps.
This guide shows, step by step and with screenshots, where the AI Notetaker lives, how to switch it on, how to decide which meetings it joins and what it keeps, how to find and manage the recordings, and how storage and credits work.
Screen | What you do there |
|---|---|
Meetings → AI Notetaker | Workspace-wide settings: switch the bot on, name it, choose what it saves and how it behaves in calls. |
Meetings → Calendar | Choose which booking calendars use the bot, each with its own switch. |
Meetings → Recordings | Everything the bot recorded: watch, download, delete, and check storage. |
Billing & Subscription | The AI Notetaker credit wallet that pays for recording time. |
ℹ️
A simple way to remember it: Recordings is what already happened; AI Notetaker and Calendar decide what happens next time.
Step 1: Find the AI Notetaker screens#
Open Meetings in the left menu.
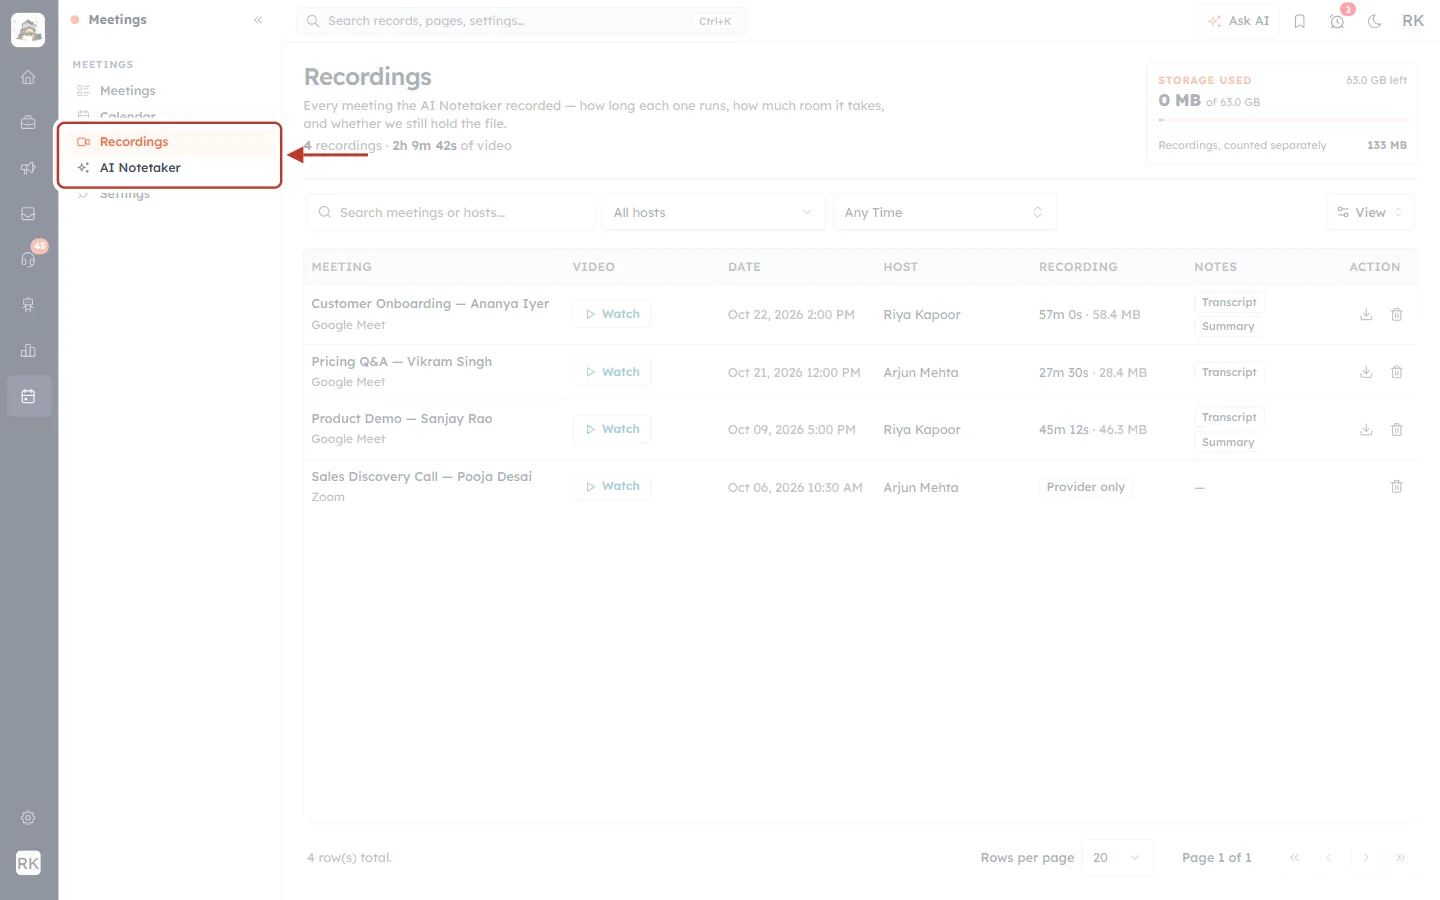
What this screenshot shows. The Meetings menu, with Recordings and AI Notetaker ringed.
Recordings opens the library of everything the bot recorded (Steps 7–9).
AI Notetaker opens the settings (Steps 2–5).
You only see these items if your profile allows it. Seeing recordings and changing the settings are separate permissions; ask your administrator if one is missing.
Step 2: Switch the AI Notetaker on for your workspace#
Click Meetings → AI Notetaker.
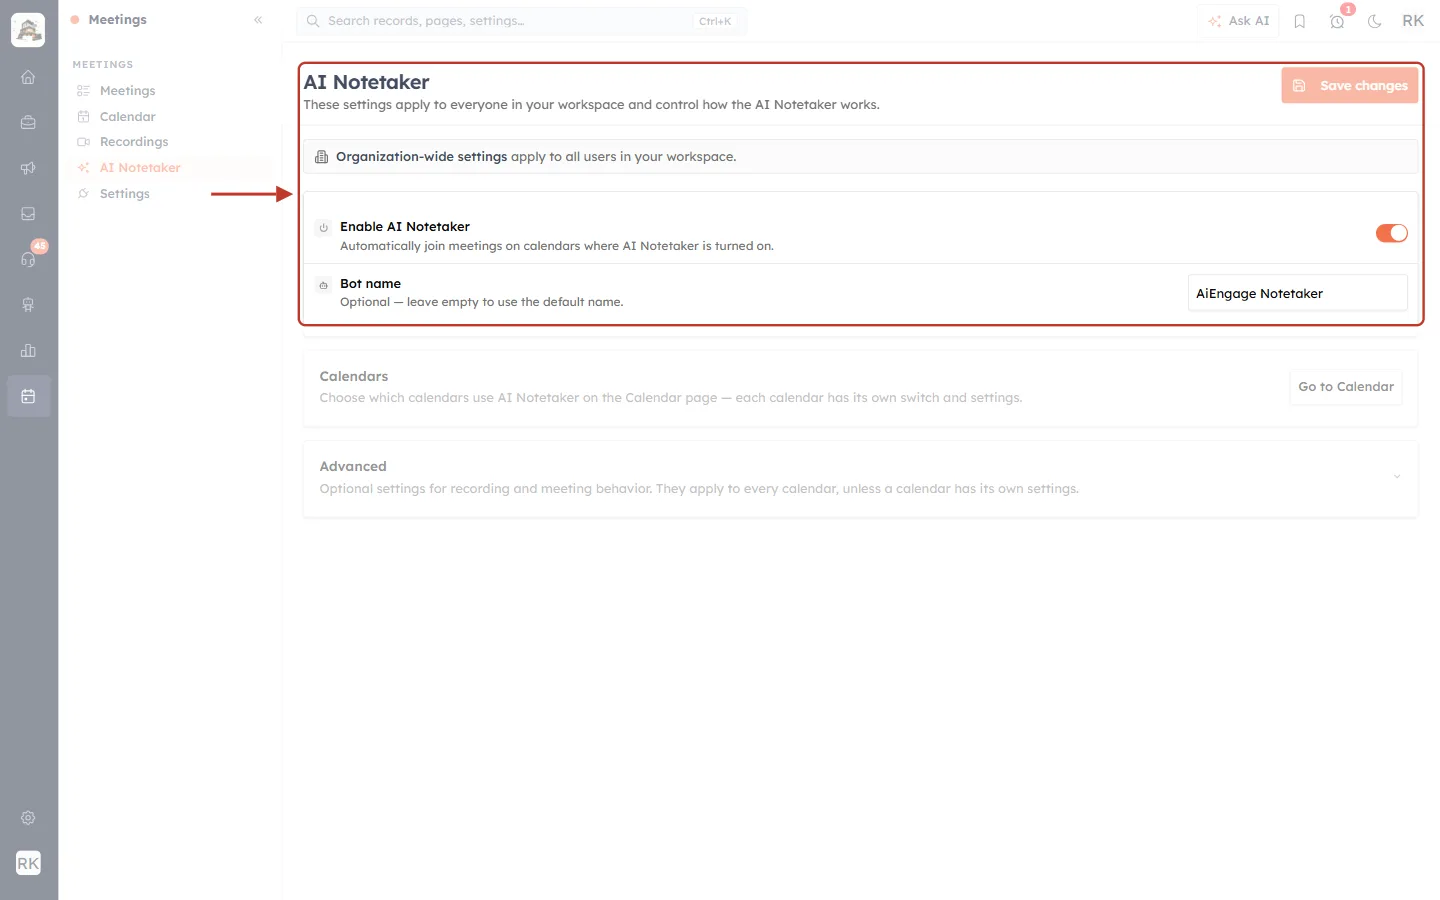
What this screenshot shows. The top of the AI Notetaker page.
The notice “Organization-wide settings apply to all users in your workspace” is a reminder that what you change here affects everyone.
Enable AI Notetaker is the master switch. When it is on, the bot joins meetings on the calendars where AI Notetaker is turned on (Step 3). When it is off, it joins nothing, whatever else is set.
Bot name is the name everyone in the call sees for the bot, here AiEngage Notetaker. Leave it empty to use the default name.
Save changes (top right) becomes active as soon as you change something.
✅
Use a name your customers will recognise, such as “Acme Notetaker”. An unknown participant in a sales call raises questions.
When you click Save changes, a confirmation lists exactly what will change for everyone.
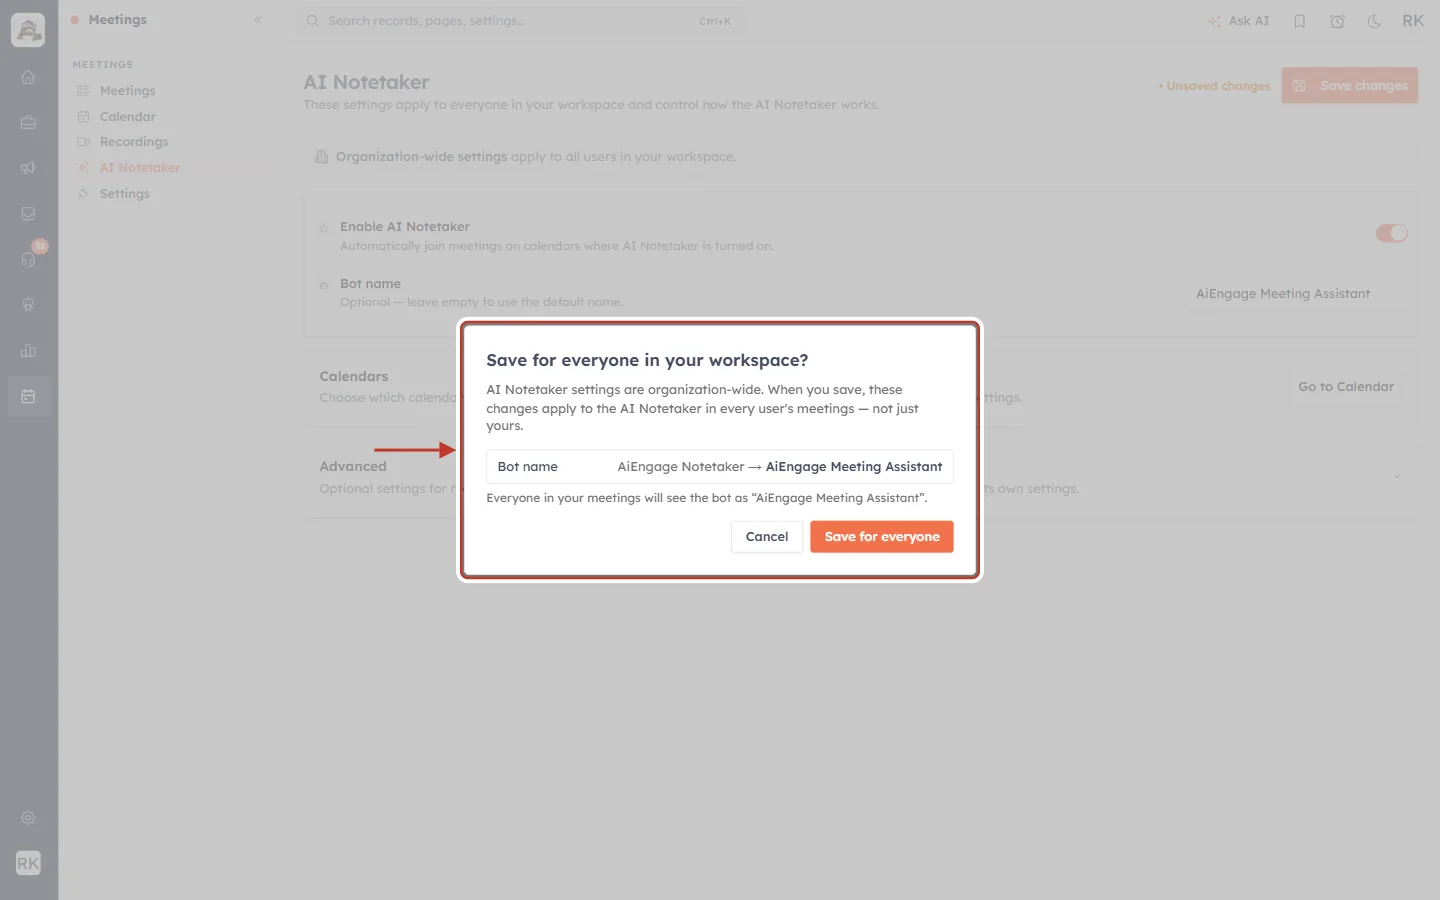
What this screenshot shows. The Save for everyone in your workspace? confirmation.
Each change is shown as old value → new value, with a line explaining the effect.
Save for everyone saves it; Cancel keeps the previous values.
Step 3: Choose which calendars the bot joins#
Which meetings get the bot is no longer set on this page. Each booking calendar now has its own switch on the Calendar page.
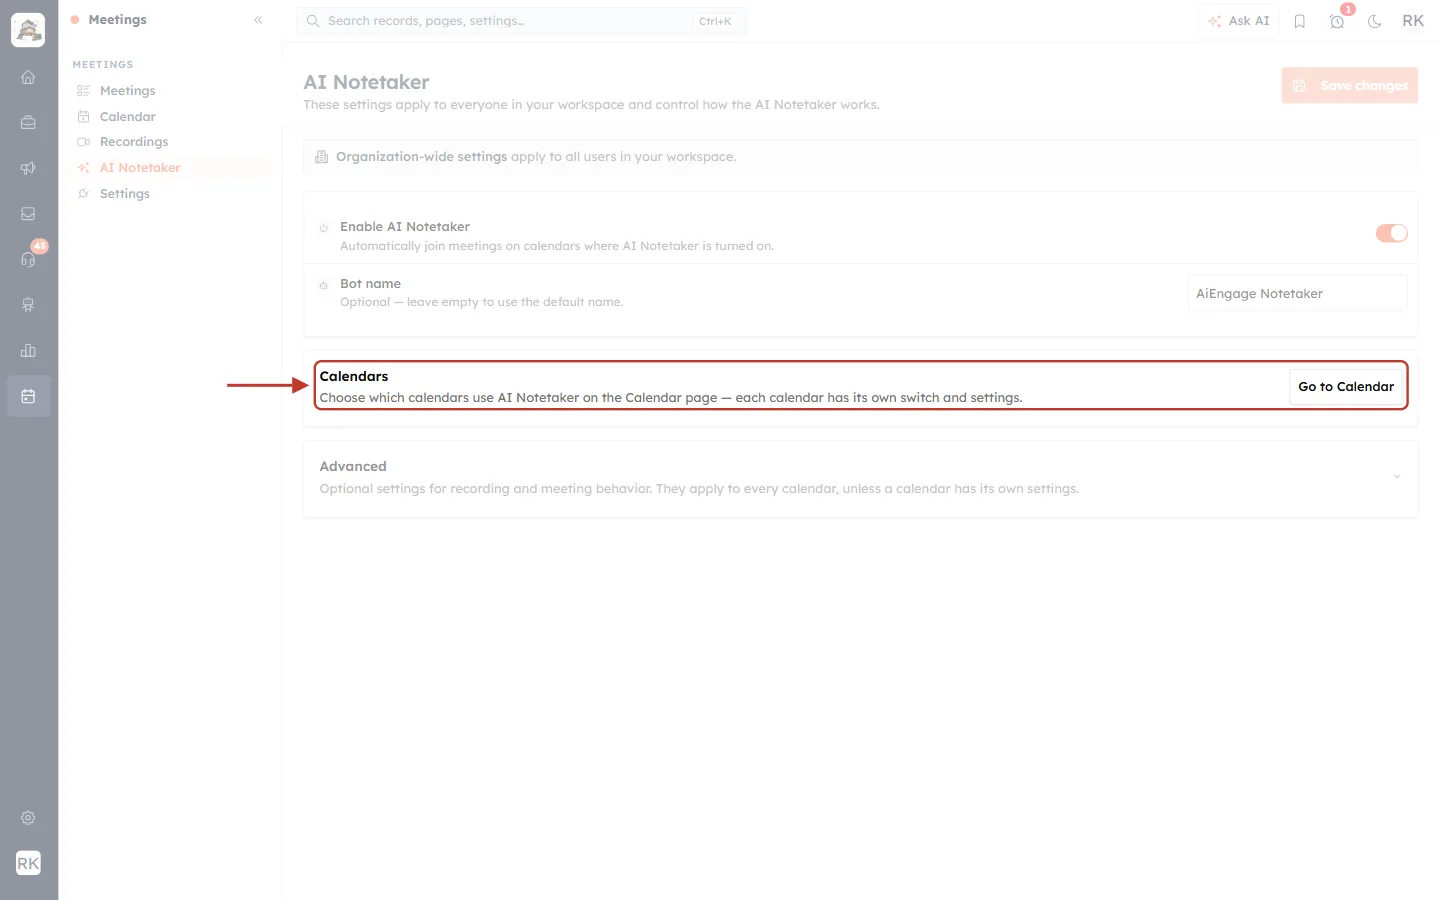
What this screenshot shows. The Calendars card on the AI Notetaker page.
It reads “Choose which calendars use AI Notetaker on the Calendar page — each calendar has its own switch and settings.”
Click Go to Calendar to open Meetings → Calendar.
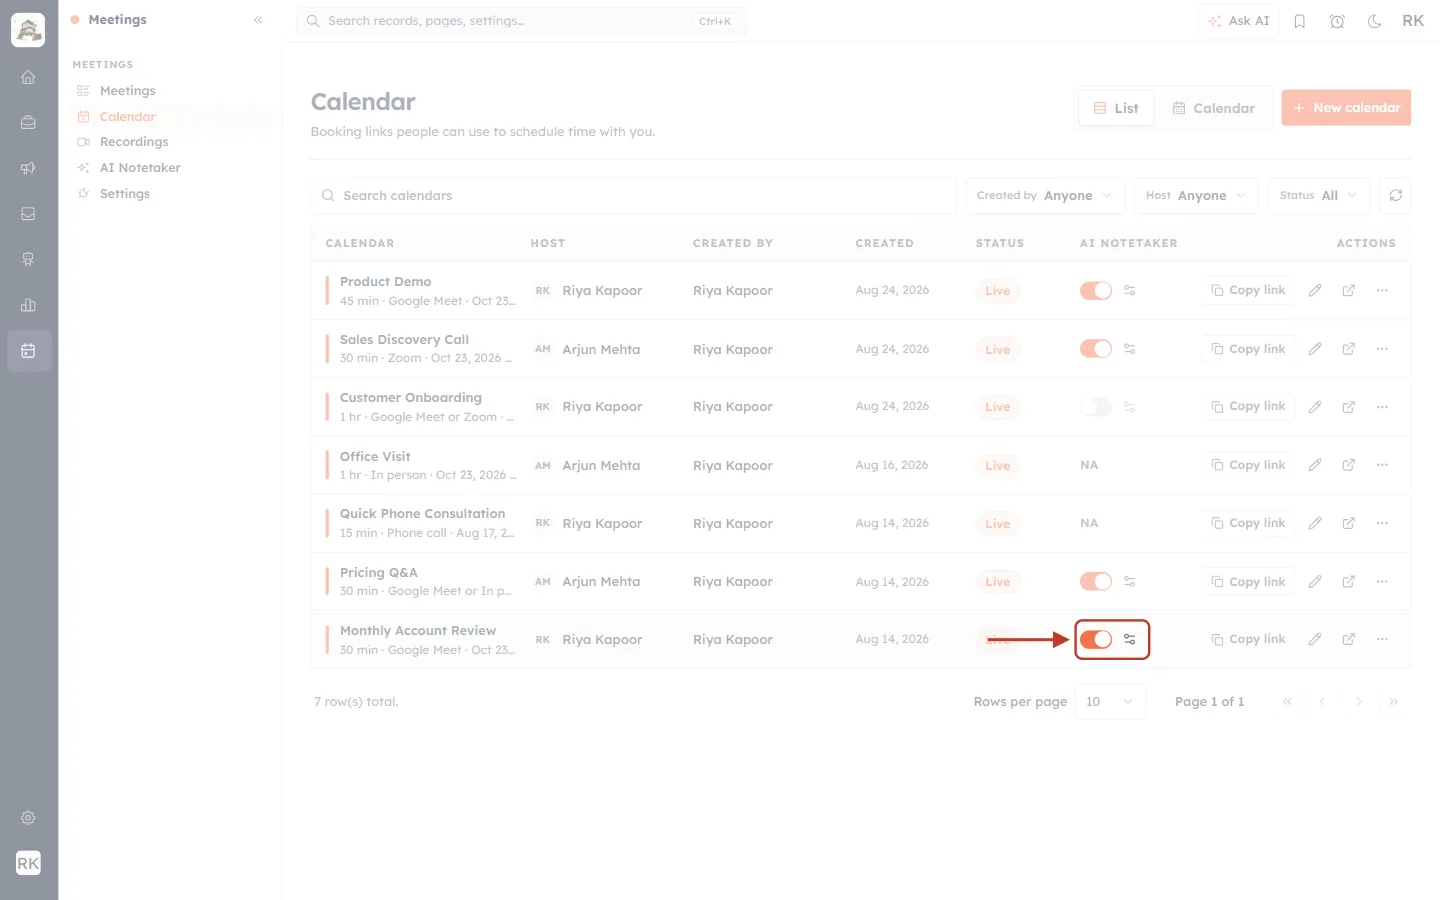
What this screenshot shows. The AI NOTETAKER column in the Calendar list, with one calendar’s switch turned on.
Orange means the bot joins new online meetings booked on that calendar; grey means it doesn’t. The change saves at once.
The sliders icon next to the switch opens that calendar’s own settings (next screenshot).
Calendars with no Google Meet or Zoom show NA, because there is no call to join.
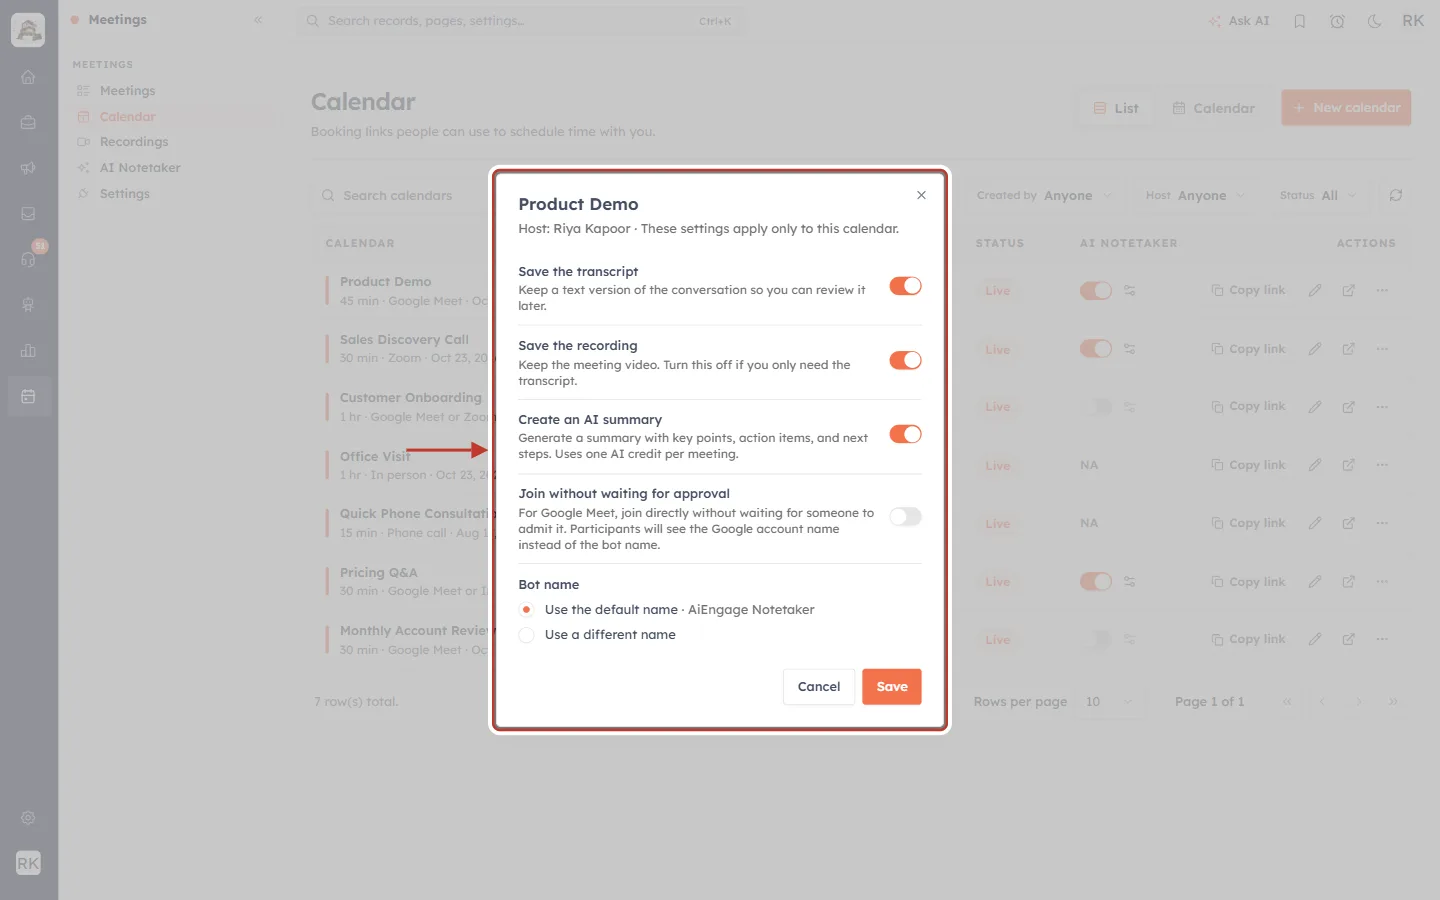
What this screenshot shows. The settings window for one calendar.
Here you can save the transcript, the recording or an AI summary for this calendar only, let the bot join without approval, and give it a different name.
Anything you don’t change follows the workspace settings. Full details: Calendar Settings Changes: Turn AI Notetaker On or Off for Each Calendar.
For a meeting you create yourself in Meetings → Meetings, there is a Get Notetaker switch on the form instead.
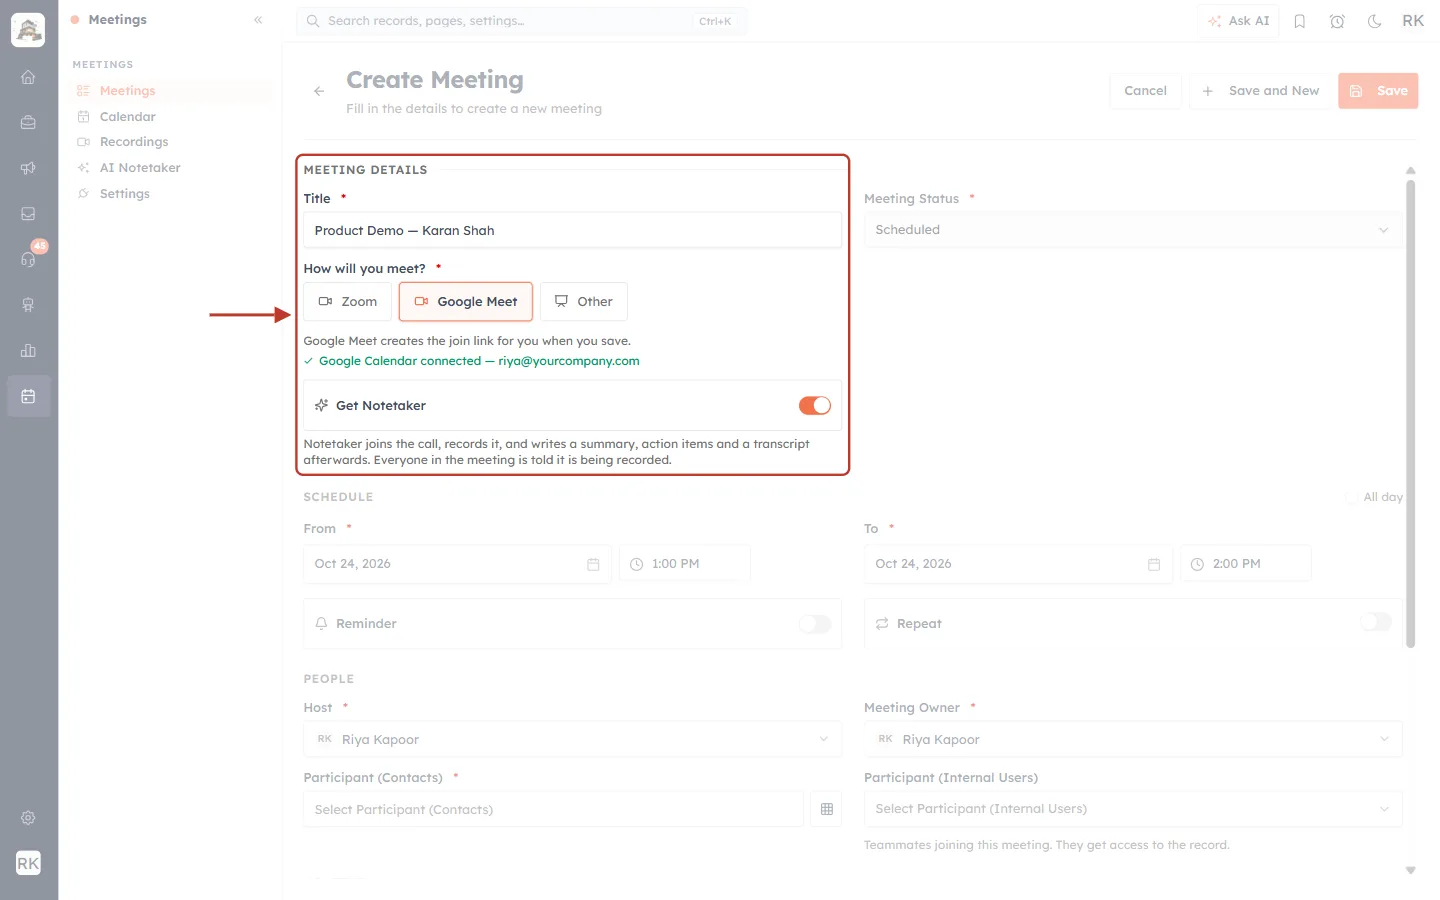
What this screenshot shows. The Get Notetaker switch on the Create Meeting form, shown after choosing Google Meet or Zoom.
It is on by default. The text below it explains that the notetaker joins the call, records it and writes a summary, action items and a transcript, and that everyone in the meeting is told it is being recorded.
Step 4: Decide what the bot keeps#
Back on Meetings → AI Notetaker, open Advanced. These settings apply to every calendar unless a calendar has its own setting.
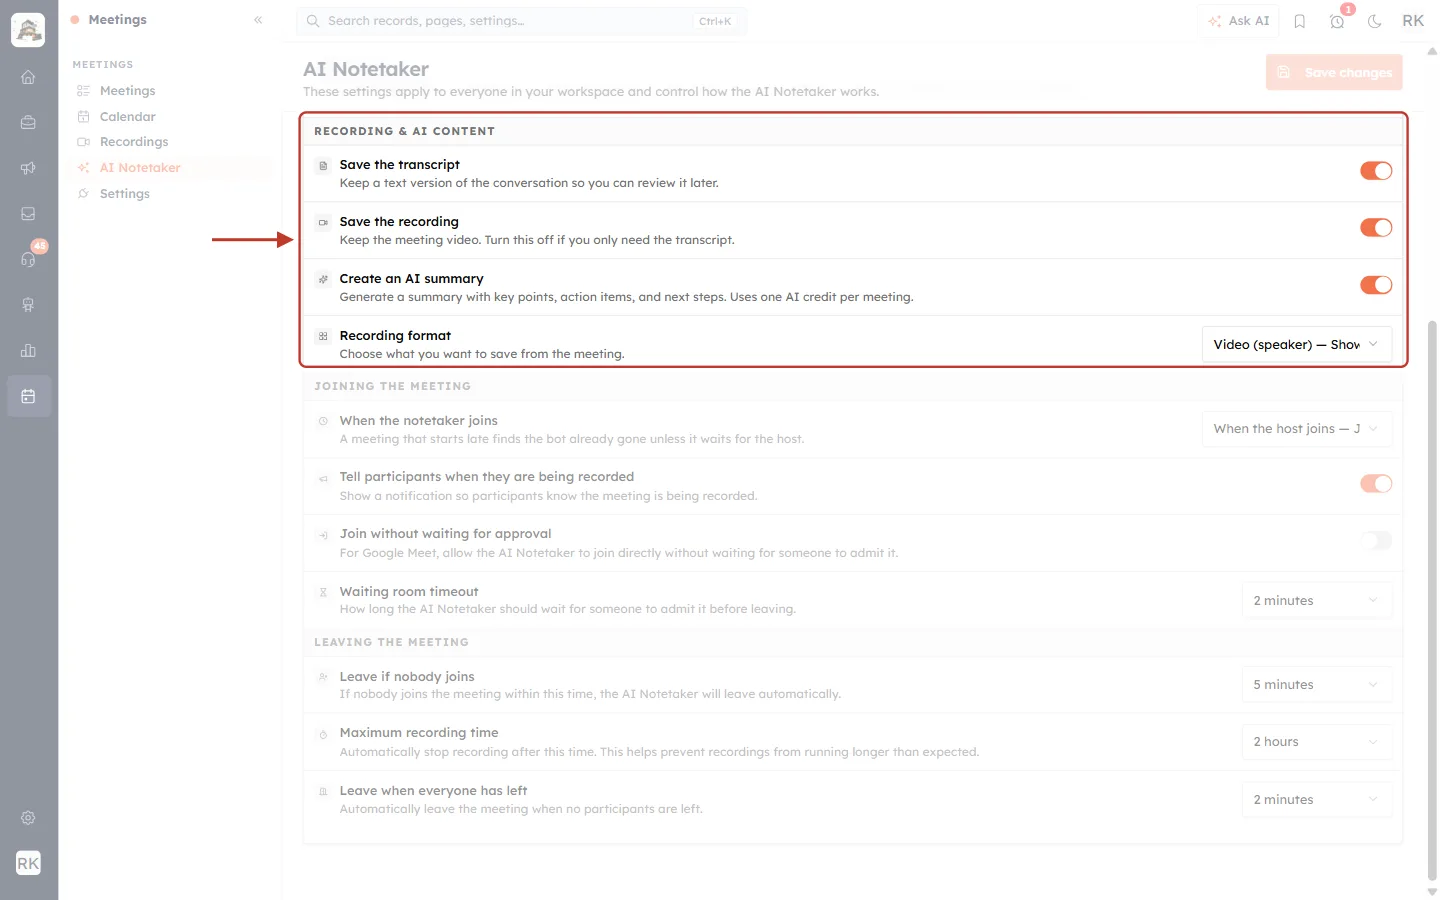
What this screenshot shows. The RECORDING & AI CONTENT section.
Save the transcript: keeps a text version of the conversation. Small and searchable; leave it on.
Save the recording: keeps the meeting video. This is what uses storage. Turn it off if you only need the transcript.
Create an AI summary: writes key points, action items and next steps. As the text says, it uses one AI credit per meeting.
Recording format: Video (speaker) shows whoever is speaking, Video (everyone) shows all participants together, and Audio only saves sound only and uses less storage.
Step 5: Set how the bot joins and leaves#
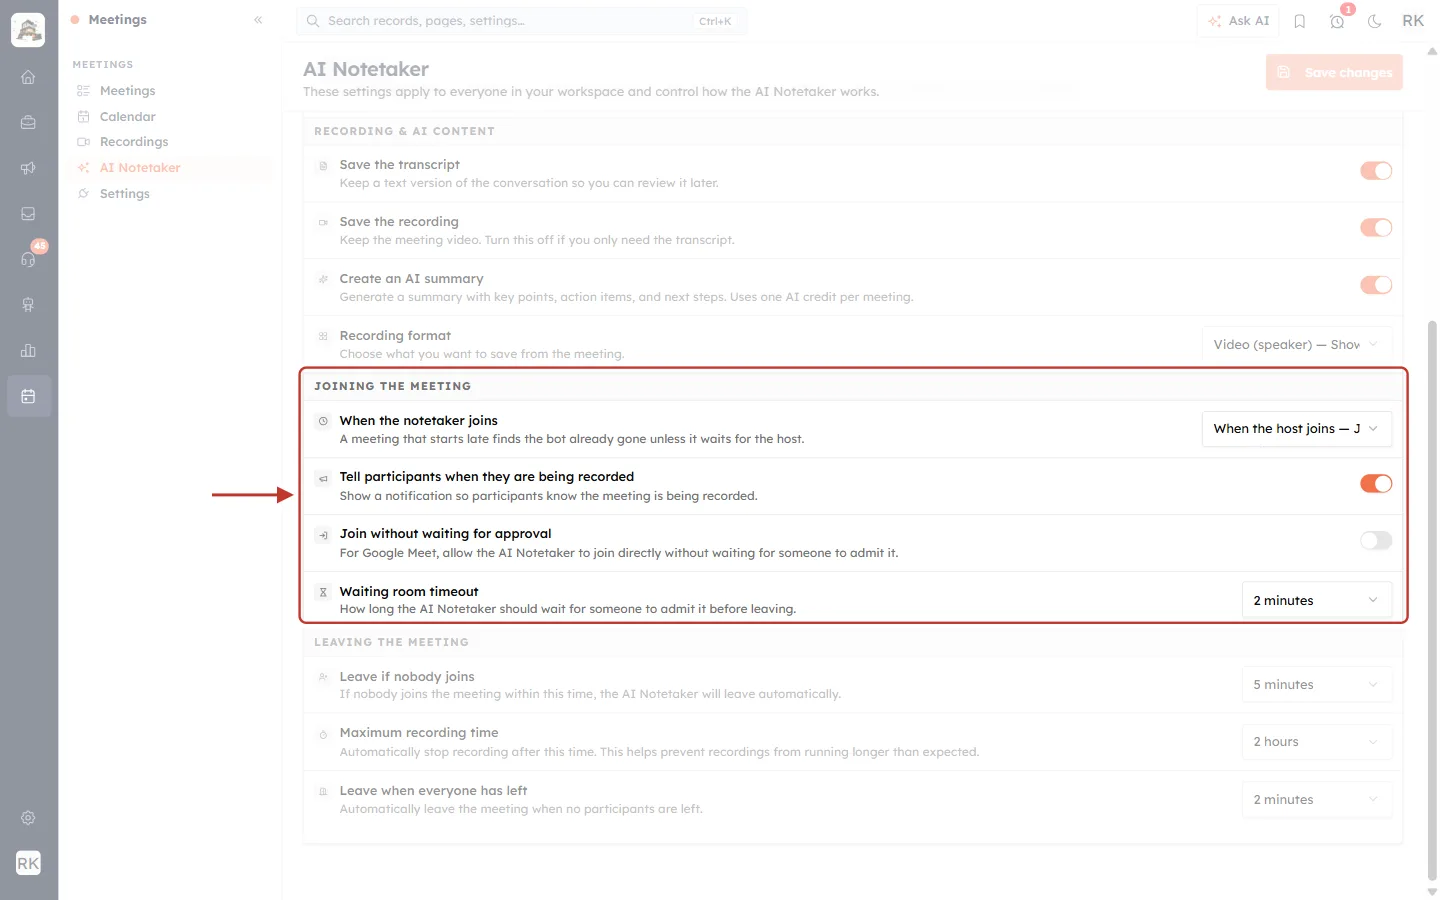
What this screenshot shows. The JOINING THE MEETING section.
When the notetaker joins: When the host joins (the default) sends the bot as soon as the host opens the meeting from the CRM, so a meeting that starts late is still recorded. At the scheduled time sends it around the booked time.
Tell participants when they are being recorded: shows a notice in the meeting. Leave this on; in many countries people must be told they are being recorded.
Join without waiting for approval: Google Meet only. The bot joins directly instead of waiting to be admitted.
Waiting room timeout: how long the bot waits to be let in before it gives up (2 minutes by default).
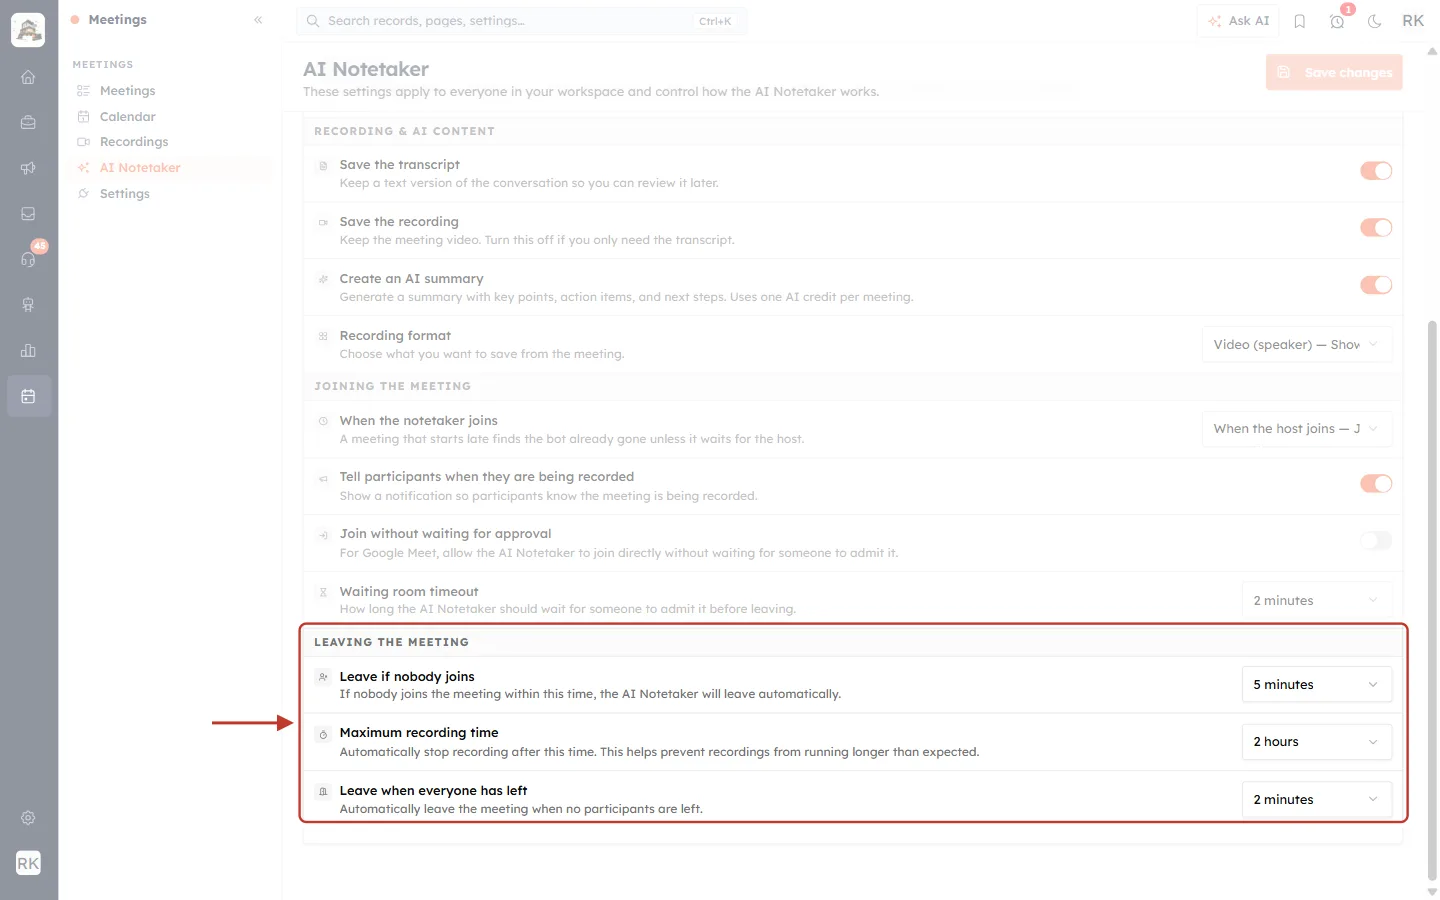
What this screenshot shows. The LEAVING THE MEETING section.
Leave if nobody joins: the bot leaves if nobody arrives within this time (5 minutes by default), so it doesn’t record an empty room.
Maximum recording time: a hard stop (2 hours by default). This is your protection against a meeting nobody closed using up storage and credit.
Leave when everyone has left: the bot leaves this long after the last person goes (2 minutes by default).
Click Save changes at the top to apply your changes.
Step 6: Make sure there is credit for the notetaker#
Notetaker time is paid from its own credit wallet. Go to Billing & Subscription → Marketing Channel Credits.
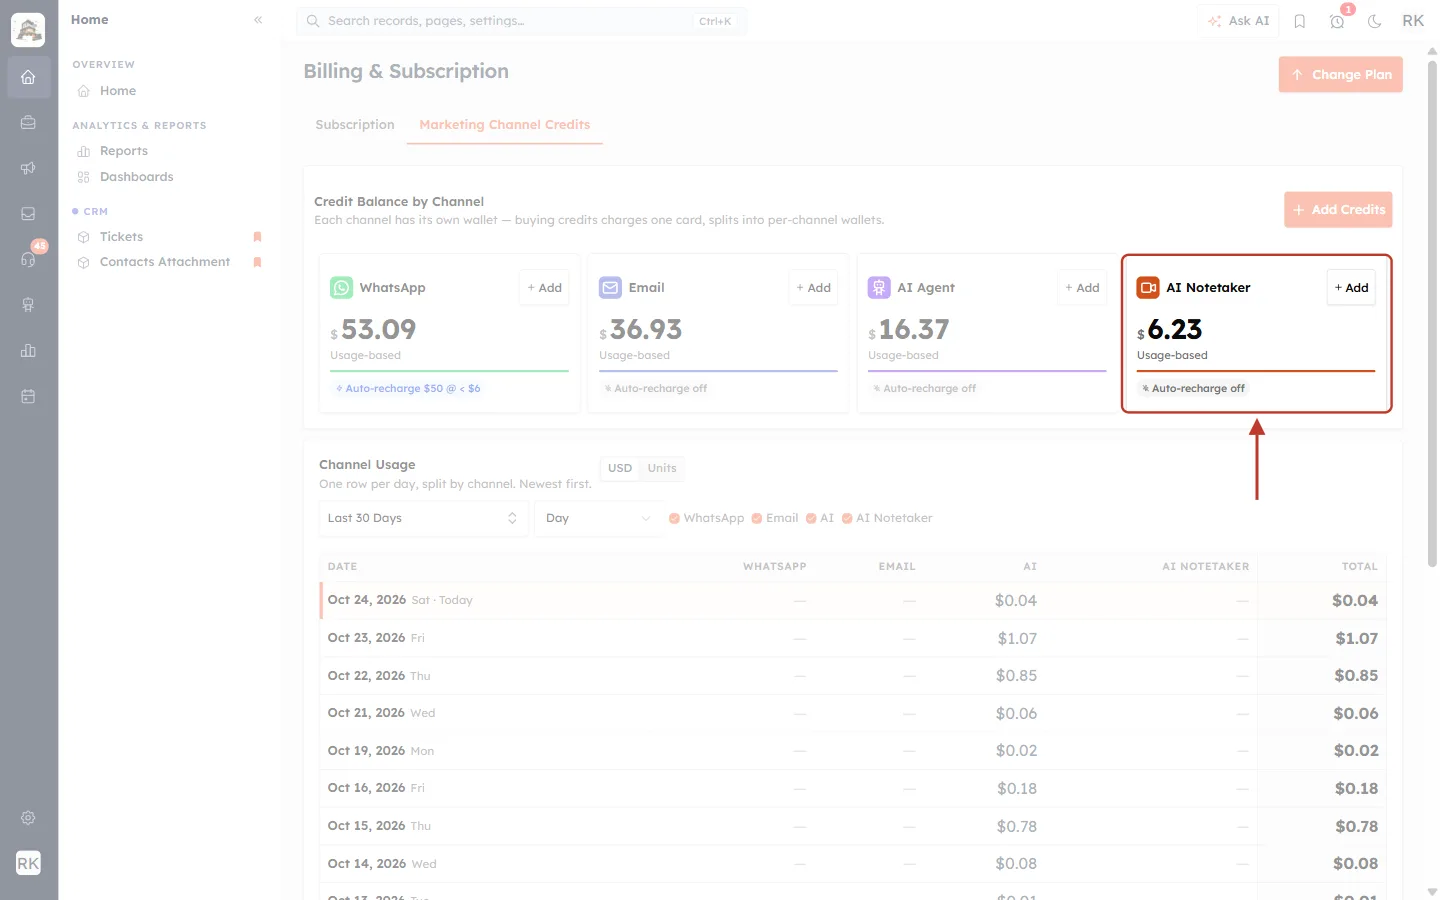
What this screenshot shows. The AI Notetaker card under Credit Balance by Channel.
The figure is the balance left in the AI Notetaker wallet. It is usage-based: you pay for the time the bot records, worked out to the second, not per meeting. A 15-minute call costs far less than a 2-hour one.
+ Add buys more credit; the pill below shows whether auto-recharge is on.
If the balance reaches $0, the card reads “Recording is paused. Add credit to start again.” and the bot isn’t sent to meetings until you top up.
The Channel Usage table below the cards shows the AI Notetaker spend per day.
ℹ️
Plans that include free notetaker hours add them once, as credit in this wallet; they are not a monthly allowance. The AI summary is paid separately, with one AI credit per meeting. The AI Notetaker isn’t available on the Free plan.
Step 7: Browse your recordings#
Open Meetings → Recordings. Every meeting the bot recorded is listed here, newest first.
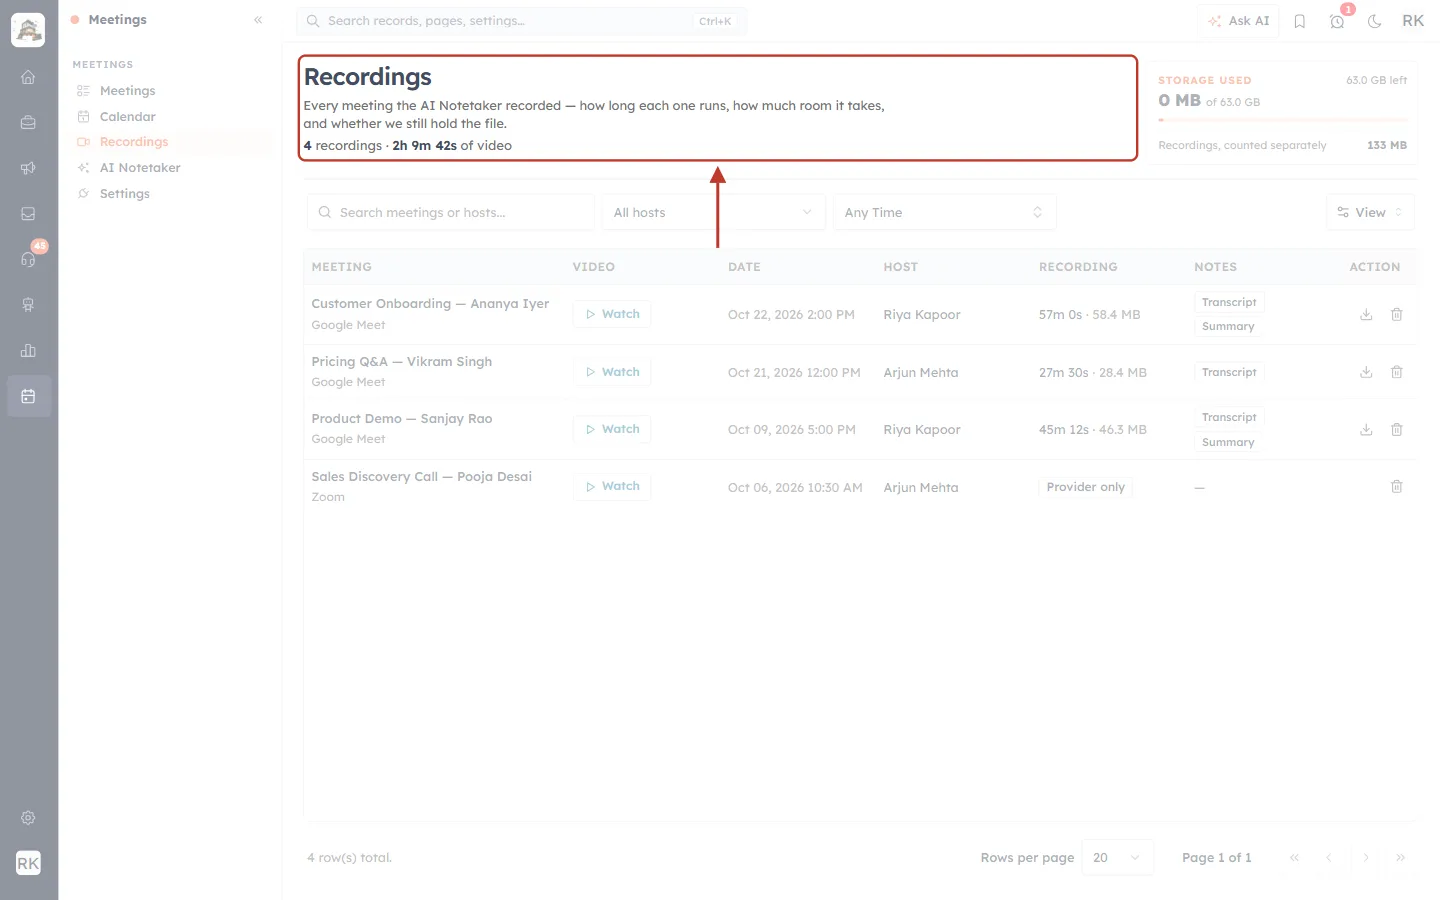
What this screenshot shows. The top of the Recordings page.
The description reminds you what the page holds: how long each recording runs, how much room it takes, and whether the file is still held.
The totals line, here 4 recordings · 2h 9m 42s of video, is a quick check on how much you are recording.
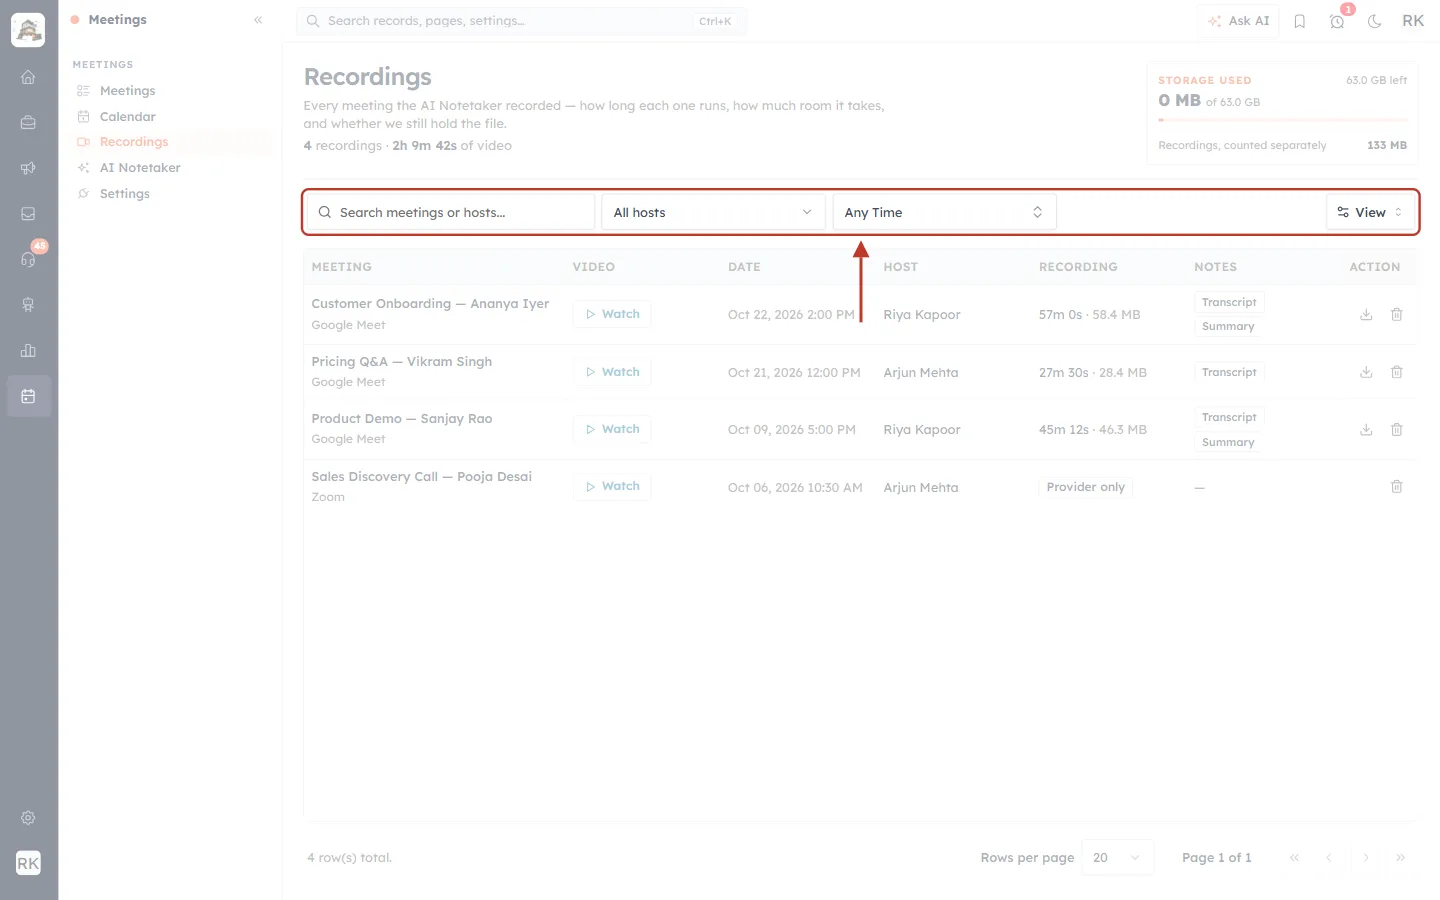
What this screenshot shows. The tools above the list.
Search meetings or hosts finds recordings by meeting title or host name.
All hosts narrows the list to one person’s meetings, which is useful when tidying up after a colleague.
Any Time filters by date; choose an older period to find recordings worth deleting.
View chooses which columns are shown.
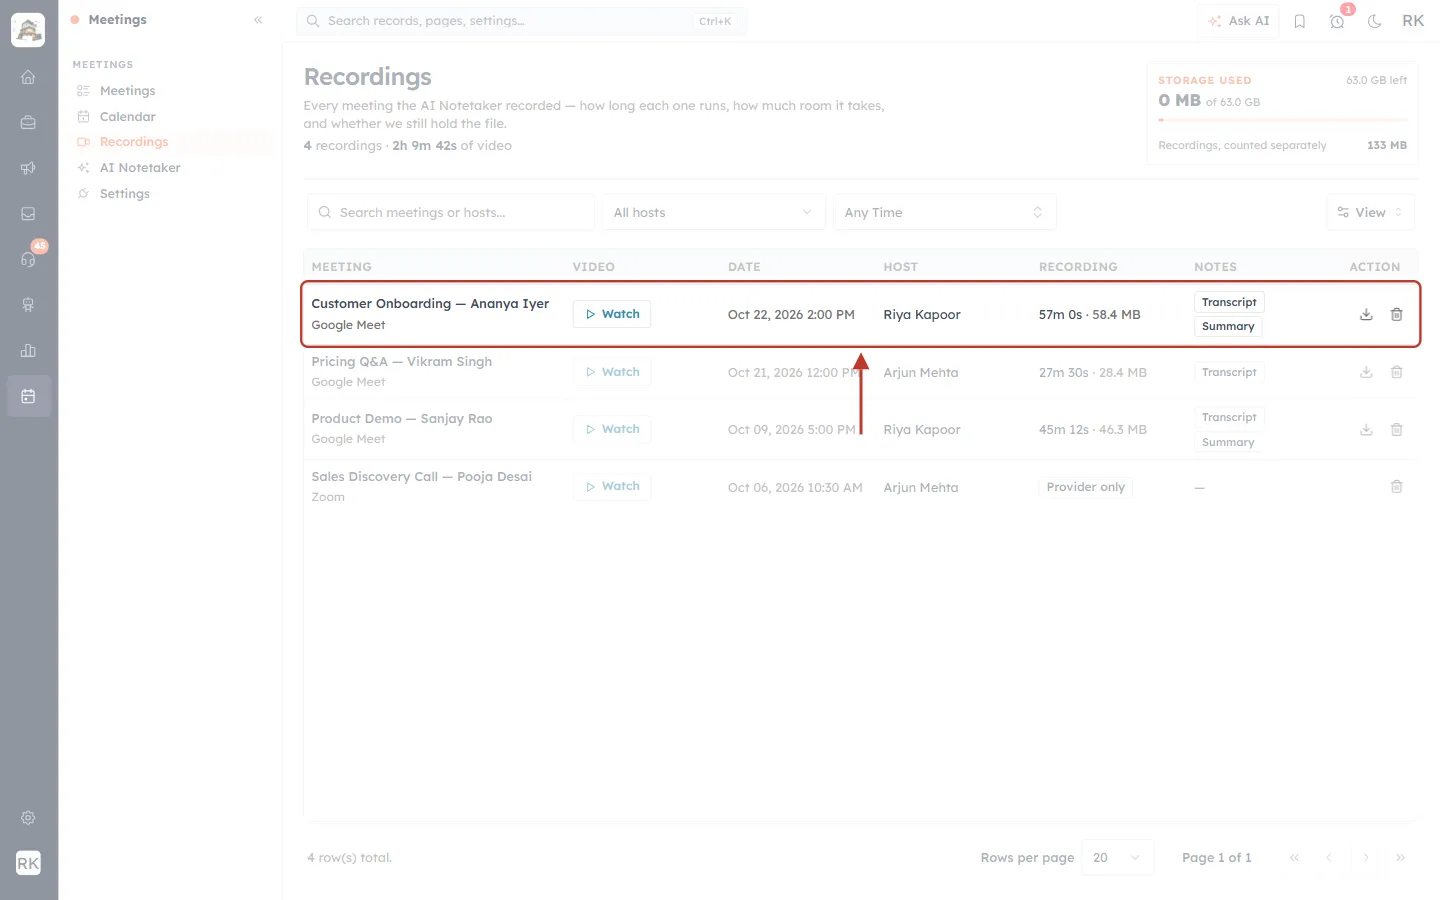
What this screenshot shows. One recording, read from left to right.
MEETING: the meeting title, with the platform (Google Meet or Zoom) below it. Click the title to open the meeting record.
Watch plays the recording in a window on this page.
DATE and HOST: when the meeting took place and whose meeting it was.
RECORDING: how long the bot recorded and the file size, here 57m 0s · 58.4 MB.
NOTES: Transcript and Summary chips show what else was saved. A dash means video only.
ACTION: the download icon saves the video file; the bin deletes it (Step 9).
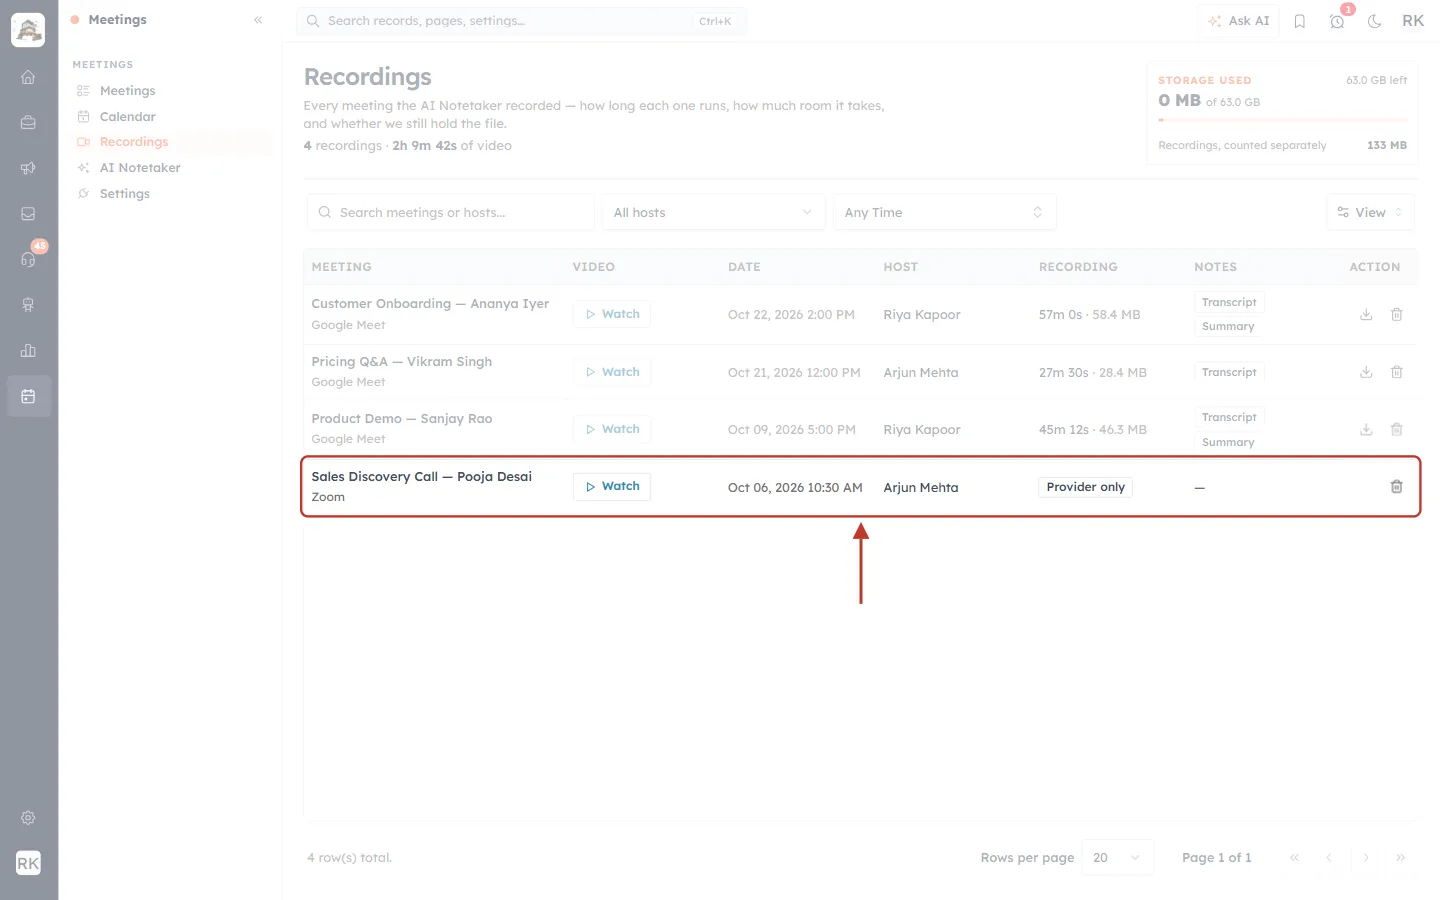
What this screenshot shows. A row marked Provider only.
The recording is held by the meeting platform, not saved to your AiEngage storage, so there is no length, size or download button.
The link to it is temporary and can’t be recovered once it expires. If you need to keep it, download it from the platform itself.
The bin removes the row from this list.
Step 8: Check your storage#
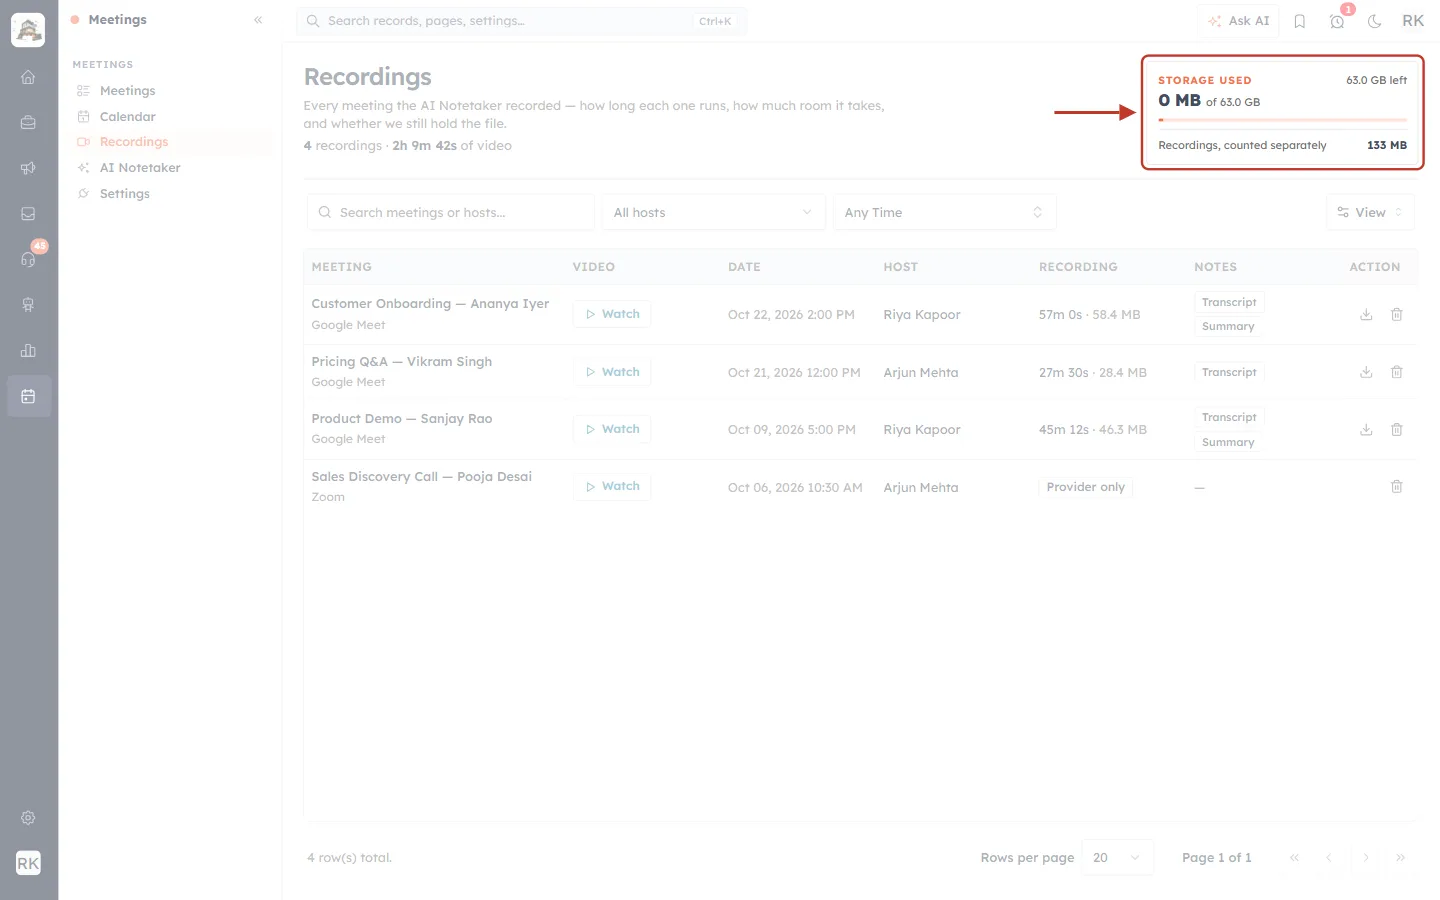
What this screenshot shows. The STORAGE USED card at the top right of the Recordings page.
The large figure and the bar show how much of your plan’s file storage is used, and GB left how much remains. This covers files across the whole CRM.
Recordings, counted separately is the total size of your meeting videos (here 133 MB). Recordings are tallied on their own, apart from plan storage.
✅
To keep recordings small: delete what nobody will watch again, turn Save the recording off where the transcript is enough, choose Audio only, and keep Maximum recording time sensible.
Step 9: Delete a recording#
Click the bin icon on a row.
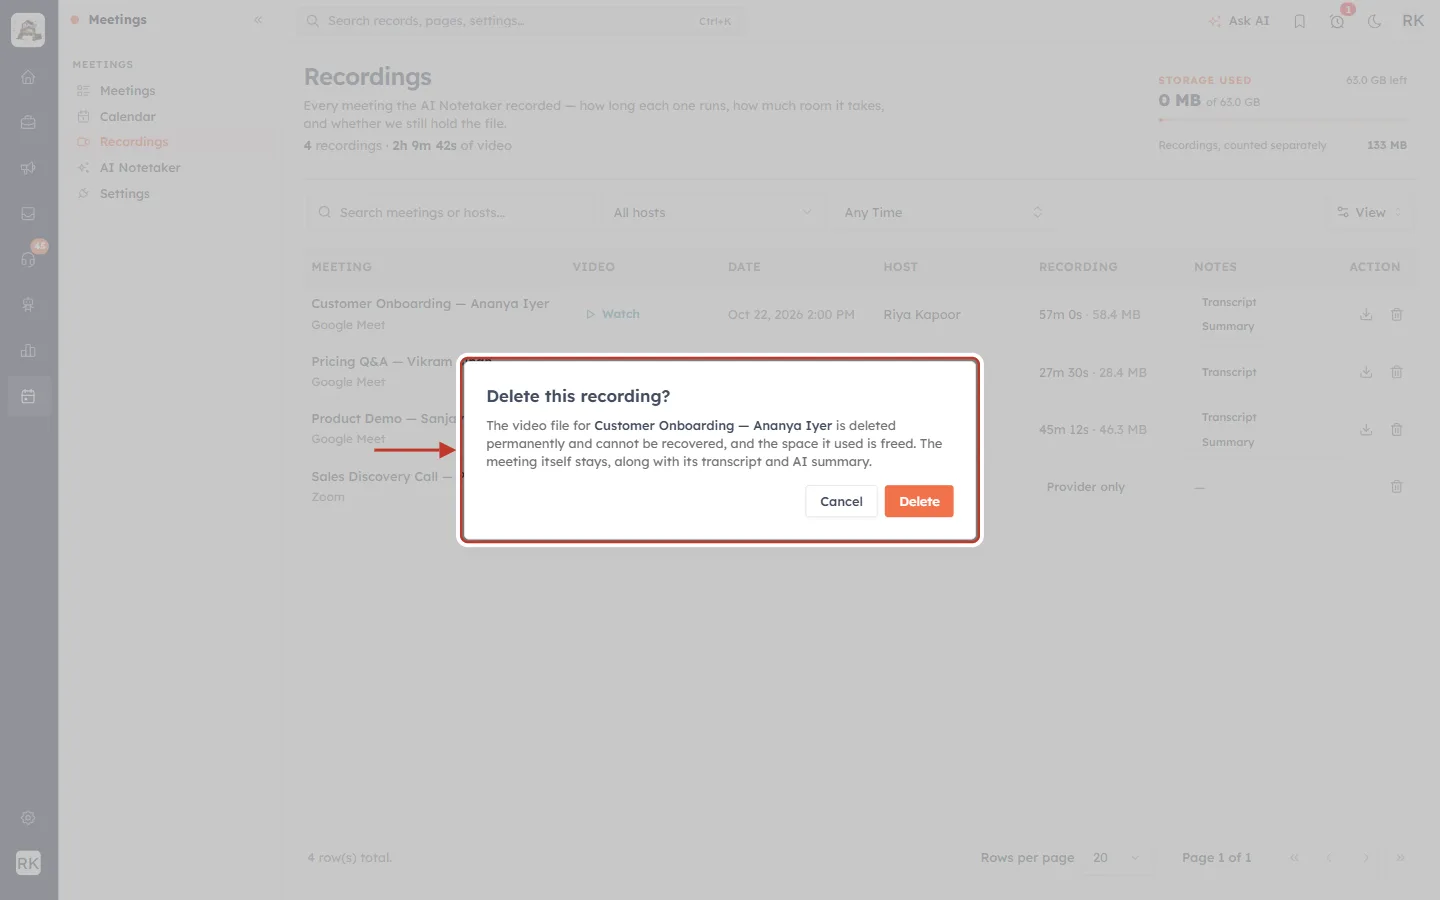
What this screenshot shows. The Delete this recording? confirmation.
The video file is deleted permanently and can’t be recovered, and the space it used is freed.
The meeting itself stays, with its transcript and AI summary.
Delete confirms; Cancel keeps the recording.
Deleting needs permission to manage recordings; you can only delete recordings of meetings you are allowed to see.
⚠️
There is no recycle bin for recordings. If there is any chance you will need the video, download it first.
Step 10: Find the recording on the meeting record#
You don’t have to go through the Recordings page: open any meeting the bot attended.
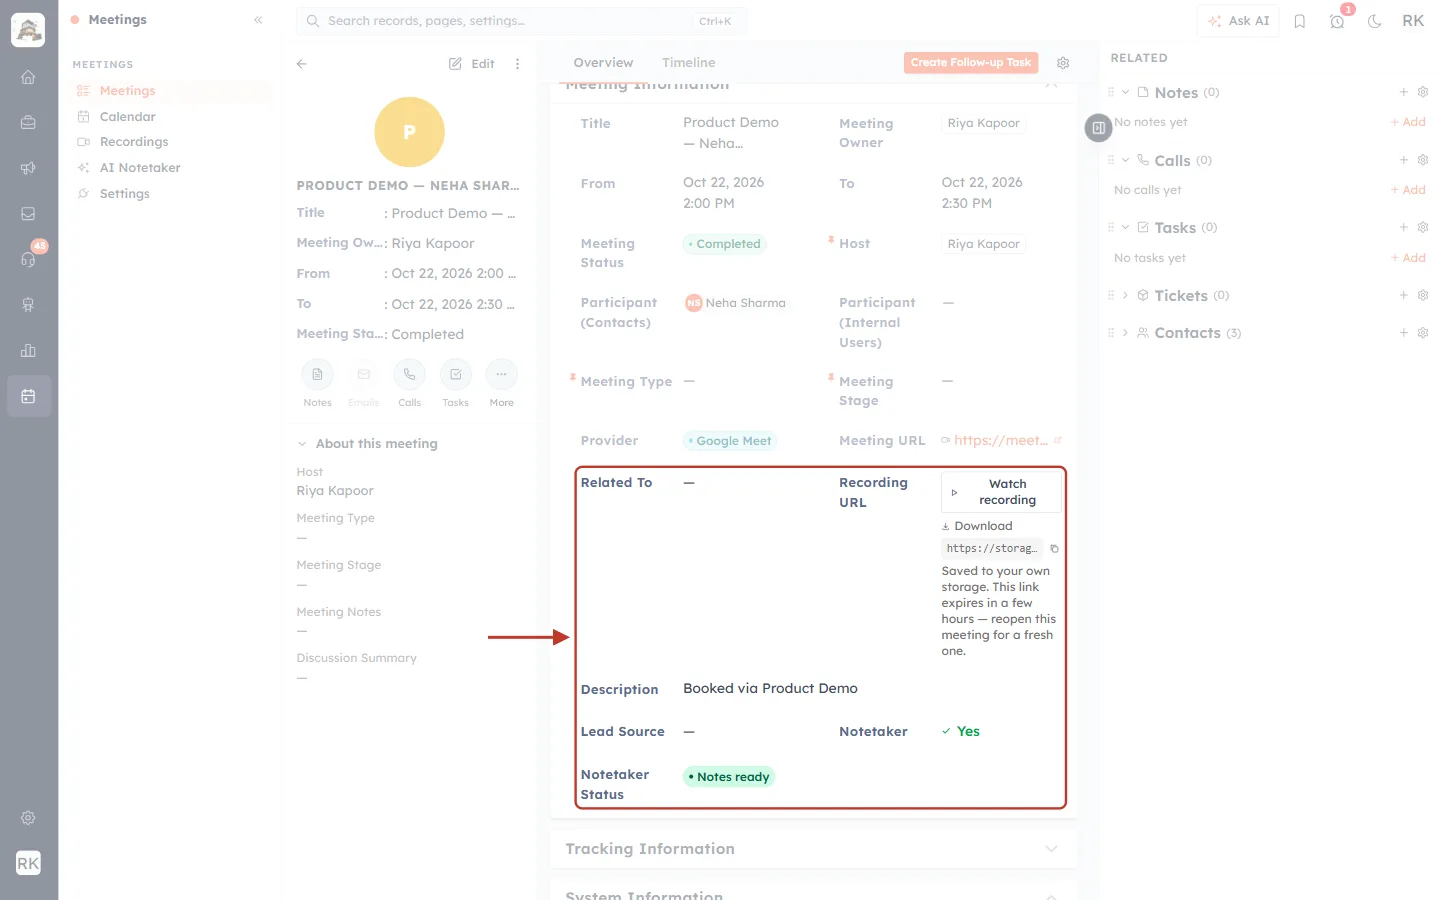
What this screenshot shows. The recording on its meeting record.
Watch recording plays it, Download saves it, and the copy button copies its link.
The link expires after a few hours, so don’t paste it into emails or tickets. Share the meeting record, or download the file and attach it.
Notetaker and Notetaker Status show whether the bot was asked to join and how far it got (for example Notes ready). See Read a Meeting Record.
Troubleshooting#
What you see | What it usually means |
|---|---|
No bot joined the meeting | Enable AI Notetaker is off, the calendar’s switch is off, the meeting isn’t on Google Meet or Zoom, or the AI Notetaker wallet is at $0. |
The bot never got in | Nobody admitted it within the waiting room timeout (Notetaker Status: Not let in). On Google Meet, turn on Join without waiting for approval. |
The meeting started late and nothing was recorded | Set When the notetaker joins to When the host joins, and open the meeting from the CRM. |
Recording but no transcript chip | Save the transcript was off for that meeting’s calendar. |
No Summary chip | Create an AI summary was off, or there were no AI credits. |
Provider only, no download | The file is held by the meeting platform, not in your storage. |
The recording link doesn’t work | It expired. Reopen the meeting record for a fresh one. |
Previous and next#
Previous: Read a Meeting Record
Next: Calendar Settings Changes: Turn AI Notetaker On or Off for Each Calendar
Related#
Was this article helpful?
Ready to implement this?
OpenAI Engage and apply what you just learned to your own workspace.
Open AI Engage CRM