Loading…


KnowledgeBase
Create a Meeting from the Meetings Module
What this covers#
The Meetings module is where every meeting in AI Engage lives — the ones you book yourself, and the ones that arrive from a booking link. This article walks through creating one by hand, from the module’s records list.
It takes one page. You fill in the details, the times, who is coming and what the meeting is about, then save.
Step 1 — Open the Meetings module#
In the left sidebar, open the Meetings section. It has two entries: Meetings, the records list, and Calendar, the same records laid out on a month grid. Click Meetings.
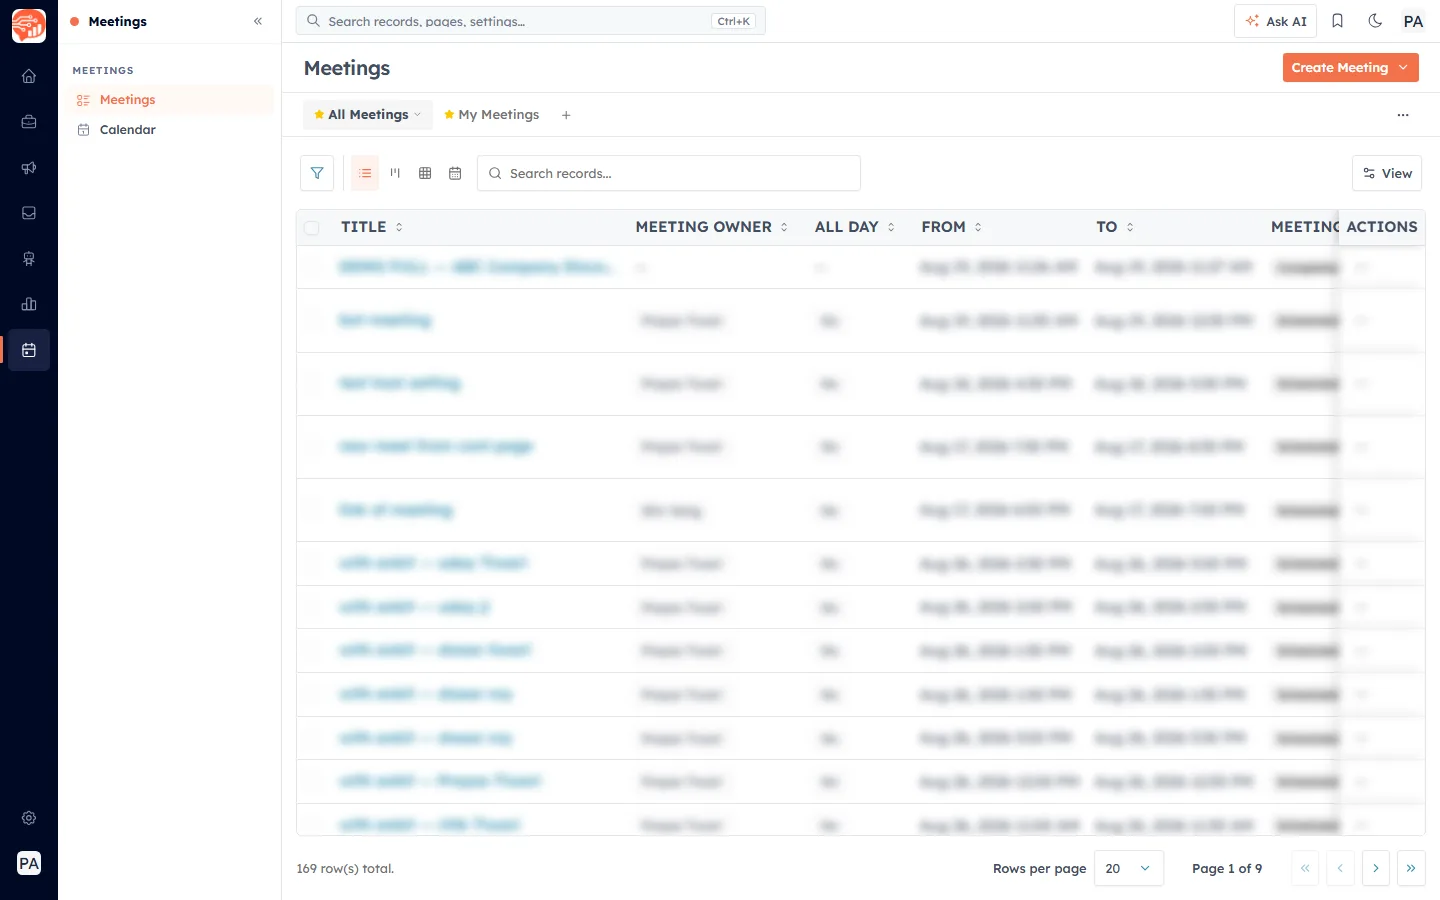
The Meetings records list. Personal data is blurred here; on your own screen you will see real meeting titles and owners.
The list shows one row per meeting, with columns for Title, Meeting Owner, All Day, From, To and Meeting Status, plus an Actions column at the end. Above it sit the saved views — All Meetings and My Meetings — and a + for adding your own.
The row of icons beneath the views switches how the records are displayed, and beside them are a search box and a filter. The total row count and the page controls sit along the bottom.
💡
My Meetings is the faster view to work in day to day — it narrows the list to the meetings you own, instead of every meeting in the account.
Step 2 — Click Create Meeting#
The orange Create Meeting button sits in the top-right of the list. It is a split button: clicking it opens a short menu rather than going straight to the form.
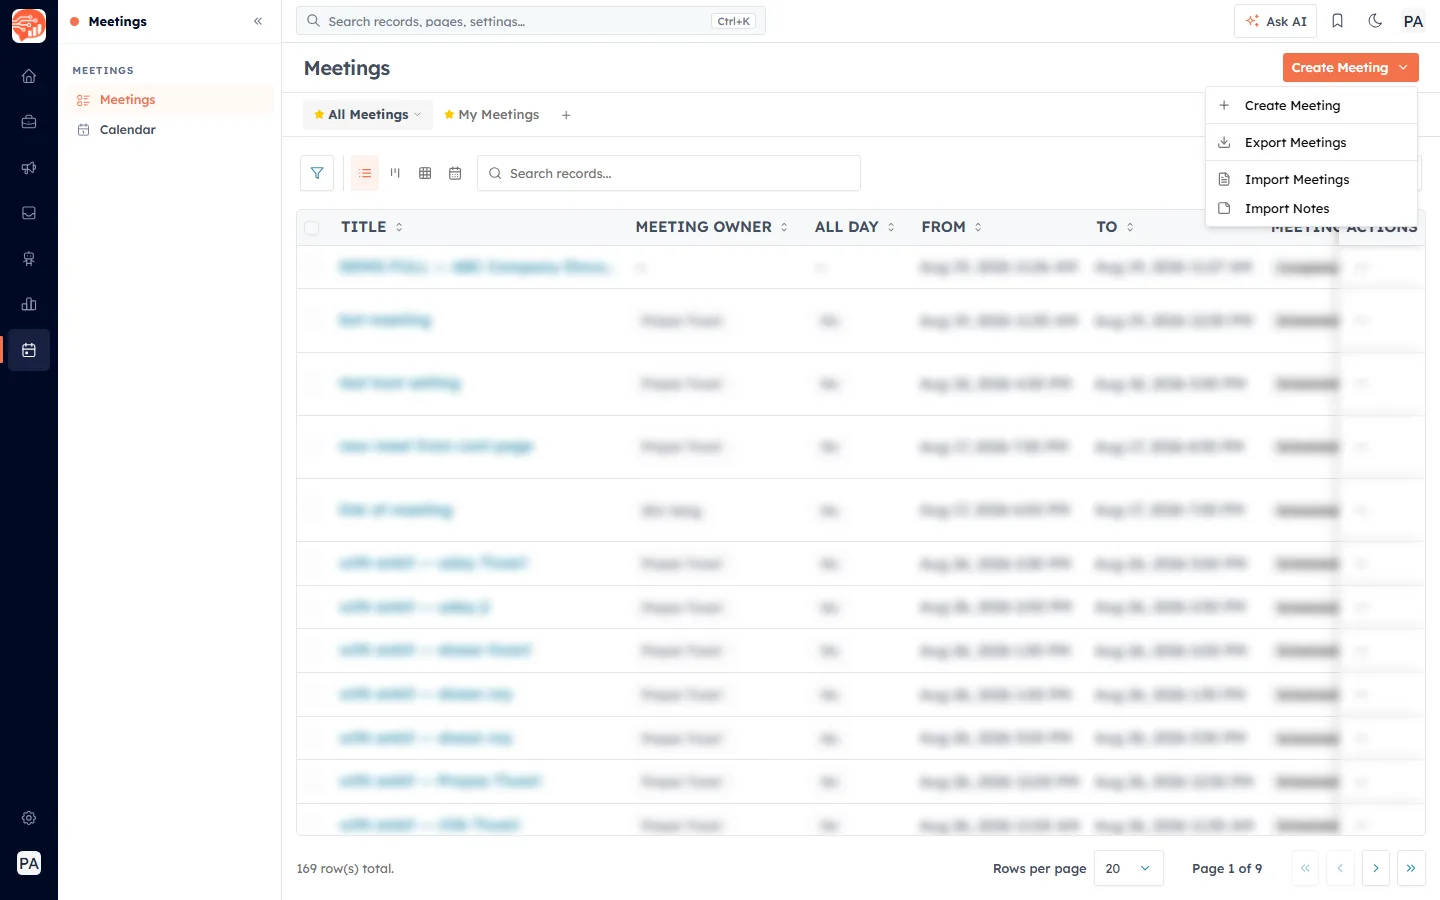
The Create Meeting menu. The first item is the one you want; the other three move meeting data in and out in bulk.
The menu holds four items:
Create Meeting — opens the form. This is the one you want.
Export Meetings — downloads the meetings in the current view.
Import Meetings — brings meetings in from a file.
Import Notes — brings in notes against existing meetings.
Choose Create Meeting. The full Create Meeting page opens, headed “Fill in the details to create a new meeting.”
Step 3 — Fill in the meeting details#
The page opens on MEETING DETAILS. Fields marked with a red asterisk (*) are required.
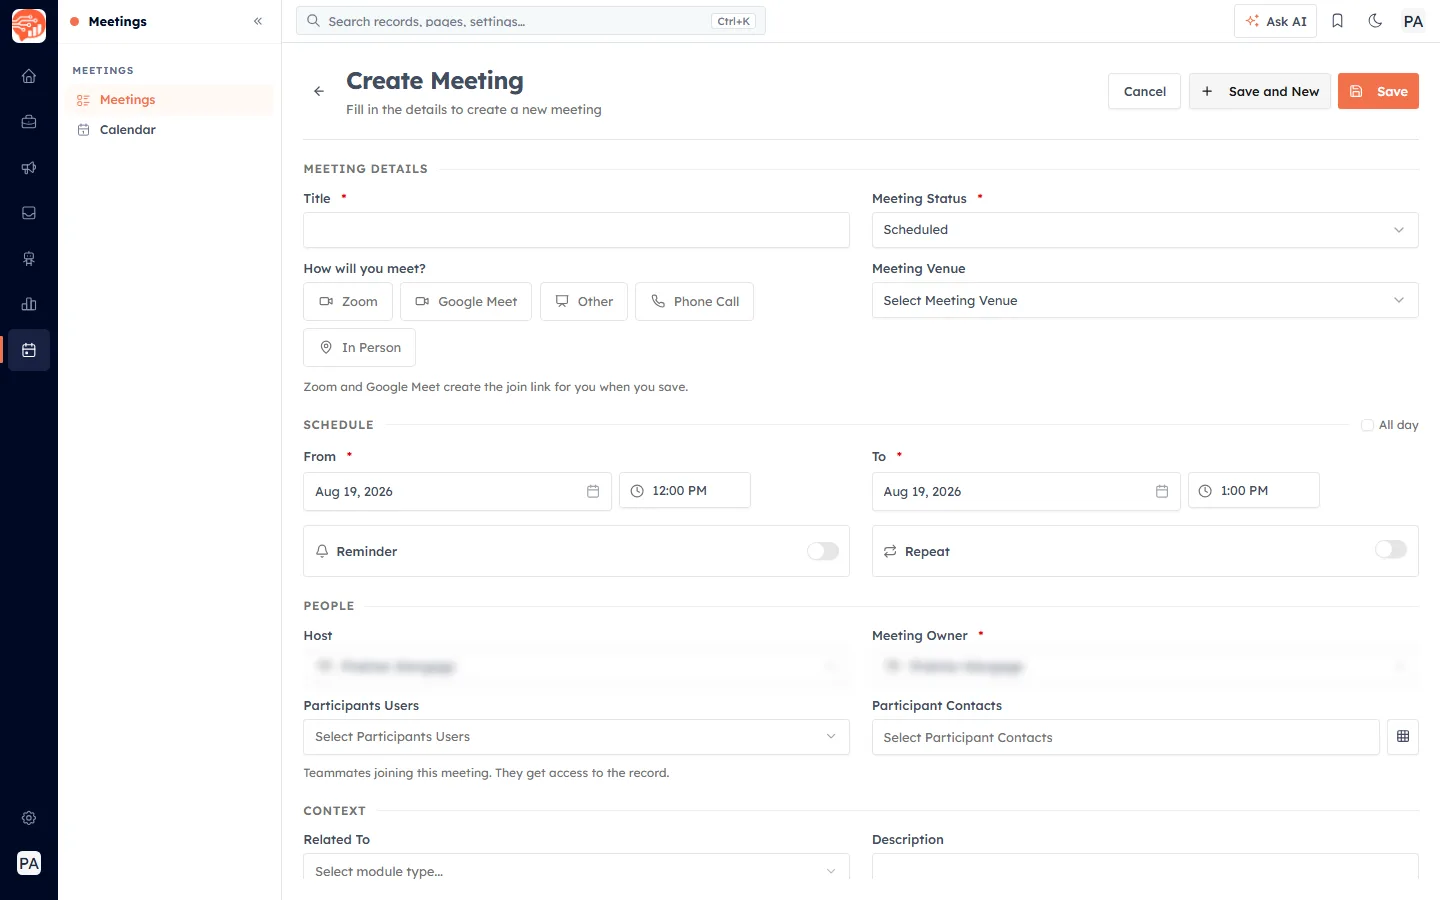
The top of the Create Meeting page. Cancel, Save and New and Save stay in the header as you scroll.
Title (required) — what the meeting is called. It is what shows in the list and on the invitation, so make it something the other person will recognise, e.g. "Product demo".
Meeting Status (required) — starts on Scheduled. Update it as the meeting progresses.
How will you meet? — five tiles: Zoom, Google Meet, Other, Phone Call and In Person. Pick one.
Meeting Venue — where it happens. Useful for in-person meetings and for rooms your organisation has already set up.
ℹ️
Choose Zoom or Google Meet and you do not need to paste a link: as the page says, “Zoom and Google Meet create the join link for you when you save.” It is generated on save and attached to the meeting.
Step 4 — Set the schedule#
The SCHEDULE section controls when the meeting runs.
From (required) — the start date and start time, in two separate boxes.
To (required) — the end date and end time. AI Engage pre-fills a one-hour slot, so if that suits you there is nothing to change.
All day — the checkbox on the right of the SCHEDULE heading, for something with no particular start time.
Reminder — a toggle. Switch it on to be nudged before the meeting starts.
Repeat — a toggle, for a meeting that recurs such as a weekly check-in, so you do not create it by hand each time.
💡
Both toggles are off by default and each reveals its own settings once switched on, so the page stays short until you actually need them.
Step 5 — Add the people#
PEOPLE covers who attends and who is accountable.
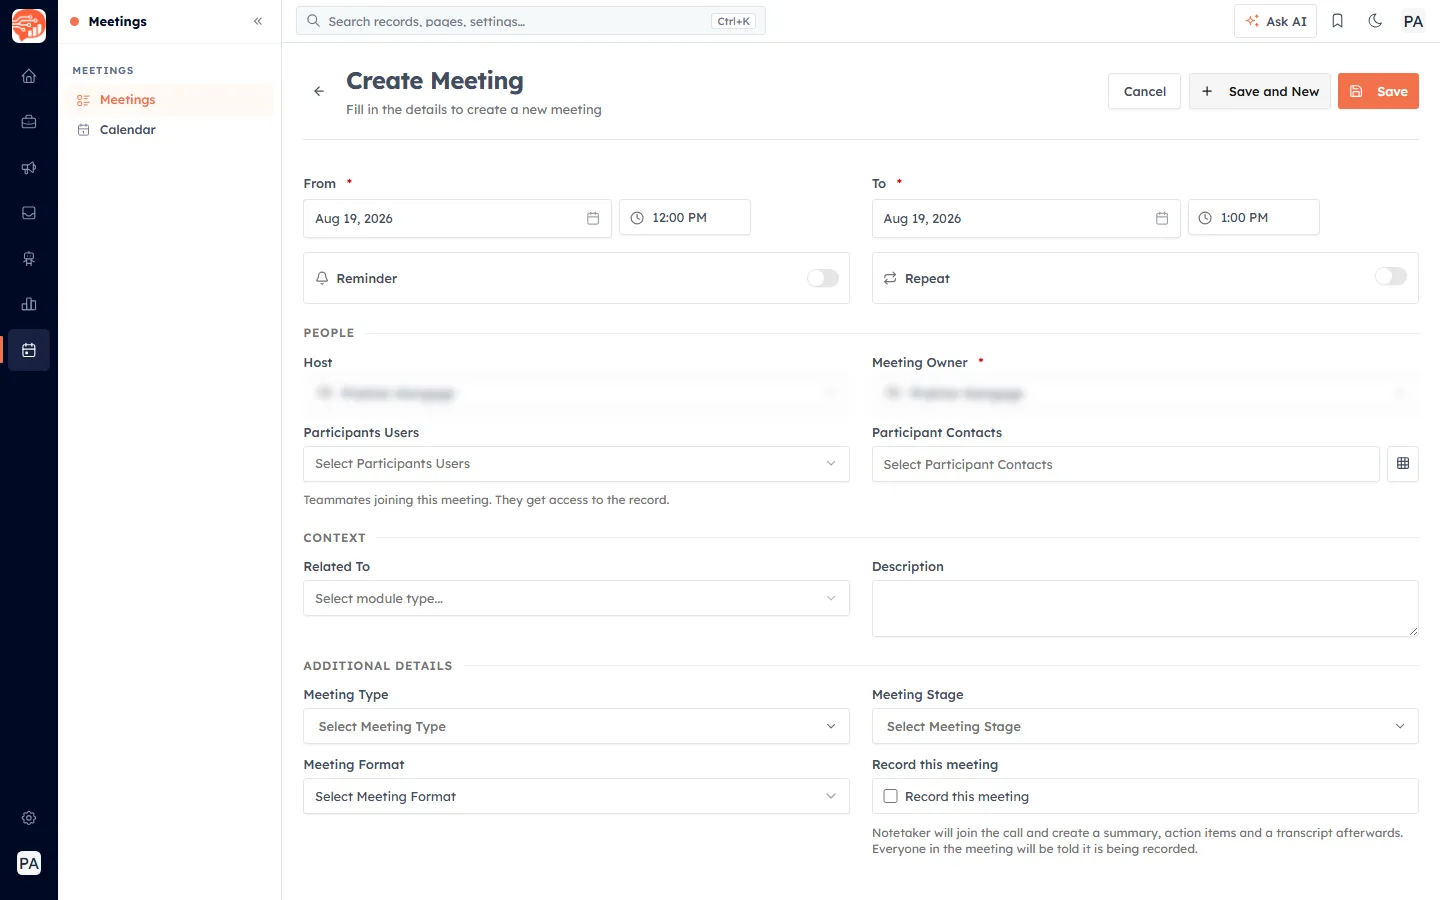
The lower half of the page. Host and Meeting Owner default to you — blurred here because they show real user records.
Host — who runs the meeting. Defaults to you.
Meeting Owner (required) — who is accountable for the record in the CRM. Also defaults to you. The two need not match: a coordinator can book a meeting a colleague will actually run.
Participants Users — your teammates. As the page notes, “Teammates joining this meeting. They get access to the record.”
Participant Contacts — the people outside your company. Type to search, or use the grid button beside the field to pick from a fuller list.
⚠️
Adding someone to Participants Users grants them access to the meeting record, not just a seat in the call. Add teammates who should be able to see the meeting and its notes.
Step 6 — Give it context, and set the extras#
The last two sections are optional, but they are what makes the meeting useful later.
CONTEXT
Related To — link the meeting to the record it is about. Pick the module first from Select module type… — Contacts, Companies, Deals, Quotes, Invoices, Products and any custom modules your organisation uses — then the specific record.
Description — an agenda, a dial-in note, anything attendees should read beforehand.
ℹ️
Setting Related To is worth the extra few seconds. The meeting then appears on that deal or contact’s own timeline, so the next person to open the record sees it happened without going hunting.
ADDITIONAL DETAILS
Meeting Type, Meeting Stage and Meeting Format — three dropdowns for classifying the meeting. These are what your reports group and filter on.
Record this meeting — a checkbox. Tick it and the AI notetaker joins the call.
⚠️
On Record this meeting the page is explicit: “Notetaker will join the call and create a summary, action items and a transcript afterwards. Everyone in the meeting will be told it is being recorded.” Attendees are notified — recording is never silent.
Step 7 — Save it#
Three buttons sit in the page header, and stay there as you scroll:
Save — creates the meeting and takes you back.
Save and New — creates it and immediately opens a fresh blank form. Use this when you are booking several meetings in a row.
Cancel — discards everything and returns to the list.
Once saved:
The meeting appears in the Meetings list, and on the Calendar view on its date.
If you chose Zoom or Google Meet, the join link is generated and attached.
If you set Related To, the meeting shows on that record’s timeline.
💡
Nothing is saved until you click Save or Save and New, so you can scroll up and down and change your mind as often as you like.
A quick checklist#
Give the meeting a Title the other person will recognise.
Pick Zoom or Google Meet and let AI Engage make the link.
Check the From and To times — the default is one hour.
Add the Participant Contacts who are actually attending.
Set Related To so the meeting lands on the right record.
Was this article helpful?
Ready to implement this?
OpenAI Engage and apply what you just learned to your own workspace.
Open AI Engage CRM