Loading…


KnowledgeBase
Call Leads Automatically with an AI Voice Agent: Meta, Outbound & AI-Qualified Leads via Workflow Webhook (English & Hindi)
What you’ll build#
An AI voice agent is a phone bot that talks to your customer in a natural voice. It can greet a new lead, ask a few qualifying questions, answer simple queries and book a follow-up, without anyone from your team picking up the phone.
In this guide you’ll connect that voice agent to AiEngage CRM with a workflow. When a new contact is created, the workflow’s Webhook action sends the contact’s phone number and name to your voice-agent flow on Plivo. Plivo then phones the contact within seconds.
The finished workflow has just two blocks:
Block | What it does | In this guide |
|---|---|---|
Trigger | Decides when the workflow runs. | Contacts → Record Created, only when Phone is not empty |
Action | Decides what happens. | Webhook → POST to the Plivo voice-agent flow URL, with the contact’s phone and first name |
You will build the English agent first. The Hindi agent works the same way with a different URL, and is covered after it.
After that, you’ll learn how to make the AI agent call only the leads that matter: leads that come from Meta (Facebook & Instagram) ads, outbound leads your team has sourced, and leads your AI agent has qualified, either one workflow per type or all three in one workflow.
ℹ️
A webhook is simply an automatic web request. When the workflow runs, AiEngage CRM sends the contact’s details to a web address (the Request URL), and the service at that address, in this case Plivo, acts on them straight away.
Before you start#
You need three things ready before building the workflow:
A voice-agent flow on Plivo. The agent’s script, voice and language are set up on Plivo, not in the CRM. The flow must start from an API request so the CRM can trigger it. Plivo’s own guides explain how to build one: Voice agents with SIP trunking and Voice agents with audio streaming.
The flow’s Request URL. Each Plivo flow has its own URL. Use the one that matches the language you want:
Contacts with a phone number that includes the country code, for example
+919876543210. Plivo cannot dial a number without it.
Language | Request URL |
|---|---|
English |
|
Hindi |
|
⚠️
Copy the URL exactly as shown, all in one piece, with no spaces. The two URLs differ only in the last part (after /flow/), which is what selects the English or the Hindi agent.
✅
If your Plivo flow has Require Authentication switched on, keep your Plivo Auth ID and Auth Token handy as well. You’ll find both on the overview page of the Plivo console. You will need them in Step 11.
Plivo documentation#
This article covers the CRM side only. Everything about building and running the voice agent itself is in Plivo’s documentation:
Plivo page | Read it for |
|---|---|
All Plivo products and APIs in one place. | |
What a Plivo AI agent is and how agent flows are built. | |
Outbound call agents, including starting a call from an external API request (what this workflow does). | |
Where to find your Auth ID and Auth Token, and when they are required. | |
Connecting a voice-agent platform to Plivo phone numbers over SIP. | |
Building a voice agent that streams call audio to your own AI services. |
Part 1: Create the workflow#
Step 1: Open the Marketing menu#
In the dark icon bar on the far left of the CRM, click the Marketing icon (the megaphone).
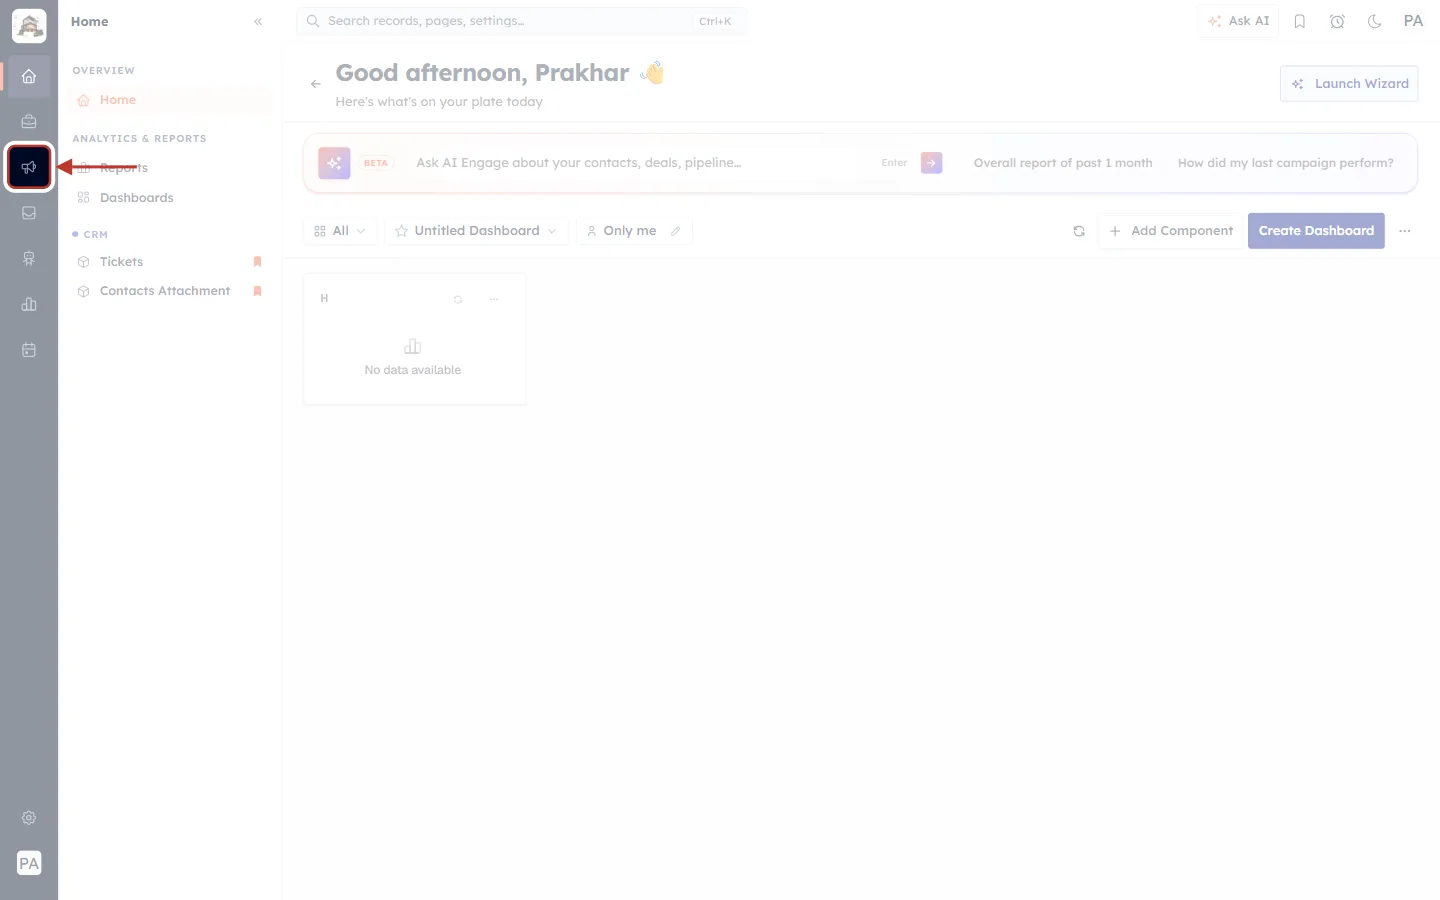
What this screenshot shows. The CRM home page, with the Marketing icon ringed in red in the left icon bar.
The red arrow points to the megaphone icon. This is the Marketing menu, where workflows live.
The other icons in the bar open other areas of the CRM, such as Sales, Inbox and Reports. You don’t need them for this guide.
The rest of the page (your home dashboard) is faded so you can see where to click.
Step 2: Open Workflow Automation#
A Marketing menu opens next to the icon bar. Click Workflow Automation.
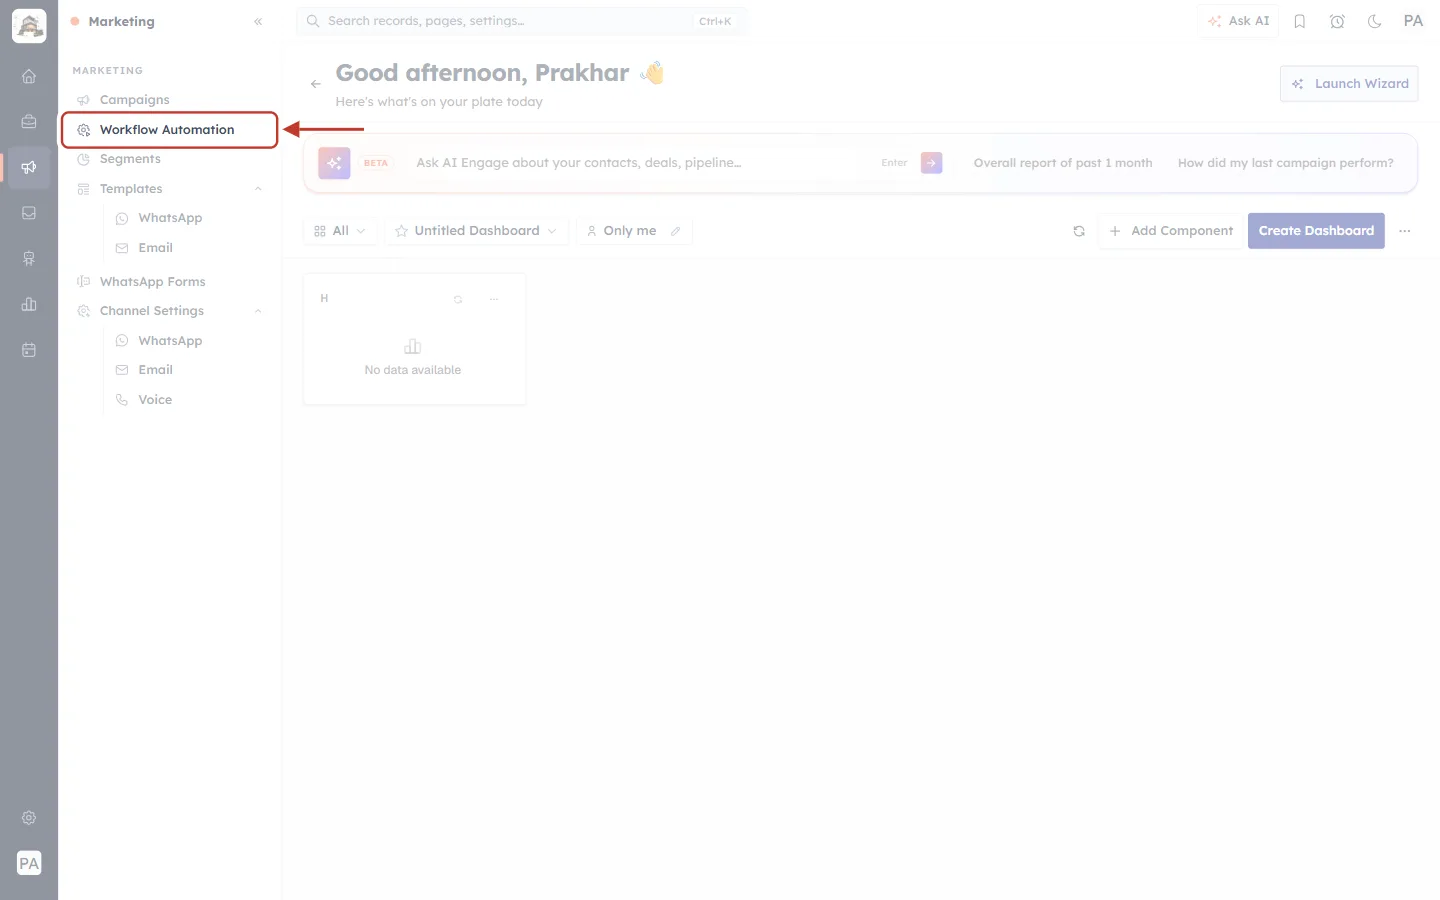
What this screenshot shows. The Marketing menu is open, with the Workflow Automation item ringed.
The menu lists Campaigns, Workflow Automation, Segments, Templates, WhatsApp Forms and Channel Settings.
The red ring and arrow mark Workflow Automation, the page where you build and manage every workflow.
Step 3: Click New Workflow#
The Workflow Automation page lists every workflow in your account. Click + New Workflow in the top-right corner.
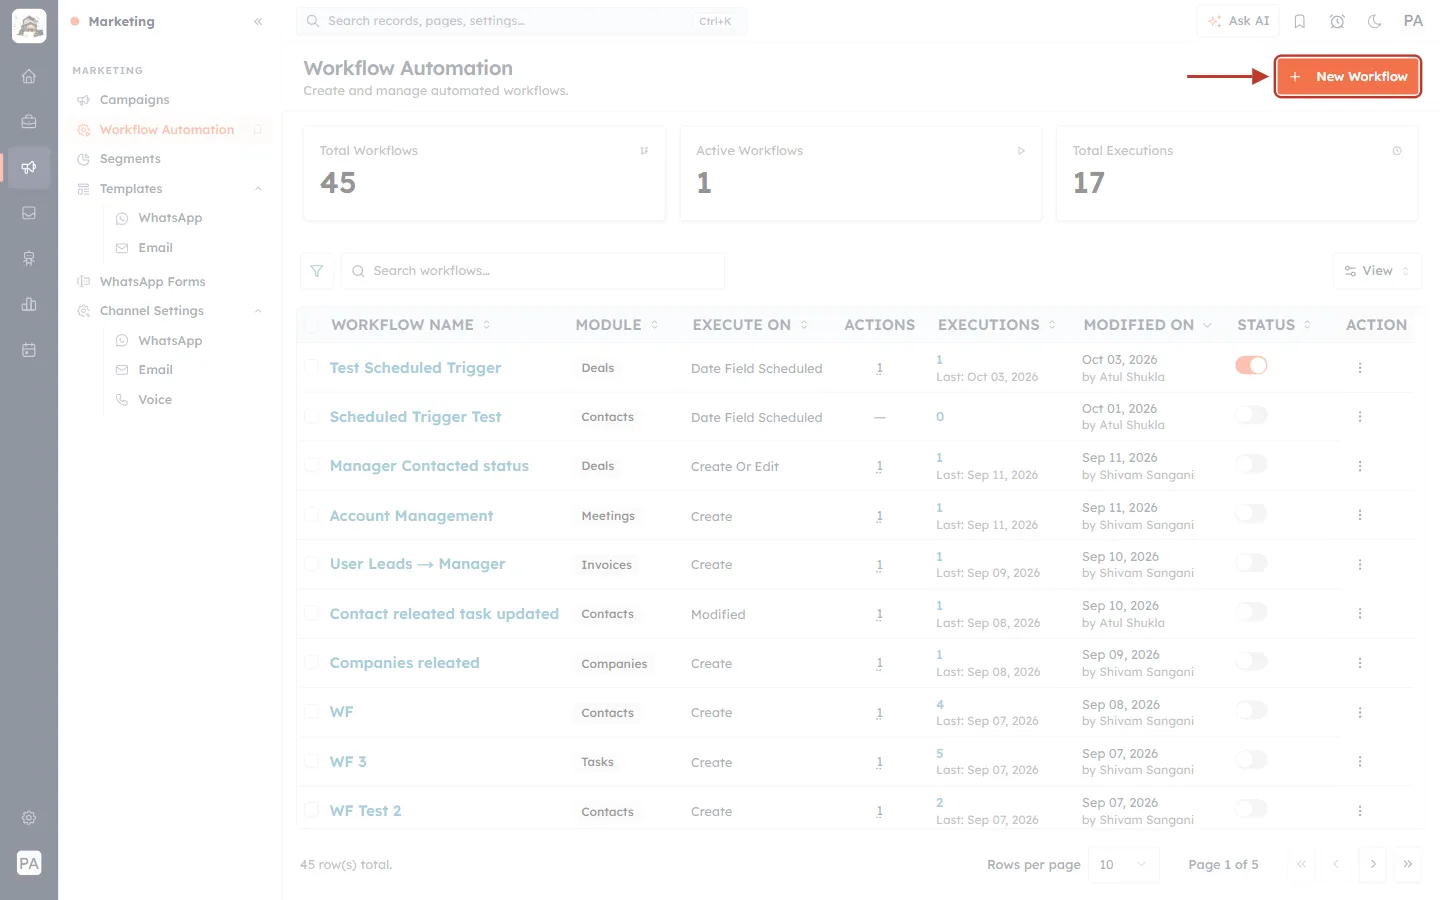
What this screenshot shows. The Workflow Automation page, with the orange New Workflow button ringed in the top-right corner.
The three cards at the top show Total Workflows, Active Workflows (the ones switched on) and Total Executions (how many times workflows have run).
The table below lists your workflows with their Module, what they Execute On, how many Actions they have, their Executions, when they were last modified, and their Status switch.
The red arrow points to + New Workflow, which starts a new one.
Step 4: Name the workflow and choose Contacts#
The Create Workflow page opens on step 1 of 2, Basic Info. Fill it in:
Workflow Name: a name you’ll recognise later, for example AI Voice Call - English.
Description (optional): a short note for your team, for example Calls every new contact with the English AI voice agent on Plivo.
Target Module: click the box and choose Contacts, because the voice agent should call new contacts.
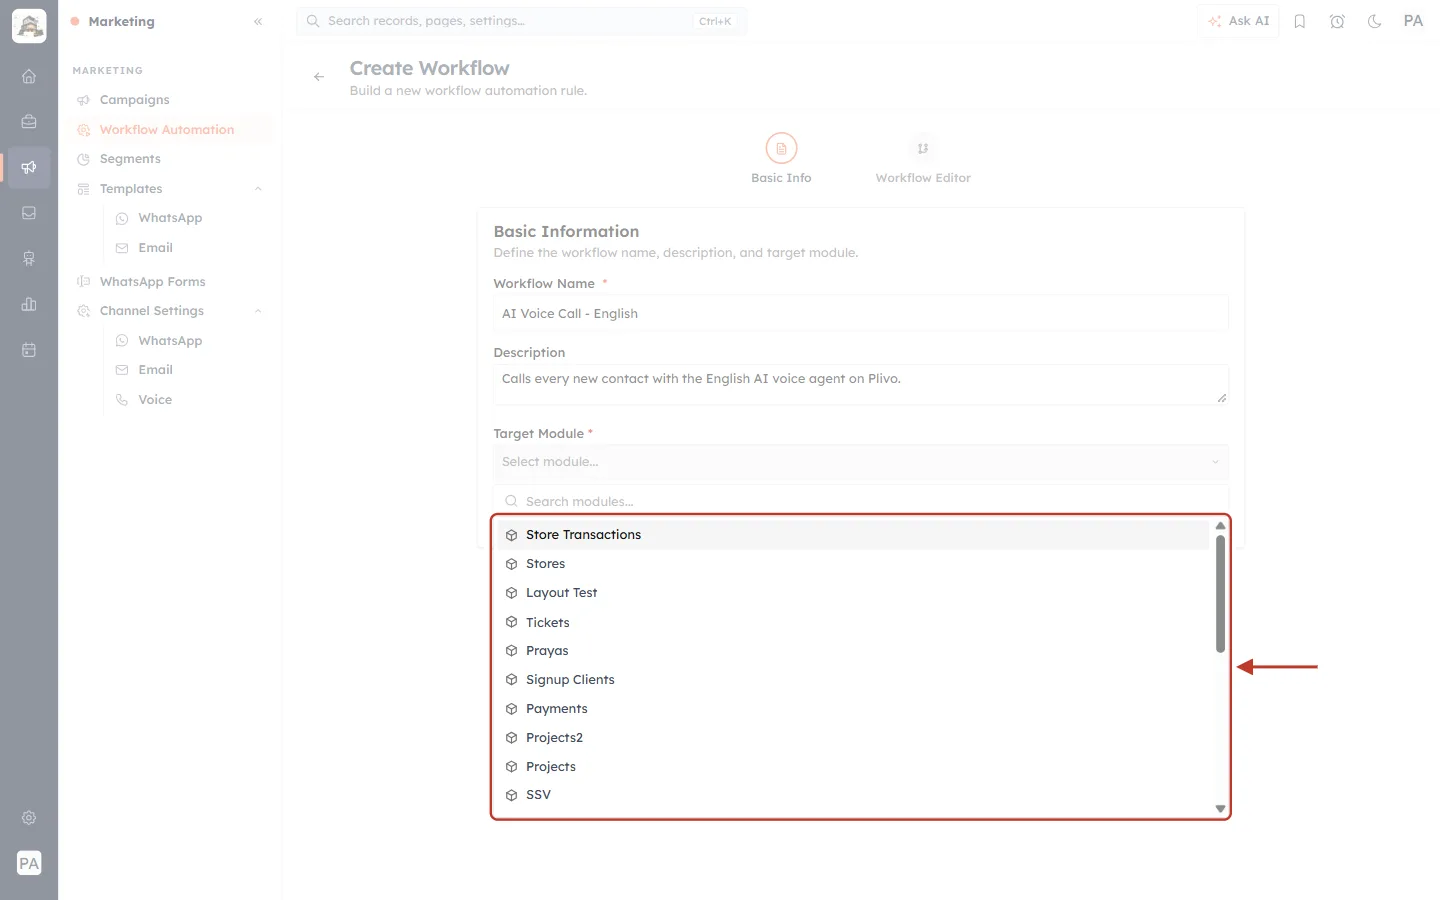
What this screenshot shows. The Target Module box is open and shows every module in your CRM.
The ringed list shows the modules a workflow can watch, such as Contacts, Companies, Deals, Tasks and any custom modules your team has added. Your list may be different.
Scroll down the list and click Contacts.
The module you choose here decides which records start the workflow and which fields you can send in the webhook later.
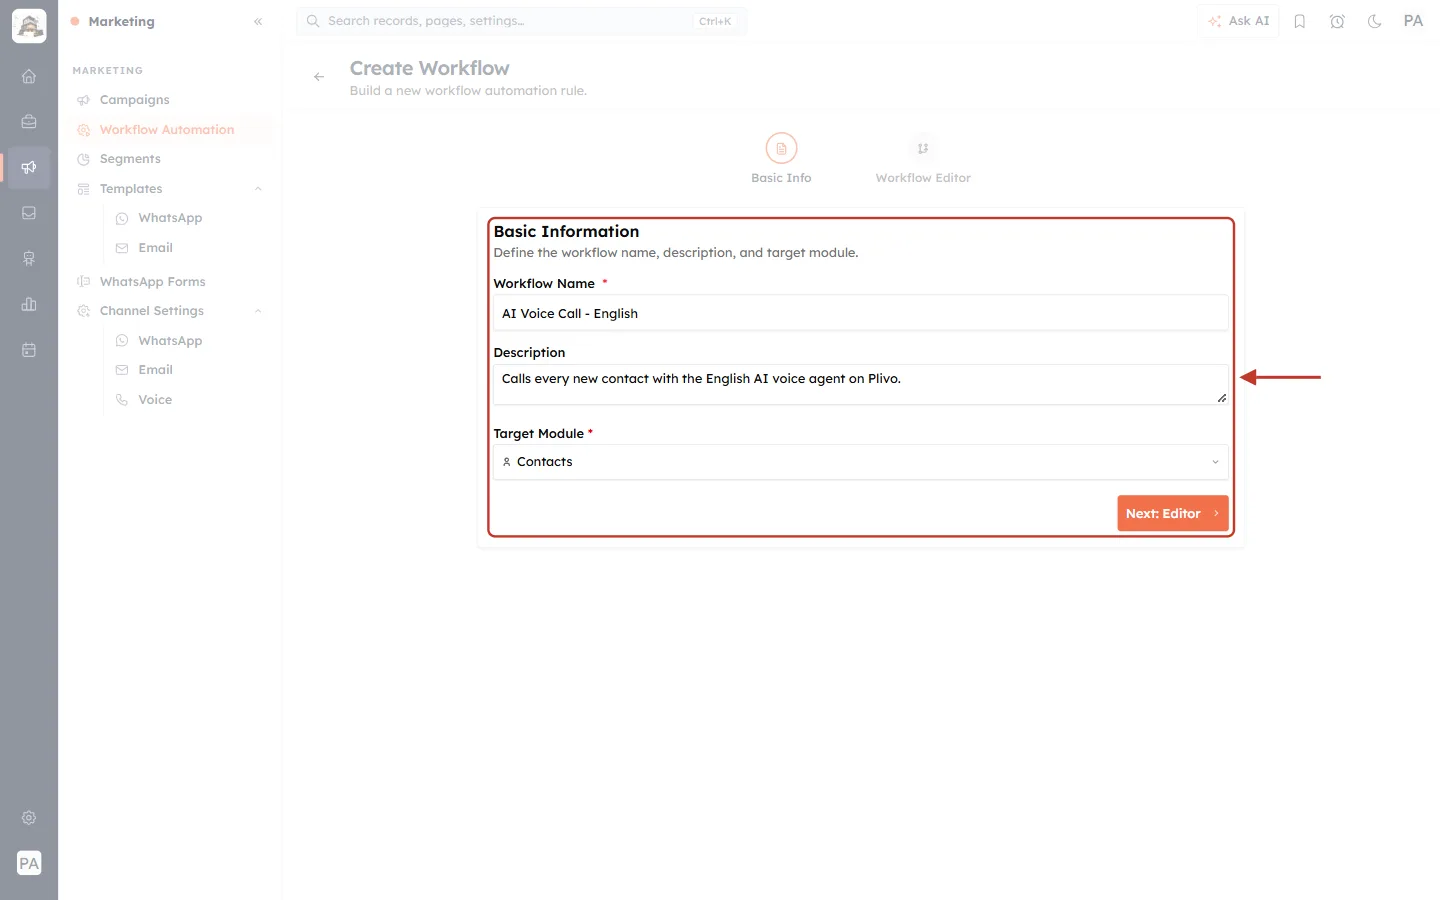
What this screenshot shows. The Basic Information card, filled in and ready to go.
Workflow Name shows AI Voice Call - English. The red star means this box is required.
Description shows the short note about what the workflow does.
Target Module now shows Contacts with the contact icon.
The orange Next: Editor button in the bottom-right corner of the card takes you to the builder.
Step 5: Go to the editor#
Click Next: Editor.
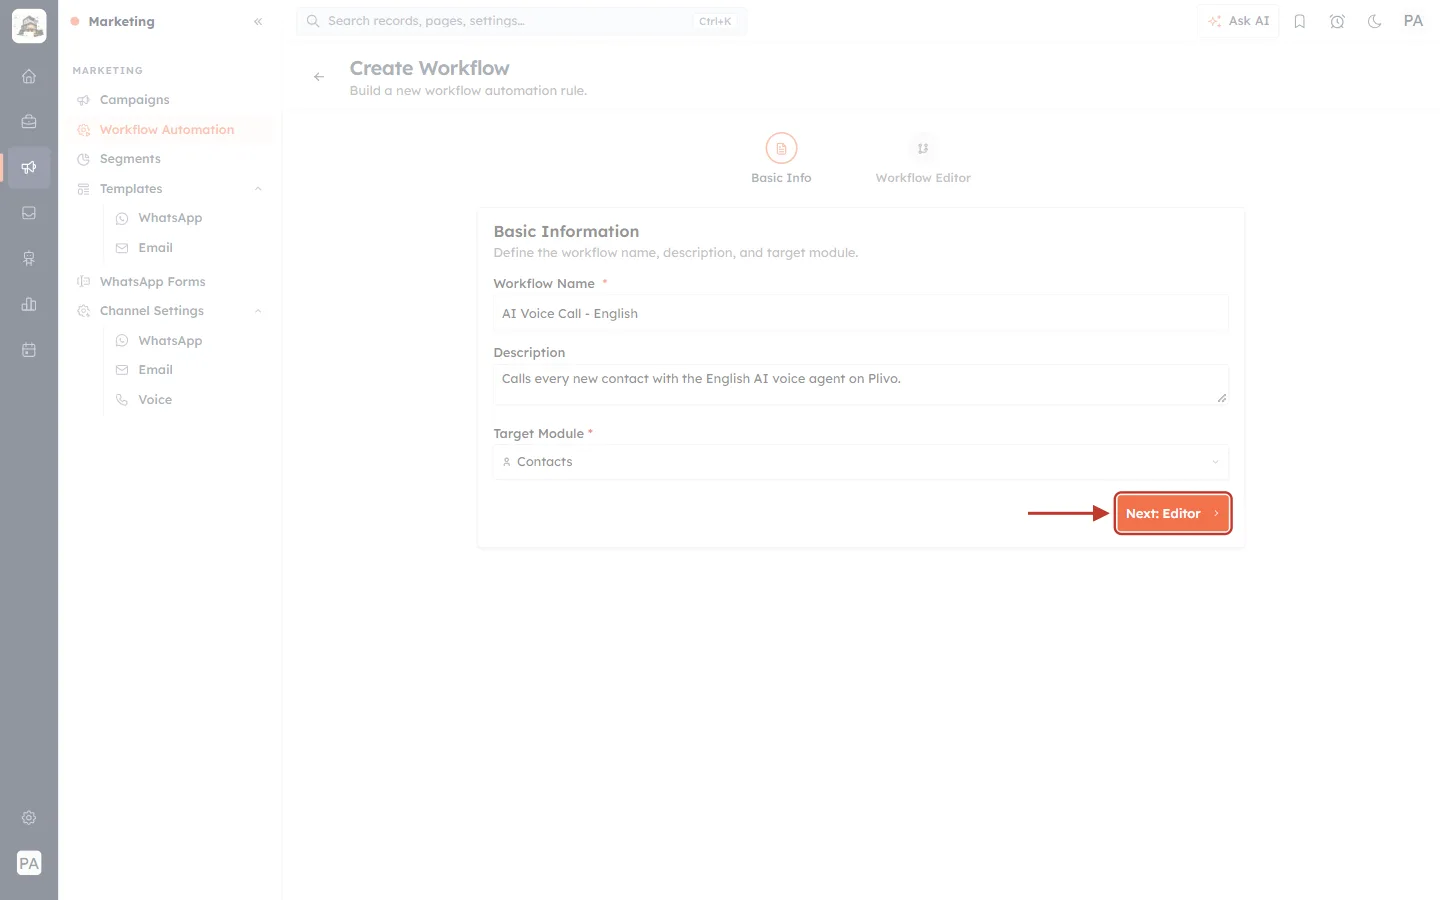
What this screenshot shows. The Next: Editor button is ringed at the bottom of the Basic Information card.
The steps at the top of the page show Basic Info (done) and Workflow Editor (next).
Clicking the ringed button opens the builder canvas. Nothing is saved yet. The workflow is only saved when you click Create Workflow at the end.
Part 2: Add the trigger (when to call)#
Step 6: Drag “Record Created” onto the canvas#
The builder has the Node Palette on the left and an empty canvas on the right. Under TRIGGERS, find Record Created (“Fires when a new record is created”). Drag it onto the canvas and let go.
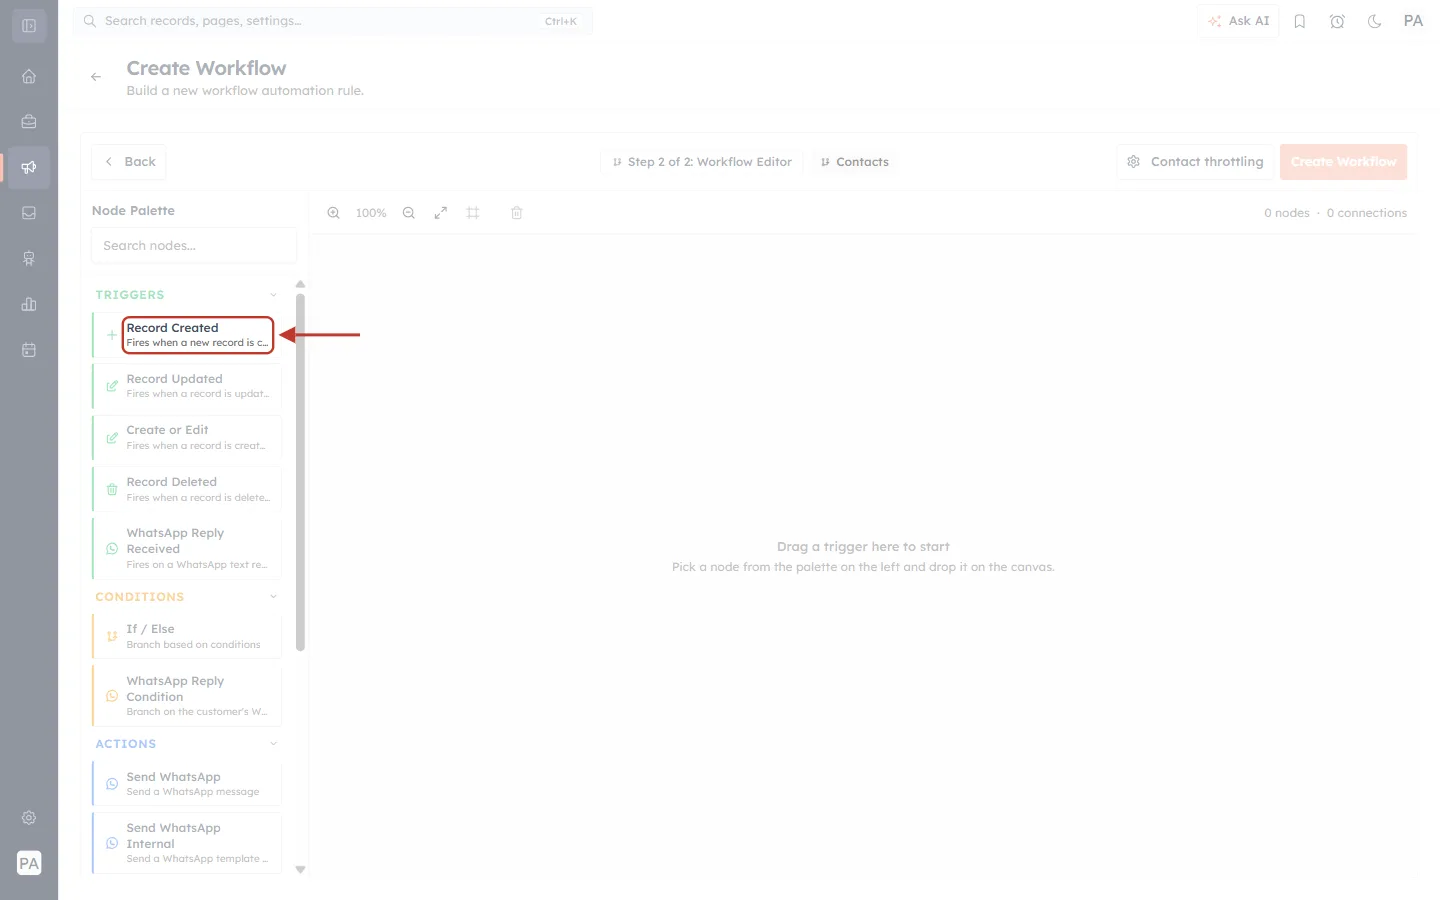
What this screenshot shows. The workflow builder with the Record Created trigger ringed in the Node Palette.
The top bar shows Step 2 of 2: Workflow Editor and the module chip Contacts, so you can always tell which module this workflow belongs to.
On the right of the top bar are Contact throttling and Create Workflow (which saves the workflow).
The palette groups its blocks into TRIGGERS (green), CONDITIONS (orange) and ACTIONS (blue).
The red arrow points to Record Created, the trigger to drag. The canvas says “Drag a trigger here to start” until you drop one.
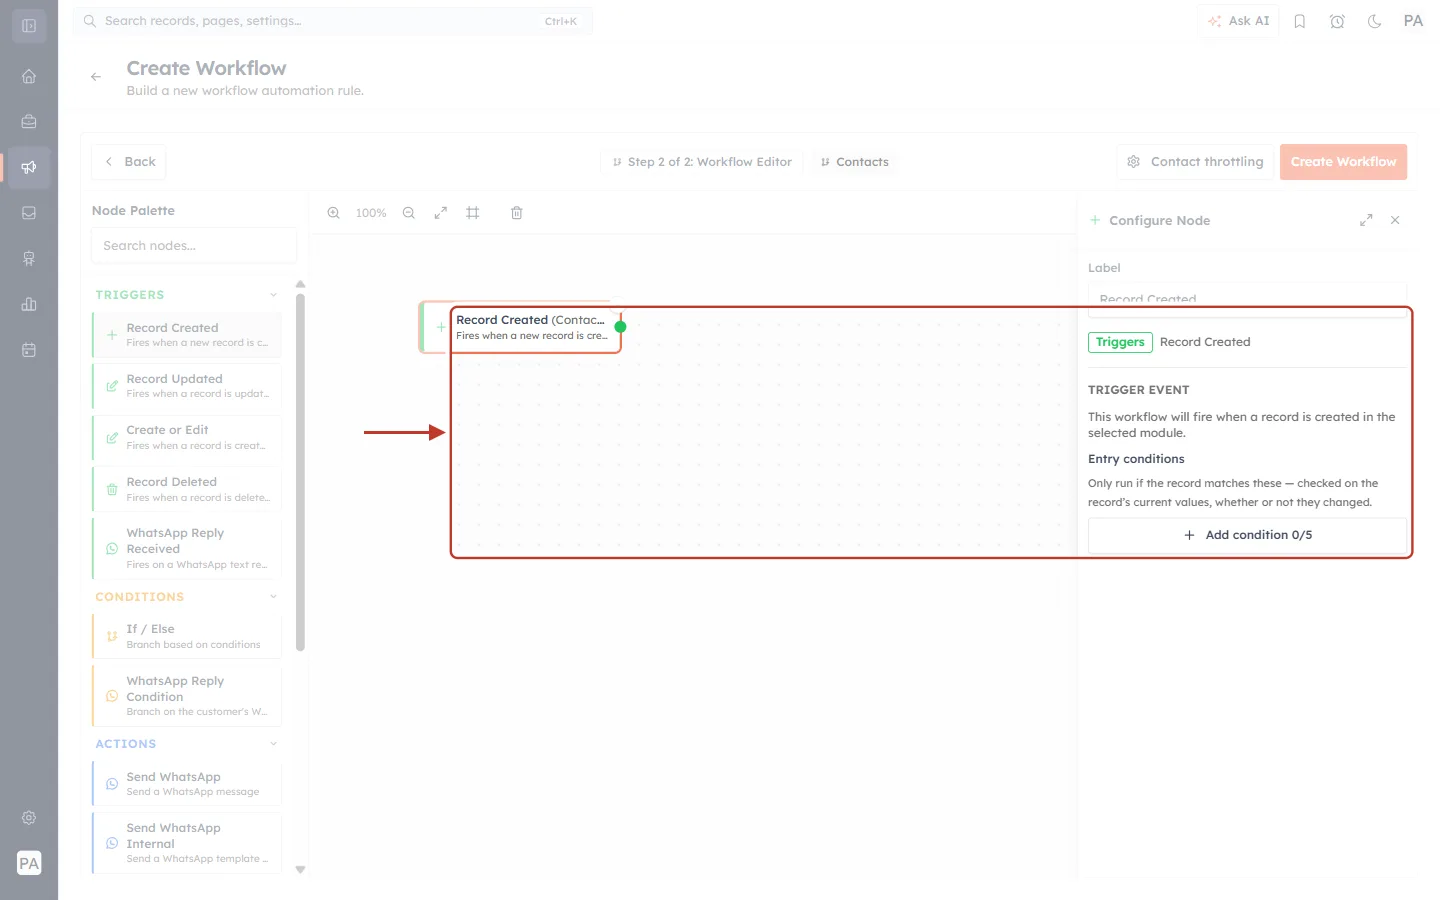
What this screenshot shows. Record Created is on the canvas, and its settings panel has opened on the right.
The ringed area covers the new Record Created (Contacts) block on the canvas and the Configure Node panel.
The panel shows the Label, a green Triggers tag, and TRIGGER EVENT: “This workflow will fire when a record is created in the selected module.”
At the bottom is Entry conditions with an + Add condition 0/5 button. You’ll use it in the next step.
Step 7: Only call contacts who have a phone number#
A voice agent can’t call a contact without a number, so add an entry condition. Click + Add condition, choose the field Phone, then choose is not empty.
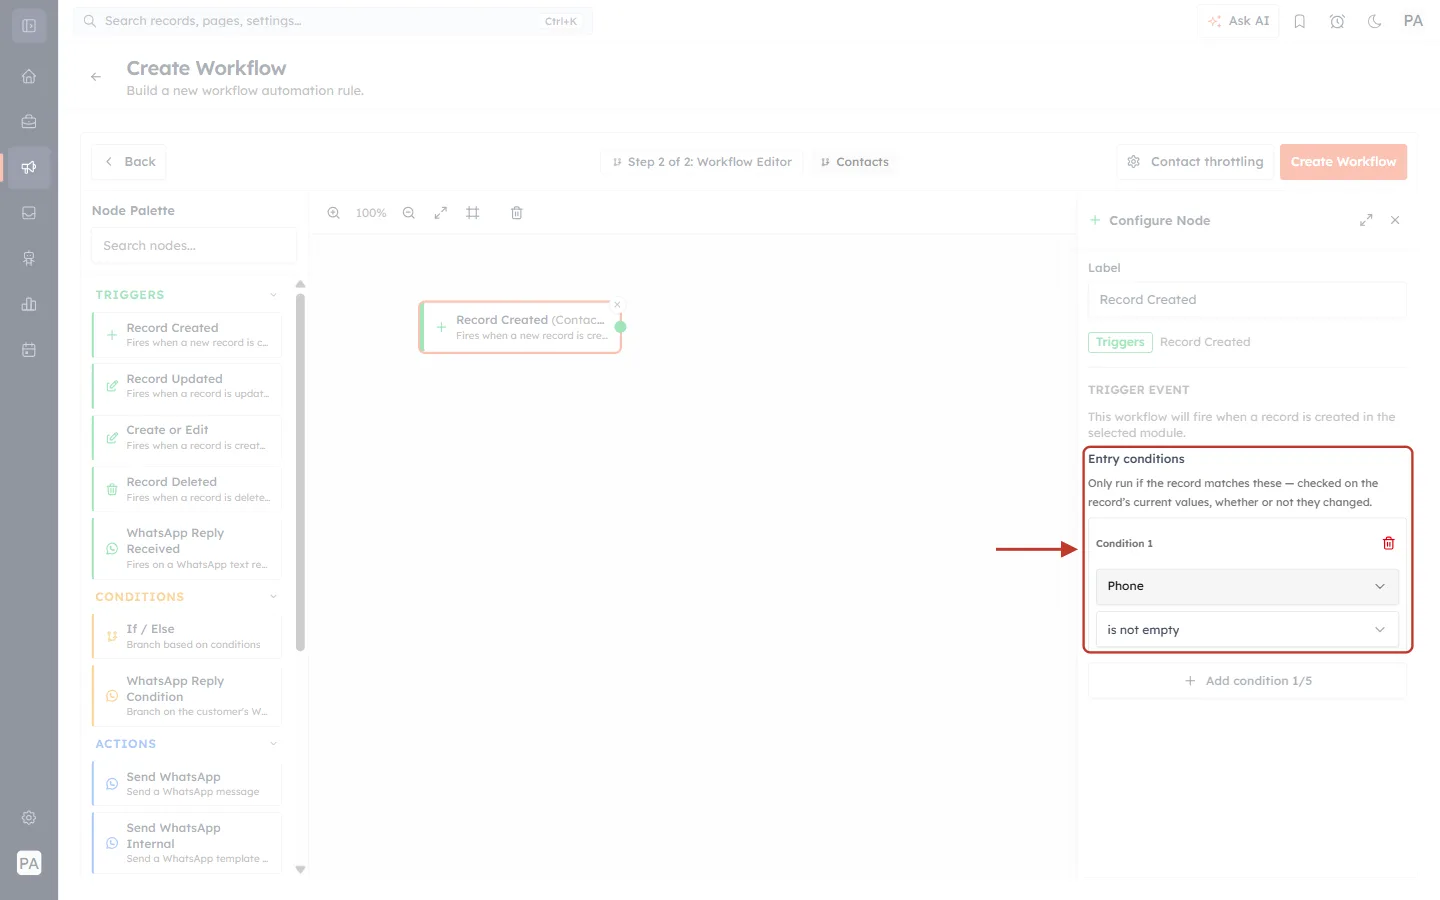
What this screenshot shows. The Entry conditions section with one condition filled in.
Condition 1 reads Phone · is not empty. The workflow now only runs for new contacts that have a phone number.
The red bin icon on the right removes the condition.
+ Add condition 1/5 lets you add up to five conditions. All of them must match. For example, add Lead Source · is · Website to call only website leads.
The note above explains that conditions are checked on the record’s current values.
Part 3: Add the Webhook (what to do)#
Step 8: Drag the Webhook action onto the canvas#
Close the trigger panel with the × in its top-right corner. Type Webhook in the Search nodes… box at the top of the palette, then drag Webhook (“Send an HTTP request to an external URL”) onto the canvas, below the trigger.
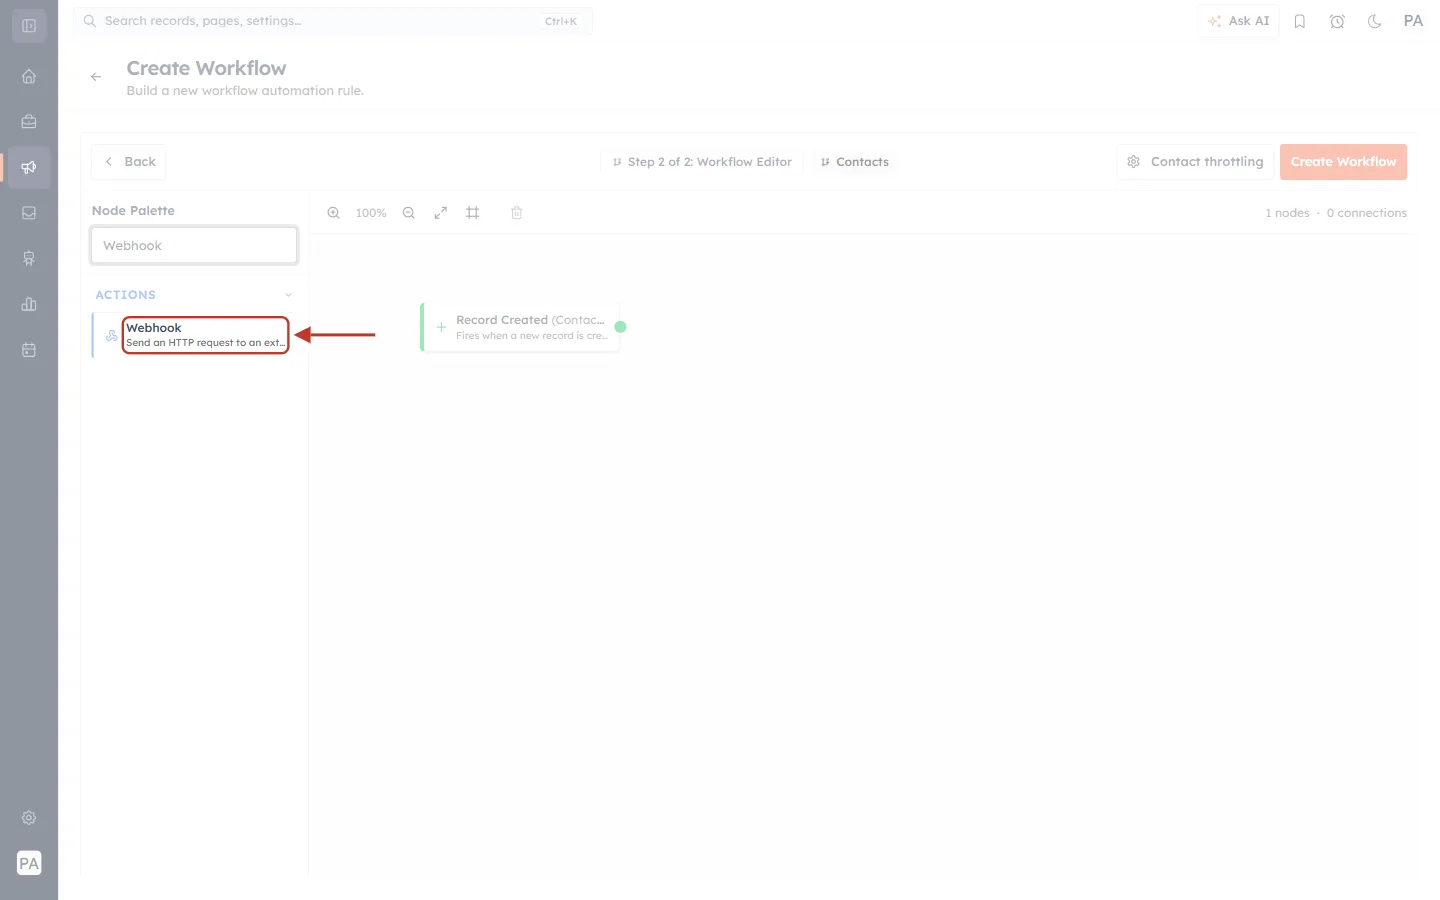
What this screenshot shows. The palette search shows the Webhook action, ringed.
The search box at the top of the palette contains Webhook, so the palette shows only matching blocks.
The Webhook block sits under ACTIONS and has a blue edge, like every action.
On the canvas you can see the Record Created (Contacts) trigger you added in Step 6.
Step 9: Connect the trigger to the Webhook#
Each block has small dots on its sides. Drag from the green dot on the right of Record Created to the blue dot on the left of Webhook. A line appears between them.
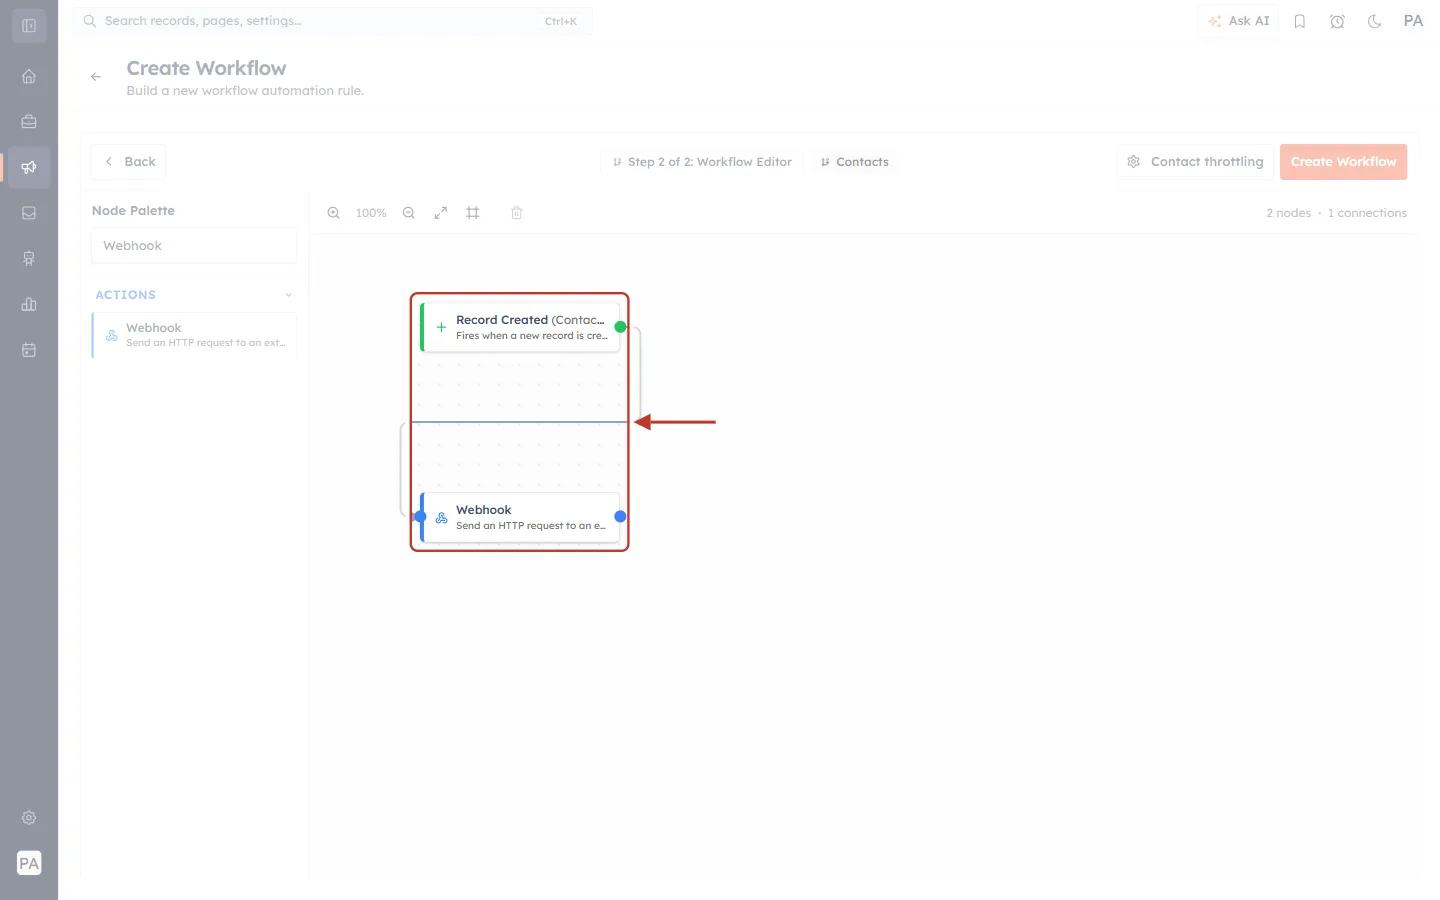
What this screenshot shows. The trigger and the Webhook block, joined by a connecting line.
The top block is the Record Created trigger. The bottom block is the Webhook action.
The red arrow points to the line that joins them. It means: when a contact is created, run the Webhook.
The counter at the top right of the canvas now reads 2 nodes · 1 connections. If it shows 0 connections, the line didn’t attach, so drag between the dots again.
⚠️
A Webhook that isn’t connected to the trigger never runs. Always check for the line, or for 1 connections in the counter.
Step 10: Open the Webhook settings and enter the Request URL#
Click the Webhook block. The Configure Node panel opens wide, because webhooks have more settings.
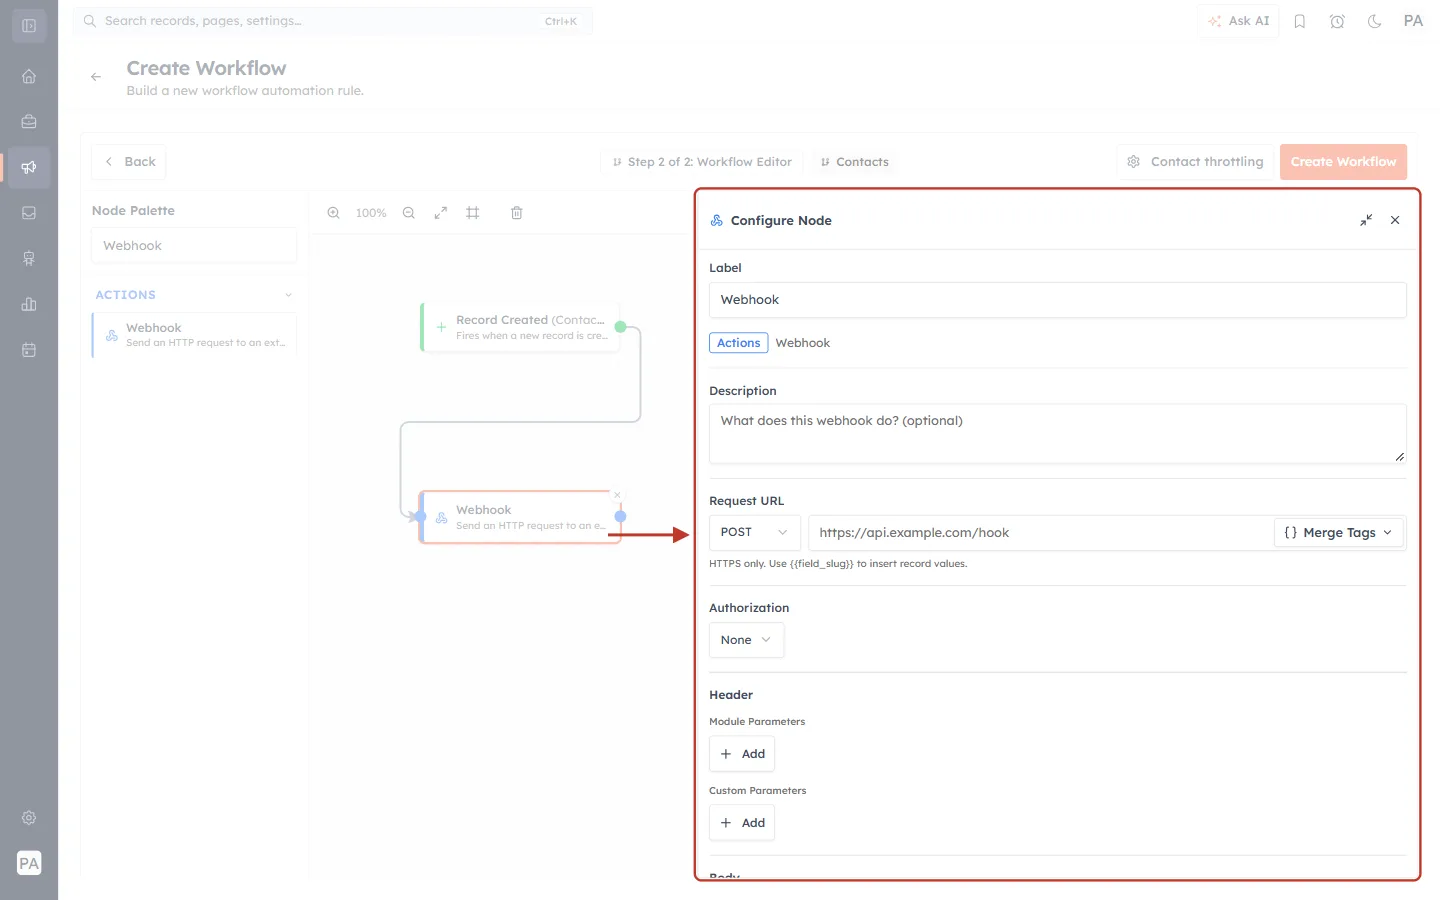
What this screenshot shows. The full Webhook settings panel, ringed, next to the canvas.
Label: the name shown on the block. It says Webhook until you change it.
The blue Actions tag and the word Webhook confirm what kind of block this is.
Description: an optional note.
Request URL: the method (POST) and the web address. The grey text https://api.example.com/hook is only a placeholder.
Authorization (None for now), then Header and, further down, Body.
First give the block a clear name and note, so anyone looking at the workflow knows what it does:
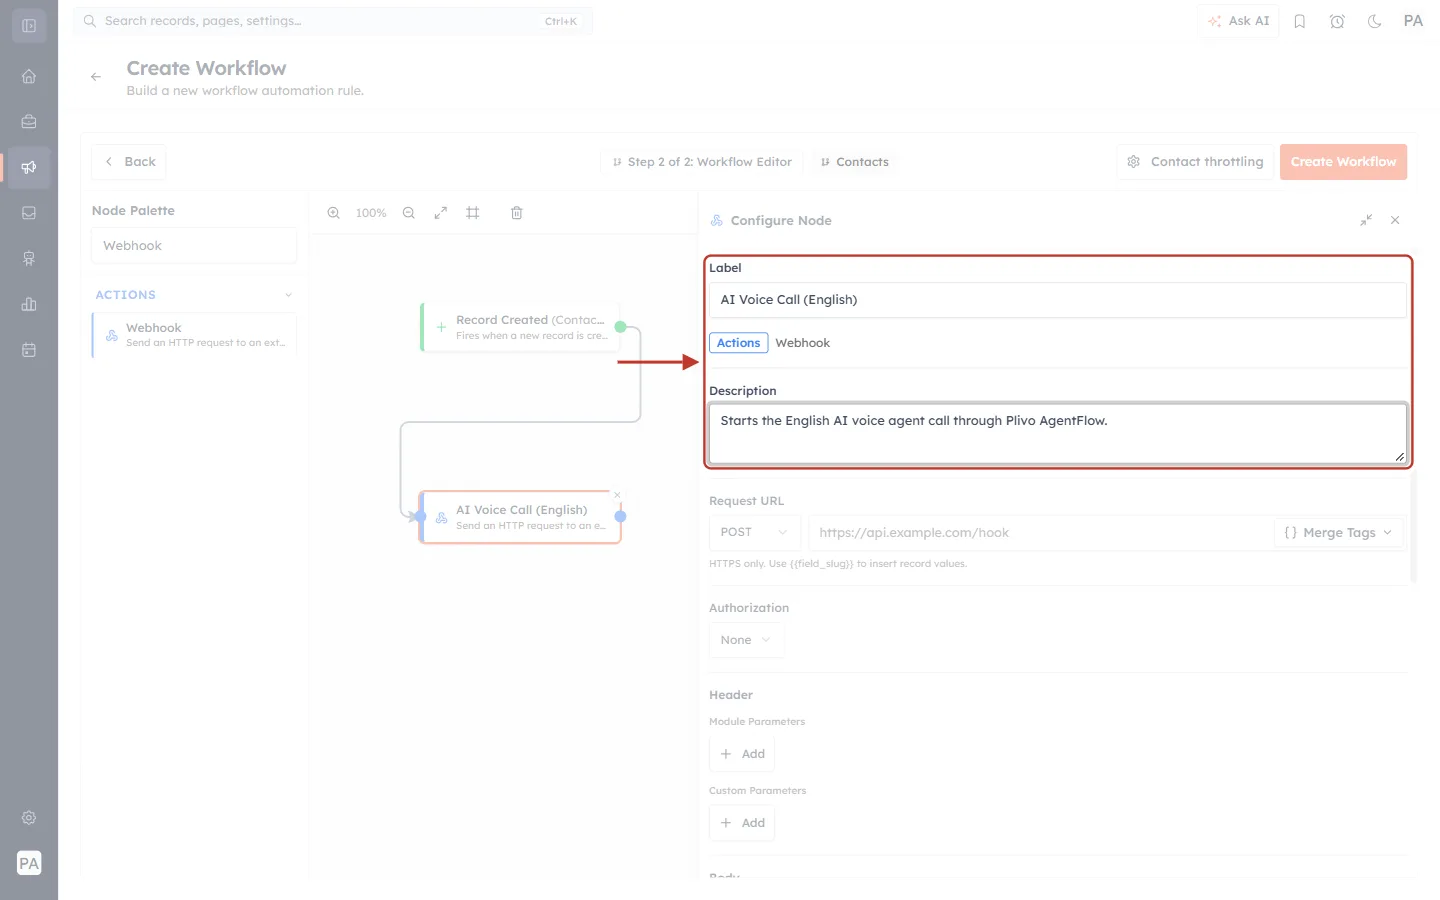
What this screenshot shows. The top of the panel with the Label and Description filled in.
Label now reads AI Voice Call (English). The block on the canvas shows the same name.
Description reads Starts the English AI voice agent call through Plivo AgentFlow.
Next, check the method. Click the small box to the left of the URL and make sure POST is selected. POST is the method that sends data, which is what starts the call.
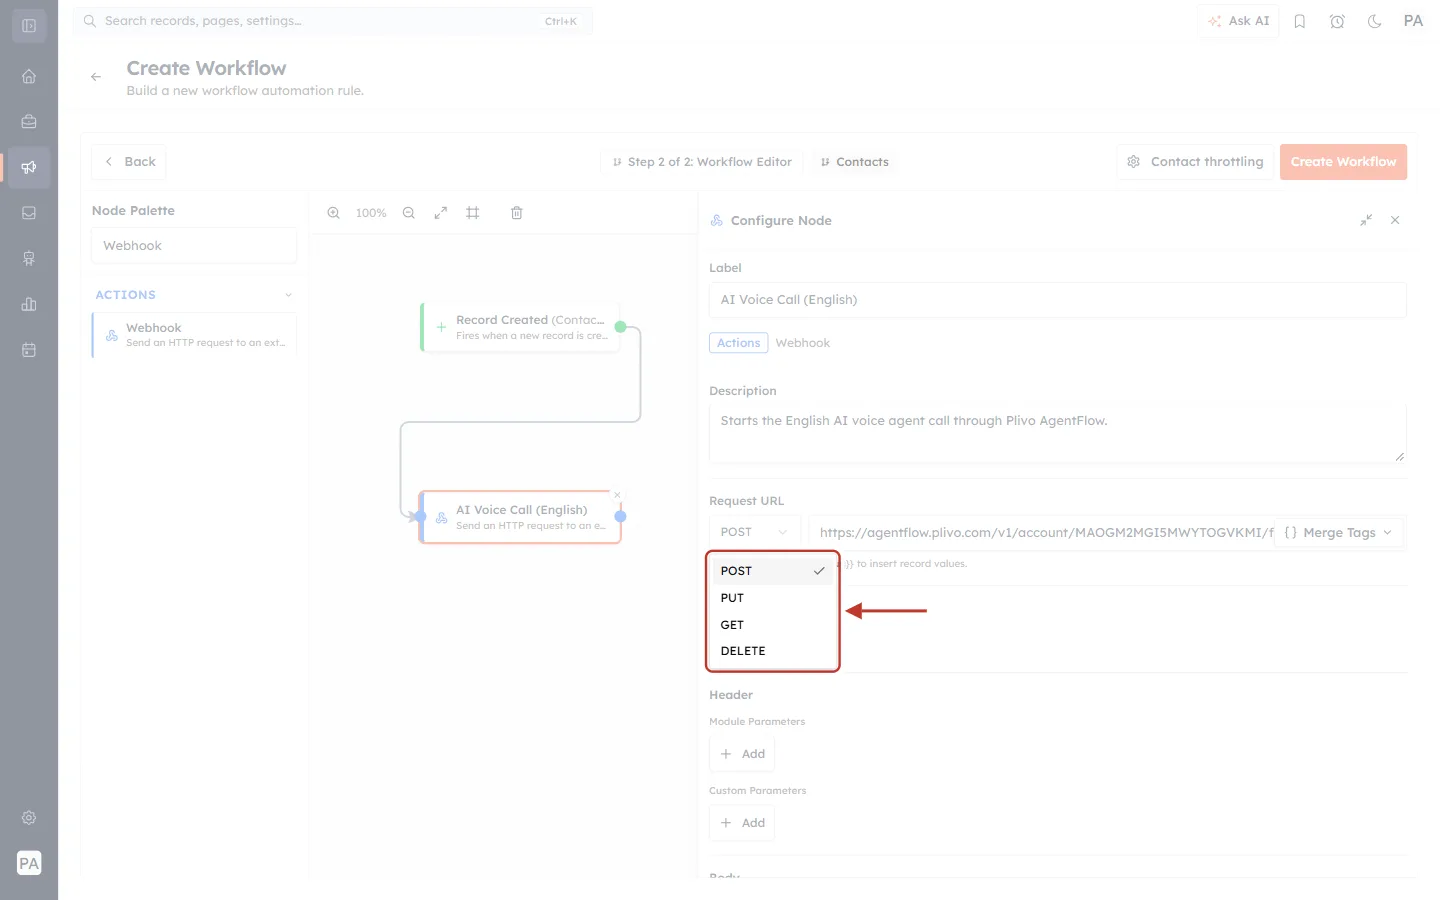
What this screenshot shows. The method list is open next to the Request URL.
The ringed list offers POST, PUT, GET and DELETE.
Choose POST. The other methods are for other kinds of services.
Now click into the URL box and paste the English Request URL:
https://agentflow.plivo.com/v1/account/MAOGM2MGI5MWYTOGVKMI/flow/5e8d8923-2c62-4165-8ab2-1d58307ce6dd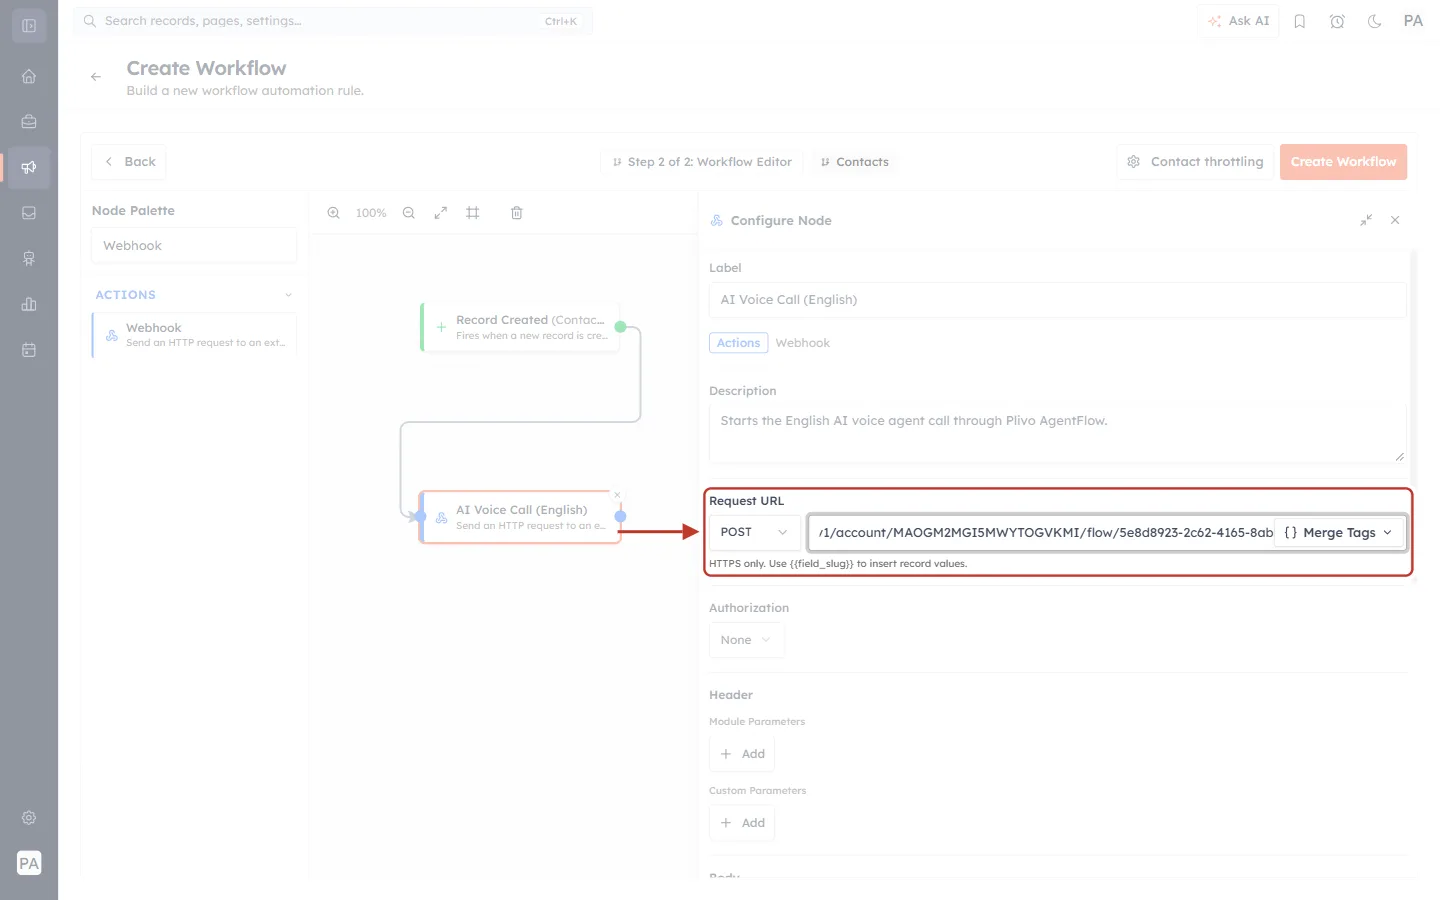
What this screenshot shows. The Request URL row with the English flow URL pasted in.
The method box on the left shows POST.
The URL box shows the end of the Plivo address, ending in …/flow/5e8d8923-2c62-4165-8ab…. The box is too narrow to show it all at once. Click into it and press Home to see the start.
{} Merge Tags on the right inserts contact fields into the URL. You don’t need it here.
The note underneath reads “HTTPS only. Use {{field_slug}} to insert record values.” The Plivo URL already starts with https://, so it is accepted.
Step 11: Set Authorization (only if your Plivo flow asks for it)#
Scroll down to Authorization and open the box.
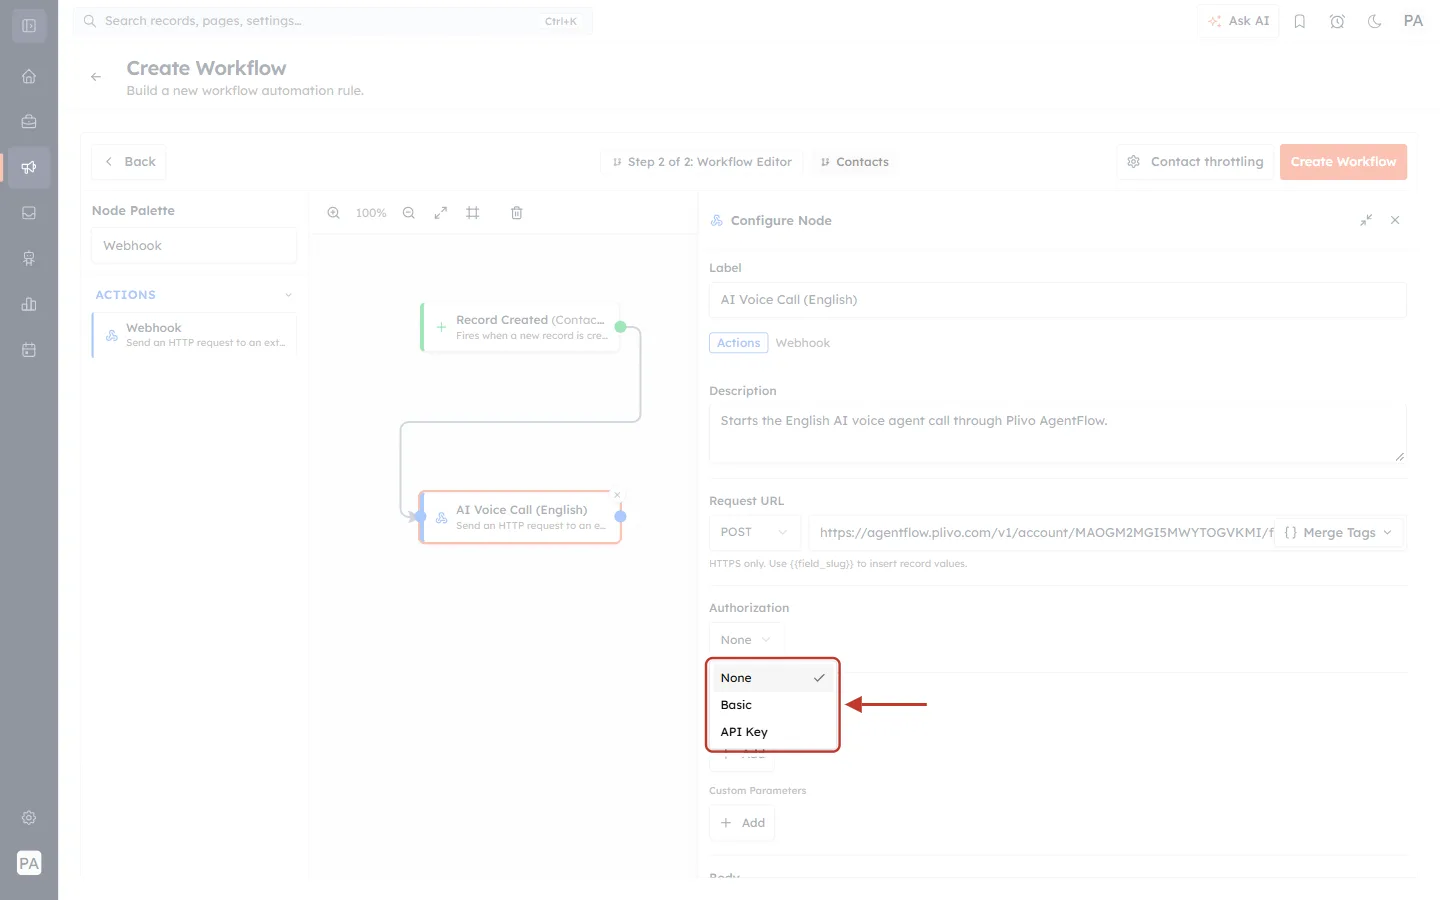
What this screenshot shows. The Authorization list is open.
None: send the request without a sign-in. Use this if Require Authentication is off in your Plivo flow.
Basic: send a username and password. Use this if Require Authentication is on.
API Key: used by other services. Plivo doesn’t need it.
If your flow requires authentication, choose Basic and fill in the two boxes that appear:
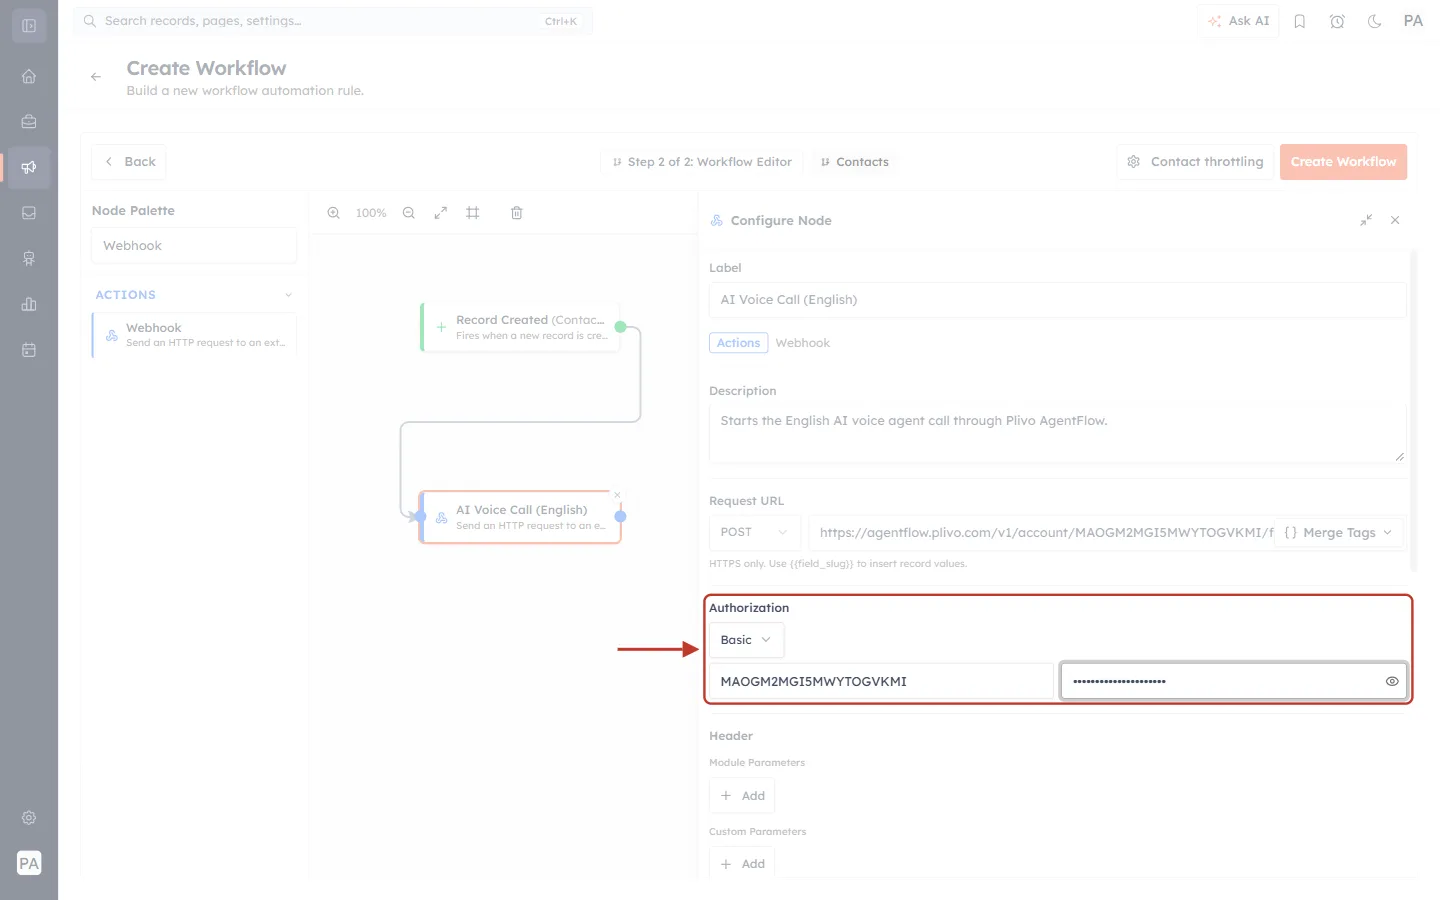
What this screenshot shows. Authorization is set to Basic, with both boxes filled in.
The left box (Username) holds your Plivo Auth ID. It is the same ID that appears in the Request URL after /account/.
The right box (Password) holds your Plivo Auth Token. It is hidden as dots. Click the eye icon to check what you typed.
The CRM turns these into the correct sign-in header for you. You don’t need to add or encode anything yourself.
ℹ️
Leave the Header section empty. When the body is JSON, the CRM adds
Content-Type: application/json automatically. For more about Authorization, see Authenticate Your Webhooks with API Key or Basic Auth.Step 12: Send the contact’s phone number and name in the Body#
Scroll down to Body. Open Type and choose JSON (from parameters).
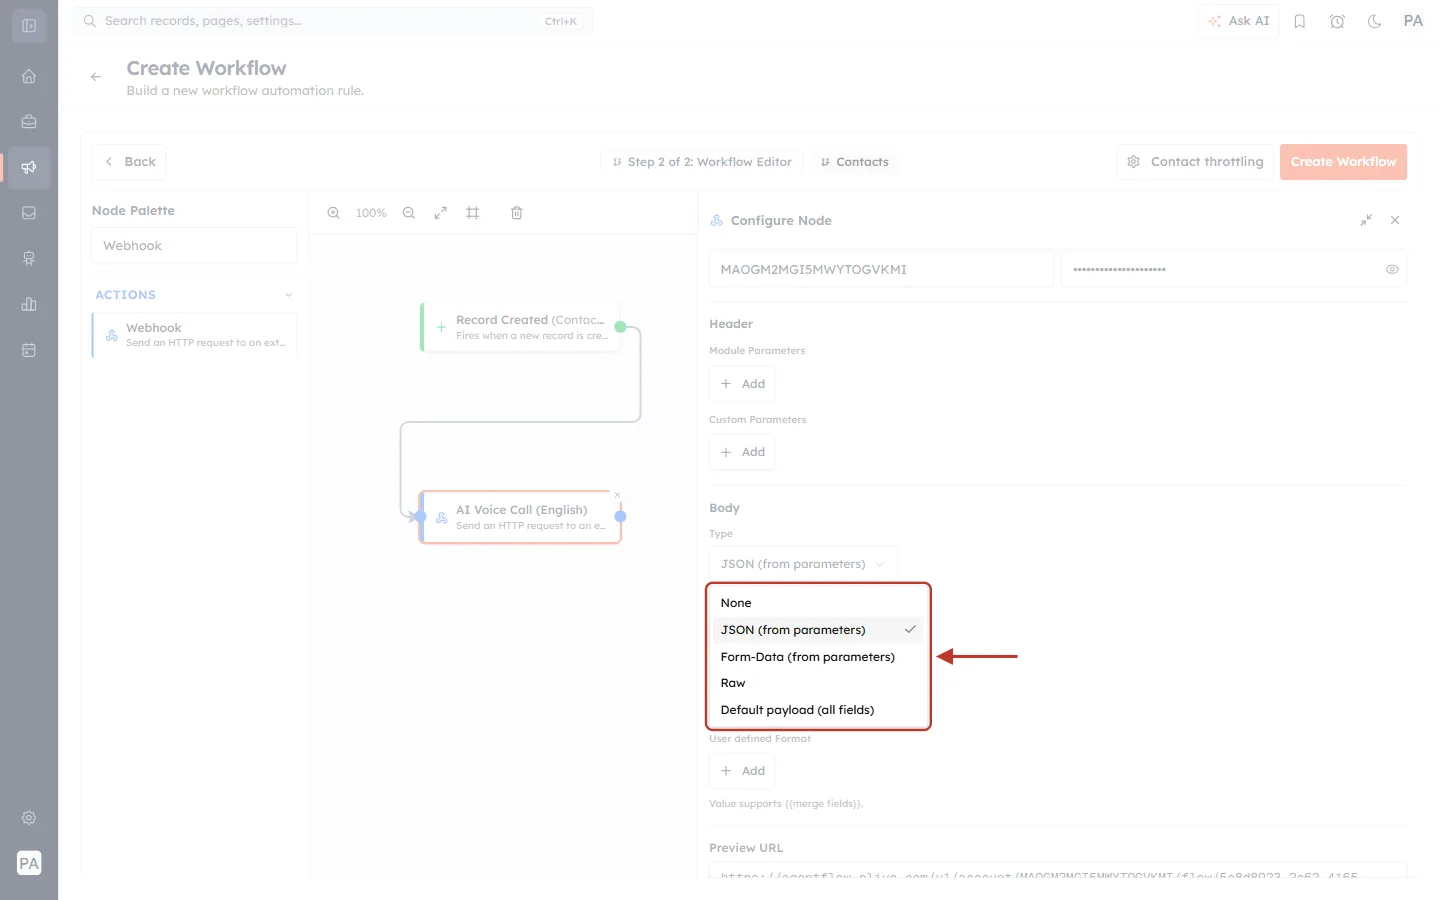
What this screenshot shows. The Body Type list is open.
None: send no body.
JSON (from parameters): build a JSON body from rows you add. This is the one to choose.
Form-Data (from parameters): the same rows, sent as a web form.
Raw: paste your own body text.
Default payload (all fields): send every field of the contact.
Under Module Parameters, click + Add once for each value you want to send. Each row has three boxes: the Parameter Name (the name the voice-agent flow expects), the module (contacts), and the field whose value is sent.
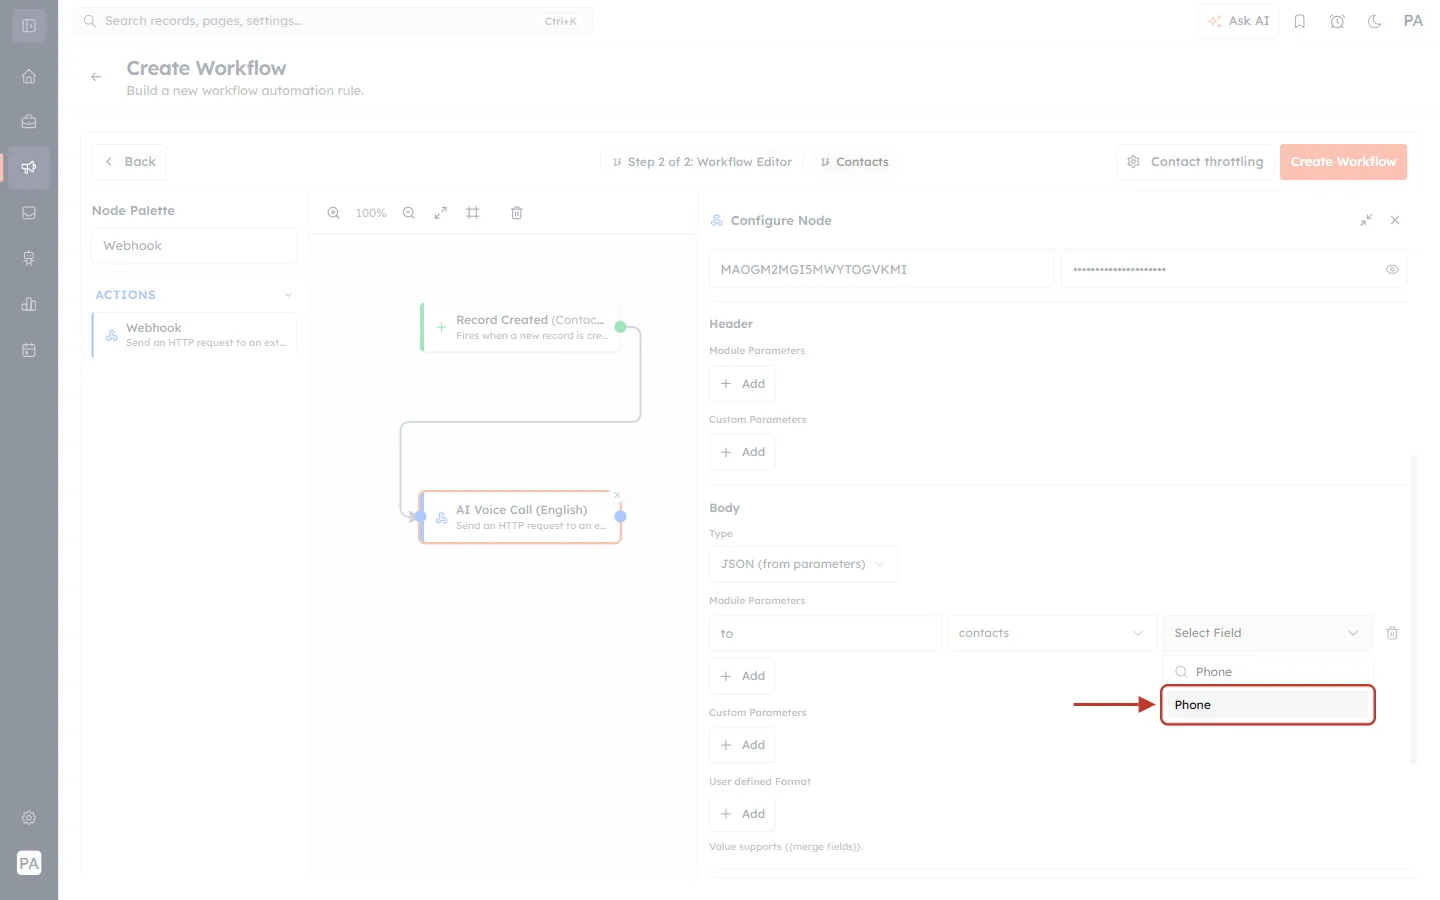
What this screenshot shows. The field list for a new body row, searched for “Phone”.
The middle box shows contacts, meaning the value comes from the contact that started the workflow.
The right box’s list is open, with Phone typed in its search box. The red arrow points to the Phone field.
Further down, Preview URL already shows the Plivo address you pasted in Step 10.
Add these two rows:
Parameter Name | Module | Field | What Plivo receives |
|---|---|---|---|
| contacts | Phone | The number the agent dials, e.g. +919876543210 |
| contacts | First Name | The name the agent can greet the contact with, e.g. Ananya |
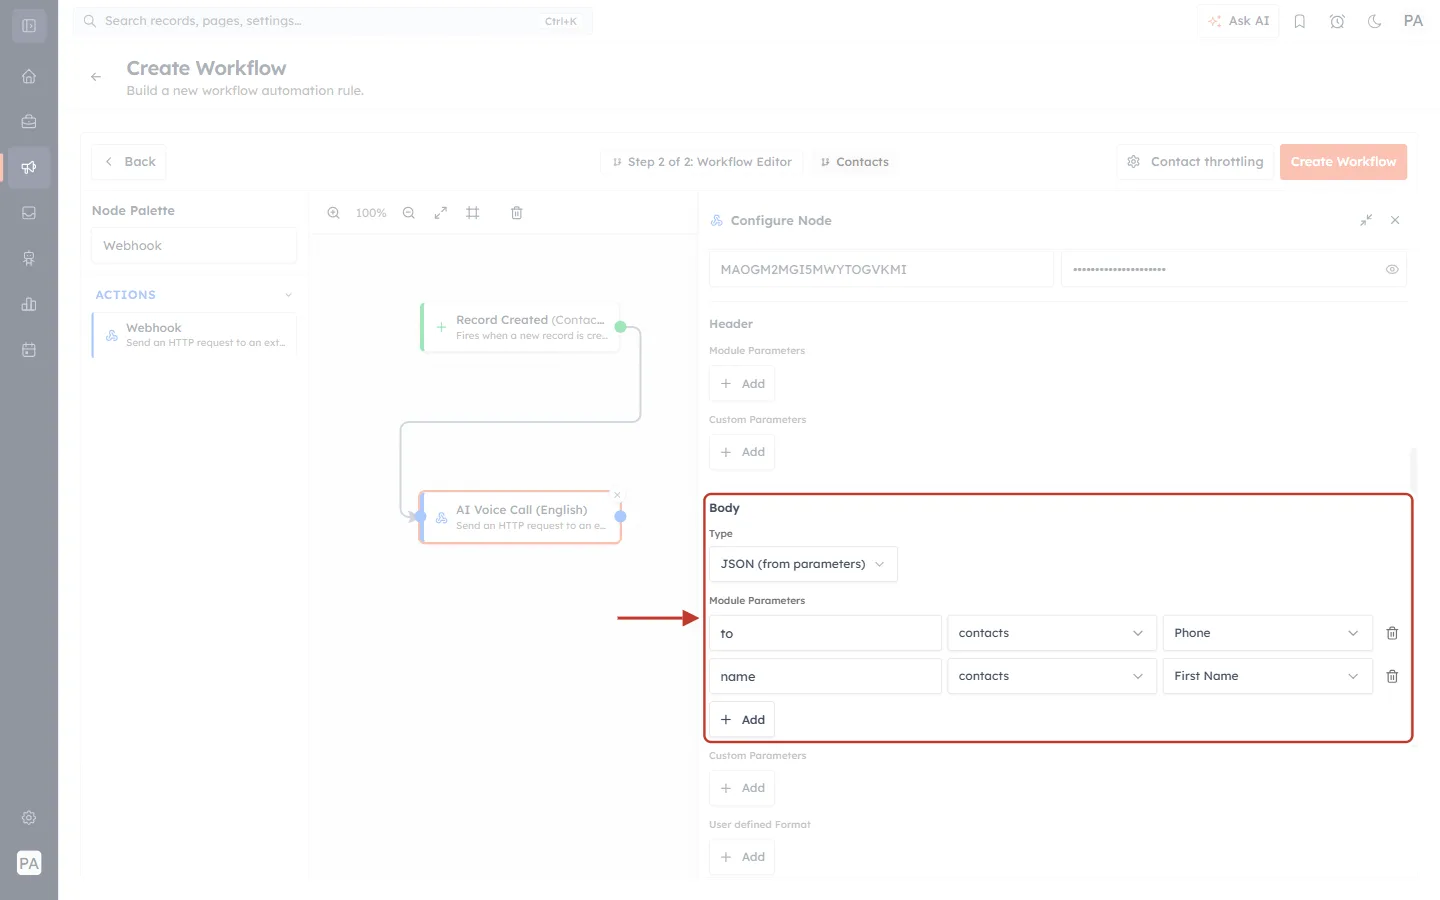
What this screenshot shows. The finished Body section, ringed.
Type is JSON (from parameters).
Row 1: to · contacts · Phone.
Row 2: name · contacts · First Name.
The bin icon at the end of a row removes it, and + Add adds another row.
Below the ring are Custom Parameters (fixed values that are the same for every call) and User defined Format (free text with merge fields). You don’t need either for a basic call.
When the workflow runs for a new contact, the CRM sends Plivo a body like this:
{
  "to": "+919876543210",
  "name": "Ananya"
}
⚠️
The Parameter Name must match the variable names your Plivo flow is built to read. to and name are used here as an example. If your flow expects other names (for example phone or customer_name), type those instead, and add a row for any other value it needs, such as Email or Company.
Step 13: Check the Preview URL#
Scroll to the bottom of the panel to Preview URL.
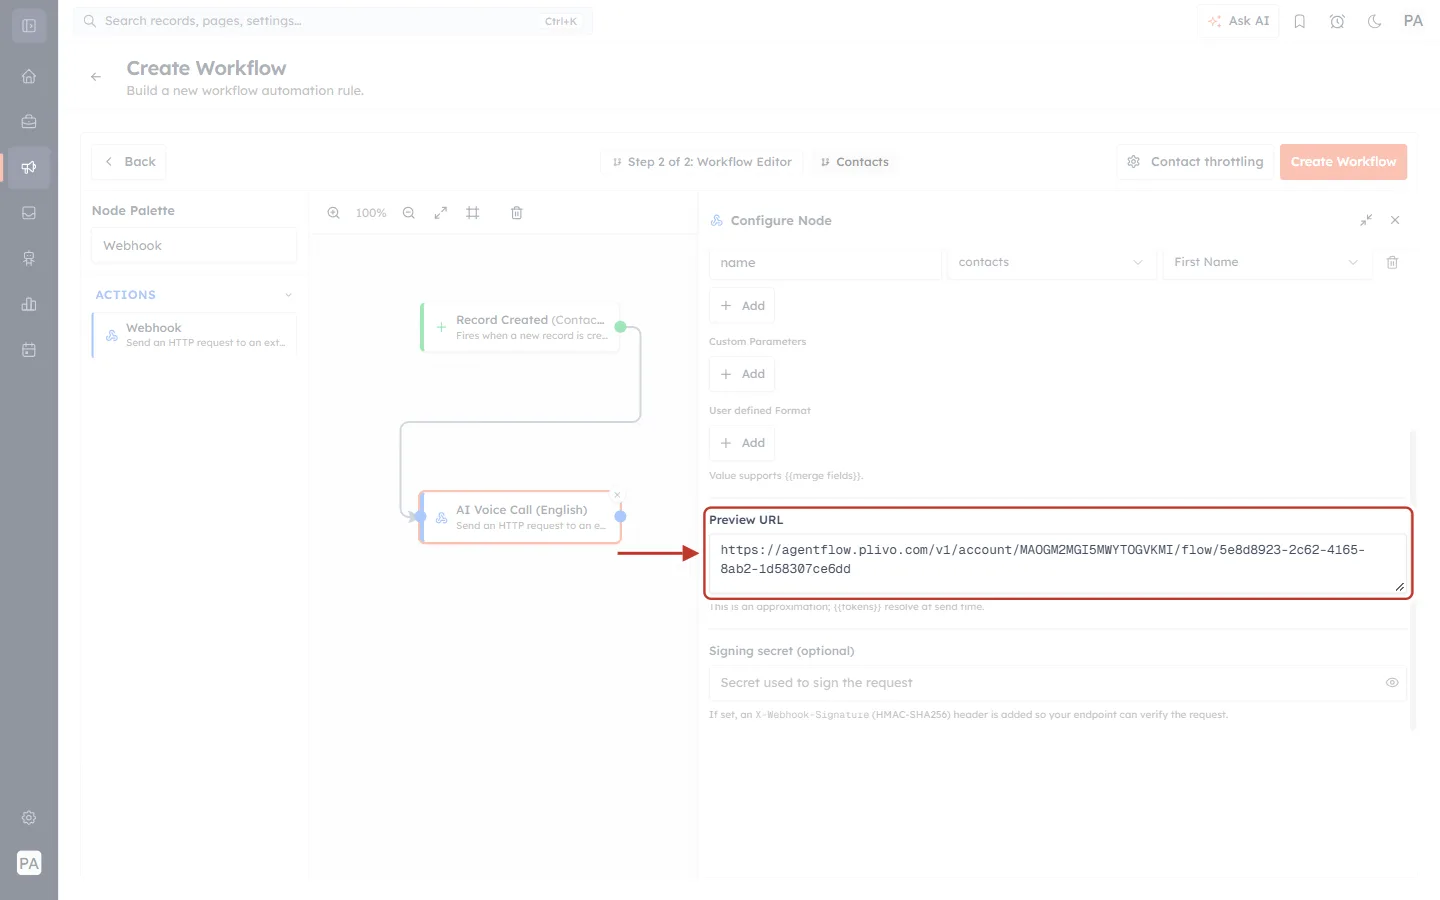
What this screenshot shows. The Preview URL box at the bottom of the panel, ringed.
It shows the full address the request goes to: the English flow URL ending in …/flow/5e8d8923-2c62-4165-8ab2-1d58307ce6dd. Check that it is complete and has no spaces.
The note underneath explains that this is an approximation, because merge tags are filled in only when the workflow runs.
Signing secret (optional), below it, adds an X-Webhook-Signature header. Plivo doesn’t need it, so leave it empty.
Step 14: Save the workflow and switch it on#
Close the panel with the ×. The canvas now shows the finished workflow:
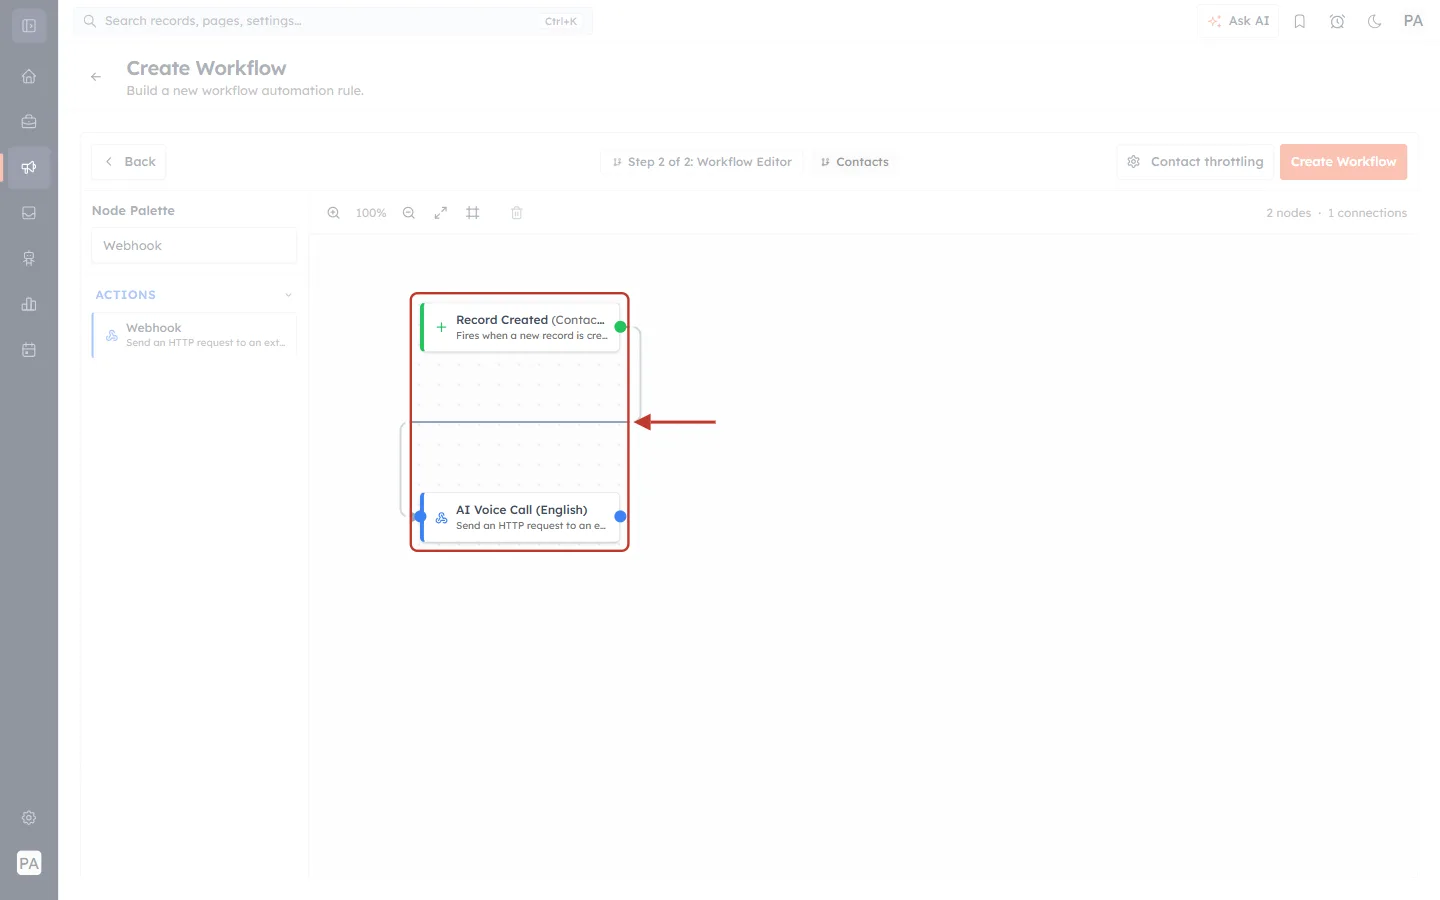
What this screenshot shows. The completed workflow on the canvas.
The top block, Record Created (Contacts), starts the workflow whenever a contact is added (and has a phone number).
The connecting line leads to AI Voice Call (English), the Webhook block you named in Step 10.
The counter reads 2 nodes · 1 connections.
Click Create Workflow in the top-right corner to save it.
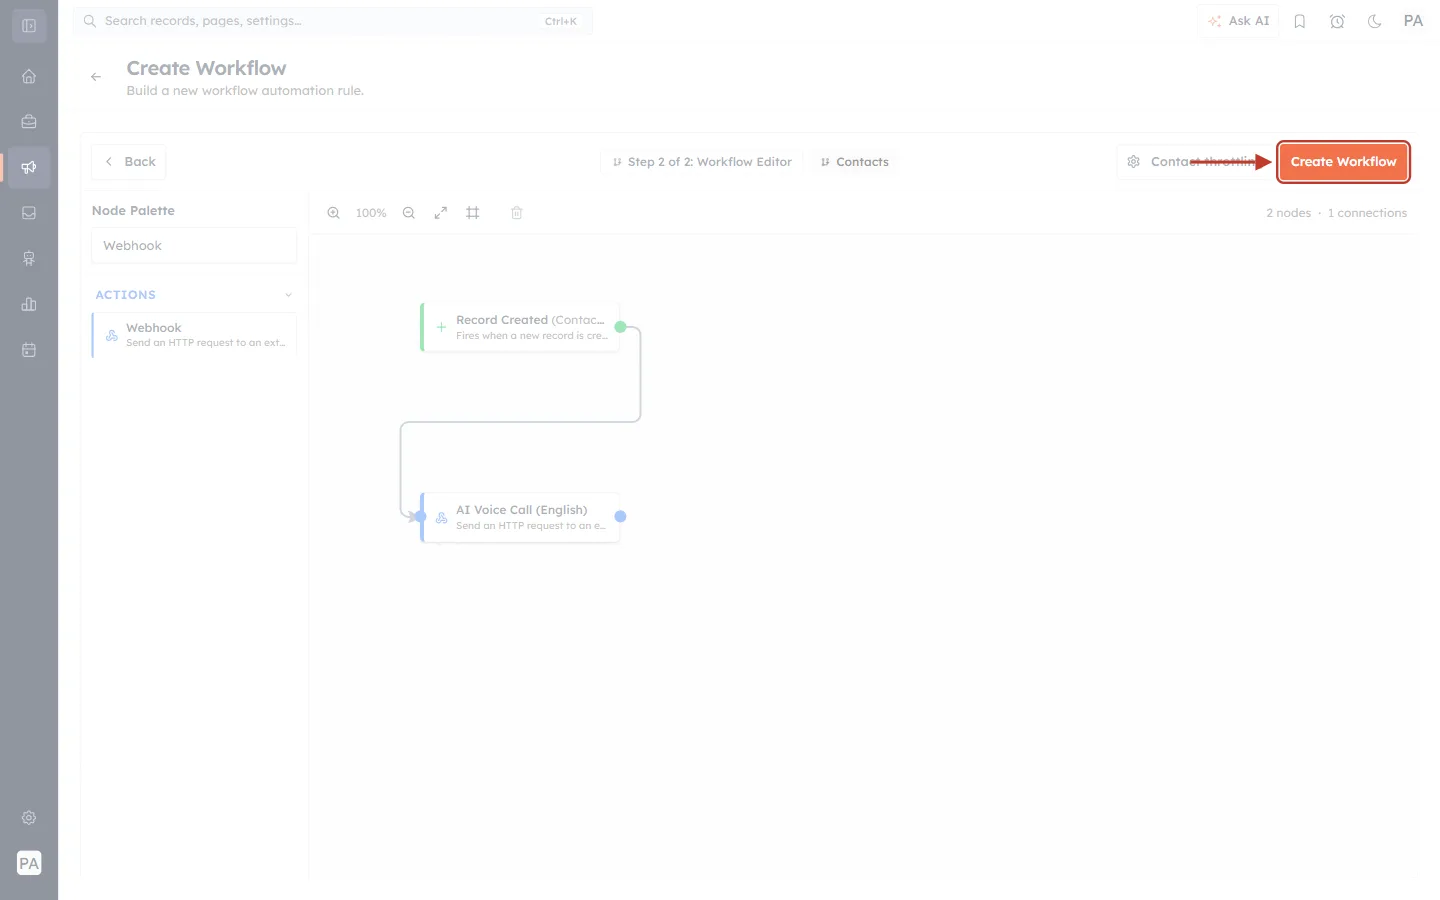
What this screenshot shows. The orange Create Workflow button, ringed in the top-right corner of the builder.
Clicking it saves the workflow and takes you back to the Workflow Automation list.
Contact throttling, to its left, limits how often the same contact can enter the workflow. See Contact Throttling & Workflow Enrollment.
Back on the Workflow Automation list, find your new workflow and turn on its Status switch. A workflow does nothing until it is switched on.
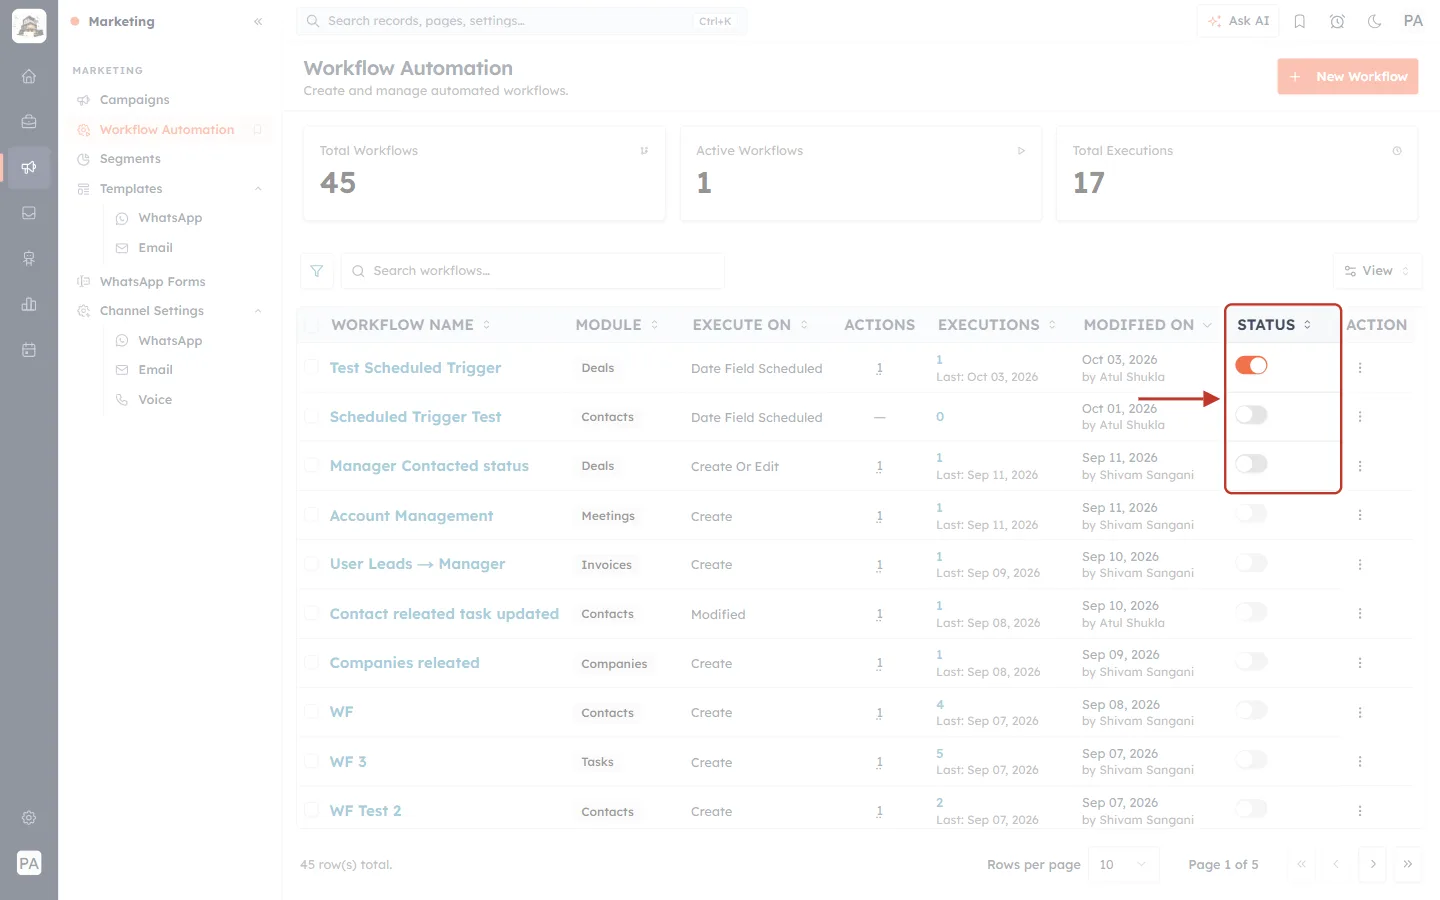
What this screenshot shows. The Status column of the workflow list, ringed.
Each workflow has a Status switch. Orange means on (the workflow runs). Grey means off.
Click the switch on the AI Voice Call - English row so that it turns orange.
The Active Workflows card at the top of the page goes up by one.
✅
Test it: create a contact with your own mobile number (including the country code) and a first name. Within a few moments your phone should ring with the English AI voice agent.
Set up the Hindi voice agent#
The Hindi agent is a separate Plivo flow with its own URL. Everything else is the same. You can set it up in either of two ways.
Option A: A separate Hindi workflow#
Repeat Steps 3–14 with the changes below. A quicker way is to open the ⋮ menu on the English workflow’s row, choose Duplicate, and then edit the copy.
Workflow Name: AI Voice Call - Hindi.
Label of the Webhook block: AI Voice Call (Hindi).
Request URL: the Hindi flow URL below.
https://agentflow.plivo.com/v1/account/MAOGM2MGI5MWYTOGVKMI/flow/a1855bf1-b2ed-423d-9819-ca81f9beb729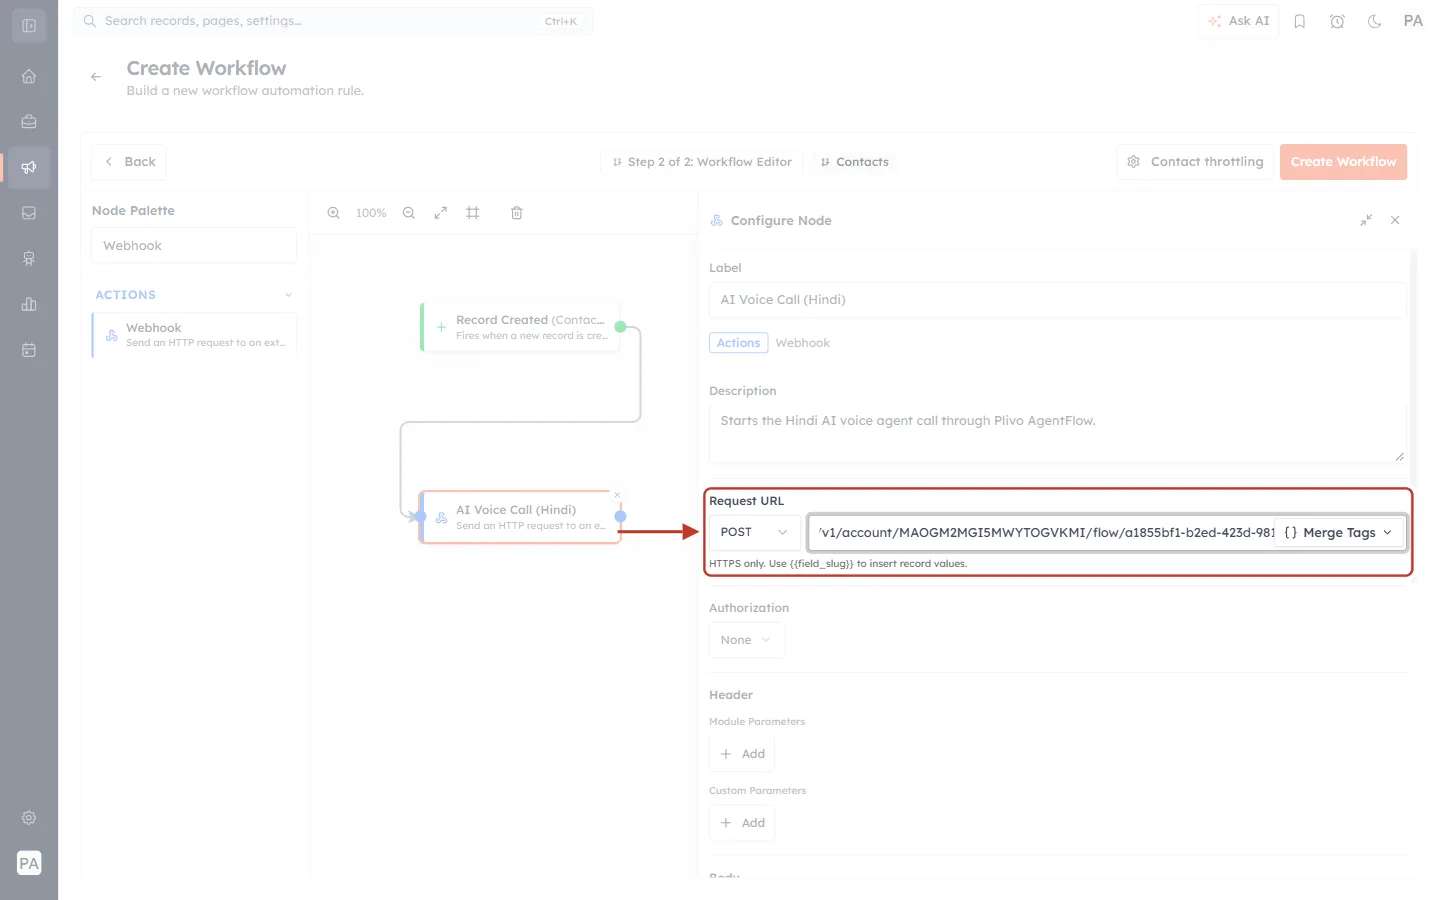
What this screenshot shows. The same Request URL row, this time holding the Hindi flow URL.
The URL ends in …/flow/a1855bf1-b2ed-423d-9819-ca81f9beb729. That last part is what makes Plivo use the Hindi agent.
The block on the canvas is labelled AI Voice Call (Hindi).
Authorization and Body are filled in exactly as for English (Steps 11–12).
⚠️
If both workflows are switched on with the same trigger and conditions, every new contact gets two calls, one in English and one in Hindi. Give each workflow an entry condition that picks the right contacts, for example a Preferred Language field that is Hindi on the Hindi workflow and is not Hindi on the English one. You can also switch one of them off.
Option B: One workflow that chooses the language#
If you prefer a single workflow, put an If / Else condition between the trigger and the webhooks. For example, check whether Preferred Language is Hindi. Connect the Yes branch to a Webhook with the Hindi URL and the No branch to a Webhook with the English URL. See Workflow Conditions & Branching: The If / Else Node for how branches work.
ℹ️
AiEngage CRM doesn’t include a language field by default. Add a dropdown field such as Preferred Language (English / Hindi) to Contacts first. See Customize Your CRM: Add Custom Fields and Configure Module Layouts.
Choose which leads the AI agent calls#
The workflow you built calls every new contact with a phone number. Most businesses want the AI agent to call only certain leads. The Entry conditions on the trigger decide which contacts the workflow lets in. Contacts that don’t match are simply skipped, and nobody is called.
This section shows three common rules, then shows how to combine all three in one workflow:
Call these leads | Trigger | Entry conditions | Why it works |
|---|---|---|---|
1. Leads from Meta ads (Facebook & Instagram lead forms) | Record Created | Phone is not empty | The Meta Lead Ads integration fills in Advertising Platform = Meta Ads on every contact it creates. |
2. Outbound leads (leads your team sourced) | Record Created | Phone is not empty | Lead Source records where the lead came from. Pick the sources your team uses for outbound. |
3. AI-qualified leads | Record Updated (Lead Status is Qualified) | Phone is not empty | Your AI agent sets Lead Status = Qualified when a chat meets your criteria, which is an update to the contact. |
Each rule goes into its own workflow, built exactly like the English workflow above (Steps 3–14). Only the trigger and its entry conditions change. The quickest way is to Duplicate the English workflow from the ⋮ menu and edit the trigger of the copy.
ℹ️
When a trigger has two or more entry conditions, a Match box appears under them. all means every condition must be true (use this for rules 1–3, so the phone check always applies). any means one true condition is enough (used in the all-in-one workflow later in this section).
Rule 1: Call leads that come from Meta (Facebook & Instagram) ads#
When you connect Meta Lead Ads, each lead submitted on a Facebook or Instagram lead form becomes a new contact. The CRM fills in the contact’s Advertising Information at the same time, including Advertising Platform, which is set to Meta Ads. That is the field to check. If you haven’t connected Meta yet, see Connect Meta Lead Ads (Facebook & Instagram).
Open the workflow’s trigger (Record Created) by clicking it on the canvas.
Keep the first condition: Phone · is not empty.
Click + Add condition. Choose the field Advertising Platform, the operator is, and type Meta Ads in the value box, spelled exactly like that.
Leave Match on all.
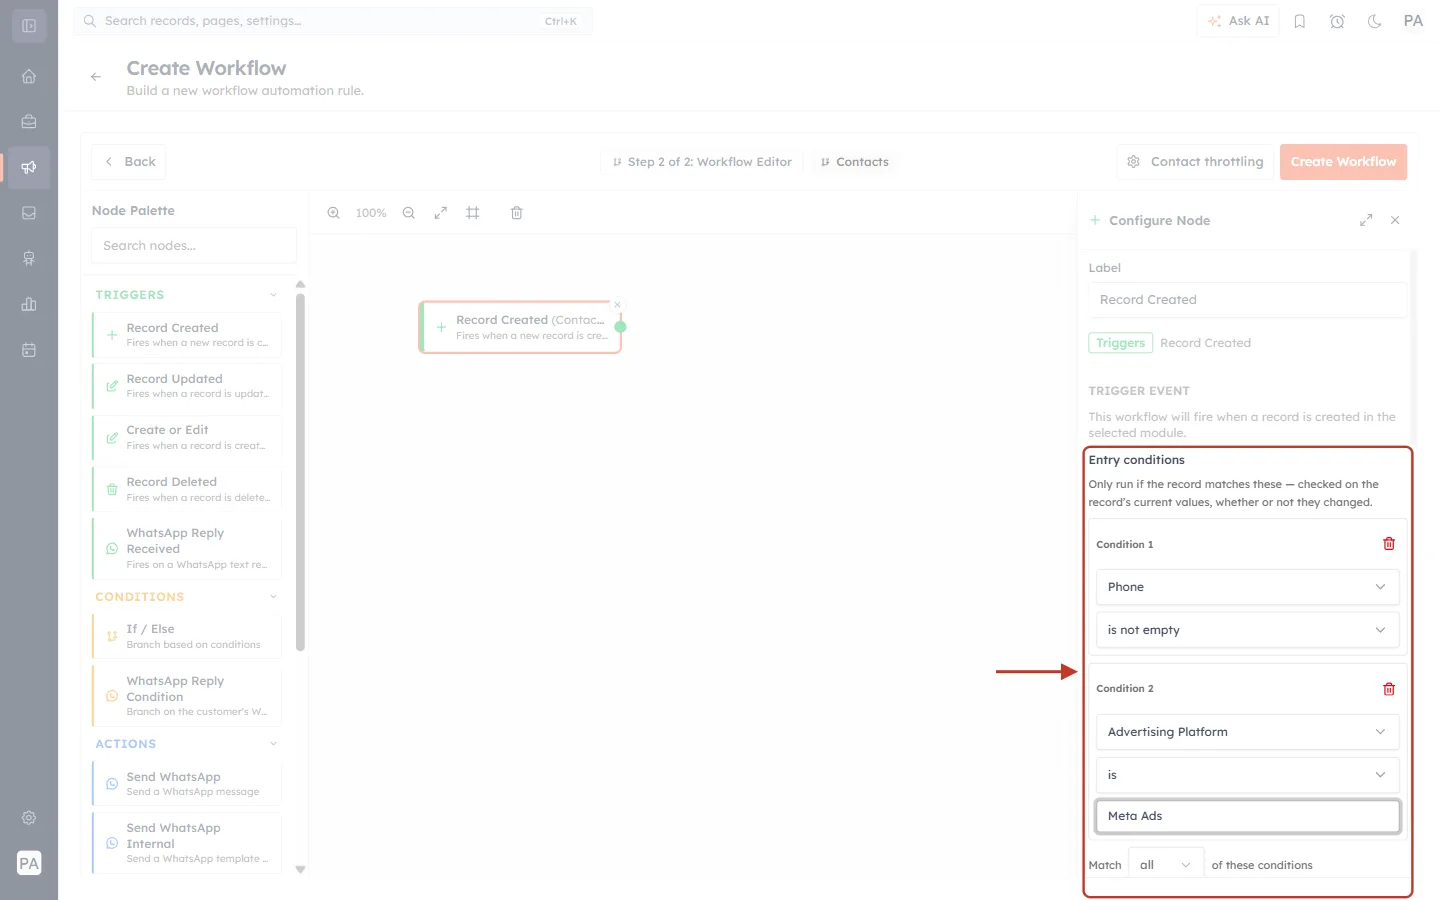
What this screenshot shows. The Record Created trigger’s Entry conditions, set up to let in only Meta ad leads.
Condition 1: Phone · is not empty, so contacts without a number are never sent to the agent.
Condition 2 (red arrow): Advertising Platform · is · Meta Ads. Advertising Platform is a text field, so the value is typed, not picked from a list.
Match all of these conditions at the bottom means both must be true: the contact came from a Meta ad and has a phone number.
On the canvas, the trigger block reads Record Created (Contacts). Contacts from Meta are created by the integration, so this trigger fires for them like any other new contact.
✅
Want only Instagram (or only Facebook) leads? Add a third condition on the Meta Platform field, which stores the surface the form was submitted on exactly as Meta sends it, for example ig for Instagram or fb for Facebook. To call leads from one particular form or campaign, use Lead Form Name or Campaign ID instead. (Campaign names are filled in later by a background sync, so they may still be empty when the contact is created.)
Rule 2: Call outbound leads#
Outbound leads are people your team found and added themselves, for example from a cold-calling list, a prospecting email or a trade show, rather than people who came to you. The CRM records where each lead came from in the Lead Source field, so the rule checks Lead Source against the sources your team uses for outbound.
Open the trigger and keep Phone · is not empty.
Click + Add condition and choose the field Lead Source.
Choose the operator is any of. This lets you pick several values, and the contact matches if its Lead Source is any one of them.
Open the value list and tick every outbound source, for example Cold Call and Sales Email.
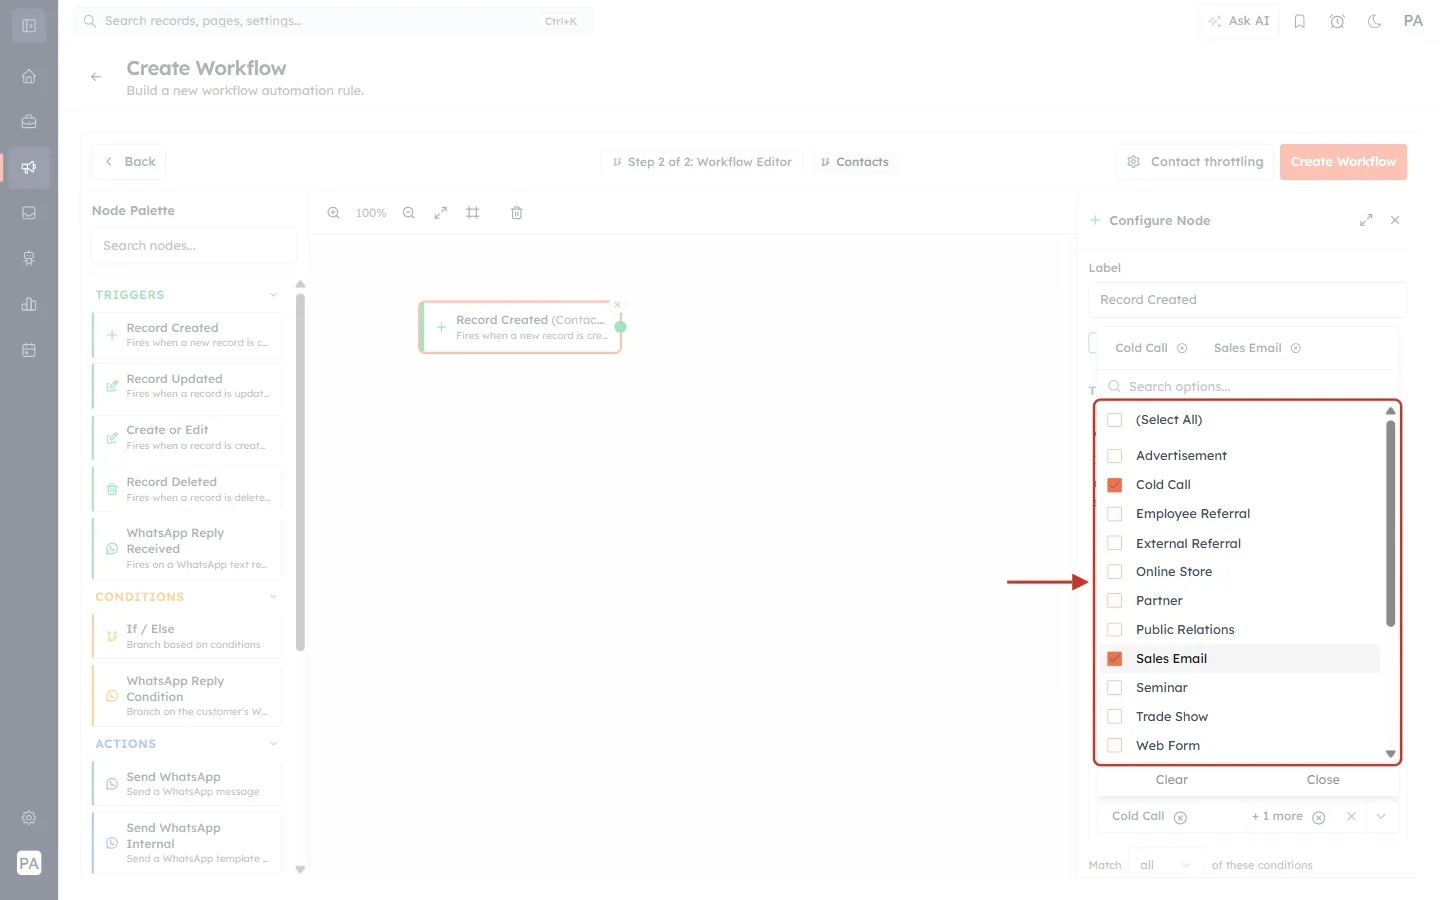
What this screenshot shows. The Lead Source value list is open, with two outbound sources ticked.
At the top, the chosen values show as chips (Cold Call, Sales Email), with a Search options… box below them for long lists.
Each value has a tick box. Here Cold Call and Sales Email are ticked (orange ticks). (Select All) at the top ticks every value.
The other values (Advertisement, Employee Referral, External Referral, Online Store, Partner, Public Relations, Seminar, Trade Show, Web Form…) are your account’s other lead sources. Your list may be different, because each account can edit its Lead Source values.
The Clear and Close buttons at the bottom of the list untick everything or close the list.
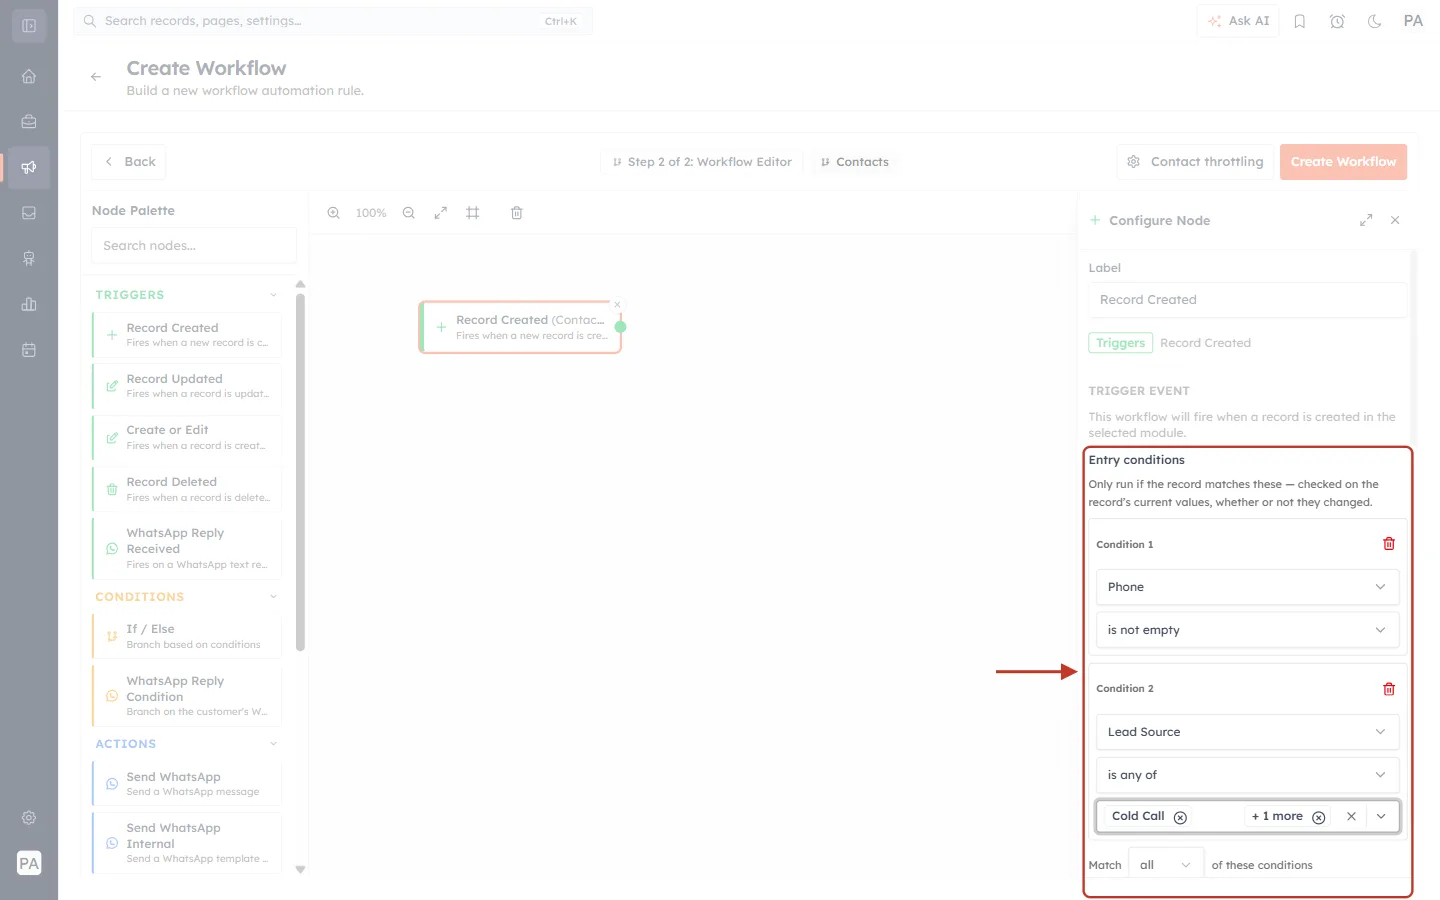
What this screenshot shows. The finished entry conditions for outbound leads.
Condition 1: Phone · is not empty.
Condition 2 (red arrow): Lead Source · is any of · Cold Call + 1 more. The “+ 1 more” chip is Sales Email. Click the box to see or change the full list.
Match all: the contact needs a phone number and an outbound Lead Source.
⚠️
There is no Lead Source value called Outbound by default. If your team prefers one simple label, add a value such as Outbound to the Lead Source field (see Customize Your CRM), ask the team to choose it when they add outbound leads, and then use Lead Source · is · Outbound in this rule. Whichever way you choose, the rule only works if Lead Source is filled in when the contact is created, so make it part of your team’s routine (or a required field).
Rule 3: Call leads your AI agent has qualified#
Your AiEngage AI agent can read each chat and, when it meets the criteria you wrote, mark the contact as a qualified lead by setting a field, usually Lead Status = Qualified. (Set this up in the agent builder’s Lead Qualification card: see Automatically Detect & Qualify Leads with Your AI Agent.) The voice agent can then call that lead straight away, while they are still interested.
Qualification happens after the contact already exists, so this rule can’t use Record Created. It uses Record Updated, set to fire only when Lead Status changes to Qualified.
Step A: Use the Record Updated trigger. In a new workflow on Contacts (or your duplicated copy, after deleting its Record Created trigger), drag Record Updated onto the canvas.
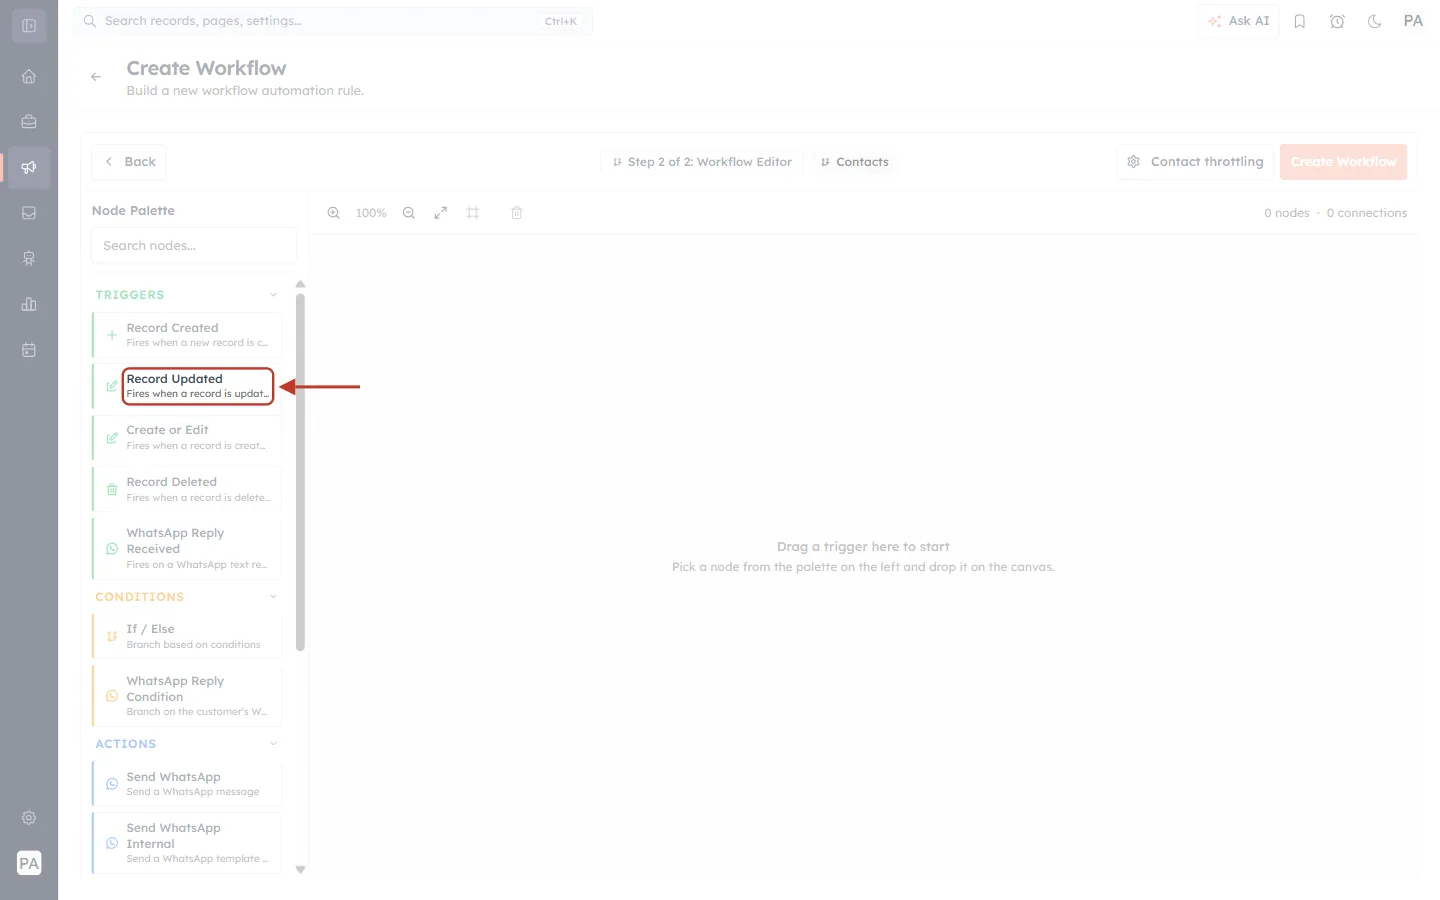
What this screenshot shows. The Node Palette, with the Record Updated trigger ringed.
Record Updated (“Fires when a record is updated”) is the second trigger under TRIGGERS.
Above it is Record Created, which you used before. Below it are Create or Edit (fires on both, used in the all-in-one workflow later), Record Deleted and WhatsApp Reply Received.
Step B: Fire only when Lead Status changes. In the trigger panel, open Fire when.
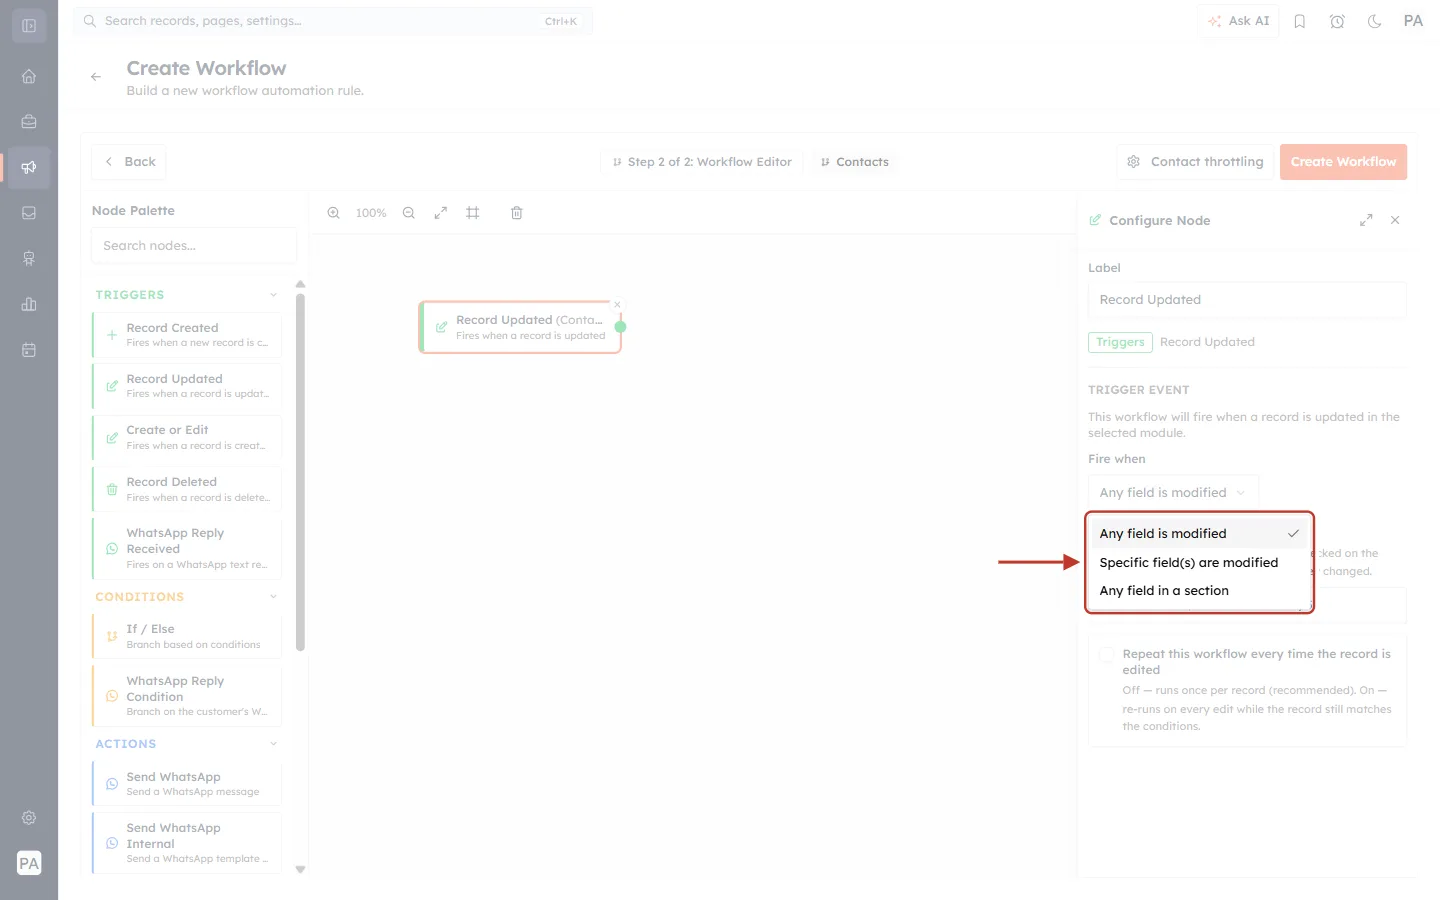
What this screenshot shows. The Fire when list is open in the Record Updated trigger panel.
Any field is modified (the default): the workflow checks the contact after every edit, of any field.
Specific field(s) are modified: the workflow only starts when a field you list changes. Choose this one.
Any field in a section: starts when any field in a chosen section of the layout changes.
Click + Add field, choose Lead Status, then open the box that says changed (any value).
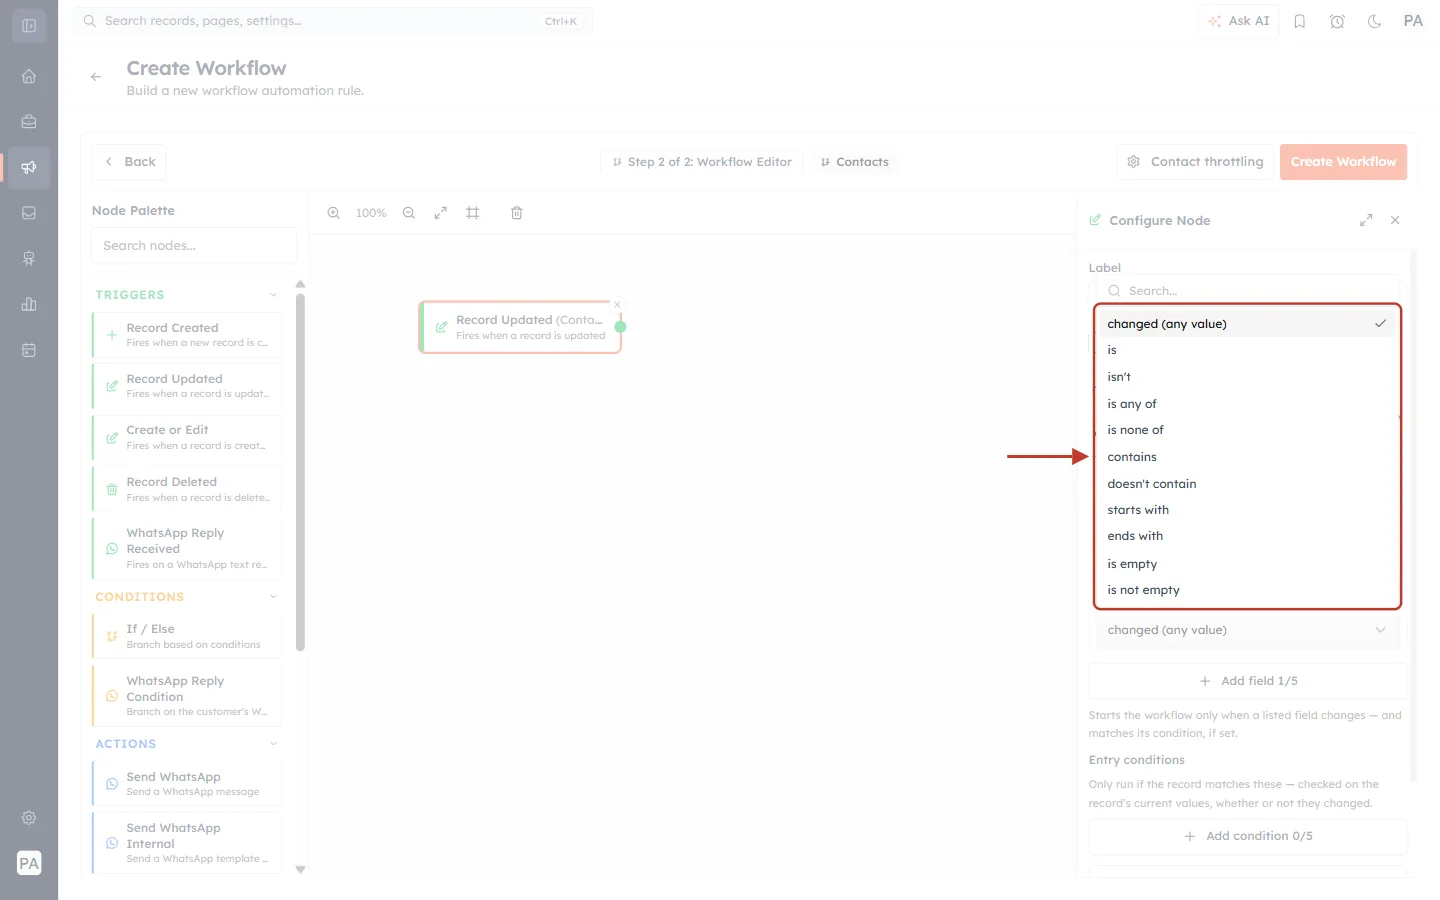
What this screenshot shows. The list of ways the watched field can change.
changed (any value): start whenever Lead Status changes to anything.
is, isn’t, is any of, is none of and the others: start only when Lead Status changes and its new value matches. Choose is.
Choose is, then pick Qualified in the value box.
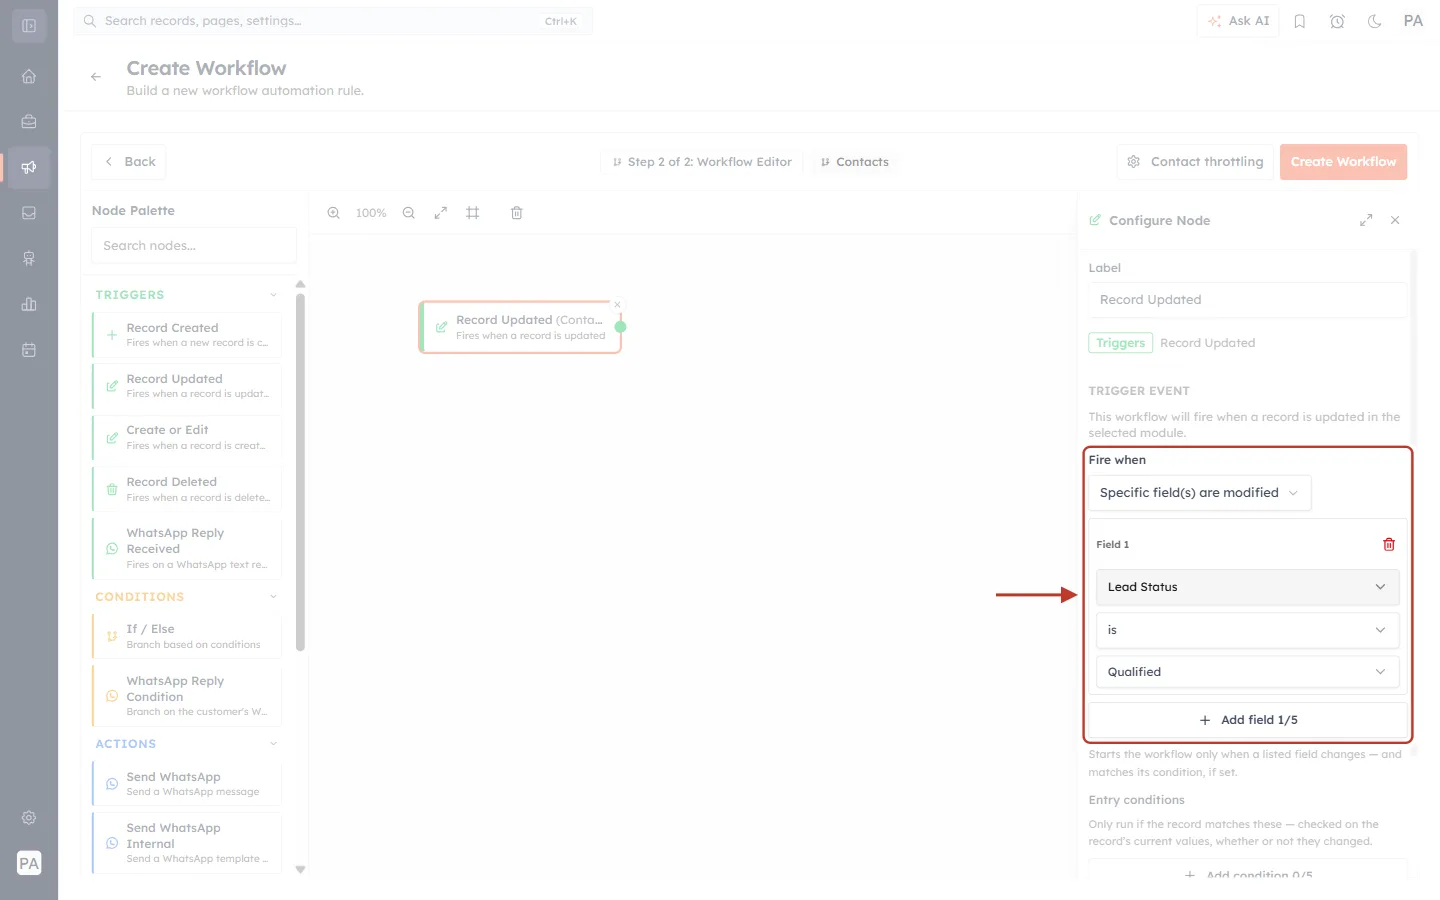
What this screenshot shows. The finished Fire when setting.
Fire when reads Specific field(s) are modified.
Field 1 (red arrow): Lead Status · is · Qualified. The workflow starts the moment Lead Status changes to Qualified, which is exactly what the AI agent does.
+ Add field 1/5 lets you watch up to five fields.
The note below the ring reads “Starts the workflow only when a listed field changes — and matches its condition, if set.”
⚠️
Use the same field and value your AI agent writes. They are the Field to update and Set value to settings in the agent’s Lead Qualification card. If your agent writes, say, Lead Stage = Hot, watch Lead Stage · is · Hot instead.
Step C: Keep the phone check. Under Entry conditions, add Phone · is not empty.
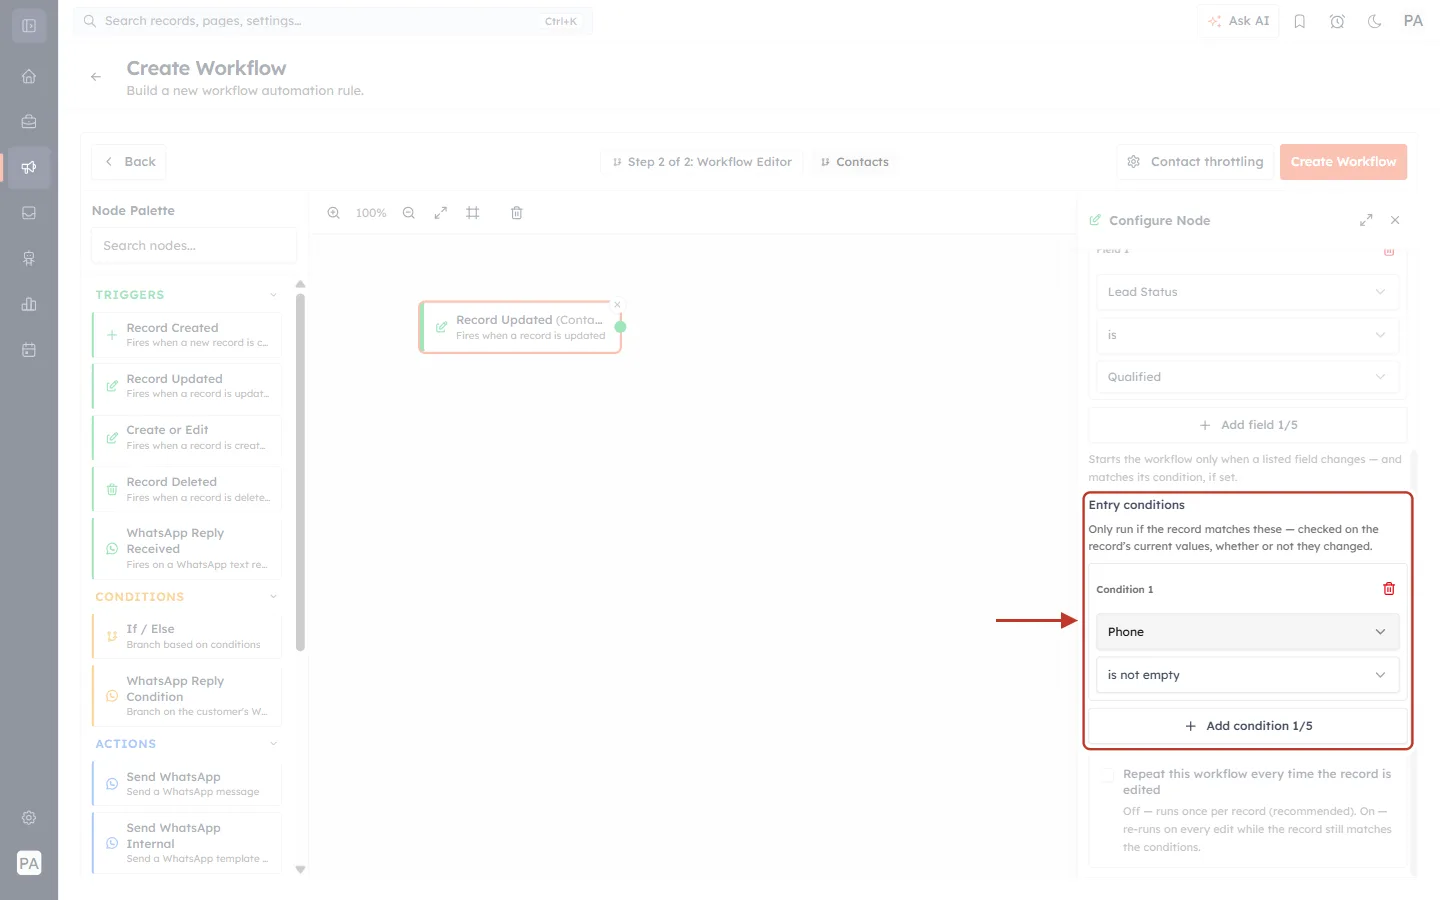
What this screenshot shows. The Entry conditions for the AI-qualified workflow.
Above the ring is the Fire when setting from the last step (Lead Status · is · Qualified).
Condition 1 (red arrow): Phone · is not empty. A chat contact may have no phone number yet, for example if they wrote in from the website chat, and they are skipped.
Step D: Leave “Repeat” off. At the bottom of the panel, leave Repeat this workflow every time the record is edited unticked.
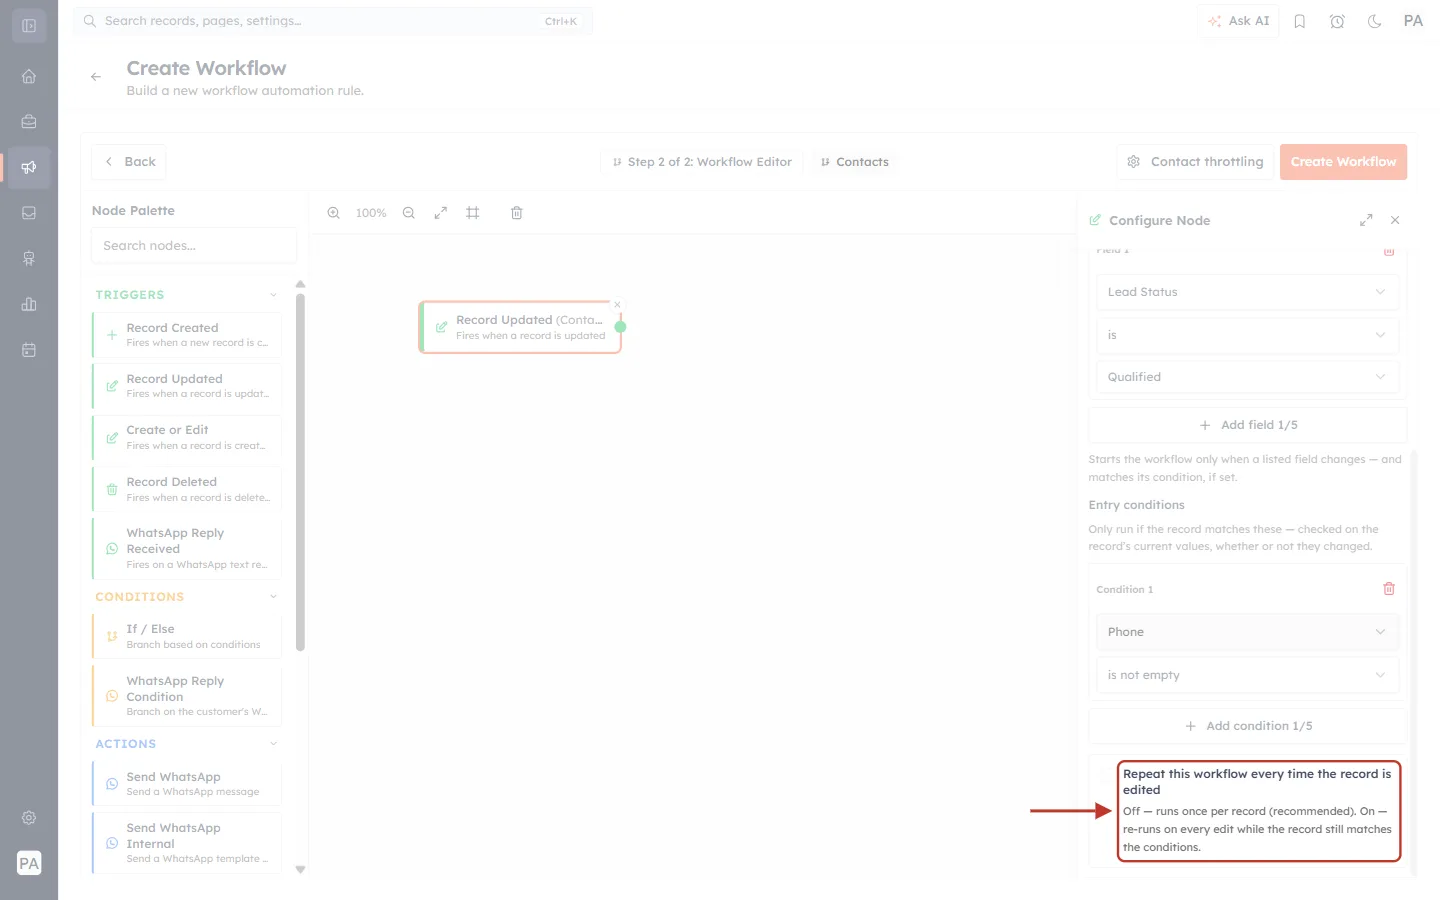
What this screenshot shows. The Repeat setting at the bottom of the trigger panel, unticked.
Off (unticked): “runs once per record (recommended)”. Each qualified lead is called once, even if their contact is edited again later.
On (ticked): the workflow runs again on every later edit while the contact still matches, so the AI agent would call them again each time. Don’t tick it for calls.
Then add the Webhook and connect it exactly as in Steps 8–14, and switch the workflow on.
All three rules in one workflow#
Instead of three workflows, you can use one workflow that calls a contact if it matches any of the three rules. It looks like this:
Block | Setting |
|---|---|
Trigger: Create or Edit | Fires when a contact is created or updated. Entry conditions: Advertising Platform is Meta Ads · Lead Source is any of Cold Call, Sales Email · Lead Status is Qualified · Match any. |
If / Else | Rule 1: Phone is not empty. |
Webhook on the Yes branch | The same Webhook as in Steps 10–12. |
1. Add the trigger and its three conditions. Drag Create or Edit onto the canvas. Under Entry conditions, add the three conditions from Rules 1–3. Then open the Match box under them.
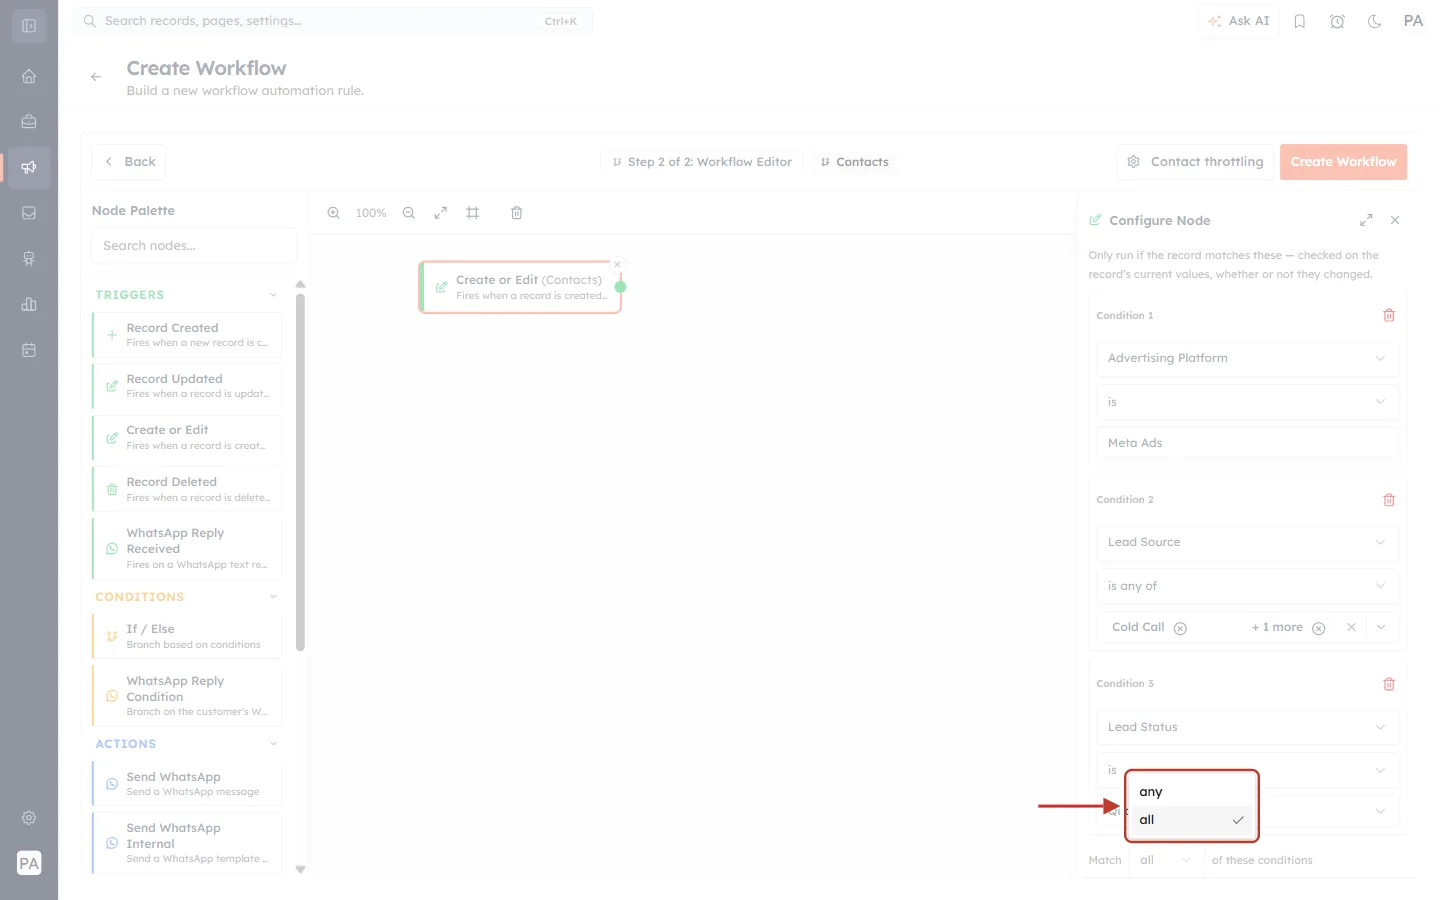
What this screenshot shows. The Match box under the entry conditions is open.
any: the contact enters the workflow if at least one condition is true. Choose this.
all: every condition must be true. A contact would need to be a Meta lead and an outbound lead and qualified, which almost never happens.
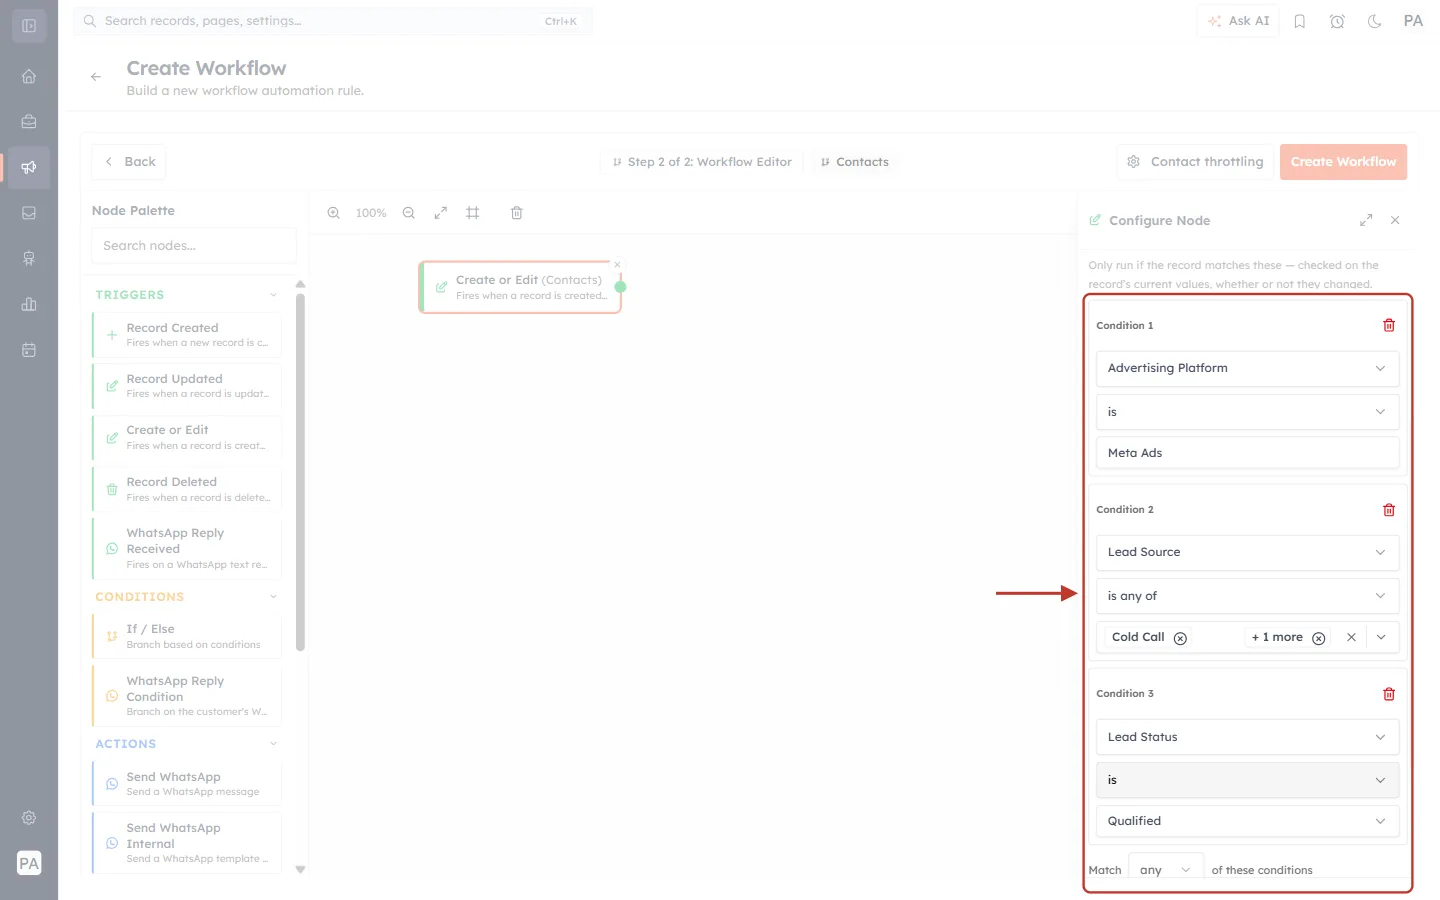
What this screenshot shows. The trigger’s three entry conditions, combined with Match any.
Condition 1: Advertising Platform · is · Meta Ads, for leads from Meta ads.
Condition 2: Lead Source · is any of · Cold Call + 1 more (Sales Email), for outbound leads.
Condition 3: Lead Status · is · Qualified, for AI-qualified leads.
Match any of these conditions at the bottom lets a contact in when any one of the three is true.
2. Check the phone number with an If / Else. With Match set to any, the phone check can’t go in the same list, because a Meta lead without a phone would still get in. Drag an If / Else block below the trigger, connect them, and give it one rule: Phone · is not empty.
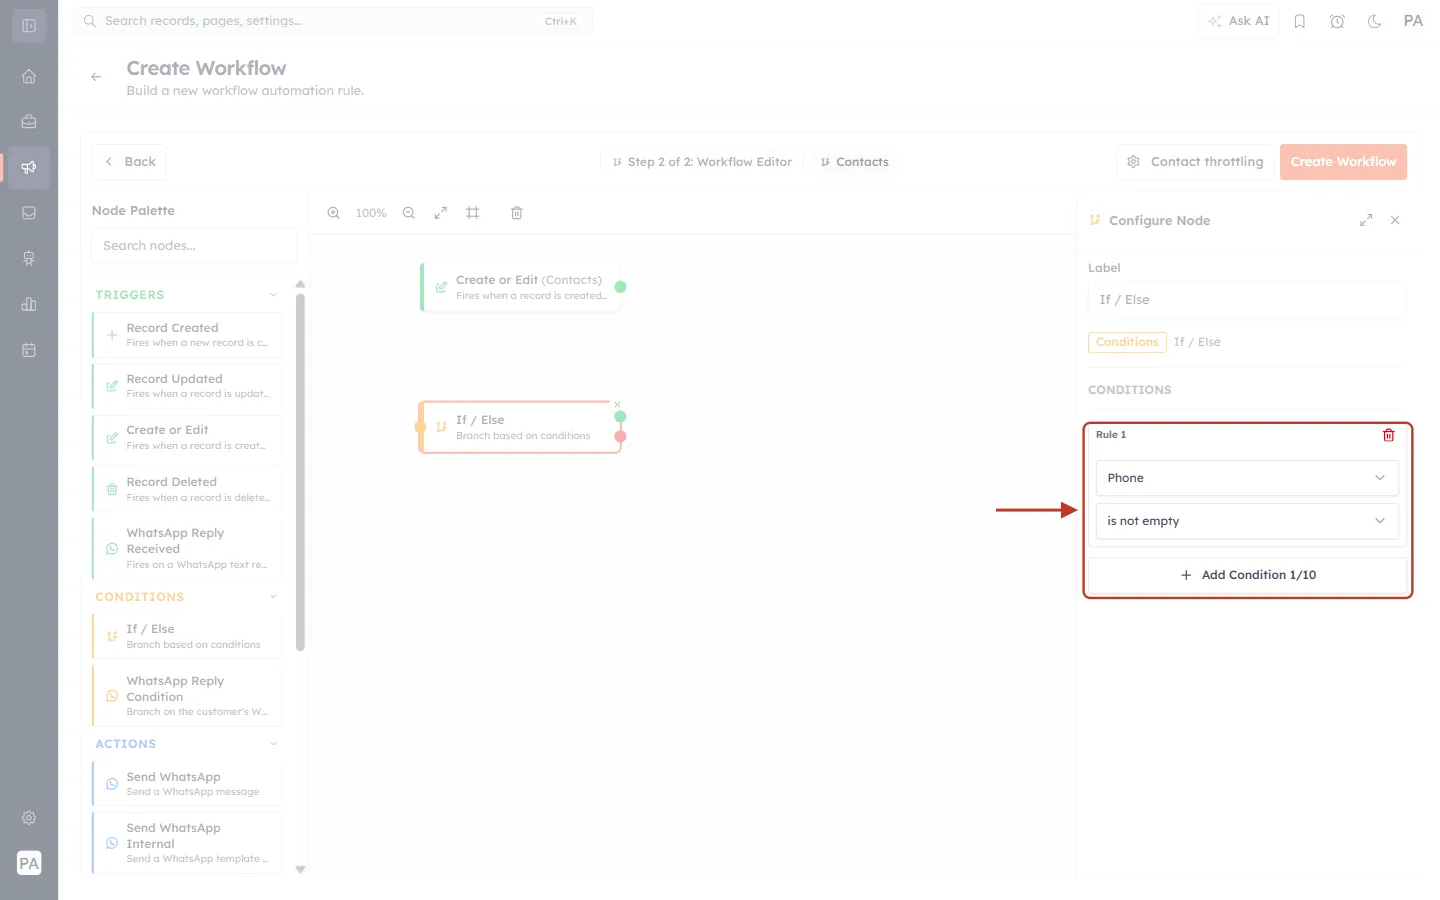
What this screenshot shows. The If / Else block’s settings with one rule.
The orange Conditions tag shows this is a condition block, not a trigger or an action.
Rule 1 (red arrow): Phone · is not empty.
+ Add Condition 1/10 adds more rules (up to ten) if you want extra checks before calling.
3. Connect the Webhook to the Yes branch. The If / Else block has two dots on its right: the green dot is Yes (the rule is true) and the red dot is No. Drag from the green dot to the Webhook. Leave the red dot unconnected, so contacts without a phone simply stop there.
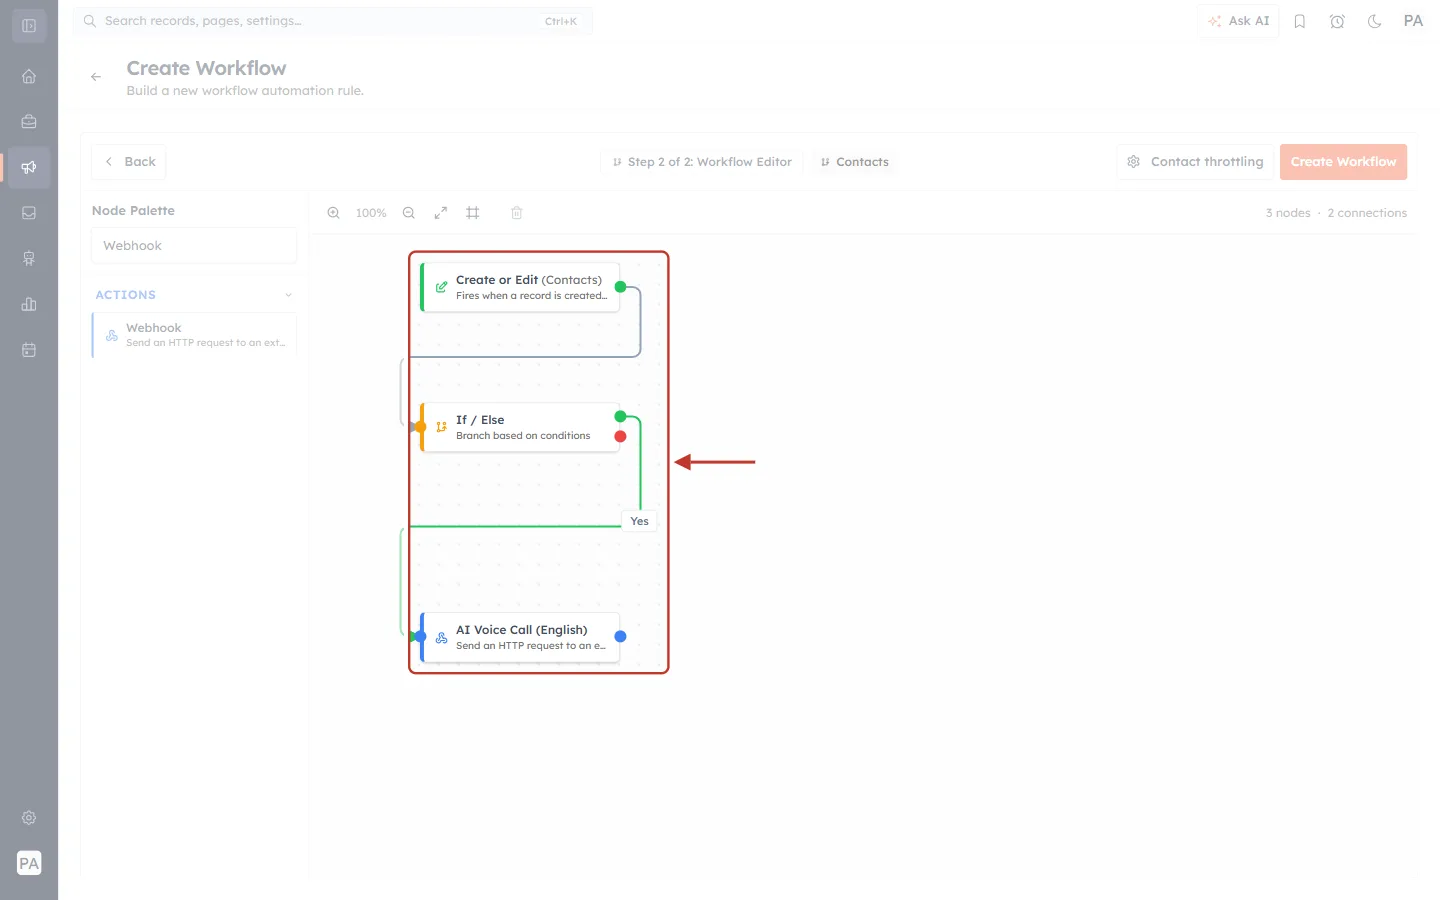
What this screenshot shows. The finished all-in-one workflow on the canvas.
Top: Create or Edit (Contacts), the trigger with the three Match-any conditions.
Middle: If / Else, the phone check. Its green (Yes) and red (No) dots are on the right.
The green line labelled Yes leads to AI Voice Call (English), the Webhook block from Steps 10–12.
The counter at the top right of the canvas reads 3 nodes · 2 connections.
⚠️
Keep the three lead rules on the trigger, not in the If / Else. A Create or Edit trigger runs once per record (unless Repeat is ticked). If the rules were in the If / Else, a contact that didn’t match when it was created would use up its one run on the No branch, and would never be called when the AI agent qualifies it later. On the trigger, a contact only “uses” its run when it actually matches.
Don’t switch on the all-in-one workflow and the separate Rule 1–3 workflows at the same time, or the same lead can be called twice.
Make sure nobody is called twice#
Leaving Repeat off already means each contact is called once per workflow. For an extra safety net, click Contact throttling in the top bar of the builder.
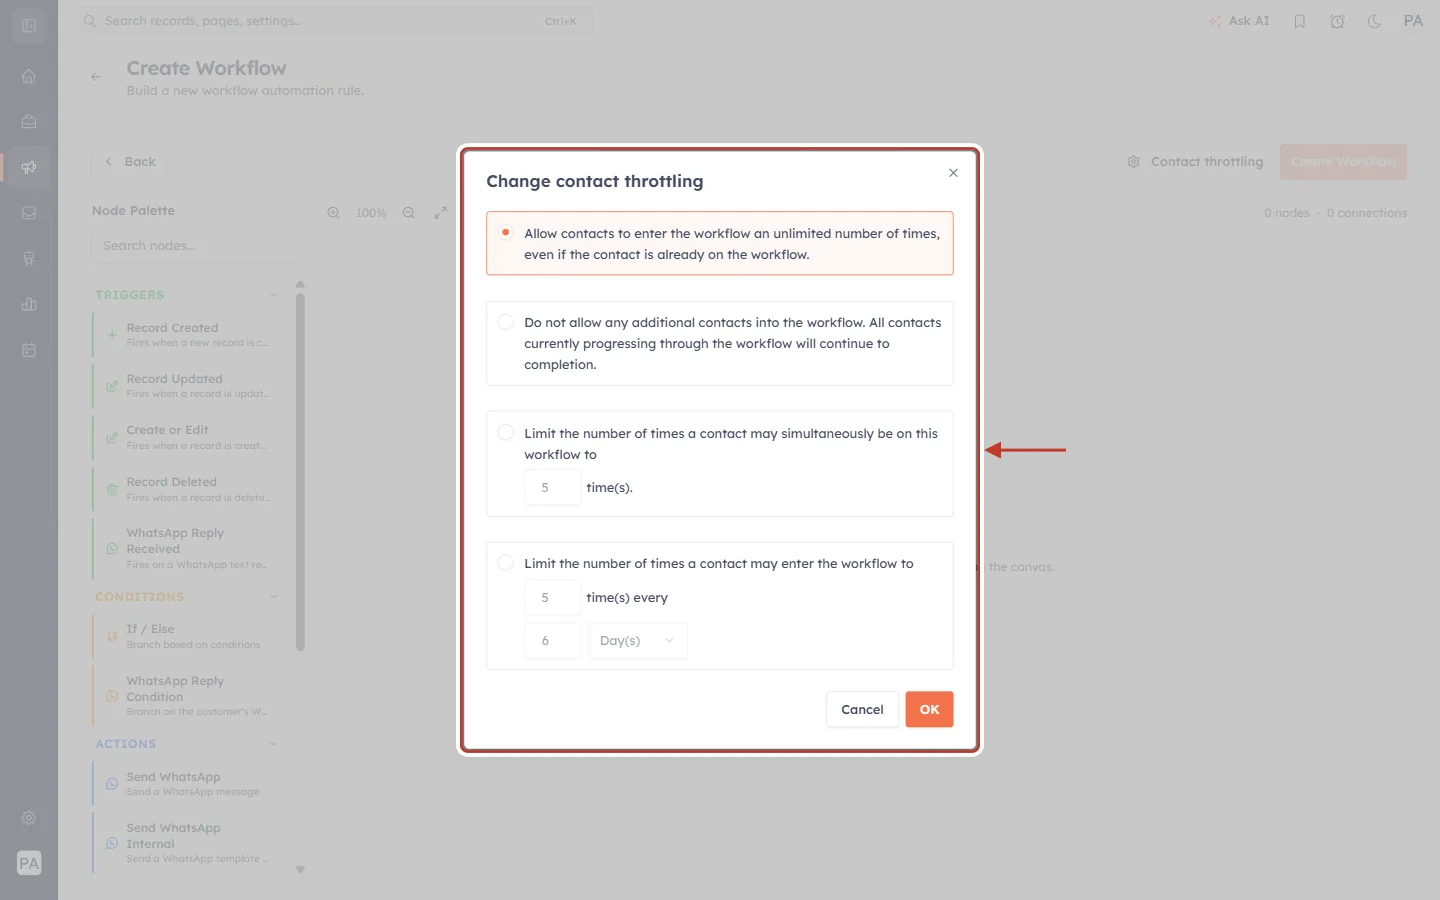
What this screenshot shows. The Change contact throttling dialog with its four options.
Allow contacts to enter the workflow an unlimited number of times (the default, highlighted in orange).
Do not allow any additional contacts into the workflow: a pause switch. Nobody new is let in, and contacts already in the workflow finish.
Limit the number of times a contact may simultaneously be on this workflow to … time(s): caps how many runs one contact can have going at once.
Limit the number of times a contact may enter the workflow to … time(s) every … Day(s): for calls, set this to 1 time every, for example, 30 days, so a lead can’t be called again within a month.
Click OK to apply your choice, or Cancel to keep the current setting. See Contact Throttling & Workflow Enrollment for more.
Check that calls are being triggered#
On the Workflow Automation list, click the number in the Executions column of your workflow, or open the ⋮ menu at the end of its row and choose View Report. Each time the workflow runs, the Webhook step is listed with its result. Open a webhook entry to see exactly what was sent to Plivo and what Plivo answered: the URL, the request body with the real phone number and name, and the HTTP status code. A status in the 200 range means Plivo accepted the request and started the call. Full details are in Monitor Workflows: Reports, Status and Execution History.
Troubleshooting#
The contact was created but no call came. Check that the workflow’s Status switch is on, that the trigger and the Webhook are connected (Step 9), and that the contact has a phone number, since the entry condition skips contacts without one.
The report shows HTTP 401 or 403. Plivo refused the sign-in. Set Authorization to Basic and re-enter the Auth ID and Auth Token (Step 11). Copy the token again from the Plivo console, because a single missing character breaks it.
The report shows HTTP 404. The Request URL is wrong or incomplete. Paste it again from this article, and check that it ends with the full flow ID and has no space at the end.
The report shows HTTP 400 or 422. Plivo received the request but didn’t like the body. Usually a Parameter Name doesn’t match what the flow expects, or the phone number is missing its country code.
The call rings but the agent speaks the wrong language. The workflow is using the other flow’s URL. Compare the end of the URL with the table in Before you start.
Contacts are getting two calls. Both the English and the Hindi workflows are running for the same contacts. See the warning under Option A.
A Meta lead wasn’t called. Open the contact and check its Advertising Platform field. It must read exactly Meta Ads. If the field is empty, the contact wasn’t created by the Meta Lead Ads integration (for example, it was imported or typed in by hand).
An outbound lead wasn’t called. Lead Source must already be filled in when the contact is created, because Rule 2 uses the Record Created trigger. If your team sets Lead Source afterwards, use the Create or Edit trigger instead (as in the all-in-one workflow).
AI-qualified leads aren’t being called. Check that the trigger is Record Updated (not Record Created), that Fire when watches the same field and value your AI agent writes, and that the contact has a phone number. Chat contacts often have only a name or email address.
The agent’s script, voice or behaviour needs changing. That is set in your Plivo flow, not in the CRM. Edit it on Plivo. The CRM workflow keeps working as long as the URL stays the same.
Frequently asked questions#
Can I trigger the call on something other than a new contact? Yes. Use another trigger such as Record Updated or Create or Edit, with a condition, for example when Lead Status changes to Interested. You can also start from Deals or another module, as long as it holds a phone number. See Workflow Triggers: Every Trigger Type Explained.
Can I wait before calling? Yes. Add a Wait step between the trigger and the Webhook, for example 10 minutes after the contact is created. See Workflow Delays & Timing.
Can I send more details to the agent? Yes. Add more Module Parameters rows (for example Email, Company or Lead Source), as long as your Plivo flow is set up to read them.
Does the CRM record the AI call? No. The call takes place on Plivo, so recordings and transcripts are kept in your Plivo account. The CRM keeps a log of the webhook request it sent.
Can I use different agents for different kinds of lead? Yes. Each workflow has its own Webhook, so the Meta-leads workflow can call one Plivo flow (for example a Hindi agent) and the AI-qualified workflow another. Just paste a different Request URL into each.
Where can I learn more about Plivo voice agents? In the Plivo documentation, especially AI Agents: overview, Call Agent, SIP trunking for voice agents and Audio streaming for voice agents.
Previous and next#
Previous: Authenticate Your Webhooks with API Key or Basic Auth
Next: Monitor Workflows: Reports, Status and Execution History
Related#
Was this article helpful?
Ready to implement this?
OpenAI Engage and apply what you just learned to your own workspace.
Open AI Engage CRM