Loading…


KnowledgeBase
Create and Publish a Help-Center Article: Write, Format, Save as Draft and Go Live (Step-by-Step)
Introduction#
An article is one page of your help center: one question answered, or one task explained step by step. Customers find it through the help-center search, through its collection, or through a link you send them.
In this guide you will create a complete article from an empty form, using a real example: “How to Reset Your Password”. You will give it a title and a short summary, put it in a collection, write and format the content, choose its Previous and Next links, and fill in the search-engine details. Then you will save it as a draft, check it, and publish it so your customers can read it.
ℹ️
The screenshots use a sample help center for a business called YourCompany, with sample collections, articles and authors. Your screen shows your own collections, articles and team members.
Stage | What you do | Step |
|---|---|---|
Start | Open the Knowledge Base and click New Article | 1–2 |
Describe | Title, slug, excerpt, collection, status and author | 3–7 |
Write | Headings, lists, links, images, videos, tables and callouts | 8–14 |
Connect | Previous / Next links and search-engine details | 15–16 |
Save | Create the article as a draft | 17 |
Go live | Publish it and check it on your help center | 18–20 |
Before you begin#
You need the Knowledge Base permission. Admins always have it. Everyone else needs Knowledge Base turned on in their profile, under Setup → Profiles → Feature Permissions → Marketing. If you can’t see the Knowledge Base in the navigation rail, ask your admin.
Create your collections first (recommended). An article is easier to find when it sits in a collection, for example Getting Started or Users & Security. You can also create a collection from inside the article form (Step 6).
Have your content ready. Write down the steps, and keep any screenshots or videos you want to show at hand.
Nothing goes public by accident. New articles start as Draft, so you can create, check and correct them before anyone else sees them.
Step 1: Open the Knowledge Base#
In the navigation rail on the far left, click the book icon. The Knowledge Base opens on the Articles page.
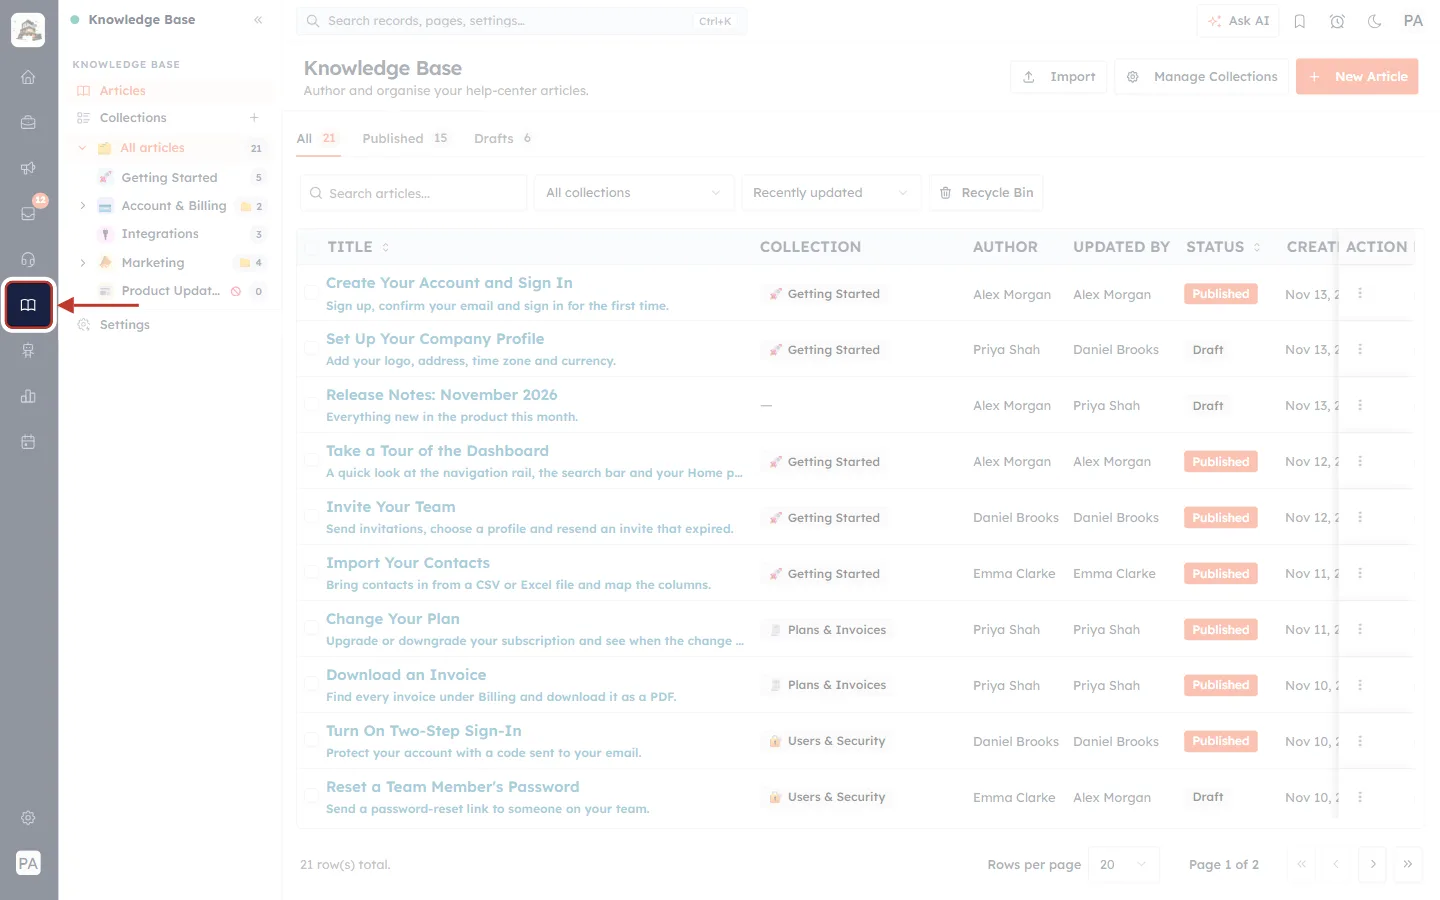
What this screenshot shows. The Knowledge Base icon (an open book) in the left navigation rail, ringed and marked with the arrow.
The rail on the far left holds an icon for each part of the CRM. The book icon opens the Knowledge Base.
The side panel next to it lists Articles, Collections and the collection tree (All articles 21, Getting Started 5 and so on) with the number of articles in each, and Settings at the bottom.
The Articles page fills the rest of the screen: the tabs All, Published and Drafts, the search box and filters, and the list of articles with their collection, author, status and dates.
At the top right are Import, Manage Collections and the orange New Article button you will use next.
Step 2: Click New Article#
Click the orange New Article button at the top right of the Articles page.
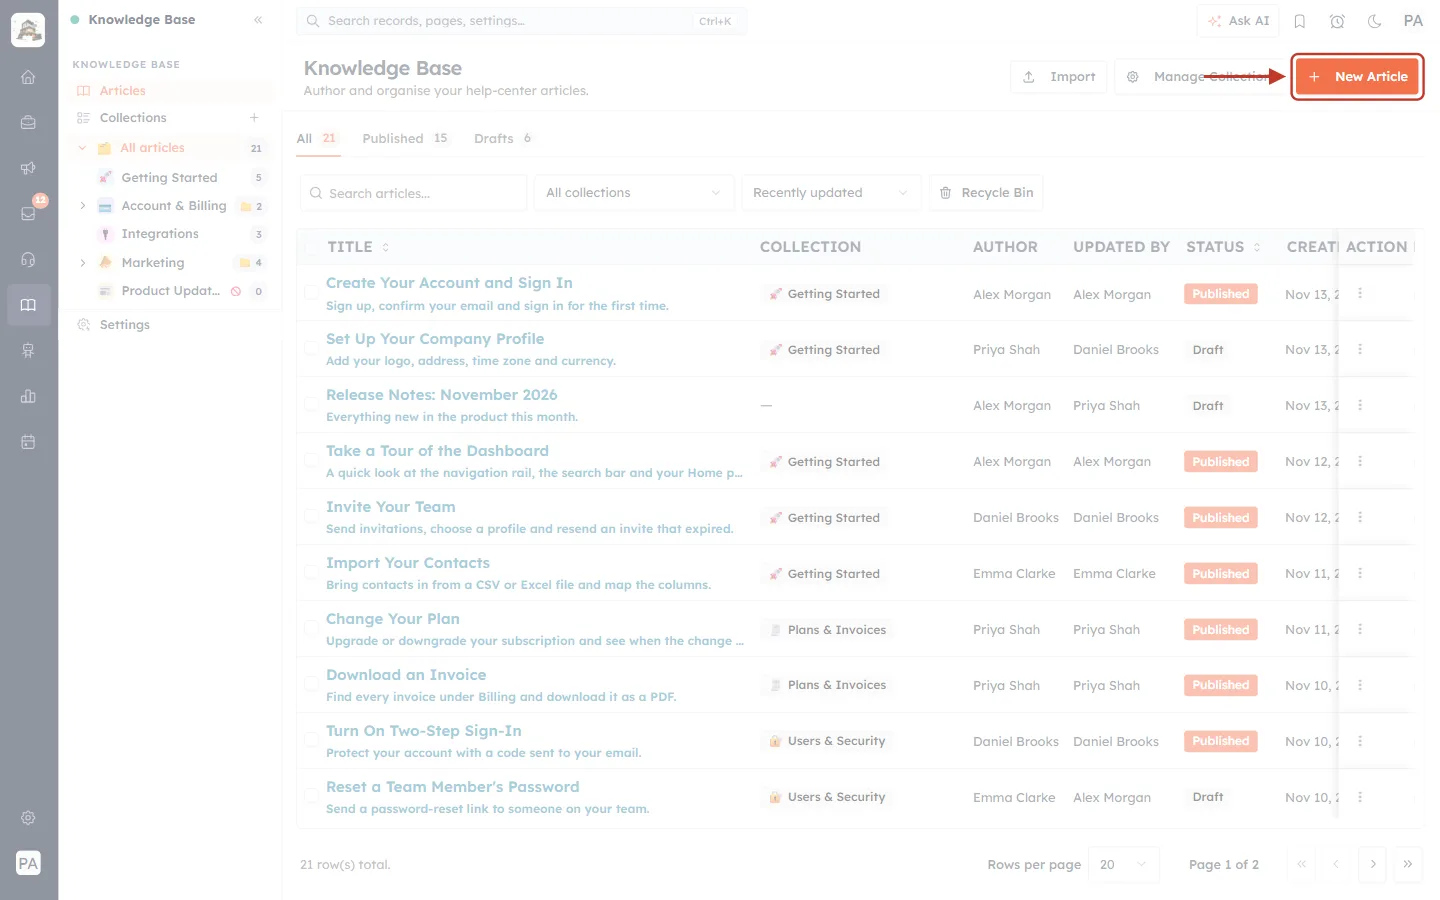
What this screenshot shows. The + New Article button, ringed, at the top right of the Knowledge Base page.
+ New Article opens an empty article form.
Import (left of it) is for bringing in many articles at once from a file or another website. Manage Collections opens the collections page. You don’t need either for this guide.
The New Article page opens. It has four sections, one under the other: Article Details, Content, Article navigation and Search engine & social (SEO).
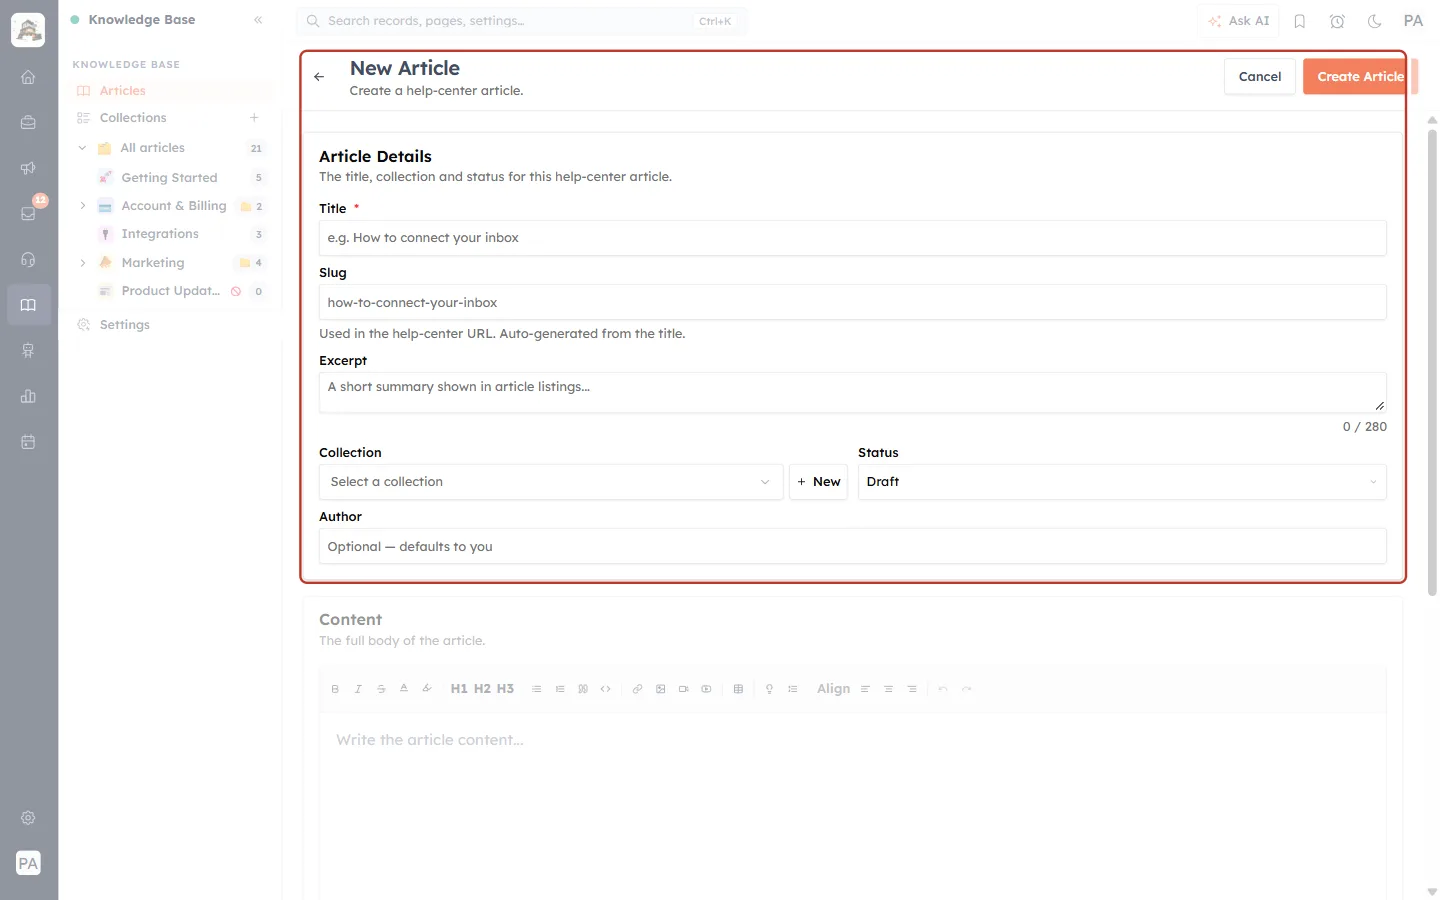
What this screenshot shows. The top of the empty New Article page with the Article Details section, ringed.
New Article — “Create a help-center article.” The ← arrow beside the title goes back to the article list.
Cancel and Create Article at the top right stay in place while you scroll, so you can save from anywhere on the page.
Article Details — “The title, collection and status for this help-center article.” It holds Title, Slug, Excerpt, Collection, Status and Author. You fill these in during Steps 3 to 7.
Below it (scroll down) are Content, Article navigation and Search engine & social (SEO).
Step 3: Enter the title#
Click in the Title box and type the article’s title. Title is the only required field, marked with a red *.
If you click Create Article without a title, the article is not saved and a red message appears under the box:
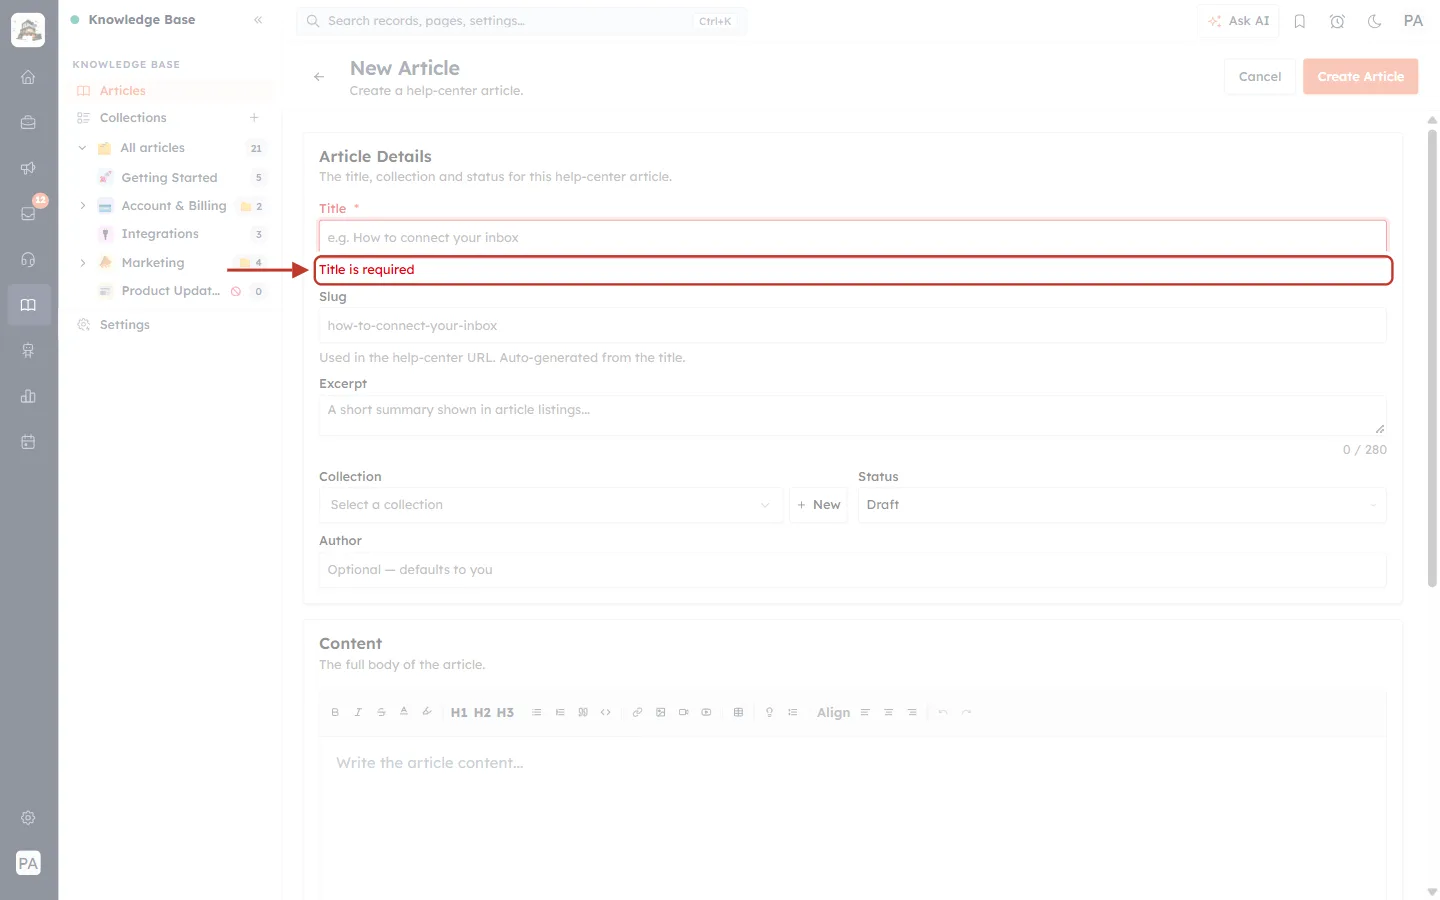
What this screenshot shows. The Title field, ringed, with the red message Title is required underneath.
The form shows this message when you try to save an article without a title.
Type a title and the message goes away. Nothing else on the form is required.
Type the title. As you type, the Slug fills itself in:
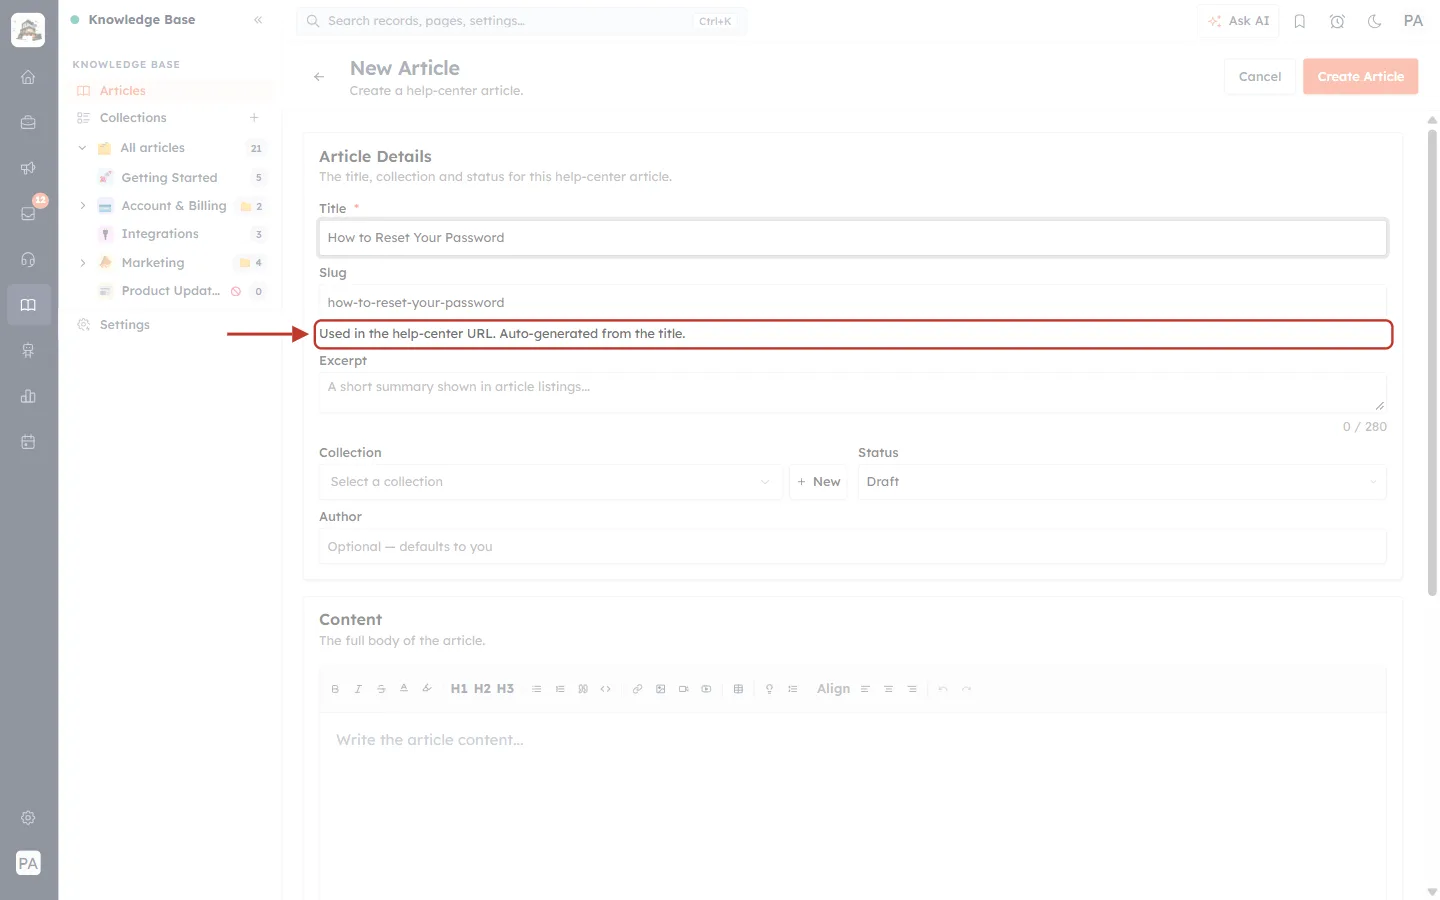
What this screenshot shows. The Title and Slug fields, ringed.
Title: “How to Reset Your Password”. Write the title the way a customer would ask the question or describe the task, for example “How to …”, “Connect …” or “Why can’t I …?”.
Slug: how-to-reset-your-password. The slug is the article’s part of the web address. “Used in the help-center URL. Auto-generated from the title.”
The slug uses lowercase letters, numbers and hyphens. Leave it as it is unless you need a shorter or different address.
⚠️
Choose the slug before you share the article. If you change the slug later, the article moves to a new address, and old links to it (in emails, chats or other articles) may no longer work.
Step 4: Write a short excerpt#
In Excerpt, write one or two sentences that summarise the article.
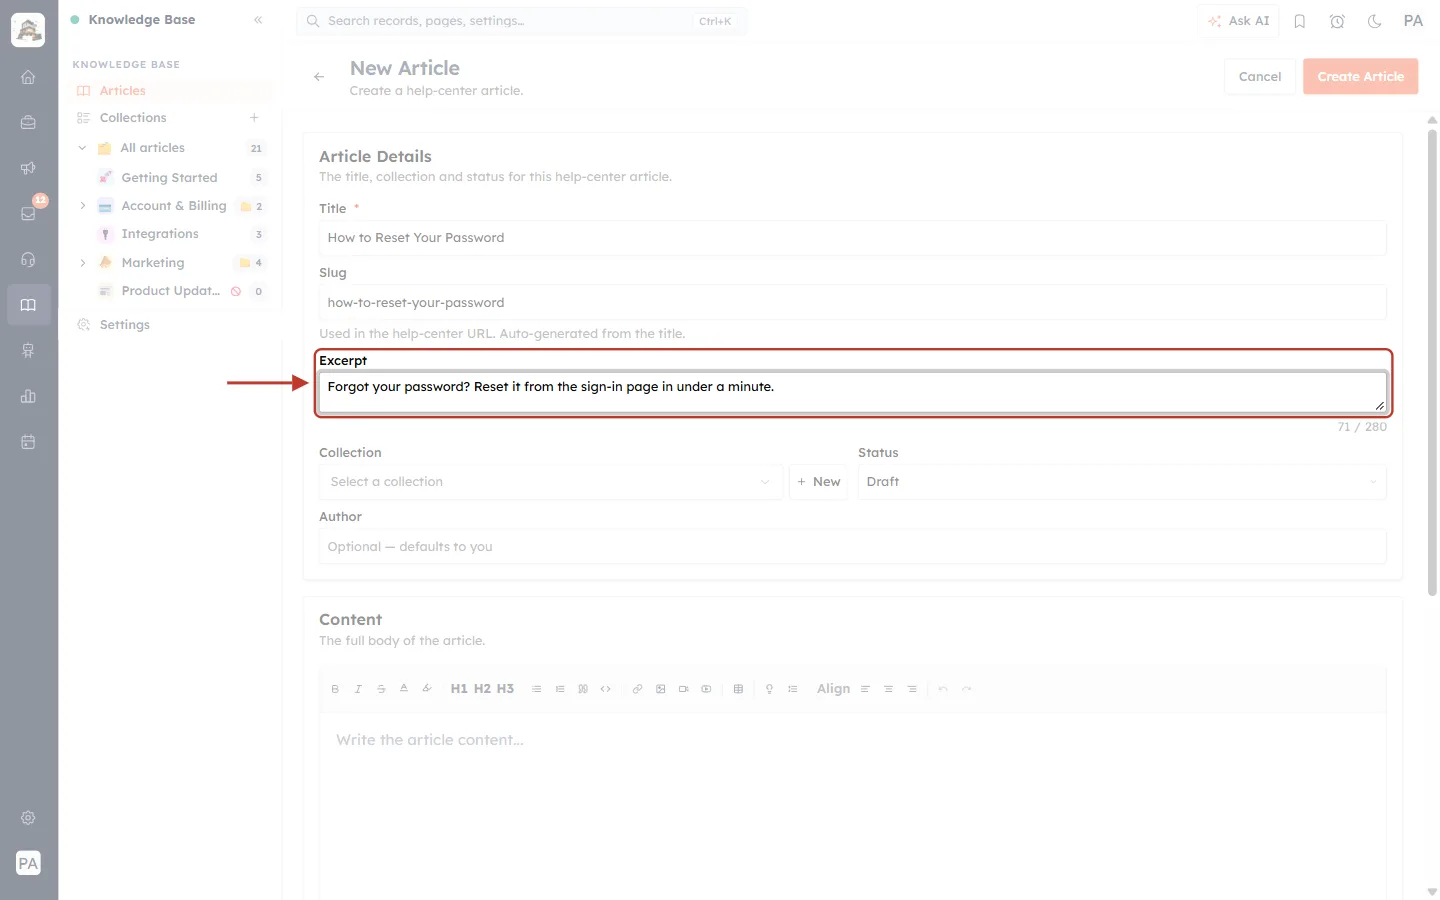
What this screenshot shows. The Excerpt field, ringed, filled in with a one-line summary.
Excerpt: “Forgot your password? Reset it from the sign-in page in under a minute.”
71 / 280 under the box counts the characters. An excerpt can be up to 280 characters long.
The excerpt appears under the title in the article list, on the collection page and in the help-center search results. A clear excerpt helps customers pick the right article at a glance.
It is also used as the search-engine description if you leave the SEO description empty (Step 16).
Step 5: Choose a collection#
Click Select a collection to open the list of your collections.
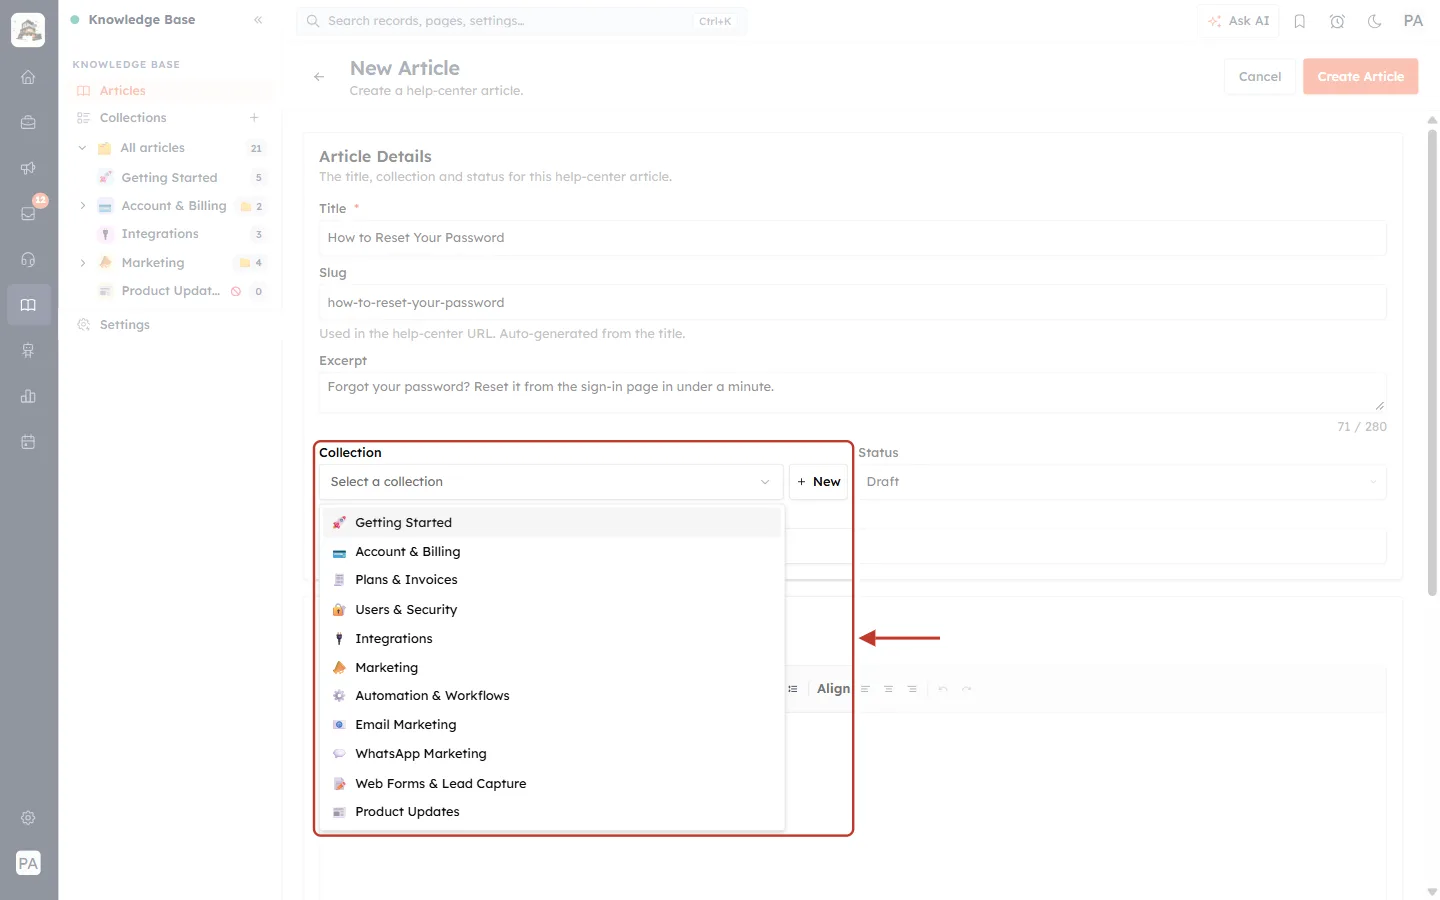
What this screenshot shows. The Collection field with its list open, ringed.
Every collection is listed with its icon: Getting Started, Account & Billing, Plans & Invoices, Users & Security, Integrations, Marketing and so on.
Sub-collections are listed too, so you can put the article straight into a sub-topic, for example Users & Security inside Account & Billing.
Click a collection to choose it. Here we choose Users & Security, because the article is about signing in.
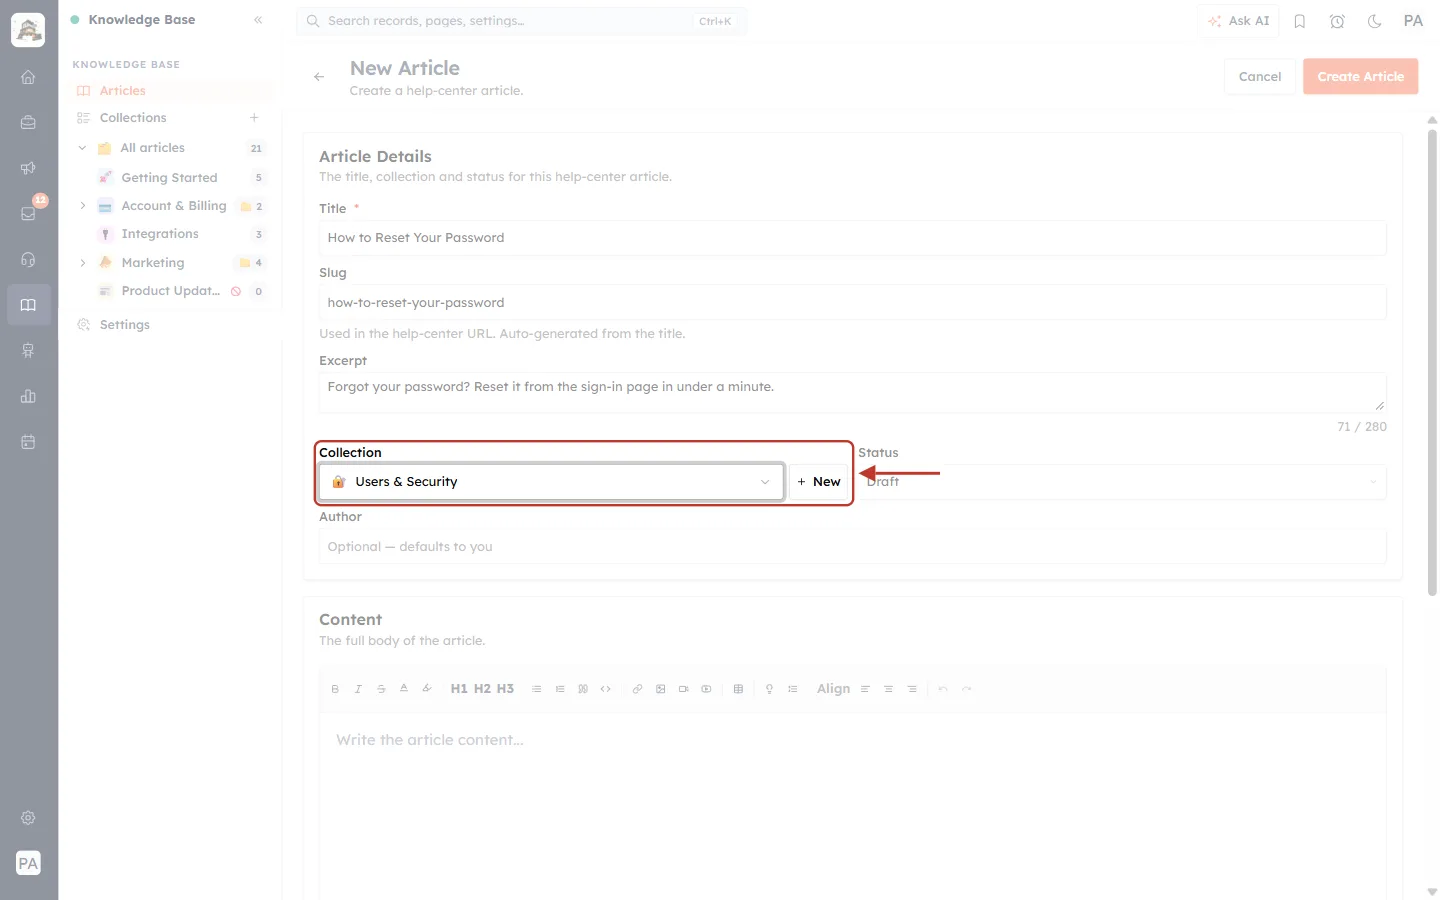
What this screenshot shows. The Collection field after choosing, ringed, with the + New button.
The field now shows 🔐 Users & Security.
+ New: if the right collection doesn’t exist yet, click this to create one without leaving the article. The new collection is created and you can then pick it here.
ℹ️
You can publish an article without a collection, but it won’t appear on any collection page, so customers can only reach it through search or a direct link. Put every published article into a collection.
Step 6: Leave the status on Draft#
Next to Collection is Status. Click it to see the two choices.
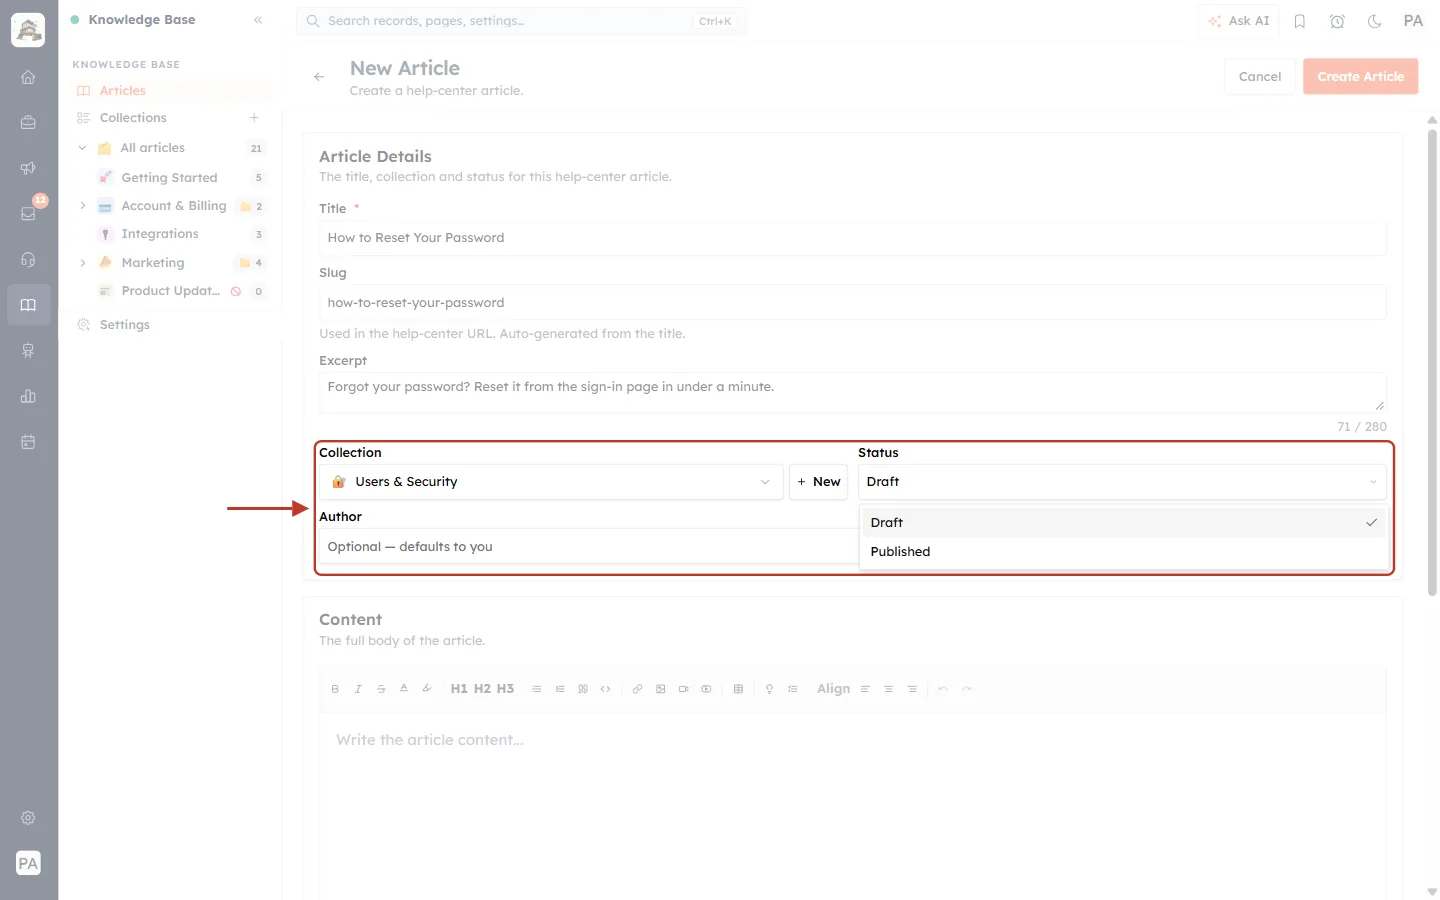
What this screenshot shows. The Collection, Status and Author fields, ringed, with the Status list open.
Draft (ticked, the default): the article is saved but hidden. Customers can’t see it on the help center or find it in search.
Published: the article goes live on your help center as soon as you click Create Article.
For a new article, keep Draft. You will check the article first and publish it in Step 18.
Author (below): covered in the next step.
Step 7: Set the author (optional)#
The Author box shows “Optional — defaults to you”. Leave it empty and your own name is saved as the author. Type a different name if you are writing the article for someone else, or if you want a team name such as “YourCompany Support”.
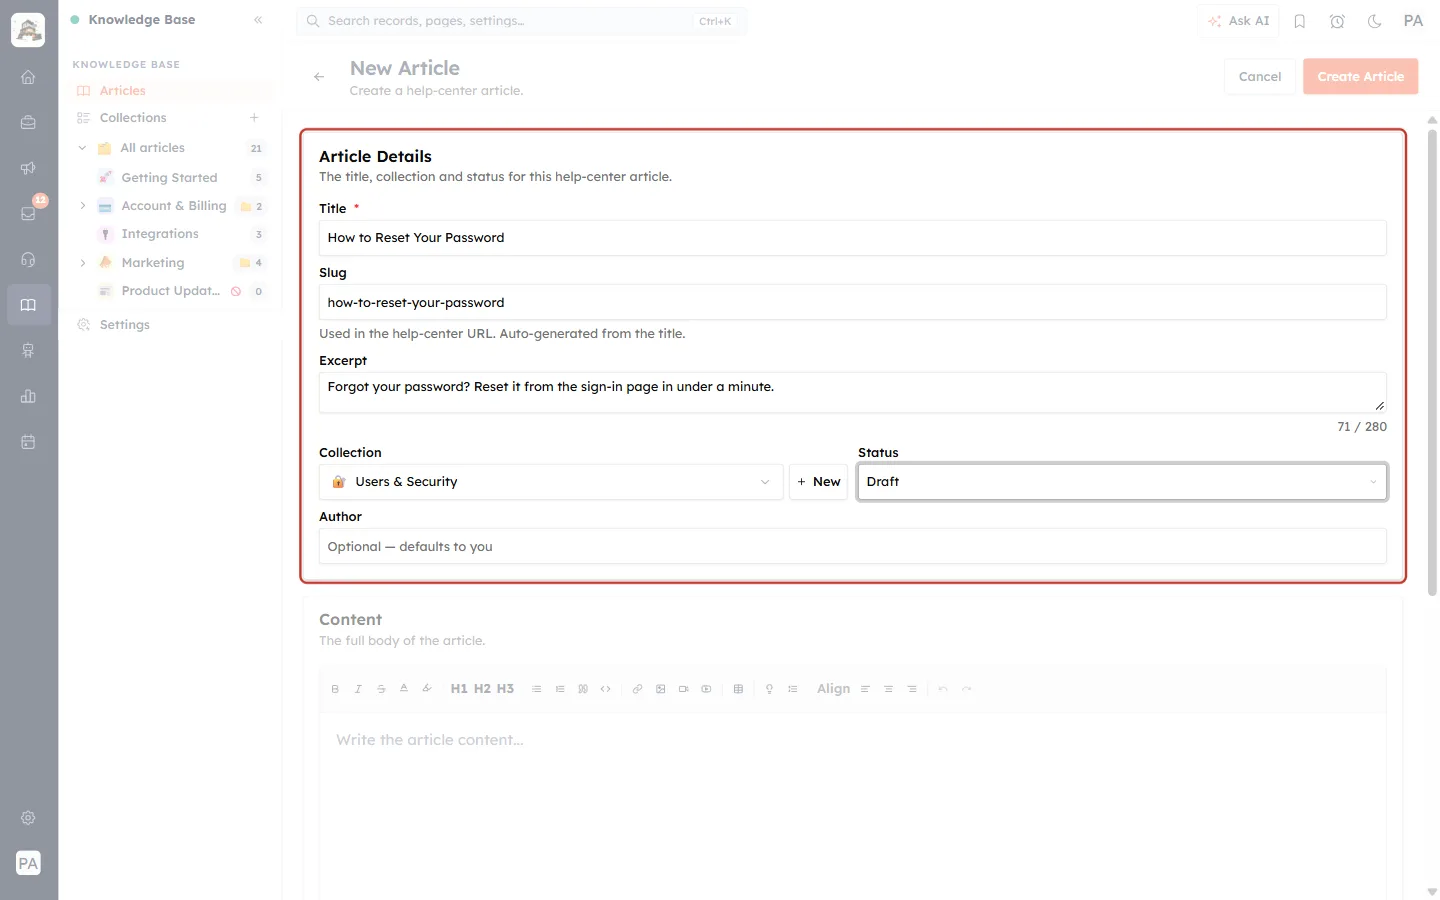
What this screenshot shows. The whole Article Details section, ringed, after Steps 3 to 7.
Title: How to Reset Your Password.
Slug: how-to-reset-your-password (made from the title).
Excerpt: the one-line summary, 71 / 280 characters.
Collection: 🔐 Users & Security.
Status: Draft.
Author: empty, so your name is used.
Step 8: Get to know the editor toolbar#
Scroll down to Content — “The full body of the article.” This is where you write the article itself. Above the writing area is the toolbar. Hover over any button to see its name.
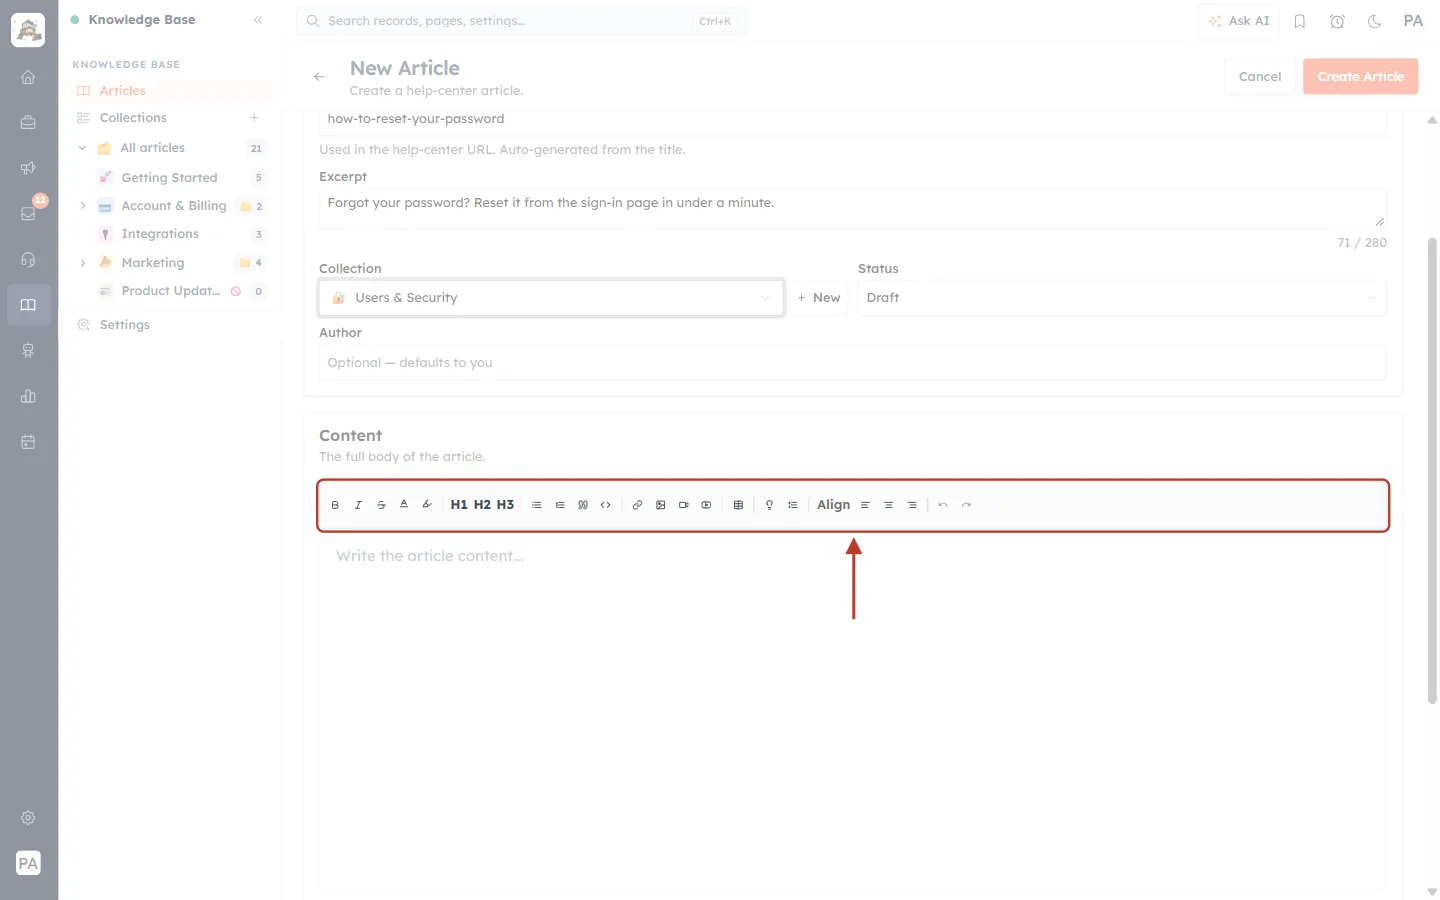
What this screenshot shows. The editor toolbar, ringed.
B Bold, I Italic, S Strikethrough, A Text color and the marker for Highlight text.
H1 H2 H3: headings (Heading 1, 2 and 3).
Bullet list, Numbered list, Blockquote (99) and Code block (<>).
Add / edit link (chain icon), Insert image, Insert video and Embed YouTube.
Insert table (grid icon), Callout box (bulb icon) and Collapsible section.
Align: Align left, Align center and Align right.
Undo and Redo arrows at the end.
Step 9: Add headings to structure the article#
Click in the writing area (“Write the article content…”), type a section name, then click H2. The line becomes a heading.
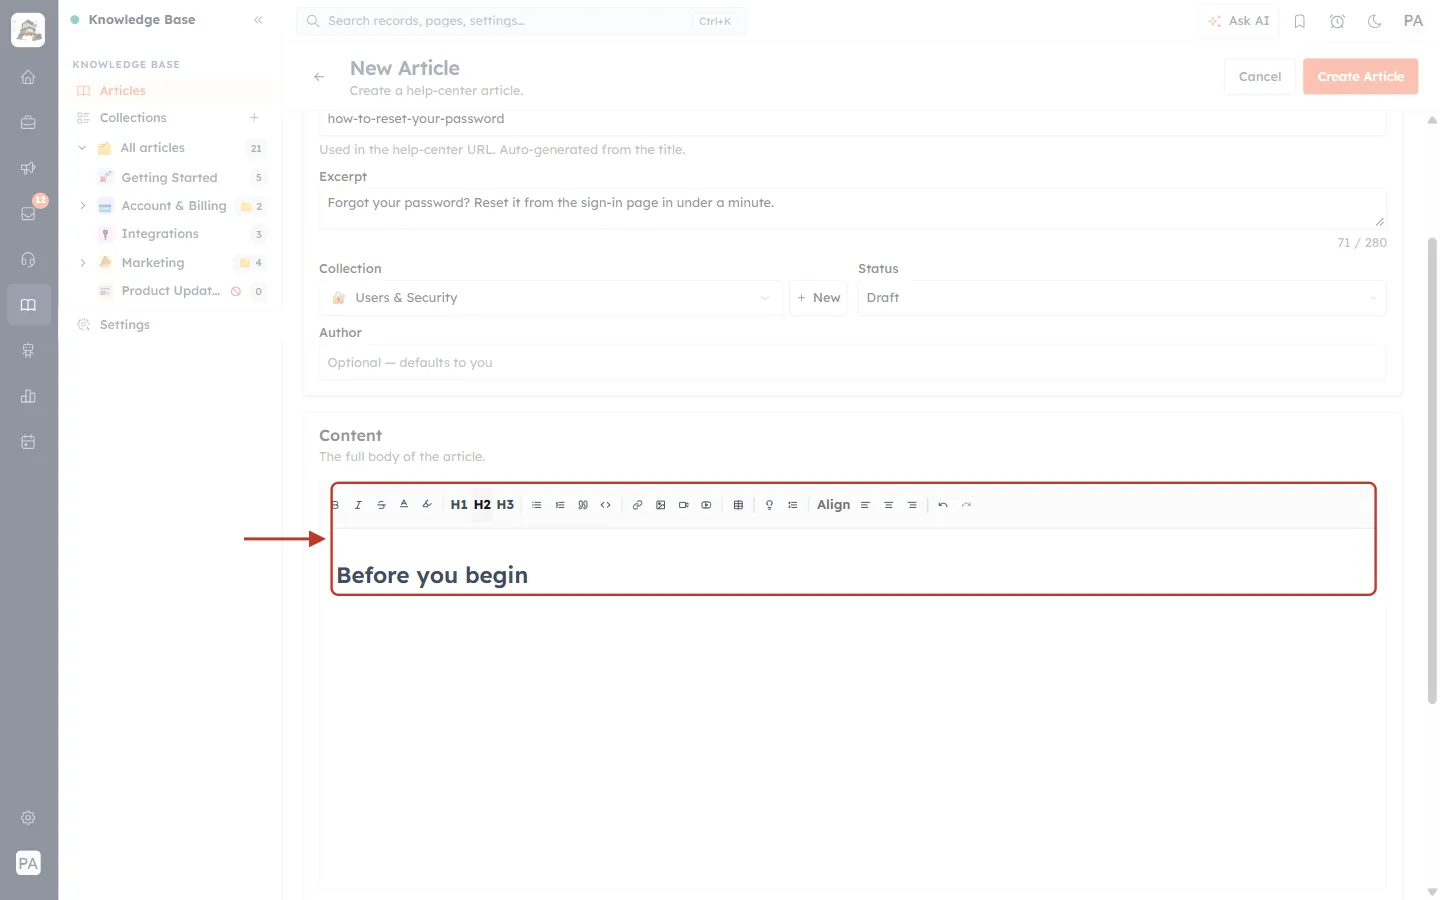
What this screenshot shows. The toolbar and the first heading, ringed. H2 is highlighted because the cursor is in an H2 heading.
“Before you begin” is now a Heading 2.
Use H2 for each main section or step (“Step 1: Open the sign-in page”) and H3 for smaller parts inside a step.
Your help center turns these headings into the On this page outline beside the article (Step 20), so customers can jump straight to the step they need.
Keep H1 for rare cases: the article title is already shown in large text at the top of the page.
Now write the rest of the article. Press Enter for a new paragraph, and use Bullet list or Numbered list for steps and options. Select words and click B to make button names and menu items stand out.
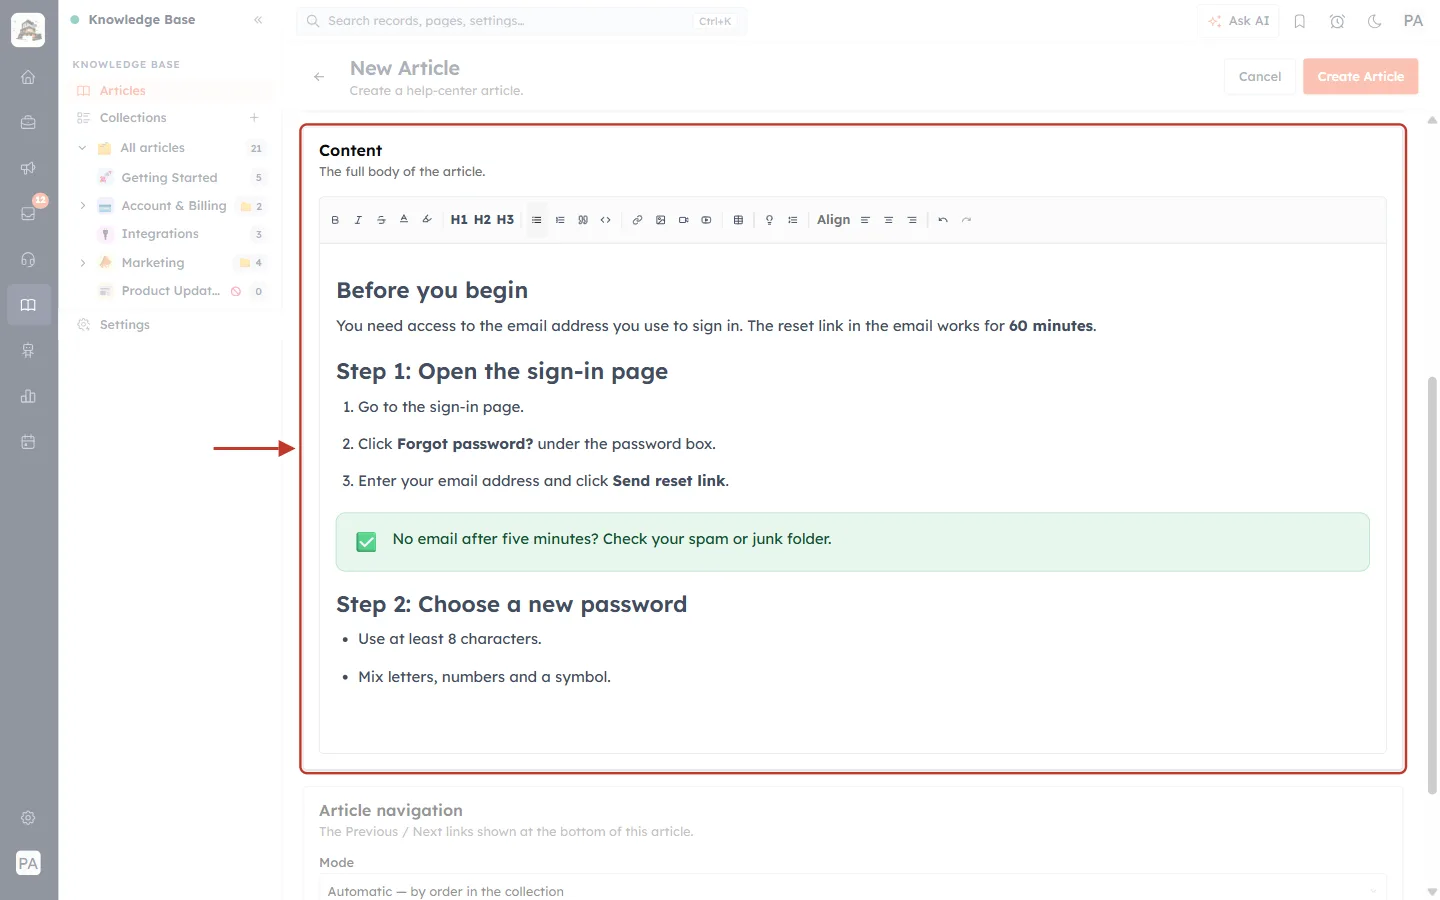
What this screenshot shows. The Content section, ringed, with the example article written in it.
Before you begin (H2) with a short paragraph. “60 minutes” is in bold.
Step 1: Open the sign-in page (H2) with a numbered list of three actions. Use a numbered list whenever the order matters.
Button names such as Forgot password? and Send reset link are bold, so customers can spot them on their own screen.
A green callout: “No email after five minutes? Check your spam or junk folder.” (Step 14).
Step 2: Choose a new password (H2) with a bullet list. Use bullets when the order doesn’t matter.
✅
Write the way you would explain it on the phone: one action per line, the exact names of buttons in bold, and the result the customer should see after each step.
Step 10: Add a link#
Links point customers to a page, a form or another article. First select the words that should become the link (here “sign-in page” in Step 1), then click Add / edit link (the chain icon).
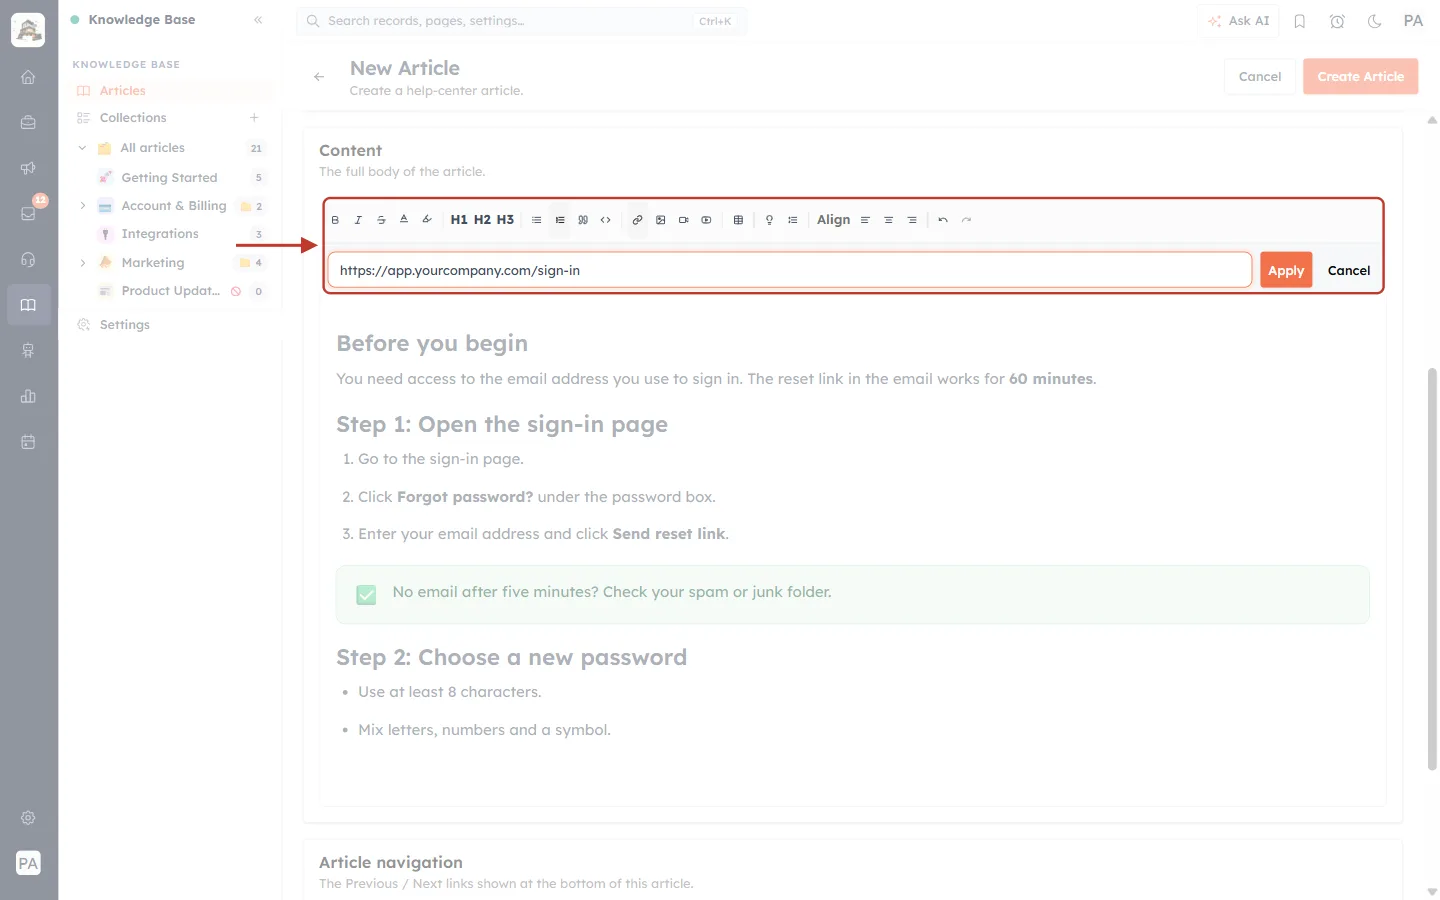
What this screenshot shows. The toolbar and the link bar that opened under it, ringed.
The box says “https://example.com (applies to selected text)”: the link is added to the words you selected.
Type or paste the full address, here https://app.yourcompany.com/sign-in.
Click Apply to add the link, or Cancel to close the bar without changes.
After Apply, the linked words turn orange and underlined (you can see “sign-in page” as a link in the later screenshots).
To change or remove a link, click inside it and click the chain icon again.
✅
To link to another help article, open that article on your help center, copy the address from the browser, and paste it into the link bar.
Step 11: Add an image#
Screenshots help customers match what they read with what they see. Put the cursor where the image should go and click Insert image. A panel opens with two ways to add it.
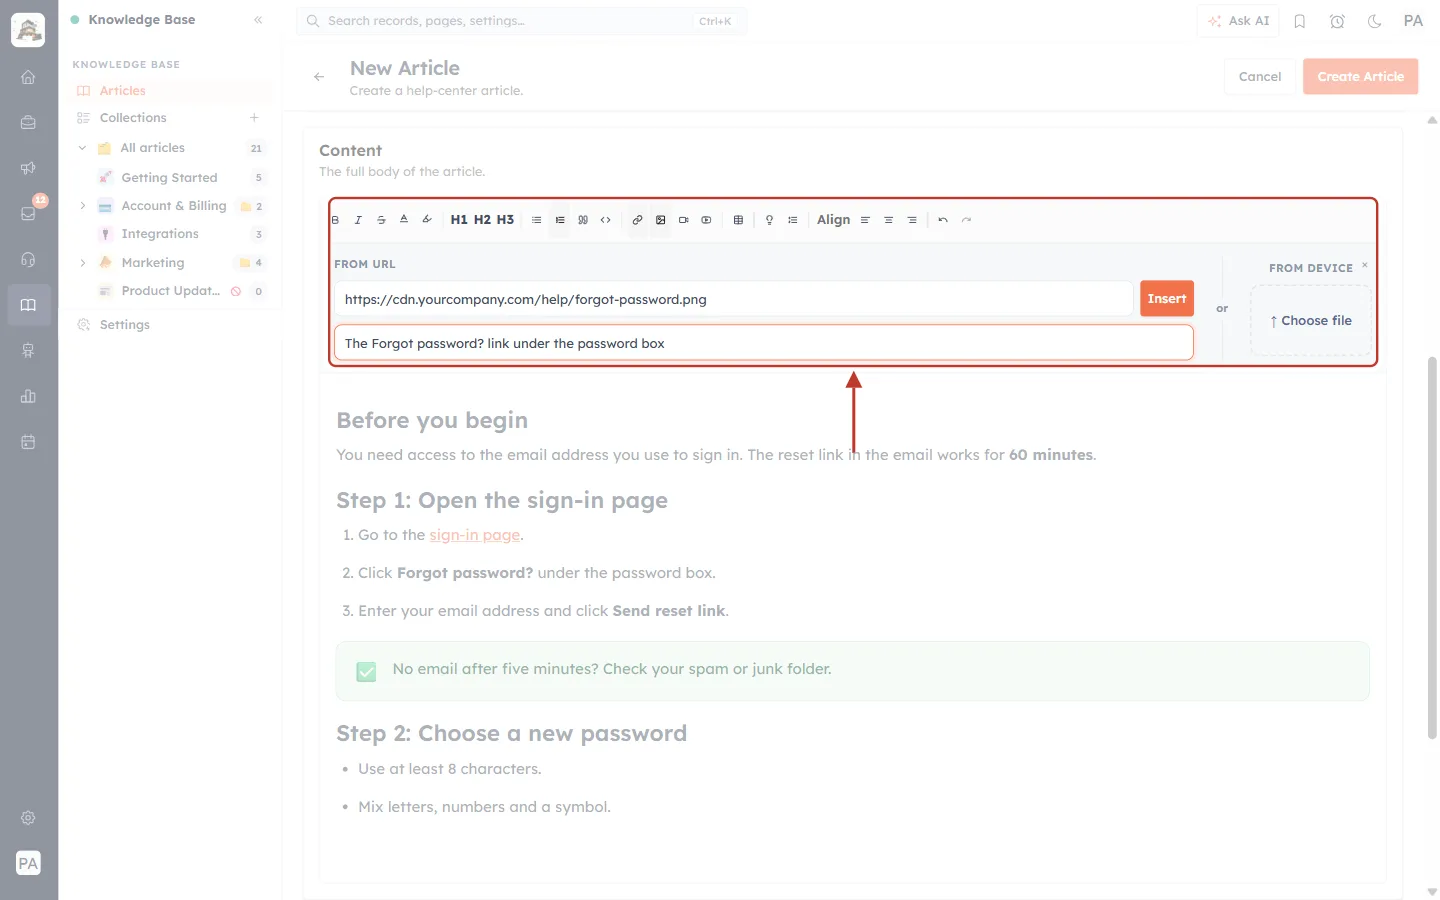
What this screenshot shows. The Insert image panel, ringed.
FROM URL: paste the address of an image that is already online (here …/forgot-password.png) and click Insert.
Alt text (optional): “describes the image for accessibility.” Screen readers read it aloud, and it shows if the image can’t load. Describe what the image shows, for example “The Forgot password? link under the password box”.
FROM DEVICE: click Choose file to upload an image from your computer instead.
The small × at the top right closes the panel without adding anything.
After inserting, use Align left / center / right to place the image.
Step 12: Add a video#
You can add two kinds of video:
Insert video (camera icon): opens your computer’s file picker so you can upload a video file into the article.
Embed YouTube (play icon): shows a box where you paste a YouTube link.
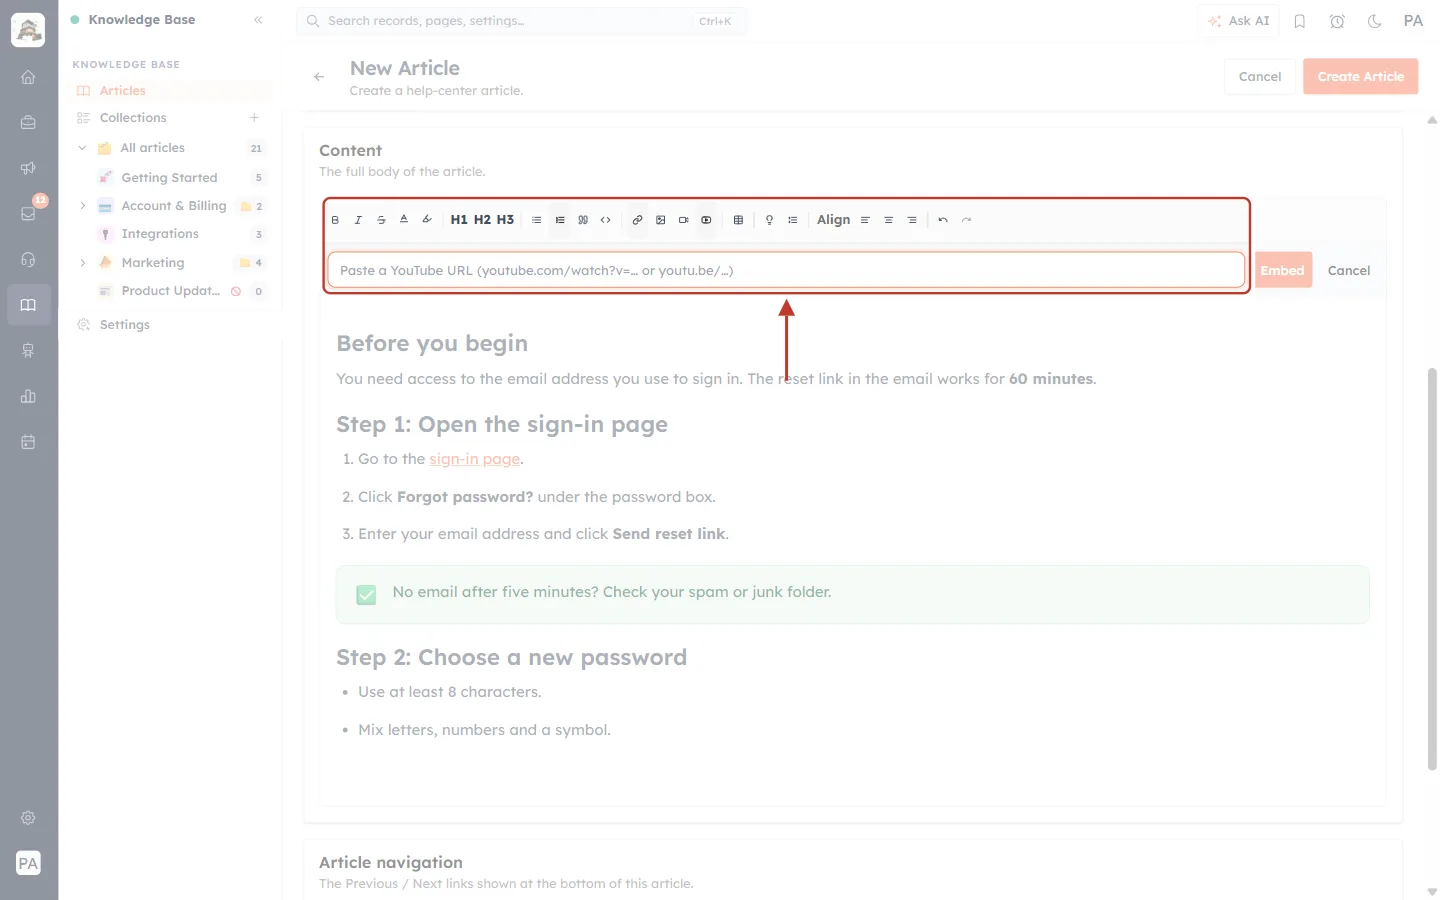
What this screenshot shows. The toolbar and the Embed YouTube bar, ringed.
The box says “Paste a YouTube URL (youtube.com/watch?v=… or youtu.be/…)”. Both kinds of YouTube address work.
Click Embed to place the video player in the article, or Cancel to close the bar.
Customers play the video right inside the article without leaving your help center.
Step 13: Add a table#
Tables are useful for comparisons, plans, limits or settings. Click Insert table, then move the mouse over the grid to choose the size.
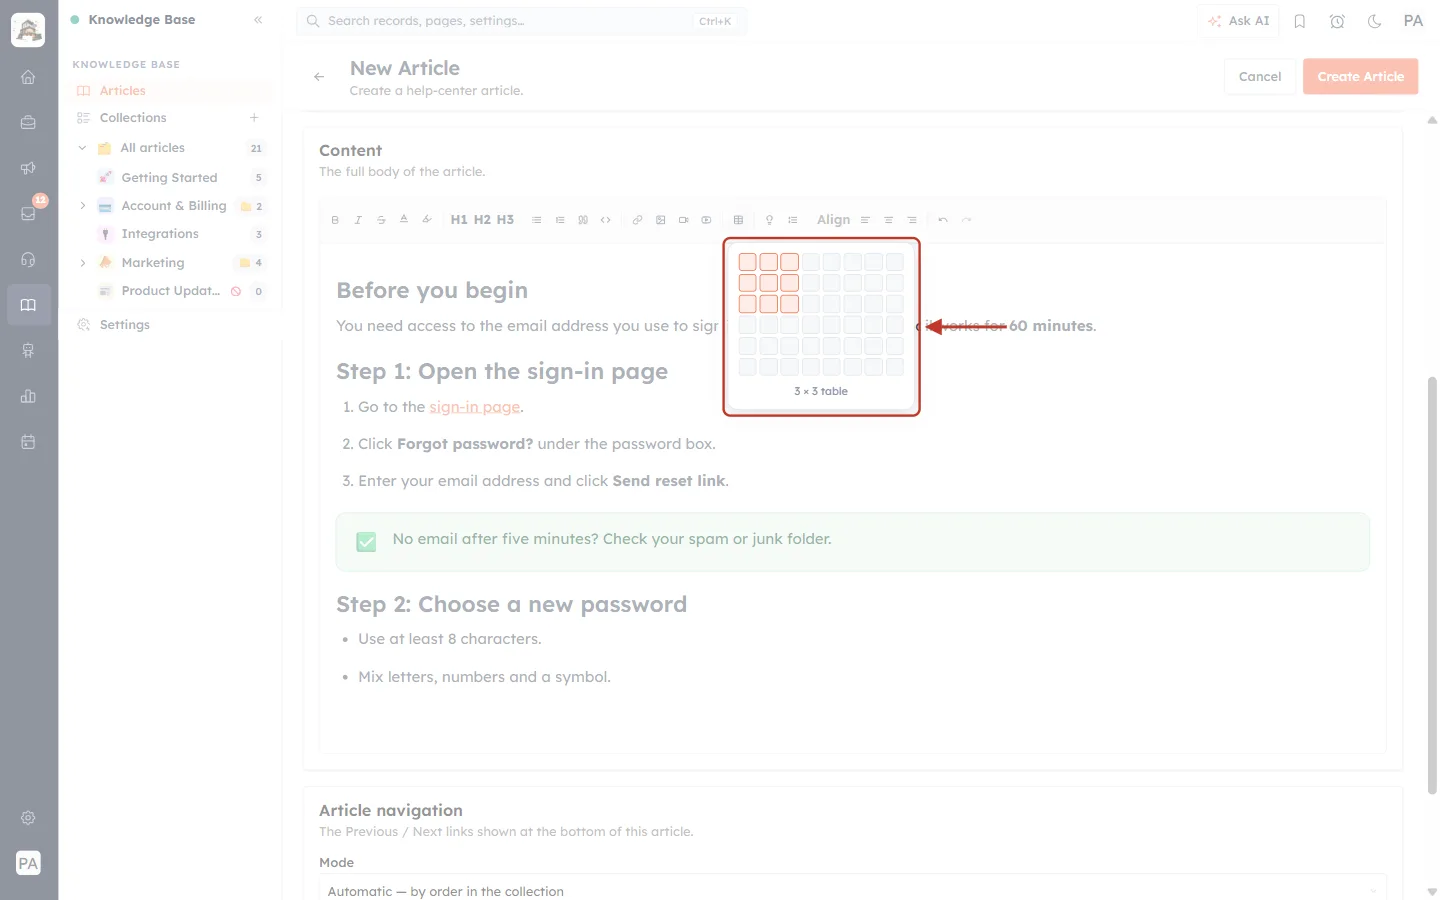
What this screenshot shows. The table size picker, ringed.
The highlighted squares show the size of the table: here 3 × 3 table (three columns and three rows).
Before you move the mouse, the picker says “Hover to choose size”.
Click to insert the table, then click in a cell and type. The first row works well as a header row.
Press Esc or click elsewhere to close the picker without inserting a table.
Step 14: Highlight a tip with a callout#
A callout is a coloured box that makes a tip, note or warning stand out from the text. Put the cursor on an empty line and click Callout box (the bulb icon), then type your note inside the box.
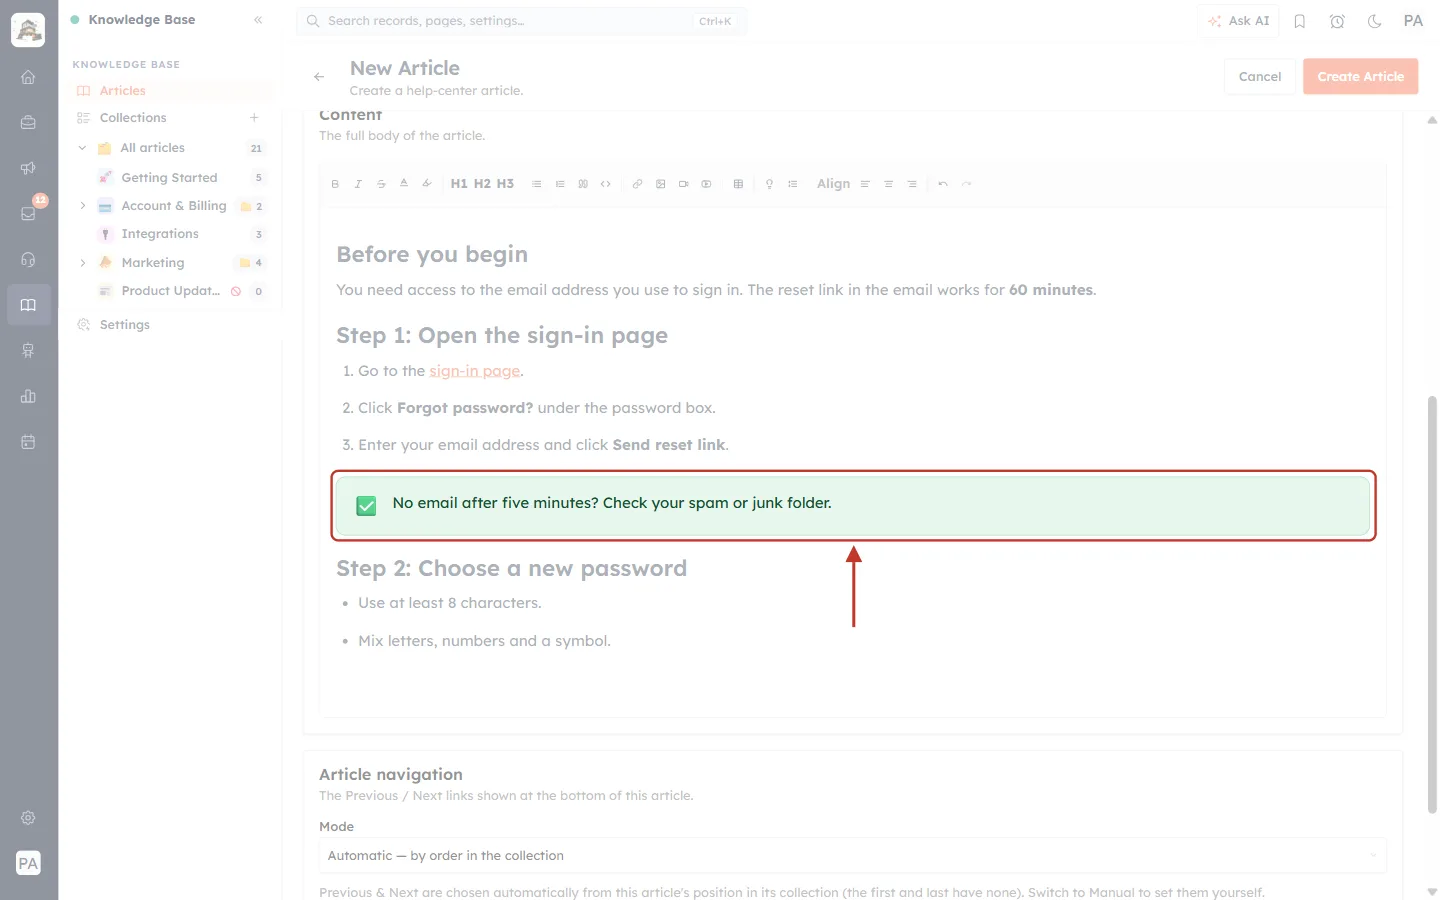
What this screenshot shows. A callout in the example article, ringed.
The box has an icon on the left and your text on the right: “No email after five minutes? Check your spam or junk folder.”
Use callouts for short extra information: a tip, an important note or a warning. Keep them to one or two sentences.
Don’t overuse them: one or two callouts per article keep them noticeable.
Two more tools work in a similar way: Collapsible section adds a block that customers can open and close, which is handy for long optional details, and Blockquote and Code block format quoted text and code or settings that customers should copy exactly.
✅
Made a mistake? Click Undo (or press Ctrl + Z) to step back, and Redo to step forward again.
Step 15: Set the Previous and Next links#
Scroll down to Article navigation. It controls the Previous and Next links shown at the bottom of the article, which lead customers on to related articles.
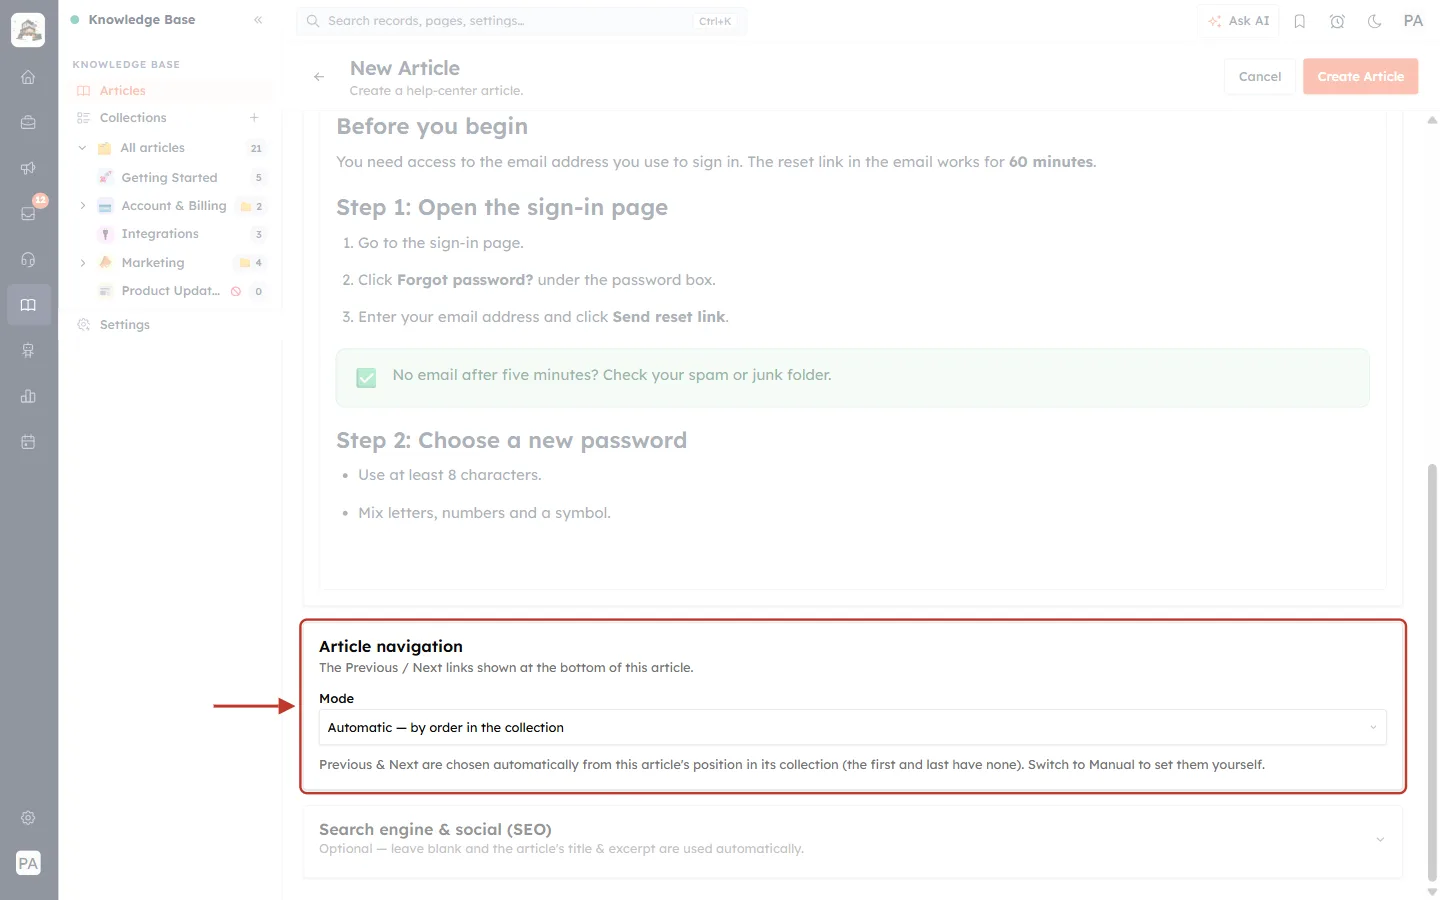
What this screenshot shows. The Article navigation section, ringed, on its default setting.
“The Previous / Next links shown at the bottom of this article.”
Mode: Automatic — by order in the collection.
“Previous & Next are chosen automatically from this article’s position in its collection (the first and last have none). Switch to Manual to set them yourself.”
The position is the drag order of articles in the collection. You set that order by opening the collection in the Articles side panel and dragging the articles.
Automatic is right for most articles. To choose the links yourself, click the Mode box:
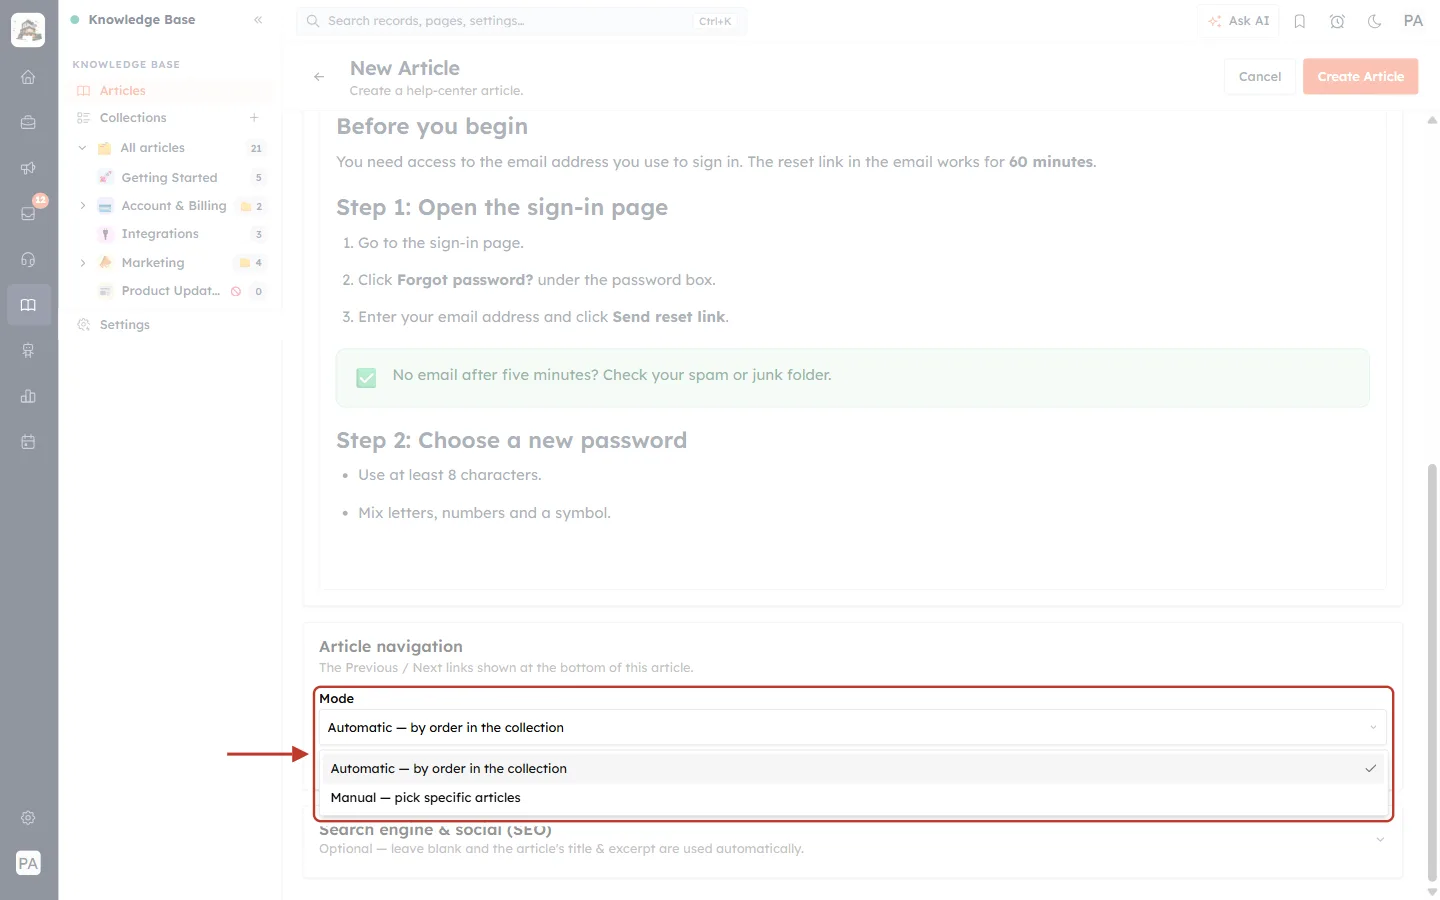
What this screenshot shows. The Mode list open, ringed.
Automatic — by order in the collection (ticked): the links follow the collection order.
Manual — pick specific articles: you choose the Previous and Next articles yourself, for example to lead customers to an article in a different collection.
Choose Manual. Two new boxes appear, Previous article and Next article. Click one of them to pick an article:
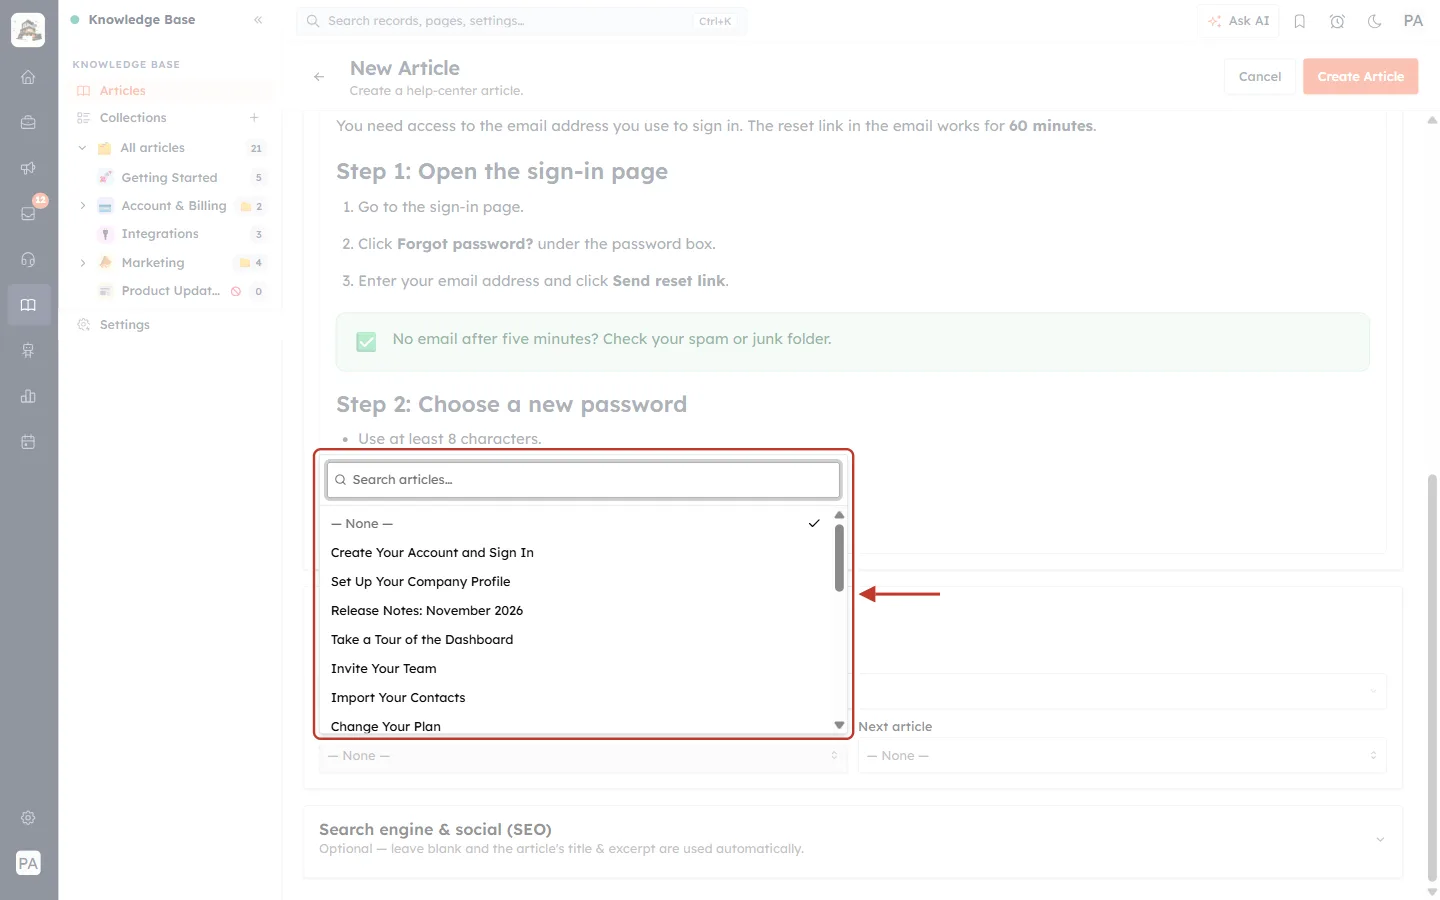
What this screenshot shows. The Previous article list open, ringed.
Search articles… at the top: type part of a title to find an article quickly.
— None — (ticked): no link on that side.
Below it are all your articles: Create Your Account and Sign In, Set Up Your Company Profile and so on. Click one to choose it.
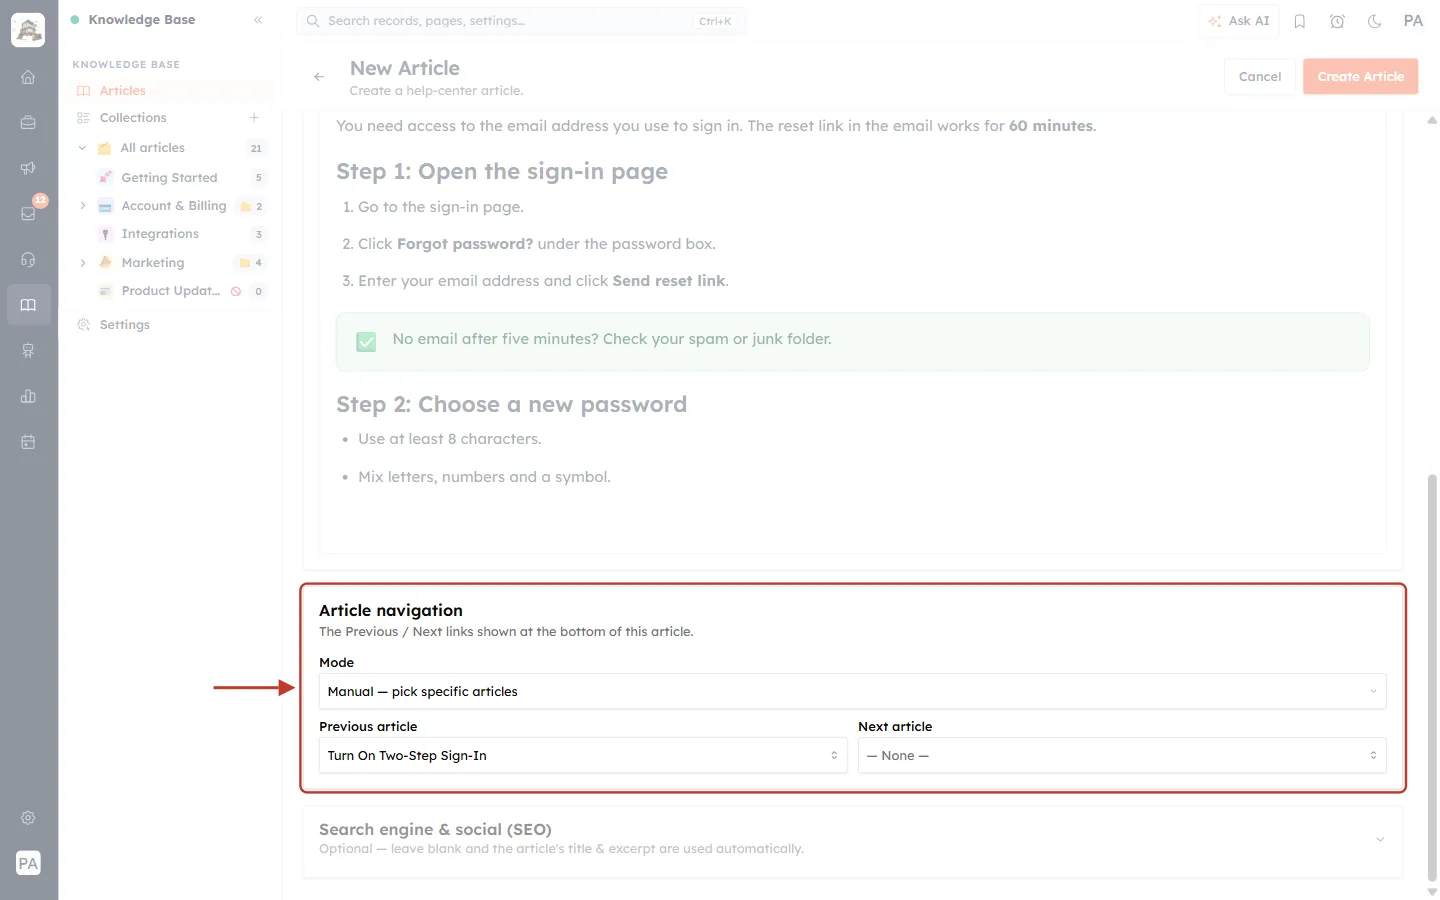
What this screenshot shows. The Article navigation section in Manual mode, ringed.
Mode: Manual — pick specific articles.
Previous article: Turn On Two-Step Sign-In.
Next article: — None —, so there is no Next link.
To go back to the automatic links, set Mode to Automatic again. For this example we leave it on Automatic.
Step 16: Fill in the search-engine details (optional)#
Click Search engine & social (SEO) to open the last section. It controls how the article looks in Google results and when someone shares its link. Everything here is optional: “leave blank and the article’s title & excerpt are used automatically.”
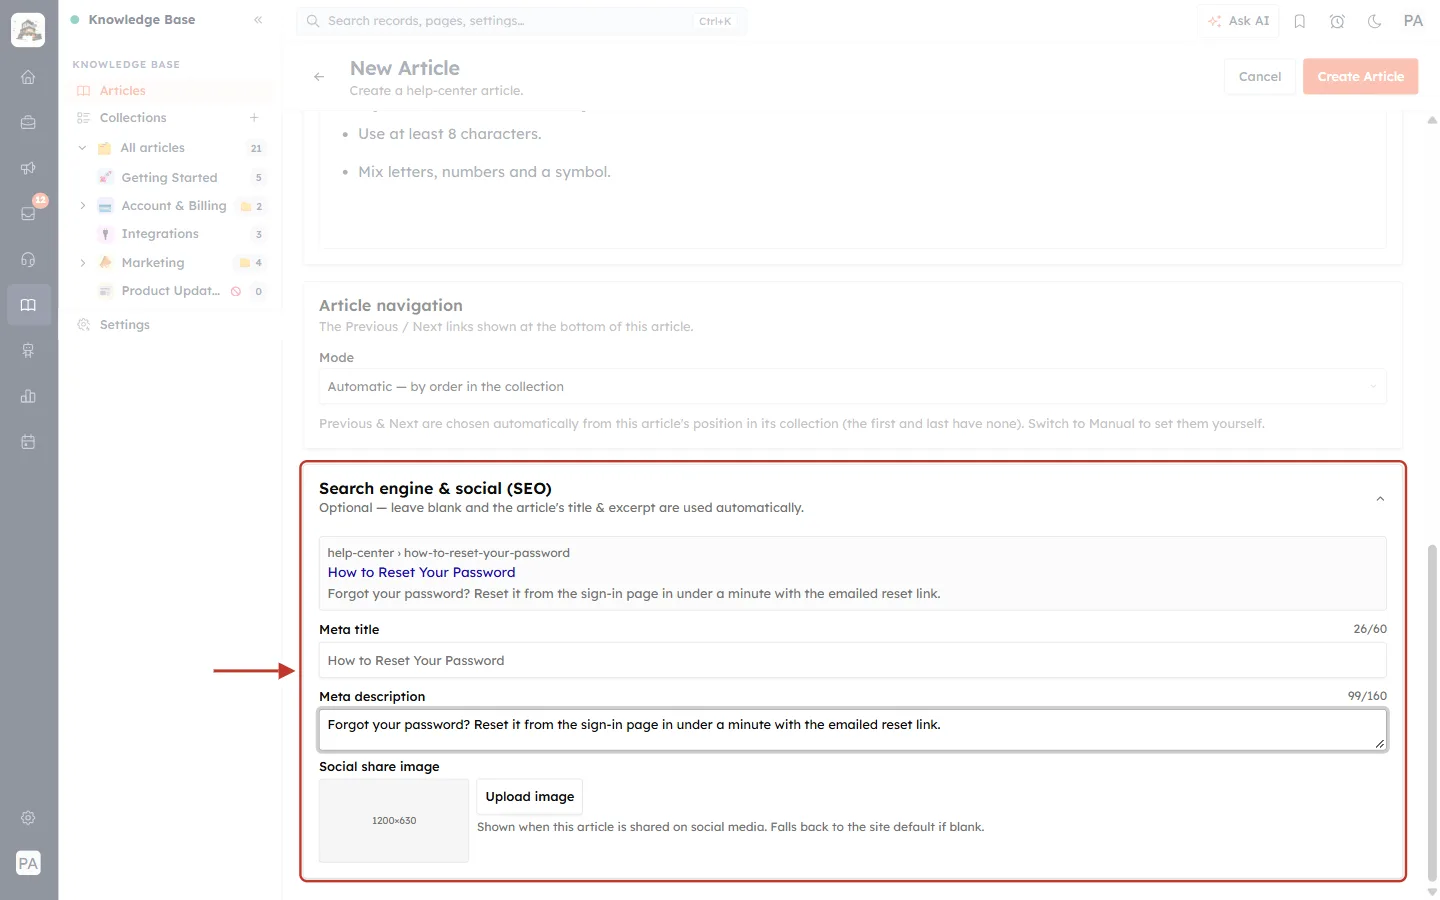
What this screenshot shows. The Search engine & social (SEO) section, ringed.
The preview box at the top shows how the article could appear in search results: the address (help-center › how-to-reset-your-password), the title in blue, and the description underneath. It updates as you type.
Meta title (26/60): the title shown in search results. It starts with the article title. Up to 60 characters.
Meta description (99/160): the text under the title in search results. Up to 160 characters. If you leave it empty, the excerpt is used.
Social share image (1200×630): click Upload image to add the picture shown when the link is shared on social media. “Falls back to the site default if blank.”
The ˄ arrow at the top right closes the section again.
Step 17: Save the article as a draft#
Scroll back to the top (or stay where you are, since the buttons stay at the top) and click Create Article.
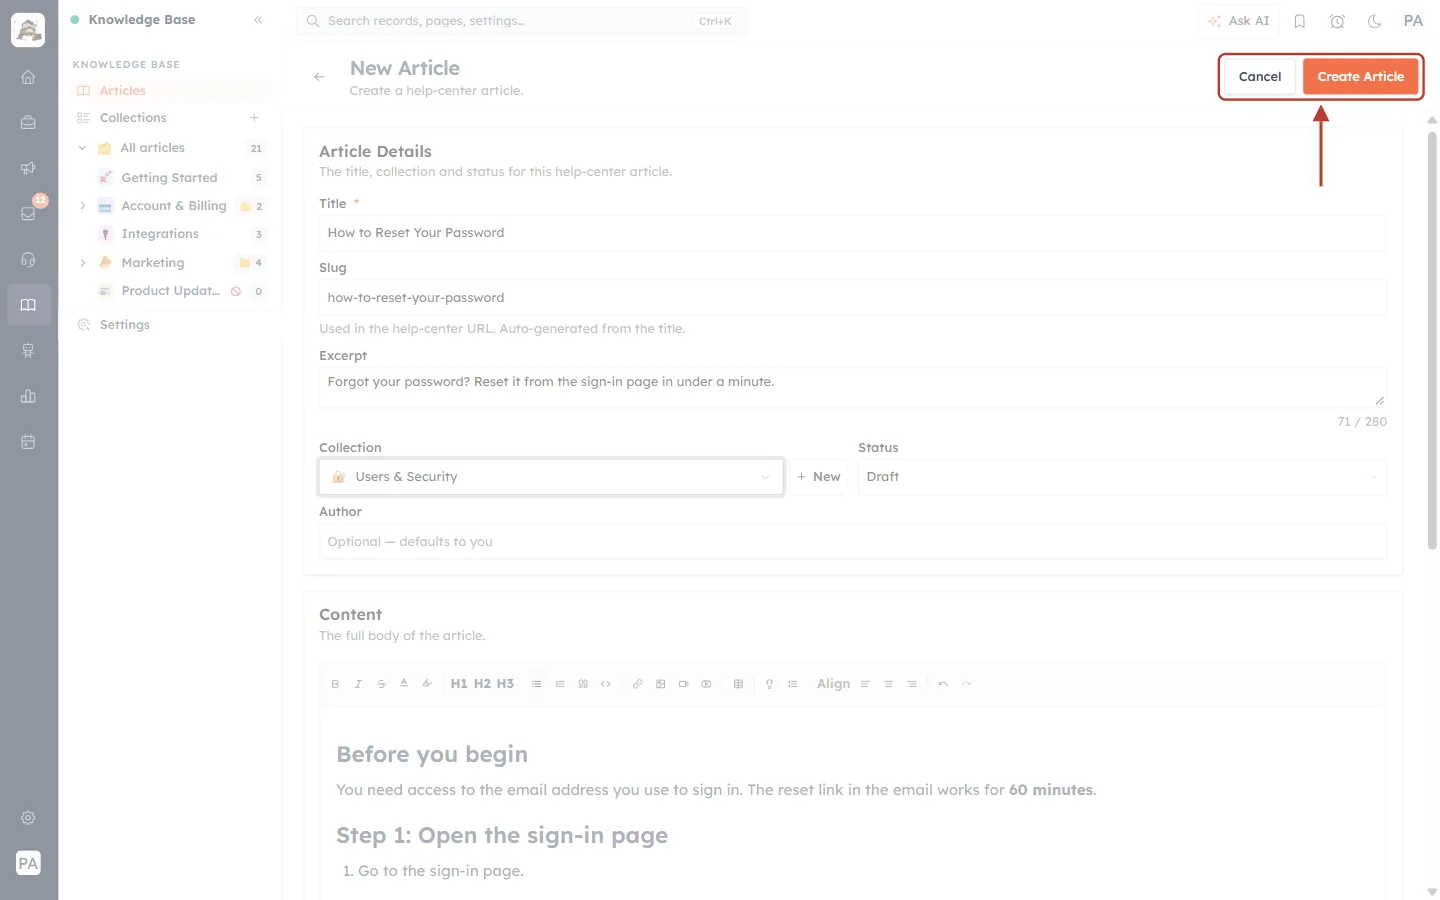
What this screenshot shows. Cancel and Create Article, ringed, at the top right of the New Article page.
Create Article saves the article with everything you entered. Because Status is Draft, it is saved but not visible to customers.
Cancel leaves the page without saving. Anything you typed is lost.
You return to the Articles page, and the new article is at the top of the list:
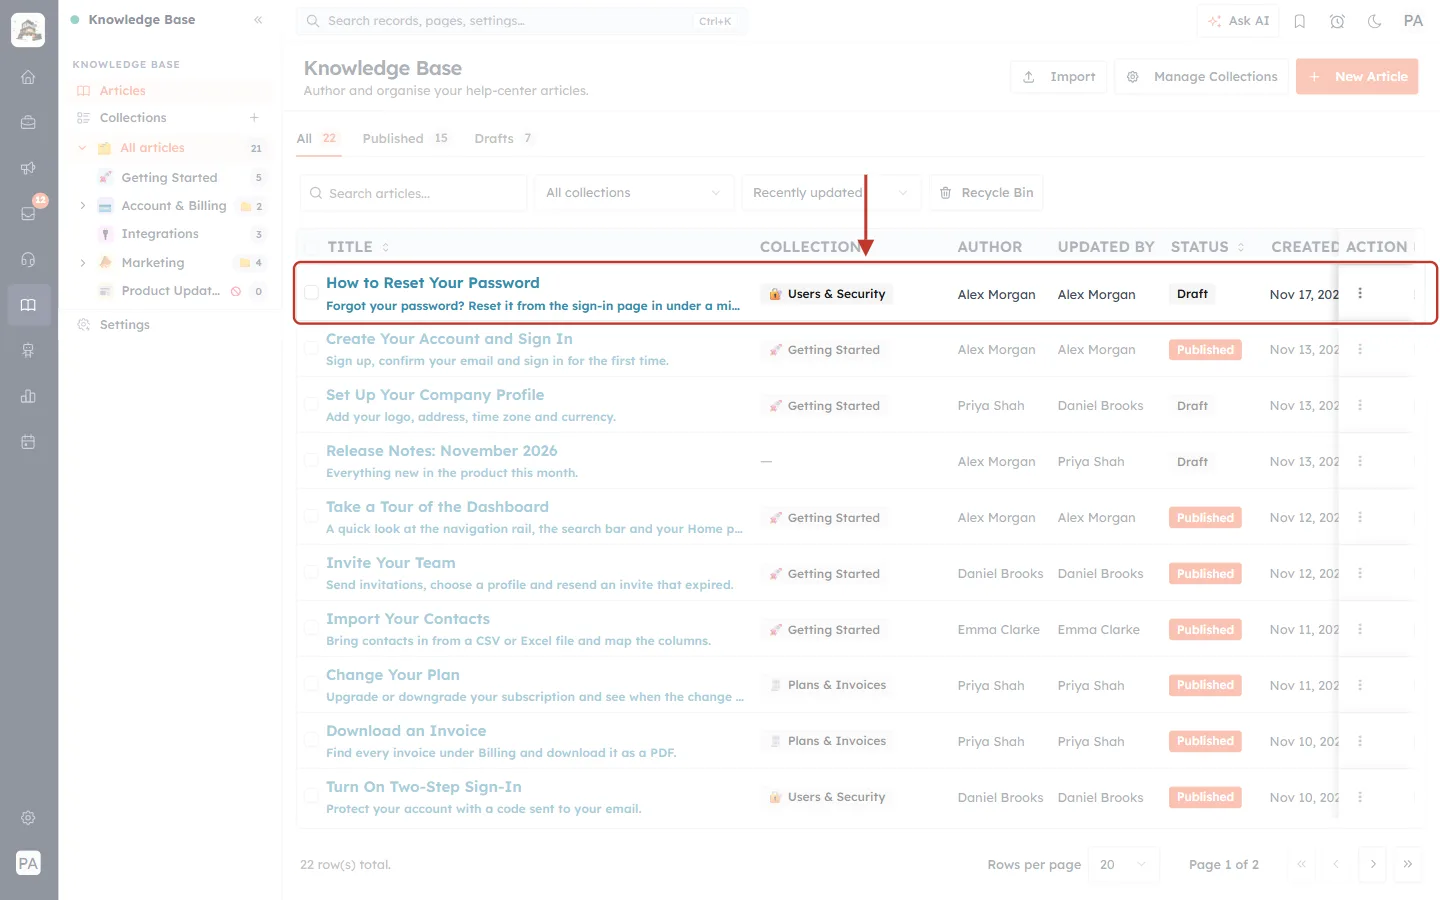
What this screenshot shows. The Articles page with the new article ringed in the first row.
TITLE: How to Reset Your Password, with its excerpt underneath.
COLLECTION: 🔐 Users & Security.
AUTHOR and UPDATED BY: your name (here Alex Morgan).
STATUS: Draft (grey). CREATED: today’s date.
The tabs at the top count it too: All 22 and Drafts 7 (one more than before).
The list is sorted by Recently updated, so the article you just saved comes first.
✅
Want to check or change the draft? Click its title (or ⋮ → Edit) to open it again. The page is now called Edit: How to Reset Your Password and the save button reads Save Changes.
Step 18: Publish the article from the list#
When the article is ready, publish it. The quickest way is from the list: click the ⋮ button in the article’s ACTION column.
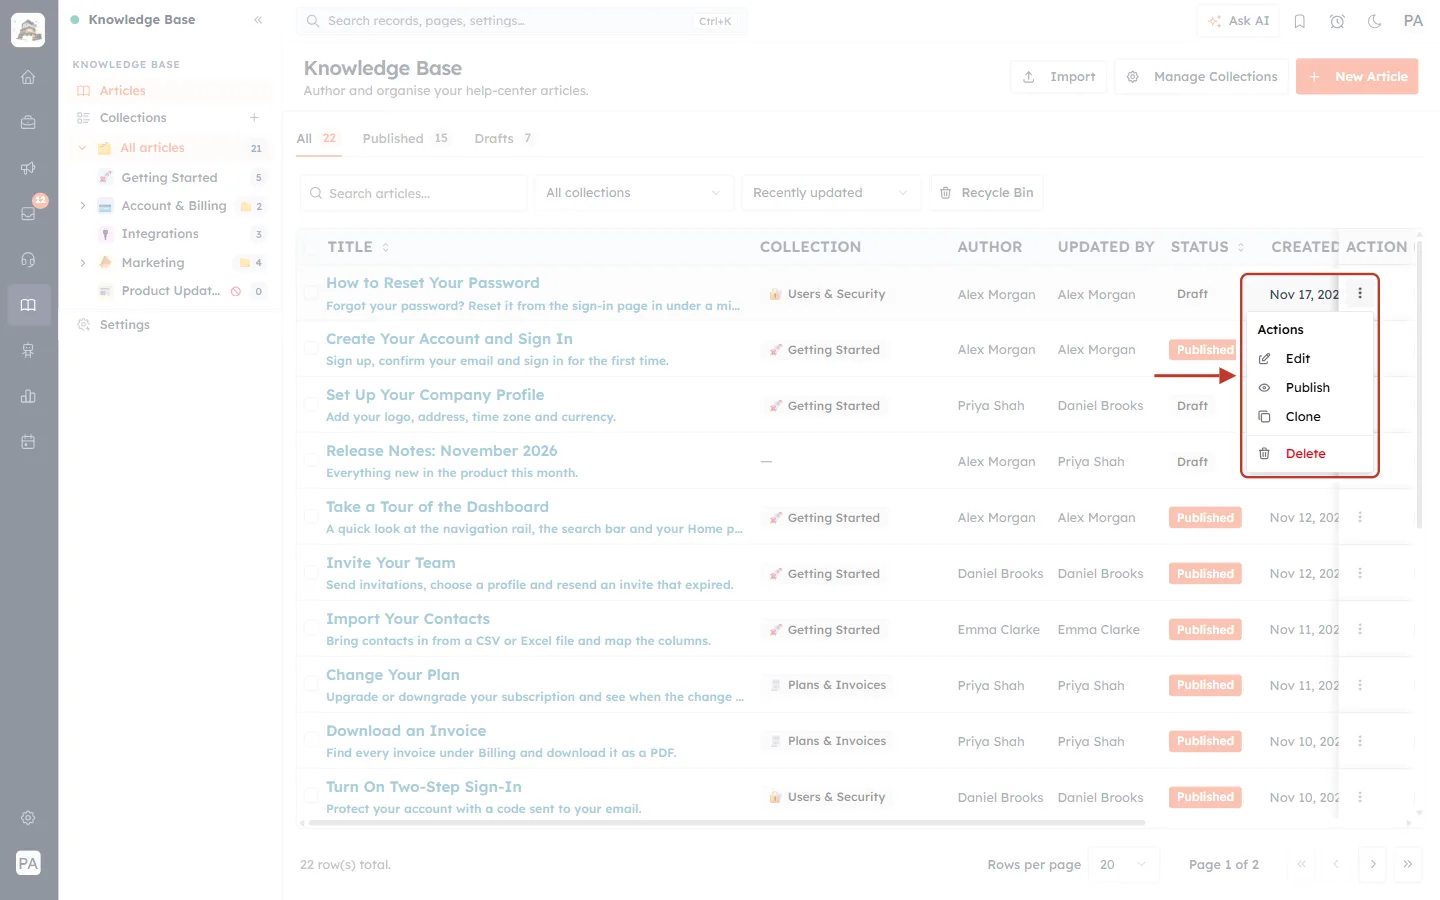
What this screenshot shows. The ⋮ menu of the draft article, ringed.
Edit: opens the article form so you can change it.
Publish: makes the article live on your help center straight away.
Clone: makes a copy of the article as a new draft.
Delete (red): moves the article to the Recycle Bin, where you can restore it later.
A draft has no View article item, because it is not on the help center yet.
Click Publish. A message confirms “Article published”, and the status changes:
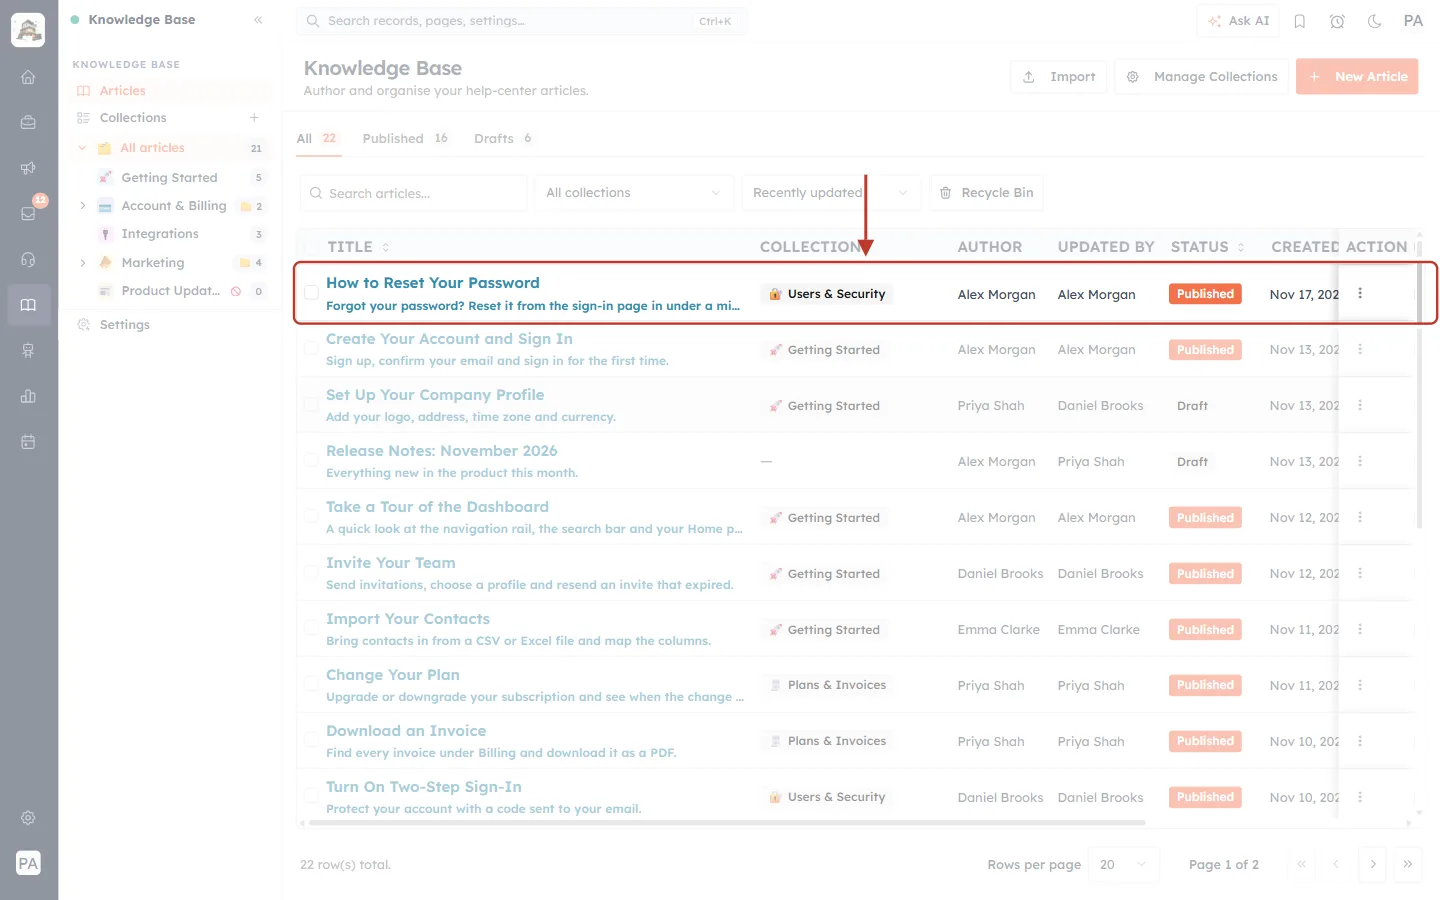
What this screenshot shows. The same row, ringed, after publishing.
STATUS is now Published in orange.
The tabs update: Published 16 (one more) and Drafts 6 (one fewer).
The article is now on your help center, in the Users & Security collection, and customers can find it in search.
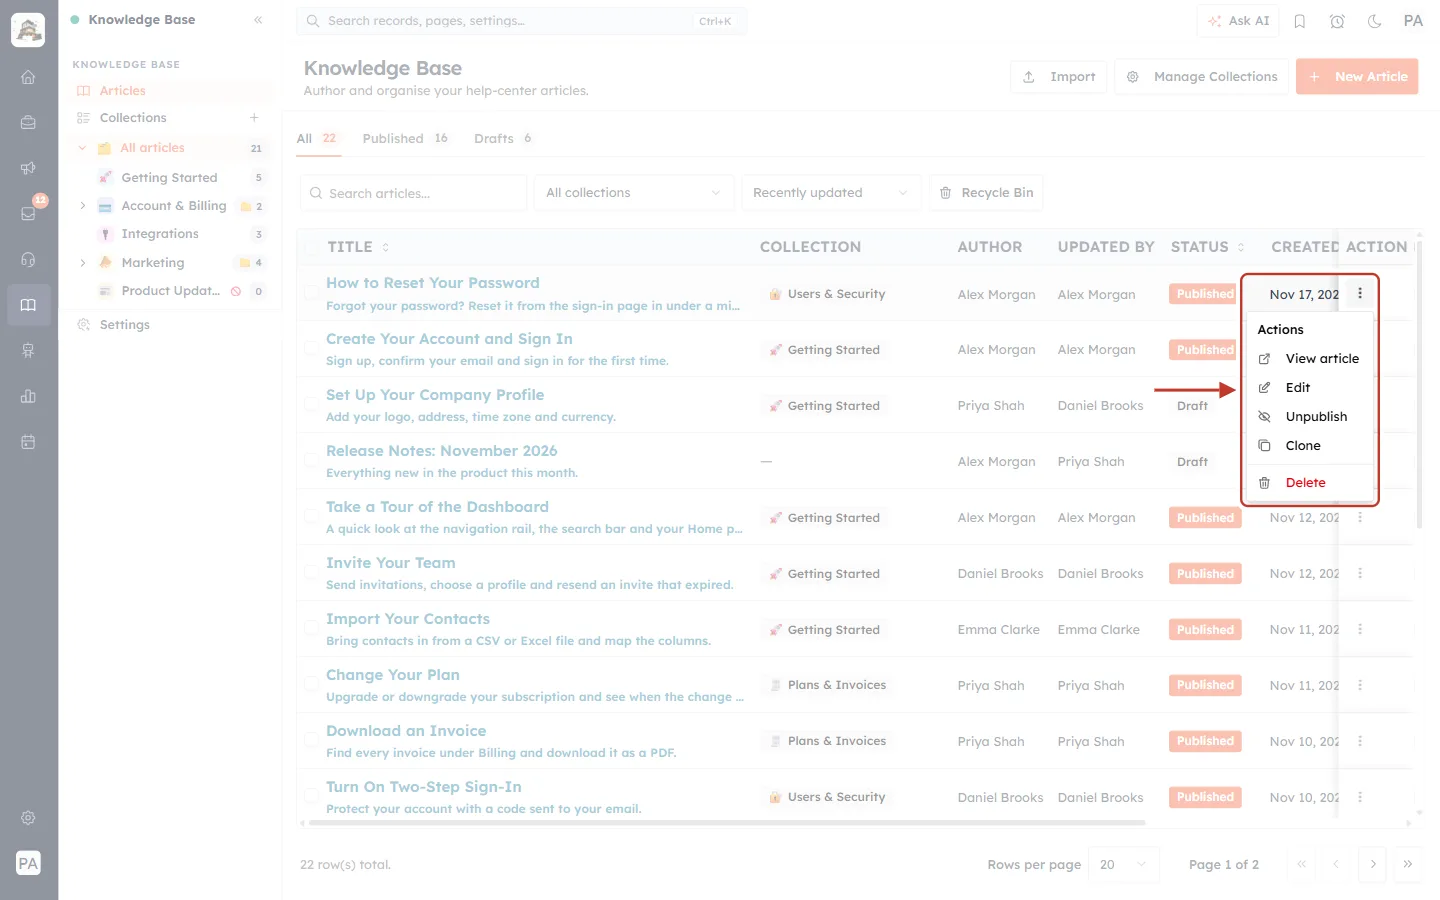
What this screenshot shows. The ⋮ menu of the now-published article, ringed.
View article is now at the top: it opens the article on your help center so you can check it (Step 20).
Unpublish replaces Publish. It turns the article back into a draft and removes it from the help center at once (“Article unpublished”).
Edit, Clone and Delete work as before.
Step 19: Or publish from the article form#
You can also publish while you edit. Open the article (click its title, or ⋮ → Edit), and in Article Details click Status:
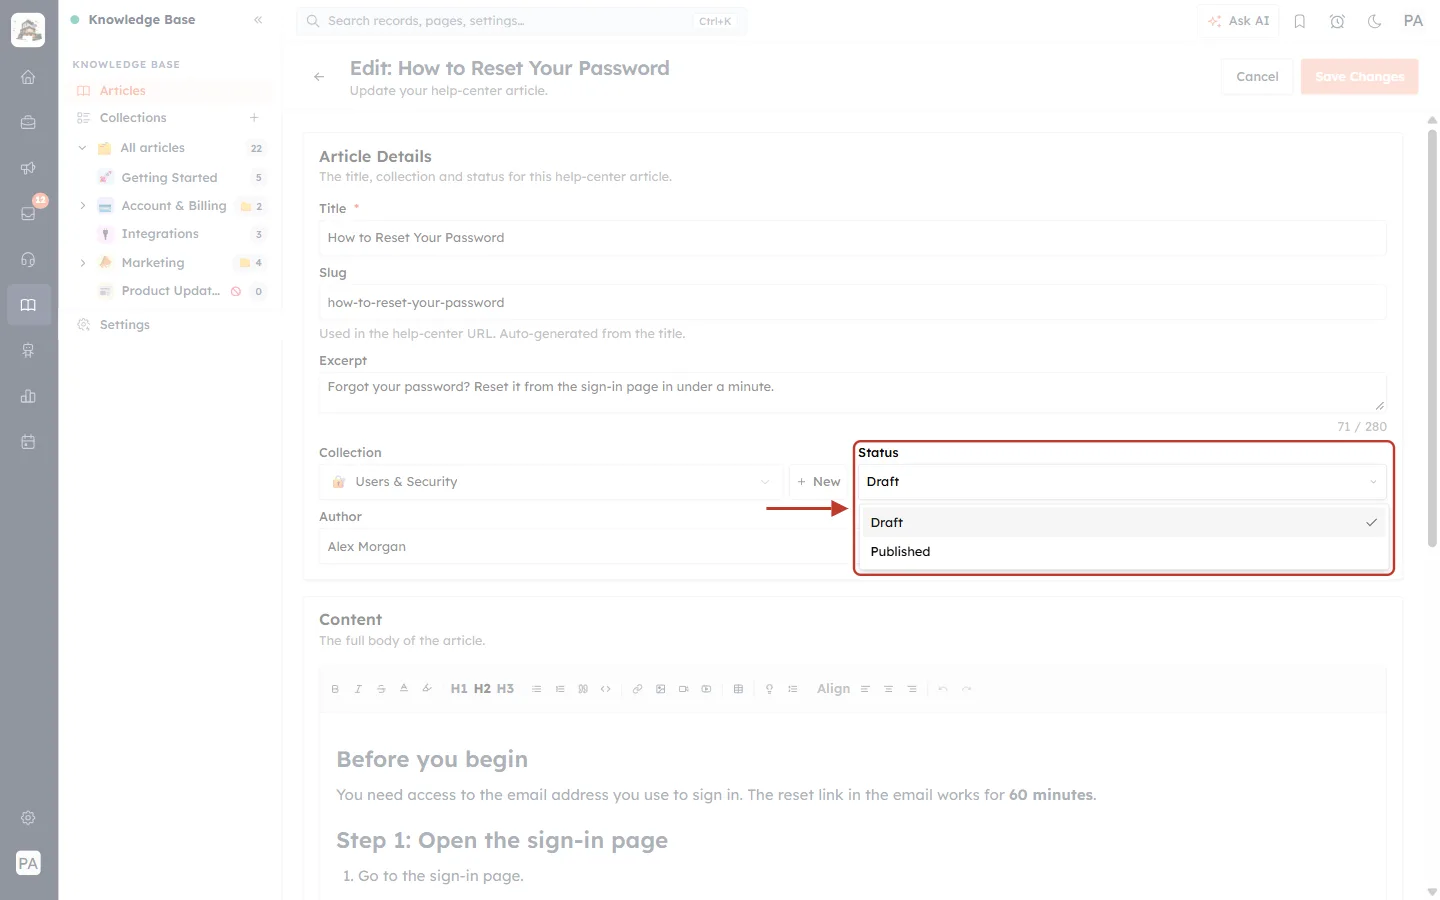
What this screenshot shows. The Status field on the Edit page, ringed, with its list open.
The page title is now Edit: How to Reset Your Password, and all the fields show what you saved.
The list shows Draft (ticked, the current status) and Published. Click Published.
The Save Changes button at the top stays pale until you change something.
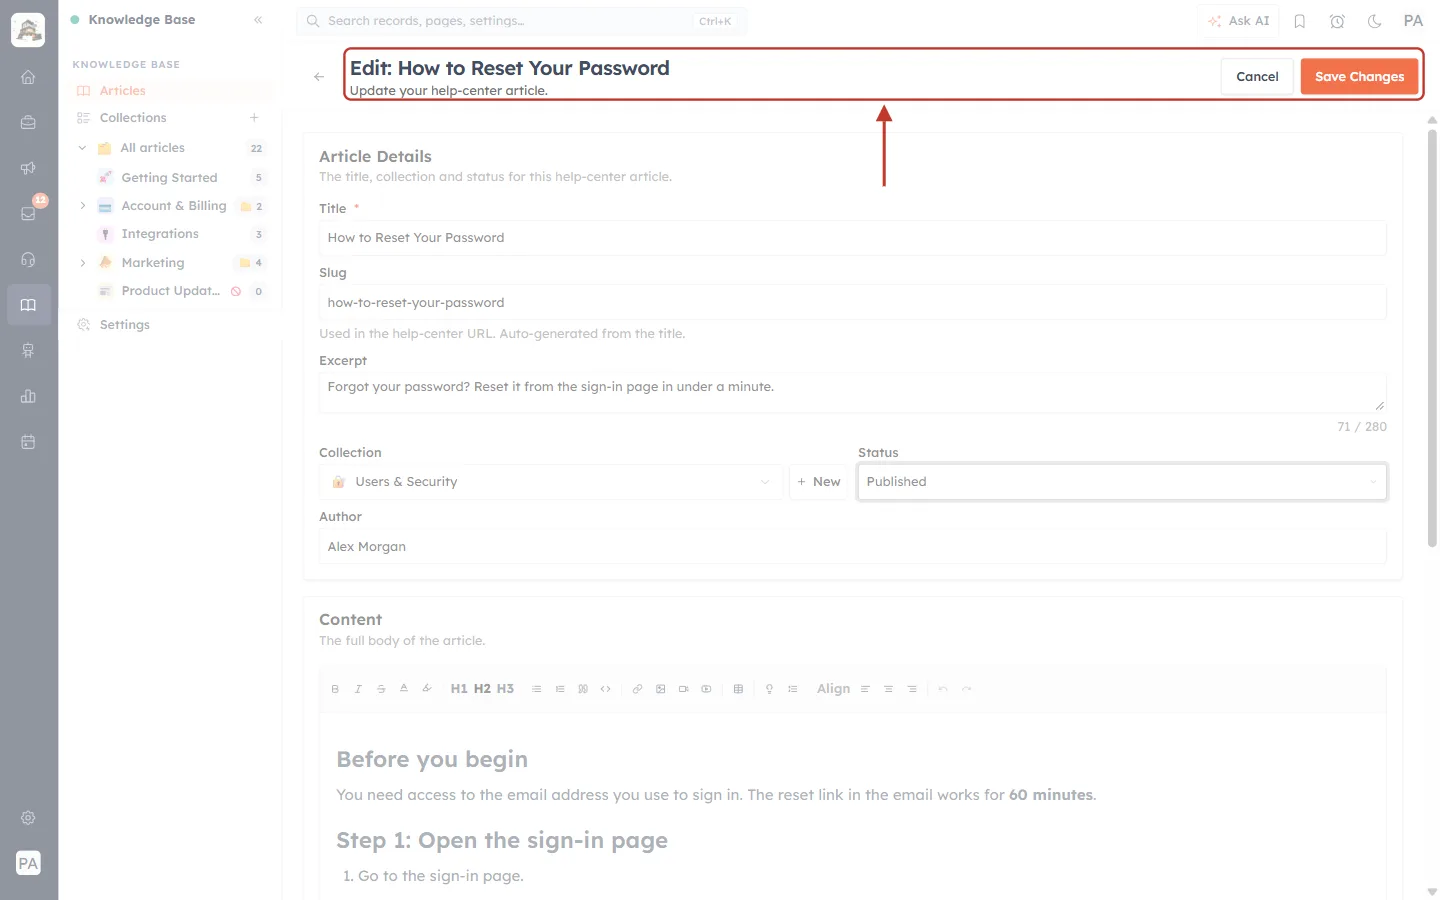
What this screenshot shows. The top of the Edit page, ringed, after choosing Published.
Edit: How to Reset Your Password — “Update your help-center article.”
Save Changes is now active (bright orange). Click it to save, and the article goes live.
Cancel leaves without saving your changes.
You can also choose Published already in Step 6 when you create an article. It then goes live as soon as you click Create Article. We recommend saving as a draft first and checking it.
⚠️
A published article is only visible to customers when its collection is published and your help center is switched on (Knowledge Base → Settings → Publish → Make my help center public). If either is off, the article stays hidden even though its status says Published.
Step 20: Check the article on your help center#
In the article list, open ⋮ → View article. Your help center opens on the article’s page, exactly as customers see it. The screenshots below show an article page on a sample help center.
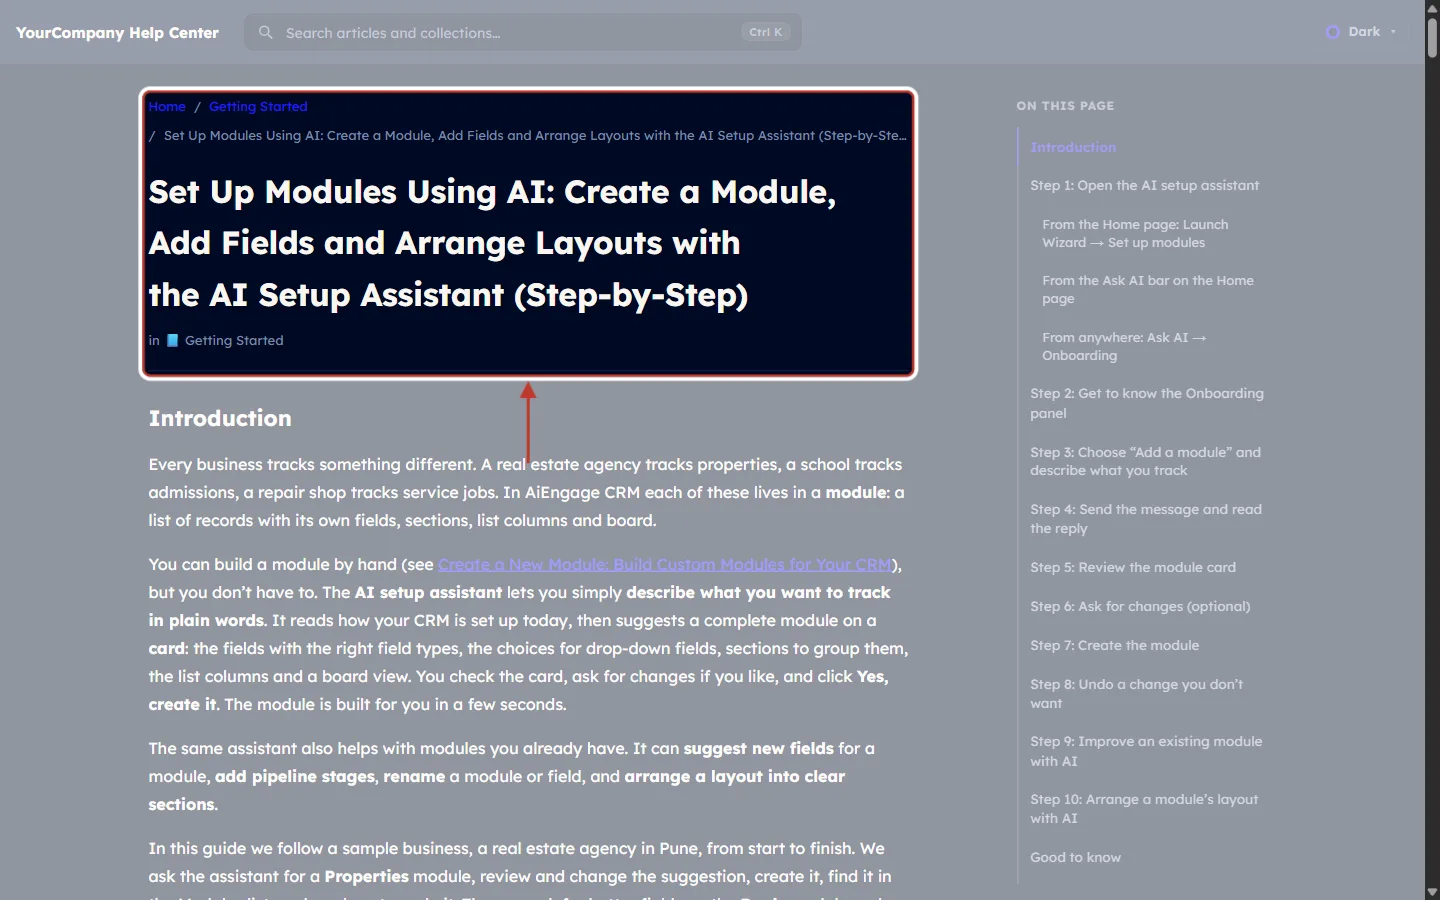
What this screenshot shows. The top of an article page, ringed.
Breadcrumb: Home / collection / article title, so customers always know where they are.
Title in large text, and the collection it belongs to underneath, which links back to the collection page.
Your content starts below, with the headings, lists, links, images and callouts you added in the editor.
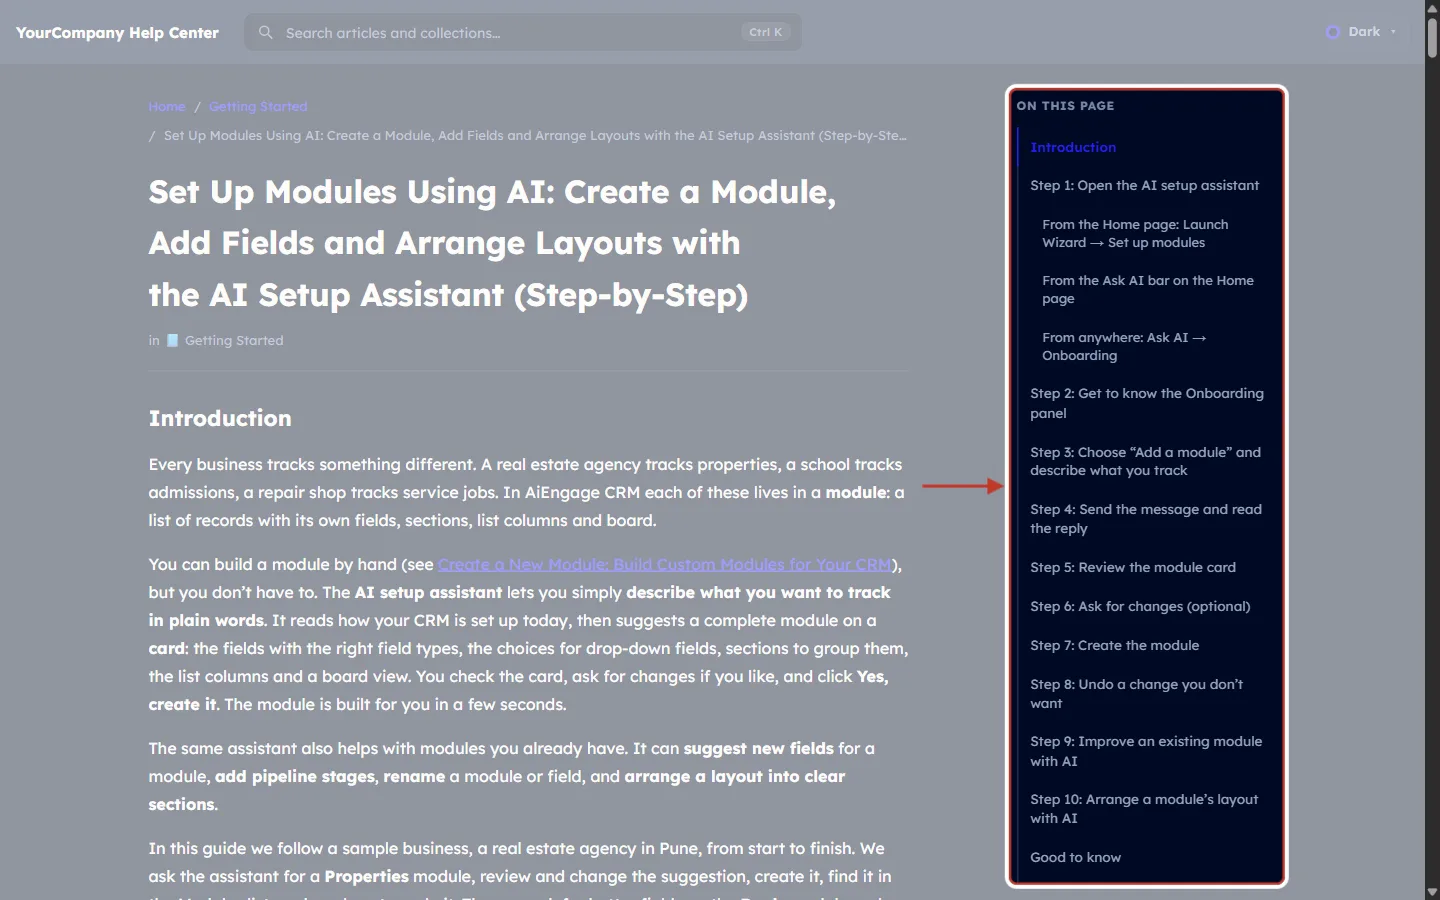
What this screenshot shows. The ON THIS PAGE outline on the right, ringed.
Built automatically from the H2 and H3 headings you used in Step 9. H3 headings are indented under their H2.
Customers click a heading to jump straight to that part of the article. The section being read is highlighted.
This is why one H2 per step works so well: the outline becomes a clickable list of steps.
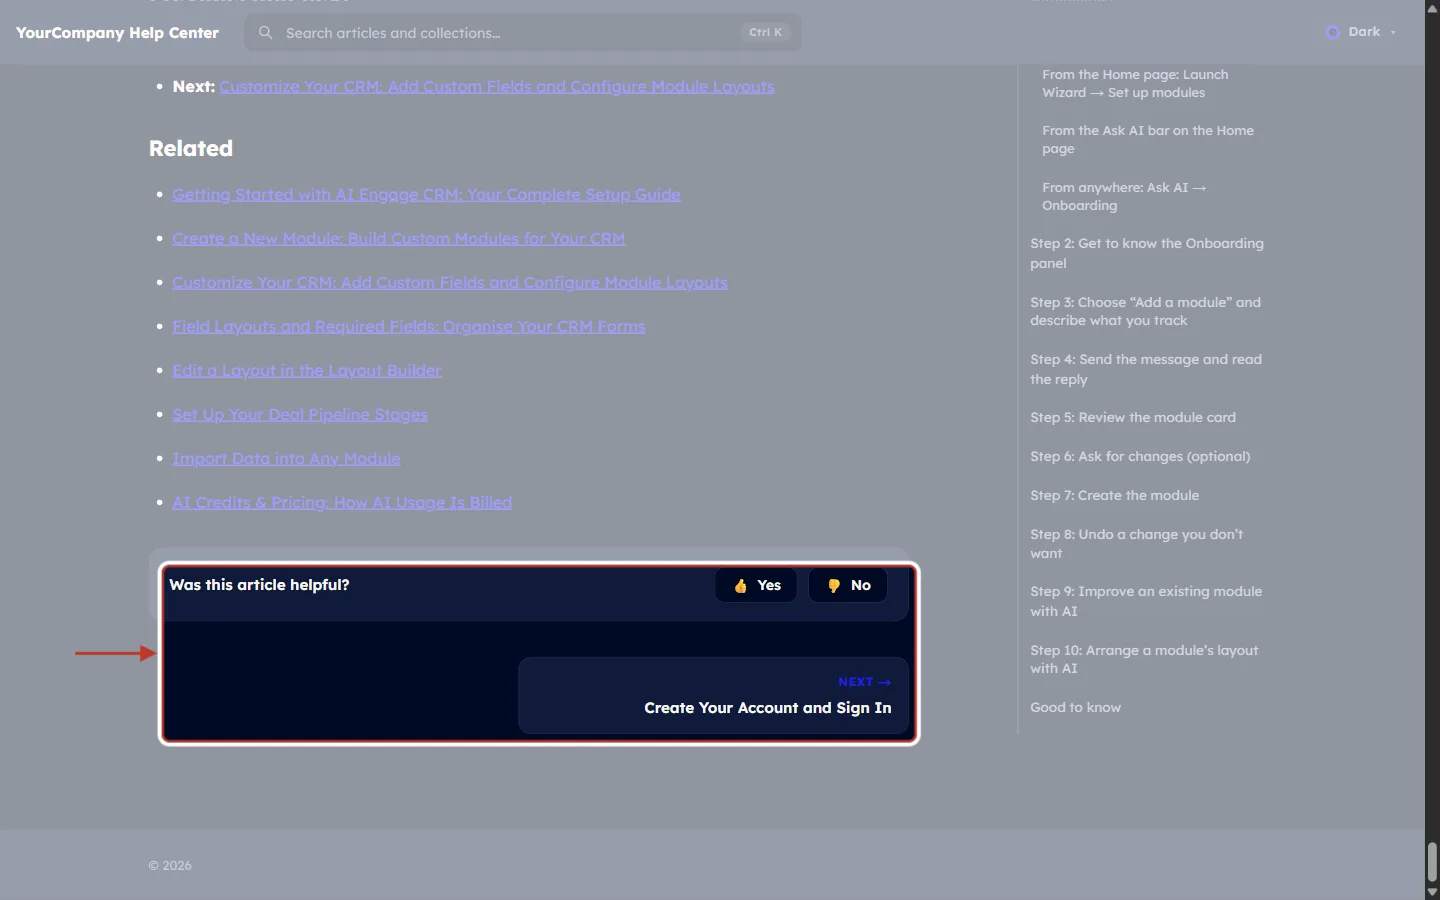
What this screenshot shows. The end of an article page, ringed.
Was this article helpful? with Yes and No. Every vote is counted in the FEEDBACK column of your article list.
The NEXT → card (and a PREVIOUS card on the left when there is one) come from the Article navigation you set in Step 15.
If you turned on the article call-to-action in Settings, its banner appears beneath every article as well.
Read the article from top to bottom on the help center. If you spot something to fix, go back to the CRM, click the title to edit it, change it and click Save Changes. A published article updates on the help center as soon as you save.
Tips for a great help article#
One article, one task. “How to reset your password” is easier to find and follow than “Everything about your account”.
Start with the answer. Put the most common solution first; move rare cases to the end or into a collapsible section.
Use the customer’s words in the title and excerpt. That is what they type into the search box.
Show, don’t only tell. Add a screenshot for every step where the customer has to find something on screen, and always fill in the alt text.
Bold the exact names of buttons, menus and fields, written exactly as they appear on screen.
Link onwards. End with Previous / Next links or a short “Related” list so customers keep finding answers.
Keep it up to date. When your product changes, edit the article and click Save Changes. Sort the list by Most viewed to see which articles matter most.
Troubleshooting#
Create Article does nothing and “Title is required” appears#
Why it happens: the Title box is empty. How to fix it: scroll to the top of the form, type a title and click Create Article again.
I published the article but customers can’t see it#
Check the article’s STATUS in the list. It must say Published.
Check its COLLECTION. If it shows a dash (—), edit the article and choose a collection.
Open Collections and check that the collection itself is Published, not Draft.
Open Settings → Publish and check that Make my help center public is on.
Refresh the help-center page in your browser.
A link in my article goes to the wrong page or doesn’t open#
Why it happens: the address was typed wrongly or is missing https://. How to fix it: edit the article, click inside the link, click the chain icon, paste the full address (starting with https://) and click Apply, then Save Changes.
My image doesn’t appear#
Why it happens: the image address in FROM URL is not a direct link to an image file, or the image is private. How to fix it: upload the image with FROM DEVICE → Choose file instead.
The Previous / Next links are not the ones I expected#
Why it happens: in Automatic mode they follow the article order in the collection. How to fix it: open the collection in the side panel and drag the articles into the right order, or switch the article’s navigation to Manual and pick the articles yourself.
Old links to my article stopped working#
Why it happens: the article’s Slug was changed, so its address changed. How to fix it: change the slug back, or update the old links with the new address.
Frequently asked questions#
Can I save an unfinished article and come back later?
Yes. Keep the status on Draft and click Create Article (or Save Changes). Find it later on the Drafts tab.
Do customers see my changes straight away?
For a published article, yes: the help center updates as soon as you click Save Changes. Changes to a draft stay hidden until you publish it.
How do I take an article offline for a while?
Open ⋮ → Unpublish. It becomes a draft again and disappears from the help center. Publish it again whenever you like.
Can I move an article to a different collection?
Yes. Edit the article, choose another collection in Collection and click Save Changes.
Can I start from an existing article?
Yes. Use ⋮ → Clone. You get a copy as a new draft that you can rename and change.
What if I delete an article by mistake?
Deleted articles go to the Recycle Bin on the Articles page. Open it and restore the article.
Previous and next#
Related#
Was this article helpful?
Ready to implement this?
OpenAI Engage and apply what you just learned to your own workspace.
Open AI Engage CRM