Loading…


KnowledgeBase
Brand and Publish Your Help Center: Logo, Colours, Hero, Footer, Custom Domain and Go Live (Step-by-Step)
Introduction#
Your Knowledge Base articles are published as a public help center: a website your customers can open and search. Before you share it, make it look like your business and decide where it lives. All of this happens on one page, Help Center Settings.
In this guide we set up the help center of a sample business, YourCompany: we choose its address and switch it on, add the brand name, logo, colour and theme, write the hero text, footer and call-to-action, check the search-engine settings, connect our own domain help.yourcompany.com, save, and look at the result.
ℹ️
The screenshots use sample settings for a business called YourCompany. Your page shows your own help center’s settings.
Tab | What you set there | Steps |
|---|---|---|
Preview | The help center’s address (handle), the public on/off switch and a private preview | 2–4 |
Branding | Brand name, tagline, logo, accent colour, theme, hero, footer and the article call-to-action | 5–11 |
SEO | Favicon, meta description and social share image for the whole help center | 12 |
Custom domain | Serve the help center on your own address, such as help.yourcompany.com | 13–15 |
Before you begin#
Permission: you need the Knowledge Base permission (admins always have it), set in Setup → Profiles → Feature Permissions → Marketing.
Have your brand assets ready: your logo (PNG, JPG or SVG; a wide logo fits best), your brand colour as a hex code (for example #F3724C), a small square icon for the browser tab, and optionally a 1200 × 630 picture for shared links.
Publish some articles first. Customers only see published articles in published collections. See Create and Publish a Help-Center Article.
For your own domain you need access to your domain’s DNS settings (for example at GoDaddy, Cloudflare or Namecheap), or someone who has it.
Step 1: Open Help Center Settings#
In the Knowledge Base side panel, click Settings at the bottom.
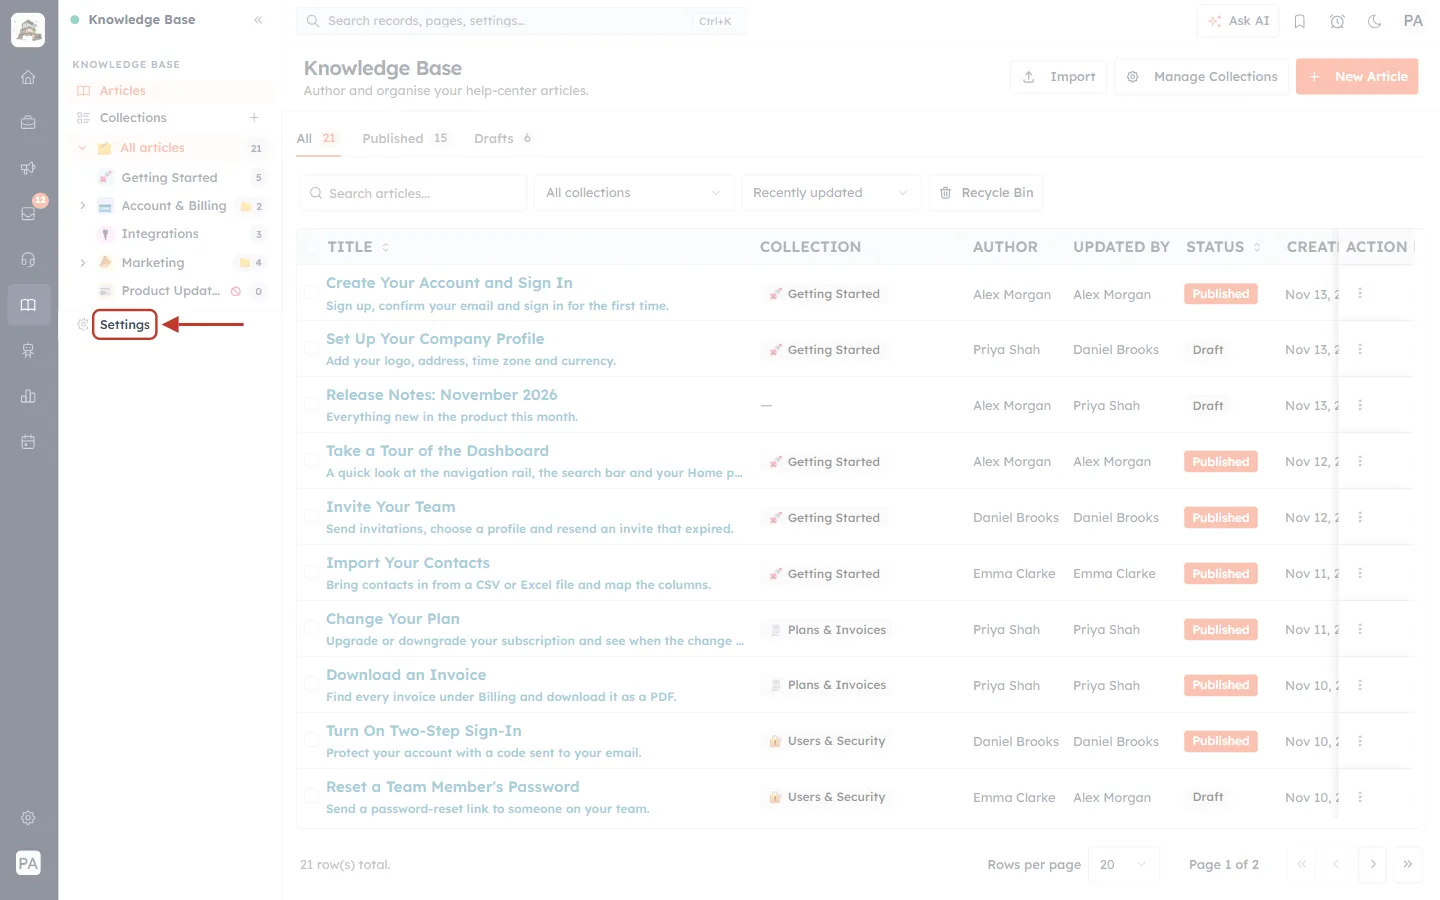
What this screenshot shows. Settings, ringed, at the bottom of the Knowledge Base side panel.
The side panel holds Articles, Collections, the collection tree and Settings.
Settings controls the whole help center; individual articles are set up in the article form instead.
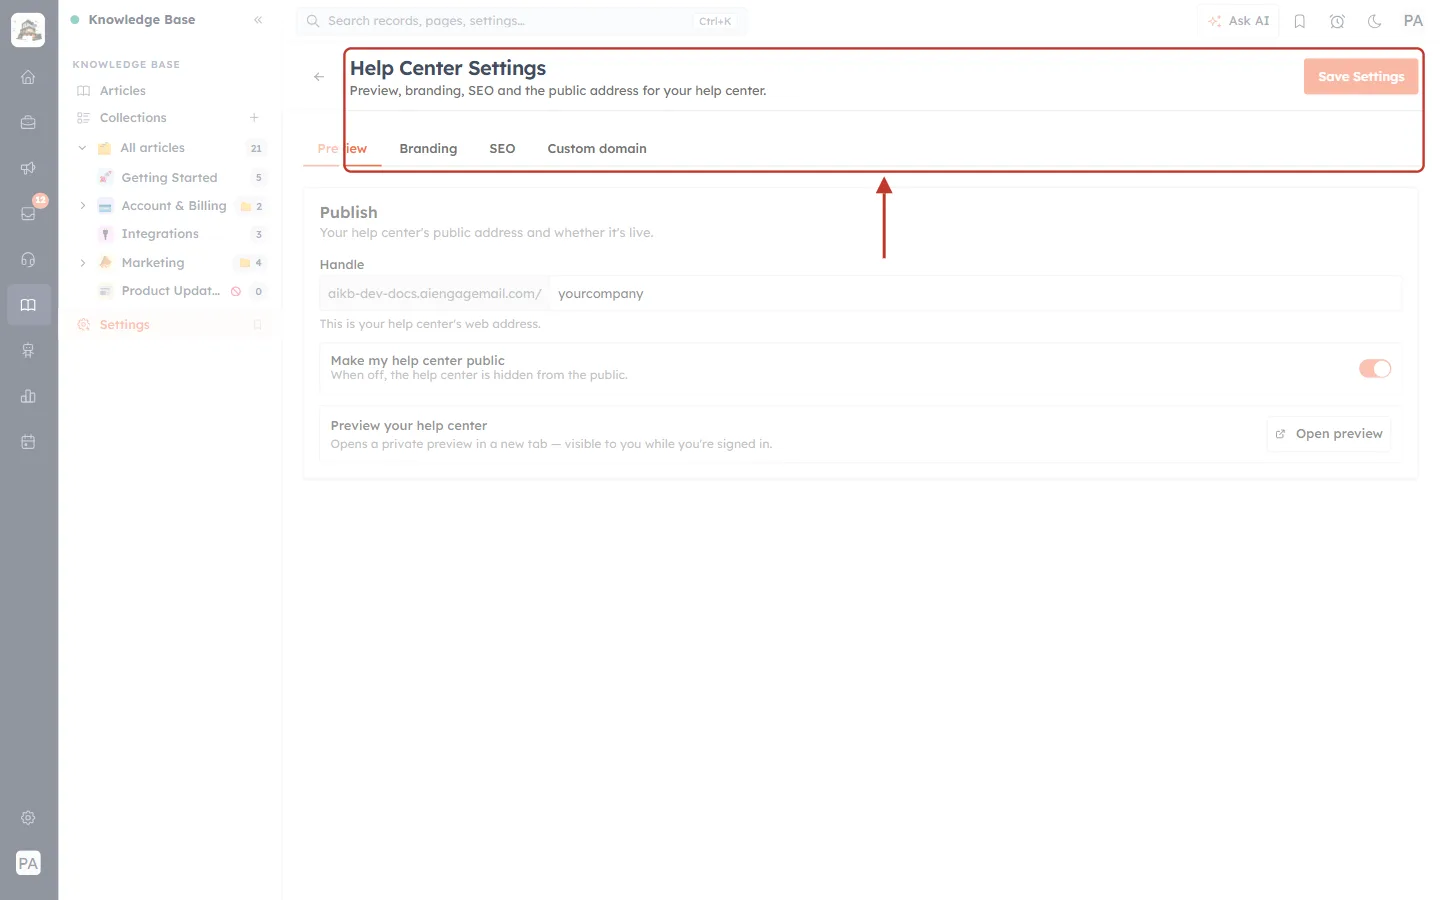
What this screenshot shows. The top of Help Center Settings, ringed.
Help Center Settings — “Preview, branding, SEO and the public address for your help center.” The ← arrow goes back to your articles.
The four tabs: Preview, Branding, SEO and Custom domain. The orange line marks the open tab.
Save Settings at the top right stays pale until you change something. It saves the Preview, Branding and SEO tabs together, so you can change several tabs and save once.
Part 1: Choose the address and go live (Preview tab)#
Step 2: Set your handle#
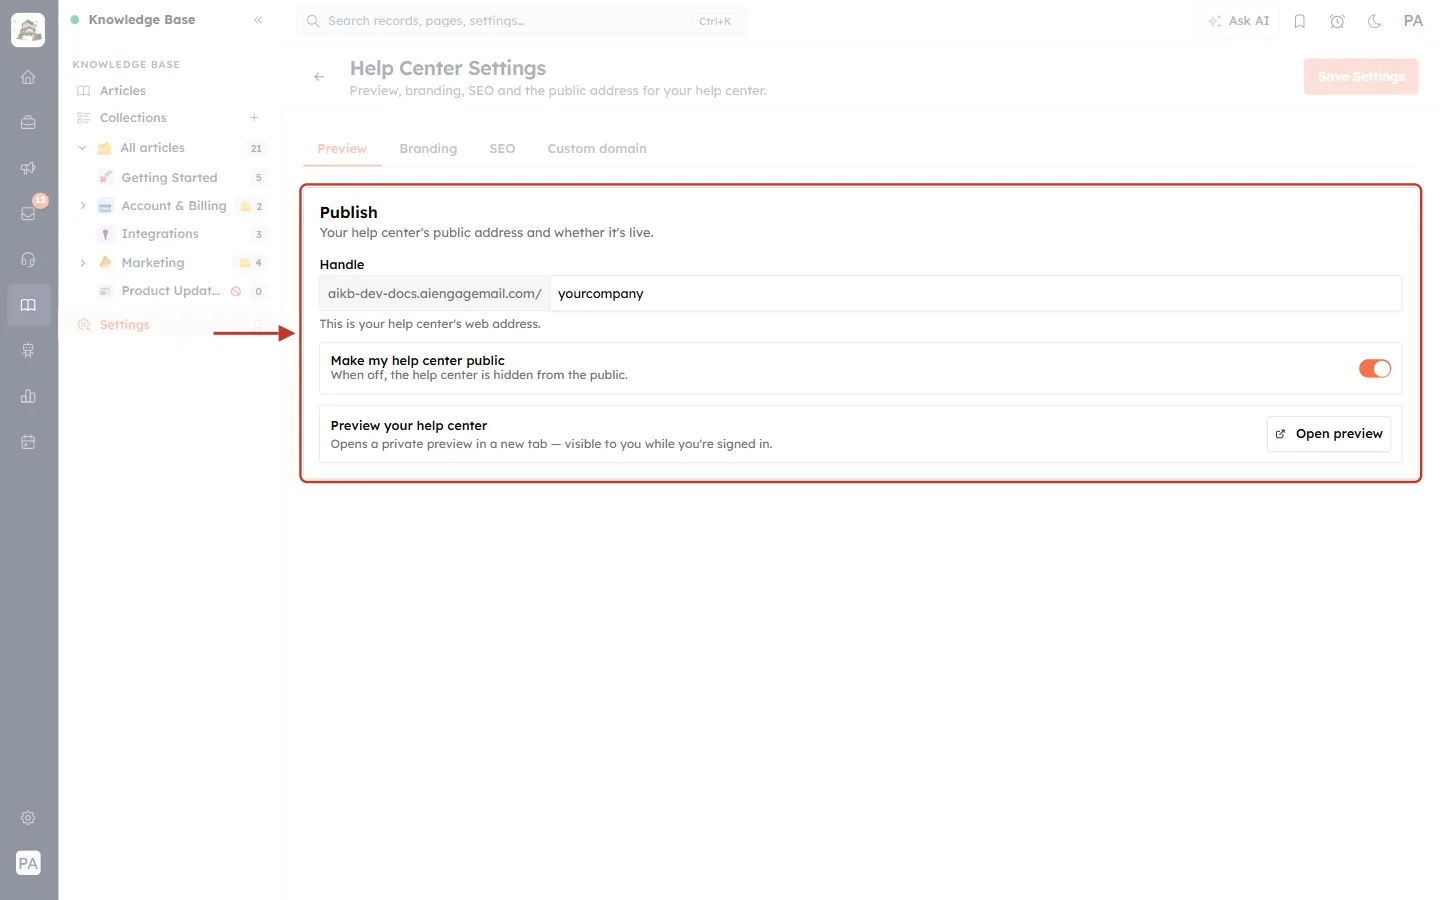
What this screenshot shows. The Publish card on the Preview tab, ringed.
Publish — “Your help center’s public address and whether it’s live.”
Handle: the last part of your help center’s built-in address.
Make my help center public: the on/off switch (Step 3).
Preview your help center with Open preview (Step 4).
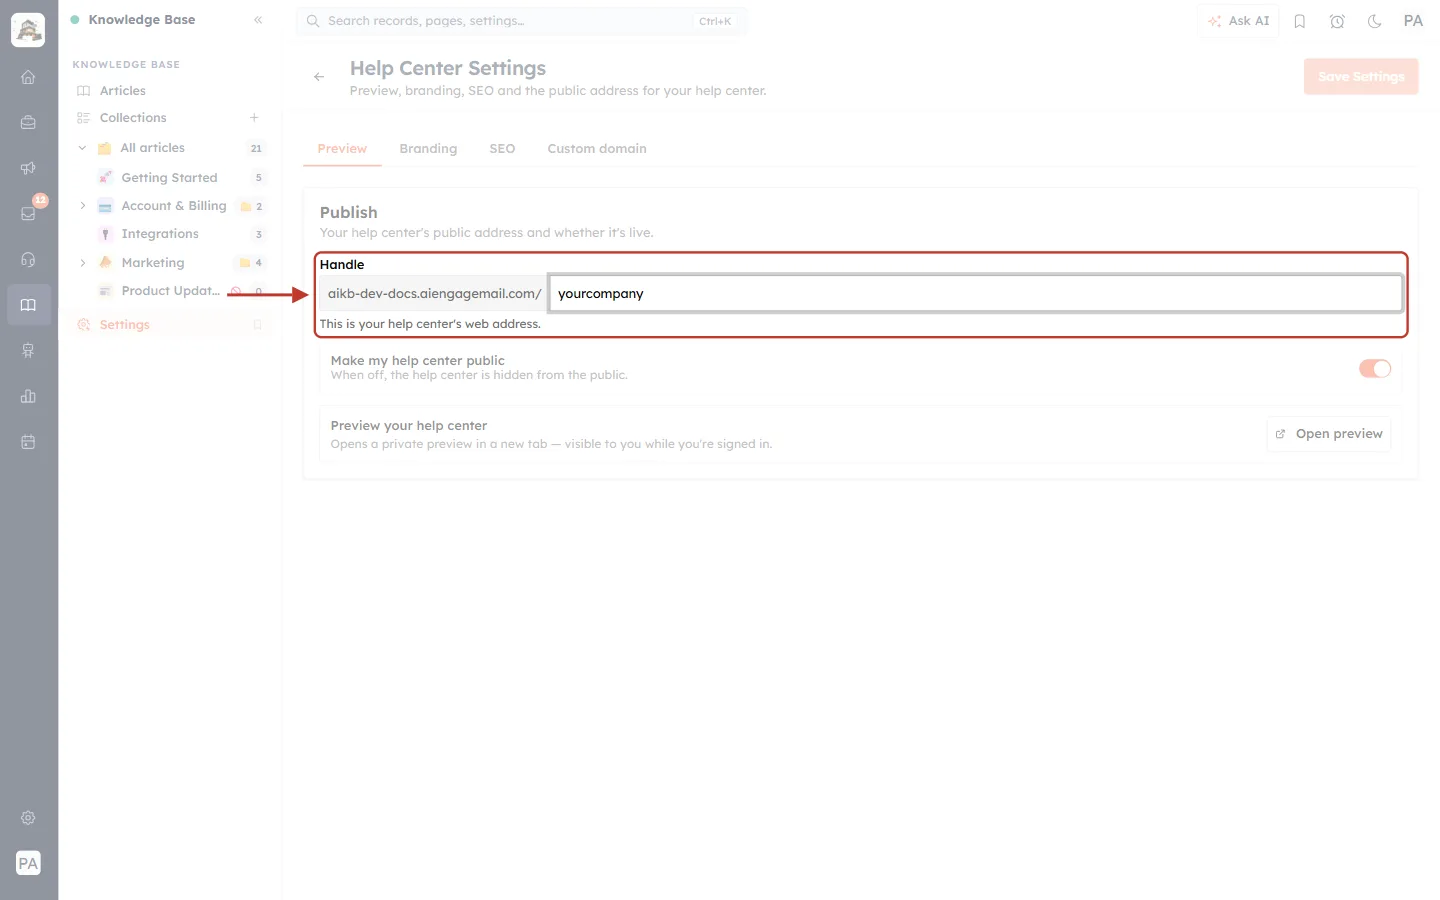
What this screenshot shows. The Handle field, ringed.
The grey part on the left is the help-center host. Your handle is added after it, so here the address is …/yourcompany.
“This is your help center’s web address.”
Use a short handle made of lowercase letters, numbers and hyphens, usually your company name, for example yourcompany or acme-support. Letters you type are turned into lowercase automatically.
⚠️
Changing the handle later changes the built-in address of every page, so links you shared before stop working. Pick it once. If you connect your own domain (Step 13), customers use that address instead.
Step 3: Switch the help center on (or off)#
Make my help center public is the master switch for the whole site.
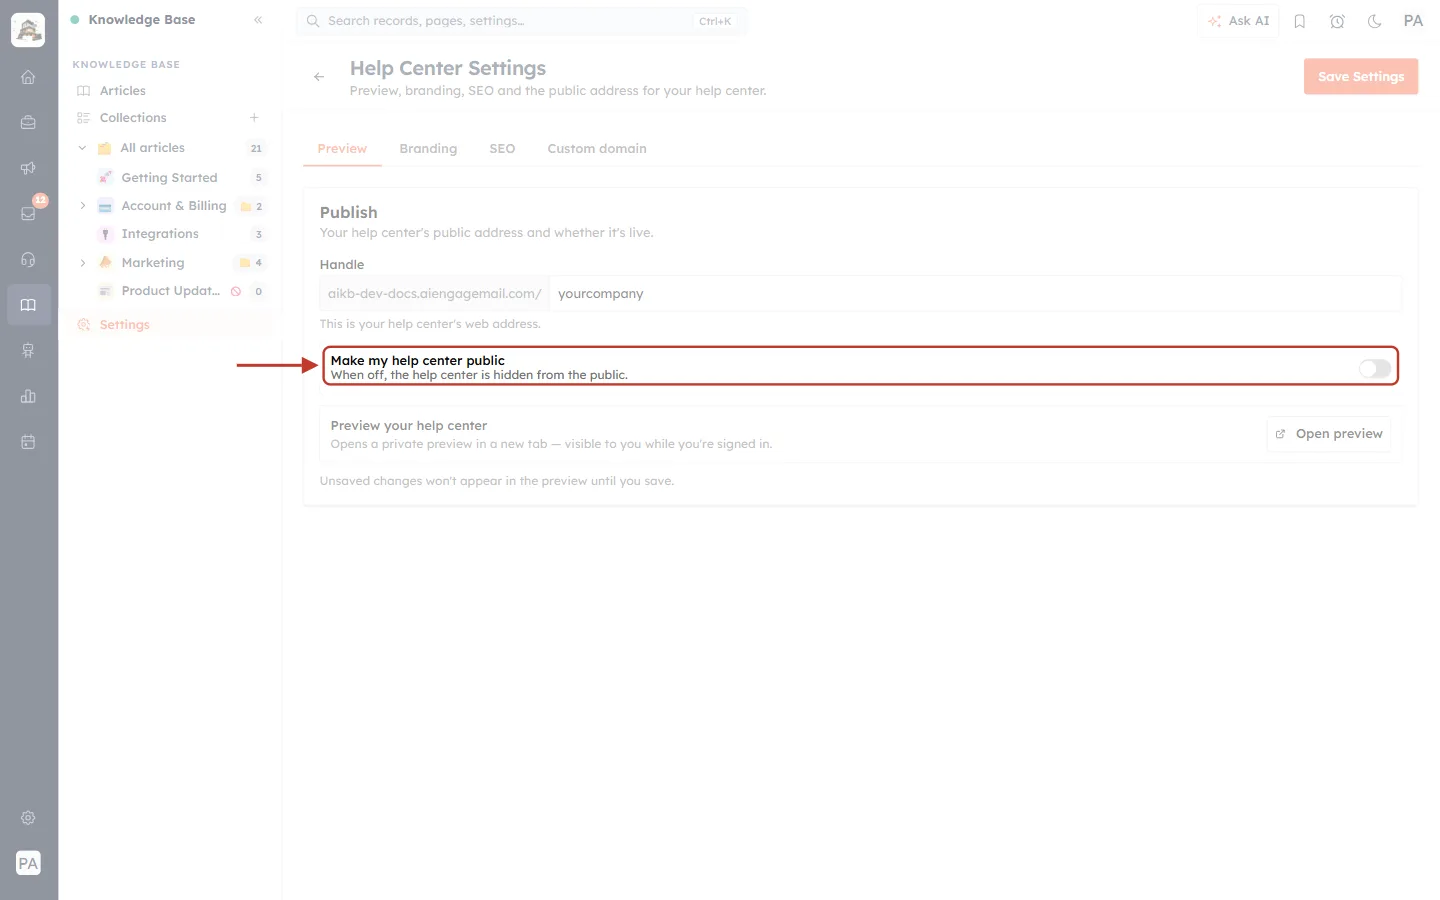
What this screenshot shows. The switch, ringed, in the off position (grey).
When it is off, “the help center is hidden from the public”. Nobody can open it, even with the address.
Keep it off while you are still setting things up.
The note under the card reads: “Unsaved changes won’t appear in the preview until you save.”
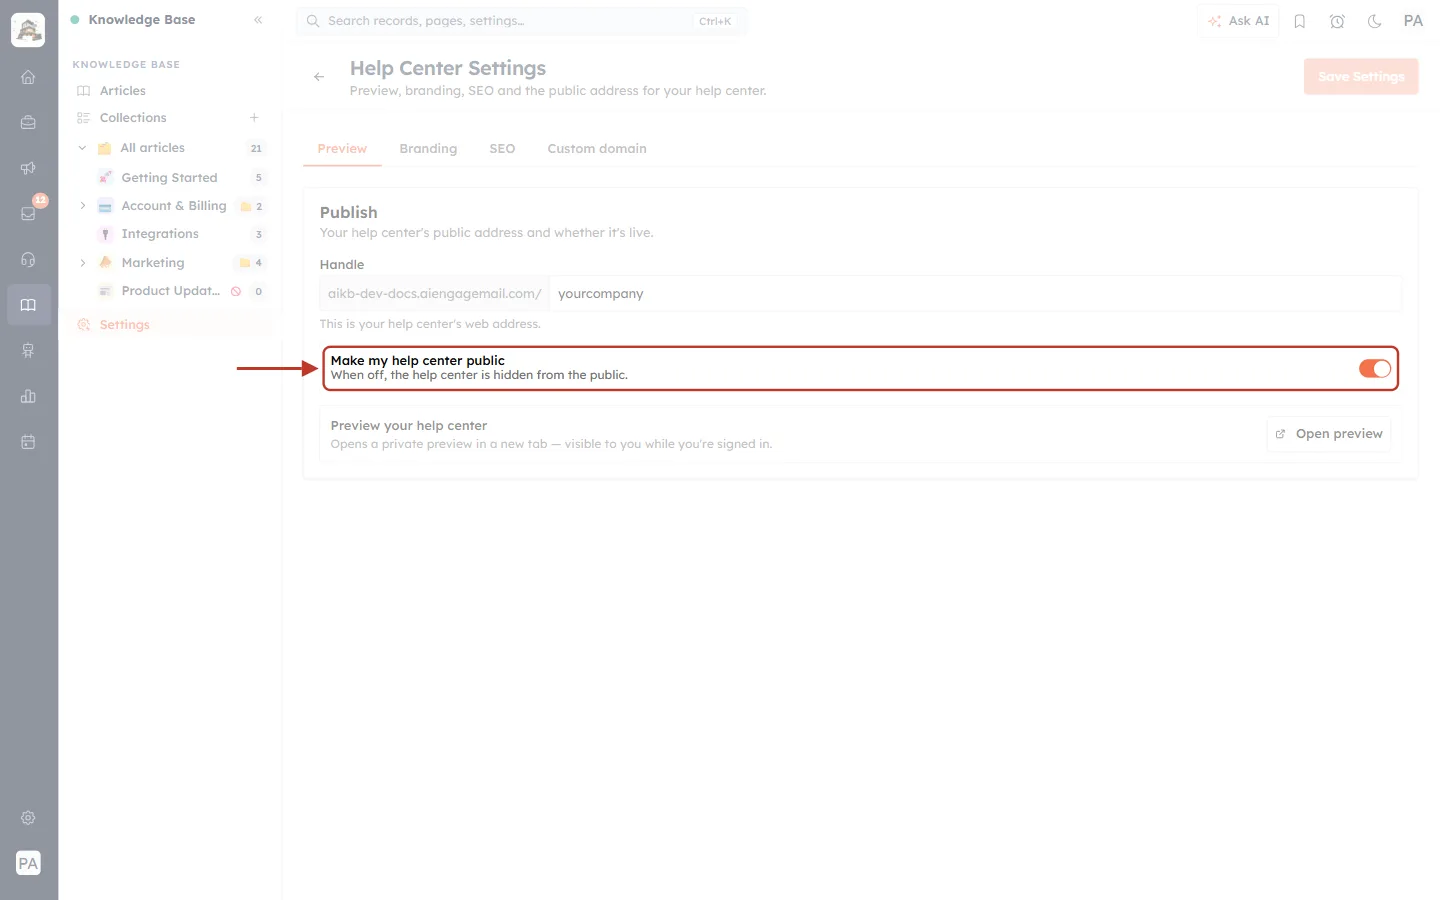
What this screenshot shows. The switch, ringed, in the on position (orange).
When it is on, anyone with the address can read your published articles and search them.
Drafts and draft collections stay hidden either way.
Click Save Settings to apply the change.
Step 4: Preview your help center privately#
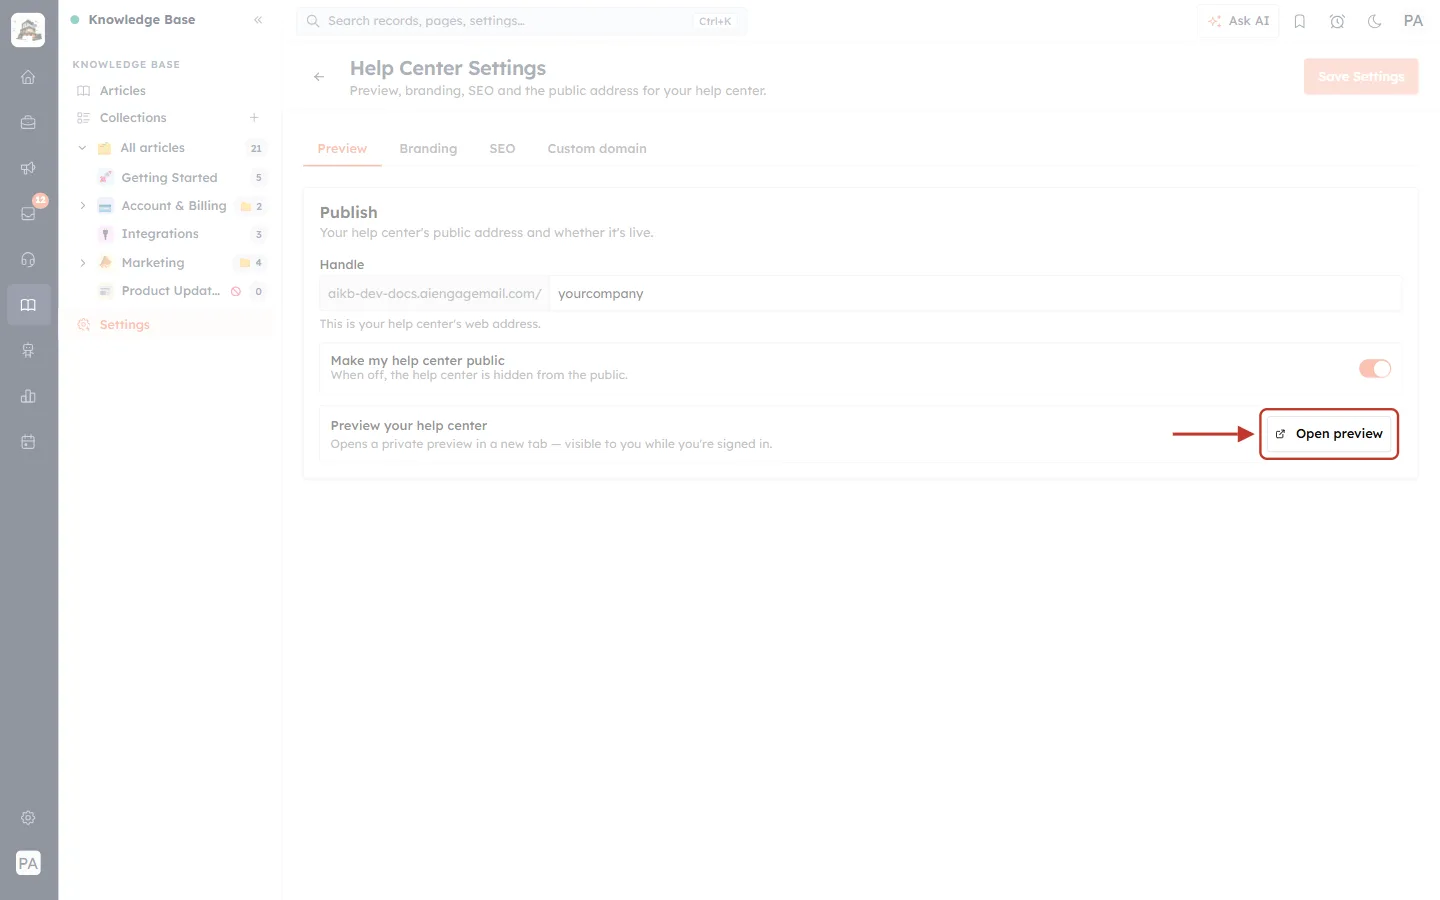
What this screenshot shows. Open preview, ringed.
“Opens a private preview in a new tab — visible to you while you’re signed in.”
Use it to check your branding before you switch the help center on, or after each change.
Save first: unsaved changes don’t appear in the preview.
Part 2: Make it look like your brand (Branding tab)#
Click the Branding tab. It has four sections: Branding, Hero, Footer and Article call-to-action.
Step 5: Brand name and tagline#
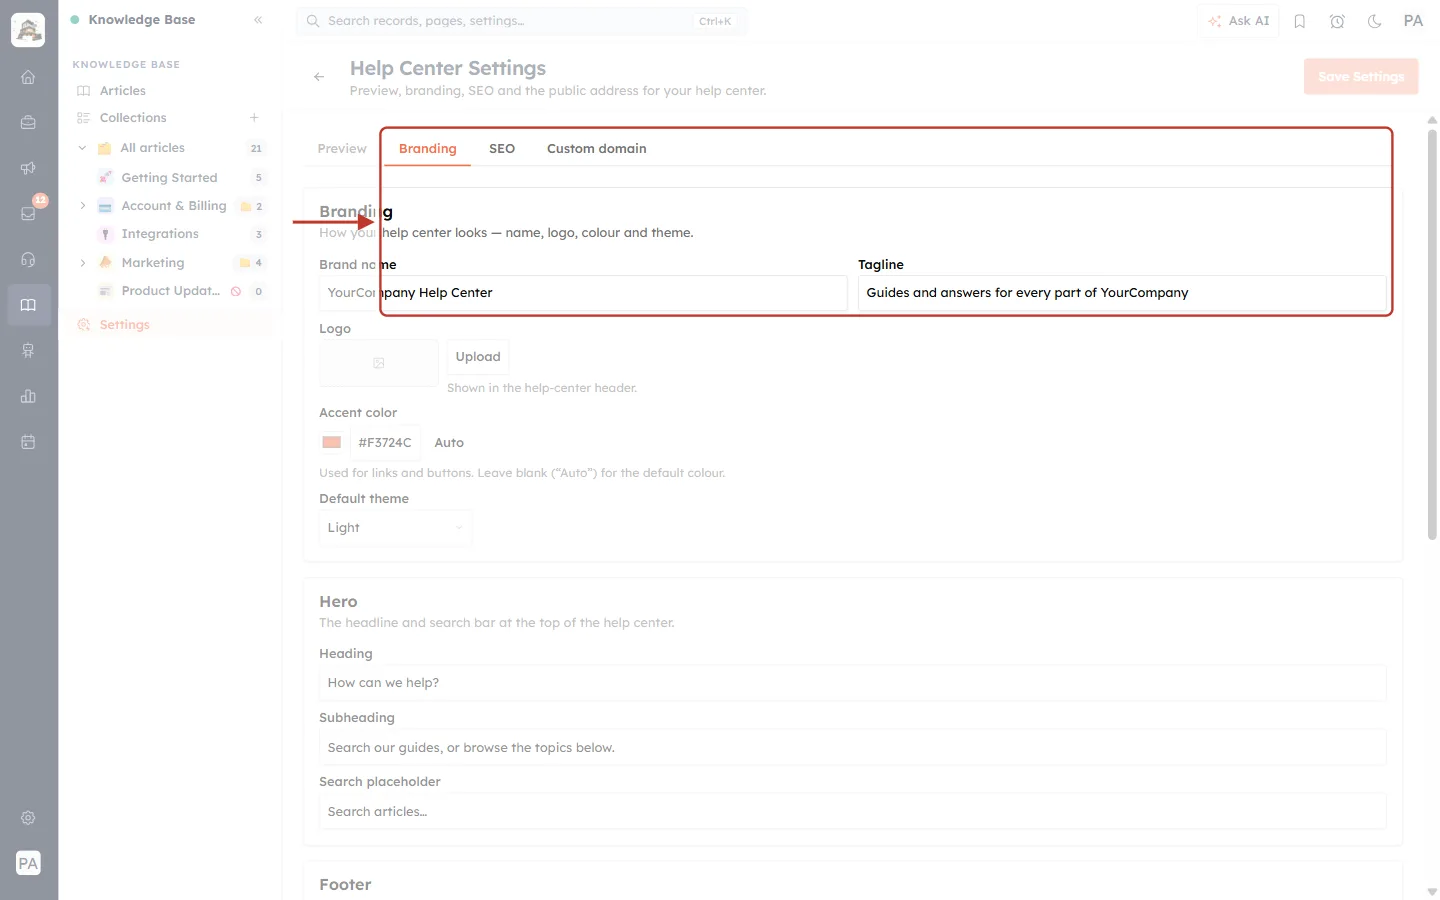
What this screenshot shows. The top of the Branding section, ringed.
Branding — “How your help center looks — name, logo, colour and theme.”
Brand name: shown at the top left of every page and in the browser tab, for example “YourCompany Help Center”.
Tagline: a short line about your help center, for example “Guides and answers for every part of YourCompany”.
Step 6: Upload your logo#
Next to Logo, click Upload and choose your logo file.
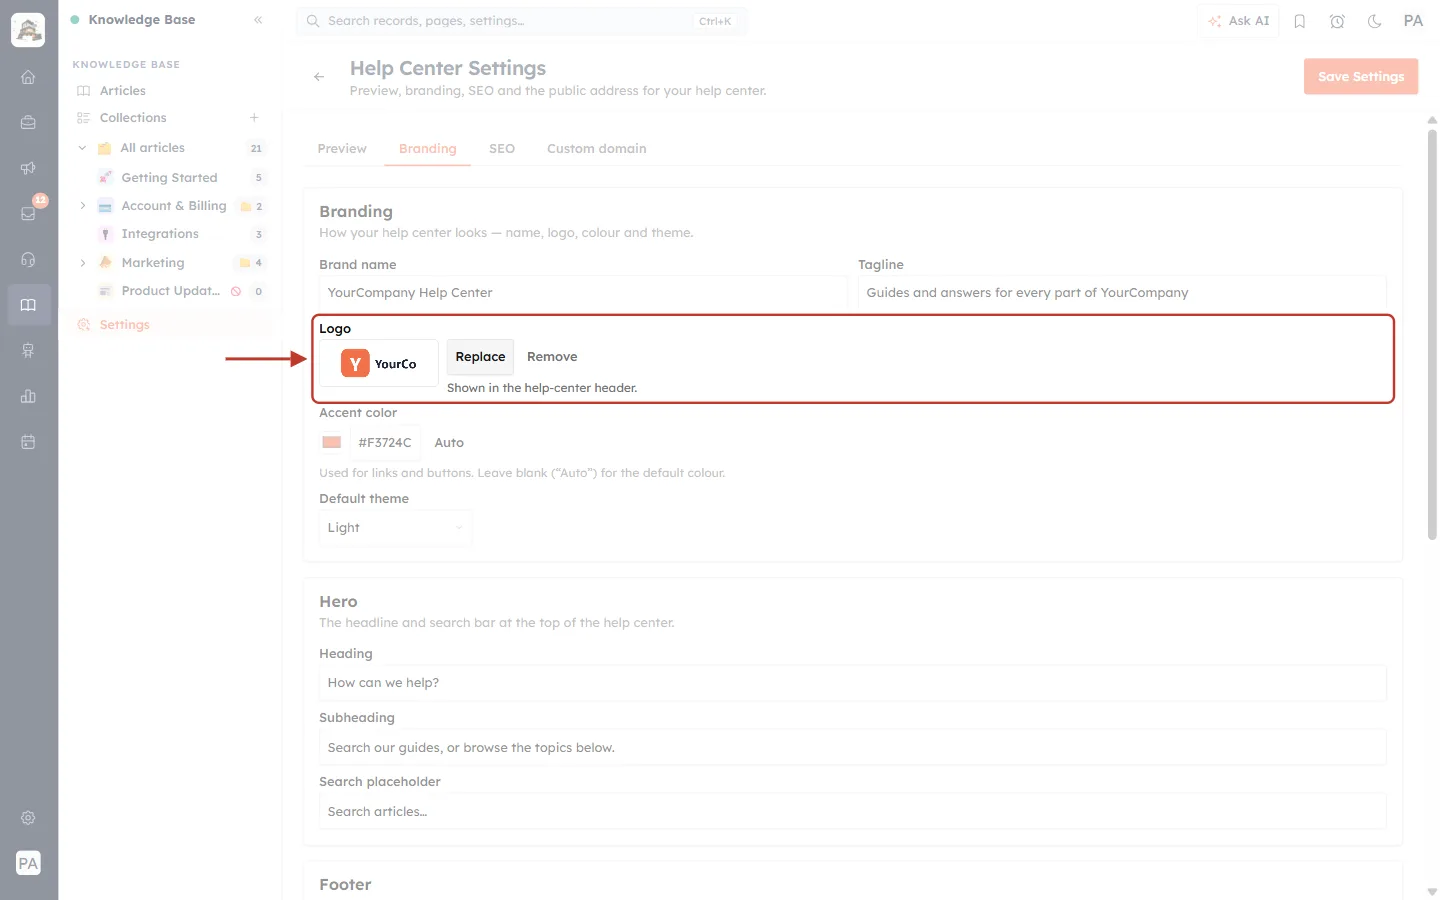
What this screenshot shows. The Logo field, ringed, after uploading.
The preview box shows the uploaded logo. It is a wide box, so a horizontal logo (icon plus name) fits best; a square logo is cropped in this preview.
“Shown in the help-center header.”
Replace: upload a different file. Remove: delete the logo, so only the brand name is shown.
✅
Use a logo with a transparent background (PNG or SVG). It then looks good in both the light and the dark theme.
Step 7: Choose the accent colour and theme#
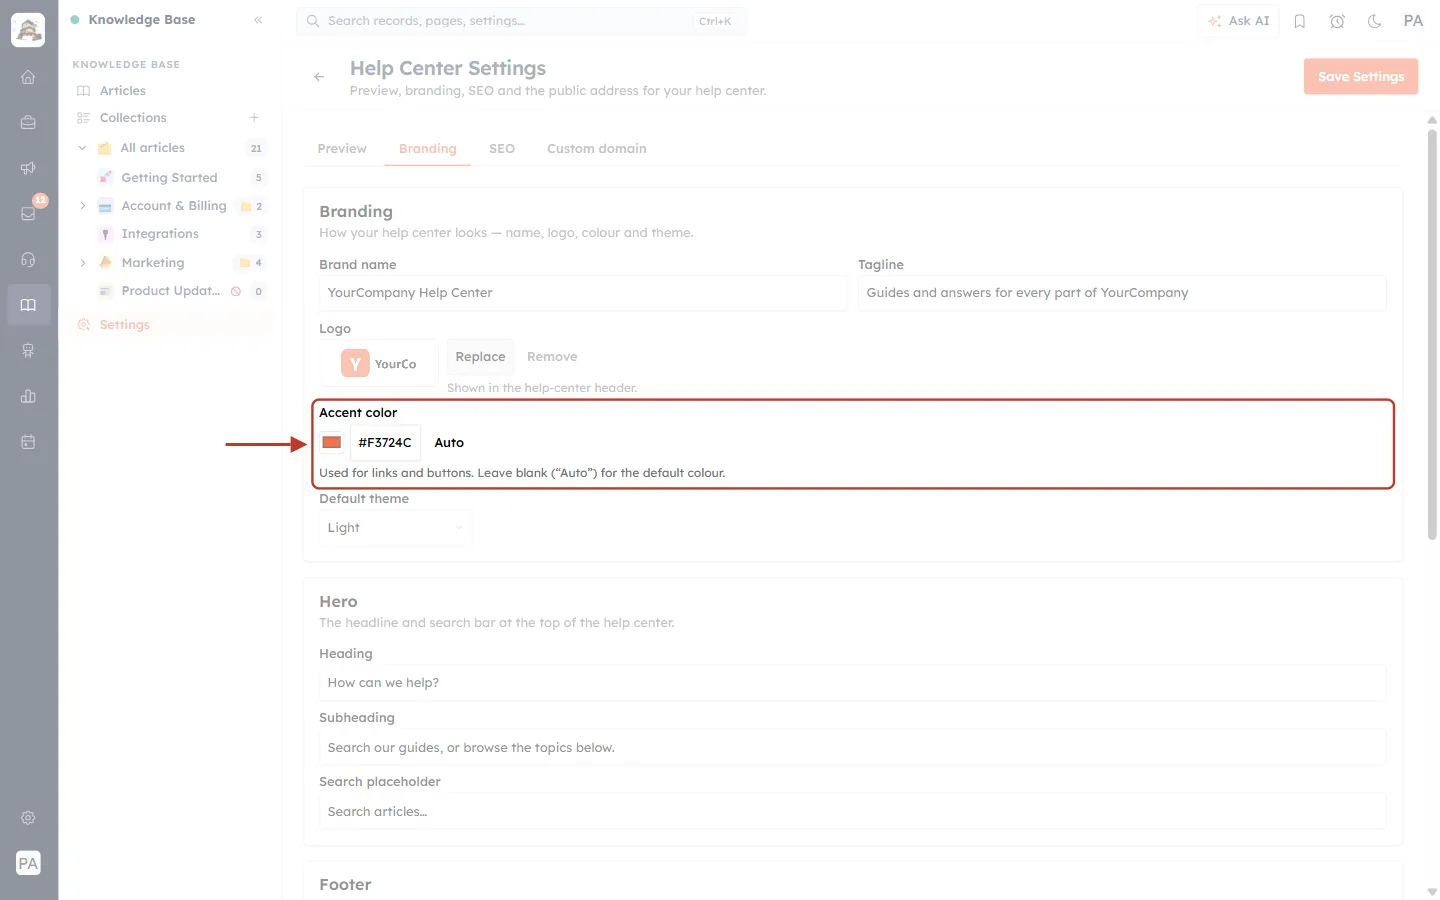
What this screenshot shows. The Accent color field, ringed.
The small coloured square opens a colour picker.
The box next to it holds the colour as a hex code: #F3724C. Type or paste your brand colour here (7 characters, starting with #).
Auto clears the colour. “Used for links and buttons. Leave blank (“Auto”) for the default colour.”
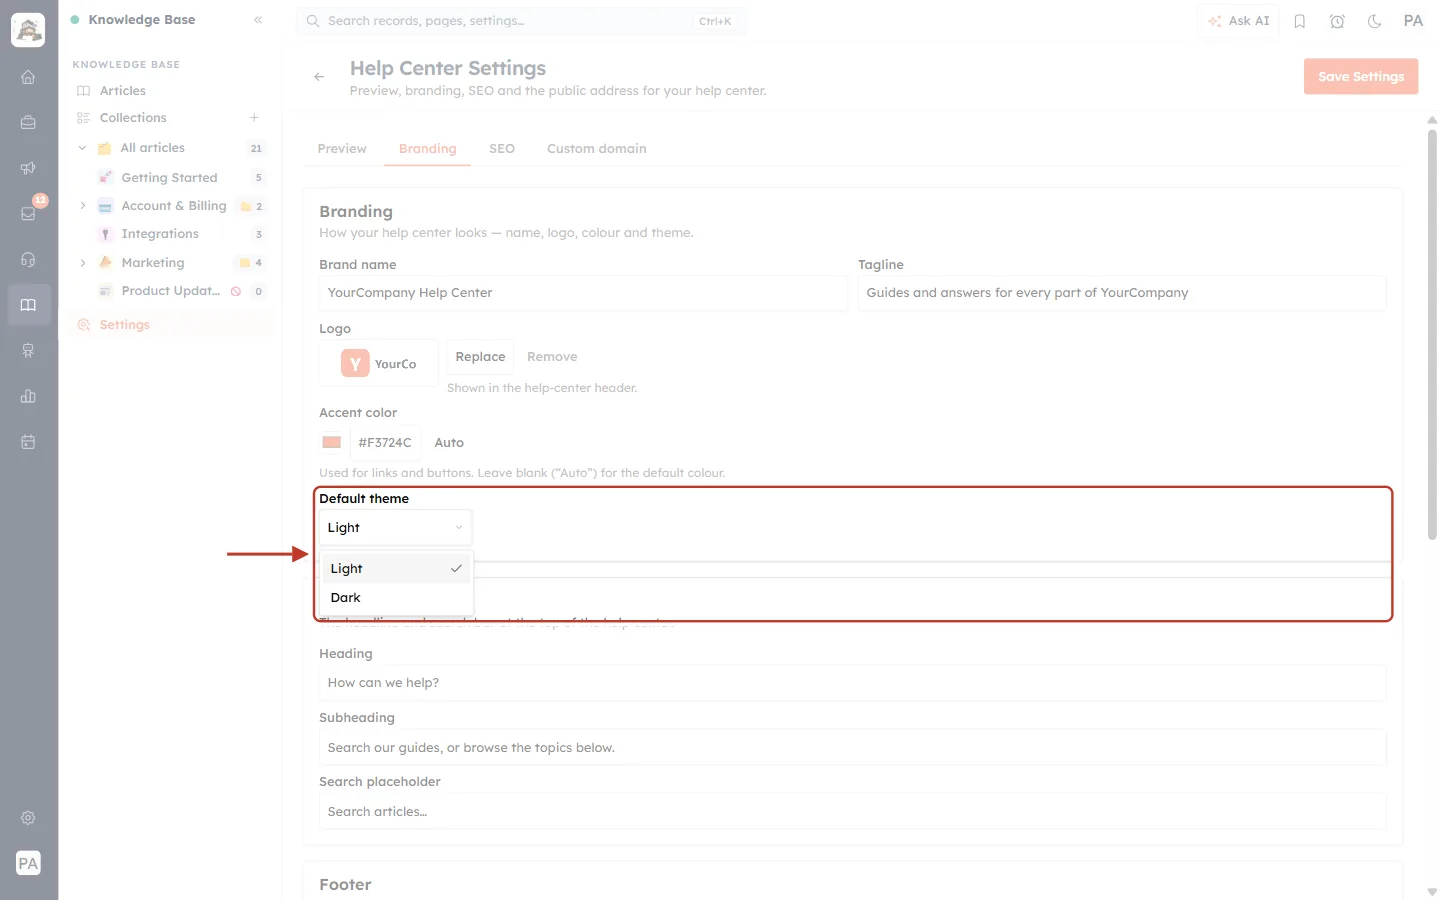
What this screenshot shows. The Default theme list, ringed.
Light (ticked) or Dark: the look customers get when they first open the help center.
Customers can still switch between light and dark themselves with the theme menu at the top right of the help center.
Step 8: Write the hero#
The hero is the big area at the top of the help-center home page, with the search box.
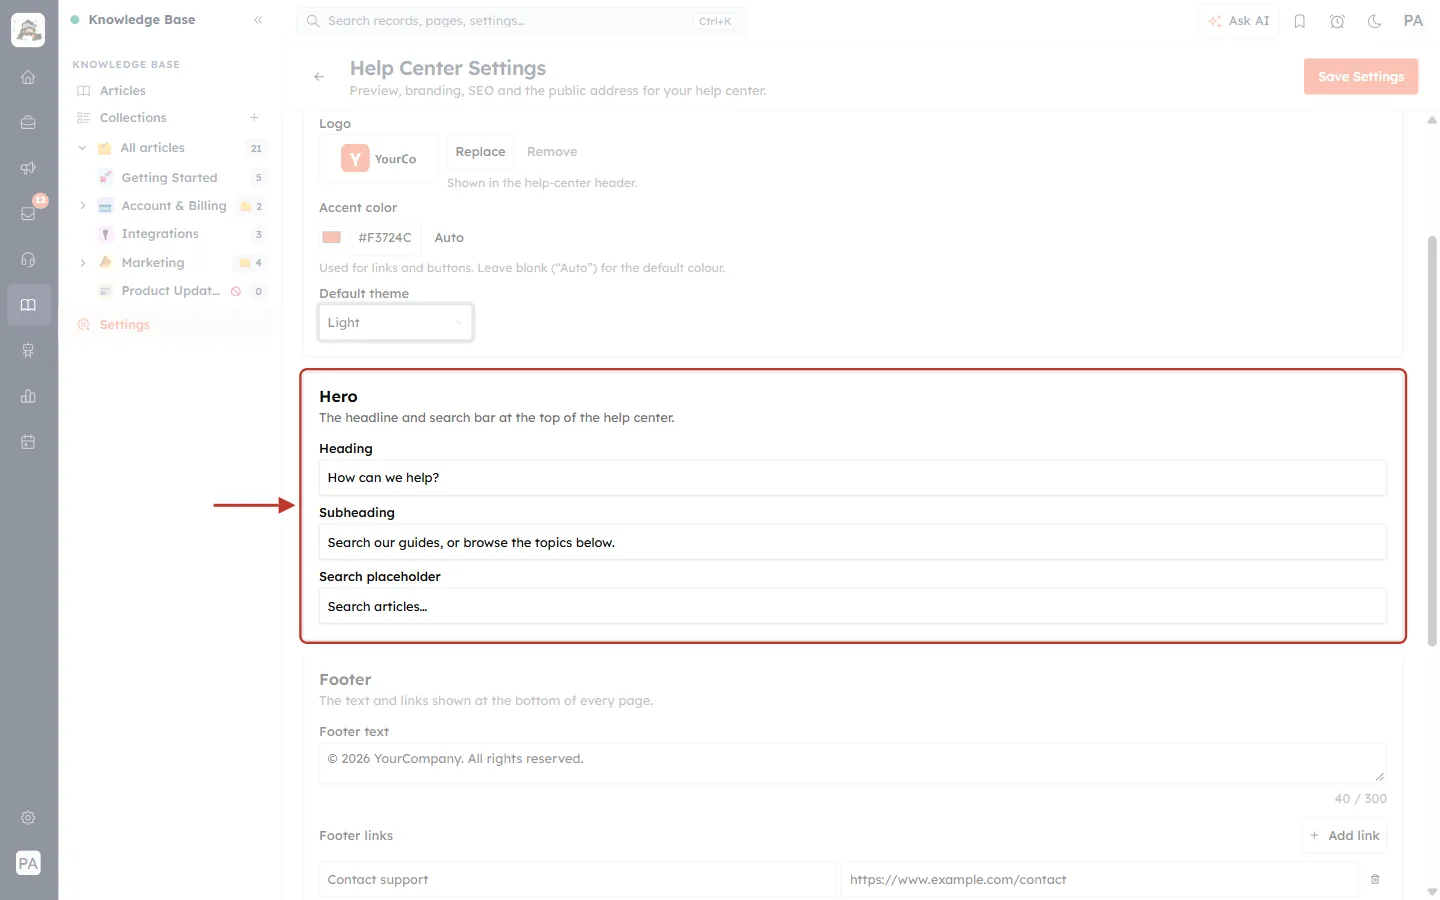
What this screenshot shows. The Hero section, ringed.
“The headline and search bar at the top of the help center.”
Heading: the big welcome line, for example “How can we help?”.
Subheading: one line under it, for example “Search our guides, or browse the topics below.”
Search placeholder: the grey hint inside the search box, for example “Search articles…”.
Step 9: Set up the footer#
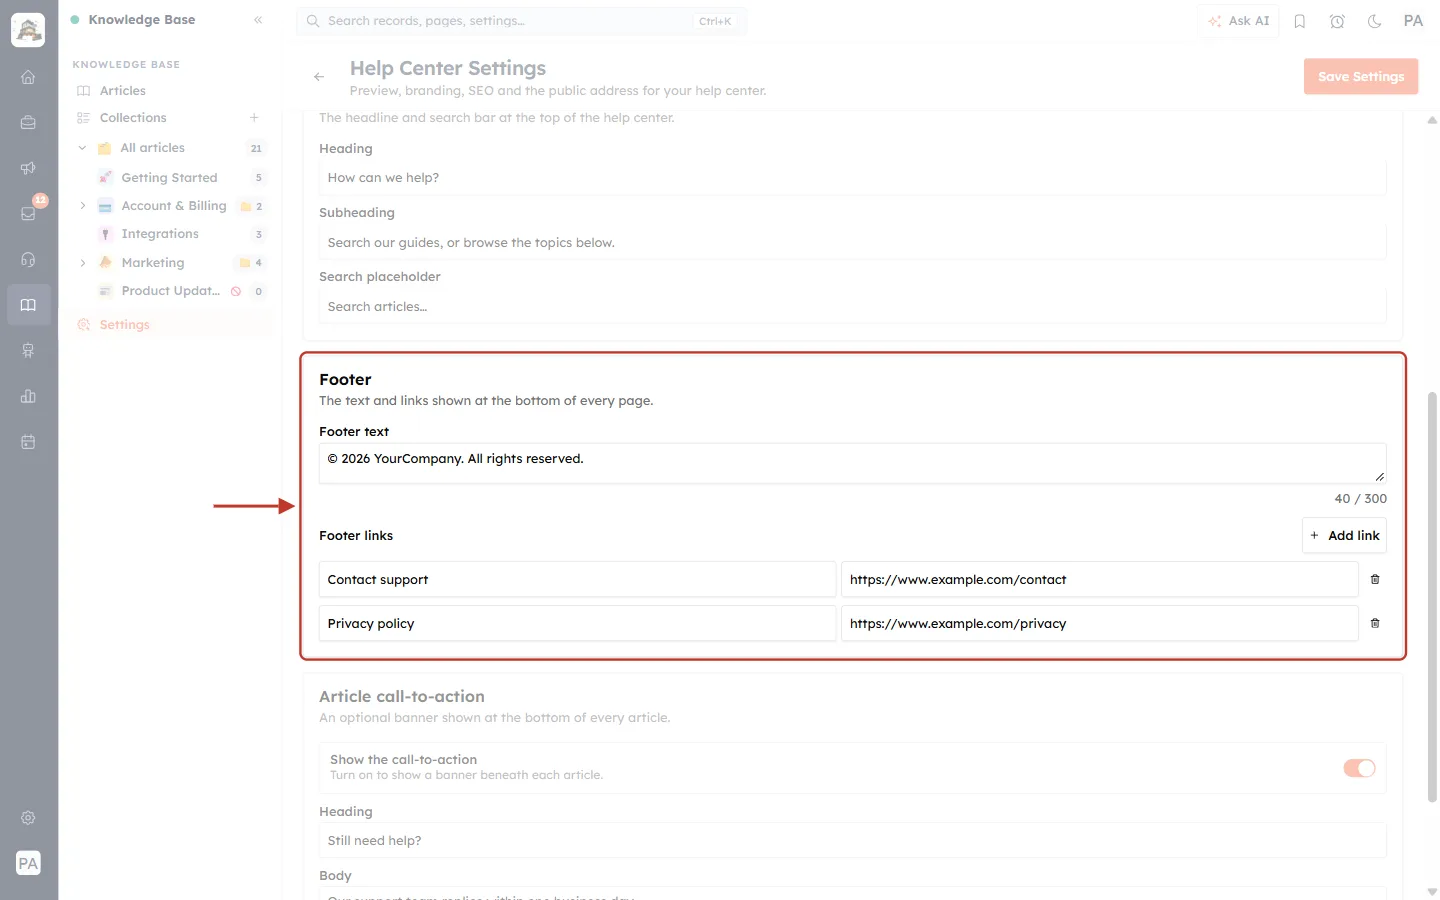
What this screenshot shows. The Footer section, ringed.
“The text and links shown at the bottom of every page.”
Footer text: up to 300 characters (here 40 / 300), for example “© 2026 YourCompany. All rights reserved.”
Footer links: each link has a label on the left (“Contact support”, “Privacy policy”) and an address on the right. The address can be a full URL or a path such as /contact.
+ Add link adds another row; the bin icon at the end of a row removes it.
Step 10: Add a call-to-action under every article#
The call-to-action is a banner at the bottom of every article. It gives customers who didn’t find their answer a clear next step.
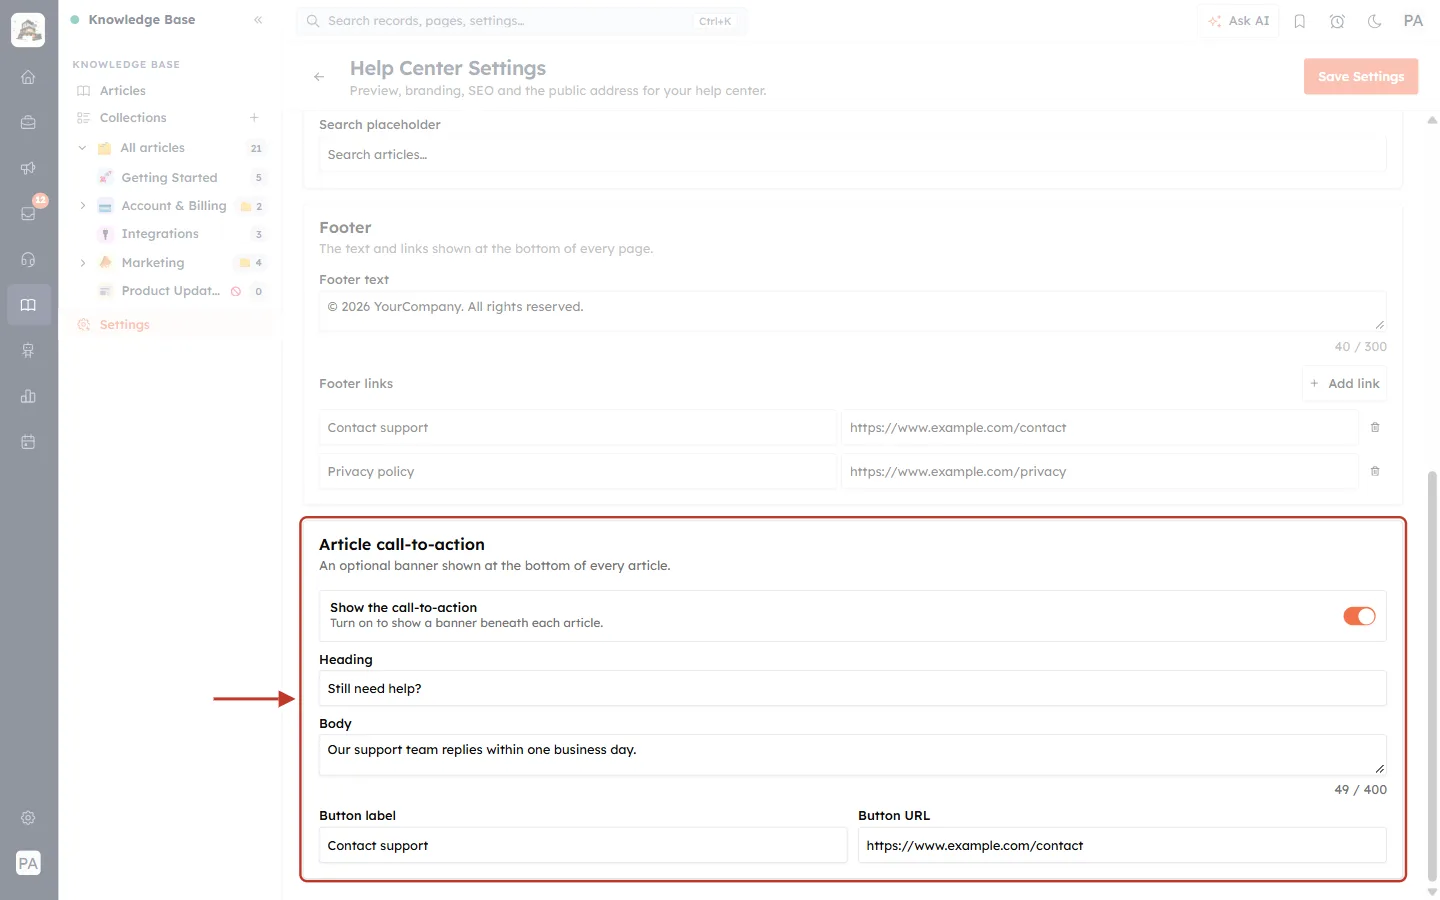
What this screenshot shows. The Article call-to-action section, ringed.
“An optional banner shown at the bottom of every article.”
Show the call-to-action: “Turn on to show a banner beneath each article.” It is on (orange) here.
Heading: for example “Still need help?”.
Body: up to 400 characters, for example “Our support team replies within one business day.”
Button label and Button URL: the banner’s button, for example Contact support linking to your contact page or a path such as /contact.
Step 11: Save your settings#
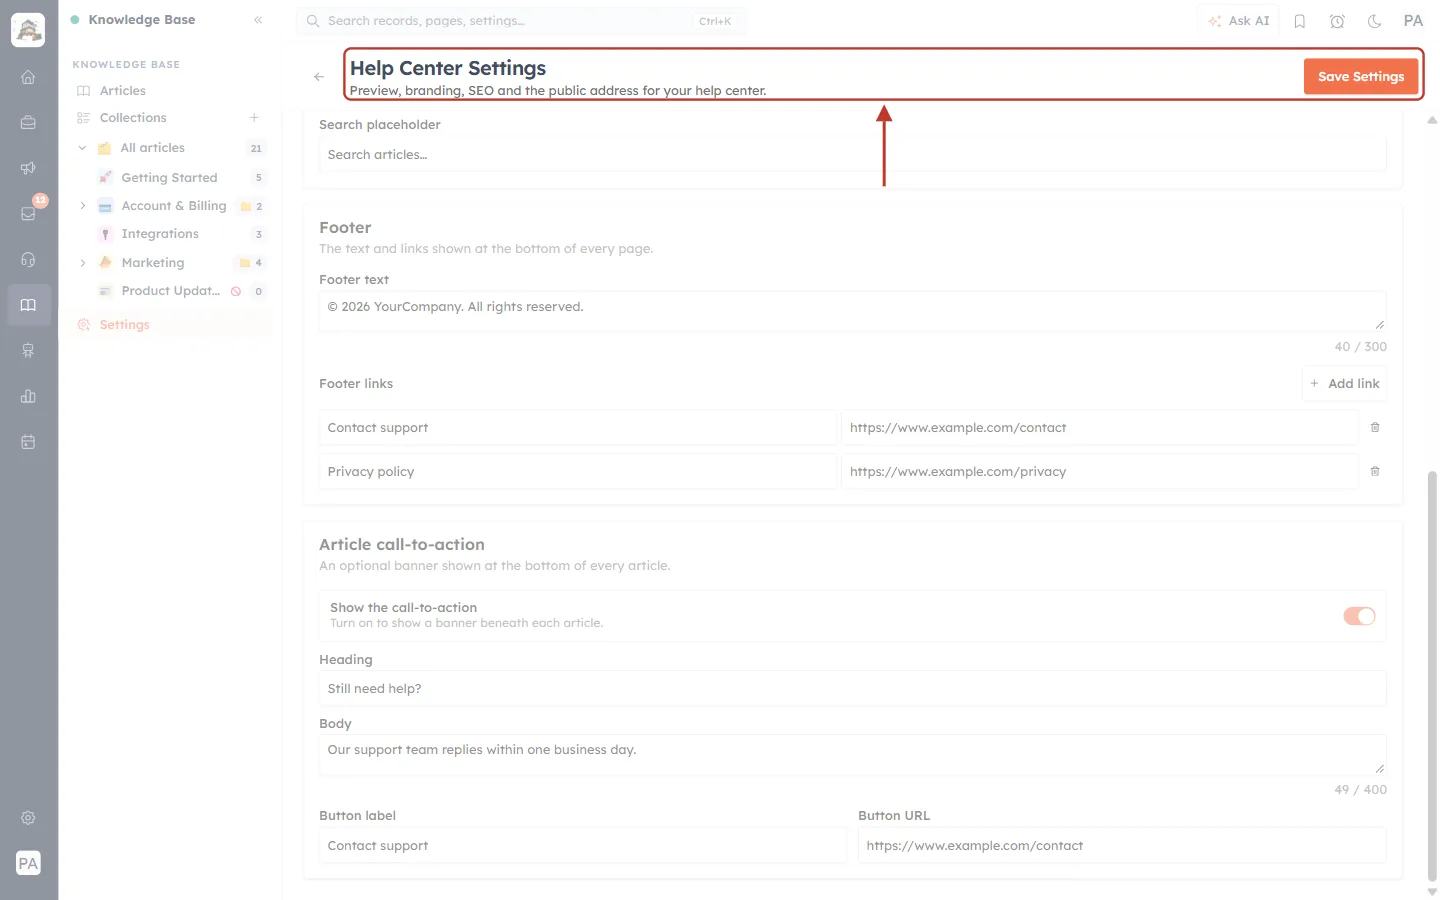
What this screenshot shows. The top of the page, ringed, with Save Settings now active.
Save Settings turns bright orange once you change something. Click it.
A message confirms “Settings saved”.
It saves the Preview, Branding and SEO tabs together. Changes appear on your help center straight away.
Part 3: Search engines and sharing (SEO tab)#
Step 12: Favicon, meta description and share image#
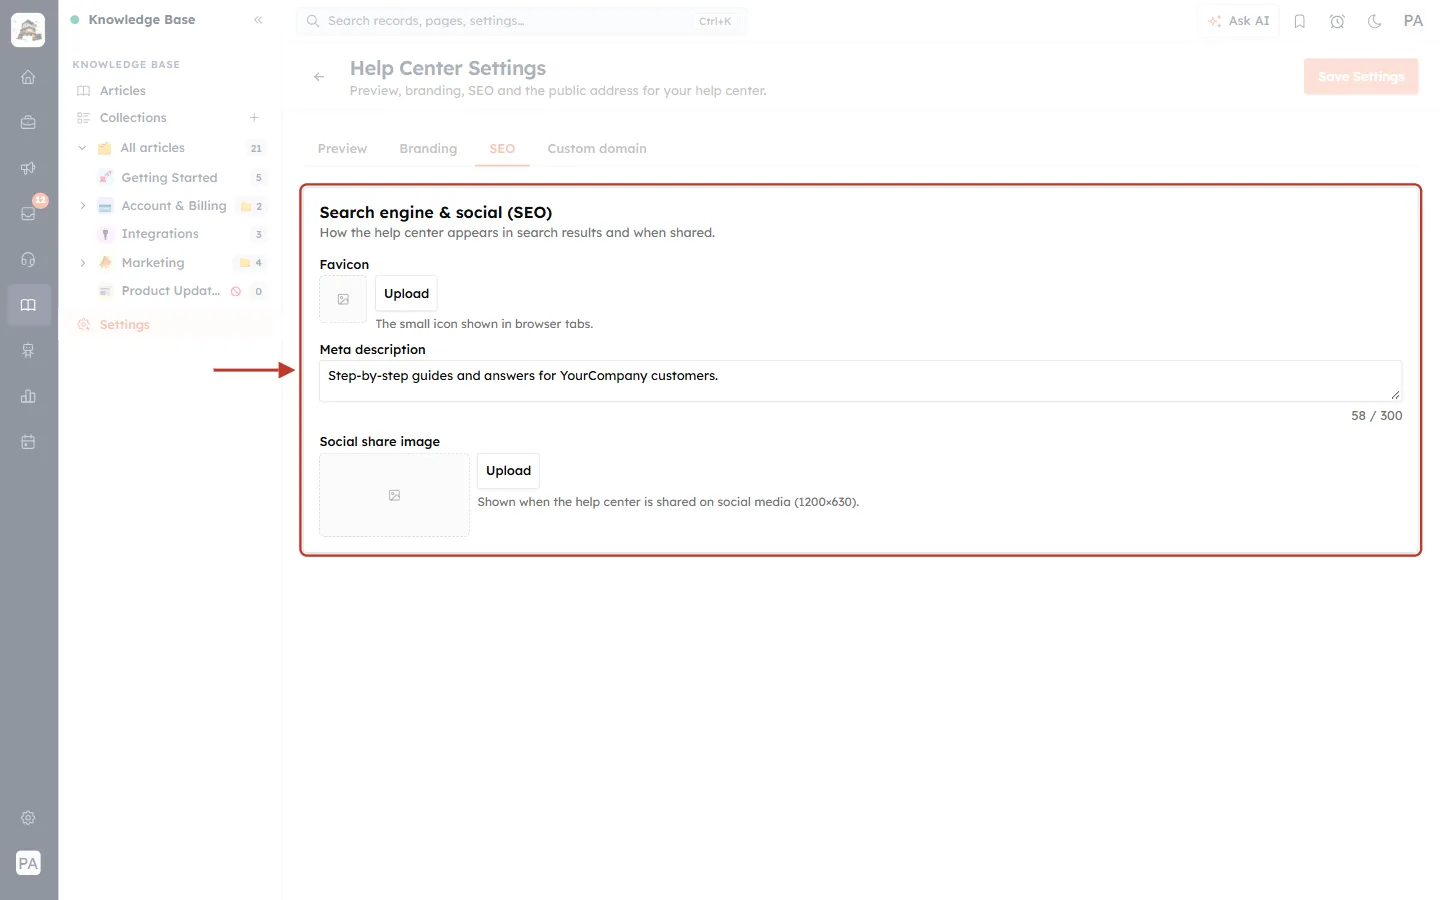
What this screenshot shows. The Search engine & social (SEO) section on the SEO tab, ringed.
“How the help center appears in search results and when shared.”
Favicon: click Upload. “The small icon shown in browser tabs.” Use a square image.
Meta description: up to 300 characters (here 58 / 300). The description search engines show for your help center’s home page.
Social share image: click Upload. “Shown when the help center is shared on social media (1200×630).” Articles without their own share image use this one.
Click Save Settings afterwards. Each article can also have its own SEO settings; see Article SEO and Navigation.
Part 4: Use your own domain (Custom domain tab)#
Your help center always works on its built-in address. With a custom domain, customers can also reach it on an address of your own, such as help.yourcompany.com.
Step 13: Enter your domain#
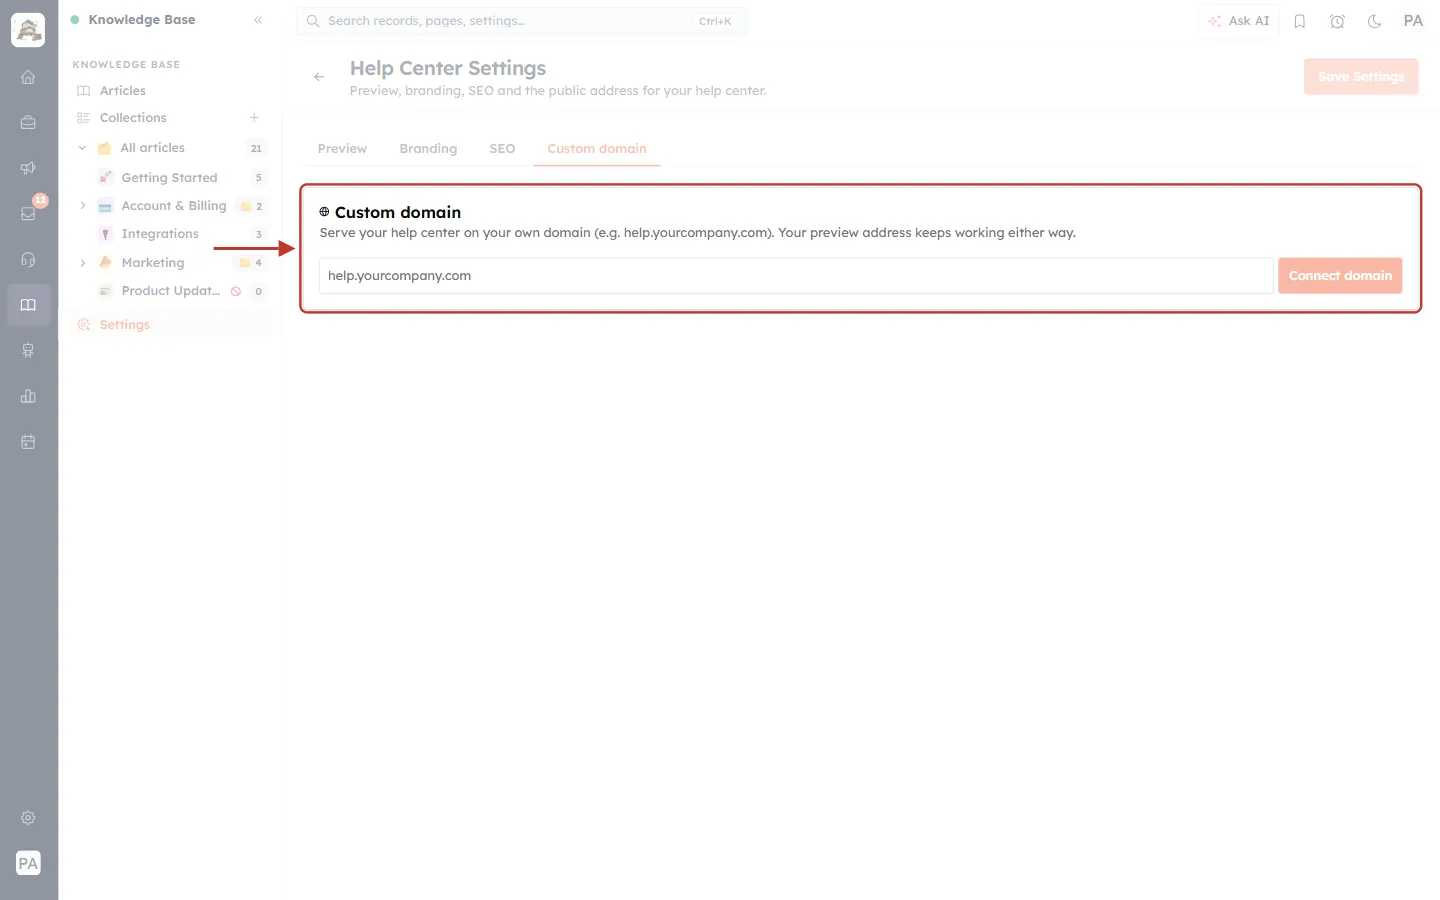
What this screenshot shows. The Custom domain section, ringed, before anything is connected.
“Serve your help center on your own domain (e.g. help.yourcompany.com). Your preview address keeps working either way.”
A box for the domain and the orange Connect domain button.
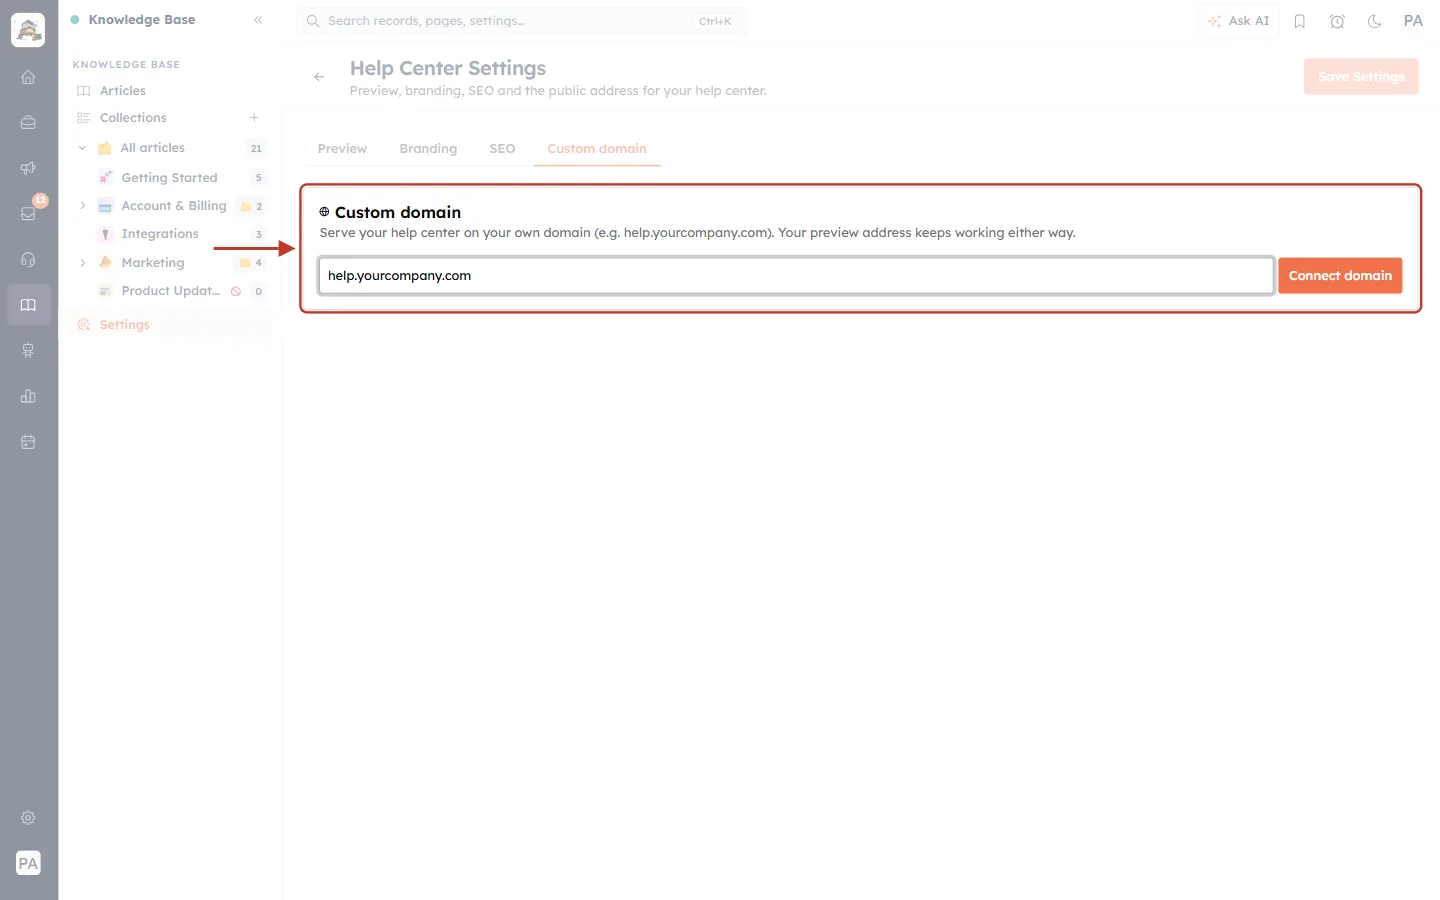
What this screenshot shows. The same section, ringed, with help.yourcompany.com typed in.
Type the full address you want, usually a sub-domain such as help., support. or docs. followed by your domain.
Click Connect domain. The domain is added straight away; you don’t need Save Settings for this tab.
Step 14: Add the DNS records#
After you connect, the page shows the records to add at your DNS provider (the company where you manage your domain):
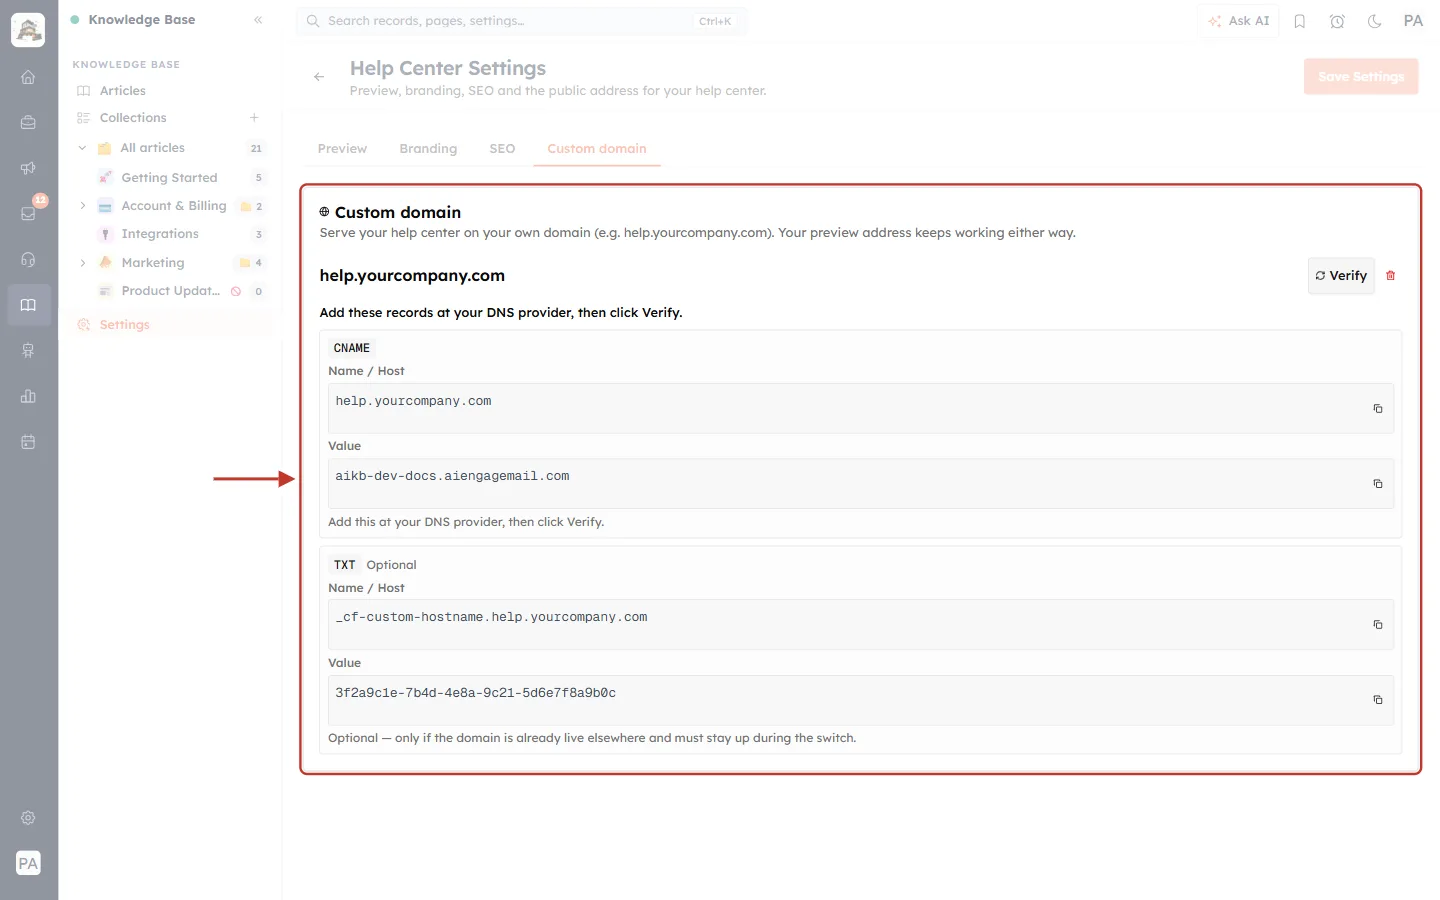
What this screenshot shows. The Custom domain section, ringed, right after connecting.
help.yourcompany.com at the top with a Verify button and a red bin icon that removes the domain again.
“Add these records at your DNS provider, then click Verify.”
CNAME (required): Name / Host = your help-center domain; Value = the help-center host it should point to. “Add this at your DNS provider, then click Verify.”
TXT (Optional): “Optional — only if the domain is already live elsewhere and must stay up during the switch.”
The copy icon at the end of each box copies the value exactly. Always copy rather than typing.
✅
At many DNS providers the Name / Host field only wants the first part: for help.yourcompany.com, enter help. If your provider adds the domain automatically, entering the full name creates help.yourcompany.com.yourcompany.com by mistake.
Step 15: Verify the domain#
When the CNAME record is added, come back and click Verify. When everything is right, the domain goes live:
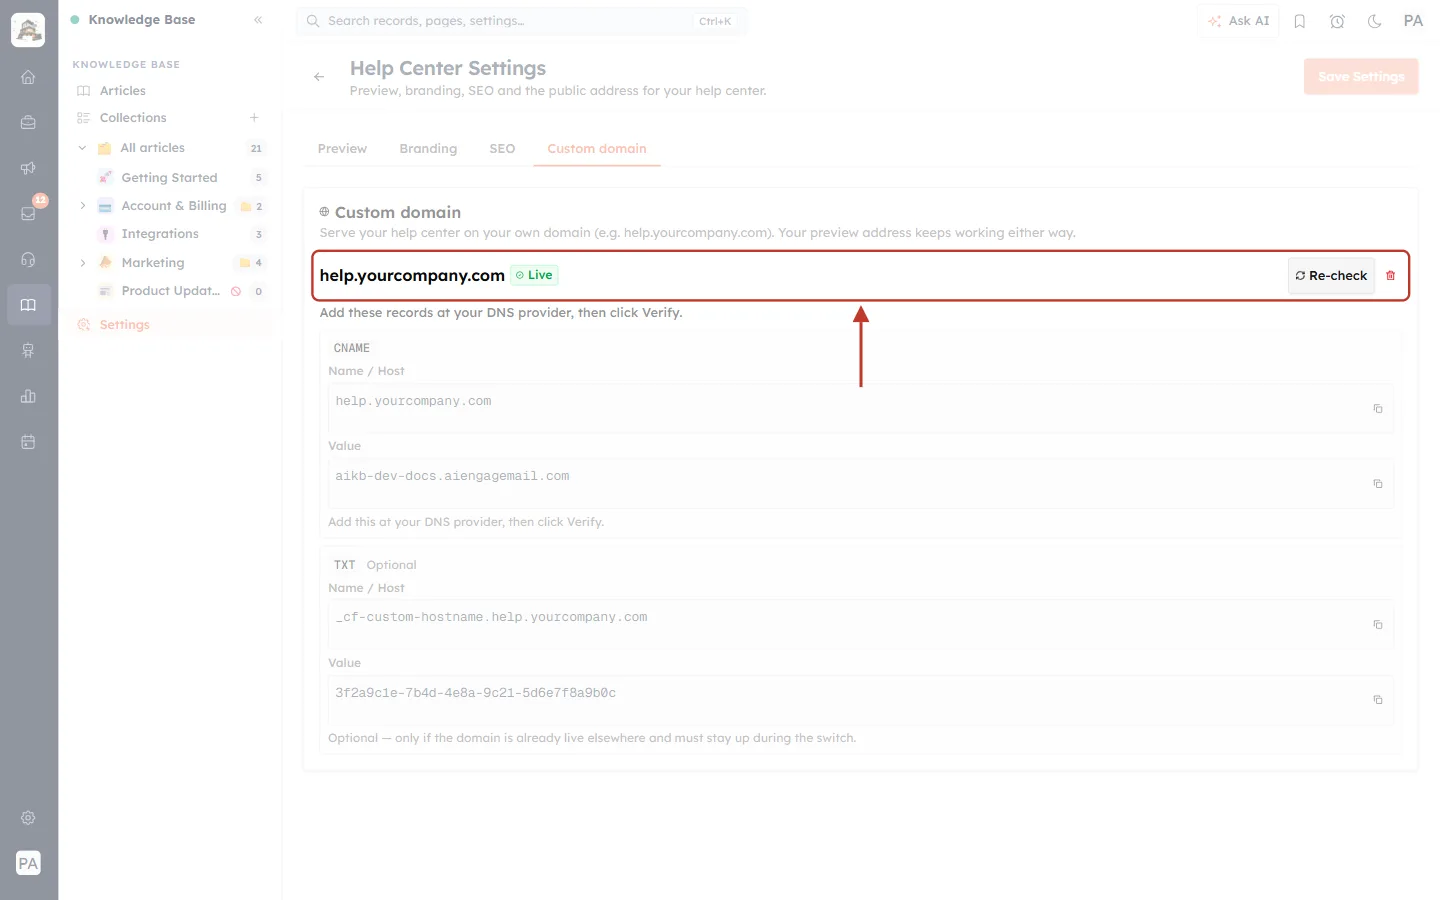
What this screenshot shows. The connected domain, ringed.
help.yourcompany.com with a green Live badge: the domain works and is secured.
Re-check checks the records again, for example after you changed them.
The red bin icon disconnects the domain. The built-in address keeps working.
⚠️
DNS changes can take from a few minutes to a few hours to reach everyone. If Verify doesn’t succeed straight away, wait a while and try again. Meanwhile the built-in address keeps working.
Step 16: See the result#
Open your help center, on your own domain or with Open preview. This is what your customers see:
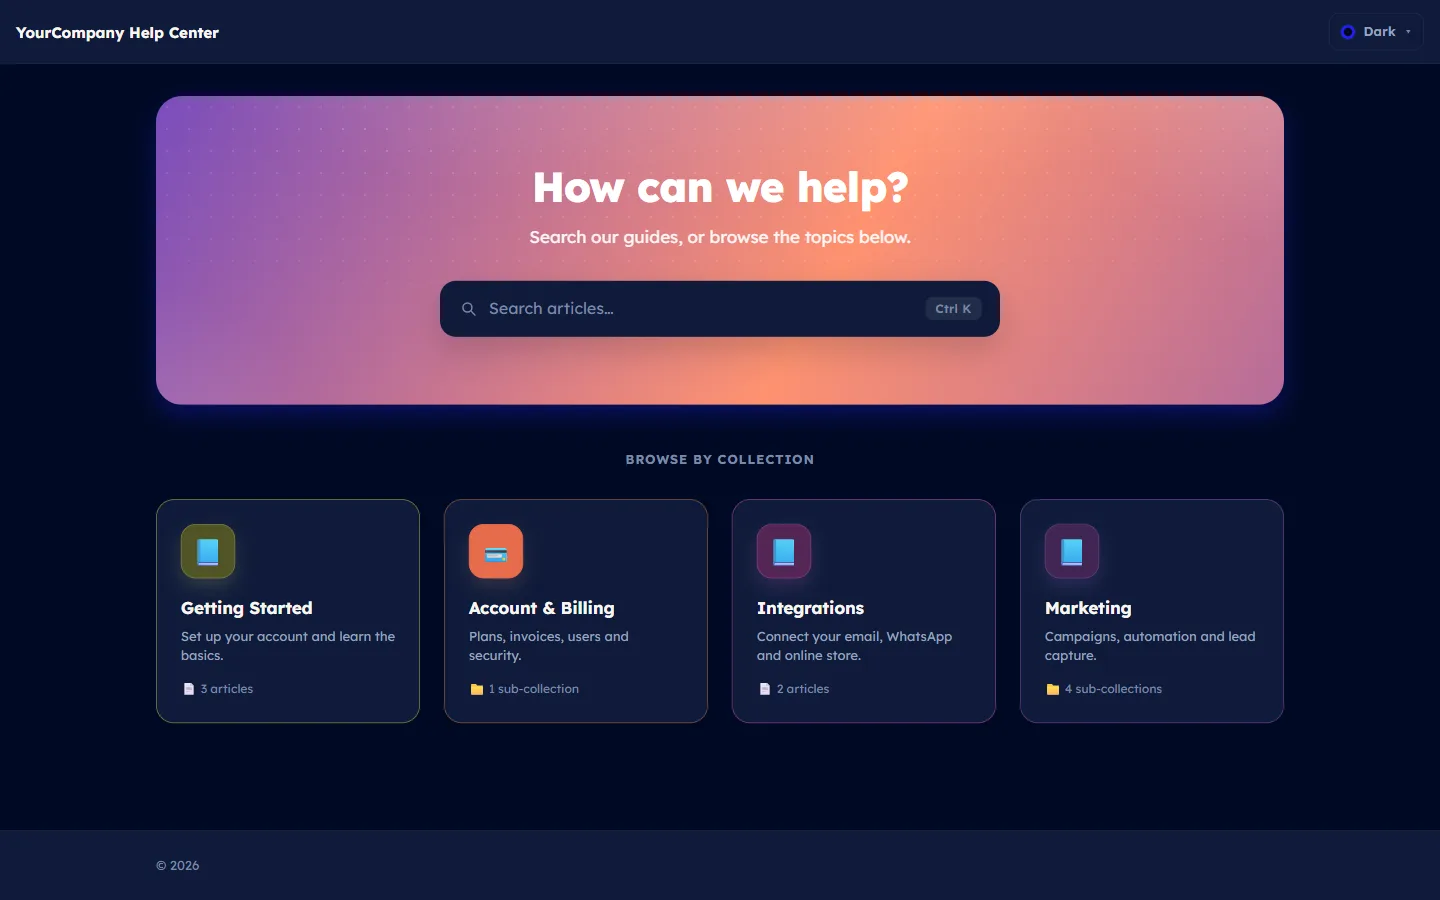
What this screenshot shows. The home page of a help center using the Dark theme.
Top bar: the brand name and logo from Step 5–6, the search box, and the theme menu (Dark ▾) where customers switch theme.
Hero: the heading, subheading and search box from Step 8.
Browse by collection: one card for each published top-level collection.
Footer at the bottom with your footer text and links from Step 9.
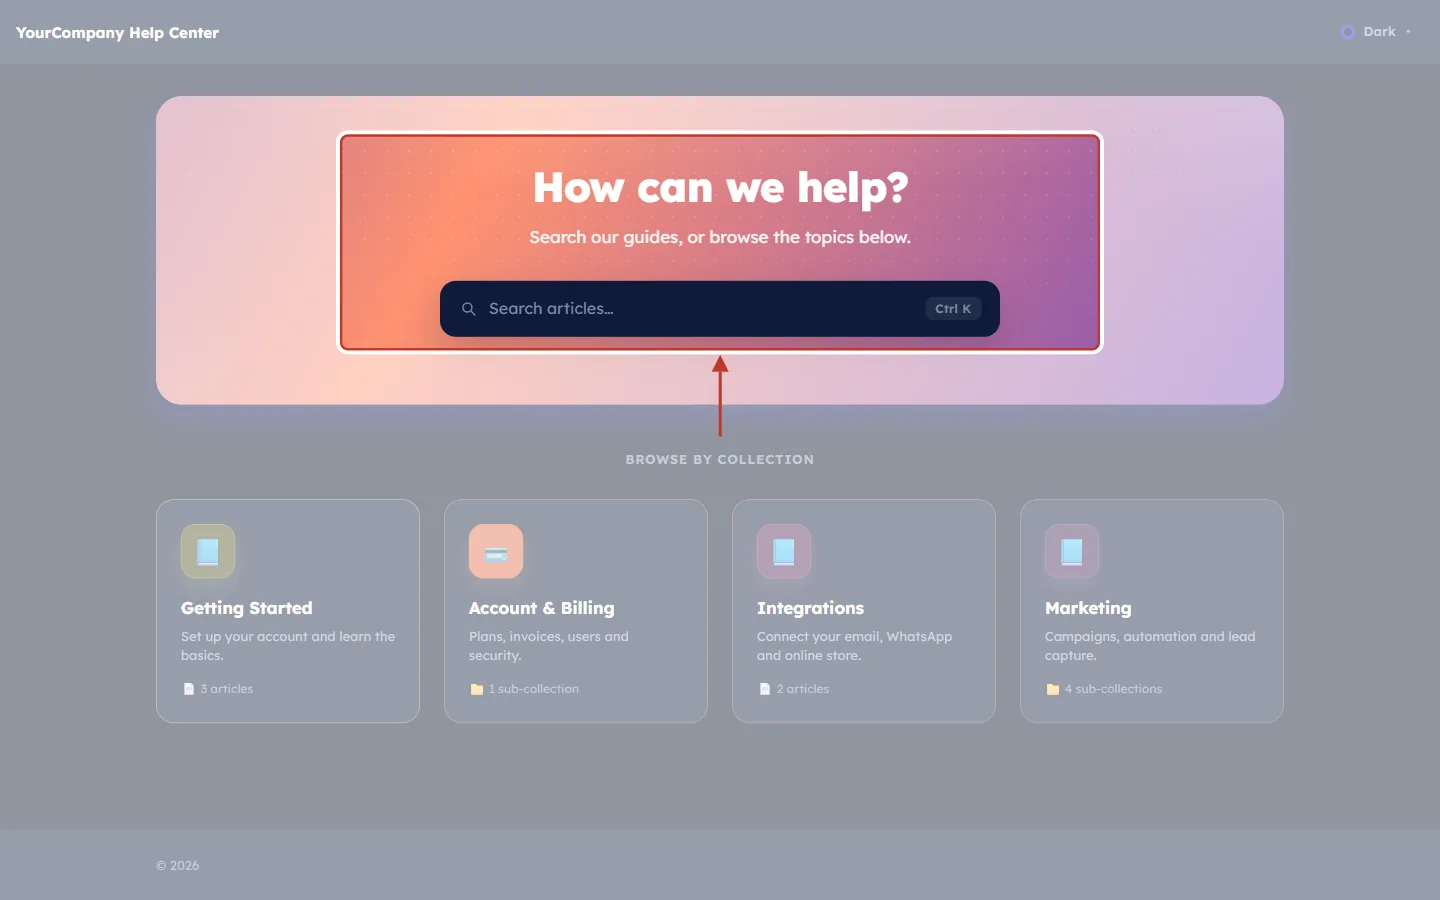
What this screenshot shows. The hero area, ringed.
How can we help?: the Hero Heading.
Search our guides, or browse the topics below.: the Subheading.
Search articles…: the Search placeholder. Customers can also press Ctrl K to jump into search.
Good to know#
One switch for everything. Make my help center public hides or shows the whole site; individual articles and collections still need to be published.
Save Settings covers three tabs. Preview, Branding and SEO are saved together. The Custom domain tab works on its own.
Your built-in address never stops working, even with a custom domain.
Customers choose their theme. The default theme is only the starting point.
Empty fields are fine. Leave the tagline, footer links or call-to-action empty and they are simply not shown.
Troubleshooting#
Customers can’t open the help center#
Check that Make my help center public is on and that you clicked Save Settings.
Check that at least some articles and their collections are Published.
If you use a custom domain, check that it shows Live on the Custom domain tab.
My changes don’t show on the help center or in the preview#
Why it happens: the changes aren’t saved. How to fix it: click Save Settings, wait for “Settings saved”, then refresh the help-center page.
My logo looks cut off or blurry#
How to fix it: upload a wide (horizontal) logo with a transparent background, at least twice the size it will be shown. SVG files stay sharp at any size.
The custom domain won’t verify#
Copy the CNAME Name and Value again with the copy icons and compare them with the record at your DNS provider.
Check the Name / Host tip under Step 14: some providers want only help.
Make sure there is no other record (for example an A record) with the same name.
Wait up to a few hours for DNS changes to spread, then click Verify or Re-check.
The accent colour isn’t accepted#
How to fix it: enter it as a 7-character hex code starting with #, for example #F3724C, or use the colour picker.
Frequently asked questions#
Can I set everything up before customers see it?
Yes. Leave Make my help center public off, use Open preview to check, and switch it on when you are ready.
Do I need a custom domain?
No. The built-in address works on its own. A custom domain just makes the address match your brand.
Can I use my main website address, like yourcompany.com?
Use a sub-domain such as help.yourcompany.com, so your main website keeps working as it does today.
Can customers use dark mode?
Yes. They can switch between light and dark with the theme menu, whatever your default theme is.
Can I turn off the banner under articles?
Yes. Switch off Show the call-to-action and click Save Settings.
Previous and next#
Related#
Was this article helpful?
Ready to implement this?
OpenAI Engage and apply what you just learned to your own workspace.
Open AI Engage CRM