Loading…


KnowledgeBase
Article SEO and Navigation: Set Previous/Next Links, Meta Title, Description and Share Image (Step-by-Step)
Introduction#
Writing a good help article is half the job. The other half is making sure customers find it and keep going after reading it. Every Knowledge Base article in AiEngage CRM has two sections for exactly that, at the bottom of the article form:
Article navigation decides the Previous and Next cards at the bottom of the article on your help center. They lead the reader to the article before and after it, like the pages of a guide.
Search engine & social (SEO) decides how the article appears in Google and other search engines, and how it looks when someone shares its link in WhatsApp, LinkedIn, Facebook or Slack.
In this guide we open an existing article, “Invite Your Team” in the Getting Started collection, and set up both: first its Previous/Next links (automatically, by changing the collection order, and manually), then its meta title, meta description and share image. At the end we look at the help-center-wide SEO settings and at the result on the help center.
ℹ️
The screenshots use a sample help center for a business called YourCompany, with sample collections, articles and authors. Your screen shows your own content.
Setting | Where customers see it | If you leave it empty |
|---|---|---|
Slug | The article’s web address | Made automatically from the title |
Excerpt | Article lists, help-center search, and search engines (if no meta description) | Nothing is shown under the title |
Previous / Next | Cards at the bottom of the article | Automatic: taken from the collection order |
Meta title | The blue link in Google results, the browser tab, shared-link previews | The article title is used |
Meta description | The text under the link in Google results and in shared-link previews | The excerpt is used |
Social share image | The picture in shared-link previews | The help center’s default share image is used |
Before you begin#
Permission: you need the Knowledge Base permission (admins always have it). It is set in Setup → Profiles → Feature Permissions → Marketing.
The article exists. These settings are on every article form, new or existing. If you haven’t written the article yet, see Create and Publish a Help-Center Article first.
Put the article in a collection. Automatic Previous/Next links work inside a collection, so an article without a collection has none.
For a share image, prepare a picture of 1200 × 630 pixels (PNG or JPG). That is the size social networks use for link previews.
Step 1: Open the article for editing#
Go to Knowledge Base → Articles. Find the article in the list and click the ⋮ button in its ACTION column, then click Edit. (Clicking the article’s title does the same.)
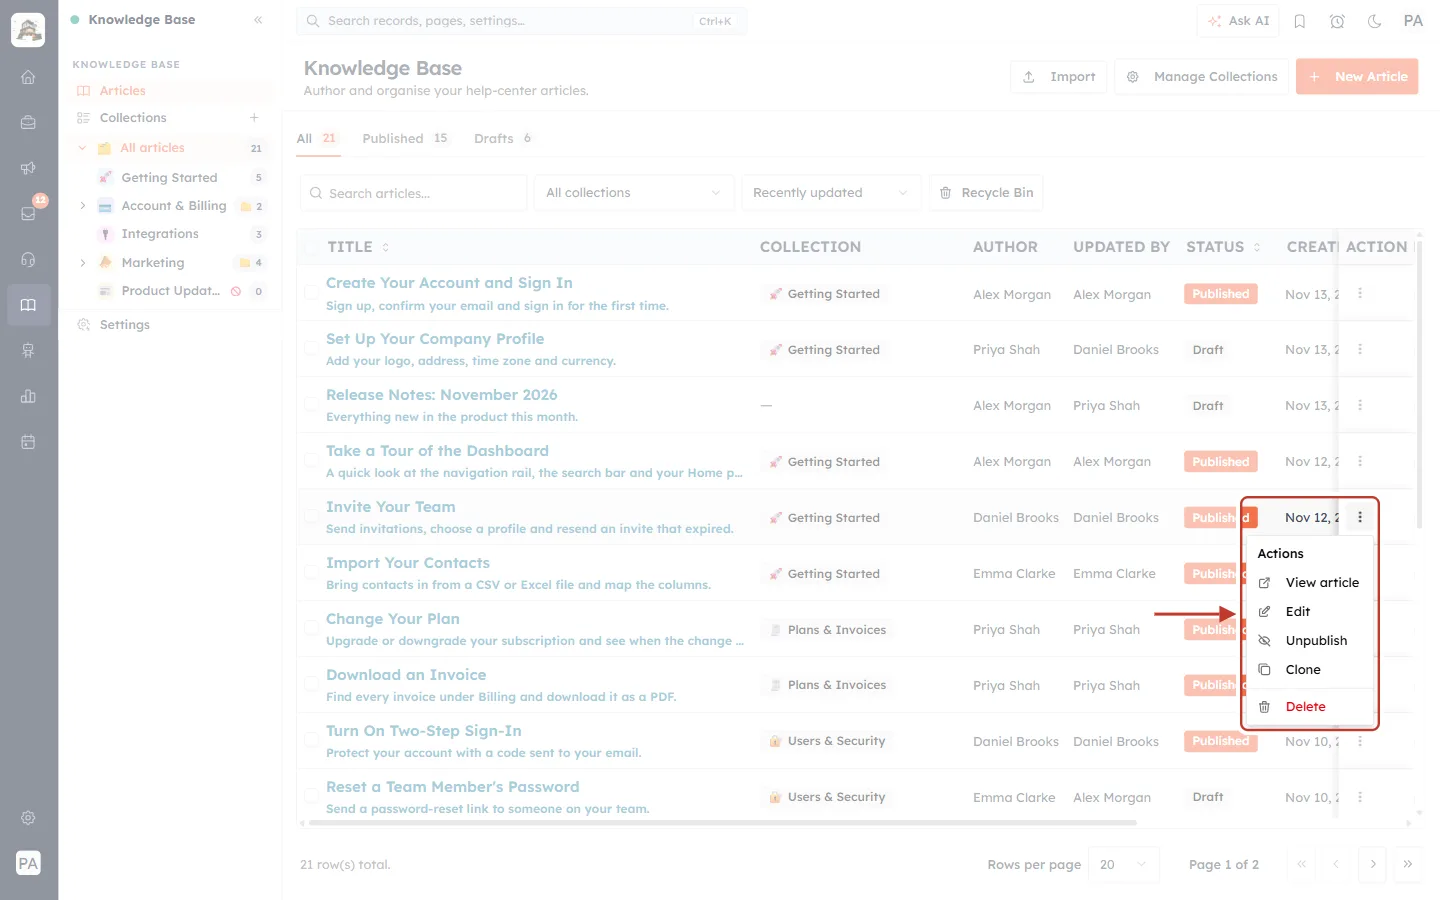
What this screenshot shows. The ⋮ menu of the article “Invite Your Team”, ringed.
Actions: View article, Edit, Unpublish, Clone and Delete. This article is published, so the menu offers View article and Unpublish.
Click Edit to open the article form.
You can change navigation and SEO settings on published articles and drafts alike.
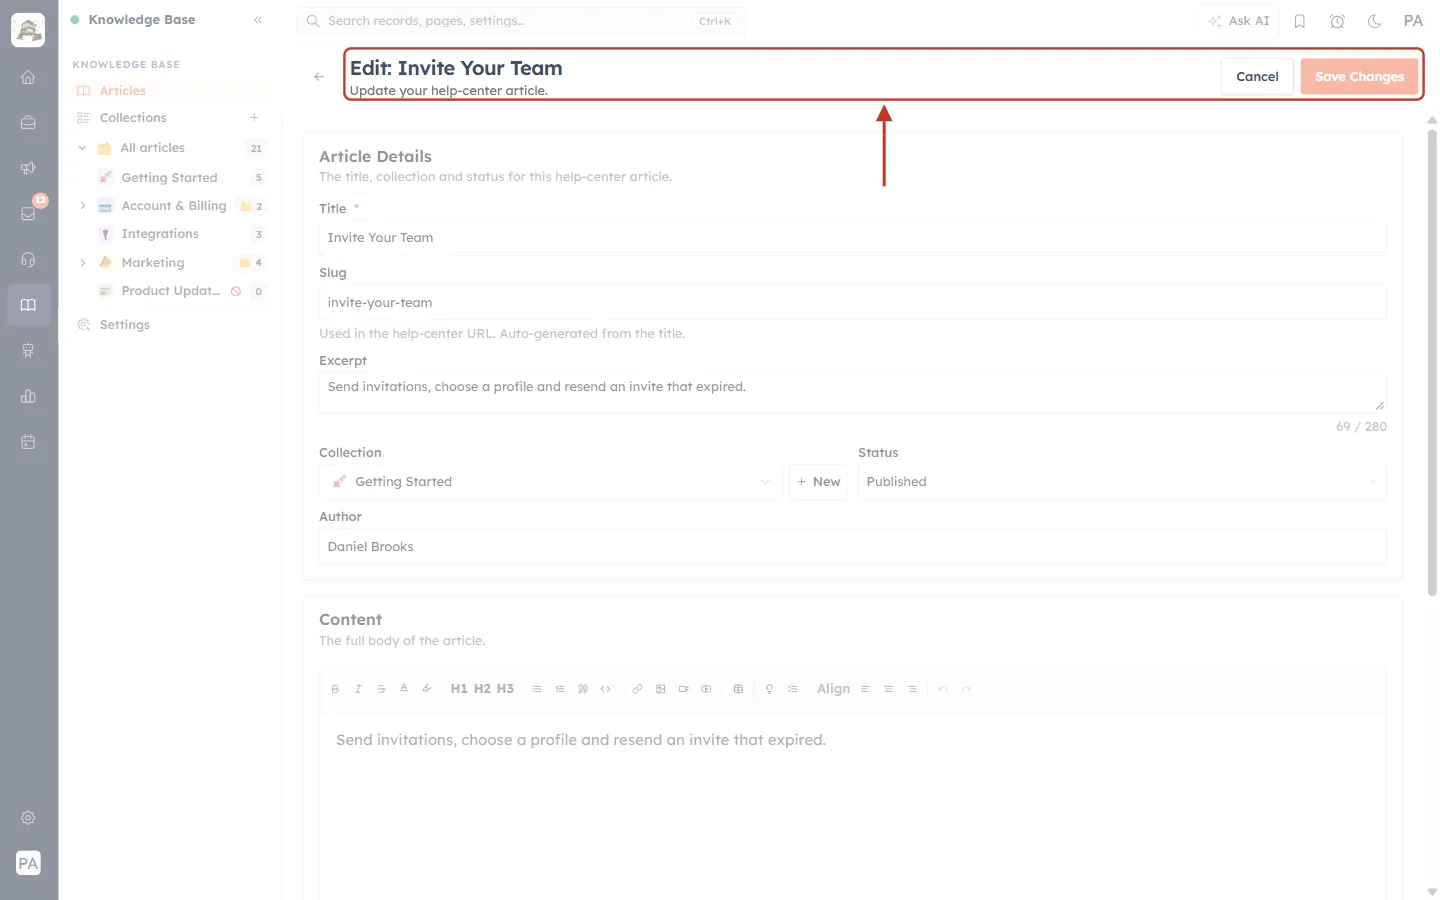
What this screenshot shows. The top of the article form, ringed: Edit: Invite Your Team with Cancel and Save Changes.
Edit: Invite Your Team — “Update your help-center article.” The ← arrow goes back to the list.
Save Changes stays pale until you change something. It stays at the top while you scroll, so you can save from any section.
Cancel leaves without saving.
Step 2: Check the slug and excerpt#
Two fields in Article Details matter for SEO even before you reach the SEO section.
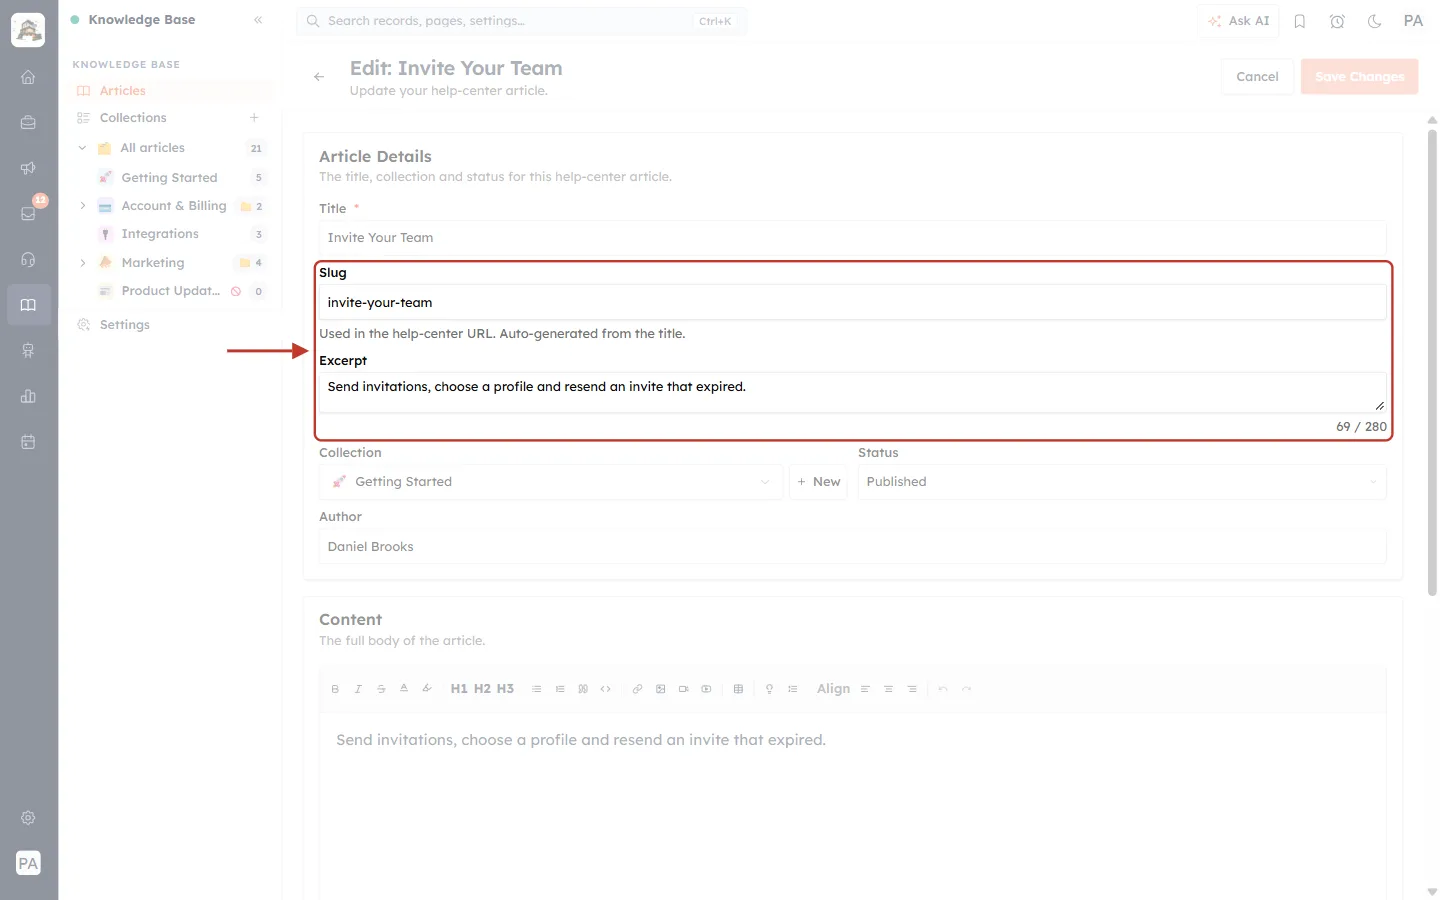
What this screenshot shows. The Slug and Excerpt fields, ringed.
Slug: invite-your-team. This is the last part of the article’s web address, for example help.yourcompany.com/article/invite-your-team. “Used in the help-center URL. Auto-generated from the title.” Short slugs made of the main words (lowercase, separated by hyphens) are easiest to read and share.
Excerpt: “Send invitations, choose a profile and resend an invite that expired.” It is shown under the title in article lists and help-center search, and it is the description search engines get when you leave the meta description empty.
69 / 280: the excerpt can be up to 280 characters, but one or two sentences work best.
⚠️
Changing the slug of a published article changes its address. Links to the old address (in emails, chats, other articles, or Google) may stop working. Decide on the slug before you publish, and change it later only if you must.
Step 3: Find the navigation and SEO sections#
Scroll down past the Content editor. The last two sections of the form are the ones this guide is about.
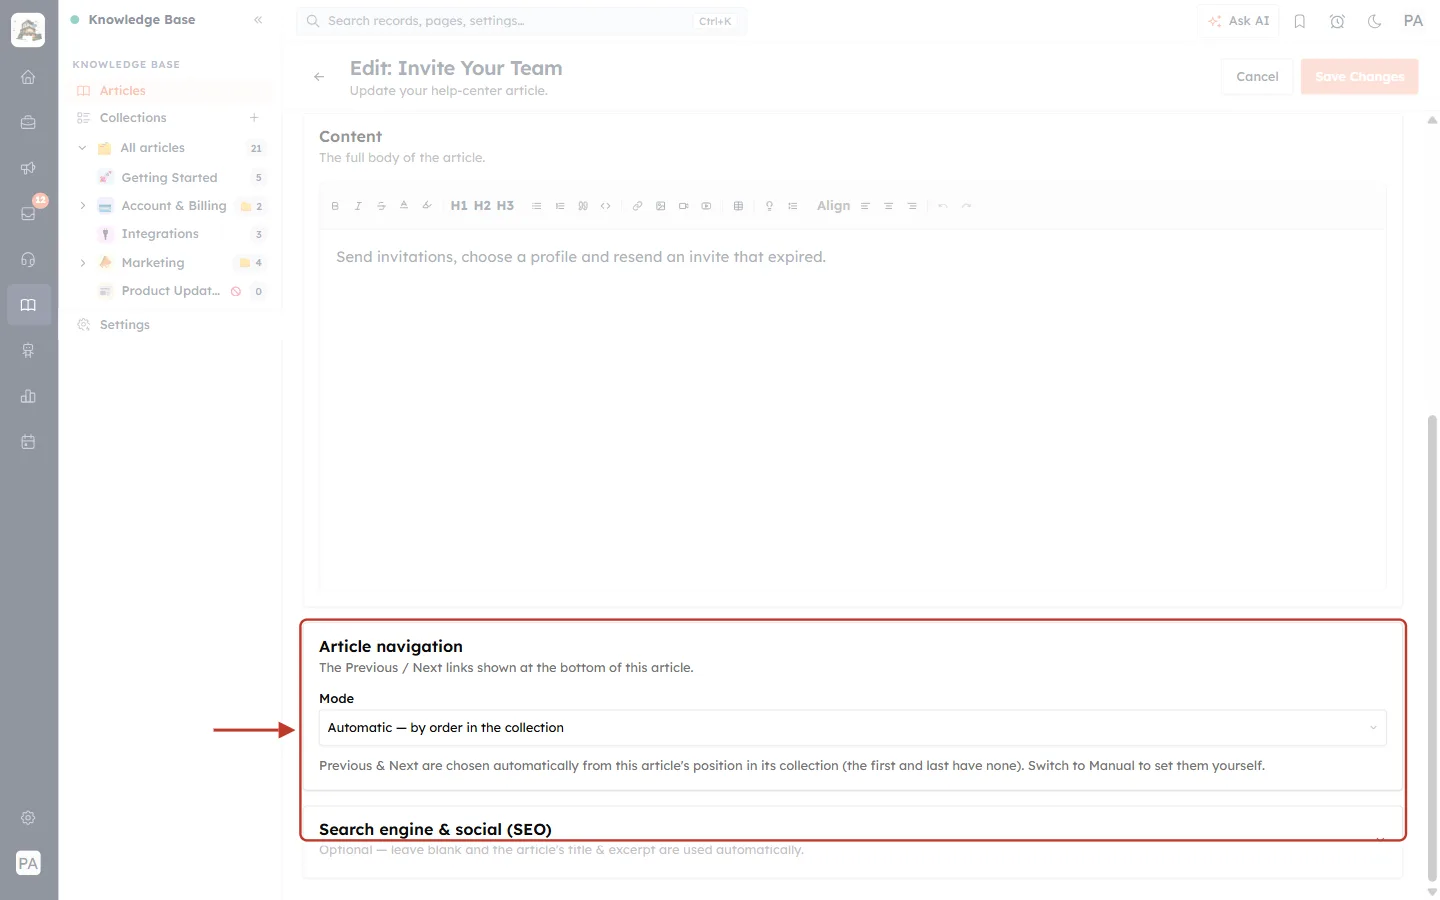
What this screenshot shows. The Article navigation section and the closed Search engine & social (SEO) section, ringed.
Article navigation — “The Previous / Next links shown at the bottom of this article.” Steps 4 to 8.
Search engine & social (SEO) — “Optional — leave blank and the article’s title & excerpt are used automatically.” It is closed by default. Steps 9 to 14.
Part 1: Previous and Next links#
At the bottom of every article on your help center, customers see two cards: ← PREVIOUS on the left and NEXT → on the right. This is how they look:
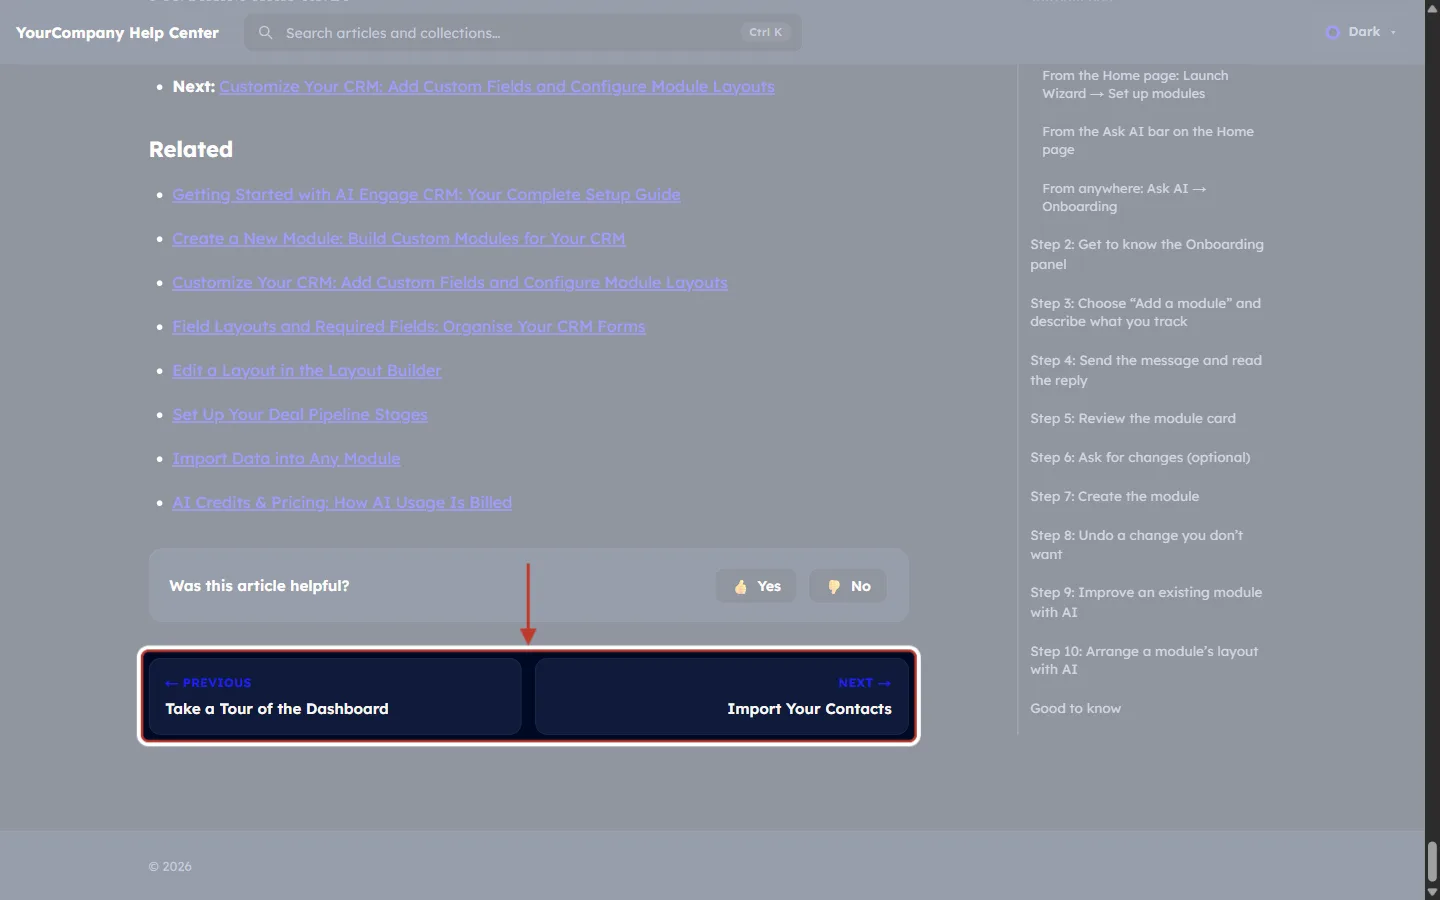
What this screenshot shows. The bottom of the “Invite Your Team” article on the help center, with the two navigation cards ringed.
← PREVIOUS — Take a Tour of the Dashboard: the article before this one. Clicking the card opens it.
NEXT → — Import Your Contacts: the article after this one.
Above the cards is Was this article helpful? with Yes and No.
If there is no previous or no next article, that card simply isn’t shown.
The cards make a collection read like a step-by-step course: customers finish one article and go straight to the next.
Step 4: Understand Automatic mode#
New articles use Automatic mode. You don’t have to pick anything: the links follow the order of the articles in the collection.
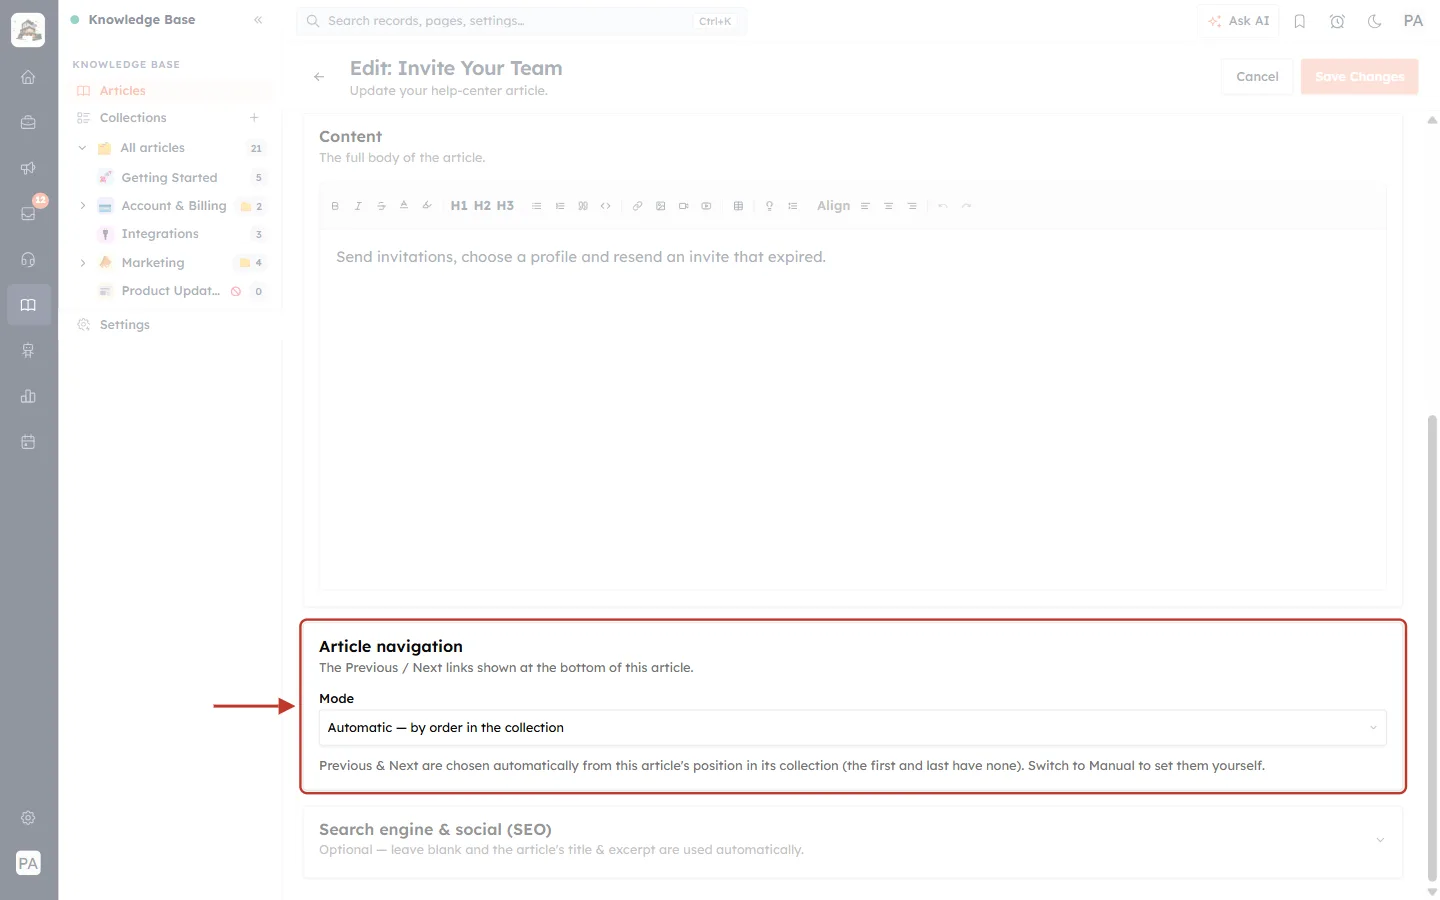
What this screenshot shows. The Article navigation section, ringed, in its default setting.
Mode: Automatic — by order in the collection.
“Previous & Next are chosen automatically from this article’s position in its collection (the first and last have none). Switch to Manual to set them yourself.”
So the first article of a collection has no Previous card, and the last one has no Next card.
Change the order of the collection (Step 5) and every article’s automatic links change with it. No article needs to be edited.
Step 5: Change the collection order#
In Automatic mode you control Previous/Next by putting the collection’s articles in the right order. In the Knowledge Base side panel, click the collection:
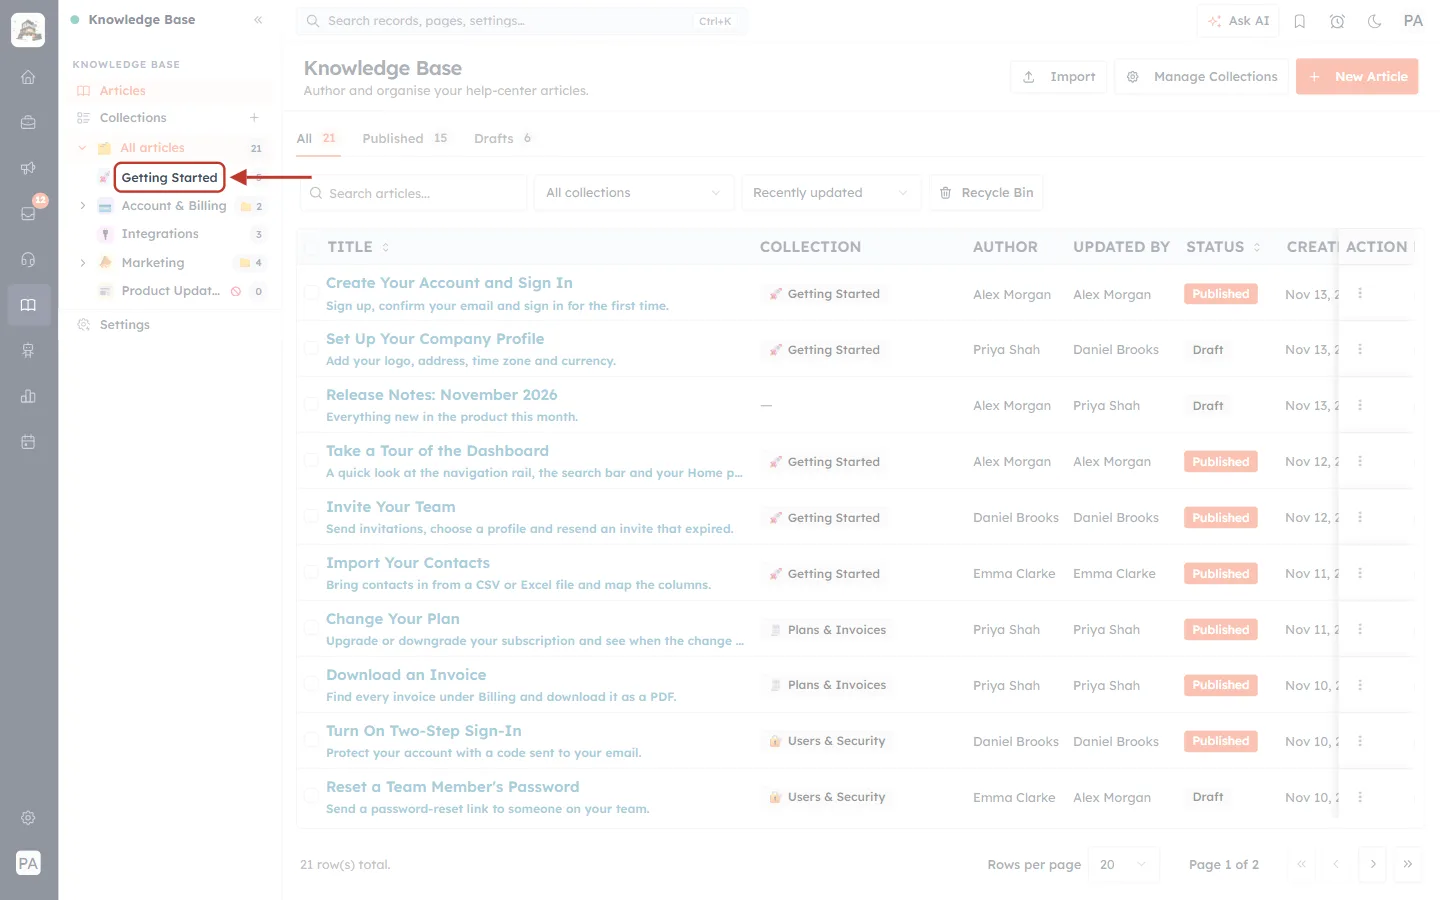
What this screenshot shows. Getting Started in the side-panel collection tree, ringed.
The tree under All articles lists your collections with the number of articles in each (Getting Started 5).
Click a collection to show only its articles in a list you can reorder.
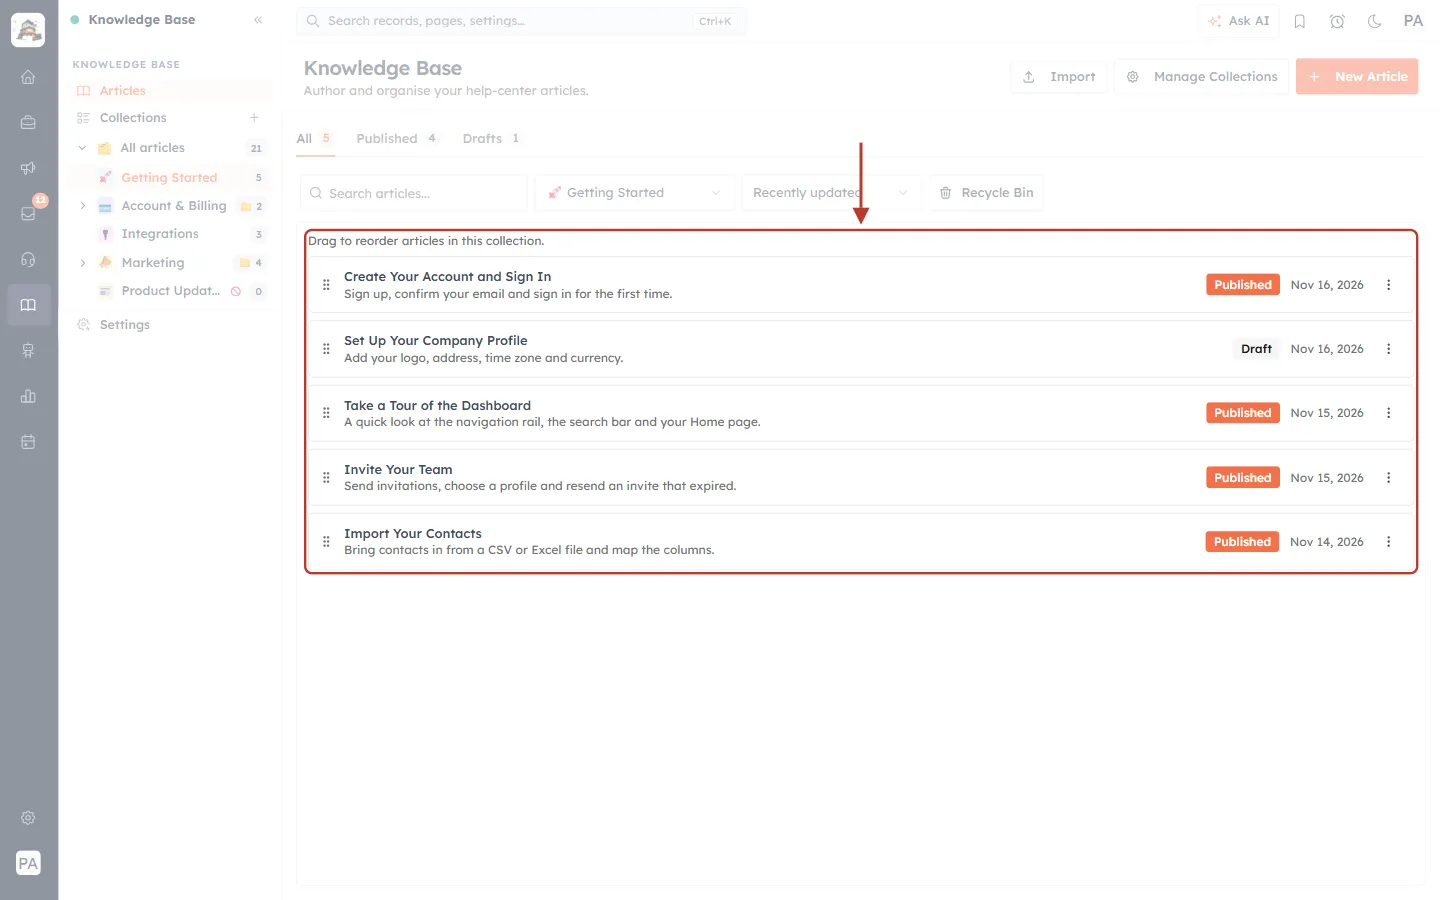
What this screenshot shows. The Getting Started articles, ringed, in their current order.
“Drag to reorder articles in this collection.”
The articles from top to bottom: Create Your Account and Sign In, Set Up Your Company Profile, Take a Tour of the Dashboard, Invite Your Team, Import Your Contacts.
Each row shows the ⠿ drag handle on the left, the title and excerpt, the status (Published or Draft), the date and the ⋮ menu.
The filter at the top now reads Getting Started, and the tabs count only this collection (All 5, Published 4, Drafts 1).
With this order, “Invite Your Team” has Take a Tour of the Dashboard as Previous and Import Your Contacts as Next.
Press and hold the ⠿ handle of an article and drag it up or down. Here we move Invite Your Team above Take a Tour of the Dashboard:
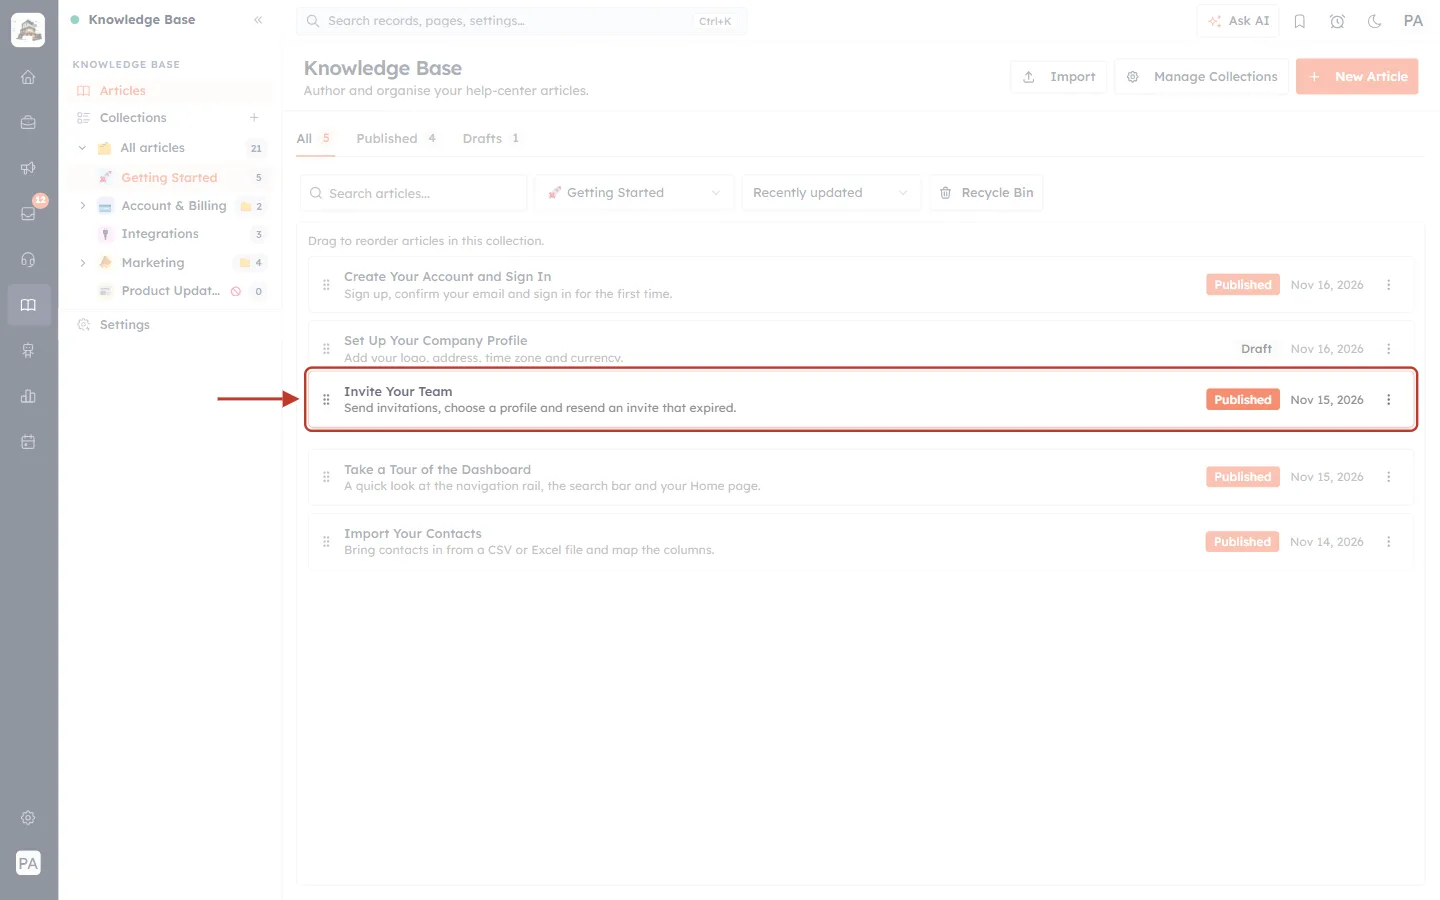
What this screenshot shows. The Invite Your Team row, ringed, while it is being dragged.
The row you are dragging stands out from the list and follows the mouse.
The other rows move aside to show where it will land.
Release the mouse button to drop it there.
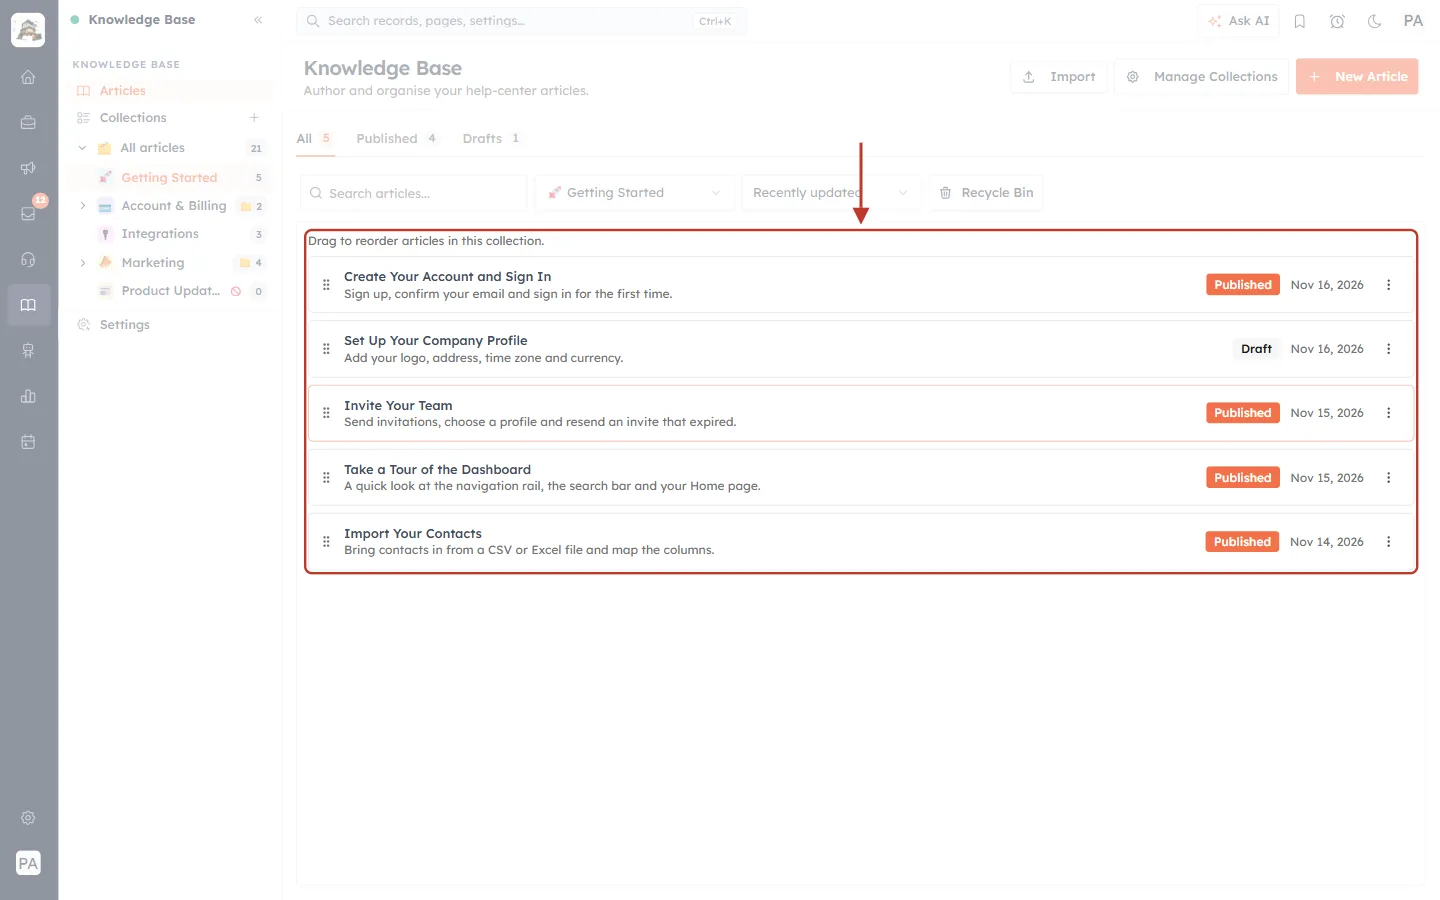
What this screenshot shows. The Getting Started list, ringed, after the drag.
The new order: Create Your Account and Sign In, Set Up Your Company Profile, Invite Your Team, Take a Tour of the Dashboard, Import Your Contacts.
The order is saved as soon as you drop the row. There is no separate Save button.
“Invite Your Team” now links back to Set Up Your Company Profile and forward to Take a Tour of the Dashboard. The neighbouring articles’ links update too.
Customers also see this order on the collection page of your help center.
✅
Put articles in the order a new customer needs them: set-up first, everyday tasks next, advanced topics and troubleshooting last. The automatic Previous/Next links then guide them through it.
Step 6: Switch to Manual mode#
Sometimes the next logical article is in a different collection, for example after inviting your team you want customers to connect their mailbox. Then choose the links yourself. In the article form, click the Mode box:
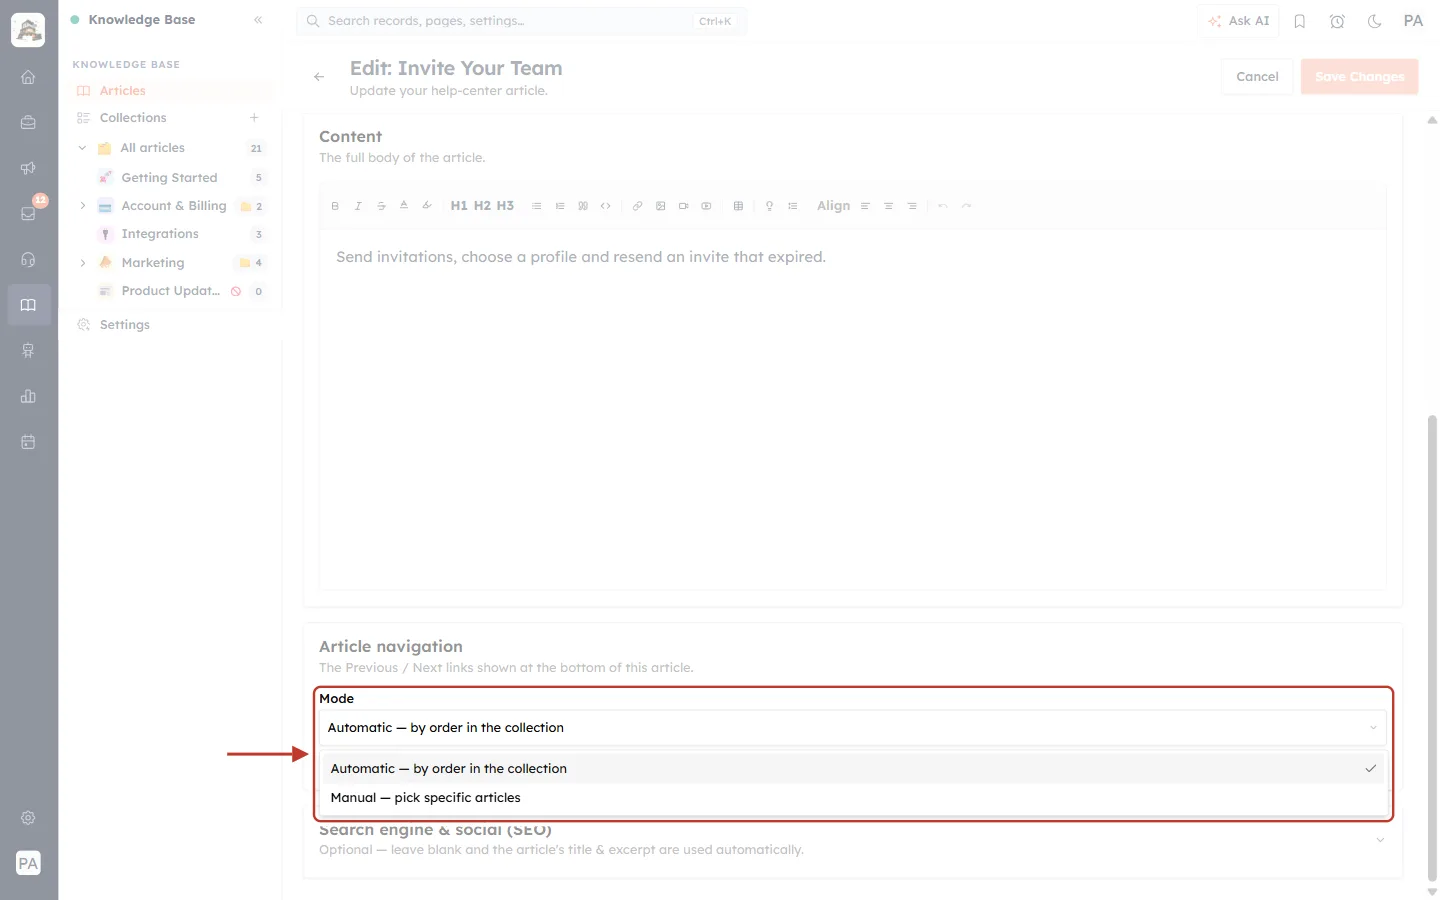
What this screenshot shows. The Mode list open, ringed.
Automatic — by order in the collection (ticked): the current setting.
Manual — pick specific articles: choose the Previous and Next articles yourself.
Click Manual — pick specific articles. Two new fields appear:
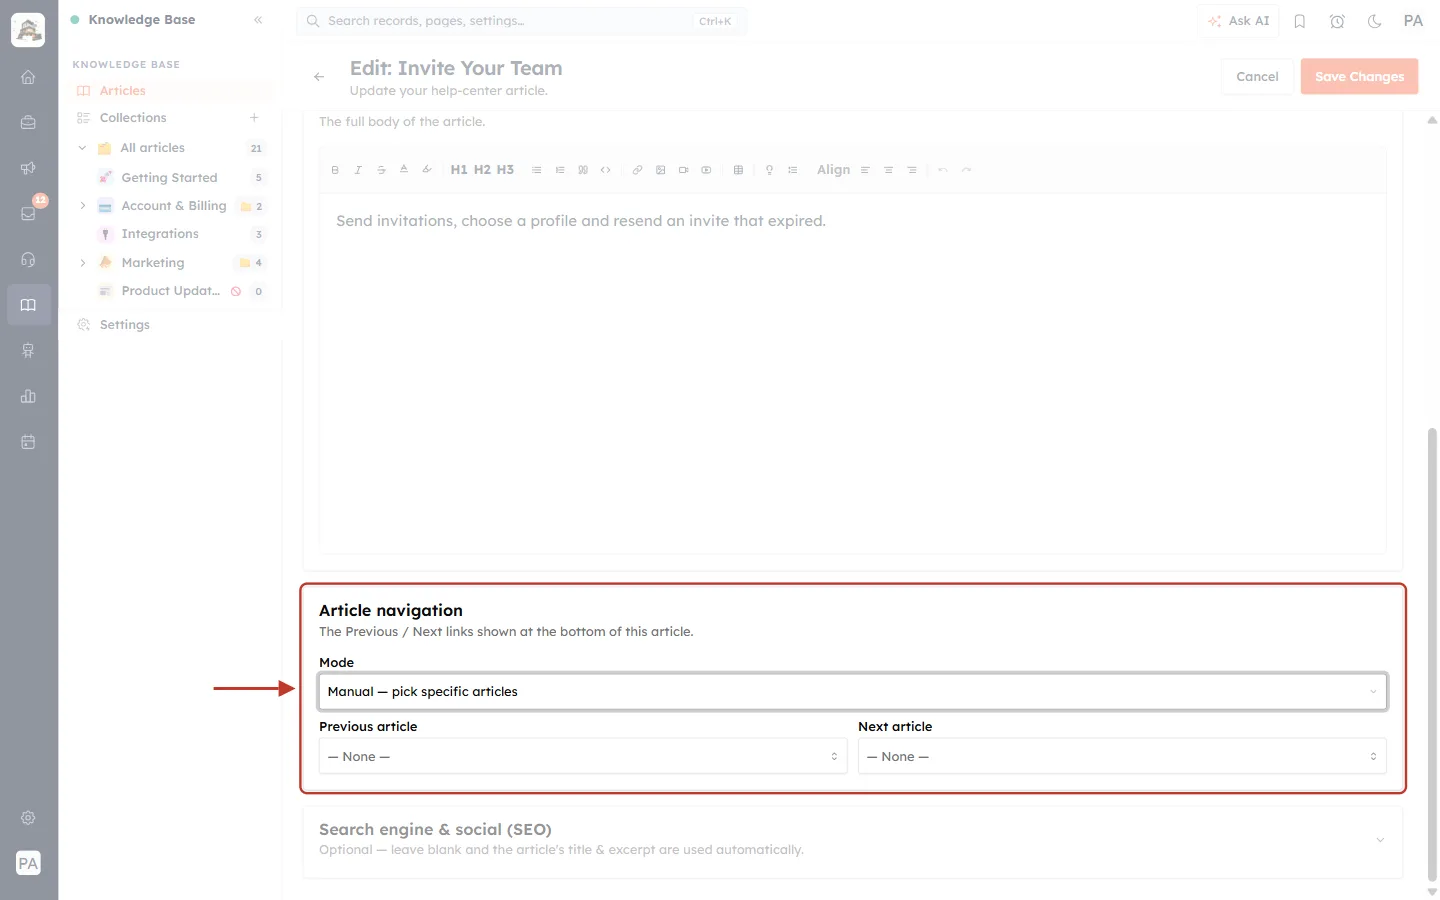
What this screenshot shows. The Article navigation section, ringed, right after switching to Manual.
Mode: Manual — pick specific articles.
Previous article and Next article, both on — None —.
In Manual mode, a side left on — None — shows no card at all. Fill in at least the Next article so readers have somewhere to go.
Step 7: Pick the Previous and Next articles#
Click the Previous article box. A list of all your articles opens with a search box at the top. Type a few letters of the title to find it quickly:
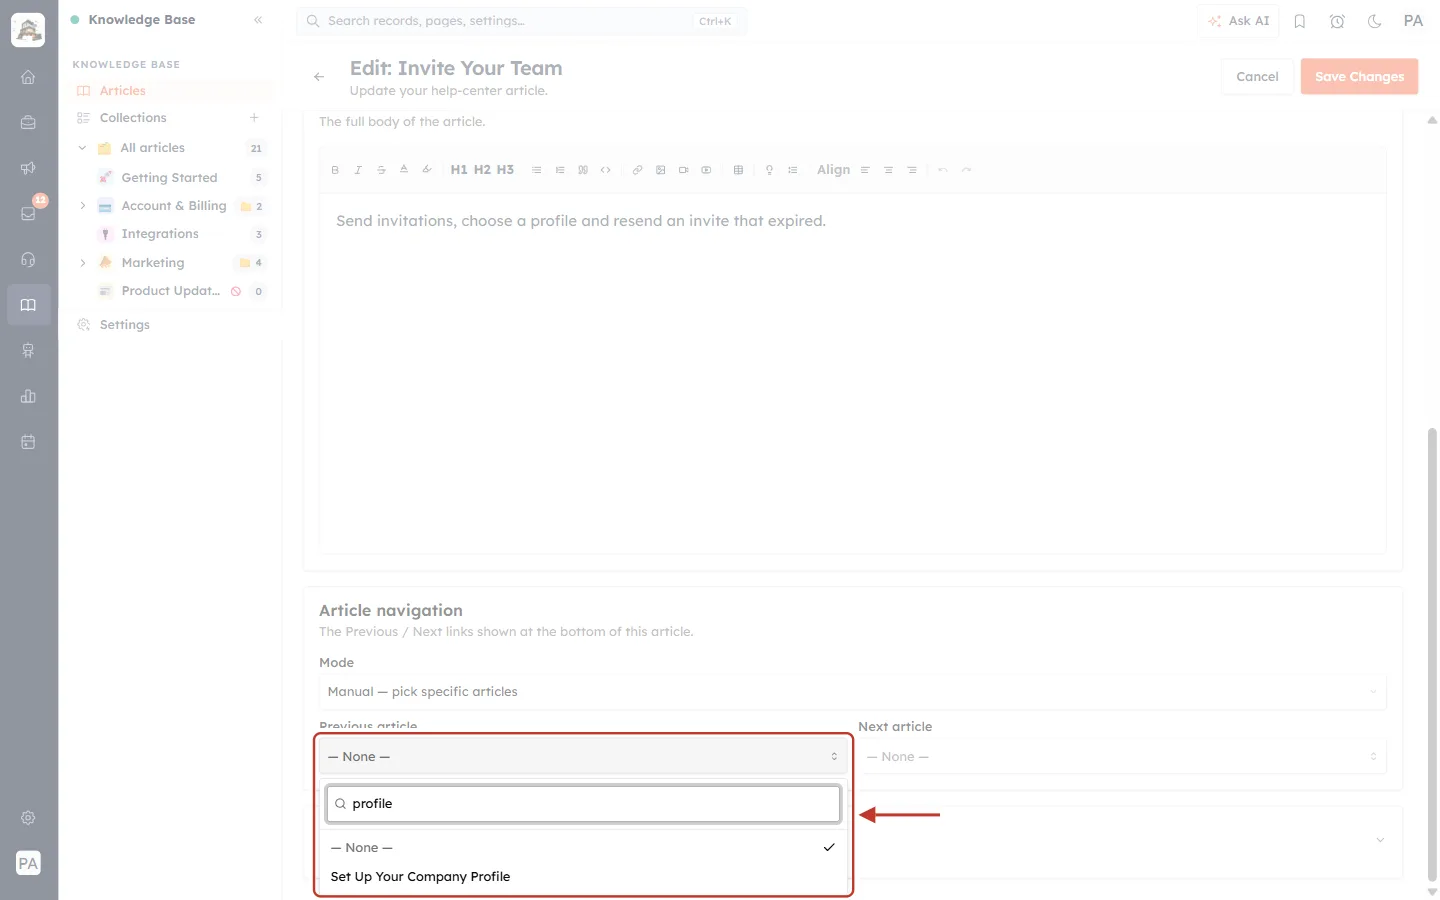
What this screenshot shows. The Previous article list, ringed, after typing “profile”.
Search articles…: we typed profile, so the list shows only matching titles.
— None — is always at the top, to clear the choice.
Set Up Your Company Profile: click it to choose it as the Previous article.
Now click Next article and do the same. You can pick an article from any collection:
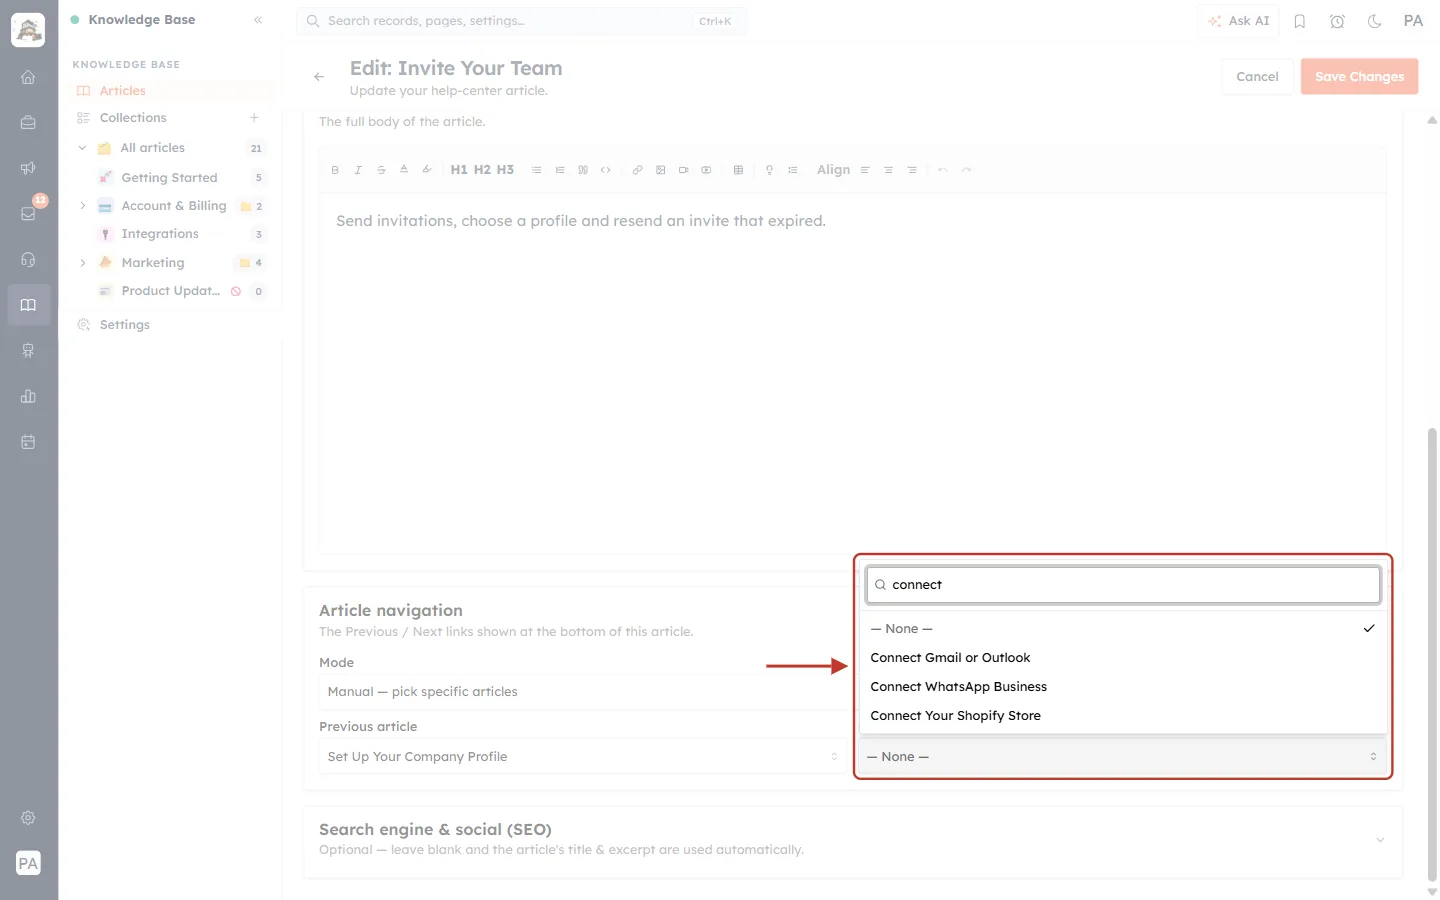
What this screenshot shows. The Next article list, ringed, after typing “connect”.
The search found three articles from the Integrations collection: Connect Gmail or Outlook, Connect WhatsApp Business and Connect Your Shopify Store.
We choose Connect Gmail or Outlook, the natural next step after inviting the team.
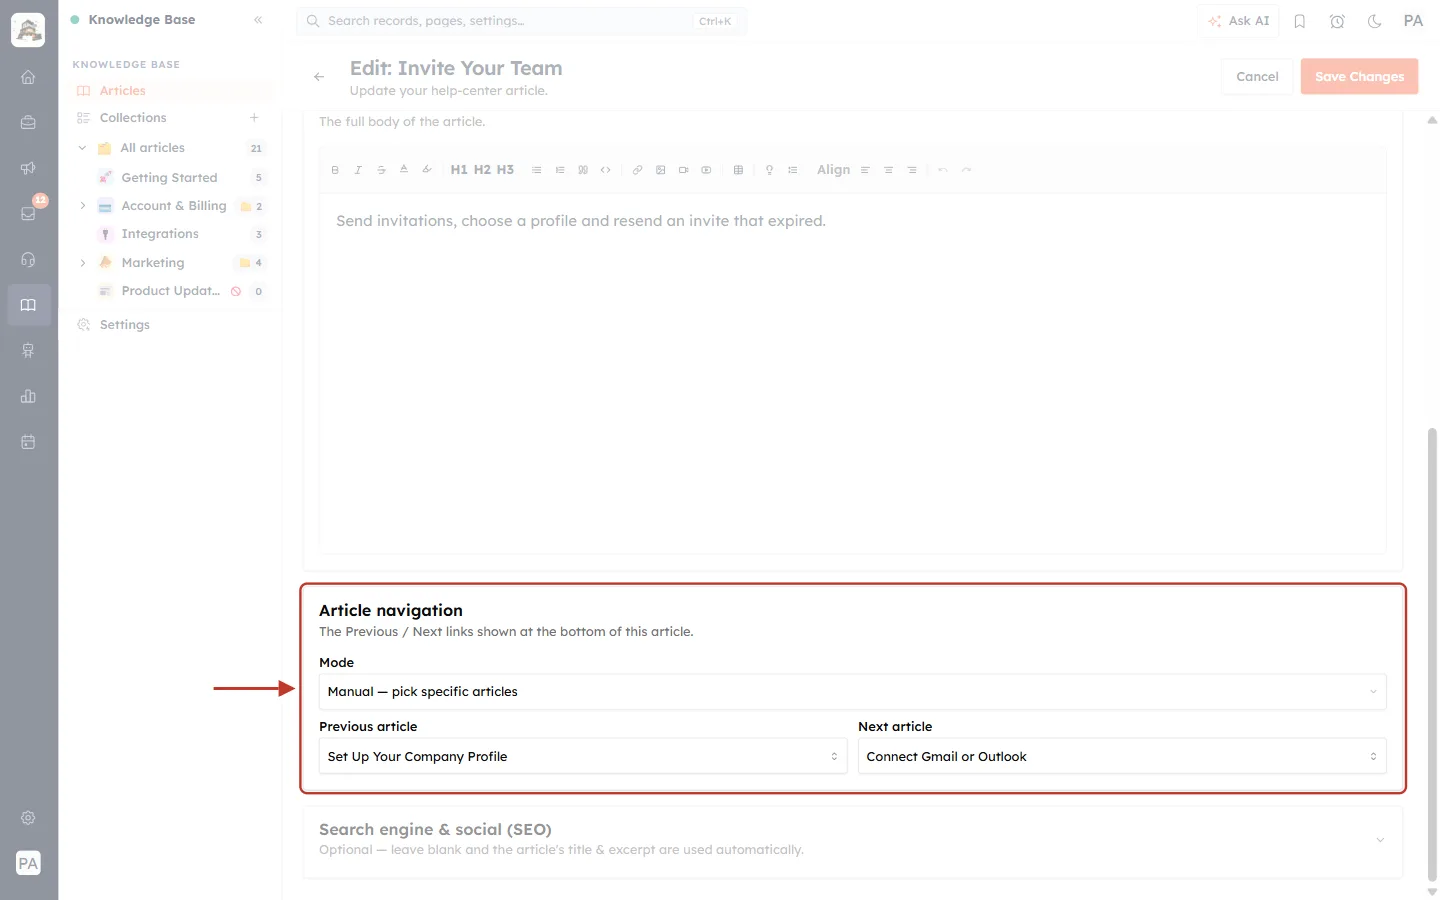
What this screenshot shows. The Article navigation section, ringed, with both links set.
Mode: Manual — pick specific articles.
Previous article: Set Up Your Company Profile.
Next article: Connect Gmail or Outlook.
These links stay the same even if you reorder the collection later. Only this article is affected; the chosen articles keep their own settings.
ℹ️
Manual links are one-way. Pointing this article’s Next to “Connect Gmail or Outlook” does not make that article point back here. If you want both directions, edit the other article too.
Step 8: Go back to Automatic (optional)#
To return to the collection order, set Mode back to Automatic — by order in the collection and click Save Changes. Your manual choices are no longer used.
Part 2: Search engines and social sharing#
Every article is a public web page, so Google and other search engines can list it, and people can share its link. The Search engine & social (SEO) section lets you fine-tune how it appears there. All fields are optional.
Step 9: Open the SEO section#
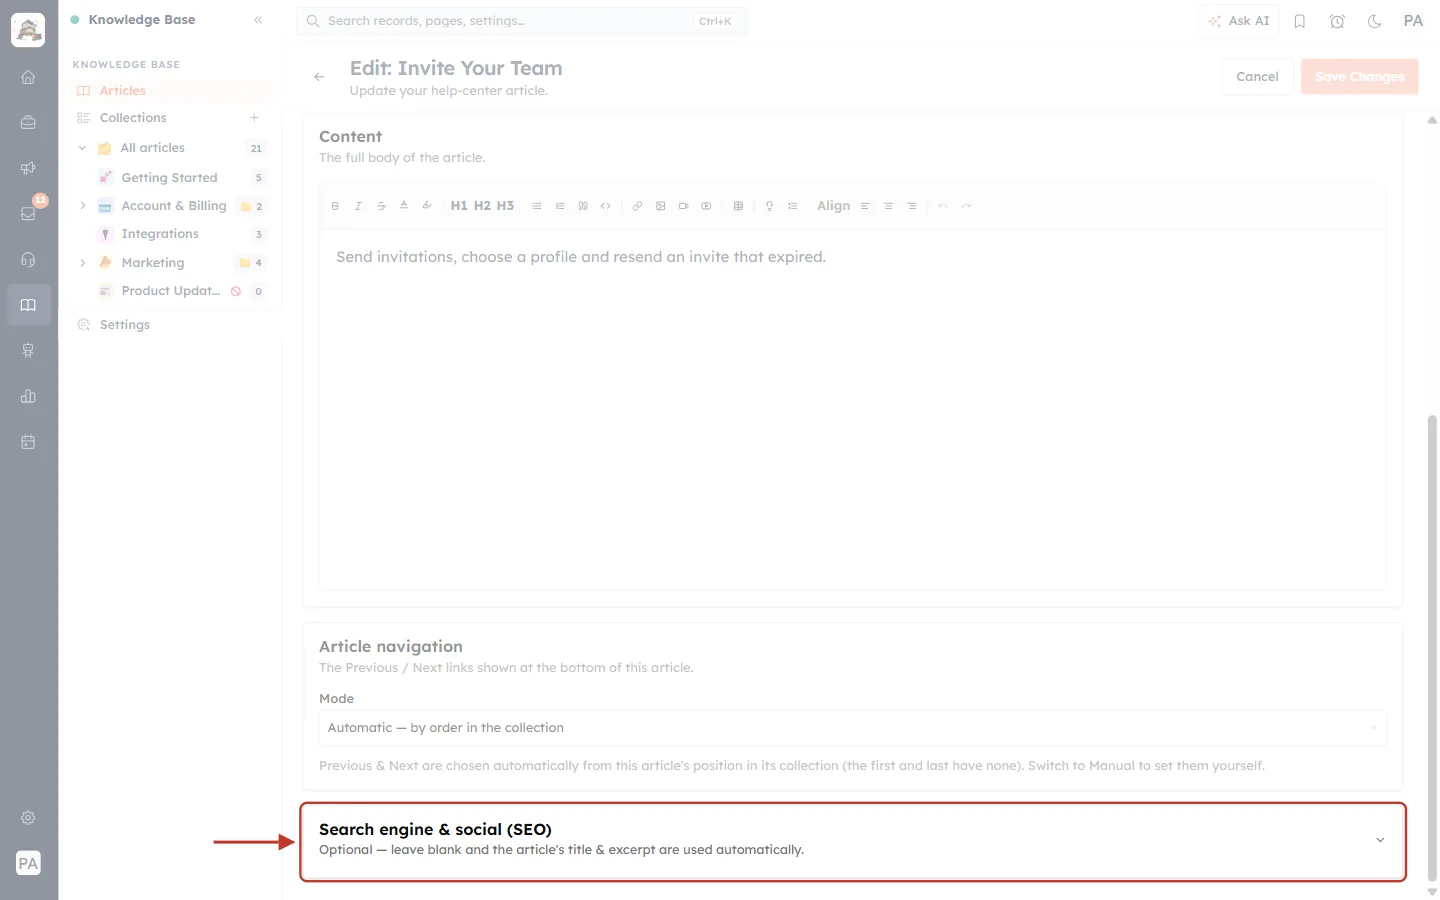
What this screenshot shows. The Search engine & social (SEO) section, ringed, while it is closed.
“Optional — leave blank and the article’s title & excerpt are used automatically.”
Click the heading (or the ˅ arrow on the right) to open it.
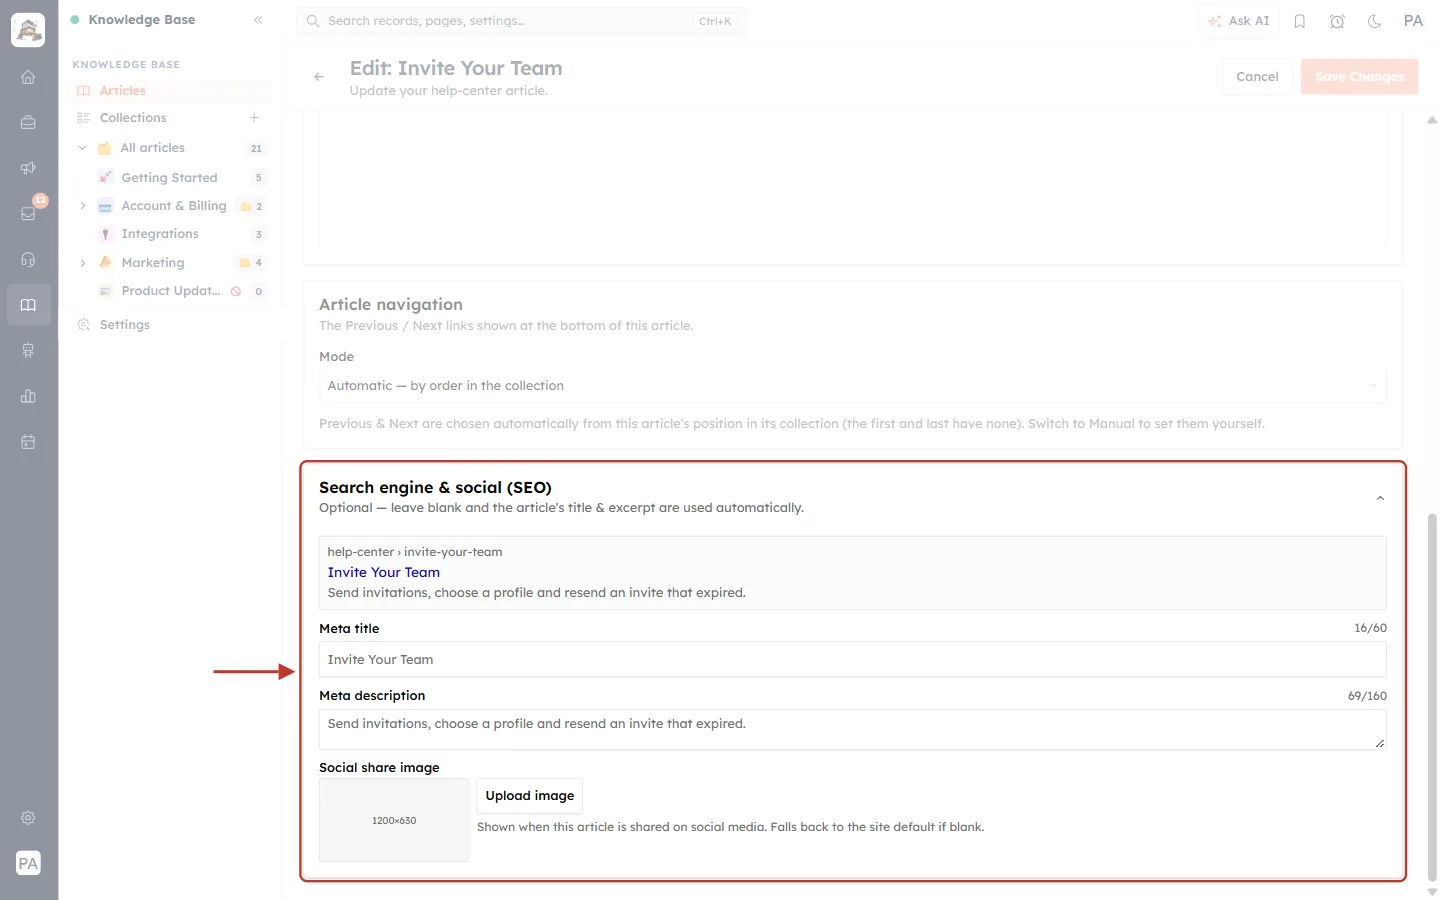
What this screenshot shows. The open SEO section, ringed, with nothing filled in yet.
The preview box at the top shows how the article could look as a search result: the address path help-center › invite-your-team, the title in blue (Invite Your Team), and the description underneath. It updates while you type.
Meta title (16/60): empty. The grey text inside is the article title, which is used while the field is empty. The counter counts that title.
Meta description (69/160): empty. The grey text is the excerpt, which is used while the field is empty.
Social share image: the empty 1200×630 box and Upload image. “Shown when this article is shared on social media. Falls back to the site default if blank.”
The ˄ arrow at the top right closes the section.
Step 10: Write a meta title#
The meta title is the clickable blue headline in Google results and the text in the browser tab. Click in Meta title and type a title that says clearly what the page is about, ideally with words customers would search for.
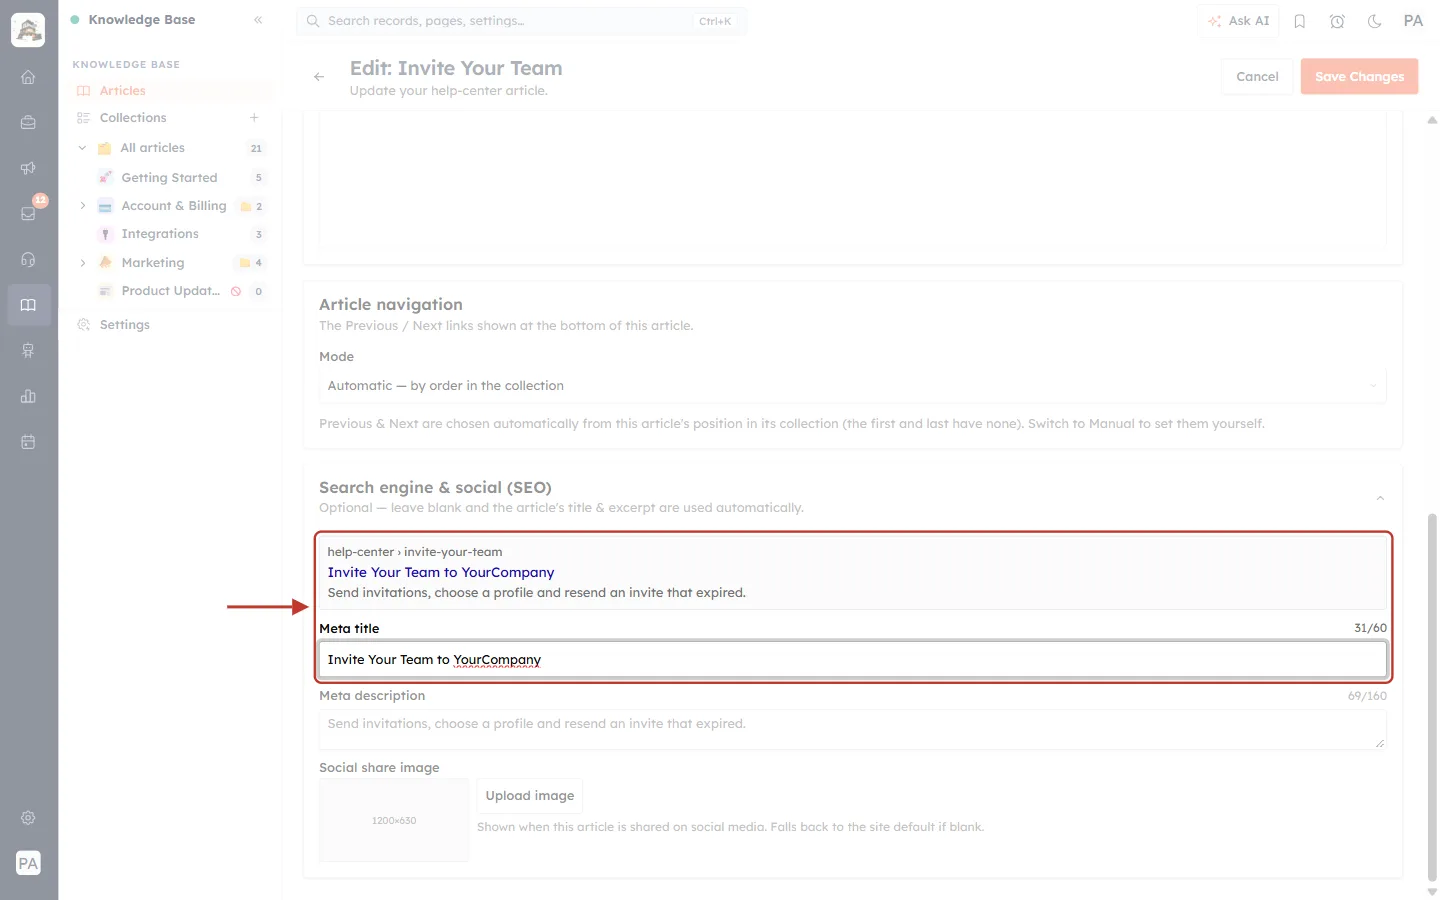
What this screenshot shows. The preview and the Meta title field, ringed.
Meta title: “Invite Your Team to YourCompany”.
The preview’s blue headline changed to the same text straight away.
On your help center, the name of your help center is added after it in the browser tab, for example “Invite Your Team to YourCompany · YourCompany Help Center”.
The counter on the right shows how many of the recommended 60 characters you used.
Keep it within about 60 characters. Search engines cut off longer titles. The field lets you type up to 70 characters and then stops; the counter just goes past 60 without a warning:
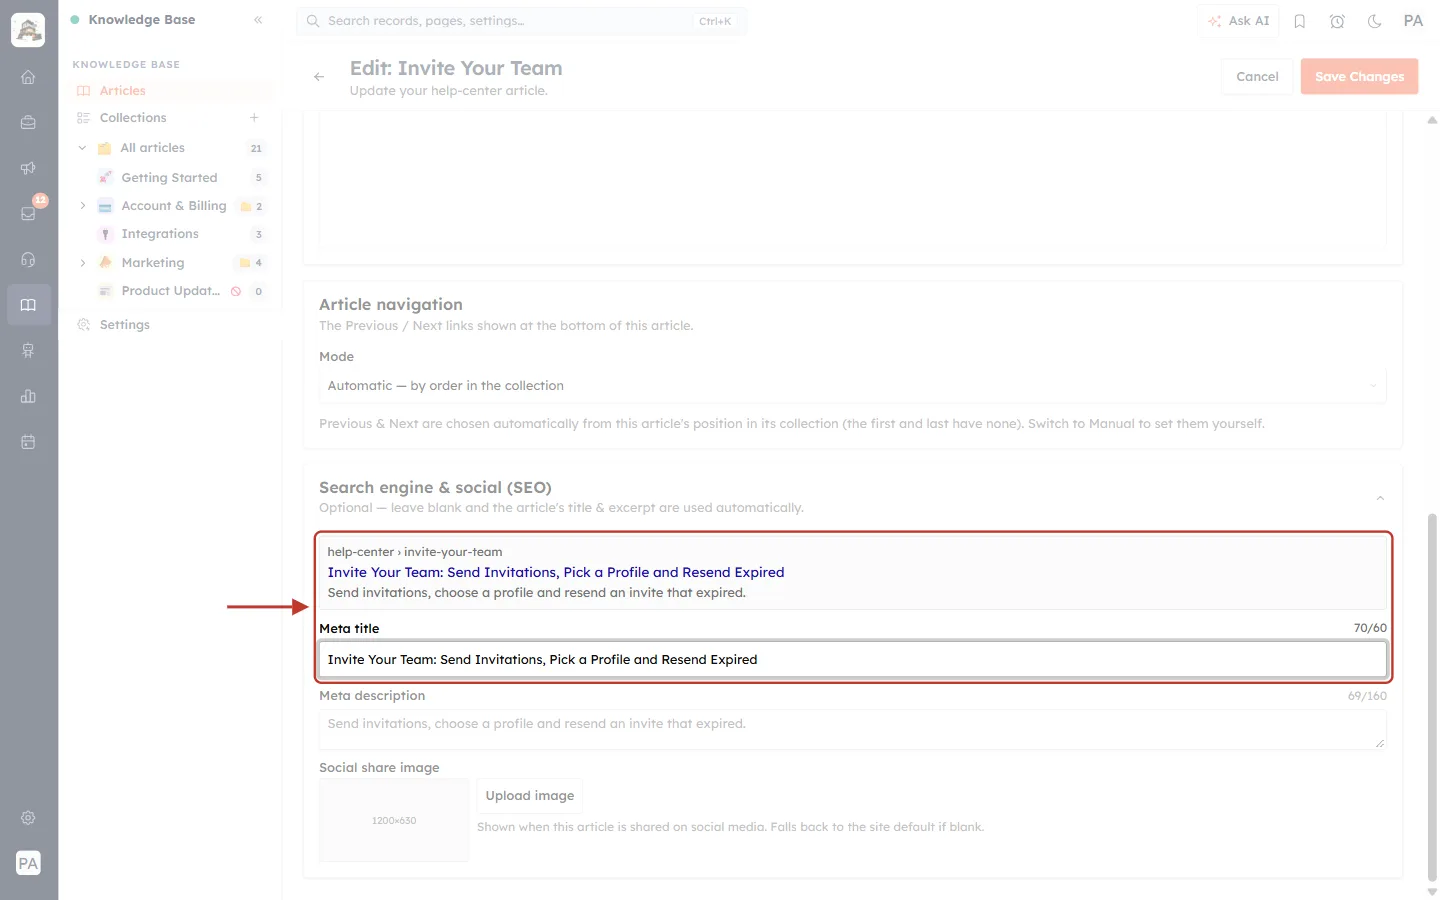
What this screenshot shows. The preview and the Meta title field, ringed, with a title that is too long.
The counter reads 70/60: ten characters over the recommended length.
Typing stopped at 70 characters, so the end of the text (“…Invites Today”) was cut off.
In Google, a title this long is usually shortened with “…”. Shorten it so the important words come first.
✅
Put the most important words first: “Invite Your Team to YourCompany” works better than “YourCompany Help: How You Can Invite Your Team”.
Step 11: Write a meta description#
The meta description is the short text under the headline in Google results and in shared-link previews. A good one makes people click. Click in Meta description and write one or two sentences.
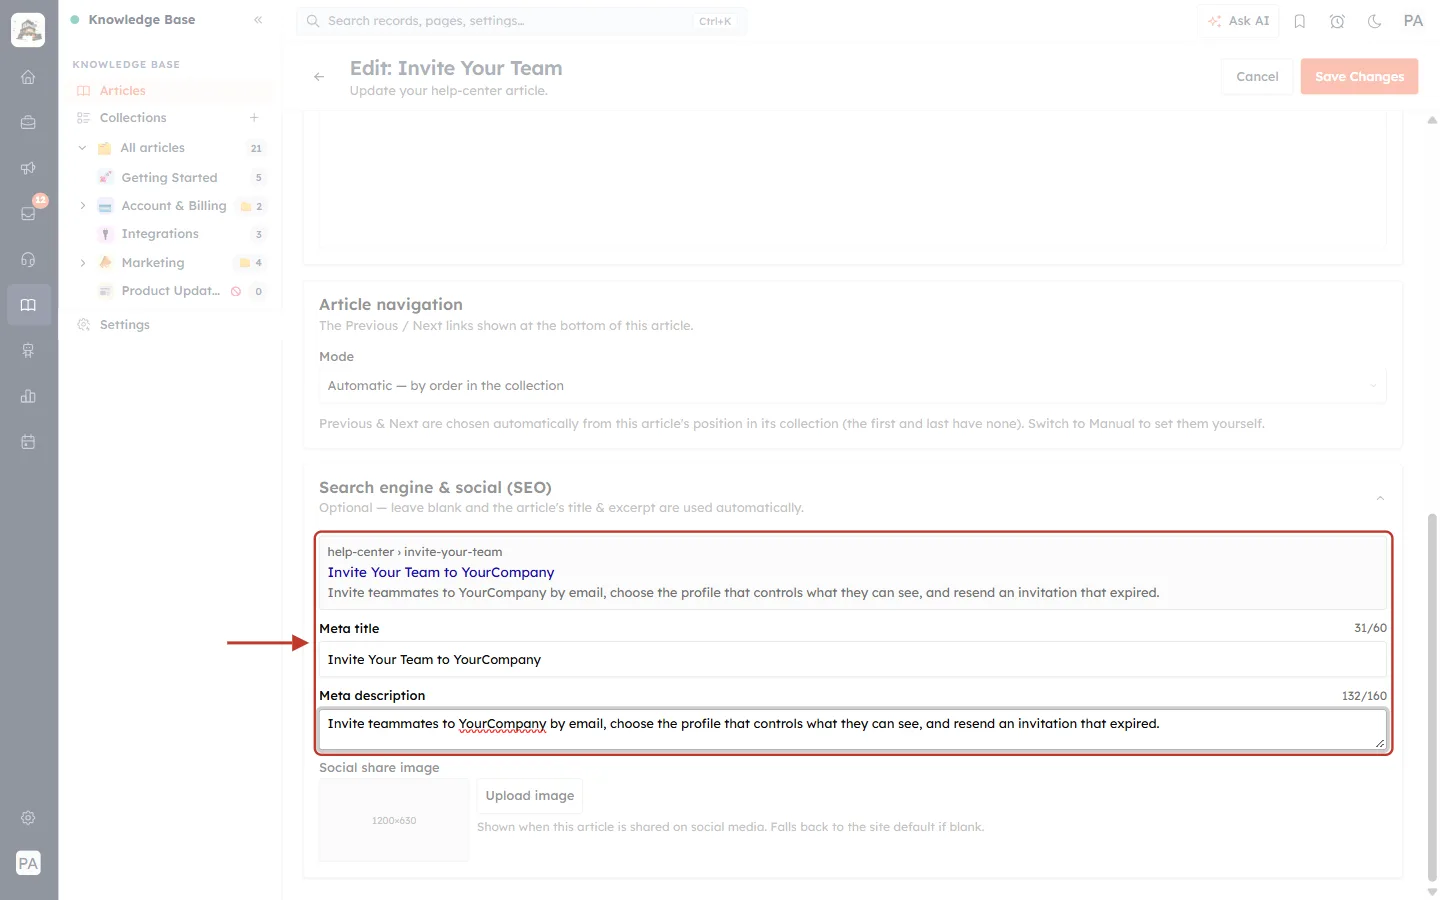
What this screenshot shows. The preview and the Meta description field, ringed.
Meta description: “Invite teammates to YourCompany by email, choose the profile that controls what they can see, and resend an invitation that expired.”
The preview now shows this text under the title instead of the excerpt.
The counter reads 132/160. Aim for about 150–160 characters. The field accepts up to 200, but search engines usually cut the rest.
Describe what the reader will be able to do after reading, in plain words.
Step 12: Add a social share image#
When someone pastes the article’s link into WhatsApp, LinkedIn, Facebook, X or Slack, a preview card appears with a picture. Choose that picture here.
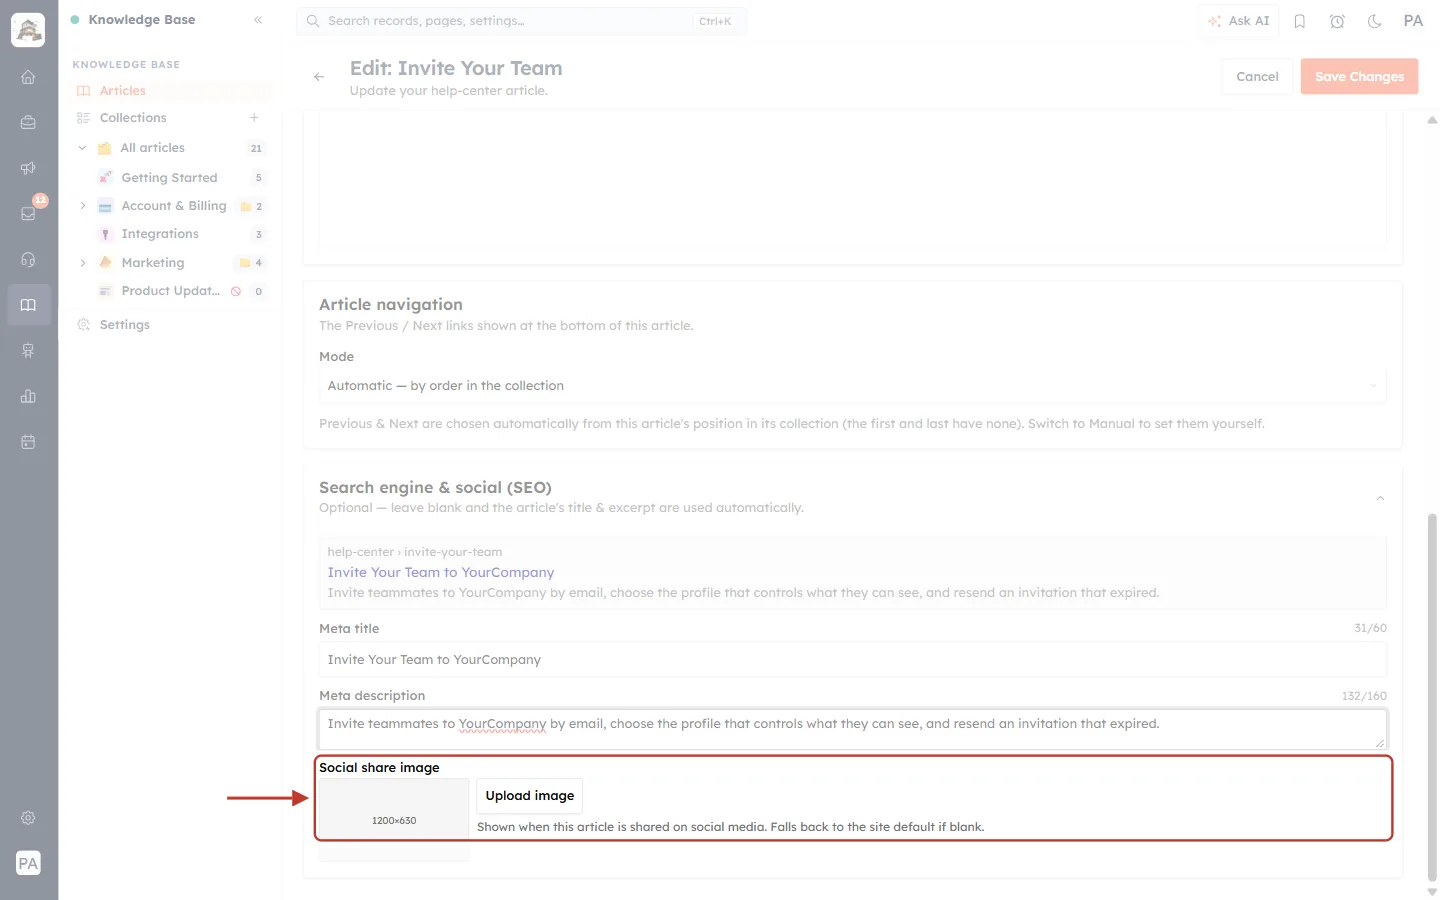
What this screenshot shows. The Social share image field, ringed.
The grey 1200×630 box is where the image appears once you upload it. 1200 × 630 pixels is the size social networks expect.
Upload image: click it and choose a PNG or JPG from your computer.
“Shown when this article is shared on social media. Falls back to the site default if blank.” The site default is the image set in Help Center Settings (Step 15).
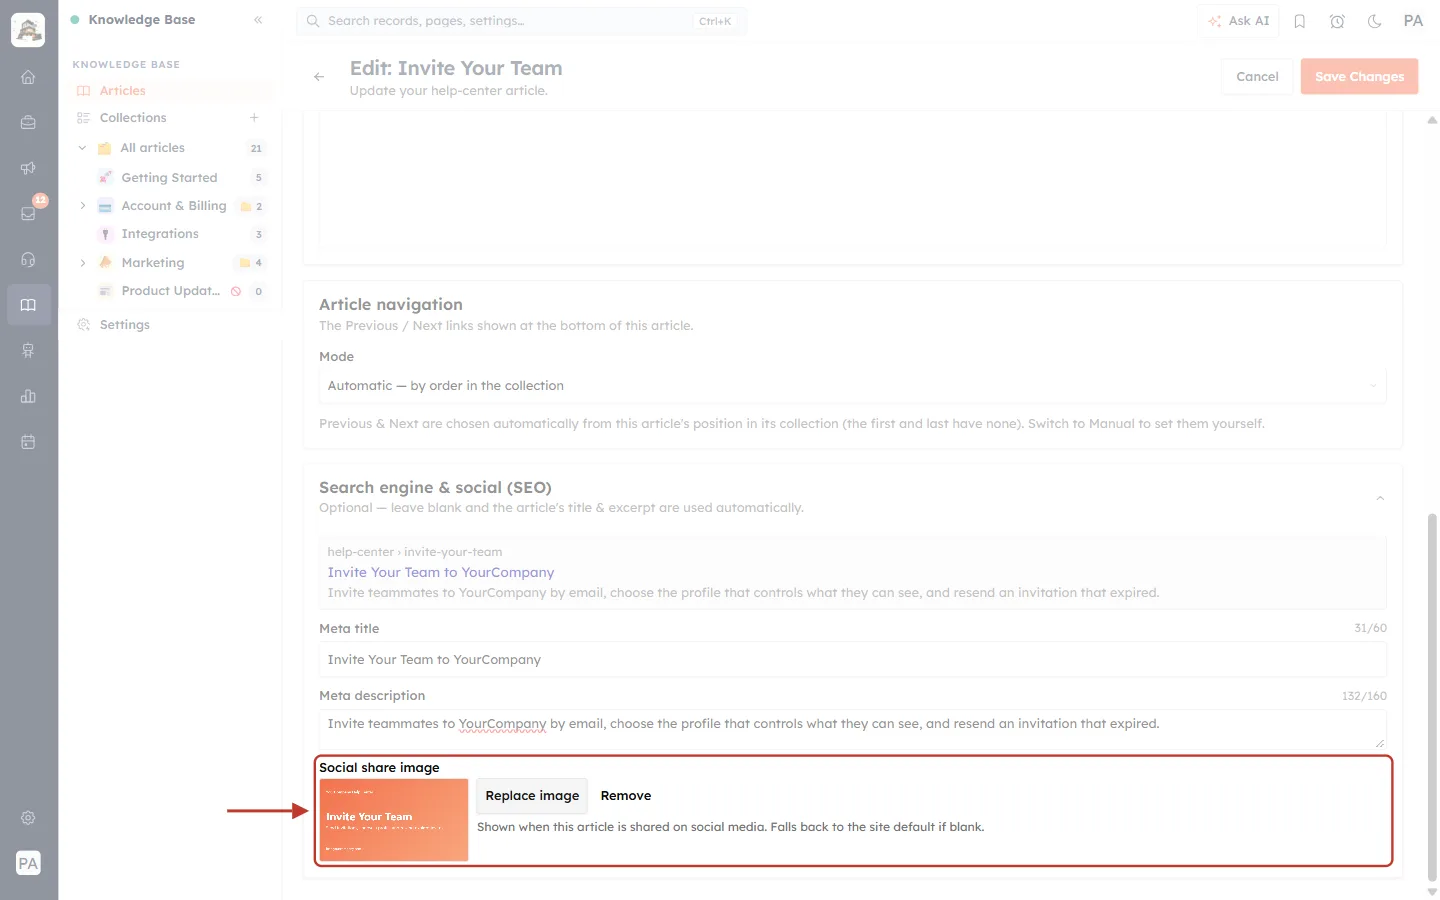
What this screenshot shows. The Social share image field, ringed, after uploading.
The thumbnail shows the uploaded image: an orange card with the help-center name and the article title “Invite Your Team”.
Replace image: upload a different picture instead.
Remove: delete it, so the site default image is used again.
✅
A good share image has large text (the article title), your logo or brand colours, and nothing important near the edges, because some apps crop the corners.
Step 13: Review the whole SEO section#
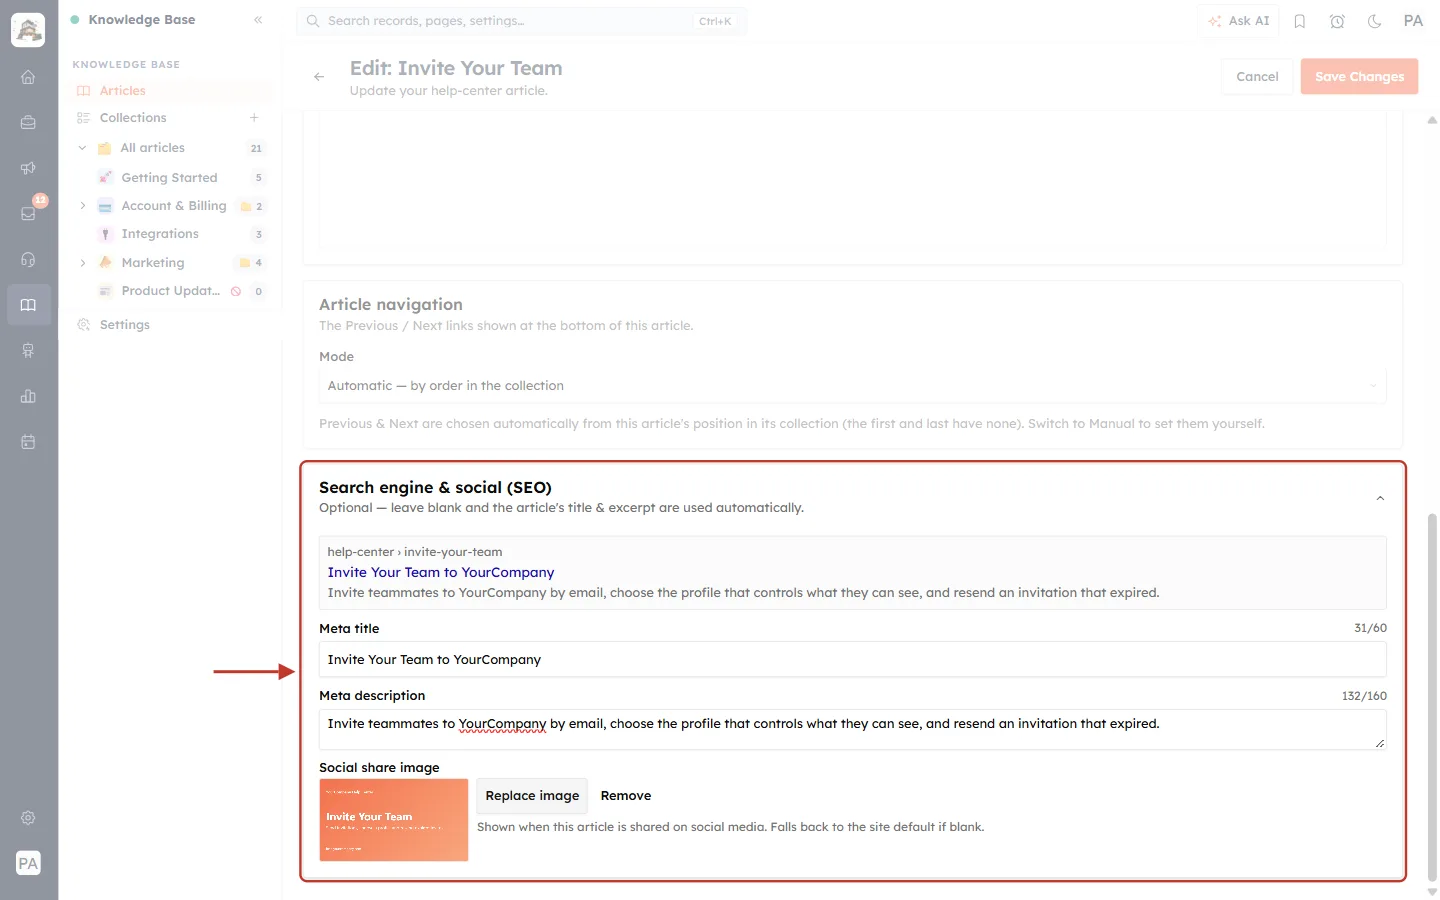
What this screenshot shows. The whole Search engine & social (SEO) section, ringed, after Steps 10 to 12.
Preview: help-center › invite-your-team, the headline “Invite Your Team to YourCompany” and the new description.
Meta title: Invite Your Team to YourCompany (31/60).
Meta description: the new description (132/160).
Social share image: the uploaded picture, with Replace image and Remove.
Step 14: Save your changes#
Scroll to the top (or stay where you are) and click Save Changes.
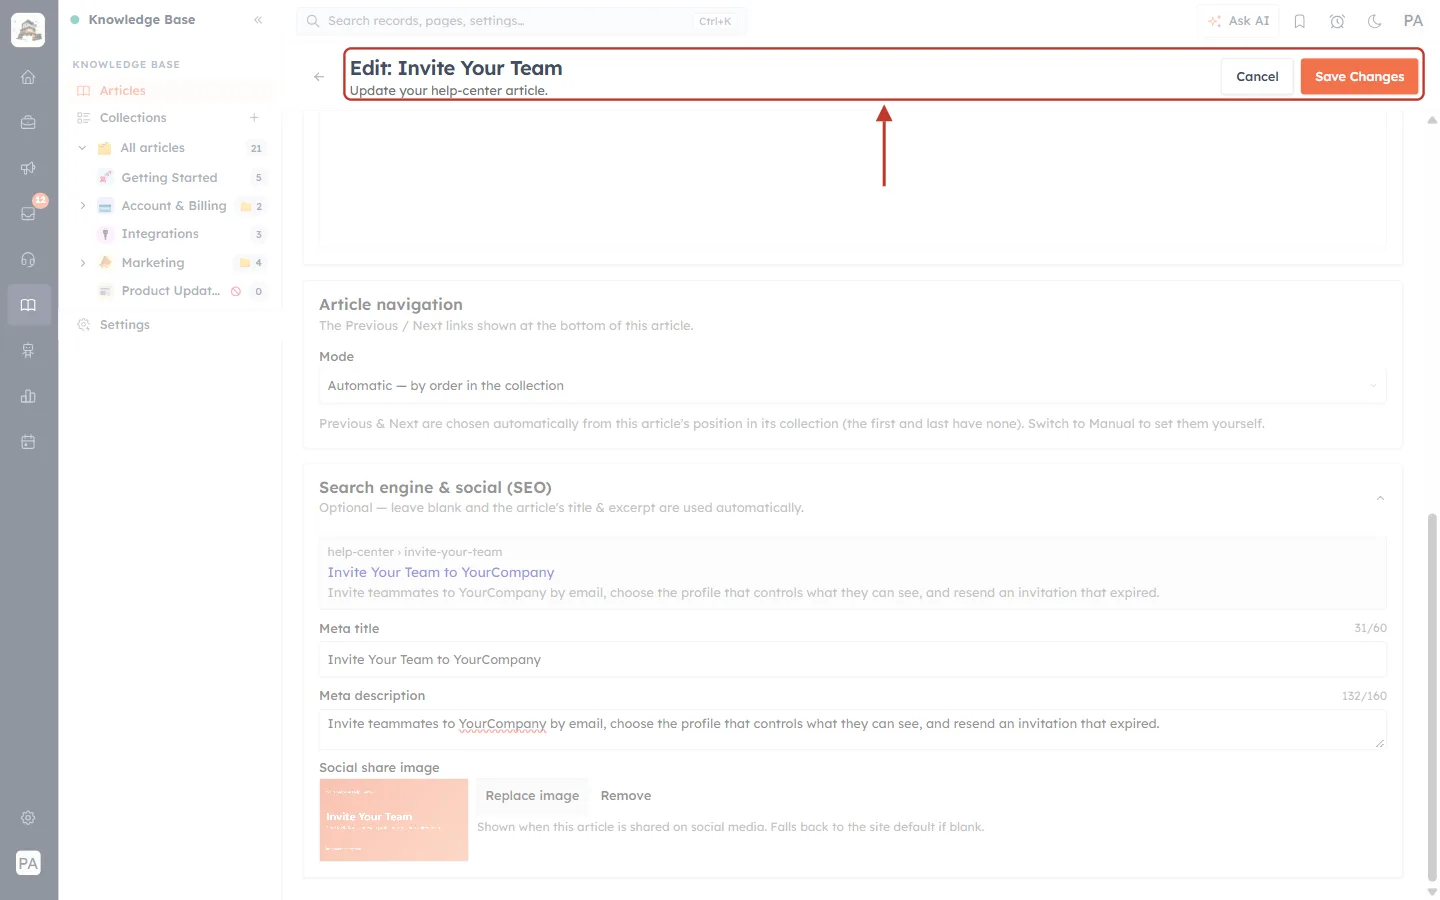
What this screenshot shows. The top of the form, ringed, with Save Changes now active.
Save Changes is bright orange because you changed something. Click it to save the navigation and SEO settings together with the rest of the article.
For a published article, the help center uses the new settings straight away.
Search engines notice the change the next time they visit the page, which can take from a few days to a few weeks. Social apps may also keep showing an old preview for a while.
Step 15: Set the help-center defaults#
Some SEO settings apply to the whole help center: they are used on the home page and collection pages, and as the fallback for every article without its own share image. Open Knowledge Base → Settings and click the SEO tab.
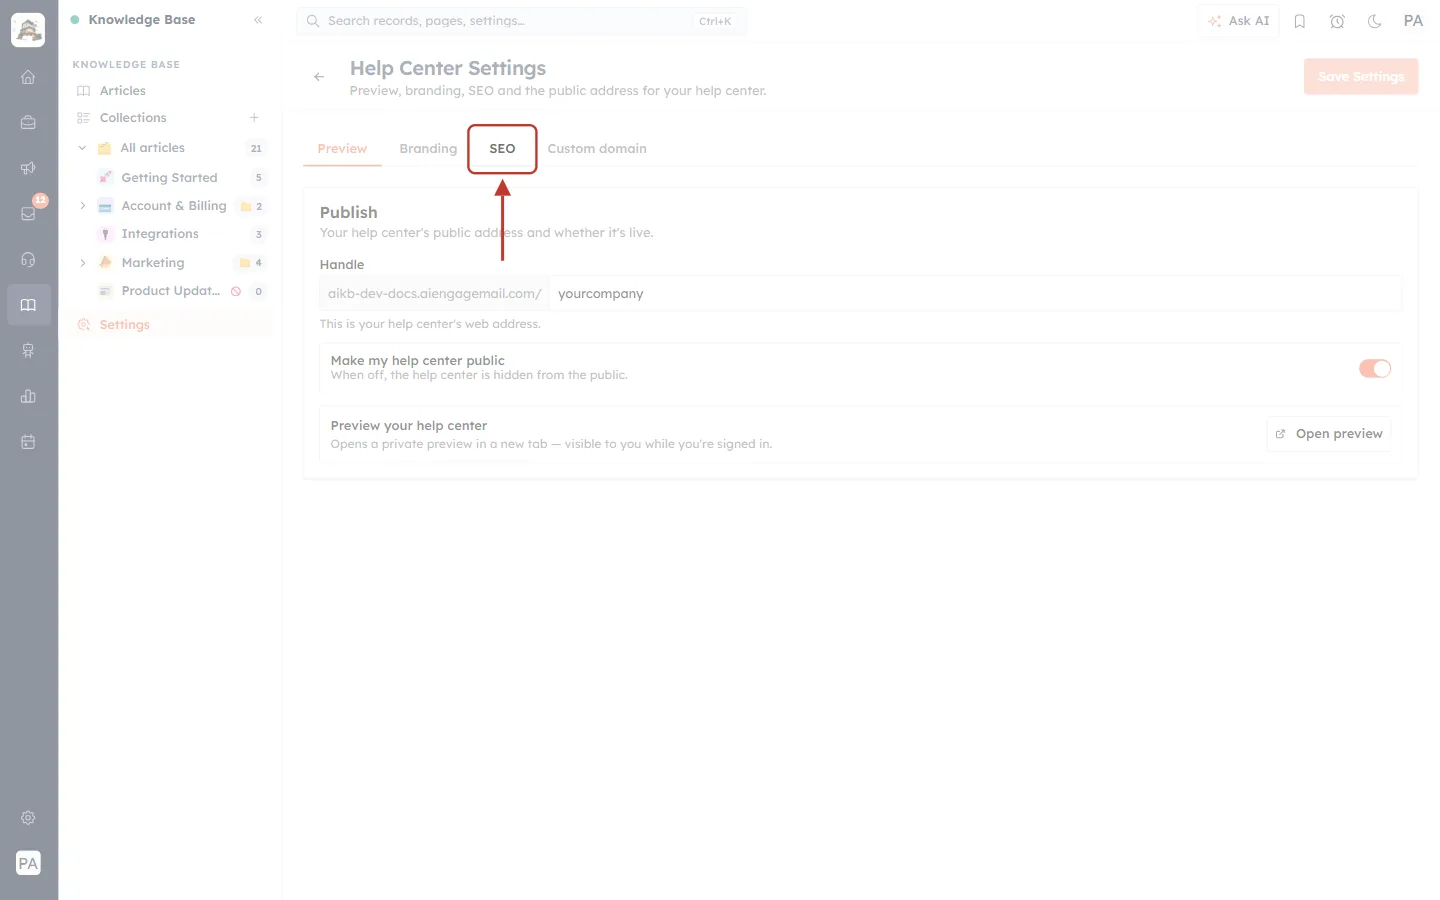
What this screenshot shows. The SEO tab, ringed, on the Help Center Settings page.
Help Center Settings — “Preview, branding, SEO and the public address for your help center.”
The tabs: Preview, Branding, SEO and Custom domain.
Save Settings at the top right becomes active after you change something.
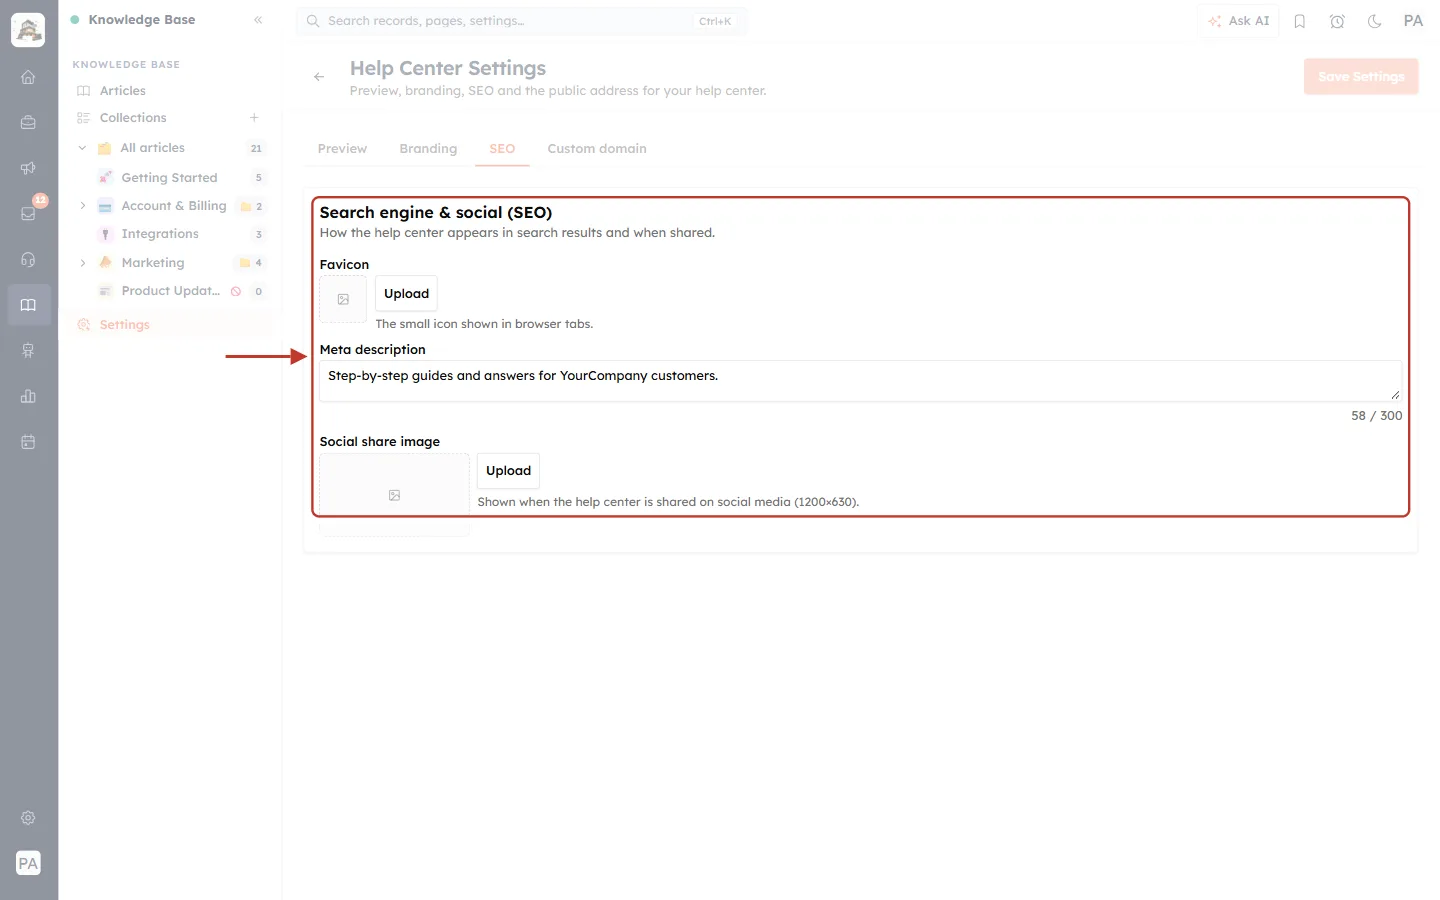
What this screenshot shows. The help-center Search engine & social (SEO) settings, ringed.
“How the help center appears in search results and when shared.”
Favicon: Upload the small icon shown in browser tabs next to the page title.
Meta description: the description of the help center as a whole, used for its home page. Up to 300 characters (here 58 / 300).
Social share image: Upload the default picture (1200×630) for shared links. Every article without its own share image uses this one.
Click Save Settings when you are done.
What your settings do on the help center#
Once the article is published, the help center turns your settings into the page information that search engines and social apps read:
On the help center | Comes from |
|---|---|
Browser tab and search-result headline | Meta title (or the article title), followed by “· your help-center name” |
Text under the headline in Google | Meta description (or the excerpt) |
Shared-link preview: title and text | Meta title and meta description (or title and excerpt) |
Shared-link preview: picture | The article’s social share image (or the help-center default) |
Page address | Your help-center address + /article/ + the slug |
Previous / Next cards | Article navigation (Automatic: collection order; Manual: your picks) |
The help center also tells search engines the one official address of each article, so the same article isn’t listed twice under different addresses.
Good to know#
All SEO fields are optional. With good titles and excerpts, the automatic values are often enough. Fill in the SEO fields for your most important articles.
Drafts are never shown on the help center, in its search or in search engines, whatever their SEO settings.
The collection order does double duty: it is the order on the collection page and the source of the automatic Previous/Next links.
Manual links point to fixed articles. If you later delete or unpublish a chosen article, edit this one and pick another.
Your own domain (Settings → Custom domain) is the address search engines will show once it is connected.
Troubleshooting#
An article shows no Previous or Next card#
Check the article’s Mode. In Automatic mode, the first article of a collection has no Previous card and the last has no Next card. Reorder the collection (Step 5) if needed.
Check that the article is in a collection. Without one, Automatic mode has nothing to follow.
In Manual mode, check that the side isn’t set to — None —.
The Previous/Next links are in the wrong order#
Why it happens: Automatic mode follows the collection order. How to fix it: click the collection in the side panel and drag the articles into the order you want (Step 5).
Google still shows the old title or description#
Why it happens: search engines update their results only when they visit the page again. Google may also choose a different text from the page if it thinks it fits the search better. What to do: wait a few days; keep the meta title short and the description specific to the page.
A shared link shows the wrong picture or an old preview#
Why it happens: the article has no share image (so the help-center default is used), or the app cached an old preview. How to fix it: upload a share image in the article’s SEO section and save. Then wait, or use the network’s own link-preview tool to refresh it.
My meta title stops before I finish typing#
Why it happens: the field holds up to 70 characters. How to fix it: shorten it to about 60 characters and put the key words first.
Frequently asked questions#
Do I have to fill in the SEO section for every article?
No. Empty fields use the article title, excerpt and the help-center default image. Fill them in where you want a better search headline or a custom share picture.
Can Previous and Next point to articles in other collections?
Yes, in Manual mode you can choose any article.
Does reordering a collection change articles that use Manual mode?
No. Manual links stay as you chose them. Only Automatic articles follow the new order.
What is the best size for the share image?
1200 × 630 pixels, as PNG or JPG.
Can I see how the article will look in Google before saving?
Yes. The preview box at the top of the SEO section updates while you type.
Previous and next#
Previous: Create and Publish a Help-Center Article: Write, Format, Save as Draft and Go Live (Step-by-Step)
Next: Recycle Bin: Delete, Restore or Permanently Delete Knowledge Base Articles (Step-by-Step)
Related#
Was this article helpful?
Ready to implement this?
OpenAI Engage and apply what you just learned to your own workspace.
Open AI Engage CRM