Loading…


KnowledgeBase
Connect a Custom Domain to Your Help Center: Add the DNS Records, Verify and Go Live on help.yourcompany.com
Introduction#
Every help center gets a preview address as soon as it is created. With a custom domain, your customers can reach the same help center at an address you own, such as help.yourcompany.com. It looks more professional and is easier to remember.
Connecting a domain takes four steps:
Type the domain in the help-center settings and click Connect domain.
Copy the DNS record that appears.
Add that record at your DNS provider (where your domain is managed, for example GoDaddy, Namecheap, Cloudflare or Google Domains).
Click Verify and wait for the Live badge.
This article walks through each step, screen by screen. Every screenshot is followed by a What this screenshot shows section that explains the whole screen. It also explains every status the domain can have and how to remove a domain.
ℹ️
Your preview address keeps working whether or not you connect a custom domain. Removing a custom domain never takes your help center offline at the preview address.
Before you begin#
You need access to the Knowledge Base. Administrators always have it. Other users need the Knowledge Base permission in their profile (Setup → Profiles → Feature Permissions → Marketing → Knowledge Base).
You need a sub-domain you own, such as help.yourcompany.com or support.yourcompany.com. A bare domain (yourcompany.com) is not supported.
You need access to your domain’s DNS settings, or someone who can add a DNS record for you (often your IT team or web developer).
Make your help center public so customers can see it at the new address. This is the Make my help center public switch on the Preview tab of the same settings page.
The screenshots use a sample help center and the sample domain help.yourcompany.com. The record values on your screen will be different. Always copy them from your own screen.
Part 1: Open the Custom domain settings#
Step 1: Click Settings in the Knowledge Base side panel#
Open the Knowledge Base (the open-book icon in the left rail). In the Knowledge Base side panel, click Settings at the bottom.
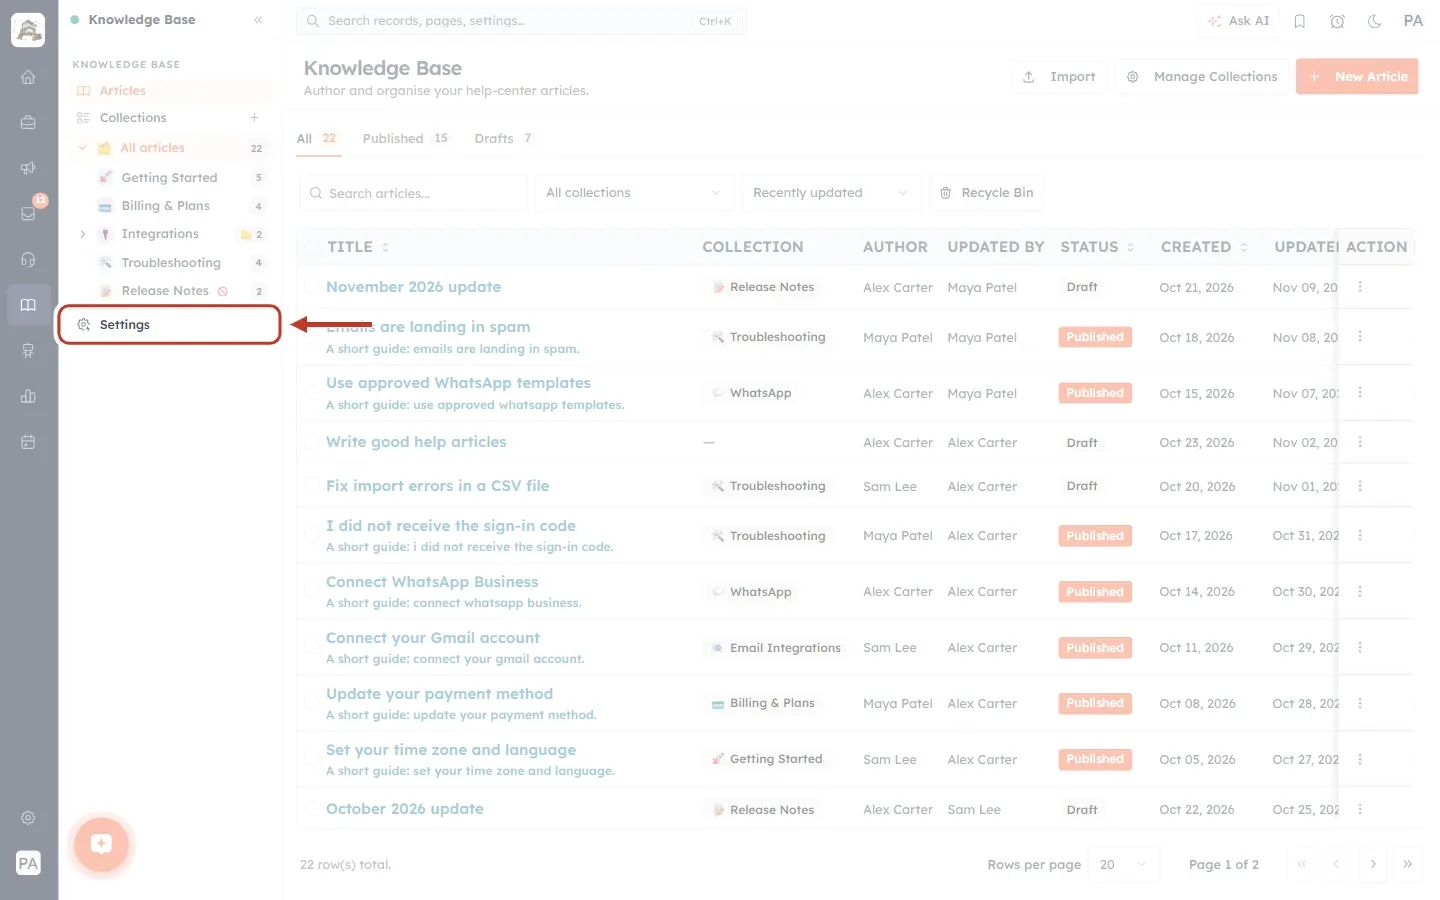
What this screenshot shows. The Knowledge Base Articles page, with Settings ringed in the side panel.
Settings sits under the collection tree, below Articles, Collections and All articles.
The rest of the page is the article list. You don’t need it for this task.
Clicking Settings opens the Help Center Settings page.
Step 2: Open the Custom domain tab#
On Help Center Settings, click the Custom domain tab.
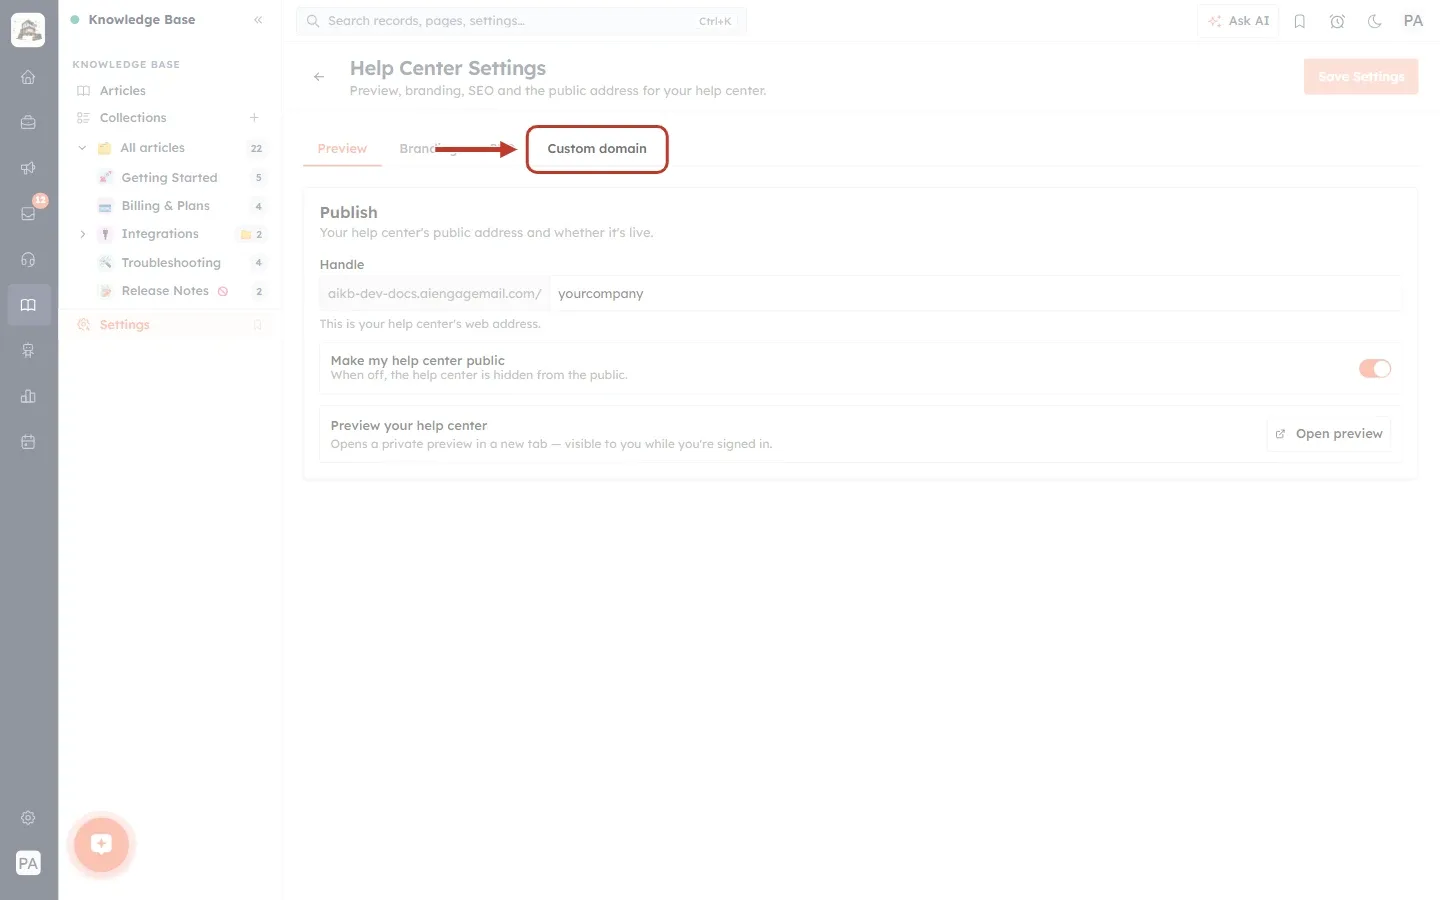
What this screenshot shows. The Help Center Settings page, open on the Preview tab, with the Custom domain tab ringed.
The four tabs are Preview, Branding, SEO and Custom domain.
The Preview tab, shown here, has your Handle (the end of your preview address) and the Make my help center public switch.
Save Settings (top right) saves the first three tabs. The Custom domain tab doesn’t use it: its buttons take effect straight away.
Part 2: Connect your domain#
Step 3: Look at the empty Custom domain card#
If no domain is connected yet, the tab shows a single card with a box for the domain and a Connect domain button.
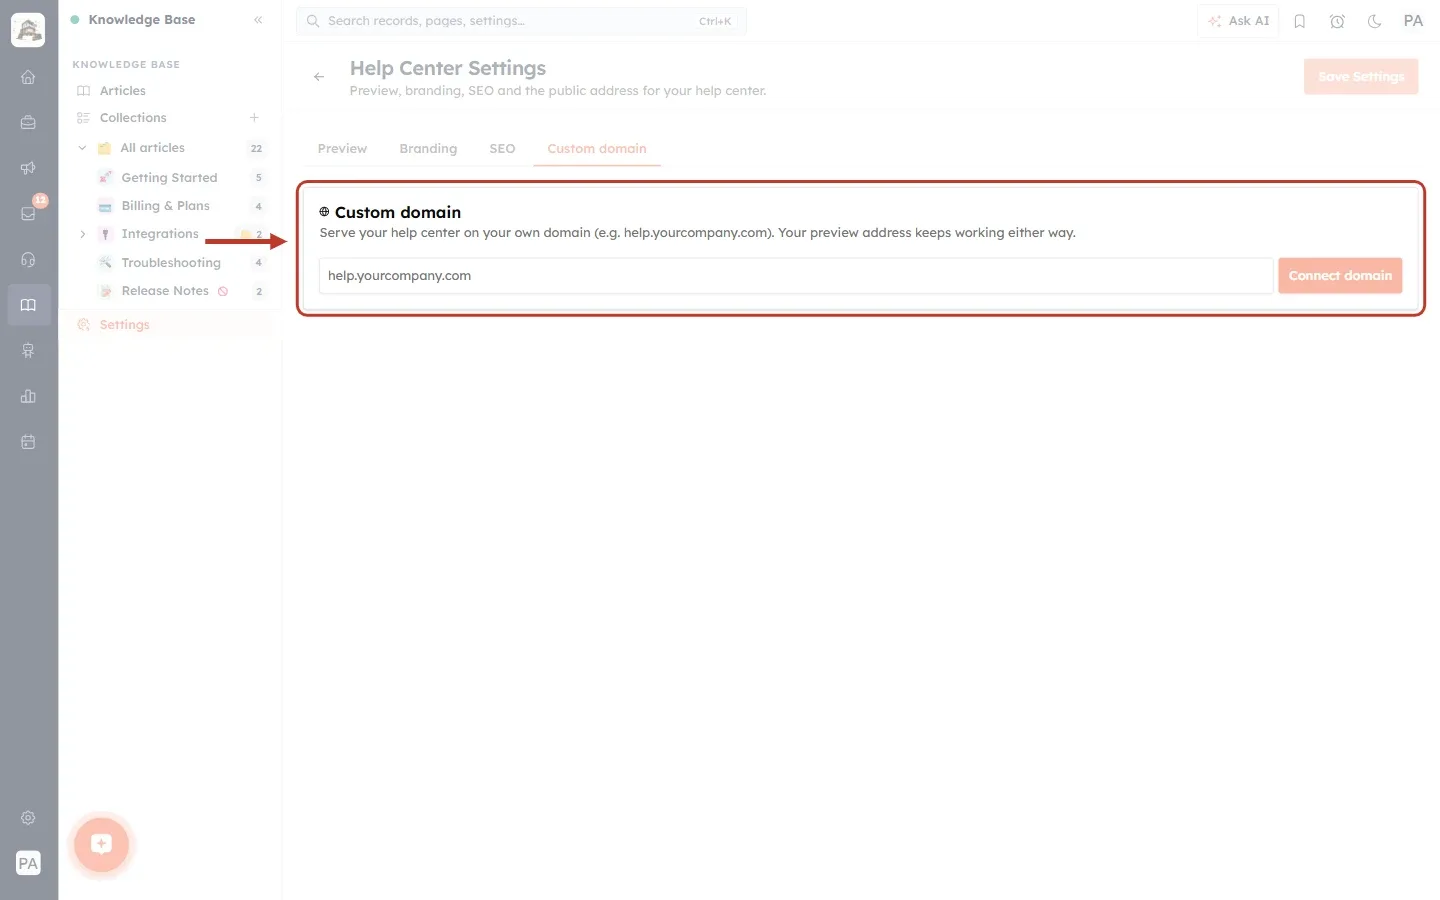
What this screenshot shows. The Custom domain card before any domain is connected, ringed.
The heading Custom domain and the note “Serve your help center on your own domain (e.g. help.yourcompany.com). Your preview address keeps working either way.”
The domain box. The grey text help.yourcompany.com is only an example. It disappears when you type.
Connect domain (right) is pale and can’t be clicked until you type something in the box.
Step 4: Make sure the domain is a sub-domain#
The domain must be a sub-domain: a name in front of your main domain, such as help.yourcompany.com. If you type a bare domain, special characters, or an AiEngage address, a red message explains the problem and nothing is connected.
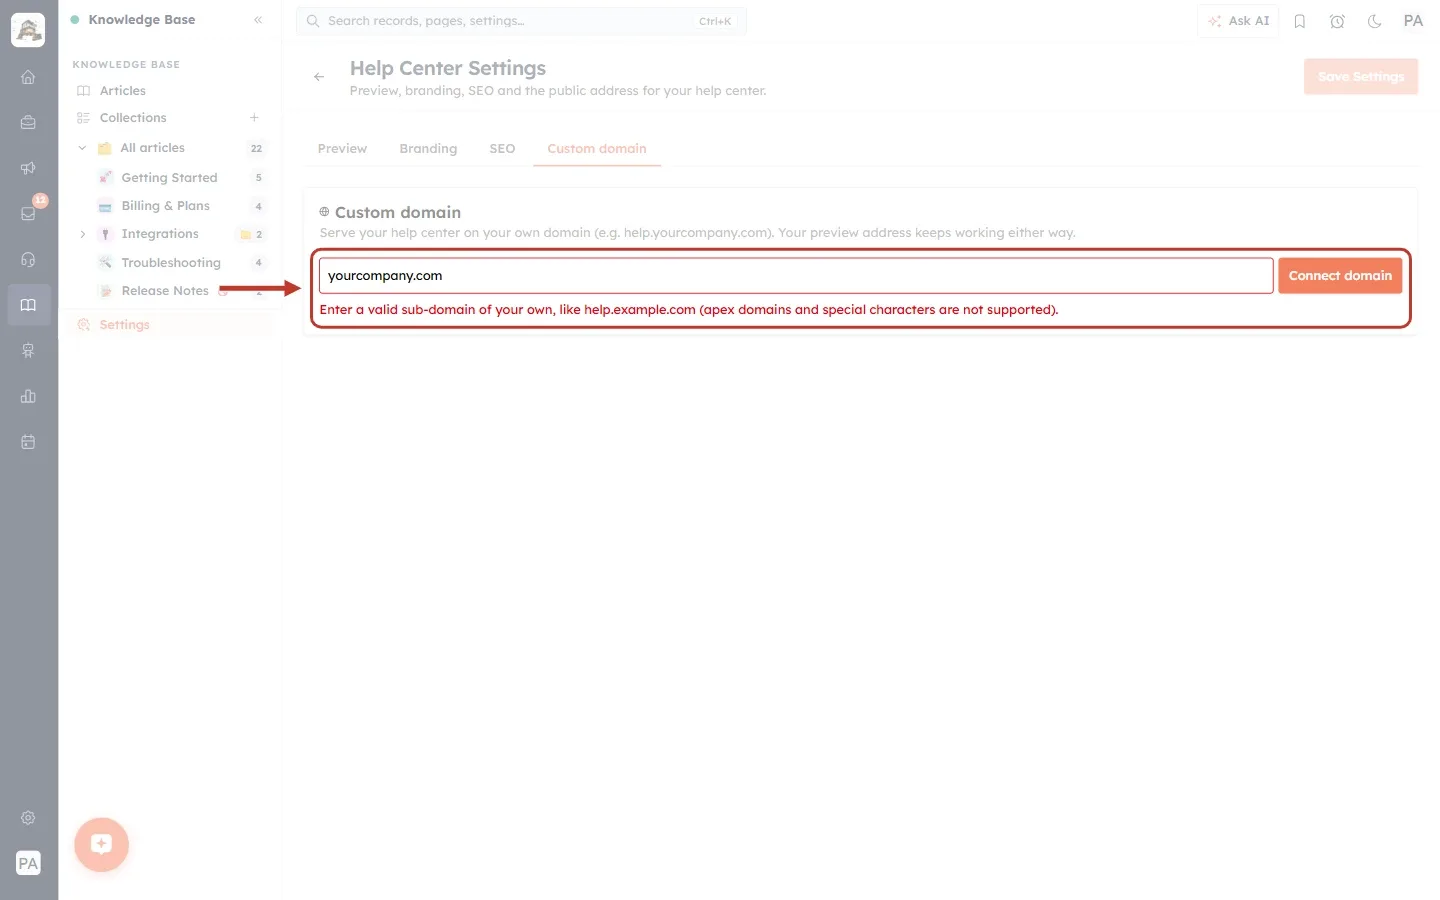
What this screenshot shows. The domain box with yourcompany.com typed in, the Connect domain button and the red error message, ringed.
The message reads “Enter a valid sub-domain of your own, like help.example.com (apex domains and special characters are not supported).”
yourcompany.com is an apex domain (the bare domain with nothing in front), so it isn’t accepted.
Only letters, numbers, dots and hyphens are allowed. Don’t type https:// or a slash.
Addresses on aiengagecrm.com, aiengageconnect.com and aiengagemail.com can’t be used.
The message disappears as soon as you start typing again.
Step 5: Type your sub-domain#
Type the full sub-domain, for example help.yourcompany.com. Capital letters and spaces at the start or end are fine: the domain is saved in lower case without them.
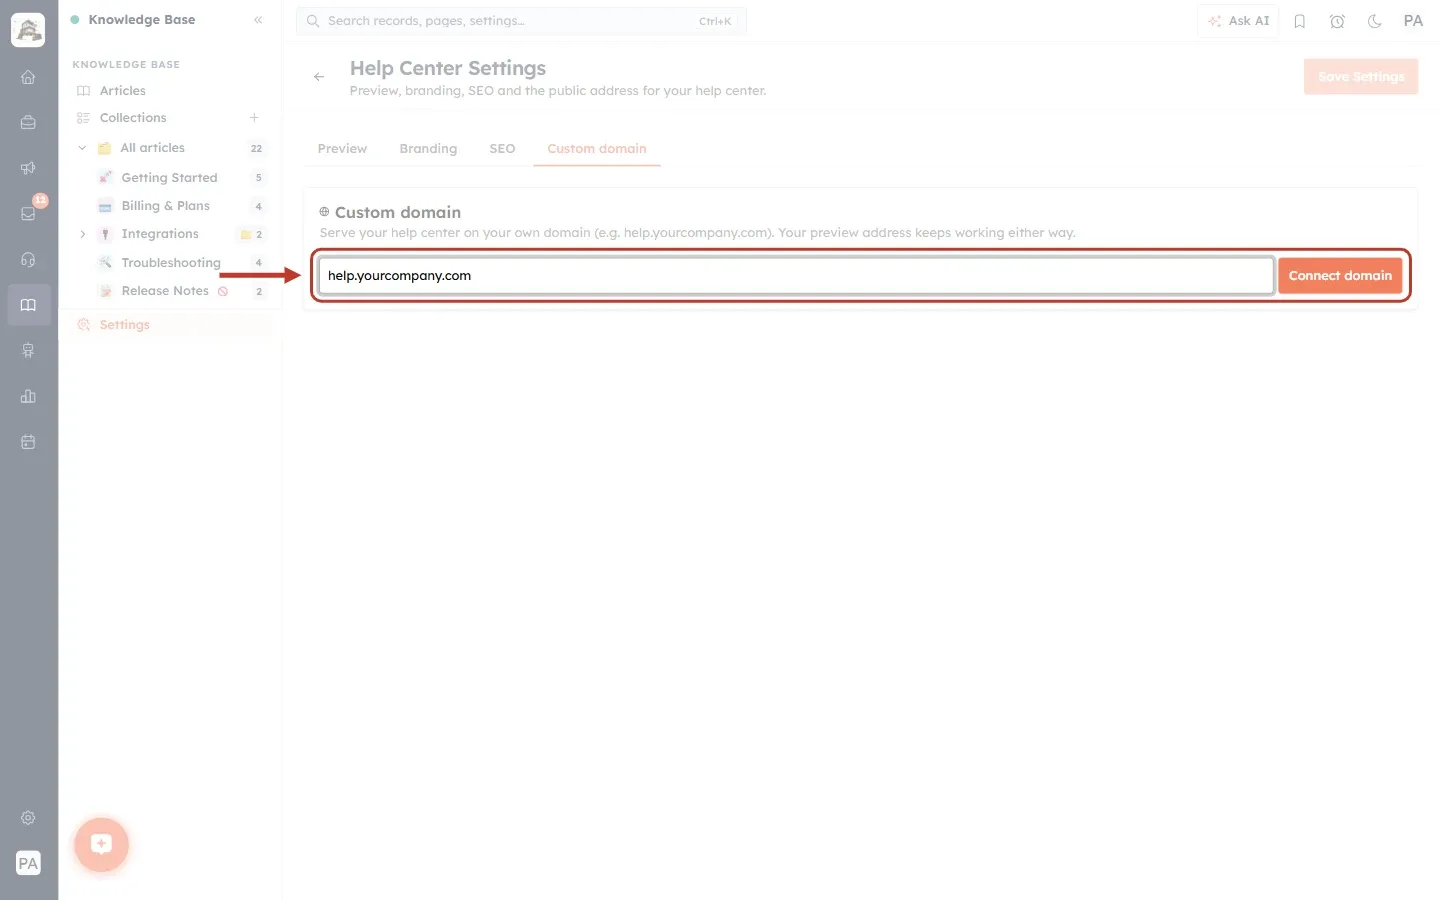
What this screenshot shows. The domain box with help.yourcompany.com typed in, and the Connect domain button, ringed.
The domain is typed without https:// and without a slash at the end.
Connect domain is now bright orange and can be clicked.
Step 6: Click Connect domain#
Click Connect domain, or press Enter in the box. While it works, the button reads Connecting…. When it is done, a confirmation appears in the bottom-right corner and the card switches to show the DNS records.
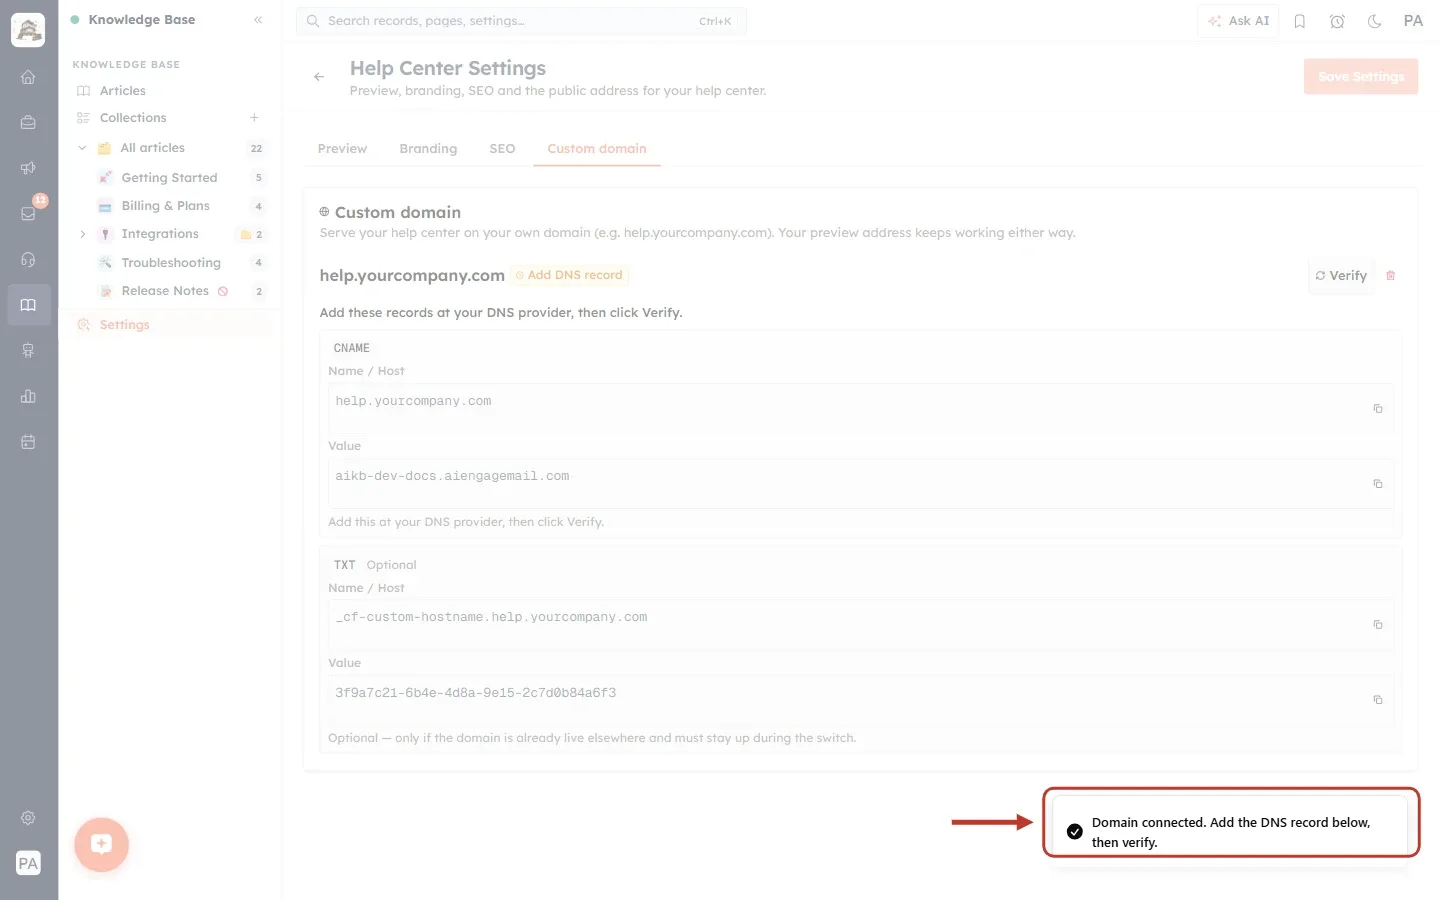
What this screenshot shows. The Custom domain tab just after connecting, with the confirmation ringed in the bottom-right corner.
The confirmation reads “Domain connected. Add the DNS record below, then verify.”
The card now shows your domain at the top, with an orange Add DNS record badge.
Below it are the DNS records to add: a CNAME record and an optional TXT record. The next steps explain both.
The domain is connected straight away. You don’t need to click Save Settings.
⚠️
Connecting the domain doesn’t make it work yet. Customers can only use the new address after you add the DNS record and it is verified.
Part 3: Add the DNS record#
Step 7: Read the domain header#
The top row of the card shows your domain, its status and two buttons.
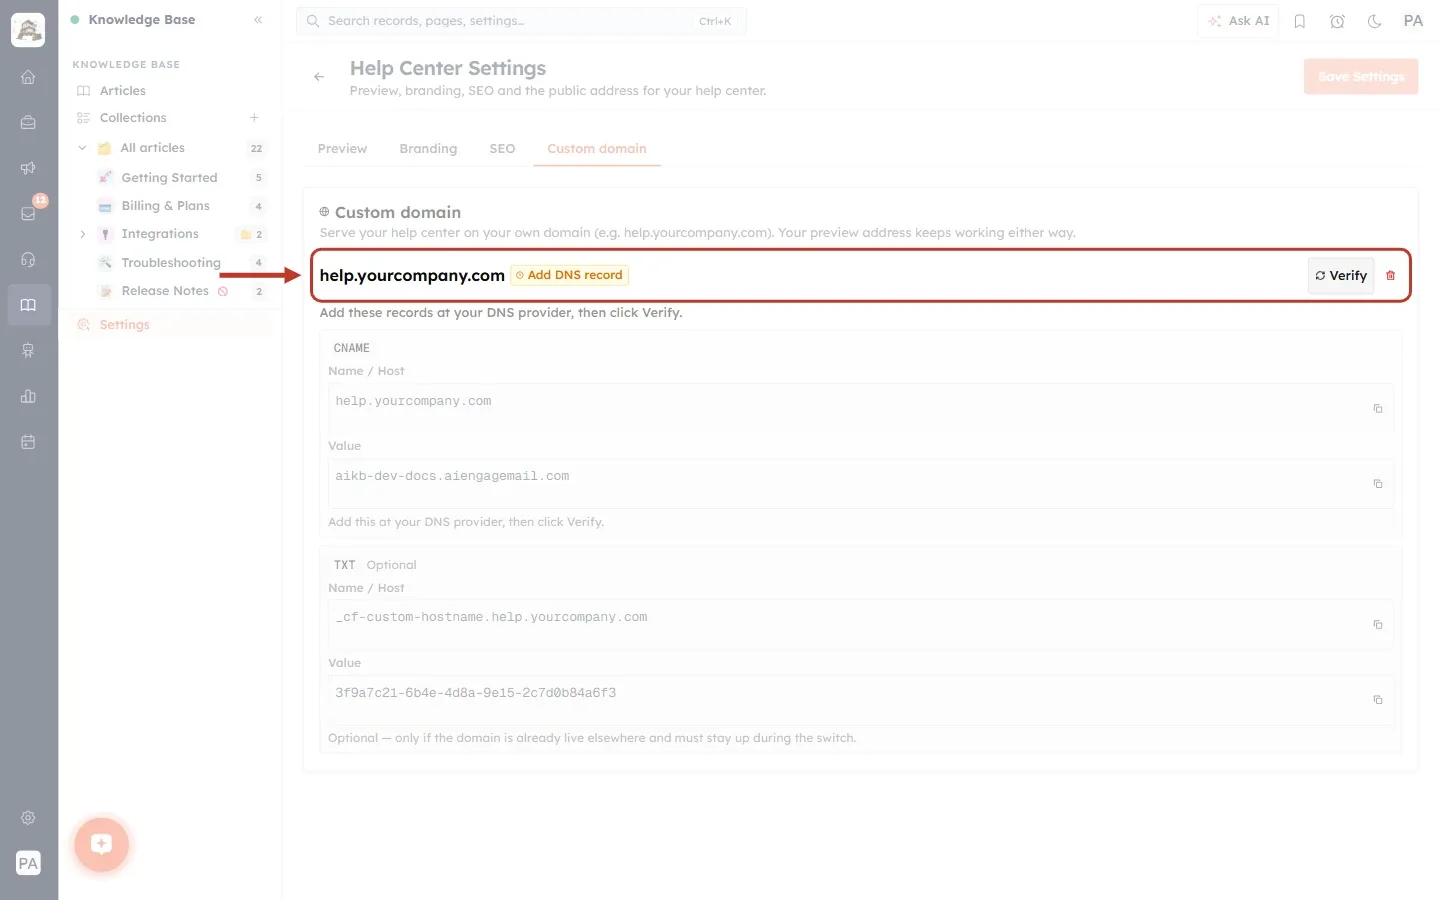
What this screenshot shows. The top row of the Custom domain card, ringed.
help.yourcompany.com is the domain you connected.
The orange Add DNS record badge means the domain is waiting for its DNS record.
Verify asks AiEngage to check the DNS record now. You’ll use it in Part 4.
The red bin icon removes the domain. See Part 5.
Under the row: “Add these records at your DNS provider, then click Verify.”
Step 8: Find the CNAME record#
The CNAME record is the one you must add. It points your sub-domain at the AiEngage help-center service.
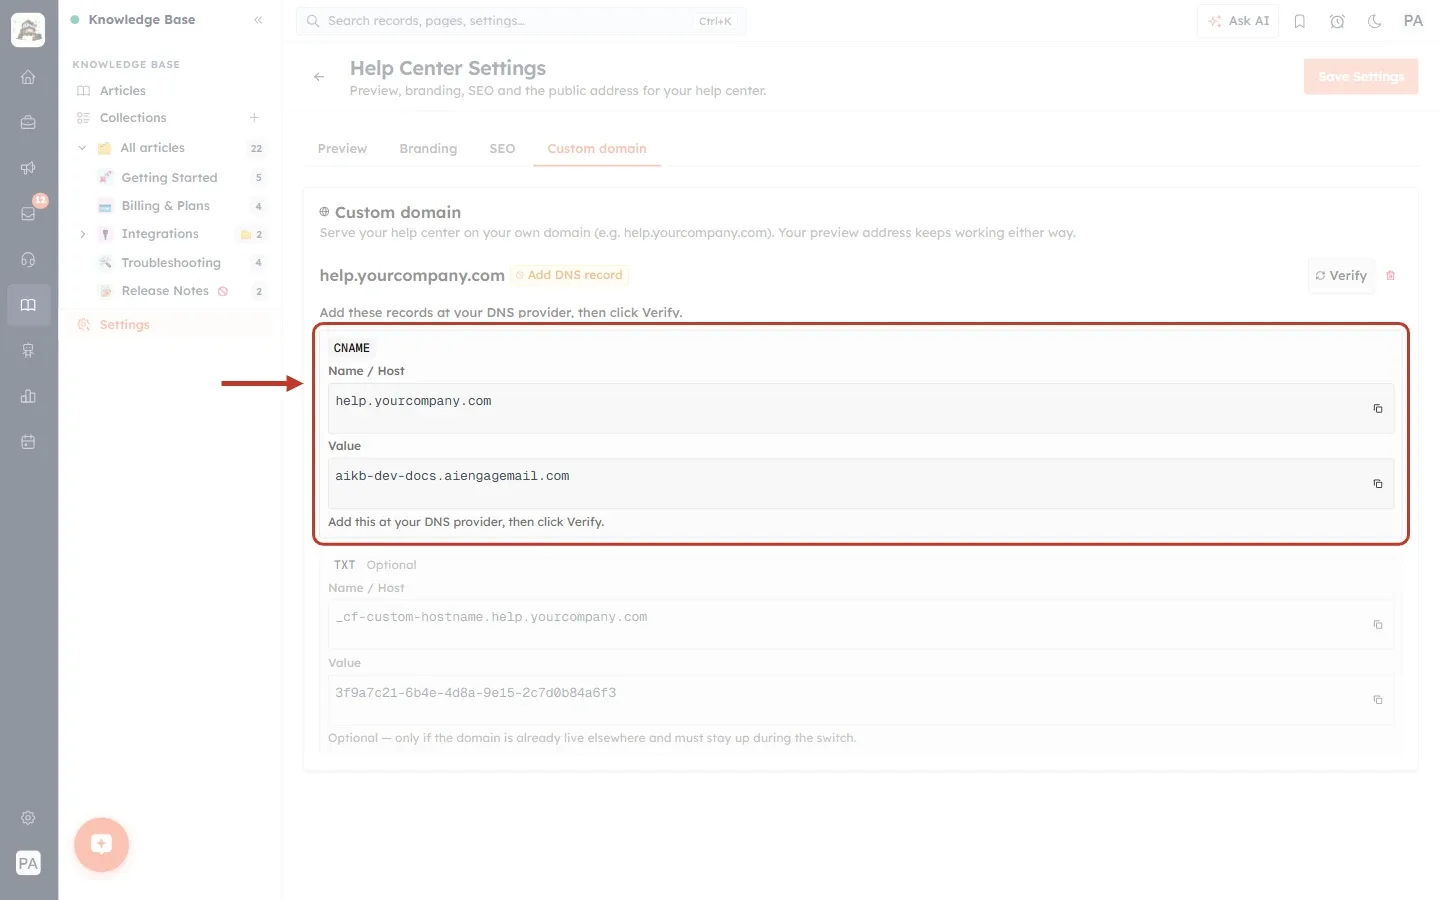
What this screenshot shows. The CNAME record box, ringed.
The grey CNAME label at the top is the record type. Choose this type at your DNS provider.
Name / Host is your sub-domain (here help.yourcompany.com).
Value is the address the record must point to (here aikb-dev-docs.aiengagemail.com). Your screen may show a different value. Always use the one on your screen.
The note “Add this at your DNS provider, then click Verify.” is under the record.
This record has no Optional label, so it is required.
Step 9: Copy the values#
Each field has a small copy icon at its right-hand end. Click it to copy the value exactly, then paste it at your DNS provider. Copying avoids typing mistakes, which are the most common reason verification fails.
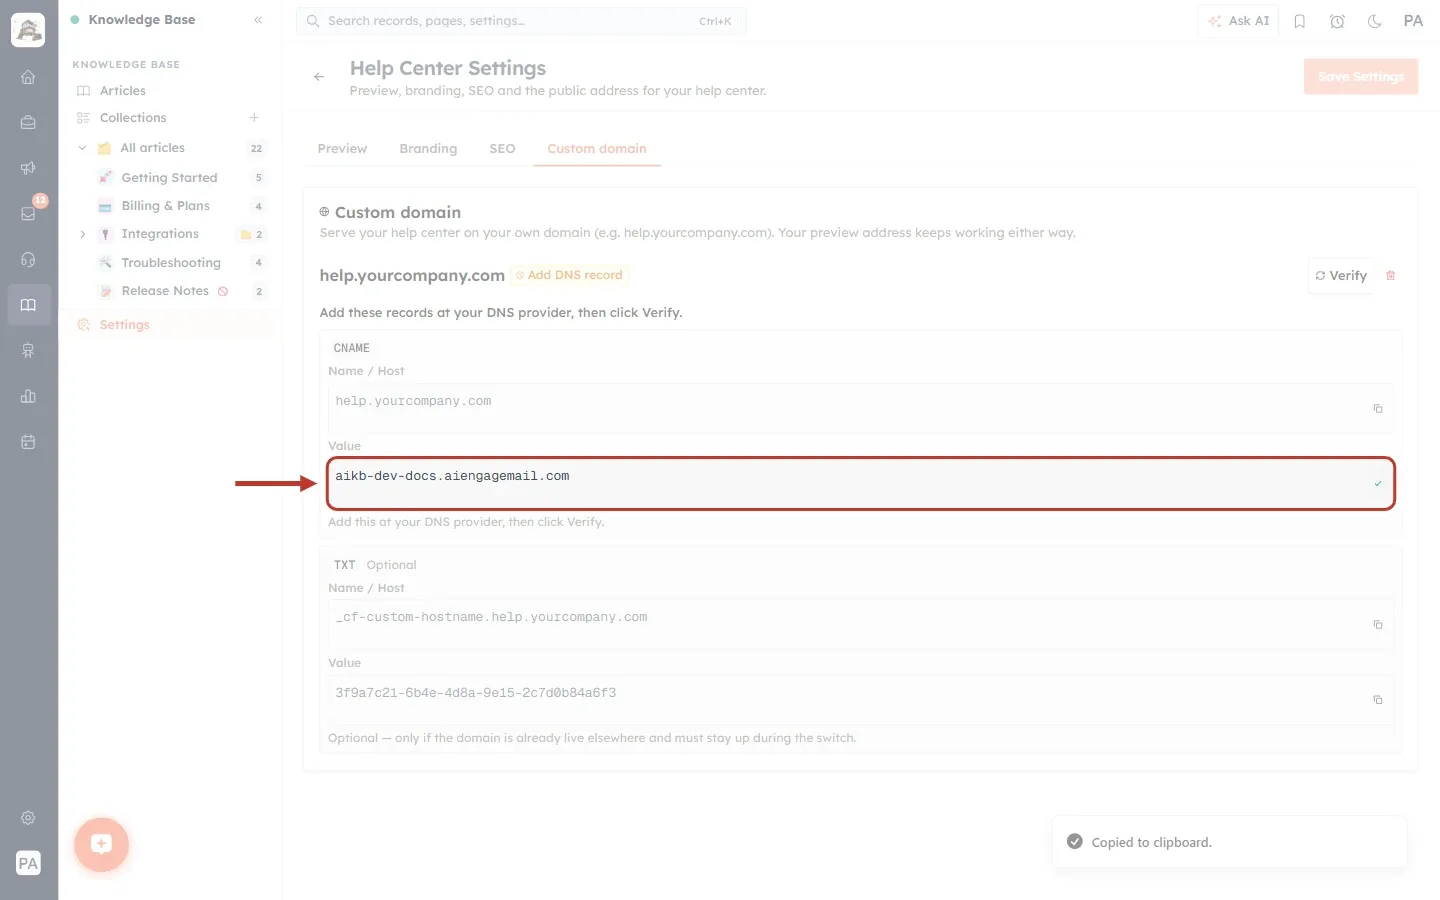
What this screenshot shows. The CNAME Value field ringed, just after clicking its copy icon.
The copy icon is at the right-hand end of the field.
The message “Copied to clipboard.” appears in the bottom-right corner to confirm the copy.
The Name / Host field above has its own copy icon.
Step 10: Add the record at your DNS provider#
Sign in to the website where your domain’s DNS is managed and open its DNS settings (often called DNS, DNS Management, Zone Editor or Advanced DNS). Then add a new record:
Type: CNAME.
Name / Host: paste the Name / Host value. Many providers add your main domain automatically. If yours does, enter only the first part (for example help instead of help.yourcompany.com), or the record ends up as help.yourcompany.com.yourcompany.com.
Value / Target / Points to: paste the Value.
TTL: leave the default, or choose the shortest option so changes take effect sooner.
Save the record.
💡
If a record for the same name already exists (for example an old CNAME or A record for help.yourcompany.com), edit or delete it first. A name can only have one CNAME record.
Step 11: Decide whether you need the TXT record#
Under the CNAME there is a TXT record marked Optional. Most people can skip it.
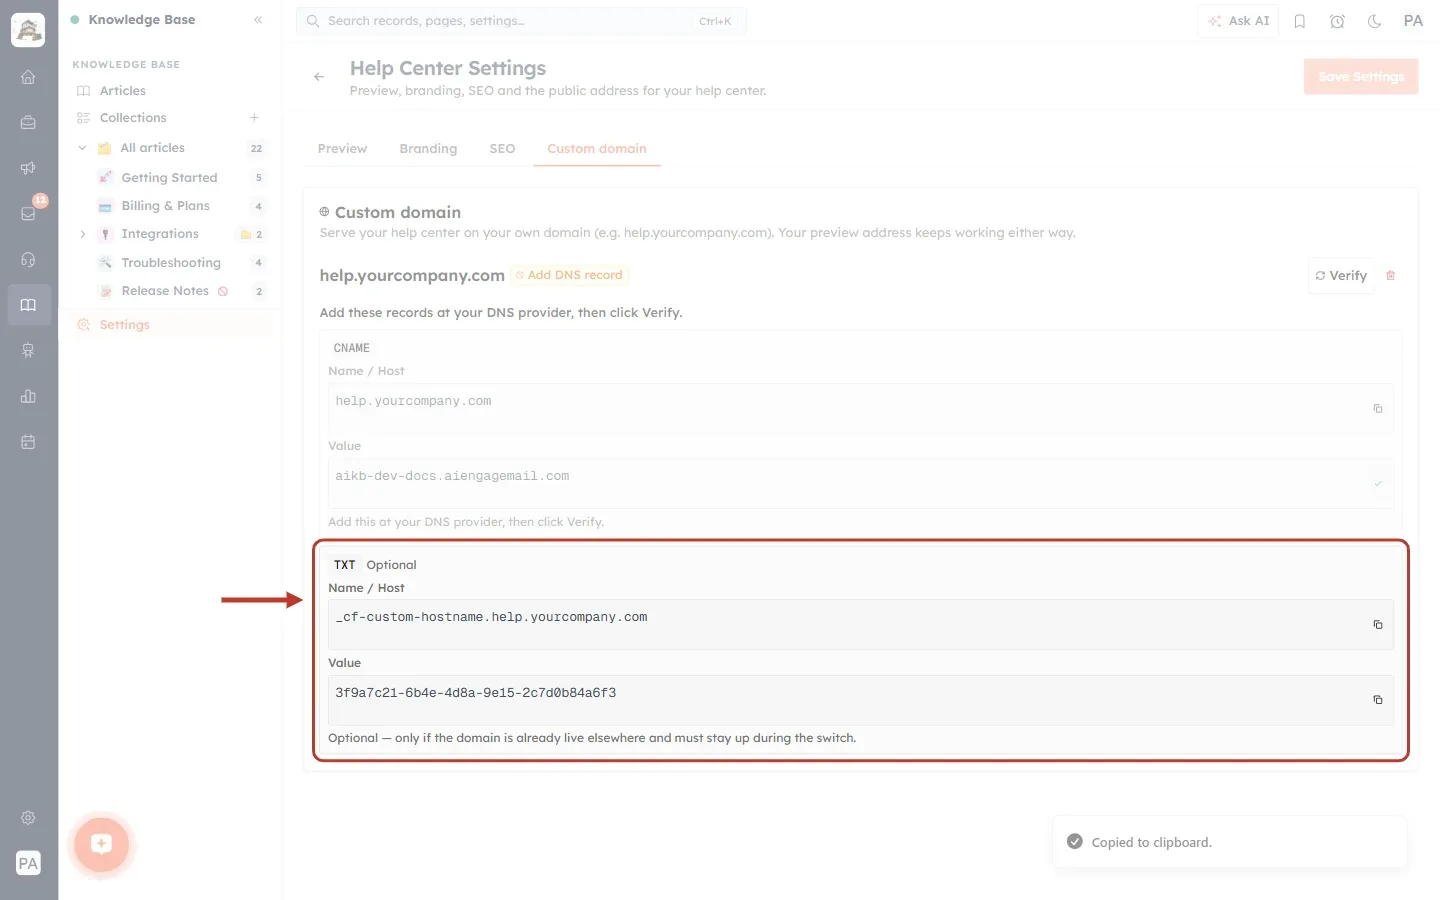
What this screenshot shows. The TXT record box, ringed.
The grey Optional label next to TXT shows it isn’t required.
Name / Host starts with _cf-custom-hostname. followed by your sub-domain.
Value is a long code made of letters, numbers and hyphens.
The note explains when to use it: “Optional — only if the domain is already live elsewhere and must stay up during the switch.”
Add the TXT record only if your sub-domain is already serving another website (for example, your old help center) and it must keep working until the switch. The TXT record lets AiEngage prove you own the domain before you move the CNAME. Add it the same way as the CNAME, with type TXT.
Part 4: Verify the domain#
Step 12: Click Verify#
After adding the record, go back to the Custom domain tab and click Verify.
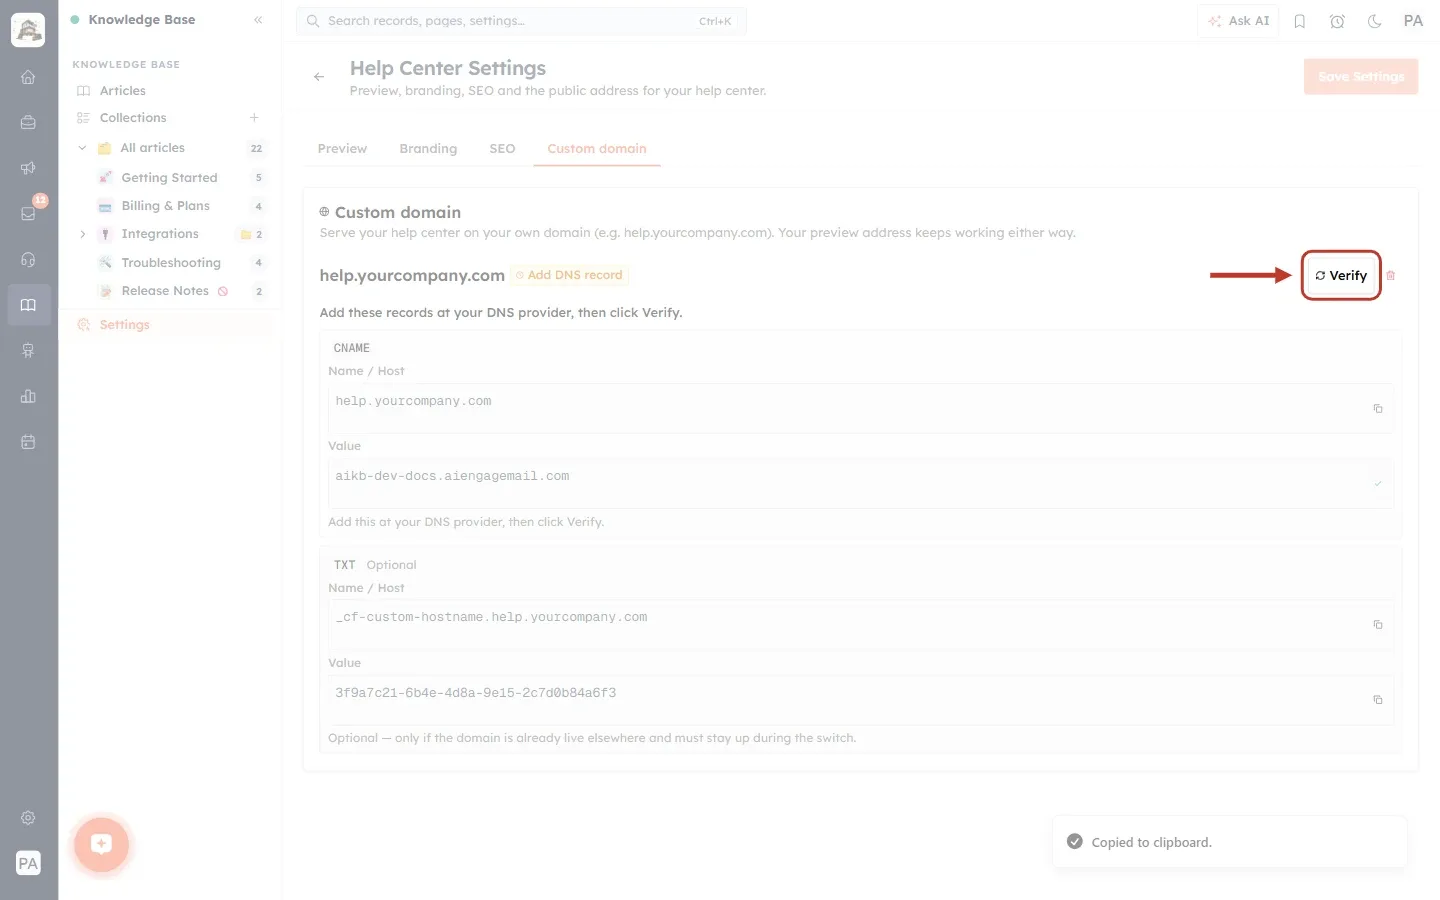
What this screenshot shows. The Verify button ringed in the top row of the card.
It has a circular-arrow icon. The icon spins while the check runs.
You can click it as often as you like.
You don’t always have to click it: while the domain is waiting, the page checks again by itself every 15 seconds for about five minutes, as long as you keep it open.
Step 13: Wait while it says Verifying…#
After you click Verify, the badge may change to Verifying… while the domain is checked and set up.
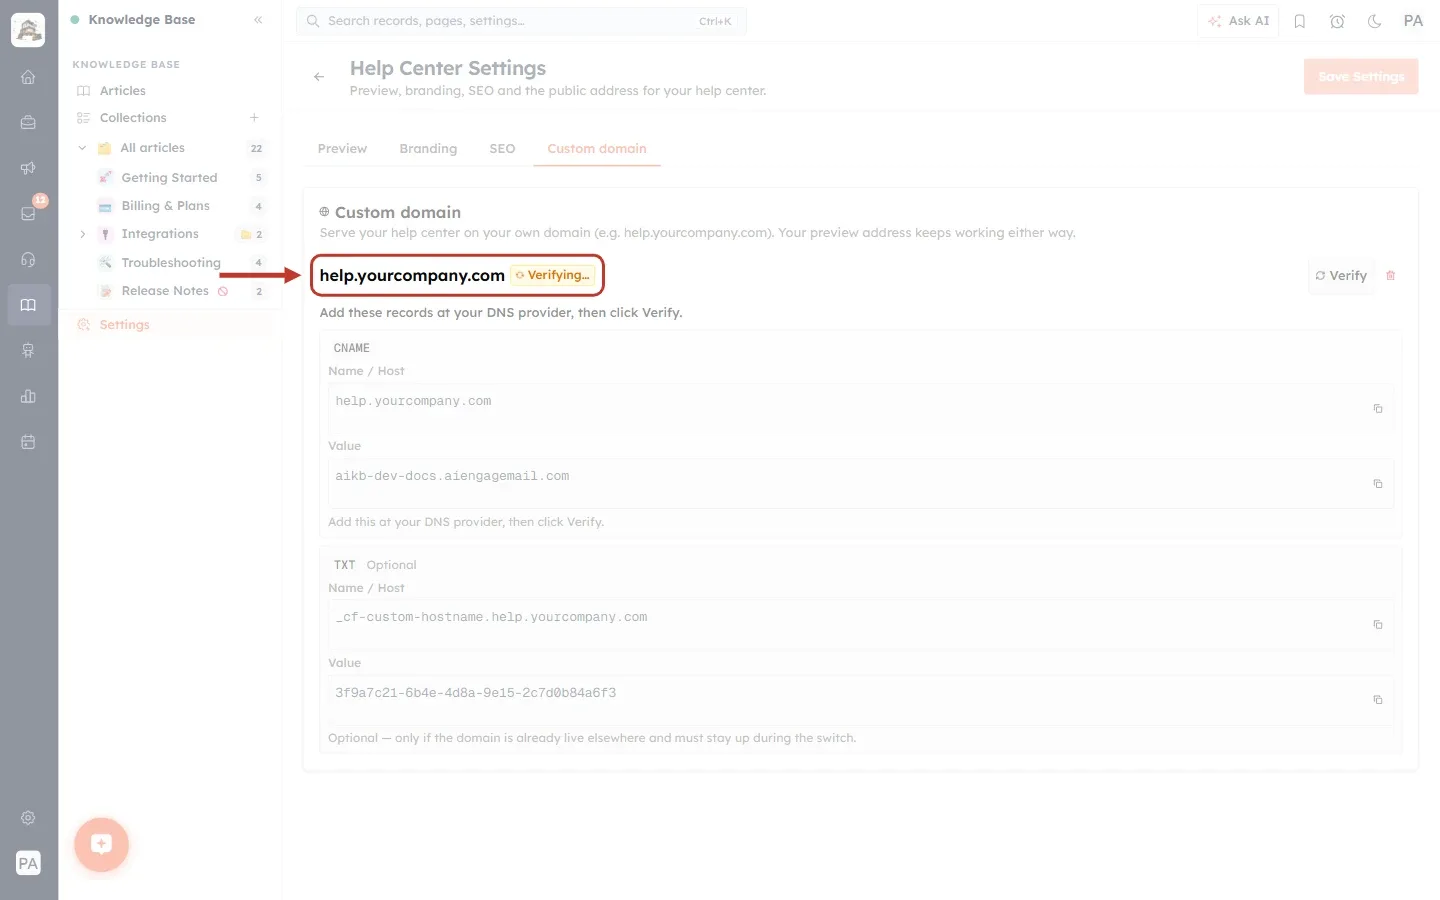
What this screenshot shows. The domain name and its Verifying… badge, ringed.
The badge is orange, with a spinning icon.
The page keeps checking by itself while it shows this badge, so you can simply wait.
The records stay on screen so you can check them.
ℹ️
DNS changes can take anywhere from a few minutes to several hours to spread across the internet (up to 48 hours with some providers). If the status hasn’t changed, come back later and click Verify again.
Step 14: Fix any problem (Action needed)#
If the check finds a problem, the badge turns red and a red box under the domain explains what is wrong.
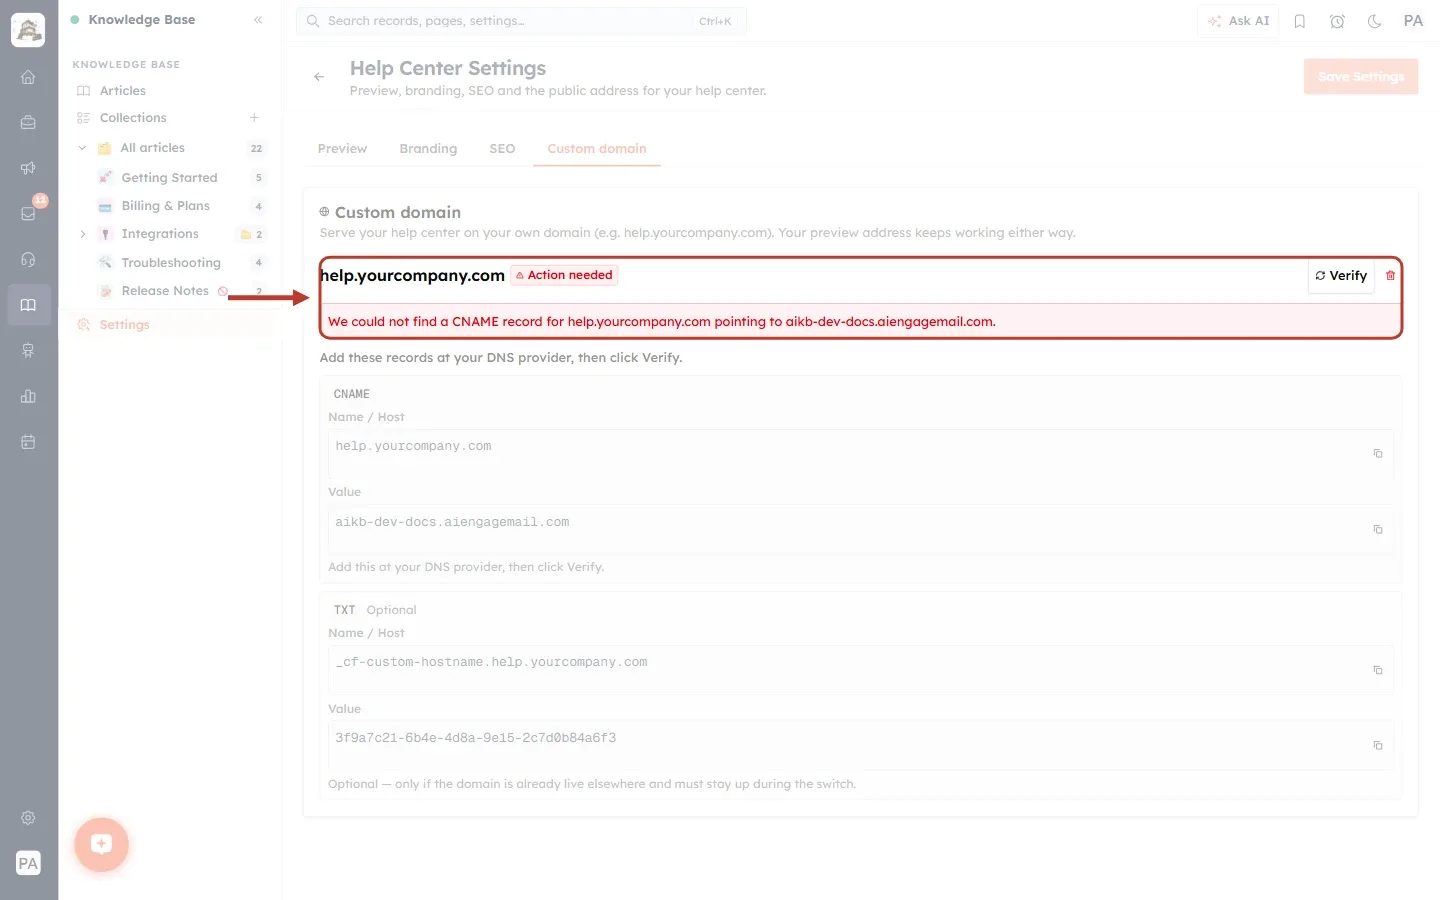
What this screenshot shows. The red Action needed badge and the explanation box under it, ringed.
Action needed means the domain isn’t working yet and something must be changed.
The red box says what is wrong. In this example the CNAME record couldn’t be found. The exact wording depends on the problem.
Fix the record at your DNS provider, wait a few minutes, then click Verify again.
The badge can show one of these statuses:
Add DNS record (orange): the domain is connected and waiting for its DNS record.
Verifying… (orange, spinning): the record was found and the domain is being set up.
Live (green): the domain works. Customers can use it.
Action needed (red): something must be fixed. Read the red box.
Failed (red): the set-up didn’t complete. Check the record, then click Verify. If it still fails, remove the domain and connect it again.
Step 15: Check that the domain is Live#
When everything is in place, the badge turns green and reads Live. Your help center now opens at your own address.
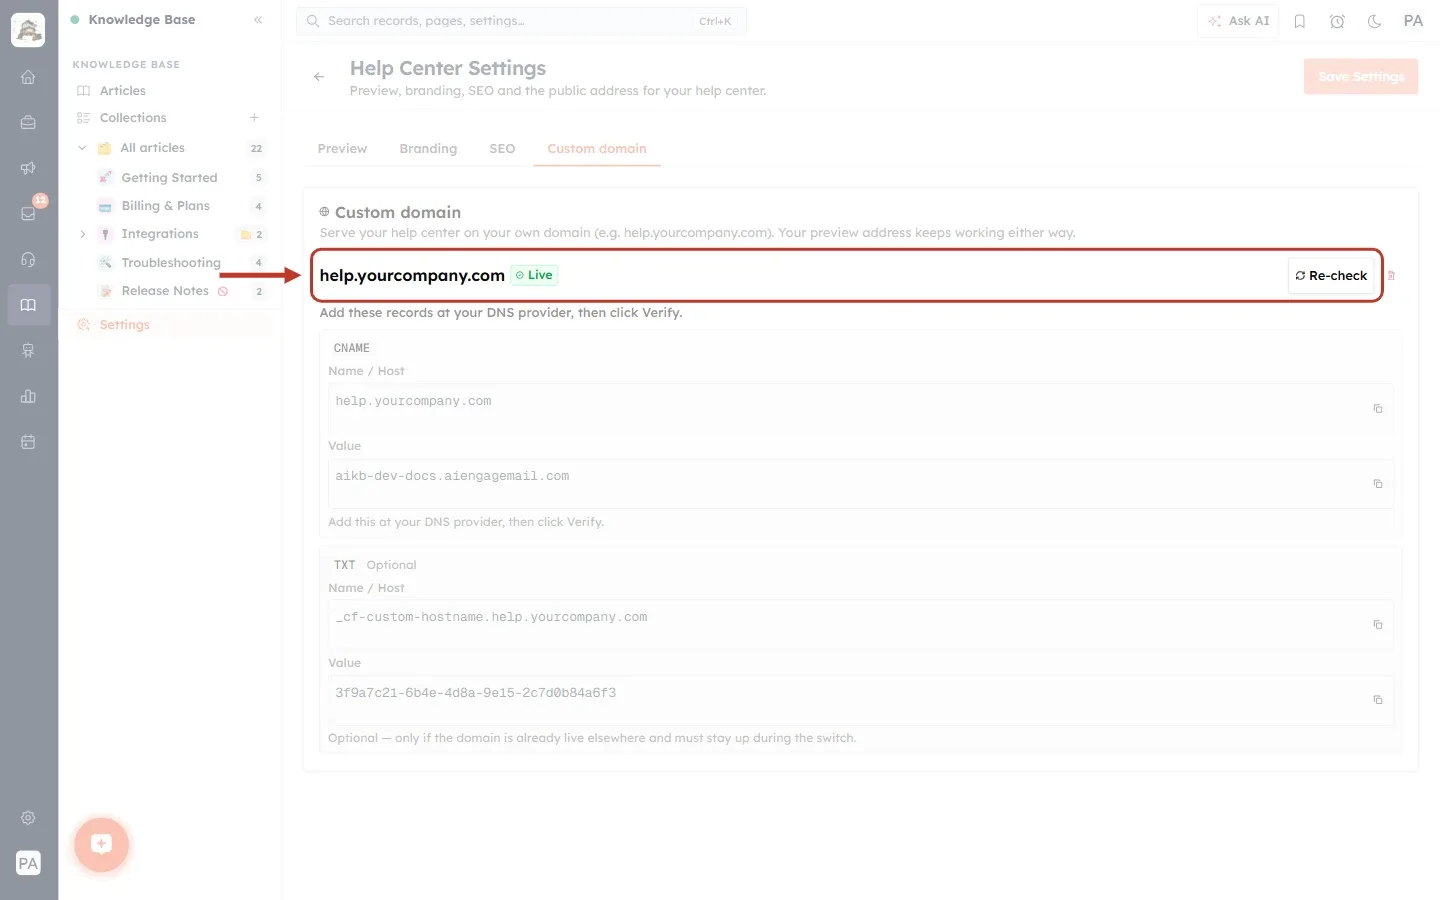
What this screenshot shows. The top row of the card for a working domain, ringed.
The green Live badge shows the domain is working.
The Verify button now reads Re-check. Click it any time to check the domain again, for example after changing your DNS settings.
The DNS records stay visible below. Don’t delete them at your DNS provider: the domain stops working if you do.
To test it, open a new browser tab and go to your domain (for example https://help.yourcompany.com). You should see your help center’s home page.
Part 5: Remove a custom domain#
Remove the domain if you want to stop using it, or to connect a different one. Only one custom domain can be connected at a time.
Step 16: Click the bin icon#
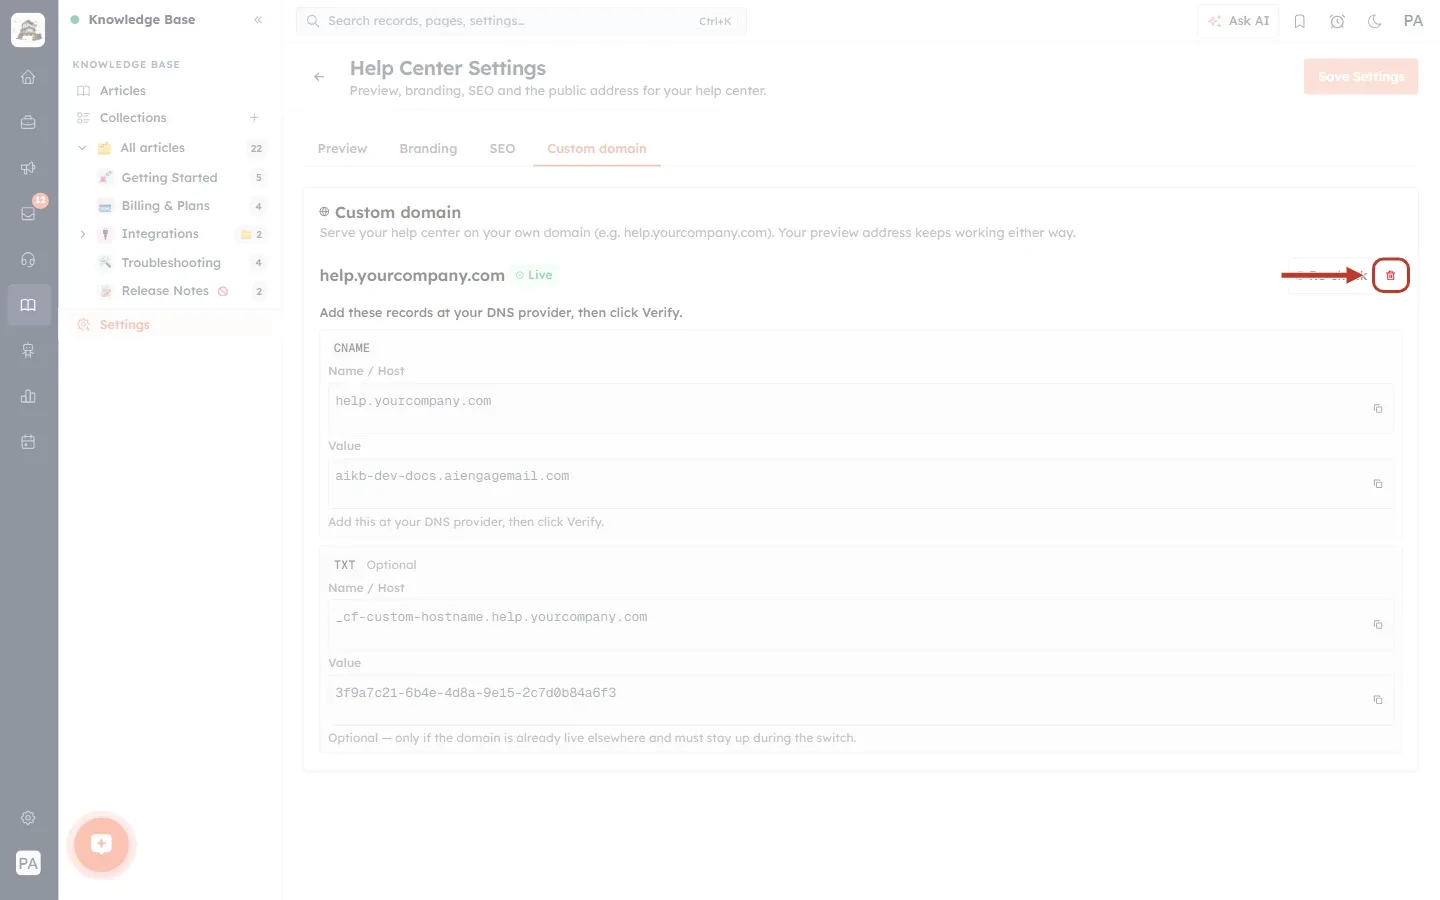
What this screenshot shows. The red bin icon at the right-hand end of the domain row, ringed.
The icon is next to Verify or Re-check.
Clicking it opens a confirmation. Nothing is removed yet.
Step 17: Confirm the removal#
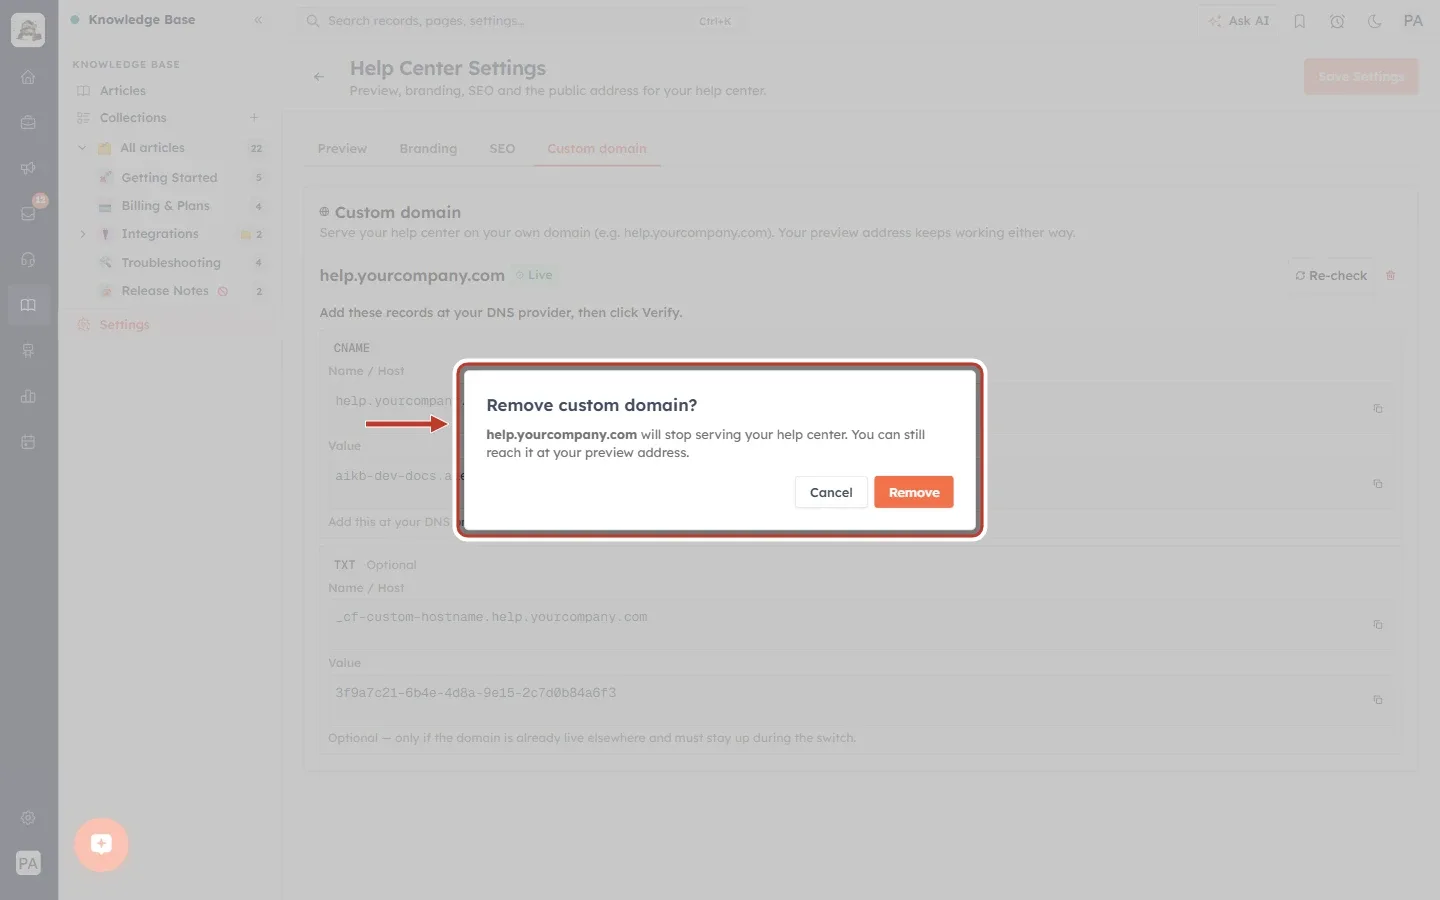
What this screenshot shows. The Remove custom domain? confirmation, ringed. The rest of the page is dimmed.
The message reads “help.yourcompany.com will stop serving your help center. You can still reach it at your preview address.”
Cancel closes the dialog and keeps the domain.
Remove (orange) removes it. While it works, the button reads Removing….
Step 18: Check the confirmation#
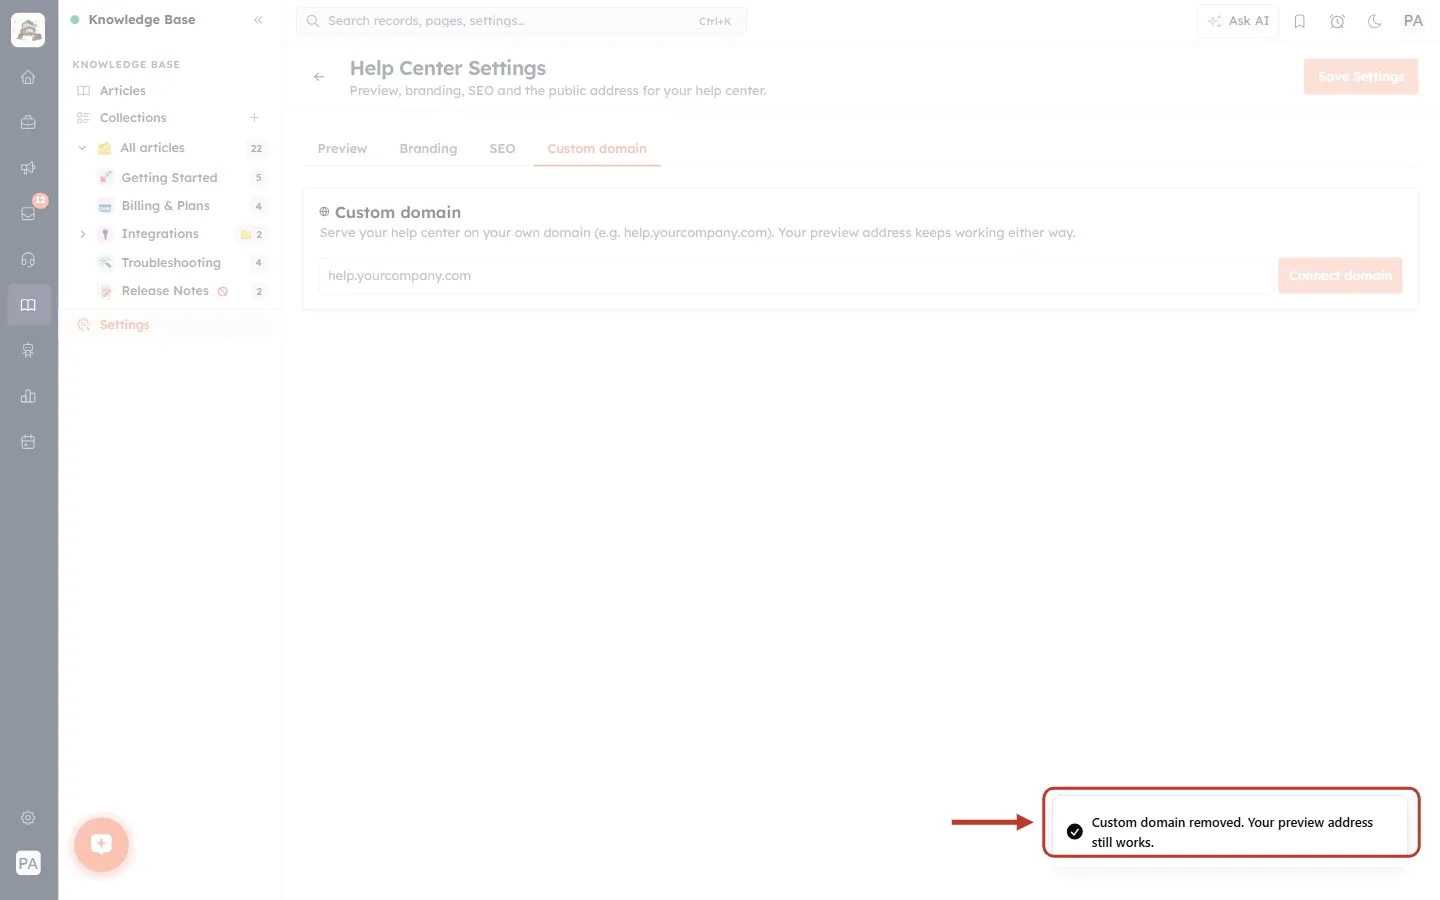
What this screenshot shows. The Custom domain tab after removing the domain, with the confirmation ringed in the bottom-right corner.
The confirmation reads “Custom domain removed. Your preview address still works.”
The card is back to the empty domain box and Connect domain, ready for a new domain.
You can now delete the CNAME (and TXT) record at your DNS provider.
Tips#
Use a clear name such as help., support. or docs. in front of your domain.
Copy, don’t type. Use the copy icons so the values match exactly.
Keep the preview address handy. It always works, so you can share it while the domain is being set up.
Update your links once the domain is Live: your website menu, email signatures, chat widgets and the call-to-action in your emails.
Leave the DNS record in place for as long as you use the domain.
Troubleshooting#
“Enter a valid sub-domain of your own, like help.example.com (apex domains and special characters are not supported).” Add a name in front of your domain (help.yourcompany.com, not yourcompany.com). Remove https://, slashes, spaces and other symbols.
Connect domain can’t be clicked. The domain box is empty. Type your domain first.
The badge stays on Add DNS record. The record hasn’t been found yet. Check the type is CNAME, the name is right (watch for the main domain being added twice) and the value matches exactly. Then wait and click Verify again.
Action needed or Failed. Read the red box, fix the record, then click Verify. If it keeps failing, remove the domain and connect it again.
“Could not refresh the domain.” The check couldn’t run. Wait a moment and click Verify again.
The domain is Live but customers see “not found” or a private page. Make sure Make my help center public is on (Preview tab) and click Save Settings.
Frequently asked questions#
Do I need to click Save Settings after connecting the domain?
No. Connect domain, Verify, Re-check and Remove all take effect immediately. Save Settings is only for the Preview, Branding and SEO tabs.
Can I use my main domain (yourcompany.com)?
No. Use a sub-domain such as help.yourcompany.com. Your main website keeps working on yourcompany.com.
Can I connect more than one domain?
No. One custom domain can be connected at a time. Remove it to connect a different one.
Does the preview address stop working?
No. The preview address keeps working before, during and after a custom domain is connected.
How long does verification take?
Often a few minutes, but DNS changes can take several hours to spread, and up to 48 hours with some providers.
Do I need the TXT record?
Only if your sub-domain is already serving another website and must stay online during the switch. Otherwise, the CNAME record is enough.
Previous and next#
Related#
Was this article helpful?
Ready to implement this?
OpenAI Engage and apply what you just learned to your own workspace.
Open AI Engage CRM